2452360 Instruction Manual www.winegard.com/carryout For receivers and programming, call 1-866-609-9374 For up-to-date information on receiver compatibility and programming, visit www.winegard.com/receivers For help, email [email protected] or call 1-800-788-4417 DO NOT RETURN ANTENNA TO PLACE OF PURCHASE POWER INSERTER See page 2 for setup instructions SD/HD SD/HD SD
Transcript
2452360
Instruction Manualwww.winegard.com/carryout
For receivers and programming, call 1-866-609-9374
For up-to-date information on receiver compatibility and programming, visit www.winegard.com/receivers
1 *source: www.satbeams.com. Coverage maps are approximate and do not guarantee coverage.
specificationsCompatible with DIreCtV®, DIsH®, & Bell tV™ programmingsupports up to two receiversFor stationary use onlyIncludes 25’ coaxial cable, 3’ coaxial cable, and power inserterUnit weight: 10 lbsUnit height (no feet): 13.5"
Diameter: 14.3"elevation range: 18–65°Azimuth: 0–416°UV-protected plastic dome
Compatible receiversreceiver models change frequently. For an up-to-date list of compatible receivers, visit www.winegard.com/receivers.
DIreCtV receiver Compatibilitythe Carryout G2+ antenna is not compatible with DIreCtV swM-only receivers (e.g. H25 or Hr34). If you have a swM-only technology receiver, winegard Model swM-840 kit is available. this swM kit will allow for proper swM technology operation with winegard mobile satellite tV antennas.
DIsH receiver Compatibilityoperation may require an HD receiver. the antenna is not compatible with DIsH Hopper™ or Joey™ receivers. Dual tuner receivers will require two coax connections from the antenna. In order to simultaneously watch or record two different programs, each program must be broadcast from the same satellite.
Compatible satellitesDIreCtV:101° or 119° (will not receive HD on 110° or any KA-band HD on 99° and 103°)
DIsH (western Arc): 110°, 119°, 129°
Bell tV: 91° or 82°
refer to maps* to determine coverage in areas of the U.s.
DIreCtV sat. 101°
DIreCtV sat. 119°
DIsH sat. 110°
DIsH sat. 119°
DIsH sat. 129°
Carryout G2+ Antenna
Dome
HandleBase
signal strengthGood Best
eyelet
NOTE Operating temperature specifications: -25° to 70° C (-13° to 158°F)
!
!
2
!
!
1.
2. 1.
3. 1.
3.
2.
3.
1.
2.
4.
5.
4.
2.
3.
4.
6.
warningsDo not place the unit in water greater than one inch deep, or water may damage the electronics.
Do not install or operate the antenna in winds of 35 mph or greater. The antenna will roll in winds ≥35 mph.
Care should be taken when transporting and setting up the antenna. Do not toss or drop the antenna.
Do not paint the antenna. Painting the antenna may cause signal degradation and will void your warranty.
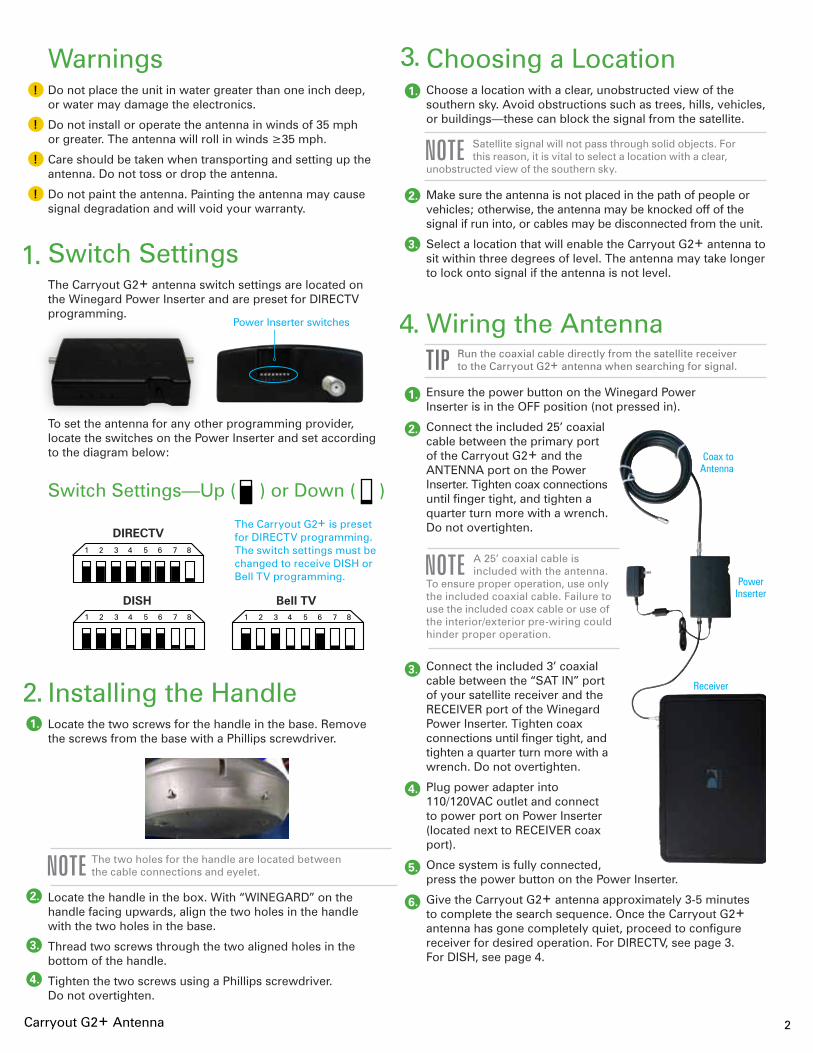
switch settingsthe Carryout G2+ antenna switch settings are located on the winegard Power Inserter and are preset for DIreCtV programming.
to set the antenna for any other programming provider, locate the switches on the Power Inserter and set according to the diagram below:
switch settings—Up ( ) or Down ( )
the Carryout G2+ is preset for DIreCtV programming. the switch settings must be changed to receive DIsH or Bell tV programming.
Installing the HandleLocate the two screws for the handle in the base. remove the screws from the base with a Phillips screwdriver.
NOTE the two holes for the handle are located between the cable connections and eyelet.
Locate the handle in the box. with “wIneGArD” on the handle facing upwards, align the two holes in the handle with the two holes in the base.
thread two screws through the two aligned holes in the bottom of the handle.
tighten the two screws using a Phillips screwdriver. Do not overtighten.
Choosing a LocationChoose a location with a clear, unobstructed view of the southern sky. Avoid obstructions such as trees, hills, vehicles, or buildings—these can block the signal from the satellite.
NOTE satellite signal will not pass through solid objects. For this reason, it is vital to select a location with a clear,
unobstructed view of the southern sky.
Make sure the antenna is not placed in the path of people or vehicles; otherwise, the antenna may be knocked off of the signal if run into, or cables may be disconnected from the unit.
select a location that will enable the Carryout G2+ antenna to sit within three degrees of level. the antenna may take longer to lock onto signal if the antenna is not level.
wiring the AntennaTIP run the coaxial cable directly from the satellite receiver
to the Carryout G2+ antenna when searching for signal.
ensure the power button on the winegard Power Inserter is in the oFF position (not pressed in).
Connect the included 25’ coaxial cable between the primary port of the Carryout G2+ and the AntennA port on the Power Inserter. tighten coax connections until finger tight, and tighten a quarter turn more with a wrench. Do not overtighten.
NOTE A 25’ coaxial cable is included with the antenna.
to ensure proper operation, use only the included coaxial cable. Failure to use the included coax cable or use of the interior/exterior pre-wiring could hinder proper operation.
Connect the included 3’ coaxial cable between the “sAt In” port of your satellite receiver and the reCeIVer port of the winegard Power Inserter. tighten coax connections until finger tight, and tighten a quarter turn more with a wrench. Do not overtighten.
Plug power adapter into 110/120VAC outlet and connect to power port on Power Inserter (located next to reCeIVer coax port).
once system is fully connected, press the power button on the Power Inserter.
Give the Carryout G2+ antenna approximately 3-5 minutes to complete the search sequence. once the Carryout G2+ antenna has gone completely quiet, proceed to configure receiver for desired operation. For DIreCtV, see page 3. For DIsH, see page 4.
Power Inserter switches
Power Inserter
Receiver
Coax to Antenna
Carryout G2+ Antenna
1 2 3 4 5 6 7 8
DIRECTV
1 2 3 4 5 6 7 8
DISH Bell TV1 2 3 4 5 6 7 8
10.
3 receiver setup instructions are accurate at time of printing and may change without notice.
1.
2.
5.
3.
4.
5.
6.
7.
8.
9.
11.
12.
13.
receiver setupConnect the receiver to a power source, and complete receiver setup. receiver setup for the primary receiver follows; if your receiver differs from the options shown, you may need to consult your receiver manual. the wording and display used in your receiver may differ slightly.
Check out online receiver setup guides for your antenna at www.winegard.com/receivers/setupguide.php.
For more information on receiver compatibility and programming, visit www.winegard.com/receivers.
DIreCtV receiver setupPress Menu on your remote. select Parental, Fav’s & Setup.
select System Setup.
In your receiver menu, you will need to identify the satellite menu. once there, find the option for Satellite Setup.
You may be required to press the DASH (-) before proceeding (underneath #7 on the remote).
select 3-LNB (18”x 20”) or 3 Satellites. If given the option of swM or Multiswitch, select Multiswitch.
Power on the antenna, and allow the antenna a few minutes to acquire signal. once the antenna has finished acquiring signal, the antenna will be silent.
After the antenna has acquired signal, press Continue; the receiver will automatically verify the setup.
errors may be displayed on the screen. It is normal to see one or two boxes with an X instead of a . select Continue.
select Continue again. the program guide will download.
when the status bar reaches 100%, press Continue.
the receiver will run Data Feed and Guide Feed tests for a few moments.
when prompted to set up the remote, select Setup Remote Later to do this at a later time.
select Watch DIRECTV. receiver setup is now complete.
Carryout G2+ Antenna
4
1.
3.
4.
5.
6.
7.
9.
2.
8.
10.
DIsH receiver setupIf using two DIsH receivers with the Carryout G2+ antenna, both receivers must be configured off of the primary port by following the steps below.
Disconnect coax cable from the satellite In port on the back of the receiver.
Press Menu on your remote. select option 6, System Setup.
select option 1, Installation.
select option 1, Point Dish.
select Check Switch.
select Test. It will go through a number of steps, then return to the screen shown here with previous information cleared. If at any point it asks you to save, select Save or Yes.
reconnect coax cable to “sat In” port on back of receiver. Power on the antenna. Allow the antenna 3–4 minutes to acquire satellites.
Check that there are no check marks by superDIsH or Alternate. If setting up a DIsH 311, 301, or 500 series receiver, in some cases you may need to check the boxes next to superDish and Alternate before running the Check switch test.
next, select Test again to install the sw64 switch. this sw64 switch is a DIsH receiver setting, not a physical part.
when you see the sw64 as the installed switch, the antenna is ready for use.
Carryout G2+ Antenna
satellite In port
Back of 211z receiver shown
5
troubleshooting
Issue Possible Cause solution
Vin indicator unlit on power inserter
• no DC power into power inserter • ensure power adapter is plugged into outlet and that outlet is providing AC power
• ensure power adapter is connected to power inserter
receiver indicator unlit on power inserter
• no communication between receiver and power inserter
• ensure 3’ coaxial cable between receiver and power inserter’s reCeIVer port is properly connected
• For DIreCtV users, ensure receiver is compatible and configured correctly. see page 3 for configuration instructions
• If cable is connected and receiver is properly configured, try different piece of rG6 coaxial cable
receiver indicator faintly lit or flickering on power inserter
• Intermittent communication between receiver and power inserter
• replace 3’ coaxial cable piece with a different piece rG6 coaxial cable
Antenna indicator unlit on power inserter
• no communication between power inserter and Carryout G2+ antenna
• ensure included 25’ coaxial cable is being used and is properly connected between power inserter’s AntennA port and Carryout G2+ PrIMArY port
• ensure power button on power inserter pushed in on position
• replace 25’ coaxial cable with different rG6 coaxial cable
Antenna indicator faintly lit or flickering on power inserter
• Intermittent communication between power inserter and Carryout G2+
• ensure included 25’ cable is being used and is properly connected between power inserter AntennA port and Carryout G2+ PrIMArY port
• replace 25’ coaxial cable with a different rG6 coaxial cable
the antenna continuously searches and eventually stops without ever acquiring any satellites.
• Possible obstructions are blocking signal from the satellite
• Check to see if the southern sky is clear. trees, buildings, large signs, or an overpass can block the signal
• rain, snow, or excessive dew on the dome can interrupt the signal. Brush any snow or dew off of the dome. If heavy rain or snowfall is blocking the signal, it may be necessary to wait until the weather clears.
the antenna appears to lock onto signal, but my receiver does not show a picture or signal reading
• receiver improperly configured for the Carryout G2+ antenna
• Verify the switch settings are set correctly for the desired provider. see switch settings on page 2
• reconfigure the receiver according to steps on page 3 or 4
I have switched satellite service providers, and the antenna is no longer working properly
• switches are not set for the correct provider
• set the switches to the correct programming provider. see switch settings on page 2
If a problem persists, contact winegard technical services at [email protected] or 1-800-788-4417.
FCC GuidelinesChanges or modifications not expressly approved by winegard could void your authority to operate the equipment.
NOTE this equipment has been tested and found to comply with the limits for a Class B digital device, pursuant to
part 15 of the FCC rules. these limits are designed to provide reasonable protection against harmful interference in a residential installation. this equipment generates, uses and can radiate radio frequency energy and, if not installed and used in accordance with the instructions, may cause harmful interference to radio communications.
Carryout G2+ Antenna
6
Using outside receptacleIf your outside tV receptacle is wired for satellite, you’ll need to locate where that receptacle leads and connect that directly to your satellite receiver.
If the outside tV receptacle is wired for cable, the wiring will have to be modified for use with satellite. the coaxial cable cannot run through any other devices or switches before the satellite receiver.
typically, if wired for cable, the wiring will either run through a winegard power supply or video switch. the easiest way to fix this is to disconnect the cable from that device, use a barrel connector, and connect a new cable that runs directly to the receiver, bypassing the power supply or video switch.
transporting & MaintenanceBefore transporting the antenna, disconnect all coaxial cabling from antenna and power inserter. Unplug power adapter from outlet.
the Carryout G2+ antenna is designed to be maintenance free. However, it is a good idea to periodically clean the dome with a soft cloth, water, and dish soap.
optional AccessoriesMt-4000 Ladder MountPermanent or temporary mount for rV with quick disconnect. Creates all the benefits of an ultra low profile roof mounted antenna plus quick and easy portability.
rK-2000 roof Mount KitPermanently mount the Carryout G2+ antenna to your vehicle roof. no need to buy another antenna to replace your portable.
tr-1518 tripod Mountthe tripod mount has adjustable height and leveling settings of 14.5”– 22” and quickly disassembles for compact storage.
Mt-sM30 window Mounttemporary mount with maximum flexibility. easy one time assembly. Includes 2 brackets for temporary side mount opt.
For more information or to purchase accessories contact your local RV dealer or winegard.com
Carryout G2+ Antenna
rev0 11/15 2452360
winegard and Carryout are registered trademarks of winegard Company. DIsH is a registered trademark of DIsH network L.L.C. DIreCtV is a registered trademark of DIreCtV, LLC. Bell tV is a registered trademark of Bell Canada, Inc.
Disclaimer: Although every effort has been made to ensure that the information in this manual is correct and complete, no company shall be held liable for any errors or omissions in this manual. Information provided in this manual was accurate at time of printing. If the antenna does not function as expected, please contact winegard Company at [email protected] or 1-800-788-4417, or visit our website at www.winegard.com.
WINEGARD MOBILE PRODUCTS LIMITED WARRANTY(2 YEARS PARTS; 1 YEAR LABOR)
winegard Company warrants this product against defects in materials or workmanship for a period of two (2) years from the date of original purchase. During year one (1) of such warranty, winegard Company will also pay authorized labor costs to
an authorized winegard dealer to repair or replace defective products. no warranty claim will be honored unless at the time the claim is made, Customer presents proof of purchase to an authorized winegard dealer (to locate the nearest authorized
winegard dealer, contact winegard Company, 3000 Kirkwood street, Burlington, Iowa 52601, telephone 800-288-8094 or visit www.winegard.com). Customer must provide proof of purchase with a dated sales receipt for the winegard product to verify
the product is under warranty. If the date of purchase cannot be verified, the warranty period shall be considered to begin thirty (30) days after the date of manufacture.
If a defect in material or workmanship is discovered, Customer may take the product to an authorized winegard dealer for service. Customer must provide proof of purchase to verify the product is under warranty. If the product is brought to an authorized winegard dealer for service prior to expiration of year one (1) of the warranty period and a defect in material or workmanship is verified by winegard technical services, winegard Company will cover the winegard dealer’s labor charges for warranty service. the winegard dealer must contact winegard technical services in advance for pre-approval of the service. Approval of the service is at the sole discretion of winegard Company.
Alternatively, Customer may ship the product prepaid to winegard technical services (located at 2736 Mt. Pleasant street, Burlington, Iowa 52601, telephone 800-788-4417). Customer must return the product along with a brief description of the problem and provide winegard technical services with Customer’s name, address, and phone number. Customer must also provide proof of purchase to verify the product is under warranty. If the product is returned before the expiration of the warranty period, winegard Company will (at its option) either repair or replace the product.
this Limited warranty does not apply if the product has been damaged, deteriorates, malfunctions or fails from: improper installation, misuse, abuse, neglect, accident, tampering, modification of the product as originally manufactured by winegard in any manner whatsoever, removing or defacing any serial number, usage not in accordance with product instructions or acts of nature such as damage caused by wind, lightning, ice or corrosive environments such as salt spray and acid rain. this Limited warranty also does not apply if the product becomes unable to perform its' intended function in any way as a result of the television signal provider making any changes in technology or service.
RETURN AUTHORIZATION POLICYA return Material Authorization (rMA) is required prior to returning any product to winegard Company or winegard warranty
services under this warranty policy. Please call our technical services Department at 800-788-4417 or send an email to [email protected] to obtain the rMA number. Please furnish the date of purchase when requesting an rMA number. enclose the product in a prepaid package and write the rMA number in large, clear letters on the outside of the package. to avoid confusion or misunderstanding, a shipment(s) without an rMA number(s) or an unauthorized return(s) will be refused and returned to Customer freight collect.
wIneGArD CoMPAnY Does not AssUMe AnY LIABILItIes For AnY otHer wArrAntIes, eXPress or IMPLIeD, MADe BY AnY otHer Person.
ALL otHer wArrAntIes wHetHer eXPress, IMPLIeD or stAtUtorY InCLUDInG wArrAntIes oF FItness For A PArtICULAr PUrPose AnD MerCHAntABILItY Are LIMIteD to tHe two YeAr PerIoD oF tHIs wArrAntY.
In states that do not allow limitations on implied warranties, or the exclusion of limitation of incidental or consequential damages, the above limitations or exclusions do not apply.
some states do not allow limitations on how long an implied warranty lasts, or the exclusion of limitation of incidental or consequential damages, so the above limitations or exclusions may not apply to you.
this warranty gives Customer specific legal rights. Customer may also have other rights that may vary from state to state.
SATELLITE RECEIVER WARRANTY see manufacturer’s limited warranty policy.