LED Lighting Control Reference Design for Machine Vision
TI Designs: TIDA-01081LED Lighting Control Reference Design for MachineVision
DescriptionThis LED lighting control reference designdemonstrates a unique approach to drive and control astring of multiple high-power light-emitting diodes(LEDs). This reference design is targeted for industrialmachine vision systems and is also suitable for otherindustrial or automotive lighting applications. Thedesign allows users to program LED current andtiming to enable the safe overdriving of LEDs forincreased brightness. The design can operateautonomously but can also be triggered or generate atrigger through an isolated interface. Internal circuitblocks support a wide input voltage range, aprogrammable input current, and input power controlas well as protect against reverse polarity,overvoltage, and overtemperature.
LED Lighting Control Reference Design for Machine Vision
An IMPORTANT NOTICE at the end of this TI reference design addresses authorized use, intellectual property matters and otherimportant disclaimers and information.
1 System Description
CAUTION:
Do not leave this reference design powered when unattended.
HOT SURFACE:
Contact may cause burns. Do not touch. Take the properprecautions when operating.
LED Safety Guidelines
CAUTION
Retinal blue light or thermal hazard = 400-nm to 780-nmwavelength.
The high-power LEDs used and controlled in this reference design are inexcess of the LED Exempt Risk Group. The viewer-related risk is dependentupon how the user installs and uses this reference design.
LEDs contained on this board are Risk Group 2, and reduce to Risk Group 1 ata distance > 0.5 m. To minimize risk of eye injury, never stare at operatingLEDs as may be harmful to the eyes.
LED Lighting Control Reference Design for Machine Vision
WARNING
To minimize risk of eye injury, do not remove LEDcover plate.Intense light sources have a high secondary blinding effect. Atemporary reduction in visual acuity and afterimages can occur,leading to irritation, annoyance, visual impairment, and evenaccidents—depending on the situation.Always consider the use of light filtering and darkening protectiveeye wear and be fully aware of surrounding laboratory type setupswhen viewing intense light sources to minimize or eliminate suchrisks to avoid accidents related to temporary blindness.
This reference design is designed with the requirements of machine vision applications for factoryautomation and logistics in mind. Machine vision has proven itself as a key technology, addressing theneeds of automated manufacturing, including inspection, identification, quality control and logistics. Theillumination solution and lighting control of machine vision systems play a major role to meet thechallenging requirements of modern imaging solutions regarding increased production speed andeffectiveness. The illumination and lighting control applications can be found as separate end equipment,but can be also found as integrated parts of cameras, code readers, or barcode scanners.
These applications have common requirements such as:• Using high-power LEDs as a source of light• Programmable LED current as a direct measure of light brightness, including a safe overdriving of the
LEDs during pulsed operation with short LED ON-times• Precise timing control, including autonomous and synchronized (externally triggered) operation with
short trigger delay time• Continuous ON as well as pulsed operation of the LEDs• Support of LED ON-times down to the µs range to avoid or reduce motion blurs (this includes ultra-fast
ramping up or down of the LED current)• Pulse repetition frequencies up to 1 kHz or above to support the frame rate requirements of high-speed
imaging• Wide supply input voltage range, supporting standard 24-V power sources as found in industrial
applications, but also other standard voltages like 12 V or 15 V
This reference design for LED lighting control reflects the market trend of using high-power LEDs as thelight source. The design demonstrates how to drive those LEDs with a programmable constant current upto 2.4 A provided by a dedicated buck LED driver. A strobe repetition frequency (frame rate) of up to 10kHz and a configurable pulse width down to 200 ns match the requirements of light sources needed forhigh-speed imaging. A digital-to-analog converter (DAC) is used to set the output current of the LED buck.The output voltage of the LED buck and the temperature of the buck LED driver as well as the buckinductor are supervised to protect against overvoltage and overtemperature. Each of the used temperaturesensors offer 64 bits of user programmable EEPROM, which allows the user to save and read data forboard identification, configuration, parameter sets, or other purposes.
A pre-boost converter enables operation over an 8-V to 36-V input voltage range. This wide input voltagerange ensures that this reference design can use 12-V, 15-V, or 24-V power supplies as input powersource. The pre-boost provides a regulated 48.5-V output, serving as the input for the downstream LEDbuck. The output of the pre-boost is supervised by a dedicated overvoltage protection (OVP) circuitry.
LED Lighting Control Reference Design for Machine Vision
The pre-boost is equipped with an adaptive average input current limit and an energy storing bank ofoutput capacitors. Those two features together avoid overloading of the input power source of thereference design while enabling a much higher instantaneous power level to drive the LEDs. The adaptiveaverage input current limit of the pre-boost results in an 8-W to 10-W input power limit while the LEDs aredriven with a peak pulse power of up to 40 W in the exemplary case of this reference design.
The common power block of the design uses an eFuse as a second level of a smart input current andinput power limit. The input current limit of the reference design can be a selectable fixed value or to beadaptive to the output voltage of the input power source. The adaptive option limits the reference design'sinput power to a range of 12 W to 15 W, which avoids the need for oversized power supplies. Thecommon power block contains further a 5-V buck and load switch, a 3.3-V LDO, and a 2.5-V reference,providing the needed point-of-load rails as well as their sequencing. The dual DAC of the common powerblock controls the adaptive current limit of the eFuse and of the pre-boost.
The reference design uses an exemplary string of five white high-power LEDs on a separate LED boardfor the purpose of demonstrating the feature set of the design. The need for ultra-fast ON- and OFF-switching of the LEDs is addressed by separate MOSFETs and their driver circuits on the LED board.
The MCU block of the reference design controls the ON- and OFF-timing of the LEDs and the value of theLED current. This flexible control allows the user to set up this reference design to generate single pulsesas well as multiple pulses (burst) with an identical pulse width or with a progressively rising pulse width.The reference design can also demonstrate how a sequence of pulses with changing intensity can begenerated. The latter two features are a pre-requisite to enable automatic exposure bracketing (AEB) andhigh dynamic range (HDR) imaging.
The MCU block interfaces furthermore with the eFuse and pre-boost, controls the sequencing of the 5-Vrails, and monitors important system voltages and currents as well as the temperature data and content ofthe total 256 bits of general purpose EEPROM provided by the four temperature sensors.
The reference design features an isolated power and data interface to enable trouble-free communicationwith a notebook or PC and triggering from external sources. The isolated UART interface supportsconfiguration, monitoring and control of the design through a simple terminal software. The isolatedinterface provides furthermore an isolated 5-V rail, which can be loaded with up to 50 mA.
Besides its use in machine vision and logistics applications, the different blocks of this reference designscan also be adapted and modified for usage in industrial and automotive lighting applications.
LED Lighting Control Reference Design for Machine Vision
1.1 Key System Specifications
Table 1. Key System Specifications
PARAMETER SPECIFICATIONS DETAILSPOWER INPUTInput voltage 8 V to 36 V —
eFuse current limit
Selectable:500 mA , 770 mA, 1 AAdaptive to provided input voltage to limit input power to 15W for input voltage of 8 V to 36 V
Section 2.4.1.5
LED OUTPUTLED string voltage Up to 24 V
Section 2.4.1.1Average LED current (brightness control) 200 mA to 2.4 A
Programmable in steps of 50 mAPulse width 200 ns to 4.9 s; programmable
Section 3.1.2.1Pulse rise- and fall-time < 40 to 100 ns; depends on LED currentMaximum duty cycle 1% to 100%; programmable; depends on LED currentPulse repetition frequency (frame rate) 0.2 Hz to 10 kHz; programmableISOLATED TRIGGER INTERFACEIsolated power output 5 V / 50 mA
LED Lighting Control Reference Design for Machine Vision
2.2 Highlighted Products
2.2.1 TPS92515HVThe TPS92515HV is a compact, monolithic switching regulator integrating a low resistance N-ChannelMOSFET. The device is intended for high-brightness LED lighting applications where efficiency, highbandwidth, PWM, analog dimming, and small size are important. The regulator operates using a constantoff-time, peak current control. After an off-time based on the output voltage, an on-time begins. The on-time ends once the inductor peak current threshold is reached. The TPS92515HV can be configured tomaintain a constant peak-to-peak ripple during the ON and OFF periods of a shunt FET dimming cycle.This constant peak-to-peak ripple is ideal for maintaining a linear response across the entire shunt FETdimming range. Steady-state accuracy is aided by the inclusion of a low-offset, high-side comparator. LEDcurrent can be modulated using either analog or PWM dimming, or both simultaneously. Other featuresinclude undervoltage lockout (UVLO), wide input voltage operation, inherent LED open operation, and awide operating temperature range with thermal shutdown. The TPS92515HV offers a high input voltagerange of up to 65 V. The device is available in a thermally enhanced 10-pin HVSSOP package.
LED Lighting Control Reference Design for Machine Vision
2.2.2 TPS92561The TPS92561 device is a boost controller for LED lighting applications using high-voltage, low-currentLEDs. A boost converter approach to lighting applications allows the creation of the smallest volumeconverter possible and enables high efficiencies beyond 90%. The device incorporates a current sensecomparator with a fixed offset enabling a simple hysteretic control scheme free of the loop compensationissues typically associated with a boost converter. The integrated OVP and VCC regulator further simplifythe design procedure and reduce external component count.
LED Lighting Control Reference Design for Machine Vision
2.2.3 TPS26602The TPS26602 device is a compact and feature rich high-voltage eFuse with a full suite of protectionfeatures. The wide supply input range of 4.2 V to 55 V allows the device to control many popular DC busvoltages. The device can withstand and protect the loads from positive and negative supply voltages up to±60 V. Integrated back-to-back FETs provide a reverse current blocking feature, making the devicesuitable for systems with output voltage holdup requirements during power fail and brownout conditions.Load, source, and device protections are provided with many adjustable features including overcurrent,output slew rate, and overvoltage and undervoltage thresholds. The internal robust protection controlblocks along with the high-voltage rating of the TPS26602 help simplify the system designs for surgeprotection. A shutdown pin provides external control for enabling and disabling the internal FETs as wellas placing the device in a low-current shutdown mode. To monitor system status and downstream loadcontrol, the device provides fault and precise current monitor output. The MODE pin allows flexibility toconfigure the device between the three current-limiting fault responses (circuit breaker, latch off, and auto-retry modes). The devices are available in a 5-mm × 4.4-mm 16-pin HTSSOP as well as 5-mm × 4-mm24-pin VQFN package and are specified over a –40°C to +125°C temperature range.
LED Lighting Control Reference Design for Machine Vision
2.2.4 LM5165The LM5165 device is a compact, easy-to-use, 3-V to 65-V, ultra-low IQ synchronous buck converter withhigh efficiency over wide input voltage and load current ranges. With integrated high-side and low-sidepower MOSFETs, up to 150 mA of output current can be delivered at fixed output voltages of 3.3 V or 5 Vor at an adjustable output. The converter is designed to simplify implementation while providing options tooptimize the performance for the target application. Pulse frequency modulation (PFM) mode is selectedfor optimal light-load efficiency or constant on-time (COT) control for nearly constant operating frequency.Both control schemes do not require loop compensation while providing excellent line and load transientresponse and short PWM on-time for large step-down conversion ratios. The high-side P-channelMOSFET can operate at a 100% duty cycle for lowest dropout voltage and does not require a bootstrapcapacitor for the gate drive. Also, the current limit setpoint is adjustable to optimize the inductor selectionfor a particular output current requirement. Selectable and adjustable start-up timing options includeminimum delay (no soft start), internally fixed (900 µs), and externally programmable soft start using acapacitor. An open-drain PGOOD indicator can be used for sequencing, fault reporting, and output voltagemonitoring. The LM5165 buck converter is available in a 10-pin, 3-mm × 3-mm, thermally-enhancedVSON-10 package with a 0.5-mm pin pitch.
LED Lighting Control Reference Design for Machine Vision
2.2.5 DAC082S085The DAC082S085 device is a full-featured, general-purpose, dual, 8-bit, voltage-output DAC that canoperate from a single 2.7-V to 5.5-V supply and consume 0.6 mW at 3 V and 1.6 mW at 5 V. TheDAC082S085 is packaged in 10-pin SON and VSSOP packages. The 10-pin WSON package makes theDAC082S085 the smallest dual DAC in its class. The on-chip output amplifier allows rail-to-rail outputswing, and the three-wire serial interface operates at clock rates up to 40 MHz over the entire supplyvoltage range. Competitive devices are limited to 25-MHz clock rates at supply voltages in the 2.7-V to3.6-V range. The serial interface is compatible with standard SPI™, QSPI™, MICROWIRE, and DSPinterfaces.
LED Lighting Control Reference Design for Machine Vision
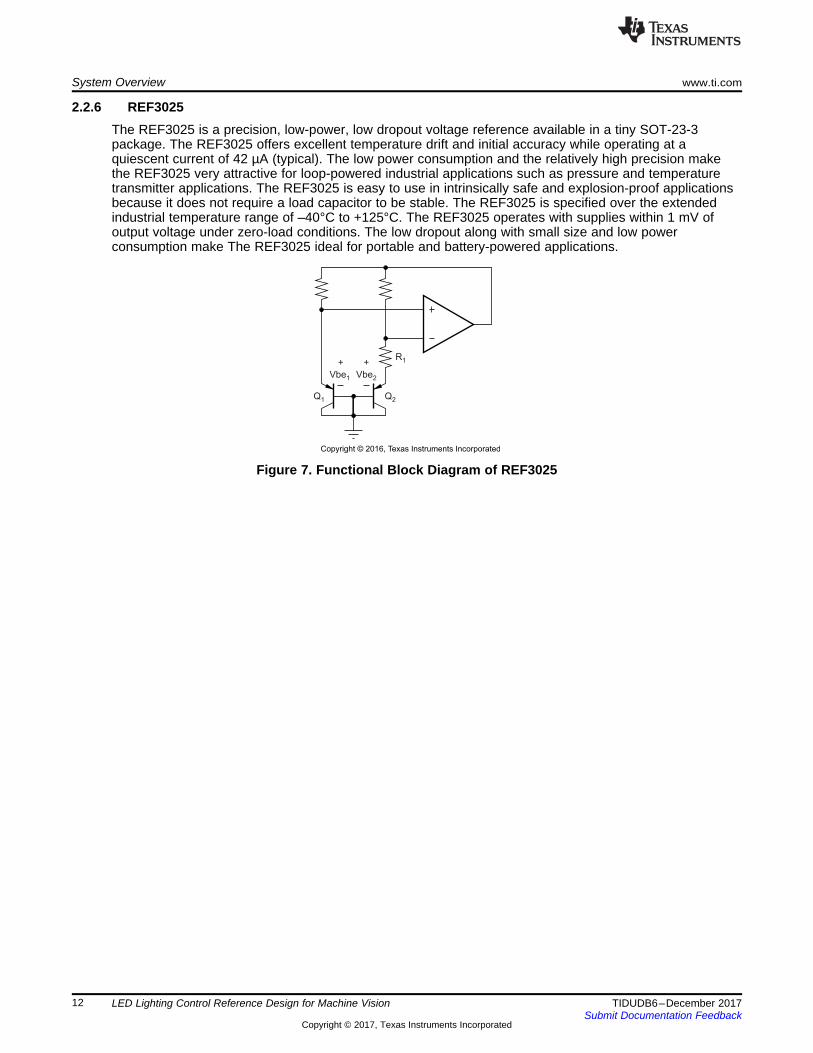
2.2.6 REF3025The REF3025 is a precision, low-power, low dropout voltage reference available in a tiny SOT-23-3package. The REF3025 offers excellent temperature drift and initial accuracy while operating at aquiescent current of 42 µA (typical). The low power consumption and the relatively high precision makethe REF3025 very attractive for loop-powered industrial applications such as pressure and temperaturetransmitter applications. The REF3025 is easy to use in intrinsically safe and explosion-proof applicationsbecause it does not require a load capacitor to be stable. The REF3025 is specified over the extendedindustrial temperature range of –40°C to +125°C. The REF3025 operates with supplies within 1 mV ofoutput voltage under zero-load conditions. The low dropout along with small size and low powerconsumption make The REF3025 ideal for portable and battery-powered applications.
LED Lighting Control Reference Design for Machine Vision
2.2.7 INA169The INA169 is a high-side, unipolar, current shunt monitor. Its wide input common-mode voltage range,high speed, low quiescent current, and tiny SOT-23 packaging enable use in a variety of applications.Input common-mode and power supply voltages are independent and can range from 2.7 V to 60 V for theINA169. The quiescent current of the device is only 60 µA, which permits connecting the power supply toeither side of the current measurement shunt with minimal error. The device converts a differential inputvoltage to a current output. This current is converted back to a voltage with an external load resistor thatsets any gain from 1 to over 100. Although designed for current shunt measurement, the circuit invitescreative applications in measurement and level shifting. The INA169 is available in a 5-pin SOT-23package. The INA169 is specified from –40°C to +85°C.
LED Lighting Control Reference Design for Machine Vision
2.2.8 DAC7311The DAC7311 (12-bit) device is a low-power, single-channel, voltage output DAC. The low powerconsumption of this device in normal operation (0.55 mW at 5 V, reducing to 2.5 µW in power-down mode)makes it ideally suited for portable, battery-operated applications. This DAC is monotonic by design,provides excellent linearity, and minimizes undesired code-to-code transient voltages while offering aneasy upgrade path within a pin-compatible family. This device uses a versatile, three-wire serial interfacethat operates at clock rates of up to 50 MHz and is compatible with standard SPI, QSPI, Microwire, anddigital signal processor (DSP) interfaces. The DAC7311 uses an external power supply as a referencevoltage to set the output range. The device incorporates a power-on reset (POR) circuit that ensures theDAC output powers up at 0 V and remains there until a valid write to the device occurs. The DAC7311contains a power-down feature, accessed over the serial interface, that reduces current consumption ofthe device to 0.1 µA at 2.0 V in power-down mode. This device is pin-compatible with the DAC8311 andDAC8411, offering an easy upgrade path from 8-, 10-, and 12-bit resolution to 14- and 16-bit. TheDAC7311 is available in a small, 6-pin, SC70 (SOT) package. This package offers a flexible, pin- andfunction-compatible, drop-in solution within the family over an extended temperature range of –40°C to+125°C.
LED Lighting Control Reference Design for Machine Vision
2.2.9 MSP430F5172The TI MSP family of ultra-low-power microcontrollers (MCUs) consists of several devices featuringdifferent sets of peripherals targeted for various applications. Combined with five low-power modes, thearchitecture is optimized to achieve extended battery life in portable measurement applications. Thedevice features a powerful 16-bit RISC CPU, 16-bit registers, and constant generators that contribute tomaximum code efficiency. The digitally controlled oscillator (DCO) allows the devices to wake up from low-power modes to active mode in less than 5 µs. The MSP430F5172 MCUs include two 16-bit high-resolution timers, two USCIs (USCI_A0 and USCI_B0), a 32-bit hardware multiplier, a high-performance10-bit analog-to-digital converter (ADC), an on-chip comparator, a 3-channel DMA, 5-V tolerant I/Os, andup to 29 I/O pins. Typical applications for this device includes analog and digital sensor systems, LEDlighting, digital power supplies, motor controls, remote controls, thermostats, digital timers, and handheldmeters.
Figure 10. Functional Block Diagram of MSP430F5172
LED Lighting Control Reference Design for Machine Vision
2.2.10 ISOW7842The ISOW7842 is a high-performance, quad-channel reinforced digital isolator with an integrated high-efficiency power converter. The integrated DC/DC converter provides up to 650 mW of isolated power athigh efficiency and can be configured for various input and output voltage configurations. Therefore, thisdevice eliminates the need for a separate isolated power supply in space-constrained isolated designs.The ISOW7842 device provides high electromagnetic immunity (EMI) and low emissions while isolatingCMOS or LVCMOS digital I/Os. The signal-isolation channel has a logic input and output buffer separatedby a silicon dioxide (SiO2) insulation barrier, whereas, power isolation uses on-chip transformersseparated by thin film polymer as insulating material. Various configurations of forward and reversechannels are available. If the input signal is lost, the default output is high for the ISOW7842 and low forthe devices with the F suffix. This device helps prevent noise currents on a data bus or other circuits fromentering the local ground and interfering with or damaging sensitive circuitry. Through innovative chipdesign and layout techniques, electromagnetic compatibility of the ISOW7842 device has beensignificantly enhanced to ease system-level ESD, EFT, surge, and emissions compliance. The high-efficiency of the power converter allows operation at a higher ambient temperature. The ISOW7842 deviceis available in a 16-pin SOIC wide-body (SOIC-WB) DWE package.
LED Lighting Control Reference Design for Machine Vision
2.2.11 LP5907The LP5907 is a low-noise LDO that can supply up to a 250-mA output current. Designed to meet therequirements of RF and analog circuits, the LP5907 device provides low noise, high PSRR, low quiescentcurrent, and low line or load transient response figures. Using new innovative design techniques, theLP5907 offers class-leading noise performance without a noise bypass capacitor and the ability for remoteoutput capacitor placement. The device is designed to work with a 1-µF input and a 1-µF output ceramiccapacitor (no separate noise bypass capacitor is required). This device is available with fixed outputvoltages from 1.2 V to 4.5 V in 25-mV steps. Contact Texas Instruments Sales for specific voltage optionneeds.
LED Lighting Control Reference Design for Machine Vision
2.2.12 TPS22810The TPS22810 is a single-channel load switch with a configurable rise time and with an integrated quickoutput discharge (QOD). In addition, the device features thermal shutdown to protect the device againsthigh junction temperature. Because of this, the safe operating area of the device is inherently ensured.The device contains an N-channel MOSFET that can operate over an input voltage range of 2.7 V to 18 V.A SOT23-5 (DBV) package can support a maximum current of 2 A. A WSON (DRV) package can supporta maximum current of 3 A. The switch is controlled by an on and off input, which is capable of interfacingdirectly with low-voltage control signals. The configurable rise time of the device greatly reduces inrushcurrent caused by large bulk load capacitances, thereby reducing or eliminating power supply droop.UVLO is used to turn off the device if the VIN voltage drops below a threshold value, ensuring that thedownstream circuitry is not damaged by being supplied by a voltage lower than intended. The configurableQOD pin controls the fall time of the device to allow design flexibility for power down. The TPS22810 isavailable in a leaded, SOT-23 package (DBV), which allows to visually inspect solder joints as well as aWSON package (DRV). The device is characterized for operation over the free-air temperature range of–40°C to +105°C.
LED Lighting Control Reference Design for Machine Vision
2.2.13 TPS7A4101The TPS7A4101 device is a very high-voltage-tolerant linear regulator that offers the benefits of athermally-enhanced package (MSOP-8) and is able to withstand continuous DC or transient input voltagesof up to 50 V. The TPS7A4101 is stable with any output capacitance greater than 4.7 µF and any inputcapacitance greater than 1 µF (over temperature and tolerance). Thus, implementations of this devicerequire minimal board space because of its miniaturized packaging (MSOP-8) and a potentially smalloutput capacitor. In addition, the TPS7A4101 offers an enable pin (EN) compatible with standard CMOSlogic to enable a low-current shutdown mode. The TPS7A4101 has an internal thermal shutdown andcurrent limiting to protect the system during fault conditions. The MSOP-8 packages has an operatingtemperature range of TJ = –40°C to +125°C. In addition, the TPS7A4101 is ideal for generating a low-voltage supply from intermediate voltage rails in telecom and industrial applications; not only can thedevice supply a well-regulated voltage rail, but it can also withstand and maintain regulation during veryhigh and fast voltage transients. These features translate to a simpler and more cost-effective electricalsurge-protection circuitry for a wide range of applications.
LED Lighting Control Reference Design for Machine Vision
2.2.14 UCC27511The UCC27511 device is a single-channel, high-speed, low-side gate driver that can effectively driveMOSFET and IGBT power switches. Using a design that inherently minimizes shoot-through current, theUCC27511 is capable of sourcing and sinking high peak-current pulses into capacitive loads offering rail-to-rail drive capability and extremely small propagation delay, typically 13 ns. The UCC27511 features adual-input design, which offers flexibility of implementing both inverting (IN– pin) and non-inverting (IN+pin) configuration with the same device. Either the IN+ or IN– pin can be used to control the state of thedriver output. The unused input pin can be used for enable and disable functions. For safety purposes,internal pullup and pulldown resistors on the input pins ensure that outputs are held low when input pinsare in floating condition. Hence the unused input pin is not left floating and must be properly biased toensure that driver output is in enabled for normal operation. The input pin threshold of the UCC27511device is based on TTL and CMOS-compatible low-voltage logic, which is fixed and independent of theVDD supply voltage. Wide hysteresis between the high and low thresholds offers excellent noiseimmunity. The UCC27511 provides a 4-A source, 8-A sink (asymmetrical drive) peak-drive currentcapability. Strong sink capability in asymmetrical drive boosts immunity against parasitic, Miller turnoneffect. The UCC27511 device also features a unique split output configuration where the gate drivecurrent is sourced through OUTH pin and sunk through OUTL pin. This unique pin arrangement allows theuser to apply independent turnon and turnoff resistors to the OUTH and OUTL pins, respectively, andeasily control the switching slew rates. The UCC27511 device is designed to operate over a wide VDDrange of 4.5 V to 18 V and a wide temperature range of –40°C to +140°C. The internal UVLO circuitry onthe VDD pin holds output low outside the VDD operating range.
LED Lighting Control Reference Design for Machine Vision
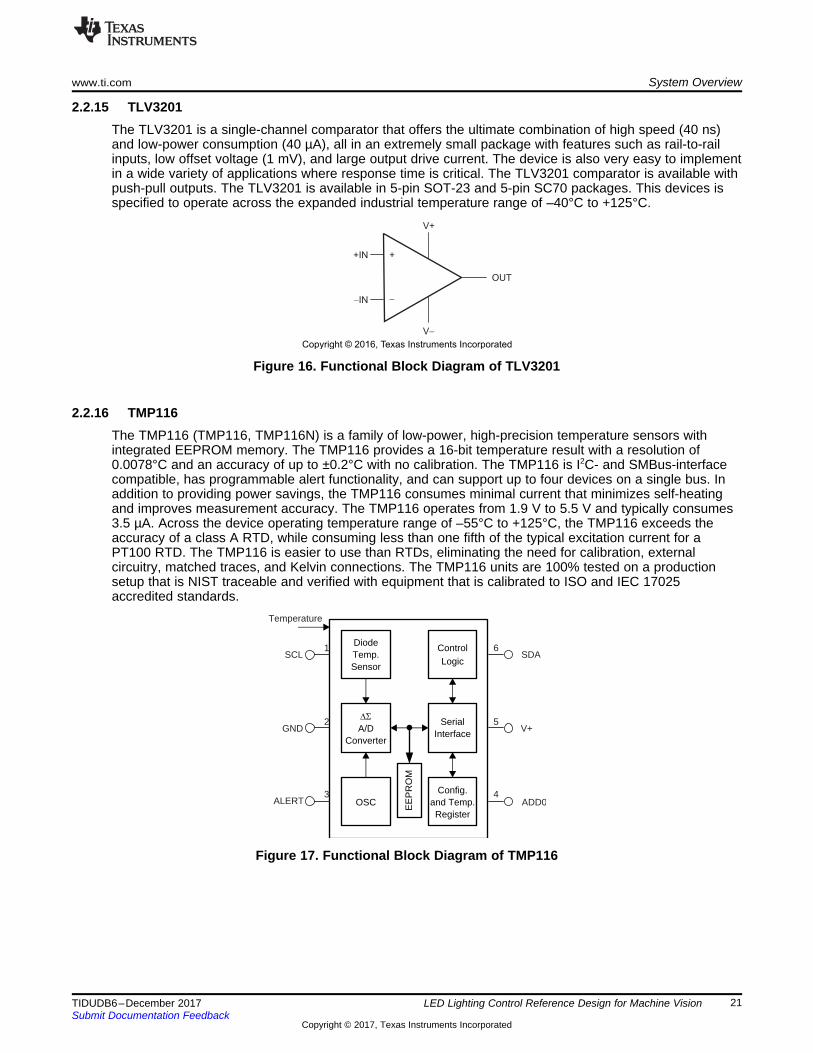
2.2.15 TLV3201The TLV3201 is a single-channel comparator that offers the ultimate combination of high speed (40 ns)and low-power consumption (40 µA), all in an extremely small package with features such as rail-to-railinputs, low offset voltage (1 mV), and large output drive current. The device is also very easy to implementin a wide variety of applications where response time is critical. The TLV3201 comparator is available withpush-pull outputs. The TLV3201 is available in 5-pin SOT-23 and 5-pin SC70 packages. This devices isspecified to operate across the expanded industrial temperature range of –40°C to +125°C.
Figure 16. Functional Block Diagram of TLV3201
2.2.16 TMP116The TMP116 (TMP116, TMP116N) is a family of low-power, high-precision temperature sensors withintegrated EEPROM memory. The TMP116 provides a 16-bit temperature result with a resolution of0.0078°C and an accuracy of up to ±0.2°C with no calibration. The TMP116 is I2C- and SMBus-interfacecompatible, has programmable alert functionality, and can support up to four devices on a single bus. Inaddition to providing power savings, the TMP116 consumes minimal current that minimizes self-heatingand improves measurement accuracy. The TMP116 operates from 1.9 V to 5.5 V and typically consumes3.5 µA. Across the device operating temperature range of –55°C to +125°C, the TMP116 exceeds theaccuracy of a class A RTD, while consuming less than one fifth of the typical excitation current for aPT100 RTD. The TMP116 is easier to use than RTDs, eliminating the need for calibration, externalcircuitry, matched traces, and Kelvin connections. The TMP116 units are 100% tested on a productionsetup that is NIST traceable and verified with equipment that is calibrated to ISO and IEC 17025accredited standards.
LED Lighting Control Reference Design for Machine Vision
2.2.17 SN74LVC1G175This single D-type flip-flop is designed for 1.65-V to 5.5-V VCC operation. The SN74LVC1G175 devicehas an asynchronous clear (CLR) input. When CLR is high, data from the input pin (D) is transferred tothe output pin (Q) on the rising edge of the clock (CLK). When CLR is low, Q is forced into the low state,regardless of the clock edge or data on D. NanoFree™ package technology is a major breakthrough indevice packaging concepts, using the die as the package.
This device is fully specified for partial-power-down applications using IOFF. The IOFF circuitry disables theoutputs, preventing damaging current backflow through the device when it is powered down.
Figure 18. Functional Block Diagram of SN74LVC1G175
Table 2. Function Table of SN74LVC1G175
INPUTS OUTPUTQCLR CLK D
H ↑ L LH ↑ H HH H or L X Q0
L X X L
2.2.18 SN74LVC1G02This single, two-input, positive-NOR gate is designed for a 1.65-V to 5.5-V VCC operation. TheSN74LVC1G02 performs the Boolean function Y = A + B or Y = A × B in positive logic. The CMOS devicehas high output drive while maintaining low static power dissipation over a broad VCC operating range.The SN74LVC1G02 device is available in a variety of packages, including the ultra-small DPW packagewith a body size of 0.8 × 0.8 mm.
Figure 19. Functional Block Diagram of SN74LVC1G02
LED Lighting Control Reference Design for Machine Vision
2.2.19 SN74LVC1G17This single Schmitt trigger buffer is designed for a 1.65-V to 5.5-V VCC operation. The SN74LVC1G17device contains one buffer and performs the Boolean function Y = A. The CMOS device has high outputdrive while maintaining low static power dissipation over a broad VCC operating range. TheSN74LVC1G17 is available in a variety of packages, including the ultra-small DPW package with a bodysize of 0.8 mm × 0.8 mm.
Figure 20. Functional Block Diagram of SN74LVC1G17
Table 4. Function Table of SN74LVC1G17
INPUTA
OUTPUTY
H HL L
2.2.20 SN74LVC1G14This single Schmitt-trigger inverter is designed for 1.65-V to 5.5-V VCC operation. The SN74LVC1G14device contains one inverter and performs the Boolean function Y = A. The device functions as anindependent inverter, but because of Schmitt action, it may have different input threshold levels forpositive-going (VT+) and negative-going (VT–) signals. NanoFree package technology is a majorbreakthrough in device packaging concepts, using the die as the package.
This device is fully specified for partial-power-down applications using IOFF. The IOFF circuitry disables theoutputs, preventing damaging current backflow through the device when it is powered down.
Figure 21. Functional Block Diagram of SN74LVC1G14 for Different Packages
LED Lighting Control Reference Design for Machine Vision
2.2.21 CSD18543Q3AThis 60-V, 8.1-mΩ, SON 3.3-mm × 3.3-mm NexFET™ power MOSFET is designed to minimize losses inpower conversion applications.
Figure 22. Top View of CSD18543Q3A
Table 5. Product Summary of CSD18543Q3ATA = 25°C TYPICAL VALUE UNIT
VDS Drain-to-source voltage 60 V
Qg Gate charge total (10 V) 11.1 nC
Qgd Gate charge gate-to-drain 1.7 nC
RDS(on) Drain-to-source on resistanceVGS = 4.5 V 12.0
mΩVGS = 10 V 8.1
VGS(th) Threshold voltage 2.0 V
2.2.22 CSD15380F3This 20-V, 990-mΩ, N-channel FemtoFET™ MOSFET is designed and optimized to minimize the footprintin many handheld and mobile applications. Ultra-low capacitance improves switching speeds. When usedin data line applications, the low capacitance minimizes noise coupling. This technology is capable ofreplacing standard small-signal MOSFETs while providing a substantial reduction in footprint size.
Figure 23. Top View of CSD15380F3
Table 6. Product Summary of CSD15380F3TA = 25°C TYPICAL VALUE UNIT
LED Lighting Control Reference Design for Machine Vision
2.2.23 TPD1E10B06The TPD1E10B06 device is a single-channel electrostatic discharge (ESD) transient voltage suppression(TVS) diode in a small 0402 package. This TVS protection product offers ±30-kV contact ESD, ±30-kVIEC air-gap protection, and has an ESD clamp circuit with a back-to-back TVS diode for bipolar orbidirectional signal support. The 12-pF line capacitance of this ESD protection diode is suitable for a widerange of applications supporting data rates up to 400 Mbps. The 0402 package is an industry standardand is convenient for component placement in space-saving applications.
Typical applications of this ESD protection product are circuit protection for audio lines (microphone,earphone, and speakerphone), SD interfacing, keypad or other buttons, VBUS pin and ID pin of USBports, and general-purpose I/O ports. This ESD clamp is good for the protection of the end equipment likeebooks, tablets, remote controllers, wearables, set-top boxes, and electronic point of sale equipment.
Figure 24. Functional Block Diagram of TPD1E10B06
2.3 Design ConsiderationsDriving high-power LEDs with pulses of high current in a fast and accurate manner is known to be adesign challenge. Designers are commonly confronted with limitations based on the basic laws of physics,component ratings, and environmental conditions.
This reference design provides an example on how to address some of these challenges in the hardwareand software design. For more details, consult outside literature.
LED Lighting Control Reference Design for Machine Vision
2.4 System Design Theory
2.4.1 Hardware
2.4.1.1 LED BuckThe LED buck is the core hardware block that directly influences the electrical characteristics of driving theLEDs. A switching regulator is selected to drive the string of five LEDs with a constant current of up to 2.4A. Using this switching regulator has the clear advantage of less power dissipation compared to any linearregulator approach. This holds especially true when considering the huge variation in the LED stringvoltage over forward current, temperature, and binned forward voltage groups.
However, using a switching regulator introduces other burdens for the design, for example noise, ripple,complexity, and ability to fulfill the demanding dynamic requirements.
The buck topology is selected because it is the only topology out of the standard non-isolated topologies(buck, boost, inverting buck-boost, SEPIC) that ensures a continuous current flow through the load (LEDs)on its output, even without the need for an energy storing output capacitor. The buck topology easesfurthermore the accurate control of its load (LEDs) current because this load current equals the inductorcurrent of the buck.
Table 7 lists the challenges for the practical design of the specific LED buck.
Table 7. Challenges of LED Buck Design and Measures to Address Them
FEATUREMEASURES TO ADDRESS DESIRED
FEATURES ADDITIONAL OR ALTERNATIVEMEASURES
L COUT FS VINILED: support short ON-times ↓ ↑
ILED: short rise, fall, or trigger delay times ↓ ↓ ↑ Start converter into shorted output, activelydischarge inductor for switching LEDs off
ILED: low ripple ↑ ↑ ↑ ↓Efficiency: high ↓ ↓Minimum ON-time limit of buck converter,do not violate ↑ ↓ ↓
A dedicated buck LED driver, TPS92515HV [1] , is chosen due to its integrated switching FET and its usedconstant off-time, peak-current control as shown in Figure 25. The principle of this special mode is basedon two states dictating the high-side FET control. The switch turns on and stays on until the programmedpeak current IL-Peak is reached. The peak current is controlled by monitoring the voltage across the senseresistor, RSENSE. When the voltage drop is higher than the programmed threshold (VIADJ/10), the peakcurrent is reached, and the switch is turned OFF, which initiates the OFF-time period tOFF. The OFF-time isderived from the output voltage VLED to create a quasi-constant inductor ripple ΔIL-PP.
Equation 1 gives the ideal values for the average inductor current, ILave, and for the average LED currentILEDave. Equation 1 is valid for positive integer numbers of switching periods only. Non-integer numbers ofswitching periods lead to a deviation from the ideal values. The resulting error is negligible for largenumbers of switching periods (when the switching frequency of the buck LED driver >> 1/LED_on_time)and for ILave >> ΔIL-PP.
LED Lighting Control Reference Design for Machine Vision
Figure 25. Principle of Hysteretic Operation: Constant Off-Time, Peak-Current Control
Furthermore, the TPS92515HV offers the advantage of a dedicated PWM dimming input to switch thebuck instantaneously ON and OFF without the delay or soft-start phases found in other DC/DC convertersand LED drivers.
The TPS92515HV provides additionally a specific IADJ input for setting the IL-Peak threshold by an analogvoltage VIADJ applied to that input pin. This feature enables the control of the average inductor current ILaveand therefore also the control of the average LED current ILED.
Although the hysteretic operation of the TPS92515HV allows a high control bandwidth, this referencedesign cannot fulfill the fast rise and fall time requirements for the LED current given in Table 1 based onthe hysteretic operation alone. The buck inductor and its physical property of slowing down any change incurrent flow through the inductor is the reason for it. This challenge can be addressed in theory byreducing the inductor value or increasing the voltage VL applied across the inductor. The former measurecan be in conflict with the minimum on-time limits of the TPS92515HV as well as with the desired lowripple of the LED current.
LED Lighting Control Reference Design for Machine Vision
This reference design uses an innovative approach to optimize VL and to achieve finally the required shorttiming requirements. Figure 26 shows the basic approach for the circuit as well as the path where theinductor current flows during the different states of operation.
Figure 26. Basic Schematic of LED Buck and LED Board
LED Lighting Control Reference Design for Machine Vision
The basic circuit diagram is furthermore supplemented by the respective timing diagram provided inFigure 27. This timing diagram shows the most important details of the signals that control the timing ofthe LED buck as well as of the switches (MOSFETs) on the LED board. Figure 27 also illustrates the idealwaveforms for the inductor current of the LED buck and for the LED current ILED.
Figure 27. Timing Diagram of LED Buck and LED Board
LED Lighting Control Reference Design for Machine Vision
Table 8 provides further specifics of the control and timing. This table not only describes each of thedifferent states shown in the timing diagram, but also provides the ideal value for the voltage VL appliedacross the inductor during each of the states. The larger the value of VL, the faster the current through theinductor can change.
Table 8. Detailed Description of LED Buck and LED Board Control and Timing
STATE DESCRIPTION VL
Trigger Interrupt, caused externally by isolated trigger input or internally by timer
1
Start of the buck LED driver (TPS92515HV) and precharge of its inductor tothe IL-Peak corresponding to the configured "I LED" (see Table 9). Start of thisstate is initiated by MCU (BUCK_ON is going high and DISCHG_L is goinglow and is based on the desired ttrigger_delay (10 µs), the estimated prechargetime (duration of state 1), and the time margin factored in (state 2). Output ofbuck is shorted by QSHORT_LED to maximize VL and to minimize the time neededfor state 1. End of state 1 is controlled by buck LED driver (TPS92515HV)when IL-Peak threshold is hit.
(2)
2
Time margin with freewheeling of IL (using Schottky diode DFW) to factor intolerances in precharging (state 1). State 2 starts automatically as soon as thebuck LED driver stops state 1. Output of buck is still shorted by QSHORT_LED tominimize VL and to minimize the drop in IL.
(3)
3 and 4
tLED_on_time is when the output of the buck is not longer shortened by QSHORT_LEDand IL flows through the LEDs (as ILED). Waveform and switching frequency ofILED are completely controlled by buck LED driver (TPS92515HV). Start of firstfalling slope of ILED is initiated by MCU control (SHORT_LED signal going low).First falling slope of ILED starts almost at the configured IL-Peak level due to theshort time margin (state 2) and the minimized drop of IL during state 2. TheMCU controls the end of tLED_on_time determined by the configured "On Time"parameter (see Table 9). As a result, the current flow through the LEDs canstop anytime during state 3 or state 4, leading to non-integer number ofswitching periods and causing a deviation of the resulting ILEDave from the idealvalue calculated by Equation 1.
Down-Slope (State 3):
(4)
Up-Slope (State 4):
(5)
5
Inductor discharge state: to start any LED pulse (flash) from a know state ofthe circuit and to ensure that minimum ON-time limit of the buck LED driver(TPS92515HV) is not violated. The MCU stops operation of buck LED driverby driving the BUCK_ON signal to go low and the DISCHG_L signal to gohigh. The latter one switches QDISCHG on and steers IL away from the LEDstowards the path through DDISCHG and RDISCHG. To be fast and effective thefollowing condition needs to be fulfilled.
(6)This approach significantly increases the voltage across the inductor VL anddecreases the time needed to completely discharge the inductor whencompared to the standard freewheeling with the LEDs simply shortened as instate 2. A fast inductor discharge reduces the average power dissipation in thefreewheeling diode and inductor compared to a pure shunt-FET dimmingimplementation.
LED Lighting Control Reference Design for Machine Vision
2.4.1.1.1 Specific Implementation of LED BuckA maximized voltage VL across the inductor is needed to obtain a fast change of the inductor current IL.According to Table 8, a maximized input voltage for state 1 is required to meet the trigger delay timespecification of 10 µs, especially for the maximum LED current ILEDave of 2.4 A. The high-voltage version ofTPS92515HV is therefore selected, offering a maximum VIN of 65 V compared to its standard (non-HV)version with only a 42-V input voltage capability.
Figure 28 shows the specific implementation of the TPS92515HV in this reference design.
Figure 28. LED Buck With IADJ-DAC and OVP
The input voltage of the LED buck (BUCK_VIN) is provided by the pre-boost (BOOST_VOUT). The LEDbuck can operate over a nominal input voltage range (BUCK_VIN) from 38 V to 49 V. C5, C6, and C91serve as bypass capacitors and need to be placed as close as possible to their respective pins of U3. Thepeak inductor current of L1 can be configured either by an external analog voltage (V_IADJ_EXT) appliedto header J2 or by an internal voltage (V_IADJ_INT) provided by the DAC U4. DAC U4 is controlled fromthe MCU. The jumper setting on header J3 selects whether the internal or external voltage is used. R7and C8 or R8 and C8 form a low-pass filter and lead to a RC time constant of roughly 2.5 µs.
LED Lighting Control Reference Design for Machine Vision
The switch node of the LED buck can be probed on test point TP1 by using a modified oscilloscope probe.The reference design contains numerous of such test points for all the different circuit blocks to simplifythe evaluation of the board. Figure 30 shows three of the four test points assigned to the LED buck. Tomodify the probe, remove the probe tip cover. In addition, the ground lead and alligator clip must bereplaced by a ground spring as shown in Figure 29. The small ground spring reduces significantly thenoise, which can couple otherwise into the long ground lead of a standard probe configuration.
Figure 29. Probe With Long Ground Lead and AlligatorClip vs Probe With Ground Spring
Figure 30. Dedicated Test Points (Blue) to SimplifyBoard Evaluation
R4, R5, and C7 are placeholders for a snubber network on the switch node of the LED buck. The type andvalue of snubber components must be adapted to the circuit of a specific design in case a snubber isneeded. Testing the reference design (see Section 3.2.3) shows a very clean switching waveform on TP1,which makes a snubber unnecessary.
The buck inductor L1 is selected carefully. This inductor influences the accuracy of the output current ofthe buck and therefore also the current through the LEDs as outlined in TPS92515x 2-A, Buck LED Driverwith Integrated N-channel FET, High-Side Current Sense, and Shunt FET PWM Dimming Capability . Theselected inductor is rated for 2.6 A, which is sufficient for the peak inductor current of 2.5 A in thisreference design. Beside this, the saturation characteristic plays an important role. The inductance ofinductors falls usually more or less rapidly in close proximity to the given rated current; however, theselected power inductor from Würth Elektronik shines with a inductance drop of only 20% at 5.2 A givenas the saturation current.
R9 and C9 are other components influencing the ripple current of the inductor and LED (states 3 shown inFigure 27). The peak-to-peak ripple current based on those components and on the 100 µH chosen for L1is roughly 200 mA, resulting in an switching frequency in the range of 600 kHz to 900 kHz. The switchingfrequency of the LED buck increases when the voltage of the LED string and the input voltage applied tothe LED buck increase; however, the switching frequency decreases when the LED current increases.
The LED buck of this reference design uses a very specific approach for protecting the buck circuit as wellas the voltage sensitive components on the LED board (MOSFETs Q3 and Q4) against overvoltage.Overvoltage events can be caused by a sudden interruption of the current flow of the buck inductor.Reasons for such interruptions are, for example, the disconnection of the LED board from the rest of thecircuit or LED open failures.
To address such cases, diode D1 is implemented to clamp any voltage on the output of the LED buck tothe safe level of the input voltage (BUCK_VIN). In addition, an overvoltage detection circuit based on thecomparator U33, the D-Flip-Flop U7, and the NOR-gate U6 is implemented. A detected overvoltage eventcauses a low-to-high transition on the comparator's output, leading to a positive edge on the clock input ofthe D-Flip-Flop. As a result, the High signal from the input pin of the D-Flip-Flop (D) is transferred to itsoutput pin (Q), which drives the output of the NOR-gate U6 low. The NOR-gate's output provides theBUCK_ON signal for the PWM input of the buck LED driver U3. The BUCK_ON signal is low due to theovervoltage event and switches the buck LED driver U3 off. This state is latched by the D-Flip-Flop.
LED Lighting Control Reference Design for Machine Vision
The overvoltage event is also detected by the MCU through the BUCK_VOUT_OV signal, which isgenerated by the D-Flip-Flop. The terminal software shows "Buck OVP fault" when an overvoltage eventfor the buck is detected. To return to a normal system state, the user needs to acknowledge the "BuckOVP fault" by "Reset OV" in the terminal software window. The "Reset OV" forces the MCU to reset the D-Flip-Flop by applying the BUCK_&_BOOST_VOUT_OV_RESET signal to the CLR input of the D-Flip-Flop.
This reference design demonstrates a dedicated solution for overtemperature protection. The temperatureof the buck converter (U3) and of the buck inductor (L1) are supervised by two separate temperaturesensors, U1 and U2. The temperature sensors communicate through the I2C bus with the MCU to enableconfiguration, readout of the sensed temperature data and alerting of overtemperature (seeSection 2.4.2.3). The measured temperatures are shown in the terminal software in the status output zoneunder "Temp:", "TPS92515", and "Inductor".
The buck inductor is not connected to ground. The thermal pad of the temperature sensor is thereforeelectrically not connected to the inductor, nor is it from a thermal perspective optimal coupled to it. Thelatter one holds true for the thermal connection of the temperature sensor sensing the temperature of theTPS92515HV as well. This can lead to severe differences between the actual temperature of thecomponents and the temperatures sensed and shown by the temperature sensors.
Therefore, the user must verify the temperature of those components under operating conditions by owntemperature measurements. Do not leave the reference design powered when unattended.
Each of the two TMP116 temperature sensors offer 64 bits of user programmable EEPROM as a uniqueand helpful feature. This feature enables the user to save and read data for board identification,configuration, parameter sets, or other purposes. Using this EEPROM is supported by the terminalsoftware's parameters "EEPROM" and "Data" as listed in Table 9.
LED Lighting Control Reference Design for Machine Vision
2.4.1.2 LED BoardThis reference design has a dedicated board (LED board) assigned to the five high-power LEDs: D9, D11,D14, D15, and D16. For demonstration purposes, this reference design uses OSLON™ Black Flat LEDs[11].These LEDs are specified in their data sheet for forward currents up to 1.5 A and provide even graphs forcurrents down to 300 mA (down to 50 mA with increased tolerances). The data sheet gives even data forthe permissible pulse handling capability up to peak pulses of 2.5 A.
Figure 32. Schematic of LED Board
The target of this reference design is to demonstrate that the LED string can be turned on and off very fastwith rise and fall times in the 40- to 100-ns range. To achieve this target specification, the two MOSFETsQ4 and Q3 are located in close proximity to the LEDs to steer the current flow.
Q4 acts as QSHORT_LED-FET (see Figure 26 and Figure 27). This FET shorts the LEDs and therefore theoutput of the LED buck during the precharge of L1 (state 1) and the first freewheeling of L1 (state 2).When this FET is switched off, the inductor current IL is steered immediately through the five LEDs,switching them on instantaneously.
Q3 acts as QDISCHG-FET, which is activated to switch the LEDs off. Q3 provides an parallel path (D7, D10,R131 to R136, and L6, Q3) to the LED string. The voltage drop across this parallel path (at the samecurrent as the LED current) is much lower than the forward voltage of the LED string. This is why the LEDcurrent is instantaneously steered away from the LEDs towards this parallel path. This parallel pathaccelerates the discharging of the buck inductor L1 to shorten the time and as a result reduce the lossesduring which the inductor's freewheeling current flows through the DC resistance of the inductor L1 as wellas through the freewheeling diode D3 of the LED buck. The reduced losses reduces the heating of thosecomponents (especially at high LED currents). L1 and D3 needs to be placed in close proximity to U3 froman EMI point of view. Those three components together form a thermal hotspot if accelerated dischargingL1 is not implemented.
LED Lighting Control Reference Design for Machine Vision
The losses and heating of the LED board are increased. In a real system, it is likely that the LED board isdesigned with a dedicated thermal board design in mind so that the additional losses can be managedbetter on the LED board.
The time needed to switch the LEDs on and off depends on the switching speed of the FETs Q3 and Q4.Dedicated MOSFET drivers (U18 and U20) provide the needed gate drive current for a fast switching ofthe FETs. Separate outputs (OUTH and OUTL) on those drivers allow a separate fine tuning for the speedwith which the MOSFETs are switched on and off. The separate IN+ and IN– pins of this driver(UCC27511 [5] ) enables its configuration as an inverting or non-inverting MOSFET driver. This kind offlexibility is used in this reference design as well.
Figure 32 shows a simplified approach for how to drive the MOSFETs alternative but is not tested in thisreference design. The shown single-gate Schmitt triggers (U17 inverting, U19 non-inverting) have areasonable output drive capability and might be sufficient for driving MOSFET. To evaluate, populate R58and R64 and remove R129, R61, R68 and R70.
The ferrite beads L6 and L7 and the snubber R130/C95 are used to improve EMI; however, these partsslow down the speed of switching the LEDs on and off. This speed is critical when using the design forultra-short LED pulses of less than 1 µs.
The LED board uses the two TMP116 temperature sensors similarly to the LED buck (see Section 2.4.2.3)to sense the temperature of the LEDs (U16) as well as of the components of the discharge path (U15).U16 is placed close to the LED D16 while U15 is placed near R131, R132, and D10. The sensedtemperatures are shown in the terminal software in the status output zone under "Temp:", "LED", and"Diodes". The "Diodes" value represents the sensed temperature of the respective resistors R131 andR132 and diode D10. The two temperature sensors do not only sense the temperatures but provide alsoan alert in case of overtemperature conditions (≥ 70°C).
The LEDs and the components of the discharge path are electrically floating and are not connected toground. The thermal pad of the temperature sensors is therefore electrically not connected to the LED orthe components of the discharge path, nor is it from a thermal perspective optimal coupled to them. Thiscan lead to severe differences between the actual temperature of the components and the temperaturessensed and shown by the temperature sensors.
Therefore, the user must verify the temperature of those components under operating conditions by owntemperature measurements. Do not leave the reference design powered when unattended.
Each of the two TMP116 sensors offer 64 bits of user programmable EEPROM as already outlined for thetemperature sensors of the LED buck.
2.4.1.3 Pre-BoostThe pre-boost has the following manifold purposes in this reference design:• Boost the 8-V to 36-V input voltage (V_IN on J19) of the reference design to the 48.5-V level needed
by the downstream LED buck• Separate the large discontinuous input ripple current of the LED buck from the input of this reference
design by converting it into the more continuous input current ripple of the pre-boost.• Provide an average input current limit, which adapts to the reference designs input voltage (V_IN on
J19). The adaptable input current limits of the pre-boost leads to a quasi-constant input power limit of 8W to 10 W, which is independent of the V_IN applied on J19.
• Implement the average input current limit of the pre-boost in a quasi-lossless manner. The pre-boostoperates always with this average input current limit as long as the pre-boost is active. This is incontrast to the reference design's higher input current limit provided by the eFuse U27. The eFuselimits the current by controlling the ON-resistance of the internal pass FET. There is therefore anincrease of losses and power dissipation in the eFuse as soon as the eFuse enters the current limitregion.
• Energy storage in the pre-boost output capacitors enables the LED buck to generate LED pulses withhigher peak power (up to 40 W and more) than the 8-W to 10-W input power limit of the pre-boost.
LED Lighting Control Reference Design for Machine Vision
2.4.1.3.1 Specific Implementation of Pre-BoostThe core of the pre-boost implementation is the pre-boost current controller, U10. The TPS92561 [2] isselected as a control device for this purpose due to its pure and simple hysteretic operation as shown inFigure 33. Two thresholds are formed as a result from a voltage applied on the ADJ-pin of U10 and froman internally superimposed ±30 mV to this ADJ voltage. These thresholds determine the control of theON- and OFF-times, tON and tOFF. The comparator-based operation principle takes complete care of theinductor and input-current control of the pre-boost without any control loop involved. The hystereticapproach also avoids the delays, bandwidth limitations, and loop stability issues commonly found instandard loop-controlled boost topologies.
This reference design uses a modified implementation of the TPS92561 device. The left schematic shownin Figure 33 represents the standard usage of the TPS92561 while the right schematic illustrates thespecific implementation of the device to enable its operation in this reference design. The main differenceis the current sensing scheme and the ground connection of the load.
The standard implementation does not allow a direct ground connection of the load (string of LEDs).Instead, the LEDs must be connected to ground through a low-side current sense resistor to enable theinductor and input current to be sensed even during the OFF-time of the boost's MOSFET (state 2, tOFF).The sensing of the inductor current during tON and tOFF is a prerequisite for equating the input current IINwith the inductor current IL.
The specific case of this more complex reference design requires a common ground usable for thecomplete system, ranging from the system's power input (J19) over the eFuse, pre-boost, MCU, and LEDbuck to the output LED string. To achieve this common ground connectivity, the low-side current sensingof the standard configuration is replaced by a high-side current sensing of the inductor current. The inputcurrent waveform is almost identical for both use cases. The modified implementation requires just thatthe RSENSE term in the equations given in Figure 33 are corrected by the resulting gain of the high-sidecurrent sensing.
Figure 33. Pre-Boost Operation—Standard vs Modified Implementation and Input Current Waveform
LED Lighting Control Reference Design for Machine Vision
A dedicated high-side current shunt monitor (INA169) is used in the real schematic of the pre-boost toimplement the high-side current sensing of the boost inductor's current (see Figure 34).
Figure 34. Schematic of Pre-Boost
R20 serves as current sense resistor, providing a voltage (VR20) of 100 mV/A. The INA169 (U8) offers adifferential input for sensing this voltage and converts the sensed voltage VR20 into a current IOUT_U8 (seeEquation 8) flowing through R33 to ground (GND). gm is the transconductance of U8 and has a value of1000 μA/V.
(8)
R33 is converting IOUT_U8 into a ground referred voltage VR33 (as shown in Equation 9), which is perfectlysuited to be used as sense voltage VSEN_U10 for the boost controller U10.
(9)
U10 compares internally the sense voltage (VSEN_U10) applied to its SEN pin with the voltage VADJ_U10applied to its ADJ pin. VADJ_U10 serves for setting the average boost inductor current limit IL2_limave, whichequals the average input current limit of the pre-boost IIN_Pre-Boost_limave. VADJ_U10 to get a specific desiredcurrent limit can be calculated according to Equation 10.
(10)
The current limit for an specific VADJ_U10 applied to the ADJ pin of U10 can be calculated by Equation 11.
LED Lighting Control Reference Design for Machine Vision
In this reference design, the VADJ_U10 is provided by the channel B of the dual DAC U28, which is part ofthe common power block. The provided VADJ_U10 is adapted (see also Section 2.4.2.9) to the input voltageapplied to J19 of this reference design to achieve the desired constant input power limit of 8 to 10 W forthe pre-boost.
U10 is powered by a separate LDO U9, generating a 6.63-V rail instead of using the internal 8.35-V LDOof U10. The output (VCC) of this internal 8.35-V LDO is shorted to its power input pin VP. This LDO(TPS7A4101 [6] ) has a maximum input voltage of 50 V (recommended) and an absolute maximum rating of55 V. This high input voltage capability gives an additional margin compared to a 42-V or 45-V maximuminput voltage capability of the TPS92561—especially when system input voltage transients like surges areconsidered. The external LDO U9 ensures a stable operation even for very low input voltages of the pre-boost down to 7.1 V. Such input conditions can be expected at the lowest system input voltage (8 V) andlargest voltage drop across the eFuse and the EMI filter at maximum load.
Due to its low dropout voltage (< 290 mV) and the ability to adjust the output voltage to 6.63 V, a muchmore stable output voltage can be expected over the full input voltage range (down to 7.1 V) when usingthis external TPS7A41 compared to the internal 8.35-V LDO of U10. The separate LDO also offers anENABLE pin, which supports a sequenced start-up of the different voltage rails of the system. For thisreference design, the 6.63-V LDO (and with it the pre-boost) is enabled by the power-good signal of the 5-V buck (PG_5V-Buck).
An additional delay is introduced by the MOSFET driver U11. The output of U11 is held low by the internalUVLO of U11, which supervises the supply voltage on the VDD pin of the MOSFET driver. U11 ispowered by the +5V0 rail, which is not powered up when the system starts. This +5V0 rail is controlled bythe MCU and comes up later during the system start-up.
This sequenced approach ensures that the eFuse can smoothly charge all the capacitors of the eFuse,the EMI filter, and the pre-boost without being disturbed by the larger start-up and operation current of thepre-boost.
The TPS92561 is designed to control current, but the device does not have an internal loop to regulateoutput voltage. The output voltage is usually determined and clamped by the forward voltage of the LEDstring when the TPS92561 is used in its standard configuration of driving LEDs directly (shown in the leftschematic of Figure 33). The device in this standard configuration has an OVP with a ±7% thresholdtolerance, which steps in when the LEDs are disconnected or when the LEDs fail to open.
The target for this reference design is to use the pre-boost not only for controlling the inductor and inputcurrent, but also for generating a regulated output voltage of 48.5 V. This 48.5-V level is high enough tocharge the buck inductor L1 quickly, but also low enough (staying below 50V) to evaluate it in laboratorieswith more severe electrical safety concerns. In addition, a backup circuit is needed for OVP in case thenominal 48.5 V is not controlled. During this failure, the voltage must stay below the maximum VDS ratingof 60 V for the boost MOSFET Q2.
Those requirements can not be fulfilled with the features of the TPS92561. Two independent comparatorshave been added therefore to add the Pre-Boost VOUT Control as well as the Pre-Boost VOUT OVP.Both comparators sense the pre-boost's output voltage VOUT_BOOST_1 and VOUT_BOOST_2 directlyon the cathode of the boost diode. From that point on, both circuits use two separate PCB traces andvoltage dividers R48,R52 and R49,R53 to feed the inputs of the two comparators. The pre-boost uses thesame type of 40-ns fast microPOWER comparators (TLV3201 [4] ) as had already been used for the OVP ofthe LED buck.
The comparator U13 used to control the output voltage is configured as a Schmitt trigger by adding apositive feedback using R54. U13 stops the TPS92561 from switching when VOUT_BOOST_1 risesabove 48.25 V to 48.75 V and restarts the switching when VOUT_BOOST_1 falls below 47.25 V to 45.75V. U13 is using the OVP pin of U10 for that purpose.
To implement an OVP function independently from the VOUT control of the boost, a separate path forstopping the switching is needed. This separate path is established by using the OVP circuit based oncomparator U14 to enable or disable the driver U11 of the MOSFET Q2. U14 is acting as a purecomparator; no external hysteresis is added. The threshold for its switching is between 53 V and 54.4 V.U14 does not control the FET driver directly, but triggers the D-Flip-Flop U12 instead. A detected
LED Lighting Control Reference Design for Machine Vision
overvoltage event causes U12 to latch, notifies the MCU by the BOOST_OV signal, and the latched Flip-Flop disables the MOSFET driver U11. The terminal software shows "Boost OVP fault". The user mustacknowledge the "Boost OVP fault" by "Reset OV" to return to a normal system state. The "Reset OV"forces the MCU to reset the D-Flip-Flop by applying the BUCK_&_BOOST_VOUT_OV_RESET signal tothe CLR input of the D-Flip-Flop.
2.4.1.4 MCUFor control and monitoring, this reference design uses the MSP430F5172. This MCU observes the supplyvoltage, the LED voltage, the boost voltage, and the current reported by the eFuse. These values areused not only for switching off in case of exceeding programmed limits, but also for controlling the settingsof the boost regulator and the eFuse current limit.
Temperatures are monitored using four TMP116 I2C sensors. Two sensors are placed on the main board:one next to the buck regulator, the other one at the inductor of the buck regulator. On the LED board, twomore sensors are placed: one monitors the temperature of the LEDs, and the other one monitors thedischarge diodes. Each sensor is programmed by the MCU to assert an alert pin to signal the MCU of anovertemperature. For more details about the monitoring, see Section 3.1.2.2.
The MCU controls the boost current as well as the eFuse current limit automatically, depending on theinput voltage through a dual-channel DAC. This DAC is connected through an SPI to the MCU. For moreinformation on this function, see Section 2.4.2.9.
For the user, the most important function of the MCU is controlling the LED flashes and providing the userinterface. The flash timings are controlled with a time resolution of up to 5 ns using timer D of theMSP430F5172. The compare outputs of the MCU are connected to the buck regulator, the short FET tocontrol the system, and to the Coff capacitor of the buck regulator. For more information on generatingflash, see Section 2.4.2.1.To understand the configuration, see the source code provided in the productfolder of this reference design.
The MCU also provides the entire user interface. This interface is stored and controlled by theMSP430F5172 and is accessible by using the UART and any terminal program on the user's PC. Nospecial software is necessary. For more information on the software for the interface, see Section 2.4.2.4.The source code is also helpful for understanding the operation.
The MCU can be programmed using an MSP-FET over the JTAG interface J13. The MSP430™ can beprogrammed by setting J11 to 2-3 and shorting J12.
The power supply of the MSP430 is decoupled by 10 Ω and 10 µF || 100 nF on each supply pin. Becausethe MSP430F5172 has two voltage rails, one operating at 5 V, it is important to respect the proper power-up sequence. The 5 V has to rise after the 3.3-V supply. This rise is achieved by switching on the 5 V witha load switch controlled by the MSP430 itself.
2.4.1.5 Common PowerThe common power block of the design provides additional protection, system management, and systemsupport functions as well as the following features:• eFuse for reverse input protection, inrush current-limited soft start, three selectable current limits or an
adaptive input current limit for constant input power clamp (12 W to 15 W), basic input OVP• Basic surge protection• EMI filter for conducted noise• Dual DAC to provide the control voltage for the adaptive current limit of the eFuse and the pre-boost• 5-V buck to generate the main supply rail used either directly by system components or by feeding the
additional 3.3-V LDO and 5-V load switch• 2.5-V reference to provide a highly precise 2.5-V rail used for all system functions that need high
LED Lighting Control Reference Design for Machine Vision
2.4.1.5.1 Specific Implementation of Common Power BlockThe header J19 is used as the power input connector, targeted to be powered from an external powersupply providing a supply voltage from 8 V to 36 V. The power supply must have at least a 15-W outputpower to use the electrical power of this reference design to its full extent. The 8-V minimum supplyvoltage must be ensured even under full power consumption of the reference design.
The TPS26602 [7] is selected as eFuse U27 and has an UVLO function for supervising the supply voltageprovided by the external power supply. The eFuse starts powering up the system for input voltages largerthan 7.6 V (typical) and stops and shuts down the system as soon as the input voltage drops below 7 V.Input voltages that exceed a level of 38 V (typical) are clamped to this level as a basic protection againstshort overvoltage events.
The eFuse can operate with input voltages up to 55 V and protects against reverse input voltages of up to–55 V. The TPS26602 has an absolute maximum input voltage rating of ±60 V and can withstand ±70 Vfor transients up to 10 ms.
The internal reverse input voltage protection makes the usually used reverse protection diodesunnecessary.
An additional level of protection, especially against surges, is provided by the used TVS and Schottkydiodes D18, D17 and D19 and D20. The TVS diodes are targeted to clamp a ±1-kV surge pulse (8 / 20µs), which is coupled by a coupling network of 40 Ω / 0.5 µF to a save voltage level below ±60 V.
Diodes D22, D23, and D24 and resistors R97, R100, R128, and R108 protect the sensitive systemcomponents (MCU, dual DAC, and the eFuse itself) from reverse input polarity. This added protection isrecommended because the external circuit of the TPS26602 differs in the proposed implementation of thisreference design from the standard configuration. The major difference is the adaptive current limit settingand the connections of the eFuse to the MCU.
The inrush current-limited soft start is programmed by the C73 connected to the DVDT pin of U27. Thiscapacitor determines the slew rate with which the output of the eFuse rises up. Without this controlled softstart, a huge peak current would flow to charge at once all the capacitors connected in one or the otherway to the OUT pin of the eFuse. These capacitors range from the capacitors of the EMI filter over theinput capacitor of the 5-V buck to the output capacitor bank of the pre-boost.
The eFuse provides a programmable current limit. This limit is usually implemented by connecting aresistor from the ILIM pin of the eFuse to the RTN pin of the TPS26602. In this case, The eFuse's outputcurrent limit ICL can be calculated using Equation 12.
(12)
In this reference design, RILIM is one of the three resistors (R101, R103, and R104) to finally get aselectable current limit depending on the jumper setting on header J20. The resistor values can beadapted to other needed current limit values as long as the specified and recommended operatingconditions for the system components are not being violated.
The very unique feature of this reference design is its adaptive current limit, which adapts the current limitto the input voltage of the system in a way that a 12-W to 15-W input power limit is achieved. The valuefor the current limit to be set is provided by the MCU and used by channel A of the dual-DAC U28 togenerate an adequate voltage to which R128 and R108 are connected. With R106 and the output of theDAC, those two resistors form together a network that is connected to the ILIM pin of the DAC when thejumper SH-J20 is placed on pins 7 and 8 of the header J20. This network then replaces the single resistorthat is usually connected from the ILIM pin of the eFuse to its RTN pin.
The output of the eFuse feeds the EMI filter. A power design seminar topic [10] serves as a guideline for thedesign of the EMI filter.
LED Lighting Control Reference Design for Machine Vision
The system start continues by starting the 5-V buck as soon as the voltage on Filter_OUT exceeds the6.75-V UVLO level of U31. An LM5165 converter is used as a simple and robust low-power switchingregulator that operates in COT mode and uses a ripple injection network R115, C83, and C85 for reducingthe output voltage ripple on the generated 5V-BUCK_OUT. This generated 5-V rail feeds the input of a3.3-V LDO as well as the input of a 5-V load switch. The 3.3-V LDO is enabled by the Power Good signalof the 5-V buck. The 5-V load switch is enabled by the 5V-LS_ON signal generated by the MCU. Thispower-up sequencing is implemented to fulfill the sequencing requirements of the MCU and to ensure asmooth power-up of the eFuse and of the complete system.
The precision 2.5-V reference U30 is fed from the 3.3V-LDO. The generated reference voltage is used asreference for the internal DAC of the MCU, as reference for the three comparators used for OVP of theLED buck and pre-boost, and for the output voltage control of the pre-boost.
2.4.1.6 Isolated Power and Data InterfaceAll external control inputs and outputs are isolated from the internal supply voltages and from the 8-V to36-V supply voltage on the power input J19. Therefore, an ISOW7842 is used as it not only provides dataisolation but also isolated power. By default, the isolated voltage is set to 5 V, but can be changed bysetting J17 from 1-2 to 2-3 to get 3.3 V. When changing this voltage, the levels of the UART interface alsochange and the correct FTDI cable or other interface must be used. The isolated voltage can be loadedwith up to 50 mA and can be accessed by the user on J14.
For reducing ripple caused by the ISOW7842 on the main 5-V rail, it is recommended to use a CRC π-filterusing 10 µF and 1 Ω.
The isolated UART is brought out at J16 and uses the standard pinout for FTDI USB UART cables. Theisolated UART interface and the NPN-In and TTL-Out signals of the isolated trigger interface are ESDprotected by using TPD1E10B06 TVS (U23 to U26) diodes.
The trigger input and output is implemented to provide a TTL and NPN input and output. The trigger NPNinput is directly connected to the ISOW7842 with a pullup resistor and ESD protection diode. The TTLinput uses an additional NPN BJT providing the same functionality. The system is designed to alwayshave a delay of 10 µs from trigger input to the LED flash.
The trigger output is designed in a similar manner, providing a TTL output with ESD protection, and aNPN output realized by a CSD18543Q3A N-Channel MOSFET. The delay between trigger output andstart of the LED flash is set to –6.5 µs.
2.4.2 SoftwareThis reference design includes software running on the MSP430F5172 to configure, monitor, and controlthe LED flash. There are four temperature sensors on the board that are monitored and cause a power offin case of overtemperature. Also, the most important voltages are monitored and displayed. The inputvoltage is used for configuring the eFuse as well as the boost regulator according to the maximum allowedinput power. A simple terminal is provided to configure the design and to display measurements.
LED Lighting Control Reference Design for Machine Vision
2.4.2.1 Flash GenerationTo generate a single flash with fast rise and fall time, the software controls the buck regulator as well asthe short FET with the timings as shown in Figure 35. When the flash sequence gets triggered, theMSP430 turns on the short FET and the buck regulator. After a given time, depending on the selectedLED current, the short FET is released.
Figure 35. Timing of Buck Regulator and Short FET
To control this sequence, timer D of the MSP430F5172 is used. This timer offers a resolution of up to 4 nsfor the compare outputs because it has an internal clock generation of 256 MHz.
To generate this timing, the control of the necessary pins is handed over to the compare outputs of thetimer module. The buck regulator is controlled by CCR1, and the short FET is controlled by he CCR2.Because the buck regulator control is active low, the compare control register (CCTL1) is configured to"Reset" at match and "Set" at the end of the sequence (configured by CCR0). The short FET is active highand only has be turned on during the buck precharge time. As a result the CCTL2 is configured to "Reset",and the output is manually set at the beginning of the sequence.
To maintain the same time from triggering and the actual flash independent from the selected current (andthe buck precharge time), the start of the buck is delayed and does not start immediately after triggering.Figure 36 shows the software flow for configuring the timer to handle this sequence. The CCR0 indicatesthe end of the sequence on the hardware side by turning off the buck regulator and on the software sideby causing an IRQ. The ISR then disables the timer (otherwise, the sequence would start again) andconfiguring the GPIOs back to software control. To this time, an offset can be added to compensatedelays and rise times caused by the hardware.
In this reference design, the trigger delay time is set to 10 µs. This delay can be changed depending onthe requirements, but must be long enough to charge the inductor of the buck regulator to the desiredcurrent.
LED Lighting Control Reference Design for Machine Vision
2.4.2.2 ADC OperationIn this reference design, the ADC measures the 3.3-V supply of the MSP430 as well as the input voltage(EFUSE_VIN) and current (EFUSE_IMON), LED voltage, and boost output voltage. The 3.3 V ismonitored to turn on the 5-V supply (+5V0) after the 3.3 V is stable to have a proper power-on sequence.
Figure 37 shows the four external channels connected to the internal ADC channels next to each other(A0 to A3). This connection enables the possibility to read the channels as sequence without interaction ofthe CPU.
Figure 37. ADC Usage on MSP430
To reduce the CPU usage on the ADC operations further, DMA is used to transfer the conversation resultsto the main memory. The sample rate of the ADC is controlled by using a timer output for controlling thesample and hold input.
By this, it is possible to get new ADC values to the memory with a limited data rate and without interactionof the CPU. The main loop can use these values and update the voltage and current reading on theconsole when the values change.
LED Lighting Control Reference Design for Machine Vision
Figure 38. ADC Operation Optimized for Low CPU Load
2.4.2.3 Temperature SensingFigure 1 shows the four TMP116 temperature sensors. Each sensor has a unique address on the I2C buswith which it can be configured and conversation results can be read.
The I2C bus is configured to run at the maximum allowed data rate of the TMP116 of 400 kHz to keep thetime of each operation as short as possible. Each TMP116 is configured to indicate overtemperature bypulling the "Alert" output low. This output is checked before every LED flash and disables the flash if theallowed temperature of 70ºC is exceeded.
When the display of measurements is enabled, one of the four sensors is checked each update cycle.When temperature changes, the updated value is printed to the console.
The thermal pad of the temperature sensors is, from a thermal perspective, not optimal coupled respectivethermal sensitive components. This can lead to severe differences between the actual temperature of thecomponents and the temperatures sensed and shown by the temperature sensors.
Therefore, the user must verify the temperature of those components under operating conditions by owntemperature measurements. Do not leave the reference design powered when unattended.
2.4.2.4 VT100 TerminalThe user interface uses a standard UART with 115200 Baud that can be connected using a USB-UARTcable to any PC. The MSP430 software makes use of the VT100 (1) control sequences for formatting theoutput. With this, it is possible to implement a simple user interface without the need of special softwareon the PC. Only a simple serial terminal program is needed.
Figure 39. Terminal
Figure 39 shows the output of the terminal. The screen is basically divided in two zones: the left half forcontrol and the right one for status output. Entering the underlined character jumps to the correspondingentry and allows the user to change the value. For more information, see Section 3.1.2.
To keep the flash jitter low, it is important to have no interrupts that can occur in parallel. UARTtransmission is either done by sending and waiting for the busy flag or it is synchronized to the timer IRQthat occurs every 100 µs.
To generate this menu, an array consisting of the structure describing these entries is created. For eachvalue that can be displayed, a separate variable must be instantiated. The menu initialization routineiterates to this array and prints every entry to the specified position. Whenever a value is changed, onlythe field containing this value has to be updated.struct menu_struct
const char *text; /** Title of entry */const int startx; /** x position */const int starty; /** y position */char *value; /** pointer to char array storing displayed value */
;const struct menu_struct menu[]=
"Control:", 0, 1, ""," "UNDERLINECHAR("O")"n Time [s]", 0, 2, ontime_value,...
LED Lighting Control Reference Design for Machine Vision
2.4.2.5 External TriggeringTo react on an external event as fast as possible, the external trigger is handled by configuring thecorresponding pin to cause an IRQ on the falling edge. Other IRQs must be avoided in this mode, as ithappens that the external interrupt occurs during another IRQ is serviced and the pin interrupt has to wait.
To avoid this, the timer IRQ is reconfigured and the internal timing is derived from the external event. If noexternal event occurs within 5 seconds, a timeout occurs and the timer ISR causes the main loop to run.
LED Lighting Control Reference Design for Machine Vision
Normally, the timer A occurs every 100 µs and controls the internal timing for sampling temperatures andLED flashing. Additionally, the UART sending is handled here. If an external trigger is selected, this ISR iscalled only when no external event occurred within the last 5 seconds.
To achieve a constant delay of 10 µs from trigger input to flash, the software has a time of less that 2 µsbefore the buck regulator has to be turned on. As soon as the ISR is entered, only a few flags arechecked before starting the timer sequence described in Figure 36. After starting the timer, enough time isleft until the flash pulse. In this time, the software checks if temperature is okay, if the "on" flag is set, andif the number of pulses is already reached. If any of these conditions are a reason to stop, the timer isturned off and the sequence is canceled before the LED is turned on.
2.4.2.6 Main ProgramThe main function initializes every necessary peripheral and then only has to check for new temperatureand voltage measurements and update the values on the user interface if monitoring is enabled.Whenever anything is entered using the interface, the new data must be checked and applied.
LED Lighting Control Reference Design for Machine Vision
2.4.2.7 Jitter ReductionWhen reacting on the trigger signal of a camera, precise timing of the flash is mandatory. Especially whenflash time is below 1 µs, a jitter in the range of 1µs is too much. Whenever a system has to handle severalIRQs that are not synchronized to each other, it happens that one IRQ occurs while another is handled.
Figure 42 shows what is happening in this case. The MSP430 is LPM0; MCLK is high when the timer IRQoccurs. Now it is a fixed time of about 1 µs until the timer ISR is handled. During the timer ISR, a port IRQis triggered (FGEN Start). The MSP430 continues to execute the timer ISR and then change to the portISR. As a result, the time from IRQ to handle the ISR is about 2 µs. Depending on when during the timerISR this happens, a different time is needed until the port ISR is executed. This scenario must be avoidedto have precise timing.
Figure 42. Jitter on External IRQ Caused by Timer (1 µs/div)
Whenever an exact timing is needed, the MSP430 must always be woken from LPM0 into the ISR.
2.4.2.8 Flash Time BracketingTo implement flash time bracketing, the flash time values are stored in a lookup table as multiplicationfactors. This table is organized as a two-dimensional array of float values.static const float flash_bracket_time[][5] =
Each bracketing value that is entered (0.25, 0.33, 0.5, 1.0, 2.0) is internally translated to an index of 1–5and used as one index for the bracketing table. The other index is the number of the current flash pulse.When bracketing is selected, before each pulse, the on-time is calculated from the entered on-time andthe multiplication factor and the timer is configured accordingly.
2.4.2.9 eFuse and Pre-Boost Current SettingWhen J20 is set to position 7–8, the MSP430 must set the current limit depending on the input voltage.Channel A of the DAC082S085 is connected to the eFuse, which is designed to allow a current range of0.28 A up to 1.43 A. The corresponding DAC value for each voltage is stored in a lookup table andapplied when the voltage changes.
Channel B of the DAC is responsible for setting the average input current of the pre-boost regulator. Tonot exceed the current limit of the eFuse, the input current of the pre-boost is also set depending on theinput voltage and is slightly lower than the current limit of the eFuse.
LED Lighting Control Reference Design for Machine Vision
3 Hardware, Software, Testing Requirements, and Test Results
3.1 Required Hardware and Software
3.1.1 HardwareFigure 43 shows the general hardware setup for this reference design.
Connect the power input connector J19 of this reference design to an isolated power supply with an outputvoltage capability in the range of 8 V to 36 V and an output power capability of at least 15 W. Connect theisolated UART interface (J16) of this reference design through a USB FTDI cable (TTL-232R-5V) with theUSB port of a PC or notebook.
For the sequence to make these connections, start the terminal application, and switch on the powersupply, see Section 3.1.2.
LED Lighting Control Reference Design for Machine Vision
3.1.2 SoftwareTo get started with the design, connect the USB FTDI cable to a PC. If the driver is not foundautomatically, download from FTDI.
The cable gets enumerated as a serial port; the address is found in the device manager. Use a preferredserial terminal application (such as PuTTY or Tera Term) to connect to this port using a baud rate of115200 baud.
First connect the cable to a PC, start the terminal application, and then power on the reference design.The MSP430 on the design sends some control commands at startup to setup the terminal.
Figure 44. Terminal After Startup
When the MSP430 powers up and the 3.3 V are stable, the galvanic isolated UART gets turned on andthe terminal is initialized and displays data as seen in Figure 44.
After startup, the default settings are loaded (1 µs on-time, a frame rate of 10 Hz, a LED current of 200mA, and internally triggered). By entering 's', the LEDs start flashing with the given parameters and "StateOff" changes to "State On".
LED Lighting Control Reference Design for Machine Vision
3.1.2.1 Changing SettingsEach parameter on the left side of the terminal screen can be changed by entering the underlinedcharacter. For example, to change the on-time, press 'o' and enter a time followed by the symbolrepresenting the desired prefix ('n' for nanoseconds; 'u' for microseconds; 'm' for milliseconds). This entryoverwrites the currently used value as seen in Figure 45. There must not be a space between the enterednumber and the symbol representing the prefix.
Figure 45. Changing Values
The input is parsed and shown after pressing enter. The terminal now shows the entered value.
Figure 46. Accepted Value
It is not possible to enter floating point values except for the frame rate. Entering a symbol for the prefix isonly possible for the "On Time" field.
LED Lighting Control Reference Design for Machine Vision
Table 9 lists the limitations of the parameter input mask.
Table 9. Parameter Overview
PARAMETER EXPLANATION POSSIBLE VALUES
On Time LED on time 200n to 4900m ('n','u','m' as symbols representing the prefix; Nospace between number and exponent; Do not enter 's' for seconds)
Frame Rate Repetition rate of internal trigger0 to 10000 (no unit; 0 = continuously on; changes to next rate that ispossible with 100-µs timer); values between 0.2 and 9.9 can beentered with one digit behind the decimal delimiter ('.')
Trigger Internal or external trigger Toggles between "Int" and "Ext"N Number of flashes 0 to 32767 (0 = continuous flashing)I LED LED current 200 to 2400 (without mA or A, no floating point)
Time Brk Flash time bracketing
Changes between "Off", "0.25", "0.33", "0.5", "1.0", "2.0",representing 1/4, 1/3, 1/2, 1 and 2 "stop increments" as used inphotography when AEB is done by shutter speed steps (seeSection 2.4.2.8 for the multiplication values)
Current Brk Current bracketing Increment the current after each flash by this step; only used when anumber of flashes is specified
Monitoring Print voltages and temperature toterminal Toggles between "On" and "Off"
Reset OV Resets OVP N/AState Operation state Toggles between "On" (LED Flashing) and "Off"EEPROM Selects TMP116 EEPROM 0 to 3 (0 = U1; 1 = U2; 2 = U15; 3 = U16)
Data Displays EEPROM data Enter the data to be written in hexadecimal and 16 bit chunks, asdisplayed
3.1.2.2 Status InformationThe right side of the terminal screen gives information about the status of the reference design, includingtemperatures, voltages, current, and some flags. Figure 47 shows the measurement points for the differentdisplayed values.
The temperatures are measured at four different points, where the majority of the heat is generated: theLEDs, the discharge path (diodes and resistors), the buck inductor, and the buck regulator TPS92515HV.At those points, a TMP116 is placed and connected to the MSP430 using an I2C bus. The TMP116 isprogrammed to generate an overtemperature event by pulling the ALERT signal low. Even when themeasurements are disabled and no values are retrieved and displayed, the reference design still turns offthe LEDs if a temperature of 70°C is exceeded. Additionally, this flag is displayed in the terminal window.
The displayed input voltage is measured at the input of the reference design (J19, EFUSE_VIN). Inputcurrent is measured by the eFuse and provided as an analog signal that is connected to the MSP430. Theoutput voltage of the pre-boost regulator can be measured at TP7. The same voltage is monitored inhardware with a comparator and a flip flop to latch overvoltage events and disable the boost regulator.This flag is displayed in the terminal window. The same applies for the buck regulator (TP2).The voltage ismonitored in the hardware and triggers a flip flop, disabling the TPS92515HV.
Additional displayed flags are:• The eFuse status flag: The fault output of the TPS26602(for more information, see TPS2660x 60-V, 2-
A Industrial eFuse With Integrated Reverse Input Polarity Protection )• 3.3 V of the MSP430: The supply voltage of the MSP430 can be fed to the ADC and monitored. This
voltage is used to switch on the load switch powering the 5 V part of the circuit after the 3.3 V arestable and above 3 V.
• Load switch status: Gives an information if the load switch is turned on. The terminal can only bedisplayed if the load switch is on, as the 5 V after the load switch power the ISOW7842 that is used forthe isolated UART.
• Failure information: When the design switches off, this can have different reasons: overtemperature,undervoltage of the boost voltage, or a fault signaled by the eFuse. This is reported to show why it hasturned off. This fault is reset by switching the LED on again (toggling State from Off to On).
LED Lighting Control Reference Design for Machine Vision
Figure 47. Status Information Measurement Points
3.1.2.3 Operation Modes
Table 10. Operation Modes
MODE DESCRIPTION
ContinuousWhen the frame rate is set to 0 Hz, continuous mode is active. The LEDs are turned oncontinuously with a set current up to 500 mA. Can be triggered externally (Trigger set to"Ext") or turned on from terminal.
Pulsed
The frame rate has to be set to any other value than 0 to enable pulsed mode. The pulsewidth ("On time") can be set, as well as the current. The number of pulses ("N") has to beset, entering 0 will allow infinite number of pulses. This mode has to be combined withinternal or external trigger.
Externally triggeredTo provide an external trigger signal, set trigger to Ext. Depending on the frame rate value(0 = Continuous, else = Pulsed) the LED will turn on or flash the preset time every edge ofthe trigger signal. Changing the trigger is only possible when State is set to off.
Standalone (internally triggered)For internal triggering, the trigger has to be set to Int and a frame rate with any value above0. This will cause LED flashes with a repetition frequency set as frame rate. Changing thetrigger is only possible when "State" is set to off.
Switched To enter switched mode, set the frame rate to 0 Hz and the trigger source to Ext. Thereference design will now switch on and off depending on the level of the trigger input.
Multi-pulsed To flash only a given number of pulses, set "N" to the number of desired pulses. 0 will leadto infinite pulses. This parameter is used with internal and external trigger.
AEB
To enable exposure bracketing set "Bracketing" to any value. This will flash five pulses withdifferent flash time based on the entered "On Time". See Section 2.4.2.8 for the resultingtimes. These pulses can be triggered internally or externally. Also it is possible to vary thecurrent of each LED flash by setting Current Brk and the number of flashes to the desiredvalue.
In all modes, it is necessary to set the State to On; otherwise, it will not flash. Some values are changedafter entering due to hardware limitations, such as timing constrains or power requirements, that exceedthe design power. It is possible to enter configurations that exceed limitations that cause malfunctions ordamage the design. Be careful when entering or changing configurations and parameters.
LED Lighting Control Reference Design for Machine Vision
3.2 Testing and Results
3.2.1 Operation Modes
3.2.1.1 Automatic Exposure Bracketing (AEB)This reference design and the related terminal software are able to demonstrate LED brightnessbracketing (implemented by current bracketing, see Figure 48) as well as time bracketing (see Figure 49)as prerequisites needed for AEB.• Channel 3: TP13—I_LED measured as voltage (100 mV / A) across the current sense resistor R67• Channel 4: TP2—BUCK_VOUT (represents the LED voltage)
The LED current changes in the shown current bracketing example from 200 mA to 2400 mA in equalincrements of 550 mA. The LED voltage is almost independent from the LED current as a result of thenonlinear VF versus IF characteristic of the LEDs D9, D11, D14, D15, and D16.
The time bracketing example has a fixed LED setting of 1000 mA. The 400-µs on-time is valid for thecentered pulse in case of the time bracketing. The on-time of the LED pulses varies according to the"Time Brk" setting of "0.5" stop increments with the sequence 0.500, 0.707, 1, 1.414, and 2.000 ofmultiplication factors referred to the centered pulse width.
Figure 48. Current Bracketing: On Time = 400 µs, FrameRate = 1428 Hz, N = 5, I LED = 200 mA, Current Brk = 550
mA, 5 Steps From 200 mA to 2.4 A in 4 Increments of550 mA
Figure 49. Time Bracketing: On Time = 400 µs, FrameRate = 1428 Hz, N = 5, ILED = 1000 mA, Time Brk = 0.5
3.2.2 External TriggeringThis reference design uses the falling edge on TP24 (non-isolated Trigger_In, channel 1) to trigger a flash(pulse) of the LEDs. The external trigger signal generated by a pulse generator is applied to the isolatedNPN-IN (pin 4) of the isolated trigger interface (J15, channel 2). The LED current is probed on TP13 (100-mΩ current sense resistor on the LED board) and assigned to channel 3. Channel 4 shows the isolatedtrigger output signal probed on the isolated TTL-OUT (pin 2 of J15).
The test verified the targeted 10-µs trigger delay time between the falling edges of the trigger input signalsand the rising edge of the LED current Figure 50. The "delay"time to trigger external systems by means ofthe isolated trigger output of this reference design is –6.5 µs (time between the rising edge of theTrigger_Out and the start of the LED pulse).
Figure 51 shows that the propagation delay caused by the digital isolator (U22) is matching its datasheetspecification and is with only 14 ns negligible for to use in this reference design.
LED Lighting Control Reference Design for Machine Vision
Figure 50. Trigger Delay of 10 µs Fixed Figure 51. ISOW7842 Propagation Delay of 14 ns
3.2.3 LED BuckThe LED buck is evaluated "stand-alone" with a resistive load instead of the LED board. The following testconditions and test setup are used:• Test without the LED board• Firmware modified: the temperature sensors U15 and U16 from the missing LED board must not cause
a fault, BOOST_VOUT/BUCK_VIN undervoltage fault disabled• J19-pin 3 powered by external 15V (ground on J19, pin 2) to ensure that the board's complete control
electronic (MCU, isolated power and data interface, and so on) is powered under normal operatingconditions
• Jumper J21 removed to disconnect the LED buck from the pre-boost. Pre-boost is running in no-loadcondition, just with C26 and C27 as its output capacitor. Pre-boost VOUT control sensesVOUT_BOOST on the remaining C26 or C27 and works therefore as expected—supervised with scopeprobe on J21-pin 2 referred to ground of the board. C28 and C25 act as bulk bypass capacitors for theLED buck converter.
• Buck_VIN is powered from external power supply, connected through an ammeter (to measure thebuck's input current) to J21-pin 1 (ground on J19-pin 1). BUCK_VIN is sensed on J21-pin 1, alsoreferred to J19-pin 1.
• USBport of the PC or notebook connected through an FTDI cable to the isolated UART interfaceheader J16, continuous mode selected in terminal (frame rate setting "0") to switch the buck on all thetime.
• Jumper SH-J3 is placed on pin 2 and 3 of header J3 to enable external V_IADJ. V_IADJ_EXT fed intoJ2-pin 4; ground is connected to J2 pin 2.
• Scope probe connected to the buck's switch node TP1 (BUCK_SW) to supervise correct switching ofbuck without spikes.
• 1-µF, 100-V X7R in parallel to 330 pF and 100µF / >50-V aluminum electrolytic capacitor connected toJ1-pins 3 and 4.To avoid that, AC voltage and AC current are seen by the voltmeters and ammetermeasuring the output voltage and output current of the buck.
• Power resistor decade connected to J1-pins 2 and 5, ammeter for measurement of BUCK_IOUTinserted into the wire connected to J1-pin 5. Current probe on the wire connected to J1-pin 2 to verifythat AC part of current does not flow through the power resistor decade and ammeter. Theoscilloscope channel to which the current probe is connected to is set to its highest sensitivity and ACcoupling. Voltmeter for measuring BUCK_VOUT connected to J1-pins 1 and 6.
The input voltage (BUCK_VIN) of the buck had been varied between 38 V and 48 V. The performance ofthe buck is evaluated at two different output voltages (BUCK_VOUT) of 13 V and 17 V to emulate thevariations of forward voltage of the LED board. The load current was stepped in 300-mA increments from200 mA up to 2.6 A for the characteristics of switching frequency FSW versus IOUT (Figure 53) and forEfficiency versus IOUT (Figure 54.
Similarly, the external V_IADJ_EXT voltage is stepped up from 250 mV to 2.25 V in increments of 250 mVto evaluate the BUCK IOUT versus BUCK V_IADJ_EXT characteristic presented in Figure 52.
LED Lighting Control Reference Design for Machine Vision
A performance comparison of an initial test conducted with the LED Board connected versus thepreviously described test with a resistive load is provided in Figure 55. VOUT is measured on J18-pin 1,referred to J8-pin 1 of the LED board. IOUT is measured across J8 (100-mV, 1-A voltage drop acrossR67). The results of the test are similar—the differences are based on the non-linear VF/IF characteristicof the LEDs and on the missing bypass path for the AC part contained on VOUT and IOUT (the bypasscapacitors 100 µF ∥ 1 µF ∥ 330 pF had not been used for this initial test with the LED board).
Figure 52. IOUT vs V_IADJ_EXT Figure 53. Switching Frequency vs IOUT
Figure 54. Efficiency vs IOUT Figure 55. LED Efficiency and VOUT_vs_IOUT:Comparing Test With LED Board vs Resistive Load
The waveform on the switch node of the LED buck are evaluated in standard configuration and withparameter control through the terminal running on a notebook. The reference design is powered by a 15-Vsource connected to J19.The switch node waveform is probed on TP1 (BUCK_SW) for LED currents of200 mA an 2.4 A. The results are shown in Figure 57 and Figure 56. Channel 1 represents the switchnode, and Channel 3 shows the LED current waveform probed on TP13 (I_LED) measured as voltage(100 mV/A) across the current sense resistor R67.
LED Lighting Control Reference Design for Machine Vision
Figure 56. Buck Switch Node at 200 mA of LED Current Figure 57. Buck Switch Node at 2400 mA of LED Current
To evaluate the OVP of the LED buck, use the same test setup to evaluate the switch node. The probesare connected as follows:• Channel 1: TP1—switch node (BUCK_SW)• Channel 2: TP3—BUCK_ON signal• Channel 3: TP13—I_LED measured as voltage (100 mV/A) across the current sense resistor R67• Channel 4: TP2—BUCK_VOUT
The reference design is configured for an LED on-time of 450 µs, a frame rate of 1000 Hz and an I_LEDof 500 mA. The following figures show a sequence of three LED pulses; the end of second and the firstLED ON pulse is during normal operation completely controlled by the BUCK_ON signal. This sequencehappened in Figure 60 during the OFF-time of the buck converters (BUCK_SW is roughly on groundpotential, freewheeling of inductor L1, decreasing I_LED). Figure 61 shows this similarly for the ON-time ofthe buck. When BUCK_SW is roughly at BUCK_VIN potential, U3's high-side switch is ON, increasingI_LED. Both figures have in common that first the BUCK_ON signal goes intentionally low, and after thatthe I_LED and BUCK_VOUT fall to zero.
The opposite happens during an overvoltage event. First the I_LED is interrupted and goes suddenly tozero. BUCK_VOUT ramps up immediately and is then clamped by D1 to the BUCK_VIN potential.Overvoltage is detected, causing the BUCK_ON signal to be forced low even before the configured LEDON-time had been elapsed.
Figure 58. LED Buck OVP—Third LED Pulse StoppedAfter Overvoltage Caused by Removing SH-J5
Figure 59. LED Buck OVP—Zoomed-in View (100 ns/div)of Figure 58
LED Lighting Control Reference Design for Machine Vision
Figure 60. LED Buck Normal Operation Control ThroughBUCK_ON Signal, LED ON/OFF—Transition During tOFF
Figure 61. LED Buck Normal Operation Control ThroughBUCK_ON Signal, LED ON/OFF—Transition During tON
3.2.4 Pre-BoostThe switch node of the pre-boost is probed on TP6 to test different output resistors for the MOSFET driverU11. Initially, the resistor values as shown in Figure 62 and Figure 63 are used. There is a slight ringingduring the falling edge of the switch node (transition to the ON-state of the FET) of the MOSFET. Thisringing is completely gone after increasing the values of the resistors as shown in Figure 64 andFigure 65. The latter resistor values have therefore been used for the final build. The testing is done with 8V applied to J19 and a resistive load on pin 2 of header J19.
LED Lighting Control Reference Design for Machine Vision
3.2.5 Common Power Block
3.2.5.1 System Power UpThe waveforms during hot-plug of the systems power input is monitored and are shown in the followingfigures. The test is conducted with 35 V of input voltage. The sharp positive and negative spike shown atthe beginning of the input current waveform (channel 4 in Figure 66) is the inrush current for chargingC67, a 1-µF MLCC capacitor. All other capacitors are at this moment still disconnected by the eFuse. Thecharging of all the other capacitors (in total more than 500 µF in capacitance) starts with the rising of theinput current to roughly 100 mA and the rising of the voltage on channel 1 (FILTER_OUT). The charging isvery smoothly and well controlled by the eFuse.
The additional rising and peaking of the input current is related to the start of the 5-V buck (channel 2) andthe start of the 3.3-V LDO (channel 1 in Figure 67), which is enabled by the PG_5V-Buck signal (TP19).The next rise in input current is a 330-mA constant current pulse, which is slightly longer than 40 ms. Thispulse is the initial start of the pre-boost and it is clearly showing its constant input current control. The nextmuch shorter input current pulse with almost the same current value is the first re-charging of the pre-boost's output capacitors by pre-boost.
The load switch U32 is enabled by the MCU. The output of U32 (+5V0) and the isolated 5-V rail (bothshown in Figure 67) come up simultaneously because the isolated DC/DC of the digital isolator U22 ispowered by the output of the load switch.
The +5V0 rail also powers the MOSFET-Driver U11 of the pre-boost, delaying any switching and currentconsumption of the pre-boost during the system power-up.
Figure 66. System Power Up 1 Figure 67. System Power Up 2
FILTER_OUT (can be considered to beequal to OUT pins of eFUSE on TP16 Channel 1 +3V3A on TP20
+5V_BUCK_OUT on TP22 Channel 2 +5V0 on TP23 (5-V rail controlled by theload switch U32)
eFuse FLT on TP28 Channel 3 eFuseFLT on TP28System input current: current probe onJ19 (pins 3 and 4) Channel 4 +VDD_ISO on TP30 (isolated 5-V rail,
LED Lighting Control Reference Design for Machine Vision
3.2.5.2 5-V BuckThe evaluation of the 5-V buck converter includes probing its switch node waveform (TP18, channel 3)and of its output voltage ripple (TP22, channel 1) at 8-V and 36-V system input voltage. The isolatedDC/DC is loaded with 100 Ω, causing 50 mA of current drawn from the isolated 5-V rail on TP30 andloading the non-isolated 5 V in the range of 100 mA, provided by the LM5165 (U31).
Figure 68. 5-V Buck: SW and VOUT Ripple; 8-V Input Figure 69. 5-V Buck: SW and VOUT Ripple; 36-V Input
The switch node waveforms are without any spikes. An additional snubber is therefore not needed. Theoutput voltage ripple is in the range of 10 mVpp and is mainly related to the current consumption of U22,which is powered by the 5V.
3.2.5.3 eFuseThe current limit characteristic of the eFuse is evaluated for input voltages of 8 V, 24 V, and 36 V. Thesupply voltage is applied to J19. A power resistor decade is used to load the output of the eFuse. Thecurrent limit behavior is tested for the three selectable current limits by placing jumper SH-J20 on therespective pins of header J20. The test results are shown in Figure 70.
Figure 70. VOUT vs IOUT for Selectable Current Limit
LED Lighting Control Reference Design for Machine Vision
4 Design Files
4.1 SchematicsTo download the schematics, see the design files at TIDA-01081.
4.2 Bill of MaterialsTo download the bill of materials (BOM), see the design files at TIDA-01081.
4.3 PCB Layout Recommendations
4.3.1 Layout PrintsTo download the layer plots, see the design files at TIDA-01081.
4.4 Altium ProjectTo download the Altium project files, see the design files at TIDA-01081.
4.5 Gerber FilesTo download the Gerber files, see the design files at TIDA-01081.
4.6 Assembly DrawingsTo download the assembly drawings, see the design files at TIDA-01081.
5 Software FilesTo download the software files, see the design files at TIDA-01081.
6 Related Documentation1. Texas Instruments, TPS92515x 2-A, Buck LED Driver with Integrated N-channel FET, High-Side
Current Sense, and Shunt FET PWM Dimming Capability Data Sheet2. Texas Instruments, TPS92561 Phase-Dimmable, Single-Stage Boost Controller for LED Lighting Data
Sheet3. Texas Instruments, INA1x9 High-Side Measurement Current Shunt Monitor Data Sheet4. Texas Instruments, TLV320x 40-ns, microPOWER, Push-Pull Output Comparators Data Sheet5. Texas Instruments, UCC2751x Single-Channel, High-Speed, Low-Side Gate Driver Data Sheet6. Texas Instruments, TPS7A41 50-V Input Voltage, 50-mA, Very High Voltage Linear Regulator Data
Sheet7. Texas Instruments, TPS2660x 60-V, 2-A Industrial eFuse With Integrated Reverse Input Polarity
Protection Data Sheet8. Texas Instruments, DAC082S085 8-Bit Micro Power DUAL Digital-to-Analog Converter With Rail-to-
Rail Output Data Sheet9. Texas Instruments, LM5165 3-V to 65-V Input, 150-mA Synchronous Buck Converter With Ultra-Low
IQ Data Sheet10. Texas Instruments, Input EMI Filter Design for Offline Phase-Dimmable LED Power Supplies Seminar11. OSRAM Opto Semiconductors, OSLON Black Flat LUW HWQP Data Sheet
LED Lighting Control Reference Design for Machine Vision
6.1 TrademarksE2E, NanoFree, NexFET, FemtoFET, MSP430 are trademarks of Texas Instruments.SPI, QSPI are trademarks of Motorola, Inc.OSLON is a trademark of OSRAM Opto Semiconductors GmbH.All other trademarks are the property of their respective owners.
7 About the AuthorsJÜRGEN SCHNEIDER is a systems engineer at Texas Instruments, where he is responsible fordeveloping TI Designs for the industrial automation segment. He holds a Dipl.-Ing. (FH) degree inindustrial electronics and has worked 13 years as a design engineer for semiconductor manufacturingequipment, telemetry systems, and electro-medical devices before joining TI in 1999. Jürgen has workedwith TI as an analog field specialist, FAE, and systems engineer for power solutions. He presents attechnical conferences and seminars and has been one of the presenters of the industry-wide known TIPower Supply Design Seminar for multiple years. Jürgen also has the distinguishment of being elected asa Member, Group Technical Staff.
STEFFEN GRAF is a systems engineer at Texas Instruments, where he is responsible for developingreference design solutions for the industrial segment. He earned his master of science in electricalengineering at the University of applied science in Darmstadt, Germany.
IMPORTANT NOTICE FOR TI DESIGN INFORMATION AND RESOURCES
Texas Instruments Incorporated (‘TI”) technical, application or other design advice, services or information, including, but not limited to,reference designs and materials relating to evaluation modules, (collectively, “TI Resources”) are intended to assist designers who aredeveloping applications that incorporate TI products; by downloading, accessing or using any particular TI Resource in any way, you(individually or, if you are acting on behalf of a company, your company) agree to use it solely for this purpose and subject to the terms ofthis Notice.TI’s provision of TI Resources does not expand or otherwise alter TI’s applicable published warranties or warranty disclaimers for TIproducts, and no additional obligations or liabilities arise from TI providing such TI Resources. TI reserves the right to make corrections,enhancements, improvements and other changes to its TI Resources.You understand and agree that you remain responsible for using your independent analysis, evaluation and judgment in designing yourapplications and that you have full and exclusive responsibility to assure the safety of your applications and compliance of your applications(and of all TI products used in or for your applications) with all applicable regulations, laws and other applicable requirements. Yourepresent that, with respect to your applications, you have all the necessary expertise to create and implement safeguards that (1)anticipate dangerous consequences of failures, (2) monitor failures and their consequences, and (3) lessen the likelihood of failures thatmight cause harm and take appropriate actions. You agree that prior to using or distributing any applications that include TI products, youwill thoroughly test such applications and the functionality of such TI products as used in such applications. TI has not conducted anytesting other than that specifically described in the published documentation for a particular TI Resource.You are authorized to use, copy and modify any individual TI Resource only in connection with the development of applications that includethe TI product(s) identified in such TI Resource. NO OTHER LICENSE, EXPRESS OR IMPLIED, BY ESTOPPEL OR OTHERWISE TOANY OTHER TI INTELLECTUAL PROPERTY RIGHT, AND NO LICENSE TO ANY TECHNOLOGY OR INTELLECTUAL PROPERTYRIGHT OF TI OR ANY THIRD PARTY IS GRANTED HEREIN, including but not limited to any patent right, copyright, mask work right, orother intellectual property right relating to any combination, machine, or process in which TI products or services are used. Informationregarding or referencing third-party products or services does not constitute a license to use such products or services, or a warranty orendorsement thereof. Use of TI Resources may require a license from a third party under the patents or other intellectual property of thethird party, or a license from TI under the patents or other intellectual property of TI.TI RESOURCES ARE PROVIDED “AS IS” AND WITH ALL FAULTS. TI DISCLAIMS ALL OTHER WARRANTIES ORREPRESENTATIONS, EXPRESS OR IMPLIED, REGARDING TI RESOURCES OR USE THEREOF, INCLUDING BUT NOT LIMITED TOACCURACY OR COMPLETENESS, TITLE, ANY EPIDEMIC FAILURE WARRANTY AND ANY IMPLIED WARRANTIES OFMERCHANTABILITY, FITNESS FOR A PARTICULAR PURPOSE, AND NON-INFRINGEMENT OF ANY THIRD PARTY INTELLECTUALPROPERTY RIGHTS.TI SHALL NOT BE LIABLE FOR AND SHALL NOT DEFEND OR INDEMNIFY YOU AGAINST ANY CLAIM, INCLUDING BUT NOTLIMITED TO ANY INFRINGEMENT CLAIM THAT RELATES TO OR IS BASED ON ANY COMBINATION OF PRODUCTS EVEN IFDESCRIBED IN TI RESOURCES OR OTHERWISE. IN NO EVENT SHALL TI BE LIABLE FOR ANY ACTUAL, DIRECT, SPECIAL,COLLATERAL, INDIRECT, PUNITIVE, INCIDENTAL, CONSEQUENTIAL OR EXEMPLARY DAMAGES IN CONNECTION WITH ORARISING OUT OF TI RESOURCES OR USE THEREOF, AND REGARDLESS OF WHETHER TI HAS BEEN ADVISED OF THEPOSSIBILITY OF SUCH DAMAGES.You agree to fully indemnify TI and its representatives against any damages, costs, losses, and/or liabilities arising out of your non-compliance with the terms and provisions of this Notice.This Notice applies to TI Resources. Additional terms apply to the use and purchase of certain types of materials, TI products and services.These include; without limitation, TI’s standard terms for semiconductor products http://www.ti.com/sc/docs/stdterms.htm), evaluationmodules, and samples (http://www.ti.com/sc/docs/sampterms.htm).