60
M4L Mobile Printer Administrator’s Manual ®
M4L Mobile Printer
Administrator’s Manual
®


READ THIS SOFTWARE LICENSE AGREEMENT BEFORE USING THIS PRINTER Software License Agreement
CAREFULLY READ THE FOLLOWING TERMS AND CONDITIONS BEFORE USING THIS PRINTER. USING THIS PRINTER INDICATES YOUR ACCEPTANCE OF THESE TERMS AND CONDITIONS. IF YOU DO NOT AGREE TO THESE TERMS AND CONDITIONS, PROMPTLY RETURN THE PRINTER AND ALL ACCOMPANYING HARDWARE AND WRITTEN MATERIALS TO THE PLACE YOU OBTAINED THEM, AND YOUR MONEY WILL BE REFUNDED.
Definitions.
“Software” shall mean the digitally encoded, machine-readable data and program. The term “Software Product” includes the Software resident in the printer and its documentation. The Software Product is licensed (not sold) to you, and Printronix, Inc. either owns or licenses from other vendors who own, all copyright, trade secret, patent and other proprietary rights in the Software Product.
License.
1. Authorized Use. You agree to accept a non-exclusive license to use the Software resident in the printer solely for your own customary business or personal purposes.
2. Restrictions.
a. To protect the proprietary rights of Printronix, Inc., you agree to maintain the Software Product and other proprietary information concerning the typefaces in strict confidence.
b. You agree not to duplicate or copy the Software Product.
c. You shall not sublicense, sell, lease, or otherwise transfer all or any portion of the Software Product separate from the printer, without the prior written consent of Printronix, Inc.
d. You may not modify or prepare derivative works of the Software Product.
e. You may not transmit the Software Product over a network, by telephone, or electronically using any means; or reverse engineer, decompile or disassemble the Software.
f. You agree to keep confidential and use your best efforts to prevent and protect the contents of the Software Product from unauthorized disclosure or use.
3. Transfer. You may transfer the Software Product with the printer, but only if the recipient agrees to accept the terms and conditions of this Agreement. Your license is automatically terminated if you transfer the Software Product and printer.
Limited Software Product Warranty
Printronix, Inc. warrants that for ninety (90) days after delivery, the Software will perform in accordance with specifications published by Printronix, Inc. Printronix, Inc. does not warrant that the Software is free from all bugs, errors and omissions.
Remedy
Your exclusive remedy and the sole liability of Printronix, Inc. in connection with the Software is replacement of defective software with a copy of the same version and revision level.
Disclaimer of Warranties and Limitation of Remedies
1. THE PARTIES AGREE THAT ALL OTHER WARRANTIES, EXPRESS OR IMPLIED, INCLUDING WARRANTIES OF FITNESS FOR A PARTICULAR PURPOSE AND MERCHANTABILITY ARE EXCLUDED. Printronix, Inc. does not warrant that the functions contained in the Software will meet your requirements or that the operation of the Software will be uninterrupted or error free. Printronix, Inc. reserves the right to make changes and/or improvements in the Software without notice at any time.
2. IN NO EVENT WILL PRINTRONIX, INC. BE LIABLE FOR LOST PROFITS, LOST DATA, BUSINESS INTERRUPTIONS, OR ANY OTHER DIRECT, INDIRECT, INCIDENTAL OR CONSEQUENTIAL DAMAGES ARISING OUT OF THE USE OF OR INABILITY TO USE THIS PRODUCT, EVEN IF PRINTRONIX, INC. HAS BEEN ADVISED OF THE POSSIBILITY OF SUCH DAMAGES, OR ANY DAMAGES CAUSED BY THE ABUSE OR MANIPULATION OF THE SOFTWARE. SOME STATES DO NOT ALLOW THE EXCLUSION OR LIMITATION OF LIABILITY FOR CONSEQUENTIAL OR INCIDENTAL DAMAGES, SO THE ABOVE LIMITATION MAY NOT APPLY TO YOU.
3. Printronix, Inc. will not be liable for any loss or damage caused by delay in furnishing a Software Product or any other performance under this Agreement.
4. Our entire liability and your exclusive remedies for our liability of any kind (including liability for negligence except liability for personal injury caused solely by our negligence) for the Software Product covered by this Agreement and all other performance or nonperformance by us under or related to this Agreement are limited to the remedies specified by this Agreement.
5. California law governs this Agreement.
Termination of License Agreement
This License shall continue until terminated. This license may be terminated by agreement between you and Printronix, Inc. or by Printronix, Inc. If you fail to comply with the terms of this License and such failure is not corrected within thirty (30) days after notice. When this License is terminated, you shall return to the place you obtained them, the printer and all copies of the Software and documentation.
U.S. Government Restricted Rights
Use, duplication or disclosure by the Government is subject to restrictions as set forth in the Rights in Technical Data and Computer Software clause at FAR 242.227-7013, subdivision 1 (3) (ii) or subparagraph (c) (1) (ii), as appropriate. Further use, duplication or disclosure is subject to restrictions applicable to restricted rights software as set forth in FAR 52.227-19 (c) (2).
Acknowledgement of Terms and Conditions
YOU ACKNOWLEDGE THAT YOU HAVE READ THIS AGREEMENT, UNDERSTAND IT, AND AGREE TO BE BOUND BY ITS TERMS AND CONDITIONS. NEITHER PARTY SHALL BE BOUND BY ANY STATEMENT OR REPRESENTATION NOT CONTAINED IN THIS AGREEMENT. NO CHANGE IN THIS AGREEMENT IS EFFECTIVE UNLESS WRITTEN AND SIGNED BY PROPERLY AUTHORIZED REPRESENTATIVES OF EACH PARTY. BY USING THIS PRINTER, YOU AGREE TO ACCEPT THE TERMS AND CONDITIONS OF THIS AGREEMENT.

This document contains proprietary information protected by copyright. No part of this document may be reproduced, copied, translated, or incorporated in any other material in any form or by any means, whether manual, graphic, electronic, mechanical, or otherwise, without the prior written consent of Printronix.
Printronix makes no representations or warranties of any kind regarding this material, including, but not limited to, implied warranties of merchantability and fitness for a particular purpose. Printronix shall not be held responsible for errors contained herein or any omissions from this material or for any damages, whether direct or indirect, incidental or consequential, in connection with the furnishing, distribution, performance, or use of this material. The information in this manual is subject to change without notice.
COPYRIGHT 2013 PRINTRONIX, INC.
Trademark Acknowledgements
CSA is a registered certification mark of the Canadian Standards Association.
EIA is a registered service mark of the Electronic Industries Association.
IEEE is a registered service mark of the Institute of Electrical and Electronics Engineers, Inc.
TUV is a registered certification mark of TUV Rheinland of North America, Inc. UL is a registered certification mark of Underwriters Laboratories, Inc.
CG Triumvirate is a trademark of Agfa Corporation.
CG Triumvirate Bold Condensed font is under license from the Monotype Corporation.
Printronix and M4L are trademarks of Printronix, Inc.
ZPL and ZPL II are registered trademarks of Zebra Technologies Corporation.
Windows is a registered trademark of Microsoft Corporation.
All other trademarks are the property of their respective owners
TableofContents
Product Introduction ............................................................................................................................... 7
Printer Features .................................................................................................................................. 8
Standard Features .......................................................................................................................... 8
General Specifications ................................................................................................................... 9
Print Specifications ...................................................................................................................... 10
Media Specifications .................................................................................................................... 10
LCD Display ................................................................................................................................ 13
Installing the Belt Clip and Battery ................................................................................................ 15
Charging the Battery .................................................................................................................... 15
Loading the Media ....................................................................................................................... 16
Loading Media in Peel-Off Mode .................................................................................................. 17
Loading Fan-fold/External Media .................................................................................................. 19
Connecting the Printer ................................................................................................................. 20
Cable Communications ................................................................................................................ 20
Wireless Communication with Bluetooth ....................................................................................... 20
Wireless Communication with WiFi ............................................................................................... 20
Power-On Utilities ........................................................................................................................ 21
Media Sensor Calibration ............................................................................................................. 22
Self Test and Dump Mode............................................................................................................ 22
Printer Initialization ...................................................................................................................... 22
Self Test ...................................................................................................................................... 23
Dump Mode ................................................................................................................................. 24
Printer Defaults ............................................................................................................................ 24
Start the Configuration Utility ..................................................................................................... 25
Performing a Calibrate Sensor by Configuration Utility ............................................................. 27
Calibrate Sensor – Auto Calibrate ............................................................................................. 27
Calibrate Sensor - Manual Setup ............................................................................................... 28
Configuration Utility ZPL2 Emulation Menu ............................................................................... 29
Setting AUTO.BAS by Configuration Utility ................................................................................ 30
Setting Bluetooth by Configuration Utility ................................................................................... 31
Setting WiFi by Configuration Utility ........................................................................................... 32
Using the LCD to Set the Printer ................................................................................................ 33
Using the LCD to Set the Printer ...................................................................................................... 35
Print Setup for General ..................................................................................................................... 35
Print Setup for Zpl2 ........................................................................................................................... 36
Sensor ............................................................................................................................................... 37
Serial Comm. .................................................................................................................................... 38
Wireless LAN .................................................................................................................................... 39
Bluetooth ........................................................................................................................................... 39
Date Time ......................................................................................................................................... 39
Display .............................................................................................................................................. 40
File Manager ..................................................................................................................................... 40
Diagnostics ....................................................................................................................................... 41
Print Config ....................................................................................................................................... 41
Dump Mode ...................................................................................................................................... 41
Battery ............................................................................................................................................... 41
Printhead........................................................................................................................................... 41
Display Languages ........................................................................................................................... 42
Emulation .......................................................................................................................................... 42
Service .............................................................................................................................................. 42
Contact Information .............................................................................................................................. 49
Communication Statements .............................................................................................................. 53

7
1
Introduction
Product Introduction
Printronix® has been the global leader in industrial printing solutions for over 40 years, earning a reputation for designing and manufacturing leading edge products and delivering them to market with unsurpassed service and support. The M4L is a comfortable, light-weight printer capable of working with any mobile receipt printing application where you need quick, simple receipts on demand. Our M4L is designed for a rough life, inside the IP54-rated environmental case to resist dust and water and with its rubber over-mold design prepared to take up to a five foot fall and keep printing. These small and light printers can be worn comfortably for a full shift, without interfering with the user’s tasks. Use USB, Bluetooth, optional 802.11 b/g/n Wireless or serial to connect to a mobile computer or even a smart phone and produce clear easy-to-read receipts hour after hour To print label formats, please refer to the instructions provided with your labeling software; if you need to write the custom programs, please refer to the ZPL/CPCL programming manual that can be found on the accessories CD-ROM or on PRINTRONIX website at http://www.printronix.com. Applications
Portable point of sale Retail item marking, markdowns, shelf labeling & shelf talkers Labels for shipping & receiving Inventory control Cross-docking Pick, pack & apply operations Print pick tickets Logistics receipts
8
Printer Features
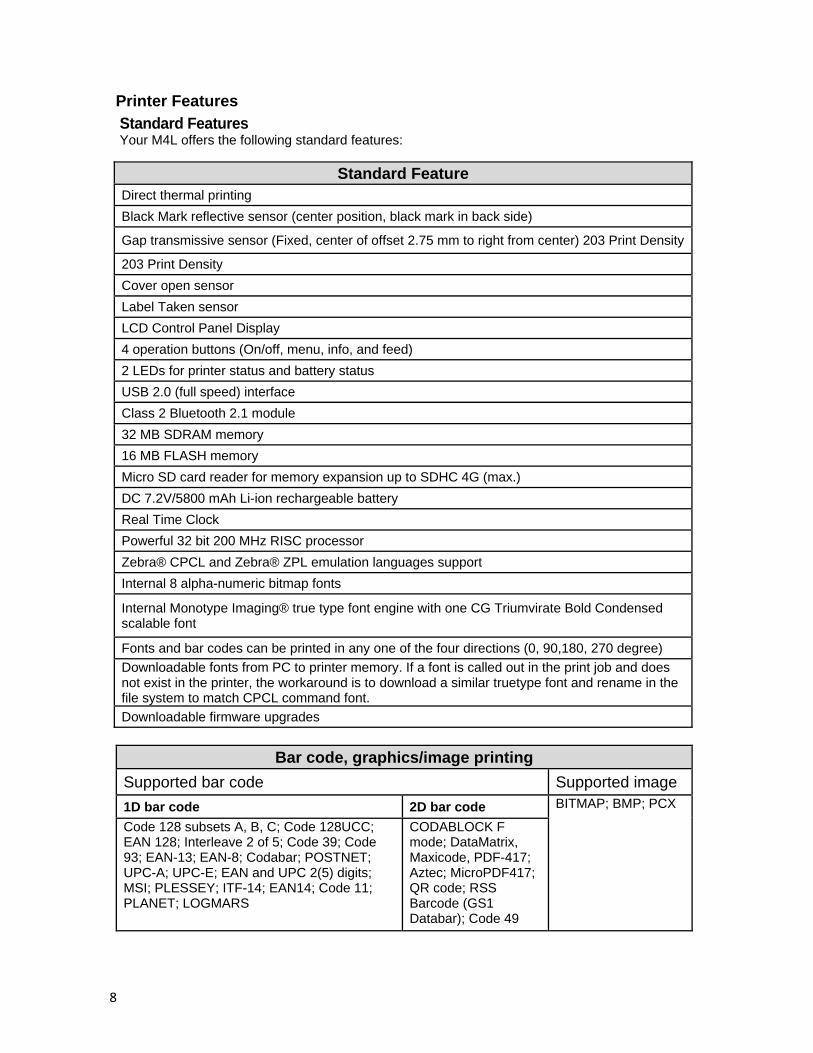
Standard Features Your M4L offers the following standard features:
Standard Feature Direct thermal printing
Black Mark reflective sensor (center position, black mark in back side)
Gap transmissive sensor (Fixed, center of offset 2.75 mm to right from center) 203 Print Density
203 Print Density
Cover open sensor
Label Taken sensor
LCD Control Panel Display
4 operation buttons (On/off, menu, info, and feed)
2 LEDs for printer status and battery status
USB 2.0 (full speed) interface
Class 2 Bluetooth 2.1 module
32 MB SDRAM memory
16 MB FLASH memory
Micro SD card reader for memory expansion up to SDHC 4G (max.)
DC 7.2V/5800 mAh Li-ion rechargeable battery
Real Time Clock
Powerful 32 bit 200 MHz RISC processor
Zebra® CPCL and Zebra® ZPL emulation languages support
Internal 8 alpha-numeric bitmap fonts
Internal Monotype Imaging® true type font engine with one CG Triumvirate Bold Condensed scalable font
Fonts and bar codes can be printed in any one of the four directions (0, 90,180, 270 degree)
Downloadable fonts from PC to printer memory. If a font is called out in the print job and does not exist in the printer, the workaround is to download a similar truetype font and rename in the file system to match CPCL command font.
Downloadable firmware upgrades
Bar code, graphics/image printing
Supported bar code Supported image
1D bar code 2D bar code BITMAP; BMP; PCX
Code 128 subsets A, B, C; Code 128UCC; EAN 128; Interleave 2 of 5; Code 39; Code 93; EAN-13; EAN-8; Codabar; POSTNET; UPC-A; UPC-E; EAN and UPC 2(5) digits; MSI; PLESSEY; ITF-14; EAN14; Code 11; PLANET; LOGMARS
CODABLOCK F mode; DataMatrix, Maxicode, PDF-417; Aztec; MicroPDF417; QR code; RSS Barcode (GS1 Databar); Code 49
9
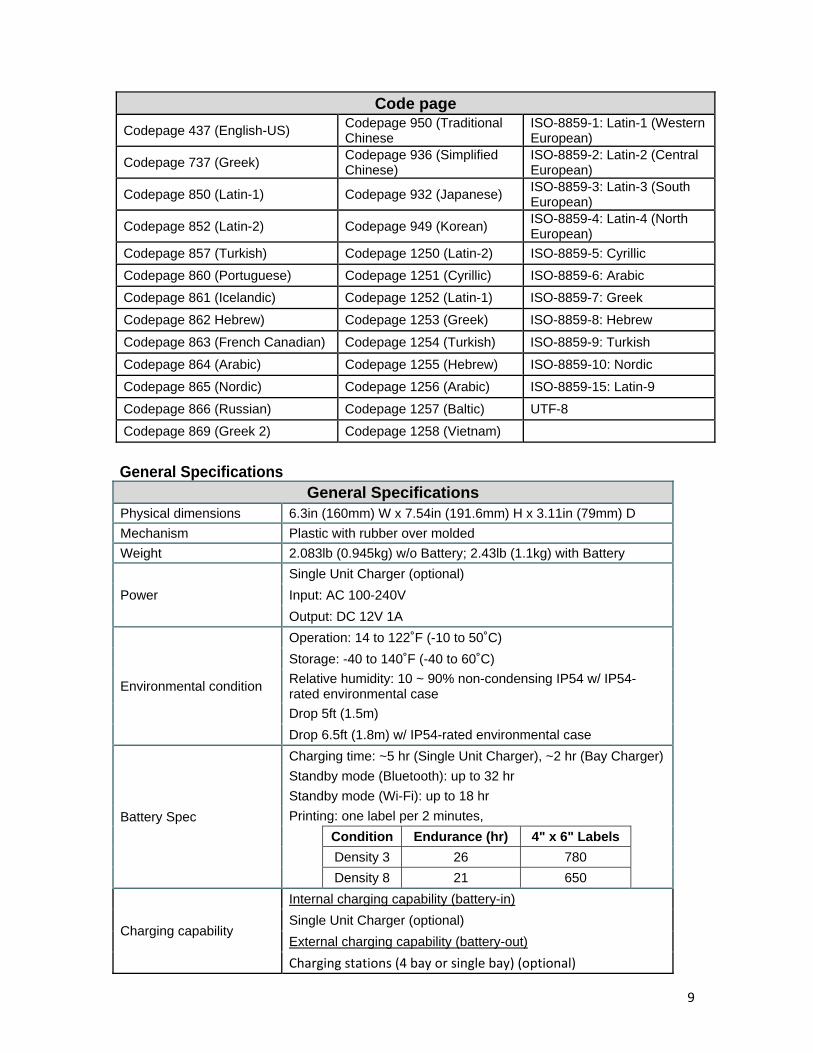
Code page
Codepage 437 (English-US) Codepage 950 (Traditional Chinese
ISO-8859-1: Latin-1 (Western European)
Codepage 737 (Greek) Codepage 936 (Simplified Chinese)
ISO-8859-2: Latin-2 (Central European)
Codepage 850 (Latin-1) Codepage 932 (Japanese) ISO-8859-3: Latin-3 (South European)
Codepage 852 (Latin-2) Codepage 949 (Korean) ISO-8859-4: Latin-4 (North European)
Codepage 857 (Turkish) Codepage 1250 (Latin-2) ISO-8859-5: Cyrillic
Codepage 860 (Portuguese) Codepage 1251 (Cyrillic) ISO-8859-6: Arabic
Codepage 861 (Icelandic) Codepage 1252 (Latin-1) ISO-8859-7: Greek
Codepage 862 Hebrew) Codepage 1253 (Greek) ISO-8859-8: Hebrew
Codepage 863 (French Canadian) Codepage 1254 (Turkish) ISO-8859-9: Turkish
Codepage 864 (Arabic) Codepage 1255 (Hebrew) ISO-8859-10: Nordic
Codepage 865 (Nordic) Codepage 1256 (Arabic) ISO-8859-15: Latin-9
Codepage 866 (Russian) Codepage 1257 (Baltic) UTF-8
Codepage 869 (Greek 2) Codepage 1258 (Vietnam)
General Specifications General Specifications
Physical dimensions 6.3in (160mm) W x 7.54in (191.6mm) H x 3.11in (79mm) D
Mechanism Plastic with rubber over molded
Weight 2.083lb (0.945kg) w/o Battery; 2.43lb (1.1kg) with Battery
Power
Single Unit Charger (optional)
Input: AC 100-240V
Output: DC 12V 1A
Environmental condition
Operation: 14 to 122˚F (-10 to 50˚C)
Storage: -40 to 140˚F (-40 to 60˚C)
Relative humidity: 10 ~ 90% non-condensing IP54 w/ IP54-rated environmental case
Drop 5ft (1.5m)
Drop 6.5ft (1.8m) w/ IP54-rated environmental case
Battery Spec
Charging time: ~5 hr (Single Unit Charger), ~2 hr (Bay Charger)
Standby mode (Bluetooth): up to 32 hr
Standby mode (Wi-Fi): up to 18 hr
Printing: one label per 2 minutes,
Condition Endurance (hr) 4" x 6" Labels
Density 3 26 780
Density 8 21 650
Charging capability
Internal charging capability (battery-in)
Single Unit Charger (optional)
External charging capability (battery-out)
Charging stations (4 bay or single bay) (optional)
10
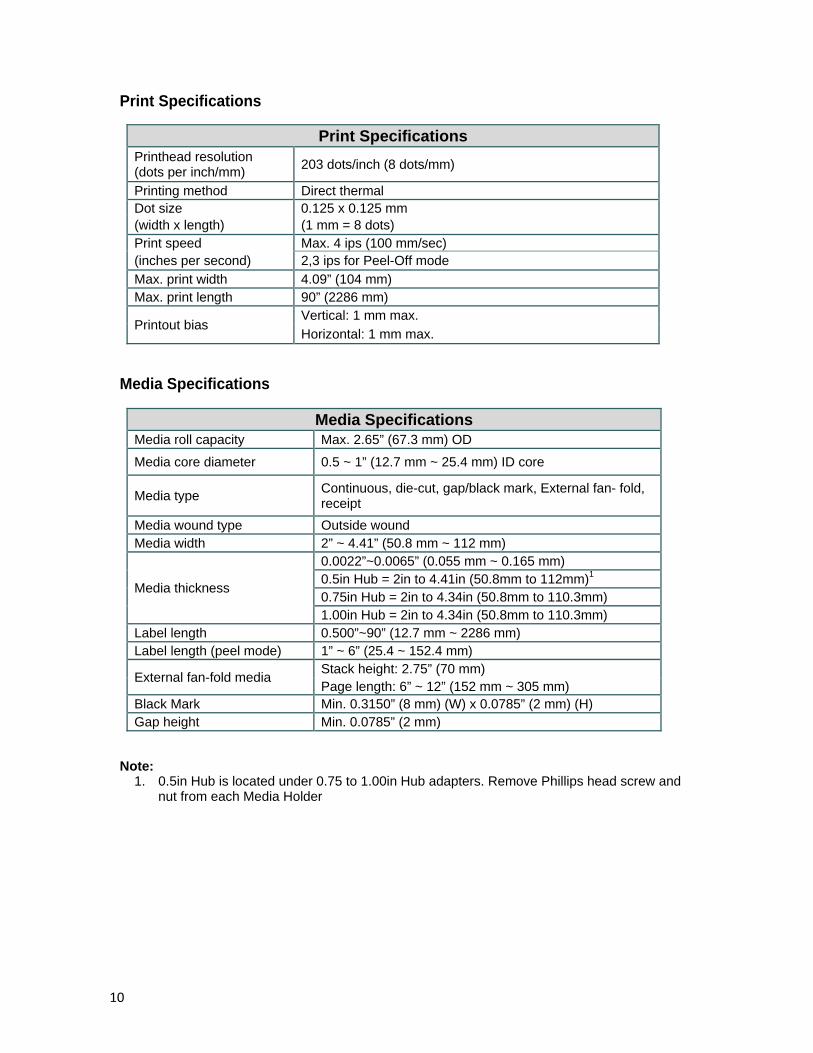
Print Specifications
Print Specifications Printhead resolution (dots per inch/mm)
203 dots/inch (8 dots/mm)
Printing method Direct thermal Dot size 0.125 x 0.125 mm (width x length) (1 mm = 8 dots) Print speed Max. 4 ips (100 mm/sec) (inches per second) 2,3 ips for Peel-Off mode
Max. print width 4.09” (104 mm) Max. print length 90” (2286 mm)
Printout bias Vertical: 1 mm max.
Horizontal: 1 mm max.
Media Specifications
Media Specifications Media roll capacity Max. 2.65” (67.3 mm) OD
Media core diameter 0.5 ~ 1” (12.7 mm ~ 25.4 mm) ID core
Media type Continuous, die-cut, gap/black mark, External fan- fold, receipt
Media wound type Outside wound Media width 2” ~ 4.41” (50.8 mm ~ 112 mm)
Media thickness
0.0022”~0.0065” (0.055 mm ~ 0.165 mm) 0.5in Hub = 2in to 4.41in (50.8mm to 112mm)1 0.75in Hub = 2in to 4.34in (50.8mm to 110.3mm) 1.00in Hub = 2in to 4.34in (50.8mm to 110.3mm)
Label length 0.500”~90” (12.7 mm ~ 2286 mm) Label length (peel mode) 1” ~ 6” (25.4 ~ 152.4 mm)
External fan-fold media Stack height: 2.75” (70 mm) Page length: 6” ~ 12” (152 mm ~ 305 mm)
Black Mark Min. 0.3150” (8 mm) (W) x 0.0785” (2 mm) (H) Gap height Min. 0.0785” (2 mm)
Note:
1. 0.5in Hub is located under 0.75 to 1.00in Hub adapters. Remove Phillips head screw and nut from each Media Holder
11
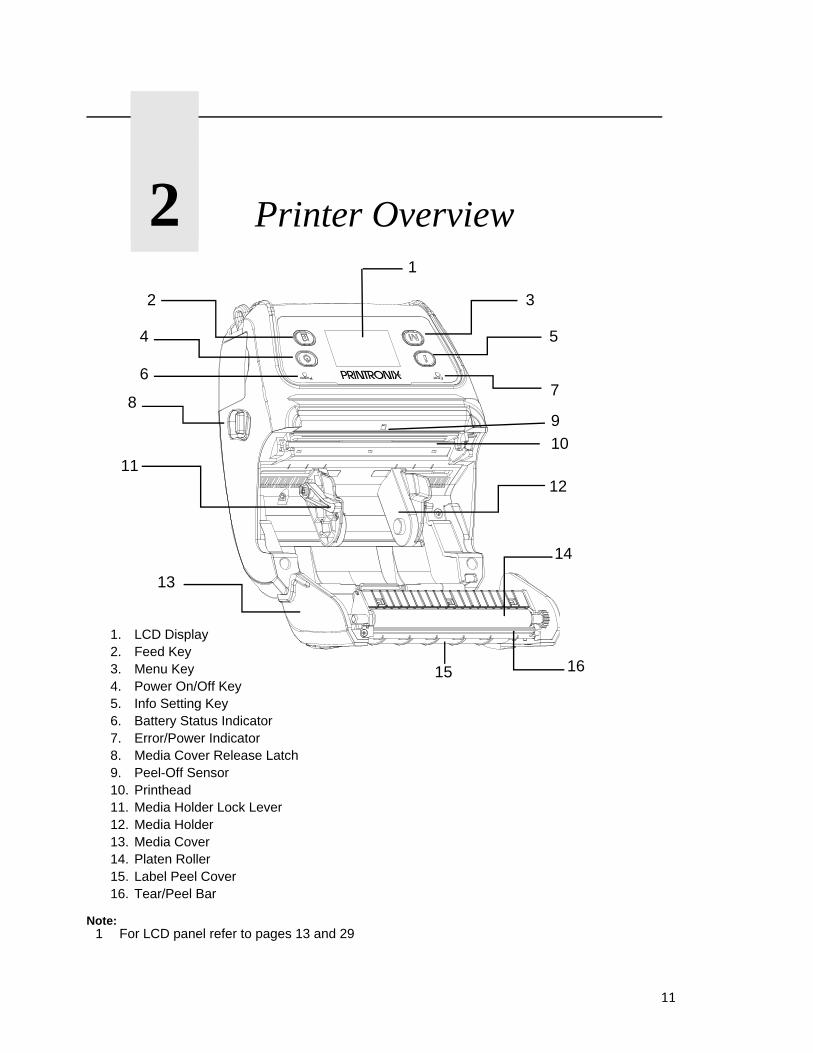
2
Printer Overview
1. LCD Display 2. Feed Key 3. Menu Key 4. Power On/Off Key 5. Info Setting Key 6. Battery Status Indicator 7. Error/Power Indicator 8. Media Cover Release Latch 9. Peel-Off Sensor 10. Printhead 11. Media Holder Lock Lever 12. Media Holder 13. Media Cover 14. Platen Roller 15. Label Peel Cover 16. Tear/Peel Bar
Note:
1 For LCD panel refer to pages 13 and 29
1
3
5
2
4
6 7
8
10 11
12
13
14
15 16
9
12
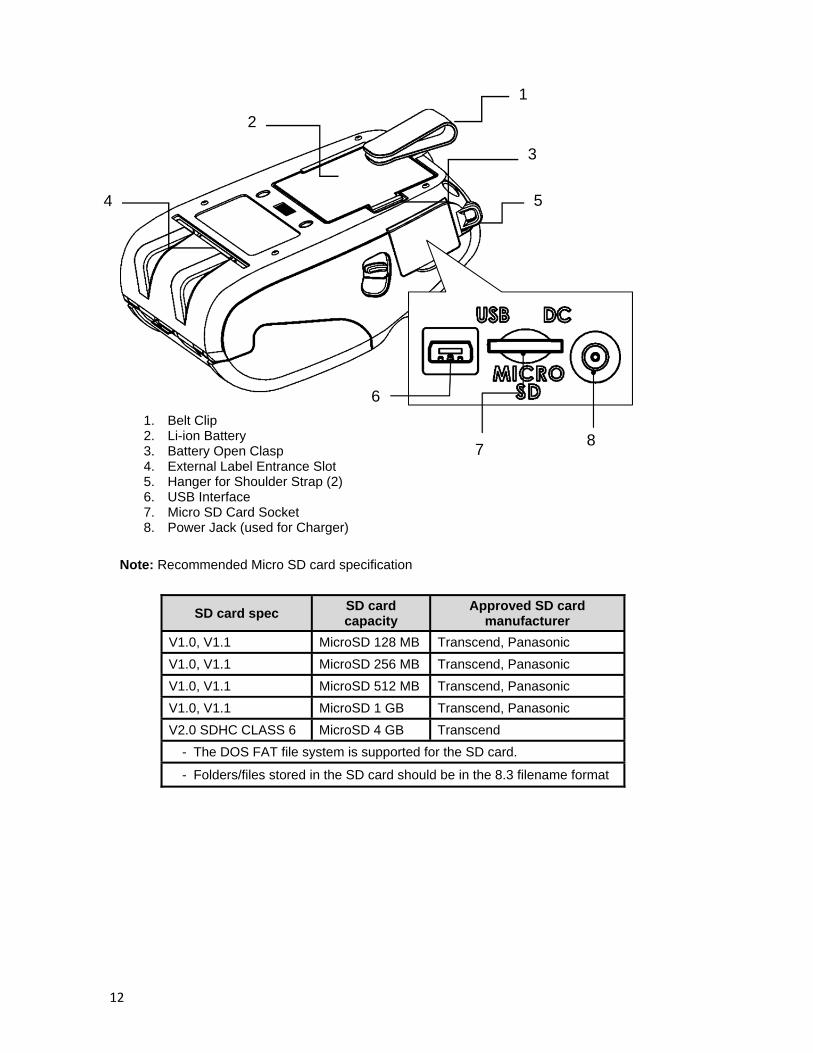
1. Belt Clip 2. Li-ion Battery 3. Battery Open Clasp 4. External Label Entrance Slot 5. Hanger for Shoulder Strap (2) 6. USB Interface 7. Micro SD Card Socket 8. Power Jack (used for Charger)
Note: Recommended Micro SD card specification
SD card spec SD card capacity
Approved SD card manufacturer
V1.0, V1.1 MicroSD 128 MB Transcend, Panasonic
V1.0, V1.1 MicroSD 256 MB Transcend, Panasonic
V1.0, V1.1 MicroSD 512 MB Transcend, Panasonic
V1.0, V1.1 MicroSD 1 GB Transcend, Panasonic
V2.0 SDHC CLASS 6 MicroSD 4 GB Transcend
- The DOS FAT file system is supported for the SD card.
- Folders/files stored in the SD card should be in the 8.3 filename format
1
2
5
3
4
6
8 7
13
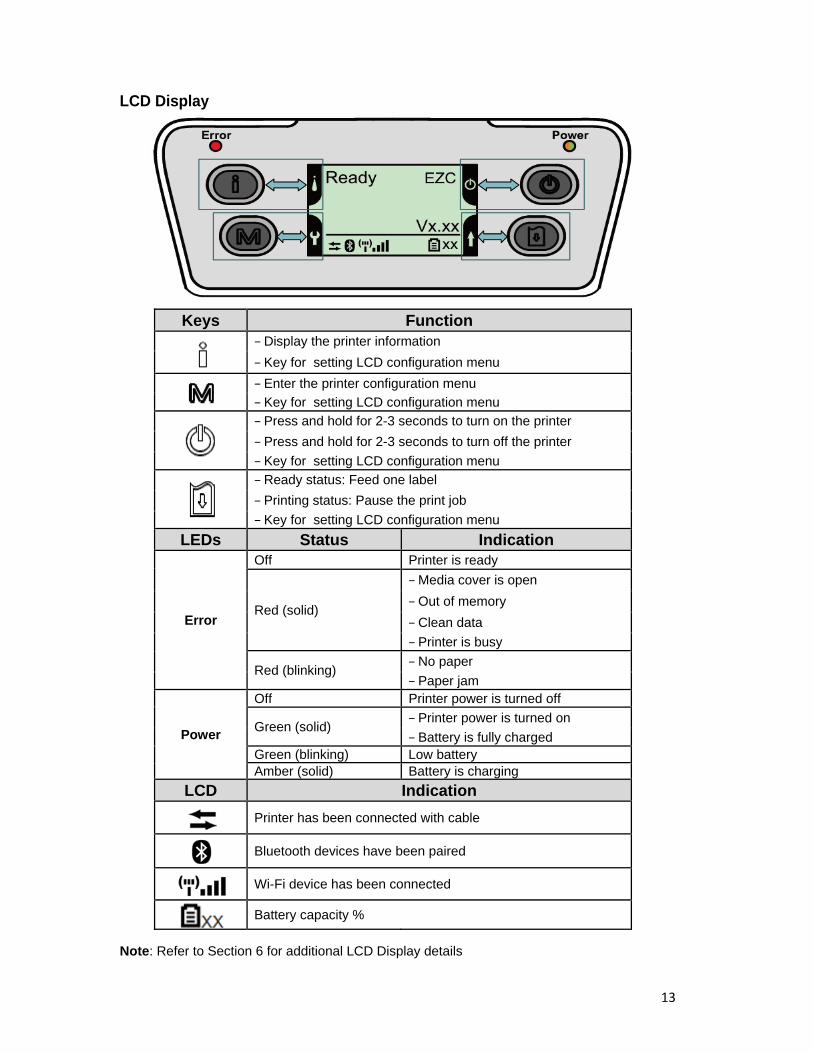
LCD Display
Keys Function
− Display the printer information
− Key for setting LCD configuration menu
− Enter the printer configuration menu
− Key for setting LCD configuration menu
− Press and hold for 2-3 seconds to turn on the printer
− Press and hold for 2-3 seconds to turn off the printer
− Key for setting LCD configuration menu
− Ready status: Feed one label
− Printing status: Pause the print job
− Key for setting LCD configuration menu
LEDs Status Indication
Error
Off Printer is ready
Red (solid)
− Media cover is open
− Out of memory
− Clean data
− Printer is busy
Red (blinking) − No paper
− Paper jam
Power
Off Printer power is turned off
Green (solid) − Printer power is turned on
− Battery is fully chargedGreen (blinking) Low battery Amber (solid) Battery is charging
LCD Indication
Printer has been connected with cable
Bluetooth devices have been paired
Wi-Fi device has been connected
Battery capacity %
Note: Refer to Section 6 for additional LCD Display details

14
15
3
Printer Setup
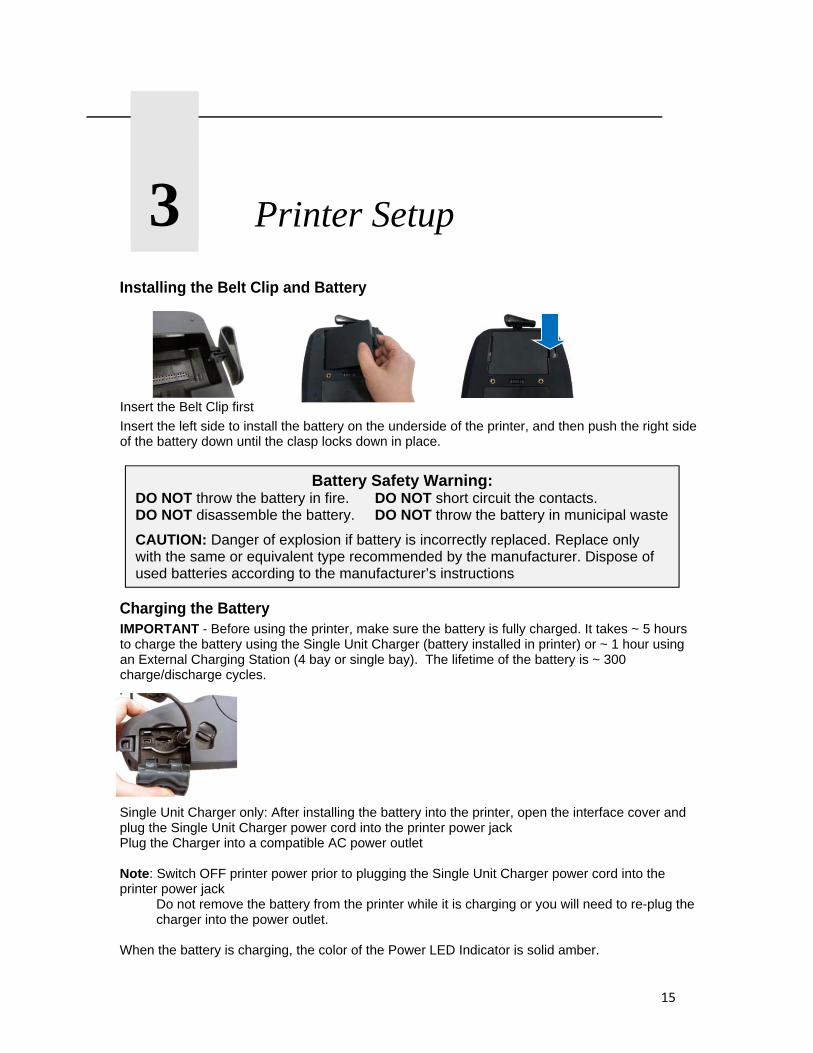
Installing the Belt Clip and Battery
Insert the Belt Clip first
Insert the left side to install the battery on the underside of the printer, and then push the right side of the battery down until the clasp locks down in place.
Charging the Battery IMPORTANT - Before using the printer, make sure the battery is fully charged. It takes ~ 5 hours to charge the battery using the Single Unit Charger (battery installed in printer) or ~ 1 hour using an External Charging Station (4 bay or single bay). The lifetime of the battery is ~ 300 charge/discharge cycles. . Single Unit Charger only: After installing the battery into the printer, open the interface cover and plug the Single Unit Charger power cord into the printer power jack Plug the Charger into a compatible AC power outlet Note: Switch OFF printer power prior to plugging the Single Unit Charger power cord into the printer power jack
Do not remove the battery from the printer while it is charging or you will need to re-plug the charger into the power outlet.
When the battery is charging, the color of the Power LED Indicator is solid amber.
Battery Safety Warning: DO NOT throw the battery in fire. DO NOT short circuit the contacts. DO NOT disassemble the battery. DO NOT throw the battery in municipal waste
CAUTION: Danger of explosion if battery is incorrectly replaced. Replace only with the same or equivalent type recommended by the manufacturer. Dispose of used batteries according to the manufacturer’s instructions
16
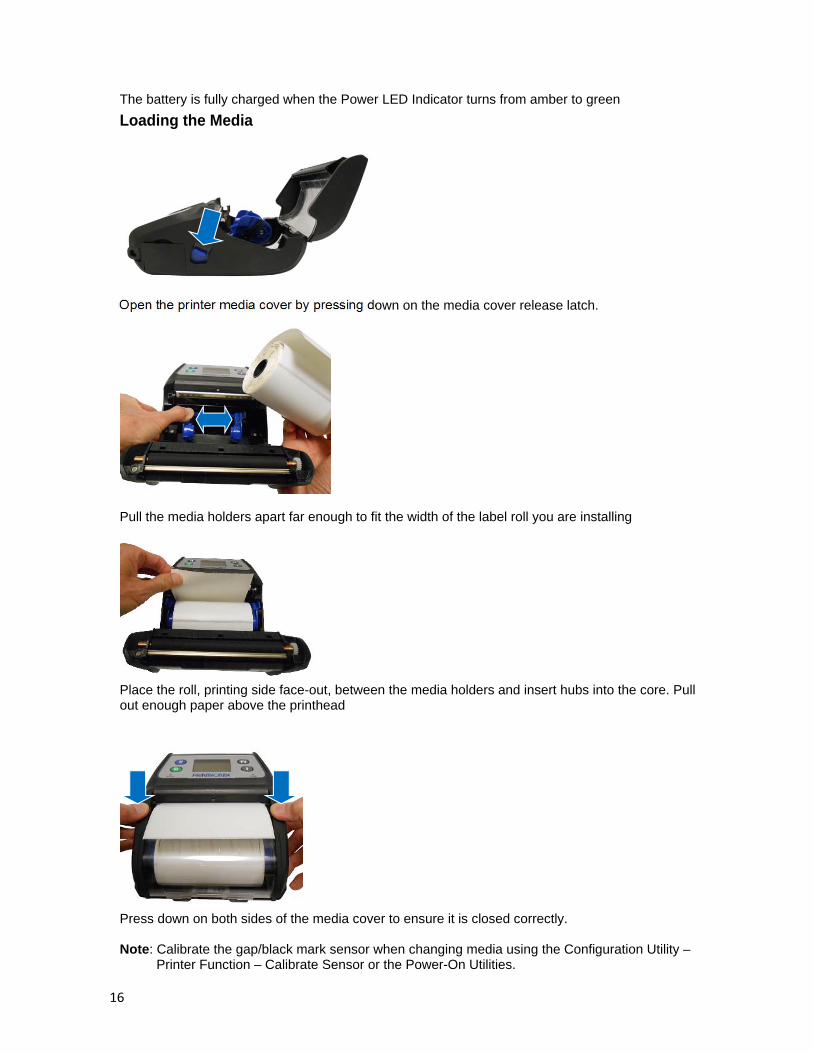
The battery is fully charged when the Power LED Indicator turns from amber to green
Loading the Media Open the printer media cover by pressing down on the media cover release latch.
Pull the media holders apart far enough to fit the width of the label roll you are installing
Place the roll, printing side face-out, between the media holders and insert hubs into the core. Pull out enough paper above the printhead
Press down on both sides of the media cover to ensure it is closed correctly. Note: Calibrate the gap/black mark sensor when changing media using the Configuration Utility – Printer Function – Calibrate Sensor or the Power-On Utilities.
17
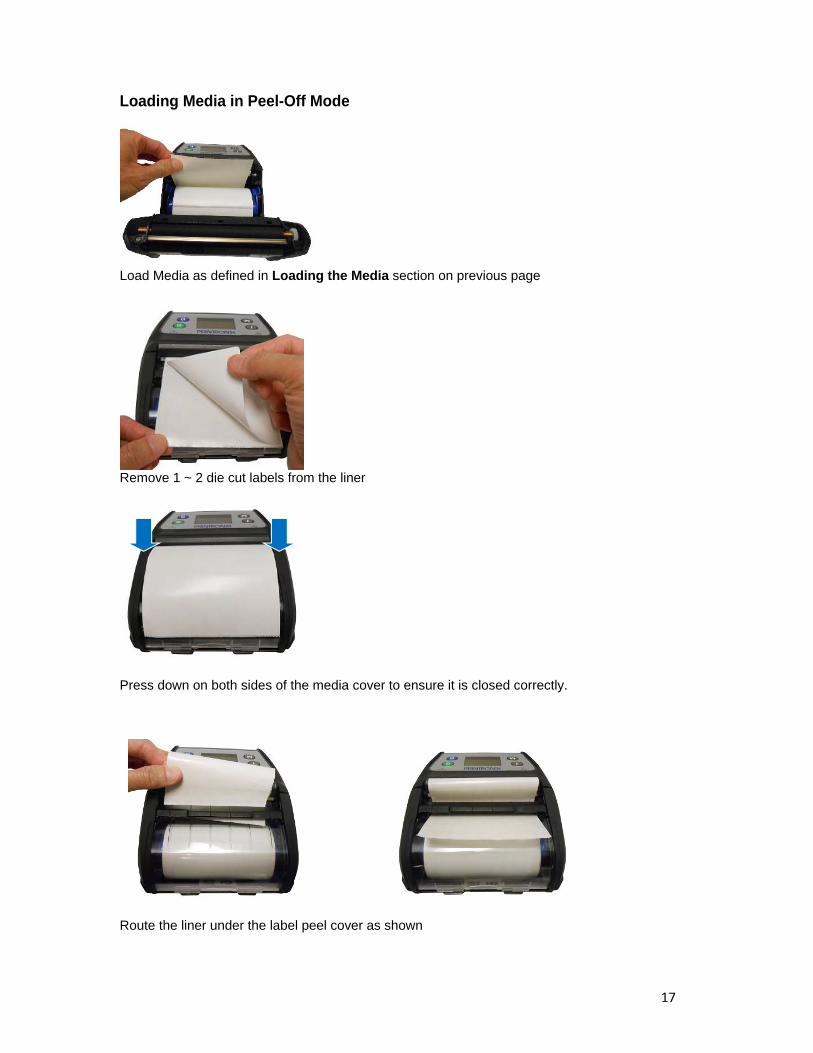
Loading Media in Peel-Off Mode
Load Media as defined in Loading the Media section on previous page
Remove 1 ~ 2 die cut labels from the liner
Press down on both sides of the media cover to ensure it is closed correctly.
Route the liner under the label peel cover as shown
18
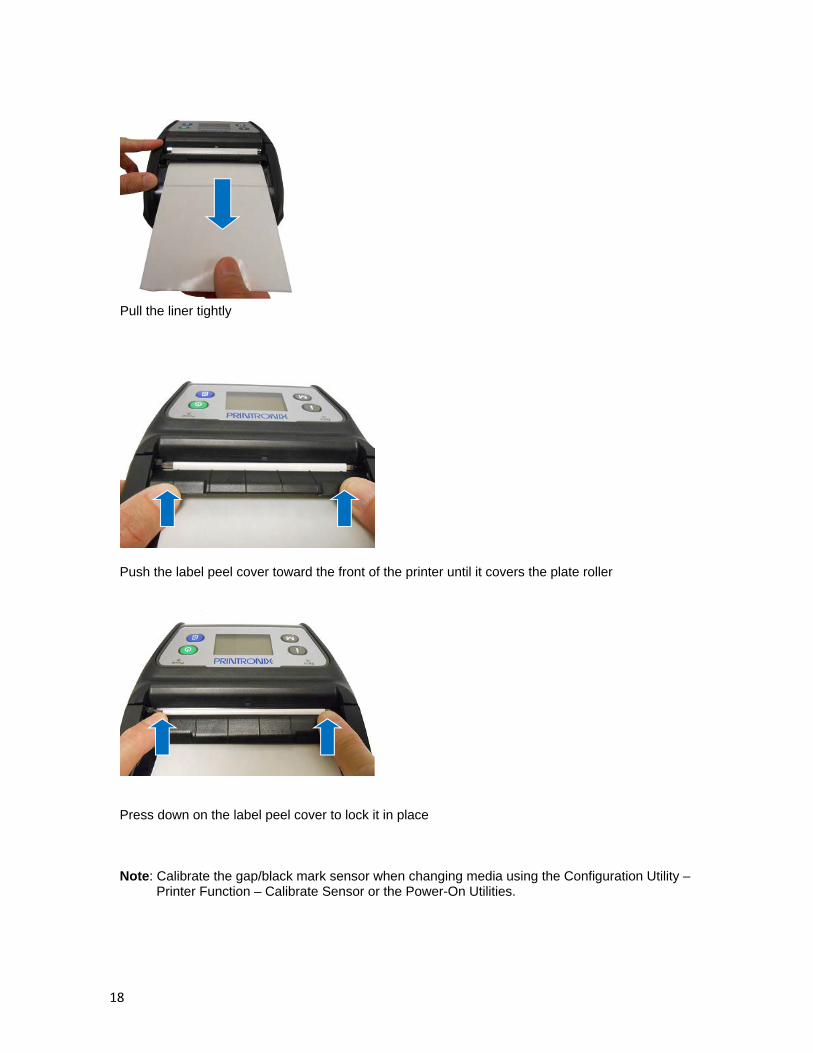
Pull the liner tightly
Push the label peel cover toward the front of the printer until it covers the plate roller
Press down on the label peel cover to lock it in place Note: Calibrate the gap/black mark sensor when changing media using the Configuration Utility – Printer Function – Calibrate Sensor or the Power-On Utilities.
19
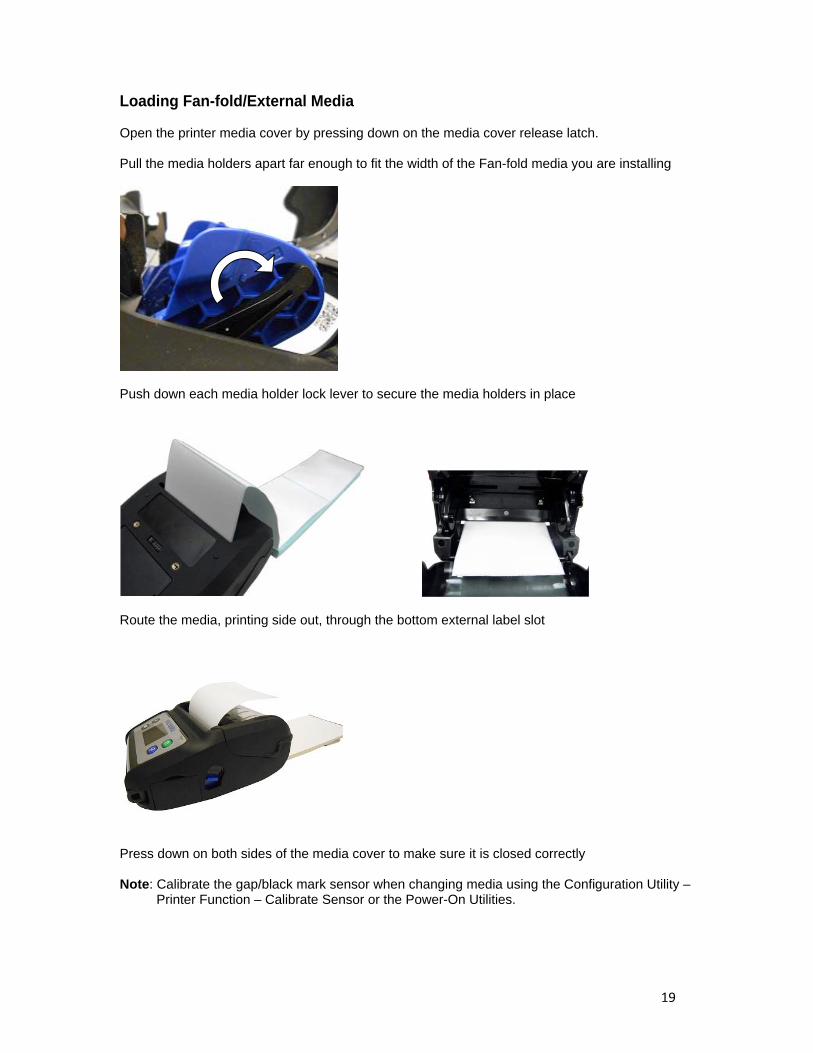
Loading Fan-fold/External Media Open the printer media cover by pressing down on the media cover release latch. Pull the media holders apart far enough to fit the width of the Fan-fold media you are installing
Push down each media holder lock lever to secure the media holders in place
Route the media, printing side out, through the bottom external label slot
Press down on both sides of the media cover to make sure it is closed correctly Note: Calibrate the gap/black mark sensor when changing media using the Configuration Utility – Printer Function – Calibrate Sensor or the Power-On Utilities.
20
Connecting the Printer The printer must establish communication with a host terminal which sends the data to be printed. There are three ways to connect the M4L series:
By an USB cable between the printer and its host terminal
By a Bluetooth short-range radio if Bluetooth is installed and enabled.
By a Wireless LAN per 802.1 b/g/n (Option)
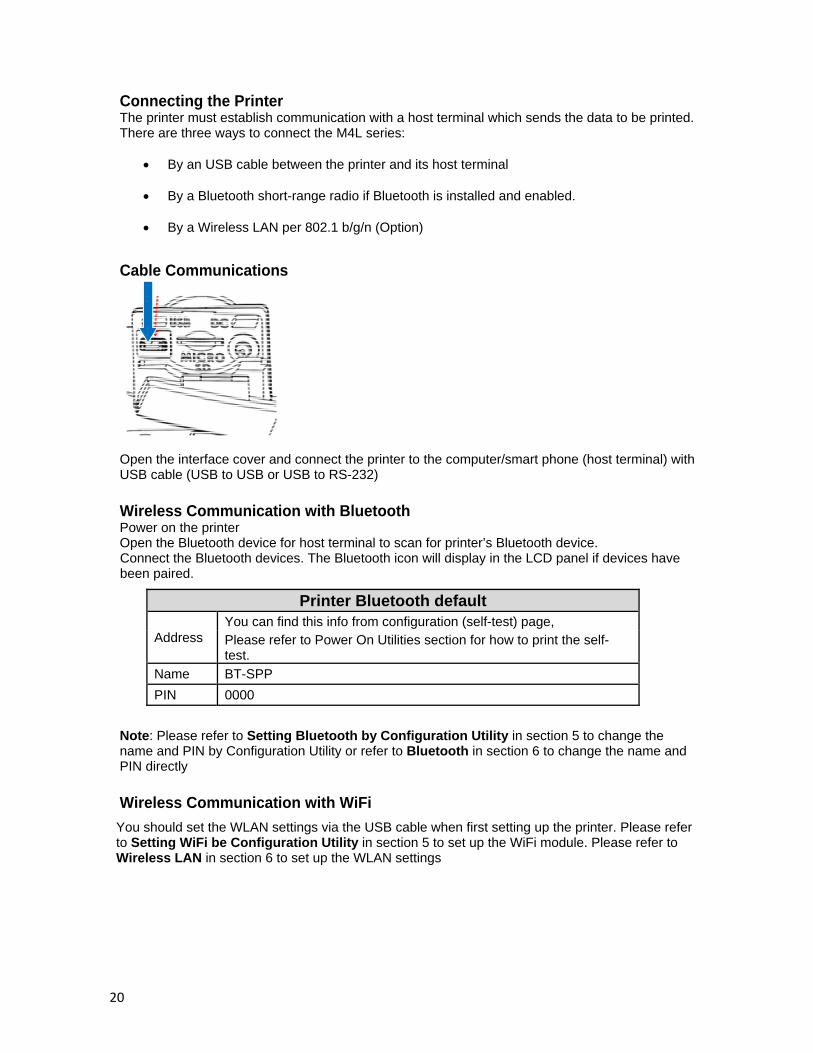
Cable Communications
Open the interface cover and connect the printer to the computer/smart phone (host terminal) with USB cable (USB to USB or USB to RS-232)
Wireless Communication with Bluetooth Power on the printer Open the Bluetooth device for host terminal to scan for printer’s Bluetooth device. Connect the Bluetooth devices. The Bluetooth icon will display in the LCD panel if devices have been paired.
Printer Bluetooth default
Address You can find this info from configuration (self-test) page, Please refer to Power On Utilities section for how to print the self-test.
Name BT-SPP
PIN 0000
Note: Please refer to Setting Bluetooth by Configuration Utility in section 5 to change the name and PIN by Configuration Utility or refer to Bluetooth in section 6 to change the name and PIN directly
Wireless Communication with WiFi
You should set the WLAN settings via the USB cable when first setting up the printer. Please refer to Setting WiFi be Configuration Utility in section 5 to set up the WiFi module. Please refer to Wireless LAN in section 6 to set up the WLAN settings
21
4
Power-On Utilities There are three power-on utilities to set up and test printer hardware. These utilities are activated by pressing the FEED key then turning on the printer power key simultaneously and releasing the FEED key when the desired utility function displays on the LCD panel to initiate that utility.
Power-On Utilities Use the following steps to initiate different power-on utilities: Turn off the printer power using the power key Press and hold the FEED key then while still pressing the FEED key press and hold down the power key Release the power key when the “Error” LED turns red. Note: At this time continue to press down on the FEED key After the printer beeps twice, wait until the desired utility displays on the LCD and then release the FEED key to initiate that utility. The order that the utilities appear on the LCD are described below:
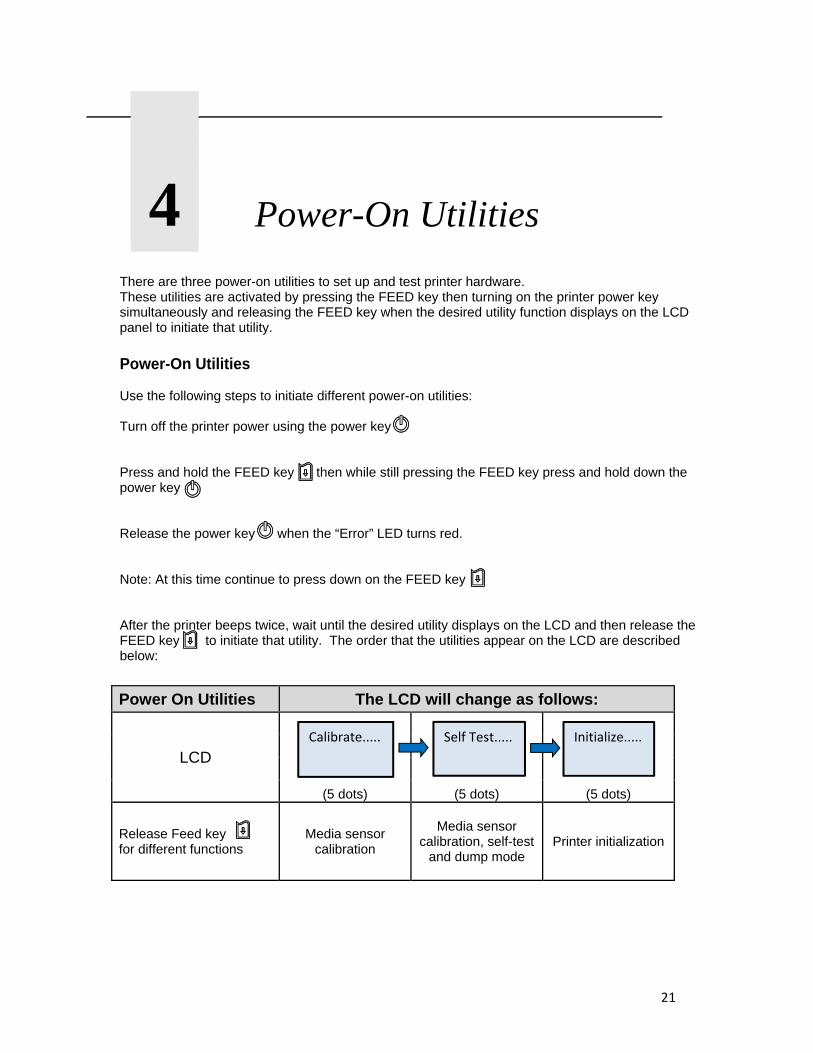
Power On Utilities The LCD will change as follows:
LCD
(5 dots) (5 dots) (5 dots)
Release Feed key for different functions
Media sensor calibration
Media sensor calibration, self-test
and dump mode Printer initialization
Calibrate..... Self Test..... Initialize.....
22
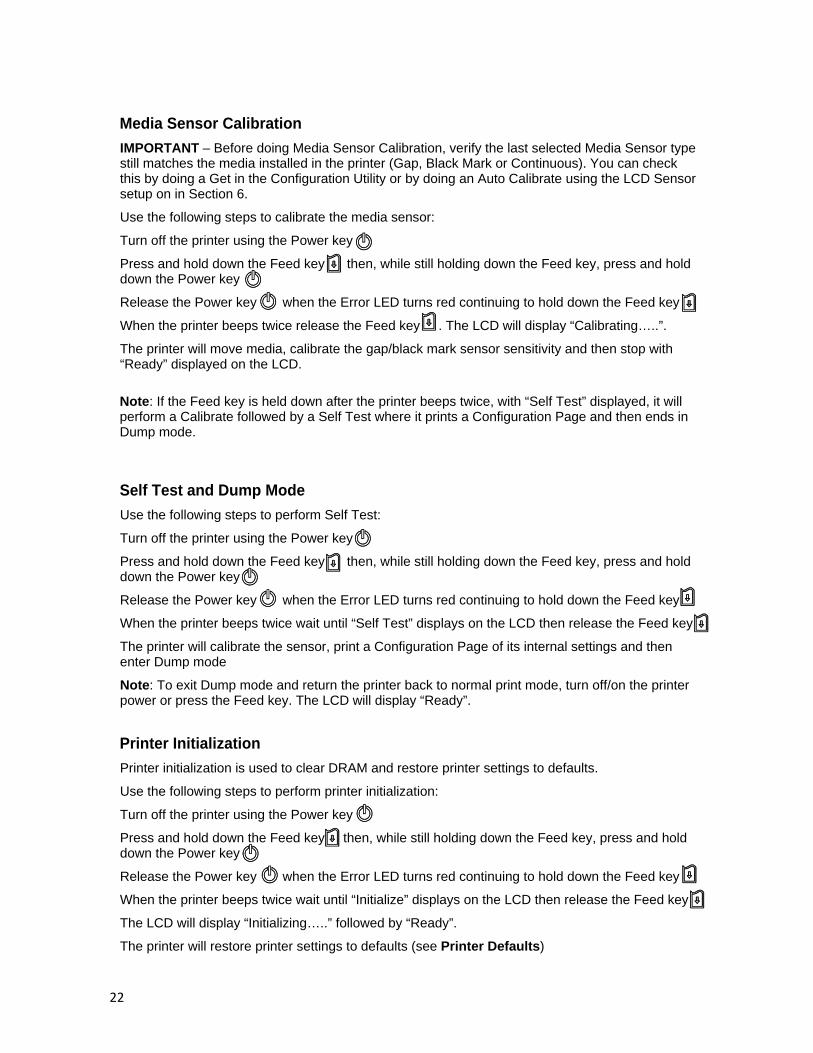
Media Sensor Calibration
IMPORTANT – Before doing Media Sensor Calibration, verify the last selected Media Sensor type still matches the media installed in the printer (Gap, Black Mark or Continuous). You can check this by doing a Get in the Configuration Utility or by doing an Auto Calibrate using the LCD Sensor setup on in Section 6.
Use the following steps to calibrate the media sensor:
Turn off the printer using the Power key
Press and hold down the Feed key then, while still holding down the Feed key, press and hold down the Power key
Release the Power key when the Error LED turns red continuing to hold down the Feed key
When the printer beeps twice release the Feed key . The LCD will display “Calibrating…..”.
The printer will move media, calibrate the gap/black mark sensor sensitivity and then stop with “Ready” displayed on the LCD.
Note: If the Feed key is held down after the printer beeps twice, with “Self Test” displayed, it will perform a Calibrate followed by a Self Test where it prints a Configuration Page and then ends in Dump mode.
Self Test and Dump Mode
Use the following steps to perform Self Test:
Turn off the printer using the Power key
Press and hold down the Feed key then, while still holding down the Feed key, press and hold down the Power key
Release the Power key when the Error LED turns red continuing to hold down the Feed key
When the printer beeps twice wait until “Self Test” displays on the LCD then release the Feed key
The printer will calibrate the sensor, print a Configuration Page of its internal settings and then enter Dump mode
Note: To exit Dump mode and return the printer back to normal print mode, turn off/on the printer power or press the Feed key. The LCD will display “Ready”.
Printer Initialization
Printer initialization is used to clear DRAM and restore printer settings to defaults.
Use the following steps to perform printer initialization:
Turn off the printer using the Power key
Press and hold down the Feed key then, while still holding down the Feed key, press and hold down the Power key
Release the Power key when the Error LED turns red continuing to hold down the Feed key
When the printer beeps twice wait until “Initialize” displays on the LCD then release the Feed key
The LCD will display “Initializing…..” followed by “Ready”.
The printer will restore printer settings to defaults (see Printer Defaults)
23
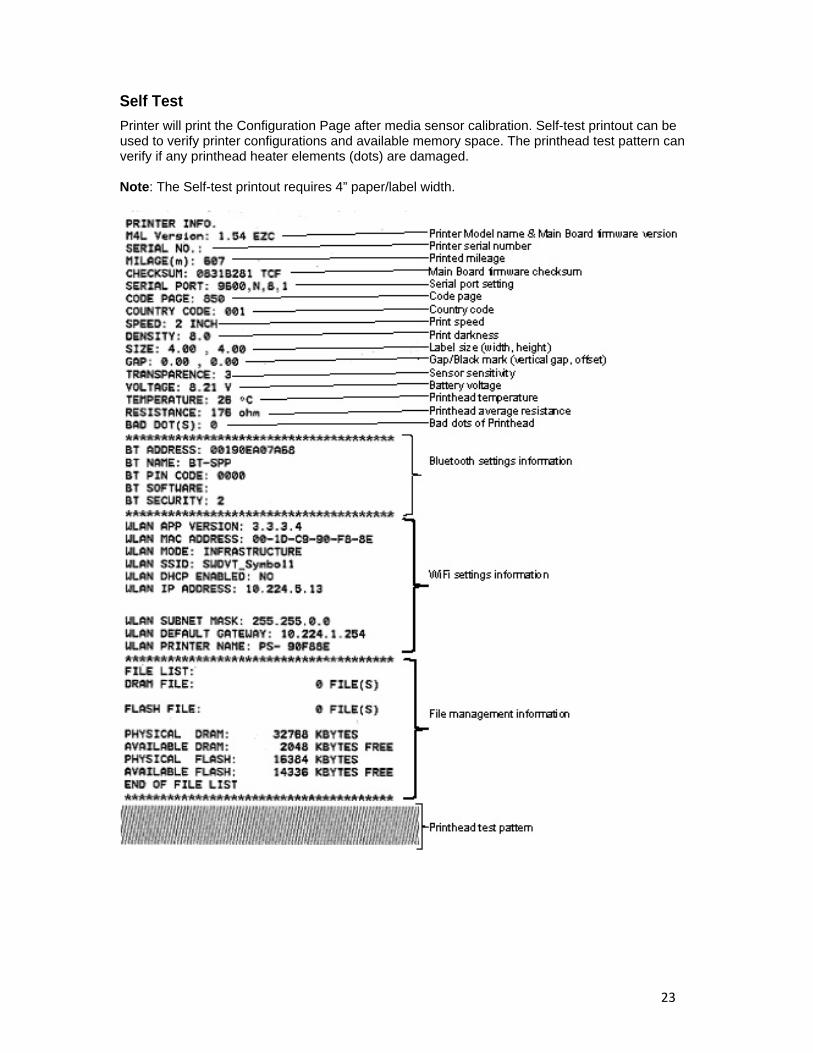
Self Test
Printer will print the Configuration Page after media sensor calibration. Self-test printout can be used to verify printer configurations and available memory space. The printhead test pattern can verify if any printhead heater elements (dots) are damaged. Note: The Self-test printout requires 4” paper/label width.
24
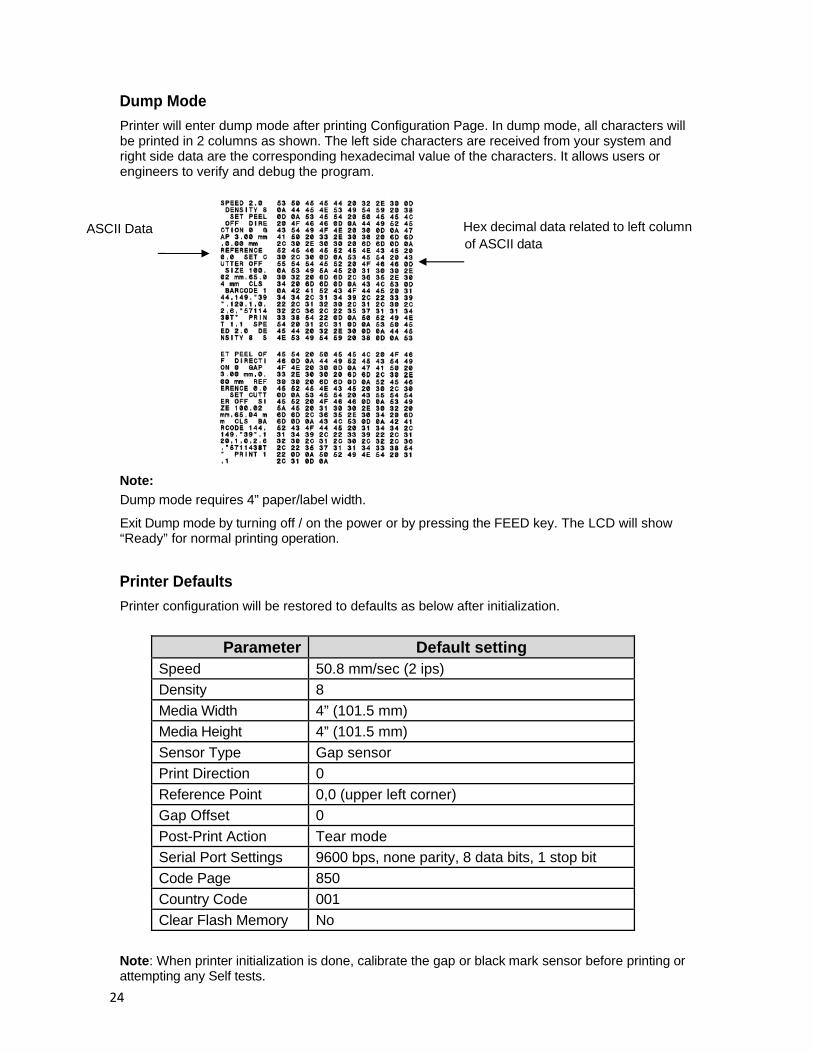
Dump Mode
Printer will enter dump mode after printing Configuration Page. In dump mode, all characters will be printed in 2 columns as shown. The left side characters are received from your system and right side data are the corresponding hexadecimal value of the characters. It allows users or engineers to verify and debug the program.
ASCII Data Hex decimal data related to left column of ASCII data
Note:
Dump mode requires 4” paper/label width.
Exit Dump mode by turning off / on the power or by pressing the FEED key. The LCD will show “Ready” for normal printing operation.
Printer Defaults
Printer configuration will be restored to defaults as below after initialization.
Parameter Default setting
Speed 50.8 mm/sec (2 ips)
Density 8
Media Width 4” (101.5 mm)
Media Height 4” (101.5 mm)
Sensor Type Gap sensor
Print Direction 0
Reference Point 0,0 (upper left corner)
Gap Offset 0
Post-Print Action Tear mode
Serial Port Settings 9600 bps, none parity, 8 data bits, 1 stop bit
Code Page 850
Country Code 001
Clear Flash Memory No
Note: When printer initialization is done, calibrate the gap or black mark sensor before printing or attempting any Self tests.
25
5
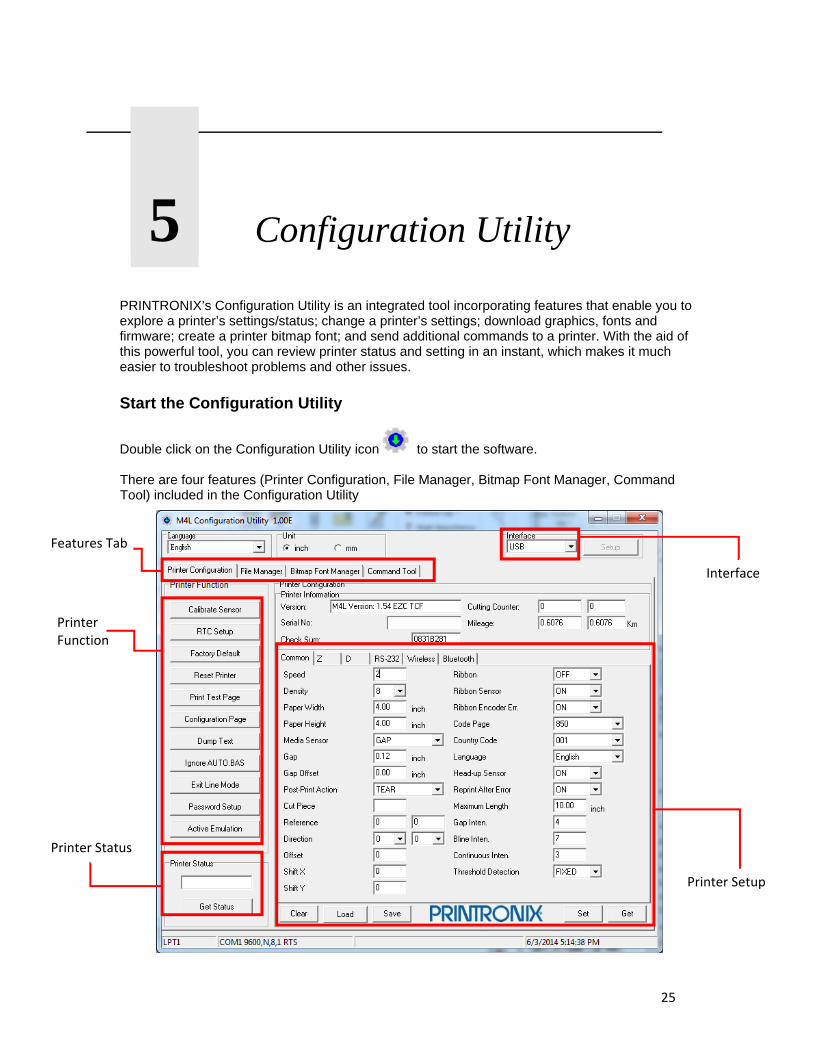
Configuration Utility PRINTRONIX’s Configuration Utility is an integrated tool incorporating features that enable you to explore a printer’s settings/status; change a printer’s settings; download graphics, fonts and firmware; create a printer bitmap font; and send additional commands to a printer. With the aid of this powerful tool, you can review printer status and setting in an instant, which makes it much easier to troubleshoot problems and other issues.
Start the Configuration Utility
Double click on the Configuration Utility icon to start the software. There are four features (Printer Configuration, File Manager, Bitmap Font Manager, Command Tool) included in the Configuration Utility
Features Tab
Printer Function
Printer Status
Printer Setup
Interface
26
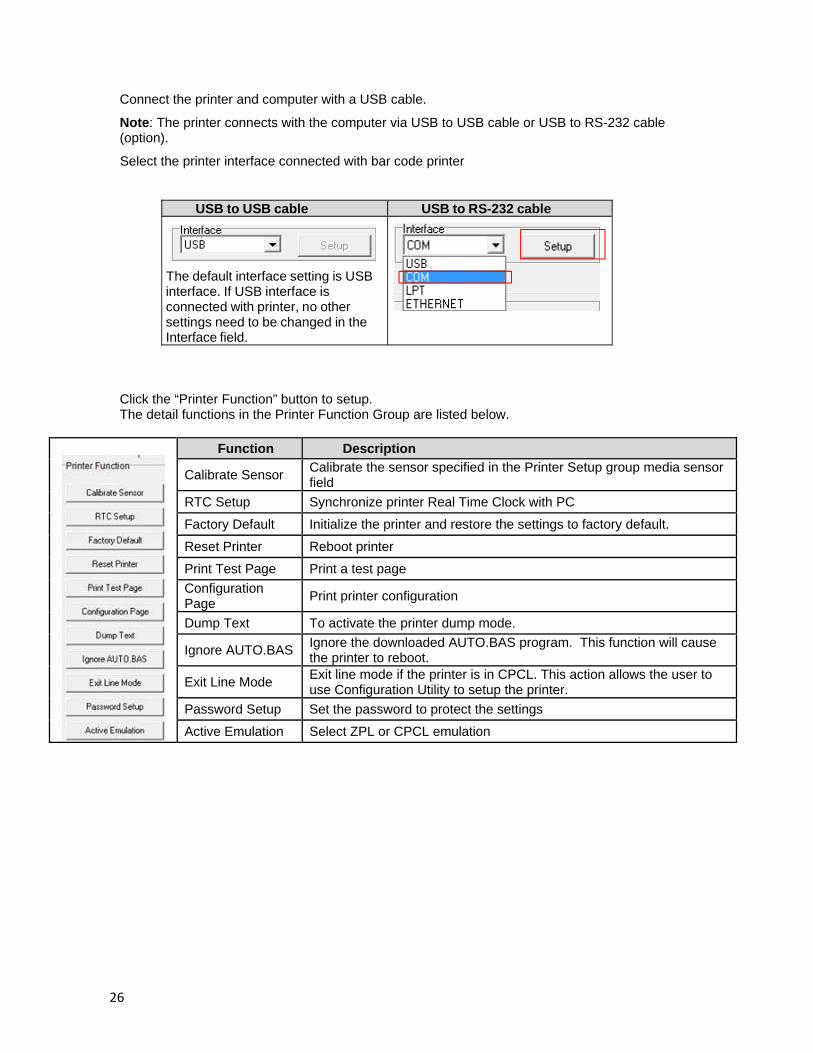
Connect the printer and computer with a USB cable.
Note: The printer connects with the computer via USB to USB cable or USB to RS-232 cable (option).
Select the printer interface connected with bar code printer
USB to USB cable USB to RS-232 cable The default interface setting is USB interface. If USB interface is connected with printer, no other settings need to be changed in the Interface field.
Click the “Printer Function” button to setup. The detail functions in the Printer Function Group are listed below.
Function Description
Calibrate Sensor Calibrate the sensor specified in the Printer Setup group media sensor field
RTC Setup Synchronize printer Real Time Clock with PC
Factory Default Initialize the printer and restore the settings to factory default.
Reset Printer Reboot printer
Print Test Page Print a test page
Configuration Page
Print printer configuration
Dump Text To activate the printer dump mode.
Ignore AUTO.BAS Ignore the downloaded AUTO.BAS program. This function will cause the printer to reboot.
Exit Line Mode Exit line mode if the printer is in CPCL. This action allows the user to use Configuration Utility to setup the printer.
Password Setup Set the password to protect the settings
Active Emulation Select ZPL or CPCL emulation
27
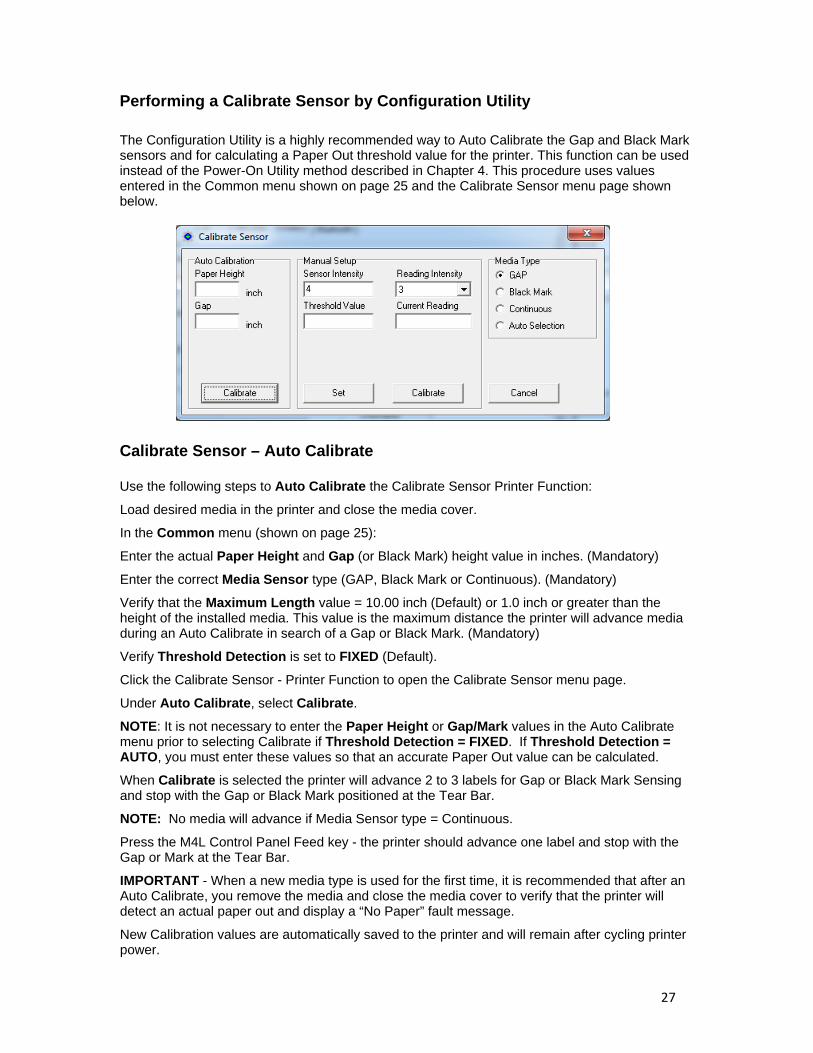
Performing a Calibrate Sensor by Configuration Utility
The Configuration Utility is a highly recommended way to Auto Calibrate the Gap and Black Mark sensors and for calculating a Paper Out threshold value for the printer. This function can be used instead of the Power-On Utility method described in Chapter 4. This procedure uses values entered in the Common menu shown on page 25 and the Calibrate Sensor menu page shown below.
Calibrate Sensor – Auto Calibrate Use the following steps to Auto Calibrate the Calibrate Sensor Printer Function:
Load desired media in the printer and close the media cover.
In the Common menu (shown on page 25):
Enter the actual Paper Height and Gap (or Black Mark) height value in inches. (Mandatory)
Enter the correct Media Sensor type (GAP, Black Mark or Continuous). (Mandatory)
Verify that the Maximum Length value = 10.00 inch (Default) or 1.0 inch or greater than the height of the installed media. This value is the maximum distance the printer will advance media during an Auto Calibrate in search of a Gap or Black Mark. (Mandatory)
Verify Threshold Detection is set to FIXED (Default).
Click the Calibrate Sensor - Printer Function to open the Calibrate Sensor menu page.
Under Auto Calibrate, select Calibrate.
NOTE: It is not necessary to enter the Paper Height or Gap/Mark values in the Auto Calibrate menu prior to selecting Calibrate if Threshold Detection = FIXED. If Threshold Detection = AUTO, you must enter these values so that an accurate Paper Out value can be calculated.
When Calibrate is selected the printer will advance 2 to 3 labels for Gap or Black Mark Sensing and stop with the Gap or Black Mark positioned at the Tear Bar.
NOTE: No media will advance if Media Sensor type = Continuous.
Press the M4L Control Panel Feed key - the printer should advance one label and stop with the Gap or Mark at the Tear Bar.
IMPORTANT - When a new media type is used for the first time, it is recommended that after an Auto Calibrate, you remove the media and close the media cover to verify that the printer will detect an actual paper out and display a “No Paper” fault message.
New Calibration values are automatically saved to the printer and will remain after cycling printer power.
28
Calibrate Sensor - Manual Setup
This method of calibrating the sensors is usually used only when the Auto Calibrate methods fail to reliably detect TOF (Top of Form) and/or calculate an actual Paper Out condition. This method is reserved for unusual media with holes or preprinted images that may trick the sensors in seeing them as a Black Mark or Gap affecting TOF.
Install desired media in the printer and close the media cover.
Select the Media Type (GAP, Black Mark Continuous or Auto Selection) located to the right of the Manual Setup.
Select Calibrate, an instruction prompt will appear under the Manual Setup.
Example: Put liner please (user must pull media out until liner gap is detected) then press Next.
Followed by: Put label please (user must pull media out until label is detected) then press Next.
Followed by: Calibration is complete or Can’t Calibrate
If Calibration was complete, the following will display:
Example: Label Reading 388
Gap Reading 950
Press the M4L Control Panel Feed key - the printer should advance one label and stop with the Gap or Mark at the Tear Bar.
IMPORTANT - When a new media type is used for the first time, it is recommended that after a Manual Setup Calibrate, you remove the media and close the media cover to verify that the printer will detect an actual paper out and display a “No Paper” fault message.
New Calibration values are automatically saved to the printer and will remain after cycling printer power.
29
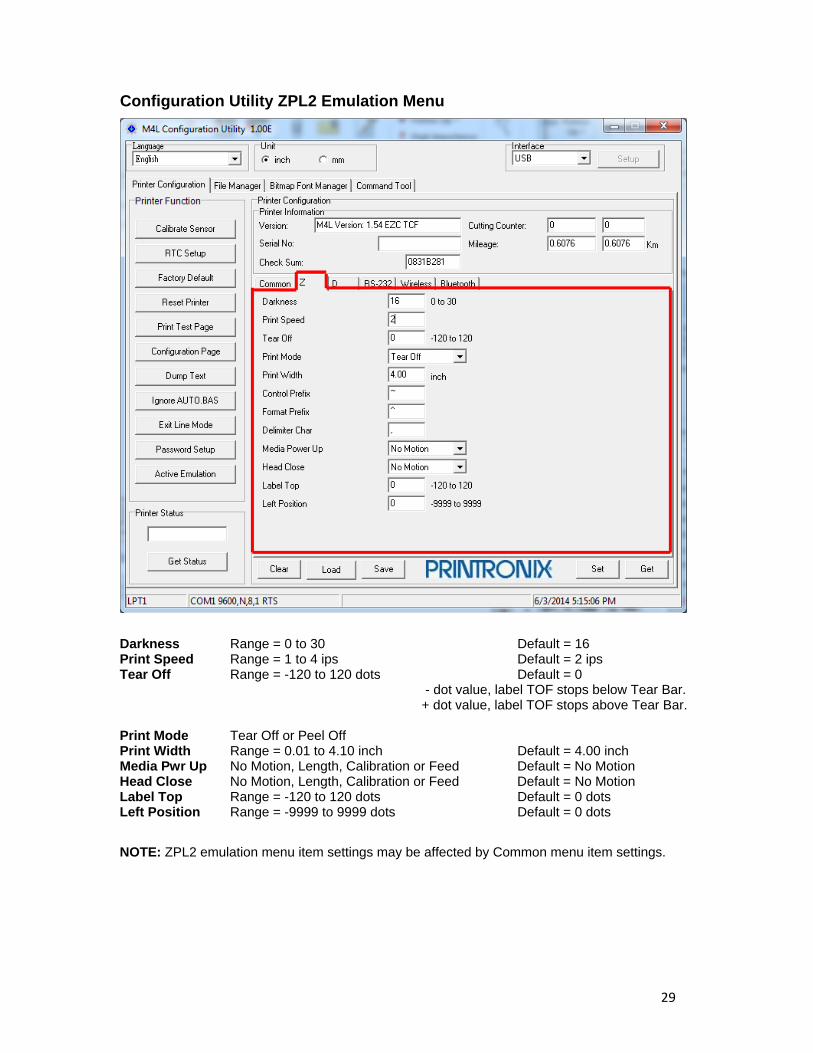
Configuration Utility ZPL2 Emulation Menu
Darkness Range = 0 to 30 Default = 16 Print Speed Range = 1 to 4 ips Default = 2 ips Tear Off Range = -120 to 120 dots Default = 0
- dot value, label TOF stops below Tear Bar. + dot value, label TOF stops above Tear Bar.
Print Mode Tear Off or Peel Off Print Width Range = 0.01 to 4.10 inch Default = 4.00 inch Media Pwr Up No Motion, Length, Calibration or Feed Default = No Motion Head Close No Motion, Length, Calibration or Feed Default = No Motion Label Top Range = -120 to 120 dots Default = 0 dots Left Position Range = -9999 to 9999 dots Default = 0 dots
NOTE: ZPL2 emulation menu item settings may be affected by Common menu item settings.
30
Setting AUTO.BAS by Configuration Utility
How to use AUTO.BAS
Create an AUTO.BAS file and load it to the printer using the Command Tool Tab. See example AUTO.BAS file below.
Reboot the printer to activate the AUTO.BAS. AUTO.BAS file will be executed first.
Now you can send the print jobs.
Configuration Utility commands will also run through AUTO.BAS. If the AUTO.BAS does not ‘END’, most of Configuration Utility commands will not work except ‘Ignore AUTO.BAS’ and ‘Reset Printer’.
To use Configuration Utility, after AUTO.BAS is activated, the user needs to click “Ignore AUTO.BAS” tab to do any configuration Utility operation, i.e. ‘Get’ or Calibrate Sensor’ , etc.
To remove AUTO.BAS,
First click “Ignore AUTO.BAS” tab which will trigger the printer to reboot.
After the printer powers up, go to ‘File Manager’ tab and click ‘Get’ under ‘File Information’ from ‘FLASH’.
You should see ‘AUTO.BAS’ listed.
Go to ‘Command Tool’ tab, enter the text ‘KILL F,”AUTO.BAS”’ (double quote around AUTO.BAS is required) and click ‘Send’. This will remove ‘AUTO.BAS’ file in the flash file system.
Reset the printer.
Example of AUTO.BAS for setting the paper width. DOWNLOAD F,"AUTO.BAS" ^XA ^PW400 ^JUS ^XZ EOP
CPCL Emulation
In CPCL emulation there are two modes, GRAPHICS MODE and LINE PRINT MODE. The printer is designed to do emulation auto switching between Zpl2 and CPCL GRAPHICS MODE, but cannot auto switch from CPCL LINE PRINT MODE to Zpl2 emulation. For print jobs in CPCL GRAPHICS MODE, the users do not need to switch emulation. Print jobs using LINE PRINT MODE, they need to manually switch to CPCL before printing. It can be done by using Configuration Utility ‘Active Emulation’ or by selecting CPCL from the M4L front panel. When the printer is running CPCL LINE PRINT emulation, you will have to either select ‘Exit Line Mode’ or manually switch over to Zpl2 emulation to perform configuration utility operation.
31
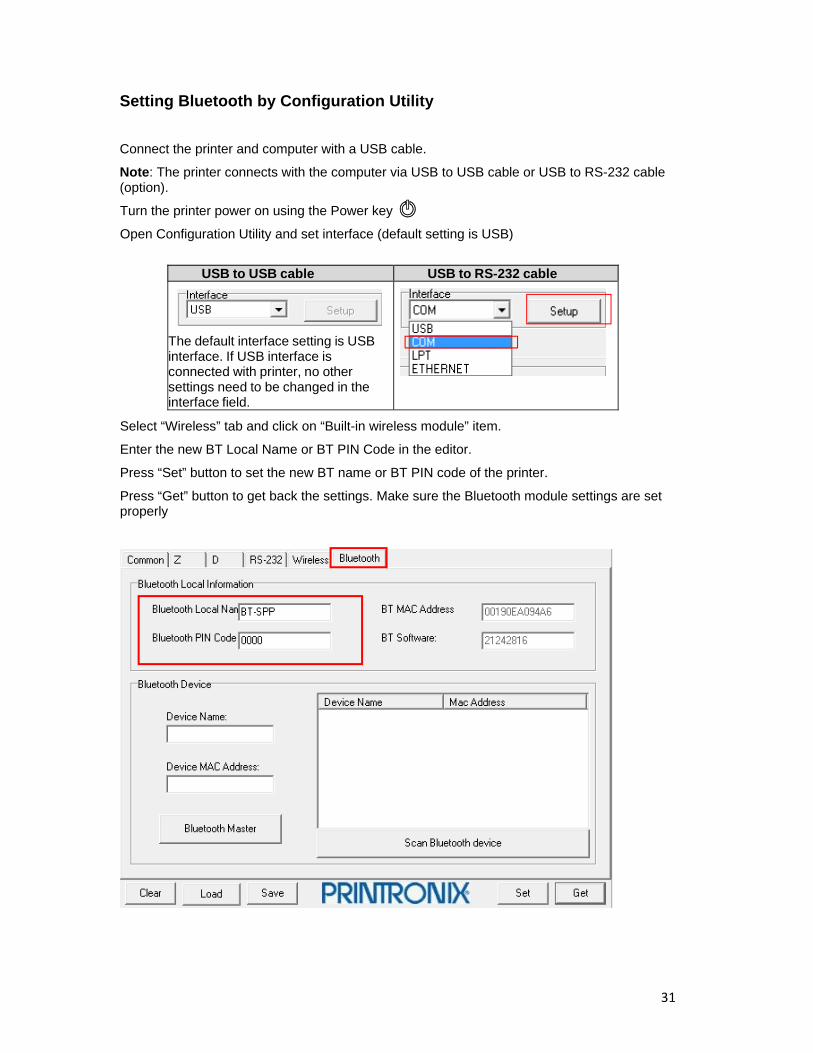
Setting Bluetooth by Configuration Utility
Connect the printer and computer with a USB cable.
Note: The printer connects with the computer via USB to USB cable or USB to RS-232 cable (option).
Turn the printer power on using the Power key
Open Configuration Utility and set interface (default setting is USB)
USB to USB cable USB to RS-232 cable
The default interface setting is USB interface. If USB interface is connected with printer, no other settings need to be changed in the interface field.
Select “Wireless” tab and click on “Built-in wireless module” item.
Enter the new BT Local Name or BT PIN Code in the editor.
Press “Set” button to set the new BT name or BT PIN code of the printer.
Press “Get” button to get back the settings. Make sure the Bluetooth module settings are set properly
32
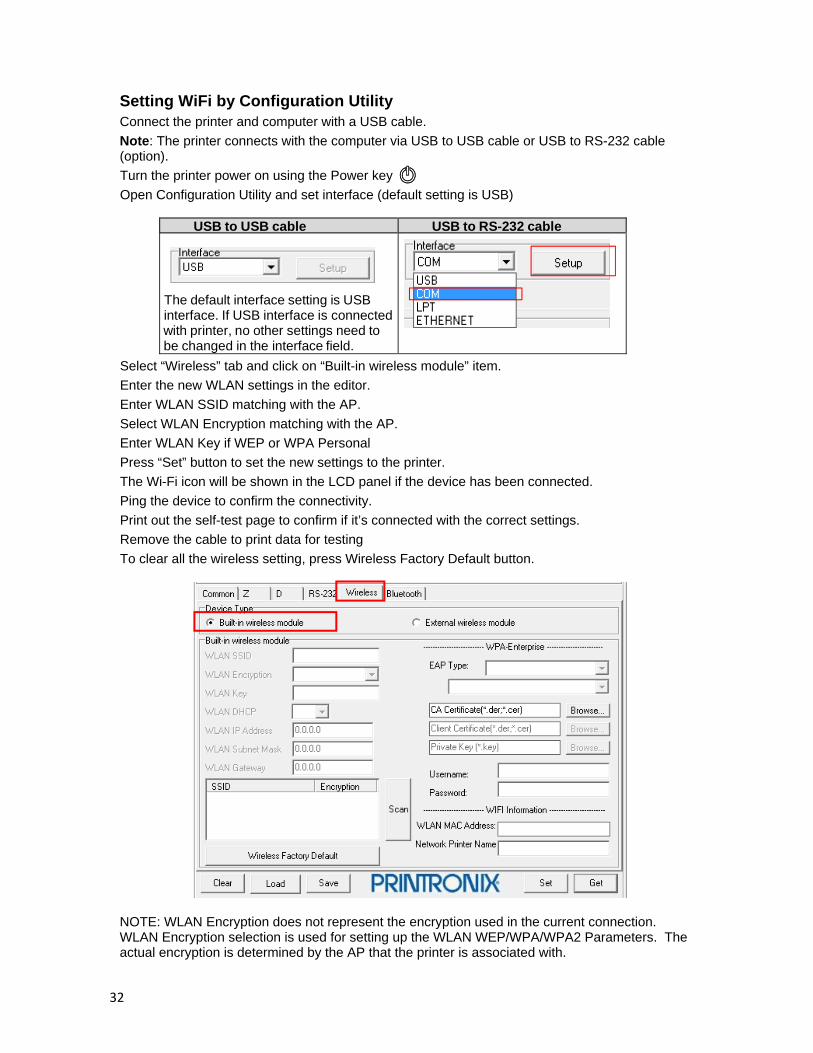
Setting WiFi by Configuration Utility Connect the printer and computer with a USB cable.
Note: The printer connects with the computer via USB to USB cable or USB to RS-232 cable (option).
Turn the printer power on using the Power key
Open Configuration Utility and set interface (default setting is USB)
USB to USB cable USB to RS-232 cable
The default interface setting is USB interface. If USB interface is connected with printer, no other settings need to be changed in the interface field.
Select “Wireless” tab and click on “Built-in wireless module” item.
Enter the new WLAN settings in the editor.
Enter WLAN SSID matching with the AP.
Select WLAN Encryption matching with the AP.
Enter WLAN Key if WEP or WPA Personal
Press “Set” button to set the new settings to the printer.
The Wi-Fi icon will be shown in the LCD panel if the device has been connected.
Ping the device to confirm the connectivity.
Print out the self-test page to confirm if it’s connected with the correct settings.
Remove the cable to print data for testing
To clear all the wireless setting, press Wireless Factory Default button.
NOTE: WLAN Encryption does not represent the encryption used in the current connection. WLAN Encryption selection is used for setting up the WLAN WEP/WPA/WPA2 Parameters. The actual encryption is determined by the AP that the printer is associated with.
33
6
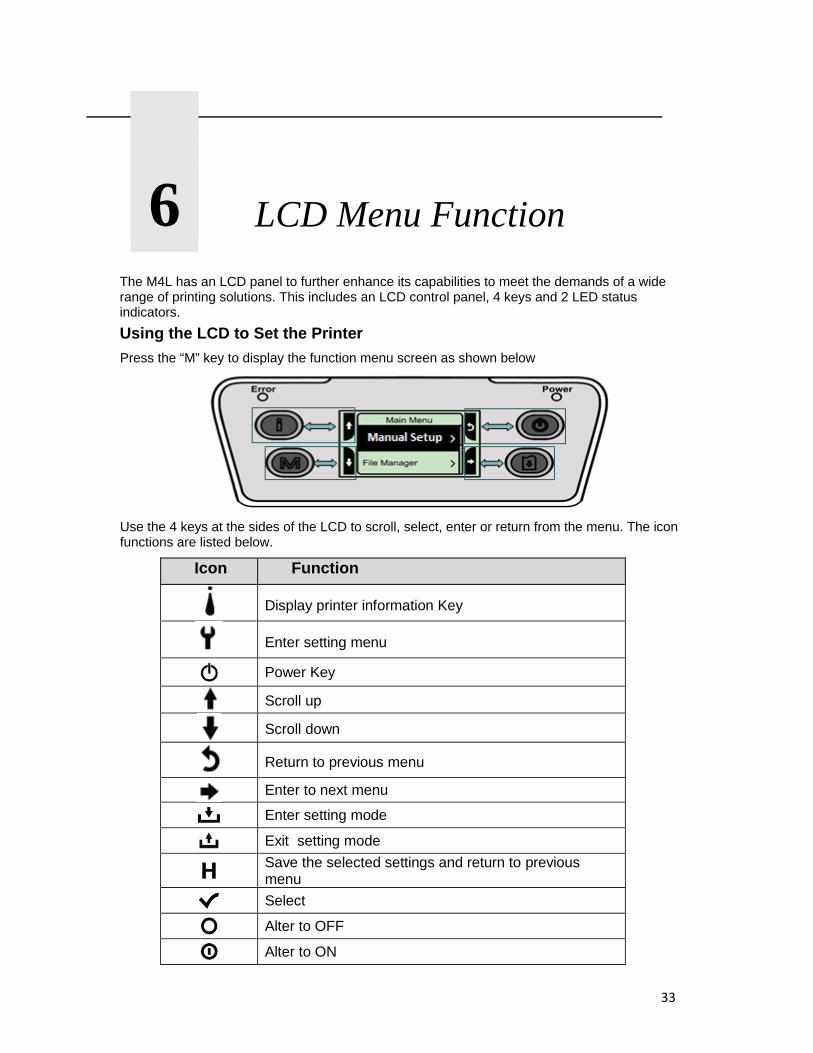
LCD Menu Function The M4L has an LCD panel to further enhance its capabilities to meet the demands of a wide range of printing solutions. This includes an LCD control panel, 4 keys and 2 LED status indicators.
Using the LCD to Set the Printer
Press the “M” key to display the function menu screen as shown below
Use the 4 keys at the sides of the LCD to scroll, select, enter or return from the menu. The icon functions are listed below.
Icon Function
Display printer information Key
Enter setting menu
Power Key
Scroll up
Scroll down
Return to previous menu
Enter to next menu
Enter setting mode
Exit setting mode
Save the selected settings and return to previous menu
Select
Alter to OFF
Alter to ON
34
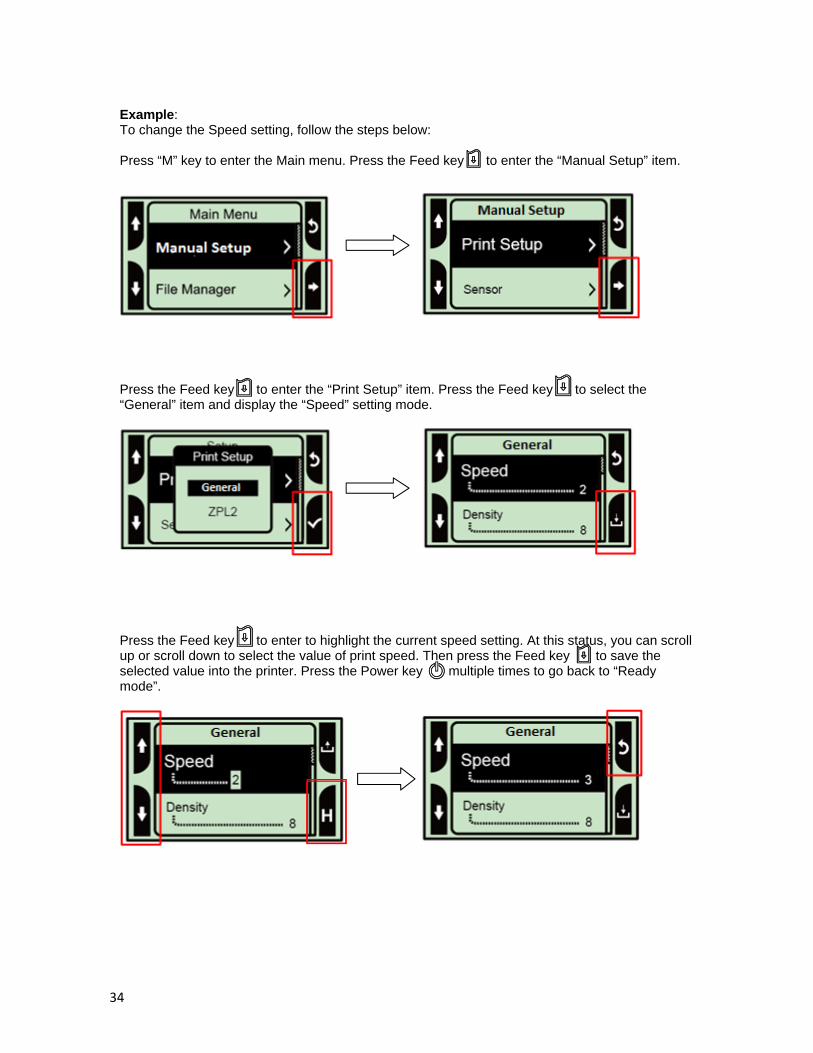
Example: To change the Speed setting, follow the steps below: Press “M” key to enter the Main menu. Press the Feed key to enter the “Manual Setup” item.
Press the Feed key to enter the “Print Setup” item. Press the Feed key to select the “General” item and display the “Speed” setting mode.
Press the Feed key to enter to highlight the current speed setting. At this status, you can scroll up or scroll down to select the value of print speed. Then press the Feed key to save the selected value into the printer. Press the Power key multiple times to go back to “Ready mode”.
35
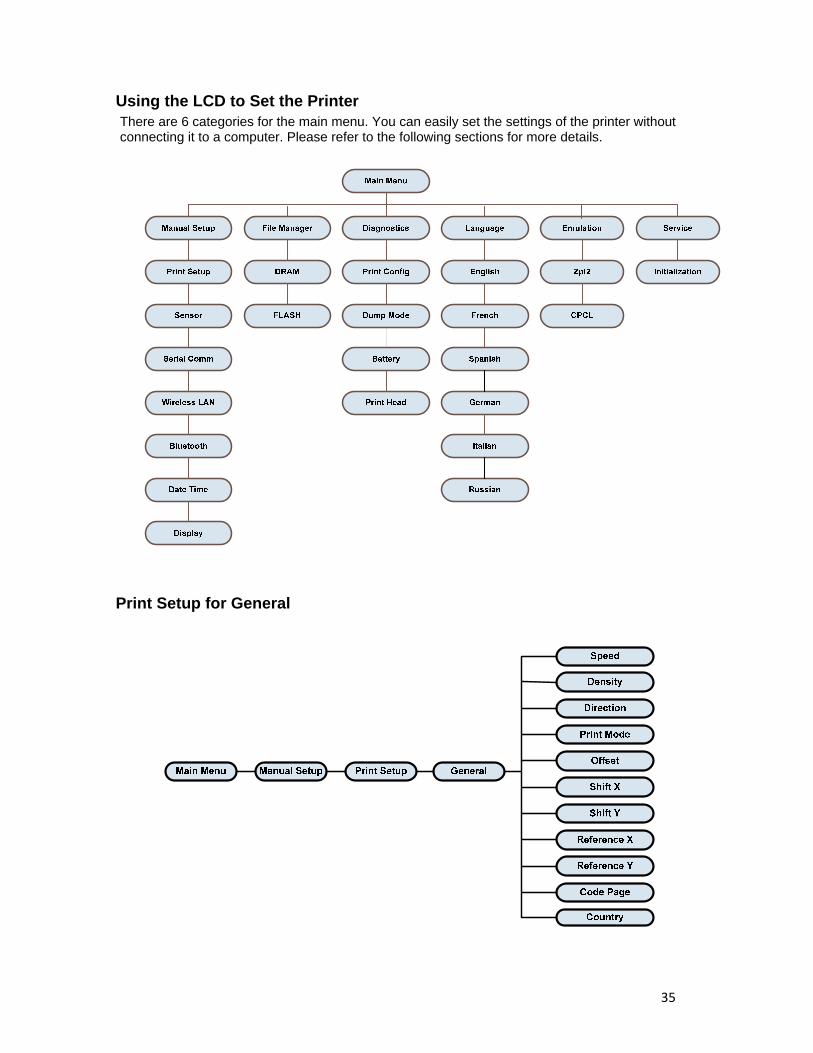
Using the LCD to Set the Printer
There are 6 categories for the main menu. You can easily set the settings of the printer without connecting it to a computer. Please refer to the following sections for more details.
Print Setup for General

36
Print Setup for Zpl2
Item Description Default
Darkness Use this item to setup printing darkness. The available setting is from 0 to 30, and the
step is 1. You may need to adjust your darkness based on selected media. 16
Print Speed Use this item to setup print speed. Available setting is from 1 to 4. 2
Tear Off This item is used to fine tune media stop location in dots.
Available value is from -120 to +120 dots. 0
Print Mode
This item is used to set the print mode. There are 2 modes as below,
Tear Off
Print Mode Description
Tear Off
Next label top of form is aligned to the print head burn line location
Peel Off Enable the Label Peel Off mode
Print Width This item is used to set print width in dots. Available value is from “2” to “832 dots”. 812
List Fonts This feature is used to print current printer available fonts list to the label. The fonts
stored in the printer’s DRAM, Flash or optional memory card. N/A
List Images This feature is used to print current printer available images list to the label. The
images stored in the printer’s DRAM, Flash or optional memory card. N/A
List Formats This feature is used to print current printer available formats list to the label. The
formats stored in the printer’s DRAM, Flash or optional memory card. N/A
List Setup This feature is used to print current printer configuration to the label. N/A
Control Prefix
This feature is used to set control prefix character. <~> Format Prefix This feature is used to set format prefix character. <^>
Delimiter Char
This feature is used to set delimiter character. <,>
Media Power Up
This option is used to set the action of the media when you turn on the printer.
No Motion
Selections Description
Feed Printer will advance one label
Calibration Printer will calibrate the sensor levels, determine
length and feed label
Length Printer will determine length and feed label
No Motion Printer will not move media
Head Close
This option is used to set the action of the media when you close the printhead
No Motion
Selections Description
Feed Printer will advance one label
Calibration Printer will calibrate the sensor levels, determine
length and feed label
Length Printer will determine length and feed label
No Motion Printer will not move media
Label Top This option is used to adjust print position vertically on the label.
The range is -120 to +120 dots. 0
Left Position This option is used to adjust print position horizontally on the label.
The range is -9999 to +9999 dots. 0
Note: If printing from enclosed software/driver, the software/driver will send out the commands, which will overwrite the settings set from the LCD panel
37
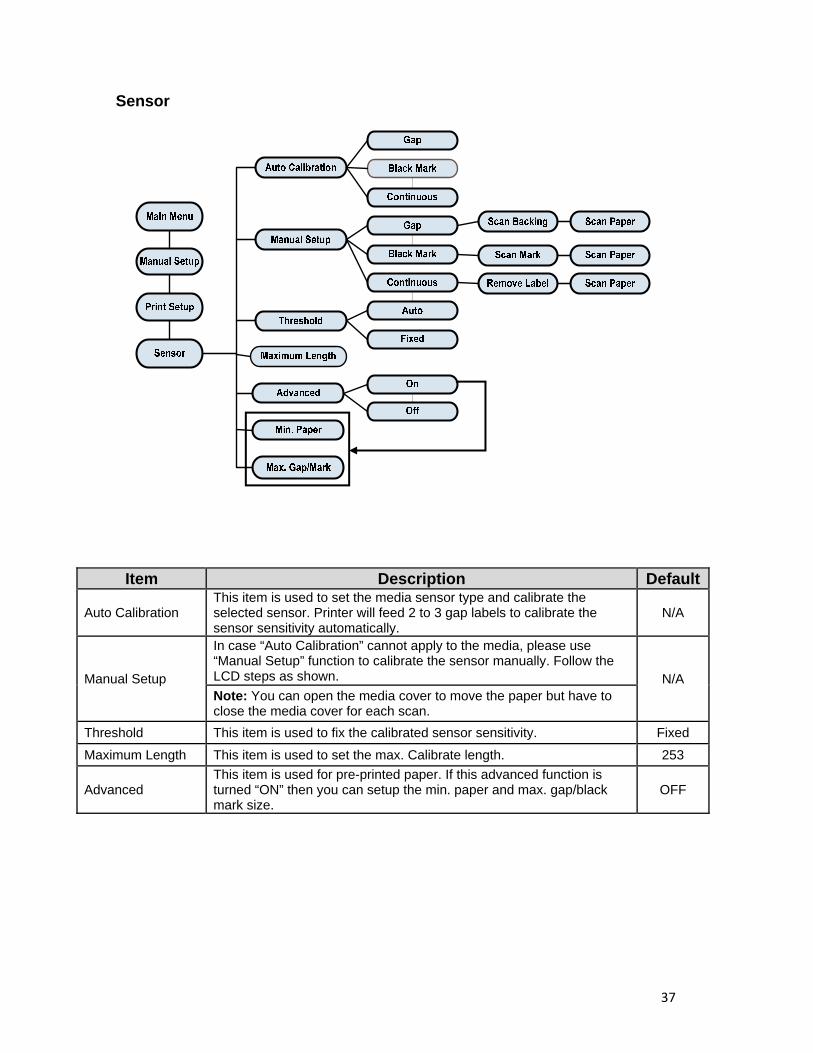
Sensor
Item Description Default
Auto Calibration This item is used to set the media sensor type and calibrate the selected sensor. Printer will feed 2 to 3 gap labels to calibrate the sensor sensitivity automatically.
N/A
Manual Setup
In case “Auto Calibration” cannot apply to the media, please use “Manual Setup” function to calibrate the sensor manually. Follow the LCD steps as shown. N/A Note: You can open the media cover to move the paper but have to close the media cover for each scan.
Threshold This item is used to fix the calibrated sensor sensitivity. Fixed
Maximum Length This item is used to set the max. Calibrate length. 253
Advanced This item is used for pre-printed paper. If this advanced function is turned “ON” then you can setup the min. paper and max. gap/black mark size.
OFF

38
Serial Comm.
Item Description Default Baud Rate This item is used to set the RS-232 baud rate. 9600
Parity This item is used to set the RS-232 parity. None
Data Bits This item is used to set the RS-232 Data Bits. 8
Stop Bit(s) This item is used to set the RS-232 Stop Bits. 1
39
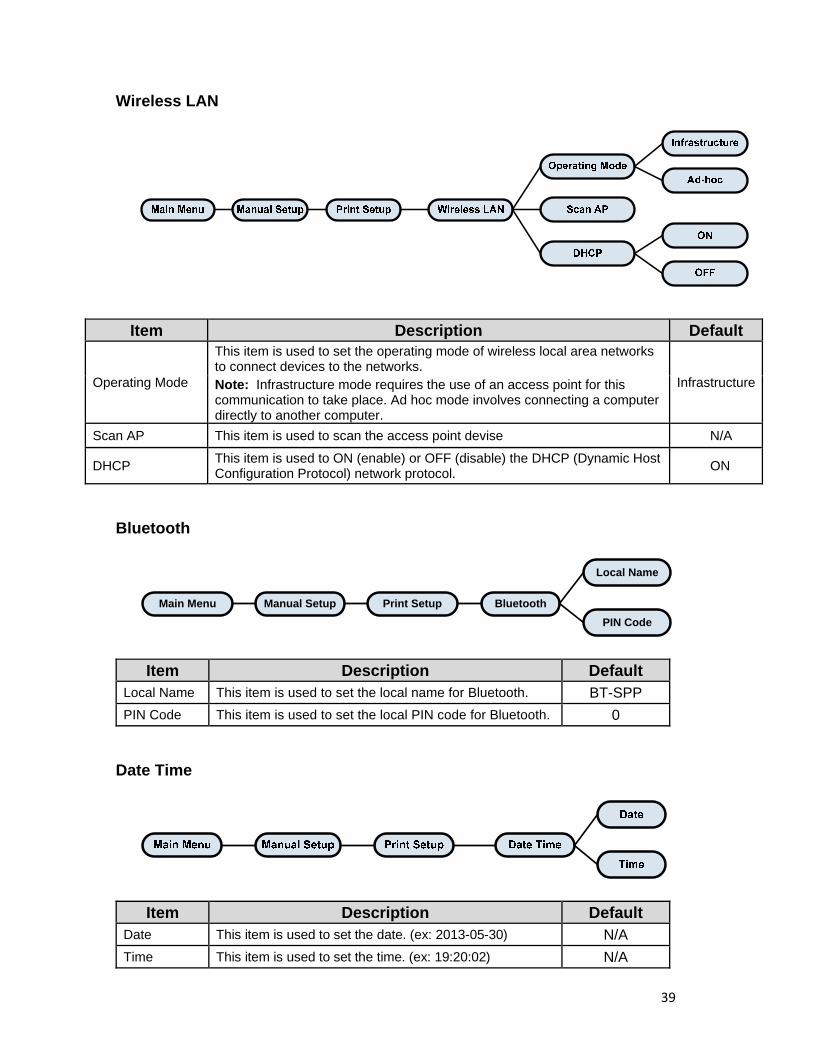
Wireless LAN
Item Description Default
Operating Mode
This item is used to set the operating mode of wireless local area networks to connect devices to the networks.
InfrastructureNote: Infrastructure mode requires the use of an access point for this communication to take place. Ad hoc mode involves connecting a computer directly to another computer.
Scan AP This item is used to scan the access point devise N/A
DHCP This item is used to ON (enable) or OFF (disable) the DHCP (Dynamic Host Configuration Protocol) network protocol.
ON
Bluetooth
Main Menu Manual Setup Bluetooth
Local Name
PIN Code
Print Setup
Item Description Default
Local Name This item is used to set the local name for Bluetooth. BT-SPP
PIN Code This item is used to set the local PIN code for Bluetooth. 0
Date Time
Item Description Default
Date This item is used to set the date. (ex: 2013-05-30) N/A
Time This item is used to set the time. (ex: 19:20:02) N/A

40
Display
Item Description Default Contrast This item is used to set the contrast for the display. 50
Backlight This item is used to set the backlight time for the display. 10 Seconds
File Manager
This feature is used to check the printer available memory and file list.
Item Description
DRAM Use this menu to show available memory space and run (.BAS) the files saved in the printer DRAM memory.
FLASH Use this menu to show available memory space and run (.BAS) the files saved in the printer Flash memory.
CARD Use this menu to show available memory space and run (.BAS) the files saved in the printer MicroSD card memory.
41
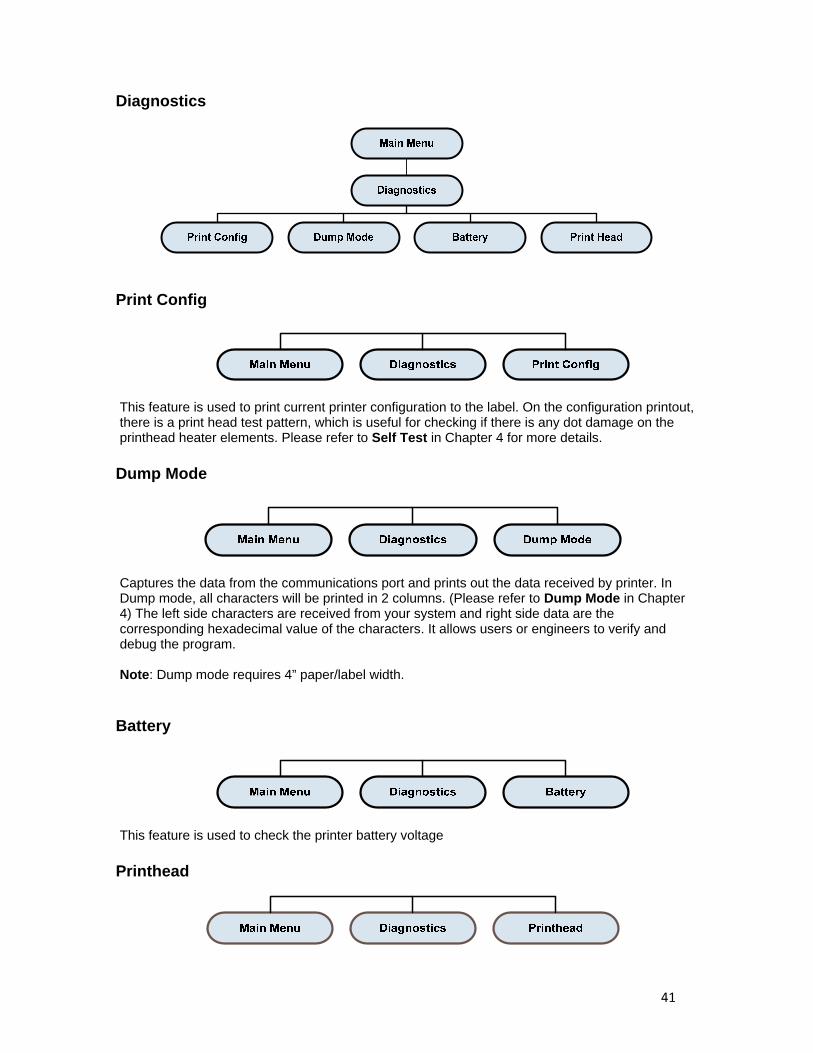
Diagnostics
Print Config
This feature is used to print current printer configuration to the label. On the configuration printout, there is a print head test pattern, which is useful for checking if there is any dot damage on the printhead heater elements. Please refer to Self Test in Chapter 4 for more details.
Dump Mode
Captures the data from the communications port and prints out the data received by printer. In Dump mode, all characters will be printed in 2 columns. (Please refer to Dump Mode in Chapter 4) The left side characters are received from your system and right side data are the corresponding hexadecimal value of the characters. It allows users or engineers to verify and debug the program. Note: Dump mode requires 4” paper/label width.
Battery
This feature is used to check the printer battery voltage
Printhead
42
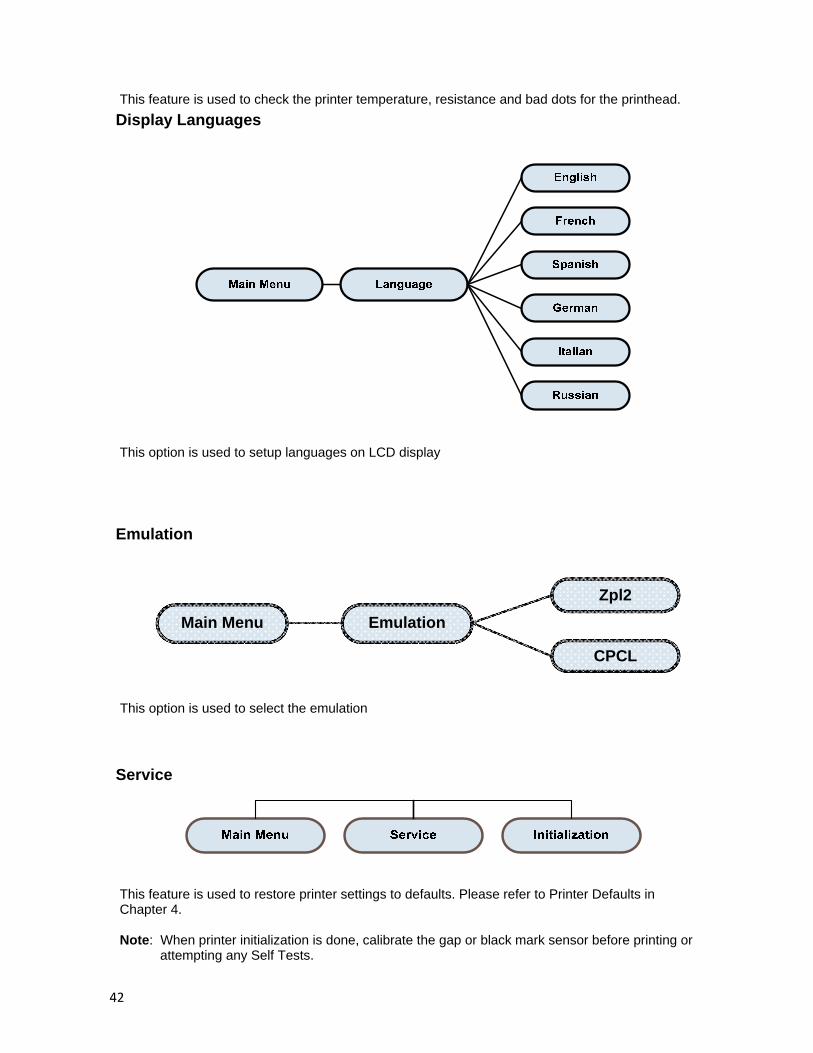
This feature is used to check the printer temperature, resistance and bad dots for the printhead.
Display Languages
This option is used to setup languages on LCD display
Emulation
Main Menu Emulation
Zpl2
CPCL
This option is used to select the emulation
Service
This feature is used to restore printer settings to defaults. Please refer to Printer Defaults in Chapter 4. Note: When printer initialization is done, calibrate the gap or black mark sensor before printing or attempting any Self Tests.
43
7
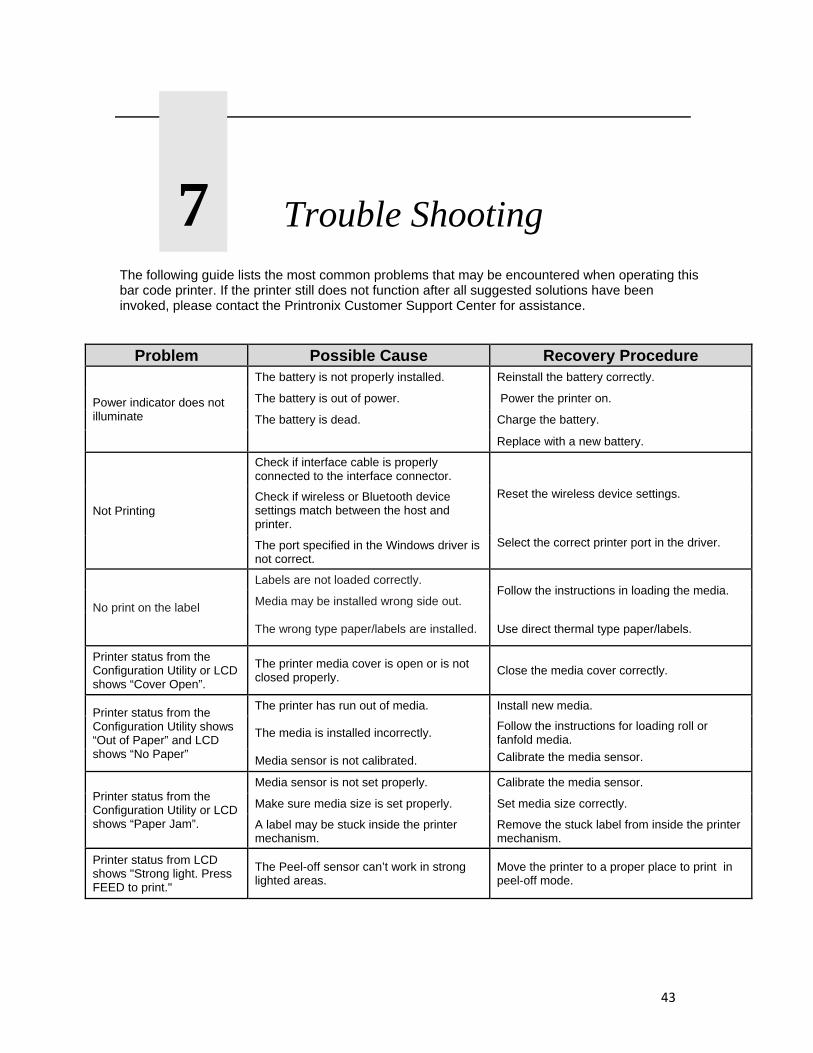
Trouble Shooting The following guide lists the most common problems that may be encountered when operating this bar code printer. If the printer still does not function after all suggested solutions have been invoked, please contact the Printronix Customer Support Center for assistance.
Problem Possible Cause Recovery Procedure
Power indicator does not illuminate
The battery is not properly installed. Reinstall the battery correctly.
The battery is out of power. Power the printer on.
The battery is dead. Charge the battery.
Replace with a new battery.
Not Printing
Check if interface cable is properly connected to the interface connector.
Reset the wireless device settings. Check if wireless or Bluetooth device settings match between the host and printer.
The port specified in the Windows driver is not correct.
Select the correct printer port in the driver.
No print on the label
Labels are not loaded correctly. Follow the instructions in loading the media.
Media may be installed wrong side out.
The wrong type paper/labels are installed. Use direct thermal type paper/labels.
Printer status from the Configuration Utility or LCD shows “Cover Open”.
The printer media cover is open or is not closed properly.
Close the media cover correctly.
Printer status from the Configuration Utility shows “Out of Paper” and LCD shows “No Paper”
The printer has run out of media. Install new media.
The media is installed incorrectly. Follow the instructions for loading roll or fanfold media.
Media sensor is not calibrated. Calibrate the media sensor.
Printer status from the Configuration Utility or LCD shows “Paper Jam”.
Media sensor is not set properly. Calibrate the media sensor.
Make sure media size is set properly. Set media size correctly.
A label may be stuck inside the printer mechanism.
Remove the stuck label from inside the printer mechanism.
Printer status from LCD shows "Strong light. Press FEED to print."
The Peel-off sensor can’t work in strong lighted areas.
Move the printer to a proper place to print in peel-off mode.
44
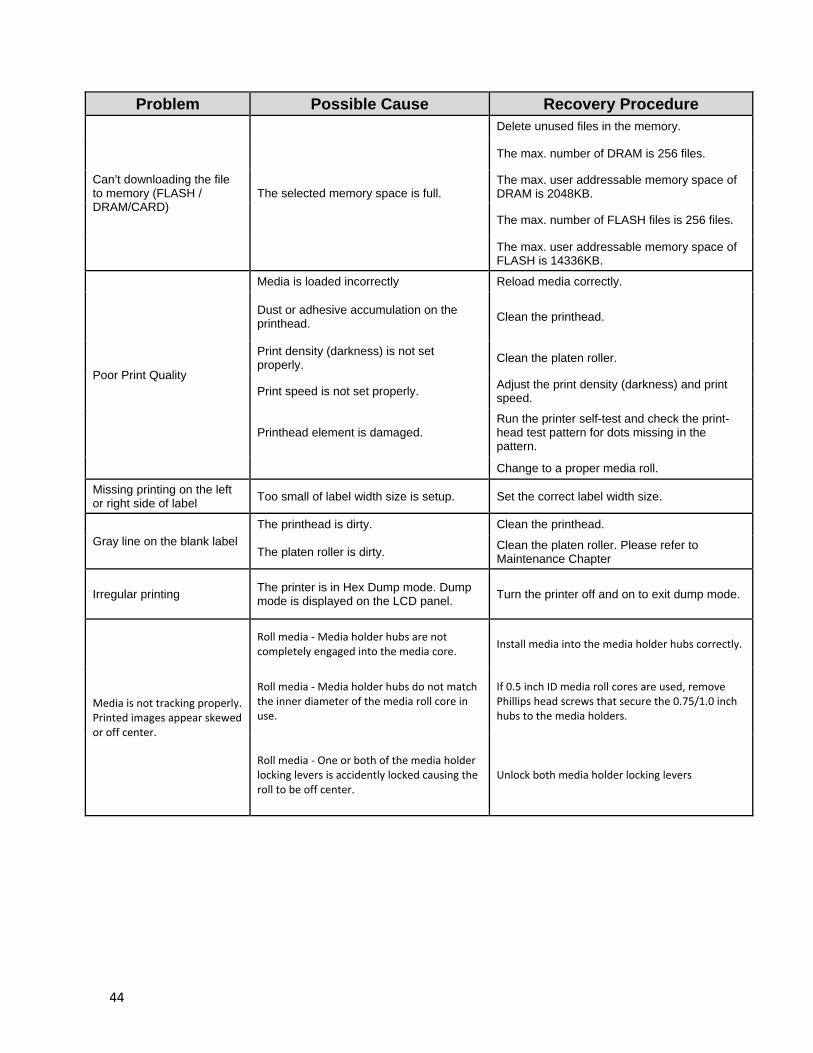
Problem Possible Cause Recovery Procedure
Can’t downloading the file to memory (FLASH / DRAM/CARD)
The selected memory space is full.
Delete unused files in the memory.
The max. number of DRAM is 256 files.
The max. user addressable memory space of DRAM is 2048KB.
The max. number of FLASH files is 256 files.
The max. user addressable memory space of FLASH is 14336KB.
Poor Print Quality
Media is loaded incorrectly Reload media correctly.
Dust or adhesive accumulation on the printhead.
Clean the printhead.
Print density (darkness) is not set properly.
Clean the platen roller.
Print speed is not set properly. Adjust the print density (darkness) and print speed.
Printhead element is damaged. Run the printer self-test and check the print- head test pattern for dots missing in the pattern.
Change to a proper media roll.
Missing printing on the left or right side of label
Too small of label width size is setup. Set the correct label width size.
Gray line on the blank label
The printhead is dirty. Clean the printhead.
The platen roller is dirty. Clean the platen roller. Please refer to Maintenance Chapter
Irregular printing The printer is in Hex Dump mode. Dump mode is displayed on the LCD panel.
Turn the printer off and on to exit dump mode.
Media is not tracking properly. Printed images appear skewed or off center.
Roll media ‐ Media holder hubs are not completely engaged into the media core.
Install media into the media holder hubs correctly.
Roll media ‐ Media holder hubs do not match the inner diameter of the media roll core in use.
If 0.5 inch ID media roll cores are used, remove Phillips head screws that secure the 0.75/1.0 inch hubs to the media holders.
Roll media ‐ One or both of the media holder locking levers is accidently locked causing the roll to be off center.
Unlock both media holder locking levers
45
Problem Possible Cause Recovery Procedure
Media holders don’t slide open to allow removal or installation of roll media.
Media holder locking lever(s) were accidently moved to the lock position.
Roll media ‐ Place locking levers in unlocked (full up) position. NOTE: Locking levers should only be used for fanfold media.
NOTE: If fanfold media is never used, locking levers can be removed from the media holders by removing 2 Phillips head screws.
Media will not advance when print job is sent or when the Form Feed key is pressed.
Left side of media cover is not completely closed.
Verify left side of media cover is completely closed. NOTE: Cover open switch is located under right side of cover.
Tear Mode ‐ Media does not tear properly against the tear bar.
Peel‐Cover incorrectly placed in forward position and is interfering with Tear‐Off.
Slide the Peel Cover toward the back of the printer when Tear mode is used.
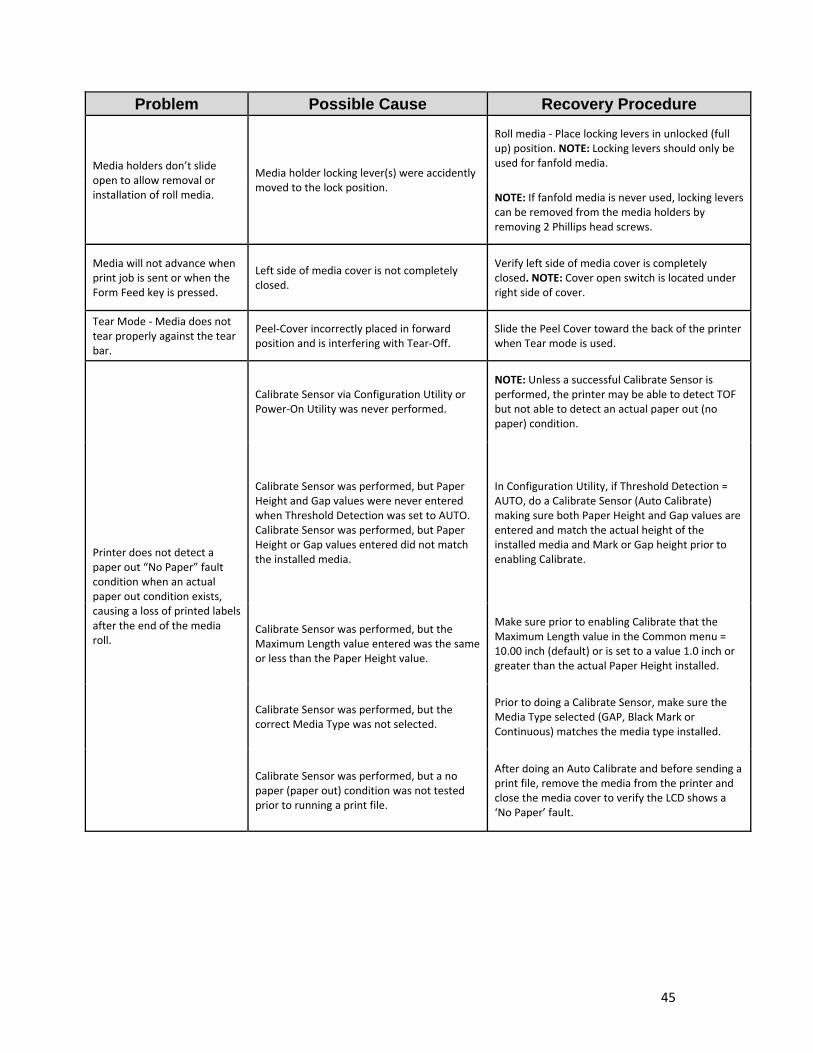
Printer does not detect a paper out “No Paper” fault condition when an actual paper out condition exists, causing a loss of printed labels after the end of the media roll.
Calibrate Sensor via Configuration Utility or Power‐On Utility was never performed.
NOTE: Unless a successful Calibrate Sensor is performed, the printer may be able to detect TOF but not able to detect an actual paper out (no paper) condition.
Calibrate Sensor was performed, but Paper Height and Gap values were never entered when Threshold Detection was set to AUTO. Calibrate Sensor was performed, but Paper Height or Gap values entered did not match the installed media.
In Configuration Utility, if Threshold Detection = AUTO, do a Calibrate Sensor (Auto Calibrate) making sure both Paper Height and Gap values are entered and match the actual height of the installed media and Mark or Gap height prior to enabling Calibrate.
Calibrate Sensor was performed, but the Maximum Length value entered was the same or less than the Paper Height value.
Make sure prior to enabling Calibrate that the Maximum Length value in the Common menu = 10.00 inch (default) or is set to a value 1.0 inch or greater than the actual Paper Height installed.
Calibrate Sensor was performed, but the correct Media Type was not selected.
Prior to doing a Calibrate Sensor, make sure the Media Type selected (GAP, Black Mark or Continuous) matches the media type installed.
Calibrate Sensor was performed, but a no paper (paper out) condition was not tested prior to running a print file.
After doing an Auto Calibrate and before sending a print file, remove the media from the printer and close the media cover to verify the LCD shows a ‘No Paper’ fault.

46
47
8
Maintenance This section discusses how to maintain your printer.
1. Use one of following materials to clean the printer.
Cotton swab or authorized Printronix Thermal Printhead Cleaning Pen (203502-002)
Lint-free cloth
Vacuum / Blower brush
100% Ethanol or 99.7% Isopropyl Alcohol
2. The cleaning process is as follows:
Printer Method Interval
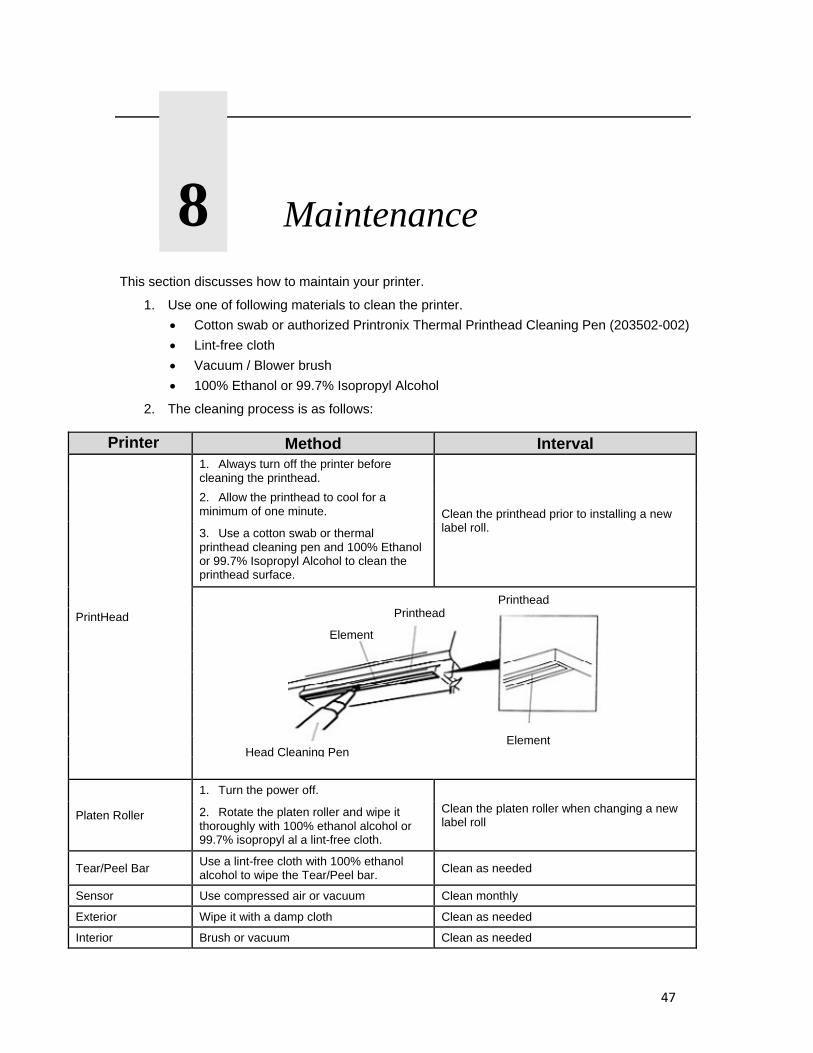
PrintHead
1. Always turn off the printer before cleaning the printhead.
Clean the printhead prior to installing a new label roll.
2. Allow the printhead to cool for a minimum of one minute.
3. Use a cotton swab or thermal printhead cleaning pen and 100% Ethanol or 99.7% Isopropyl Alcohol to clean the printhead surface.
Platen Roller
1. Turn the power off.
Clean the platen roller when changing a new label roll
2. Rotate the platen roller and wipe it thoroughly with 100% ethanol alcohol or 99.7% isopropyl al a lint-free cloth.
Tear/Peel Bar Use a lint-free cloth with 100% ethanol alcohol to wipe the Tear/Peel bar.
Clean as needed
Sensor Use compressed air or vacuum Clean monthly
Exterior Wipe it with a damp cloth Clean as needed
Interior Brush or vacuum Clean as needed
Head Cleaning PenElement
Element
PrintheadPrinthead

48
49
A
Contact Information Contact Information
Printronix Customer Support Center
IMPORTANT Please have the following information available prior to calling the Printronix Customer Support Center:
Model number
Serial number (located on the back of the printer)
Installed options (i.e., interface and host type if applicable to the problem)
Configuration printout (Press CONFIG on the control panel, then press
ENTER)
Network test page if Ethernet is enabled.
Is the problem with a new install or an existing printer?
Description of the problem (be specific)
Good and bad samples that clearly show the problem (faxing or emailing of these samples may be required)
Americas (714) 368-2686
Europe, Middle East and Africa (31) 24 6489 311
Asia Pacific (65) 6548 4114
China (86) 800-999-6836
http://www.printronix.com/support.aspx
Printronix Supplies Department
Contact the Printronix Supplies Department for genuine Printronix supplies.
Americas (800) 733-1900
Europe, Middle East and Africa (33) 1 46 25 19 07
Asia Pacific (65) 6548 4116 Or (65) 6548 4132
China (86) 400-886-5598
India (800) 102-7869
http://www.printronix.com/public/supplies/default.aspx

50
Corporate Offices
Printronix, Inc. 15345 Barranca Parkway Irvine, CA 92618 U.S.A. Phone: (714) 368-2300 Fax: (714) 368-2600
Printronix Inc. c/o Printronix Nederland BV Bijsterhuizen 11-38 6546 AS Nijmegen The Netherlands Phone: (31) 24 6489489 Fax: (31) 24 6489499
Printronix Schweiz GmbH 42 Changi South Street 1 Changi South Industrial Estate Singapore 486763 Phone: (65) 6542 0110 Fax: (65) 6546 1588
Printronix Commercial (Shanghai) Co. Ltd 22F, Eton Building East No.555, Pudong Av. Shanghai City, 200120, P R China Phone: (86) 400 886 5598 Fax: (86-21) 5138 0564
Visit the Printronix web site at www.printronix.com
51
B
Notices
This information was developed for products and services offered in the U.S.A.
Printronix may not offer the products, services, or features discussed in this document in other countries. Consult your Printronix representative for information on the products and services currently available in your area. Any reference to an Printronix product, program, or service is not intended to state or imply that only that Printronix product, program, or service may be used. Any functionally equivalent product, program, or service that does not infringe any Printronix intellectual property rights may be used instead. However, it is the user’s responsibility to evaluate and verify the operation of any non- Printronix product, program, or service.
Printronix may have patents or pending patent applications covering subject matter described in this document. The furnishing of this document does not give you any license to these patents. You can send license inquires, in writing, to:
Printronix, Inc. 15345 Barranca Parkway Irvine, CA 92618 U.S.A.
The following paragraph does not apply to the United Kingdom or any other country where such provisions are inconsistent with local law:
PRINTRONIX PROVIDES THIS PUBLICATION “AS IS” WITHOUT WARRANTY OF ANY KIND, EITHER EXPRESS OR IMPLIED, INCLUDING, BUT NOT LIMITED TO, THE IMPLIED WARRANTIES OF NON- INFRINGEMENT, MERCHANTABILITY OR FITNESS FOR A PARTICULAR PURPOSE. Some states do not allow disclaimer of express or implied warranties in certain transactions, therefore, this statement may not apply to you.
This information could include technical inaccuracies or typographical errors. Changes are periodically made to the information herein; these changes will be incorporated in new editions of the publication. Printronix may make improvements and/or changes in the product(s) described in this publication at any time without notice.
Any references in this information to non-Printronix Web sites are provided for convenience only and do not in any manner serve as an endorsement of those Web sites. The materials at those Web sites are not part of the materials for this Printronix product and use of those Web sites is at your own risk.
Any performance data contained herein was determined in a controlled environment. Therefore, the results obtained in other operating environments may vary significantly. Some measurements may have been made on development-level systems and there is no guarantee that these measurements will be the same on generally available systems. Furthermore, some measurement may have been estimated through extrapolation. Actual results may vary. Users of this document should verify the applicable data for their specific environment.
52
Information concerning non-Printronix products was obtained from the suppliers of those products, their published announcements or other publicly available sources. Printronix has not tested those products and cannot confirm the accuracy of performance, compatibility or any other claims related to non-Printronix products. Questions on the capabilities of non-Printronix products should be addressed to the suppliers of those products.
Printronix encourages owners of information technology (IT) equipment to responsibly recycle their equipment when it is no longer needed. Printronix offers a variety of programs and services to assist equipment owners in recycling their IT products. Information on these product recycling offerings can be found on Printronix’s Internet site at http://www.printronix.com.
Note!
Before using this information and the product it supports, read the information and Communication Statements on page 383.
If you are viewing this information softcopy, the photographs and color illustrations may not appear.
For online versions of this book, we authorize you to:
• Copy, modify, and print the documentation contained on the media, for use within your enterprise, provided you reproduce the copyright notice, all warning statements, and other required statements on each copy or partial copy.
• Transfer the original unaltered copy of the documentation when you transfer the related Printronix product (which may be either machines you own, or programs, if the program’s license terms permit a transfer). You must, at the same time, destroy all other copies of the documentation.
You are responsible for payment of any taxes, including personal property taxes, resulting from this authorization.
Your failure to comply with the terms above terminates this authorization. Upon termination, you must destroy your machine readable documentation.
53
Communication Statements FEDERAL COMMUNICATIONS COMMISSION (FCC) STATEMENT
This equipment has been tested and found to comply with the limits for a Class B digital device, pursuant to part 15 of the FCC Rules. These limits are designed to provide reasonable protection against harmful interference in a residential installation. This equipment generates, uses and can radiate radio frequency energy and, if not installed and used in accordance with the instructions, may cause harmful interference to radio communications. However, there is no guarantee that interference will not occur in a particular installation. If this equipment does cause harmful interference to radio or television reception, which can be determined by turning the equipment off and on, the user is encouraged to try to correct the interference by one or more of the following measures:
Reorient or relocate the receiving antenna.
Increase the separation between the equipment and receiver.
Connect the equipment into an outlet on a circuit different from that to which the receiver is connected.
Consult the dealer or an experienced radio/ TV technician for help. CAUTION:
Any changes or modifications not expressly approved by the grantee of this device could void the user's authority to operate the equipment.
This device complies with Part 15 of the FCC Rules. Operation is subject to the following two conditions:
This device may cause harmful interference, and
This device must accept any interference received, including interference that may cause undesired operation. RF exposure warning (WiFi)
This equipment must be installed and operated in accordance with provided instructions and must not be co-located or operating in conjunction with any other antenna or transmitter. End-users and installers must be providing with antenna installation instructions and transmitter operating conditions for satisfying RF exposure compliance.
M4L-WG - SAR Value: 0.663 W/kg
M4L-WK - SAR Value: 0.89 W/kg RF exposure warning (For M4L-WG Bluetooth enabled devices only)
The equipment complies with FCC RF exposure limits set forth for an uncontrolled environment. The equipment must not be co-located or operating in conjunction with any other antenna or transmitter. Battery Safety Warning:
DO NOT throw the battery in fire. DO NOT short circuit the contacts. DO NOT disassemble the battery. DO NOT throw the battery in municipal waste. Contact your local waste agency for the correct disposal procedure
CAUTION: Danger of explosion if battery is incorrectly replaced. Replace only with the same or equivalent type recommended by the manufacturer. Dispose of used batteries according to the manufacturer’s instructions The symbol of the crossed out wheeled bin indicates that the battery should not be placed in municipal waste.

54
CE Notice (European Union)
Marking by the CE symbol indicates compliance to the EMC directive and Low Voltage Directive of the European Union. Such marking is indicative that this system meets the following technical standards:
EN 55022 “Limits and Methods of Measurement of Radio Interference Characteristics of Information Technology Equipment.”
EN 55024 “Electromagnetic Immunity Requirements for Information Technology Equipment”
EN 60950 “Safety of Information Technology Equipment”
EN 300328, EN 301489 “Electromagnetic Compatibility and Radio spectrum Matters’
Konformitätserklärung: FCC Klasse B entspricht EMVG Klasse B Für alle in Deutschland vertriebenen EN 55022 Klasse B Geräte: Zulassungsbescheinigung laut dem Deutschen Gesetz über die elektromagnetische Verträglichkeit von Geräten (EMVG) vom 18. September 1998 (bzw. der EMC EG Richtlinie 89/336): Dieses Gerät ist berechtigt in Übereinstimmung mit dem Deutschen EMVG das EG-Konformitätszeichen - CE - zu führen. Verantwortlich für die Konformitätserklärung nach Paragraph 5 des EMVG ist die: Printronix Deutschland GmbH Goethering 56 D-63067 Offenbach Deutschland
Informationen in Hinsicht EMVG Paragraph 4 Abs. (1) 4: Das Gerät erfüllt die Schutzanforderungen nach EN 55024 und EN 55022 Klasse B. EN 55022 Klasse B Geräte müssen mit folgendem Warnhinweis versehen werden: “Warnung: dies ist eine Einrichtung der Klasse B. Diese Einrichtung kann im Wohnbereich Funkstörungen verursachen. In diesem Fall kann vom Betreiber verlangt werden, angemessene Maßnahmen durchzuführen und dafür aufzukommen.”
EN 55024 Hinweis: Wird dieses Gerät in einer industriellen Umgebung betrieben (wie in EN 55024 festgelegt), dann kann es dabei eventuell gestört werden. In solch einem Fall ist der Abstand bzw. die Abschirmung zu der industriellen Störquelle zu vergrößern. Anmerkung: Um die Einhaltung des EMVG sicherzustellen sind die Geräte, wie in den Printronix Handbüchern angegeben, zu installieren und zu betreiben.
Konformitätsklassen: CE: EN 55022/24, IEC 61000-3-3, IEC 61000-3-2, EN 300328, EN 301489 EN 60950-1 durchgeführt von TÜV SÜD
Wichtige Sicherheits-Hinweise 1. Bitte lesen Sie die Hinweis sorgfältig durch. 2. Heben Sie diese Anleitung für den späteren Gebrauch auf. 3. Vor jedem Reinigen ist das Gerät vom Stromnetz zu trennen. Verwenden Sie keine Flüssig-oder Aerosolreiniger. Am besten eignet sich ein angefeuchtetes Tuch zur Reinigung. 4. Die Netzspannungs-Steckdose soll nahe dem Gerät angebracht und leicht zugänglich sein. 5. Das Gerät ist vor Feuchtigkeit zu schützen. 6. Bei der Aufstellung des Gerätes ist auf sicheren Stand zu achten. Ein Kippen oder Fallen könnte Beschädigungen hervorrufen. 7. Beachten Sie beim Anschluss ans Stromnetz die Anschlusswerte. 8. Dieses Gerät kann bis zu einer Außentemperatur von maximal 40¬ betrieben werden.

55
Batterie-Sicherheitshinweis:
Batterie nicht in offenes Feuer werfen.
Batterie nicht kurzschließen.
Batterie nicht zerlegen.
Batterie nicht über den Hausmüll entsorgen.
Auf fachgerechte Entsorgung achten (Kennzeichnung durch durchgestrichene Mülltonne).
Achtung! Explosionsgefahr bei unsachgemäßem Austausch der Batterie. Ersatz nur durch Original- oder vom Hersteller empfohlenen Typ. Entsorgung gebrauchter Batterien nach Angaben des Herstellers durchführen.
56
Software License Agreement
Your printer contains, among other software, application software, but not limited to the Ethernut Operating System (the “Ethernut Software”) as embedded software. The terms of this Agreement apply to the Ethernut Operating System, and all other embedded software supplied with the printer. You accept the terms of this Agreement by your initial use of your printer. The Ethernut operating system is a free operating system and can be found at http://www.ethernut.de. From its website: “This is an Open Source Hardware and Software Project for building tiny Embedded Ethernet Devices. The target software is an Open Source implementation of a Real Time Operating System called Nut/OS and a TCP/IP protocol suite named Nut/Net.” Ethernut is available under the BSD License (http://www.opensource.org/licenses/bsd-license.php). This license is very liberal and does not require any disclosure of proprietary application code or updates to the Ethernut code. The copyright included with the Ethernut source code is as follows: /* * Copyright (C) 2004 by egnite Software GmbH. All rights reserved. * * Redistribution and use in source and binary forms, with or without * modification, are permitted provided that the following conditions * are met: * * 1. Redistributions of source code must retain the above copyright * notice, this list of conditions and the following disclaimer. * 2. Redistributions in binary form must reproduce the above copyright * notice, this list of conditions and the following disclaimer in the * documentation and/or other materials provided with the distribution. * 3. Neither the name of the copyright holders nor the names of * contributors may be used to endorse or promote products derived * from this software without specific prior written permission. * * THIS SOFTWARE IS PROVIDED BY EGNITE SOFTWARE GMBH AND CONTRIBUTORS * ``AS IS'' AND ANY EXPRESS OR IMPLIED WARRANTIES, INCLUDING, BUT NOT * LIMITED TO, THE IMPLIED WARRANTIES OF MERCHANTABILITY AND FITNESS * FOR A PARTICULAR PURPOSE ARE DISCLAIMED. IN NO EVENT SHALL EGNITE * SOFTWARE GMBH OR CONTRIBUTORS BE LIABLE FOR ANY DIRECT, INDIRECT, * INCIDENTAL, SPECIAL, EXEMPLARY, OR CONSEQUENTIAL DAMAGES (INCLUDING, * BUT NOT LIMITED TO, PROCUREMENT OF SUBSTITUTE GOODS OR SERVICES; LOSS * OF USE, DATA, OR PROFITS; OR BUSINESS INTERRUPTION) HOWEVER CAUSED * AND ON ANY THEORY OF LIABILITY, WHETHER IN CONTRACT, STRICT LIABILITY, * OR TORT (INCLUDING NEGLIGENCE OR OTHERWISE) ARISING IN ANY WAY OUT OF * THE USE OF THIS SOFTWARE, EVEN IF ADVISED OF THE POSSIBILITY OF * SUCH DAMAGE. * * For additional information see http://www.ethernut.de/ * * Copyright (c) 1990 The Regents of the University of California. * All rights reserved. * * Redistribution and use in source and binary forms, with or without * modification, are permitted provided that the following conditions * are met: * 1. Redistributions of source code must retain the above copyright * notice, this list of conditions and the following disclaimer.
57
* 2. Redistributions in binary form must reproduce the above copyright * notice, this list of conditions and the following disclaimer in the * documentation and/or other materials provided with the distribution. * 3. Neither the name of the University nor the names of its contributors * may be used to endorse or promote products derived from this software * without specific prior written permission. * * THIS SOFTWARE IS PROVIDED BY THE REGENTS AND CONTRIBUTORS ``AS IS'' AND * ANY EXPRESS OR IMPLIED WARRANTIES, INCLUDING, BUT NOT LIMITED TO, THE * IMPLIED WARRANTIES OF MERCHANTABILITY AND FITNESS FOR A PARTICULAR PURPOSE * ARE DISCLAIMED. IN NO EVENT SHALL THE REGENTS OR CONTRIBUTORS BE LIABLE * FOR ANY DIRECT, INDIRECT, INCIDENTAL, SPECIAL, EXEMPLARY, OR CONSEQUENTIAL * DAMAGES (INCLUDING, BUT NOT LIMITED TO, PROCUREMENT OF SUBSTITUTE GOODS * OR SERVICES; LOSS OF USE, DATA, OR PROFITS; OR BUSINESS INTERRUPTION) * HOWEVER CAUSED AND ON ANY THEORY OF LIABILITY, WHETHER IN CONTRACT, STRICT * LIABILITY, OR TORT (INCLUDING NEGLIGENCE OR OTHERWISE) ARISING IN ANY WAY * OUT OF THE USE OF THIS SOFTWARE, EVEN IF ADVISED OF THE POSSIBILITY OF * SUCH DAMAGE.

58
59
I
Index
B
Battery, 41 Bluetooth, 39
C
Cable Communications, 20 Charging the Battery, 15 Connecting the Printer, 20
D
Date Time, 39 Display, 40 Display Languages, 42 Dump Mode, 24, 41
F
File Manager, 40
I
Installing the Belt Clip and Battery, 15
L
LCD Display, 13 Loading Fan‐fold/External Media, 19 Loading Media in Peel‐Off Mode, 17
M
Media Sensor Calibration, 22
Media Specifications, 10
P
Power‐On Utilities, 21 Print Config, 41 Print Specifications, 10 Printer Defaults, 24 Printer Initialization, 22 Printer Setup for EPL2, 36 Printhead, 41
S
Self Test, 23 Self Test and Dump Mode, 22 Sensor, 37 Serial Comm., 38 Service, 42 Setting Bluetooth by Configuration Utility, 31 Standard Features, 8 Start the Configuration Utility, 25
U
Using the LCD to Set the Printer, 33, 35
W
Wireless Communication with Bluetooth, 20 Wireless Communication with WiFi, 20 Wireless LAN, 39

258192-001B


