216
User Guide MailMarshal Exchange 5.3 November 2008

User Guide
MailMarshal Exchange 5.3November 2008

THIS DOCUMENT AND THE SOFTWARE DESCRIBED IN THIS DOCUMENT ARE FURNISHED UNDER AND ARE SUBJECT TO THE TERMS OF A LICENSE AGREEMENT OR A NON-DISCLOSURE AGREEMENT. EXCEPT AS EXPRESSLY SET FORTH IN SUCH LICENSE AGREEMENT OR NON-DISCLOSURE AGREEMENT, MARSHAL LIMITED PROVIDES THIS DOCUMENT AND THE SOFTWARE DESCRIBED IN THIS DOCUMENT "AS IS" WITHOUT WARRANTY OF ANY KIND, EITHER EXPRESS OR IMPLIED, INCLUDING, BUT NOT LIMITED TO, THE IMPLIED WARRANTIES OF MERCHANTABILITY OR FITNESS FOR A PARTICULAR PURPOSE. SOME JURISDICTIONS DO NOT ALLOW DISCLAIMERS OF EXPRESS OR IMPLIED WARRANTIES IN CERTAIN TRANSACTIONS; THEREFORE, THIS STATEMENT MAY NOT APPLY TO YOU.
This document and the software described in this document may not be lent, sold, or given away without the prior written permission of Marshal, except as otherwise permitted by law. Except as expressly set forth in such license agreement or non-disclosure agreement, no part of this document or the software described in this document may be reproduced, stored in a retrieval system, or transmitted in any form or by any means, electronic, mechanical, or otherwise, without the prior written consent of Marshal. Some companies, names, and data in this document are used for illustration purposes and may not represent real companies, individuals, or data. This document could include technical inaccuracies or typographical errors. Changes are periodically made to the information herein. These changes may be incorporated in new editions of this document. Marshal may make improvements in or changes to the software described in this document at any time.
© 2008 Marshal Limited, all rights reserved.
U.S. Government Restricted Rights: The software and the documentation are commercial computer software and documentation developed at private expense. Use, duplication, or disclosure by the U.S. Government is subject to the terms of the Marshal standard commercial license for the software, and where applicable, the restrictions set forth in the Rights in Technical Data and Computer Software clauses and any successor rules or regulations.
Marshal, MailMarshal, the Marshal logo, WebMarshal, Security Reporting Center and Firewall Suite are trademarks or registered trademarks of Marshal Limited or its subsidiaries in the United Kingdom and other jurisdictions. All other company and product names mentioned are used only for identification purposes and may be trademarks or registered trademarks of their respective companies.

Contents
About This Book and the Library ..........................................................................................................xiiiConventions ..............................................................................................................................................xivAbout Marshal ...........................................................................................................................................xv
Chapter 1Introducing MailMarshal 1What Does MailMarshal Do? ....................................................................................................................1Where is MailMarshal Installed? ................................................................................................................2How Does MailMarshal Work? .................................................................................................................2Virus Scanning .............................................................................................................................................3MailMarshal Exchange and MailMarshal SMTP ....................................................................................4Online Help ..................................................................................................................................................4
Chapter 2Pre-Installation 5Hardware Required for MailMarshal Server ............................................................................................6Software Required for MailMarshal Server .............................................................................................6Software Required for Other Components .............................................................................................7Email Routing ..............................................................................................................................................7Gathering Information Before Installation .............................................................................................8
Chapter 3Installation 9Procedures to Install MailMarshal Server ..............................................................................................10
Contents iii

Configuration Wizard ............................................................................................................................... 10Welcome - Configuration Import ............................................................................................ 11License ......................................................................................................................................... 11Local Domains ........................................................................................................................... 12Administrative Notifications .................................................................................................... 13Logging ........................................................................................................................................ 14An Array of MailMarshal Servers ............................................................................................ 16Finished ....................................................................................................................................... 16
MailMarshal Console Installation ........................................................................................................... 17Console Security Issues ............................................................................................................. 18
MailMarshal Configurator Remote Installation .................................................................................... 19Uninstalling MailMarshal ......................................................................................................................... 20Importing a MailMarshal Configuration ............................................................................................... 20
Chapter 4Monitoring and Control 23The Configurator ...................................................................................................................................... 23
Configurator Root ...................................................................................................................... 24User Preferences ........................................................................................................................ 25Server Properties ........................................................................................................................ 25Rulesets ........................................................................................................................................ 26User Groups ............................................................................................................................... 26Virus Scanners ............................................................................................................................ 26External Commands .................................................................................................................. 27Folders ......................................................................................................................................... 27Email Templates ........................................................................................................................ 27TextCensor Scripts ..................................................................................................................... 27Logging Classifications .............................................................................................................. 27Message Stamps .......................................................................................................................... 28LDAP Connections ................................................................................................................... 28News and Support ..................................................................................................................... 28
Windows Event Log ................................................................................................................................. 28
iv User Guide

Windows Performance Counters ............................................................................................................29
Chapter 5Rulesets and Rules 31Best Practices .............................................................................................................................................32Viewing and Printing Rulesets .................................................................................................................33Creating a Ruleset ......................................................................................................................................34Editing a Ruleset ........................................................................................................................................38
To Copy or Move Rules Between Rulesets ............................................................................38To Enable or Disable a Ruleset ................................................................................................39
Order of Evaluation ..................................................................................................................................39Adjusting the Order of Evaluation of Rulesets .....................................................................39Adjusting the Order of Evaluation of Rules ..........................................................................39
Creating a New Rule .................................................................................................................................40Copying a Rule ...........................................................................................................................................42Editing a Rule .............................................................................................................................................42User Matching Criteria ..............................................................................................................................42
Contents v

Rule Conditions ......................................................................................................................................... 44Where message attachment is of type ..................................................................................... 45Where attachment fingerprint is/is not known ..................................................................... 46Where message size is ............................................................................................................... 47Where the estimated bandwidth required to deliver this message is ................................. 47Where message contains attachments named ........................................................................ 47Where message triggers TextCensor script(s) ........................................................................ 48Where the result of a virus scan is ........................................................................................... 49Where the external command is triggered ............................................................................. 52Where attachment parent is of type ........................................................................................ 53Where message attachment size is ........................................................................................... 53Where number of recipients is count ...................................................................................... 54Where message contains one or more headers ..................................................................... 54Where number of attachments is count ................................................................................. 55Where message is categorized as ............................................................................................. 56Where the attached image is/is not/may be inappropriate ................................................. 57
Rule Actions ............................................................................................................................................... 61Copy the message ....................................................................................................................... 62BCC a copy of the message ...................................................................................................... 62Run the external command ...................................................................................................... 63Send a notification message ...................................................................................................... 63Strip attachment ......................................................................................................................... 63Write log message(s) .................................................................................................................. 63Stamp message with message stamp ....................................................................................... 64Rewrite message headers ........................................................................................................... 64Add attachments to valid fingerprints list .............................................................................. 65Move the message ...................................................................................................................... 65Park the message ........................................................................................................................ 65Delete the message .................................................................................................................... 66Pass the message to Rule .......................................................................................................... 66
vi User Guide

Chapter 6User Groups 69To Create a New Standard User Group ................................................................................................69To Add Members to a Standard User Group .......................................................................................70To Add an LDAP User Group ...............................................................................................................70To Move and Copy User Groups ...........................................................................................................72
Chapter 7Virus Scanners 73Excluding Working Folders From Virus Scanning ..............................................................................75
Details of Excluded Directories ...............................................................................................76Configuring MailMarshal Exchange to Use an Antivirus Product ....................................................76Best Practices .............................................................................................................................................77Viewing Virus Scanner Properties ..........................................................................................................78Using Other Virus Scanners ....................................................................................................................80Testing Virus Scanners .............................................................................................................................80
Chapter 8External Commands 83Uses of External Commands ...................................................................................................................85Message Release .........................................................................................................................................86
To Use Message Release ............................................................................................................86
Chapter 9Folders 89Creating a New Folder ..............................................................................................................................89
Standard Folders .........................................................................................................................90Parking Folders ...........................................................................................................................91
Editing an Existing Folder .......................................................................................................................92Changing the Default Folder Location ..................................................................................................92Folder Security ...........................................................................................................................................92
Contents vii

Chapter 10Email Templates 95Creating an Email Template .................................................................................................................... 96Duplicating an Email Template .............................................................................................................. 97Editing an Email Template ...................................................................................................................... 97Deleting an Email Template .................................................................................................................... 97Variables ..................................................................................................................................................... 98
Date Formatting ....................................................................................................................... 100
Chapter 11TextCensor Scripts 103TextCensor Syntax .................................................................................................................................. 104Weighting the Script ............................................................................................................................... 105Adding a TextCensor Script .................................................................................................................. 107Editing a TextCensor Script .................................................................................................................. 109Duplicating a TextCensor Script .......................................................................................................... 109Importing a TextCensor Script ............................................................................................................. 110Exporting a TextCensor Script ............................................................................................................. 110Testing TextCensor Scripts ................................................................................................................... 111Using TextCensor Effectively ............................................................................................................... 112
Constructing TextCensor Scripts .......................................................................................... 112Decreasing Unwanted Triggering .......................................................................................... 113
Chapter 12Logging Classifications 115Creating a Logging Classification ......................................................................................................... 116Editing a Logging Classification ........................................................................................................... 117Duplicating a Logging Classification ................................................................................................... 117Deleting a Logging Classification ......................................................................................................... 117Logging Classification Usage ................................................................................................................ 117
viii User Guide

Chapter 13Message Stamps 119Creating a New Message Stamp ............................................................................................................119Duplicating a Message Stamp ................................................................................................................121Editing a Message Stamp .......................................................................................................................121Deleting a Message Stamp .....................................................................................................................121
Chapter 14Header Matching and Rewriting 123Header Wizard .........................................................................................................................................124
Field Matching ..........................................................................................................................125Matching/Substitution Options .............................................................................................127Substitution Actions .................................................................................................................128Naming and Testing .................................................................................................................130
Order of Evaluation ................................................................................................................................131Regular Expression Syntax .....................................................................................................................131
Shortcuts ....................................................................................................................................131Reserved Characters .................................................................................................................133Examples ....................................................................................................................................134Map Files ....................................................................................................................................135
Chapter 15LDAP Connections 137Adding a New LDAP Server Connection ...........................................................................................138Editing an LDAP Server Connection ..................................................................................................142Deleting an LDAP Server Connection ................................................................................................142
Chapter 16Server Properties 143General ......................................................................................................................................................144
Export Configuration ..............................................................................................................145Import Configuration ..............................................................................................................145
Contents ix

Local Domains ........................................................................................................................................ 146To Create a New Local Domain ............................................................................................ 147To Edit a Local Domain ......................................................................................................... 147Wildcards ................................................................................................................................... 147
Logging ..................................................................................................................................................... 149Logging Options ...................................................................................................................... 150Server Array .............................................................................................................................. 150
Internet Access ........................................................................................................................................ 151Spam Updates .......................................................................................................................................... 152License Info ............................................................................................................................................. 154Advanced .................................................................................................................................................. 157
Change Folder Locations ........................................................................................................ 157Exchange Agent State ............................................................................................................. 159Additional Options .................................................................................................................. 159
Chapter 17Reports 163To Install MailMarshal Reports ............................................................................................................ 164Starting MailMarshal Reports ................................................................................................................ 164
Report Properties ..................................................................................................................... 165Generating Reports .................................................................................................................. 166Report Parameters ................................................................................................................... 167
Report Window ....................................................................................................................................... 170Toolbar Options ...................................................................................................................... 171Drill-down ................................................................................................................................. 171
Customizing Reports .............................................................................................................................. 172Reports Based on Existing Reports ...................................................................................... 172Reports Based on Default Types ........................................................................................... 172
Exporting Reports .................................................................................................................................. 173Export Options ........................................................................................................................ 173
x User Guide

Chapter 18The Console 177Connecting to the MailMarshal Server .................................................................................................178Console Security Issues ..........................................................................................................................179The Main Console Screen ......................................................................................................................180Message Folders .......................................................................................................................................180 Message Folder Actions ........................................................................................................................181
Forwarding a Message .............................................................................................................182Deleting a Message ...................................................................................................................182Processing a Message ...............................................................................................................182Viewing a Message and Message Log ....................................................................................184Interpreting Message Logs ......................................................................................................185
Mail History ..............................................................................................................................................186History Search ..........................................................................................................................................187
Wildcard Functions ..................................................................................................................189Alert History .............................................................................................................................................189News and Support ...................................................................................................................................190
Chapter 19MailMarshal and the MMC 191Configurator and Console in the Same MMC ....................................................................................192
Appendix AThird Party Extensions 193Image Analyzer ........................................................................................................................................193
Why Would I Use Image Analyzer? ......................................................................................194What Results Can I Expect From Image Analyzer? ...........................................................194How Does Image Analyzer Address the Issues? .................................................................195
Virus Scanning Software ........................................................................................................................195Anti-Spyware Scanners ...........................................................................................................................196
Index 197
Contents xi

xii User Guide

About This Book and the Library
The User Guide provides conceptual information about MailMarshal Exchange. This book defines terminology and various related concepts.
Intended AudienceThis book provides information for individuals responsible for understanding MailMarshal Exchange concepts and for individuals managing MailMarshal Exchange installations.
Other Information in the LibraryThe library provides the following information resources:
User Guide Provides conceptual information and detailed planning and installation information about MailMarshal Exchange. This book also provides an overview of the MailMarshal Exchange user interfaces and the Help.
Help Provides context-sensitive information and step-by-step guidance for common tasks, as well as definitions for each field on each window.
xiii

Conventions
The library uses consistent conventions to help you identify items throughout the documentation. The following table summarizes these conventions.
Convention Use
Bold • Window and menu items• Technical terms, when introduced
Italics • Book and CD-ROM titles• Variable names and values• Emphasized words
Fixed Font • File and folder names• Commands and code examples• Text you must type• Text (output) displayed in the command-line interface
Brackets, such as [value] • Optional parameters of a command
Braces, such as {value} • Required parameters of a command
Logical OR, such asvalue1 | value2
• Exclusive parameters. Choose one parameter.
xiv User Guide

About Marshal
Marshal is a global vendor of Comprehensive Secure Email and Internet Management solutions that integrate content filtering, compliance, secure messaging and archiving, to protect businesses against email and internet-based threats. Marshal's content security solutions take a proactive approach to identifying email and web vulnerabilities to protect over seven million international users in more than 18,000 companies from the risks of email and Internet threats.
Marshal helps businesses of any size to:
• secure their IT network from incoming, outgoing and internal office email as well as internet content abuse and threats such as viruses, spam, malicious code and offensive content;
• protect company networks, employees, business assets and corporate reputation;
• comply with acceptable use policies, as well as corporate governance legislation and regulations for email retention and management needs.
The Marshal Security SuiteHosted Service:
MailMarshal Service Provider Edition – hosted email security services
Gateway: MailMarshal SMTP – gateway email security MailMarshal Secure Email Server – email encryption and authentication Marshal Security Appliance – gateway email securityWebMarshal – secure web gatewayMarshal Security Reporting Center – firewall, VPN and proxy server reportsMarshal Firewall Suite – Firewall activity reports
Local Network/Client: MailMarshal Exchange – internal email management Marshal EndPoint Security – end user access and activity monitoring and enforcement
xv

Contacting MarshalPlease contact us with your questions and comments. We look forward to hearing from you. For support around the world, please contact your local partner. For a complete list of our partners, please see our website. If you cannot contact your partner, please contact our Technical Support team.
Telephone: +44 (0) 1256 848 080 (EMEA)+1 404 564 5800 (Americas)+ 64 9 984 5700 (Asia-Pacific)
Sales Email: [email protected]
Support: www.marshal.com/support
Website: www.marshal.com
xvi User Guide

Chapter 1
Introducing MailMarshal
MailMarshal Exchange is an Intranet email content management solution. It provides monitoring and control of office email communications for organizations deploying Microsoft Exchange.
MailMarshal Exchange 5.3 supports Exchange 2007. MailMarshal Exchange 5.2 supports Exchange 2000 or Exchange 2003.
The purpose of MailMarshal is to enforce an organization's Acceptable Use Policy for email. Such a policy may regulate what content can be sent by email to recipients inside or outside the organization. A policy may also call for disclaimers or other official message stamps, archive copies of messages, and controls on the size or volume of email allowed. Protection against email transmission of viruses and other harmful material is an additional goal in most cases.
What Does MailMarshal Do? MailMarshal scans the content of messages and attachments as they are received by Microsoft Exchange. It can scan lexical content (such as subject lines, message text and attached documents). It can also determine the structure and size of messages and attachments. MailMarshal also allows scanning for viruses using third-party virus scanners.
Chapter 1 • Introducing MailMarshal 1

Based on the result of these scans, many actions can be performed. These include blocking or quarantining of messages, making copies, stripping of attachments, sending notifications, adding disclaimers, and many others.
Where is MailMarshal Installed? MailMarshal Exchange is installed on the Exchange Server computer. It complements, and is compatible with, traditional Internet firewalls, SMTP mail servers, anti-virus and security applications. The only pre-requisite is that MailMarshal must reside on the Exchange Server. MailMarshal consists of several pieces of software-the Server, Configurator, Console and Reporting Database.
The MailMarshal Server software integrates with Exchange Server using the Transport Agent architecture. All email processed by Exchange is filtered by MailMarshal.
The Configurator is installed on the same machine as the MailMarshal Server software, and can also be run from a remote workstation. This module allows setup of the basic connections required to use MailMarshal. It also allows configuration of email processing rules and components, such as virus scanners and TextCensor scripts.
The flow of email through MailMarshal is monitored using the Console, which can be installed on the email administrator's workstation. Through the Console MailMarshal's logs can be examined, and blocked items can be released if necessary.
MailMarshal can log email activity to a SQL Server database, and use the information to produce detailed reports. The reporting suite, using an included runtime version of Crystal Reports, can be installed on any workstation.
How Does MailMarshal Work? The MailMarshal Exchange Transport Agent retrieves email messages from Exchange.
2 User Guide

The Engine unpacks each email message (unzipping archive or compressed files if necessary) and splits the message into its individual components. It then tests the whole message and each component against the Rules that have been set up in the Configurator.
Rules are composed of three parts: User Matching, Conditions, and Actions. Details of rule configuration are given in Chapter 5, “Rulesets and Rules.”.
User Matching criteria allow filtering of messages by the sender and recipients. Other Conditions can match based on the header information, text content of the message and attachments, attached file types, message size, virus check by a third-party virus scanner, and other criteria.
Based on the results of User Matching and Condition testing, the email message is accepted, modified or quarantined. Accepted email is passed to Microsoft Exchange, which then forwards it to the appropriate recipients.
Messages can be stamped with a notice and/or stripped of objectionable attachments. Quarantined messages are placed into one of several folders defined for that purpose. They can be retrieved by the email administrator (using the Console) for examination or re-processing.
Messages that cannot be unpacked or delivered are directed to special DeadLetter folders.
Where MailMarshal takes action on a message, notifications or copies of the original message can be sent as required. These messages can be customized; see Chapter 10, “Email Templates.”
All MailMarshal server activities are logged in detail to a text file. The relevant log can be appended to a notification message.
Virus Scanning MailMarshal invokes other vendors' virus checking software to detect viruses. A number of commercially available scanners have been tested and shown to work with MailMarshal. For full virus protection, a licensed version of a virus scanner should be installed and its virus definition files kept up to date. MailMarshal can use multiple virus scanners to provide extra protection. Information on virus scanner configuration appears in Chapter 7, “Virus Scanners.”
Chapter 1 • Introducing MailMarshal 3

Because many email viruses are associated with known message text or file types, MailMarshal can also block viruses using these criteria. Where best security practices are followed to block suspicious files, MailMarshal can often stop new viruses before scanner updates arrive.
MailMarshal Exchange and MailMarshal SMTPMailMarshal Exchange shares many features with MailMarshal SMTP, the SMTP based Email Content Security product from Marshal. MailMarshal Exchange adds the ability to scan internal email within the Exchange Server.
For technical reasons, some components of MailMarshal are not available within MailMarshal Exchange, including Receiver Rules and other Receiver based functions, and the MailMarshal Secure module for S/MIME email encryption. However these functions can be obtained by running MailMarshal SMTP in the same environment. MailMarshal Exchange and MailMarshal SMTP can be run on the same computer (subject to adequate system resources).
Within this Guide, “MailMarshal” always refers to MailMarshal Exchange unless otherwise stated.
Online Help MailMarshal provides online help for assistance during installation and use of the software. Help is accessed through the Help menu or by pressing the [F1] key.
Extended up-to-the-minute support is available on the Marshal website. The website at http://www.marshal.com features news, a support Knowledge Base, User Forum, and maintenance upgrades.
4 User Guide

Chapter 2
Pre-Installation
MailMarshal consists of several components, which can be located on different machines within an organization's network. The components are:
• MailMarshal Server
• MailMarshal Configurator
• MailMarshal Console
• MailMarshal Reports
The MailMarshal Server software must be installed on the Microsoft Exchange Server computer. All other components can be installed under Windows Server 2008 (32 or 64 bits), Windows Server 2003 (32 or 64 bits), Windows Vista (32 or 64 bits, minimum Service Pack 1), or Windows XP (32 bits only, minimum Service Pack 2).
Chapter 2 • Pre-Installation 5

Hardware Required for MailMarshal Server MailMarshal hardware requirements are heavily dependent on the Microsoft Exchange setup. Hardware requirements naturally vary depending on the number of email users and the amount of email traffic. Consult the Microsoft sizing guidelines for Exchange Server. MailMarshal fully supports multi-processor computers for very high traffic sites. Please contact Marshal or your Marshal partner for a recommended configuration.
Software Required for MailMarshal Server The following software must be present where MailMarshal is installed:
• Windows Server 2008, Server 2003 SP2, or Server 2003 R2 SP2 (64 bits) with Active Directory.
• Microsoft Exchange 2007 with Hub Transport role. (To use MailMarshal Exchange with Exchange 2000 or Exchange 2003, use MailMarshal Exchange 5.2).
• For reporting, use SQL Server 2005, or SQL Express (on the Exchange Server or an accessible dedicated database server). SQL Express is a free runtime version of SQL Server. The latest service pack is recommended for SQL Server or SQL Express.
NoteDisk requirements are largely driven by Exchange. However, if you intend to archive significant numbers of messages, MailMarshal Exchange will require additional disk space. Marshal suggests 50GB of free space for typical rules on a 1000 user system
Notes• MailMarshal must be installed on a NTFS partition. 8.3 file name creation must
be enabled.
• Due to the limitations on database size in SQL Express, the fully licensed version of SQL Server is recommended for sites over 500 users in size. For more information on database sizing, please see Marshal Knowledge Base article Q10724.
6 User Guide

• To help ensure smooth functioning of MailMarshal Exchange, Marshal recommends the following:
- Install MailMarshal Exchange on all Hub Transport servers to ensure that all messages are scanned.
- For performance reasons, select a DLL integrated virus scanner. Do not use a command line scanner.
- For performance reasons, do not install other roles on the servers (particularly, do not install the Unified Messaging role)
- Although it is possible to add some Microsoft Edge Transport components to a Hub Transport server, Marshal recommends you do not add these components.
- Do not change the user for the Exchange Transport Service.
- Do not manually adjust settings in the Exchange agents.config file, the transport agent priorities, or the default settings for the Replay directory.
Software Required for Other Components MailMarshal Configurator, Console and Reports can be run under Windows Server 2008 (32 or 64 bits), Windows Server 2003 (32 or 64 bits), Windows Vista SP1 (32 or 64 bits), or Windows XP Professional SP2 and above (32 bits only). They require the Microsoft Management Console (MMC) 1.2 or 1.3, and Microsoft Internet Explorer 6 or above.
Email Routing Because MailMarshal functions as a “plug-in” to Microsoft Exchange Server, all email sending and receipt functions are handled by Exchange. MailMarshal processes all email sent to, from, or within Exchange, no matter what protocol is used.
Chapter 2 • Pre-Installation 7

Gathering Information Before Installation This Manual presupposes that Microsoft Exchange Server has been installed and configured to deliver email. Only the steps needed to add MailMarshal to the environment are covered.
Before beginning installation of MailMarshal, information about the environment should be gathered. A basic list of required information is given below.
• The organization's Internet domain name (such as ourcompany.com).
• Names of any other local domains for which the Exchange Server/MailMarshal will process email (such as oursubsidiaries.com).
• The administrator's email address.
• The virus scanning software (with an appropriate license) to be used with MailMarshal.
• Are all prerequisites present? (If not, system restart could be required while installing them.)
NoteCertain directories must be excluded from “on access” or resident virus scanning. For more details, see Chapter 7, “Virus Scanners.”
8 User Guide
Chapter 3
Installation
The MailMarshal Installation process consists of two parts: installation of the software and any prerequisites onto the server, and configuration of the software to send and receive email.
Installation optionally includes setting up the MailMarshal Reports database, which stores usage information.
After installation and configuration, Rules must be customized to implement the desired policies.
The MailMarshal Server, Configurator, Console, and Reports can be installed on different computers. The Configurator and Console will always be installed on the MailMarshal server computer, but can also be installed elsewhere.
This chapter assumes that the Exchange Server is running correctly, and that decisions have been made as to where in the network the database and other components will be installed.
NoteThe Microsoft Exchange and IIS services will be stopped during MailMarshal Server installation. This includes the Exchange Information Store, MTA, and the IIS WWW and FTP services. The services are restarted automatically. Typical down time for these services is less than 5 minutes.
Chapter 3 • Installation 9

Procedures to Install MailMarshal ServerPreliminary Steps:
1. Log on to the server as a user with administrative privilege. Run the downloaded MailMarshal Installer file, or insert the MailMarshal disk into the server CD-Rom drive. Select Install MailMarshal Exchange.
2. Carefully read the information given on the screens License Agreement and Important Information. By selecting I Accept on the License Agreement screen, you accept the terms of the License.
3. In the Select MailMarshal Exchange Setup Type window, select the components to be installed. To change the installation location, click Change then browse to the desired location.
4. Click Next, then Install to start installation. The selected components (and any required prerequisites, if available from the install package) will be installed.
5. When the InstallShield Wizard Completed screen appears, choose whether or not to launch the Configurator. You must run the Configurator to complete the installation.
Configuration WizardWhen the MailMarshal Configurator is first run, MailMarshal launches a wizard that requests the configuration information needed to complete installation. For more information on configuration options, please refer to Chapter 16, “Server Properties.” The Wizard process includes the following steps:
NoteMailMarshal must be installed on a NTFS partition.
10 User Guide

Welcome - Configuration Import The first screen of the Configuration Wizard gives basic welcome information. If you wish to import a configuration (to restore a backup or create an additional member of an array), check the box I have an existing MailMarshal Configuration to import. The Wizard will then request the location of the import file and attempt to import it. If import is successful, the Wizard will report the key details imported and continue with the screen An Array of MailMarshal Servers.
License Enter your Company Name. Enter your License Key, provided by Marshal or your local Marshal reseller. If you do not have a License Key, click the URL link provided to connect to the Marshal website. Complete the MailMarshal Exchange Trial Key Request form; a trial key will immediately be emailed to the address you specify.
Chapter 3 • Installation 11
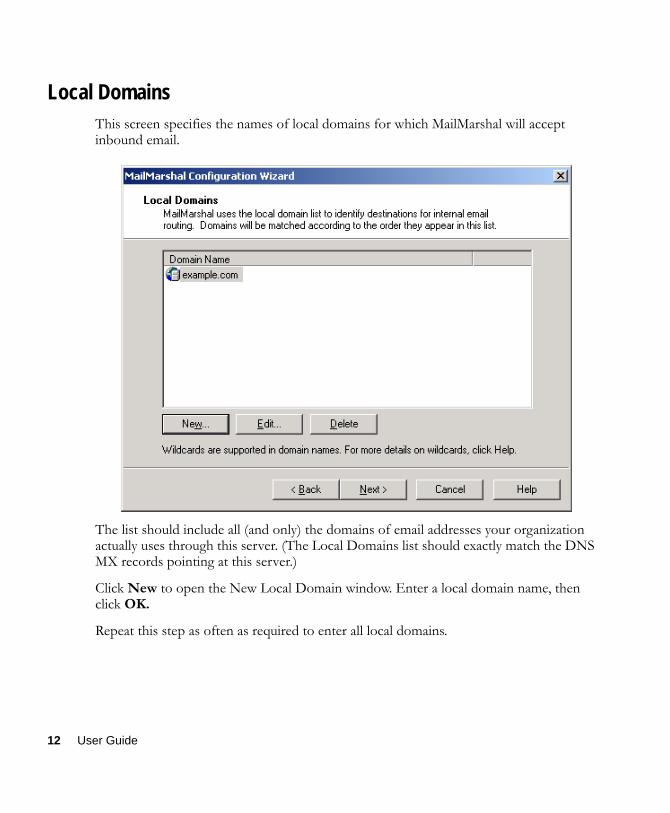
Local Domains This screen specifies the names of local domains for which MailMarshal will accept inbound email.
The list should include all (and only) the domains of email addresses your organization actually uses through this server. (The Local Domains list should exactly match the DNS MX records pointing at this server.)
Click New to open the New Local Domain window. Enter a local domain name, then click OK.
Repeat this step as often as required to enter all local domains.
12 User Guide

Multiple local domains can be entered using wildcards (for instance, *.ourbusiness.com can be entered if all subdomains of ourbusiness.com are handled through this server). See “Wildcards” on page 147 for a description of MailMarshal’s wildcard syntax.
Administrative Notifications Administrative notifications (such as DeadLetter reports) will be sent to the address specified in the Recipient Address field.
NoteMailMarshal’s permanent License Keys are bound to the list of local domains specified in this list. Each time the list of domain names changes, a new key is required. See “License Info” on page 154 for information on requesting a new key.
Chapter 3 • Installation 13

This should be a valid and appropriate mailbox or group alias. Administrative and user notifications and other automated email from MailMarshal will be sent “from” the address entered in the From Address field. This should also be a valid address to allow for replies to notifications.
Logging MailMarshal can log details of the processing and delivery status of messages to a database. When logging has been enabled, the Mail History can be viewed in the Console and a wide variety of reports run from MailMarshal Reports.
To enable logging, check the checkbox I want to log message details, see above. Check the I want to report on email attachment details checkbox to enable reporting on attachments within email messages.
14 User Guide

To continue processing email if the log records cannot be written to the database, check the box I want MailMarshal to continue if the database becomes unavailable. To stop processing email when the database is unavailable, clear this box. (This option should be chosen if logging of traffic is essential. If processing is stopped, email will still be accepted and held in the Incoming directory.)
Select the period for log retention (the default is 100 days). Most installations will want to retain logs for several months to allow flexibility in reporting periods.
Click Select Database to choose the location of the SQL database where the information will be stored.
In the Create/Select Database window, enter the name of the SQL Server (or MSDE) computer in the first box. You can browse the network if necessary. Enter the name of the database you wish to use, and the SQL user name and password. If you believe that a MailMarshal database has previously been installed in the given location and you wish to overwrite it, check the box to recreate the database.
NoteThe database password can be changed using SQL administration tools or command-line SQL entry. However this procedure must be used with caution if other applications are using the database. For further information please see Marshal Knowledge Base article Q10251.
Chapter 3 • Installation 15

If more than one MailMarshal server will be logging to the same database, check the box I have more than one MailMarshal server.
An Array of MailMarshal Servers If the box I have more than one MailMarshal server is checked on the Logging screen, this screen is displayed. Select a letter from the drop-down box to uniquely identify logging records from this MailMarshal Server.
If a configuration has been imported, the box I have more than one MailMarshal server appears on this screen. If more than one MailMarshal server will be logging to the same database, check the box then select a letter.
Finished Basic configuration of the MailMarshal Server is now complete. The MailMarshal Configurator starts automatically on completion of the Wizard.
Changes to the configuration can be made through the Tools > Server Properties menu in the Configurator. Several advanced selections are also available in that menu. For complete information see Chapter 16, “Server Properties.”
Before MailMarshal can be put into production, the following steps should be taken within the MailMarshal Configurator:
1. Install and configure third party virus scanning software, and configure virus scanners within MailMarshal, if desired. Most installations use a virus scanner. See Chapter 7, “Virus Scanners.”
2. If you want to use MailMarshal Exchange to filter spam, configure internet access for updates. See “Internet Access” on page 151.
3. Customize Rulesets and enable Rule processing. See Chapter 5, “Rulesets and Rules.”
NoteCertain directories must be excluded from “on access” or resident virus scanning. See Chapter 7, “Virus Scanners.”
16 User Guide

4. Start MailMarshal Services including the Exchange Connector. Closing the MailMarshal Configurator will prompt you to start these services.
MailMarshal Console Installation The MailMarshal Console provides day-to-day administrative access to the MailMarshal server and email stream, including a real-time view of email processing and management of rejected and quarantined messages. The console is installed automatically on the MailMarshal Server when a server install is performed. If the MailMarshal Console software is to be used on any other machine it must also be installed on that machine. It can be installed directly from the MailMarshal CD-ROM or from an install folder copied from the CD-ROM. See Chapter 2, “Pre-Installation,” for a list of software prerequisites for the Console.
To install the MailMarshal Console:
1. Log in with sufficient access rights to install software onto the local machine and to access the install folder for MailMarshal.
2. Run the MailMarshal installation program or setup.exe to install the MailMarshal Console software.
3. Under Setup, choose Custom/Complete, then Console.
4. Run the newly installed software.
5. If the MailMarshal Server is not running on the same machine, a Change Server window will prompt for the IP Address or name of the MailMarshal Server machine. This window box can be reached at any time by right-clicking on the MailMarshal Console folder in the Console menu tree.
Configuration information for MailMarshal Console is stored in the client machine registry.
NoteWhenever you update or upgrade the MailMarshal Server you must also upgrade the Console on remote machines.
Chapter 3 • Installation 17

Console Security Issues MailMarshal Console uses the Windows secure RPC mechanism to communicate (via TCP port 18001) with the MailMarshal Server. A console user must have an account and password that can be validated by the MailMarshal Server. If the MailMarshal server is in a different domain you can either set up a trust relationship or create local accounts on the MailMarshal Server computer. If the Console and the Server are separated by a firewall (for instance, if the Server is located in a DMZ), port 18001 must be opened in the firewall to allow remote Console access.
To view the messages in the quarantine folders the account in use must have read access to the folders (located by default in the Rulesets subdirectory of the MailMarshal installation directory). To make changes to items (for instance, to forward email) the account will also need write access. Access to the folders should be limited by using Windows security.
To implement access control for other features, edit the access permissions on the MailMarshal.key file (in the MailMarshal folder on the server). Read access to this file allows the user to view the service status and mail history. Write access to this file gives the ability to reload services.
NoteFor details on changing the Console communication to another port, see “Additional Options” on page 159.
18 User Guide

MailMarshal Configurator Remote Installation The MailMarshal Configurator software provides access to all setup functions for MailMarshal, including server configuration and setup of Rules and Rule elements. The Configurator is installed automatically on the MailMarshal Server when a server install is performed. If the MailMarshal Configurator software is to be used on any other machine it must also be installed on that machine. It can be installed directly from the MailMarshal CD-ROM or from an install folder copied from the CD-ROM. See Chapter 2, “Pre-Installation,” for a list of software prerequisites for the Configurator.
To install the MailMarshal Configurator:
1. Log in with sufficient access rights to install software onto the local machine and to access the install folder for MailMarshal.
2. Run the MailMarshal installation program or setup.exe to install the MailMarshal Configurator software.
3. Under Setup, choose Custom/Complete, then Configurator.
4. Run the newly installed software.
5. If the MailMarshal Server is not running on the same machine, a Change Server window will prompt for the IP Address or name of the MailMarshal Server machine. This window box can be reached at any time by right-clicking on the MailMarshal Configurator element in the left pane of the Configurator.
NoteIt is not recommended to connect the Configurator to the MailMarshal Server through a firewall, as additional NetBios ports must be opened to make this possible. If access through a firewall is required, use of a remote access tool such as Microsoft Terminal Services is recommended.
NoteWhenever you update or upgrade the MailMarshal Server you must also upgrade the Configurator on remote machines.
Chapter 3 • Installation 19

Uninstalling MailMarshalTo uninstall MailMarshal:
1. Log on to the MailMarshal Server computer with administrative rights.
2. Start the MailMarshal Configurator. From the Advanced tab of Server Properties, disable the Exchange plug-in (Agent).
3. Exit from the Configurator and ensure that no Console instances are running.
4. Stop the MailMarshal Controller service using the Control Panel Services applet. This should stop all other MailMarshal services.
5. Uninstall MailMarshal using the Control Panel Add/Remove Programs applet. System restart might be suggested to remove some files.
6. Uninstall the MailMarshal Configurator, Console and Reports software on workstations.
7. If appropriate, drop the MailMarshal database using SQL administration tools.
Importing a MailMarshal ConfigurationWhere MailMarshal is being reinstalled, or installed in a cluster environment, it is sometimes desirable to import configuration settings.
Warning• Incorrect use of this feature could damage your MailMarshal installation. Always save
current settings (using the export facility) before performing this procedure.
• The Merge with current configuration option must only be used with specially constructed files supplied by Marshal.
20 User Guide
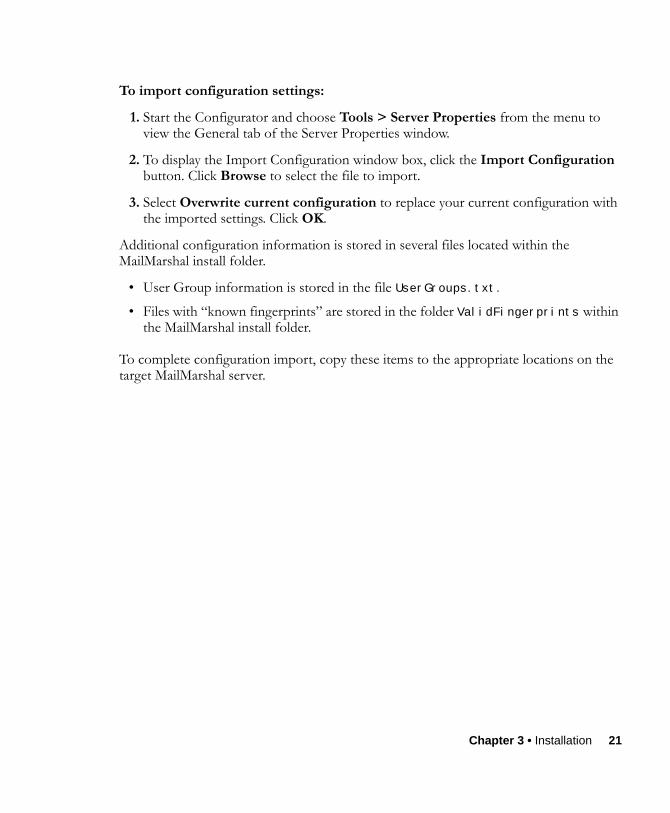
To import configuration settings:
1. Start the Configurator and choose Tools > Server Properties from the menu to view the General tab of the Server Properties window.
2. To display the Import Configuration window box, click the Import Configuration button. Click Browse to select the file to import.
3. Select Overwrite current configuration to replace your current configuration with the imported settings. Click OK.
Additional configuration information is stored in several files located within the MailMarshal install folder.
• User Group information is stored in the file UserGroups.txt.
• Files with “known fingerprints” are stored in the folder ValidFingerprints within the MailMarshal install folder.
To complete configuration import, copy these items to the appropriate locations on the target MailMarshal server.
Chapter 3 • Installation 21

22 User Guide

Chapter 4
Monitoring and Control
Operation of MailMarshal is monitored and controlled through three applications: the Configurator, the Console and the Reports. Additional monitoring and control functions are available through the Windows Event Log, Windows Performance Counters, and the Message Release external command.
Detailed information on the Console, Reports, and External Commands (including Message Release) is provided in other chapters of this manual.
The Configurator The MailMarshal Configurator is used to set up and modify the Rules and rule elements that control how email is processed by the MailMarshal Server. The Configurator also allows advanced setup and modification of the Server Properties, which control email flow and logging. The Configurator is always installed on the MailMarshal Server computer during initial setup. It can also be installed on any workstation. For installation instructions, please see Chapter 3, “Installation.”
The MailMarshal Configurator is implemented as a snap-in to the Microsoft Management Console (MMC). For general information and tips about the MMC, please see Chapter 19, “MailMarshal and the MMC.” This manual assumes that the MMC is displaying both the left (menu tree) and right (details) panes.
Chapter 4 • Monitoring and Control 23

Start the Configurator from the Windows Start menu. Ensure that the MailMarshal Configurator folder is expanded. The left menu pane presents the top level functions of MailMarshal. Detailed information is presented in the right pane.
The following elements are available in the Configurator. Many of these elements are covered in more detail in following chapters of this manual.
Configurator Root When MailMarshal Configurator is selected in the left pane, the status of the MailMarshal Engine service is shown at the bottom of the right pane.
NoteOnly one instance of the MailMarshal Configurator can be active per MailMarshal Server. Attempting to start a second Configurator results in the notice “MailMarshal settings are locked.”
24 User Guide

To start the MailMarshal Engine service, click the Start icon in the toolbar. To stop the services, click the Stop icon in the toolbar. By default, the start/stop status of this service persists through server restarts.
When changes to the Rules or rule elements have been made in the Configurator but not yet reloaded on the Server, the caption MailMarshal Configurator will be followed by -*- To reload the Server, click the Reload icon on the toolbar. Changes will take effect immediately.
Some configuration changes require the MailMarshal services to be restarted. When this action is necessary you will be prompted to do so. Until services are restarted, the caption MailMarshal Configurator will be followed by -!-
Restarting the services takes only a few seconds and does not seriously affect email flow.
User Preferences By default, MailMarshal prompts the user when the configuration must be reloaded or services restarted. These prompts can be disabled through a selection on the prompting message boxes. The prompts and default behavior can be set from the Tools > User Preferences menu.
Server Properties Click Tools > Server Properties in the menu to view the MailMarshal Server Properties window. The various tabs of this window allow setup of MailMarshal’s report logging database, as well as several minor options. Backup and restore of the MailMarshal configuration is also available. Detailed information on this window is available in Chapter 16, “Server Properties.”
Chapter 4 • Monitoring and Control 25

Rulesets Select this item to view a list of MailMarshal’s Rulesets in the right pane. Rulesets contain the Rules that determine how email messages are processed. Rules can depend on recipient, message size, and other factors. Available actions include content scanning, third-party virus scanning, message stamping, and others. For detailed information on Rules and Rulesets, please see Chapter 5, “Rulesets and Rules.”
User Groups Select this item to view a list of MailMarshal’s User Groups. These Groups can be used to apply different Rules to various email users. For instance you can apply different message stamps to outbound email from various departments. User Groups can be created within MailMarshal or imported via LDAP from any available directory server. For detailed information please see Chapter 6, “User Groups.”
Virus Scanners Select this item to view a list of third-party virus scanners that have been configured for use by MailMarshal. Scanners in the list can be used to check message content and attachments. For more information on configuring virus scanners, please see Chapter 7, “Virus Scanners.”
NoteWhen this item is selected, click the Print icon in the toolbar to view and optionally print a list of all currently configured Rulesets and Rules.
NoteActive Directory groups and users can also be used within Rules. For more information, please see Chapter 5, “Rulesets and Rules.”
26 User Guide

External Commands Select this item to view a list of external commands that MailMarshal can invoke. Most command-line executable programs can be used in this way. DLLs can also be invoked. External commands can be used either to test the content of a message, or to perform an action as a result of a condition being triggered by a message. For more information, please see Chapter 8, “External Commands.”
Folders Select this item to view a list of folders into which MailMarshal can place email messages. Folders can be used to quarantine messages based on content, to take copies of selected messages, and to park messages for later delivery. Folder names, subfolders, and physical locations can be changed. For more information please see Chapter 9, “Folders.”
Email Templates Select this item to view a list of templates that can be used when MailMarshal sends an automated message. Templates can contain variables and can have attachments. They can be created and modified to suit any need. For more information please see Chapter 10, “Email Templates.”
TextCensor Scripts Select this item to view a list of MailMarshal’s TextCensor Scripts. These Scripts are used within Rules to review the content of email messages and attachments. A number of scripts are installed by default. They can be edited and new scripts can be added. For more information, please see Chapter 11, “TextCensor Scripts.”
Logging Classifications Select this item to view a list of classifications available when message traffic is logged by MailMarshal. Classifications can be added and modified to suit local need. For more information, please see Chapter 12, “Logging Classifications.”
Chapter 4 • Monitoring and Control 27

Message Stamps Select this item to view a list of message stamps that can be appended by MailMarshal. Stamps can be used for disclaimers, or to notify a recipient of action taken by MailMarshal. Message stamps can be in HTML and plain text format, and can be inserted at the top or bottom of an email message. For more information please see Chapter 13, “Message Stamps.”
LDAP Connections Select this item to view a list of LDAP (Lightweight Directory Access Protocol) server connections that have been configured in MailMarshal. LDAP allows MailMarshal to populate User Groups from remote directory servers. (This ability is in addition to the default Active Directory integration.) For more information on configuring LDAP connections, please see Chapter 15, “LDAP Connections.” Information on LDAP User Groups can be found in Chapter 6, “User Groups.”
News and Support Select this item to view the Marshal website in the right pane. This site features the latest support information, including a Knowledge Base and a Support Forum. To access the full range of resources, customers should log in to the site.
Windows Event Log MailMarshal logs a number of events and alerts to the Windows Event Log. Each event type is given a unique Event ID number. These events can be reviewed in the Event Viewer. They can also be used to trigger automatic actions (such as SNMP traps, pages, service restarts, or popup notifications) via the Windows tool evntwin.exe or third-party products.
28 User Guide

Windows Performance Counters The MailMarshal Engine makes several counters available to the Windows Performance Monitor.
Please see the Performance Monitor documentation for full information on its capabilities including remote monitoring.
Notes• After installation of MailMarshal, system restart might be required before the
MailMarshal Performance Counters are visible in the Performance Monitor.
• To view the MailMarshal Exchange performance counters in Windows Server 2008 (64 bits), you must run the MMC in 32 bit mode. Use the following command line to start Performance Monitor: MMC /32 perfmon.msc
Chapter 4 • Monitoring and Control 29

30 User Guide

Chapter 5
Rulesets and Rules
Rules define how MailMarshal treats email messages. For convenience, all Rules are defined within Rulesets (groups of Rules that share base User Matching conditions). Conditions defined for a Ruleset must be satisfied before any Rule in that Ruleset is evaluated.
An organization can have just a few Rulesets, or many. For example, one Ruleset might apply to all messages outbound from the organization, and another Ruleset apply to all inbound messages. Alternatively or in addition, an organization can be divided into departments, with Rules governing email to and from each department grouped into a separate Ruleset. While some default Rulesets and Rules are provided with MailMarshal, changes and additions should be made to meet local needs. A minimum of three Rulesets is recommended: one for incoming email, one for outgoing email, and one for email between internal users.
Each Rule has three parts: User Matching, Conditions, and Actions. The User Matching and Conditions sections are used to evaluate each message. Messages that meet the specified criteria are subjected to the specified Actions.
Chapter 5 • Rulesets and Rules 31

Best Practices A wide variety of Rules can be created within MailMarshal. Marshal recommends the following basic practices to ensure security and ease of administration:
• Keep rules simple. Simple rules are easier to debug and often faster to run.
• Archive messages. Archiving gives an extra layer of backup in case of email server or delivery problems, as well as being useful for rule testing.
• Block most attached files by default (both by file extension and by file type). MailMarshal is shipped with example Rules to accomplish this.
• Block password protected attachments.
• Block encrypted attachments (for instance, files of type ‘Encrypted Word Document’).
• Block encrypted messages that MailMarshal cannot decrypt (for instance, PGP and S/MIME messages).
• Subscribe to email notification lists for virus outbreaks (such lists are offered by many anti-virus software companies). When an outbreak occurs, block the offending messages by subject line or other identifying features.
32 User Guide

Viewing and Printing Rulesets To view and optionally print a list of all currently configured Rulesets and Rules, first select Rulesets in the left pane of the Configurator. Click the Print icon in the toolbar to view the Ruleset and Rule definitions in a new window, as shown below. To view an individual Ruleset, select that Ruleset in either pane and click the Print icon.
Chapter 5 • Rulesets and Rules 33

Creating a Ruleset To create a Ruleset, in the MailMarshal Configurator, select Rulesets in the left pane. Then click the New Ruleset icon in the toolbar to start the New Ruleset Wizard, as shown below.
Select the conditions under which the Ruleset should be used by checking boxes in the upper pane. Scroll down to see the full list of conditions. The conditions selected will be presented in the lower pane.
Where the matching condition requires specific information to be completed, the incomplete information appears in the Rule description as a red hyperlink. Click on the hyperlink to open a window box allowing this information to be entered. Where specific information has been entered the Rule description displays this information as a blue hyperlink; click on this link to edit the information.
34 User Guide

Clicking on the hyperlink People opens the Enter Users window. This window has two tabs.
• The MailMarshal User Groups tab presents a list of standard and LDAP User Groups configured within MailMarshal, as seen above. Expand any group in the right pane of this window to see its members. Double-click on any user group or individual address to add it to the list.
A new user (SMTP address) can be added to the list by clicking the New User button. A new User Group can be created by clicking the New User Group button. Once the Ruleset has been created the group should be populated using the functions available in the User Groups item of the Configurator tree.
Chapter 5 • Rulesets and Rules 35

• The Active Directory User Groups tab permits selection of groups or users retrieved from available Active Directory servers, as seen below. Use the Look In menu to limit the available selections to certain directories (if more than one is available).
Select any group in the top left pane of this window to see its members in the top right pane. Double-click on any user group or member name to add it to the list in the lower pane.
Delete a group or address from the list by clicking Delete. Close this window and return to the New Ruleset Wizard by clicking OK.
36 User Guide

In the final screen of the New Ruleset Wizard, as seen below, give the Ruleset a name. Choose whether to enable the Ruleset. Optionally choose a starting and/or ending date for the Ruleset to be enabled. Check the boxes for “from” and “to” then enter dates, or click the arrow to view a calendar.
Optionally choose a daily or weekly schedule for the Ruleset. Check the box then click Schedule to use the Ruleset Schedule window.
Alter the schedule block if desired:
• Drag using the left mouse button to add to the blue “enabled” area.
• Drag using the right mouse button to erase from the blue “enabled” area.
• To reset the schedule to the default time block, click Set Default Schedule.
• Choose to “snap” the schedule times to the nearest full, half or quarter hour using the drop down box.
• Click OK to save the schedule, or Cancel to lose any changes.
Chapter 5 • Rulesets and Rules 37

Finally, choose whether to launch the New Rule Wizard. A Ruleset must contain at least one Rule to have any effect.
Editing a Ruleset To edit a Ruleset, in the MailMarshal Configurator, select Rulesets in the left pane. Right click the Ruleset to be edited in the right pane and select Properties from the context menu. The Ruleset is presented in a window with two tabs, “General” and “Filtering”, which allow all information in the Ruleset to be modified.
To Copy or Move Rules Between Rulesets To move a Rule between Rulesets, select the Rule’s parent Ruleset in the left pane of the Configurator. Drag the desired Rule from the list in the right pane to a different Ruleset in the left pane.
To copy a Rule, hold down the <CTRL> key while dragging the Rule.
38 User Guide

To Enable or Disable a Ruleset To enable or disable a Ruleset, edit it then check or uncheck the box “enable Ruleset after next reload”. Alternatively, right click the Ruleset in the right pane and select All Tasks > Enable or All Tasks > Disable from the popup menu.
Order of Evaluation The order in which Rulesets and Rules are evaluated is significant. Certain Rule actions are terminal (they stop further Rule processing). This is indicated in the Rule description.
For instance, a virus scanning Rule will normally be evaluated first, and if a virus is found the message will be quarantined immediately–no further Rules will be evaluated.
Rulesets are evaluated in “top down” order as shown in the Configurator.
Adjusting the Order of Evaluation of Rulesets To adjust the order of evaluation of Rulesets, select Rulesets in the menu pane. Select a Ruleset in the right pane, and move it up or down using the arrows in the toolbar. Click the Reload Server Rules icon to effect the change in order.
Adjusting the Order of Evaluation of Rules To adjust the order of evaluation of Rules, expand a Ruleset. Select a Rule in the right pane, and move it up or down using the arrows in the toolbar. Click the Reload Server Rules icon to effect the change in order.
NoteA Rule containing a “Goto” action (“Pass the message to Rule”) cannot be moved below the Rule it is set to go to. Attempting such a move raises a warning notice. See “Rule Actions” on page 61 for more information.
Chapter 5 • Rulesets and Rules 39

Creating a New Rule To create a new Rule, in the left pane of the Configurator, expand the Ruleset that should contain the new Rule. Click the New Rule icon in the toolbar to start the Rule Wizard.
The first screen of the Rule Wizard, User Matching, specifies to whom the Rule will apply, see above. Check the appropriate boxes in the upper pane to add matching conditions to the Rule description. Scroll down to see the full list of conditions.
NoteIf no User Matching boxes are checked, the Rule will apply to all messages (subject to the limitations imposed by the parent Ruleset). Matching conditions determined by the parent Ruleset are displayed in gray text and cannot be edited here. If these conditions must be changed, edit the properties of the parent Ruleset.
40 User Guide

Where the matching condition requires specific information to be completed, the incomplete information appears in the Rule description as a red hyperlink. Click the hyperlink to open a window allowing this information to be entered. Where specific information has been entered the Rule description displays the specific information as a blue hyperlink; click on this link to edit the information.
The second screen of the Rule Wizard, Conditions, specifies other tests to be performed on the message and its attachments. Choices are made as in the previous screen. For a detailed list of Conditions, see “Rule Conditions” on page 44.
The third screen of the Rule Wizard, Actions, sets the actions to be taken if a message meets the specified conditions. Choices are made as in the previous screens. For a detailed list of Actions, see “Rule Actions” on page 61.
The fourth and final screen of the Rule Wizard, Finish, presents the complete Rule in the description pane where it can be edited.
Chapter 5 • Rulesets and Rules 41

The Rule must be named. By default the Rule is “turned on” (used to process messages)
Copying a Rule To copy a Rule, right-click it in the Configurator. To make a copy in the current Ruleset, choose Duplicate from the context menu. To make a copy in another Ruleset, choose Copy from the context menu; then right-click the target Ruleset and choose Paste.
Editing a Rule To edit a Rule, double click it in the right pane of the Configurator. The Rule will be presented in the Finish window of the Rule Wizard. Hyperlinked details can be edited from this pane. If more basic changes to conditions or actions are required, click Back to view the User Matching, Conditions, and Actions screens.
User Matching Criteria When creating Rulesets and Rules, the following User Matching criteria are available:
Where message is incoming Action will be taken if the message is addressed to a domain within MailMarshal’s Local Domains list.
Where message is outgoing Action will be taken if the message is addressed to a domain outside MailMarshal’s Local Domains list.
NoteNew Rules and changes do not take effect until the Rules are reloaded (using either the Reload Server Rules icon in the toolbar or the menu item Tools > Reload Rules on Server).
42 User Guide

Where addressed to people Action will be taken if a recipient of the message is found in the list of addresses specified. See “Creating a Ruleset” on page 34 for details on choosing which “people” are included in these conditions.
Where addressed from people Action will be taken if the sender of the message is found in the list specified.
Where addressed either to or from people Action will be taken if a recipient or sender of the message is found in the list specified.
Where addressed both to people and from people Action will be taken if the sender of the message is found in the first list specified, and the recipient of the message is found in the second list specified.
Except where addressed to people Action will not be taken if a recipient of the message is found in the list specified.
Except where addressed from people Action will not be taken if the sender of the message is found in the list specified.
Except where addressed either to or from people Action will not be taken if a recipient or sender of the message is found in the list specified.
NoteWhenever a list of “people” is required in a condition, the list can contain individual email addresses, domains, MailMarshal user groups, Active Directory users and Active Directory groups.
Chapter 5 • Rulesets and Rules 43

Except where addressed both to people and from people Action will not be taken if the sender of the message is found in the first list specified, and the recipient of the message is found in the second list specified
Rule Conditions The following conditions are available for use in Rules. They are further explained below:
• Where message attachment is of type
• Where attachment fingerprint is/is not known
• Where message size is
• Where the estimated bandwidth required to deliver this message is
• Where message contains attachment(s) named
• Where message triggers TextCensor script(s)
• Where the result of a virus scan is
• Where the external command is triggered
• Where attachment parent is of type
• Where message attachment size is
• Where number of recipients is count
• Where message contains one or more headers
• Where the attached image is/is not/may be inappropriate
Note“Except” matching criteria are the key to creating exception based policies. Rules that apply to all recipients with the exception of small specific groups help to ensure that security policies are uniformly applied. For instance, a Rule could apply “Where the message is incoming except where addressed to Managers.”
44 User Guide

• Where number of attachments is count
• Where message is categorized as
Where message attachment is of type MailMarshal checks the structure of all attached files to determine their type. Over 150 types are recognized as of this writing. Selecting the hyperlink “file types” opens a selection window including several categories of files.
Select an entire category by checking the associated box. Expand any category to see the list of types included, and check the required boxes. When satisfied click OK to return to the Rule Wizard.
NoteIf many conditions are specified in a single Rule they must all be satisfied for the Rule action to be taken. To match any of several single conditions, place each one in its own Rule. It pays to keep Rules simple and ensure they are logical–it is possible to create nonsensical Rules in MailMarshal!
Chapter 5 • Rulesets and Rules 45

Where attachment fingerprint is/is not known The “fingerprint” identifies a specific file (such as a particular image). Click the hyperlink and choose to base the condition on fingerprints that are known or unknown. To add a file to the list of “known” files, use the “add to valid fingerprints” Rule action, or select Add Fingerprints while processing messages in the Console (see Chapter 18, “The Console,” for further information). To delete a file from the list of “known” files, delete the file from the ValidFingerprints subfolder of the MailMarshal install folder then reload the MailMarshal configuration.
Note• This condition can be useful to exclude certain images, such as corporate logos or
signatures, from triggering quarantine Rules. For example, to take action only on unrecognized images, use the following conditions:
When a message arrivesWhere message attachment is of type IMAGEAnd where attachment fingerprint is not known
• Files can also be made known by placing them in the ValidFingerprints sub-folder and restarting the Engine; however this must be done with care. See Marshal Knowledge Base article Q10543 for further information.
46 User Guide

Where message size is The size of the entire message, before unpacking, will be considered. Choose a size and matching method using the Message Size window.
Where the estimated bandwidth required to deliver this message is The bandwidth required to deliver a message is calculated by multiplying the message size by the number of unique domains to which it is addressed. The intended use of this criterion is to move high-bandwidth messages to a “parking” folder for delivery outside peak hours. They could also be blocked entirely.
Where message contains attachments named Enter a list of file names, separated by semi-colons. The * and ? wildcards are supported (for example, *.SHS;*.VBS;*.DO?). This condition is particularly useful for quickly blocking dangerous file types such as VBS, or known virus attachments such as “creative.exe”. However, it checks only the file name and not the internal type; use “Where message attachment is of type” to check files by structure.
NoteMailMarshal checks the size of the received message in its encoded format. This is typically 33% larger than the size reported by an email client.
Chapter 5 • Rulesets and Rules 47

Where message triggers TextCensor script(s) Choose a TextCensor script to be used in evaluating the message.
Depending on the settings of the individual script, various parts of the message and its attachments can be scanned. Within the Select TextCensor Script window, see above, select a script and click Edit Script to view or change it; click New Script to create a new script, which will be automatically selected when you return to the window. See Chapter 11, “TextCensor Scripts,” for detailed information on creating Scripts.
NoteMore than one TextCensor script can be included in a Rule. However, for the Rule to be triggered, all included scripts must trigger.
48 User Guide

Where the result of a virus scan isThis condition allows you to select from the virus scanning and cleaning features available in MailMarshal Exchange. Use the rule condition window, shown below, to choose the desired virus scanning action and the results to be checked for.
You can choose the virus scanners MailMarshal Exchange uses when processing this condition.
• All Scanners: MailMarshal Exchange uses all configured virus and spyware scanners to scan all parts of the message and attachments. This option is the equivalent of virus scanning rules in MailMarshal Exchange 5.1 and earlier versions.
• Specific scanners: To limit the virus scan to specific installed scanners, choose this option then select the desired scanners from the list. MailMarshal Exchange uses the scanners you select. This setting can be useful if only some installed scanners support virus cleaning, or to provide separate rules for virus and spyware scanning.
Chapter 5 • Rulesets and Rules 49
You can choose the scanner results that will cause this condition to trigger. To choose options, select the appropriate boxes on the Select Virus Scanner Results window.
• Contains Virus: The condition will trigger if any part of the message contains a virus. This is the basic condition.
• ...and is Cleaned: When you select this item, the condition will only trigger if the code returned indicates that the virus was cleaned. This condition can be used in a Clean Viruses rule. You cannot choose this option if any non-DLL scanners are selected.
For further information about setting up virus cleaning rules, see the next section.
• ...and Name Matches: When you select this item, the condition will only trigger if the name of the virus as returned by the scanner matches the text in the field. You can use this condition to modify the MailMarshal Exchange response based on certain virus behaviors. For instance you can choose not to send notifications to the sender address for viruses known to spoof the “from” address. You can use wildcard characters when you enter virus names. For more information, see “Wildcards” on page 147.
• Password Protected: When you select this item, the condition will trigger if the scanner reports the file as password protected.
• File is corrupt: When you select this item, the condition will trigger if the scanner reports the file as corrupt.
• Virus scanner signatures out of date: When you select this item, the condition will trigger if the scanner reports its signature files are out of date.
50 User Guide

• Could not fully unpack or analyze file: When you select this item, the condition will trigger if the scanner reports that it could not unpack the file.
• Unexpected scanner error: When you select this item, the condition will trigger if the scanner reports an unknown error or the code returned is unknown.
To Set Up Virus CleaningIf you want MailMarshal Exchange to attempt to “clean” viruses from email messages, you must install at least one DLL based virus scanner and set up two rules. The default configuration for new installations of MailMarshal Exchange includes appropriate rules.
The first rule must have these options selected:
• Contains Virus
• ...and is Cleaned
The second rule must be a standard virus blocking rule, using the option Contains Virus and invoking a move to a quarantine folder or other blocking action.
NoteThe detailed failure results depend on return codes provided by the individual scanner vendors.
With the exception of Contains Virus and Unexpected scanner error, the virus scanning features listed on the rule condition window can only be used with DLL based scanners. If you attempt to select options that are not supported by the scanners you have selected, MailMarshal Exchange will not allow you to save your selections.
Use the option “Unexpected scanner error” to specify an action MailMarshal Exchange should take when the code returned by the scanner is not known to MailMarshal Exchange. If this option is not selected in a rule condition, an unexpected return code will result in the message being dead lettered. For command line scanners, configure the list of return codes in the virus scanner properties. For more information about virus scanner properties, see Chapter 7, “Virus Scanners.”
Chapter 5 • Rulesets and Rules 51

If a virus cannot be cleaned, MailMarshal Exchange takes the following actions:
1. MailMarshal Exchange applies the rest of the email policy.
2. If no quarantine (move to folder) or other blocking rule has been triggered after all rules have been applied, MailMarshal Exchange deadletters the affected message.
3. The message log and MailMarshal Exchange Engine log will indicate that the message still contains a virus.
4. If you choose to forward or process the affected message, MailMarshal Exchange displays a warning indicating that the message contains a virus.
Where the external command is triggered Select one or more external commands to be used to test the message. If more than one command is specified, all commands must be triggered for this condition to be triggered. External commands can be executable programs or DLLs. See Chapter 8, “External Commands.”
52 User Guide

Where attachment parent is of type This condition is intended to be used with the above condition (attachment of type), and causes MailMarshal to consider the file type of the parent container as well as that of the attachment (for instance, Microsoft Word documents containing images). Clicking the hyperlink “parent types” opens a selection window offering all valid parent type. The window also allows the condition to be applied to types in or out of the selected list.
Where message attachment size is The size of each attachment is evaluated after all unpacking, unzipping, etc. is complete. An attachment size can be larger than the size of the original message, due to decompression of archive files.
NoteThis condition can be useful to exclude images and other inclusions within Microsoft Word documents from quarantine Rules. For example,
When a message arrivesWhere message attachment is of type IMAGEAnd where attachment parent is not of type: DOC
See also the condition “Where attachment fingerprint is/is not known.”
Chapter 5 • Rulesets and Rules 53

Where number of recipients is count This condition is typically used to block messages with large recipient lists as suspected spam.
Where message contains one or more headers This condition can be used to check for the presence, absence, or content of any message header, including custom headers. It would typically be used to check for blank or missing headers.
Within the Header Match window, see above, click New to create a new header match using the Header Matching Wizard. See Chapter 14, “Header Matching and Rewriting,” for more information on this Wizard.
More than one header match can be used in a single condition; however all matches must be true for the condition to be true (logical ‘and’). To match any of several header conditions (logical ‘or’), include more than one Rule with one condition per Rule.
To edit any Header Match condition (or view its details), highlight it then click Edit to restart the Header Matching Wizard. To delete a Header Match condition, highlight it then click Delete.
NoteHeader Match conditions are only available within the Rule where they are created. To use the same condition in more than one Rule, create it in each Rule.
54 User Guide

Where number of attachments is count This condition is typically used to block messages with large numbers of attachments. (The number of attachments can be counted using top level attachments only, or top level attachments to email messages including any attached messages, or all attachments at all levels).
Note“Top level attachments” are the files explicitly attached by name to an email message. Other files, such as the contents of a zip archive or images within a Microsoft Word document, can be contained within the top-level attachments.
Chapter 5 • Rulesets and Rules 55

Where message is categorized asThis condition allows you to take action on messages that trigger a category script. Select one or more categories using the rule condition window.
NoteMailMarshal Exchange uses this condition to apply SpamCensor. MailMarshal Exchange can automatically download updates to the SpamCensor category. For more information, see “Spam Updates” on page 152.
56 User Guide

If a category includes multiple types (sub-categories), you can choose to include or exclude sub-types. To make a condition based on types, select (highlight) the parent item in the category list, check the associated box, select Filter by type, then select one or more items from the type list.
You can also choose to exclude subtypes by clicking the option Where type is ANY except.
Where the attached image is/is not/may be inappropriateThis condition allows you to take action on a message based on the result of analysis of attached images by Image Analyzer (an optional component licensed separately).
MailMarshal passes the following types of files that it unpacks from a message to Image Analyzer for analysis:
• Files MailMarshal recognizes as IMAGE types
• Binary files of unknown type.
Image Analyzer actually scans files of the following types: BMP, DIB, JPEG, JPG, JPE, J2K, JBG, JPC, PNG, PBM, PGM, PPM, SR, RAS, TIFF, TIF, GIF, TGA, WMF, PGX, PNM, RAS. For more information see Marshal Knowledge Base article Q11622.
NoteIf the Filter by type box is disabled, no sub-categories are available for the category you have highlighted.
Notes• You cannot select this rule condition if Image Analyzer is not licensed.
• If the Image Analyzer license expires while this condition is selected, images will not be scanned by Image Analyzer. In this case the MailMarshal Engine log will show that Image Analyzer has not been used because it is not licensed.
Chapter 5 • Rulesets and Rules 57

In the rule condition window, shown below, select the detailed criteria for this condition.
The attached image is inappropriate: Specifies that the condition will trigger if Image Analyzer returned a score higher than the “inappropriate above” setting.
The attached image may be inappropriate:Specifies that the condition will trigger if Image Analyzer returned a score between the “appropriate below” and the “inappropriate above” setting.
The attached image is not inappropriate: Specifies that the condition will trigger if Image Analyzer returned a score below the “appropriate below” setting.
58 User Guide

Click Settings to open the Image Analysis Settings window. This window allows you to configure advanced settings for Image Analyzer.
You can choose from the following basic detection settings:
Normal: Specifies that the default Image Analyzer triggering levels should be used.
High: Specifies that high sensitivity Image Analyzer triggering levels should be used. This setting detects more objectionable content, but also produces more false positive results.
Chapter 5 • Rulesets and Rules 59

Custom: Allows you to set the Image Analyzer triggering levels using the slider controls, and to set advanced options using the controls in the Settings section.
Appropriate below:Specifies the maximum Image Analyzer return value that causes an image to be classified as “appropriate” (not likely to be pornographic). The default value is 49.
Inappropriate above:Specifies the minimum Image Analyzer return value that causes an image to be classified as “inappropriate” (likely to be pornographic). The default value (Normal mode) is 75.
You can further tune Image Analyzer with advanced options. The default settings in this section have been selected after extensive testing.
Enable Negative curvature checking: Specifies that the Image Analyzer engine will scan “negative curves.” This option should be selected if a low false positive rate is more important than letting some offensive images through. Defaults to selected in Normal mode, and not selected in High mode.
Edge sensitivity: Defines the value which tunes the Image Analyzer engine to detect edges in images. Defaults to 1 (low) in Normal mode. Edge detection is an important step in detecting objects within an image as it helps in the elimination of unwanted objects. Edge detection is used for identification of body parts from other objects in an image. Changing this parameter affects the detection of body parts within an image. Selecting a lower edge sensitivity setting makes the system prone to detecting non-body parts as body parts. Selecting a higher edge sensitivity setting makes the system detect objects it believes are more likely to be body parts.
60 User Guide

Curvature sensitivity: Defines the value which tunes the Image Analyzer engine to detect curvature radius within images. Defaults to 6 (Medium). All human body parts have curves. The curvature sensitivity is used for identification of body parts. If you lower this parameter, the system will detect curves with a smaller radius that may be out of the range of the curvature of human body parts. Likewise, if you increase this parameter, the system will detect curves with a larger radius that may also be out of this range.
Body size reduction:Defines the value which tunes the Image Analyzer engine to identify body parts in scale with the size of the image. Defaults to 1 (Small). This parameter eliminates body parts which are mathematically acceptable but not technically acceptable. Increasing this parameter causes more filtration to take place and will lead to larger objects being considered as body parts. Likewise, by decreasing this parameter, smaller objects will be considered as body parts. Increasing this setting to medium can increase the accuracy of detection in some environments but is not recommended as a default setting.
Rule Actions The following actions are available for selection Rules. Details of each action are given below.
• Copy the message
• BCC a copy of the message
• Run the external command
• Send a notification message
• Strip attachment
• Write log message(s)
• Stamp message with message stamp
• Rewrite message headers
Chapter 5 • Rulesets and Rules 61

• Add attachments to valid fingerprints list
• Move the message (terminal action)
• Park the message (terminal action)
• Delete the message (terminal action)
• Pass the message to Rule
If a terminal action is performed, no further Rules will be processed for the affected message.
When a new Rule is created, by default the following options are checked: send notification message, write log message, move the message (to a folder).
Copy the message Copy the email message file to the specified folder. To make the message processing log available in the same folder, check the box at the bottom of the window. The message log showing how the message was processed will then be available in the Console. If a new folder is required, click the New Folder button to start the New Folder Wizard. See Chapter 9, “Folders,” for more information.
BCC a copy of the message Send a blind copy of the message to one or more email addresses. These should be entered as complete SMTP addresses (in the form [email protected]), separated by semi-colons. The original message will not be modified in any way by this action, so the original recipient would not know a copy had been taken.
NoteYou can use this action in combination with “delete the message” to effectively forward messages to a different recipient.
62 User Guide

Run the external command Choose one or more commands to be run from the list of pre-defined external commands. See Chapter 8, “External Commands,” for information on defining external commands. To run the same application with different parameters under different conditions, use more than one external command definition.
Send a notification message Send one or more email messages based on the templates checked in the selection window. To view or edit the details of a particular template, select it then click Edit Template. To create a new template, click New Template; the new template will automatically be selected for use when you return to the template selection window. For further information on templates, see Chapter 10, “Email Templates.”
Strip attachment Where the Rule conditions are triggered by a specific attachment, remove this attachment from the message. This action would typically be used to remove attachments of specific file types or file names.
Write log message(s) Select one or more logging classifications from the list. Check the box to write a logging classification for every component of the message (that is, a separate record for each image file in a message). To view or edit the detailed information in the classification, click Edit in the selection window. To create a new classification, click New in the selection window. For details on classifications, see Chapter 12, “Logging Classifications.”
NoteWhen an attachment is stripped, normally the original message should be copied for later retrieval if necessary, and stamped to inform the recipient that an attachment has been stripped.
Chapter 5 • Rulesets and Rules 63

Stamp message with message stamp Choose one or more message stamps to be added to the message body. Stamps will be at the top or bottom of the message as selected when they were created. To view or edit the details of a particular message stamp, select it then click Edit Stamp. To create a new stamp, click New Stamp; the new message stamp will automatically be selected when you return to the stamp selection window. See Chapter 13, “Message Stamps,” for details.
Rewrite message headers This action can be used to modify, add, or delete almost any message header, including custom headers. It would typically be used to repair blank or missing headers, or to insert a notification into the subject.
Within the Header Rewrite window, see below, click New to create a new header rewrite rule using the Header Rewrite Wizard.
NoteBecause MailMarshal Exchange relies on Microsoft Exchange Server for email sending, routing of the current message cannot be altered through Header Rewrite. Routing changes (for instance, through changes to the field Envelope Recipient) are available in MailMarshal SMTP.
64 User Guide

See Chapter 14, “Header Matching and Rewriting,” for more information on this Wizard.
More than one Rewrite rule can be included in the same action. The order of application of the rules can be significant. Adjust the order by selecting a rule and using the up and down arrows in the Header Rewrite window.
Add attachments to valid fingerprints list Add the attachments to MailMarshal’s list of “valid fingerprints” (normally used for images or other files that require special treatment, such as company logos). Choose whether to add all attachments, or only images, to the list. See the Rule condition “Where attachment fingerprint is/is not known” for more information.
Move the message Move the email message file to the specified folder. To make the message processing log available in the same folder, check the box at the bottom of the window. The message log explaining how the message was processed will then be available in the Console. If a new folder is required, click the New Folder button to start the New Folder Wizard (see Chapter 9, “Folders,” for more information). This is a terminal action–no further Rules will be processed for a message if this action is performed.
Park the message Move the email message file to the specified parking folder for release according to the schedule associated with that Folder. If a new folder with a different schedule is required, click the New Folder button to start the New Folder Wizard (see Chapter 9, “Folders,” for more information). This is a terminal action–no further Rules will be processed for a message if this action is performed.
NoteHeader Rewrite rules are only available within the Rule where they are created. To perform the same action in more than one Rule, create it in each place.
Chapter 5 • Rulesets and Rules 65

Delete the message Delete the email message file. Do not send the message to its original destination. This is a terminal action–no further Rules will be processed for a message if this action is performed.
Pass the message to Rule If no “terminal” Rule action has been taken, this action allows a choice of which further Rules to apply.
Several choices are available, see above, including
• Skip the next Rule (do not apply it).
• Skip to the next Ruleset (do not apply further Rules in this Ruleset).
66 User Guide

• Skip all further Rules (pass the message through to the intended recipients).
• Skip to a particular Ruleset or Rule.
Note• It is only possible to skip to a Rule that is evaluated after the current Rule. (The
order of evaluation can be changed; see“Order of Evaluation” on page 39.)
• When skipping to a Rule in a different Ruleset, remember that the parent Ruleset conditions can prevent its having any effect. For instance, skipping from MailMarshal’s default Inbound Ruleset to the Outbound Ruleset is allowed, but Rules in the Outbound Ruleset will have no effect on inbound messages.
Chapter 5 • Rulesets and Rules 67

68 User Guide

Chapter 6
User Groups
MailMarshal User Groups are used within Rulesets and Rules to specify to whom the Rules apply. User Groups contain lists of email addresses and/or domains (wildcards can be used). User Groups can be created and populated within MailMarshal by entering email addresses manually. User Groups can also be imported from an LDAP server (such as Microsoft Exchange or Lotus Notes), in which case their membership is updated automatically on a defined schedule.
To create and maintain User Groups, in the Configurator, expand the element User Groups.
To Create a New Standard User Group Click the New User Group icon in the toolbar to open the New User Group window. Enter a name for the User Group.
NoteActive Directory groups and users can also be used directly within Rulesets and Rules. It is not necessary to import Active Directory entries before using them. See “Creating a Ruleset” on page 34.
Chapter 6 • User Groups 69

To Add Members to a Standard User Group Select the appropriate User Group from the right pane of the Configurator. Click the New Member icon in the toolbar to open the Insert into User Group window.
Enter an individual SMTP address, a wildcarded address, or a domain name in the box. (The available wildcards are the same as those used for local domain names–for details, see “Wildcards” on page 147.) Click Add or use the <Enter> key to add the value. The window remains open and additional values can be added. If an individual address was entered, the domain name portion of the address is retained and only the new user name need be entered.
To Add an LDAP User Group LDAP user groups are used in the same way as standard MailMarshal user groups. However, MailMarshal populates an LDAP group by retrieving a list of members from an LDAP server, such as Lotus Notes. The membership of LDAP groups is automatically updated on the schedule specified in the LDAP connection window.
To work with LDAP User Groups, you must configure at least one LDAP User Group Connection (see Chapter 15, “LDAP Connections”).
NoteActive Directory Server users and groups can be selected from the User Matching screen of the Ruleset and Rule Wizards. No prior setup is required.
70 User Guide

Click the Add LDAP User Group icon, or right-click User Groups in the tree then click New, then select the LDAP user group.
Select the LDAP connection to be worked with from the menu and click OK. If no entries appear in the menu, no LDAP user group connections have been configured.
MailMarshal will then query the server for a list of available user groups, and display the results in a list.
If MailMarshal is unable to connect to the server no groups will be shown. Select an LDAP group from the list. This group will appear in the list of User Groups. The group name will consist of the LDAP Connection name and the group name as retrieved from the server. Repeat this action to add other user groups. When done, click OK.
Chapter 6 • User Groups 71

Initially, an LDAP group will be empty of users; it will be populated at the next scheduled update. An LDAP user group can immediately be specified in any MailMarshal rules; however, such rules should not be made effective (that is, the server should not be reloaded) until the group has been populated.
To Move and Copy User Groups To copy a User Group, right-click it in the Configurator. To make a copy, choose Duplicate from the context menu.
To move a User Group so that it is included within another User Group, drag it over the target Group.
To copy a User Group so that it is included within another User Group, hold down the <CTRL> key while dragging.
NoteAlthough MailMarshal does not prohibit adding and deleting members from LDAP groups, such changes will not be sent to the LDAP server, and they will be lost during the next scheduled update from the LDAP server. Any changes to membership of these groups must be made at the LDAP server.
72 User Guide

Chapter 7
Virus Scanners
MailMarshal is not a traditional virus scanner; however MailMarshal does provide substantial proactive protection against viruses through file name and file type checking, as well as TextCensor scanning for virus-related text and harmful commands.
MailMarshal can also invoke third-party virus scanners to check email messages and attachments for viruses. Nearly all MailMarshal installations use third-party virus scanning.
MailMarshal allows you to use one or more virus scanners to check email for viruses. Because virus scanners have differing architecture, some organizations choose to use multiple scanners.
MailMarshal invokes the virus scanner after unpacking all elements of an email message. MailMarshal then passes the elements to the scanner software for analysis, and takes action based on the code returned from the scanner.
A sample virus scanning rule is include in the MailMarshal default Rules. It can be modified to suit local conditions. For details on configuring virus scanning see Chapter 5, “Rulesets and Rules.”.
NotesAnti-spyware scanning (PestPatrol for Marshal and CounterSpy for Marshal) can also be implemented using the same methods. For more information about the value of anti-spyware scanning, see “Anti-Spyware Scanners” on page 196.
Chapter 7 • Virus Scanners 73

To work with MailMarshal Exchange, an antivirus product must offer a command-line interface or be supported by a custom MailMarshal Exchange DLL. The scanner must return a documented response indicating whether or not a virus is detected. Most commercially available virus scanners meet these specifications. For more information about supported antivirus products, see Marshal Knowledge Base article Q10923.
Each virus scanner to be used should be installed on the MailMarshal Server computer according to the manufacturer’s instructions.
To allow MailMarshal Exchange to use your antivirus product to scan email for viruses, first exclude specific MailMarshal Exchange folders from virus scanning. The MailMarshal Exchange Engine service does not run if an antivirus product scans these folders. Then, you must configure MailMarshal Exchange to use the antivirus product you installed.
NoteDLL based scanners are significantly faster than command line scanners, because the scanner is always memory resident. Marshal recommends the use of DLL scanners for sites with high message traffic.
NoteMcAfee for Marshal requires installation of the McAfee for Marshal Console, available in a separate download from Marshal.
This interface is enabled through a special MailMarshal product key. MailMarshal trial keys have this feature enabled. Permanent keys for McAfee for Marshal are available from Marshal suppliers.
NoteThe discussion in this section also applies to Anti-spyware scanning products (PestPatrol for Marshal and CounterSpy for Marshal). For more information about the value of anti-spyware scanning, see “Anti-Spyware Scanners” on page 196.
74 User Guide

Excluding Working Folders From Virus ScanningNetwork servers are usually protected by virus scanning packages to search disk directories for contaminated files, particularly newly-created or imported files.
However, you must ensure that certain directories, which are used by MailMarshal to process and quarantine infected email messages, are excluded from any existing resident or “on-access” anti-virus scanning. These include the Incoming, Explode (MMEExp), and Rulesets directories.
By default new MailMarshal installations create all of these directories within the MailMarshal install directory. If the locations are changed then virus scanning exclusions must be changed to reflect the new locations. The locations of these directories can be verified from the Advanced tab of Server Properties.
MailMarshal checks for resident file scanning by attempting to write the standard test virus file eicar.com (not a real virus) in each of the directories that must be excluded from scanning. If any of these files are removed or cleaned by a resident scanner, or MailMarshal is denied access to the files, the MailMarshal engine will not start and the email administrator will be notified.
If the check succeeds, MailMarshal deletes the eicar.com files (except for one copy left in MMEExp\avcheck.)
Please refer to the virus scanner manufacturer’s documentation for information on excluding directories from on-access scanning (for example, in Networks Associates NetShield, exclusions are set via the Exclusions tab in Scan Properties). If the virus scanner does not have the facility to exclude the appropriate directories, on-access scanning must be disabled completely.
NoteEarlier versions of MailMarshal placed the default Explode directory in the root of the system drive (for instance C:\MMEExp). This location will not be changed during product upgrade, but can be changed from the Advanced tab of Server Properties.
Chapter 7 • Virus Scanners 75

Details of Excluded Directories • Incoming: MailMarshal places received email in this directory before processing it.
• Explode (MMEExp): MailMarshal copies files to the Explode directory and invokes virus scanners explicitly to check for viruses. If a resident virus scanner found and cleaned a file here, MailMarshal's virus scanning might then determine the file to be clean. MailMarshal would then pass the original message through with the virus still present.
• Rulesets: Folders within the Rulesets directory are used to store messages, including those “quarantined” by virus scanning rule actions.
Configuring MailMarshal Exchange to Use an Antivirus Product
To configure virus scanning in MailMarshal:
1. Ensure you have installed one or more supported virus scanners on the MailMarshal Exchange Server computer, following the manufacturer's instructions. If your antivirus scanner supports remote access, you can install the scanner in a central location to support several email processing servers.
2. Ensure the scanner does not perform on-demand scanning of the MailMarshal Exchange excluded folders. For more information, see “Excluding Working Folders From Virus Scanning” on page 75.
3. Open the MailMarshal Exchange Configurator.
4. In the left pane of the Configurator, expand MailMarshal Configurator > Policy Elements, and select Virus Scanners.
5. On the Action menu, choose New Virus Scanner.
6. On the Welcome window, click Next.
7. On the Select a Virus Scanner window, select your antivirus scanner from the list.
76 User Guide

8. If you are configuring a command line scanner, on the Configure Virus Scanner Path window, specify or browse to identify the location of the antivirus scanner program, such as c:\McAfee\Scan.exe.
9. If the scanner is installed remotely, on the Configure Virus Scanner Location window enter the server name or IP address and port where the scanner can be accessed.
10. If your scanner is not in the list, select Custom Scanner. Specify the details of your antivirus software, and then, click Next. For more information about required values in the fields, see Help.
11. On the Completing window of the Wizard, click Finish to add the virus scanner. MailMarshal Exchange will test the action of the scanner.
If you plan to use more than one virus scanner, repeat Steps 5 through 11 for each scanner.
Best Practices Marshal recommends the following basic practices to ensure security with respect to viruses and virus scanning:
• Block messages and attachments that MailMarshal cannot scan, such as password protected attachments and encrypted attachments (for instance, files of type ‘Encrypted Word Document’).
• Block encrypted messages that MailMarshal cannot decrypt, such as PGP and S/MIME messages.
Chapter 7 • Virus Scanners 77

• Block executable and script files by type and name. This helps to ensure that unknown viruses will not be passed through.
• Subscribe to email notification lists for virus outbreaks (such lists are offered by many anti-virus software companies). When an outbreak occurs, block the offending messages by subject line or other identifying features.
Viewing Virus Scanner Properties Double click the name of any virus scanner in the right pane to review and change MailMarshal’s configuration information for that scanner.
For most DLL based scanners no configuration is required or available.
For command line scanners, you can review and change the following information:
The Name is the reference for this scanner within MailMarshal Exchange. The Command Line refers to the location of the executable file. The Parameters field allows you to enter any necessary additional command line parameters to ensure operation compatible with MailMarshal Exchange.
The Timeout values indicate how long MailMarshal Exchange will wait for the scanner to complete its task. The default values are generous. If you find that the virus scanner is timing out (indicated in the Engine text log file), you can adjust these values. However, repeated timeouts probably indicate a need for greater system resources.
NoteIf resident or “on access” virus scanning is enabled, MailMarshal’s working folders must be excluded from scanning. See “Excluding Working Folders From Virus Scanning” on page 75.
78 User Guide

The checkbox Single Thread indicates whether the scanner must operate on one message at a time, or can be invoked multiple times. Command line scanners will generally require this box to be checked.
The two remaining fields are used to enter trigger values which specify the meaning of the code returned from the virus scanner.
• Command is triggered if return code is: Enter values used by the scanner to indicate the presence of a virus or errors encountered scanning the file. When the scanner returns one of these values, the MailMarshal Rule condition is triggered.
• Command is not triggered if return code is: Enter values used by the scanner to indicate a clean file with no virus or malware. When the scanner returns one of these values, the MailMarshal Rule condition is NOT triggered.
If the code returned matches neither field, the associated email message is moved to the “Undetermined” dead letter folder and an email notification is sent to the MailMarshal administrator.
Chapter 7 • Virus Scanners 79

Entries in both fields can be exact numeric values, ranges of values (such as 2-4), greater than or less than values (such as <5, >10). More than one expression can be entered in each field, separated by commas (such as 1-6,8,>10). Consult the virus scanner documentation for details on return codes.
Using Other Virus Scanners Most commercial virus scanners can be used with MailMarshal. Generally, the following considerations apply when using an alternative virus scanner.
Verify that a Windows Server compatible version is available. The product must have a command line interface and must be capable of running silently in the background.
When entering the virus scanner information in the New Virus Scanner Wizard, choose Custom Scanner. Enter the path to the executable file and the parameters for silent operation. In the Parameters box, use the string “{CmdFileName}” (including the quotation marks) to indicate to the scanner software which folders it is to scan. Review the parameter syntax for a pre-configured scanner to understand the use of this entry.
Testing Virus Scanners You can test scanner installation with a local file. You can also test email scanning rules.
To check the result when a scanner finds a virus, use the standard test file eicar.com (this is not a real virus, but will cause scanners to trigger).
NoteBefore entering new values for scanner parameters in MailMarshal Exchange, test the scanner from the command line using the new parameters. If MailMarshal Exchange invokes a scanner with invalid parameters, the result can cause all messages to be treated as infected.
80 User Guide

To test installed virus scanners:
1. In the left pane of the Configurator, select Virus Scanners.
2. Click the Test Virus Scanners icon in the toolbar.
3. Select a file to use for the test. If you want to use the standard test file eicar.com, you can find a copy in the avcheck folder in the MailMarshal Exchange installation folders. For a new installation, by default this folder is: C:\Program Files\Marshal\MailMarshal Exchange\MMEExp\avcheck
4. Click Open to start the test.
To test virus scanning rules:
If MailMarshal virus scanning rules are enabled, you can check scanning by sending a test virus in an email message.
• To test outbound scanning, attach the eicar.com file to an email message and send it through MailMarshal Exchange to an external test email account. If the virus scanner and scanning Rule are correctly configured to stop outbound viruses, your MailMarshal Exchange installation should take action on the message.
• To test inbound scanning, use the automated email test service from Marshal.
Send an email message to [email protected] to get information about how to receive a message containing the file eicar.com
Chapter 7 • Virus Scanners 81

82 User Guide

Chapter 8
External Commands
An external command is a custom executable or batch file that can be run by MailMarshal. The command can be used to check email messages for a condition, or to perform an action when a message meets some other condition. MailMarshal is provided with an external command for message release, and some other suggested uses are given in this chapter.
In order for an external command to be used to check for a condition, the command must return a standard return code.
Chapter 8 • External Commands 83
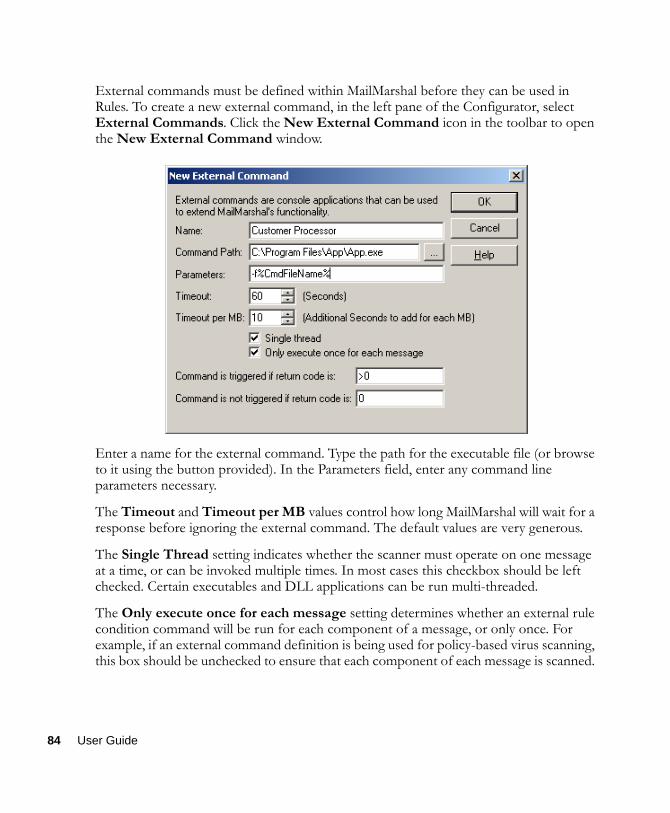
External commands must be defined within MailMarshal before they can be used in Rules. To create a new external command, in the left pane of the Configurator, select External Commands. Click the New External Command icon in the toolbar to open the New External Command window.
Enter a name for the external command. Type the path for the executable file (or browse to it using the button provided). In the Parameters field, enter any command line parameters necessary.
The Timeout and Timeout per MB values control how long MailMarshal will wait for a response before ignoring the external command. The default values are very generous.
The Single Thread setting indicates whether the scanner must operate on one message at a time, or can be invoked multiple times. In most cases this checkbox should be left checked. Certain executables and DLL applications can be run multi-threaded.
The Only execute once for each message setting determines whether an external rule condition command will be run for each component of a message, or only once. For example, if an external command definition is being used for policy-based virus scanning, this box should be unchecked to ensure that each component of each message is scanned.
84 User Guide

Where the external command will be used as a Rule condition, set the trigger return code information. This information should be specified in the documentation of the executable.
Two fields are used to enter trigger values that further specify the meaning of the code returned from the virus scanner.
• If the code returned matches any value entered in the field Command is triggered if return code is, MailMarshal will consider the condition to be satisfied.
• If the code returned matches any value entered in the field Command is not triggered if return code is, MailMarshal will consider the condition not to be satisfied.
• If the code returned matches neither field, the file is moved to the Undetermined deadletter folder and an email notification is sent to the MailMarshal administrator.
Entries in both fields can be exact numeric values, ranges of values (such as 2-4), greater than or less than values (such as <5, >10). More than one expression can be entered in each field, separated by commas (such as 1,4,5,>10).
Uses of External Commands Custom executables or batch files can be used with the Rule condition Where message triggers an external command. For instance, fgrep.exe can be used for advanced expression matching.
Custom executables can also be used with the Rule action Run the external command. For instance, a particular email subject line might invoke a batch file to start or stop a system service, or to send a page or network notification to an administrator.
Chapter 8 • External Commands 85
Message Release MailMarshal is provided with a pre-configured external command, MMReleaseMessage.exe This command allows email users to release selected messages from MailMarshal folders. (Messages can also be released using the MailMarshal Console.)
To Use Message Release 1. Create or modify a Mail Marshal Rule that moves certain messages to a Folder.
2. In this Rule, include a Rule Action that sends a Notification message. The body of this message must contain the variable {ReleaseProcessRemaining} or {ReleasePassThrough}. These variables allow a choice of release actions; see “Processing a Message” on page 182 for details. MailMarshal includes a pre-configured template, Automatic Message Release Outbound, which includes the {ReleaseProcessRemaining} variable.
3. To process message release requests, create a MailMarshal Rule similar to the following:
When a message arrivesWhere addressed to [email protected] the external command Message ReleaseAnd write log message(s) with Release RequestsAnd delete the message
(The logging classification “Release Requests” is pre-configured.)
Automatic Message Release should be used sparingly as it tends to defeat MailMarshal's purpose. The {ReleaseProcessRemaining} variable is preferred because it forces all messages to be evaluated against all Rules.
NoteThe From address must be one that guarantees that replies will pass through MailMarshal. Do not use a local domain address if you plan to process requests from internal users. The address need not be valid but it must be well-formed. For instance, the template Automatic Message Release Outbound uses a From address of [email protected]
86 User Guide

Message Release OptionsThe Message Release external command has the following syntax:
MMReleaseMessage [-r recipient] [-l] {MessageName}
To use the options, edit the external command definition. In the properties, change the parameters field to include the required options.
-l leave message in folder-r send only to named recipient
By default the Message Release executable releases the message to all recipients and deletes the message after releasing it. Using these options can result in a message being sent to a user more than once. You can use two parameters to modify release behavior:
To leave a copy of the message on the server after releasing it, change the parameters field to include -l {MessageName} (the parameter is a lower case letter L).
You can also configure the message release facility to release the message only to the user requesting it. Typically you would use this option in the case of incoming messages addressed to more than one user. To implement this function, change the parameters field to include -r {From}. The message will be released only to the email address from which the request was sent. This need not be one of the original recipients. The message will be left on the server and can be released again.
Note{MessageName} is a MailMarshal variable. The braces are part of the variable syntax. You must include this literal string in the command parameters.
NoteYou can set up Message Release to generate a notification on failure, by running the command as a condition rather than an action. The Message Release external command returns 0 on success and 1 on failure.
Chapter 8 • External Commands 87

88 User Guide
Chapter 9
Folders
MailMarshal uses folders for several purposes related to rule processing.
An email message that triggers a rule can be copied or moved to a folder. This action is commonly taken for messages that are suspected of containing viruses, but can also be used for archival or other purposes.
An outgoing email message can be “parked” to a folder for scheduled later delivery.
An email message that cannot be processed (due to addressing or structure problems) will be placed in a subfolder of the dead letter folder.
To work with folders, select Folders in the left pane of the Configurator.
Creating a New Folder To create a new folder, click the New Folder icon in the toolbar to start the New Folder Wizard. On the first page of the Wizard, choose whether the folder is to be a Standard or a Parking folder. On the next page of the Wizard, give the folder a name. Further options depend on whether the folder is a Standard or a Parking folder.
Chapter 9 • Folders 89

Standard Folders A time limit can be set for message retention in the folder. This option is typically used for “quarantine” folders where the message can be released on request from the user to an administrator. Messages will be deleted automatically after the set time.
Subdirectories can be created periodically within the folder. This option is typically used where a substantial volume of email is expected, so that messages are easier to find.
Check the box Folder is used for message archiving to create an Archive folder. Within the MailMarshal Console, messages in Archive folders are assumed to be “stored”: they can be viewed and forwarded but not deleted. Messages in other Standard folders are assumed to be “in process” and they can be reprocessed or deleted, among other actions. See Chapter 18, “The Console” for further information.
Click Finish to create the folder, or Cancel to lose any changes.
90 User Guide

Parking Folders When a Rule moves a message to this type of folder, it will be “parked” if the time is within the blue schedule block and released (or sent immediately) when the time is outside the blue schedule block.
Use the checkbox Continue processing rules on release to determine what happens to parked messages when they are released from this Folder for delivery. If the box is checked, the message will be evaluated against all rules after the Rule that placed the message in this Folder.
Alter the schedule block if desired:
• Drag using the left mouse button to add to the blue “parking” area.
• Drag using the right mouse button to erase from the blue “parking” area.
Chapter 9 • Folders 91

• To reset the schedule to the default time block, click Set Default Schedule.
• Choose to “snap” the schedule times to the nearest full, half or quarter hour using the drop down box.
Click Finish to create the folder, or Cancel to lose any changes.
Editing an Existing Folder To edit the properties of an existing Folder, double-click its name in the right hand pane of the Configurator. Make any required changes, then click OK.
Changing the Default Folder Location The default location for message folders is the Rulesets subfolder of the MailMarshal install directory. The base physical path for all folders can be changed to any location on a local drive. Please see “Change Folder Locations” on page 157 for details.
Folder Security Permission to use the MailMarshal Console (to view and take action on messages in folders) is controlled by setting user permissions on the MailMarshal.key file. See “Console Security Issues” on page 179.
NoteIf the folder physical path is changed, any messages in the old location must be moved manually to the new location.
92 User Guide

In some cases it is desirable to set different access permissions for different folders (for instance, if archived messages are to be available to the users who sent them). Detailed control of these permissions can be achieved using standard Windows security procedures for the physical folder.
Chapter 9 • Folders 93

94 User Guide

Chapter 10
Email Templates
Email Templates allow notification email messages to be sent based on the outcome of Rule processing. This facility is most often used to notify appropriate parties when a message is blocked.
Notifications are a very powerful tool to inform and modify user behavior. When well thought out and constructed, they can substantially reduce time spent on administration of email.
Notifications can also be used as a general autoresponder based on message headers or content. For instance, a message to [email protected] with the subject “Send Catalog” might trigger a rule returning the product catalog to the sender as an email attachment.
The same Rule outcome can send several notification messages. For instance, if a virus is detected the email administrator, external sender, and intended internal recipient of the message might each receive a different message.
Attachments can be included with a notification. Attachments can include the original message, the MailMarshal processing log for the message, and any other file (such as a virus scanner log file).
To work with Templates, select Email Templates in the left pane of the Configurator.
MailMarshal is provided with numerous templates by default. These are a good source of ideas for the creation of new templates.
Chapter 10 • Email Templates 95

Creating an Email Template Click the New Template icon in the toolbar to open the New Email Template window.
Give the Template a name.
MailMarshal allows variable information to be inserted into the message headers and body from the original email (which triggered a Rule, invoking this Template). Variables are enclosed within braces { }. To see a list of variables available in any field, type { to open a context menu. See also “Variables” on page 98.
NotePrevious versions of MailMarshal used percent signs % % to enclose variables. This syntax is no longer supported. When you upgrade MailMarshal Exchange, existing references are updated.
96 User Guide

Enter appropriate information in the Header Details section. For instance, enter the email address to which replies should be sent in the Return Path field.
To attach the original message, the MailMarshal message processing log, or another file to the notification, check the appropriate box and enter the file name if necessary.
Enter an appropriate message in the Message Body field. Variables marked with braces { } can be used. Variables can be nested and Windows environment variables can be included using the variable {env=}
A file can be included in the body of a notification message using the variable {file=filepath}
Duplicating an Email Template To copy a Template, right-click it in the Configurator. Choose Duplicate from the context menu. After duplicating the Template, make any required changes to the copy.
Editing an Email Template To edit a Template, double-click on its name in the right hand pane of the Configurator. Make the required changes then click OK.
Deleting an Email Template To delete a Template, select it in the right hand pane of the Configurator then click the Delete icon in the toolbar.
NoteWhen sending a notification to the original sender of an email message, use the {ReturnPath} variable in the To: field to reduce the chance of looped messages.
Chapter 10 • Email Templates 97

VariablesVariables are available for use in email templates, logging classifications, and message stamps.
The following table lists commonly used variables and the information provided.
NoteNot all variables are available in all contexts. For instance, the virus scanner variables are populated when a virus scan rule runs. If no information is available to substitute, a variable may return no text or may show the variable name.
Variable Data inserted
{Administrator} Email address of the administrator as set in the Configuration Wizard and accessible from the General tab of the Server Properties window.
{Date} The current date. For more information, see “Date Formatting” on page 100.
{Errorlevel} The last error returned by a virus scanner or an external command.
{ExternalCommand} The name of the last External Command used.
{Env=varname} Inserts the value of a Windows environment variable.
{ExternalSender} Returns 'External' or 'Internal' depending on whether the sender was outside or inside the local domains.
{File=fullpath} Inserts a text file within the body of a message (for instance, can be used to insert the MailMarshal Exchange log for a message in a notification email body).
{FormattedRecipients} The recipients of the message, listed in the To: or CC: fields.
{From} Email address in the 'From' field of the message.
98 User Guide

{Hostname} The host name of the server.
{If variable}...[{else}...]{endif} Allows conditional substitution of text. The condition is true if the variable is not empty. For example: {If VirusName}This message contained the virus {VirusName}.{endif}
The Else clause is optional.
{Install} The install location of MailMarshal Exchange.
{LastAttemptDate} The date and time of the most recent attempt to deliver the message.
{LastTextCensorRuleTriggered} The name of the TextCensor Script that was run and the phrase that triggered.
{Message-ID} The original Exchange ID of the message
{MessageFullName} Full path to the message file.
{MessageName} Filename only of the message.
{Recipient} Message recipient. Includes multiple recipients and CC recipients.
{ReleasePassThrough} Inserts a code recognized by MailMarshal Exchange to release the message applying no further rules. See “Message Release” on page 86.
{ReleaseProcessRemaining} Inserts a code recognized by the gateway to release the message applying any additional applicable rules. See “Message Release” on page 86.
{ReplyTo} Email address in the 'Reply to' field of the message.
{ReturnPath} SMTP “Mail From” email address.
{RuleTitle} The title of the rule triggered by the message.
{RuleSetTitle} The title of the ruleset triggered by the message.
Variable Data inserted
Chapter 10 • Email Templates 99

Date FormattingWhen you use dates in variables, you can include formatted dates. This feature is especially useful to avoid confusion about the order of day, month, and year in dates.
{Sender} Email address of the sender. Uses the address in the “From” field unless it is empty, in which case the “Reply to” address is used.
{SenderIP} IP address of the sender.
{ServerAddress} Email address used as the 'From' address for notifications as set in the Configuration Wizard and accessible from the General tab of the Server Properties window.
{SpamCensorResult} The result string as returned by the SpamCensor facility.
{StrippedFiles} The names of any attachment files stripped from the message by rule action.
{Subject} The message subject.
{ThreadWorking} The MailMarshal Exchange working folder name.
{Time} The current time. For more information, see “Date Formatting” on page 100.
{VirusName} Name of the virus detected. This information is only available if the virus scanner being used is a DLL based scanner. If a command line scanner reports a virus this variable is set to “Unknown.”
{VirusScanner} Name of the virus scanner used.
Variable Data inserted
100 User Guide

To use date formatting, include the template variable {date=%%var} where var is one of the sub-variables from the table below. You can include more than one sub-variable within the same date variable. For instance {date=%%d %%b %%Y} would return 07 Apr 2004.
The following table lists the available date formatting sub-variables:
NoteEach sub-variable must be preceded by %%. For example, to ensure that the date is formatted according to the Windows locale, use {date=%%c}.
Variable Value inserted
a Abbreviated weekday name
A Full weekday name
b Abbreviated month name
B Full month name
c Date and time representation appropriate for locale
d Day of month as decimal number (01–31)
H Hour in 24-hour format (00–23)
I Hour in 12-hour format (01–12)
j Day of year as decimal number (001–366)
m Month as decimal number (01–12)
M Minute as decimal number (00–59)
p Current locale's A.M./P.M. indicator for 12-hour clock
S Second as decimal number (00–59)
U Week of year as decimal number, with Sunday as first day of week (00–53)
w Weekday as decimal number (0–6; Sunday is 0)
W Week of year as decimal number, with Monday as first day of week (00–53)
Chapter 10 • Email Templates 101

x Date representation for current locale
X Time representation for current locale
y Year without century, as decimal number (00–99)
Y Year with century, as decimal number
z Time-zone name or abbreviation; no characters if time zone is unknown
Variable Value inserted
102 User Guide

Chapter 11
TextCensor Scripts
TextCensor scripts are used to check for the presence of particular lexical content in an email message. The check can include all parts of the message, including the message headers, message body, and any attachments that can be lexically scanned. It can also be limited to one or more of these areas.
A script can include many conditions based on text combined with Boolean and proximity operators. Triggering of the script is based on the weighted result of all conditions.
TextCensor scripts are invoked by Standard Rules.
To work with TextCensor Scripts, select TextCensor Scripts in the left pane of the Configurator.
Chapter 11 • TextCensor Scripts 103

TextCensor Syntax TextCensor scripts contain one or more lines, each consisting of a word or phrase.
• The wildcard character * can be used at the end of a word only (for instance, “be*” matches “being” and “behave”).
• Parentheses should be used to set the order of evaluation and for grouping.
• Each line can include Boolean and proximity operators. The operators must be entered in capital letters. The six supported operators are:
When you use NEAR and FOLLOWEDBY, a “word” is defined as any group of one or more contiguous alphanumeric characters, bounded at each end by non-alphanumeric characters. If any non-alphanumeric characters have been included as “special characters”, each single special character is also counted as a “word”.
Operator Function Example
AND Matches when all terms are present Dog AND cat
OR Matches when any term is present dog OR catdog OR (cat AND rat)
NOT Logical negation of terms; use after other operators; means “anything else but.”
Dog AND NOT catDog FOLLOWEDBY (NOT house)
NEAR Matches when two terms are found within the specified number of words of each other. The default is 5.
Dog NEAR=2 bone
FOLLOWEDBY Matches when one term follows another within the specified number of words. The default is 5.
Dog FOLLOWEDBY=2 house
INSTANCES Matches when a term is found the specified number of times. You must specify a value.
Dog INSTANCES=3
104 User Guide

For instance, by default “S-P-A-M” counts as four words. If the “-” character is entered as a “special character,” then the same text counts as 7 words.
Weighting the Script Each script is given a trigger level, expressed as a number. If the total score of the content being checked reaches or exceeds this level, the script is triggered. The total score is determined by summing the scores resulting from evaluation of the individual lines of the script.
NoteThe INSTANCES operator is provided for compatibility with earlier TextCensor scripts, but its use is discouraged. The use of appropriate weighting (see below) will produce the same result with improved performance.
NoteThe script will be applied separately to each part of a message. For instance, if both Headers and Message Body are selected for evaluation, the script will be evaluated once for the headers, then again for the body. Script triggering is not cumulative over the parts.
Chapter 11 • TextCensor Scripts 105

Each line in a script must be given a positive or negative weighting level and a weighting type. The type determines how the weighting level of the line is figured into the total score of the script. There are four weighting types:
Negative weighting levels and trigger levels can be used to allow for the number of times a word can appear in an inoffensive message. For instance: if “breast” is given a positive weighting in an “offensive words” script, “cancer” could be assigned a negative weighting (since the presence of this word suggests the use of “breast” is medical/descriptive).
Weighting Type
Description Details
Standard Each match of the words or phrases will add the weighting value to the total.
If the weighting level of this item is 5, every match will add 5 to the total.
Decreasing Each match of the words or phrases will add a decreasing (logarithmic) weighting value to the total. Each additional match is less significant than the one before.
If the weighting level of this item is 5, the first five matches will add 5, 4, 4, 3, and 3 to the total.
Increasing Each match of the words or phrases will add an increasing (exponential) weighting value to the total. Each additional match is more significant than the one before.
If the weighting level of this item is 5, the first five matches will add 5, 5, 6, 6, and 7 to the total.
Once Only Only the first match of the words or phrases will add the weighting value to the total.
If the weighting level of this item is 5, this item will contribute at most 5 to the total, no matter how many times it matches.
NoteBecause script evaluation stops when the trigger level is reached, items with negative weighting should be evaluated first. Use the Sort List button to set the order of evaluation correctly.
106 User Guide

Adding a TextCensor Script Click the New TextCensor Script icon in the toolbar to open the New TextCensor Script window. Give the script a name. Check the various boxes to select which portions of an email message will be scanned by this script.
By default only alphanumeric characters can be entered in TextCensor items. If any non-alphanumeric characters are required, click on the checkbox to enable matching for special characters and enter any special characters to be matched. For instance, to match the HTML tag fragment “<script” you must enter the < in this field. To match parentheses ( ) you must enter them in this field.
NoteThe script will be applied separately to each part. For instance, if both Headers and Message Body are selected, the script will be evaluated once for the headers, then again for the body. Script triggering is not cumulative over the parts.
Chapter 11 • TextCensor Scripts 107

Click on New to open the New TextCensor Item window.
Select a weighting level and type for this item (see “Weighting the Script” on page 105 for more information)
Enter the item, optionally using the operators described earlier in this section, such as
(Dog FOLLOWEDBY hous*) AND NOT cat
In this example the item weighting will be added to the script total if the scanned text contains the words “dog house” (or “dog houses”, etc.) in order, and does not contain the word “cat”
NoteTextCensor items are case insensitive by default. However, quoted content is case sensitive. For instance, “textcensor” would not trigger on the title of this chapter.
108 User Guide

Click Add (or press <Enter>) to add the item to this script. The window box remains open and additional items can be created. When all items have been entered, click Close to return to the New TextCensor Script window.
Select a Weighting Trigger Level. If the total score of the script reaches or exceeds this level, the script will be triggered. The total score is determined by evaluation of the individual lines of the script.
Click Sort List to set the order of evaluation. Items with negative weighting levels will be set to evaluate first.
Editing a TextCensor Script Double-click the script to be edited in the right pane to open the Edit TextCensor Script window.
A line can be edited by double-clicking on it or deleted by selecting it then clicking Delete.
The script name, parts of the message tested, special characters, and weighting trigger level can be changed. Use the Sort List button if necessary to adjust the order of items.
Click OK to accept changes or Cancel to revert to the stored script.
Duplicating a TextCensor Script To copy a TextCensor Script, right-click it in the Configurator. Choose Duplicate from the context menu. After duplicating the Script, make any required changes to the copy.
NoteBecause evaluation of a Script stops when the trigger level is first reached, setting evaluation order is important.
Chapter 11 • TextCensor Scripts 109

Importing a TextCensor Script TextCensor Scripts can be imported from CSV (comma separated) files.
Click the New TextCensor Script icon in the toolbar. Click Import.
Choose the file to be imported, and click Open. In the Edit TextCensor Script window, click OK.
Exporting a TextCensor Script TextCensor Scripts can be exported to CSV (comma separated) files.
Double-click the script to be exported in the right pane to open the Edit TextCensor Script window.
Click Export. Enter the name of the file to which the script should be exported, and click Save.
In the Edit TextCensor Script window, click OK.
NoteTextCensor Scripts exported from MailMarshal 4.2.5 and earlier versions do not include the Weighting Trigger Level, Special Characters, and Apply to following parts settings. When importing such a script, this information must be added manually.
110 User Guide
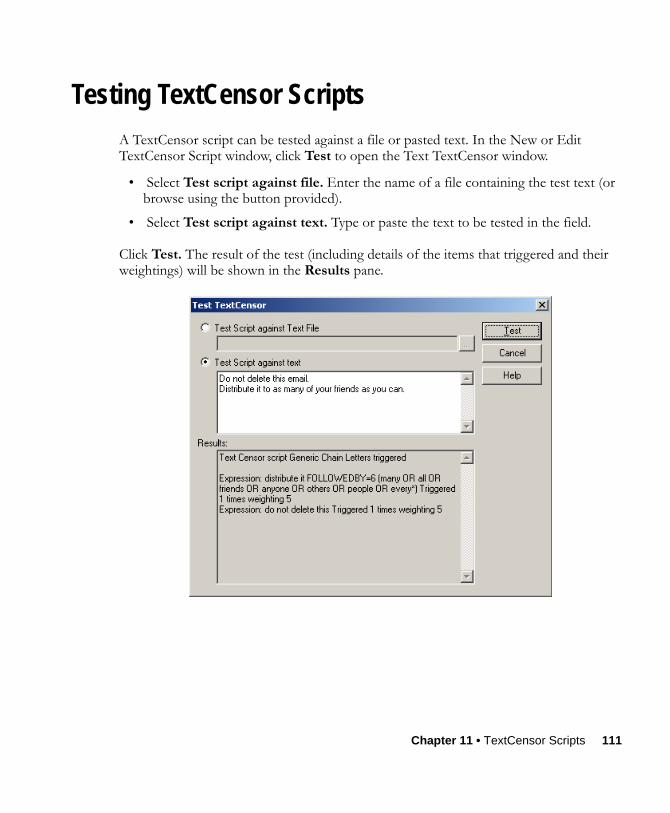
Testing TextCensor Scripts A TextCensor script can be tested against a file or pasted text. In the New or Edit TextCensor Script window, click Test to open the Text TextCensor window.
• Select Test script against file. Enter the name of a file containing the test text (or browse using the button provided).
• Select Test script against text. Type or paste the text to be tested in the field.
Click Test. The result of the test (including details of the items that triggered and their weightings) will be shown in the Results pane.
Chapter 11 • TextCensor Scripts 111

Using TextCensor Effectively The effective use of TextCensor scripts depends on understanding how the Text Censor facility works and what it does.
Text censor rules are evaluated against text portions of messages (including headers, message bodies, and attachment content).
Constructing TextCensor Scripts The key to creating good TextCensor scripts is to enter exact words and phrases that are not ambiguous. They must match the content to be blocked. Also, if certain words and phrases are considered to be more undesirable than others, those words and phrases should be given a higher weighting to reflect the level of undesirability.
In creating TextCensor scripts, a balance must be struck between over-generality and over-specificity. For instance, suppose a script is required to check for sports-related messages. To enter the words “score” and “college” alone would be ineffective in that those words could appear in many messages. Hence the script would trigger too often, potentially blocking general email content.
The same script (to find sports-related messages) would be better constructed using the phrases “extreme sports”, “college sports” and “sports scores” as these phrases are sport specific. However, using only a few very specific terms might cause the script not to trigger often enough.
Again using the sports example used above, the initials NBA and NFL, which are very sports specific, should be given a suitably higher weighting (promoting earlier triggering) than, for instance, “college sports”.
112 User Guide

Decreasing Unwanted Triggering TextCensor scripts sometimes trigger on message content which is not obviously related to the content types they are intended to match. The recommended procedure to troubleshoot this problem is:
1. Use the problem script in a Rule that copies messages and their processing logs to a folder (for instance, “suspected sports messages”).
2. After using this rule for some time, check on the messages that have triggered the script. Review the message logs to determine exactly which words caused the script to trigger (see “Interpreting Message Logs” on page 185).
3. Revise the script by changing the weighting, weighting type, or key words, so as to trigger only on the intended messages.
4. When satisfied, modify the Rule so as to block messages that trigger the script, and to notify the sender and/or the intended recipient.
Chapter 11 • TextCensor Scripts 113

114 User Guide

Chapter 12
Logging Classifications
Log records are further categorized by Logging Classifications. Messages can be classified within Standard Rule Actions. Both MailMarshal Reports and the Console Message History/Search can show the classification of a message.
Each Rule should include a logging action. MailMarshal’s default Rules include such actions.
Logging Classifications can be added and customized. To work with Logging Classifications in the Configurator, select Logging Classifications from the left hand menu tree.
NoteFor general information on logging and reporting see Chapter 17, “Reports.”
Chapter 12 • Logging Classifications 115

Creating a Logging Classification Click the New Logging Classification icon in the toolbar to open the New Logging Classifications window.
In the window, enter a meaningful name for the classification.
Enter a number as the classification code for this classification. Reports can be generated using these codes. By default the next available number in sequence is used for a new classification; however, the same number can be used for more than one classification.
Give a brief description of the classification and its purpose. This description will be used in the Console and Reports, and can contain variables marked by { } as in the Email Templates. For a list of common variables, see “Variables” on page 98.
Click OK to add the classification.
116 User Guide

Editing a Logging Classification To edit an existing logging classification, double-click it in the right pane of the configurator to view its properties. Make any required changes then click OK.
Duplicating a Logging Classification To copy an existing logging classification, right-click it in the Configurator. Choose Duplicate from the context menu. After duplicating the classification, make any required changes to the copy.
Deleting a Logging Classification To delete a logging classification, select it in the right pane of the configurator, then click the Delete icon in the toolbar.
Logging Classification Usage Logging classifications are most commonly used to report on broad categories, such as viruses or executable files quarantined. However they can also be used to record very specific occurrences such as a specific file or size of file being sent. For instance, the question “How many PDF files over 500K in size were sent by Sales” could be answered by creating a Rule to log sending of such files.
Chapter 12 • Logging Classifications 117

118 User Guide

Chapter 13
Message Stamps
Message stamps are short blocks of text that can be applied to the top or bottom of an email message body. MailMarshal message stamps can include a plain text and an HTML version. The appropriate stamp format will be applied to the body text of the same type in the message.
Message stamps are typically used for corporate disclaimers or advertising on outgoing email. Message stamps can also be used by MailMarshal to notify the recipient that a message has been processed (for instance, by having an offending attachment stripped).
To work with message stamps in the Configurator, select Message Stamps in the left pane. Message stamps can also be created and edited from the stamp selection window during Rule creation.
Creating a New Message Stamp In the Configurator, click the New Message Stamp icon to open the New Message Stamp window. Give the stamp a name and select whether it is to appear at the top or the bottom of messages.
Enter a plain text version of the message stamp in the Plain Text tab. Then enter an HTML version of the stamp, if desired, in the HTML tab. Various formatting, including hyperlinks, can be applied to the HTML text using the buttons provided.
Chapter 13 • Message Stamps 119

To view the raw HTML, right-click in the HTML pane and select Edit Raw HTML. Edit the HTML, or paste HTML source from another editor, then click OK to return to the message stamp window.
Click OK to add the new stamp to the list of available message stamps.
Both plain text and HTML message stamps can include the same variables available within email notification templates. To learn more about variables, see the Help for this window, and Chapter 10, “Email Templates.” For a list of variables, see “Variables” on page 98. The example stamps provided with MailMarshal are a good source of ideas.
NoteIf RTF message stamping is enabled, the plain text message stamp will be used with RTF messages. For information about enabling RTF stamping, see “Additional Options” on page 159.
120 User Guide

Duplicating a Message Stamp To copy a Message Stamp, right-click it in the Configurator. Choose Duplicate from the context menu. After duplicating the Message Stamp, make any required changes to the copy. Remember to make changes to both the Plain Text stamp and the HTML stamp.
Editing a Message Stamp To edit a Message Stamp, double-click on its name in the right hand pane of the Configurator. Make the required changes then click OK. Remember to make changes to both the Plain Text stamp and the HTML stamp.
Deleting a Message Stamp To delete a Message Stamp, select it in the right hand pane of the Configurator then click the Delete icon in the toolbar.
Chapter 13 • Message Stamps 121

122 User Guide

Chapter 14
Header Matching and Rewriting
MailMarshal can apply Regular Expression matching to find and/or modify email header and envelope detail.
Header matching is available as a Rule condition. Header rewriting can be performed by a Rule action.
Regular expressions are extremely powerful but somewhat difficult to construct. Especially in the case of rewriting, great care should be taken to ensure that the rules perform as expected.
Basics of Regular Expression syntax are given later in this chapter.
Some examples of actions that can be performed are:
• Address modification - for example, changing [email protected] to [email protected].
• Field removal - for example, stripping out the received: lines from outbound messages.
• Alias substitution - for example, replacing addresses via a lookup table, as in [email protected] being replaced by [email protected].
• Domain masquerading - for example, replacing all addresses in thisdomain.com with identical addresses in thatdomain.com.
Chapter 14 • Header Matching and Rewriting 123

• Subject line modification - for example, notifying a user that attachments have been stripped from a message.
• Adding header lines - for example, to mark a message as having been processed.
Header Wizard Header matching and rewriting rules are created using a wizard. To start the wizard, click New within the parent window (Rule condition or Rule action). The steps in the wizard are as follows:
• An introduction that gives warning information (for Rewriting only).
• A field matching window to select the header or envelope fields to be matched, and the portion of the field to be modified.
• A substitution options window where matching and substitution expressions are entered.
• A naming and test window that allows you to name the rule and test the matching and substitution expressions.
In addition, the order of evaluation of header rewriting rules can be adjusted using the arrows at the bottom of the parent window. See “Order of Evaluation” on page 131.
Notes• MailMarshal Exchange cannot use header rewriting to reroute an email message
(that is, no changes can be made to the “Envelope Recipient” header). If this functionality is required, MailMarshal SMTP should be used.
• Test any rewriting rules thoroughly. Invalid headers can cause all affected messages to be undeliverable.
124 User Guide

Field Matching In this screen of the Wizard select the fields to be matched or rewritten from the list. If the field you want is not in the list, click Add custom field then enter the field name (for instance, x-Custom-Field).
Choose the appropriate parsing method from the list.
As an example of different parsing methods, consider the following To: header.
To: (A User) [email protected], “Another user at domain2.com” [email protected]
NoteIf inserting a custom field, use the parsing method Entire Line.
Chapter 14 • Header Matching and Rewriting 125

The following table shows the field data that is passed to the substitution engine for the various parsing methods.
When matching or modifying address fields in the email header you would usually select the field parsing method Email Address. Each email address in the field is then passed to the substitution engine, while no other characters will be changed.
Parsing method Data passed to the substitution engine
Entire line (A User) [email protected] , “Another user at domain2.com” [email protected]
Email address [email protected] [email protected]
Domain domain.com domain2.com
126 User Guide

Matching/Substitution Options In this screen of the Wizard, set up the rules that match the selected fields. For a list of shortcuts to some common Regular Expression feature, click the arrow to the right of each field. See “Regular Expression Syntax” on page 131 for details of the available options.
Optional Exclusion Filter This field allows you to ensure the Header Match or Rewrite does not occur, regardless of whether the Field Search Expression is matched. The exclusion filter is provided since it can be difficult to express exclusions in regular expressions.
To use the exclusion filter, check the box. In the field, enter a Regular Expression. If the selected header(s) match this expression, they will not be matched or rewritten by the rule.
Chapter 14 • Header Matching and Rewriting 127

Field Search Expression In this field, enter a Regular Expression that is used to select the data for matching or rewriting. If the selected header(s) match this expression, they will be matched or rewritten by the Rule (subject to the exclusion filter, above).
Substitution Actions When rewriting, three actions are available to be taken on the data matched.
Substitute into field using expression This action allows the matched data to be replaced using a sed or Perl-like syntax. Sub-expressions which were generated from the field search can be used here as $1 through $9.
Map using file This action provides for substitutions from a file, to allow a level of indirection in resolving what to substitute into the field.
File name: Enter the name of a map file (or browse for it using the button provided). This file must be plain text. Each line of the file must contain a key and value pair separated by a comma–for example
[email protected], [email protected] [email protected], [email protected]
The first entry in the line is a lookup key. The second value is the result to be substituted in place of the original field when the key is matched. If the key value is not found in the map file then it is returned unchanged as the result.
Lookup key: Enter a Regular Expression that will match the lookup keys in the map file. It should contain at least one sub-expression ($1 through $9) generated by the field search.
128 User Guide

Delete the field This action returns an empty string if the search expression matches. More usefully, if Entire line is selected in the parsing options, Delete the field removes the entire header line from the email.
A possible use if this action is to remove Received: lines from outbound email, so as to hide internal routing information from external recipients.
To achieve this effect, select the Received: field and a parsing method of Entire line, then provide a search expression that will match the hosts you wish to hide and select Delete field. For instance, your search expression might look like
from (secret.host | private.host).my.domain.com
Insert if missing If any selected header does not exist, the text of this field will be used to create it. For instance, if you have added the custom header x-MyNewField then you might enter the value Created by Header Rewrite.
NoteWhile such deletions give a higher level of security, they are not generally recommended as they make tracing any email problems difficult.
Chapter 14 • Header Matching and Rewriting 129

Naming and Testing In the final window of the Header Wizard, enter a name for the new Rule. Optionally enter a comment, which should explain the purpose of the rule.
Rule Test Enter an input string in the Source field and click Test. The result will appear in the Result field. For rewriting actions, the result will be the rewritten string. For matching, the result will be “matched” or “not matched”.
If this is a rewriting rule, it is possible to select whether the changes will be actually applied and/or logged. Check the box Enable field changes to apply this rule to messages. Check the box Log changes to write a log of changes to the MailMarshal logs for the message. If only Log changes is checked, the logs will show the changes that would have occurred, but no changes will actually be made.
130 User Guide

When satisfied with the new Rule, click Finish to return to the parent window (Rule condition, action, or Header Rewrite tab).
Order of Evaluation If several header matching rules are used within a single Rule condition, all must evaluate true for the condition to be true.
If several rewriting rules are used within a single Rule action, the order of evaluation will be significant. Rewriting actions will be applied in top-down order as shown in the window. Adjust the order of evaluation using the arrows provided below the list of rewriting actions.
Regular Expression Syntax MailMarshal implements a full-featured regular expression syntax. Full documentation of this syntax is beyond the scope of this manual. Additional documentation and links to further information can be found in Marshal Knowledge Base article Q10520.
A few basics are given below.
ShortcutsThe arrow to the right of each field on the matching/substitution page of the header rule wizard provides access to some commonly used Regular Expression features.
Selection Inserts Usage
Any Character . Matches any single character.
Chapter 14 • Header Matching and Rewriting 131

Character in range [ ] Enter a range or set of characters to be matched within the brackets. For instance, to match lower case characters you could enter a-z between the brackets.
Character not in range [^] Enter a range or set of characters after the ^. Matches any character not in the set.
Beginning of line ^ Text to the right of the ^ will only match if found at the beginning of the line.
End of line $ Text to the left of the $ will only match if found at the end of the line.
Tagged expression ( ) The content within the parentheses will be considered as a single expression for repeat purposes. This expression will be saved for use within the substitution field.
Or | The field will be matched if it matches either the expression before the | or the expression after the |.
0 or more matches * The expression before the * will be matched if it is repeated any number of times, including zero.
1 or more matches + The expression before the + will be matched if it is repeated at least once.
Repeat { } Enter a number or two numbers separated by a comma within the braces. The expression before the braces will be matched if it is repeated the number of times specified. See “Repeat Operators * + ? {}” on page 133.
Whitespace [[:space:]] Matches a single whitespace character (space, tab, and so on.).
Alphanumeric character [[:alnum:]] Matches a single letter or number character.
Alphabetic character [[:alpha:]] Matches a single letter character.
Selection Inserts Usage
132 User Guide

Reserved CharactersSome characters have special meanings within regular expressions.
OperatorsThe following characters are reserved as regular expression operators:
* . ? + ( ) { } [ ] $ \ | ^
To match any of these characters literally, precede it with \
For example, to match marshal.com enter marshal\.com
Wildcard Character .The dot character (.) matches any single character.
Repeat Operators * + ? {}A repeat is an expression that occurs an arbitrary number of times.
An expression followed by * can be present any number of times, including zero. An expression followed by + can be present any number of times, but must occur at least once. An expression followed by ? can occur zero times or once only. You can specify a precise range of repeated occurrences as a comma-separated pair of numbers within {}. For instance,
ba* will match b, ba, baaa, etc.
ba+ will match ba or baaaa for example but not b.
ba? will match b or ba.
ba{2,4} will match baa, baaa and baaaa.
Decimal digit [[:digit:]] Matches a single number character 0-9.
Selection Inserts Usage
Chapter 14 • Header Matching and Rewriting 133

Parentheses ( )Parentheses serve two purposes:
• To group items together into a sub-expression. You can apply repeat operators to sub-expressions in order to search for repeated text.
• To mark a sub-expression that generated a match, so it can be used later for substitution.
For example, the expression (ab)* would match all of the string
ababab
The expression “ab” would be available in a variable (tagged expression) with a name in the range $1...$9 (see the matching and substitution examples in following sections).
AlternativesAlternatives occur when the expression can match either one sub-expression or another. In this case, each alternative is separated by a |. Each alternative is the largest possible previous sub-expression (this is the opposite to repetition operator behavior).
a(b|c) could match ab or ac
abc|def could match abc or def
ExamplesThe following sections show examples of matching and substitution strings.
MatchingThe expression
(.+)@(.+)\.ourcompany\.com$will match a sequence of 1 or more characters followed by an @ followed by another sequence of 1 or more characters, followed by .ourcompany.com at the end of the field.
134 User Guide

That is, it will match [email protected] and [email protected] but not [email protected]
SubstitutionUsing the example given in the preceding section, the substitution expression
$1@$2.co.uk.euwould yield [email protected], [email protected] and [email protected] respectively. The last result might be somewhat surprising, but it is a result of the fact that data that does not match part of the regular expression is simply copied across.
Map FilesMailMarshal SMTP allows substitution using regular expressions to search for an entry in text file known as a map file. Each line in the map file contains two values separated by a comma. If the search expression matches the first value in a line, MailMarshal SMTP substitutes the second value. If the search expression does not match the first value in any line, MailMarshal SMTP substitutes the search expression.
A typical use of map files is to redirect incoming email to arbitrary addresses. The following simple example modifies email addresses using a map file.
Map [email protected], [email protected]@domain.co.uk, [email protected]
Search expression(.+)@domain\.co\.uk$
Lookup [email protected]
Chapter 14 • Header Matching and Rewriting 135

Sample resultsThe following table shows the matching addresses when the sample mapping file above is used.
Input Email Address Result
[email protected] [email protected]
[email protected] [email protected]
[email protected] [email protected]
136 User Guide

Chapter 15
LDAP Connections
LDAP (Lightweight Directory Access Protocol) is a system for retrieving directory information, such as lists of users, from a remote source. The source can be public (available for anonymous use) or private. Servers providing LDAP support include:
• Lotus Notes
• Microsoft Exchange
• Microsoft Active Directory
• Novell GroupWise
• Many Sendmail systems
Within MailMarshal, LDAP connections are used to import user and group information for User Groups. See Chapter 6, “User Groups,” for further information.
Before LDAP can be used to retrieve information, a connection to the remote LDAP server must be established.
NoteActive Directory Server users and groups can be selected from the User Matching screen of the Ruleset and Rule Wizards. No prior setup is required.
Chapter 15 • LDAP Connections 137

Adding a New LDAP Server Connection Highlight LDAP Connections in the menu tree, then click the New LDAP Connection icon in the toolbar to start the New LDAP Connection wizard.
In the LDAP Connection Wizard–Server window, see below, enter the name of the server to be queried into the LDAP Server field. This can be a fully qualified Internet server name or simply the name of a server on the local LAN. Examples of LDAP server names are:
• ldap.netscape.com
• directory.baycorpid.co.nz
• IBMMAIL01
If desired use the browse button provided to select a server on the LAN.
138 User Guide

The Port number field is used to enter the port on which the remote LDAP server accepts queries. The default value is port 389. However this can be changed where more than one LDAP server is hosted at the same IP address. For example, when running Microsoft Exchange 5.5 on a Windows 2000 Active Directory server, both Exchange and Active Directory provide LDAP services. The network administrator will configure the servers to use different port numbers.
Enter the logon name and password, if required, in the appropriate fields. If using Windows integrated security, enter the logon domain as well.
Select an LDAP Search Root, if necessary, in the next window. The Search Root is used to limit the amount of information returned in LDAP queries, and specifies the root container of the LDAP server to be searched. This field is usually left blank; however, if the search does not work, ask the LDAP server administrator for an entry. Typically the entry would be the base LDAP Distinguished Name for the organization (for instance, dc=ourcompany.com or o=OurCompany Corporation).
Alternatively, if the LDAP server is a Microsoft Active Directory server, check the box to populate the list of available search roots. Then select a root from the list.
NoteServer name, port, and login information should be obtained from the LDAP server administrator.
Chapter 15 • LDAP Connections 139

In the final window of the Wizard, enter a name that will be used to identify the LDAP connection (within MailMarshal only).
Select an Update Interval. The default period between updates is 240 minutes (4 hours). All groups derived from this connection will be updated at the time specified. A shorter time might be desirable if, for example, this option is used to synchronize user information between MailMarshal and Microsoft Exchange 5.5, and many new users are being added. Conversely, if few users are ever added, setting a longer interval will reduce overhead.
140 User Guide

The field Next Update shows the time when the next update is due.
Check the box Test the connection on finish then click Finish to test that the server details are correct. MailMarshal should state that the connection has been made and some groups and members found.
NoteIf the Next Update time is reset, updates will occur at the time set and at each Update Interval thereafter. For instance, if the Next Update field is changed to 14:30 today and the Next Update field shows 240 minutes, the updates will occur at 14:30, 18:30, and each 4 hours thereafter.
The MailMarshal Controller checks every 5 minutes to see if any LDAP user groups need updating. If the Next Update field is used to schedule an immediate update, this might not occur for up to 5 minutes.
Note• If the test is unsuccessful, error messages are typically unspecific. The information
given (such as “no groups found”) might not necessarily pinpoint the problem entry, so all information entered must be checked. If necessary contact the LDAP server administrator.
• A local network or LDAP server can be configured to allow access only from certain machines or users. The Test button only tests the connection from the Configurator. Because the MailMarshal Controller service can have different security permissions, be sure to check that the Controller is updating LDAP groups correctly. The Controller log file should show messages from the LDAP action. The membership of the groups should change appropriately.
Chapter 15 • LDAP Connections 141

When all details are correct, click Finish in the New LDAP Connection window. The LDAP connection is ready to be used. See Chapter 6, “User Groups,” for further details on using information retrieved through LDAP.
Editing an LDAP Server Connection To edit an existing LDAP connection, double-click it in the right pane of the Configurator to restart the LDAP Connection Wizard.
Deleting an LDAP Server Connection To delete an existing LDAP connection, select it in the right pane of the Configurator then click the Delete icon in the toolbar.
142 User Guide

Chapter 16
Server Properties
MailMarshal’s Server Properties include a variety of server setup information and advanced options. During installation a wizard gathers enough of this information to enable the product to function. To access the full range of Server Properties for maintenance and reconfiguration purposes, choose Tools > Server Properties from the Configurator menu to view the Server Properties window. This window includes the following tabs, which are covered in detail in the sections of this chapter:
General: Alter server email address information; control configuration export/import.
Local Domains: Select how MailMarshal should deliver inbound email.
Logging: Choose whether, where, and how much information should be logged.
License Info: Make Permanent Key request; see details of the current license key.
Internet Access:Set up proxy details for SpamCensor updates.
Spam Updates:Enable and monitor updates of the SpamCensor facility.
Advanced: Control folder location, Exchange integration, and additional options.
Chapter 16 • Server Properties 143

(The tabs General, Local Domains, and Logging are presented in the Installation Wizard when MailMarshal is installed.)
General Administrative notifications (such as dead letter reports) will be sent to the Recipient Address. This should be a valid and appropriate mailbox or group alias, which is regularly monitored by the email administrator. Administrative notifications and other automated email from MailMarshal will be sent from the From Address. This address should also be a valid SMTP address to allow for replies to notifications. (Template generated messages can have a different “from” address, as entered in the template).
144 User Guide

Export Configuration The MailMarshal configuration data, including server properties, Rulesets, and Rule elements, is stored in the Windows Registry (with the exception of user group information, which is found in the file UserGroups.txt in the MailMarshal install folder, and files with known fingerprints, which are stored in the subfolder ValidFingerprints of the MailMarshal install folder).
To export configuration data, click Export Configuration. Enter an appropriate file name and location. To save User Group information, copy UserGroups.txt. To save fingerprint information, copy the folder ValidFingerprints and its contents.
Import Configuration MailMarshal Registry information can be imported, either to restore a previously created configuration or to merge a partial configuration.
To import configuration data, click Import Configuration.
WarningExport configuration data safely before performing an import. The Merge function requires a specially created file, and should be used only on advice from Marshal Technical Support.
Chapter 16 • Server Properties 145

Within the Import Configuration window, see above, enter or browse to the appropriate file name. Choose to overwrite or merge configurations using the radio buttons. Click OK to perform the import. If User Group information is needed, copy UserGroups.txt to the MailMarshal install folder. If attachment fingerprint information is needed, copy the required files to the folder ValidFingerprints in the MailMarshal install folder.
Local Domains This tab specifies the names of domains that MailMarshal should consider as local.
146 User Guide

The list should include all (and only) the domains of email addresses your organization actually uses on this Exchange server. Each entry in this list should be matched by DNS MX records (and firewall relay settings, if necessary) so that email for these domains is passed to this server.
To Create a New Local Domain Click New to open the New Local Domain window. Enter a domain name, then click OK. Repeat this step as often as required to enter all local domains.
Multiple local domains can be entered using wildcards (for instance *.ourbusiness.com can be entered if several subdomains are handled on this server). See “Wildcards” on page 147 for a description of MailMarshal’s wildcard syntax.
When invalidated because of a domain change, the key reverts to a fully functional 14 day trial. This allows ample time to contact Marshal for a new permanent key. There is no charge for the new key.
To Edit a Local Domain Select the domain to be edited from the list and click Edit. Make any changes required, then click OK.
WildcardsLocal domains can be entered using several wildcard characters. The same characters are used in User and Group matching for standard and receiver rules.
NoteMailMarshal’s permanent License Keys are bound to the list of local domains specified here. Each time the list of domain names changes, a new key is required. See “License Info” on page 154 for information on requesting a new key.
Chapter 16 • Server Properties 147

The following syntax is supported:
Examples
*.ourcompany.com matchespop.ourcompany.com,hq.ourcompany.com, etc.
mail[0-9].ourcompany.com matchesmail5.ourcompany.com but not maila.ourcompany.com
mail[!0-9].ourcompany.com matches mails.ourcompany.com but not mail3.ourcompany.com
Character Function
* Matches any number of characters
? Matches any single character
[abc] Matches a single character from a b c
[!abc] or [^abc] Matches a single character except a b or c
[a!b^c] Matches a single character from a b c ! ^
[a-d] Matches a single character in the range from a to d inclusive
[^a-z] Matches a single character not in the range a to z inclusive
NoteThe !, -, and ^ are special characters only if they are inside [ ] brackets. To be a negation operator, ! or ^ must be the first character within [ ].
148 User Guide

Logging To enable logging of MailMarshal’s message processing, check the box Enable Logging on this tab.
When logging has been enabled, the Mail History can be viewed in the Console and a wide variety of reports run from MailMarshal Reports. For maximum detail, check the Log Attachment Details checkbox. Choose the period for retention of data (the default is 100 days), see above.
Click Create/Select Database to choose the location of the SQL database where the information will be stored. In the Create/Select Database window, enter the name of the SQL Server (or MSDE) computer in the first box. Browse the network if necessary using the button provided. Enter the name of the database to use, and the SQL user name and password.
Chapter 16 • Server Properties 149

The option Connect using TCP is often useful where the database is behind a firewall. TCP port 1433 must be opened through the firewall in this case.
If you believe that a MailMarshal database has previously been installed in the given location and you do not wish to use it, check the box to recreate the database.
Logging Options • Log Attachment Details: To log the details of message attachment processing,
check this box.
• Continue Processing even if database becomes unavailable: To continue processing email if the log records cannot be written to the database, check this box. (This option should only be chosen if logging of traffic is not essential.) To stop processing email when the database is unavailable, clear this box. If processing is stopped for this reason, email will still be accepted and held in the Incoming directory.
Choose the period for retention of data (the default is 100 days).
Server Array MailMarshal can be configured into an array of servers, typically for load balancing purposes. All MailMarshal servers can log reporting information to the same SQL database. To allow identification of the individual MailMarshal server logs, each MailMarshal instance (up to 26) can be identified by a letter.
To enable array logging, click the checkbox MailMarshal is used in an array. Choose an identifying letter from the drop-down box.
NoteThe database password can be changed using SQL administration tools or command-line SQL entry. However this procedure must be used with caution if other applications are using the database. For further information please see Marshal Knowledge Base article Q10251.
150 User Guide

Internet AccessThis tab of Server Properties allows you to define the path for HTTP and FTP connection to the Internet. This connection is used by MailMarshal Exchange to retrieve SpamCensor anti-spam updates from Marshal.
Direct access No special configuration is required; the Internet is available from this computer without a proxy.
Chapter 16 • Server Properties 151

Proxy MailMarshal Exchange connects to the Internet using the proxy server details provided. Only Basic Authentication is supported.
• Proxy Name: The name of the proxy server computer. This may be a local computer name, fully qualified domain name, or IP address.
• Port: The port number on which the proxy server accepts requests (typically port 8080).
• User Name: The user name can include Windows domain information in “backslash” format (for instance ourcompany\username).
• Password: The password associated with the user name (entered twice for confirmation).
Spam UpdatesMarshal provides updates for the SpamCensor facility to all customers with current MailMarshal Exchange maintenance contracts. The updates are delivered through the Web by HTTP and HTTPS. To configure proxy settings for the updates, see the Internet Access tab.
This tab displays the results of the latest check, and allows you to check for updates immediately.
• If you do not want the SpamCensor to update automatically, clear the check box Enable Automatic Updates.
• If you want to be notified each time an update occurs, check the box Send email to the administrator. To set the address where these notifications are sent, see the General tab.
152 User Guide

• If you want to perform a check for SpamCensor updates immediately, click Check for Updates Now.
NoteTo apply SpamCensor to messages, use the rule condition “Where message is categorized as.” For more information, see “Where message is categorized as” on page 56.
Chapter 16 • Server Properties 153

License Info This tab displays the details of the current Product License Key.
A new key must be requested if the local domain names are changed. A key can also be requested to increase the licensed user count, or to purchase the product (if it is running as a free trial).
Use the radio buttons to select how MailMarshal behaves if a license key becomes invalid or expires. In all cases, MailMarshal continues to accept messages, subject to available disk space.
154 User Guide

• Pass through all mail... Allow email delivery to continue, but without any evaluation of content or virus scanning. Typically this option would be chosen for trial sites.
• Halt all processing... Hold messages in the Incoming directory. Messages will be held until a valid key is entered or this choice is changed. This is the more secure option.
To request a new key click Request Key.
Chapter 16 • Server Properties 155

Enter the appropriate contact information in the form. MailMarshal automatically appends the current local domain list and key details. Enter any additional comments (such as the number of new user licenses desired) in the Additional Information field, as above. Click Send Request to email the data to Marshal.
Notes• Changing or adding a local domain name will invalidate the license key. When
invalidated for this reason, the key reverts to a 14 day trial. This allows ample time to contact Marshal for a new permanent key. There is no charge for this service.
• If the trial license expires, Exchange message flow continues but no MailMarshal processing will be applied. The administrator will be notified daily by email if a key is due to expire or has expired. To enter a key click the Enter Key button, type or paste the key provided by Marshal, then click OK. An information box will report the validity details of the key you entered.
156 User Guide

Advanced Several options are available on this tab. These options generally do not require changes.
Change Folder Locations Locations of the folders used by MailMarshal can be altered. Stop the MailMarshal Exchange Engine service using the Configurator before changing locations.
Chapter 16 • Server Properties 157

Before changing folder locations here, the new locations should be planned. MailMarshal will create the folders, if necessary, during the change process. Any data (such as message files) must be manually moved to the new folders.
Click Change Folders to open the MailMarshal Folders window.
Enter the appropriate location for each folder.
When done, click OK to close the window box and return to Server Properties, or Cancel to discard any folder location changes.
WarningChanging the directory paths can damage the MailMarshal installation if performed incorrectly. Current settings and data should be backed up before performing this procedure.
Folder locations are discussed in Marshal Knowledge Base article Q10423.
158 User Guide

Exchange Agent State MailMarshal Exchange integration with the Exchange Server can be enabled or disabled. The current state displays in the Exchange Agent State section of the Advanced tab.
To alter the state, click Edit Agent State. Choose one of the three options:
• Install and Enable: A connection to the Exchange Server will be established and MailMarshal Rules will be applied.
• Install but Disable: A connection to the Exchange Server will be established but MailMarshal Rules will not be applied to messages.
• Uninstall: MailMarshal's connection to the Exchange Server will be uninstalled.
Additional Options This window gathers several rarely changed settings. To restore the default settings (for any individual tab or all tabs within this window), click the Default button.
Chapter 16 • Server Properties 159

General
Engine:
• Enable RTF Stamping: Check this box to enable message stamping of messages generated in RTF format by Microsoft Exchange.
• Maximum Attachment Unpacking Depth: The number of levels of archive recursion (for instance zip file within a zip file) that MailMarshal will attempt to unpack before deadlettering the email as “suspicious.”
• Maximum MIME Nesting Depth: The number of levels of MIME (email encoding) recursion (for instance message within a message) that MailMarshal will attempt to unpack before deadlettering the email as “suspicious.”
160 User Guide

Controller:
• Controller RPC Port: The port used by the MailMarshal Configurator and Console to communicate with the MailMarshal Server.
Templates This tab allows you to set alternatives to the “built-in” administrative email messages used by MailMarshal. To alter any of these messages, first create a suitable email template. Then select your newly created template using the appropriate drop-down menu on this tab. Please see the Marshal Knowledge Base for details of the variables included in the default templates. The following functions are covered by these templates:
• Dead Letter (Engine): Sent to the Administrator when the MailMarshal Engine places an email in the DeadLetter folder.
• Undetermined: Sent to the Administrator when the MailMarshal Engine places an email in the DeadLetter - Undetermined folder.
NoteThe MailMarshal Controller service must be restarted (from the Service Control Manager) in order for a change in this port assignment to take effect. Remember to restart all dependent services. The port setting must then be changed in the Configurator and Console.
Chapter 16 • Server Properties 161

Address BypassThis tab allows you to manage a list of email addresses that will bypass all MailMarshal Exchange processing. You can use this list to work around any issues you may encounter with processing messages for a specific address. The bypass only affects messages directly addressed to, or sent from, an address. For more information, see Help.
NoteUse this list with caution. Email addressed directly to or sent from any address on the list will not be processed by MailMarshal, and will not be checked for viruses or other malicious content.
162 User Guide

Chapter 17
Reports
MailMarshal Reports allows generation of reports based on the information logged by the MailMarshal Server. A wide range of reports is available including overall summaries and per-user information.
In order for reports to be generated, logging must first be enabled, either in the MailMarshal installation wizard or from the Reports tab of Server Properties.
MailMarshal Reports can be installed on one or more workstations or servers that can connect to the logging database. For details of prerequsites, see “Software Required for Other Components” on page 7. MailMarshal Reports is implemented as a MMC snap-in using a licensed runtime version of Crystal Reports. For general information and tips on the MMC, please see Chapter 19, “MailMarshal and the MMC.” This manual assumes that the MMC is displaying the left (menu tree) pane as well as the right (details) pane.
Chapter 17 • Reports 163

To Install MailMarshal Reports The Reports application is included in the downloadable installation package or on the MailMarshal distribution CD-Rom. From the autorun or Setup Wizard application, choose Install Reports. Carefully read and accept the license information. Choose a destination location and program folder. Complete the installation wizard. You will set the location of the MailMarshal database from which to produce reports is made when you run the Reports application.
Starting MailMarshal Reports Run the MailMarshal Reports application from the Windows Start menu. To choose the MailMarshal Exchange database, enter appropriate information in the Database tab of the Report Group window, if it displays.
• SQL Server Name: the name of the computer where the MailMarshal Reports database resides. Type in the name of the SQL Server (or MSDE) computer where the MailMarshal database resides, or browse the local network using the browse button provided.
• Windows NT or SQL Authentication: Choose whether to connect using the NT logon of the active user, or a SQL username and password.
• User Name: If using SQL authentication, enter the SQL user name associated with the MailMarshal database. By default the user name is “sa”
• Password: If using SQL authentication, enter the SQL password for the database. By default the password for the “sa” account is blank.
NoteIf the MailMarshal Reports application will be run by users who do not have administrative rights (for instance, username “sa”), the administrator should run MailMarshal Reports immediately after setup, connect to the database and select Tools > Load SQL Scripts. The result should be “SQL scripts successfully loaded.” This action is only required once per Reports installation. After this action has been completed all users should have access rights.
164 User Guide

• Database Name: Enter the name of the MailMarshal database. Choose a name from the drop-down list, or type in a new name.
• Always request database details: If this box is checked, this database connection window will appear each time MailMarshal Reports is started.
• Connect to database using TCP/IP: If this box is checked, the database connection will be attempted using TCP/IP. This setting can be useful where the database server and the Reports workstation are separated by a firewall or not within the same local network.
To view the list of available reports, expand the left pane menu tree. Basic information about each folder and report displays in the Description column.
Report Properties To view the full definition of a particular report, highlight it and then click the Properties icon in the toolbar.
Chapter 17 • Reports 165

The Report Properties window has four tabs.
• General: Shows the report name (as shown in the MMC) and a more complete description.
• Parameters: Shows the report title (as seen when the report is generated). Click Edit to view and change the parameters using the parameters detail window.
If the box Request parameters before running report is checked, the parameters detail will be presented each time the report is generated, so you can confirm or change the information. If this box is not checked, the parameters will not be requested when the report is generated.
• Report: Shows information on the report definition file and DLL.
• Select: Allows you to select a new report definition file from the list. This should only be done if you are creating a new custom report.
Generating Reports Begin generating a report by double-clicking on it in the right pane. Choose detailed parameters in the parameter detail window. When all options are chosen, click OK to view the report in a new window.
NoteNot all options are available for all reports.
166 User Guide
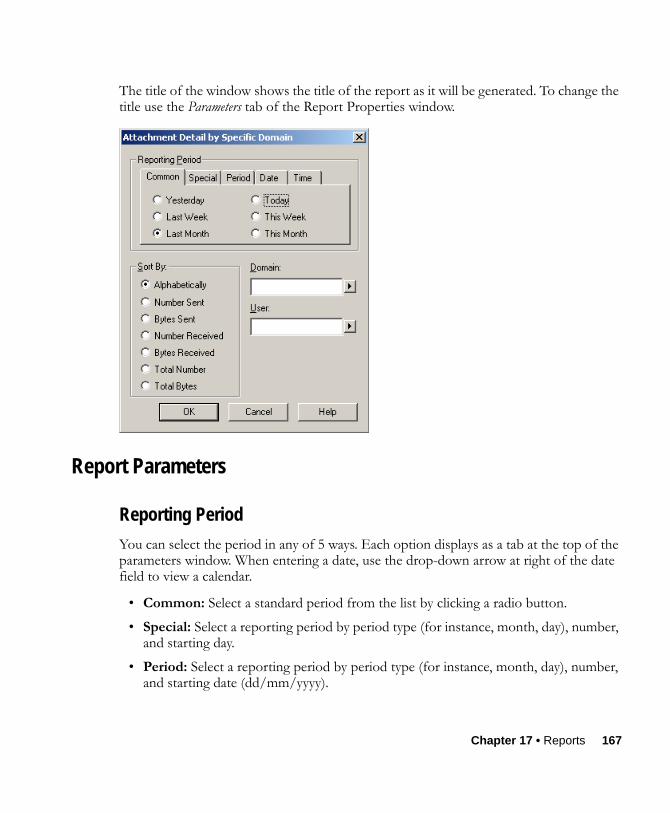
The title of the window shows the title of the report as it will be generated. To change the title use the Parameters tab of the Report Properties window.
Report Parameters
Reporting Period You can select the period in any of 5 ways. Each option displays as a tab at the top of the parameters window. When entering a date, use the drop-down arrow at right of the date field to view a calendar.
• Common: Select a standard period from the list by clicking a radio button.
• Special: Select a reporting period by period type (for instance, month, day), number, and starting day.
• Period: Select a reporting period by period type (for instance, month, day), number, and starting date (dd/mm/yyyy).
Chapter 17 • Reports 167

• Date: Select a reporting period by starting and ending dates. If Inclusive is checked, the ending date will be included in the report.
• Time: Select a reporting period by starting and ending dates and times.
Sort By Many sorting options are provided. Not all options are available for all report types. See Help for details.
Domain, User, Subject, Message Name, Classification, Description Optionally enter text to search for in any or all of these fields. Wildcard syntax is available as supported in the Configurator for local domains. For a full description of the syntax, see “Wildcards” on page 147.
A menu of available wildcards is available through the button at right of each field. The following functions are available:
• Any Character: Match any single character (inserts “?” into query).
• Any String: Match any number of characters (inserts “*” into query).
• Character in Range: Match any character in the given range (inserts [ ] into query; add a range of characters, such as a-z).
• Character not in range: Match any character not in the given range (inserts [^] into query; add a range of characters such as a-z after the ^).
• All: show all items without limits.
• Starting With: show items starting with the characters entered.
• Ending With: show items ending with the characters entered.
• Containing: show items containing the characters entered.
168 User Guide

For the Classification field, click the button to the right of the field and choose Select. to view a list of available items. To include one or more items in a report, check the appropriate boxes.
Size Enter a minimum (and optionally a maximum) message size to search for. Select a size unit from K (Kilobytes) or M (Megabytes).
Sent Messages Counted If present this option allows you to choose how sent messages are counted in the report:
• Once (A count of messages sent to MailMarshal by the sender.)
• Per Session (A count of resulting messages sent outbound. This is normally one per recipient domain.)
• Per Recipient (A count of all recipients for all messages.)
Local Domains Only When this box is checked only information on Local Domains will be reported.
Include Internal Traffic When this box is checked messages sent through MailMarshal between Local Domains will be included in the totals.
NoteYou can use either the Select option or wildcards, but not both.
NoteThe “per session” method most closely reflects Internet bandwidth usage.
Chapter 17 • Reports 169

Sender Only
When this box is checked, only messages sent by the selected user will be returned.
Costing Enter values for the cost to send and to receive one megabyte of data. Do not include a currency symbol; it will be supplied from the system settings.
Report Window Within the Report window, several options are available to customize the view and see additional details.
The Help menu includes two choices: general help on the window features, and help about the specific report fields.
170 User Guide

Toolbar Options • Close Current View: close the drill-down tab currently showing.
• Print: print a copy of the report, or selected pages. (Printer setup is available from the File menu)
• Toggle group tree: show a list of available detail items in a separate pane. Double-click on any of these items to jump to it in the main report. If the item is a group, click the + icon to view the members of the group.
• Magnification: choose the magnification of the report on screen.
• Page selector: shows the number of pages in the report. Choose the page to view.
• Stop button (available while report is being generated): Stop generating the report. Optionally show the partial report.
• Find: search the report for text.
Drill-down Some fields in a report are linked to detailed information or limited views. The mouse pointer shows a magnifying glass when moved over these fields. In addition, a tool tip will indicate that drill-down is possible. Double-click to see the drill-down report.
Drill-down items that have been viewed within the current report window are saved as tabs at the top of the window. Click any tab to view the associated report. Use the Close current view icon to delete a drill-down view and its tab.
NoteThe scroll bar in the report window is limited to the current page. Use the page selector to move between pages.
NoteIf the text in a field is truncated, hold the mouse over the field to see the complete information.
Chapter 17 • Reports 171
Customizing Reports Existing MailMarshal Reports can be customized with local parameters. These reports can then be run simply by double-clicking. Customized reports can be based on existing reports, or on the default report types.
Reports Based on Existing Reports Choose an existing report type to use as a template. Make a copy of this report by dragging it to the desired location while holding down the <CTRL> key.
Edit the copy of the report by double-clicking it (or right-click and select Properties). Within the Report Properties window, make any desired customizations and changes.
To allow the report to be run without confirmation, uncheck the box Request parameters before running report.
When satisfied, click OK in the Report Properties window. The custom report is now available.
Reports Based on Default Types Select the group (folder icon) where the custom report is to be placed. Choose New > Report. from the Action menu to use the New Report wizard.
Complete the pages of the wizard to place the newly customized report in the group. Details of the information required are given in “Report Properties” on page 165.
NoteIt is not currently possible for users to create new report types.
NoteIf the <CTRL> key is not held down the existing report will be moved.
172 User Guide

Exporting Reports MailMarshal Reports can be exported (saved) in a variety of formats (as provided by the Crystal Reports engine). The presentation quality varies depending on the format selected. In general the best formats to use are: Crystal Report, DHTML, text, Excel, and RTF.
Export can be started by right-clicking on the report name and choosing Export, or by clicking the Export icon from the report window toolbar.
Export Options The Export Options window is presented when Export is selected (from the report window or by right-clicking on a report name). This window can also be accessed by right-clicking on a report name and choosing Export Options. The options selected are retained as the defaults for the report instance.
On the first page of the Export Options window, choose how to create the export:
• File: saves the export as a file. A name will be entered by default. To select a specific name, use the browse button or type a file name in the field.
• Application: opens the export directly in the required application (such as Internet Explorer or Lotus 123). Uncheck the box Use Temporary File to save the data in a permanent named file as well.
• Email: attaches the exported data to an email message using the default email application.
NoteDrill-down pages are only available in the Crystal Report export format. All other export formats show only the main report view.
Chapter 17 • Reports 173

Depending on the type of export chosen, additional options may be available.
Email Options The report will be attached to the email as a file of the type chosen in the export options page.
• Send to: Enter the email address to which the message should be sent.
• Copy to: Optionally enter an email address to which the message should be CC'd.
• Subject: Optionally enter a subject for the email message.
• Message: Optionally enter a message body describing the attachment.
174 User Guide

Excel OptionsThese options are available for the Excel 7.0 or 8.0 “extended” export option.
• Use worksheet functions for report subtotals: the subtotals will be dynamically generated by Excel.
• Column headings: Headings will be exported to the worksheet.
• Use tabular format: Each report detail is placed in a single worksheet row (printed format sometimes uses more than one line for a detail record).
• Constant column width: If checked, set the initial width for Excel columns using the spin boxes.
To export the data as a ‘pure’ worksheet with only the column values, turn off column headings, turn on tabular format and turn off constant width. The Subtotals setting could be checked or unchecked, but not all columns can be totaled.
HTML Options • Generate navigation buttons: add links at the bottom of each page to jump to the
first, next, previous, or last page of the report.
• Create all output on one page: Use one HTML document for all output. Page divisions will be indicated graphically.
Pagination Options • Lines per page: set the number of output lines between page break characters, using
the spin box. This option is used for export of a report to paginated text.
NoteSome fields are suffixed with K (for example, 1,457K). These cannot be subtotaled.
Chapter 17 • Reports 175

Separator Options These options are used when creating a values text file (character separated values, comma separated values, data interchange format, and tab separated values).
• Format numbers as in report: Numbers are output with text formatting (such as comma separation of thousands). Unchecking this option causes numbers to be output in a basic format.
• Format dates as in report: Dates are output with text formatting. Unchecking this option causes numbers to be output in a basic format.
The following additional options are available for character separated values only:
• Field separator: the character (or characters) marking the boundary between two fields. In addition to printable characters, special separators include:
• String delimiter: the character (or characters) marking the beginning and end of field text. The same choices are available as for field separators. This field can also be blank, in which case no delimiter is inserted
Field Entry Separator used
\t Tab character
\n New Line character
\r Carriage Return
\0 NUL character (Hexadecimal 00)
\\ \ (backslash)
\xHH Any character (two hexadecimal digits)
176 User Guide

Chapter 18
The Console
The MailMarshal Console is used for day-to-day administration of the MailMarshal Server. Actions available from the Console include:
• Viewing the status of the MailMarshal Engine service.
• Reviewing messages that MailMarshal has moved or copied to folders.
• Releasing or reprocessing messages from folders if appropriate.
• Viewing a list of messages processed and their disposition.
• Searching for messages by header information (address, subject, etc.).
• Viewing service alerts.
• Viewing news and support information from the Marshal website.
The Console is installed on the MailMarshal Server computer and can also be installed on any Windows 95 or higher workstation with appropriate access to the server. See Chapter 3, “Installation,” for prerequisites and detailed instructions.
The Console is implemented as a snap-in to the Microsoft Management Console (MMC). For general information and tips on the MMC, please see Chapter 19, “MailMarshal and the MMC.” This manual assumes that the MMC is displaying the left (menu tree) pane as well as the right (details) pane.
Chapter 18 • The Console 177
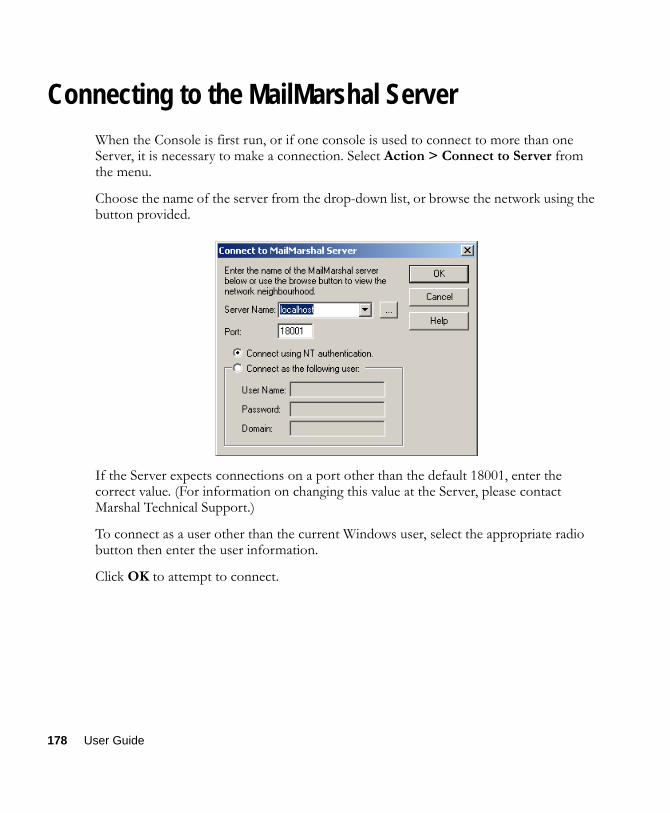
Connecting to the MailMarshal Server When the Console is first run, or if one console is used to connect to more than one Server, it is necessary to make a connection. Select Action > Connect to Server from the menu.
Choose the name of the server from the drop-down list, or browse the network using the button provided.
If the Server expects connections on a port other than the default 18001, enter the correct value. (For information on changing this value at the Server, please contact Marshal Technical Support.)
To connect as a user other than the current Windows user, select the appropriate radio button then enter the user information.
Click OK to attempt to connect.
178 User Guide

Console Security Issues MailMarshal Console uses the Windows secure RPC mechanism to communicate with the MailMarshal Server. A console user must have an account and password that can be validated by the MailMarshal Server. If the MailMarshal machine is in a different domain you can either set up a trust relationship or create local accounts on the MailMarshal Server computer. If the Console and the Server are separated by a firewall (for example if the Server is located in a DMZ), port 18001 must be opened in the firewall to allow remote Console access.
To view the email in the quarantine folders the account in use must have read access to the folders. If you wish to make changes to items (for example forward email, reprocess messages) the account will also need write access. Access to the folders should be limited by using Windows security.
To implement access control for other features, edit the access permissions on the MailMarshal.key file (in the MailMarshal folder on the server). Read access to this file allows the user to view the service status and mail history. Write access to this file gives the ability to reload services.
Chapter 18 • The Console 179

The Main Console Screen In the left pane, expand the element MailMarshal Exchange Console to see the console menu tree. Select MailMarshal Console to view the main Console screen in the right pane. This screen provides summary information on MailMarshal operation.
The top section displays the status, version number, and number of messages processed by the MailMarshal Engine.
The bottom section displays recent Service Alerts. Click the button View Alert History to see a complete list in the Alert History screen.
Message Folders To view a list of MailMarshal’s message folders, expand the menu item Mail Folders. These Folders include the Archive, Parking and regular folders into which messages are placed through Rule action, as well as the dead letter folders used for messages which cannot be processed.
180 User Guide

To view the contents of a folder, select it in the left pane. The contents will be displayed in the right pane.
Folders can have subfolders created periodically if this option has been set up in the Configurator. By default no more than 1000 items will be retrieved for each folder. This number can be adjusted by choosing Tools > Options from the menu.
Message Folder Actions To search for a message by its MailMarshal message name, use the search icon in the toolbar. (If Mail History is enabled, a more powerful search is available; see “History Search” on page 187.)
Messages in folders can be forwarded, deleted, processed, and viewed.
Notes• Users who have read-only access to a folder cannot delete messages.
• Messages in Archive folders cannot be deleted.
Chapter 18 • The Console 181

Forwarding a Message To forward a message, select it then click the Forward icon on the toolbar (or open it then click the Forward icon on the message window toolbar). To forward to multiple addresses, enter them separated by semi-colons (for example, [email protected]; [email protected]).
Deleting a Message To delete a message, select it then click the Delete icon. This option deletes the message from the folder permanently.
Processing a Message One or more messages can be selected for processing. Clicking the Process Message(s) icon raises the Process Message window.
182 User Guide

The following actions are available:
• Continue processing the message: This option continues processing the message after the Rule that placed it in the current folder. This action can be used to release a message from quarantine while testing it for any further violations of policy.
• Reprocess the message: This option resubmits the message for processing by the current set of MailMarshal Rules. This option can be useful when Rules have been adjusted.
• Pass the message through: This option allows the message to be queued for delivery with no further evaluation.
If the checkbox Only apply this action to the following users is checked, the selected option will be effective for one or more recipients of the message as selected using the detail checkboxes.
The following additional options are available:
• Delete the message after processing (selected by default): Once the selected actions have been performed, the message is deleted from the folder.
• Add attachment fingerprints: Attachments (including images embedded in Microsoft Word documents) will be saved in the folder ValidFingerprints (located in the MailMarshal install folder). The unique “fingerprint” of each attachment will be loaded by the MailMarshal Engine. These attachments can be the subject of a Rule condition if they are found in the future. See the Standard Rule condition “Where attachment fingerprint is/is not known” for more details. All attachments, or only images, can be “fingerprinted.”
NoteThe “Continue Processing” and “Pass Through” options can also be requested using a specially formatted email message. See “Message Release” on page 86.
NoteA file can be removed from the list of recognized fingerprints by deleting it from the ValidFingerprints folder and reloading the configuration.
MailMarshal automatically deletes a fingerprint (and the associated file) if it does not trigger a condition for six months.
Chapter 18 • The Console 183

Viewing a Message and Message Log To view a message and its associated processing log (which indicates the reason for its placement in the folder), double-click on it in a Message folder or History view.
The title of the window shows the message subject. The body of the window shows basic information about the message and any attachments.
The lower portion of the message window includes three tabs: Message, Log, and Details. The Message and Details tabs restrict access to items that could represent security threats.
MessageShows the message body in the richest available format (HTML, RTF, or plain text).
184 User Guide

DetailsShows a tree view of the components of the message. You can click on any item to view it in detail.
LogShows the MailMarshal Exchange processing log for the message.
You can copy message text to the Clipboard from any of the message tabs. MailMarshal Exchange does not support Ctrl-C for copying from the Message Viewer.
To copy message text to the Clipboard:
1. Open a message.
2. Select the tab from which you want to copy text.
3. Select the text you want to copy.
4. Right-click and select Copy.The message headers can be examined by clicking the Log tab.
Interpreting Message Logs A message log includes information on the structure of the message, and records any Rules that it triggered and the reasons for triggering.
The below figure shows a message that MailMarshal has identified as BA0000000c.0000000c.mml. The message contains a message header (MHDR), two message bodies (Text and HTML) (MBODY), an attached ZIP archive (ZIP), and an executable file (EXE) included within the archive (inclusion is indicated by the indentation of the line in the log).
The message log also indicates which Rules were applied to the message, which if any were triggered, and what action was taken. The log line for a triggered Rule includes the notation “TRUE” and actions taken follow this line. In the example below, the executable triggered the rule “Block EXECUTABLE Files” in the ruleset “Inbound Messages”.
NoteProcessing logs are only available if copied by the Rule that placed the item in the folder.
Chapter 18 • The Console 185

... 1452 15:44:57.576 1 user(s) match rule - Block EXECUTABLE Files 1452 15:44:57.576 Name=U1\B000000001.00000001.mml (MAIL,55320) False 1452 15:44:57.576 Name=U2\MsgHeader.txt (MHDR,602) False 1452 15:44:57.576 Name=U2\Plain (MBODY,14) False 1452 15:44:57.576 Name=U2\Fgrep.zip (ZIP,39657) False 1452 15:44:57.576 Name=U3\fgrep.exe (EXEW32,82944) TRUE Terminal 1452 15:44:57.576 Requesting Action <Inbound Messages:Block EXECUTABLE Files:MailTemplate> be run 1452 15:44:57.746 Requesting Action <Inbound Messages:Block EXECUTABLE Files:LogMessage> be run 1452 15:44:57.746 Requesting Action <Inbound Messages:Block EXECUTABLE Files:MoveMessage> be run 1452 15:44:57.746 Action LogMessage for Component U3\fgrep.exe 1452 15:44:57.756 Action MoveMessage for Component U3\fgrep.exe...
If a TextCensor script is triggered, the details of the script evaluation are included in the log. In the following excerpt, two expressions in the Generic Chain Letters script were triggered:
... 1452 16:02:24.551 1 user(s) match rule - Block Chain Letters 1452 16:02:24.551 TextCensor triggered: Script Generic Chain Letters Triggered Expression: chain letter* Triggered 1 times weighting 5 Expression: send this FOLLOWEDBY=6 (many OR all OR friends OR anyone OR others OR people OR every*) Triggered 1 times weighting 5
1452 16:02:24.551 Name=U1\B000000002.00000001.mml (MAIL,2998) TRUE Terminal ...
Mail History Mail History is a record of recent messages processed by MailMarshal. By default no more than 1000 items will be retrieved. This number can be adjusted by choosing Tools > Options from the menu.
This information is derived from the report logging database, so logging must be enabled to view the history.
To view the history, select Mail History in the console tree.
186 User Guide
Messages that were successfully sent display a yellow envelope icon and Sent To: information in the Status column.
Messages that passed the Rule processing but could not be sent display an icon with a red “x” and the failure reason in the Status column.
If a message triggers a rule that generates a logging classification, the icon will be blue and the Status column will display the text associated with the classification. In addition, the Class Code column shows the numerical logging classification code.
Double-click any message to view it. Only messages held in the MailMarshal Folders can be viewed.
History Search Messages in the MailMarshal Message History can be searched by size, header information, or delivery time.
To start a search, select Mail History or History Search Results, then choose Action > Search from the menu.
NoteIt is always possible to search for messages by their MailMarshal Message Name, regardless of the Logging setting. See “Message Folder Actions” on page 181.
Chapter 18 • The Console 187

The following search criteria can be used in the Search Details window. The results are available by double-clicking the History Search Results node in the menu tree. All fields are optional.
• Period: Enter “from” and “to” dates and times (or select them using the date controls and spin boxes). The button provides the pre-configured settings for “yesterday”, “today”, “last hour”, and “last 24 hours”, as well as “Now” which resets the “to” time to the current time.
• Size: Enter a minimum message size (and optionally a maximum size). Choose whether these sizes are expressed in Kilobytes or Megabytes. The default is to search for all messages regardless of size (minimum size of 0).
• Sender: Enter values for the user and domain. To search for all messages from a domain, leave the user field blank. To search for messages from or to an address, check the “or receiver” checkbox.
• Recipient: Enter values for the user and domain as for the sender.
• Subject: Enter a value.
188 User Guide

• Delivery time: Enter a minimum value in seconds.
• Classification: Enter a numerical classification code (as defined in the Configurator under Logging Classifications). Enter zero to ignore classification codes.
Wildcard Functions The Sender, Recipient and subject fields can be searched using the same wildcard syntax supported in the Configurator for local domains. See “Wildcards” on page 147 for a full description of the syntax.
A menu of available wildcards is available through the button at right of each field. The following functions are available:
• Any Character: Match any single character (inserts “?” into query).
• Any String: Match any number of characters (inserts “*” into query).
• Character in Range: Match any character in the given range (inserts [ ] into query; add a range of characters such as a-z).
• Character not in range: Match any character not in the given range (inserts [^] into query; add a range of characters such as a-z after the ^).
• All: show all items without limits.
• Starting With: Show items starting with the characters entered.
• Ending With: Show items ending with the characters entered.
• Containing: Show items containing the characters entered.
Alert History To view a historical list of service alerts, select Alert History in the menu tree.
Chapter 18 • The Console 189

News and Support Select this item to view the Marshal website in the right pane. This site features the latest support information, including a Knowledge Base and a Support Forum. To access the full range of resources, customers should log in to the site. Obtain login details, if necessary, by contacting Marshal.
190 User Guide

Chapter 19
MailMarshal and the MMC
The MailMarshal Configurator Console, and Reports are implemented as snap-ins to the Microsoft Management Console (MMC). Users of other MMC applications (such as WebMarshal Console and Microsoft SQL Server) will be familiar with this interface.
By default, the MMC features a tool bar, a menu, and two main panes. The left pane contains a menu tree, while detailed information appears in the right pane.
• To expand an element (branch) of the menu tree, click on the associated + symbol. This will show the elements contained within this branch.
• To select an item in either pane, click on it to highlight it.
• Selecting an item in the left pane will display the associated detail information in the right pane.
• To collapse an expanded menu element click on the associated -symbol.
• If the left pane is not visible, click the Show/Hide Console Tree icon in the toolbar. It should appear “pushed in.”
NoteThe tool bar and menu bar of MMC are context dependent. The available icons and choices depend on which item is selected in the main panes. If an icon referred to is not visible, ensure that the appropriate item is selected. For instance, the arrow icons, which allow rules to be moved up or down in order of evaluation, are only visible when a rule is selected in the right pane.
Chapter 19 • MailMarshal and the MMC 191

While this Guide usually refers to choices from the tool bar, in many cases the MMC also provides equivalent choices from pop-up context menus, which are made available by right-clicking on the selected item.
Configurator and Console in the Same MMC Where more than one MMC snap-in (such as the MailMarshal Configurator, MailMarshal Console, and WebMarshal Console) is to be used from the same machine, a new MMC Console can be created which contains all the required snap-ins.
To create a custom MMC Console, run mmc.exe from a command prompt. Choose File > Add/Remove Snap-in from the main menu. In the Add/Remove Snap-in window, click Add to see a list of available snap-ins. Double-click each desired snap-in to add it to the list. When done, click Close, then OK.
To save the custom Console, choose File > Save from the main menu. Select a location for the .msc file.
Double-click this file to run the custom console.
NoteOnly one instance of the MailMarshal Configurator can be active per MailMarshal Server. Attempting to start a second Configurator results in the notice “MailMarshal settings are locked.”
192 User Guide

Appendix A
Third Party Extensions
MailMarshal Exchange supports integration with a number of third party products that extend MailMarshal scanning and filtering capabilities. These products include virus scanning software, anti-spyware scanners, and image analysis software.
Image AnalyzerImage Analyzer is a third party deep image analysis product that has been fully integrated into the MailMarshal content scanning engine. Integration with Image Analyzer allows MailMarshal to assess the content of images that pass through the email server. For usage details, see “Where the attached image is/is not/may be inappropriate” on page 57. Marshal also provides integrated licensing for this product.
Because MailMarshal unpacks the content of a message, extracting the attachments and the content inside archive files, Microsoft Word documents, and other packed formats, Image Analyzer can scan the image content from all components of the target message.
The main target content that Image Analyzer attempts to detect is pornographic images. Image Analyzer uses a variety of techniques in its analysis to make this determination. It is important to note that detection of this type of content is not an exact science, and the level of technology available today means that there will be a degree of false-positive and false-negative detections. A number of control settings can be selected when creating a rule for image analysis, to help tune the results of the analysis.
Appendix A • Third Party Extensions 193

Why Would I Use Image Analyzer?The primary goal for organizations deploying image analysis technology is to reduce legal liability and to ensure that company reputation is not compromised. Image Analyzer allows your organization to utilize leading technology, and provides evidence of due diligence in protecting your employees from receiving material that may be offensive or in some cases illegal. Executives in some countries can be held legally liable for not exercising due diligence in preventing material of this nature from entering or being stored on their systems.
Many organizations today are blocking all image content entering their organization to ensure that offensive material cannot enter. However, blocking all images can prevent the transmission of images that are required for business purposes.
Image Analyzer allows the organization to permit email transfer of legitimate images, and also to meet its legal obligations of due diligence and its more general moral obligations of protecting its employees from offensive material being delivered to them over a medium that they have no control over.
What Results Can I Expect From Image Analyzer?Image Analyzer has tested their technology with a wide range of image content that typically travels the Internet. The published results of this testing show a false-positive rate (the rate at which non-pornographic images are detected as inappropriate) of between 3% and 7%. The results also show a false-negative rate (the rate at which inappropriate images are not reported) of between 17% and 26%. Based on the type of content entering your organization you may see similar or slightly better results. These results compare favorably with other products on the market.
194 User Guide

How Does Image Analyzer Address the Issues?Although today’s technology does not allow Image Analyzer to provide 100% protection against inappropriate image content, use of Image Analyzer can help in two ways.
• Use of Image Analyzer can help to reduce liability by showing due diligence in providing an appropriate environment.
• The policy based functionality of MailMarshal allows social education on this issue within an organization. Individuals who exchange inappropriate material tend to do so repeatedly. MailMarshal can send a notification to the sender when it detects inappropriate content. Even if MailMarshal does not detect every instance of the material, the individuals will be educated that the content of email is being analyzed and monitored. The risk of action being taken, or social embarrassment, rapidly increases. Most users will cease to send material that they know is not acceptable under your organization’s policy.
Virus Scanning SoftwareMailMarshal Exchange provides high-throughput DLL interfaces to a number of well-known virus scanning products. In addition to a DLL interface, MailMarshal also provides integrated licensing and a customized upgrade component for the McAfee scanner (known as McAfee for Marshal). For usage details, see Chapter 7, “Virus Scanners.”
Anti-virus software is considered a basic requirement for secure business networks. Integration of anti-virus scanning with MailMarshal allows checking for email viruses at the network boundary. This capability provides an added layer of protection beyond what desktop scanners can provide.
Appendix A • Third Party Extensions 195

Anti-Spyware ScannersMailMarshal Exchange provides high-throughput DLL interfaces, integrated licensing, and customized upgrade components for two anti-spyware scanners: PestPatrol and CounterSpy. These components are known as PestPatrol for Marshal and CounterSpy for Marshal.
Anti-spyware scanners provide significantly different benefits from virus scanners. Spyware behaviors can include key logging and other information theft, as well as annoying pop-ups and browser redirection. These behaviors are not usually classified as “viruses” because they do not usually attempt to spread themselves automatically and they do not destroy data or programs. However they can have a serious effect on security and productivity.
Integration of anti-spyware scanning with MailMarshal allows checking for email-borne spyware at the network boundary. This capability provides an added layer of protection beyond what desktop scanners can provide.
Configuration of anti-spyware scanners within MailMarshal uses the anti-virus configuration interface. For usage details, see Chapter 7, “Virus Scanners.”
196 User Guide

Index
AAcceptable Use Policy 1Actions, see Rule ActionsActive Directory Server 6, 36, 70, 137–139Administrator Email Addresses 13, 144Advanced Options 157–159Alert History 180Anti-Spyware 73, 74, 196Archiving 32, 90, 180Attachment details, logging, 14, 48, 149Attachment Fingerprints 21, 62, 65, 145, 183Attachment Parent 53Attachments 14, 41–55, 77, 95, 103, 107, 112,
150, 160Scanning for viruses 49Stripping 63Unpacking 160
Automatic Message Release 86
BBacking up
Configuration 145TextCensor Scripts 110
Best Practices 32, 77
CClassifications, see Logging ClassificationsConfiguration, Import and Export 110, 145Configurator 23–28, 192Console 163–176, 192Controller, MailMarshal 20, 141, 161CounterSpy for Marshal 73, 74, 196Crystal Reports 163
DDatabase
Create/Select 149Logging 14, 15, 149, 163, 165, 186
Date formatting 100Dead 161Dead Letter 79, 85, 89, 144, 161, 180Dead Letters
Causes 51, 52Domains 42, 168, 169
See also Local DomainsDrill-down 171
Index 197

EEmail 95Email Templates, see TemplatesEngine, MailMarshal 3, 24, 46, 75, 160, 161,
180Exchange, see Microsoft ExchangeExporting 173Exporting Configuration 110, 144Exporting Reports 173External 83, 85External Commands 63, 83–87
FFiltering 38Fingerprints, see Valid FingerprintsFolder Actions, Console 180–185Folders 62, 65, 78, 79, 80, 85, 89, 89–93, 145,
157, 179and virus scanning 75Dead Letter 85Parking 89, 91Standard 90
GGoto Action 61Goto action 39
HHardware Requirements 6Header 123Header Matching 124–127
Map Files 135Header Rewriting 123–135Help xiii, 4
History 14, 149, 180, 186History Search 187History, see Alert History, Mail HistoryHTTPS 152
IImage Analyzer 57, 193Importing Configuration 11, 15, 19, 110, 145Installation 9, 9–19, 164Introducing 1
KKeys, MailMarshal license 11, 13, 147–156,
164Knowledge Base 4
LLDAP 35, 69, 70, 71, 137, 137–142License Key, see KeysLicensing 154–156Local Domains 8, 12–13, 42, 146–148, 168Logging 14, 63, 115, 149–150, 184Logging Classifications 115–117Logs, see Message Logs, Windows Event Logs
MMailMarshal 191MailMarshal SMTP 4Message 119Message Folders, see FoldersMessage Logs 63, 149, 184–186Message Names 168, 181, 187Message Parking 47, 65, 91, 180Message Stamp 61, 119–121
198 User Guide

Microsoft Active Directory Server 36, 43, 69, 139
Microsoft Exchange 1, 3, 6–8, 9Microsoft Management Console 191Monitoring 23MSDE 15, 149, 164MX record 12, 147
NNews and Support 28Notifications 13, 28, 50, 61, 79, 85, 95, 97, 144
Oof 31Online Help 4Order of Evaluation 39, 67, 106, 109, 124,
131
PPass Message Through 86, 183Pass message to Rule 62Permanent Key 13, 74, 147, 156PestPatrol for Marshal 73, 74, 196Plug-in 7, 20, 159Ports, see TCP PortsPre 5Process Message 182
QQuarantine folders, see FoldersQuarantined messages 17, 46, 53, 90, 179, 183
RRegular Expressions 127–??, 131–136, ??–136Release Message 65, 86, 183Reload Rules 25, 179Reports 13, 14, 116, 149, 163, 163–176Restoring Configuration 110, 145RTF Message Stamping 120, 160Rule Actions 61–67Rule Conditions 44–53Rule User Matching 42–44Rules 34–67Rulesets 31, 31–39
Enabling 39Printing 33
SScanners, see Virus ScannersSchedules 37, 65, 69, 70, 91, 141Security Issues 18, 77, 92, 141, 179Server 143Server Array 10, 16, 150Server Properties 143–159Service Alerts 28, 180, 189Services
MailMarshal 17–18, 23, 25, 157, 161, 178Microsoft Exchange 9
SMTP Addresses 34, 53, 69, 143Software Requirements 5, 6Spam 54SpamCensor 56, 152SQL Express 6SQL Server 6, 14, 20, 149, 164Stub, see Plug-inSubject Line 32, 78, 85, 95, 123, 168, 174, 188
Index 199

TTCP Ports
1433 15018001 18, 178, 179
Template (email notification) 63, 86, 95–97Testing
LDAP Connections 138TextCensor Scripts 107–113
TextCensor 103TextCensor Scripts 103The 177Third 193
UUninstalling MailMarshal 20Unpacking Depth 159User 69User Groups 21, 35, 43, 69–72, 141, 145, 146User Matching, see Rule User Matching
VValid Fingerprints, see Attachment
FingerprintsVariables 100Virus 73Virus cleaning 49, 51Virus Scanners 73–76Virus scanners
Results 49Rule condition 49
WWebsite, Marshal Software 4Wildcards 104, 131, 147Windows Directories 75, 158Windows Event Logs 28Windows Performance Monitor 29
200 User Guide


