UNCLASSIFIED UNCLASSIFIED Microsoft NetMeeting 3.0 Security Microsoft NetMeeting 3.0 Security Microsoft NetMeeting 3.0 Security Microsoft NetMeeting 3.0 Security Assessment and Configuration Assessment and Configuration Assessment and Configuration Assessment and Configuration Guide Guide Guide Guide Systems and Network Attack Center (SNAC) [email protected]5 October 2001 Version 1.14 Authors: James M. Hayes, Capt Trent H. Pitsenbarger
Transcript
UNCLASSIFIED
UNCLASSIFIED
Microsoft NetMeeting 3.0 Security Microsoft NetMeeting 3.0 Security Microsoft NetMeeting 3.0 Security Microsoft NetMeeting 3.0 Security Assessment and Configuration Assessment and Configuration Assessment and Configuration Assessment and Configuration
! Do not attempt to implement any of the settings in this guide without first testing in a non-operational environment.
! This document is only a guide containing recommended security settings. It is not meant to replace well-structured policy or sound judgment. Furthermore this guide does not address site-specific configuration issues. Care must be taken when implementing this guide to address local operational and policy concerns.
! SOFTWARE IS PROVIDED "AS IS" AND ANY EXPRESS OR IMPLIED WARRANTIES, INCLUDING, BUT NOT LIMITED TO, THE IMPLIED WARRANTIES OF MERCHANTABILITY AND FITNESS FOR A PARTICULAR PURPOSE ARE EXPRESSLY DISCLAIMED. IN NO EVENT SHALL THE CONTRIBUTORS BE LIABLE FOR ANY DIRECT, INDIRECT, INCIDENTAL, SPECIAL, EXEMPLARY, OR CONSEQUENTIAL DAMAGES (INCLUDING, BUT NOT LIMITED TO, PROCUREMENT OF SUBSTITUTE GOODS OR SERVICES; LOSS OF USE, DATA, OR PROFITS; OR BUSINESS INTERRUPTION) HOWEVER CAUSED AND ON ANY THEORY OF LIABILITY, WHETHER IN CONTRACT, STRICT LIABILITY, OR TORT (INCLUDING NEGLIGENCE OR OTHERWISE) ARISING IN ANY WAY OUT OF THE USE OF THIS SOFTWARE, EVEN IF ADVISED OF THE POSSIBILITY OF SUCH DAMAGE.
! Please keep track of the latest security patches and advisories at http://www.microsoft.com/technet/security/current.asp.
! This document contains possible recommended settings for the system Registry. You can severely impair or disable a Windows System with incorrect changes or accidental deletions when using a Registry editor (Regedt32.exe or Regedit.exe) to change the system configuration. Currently, there is no “undo” command for deletions within the Registry. Registry editor prompts you to confirm the deletions if “Confirm on Delete” is selected from the options menu. When you delete a key, the message does not include the name of the key you are deleting. Therefore, check your selection carefully before proceeding.
The majority of this document is based upon work performed by the Mitre Corporation. Our thanks.
UNCLASSIFIED
UNCLASSIFIED v
Trademark Information
Microsoft, MS-DOS, Windows, Windows 2000, Windows NT, Windows 98, Windows 95, Windows for Workgroups, Windows 3.1, and NetMeeting are either registered trademarks or trademarks of Microsoft Corporation in the U.S.A. and other countries.
All other names are registered trademarks or trademarks of their respective companies.
Secure Installation and Configuration of NetMeeting 3.01 43 8.1 Installation 43 8.2 Secure Configuration of NetMeeting 3.01 48
Secure Installation and Configuration of NetMeeting Resource Kit 3.0 63 9.1 Installation 63 9.2 Secure Configuration 65
Glossary 83
Revisions 85
UNCLASSIFIED
UNCLASSIFIED viii
List of Figures
Figure Page
2-1 NetMeeting Directory Services via Internet Locator Service 4
2-2 Video Conferencing 6
2-3 Chat Interface 8
2-4 Whiteboard Interface 9
2-5 File Transfer Interface 9
2-6 File Transfer Status 10
2-7 Program Sharing 11
2-8 Remote Desktop Sharing 1 12
2-9 Remote Desktop Sharing 2 12
2-10 Remote Desktop Sharing 3 13
4-1 VTCP Secure 18
4-2 User Information Dialog Box 19
4-3 Meeting Options 21
4-4 Security Options 23
4-5 Call Status Indicators 26
4-6 Access Control Options 27
4-7 Remote Desktop Sharing (RDS) Architecture 29
4-8 Sharing Dialog Box 30
4-9 Access Control Dialog Box 31
4-10 Sharing and Control Options 32
4-11 NetMeeting Resource Kit 3.0 Wizard 34
UNCLASSIFIED
UNCLASSIFIED ix
8-1 Microsoft NetMeeting Page 44
8-2 NetMeeting Download Page 1 45
8-3 NetMeeting Download Page 2 46
8-4 Windows NetMeeting 3.01 Install 47
8-5 NetMeeting License Agreement 47
8-6 Directory for NetMeeting 48
8-7 Installation Complete 48
8-8 NetMeeting Configuration 1 49
8-9 NetMeeting Configuration 2 49
8-10 User Information 50
8-11 Directory Server Logon 51
8-12 Network Connection Type 51
8-13 Shortcuts & Quick Launch 52
8-14 Audio Tuning Wizard 1 53
8-15 Audio Tuning Wizard 2 54
8-16 Record Microphone Volume 55
8-17 Audio Tuning 3 55
8-18 Options Menu 56
8-19 General Tab 57
8-20 Security Tab Secure Options 59
8-21 Audio Tab Secure Options 60
8-22 Video Tab Secure Options 61
9-1 NetMeeting Resource Kit 3.0 Installation 63
9-2 License Agreement 64
UNCLASSIFIED
UNCLASSIFIED x
9-3 Successful Install 64
9-4 NetMeeting Resource Kit 3.0 Wizard 65
9-5 Configuration Options 66
9-6 Set Calling Options 1 67
9-7 Set Calling Options 2 68
9-8 Set Calling Options 3 69
9-9 Set Security Options 1 70
9-10 Set Security Options 2 71
9-11 Restrict the use of the Options Dialog Box 72
9-12 Restrict the use of Audio 73
9-13 Restrict the use of Video 74
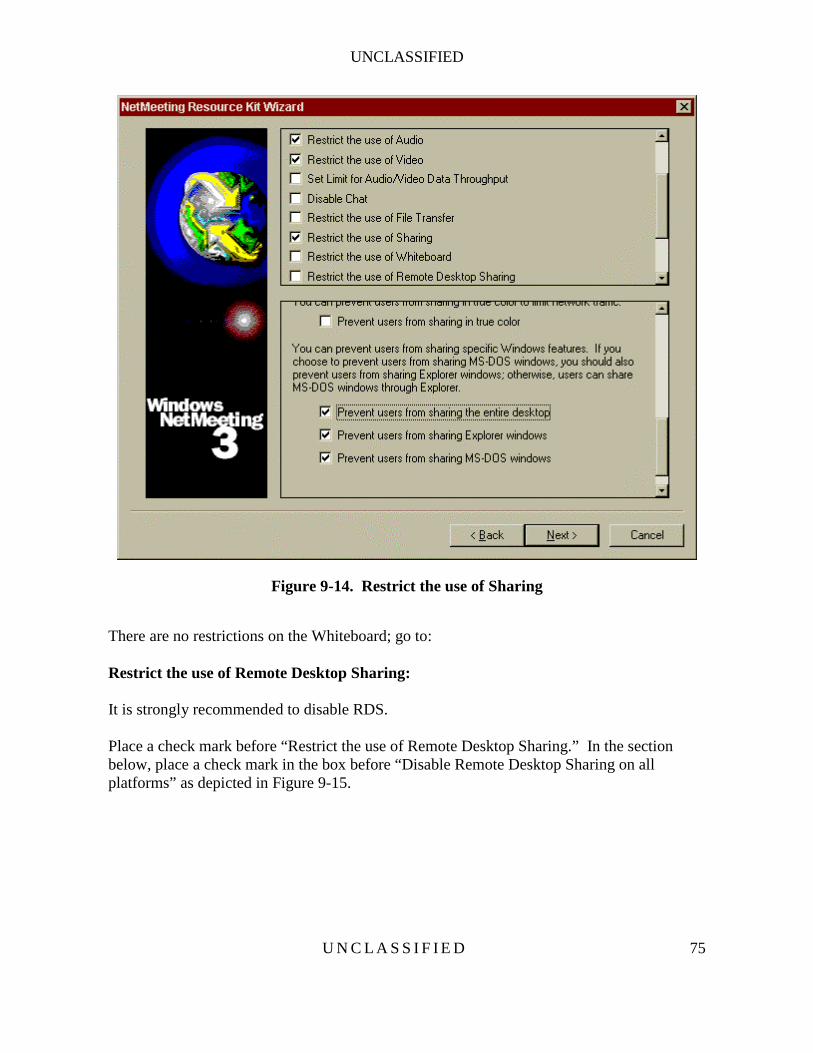
9-14 Restrict the use of Sharing 75
9-15 Restrict the use of Remote Desktop Sharing 76
9-16 Restrict the use of Directory Servers 77
9-17 Saving Customized Profile 78
9-18 Custom Distribution File 1 79
9-19 Custom Distribution File 2 80
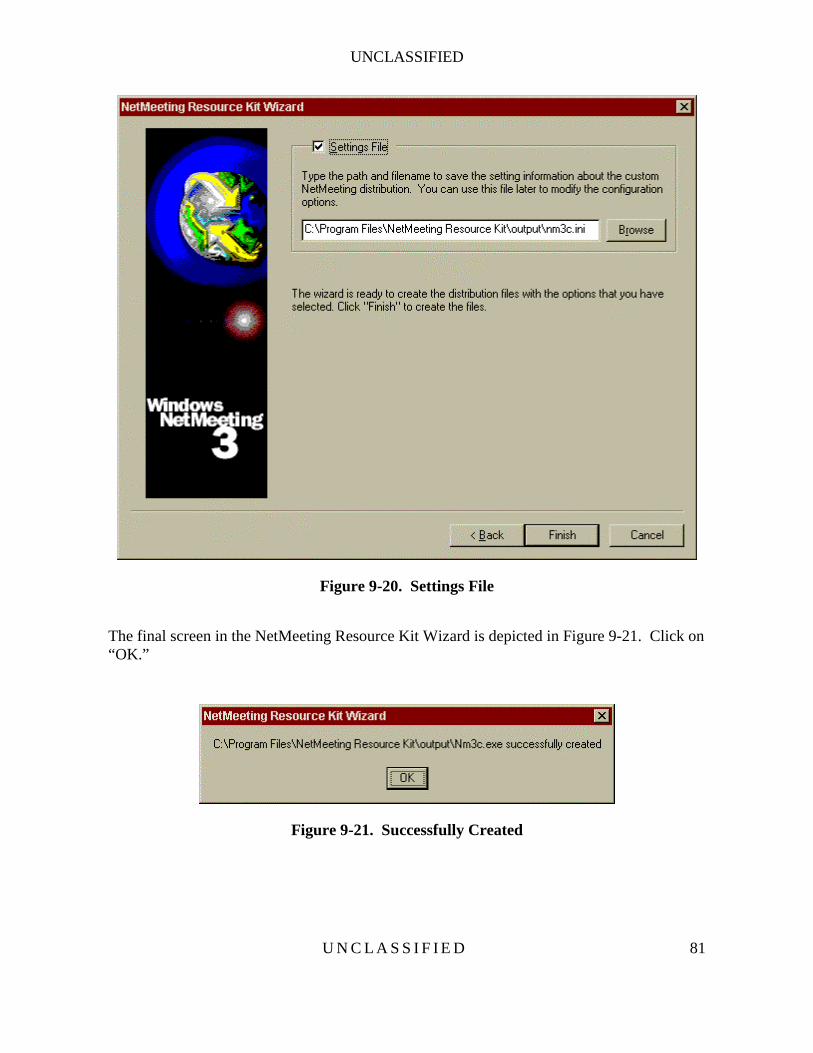
9-20 Settings File 81
9-21 Successfully Created 81
UNCLASSIFIED
UNCLASSIFIED xi
List of Tables
6-1 Network Ports Used by NetMeeting 39
UNCLASSIFIED
UNCLASSIFIED 1
Section 1
Introduction
1.1 Purpose The purpose of this document is to present the security assessment results of the Microsoft NetMeeting 3.0 collaboration tool (with the 3.01 service pack 1 applied), to review known issues and vulnerabilities associated with the earlier version of NetMeeting (Version 2.1), and discuss these issues and vulnerabilities in relation to NetMeeting 3.01. Finally, this paper provides a two-part Secure Configuration Guide. The first part focuses on individual installation and configuration of NetMeeting 3.01, and the second part focuses on enterprise-wide distribution using the NetMeeting Resource Kit 3.0.
1.2 Scope In fiscal year 1998, MITRE conducted a review of NetMeeting 2.1 and found it to be lacking in the most basic security areas. While the focus of this document is on NetMeeting 3.01, the security assessment was performed within the context of the security afforded by the previous version of NetMeeting, version 2.1. As such, this document identifies the security issues and findings from prior work, and addresses information security issues associated with the new NetMeeting version 3.01 such as identification and authentication, access control, privacy and confidentiality, integrity, nonrepudiation, auditing, and availability. This is not an overall product assessment. Issues such as user interface design, system performance, product support, or infrastructure issues are not evaluated unless they relate to security concerns. Please note that the recommendations made in this document are valuable only in the context of a sound organizational security policy. The best use of this document is in helping to define that policy as it relates to NetMeeting. In simpler terms, just because this documents recommends a course of action that DOES NOT mean those recommendations are appropriate for all situations – this guidance must be tempered in light of local security needs.
UNCLASSIFIED
UNCLASSIFIED 2
1.3 References The following references are cited throughout this document.
• NetMeeting Resource Kit 3.0, Microsoft • NetMeeting Software Developer’s Kit (SDK) Version 3.0, Microsoft
UNCLASSIFIED
U N C L A S S I F I E D 3
Section 2
NetMeeting Product Overview
NetMeeting is a collaborative computing tool designed to allow two or more people to enter a virtual meeting from geographically dispersed locations. NetMeeting provides a virtual space within which the participants can communicate via voice, video, Chat, or Whiteboard, and can share applications and documents. This section provides a brief overview of the general requirements, features, and capabilities of NetMeeting. The vendor’s product claims and features identified here are analyzed and tested for security vulnerabilities in Sections 4 and 5.
2.1 System Requirements NetMeeting runs on Windows 95, Windows 98, and Windows NT/2000, platforms. It is used for communication and collaboration across the Internet or a local-area network (LAN) using Transport Control Protocol and Internet Protocol (TCP/IP). The user’s physical connection to the network is irrelevant to the operation of NetMeeting, though there are user-adjustable settings for matching the conference bandwidth to the network medium. Prior to loading NetMeeting, Microsoft’s Internet Explorer, Version 4.0 or higher must be present on each user’s computer. NetMeeting is not compatible with any other browser and requires Internet Explorer to install and operate properly.
2.2 Typical Collaboration Features This section describes NetMeeting’s collaboration features and provides context for the security assessment in Section 4.
2.2.1 Directory Services Directory services allow a person to find the basic information required to connect to, and collaborate with, one or more persons. The minimum information typically required to complete a connection to someone is that person’s network address. This can take the form of an e-mail address, Internet Protocol (IP) address, or user name on a particular Internet Service Provider (ISP). There are directory listings that can provide one or more of these pieces of information given the proper name of the person in question. Once the required address of each intended conference participant is obtained, the conference host can place a call to each and establish the conference. Communication and/or collaboration can then commence. If users know the IP address of each other, they can connect point-to-point without having to log on to a directory server. However, many users today prefer to log on to a directory server that identifies all available users. Once they log on, they can select the user(s) they wish to communicate with without being required to know the Internet address beforehand.
UNCLASSIFIED
U N C L A S S I F I E D 4
An Internet Locator Service (ILS) is a component of the Microsoft Site Server, which creates a dynamic directory of NetMeeting users. This directory provides a list of all participants who are currently logged in to that directory. NetMeeting participants can then initiate calls and meetings directly from the directory server. ILS servers can be set up by any organization to provide directory services to their users. Many existing public ILS servers are available via the Internet as well. Figure 2-1 shows the interface for the NetMeeting directory service.
Figure 2-1. NetMeeting Directory Services via Internet Locator Service
To be listed in the directory, users must log into a specified ILS server, (“directoryserver.companyx.com” in the example). The ILS server keeps track of the current Internet addresses of the registered users. To call someone on the list, the user double-clicks on the individual’s name, and NetMeeting will place the call. This is convenient for users who are assigned a dynamic Internet address through their network providers.
UNCLASSIFIED
U N C L A S S I F I E D 5
2.2.2 One-to-One Audio/Video Conferencing Audio services allow participants to communicate via audio (voice and multimedia material). To use these services, the participants must have multimedia capabilities in their computers (speakers and microphone or a telephone interface). Video services allow participants to use video cameras to see each other during the conference. In order to transmit video, a participant must have a video camera connected to their computer. The quality of both audio and video transmission is directly related to the bandwidth of the network medium used for the conference. In general, lower network bandwidth results in lower quality of audio. NetMeeting uses the typical bandwidth configurations, which are handled on a per-client basis for the following network types:
• 14.4 kilobits per second modems • 28.8 kilobits or faster modems • Cable, xDSL or Integrated Services Digital Network (ISDN) • LAN
NetMeeting also utilizes other techniques to maximize performance and decrease network traffic: • Caching graphical objects
• Specialized bitmap compression • Sending graphical information as orders rather than sending actual graphical data and
updating bitmaps • Smart-order encoding: In Program Sharing, once an item is edited, only new data is sent
to be displayed rather than sending the entire document. • Outgoing data queue: Items are queued in real-time so they are ready to be
transmitted instantly rather than waiting to queue them all at once. • Smart spoiling: NetMeeting looks for existing output in the queue and deletes it
before new output is queued. • Smart monitoring: Monitors information in the outgoing data queue and if it
becomes too large, NetMeeting collects and transmits all information over the network at once.
The highest priority is given to audio in a NetMeeting call, then the data stream and finally the video stream. NetMeeting policies can be configured to set values for average audio and video throughput limits. Collaboration tools generally have audio coder/decoders (codecs) built in to allow compression and decompression of the audio stream to accommodate bandwidth limitations. These aid NetMeeting in establishing low-bit rate connections, which are necessary for transmissions over the Internet.
UNCLASSIFIED
U N C L A S S I F I E D 6
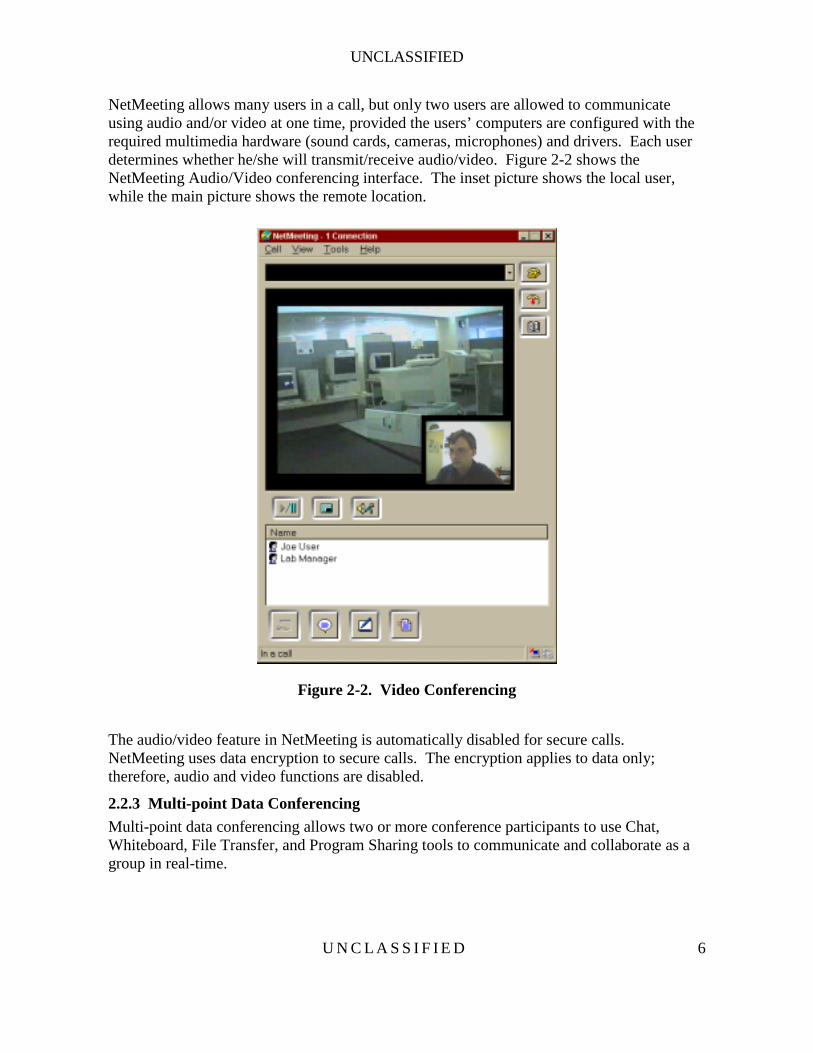
NetMeeting allows many users in a call, but only two users are allowed to communicate using audio and/or video at one time, provided the users’ computers are configured with the required multimedia hardware (sound cards, cameras, microphones) and drivers. Each user determines whether he/she will transmit/receive audio/video. Figure 2-2 shows the NetMeeting Audio/Video conferencing interface. The inset picture shows the local user, while the main picture shows the remote location.
Figure 2-2. Video Conferencing
The audio/video feature in NetMeeting is automatically disabled for secure calls. NetMeeting uses data encryption to secure calls. The encryption applies to data only; therefore, audio and video functions are disabled.
2.2.3 Multi-point Data Conferencing Multi-point data conferencing allows two or more conference participants to use Chat, Whiteboard, File Transfer, and Program Sharing tools to communicate and collaborate as a group in real-time.
UNCLASSIFIED
U N C L A S S I F I E D 7
2.2.3.1 Chat Chat services allow participants to have real-time two-way text communications in full duplex. This type of service is better, for example, than instant messaging because the Chat participants see each keystroke as it occurs, which feels more natural for users. Participants in a meeting can use Chat to communicate in the absence of audio support, or when bandwidth constraints make audio support unusable. Chat is a text messaging feature that allows users to communicate in real-time, providing a written archive of this communication. Chat can be used between two or more participants. A special option allows two participants in a multi-point conference to have a private Chat within the group. Figure 2-3 shows the NetMeeting Chat interface. Users can choose to send messages to a specific user or to everyone in the meeting.
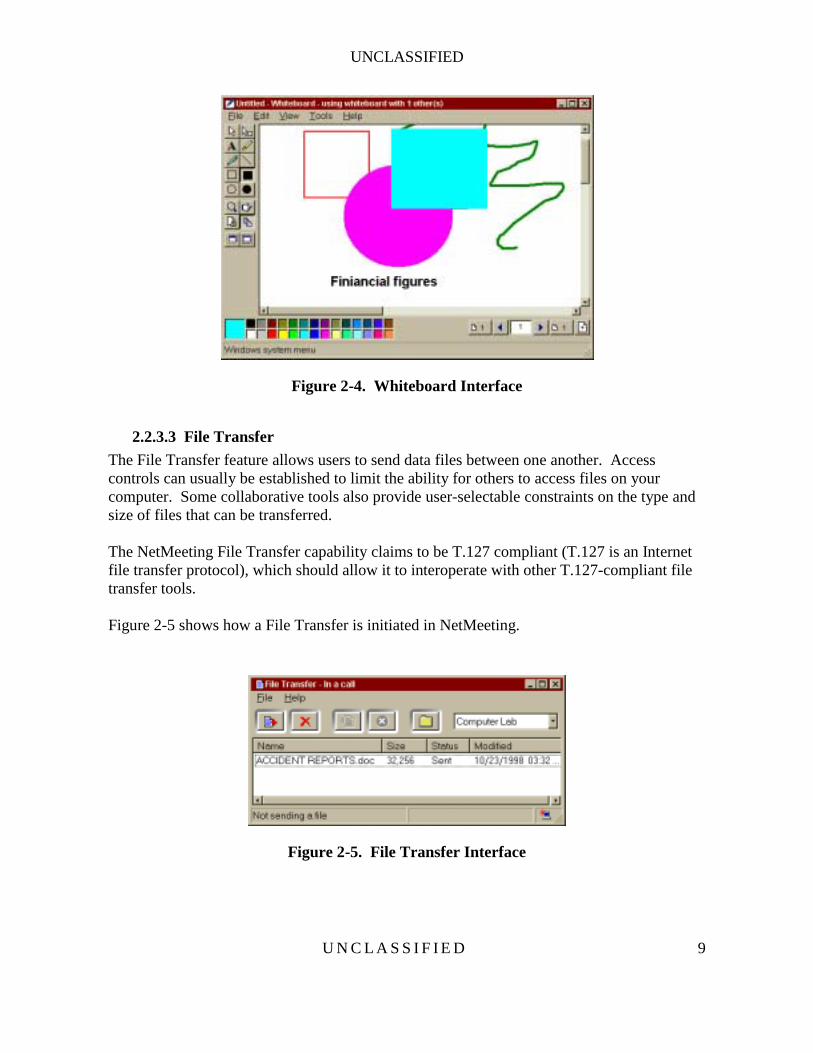
2.2.3.2 Whiteboard The Whiteboard feature allows users to create, review, and modify text and graphical information in a collaborative way. Generally, all participants can add to or modify the contents of the Whiteboard at any time, though access control rules can be applied to restrict this. Information created or modified in this manner can be incorporated into other document types for final release. Meeting participants can simultaneously review, create, and update graphical information displayed on a Whiteboard.
UNCLASSIFIED
U N C L A S S I F I E D 8
Figure 2-3. Chat Interface
NetMeeting’s Whiteboard feature is object-oriented, rather than pixel-based, allowing users to select specific objects to highlight or modify. The NetMeeting Whiteboard claims to be T.126 compliant (T.126 is an Internet whiteboard protocol), which means it should be compatible and able to be used with other T.126-compliant whiteboard tools. Figure 2-4 shows the Whiteboard interface.
UNCLASSIFIED
U N C L A S S I F I E D 9
Figure 2-4. Whiteboard Interface
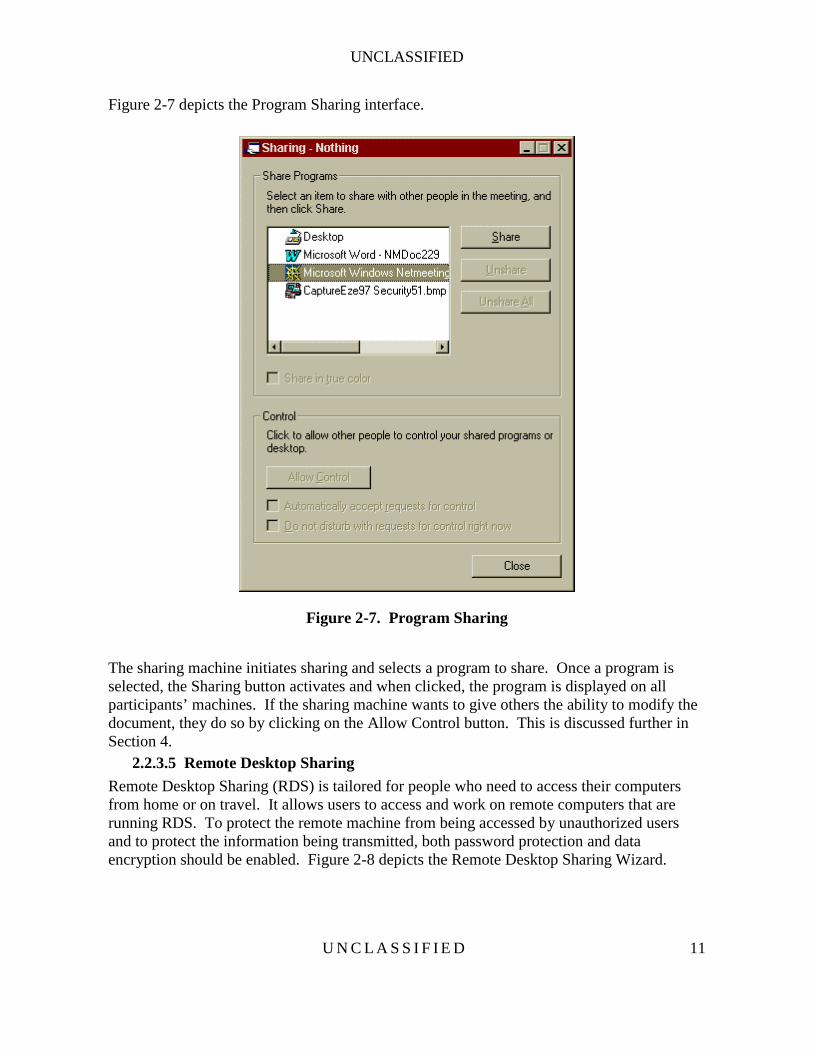
2.2.3.3 File Transfer The File Transfer feature allows users to send data files between one another. Access controls can usually be established to limit the ability for others to access files on your computer. Some collaborative tools also provide user-selectable constraints on the type and size of files that can be transferred. The NetMeeting File Transfer capability claims to be T.127 compliant (T.127 is an Internet file transfer protocol), which should allow it to interoperate with other T.127-compliant file transfer tools. Figure 2-5 shows how a File Transfer is initiated in NetMeeting.
Figure 2-5. File Transfer Interface
UNCLASSIFIED
U N C L A S S I F I E D 10
The sender selects a file from the standard Windows file pull-down menu (such as accident reports.doc), selects the recipient(s) from the user name pull-down list (Mike in the Computer Lab), and clicks the Send button. The transfer status (Sent) is displayed. Each File Transfer recipient sees a pop-up window similar to the one displayed in Figure 2-6.
Figure 2-6. File Transfer Status
The window shows the status of the incoming transfer, the name of the alleged sender (Joe User), and a warning about potentially malicious code. Also, the receiver of the file has the option to close, open or delete the file either during the transfer or after the transfer.
2.2.3.4 Program Sharing Program (or application) Sharing services allow a program on one participant’s computer to be shared with other call participants. The initiator can then pass control to another participant, allowing real-time modifications to be made by the second participant. This feature is generally used to broadcast a presentation (such as Microsoft PowerPoint) to the participants for comments, enabling the initiator to make live modifications. Program Sharing enables participants to share the software application loaded on a single machine, rather than requiring an individual installation on each computer as a prerequisite to viewing and modifying the material being presented.
UNCLASSIFIED
U N C L A S S I F I E D 11
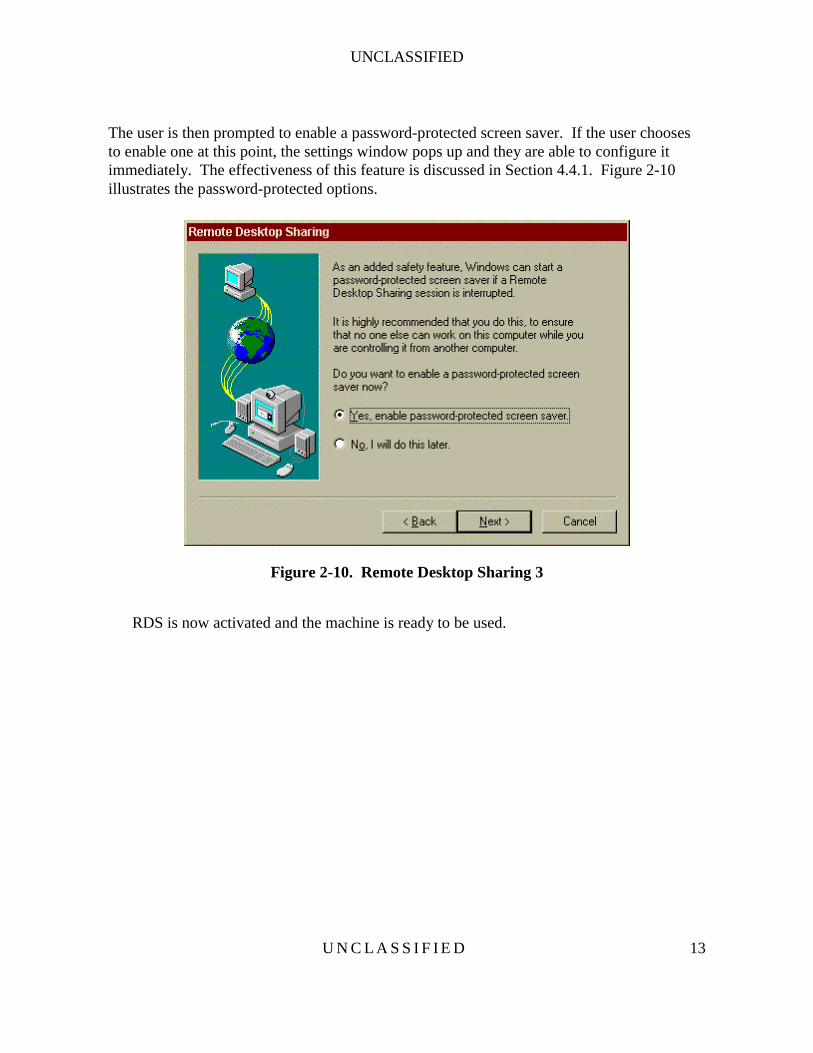
Figure 2-7 depicts the Program Sharing interface.
Figure 2-7. Program Sharing
The sharing machine initiates sharing and selects a program to share. Once a program is selected, the Sharing button activates and when clicked, the program is displayed on all participants’ machines. If the sharing machine wants to give others the ability to modify the document, they do so by clicking on the Allow Control button. This is discussed further in Section 4.
2.2.3.5 Remote Desktop Sharing Remote Desktop Sharing (RDS) is tailored for people who need to access their computers from home or on travel. It allows users to access and work on remote computers that are running RDS. To protect the remote machine from being accessed by unauthorized users and to protect the information being transmitted, both password protection and data encryption should be enabled. Figure 2-8 depicts the Remote Desktop Sharing Wizard.
UNCLASSIFIED
U N C L A S S I F I E D 12
Figure 2-8. Remote Desktop Sharing 1
Once the wizard is initiated, if the computer is running Windows 95/98/Me, the user is required to enter a password that will be used to access the machine remotely. Figure 2-9 depicts this interface1.
Figure 2-9. Remote Desktop Sharing 2 1 Windows NT/2000 users gain access by virtue of their membership in a group called “NetMeeting RDS
Users” which is created and populated by the administrator.
UNCLASSIFIED
U N C L A S S I F I E D 13
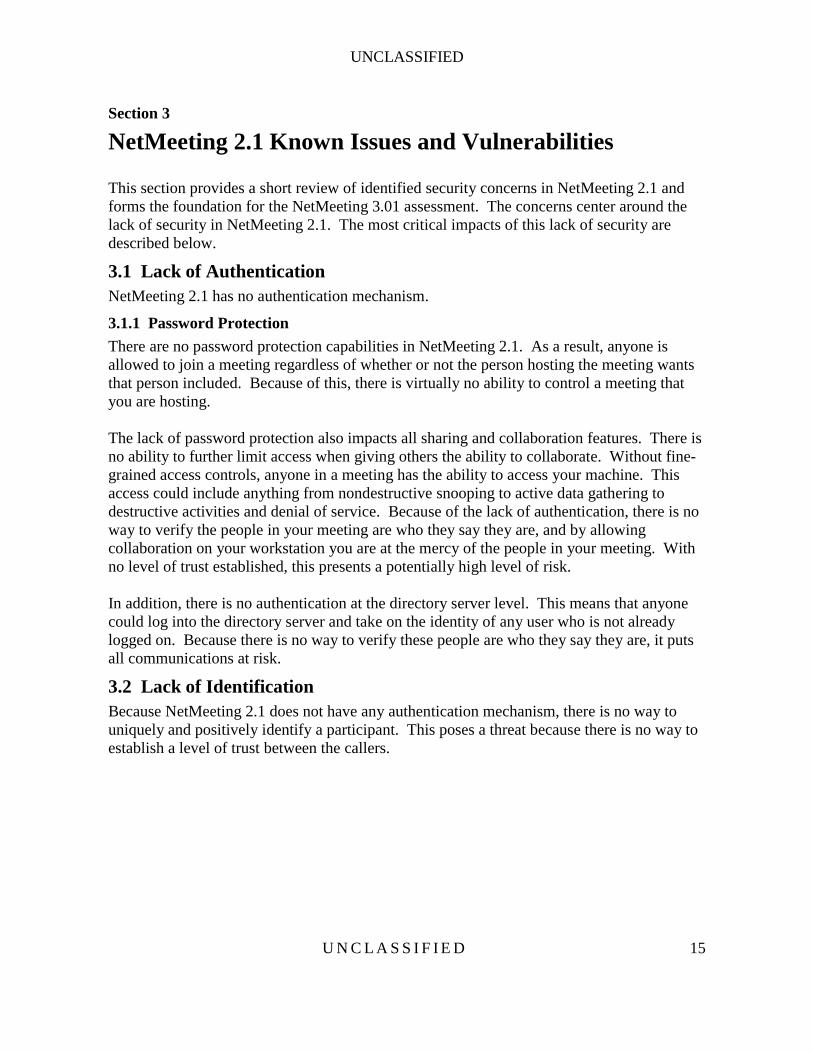
The user is then prompted to enable a password-protected screen saver. If the user chooses to enable one at this point, the settings window pops up and they are able to configure it immediately. The effectiveness of this feature is discussed in Section 4.4.1. Figure 2-10 illustrates the password-protected options.
Figure 2-10. Remote Desktop Sharing 3
RDS is now activated and the machine is ready to be used.
UNCLASSIFIED
U N C L A S S I F I E D 15
Section 3
NetMeeting 2.1 Known Issues and Vulnerabilities
This section provides a short review of identified security concerns in NetMeeting 2.1 and forms the foundation for the NetMeeting 3.01 assessment. The concerns center around the lack of security in NetMeeting 2.1. The most critical impacts of this lack of security are described below.
3.1 Lack of Authentication NetMeeting 2.1 has no authentication mechanism.
3.1.1 Password Protection There are no password protection capabilities in NetMeeting 2.1. As a result, anyone is allowed to join a meeting regardless of whether or not the person hosting the meeting wants that person included. Because of this, there is virtually no ability to control a meeting that you are hosting. The lack of password protection also impacts all sharing and collaboration features. There is no ability to further limit access when giving others the ability to collaborate. Without fine-grained access controls, anyone in a meeting has the ability to access your machine. This access could include anything from nondestructive snooping to active data gathering to destructive activities and denial of service. Because of the lack of authentication, there is no way to verify the people in your meeting are who they say they are, and by allowing collaboration on your workstation you are at the mercy of the people in your meeting. With no level of trust established, this presents a potentially high level of risk. In addition, there is no authentication at the directory server level. This means that anyone could log into the directory server and take on the identity of any user who is not already logged on. Because there is no way to verify these people are who they say they are, it puts all communications at risk.
3.2 Lack of Identification Because NetMeeting 2.1 does not have any authentication mechanism, there is no way to uniquely and positively identify a participant. This poses a threat because there is no way to establish a level of trust between the callers.
UNCLASSIFIED
U N C L A S S I F I E D 16
3.3 Lack of Encryption Capability Data encryption is especially important, when using collaboration tools, to protect the information that is being exchanged and ensure that it cannot be read by any unauthorized persons. Because there is no ability to encrypt data when using NetMeeting 2.1, there is a high risk that the information being exchanged during these meetings can be intercepted by an unauthorized party.
UNCLASSIFIED
U N C L A S S I F I E D 17
Section 4
Security Assessment of NetMeeting 3.01
Due to the significant security issues described in Section 3, Microsoft released NetMeeting 3.01 with new security and administrative features to mitigate these shortcomings. The new features include password protection, user authentication, and data encryption. This section provides an empirical assessment of these features and their effectiveness.
4.1 Assessment Environment The assessment environment consisted of a combination of Windows 95, 98, and NT 4.0 multimedia workstations running NetMeeting 3.0 software with the 3.01 service patch applied. At the time of testing, this was the latest release. The test network included MITRE’s own Intranet, the external extranet, and dial-up services. The MITRE-produced VTCP/Secure package, version 4.3, was also used to set up an encrypted tunnel allowing a connection to MITRE’s secure network through a public ISP or sponsor network. VTCP/Secure provides a mechanism that lets a user establish a secure communications path over an untrusted network while allowing (with a few exceptions) applications on the user’s computer to act as if they were running on a node of the secure network. A VTCP client establishes a connection with a trusted authentication server on the secure network and exchanges traffic with it using encrypted data (using a 56-bit key, which is renegotiated between the client and server every 40 minutes) encapsulated within a normal network packet. This reduces the probability that the contents of the packets can be made to yield usable information if intercepted by an unauthorized observer, and also protects against unauthorized modification or spoofing.2 Figure 4-1 depicts VTCP/Secure connecting a user on the Internet to a MITRE’s enterprise network.
2 This information was paraphrased from the MITRE Information Infrastructure and VTCP Secure Pilot Test
Persons Handout document.
UNCLASSIFIED
U N C L A S S I F I E D 18
InsecurePPP Link
(encrypted)
LocalISP
The Internet
VSGATE(MITRE)
InsecureTrunk
(encrypted)
MITRE internalnetwork
Secure MITREpath (plaintext)
Authentication
SecureIDServer
Figure 4-1. VTCP Secure
The workstations were loaded with Microsoft Internet Explorer 5.0 to process certificates. Both personal and MITRE-issued certificates were used in the testing. For directory services, MITRE used its own ILS server to locate and connect test personnel.
4.2 Identification and Authentication (I&A) Identification mechanisms are intended to force users to identify themselves in some way to the other conference participants prior to joining the conference. Authentication mechanisms are intended to verify the identity of other conference participants, and to assure participants that transmissions are in fact from the sender who appears to be originating the transmission. This prevents someone from masquerading as a valid participant and intercepting transmissions. NetMeeting 3.01 now provides both, as described below.
4.2.1 Identification in NetMeeting 3.01 For identification purposes, NetMeeting 3.01 asks for certain information from the user when the software is loaded on the computer. The minimum required fields are First and Last name, and an e-mail address. This information is passed as identification to the other users in a conference or to a directory server when used as a locator service. Figure 4-2 shows the User Information Dialog Box used to enter this information.
UNCLASSIFIED
U N C L A S S I F I E D 19
Figure 4-2. User Information Dialog Box
Caution: Identification Though this user information is required, it is not validated, and can be easily forged by either the installer or by any subsequent user at any time. Thus, a user can assume the identity of anyone he/she chooses.
NetMeeting provides two ways to initiate a conference with other users: direct calls or directory calls. In a direct call, conference participants call each other using point-to-point Internet (or IP) addresses. Calls can consist of two or more participants. In a multi-party (conference) call with three or more participants, a participant joins the conference when called by the person hosting the conference, or by calling any other participant already in the conference.
UNCLASSIFIED
U N C L A S S I F I E D 20
Caution: Direct Calling NetMeeting establishes a bond between the first two people in the conference. If either person hangs up during the conference, every meeting participant is instantly disconnected from the call without warning. Moreover, NetMeeting does not overtly identify this bond relationship. This may not be a problem in a small meeting where participants notice who connects first. However, in a large meeting, where the identity of the first two people is not established, the meeting could be disconnected and all information lost if one of the two key participants hangs up. The workaround is to ensure that all meetings are “hosted” (described in Section 4.2.2 below). In a hosted meeting, NetMeeting bonds only with the hosting party.
In a directory call, the initiator first logs into a directory server, which lists all available users. Once logged into the directory server, the initiator can double click on the users he/she wishes to include in the conference, thus eliminating the need to know the specific Internet addresses of the other parties. The type of directory server used by NetMeeting is called an ILS, which is based on the Lightweight Directory Access Protocol (LDAP). Warning: Directory Server There are two concerns when a using a directory server. First, the information used to log into the server is the same user information provided when the program was installed, which is static, is not authenticated, and, as stated earlier, can be forged quite easily. Because the validity of this information is in question, the actual identity of the listed users is not trustworthy. A second issue with ILS directory servers is a lack of log-in accounting. Every user who chooses to log into a directory server, must explicitly log off of the directory server before they exit NetMeeting. Otherwise, they will remain logged in indefinitely (or until they explicitly reopen the application and log off the directory server). This persistence has the unwanted and undesired effect of allowing the next user of the system to have the same identity and access controls as the previous user.
4.2.2 User Authentication NetMeeting 3.01 has added new features to help with authentication of its users. These features have also introduced a new term—meeting. Instead of calling everyone into a conference call, a host can now initiate a meeting and invite specified people to join it. These meetings can be initiated with or without security features at the discretion of the host. If the host enables certificate security features, then all participants are forced to do the same, or they will not be admitted to the meeting.
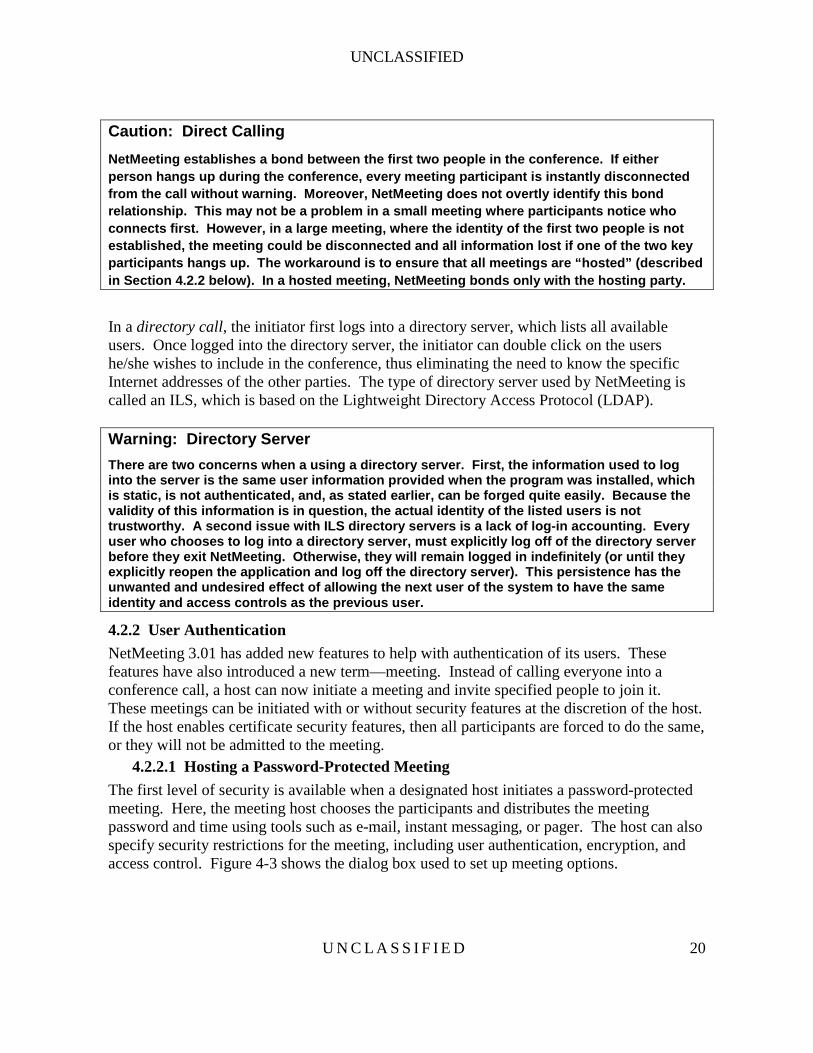
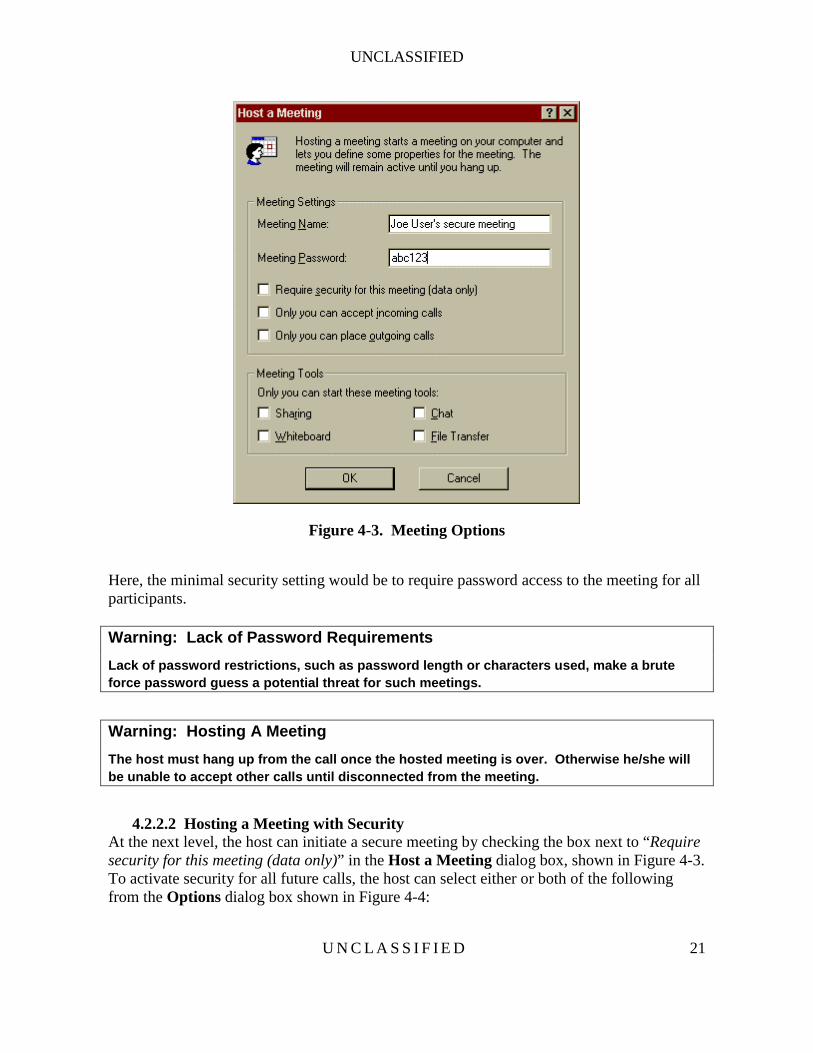
4.2.2.1 Hosting a Password-Protected Meeting The first level of security is available when a designated host initiates a password-protected meeting. Here, the meeting host chooses the participants and distributes the meeting password and time using tools such as e-mail, instant messaging, or pager. The host can also specify security restrictions for the meeting, including user authentication, encryption, and access control. Figure 4-3 shows the dialog box used to set up meeting options.
UNCLASSIFIED
U N C L A S S I F I E D 21
Figure 4-3. Meeting Options
Here, the minimal security setting would be to require password access to the meeting for all participants. Warning: Lack of Password Requirements Lack of password restrictions, such as password length or characters used, make a brute force password guess a potential threat for such meetings.
Warning: Hosting A Meeting The host must hang up from the call once the hosted meeting is over. Otherwise he/she will be unable to accept other calls until disconnected from the meeting.
4.2.2.2 Hosting a Meeting with Security
At the next level, the host can initiate a secure meeting by checking the box next to “Require security for this meeting (data only)” in the Host a Meeting dialog box, shown in Figure 4-3. To activate security for all future calls, the host can select either or both of the following from the Options dialog box shown in Figure 4-4:
UNCLASSIFIED
U N C L A S S I F I E D 22
• “I prefer to receive secure incoming calls. Accept only secure calls when I’m not in a
meeting” • “I prefer to make secure outgoing calls” When entering a secure meeting, participants are prompted for their digital certificate password first, followed by the meeting password. Digital certificates are further discussed in Section 4.2.2.2.1.
4.2.2.2.1 Digital Certificates NetMeeting uses digital certificates to verify the identity of a caller or meeting participant. These certificates bind the identity of the certificate owner to a set of digital keys that can be used to encrypt and/or digitally sign information shared in the meeting; however, it is important to note that the identity established in the General tab of NetMeeting is not bound to the digital certificate. Typically, each certificate contains the owner’s name, the name and digital signature of the entity that issued the certificate, and the certificate expiration date. Additional attribute information, such as serial numbers and e-mail addresses may be included. Meeting participants should view the properties of each user every time they connect to a meeting. Meeting participants whose certificates contain errors such as unknown root or signature verification failure should not be allowed to participate in a meeting. In addition, only those roots necessary for certificate validation should remain in the certificate store.
UNCLASSIFIED
U N C L A S S I F I E D 23
Figure 4-4. Security Options
All users must provide a digital certificate to participate in a secure call. NetMeeting allows users to either provide their own personal certificate (encryption and authentication) or use the default NetMeeting certificate (encryption). The meeting host can view each caller’s credentials before accepting the caller into a secure meeting. Once accepted into the secure meeting, each participant can view the credentials of any of the other participants. Figure 4-4 shows the Security Options dialog box for selecting the certificate type. The default NetMeeting certificate is generated during setup and is installed in the Windows certificate store. This is shown in Figure 4-4 as “Use privacy (encryption) only.” This certificate provides encryption only—it does not provide user authentication by a trusted entity. A NetMeeting user may utilize a personal certificate for user authentication and data encryption for “secure” calls. This is shown in Figure 4-4 as “Use this certificate for privacy
UNCLASSIFIED
U N C L A S S I F I E D 24
and authentication.” Personal certificates are considered more secure than default NetMeeting certificates, since they are theoretically issued by a trusted third-party Certificate Authority (CA). To use a personal certificate, users must first import into Internet Explorer (IE) the Root Certificate for the issuing Certificate Authority. Once the Root CA has been installed, the user imports their personal certificate into IE. Once imported, XEnroll (an IE browser control) processes the certificate enrollment, and the certificate is then added to the Windows certificate store. NetMeeting looks to the Windows certificate store when Security is activated and personal certificates are used. If the Root CA’s certificate is not imported first, authentication fails. NetMeeting uses the Microsoft Crypto API (CAPI) to manage certificates and secure data channels. The Crypto API, which is a core component of Windows 95, 98, NT 4.0, and 2000, provides a standard framework that programs can use to obtain cryptographic and certificate services. Once the user has selected the call and certificate type to use, security is activated. When using a personal certificate, each user must supply a personal certificate password when the application opens. Caution: NetMeeting Exclusively Requires Internet Explorer NetMeeting REQUIRES the Internet Explorer windows certificate store to manage digital certificates and enable security. NetMeeting does not work with any other certificate store or browser. This represents a problem for users where IE is not available. Caution: Erratic Behavior NetMeeting operates erratically with security enabled. At times, it does not recognize that security has been activated, while other times it instantly asks for a certificate password. Users must exit and restart NetMeeting after making configuration changes to ensure the changes have been activated. When a secure call is initiated, audio and video options are automatically disabled (i.e., they are grayed out on the user interface). Any remaining data shared in the conference (Chat, Whiteboard, File Sharing) is encrypted using Microsoft’s Crypto API.
UNCLASSIFIED
U N C L A S S I F I E D 25
Warning: Secure Calls NetMeeting cannot differentiate between a secure encrypted call and a secure authenticated call. Each call participant must have security turned on to be able to participate in a secure call, but there is no way to tell if the participants are fully authenticated or not. Authentication can be forced by enabling the Do not allow connections with incomplete authentication option through the NetMeeting Resource Kit. Also, authentication using digital certificates can be forced by requiring a relative distinguished name (RDN) be specified for a CA, but in either case it does not mean that the user’s digital certificate is bound to the NetMeeting user identity or that a trusted CA signed the certificate.
4.3 Confidentiality Confidentiality (or privacy) ensures that the information content passed between two or more parties in a conference is not susceptible to passive interception and analysis. Protection can be provided at either the stream level, which protects the end-to-end transmission medium, or at the individual message level, which protects user-specified portions of data, such as specific e-mail messages. NetMeeting 3.01 addresses confidentiality and privacy by encrypting the data stream between meeting participants, but only if the host explicitly initiates the meeting as a secure meeting. Data encryption using Microsoft’s Crypto API applies to Whiteboard, Chat, shared programs, and transferred files. Audio and video communications are automatically disabled during encrypted meetings. When a secure call is in progress, a yellow safety lock icon is placed on the NetMeeting User Interface (UI) as illustrated in Figure 4-5. Caution: Data Encryption Data is encrypted only if all meeting participants are using NetMeeting 3.01 or later, and they have established a secure meeting. If a user attempts to connect to a meeting with an earlier version of NetMeeting, or without having specified a secure call, then the call is automatically rejected. Warning: Selecting Security Options Calls are not secure if a user selects a certificate but does not select at least one secure call option. To ensure that security is functioning properly during a call, observe the call status indicator on the bottom left side of the call window. It should say “In a secure call” and the yellow padlock at the lower right corner of the window should be in the closed position as illustrated in Figure 4-5. If the padlock is open, then the call is not secure.
UNCLASSIFIED
U N C L A S S I F I E D 26
Figure 4-5. Call Status Indicators
4.4 Access Control In the context of collaboration, access control provides the ability to limit and control access to conference audio, video, documents, and applications, based on the mechanisms used for identification and authentication. NetMeeting provides several mechanisms for controlling access to various aspects of a meeting, as shown in Figure 4-6. The meeting host can choose to be the only person allowed to initiate outgoing calls and/or accept incoming calls while in a secure meeting. Theoretically, this should prevent a “back door” condition where an unauthorized person can dial into a participant who is connected to a secure meeting (not requiring acceptance by the meeting host), and gain access to the secure meeting covertly. However, it may be possible for a meeting participant to use some other third party utility to allow unauthorized person access to the meeting.
UNCLASSIFIED
U N C L A S S I F I E D 27
Figure 4-6. Access Control Options
Referring again to Figure 4-6, the meeting host can also restrict access to conference features. For instance, the host can allow anyone in the conference to initiate Chat, Whiteboard, File Transfer, Program Sharing, or access to these features can be restricted to the meeting host. Testing revealed that these controls do indeed restrict access to the specified collaboration features. Several tests were run to verify the ability to limit access to specific features. In each test scenario, the user was not able to access any feature that the meeting host overtly restricted.
4.4.1 Remote Desktop Sharing NetMeeting has added the ability to enforce security on its RDS feature. To access a remote workstation, the user must set up a username and password when accessing a Windows 95/98/Me computer. The idea is to protect the workstation from being accessed by others who do not have the correct username and password. To manage access to a Windows NT or Windows 2000, place remote desktop sharing users into the NetMeeting RDS Users group. Users then supply his or her account name and password to gain access.
UNCLASSIFIED
U N C L A S S I F I E D 28
The second layer of security for RDS is data encryption. The user can set up RDS so that access to the workstation must be secure. This ensures that others cannot capture the data being transmitted. Finally, NetMeeting provides features which help protect the local access to remotely shared workstations. Testing of the RDS feature revealed several items of note. Warning: Remote Desktop Sharing: Lack of Password Requirements Passwords on RDS are case sensitive, but there are no other password restrictions or requirements.
Once a user (User A) creates an RDS username and password on the remote workstation (or is a member of the NetMeeting RDS Users group), they can access that workstation from other locations. NetMeeting documentation states that if someone (User B) attempts to use the remotely shared workstation while the remote user (User A) is logged in, the password-protected screen saver immediately engages and locks User B out. Testing revealed that this is not a completely accurate characterization of this feature. The test was repeated on three different machines; the screen saver failed to engage each time someone tried to use the machine. While User B was prevented from being able to use the workstation, they could watch all of User A’s activity. There is an important caveat on this observation -- it is important to enable the screen saver password protection feature. Without doing so, User B is able to easily take control on the workstation provided he has physical access. In addition, there have been reports that it is possible for User B to take control of the workstation even with the screensaver feature enabled. Physical security for the computer being accessed via RDS is paramount.
Caution: Remote Desktop Sharing Screen Saver Protection The screen saver protection option in RDS does not lock the person out as advertised. While User B could not use the workstation, they could observe all remote activity of User A. Though this is not inherently a security risk, users should assume that the transactions are not private.
Warning: Hijacking of RDS Sessions Although unconfirmed by the authors, there have been reports via the Internet that it is possible for User B to take control of the workstation even with the screensaver feature enabled. Physical security for the computer being accessed via RDS is paramount.
Caution: Remote Desktop Sharing Remote Screen Saver Protection When the remote user stops working, the password-protected screen saver on the remote workstation engages to protect the workstation from access. This will not work unless the screen saver is manually configured and a lockout time period is specified during RDS setup.
UNCLASSIFIED
U N C L A S S I F I E D 30
4.4.2 Program Sharing The program-sharing feature of NetMeeting allows users to collaborate on documents, briefings, spreadsheets, and similar items without requiring each participant to have the particular program installed on the workstation. The security enhancement in NetMeeting 3.01 is that the machine sharing the program now has better control with respect to the shared item. A meeting participant who wants to initiate a document share opens the document in its native program (such as Microsoft Word, Excel, or PowerPoint) and then opens the Sharing dialog box, as shown in Figure 4-8, which lists all programs currently open on the initiator’s machine. From the list, the initiator selects the program to share and clicks “Share”.
Figure 4-8. Sharing Dialog Box
Once sharing is enabled, the document appears on the screen of each person in the call. The sharing initiator controls the shared program at this point. If the initiator scrolls through the
UNCLASSIFIED
U N C L A S S I F I E D 31
document, the document then scrolls on everyone’s machine simultaneously, albeit with some delay. The participant with the sharing machine can select “Allow Control,” shown in Figure 4-9, and then choose to “Automatically accept requests for control” which allows other participants to request control of the document. If the initiator does not automatically accept requests for control, then users who want to edit the document must double click on their copy of the document, select “Request Control” in the pop-up window, and wait for approval from the initiator. This gives the initiator the ability to retain some control over the document.
Figure 4-9. Access Control Dialog Box
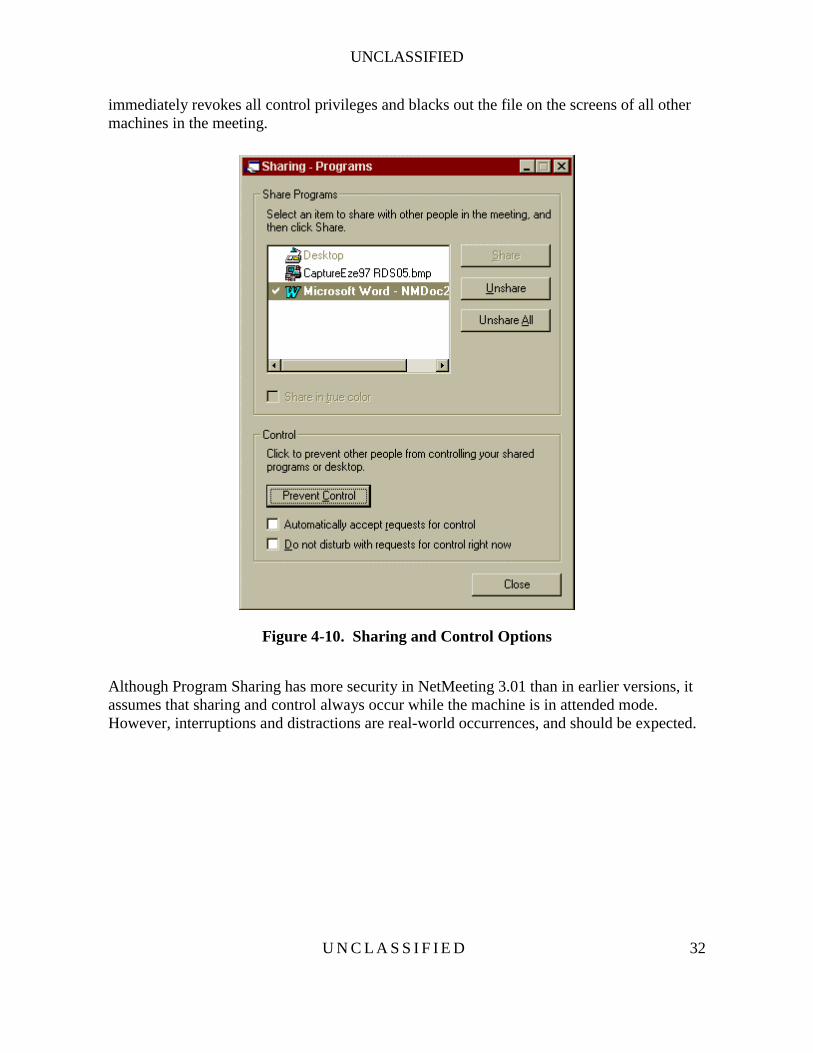
To stop someone from controlling the document at any time, the participant with the sharing machine can either press the <ESC> key, which immediately revokes all control privileges, or, if the Sharing window is open and accessible, the participant can click “Prevent Control,” as shown in Figure 4-10. If the screen saver of the sharing machine turns on, it
UNCLASSIFIED
U N C L A S S I F I E D 32
immediately revokes all control privileges and blacks out the file on the screens of all other machines in the meeting.
Figure 4-10. Sharing and Control Options
Although Program Sharing has more security in NetMeeting 3.01 than in earlier versions, it assumes that sharing and control always occur while the machine is in attended mode. However, interruptions and distractions are real-world occurrences, and should be expected.
UNCLASSIFIED
U N C L A S S I F I E D 33
Warning: Program Sharing Once a user sharing a machine has given control to someone else in the meeting, the second user assumes the sharing user’s identity during the hand-off period and has the privileges for and access to the sharing user’s entire hard drive. This includes any servers and/or private folders. If the sharing user is distracted for a moment and is not intently watching, the second user could copy and mail files to themselves, access private information, plant a virus, or delete files. Program sharing assumes a level of trust that may not be realistic in some environments and, unless the sharing session always occurs in attended mode, regardless of distractions, use of the “allow control” feature is not recommended.
4.5 Nonrepudiation Nonrepudiation prevents the sender or receiver of data or a message from denying it later. It also allows the recipient to prove that the received information was actually sent by the alleged sender. NetMeeting 3.01 provides no specific feature for nonrepudiation, but it does require users to use only personal certificates to encrypt and authenticate messages, so it can verify the identity of the sender and receiver.
4.6 Integrity Integrity assures the recipients of transmissions that no data has been lost or tampered with en-route to them. As with confidentiality, this can be invoked at the stream level or at individual message level. While NetMeeting provides encryption to secure data being transferred, it does not have a specific feature to directly address integrity.
4.7 Availability Availability is a metric that describes the potential for a computer system or service to be ready when called upon by a user. The availability of computer systems can be critically reduced by denial-of-service attacks. NetMeeting 3.01 provides no inherent means of protecting against a denial-of-service attack. If the computer system used is vulnerable to attack, then the conference is also vulnerable. Measures should be taken to protect the computer system from denial of service attacks by preventing malicious code from being loaded onto the system and by preventing suspicious network traffic from entering the system. This can be achieved through judicious use of intrusion detection products, firewalls, and system logging.
4.8 Auditing NetMeeting 3.01 provides no auditing features. It does allow individual users to save the contents of Chat sessions as a chronological record of events. Other than that, there is no record of calls made or attempted, calls received, or configuration changes made.
UNCLASSIFIED
U N C L A S S I F I E D 34
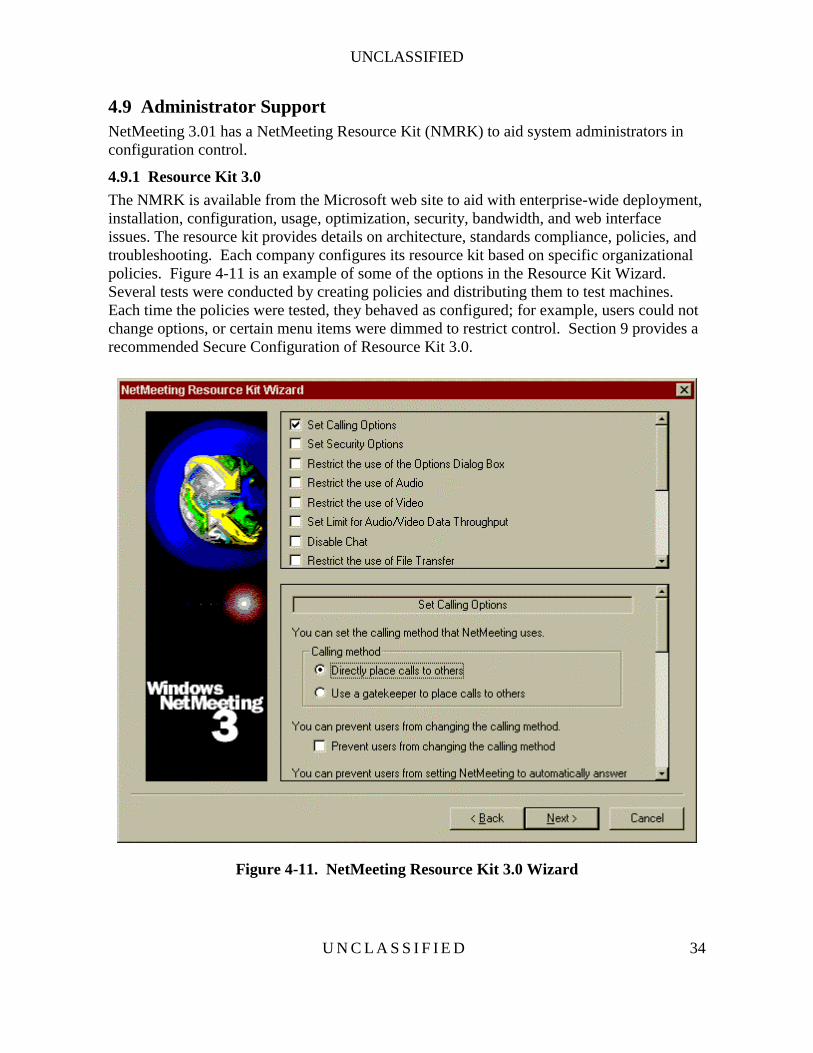
4.9 Administrator Support NetMeeting 3.01 has a NetMeeting Resource Kit (NMRK) to aid system administrators in configuration control.
4.9.1 Resource Kit 3.0 The NMRK is available from the Microsoft web site to aid with enterprise-wide deployment, installation, configuration, usage, optimization, security, bandwidth, and web interface issues. The resource kit provides details on architecture, standards compliance, policies, and troubleshooting. Each company configures its resource kit based on specific organizational policies. Figure 4-11 is an example of some of the options in the Resource Kit Wizard. Several tests were conducted by creating policies and distributing them to test machines. Each time the policies were tested, they behaved as configured; for example, users could not change options, or certain menu items were dimmed to restrict control. Section 9 provides a recommended Secure Configuration of Resource Kit 3.0.
Figure 4-11. NetMeeting Resource Kit 3.0 Wizard
UNCLASSIFIED
U N C L A S S I F I E D 35
Section 5
Security Cautions & Warnings Summary for NetMeeting 3.01
5.1 Summary of Cautions 5.1.1 No Backwards Compatibility
• For the security features to work properly, each participant must use NetMeeting 3.01 or higher. If someone uses an earlier version, they will not be allowed into a secure call.
5.1.2 Identification • Although at NetMeeting startup users are asked to identify themselves to the
application, there is no authentication to verify that they are who they say they are. This permits users to take on someone’s identity and act maliciously.
5.1.3 Direct Calling • If users do not host a meeting and instead initiate the meeting by dialing someone
directly, NetMeeting establishes a bond between the first two persons in the call. NetMeeting does not identify the persons who are linked by this bond. If either of the two hang up, the entire call ends with no warning to the others in the call.
5.1.4 Windows Certificate Store • NetMeeting requires IE’s windows certificate store ONLY. It does not recognize
certificates in any other certificate stores. This means users who do not have access to IE cannot use certificate security.
5.1.5 Erratic Behavior When Security is Activated • NetMeeting behaves erratically when security is enabled. At times, it recognizes
that security has been turned on, and other times, it does not recognize security. The application should be rebooted after security options have been selected to ensure that security has been activated properly.
5.1.6 Data Encryption • Data encryption only occurs if all users are using NetMeeting 3.01 or later and if
they have established a secure meeting. If users running an earlier version of NetMeeting attempt to connect to a secure call, they are rejected.
5.1.7 Remote Desktop Sharing Screen Saver Protection • The screen saver protection option allows others to observe all activities on the
remote machine. Although this is not an inherent security risk, users should be aware that their activities can be monitored and are not private.
UNCLASSIFIED
U N C L A S S I F I E D 36
5.1.8 Remote Desktop Sharing Remote Screen Saver Protection • When the remote user stops working, the password-protected screen saver on the remote workstation engages to protect the workstation from access. This will not work unless the screen saver is manually configured and a lockout time period is specified.
5.2 Summary of Warnings 5.2.1 Hosting A Meeting
• The host must hang up from the call once the hosted meeting is over. Otherwise he/she will be unable to accept other calls until disconnecting from the meeting.
5.2.2 Secure Calls • NetMeeting cannot differentiate between a secure encrypted call and a secure
authenticated call. Users should verify that the call window displays the Status Bar on the bottom left-hand side of the window. Under “View” a check mark should appear beside the “Status Bar” option. This ensures that the call type displays.
5.2.3 Selecting Security Options • In addition to selecting a certificate type, users must choose at least one calling
option under the Security tab or the calls are not secure.
In a password-protected secure call, the host must choose both of the following options to ensure that no one can place an outside call:
• “I prefer to receive secure incoming calls. Accept only secure calls when I’m not in a meeting.”
• “I prefer to make secure outgoing calls.” 5.2.4.2 Lack of Password Requirements
There are no restrictions on the characters used for a password or on the length of the password, making brute-force password guessing a potential threat.
5.2.4.3 Hijacking of RDS Sessions Although unconfirmed by the authors, there have been reports via the Internet that it is possible for a person with physical access to take control of a workstation which is being accessed via RDS. Physical security for the computer being accessed via RDS is paramount.
5.2.6 Program Sharing • The amount of control given to the users is not balanced by comparable ability to
limit their actions. Because meeting participants assume the identity of the user sharing the program, they are given wide-open access to system resources. If the
UNCLASSIFIED
U N C L A S S I F I E D 37
sharing user is distracted or does not work in attended mode, their hard drive can be accessed with their privileges, including all servers and private folders. Program Sharing assumes a level of trust that may not be realistic in some environments. Unless each session is in attended mode, Program Sharing is not recommended.
5.2.7 Directory Server • The information used to populate the directory server is not authenticated and can
be easily forged. Because of this, the actual identity of the users is not trustworthy.
• The second issue with directory servers is the lack of log-in accountability. Once logged into a directory, users remain logged in until they explicitly log out. This means that the list of users in a directory may not accurately reflect who is actually logged in at that time. Also, if someone else uses a logged-in user’s workstation, they assume the identity of that user.
UNCLASSIFIED
U N C L A S S I F I E D 39
Section 6
General Networking Issues
6.1 Firewalls NetMeeting relies very heavily on the H.323 protocol which utilizes a large number of ports in order function. This can create a problem when attempting to operate through firewalls that are not capable of performing stateful inspection of NetMeeting packets. To use NetMeeting through a firewall with this limitation, the firewall must be configured to allow certain ports. Table 6-1 identifies these ports. As this tables shows, a large range of ports must remain open to support NetMeeting audio and video which is never desirable from a system security perspective.
Table 6-1. Network Ports Used by NetMeeting
Port Number
Port Type Protocol NetMeeting Use
389 TCP, static LDAP Internet Locator Service (ILS) 522 TCP, static ULP User Location Service (obsolete after NM ver. 1.0) 1503 TCP, static Imtc-mcs T.120 data collaboration 1720 TCP, static H323hostcall H.323 call setup 1731 TCP, static Msiccp Audio call control 1024 – 65535
TCP, dynamic
H.245 H.323 call control
1024 – 65535
UDP, dynamic
RTP/RTCP H.323 audio/video stream
System administrators have several options when allowing NetMeeting through firewall that do not support NetMeeting protocols. First, they can open all these ports and allow NetMeeting traffic unfettered through the firewall. Second, they can allow only text-based NetMeeting traffic. This will eliminate the need to leave a wide range of ports open; only ports 389, 522, and 1503 will be needed through the firewall. Of course, this considerably constrains NetMeeting functionality across the firewall. However, if NetMeeting’s encryption capabilities are used, audio and video are already disabled. The final trans-firewall NetMeeting option entails the use of a virtual private network; this is the recommended approach and it is detailed further in the section that follows.
6.2 Virtual Private Networks (VPN) The recommended trans-firewall NetMeeting configuration uses a Virtual Private Network (VPN). A VPN is an encrypted point-to-point “tunnel” from one system behind the firewall to another pre-determined system outside the firewall. As the data is encrypted and the
UNCLASSIFIED
U N C L A S S I F I E D 40
remote end specified, VPN traffic is generally allowed unrestricted through a firewall. Using NetMeeting across a VPN, MITRE sought to answer the following questions: (1) Could the number of open firewall ports be reduced, and (2) would the application’s audio and video work over this medium? The answers were YES and YES. Using Timestep VPNs, the MITRE team was successful in setting up a VPN using triple DES encryption and running NetMeeting 3.01 over the encrypted channel. The packages were filtered through a Linux box running ipchains as the firewall. Only port 49680 and protocol 50 (IPv6 crypt) needed to be opened through the firewall for the VPN to work. Both audio and video functions worked well over the VPN, proving that it is possible to securely use both the audio and video features of NetMeeting without using NetMeeting’s packaged security. MITRE also tested NetMeeting 3.01 using software-based VPNs (SSH, VTCP Secure); however, these tests were not as successful as the tests using the hardware-based Timestep VPN. Test results were inconsistent and revealed that the VPN did cause some erratic behavior for NetMeeting sessions. For instance, when logged into a server through a VPN, the user is typically assigned a new Internet (or IP) address that is specific to the enterprise. Therefore, the Internet address required for a NetMeeting session is the enterprise address, and not the user’s address assigned by the service provider. Determining the secondary address for use in placing a NetMeeting call may be a problem. Some enterprises, like MITRE, provide a lookup feature to indicate the user’s current address. Others may not. This would force VPN users to use a directory service of some kind to find and connect to other users. In summary, a Virtual Private Network provides the most secure means to use all NetMeeting collaboration options through a firewall. Only two ports need to be allowed through the firewall, and the audio and video capabilities can be used in a secure manner.
UNCLASSIFIED
U N C L A S S I F I E D 41
Section 7
Summary Recommendations
Microsoft has added a level of I&A and privacy to NetMeeting 3.01 that enhances the security posture for sharing nonsensitive information. However, due to several identified security weaknesses in the tool’s design and implementation, NetMeeting 3.01 should not be used for sharing sensitive information without understanding the associated risks and taking the appropriate safeguards. The risk of exposure is high without peripheral safeguards in place to minimize such risk. The following is a list of recommendations for secure collaboration when using NetMeeting:
• Require use of security • Require use of personal certificates for both encryption and authentication • Disable use of Audio and Video unless using it across a VPN • Place restrictions on what programs can be shared using NMRK • Require all collaboration take place in attended mode • Disable use of Remote Desktop Sharing feature
Sections 8 and 9 detail how to securely install and configure NetMeeting for an individual workstation (Section 8) and for company-wide distribution (Section 9). The NMRK is a vital component in establishing secure collaboration policies that should be followed in all environments. The NMRK allows system administrators to create profiles based on their company policies, configure the application to support those policies, and prevent users from changing and/or altering options. The primary recommendation is to follow the Secure Configuration Guide for Resource Kit 3.0 provided in Section 9.
UNCLASSIFIED
U N C L A S S I F I E D 43
Section 8
Secure Installation and Configuration of NetMeeting 3.01
8.1 Installation There are two means by which NetMeeting can be installed. One can install an uncustomized version of NetMeeting or an administrator can generate a restricted installation using the NetMeeting resource kit. The later is generally preferred as it allows the administrator to have control over numerous security related settings which are otherwise left up to the discretion of the user. In the interest of completeness, both installation approaches will be discussed. The direct install is detailed in this chapter with the use of the NetMeeting resource kit covered in the next chapter. To install NetMeeting 3.01, go to the Microsoft NetMeeting web site located at: http://www.microsoft.com/windows/netmeeting and click on the Download button3. The Microsoft NetMeeting web page is displayed in Figure 8-1.
3 Note that NetMeeting is provided with Windows 2000 – a download is not necessary.
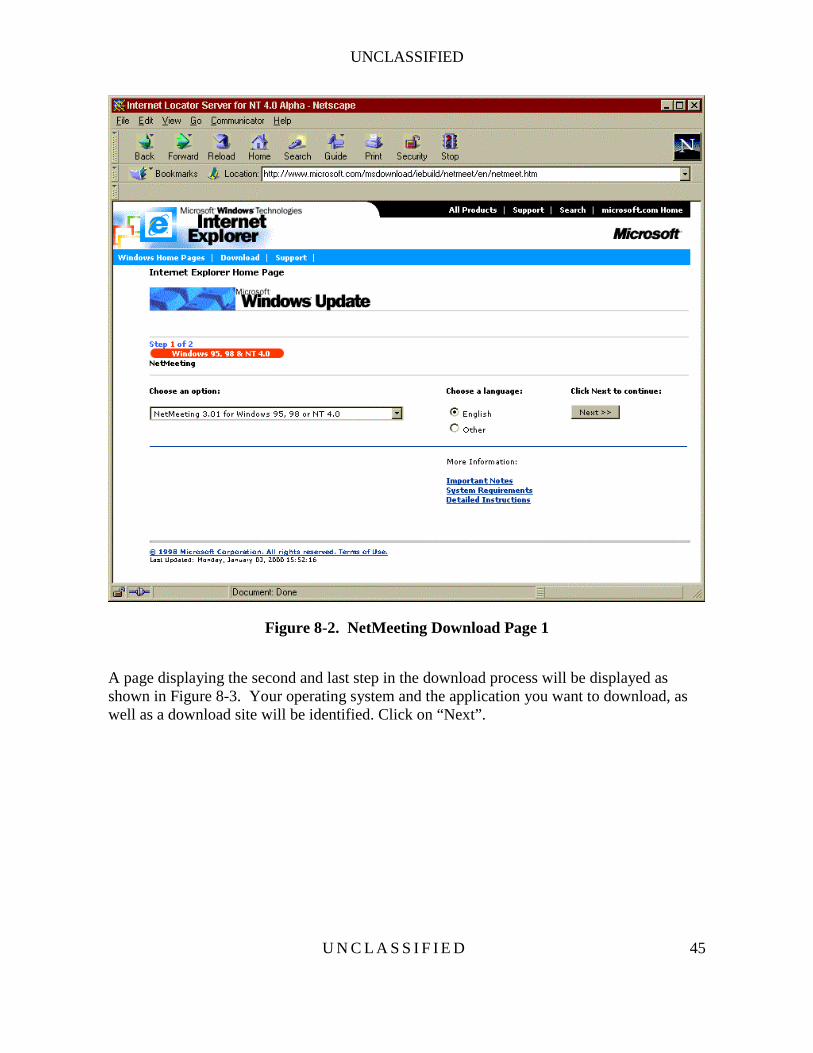
The NetMeeting Download Page will be displayed, as illustrated in Figure 8-2. Identify your operating system and click on “Next”.
UNCLASSIFIED
U N C L A S S I F I E D 45
Figure 8-2. NetMeeting Download Page 1
A page displaying the second and last step in the download process will be displayed as shown in Figure 8-3. Your operating system and the application you want to download, as well as a download site will be identified. Click on “Next”.
UNCLASSIFIED
U N C L A S S I F I E D 46
Figure 8-3. NetMeeting Download Page 2
The application will then be downloaded onto your system into a directory of your choice. Once the download has completed, the application can be installed. To begin installation, locate the folder where you directed the application to be downloaded and double-click on the Nm30 icon. The Windows NetMeeting 3.01 window, shown in Figure 8-4 will open and you will be asked if you want to install NetMeeting. Click “Yes.”
UNCLASSIFIED
U N C L A S S I F I E D 47
Figure 8-4. Windows NetMeeting 3.01 Install
You will then be presented with the NetMeeting license agreement shown in Figure 8-5. After reviewing the license agreement and agreeing to the terms, click on “Yes.”
Figure 8-5. NetMeeting License Agreement
NetMeeting will then extract all of the files and prepare to install the application. Once the files have been extracted, NetMeeting will establish a directory to install the application. Users can either accept the default location, or click on “Browse” and redirect it to a folder of their choice, as illustrated in Figure 8-6. If the prompt says that the folder you have selected does not exist, click on “Yes” and allow NetMeeting to create one for you.
UNCLASSIFIED
U N C L A S S I F I E D 48
Figure 8-6. Directory for NetMeeting
When NetMeeting has finished installing, you will receive the following message illustrated in Figure 8-7.
Figure 8-7. Installation Complete
8.2 Secure Configuration of NetMeeting 3.01 Once NetMeeting has been installed, it can be configured by navigating to the NetMeeting directory and double-clicking on the conf.exe icon. Configuration begins with a brief description of the application, as depicted in Figure 8-8. After reading the description, click “Next.”
UNCLASSIFIED
U N C L A S S I F I E D 49
Figure 8-8. NetMeeting Configuration 1
The next window shown in Figure 8-9, briefly describes the application sharing function and the steps needed to enable it. Click on “Next.”
Figure 8-9. NetMeeting Configuration 2
UNCLASSIFIED
U N C L A S S I F I E D 50
The next screen in the configuration process is the user identification screen shown in Figure 8-10. Users must enter the required fields including, First Name, Last Name and E-mail address. After entering the required information, click on “Next.”
Figure 8-10. User Information
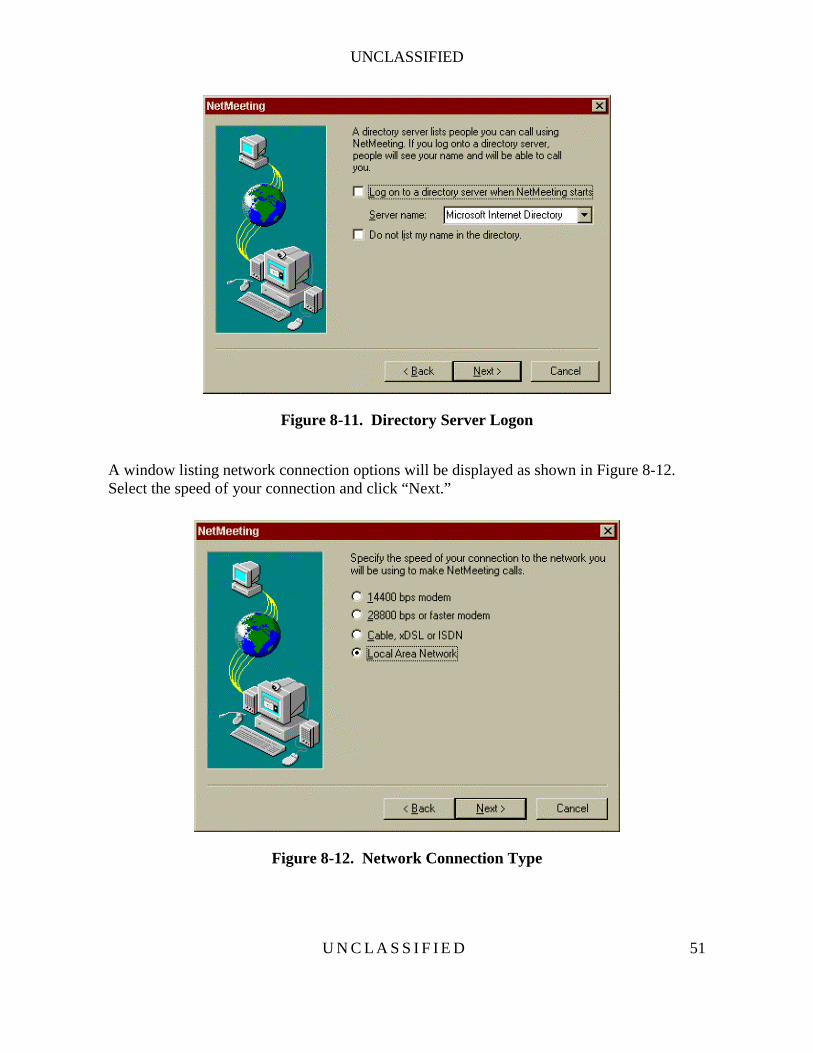
Figure 8-11 depicts the next set of options in the NetMeeting configuration process. It is recommended that the check mark in the box next to “Log on to a directory server when NetMeeting starts” be deselected, i.e., the check mark removed from this box. Because directory servers offer no authentication, information can be easily forged and identities can be stolen. Therefore, it is more secure to place direct calls using IP addressing rather than using the information in the directory server. Following completion of this action, click on “Next.”
UNCLASSIFIED
U N C L A S S I F I E D 51
Figure 8-11. Directory Server Logon
A window listing network connection options will be displayed as shown in Figure 8-12. Select the speed of your connection and click “Next.”
Figure 8-12. Network Connection Type
UNCLASSIFIED
U N C L A S S I F I E D 52
The window depicted in Figure 8-13 will be displayed. Place a check mark next to each option to put a shortcut to NetMeeting on your desktop and to add an icon in the quick launch bar. Click “Next.”
Figure 8-13. Shortcuts & Quick Launch
The Audio Tuning Wizard screen will be displayed as illustrated in Figure 8-14. Click “Next.”
UNCLASSIFIED
U N C L A S S I F I E D 53
Figure 8-14. Audio Tuning Wizard 1
Figure 8-15 illustrates the next step in the audio tuning wizard. If you have speakers connected to your machine, make certain they are connected properly and click on the “Test” button. Adjust volume by moving the playback slidebar and then click “Next.”
UNCLASSIFIED
U N C L A S S I F I E D 54
Figure 8-15. Audio Tuning Wizard 2
The next step is to set the volume on the microphone. As depicted in Figure 8-16 below, read the sentence into your microphone, then click “Next.”
UNCLASSIFIED
U N C L A S S I F I E D 55
Figure 8-16. Record Microphone Volume
The final screen for the Audio Tuning Wizard will now be displayed as seen in Figure 8-17. Click on “Finish.”
Figure 8-17. Audio Tuning 3
UNCLASSIFIED
U N C L A S S I F I E D 56
The NetMeeting application, as seen in Figure 8-18, will now open for the first time. Go under the Tools menu and select Options.
Figure 8-18. Options Menu
Figure 8-19 displays the General tab in the Options menu. Verify the following information. Under My directory information, verify: • All information is entered correctly
Under Directory Settings, verify: • There IS a check mark before “Do not list my name in the directory” • There is NO check mark before “Log on to a directory server when NetMeeting starts” Under General, verify: • There is NO check mark before “Run NetMeeting in the background when Windows
starts”
UNCLASSIFIED
U N C L A S S I F I E D 57
• There IS a check mark before “Show the NetMeeting icon on the taskbar” There are no special options to be set under Bandwidth Settings or Advanced Calling.
Figure 8-19. General Tab
The next step is to enable security. It is recommended that a third-party certificate be used to provide authentication and encryption. If you have a third-party personal certificate installed in Internet Explorer 5.x Windows Certificate Store, skip to the Security Tab section below. If not, click “OK” to close the Options/General window and proceed with the following instructions to import your certificate into IE 5.x. Importing the Root CA certificate into the Trusted Root Store
1. Download your Root CA certificate to your desktop (this will save as a file). 2. Make certain that the file has an extension of *.crt. 3. Double-click on this file to start the certificate import wizard.
UNCLASSIFIED
U N C L A S S I F I E D 58
4. Click on the Install Certificate button on the dialog box that appears. 5. Click “Next” when the Certificate Manager Import Wizard dialog appears. 6. Make sure that “Automatically select...” is selected, and click “Next.” 7. Verify that the Certificate Store selected by the Wizard is listed as “Trusted Root
Certification Authorities.” 8. Click “Finish.” 9. Verify the information in the dialog that appears, and click Yes to the question “Do
you want to ADD the following certificate to the Root Store?” 10. If the import was successful, you will get a dialog box indicating this. Click “OK.” 11. Close the Certificate window by clicking on “OK.” 12. To verify that the import was successful, double click on the downloaded file. In the
certificate window that appears, click on the Certification Path tab at the top. The Certificate status: box will state that “This certificate is OK.”
13. You can now delete the certificate on your desktop.
Importing your personal certificate into IE 5.0 1. Insert the floppy disk containing your exported certificate file. 2. Double-click on the exported certificate file. 3. Once the Certificate Manager Import Wizard starts, click Next. 4. Click “Next” if the file to import is correctly displayed. If not, click Browse and
select the appropriate file. 5. Enter the password used to secure the certificate when it was exported from another
browser. If it was not exported, enter the certificate password. 6. Make sure both “Enable strong private key protection” and “Mark the private key as
exportable” are checked. Click “Next.” 7. Make sure “Automatically select ...” is selected, and click “Next.” 8. Click “Finish.” 9. Make sure the Security Level is set to High. (Click on “Set Security Level” and
change the setting if it is not.) 10. Follow the instructions in the dialog about setting a password for the Private Key
Container. 11. Enter the password that was just established. Make sure that Remember Password is
NOT checked, and click “OK.” 12. A dialog box indicating that the import was successful should be displayed. 13. Close out of Internet Explorer.
Open the NetMeeting application, go under Tools, Options and click on the Security tab.
UNCLASSIFIED
U N C L A S S I F I E D 59
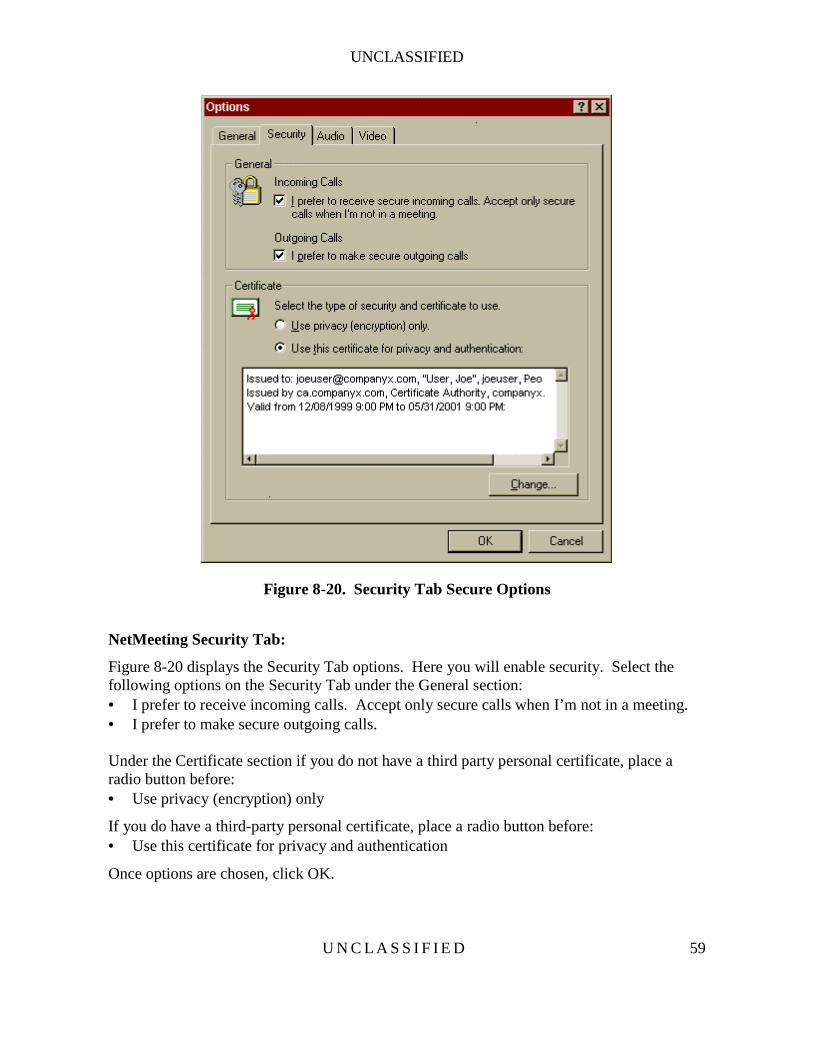
Figure 8-20. Security Tab Secure Options
NetMeeting Security Tab:
Figure 8-20 displays the Security Tab options. Here you will enable security. Select the following options on the Security Tab under the General section: • I prefer to receive incoming calls. Accept only secure calls when I’m not in a meeting. • I prefer to make secure outgoing calls. Under the Certificate section if you do not have a third party personal certificate, place a radio button before: • Use privacy (encryption) only
If you do have a third-party personal certificate, place a radio button before: • Use this certificate for privacy and authentication
Once options are chosen, click OK.
UNCLASSIFIED
U N C L A S S I F I E D 60
NOTE: It is highly recommended to use a third party certificate, which provides both authentication and encryption. Next, click on the Audio tab depicted in Figure 8-21. Ensure that the following options have check marks: • Automatically adjust microphone volume while in a call • Adjust silence detection automatically (recommended) While audio and video features are disabled in all secure calls, if a person was to inadvertently place an insecure call, it would be prudent to have these options checked.
Figure 8-21. Audio Tab Secure Options
Under the Video Tab, make certain there are no check marks before: • Automatically send video at the start of each call • Automatically receive video at the start of each call
UNCLASSIFIED
U N C L A S S I F I E D 61
This is shown in Figure 8-22.
Figure 8-22. Video Tab Secure Options
Once you have verified all of the options above, click OK. Next, close out of the NetMeeting application. This will ensure that security is enabled and functioning properly. The next time you open the application, you will be prompted for your personal certificate password before you are allowed to use the application.
UNCLASSIFIED
U N C L A S S I F I E D 63
Section 9
Secure Installation and Configuration of NetMeeting Resource Kit 3.0
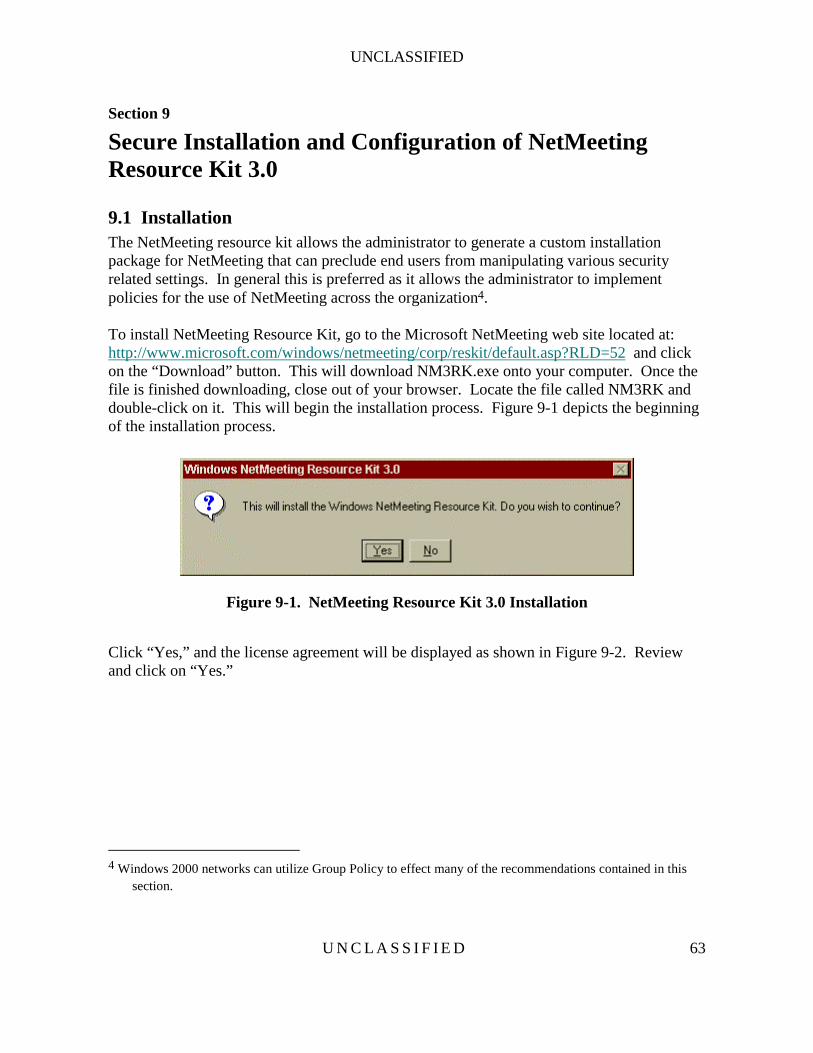
9.1 Installation The NetMeeting resource kit allows the administrator to generate a custom installation package for NetMeeting that can preclude end users from manipulating various security related settings. In general this is preferred as it allows the administrator to implement policies for the use of NetMeeting across the organization4. To install NetMeeting Resource Kit, go to the Microsoft NetMeeting web site located at: http://www.microsoft.com/windows/netmeeting/corp/reskit/default.asp?RLD=52 and click on the “Download” button. This will download NM3RK.exe onto your computer. Once the file is finished downloading, close out of your browser. Locate the file called NM3RK and double-click on it. This will begin the installation process. Figure 9-1 depicts the beginning of the installation process.
Next, the resource kit files will be extracted and you will be prompted for a directory in which to install the files. Accept the default location C:\ProgramFiles\NetMeeting Resource Kit and click “OK.” All files will now be copied into that location in preparation for installation. Once the copy has completed you will receive a message stating the resource kit was successfully installed, as depicted in Figure 9-3.
Figure 9-3. Successful Install
The NetMeeting Resource Kit is now installed and ready for secure configuration.
UNCLASSIFIED
U N C L A S S I F I E D 65
9.2 Secure Configuration To launch the NetMeeting Resource Kit 3.0, go to your Start Menu, Programs, NetMeeting Resource Kit 3.0, and select the NetMeeting Resource Kit Wizard. You will see the following window as depicted in Figure 9-4, click “Next.”
.
Figure 9-4. NetMeeting Resource Kit 3.0 Wizard
In the next window, shown if Figure 9-5, click on “Create a new configuration from scratch” and click “Next.”
UNCLASSIFIED
U N C L A S S I F I E D 66
Figure 9-5. Configuration Options
NetMeeting will now display all available options. Set Calling Options: Place a check mark in the “Set Calling Options” box. NetMeeting will display the Set Calling Options, as depicted in Figure 9-6 below. Place a radio button before “Directly place calls to others5” and a check mark before “Prevent users from changing the calling method” options. Use the right scroll bar to view more Set Calling Options.
5 This recommendation is made simply because the other option – use of a gateway for call placement -- was
not evaluated under this task.
UNCLASSIFIED
U N C L A S S I F I E D 67
Figure 9-6. Set Calling Options 1
Place a check mark before “Disable Automatic Call Answering” as illustrated in Figure 9-7 and continue to scroll down to select the network speed as depicted in Figure 9-8.
UNCLASSIFIED
U N C L A S S I F I E D 68
Figure 9-7. Set Calling Options 2
UNCLASSIFIED
U N C L A S S I F I E D 69
Figure 9-8. Set Calling Options 3
Place a radio button next to your correct network connection speed and continue with the Set Security Options section below.
Set Security Options: Place a check mark in the Set Security Options box. NetMeeting will now display the “Configure Security” options as shown in Figure 9-9 below.
UNCLASSIFIED
U N C L A S S I F I E D 70
Figure 9-9. Set Security Options 1
Place a radio button next to “Required: users must place and receive encrypted calls” and scroll down to next section. Enforce using personal certificates to provide authentication by placing a check mark next to the “Do not allow connections with incomplete authentication” option depicted in Figure 9-10. Although not checked, the “Specify RDN of required certificate authority:” box should be checked when possible. This will force the use of digital certificates and not allow the use of a user’s NetMeeting Certificate. As stated before, the digital certificate is not necessarily bound to the NetMeeting identity.
UNCLASSIFIED
U N C L A S S I F I E D 71
Figure 9-10. Set Security Options 2
Restrict the use of the Options Dialog Box:
Place a check mark in the box preceding the “Restrict the use of Options Dialog Box” as illustrated in Figure 9-11. Next, place a check mark in the box before “Disable the Advanced Calling Button.”
UNCLASSIFIED
U N C L A S S I F I E D 72
Figure 9-11. Restrict the use of the Options Dialog Box
Restrict the Use of Audio:
Place a check mark before “Restrict the use of Audio” box to display options as illustrated in Figure 9-126. In the section below, place a check mark before “Prevent users from using audio,” and click on “Next.”
6 This recommended is made inasmuch as NetMeeting encryption capabilities do not work for audio and video
connections. Alternately, VPN technology can be used to provide this functionality.
UNCLASSIFIED
U N C L A S S I F I E D 73
Figure 9-12. Restrict the use of Audio
Restrict the use of Video:
Place a check mark before “Restrict the use of Video” option. In the next section, place a check mark before “Prevent users from sending video” and “Prevent uses from receiving video” box as depicted in Figure 9-137.
7 These recommendations are made inasmuch as NetMeeting encryption capabilities do not work for audio and
video connections. Alternately, VPN technology can be used to provide this functionality.
UNCLASSIFIED
U N C L A S S I F I E D 74
Figure 9-13. Restrict the use of Video
There are no security settings for Set Limit for Audio/Video Data Throughput, Disable Chat, or Restrict the use of File Transfer. Go to: Restrict the use of Sharing:
Place a check mark in the box before the “Restrict the use of Sharing” option. In the section below, scroll down to the end and place check marks before all three of these options: “Prevent users from sharing the entire desktop,” “Prevent users from sharing Explorer windows,” and “Prevent users from sharing MS-DOS windows” as illustrated in Figure 9-14.
UNCLASSIFIED
U N C L A S S I F I E D 75
Figure 9-14. Restrict the use of Sharing
There are no restrictions on the Whiteboard; go to: Restrict the use of Remote Desktop Sharing: It is strongly recommended to disable RDS. Place a check mark before “Restrict the use of Remote Desktop Sharing.” In the section below, place a check mark in the box before “Disable Remote Desktop Sharing on all platforms” as depicted in Figure 9-15.
UNCLASSIFIED
U N C L A S S I F I E D 76
Figure 9-15. Restrict the use of Remote Desktop Sharing
Do not put a check mark before “Configure NetMeeting Online Support,” click on “Next.” Restrict the use of Directory Servers: Deselect the check mark in the “Allow users to use directory services” box and click “Next” as depicted in Figure 9-16.
UNCLASSIFIED
U N C L A S S I F I E D 77
Figure 9-16. Restrict the use of Directory Servers
Customize Installation:
At this point, the Resource Kit prompts you for a directory to save this profile. Verify there is a check mark in the box before “Customize Installation” and accept the default directory for the installation as illustrated in Figure 9-17. Click “Next.” You will be prompted saying the output file does not exist, do you want to create it? Click “Yes.”
UNCLASSIFIED
U N C L A S S I F I E D 78
Figure 9-17. Saving Customized Profile
Custom Distribution File:
Figures 9-18 and 9-19 illustrate the custom distribution file window consisting of all options you have selected for this profile. Review their contents and make certain there is a check mark before “Summary File,” click “Next.” You will be prompted that the output file does not exist, click “Yes” to create one. The summary file provides an easy-reference text document of all selected options in the newly created profile. Its purpose is to provide a quick reference document, which lists all options selected for that particular profile. When multiple profiles are created to give more access to one group of employees, a system administrator would save the summary file with more specific names, for example, SummaryTechStaff versus SummaryManagers.
UNCLASSIFIED
U N C L A S S I F I E D 79
Figure 9-18. Custom Distribution File 1
UNCLASSIFIED
U N C L A S S I F I E D 80
Figure 9-19. Custom Distribution File 2
Settings File:
The final step is creating the settings file as depicted in Figure 9-20. Verify there is a check mark before the “Setting File” option, and click “Finish” to create the file. If you are prompted that the file does not exist, click “Yes” to create it.
UNCLASSIFIED
U N C L A S S I F I E D 81
Figure 9-20. Settings File
The final screen in the NetMeeting Resource Kit Wizard is depicted in Figure 9-21. Click on “OK.”
Figure 9-21. Successfully Created
UNCLASSIFIED
U N C L A S S I F I E D 82
The distribution profile should either be distributed to all users or placed in a folder where they can access it for installation. Once they download the Nm3c.exe, they need to double-click on it to install the profile.
UNCLASSIFIED
U N C L A S S I F I E D 83
Glossary
CA Certificate Authority
CAPI Crypto API
COIs Communities of Interest
I&A Identification and Authentication
IC Intelligence Community
IE Internet Explorer
ILS Internet Locator Service
IP Internet Protocol
ISDN Integrated Services Digital Network
ISP Internet Service Provider
LAN Local-Area Network
LDAP Lightweight Directory Access Protocol
NMRK NetMeeting Resource Kit
RDS Remote Desktop Sharing
SDK Software Developer’s Kit
TCP/IP Transport Control Protocol and Internet Protocol
UI User Interface
VPN Virtual Private Network
UNCLASSIFIED
U N C L A S S I F I E D 85
Revisions
Version 1.11. Added warnings and trademark sections. Version 1.12. Provided detail regarding the use of the NetMeeting RDS Users Group for controlling access to Windows NT/2000 computers via the Remote Desktop Sharing feature and mentioned how Windows 2000 group policy can be utilized to control various NetMeeting settings. Version 1.13. Corrected a problem with page numbering and removed a superfluous entry from the table of contents. Version 1.14.
• Clarified that the document was written based upon the service pack 1 release • Expanded on the need for enabling the screen saver password protection option when
using RDS • Added a warning concerning the need for physical security for workstations being