60
Mini Hi-Fi Component System ©2000 Sony Corporation Operating Instructions 4-227-119-32(1) MHC-VX33
1
Mini Hi-FiComponentSystem
©2000 Sony Corporation
Operating Instructions
4-227-119-32(1)
MHC-VX33
2
WARNINGTo prevent fire or shock hazard, do notexpose the unit to rain or moisture.To avoid electrical shock, do not open the cabinet.Refer servicing to qualified personnel only.
Do not install the appliance in a confined space,such as a bookcase or built-in cabinet.
This appliance is classifiedas a CLASS 1 LASERproduct. The CLASS 1LASER PRODUCTMARKING is located onthe rear exterior.
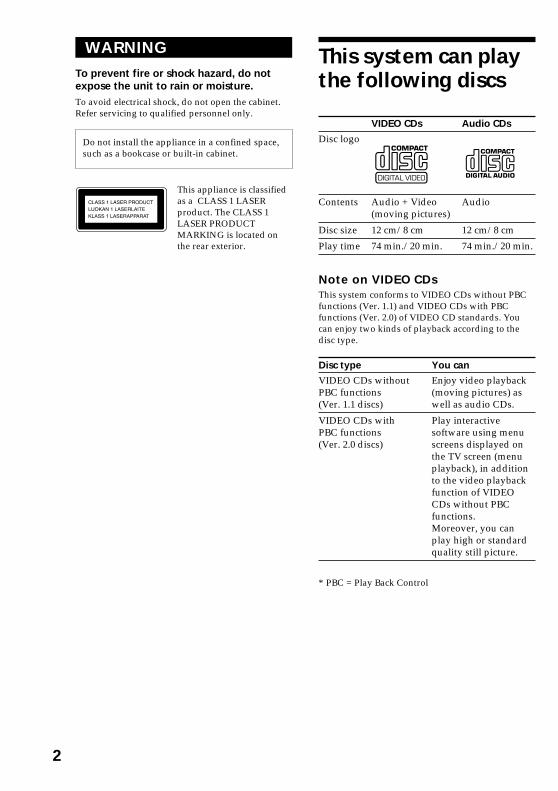
This system can playthe following discs
VIDEO CDs Audio CDs
Disc logo
Contents Audio + Video Audio(moving pictures)
Disc size 12 cm/8 cm 12 cm/8 cm
Play time 74 min./20 min. 74 min./20 min.
Note on VIDEO CDsThis system conforms to VIDEO CDs without PBCfunctions (Ver. 1.1) and VIDEO CDs with PBCfunctions (Ver. 2.0) of VIDEO CD standards. Youcan enjoy two kinds of playback according to thedisc type.
Disc type You can
VIDEO CDs without Enjoy video playbackPBC functions (moving pictures) as(Ver. 1.1 discs) well as audio CDs.
VIDEO CDs with Play interactivePBC functions software using menu(Ver. 2.0 discs) screens displayed on
the TV screen (menuplayback), in additionto the video playbackfunction of VIDEOCDs without PBCfunctions.Moreover, you canplay high or standardquality still picture.
* PBC = Play Back Control
3
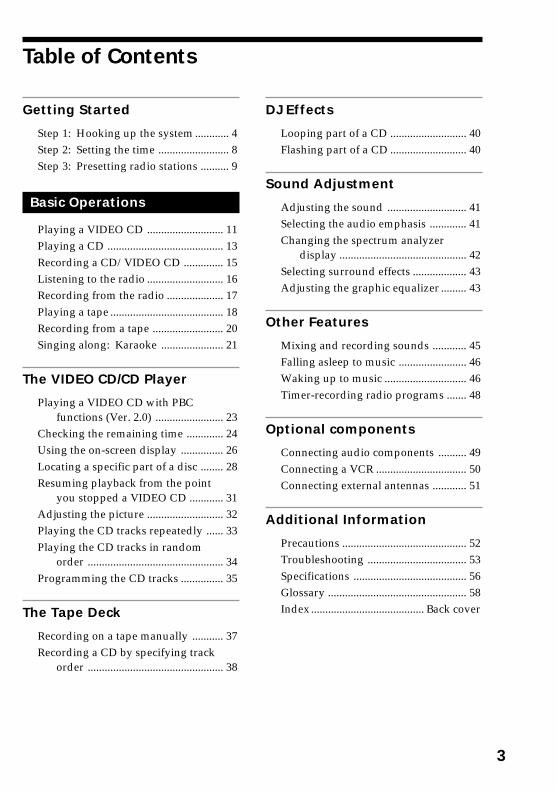
Table of Contents
Getting Started
Step 1: Hooking up the system ............ 4Step 2: Setting the time ......................... 8Step 3: Presetting radio stations .......... 9
Basic Operations
Playing a VIDEO CD ........................... 11Playing a CD ......................................... 13Recording a CD/VIDEO CD .............. 15Listening to the radio ........................... 16Recording from the radio .................... 17Playing a tape ........................................ 18Recording from a tape ......................... 20Singing along: Karaoke ...................... 21
The VIDEO CD/CD Player
Playing a VIDEO CD with PBCfunctions (Ver. 2.0) ........................ 23
Checking the remaining time ............. 24Using the on-screen display ............... 26Locating a specific part of a disc ........ 28Resuming playback from the point
you stopped a VIDEO CD ............ 31Adjusting the picture ........................... 32Playing the CD tracks repeatedly ...... 33Playing the CD tracks in random
order ................................................ 34Programming the CD tracks ............... 35
The Tape Deck
Recording on a tape manually ........... 37Recording a CD by specifying track
order ................................................ 38
DJ Effects
Looping part of a CD ........................... 40Flashing part of a CD ........................... 40
Sound Adjustment
Adjusting the sound ............................ 41Selecting the audio emphasis ............. 41Changing the spectrum analyzer
display ............................................. 42Selecting surround effects ................... 43Adjusting the graphic equalizer ......... 43
Other Features
Mixing and recording sounds ............ 45Falling asleep to music ........................ 46Waking up to music ............................. 46Timer-recording radio programs ....... 48
Optional components
Connecting audio components .......... 49Connecting a VCR ................................ 50Connecting external antennas ............ 51
Additional Information
Precautions ............................................ 52Troubleshooting ................................... 53Specifications ........................................ 56Glossary ................................................. 58Index ........................................ Back cover
4
2
5
4
1
3
R
+L
+
–
Getting Started
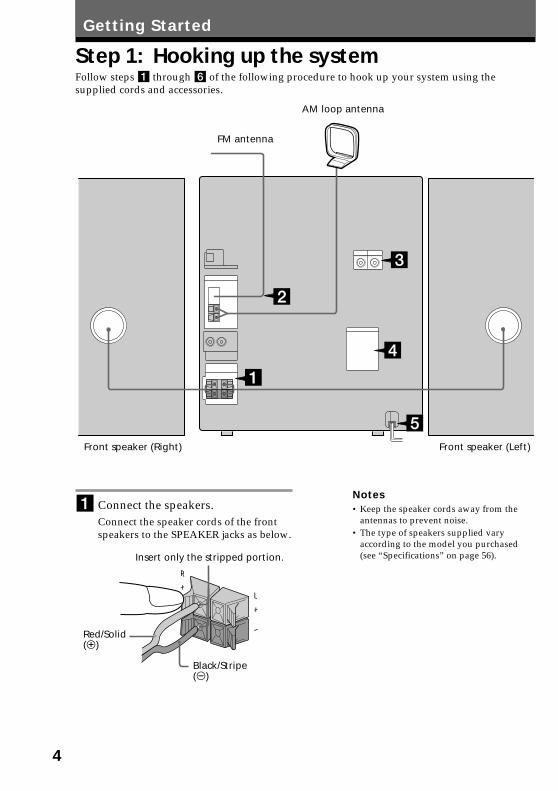
Step 1: Hooking up the systemFollow steps 1 through 6 of the following procedure to hook up your system using thesupplied cords and accessories.
Notes• Keep the speaker cords away from the
antennas to prevent noise.• The type of speakers supplied vary
according to the model you purchased(see “Specifications” on page 56).
1 Connect the speakers.Connect the speaker cords of the frontspeakers to the SPEAKER jacks as below.
AM loop antenna
Front speaker (Left)Front speaker (Right)
Insert only the stripped portion.
Black/Stripe(#)
Red/Solid(3)
FM antenna
5
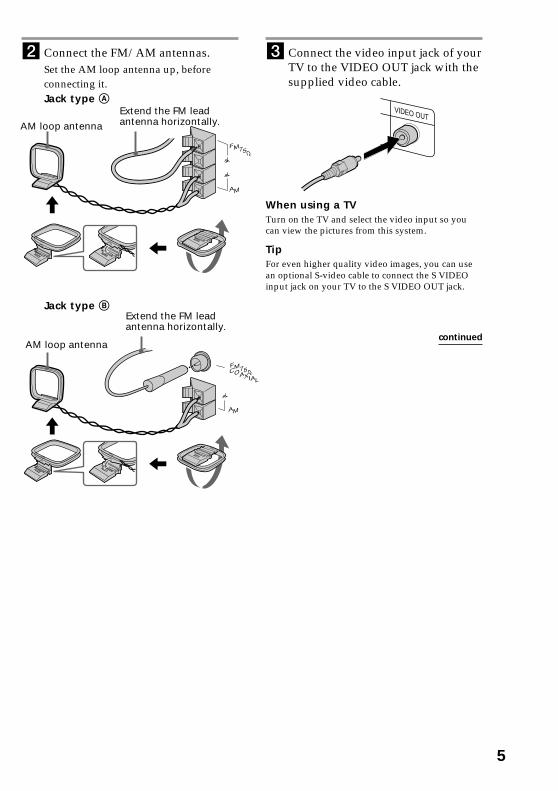
2 Connect the FM/AM antennas.Set the AM loop antenna up, beforeconnecting it.Jack type A
Jack type B
FM75
AM
COAXIAL
FM75
AM
VIDEO OUT
Extend the FM leadantenna horizontally.
AM loop antenna
Extend the FM leadantenna horizontally.
AM loop antenna
3 Connect the video input jack of yourTV to the VIDEO OUT jack with thesupplied video cable.
When using a TVTurn on the TV and select the video input so youcan view the pictures from this system.
TipFor even higher quality video images, you can usean optional S-video cable to connect the S VIDEOinput jack on your TV to the S VIDEO OUT jack.
continued

6
VOLTAGE SELECTOR
120V 220V
230 - 240V
4 For models with a voltage selector,set VOLTAGE SELECTOR to thelocal power line voltage.
5 Connect the power cord to a walloutlet.The demonstration appears in thedisplay. When you press ?/1, the systemturns on and the demonstrationautomatically ends.If the supplied adapter on the plug doesnot fit your wall outlet, detach it fromthe plug (only for models equipped withan adapter).
Step 1: Hooking up the system(continued) 6 Follow the instructions below to set
the color system according to yourTV. The factory setting is AUTO.Make sure the power is off eachtime before setting the color system.After you set the color system, thepower turns on automatically andthe function is set to CD.
If your TV automatically changes thecolor system according to the inputsignal:Press ?/1 while holding down X. The colorsystem is set to AUTO.
AUTO automatically changes the colorsystem of the video output according to thecolor system of the current VIDEO CD.
If the color system of your TV is NTSC:Press ?/1 while holding down >. The colorsystem is set to NTSC.
If the color system of your TV is PAL:Press ?/1 while holding down .. The colorsystem is set to PAL.
NoteWhen you set color system to NTSC and play back aVIDEO CD recorded in the PAL color system, thepicture image may be distorted depending on thedisc. Similarly, when you set color system to PALand play back a VIDEO CD recorded in the NTSCcolor system, the picture image may be distorteddepending on the disc.
To connect optional componentsSee page 49.
To deactivate the demonstrationWhen you set the time (“Step 2: Setting thetime” on page 8), the demonstration isdeactivated.
To activate/deactivate the demonstrationagain, press DISPLAY once while the systemis off.

7
To attach the front speaker padsAttach the supplied front speaker pads to thebottom of the speakers to stabilize thespeakers and prevent them from slipping.
Inserting two size AA (R6)batteries into the remoteRemote type A
Remote type B
Using the remoteYou can use the shaded buttons shown belowto operate a Sony TV.
To Press
Turn the TV on or off TV ?/1
Switch the TV's TV/VIDEO.video input
Change the TV TV CH +/–.channels
Adjusts the volume TV VOL +/–.of the TV speaker(s)
TipWith normal use, the batteries should last for aboutsix months. When the remote no longer operates thesystem, replace both batteries with new ones.
NoteIf you do not use the remote for a long period oftime, remove the batteries to prevent possibledamage from battery leakage.
When carrying this systemMake sure that all discs are removed from theunit. To protect the CD mechanism, holddown CD and press ?/1 while the power ison. “LOCK” appears in the display and thepower is turned off.
TV
TV VOL +/
TV CH +/
TV/VIDEO
} }]
]
8
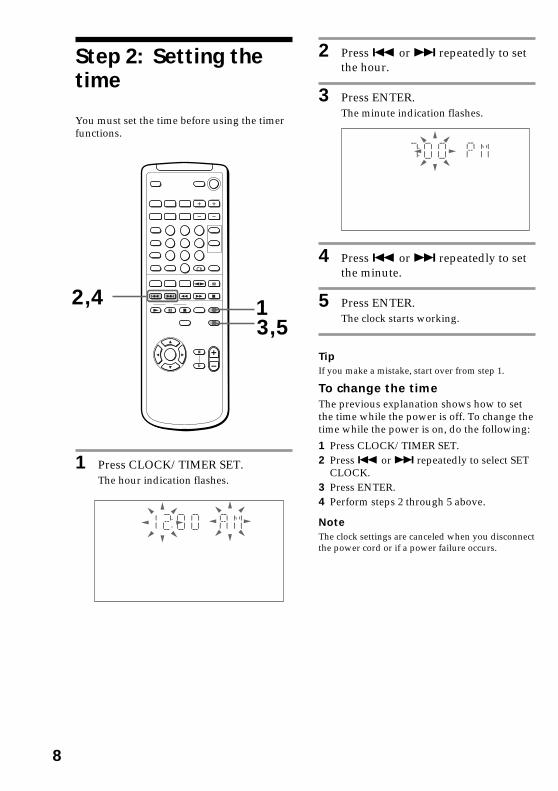
1 Press CLOCK/TIMER SET.The hour indication flashes.
2 Press . or > repeatedly to setthe hour.
3 Press ENTER.The minute indication flashes.
4 Press . or > repeatedly to setthe minute.
5 Press ENTER.The clock starts working.
TipIf you make a mistake, start over from step 1.
To change the timeThe previous explanation shows how to setthe time while the power is off. To change thetime while the power is on, do the following:
1 Press CLOCK/TIMER SET.2 Press . or > repeatedly to select SET
CLOCK.3 Press ENTER.4 Perform steps 2 through 5 above.
NoteThe clock settings are canceled when you disconnectthe power cord or if a power failure occurs.
N X x
xMm>.
nN
O
v
V
b B
X
Step 2: Setting thetime
You must set the time before using the timerfunctions.
13,5
2,4
9
TUNEDSTEREO
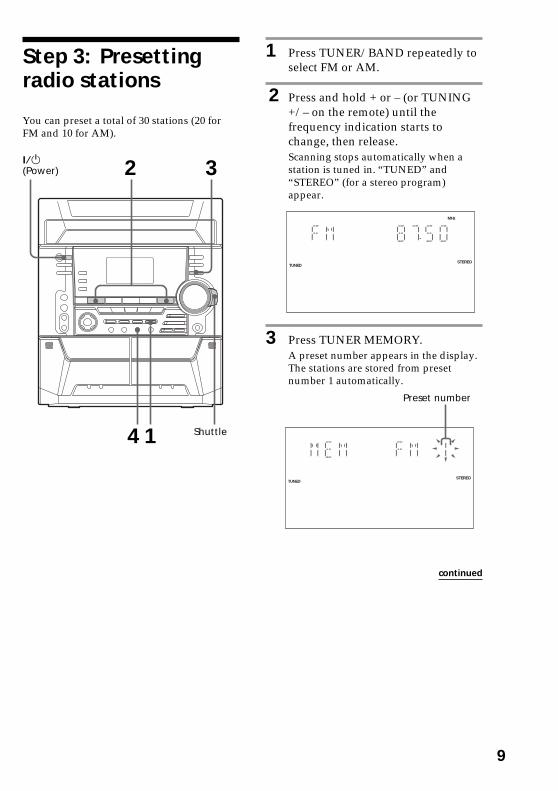
1 Press TUNER/BAND repeatedly toselect FM or AM.
2 Press and hold + or – (or TUNING+/– on the remote) until thefrequency indication starts tochange, then release.Scanning stops automatically when astation is tuned in. “TUNED” and“STEREO” (for a stereo program)appear.
3 Press TUNER MEMORY.A preset number appears in the display.The stations are stored from presetnumber 1 automatically.
TUNEDSTEREO
MHz
Preset number
Step 3: Presettingradio stations
You can preset a total of 30 stations (20 forFM and 10 for AM).
2 3
4 1
?/1(Power)
Shuttle
continued
10
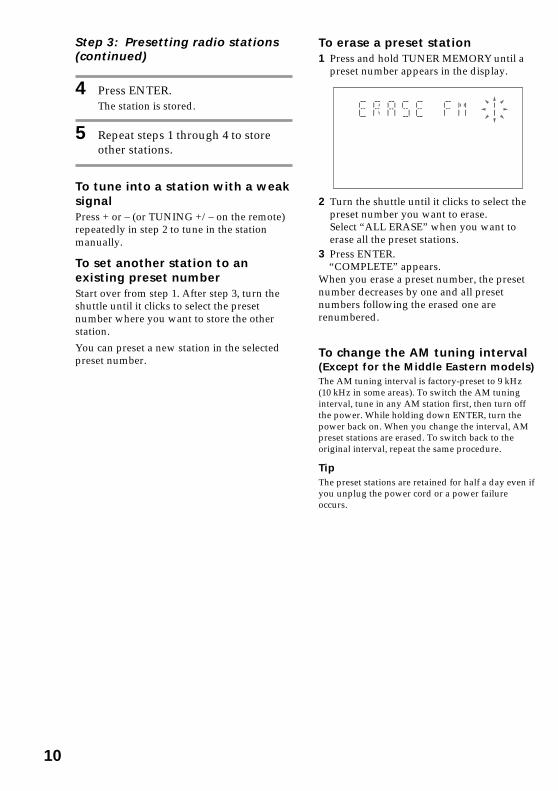
To erase a preset station1 Press and hold TUNER MEMORY until a
preset number appears in the display.
2 Turn the shuttle until it clicks to select thepreset number you want to erase.Select “ALL ERASE” when you want toerase all the preset stations.
3 Press ENTER. “COMPLETE” appears.When you erase a preset number, the presetnumber decreases by one and all presetnumbers following the erased one arerenumbered.
To change the AM tuning interval(Except for the Middle Eastern models)The AM tuning interval is factory-preset to 9 kHz(10 kHz in some areas). To switch the AM tuninginterval, tune in any AM station first, then turn offthe power. While holding down ENTER, turn thepower back on. When you change the interval, AMpreset stations are erased. To switch back to theoriginal interval, repeat the same procedure.
TipThe preset stations are retained for half a day even ifyou unplug the power cord or a power failureoccurs.
4 Press ENTER.The station is stored.
5 Repeat steps 1 through 4 to storeother stations.
To tune into a station with a weaksignalPress + or – (or TUNING +/– on the remote)repeatedly in step 2 to tune in the stationmanually.
To set another station to anexisting preset numberStart over from step 1. After step 3, turn theshuttle until it clicks to select the presetnumber where you want to store the otherstation.
You can preset a new station in the selectedpreset number.
Step 3: Presetting radio stations(continued)
Basic O
pera
tion
s
11
VideoCD
x
DISC SKIPEX-CHANGE
VOLUME. >
PLAYMODE
hH
X
PREV
NEXT
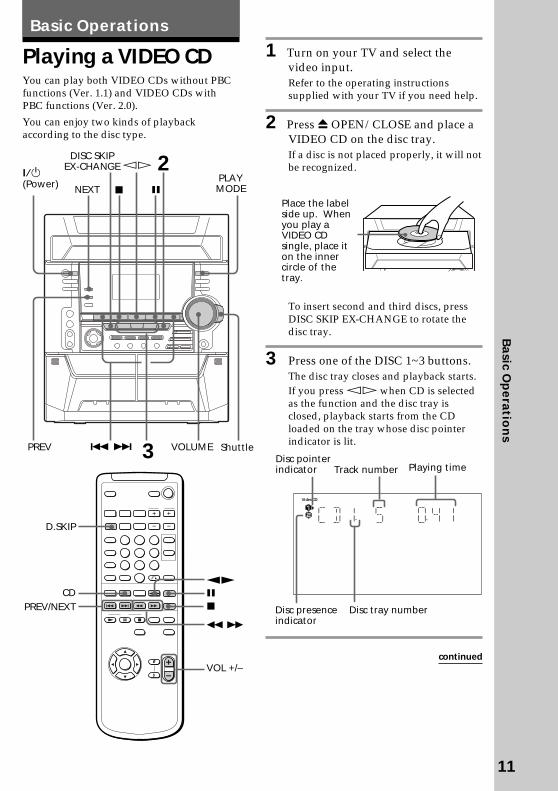
1 Turn on your TV and select thevideo input.Refer to the operating instructionssupplied with your TV if you need help.
2 Press Z OPEN/CLOSE and place aVIDEO CD on the disc tray.If a disc is not placed properly, it will notbe recognized.
To insert second and third discs, pressDISC SKIP EX-CHANGE to rotate thedisc tray.
3 Press one of the DISC 1~3 buttons.The disc tray closes and playback starts.If you press hH when CD is selectedas the function and the disc tray isclosed, playback starts from the CDloaded on the tray whose disc pointerindicator is lit.
?/1(Power)
Basic Operations
Playing a VIDEO CDYou can play both VIDEO CDs without PBCfunctions (Ver. 1.1) and VIDEO CDs withPBC functions (Ver. 2.0).
You can enjoy two kinds of playbackaccording to the disc type.
Place the labelside up. Whenyou play aVIDEO CDsingle, place iton the innercircle of thetray.
Playing timeTrack number
3
2
Disc tray number
Shuttle
Disc presenceindicator
Disc pointerindicator
continued
N X x
sMm>.
nN
O
v
V
b B
nN
D.SKIP
CD X
xPREV/NEXT
m M
VOL +/–
S

12
To
Stop play
Pause
Select a track orscene*2
Find a point in atrack or scene(Lock Searchfunction)
Select a VIDEOCD in stop mode
Play only theVIDEO CD youhave selected
Play all VIDEOCDs
Remove theVIDEO CD
Exchange otherVIDEO CDswhile playing
Adjust thevolume
*1 There may be some disturbance in the videoimage.
*2 Only when the PBC function is set to off or whenplaying VIDEO CDs without PBC functions (Ver1.1).
*3 Only for VIDEO CDs with PBC functions (Ver 2.0)while the PBC function is set to on.
*4 SHUFFLE means to playback in random order(see page 34). This function cannot be used duringmenu playback of a VIDEO CD with PBCfunctions (Ver 2.0).
Tips• You can switch from another source to the VIDEO
CD player and start playing a VIDEO CD just bypressing one of the DISC 1~3 buttons (AutomaticSource Selection).
• If there is no VIDEO CD in the player, “CD NODISC” appears in the display.
• When a disc tray holding a VIDEO CD is selected(or the VIDEO CD in the disc tray is playing) thedisc pointer indicator lights. When a disc trayholding a VIDEO CD is not selected, the discpresence indicator lights, but the disc pointerindicator does not light. When all disc trays areempty, both the disc presence indicator and discpointer indicator light.
NoteWhen a tray has not been read by the unit, the discpresence indicator may light even though there is nodisc on the tray.
Playing a VIDEO CD (continued)
Do this
Press x.
Press X*1. Press again toresume playback.
Press > to go forward or .to go back. When you playVIDEO CDs with PBC functions(Ver 2.0), see page 23.
There are two types ofsearching:1 Turn the shuttle until itclicks during playback andhold. According to the lengthof turning the shuttle, speedchanges as follows (press andhold down m/M on theremote):1 (slow) t 2 (normal) t3 (high)Release the shuttle at thedesired speed and the searchgoes on at the speed.Press hH to stop searchingand start playback at thedesired point.2 Turn the shuttle until itclicks during playback. Eachtime it is turned, speedchanges as follows (pressm/M on the remote):1 (slow) t 2 (normal) t3 (high) t 1 (slow) …Press hH to stop searchingand start playback at thedesired point.
Press a DISC 1~3 button orDISC SKIP EX-CHANGE (orD. SKIP on the remote).
Press PLAY MODE repeatedlyuntil “CONTINUE 1 DISC”,“PBC 1 DISC”*3 or “SHUFFLE1 DISC”*4 appears.
Press PLAY MODE repeatedlyuntil “CONTINUE ALLDISCS”, “PBC ALL DISCS”*3
or “SHUFFLE ALL DISCS”*4
appears.
Press Z OPEN/CLOSE.
Press DISC SKIPEX-CHANGE.
Turn VOLUME (or pressVOL +/– on the remote).

Basic O
pera
tion
s
13
1 Press Z OPEN/CLOSE and place aCD on the disc tray.If a disc is not placed properly, it will notbe recognized.
To insert second and third discs, pressDISC SKIP EX-CHANGE to rotate thedisc tray.
2 Press one of the DISC 1~3 buttons.The disc tray closes and playback starts.If you press hH when CD is selectedas the function and the disc tray isclosed, playback starts from the CDloaded on the tray whose disc pointerindicator is lit.
Playing a CD— Normal Play
You can play up to three CDs in a row.Place with thelabel side up.When you play aCD single (8 cmCD), place it onthe inner circleof the tray.
2
1
Disc tray number
Playing timeTrack number
?/1(Power)
Disc pointerindicator
Disc presenceindicator
Shuttle
continued
x
DISC SKIPEX-CHANGE
VOLUME. >
PLAYMODE
hH
X
N X x
sMm>.
nN
O
v
V
b B
nN
CD
D.SKIP
X
x. >
m M
VOL +/–
S

14
To Do this
Stop playback Press x.
Pause Press X. Press again to resumeplayback.
Select a track During play or pause, press> (to go forward) or .(to go back).
Find a point in Turn the shuttle clockwisea track (Lock (to go forward) orSearch function) counterclockwise (to go
back) until it clicks(or press M or m on theremote) and then press hHwhen you find the desiredpoint .
Select a CD Press a DISC 1~3 button orin stop mode DISC SKIP EX-CHANGE (or
D. SKIP on the remote).
Play only the Press PLAY MODECD you have repeatedly until “CONTINUEselected 1 DISC” or “SHUFFLE 1
DISC” appears.
Play all CDs Press PLAY MODE repeatedlyuntil “CONTINUE ALLDISCS” or “SHUFFLE ALLDISCS” appears.
Remove the CD Press Z OPEN/CLOSE.
Exchange other Press DISC SKIPCDs while EX-CHANGE.playing
Adjust the Turn VOLUME (or pressvolume VOL +/– on the remote).
Tips• You can switch from another source to the CD
player and start playing a CD just by pressing oneof the DISC 1~3 buttons (Automatic SourceSelection).
• If there is no CD in the player, “CD NO DISC”appears in the display.
• When a disc tray holding a CD is selected (or theCD in the disc tray is playing) the disc pointerindicator lights. When a disc tray holding a CD isnot selected, the disc presence indicator lights, butthe disc pointer indicator does not light. When alldisc trays are empty, both the disc presenceindicator and disc pointer indicator light.
NoteWhen a tray has not been read by the unit, the discpresence indicator may light even though there is nodisc on the tray.
Playing a CD (continued)

Basic O
pera
tion
s
15
1 Press A and insert a recordable tapeinto deck B.
2 Press CD.
— CD Synchro Recording
The CD SYNC HI-DUB button lets you recordfrom a CD to a tape easily. You can use aTYPE I (normal) tape.
Recording a CD/VIDEOCD
Insert with theside you wantto recordfacing forward
3 5
16 4
Place with the labelside up. When youplay a CD single (8cm CD), place it onthe inner circle ofthe tray.?/1
(Power)
2
hH
p
DISC SKIPEX-CHANGE
3 Press Z OPEN/CLOSE and place aCD.Then press Z OPEN/CLOSE again toclose the disc tray.When the CD you want to record is notselected, press DISC SKIP EX-CHANGErepeatedly to select the CD you want.
4 Press CD SYNC HI-DUB.Deck B stands by for recording and theCD player stands by for playback. Theindicator on REC PAUSE/STARTflashes.
5 Press DIRECTION repeatedly toselect g to record on one side.Select j (or RELAY) to record onboth sides.
6 Press REC PAUSE/START.Recording starts.
To stop recordingPress x.
Tips• If you want to record from the reverse side, press
TAPE A/B repeatedly to select deck B after step 1.Press hH to start playback of the reverse side,then press x where you want to start recording.The reverse indicator of deck B lights (see page19).
• When you record on both sides, be sure to startfrom the front side. If you start from the reverseside, recording stops at the end of the reverse side.
NoteYou cannot listen to other sources while recording.
16
MHz
TUNEDSTEREO
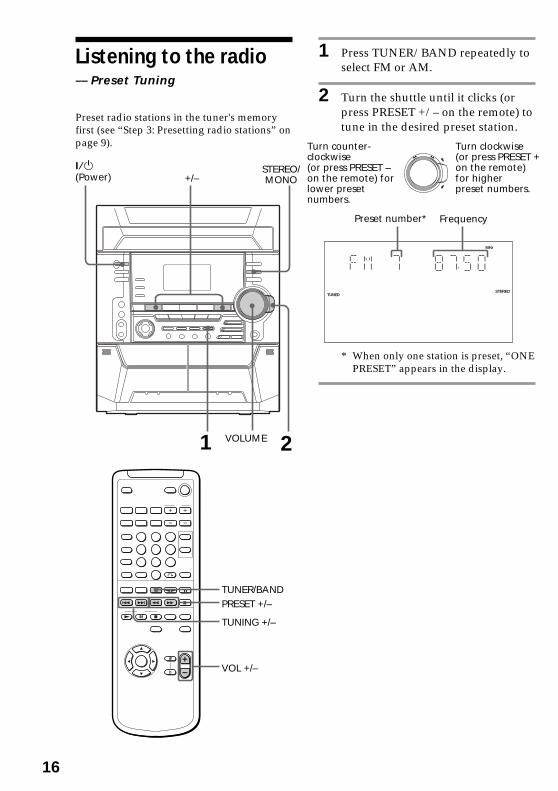
1 Press TUNER/BAND repeatedly toselect FM or AM.
2 Turn the shuttle until it clicks (orpress PRESET +/– on the remote) totune in the desired preset station.
* When only one station is preset, “ONEPRESET” appears in the display.
m
MM
m
N X x
xMm>.
nN
O
v
V
b B
X TUNER/BAND
VOL +/–
PRESET +/–
TUNING +/–
+/–STEREO/MONO
VOLUME
Listening to the radio–– Preset Tuning
Preset radio stations in the tuner's memoryfirst (see “Step 3: Presetting radio stations” onpage 9).
21
Preset number* Frequency
?/1(Power)
Turn counter-clockwise(or press PRESET –on the remote) forlower presetnumbers.
Turn clockwise(or press PRESET +on the remote)for higherpreset numbers.
Basic O
pera
tion
s
17
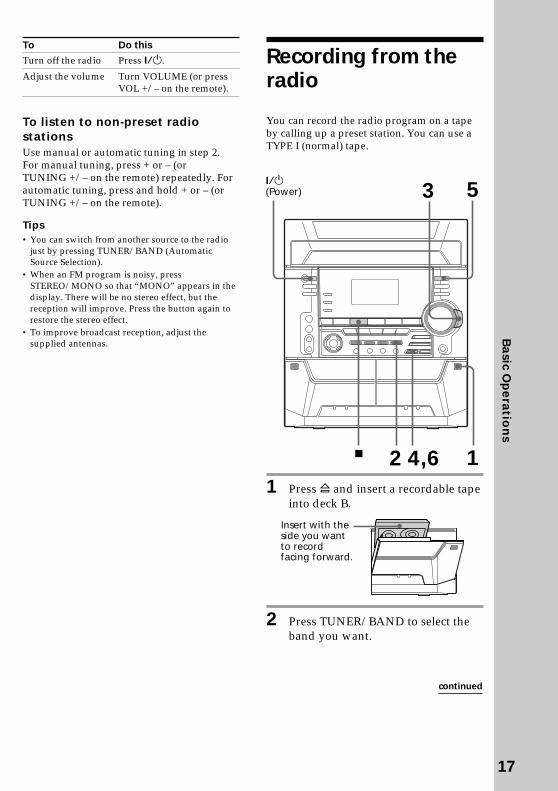
Recording from theradio
You can record the radio program on a tapeby calling up a preset station. You can use aTYPE I (normal) tape.
1 Press A and insert a recordable tapeinto deck B.
2 Press TUNER/BAND to select theband you want.
p
Insert with theside you wantto recordfacing forward.
5
12
3
To Do this
Turn off the radio Press ?/1.
Adjust the volume Turn VOLUME (or pressVOL +/– on the remote).
To listen to non-preset radiostationsUse manual or automatic tuning in step 2.For manual tuning, press + or – (orTUNING +/– on the remote) repeatedly. Forautomatic tuning, press and hold + or – (orTUNING +/– on the remote).
Tips• You can switch from another source to the radio
just by pressing TUNER/BAND (AutomaticSource Selection).
• When an FM program is noisy, pressSTEREO/MONO so that “MONO” appears in thedisplay. There will be no stereo effect, but thereception will improve. Press the button again torestore the stereo effect.
• To improve broadcast reception, adjust thesupplied antennas.
4,6
?/1(Power)
continued

18
3 Turn the shuttle until it clicks totune in a preset station.
4 Press REC PAUSE/START.Deck B stands by for recording.
5 Press DIRECTION repeatedly toselect G to record on one side.Select j (or RELAY) to record onboth sides.
6 Press REC PAUSE/START.Recording starts.
To stop recordingPress x.
Tips• If you want to record from the reverse side, press
TAPE A/B repeatedly to select deck B after step 1.Press hH to start playback of the reverse side,then press x where you want to start recording.The reverse indicator of deck B lights (see page19).
• When you record on both sides, be sure to startfrom the front side. If you start from the reverseside, recording stops at the end of the reverse side.
• To record non-preset stations, use + and – in step 3to tune in the desired station manually.
• If noise is heard while recording from the radio,move the respective antenna to reduce the noise.
MHz
TUNEDSTEREO
N X x
sMm>.
nN
O
v
V
b B
X
VOL +/–
nN
x
X
. >
m M
TAPE A/B
Playing a tape
You can use a TYPE I (normal) tape. You canalso use ./> to quickly search for songsyou want to hear (AMS* function). To selecteither deck A or B, press TAPE A/Brepeatedly.* AMS (Automatic Music Sensor)
x
VOLUME
. >
X
m
MM
m
12
3
2
?/1(Power)
Turn clockwise(or press PRESET +on the remote)for higher presetnumbers.
Turn counter-clockwise (orpress PRESET –on the remote)for lower presetnumbers.
Preset number Frequency4
Shuttle
Recording from the radio(continued)

Basic O
pera
tion
s
19
Searching for the beginning of atrack (AMS*)During playback, press . or >repeatedly for the number of songs you wantto skip forward (or backward).
The search direction, + (forward) or – (back),and number of songs being skipped (1~9)appear in the display.
Example: searching forward 2 songs
* AMS (Automatic Music Sensor)
TipWhen no tapes are inserted, all the indicators light.When a tape (tapes) is (are) inserted, correspondingpresence and forward/reverse indicators light.
Notes• The deck stops automatically after repeating the
sequence five times.• The AMS function may not operate correctly
under the following circumstances:–When the unrecorded space between songs is
less than 4 seconds long.–If completely different information is recorded
on the left and right channels.–When there are continuous sections of extremely
low level or low frequency sound (like those of abaritone sax).
–When the unit is placed near a television. (In thiscase, we recommend moving the unit fartheraway from the television or turning off thetelevision.)
1 Press TAPE A/B.To select deck A or B, press TAPE A/Brepeatedly.
2 Press A and insert a recorded tapein deck A or B.
3 Press DIRECTION repeatedly toselect g to play one side. Selectj to play both sides.To play both decks in succession, selectRELAY (Relay Play)*.
4 Press hH.Press hH again to play the reverseside. The tape starts playing.
Insert with theside you wantto play facingforward.
To Do this
Stop playback Press x.
Pause Press X. Press again toresume playback.
Fast-forward Turn the shuttle clockwise untilit clicks while playing the frontside or counterclockwise untilit clicks while playing thereverse side (or press M orm on the remote).
Rewind Turn the shuttlecounterclockwise until itclicks while playing the frontside or clockwise until itclicks while playing thereverse side (or press m orM on the remote).
Remove the cassette Press A.
Adjust the volume Turn VOLUME (or pressVOL +/– on the remote).
Forwardindicator
Reverseindicator
Tapepresenceindicator
* Relay Play always follows the following sequence: t Deck A (front side) t Deck A (reverse side)
Deck B (reverse side) T Deck B (front side) T

20
1 Press TAPE A/B.
2 Press A and insert a recorded tapein deck A and a recordable tape indeck B.
3 Press CD SYNC HI-DUB.Deck B stands by for recording.
p
Recording from atape— High-speed Dubbing
4 Press DIRECTION repeatedly toselect g to record on one side.Select j (or RELAY) to record onboth sides.
5 Press REC PAUSE/START.Dubbing starts.
To stop dubbingPress x.
Tips• When you dub on both sides, start recording from
the front side. If you record from the reverse side,recording stops at the end of the reverse side.
• If you set DIRECTION to j when the tapesused have different lengths, the tape in each deckreverses independently. If you select RELAY, thetapes in both decks reverse together.
You can use a TYPE I (normal) tape.
Insert with theside you wantto play/recordfacing forward.
1 32
?/1(Power)
5 2
4
Basic O
pera
tion
s
21
VOLUME
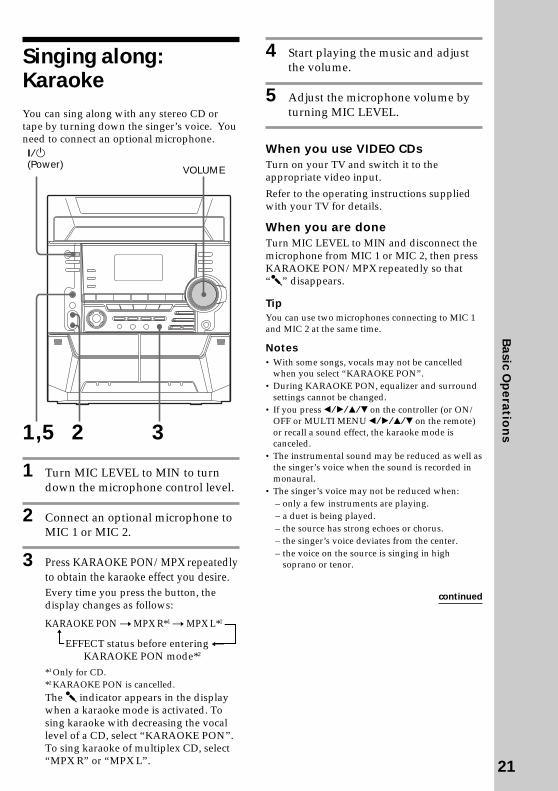
4 Start playing the music and adjustthe volume.
5 Adjust the microphone volume byturning MIC LEVEL.
When you use VIDEO CDsTurn on your TV and switch it to theappropriate video input.
Refer to the operating instructions suppliedwith your TV for details.
When you are doneTurn MIC LEVEL to MIN and disconnect themicrophone from MIC 1 or MIC 2, then pressKARAOKE PON/MPX repeatedly so that“m” disappears.
TipYou can use two microphones connecting to MIC 1and MIC 2 at the same time.
Notes• With some songs, vocals may not be cancelled
when you select “KARAOKE PON”.• During KARAOKE PON, equalizer and surround
settings cannot be changed.• If you press b/B/v/V on the controller (or ON/
OFF or MULTI MENU b/B/v/V on the remote)or recall a sound effect, the karaoke mode iscanceled.
• The instrumental sound may be reduced as well asthe singer’s voice when the sound is recorded inmonaural.
• The singer’s voice may not be reduced when:– only a few instruments are playing.– a duet is being played.– the source has strong echoes or chorus.– the singer’s voice deviates from the center.– the voice on the source is singing in high
soprano or tenor.
Singing along:Karaoke
321,5
You can sing along with any stereo CD ortape by turning down the singer’s voice. Youneed to connect an optional microphone.?/1(Power)
continued
R
1 Turn MIC LEVEL to MIN to turndown the microphone control level.
2 Connect an optional microphone toMIC 1 or MIC 2.
3 Press KARAOKE PON/MPX repeatedlyto obtain the karaoke effect you desire.Every time you press the button, thedisplay changes as follows:
KARAOKE PON t MPX R*1 t MPX L*1
EFFECT status before entering TKARAOKE PON mode*2
*1 Only for CD.*2 KARAOKE PON is cancelled.The m indicator appears in the displaywhen a karaoke mode is activated. Tosing karaoke with decreasing the vocallevel of a CD, select “KARAOKE PON”.To sing karaoke of multiplex CD, select“MPX R” or “MPX L”.

22
Adjusting the keyThis function allows you to adjust the key tosuit your vocal range when playing a VIDEOCD or standard audio CD.
, Press KEY CONTROL or .You can adjust the key higher of lower in13 halftone steps ( 6 ~ 6).
N X x
v
V
b B
KEY CONTROL#/2
ECHO LEVEL
Adjusting themicrophone echo
, Turn ECHO LEVEL to adjust theecho effect.
To cancel the echoingTurn ECHO LEVEL to MIN.
?/1(Power)
Singing along: Karaoke(continued)
NoteThis function cannot be used with the tape deck.
23
x
DISC SKIPEX-CHANGE PLAY
MODE
PREV
NEXT
RETURN
N X x
sMm>.
nN
O
X nN, SELECTx
RETURN O
?/1
D. SKIP
CD
PREV/NEXT
ENTER
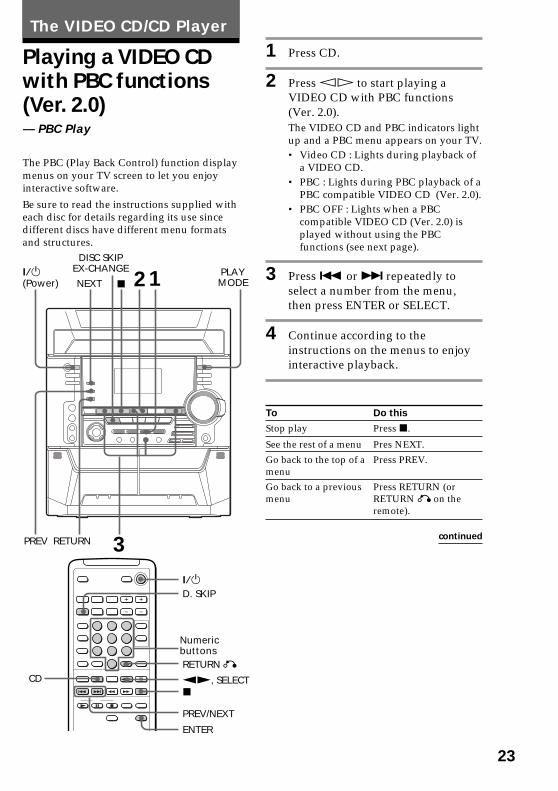
The VIDEO CD/CD Player
Playing a VIDEO CDwith PBC functions(Ver. 2.0)–– PBC Play
The PBC (Play Back Control) function displaymenus on your TV screen to let you enjoyinteractive software.
Be sure to read the instructions supplied witheach disc for details regarding its use sincedifferent discs have different menu formatsand structures.
1 Press CD.
2 Press hH to start playing aVIDEO CD with PBC functions(Ver. 2.0).The VIDEO CD and PBC indicators lightup and a PBC menu appears on your TV.• Video CD : Lights during playback of
a VIDEO CD.• PBC : Lights during PBC playback of a
PBC compatible VIDEO CD (Ver. 2.0).• PBC OFF : Lights when a PBC
compatible VIDEO CD (Ver. 2.0) isplayed without using the PBCfunctions (see next page).
3 Press . or > repeatedly toselect a number from the menu,then press ENTER or SELECT.
4 Continue according to theinstructions on the menus to enjoyinteractive playback.
To Do this
Stop play Press x.
See the rest of a menu Pres NEXT.
Go back to the top of a Press PREV.menu
Go back to a previous Press RETURN (ormenu RETURN O on the
remote).
continued
Numericbuttons
?/1(Power) 12
3

24
DISPLAY
To cancel PBC Playback of VIDEOCDs with PBC functions (Ver. 2.0)There are two ways to cancel the PBCfunctions.
• Before you start playing, select the trackyou want using ./>, then pressENTER or SELECT.
• Before you start playing, select the tracknumber using the numeric buttons on theremote.
The PBC OFF indicator lights up andplayback begins from the selected track. Stillimages, such as the menu screens, will not beshown.
To select a menu number usingthe remotePress the numeric buttons in the order youwant in step 2. To enter track numbers 10 orover, first press >10, then press the numericbuttons. To enter 0, use the 10/0 button.
Tips• When appears on the TV screen, you have
pressed an invalid button. Press a button indicatedby the instructions on the menu screen.
• When you press NEXT during menu playback orwhile playing moving pictures, the next scene onthe disc appears. Also refer to the instructionssupplied with the disc.
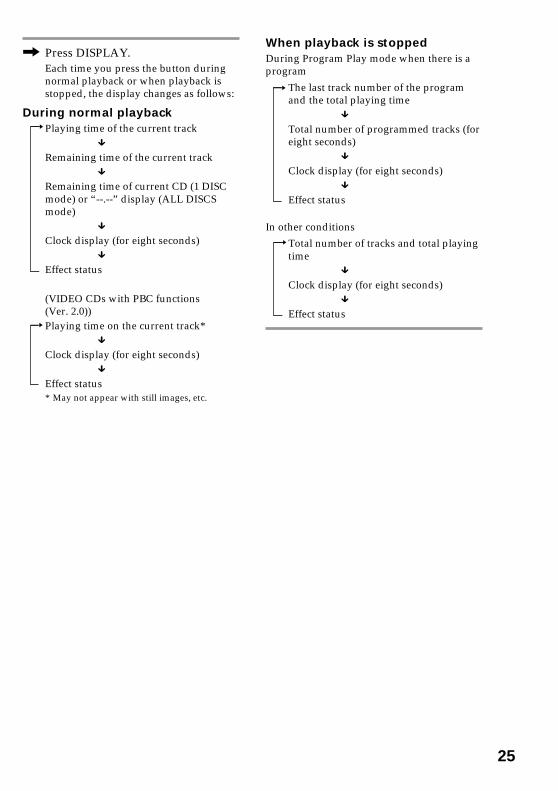
Checking theremaining time
You can check the remaining time of thecurrent track or that of the CD.
?/1(Power)
Playing a VIDEO CD with PBCfunctions (Ver. 2.0) (continued)
25
t
t
t
t
When playback is stoppedDuring Program Play mode when there is aprogram
The last track number of the programand the total playing time
x
Total number of programmed tracks (foreight seconds)
x
Clock display (for eight seconds)x
Effect status
In other conditions
Total number of tracks and total playingtime
x
Clock display (for eight seconds)x
Effect status
, Press DISPLAY.Each time you press the button duringnormal playback or when playback isstopped, the display changes as follows:
During normal playbackPlaying time of the current track
x
Remaining time of the current trackx
Remaining time of current CD (1 DISCmode) or “--.--” display (ALL DISCSmode)
x
Clock display (for eight seconds)x
Effect status
(VIDEO CDs with PBC functions(Ver. 2.0))Playing time on the current track*
x
Clock display (for eight seconds)x
Effect status* May not appear with still images, etc.

26
• During playback of an audio CD inProgram Play mode
1 Current disc and track number2 KARAOKE effect status3 “PROGRAM”4 Programmed disc and track numbers5 Elapsed time of current track6 Key control level or no display7 “REPEAT”, “REPEAT 1” or no display
• During stop mode of a VIDEO CD withPBC functions
1 “RESUME” or no display2 KARAOKE effect status3 “AUTO PBC”4 Key control level or no display5 Total playing time of current disc6 “REPEAT”, “REPEAT 1” or no display
• During stop mode of a VIDEO CD oraudio CD (except Program Play mode)
1 “RESUME” or no display2 KARAOKE effect status3 Play mode4 Key control level or no display5 Total playing time of current disc6 “REPEAT”, “REPEAT 1” or no display
42
1
AUTO PBC REPEAT
KARAOKE DISC1 62 : 00
RESUME VCD STOP
56
23 1
4
2
1
PROGRAM
1. D 1 – 3
2. D 1 – 8
3. D 1 – 12
4. D 2 – 1
5. D 3 – 10
REPEAT
KARAOKE
DISC 2 - 1 0 : 20 5
762
3 1
B
?/1
ON SCREEN
Using the on-screendisplay
You can check the current operating statusand disc information of VIDEO CDs or audioCDs during playback or in stop mode bysuperimposing a display on top of the imageson your TV screen.
, Press ON SCREEN.Each time you press this button, the on-screen display changes as follows:
t ON SCREEN 1 t ON SCREEN 2
ON SCREEN OFF T
ON SCREEN 1 display• During playback of an audio CD (except
Program Play mode)
1 Current disc and track number2 KARAOKE effect status3 Play mode4 Key control level or no display5 Elapsed time of current track6 “REPEAT”, “REPEAT 1” or no display
4
2
1
CONTINUE REPEAT
KARAOKE
DISC 3 - 3 0 : 20 5
623 1
42
1
CONTINUE REPEAT
KARAOKE DISC1 62 : 00
RESUME VCD STOP
56
23 1

27
• During stop mode of a VIDEO CD oraudio CD in Program Play mode
1 KARAOKE effect status2 “PROGRAM”3 Programmed disc and track numbers4 Total playing time of program5 “REPEAT”, “REPEAT 1” or no display6 Key control level or no display
ON SCREEN 2 display• During playback of a VIDEO CD
1 Current disc and track number*2 Elapsed time of current track* “SCENE” and number is displayed during
playback of a VIDEO CD with PBC functions
• During playback of an audio CDDisplay is the same as ON SCREEN 1.
• During stop mode of a VIDEO CD (exceptProgram Play mode)
1 “RESUME” or no display2 KARAOKE effect status3 Play mode*4 Total track numbers of each disc5 Current disc number and total playing
time of current disc6 “REPEAT”, “REPEAT 1” or no display7 Key control level or no display* “AUTO PBC” display for a VIDEO CD with
PBC functions
• During stop mode of an audio CD(except Program Play mode)
1 KARAOKE effect status2 Play mode3 Disc number and track numbers4 Current disc number and total playing
time of current disc5 “REPEAT”, “REPEAT 1” or no display6 Key control level or no display
• During stop mode of a VIDEO CD oraudio CD in Program Play mode
Display is the same as ON SCREEN 1.
ON SCREEN OFFNo display (except for special menus).
NoteNormally, leave the display mode set to either ONSCREEN 1 or 2. When you select ON SCREEN OFF,you cannot check the operating status whileoperating the CD player. In this case, check theinformation on the front panel display.
To switch language of on-screendisplay (Chinese model only)You can switch the messages in the on–screendisplay from Chinese to English.
1 Press SPECIAL MENU.2 Press 4.
The messages switch from Chinese toEnglish.
To switch back to Chinese messages, repeatthis operation.4
2
1
CONTINUE
DISC 1 VCD TR 1 – 12
VCD TR 1 – 16
CD TR 1 – 10
DISC 2
DISC 3
REPEAT
KARAOKE 62 : 00
RESUME VCD STOP
567
23 1
DISC 1
1 DISC 1 - 7 0 : 55 2
3
2PROGRAM
1. D 1 – 3
2. D 1 – 8
3. D 1 – 12
4. D 2 – 1
5. D 3 – 10
REPEAT
KARAOKE
VCD
TOTAL
STOP
25 : 40 45
6
12 1
3
2CONTINUE
DISC 1 VCD TR 1 – 12
VCD TR 1 – 16
CD TR 1 – 10
DISC 2
DISC 3
REPEAT
KARAOKE 60 : 00
CD STOP
456
12 1
DISC 3

28
N X x
xMm>.
nN
O
v
V
b B
X
x
SPECIAL MENU
ON SCREEN
PREV/NEXT
>10nN
D.SKIPCLEAR
Locating by elapsed time–– Time SearchYou can use elapsed time as a guide to find acertain part of a VIDEO CD. “Elapsed time”means the time from the beginning of thedisc. It is not the playing time of the currenttrack as shown in the display.
It is especially useful when playing discs thathave only a few track divisions.
This function cannot be used during playbackof VIDEO CDs with PBC functions (Ver. 2.0).
1 Press SPECIAL MENU.
2 Press 1 to select “1) TIMESEARCH.”
3 Press the numeric buttons (1 – 10/0)to enter the time (in minutes) for thesection you want.To enter 10 minutes: Press 1 p 10/0.The selected elapsed time appears on theTV screen.To reenter the time: Press CLEAR, andthen press numeric buttons again.
4 Press nN.Playback starts from the selected time.
To stop playbackPress x.
To use time search with VIDEOCDs with PBC functions (Ver. 2.0)Select “1) TIME SEARCH” before you startplaying the VIDEO CD, to light the PBC OFFindicator and play without PBC functions.
Locating a specificpart of a disc–– Special Menu
This player has 3 different search features.Select the search feature you want from theSPECIAL MENU.
The TV screen must be ON to use thesefunctions.
Numeric buttons
29
D 1 DIGEST
1
5
9
2
6
3
7
4
8
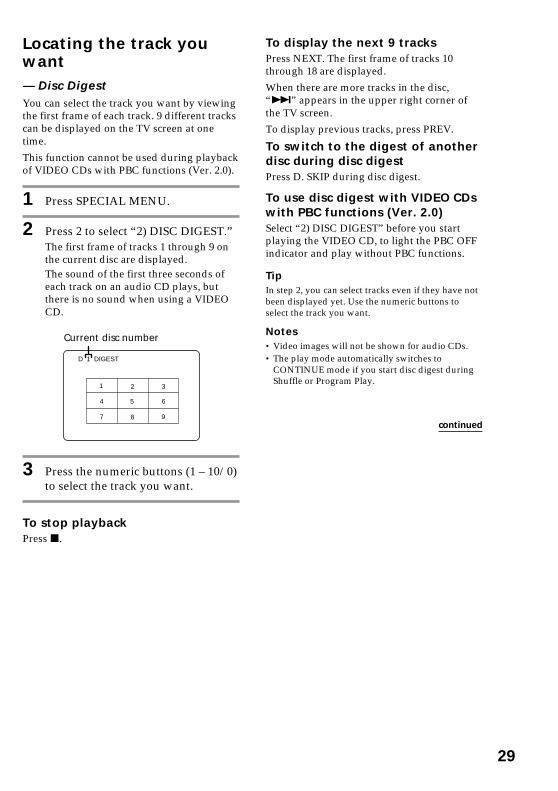
To display the next 9 tracksPress NEXT. The first frame of tracks 10through 18 are displayed.
When there are more tracks in the disc,“>” appears in the upper right corner ofthe TV screen.
To display previous tracks, press PREV.
To switch to the digest of anotherdisc during disc digestPress D. SKIP during disc digest.
To use disc digest with VIDEO CDswith PBC functions (Ver. 2.0)Select “2) DISC DIGEST” before you startplaying the VIDEO CD, to light the PBC OFFindicator and play without PBC functions.
TipIn step 2, you can select tracks even if they have notbeen displayed yet. Use the numeric buttons toselect the track you want.
Notes• Video images will not be shown for audio CDs.• The play mode automatically switches to
CONTINUE mode if you start disc digest duringShuffle or Program Play.
Locating the track youwant–– Disc DigestYou can select the track you want by viewingthe first frame of each track. 9 different trackscan be displayed on the TV screen at onetime.
This function cannot be used during playbackof VIDEO CDs with PBC functions (Ver. 2.0).
1 Press SPECIAL MENU.
2 Press 2 to select “2) DISC DIGEST.”The first frame of tracks 1 through 9 onthe current disc are displayed.The sound of the first three seconds ofeach track on an audio CD plays, butthere is no sound when using a VIDEOCD.
3 Press the numeric buttons (1 – 10/0)to select the track you want.
To stop playbackPress x.
Current disc number
continued
30
TRACK 1 DIGEST
1
5
9
2
6
3
7
4
8
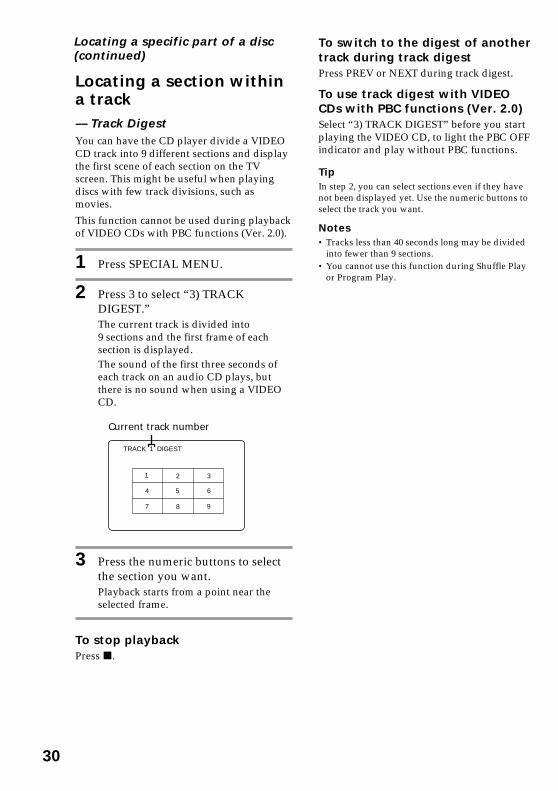
To switch to the digest of anothertrack during track digestPress PREV or NEXT during track digest.
To use track digest with VIDEOCDs with PBC functions (Ver. 2.0)Select “3) TRACK DIGEST” before you startplaying the VIDEO CD, to light the PBC OFFindicator and play without PBC functions.
TipIn step 2, you can select sections even if they havenot been displayed yet. Use the numeric buttons toselect the track you want.
Notes• Tracks less than 40 seconds long may be divided
into fewer than 9 sections.• You cannot use this function during Shuffle Play
or Program Play.
Locating a section withina track–– Track DigestYou can have the CD player divide a VIDEOCD track into 9 different sections and displaythe first scene of each section on the TVscreen. This might be useful when playingdiscs with few track divisions, such asmovies.
This function cannot be used during playbackof VIDEO CDs with PBC functions (Ver. 2.0).
1 Press SPECIAL MENU.
2 Press 3 to select “3) TRACKDIGEST.”The current track is divided into9 sections and the first frame of eachsection is displayed.The sound of the first three seconds ofeach track on an audio CD plays, butthere is no sound when using a VIDEOCD.
3 Press the numeric buttons to selectthe section you want.Playback starts from a point near theselected frame.
To stop playbackPress x.
Current track number
Locating a specific part of a disc(continued)
31
N X x
xMm>.
nN
O
v
V
b B
X
x
nN
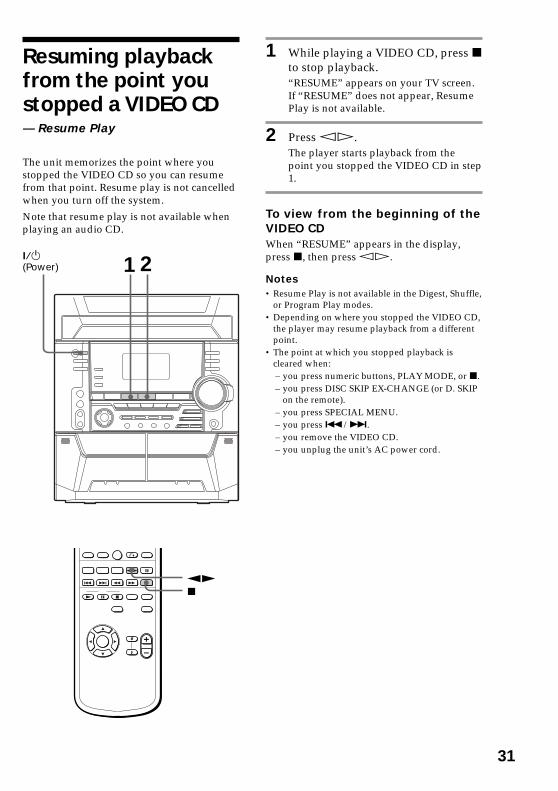
1 While playing a VIDEO CD, press xto stop playback.“RESUME” appears on your TV screen.If “RESUME” does not appear, ResumePlay is not available.
2 Press hH.The player starts playback from thepoint you stopped the VIDEO CD in step1.
To view from the beginning of theVIDEO CDWhen “RESUME” appears in the display,press x, then press hH.
Notes• Resume Play is not available in the Digest, Shuffle,
or Program Play modes.• Depending on where you stopped the VIDEO CD,
the player may resume playback from a differentpoint.
• The point at which you stopped playback iscleared when:– you press numeric buttons, PLAY MODE, or x.– you press DISC SKIP EX-CHANGE (or D. SKIP
on the remote).– you press SPECIAL MENU.– you press ./>.– you remove the VIDEO CD.– you unplug the unit’s AC power cord.
Resuming playbackfrom the point youstopped a VIDEO CD–– Resume Play
The unit memorizes the point where youstopped the VIDEO CD so you can resumefrom that point. Resume play is not cancelledwhen you turn off the system.
Note that resume play is not available whenplaying an audio CD.
?/1(Power) 1 2
32
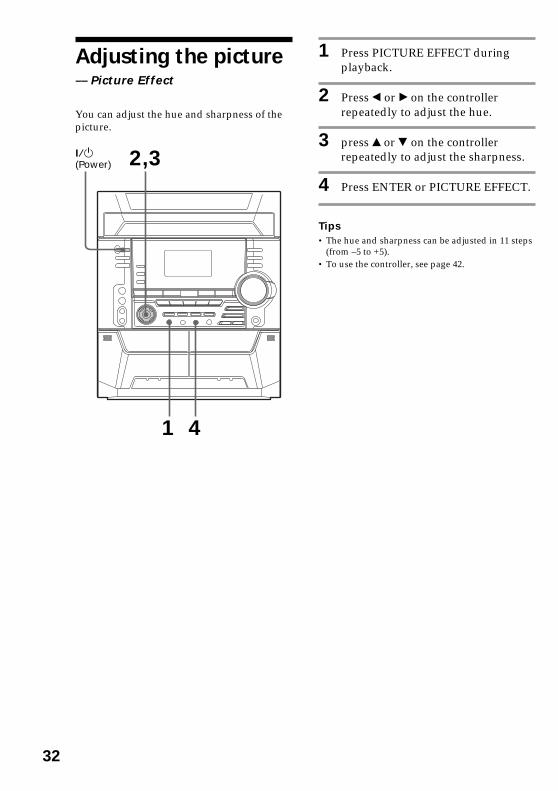
Adjusting the picture–– Picture Effect
You can adjust the hue and sharpness of thepicture.
?/1(Power)
41
2,3
1 Press PICTURE EFFECT duringplayback.
2 Press b or B on the controllerrepeatedly to adjust the hue.
3 press v or V on the controllerrepeatedly to adjust the sharpness.
4 Press ENTER or PICTURE EFFECT.
Tips• The hue and sharpness can be adjusted in 11 steps
(from –5 to +5).• To use the controller, see page 42.
33
REPEAT
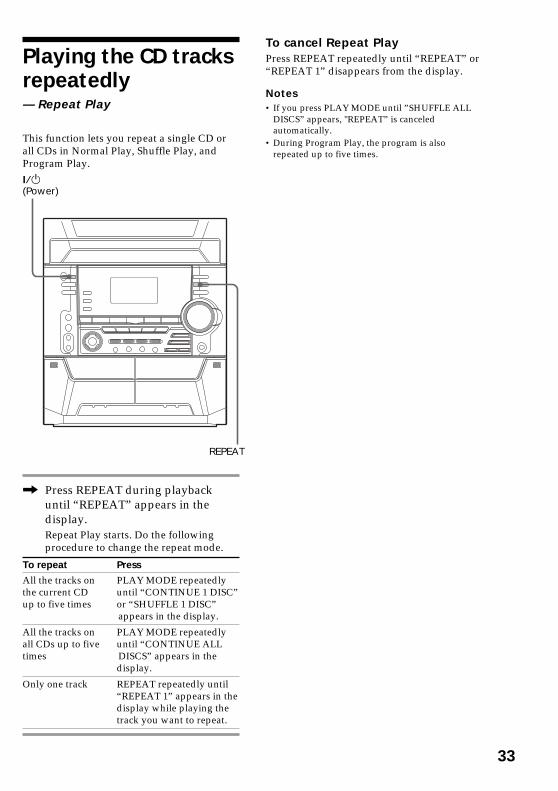
Playing the CD tracksrepeatedly–– Repeat Play
This function lets you repeat a single CD orall CDs in Normal Play, Shuffle Play, andProgram Play.
, Press REPEAT during playbackuntil “REPEAT” appears in thedisplay.Repeat Play starts. Do the followingprocedure to change the repeat mode.
To cancel Repeat PlayPress REPEAT repeatedly until “REPEAT” or“REPEAT 1” disappears from the display.
Notes• If you press PLAY MODE until ”SHUFFLE ALL
DISCS” appears, "REPEAT” is canceledautomatically.
• During Program Play, the program is alsorepeated up to five times.
To repeat Press
All the tracks on PLAY MODE repeatedlythe current CD until “CONTINUE 1 DISC”up to five times or “SHUFFLE 1 DISC”
appears in the display.
All the tracks on PLAY MODE repeatedlyall CDs up to five until “CONTINUE ALLtimes DISCS” appears in the
display.
Only one track REPEAT repeatedly until“REPEAT 1” appears in thedisplay while playing thetrack you want to repeat.
?/1(Power)
34
DISC 1~3
>
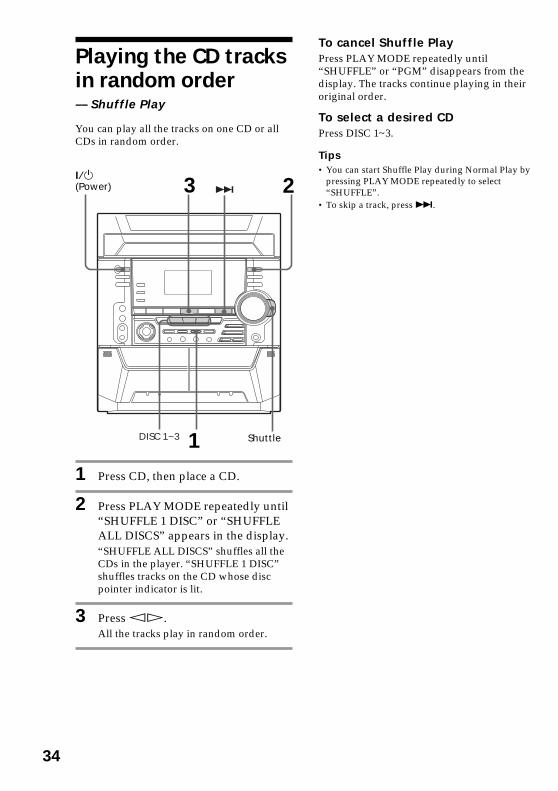
Playing the CD tracksin random order–– Shuffle Play
You can play all the tracks on one CD or allCDs in random order.
1 Press CD, then place a CD.
2 Press PLAY MODE repeatedly until“SHUFFLE 1 DISC” or “SHUFFLEALL DISCS” appears in the display.“SHUFFLE ALL DISCS” shuffles all theCDs in the player. “SHUFFLE 1 DISC”shuffles tracks on the CD whose discpointer indicator is lit.
3 Press hH.All the tracks play in random order.
To cancel Shuffle PlayPress PLAY MODE repeatedly until“SHUFFLE” or “PGM” disappears from thedisplay. The tracks continue playing in theiroriginal order.
To select a desired CDPress DISC 1~3.
Tips• You can start Shuffle Play during Normal Play by
pressing PLAY MODE repeatedly to select“SHUFFLE”.
• To skip a track, press >.
3 2
1 Shuttle
?/1(Power)

35
PGM
N X x
xMm>.
nN
O
v
V
b B
X nN
x
. >
CD
CHECK
CLEAR
p
1 Press CD, then place a CD.
2 Press PLAY MODE repeatedly until“PGM” appears in the display.
3 Press one of the DISC 1~3 buttons toselect a CD.To program all the tracks on a CD atonce, proceed to step 5 while “AL”appears in the display.
4 Press . or > until the desiredtrack appears in the display.
5 Press ENTER.The track is programmed. The programstep number appears, followed by thetotal playing time.
6 To program additional tracks,repeat steps 3 to 5.Skip step 3 to select tracks from thesame disc.
7 Press hH.All the tracks play in the order youselected.
Programming the CDtracks–– Program Play
You can make a program of up to 32 tracksfrom all the CDs in the order you want themto be played.
Disc number
Track number
13
4
5
7
Total playing time(including selected track)
?/1(Power) 24
continued

36
To Press
Check the CHECK on the remoteprogram repeatedly. After the last
track, “CHECK END”appears.
Clear a track from CLEAR on the remote inthe end stop mode.
Clear a specific CHECK on the remotetrack repeatedly until the
number of the track to beerased appears, then pressCLEAR.
Add a track to the 1 Select the disc tray with aprogram in stop DISC 1~3 button.mode 2 Select the track by
pressing ./>.3 Press ENTER.
Clear the entire x once in stop mode orprogram twice during playback.
Tips• The program you made remains in the system’s
memory even after it has been played back. PressCD, then press hH to play the same programagain.
• If “--.--” appears instead of the total playing timeduring programming, this means:– you have programmed a track number
which exceeds 20.– the total playing time has exceeded 100 minutes.
To cancel Program PlayPress PLAY MODE repeatedly until “PGM”or “SHUFFLE” disappears from the display.
Programming the CD tracks(continued)
37
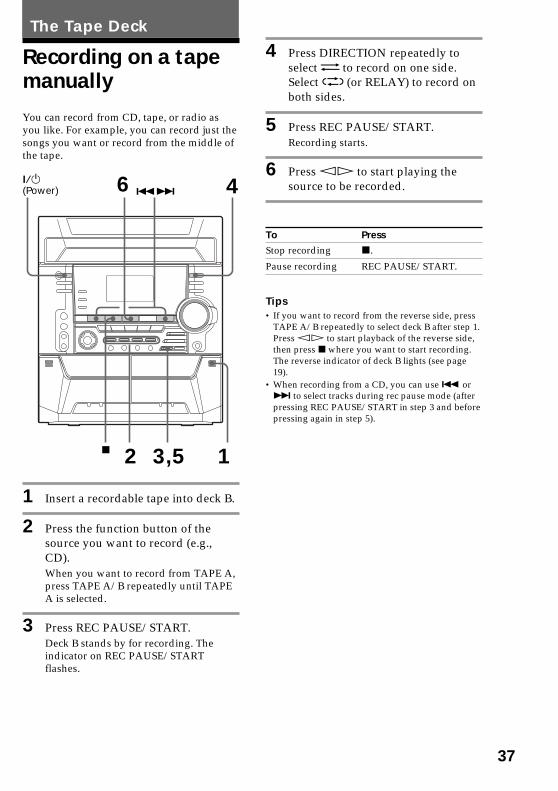
You can record from CD, tape, or radio asyou like. For example, you can record just thesongs you want or record from the middle ofthe tape.
1 Insert a recordable tape into deck B.
2 Press the function button of thesource you want to record (e.g.,CD).When you want to record from TAPE A,press TAPE A/B repeatedly until TAPEA is selected.
3 Press REC PAUSE/START.Deck B stands by for recording. Theindicator on REC PAUSE/STARTflashes.
x
.>
Recording on a tapemanually
4 Press DIRECTION repeatedly toselect g to record on one side.Select j (or RELAY) to record onboth sides.
5 Press REC PAUSE/START.Recording starts.
6 Press hH to start playing thesource to be recorded.
To Press
Stop recording x.
Pause recording REC PAUSE/START.
Tips• If you want to record from the reverse side, press
TAPE A/B repeatedly to select deck B after step 1.Press hH to start playback of the reverse side,then press x where you want to start recording.The reverse indicator of deck B lights (see page19).
• When recording from a CD, you can use . or> to select tracks during rec pause mode (afterpressing REC PAUSE/START in step 3 and beforepressing again in step 5).
The Tape Deck
2 1
4
3,5
?/1(Power) 6

38
PGM
N X x
xMm>.
nN
O
v
V
b B
X
CHECK
EDIT
x
1 Place a CD and insert a recordabletape into deck B.
2 Press CD.
3 Press PLAY MODE repeatedly until“PGM” appears in the display.
4 Press one of the DISC 1~3 buttons toselect a CD.To program all the tracks on a CD atonce, proceed to step 6 while “AL”appears in the display.
5 Press . or > until the desiredtrack appears in the display.
6 Press ENTER.The track is programmed. The programstep number appears, followed by thetotal playing time.
7 To program additional tracks to berecorded on side A, repeat steps 4 to6.Skip step 4 to select tracks from the samedisc.
Recording a CD byspecifying track order— Program Edit
1
2
4
6 10
You can record tracks from all the CDs in theorder you want. When programming, makesure the playing times for each side do notexceed the length of one side of the tape.
12
Disc number
Track number
Total playing time(including selected track)
?/1(Power)
1
5 3,115 8

39
8 Press X to insert a pause at the endof side A.“P” appears in the display and the totalplaying time resets to “0.00” in thedisplay.
9 Repeat steps 5 and 6 for tracks fromthe same disc or steps 4 to 6 fortracks from another disc to programthe remaining tracks to be recordedon side B.
10 Press CD SYNC HI-DUB.Deck B stands by for recording and theCD player stands by for playback. Theindicator on REC PAUSE/STARTflashes.
11 Press DIRECTION repeatedly toselect g to record on one side.Select j (or RELAY) to record onboth sides.
12 Press REC PAUSE/START.Recording starts.
To stop recordingPress x.
To check the orderPress CHECK on the remote repeatedly. Afterthe last track, “CHECK END” appears.
To cancel Program EditPress PLAY MODE repeatedly until “PGM”or “SHUFFLE” disappears from the display.
Selecting tape lengthautomatically—Tape Select Edit
You can check the most suitable tape lengthfor recording a CD. Note that you cannot useTape Select Edit for discs containing over 20tracks.
1 Place a CD.
2 Press CD.
3 Press EDIT once, so that “EDIT”flashes.The required tape length for thecurrently selected CD appears, followedby the total playing time for side A andside B respectively.

40
Flashing part of a CD— Flash
With the Flash function, you can “flash” theCD sound during playback. This lets youcreate original recordings.
, Press and hold FLASH on theremote during playback at the pointyou want to start the Flash function,and release to resume normal play.
To adjust the flash lengthPress MULTI MENU v/V on the remotewhile pressing FLASH to select different flashlengths (FLASH 1~20).
To use LOOP and FLASH togetherPress and hold both LOOP and FLASH at thesame time.
NoteThe loop and flash length cannot be adjusted duringthis operation. Adjust the loop and flash lengthsindependently beforehand if necessary.
Looping part of a CD— Loop
With the Loop function, you can repeat partof a CD during playback. This lets you createoriginal recordings.
, Press and hold LOOP on the remoteduring playback at the point youwant to start the Loop function, andrelease to resume normal play.
To adjust the loop lengthPress MULTI MENU v/V on the remotewhile pressing LOOP to select different looplengths (LOOP 1~20).
N X x
xMm>.
nN
O
v
V
b B
X
LOOP
MULTI MENU v/V
N X x
xMm>.
nN
O
v
V
b B
X
FLASH
MULTI MENU v/V
DJ Effects
41
N X x
xMm>.
nN
O
v
V
b B
X
MULTI MENU v/V
MULTI MENU b/B
ON/OFF
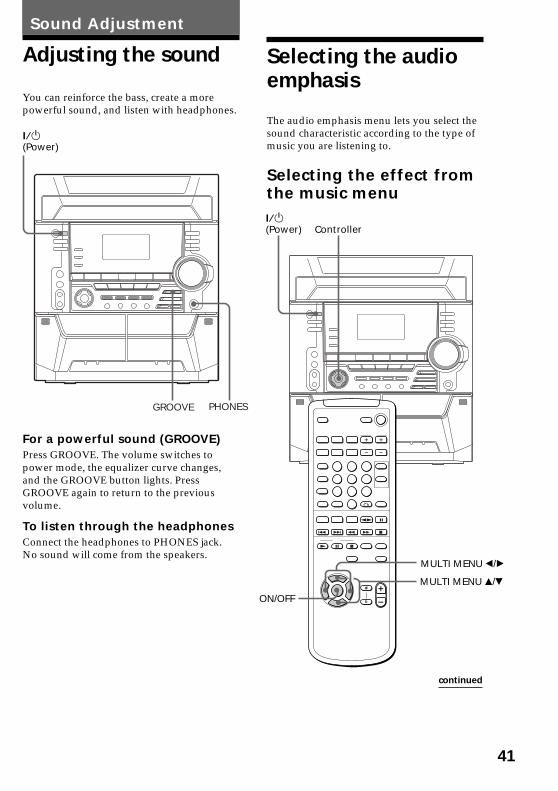
You can reinforce the bass, create a morepowerful sound, and listen with headphones.
For a powerful sound (GROOVE)Press GROOVE. The volume switches topower mode, the equalizer curve changes,and the GROOVE button lights. PressGROOVE again to return to the previousvolume.
To listen through the headphonesConnect the headphones to PHONES jack.No sound will come from the speakers.
GROOVE PHONES
Adjusting the sound
Sound Adjustment
?/1(Power)
Selecting the audioemphasis
The audio emphasis menu lets you select thesound characteristic according to the type ofmusic you are listening to.
Selecting the effect fromthe music menu?/1(Power) Controller
continued

42
SPECTRUM
v
V
b B
M
m
< ,
t
Changing thespectrum analyzerdisplayYou can enjoy changing the display whilelistening to the music.
, Press SPECTRUM.Every time you press the button, thedisplay changes as follows:SPECTRUM 1
x
SPECTRUM 2x
SPECTRUM 3x
IMAGE PATTERNx
SPECTRUM OFF*
?/1(Power)
Effect
ROCKPOPJAZZDANCESOULORIENTAL
ACTIONDRAMASFGAME
USER FILE
For
Standard music sources
Soundtracks and speciallistening situations
See page 44
, Press b or B on the controller (orMULTI MENU b/B on the remote)to select the preset you desire.The preset name appears in the display.See the chart “Music menu options”.
To select USER FILEPress v on the controller (or MULTI MENU von the remote).
To cancel the effectPress V repeatedly on the controller (MULTIMENU V or ON/OFF on the remote) so that“EFFECT OFF” appears in the display.
Music menu options“SURROUND” appears if you select an effectwith surround effects.
TipRefer to the illustration to use the controller.Put your finger in the hollow and move in thedirection you want (v/V/b/B).
Selecting the audio emphasis(contined)
* The display slightly dims.

43
Selecting surroundeffectsYou can enjoy surround effects.
, Press CINEMA SPACE repeatedlyto select the surround effect youdesire.Every time you press the button, thedisplay changes as follows:
CINEMA SPACE*x
SURROUND ONx
SURROUND OFF* CINEMA SPACE is the surround effect for
movies.
NoteWhen you choose other sound effects, the surroundeffect will be canceled.
CINEMA SPACE
?/1(Power)
1 5
2,3?/1(Power)
Adjusting the graphicequalizerYou can adjust the sound by raising orlowering the levels of specific frequencyranges.
Before operation, first select the audioemphasis you want for your basic sound.
1 Press EQ EDIT.
2 Press b or B on the controllerrepeatedly to select a frequencyband.
Frequency band
t
continued
44
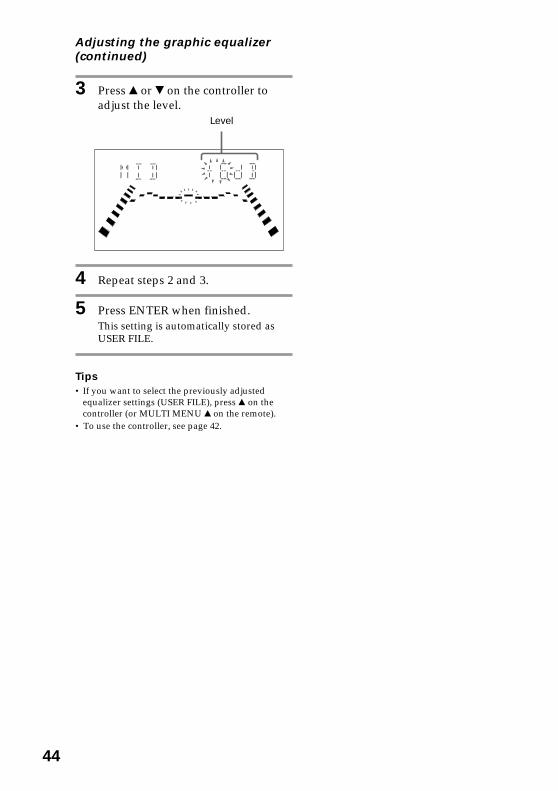
3 Press v or V on the controller toadjust the level.
4 Repeat steps 2 and 3.
5 Press ENTER when finished.This setting is automatically stored asUSER FILE.
Tips• If you want to select the previously adjusted
equalizer settings (USER FILE), press v on thecontroller (or MULTI MENU v on the remote).
• To use the controller, see page 42.
Level
Adjusting the graphic equalizer(continued)
45
Other Features
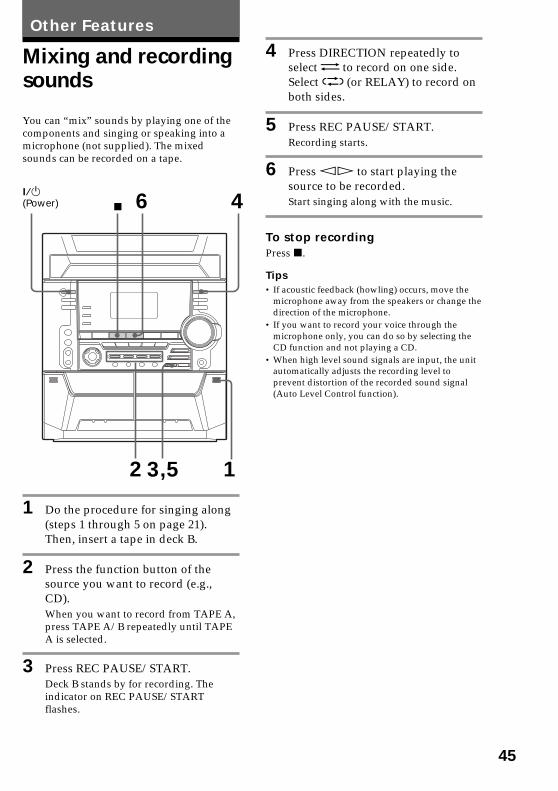
Mixing and recordingsounds
You can “mix” sounds by playing one of thecomponents and singing or speaking into amicrophone (not supplied). The mixedsounds can be recorded on a tape.
1 Do the procedure for singing along(steps 1 through 5 on page 21).Then, insert a tape in deck B.
2 Press the function button of thesource you want to record (e.g.,CD).When you want to record from TAPE A,press TAPE A/B repeatedly until TAPEA is selected.
3 Press REC PAUSE/START.Deck B stands by for recording. Theindicator on REC PAUSE/STARTflashes.
x
2
4
13,5
?/1(Power) 6
4 Press DIRECTION repeatedly toselect g to record on one side.Select j (or RELAY) to record onboth sides.
5 Press REC PAUSE/START.Recording starts.
6 Press hH to start playing thesource to be recorded.Start singing along with the music.
To stop recordingPress x.
Tips• If acoustic feedback (howling) occurs, move the
microphone away from the speakers or change thedirection of the microphone.
• If you want to record your voice through themicrophone only, you can do so by selecting theCD function and not playing a CD.
• When high level sound signals are input, the unitautomatically adjusts the recording level toprevent distortion of the recorded sound signal(Auto Level Control function).

46
You can wake up to music at a preset timeevery day. Make sure you have set the clock(see “Step 2: Setting the time” on page 8).
1 Prepare the music source you wantto play.• CD: Insert a CD. To start from a
specific track, make a program (see“Programming the CD tracks” onpage 35).
• Tape: Insert a tape with the side youwant to play facing forward.
• Radio: Tune in the preset station youwant (see “Listning to the radio” onpage 16).
2 Adjust the volume.
3 Press CLOCK/TIMER SET.“SET (DAILY 1)” appears.
N X x
xMm>.
nN
O
v
V
b B
CLOCK/TIMER SELECT
SLEEP
Waking up to music— Daily Timer
2
4,5,83
4,5,7
9
Falling asleep tomusic— Sleep Timer
You can set the system to turn off at a presettime, so you can fall sleep to music. You canpreset the time to be turned off in 10 minutesincrements.
, Press SLEEP.Every time you press the button, theminute display (the turn-off time)changes as follows:AUTO t 90 t 80 t 70t … t 10 t OFF t AUTO …
When you choose “AUTO”The power turns off when the current CD ortape finishes playback (for up to 100minutes).
To check the remaining timePress SLEEP once.
To change the time to turn offPress SLEEP repeatedly until the time youwant appears.
To cancel the Sleep Timer functionPress SLEEP repeatedly until “SLEEP OFF”appears.
47
1
8 Press ENTER.The type of timer (DAILY 1 or DAILY 2),followed by the start time, stop time, andthe music source, appear, then theoriginal display appears.
9 Turn off the power.
To check the settingPress CLOCK/TIMER SELECT and press. or > repeatedly to select therespective mode (DAILY 1 or DAILY 2), thenpress ENTER.
To change the setting, start over from step 1.
To cancel the timer operationPress CLOCK/TIMER SELECT and press. or > repeatedly to select “TIMEROFF”, then press ENTER.
TipThe power turns on 15 seconds before the presettime.
Notes• You cannot activate DAILY 1 and DAILY 2 Timer
at the same time.• You cannot set the timer if the starting time and
stopping time are the same.• When you use the Sleep Timer, Daily Timer will
not turn on the system until the Sleep Timer turnsit off.
• You cannot activate Daily Timer and Timer-recording at the same time.
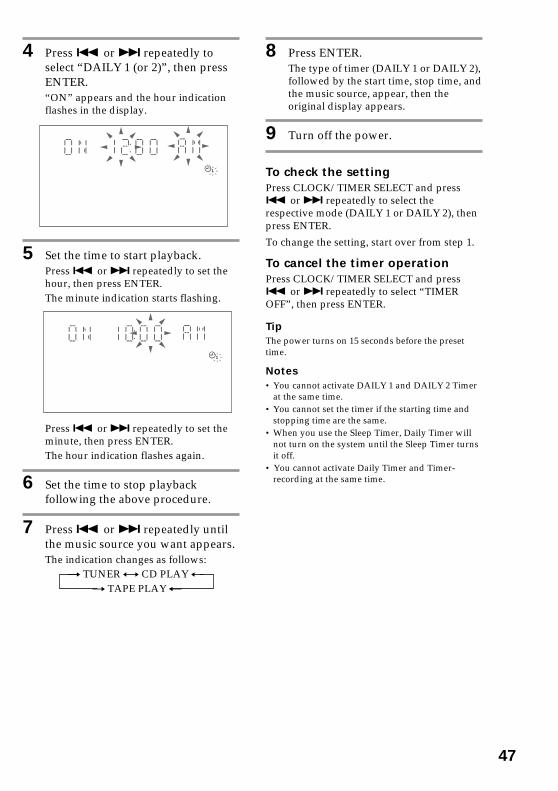
4 Press . or > repeatedly toselect “DAILY 1 (or 2)”, then pressENTER.“ON” appears and the hour indicationflashes in the display.
5 Set the time to start playback.Press . or > repeatedly to set thehour, then press ENTER.The minute indication starts flashing.
Press . or > repeatedly to set theminute, then press ENTER.The hour indication flashes again.
6 Set the time to stop playbackfollowing the above procedure.
7 Press . or > repeatedly untilthe music source you want appears.The indication changes as follows:
t TUNER y CD PLAY T t TAPE PLAY T
1
48
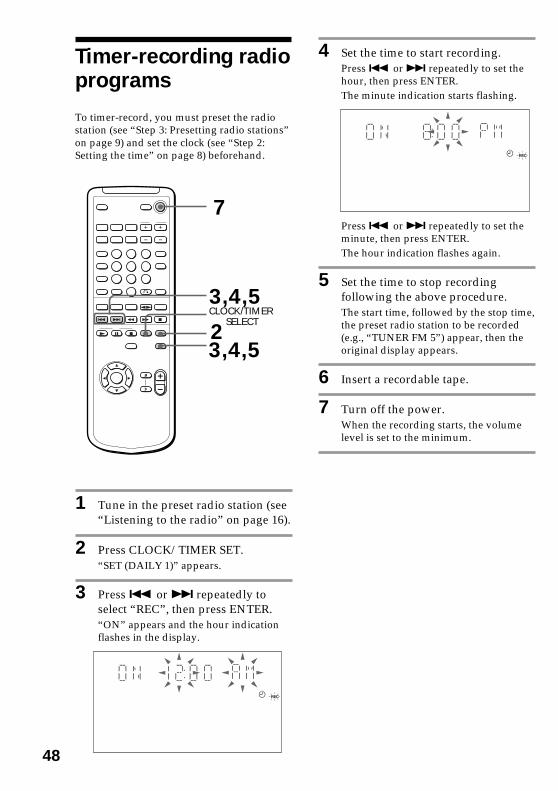
4 Set the time to start recording.Press . or > repeatedly to set thehour, then press ENTER.The minute indication starts flashing.
Press . or > repeatedly to set theminute, then press ENTER.The hour indication flashes again.
5 Set the time to stop recordingfollowing the above procedure.The start time, followed by the stop time,the preset radio station to be recorded(e.g., “TUNER FM 5”) appear, then theoriginal display appears.
6 Insert a recordable tape.
7 Turn off the power.When the recording starts, the volumelevel is set to the minimum.
REC
REC
N X x
xMm>.
nN
O
v
V
b B
CLOCK/TIMER SELECT
1 Tune in the preset radio station (see“Listening to the radio” on page 16).
2 Press CLOCK/TIMER SET.“SET (DAILY 1)” appears.
3 Press . or > repeatedly toselect “REC”, then press ENTER.“ON” appears and the hour indicationflashes in the display.
To timer-record, you must preset the radiostation (see “Step 3: Presetting radio stations”on page 9) and set the clock (see “Step 2:Setting the time” on page 8) beforehand.
3,4,5
3,4,5
2
7
Timer-recording radioprograms

49
Connecting audiocomponents
Select one of the following connections,depending on the component to be connectedand method of connecting. Refer to theinstructions of each component.
Connecting an MD deckfor digital recordingYou can record from CD into the MD deckdigitally by connecting an optional opticalcable.
To the digital input jack of the MD deck
Optional componentsTo check the settingPress CLOCK/TIMER SELECT and press. or > repeatedly to select “REC”, thenpress ENTER.
To change the setting, start over from step 1.
To cancel the timer operationPress CLOCK/TIMER SELECT and press. or > repeatedly to select “TIMEROFF”, then press ENTER.
Notes• If the power is on at the preset time, the recording
will not be made.• You cannot set the timer if the starting time and
stopping time are the same.• When you use the Sleep Timer, Timer-recording
will not turn on the system until the Sleep Timerturns it off.
• You cannot activate Timer-recording and DailyTimer at the same time.
continued
50
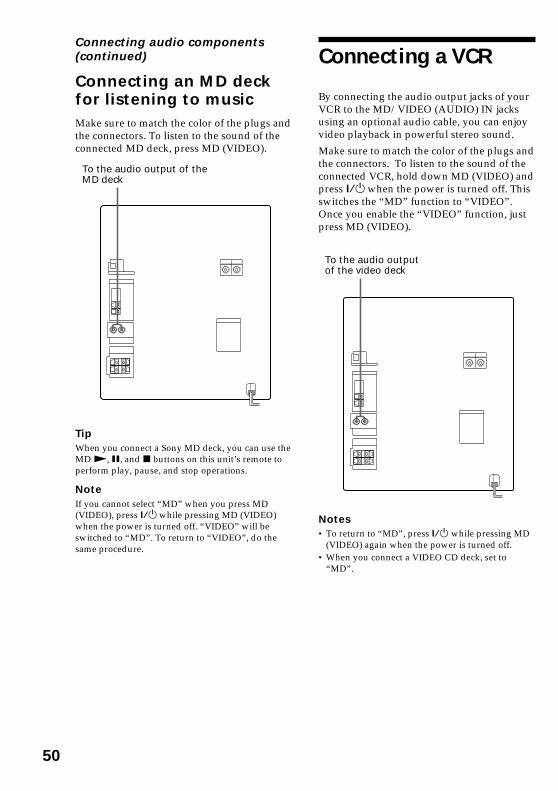
Connecting an MD deckfor listening to musicMake sure to match the color of the plugs andthe connectors. To listen to the sound of theconnected MD deck, press MD (VIDEO).
TipWhen you connect a Sony MD deck, you can use theMD N, X, and x buttons on this unit’s remote toperform play, pause, and stop operations.
NoteIf you cannot select “MD” when you press MD(VIDEO), press ?/1 while pressing MD (VIDEO)when the power is turned off. “VIDEO” will beswitched to “MD”. To return to “VIDEO”, do thesame procedure.
To the audio output of theMD deck
To the audio outputof the video deck
Connecting a VCR
By connecting the audio output jacks of yourVCR to the MD/VIDEO (AUDIO) IN jacksusing an optional audio cable, you can enjoyvideo playback in powerful stereo sound.
Make sure to match the color of the plugs andthe connectors. To listen to the sound of theconnected VCR, hold down MD (VIDEO) andpress ?/1 when the power is turned off. Thisswitches the “MD” function to “VIDEO”.Once you enable the “VIDEO” function, justpress MD (VIDEO).
Notes• To return to “MD”, press ?/1 while pressing MD
(VIDEO) again when the power is turned off.• When you connect a VIDEO CD deck, set to
“MD”.
Connecting audio components(continued)

51
FM75
AM
COAXIAL
FM75
AM
FM75
AM
COAXIAL
FM75
AM
AM antennaConnect a 6- to 15- meter (20- to 50- feet)insulated wire to the AM antenna terminal.Leave the supplied AM loop antennaconnected.
Jack type A
Jack type B
Connecting externalantennasConnect the external antenna to improve thereception. Refer to the instructions of eachcomponent.
FM antennaConnect the optional FM external antenna.You can also use the TV antenna instead.
Jack type A
Jack type B
Insulated wire (not supplied)
Insulated wire (not supplied)
IEC standard socketconnector(not supplied)
75-ohm coaxial cable(not supplied)
52
Notes on CDs• Before playing, clean the CD with a cleaning cloth.
Wipe the CD from the center out.• Do not use solvents such as benzene, thinner,
commercially available cleaners or anti-staticspray intended for vinyl LPs.
• Do not expose the CD to direct sunlight or heatsources such as hot air ducts, nor leave it in a carparked in direct sunlight.
Cleaning the cabinetUse a soft cloth slightly moistened with milddetergent solution.
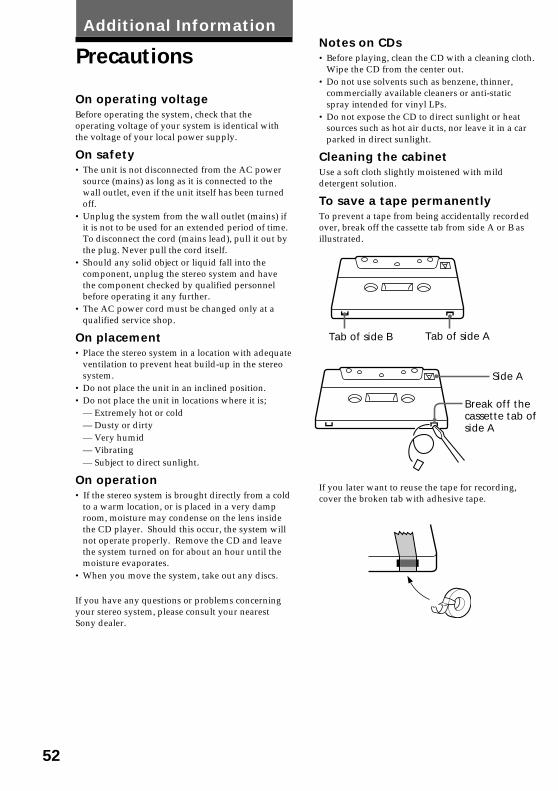
To save a tape permanentlyTo prevent a tape from being accidentally recordedover, break off the cassette tab from side A or B asillustrated.
If you later want to reuse the tape for recording,cover the broken tab with adhesive tape.
Precautions
On operating voltageBefore operating the system, check that theoperating voltage of your system is identical withthe voltage of your local power supply.
On safety• The unit is not disconnected from the AC power
source (mains) as long as it is connected to thewall outlet, even if the unit itself has been turnedoff.
• Unplug the system from the wall outlet (mains) ifit is not to be used for an extended period of time.To disconnect the cord (mains lead), pull it out bythe plug. Never pull the cord itself.
• Should any solid object or liquid fall into thecomponent, unplug the stereo system and havethe component checked by qualified personnelbefore operating it any further.
• The AC power cord must be changed only at aqualified service shop.
On placement• Place the stereo system in a location with adequate
ventilation to prevent heat build-up in the stereosystem.
• Do not place the unit in an inclined position.• Do not place the unit in locations where it is;
— Extremely hot or cold— Dusty or dirty— Very humid— Vibrating— Subject to direct sunlight.
On operation• If the stereo system is brought directly from a cold
to a warm location, or is placed in a very damproom, moisture may condense on the lens insidethe CD player. Should this occur, the system willnot operate properly. Remove the CD and leavethe system turned on for about an hour until themoisture evaporates.
• When you move the system, take out any discs.
If you have any questions or problems concerningyour stereo system, please consult your nearestSony dealer.
Additional Information
Tab of side B Tab of side A
Side A
Break off thecassette tab ofside A
53
Troubleshooting
If you run into any problem using this stereosystem, use the following check list.
First, check that the power cord is connectedfirmly and the speakers are connectedcorrectly and firmly.
Should any problem persist, consult yournearest Sony dealer.
General
The display starts flashing as soon as youplug in the power cord even though youhaven’t turned on the power(demonstration mode).
•Press DISPLAY when the power is turnedoff. The demonstration disappears.The demonstration mode appearsautomatically the first time you plug inthe power cord or if there is a poweroutage lasting longer than half a day.
The clock setting/radio presetting/timer iscanceled.
•The power cord is disconnected or apower failure occurs longer than half aday.Redo the following:— “Step 2: Setting the time” on page 8— “Step 3: Presetting radio stations” on
page 9If you have set the timer, also redo“Waking up to music” on page 46 and“Timer-recording radio programs” onpage 48.
There is no sound.•Turn VOLUME clockwise.•The headphones are connected.•Insert only the stripped portion of the
speaker cord into the SPEAKER jack.Inserting the vinyl portion of the speakercord will obstruct the speakerconnections.
•There is no audio output during timerrecording.
Before placing a cassette in thetape deckTake up any slack in the tape. Otherwise the tapemay get entangled in the parts of the tape deck andbecome damaged.
When using a tape longer than 90minutesThe tape is very elastic. Do not change the tapeoperations such as play, stop, and fast-winding (etc.)frequently. The tape may get entangled in the tapedeck.
Cleaning the tape headsClean the tape heads after every 10 hours of use.When the tape heads become dirty;
— the sound is distorted— there is a decrease in sound level— the sound drops out— the tape does not erase completely— the tape does not record.
Make sure to clean the tape heads before you startan important recording or after playing an old tape.Use separately sold dry-type or wet-type cleaningcassette. For details, refer to the instructions of thecleaning cassette.
Demagnetizing the tape headsDemagnetize the tape heads and the metal parts thathave contact with the tape every 20 to 30 hours ofuse with a separately sold demagnetizing cassette.For details, refer to the instructions of thedemagnetizing cassette.
In case color irregularity isobserved on nearby a TV screen.With the magnetically shielded type of speakersystem, the speakers can be installed near a TV set.However, color irregularity may still be observed onthe TV screen depending on the type of your TV set.
If color irregularity is observed…Turn off the TV set once, then turn it on after 15 to30 minutes.
If color irregularity is observedagain…Place the speakers farther away from the TV set.
continued
54
There is severe hum or noise.•A TV or VCR is placed too close to the
stereo system. Move the stereo systemaway from the TV or VCR.
The sound from the connected source isdistorted.
•If “VIDEO” appears in the display whenyou press MD (VIDEO), switch thedisplay to ”MD” (see ”Note: Connectingaudio components” on page 50).
“0:00” (or “12:00 AM”) flashes in thedisplay.
•A power interruption occurred. Set theclock and timer settings again.
The timer does not function.•Set the clock correctly.
DAILY 1, DAILY 2, and REC do not appearwhen you press CLOCK/TIMER SET.
•Set the timer correctly.•Set the clock.
The remote does not function.•There is an obstacle between the remote
and the system.•The remote is not pointing in the
direction of the system’s sensor.•The batteries have run down. Replace the
batteries.
There is acoustic feedback.•Decrease the volume level.•Move the microphone away from the
speakers or change the direction of themicrophone.
The color irregularity on a TV screenpersists.
•Turn off the TV set once, then turn it onafter 15 to 30 minutes. If the colorirregularity still persists, place thespeakers farther away from the TV set.
“PROTECT” and “PUSH POWER” appearalternately.
•A strong signal was input. Press ?/1 toturn off the power, leave the systemturned off for a while, then press ?/1again to turn on the power. If“PROTECT” and “PUSH POWER”appear alternately even after the power isturned on again, press ?/1 to turn off thepower and check the speaker cord.
Speakers
Sound comes from one channel orunbalanced left and right volume.
•Check the speaker connection andspeaker placement.
Sound lacks bass.•Check that the speaker’s + and – jacks are
connected correctly.
VIDEO CD/CD Player
There is no picture.•Check that the player is connected
securely.•Make sure you operate the TV correctly.•Make sure you set the color system
correctly, according to your TV (color)system.
•Press CD.
The CD tray does not close.•The CD is not placed properly.
The CD will not play.•The CD is not lying flat in the disc tray.•The CD is dirty.•The CD is inserted label side down.•Moisture condensation has built up.
Remove the CD and leave the systemturned on for about an hour until themoisture evaporates.
Play does not start from the first track.•The player is in program or shuffle mode.
Press PLAY MODE repeatedly until“PGM” or “SHUFFLE” disappear.
“OVER” is displayed.•You have reached the end of the CD.
Turn the shuttle counterclockwise until itclicks and hold.
Troubleshooting (continued)
55
Tape Deck
The tape does not record.•No tape in the cassette holder.•The tab has been removed from the
cassette (see “To save a tapepermanently” on page 52).
•The tape has reeled to the end.
The tape does not record nor play or thereis a decrease in sound level.
•The heads are dirty. Clean them (see“Cleaning the tape heads” on page 53).
•The record/playback heads aremagnetized. Demagnetize them (see“Demagnetizing the tape heads” on page53).
The tape does not erase completely.•The record/playback heads are
magnetized. Demagnetize them (see“Demagnetizing the tape heads” on page53).
There is excessive wow or flutter, or thesound drops out.
•The capstans or pinch rollers are dirty.Clean them (see “Cleaning the tapeheads” on page 53).
Noise increases or the high frequencies areerased.
•The record/playback heads aremagnetized. Demagnetize them (see“Demagnetizing the tape heads” on page53).
After pressing hH or A, there is amechanical noise, “EJECT” appears in thedisplay, and the unit enters standby modeautomatically.
• The cassette tape was not insertedcorrectly. Eject the tape and turn thepower back on.
Tuner
There is severe hum or noise (“TUNED” or“STEREO” flashes in the display).
•Adjust the antenna.•The signal strength is too weak. Connect
the external antenna.
A stereo FM program cannot be received instereo.
•Press STEREO/MONO so that “STEREO”appears.
If other troubles not describedabove occur, reset the system asfollows:1 Unplug the power cord.2 Plug the power cord back in.3 Press x, ENTER, and ?/1 at the same time.4 Press ?/1 to turn on the power.The system is reset to the factory settings. Allthe settings you made, such as the presetstations, clock, timer, and color system arecleared. You should set them again.
56
Amplifier sectionMHC-VX33:The following measured at AC 120, 220, 240 V50/60 HzDIN power output (rated) 75 + 75 watts
(6 ohms at 1 kHz, DIN)Continuous RMS power output (reference)
100 + 100 watts(6 ohms at 1 kHz,10% THD)
InputsMD/VIDEO IN: voltage 450/250 mV,(phono jacks) impedance 47 kilohmsMIC: sensitivity 1 mV,(mini jack) impedance 10 kilohms
OutputsVIDEO OUT: max. output level(phono jack) 1Vp-p, unbalanced, Sync
negative, load impedance75 ohms
S-VIDEO OUT: Y: 1Vp-p, unbalanced,(4-pin/mini-DIN jack) Sync negative,
C: 0.286Vp-p,load impedance 75 ohms
PHONES: accepts headphones of(stereo mini jack) 8 ohms or moreSPEAKER:MHC-VX33: accepts impedance of 6 to
16 ohms
SpecificationsVIDEO CD/CD player sectionSystem Compact disc and digital
audio systemLaser Semiconductor laser
(λ=780 nm)Emission duration:continuous
Laser output Max. 44.6 µW**This output is the valuemeasured at a distance of200 mm from theobjective lens surface onthe Optical Pick-up Blockwith 7 mm aperture.
Wavelength 780 – 790 nmFrequency response 2 Hz – 20 kHz (±0.5 dB)Signal-to-noise ratio More than 90 dBDynamic range More than 90 dBVideo color system format
NTSC, PALCD OPTICAL DIGITAL OUT(Square optical connector jack, rear panel)Wavelength 660 nmOutput Level –18 dBm

57
GeneralPower requirementsThai model: 220 V AC, 50/60 HzOther models: 120 V, 220 V or
230 – 240 V AC, 50/60 HzAdjustable with voltageselector
Power consumption 190 watts
Dimensions (w/h/d) Approx. 280 x 325 x 403 mm
Mass Approx. 8.9 kg
Supplied accessories: AM loop antenna (1)FM lead antenna (1)Remote Commander (1)Batteries (2)Video cable (1)Front speaker pads (8)
Design and specifications are subject to changewithout notice.
Tape player sectionRecording system 4-track 2-channel stereoFrequency response 40 – 13,000 Hz (±3 dB),
using Sony TYPE Icassette
Wow and flutter ±0.15% W.Peak (IEC)0.1% W.RMS (NAB)±0.2% W.Peak (DIN)
Tuner sectionFM stereo, FM/AM superheterodyne tuner
FM tuner section
Tuning rangeTourist model: 76.0 – 108.0 MHzOther models: 87.5 – 108.0 MHzAntenna FM lead antennaAntenna terminals 75 ohm unbalancedIntermediate frequency 10.7 MHz
AM tuner section
Tuning rangeMiddle Eastern model: 531 – 1,602 kHz
(with the interval set at9 kHz)
Other models: 531 – 1,602 kHz(with the interval set at9 kHz)530 – 1,710 kHz(with the interval set at10 kHz)
Antenna AM loop antennaAntenna terminals External antenna terminalIntermediate frequency 450 kHz
SpeakerSS-VX33/SS-VX33B for MHC-VX33Speaker system 2-way, bass-reflex typeSpeaker unitsWoofer: 15 cm, cone typeTweeter: 10 cm, cone typeNominal impedance 6 ohmsDimensions (w/h/d) Approx. 215 x 325 x 275 mmMass Approx. 4 kg net per
speaker
58
Glossary
Auto PauseAn automatically pauses according to thesignal encoded on the disc while playing aVIDEO CD. If the CD player does not resumeplay for a long time, press hH to resumeplay manually.
Menu PlaybackPlayback using the menu screens recorded onVIDEO CDs with PBC functions. You canenjoy simple interactive software using themenu playback function.
Playback Control (PBC)Signals encoded on VIDEO CDs (Version 2.0)to control playback.
By using menu screens recorded on VIDEOCDs with PBC functions, you can enjoyplaying simple interactive software, softwarewith search functions, and so on.
When you select a VIDEO CD with PBCfunctions on this player, the PBC indicatorlights up.
TrackSections of a picture or a music piece on disc.Each track is assigned a track number to helpyou locate the track you want.
VIDEO CDA compact disc which contains movingpictures.
VIDEO CDs contain compact pictureinformation using the MPEG 1 format, one ofthe world wide standards of digital compacttechnology. The picture information iscompressed about 120 times. Consequently, a12 cm VIDEO CD can contain up to 74minutes of moving pictures.
VIDEO CDs also contain compact audioinformation. Sounds outside the range ofhuman hearing are compressed while thesounds we can hear are not compressed.VIDEO CDs can hold six times the audioinformation of conventional audio CDs.
There are two versions for VIDEO CDs:
Version 1.1 (VIDEO CDs without PBCfunctions):
You can play only moving pictures andsounds.
Version 2.0 (VIDEO CDs with PBC functions):
You can play still pictures and enjoy PBCfunctions.
This player can play to both versions.

59

60
IndexK
Karaokeadjusting the key 22adjusting themicrophone echo 22reducing the vocals(KARAOKE PON) 21singing along with amultiplex CD (MPX R/MPX L) 21
L
Lock Search 12Loop 40
M
Microphone mixing 45
N, O
Normal Play 11, 13
P, Q
Playinga CD 13a preset station 16a tape 18a VIDEO CD 11tracks in random order(Shuffle Play) 34tracks in the desiredorder (Program Play) 35tracks repeatedly(Repeat Play) 33
Presetting radio stations 9Preset tuning 16Program Edit 38Program Play 35Protecting recordings 52
R
Radio stationspresetting 9tuning in 16
Recordinga CD/VIDEO CD 15a radio program 17timer-recording 48
Repeat Play 33Resetting the system 55
S
Saving recordings 52Searching
Time Search 28Selecting
the audio emphasis 41the color system 6
Setting the time 8Shuffle Play 34Sleep Timer 46Sound adjustment 41-44Speakers 4
T, U
Tape Select Edit 39Timer
falling asleep to music46timer-recording 48waking up to music 46
Troubleshooting 53-55Tuner 9, 16Tuning interval 10
V, W, X, Y, Z
VIDEO CD/CD player11-15, 23-36
A
Adjustingthe graphic equalizer 43the sound 41the volume 12, 14, 17, 19
Antennas 5, 51
B
Batteries 7
C
CD player 13-15, 33-36CD Synchro Recording 15Clock setting 8Connecting 4-7, 49-51
D
Daily timer 46Digest
Disc Digest 29Track Digest 30
Display 24
E
Edit 38, 39
F, G
Flash 40
H, I, J
High-speed Dubbing 20Hooking up
optional components49-51the antennas 5, 51the power 6the system 4
Sony Corporation Printed in Indonesia


