15
Interior Systems Montageanleitung / Installation guide UPG & EPG Version 1.2 Artikel-Nr./Part-No.:12597
Interior Systems
Montageanleitung / Installation guide
UPG & EPG
Version 1.2
Artikel-Nr./Part-No.:12597
Ludwig-Rinn-Straße 10-14 • D- 35452 Heuchelheim/Gießen • Phone: +49 6 41-9 62 84-0 • Fax: +49 6 41-9 62 84-28 • www.tci.de Ludwig-Rinn-Straße 10-14 • D- 35452 Heuchelheim/Gießen • Phone: +49 6 41-9 62 84-0 • Fax: +49 6 41-9 62 84-28 • www.tci.de
Seite 2 von 28 Seite 3 von 28
INHALTSVERZEICHNIS1. HAFTUNG / COPYRIGHT 4
1.1 ALLGEMEINE INFORMATIONEN 6
2. EINBAU DES PUREKNX-BASE7 2.1 EINBAU DES PUREKNX-BASE7 DIREKT IN DIE WAND 8 2.2 EINBAU DES PUREKNX-BASE7 IN DAS UPG 8
3. MONTAGEVORBEREITUNG: MURA 10 3.1 EINBAU UPG [UNTERPUTZGEHÄUSE] 10 3.2 EINBAU UPG MIT PUTZSCHUTZ 12 3.3 EINBAU EPG [EINPUTZGEHÄUSE] 14 3.4 MONTAGEHINWEIS 14 3.5 EINSETZEN DES GERÄTES 16 4. MONTAGEVORBEREITUNG: PUREKNX-TREND & LUNA 18 4.1 EINBAU UPG [UNTERPUTZGEHÄUSE] 18 4.2 EINBAU EPG [EINPUTZGEHÄUSE] 21 4.3 MONTAGEHINWEIS 22 4.4 EINSETZEN DES GERÄTES 22
5. SUPPORT 5.1 SUPPORT 24 5.2 RÜCKSENDUNG 24 5.3 HERSTELLERGARANTIE 26
LIST OF CONTENT1. LIABILITY / COPYRIGHT 5
1.1 GENERAL INFORMATION 7
2. ASSEMBLING THE PUREKNX-BASE7 2.1 MOUNTING THE PUREKNX-BASE7 DIRECTLY INTO THE WALL 9 2.2 MOUNTING THE PUREKNX-BASE7 INTO ITS UPG 9
3. PREPARING OF ASSEMBLY: MURA 11 3.1 MOUNTING THE UPG [BUILT-IN BOX] 11 3.2 MOUNTING THE UPG WITH PLASTERING PROTECTION 13 3.3 MOUNTING THE EPG [BUILT-IN BOX FOR FLUSH MOUNTING] 15 3.4 INSTRUCTION OF INSTALLATION 15 3.5 INSERTION OF THE DEVICE 17 4. PREPARING OF ASSEMBLY: PUREKNX-TREND & LUNA 19 4.1 MOUNTING THE UPG [BUILT-IN BOX] 19 4.2 MOUNTING THE EPG [BUILT-IN BOX FOR FLUSH MOUNTING] 21 4.3 INSTRUCTION OF INSTALLATION 22 4.4 INSERTION OF THE DEVICE 22
5. SUPPORT 5.1 SUPPORT 25 5.2 DISPATCH 25 5.3 MANUFACTURER‘S GUARANTEE 27

Ludwig-Rinn-Straße 10-14 • D- 35452 Heuchelheim/Gießen • Phone: +49 6 41-9 62 84-0 • Fax: +49 6 41-9 62 84-28 • www.tci.de Ludwig-Rinn-Straße 10-14 • D- 35452 Heuchelheim/Gießen • Phone: +49 6 41-9 62 84-0 • Fax: +49 6 41-9 62 84-28 • www.tci.de
Seite 4 von 28 Seite 5 von 28
1. Haftung / CopyrightRedaktion Florian Schiller
Copyright tci GmbH, Ludwig-Rinn-Str. 10-14, 35452 Heuchelheim, Deutschland
Dieses Handbuch, sowie die Hard- und Software, die es beschreibt, ist urheberrechtlich geschützt und darf ohne ausdrückliche schriftliche Genehmigung der tci GmbH in keiner Weise vervielfältigt, übersetzt oder in eine andere Darstellungs-form gebracht werden.
Warenzeichen Windows�, Windows XP embedded� und Windows 7� embedded sind eingetragene Warenzeichen der Microsoft Corp.
Diejenigen Bezeichnungen in dieser Publikation von Erzeugnissen und Verfahren, die zugleich Warenzeichen sind, wurden nicht besonders kenntlich gemacht. Solche Namen sind Warenzeichen der jeweiligen Warenzeicheninhaber. Aus dem Fehlen der Markie-rung ® kann nicht geschlossen werden, dass diese Bezeichnun-gen freie Warennamen sind.
Hinweis Herausgeber, Übersetzer und Autoren dieser Publikation haben mit größter Sorgfalt die Texte, Abbildungen und Programme erarbeitet. Dennoch können Fehler nicht völlig ausgeschlossen werden. Die tci GmbH übernimmt daher weder eine Garantie noch eine juristische Verantwortung oder Haftung für Folgen, die auf fehlerhafte Angaben zurückgehen. Mitteilungen über eventuelle Fehler werden jederzeit gerne entgegengenommen.
Die Angaben in diesem Handbuch gelten nicht als Zusicherung bestimmter Produkteigenschaften. Änderungen, die dem technischen Fortschritt dienen, bleiben vorbehalten.
Haftung Die tci GmbH haftet nicht für unmittelbare Schäden, die im Zusammenhang mit der Lieferung oder dem Gebrauch der Dokumentation stehen. Wir haften zudem auch nicht für etwaige Fehler in dieser Publikation. Wir verpflichten uns in keiner Weise, die in dieser Dokumentation enthaltenen Informationen auf den aktuellsten Stand zu bringen oder auf dem neuesten Stand zu halten.
Alle Rechte vorbehalten • Printed in GermanyGedruckt auf chlorfrei gebleichtem Papier.
1. Liability / CopyrightEdited by Florian Schiller
Copyright tci GmbH, Ludwig-Rinn-Str. 10-14, D-35452 Heuchelheim, Germany
This manual, as well as the hard and software, which it describes is protected by copyright and may not be duplicated, translated or presented in any form without the written consent of tci GmbH.
Trademark Windows�, Windows XP� embedded and Windows 7� embedded are registered trademarks of Microsoft Corp.
Those designation of products and procedures in this publication, which are also trademarks, have not been expressly stated as such. These names are trademarks of the respective trademark owners. However, the absence of the ® symbol, implies in no way that the designations are exempt from such rights.
Note Publisher, translators and authors of this publication have carefully developed the texts, illustrations and programs. However, errors can not be completely ruled out. tci GmbH, shall neither warrant nor be held legally responsible for consequences which occur due to incorrect data. Information concerning errors are welcome at any time.
The information in this operating manual does not guarantee definite product properties. Modifications concerning the support of technical progress will be reserved.
Liability tci GmbH shall not be held liable for immediate damage occurring in connection with the supply or utilization of the documents. In addition, we shall not be held liable for any errors found in this publication. We are not obliged in any way to update the information contained in this document to latest standards.
All rights reserved • Printed in GermanyPrinted on chlorine-free, bleached Paper.
Ludwig-Rinn-Straße 10-14 • D- 35452 Heuchelheim/Gießen • Phone: +49 6 41-9 62 84-0 • Fax: +49 6 41-9 62 84-28 • www.tci.de Ludwig-Rinn-Straße 10-14 • D- 35452 Heuchelheim/Gießen • Phone: +49 6 41-9 62 84-0 • Fax: +49 6 41-9 62 84-28 • www.tci.de
Seite 6 von 28 Seite 7 von 28
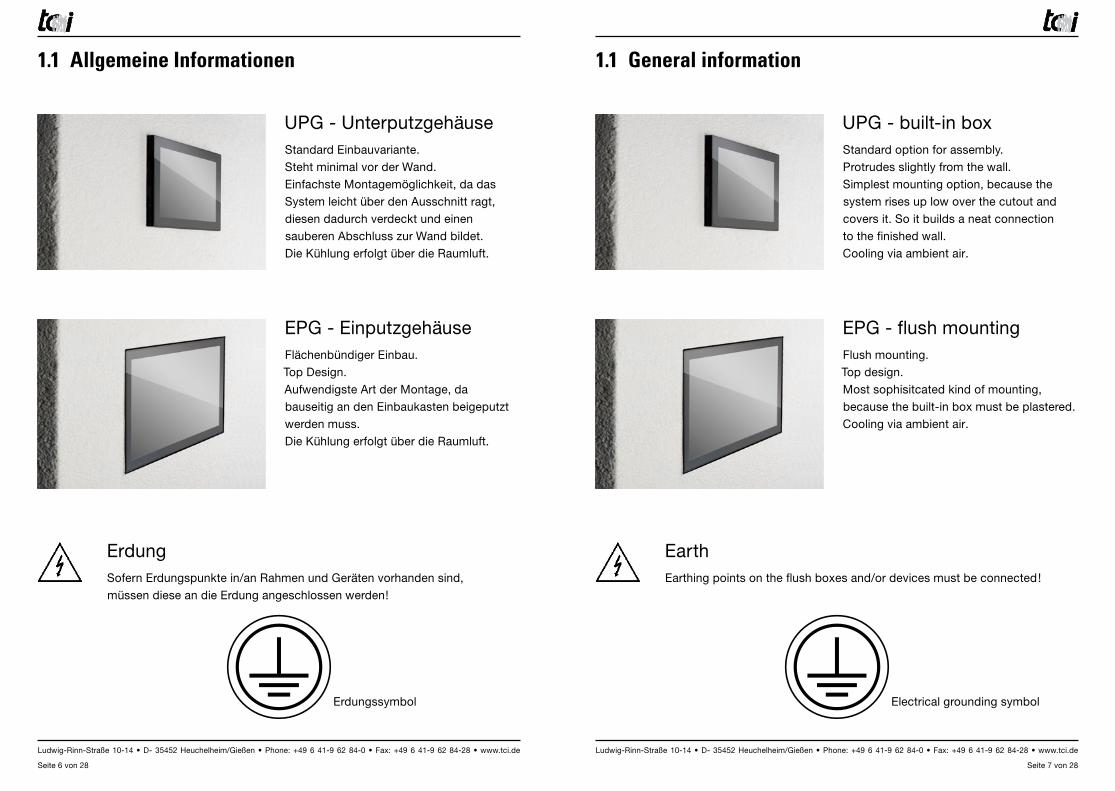
UPG - UnterputzgehäuseStandard Einbauvariante.Steht minimal vor der Wand.Einfachste Montagemöglichkeit, da das System leicht über den Ausschnitt ragt, diesen dadurch verdeckt und einen sauberen Abschluss zur Wand bildet.Die Kühlung erfolgt über die Raumluft.
1.1 Allgemeine Informationen
UPG - built-in boxStandard option for assembly.Protrudes slightly from the wall.Simplest mounting option, because thesystem rises up low over the cutout and covers it. So it builds a neat connection to the finished wall.Cooling via ambient air.
1.1 General information
EPG - EinputzgehäuseFlächenbündiger Einbau.Top Design.Aufwendigste Art der Montage, da bauseitig an den Einbaukasten beigeputztwerden muss.Die Kühlung erfolgt über die Raumluft.
ErdungSofern Erdungspunkte in/an Rahmen und Geräten vorhanden sind, müssen diese an die Erdung angeschlossen werden!
EarthEarthing points on the flush boxes and/or devices must be connected!
Erdungssymbol Electrical grounding symbol
EPG - flush mountingFlush mounting.Top design.Most sophisitcated kind of mounting, because the built-in box must be plastered.Cooling via ambient air.
Ludwig-Rinn-Straße 10-14 • D- 35452 Heuchelheim/Gießen • Phone: +49 6 41-9 62 84-0 • Fax: +49 6 41-9 62 84-28 • www.tci.de Ludwig-Rinn-Straße 10-14 • D- 35452 Heuchelheim/Gießen • Phone: +49 6 41-9 62 84-0 • Fax: +49 6 41-9 62 84-28 • www.tci.de
Seite 8 von 28 Seite 9 von 28
MontageMounting Schrauben im Lieferumfang
Screws are part of delivery
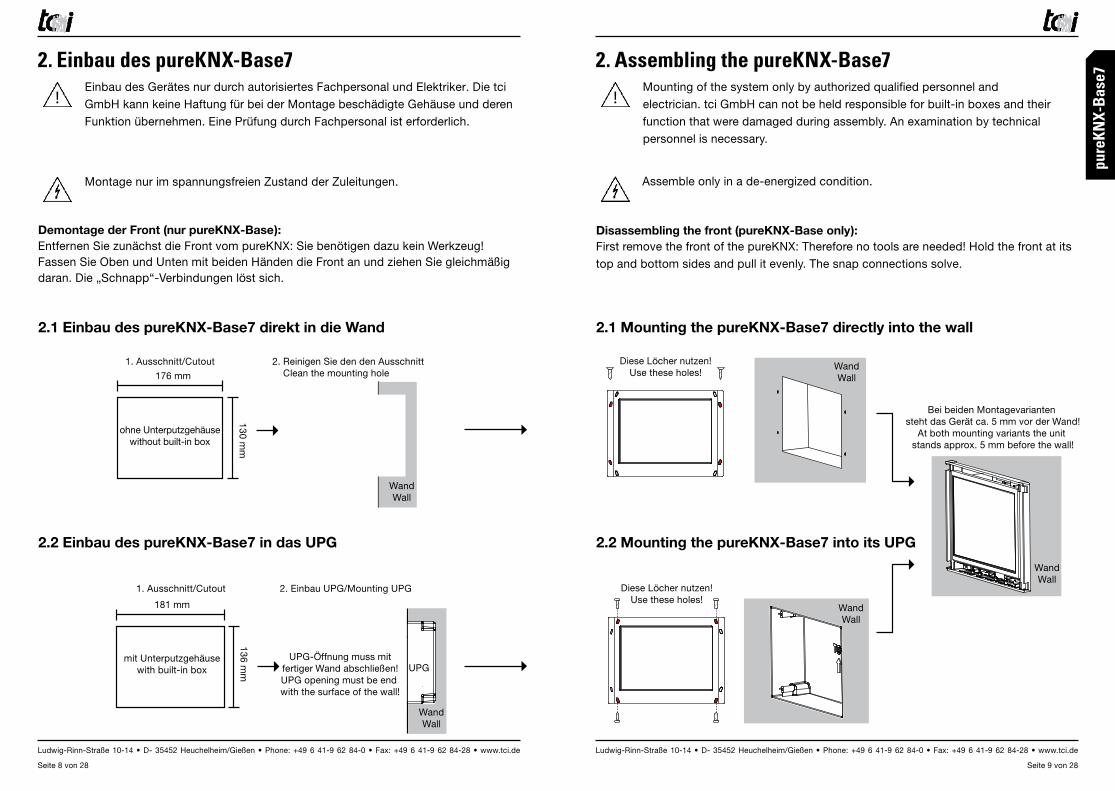
Bei beiden Montagevarianten steht das Gerät ca. 5 mm vor der Wand!
At both mounting variants the unit stands approx. 5 mm before the wall!
WandWall
176 mm
130 mm
1. Ausschnitt/Cutout
ohne Unterputzgehäusewithout built-in box
3. Einbau pureKNX direkt in die Wand/ Mounting pureKNX directly into the wall
Diese Löcher nutzen!Use these holes!
2. Reinigen Sie den den Ausschnitt Clean the mounting hole
WandWall
WandWall
181 mm
136 mm
1. Ausschnitt/Cutout
mit Unterputzgehäusewith built-in box
2. Einbau UPG/Mounting UPG
WandWall
UPGUPG-Öffnung muss mit
fertiger Wand abschließen!UPG opening must be end with the surface of the wall!
3. Einbau pureKNX in UPG/ Mounting pureKNX into UPG
WandWall
Diese Löcher nutzen!Use these holes!
2. Einbau des pureKNX-Base7
!Einbau des Gerätes nur durch autorisiertes Fachpersonal und Elektriker. Die tci GmbH kann keine Haftung für bei der Montage beschädigte Gehäuse und deren Funktion übernehmen. Eine Prüfung durch Fachpersonal ist erforderlich.
Montage nur im spannungsfreien Zustand der Zuleitungen.
Demontage der Front (nur pureKNX-Base):Entfernen Sie zunächst die Front vom pureKNX: Sie benötigen dazu kein Werkzeug! Fassen Sie Oben und Unten mit beiden Händen die Front an und ziehen Sie gleichmäßig daran. Die „Schnapp“-Verbindungen löst sich.
2.1 Einbau des pureKNX-Base7 direkt in die Wand 2.1 Mounting the pureKNX-Base7 directly into the wall
2.2 Einbau des pureKNX-Base7 in das UPG 2.2 Mounting the pureKNX-Base7 into its UPG
2. Assembling the pureKNX-Base7
!Mounting of the system only by authorized qualified personnel and electrician. tci GmbH can not be held responsible for built-in boxes and their function that were damaged during assembly. An examination by technical personnel is necessary.
Assemble only in a de-energized condition.
Disassembling the front (pureKNX-Base only): First remove the front of the pureKNX: Therefore no tools are needed! Hold the front at its top and bottom sides and pull it evenly. The snap connections solve.
MontageMounting Schrauben im Lieferumfang
Screws are part of delivery
Bei beiden Montagevarianten steht das Gerät ca. 5 mm vor der Wand!
At both mounting variants the unit stands approx. 5 mm before the wall!
WandWall
176 mm
130 mm
1. Ausschnitt/Cutout
ohne Unterputzgehäusewithout built-in box
3. Einbau pureKNX direkt in die Wand/ Mounting pureKNX directly into the wall
Diese Löcher nutzen!Use these holes!
2. Reinigen Sie den den Ausschnitt Clean the mounting hole
WandWall
WandWall
181 mm
136 mm
1. Ausschnitt/Cutout
mit Unterputzgehäusewith built-in box
2. Einbau UPG/Mounting UPG
WandWall
UPGUPG-Öffnung muss mit
fertiger Wand abschließen!UPG opening must be end with the surface of the wall!
3. Einbau pureKNX in UPG/ Mounting pureKNX into UPG
WandWall
Diese Löcher nutzen!Use these holes!
pure
KNX-
Bas
e7
MontageMounting Schrauben im Lieferumfang
Screws are part of delivery
Bei beiden Montagevarianten steht das Gerät ca. 5 mm vor der Wand!
At both mounting variants the unit stands approx. 5 mm before the wall!
WandWall
176 mm
130 mm
1. Ausschnitt/Cutout
ohne Unterputzgehäusewithout built-in box
3. Einbau pureKNX direkt in die Wand/ Mounting pureKNX directly into the wall
Diese Löcher nutzen!Use these holes!
2. Reinigen Sie den den Ausschnitt Clean the mounting hole
WandWall
WandWall
181 mm
136 mm
1. Ausschnitt/Cutout
mit Unterputzgehäusewith built-in box
2. Einbau UPG/Mounting UPG
WandWall
UPGUPG-Öffnung muss mit
fertiger Wand abschließen!UPG opening must be end with the surface of the wall!
3. Einbau pureKNX in UPG/ Mounting pureKNX into UPG
WandWall
Diese Löcher nutzen!Use these holes!

Ludwig-Rinn-Straße 10-14 • D- 35452 Heuchelheim/Gießen • Phone: +49 6 41-9 62 84-0 • Fax: +49 6 41-9 62 84-28 • www.tci.de Ludwig-Rinn-Straße 10-14 • D- 35452 Heuchelheim/Gießen • Phone: +49 6 41-9 62 84-0 • Fax: +49 6 41-9 62 84-28 • www.tci.de
Seite 10 von 28 Seite 11 von 28
3. Preparation of assembly: muraMounting of the built-in box:
You have the following options for mounting the built-in box:A) using straight plates for plastering into
masonary (optionally).B) using the holes of the frame for assemb-
ling it into a cavity wall construction.
Introduction about positioning the built-in box:
The position of the built-in box depends on the body height of the user. We recom-mend: The middle of the Display ~ 1650 mm above the finished ground floor.
Dismounting the device:Unscrew the 4 screws and take the unit out of the built-in box.
3.1 Mounting the UPG[Built-in box]Please make sure not to distort the built-in box, because the device can be damaged by mounting or reduced in its livetime.
3. Montagevorbereitung: muraEinbau des Unterputzgehäuses:
Zum Einbau des Unterputzgehäuses stehen Ihnen folgende Optionen zur Verfügung:A) mit den vorhandenen Betonbaulaschen
in massivem Mauerwerk (Option)B) mit den im Rahmen vorhandenen
Löchern zur Montage in Hohlraum- wänden.
Empfehlung zur Positionierung des Unterputzgehäuses:
Die richtige Position des Unterputzgehäuse hängt von Körpergröße des Benutzers ab. Wir empfehlen: Displaymitte ~ 1650 mm vom fertigen Fußboden.
Ausbau aus dem Unterputzgehäuse:Entfernen Sie die 4 Schrauben und nehmen Sie das Gerät aus dem Unterputzgehäuse.
3.1 Einbau UPG [Unterputzgehäuse]
Achten Sie bei der Montage darauf, dass das Unterputzgehäuse bei der Montage nicht verzogen wird, da das Gerät sonst beim Einbau Schaden nehmen und/oder sich dessen Lebenszeit verringern kann.
A (8x) (optional/optionally)
B (4x)
Wand/Wall
!
Richtig!OK!
Falsch!Not OK!
WandWall
WandWall
Wand/Wall
UPG
Wandausschnitt
Mounting hole
M5x10
Von der Innenseite verschrauben.Bolt down from the inside.
Wand/Wall
Unterputz-gehäuse
built-in box
!
Putzschutz
Plastering protection
!
!ACHTUNG: Vorsicht bei der Montage und Demontage des Frontrahmens. Der Touch könnte Schaden nehmen.
A (8x) (optional/optionally)
B (4x)
Wand/Wall
!
Richtig!OK!
Falsch!Not OK!
WandWall
WandWall
Wand/Wall
UPG
Wandausschnitt
Mounting hole
M5x10
Von der Innenseite verschrauben.Bolt down from the inside.
Wand/Wall
Unterputz-gehäuse
built-in box
!
Putzschutz
Plastering protection
!
!ATTENTION: Please be careful when mounting or dismounting the device‘s front frame. The touch can be damaged.
mur
a

Ludwig-Rinn-Straße 10-14 • D- 35452 Heuchelheim/Gießen • Phone: +49 6 41-9 62 84-0 • Fax: +49 6 41-9 62 84-28 • www.tci.de Ludwig-Rinn-Straße 10-14 • D- 35452 Heuchelheim/Gießen • Phone: +49 6 41-9 62 84-0 • Fax: +49 6 41-9 62 84-28 • www.tci.de
Seite 12 von 28 Seite 13 von 28
3.2 Mounting the UPG with plastering protection
Mounting of the touch after plastering.Don’t cover the ventilation slots at the top and bottom sides! Should the ventilation slots be covered by the finery, 4 equally strong distance disks must be used.
3.2 Einbau UPG mit Putzschutz
Montage des Touches nach dem Verputzen.Lüftungschlitze an Ober- und Unterseite dürfen nicht verdeckt werden! Sollten durch den Putz die Lüftungschlitze verdeckt sein, müssen 4 gleichstarke Distanzscheiben verwen-det werden.
Wand/Wall
!
Richtig!OK!
Falsch!Not OK!
WandWall
WandWall
Wand/Wall
UPG
Wandausschnitt
Mounting hole
M5x10
Von der Innenseite verschrauben.Bolt down from the inside.
Wand/Wall
Unterputz-gehäuse
built-in box
!
Putzschutz
Plastering protection
!
Wand/Wall
!
Richtig!OK!
Falsch!Not OK!
WandWall
WandWall
Wand/Wall
UPG
Wandausschnitt
Mounting hole
M5x10
Von der Innenseite verschrauben.Bolt down from the inside.
Wand/Wall
Unterputz-gehäuse
built-in box
!
Putzschutz
Plastering protection
!
Wand/Wall
!
Richtig!OK!
Falsch!Not OK!
WandWall
WandWall
Wand/Wall
UPG
Wandausschnitt
Mounting hole
M5x10
Von der Innenseite verschrauben.Bolt down from the inside.
Wand/Wall
Unterputz-gehäuse
built-in box
!
Putzschutz
Plastering protection
!
Wand/Wall
!
Richtig!OK!
Falsch!Not OK!
WandWall
WandWall
Wand/Wall
UPG
Wandausschnitt
Mounting hole
M5x10
Von der Innenseite verschrauben.Bolt down from the inside.
Wand/Wall
Unterputz-gehäuse
built-in box
!
Putzschutz
Plastering protection
!
mur
a

Ludwig-Rinn-Straße 10-14 • D- 35452 Heuchelheim/Gießen • Phone: +49 6 41-9 62 84-0 • Fax: +49 6 41-9 62 84-28 • www.tci.de Ludwig-Rinn-Straße 10-14 • D- 35452 Heuchelheim/Gießen • Phone: +49 6 41-9 62 84-0 • Fax: +49 6 41-9 62 84-28 • www.tci.de
Seite 14 von 28 Seite 15 von 28
3.3 Einbau EPG [EINPUTZGEHÄUSE]Bei der Verwendung eines EPG‘s müssen Sie darauf achten, dass die Oberkannte mit der fertigen Wandfläche abschließt. Die Box wird von den Innenseiten verschraubt. Eine Nachjustierung des EPG‘s nach dem verputzen ist daher noch möglich. Da die vordere Kante des EPG‘s sichtbar bleibt, muss diese bei der Endbearbeitung der Wand geschützt werden.
3.4 Montagehinweis
!Einbau des Gerätes nur durch autorisiertes Fachpersonal und Elektriker. Die tci GmbH kann keine Haftung für bei der Montage beschädigte Gehäuse und deren Funktion übernehmen. Eine Prüfung durch Fachpersonal ist erforderlich.
Montage nur im spannungsfreien Zustand der Zuleitungen.
Montagehilfe beim UPG
Sie finden die Montagehilfe im Zubehör-karton. Sie besteht aus zwei abgewinkelten Blechen und dafür vorgesehene Schrauben. Montieren Sie beide Bleche wie in der Abbildung gezeigt in das Unterputzgehäuse an der Oberseite.
Montagehilfe beim EPGWie im Bild gezeigt können Sie mit den mitgelieferten Distanzstreifen die Position des Gerätes von der Unterkannte bestimmem.
ambiento10WmuraFront ambiento10Wmura
EPG: Einputzkasten zum flächenbündigen Einbau Built-in box, flush mounting with the adjacent areas
19
0
302
20
1 m
m
313 mm
18
3 m
m
287 mm
21 mm
43 mm
18
9 m
m
293 mm
18
1 m
m
285 mm
48 mm
UPG: Unterputzkasten built-in box
Rev.: 1.1 | 01.06.2010
3.3 Mounting the EPG [BUILT-IN BOX FOR FLUSHMOUNTING]
By using an EPG please make sure that the top edge fits tightly to the finished wall. The EPG gets screwed from the inner sides. So it is possible to readjust the EPG‘s position after plastering. Due to the fact that the front edge remains visible, it has to be protected during the completion of the wall.
3.4 Instruction of installation
!Mounting of the system only by authorized qualified personnel and electrician. tci GmbH can not be held responsible for built-in boxes and their function that were damaged during assembly. An examination by technical personnel is necessary.
Assemble only in a de-energized condition.
Fit-up aid of the UPGYou will find the fit-up aid into the accessory box. It includes two angled plates and their screws. Please mount the laminations as figured into the built-in box on the top side.
EPG‘s fit-up aid You may use the spacer strips for positioning the device from its lower edge as shown in the picture on the right side.
ambiento10WmuraFront ambiento10Wmura
EPG: Einputzkasten zum flächenbündigen Einbau Built-in box, flush mounting with the adjacent areas
19
0
302
20
1 m
m
313 mm
18
3 m
m
287 mm
21 mm
43 mm
18
9 m
m
293 mm
18
1 m
m
285 mm
48 mm
UPG: Unterputzkasten built-in box
Rev.: 1.1 | 01.06.2010
mur
a

Ludwig-Rinn-Straße 10-14 • D- 35452 Heuchelheim/Gießen • Phone: +49 6 41-9 62 84-0 • Fax: +49 6 41-9 62 84-28 • www.tci.de Ludwig-Rinn-Straße 10-14 • D- 35452 Heuchelheim/Gießen • Phone: +49 6 41-9 62 84-0 • Fax: +49 6 41-9 62 84-28 • www.tci.de
Seite 16 von 28 Seite 17 von 28
UPGSetzen Sie das Gerät in den Einbau-rahmen ein und schrauben Sie es mit den 4 mitgelieferten Schrauben fest. Setzen Sie nun die Front auf (bevor Sie das Gerät in Betrieb nehmen!).
EPGGleiche Einbauanleitung wie oben beschrieben.
UPGFit the device into the built-in box and fix it with the 4 screws included with the delivery. Please attach the front to the device now (before turning it on!).
EPGInstructions for assembly are the same as described above.
3.5 Einsetzen des Gerätes 3.5 Insertion of the device
mur
a

Ludwig-Rinn-Straße 10-14 • D- 35452 Heuchelheim/Gießen • Phone: +49 6 41-9 62 84-0 • Fax: +49 6 41-9 62 84-28 • www.tci.de Ludwig-Rinn-Straße 10-14 • D- 35452 Heuchelheim/Gießen • Phone: +49 6 41-9 62 84-0 • Fax: +49 6 41-9 62 84-28 • www.tci.de
Seite 18 von 28 Seite 19 von 28
4. Montagevorbereitung: pureKNX-Trend & lunaEinbau des Unterputzgehäuses:
Zum Einbau des Unterputzgehäuses stehen Ihnen folgende Optionen zur Verfügung:A) mit den vorhandenen Betonbaulaschen in massivem Mauerwerk (Option)B) mit den im Rahmen vorhandenen Langlöchern zur Montage in Hohlraumwänden.
Empfehlung zur Positionierung des Unterputzgehäuses:
Die richtige Position des Unterputzgehäuse hängt von Körpergröße des Benutzers ab. Wir empfehlen: Displaymitte ~ 1650 mm vom fertigen Fußboden.
Ausbau aus dem Unterputzgehäuse:Entfernen Sie die 4 Schrauben und nehmen Sie das Gerät aus dem Unterputzgehäuse.
4.1 Einbau UPG [Unterputzgehäuse]
Achten Sie bei der Montage darauf, dass das Unterputzgehäuse bei der Montage nicht verzogen wird, da das Gerät sonst beim Einbau Schaden nehmen und/oder sich dessen Lebenszeit verringern kann.
EPGmura16W-GT31.05.2013Rev. 1.0
Unten/Bottom
Front
387mm
369mm9mm 9mm
23m
m
74m
m24
2m
m
Seite/Side22
4m
m9
mm
9m
m
UPGmura16W-GT31.05.2013Rev. 1.0
Unten/Bottom
Front Seite/Side
378mm
233
mm
225
mm
370mm
225
mm
71m
m
64m
m
233
mm
Wand/Wall
!
Richtig!OK!
Falsch!Not OK!
WandWall
WandWall
Wand/Wall
UPG
Wandausschnitt
Mounting hole
Von der Innenseite verschrauben.Bolt down from the inside.
!
Unterputz-gehäuse
built-in box
!
A (4x)(optional)
B (12x)
4. Preparation of assembly: pureKNX-Trend & lunaMounting of the built-in box:
You have the following options for mounting the built-in box:A) using straight plates for plastering into masonary (optionally).B) using the slotted holes of the frame for assembling it into a cavity wall construction.
Introduction about positioning the built-in box:
The position of the built-in box depends on the body height of the user. We recom-mend: The middle of the Display ~ 1650 mm above the finished ground floor.
Dismounting the device:Unscrew the 4 screws and take the unit out of the built-in box.
4.1 Mounting the UPG[Built-in box]Please make sure not to distort the built-in box, because the device can be damaged by mounting or reduced in its livetime.
Wand/Wall
!
Richtig!OK!
Falsch!Not OK!
WandWall
WandWall
Wand/Wall
UPG
Wandausschnitt
Mounting hole
Von der Innenseite verschrauben.Bolt down from the inside.
!
Unterputz-gehäuse
built-in box
!
pur
eKN
X-Tr
end
& lu
na
EPGmura16W-GT31.05.2013Rev. 1.0
Unten/Bottom
Front
387mm
369mm9mm 9mm
23m
m
74m
m24
2m
m
Seite/Side
224
mm
9m
m9
mm
UPGmura16W-GT31.05.2013Rev. 1.0
Unten/Bottom
Front Seite/Side
378mm
233
mm
225
mm
370mm
225
mm
71m
m
64m
m
233
mm
A (4x)(optional)
B (12x)

Ludwig-Rinn-Straße 10-14 • D- 35452 Heuchelheim/Gießen • Phone: +49 6 41-9 62 84-0 • Fax: +49 6 41-9 62 84-28 • www.tci.de Ludwig-Rinn-Straße 10-14 • D- 35452 Heuchelheim/Gießen • Phone: +49 6 41-9 62 84-0 • Fax: +49 6 41-9 62 84-28 • www.tci.de
Seite 20 von 28 Seite 21 von 28
Montage des Touches nach dem Verputzen.Lüftungschlitze an Ober- und Unterseite dürfen nicht verdeckt werden!
Mounting of the touch after plastering.Don’t cover ventilation slots at the top and bottom side!
Wand/Wall
!
Richtig!OK!
Falsch!Not OK!
WandWall
WandWall
Wand/Wall
UPG
Wandausschnitt
Mounting hole
Von der Innenseite verschrauben.Bolt down from the inside.
!
Unterputz-gehäuse
built-in box
!
Wand/Wall
!
Richtig!OK!
Falsch!Not OK!
WandWall
WandWall
Wand/Wall
UPG
Wandausschnitt
Mounting hole
Von der Innenseite verschrauben.Bolt down from the inside.
!
Unterputz-gehäuse
built-in box
!
4.2 Einbau EPG [EINPUTZGEHÄUSE] / Mounting the EPG [BUILT-IN BOX FOR FLUSHMOUNTING]
Bei der Verwendung eines EPG‘s müssen Sie darauf achten, dass die Oberkannte mit der fertigen Wandfläche abschließt. Die Box wird von den Innenseiten verschraubt. Eine Nachjustierung des EPG‘s nach dem verputzen ist daher noch möglich. Da die vordere Kante des EPG‘s sichtbar bleibt, muss diese bei der Endbearbeitung der Wand geschützt werden.
By using an EPG please make sure the top edge fits tightly to the finished wall. The EPG gets screwed from the inner sides. So it is possible to readjust the EPG‘s position after plastering. Due to the fact that the front edge remains visible, it must be protected during the completion of the wall.
Bsp./e.g. EPG luna16
EPGmura16W-GT31.05.2013Rev. 1.0
Unten/Bottom
Front
387mm
369mm9mm 9mm
23m
m
74m
m24
2m
m
Seite/Side
224
mm
9m
m9
mm
UPGmura16W-GT31.05.2013Rev. 1.0
Unten/Bottom
Front Seite/Side
378mm
233
mm
225
mm
370mm
225
mm
71m
m
64m
m
233
mm
pur
eKN
X-Tr
end
& lu
na

Ludwig-Rinn-Straße 10-14 • D- 35452 Heuchelheim/Gießen • Phone: +49 6 41-9 62 84-0 • Fax: +49 6 41-9 62 84-28 • www.tci.de Ludwig-Rinn-Straße 10-14 • D- 35452 Heuchelheim/Gießen • Phone: +49 6 41-9 62 84-0 • Fax: +49 6 41-9 62 84-28 • www.tci.de
Seite 22 von 28 Seite 23 von 28
4.4 Einsetzen des Gerätes / Insertion of the device
1
3
4
2
5
4.3 Montagehinweis / Instruction of installation
!Einbau des luna nur durch autori-siertes Fachpersonal und Elektriker. Die tci GmbH kann keine Haftung für die montierte Unterputzgehäuse und deren Funktion übernehmen. Eine Prüfung durch Fachpersonal ist erforderlich.
Mounting of the built-in box only by authorized qualified personnel and electrician. tci GmbH assumes no liability for the installed built-in box and their function. An examination by technical personnel is necessary.
Montage nur im spannungsfreien Zustand der Zuleitungen.
Assemble only in a de-energized condition.
1. & 2. Setzen Sie das Gerät auf die 4 Montagelaschen des Rahmens
Please put the device on the 4 mounting brackets of the installation frame
3. & 4. Halten Sie das Gerät sicher in Posi-tion und ziehen Sie die 4 Schrauben mit beigelegtem Inbusschlüssel fest
Reliably hold the device in position and tighten the 4 screws with the Allen key, which is part of the delivery
5. Drücken Sie das Gerät sanft in den Rahmen bis es merklich einrastet
Now gently push the device into the installation frame until it locks in place
EPGmura16W-GT31.05.2013Rev. 1.0
Unten/Bottom
Front
387mm
369mm9mm 9mm
23m
m
74m
m24
2m
m
Seite/Side
224
mm
9m
m9
mm
UPGmura16W-GT31.05.2013Rev. 1.0
Unten/Bottom
Front Seite/Side
378mm
233
mm
225
mm
370mm
225
mm
71m
m
64m
m
233
mm
Wand/Wall
!
Richtig!OK!
Falsch!Not OK!
WandWall
WandWall
Wand/Wall
UPG
Wandausschnitt
Mounting hole
Von der Innenseite verschrauben.Bolt down from the inside.
!
Unterputz-gehäuse
built-in box
! pur
eKN
X-Tr
end
& lu
na
(nur / only EPG!)
)* Abb. luna22. Andere System mit ähnlicher Mechanik! )* fig. luna22. Other models with similiar action!
*
*

Ludwig-Rinn-Straße 10-14 • D- 35452 Heuchelheim/Gießen • Phone: +49 6 41-9 62 84-0 • Fax: +49 6 41-9 62 84-28 • www.tci.de Ludwig-Rinn-Straße 10-14 • D- 35452 Heuchelheim/Gießen • Phone: +49 6 41-9 62 84-0 • Fax: +49 6 41-9 62 84-28 • www.tci.de
Seite 24 von 28 Seite 25 von 28
5. Support5.1 SupportWir unternehmen im Vorfeld alles, um die Funktionsfähigkeit unserer Systeme zu ge-währleisten. Sorgfältige Auswahl der Komponenten, aufwendige Tests und Prüfverfahren stellen dies sicher. Dennoch kann es zu Ausfällen kommen. In einem solchen Fall steht Ihnen unsere Hotline zur Verfügung. Wir helfen schnell und unkompliziert.
Rat und Hilfe bzw. Support erhalten Sie unter der
Telefonnummer E-Mail
0641-96284-55 [email protected]
Wir beantworten Ihre Fragen oder lösen Ihre Probleme so schnell wie möglich.
5.2 RücksendungDie richtige Verpackung ist der erste Schritt zur problemlosen Versendung eines Gerä-tes. Verwenden Sie ausschließlich für Ihre Rücksendungen Original-Verpackungen von tci, darin enthalten sind 2 Inletts und ein Umkarton. Sollten Sie keine Verpackung mehr haben, wenden Sie sich bitte an unseren Support.Unsachgemäß verpackte und dadurch beschädigte Geräte können von der Garantie ausgeschlossen werden, wenn die Beschädigungen auf die unsachgemäße Verpackung zurückzuführen ist. Wir empfehlen den Versand mit einer Spedition, da erfahrungsgemäß hierbei weniger Schäden entstehen. Einen Verpackungshinweis und einen Reparaturschein finden Sie unter www.tci.de/support.
5. Support5.1 SupportIt is our priority to guarantee the functionality of our systems. This is ensured by a careful selection of components, extensive inspection and test procedure. However, errors cannot be completely ruled out. If you should have any problems with your unit, please do not hesitate to contact our hotline. We will assist you immediately and without any complications.
You can reach our Support team at
Phone number E-Mail
+49-(0)641-96284-55 [email protected]
We will answer your questions or solve any problems you might have with your unit.
5.2 Dispatch The right packaging is the first step for a trouble-free dispatch of a device. Please only use the original tci protective packaging for your returns. Devices that get damaged due to improper packaging can be excluded from guarantee. We suggest to task a private forwarding agent with the shipment, because by our experi-ence the devices get less damaged during the transport.Further packaging information and a repair form you will find under www.tci.de/support.

Ludwig-Rinn-Straße 10-14 • D- 35452 Heuchelheim/Gießen • Phone: +49 6 41-9 62 84-0 • Fax: +49 6 41-9 62 84-28 • www.tci.de Ludwig-Rinn-Straße 10-14 • D- 35452 Heuchelheim/Gießen • Phone: +49 6 41-9 62 84-0 • Fax: +49 6 41-9 62 84-28 • www.tci.de
Seite 26 von 28 Seite 27 von 28
5.3 HerstellergarantieDie tci - Gesellschaft für technische Informatik mbH (TCI) gewährt ihrem Käufer eine 12-monatige Produktgarantie auf von TCI hergestellte Produkte. Tritt bei einem von TCI hergestellten Produkt innerhalb von 12 Monaten nach Lieferung ein Mangel auf, wird TCI diesen unter nachgenannten Voraussetzungen nach eigener Wahl entweder durch Liefe-rung eines Neugerätes, Austausch von Teilen oder durch Reparatur beseitigen.TCI trägt im Rahmen seiner Garantieleistungen während der Garantiezeit die mit dem Austausch oder der Reparatur von Produkten oder Produktteilen verbundenen Kosten, soweit der Mangel im Rahmen einer ordnungsgemäßen Nutzung der Produkte aufgetreten ist. Die Kosten zur Feststellung des Man-gels beim Käufer sowie des Ein- oder Ausbaus sind vom Käufer zu tragen. Transport und Versand von Produkten oder Produktteilen erfolgen auf Gefahr und Kosten des Käufers.Garantiezeiten beginnen jeweils mit dem Tag, an dem die Lieferung des Produktes erfolgt. Die Erbrin-gung von Garantieleistungen verlängern die Garantiezeiten nicht.Die im oder zum Austausch gelieferten Produkte oder Produktteile sind neu oder neuwertig und in einwandfreiem, funktionstüchtigem Zustand; ausgetauschte Produkte oder Produktteile werden mit Absendung durch TCI oder Abholung der entsprechenden Austauschteile bei TCI deren Eigentum; der Käufer garantiert, dass Rechte Dritter diesem Austausch und Eigentumsübergang nicht im Wege stehen.Ansprüche aus dieser Garantie sind innerhalb von einem Monat ab Kenntnis des Mangels schrift-lich bei TCI anzumelden. Derzeitige Anschrift ist tci -Gesellschaft für technische Informatik mbH; Ludwig-Rinn-Straße 10-14; 35452 Heuchelheim / Gießen. Weitergehende Ansprüche, insbesondere Schadensersatzansprüche, sind von der Garantie nicht umfasst. Die gesetzliche Mängelhaftung bleibt von der Garantie unberührt. Es gilt das Recht der Bundesrepublik Deutschland unter Ausschluss des UN-Kaufrechts. Ist der Kunde Kaufmann, ist Gerichtsstand für Streitigkeiten aus dieser Garantie der Sitz von TCI.Voraussetzungen für Garantieleistungen:1. Es handelt sich um einen Mangel, der nach
dem Kauf entstanden ist.2. Das betreffende Produkt ist über die Serien-
nummer eindeutig identifizierbar.3. Vorlage des Kaufbelegs. 4. Äußere Faktoren, wie z.B. Brand, Vanda-
lismus, nicht autorisierte Eingriffe, zu hohe Temperaturen etc., oder normaler Verschleiß sind als Ursache ausgeschlossen.
5. Das Produkt wurde nicht verändert, ausge-nommen von autorisierten TCI-Mitarbeitern /-Partnern.
6. Das Produkt wurde ausschließlich sachgemäß entsprechend der Bedienung¬sanleitung und Dokumentation angewendet.
7. Die Installation, Bedienung, Reparatur und Wartung erfolgt gemäß den von TCI zur Ver-fügung gestellten Vorgaben. Dies bedeutet im Einzelnen:
a. Installation, Aufbau und Montage erfolgen gemäß der Bedienungs- und Montageanlei-tung und durch eine entsprechende Fachkraft.
b. Eine im Garantiefall notwendige Reparatur wird ausschließlich von einem TCI-Mitarbeiter/-Partner oder mit von tci zur Verfügung gestell-ten Ersatzteile durchgeführt.
c. Das betreffende Produkt wird ausschließ-lich in Verbindung mit kompatiblen Produkten angewendet.
Nicht von der Garantie umfasst: 1. Maßnahmen zur Beseitigung von Störungen,
die auf Bedienungsfehlern, sonstiger unsach-gemäßer Behandlung, technischen Eingriffen seitens des Käufers oder Dritter oder auf äußeren, nicht von TCI zu vertretenden Ein-flüssen beruhen.
2. Kosten von Austauschteilen, die einem besonderen Verschleiß unterliegen, von Ver-brauchsmaterial und von Datenträgern.
3. Instandsetzung von Zubehör, Änderungen, Anbauten oder sonstigen Einrichtungen, die nicht von tci geliefert wurden.
4. Instandsetzungsarbeiten, wenn die Umge-bungs-bedingungen lt. der Dokumentation nicht eingehalten wurden.
5. Mängel, die durch mangelhafte Systemausle-gung, Systemkonfiguration und Montageart, durch den Betrieb unter ungeeigneten Umge-bungsbedingungen oder sonstigen ungeeig-neten Betriebsmethoden, durch ungeeignete Wartung oder ungeeig¬nete Tests oder durch Einflüsse wie Verunreinigungen bedingt sind.
5.3 Manufacturer’s Guaranteetci Gesellschaft für technische Informatik mbH (TCI) provides a 12-month product guarantee to the purchaser, which covers products manufactured by TCI.Should a defect be determined with a product manufactured by TCI within 12 months after delivery, then TCI will remove this defect at their own option either by providing a new product, or by replacing parts or by repairing the product subject to the conditions defined below. Within the scope of the guarantee, TCI will bear all costs related to the replacement of parts or the repair of products or product parts during the term of this guarantee, insofar as the defect has oc-curred during proper use of the product. Any costs incurred for the determining of the defect as well as costs of mounting and demounting at the customer’s premises are to be borne by the purchaser. Delivery and dispatch of products or product parts will be effected at the purchaser’s risk and expen-se. The term of guarantee shall begin from the date of delivery of the product. Any services provided within the scope of the guarantee do not extend the term of guarantee. All products or product parts delivered as or for a replacement are new or equivalent to new and in perfect operative condition; replaced products or product parts will become property of TCI as soon as they are sent off to or collected by TCI; the purchaser guarantees that there are not any legal im-pediments to such transfer of product and ownership which might result from third-party rights. Any claims under this guarantee are to be made to TCI in writing within one month after cognizance of the defect. Current address: tci -Gesellschaft für technische Informatik mbH; Ludwig-Rinn-Strasse 10-14; 35452 Heuchelheim / Giessen Germany. Any further claims, claims for damages in particular, are excluded from this guarantee. Statutory liability for defects remains unaffected of this guarantee. The German law shall apply to all matters related to this guarantee. In case the purchaser is a mer-chant, place of jurisdiction for any litigation resulting from this guarantee shall be the location of the registered office of TCI.
Terms of guarantee:1. Only defects that have occurred after the
purchase are covered by this guarantee. 2. The product in question must be clearly iden-
tifiable by its serial number. 3. The voucher of the purchase has to be submitted. 4. External factors, e.g. fire, vandalism, unau-
thorized handling, excessive temperatures etc., or normal wear are excluded from the guarantee.
5. The product must not have been modified, ex-cept by authorized TCI employees or partners.
6. The product has been used exclusively in a competent way according to the operating manual and documentation.
7. Installation, operation, repair, and maintenance have been performed according to the instructions and the operating documentation the purchaser has obtained from TCI. This means in particular:
a. Installation, setup, and mounting have been performed according to the installation and operating instructions in the documentation and by a competent professional.
b. Necessary repair work during the term of guarantee has been performed exclusively by a TCI employee or authorized partner or with spare parts provided by TCI.
c. The product concerned has been used exclusively in connection with compatible products.
Excluded from this guarantee are:1. All measures for the removal of defects that
have been caused by operating mistakes, other incompetent handling, technical inter-vention on the part of the purchaser or any third party or any other external influence TCI can not be held responsible for;
2. Costs of replacement parts subject to extreme wear and of consumables and data carriers;
3. Maintenance or repair of accessories, modi-fied parts, added parts or any other part that have not been delivered by TCI;
4. Repair work that has become necessary because the limits of the environmental spe-cifications in the documentation have been exceeded;
5. Defects that have resulted from an inadequate system layout, system configuration, and type of mounting, or from operation under inappro-priate environmental conditions or from other inappropriate operating methods or from incompetent maintenance or inappropriate tests or from influences like contamination.

Ludwig-Rinn-Straße 10-14 • D-35452 Heuchelheim/Gießen Tel.: +49 (0) 6 41- 9 62 84 -0 • Fax: +49 (0) 6 41- 9 62 84 -28
e-mail: [email protected] • www.ambiento.de


