38
Doc. P/N: WSP-009-005 Version: V1.1 Issue Date: June 2012 NAVIGATOR Doc. P/N: WSP-009-003 Version: V1.6 Issue Date: January 2015

Doc
. P/N
: W
SP-
009-
005
Ver
sion
: V
1.1
Issu
e D
ate:
Ju
ne
2012
NAVIGATOR
Doc
. P/N
: W
SP-
009-
003
Ver
sion
: V
1.6
Issu
e D
ate:
Ja
nu
ary
2015

Doc. P/N: WSP-009-003Version: V1.6Issue Date: January 2015
www.wassp.com
Navigator Manual
Page 2 of 38
Revision Date Reason for Change Version4 Feb 2010 Converted from original MS Word version V1.013 Feb 2010 Completed first release version. V1.128 Jan 2011 Added features from second release version V1.220 Nov 2011 Updated figures & specs V1.327 June 2012 V1.01 updates V1.428 November 2013 V2.1 Updates V1.513 January 2015 V2.4 Updates V1.6
Document Revision History
Warnings, Cautions, and Notes
Warnings, cautions, and notes are indicated by the following icons throughout this manual:
A WARNING indicates that if the instruction is not heeded, the action may result in loss of life or serious injury.
A CAUTION indicates that if the instruction is not heeded, the action may result in equipment damage or software malfunction.
A Note indicates a tip or additional information that could be helpful while performing a procedure.
Related Documents
Document P/Number TitleWSP-009-001 WASSP-F Operator Manual
WSP-009-002 WASSP-F Installation Manual
WSP-009-004 WMB-3250 Operator Manual
WSP-009-005 WMB-3250 Installation Manual
General NoticesENL reserves the right to change the contents of this manual and any system specifications without notice.Contact ENL regarding copying or reproducing this manual.WASSP is not designed to comply with hydrographic mapping standards and therefore must not be used as a navigational mapping tool.
Safety Notices
The installer of the equipment is solely responsible for the correct installation of the equipment. ENL assumes no responsibility for any damage associated with incorrect installation.
Electrical Safety ► Fire, electrical shock, or equipment damage may occur if
the transceiver becomes wet.

Doc. P/N: WSP-009-003 Version: V1.6Issue Date: January 2015
www.wassp.comPage 3 of 38
Navigator Manual
Contents4 Purpose of this Manual
4 Introducing the WASSP Navigator System
4 Main Features6 SystemConfiguration7 Software Installation7 Hardware Connection8 Loading and Launching Navigator9 Registering a Navionics Chart Card10 Navionics Chart Card errors11 Chart Loading
12 Navigator Operation
14 System Setup22 2D Window
22 Ship23 Layers28 Marks30 Text Box31 ProfilesandLines
34 3D Window
34 Vessel35 Text Box35 Vertical Scale36 3D Fish

Doc. P/N: WSP-009-003Version: V1.6Issue Date: January 2015
www.wassp.com
Navigator Manual
Page 4 of 38
This manual describes how to operate the WMB Navigator software through its graphical user interface.
Purpose of this Manual
Introducing the WASSP Navigator SystemThe WASSP Navigator is an adjunct to the WASSP Multibeam Sonar System. The Navigator software connects to the WASSP software and processes the WASSP output data to produce geo-referenced maps in real time. The interconnection can use a computer network which allows WASSP and Navigator to be operated on two different computers.
The Navigator maps can subsequently be viewed independently to the WASSP system. The operator can move to any part of the globe and view previously recorded maps in 2D and 3D. The maps provide an ability to dynamically change the depth colours while viewing and to adjust the colours and shading for depth, contours and backscatter displays.
The 3D display on the Navigator provides an ability to change the vertical scale (1x, 2x, 4x), to rotate the view from any angle, and can provide a simple 3D viewofwatercolumndatasuchasfish.
The WASSP Navigator provides the following features:
► Create maps in real-time from the WASSP Generate new maps from the WASSP bottom detections at up to four times the resolution of the current WASSP maps.
► Maps can be found at any part of the globe The operator can position the displayed view to be in any part of the world. The view can be zoomed in or out to show smaller or larger areas.
► Dynamic Resolution The displayed resolution of the maps is dynamically changed to suit the current level of zoom. This provides a performance advantage because the operator is not delayed while unnecessary detail is loaded.
► Map Resolution Based on Depth The Navigator dynamically changes the resolution of the stored maps to suit the depth of the seafloor. Shallow seafloor is stored at resolutions as high as 250mm to give the maximum detail available, while deep seafloors have their resolution restricted to 4m to avoid saving spurious fine detail.
► Chart Overlay The Navigator can display the WASSP seafloor data overlaid on a vector Navionics hydrographic chart. The displayed chart features can be selectively turned on of off as required.
► Use Your Existing Navionics Charts The WASSP Navigator uses standard Navionics Gold SD Card maps plugged in to a card reader. Maps are available from Navionics to cover almost every
Main Features

Doc. P/N: WSP-009-003 Version: V1.6Issue Date: January 2015
www.wassp.comPage 5 of 38
Navigator Manual
part of the world. ► Boat Position Shown
The position of the boat is shown on the map as the data is received from the WASSP in real time. The boat icon also indicates the current boat heading and thus provides a simple but effective charting function.
► Depth Indicators The depth under the cursor at any point on the WASSP seafloor displayed can be dynamically displayed on the 2D and 3D maps. The depth is updated con-tinuously as the cursor is moved.
► Vessel Track The track of the vessel may be displayed if desired.
► Marks The chart can be annotated with marks at the current vessel position and marks at the cursor position. A menu options allows marks to be displayed or hidden. Marks can be edited, colour and symbol changed.
► Profile Using the two profile markers a cross section of the seafloor can be displayed in a separate profile window.
► Databases The Navigator uses one or more database to store and display the WASSP data including the depths, backscatter, and water column information. Addition-al databases can be created at any time and the incoming data switched to it. Existing databases can be selected for viewing at any time and it is possible to view one database while recording to another. The databases are not restricted by geographic area (they can span the whole world) nor by resolution (they will contain all depth resolutions proportional to the depths of the points stored).

Doc. P/N: WSP-009-003Version: V1.6Issue Date: January 2015
www.wassp.com
Navigator Manual
Page 6 of 38
Figure 1 – Overview of a fully functional WASSP System
System Configuration
31.07.13
423
.11.11
ADDE
D US
B
JWSR

Doc. P/N: WSP-009-003 Version: V1.6Issue Date: January 2015
www.wassp.comPage 7 of 38
Navigator Manual
DongleThe Navigator requires the use of a USB Dongle to operate. If the correct dongle is not detected then the program will not operate.
TheDonglecontainsencryptedfilesandstructures.DonoteditanyfilesontheDongle.Additionally,donotre-formattheDongleorcopythefilestoanother Dongle as this will damage the Dongle and it will not operate.
Software Installation
Hardware Connection WASSP Navigator can either be be run on the WASSP Processor or a seperate computer connected to your existing WASSP Processor via an Ethernet hub/switch.
Connecting cables are straight CAT5E or equivalent with RJ45 connectors each end.
Note that if an Ethernet hub/switch is used it will normally come with its own plug-pack power supply which will require its own power outlet.

Doc. P/N: WSP-009-003Version: V1.6Issue Date: January 2015
www.wassp.com
Navigator Manual
Page 8 of 38
Loading and Launching Navigator
The WASSP Navigator setup is located on the supplied dongle.
Install the Navigator software by double-clicking on the “setup” icon. Follow the on-screen installation instructions.
Once installed the Navigator is launched by double-clicking on the Navigator desktopicon.OnstartupNavigatorfirstchecksfortheDongle.
If the dongle is not found then Navigator will not run in realtime. Click on OK. If you wish to use the connection to the WASSP to create maps or move the vessel about on the map you will need to insert a licenced dongle and rescan for a dongle, or restart the Navigator application.

Doc. P/N: WSP-009-003 Version: V1.6Issue Date: January 2015
www.wassp.comPage 9 of 38
Navigator Manual
Navionics charts are normally stored on an SD card. These cards have to be registered online before they can be used with your WASSP Navigator software.
Some Navionics Chart Cards come supplied with a USB SD card reader. In these cases, either the supplied USB card reader or the SD card reader on the WASSP Processor can be used. If you have already connected your WASSP Processor to the internet, and the charting view has displayed charting detail, then your Navionics card is already registered, or does not require registration.
To register your Navionics chart, please follow these steps:
Registering a Navionics Chart Card
1Turn on the WASSP Processor.
Before running Navigator, ensure the WASSP Processor is connected to the internet.
This can be done by connecting the WASSP Processor to an internet router via a network cable connected to the secondary network port at the rear of the WASSP Processor.
2Insert the Navionics Chart Card into the WASSP Processor.
3Start Navigator and accept the Navigational Warning on the splash screen.
If no dongle is found, a Dongle Error message appears on the screen.
Ensure a licenced WASSP dongle has been plugged into a USB port and restart Navigator. If this doesn’t work, remove the dongle and try plugging it in again.
4Once Navigator has initialised while connected to the internet, the chart licence on your Navionics card should be automatically registered to the WASSP Processor.
Each Navionics chart card can only be registered to a maximum of 5 different PCs.

Doc. P/N: WSP-009-003Version: V1.6Issue Date: January 2015
www.wassp.com
Navigator Manual
Page 10 of 38
Once the card has been plugged in and successfully registered to your WASSP Processor, you should not receive any errors. Here are some of the errors you might encounter while attempting to use / register your Navionics Chart Card:
Navionics Chart Card errors
Error Description Resolution
The Navionics Chart Card
cannot be read by the system.
Check that the Navionics Chart Card
is properly inserted into the SD card
reader.
Reboot the WASSP Processor.
The WASSP Processor is not
connected to the internet and
is therefore unable to register
the Navionics Chart Card with
the registration server.
Check the WASSP Processor’s
connection to the internet.
Ensure you are using the correct
network port at the rear of the
WASSP Processor.
The Navionics Chart Card you
are using has exceeded its
registration limit.
Each Navionics Chart Card can only
be registered to a maximum of 5
different PCs.
Use a Navionics Chart Card which has
not exceeded its registration limit.
This may require purchasing a new
card.
The Navionics registration
server is returning an error.
There is nothing wrong with
your system - this message
occurs because of a fault with
their registration server.
Wait for the Navionics server fault to
befixedandtryagain.
The WASSP program has
detected a second version of
the same Navionics chart.
Close WASSP, use Windows Explorer
to navigate to %APPDATA%\
WASSP\Navigator and delete the
TmpMap folder.
Restart WASSP - the charts should
load successfully from the card. If
not, they may need to be registered.

Doc. P/N: WSP-009-003 Version: V1.6Issue Date: January 2015
www.wassp.comPage 11 of 38
Navigator Manual
When the Navigator starts up, it checks for a Navionics Chart Card. If a map cannot be found then Navigator displays a message advising that no maps could beloaded.Inthisconfiguration,alow-resolutionworldmapisused.
Ifyougetanerrormessage“CannotLoadChart”,clickonOK.Confirmthatthe Navionics Chart Card is correctly inserted in the SD Card Reader and select “Rescan for Chart Card” in the System Setup window.
If the Navionics Chart Card is changed, the “Rescan for Chart Card” must also be selected.
Chart Loading
When using the ‘Rescan for Chart Card’ button, be aware that the Chart Card data has to load. During this time, the Navigator will be unusable.

Doc. P/N: WSP-009-003Version: V1.6Issue Date: January 2015
www.wassp.com
Navigator Manual
Page 12 of 38
Navigator OperationAfter clicking on the Navigator Icon on your computer’s desktop, the Navigator application will load. After a few seconds, you will see the start-up screen display shown below:
Click on OK to continue on to the Navigator chart screen - see next page.

Doc. P/N: WSP-009-003 Version: V1.6Issue Date: January 2015
www.wassp.comPage 13 of 38
Navigator Manual
Once the initial splash screens have been displayed the Navigator displays the last viewed map at the previous location and zoom scale.
The System Menu is initially shown as an icon at the top left hand corner of the display. Clicking on this icon reveals a number of further icons that provide access to lower level menu functions.
Ship
Click to show/hide
Icons Menu
Layers
Marks
Text
Profiles and Lines
3D Window
System Setup
Error Icons
No Network Connection
Chart Overlay turned off
Database recording change
No chart card or chart card is not being read by reader.
No Dongle Found(WASSP Link Disabled)
Exit Navigator
Doc. P/N: WSP-009-003Version: V1.6Issue Date: January 2015
www.wassp.com
Navigator Manual
Page 14 of 38
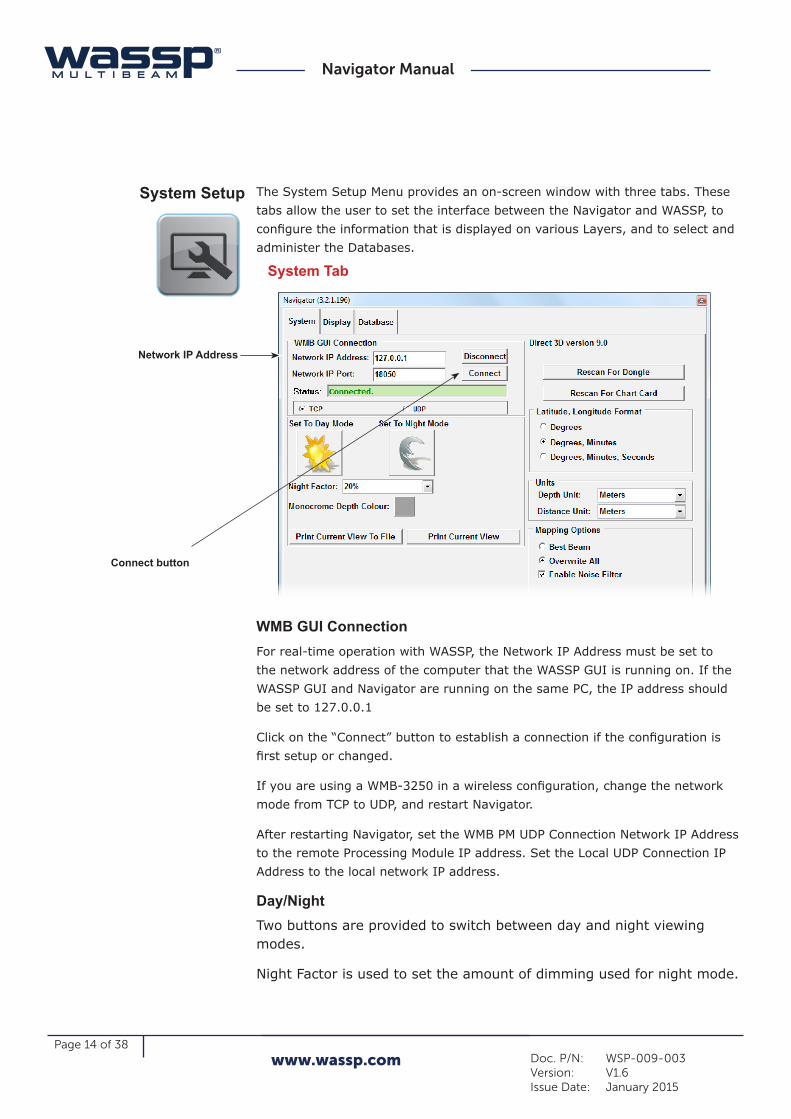
System Setup The System Setup Menu provides an on-screen window with three tabs. These tabs allow the user to set the interface between the Navigator and WASSP, to configuretheinformationthatisdisplayedonvariousLayers,andtoselectandadminister the Databases.
System Tab
WMB GUI ConnectionFor real-time operation with WASSP, the Network IP Address must be set to the network address of the computer that the WASSP GUI is running on. If the WASSP GUI and Navigator are running on the same PC, the IP address should be set to 127.0.0.1
Clickonthe“Connect”buttontoestablishaconnectioniftheconfigurationisfirstsetuporchanged.
IfyouareusingaWMB-3250inawirelessconfiguration,changethenetworkmode from TCP to UDP, and restart Navigator.
After restarting Navigator, set the WMB PM UDP Connection Network IP Address to the remote Processing Module IP address. Set the Local UDP Connection IP Address to the local network IP address.
Day/NightTwo buttons are provided to switch between day and night viewing modes.
Night Factor is used to set the amount of dimming used for night mode.
Network IP Address
Connect button

Doc. P/N: WSP-009-003 Version: V1.6Issue Date: January 2015
www.wassp.comPage 15 of 38
Navigator Manual
Software default settings are shown, e.g. depth in Meters. These may be changed to suit individual preferences.
Monochrome Depth ColourThisallowstheusertoselectthecolourtheseafloorwillappearinmonochromecolourmode.Theseafloorwillberenderedinthiscolourwithshading.Itisuseful for when the 3D water column information is being shown.
Rescan For DongleUsed to rescan for the WASSP Navigator dongle if it is no longer detected.
The system will check for the presence of the dongle periodically and if the dongle is missing, the realtime inputs will be disabled.
Rescan For Chart CardIf the Navionics Gold SD card is not read correctly on startup or if you change the SD card after running the Navigator you can use this button to re-scan for the chart card.
Latitude, Longitude FormatAllow selection of how the latitude and longitude will be displayed in the Nav Box on the main window.
UnitsSelects the unit used for showing depth soundings and distance measurements. Selectable units are meters and feet (as well as fathoms for depth).
Mapping Options ► Best Beam
This stops less accurate points from the outside beams overwriting the more accurate points from the inside beams.
► Overwrite All This option allows the user to overwrite all map points with new points as they are received.
► Enable Noise Filter When enabled this filter will reduce the noisy points which occur when the detection line mistracks the seafloor.
It is recommended to .select Best Beam method and to enable the noise filter.
Doc. P/N: WSP-009-003Version: V1.6Issue Date: January 2015
www.wassp.com
Navigator Manual
Page 16 of 38
Display TabThe Display Tab provides the operator with the ability to determine which information is displayed on the Navionics charts by turning the chart layers on or off, how the vessel track is displayed, and where and how depth information is displayed.
Chart LayersSelects the layers which will be shown on the chart overlay. Set must be pressed for changes to occur.
► Anchorage Areas Areas where vessels can anchor and shows marinas, jetties and wharfs.
► Cables Overlays locations of underwater cables.
► Depth Contours Shows the depth contour lines from the chart card.
► Depth Soundings Shows the single depth soundings from the chart card.
► Nature Of Seabed Indicates what the seabed is at various locations.
► Nav Aids Shows location of navigational lights, beacons, buoys and markers
► Port Show port shapes such as pylons.

Doc. P/N: WSP-009-003 Version: V1.6Issue Date: January 2015
www.wassp.comPage 17 of 38
Navigator Manual
► Pipeline Show location of pipelines.
► Wreck, Rocks Locations of wrecks and rocky areas.
► Names Shows names of harbours and locations on the chart. Will also show warnings and information.
► Background Colour Sets the background colour of the chart/bathymetry.
► Maximum Colour Depth
Select the maximum depth for the depth colour range to extend to (default 800m)
► Disable Chart You can disable the Navionics Chart layer by checking this box.
Vessel TrackAllows customising how the vessel track will be shown on the main window.
► Colour Allows the colour of the vessel track to be changed.
► Thickness Changes how thick the vessel track will be drawn.
► Distance Distance between track points when using distance mode.
► Time Time between adding new vessel track points when using time mode.
► Mode Selects track by distance or time.
Other Settings
► 3D Targets Age Selecthowlong3Dfisharedisplayedfor.
► 2D Fish Type Selectswhichmethodisusedtodisplayfishonthe2D display
► Hdg Line Width Changes thickness of the heading line drawn from the vessel icon.
► Contour Interval Sets how often the contour lines are drawn for the generate WASSP data when in contour mode.
► Menu Position Allows re-location of where the icon menu will be displayed. This can be useful if using a touch screen.
► Show Depth At Cursor 3D/2D
Shows depth label at mouse cursor on 3D/2D.
► Show Menu Labels Draws menu title next to menu icons.
► Show Mark Label/Value
Shows a mark’s label/value
► Draw Line To Sea-floor
Drawsverticallinefromvesseltoseafloorin3D.
► Enable Lighting for Hardness
When selecting backscatter overlay, this will show lighting changes due to slope if enabled.
► Show Menu Labels Toggles text when placing the cursor over menu icons.
► Show Scale on 2D Toggles the map scale on the 2D display
► Hide Lines Disables all Line Manager lines from being displayed

Doc. P/N: WSP-009-003Version: V1.6Issue Date: January 2015
www.wassp.com
Navigator Manual
Page 18 of 38
Database TabNavigator stores and displays the WASSP information in Databases. Each database can store information from any geographic area or areas. The areas do not have to be co-located or continuous but can cover different parts of the globe if desired.
The Database File Path must be set to the directory in which the databases are created. Additional databases can be created by clicking on the “New” button.
The databases allow the operator to store WASSP information from one or more visits to an area. This allows changes between the visits to be easily compared for example. A database may however be over written by selecting it for writing on a subsequent visit.
The Database Tab provides an ability to select both a “Viewing” and a “Recording” database. The information displayed on the Navigator is always taken from the “Viewing” database. Incoming data from the WASSP is always written to the “Recording” database. The two databases are usually the same but they do not have to be. By selecting a different database for “Viewing” than “Recording”, the operator is able to look at the information previously recorded while still saving to the recording database.
Disk Space Remaining Indication.

Doc. P/N: WSP-009-003 Version: V1.6Issue Date: January 2015
www.wassp.comPage 19 of 38
Navigator Manual
WhentheWASSPNavigatorisfirstinstalledaDatabasecalled“Default”willbegenerated. This is automatically setup ready for storing WASSP information.
Adding a new databaseTo add a new database, click on the “NEW” button at the bottom right of the window. The following prompt will appear.
Enter a name for the database. And click “OK’ to add.
The new database will show up on both the viewing and recording side. The databasefilesaresortedbynamesothedatabasemaynotshowupatthebottom of the list.
Filling your Hard DriveNavigator data can quickly accumulate for heavy users. As your hard drive fillsupwithdata,Navigatorwillpostthewarning“Harddrivespaceisgettinglow”. At this point, steps should be taken to move databases to another drive, or perform database reduction on large databases so that hard drive space is cleared. See Database Management below for information on how to do this.
If the free space on your hard drive gets to a dangerous level, Navigator will display the error “Low Hard Drive Space, Mapping Disabled”, and stop recording data.Whensufficientharddrivespaceiscleared,recordingwillresume.
Database ManagementDatabase Management allows you to export recorded databases to an external storage location such as a USB drive. This allows you to free up space on the WASSP Processor.
As the database will be created as a new folder on the PC. It is best to use plain text and numbers as some characters cannot be used.
Database Grid Size can be chosen (0.25, 0.5 or 1; 1m being the lowest resolution forsmallerfilesize)

Doc. P/N: WSP-009-003Version: V1.6Issue Date: January 2015
www.wassp.com
Navigator Manual
Page 20 of 38
Database ExportClick on the “Manage” button on the bottom right of the window.
Select the database you want to export.
Click Save Database to Disk and select location to save.
Database ReductionA database on the WASSP Processor can be reduced in size by converting it from a high resolution to a medium resolution database. When this is done the grid size is changed from 0.25 to 0.5 metres.
Before reducing the database, carry out the database export as above, saving the data to an external storage device (if desired), as all high resolution data will be lost.
Click on the “Manage” button on the bottom right of the window.
Select the database you want to export.

Doc. P/N: WSP-009-003 Version: V1.6Issue Date: January 2015
www.wassp.comPage 21 of 38
Navigator Manual
In the window the size of the database is displayed. Next to the “Convert to 0.5 Gridding” button, the size redution is indicated.
Click the “Convert to 0.5 Gridding” button and select location to save.
Database File PathDatabases will be generated in C:\WMBData\BathMaps as default. This can be changed by clicking on the “...” button. Several locations on the PC hard-drive can be used if required and changed when necessary.
Beawarethatifyouchangethefilepathwhilerecordingtoadatabase,thatdata base will no longer be visible and data loss can occur.
DemoAs part of a standard WASSP Navigator install there is a small demo database which can be selected by pressing the Demo Button. When green this demo database is shown on the “viewing” side.
If the demo database is selected, the Navigator will automatically go to the location of the database for demo viewing. When the demo button is clicked again, the Navigator will return the view to the previous position.
The text ‘Demo Mode’ will be present on the main window when in demo mode.
Show Bookmarks This button opens the Bookmarks List. For more information about bookmarks read about the Add Bookmark function.

Doc. P/N: WSP-009-003Version: V1.6Issue Date: January 2015
www.wassp.com
Navigator Manual
Page 22 of 38
The2Dwindowshowsabirds-eyeviewofthechartandWASSPseafloordata.This is the main window and is used for moving around the globe and zooming in/out.
The interface to the Navigator uses the functions of a standard mouse or touch screen.
► Left Mouse Button Select menu, interface with map.
► Mouse Wheel Zoom In/Out
Ship
When this button is enabled, the map will scroll along with the vessel as new GPS position information is received.
To disable this mode click on the icon again or pan the display.
Center On Ship
When this button is enabled, the map will always be drawn with north pointing directly up the screen.
The vessel will rotate to show current heading.
When this button is enabled, the map rotate around the vessel.
The vessel icon will always point directly up the screen.
North Up
Heading Up
2D Window

Doc. P/N: WSP-009-003 Version: V1.6Issue Date: January 2015
www.wassp.comPage 23 of 38
Navigator Manual
When this button is enabled, the vessel track will be displayed over the seafloormapandchart.
This track will continue to update based on user settings under System ConfigontheDisplayTab.
Show Vessel Track
Layers The Layers Menus select the type of information to be displayed on the map.
The Lighting / Colour button will open a new window for setting the colours and lighting.
The Colour tab window shown allows you to set the depth limits over which the colourrangewillapplywhenviewingseafloordata.
There are two angled arrow buttons. The top one sets the depth the colours will start from. The bottom one sets the depth the colours will end at.
Both buttons can be clicked on with the left mouse button and then dragged up/down. Then the mouse button is released the colours will change on the main window.
The other four up/down arrow buttons can be used tofine-tunethecolourrange.
Coloursonlyeffectthedisplayofseafloordataifincolour depth mode.
The Auto Colour check box links the Navigator Depth Colour selection to that of the WASSP GUI. When the WASSP Colours change the Navigator colour settings change to match those of the WASSP system. This means if the WASSP Auto colour feature is selected the colours on Navigator will update automatically.
It is not possible to change the colour range in Navigator unless the Auto Colour check box is unchecked.
Lighting / Colour

Doc. P/N: WSP-009-003Version: V1.6Issue Date: January 2015
www.wassp.com
Navigator Manual
Page 24 of 38
The Lighting tab window shown here allows you to set the direction from which the apparent lightiscomingfromwhenviewingseafloordata.
There are four choices.
Light from North, South, East or West.
Left click on one of the four buttons around the globe image to change the lighting direction.
The Light Level slider can be left clicked with the mouse and dragged to change the intensity of the lighting.
Whentheleftmouseisreleased,theseafloordata shown will be updated with the new lighting level.
The Shadow Level slider can be used in a similar way to the Light Level slider to adjust the length ofshadowscastbyobjectsonthesea-floor.Thedarkness of the shadow is adjusted by the Light Level slider.
Shadow Level set to zero, anditisdifficulttotellthesignificanceofthiswreck.
Shadow Level set to eight makes this wreck cast a shadow. The length of the shadowreflectshowbigthewreck is.

Doc. P/N: WSP-009-003 Version: V1.6Issue Date: January 2015
www.wassp.comPage 25 of 38
Navigator Manual
The Hardness tab window shown here allows you to set the backscatter colour range.
Correct setting of these controls will greatly help displayseafloorchanges.
To change the gain values for Soft/Steep bottom (top arrow) or Hard/Flat bottom (bottom arrow), left click on one of the buttons and hold, then drag up/down to change the values.
The Histogram can display either the backscatter range visible in the current display, or from data collected over time (History). The History data can be cleared by clicking the Trash icon.
Colour or black and white (grey) backscatter can be selected by clicking on the Colour or Grey buttons at the bottom of the window.
Click on ClosetoexittheConfigurationwindow.
Colour by depth allows the user to showtheseafloordatacolouredbetween the selected values on the configurationwindows.
By changing this range of colours you can show up more detail of the area you are viewing.
Any area which is outside the selected colour range will show up as grey.
Colour Depth

Doc. P/N: WSP-009-003Version: V1.6Issue Date: January 2015
www.wassp.com
Navigator Manual
Page 26 of 38
Monochrome depth is used to display theseafloorusingonlyonecolour.
This colour can be changed from the SystemConfig(SystemPage).
Theseafloorimagewillstillbelitfrom the selected lighting direction.
This mode is useful if using 3D water column to help distinguish between the 3D water column marks and the seafloor.
Show backscatter is used to display the backscatter/hardness information ontopoftheseafloormap.
The backscatter information can be displayed in grey-scale or colour-scale.
Changes in hardness will show up as different intensity/colour.
Thismodeisveryusefulforfindingthechangesinseafloorevenwhentheseafloorisveryflat.Givingtheuser a good indication on where the rocky/hard areas and the soft/muddy areas are.
Show Backscatter
Monochrome Depth

Doc. P/N: WSP-009-003 Version: V1.6Issue Date: January 2015
www.wassp.comPage 27 of 38
Navigator Manual
Show 3D Fish
Show 3D Fish will overlay the detected water column marks on the 2Dseafloordisplay.
These marks are coloured by intensity, so red marks are strong echoes and blue marks weak echoes.
Thefishmarksarestoredonthecomputers hard-drive. There is a finitenumberoffishmarkswhichcan be stored. Once this maximum has been reached for a geographical area,theoldestfishmarksareremoved.
These marks also show up on the 3D window.
Thismodedrawstheseafloorbycolour and traces the contours of the seaflooratthespecifiedinterval.
This interval is setup in the System ConfigundertheDisplayTab.
Contour Lines

Doc. P/N: WSP-009-003Version: V1.6Issue Date: January 2015
www.wassp.com
Navigator Manual
Page 28 of 38
Marks
When this button is clicked a mark will be placed at the current vessel position.
This mark will be identical to the last mark added. To change the mark settings simply left click on the mark you wish to change.
Mark At Vessel
Marks are used to place a user marker at a location of interest
When this button is clicked a mark will show under the mouse cursor.
The next time the left mouse button is clicked this mark will be placed at the mouse cursor position. This mark will be identical to the last mark added. To change the mark settings simply left click on the mark you wish to change.
Mark At Cursor
The mark will have a yellow circle when it is highlighted. Left clicking will bring up the MarkSetupwindow.Configuringthemarkisoptional.
Press to change Mark Colour
Press to change Mark Shape
Enter Mark Name
Enter a number Mark Position can be changed.
Press to Close AND Activate changes made to the Mark Press this to enable deleting the mark.
Press UPDATE to complete the process.
Press to Close without saving changes.

Doc. P/N: WSP-009-003 Version: V1.6Issue Date: January 2015
www.wassp.comPage 29 of 38
Navigator Manual
Mark At Lat/Long
When this button is clicked the Mark Setup form will appear.
Enter mark information including the mark position and press Add to add a new mark at the entered latitude and longitude. As with all marks the colour, shape,nameandvaluecanbemodifiedasdesired.
Add Bookmark
When this button is clicked a bookmark will be placed at the cursor position when the operator next presses the left mouse button.
What is a bookmark?A bookmark is similar to a marked screen position. It is designed for saving the area you can currently see. If you GOTO a bookmark:
► The Current view location changes to centre on the bookmark’s position. ► The Zoom level changes to the zoom level at time of bookmark creation. ► The Current Viewing Database changes to the database being shown at the
time the bookmark was created.
Left clicking on a Bookmark brings up the Bookmark list, and this enables moving to another bookmark, changing the name of any of the bookmarks, and shows the position and date of creation of each bookmark. The icon for a bookmark cannot be changed, unlike a mark.
Enter a position in the form degrees, decimal minutes,
quadrant (N/S/E/W) and press ADD to create the mark
at his position.

Doc. P/N: WSP-009-003Version: V1.6Issue Date: January 2015
www.wassp.com
Navigator Manual
Page 30 of 38
Mark Enable
When this button is enabled all marks will be shown on top the of map/chart. When disabled all marks will be removed from the map display.
Thisallowstheusertoseetheseafloordetailwhichthemarkimagemayobscure.
Press this button to Close this window and to GOTO the selected bookmark. Press to
Close
Left click on one of the marks in the list to select it.
Pressing this button deletes the bookmark permanently.
Press to update the name of the selected bookmark to the text entered.
Text Box These options effect what is shown in the Text Box overlay on the main window.
► Depth At Cursor Shows the depth value at the mouse cursor.
► Bearing From Vessel The angle from the center of the vessel to the mouse cursor.
► Distance From Vessel Distance from center of the vessel to the mouse cursor.
► Latitude, Longitude Shows the latitude and longitude at the mouse cursor position.
► Speed over Ground Current vessel speed over ground.

Doc. P/N: WSP-009-003 Version: V1.6Issue Date: January 2015
www.wassp.comPage 31 of 38
Navigator Manual
Add Measure
When the Add Measure button is clicked and green. The next two left mouse clicks will add two measure markers on the main window.
After placing marker #1 the distance between both markers will be displayed on the line between them.
When placing marker #2 the line will then be anchored in place.
After this both marker can be re-located by placing the mouse cursor over the marker and then holding down the left mouse button and dragging the marker to a new location.
The marker purpose is to provide a measuring tool between two points on the mapandalsotoprovideaprofilingfunctionwhichwillprovideacrosssectionoftheseafloordepthsbetweenthetwomarksintheprofilewindow.
Click the Add Measure button again to remove markers.
Profiles and Lines These tools can be used to measure the distance between two points on the chartdisplay.TheseafloorprofilebetweenthesetwopointscanbeviewedintheProfileWindow.TheLineManagercanbeusedtocreatelinesthatareoverlayed on the map/chart.
Doc. P/N: WSP-009-003Version: V1.6Issue Date: January 2015
www.wassp.com
Navigator Manual
Page 32 of 38
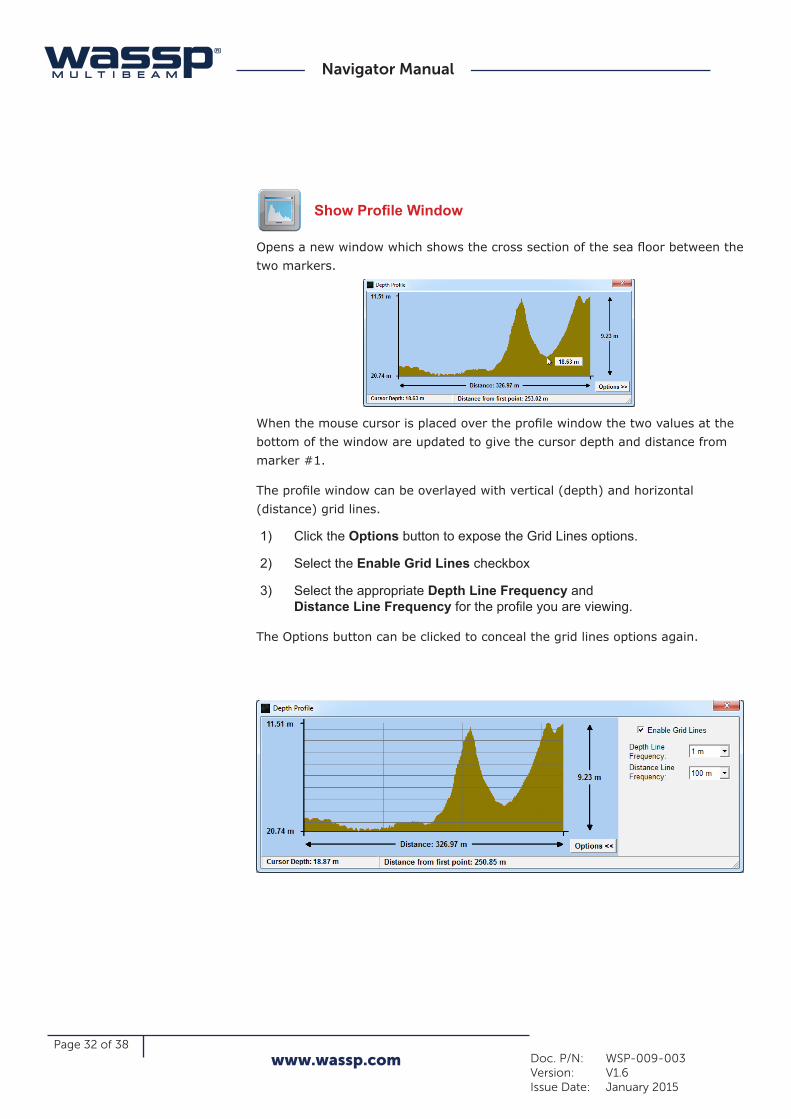
Whenthemousecursorisplacedovertheprofilewindowthetwovaluesatthebottom of the window are updated to give the cursor depth and distance from marker #1.
Theprofilewindowcanbeoverlayedwithvertical(depth)andhorizontal(distance) grid lines.
1) Click the Options button to expose the Grid Lines options.
2) Select the Enable Grid Lines checkbox
3) Select the appropriate Depth Line Frequency and Distance Line Frequency for the profile you are viewing.
The Options button can be clicked to conceal the grid lines options again.
Show Profile Window
Opensanewwindowwhichshowsthecrosssectionoftheseafloorbetweenthetwo markers.

Doc. P/N: WSP-009-003 Version: V1.6Issue Date: January 2015
www.wassp.comPage 33 of 38
Navigator Manual
Line Manager
The Line Manager is a tool for overlaying lines on the map/chart.
Creating a line: ► Click New on the line manager. ► Click on the 2D window to set the start
point of the line ► Click again to set the end point ► Edit the name and coordinates as
required ► The colour of the line can also be set to one of 16 preset colours ► Click Save.
Duplicating a line: ► Select the line to duplicate from the line list ► Click Duplicate ► Click Edit ► Adjust the name, coordinates and colour as required - the line start and end
points can also be repositioned using the mouse
Hiding/Unhiding a line: ► Select the line to hide/unhide from the line list ► Check/Uncheck the Hide checkbox
Deleting a line: ► Select the line to delete from the line list ► Click Edit ► Click Delete
Line List
Colour Selection
Close the Line Manager
Create a New Line
Initial Line Heading
Line Distance
The total number of lines is restricted to 100.

Doc. P/N: WSP-009-003Version: V1.6Issue Date: January 2015
www.wassp.com
Navigator Manual
Page 34 of 38
3D Window This button is used to bring up the 3D window. The 3D window is used to show a 3D view of what is shown on the main window. This view can be moved/rotatedtoviewtheseafloordatain3D.3Dimagedataisthesamedataasshown on the 2D main window.
The interface to the Navigator uses the functions of a standard mouse:
► Left Mouse Button Select menu, interface with display.
► Mouse Wheel Zoom In/Out.
► Right Mouse Button Move display up/down.
► Cursor Keys Pan display left/right/up/down.
► Double Left Click Return to center of display.
Vessel
Enabling show swath will draw a green/red swath coverage indicator under the current vessel position.
This can be used to give an indication on the area the sonar is currently seeing.
Show Swath
Selecting North up mode is the same as on the main window.
North will always be up/into the screen.
North Up in the 3D window can be different from the setting on the main window.
Selecting Heading up mode is the same as on the main window.
The vessel will always point up/into the screen.
Heading Up in the 3D window can be different from the setting on the main window.
North Up
Heading Up

Doc. P/N: WSP-009-003 Version: V1.6Issue Date: January 2015
www.wassp.comPage 35 of 38
Navigator Manual
Vertical Scale
This scale is 1:1 so all features are drawn as the would be seen underwater.
1x Vertical Scale
This scale is 2:1 so all features are drawn twice as high as they would be seen underwater. Depths will also be shown twice as deep.
This scale is 4:1 so all features are drawn four times as high as they would be seen underwater. Depths will also be shown four times as deep.
2x Vertical Scale
4x Vertical Scale
Selecting Free Rotate allows the user to use the mouse to rotate, zoom and pan the 3D display using the mouse and keyboard cursor keys.
Free Rotate
These options effect what is shown in the Text Box overlay on the 3D window.
► Depth At Cursor Shows the depth value at the mouse cursor.
► Speed over Ground Current vessel speed over ground.
Text Box

Doc. P/N: WSP-009-003Version: V1.6Issue Date: January 2015
www.wassp.com
Navigator Manual
Page 36 of 38
3D Fish Enabling 3D Fish will overlay the detected water column marks on the 3D display.
These marks are coloured by intensity, so red marks are strong echoes and blue marks weak echoes.
Thefishmarksarestoredonthecomputershard-drive.Thereisafinitenumberoffishmarkswhichcanbestored.Oncethismaximumhasbeenreachedforageographicalarea,theoldestfishmarksareremoved.
To get the best from the water column data, the Fish Options should be correctly set in the WASSP GUI.
ItisrecommendedthatthefishthresholdinWASSP be set to 4 or above depending on how noisy the sonar display is.
If Show Depth At Cursor 3D is enabled, the depthofafishmarkcanbedeterminedbypositioning the cursor on top of the mark. If thecursorispositionedontheseafloor,thedepthindicatedisthedepthoftheseaflooratthat point. WASSP GUI Fish Options

Doc. P/N: WSP-009-003 Version: V1.6Issue Date: January 2015
www.wassp.comPage 37 of 38
Navigator Manual
THIS PAGE HAS BEEN LEFT INTENTIONALLY BLANK.

www.wassp.com
65 Gaunt StreetWesthavenAuckland 1010New Zealand
PO Box 5849Auckland 1141
WASSP Ltd. reserve the right to change this manual without notice.
The information in this manual may not, in whole or in part, be copied, reproduced, photocopied, translated, or reduced to any electronic medium or machine readable form without the prior written consent of WASSP Ltd.
Copyright© 2015 WASSP Ltd. All Rights Reserved.
WASSP Ltd.Phone: +64 9 373 5595Fax: +64 9 379 5655Email: [email protected]: www.wassp.com
Doc
. P/N
: W
SP-
009-
003
Ver
sion
: V
1.6
Issu
e D
ate:
Ja
nu
ary
2015


