138
http://www.3com.com/ Part Number 900-0210-01 Published April 2005 NBX ® Business Telephone Guide NBX Networked Telephony Solutions System Release 5.0

http://www.3com.com/
Part Number 900-0210-01 Published April 2005
NBX® Business Telephone Guide
NBX Networked Telephony SolutionsSystem Release 5.0

3Com Corporation350 Campus Drive Marlborough, MA 01752-3064
Copyright © 1998–2005, 3Com Corporation. All Rights Reserved. No part of this documentation may be reproduced in any form or by any means or used to make any derivative work (such as translation, transformation, or adaptation) without written permission from 3Com Corporation.
3Com Corporation reserves the right to revise this documentation and to make changes in content from time to time without obligation on the part of 3Com Corporation to provide notification of such revision or change.
3Com Corporation provides this documentation without warranty, term, or condition of any kind, either implied or expressed, including, but not limited to, the implied warranties, terms, or conditions of merchantability, satisfactory quality, and fitness for a particular purpose. 3Com may make improvements or changes in the product(s) and/or the program(s) described in this documentation at any time.
If there is any software on removable media described in this documentation, it is furnished under a license agreement included with the product as a separate document, in the hardcopy documentation, or on the removable media in a directory file named LICENSE.TXT or !LICENSE.TXT. If you are unable to locate a copy, please contact 3Com and a copy will be provided to you.
UNITED STATES GOVERNMENT LEGENDS:
If you are a United States government agency, then this documentation and the software described herein are provided to you subject to the following:
United States Government Legend: All technical data and computer software is commercial in nature and developed solely at private expense. Software is delivered as Commercial Computer Software as defined in DFARS 252.227-7014 (June 1995) or as a commercial item as defined in FAR 2.101(a) and as such is provided with only such rights as are provided in 3Com’s standard commercial license for the Software. Technical data is provided with limited rights only as provided in DFAR 252.227-7015 (Nov 1995) or FAR 52.227-14 (June 1987), whichever is applicable. You agree not to remove or deface any portion of any legend provided on any licensed program or documentation contained in, or delivered to you in conjunction with guide.
Unless otherwise indicated, 3Com registered trademarks are registered in the United States and may or may not be registered in other countries.
3Com, the 3Com logo, and NBX are registered trademarks of 3Com Corporation. NBX NetSet and pcXset are trademarks of 3Com Corporation.
Other brand and product names may be registered trademarks or trademarks of their respective holders.

CONTENTS
ABOUT THIS GUIDE
How to Use This Guide 10Conventions 10Documentation 11
Comments on the Documentation 12
1 GETTING STARTED
Setting Up Your Password and Voice Mail for the First Time 13NBX NetSet Utility 15
Starting the NBX NetSet Utility 16Navigation and Shortcut Icons in the NBX NetSet Utility 16
Quick Reference Guides 17
2 3COM 3102 BUSINESS TELEPHONE Telephone Buttons and Controls 19Programmable Access Buttons 22Status Lights for System Appearance Buttons 24
3 3COM 1102, 2102, AND 2102-IR BUSINESS TELEPHONES Telephone Buttons and Controls 25Programmable Access Buttons 28Status Lights for System Appearance Buttons 30
4 NBX MESSAGING
NBX Messaging Components 31Important Considerations 32
Changing Your Password 32Security Tips 33
Changing Your Name Announcement and Personal Greetings 33

4
Listening to NBX Messages 34Message Indicators 34Listening from Your Computer 35Listening from Your 3Com Telephone 35Listening from Any Internal 3Com Telephone 35Listening from an External Location 35Managing Your Messages 36Information About Your Messages 37
Replying to a Message 37Forwarding a Message 38Creating and Sending a Message 39Using Voice Mail Group Lists 40
Viewing System Groups 40Creating Personal Groups 40Modifying or Deleting Personal Groups 41
Marking a Message as Private or Urgent 43Other Ways to Manage Your Voice Mail Messages 44Other Kinds of Mailboxes 44
Greeting-Only Mailbox 44Phantom Mailbox 45Group Mailbox 45
5 STANDARD FEATURES
Answering a Call 47Caller ID 48Answering a Second Call 48
Using the 3Com Telephone Display Panel 48Tips on Using the Lists 49
Dialing a Call 50An Internal Call 50An External Call 50Redialing a Call 50
5
Forwarding Incoming Calls 51Call Coverage Points 51Condition to Forward Calls 51Setting Call Forward from the Telephone 51Setting Call Forward from the NetSet Utility 54Call Forward Precedence 56
Putting a Call on Hold 57Dialing Another Call 57More Than One Call 57
Transferring a Call 58Announced (Screened) Transfer 58Blind Transfer 58
Direct Mail Transfer 59Establishing a Conference Call 59
Disconnecting the Last Person That You Called 60More About Conference Calls 61
Setting the Volume 61
6 PERSONALIZING YOUR TELEPHONE
Guidelines About Features on NBX Telephones 63Ringer Tones 64Speed Dials 64
Personal Speed Dials 65System-wide Speed Dials 66Special Case: One-Touch Speed Dials 66Printing Speed Dial Lists 67Printing Labels 68
Off-Site Notification 68Managing Off-site Notification Using the Telephone 72
Do Not Disturb 73Preventing Unauthorized Use of Your Telephone 74
Telephone Locking 74Call Permissions 75
Class of Service Override 75

6
Using a Headset 76With the 3Com Manager’s Telephone and 3Com 3102 Business Telephone 76General Headset Instructions 76Returning to the Headset After a Long Delay 77
Using Hands Free Active on Intercom 78Palm Integration 78
7 GETTING MORE FROM YOUR TELEPHONE SYSTEM
Listening to Your Messages in Your E-mail 80Account (Billing) Codes 80Caller ID 81
Internal and External Caller ID 81Calling Line Identity Restriction (CLIR) 82
Call Pickup 83Directed Call Pickup on a Specific Telephone 83Group Call Pickup 84
Automatic Call Distribution Groups, Hunt Groups, and Calling Groups 84Automatic Call Distribution 85Hunt Groups 87Calling Groups 89Group Membership 89
Supervisory Monitoring 90Monitor 90Whisper 91Barge-In 92Change Agent 92Interactions 92
Call Park 93Paging 94
Paging the System 95Paging Zones 95
Configurable Operators 96How Configurable Operators Work 96Configuring the Operators 97
7
Using Message Waiting Indicator to Telephone 98Sending an MWI Message 98Retrieving an MWI Message 98Deleting MWI Messages 99Cancelling an MWI Message 99
Dialing a Call to a Remote Office 100Using Unique Extensions 100Using Site Codes 101
Bridged Extensions 102Delayed Ringing 103Using Pulse Dialing 103Additional Applications 105
8 FEATURE CODES
NBX Tones 107Feature Codes with 3Com Telephones 108
3Com Business Telephone 109Using Feature Codes 109
9 3COM 3105 AND 1105 ATTENDANT CONSOLES
3Com Attendant Console 114Access Buttons 114Feature Buttons 114Attendant Console Labels 117
Opening the 3105 Attendant Console Label Cover 117Complement Attendant Software 118
Managing Calls 119
A TELEPHONE INSTALLATION AND MAINTENANCE
Connecting the Telephone 121Installing the 3102 Telephone Label Plate 123Attaching and Adjusting the Articulating Support Bracket 123Attaching and Adjusting the Fixed Support Bracket 125
Low-Profile and High-Profile Positions 125Wall-Mount Position 126Security Wall-Mount Bracket 127

8
Moving Your Telephone 128Swapping Telephones 128Cleaning Your Telephone 128Troubleshooting Problems 128
INDEX

ABOUT THIS GUIDE
This guide is intended for anyone using:
■ 3Com® Business Telephones
■ 3Com Attendant Consoles
■ NBX Complement Attendant Software.
It includes information about using the NBX Voice Mail system and the NBX NetSet™ administration utility for personal telephone settings.
Devices documented in this guide include:
■ Telephones
■ 3Com 3102 Business Telephone
■ 3Com 2102 Business Telephone
■ 3Com 2102-IR Business Telephone
■ 3Com 1102 Business Telephone
■ Attendant Consoles
■ 3Com 3105 Attendant Console
■ 3Com 1105 Attendant Console
■ NBX Complement Attendant Software
If the information in the release notes (readme.pdf) on the NBX Resource Pack CD differs from the information in this guide, follow the instructions in the release notes.
Analog telephones connected through the Analog Terminal Card or the Analog Terminal Adapter can use most of the features described in this book. See the NBX Feature Codes Guide for Analog Telephones in the NBX NetSet utility.

10 ABOUT THIS GUIDE
How to Use This Guide
Table 1 shows where to look for specific information in this guide.
Conventions Table 2 defines some commonly used words and phrases in this guide.
Table 1 Where to Find Information
If you are looking for information about Turn to
How to get started with your new telephone Chapter 1
The 3Com 3102 Business Telephone Chapter 2
The 3Com 1102, 2102, and 2102-IR Business Telephones Chapter 3
NBX Voice Messaging features Chapter 4
Using standard telephone features Chapter 5
Personalizing your telephone Chapter 6
Enhanced system features Chapter 7
Feature codes Chapter 8
The Attendant Console and Complement Attendant Software Chapter 9
Telephone maintenance and troubleshooting information Appendix A
References to all topics in this book Index
Table 2 Common Terms
Term Definition
Auto Attendant The set of voice prompts that answers incoming calls and describes actions that a caller or user can take to access individual services.
Administrator The person who is responsible for maintaining your 3Com Networked Telephony Solution.
Receptionist The person who answers the majority of incoming telephone calls. In some business environments, this person may be a switchboard operator.
User A person who has a single 3Com Telephone or an analog telephone connected to the NBX system through an ATC card or the single-port ATA device.

Documentation 11
Table 3 lists conventions that are used throughout this guide.
Documentation The documentation set for 3Com NBX Networked Telephony Solutions is designed to help NBX telephone users, installers, and administrators maximize the full potential of the system.
The NBX Resource Pack CD contains many guides to the NBX products and their related 3Com applications.
When you log in to the NBX NetSet utility as a user, you can view the PDF versions of the NBX Telephone Guides and NBX Feature Codes Guide by clicking the icons at the bottom of the screen. You can view the Quick Reference Guide for your telephone by clicking the Telephone Quick Reference button.
The NBX NetSet utility also includes a searchable Help system with Help buttons on each screen.
An administrator who logs in can also see the NBX Installation Guide and the NBX Administrator’s Guide.
Table 3 Icons
Icon Type Description
Information note Information that describes important features or instructions.
Caution Information that alerts you to potential loss of data or potential damage to an application, system, device, or network.
Warning Information that alerts you to potential personal injury.

12 ABOUT THIS GUIDE
Comments on theDocumentation
Your suggestions are important to us. They help us to make the NBX documentation more useful to you.
Please send your e-mail comments about this guide or any of the 3Com NBX documentation and Help systems to:
Include the following information with your comments:
■ Document title
■ Document part number (found on the front or back page)
■ Page number
As always, please address all questions regarding the NBX hardware and software to your 3Com NBX Voice-Authorized Partner.

1
GETTING STARTEDAs soon as you are given a telephone and extension number, you need to set up a password and record your name announcement and personal greeting.
This chapter covers these topics:
■ Setting Up Your Password and Voice Mail for the First Time
■ NBX NetSet Utility
■ Quick Reference Guides
For how to access NBX® features from an analog telephone, set your password as described next and then see the NBX Feature Codes Guide in the NBX NetSet™ utility.
Setting Up Your Password and Voice Mail for the First Time
The procedure by which you set up your password and voice mailbox for the first time depends on:
■ The kind of telephone that you have
■ The kind of voice messaging system on your NBX system. Ask your administrator what kind of voice messaging is active on your system.
Table 4 describes how to set up your first password.
For details on tones and feature codes, see Chapter 8. For details on tones and feature codes on analog telephones, see the NBX Feature Codes Guide in the NBX NetSet utility.

14 CHAPTER 1: GETTING STARTED
Table 4 Setting Your NBX NetSet Utility and NBX Messaging Password
Feature 3Com Phones Analog Telephones
Password — Set Initially
If your system uses NBX Messaging, follow the NBX voice prompts to set your NBX password (which is the same for the NBX NetSet utility and voice messaging) OR use the NBX NetSet utility, described next.
If your system uses a voice messaging application other than NBX Messaging, use this code sequence to set your password for the NBX NetSet utility. 3Com recommends that you use the same password for the NBX NetSet utility and your messaging application.
For all voice messaging systems:
■ Use only 4- to 10-digit numbers
■ Do not use letters, *, or # as part of your password.
Message button and follow the voice prompts
OR, for systems that do not use NBX Messaging:
Feature+ 434+ new password+ #+ repeat your new password+ #
500 ** and follow the voice prompts
OR, for systems that do not use NBX Messaging:
#(Feature Entry Tone)+ 434(Feature Entry Tone)+ new password+ #(Feature Entry Tone)+ repeat your new password+ #(Confirmation Tone)
Password — Change
If your system uses NBX Messaging, follow the NBX voice prompts to change your NBX password (which changes your NBX NetSet utility password, because they are the same) OR use the NBX NetSet utility, described next.
If your system uses a voice messaging application other than NBX Messaging, use this code sequence to change your password for the NBX NetSet utility. 3Com recommends that you use the same password for the NBX NetSet utility and your voice messaging application.
For all voice messaging systems:
■ If you forget your password, the administrator can reset it to your extension. Then use this code (for applications other than NBX Messaging) or the NBX voice prompts to change it.
Message button+ current password+ #+ 9+ 2+ follow the prompts
OR, for systems that do not use NBX Messaging:
Feature+ 434+ current password+ #+ new password+ #+ repeat your new password
500 **+ extension number+ current password+ #+ 9 + 2+ follow the prompts
OR, for systems that do not use NBX Messaging:
#(Feature Entry Tone)+ 434(Feature Entry Tone)+ current password+ #(Feature Entry Tone)+ new password+ #(Feature Entry Tone)+ repeat your new password+ #(Confirmation Tone)
NBX NetSet Utility 15
After you have set your initial NBX password, continue to follow the voice prompts to record your name announcement. Your name announcement tells callers that they have reached your voice mailbox.
Then follow the voice prompts to record your personal greeting. Your personal greeting lets callers know important information about you, for instance, that you are on vacation, available at another number, or unavailable for a specified amount of time.
At any time you can change these greetings or record more than one personal greeting and choose which one is active. See “Changing Your Name Announcement and Personal Greetings” in Chapter 4.
NBX NetSet Utility The NBX NetSet utility has two interfaces:
■ Administrator — Your administrator logs in with a special password and uses the NBX NetSet utility to manage and configure system-wide telephone settings and many of the settings for your telephone.
■ User — As a telephone user, you log in to the NBX NetSet utility with your own system ID (your extension) and password to:
■ View and change your telephone’s personal settings, such as speed dials, ringer tone, and specify where you want your calls to go when you cannot answer them (your call coverage points).
■ Listen to and delete your voice messages from your computer as an alternative to managing calls on your telephone.
■ View your call permissions, certain current feature settings, and the internal user directory to call other users on your system.
■ Log in to and out of one or all ACD groups, hunt groups, and calling groups of which your telephone is a member.
See Chapter 5, Chapter 6, and Chapter 7 for discussions about the standard and enhanced features that you can monitor and change in the NBX NetSet utility. See Chapter 4 for voice messaging features.
If your NBX system uses a messaging application other than NBX Messaging, off-site notification and other voice messaging features are available through your messaging application. See the application’s documentation rather than using this Guide.
16 CHAPTER 1: GETTING STARTED
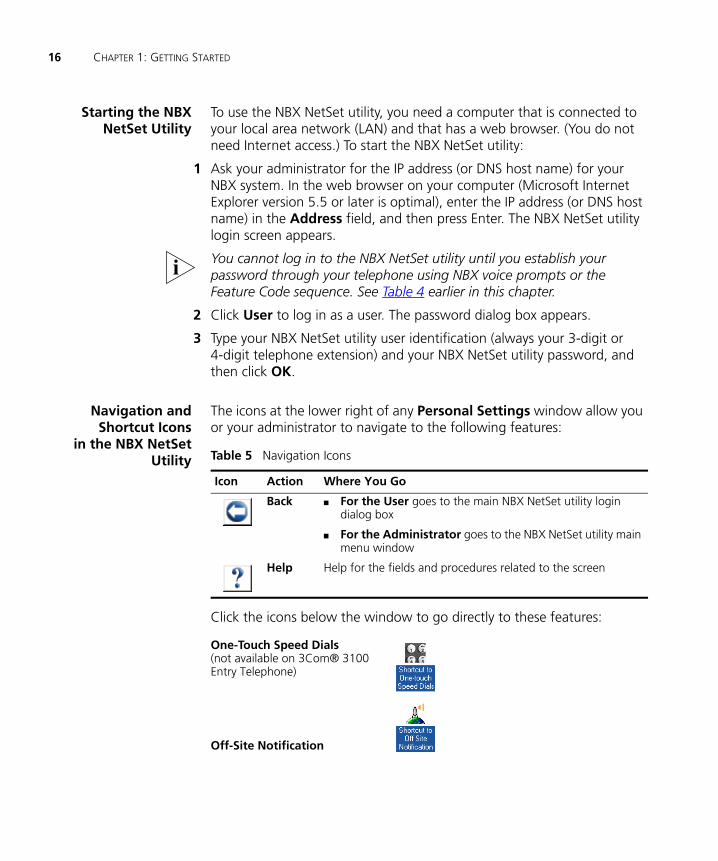
Starting the NBXNetSet Utility
To use the NBX NetSet utility, you need a computer that is connected to your local area network (LAN) and that has a web browser. (You do not need Internet access.) To start the NBX NetSet utility:
1 Ask your administrator for the IP address (or DNS host name) for your NBX system. In the web browser on your computer (Microsoft Internet Explorer version 5.5 or later is optimal), enter the IP address (or DNS host name) in the Address field, and then press Enter. The NBX NetSet utility login screen appears.
You cannot log in to the NBX NetSet utility until you establish your password through your telephone using NBX voice prompts or the Feature Code sequence. See Table 4 earlier in this chapter.
2 Click User to log in as a user. The password dialog box appears.
3 Type your NBX NetSet utility user identification (always your 3-digit or 4-digit telephone extension) and your NBX NetSet utility password, and then click OK.
Navigation andShortcut Icons
in the NBX NetSetUtility
The icons at the lower right of any Personal Settings window allow you or your administrator to navigate to the following features:
Click the icons below the window to go directly to these features:
Table 5 Navigation Icons
Icon Action Where You Go
Back ■ For the User goes to the main NBX NetSet utility login dialog box
■ For the Administrator goes to the NBX NetSet utility main menu window
Help Help for the fields and procedures related to the screen
One-Touch Speed Dials(not available on 3Com® 3100 Entry Telephone)
Off-Site Notification
Quick Reference Guides 17
Quick Reference Guides
To open and print a copy of the Quick Reference Guides for the most frequently used features on your telephone:
1 Log in to the NBX NetSet utility. See “Starting the NBX NetSet Utility” earlier in this chapter.
2 Click Telephone Quick Reference. The quick reference guide that pertains to your telephone appears. Adobe Acrobat Reader 5.0 or higher is required to view the file. Adobe Acrobat Reader is available free from the Adobe Web site:www.adobe.com
Telephone Guides (including this guide)
NBX Feature Codes Guide

18 CHAPTER 1: GETTING STARTED

2
3COM 3102 BUSINESS TELEPHONEThis chapter describes the buttons, controls, and features on the 3Com® 3102 Business Telephone. It covers these topics:
■ Telephone Buttons and Controls
■ Programmable Access Buttons
■ Status Lights for System Appearance Buttons
For how these features work on an analog telephone that is connected to the NBX® system, click the NBX Feature Codes Guide icon below any screen in the NBX NetSet™ utility.
Telephone Buttons and Controls
Figure 1 shows the buttons and controls on the 3Com 3102 Business Telephone. The features are discussed after the picture.
20 CHAPTER 2: 3COM 3102 BUSINESS TELEPHONE
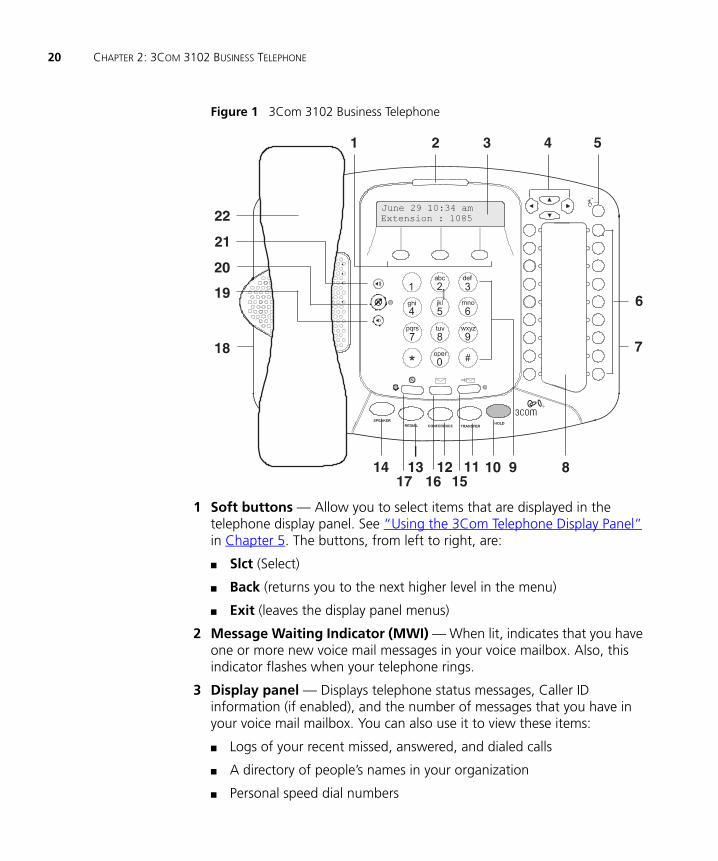
Figure 1 3Com 3102 Business Telephone
1 Soft buttons — Allow you to select items that are displayed in the telephone display panel. See “Using the 3Com Telephone Display Panel” in Chapter 5. The buttons, from left to right, are:
■ Slct (Select)
■ Back (returns you to the next higher level in the menu)
■ Exit (leaves the display panel menus)
2 Message Waiting Indicator (MWI) — When lit, indicates that you have one or more new voice mail messages in your voice mailbox. Also, this indicator flashes when your telephone rings.
3 Display panel — Displays telephone status messages, Caller ID information (if enabled), and the number of messages that you have in your voice mail mailbox. You can also use it to view these items:
■ Logs of your recent missed, answered, and dialed calls
■ A directory of people’s names in your organization
■ Personal speed dial numbers
Telephone Buttons and Controls 21
■ System-wide speed dial numbers
■ Call forward setting for all calls
4 Scroll buttons (Up, Down, Left, Right) — Allow you to scroll through the items in the telephone display panel. See “Using the 3Com Telephone Display Panel” in Chapter 5. The left and right buttons are reserved for future use.
5 Program button — Reserved for future use.
6 Programmable Access buttons — Allow you and your administrator to assign features to specific buttons. See “Programmable Access Buttons” and “Status Lights for System Appearance Buttons” later in this chapter.
7 Microphone (located on the side of the telephone) — Activated when the telephone is in speaker phone mode, that is, after you press the Speaker button or the (Hands Free) button. For best results, keep the area around the microphone free of obstructions.
8 Label area for Access buttons
9 Telephone key pad
10 Hold button — Places a caller on hold. See “Putting a Call on Hold” in Chapter 5.
11 Transfer button — Sends the currently active call to another telephone. See “Transferring a Call” in Chapter 5.
12 Conference button — Establishes a single call with up to three additional internal parties, external parties, or both. See “Establishing a Conference Call” in Chapter 5.
13 Redial button — Redials the last telephone number or extension that you called. See “Redialing a Call” in Chapter 5.
14 Speaker button — Enables you to use the speaker phone feature. Press the Speaker button before you dial the call, when your telephone is ringing, or while a call is in progress. To turn the speaker phone off and resume the conversation, pick up the handset.
15 Forward to Voice Mail button — Directs all incoming calls, after one ring, to your voice mail or to wherever you have specified in NBX NetSet > User Information > Call Forward. See “Other Ways to Manage Your Voice Mail Messages” in Chapter 4.
16 Message button — Accesses your voice mail messages through the NBX Messaging system. See “Listening to NBX Messages” in Chapter 4.

22 CHAPTER 2: 3COM 3102 BUSINESS TELEPHONE
17 Hands Free button — Allows you to answer internal (intercom) calls without picking up the handset. To activate this feature, press the button before calls come in to your telephone. When the feature is enabled, the indicator is lit. When you receive an internal call, your telephone sounds a tone and activates the speaker phone.
An external call (a call from outside your NBX system) rings to your telephone as usual.
18 Headset connector — Located on the underside of the telephone, this RJ-11 connector enables you to plug in a headset so that you can listen to calls and have your hands free. See “Using a Headset” in Chapter 6.
To enable the use of a connected headset, press the Headset button (by default, button 16 at the top of the right column of buttons).
19 Volume down — Lowers the volume of the ringer, the speaker, the handset, or the headset. See “Setting the Volume” in Chapter 5.
20 Mute button — Enables you to prevent callers from hearing what you are saying during a telephone call, although you can still hear them. Press the button to turn off the telephone’s microphone when you are using the handset or headset, or when your telephone is in speaker phone mode. To turn off the Mute feature, press the button again.
21 Volume up — Raises the volume of the ringer, the speaker, the handset, or the headset. See “Setting the Volume” in Chapter 5.
22 Handset
Programmable Access Buttons
Figure 2 shows the 18 programmable Access buttons on the 3Com 3102 Business Telephone. To view or change the current features on your telephone’s buttons (button mappings), click the Shortcut to One-Touch Speed Dials icon on any NBX NetSet utility screen. Click the Help button for instructions.
Programmable Access Buttons 23
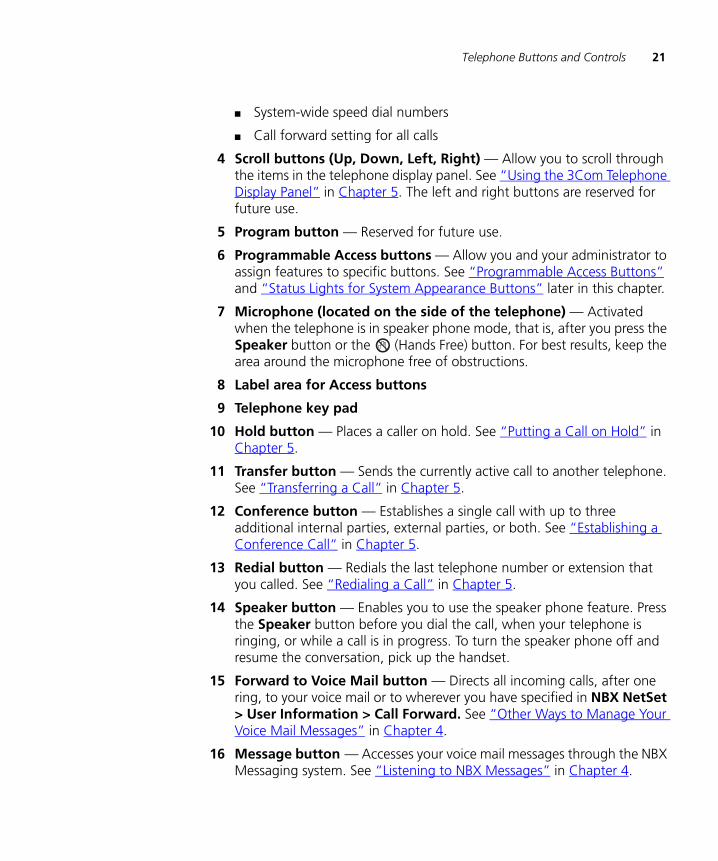
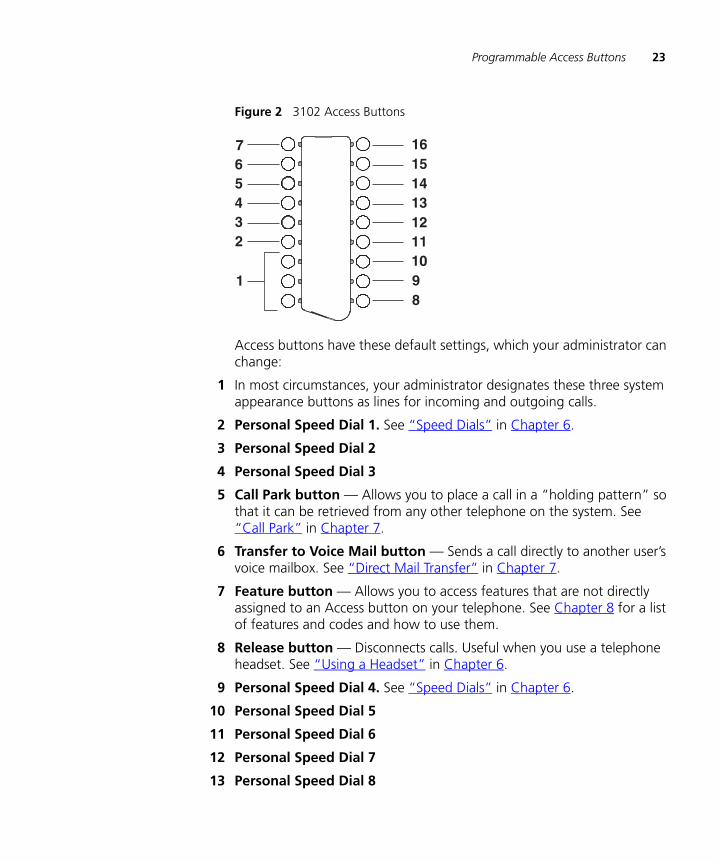
Figure 2 3102 Access Buttons
Access buttons have these default settings, which your administrator can change:
1 In most circumstances, your administrator designates these three system appearance buttons as lines for incoming and outgoing calls.
2 Personal Speed Dial 1. See “Speed Dials” in Chapter 6.
3 Personal Speed Dial 2
4 Personal Speed Dial 3
5 Call Park button — Allows you to place a call in a “holding pattern” so that it can be retrieved from any other telephone on the system. See “Call Park” in Chapter 7.
6 Transfer to Voice Mail button — Sends a call directly to another user’s voice mailbox. See “Direct Mail Transfer” in Chapter 7.
7 Feature button — Allows you to access features that are not directly assigned to an Access button on your telephone. See Chapter 8 for a list of features and codes and how to use them.
8 Release button — Disconnects calls. Useful when you use a telephone headset. See “Using a Headset” in Chapter 6.
9 Personal Speed Dial 4. See “Speed Dials” in Chapter 6.
10 Personal Speed Dial 5
11 Personal Speed Dial 6
12 Personal Speed Dial 7
13 Personal Speed Dial 8
24 CHAPTER 2: 3COM 3102 BUSINESS TELEPHONE
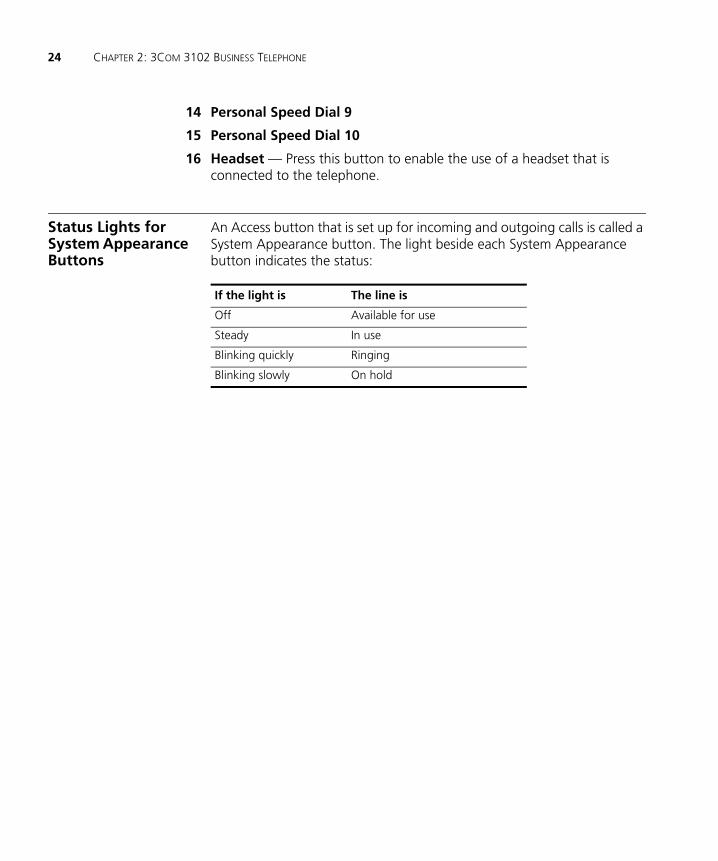
14 Personal Speed Dial 9
15 Personal Speed Dial 10
16 Headset — Press this button to enable the use of a headset that is connected to the telephone.
Status Lights for System Appearance Buttons
An Access button that is set up for incoming and outgoing calls is called a System Appearance button. The light beside each System Appearance button indicates the status:
If the light is The line is
Off Available for use
Steady In use
Blinking quickly Ringing
Blinking slowly On hold

3
3COM 1102, 2102, AND 2102-IR BUSINESS TELEPHONESThis chapter describes the buttons, controls, and features on the following 3Com® Telephones:
■ 3Com 1102 Business Telephone
■ 3Com 2102 Business Telephone
■ 3Com 2102-IR Business Telephone
The chapter covers these topics:
■ Telephone Buttons and Controls
■ Programmable Access Buttons
■ Status Lights for System Appearance Buttons
For how these features work on an analog telephone that is connected to the NBX® system, click the NBX Feature Codes Guide icon below any screen in the NBX NetSet™ utility.
Telephone Buttons and Controls
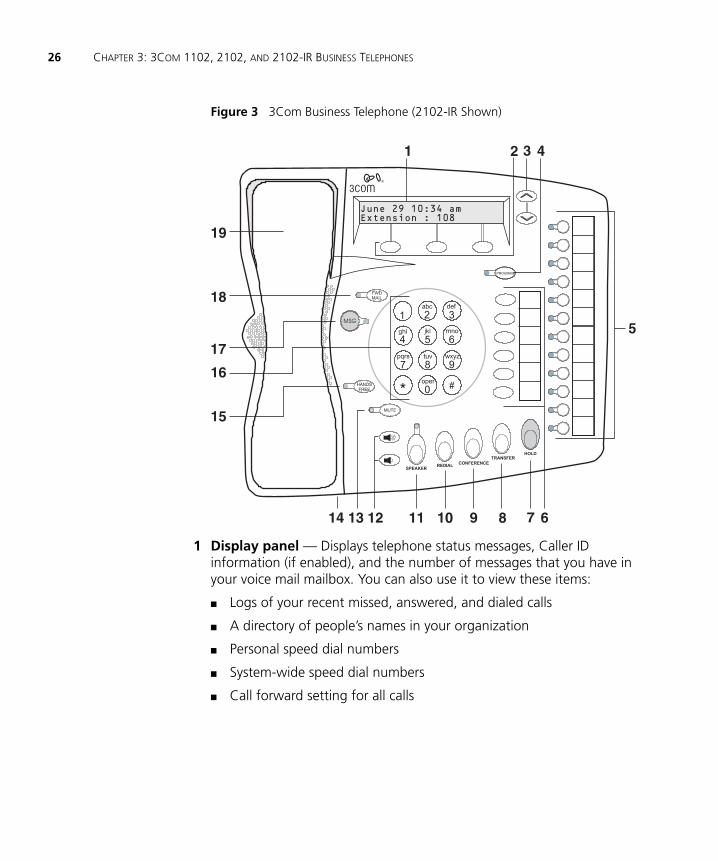
Figure 3 shows the buttons and controls on the 3Com 1102, 2102 and 2102-IR Business Telephones.
26 CHAPTER 3: 3COM 1102, 2102, AND 2102-IR BUSINESS TELEPHONES
Figure 3 3Com Business Telephone (2102-IR Shown)
1 Display panel — Displays telephone status messages, Caller ID information (if enabled), and the number of messages that you have in your voice mail mailbox. You can also use it to view these items:
■ Logs of your recent missed, answered, and dialed calls
■ A directory of people’s names in your organization
■ Personal speed dial numbers
■ System-wide speed dial numbers
■ Call forward setting for all calls

Telephone Buttons and Controls 27
2 Soft buttons — Allow you to select items that are displayed in the telephone display panel. See “Using the 3Com Telephone Display Panel” in Chapter 5.
The soft buttons, from left to right, are:
■ Slct (Select)
■ Back (returns you to the next higher level in the menu)
■ Exit (leaves the display panel menus)
3 Scroll buttons (Up, Down) — Allow you to scroll through the items in the telephone display panel. See “Using the 3Com Telephone Display Panel” in Chapter 5.
4 Program button — Reserved for future use.
5 Programmable Access buttons and label area — Allow you and your administrator to assign features to specific buttons. See “Programmable Access Buttons” and “Status Lights for System Appearance Buttons” later in this chapter.
6 Programmable Access and label area — Allow you and your administrator to assign features to specific buttons. See “Programmable Access Buttons” later in this chapter.
7 Hold button — Places a caller on hold. See “Putting a Call on Hold” in Chapter 5.
8 Transfer button — Sends the currently active call to another telephone. See “Transferring a Call” in Chapter 5.
9 Conference button — Establishes a single call with up to three additional internal parties, external parties, or both. See “Establishing a Conference Call” in Chapter 5.
10 Redial button — Redials the last telephone number or extension that you called. See “Redialing a Call” in Chapter 5.
11 Speaker button — Enables you to use the speaker phone feature. Press the Speaker button before you dial the call, when your telephone is ringing, or while a call is in progress. To turn the speaker phone off and resume the conversation, pick up the handset.
12 Volume up and down buttons — Raises and lowers the volume of the ringer, the speaker, the handset, or the headset. See “Setting the Volume” in Chapter 5.

28 CHAPTER 3: 3COM 1102, 2102, AND 2102-IR BUSINESS TELEPHONES
13 Mute button — Enables you to prevent callers from hearing what you are saying during a telephone call. Press the Mute button to turn off the telephone’s microphone when you are using the handset or when your telephone is in speaker phone mode. To turn off the Mute feature, press the Mute button again.
14 Infrared Port (2102-IR only) — Receives infrared signals from a hand-held device running the Palm Operating System. See “Palm Integration” in Chapter 6.
15 Hands Free button — Allows you to answer internal (intercom) calls without picking up the handset. To activate this feature, press the Hands Free button before calls come in to your telephone. When this feature is enabled, the indicator is lit. When you receive an internal call, your telephone sounds a tone and activates the speaker phone.
An external call (a call from outside your NBX system) rings to your telephone as usual.
16 Telephone key pad
17 MSG (Message) button — Accesses your voice mail messages through the NBX Messaging system. See “Listening to NBX Messages” in Chapter 4. The status light beside this button acts as a message waiting indicator (you have one or more messages in your voice mailbox).
18 FWD MAIL (Forward to Voice Mail) button — Directs all incoming calls to your voice mail (or to wherever you have specified in NetSet > User Information > Call Forward Default) after one ring. See “Other Ways to Manage Your Voice Mail Messages” in Chapter 4.
19 Handset
Programmable Access Buttons
Figure 4 displays the 18 programmable Access buttons. The One-Touch Speed Dials screen in the NBX NetSet utility shows your telephone’s current button mappings.

Programmable Access Buttons 29
Figure 4 Access Buttons on 3Com 1102, 2102, and 2102-IR Telephones
Access buttons have these default settings, which your administrator can change:
1 Feature button — Allows you to access features that are not directly assigned to an Access button on your telephone. See Chapter 8 for a list of features and codes and how to use them.
2 Direct Mail Transfer button — Sends a call directly to another user’s voice mailbox. See “Direct Mail Transfer” in Chapter 7.
3 Call Park button — Allows you to place a call in a “holding pattern” so that it can be retrieved from any other telephone on the system. See “Call Park” in Chapter 7.
4 Flash button (analog line only) — Toggles the current call to another call if the line has the Call Waiting service from your local telephone company, or enables call transfer if the line has the Call Transfer service.
5 Unassigned — This button has no default assigned function.
6 Release button — Disconnects calls. Useful when you use a telephone headset. See “Using a Headset” in Chapter 6.
7 Typically, you can use these nine buttons for personal speed dial settings, although the administrator can map them to other features. See “Speed Dials” in Chapter 6.
8 In most circumstances, your administrator designates these three system appearance buttons as lines for incoming and outgoing calls.
7
8
1
2
3
4
5
6
30 CHAPTER 3: 3COM 1102, 2102, AND 2102-IR BUSINESS TELEPHONES
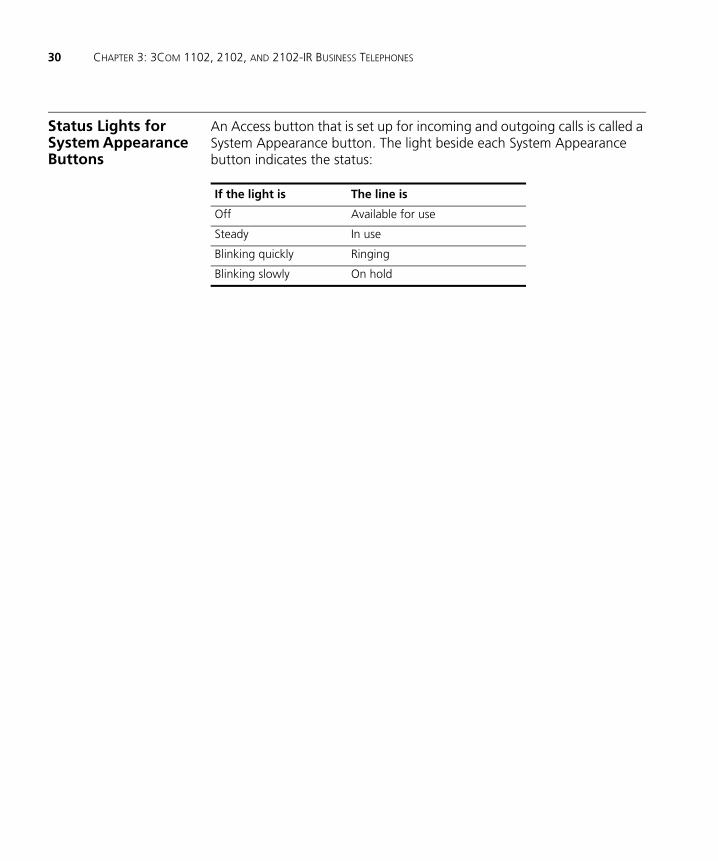
Status Lights for System Appearance Buttons
An Access button that is set up for incoming and outgoing calls is called a System Appearance button. The light beside each System Appearance button indicates the status:
If the light is The line is
Off Available for use
Steady In use
Blinking quickly Ringing
Blinking slowly On hold

4
NBX MESSAGINGThis chapter describes the NBX® Networked Telephony Solutions voice messaging features. It covers these topics:
■ NBX Messaging Components
■ Changing Your Password
■ Changing Your Name Announcement and Personal Greetings
■ Listening to NBX Messages
■ Replying to a Message
■ Forwarding a Message
■ Creating and Sending a Message
■ Using Voice Mail Group Lists
■ Marking a Message as Private or Urgent
■ Other Ways to Manage Your Voice Mail Messages
■ Other Kinds of Mailboxes
NBX Messaging Components
A key component of the NBX Networked Telephony Solutions is the NBX Messaging system, which includes voice mail, off-site notification, and several administrative features. Voice mail allows callers to leave voice messages in your voice mailbox when you are not able to answer your telephone. You can listen to, save, and forward those messages from any touch-tone telephone.
If your system uses a messaging application other than NBX Messaging, use the documentation for your messaging application instead of the instructions in this chapter. Exception: Use the procedures in “Changing Your Password” regardless of your messaging application.

32 CHAPTER 4: NBX MESSAGING
ImportantConsiderations
■ The steps are the same for initially setting up the name announcement, personal greetings, and passwords for personal, greeting-only, and phantom mailboxes. See “Setting Up Your Password and Voice Mail for the First Time” in Chapter 1 for details. (Your administrator creates group mailboxes and their passwords.)
■ For changes to passwords and greetings, see “Changing Your Password” and “Changing Your Name Announcement and Personal Greetings” later in this chapter.
■ The default setting for the maximum length of each voice mail message on the system is 5 minutes. Your administrator can configure your organization’s NBX Messaging system to receive and store voice mail messages that are up to 10 minutes long.
■ Use the Off-Site Notification feature if you want the NBX system to notify you when callers leave voice mail messages in your voice mailbox. See “Off-Site Notification” in Chapter 6.
■ With a touch-tone telephone, you are able to bypass system messages using option buttons if you are configuring passwords and greetings. However, you cannot bypass voice mail messages in this manner.
Changing Your Password
You use the same 4-digit to 10-digit password to log in to the NBX NetSet™ utility and to access your NBX voice mail. You can change this password with your telephone (using the NBX voice prompts or a feature code) or through the NBX NetSet utility.
To set up your password for the first time, see Table 4 and “NBX NetSet Utility” in Chapter 1. Table 4 also describes how to change your password.
If you forget your password, the administrator can set it to be your extension number. Then follow the instructions in Table 4 in Chapter 1 to change it to a more secure password. Also see “Security Tips” next.
If your NBX system uses a messaging system other than NBX Messaging:
■ Use the feature code method described in Table 4 in Chapter 1 to set and change the NBX NetSet utility password.
■ 3Com recommends that you use the same password for your voice messaging system and for the NBX NetSet utility.

Changing Your Name Announcement and Personal Greetings 33
Security Tips ■ Change your password often.
■ Do not use passwords that can easily identify you, such as your phone extension or birth date.
■ Avoid simple passwords such as 1234 or 0000.
■ Use numbers only; do not use letters, *, or # as part of your password.
■ Longer passwords are more secure. You can use up to 10-digits for your password.
■ Never tell your password to anyone.
Changing Your Name Announcement and Personal Greetings
You set name announcement and personal greeting when you first set your voice mail. See “Setting Up Your Password and Voice Mail for the First Time” in Chapter 1. Change your personal greeting often, to ensure that callers hear up-to-date information.
You can record up to five personal greetings and choose which to use from the telephone. You can also review, delete, or choose which to make active with the NetSet utility.
If appropriate, you may also want to change the greeting for an extension that is a “greeting-only mailbox,” so that callers do not attempt to leave messages. See “Greeting-Only Mailbox” later in this chapter.
To change your name announcement or personal greetings:
1 Log in to your mailbox at your telephone or remotely.
2 Press 9 for Mailbox Options and then press 1.
3 To review or change your name announcement, press 1 and follow the prompts.
4 To review or change your personal greetings, press 2 and follow the prompts.
Using the NetSet utility, you can review or delete a personal greeting or choose which of your recorded greetings to make active.
To hear or delete your personal greetings or choose your active personal greeting from the NetSet utility:
1 Log in to the NetSet utility with your extension and password.
2 Select NBX Messaging > Personal Greeting.

34 CHAPTER 4: NBX MESSAGING
3 Select a greeting.
a Click Select to choose the greeting as the active greeting.
b Click Listen to hear the greeting.
c Click Delete to delete the greeting. You cannot delete greeting number 1; you can re-record it through the phone.
If you forget your password, the administrator can set it to be your extension number. Then follow the instructions in Table 4 in Chapter 1 to change it to a more secure password. Also see “Security Tips” earlier in this chapter.
Listening to NBX Messages
You can listen to your NBX voice mail messages from your 3Com® Telephone, from any touch-tone telephone, or by logging in to the NBX NetSet utility. After you listen to messages, you can save or delete them to clear them from the New Messages queue. For how to set up your NBX NetSet utility password the first time, see Table 4 and “NBX NetSet Utility” in Chapter 1.
If your system uses a messaging application other than NBX Messaging, use the documentation for your messaging application instead of these instructions.
Message Indicators Here is how you can tell if you have messages in your mailbox:
■ On a 3Com 3102 Business Telephone — The indicator bar above the display panel is lit, and the display panel shows the number of messages. Example: 3 Msgs 2 New.
■ On a 3Com 1102, 2102, or 2102-IR Business Telephone — The indicator next to the MSG button is lit, and the display panel shows the number of messages. Example: 3 Msgs 2 New.
■ On an analog telephone — Pick up the handset. If you hear the New Messages Tone (rapid stutter tone), you have new messages or messages that you have listened to but have not yet saved or deleted. For information on accessing NBX features from an analog telephone, see the NBX Feature Codes Guide in the NBX NetSet utility.
■ In the NBX NetSet utility — Log in as a user. The list of your messages appears in the Voice Mail Messages area on the NBX NetSet > User Information screen. A new message has a * next to it. A forwarded messages has -->Fw: next to it.

Listening to NBX Messages 35
Listening from YourComputer
To listen to your messages from your computer, you must have a way of playing audio files:
■ A USB audio device such as a USB headset and an operating system that supports USB
OR
■ A sound card, an application such as Windows Media Player, and either headphones or speakers
1 Log in to the NBX NetSet utility with your extension and password.
2 Select a message in User Information > Voice Mail Messages.
3 Click Listen.
4 The third-party application downloads the voice message and plays it.
5 To delete the message, select the message and then click Delete.
Listening from Your3Com Telephone
To listen to your messages from your own 3Com Telephone:
1 Pick up the handset and press the Message button to access the mailbox.
2 At the prompt, dial your password and press #.
3 See Table 6 for the buttons that you use to manage your messages.
Listening from AnyInternal 3Com
Telephone
To listen to your messages from any 3Com Telephone other than your own within your NBX system:
1 Pick up the handset and press the Message button.
2 Press * and dial your extension. You hear your name announcement.
3 Dial your password and press #.
4 See Table 6 for the buttons that you use to manage your messages.
Listening from anExternal Location
To listen to your messages from an external telephone:
■ If you can dial your telephone extension directly — Press * during your personal greeting. At the prompts, enter your extension and password, and press #.
36 CHAPTER 4: NBX MESSAGING
■ If you call the main telephone number of your organization and:
■ The Automated Attendant answers — Press * * during your personal greeting. At the prompts, enter your extension and password, and press #.
■ The receptionist answers — Ask to be transferred to your voice mail. Press * during your personal greeting. At the prompts, enter your extension and password, and press #.
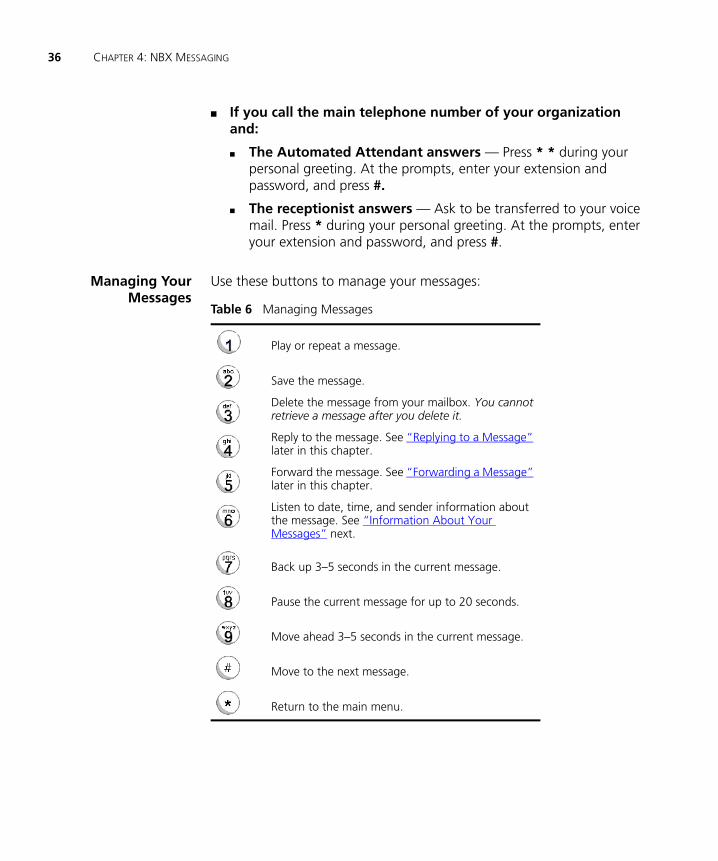
Managing YourMessages
Use these buttons to manage your messages:
Table 6 Managing Messages
Play or repeat a message.
Save the message.
Delete the message from your mailbox. You cannot retrieve a message after you delete it.
Reply to the message. See “Replying to a Message” later in this chapter.
Forward the message. See “Forwarding a Message” later in this chapter.
Listen to date, time, and sender information about the message. See “Information About Your Messages” next.
Back up 3–5 seconds in the current message.
Pause the current message for up to 20 seconds.
Move ahead 3–5 seconds in the current message.
Move to the next message.
Return to the main menu.

Replying to a Message 37
Information AboutYour Messages
To listen to date, time, and sender information about a message in your mailbox, press 6 during or after the message, and then press one of these buttons:
Replying to a Message
You can send a reply to a voice mail message, provided that the NBX system has received the necessary caller ID information.
If you receive a message that is marked Private, you can reply to the originator, but you cannot forward the message to others.
To reply to a message after you listen to it:
1 Press 4.
If the message has been sent to more than one person, press 1 to reply only to the sender or press 2 to reply to all of the recipients.
2 After the tone, record your reply.
3 Hang up, or press # for more options.
4 If you press #, press one of these buttons:
Date and time information.
Sender information.
Listen to the previous message.
Send your reply.
Re-record your reply.
Listen to your reply.
Mark the message Private or Urgent. See “Marking a Message as Private or Urgent” later in this chapter.
Cancel your message.
38 CHAPTER 4: NBX MESSAGING
Forwarding a Message
You can forward most messages, with or without comments.
If you receive a message that is marked Private, you cannot forward it.
To forward a message:
1 Log in to your voice mailbox at your telephone or remotely.
2 Listen to a message that you want to forward, and press 5.
3 After the tone, record an introductory message and then press # OR if you choose not to record a comment, press # when you hear the tone.
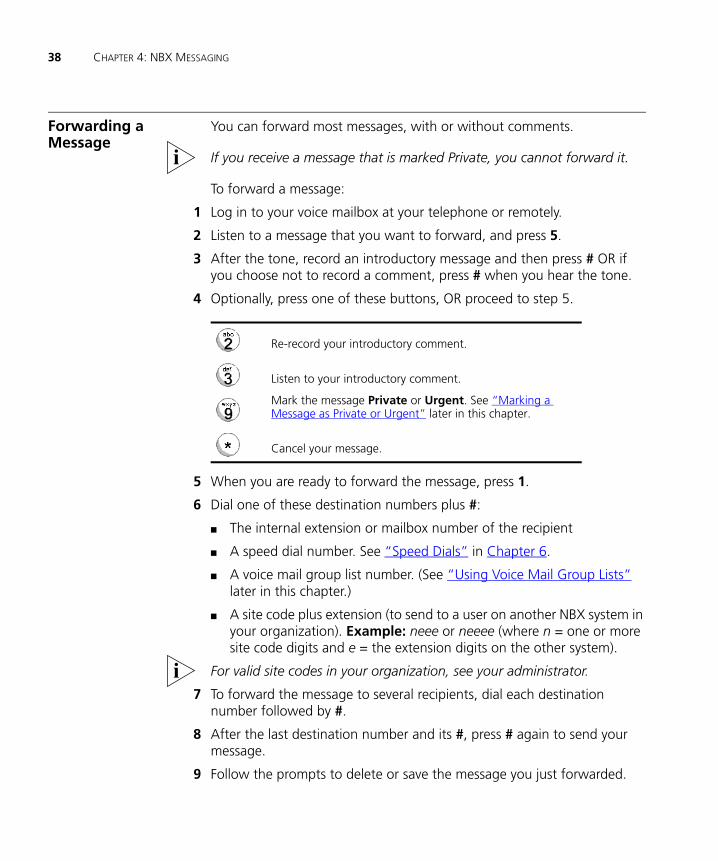
4 Optionally, press one of these buttons, OR proceed to step 5.
5 When you are ready to forward the message, press 1.
6 Dial one of these destination numbers plus #:
■ The internal extension or mailbox number of the recipient
■ A speed dial number. See “Speed Dials” in Chapter 6.
■ A voice mail group list number. (See “Using Voice Mail Group Lists” later in this chapter.)
■ A site code plus extension (to send to a user on another NBX system in your organization). Example: neee or neeee (where n = one or more site code digits and e = the extension digits on the other system).
For valid site codes in your organization, see your administrator.
7 To forward the message to several recipients, dial each destination number followed by #.
8 After the last destination number and its #, press # again to send your message.
9 Follow the prompts to delete or save the message you just forwarded.
Re-record your introductory comment.
Listen to your introductory comment.
Mark the message Private or Urgent. See “Marking a Message as Private or Urgent” later in this chapter.
Cancel your message.

Creating and Sending a Message 39
Creating and Sending a Message
To create and send a message directly without actually making a call, follow these steps:
1 Log in to your mailbox at your telephone or remotely.
2 Dial 2 to select Create and Send a Message.
3 At the tone, record a message that is at least 2 seconds long, and press # to end the recording.
4 Optionally, press one of these buttons, OR proceed to step 5.
5 When you are ready to send the message, press 1.
6 Dial one of these destination numbers plus #:
■ The internal extension or mailbox number of the recipient
■ A speed dial number. See “Speed Dials” in Chapter 6.
■ A voice mail group list number. (See “Using Voice Mail Group Lists” later in this chapter.)
■ A site code plus extension (to send to a user on another NBX system in your organization). Example: neee or neeee (where n = one or more site code digits and e = the extension digits on the other system)
For valid site codes in your organization, see your administrator.
7 To send the message to several recipients, dial each destination number followed by #.
8 After the last destination number and its #, press # again to send your message.
Re-record the message.
Review the message.
Mark the message Private or Urgent. See “Marking a Message as Private or Urgent” later in this chapter.
Cancel the message.

40 CHAPTER 4: NBX MESSAGING
Using Voice Mail Group Lists
A Voice Mail Group, also called a mail group or mail list, is a collection of extensions with a special “group number.” Use it to send a message to everyone on the list at the same time.
A Voice Mail Group is not the same as an ACD Group, Hunt Group, or Calling Group. See “Automatic Call Distribution Groups, Hunt Groups, and Calling Groups” in Chapter 7.
Viewing SystemGroups
System Voice Mail Groups can be set up by your administrator. You can send a message to everyone in a System Voice Mail Group by using * plus the two-digit group number.
You can see a list of System Voice Mail Groups and the membership of each group through the NBX NetSet utility.
To view System Voice Mail Groups:
1 Log in to Netset > NBX Messaging > System Group List. A list of System Group IDs and Names displays.
2 To view the membership of any group, select the group and click Membership.
Creating PersonalGroups
You can create your own Personal Voice Mail Group either through the telephone or through the NBX NetSet Utility.
To create a personal voice mail list through the telephone:
1 Log in to your mailbox at your telephone or remotely.
2 Dial 9 for Mailbox Options.
3 Dial 3 for Group Lists, and then 2 for Create Group.
4 Dial a 2-digit number, 01–99, which becomes the Group Number.
5 After the tone, speak a name for the group, and press #.
6 Dial one of these numbers:
■ 1 to save the group name and proceed to step 7
■ 2 to change the group name and return to step 5
■ * to exit without saving

Using Voice Mail Group Lists 41
7 Dial one of these destination numbers plus #:
■ The internal extension or mailbox number of the recipient
■ A speed dial number. See “Speed Dials” in Chapter 6
■ Another personal or system group list number
■ A VPIM extension
■ A site code plus extension (to send to a user on another NBX system in your organization). Example: neee or neeee (where n = one or more site code digits and e = the extension digits on the other system)
For valid site codes in your organization, see your administrator.
8 When you have added all of the destination numbers, press:
■ 1 to save the group list
■ 2 to cancel creating the group
■ ** to return to the previous menu
OR hang up.
To create a Personal Voice Mail List through the NBX NetSet Utility:
1 Log in Netset > NBX Messaging > Personal Group List. You see a list of your current personal voice mail groups with Group IDs and Group Names.
2 Click Add.
3 Enter a Group ID, a number from 01–99 that is not used for a current group.
4 Enter a Name for the new group.
5 Enter any VPIM extensions in the VPIMs box.
6 Select members from the Non-Members list and move them to the Members list by clicking the left arrow.
7 Click Apply and OK to complete the list.
Modifying orDeleting Personal
Groups
You can review your Personal Voice Mail Groups, add members, or delete a group from the telephone or from the NBX NetSet utility.
To review or modify a Personal Voice Mail Group from the telephone:
1 Log in to your mailbox at your telephone or remotely.
2 Dial 9 for Mailbox Options.
42 CHAPTER 4: NBX MESSAGING
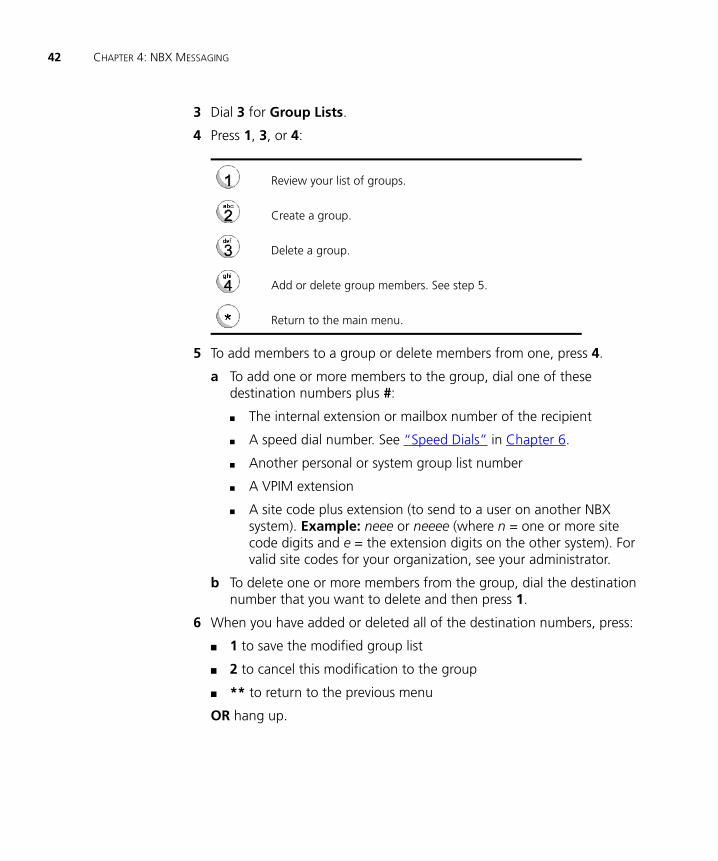
3 Dial 3 for Group Lists.
4 Press 1, 3, or 4:
5 To add members to a group or delete members from one, press 4.
a To add one or more members to the group, dial one of these destination numbers plus #:
■ The internal extension or mailbox number of the recipient
■ A speed dial number. See “Speed Dials” in Chapter 6.
■ Another personal or system group list number
■ A VPIM extension
■ A site code plus extension (to send to a user on another NBX system). Example: neee or neeee (where n = one or more site code digits and e = the extension digits on the other system). For valid site codes for your organization, see your administrator.
b To delete one or more members from the group, dial the destination number that you want to delete and then press 1.
6 When you have added or deleted all of the destination numbers, press:
■ 1 to save the modified group list
■ 2 to cancel this modification to the group
■ ** to return to the previous menu
OR hang up.
Review your list of groups.
Create a group.
Delete a group.
Add or delete group members. See step 5.
Return to the main menu.
Marking a Message as Private or Urgent 43
To review or modify a Personal Voice Mail Group from the NBX NetSet utility:
1 Log in Netset > NBX Messaging > Personal Group List. You see a list of your current personal voice mail groups.
2 Select the group to review or modify.
3 Click Modify.
4 You can change the Name for the group.
5 You can enter any VPIM extensions in the VPIMs box.
6 You can select members from the Non-Members list and move them to the Members list by clicking the left arrow. OR select members from the Members list and move them to the Non-Members list by clicking the right arrow.
7 Click Apply and OK to complete your changes.
To delete a Personal Voice Mail Group from the NBX NetSet utility:
1 Log in Netset > NBX Messaging > Personal Group List. You see a list of your current personal voice mail groups.
2 Select the group to delete.
3 Click Remove.
4 Click Yes to confirm.
Marking a Message as Private or Urgent
When you compose a voice message, you can select Private or Urgent from the delivery options. If you do not select a delivery option, your message is sent as a Normal message.
■ Private Messages — The recipient cannot forward the message to others.
■ Urgent Messages — Places the message at the beginning of the recipient’s message queue. Urgent messages are heard first.
1 Follow the steps in “Replying to a Message”, “Forwarding a Message”, or “Creating and Sending a Message” earlier in this chapter.
2 In step 4 of those instructions, press 9.

44 CHAPTER 4: NBX MESSAGING
3 To mark the message Urgent, press 1. To mark the message Private, press 2.
4 To send the marked message, press 1, or listen to the prompts for other choices.
Other Ways to Manage Your Voice Mail Messages
You can listen to and, in some configurations, delete your voice messages from within an e-mail application or a messaging application using your Internet browser. For details, see “Listening to Your Messages in Your E-mail” in Chapter 7.
Other Kinds of Mailboxes
The NBX system allows you (for the greeting-only mailbox) or the administrator (for phantom or group mailboxes) to set up mailboxes for special situations, as described in this section.
Greeting-OnlyMailbox
When you designate your mailbox as a greeting-only mailbox, callers hear your personal greeting but they cannot leave a voice mail message.
To change your voice mailbox to a greeting-only mailbox, selectNBX NetSet > NBX Messaging > Greeting Only Mailbox.
Examples:
■ When you take an extended leave of absence, you can create a personal greeting with your scheduled date of return and whom to call during your absence. Callers can be transferred but are unable to leave voice messages for you. When you return, clear the Greeting Only Mailbox check box so that callers can leave messages again.
■ If you are a teacher, you can create a new personal greeting on the school’s NBX system every day to explain homework assignments. Students call in to the greeting-only mailbox to get the homework information but cannot leave a message for you on this mailbox.
■ If you are the administrator, you can create a greeting-only mailbox and use the personal greeting to post information for employees, such as a notice that the offices are closed because of bad weather.
When you create the personal greeting, remember to tell callers that they cannot leave messages in this voice mailbox. For instructions on changing the personal greeting, see “Changing Your Name Announcement and Personal Greetings” earlier in this chapter.

Other Kinds of Mailboxes 45
In addition to preventing a caller from leaving a message, a greeting-only mailbox does not allow anyone to forward or create and send a message to it or reply to a message that was sent from its extension
Avoid adding a greeting-only mailbox to a personal voice mail group list.
Phantom Mailbox A phantom mailbox does not have an actual telephone associated with it. The administrator sets up a phantom mailbox.
Examples:
■ If you are a sales representative who travels constantly for your organization and never comes into the office, you still need a way to receive telephone messages. Using your phantom mailbox, you can retrieve, forward, and save messages in the same way that any other employee can but without a physical telephone connected to your NBX system.
■ If you are an employee who lives a long distance from your office and works from home, customers and others can leave messages in the your phantom mailbox and you can call in to the NBX system to retrieve them, or you can listen to them from the NBX NetSet utility.
You retrieve messages from a phantom mailbox in the same way that you retrieve messages from a personal mailbox. See “Listening to NBX Messages” earlier in this chapter.
Group Mailbox A group mailbox is a voice mailbox from which a group of users can retrieve messages. Your administrator creates group mailboxes and can explain how to retrieve messages that are left in the group mailbox.
Example:
■ During nonbusiness hours, the system can send incoming telephone calls for your sales department to a group mailbox. Your administrator assigns to the appropriate sales people the ability to listen to, forward, or otherwise handle all messages that are directed to the group mailbox.
Your administrator can assign (map) a Message Waiting Indicator for the group mailbox to an Access button on the 3Com Business Telephone of each group member. The light next to the mapped button indicates when the group mailbox has messages in it. Any group member can press the button to retrieve messages from the group mailbox.

46 CHAPTER 4: NBX MESSAGING
5
STANDARD FEATURESThis chapter describes standard features of the NBX® Telephones. It covers these topics:
■ Answering a Call
■ Using the 3Com Telephone Display Panel
■ Dialing a Call
■ Forwarding Incoming Calls
■ Putting a Call on Hold
■ Transferring a Call
■ Direct Mail Transfer
■ Establishing a Conference Call
■ Setting the Volume
For help on accessing NBX features from an analog telephone, see the NBX Feature Codes Guide in the NBX NetSet™ utility.
If your system uses a messaging application other than NBX Messaging, use the documentation for your messaging application instead of the instructions in this chapter.
Answering a Call To answer an incoming call, pick up the handset. If you are using a 3Com® Business Telephone, you can press the Speaker button. If you have enabled Handsfree Active on Intercom, you can simply speak to answer internal calls.
An unanswered call on any telephone on the NBX system is forwarded to the call coverage point that you specify in NBX NetSet > User Information > Call Forward Default or Call Forward Override. To specify the number of times that your telephone rings before the call is

48 CHAPTER 5: STANDARD FEATURES
forwarded or to specify where you want the call to go, see “Forwarding Incoming Calls” later in this chapter.
Caller ID The display panel on your 3Com Telephone shows the name and extension of an internal caller. For an external caller, if your organization purchases Caller ID service from your telephone company and if the external caller allows Caller ID information to be broadcast, the display panel shows the external caller’s name and telephone number.
Answering aSecond Call
On 3Com Business Telephones, when a new call arrives while you are on a call:
1 Press Hold to put the current call on hold.
2 Press the Access button for the line on which the new call is arriving.
3 To return to the earlier call, hang up the new call, or put it on hold, or transfer it, and then press the Access button for the original call.
Using the 3Com Telephone Display Panel
Use the telephone display panel of your 3Com Telephone to dial a number:
■ Call Logs — The logs of the most recent calls to and from your telephone (Missed Calls, Answered Calls, Dialed Calls).
■ Directory — A list of the users on your system and their extensions.
■ Personal Speed Dials — A list of personal speed dial numbers that you have set in NBX NetSet > Speed Dials.
■ System-wide Speed Dials — A list of the system-wide speed dial numbers set by your administrator. You can print and view these numbers in NBX NetSet > System Speed Dials.
To access the display panel lists:
1 Pick up the handset. Press the up or down scroll key to the right of the display.
On 3Com Business Telephones, you can press a scroll key, select a number, and dial without picking up the handset.
2 Use the scroll buttons to move through the lists. When you see the list that you want to use, press the button under Slct (Select).

Using the 3Com Telephone Display Panel 49
3 Use the scroll keys to move to the name or number that you want to call. Verify that the cursor is at the entry you want, and press the button under Slct.
4 To move back to the previous menu, press the button under Back.
5 To leave the lists entirely, press the Exit soft button. OR press an Access button that is programmed for Release. OR hang up.
Tips onUsing the Lists
After you press the up or down scroll key (3102 Business Telephone scroll keys shown), if you do not select an item immediately, the display alternates between the list:
and the menu choices:
In the user directory, names appear in alphabetical order, by last name. The system updates the directory when the administrator adds or removes users.
In the user directory, to move quickly to the first name that begins with a particular letter, you can use the key pad. Example: Press 3 to show the first name that begins with D; press 3 twice to move to the first name that begins with E; press 3 three times to move to the first name that begins with F. Then scroll up or down to the name that you want.
Call LogsDirectory
Select an entry Slct | Back | Exit
Lee Man YeeLee Margaret

50 CHAPTER 5: STANDARD FEATURES
Dialing a Call This section describes standard dialing features. For information on dialing from an analog telephone, see the NBX Feature Codes Guide in the NBX NetSet utility.
An Internal Call To dial an internal call:
1 Pick up the handset. On 3Com Business Telephones, you can press the Speaker button. You hear the dial tone. If necessary, select an internal line.
2 Dial the person’s 3-digit or 4-digit extension. Or use the display panel to find and dial the name of the person whom you want to call in the user directory, call logs, or a speed dial list.
3 When you are finished, hang up the handset. If you pressed the Speaker button, press it again to end the call.
For details about placing calls to remote or branch offices, see “Dialing a Call to a Remote Office” in Chapter 7.
An External Call To dial an external call:
1 Pick up the handset. On 3Com Business Telephones, you can press the Speaker button. You hear the dial tone. If necessary, dial 9, 8 or whatever to access an external line. If one of the Access buttons is configured to access an external line directly, you can press that button.
2 Dial the number. Or use the display panel on a 3Com Telephone to scroll to a missed, answered, or dialed number, or a personal or system-wide speed dial number. If you have programmed one of the One-Touch buttons, press that button.
3 When you finish speaking, hang up the handset. If you pressed the Speaker button, press it again to end the call.
Redialing a Call On a 3Com Business Telephone:
■ Pick up the handset and press Redial to dial the most recent number that you called.
OR
■ Use the Call Logs on the display panel to redial a recently missed, answered, or dialed call.
Forwarding Incoming Calls 51
Forwarding Incoming Calls
You can choose when and where to forward unanswered incoming calls. Unanswered calls that come in directly to your extension go to a call coverage point. You can set different call coverage points for different conditions: default, no answer, busy, and all calls.
Unanswered calls that come to your telephone through ACD groups, hunt groups, and calling groups follow the call coverage path that your administrator sets up for the group. See “Automatic Call Distribution Groups, Hunt Groups, and Calling Groups” in Chapter 7.
When you specify call forwarding, you specify the call coverage point and the condition under which to forward calls.
Call Coverage Points Your call coverage points are the destinations you forward your calls to when you do not answer. They can be telephone extensions or external telephone numbers, your voice mail box, or an automated attendant.
Condition to ForwardCalls
You can choose when to forward calls:
■ Default —Forwards unanswered incoming calls to your default call coverage point after a specified number of rings if you have not specified another condition.
■ Call Forward No Answer — Forwards unanswered incoming calls to a call coverage point when your phone rings for a specified number of rings.
■ Call Forward Busy —Forwards incoming calls to a call coverage point when your phone is busy.
If you have multiple lines, all lines must be in use in order for Call Forward Busy to engage.
■ Call Forward All — Forwards all incoming calls without ringing to a call coverage point regardless of the state of your phone.
Use this feature when, for example, you plan to be away from your phone for an extended period of time.
Setting Call Forwardfrom the Telephone
You can set call forwarding from your telephone. You choose the condition for call forwarding (default, no answer, busy, or all) and the destination. When you specify an external telephone number as the destination, start by entering a 9 or 8 or whatever is required to access an outside line. Example: 912815551212 dials (281) 555-1212. You can

52 CHAPTER 5: STANDARD FEATURES
enter a * if a pause is required between an access code and a destination number.
The number that you choose may be limited by your call permissions. To view your permissions, see NBX NetSet > User Information > Call Permissions.
From the telephone, you can set call forwarding using feature codes. Use the NetSet utility to see your call forwarding settings. Your administrator can also set programmable access buttons for call forwarding. And you can select Call Forward All directly from the display panel.
Forward to Mail
From the telephone, you can set your 3Com Telephone so that all incoming calls go directly to your default call coverage point, usually your voice mailbox. You can change the destination to the Auto Attendant or receptionist or a different telephone number. This feature is referred to as FWD MAIL, Forward to Mail, Forward All Calls to Voice Mail, and Forward All Calls to VM. When Forward to Mail is in effect, your telephone rings once before forwarding the call to your default call coverage point.
On a 3Com 3102 Business Telephone:
1 Press the (Forward to Mail) button. The indicator light turns on.
2 To turn off Forward to Mail, press the button again. The light turns off.
On a 3Com 1102, 2102, or 2102-IR Business Telephone:
1 Press the FWD MAIL (Forward to Mail) button. The indicator light turns on.
2 To turn off Forward to Mail, press the button again. The light turns off.
To set your default call forwarding destination, use the NetSet utility. See “Default” later in this section.
To prevent the telephone from ringing even once, use the Do Not Disturb feature (see “Do Not Disturb” in Chapter 6) or use the Call Forward All feature (see “Call Forward All” later in this section).
Call Forward No Answer, Call Forward Busy, and Call Forward All override this Forward to Mail setting if they are in effect. If you turn off Forward to Mail and no other call forward options are in effect, unanswered calls still go to your default call coverage point but after the number of rings specified in NBX NetSet > User Information > Call Forward Default.

Forwarding Incoming Calls 53
To view your current Forward to Mail setting, log in toNBX NetSet > User Information > Feature Settings and see Forward All Calls to VM.
Call Forward No Answer
To set Call Forward No Answer:
1 Pick up the handset, and press Feature + 466.
2 Dial the number that you want to forward calls to and press #. If the display shows the destination number you want, just press # to accept it.
3 To turn off Call Forward No Answer, pick up the handset and press Feature + 466 again.
You can specify the number of rings before the call is forwarded by logging into NBX NetSet > User Information > Call Forward Override.
Call Forward Busy
To set Call Forward Busy:
1 Pick up the handset, and press Feature + 467.
2 Dial the number that you want to forward calls to and press #. If the display shows the destination number you want, just press # to accept it.
3 To turn off Call Forward Busy, pick up the handset and press Feature + 467 again.
Call Forward All
To set Call Forward All:
1 Pick up the handset, and press Feature + 465.
2 Dial the number that you want to forward calls to and press #. If the display shows the destination extension you want, just press # to accept it.
3 To turn off Call Forward All, pick up the handset and press Feature + 465 again.
To set Call Forward All from the display panel:
1 Scroll to CFWD ALL on the display panel.
2 Press the Set soft button to select CFWD ALL.
3 Press the Set soft button again.
54 CHAPTER 5: STANDARD FEATURES
4 If the telephone number you want was entered previously and displays, press # to accept it. Otherwise, enter the telephone number to forward calls to and press #.
To cancel Call Forward All from the display panel:
1 Scroll to CFWD ALL on the display panel.
2 Press the Set soft button to select CFWD ALL.
3 Press the Set soft button again to select Cancel CFWD ALL.
Setting Call Forwardfrom the NetSet
Utility
From the NetSet utility, you can set default call forwarding or choose to override the default with a condition for call forwarding (No Answer, Busy, or All) and a destination. For telephone numbers, do not use parentheses, hyphens, or spaces. When you specify an external telephone number, start by entering a 9 or 8 or whatever is required to access an outside line. Example: 912815551212 dials (281) 555-1212. You can enter a * if a pause is required between an access code and a destination number.
Default
The Call Forward Default page defines basic call forwarding. You choose from four destinations: voicemail box, a phone number, the automated attendant, or disconnection. You can override these settings on the Call Forward Override page or by making changes on the telephone.
To set the default call forwarding:
1 Log in to NBX NetSet > User Information > Call Forward Default.
2 Select your choice for the Number of rings before forwarding a call.
3 Select a call coverage point:
■ If you select Forward to voicemail box, the caller can leave a message.
■ If you select Forward phone number, enter that extension or external phone number in the box.
The number that you choose may be limited by your call permissions. To view your permissions, see NBX NetSet > User Information > Call Permissions.
Forwarding Incoming Calls 55
The check box below Forward phone number specifies where you want to forward calls that are not answered at the internal extension that you specified as the Forward phone number.
If you check the box, calls that are unanswered at the number you forward them to are passed on to your choice of:
■ User Voicemail — Your voicemail box
■ Default Menu — The default automated attendant, usually extension 500
■ Voicemail — The default system voicemail, usually extension 501
If you leave the box unchecked, calls that are unanswered at the number you forward them to are passed on to the destination specified for that number. This setting can result in having your calls forwarded to another person’s voicemail or to a loop of forwarding where the call is never answered.
■ If you select Automated Attendant, you can choose to forward calls to your choice of:
■ Default Menu — The default automated attendant, usually extension 500
■ Voicemail — The default system voicemail, usually extension 501
■ If you select Disconnect (no coverage), the system disconnects an incoming call if it is not answered after the specified number of rings.
4 Click Apply, and then click OK.
Override
To set the call forward override:
1 Log in to NBX NetSet > User Information > Call Forward Override.
2 Select your call forward conditions:
■ If you select Call Forward All, calls will not ring at all on your extension and will be immediately forwarded to the extension or external phone number you specify in the box.

56 CHAPTER 5: STANDARD FEATURES
■ If you select the next button, you can select either or both of the following conditions:
If you select Call Forward Busy, calls will not ring at all when all of your lines are busy and will be immediately forwarded to the extension or external phone number you specify in the box.
If you select Call Forward No Answer, calls ring the number of times you specify in the rings box. If they are not answered then, they will be forwarded to the extension or external phone number you specify in the box.
■ If you select No action, call forwarding follows the specifications of the Call Forward Default page.
3 Click Apply, and then click OK.
Call ForwardPrecedence
Five features can interact to affect call forwarding: Forward to Mail, Call Forward No Answer, Call Forward Busy, Call Forward All, and Do Not Disturb. If they are enabled at the same time, the NBX system determines precedence, which call forwarding path is in effect, according to the following rules:
■ If Call Forward All is enabled, all calls are immediately forwarded to the Call Forward All destination. All other feature settings are ignored.
■ If Do Not Disturb is enabled and Call Forward All is not enabled, all calls are immediately forwarded to the Call Forward Default destination. All other feature settings are ignored.
■ If Call Forward Busy is enabled and Call Forward All and Do Not Disturb are not enabled, all calls received when this extension is busy are immediately forwarded to the Call Forward Busy destination. All other feature settings are ignored.
■ If Call Forward No Answer is enabled and Call Forward All and Do Not Disturb are not enabled, all calls received when this extension is not busy are forwarded to the Call Forward No Answer destination after the specified number of rings. All other feature settings are ignored.
■ If Forward to Mail is enabled and Call Forward All, Do Not Disturb, Call Forward No Answer, and Call Forward Busy are not enabled, all calls received when this extension is not busy are forwarded to the Call Forward Default destination after one ring.
Putting a Call on Hold 57
■ If no call forwarding settings are enabled, all calls received this extension is busy are immediately forwarded to the Call Forward Default destination. If this extension is not busy, all calls are forwarded to the Call Forward Default destination after the number of rings specified in the Call Forward Default page of the NetSet utility.
Putting a Call on Hold
You can put a call on hold for any reason.
On 3Com Business Telephones:
1 Press the Hold button.
2 To return to the call, press the appropriate Access button.
Dialing Another Call You can place a call on hold to dial a new call,
On 3Com Business Telephones:
1 Press the Hold button.
2 Press one of the Access buttons that is currently not being used.
3 When you hear dial tone, dial the second call.
More Than One Call The number of simultaneous calls that you can have on your 3Com Telephone is limited by the number of Access buttons that are defined for your extension. The default is the bottom three buttons in the column of Access buttons on the left of the 3102 Business Telephone and the bottom three Access buttons in the column on the right on the 1102, 2102, or 2102-IR Business Telephones. Your administrator can verify the number and location on your telephone.
To place more than one call on hold on a 3Com Business Telephone:
1 To place the current call on hold, press the Hold button.
■ To make a call, press one of the Access buttons that is currently not being used. When you hear dial tone, dial the call.
■ To receive a call, locate the flashing status light that indicates the incoming call and press the associated Access button.
2 To place the new call on hold, press Hold.
3 To return to either call, press the appropriate Access button.
4 To place or receive another new call, repeat the previous steps.

58 CHAPTER 5: STANDARD FEATURES
Transferring a Call When you answer an incoming telephone call, the Transfer feature allows you to send that call from your telephone to any other internal line or, if your call permissions allow, to an outside line. To view your permissions, log in to NBX NetSet > User Information > Call Permissions. Your administrator can change your call permissions.
Announced(Screened) Transfer
Before you complete a transfer, you can announce to the recipient that you are transferring a call. The recipient can then decide whether to take the call. To announce a transfer:
1 While on a call, press the Transfer button. The system places the caller on hold and selects a new line.
2 Dial the number to which you want to transfer the call.
3 When the recipient answers, announce the call.
■ If the recipient wants to take the call, press Transfer again to complete the transfer. Hang up the handset.
■ If the recipient does not want to take the call, retrieve it by pressing the Access button on which the call originated.
Your administrator can disable Announced Transfers (by enabling the One Button Transfer feature) for the entire NBX system. When that setting is enabled, every time that you transfer a call, the call is transferred as soon as you dial the extension and hang up — without waiting for you to announce the call.
Blind Transfer In a blind transfer, you transfer the call without notifying the recipient:
1 While on a call, press the Transfer button. The system places the caller on hold and selects a new line.
2 Dial the number to which you want to transfer the call.
3 As soon as you hear a full ring, press the Transfer button and hang up. (If you press the Transfer button too soon after you dial the number, the transfer may not occur.)

Direct Mail Transfer 59
Direct Mail Transfer You can transfer a call directly into another user’s voice mailbox. The call does not ring on that user’s telephone.
Calls transferred to a user’s mailbox by means of Direct Mail Transfer are always directed into that user’s voice mailbox, even if the recipient has specified a different call coverage point.
On a 3Com Business Telephone:
1 While you are on a call, press the Access button assigned to Direct Mail Transfer.
2 Dial the extension of the person to whose voice mailbox you want to transfer the call.
3 Hang up the handset.
Establishing a Conference Call
You can establish a Conference Call with up to four parties, including yourself. You must be using a telephone on the NBX system to establish the call. The other three parties can be any combination of internal and external parties.
Follow these steps:
1 Dial a call, or receive a call from someone else. Two parties are now on the call.
2 While on the call, press the Conference button. The system selects a new line and places the first party on hold.
3 Dial a call to an internal or external third party.
■ For an announced conference, wait for the third party to answer the call. The second party remains on hold, and you may converse with the third party privately until you finish adding the third party. To add the third party, press the Conference button the second time.
■ For a blind conference, press the Conference button immediately after you dial the number. You return to the conference, and you and the second party hear the called party’s telephone ringing.
You can also use Feature + 430 to add another party to a conference.
If the third party answers, three parties are now in the conference call.

60 CHAPTER 5: STANDARD FEATURES
If the third party is internal and does not answer, the attempt to conference that party is cancelled. You cannot establish a conference call with an NBX user’s voice mailbox.
4 Repeat steps 2 and 3 to conference in a fourth party.
■ You can activate speaker phone operation during the conference call by pressing the Speaker button.
■ You can turn off the microphone or the mouthpiece on the handset by pressing the Mute or button. The other parties cannot hear you, but you can hear them.
■ For details about the Speaker and Mute features, see “Telephone Buttons and Controls” in Chapter 2 for the 3102 Business Telephone or “Telephone Buttons and Controls” in Chapter 3 for the 1102, 2102, and 2102-IR Business Telephones.
Disconnecting theLast Person
That You Called
Use the Conference Drop feature to disconnect the last person that you add to a conference call. This feature is helpful if, when you add a party, your call is answered by someone else.
■ Only the person who added the last caller to the conference call can drop that caller.
■ Your administrator can configure any Access button on a 3Com Telephone or the Attendant Console to be a Conference Drop button.
On a telephone that does not have a button programmed for Conference Drop:
1 Press Feature + 431.
2 The system returns you to the others who are in the conference call.
Setting the Volume 61
More AboutConference Calls
■ To place your part of a conference call on hold, press the Hold or button. The other parties can talk among themselves, but they cannot hear you. Music on Hold does not play when a conference call is on hold.
■ To transfer a conference call to another telephone, press the Transfer button. Dial the number to which you want to transfer the call, announce to the recipient (optionally) that you are transferring a conference call, and then press the Transfer button again.
■ All of the conferenced parties are transferred except yourself.
■ Your ability to drop the last person that you added to the conference is transferred to the person who accepts the transfer.
Setting the Volume On any 3Com Telephone, use the Volume Control buttons to raise or lower one of these volumes:
■ Ring Volume — To raise or lower the volume of the ring, press the up or down Volume Control button repeatedly while your telephone is ringing, until the volume is at the level that you prefer. To read how ringer volume is different from ringer tone, see “Ringer Tones” in Chapter 6.
■ Handset Volume — To raise or lower the volume of the dial tone or the sound that you hear when you are using the handset, pick up the handset and then press the up or down Volume Control button repeatedly until the volume is at the level that you prefer. You can change the handset volume during a conversation or by listening to the dial tone.
■ Speaker Volume — To raise or lower the volume of the sound that you hear when you are using the speaker phone for a conversation or just listening to the dial tone, press the Speaker button and then press the up or down Volume Control button repeatedly until the volume is at the level that you prefer.
■ Headset Volume — To raise or lower the volume of the dial tone or the sound that you hear on the headset, put on the headset and activate it as specified for your headset. When you hear the dial tone or during a conversation, press the up or down Volume Control button repeatedly until the volume is at the level that you prefer. See “Using a Headset” in Chapter 6.

62 CHAPTER 5: STANDARD FEATURES
6
PERSONALIZING YOUR TELEPHONEYour NBX® Networked Telephony System has many features that can make your telephone easier to use. This chapter describes:
■ Guidelines About Features on NBX Telephones
■ Ringer Tones
■ Speed Dials
■ Off-Site Notification
■ Do Not Disturb
■ Preventing Unauthorized Use of Your Telephone
■ Class of Service Override
■ Using a Headset
■ Palm Integration
For help on accessing NBX features from an analog telephone, see the NBX Feature Codes Guide below any screen in the NBX NetSet™ utility. For how to set up your NBX NetSet utility password for the first time, see Chapter 1.
If your system uses a messaging application other than NBX Messaging, use the documentation for your messaging application instead of these instructions.
Guidelines About Features on NBX Telephones
■ If your telephone does not have a button programmed for Feature, ask your administrator to program one.
■ Because your administrator determines whether some of the features that are described in this chapter are available for your telephone or for the entire system, some of these features may not be available to you.
64 CHAPTER 6: PERSONALIZING YOUR TELEPHONE
■ The settings on your telephone, including your extension, personal settings, and system settings, remain the same even when you move your telephone from one Ethernet jack to another, as long as both Ethernet connections are part of the same LAN.
■ Because your extension and personal settings are associated with your telephone, you cannot switch your telephone with another user’s telephone without first having your administrator reassociate your profile with the other telephone.
Ringer Tones To help you to distinguish the ring tone of your 3Com Telephone from the sound of other phones, use the NBX NetSet utility to select one of nine ringing tones. You can also choose Silent Ring to disable audible ringing.
To change the ringer tone:
1 Verify that your computer has a sound device (a USB headset or a sound card with either headphones or speakers).
2 Log in to NBX NetSet > Ringer Tones.
3 Click each of the nine Sample Ringer Tone buttons to hear the choices.
4 From the Ringer Tone Setting pull-down list, select the number of the tone that you want.
5 Click Apply.
When you choose Silent Ring, the status light or display panel icon flashes when a call arrives, but the telephone never rings. A headset attached to the headset connector of a 3102 Business Telephone also plays a tone audible only through the headset.
Speed Dials This section describes the types of speed dials:
■ Personal
■ System-wide
■ One-Touch
It also describes how you can print a list of speed dials. You can also print a set of labels for your telephone, showing which of your buttons are mapped to features and speed dial numbers.

Speed Dials 65
Personal Speed Dials You can create a list of up to 99 personal speed dials (using ID numbers 601 through 699) for your telephone. These speed dials are available only from the telephone for which they were created.
You create, view, and print your personal speed dial list using the NBX NetSet utility. You can view and dial a personal speed dial number using the telephone display panel of a 3Com Telephone.
Your first personal speed dial numbers appear on whichever of the Access buttons at the right of your 3Com Business Telephone are not used for other purposes.
The bottom 3 buttons on a 3Com Business Telephone are normally reserved for your extension. On a 3Com 3102 Business Telephone, by default, your extension appears on the bottom 3 buttons of the left column of 9 buttons. On the 1102, 2102, and 2102-IR Business Telephones, your extension appears by default on the bottom 3 buttons of the column of 12 buttons.
Your administrator may have mapped some of the buttons to features. See “Special Case: One-Touch Speed Dials” later in this chapter.
To assign or change a personal speed dial number:
1 Select NBX NetSet > Speed Dials > Personal.
2 In the Personal Speed Dials box, select an unassigned speed dial ID number, or select the speed dial ID number for which you want to change the speed dial number.
3 In the Destination Number text box, type the telephone number that you want the system to dial when you use that ID number.
Include all of the prefix numbers that you would normally dial, such as a 9 or 8 or 1 to access an outside line, and, if necessary, the country code or area code. Do not use spaces, hyphens, commas, or other nonnumeric characters.
4 In the Account Code box, type an account code if it is required or useful for calls to this destination.
5 In the Comment text box, type a brief description, usually a name, that corresponds to the number.
6 After you have made all of your changes to the personal speed dials, click Apply, and then click Close.
66 CHAPTER 6: PERSONALIZING YOUR TELEPHONE
To use a personal speed dial:
1 Pick up the handset. Or you can press the Speaker button.
2 Press the Feature button plus the 3-digit personal speed dial code for the number that you want to call. Or scroll to Personal Speed Dials on the display panel, press Slct, scroll to the number that you want to dial, and press Slct again.
If you dial a speed dial code that has no number assigned to it, the display panel on your telephone shows the message “No number stored.”
System-wideSpeed Dials
The administrator can set up to 100 system-wide speed dials (using ID numbers 700 through 799) for numbers that are dialed frequently by many internal users. You can view the system-wide speed dial list through the NBX NetSet utility. Or you can view and dial from it using the telephone display panel.
You can ask the administrator to map a system-wide speed dial ID number to one of the Access buttons on your telephone. See “Special Case: One-Touch Speed Dials” next.
To use a system-wide speed dial:
1 Pick up the handset. Or you can press the Speaker button.
2 Press the Feature button plus the 3-digit system-wide speed dial ID code for the number that you want to call. Or scroll to System Speed Dials on the display panel, press Slct, scroll to the number that you want to dial, and press Slct again.
If you dial a speed dial code that has no number assigned to it, the display panel on your telephone shows the message “No number stored.”
Special Case:One-Touch
Speed Dials
One-Touch speed dials use Access buttons.
In most circumstances, your administrator designates 3 Access buttons as extension lines to manage incoming and outgoing telephone calls.
■ 3Com 3102 Business Telephone — See item 1 in Figure 2 in Chapter 2.
■ 3Com 1102, 2102, and 2102-IR Business Telephones — See item 8 in Figure 4 in Chapter 3.

Speed Dials 67
Any of the remaining buttons that the administrator has not mapped to a feature or system-wide speed dial is available for a One-Touch speed dial.
Use either the One-Touch or the Personal speed dial screen to assign or change the One-Touch speed dial numbers on your telephone. If you make a change in one screen, it appears in the other screen. See “Personal Speed Dials” or follow these steps for the One-Touch screen.
To add or change a One-Touch speed dial on an available Access button:
1 Log in to NBX NetSet > Speed Dials > One Touch.
2 Any box that has an asterisk in the margin is available for a personal or system-wide speed dial. In any of the asterisked text boxes under Number, type the telephone number to which you want to assign a speed dial button. Or change the telephone number in a box that already has a speed dial number.
Include all of the prefix numbers that you would normally dial, such as a 9 or 8 or 1 to access an outside line, and, if necessary, the country code or area code.
To include an account code, include the feature code, account code, and # before the telephone number Example: [888]1234#9785551212. Do not use spaces, hyphens, commas, or nonnumeric characters other than # and brackets.
3 In the Description text box, type a brief description, usually a name that corresponds to the number.
4 After you have made all of your changes to the One-Touch speed dials, click Apply, and then click OK.
If you make a change in this screen, the change also appears in the Personal Speed Dials screen. See “Personal Speed Dials” earlier in this chapter.
PrintingSpeed Dial Lists
You may find it useful to have a paper list of personal or system speed dials. To print a list of speed dials:
1 Log in to NBX NetSet > Speed Dials > Personal or System-wide.
2 Click
3 A list appears with all of the personal or system-wide speed dial numbers that are allocated to your telephone.
4 Click Print to print the list.
68 CHAPTER 6: PERSONALIZING YOUR TELEPHONE
Printing Labels You can print labels that identify the numbers and features that are assigned to Access buttons on your telephone or attendant console using the LabelMaker in the NBX NetSet utility or on the NBX Resource Pack CD.
To print labels for your telephone or attendant console:
1 Log in to NBX NetSet > Speed Dials.
2 Choose Telephone Labels or Attendant Console Labels. Save the file to your choice of location on your PC, and then open the file to start the LabelMaker program.
3 Find the page in the LabelMaker that has labels for your telephone.
4 Edit the label template by clicking any of the label text boxes to highlight the existing text, and then typing new text.
5 Press Tab to move to the next text field in the label.
6 Click the Print button at the top of the LabelMaker screen to open the Print dialog. Be sure to specify which page you want to print. Typically, the default is to print all pages.
7 Click Print.
8 Cut out the labels and put them in the label holders of your 3Com Telephone or your Attendant Console.
9 To save the edited LabelMaker, click the Save button at the top of the LabelMaker screen. Or you can click File > Save As to save the LabelMaker to a new location.
To reuse your saved LabelMaker, you must run the file that you saved to your computer. If you download the LabelMaker from the NBX NetSet utility again, you get the default version, and the download might overwrite your saved LabelMaker. To create a Windows Desktop shortcut to your saved LabelMaker, right-click the saved file and then click Send To > Desktop (create shortcut).
Off-Site Notification
When you enable off-site notification, the NBX Messaging system notifies you by e-mail, pager, or telephone that you have received voice mail. You can then retrieve your messages. Off-site notification consists of one cycle of up to five attempts to reach you, one attempt for each Attempt row that you configure in the Off-Site Notification screen.

Off-Site Notification 69
If your system uses a messaging application other than NBX Messaging, use the documentation for your messaging application instead of these instructions.
To configure off-site notification for your NBX voice mailbox:
1 In NBX NetSet > NBX Messaging > Off-Site Notification, look for the System and Group columns in the upper right corner. If the columns show “Yes,” your system administrator has enabled off-site notification for the NBX system and for the Class of Service group to which your telephone belongs. If “No,” ask to have these features enabled.
2 Check Enabled.
3 If you want to be notified only about urgent voice mail messages, also check Urgent Messages Only.
4 In the first Attempt row, in the Method drop-down list, select Pager, VoiceMail, or EMail
The cycle of notice behaviors differs depending on the method that you specify for the first attempt. See “Notice Behaviors” later in this chapter.
5 In the Number/Address field:
■ If you selected Pager for Method in step 4:
■ Enter a pager number. Do not use parentheses, hyphens, or spaces. Ask your administrator if you need to include the area code and any other digits that your system needs to dial an outside number, such as 9, 8, 1, or 0. After you receive the pager message, you call in to your voice mailbox to listen to your messages.
■ In the Numeric Page field, indicate what you want the pager to display. Enter a series of digits, such as your telephone extension number.
■ If you selected VoiceMail for Method in step 4:
■ Enter the telephone number at which you want to be notified. Do not use parentheses, hyphens, or spaces. Ask your administrator if you need to include the area code and all other digits that your system needs to dial an outside number, such as 9, 8, 1, or 0.
When you choose to be notified by voice mail, the NBX system calls the number that you enter in this field. When you answer the call, the system announces the new voice message and allows you to follow the prompts to access your voice mailbox and listen to and delete any of your messages.
70 CHAPTER 6: PERSONALIZING YOUR TELEPHONE
■ If you selected EMail for Method in step 4:
■ Enter the e-mail address at which you want to be notified. You can use different e-mail addresses for different Attempts.
When you choose to be notified by e-mail message, the NBX system sends you an e-mail message for each voice mail message that you receive. The voice message may be attached to the e-mail message as a WAV file. See the tables in “Notice Behaviors” later in this section.
You can listen to the messages using your PC sound device (a USB headset or a sound card with either speakers or headphones).
If you delete the e-mail notice with its attached WAV file after you listen to the message, you delete only the copy. The original voice mail message remains in your NBX voice mailbox. You must log in to the NBX voice mail system by telephone or through the NBX NetSet utility to delete your messages.
6 From the Interval drop-down list box, select the number of minutes that you want the system to wait after each attempt before it moves to the next attempt.
The “best” time interval depends on the Attempt method that you choose. For instance, allow sufficient time after a Pager notification for the usual delay at your pager supplier.
7 Click Apply.
8 Repeat steps 4 through 7 to set up additional attempts if you want.
The cycle of notice behaviors differs depending on the method that you select for the first attempt. See “Notice Behaviors” at the end of this section.
9 You do not need to configure every Attempt row. When you have configured all of the Attempt rows that you want, click OK. The NBX Messaging tab appears.
10 Test your off-site notification settings by leaving yourself a voice mail message.
Additional Notes
■ You can use the same notification method for all five attempts, or any combination of methods.
■ If your voice mailbox is full and someone tries to leave you a voice mail message, the NBX system does not send you an e-mail notification.

Off-Site Notification 71
■ When you activate the Telephone Locking feature on your telephone, the NBX system sends you off-site notification messages only if the notification number (for example, your pager number) is a toll-free telephone number. See “Telephone Locking” later in this chapter.
Notice Behaviors
These tables explain how the cycle of notice behaviors depends on the method that you select for the first attempt. See the definitions as well as “Resetting the Off-Site Notification Cycle”.
■ If you specify EMail for the first attempt:
■ If you specify Pager or VoiceMail for the first attempt:
Attempt Method Notice Behavior
1 E-mail ■ You receive an e-mail notice for each voice message.
■ Each e-mail notice contains information about the voice message (like time of receipt and the number that called), and the voice message is attached as a WAV file.
and then you configure attempt:
2 through 5 as E-mail ■ You receive an additional e-mail notice for each voice message.
■ The second e-mail notice contains no information about the voice message (like time of receipt and the number that called) and no WAV file attachment.
2 through 5 as Pager ■ You receive a pager call for each voice message.
2 through 5 as VoiceMail ■ You receive a telephone call for each voice message. Follow the prompts to log in and listen to messages, or log in to the NBX NetSet utility.
Attempt Method Effect
1 Pager or Voice Mail
■ You receive a telephone call or pager call for only the first new voice message.*
and then you configure attempt:
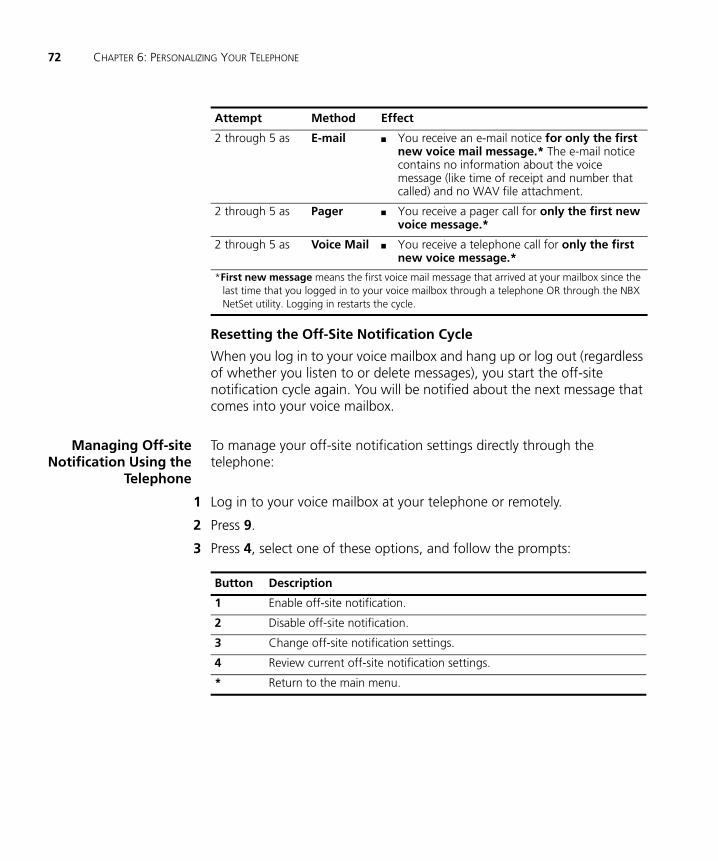
72 CHAPTER 6: PERSONALIZING YOUR TELEPHONE
Resetting the Off-Site Notification Cycle
When you log in to your voice mailbox and hang up or log out (regardless of whether you listen to or delete messages), you start the off-site notification cycle again. You will be notified about the next message that comes into your voice mailbox.
Managing Off-siteNotification Using the
Telephone
To manage your off-site notification settings directly through the telephone:
1 Log in to your voice mailbox at your telephone or remotely.
2 Press 9.
3 Press 4, select one of these options, and follow the prompts:
2 through 5 as E-mail ■ You receive an e-mail notice for only the first new voice mail message.* The e-mail notice contains no information about the voice message (like time of receipt and number that called) and no WAV file attachment.
2 through 5 as Pager ■ You receive a pager call for only the first new voice message.*
2 through 5 as Voice Mail ■ You receive a telephone call for only the first new voice message.*
*First new message means the first voice mail message that arrived at your mailbox since the last time that you logged in to your voice mailbox through a telephone OR through the NBX NetSet utility. Logging in restarts the cycle.
Attempt Method Effect
Button Description
1 Enable off-site notification.
2 Disable off-site notification.
3 Change off-site notification settings.
4 Review current off-site notification settings.
* Return to the main menu.

Do Not Disturb 73
Do Not Disturb When the Do Not Disturb feature is in effect, calls coming in to your telephone immediately go to your default call coverage point without ringing. You set the default call coverage point by logging in to NBX NetSet > User Information > Call Forward Default. See “Forwarding Incoming Calls” in Chapter 5.
If Call Forward All is in effect, it overrides Do Not Disturb. Calls go to the call coverage point defined for Call Forward All in NBX NetSet > User Information > Call Forward Override.
You can ask your administrator to map the Do Not Disturb feature to an available Access button on your 3Com Telephone, or you can use the Feature Code to enable and disable the feature.
When Do Not Disturb is in effect:
■ It overrides Call Forward No Answer, Call Forward Busy, and FWD MAIL.
■ Your telephone does not ring when it receives an incoming call.
The associated status light does flash when a call arrives.
■ You can use the telephone to dial outgoing calls.
■ You can use the telephone to dial internal and external pages.
■ a 3Com Business Telephone or 3Com Manager’s Telephone does not broadcast incoming paging messages over the speaker.
■ If your telephone is part of a call pickup group, no other telephone in the pickup group can retrieve a call that comes directly in to your telephone. The incoming call goes immediately to the call coverage point (voice mail, auto attendant, or other extension).
■ If your telephone is part of an ACD group, a hunt group, or a calling group, incoming calls to the group ring on your telephone. Calls coming in directly to your telephone (not directed to the group) do not ring on your telephone. To prevent every call from ringing, you must enable Do Not Disturb and also log out of the group.
To enable and disable Do Not Disturb using the feature code:
1 Pick up the handset and press Feature + 446.
2 Hang up. Your telephone is now in Do Not Disturb mode. The display panel on a 3Com Telephone shows DO NOT DISTURB.
74 CHAPTER 6: PERSONALIZING YOUR TELEPHONE
3 To disable Do Not Disturb mode, repeat steps 1 and 2. The DO NOT DISTURB message disappears from the display panel.
To view your current Do Not Disturb setting even if you do not have a 3Com Telephone or if you are away from your desk, log in to NBX NetSet > User Information > Feature Settings.
Preventing Unauthorized Use of Your Telephone
To prevent others from dialing long-distance or other unauthorized calls from your telephone permanently, ask your administrator to adjust the call permissions schedule for your extension, or you can adjust it temporarily with the Telephone Locking feature.
Telephone Locking To enable and disable the Locking feature using the feature code:
1 Pick up the handset and press Feature + 432. The display panel on a 3Com Telephone prompts you to enter your password.
2 Enter your password + # and hang up.
Your telephone is now locked. The display panel shows the Lock icon. It displays only the directory and system-wide speed dials.
3 To turn off this feature, repeat steps 1 and 2. The Lock icon disappears. Your call logs and personal speed dials are again available.
Additional Notes
■ When Telephone Locking is activated, a person using your telephone can dial only toll-free calls, calls to emergency services (such as 911 in the United States), or calls to telephone numbers that have been programmed in your system as “internal” calls.
■ Even when Telephone Locking is active on your telephone, your off-site notification choices remain in effect. That is, notification of voice mail messages is sent to the outside telephone numbers or paging numbers that you have specified in NBX NetSet > NBX Messaging > Off-Site Notification, even if these numbers are not toll-free.
■ You can view your current Telephone Lock setting by logging in to NBX NetSet > User Information > Feature Settings.

Class of Service Override 75
Call Permissions Your administrator establishes Call Permissions to control the types of calls that can be dialed from your telephone. The administrator can configure these permissions to change depending on the time of day. For example, your administrator can prevent long-distance calls from being dialed from your telephone outside of business hours.
To view your current call permissions, log in to NBX NetSet > User Information > Call Permissions.
Class of Service Override
The Class of Service Override feature allows you to apply the features of your own 3Com Telephone temporarily to another 3Com Telephone on the same local network.
Example:
■ The telephone in your organization’s conference room is configured so that long-distance telephone calls cannot be dialed from it. You may, however, need to place a long-distance call during a meeting. Using the Class of Service Override feature, you can apply the features of your own telephone to the conference room telephone for one call only and dial the call, assuming that your Call Permissions allow you to make long-distance calls from your own telephone.
If your system uses a messaging application other than NBX Messaging, use the documentation for your messaging application instead of these instructions.
To activate the one-call-only Class of Service Override from a 3Com Telephone:
1 Pick up the handset.
2 Press Feature + 433.
3 Dial your telephone extension and press #.
4 Dial your voice mailbox password and press #.
5 When you hear the dial tone, you can dial the call in the same way that you do from your own 3Com Telephone.
When you use Class of Service (CoS) Override, any reports that are generated on the NBX system indicate that the CoS features of your own 3Com Telephone were applied temporarily to the telephone on which you made the call.

76 CHAPTER 6: PERSONALIZING YOUR TELEPHONE
Using a Headset You can use a headset that has a microphone with any telephone on an NBX system.
■ For how to use a typical headset and amplifier with 3Com Telephones other than the 3Com Manager’s Telephone or 3102 Business Telephone, see “General Headset Instructions” later in this section.
■ For how to connect and use a headset with the 3Com Manager’s Telephone and 3102 Business Telephone, read the next section.
With the 3ComManager’s Telephone
and 3Com 3102Business Telephone
The 3Com Manager’s Telephone and 3Com 3102 Business Telephone have a headset jack located on the underside of the telephone on the left side.
To prepare the headset for all calls on the 3Com Manager’s Telephone and 3102 Business Telephone:
1 Plug the headset connector into the headset jack on the underside of the telephone. See Figure 12 in Appendix A for the location of the jack.
2 Press the Headset button. By default, this is the Access button just below the (Program) button at the top right corner of the telephone.
3 Verify that the indicator light beside the Headset button turns on.
To answer a call when you are using the headset:
1 Put the headset on. When a call comes in, press the System Appearance button beside the flashing light. You are connected to the call.
The handset can be either on hook or off hook.
To end a call when you are using the headset, press the Release button on the telephone. By default, the Release button is located at the bottom of the right column of Access buttons.
To configure a 3102 Business Telephone to ring through the headset and not on the telephone, set the ringer tone to Silent Ring. See “Ringer Tones” on page 64.
General HeadsetInstructions
For 3Com Telephones other than the 3Com Manager’s Telephone or 3102 Business Telephone, follow these instructions.
You may need to modify some of these instructions for some headsets or amplifiers. See the instructions that come with your equipment.

Using a Headset 77
To prepare a headset for all calls:
1 Insert the cord for the headset amplifier into the handset cord receptacle on the underside of the telephone.
2 Insert the cord for the telephone handset into the headset amplifier.
3 Put on the headset.
4 Pick up the telephone handset and set it on your desk.
To prepare a headset so that you can choose either the handset or the headset for each call:
1 Insert the cord for the headset amplifier into the handset cord receptacle on the underside of the telephone.
2 Insert both the headset cord and the handset cord into the headset amplifier.
3 For headset calls: Lift the handset off the telephone and leave it off. Use the headset microphone and earphones.
Even when the headset is plugged into the amplifier, you must remove the handset from the cradle to use the headset.
4 For handset calls: Press the button on the headset amplifier that turns the headset off, pick up the handset, and speak into it.
To manage calls when you are using the headset:
1 Put the headset on. When a call comes in:
■ If the handset is on hook, pick it up, set it on your desk, and begin to speak.
■ If the handset is off hook, press the System Appearance button beside the flashing light.
2 To end a call when you are using a headset:
■ On a 3Com Business Telephone, press the Release button, depress the hook switch, or hang up the handset.
Returning to theHeadset After a
Long Delay
Certain brands of headsets enter a power-saving mode that prevents the telephone from ringing for one or more calls when both of these circumstances are true:
■ The headset amplifier buttons for Mute and On are both set to On.
■ The handset is off the phone for a long time (for instance, overnight).
78 CHAPTER 6: PERSONALIZING YOUR TELEPHONE
It may take a few minutes for your headset to return from the power-saving mode to the active mode when calls first come in, so your telephone may not ring until the headset has returned to active mode, and you may miss a call.
If you plan to not use the headset for a long time (for instance, overnight), 3Com recommends that you set the mute and headset buttons on the amplifier to Off and hang up the handset on your telephone. When you are ready to receive calls again, set up the headset for receiving calls:
1 Pick up the handset on your telephone and set it on your desk.
2 Put on the headset. On the amplifier, set the headset button to On.
Using Hands Free Active on Intercom
You can use your phone as an intercom. You can answer internal (intercom) calls without picking up the handset. When you receive an internal call, your telephone sounds a tone and activates the speaker phone.
An external call (a call from outside your NBX system) rings to your telephone as usual.
To enable Hands Free Active on Intercom, press the Hands Free or the button before calls come in to your telephone. When the feature is enabled, the indicator is lit. To disable Hands Free Active on Intercom, press the Hands Free or the button again.
Palm Integration (3Com 2102-IR Business Telephone only) — The infrared port on the front edge of the 3Com 2102-IR Business Telephone receives infrared signals from a hand-held device that runs the Palm operating system. You can use your hand-held device to call numbers in its directory and to perform standard telephone operations, such as Forward, Redial, and Transfer.
Install the Palm Dialer software (available on the NBX Resource Pack CD) on your hand-held device. See your administrator for details.

7
GETTING MORE FROM YOUR TELEPHONE SYSTEMThis chapter covers these topics:
■ Listening to Your Messages in Your E-mail
■ Account (Billing) Codes
■ Caller ID
■ Call Pickup
■ Automatic Call Distribution Groups, Hunt Groups, and Calling Groups
■ Supervisory Monitoring
■ Call Park
■ Paging
■ Configurable Operators
■ Using Message Waiting Indicator to Telephone
■ Dialing a Call to a Remote Office
■ Bridged Extensions
■ Delayed Ringing
■ Using Pulse Dialing
■ Additional Applications
Security Note: Several of the features described in this chapter include configuring a telephone line to appear on more than one 3Com® Business Telephone or 3Com Manager’s Telephone. For any of these features, if one person is using a telephone line, no one else can listen in on that same line from a different telephone.
If your system uses a messaging application other than NBX® Messaging, use the documentation for your messaging application instead of the instructions in this chapter.
80 CHAPTER 7: GETTING MORE FROM YOUR TELEPHONE SYSTEM
For help on accessing NBX features from an analog telephone, see the NBX Feature Codes Guide in the NBX NetSet™ utility. For how to set up your NBX NetSet utility password the first time, see Chapter 1.
Listening to Your Messages in Your E-mail
You can listen to your voice mail from any computer that allows you to access your e-mail. Your e-mail software application must be IMAP-4 compliant, such as Microsoft Outlook. See your administrator for assistance with this feature.
If you configure your first off-site notification method to send you an e-mail message when you have voice messages, the NBX system sends each voice mail message as a sound-file attachment to an e-mail message. To listen to your messages using your computer, it must have a sound device such as a USB headset or a sound card with either speakers or headphones.
When you delete the e-mail message that contains the attached voice message, you are not deleting the voice message on the NBX system. To delete voice messages from the NBX system, you must access your voice mailbox through the telephone or the NBX NetSet utility.
See “Off-Site Notification” in Chapter 6 for a discussion of off-site notification behavior.
Account (Billing) Codes
Account Codes allow your administrator to track calls that are associated with an individual client or account. When you dial a call or when you answer your telephone, you dial a numeric account code that allows the NBX system to track time spent on the telephone with a client, perhaps to be associated with a billable account.
You may be forced to enter an account code for outgoing external calls. See NetSet > Personal Settings > User Information > Call Permissions to see if you are forced to enter an account code. See NetSet > Personal Settings > Account Codes for a list of public account codes.

Caller ID 81
To enter an account code for an outgoing external call:
1 Dial the phone number.
If an account code is required on a 3Com Entry Telephone or analog telephone, you hear silence as the system waits for the required account code.
If an account code is required on a 3Com Business, Basic, or Manager’s Telephone, the display panel prompts you for the required account code.
2 Press the # key.
3 Dial the account code that has been assigned by your administrator, and then press the # key.
The NBX system records the account code and completes the call:
■ The account name, if known, displays. If the account code is incorrect, you are prompted to enter it again.
■ On a 3Com Entry Telephone or analog telephone, if the account code is incorrect you may have to dial the phone number, press #, dial the correct account code, and press # again.
To enter an account code at any time before or during an incoming or outgoing call:
1 Press Feature + 888.
2 Dial the account code that has been assigned by your administrator, and then press the # key.
The NBX system records the account code and applies it to:
■ The next call, if you activate the Account Codes feature before a call arrives at your telephone
■ The current call, if you activate the Account Codes feature during a call
Caller ID Your administrator can set up your NBX system to allow for Internal and External Caller ID or can configure the system so that you can block your identity (telephone number) from anyone you call.
Internal and ExternalCaller ID
By default, the NBX system shows the extension and name of any internal caller on the display panel of your 3Com Telephone.

82 CHAPTER 7: GETTING MORE FROM YOUR TELEPHONE SYSTEM
External Caller ID provides the same information for external incoming calls if your organization subscribes to the service from your local telephone company and if the caller has not blocked the information from being sent to the NBX system.
Availability and service charges for External Caller ID vary by location.
Calling Line IdentityRestriction (CLIR)
On certain NBX systems, if your organization subscribes to Caller ID service from your local telephone company, you can choose to prevent the NBX system from transmitting your Caller ID information to outside parties when you dial a call. Your administrator must enable this feature, called Calling Line Identity Restriction (CLIR), on the NBX system. If this feature is enabled system-wide, you can choose to restrict calls:
■ For all external (outbound) calls that you dial
OR
■ For only the next single external (outbound) call that you dial
Your administrator can configure your system so that CLIR is always active, in which case you cannot change the CLIR settings on your telephone to override this option.
CLIR for All External Calls
To enable CLIR-All for all calls from your telephone:
1 Pick up the handset, and press Feature + 889. The display panel on your 3Com Telephone shows CLIR-ALL on.
2 Dial the number that you want to call.
The NBX system does not send caller ID information on this call or any future calls until you disable this feature.
To disable CLIR-All:
1 Pick up the handset.
2 Press Feature + 889 again. CLIR-ALL off appears briefly in the display panel and then disappears when you hang up the handset.
To view your current CLIR-All setting, log in to NBX NetSet > User Information > Feature Settings.
Call Pickup 83
CLIR for Next External Call Only
To enable CLIR for only the next call from your telephone:
1 Pick up the handset.
2 Press Feature + 890. The telephone display panel shows CLIR-NEXT on.
3 Dial the number that you want to call.
4 When you disconnect the call, the CLIR feature is no longer in effect. CLIR-NEXT on disappears from the display panel.
If you hang up the handset without making a call, the CLIR-NEXT feature remains active and will apply to the next external call that you make. If you are unsure about whether CLIR-NEXT is active, pick up the handset, press Feature + 890, and read the status message in the display panel of your telephone.
Call Pickup Use the Call Pickup feature to answer a call that is ringing on another telephone. This feature is best arranged in advance when you and another user know that it would be convenient or necessary to answer calls ringing on that user’s telephone.
You can answer a call that is ringing on another telephone only if you and that user both are members of the same Call Pickup group or if that user is a member of a Call Pickup group that allows “nonmember pickup.” Your administrator configures call pickup groups and can tell you which group you belong to.
To view the list of Call Pickup groups of which you are a member:
1 Log in to NBX NetSet > User Information > Call Pickup.
2 Select the group number that you want to view from the Group List, and click Details to list the members of that group.
Directed Call Pickupon a Specific
Telephone
You can answer a call that is ringing on a specific user’s telephone.
Using the feature code:
1 Pick up the handset.
2 Press Feature + 455 and the user’s extension. The call is directed to your telephone.
84 CHAPTER 7: GETTING MORE FROM YOUR TELEPHONE SYSTEM
Using One-Touch Pickup:
1 Pick up the handset.
2 Press the Access button that your administrator has assigned to Pickup Ext.
3 Dial the extension number of the ringing telephone.
Group Call Pickup You can answer a call that is ringing on a group member’s telephone.
Using the feature code:
1 Pick up the handset.
2 Press Feature + 456 and the group number. The call is directed to your telephone.
Using One-Touch Pickup:
1 Pick up the handset.
2 Press the Access button that your administrator has assigned to Pickup Group.
3 Dial the group number.
Automatic Call Distribution Groups, Hunt Groups, and Calling Groups
Your administrator can establish formal and informal call centers so that incoming calls can be directed to several telephones that have been associated into automatic call distribution groups, hunt groups, or calling groups.
A call center is a general term that refers to any system that accepts incoming calls to a site and ensures that those calls are sent to the proper destination within the site. The call center can be used, for example, as a help desk, a reservations counter, an information hotline, or a customer service center.
If you do not answer, calls that come in to your telephone:
■ Through your extension go to the call coverage point that you have set up.
■ Through an automatic call distribution group, hunt group, or calling group follow the call coverage path set up by the administrator for that group.
Automatic Call Distribution Groups, Hunt Groups, and Calling Groups 85
Automatic CallDistribution
Automatic Call Distribution (ACD) distributes calls to agents and queues the calls that have not been answered before a predetermined time expires. The ACD also manages prerecorded announcements to callers, manages individual ACD agents and groups of agents, and provides database reports on both calls and agents.
Calls coming into ACD are distributed according to rules configured by the administrator. An agent becomes available to receive ACD calls by logging in to the ACD group.
To log in to an ACD group using your 3Com Telephone:
1 Pick up the handset.
2 Press Feature + the feature code for the ACD group. Your administrator can tell you which feature code to use.
3 Dial the ACD group password. Your administrator can tell you which password to use.
4 Press # and hang up.
To log out of an ACD group using your 3Com Telephone:
1 Pick up the handset.
2 Press Feature + the feature code for the ACD group.
3 Dial the ACD group password.
4 Press # and hang up.
Your administrator can configure an ACD group to an Access button. To log in to or to log out of the ACD group, press the specified Access button. The indicator next to the button lights to show that you are logged in. Your administrator can configure whether you are allowed to log out or not.
To log in to an ACD group using the NBX NetSet utility:
1 Log in to NBX NetSet > User Information > ACD Groups.
2 Select the ACD group to log in to.
3 Click Log In, and then click Close.
If you log in to an ACD group and do not answer a call when it rings on your telephone, the system may log you out of the group depending on how the administrator has configured the group.

86 CHAPTER 7: GETTING MORE FROM YOUR TELEPHONE SYSTEM
To log out of an ACD group using the NBX NetSet utility:
1 Log in to NBX NetSet > User Information > ACD Groups.
2 Select the ACD group to log out of.
3 Click Log Out, and then click Close.
Viewing ACD User Status
NBX NetSet > User Information > ACD Groups shows each ACD group that you are a member of. Click each column heading to arrange the information in ascending or descending order.
■ Ext. — Shows the extension number of the ACD group.
■ ACD Group Name — Shows the name of the ACD group.
■ Queue — Shows the number of calls to this ACD group currently in the queue.
■ Answered — Shows the number of calls that have been answered by this ACD group since NBX system startup.
■ Status — Shows whether you are currently logged in or out of the ACD group.
■ State — Shows whether your extension has been locked in to the ACD group. If your extension has been locked into the ACD group, only the administrator can log you out. If your extension is not locked into the ACD group, you can log yourself out.
You can also perform the following actions:
■ Select All — Select for an action all ACD groups of which you are a member.
■ Log In — Log in to the selected ACD group (or groups).
■ Log Out — Log out from the selected ACD group (or groups).
■ Detail — Opens the ACD Groups - Status Details screen, which provides information about a selected group.
Viewing ACD Group Status Details
Click Detail in NBX NetSet > User Information > ACD Groups to show more detailed information about the agents of this ACD group. Click each column heading to arrange the information in ascending or descending order.

Automatic Call Distribution Groups, Hunt Groups, and Calling Groups 87
■ Ext. — Shows the extension number of each agent in the group
■ First Name — Shows the first name of each agent
■ Last Name — Shows the last name of each agent
■ Rank — Shows the order in which calls are routed to agents in the group
■ Status — Shows whether each agent is currently logged in or out of the ACD group
■ State — Shows which agents’ extensions have been locked in to the ACD group
Hunt Groups Incoming calls ring to one member of the hunt group. If that member’s telephone is in use, or if that member does not answer the call, the system “hunts” for another member of the group until the call is answered or is forwarded to the group call coverage point. For example, if there are no available members of the hunt group, the call might be forwarded to a group mailbox or to the receptionist. Figure 5 shows the path of a call coming into a hunt group.
Figure 5 Sample Hunt Group Configuration
1 Incoming Telephone Call
2 Telephone #1
3 Telephone #2
4 Telephone #3
5 Group Voice Mailbox
88 CHAPTER 7: GETTING MORE FROM YOUR TELEPHONE SYSTEM
Hunt groups can be static or dynamic:
■ If you are in a static hunt group, you are always part of that group along with the other group members.
■ If you are in a dynamic hunt group, you must log in to the group to be part of it.
To log in to a dynamic hunt group using your 3Com Telephone:
1 Pick up the handset.
2 Press Feature + the feature code for the hunt group. Your administrator can tell you which feature code to use.
3 Dial the hunt group password and press #. Your administrator can tell you which password to use.
To log out of a dynamic hunt group using your 3Com Telephone:
1 Pick up the handset.
2 Press Feature + the feature code for the hunt group.
3 Dial the hunt group password.
4 Hang up the telephone.
Your administrator can configure a hunt group to an Access button. To log in to or to log out of the hunt group, press the specified Access button. The indicator next to the button lights to show that you are logged in.
To log in to a dynamic hunt group using the NBX NetSet utility:
1 Log in to NBX NetSet > Hunt Groups.
2 Select the hunt group to which you want to log in.
3 Click Log In, and then click Close.
If you log in to a dynamic hunt group and do not answer a call when it rings on your telephone, the system may log you out of the group depending on how the administrator has configured the group.
To log out of a dynamic hunt group using the NBX NetSet utility:
1 Log in to NBX NetSet > Hunt Groups.
2 Select the hunt group from which you want to log out.
3 Click Log Out, and then click Close.

Automatic Call Distribution Groups, Hunt Groups, and Calling Groups 89
To log in to all hunt groups of which you are a member:
1 Log in to NBX NetSet > Hunt Groups.
2 Click the Login all button.
To log out of all hunt groups of which you are a member:
1 Log in to NBX NetSet > Hunt Groups.
2 Click the Logout all button.
Calling Groups One type of hunt group is the Calling Group. Calling groups allow an incoming call to ring simultaneously on all telephones in a group, for example, a customer service group. To log in to or out of a calling group, follow the steps in “Hunt Groups” earlier in this chapter.
Figure 6 shows the path of a call coming in to a calling group.
Figure 6 Sample Calling Group Configuration
Group Membership To view the list of users that belong to a group:
1 In NBX NetSet > User Information > Hunt Groups, select a group.
2 Click Details.
1 Incoming Telephone Call
2 Telephone #1
3 Telephone #2
4 Telephone #3
5 After a specified number of rings with no answer
6 Receptionist
6

90 CHAPTER 7: GETTING MORE FROM YOUR TELEPHONE SYSTEM
Supervisory Monitoring
Supervisory monitoring is typically used in call centers to allow supervisors to join a conversation between an agent and a customer to ensure proper customer support. The supervisor’s presence may or may not be announced to the agent or customer by a tone. Supervisory monitoring can be used only with incoming calls to Automatic Call Distribution Groups and Hunt Groups. Other calls to and from the agent’s telephone are unavailable to the supervisor. The supervisor must provide a password to access the agent’s extension during these calls.
Your organization may be legally required to add an announcement to tell callers that their call may be monitored.
Agents — must be logged in as members of an ACD or Hunt Group. Anyone, however, who picks up a call that comes through an ACD or Hunt Group may be monitored like an agent. This includes people who take a transferred call or answer one with call pickup.
Supervisors — are people using the supervisory monitoring password to monitor the ACD or Hunt Group. A call could be forwarded through more than one group; the supervisor must provide the password of the most recent group. The supervisor must use a 3Com Telephone with a display panel and appropriate soft buttons, not a 3Com Entry Telephone, 3Com Cordless Telephone, 3Com 2101 Basic Telephone, or an analog telephone.
Customers — are people who make an incoming call to an ACD or Hunt Group number. It can be an internal or external caller.
Monitor — allows the supervisor to listen to a call.
Whisper — allows the monitoring supervisor to speak to the agent without the customer hearing.
Barge-In — allows the supervisor to speak to both the agent and the customer.
Monitor Monitor (also called Silent Monitor) allows an authorized supervisor to listen to calls that come in to an agent through an ACD or Hunt Group. The administrator configures the NBX system to specify whether a tone audible to the agent plays when the supervisor joins to monitor the call.
Supervisory Monitoring 91
To monitor an agent’s ACD or Hunt Group call:
1 Pick up the handset.
2 Press Feature + 425. Or press the Access Button if one is configured for Monitor.
The display panel prompts you for the ACD or Hunt Group extension number.
3 Enter the ACD or Hunt Group extension number. Press the OK soft button or press #.
The display panel prompts you for the supervisory monitoring password for that ACD or Hunt Group.
4 Enter the password. Press OK or #.
The display panel prompts for the extension number of the agent.
5 Enter the extension number. Press OK or #.
■ You join the call, either silently or with a tone announcing the call to the agent depending on system configuration.
■ Your display panel now shows options to Whisper, Change Agent, or Barge-In.
■ Only the supervisor’s display panel indicates that supervisory monitoring is in use.
Whisper Whisper (also called Coaching) allows a supervisor to speak to the agent during a monitored call without the customer hearing this advice. The administrator configures the NBX system to specify if a tone audible to the agent is played when the supervisor enables Whisper.
To use Whisper or Barge-In, a supervisor must first be monitoring the call.
To whisper to an agent:
1 Monitor the ACD or Hunt Group call.
2 Press the soft button to select Whisper from the display panel.
■ Whisper is enabled for you, either silently or with a tone announcing the change, depending on system configuration.
■ Your display panel now provides options to Monitor, Change Agent, or Barge-In.
92 CHAPTER 7: GETTING MORE FROM YOUR TELEPHONE SYSTEM
Barge-In Barge-In allows a supervisor to speak to both the agent and customer during a monitored call. The administrator configures the NBX system to specify whether a tone audible to the agent and customer is played when the supervisor enables Barge-In.
To use Whisper or Barge-In, a supervisor must first be monitoring the call.
To barge in to a call:
1 Monitor the ACD or Hunt Group call.
2 Press the soft button to select Barge-In from the display panel.
■ Barge-In is enabled for you, either silently or with a tone announcing the change, depending on system configuration.
■ Your display panel now provides options to Monitor, Change Agent, or Whisper.
Change Agent While supervisory monitoring is enabled on a call, a supervisor can change the agent being monitored.
To monitor a different agent in the same ACD or Hunt Group:
1 Monitor the ACD or Hunt Group call.
2 Press the soft button to select Change Agent.
The display panel prompts you for the extension number of the agent.
3 Enter the extension number of the agent and select OK or press #.
■ You begin to monitor the call, either silently or with a tone announcing the call to the agent depending on system configuration.
■ Your display panel now provides options to Whisper, Change Agent, or Barge-In.
Interactions ■ A supervisor can monitor a call, put it on hold, and monitor a second call. A supervisor can invoke supervisory monitoring on only two calls (one active and one on hold) at a time.
■ If a customer or agent conferences in an additional caller, or transfers, parks, or sends a call to voice mail, a supervisor monitoring the call is dropped from the call.
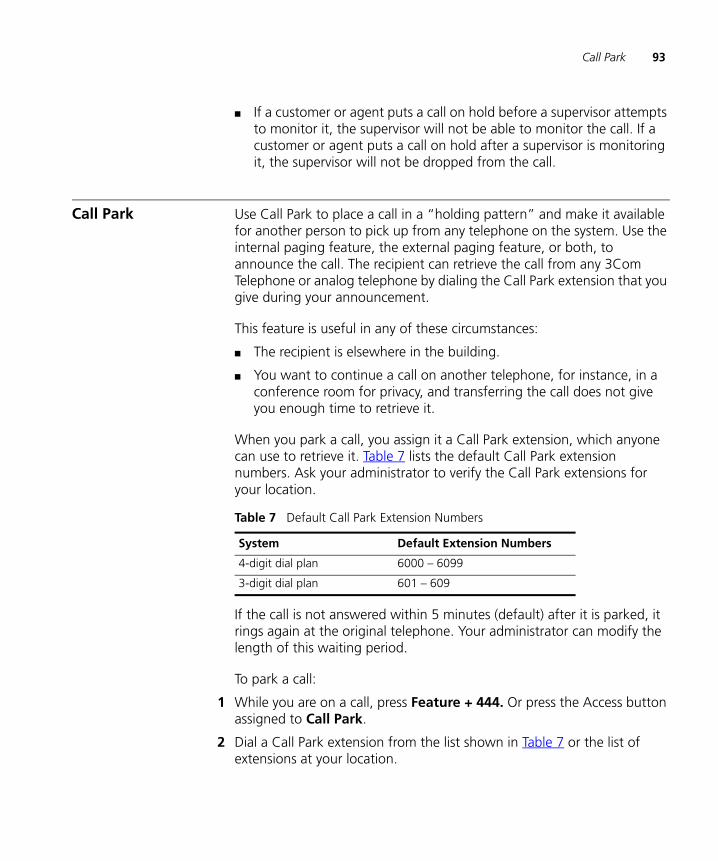
Call Park 93
■ If a customer or agent puts a call on hold before a supervisor attempts to monitor it, the supervisor will not be able to monitor the call. If a customer or agent puts a call on hold after a supervisor is monitoring it, the supervisor will not be dropped from the call.
Call Park Use Call Park to place a call in a “holding pattern” and make it available for another person to pick up from any telephone on the system. Use the internal paging feature, the external paging feature, or both, to announce the call. The recipient can retrieve the call from any 3Com Telephone or analog telephone by dialing the Call Park extension that you give during your announcement.
This feature is useful in any of these circumstances:
■ The recipient is elsewhere in the building.
■ You want to continue a call on another telephone, for instance, in a conference room for privacy, and transferring the call does not give you enough time to retrieve it.
When you park a call, you assign it a Call Park extension, which anyone can use to retrieve it. Table 7 lists the default Call Park extension numbers. Ask your administrator to verify the Call Park extensions for your location.
If the call is not answered within 5 minutes (default) after it is parked, it rings again at the original telephone. Your administrator can modify the length of this waiting period.
To park a call:
1 While you are on a call, press Feature + 444. Or press the Access button assigned to Call Park.
2 Dial a Call Park extension from the list shown in Table 7 or the list of extensions at your location.
Table 7 Default Call Park Extension Numbers
System Default Extension Numbers
4-digit dial plan 6000 – 6099
3-digit dial plan 601 – 609
94 CHAPTER 7: GETTING MORE FROM YOUR TELEPHONE SYSTEM
If you select a Call Park extension that is already in use, Park Cancelled appears on the display panel on your 3Com Telephone, and the call rings back to your telephone. Try another Call Park extension.
To notify another user about the parked call:
■ From 3Com Business Telephones, select an Access button that is assigned for placing telephone calls, and dial the user’s extension, or use the paging feature. See “Paging” next for details.
To retrieve a parked call:
1 Pick up the handset of any telephone on the system.
2 Dial the Call Park extension that was assigned to the call.
Paging Paging is the general term used to describe the act of broadcasting a voice message through audio speakers.
You can:
■ Page all extensions with speakers on the system
This method uses default codes in Table 8.
■ Page a subset of all extensions on the system, called a zone.
This method uses extensions that the administrator configures for this purpose.
Each method allows you to broadcast a message to different destinations, depending on your location and equipment.
Do not press the Feature button before you dial the Paging code.

Paging 95
Paging the System When you page the system, you broadcast a message to all internal extensions with speakers, to a Public Address (PA) system, or to both simultaneously. Paging codes, as described in Table 8, have default values for each destination.
To page, perform the following steps using your 3Com Telephone:
1 Pick up the handset.
2 Dial the appropriate paging code on your system.
3 Speak the broadcast message into your handset and hang up.
Paging Zones A page zone is a subset of internal extensions to which you can direct a broadcast using a configured extension. You can page a zone, a P.A. system, or both the zone and the P.A. system simultaneously. Zone extensions are configured by the administrator.
To discover the page zone extensions on your system:
1 Log in to NBX NetSet > Personal Information > User Information > Page Zones.
The NetSet utility lists the existing page zones and their extension numbers.
2 Click Details to list the members of each zone.
Table 8 Paging Codes
Feature3-digit dial plan(default codes)
4-digit dial plan(default codes)
External Paging
Broadcast an announcement over a public address system that has a paging amplifier and speaker system that is connected to your NBX system
620 6200
Internal Paging
Broadcast an announcement through the speakers on all NBX Telephones with speakers on your system except those that have been set to Do Not Disturb.
621 6201
Simultaneous Paging
Broadcast an announcement externally and internally at the same time.
622 6202

96 CHAPTER 7: GETTING MORE FROM YOUR TELEPHONE SYSTEM
You can view zone memberships only if the administrator authorizes you to do so.
To page a zone, a P.A. system, or both, perform the following steps using your 3Com Telephone:
1 Pick up the handset.
2 Dial the appropriate extension to page the zone.
3 Speak the broadcast message into your handset.
4 Hang up.
3Com Cordless Telephones, 3Com Entry Telephones, and analog telephones can initiate but cannot receive a zone page.
Configurable Operators
The Configurable Operators feature gives a caller who is directed to voice mail the option of going to another destination.
You can configure your own operators for those who call your extension (if the administrator allows it), and you can also use this feature as a caller to another device.
How ConfigurableOperators Work
Following is a brief description of how the system directs a caller from your voice mail to operators that you designate:
1 If you do not answer a call, the system invokes your voice mail.
2 The caller listens to your prerecorded voice mail message, which includes the instruction to press an access digit (0 or 9) in order to reach the appropriate operator.
When you employ a configurable operator, you must re-record your personal voice mail greeting to tell callers that an operator is available to them if they press the appropriate access digit during the voice mail greeting.
3 The caller presses 0 or 9.
4 The call is redirected to the operator that you designated.
The caller can leave a message, and then press 0 or 9 to transfer to a configured operator.
Configurable Operators 97
Configuring theOperators
You can view the operators’ settings, and modify those settings if your administrator allows it.
The operator’s call-handling rules (such as call coverage) may apply to the voice mail caller. Also, you must have external-to-external permissions in order for transfers to external phone numbers to complete successfully.
If you or the administrator do not configure operator destinations, the system directs an operator-bound caller to extension 501.
Viewing Your Operator Permissions
To find out if you have permission to configure operators:
1 Log on to NetSet > User Information > Call Permissions.
Your current permissions to configure the System Operator and the Personal Operator appear in the User Information window.
Configuring the Operator Destinations
To configure your own destinations for System and Personal Operator:
1 Log on to NetSet > NBX Messaging > Personal Operators.
The current System Operator and Personal Operator extensions and access digits appear. If the administrator has given you the appropriate configuration permissions, the extensions appear in editable text boxes.
2 Edit the destinations to include the appropriate extensions.
The operator destination text string cannot exceed 16 characters.
3 Click Apply to make the changes and keep this screen open, or click OK to make the changes and close the screen.
If you clear an operator destination (using the Clear check box), calls directed to that operator are directed instead to the default system operator (extension 501).

98 CHAPTER 7: GETTING MORE FROM YOUR TELEPHONE SYSTEM
Using Message Waiting Indicator to Telephone
The Message Waiting Indicator (MWI) to Telephone allows a user to light a status button next to a programmable access button and leave a call back number on another telephone. This feature is distinct from voice mail in that the telephone does not ring and there is no voice mail message. The light appears next to the Access button, not the message waiting light used for voice mail. Example: A principal can use this feature to notify a teacher, without interrupting the class, to call the office as soon as possible.
Sending an MWIMessage
You can send an MWI message to any telephone on your NBX system that has an MWI Retrieve button enabled. Sending an MWI message turns on the light on the target telephone if it is not already lit, and leaves your telephone number as a callback number.
You cannot send an MWI message to:
■ Telephones that do not have an MWI Retrieve button enabled or that have reached their MWI message limit (30)
■ Remote NBX systems over external line
■ Calling Groups, Hunt Groups, or ACD Groups
To send an MWI message:
1 Pick up the handset, and press Feature + 412. Or press the MWI to Ph Send access button. The display panel on your 3Com Telephone shows Send MWI To:.
2 Dial the extension that you want to call and press #.
3 The display panel on your 3Com Telephone shows Success.
Retrieving an MWIMessage
To receive and retrieve an MWI message, you must have a 3Com Telephone with a display panel and a programmable access button with status light configured (by your administrator) for MWI Retrieve. Your administrator can also configure additional buttons for MWI To Ph Send and MWI Cancel.
An analog telephone cannot receive an MWI message.
When the light is lit on your telephone, you can press the MWI Retrieve button, scroll through your display panel to see the caller ID, and return the call. When you press the MWI Retrieve button, you turn off the MWI light. You may still have one or more calls in a list to return.

Using Message Waiting Indicator to Telephone 99
To retrieve an MWI number:
1 Pick up the handset and press the MWI Retrieve access button. The display panel shows the total number of MWI messages and the number of new MWI messages on your list.
2 Scroll down the display panel to see the extension for the most recent MWI sender. The most recent call is at the top of the list.
3 Press the Call soft button to call the sender.
You can also retrieve an MWI message with Feature + 414.
Deleting MWIMessages
Press the MWI Retrieve button to turn off the MWI light until you receive another MWI message. It does not delete the MWI message. Messages remain in your list until you explicitly delete them or until the NBX system is rebooted. Your telephone can store a maximum of 30 MWI messages. When it is full, it will reject new messages, so be sure to delete unneeded messages.
To delete all MWI messages:
1 Press the MWI Retrieve access button. The display panel shows the number of MWI messages on your list and the options to Delete All or Exit.
2 Press the Delete All soft button.
3 The display panel asks you to confirm the delete of the whole MWI list. Press the Yes soft button.
To delete a single MWI message:
1 Press the MWI Retrieve access button. The display panel shows how many MWI messages are on your list.
2 Scroll down the display panel to see the MWI message you want to delete.
3 Press the Delete soft button.
4 The display panel asks you to confirm the delete of the entry. Press the Yes soft button.
Cancelling an MWIMessage
After you have sent an MWI message, you can cancel it and remove it from the list on the target telephone. If it is the only unattended MWI message on the target telephone, cancelling it turns off the MWI light.

100 CHAPTER 7: GETTING MORE FROM YOUR TELEPHONE SYSTEM
You can cancel an MWI message only from the same extension from which you sent the MWI message.
To cancel an MWI message:
1 Pick up the handset and press Feature + 413. Or press the MWI Cancel access button. The display panel on your 3Com Telephone shows Cancel MWI To:.
2 Dial the extension to which you sent the MWI message that you want to cancel and press #.
3 The display panel on your 3Com Telephone shows Cancel Sent.
Dialing a Call to a Remote Office
You can dial calls between sites in your organization that are separated geographically but that are linked by a Wide Area Network (WAN) connection. Each site must have an NBX system. Typical configurations are described in the next sections.
Using UniqueExtensions
In the sample network shown in Figure 7, everyone in the entire organization has a unique telephone extension. Whenever you make a call to an extension that is not located at your own site, your NBX system sets up a connection to the NBX system at the other extension’s site.
In this example, to call a user in Dallas, a user in Chicago dials a Dallas extension (3000 through 3999). The dial plan on the Chicago NBX system sets up the necessary connection to the Dallas NBX system and then to the extension at that site.

Dialing a Call to a Remote Office 101
Figure 7 Using Unique Extensions to Dial Remote Offices
Using Site Codes If some users have overlapping telephone extensions, your administrator can configure your telephone system to use site codes for you to dial people at remote offices. Your administrator chooses the site codes for your system. In this example, you dial a site code first, followed by the extension at the site.
For example, as shown in Figure 8, to call someone in Atlanta, a user in Chicago dials the site code 62 and then the appropriate extension (1000 through 3999). To reach a user in Dallas, a user in Chicago dials 63 and then the appropriate extension (1000 through 3999). The site code prevents conflicts between the remote extension number and a duplicated extension number at the local site (Chicago).
1 NBX System in Chicago
Extensions: 1000–1999
2 Wide Area Network (WAN)
3 NBX System in Atlanta
Extensions: 2000–2999
4 NBX System in Dallas
Extensions: 3000–3999
1 3
4
2
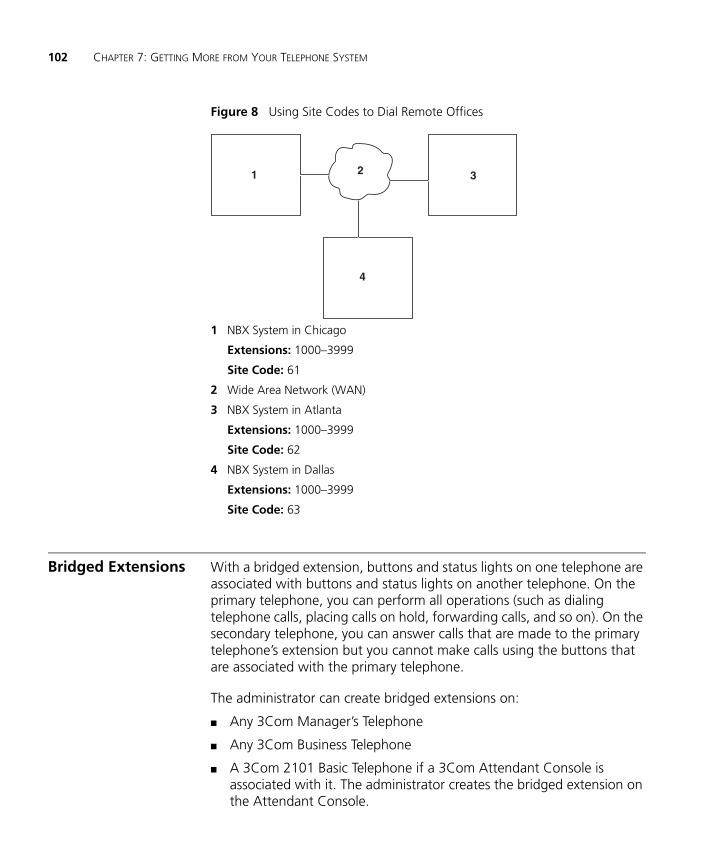
102 CHAPTER 7: GETTING MORE FROM YOUR TELEPHONE SYSTEM
Figure 8 Using Site Codes to Dial Remote Offices
Bridged Extensions With a bridged extension, buttons and status lights on one telephone are associated with buttons and status lights on another telephone. On the primary telephone, you can perform all operations (such as dialing telephone calls, placing calls on hold, forwarding calls, and so on). On the secondary telephone, you can answer calls that are made to the primary telephone’s extension but you cannot make calls using the buttons that are associated with the primary telephone.
The administrator can create bridged extensions on:
■ Any 3Com Manager’s Telephone
■ Any 3Com Business Telephone
■ A 3Com 2101 Basic Telephone if a 3Com Attendant Console is associated with it. The administrator creates the bridged extension on the Attendant Console.
1 NBX System in Chicago
Extensions: 1000–3999
Site Code: 61
2 Wide Area Network (WAN)
3 NBX System in Atlanta
Extensions: 1000–3999
Site Code: 62
4 NBX System in Dallas
Extensions: 1000–3999
Site Code: 63
1 3
4
2
Delayed Ringing 103
Example:
If an assistant’s job is to answer a manager’s telephone calls, the administrator can map the manager’s extension on the assistant’s telephone. The manager’s telephone is the primary telephone, and the assistant’s telephone is the secondary telephone.
Your administrator can map a primary telephone’s extension to one or more secondary telephones.
Delayed Ringing (3Com Business Telephone, 3Com Manager’s Telephone, and Attendant Console only) The Delayed Ringing feature prevents a call on a shared line from ringing on a specific telephone until the incoming call rings on another telephone for a specified number of times.
A shared line can be a bridged extension or an incoming analog telephone line that is mapped to more than one telephone.
Example:
The administrator programs (maps) a telephone extension to appear on both a manager’s telephone and the assistant’s telephone; that is, it is a bridged extension. The administrator has also enabled the Delayed Ringing feature on the manager’s telephone and has specified 4 rings (a typical setting).
When a call comes in to the manager on that extension, the assistant’s telephone rings 4 times before the call audibly rings on the manager’s telephone. Even during the first silent rings, the line’s status light on the manager’s telephone flashes, allowing the manager to answer the call if required.
Using Pulse Dialing In some locations, analog telephone users must dial telephone calls using pulse dialing instead of tone dialing (also called Dual Tone Multi Frequency, or DTMF, dialing).
Your administrator must configure the Analog Line Card ports for pulse dialing.

104 CHAPTER 7: GETTING MORE FROM YOUR TELEPHONE SYSTEM
Examples:
■ Some of your telephone lines are provided by a telephone company that supports only pulse dialing while other lines are provided by a different telephone company that supports DTMF dialing.
■ Your organization’s telephone service provider offers low-cost, pulse-dialing-only service.
■ In some situations, you must switch to DTMF dialing during a call. For example, if your call is answered by an automated attendant that requires that you enter information from your telephone keypad, you must typically enter the information using DTMF dialing.
To change from pulse dialing to DTMF during a call:
1 Press Feature + 891.
2 Your connection is switched from pulse to tone (DTMF) for the remainder of the call. When you hang up, the port you were using on the Analog Line Card reverts to pulse dialing mode.
Your administrator can map a button on your telephone so that you can press the button to change from pulse dialing to DTMF during a call. When you hang up, the port that you were using on the Analog Line Card reverts to pulse dialing mode.
You can configure a personal speed dial in the NBX NetSet utility to dial a number in pulse dial mode and then to switch to DTMF. Use the left angle-bracket character (<) in the NBX NetSet utility as the command to switch to DTMF mode. You can also include the digits that you want the system to dial after it switches to DTMF. The system dials any digits after the < using DTMF tones. When you hang up, the port that you were using on the Analog Line Card reverts to pulse dialing mode.
For additional information about programming speed dials, see “Personal Speed Dials” in Chapter 6.

Additional Applications 105
Additional Applications
These software applications are available on the NBX Resource Pack CD:
■ NBX Call Reports *
■ NBX TAPI Service Provider (NBXTSP)
■ NBX Desktop Call Assistant *
■ Complement Attendant Software *
■ Palm Dialer
■ pcXset™ Soft Telephone *
■ NBX Media Driver
* Applications with a * have been tested with Windows XP Home Edition and Windows XP Professional Edition.

106 CHAPTER 7: GETTING MORE FROM YOUR TELEPHONE SYSTEM

8
FEATURE CODESThis chapter describes how to use feature codes with the 3Com® Telephones. It covers these topics:
■ NBX Tones
■ Feature Codes with 3Com Telephones
■ Using Feature Codes
For help on accessing NBX® features from an analog telephone, see the NBX Feature Codes Guide in the NBX NetSet™ utility.
NBX Tones As you use your 3Com Telephone to receive voice mail and use the feature codes on the NBX system, you hear these tones:
■ Dial Tone — When you lift the receiver to place a call or begin using one of the features, you hear the normal Dial Tone (except for the circumstance described in the next bulleted item).
■ New Messages Dial Tone — When your voice mailbox has either new or unsaved messages and you pick up your handset, you hear the New Messages Dial Tone (a repeated short tone, also called the “stutter” tone) until you delete or save every message. Your administrator can turn the New Messages Dial Tone on or off.
■ Feature Entry Tone — When you lift the handset and press the Feature button to begin using one of the features, you hear the Feature Entry Tone, which is a steady sound at a lower pitch than the normal dial tone. You must enter data, for instance a feature code number, your password, or an extension, as specified in Table 9.
■ Confirmation Tone — After certain steps, as when you add a party to a conference call, you hear a short Confirmation Tone or “beep,” which confirms that you have completed the action.
■ Error Tone — You hear the “fast busy” tone, also called the “congestion” tone, when no circuits are available. In addition, you

108 CHAPTER 8: FEATURE CODES
hear the Error Tone if you make an error such as trying to enter an unsupported feature code, an invalid extension, or an invalid password. Hang up and start the feature code sequence again.
■ Feature Active Tone — Example: You activate one of the “persistent” features, for instance, you lock your telephone, and then hang up. The next time that you pick up the handset on your analog telephone, you hear the Feature Active Tone. This pair of tones, a sound followed by a higher sound, is repeated to remind you that you have enabled one of these features:
■ Caller ID Restriction — All
■ Do Not Disturb
■ Forward All Calls to Voice Mail (that is, to your call coverage point)
■ Lock or Unlock Your Telephone
■ Call Forward All
■ Call Forward Busy
■ Call Forward No Answer
These features are “persistent,” that is, each one remains active until you turn it off, as described in Table 9.
If you forget which of the persistent features you have activated on your telephone, log in to NBX NetSet > User Information > Feature Settings. See “NBX NetSet Utility” in Chapter 1 for information on how to log in to the NBX NetSet utility.
Exception: If you have activated one or more persistent features and your mailbox has messages, you hear the New Messages Dial Tone whenever you pick up the handset until you have deleted all messages.
Feature Codes with 3Com Telephones
A large number of telephone features are available by pressing the Feature button on a 3Com Telephone and entering a three-digit feature code. These feature codes are listed in Table 9.
■ If your telephone does not have a button programmed for Feature, ask your administrator to program one.
■ Because your administrator determines whether some of the features that are described in this chapter are available for your telephone or for the entire system, some of these features may not be available to you.
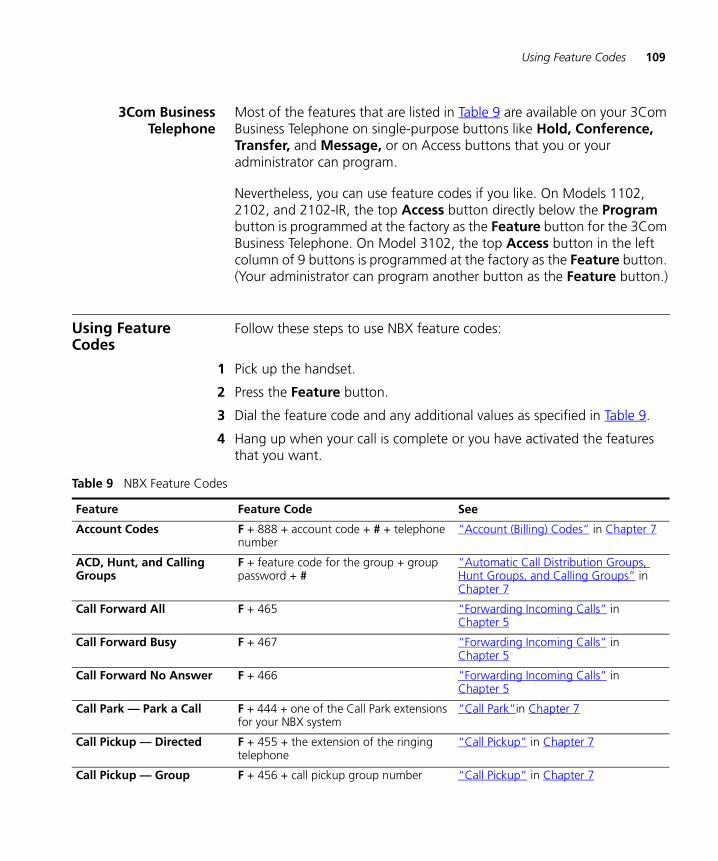
Using Feature Codes 109
3Com BusinessTelephone
Most of the features that are listed in Table 9 are available on your 3Com Business Telephone on single-purpose buttons like Hold, Conference, Transfer, and Message, or on Access buttons that you or your administrator can program.
Nevertheless, you can use feature codes if you like. On Models 1102, 2102, and 2102-IR, the top Access button directly below the Program button is programmed at the factory as the Feature button for the 3Com Business Telephone. On Model 3102, the top Access button in the left column of 9 buttons is programmed at the factory as the Feature button. (Your administrator can program another button as the Feature button.)
Using Feature Codes
Follow these steps to use NBX feature codes:
1 Pick up the handset.
2 Press the Feature button.
3 Dial the feature code and any additional values as specified in Table 9.
4 Hang up when your call is complete or you have activated the features that you want.
Table 9 NBX Feature Codes
Feature Feature Code See
Account Codes F + 888 + account code + # + telephone number
“Account (Billing) Codes” in Chapter 7
ACD, Hunt, and Calling Groups
F + feature code for the group + group password + #
“Automatic Call Distribution Groups, Hunt Groups, and Calling Groups” in Chapter 7
Call Forward All F + 465 “Forwarding Incoming Calls” in Chapter 5
Call Forward Busy F + 467 “Forwarding Incoming Calls” in Chapter 5
Call Forward No Answer F + 466 “Forwarding Incoming Calls” in Chapter 5
Call Park — Park a Call F + 444 + one of the Call Park extensions for your NBX system
“Call Park”in Chapter 7
Call Pickup — Directed F + 455 + the extension of the ringing telephone
“Call Pickup” in Chapter 7
Call Pickup — Group F + 456 + call pickup group number “Call Pickup” in Chapter 7

110 CHAPTER 8: FEATURE CODES
Call Toggle F + 409 Toggles between two calls. To return to the first call, press the button for the line where the first call came in, press Call Toggle (2101), or repeat F + 409.
Caller ID Restriction (CLIR — All) — On/Off
F + 889 “Caller ID” in Chapter 7
Caller ID Restriction (CLIR — Next Call)
F + 890 “Caller ID” in Chapter 7
Class of Service Override F + 433 + your own extension + # + your password + # + the outside party’s number
“Class of Service Override” in Chapter 6
Conference Call — Drop F + 431 “Establishing a Conference Call” in Chapter 5
Direct Mail Transfer F + 441 + other person’s extension + hang up
“Direct Mail Transfer” in Chapter 5
Do Not Disturb — On/Off F + 446 “Do Not Disturb” in Chapter 6
Flash F + 260 If your NBX system is connected to a Central Office by one or more Analog Line Card ports, and if the CO provides your organization with a feature such as Call Waiting that requires a flash signal, use this sequence to signal the CO to put the existing call on hold and toggle to the call that is waiting.
To return to the first call, repeat F + 260.
Forward All Calls to Voice Mail — On/Off
F + 440 “Other Ways to Manage Your Voice Mail Messages”in Chapter 4
Hands Free — On/Off F + 100 Set your phone so that internal calls automatically come through your speaker. You answer directly, without lifting the handset.
Incoming calls connect with no ring, and the caller can immediately hear you.
Hold F + 402 “Putting a Call on Hold” in Chapter 5.
Lock Your Telephone — On/Off
F + 432 + password + # “Preventing Unauthorized Use of Your Telephone” in Chapter 6
Message Waiting Indicator to Phone — Send
F + 412 “Using Message Waiting Indicator to Telephone” in Chapter 7
Message Waiting Indicator to Phone — Cancel
F + 413 “Using Message Waiting Indicator to Telephone” in Chapter 7
Table 9 NBX Feature Codes (continued)
Feature Feature Code See
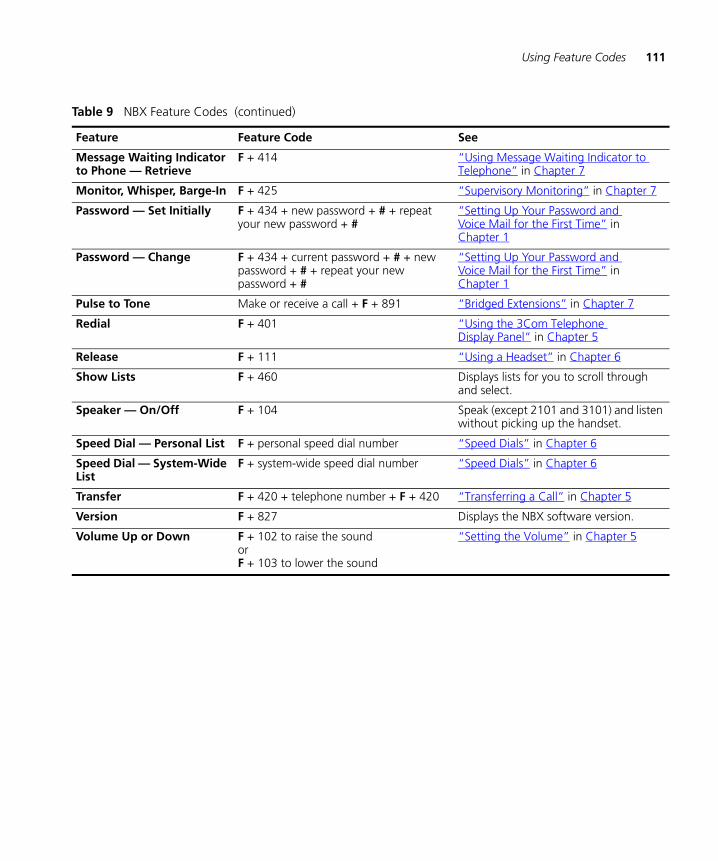
Using Feature Codes 111
Message Waiting Indicator to Phone — Retrieve
F + 414 “Using Message Waiting Indicator to Telephone” in Chapter 7
Monitor, Whisper, Barge-In F + 425 “Supervisory Monitoring” in Chapter 7
Password — Set Initially F + 434 + new password + # + repeat your new password + #
“Setting Up Your Password and Voice Mail for the First Time” in Chapter 1
Password — Change F + 434 + current password + # + new password + # + repeat your new password + #
“Setting Up Your Password and Voice Mail for the First Time” in Chapter 1
Pulse to Tone Make or receive a call + F + 891 “Bridged Extensions” in Chapter 7
Redial F + 401 “Using the 3Com Telephone Display Panel” in Chapter 5
Release F + 111 “Using a Headset” in Chapter 6
Show Lists F + 460 Displays lists for you to scroll through and select.
Speaker — On/Off F + 104 Speak (except 2101 and 3101) and listen without picking up the handset.
Speed Dial — Personal List F + personal speed dial number “Speed Dials” in Chapter 6
Speed Dial — System-Wide List
F + system-wide speed dial number “Speed Dials” in Chapter 6
Transfer F + 420 + telephone number + F + 420 “Transferring a Call” in Chapter 5
Version F + 827 Displays the NBX software version.
Volume Up or Down F + 102 to raise the soundorF + 103 to lower the sound
“Setting the Volume” in Chapter 5
Table 9 NBX Feature Codes (continued)
Feature Feature Code See

112 CHAPTER 8: FEATURE CODES

9
3COM 3105 AND 1105 ATTENDANT CONSOLES3Com Attendant Consoles and the NBX Complement Attendant Software (CAS) application enable a receptionist to handle high call volumes efficiently. Although receptionists are the primary users of the Attendant Console and CAS, the two can also be used by busy sales representatives and others who receive a high volume of telephone calls or who make frequent calls to the same telephone numbers.
This chapter covers these features:
■ 3Com Attendant Console — A device that works along with 3Com
Telephones to increase call handling capability. In many offices, the Attendant Console is used by a receptionist or switchboard operator, who is referred to in this guide as “the receptionist.”
■ Complement Attendant Software (CAS) — A software application that allows a receptionist to answer and route calls using a personal computer. Your administrator installs the Complement Attendant Software on your computer from the NBX Resource Pack CD.
The Attendant Console and Complement Attendant Software can be used at the same time. However:
■ When incoming calls appear on the Attendant Console, you must handle them using the buttons of the console.
■ When calls appear on the CAS computer screen, you must handle them using the mouse and the CAS software features.

114 CHAPTER 9: 3COM 3105 AND 1105 ATTENDANT CONSOLES
3Com Attendant Console
The 3Com 3105 and 1105 Attendant Consoles each have 50 Access buttons and 4 preprogrammed Feature buttons. Although the design of the two Attendant Consoles is different, the buttons work the same way. In effect, the Attendant Console is an extension of the 3Com Telephone to which it is associated.
See Figure 9 for 3Com 3105 Attendant Console buttons and controls and Figure 10 for 3Com 1105 Attendant Console buttons and controls.
Access Buttons The 50 Access buttons on a 3Com Attendant Console can each have two sets of assignments: 1 through 50, and 51 through 100. To toggle between the two sets of assignments, you press the Shift button.
Your administrator can assign features to each Access button. Possible features include:
■ Status of internal telephone extensions (busy, available)
■ Status of external telephone lines
■ Speed dials for:
■ User extensions
■ Pager numbers
■ Cellular telephone numbers
■ Message Waiting Indicators (MWI) for:
■ Group mailboxes
■ Phantom or personal mailboxes
■ Time of Day Service Modes (See your administrator for details.)
■ Status of ACD, Hunt, and Calling Group lines
Feature Buttons The four Feature buttons are preprogrammed for the most common features needed by a receptionist: Transfer, Transfer to Voicemail, Park, and Hold. The Shift button does not affect the operation of the Feature buttons. Your administrator can change the features assigned to each button using the NBX NetSet utility.
Figure 9 and the text that follows it describe the features on the 3Com 3105 Attendant Console. Figure 10 and the text that follows it describe the 3Com 1105 Attendant Console.
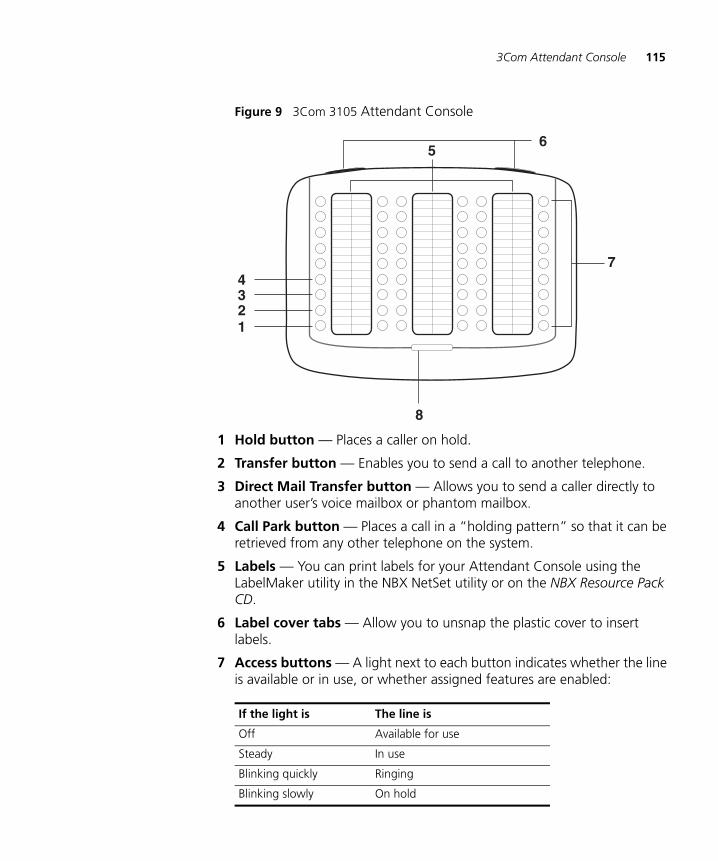
3Com Attendant Console 115
Figure 9 3Com 3105 Attendant Console
1 Hold button — Places a caller on hold.
2 Transfer button — Enables you to send a call to another telephone.
3 Direct Mail Transfer button — Allows you to send a caller directly to another user’s voice mailbox or phantom mailbox.
4 Call Park button — Places a call in a “holding pattern” so that it can be retrieved from any other telephone on the system.
5 Labels — You can print labels for your Attendant Console using the LabelMaker utility in the NBX NetSet utility or on the NBX Resource Pack CD.
6 Label cover tabs — Allow you to unsnap the plastic cover to insert labels.
7 Access buttons — A light next to each button indicates whether the line is available or in use, or whether assigned features are enabled:
If the light is The line is
Off Available for use
Steady In use
Blinking quickly Ringing
Blinking slowly On hold

116 CHAPTER 9: 3COM 3105 AND 1105 ATTENDANT CONSOLES
8 Shift button — Enables you to toggle between the two sets of Access button assignments on the Console. Press the Shift button to switch between assignments 1 through 50 and assignments 51 through 100. The Shift button LED is lighted when you have buttons 51 through 100 selected.
Figure 10 and the text that follows it describe the features on the 3Com 3105 Attendant Console.
Figure 10 3Com 1105 Attendant Console
1 Access buttons — A light next to each button indicates whether the line is available or in use, or whether assigned features are enabled. Status indicator lights show the following:
2 Shift button — Enables you to toggle between the two sets of button assignments on the Console. Press the Shift button for assignments 1 through 50. Press Shift again for assignments 51 through 100. The Shift button LED is lighted when you have buttons 51 through 100 selected.
SHIFT
A
B
If the light is The line is
Off Available for use
Steady In use
Blinking quickly Ringing
Blinking slowly On hold

Opening the 3105 Attendant Console Label Cover 117
3 Labels — You can print labels for your Attendant Console using the LabelMaker forms in the NBX NetSet utility or on the NBX Resource Pack CD. See “Printing Labels” in Chapter 6.
4 Transfer button — Enables you to send a call to another telephone. See “Transferring a Call” in Chapter 5.
5 Direct Mail Transfer button — Allows you to send a caller directly to another user’s voice mailbox or phantom mailbox. See “Direct Mail Transfer” in Chapter 5.
6 Call Park button — Places a call in a “holding pattern” so that it can be retrieved from any other telephone on the system. See “Call Park” in Chapter 7.
7 Hold button — Places a caller on hold. See “Putting a Call on Hold” in Chapter 5.
Attendant ConsoleLabels
To create, print, and save labels for your Attendant Console, see “Printing Labels” in Chapter 6.
Opening the 3105 Attendant Console Label Cover
After you print the labels and then cut them out, remove the plastic cover from the Attendant Console by pulling up on the two tabs at the top of the Attendant Console until the top of the cover pops off.
Figure 11 3105 Attendant Console Label Cover Tabs

118 CHAPTER 9: 3COM 3105 AND 1105 ATTENDANT CONSOLES
Complement Attendant Software
The Complement Attendant Software is an optional component, which requires a license. On your personal computer, the Complement Attendant Software displays your telephone directory in a series of tabs. Each tab sorts the directory by a different type of information, for example, by last name, by department, or by extension.
When you answer a call using the Complement Attendant Software, you can select a user from the directory and transfer the call to that user.
Table 10 describes the main elements of the Complement Attendant Software screens.
Table 10 Elements of the Complement Attendant Screens
Field Purpose
Display Panel Displays Caller ID information (name and extension number), the status of a call, and the duration of the call. The number of calls displayed depends on the number of access lines that you have specified in your general settings.
Find/Phone# Display Provides the extension number and name of the person selected in the directory.
Clear Button Cancels previous criteria.
Extension Tab Sorts the data in the directory by listing the extension numbers in ascending order.
First Tab Sorts the list of users in alphabetical order by first name.
Last Tab Sorts the list of users in alphabetical order by last name.
Department Tab Sorts the directory by the user department.
Hidden Tab Hides entries in the NBX directory that you do not want to appear on other tabs, such as conference room phones.
Quick Tab Provides access to frequently used entries in the directory.

Complement Attendant Software 119
Table 11 describes Complement Attendant Software buttons and the keyboard shortcuts to functions on the Action menu.
Managing Calls To manage incoming calls using the Complement Attendant Software, click the buttons at the bottom of the screen, as described here:
1 Select a sort method by clicking the appropriate tab. For example, to select a user by last name, click the Last tab.
2 Click the user’s name. The user’s extension number and name appear in the Find/Phone # field.
3 Click the button for the way that you want to handle the call. For example, to transfer a call, click Transfer. To park a call, click Park.
For additional information on using the Complement Attendant Software, see the Help system in the software.
Table 11 Attendant Software Buttons and Keyboard Shortcuts
Button PurposeKeyboard Shortcut
Answer Answers an incoming call. Alt+A
Dial Dials a selected number to place an outgoing call. Alt+D
Park Places a call in a “holding pattern” so that it can be retrieved from another telephone on the system.
Alt+K
UnPark Releases a caller from a “holding pattern.” Alt+U
Release Terminates a call. Alt+R
Hold Places a caller on hold. Alt+H
UnHold Removes a caller from being on hold and returns to the call.
Alt+N
Transfer Forwards a call to another telephone. Alt+T
Complete Transfer Completes the transfer of a call. Alt+M
Cancel Transfer Cancels a transfer. Alt+S
Conference Establishes a single call with up to three additional internal or external parties.
Alt+C
Complete Conference
Completes the conference call. Alt+P
Cancel Conference Cancels the addition of a party to a conference call.
Alt+E

120 CHAPTER 9: 3COM 3105 AND 1105 ATTENDANT CONSOLES

A
TELEPHONE INSTALLATION AND MAINTENANCEThis chapter covers these topics:
■ Connecting the Telephone
■ Installing the 3102 Telephone Label Plate
■ Attaching and Adjusting the Articulating Support Bracket
■ Attaching and Adjusting the Fixed Support Bracket
■ Moving Your Telephone
■ Swapping Telephones
■ Cleaning Your Telephone
■ Troubleshooting Problems
Connecting the Telephone
Although the connector layout varies between telephones, all 3Com Telephones and attendant consoles use these symbols to identify the connectors:
■ Power connection for an AC power adapter.
Network connection. Connects the device to the network. A powered Ethernet cable that conforms to the Power over Ethernet (IEEE 802.3af) standard is acceptable for:
■ 3Com 3100 Entry Telephones
■ 3Com 3101 Basic Telephones
■ 3Com 3102 Business Telephones
■ 3Com 3103 Manager’s Telephones
■ 3Com 3105 Attendant Consoles
■ Older 3Com telephones that include “PE” in the part number
Switch port for connecting a computer or other network device, such as a 3Com Attendant Console, to the network.

122 APPENDIX A: TELEPHONE INSTALLATION AND MAINTENANCE
Figure 12 shows underside of the 3Com 3102 Business Telephone. Connection details for each type of 3Com device are listed on the packing sheet that is shipped with the device.
Figure 12 Underside of the 3Com 3102 Business Telephone
CAUTION: The NBX system operates over the LAN, not through traditional telephone wiring. Your telephone connects to the NBX system through an RJ-45 LAN connector instead of an RJ-11 telephone connector. Your telephone will not work unless it is connected properly. Ask your administrator if you have questions about your telephone connection.
The underside of a 3Com Telephone or attendant console includes:
1 AC power adapter connection.
2 Ethernet connector for connection to the LAN.
3 Ethernet connector for an optional connection to your desktop computer. Not on 3100.
4 Handset connector
5 Headset connector (3102 and 3103 only)
6 Tabs for the support bracket
Handset connector.
Headset connector. 3Com 3102 and 3103 only.

Installing the 3102 Telephone Label Plate 123
■ For information about the underside of each 3Com Telephone, and for information about how to connect any 3Com Telephone or Attendant Console to a Power over Ethernet source, see the packing sheet that comes with the device.
■ The following device support brackets have built-in strain relief clamps: 3101, 3102, 3103, 3105, and 3100.
Installing the 3102 Telephone Label Plate
The 3Com 3102 Business Telephone has a label plate with localized button labels that you must install. Once you snap the plate onto the telephone, you cannot remove it.
To install the plate, slip the tabs along the top edge of the plate into the slots on the telephone, and then press firmly along the bottom edge of the plate until you feel it snap into place.
Figure 13 3Com 3102 Label Plate
Attaching and Adjusting the Articulating Support Bracket
The articulating support bracket is common to the following devices:
■ 3Com 3105 Attendant Console
■ 3Com 3102 Business Telephone
Figure 14, Figure 15, and Figure 16 show the 3Com 3102 Business Telephone. The instructions apply to all of these devices.
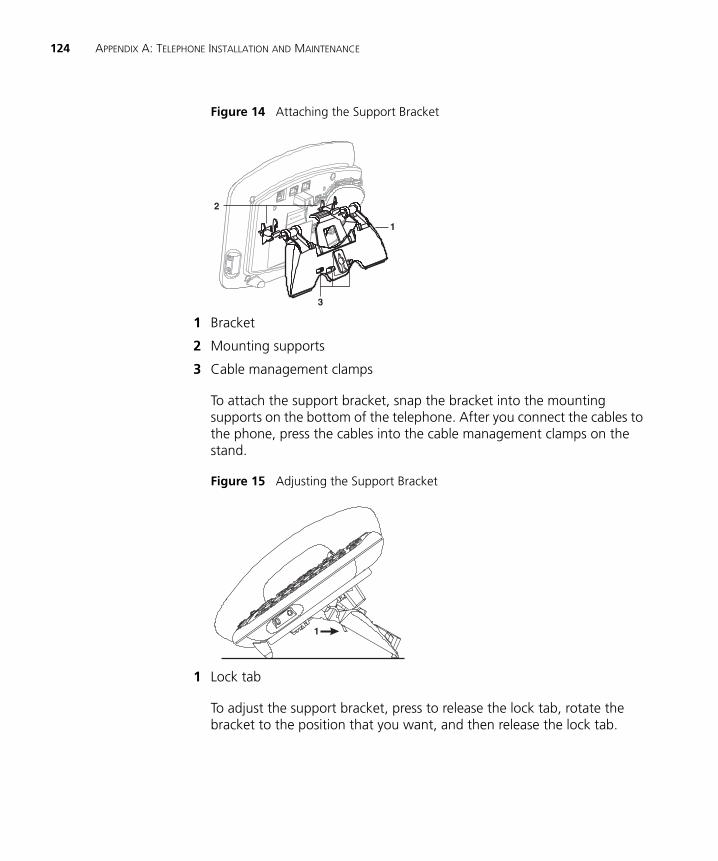
124 APPENDIX A: TELEPHONE INSTALLATION AND MAINTENANCE
Figure 14 Attaching the Support Bracket
1 Bracket
2 Mounting supports
3 Cable management clamps
To attach the support bracket, snap the bracket into the mounting supports on the bottom of the telephone. After you connect the cables to the phone, press the cables into the cable management clamps on the stand.
Figure 15 Adjusting the Support Bracket
1 Lock tab
To adjust the support bracket, press to release the lock tab, rotate the bracket to the position that you want, and then release the lock tab.

Attaching and Adjusting the Fixed Support Bracket 125
Figure 16 Wall Mounting
1 Bottom supports
When you mount a device on a wall, attach the support bracket and adjust it so that the bottom of the support bracket rests against the bottom supports on the device.
Safe wall mounting requires 3/4-inch drywall and 1.5-inch drywall screws.
Attaching and Adjusting the Fixed Support Bracket
The fixed support bracket is common to the following devices:
■ 3Com1105 Attendant Console
■ 3Com 1102, 2102, and 2102-IR Business Telephones
The fixed support bracket can be attached in low profile, high profile, or wall mount positions. Tabs on the underside of the telephone slip into slots on the bracket, and the opposite mounting points snap into place.
Low-Profile andHigh-Profile Positions
In Figure 17, the support bracket is outlined to show you how to install the device in the low-profile and high-profile desktop positions.

126 APPENDIX A: TELEPHONE INSTALLATION AND MAINTENANCE
Figure 17 Low-Profile and High-Profile Desktop Positions
Wall-Mount Position To mount a device on a wall, put the bracket on the opposite end of the telephone in the low-profile position. Pull and twist the knob on the underside of the phone 90 degrees (Figure 18) so that the spring- loaded peg projects out on the top of the phone (Item 1 in Figure 19).
Figure 18 Knob for the Handset Support Peg

Attaching and Adjusting the Fixed Support Bracket 127
Figure 19 shows an 3Com 2102 Telephone in the wall-mount position. Safe wall mounting requires 3/4-inch drywall and 1.5-inch drywall screws.
Figure 19 Wall-Mount Position
1 Handset support peg
2 Wall with a solid backing
3 Support bracket in the low-profile position on opposite end of telephone
Security Wall-MountBracket
An optional security wall-mount bracket that ensures that the device cannot be removed by unauthorized persons is available for the following devices:
■ 3Com 1102, 2102 and 2102-IR Business Telephones
For how to order this bracket, consult your 3Com NBX Voice-Authorized Partner. Read and follow the instructions that come with the bracket.
1
2
3

128 APPENDIX A: TELEPHONE INSTALLATION AND MAINTENANCE
Moving Your Telephone
All 3Com Telephones have the Automatic Telephone Relocation feature. Each telephone has a unique “address.” You can move your telephone to another location, connect it to any Ethernet jack on the LAN, and still maintain all of your personalized features, speed dials, and extension number.
Swapping Telephones
Because your extension number and personal settings are associated with your physical telephone, only your administrator can move phone extension settings from one telephone to another.
Cleaning Your Telephone
Always unplug your telephone from the power source and from the network before you clean it. Use a soft cloth dampened with mild detergent.
WARNING: Failure to unplug the telephone before you clean it could result in electrical shock.
Troubleshooting Problems
Table 12 lists possible problems that you may encounter and the most likely solutions. Where possible, each solution refers to the section in this guide where you can find detailed information.
Table 12 Possible Problems
Possible Problem Suggested Solutions
My telephone has no dial tone. The display panel is blank.
■ Verify that the power cord is fully inserted in the correct connector on the underside of the telephone. Use the strain relief tab to prevent the cord from becoming unplugged.
■ Verify that each Ethernet cable is connected and that each cable is in the proper connection.
■ Remove and add power to the telephone by unplugging the power cord at the electric outlet and plugging it back in.
■ If the telephone is powered through a powered Ethernet cable, make sure that power is applied to the cable at its source.

Troubleshooting Problems 129
My telephone has “locked up.”
■ Your telephone has lost the connection to the system. Remove the Ethernet cord from the jack, and then re-insert it into the jack.
■ Wait a few seconds. If the telephone still appears to be locked, disconnect the electrical power for your telephone, and then plug it back in.
Callers cannot leave messages on my voice mail.
■ Your mailbox may be full. Log in to your voice mailbox and delete some messages.
■ Your telephone may be set up for Greeting Only Mailbox. Log in to NBX NetSet > NBX Messaging and clear the Greeting Only Mailbox checkbox.
When I park a call, the display panel shows “Park xtn in use,” and the call returns to my telephone.
You have selected a Call Park extension that is already in use. Try another Call Park extension. Your administrator can add additional Call Park Extensions. For details, see “Call Park” in Chapter 7.
When I dial 9 or 8 to access an outside line, the display panel shows “All Ports Busy.”
No outside lines are available. Try again in a few minutes.
After I call another user in my organization, I hear a tone but no ringing.
The other user may have the Hands Free Active on Intercom feature enabled. Begin speaking after you hear the tone. For details, see “Telephone Buttons and Controls” in Chapter 2 or Chapter 3.
On my 3Com Business Telephone or 3Com Manager’s Telephone, all incoming internal calls come over my speaker phone.
You have the Hands Free Active on Intercom feature enabled. For details, see “Telephone Buttons and Controls” in Chapter 2 or Chapter 3.
When I try to access the NBX NetSet utility, I do not get a response after I type the NBX system’s IP address and press Enter.
Ask your administrator to verify the IP address that you typed into your web browser.
I am unable to log in to the NBX NetSet utility.
You must set up your voice mail before you can use the NBX NetSet utility. Press the Message button. The prompts guide you through the setup. Then use your voice mail password to access the NBX NetSet utility. If you are on an analog telephone, see “Setting Up Your Password and Voice Mail for the First Time” in Chapter 1.
Table 12 Possible Problems (continued)
Possible Problem Suggested Solutions
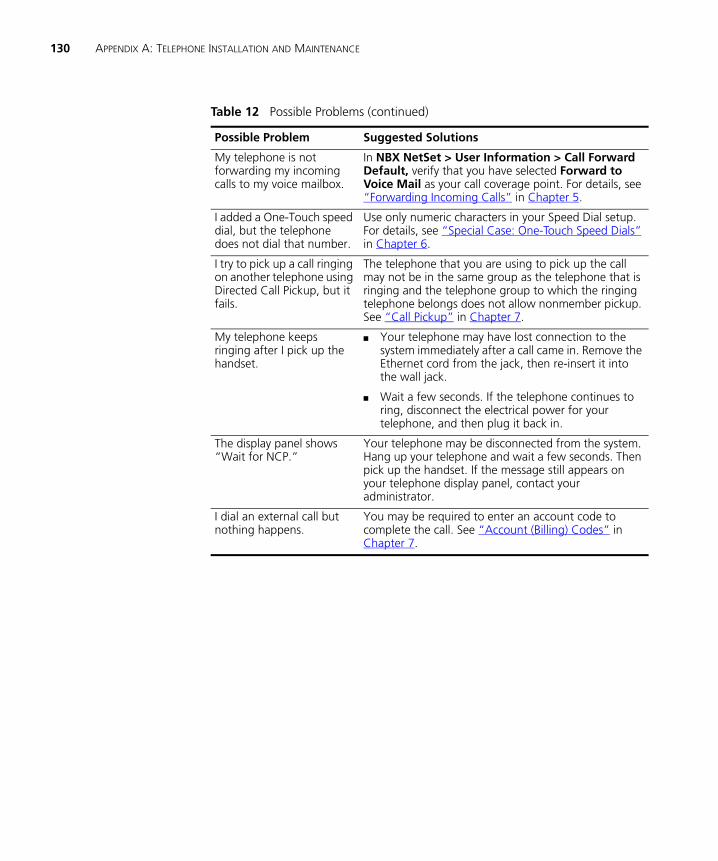
130 APPENDIX A: TELEPHONE INSTALLATION AND MAINTENANCE
My telephone is not forwarding my incoming calls to my voice mailbox.
In NBX NetSet > User Information > Call Forward Default, verify that you have selected Forward to Voice Mail as your call coverage point. For details, see “Forwarding Incoming Calls” in Chapter 5.
I added a One-Touch speed dial, but the telephone does not dial that number.
Use only numeric characters in your Speed Dial setup. For details, see “Special Case: One-Touch Speed Dials” in Chapter 6.
I try to pick up a call ringing on another telephone using Directed Call Pickup, but it fails.
The telephone that you are using to pick up the call may not be in the same group as the telephone that is ringing and the telephone group to which the ringing telephone belongs does not allow nonmember pickup. See “Call Pickup” in Chapter 7.
My telephone keeps ringing after I pick up the handset.
■ Your telephone may have lost connection to the system immediately after a call came in. Remove the Ethernet cord from the jack, then re-insert it into the wall jack.
■ Wait a few seconds. If the telephone continues to ring, disconnect the electrical power for your telephone, and then plug it back in.
The display panel shows “Wait for NCP.”
Your telephone may be disconnected from the system. Hang up your telephone and wait a few seconds. Then pick up the handset. If the message still appears on your telephone display panel, contact your administrator.
I dial an external call but nothing happens.
You may be required to enter an account code to complete the call. See “Account (Billing) Codes” in Chapter 7.
Table 12 Possible Problems (continued)
Possible Problem Suggested Solutions

INDEX
AAccess buttons
1102, 2102, and 2102-IR Business Telephones 27
1105 Attendant Console 1163102 Business Telephone 213105 Attendant Console 115
account codes and billing codes 80feature code 109
ACD 84and the Do Not Disturb feature 73feature code 109
administrator, definition 10agent (supervisory monitoring) 90
change 92all calls, forwarding 51All Ports Busy message 129analog telephones on an NBX system 13announcements, broadcasting 94, 95answering calls 47applying your call permissions to another
telephone 75Attendant Console
1105 Access buttons 1163105 Access buttons 115creating labels 68overview 114
Auto Attendant, definition 10automatic call distribution (ACD) 84
feature code 109automatic telephone relocation 64
Bbarge-in 92billing and account codes 80
feature code 109blocking
internal and external ID 81unauthorized outbound calls 74
bracket1102, 2102, 2102-IR, security wall-mount 1273102, telephone support 123
branch offices, calling 100bridged extensions 102, 103broadcasting announcements 94, 95busy line (call forwarding) 51buttons
1102, 2102, 2102-IR Business Telephones 251105 Attendant Console 1163102 Business Telephone 193105 Attendant Console 115
Ccall centers 84call coverage point 51call forward
all calls 51busy line 51call coverage point 51default 52, 54feature codes 109override 55precedence 56problems with 130ring no answer 51
call logs, on telephone display panel 48call park
default extensions 93feature code 109introduction 93retrieving a parked call 94
Call Park button1102, 2102, 2102-IR Business Telephones 291105 Attendant Console 1173102 Business Telephone 233105 Attendant Console 115
call permissionsapplying yours to another telephone 75introduction 75
call pickupdirected 83feature codes 109group 84introduction 83problem 130

132 INDEX
call togglefeature code 110
Call Transfer service (analog lines) 29Call Waiting service (analog lines) 29caller ID
feature code 110identity restriction 82restricting on outbound calls 81
calling groupsand the Do Not Disturb feature 73feature code 109overview 84sample configuration 89
Calling Line Identity Restriction (CLIR) 82feature codes 110
CAS 118change agent (supervisory monitoring) 92Class of Service (CoS) override 75
feature code 110cleaning telephones 128CLIR 82
feature codes 110coaching 91codes
account and billing 80feature codes 107NBX Feature Codes Guide 9
Complement Attendant Software (CAS)computer screens and tabs 118features 118introduction 113keyboard shortcuts 119
Conference button1102, 2102, 2102-IR Business Telephones 273102 Business Telephone 21
conference callsadding parties 59dropping last party 60feature code 110introduction 59
configurable operators 96confirmation tone 107connecting a headset
3102 Business Telephone 22, 76general 76
connecting telephones 64, 128caution, RJ-45 versus RJ-11 jacks 122electrical power 121
conventions, documentation 10creating voice mail messages 39customer (supervisory monitoring) 90
Ddelayed ringing 103dial tone 107
troubleshooting a 3Com Telephone 128dialing calls
other methods 50redial 50release with headset 76switching from pulse to tone 103
direct mail transferfeature code 110overview 59
Direct Mail Transfer button1102, 2102, 2102-IR Business Telephones 291105 Attendant Console 1173102 Business Telephone 233105 Attendant Console 115
directed call pickup 83display panel
1102, 2102, 2102-IR Business Telephones 263102 Business Telephone 20call logs, user directory, and speed dial lists 48
Do Not Disturb Featureand call forwarding 56
Do Not Disturb feature 73feature code 110
dual tone multi-frequency (DTMF) dialing 103dynamic hunt groups 88
Eelectrical shock, avoiding 128e-mail
getting voice mail messages in 44notification of voice mail messages 68
error tone 107External Paging
dial code 95external telephone calls, dialing 50
Ffeature active tone 108Feature button
1102, 2102, and 2102-IR Business Telephone 293102 Business Telephone 23
feature codes 107Feature Codes Guide in NBX NetSet utility 13feature entry tone 107
G 133
feature settingsCall Forward All 51Call Forward Busy 51Call Forward No Answer 51CLIR-All 82Do Not Disturb 74Forward Calls to Mail 53
Find/Phone Tab, Complement Attendant Software (CAS) 118
Flash button1102, 2102, 2102-IR Business Telephones 29
flash, feature code 110forgot my password 32, 34Forward to Voice Mail 52, 110forwarding calls
all calls 51directly to another user’s mailbox 59no answer 51to your call coverage point 51to your voice mailbox 51, 52unanswered calls 51
forwarding voice mail messages 38FWD MAIL 52Fwd Mail button
1102, 2102, and 2102-IR Business Telephones 28
3102 Business Telephone 21using 52
GGreeting-Only mailboxes 44group call pickup 84group lists, personal voice mail
creating 40modifying 41
group voice mailbox 45
Hhands free 78
feature code 110Hands Free button
1102, 2102, and 2102-IR Business Telephones 28
3102 Business Telephone 22handset volume 61headset
connector on 3102 Business Telephone 22using 76, 78volume 61
Headset button, 3102 Business Telephone 24
holdBusiness Telephones 57feature code 110introduction 57more than one call 57
Hold button1102, 2102, and 2102-IR Business
Telephones 271105 Attendant Console 1173102 Business Telephone 213105 Attendant Console 115
hunt groupsand the Do Not Disturb feature 73calling groups 89dynamic 88feature code 109introduction 87logging in to or out of 89sample configuration 87static 88
Iicons in the NBX NetSet utility
navigation 16shortcuts 16
icons, display panellocked telephone 74
incoming callsACD groups 84answering 47calling groups 87forwarding directly to another user’s mailbox 59hunt groups 87transferring 58
indicators of voice mail messagesoff-site notification 68on your phone 34
infrared port 28installing telephones 121intercom 78
Hands Free button, 1102, 2102, and 2102-IR Business Telephones 28
Hands Free button, 3102 Business Telephone 22internal paging 94, 95
internal caller ID 81internal calls, dialing 50Internal Paging
dial code 95
Jjack, Ethernet 64

134 INDEX
LLabel cover tabs
3105 Attendant Console 115LabelMakers
for attendant consoles 68for telephones 68Windows Desktop shortcut 68
labelsAttendant Console, creating 68printing 68
length of voice messages 32lights, status
1102, 2012, and 2102-IR Business Telephone 303102 Business Telephone 24
listening to messages 34from remote telephones 35
listsdisplay lists feature code 111modifying personal voice mail group lists 41personal voice mail group lists 40printing speed dials 67
locking your telephoneblocking unauthorized calls 74feature code 110off-site notification restriction 71
logs on NBX telephone display panelanswered calls 48dialed calls 48missed calls 48
long-distance calls, preventing 74
Mmail group lists
personal 40system 40
mailboxesgreeting-only 44group 45phantom 45setting up personal 13
maintenance, telephone 121Message button
1102, 2102, and 2102-IR Business Telephones 28
3102 Business Telephone 21message waiting for voice mail indicators
1102, 2102, and 2102-IR Business Telephones 28, 34
3102 Business Telephone 20, 34for a telephone group 45
message waiting indicator for voice mailanalog telephones 34
message waiting indicator to telephone 98cancelling 99deleting 99feature codes 110retrieving 98sending 98
messagescreating and sending 39forwarding 38listening, from a remote location 35listening, from telephone 35listening, NBX NetSet utility 34maximum length 32Message Waiting Indicator for a group 45private 43replying to 37sending 39urgent 43
Messaging, NBX 31microphone
3102 Business Telephone 21monitor 90monitoring, supervisory 90moving telephones 64, 128MSG button
1102, 2102, and 2102-IR Business Telephones 28
Mute button1102, 2102, and 2102-IR Business
Telephones 283102 Business Telephone 22
MWISee message waiting for voice mail indicators
Nname announcement
changing 33setting the first time 14
NBX Business Telephones1102, 2102, and 2102-IR 253102 19
NBX Messaging 31NBX NetSet password
changing 14forgotten 14initial 14, 16overview 32

O 135
NBX NetSet utilitygetting started 16listening to messages 34overview 15problems with 129
new messages dial tone 107notification, off-site 68
Ooff-site notification 68
managing using the telephone 72operators
configuring 96viewing 97
outbound callsdialing 50speed dials 64
Ppage zones
extensions 95pager, off-site notification 68paging 94
required equipment 94, 95restricted by Do Not Disturb 73to announce a parked call 93zones 96
Palm integration 78Park button
3105 Attendant Console 115parking a call
feature code 109overview 93retrieving a parked call 94
passwordschanging in the NBX NetSet utility 16changing on the telephone 32feature codes 111forgotten 32, 34security tips 33
permissionsallowed calls 75viewing your call permissions 75
persistent features 108personal greeting
changing 33selecting 33setting the first time 14
personal speed dial buttons1102, 2102, and 2102-IR Business Telephone 293102 Business Telephone 23
personal speed dial numbers 65personal voice mail group lists
creating 40modifying 41
phantom mailboxes 45picking up calls 83
feature codes 109position, wall-mount bracket 126printing labels 68printing speed dial lists 67private messages 43problems, solving 121Program button
1102, 2102, and 2102-IR Business Telephones 27
3102 Business Telephone 21programmable Access buttons
1102, 2102, and 2102-IR Business Telephones 27, 28
1105 Attendant Console 1163102 Business Telephone 21, 223105 Attendant Console 115
public address system 94, 95pulse dialing 103
feature codes 111
QQuick Reference sheets 17
Rreceptionist
and the Attendant Console 114and the Complement Attendant Software
(CAS) 118definition 10
Redial button1102, 2102, and 2102-IR Business
Telephones 273102 Business Telephone 21
redialing calls 50feature code 111
Release button1102, 2102, and 2102-IR Business
Telephones 293102 Business Telephone 23
release, feature code 111releasing calls with headset 76relocating telephones 128remote notification 68remote offices, calling 100replying to voice mail messages 37
136 INDEX
ring no answer (call forwarding) 51ringer
tone, choosing 64volume 61
ringingdelayed 103Do Not Disturb 73
RJ-11 jack caution, avoiding use with 3Com Telephones 122
RJ-45 jack caution, using instead of RJ11 122
Sscroll buttons
1102, 2102, and 2102-IR Business Telephones 27
3102 Business Telephone 21security
passwords 32, 33preventing unauthorized outbound calls 74telephone line on multiple telephones 79wall-mount bracket, 1102, 2102, 2102-IR 127
sending messages 39shared telephone lines
bridged extensions 102delayed ringing 103hunt groups 84
Shift button1105 Attendant Console 1163105 Attendant Console 116
show lists, feature code 111silent monitor 90silent ring 64Simultaneous Paging
dial code 95site codes 101soft buttons
1102, 2102, and 2102-IR Business Telephones 27
3102 Business Telephone 20software, Complement Attendant (CAS) 118sound volume
1102, 2102, and 2102-IR Business Telephone 273102 Business Telephone 22
Speaker button1102, 2102, and 2102-IR Business
Telephones 273102 Business Telephone 21
speaker phone1102, 2102, and 2102-IR Business
Telephones 273102 Business Telephone 21feature code 111problems with 129using 50volume 61
speed dials 64One-Touch 66personal speed dial numbers 65printing lists of 67problems with 130system-wide speed dial numbers 66
supervisory monitoring 90supervisor 90
support bracket1102, 2102, 2102-IR, security wall-mount 1273102, attaching 123
support brackets1105, attaching 1253105, attaching 123
system voice mail groups 40
Ttabs, Complement Attendant Software (CAS)
screens 118telephone line on multiple telephones, security 79telephone maintenance 121telephone number, for off-site notification 69telephone support brackets
1105 1253102 1233105 123
telephonescleaning 128connecting 121mounting 1105 125mounting 3105 123mounting, 3102 123moving and swapping 128
time-of-day calling restrictions 74toggle calls
feature code 110toll calls, preventing others from dialing 75tone dialing 103tones, 3Com Telephones 107tones, ringer selection 64
U 137
Transfer button1102, 2102, and 2102-IR Business
Telephones 271105 Attendant Console 1173102 Business Telephone 213105 Attendant Console 115
transferring calls 58feature code 111
troubleshootingintroduction 121list of possible problems 128
Uunauthorized use of telephone, preventing 74urgent messages 43user, definition 10
Vversion, feature code 111voice mail
accessing through e-mail 44changing your password 32components 31creating messages 39forwarding 38greeting-only mailbox 44group mailboxes 45groups 40indicators 34initializing 13listening remotely 35listening to messages 34maximum message length 32password security tips 33personal group lists, creating and modifying 41private messages 43problems with 129replying to 37retrieving from a remote location 35sending 39setting up 13urgent messages 43
volume control buttons1102, 2102, and 2102-IR Business Telephone 273102 Business Telephone 22
volume settings 61feature codes 111speaker 61
WWait for NCP message 130wall-mount bracket 126whisper 91Windows Desktop shortcut, for LabelMaker 68
Zzone paging 94

138 INDEX


![Telecomm presentation [2005]](https://static.documents.pub/doc/80x56/55508844b4c9051e5b8b4b8a/telecomm-presentation-2005.jpg)


