Barudan Technical Sewing Head Maintenance Manual 8/1/97 ZN Sewing Head B 8-1 TOOLS NEEDED 3 mm T-handle Allen Wrench 2.5 mm Allen Wrench Phillip Screwdriver Needle Screwdriver New Needle Cleaning Brush Flashlight NEEDLE DEPTH ADJUSTMENT PURPOSE: The needle must rise 2-3 mm from bottom dead center thus forming a loop behind the needle. As the hook point passes behind the needle it captures the formed loop. If the Needle Bar is too high or too low the sewing quality is effected. The needle can not capture the loop therefore a stitch will not be formed or not form properly. CAUSES: < Red caps worn or broken. < Broken needle. < “Slam” into hoop. < Changed needle brand. SYMPTOMS: < Skip Stitches < Looping < Fraying < Breaking Thread < Breaking Needles PROCEDURE: 1. Using the Automat/Controller, position Sewing Heads to Needle #1. 2. Power down Embroidery Machine
Transcript
Barudan Technical Sewing Head Maintenance Manual8/1/97
ZN Sewing Head B8-1
TOOLS NEEDED3 mm T-handle Allen Wrench
2.5 mm Allen WrenchPhillip ScrewdriverNeedle Screwdriver
New NeedleCleaning Brush
Flashlight
NEEDLE DEPTH ADJUSTMENT
PURPOSE:The needle must rise 2-3 mm from bottom dead center thus forming a loop behind the needle. Asthe hook point passes behind the needle it captures the formed loop. If the Needle Bar is too highor too low the sewing quality is effected. The needle can not capture the loop therefore a stitch willnot be formed or not form properly.
CAUSES:< Red caps worn or broken.< Broken needle.< “Slam” into hoop.
1. Using the Automat/Controller, position Sewing Heads to Needle #1.
2. Power down Embroidery Machine
Barudan Technical Sewing Head Maintenance Manual8/1/97
8-2ZN Sewing Head Macpherson Meistergram
Figure 1
Figure 2
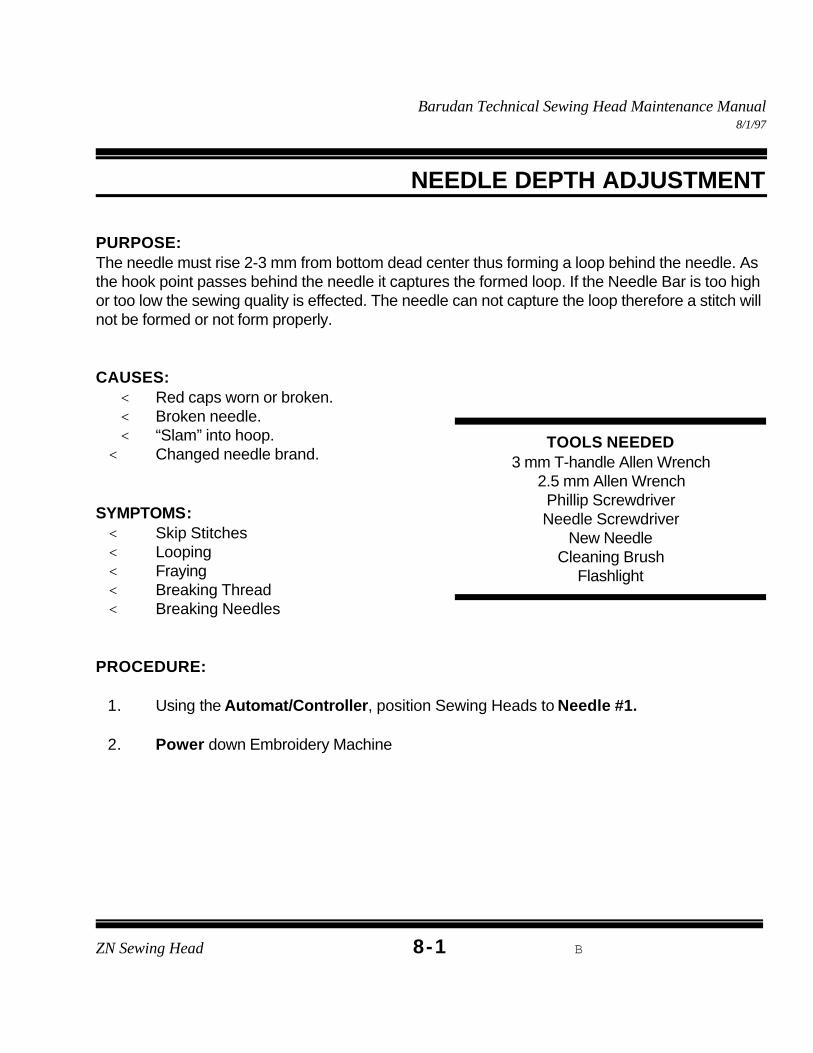
3. Pull Thread Keep Lever to left to disengage thread apron clamps. See Figure 1.
4. Disengage Needle Bar Driver.
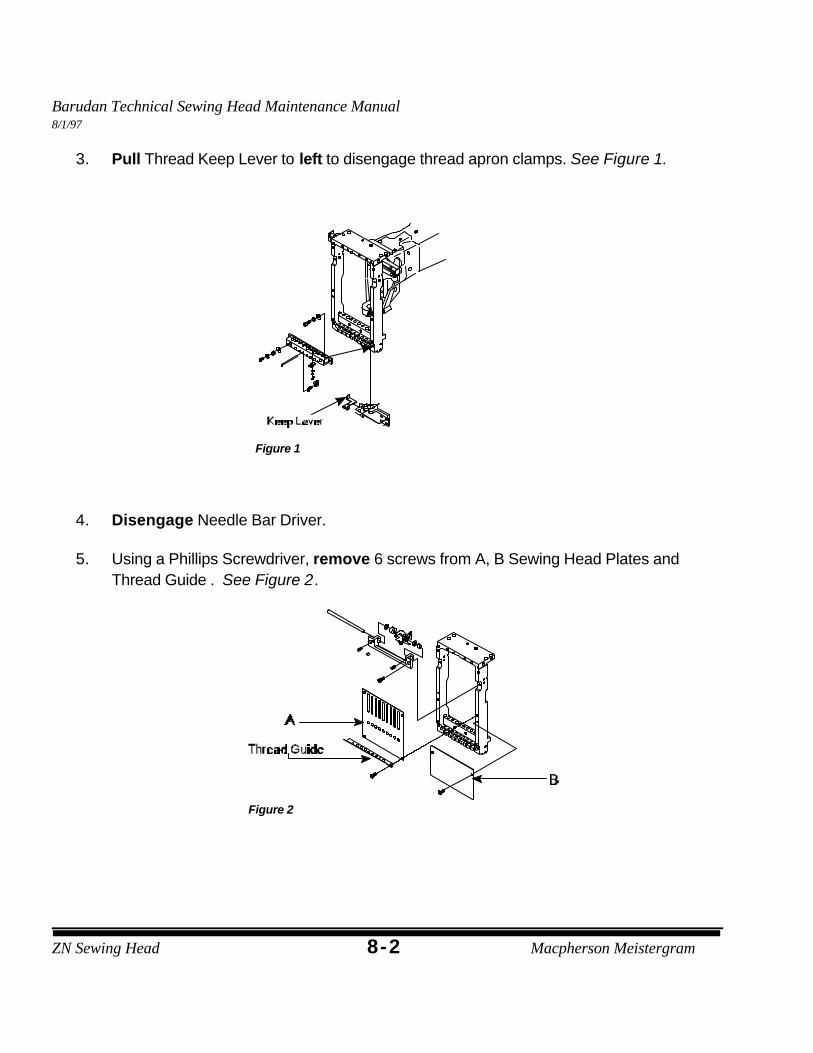
5. Using a Phillips Screwdriver, remove 6 screws from A, B Sewing Head Plates andThread Guide . See Figure 2.
Barudan Technical Sewing Head Maintenance Manual8/1/97
ZN Sewing Head B8-3
Note: When removing Sewing Head Plate A from Sewing HeadNumber One, lift straight up then pull towards you. Back side ofcover wraps around the needle position indicator and incorrectremoval can damage the indicator.
Figure 3
6. Using a 2.5 mm Allen Wrench, remove throat plate screws.
7. Remove throat plate.
8. Remove bobbin case from Hook Assembly.
9. Using cleaning brush, clean any thread debris or lint from hook area.
10. While Standing in front of training sewing head, rotate gangshaft until Take-up Leversare in up position, this is called Color Change Position. (On Embroidery Machinerotate degree wheel [numbers ascend] to 244 degrees).
11. Remove thread from Needle #1.
12. Using Needle Screwdriver, loosen needle set screw.
13. Remove and discard old needle.
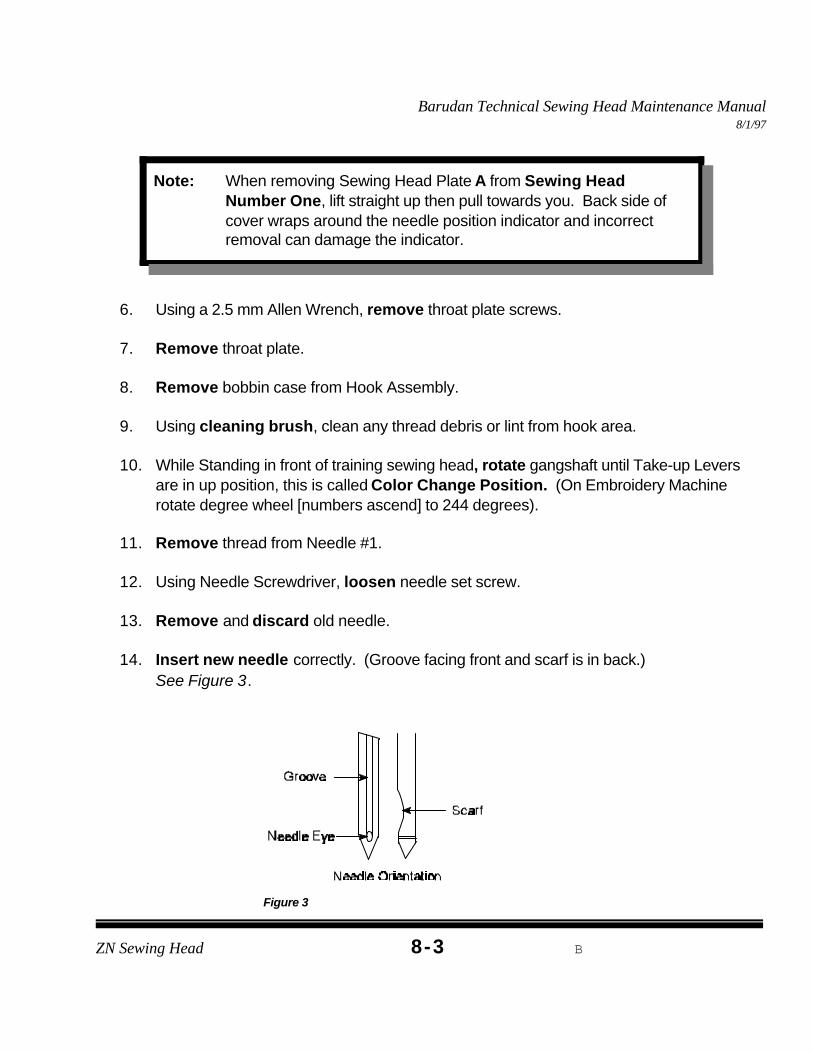
14. Insert new needle correctly. (Groove facing front and scarf is in back.) See Figure 3.
Barudan Technical Sewing Head Maintenance Manual8/1/97
ZN Sewing Head V8-4
15. Using Needle Screwdriver, tighten needle set screw.
16. Engage Needle Bar Driver.
17. Rotate gangshaft so needle is at its lowest point (Bottom Dead Center). (Rotatedegree wheel to zero degrees this is called Bottom Dead Center).
Barudan Technical Sewing Head Maintenance Manual8/1/97
ZN Sewing Head B8-5
Figure 4
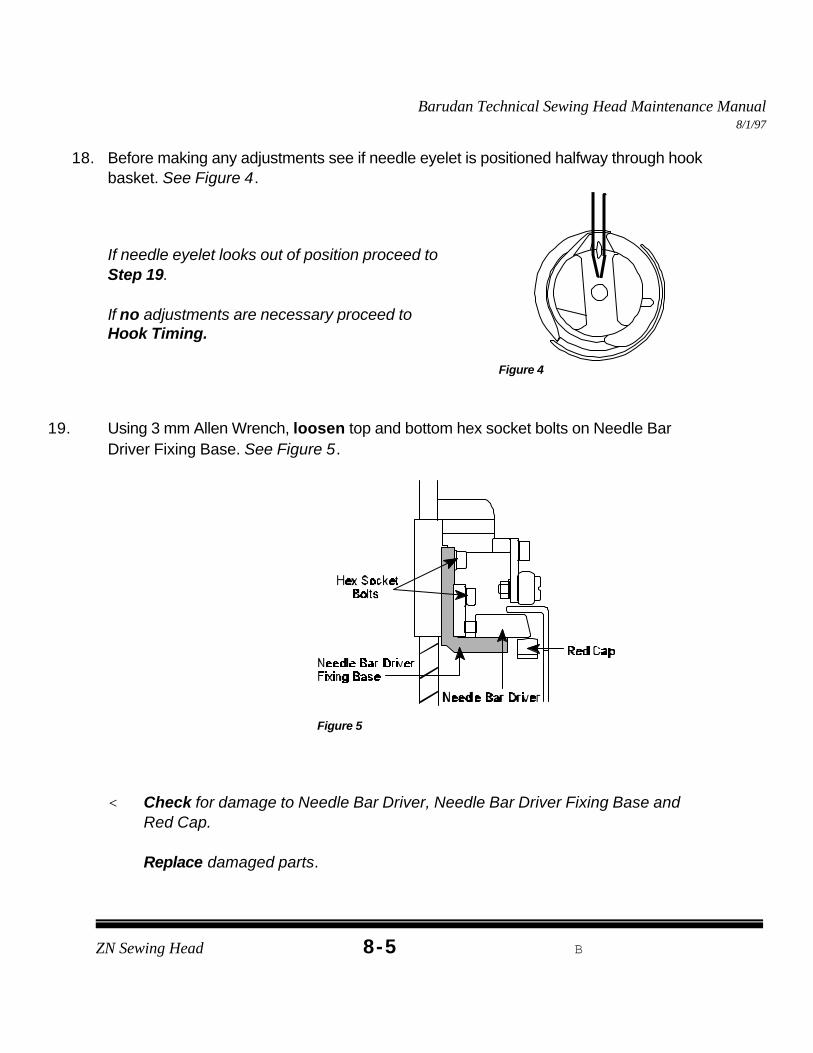
18. Before making any adjustments see if needle eyelet is positioned halfway through hookbasket. See Figure 4.
If needle eyelet looks out of position proceed to Step 19.
If no adjustments are necessary proceed toHook Timing.
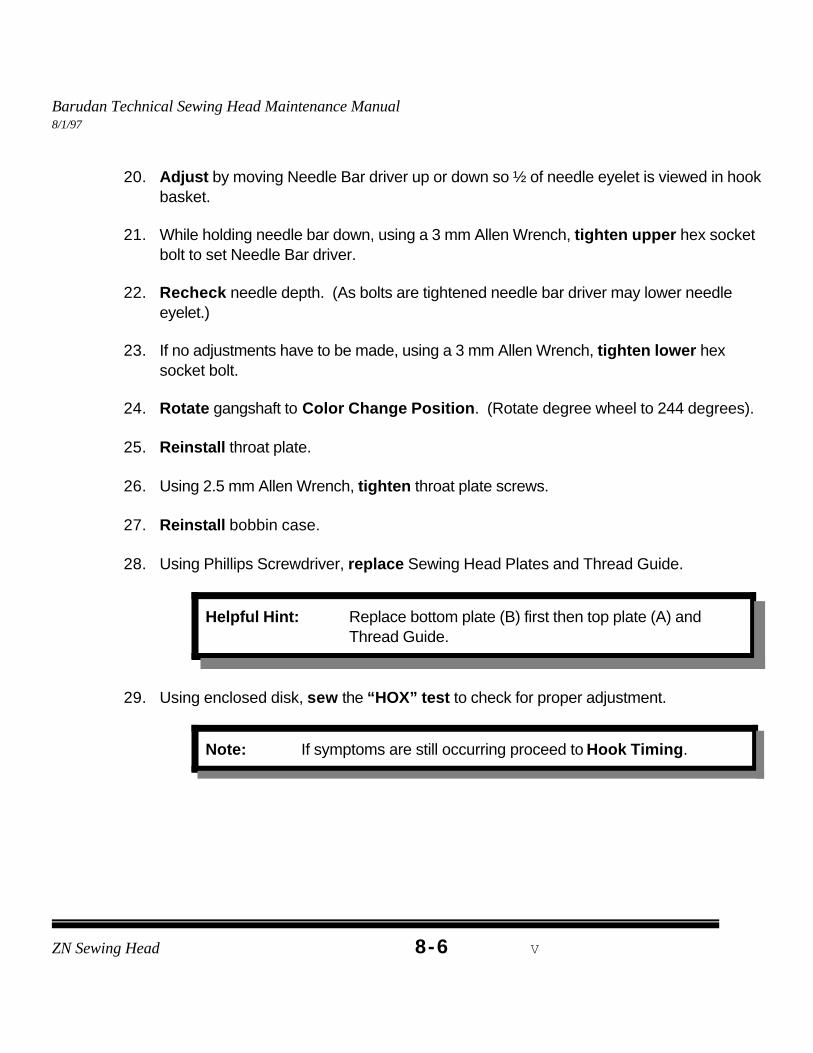
19. Using 3 mm Allen Wrench, loosen top and bottom hex socket bolts on Needle BarDriver Fixing Base. See Figure 5.
Figure 5
< Check for damage to Needle Bar Driver, Needle Bar Driver Fixing Base andRed Cap.
Replace damaged parts.
Barudan Technical Sewing Head Maintenance Manual8/1/97
ZN Sewing Head V8-6
Helpful Hint: Replace bottom plate (B) first then top plate (A) andThread Guide.
Note: If symptoms are still occurring proceed to Hook Timing.
20. Adjust by moving Needle Bar driver up or down so ½ of needle eyelet is viewed in hookbasket.
21. While holding needle bar down, using a 3 mm Allen Wrench, tighten upper hex socketbolt to set Needle Bar driver.
22. Recheck needle depth. (As bolts are tightened needle bar driver may lower needleeyelet.)
23. If no adjustments have to be made, using a 3 mm Allen Wrench, tighten lower hex
socket bolt.
24. Rotate gangshaft to Color Change Position. (Rotate degree wheel to 244 degrees).
25. Reinstall throat plate.
26. Using 2.5 mm Allen Wrench, tighten throat plate screws.
27. Reinstall bobbin case.
28. Using Phillips Screwdriver, replace Sewing Head Plates and Thread Guide.
29. Using enclosed disk, sew the “HOX” test to check for proper adjustment.
Barudan Technical Sewing Head Maintenance Manual8/1/97
Hook timing is probably the most misunderstood aspect of embroidery machine mechanics. Ithas nothing to do with the type of fabric, tension or synchronization of the heads on a multi-headmachine.
PURPOSE:Hook timing is the proper position of the Hook Assembly in relation to the needle in order to forma stitch. The hook is directly attached to the drive shaft, eliminating the need to routinely re-timeit.
CAUSES:< Something gets caught in Hook Assembly.< Size of needle has drastically changed.< A build-up of thread behind hook pushes hook out
of line.
SYMPTOMS:< Machine fails to form or complete a stitch. < Excessive Needle Breaks.< Thread Frays< “Birdnesting”
PROCEDURE:Needle depth must be checked before timing the hook.
A. PREPARATION
1. Using Automat/Controller position Sewing Heads to Needle #1.
2. Power down Embroidery Machine.
3. Disengage Needle Bar Driver.
Barudan Technical Sewing Head Maintenance Manual8/1/97
ZN Sewing Head V8-8
Figure 1
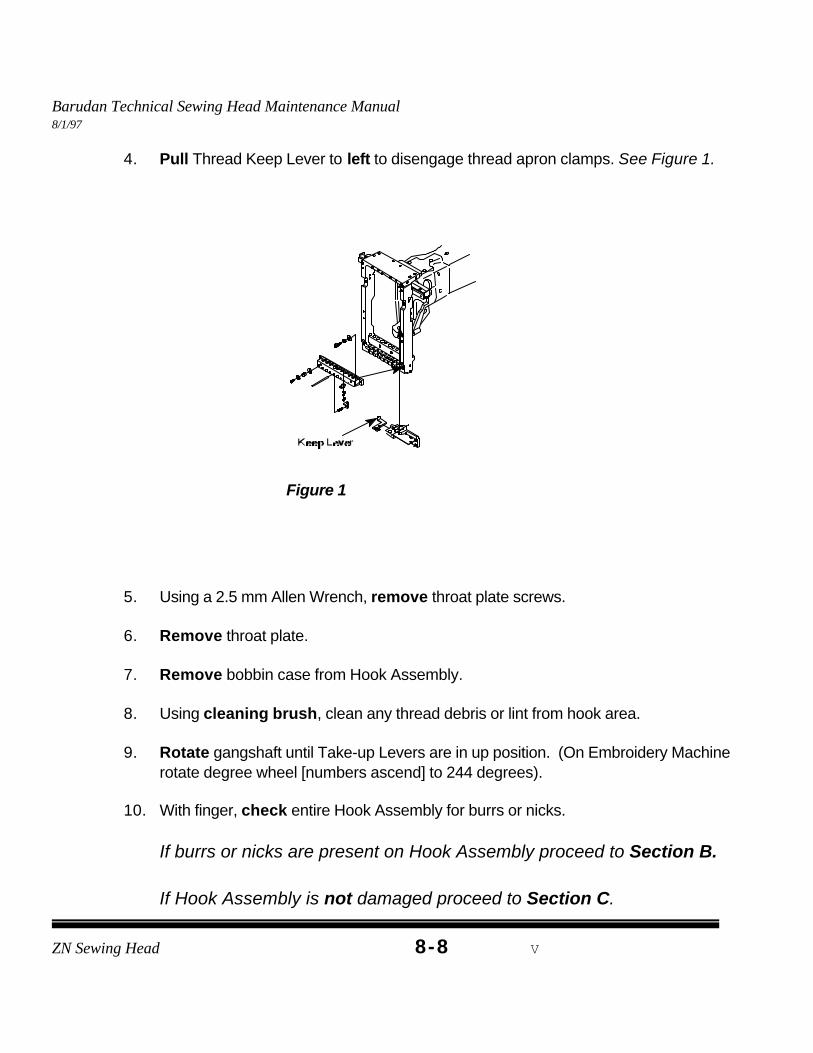
4. Pull Thread Keep Lever to left to disengage thread apron clamps. See Figure 1.
5. Using a 2.5 mm Allen Wrench, remove throat plate screws.
6. Remove throat plate.
7. Remove bobbin case from Hook Assembly.
8. Using cleaning brush, clean any thread debris or lint from hook area.
9. Rotate gangshaft until Take-up Levers are in up position. (On Embroidery Machinerotate degree wheel [numbers ascend] to 244 degrees).
10. With finger, check entire Hook Assembly for burrs or nicks.
If burrs or nicks are present on Hook Assembly proceed to Section B.
If Hook Assembly is not damaged proceed to Section C.
Barudan Technical Sewing Head Maintenance Manual8/1/97
ZN Sewing Head B8-9
B. HOOK ASSEMBLY REPLACEMENT
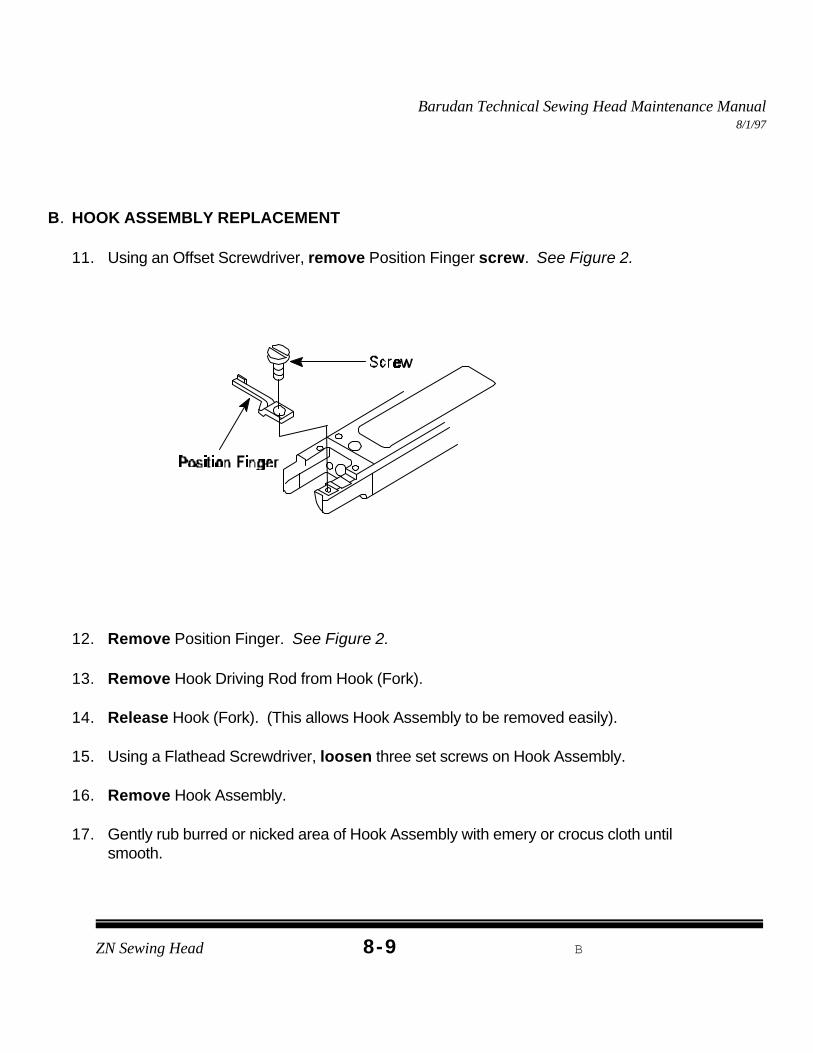
11. Using an Offset Screwdriver, remove Position Finger screw. See Figure 2.
12. Remove Position Finger. See Figure 2.
13. Remove Hook Driving Rod from Hook (Fork).
14. Release Hook (Fork). (This allows Hook Assembly to be removed easily).
15. Using a Flathead Screwdriver, loosen three set screws on Hook Assembly.
16. Remove Hook Assembly.
17. Gently rub burred or nicked area of Hook Assembly with emery or crocus cloth untilsmooth.
Barudan Technical Sewing Head Maintenance Manual8/1/97
ZN Sewing Head V8-10
Note: If burrs or nicks can not be smoothed, replace with new HookAssembly.
Figure 4
Figure 3
18. Rotate gangshaft to Color Change Position. (Rotate degree wheel to 244 degrees).
19. Replace repaired or new Hook Assembly on bottom shaft.
20. Rotate Hook Point to 9:00 position.
21. Snug set screw closest to Hook Point.
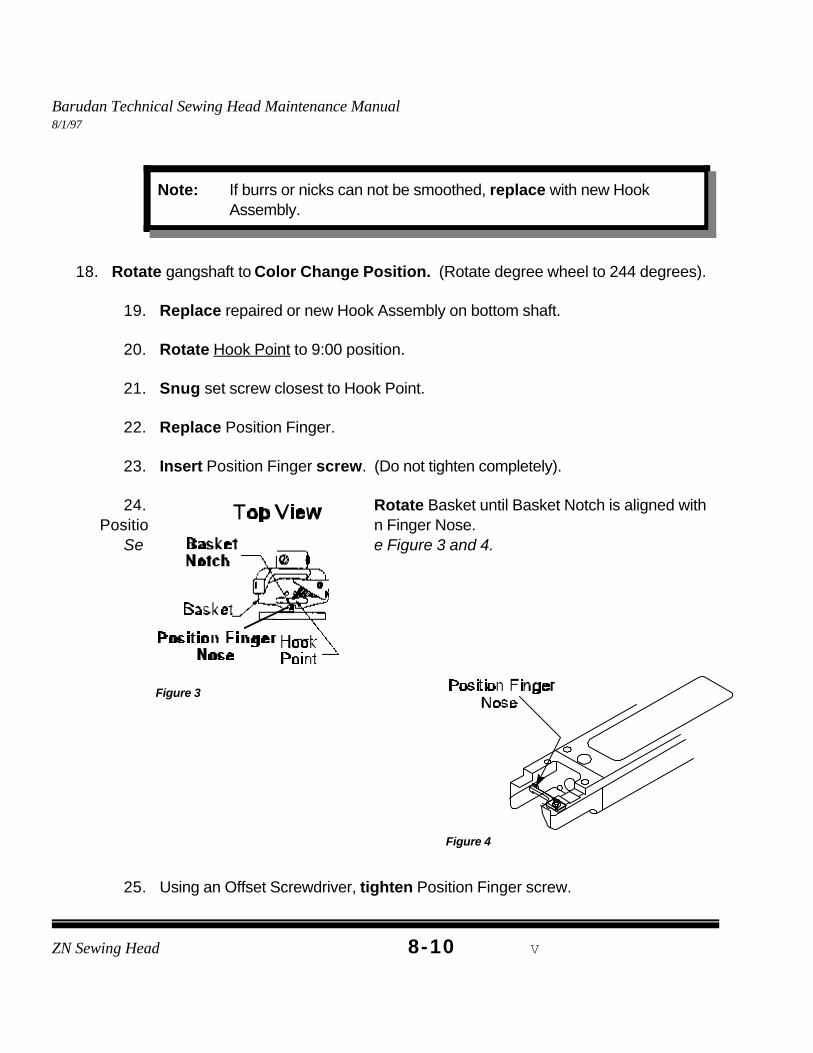
22. Replace Position Finger.
23. Insert Position Finger screw. (Do not tighten completely).
24. Rotate Basket until Basket Notch is aligned withPositio n Finger Nose.
Se e Figure 3 and 4.
25. Using an Offset Screwdriver, tighten Position Finger screw.
Barudan Technical Sewing Head Maintenance Manual8/1/97
ZN Sewing Head B8-11
Figure 5
26. Replace Hook Driving Rod.
27. Rotate gangshaft to Color Change Position. (Rotate degree wheel to 244 degrees).
C. HOOK POINT TIMING
28. Remove thread from Needle #1.
29. Loosen needle set screw.
30. Remove and discard old Needle.
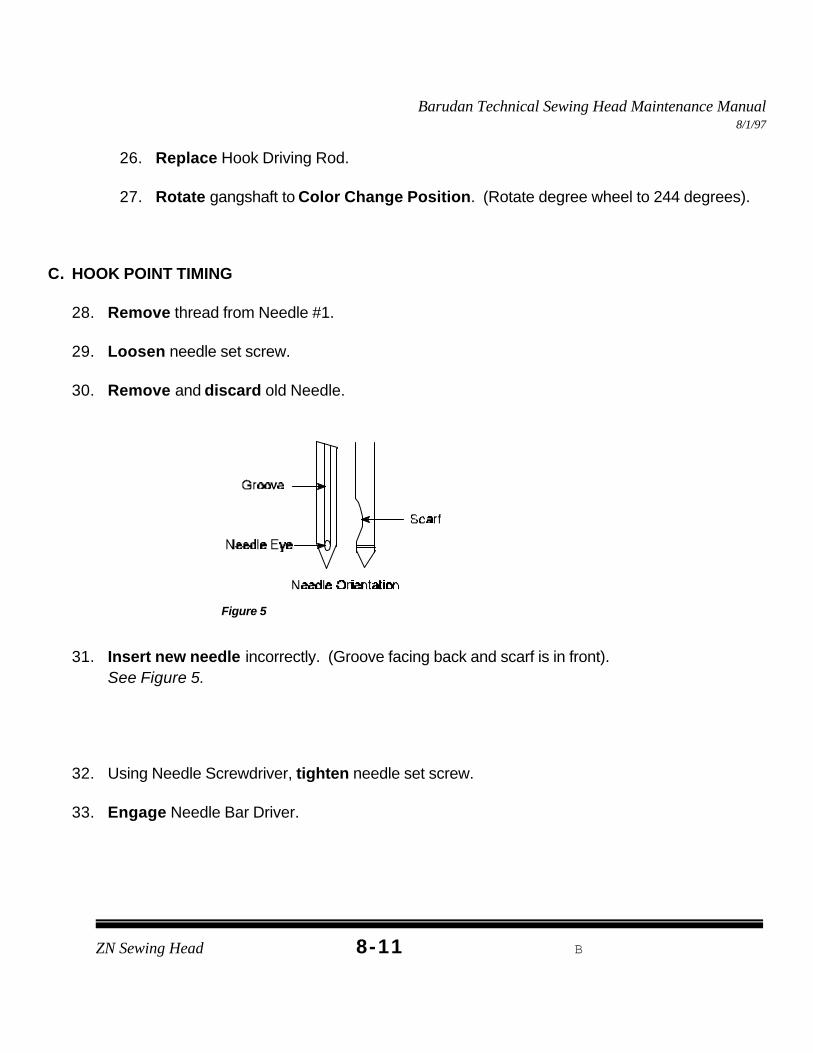
31. Insert new needle incorrectly. (Groove facing back and scarf is in front). See Figure 5.
32. Using Needle Screwdriver, tighten needle set screw.
33. Engage Needle Bar Driver.
Barudan Technical Sewing Head Maintenance Manual8/1/97
ZN Sewing Head V8-12
Figure 6
Figure 7
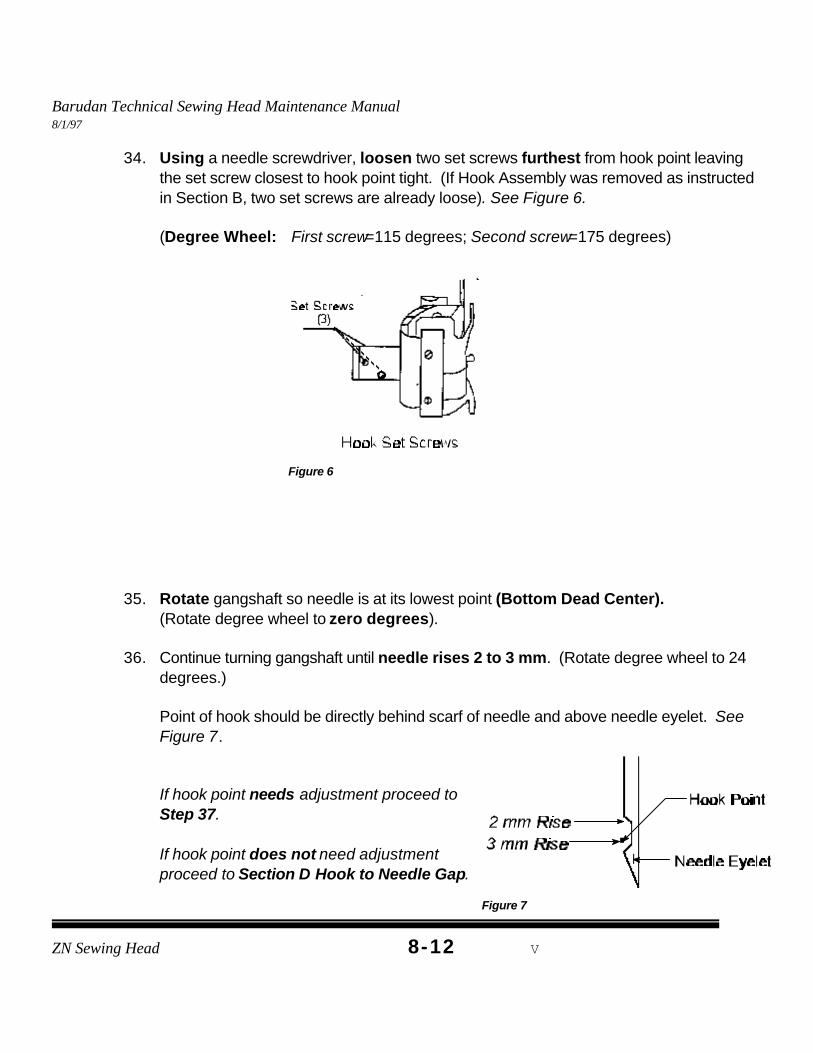
34. Using a needle screwdriver, loosen two set screws furthest from hook point leavingthe set screw closest to hook point tight. (If Hook Assembly was removed as instructedin Section B, two set screws are already loose). See Figure 6.
(Degree Wheel: First screw=115 degrees; Second screw=175 degrees)
35. Rotate gangshaft so needle is at its lowest point (Bottom Dead Center). (Rotate degree wheel to zero degrees).
36. Continue turning gangshaft until needle rises 2 to 3 mm. (Rotate degree wheel to 24degrees.)
Point of hook should be directly behind scarf of needle and above needle eyelet. SeeFigure 7.
If hook point needs adjustment proceed to Step 37.
If hook point does not need adjustmentproceed to Section D Hook to Needle Gap.
Barudan Technical Sewing Head Maintenance Manual8/1/97
ZN Sewing Head B8-13
Barudan Technical Sewing Head Maintenance Manual8/1/97
ZN Sewing Head V8-14
Figure 8
37. Using Flathead Screwdriver, loosen remaining set screw (closest to hook point).
38. Adjust so tip of hook point is behind and in middle of needle. See Figure 8.
39. Using Flathead Screwdriver, tighten set screw closest to hook point
D. HOOK TO NEEDLE GAPHook Point must be directly behind needle and as close to needle as possible. (Should notcause needle to bend).
Proceed to Step 40 if adjustments have to be made to gap.
Proceed to Step 51 if no adjustments have to be made to gap.
40. Using a Flathead Screwdriver, loosen set screw closest to Hook Point.
Barudan Technical Sewing Head Maintenance Manual8/1/97
ZN Sewing Head B8-15
41. Adjust Hook Assembly by moving Hook Point closer or further away from needle. (GettingHook Point close to needle but not touching.)
42. Once adjustment has been made, using a Flathead Screwdriver, tighten set screw closest to
Hook Point.43. Rotate gangshaft to Color Change Position. (Rotate degree wheel to 244 degrees).
44. Using Needle Screwdriver, loosen needle set screw.
45. Rotate Needle to correct position. (Groove facing front and scarf is in back).
46. Using Needle Screwdriver, tighten needle set screw.
47. To check for correct adjustment, rotate gangshaft until Hook Point is behind needle. (Rotate degree wheel to 24 degrees).
48. Hook Point should be directly behind needle and as close to needle as possible. (Should not cause needle to bend).
49. If Hook Point Timing and Gap is adjusted properly, using Flathead Screwdriver, tightentwo remaining set screws (furthest from hook point). If adjustment is not properly setrepeat the above steps until proper adjustment has been accomplished.
50. Rotate gangshaft to Color Change Position. (Rotate degree wheel to 244 degrees).
If removed Hook Assembly as instructed in Section B proceed toPosition Finger Adjustment
If Hook Assembly was not removed proceed to Step 54.
Barudan Technical Sewing Head Maintenance Manual8/1/97
ZN Sewing Head V8-16
51. Using Needle Screwdriver, loosen needle set screw.
52. Rotate needle to correct position. (Groove facing front and scarf is in back).
53. Using Needle Screwdriver, tighten needle set screw.
54. Reinstall throat plate.
55. Using 2.5 mm Allen Wrench, tighten throat plate screws.
56. Reinstall bobbin case in Hook Assembly.
57. Using enclosed disk, sew the “HOX” test to check for proper adjustment.
Barudan Technical Sewing Head Maintenance Manual8/1/97
ZN Sewing Head B8-17
TOOLS NEEDEDOffset Screwdriver
Figure 1
POSITION FINGER ADJUSTMENT
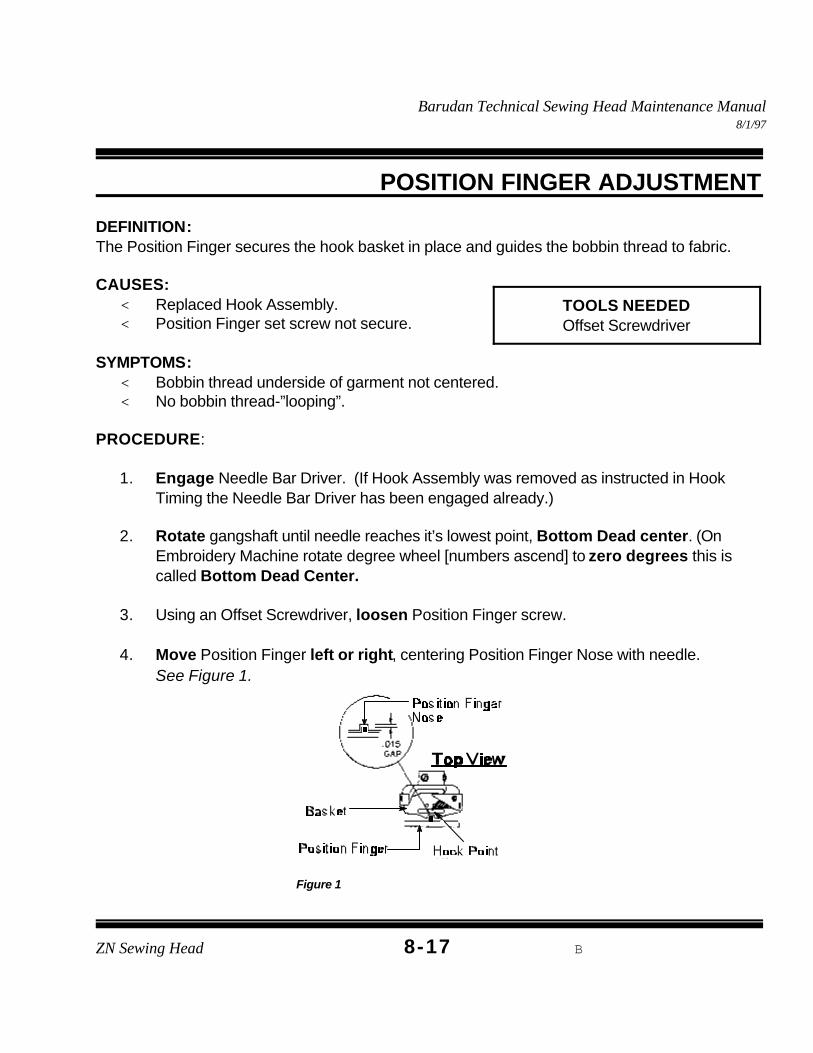
DEFINITION:The Position Finger secures the hook basket in place and guides the bobbin thread to fabric.
CAUSES:< Replaced Hook Assembly.< Position Finger set screw not secure.
SYMPTOMS:< Bobbin thread underside of garment not centered.< No bobbin thread-”looping”.
PROCEDURE:
1. Engage Needle Bar Driver. (If Hook Assembly was removed as instructed in HookTiming the Needle Bar Driver has been engaged already.)
2. Rotate gangshaft until needle reaches it’s lowest point, Bottom Dead center. (OnEmbroidery Machine rotate degree wheel [numbers ascend] to zero degrees this iscalled Bottom Dead Center.
3. Using an Offset Screwdriver, loosen Position Finger screw.
4. Move Position Finger left or right, centering Position Finger Nose with needle. See Figure 1.
Barudan Technical Sewing Head Maintenance Manual8/1/97
ZN Sewing Head V8-18
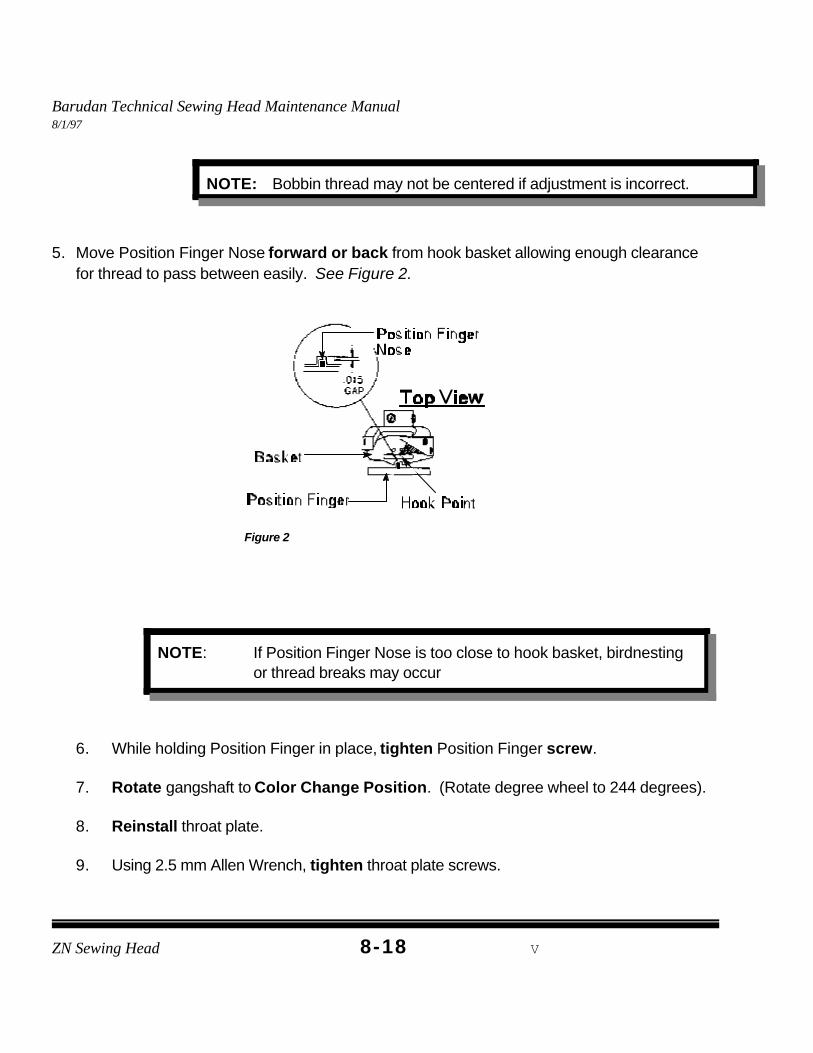
NOTE: Bobbin thread may not be centered if adjustment is incorrect.
Figure 2
NOTE: If Position Finger Nose is too close to hook basket, birdnestingor thread breaks may occur
5. Move Position Finger Nose forward or back from hook basket allowing enough clearancefor thread to pass between easily. See Figure 2.
6. While holding Position Finger in place, tighten Position Finger screw.
7. Rotate gangshaft to Color Change Position. (Rotate degree wheel to 244 degrees).
8. Reinstall throat plate.
9. Using 2.5 mm Allen Wrench, tighten throat plate screws.
Barudan Technical Sewing Head Maintenance Manual8/1/97
ZN Sewing Head B8-19
10. Reinstall bobbin case in Hook Assembly.
11. Using enclosed disk, sew the “HOX” test to check for proper adjustment.
Barudan Technical Sewing Head Maintenance Manual8/1/97
ZN Sewing Head V8-20
TOOLS NEEDED3 mm Allen WrenchPhillips ScrewdriverNeedle Screwdriver
New NeedlesNew Needle Bar
New Small SpringFlashlight
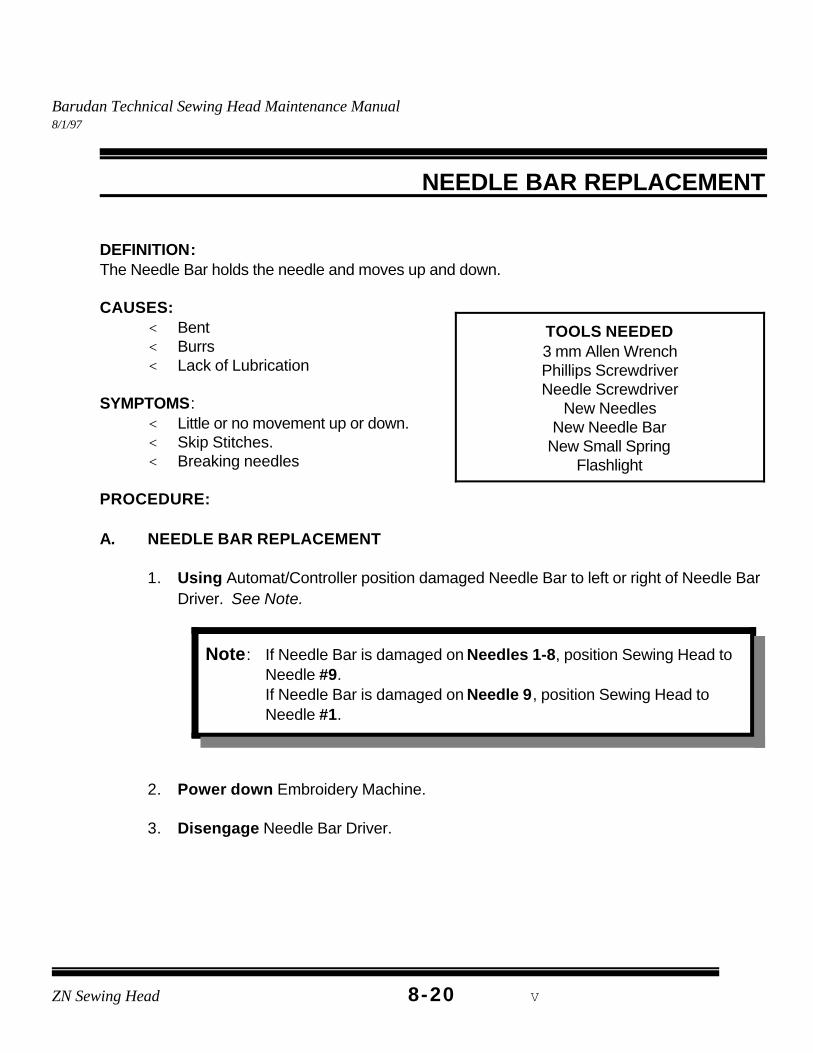
Note: If Needle Bar is damaged on Needles 1-8, position Sewing Head toNeedle #9.If Needle Bar is damaged on Needle 9, position Sewing Head toNeedle #1.
NEEDLE BAR REPLACEMENT
DEFINITION:The Needle Bar holds the needle and moves up and down.
CAUSES:< Bent < Burrs< Lack of Lubrication
SYMPTOMS:< Little or no movement up or down.< Skip Stitches.< Breaking needles
PROCEDURE:
A. NEEDLE BAR REPLACEMENT
1. Using Automat/Controller position damaged Needle Bar to left or right of Needle BarDriver. See Note.
2. Power down Embroidery Machine.
3. Disengage Needle Bar Driver.
Barudan Technical Sewing Head Maintenance Manual8/1/97
ZN Sewing Head B8-21
Figure 1
Figure 2
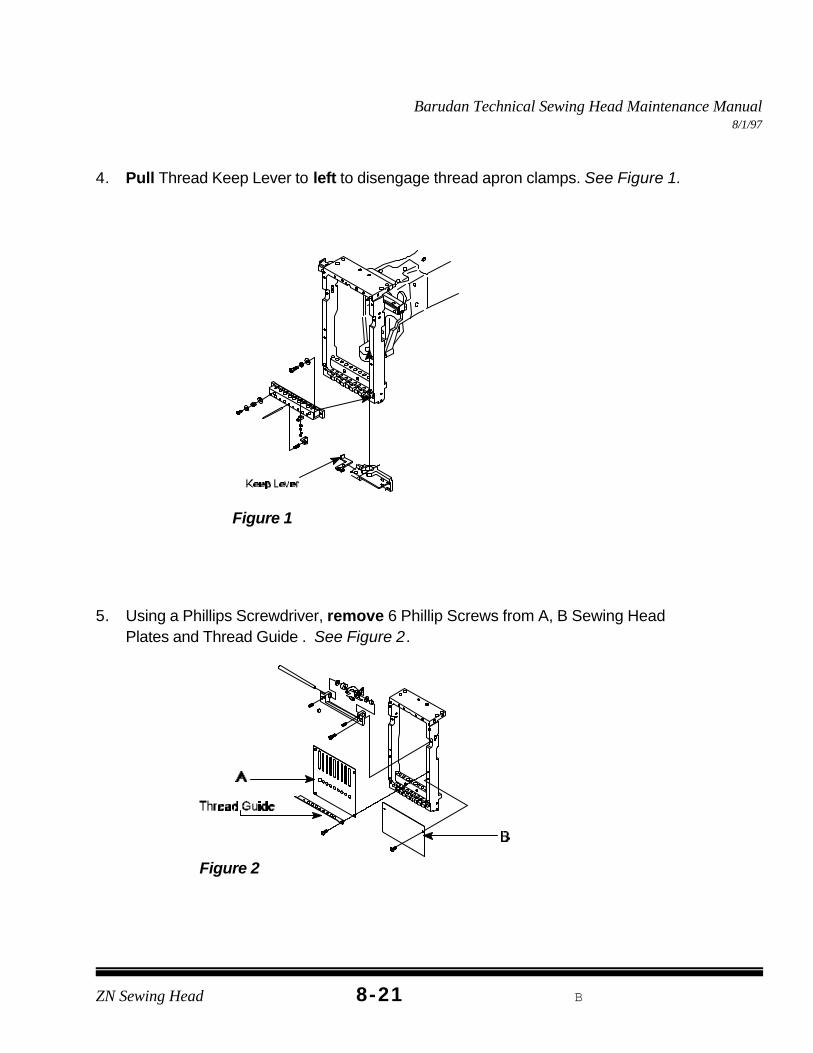
4. Pull Thread Keep Lever to left to disengage thread apron clamps. See Figure 1.
5. Using a Phillips Screwdriver, remove 6 Phillip Screws from A, B Sewing HeadPlates and Thread Guide . See Figure 2.
Barudan Technical Sewing Head Maintenance Manual8/1/97
ZN Sewing Head V8-22
Note: When removing Sewing Head Plate A from Sewing HeadNumber One, lift straight up then pull towards you. Back side ofcover wraps around the needle position indicator and incorrect
6. Using a 3 mm Allen Wrench remove 2-Allen Screws on the Take-up LeverAssembly.
7. Remove Take-up Lever Assembly.
8. Using a Needle Screwdriver, loosen needle set screw and remove needle.
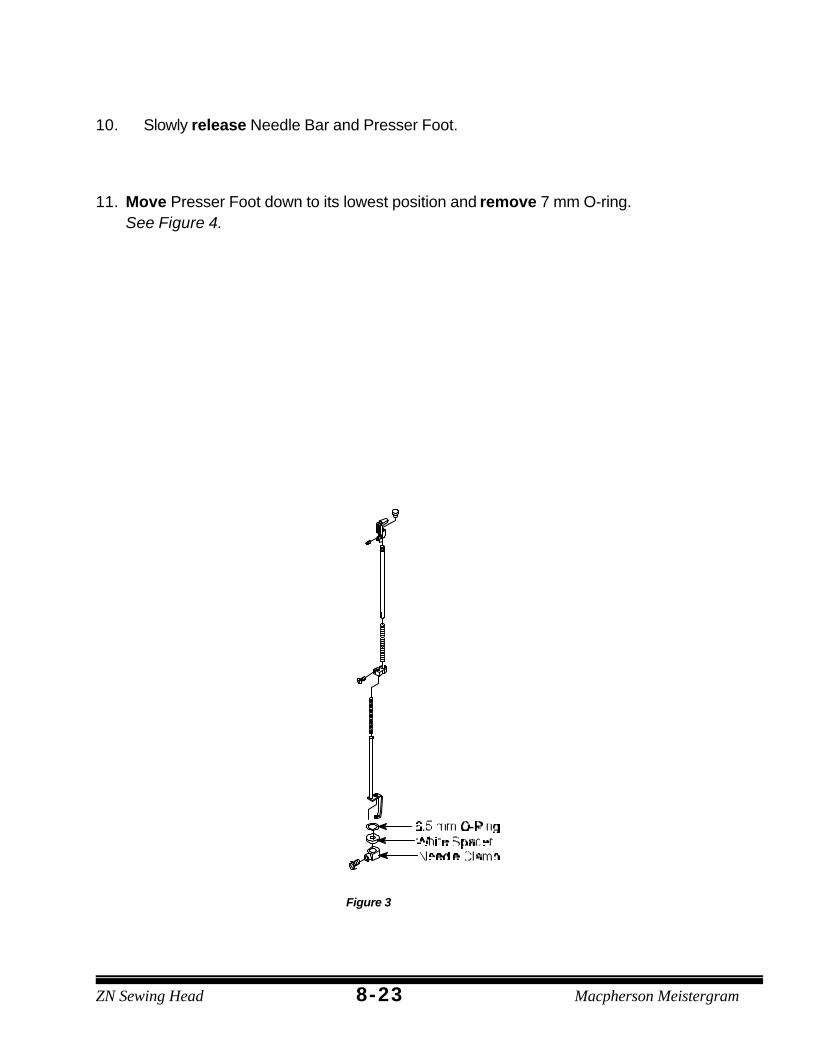
9. Squeeze and hold Needle Bar and Presser Foot together and remove needleclamp, white spacer and 6.5 mm O-ring. See Figure 3.
8-23ZN Sewing Head Macpherson Meistergram
Figure 3
10. Slowly release Needle Bar and Presser Foot.
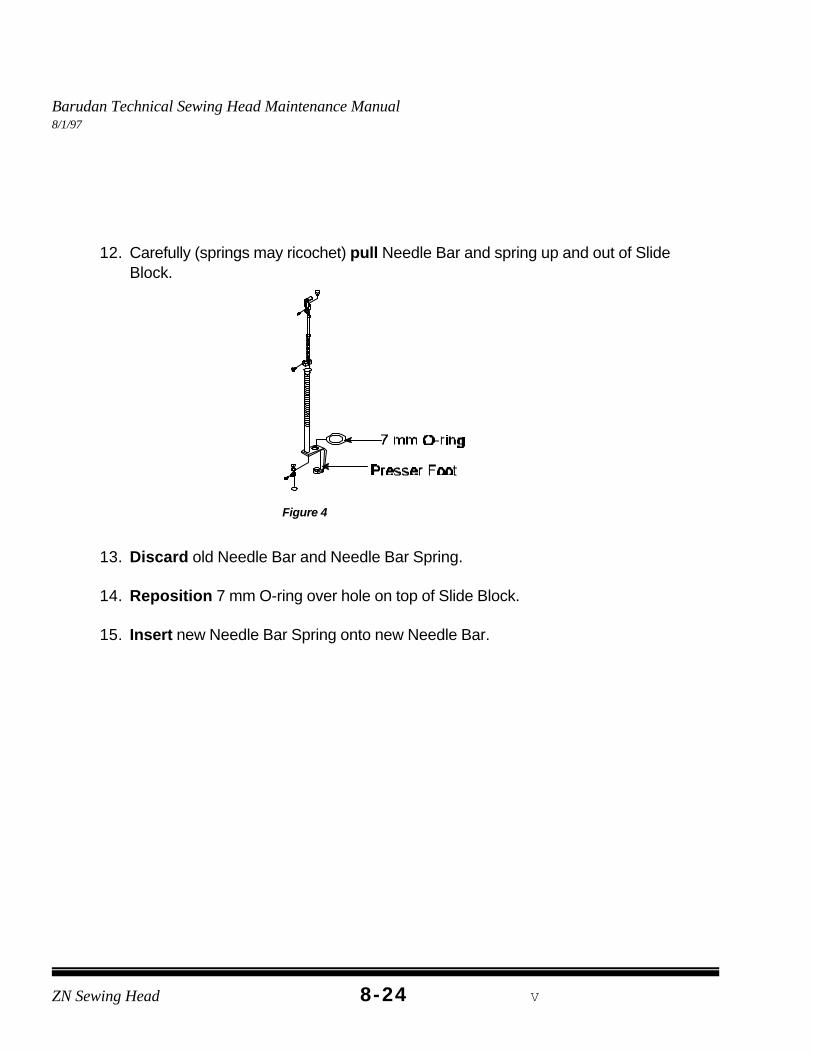
11. Move Presser Foot down to its lowest position and remove 7 mm O-ring.See Figure 4.
Barudan Technical Sewing Head Maintenance Manual8/1/97
ZN Sewing Head V8-24
Figure 4
12. Carefully (springs may ricochet) pull Needle Bar and spring up and out of SlideBlock.
13. Discard old Needle Bar and Needle Bar Spring.
14. Reposition 7 mm O-ring over hole on top of Slide Block.
15. Insert new Needle Bar Spring onto new Needle Bar.
Barudan Technical Sewing Head Maintenance Manual8/1/97
8-25ZN Sewing Head Macpherson Meistergram
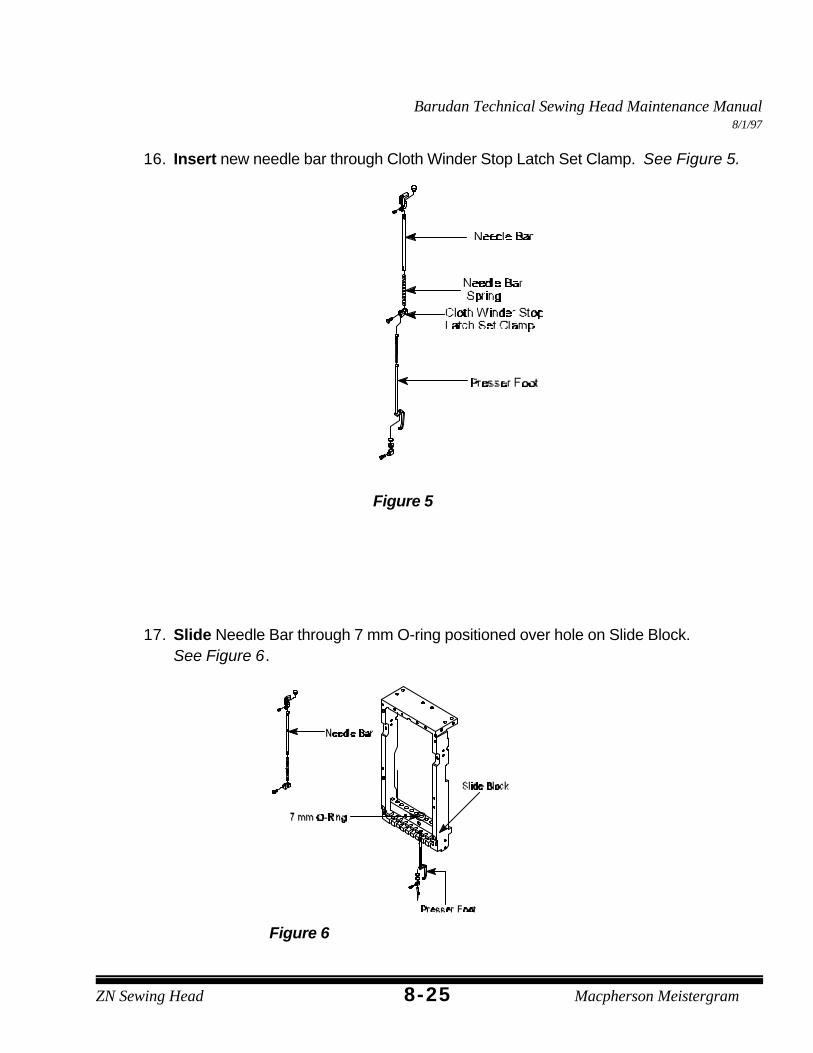
Figure 5
Figure 6
16. Insert new needle bar through Cloth Winder Stop Latch Set Clamp. See Figure 5.
17. Slide Needle Bar through 7 mm O-ring positioned over hole on Slide Block. See Figure 6.
Barudan Technical Sewing Head Maintenance Manual8/1/97
ZN Sewing Head V8-26
Note: If Positioned Sewing Head to Needle #1, position Take-up Lever #1on Take-up Lever Driver Roller.If Positioned Sewing Head to Needle #9, position Take-up Lever #9on Take-up Lever Driver Roller.
Helpful Hint: Replace bottom plate (B) first then top plate (A) andThread Guide.
18. Continue inserting Needle Bar through Slide Block. See Figure 6.
19. Press Needle Bar down and insert 7 mm O-ring onto Needle Bar.
20. Press Needle Bar and Presser Foot together making sure Presser Foot Shaft linesup with Needle Bar Guide Notch.
21. While holding Needle Bar and Presser Foot together slide 6 mm O-ring and whitespacer onto Needle Bar.
22. Insert Needle Clamp onto Needle Bar and align set screw with bottom hole then snugset screw.
23. Insert Needle correctly. (Groove facing front and scarf is in back).
24. Using a Needle Screwdriver, tighten Needle set screw.
25. While holding the Take-up lever assembly, align all Take-up Levers in the up position.
26. Position the Take-up Lever Assembly so back of Take-up levers notches slide ontothe Stocker.
27. Using a 3 mm Allen Wrench, tighten 2 Allen Screws to secure Take-up LeverAssembly.
28. Using Phillips Screwdriver, replace Sewing Head Plates and Thread Guide.
Barudan Technical Sewing Head Maintenance Manual8/1/97
8-27ZN Sewing Head Macpherson Meistergram
TOOLS NEEDED2.5 mm Allen WrenchPhillips ScrewdriverNeedle ScrewdriverNew Presser Foot
New Needle Bar Spring (lower)MOST PRESSER FEET CAN BE BENT BACKINTO SHAPE.
Note: If Needle Bar is damaged on Needles 1-8, position Sewing Head toNeedle #9.If Needle Bar is damaged on Needle 9, position Sewing Head toNeedle #1.
PRESSER FOOT REPLACEMENT
DEFINITION:Presses down on material to prevent flagging.
1. Using Automat/Controller position damaged Needle Bar to left or right of NeedleBar Driver. See Note.
2. Power down Embroidery Machine.
Barudan Technical Sewing Head Maintenance Manual8/1/97
ZN Sewing Head V8-28
Figure 1
Figure 2
Note: When removing Sewing Head Plate A from Sewing HeadNumber One, lift straight up then pull towards you. Back side ofcover wraps around the needle position indicator and incorrectremoval can damage the indicator.
3. Disengage Needle Bar Driver.
4. Lower drop table.
5. Pull Thread Keep Lever to left to disengage thread apron clamps. See Figure 1.
6. Using a Phillips Screwdriver, remove 6 screws from A, B Sewing Head Plates andThread Guide . See Figure 2.
Barudan Technical Sewing Head Maintenance Manual8/1/97
ZN Sewing Head B8-29
Figure 3
Figure 4
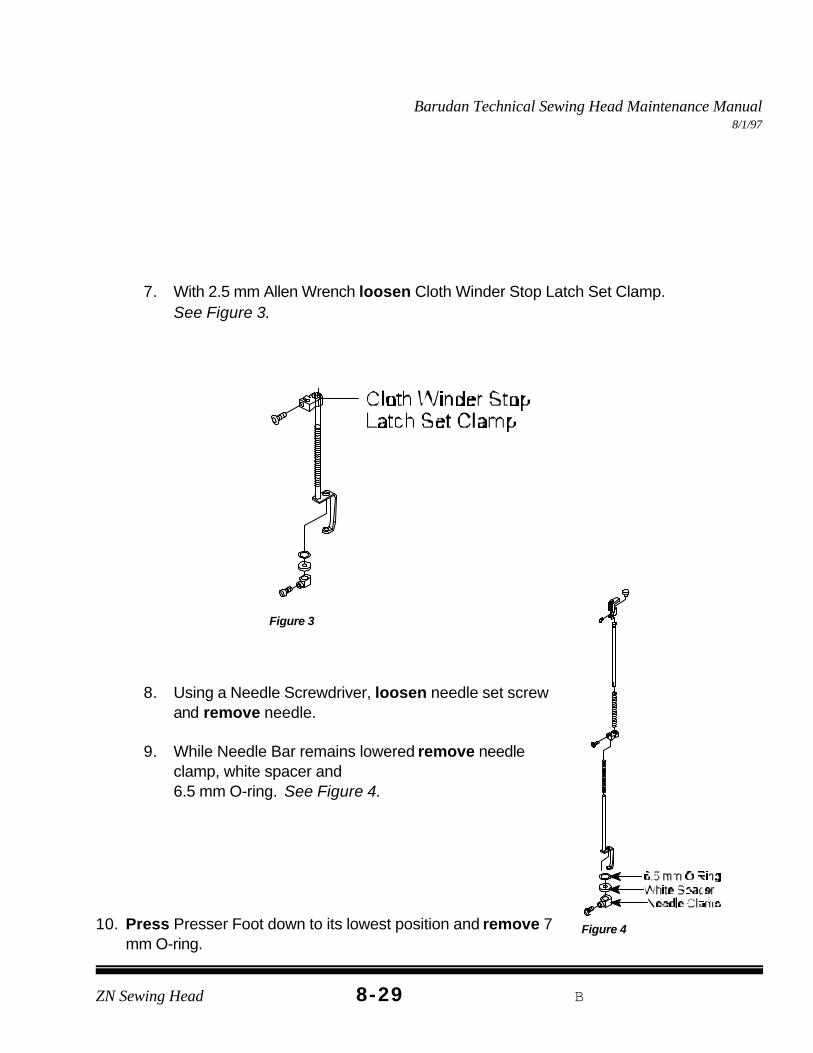
7. With 2.5 mm Allen Wrench loosen Cloth Winder Stop Latch Set Clamp. See Figure 3.
8. Using a Needle Screwdriver, loosen needle set screwand remove needle.
9. While Needle Bar remains lowered remove needleclamp, white spacer and 6.5 mm O-ring. See Figure 4.
10. Press Presser Foot down to its lowest position and remove 7mm O-ring.
Barudan Technical Sewing Head Maintenance Manual8/1/97
ZN Sewing Head V8-30
Figure 5
Figure 6
See Figure 5.
11. Slide damaged Presser Foot down and out.
12. Carefully (spring may ricochet) pull Presser Foot down and out of Slide Block.
13. Remove Presser Foot and Needle Bar Spring (lower). See Figure 6.
Barudan Technical Sewing Head Maintenance Manual8/1/97
ZN Sewing Head B8-31
Figure 7
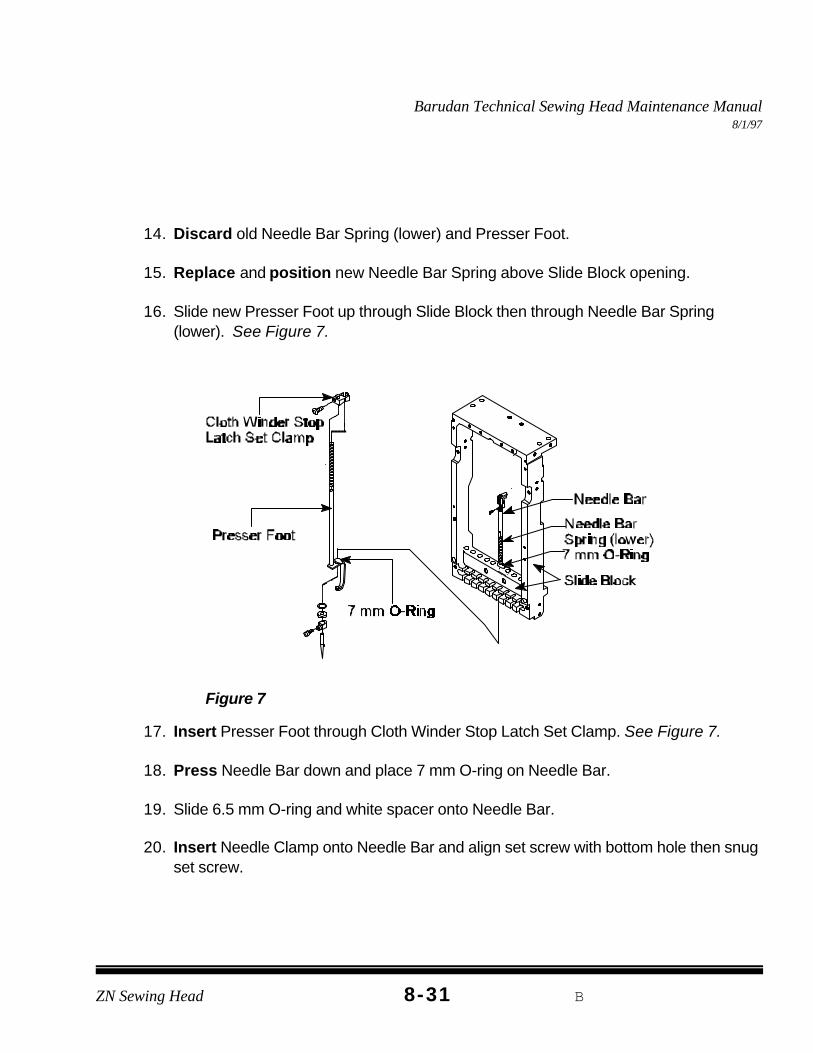
14. Discard old Needle Bar Spring (lower) and Presser Foot.
15. Replace and position new Needle Bar Spring above Slide Block opening.
16. Slide new Presser Foot up through Slide Block then through Needle Bar Spring(lower). See Figure 7.
17. Insert Presser Foot through Cloth Winder Stop Latch Set Clamp. See Figure 7.
18. Press Needle Bar down and place 7 mm O-ring on Needle Bar.
19. Slide 6.5 mm O-ring and white spacer onto Needle Bar.
20. Insert Needle Clamp onto Needle Bar and align set screw with bottom hole then snugset screw.
Barudan Technical Sewing Head Maintenance Manual5/1/97
ZN Sewing Head V8-32
Figure 8
Helpful Hint: Replace bottom plate (B) first then top plate (A) andThread Guide.
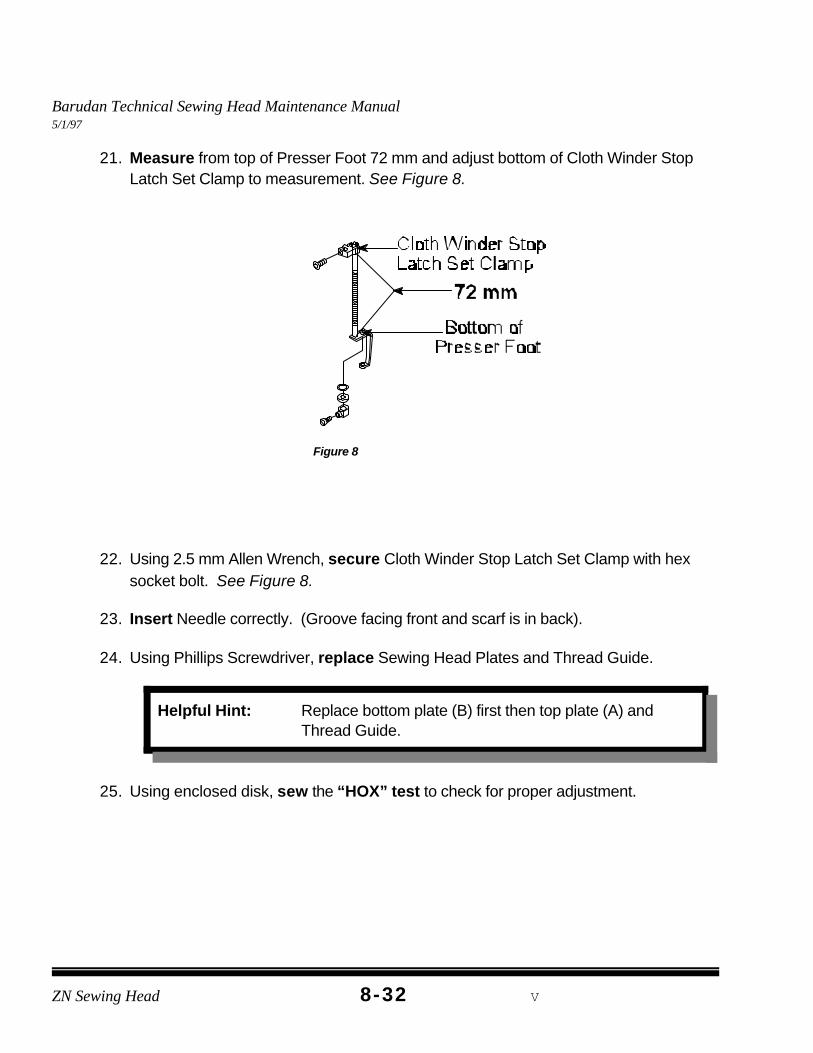
21. Measure from top of Presser Foot 72 mm and adjust bottom of Cloth Winder StopLatch Set Clamp to measurement. See Figure 8.
22. Using 2.5 mm Allen Wrench, secure Cloth Winder Stop Latch Set Clamp with hexsocket bolt. See Figure 8.
23. Insert Needle correctly. (Groove facing front and scarf is in back).
24. Using Phillips Screwdriver, replace Sewing Head Plates and Thread Guide.
25. Using enclosed disk, sew the “HOX” test to check for proper adjustment.
Barudan Technical Sewing Head Maintenance Manual8/1/97
ZN Sewing Head B8-33
TOOLS NEEDED2 mm T-Handle Allen Wrench3 mm T-Handle Allen Wrench
Phillips ScrewdriverNew Take-Up Lever (s)
Figure 1
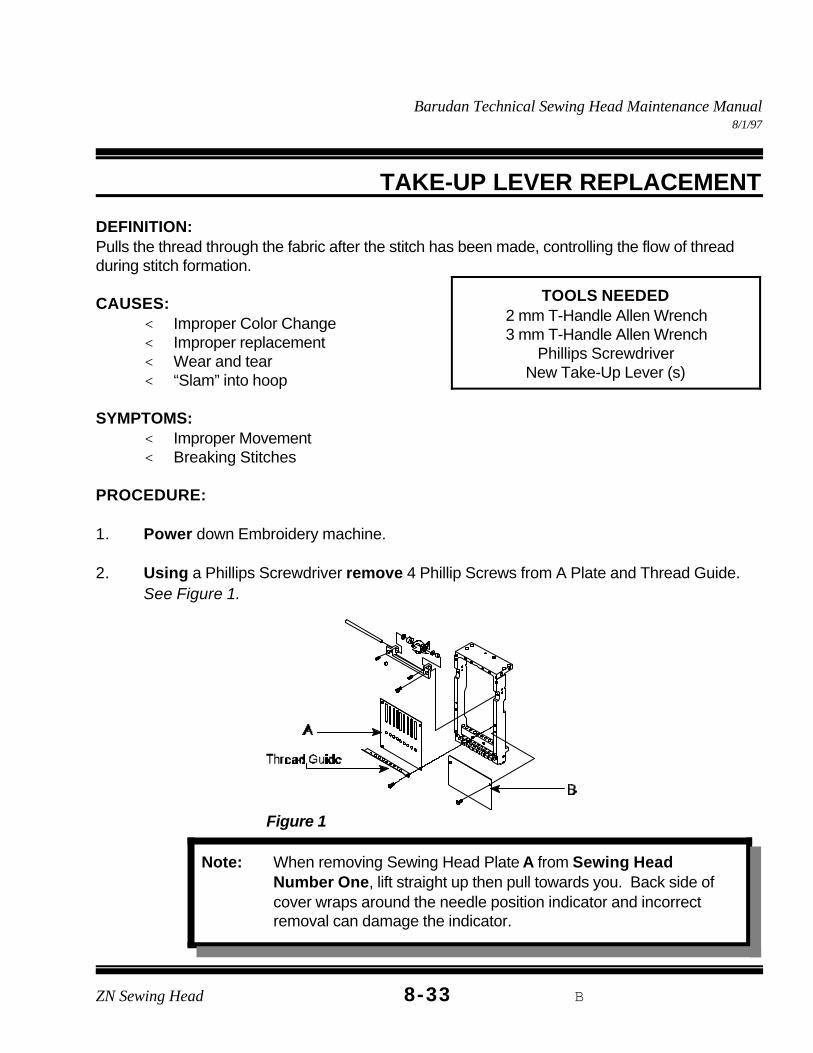
Note: When removing Sewing Head Plate A from Sewing HeadNumber One, lift straight up then pull towards you. Back side ofcover wraps around the needle position indicator and incorrectremoval can damage the indicator.
TAKE-UP LEVER REPLACEMENT
DEFINITION:Pulls the thread through the fabric after the stitch has been made, controlling the flow of threadduring stitch formation.
CAUSES:< Improper Color Change< Improper replacement< Wear and tear< “Slam” into hoop
SYMPTOMS:< Improper Movement< Breaking Stitches
PROCEDURE:
1. Power down Embroidery machine.
2. Using a Phillips Screwdriver remove 4 Phillip Screws from A Plate and Thread Guide. See Figure 1.
Barudan Technical Sewing Head Maintenance Manual8/1/97
ZN Sewing Head V8-34
Figure 2
Figure 3
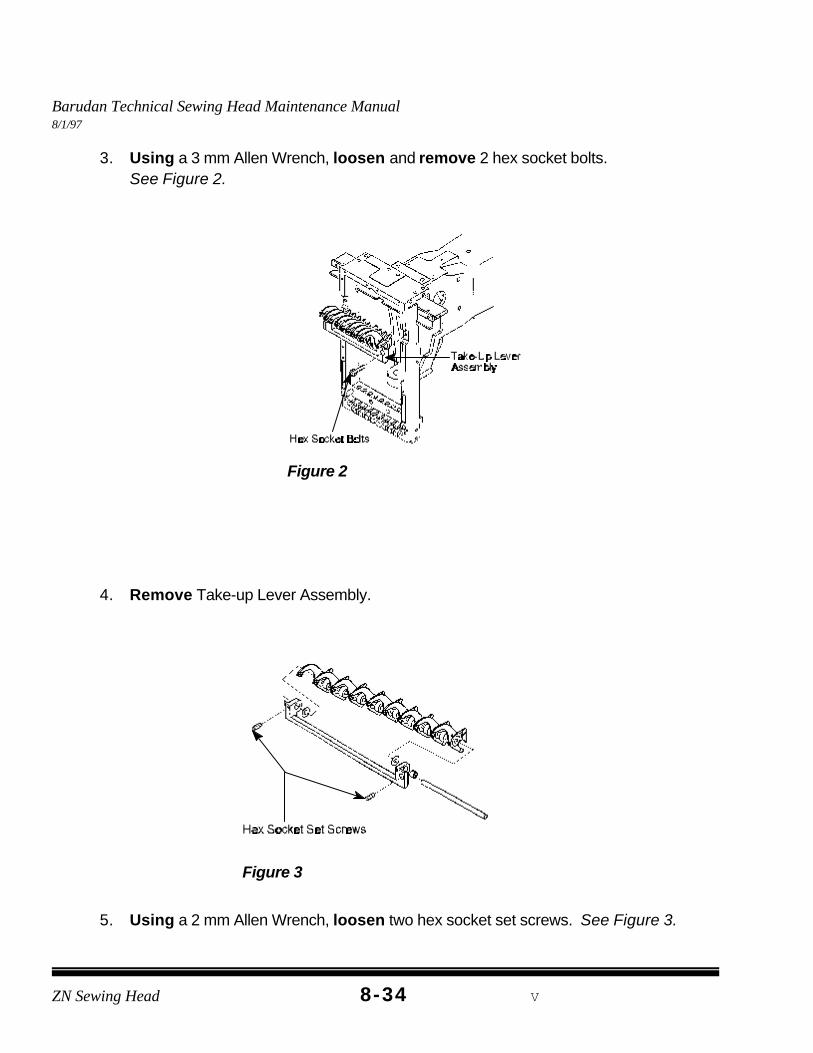
3. Using a 3 mm Allen Wrench, loosen and remove 2 hex socket bolts. See Figure 2.
4. Remove Take-up Lever Assembly.
5. Using a 2 mm Allen Wrench, loosen two hex socket set screws. See Figure 3.
Barudan Technical Sewing Head Maintenance Manual8/1/97
ZN Sewing Head B8-35
Helpful Hint: Remove Take-Up Levers over a table.
Figure 4
6.Using 2 mm Allen Wrench, Push and Slide Take-Up Lever Shaft out until the damagedTake-Up Lever can be removed.
7. Remove damaged Take-Up Lever.
8. Replace with new Take-Up Lever.
9. Slide Take-Up Lever Shaft through all Take-Up Levers, Take-Up Lever Spacer &
Take-Up Lever Shim.(If pushed Take-Up Lever Shaft from right replace Take-Up Lever Collar). See Figure 4.
Barudan Technical Sewing Head Maintenance Manual8/1/97
ZN Sewing Head V8-36
Figure 5
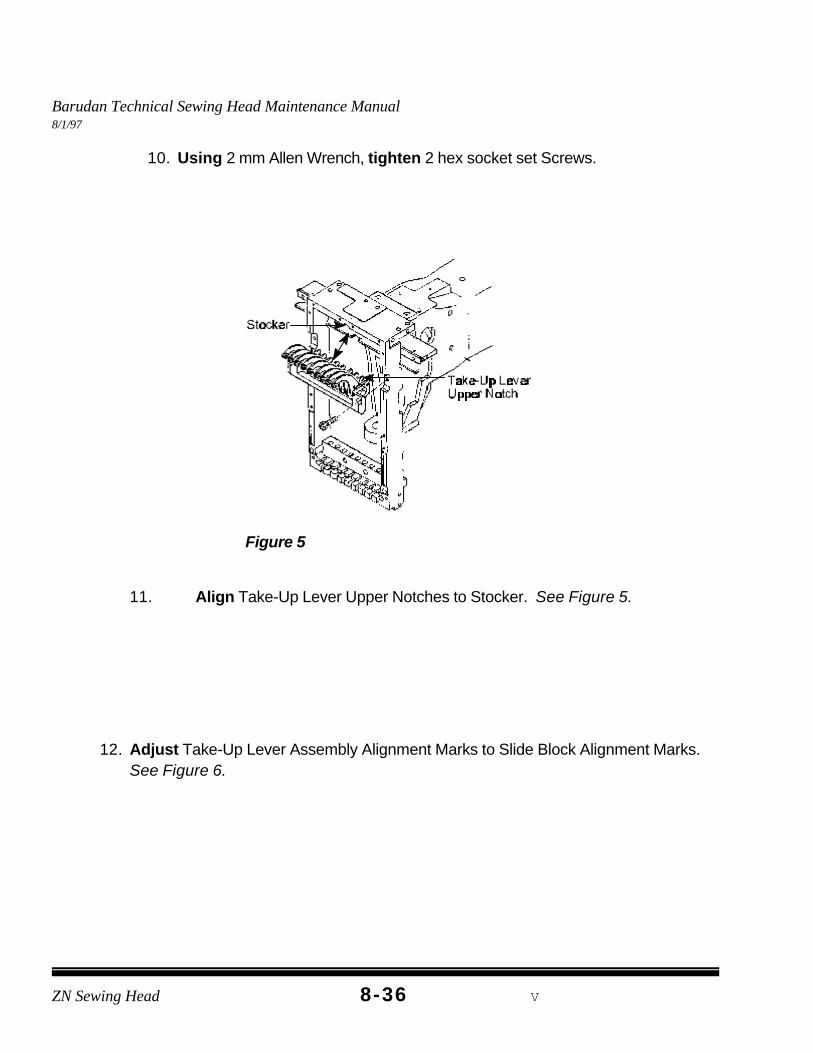
10. Using 2 mm Allen Wrench, tighten 2 hex socket set Screws.
11. Align Take-Up Lever Upper Notches to Stocker. See Figure 5.
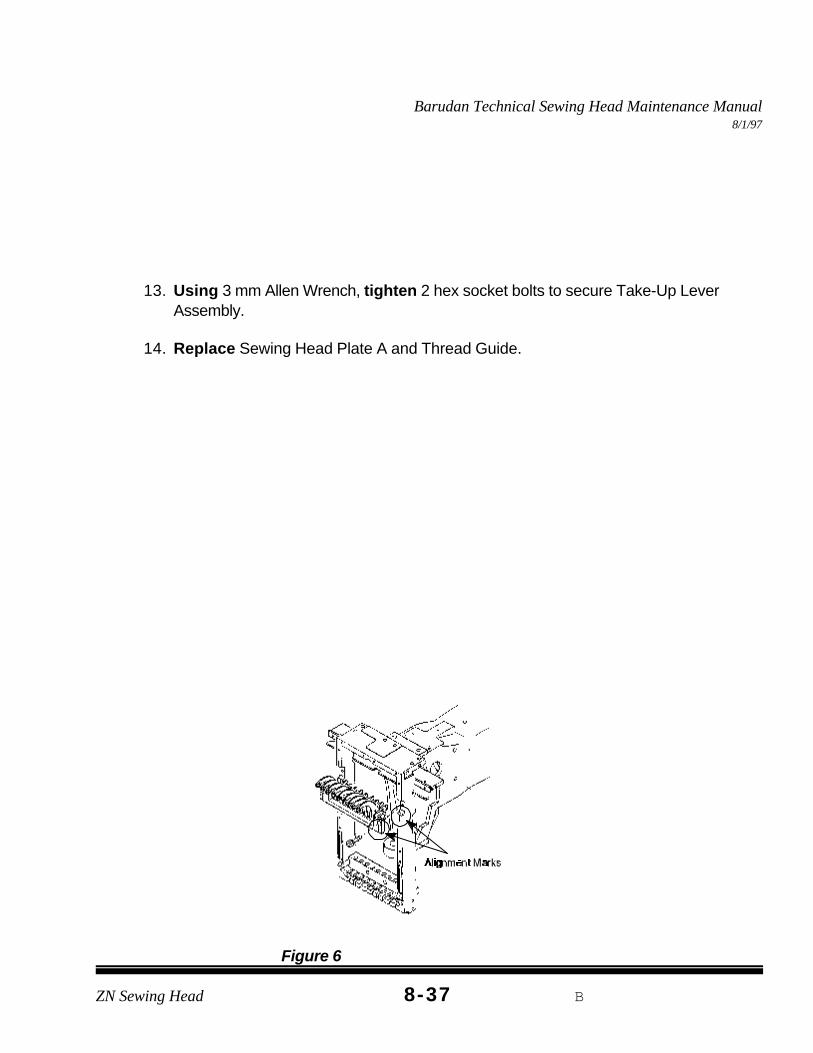
12. Adjust Take-Up Lever Assembly Alignment Marks to Slide Block Alignment Marks. See Figure 6.
Barudan Technical Sewing Head Maintenance Manual8/1/97
ZN Sewing Head B8-37
Figure 6
13. Using 3 mm Allen Wrench, tighten 2 hex socket bolts to secure Take-Up LeverAssembly.
14. Replace Sewing Head Plate A and Thread Guide.
Barudan Technical Sewing Head Maintenance Manual8/1/97
ZN Sewing Head V8-38
TOOLS NEEDED2 mm Allen Wrench
2.5 mm Allen Wrench3 mm T-Handle Allen Wrench
Phillips ScrewdriverOffset Phillips Screwdriver
Needle ScrewdriverFlashlight
NEEDLE BAR DRIVER AND FIXING BASE REPLACEMENT
DEFINITION:Drives the Needle Bar down.
CAUSES:< Lack of oil on Needle Bar< Improper replacement< Wear and tear< “Slam” into hoop
1. Using Automat/Controller position Sewing Heads to Needle #1.
2. Power down Embroidery Machine.
3. Disengage Needle Bar Driver.
Barudan Technical Sewing Head Maintenance Manual8/1/97
ZN Sewing Head B8-39
Figure 1
Note: When removing Sewing Head Plate A from Sewing HeadNumber One, lift straight up then pull towards you. Back side ofcover wraps around the needle position indicator and incorrectremoval can damage the indicator.
Figure 2
4. Using a Phillips Screwdriver, remove 6 screws from A, and B Sewing Head Plates and Thread Guide . See Figure 1.
5. Using an Offsest Phillips screwdriver, remove phillips screws from Side Cover(Left). See Figure 2.
Barudan Technical Sewing Head Maintenance Manual8/1/97
ZN Sewing Head V8-40
Figure 4
Figure 5
6. Remove Side Cover (Left).
7. Remove Needle Bar Driver Return Spring from post.
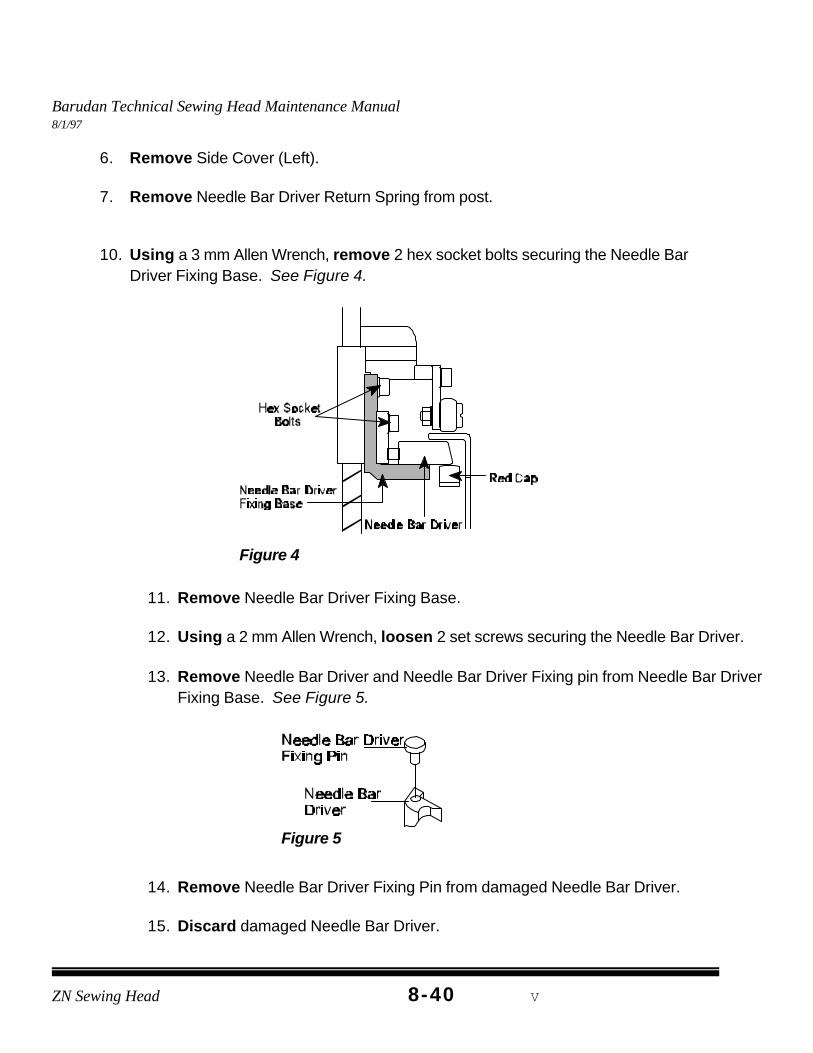
10. Using a 3 mm Allen Wrench, remove 2 hex socket bolts securing the Needle BarDriver Fixing Base. See Figure 4.
11. Remove Needle Bar Driver Fixing Base.
12. Using a 2 mm Allen Wrench, loosen 2 set screws securing the Needle Bar Driver.
13. Remove Needle Bar Driver and Needle Bar Driver Fixing pin from Needle Bar DriverFixing Base. See Figure 5.
14. Remove Needle Bar Driver Fixing Pin from damaged Needle Bar Driver.
15. Discard damaged Needle Bar Driver.
Barudan Technical Sewing Head Maintenance Manual8/1/97
ZN Sewing Head B8-41
16. Replace Needle Bar Driver Fixing Pin into new Needle Bar Driver.
17. Check for damage to Needle Bar Driver Fixing Base. (If damaged replace).
18. Using a 2 mm Allen Wrench, remove 2 set screws from damaged Needle Bar DriverFixing Base.
19. Discard damaged Needle Bar Driver Fixing Base.
19. Install 2 set screws into new Needle Bar Driver Fixing Base using a 2 mm AllenWrench.
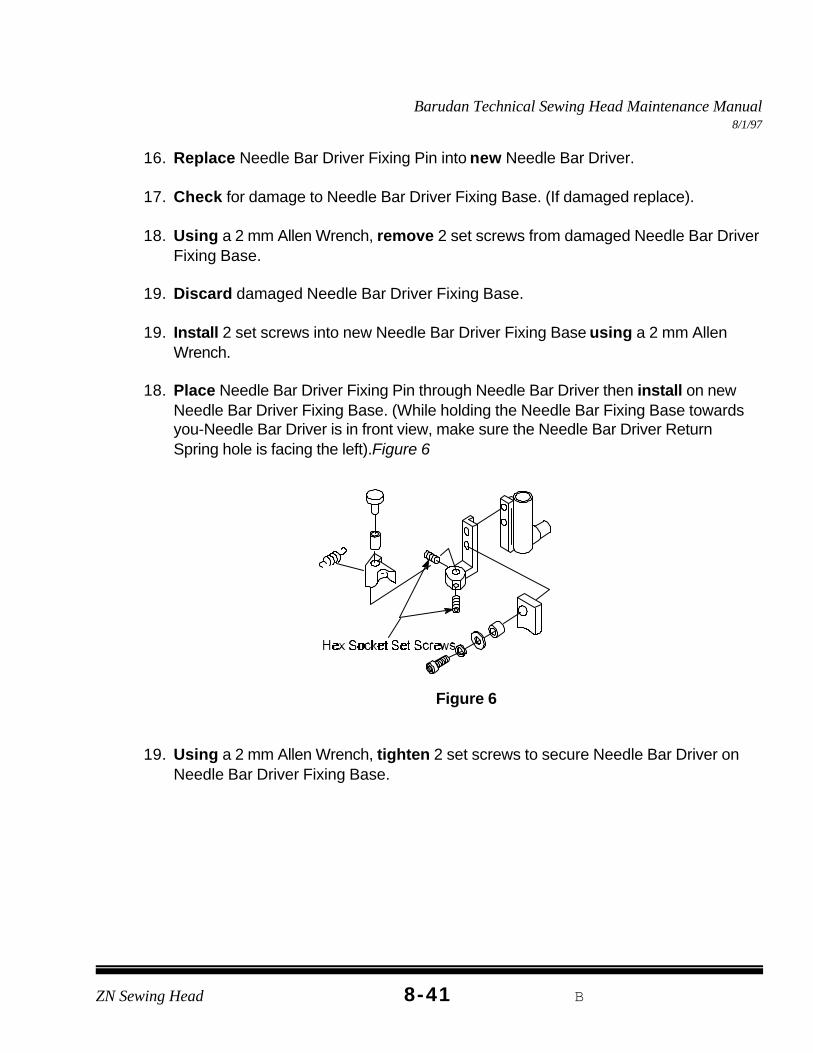
18. Place Needle Bar Driver Fixing Pin through Needle Bar Driver then install on newNeedle Bar Driver Fixing Base. (While holding the Needle Bar Fixing Base towardsyou-Needle Bar Driver is in front view, make sure the Needle Bar Driver ReturnSpring hole is facing the left).Figure 6
19. Using a 2 mm Allen Wrench, tighten 2 set screws to secure Needle Bar Driver onNeedle Bar Driver Fixing Base.
Figure 6
Barudan Technical Sewing Head Maintenance Manual8/1/97
ZN Sewing Head V8-42
Figure 6
Figure 7
20. Replace Needle Bar Driver Return Spring to Needle Bar Driver.
20. Align Driver Fixing Base Spacer behind Needle Bar Driver Fixing Base making sureboth holes are aligned.
21. Engage Needle Bar Driver.
22. Align both Driver Fixing Base Spacer and Needle Bar Driver Fixing Base to NeedleBar Driver Guide Block.
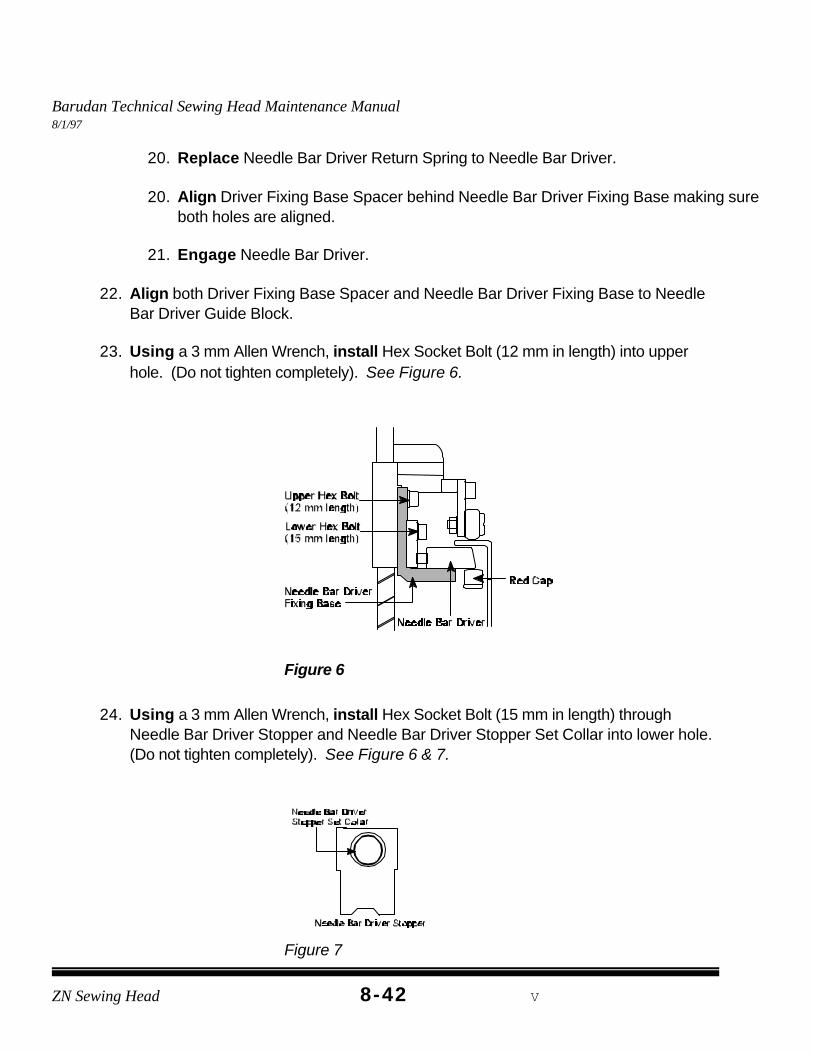
23. Using a 3 mm Allen Wrench, install Hex Socket Bolt (12 mm in length) into upperhole. (Do not tighten completely). See Figure 6.
24. Using a 3 mm Allen Wrench, install Hex Socket Bolt (15 mm in length) throughNeedle Bar Driver Stopper and Needle Bar Driver Stopper Set Collar into lower hole. (Do not tighten completely). See Figure 6 & 7.
Barudan Technical Sewing Head Maintenance Manual8/1/97
ZN Sewing Head B8-43
Figure 9
25. Attach Needle Bar Driver Return Spring to post.
26 Using a 2.5 mm Allen Wrench, remove throat plate screws.
27. Remove throat plate.
28. Remove bobbin case from Hook Assembly.
29. Using cleaning brush, clean any thread debris or lint from hook area.
34. Remove thread from Needle #1.
35. Using Needle Screwdriver, loosen needle set screw.
36. Remove and discard old needle.
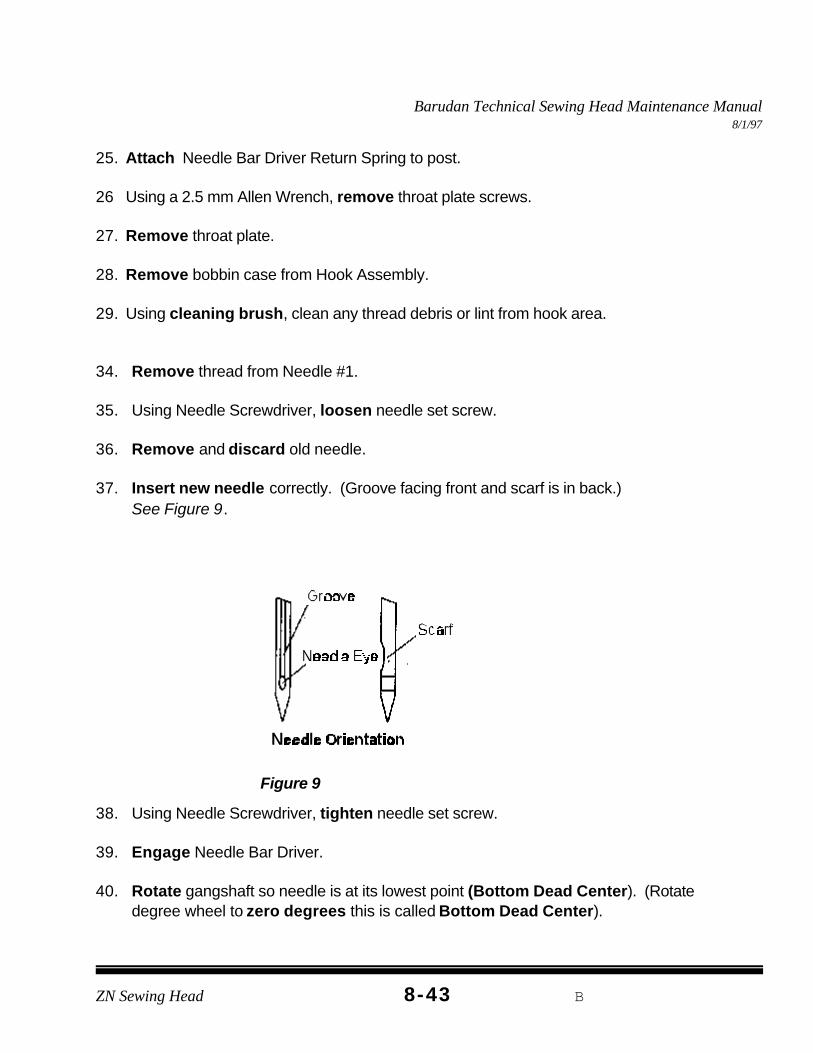
37. Insert new needle correctly. (Groove facing front and scarf is in back.) See Figure 9.
38. Using Needle Screwdriver, tighten needle set screw.
39. Engage Needle Bar Driver.
40. Rotate gangshaft so needle is at its lowest point (Bottom Dead Center). (Rotatedegree wheel to zero degrees this is called Bottom Dead Center).