116
Nokia N9 User Guide Issue 1.2
| Date post: | 30-Mar-2018 |
| Category: |
Documents |
| Upload: | nguyentuong |
| View: | 219 times |
| Download: | 0 times |
Nokia N9 User Guide
Issue 1.2

Contents
Safety 4
Get started 6Keys and parts 6Insert the SIM card and charge thebattery 8First start-up 11Find more help 15
Basic use 15Home views and status area 15Touch screen 20Write text 24Control profiles, tones, and volume 28Search your phone 29Explore Nokia services 29
Personalisation 31Change the wallpaper 31View notifications and feeds 31
Connectivity 32Internet connections 32WLAN 34NFC 35Bluetooth 38USB data cable 40
Web and RSS feeds 40Web browser 40RSS feeds 42
Contacts and social networkingfriends 43Contacts 43Social networking friends 46
Calls 47Ways to make calls 47
Call a phone number 48Call a contact 48Make a conference call 48Answer or decline calls 49Answer a call 49Reject a call 49Turn to silence 50Divert calls to your voice mailbox oranother phone number 50Call your voice mailbox 51During a call 51Activate the loudspeaker during acall 51Noise cancellation 51Answer a waiting call 52Recent calls 52View your missed calls 53View your received calls 53Call the last dialled number 53About internet calls 53Install an internet call service 54Sign in to an internet call service 54Make an internet call 54Set your availability status 55
Messaging and social networks 55Set up all your accounts in one go 55Messages 56Instant messaging 58Mail 58Mail for Exchange 60
Music and videos 61Music player 61Videos 64
Camera and Gallery 65Take photos 65Record videos 69Send and share photos and videos 69Gallery 71Photo editor 74
2 Contents

Video editor 75View your photos and videoswirelessly on your homeentertainment system 75
Maps and navigation 76GPS 76Maps 78Drive 85
Productivity and time 88Time management 88Productivity 92
Phone management 93Keep your phone software andapplications up to date 93Back up 94Manage applications 95Memory 97Synchronise content 97Protect your phone 98Reset your phone 100Battery 101
Tips 103Access codes 103Send your security code to a trustedperson 104
Protect the environment 104Save energy 104Recycle 104
Product and safety information 105
Index 112
Contents 3
Safety
Read these simple guidelines. Not following them may be dangerous or illegal. Forfurther information, read the complete user guide.
SWITCH OFF IN RESTRICTED AREASSwitch the device off when mobile phone use is not allowed or when it maycause interference or danger, for example, in aircraft, in hospitals or nearmedical equipment, fuel, chemicals, or blasting areas. Obey all instructionsin restricted areas.
ROAD SAFETY COMES FIRSTObey all local laws. Always keep your hands free to operate the vehicle whiledriving. Your first consideration while driving should be road safety.
INTERFERENCEAll wireless devices may be susceptible to interference, which could affectperformance.
QUALIFIED SERVICEOnly qualified personnel may install or repair this product.
BATTERIES, CHARGERS, AND OTHER ACCESSORIESUse only batteries, chargers, and other accessories approved by Nokia foruse with this device. Third-party chargers that comply with the IEC/EN62684 standard, and that can connect to your device micro USB connector,may be compatible.Do not connect incompatible products.
KEEP YOUR DEVICE DRYYour device is not water-resistant. Keep it dry.
GLASS PARTSThe device screen is made of glass. This glass can break if the device isdropped on a hard surface or receives a substantial impact. If the glassbreaks, do not touch the glass parts of the device or attempt to removethe broken glass from the device. Stop using the device until the glass isreplaced by qualified service personnel.
4 Safety

PROTECT YOUR HEARINGListen to a headset at a moderate level, and do not hold the device nearyour ear when the loudspeaker is in use.
Safety 5

Get started
Keys and partsFront
1 Nokia AV connector (3.5 mm)2 Micro-USB connector3 Earpiece4 SIM card holder5 Volume/Zoom key. Used also to change the profile.6 Power/Lock key7 Front camera lens8 Charging indicator9 Touch screen
Do not attempt to remove the battery from the device. To replace the battery, takethe device to your nearest authorised service facility.
6 Get started

Back
10 Camera flash11 Secondary microphone12 Camera lens. If there is protective tape on the camera lens, remove the tape.13 Microphone14 Loudspeaker
HeadsetYou can connect a compatible headset or compatible headphones to your phone.
Control music with your headsetTo pause or resume playback, press the button on the headset. To skip to the nextsong, press the button for about two seconds.
Do not connect products that create an output signal, as this may damage the device.Do not connect any voltage source to the Nokia AV connector. If you connect anexternal device or headset, other than those approved by Nokia for use with thisdevice, to the Nokia AV connector, pay special attention to volume levels.
Get started 7

Antenna locationsAvoid touching the antenna area while the antenna is in use. Contact with antennasaffects the communication quality and may reduce battery life due to higher powerlevel during operation.
1 GPS antenna2 Bluetooth and WLAN antenna3 Cellular antenna
Insert the SIM card and charge the batteryInsert the SIM cardThis device is designed to be used with a mini-UICC SIM card, also known as a micro-SIM card only. A micro-SIM card is smaller than the standard SIM card.
Do not attach any stickers to your SIM card.
1 To open the cover of the micro-USB connector, press the left end of the cover.
2 To unlock the SIM card holder, slide the holder to the left. Carefully pull out theholder.
8 Get started

3 Make sure the contact area is facing up, and insert the SIM card into the SIM cardholder.
4 Insert the SIM card holder back into the phone. To lock the SIM card holder, slidethe holder to the right.
5 Close the cover of the micro-USB connector.
Remove the SIM card1 Open the cover of the micro-USB connector.2 To unlock the SIM card holder, slide the holder to the left. Carefully pull out the
holder.3 Pull the card out.
Charge the batteryYour battery has been partially charged at the factory, but you may need to rechargeit before you can switch on your phone for the first time.
If the phone indicates a low charge, do the following:
Get started 9

You do not need to charge the battery for a specific length of time, and you can usethe phone while it is charging.
When the battery is charging, the charging indicator flashes slowly. When the batteryis full, the charging indicator is continuously on.
If the battery is completely discharged, it may take several minutes before thecharging indicator is displayed or before any calls can be made.
Charge the battery over USBBattery low, but you don't have a charger with you? You can use a compatible USBcable to connect your phone to a compatible device, such as a computer.
You can use USB charging when a wall outlet is not available. Data can be transferredwhile charging the device. The efficiency of USB charging power varies significantly,and it may take a long time for charging to start and the device to start functioning.
You can use your phone while it's charging.
10 Get started
To avoid breaking the charger connector, be careful when connecting ordisconnecting the charger cable.
About the batteryYour phone has an internal, nonremovable, rechargeable battery. Use only Nokiaapproved chargers designated for this phone. You can also use a compatible USB datacable to charge your phone.
Important: Only qualified personnel or an authorised service facility shouldreplace the battery. Unauthorised battery replacement may invalidate your warranty.
Authorised retail points may also offer a battery replacement service.
To check the condition of the battery, select and Device > Battery.
You can set your phone to automatically activate power saving mode when the batterycharge level is low. Select and Device > Battery > Power saving mode, andactivate Automatic.
When power saving mode is activated, you may not be able to modify the settings ofcertain applications.
First start-upSwitch the phone on or offPress and hold the power key until the phone vibrates.
Get started 11

Use your phone for the first timeGet off to a flying start – your phone guides you through the initial setup when youinsert your SIM card and switch your phone on for the first time. You can alsosubscribe to the Tips and Offers service, to receive helpful tips and tricks on how tomake the most of your phone.
To use Nokia services, create a Nokia account. You need an internet connection. Forinformation about data transmission charges, contact your service provider. If youcan't connect to the internet, you can create an account later.
If you already have a Nokia account, sign in.
Tip: Forgotten your password? You can request it to be sent to you in a mail or textmessage.
To create a Nokia account later, use your phone to access a Nokia service, and youare prompted to create an account.
To make an emergency call during the initial setup, select .
Lock the keys and screenTo avoid accidentally making a call when your phone is in your pocket or bag, lock thekeys and screen of your phone.
Press the power key.
12 Get started

Unlock the keys and screenPress the power key, and swipe from the outside of the screen onto the screen. Youcan swipe from any direction.
Tip: You can also tap the screen twice, and swipe from the outside of the screen ontothe screen.
Tip: Received a notification on the lock screen? To go straight to the relatedapplication, drag the notification to the left or right edge of the screen.
Set the keys and screen to lock automatically1 Select and Device > Display > Display time-out.2 Select the length of time after which the keys and screen are locked automatically.
Copy contacts from your old phoneIf your contacts list is empty, you can easily copy your contacts from your old phone— even if it's not a Nokia phone.
Your old phone needs to support Bluetooth, and the contacts need to be stored inthe phone memory, not on the SIM card.
Select , and follow the instructions.
Get started 13

Tip: To copy your contacts later, in the contacts list, select > Import contacts. Tocopy your calendar events and text messages, select > Sync and backup > Sync.The available options may vary.
Copy content from your computerGet off to a flying start without missing a beat. You can copy your important info,such as calendar entries and contacts, to your new phone from your computer.
If your calendar and other content is stored online, for example, in a Google, MicrosoftExchange, or Windows Live account, just add the account to your phone, and synccontent straight from the cloud.
1 Select .2 Add your account to your phone.3 Check that the sync is active, and select Done.
Tip: If you use an online calendar, you may be able to sync it with CalDAV.
If your content, such as contacts and calendar entries, is only stored locally in Outlookon your PC, copy them to your new phone from your Hotmail account.
1 Sync the desired content from your Outlook to Hotmail using Microsoft OfficeOutlook Hotmail Connector. To download and install, search for it atwww.microsoft.com/download, and follow the instructions shown on yourcomputer. You may need to select to manually configure the settings.
2 To import the content from Hotmail to your new phone, select , and Addaccount > Mail for Exchange.
3 Type in your Hotmail or Windows Live mail address, your username and password,and select Manual setup.
4 Type in m.hotmail.com as the server address, and select Done.
Install Nokia Link on your computerHave your favourites with you, wherever you may roam. Use the Nokia Link computerapplication to sync your own music, videos, and photos, or back up your phone toyour computer.
To find out more about Nokia Link, or to download and install the latest version onyour computer, go to www.nokia.com/nokialink.
When you connect your phone to your computer, select Sync and connect as the USBconnection mode.
Your phone is not compatible with Nokia Suite.
14 Get started

Find more helpUse the user guide in your phoneSelect .
Search the user guideSelect , and start entering a word in the search field.
Switch between the user guide and an applicationTo return to the home view, swipe from the outside of the screen onto the touchscreen. To open the desired application, select the application from the Applicationsor Open applications view.
Links to related topics may be at the end of instructions.
SupportWhen you want to learn more about how to use your phone, or if you're unsure howyour phone should work, read the user guide in your phone. Select .
If you have an issue, do the following:
• Reboot your phone. Press and hold the power key for at least 8 seconds. Thephone switches off. To switch your phone on again, press and hold the power keyuntil the phone vibrates.
• Update your phone software• Restore the original factory settings
If your issue remains unsolved, contact Nokia for repair options. Go towww.nokia.com/repair. Before sending your phone for repair, always back up yourdata, as all personal data in your phone may be deleted.
Basic use
Home views and status areaSwitch between viewsYour phone has separate views for applications, notifications and feeds, and for openapplications.
Flick left or right.
Basic use 15

• In the Events view, you receive notifications of messages and missed calls. Feedsfrom different applications or services are also displayed.
• In the Applications view, you can open applications.• In the Open applications view, you can switch between open applications and
tasks, and close applications you're not using.
Close an applicationTap and hold the Open applications view, and select on the application.
Tip: To close the current application fully, you can also swipe from the top of thescreen. Unsaved data in the app may be lost.
Switch between open applicationsIn the Open applications view, you can see which applications and tasks are open inthe background, and switch between them.
Select the desired application.
Tip: To see an overview of open applications, place two fingers on the screen, andslide your fingers together. To return to the more detailed view, slide your fingersapart.
16 Basic use

Applications running in the background increase the demand on battery power anduse memory. To close an application that you are not using, tap and hold the Openapplications view, and select on the application to close.
Open the status menu to access common settingsYou don't have to navigate long paths to, for example, open, switch, or close aninternet connection, or change your availability status. You can access these settingsdirectly in the status menu, no matter what application or view you are in.
Tap the status area.
Close the status menuTap the status area.
Open the quick launch bar to access common applicationsIn all applications, and even on the lock screen, you can easily make a call, or accessthe camera, web, or messages.
When holding your phone upright, drag your finger from below the bottom of thescreen onto the screen, and hold your finger in place, until the quick launch bar isdisplayed.
Basic use 17
Close the quick launch barTap outside the quick launch bar.
Reorganise the Applications viewDid you know that you can personalise the Applications view? Move your favouriteapplications to the top of the view, and hide the less used in folders.
Select and hold the application icon, and drag it to the new location.
Create a folder1 Tap and hold the Applications view.2 From the toolbar, select New folder.3 Open the new folder, select the folder name, and rename the folder.
18 Basic use

Remove an application or folderSelect and hold the application or folder icon, and select .
You can only remove empty folders, and may not be able to remove someapplications.
Status area indicatorsYour phone's status area shows you what's going on in your phone. These are someof the icons that may be shown in the status area:
General indicators
An alarm is set.The silent profile is activated.Indicates the battery status. In power saving mode, the indicator is .
Notification indicators
You have missed a call.You have a new mail message.You have a new text message.You have a new voicemail message.An update is available for your phone software.
Call indicators
A call is active.A call is active. Your microphone is muted.Your calls are diverted to another number or your voice mailbox.
Availability indicators
Your availability status is online.Your availability status is busy.
Network indicators
You have a GSM data connection (network service). indicates that data isbeing transferred.You have an EGPRS data connection (network service). indicates that datais being transferred.You have a 3G data connection (network service). indicates that data isbeing transferred.
Basic use 19

You have an HSPA data connection (network service). indicates that datais being transferred.Your phone is connected to a WLAN.
Connectivity indicators
Signal strengthThe SIM card is not available.Flight mode is activated.Bluetooth is activated. indicates that data is being transferred.GPS is activated.Your phone is transferring content. indicates that a transfer is pending. indicates that a transfer has failed.
Touch screenAbout the touch screenTo control your phone, lightly touch the screen with your fingertips. The screen doesnot respond when you use your fingernails.
If your fingertips are cold, the screen may not respond to your touch.
Important: Avoid scratching the touch screen. Never use an actual pen, pencil, orother sharp object on the touch screen.
Touch screen actionsTo use your phone, tap or tap and hold the touch screen.
Open an app or select an itemTap the app or item.
Go back to the home viewTo leave an app and go back to the home view, swipe from the outside of the touchscreen onto the screen. You can swipe from the left, right, or bottom of the screen.The app is left running in the background.
20 Basic use

Tip: To close the current app fully, swipe from the top of the screen. Unsaved datain the app may be lost.
FlickPlace your finger on the screen, then slide it in the direction you want.
Example: To switch between home views, flick left or right. To scroll in a list or menu,slide your finger up or down.
Tap and hold to see more optionsPlace your finger on an item until the menu opens.
Example: To send a contact card or delete an alarm, tap and hold the contact or alarm,then select the option you want.
Basic use 21
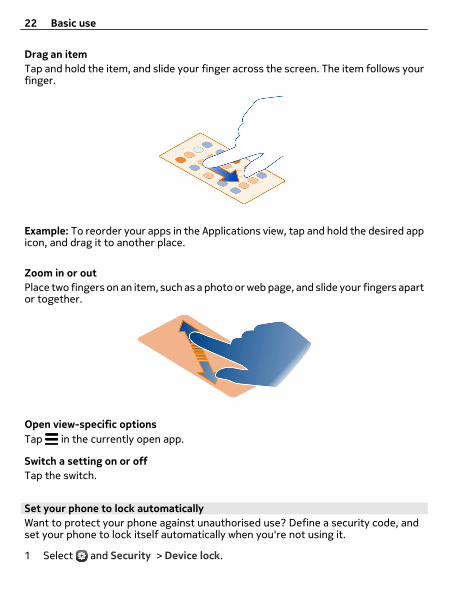
Drag an itemTap and hold the item, and slide your finger across the screen. The item follows yourfinger.
Example: To reorder your apps in the Applications view, tap and hold the desired appicon, and drag it to another place.
Zoom in or outPlace two fingers on an item, such as a photo or web page, and slide your fingers apartor together.
Open view-specific optionsTap in the currently open app.
Switch a setting on or offTap the switch.
Set your phone to lock automaticallyWant to protect your phone against unauthorised use? Define a security code, andset your phone to lock itself automatically when you're not using it.
1 Select and Security > Device lock.
22 Basic use
2 Select Security code, and enter a security code (at least 5 characters). You canuse numbers, symbols, and upper and lower case letters.Keep the security code secret and in a safe place separate from your phone. Ifyou forget the security code, and cannot recover it, your personal data is deletedbefore you can use the phone again. If you've set the number of times you canenter the wrong security code, your phone deletes your data and resets itselfback to original settings after the last try. If you haven't limited the number oftimes, your phone requires service before you can use it again.
3 Select Autolock, and define the length of time after which the phone is lockedautomatically.
Unlock your phone1 Press the power key, and swipe from the outside of the screen onto the screen.
You can swipe from any direction.2 Enter the security code, and select OK.
Tip: You can also tap the screen twice, and swipe from the outside of the screen ontothe screen.
Tip: When you update your phone software using the Nokia Software Updater PC app,the language of your on-screen keyboard is set back to the default language. If yoursecurity code includes characters that are not part of this on-screen keyboard, select
, then swipe left or right across the keyboard to change the language of the on-screen keyboard to the one you used when creating the security code.
Tip: If you have defined a trusted person, if you ever forget your security code, youcan send them the code in a text message. Select Device lock > Trusted person >Select trusted person and a contact from the list. If the trusted person's phonenumber changes in the contacts list, you need to change it manually
Phone lock settingsYou can define a security code and set your phone to automatically lock itself whenyou're not using it.
Some services, such as Mail for Exchange, may require that you define a security codefor your phone. Depending on administrator security requirements, also your phonelock settings may be changed, such as Autolock and Number of tries.
Select and Security > Device lock, and from the following:
Autolock — Set the length of time before the phone locks automatically.Security code — Change the security code. To use the phone lock, you need to definea security code.
Basic use 23

Number of tries — Set a limit for incorrect security code attempts. After the limit isreached, the phone is reset to original settings and all user data is deleted.Trusted person — Set one of your contacts as a trusted person. If you have defineda trusted person, if you ever forget your security code, you can send the code to thetrusted person in a text message. After entering the incorrect security code, selectRecover, and follow the displayed instructions.Remote security features — Set up remote lock. If you lose your phone, you canremotely lock it or delete the data saved on it.
Write textWrite with the virtual keyboardSelect a text input field.
1 Character keys2 Shift key3 Symbol key4 Space key5 Enter key6 Backspace key
Insert an upper case character when writing in lower case, or vice versaSelect the shift key before inserting the character. To activate caps lock mode, selectthe key twice. The shift key is highlighted. To return to normal mode, select the shiftkey again.
Enter a number or a special characterSelect the symbol key. To view more symbols, select the 1/2 key.
Tip: To quickly add a number or a commonly used special character, select the symbolkey, and slide your finger to the character without lifting. When your lift your finger,the character is inserted, and the keyboard returns to the normal text view.
24 Basic use

Enter an accented characterSelect and hold the character to which you want to add an accent, and slide your fingerto the desired accented character without lifting.
Delete a characterSelect the backspace key.
Change the fontIn some applications, such as Mail and Notes, you can change the font. Select the textinput field, and from the pop-up menu, select the desired option. To change the fontof an individual word, drag to select the word, and select and the desired option.
Copy and paste textIn a text input field, drag to select the text you want to copy, and from the pop-upmenu, select Copy. To paste the text, select a text input field, then select the placewhere you want to paste the text, and from the pop-up menu, select Paste.
Use several writing languagesSelect and Time and language > Text input > Installed input methods, then selectthe writing languages.
If you have selected more than one writing language, you can switch betweenlanguages.
Change the writing languagePlace a finger beyond the left or right edge of the touch screen, and drag your fingeracross over the virtual keyboard.
Close the virtual keyboardFlick the virtual keyboard down, or tap outside the text input field.
Tip: To place the cursor precisely where you want to, select and hold the text, until amagnifier is displayed. Without lifting your finger, drag the cursor to the desiredlocation.
Basic use 25

Write text using error correctionError correction is based on a built-in dictionary to which you can add new words.
1 Start writing the word. The word suggestion changes after each key selection.2 To accept a suggested word, select the suggested word.3 To view more spelling suggestions, select and hold the suggested word.4 To add a word to the dictionary, select and hold the suggested word, and select
Add to dictionary.
Deactivate error correction for all editors in your phoneSelect and Time and language > Text input, and deactivate Error correction.
Tip: To use the space key to accept a suggested word, select and Time andlanguage > Text input, and activate Insert with space key. If you want to insert aspace without accepting the suggested word, select the backspace key.
Write using SwypeWant to write faster? Use Swype to write text quickly and easily.
Activate Swype1 Select and Time and language > Text input, and activate Swype.2 Select Swype settings and the language.
26 Basic use
Write using SwypeTo open the virtual keyboard, select a text input field. Slide your finger from letter toletter; you don't have to be so accurate. Swype usually knows if you want to write thesame letter twice without you doing anything, but if you want to be sure, scribble onor make a loop on the letter. A space is automatically inserted when you lift your fingerto write the next word.
Tip: To temporarily deactivate the auto space feature, slide your finger from thespace key to the backspace key. To make this setting permanent, or to modify othersettings, select and hold the Swype key on the bottom left of the keyboard.
Write and edit text using word suggestionAs you write, a list of possible words is displayed. To scroll through the list, drag yourfinger left or right on the list. If the desired word is displayed, select it. If the desiredword is first in the list, start entering the next word, and the word is automaticallyinserted.To see a list of alternatives for a word that you have already entered, select the word.
Add a word to the dictionaryWrite the letters of the word one by one, then select the word from the wordsuggestion list. Confirm when asked.
Tip: To add several words, phone numbers, or words that contain numbers andsymbols to the dictionary quickly, drag to highlight them, then select the Swype key.
Change the case of a wordDrag to highlight the word, then swipe from the Swype key to the shift key. Select thedesired option from the list.
Tip: To capitalise the initial letter of a word, in one fluid motion, place your finger onthe letter, slide your finger up above the keyboard, and slide back down to the nextletter. Write the rest of the word as normal.
Insert an accented character, symbol, or numberTo view a list of characters available on a particular key, select and hold the key. Selectthe character from the list.
Example: To insert the letter á, select and hold the a key, and from the displayed list,select á.
Basic use 27

Tip: If you want to move the cursor within the text, or find other options for editingyour text, swipe from the Swype key to the +!= key.
For more help, tips, and videos on using Swype, go to www.swype.com.
Control profiles, tones, and volumeChange the volume of a call, song, or videoUse the volume keys.
The built-in loudspeaker allows you to speak and listen from a short distance withouthaving to hold the phone to your ear.
Activate or deactivate the loudspeaker during a callSelect .
Change your profile for meetingsWaiting for a call but can't let your phone ring? You can set your phone to discreetlybeep once instead of ringing.
Open the status menu, and drag the profile slider to Beep.
Tip: You can also use the volume keys to change the current profile. Press the volumekeys up or down until the desired profile is displayed.
This is possible in views where the key is not used for controlling volume or zoomlevel.
Tip: You can personalise the ringtones or sound volume, and select whether thephone vibrates when you receive a call. Select and Sounds and vibration.
Tip: Download more ringtones from Nokia Store. Select and Sounds andvibration > Ringtone > Get more from Nokia Store. To learn more about Nokia Store,go to www.nokia.com/support.
Use your phone offlineIn places where you do not want to make or receive calls, you may still access yourcalendar, music, and offline games if you activate flight mode. Switch the phone offwhen mobile phone use is not allowed or when it may cause interference or danger.
Select , and activate Flight mode.
When flight mode is activated, you can still connect to a WLAN to, for example, readyour mail or browse the internet. You can also activate Bluetooth and NFC.
28 Basic use

Remember to comply with the instructions and safety requirements given by, forexample, an airline, and any applicable laws and regulations.
Silence your phoneWhen the silent profile is activated, your phone tones are muted. Activate this profilewhen you are, for example, at the cinema or in a meeting.
Open the status menu, and drag the profile slider to Silent.
When the silent profile is activated, alarm tones still sound. You can also, for example,listen to music.
Search your phoneExplore your phone and the internet. As you enter your search word, search startsnarrowing down the results for you, listing suggestions such as help topics, apps,music, videos and much more.
1 Select .2 Start entering a search word, and select from the proposed matches.3 To search on the internet, select the internet search link at the end of the search
results.
Search from within an applicationSelect , start entering a search word, and select from the proposed matches. Thisis not available in all applications.
Explore Nokia servicesNokia servicesWith Nokia services, you can find new places and services, and stay in touch with yourfriends. You can do, for example, the following:
• Download games, applications, videos, and ringtones to your phone• Find your way with free walk and drive navigation, plan trips, and view locations
on a map• Get music
Some items are free of charge, others you may need to pay for.
The available services may also vary by country or region, and not all languages aresupported.
To use Nokia services, you need a Nokia account. When you access a service on yourphone, you are prompted to create an account.
Basic use 29

For more information, go to www.nokia.com/support.
Nokia accountWhen you switch your phone on for the first time, your phone guides you throughcreating a Nokia account.
With your Nokia account, you can, for example:
• Access all Nokia services with a single username and password, both on yourphone and a compatible computer
• Download content from Nokia services• Save details about your phone model and contact information. You can also add
your payment card details.• Save your favourite places to Nokia Maps
To learn more about the Nokia account and Nokia services, go to www.nokia.com/support.
To create a Nokia account later, use your phone to access a Nokia service, and youare prompted to create an account.
About the Nokia Maps web service With the Nokia Maps web service, you can view locations from all around the world.
You can do the following:
• Search for addresses, places of interest, and services• Create routes, and get turn-by-turn directions• Save your favourite places and routes to your Nokia account• Synchronise your favourites with your compatible Nokia phone, and access them
on the go.
To use the Nokia Maps web service, go to www.nokia.com/maps.
About Nokia Music With Nokia Music, you can download songs to your phone and your compatiblecomputer.
To start discovering music, go to www.nokia.com/music.
About Nokia Store You can download mobile games, apps, videos, pictures, and ringtones to your
phone. Some items are free of charge; others you need to pay for with your creditcard or in your phone bill.
30 Basic use

The availability of payment methods depends on your country of residence and yournetwork service provider.
Nokia Store offers content that is compatible with your phone and relevant to yourtastes and location.
Select . To learn more about Nokia Store, go to www.nokia.com/support.
Personalisation
Change the wallpaperWant to see your favourite landscape or pictures of your family in the background ofthe lock screen? You can change the wallpaper to personalise the lock screen to yourliking.
1 Select and the desired picture.2 Tap the screen to display the toolbar, and select > Set as wallpaper.3 Move the cropping area, to get the best possible fit.4 Select Done.
Tip: You can also use preinstalled pictures, or download more wallpapers from NokiaStore. Select and Wallpaper. To learn more about Nokia Store, go towww.nokia.com/support.
View notifications and feedsRead recent posts from your social networking contacts and favourite web feeds, allin the same view with your received notifications.
The Events view contains the following:
• Notifications about, for example, your missed calls, unread messages, andsoftware updates
• Feeds from different applications and services, such as social networkingapplications and web feeds
The Events view items are interactive. Select, for example, the feed you want to viewin more detail.
Example: To check and install suggested software updates, select the notificationindicated with .
When you set up your social networking accounts, your friends' status updates areautomatically displayed in the Events view. Similarly, if you activate Show feed onhome screen when you subscribe to web feeds, your feeds are automaticallydisplayed.
Personalisation 31
Tip: You can refresh feeds manually. In the Events view, select Refresh.
Remove a current feed from a certain application or serviceSelect and hold the feed, and select Clear.This does not deactivate the feed.
Using services or downloading content may cause transfer of large amounts of data,which may result in data traffic costs.
Connectivity
Internet connectionsDefine how your phone connects to the internetDoes your network service provider charge you a fixed fee for data transfer, or on apay as you use basis? To use the optimal connection method, modify the WLAN andmobile data settings.
Select and Internet connection > Connect to internet.
If your network service provider charges you a fixed fee, the easiest method is to setyour phone to connect to WLAN and mobile data connections automatically, to keepyour phone constantly online.
Connect to an available WLANSelect and hold the WLAN connection, and select Use automatically.
Use a mobile data connectionSelect and hold the mobile data connection, and select Use automatically.
Stop using the connection automaticallySelect and hold the connection, and select Use manually.
If your network service provider costs depend on the amount of data you use, youmay want to select the network manually. If there are no automatically used networksavailable and you do something that requires an internet connection, you are askedto select a connection.
Request confirmation before using a mobile data connection when outside yourhome networkSelect and Mobile network > Data roaming > Always ask.To set the phone to connect automatically, select Always allow. Connecting whenabroad can raise data transfer costs substantially.
32 Connectivity

When you connect to a network for the first time, all your credentials and settings forthat network are saved, so that you don't have to enter the data every time youconnect.
To view a list of your automatically and manually used networks, select andInternet connection > Edit networks.
Keep track of your data trafficTo avoid surprises with mobile data costs, you can set your phone to notify you whenyou have transferred a certain amount of data using your mobile data connection.
Select and Mobile network > Counters.
View the amount of data sent and receivedGo to In home network or When roaming.
Get a notification every time you reach a limitGo to In home network or When roaming. Activate Data limit warning, and enter thelimit in the field.The limit is active by default when outside the home network.
The limit is phone specific. If you use your SIM card in another phone, you need to setthe limits in that phone.
Close data connections when not in useTo help save data costs, you can set your phone to close the mobile data connectionwhen you don't need it.
Select and Mobile network or Internet connection.
If you deactivate background connections, the internet connection is active only whenyou, for example, select a web link. Your phone does not activate the connectionautomatically, for example, to check for new mail. When outside the home network,background mobile data connections are deactivated by default.
Close background connectionsDeactivate Allow background connections.
Close a network connectionIf an application in the background is using an internet connection, you can close theconnection without closing the application.
1 Open the status menu. Your current network connections are displayed.
Connectivity 33

2 Select the connection to close and Disconnect.
Close all network connectionsSelect and activate Flight mode.
WLANAbout WLAN connectionsYou can connect to a wireless local area network (WLAN) in the status menu. Tap thestatus area.
Important: Use encryption to increase the security of your WLAN connection.Using encryption reduces the risk of others accessing your data.
Note: Using WLAN may be restricted in some countries, for example, in France andIreland. For more information, contact your local authorities.
This phone supports the 802.11a, 802.11b, 802.11g, and 802.11n WLAN protocols.You can create an 802.11n connection using either the 2.4 or 5 GHz frequency band.
Connect to a WLAN at homeTo help save data costs, connect to your home WLAN when you are at home and wantto browse the web on your phone.
1 Open the status menu, and select No internet connection.You can see the available network connections. indicates a WLAN connection,and indicates a mobile data connection.
2 Select your home WLAN and Connect.If your home WLAN is secured, enter the passcode.If your home WLAN is hidden, select Hidden WLAN > Connect, and enter thenetwork name (service set identifier, SSID).
34 Connectivity

Connect to a WLAN on the moveConnecting to a WLAN is a handy way of accessing the internet when not at home.Connect to public WLANs in public places, such as a library or internet café.
1 Open the status menu, and select No internet connection.You can see the available network connections. indicates a WLAN connection,and indicates a mobile data connection.
2 Select the desired WLAN connection and Connect.
Close the WLAN connection1 Open the status menu.2 Select the connection and Disconnect.
About streaming your media filesAre there some photos or videos stored on your phone that you would like to see onanother device, such as a TV? Or some music that you would like to listen to throughyour home stereo? Use your phone to stream media files to your DLNA deviceswirelessly.
To do this, you need a WLAN, and your phone and the DLNA device need to beconnected to the WLAN. For best results, your wireless router should be connectedto your DLNA device over a cable connection.
For more info on how to set up the WLAN connection, go to www.nokia.com/support.
Stream photos or videosSee "View your photos and videos wirelessly on your home entertainmentsystem", p. 75.
Stream musicSee "Stream your music wirelessly on your home entertainment system", p. 63.
NFCAbout NFCNear Field Communication (NFC) makes connecting and sharing easy and fun. Nokiaphones and accessories that support NFC are connected wirelessly when you touchthem together.
With NFC, you can:
• Share your own content between two compatible phones that support NFC.
Connectivity 35
• Connect to compatible Bluetooth accessories that support NFC, such as aheadset or a wireless loudspeaker.
• Touch tags to get more content for your phone or to access online services.
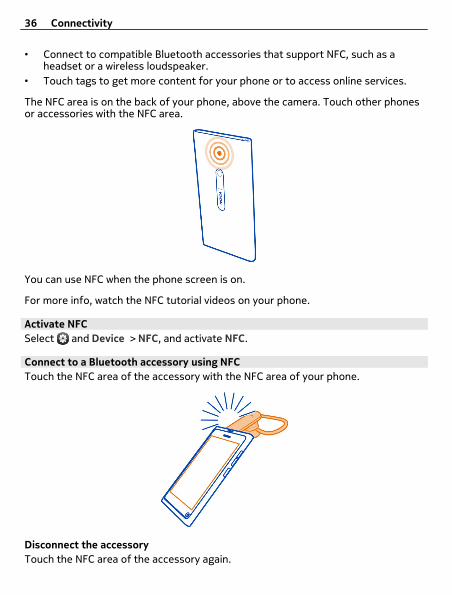
The NFC area is on the back of your phone, above the camera. Touch other phonesor accessories with the NFC area.
You can use NFC when the phone screen is on.
For more info, watch the NFC tutorial videos on your phone.
Activate NFCSelect and Device > NFC, and activate NFC.
Connect to a Bluetooth accessory using NFCTouch the NFC area of the accessory with the NFC area of your phone.
Disconnect the accessoryTouch the NFC area of the accessory again.
36 Connectivity

For more information, see the user guide of the accessory.
Send a picture, video, or contact to another phone that supports NFCYou can share your own pictures, videos, and contacts when you touch another phonethat supports NFC.
Share a picture1 Select a picture in Gallery.2 Touch the NFC area of the other phone with the NFC area of your phone. The
picture is sent using Bluetooth.
Access an online service using NFCWhen you touch an NFC tag that contains a web address with the NFC area of yourphone, the website opens in your phone web browser.
Tip: NFC tags can also contain information such as a phone number or business card.When you see a phone number in an advertisement that supports NFC, to call thenumber, touch the tag.
Connectivity 37

BluetoothAbout Bluetooth connectivitySelect and Bluetooth.
You can connect wirelessly to other compatible devices, such as phones, computers,headsets, and car kits.
You can use the connection to send items from your phone, and print files with acompatible printer.
Since devices with Bluetooth wireless technology communicate using radio waves,they do not need to be in direct line-of-sight. However, they must be within 10 metres(33 feet) of each other, although the connection may be subject to interference fromobstructions such as walls or from other electronic devices.
When your phone is locked, only connections to authorised devices are possible.
Note: There may be restrictions on the use of Bluetooth technology in somecountries. For example, in France, you are only allowed to use Bluetooth technologyindoors. For more information, contact your local authorities.
Connect to a wireless headsetWith a wireless headset, you can answer a call even if your phone is not directly athand, and you can have your hands free, for example, to continue working at yourcomputer during a call. Wireless headsets are available separately.
Select and Bluetooth.
1 Activate Bluetooth.2 Switch the headset on.3 Select Bluetooth devices.4 To pair your phone and the headset, select the headset from the list.
38 Connectivity

5 You may need to enter a passcode. For details, see the user guide of the headset.
Send a picture or other content to another phone or deviceYou can use Bluetooth to send pictures, videos, and other content created by you toyour friend's compatible phones and devices and to your computer.
You can have several Bluetooth connections active at a time. For example, if you areconnected to a compatible headset, you can also send files to another compatibledevice at the same time.
1 Select and hold the item, for example, a picture, and select Share > Bluetooth.2 Select the device to connect to. Bluetooth devices within range are displayed.3 If the other device requires a passcode, enter the passcode. The passcode, which
you can define yourself, must be entered in both devices. The passcode in somedevices is fixed. For details, see the user guide of the device.The passcode is valid only for the current connection.
Tip: If you connect to a device frequently, to set it as authorised, select andBluetooth. Make sure Bluetooth is activated. Select Bluetooth devices and the device,and activate Connect automatically. When a device is authorised, you do not have toenter the passcode every time.
Protect your phoneWhen Bluetooth is activated in your phone, you can control who can find and connectto your phone.
Select and Bluetooth.
Prevent others from detecting your phoneDeactivate Visibility.When your phone is hidden, others cannot detect it. However, paired devices can stillconnect to your phone.
Operating the device in hidden mode is a safer way to avoid malicious software. Donot accept Bluetooth connection requests from sources you do not trust. You canalso deactivate Bluetooth function when you are not using it.
Do not pair with or accept connection requests from an unknown device. This helpsto protect your phone from harmful content.
Connectivity 39

USB data cableSync photos or other content between your phone and a computerYou can use a USB cable to sync photos, videos, music, and other content created byyou between your phone and a computer.
1 Use a compatible USB cable to connect your phone to a compatible computer.The phone is displayed as a portable device on your computer.
2 Use the file manager of the computer to sync the content.
Select the USB modeFor best results when using a USB cable to get content from or when synchronisingwith your computer, use the appropriate USB mode.
1 Use a compatible USB cable to connect your phone to your compatible computeror other device.
2 When prompted, select from the following:
Use as mass storage — Your phone is recognised as a USB flash memory. Youcan also connect your phone to other devices, such as a home or car stereo.
While connected to a computer in this mode, you may not be able to use some ofthe phone applications. It is possible to use your computer to view, sync, move,or delete the photos, music, and other content stored on your phone.Sync and connect — You have connected to a computer that has Nokia Linkinstalled. In this mode, you can synchronise your phone with Nokia Link and useother Nokia Link features.
This mode is activated automatically when you open the Nokia Link application.
Tip: To set the default USB mode, used every time you connect your phone, select and Accessories > USB.
Web and RSS feeds
Web browserAbout the web browserSelect .
Catch up on the news, and visit your favourite websites. You can use your phone webbrowser to view web pages on the internet.
To browse the web, you must be connected to the internet.
40 Web and RSS feeds

Tip: In all apps, and even on the lock screen, you can easily access the web. Hold yourphone upright, and drag your finger from below the bottom of the screen onto thescreen. Hold your finger in place, until the quick launch bar is displayed.
Websites may ask to access your current location info to, for example, personalisethe info they show you. If you allow a website to use your location info, your locationmay be visible to others, depending on the website. Read the privacy policy of thewebsite.
Browse the webSelect .
Tip: If your service provider does not charge you a fixed fee for data transfer, to savedata costs in your phone bill, you can use a WLAN to connect to the internet.
Go to a websiteSelect from your most visited websites, or select the web address bar, and write aweb address.
Search the internetSelect the web address bar, write a search word, and select the search word belowthe web address bar.
Open a new browser windowSelect > Open new window.
Zoom in or outPlace two fingers on the screen, and slide your fingers apart or together.
Tip: To quickly fit a section of a web page to your phone screen, double-tap thescreen.
Copy text1 Select and hold a word.2 Drag to select the text you want to copy, and select Copy.
Send a web linkSelect > Share this page and the sharing method.
Let the browser remember your passwordsSelect and Applications > Web, and activate Remember passwords.
Web and RSS feeds 41

Clear private dataSelect and Applications > Web > Clear private data and what you want to clear.
Add a bookmarkIf you visit the same websites all the time, add them to your Applications view, so youcan easily access them.
Select .
While browsing, select > Add to home screen.
Tip: To find your bookmarks more easily, create a folder for them in the Applicationsview.
Tip: While browsing, to quickly go to a website you visit often, select the web addressbar and a website from your most visited websites.
RSS feedsSubscribe to a web feedYou don't have to visit your favourite websites regularly to keep up with what's newon them. You can subscribe to web feeds and get links to latest content automatically.You can read your feeds in Feeds or in the Events view.
Select .
Web feeds on web pages are usually indicated with . They are used to share, forexample, the latest news headlines or blog entries.
1 Select , and go to a blog or web page that contains a web feed.2 Select > Subscribe to feed.3 To show the feed in the Events view, activate Show feed on home screen.
Tip: If you know the address of the feed, you can add the feed in Feeds. Select ,and enter the address.
Update a feedSelect and hold the feed, and select Update.
Update all feedsSelect .
Set feeds to automatically updateSelect and Applications > Feeds > Update feeds > Always automatically.
42 Web and RSS feeds

Define how often feeds are updatedSelect and Applications > Feeds > Auto-update interval.
Contacts and social networking friends
ContactsAbout ContactsSelect .
You can save and organise your friends' phone numbers, addresses, and othercontact information.
Save phone numbers and mail addressesYou can save your friends' phone numbers, mail addresses, and other information toyour contacts list.
Select .
Add a contact to the contacts list1 Select .
2 Select a field, and fill in the details.
Tip: Create a contact card for yourself, so you can easily send your contactinformation to others.
Edit contact information1 Select a contact.2 Select > Edit.3 Select a field, and edit the details.4 To view more fields, select .
Save a number from a received call or messageHave you received a call or a message from a person whose phone number is not yetsaved in the contacts list? You can easily save the number in a contact list entry.
Save a number from a received call1 Select .2 Select a phone number and .
3 To create a new contacts list entry, select Add new. To add the number to anexisting entry, select Merge.
Contacts and social networking friends 43

Save a number from a received message1 Select .2 Select and hold a conversation, and select Open contact card.3 Select Save.4 Select Edit, and fill in the contact details. To add the number to an existing entry,
select Merge.
Find contacts quicklyWant to find someone's contact info quickly without too much scrolling? Set yourmost important contacts as favourites. That way they're shown at the top of thecontacts list. You can also fast scroll or search to browse your contacts list.
Select .
Set a contact as a favouriteSelect the contact and . The contact is moved to the top of your contacts list.
Remove a contact from favouritesSelect the contact and . The contact remains in your standard contacts list.
Fast scroll to a contactSlide your finger up and down on the right side of the contacts list to jump to a letterof the alphabet.
Search for a contactStart writing in the Search field. Matching contacts are shown.
Tip: If you are signed in to Mail for Exchange or Skype, you can also search the contactsstored on those services.
Add a photo for a contactWant to see quickly who is calling you? Add a photo from Gallery, or take a new photo.
Select .
1 Select and hold the contact, and from the pop-up menu, select Edit.2 Select Add image.3 To use an existing photo, select Select from Gallery and a photo.4 To take a new photo, select Capture new image.
44 Contacts and social networking friends

5 To crop the photo, drag the slider at the bottom right corner of the frame. Dragthe frame to reposition.
6 Select Done.
If you have linked contacts from social networking services to your contacts list, thephoto used in the service is used automatically.
Change the photo for a contact1 Select the contact and the current photo.2 Select a new photo from Gallery, or take a new photo.
Set a ringtone for a contactWant to be able to hear that a particular person is calling you? You can set a ringtonespecifically for that person.
Select .
1 Select a contact.2 Select > Edit > > Ringtone:, and the ringtone to use for the contact.
Copy contacts from the SIM card to your phoneIf you have contacts stored on your SIM card, you can copy them to your phone. Youcan add more details to contacts that are stored on your phone, such as alternativephone numbers, addresses, or a picture.
Select .
1 Select > Import contacts > SIM card.2 Select the contacts you want to copy, or select Mark all to copy all the contacts.3 Select Import.
Tip: After copying your SIM contacts to your phone, or after importing contacts, anyduplicate contacts are automatically merged into one.
Create a contact groupWhen you have created contact groups, you can send a message to several people atthe same time. For example, you can assign the members of your family to one group.
Select .
1 Select > Add group.2 Enter a name for the group.3 Select .
Contacts and social networking friends 45

4 Select the contacts you want to add to the group, and select Done.5 Select Save.
Send a message to a group of peopleWould you like to send a message to all your family members quickly? If you haveassigned them to a group, you can send a message to all of them at the same time.
Select .
1 Select the group.2 Select Message or Mail.
Social networking friendsAbout online friendsYou can bring all the status updates posted by your friends to your social networkingservices to a single view. Feeds from your social networking applications are shownin the Events view. You can also comment on your friends' status updates. If you linkyour online friends' profiles to their entries in your contacts list, their status updatesare displayed on their contact cards in your contacts list.
Using social networking services requires network support.
For information about data transmission charges, contact your service provider.
The social networking services are third-party services and not provided by Nokia.Check the privacy settings of the social networking service you are using as you mayshare information with a large group of people. The terms of use of the socialnetworking service apply to sharing information on that service. Familiarise yourselfwith the terms of use and the privacy practices of that service.
Bring your online friends status updates to one viewSign in to social networking services, so you can see your online friends' statusupdates in the Events view.
Select .
1 Select Add account and a service.2 Sign into the social networking service that you use.
Show your online friends' status updates in the contact cardsWhen you add an account for a social networking service, you can allow the automaticlinking of your online friends' profiles from the services to the friends' entries in yourcontacts list. After linking, you can set your most important contacts as favourites,
46 Contacts and social networking friends

and you'll see their latest status update in Contacts. You can also see the contactdetails and latest status updates in the individual contact cards.
Select .
Import your friends' profiles1 Select > Import contacts > Online service.2 Select a service, and create an account, if necessary. Your friends' profiles are
linked automatically to their entries in your contacts list.
Contact details are copied to the respective entries in your contact list when possible.Existing details are not deleted. Any duplicate contacts are automatically merged intoone.
Tip: Some services do not automatically merge imported contacts. To mergeimported contacts manually, select > Merge contacts > Refresh.
Merge your friends' profiles1 Select the contact and > Merge.2 Select one or more other profiles to link to the contact.
Tip: If you set your most important contacts as favourites, you can see their lateststatus update in Contacts.
View others' availability informationWith availability indicators, you can see when your friends are online. You can see theirlocation and if they are available to chat or answer an internet call, and they can seeyour availability information.
Sign in to the instant messaging or internet call services that you use, and select.
Availability information is displayed on the contact picture if supported by the onlineservice.
Calls
Ways to make callsTo make a call, you can:
• Enter a phone number• Search your contacts list• Select from your last dialled numbers
Calls 47
Call a phone numberSelect .
1 Select .
2 Enter the phone number.To delete a number, select
To enter the + character, used for international calls, select * twice.3 To make the call, select .
4 To end the call, select .
Tip: In all apps, and even on the lock screen, you can easily make a call. Hold yourphone upright, and drag your finger from below the bottom of the screen onto thescreen. Hold your finger in place, until the quick launch bar is displayed.
Call a contactSelect .
1 To search for a contact, enter the first letters or characters of the contact's firstor second name in the search field.
2 Select the contact and the number.
Send a message to the contactSelect the contact and next to the phone number.
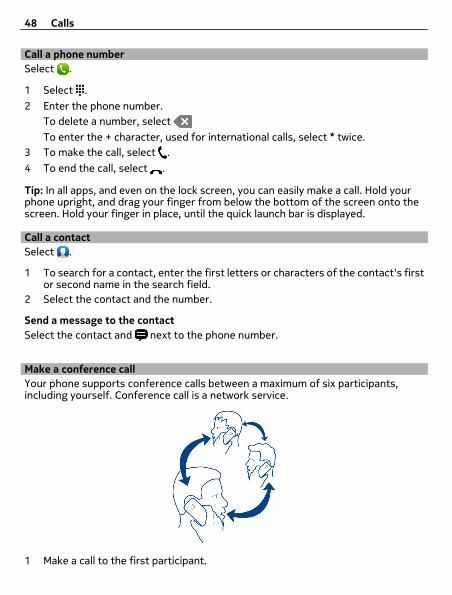
Make a conference callYour phone supports conference calls between a maximum of six participants,including yourself. Conference call is a network service.
1 Make a call to the first participant.
48 Calls

2 To make a call to another participant, select > New call to contact or OpenPhone. The first call is put on hold.
3 When the new call is answered, to start the conference call, select Conferencecall.
Add a new participant to a conference callMake a call to another participant, and to add the new call to the conference call,select Conference call.
Have a private conversation with a conference call participantSelect .
Next to the participant name or number, select . The conference call is put on holdon your phone. The other participants continue the conference call.To return to the conference call, select .
Drop a participant from a conference callSelect , and next to the participant name or number, select .
End an active conference callSelect .
Answer or decline callsWhen someone is calling, you can:
• Answer the call• Decline the call• Decline the call with a text message• Silence the call
You can set your phone to divert all calls to your voice mailbox or to another phonenumber.
Answer a callWhen a call arrives, select .
When someone is calling you while your phone is locked, to access the incoming callview, swipe from the outside of the screen onto the screen. You can then answer thecall.
Reject a callWhen a call arrives, select .
Calls 49
Reply to a call with a text message1 When a call arrives, select > , and edit the message, informing that you
cannot answer the call.2 To send the message, select Send.
Tip: You can automatically divert rejected calls to your voice mailbox or another phonenumber (network service). Select and Device > Call > Call divert.
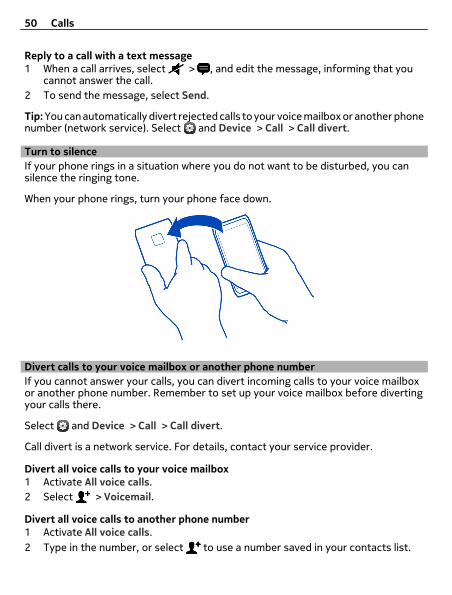
Turn to silenceIf your phone rings in a situation where you do not want to be disturbed, you cansilence the ringing tone.
When your phone rings, turn your phone face down.
Divert calls to your voice mailbox or another phone numberIf you cannot answer your calls, you can divert incoming calls to your voice mailboxor another phone number. Remember to set up your voice mailbox before divertingyour calls there.
Select and Device > Call > Call divert.
Call divert is a network service. For details, contact your service provider.
Divert all voice calls to your voice mailbox1 Activate All voice calls.2 Select > Voicemail.
Divert all voice calls to another phone number1 Activate All voice calls.2 Type in the number, or select to use a number saved in your contacts list.
50 Calls

Several diverting options, such as If busy and If not answered can be active at thesame time.
Call your voice mailboxYou can divert your incoming calls to your voice mailbox. Callers can also leave you amessage if you do not answer. Voice mailbox is a network service.
Select .
Select , and select and hold 1.
If the voice mailbox number is not saved, your phone asks for it. Type in the numberreceived from your network service provider, and select Save.
Change the phone number of your voice mailbox1 Select and > > Edit voicemail number.2 Type in the number, and select Save.
Add another voice mailbox1 Select and > > Edit voicemail number > Add number.2 Type in the number, and select Save.
During a callDuring a call, you can:
• Activate the loudspeaker• Add callers, to make a conference call• Answer a waiting call
Activate the loudspeaker during a callTo allow others in the room to join in with a call, activate the built-in loudspeaker.
Select Loudspeaker.
Deactivate the loudspeakerSelect Loudspeaker.
Noise cancellationIf you are calling from a noisy environment, your phone filters out background noise,to make your voice sound clearer to the person at the other end of the line.
Noise cancellation is not available when using the loudspeaker or a headset.
Calls 51

For the best noise cancellation, hold the phone with the earpiece to your ear and themain microphone towards your mouth. Do not cover the secondary microphone nextto the camera flash.
If you want to let the person at the other end of the line also hear the backgroundnoise, for example, the music when you're at a concert, you can temporarilydeactivate noise cancellation.
Activate or deactivate noise cancellationSelect and Device > Call, and activate or deactivate Noise cancellation.
Answer a waiting callYou can answer a call when you have another call in progress. Call waiting is a networkservice.
Select the waiting call and . The first call is put on hold.
Activate, deactivate, or check the status of the serviceSelect and Device > Call, and activate or deactivate Call waiting.
Swap between an active call and a call on holdSelect the call.
Connect the call on hold to the active call to start a conference callSelect Conference call.
End an active callSelect .
End both callsSelect > End all calls.
Recent callsYour call history is stored on your phone.
52 Calls
Missed and received calls are logged only if supported by the network, and the phoneis switched on and within the network service area.
View your missed callsIn the Events view, you can see when you have missed calls. To view the phonenumbers or contacts, select the displayed notification. The caller's name is displayedif stored in the contacts list.
Missed and received calls are logged only if supported by the network, and the phoneis switched on and within the network service area.
Call back a contact or numberSelect the contact or number and .
View the missed calls list laterSelect and > > Missed calls.
View your received callsSelect .
Received calls are logged only if supported by the network, and the phone is switchedon and within the network service area.
Select > > Received calls.
Call back the contact or numberSelect the contact or number and .
Call the last dialled numberTrying to call someone, but they are not answering? It is easy to call them again. Inthe call history view, you can see information about the calls you have made andreceived.
Select .
Select > , and from the pop-up menu, select Dialled calls.
To call the last dialled number, select the contact or number from the list and .
About internet callsYou can make and receive calls over the internet. Internet call services may supportcalls between computers, between mobile phones, and between a VoIP device and atraditional telephone. The internet call service is a network service.
Calls 53

Some internet call service providers allow free internet calls. For availability andconnectivity costs, contact your internet call service provider.
To make or receive an internet call, you must be in the service area of a WLAN or havea packet data (GPRS) connection in a 3G network, and be signed in to an internet callservice.
Install an internet call serviceSelect .
1 Select Add account and an internet call service provider.2 Enter required details, such as your username and password.3 To sign in to the service, select Sign in.
When an internet call service has been installed, the service is displayed in thecontacts list and the Accounts application.
Tip: You can search for internet call services from Nokia Store. To learn more aboutNokia Store, go to www.nokia.com/support.
Sign in to an internet call serviceSelect .
Select the internet call service, and activate the account.
Deactivate a serviceSelect the account, and deactivate it. When you deactivate an account, all contentrelated to the account is hidden.
Set all services to offlineSet your availability status to All offline.
Make an internet callWhen you are signed into an internet call service, you can make an internet call fromthe contacts list or enter a phone number manually.
Call a contact in the contacts list1 Select and .
2 Select a contact and an internet call service.
Make an internet call to a phone number1 Select and .
54 Calls

2 Enter the phone number.3 Select , an internet call service, and .
Set your availability statusWant to receive instant messages or internet calls from your friends? Set youravailability status to .
Open the status menu, and select Availability.
Set your availability status for all your accountsSelect All online or All offline.
Set your availability for an individual accountSelect the account and the desired availability status.
When you're signed in to several instant messaging or internet call services at thesame time, you can post a single status message to all the services.
Post a status message1 Open the status menu, and select Availability > Update status message .2 Select the text input field, and write your status message.3 Select Update.
Share your location in your status message1 Open the status menu, and select Availability > Update status message > Add
location.2 Select Street, District, or City.3 Select the Add location check box.
Location sharing is available only if it is supported by the service.
Important: Before sharing your location, always consider carefully with whom youare sharing. Check the privacy settings of the social networking service you are using,as you might share your location with a large group of people.
Messaging and social networks
Set up all your accounts in one goSet up and manage your accounts for instant messaging (IM), mail, and various otherservices, all in one view.
Select .
Messaging and social networks 55
1 Select Add account.2 Select an account, and follow the displayed instructions.3 After setting up the account, to add another account, select Add more
accounts.
When you set up an account, you need to sign in with your credentials. Your phoneremembers your credentials in future.
Tip: To protect your accounts against unauthorised use, lock your phone when notin use.
Deactivate a serviceSelect the account, and deactivate it. When you deactivate an account, all contentrelated to the account is hidden.
Remove a serviceSelect the account and > Delete.
MessagesAbout MessagesSelect .
You can send and receive different kinds of messages:
• Text messages• Multimedia messages that contain your pictures or videos• Instant messages (network service)
Messages requires network support.
Tip: To access messages quickly, hold your phone upright, and drag your finger frombelow the bottom of the screen onto the screen. Hold your finger in place, until thequick launch bar is displayed.
You can send text messages that are longer than the character limit for a singlemessage. Longer messages are sent as two or more messages. Your service providermay charge accordingly.
Characters with accents, other marks, or some language options, take more space,limiting the number of characters that can be sent in a single message.
Using services or downloading content may cause transfer of large amounts of data,which may result in data traffic costs.
56 Messaging and social networks

Send a messageWith text and multimedia messages, you can quickly contact your friends and family.In a multimedia message, you can attach your videos, photos, and sound clips thatyou want to share.
Select .
1 Select .
2 To select recipients from the contacts list, select the To field and . To type inthe recipient’s name or phone number, select the To field.
3 Write your message.4 To add an attachment, select .
Tip: If you want to add a new photo to your message, select > Camera. Takethe photo, and it is added to your message.
5 Select Send.
Sending a message with an attachment may be more expensive than sending a normaltext message. For more information, contact your service provider.
If the item you insert in a multimedia message is too large for the network, the devicemay automatically reduce the size.
Only compatible devices can receive and display multimedia messages. Messagesmay look different in different devices.
Read a received messageWhen you receive a new message, a notification is shown in the Events view. Selectthe notification to open the message.
To view your messages later, select .
Reply to the received message1 Select a conversation in the Messages view.2 Select the text input field at the bottom of the display.3 Write your message.4 Select Send.
Forward the message1 Select a conversation in the Messages view.2 Select and hold the message, and select Forward.
Messaging and social networks 57

Forward a multimedia message1 Select a conversation in the Messages view.2 Select the multimedia message.3 Select > Forward.
Save a picture or other multimedia itemWith the message open, select and hold the item, and select Save as. You can viewthe item in the corresponding application. For example, to view saved photos, openGallery.
Tip: To view text messages and instant messages separately, select .
Change the phone languageSelect and Time and language > Language.
Instant messagingCreate an instant messaging accountTo chat with your contacts, you need an instant messaging account in your phone.
Select and Add account, and follow the displayed instructions.
Send an instant messageSelect .
1 Select and a contact.
2 Write your message, and select Send.
Tip: You can sign in to and chat in several services at the same time. Switch betweendifferent chat services in the Open applications view.
MailAbout MailSelect .
You can start using your existing mail address with your phone, and read, respond to,and organise your mail on the go.
Sending or receiving mail on your phone may be chargeable. For information onpossible costs, contact your service provider.
Mail is a network service, and may not be available in all regions.
Add a mailboxYou can add several mailboxes to your phone.
58 Messaging and social networks

Select .
Select an account, and follow the displayed instructions.
Add a mailbox laterSelect , and follow the displayed instructions.
Delete a mailbox1 Select .2 Select the mailbox and > Delete.
Read a received mailWhen you receive new mail, a notification is shown in the Events view. Select thenotification to open the mail.
To read your mail later, select .
Tip: To zoom in or out, place two fingers on the screen, and slide them together orapart.
Reply to the mailWith the mail open, select > To sender, or if there is more than one recipient,select To all.
Forward the mailWith the mail open, select .
Delete the mailWith the mail open, select .
Send a mailYou can use your phone to write and send mail, and attach files to your mail.
Select . If you have more than one mail account, select an account.
1 Select .
2 Type in the mail address. To add a recipient from your contacts list, select .
Tip: When using your Mail for Exchange account, your phone can also searchrecipients from your global address list. Just type in part of the recipient's name,select the number next to the suggested recipient, then select the recipient.
3 To add an attachment, select > Attachments:.
Messaging and social networks 59

4 Select Send.
View mail threadsYou can view your mails as threads. With threads, it is easy to keep up with what hasbeen said as you can see all mails you have sent or received under a subject in a singleview.
Select and a mailbox. If threads are not showing, select and Applications > Mailto switch them on.
Select a thread to open it. Use the arrow buttons to browse through the thread. Ifyou want to quickly search for a particular mail, select Threads and a mail.
You can have both mail threads and single mails in your inbox. Each thread has anumber on the right that indicates how many mails there are in the thread.
Reply to a mail in a threadWith the thread open, select . You are replying to the latest mail in the thread. Ifyou want to reply to a mail in the middle of the thread, browse to the mail, then select
.
Forward a threadWith the thread open, select . The forwarded thread is added as an attachment.
Delete a mailWith the thread open, select . The latest mail in the thread is deleted. To delete thewhole thread, select Thread > > Delete thread.
Mail for ExchangeAbout Mail for ExchangeWould you like to have your work mail, contacts, and calendar at hand, whether youare sitting by your computer or on the go with your phone? You can synchronise theimportant content between your phone and a Microsoft Exchange server.
Select and Add account > Mail for Exchange.
Mail for Exchange can be set up only if your company has a Microsoft Exchange server.In addition, your company IT administrator must have activated Microsoft ExchangeActiveSync for your account.
Use of the Mail for Exchange is limited to over-the-air synchronisation of PIMinformation between the Nokia device and the authorised Microsoft Exchange server.
Before starting to set up Mail for Exchange, make sure you have the following:
60 Messaging and social networks

• A corporate mail address• Your Exchange server name (contact your company IT department)• Your network domain name (contact your company IT department)• Your office network password
Depending on the Exchange server configuration, you may need to enter additionalinformation. If you do not know the correct information, contact your company ITdepartment.
When you set up your Mail for Exchange account, your phone may ask you to definea security code. Depending on your Mail for Exchange administrator's securityrequirements, also your phone lock settings may be changed, such as Autolock andNumber of tries. When you have defined a security code, if you don't use your phonefor a while, it locks itself. To use your phone again, you need to enter the code.
Synchronisation takes place automatically in intervals defined when setting up theMail for Exchange account. Only content defined when setting up the account issynchronised. To synchronise additional content, modify the Mail for Exchangesettings.
Respond to a meeting requestYou can respond to meeting requests using Mail for Exchange. When you accept ameeting request, it appears in your calendar.
1 In the Events view, select the mail notification, or select and the mail. If youhave more than one mail account, select an account.
2 Select > Accept, Tentative, or Decline.
Music and videos
Music playerAbout the music playerSelect .
You can use your phone's music player to listen to music and podcasts while on themove.
Play musicSelect .
Select a song or album. You can also select a podcast.
Tip: To listen to songs in a random order, select .
Music and videos 61

Pause or resume playbackTo pause playback, select ; to resume, select .
Play the next or previous songSelect or , or flick the album art left or right.
Browse music in Nokia MusicSelect Music Store.
Delete music from your collectionSelect and hold a song or album, and select Delete.
Tip: When listening to music, you can return to the home screen, leaving the musicplaying in the background.
Create a playlistWant to listen to different music for different moods? With playlists, you can createselections of songs to play in a specific order.
Select .
1 Select and hold a song or album, and from the pop-up menu, select Add toplaylist.
2 Enter a name for the playlist.
Play a playlistSelect Playlists and the desired playlist.
Remove a song from a playlistIn the playlist view, select > Remove songs > Remove.This does not delete the song from the phone; it only removes it from the playlist.
Tip: To quickly add the song you're listening to the Favourites playlist, select .
Explore recommendations from Nokia Music Want to explore new music but don't know where to start? Let your phone suggestalbums matching your taste, and get inspired.
Select .
When browsing artists, albums, or songs, select an album suggested under You mightalso like.
62 Music and videos
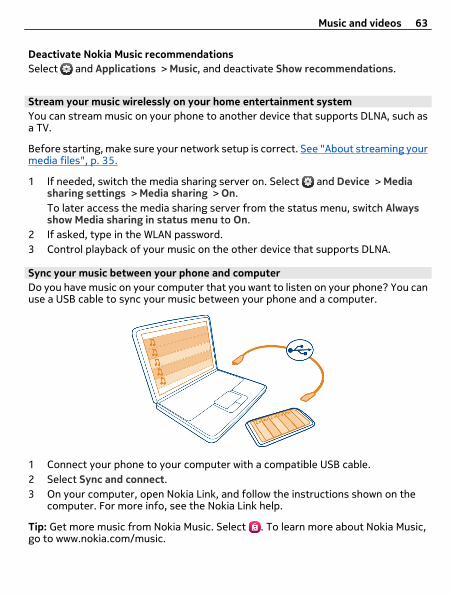
Deactivate Nokia Music recommendationsSelect and Applications > Music, and deactivate Show recommendations.
Stream your music wirelessly on your home entertainment systemYou can stream music on your phone to another device that supports DLNA, such asa TV.
Before starting, make sure your network setup is correct. See "About streaming yourmedia files", p. 35.
1 If needed, switch the media sharing server on. Select and Device > Mediasharing settings > Media sharing > On.To later access the media sharing server from the status menu, switch Alwaysshow Media sharing in status menu to On.
2 If asked, type in the WLAN password.3 Control playback of your music on the other device that supports DLNA.
Sync your music between your phone and computerDo you have music on your computer that you want to listen on your phone? You canuse a USB cable to sync your music between your phone and a computer.
1 Connect your phone to your computer with a compatible USB cable.2 Select Sync and connect.3 On your computer, open Nokia Link, and follow the instructions shown on the
computer. For more info, see the Nokia Link help.
Tip: Get more music from Nokia Music. Select . To learn more about Nokia Music,go to www.nokia.com/music.
Music and videos 63

VideosAbout VideosSelect .
You can browse, download, and watch videos on your phone when out and about.
Tip: Get new videos from Nokia Store. For more information, go to www.nokia.com/support.
Using services or downloading content may cause transfer of large amounts of data,which may result in data traffic costs.
Play a videoTo browse your video collection, select . To browse the videos you have recorded,select .
1 Select a video.2 To use the video player controls, tap the screen.
Sync your videos between your phone and PCDo you have videos that you want to watch on your phone? You can sync your videosbetween your computer and your phone.
1 Use a compatible USB cable to connect your phone to your computer.2 Select Sync and connect.3 On your computer, open Nokia Link. For more info, see the Nokia Link help.
On your phone, videos that are in a supported format are displayed in Videos.
Stream or download videos from the internetYou can download or stream videos over the air from compatible internet videoservices. When you stream a video, you can start to watch it soon after starting; youdo not need to wait for the whole video to download first.
Select , and search for a video.
Play a videoSelect a video. To access the video player controls, tap the screen.
Some videos can be streamed over the air, but others must be first downloaded toyour phone. Downloads continue in the background if you close the application. Thedownloaded videos are saved in Videos.
64 Music and videos

Tip: Get new videos from Nokia Store. To learn more about Nokia Store, go towww.nokia.com/support.
Using services or downloading content may cause transfer of large amounts of data,which may result in data traffic costs.
Enjoy surround sound through your headphonesWant to enjoy the realistic and intense sounds of a movie or a concert experience?With Dolby™ Digital Plus 5.1 multichannel audio, you can enjoy immersive surroundsound over any pair of headphones.
1 Connect headphones to your phone.
2 To activate or deactivate surround sound, select and Applications > Videos >Dolby Headphone.
Dolby™ Headphone can use any native 5.1 content, but can also convert 2-channelcontent into surround sound.
Camera and Gallery
Take photosAbout the cameraSelect .
Why carry a separate camera if your phone has all you need for capturing memories?With your phone camera, you can easily take photos or record videos.
The back camera on your phone is an 8-megapixel autofocus camera. The wide-angleCarl Zeiss™ lens lets you capture more, by broadening the angle of view, for example,when taking a group photo in a confined space.
You can later use your phone to view or edit the photos and view the videos, sharethem on the internet, or send them to compatible devices.
Camera and Gallery 65
Tip: To access the camera quickly, hold your phone upright, and drag your finger frombelow the bottom of the touch screen onto the screen. Hold your finger in place, untilthe quick launch bar is displayed.
Take a photoSelect .
Select and hold . The focus is locked when a blue rectangle is displayed. To takethe photo, lift your finger. Do not move the phone before the photo is saved and thephone is ready for a new photo.
Zoom in or outUse the volume keys.
Focus on a specific object or areaTap the object or area on the screen.Touch focus is always activated. However, it is not available in landscape or sportsscene modes.
When taking a photo, you can recompose it without losing the focus point.
Recompose a photo while taking it1 To lock the focus, select and hold . The focus is locked when a blue rectangle
is displayed.2 Recompose the photo.3 To take the photo, lift your finger.
Tip: To mark a photo as a favourite right after taking it, select , tap the screen toshow the toolbar, and select . Later, you can find the photo on the tab in Gallery.
With the face tracking feature, you can take sharp photos of people's faces. Itoptimises focus, white balance, and exposure, and draws rectangles around faces,even when they are moving. It is not available in landscape, sports, night, and macroscene modes.
Switch face tracking on or offTap the settings area, and switch Face detection on or off.
If you tap the screen to move the focus, face tracking is switched off. To switch it onagain, tap the middle of the screen. Face tracking is also switched on when you returnto the camera from another view.
66 Camera and Gallery

Photos and videos taken with your phone are saved in Gallery. To open Gallery, select.
Camera tipsSelect .
Here are some tips to help you use the camera.
• Use both hands to keep the camera steady.• To zoom in, use the volume keys or the zoom slider on the screen.
When you zoom in, the image quality may decrease.• To interrupt taking a photo after selecting , slide your finger away from ,
then lift it.• The camera goes to battery saving mode after about a minute of inactivity. To
wake up the camera, tap the screen.
Keep a safe distance when using the flash. Do not use the flash on people or animalsat close range. Do not cover the flash while taking a photo.
• To switch between taking photos and recording videos, select or .
• To change camera settings, such as flash, scene modes, aspect ratio, andresolution, tap the settings area , and select the setting.
• By default, photos use the 16:9 aspect ratio and have a 7 Mpix resolution. Thisaspect ratio is best suited to view the photos on a TV, as there are no black edges.To take 8 Mpix photos, change the aspect ratio to 4:3. Tap the settings area, andselect the appropriate settings.
• To share a photo or video with NFC directly from the camera, the photo or videoneeds to be shown on the screen. By default, the captured content is not shownafter taking a photo or recording a video. To show it, tap the settings area, andselect the appropriate setting for Show captured content.
• In all applications, and even on the lock screen, you can easily access the camera.Hold your phone upright, and drag your finger from below the bottom of the touchscreen onto the screen. Hold your finger in place, until the quick launch bar isshown.
Take a close-up photoIt can be tricky to get small objects, such as insects or flowers, in focus. You need tomove the camera closer to the object. To take sharp and precise photos of even thetiniest details, use close-up mode.
Select .
Camera and Gallery 67

Switch close-up mode onTap the settings area, and in Scene, select Macro.
Take a photo in the darkWant to take better photos even in dim light? Switch night mode on.
Select .
Switch night mode onTap the settings area, and in Scene, select Night.
Tip: You can also record videos in dim light. To turn night video mode on, switch tovideo mode, tap the settings area, and select Video at night.
Take a photo of a moving objectAre you at a sports event and want to capture the action with your phone? Use sportsmode to take a sharper photo of moving people.
Select .
Switch sports mode onTap the settings area, and in Scene, select Sports.
Take a series of photosWould you like to shoot lots of photos quickly, to capture the perfect moment of anaction or facial expression? Use continuous shutter mode.
Select .
Change the shutter modeTap the settings area, then switch Continuous shutter mode on.
Save location info to your photos and videosIf you sometimes want to find all your photos or videos that match a certain location,or sometimes struggle to remember where you were when you took a particular photoor recorded a video, you can set your phone to automatically record the location andadd geotags to your photos and videos.
GPS is used to record the coordinates of your location. Geotagging converts thecoordinates into location tags with info of, for example, the country and the city. Thisis a network service and may result in data costs.
68 Camera and Gallery
The location info may not be available in all regions.
Select .
You need to switch GPS on before you can switch geotagging on.
Switch GPS and geotagging on1 Tap the settings area, and select Use GPS.
It may take several minutes to obtain the coordinates of your location. Theavailability and quality of GPS signals may be affected by your location, buildings,natural obstacles, and weather conditions. This feature requires network service.
2 Select Use geotags.
Tip: You can also add or edit geotags later, in Gallery.
Location information can be attached to an image or a video clip, if locationinformation is available. Location information may become visible to third parties, ifimages or video clips are shared.
Record videosRecord a videoBesides taking photos with your phone, you can also capture your special momentsas videos.
Select .
1 To switch from photo mode to video mode, if necessary, select .
2 To start recording, select . A red record icon is displayed.
3 To stop recording, select . The video is automatically saved in Gallery. To openGallery, select .
Send and share photos and videosSend a photo or videoYou can send photos and videos in a multimedia or mail message, or using Bluetoothor NFC.
Select .
Send in a multimedia message1 Take a photo or record a video.2 Select > and Multimedia message.
Camera and Gallery 69

3 To select a recipient from your contacts list, select To > . To write therecipient’s name or phone number manually, select the To field, and write thename or phone number.
4 Select Send.
Send in a mail1 Take a photo or record a video.2 Select > and Mail.3 To select a recipient from your contacts list, select . You can also write the
address in the To field.4 Select Send.
Send using Bluetooth1 Take a photo or record a video.2 Select > and Bluetooth.
3 Select the device to connect to, and select Continue.4 If the other device requires a passcode, type in the passcode.
Send using NFC1 Take a photo or record a video.2 Select > and NFC.
3 Touch the other phone with the NFC area of your phone.
Share a photo or video directly from the cameraAfter taking a photo or recording a video, you can upload your photo or video to asharing service.
Select .
1 Take a photo or record a video.2 Select .
3 If necessary, tap the screen to show the toolbar, and select > New account.4 Sign into a sharing service, and follow the displayed instructions.
Tip: You can also share pictures or videos from Gallery, or with another phone thatsupports NFC. To share with NFC, after taking a photo or recording a video, touch theNFC area of the other phone with the NFC area of your phone.
Not all sharing services support all file formats or videos recorded in high quality.
70 Camera and Gallery

GalleryAbout GallerySelect .
The photos you have taken or videos you have recorded are collected in Gallery, whereyou can view and edit them.
You can also view the photos and videos on a compatible TV.
To find your photos and videos easily, add tags to them, or mark them as favourites.
View a photo or videoSelect .
Browse photos and videosTo browse all photos on the phone or videos recorded with the phone camera, select
, then scroll up or down. To browse the photos taken or videos recorded with thephone camera, select , then scroll up or down.
View a photo in full screen modeSelect the photo. To show the toolbar, tap the photo.
Zoom in or outPlace two fingers on the screen, and slide your fingers apart or together.
Tip: To quickly zoom in or out, double-tap the screen.
View photos as a slide showSelect a photo, tap the screen to show the toolbar, and select > Slide show. Theslide show starts from the selected photo. To stop the slide show, tap the screen.
Play a videoSelect a video.
Camera and Gallery 71

Photos and videos can also be sent to you from a compatible device. You can view areceived photo directly in Gallery and a received video in Videos.
Organise your photos and videosTo organise your photos and videos, add tags to them, or mark them as favourites.With tags and favourites, it's easy to categorise and find the photos and videos inGallery.
Select .
Tags are keywords that you can create and attach to your photos and videos. Geotagsare tags that include location information, such as country and city.
Add a tag1 Select a photo or video, tap the screen to show the toolbar, and select > Edit
tags.2 Select a tag. To create a new tag, select Add new tag.
You can also add the same tags to several photos or videos at a time.
Add tags to several photos or videos1 In the Gallery main view, select > Edit tags.2 Select the photos or videos and Edit tags.3 Select the tags, or create new ones, and select Done.
Add a geotagSelect a photo or video, tap the screen to show the toolbar, and select > Edittags > Edit geotags. Move the indicator to the correct location, then select Done >Done.
View the photos and videos that match a tagIn the Gallery main view, select > Filter by tags, then select the tag and View.You can also view photos and videos that match several tags. Selecting several tagsshows the photos and videos that are marked with all of the selected tags.
Mark as a favouriteSelect a photo or video, tap the screen to show the toolbar, and select .
View the photos and videos that are marked as favouritesIn the Gallery main view, open the tab.
72 Camera and Gallery

Tag people in your photosTo easily combine the names with the faces in your photos, add face tags to yourphotos in Gallery.
Select .
Face recognition needs to be on before you can add face tags.
Switch face recognition onSelect and Applications > Gallery, and switch Face recognition on.
Add a face tag to an unnamed face1 Select a photo, tap the screen to show the toolbar, and select the bubble with the
question mark.2 Write the name, or select , and select the person from your contacts list.
3 Select Save.
After you have named a face a few times, the app starts to suggest a name for a faceit recognises.
Accept or change a suggested face tag1 Select a photo, tap the screen to show the toolbar, and select the bubble with the
suggested name.2 To accept the suggested name, select Save. To change the name, select , then
select the person from your contacts list. You can also start writing a name, andthe phone suggests a matching name from your contacts list.
Tip: To quickly accept the suggested name, double-tap the bubble.3 Select Save.
View tagged photosIn the Gallery main view, open the tab.
All the face tags that you have added to your photos in your phone may not be visiblewhen you share the photos in a social networking service. In some social networkingservices, you can only add face tags to persons on your friend list.
View a photo or video on a TVWant to show the photos and videos on your phone to your family and friends?Connect your phone to a compatible TV, and view the photos and videos on a biggerscreen.
Camera and Gallery 73

You need to use a Nokia Video Connectivity Cable (available separately), and may needto change the TV-out settings.
Change the TV-out settingsSelect and Accessories > TV-out.
Do not connect products that create an output signal as this may cause damage tothe phone. Do not connect any voltage source to the headset connector. If youconnect an external device or headset, other than those approved by Nokia for usewith this phone, to the headset connector, pay special attention to volume levels.
1 Plug a Nokia Video Connectivity Cable to the video input of a compatible TV. Thecolour of the plugs must match the colour of the sockets.
2 Plug the other end of the Nokia Video Connectivity Cable to the headsetconnector of your phone.
3 Select a photo or video.
Tip: If your TV supports DLNA, and is connected to a WLAN, you can view the photosand videos also without the cable connection. See "View your photos and videoswirelessly on your home entertainment system", p. 75.
Photo editorEdit a photo you have takenDo you need to crop your photos or remove red eyes? You can easily do simple editsto the photos you have taken with your phone.
When you edit a photo, you do not lose the original shot. In other words, you can undoall the edits or revert to the original photo at any time.
Select .
74 Camera and Gallery

Apply an effectSelect a photo, tap the screen to show the toolbar, and select > Edit and thedesired option. The changes you make are saved automatically.
You can undo or redo changes even after closing Gallery or restarting the phone.
Undo or redo an effectSelect or .
To view your edited photos, select .
Reset to originalSelect the photo, tap the screen to show the toolbar, and select > Edit > Resetto original.
Video editorEdit your videosCut and trim your videos down to the essentials.
Select and a video.
1 Tap the screen to show the toolbar, and select > Edit.2 Drag the handles to mark the start and end of your video.3 To add music to your video, select .
4 To preview your video, select .
5 To save your video, select Done.
If you try to send a video in a multimedia message, and the file size or length exceedsthe allowed limit, the video editor opens automatically.
View your photos and videos wirelessly on your home entertainment systemYou can stream photos and videos on your phone to another device that supportsDLNA, such as a TV.
Before starting, make sure your network setup is correct. See "About streaming yourmedia files", p. 35.
1 If needed, switch the media sharing server on. Select and Device > Mediasharing settings > Media sharing > On.To later access the media sharing server from the status menu, switch Alwaysshow Media sharing in status menu to On.
Camera and Gallery 75

2 If asked, type in the WLAN password.3 View and control playback of your photos and videos on the other device that
supports DLNA.
Maps and navigation
GPSAbout positioning methodsYour phone displays your location using GPS, A-GPS, WLAN, or cellular positioning.
The Global Positioning System (GPS) is a satellite-based navigation system used forcalculating your location. Assisted GPS (A-GPS) is a network service that sends youGPS data, improving the speed of the positioning. In addition, other enhancementsto GPS may be used to improve and speed up the positioning. These may requiretransferring small amounts of data over the cellular network.
Wireless local area network (WLAN) positioning improves position accuracy when GPSsignals are not available, especially when you are indoors or between tall buildings.
With cellular positioning, the position is determined through the cellular networkantenna your phone is currently connected to.
To save on data costs, you can deactivate A-GPS in your phone positioning settings,but calculating your location may take much longer.
You can deactivate WLAN in your phone internet connection settings.
Depending on the available positioning methods, the accuracy of positioning mayvary from a few metres to several kilometres.
The availability and quality of GPS signals may be affected by your location, satellitepositions, buildings, natural obstacles, weather conditions, and adjustments to GPSsatellites made by the United States government. GPS signals may not be availableinside buildings or underground.
Do not use GPS for precise location measurement, and never rely solely on thelocation information provided by GPS and cellular networks.
Coordinate information may not be available in all regions.
Deactivate assisted GPS (A-GPS)Assisted GPS (A-GPS) helps your phone determine your current location more quickly.A-GPS is a network service. To save on data costs, especially when abroad, you candeactivate the service.
76 Maps and navigation

Select and Device > GPS and positioning, and deactivate Mobile dataconnection.
The Assisted GPS (A-GPS) network service retrieves location information using thecellular network, and assists GPS in calculating your current location.
Your phone is preconfigured to use the Nokia A-GPS service, if no service provider-specific A-GPS settings are available. The assistance data is retrieved from the NokiaA-GPS service server only when needed.
You must have a mobile data internet access point defined in the phone to retrieveassistance data.
Note: The use of assisted positioning methods may involve exchanging yourlocation data, wireless network identifiers along with your unique phone or networkservice provider identifiers with a location server. Nokia processes this informationanonymously. Depending on your positioning settings and your use of locationservices, your phone may connect to other service providers’ servers, which are notcontrolled or operated by Nokia. Check the privacy policies of such service providersto understand how they process your location data.
Tips on creating a GPS connection
Check the satellite signal status in the status area indicates an active GPS connection.
If a satellite signal cannot be found, consider the following:
• If you are indoors, go outdoors to receive a better signal.• If you are outdoors, move to a more open space.• If the weather conditions are bad, the signal strength may be affected.• Some vehicles have tinted (athermic) windows, which may block the satellite
signals.• Make sure you do not cover the antenna with your hand.
Maps and navigation 77

• Use an external GPS receiver.
The GPS receiver uses the phone battery. Using GPS may drain the battery morequickly.
MapsAbout MapsSelect .
Maps shows you what is nearby, and guides you where you want to go.
• Find cities, streets, and places of interest.• Plan your route.• Find your way with turn-by-turn directions.
Some services may not be available in all countries, and may be provided only inselected languages. The services may be network dependent. For more information,contact your network service provider.
Using services or downloading content may cause transfer of large amounts of data,which may result in data traffic costs.
Contents of digital maps may sometimes be inaccurate and incomplete. Never relysolely on the content or the service for essential communications, such as inemergencies.
Some content is generated by third parties and not Nokia. The content may beinaccurate and is subject to availability.
View your location and the mapSee your current location on the map, and browse maps of different cities andcountries.
Select .
78 Maps and navigation

indicates your current location, if available. If your current location is not available, indicates your last known location.
Browse the map1 Drag the map with your finger. By default, the map is oriented north.2 You can also use two fingers to rotate the map.
To enable two-finger rotation, select > Settings, and activate Two-finger maprotation.
View your current locationSelect on the map.
If you search for or browse to a location, and view details about the location, theinformation for the location you are currently viewing is displayed. To return toviewing your current location, or to view information for your current location, select
.
Zoom in or outTo zoom in, double-tap the map, or place two fingers on the map and slide them apart.To zoom out, slide your fingers together.
Tip: You can also use the zoom bar. To display the bar in the different views, select > Settings, and activate Zoom bar.
If you browse to an area not covered by the street maps that are stored on your phone,and you have an active data connection, new street maps are automaticallydownloaded.
New street maps are also downloaded if you upgrade to the latest Maps applicationversion.
Maps and navigation 79

Map coverage varies by country and region.
Change the look of the mapView the map in different modes, to easily identify where you are.
Select .
Select and from the following:
Map — In the standard map view, details such as location names or motorwaynumbers are easy to read.Satellite — For a detailed realistic view, use satellite images.Terrain — View at a glance the ground type, for example, when you are travelling off-road.Public transport lines — View selected public transport services, such as metro, bus,or tram routes.3D Mode — For a more realistic view, change the perspective of the map.Nightmode — Dim the colours of the map. When travelling at night, the map is easierto read in this mode.3D Landmarks — Display prominent buildings and attractions on the map.
The available options and features may vary by region. The unavailable options aredimmed.
Get guidanceYou can get guidance for walking, driving, or travelling by public transport.
Select and .
Voice guidance, if available for your language, helps you find your way to a destination,leaving you free to enjoy the journey.
Get voice guidance1 Use your current location as the starting point, or enter a location in the field,
and select from the proposed matches.2 Enter the destination in the appropriate field.3 The selected destination is displayed on the map. Select the destination marker
and or , and select Get directions.
4 To start voice-guided navigation, select Navigate. To view written directions,select .
80 Maps and navigation

Tip: For walk navigation, voice guidance is by default deactivated. To activate it, select > Voice guidance, or, if no language has been selected Select voice.
You can get guidance on which bus, train, or underground lines to use, and how toget to the stations or stops.
Get guidance for public transport1 When you have entered your destination, select the destination marker on the
map and > Get directions.A map of the route is displayed.
2 For detailed instructions, select .
Tip: To navigate to a place you have found through nearby or category search, selectthe place marker and .
Download and update mapsSave street maps to your phone, so you can browse the maps without an internetconnection and save on data costs when travelling.
Select .
To download and update maps on your phone, you need an active WLAN connection.
Download maps1 Select > Manage maps > > Add maps.2 Select the continent and country, and select Download.
Update maps1 Select > Manage maps > > Check for updates.2 If new updates are available, the phone offers those to you. Select Download.
Use Maps offlineTo save data costs, especially when travelling, you can also use Maps without aninternet connection.
Select .
When you have downloaded the needed maps to your phone, you can use, forexample, positioning, search, and navigation also in offline mode.
Select > Settings, and deactivate Online.
Tip: To make sure that you can use Maps offline when abroad, download the neededmaps to your phone before the trip.
Maps and navigation 81

Find a locationMaps helps you find specific locations, places of interest, and businesses.
Select and .
Search for a location1 Enter search words, such as a street address or place name in the Search field.2 Select an item from the list of proposed matches.
The location is displayed on the map.
If no search results are found, make sure the spelling of your search words is correct.
View the list of proposed matchesSelect .
Search for nearby places1 Select .
The nearby public places are shown as place markers on the map.2 To view a list of the nearby places, select .
3 To view the details of a place, select the place marker and its information field.
Search for places by category1 Select > Categories and a category.2 To view the details of a place, select the place from the list.3 To view the place on a bigger map, tap the map.
Tip: To view the details of a found place, you can also select its marker on the map.
Problems with your internet connection may affect results when searching online.
If you have maps of the searched area stored on your phone, to avoid data transfercosts, you can also get search results without an active internet connection, but thesearch results may be limited.
Save a favourite placeSave an address or a place of interest, so it can be quickly used later.
Select .
Save a placeOn the map, select a location marker and its information field.
82 Maps and navigation
On the information page, select .
View and edit your favourite placesYou can quickly access the places you have saved.
Select and > Favourites.
View a saved place on the mapIn your favourites list, select the place, and tap the map.
It is also possible to check the contact information for a saved place, if available. Forexample, you can call a restaurant or view its website.
Contact a place1 In your favourites list, select the place and Contact.2 You can select the phone number, mail address, or web address.
Edit or delete a saved place1 In your favourites list, select the place.2 Select , and edit the name or description. To delete the place, select Delete.
Send a place to a friendWhen you want to show your friends where a place is on the map, you can send theplace to them.
Select .
To view the place on the map, your friends don't need to have a Nokia phone, but anactive internet connection is required.
1 Select the location marker on the map and its information field. The informationpage is displayed.
2 Select .
A mail or text message containing a link to the location on the map is sent to yourfriend.
Walk to your destinationWhen you need directions to follow a route on foot, Maps guides you over squares,and through parks, pedestrian zones, and even shopping centres.
Select .
Maps and navigation 83

1 Select , and enter your destination.
2 On the map, select the destination location marker and > Get directions.3 To start voice-guided navigation, select Navigate.
View the whole route1 Select .
2 To zoom into your current location, select .
Deactivate voice guidanceSelect > Voice guidance.
Change the guidance voice > Select voice.
Prevent the display switching off > Backlight always on.
Use the compassWhen the compass is switched on and properly calibrated, the map rotates so that itshows the direction you are facing. The compass points to true north.
Select .
Switch the compass onSelect .
Switch the compass offSelect . The map is oriented north.
If the compass needs calibration, follow the instructions shown on the phone.
The compass has limited accuracy. Electromagnetic fields, metal objects, or otherexternal circumstances may also affect the accuracy of the compass. The compassshould always be properly calibrated.
Give feedback on MapsParticipate in improving the Maps application, and send your feedback.
Select .
1 Select > Feedback.2 Select how likely you are to recommend Maps to other people.
84 Maps and navigation

You can also give your reasons. The feedback is anonymous.3 Select Submit.
To give feedback, you need to have an active internet connection.
After you have sent your feedback for the current version of Maps, the option is nolonger available.
DriveDrive to your destinationWhen you need clear turn-by-turn directions optimised for use while driving, Drivehelps you get to your destination.
Select .
To use Drive, you need to be signed in to your Nokia account.
Drive to a destinationSelect > Set destination and the appropriate option.
Tip: To set your destination, you can also select and hold your destination on the map,and select Drive to.
You can start driving without a set destination. The map follows your location.
By default, the map rotates to your driving direction. The compass always pointsnorth.
Drive to your homeSelect > Set destination > Home.
When you select Home for the first time, you are asked to define your home location.
Change your home locationSelect > Settings > Home location.
Tip: To explore your surroundings on a full screen map, tap the map.
See an overview of your routeIn the navigation view, select .
Obey all local laws. Always keep your hands free to operate the vehicle while driving.Your first consideration while driving should be road safety.
Maps and navigation 85

Get voice guidanceVoice guidance helps you find your way to a destination, leaving you free to enjoy thejourney.
Select .
1 Select > Settings > Navigation voice.2 Select a language, or to deactivate voice guidance, select None. Voice guidance
may not be available for your language.
You can also download new navigation voices.
Download navigation voicesSelect > Settings > Navigation voice > Download new and a voice.
You can use other applications when navigating, and still hear the voice guidance.
View places on the mapLooking for a petrol station, parking place, or a place to eat? Set your phone to displaythem on the map.
Select .
1 Select > Settings > Map layers > Places.2 Select the categories you want to see on the map.
Tip: Drive displays landmarks, such as prominent buildings and attractions, on themap. Landmarks are best viewable in 3D. If you don’t see any landmarks, zoom in.
If you want to hide landmarks, select > Settings > Map layers, and deactivateLandmarks.
Select your preferred routeDrive can choose the route that best suits your needs and preferences.
Select .
1 Select > Set destination and the appropriate option.2 Before starting navigation, select .
3 Define if you want to allow or avoid using, for example, motorways, toll roads, orferries.
4 Select > Start navigation.
86 Maps and navigation

Navigate offlineTo save data costs, you can also use Drive offline.
Select .
Select > Settings, and clear the Connection check box.
Some features, such as search results, may be limited when using Drive offline.
Change the look of the Drive viewWould you like to see a more realistic 3D map, or are you using Drive at night, whenit's dark? With the different map modes, you can see the information you need clearlyat all times.
Select .
Change the map typeSelect > 2D, 3D, or Sat..
To see the map clearly also when it is dark, you can activate night mode.
Activate night modeSelect > Settings > Map colours > Night.
Save a placeTo aid your travel planning, you can search for hotels, attractions, or petrol stations,and save them to your phone.
Select .
1 To search for an address or place, select > Set destination > Search.2 Select the place from the proposed matches.3 Select .
Save your current locationSelect > Save location.
Drive to a saved placeSelect > Set destination > Favourites and the place.
Maps and navigation 87
Synchronise your favouritesPlan where you want to go on your trip – find the places at the Nokia Maps website,synchronise the saved places with your phone, and access the plan on the go.
Select .
Synchronise saved placesSelect > Set destination > Favourites > Synchronize.
Synchronising requires an internet connection, and may involve the transmission oflarge amounts of data through your service provider’s network. For information aboutdata transmission charges, contact your service provider.
To use the Nokia Maps web service, go to www.nokia.com/maps.
Productivity and time
Time managementClockLearn how to set the time and date of your phone, and how to set alarms.
About the clockSelect .
Set and manage alarms.
Set an alarmWant to wake up to your favourite song in the morning? You can use your phone asan alarm clock.
Select .
1 Select .
2 Set the alarm time, and enter a description.3 To set the alarm to sound, for example, at the same time every day, select More
options > Repeat > Every day.4 To set the alarm tone, select Alarm tone.
Remove an alarmIn the Alarms view, select and hold the alarm, and from the pop-up menu, selectDelete.
88 Productivity and time

Tip: In the Alarms view, you can use the switch to temporarily deactivate an alarm.
Snooze an alarmWhen an alarm sounds, you can snooze the alarm. This pauses the alarm for a definedlength of time.
When the alarm sounds, select Snooze.
Set the length of the snooze time for an alarmSelect the alarm and More options > Snooze time, and set the length of time.
Tip: To snooze the alarm, you can also turn your phone face down.
Set the time and dateSelect and Time and language > Time and date.
Update the time and date automaticallyYou can set your phone to update the time, date, and time zone automatically.Automatic update is a network service.
Select and Time and language > Time and date, and activate Automatic timeupdate.
CalendarAbout the calendarSelect .
With your phone calendar, you can keep your schedules organised.
Productivity and time 89

View your schedule for the weekYou can browse your calendar events in different views. To see an overview of aparticular week, use the week view.
Select .
Select .
Tip: To view a list of your upcoming events, select .
Add a task to your to-do listDo you have important tasks to handle at work, library books to return, or maybe anevent you want to attend? You can add tasks (to-do notes) to your calendar. If youhave a particular deadline, set a reminder.
Select .
1 Select > Show to-dos.2 Select .
3 Fill in the fields.4 Activate Due date.5 To set a reminder, select Reminder: and the interval, and set the reminder time.
Mark a task as completedIn the to-do list, select the check box next to the task.
Add a calendar event Select .
1 In a calendar view, select .
2 Fill in the fields.3 To invite participants, select > Add contacts > and the contacts.4 Select Save.
Set the default length of reminder timeSelect and Applications > Calendar > Default reminder displayed, and set thelength of the reminder.
90 Productivity and time
Add the location to a calendar entryDo you have an appointment in a place you are not familiar with? If you add thelocation to the meeting entry, you can check the location from a map before settingoff.
Select .
Add the location manuallyWhen adding a meeting event, select Location:, and enter the address.
Select the location from the map1 When adding a meeting event, select Add location > .2 To zoom in, tap the map twice.3 Select a location on the map.4 Select Done.
To add a location to a meeting event later, open the meeting event, and select .
Use separate calendars for work and free timeYou can have more than one calendar. Create one for work and others for your freetime, such as family or hobbies.
Select and > Manage calendars.
Create a new calendar1 Select .
2 Enter a name, and set a colour code for the calendar. In different calendar views,the colour codes indicate to which calendar an event is saved.
When a calendar is hidden, the calendar events and reminders are not displayed indifferent calendar views or in the Events view.
Define the visibility for a calendarSelect the desired calendar, and activate or deactivate Show this calendar andreminders.
Modify the settings for a calendarSelect and Applications > Calendar.
Use Microsoft ActiveSync™1 Select > Add account.
Productivity and time 91

2 Select Mail for Exchange, and enter your user credentials.3 Select Manual setup, and select the items you want to sync.4 Enter the server address, and select Done.
Sync with another mail or calendar service1 Select > Add account.2 Select a service, enter your user credentials, and select Sign in.
ProductivityUse the calculatorSelect .
1 Enter the first number of the calculation.2 Select a function, such as add or subtract.3 Enter the second number of the calculation.4 Select =.
This feature is designed for personal use. Accuracy may be limited.
Read office documentsYou can view documents, such as PDFs, Microsoft Office and Open Document Formatdocuments, spreadsheets, and presentations.
Select .
Sort files by name, date, or document typeSelect > Sort by > Name, Time or Type
View a document in full screen modeSelect the document. To display the toolbar, tap the document.
Jump to a pageSelect , and enter the page number.
Share a document1 Select > Share.2 Select the sharing method.
Not all file formats or features are supported.
92 Productivity and time

Make a shopping listShopping lists on paper are easy to lose. Instead of writing them on paper, you canmake your shopping lists with Notes. This way, you always have the list with you!
Select .
1 To add a new note, select .
2 Enter text in the note field.
Phone management
Keep your phone software and applications up to dateAbout phone software and app updates Stay in step with the beat – update your phone software and apps to get new andenhanced features for your phone. Updating the software may also improve yourphone performance. You may also receive important security updates.
It is recommended that you back up your personal data before updating your phonesoftware.
Warning:If you install a software update, you cannot use the device, even to make emergencycalls, until the installation is completed and the device is restarted.
Using services or downloading content may cause transfer of large amounts of data,which may result in data traffic costs.
Before starting the update, connect a charger or make sure the device battery hasenough power.
After the update, the instructions in the user guide may no longer be up to date. Youmay find the updated user guide at www.nokia.com/support.
Phone management 93

View your software versionSelect and About product.
Tip: You can also dial *#0000#.
Update phone software and applications using your phoneYour phone informs you when updates are available for your phone software or forindividual applications. To keep your phone up to date, download and install theupdates on your phone (network service). You can also check for updates manually.
When an update is available for your phone software, a notification message with theicon is displayed in the Events view. Updates for individual applications areindicated with the icon . To view and install the available update, select thenotification message.
It is recommended that you create a backup before updating your phone software.
Check for updates manually1 Select > Applications > Manage applications.2 Open the tab, and select to refresh the view.
You can update individual applications or all available applications.
Update phone software using your PCYou can use the Nokia Software Updater PC app to update your phone software. Youneed a compatible PC, a high-speed internet connection, and a compatible USB cableto connect your phone to the PC. To restore all your personal info to your phone, backup your phone to your computer before you start updating your phone.
Tip: When you update your phone software, the language of your on-screen keyboardis set back to the default language. If your security code includes characters that arenot part of this on-screen keyboard, select , then swipe left or right across thekeyboard to change the language of the on-screen keyboard to the one you usedwhen creating the security code.
You can download the Nokia Software Updater app from www.nokia.com/support.
Back upBack up filesWant to make sure that you will not lose any important files? You can create backupsof the phone memory.
Select and Sync and backup > Backup.
It is recommended that you back up the phone memory regularly.
94 Phone management

Tip: To restore a backup, select the backup file to restore and Restore, and followthe instructions shown on the phone. You may not be able to restore some installedapplications.
Large media files such as photos and videos are not included in the phone backups.You can use the Nokia Link application to sync your important files, such as photosand videos, with a compatible computer. You can also use Nokia Link to back up andrestore content, such as your contacts, calendar entries, and messages. To accessthe backup and restore feature, select .
Manage applicationsAbout ApplicationsSelect > Applications > Manage applications.
You can update and remove application packages, such as applications and add-ons.
Install new applicationsWith Nokia Store, you can download mobile games, applications, and different kindsof add-ons to your phone.
Select .
On some websites, to install an application, you can select a link to a file with the .debfile extension. To be able to install applications from mail attachments, file systems,websites, or repositories other than Nokia Store, you need to enable this in theinstallation settings.
Enable installation from outside Nokia StoreSelect and Applications > Installations, and activate Allow installations from non-Store sources.
Only install applications that are compatible with your phone.
Phone management 95

Important: Only install and use applications and other software from sources thatyou trust. Applications from untrusted sources may include malicious software thatcan access data stored in your device, cause financial harm, or damage your device.
View installed applicationsSelect > Applications > Manage applications.
View the details of an applicationSelect the application.
Remove an application from your phoneYou can remove installed applications that you no longer want to keep or use, toincrease the amount of available memory.
Tap and hold the Applications view, and select on the application.
Once confirmed and started, the uninstallation process cannot be cancelled.
If you remove an application, you may not be able to open files created with theremoved application.
If an installed application depends on a removed application, the installed applicationmay stop working. For details, see the user guide of the installed application.
To view the details of an application before removing it, select > Applications >Manage applications and the application. To remove the application, selectUninstall.
Restore an application packageYou can create a backup file for your phone and, if needed, later restore theapplication packages you want.
You may not be able to restore some of the installed applications.
1 Select > Sync and backup > Backup.2 Select a backup file to restore and Restore, and follow the displayed instructions.3 After the restore, you are asked if you also want to restore application packages.
If there are packages to be restored, to view the available packages, select Yes.4 Select the application package to restore and Restore.
You can also restore application packages later. Select > Applications > Manageapplications.
96 Phone management

MemoryFree up phone memoryDo you need to increase the available phone memory, so you can install moreapplications or add more content?
You can delete the following if no longer needed:
• Text, multimedia, and mail messages• Contact entries and details• Applications• Music, pictures, or videos
Copy content you want to keep to a compatible computer.
Synchronise contentSynchronise your important informationWould you like to have your contacts, calendar, notes, and other content backed upand at hand, whether you are sitting by your computer or on the go with your phone?Synchronise your important content to online services, and access them fromanywhere you go. You can also synchronise content with other devices, such asphones or computers.
Synchronise with online servicesSelect .
Synchronise with other devicesSelect > Sync and backup > Sync.
When you open the application, the default or previously used synchronisationprofiles are displayed. You may receive synchronisation settings as a configurationmessage from your service provider.
Synchronise with online servicesHave all your accounts, contacts, calendar entries, and other important informationsynchronised to your phone. Back up your important content online for easy transferor restoring to your phone.
Select .
Synchronising with services is on by default.
Include or exclude contentSelect an account and the content type to include or exclude.
Phone management 97
The available options may vary.
Deactivate syncSelect an account, and deactivate Schedule.
Synchronise content with another phoneKeep your important information synchronised between, for example, your personaland work phone.
Select > Sync and backup > Sync.
Create a sync profile1 Select Add device. If you already have created other sync profiles, select .
2 Select the other phone and Continue3 Follow the displayed instructions on both phones.4 Select the content to synchronise. The available options may vary. You may also
be able to select which phone's data you want to keep if there are conflicts, forexample, different phone numbers for the same contact.
5 To synchronise, select Sync.
Synchronise using an existing sync profileMake sure Bluetooth is activated on both phones, and select Sync.
Include or exclude content typesIn the desired profile, select the content types.
Remove a sync profileIn the desired profile, select .
Protect your phoneSet your phone to lock automaticallyWant to protect your phone against unauthorised use? Define a security code, andset your phone to lock itself automatically when you're not using it.
1 Select and Security > Device lock.2 Select Security code, and enter a security code (at least 5 characters). You can
use numbers, symbols, and upper and lower case letters.Keep the security code secret and in a safe place separate from your phone. Ifyou forget the security code, and cannot recover it, your personal data is deletedbefore you can use the phone again. If you've set the number of times you canenter the wrong security code, your phone deletes your data and resets itself
98 Phone management
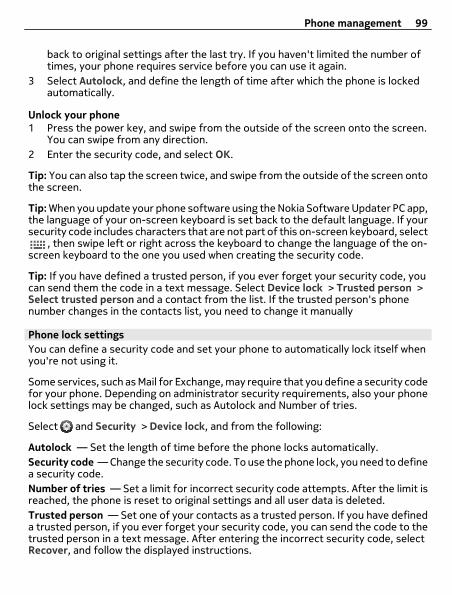
back to original settings after the last try. If you haven't limited the number oftimes, your phone requires service before you can use it again.
3 Select Autolock, and define the length of time after which the phone is lockedautomatically.
Unlock your phone1 Press the power key, and swipe from the outside of the screen onto the screen.
You can swipe from any direction.2 Enter the security code, and select OK.
Tip: You can also tap the screen twice, and swipe from the outside of the screen ontothe screen.
Tip: When you update your phone software using the Nokia Software Updater PC app,the language of your on-screen keyboard is set back to the default language. If yoursecurity code includes characters that are not part of this on-screen keyboard, select
, then swipe left or right across the keyboard to change the language of the on-screen keyboard to the one you used when creating the security code.
Tip: If you have defined a trusted person, if you ever forget your security code, youcan send them the code in a text message. Select Device lock > Trusted person >Select trusted person and a contact from the list. If the trusted person's phonenumber changes in the contacts list, you need to change it manually
Phone lock settingsYou can define a security code and set your phone to automatically lock itself whenyou're not using it.
Some services, such as Mail for Exchange, may require that you define a security codefor your phone. Depending on administrator security requirements, also your phonelock settings may be changed, such as Autolock and Number of tries.
Select and Security > Device lock, and from the following:
Autolock — Set the length of time before the phone locks automatically.Security code — Change the security code. To use the phone lock, you need to definea security code.Number of tries — Set a limit for incorrect security code attempts. After the limit isreached, the phone is reset to original settings and all user data is deleted.Trusted person — Set one of your contacts as a trusted person. If you have defineda trusted person, if you ever forget your security code, you can send the code to thetrusted person in a text message. After entering the incorrect security code, selectRecover, and follow the displayed instructions.
Phone management 99

Remote security features — Set up remote lock. If you lose your phone, you canremotely lock it or delete the data saved on it.
Hide private information from your notificationsDon't want to let other people see who has called you? When you have missed a callor received a message, a notification is displayed on the lock screen. You can definehow much information is displayed.
Select and Notifications > Notifications, and activate or deactivate Hide privateinformation.
When Hide private information is activated, only the number of received messagesand missed calls is displayed.
When Hide private information is not activated, when you have received a messageor missed a call, the following information is displayed:
• The name of the person who has tried to call you• The sender of the message you have received• Part of the message content
Develop your own applicationsYou can create your own applications for the phone using an applicable softwaredevelopment kit (SDK).
You need to activate developer mode on the phone to be able to use it as a target forapplication development. Developer mode enables connectivity between thedevelopment host and the phone, and provides a few additional tools on the phone.
Activate developer modeSelect and Security > Developer mode, and activate Developer mode.
It is recommended that you do not activate developer mode, unless you intend todevelop applications for the phone. Activating developer mode does not expose thephone to security risks, but you may accidentally delete important system files.
For more information, go to developer.nokia.com.
Reset your phoneIf your phone stops respondingRestart your phone. Press and hold the power key for at least 8 seconds. To switchyour phone on again, press and hold the power key until the phone vibrates.
No content, such as contacts or messages, is deleted.
100 Phone management
Restore original settingsIf your phone is not working properly, you can reset some settings to their originalvalues.
1 End all active calls and connections.2 Select and Reset > Restore settings.3 If prompted, enter the security code.
After restoring the original settings, the phone switches off, and then on again. Thismay take longer than usual.
Restoring original settings does not affect personal data stored on your phone, suchas:
• Contacts• Calendar entries• Documents, music, messages, or notes• Internet bookmarks• Accounts, security codes, or passwords
Prepare your phone for recyclingIf you buy a new phone, or otherwise want to dispose of your phone, Nokiarecommends that you recycle your phone. Beforehand, remove all personal info andcontent from your phone.
Remove all content and restore settings to the default values1 Back up the content you want to keep to a compatible computer.2 End all active connections and calls.3 Select and Reset > Clear device.
The process may take several minutes.4 Your phone switches off. Wait until the spinning icon on the screen has
disappeared, then switch your phone on again. Check carefully that all yourpersonal content, such as contacts, photos, music, videos, notes, messages,mails, presentations, games, and other installed applications have been removed.Content and info stored on the SIM card is not removed.
Remember to remove your SIM card from the phone.
BatteryProlong battery lifeIf it seems you're always looking for a charger, there are steps you can take to reducethe power consumption of your phone, and keep talking for longer.
Phone management 101

• Always charge the battery fully.• When power saving mode is activated, the phone does not scan, or scans less
often, for available WLAN networks, and closes connections when they are notused by any application.
Tip: To check the battery status, and activate power saving mode, select andDevice > Battery.
Close the applications you are not usingTap and hold the Open applications view, and select Close all, or select on theapplication you want to close.
Sounds and effects• Mute unnecessary tones, such as touch screen tones.• Use wired headphones, rather than the loudspeaker.• Change the length of the time-out period after which the phone display switches
off.
Set the length of the time-out periodSelect and Device > Display > Display time-out.
Decrease display brightnessSelect , and drag the Brightness slider.
Activate a dark wallpaperSelect and Wallpaper.
Network use• If you are listening to music or otherwise using your phone, but do not want to
make or receive calls, activate the flight mode.• Use a WLAN connection to connect to the internet, rather than a packet data
(GPRS or 3G) connection.• If your phone is set to use both GSM and 3G networks (dual mode), the phone
uses more power when searching for the 3G network.
Set your phone to use only the GSM networkSelect and Mobile network > Network mode > GSM.
Deactivate Bluetooth when not neededSelect and Bluetooth.
102 Phone management

Establish a packet data (3G or GPRS) connection only when neededSelect and Mobile network > Data roaming and activate Always ask.
Tips
Access codes
PIN code
(4-8 digits)
This protects your SIM card against unauthorised use or isrequired to access some features.
You can set your phone to ask for the PIN code when you switchit on.
If not supplied with your SIM card or you forget the code,contact your service provider.
If you type in the code incorrectly three times in a row, youneed to unblock the code with the PUK code.
PUK code
(8 digits)
This is required to unblock a PIN code.
If not supplied with your SIM card, contact your serviceprovider.
IMEI number
(15 digits)
This is used to identify valid phones in the network. Thenumber can also be used to block, for example, stolenphones.You may also need to give the number to Nokia Careservices.
To view your IMEI number, dial *#06#.
Lock code (securitycode)
(min. 5 digits orcharacters)
This helps you protect your phone against unauthorised use.
You can set your phone to ask for the lock code that youdefine.
Keep the code secret and in a safe place, separate from yourphone.
If you forget the security code, and cannot recover it, yourpersonal data is deleted before you can use the phone again.If you've set the number of times you can type in the wrongsecurity code, your phone deletes your data and resets itselfback to original settings after the last try. If you haven't limited
Tips 103

the number of times, your phone requires service before youcan use it again.
For more information, contact Nokia Care or your phonedealer.
Send your security code to a trusted personWant to protect your phone, but afraid you may forget your security code? Define atrusted person, and if you forget your security code, you can send the code to thattrusted person.
Define your trusted personSelect and Security > Device lock > Trusted person > Select trusted person, andselect the desired contact.
If the phone number of your trusted person changes, you need to change it manually.
Recover the codeAfter entering the incorrect security code, select Recover, and follow the displayedinstructions.
Protect the environment
Save energyYou do not need to charge your battery so often if you do the following:
• Close applications and data connections, such as your WLAN or Bluetoothconnection, when not in use.
• Lower the brightness of the screen.• Set your phone to enter power saving mode after the minimum period of
inactivity.• Switch off unnecessary sounds, such as touch screen tones.
Recycle
When this phone has reached the end of its working life, all of its materials can berecovered as materials and energy. To guarantee the correct disposal and reuse,
104 Protect the environment

Nokia co-operates with its partners through a program called We:recycle. Forinformation on how to recycle your old Nokia products and where to find collectionsites, go to www.nokia.com/werecycle, or call the Nokia Care contact centre.
Recycle packaging and user guides at your local recycling scheme.
The crossed-out wheeled-bin symbol on your product, battery, literature, orpackaging reminds you that all electrical and electronic products, batteries, andaccumulators must be taken to separate collection at the end of their working life.This requirement applies in the European Union. Do not dispose of these products asunsorted municipal waste. For more information on the environmental attributes ofyour device, see www.nokia.com/ecodeclaration.
Product and safety information
Network services and costsYour device is approved for use on the UMTS 850, 900, 1900, 1700/2100, 2100 MHz and GSM 850, 900, 1800, 1900 MHznetworks. To use the device, you need a subscription with a service provider.
Using network services and downloading content to your device requires a network connection and may result in data trafficcosts. Some product features require support from the network, and you may need to subscribe to them.
View information about your phoneTo view type approval notices and detailed information about your phone's software and hardware, select and Aboutproduct.
Open source software noticeThis product includes certain open source software.
The exact terms of the licences, disclaimers, acknowledgements, and notices are reproduced in the materials provided withthis product. Nokia offers to provide you with the source code as defined in the applicable licence. Go to harmattan-dev.nokia.com, or send a mail to [email protected] or a written request to:
Source Code Requests
Nokia Corporation
P.O.Box 226
FI-00045 Nokia Group
Finland
This offer is valid for a period of three (3) years from the date of the distribution of this product by Nokia.
By submitting a request, you give your consent that Nokia (or third parties on behalf and under direct authority of Nokia)will process your personal data. The processing will be done for the purpose of the request and the undertakings related
Product and safety information 105

to it. The main reason for storing this data is to prove compliance with the license terms. The data processing will be donein compliance with Nokia guidelines and applicable legislation.
Take care of your deviceHandle your device, battery, charger and accessories with care. The following suggestions help you protect your warrantycoverage.
• Keep the device dry. Precipitation, humidity, and all types of liquids or moisture can contain minerals that corrodeelectronic circuits. If your device gets wet, allow the device to dry.
• Do not use or store the device in dusty or dirty areas. Moving parts and electronic components can be damaged.
• Do not store the device in high temperatures. High temperatures can shorten the life of the device, damage thebattery, and warp or melt plastics.
• Do not store the device in cold temperatures. When the device warms to its normal temperature, moisture can forminside the device and damage electronic circuits.
• Do not attempt to open the device other than as instructed in the user guide.
• Unauthorised modifications may damage the device and violate regulations governing radio devices.
• Do not drop, knock, or shake the device. Rough handling can break internal circuit boards and mechanics.
• Only use a soft, clean, dry cloth to clean the surface of the device.
• Do not paint the device. Paint can clog moving parts and prevent proper operation.
• Keep your device away from magnets or magnetic fields.
• To keep your important data safe, store it in at least two separate places, such as your device, memory card, orcomputer, or write down important information.
During extended operation, the device may feel warm. In most cases, this is normal. If you suspect the device is not workingproperly, take it to the nearest authorised service facility.
RecycleAlways return your used electronic products, batteries, and packaging materials to dedicated collection points. This wayyou help prevent uncontrolled waste disposal and promote the recycling of materials. Check how to recycle your Nokiaproducts at www.nokia.com/recycling.
Batteries and chargersBattery and charger informationYour device has an internal, non-removable, rechargeable battery. Do not attempt to remove the battery, as you maydamage the device. To replace the battery, take the device to the nearest authorised service facility.
This device is intended for use when supplied with power from the following chargers: AC-16. The exact Nokia charger modelnumber may vary depending on the plug type, identified by E, X, AR, U, A, C, K, B, or N.
Third-party chargers that comply with the IEC/EN 62684 standard, and that can connect to your device micro USB connector,may be compatible.
The battery can be charged and discharged hundreds of times, but it will eventually wear out. When the talk and standbytimes are noticeably shorter than normal, to replace the battery, take the device to the nearest authorised service facility.
Battery safety
Note: The battery in your device is non-removable, so refer to the battery-related statements as applicable to yourdevice.
When you unplug a charger or an accessory, hold and pull the plug, not the cord.
106 Product and safety information

When your charger is not in use, unplug it from the electrical plug and the device. Do not leave a fully charged batteryconnected to a charger, as overcharging may shorten the battery’s lifetime. If left unused, a fully charged battery will loseits charge over time.
Always keep the battery between 15°C and 25°C (59°F and 77°F). Extreme temperatures reduce the capacity and lifetimeof the battery. A device with a hot or cold battery may not work temporarily.
Accidental short-circuiting can happen when a metallic object touches the metal strips on the battery. Short-circuiting maydamage the battery or the connecting object.
Do not dispose of batteries in a fire as they may explode. Dispose of batteries according to local regulations. Recycle whenpossible. Do not dispose as household waste.
Do not dismantle, cut, open, crush, bend, puncture, or shred cells or batteries. If a battery leaks, do not let battery liquidtouch skin or eyes. If this happens, immediately flush the affected areas with water, or seek medical help.
Do not modify, remanufacture, attempt to insert foreign objects into the battery, or immerse or expose it to water or otherliquids. Batteries may explode if damaged.
Use the battery and charger for their intended purposes only. Improper use, or use of unapproved batteries or incompatiblechargers may present a risk of fire, explosion, or other hazard, and may invalidate any approval or warranty. If you believethe battery or charger is damaged, take it to a service centre for inspection before continuing to use it. Never use a damagedbattery or charger. Only use the charger indoors.
Additional safety informationMake an emergency call1 Make sure the phone is switched on.
2 Check for adequate signal strength. You may also need to do the following:
• Insert a SIM card.
• Make sure flight mode is not activated.
• If the phone screen and keys are locked, unlock them.
3 Go to the Applications view, and select and .
4 Enter the official emergency number for your present location. Emergency call numbers vary by location.
5 Select to start the call.
6 Give the necessary information as accurately as possible. Do not end the call until given permission to do so.
Make an emergency call without entering PIN, PUK, or security code
1 When the phone asks for the code, select .
2 Enter the emergency number for your present location.
3 Select Call to start the call. After the emergency call, you need to enter the required PIN, PUK, or security code to beable to use other phone functions.
When you switch your phone on for the first time, you are asked to create your Nokia account. To make an emergency call
during the account setup, select .
Important: Emergency calls can be made using the cellular phone. It is not possible to make an emergency call usingvoice calls over the internet (internet calls). Connections in all conditions cannot be guaranteed. Never rely solely on anywireless device for essential communications like medical emergencies.
Product and safety information 107

Small childrenYour device and its accessories are not toys. They may contain small parts. Keep them out of the reach of small children.
Medical devicesOperation of radio transmitting equipment, including wireless phones, may interfere with the function of inadequatelyprotected medical devices. Consult a physician or the manufacturer of the medical device to determine whether they areadequately shielded from external radio frequency energy.
Implanted medical devicesManufacturers of medical devices recommend a minimum separation of 15.3 centimetres (6 inches) between a wirelessdevice and an implanted medical device, such as a pacemaker or implanted cardioverter defibrillator, to avoid potentialinterference with the medical device. Persons who have such devices should:
• Always keep the wireless device more than 15.3 centimetres (6 inches) from the medical device.
• Not carry the wireless device in a breast pocket.
• Hold the wireless device to the ear opposite the medical device.
• Turn the wireless device off if there is any reason to suspect that interference is taking place.
• Follow the manufacturer directions for the implanted medical device.
If you have any questions about using your wireless device with an implanted medical device, consult your health careprovider.
Hearing
Warning:When you use the headset, your ability to hear outside sounds may be affected. Do not use the headset where it can endangeryour safety.
Some wireless devices may interfere with some hearing aids.
Nickel
Note: The surface of this device does not contain nickel in the platings. The surface of this device contains stainlesssteel.
Protect your device from harmful contentYour device may be exposed to viruses and other harmful content. Take the following precautions:
• Be cautious when opening messages. They may contain malicious software or otherwise be harmful to your device orcomputer.
• Be cautious when accepting connectivity requests, browsing the internet, or downloading content. Do not acceptBluetooth connections from sources you do not trust.
• Only install and use applications and other software from sources that you trust. Applications from untrusted sourcesmay include malicious software that can access data stored in your device, cause financial harm, or damage yourdevice.
• Install antivirus and other security software on your device and any connected computer. Only use one antivirusapplication at a time. Using more may affect performance and operation of the device and/or computer.
• If you access preinstalled bookmarks and links to third party internet sites, take the appropriate precautions. Nokiadoes not endorse or assume liability for such sites.
108 Product and safety information

Operating environmentThis device meets radio frequency exposure guidelines in the normal use position at the ear or at least 1.5 centimetres (5/8inch) away from the body. Any carry case, belt clip, or holder for body-worn operation should not contain metal and shouldposition the device the above-stated distance from your body.
To send data files or messages requires a quality connection to the network. Data files or messages may be delayed untilsuch a connection is available. Follow the separation distance instructions until the transmission is completed.
Parts of the device are magnetic. Metallic materials may be attracted to the device. Do not place credit cards or othermagnetic storage media near the device, because information stored on them may be erased.
VehiclesRadio signals may affect improperly installed or inadequately shielded electronic systems in motor vehicles such aselectronic fuel injection, electronic antilock braking, electronic speed control, and air bag systems. For more information,check with the manufacturer of your vehicle or its equipment.
Only qualified personnel should install the device in a vehicle. Faulty installation or service may be dangerous and mayinvalidate your warranty. Check regularly that all wireless device equipment in your vehicle is mounted and operatingproperly. Do not store or carry flammable liquids, gases, or explosive materials in the same compartment as the device, itsparts, or accessories. Remember that air bags inflate with great force. Do not place your device or accessories in the airbag deployment area.
Potentially explosive environmentsSwitch off your device in any area with a potentially explosive atmosphere, for example near gas pumps at service stations.Sparks in such areas could cause an explosion or fire resulting in bodily injury or death. Observe restrictions in fuel servicestations, storage, and distribution areas; chemical plants; or where blasting operations are in progress. Areas with apotentially explosive atmosphere are often, but not always, clearly marked. They include areas where you would be advisedto turn off your vehicle engine, below deck on boats, chemical transfer or storage facilities and where the air containschemicals or particles such as grain, dust, or metal powders. You should check with the manufacturers of vehicles usingliquefied petroleum gas (such as propane or butane) to determine if this device can be safely used in their vicinity.
Certification information (SAR)This mobile device meets guidelines for exposure to radio waves.
Your mobile device is a radio transmitter and receiver. It is designed not to exceed the limits for exposure to radio wavesrecommended by international guidelines. These guidelines were developed by the independent scientific organisationICNIRP and include safety margins designed to assure the protection of all persons, regardless of age and health.
The exposure guidelines for mobile devices employ a unit of measurement known as the Specific Absorption Rate or SAR.The SAR limit stated in the ICNIRP guidelines is 2.0 watts/kilogram (W/kg) averaged over 10 grams of tissue. Tests for SARare conducted using standard operating positions with the device transmitting at its highest certified power level in all testedfrequency bands. The actual SAR level of an operating device can be below the maximum value because the device is designedto use only the power required to reach the network. That amount changes depending on a number of factors such as howclose you are to a network base station.
The highest SAR value under the ICNIRP guidelines for use of the device at the ear is 1.16 W/kg.
Use of device accessories may result in different SAR values. SAR values may vary depending on national reporting andtesting requirements and the network band. Additional SAR information may be provided under product information atwww.nokia.com.
Product and safety information 109

Copyright and other notices
DECLARATION OF CONFORMITY
Hereby, NOKIA CORPORATION declares that this RM-696 product is in compliance with the essential requirements and otherrelevant provisions of Directive 1999/5/EC. A copy of the Declaration of Conformity can be found at http://www.nokia.com/global/declaration.
© 2012 Nokia. All rights reserved.
Nokia, Nokia Connecting People, Nokia Original Accessories, and Nseries are trademarks or registered trademarks of NokiaCorporation. Nokia tune is a sound mark of Nokia Corporation. Other product and company names mentioned herein maybe trademarks or tradenames of their respective owners.
Reproduction, transfer, distribution, or storage of part or all of the contents in this document in any form without the priorwritten permission of Nokia is prohibited. Nokia operates a policy of continuous development. Nokia reserves the right tomake changes and improvements to any of the products described in this document without prior notice.
When using this device, obey all laws and respect local customs, privacy and legitimate rights of others, including copyrights.Copyright protection may prevent you from copying, modifying, or transferring images, music, and other content.
Manufactured under license from Dolby Laboratories.
Dolby and the double-D symbol are trademarks of Dolby Laboratories.
The Bluetooth word mark and logos are owned by the Bluetooth SIG, Inc. and any use of such marks by Nokia is under license.
This product is licensed under the MPEG-4 Visual Patent Portfolio License (i) for personal and noncommercial use inconnection with information which has been encoded in compliance with the MPEG-4 Visual Standard by a consumer engagedin a personal and noncommercial activity and (ii) for use in connection with MPEG-4 video provided by a licensed videoprovider. No license is granted or shall be implied for any other use. Additional information, including that related topromotional, internal, and commercial uses, may be obtained from MPEG LA, LLC. See http://www.mpegla.com.
To the maximum extent permitted by applicable law, under no circumstances shall Nokia or any of its licensors be responsiblefor any loss of data or income or any special, incidental, consequential or indirect damages howsoever caused.
The contents of this document are provided "as is". Except as required by applicable law, no warranties of any kind, eitherexpress or implied, including, but not limited to, the implied warranties of merchantability and fitness for a particularpurpose, are made in relation to the accuracy, reliability or contents of this document. Nokia reserves the right to revisethis document or withdraw it at any time without prior notice.
Reverse engineering of software in the device is prohibited to the extent permitted by applicable law. Insofar as this userguide contains any limitations on Nokia's representations, warranties, damages and liabilities, such limitations shall likewiselimit any representations, warranties, damages and liabilities of Nokia's licensors.The availability of products, features, applications and services may vary by region. For more information, contact yourNokia dealer or your service provider. This device may contain commodities, technology or software subject to export lawsand regulations from the US and other countries. Diversion contrary to law is prohibited.Nokia does not provide a warranty for or take any responsibility for the functionality, content, or end-user support of third-party applications provided with your device. By using an application, you acknowledge that the application is provided asis. Nokia does not make any representations, provide a warranty, or take any responsibility for the functionality, content,or end-user support of third-party applications provided with your device.The availability of Nokia services may vary by region.
110 Copyright and other notices

FCC NOTICE
Your device may cause TV or radio interference (for example, when using a telephone in close proximity to receivingequipment). The FCC can require you to stop using your telephone if such interference cannot be eliminated. If you requireassistance, contact your local service facility. This device complies with part 15 of the FCC rules. Operation is subject to thefollowing two conditions: (1) This device may not cause harmful interference, and (2) this device must accept any interferencereceived, including interference that may cause undesired operation. Any changes or modifications not expressly approvedby Nokia could void the user's authority to operate this equipment.The FCC ID is printed inside the SIM card slot. To view the ID, remove the SIM card holder.
Some operations and features are SIM card and/or network dependent, MMS dependent, or dependent on the compatibilityof devices and the content formats supported. Some services are subject to a separate charge.
/Issue 1.2 EN
Copyright and other notices 111

Index
AA-GPS (assisted GPS) 76access codes 103accounts 55, 58, 97alarm clock 88, 89antennas 8applications 16, 18, 95, 96— developing 100availability 47availability status 55
Bbacking up content 94battery 11, 106— charging 9, 10— saving power 101blogs 42Bluetooth 38, 39bookmarks 42browser
See web browser
Ccable connection 40calculator 92calendar 89, 90, 91call waiting 52calls 47, 49, 51, 53— answering 49— conference 48— dismissing 49— diverting 50— emergency 107— forwarding 50— internet calls 53, 54— last dialled 53— log 52— making 48
— rejecting 49camera 65— location info 68— recording videos 69— sending photos 69— sending videos 69— sharing pictures 70— sharing videos 70— taking photos 66, 67, 68charging the battery 9, 10, 106chat services (IM) 56, 58clock 88, 89connectivity 33contacts 43, 47— adding 43— copying 13, 45— editing 43— favourites 44— groups 45, 46— in social networks 46— photos 44— ringtones 45— saving 43— synchronising 97, 98copying content 12, 14, 97
Ddata connections 32, 33— Bluetooth 38— costs 33— packet data 33— WLAN 33date and time 89device lock 22, 98diverting calls 50DLNA (Digital Living Network Alliance) 35,63, 73, 75Dolby™ 65Drive— changing views 87— favourites 88
112 Index

— map view 86, 87— navigating 85, 87— planning routes 86— routes 85— saving places 87— synchronising 88— voice guidance 86
Ee-mail 58
See mailemergency calls 107environmental tips 104event 90
Ffactory settings, restoring 101favourites 44feeds, news 42file management 94flight mode 28forwarding calls 50
GGallery 71GPS (global positioning system) 76, 77
Hheadphones 65headset 7, 38, 65help 15home screen 15
Iicons 19IM (instant messaging) 56, 58IMEI number 103inbox, messages 57indicators 19installing applications 95internet
See web browserinternet calls 53, 54internet connection 32
Kkeyboard 24, 26keyguard 12keys and parts 6, 7
Llanguage settings 58location info 68location information 76, 91lock code 22, 23, 98, 99, 103, 104locking— device 23, 99— keys 12— phone 22, 23, 98, 99, 104— screen 12log 52loudspeaker 28, 51
Mmail 58, 60, 61— attachments 59— creating 59— mailbox 58— reading and replying to 59— sending 59— setup 58— threads 60Mail for Exchange 60, 61mailbox— voice 51Maps 78— changing views 80— compass 84— current location 78— downloading maps 81— feedback 84— finding locations 82
Index 113

— guidance 80— map view 78, 80— navigating 83— offline 81— positioning 76— saved places 82, 83— saving places 82— sharing locations 83— walking routes 83meeting requests 61memory 101— clearing 97menu 18messages 56, 57— sending 57MMS (multimedia message service) 57mobile data connection 33movies 75multimedia messages 56, 57multitasking 16music 30, 61, 62, 63— playlists 62
Nnews feeds 42NFC 35NFC (Near Field Communication) 36, 37noise cancellation 51Nokia account 30Nokia Link 14Nokia Maps 30Nokia services 29, 30Nokia Store 30Nokia support information 15notes 93notifications 100
Ooffice applications 92on-screen keyboard 24, 26
Ppersonalising your device 31personalising your phone 31phone— rebooting 100— setup 12— switching on/off 11, 100phone lock 22, 98phonebook
See contactsPhoto editor 74photos— editing 74— location info 68— organising 72— sending 69— sync 40— tagging 73— taking 66, 67, 68— viewing 71, 73, 75— viewing on a TV 73, 75pictures— sending 39— sharing 70PIN codes 103playlists 62positioning information 76powering on/off 11powering phone on/off 100profiles 28, 29PUK codes 103
Qquick launch bar 17
Rrebooting 100recording— videos 69recycling 104restoring content 96
114 Index

restoring settings 101ringing tones 50ringtones 45
Ssearching 29security code 22, 23, 98, 99, 103, 104settings— access points 32— language 58— restoring 101sharing, online 70shortcuts 31silent profile 29SIM card 8, 45SMS (short message service) 57social networks 46software 94software updates 93, 94speakerphone 28status menu 17status updates 46support 15switching on/off 11switching phone on/off 100Swype 26sync 40, 63, 64synchronisation 97, 98
Ttags 72, 73taking photos
See cameratasks 90technical information 105text input 24, 26text messages 56, 57time and date 89touch screen 20, 24, 26transfer— content 98
transferring content 12, 13, 14, 40,63, 64, 97turning on/off 11turning phone on/off 100TV— viewing photos 73
Uupdates— applications 94— apps 93— phone software 93, 94USB charging 10USB connection 40user guide 15
Vvideo— editing 75videos 64— downloading 64— location info 68— organising 72— playing 64— recording 69— sending 39, 69— sharing 70— streaming 64— sync 40, 64— watching 64, 71, 73, 75— watching on a TV 73, 75virtual keyboard 24, 26voice calls
See callsvolume control 28
Wwallpaper 31web browser 40, 41— bookmarks 42web connection 32
Index 115

web feeds 42WLAN (wireless local area network)34, 35
116 Index


