1. To minimize the electrostatic discharge, wipe the enclosure surface with a damp cloth only. 2. The cable entry holes must be connected by means of suitable cable entry devices which are certified separately with ATEX certificate and the IP degree of cable entries shall be IP66 as a minimum. No tension or pulling is allowed on the entry cable, it can impair the explosion safety of the equipment. The unused entry holes must be blocked by means of suitable blanking elements which are separately certified separately with ATEX certificate and the IP degree of blanking elements shall be IP66 as a minimum. 4.The installation must be installed according to the requirements of EN 60079-14: latest version (or its National equivalent standards). 5. The Ni-cd secondary battery KRH26/51(C)2500TX8, 9.6V in the emergency LED linear explo- sion-proof light must be only replaced by the manufacturer or NJZ authorized distribution partner REV: A 1.1 Page: 1 REV: A 1.1 Page: 12 Explosion Proof Lighting CAUTION: Teflon tape and some pipe sealants are destructive to hydraulic components. Always use extreme caution and follow manufacturer’s recommendations for proper application of any sealant in order to prevent contamination. STEP 3: Screw finger tight into the port STEP 4: Wrench tighten the fitting to the correct Turns Past Finger Tight position. A properly assembled fittings total thread engagement should be 3.5 to 6 turns. CAUTION: Never back off an installed pipe fitting to achieve proper alignment. Loosening installed pipe fittings will corrupt the seal and contribute to leakage and failure. (*Applicable standard: ASME B1.20.1-2013) STEP 1: Inspect port and fitting to ensure that both are free of contaminants and excessive burrs and nicks. STEP 2: Apply a stripe of an anaerobic liquid pipe sealant around the male threads leaving the first two threads uncovered. If no liquid sealant is available, wrap Teflon tape (width of 12.7mm and thickness of 0.1mm) 2.5- 3 turns in a clockwise direction, viewed from the pipe end, leaving the rest two threads uncov- ered. NPT Assembly Instructions:
Transcript
1. To minimize the electrostatic discharge, wipe the enclosure surface with a damp cloth only.2. The cable entry holes must be connected by means of suitable cable entry devices which arecertified separately with ATEX certificate and the IP degree of cable entries shall be IP66 as aminimum. No tension or pulling is allowed on the entry cable, it can impair the explosion safetyof the equipment.The unused entry holes must be blocked by means of suitable blanking elements which areseparately certified separately with ATEX certificate and the IP degree of blanking elements shallbe IP66 as a minimum.4.The installation must be installed according to the requirements of EN 60079-14: latest version(or its National equivalent standards).5. The Ni-cd secondary battery KRH26/51(C)2500TX8, 9.6V in the emergency LED linear explo-sion-proof light must be only replaced by the manufacturer or NJZ authorized distributionpartner
REV: A 1.1Page: 1
REV: A 1.1Page: 12
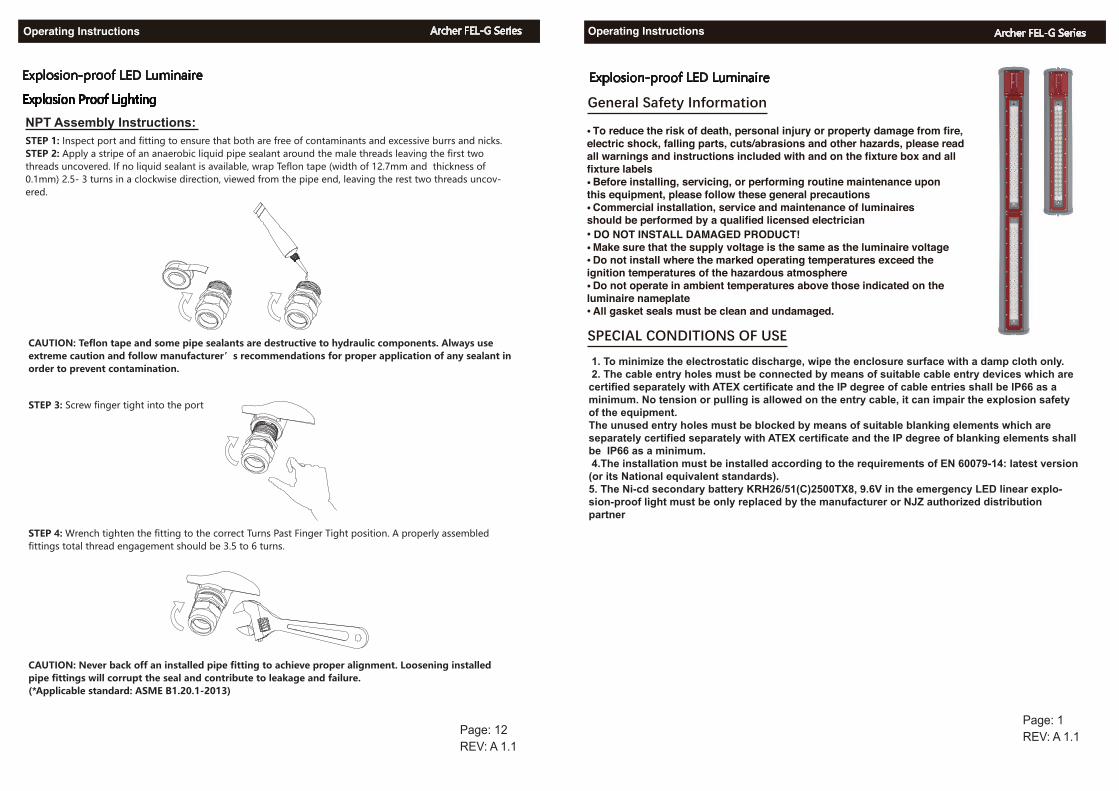
Explosion Proof Lighting
CAUTION: Teflon tape and some pipe sealants are destructive to hydraulic components. Always use extreme caution and follow manufacturer’s recommendations for proper application of any sealant in order to prevent contamination.
STEP 3: Screw finger tight into the port
STEP 4: Wrench tighten the fitting to the correct Turns Past Finger Tight position. A properly assembled fittings total thread engagement should be 3.5 to 6 turns.
CAUTION: Never back off an installed pipe fitting to achieve proper alignment. Loosening installed pipe fittings will corrupt the seal and contribute to leakage and failure.(*Applicable standard: ASME B1.20.1-2013)
STEP 1: Inspect port and fitting to ensure that both are free of contaminants and excessive burrs and nicks.STEP 2: Apply a stripe of an anaerobic liquid pipe sealant around the male threads leaving the first two threads uncovered. If no liquid sealant is available, wrap Teflon tape (width of 12.7mm and thickness of 0.1mm) 2.5- 3 turns in a clockwise direction, viewed from the pipe end, leaving the rest two threads uncov-ered.
CERT: TPS 20 ATEX 095986 0026 X IECEx TPS 19.0024X
100
-20°C ≤ Ta. ≤ +50°C
WARNING DO NOT TRANSPORT THROUGH A HAZARDOUS AREA
Ex db eb mb IIC T6 GbEx tb IIIC T80°C Db
Model: NJZ-FEL-G-60(LED linear explosion proof light)Ordering#: Means the model catalog #Cable Entry: For example: 4*M25*1.5, means the type of threadSerial No: XXXXXX, Means the manufacturing batch # and production dates 60W means the rated power 60W5000K means the color temperatureIK means impact protection degree IP means dustproof and waterproof degreeTamb: -20℃ to +50℃(Operating temperature range of the Emergency model)0123 means the Number of notify body that released the QAN
Nameplate (ATEX & IECEx)
Dust
Category
Group
Gas
Flameproof Optical radiation Increase safety
Encapsulation
Gas group
T-class
Zone 1 Zone 2
Explosion proof
Dust ignition protection
Group
80 deg C
Zone 21 and Zone 22
REV: A 1.1Page: 11
REV: A 1.1Page: 2
We will repair, or at our option, replace the defective product (exterior finish, housing and heat sinks, lens, LED engine, power supply) during the standard warranty period. This warranty applies only to the repair or replacement of the product and only when the product is properly handled, installed and maintained according to our instructions. This warranty excludes defects resulting from improper installation, acts of God, fire, vandalism or civil disturbances, power surges or improper power supply, and corrosive environment installations. This warranty does not cover equipment, systems or components from other manufacturers that the Purchaser uses in conjunction with the Product. Any repair, alteration or modification of the Product, including replacement of Product components with components of other manufacturers will void the warranty in its entirety.
Battery One (1) Year
Within the scope of maintenance or inspection routine the following should be included:
- Protective hoses covering the connection cables- Cable entries must be free of corrosion.- Perform visual mechanical and electrical inspections on a regular basis. We recommend routinechecks to be made on a yearly basis.- The PC cover should be cleaned periodically as needed to ensure continued photometricperformance.- Inspect the luminaire to ensure that it is free of any obstructions or contamination (i.e. excessivedust build up). Clean with a non-abrasive, damp cloth if needed.
Internal earthing are provided in the terminal compartment and end shield. The internal earthing bolt: M4X6, torque is 3Nm, the section area of internal earthing wire is 0.84 mm2.
The external bonding is provided on the external surface of end shield. The bolt is M6X10 hexagon socket cap screws. The external earthing wire is 4 mm2. The torque of external bonding is 4Nm. External bondings are secured against loosen.
Use hexagonal wrench to open the screw of metallic press board of light-transmission and the end cover of enclosure then the LED driver can be installed or replaced by the end user. How to replace the LED driver shall be contact to NJZ authorized distribution partner or NJZ. The driver must not be replaced by other brands.
REV: A 1.1Page: 3
REV: A 1.1Page: 10
Inspection
Internal and external grounding
Open the light
Models:
Operating characteristic:
CAUTION:
Connecting panels to AC source supply:
Dimming control wire:
1.Loosen the four pcs of M4 hexagon bolts of terminal cover at torque value 3 N-m;2.The thread of entry hole of Tank is M20、M25、1/2” NPT、3/4”NPT. Connect the Tank to suitableconduit;3.The user shall be equipped the cable entry device with an explosion-proof lead-in device and the plugis M20、M25、1/2” NPT、3/4”NPT;Inset the wire from outside through the conduit and the entry holeof Tank, and then connect to terminal block;4.Introduce the wires of branch circuit as following:Brown-wire connects to LineBrown -wire connects to Wall SwitchBlue-wire connects to NeutralGreen-wire connects to Ground5.Connect the Battery BAT1 and BAT2 ;6.Re-attach the terminal cover and tighten it by four pcs of M4 hexagon bolts of terminal cover attorque value 3 N-m;7.Check the tightness of conduit and terminal cover.NOTE: Parts necessary to achieve a specific type of protection or used to prevent access to uninsulat-ed live parts shall be capable of being released or removed only with the aid of a tool.NOTE: Further information on the installation of conduit or associated fittings into threaded or plainholes can be found in EN 60079-14.
Certificates
Electrical Connection
The Battery Replacement
Repair and maintenance work shall be conducted by the end user only after the LED linear light isn’t energized. Repair and maintenance shall be conformed to EN&IEC 60079-19.In addition, the relevant national regulation which apply to the maintenance/servic-ing of electrical apparatus in explosive atmospheres shall be observed.
Any unforeseen repairs or overhaul may only be carried out with NJZ spare parts. LED driver and LED lens chamber must not be repaired by the end user.
NOTE: Should the luminaire enclosure be damaged, only a full luminaire replace-ment will be permitted. In case of doubt, the equipment should be returned to NJZ for inspection/repair.
WARNING:Modifications to the device or changes of its design are not permitted.
This equipment must be operated according to the intended purpose in a perfect and undamaged condition.
REV: A 1.1Page: 9
REV: A 1.1Page: 4
WARNING – DO NOT TRANSPORT THROUGH A HAZARDOUS AREA
REV: A 1.1Page: 5
REV: A 1.1Page: 8
NOTE:We recommend cells or batteries are charged and discharged at least once every 6 months.Charge at 0.1 ItA for 16hrs, rest 10min, then discharge with 0.2 ItA to 1.0V/cell. then charge at 0.2ItA to 120min.NOTE:The battery in not before use, please don't and circuit connection, prevent due to the circuit board to consumption overdischarge and damage to the battery.