48
omxplayerGUI Manual 7th Edition - Version 1.7.9.5 (c) 2014-2017 by Günter Kreidl

omxplayerGUI Manual
7th Edition - Version 1.7.9.5
(c) 2014-2017 by Günter Kreidl

Content1) Introduction.....................................................................................................................4
2) Installation and Usage....................................................................................................6a) Installing the Kweb Suite..............................................................................................................6b) Installing youtube-dl......................................................................................................................6c) Updating omxplayerGUI................................................................................................................7
3) omxplayerGUI Frontend.................................................................................................8a) Using the omxplayerGUI Frontend.............................................................................................8b) Using the Web Interface..............................................................................................................10
4) omxaudioplayer.............................................................................................................12
5) omxplayerGUI – the Video Player Window.................................................................13a) Understanding the Two Different Modes...............................................................................13b) Using the Interface.......................................................................................................................14c) Keyboard Control..........................................................................................................................16d) Windowless Mode.........................................................................................................................17
6) Web Browser Support: Playing Web Video in High Quality......................................18a) Introduction: Playing Web Video Inside Browsers..............................................................18b) Using omxplayerGUI for Web Video in Almost Any Browser...........................................19c) Using the Youtube-DL-Server.....................................................................................................20
7) Create a Web Frontend for Your Media Collection....................................................22a) Introduction....................................................................................................................................22b) Tutorial: Adding Your Local Media to the Web Player Interface.....................................22c) Tutorial: Creating a Remotely Controlled Media Player.....................................................23
8) omxplayerGUI Settings.................................................................................................27a) Choosing Presets............................................................................................................................27b) List of All Options Used by omxplayerGUI.............................................................................27c) Additional Options Added in Version 1.7.3.............................................................................35
9) Developers Section........................................................................................................37a) Introduction....................................................................................................................................37b) Playing Media in Overlay Mode................................................................................................37c) Using Special Playlists..................................................................................................................38d) Using the Youtube-DL-Server.....................................................................................................39e) Controlling Web Video.................................................................................................................39
Appendix A: Keyboard commands...................................................................................42Special omxplayerGUI Keyboard Controls.............................................................................42omxplayerGUI Keyboard Controls (Play Mode)....................................................................43
Appendix B: Additional Codecs........................................................................................44
Appendix C: About Youtube-DL........................................................................................45
Appendix D: List of Youtube-DL-Server Commands......................................................47
Appendix E: Known Problems..........................................................................................49
2

1) Introduction
omxplayerGUI is a program to manage playing all kinds of media with omxplayer in lots of different ways. It's one of the helper programs of the kweb package (Minimal Kiosk Browser), but it can also be used stand-alone. omxplayerGUI also supports extracting videos from websites containing HTML5 video or from all video websites supported by youtube-dl. It uses Python's Tkinter GUI elements, which look a bit simplistic by modern standards, but do not require any other packages to be installed. OmxplayerGUI has been written in Python and then compiled to a binary version using nuitka.
Omxplayer is the most efficient media player for the Raspberry Pi. It's a command line program which is controlled by keyboard commands and can also be controlled from other applications using dbus commands. OmxplayerGUI uses both methods to control omxplayer.
It's important to understand how omxplayer works. It uses the GPU of the Raspberry Pi to decode the video and sends it directly to the video output superimposing it on top of the normal display (of the desktop, for example) in a separate layer. That's one of the reasons, why it's so efficient. Other methods can be used to display the decoded video inside a GUI application, but this requires real time copying of the decoded video into theframe buffer; the webkit3 engine supplied by the Raspberry Pi Foundation (and used by epiphany and kweb3) works this way to play (HTML5) web video inside the browser window. But this method is very inefficient compared to omxplayer's layer method and only works well for low resolutions and limited screen areas.
OmxplayerGUI works differently: It looks like it's playing the video inside a window, but in fact the video area is still running in a screen overlay; you will immediately notice that, if you move another window on top of the video window: the video is shining through. But nevertheless you can move or resize the video window and the video size and position will immediately match the new window size and position without breaking the video playback. You can also hide the video window and let it play on in thebackground. Full screen and refresh modes (adjusting the video display to the size and frame rate of the video) are of course also supported.
This can only work if omxplayer and the GUI use the same coordinate system and screen size. All kinds of overscan settings will break this, because the frame buffer size (used by the GUI environment) and the real screen size (used by omxplayer) don't match. I'm quite sure, that overscan is not needed in 99.99% of all cases; modifying the settings of your monitor or TV or using custom resolutions (only in rare cases) instead is always a better solution. If you cannot avoid using overscan you will have to use the overscan compensation settings, which have been added in version 1.7.3.
omxplayerGUI is used by kweb(3) to play local or web video of all kinds, but it can also be used stand-alone as a desktop video player. It registers with the desktop environment as a separate media player application and can be opened from the application menu or from the file manager, using its “open” or “open with” commands for all kinds of media
3

files or playlists. If it is called without any arguments (from the application menu, for example) it will display a simple frontend window from which you can open media files or URLs or extract videos from websites. It also contains some tools to open, create and save your own playlists.
If a matching version of youtube-dl is installed, the omxplayerGUI frontend will also start the youtube-dl-server in the background which gives you some additional advantages:1) It will speed up the extraction of video URLs from video websites considerably.2) It allows easy integration of omxplayerGUI into many browsers (Firefox, Chromium, Midori).3) It creates a simple but very effective web interface to access your local media from kweb or any other browser.
For developers of embedded applications like web kiosks or digital signage applications, omxplayerGUI (combined with the youtube-dl-server) supports a number specialized functions which are explained in greater detail in chapter 9.
4

2) Installation and Usage
a) Installing the Kweb Suite
omxplayerGUI is installed as part of the kweb suite (Minimal Kiosk Browser) package. A separate installation is not supported any more, because kweb and omxplayerGUI share a common environment (helper programs and global settings). You might think of omxplayerGUI as an application that has two interfaces: kweb(3) and a stand-alone media player interface.So you have to install kweb even if you are only interested in the media player itself. You don't have to use the browser if you don't want to, but it is at least required to manage omxplayerGUI's rather complex settings. Kweb also has a built-in update function, whichyou may use to update the whole package to the latest release.
To get the latest version of the kweb suite, visit the following page on the Raspberry Pi forum: https://www.raspberrypi.org/forums/viewtopic.php?t=40860.
After installation you will find omxplayerGUI as a new program in your application menu. From a terminal command line you can run it with:
omxplayergui [option] [mode] [url] [mimetype]
“option” may be one of these:“--preset=presetname”, “--config=fullpath”, “--opts=omxoptions”where “presetname” must be the name of a preset file created with kweb's settings page and “fullpath” must be the full path to a python file (.py), that contains global variables, similar to kwebhelper_settings.py. The “–opts=..” option is only used in special circumstances (non-GUI modes) and may contain a list of omxplayer options, separated by a semicolon (see chapter 9 for details).
“mode” may be either 'av' (or -av) or 'ytdl' (or -ytdl) and url is any valid file path or web url. If no mode is given, 'av' will be used. 'ytdl' is the extraction mode for web video and requires a valid URL to a web page containing web video. omxplayerGUI uses youtube-dl to extract video links from websites like youtube.com and many others. It can also extract HTML5 video links directly.
You can also right click any media (audio, video or playlist) file inside your file manager window to open it with omxplayerGUI.
If no URL argument is given or called from the application menu, omxplayerGUI will start with a simple frontend.
b) Installing youtube-dl
For web video support, you have to install youtube-dl. This is a very powerful Python application which allows you to download web video from a lot of websites (more than
5

600). omxplayerGUI uses it to extract web video URLs from web pages and feeds those video URLs directly to omxplayer for immediate playback (nothing is downloaded!).
Unfortunately the youtube-dl version from the Raspbian repository is useless, because it cannot be updated. The video websites are constantly changing and youtube-dl has always to adapt to these changes. There are different methods to install and update youtube-dl (and all of them work with omxplayerGUI), but to get the best performance you should use the tools provided by the kweb environment. During the (first) installation of the kweb suite, you will be asked, if you want to install youtube-dl. If you answer with “y”, the latest version from github will be installed in your home directory.
If you want to install youtube-dl at a later time or if you want to upgrade it, start kweb and click on “Applications”. At the bottom you'll find a number of youtube-dl tools. Click the “Install (Git)” button to install a recent version from github (if you missed that duringinstallation of kweb). Use the button “Update (Git)” from time to time to get the newest version.
To speed up the use of youtube-dl (access time) version 1.7.0 (and newer) of the kweb package now contains a youtube-dl-application-server. This server can also be started (and closed) from a button on the application page. omxplayerGUI's stand-alone frontendwill start the server automatically, if the youtube-dl is available and the server is not already running. This is now the recommended way to use it and 98% of all users will never have to start it separately.
c) Updating omxplayerGUI
To get the latest upgrade of omxplayerGUI, you have to upgrade the kweb suite. The easiest way to do this is from kweb itself. Open kweb. On the bottom of its menu page you will find a button “Check for Program Update”. If you click this button, a terminal will open. You will either get a message, that your version is up to date, or you will be asked if you want to upgrade to the latest version. Answer with “y” to install the upgrade.
6

3) omxplayerGUI Frontend
a) Using the omxplayerGUI Frontend
When not used from Minimal Kiosk Browser and started without any arguments, omxplayerGUI will open with a simple frontend:
The interface consists of an entry line (for file paths or URLs), a first row of action buttons, a playlist area and a second row of action buttons to manage playlist content.
If you click the “Open” button, a simple file dialogue will appear and you may select any kind of media or playlist file to play. Depending on the kind of file, either omxaudioplayer or omxplayerGUI (the video player) will open and start playing your file(s).
The “Play/Stream” and “Extract” functions require a valid URL or file path, that you have to enter in the text field above. You can use copy & paste for this, by right clicking into the text field and selecting “clear & paste” from the small pop-up menu.
If you have a valid (full) file path or a web link URL pointing to an audio/video file or stream on the internet (or a playlist) entered into the text field, you can play it by clickingon “Play/Stream”. Depending on the content, either the audio or video player interface will be opened.
If you have entered a URL pointing to a web video page (something like “https://www.youtube.com/watch?v=o774LMtfeJY”), you can click the “Extract” button. Youtube-dl will be used to extract the video URL from that link and, if successful, omxplayerGUI will open and start playing the video. You can also use links to web pages containing HTML5 video and then omxplayerGUI will extract the video URLs from such pages and play them.
There's also a special function included to search for videos on youtube.com. If you entersomething like:?raspberry pi
into the text entry field and click on “Extract”, a search on youtube.com for these key
7

words will be started and after a while (around one minute!), a video window will appear and start playing the first video of the search results. If you stop the video, you will see a playlist with up to 20 search results for “raspberry pi”, all of which can be directly played without any further delay. If the last of the search terms is a number, it will be used to set the page number of the youtube search, e .g.?raspberry pi 3
will result in page3 (videos number 40 - 59) of a youtube search for “raspberry pi.”
The “Web” button is only enabled, if the youtube-dl-server has been started in the background and at least one player_directory is defined. If you click it, the omxplayerGUIfrontend will hide to the taskbar and the web frontend will be opened in a small kweb window. Check the next chapter for more details. If you close the kweb window again, the omxplayerGUI frontend will automatically come to the front again.
Note: Although the frontend window will be automatically hidden, when you open the web interface window, it can still be used if you need it. Just click its entry in the taskbar.
The “Help” button can be used to open this manual directly from the player.
If you click the “Settings” button, it will open a kweb browser window as root (passwordmay be required) and show the settings page for kwebhelper and omxplayerGUI (see below for details).
Clicking the “Quit” button will close the application, but only if all player windows have been closed.
The lower range of buttons is used for creating and managing playlists:
“Load” will open a file selector and you can select any m3u(8) or pls playlist from your file system. The contents will be shown in the playlist area above.
Clicking “Save List” will let you save a previously created or modified playlist in M3U format.
“Add Files” will open a file selector and you can add one or more media files to your playlist. To select multiple files you have to use the SHIFT and CTRL keys in the usual way.
When you click the “Folder” button, you can select a directory containing media files. Media files from sub-directories of all levels will also be included.
The “Delete” button will let you delete one or more selected entries from your playlist. Multiple entries can be selected by drawing the mouse with the left mouse button held down or by using the SHIFT and CTRL key in the usual way.
8

Click “Play All” to open your complete playlist in a player window and start playing. Depending on the content it will open an omxaudioplayer (audio only) or an omxplayerGUI (video or mixed content) window.
To play a single file from your playlist simply double click its name entry.
b) Using the Web Interface
If the youtube-dl-server is running in the background (which is the default behaviour), you can open the web interface using kweb by clicking the web button. It's also possible to open the web interface in any other browser by going to http://localhost:9192/. But with kweb it will need less resources, because it is started in a low memory mode.
With the default settings the web interface will look like this:
Using the default settings or most default presets, the “Local Media” section will have oneentry “Pi”, which points to your “/home/pi” directory and lets you browse it for media files or playlists. Chapter 7 b) explains how you can modify it to point to one or more rootdirectories of your local media collection and these settings have been used for the following examples.
The web interface allows fast browsing and very “snappy” access to all files in your media collection and provides additional functionality like creating (sorted or shuffled) playlists on the fly.
The top line is used for navigation. Clicking the “Home” link will bring you back to the start page.The “Media” section contains all audio and videofiles found in the current directory. Clicking on a file name will immediately play
9

it with omxplayerGUI. Clicking on “Play: Files” will create a playlist of all files and send itto omxplayerGUI. The “Shuffle: Files” command will do the same, but the files will be played in a random order (useful for large audio collections).
The page may contain up to three sections: “Directories”, “Media” and “Playlists”. Clicking on “Recursive” will create a playlist of the files in the current directory and in all sub-directories (ordered or shuffled).
If you click on a media file or use one of the playlistfunctions, omxplayerGUI (or its audioplayer) will openand start playing the file(s). The web interface will showa simple “Playing” page displaying the title of the file or the root folder name of the playlist. Clicking the “Go Back” button will bring you back to the last page.
The start page of the web frontendcontains two simple web forms. Thefirst one, “Web Video”, can be usedto extract and play web video from alot of video websites. Enter the URLof a website containing video into the form or drag and drop an URL from another browser window into the formfield and click “Extract & Play”.The web interface will display amessage and omxplayerGUI willtry to extract the video URL and play the video.
The second web form, “Direct Play”, can be used in a similar way, but works either with URLs pointing directly to a web video or a full file path of a local media or playlist file. You can also drag a file from a filebrowser window and drop it directlyinto the web form, which will add apath starting with “file://”. Click the“Play” button to start playing thevideo, audio or playlist.
10

4) omxaudioplayer
If you open an audio file or a playlist(m3u and pls) containing only audiofiles or streams, omxplayerGUI will beopened in audio mode as“omxaudioplayer”. All files will beshown in a playlist.
Buttons and their keyboard controls:
Play/Pause – Space, p, Return or Keypad Enter: will play the currently selected song, or pause or resume playing, when it is already playing.Stop – ESC or q: will stop playing a song.Backward - ←: Jump backwards by about 10 seconds.Forward - →: Jump forward by about 10 seconds.Previous – ↑: If a song is playing and selected, stop it and play the previous song in the list. If a song is playing and you have selected another song, jump to that song and play it.If no song is playing, select the previous song and play it.Next – ↓: If a song is playing and selected, stop it and play the next song in the list. If a song is playing and you have selected another song, jump to that song and play it. If no song is playing, select the next song and play it.
Volume control: move the slider to change the volume between -60 and +12 db. You can also click into the grey areas besides the slider to change the volume by 3 db, or use the '-'and '+' keys (also on the numeric keypad).
The keyboard commands are very similar to those used by omxplayer, except for the Up and Down arrow keys, which are not used for jumping ahead or backwards by 10 minutes, but for playing the previous or next song.
Functions inside the playlist window:
If you select another song, while a song is playing, it will be played when the current song is finished or when you click on the Previous or Next button. If you double click another song than the currently selected one, it will be played (and a currently playing song will be stopped). If you double click the currently playing song, it will be stopped.
11

5) omxplayerGUI – the Video Player Window
a) Understanding the Two Different Modes
Depending on a setting in kwebhelper_settings.py (edited via kweb's settings page), two different modes can be used. freeze_window = False = extended mode, or freeze_window = True = simple mode
In simple mode (without using dbus commands) a video window is "frozen" to the screenwhile a video is playing. The video window cannot be moved, resized or minimized until the video has been stopped. The use of simple mode is shown in the title bar of the window with an extension: "(f)" (= frozen).
In extended mode the video window can be moved, resized or minimized while a video is playing. The video area will be adjusted as soon as your moving or resizing action is finished. While the window is minimized (hidden), the video will be invisible but play onand you will still hear the sound.
Note: Using the simple mode is not recommended any more. It was a workaround for older omxplayer versions at the time omxplayerGUI was first published.
Even in extended mode, the video window is “frozen” for a few seconds at the beginning (shown in the title bar) and some controls are disabled, while the program checks, if seeking in the video is possible and if its duration is known. If seeking is not possible, the window remains in the frozen state. If a duration cannot be found, the seek bar remains disabled. It's also possible to toggle between both modes at run time with a keyboard command ALT+u (if video has been stopped).
Some videos (especially rtmp://, rtsp:// and mmsh:// streams) will always be played in frozen or simple mode, if they do not support seeking.
You can play more than one video at the same time. I've managed to play up to 4 videos at the same time, 3 SD video and one 720p video TV stream, or even 6 SD videos. This shows how powerful the GPU of the Raspberry Pi is. If you play more than one video and pause one of them, the sound will get lost on all videos. You have to pause and start againeach video to get the sound back (this may change with newer versions of omxplayer, seeissue http s ://github.com/popcornmix/omxplayer/issues/184 ).
It's also possible to play one video on top of another one using different layers (see keyboard commands below). If multiple video windows are opened from the frontend window, they are layered automatically. This way it's very easy to create a PIP (picture in picture) effect.
12

b) Using the InterfaceWhen running in video mode, the GUI window has two lines of control elements at the bottom. The first line is the same as within an omxaudioplayer window (see above for details). The second line contains three menu buttons and another slider, which will be explained in detail here. In simple mode, you can only change these settings when no video is running; in extended mode most of these settings are available while a video is being played.
It's also possible, to hide these controls completely (and use only keyboard commands to control the player window). This can be toggled at run time with ALT+h. You can start theplayer in this mode by setting “hide_controls” to “True” (see below)
The "Mode:" menu contains the following choices: full - play video full screen without any window elements refresh - play video full screen without any window elements with omxplayer's -r option to change screen resolution and frequency Both of these options only have an effect, when no video is playing. You have to select full screen mode,
before you start a video.
Note: It's always possible to switch into a “simulated” full screen mode while a video is playing using two keyboard commands: ALT+h (to hide the controls), followed by ALT+f (to go to full screen). Both are toggle commands and by applying them again you'll return to window mode.
auto – If you select this mode before starting a video, the program will try to get information about the aspect ratio of the video and set the window size or the play area inside the current window accordingly. How this is done, depends on the value of “get_DAR” in the settings. By default, this is set to false and omxplayerGUI will try to get the aspect information when the video starts playing (using dbus communication).If get_DAR is set to true, omxplayerGUI will try to get the information before the video is started. This will take another two or three seconds, before the video starts - with large avi files even more.If the video has been started in one of the other numbered modes, auto detection of the aspect ratio always runs in the background and will be available after a short while; so you can switch to auto mode when the selected mode doesn't fit.
13

4:3, 16:9, 16:10, 2.21:1, 2.35:1 , 2.39:1 All these options define the ratio of width to height of a video manually. In extended mode, you can change these settings while a video is running. In simple mode only whena video has been stopped or not started yet. If none of these ratios seems to be right, choose auto mode (in extended mode you can also change this at run time).
Note: It depends on the omxplayerGUI settings if those modes stretch both the video area and the video window or just the window to match the video size. There's a “trueaspect” preset available, which will tell omxplayer to always use thecorrect video aspect (inside the window), independent of the window size (letterbox mode). This requires an omxplayer version from 2016.
The "Lines:" menu contains a number of settings that define the height of the video area, ranging from "min" (minimal height, see below) then some numbers like this: 320,384,432,480,512,576,720,800,900 to max (maximize window) and full (full screen without window title bar, but controls at the bottom)
The "min" size depends on the font height used for the interface, defined on the settings page. The smallest height is 288 lines, when the font height is set to the minimal value of 10 (points). In all other cases it's font height*28. The numbers following "min" depend on the min value and on the size of your screen. In extended mode you can change the height of the video at run time and the video area will be resized immediately. It's also possible to resize the video window manually by dragging the corner of the window.
The "Stream:" menu contains only two options, "video" and "audio". It can only be changed if the player has been stopped. In some cases omxplayerGUI cannot decide if a stream link provides audio (e. g. web radio) or video. You can select whether the player should handle such streams as audio or video streams. It's not really important in most cases, as omxplayer will handle it by itself, but you can avoid getting a black screen (when full or refresh mode has been selected) when you just want to listen to a web radio stream.
If the player window is large or near the bottom of the screen, the menu list will pop up upwards and would be hidden behind the video area if a video is running. To avoid this, the video is set to half transparent for 2 seconds when you click any of the menu buttons.You can also control all these menus from the keyboard (see below for details).
The video position slider: before you start a video you can set the starting position (between 0 and 180 minutes, in steps of 3 seconds). In extended mode you can also set the video position at run time, but only if seeking in the file or stream is possible and a
14

duration is known. This will be available a few seconds after starting the video, and it will also be limited to the real duration of the video.The video position slider display units are minutes with seconds as decimal value (0.05 matches 3 seconds).
Note: The slider position is not updated to the actual video position while a video isrunning. This would require a rather heavy communication between omxplayer and omxplayerGUI and I've decided against it; I prefer things to be fast and snappy and using as few resources as possible.
c) Keyboard Control
omxplayerGUI (and also omxaudioplayer) supports all keyboard commands of omxplayer with two exceptions: The Up and Down arrow keys are used for playlist control (go to next or previous song orvideo in the playlist) instead for large jumps (600 seconds) forward or backward. You have to use PageUp and PageDown instead (or “,” and “.”). For some commands omxplayerGUI supports additional options: Space bar, 'p', Return and Enter on the numeric pad all play/pause a video '+' and '-' can also be used from the numeric keypad for sound volume control.Appendix A contains a list of all keyboard commands including a comparison between omxplayer and omxplayerGUI.
omxplayerGUI supports its own special command set using the left ALT key in combination with the following keys:
c,q - close player (also in omxaudioplayer) m - toggle Lines: mode between max and min (or toggle between maximize and un-maximize in audio player mode). f - toggle Lines: mode between full and max (or toggle between full screen and window in audio player mode). 0 ... 9: select Lines: mode between "min" (0) and largest number. Depending on the number of available options, the larger numbers all may have the same effect. '+' and '-' move through aspect ratios forward or backward (between 'auto' and '2.39:1') a - set aspect ratio to 'auto'u - toggle between simple and extended mode (visible in title bar where an '(f)' is added for simple mode). Only possible when no video is playing.s - save playlist as m3u file (also in omxaudioplayer). h - hide / show all control elements at the bottom .r – reload video information (seekable, duration, aspect ratio) toggling the method used at the same time. When video is not playing, it toggles the get_DAR settings value.k - the kill switch: sometimes omxplayer hangs and does not return. This command sends a killall command to all omxplayer.bin instances and also to all send-dbus instances.
15

NumPad+ and NumPad- or PageUp and PageDown - Set the video layer (default and minimum = 0) to a higher or lower value; this will allow overlays. Layer numbers > 0 willbe shown in the title bar. Only possible when no video is playing.
If you stop playing a video file, the omxplayerGUI window will switch to playlist view. Handling the playlist is done exactly the same way as in omxaudioplayer (see above).
d) Windowless Mode
omxplayerGUI can also play videos in a windowless mode (depending on special settings,see below). In this case a terminal (xterm) will be started, to blank and fill the whole screen and give keyboard control and then play videos full screen with omxplayer. This is the old mode used by Minimal Kiosk Browser up to version 1.4. This mode is not used from the standalone frontend.
The main use is for developers of embedded applications with kweb. They can also run media without starting a terminal first (but then there are no keyboard controls available). This can be used in digital signage applications, for example, to run music in the background or to overlay video to certain areas of a web page (with especially set up presets).
There's a preset installed for the windowless method named “nogui”.
16

6) Web Browser Support: Playing Web Video in High Quality
a) Introduction: Playing Web Video Inside Browsers
This has been the subject of numerous discussions on the Raspberry Pi forum. People expect to watch web video (typically youtube, but there are many more video websites) inside a web browser as they have been used to on Desktop PCs and are disappointed, when it doesn't work or only in a limited way.
We have to differentiate between to kinds of browser: Browsers without hardware acceleration for video (Firefox, kweb, Midori, Qupzilla …) and browsers which have some kind of hardware acceleration built in (epiphany and kweb3, chromium-browser) due to special developments done of funded by the Raspberry Pi Foundation.
Let's start with the first group, browsers which have to use the software decoding by the CPU to display web video. This does work to some degree on the RPI 3 only - all former Raspberry Pi models are too slow for this. The typical 360p video size plays quite well in almost any browser and 720p (cinema mode on youtube.com) is just about possible, but with a lot of missing frames. The CPU load is very high and if other processes running in the background use a lot of CPU, video performance may suffer.
The Raspberry Pi Foundation has invested some work and money into development to add hardware (GPU) decoding to some browsers. Let's first have a look how this works: the content of the video stream is sent to GPU, which decodes the video. The resulting video has to be copied back in real time into the frame buffer and this is not simply a copying process but also involves a colour space conversion from some kind of YUV to RGB(A). How good this works depends on the screen area used. As a rule of thumb you can say, it works up to 720p, but full screen mode on a HD screen (e. g. 1080p) is not possible.
There are two kinds of browsers which use this method: webkit3 based browsers like epiphany and kweb3 and recently a special version of the chromium-browser.
Epiphany (and kweb3) run quite well on any Raspberry Pi, but the engine contains quite a lot of bugs and work on the engine has stopped a long time ago and it will vanish at some time in the future. Kweb3 is a bit more stable than epiphany, because it has disabled some features. The engine supports quite a lot of video formats. Trying to play a web video in full screen mode will usually freeze your system.
Chromium-browser supports only H264 video and does it quite well. But chromium is a memory hog and is almost impossible to use on a Raspberry Pi with only 512 MB of memory, which means it is only usable on a Raspberry Pi 2 and 3,
There are a few other things to consider. While the web browser plays a web video there's usually quite a lot of other stuff going on in the background: practically all video
17

websites have lots of Javascript scripts running in the background, which need quite a lotof memory and CPU time. Disabling Javascript could block this, but the providers have taken care about this: video will not play with Javascript disabled.
And memory is always a problem: web browsers need a lot and as soon as your Raspberry Pi starts swapping, all video performance is lost.
If you want to watch web video in high quality and full screen and start this directly from your browser there's only one solution: the “kweb method”. From day one of it's development (there was no Rpi 2 or 3 yet), kweb had a method built in to play web video with omxplayer. It uses youtube-dl to extract the video URL and sends this URL to omxplayer(GUI). Usage of memory and CPU is really low and this works on all Raspberry Pis Models.
Meanwhile development has come a long way and I have invested quite a lot of work to make this more comfortable to use (omxplayerGUI has been added in version 1.5), to speed up the use of youtube-dl (youtube-dl-server was added in version 1.7) and to make this method available for most other browsers. The next chapter will explain all the details you need to know.
b) Using omxplayerGUI for Web Video in Almost Any Browser
Let's start with kweb (and kweb 3). If you navigate to a web page containing web video, you can click the “Play” button and omxplayerGUI will be started to play the video. This will always work, if a working version of youtube-dl is installed and the website is supported by youtube-dl (more than 600 websites!) or if the web page contains a simple HTML5 video. If the youtube-dl-server is running, access to the video will be much faster.The easiest way to accomplish this is to start omxplayerGUI (frontend) from the application menu. The video request will be sent to the running omxplayerGUI instance. It will usually start playing within 2 or 3 seconds (the first video may take a little bit longer) on a RPi3.
Note: This will usually not work with web pages which contain embedded youtube (or other) video. You have first navigate to the original video page (the embedded player offers this).
Now let's add this function to other browsers. I've successfully implemented this method in Firefox, Chromium and Midory. We have to add a bookmark which should appear as abutton in the browser toolbar. In Firefox and Chromium this is in the “Bookmarks Toolbar” section. In Midori you have to enable “Show in toolbar” in the “Add Bookmark” form.
A new Bookmark requires a title and an URL. As title use something like “Play Video” or “omxplayerGUI” or whatever you like. In the URL field enter the following (one line):
18

javascript:(function(){var%20target_url=window.location.href;var%20ytsvr="http://localhost:9192/play?url=";var%20final=ytsvr.concat(encodeURIComponent(target_url));var%20myWindow=window.open(final,'_top')})();
A new button with the title you have chosen should now appear in the browser toolbar.
This method requires the youtube-dl-server to run. In order to use it, you have to start omxpayerGUI from the application menu, which will also run the youtube-dl-server in the background. Now you can navigate to any kind of video page and click the new toolbar button to play the video with omxplayerGUI (it will use the already running instance and not start a new player). In the browser tab you will see something like this:
I know that some people would prefer to stay on the original video page instead (and in fact there is a method that does it), but there are a lot of advantages using this method: the browser will stop buffering and playing the video inside the browser window and all the Javascript crap running in the background and eating resources will be stopped.
To return to the original video page after watching the video with omxplayerGUI, click the “Go Back” button.
Note: youtube-dl also supports youtube search results and channels, but this will take some time (up to a minute). The frontend window of omxplayerGUI will appear frozen during this time. You will simply need some patience. The resulting video window of omxplayerGUI will contain all the videos from the search list and will start playing the first one. If you stop the video you will see the playlist containing all titles. Each one can be played immediately.
c) Using the Youtube-DL-Server
The youtube-dl-server is an additional tool to speed up playing web videos. The idea behind it is quite simple: start youtube-dl only once instead of each time you want to watch web video. Using it reduces the time from clicking the “Play” button in kweb to watching the video to 2 or 3 seconds (the first video may take a little bit longer to start). It's very useful if you want to watch multiple web videos.
The server is also used as a simple but effective web frontend to your local media collection. This has already been explained in chapter 3 b) and chapter 7 will provide additional information.
For developers of embedded applications, especially for kiosk and digital signage applications, the server also provides some useful functions which are explained in chapter 9.
19

Starting the youtube-dl-server
1) Running the omxplayer frontend will start the server automatically. It will be closed, when you close the frontend.
Note: This is the recommended method for most users. The server will run in”embedded mode”, allowing a very fast communication with omxplayerGUI. Andall video requests will be sent to the already running omxplayerGUI instance instead of starting a new instance with each request. I believe that 98% of all users will never have to use the youtube-dl-server as a separate application.
2) From kweb(3): Go to “Aplications”. Click “Start Server” at the bottom. The server will run inside a terminal. Use “Stop Server” from the Applications page to stop it again.
3) From the command line:ytdl_server.py [options]
Or to run it quietly in the background:bgstart_ytdl_server.sh [options] &
To stop it you can call the following URL from any browser:http://localhost:9192/stop
A command line argument to stop it cleanly:wget -O /dev/null http://localhost:9192/stop
You can also add a button to kweb's application page which will start the server in the background. On the “Applications” page select “edit”. Kweb's text editor will open. Scroll to the bottom of the text and add:Start Server (hidden)=bgstart_ytdl_server.sh
If you have created your own preset (e. .g “myplayer”) which you want to use, you can add instead:Start Server (hidden)=bgstart_ytdl_server.sh -t=myplayer
Then click “Save & Create” and reload the Applications page to see your new button.
If you run multiple Raspberry Pis on your network, it is possible to run the youtube-dl-server only on one computer and use it from all your Raspberry Pis. On the client machines replace “localhost” by the IP of the Raspberry Pi running the server in 'ytdl_server_host' on the settings page. In this case the embedded mode (running inside the omxplayerGUI frontend) is not available on the client machines.
Youtube-DL-Server options:
-p=port Server port, default = 9192-f=formatstring youtube-dl format, default = best-t=preset start server with preset (name without .preset extension)-s=style file name of a style sheet from /usr/local/share/kweb-a-=alternate_player use another player, e. g. vlc, only possible in standalone mode
20

7) Create a Web Frontend for Your Media Collection
a) Introduction
The main use of the youtube-dl-server is to provide a fast method for extracting web video addresses. As such it is used and controlled by omxplayerGUI. But it can also work in another way, controlling omxplayerGUI to play media content of any kind. In fact, this method is used to add omxplayerGUI support to all kinds web of browsers.
Version 1.7.2 added tools for developpers of embedded applications (see chapter 9).
In version 1.7.3 new functions have been added to the server which allow an extended use as a web frontend to your media collection from kweb or any other web browser. You can browse your media files, play any media file just by clicking on it and create playlists on the fly (ordered or shuffled, containing just the files from one directory or from all sub-directories). And all this is fast and snappy, doesn't need any database and isalways up tp date.
In version 1.7.9.5 running in an embedded mode within omxplayerGUI has been added and you can now directly access the server from the omxplayerGUI frontend.
With a special set of options you can also use it to remotely control your media from another computer (smartphone, tablet). The next two chapters will show you step by stephow you can extend and use these functions.
b) Tutorial: Adding Your Local Media to the Web Player Interface
Start omxplayerGUI and click on “Settings”. The omxppayerGUI frontend will disappear and kweb will be opened as root (may require a password) and show the settings page. Scroll down to bottom. The multiline text field “player_directories” has one default entry,which is not very useful, just for demonstration purposes: “Pi=/home/pi”. Replace it with a number of “name=path” pairs, each one on a separate line, like “Video=/home/pi/Video”etc., pointing to the root of your media directories.
Note: Both the name and the path entry may not contain any spaces or non-standard (ASCII) characters. If your media paths contain spaces or special characters create symbolic links pointing to them, e. g. from a terminal:ln -s “/home/pi/My nicest movies” nicemovies
and use them instead of the real directory names. This restriction applies only to the names and paths of these settings. Directory or file names inside your directories are not restricted inany way.
My own player_directories looklike this (I've mounted a numberof network drives in /media):
21

If you have added all your media directories, click the “save” button. This is all it needs but we do one more thing. At the bottom add a name for a new preset, e. g. “myplayer” and click “Save Preset”. This is something you always should do, if you have applied yourown settings options. The default presets will be overwritten with each program update and you might loose your work if you don't save it as your private preset.
If you now close kweb, theomxplayerGUI frontend willappear again and you areready to test the new settings.Click the “Web” button toopen the web frontend withkweb which will now showall your new entries in thetop line as “Local Media”. Inchapter 3 b) you have alreadylearned how to use it.
You can change the look of the web interface byapplying a different style. On the “Settings” page youcan enter a style sheet (colour scheme, font sizes) to be used by the player. The kweb package already contains a number of CSS files which you can use. You will find them in “/usr/local/share/kweb”. You can also create your own styles: start with an existing style sheet and modify colours and font sizes.
Although kweb is best suited to use the web interface, any other browser can also be used. Just go to “http://localhost:9192/”.
c) Tutorial: Creating a Remotely Controlled Media Player
The web interface we created in the last chapter is for use on the same Raspberry Pi which we use to play the media. In this chapter we will show you how you can use the youtube-dl-server to create a remotely controlled media player. Remotely controlled means using a web browser on a different computer (another Raspberry Pi or a smartphone or tablet).
In this mode omxplayerGUI runs omxplayer always in full screen mode, similar to its command line use. But you don't (and can't) control the player using keyboard commands, as you would do from the command line. The server will let you control it from the remote web interface instead.
We open the settings page either from kweb or from omxplayerGUI. At first we click on the preset button named “remoteplayer” and reload the page afterwards. Now we scroll to the bottom of the page and add our media root directories as described in the last chapter. We save our settings as a new preset, e. g. “myremote” and close kweb. If
22
omxplayerGUI is still running, we have to close it now. For this application we have to start the youtube-dl-server as a standalone application.
Open a terminal and run:bgstart_ytdl_server.sh -t=myremote
Now we connect to the Raspberry Pi running the server from another computer with anykind of browser (from your smartpone's browser, for example)http://IP:9192/
where “IP” must be the local IP of the Raspberry Pi running the server.
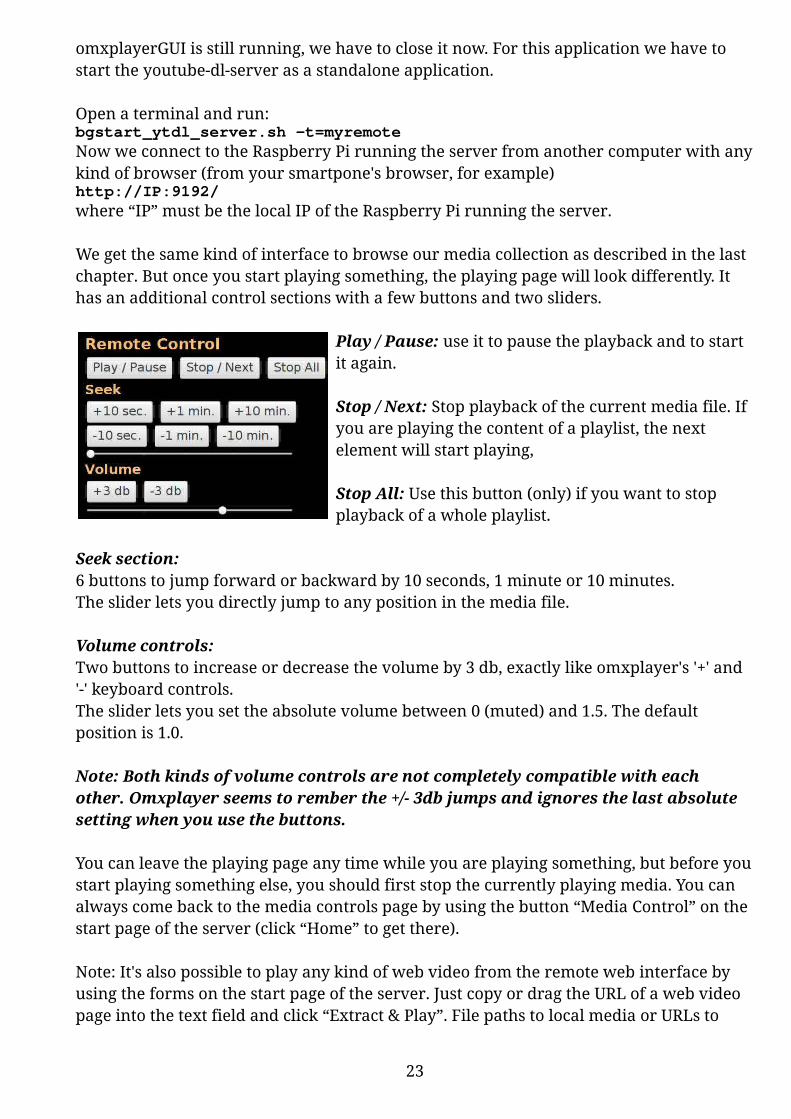
We get the same kind of interface to browse our media collection as described in the last chapter. But once you start playing something, the playing page will look differently. It has an additional control sections with a few buttons and two sliders.
Play / Pause: use it to pause the playback and to start it again.
Stop / Next: Stop playback of the current media file. If you are playing the content of a playlist, the next element will start playing,
Stop All: Use this button (only) if you want to stop playback of a whole playlist.
Seek section:6 buttons to jump forward or backward by 10 seconds, 1 minute or 10 minutes. The slider lets you directly jump to any position in the media file.
Volume controls: Two buttons to increase or decrease the volume by 3 db, exactly like omxplayer's '+' and '-' keyboard controls.The slider lets you set the absolute volume between 0 (muted) and 1.5. The default position is 1.0.
Note: Both kinds of volume controls are not completely compatible with each other. Omxplayer seems to rember the +/- 3db jumps and ignores the last absolute setting when you use the buttons.
You can leave the playing page any time while you are playing something, but before youstart playing something else, you should first stop the currently playing media. You can always come back to the media controls page by using the button “Media Control” on the start page of the server (click “Home” to get there).
Note: It's also possible to play any kind of web video from the remote web interface by using the forms on the start page of the server. Just copy or drag the URL of a web video page into the text field and click “Extract & Play”. File paths to local media or URLs to
23

direct web streams can be entered into the second form and started by clicking the “Play” button.
omxplayerGUI needs XORG (because it is basically a GUI program), but we don't want to start the whole Desktop enviroment just to run a remotely controlled media player. In the last part of this tutorial I will show you how you can create a remotely controlled standalone media player application. This could be a media player connected to your TV or a pure audio player connected to your audio amplifier. The first thing you should do isto set your Raspberri Pi to boot to the command line (with auto-login) using raspi-config. We won't mangle around with the Desktop settings and you can still go to the Desktop by running “startx”.
For the media player we need some kind of background or opening screen or wallpaper. From the command line run:feh –-bg-fill /path/to/wallpaper.png
You have to use the correct path to your image (png or jpg).
Now we create a start script. Inside your home folder (pi) run:nano kremote
This will open an empty new text file. Enter the following:#!/bin/basheval $(cat ~/.fehbg)bgstart_ytdl_server.sh -t=myremote#sudo shutdown -h now
Save it with CTRL-o and close the editor with CTRL-x.This assumes that your remote player preset is named “myremote”. The last line is commented out and can later be used to automatically shut down your Raspberry Pi when you close the player.We have to make the file executable:chmod +x kremote
Now we can test our application. From the command line run:xinit ./kremote -- vt$(fgconsole)
You will see the wallpaper or opening screen of your remote player application. Now connect to it from another computer's (smartphone or tablet) browser, as described above, and test your player by navigating and starting video or audio files.
When you click “Stop Server” on the start page of your player, the application will close and return to the command line.
If that's all runnig well we can now modify our system to boot into the player and to shutdown your Raspberry Pi if you close the player. Runsudo nano /etc/X/Xwrapper.confIf the last line reads:allowed_users=console
change it toallowed_users=anybody
and save the file (CTRL-o).
24
Now open another file:sudo nano /etc/rc.local
Just before the last line (“exit 0”) enter the following lines:chmod a+rw /dev/tty0chmod g+rw /dev/tty*sleep 10su -l pi -c "xinit ./kremote"
and save the file.
If you now reboot your Raspberry Pi, it should boot directly into your player screen. When you close the server, it will return to the command line. To enable automatic shut down, remove the leading “#” from the last line of your “kremote” script.
You can turn any Raspberry Pi into a network controlled media player. It doesn't have to be a Raspberry Pi 2 or 3. It just needs a network connection and access to some media (mounted network shares or a USB dongle or HDD).
25

8) omxplayerGUI Settings
omxplayerGUI can be fine tuned in many ways using a web interface (settings page) in Minimal Kiosk Browser (kweb). omxplayerGUI shares its global settings with other utilities from the kweb environment. When editing the properties of omxplayerGUI you can simply ignore these additional settings.
The omxplayerGUI front end can open this settings page by calling kweb with a special configuration (as root for easier editing).
You can also call this page from inside kweb, either from its menu page, the control panelor by entering “:s” in the URL entry line. See the kweb manual for details.
a) Choosing Presets
On top of the web page, you'll see a few buttons with “presets”, which can be chosen witha mouse click. After selecting a preset, you have to reload the web page to see which options have been set. Seven presets are predefined: “default” (default settings), “analogaudio” (same as default but using line audio output instead of HDMI audio), “nogui” (windowless mode), “trueaspect” (use letterbox aspect-mode inside windows), “overlay” (to be used in embedded applications), “noserver” (disables the youtube-dl server and the web frontend) and “remoteplayer” (to use the remote web frontend of theyoutube-dl server). You'll see later, how you can create your own presets.
b) List of All Options Used by omxplayerGUI
The following list will show all settings for omxplayerGUI in the same way as they are shown in the web interface. Each option can be edited and saved separately.The number of settings options may be rather overwhelming for a beginner, but many ofthem are only of interest for a developer of embedded applications. The following options may be useful for a normal user:Interface (all): fontname, fontheightInterface (audio player): maxlines, lwidthInterface (video player): videoheight, screenmode, videomodeCommon player options: defaultaudiovolume, autoplay, autofinishIf you need to send special options to omxplayer, you can enter them in 4 different places:omxoptions (video player)omxaudiooptions (audio player)omx_livetv_options (video player, special settings for live TV streams)youtube_omxoptions (video player, used for web video)
26

GENERAL OMXPLAYER AUDIO VIDEO OPTIONSOptions for omxplayer to be used when playing video
omxoptions: Enter one element per line!
You can add most of the options of omxplayer, but some are filtered out in window mode.
For options requiring arguments, the argument must be entered on a separate line!
Options for omxplayer to be used when playing audio
omxaudiooptions: Enter one element per line!
You can add most of the options of omxplayer, but some are filtered out in window mode.
For options requiring arguments, the argument must be entered on a separate line!
Special options for watching live tv streams (omxplayer)
omx_livetv_options: Enter one element per line!
You can add most of the options of omxplayer, but some are filtered out in window mode.
For options requiring arguments, the argument must be entered on a separate line!
Add the start of your live tv stream links to this list to enable live tv options
live_tv: Enter one element per line!
Example: If you have a live TV streamer running on
http://192.168.0.1:9080
add this (partial) URL to the list.
For all URLs starting with this partial URL omx_livetv_options (previoussetting) will be used instead of normal omxoptions.
27
save
save
--live
save
save
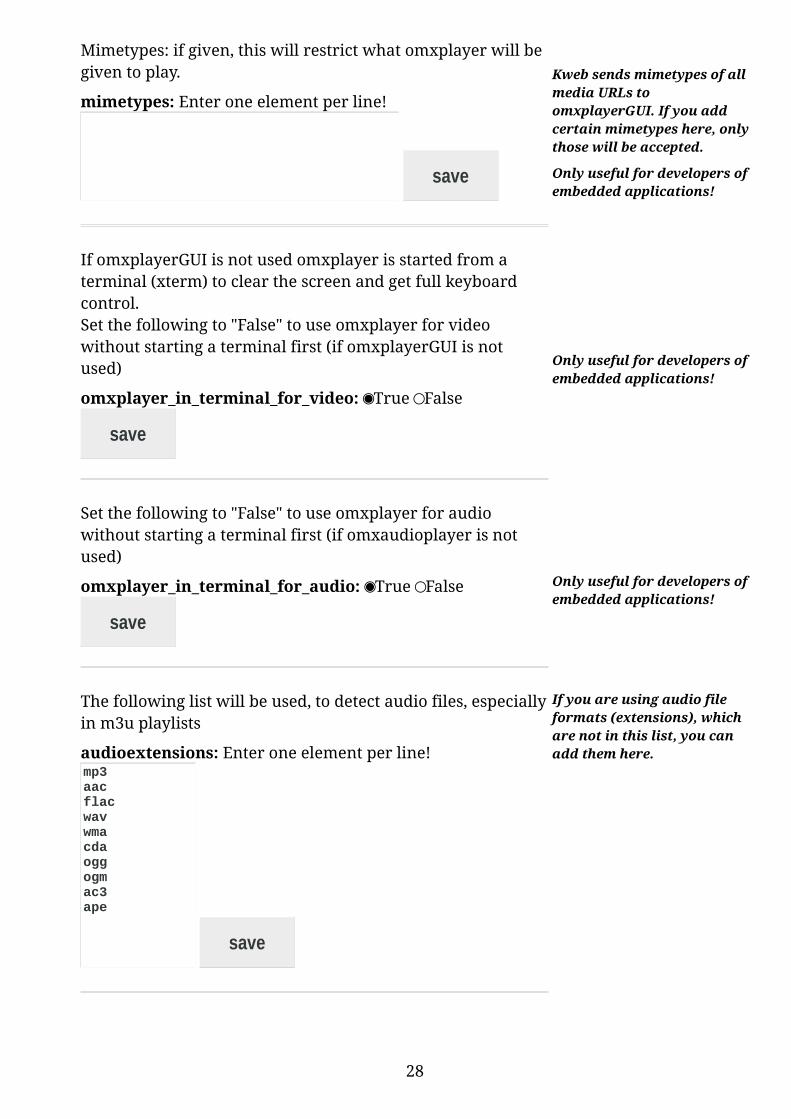
Mimetypes: if given, this will restrict what omxplayer will be given to play.
mimetypes: Enter one element per line!
Kweb sends mimetypes of all media URLs to omxplayerGUI. If you add certain mimetypes here, onlythose will be accepted.
Only useful for developers ofembedded applications!
If omxplayerGUI is not used omxplayer is started from a terminal (xterm) to clear the screen and get full keyboard control.Set the following to "False" to use omxplayer for video without starting a terminal first (if omxplayerGUI is not used)
omxplayer_in_terminal_for_video: True False
Only useful for developers ofembedded applications!
Set the following to "False" to use omxplayer for audio without starting a terminal first (if omxaudioplayer is not used)
omxplayer_in_terminal_for_audio: True False Only useful for developers ofembedded applications!
The following list will be used, to detect audio files, especiallyin m3u playlists
audioextensions: Enter one element per line!
If you are using audio file formats (extensions), which are not in this list, you can add them here.
28
save
save
save
mp3aacflacwavwmacdaoggogmac3ape
save
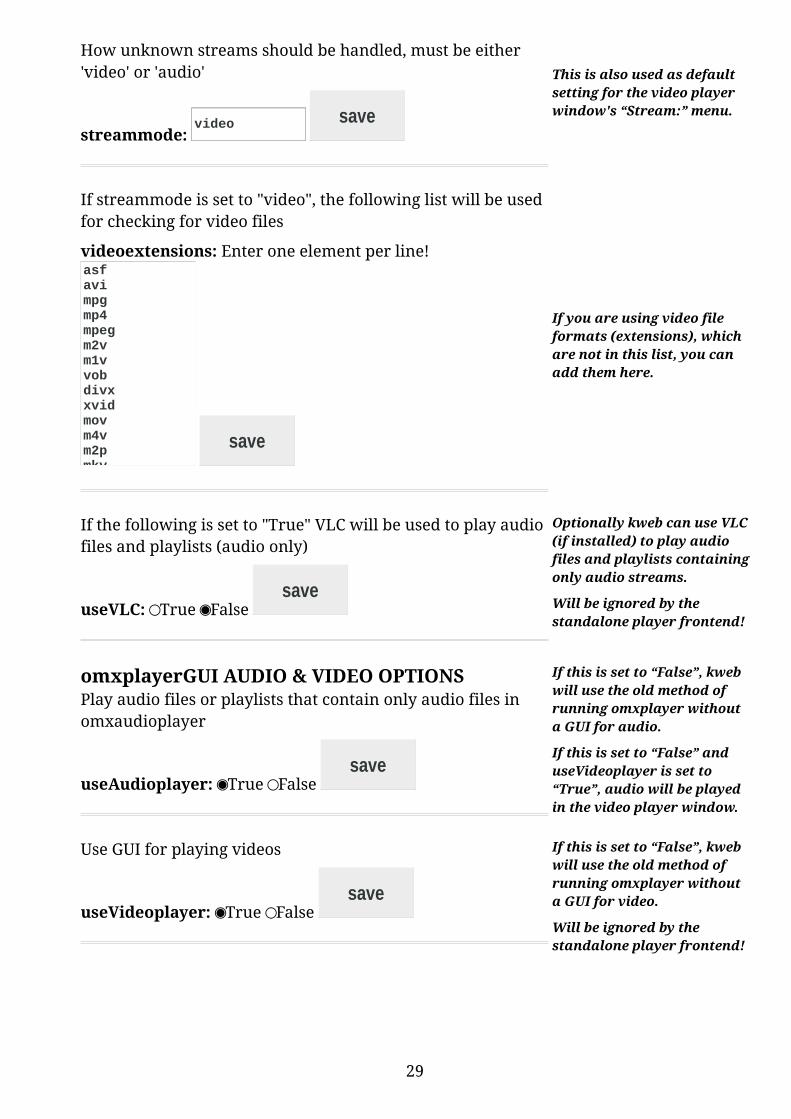
How unknown streams should be handled, must be either 'video' or 'audio'
streammode:
This is also used as default setting for the video player window's “Stream:” menu.
If streammode is set to "video", the following list will be used for checking for video files
videoextensions: Enter one element per line!
If you are using video file formats (extensions), which are not in this list, you can add them here.
If the following is set to "True" VLC will be used to play audio files and playlists (audio only)
useVLC: True False
Optionally kweb can use VLC(if installed) to play audio files and playlists containingonly audio streams.
Will be ignored by the standalone player frontend!
omxplayerGUI AUDIO & VIDEO OPTIONSPlay audio files or playlists that contain only audio files in omxaudioplayer
useAudioplayer: True False
If this is set to “False”, kweb will use the old method of running omxplayer without a GUI for audio.
If this is set to “False” and useVideoplayer is set to “True”, audio will be played in the video player window.
Use GUI for playing videos
useVideoplayer: True False
If this is set to “False”, kweb will use the old method of running omxplayer without a GUI for video.
Will be ignored by the standalone player frontend!
29
video save
asfavimpgmp4mpegm2vm1vvobdivxxvidmovm4vm2pmkvm2tstsmtswmvwebm
save
save
save
save

Volume setting when starting omxplayerGUI ranging from -20 to 4 ( -60 to +12 db)
defaultaudiovolume:
This value will be used for audio and video player windows.
Start playing the first (or only) file automatically
autoplay: True False
Close the GUI if the last (or only) file has been played to the end
autofinish: True False
This closes a player window, not the standalone frontend.
Interface settings for omxaudioplayer and omxplayerGUI (video)The font to be used for playlist and buttons
fontname:
You should only use a font that is available on your system!
Font size between 10 and 22, will also determine the size of the GUI window:
fontheight:
Number of entries displayed in playlist window, between 5 and 25:
maxlines:
This defines the visible vertical size of a playlist in an omxaudioplayer window.
30
save
save
SansSerif save
12 save
8 save
0 save

Width of the window, value between 40 and 80, defines the minimum number of characters of the song name displayed in the songlist (usually much more are shown!), not used for video mode
lwidth:
This defines the visible horizontal size of a playlist in an omxaudioplayer window.
Minimal height of video area (also depends on fontheight!), 288 or more:
videoheight:
This defines the minimal vertical size of a video player window.
Default 'Lines:' mode, must be one of those: 'min','max', 'full'
screenmode:
Default video mode: set this to 'full' or 'refresh' for full screen,to 'auto' (for automatic detection of the aspect ration) or to one of these:'4:3','16:9','16:10','2.21:1','2.35:1','2.39:1' to play in a window(you can also add one additional value here):
videomode:
Set the following to "True" for simple mode (no window resizing, moving etc. while playing video);must be set to “True” for older omxplayer versions
freeze_window: True False
Should not be used any more, but may be required if you use a very old version of omxplayer.
31
40 save
288 save
max save
16:9 save
save

If True, get video information using a second omxplayer process instead of using dbus.Starting the player in auto mode may be slower.Not recommended on a single core Raspberry Pi.
get_DAR: True False
Get video information (duration, seekable, aspect ratio) using a second instance of omxplayer, either in the background or before video is started (in auto mode). Modified in version 1.7.5.
If the following is set to “True”, all control elements are hidden (can be enabled later on with ALT+h)
hide_controls: True False
This setting only applies to video player windows.
ONLINE VIDEO OPTIONSOptions for pages containing video, either HTML5 video tags or all websites supported by youtube-dl.If html5 video tags include more than one source format, select the preferred one here.
preferred_html5_video_format:
Choose whether HTML5 URL extraction is tried first and youtube-dl extraction afterwards or vice versa.
html5_first: True False
HTML5 video URL extraction is faster, but only works for certain pages.
Additional youtube-dl options, e. g. selecting a resolution or file format
youtube_dl_options: Enter one element per line!
You should only change the default setting, if you really know, what you are doing, orweb video might stop working
32
save
save
.mp4 save
save
-fbest
save
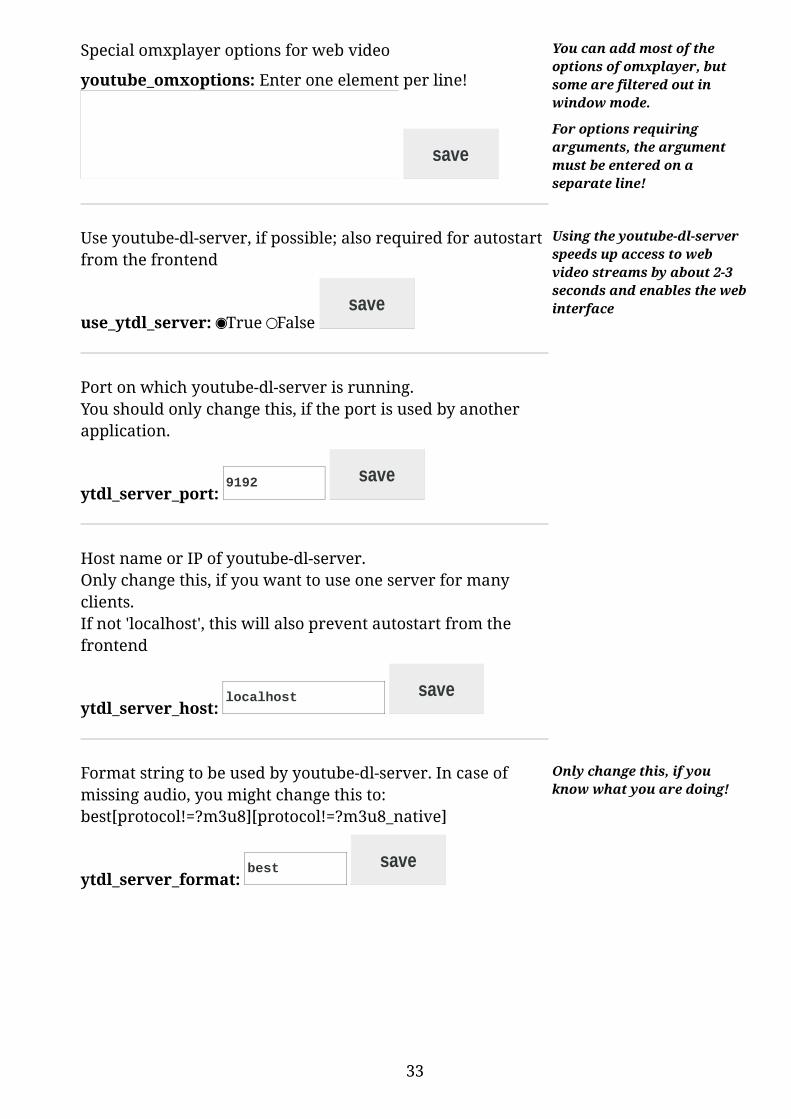
Special omxplayer options for web video
youtube_omxoptions: Enter one element per line!
You can add most of the options of omxplayer, but some are filtered out in window mode.
For options requiring arguments, the argument must be entered on a separate line!
Use youtube-dl-server, if possible; also required for autostart from the frontend
use_ytdl_server: True False
Using the youtube-dl-server speeds up access to web video streams by about 2-3 seconds and enables the web interface
Port on which youtube-dl-server is running.You should only change this, if the port is used by another application.
ytdl_server_port:
Host name or IP of youtube-dl-server.Only change this, if you want to use one server for many clients.If not 'localhost', this will also prevent autostart from the frontend
ytdl_server_host:
Format string to be used by youtube-dl-server. In case of missing audio, you might change this to:best[protocol!=?m3u8][protocol!=?m3u8_native]
ytdl_server_format:
Only change this, if you know what you are doing!
33
save
save
9192 save
localhost save
best save

c) Additional Options Added in Version 1.7.3
In version 1.7.3 a few more settings options have been added. The first group is only usedby the youtube-dl-server to manage the web interface for your local media collection.
Important Note: both name (value1) and path (value2) entries may not contain spaces or non-standard (ASCII) characters! If your main media
directories do not match these conditions, you have to create appropriate symbolic links and use these instead of the real path.
If no style name is given, a built-in style sheet will be used.
See the next chapter for details.
The next two options are applied to omxplayerGUI and can be used to compensate a possible offset between the video window and the omxplayer overlay, when you cannot avoid using overscan.
d) Creating Presets
After editing a number of options you can save the complete actual settings as a preset, which can later be loaded with a simple mouse click.
To save a preset, enter a name and click “Save Preset”. To overwrite it again later with different settings, simply use the same name. To delete a preset, enter its name and click “Delete Preset”.
To load a preset, simply click on the button with its name. Reload the page afterwards to see the active settings. This function is also available at the top of the settings page.
Note: It's highly recommended to save your own settings as named presets, because otherwise your settings will be lost when upgrading the kweb package.
34

It's important to understand, what happens, when you click a preset button. There is one global settings file (kwebhelper_settings.py) which is used by some components of the kweb environment (including omxplayerGUI and ytdl_server.py). If you click a preset button, the content of the global settings file is replaced by the content of the preset file. And the settings page file is updated to match the current settings (it still needs a reload in kweb to show the current values).
Both omxplayerGUI and the Youtube-DL-Server can use different settings (other than the global ones), if started from the command line or a script with appropriate options:omxplayergui -–preset=... (name of the preset)ytdl_server.py -t=.. (name of the preset)bgstart_ytdl_server.sh -t=.. (name of the preset)
35

9) Developers Section
a) Introduction
If you are using the Raspberry Pi for digital signage or kiosk applications and need to include video, the Raspberry Pi will soon come to its limits. On a Raspberry Pi 3 (but not on older models) kweb (and also some other browsers) can play 360p video in good quaility, but when playing larger resolutions (or in larger screen areas) it will start lagging. Theoretically you could use kweb3 or epiphany with HW accelerated video, but the underlying engine is so buggy, that your application will sooner or later crash.
A better solution is to use omxplayerGUI in overlay mode instead of using HTML5 video inside your applications. Version 1.7.2 has added a number of features which let you include and control web video from your applications in a very flexible way and in any quality up to 1080p. And it will run on any Raspberry Pi because it doesn't need much CPU power.
Note: Most of the methods described here will work in any browser, not just in kweb or kweb3.
b) Playing Media in Overlay Mode
Using special settings omxplayerGUI will run video in overlay mode without any GUI andwithout opening a terminal first (as with the “nogui” preset). Version 1.7.2 comes with a new preset named “overlay”. Choosing it on kweb's “Settings” page will set the following options:omxplayer_in_terminal_for_video=False omxplayer_in_terminal_for_audio=False useAudioplayer=False useVideoplayer=False
By default video will run in full screen. To restrict it to a certain screen area, add--winx1,y1,x2,y2
to omxoptions. The video will run in the area defined by x1,y1 (upper left edge) and x2,y2 (lower right edge).A button to start the video might look like this:<a href=URL><button>Play Video</button></a>
URL must point to a video stream or file.To start a video automatically when the page loads, add a small invisible iframe like this:<iframe src="URL" width="0" height="0" name="video"></iframe>
Now this isn't very flexible for different reasons:1) It will only work in kweb(3)2) Video will always run in the same the area defined in the preset.3) You have no way of controlling the video (stopping it, for example).
But this is just the beginning. Version 1.7.2 adds many advanced features. So let's go on.
36

c) Using Special Playlists
For directly accessible video files or streams this method uses extended m3u playlist files. Usually such a playlist format looks like this: #EXTM3U #EXTINF:-1,Video Title URL or file path
Instead of "-1" you can use the length of the video in seconds.
For this special purpose we use the video title information field for something else: #EXTM3U #EXTINF:-1,omxoptions=--win;200,140,1800,1040 http://distribution.bbb3d.renderfarming.net/video/mp4/bbb_sunflower_1080p_60fps_normal.mp4
The title is replaced by "omxoptions=" followed by a number of omxplayer options, separated by semicolons. In this case we use the "--win" option with a set of values to play the video in a 1600x900 size, with the upper left edge at 200,140 (x,y). Loading this m3u playlist from a link, button or an iframe (auto-start), will play the Big Buck Bunny video in the defined area.
You can use any omxplayer options; it's possible to use layering for PiP (picture in picture) effects, or using half transparent videos, setting the volume or start position etc.
There's one special option, which you can add, which does not belong to omxplayer: "stop", e. g. #EXTINF:-1,omxoptions=--win;200,140,1800,1040;stop
This will stop any running video, before starting the new one. This way you can create buttons to play different videos and an already running video will be replaced by the new one. It's also possible to use the stop command alone like this: #EXTM3U #EXTINF:-1,omxoptions=stop dummy.mp4
This way you can easily create a "stop video" button.
To start video automatically when the page loads, add a small invisible iframe: <iframe src="paylist1.m3u" width="0" height="0" name="video"></iframe>
The src attribute must point to the playlist. A button to start a second video may be created like this: <a href="playlist2.m3u" target="video""><button>Video 2</button></a>
Note: This method works in any browser if you can set it to open m3u playlists withomxplayerGUI. I've successfully tested it with Firefox and Chromium-Browser.
Now we can overlay video in any screen area and we also have a method to stop the video. But much more is possible if we use the youtube-dl-server (on the local machine).
37

d) Using the Youtube-DL-Server
If the youtube-dl-server is running on the client machine we can use it for a much finer controlled display of web video and also embed web video from youtube.com or other video websites.
Note: For this method you must always use small, invisible iframes, not direct links.
Instead of using m3u playlist files we now use URLs pointing to the youtube-dl-server using some of its special commands. To play the Big Buck Bunny video when the page starts, we can add an iframe like this:<iframe src="http://localhost:9192/dplay?url=http://distribution.bbb3d.renderfarming.net/video/mp4/bbb_sunflower_1080p_60fps_normal.mp4&omxoptions=--win;200,140,1800,1040;stop" width="0" height="0" name="video"></iframe>
We can add buttons (links) to our web page, which play other videos (in different screen areas, if you like). They should use the iframe as target:<a href="http://localhost:9192/dplay?url=URL&omxoptions=--win;620,140,1900,860;stop" target="video""><button>Video 2</button></a>
URL must point to another video stream.
We can also add videos from youtube.com, vimeo.com or many other websites using the “play” command instead of the “dplay” (direct play) command:<a href="http://localhost:9192/play?url=https://player.vimeo.com/video/91631396&omxoptions=--win;300,140,1900,1040;stop" target="video""><button>Vimeo</button></a>
Of course you can also set the “src” attribute of the iframe from a Javascript function.
e) Controlling Web Video
The youtube-dl-server provides one more command which gives us fine-grained control over any kind of media we are playing with the overlay method:http://localhost:9192/omxcmd?cmd=...&value=...&dbusadr =...
value and dbusadr are optional. Some commands need a value, some don't.
These URLs send commands to omxplayer via dbus. If you have more than one instance of omxplayer running you can control them separately by using different dbus addresses. The default address is "dbusadr=org.mpris.MediaPlayer2.omxplayer" (you do not have to use it in your commands). If you want to use your own, you must use this name and add something to it, e.g. "dbusadr=org.mpris.MediaPlayer2.omxplayer1". You must also add it to the omxoptions like this, when starting the video: --dbus_name;org.mpris.MediaPlayer2.omxplayer1
To use the command interface, we should add a second invisible iframe to our web page:<iframe src="empty.html" width="0" height="0" name="command"></iframe>
An empty HTML page named “empty.html” must be available on your server.
38

Now we can control the web video using buttons, forms or sliders. Here's a simple example of a Play/Pause button:<a href="http://localhost:9192/omxcmd?cmd=pause" target="command""><button>Play / Pause</button></a>
Supported Commands:
Commands not requiring a value: 'position', 'canseek', 'duration', 'aspect', 'pause', 'stop', 'hidevideo', 'unhidevideo', 'volumeup', 'volumedown', 'togglesubtitles', 'hidesubtitles', 'showsubtitles'
Commands requiring a (single) value: 'volume': 0 ... 1.5 (floating point) 'seek': relative jump forward or backward (negativ) in microseconds. 'setposition': go to position (in microseconds) 'setalpha': transparency 0-255
Commands requiring 4 values, which must be send as value=v1,v2,v3,v4 'setvideopos': set display area, value=x1,y1,x2,y2 'setvideocroppos': set crop area, value=x1,y1,x2,y2
There's one more special command, which is not a dbus command at all, but is translatedinto a a setpos command after checking the duration: 'moveto' followed by a percentage value between 0 and 99.9, e. g. /omxcmd?cmd=moveto&value=50
(move to the middle of the video).
Each command returns something in text/plain format. Usually you will hide that from the user (invisible iframe), but you can use the results in Javascript AJAX calls.If no omxplayer instance is running, "no player" is returned. If executing the command returns an error, 'error' is sent as result. If the command doesn't return a value, "ok"is sent back, otherwise the return value of the command, e .g. 'duration' will return the duration of the video in microseconds.
Here are two more examples creating sliders for volume control and video position. This requires a little bit of Javascript:<script type="text/javascript"> function setvol(val) { document.getElementsByName("command")[0].src = "http://localhost:9192/omxcmd?cmd=volume&value="+val; } function moveto(val){ document.getElementsByName("command")[0].src = "http://localhost:9192/omxcmd?cmd=moveto&value="+val; } </script>
The slider code looks like this:Vol: <input type="range" min="0.0" max="1.5" value="1" step="0.125" onchange="setvol(this.value)">Pos: <input type="range" min="0" max="99" value="0" step ="0.2" onchange="moveto(this.value)">
39

Note: All the methods described in chapter 8 c) to 8 e) can be combined together in one web page and should work with any browser, not just kweb.
I have created a small test page that shows all methods in action. Select the “overlay” preset, start the youtube-dl-server and go to http:steinerdatenbank.de/software/vtest.html (enable Javascript in kweb).
You can also download the example package (web page and playlists) from http:steinerdatenbank.de/software/overlayexamples.zip
This should give you enough ideas how to implement these features into your own application.
40

Appendix A: Keyboard commands
Special omxplayerGUI Keyboard Controls
Key Mode Action
ALT c, q any quit player
ALT k playing kill omxplayer instance, when blocking
ALT m any toggle window between max and min
ALT f any toggle window between full and max
ALT 0 any window min size
ALT 1...9 any other window sizes
ALT s playlist save playlist
ALT u playlist toggle between simple (f) and extended mode
ALT h any hide / show controls
ALT a any set “Mode:” (aspect ratio) to “auto”
ALT r anyToggle get_DAR and reload video information if video is running.
ALT KP+, PgUp playlist layer number + 1
ALT KP-, PgDown playlist layer number - 1
ALT + any next Mode: (aspect ratio)
ALT - any previous Mode: (aspect ratio)
41

omxplayerGUI Keyboard Controls (Play Mode)
omxplayerGUI uses almost the same keyboards commands as omxplayeromxplayer GUI Action
1 1 decrease speed
2 2 increase speed
< < rewind
> > fast forward
z z show info
j j previous audio stream
k k next audio stream
i i previous chapter
o o next chapter
n n previous subtitle stream
m m next subtitle stream
s s toggle subtitles
d d decrease subtitle delay (- 250 ms)
f f increase subtitle delay (+ 250 ms)
q q, Esc exit omxplayer
p, space p, space, Return, Enter pause/resume
- -, KP- decrease volume
+, = +, KP+ increase volume
left arrow left arrow seek -30 seconds
right arrow right arrow seek +30 seconds
down arrow PgDown, “,” seek -600 seconds
up arrow PgUp, . seek +600 seconds
up arrow previous playlist item
down arrow next playlist item
42

Appendix B: Additional Codecs
Omxplayer can only play video supported by the GPU hardware. On a default system thisincludes H263, H264 and MP4 codecs.
An extended version of the Raspberry Pi firmware supports more codecs, which run as software on the GPU: MJPEG, OGV, VP6, VP8To enable these codecs, you have to addstart_x=1
to /boot/config.txt
To use omxplayer(GUI) with MPEG2 encoded video (DVD, most SD TV streams) or with typical Windows video formats, you have buy and enable the additional codec licences from the Raspberry Pi Foundation (MPEG2 and VC1).
With all these codecs enabled, omxplayerGUI will play almost any kind of video file or stream.
The new H265 codec format is not supported.
43

Appendix C: About Youtube-DL
omxplayerGUI uses youtube-dl to fetch the video URL (and it's title) from a web page containing the video. Youtube-dl is a great hacking tool written in Python and available for every platform. In the beginning it could be used to download videos from youtube.com (hence its name). Meanwhile it supports more than 600 video websites ( a full list of supported sites: http://rg3.github.io/youtube-dl/supportedsites.html ).
omxplayerGUI doesn't download anything. It just uses youtube-dl to get the video URL and plays the video from the online stream, similar to a web browser.
The video websites are changing all the time and youtube-dl has to adapt to these changes. It will only continue to work if you update it from time to time. Therefore the version from the Raspbian repository is completely useless because it cannot update itself and will receive no updates from the Debian maintainers. If you have installed it for some reason, the first thing you should do is to remove it immediately (using “sudo dpkg -r youtube-dl”). There are three different methods to install a working version of youtube-dl:
1) Download the compressed versionyoutube-dl is distributed as compressed version which contains all its (600+) modules in text form and will work on any platform (if Python is installed). It can update itself (“sudo youtube-dl -U”). Using it on the Raspberry Pi is not recommended for two reasons:It's very slow to start (unpacking and converting its 600+ modules takes a lot of time) andthe youtube-dl-server (described in the next chapter) will not work with it.If you prefer to use it, copy it to /usr/bin (not to /usr/local/bin as described on the download page), because that might break other installations. Download page:http://rg3.github.io/youtube-dl/download.html
2) Installing the Python module package version using pip
Runningsudo pip install youtube-dl
will install youtube-dl as a Python module package and create a start script in /usr/local/bin for command line use. To update it, runsudo pip install --upgrade youtube-dl
from time to time.
This versions starts almost twice as fast as the compressed version (because of pre-compiled .pyc modules) and can also be used to run the youtube-dl-server.
Note: On Raspbian Jessie pip is currently completely broken and so this method doesn't work any more. It will work again on Raspbian Stretch and then will become the recommended method.
44

3) Installing from github
This is the preferred method for omxplayerGUI and will install the bleeding edge version. During installation of the kweb package, you will be asked if you want to install this version. If you missed that, run kweb, go to “Applications” and click “Install (git)”. To update it, click the button “Update (git)“.youtube-dl will be installed into a directory in the root of your user directory and a symbolic link will be created in /usr/bin for command line use.
This versions starts almost twice as fast as the compressed version (because of pre-compiled .pyc modules) and can also be used to run the youtube-dl-server.
Note: The github version and the Python module version can coexist in a friendly way. omxplayerGUI will prefer the github version. Command line use will prefer the Python module version.
45

Appendix D: List of Youtube-DL-Server Commands
By default the youtube-dl-server runs on port 9192 and can be called with:http://localhost:9192/
The following commands are supported:
'/', '/index', 'index.html':
Shows a simple web page where you can enter a video web page address or a file path orstream URL (in the second form) and play the video with omxplayerGUI. If you have added player directories to your settings it will show a navigation bar on top.
/run
Returns “ok” as text/plain
/stop
displays a short message and stops the server
/stopall
kills all running omxplayer.bin and omxplayerGUI instances and returns “OK” as text/plain.
/info?url=URL
URL must point to a video website. Returns the title of the video (if available) and its URL,separated by a newline character as text/plain. If the URL points to a youtube channel, playlist or search result, multiple titles and video URLs are returned.
/redir?url=URL
URL must point to a video website. Returns a redirect (302) message pointing to the web video stream. This can be used to play web video with the video player built into browsers.
/play?url=URL&omxoptions=
URL must point to a video website. 'omxoptions' is optional and may contain any numberof omxplayer options and arguments separated by a ';' and one additional command = 'stop'. This plays the web video from the website given by URL in omxplayerGUI. 'omxoptions' are only used in overlay mode. Returns a simple web page containing “Playing: ...” and a ”Go Back” button as text/html. In remote control mode this page includes buttons and sliders to control the video.
/dplay?url=URL&omxoptions=
URL must directly point to a video URL (e. g. http://myserver/video.mp4). 'omxoptions' is optional and may contain any number of omxplayer options and arguments separated by a ';' and one additional command = 'stop'. This plays the web video from URL in omxplayerGUI. 'omxoptions' are only used in overlay mode. Returns a simple web page containing “Playing: ...” and a ”Go Back” button as text/html. In remote control mode this page includes buttons and sliders to control the video.
46

/omxcmd?cmd=...&value=...&dbusadr =...
'value' and 'dbusadr' are optional. Sends a dbus command to omxplayer (if it is running). Returns a short message as text/plain. For a full list of possible commands and return values see chapter 9 e).'/empty' or '/empty.html'
returns a very simple empty web page as text/html, which can be used as default “src” attribute of a hidden iframe.
/control
Returns the “Playing” page with “Media Control” instead of “Playing: ….”. This is used by the remote player interface to access the media control elements at any time.
Note: The next two commands require a PATH argument that has to be built in a special way. It may not start with a “/” and the first part must be a name defined in“player_directories”, optionally followed by sub-directories (divided by slashes). This prevents the player interface from accessing files or directories outside of the defined media paths.
/dir?path=
followed by a PATH argument constructed as explained above. Returns a directory page as text/html showing sub-directories, media files and playlists and a navigation bar on top.
/playlist?path=PATH&mode=MODE&name=pl.m3u
The PATH argument must be constructed as explained above.“MODE” my be one of the following:o = ordered, files from the current path onlys = shuffled, files from the current path onlyor = ordered, files from the current path and any sub-directorysr = shuffled, files from the current path and any sub-directoryIf “&mode=...” is missing, mode “o” is used.“&name=pl.m3u” is optional and used by the internal system. Don't use any other “name”argument.Returns an m3u playlist (if any media files are found) as audio/x-mpegurl.
47

Appendix E: Known Problems
If started with hidden controls and the controls are enabled later on, switching between video aspects may not work if the window is manually resized to the smallest possible size (which is too small in this case). Select the 'min' value from the “Lines:” menu in this case.
48


