130
10.1 inch Display GET STARTED Radio Instruction Manual
P68499605AA Second Edition
©2020 FCA US LLC. All Rights Reserved.Chrysler, Dodge, Jeep, Ram, Mopar and Uconnect are trademarks of FCA US LLC.FIAT is a registered trademark of FCA Group Marketing S.p.A., used under license by FCA US LLC. App Store is a registered trademark of Apple Inc. Google Play Store is a registered trademark of Google.
10.1 inch Display
GET STARTED
Radio Instruction Manual

TABLE OF CONTENTS
1
2
3
4
5
6
7
1 UCONNECT INTRODUCTION ................................................................................................... 5
2 UCONNECT MODES ...................................................................................................................22
3 ANDROID AUTO™ & APPLE CARPLAY® ......................................................................... 64
4 NAVIGATION MODE — IF EQUIPPED ..................................................................................71
5 CONNECTED SERVICES ........................................................................................................ 93
6 CONNECTED SERVICES FAQS ........................................................................................... 118
7 INDEX.............................................................................................................................................. 124
21_00_U5_EN_USC_t.book Page 1

2
UCONNECT INTRODUCTIONUCONNECT 5/5 NAV WITH 10.1-INCH DISPLAY ..................................................................5CUSTOMIZABLE MENU BARS................................7
Upper Status Bar ........................................... 7Bottom Menu Bar .......................................... 8
PROFILES...............................................................10Creating A New Profile.................................11Selecting Between Profiles ......................... 11Editing And Deleting A Profile .....................12Valet Mode ................................................... 13
NOTIFICATIONS.....................................................14SAFETY AND GENERAL INFORMATION ............16
Assist Call — If Equipped ............................ 16SOS Call — If Equipped ................................ 16
SECURITY FEATURES ..........................................19Safety Guidelines......................................... 19Cybersecurity ...............................................19Safe Usage Of The Uconnect System......... 20Care And Maintenance................................ 20General Information .................................... 21
UCONNECT MODESSTEERING WHEEL AUDIO CONTROLS ..............22
Radio Operation........................................... 22Media Mode ................................................. 22
HOME SCREEN......................................................23Home Screen Operation.............................. 23Widgets......................................................... 24
MEDIA MODE ....................................................... 26Introduction.................................................. 26Media Mode Controls .................................. 27HD Radio™ — If Equipped ........................... 29SiriusXM® Satellite Radio Mode — If Equipped .................................... 32Saving Presets To A Driver Memory Profile — If Equipped.................................... 37Setting Presets............................................. 38Audio Source Selection ............................... 39Connected Device Source Modes ............. 39Audio Settings ............................................. 41
PHONE MODE ...................................................... 43Overview....................................................... 43Device Manager And Phone Setup............. 45Keypad ......................................................... 50Recent ......................................................... 51Adding A Favorite......................................... 51Contacts (Automatic Phonebook Transfer From Mobile Phone) ................................... 52Messages ..................................................... 52Phone Operation.......................................... 53Things You Should Know About Uconnect Phone .......................................... 56
VEHICLE MODE..................................................... 58Operating Vehicle Mode.............................. 58
APPS MODE (APPS DRAWER) ........................... 59Operating Apps Mode.................................. 59Setting A Favorite App ................................. 60Amazon Alexa Built-In.................................. 60App Updates................................................. 63
ANDROID AUTO™ & APPLE CARPLAY®ANDROID AUTO™ ................................................64
Maps............................................................. 65Music............................................................ 66Communication ........................................... 66Apps.............................................................. 66Android Auto™ Voice Command ................ 66
APPLE CARPLAY® ...............................................67Phone ........................................................... 68Music............................................................ 68Messages..................................................... 68Maps............................................................. 68Apps.............................................................. 69Apple CarPlay® Voice Command .............. 69
ANDROID AUTO™ AND APPLE CARPLAY® TIPS AND TRICKS .................................................69
NAVIGATION MODE — IF EQUIPPEDOPERATING NAVIGATION MODE — IF EQUIPPED..........................................................71
TomTom® Navigation Main Menu ............. 71Planning A Route ......................................... 73Ending A Route ............................................ 76Changing Your Route................................... 76Options Menu .............................................. 77Navigation Cluster Display — If Equipped .. 81
21_00_U5_EN_USC_t.book Page 2

3
POINTS OF INTEREST...........................................81About Points Of Interest .............................. 81Using POIs To Plan A Route......................... 81Finding Specific POIs ................................... 82
VOICE COMMANDS — IF EQUIPPED ...................83About Voice Command ................................ 83Using Voice Control...................................... 83
GUIDANCE VIEW ...................................................84About Guidance View................................... 84
ADVANCED LANE GUIDANCE ..............................85About Lane Guidance ..................................85Using Lane Guidance ..................................85
MAP VIEW..............................................................85About Map View ........................................... 85
DYNAMIC RANGE MAPPING ...............................86FAVORITES.............................................................87
About Favorites ............................................ 87Using Favorites ............................................ 87Adding A Location To Favorites................... 88Deleting A Location From Favorites............ 89
SETTINGS ...............................................................89Show ............................................................. 89Map View...................................................... 90Routing ......................................................... 90Sounds & Alerts ........................................... 90Other ............................................................. 92
COPYRIGHT NOTICES ...........................................92
CONNECTED SERVICES INTRODUCTION TO CONNECTED SERVICES .... 93
What Is SiriusXM Guardian™?.................... 93Activation ..................................................... 94Included Trial Period For New Vehicles...... 94Features And Packages .............................. 94SiriusXM Guardian™ Contact Information And Business Hours .................................... 94
GETTING STARTED WITH CONNECTED VEHICLE SERVICES ............................................. 95
Download The Uconnect App...................... 95Using Your Owner’s Site .............................. 96
USING SIRIUSXM GUARDIAN™ ......................... 97SOS Call ....................................................... 97Automatic SOS — If Equipped ...................101Remote Commands...................................102Remote Door Lock/Unlock .......................103Remote Vehicle Start ................................104Remote Horn & Lights ..............................105Roadside Assistance Call .........................105Send & Go .................................................106Vehicle Finder ...........................................1074G Wi-Fi Hotspot — If Equipped ...............109
Stolen Vehicle Assistance ........................110Monthly Vehicle Health Report ................110Vehicle Health Alert ..................................111In-Vehicle Notifications — If Equipped .....111Amazon Alexa Skill — If Equipped.............111Google Assistant — If Equipped ................112Family Drive Alerts — If Equipped ............113SmartWatch Integration — If Equipped ...113Uconnect Market .......................................113
MANAGE MY SIRIUSXM GUARDIAN™ ACCOUNT ............................................................ 114
How To Manage My SiriusXM Guardian™ Account .....................................................114
SOFTWARE UPDATES ....................................... 114USB Updates..............................................114Software Over the Air Updates .................115Wi-Fi Updates.............................................116
MODULE UPDATES ............................................ 117Module Over the Air Updates....................117
21_00_U5_EN_USC_t.book Page 3

4
CONNECTED SERVICES FAQs CONNECTED SERVICES SOS FAQS ................. 118CONNECTED SERVICES REMOTE DOOR LOCK/UNLOCK FAQS ....................................... 118CONNECTED SERVICES ROADSIDE ASSISTANCE FAQS ........................................... 119CONNECTED SERVICES SEND & GO FAQS .... 119CONNECTED SERVICES VEHICLE FINDER FAQS ................................................................... 119
CONNECTED SERVICES STOLEN VEHICLE ASSISTANCE FAQS ............................................119CONNECTED SERVICES REMOTE VEHICLE START FAQS .......................................................120CONNECTED SERVICES REMOTE HORN & LIGHTS FAQS.......................................120CONNECTED SERVICES ACCOUNT FAQS ........121DATA COLLECTION & PRIVACY ........................123
21_00_U5_EN_USC_t.book Page 4

5
UCONNECT INTRODUCTION
UCONNECT 5/5 NAV WITH 10.1-INCH DISPLAY
Uconnect 5/5 NAV With 10.1-inch Display
1 — Home Button 5 — Phone Button2 — Radio/Media Button 6 — Vehicle Button3 — Climate Button 7 — Apps Button4 — Navigation Button (If Equipped)
1
21_00_U5_EN_USC_t.book Page 5

6 UCONNECT INTRODUCTION
NOTE: Uconnect screen images are for illustration purposes only and may not reflect exact software for your vehicle.
If the Uconnect system is not responding properly, push down the power button on the instrument panel for 10 seconds to reset the system. The ignition does not have to be OFF to perform this task.
Feature Description
HomePress the Home button on the touchscreen to access the radio Home Screen. This screen will allow the user to set shortcuts and widgets for easy access for their favorite radio features. This screen can change depending on the selected profile.
Media Press the Media button to enter Media Mode and access the radio functions and external audio sources Ú page 26.
Phone Press the Phone button to enter Phone Mode and access the hands-free phone system Ú page 43.
VehiclePress the Vehicle button on the touchscreen to access specific vehicle features as well as vehicle settings.Refer to “Uconnect Settings” in “Multimedia” in the Owner’s Manual for further information.
Enter/Browse & Tune/Scroll Push the Enter/Browse button to accept a highlighted selection on the screen. Rotate the Tune/Scroll rotary knob to scroll through a list or tune a radio station.
Screen Off Push the Screen Off button to turn the screen on or off.Mute Push the Mute button to turn the audio of the radio system off. Push it again to turn the audio back on.
Volume And On/Off Rotate the rotary knob to adjust the volume. Push the Volume And On/Off button to turn the system on or off.Back Push the Back button to return to a previous menu or screen.
Apps Press the Apps button on the touchscreen to view the favorites, recently used, and all available apps downloaded to the system.
21_00_U5_EN_USC_t.book Page 6

UCONNECT INTRODUCTION 7
CUSTOMIZABLE MENU BARSThe radio system is equipped with a customizable Upper Status Bar and the Bottom Menu Bar.
UPPER STATUS BAR
Upper Status Bar
The Upper Status Bar contains customizable shortcuts to several radio system features. To select a shortcut in the Upper Status Bar, follow the steps below:
1. Swipe downwards from the top of the touchscreen. A list of available shortcuts will display.
2. Press and hold on the desired shortcut.
3. Drag the shortcut to one of the available shortcut boxes. If there was a previous shortcut occupying the box, it will be replaced by the new shortcut.
Changing The Upper Status Bar
The driver and passenger climate control shortcuts can be selected to display a temperature slider, controls for heated or vented seats, and the heated steering wheel. Press the climate control shortcut; a drop down will display the available options. The driver and passenger temperature sliders can be set independently of each other.
ClimatePress the Climate button to enter Climate Mode and access the climate control functions.Refer to “Climate Controls” in “Getting To Know Your Vehicle” in the Owner’s Manual for further information.
Nav (Navigation) — If Equipped Press the Nav button to enter Navigation Mode and use the system’s built-in Navigation software Ú page 71.
Feature Description
1
21_00_U5_EN_USC_t.book Page 7

8 UCONNECT INTRODUCTION
BOTTOM MENU BAR
The Bottom Menu Bar contains the menu icons for the radio system. These icons can be rearranged to the user’s preference. To editthe Bottom Menu Bar, follow these steps:
Bottom Menu Bar
1. Press and hold, and then drag the selected icon to the desired location in the Bottom Menu Bar.
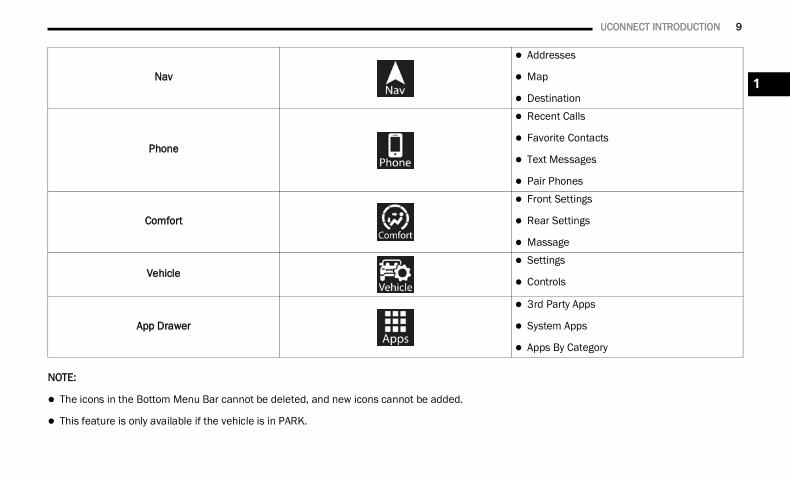
2. Release the selected icon. It will now occupy the new location. Each icon will navigate you to different customizable features, settings, and more:
Home Widgets
Pages
Media
Sources, Now Playing
Audio Settings
Rear Seat Entertainment (if equipped)
21_00_U5_EN_USC_t.book Page 8
UCONNECT INTRODUCTION 9
NOTE:
The icons in the Bottom Menu Bar cannot be deleted, and new icons cannot be added.
This feature is only available if the vehicle is in PARK.
Nav
Addresses
Map
Destination
Phone
Recent Calls
Favorite Contacts
Text Messages
Pair Phones
Comfort
Front Settings
Rear Settings
Massage
Vehicle Settings
Controls
App Drawer
3rd Party Apps
System Apps
Apps By Category
1
21_00_U5_EN_USC_t.book Page 9

10 UCONNECT INTRODUCTION
PROFILESThe Uconnect 5 radio system can create upto five User Profiles. These profiles will save user-specific settings and presets. You can swap between Profiles through the Profile menu. By pressing the “i” button in the profile creation menu, the user can review what features are saved to a profile.
Profile Menu
The saved features are:
Screen Layout
Home Screen Customization
Menu Bar Order
Status Bar Customization
Apps
App Drawer Favorites
Recent Apps
Media
Your Mixed Presets
Last Played Media Source
Navigation
Favorite And Recent Destinations
Predictive Navigation
Bluetooth®
Favorite Devices
Notification
Notification Settings
Saved Settings Through Profiles
21_00_U5_EN_USC_t.book Page 10
UCONNECT INTRODUCTION 11
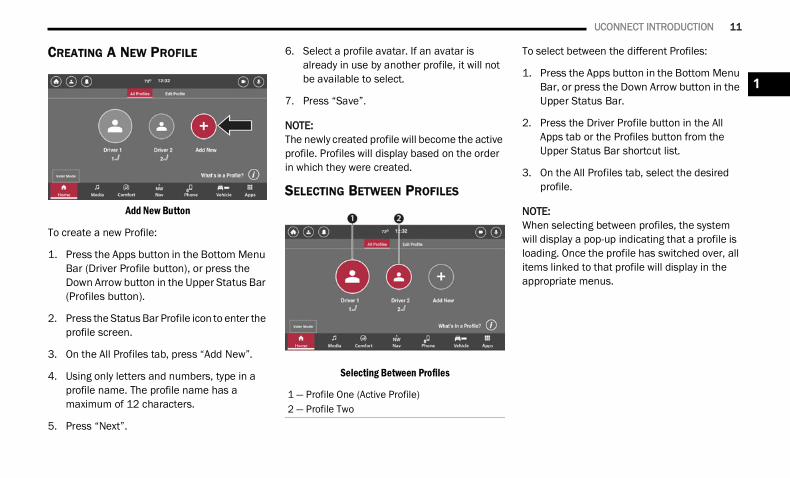
CREATING A NEW PROFILE
Add New Button
To create a new Profile:
1. Press the Apps button in the Bottom Menu Bar (Driver Profile button), or press the Down Arrow button in the Upper Status Bar (Profiles button).
2. Press the Status Bar Profile icon to enter the profile screen.
3. On the All Profiles tab, press “Add New”.
4. Using only letters and numbers, type in a profile name. The profile name has a maximum of 12 characters.
5. Press “Next”.
6. Select a profile avatar. If an avatar is already in use by another profile, it will not be available to select.
7. Press “Save”.
NOTE:The newly created profile will become the active profile. Profiles will display based on the order in which they were created.
SELECTING BETWEEN PROFILES
Selecting Between Profiles
To select between the different Profiles:
1. Press the Apps button in the Bottom Menu Bar, or press the Down Arrow button in the Upper Status Bar.
2. Press the Driver Profile button in the All Apps tab or the Profiles button from the Upper Status Bar shortcut list.
3. On the All Profiles tab, select the desired profile.
NOTE:When selecting between profiles, the system will display a pop-up indicating that a profile is loading. Once the profile has switched over, all items linked to that profile will display in the appropriate menus.
1 — Profile One (Active Profile)2 — Profile Two
1
21_00_U5_EN_USC_t.book Page 11

12 UCONNECT INTRODUCTION
EDITING AND DELETING A PROFILE
After a Profile is created, you can edit a profile by following these steps:
1. Press the Apps button in the Bottom Menu Bar, or press the Down Arrow button in the Upper Status Bar.
2. Press the Driver Profile button in the All Apps tab or the Profiles button from the Upper Status Bar shortcut list.
3. On the All Profiles tab, select the desired Profile if it is not already active.
4. Once the desired Profile has loaded, or if it was already selected, press the Edit Profile tab. A list of available settings will display.
5. Press the desired setting to adjust it. Some settings will display pop-ups or redirect to another menu.
Edit Profile
The list of settings is:
Setting Name DescriptionEdit Name Change the active Profile’s name.
Change Avatar Change the active Profile’s avatar.Welcome Pop-up Change the display or size of the “welcome” pop-up after the Profile has loaded.
Delete Profile Remove the active Profile from the system.What Is Linked To My Profile? View a list of settings and features that will save to the active Profile.
More Settings Access additional Profile settings, located within the vehicle’s setting tab. For more information on Uconnect Settings, refer to “Uconnect Settings” in “Multimedia” in the Owner’s Manual.
21_00_U5_EN_USC_t.book Page 12
UCONNECT INTRODUCTION 13
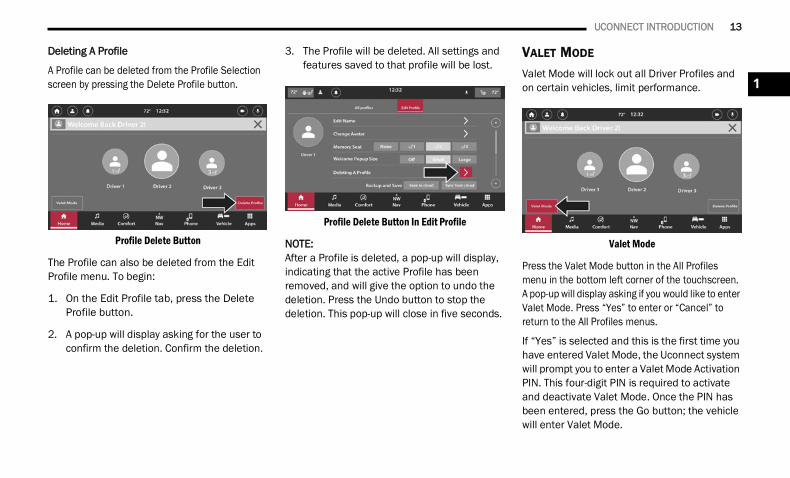
Deleting A Profile
A Profile can be deleted from the Profile Selection screen by pressing the Delete Profile button.
Profile Delete Button
The Profile can also be deleted from the Edit Profile menu. To begin:
1. On the Edit Profile tab, press the Delete Profile button.
2. A pop-up will display asking for the user to confirm the deletion. Confirm the deletion.
3. The Profile will be deleted. All settings and features saved to that profile will be lost.
Profile Delete Button In Edit Profile
NOTE:After a Profile is deleted, a pop-up will display, indicating that the active Profile has been removed, and will give the option to undo the deletion. Press the Undo button to stop the deletion. This pop-up will close in five seconds.
VALET MODE
Valet Mode will lock out all Driver Profiles and on certain vehicles, limit performance.
Valet Mode
Press the Valet Mode button in the All Profiles menu in the bottom left corner of the touchscreen. A pop-up will display asking if you would like to enter Valet Mode. Press “Yes” to enter or “Cancel” to return to the All Profiles menus.
If “Yes” is selected and this is the first time you have entered Valet Mode, the Uconnect system will prompt you to enter a Valet Mode Activation PIN. This four-digit PIN is required to activate and deactivate Valet Mode. Once the PIN has been entered, press the Go button; the vehicle will enter Valet Mode.
1
21_00_U5_EN_USC_t.book Page 13
14 UCONNECT INTRODUCTION
A “locked” symbol will appear over the Driver Profile icon in the Upper Status Bar.
Exiting Valet Mode
Exit Valet Mode
When the vehicle is started or was previously placed in Valet Mode, a pop-up will display that the vehicle is in Valet Mode. Select “Yes” to deactivate valet mode. Alternatively, press the Locked Profile icon in the Upper Status Bar to exit Valet Mode.
Enter your four-digit Valet Mode PIN and press “Go”. Valet Mode will be deactivated. The Uconnect system will load the last active profile before the vehicle was placed in Valet Mode.
Valet Mode PIN
NOTE:
Valet Mode cannot be activated or deacti-vated while the vehicle is in motion.
For activation and deactivation, you will have 10 attempts to enter your four-digit PIN. After 10 attempts, the Uconnect system will cancel activation/deactivation, and it will not be available for 30 minutes.
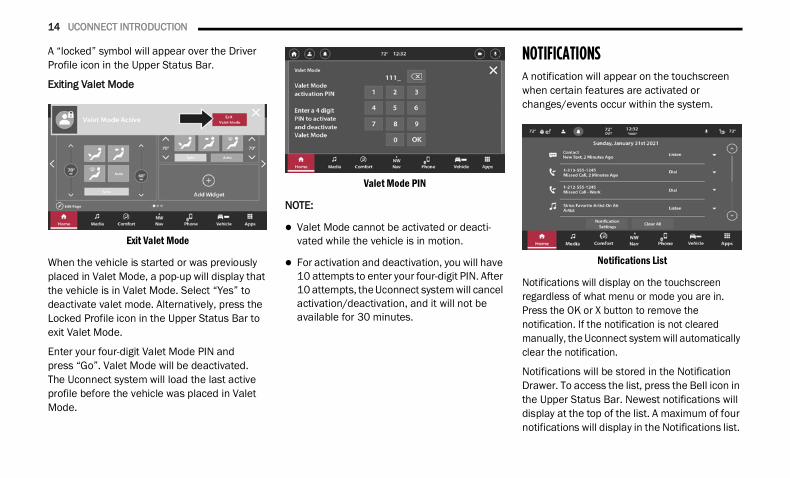
NOTIFICATIONSA notification will appear on the touchscreen when certain features are activated or changes/events occur within the system.
Notifications List
Notifications will display on the touchscreen regardless of what menu or mode you are in. Press the OK or X button to remove the notification. If the notification is not cleared manually, the Uconnect system will automatically clear the notification.
Notifications will be stored in the Notification Drawer. To access the list, press the Bell icon in the Upper Status Bar. Newest notifications will display at the top of the list. A maximum of four notifications will display in the Notifications list.
21_00_U5_EN_USC_t.book Page 14

UCONNECT INTRODUCTION 15
If more than four are present, press the Up or Down Arrow button to scroll through the list.
Notification Bell
NOTE:When the vehicle is in motion, you will be unable to scroll through this menu.
Toast Notifications
A “toast” is a small message that shows up in its own box near the top of the screen, and disappears on its own after a few seconds.
Pop-Ups
A window appears with buttons you can click or a list of options to choose from. Dismiss it by pressing “X”.
Pressing on a notification will redirect you to the applicable mode or app.
Press the Delete button to remove the notification; you can also swipe right or left to remove the notification. Press the Don’t Show Again button to prevent this type of notification from showing in the future.
Deleting A Notification
Press the Clear All button to remove all the notifications. On vehicle shut off and then start, all Notifications will be cleared.
You can adjust the Notification settings to set which type of notifications you will receive. Press the Notifications Settings button while viewing the Notifications list, or through the Settings tab in Vehicle Mode, select the Notifications setting menu.
The following Notifications can be deactivated/activated through the Uconnect system:
Predictive Navigation Notifications
New Text Message
Missed Calls
App Drawer Favoriting Pop-ups
App Drawer Unfavoriting Pop-ups
1
21_00_U5_EN_USC_t.book Page 15

16 UCONNECT INTRODUCTION
SAFETY AND GENERAL INFORMATION ASSIST CALL — IF EQUIPPED If your vehicle is equipped with this feature and you are within cellular range, and you have an active subscription, you may be able to connect to the following:
Roadside Assistance Call
SiriusXM Guardian™ Customer Care
Uconnect Care
Vehicle Care by pushing the ASSIST button.
NOTE:Roadside Assistance and SOS require an activate and account set-up with SiriusXM Guardian™.
To the extent any such calls incur additional costs, you are responsible for them. For example, if towing services are needed, a charge may incur depending on your vehicle’s warranty or the coverage of your insurance carrier. If Roadside Assistance is provided to your vehicle, you agree to be responsible for any additional roadside assistance service costs that you may incur.
SiriusXM Guardian™ may record and monitor your conversations with Roadside Assistance Call, SiriusXM Guardian™ Customer Care, Uconnect Care or Vehicle Care, whether such conversations are initiated through the SiriusXM Guardian™ services connected services
in your vehicle, or via a landline or mobile telephone, and may share information obtained through such recording and monitoring in accordance with regulatory requirements. You acknowledge, agree and consent to any recording, monitoring or sharing of information obtained through any such call recordings.
SOS CALL — IF EQUIPPED
The SOS Call system is an embedded phone system that allows you to connect to an agent in an emergency. You can choose to press the SOS Call button on the Rearview Mirror or Overhead Console to contact an agent.
SOS Call Operating Instructions
1. Push the SOS Call button on the Rearview Mirror or Overhead Console.
NOTE:In case the SOS Call button is pushed in error, there will be a 10-second delay before the SOS Call system initiates a call to an Emergency Services Agent. To cancel the SOS Call connec-tion, push the SOS Call button on the Rearview Mirror or Overhead Console or press the Cancel-lation button on the Phone Screen. Termination of the SOS Call will turn the green LED light on the Rearview Mirror or Overhead Console off.
2. The LED light on the Rearview Mirror or Overhead Console will turn green once a connection to an Emergency Services Agent has been made.
21_00_U5_EN_USC_t.book Page 16

UCONNECT INTRODUCTION 17
3. Once a connection between the vehicle and an Emergency Services Agent is made, the SOS Call system may transmit the following important vehicle information to a Emergency Services Agent:
Indication that the occupant placed an SOS Call.
The vehicle brand.
The last known GPS coordinates of the vehicle “if equipped”.
4. You should be able to speak with the Emergency Services Agent through the vehicle audio system to determine if additional help is needed.
NOTE:
Your vehicle may be transmitting data as authorized by the subscriber.
Once a connection is made between the vehicle’s SOS Call system and the Emer-gency Services Agent, the agent may be able to open a voice connection with the vehicle to determine if additional help is needed. Once the agent opens a voice connection with the vehicle’s SOS Call system, the operator should be able to speak with you or other vehicle occu-pants and hear sounds occurring in the vehicle. The vehicle’s SOS Call system will attempt to remain connected with the agent until the agent terminates the connection.
5. The Emergency Services Agent may attempt to contact appropriate emergency responders and provide them with important vehicle information and GPS coordinates.
WARNING!ALWAYS obey traffic laws and pay attention to the road. ALWAYS drive safely with your hands on the steering wheel. You have full responsibility and assume all risks related to the use of the features and applications in this vehicle. Only use the features and applications when it is safe to do so. Failure to do so may result in an accident involving serious injury or death.
WARNING! If anyone in the vehicle could be in danger
(e.g., fire or smoke is visible, dangerous road conditions or location), do not wait for voice contact from an Emergency Services Agent. All occupants should exit the vehicle immediately and move to a safe location.
Never place anything on or near the vehicle’s operable network and GPS antennas. You could prevent operable network and GPS signal reception, which can prevent your vehicle from placing an emergency call. An operable network and GPS signal reception is required for the SOS Call system to function properly.
1
21_00_U5_EN_USC_t.book Page 17

18 UCONNECT INTRODUCTION
(Continued)
SOS Call System LimitationsIf the SOS Call system detects a malfunction, any of the following may occur at the time the malfunction is detected, and at the beginning of each ignition cycle:
The Rearview Mirror light will continuously be illuminated red.
The Phone Screen on the radio will display the following message “Vehicle phone requires service. Please contact your dealer.”
An In-Vehicle Audio message will state “Vehicle phone requires service. Please contact your dealer.”
Even if the SOS Call system is fully functional, factors beyond FCA US LLC’s control may prevent or stop SOS Call system operation. These include, but are not limited to, the following factors:
The ignition key is in OFF position.
The vehicle’s electrical systems are not intact.
The SOS Call system software and/or hard-ware are damaged during a crash.
The vehicle battery loses power or becomes disconnected during a vehicle crash.
LTE (voice/data) or 3G or 4G (data) coverage and/or Global Positioning Satellite signals are unavailable or obstructed.
WARNING! The SOS Call system is embedded into the
vehicle’s electrical system. Do not add after-market electrical equipment to the vehicle’s electrical system. This may prevent your vehicle from sending a signal to initiate an emergency call. To avoid interference that can cause the SOS Call system to fail, never add aftermarket equipment (e.g., two-way mobile radio, CB radio, data recorder, etc.) to your vehicle’s elec-trical system or modify the antennas on your vehicle. IF YOUR VEHICLE LOSES BATTERY POWER FOR ANY REASON (INCLUDING DURING OR AFTER AN ACCIDENT), THE UCONNECT FEATURES, APPS AND SERVICES, AMONG OTHERS, WILL NOT OPERATE.
Modifications to any part of the SOS Call system could cause the air bag system to fail when you need it. You could be injured if the air bag system is not there to help protect you.
WARNING! Ignoring the Rearview Mirror light could
mean you will not have SOS Call services.If the Rearview Mirror light is illuminated, have an authorized dealer service the SOS Call system immediately.
The Occupant Restraint Control module turns on the air bag Warning Light on the instrument panel if a malfunction in any part of the system is detected. If the Air Bag Warning Light is illuminated, have an authorized dealer service the Occupant Restraint Control system immediately.
WARNING! (Continued)
21_00_U5_EN_USC_t.book Page 18

UCONNECT INTRODUCTION 19
Network congestion.
Weather conditions.
NOTE:
Your vehicle may be transmitting data as authorized by the subscriber.
Never place anything on or near the vehicle’s or GPS antennas. You could prevent a GPS signal reception, which can prevent your vehicle from placing an emergency call. An operable network connection and a GPS signal is required for the SOS Call system to function properly.
SECURITY FEATURES SAFETY GUIDELINES
Please read and follow these safety precautions. Failure to do so may result in injury or property damage.
Do NOT attach any object to the touchscreen. Doing so can result in damage to the touchscreen.
Glance at the screen only when safe to do so. If prolonged viewing of the screen is required, park in a safe location.
Stop use immediately if a problem occurs. Failure to do so may cause injury or damage to the product. Return it to an authorized dealer for repair.
Ensure the volume level of the system is set to a level that still allows you to hear outside traffic and emergency vehicles.
CYBERSECURITY Your vehicle may be a connected vehicle and may be equipped with both wired and wireless networks. These networks allow your vehicle to send and receive information. This information allows systems and features in your vehicle to function properly.
Your vehicle may be equipped with certain security features to reduce the risk of unauthorized and unlawful access to vehicle systems and wireless communications. Vehicle software technology continues to evolve over time and FCA US LLC, working with its suppliers, evaluates and takes appropriate steps as needed. Similar to a computer or other devices, your vehicle may require software updates to improve the usability and performance of your systems or to reduce the potential risk of unauthorized and unlawful access to your vehicle systems.
The risk of unauthorized and unlawful access to your vehicle systems may still exist, even if the most recent version of vehicle software (such as Uconnect software) is installed.
WARNING!ALWAYS obey traffic laws and pay attention to the road. ALWAYS drive safely with your hands on the steering wheel. You have full responsibility and assume all risks related to the use of the features and applications in this vehicle. Only use the features and applications when it is safe to do so. Failure to do so may result in an accident involving serious injury or death.
WARNING!ALWAYS drive safely with your hands on the steering wheel. You have full responsibility and assume all risks related to the use of the Uconnect features and applications in this vehicle. Only use Uconnect when it is safe to do so. Failure to do so may result in an accident involving serious injury or death.
1
21_00_U5_EN_USC_t.book Page 19

20 UCONNECT INTRODUCTION
NOTE:
FCA US LLC or your dealer may contact you directly regarding software updates.
To help further improve vehicle security and minimize the potential risk of a security breach, vehicle owners should:
Routinely check www.driveuconnect.com/support/software-update.html (US Resi-dents) or www.driveuconnect.ca (Canadian Residents) to learn about available Uconnect software updates.
Only connect and use trusted media devices (e.g. personal mobile phones, USBs, CDs).
SAFE USAGE OF THE UCONNECT SYSTEM
The Uconnect system is a sophisticated elec-tronic device. Do not let young children use the system.
Permanent hearing loss may occur if you play your music or sound system at loud volumes. Exercise caution when setting the volume on the system.
Keep drinks, rain and other sources of mois-ture away from the system. Besides damage to the system, moisture can cause electric shocks as with any electronic device.
NOTE:Many features of this system are speed depen-dent. For your own safety, it is not possible to use some of the touchscreen features while the vehicle is in motion.
CARE AND MAINTENANCE
Do not press the touchscreen with any hard or sharp objects (pen, USB stick, jewelry, etc.), which could scratch the surface.
Do not spray any liquid or chemicals directly on the screen! Use a clean and dry microfiber lens cleaning cloth in order to clean the touchscreen.
If necessary, use a lint-free cloth dampened with a cleaning solution, such as isopropyl alcohol or an isopropyl alcohol and water solution ratio of 50:50. Be sure to follow the solvent manufacturer's precautions and directions.
WARNING! It is not possible to know or to predict all of the
possible outcomes if your vehicle’s systems are breached. It may be possible that vehicle systems, including safety related systems, could be impaired or a loss of vehicle control could occur that may result in an accident involving serious injury or death.
ONLY insert media (e.g., USB or CD) into your vehicle if it came from a trusted source. Media of unknown origin could possibly contain mali-cious software, and if installed in your vehicle, it may increase the possibility for vehicle systems to be breached.
As always, if you experience unusual vehicle behavior, take your vehicle to your nearest authorized dealer immediately.
21_00_U5_EN_USC_t.book Page 20

UCONNECT INTRODUCTION 21
GENERAL INFORMATION
The following regulatory statement applies to all Radio Frequency (RF) devices equipped in this vehicle:
This device complies with Part 15 of the FCC Rules and with Innovation, Science and Economic Development Canada license-exempt RSS standard(s). Operation is subject to the following two conditions:
1. This device may not cause harmful interference, and
2. This device must accept any interference received, including interference that may cause undesired operation.
Le présent appareil est conforme aux CNR d`Innovation, Science and Economic Development applicables aux appareils radio exempts de licence. L'exploitation est autorisée aux deux conditions suivantes:
1. l'appareil ne doit pas produire de brouillage, et
2. l'utilisateur de l'appareil doit accepter tout brouillage radioélectrique subi, même si le brouillage est susceptible d'en compro-mettre le fonctionnement.
La operación de este equipo está sujeta a las siguientes dos condiciones:
1. es posible que este equipo o dispositivo no cause interferencia perjudicial y
2. este equipo o dispositivo debe aceptar cualquier interferencia, incluyendo la que pueda causar su operación no deseada.
NOTE:Changes or modifications not expressly approved by the party responsible for compli-ance could void the user’s authority to operate the equipment.
1
21_00_U5_EN_USC_t.book Page 21
22
UCONNECT MODES
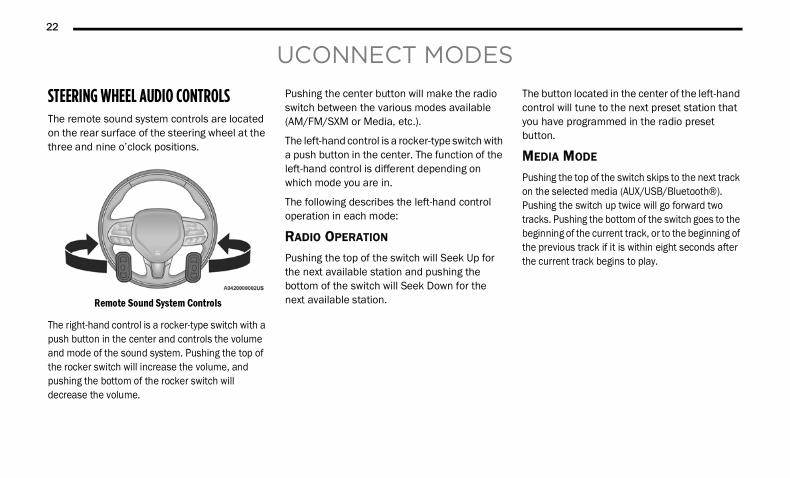
STEERING WHEEL AUDIO CONTROLS The remote sound system controls are located on the rear surface of the steering wheel at the three and nine o’clock positions.
Remote Sound System Controls
The right-hand control is a rocker-type switch with a push button in the center and controls the volume and mode of the sound system. Pushing the top of the rocker switch will increase the volume, and pushing the bottom of the rocker switch will decrease the volume.
Pushing the center button will make the radio switch between the various modes available (AM/FM/SXM or Media, etc.).
The left-hand control is a rocker-type switch with a push button in the center. The function of the left-hand control is different depending on which mode you are in.
The following describes the left-hand control operation in each mode:
RADIO OPERATION
Pushing the top of the switch will Seek Up for the next available station and pushing the bottom of the switch will Seek Down for the next available station.
The button located in the center of the left-hand control will tune to the next preset station that you have programmed in the radio preset button.
MEDIA MODE
Pushing the top of the switch skips to the next track on the selected media (AUX/USB/Bluetooth®). Pushing the switch up twice will go forward two tracks. Pushing the bottom of the switch goes to the beginning of the current track, or to the beginning of the previous track if it is within eight seconds after the current track begins to play.
21_00_U5_EN_USC_t.book Page 22
UCONNECT MODES 23
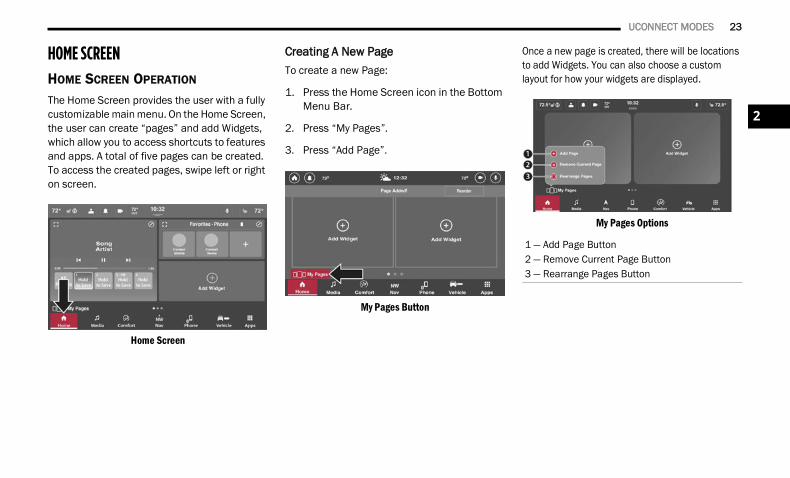
HOME SCREENHOME SCREEN OPERATION
The Home Screen provides the user with a fully customizable main menu. On the Home Screen, the user can create “pages” and add Widgets, which allow you to access shortcuts to features and apps. A total of five pages can be created. To access the created pages, swipe left or right on screen.
Home Screen
Creating A New PageTo create a new Page:
1. Press the Home Screen icon in the Bottom Menu Bar.
2. Press “My Pages”.
3. Press “Add Page”.
My Pages Button
Once a new page is created, there will be locations to add Widgets. You can also choose a custom layout for how your widgets are displayed.
My Pages Options
1 — Add Page Button2 — Remove Current Page Button3 — Rearrange Pages Button
2
21_00_U5_EN_USC_t.book Page 23

24 UCONNECT MODES
Reordering Pages
Reordering Pages
Pages can be reordered on the Home Screen. To reorder the Pages:
1. Press the Home Screen icon in the Bottom Menu Bar.
2. Press “My Pages”.
3. Press “Reorder Pages”.
4. The screen will display all the available pages. Press and hold the desired page, and then drag it to the desired location.
5. Once complete, press “Done” to return to the Home Screen, or press “Cancel” to undo the change and return to the Home Screen.
Deleting A PageTo delete a Page:
1. Press the Home Screen icon in the Bottom Menu Bar.
2. Navigate to the page that you want to delete.
3. Press “My Pages”.
4. Press “Delete Current Page”. The current page will be immediately deleted.
NOTE:A pop-up will display on the screen, indicating that the current page has been removed. An Undo option will be displayed on the pop-up. Press it to undo the page deletion.
WIDGETS
On the Home Screen, the user can add Widgets to their Pages. These Widgets will provide an easy way to access radio-specific features like the radio controls, the navigation map, and climate controls. Widgets can be easily added, removed, or rearranged on the Home Screen.
Widgets
1 — Favorite Phone Widget2 — Now Playing Widget
21_00_U5_EN_USC_t.book Page 24

UCONNECT MODES 25
In addition to being a shortcut to that feature, the Widget allows the user to directly interact with the feature (i.e., adjust the vehicle temperature and change Media sources). Some of the available Widgets are:
NOTE:Additional Widgets may be available and may be vehicle specific depending on the equipped features.
Widget Name Description
Now Playing This Widget will display what is currently playing in the Media tab. The user can change the Source, select a new radio station, change the current audio track, and select from preset radio stations.
Climate This Widget will display and allow the user to adjust the current vehicle temperature and the selected air flow.
Phone — Favorites This Widget will display favorite phone numbers for the active Profile. The user can select a phone number and initiate a call.
Phone — Recents This Widget will display the most recent calls made from the active profile. The user can select a phone number and initiate a call.
Shortcuts This Widget will display available shortcuts to radio features. The user can add shortcuts to the list and select them to go to that specific menu or function.
Seats This Widget will display the controls for the heated and vented heats. The user can turn the heated and vented seats on or off.
Navigation This Widget will display and allow the user to utilize the Navigation feature within the vehicle to navigate to and from specific destinations.
2
21_00_U5_EN_USC_t.book Page 25

26 UCONNECT MODES
Adding/Changing A Widget
Adding A Widget
To add or change a Widget:
1. Press the Home icon in the Bottom Menu Bar.
2. Swipe to the desired Page where the new Widget will be added.
3. On the Widget, press the Edit (Pencil) button.
4. A list of Widgets will display. Select the desired one. The Widget will appear in the selected location. If a previous Widget was present, it will be replaced with the new one.
5. To view the feature in full screen, press the Enlarge icon on the Widget.
Widget Selection
Deleting A WidgetTo delete a Widget:
1. Press the Edit (Pencil) icon on the Widget.
2. From the list of available Widgets, press the Remove Widget button.
3. The selected Widget will be removed from the Page.
MEDIA MODE INTRODUCTION
Media Mode provides access to all the radio and connected device-related functions of the Uconnect system. In Media Mode, you can save your favorite radio stations, stream music from your USB or Bluetooth® device, and adjust the system’s audio settings.
Media Mode can be accessed by pressing the Media button in the Bottom Menu Bar. To change between the different pages, swipe left or right on the screen or press the option on the screen.
Media Mode
21_00_U5_EN_USC_t.book Page 26
UCONNECT MODES 27
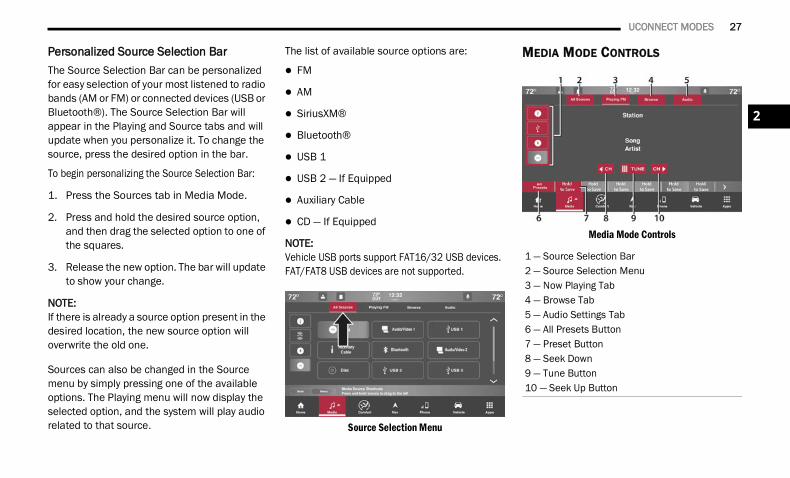
Personalized Source Selection BarThe Source Selection Bar can be personalized for easy selection of your most listened to radio bands (AM or FM) or connected devices (USB or Bluetooth®). The Source Selection Bar will appear in the Playing and Source tabs and will update when you personalize it. To change the source, press the desired option in the bar.
To begin personalizing the Source Selection Bar:
1. Press the Sources tab in Media Mode.
2. Press and hold the desired source option, and then drag the selected option to one of the squares.
3. Release the new option. The bar will update to show your change.
NOTE:If there is already a source option present in the desired location, the new source option will overwrite the old one.
Sources can also be changed in the Source menu by simply pressing one of the available options. The Playing menu will now display the selected option, and the system will play audio related to that source.
The list of available source options are:
FM
AM
SiriusXM®
Bluetooth®
USB 1
USB 2 — If Equipped
Auxiliary Cable
CD — If Equipped
NOTE:Vehicle USB ports support FAT16/32 USB devices. FAT/FAT8 USB devices are not supported.
Source Selection Menu
MEDIA MODE CONTROLS
Media Mode Controls
1 — Source Selection Bar2 — Source Selection Menu3 — Now Playing Tab4 — Browse Tab5 — Audio Settings Tab6 — All Presets Button7 — Preset Button8 — Seek Down9 — Tune Button10 — Seek Up Button
2
21_00_U5_EN_USC_t.book Page 27

28 UCONNECT MODES
Volume and On/Off Control
Push the Volume and On/Off control knob to turn the Uconnect system on and off.
The electronic volume control turns continuously (360 degrees) in either direction, without stopping. Turning the Volume and On/Off control knob clockwise increases the volume, and counterclockwise decreases it.
When the audio system is turned on, the sound will be set at the same volume level as last played.
Mute Button
Push the Mute button to mute or unmute the system.
Tune/Scroll Control
Turn the rotary Tune/Scroll control knob clockwise to increase or counterclockwise to decrease the radio station frequency. Push the Enter/Browse button to choose a selection.
Seek Up and Seek Down
Press and release the Seek Up or Seek Down button to tune the radio to the next available station or channel. During a Seek Up/Down function, if the radio reaches the starting station after passing through the entire band
two times, the radio will stop at the station where it began.
Fast Seek Up and Fast Seek Down
Press, hold, and then release the Seek Up or Seek Down button to advance the radio through the available stations or channels at a faster rate. The radio stops at the next available station or channel when the button on the touchscreen is released.
NOTE:Pressing and holding either the Seek Up or Seek Down button will scan the different frequency bands at a slower rate.
Tune
Press the Tune button located at the bottom of the radio screen to directly tune to a desired radio station or channel.
Press the available number button on the touchscreen to begin selecting a desired station. Once a number has been entered, any numbers that are no longer possible (stations that cannot be reached) will become deactivated/grayed out.
Once the last digit of a station has been entered, press the Tune button. The Direct Tune screen will close, and the system will automatically tune to that station.
Track/All Stations
Under the Browse tab, depending on the selected Source the available selectable options will vary. From there, you can view a list of all available radio stations or audio tracks on a connected device.To select a track/station, press the desired track/station on the touchscreen; the system will tune to that station or play that audio track.
Browse Tab
1 — Browse By Folders2 — Browse By Artist3 — Browse By Playlist4 — Browse By Song
21_00_U5_EN_USC_t.book Page 28

UCONNECT MODES 29
HD RADIO™ — IF EQUIPPED
HD Radio™ technology is the digital evolution of analog AM/FM radio. Your system has a special receiver, which allows it to receive digital broadcasts (where available) in addition to the analog broadcasts. Digital broadcasts provide free, crystal clear audio with no static or distortion.
For more information and a guide to available stations and programming, please visit hdradio.com.
To begin using HD Radio™:
1. Press the Media Button.
2. Select AM or FM tab.
3. Select the HD button.
When HD Radio™ reception is enabled and a station with HD Radio™ broadcasts is playing, the following indicators may appear on the screen:
HD) Radio™ Logo: This indicator will display in gray when a digital station is being acquired and will appear in orange and white when digital audio is playing. When this logo is available, you will also see Station Call Sign (e.g. WNIC), Title and Artist fields on screen.
Multicast Indicator (1 2 3….): These numbers will appear if the current station has multiple digital broadcasts. Press Seek Up or Down button repeatedly to access the other digital broadcasts. The numbers that are high-lighted signify available digital channels where new/different content is available. HD1 will signify the main programming service and is available in analog and digital broadcasts. Any additional multicast stations (HD2–HD8) are only broadcast digitally.
Album Art/Station Logo: Some HD Radio™ stations broadcast station logos and album art associated with the song being played as part of the HD Radio™ broadcast service. Station logo art is stored in the radio and may take up to five minutes to learn for each station that supports station logo service. Album art is broadcast at the beginning of songs. If tuning into the middle of a song, the art may not be available.
When HD Radio™ broadcasts are active, you can access the following functions:
Seek Up And Down: Press to seek to the next strong radio station. If the current station has multiple digital broadcasts, the multicast indicator numbers will display. Press “Seek”
repeatedly to advance through all available broadcasts. If you are on the last multicast channel, press “Seek Up” to advance to the next strong station.
Saving A Multicast Station As A Preset: When the channel is active on-screen, press and hold a Preset button; it will save the station to the available slot. When recalling a HD2/HD3 memory preset, there will be a momentary mute before the digital audio is played as the system acquires the digital signal. If you have turned this feature off, this will automatically turn on HD Radio™ broad-casts and will tune to the selected frequency. As with any saved radio station, you will not be able to access the saved station if your vehicle is outside the station’s reception area.
“LIVE” Ballgame Mode Broadcasts: If a station has a live broadcast (such as a base-ball game), “LIVE” may appear on screen beside the multicast numbers. These are analog broadcasts with digital components (i.e. artist, title). If HD1 is in a live broadcast mode, the HD Radio™ logo will be gray. You will hear analog audio; the user will still be able to tune to the multicast channels.
2
21_00_U5_EN_USC_t.book Page 29

30 UCONNECT MODES
Reception Area: If you are listening to a multicast (HD2, HD3, etc.) station and you are on the fringe of the reception area, the station may mute due to weak signal strength. If you are listening to HD1, the system will simply switch to the analog broadcast until the digital broadcast is available again.
However, if you are listening to any of the possible multicast (HD2–HD8) channels, the station will mute and stay muted unless it is able to connect to the digital signal again. While in this state, the text “buffering” will appear for 30 seconds. If it is not able reconnect to the digital signal, the screen will be cleared and “HD Radio™ Signal Unavailable” will appear in artist and title field area
Station Blending: When a HD1 station is received, the system will play the analog audio broadcast from the station for a few seconds and then, if the receiver verifies the station is an HD Radio™ station, it will transition to play the digital audio broadcast. Depending on the station quality, you may hear a slight sound change when the station transitions from analog to the digital broadcast. The shift from analog to digital or digital back to analog sound is known as “blending”.
Station Issues: In order to provide the best possible experience, a contact form has been developed to report any station issues found while listening to a station broadcasting with HD Radio™ technology. Every station is independently owned and operated. These stations are responsible for ensuring all audio streams and data fields are accurate. This form can be found at https://hdradio.com/stations/feedback/.
Troubleshooting
Experience Cause ActionMismatch of time alignment — a user may hear a short period of programming replayed or an echo, stutter, or skip.
The radio stations analog and digital volume is not properly aligned or the station is in ballgame mode.
None. It is a radio broadcast issue. The user can contact the station.
Sound fades, blending in and out. Radio is shifting between analogue and digital audio.
Reception issue: it may clear up as the vehicle continues to be driven. Turning off HD Radio™ can force the radio to sue analogue audio.
21_00_U5_EN_USC_t.book Page 30

UCONNECT MODES 31
HD Radio™ Technology manufactured under license from iBiquity Digital Corporation. US and Foreign Patents. For patents, see http://dts.com/patents. HD Radio, Artist Experience, and the HD, HD Radio, and "ARC" logos are registered trademarks or trademarks of iBiquity Digital Corporation in the United States and/or other countries.
Audio mute condition when an HD2/HD3 multicast channel is playing.
The radio does not have access to digital signals at the moment.
This is normal behavior, wait until the digital signal returns. If out of coverage area, seek a new station.
Audio mute delay when selecting an HD2/HD3 multicast channel preset.
The digital multicast content is not available until HD Radio™ broadcast can be decoded and make the audio available. This can take up to seven seconds.
This is normal behavior. Wait until the audio is available again.
Text information does not match the present song audio or no text information shown for the present selected frequency.
Data service issue by the radio broadcaster. Broadcaster should be notified. Use the form at https://hdradio.com/stations/feedback/
Troubleshooting
Experience Cause Action
2
21_00_U5_EN_USC_t.book Page 31

32 UCONNECT MODES
SIRIUSXM® SATELLITE RADIO MODE — IF EQUIPPED
SiriusXM® Satellite Radio
SiriusXM® Satellite Radio uses direct satellite-to-receiver broadcasting technology to provide clear, coast to coast radio content. SiriusXM® is a subscription-based service.
Visit siriusxm.com/getallaccess or review your SiriusXM® Radio pamphlet in your Owner’s Manual kit.
SiriusXM® services require subscriptions, sold separately after the trial included with the new vehicle purchase. If you decide to continue your service at the end of your trial subscription, the plan you choose will automatically renew and bill at then-current rates until you call SiriusXM® at
866-635-2349 to cancel. See SiriusXM® Customer Agreement for complete terms at www.siriusxm.com (US) or www.siriusxm.ca (Canada). All fees and programming subject to change. SiriusXM® satellite service is available only to those at least 18 and older in the 48 contiguous US and D.C. SiriusXM® satellite service is also available in Puerto Rico (with coverage limitations) and Canada. Internet radio service is available throughout our satellite service area and in AK. © 2020 SiriusXM® Radio Inc. SiriusXM® and all related marks and logos are trademarks of SiriusXM® Radio Inc.
This functionality is only available for radios equipped with a Satellite receiver. In order to receive satellite radio, the vehicle needs to be outside with a clear view to the sky.
If the screen shows Acquiring Signal, you might have to change the vehicle’s position in order to receive a signal. In most cases, the satellite radio does not receive a signal in underground parking garages or tunnels.
Acquiring SiriusXM® Subscription
To activate the SiriusXM® Satellite Radio subscription, US residents visit https://www.siriusxm.com/phx/trial-offer/fca or call: 1-800-643-2112.
Canadian residents visit https://www.siriusxm.ca/ or call: 1-888-539-7474.
NOTE:You will need to provide the SiriusXM® ID (RID) located at the bottom of the Channel 0 screen.
The Satellite Mode is activated by a press of the SXM button on the touchscreen.
When in Satellite mode:
The SXM button on the touchscreen is highlighted.
The SiriusXM® Presets are displayed at the bottom of the screen.
The SiriusXM® Channel Number is displayed in the center.
The Program Information is displayed at the bottom of the Channel Number.
The SiriusXM® function buttons are displayed below the Program Information.
21_00_U5_EN_USC_t.book Page 32

UCONNECT MODES 33
Tuning is done by operating the Tune Knob or by the Tune button, similar to other Radio Bands.
In addition to the tuning operation functions common to all radio modes, the replay and related buttons are available in SiriusXM® Mode.
SiriusXM® Satellite Radio
No Subscription
Radios equipped with a Satellite receiver require a subscription to the SiriusXM® Service. When the Radio does not have the necessary subscription, the Radio is able to receive the Preview channel only.
SiriusXM® with 360L — If EquippedThe new SiriusXM® with 360L delivers more content variety for all users including access to specific streaming channels and On Demand Content (once trial has expired, a purchased data plan will be required to receive streaming channels and On Demand Content). It allows you to have more control over your listening experience, as well as designing a customizable favorites menu of content, exactly how you want it. The system will recommend content based on your listening habits, providing endless listening options.
Voice Search
Press the Search button and speak terms such as your favorite artist, sports team, talk show or celebrity. The personalized search results are ordered by relevancy to the search term spoken. The most relevant content is listed first based on listening history.
Personalized Listening Experience
Recommendations (For You) are based on each listeners’ listening habits. The recommendations can improve and grow through increased use. The more the listener listens, the better the recommendations get. Similar channels will also become easier to find based on the user’s listening history.
NOTE:Additional capabilities (like Voice Search and Personalized recommendations) are available only when there is a data connection to the Cloud.
1 — Browse2 — Audio Settings3 — Search Button4 — SiriusXM® 360 Profile Settings5 — Related Button
6 — Seek Down7 — Tune Button8 — Seek Up9 — Replay Button10 — Notification Button 2
21_00_U5_EN_USC_t.book Page 33
34 UCONNECT MODES
Account Management
SiriusXM® has made it easy for you to control your account from your vehicle. Some key account management features, now available to access from your vehicle, include:
Subscribing to a SiriusXM® audio service
Setting up a login for online account center
Creating SiriusXM® listener profiles
Updating your contact information
Seeing the duration left in your SiriusXM® trial and the status of your account
Delivering Variety
Not only does SiriusXM® offer 160+ satellite channels in your car, you also get all Streaming Channels and On Demand Content. That way, you’ll never have to miss a favorite show. Die-hard sports fans can easily find and follow a favorite sports team on-the-go with the dedicated Live Sports Category. The feature has all NFL®, MLB®, NBA®, NHL®, college football and college basketball games. It broadcasts all games with national unbiased game calls when available.
Enhanced Sports PxP And Live Sports FeatureYour favorite sports teams must be loaded onto your SiriusXM® favorites bar, which are located under the Favorites menu item.
Tap and hold the League Logo on the Now Playing page. It will then display the Team Preset Modal which displays the teams for the play-by-play game currently being broadcast.
To access the various sports teams:
1. Press on the Media icon on your touchscreen, and navigate to the SiriusXM® icon on the left-hand side of the screen.
2. Press the Browse Tab where you will be able to fine-tune your search by each separated category.
3. Under the Sports category, you will then be able to locate the desired game or show. Press and hold the event/show to save it as a favorite.
You can also add a new favorite through the SiriusXM® Favorites menu, under the Listener Profile menus. When you are listening to a station or event, click the Add button on the SiriusXM® Favorites menu.
Within the individual Sports categories, all Team channels are displayed as well as the generic sports channels.
Long press a Team Logo or Channel Logo and it will add/remove the team to your SiriusXM® Favorites.
Adding SiriusXM® Profiles FeatureSiriusXM® created a listener profile featurethat allows you to add/change/delete listener profiles. When switching users, favorites, vehicle presets, listening history, recommendations and personalized features will reflect the last selected listener profile by the driver.
If more than one SiriusXM® profile has been created, when switching between Driver 1 and Driver 2 SiriusXM® listener profiles, the vehicle preset bar will change/update automatically/accordingly. If only one SiriusXM® listener profile exists, then the presets bar will not change.
NOTE:If there are no named listener profiles, the default listener avatar will be shown with text prompting you to create a listener profile.
21_00_U5_EN_USC_t.book Page 34

UCONNECT MODES 35
To create a new listener profile (speed restricted feature):
1. From the Profile and Settings menu, select the “Create Listener” option.
2. Begin adding a new listener profile by using the keyboard with whatever characters you choose.
3. After pressing the next button, you can then choose from a set of eight generic avatars to further personalize your listener profile, and then touch the Done button.
NOTE:Users can download the SiriusXM® smartphone App and use the Radio ID for free access, if the subscription allows you to access SiriusXM® content outside of your vehicle.
NOTE:Names and avatars can be changed at any given time, and the change will be reflected on all devices associated with the same Radio ID account.
4. Once you have selected an avatar, you will be returned to the Profile and Settings menu with the new listener profile you have just created.
NOTE:If an account already has five or more listeners, the option to “Add Listener” will not be available.
The Switch Listener Profile screen allows you to switch between existing listener profiles.
To delete a listener profile:
1. Press and hold the Listener Profile you want to delete. Press the Remove button on the Profile.
2. A pop-up message will appear and mention that deleting the listener profile is not recoverable. If you are sure you want to continue, press the Delete button.
Replay The replay function provides a means to store and replay up to 22 minutes of music audio and 48 minutes of talk radio. Once the channel is switched, content in replay memory is lost.
Press the Replay button on the touchscreen. The Play/Pause, Rewind/Forward and Live buttons will display at the top of the screen, along with the replay time.
You can exit by pressing the Replay button on the touchscreen any time during the Replay mode.
2
21_00_U5_EN_USC_t.book Page 35

36 UCONNECT MODES
Favorites Press the Favorites button in the Listen Profile to view a list of your favorite stations and set new favorites.
The Favorites menu provides a means to Edit the Favorites list and to configure the Alert Settings, along with providing a list of Channels currently airing any of the items in the Favorites list.
You can scroll the Favorites list by pressing the Up and Down arrows located at the right side of
the screen. Scrolling can also be done by operating the TUNE/SCROLL knob as well.
Remove Favorites
Press the Remove Favorites tab at the top ofthe screen. Press the Delete All button on the touchscreen to delete all of the Favorites or press the Trash Can icon next to the Favorite to be deleted.
Alert Settings
Press the Alert Settings tab at the top of the Favorites screen. The Alert Settings menu allows you to choose from a Visual alert or Audible and Visual alert when one of your favorites is airing on any of the SiriusXM® channels.
You can exit the Favorites menu by a press of the Back button.
Play/PausePress the Pause/Play button on the touchscreen to pause the playing of live or rewound content at any time. Play can be resumed by pressing the Pause/Play
button on the touchscreen.
Rewind
Press the Rewind button on the touchscreen to rewind the content in steps of five seconds. Pressing the Rewind button on the touchscreen for more than
two seconds rewinds the content. The Radio begins playing the content at the point at which the press is released.
Forward
Each press of the Forward button on the touchscreen forwards the content in steps of five seconds. Forwarding of the content can only be done when the
content is previously rewound, and therefore, can not be done for live content. A continuous press of the Forward button on the touchscreen also forwards the content. The Radio begins playing the content at the point at which the
press is released.Live — If Equipped Live Press the Live button on the touchscreen to resume the playing of Live content.
21_00_U5_EN_USC_t.book Page 36
UCONNECT MODES 37
Browse In SXM Press the Browse button on the touchscreento edit Presets and set Favorites, along with providing the SiriusXM® Channel List.
PresetsPress the Presets button (if equipped) located at the left of the Browse screen.
You can scroll the Presets list by pressing the Up and Down arrows located at the right side of the screen. Scrolling can also be done by operating the Tune/Scroll knob as well.
Preset Selection
A preset can be selected by pressing any of the listed Presets, or by pushing the Enter/Browse button on the Tune/Scroll knob to select the currently highlighted Preset. When selected, the Radio tunes to the station stored in the Preset.
Deleting A Preset
A preset can be deleted in the Presets Browse screen by pressing the Trash Can icon for the corresponding Preset.
Game ZonePress the Game Zone button, located at the left of the Browse screen. This feature provides you with the ability to select teams, edit the selection, and set alerts.
Live Sports
Press the Live Sports tab at the top of the screen. The Live Sports list provides a list of Channels currently airing any of the items in the Selections list, and pressing any of the items in the list tunes the radio to that channel.
Play-By-Play — If Equipped
Press the Play-By-Play button on the touchscreen to activate the League Scroll list. Press the chosen league and a scroll list of all teams within the league will appear, then you can select a team by pressing the corresponding box. A check mark appears for all teams that are chosen.
Remove Selection/Trash Can Icon
To remove, press the listener profile icon. Press the Delete All button on the touchscreen to delete all of the selections or press the Trash Can icon next to the selection to be deleted.
Alert Settings
Press the Alert Setting tab at the top of the screen. The Alert Settings menu allows you to choose from “Alert me to on-air games upon start” or “Alert upon score update” or both when one or more of your selections is airing on any of the SiriusXM® channels.
Tune StartTune Start begins playing the current song from the beginning when you tune to a music channel using one of the 12 presets. This feature occurs the first time the preset is selected during that current song.
SAVING PRESETS TO A DRIVER MEMORY PROFILE — IF EQUIPPED
After setting the desired radio presets:
1. Push the S button on the Driver Memory Switch.
2. Within five seconds of pushing S, push the 1 or 2 button. The radio preset will be saved to Driver Memory Profile 1 or Driver Memory Profile 2.
2
21_00_U5_EN_USC_t.book Page 37

38 UCONNECT MODES
3. To recall a Driver Memory Profile, push either the 1 or 2 button; the radio will display the preset radio stations.
Driver Memory Buttons
After setting/changing the desired radio presets, (e.g. SXM/AM/FM) your updates will be saved under the current active profile automatically. Seat alignment will not be saved automatically. For more information, refer to “Driver Memory Settings” in “Getting To Know Your Vehicle” in the Owner’s Manual.
SETTING PRESETS
Setting Presets
The Presets are available for all radio stations, and are activated by pressing any of the Preset buttons, located at the bottom of the screen, or by pressing the Browse tab, selecting “Presets”, and then pressing the desired preset station.
When you are on a station that you wish to save as a preset, press and hold the numbered button on the touchscreen for more than two seconds. This can be completed in the Playing tab or in the Browse tab, under “Presets”.
To view all available presets, press the Presets button under the Browse tab. The number of shown presets can also be adjusted on this page.
Preset FeaturesPreset Selection
A Preset can be selected by pressing any of the listed Presets or by pushing the Enter Browse button on the Tune/Scroll knob to select the currently highlighted Preset.
When selected, the radio tunes to the station stored in the Presets.
Deleting Presets
A Preset can be deleted in the Presets Browse screen by pressing the X button next to the corresponding Preset.
21_00_U5_EN_USC_t.book Page 38
UCONNECT MODES 39
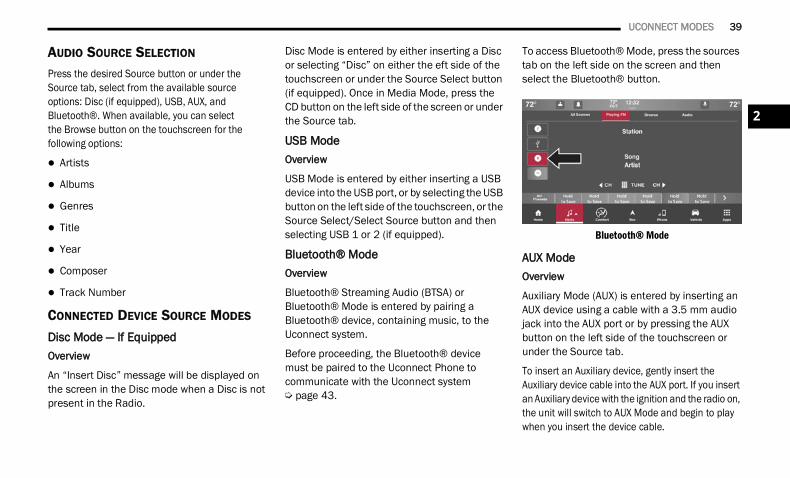
AUDIO SOURCE SELECTION
Press the desired Source button or under the Source tab, select from the available source options: Disc (if equipped), USB, AUX, and Bluetooth®. When available, you can select the Browse button on the touchscreen for the following options:
Artists
Albums
Genres
Title
Year
Composer
Track Number
CONNECTED DEVICE SOURCE MODES Disc Mode — If EquippedOverview
An “Insert Disc” message will be displayed on the screen in the Disc mode when a Disc is not present in the Radio.
Disc Mode is entered by either inserting a Disc or selecting “Disc” on either the eft side of the touchscreen or under the Source Select button (if equipped). Once in Media Mode, press the CD button on the left side of the screen or under the Source tab.
USB ModeOverview
USB Mode is entered by either inserting a USB device into the USB port, or by selecting the USB button on the left side of the touchscreen, or the Source Select/Select Source button and then selecting USB 1 or 2 (if equipped).
Bluetooth® ModeOverview
Bluetooth® Streaming Audio (BTSA) or Bluetooth® Mode is entered by pairing a Bluetooth® device, containing music, to the Uconnect system.
Before proceeding, the Bluetooth® devicemust be paired to the Uconnect Phone to communicate with the Uconnect system Ú page 43.
To access Bluetooth® Mode, press the sources tab on the left side on the screen and then select the Bluetooth® button.
Bluetooth® Mode
AUX ModeOverview
Auxiliary Mode (AUX) is entered by inserting an AUX device using a cable with a 3.5 mm audio jack into the AUX port or by pressing the AUX button on the left side of the touchscreen or under the Source tab.
To insert an Auxiliary device, gently insert the Auxiliary device cable into the AUX port. If you insert an Auxiliary device with the ignition and the radio on, the unit will switch to AUX Mode and begin to play when you insert the device cable.
2
21_00_U5_EN_USC_t.book Page 39

40 UCONNECT MODES
Controlling The Auxiliary Device
The control of the Auxiliary device (e.g., selecting playlists, play, fast forward, etc.) cannot be provided by the radio; use the device controls instead. Adjust the volume with the Volume button, Volume/Mute rotary knob, or the On/Off rotary knob, or with the volume of the attached device.
NOTE:The radio unit is acting as the amplifier for audio output from the Auxiliary device. Therefore, if the volume control on the Auxiliary device is set too low, there will be insufficient audio signal for the radio unit to play the music on the device.
Browse
If supported by the device, you can browse by Folders, Artists, Playlists, Albums, Songs, etc. Press the desired button on the touchscreen. The center of the browse window shows items and its sub-functions, which can be scrolled through by pressing the Up and Down buttons to the right. The Tune/Scroll knob can also be used to scroll.
Repeat
In Disc Mode, press the Repeat button on the touchscreen to toggle the repeat functionality. The Repeat button on the touchscreen is highlighted when active. The Radio will continue to play the current track, repeatedly, as long as the repeat is active. To cancel Repeat, press the Repeat button on the touchscreen a second time.
In USB Mode, press the Repeat button on the touchscreen to toggle the repeat functionality. The Repeat button on the touchscreen is highlighted when active. The Radio will continue to play the current track, repeatedly, as long as the repeat is active. Press the Repeat button again to enter Repeat All. The radio will continue to play all the current tracks, repeatedly, as long as the repeat function is active. To cancel Repeat, press the Repeat button a third time.
Shuffle
In Disc Mode, press the Shuffle button on the touchscreen to play the selections on the compact disc in random order. Press the button on the touchscreen a second time to turn this feature off.
In USB Mode, press the Shuffle button on the touchscreen to play the selections on the USB device in random order to provide an interesting change of pace. Press the Shuffle button on the touchscreen a second time to turn this feature off.
Media Mode Voice Commands — If EquippedUse your voice to quickly get to the AM, FM, SiriusXM® Satellite Radio stations, or other audio Sources you would like to hear. (Subscription or included SiriusXM® Satellite Radio trial required.)
Push the Voice Recognition (VR) button on the steering wheel or say the system activation word. The system activation word can either be “Uconnect” or the brand name of the vehicle. This word can be altered in the Uconnect Settings.
21_00_U5_EN_USC_t.book Page 40

UCONNECT MODES 41
After the beep, say one of the following commands and follow the prompts to switch your media source or choose an artist.
“Tune to Satellite Channel Hits 1”
“Change source to Bluetooth®”
“Change source to AUX”
“Change source to USB”
“Play artist Beethoven”; “Play album Greatest Hits”; “Play song Moonlight Sonata”; “Play genre Classical”
Did You Know:
At any time, if you are not sure of what to say or want to learn a Voice Command, push the VR button or say the activation word and say “Help”. The system provides you with a list of commands.
Press the Browse button on the touchscreen to see all of the music on your USB device. Your Voice Command must match exactly how the artist, album, song, and genre infor-mation is displayed.
AUDIO SETTINGS Press the Audio button within the Settings main menu to activate the Audio Settings screen.
The audio settings can also be accessed on the Radio Mode screen by pressing the Audio button. You can swipe left or right on the touchscreen to access the different audio settings, as well as return/exit the Audio Settings screen.
You can also control different features with different volumes such as phone, media, navigation, and voice recognition. The dedicated volume adjustment menu is located within the Audio Settings tab.
Audio Settings
1 — Balance/Fade2 — Equalizer3 — Speed Adjusted Volume4 — Surround Sound — If Equipped5 — Aux Volume Offset6 — Auto Play7 — Radio Off With Door
2
21_00_U5_EN_USC_t.book Page 41
42 UCONNECT MODES
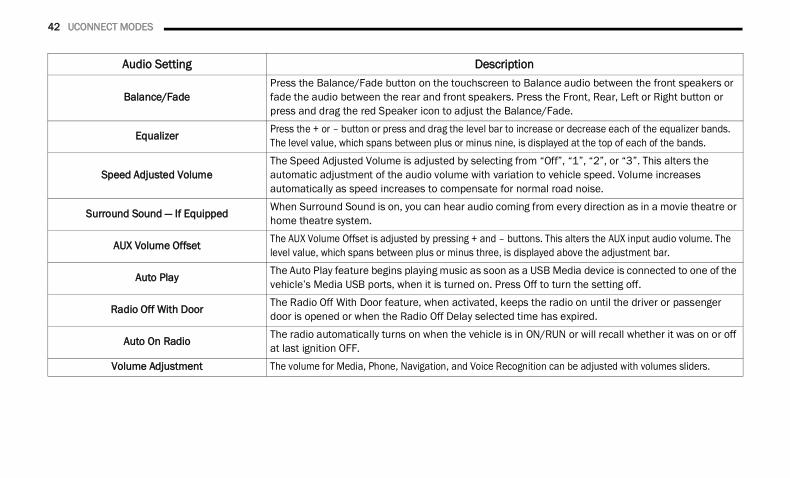
Audio Setting Description
Balance/FadePress the Balance/Fade button on the touchscreen to Balance audio between the front speakers or fade the audio between the rear and front speakers. Press the Front, Rear, Left or Right button or press and drag the red Speaker icon to adjust the Balance/Fade.
Equalizer Press the + or – button or press and drag the level bar to increase or decrease each of the equalizer bands. The level value, which spans between plus or minus nine, is displayed at the top of each of the bands.
Speed Adjusted VolumeThe Speed Adjusted Volume is adjusted by selecting from “Off”, “1”, “2”, or “3”. This alters the automatic adjustment of the audio volume with variation to vehicle speed. Volume increases automatically as speed increases to compensate for normal road noise.
Surround Sound — If Equipped When Surround Sound is on, you can hear audio coming from every direction as in a movie theatre or home theatre system.
AUX Volume Offset The AUX Volume Offset is adjusted by pressing + and – buttons. This alters the AUX input audio volume. The level value, which spans between plus or minus three, is displayed above the adjustment bar.
Auto Play The Auto Play feature begins playing music as soon as a USB Media device is connected to one of the vehicle’s Media USB ports, when it is turned on. Press Off to turn the setting off.
Radio Off With Door The Radio Off With Door feature, when activated, keeps the radio on until the driver or passenger door is opened or when the Radio Off Delay selected time has expired.
Auto On Radio The radio automatically turns on when the vehicle is in ON/RUN or will recall whether it was on or off at last ignition OFF.
Volume Adjustment The volume for Media, Phone, Navigation, and Voice Recognition can be adjusted with volumes sliders.
21_00_U5_EN_USC_t.book Page 42

UCONNECT MODES 43
PHONE MODE OVERVIEW
Uconnect Phone is a voice-activated, hands-free, in-vehicle communications system. It allows you to dial a phone number with your mobile phone.
The feature supports the following:
Voice Activated Features
Hands-Free dialing via Voice (“Call John Smith Mobile” or, “Dial 248-555-1212”).
Hands-Free text-to-speech listening of your incoming SMS messages.
Hands-Free Text Message Replying: Forward one of 18 predefined SMS messages to incoming calls/text messages.
Redialing last dialed numbers (“Redial”).
Calling Back the last incoming call number (“Call Back”).
Viewing Call logs on screen (“Show Incoming Calls,” “Show Outgoing Calls,” “Show Missed Calls,” “Show Recent Calls”).
Searching Contacts phone number (“Search for John Smith Mobile”).
Screen Activated Features
Dialing via Keypad using touchscreen.
Viewing and Calling contacts from Phone-books displayed on the touchscreen.
Setting Favorite Contact Phone numbers so they are easily accessible on the Main Phone screen.
Viewing and Calling contacts from Recent Call logs.
Reviewing your recent Incoming SMS Messages.
Pairing up to 10 phones/audio devices for easy access to connect to them quickly.
NOTE:Your phone must be capable of SMS messaging via Bluetooth® for messaging features to work properly.
Your mobile phone’s audio is transmitted through your vehicle’s audio system; the system will automatically mute your radio when using the Uconnect Phone.
For Uconnect customer support:
US residents — visit UconnectPhone.com or call 877-855-8400
Canadian residents — visit Uconnect-Phone.com or call 1-800-465-2001 (English) or 1-800-387-9983 (French).
Visit UconnectPhone.com
Uconnect Phone allows you to transfer calls between the system and your mobile phone as you enter or exit your vehicle and enables youto mute the system's microphone for private conversation.
2
21_00_U5_EN_USC_t.book Page 43

44 UCONNECT MODES
The Phone feature is driven through your Bluetooth® “Hands-Free Profile” mobile phone. Uconnect features Bluetooth® technology — the global standard that enables different electronic devices to connect to each other without wires or a docking station. Ensure your phone is turned on with Bluetooth® active and has been paired to the Uconnect system. Up to 10 mobile phones or audio devices are allowed to be linked to the system.
Phone Button — If Equipped
The Phone button on your steering wheel is used to get into the Phone Mode and make calls, show recent, incoming or outgoing calls, view phonebook, etc. When you press the button you will hear a BEEP.
Voice Recognition And Phone Buttons
Voice Command Button — If Equipped
The Voice Command button on your steering wheel is only used for “barge in” and when you are already in a call or want to make another call.
The button on your steering wheel is also used to access the Voice Commands for the Uconnect Voice Command features if your vehicle is equipped.
The Uconnect Phone is fully integrated with the vehicle's audio system. The volume can be adjusted either from the radio volume control knob or from the right switch on the rear side of the steering wheel.
VR “Wake Up” Words (Voice Recognition Activation Word) — If Equipped
The Voice recognition “Wake Up” word can be used to activate your Uconnect Voice Recognition system without pressing a button. To begin, say the programmed activation word: either “Uconnect” or the brand name of the vehicle (i.e., Dodge or Chrysler).
As an example, say “Hey Uconnect, call Bill Smith”. The system will then dial the contact without the need to press any buttons.
WARNING!ALWAYS drive safely with your hands on the steering wheel. You have full responsibility and assume all risks related to the use of the Uconnect features and applications in this vehicle. Only use Uconnect when it is safeto do so. Failure to do so may result in an accident involving serious injury or death.
1 — Push To Enter Phone Mode Or To Answer A Phone Call And Send Or Receive A Text2 — For All Radios: Push Voice Recognition Button To Begin Radio, Media, Apps, Climate, And Navigation (If Equipped) Functions3 — Push To End Call
21_00_U5_EN_USC_t.book Page 44

UCONNECT MODES 45
DEVICE MANAGER AND PHONE SETUP
Accessing The Device ManagerThe Device Manager provides an easy way to add new devices/smartphones, change device/smartphone settings, and activate Do Not Disturb.
To access the Device Manger:
1. Press the Phone button in the Bottom Menu Bar.
2. Press “Device Manager”.
The Device Manager will list all the available devices that have previously been paired and connected to the system. To add a new device, press the Add Device button.
A connected device will highlight and display the words “Connected” underneath the device name. If the device is a “favorite”, a star will be displayed to the left of the device name.
On a connected device, you can choose to allow certain functions on a device. Press on Phone or Music Note icon to adjusted these functions:
When neither icon is highlighted: the device will disconnect from the system.
When the Phone icon is highlighted: the system will allow the phone to answer and place calls.
When the Music Note icon is highlighted: the device will be able to play audio through Bluetooth® connection.
When both the Phone icon and Music Note icon are highlighted: the device will have full functionality and can answer/place calls as well as stream audio.
Apple CarPlay® and Android Auto™ can also be allowed/deactivated from the Device Manager. Press the corresponding icon next to the device name to allow access to Apple CarPlay® or Android Auto™.
Pair A DeviceTo begin using Bluetooth® functionality and Uconnect Phone, you must pair your compatible Bluetooth®-enabled device.
To complete the pairing process, you will need to reference your mobile phone/device user’s manual. Please visit UconnectPhone.com for complete mobile phone compatibility information.
Pairing A Phone
NOTE:
You must have Bluetooth® enabled on your device to complete this procedure.
The vehicle must be in PARK or at a standstill.
2
21_00_U5_EN_USC_t.book Page 45

46 UCONNECT MODES
Follow the steps below to pair your device:
1. Place the ignition in the ACC or ON/RUN position.
2. Press the Phone button.
NOTE:
If there are no phones currently connected with the system, a pop-up will appear asking if you would like to pair a mobile phone.
This pop-up only appears when the user enters Phone Mode and no other device(s) have previously been paired. If the system has a phone previously paired, even if no phone is currently connected with the system, this pop-up will not appear.
3. Select “Yes” to begin the pairing process.
4. Search for available devices on your Bluetooth®-enabled device.
Searching For Bluetooth® Devices
Access your device’s settings.
Ensure Bluetooth® in enabled. Once enabled, the device will begin to search for Bluetooth® connections.
5. If “No” is selected, and you still would like to pair a device, press the Device Manager button.
Press the Add Device button.
Search for available connections on your Bluetooth®-enabled device (see below). When prompted on the phone, select “Uconnect” and accept the connection request.
6. An in-progress screen will display while the system is connecting.
7. When your device finds the Uconnect system, select the system’s name. A PIN may need to be entered.
PIN Location
8. When prompted on the device, accept the connection request from Uconnect.
21_00_U5_EN_USC_t.book Page 46

UCONNECT MODES 47
9. When the pairing process has successfully completed, the system will prompt you to choose whether or not this is your favorite device. Selecting “Yes” will make this device the highest priority. This device will take precedence over other paired devices within range and will connect to the Uconnect system automatically when entering the vehicle. Two phones can be set as a favorite (Favorite 1 and Favorite 2)
Make Favorite Setting
NOTE:
For devices which are not made a favorite, the device priority is determined by the order in which it was paired. The latest device paired will have the higher priority.
During the pairing procedure, you may receive a pop-up on your device for the Uconnect system to access your “messages” and “contacts”. Selecting “Ok” or “Allow” will sync your contacts with the Uconnect system.
Software updates on your device or the Uconnect system may interfere with the Bluetooth® connection. If this happens, simply repeat the pairing process. However, first, make sure to delete the device from the list of devices on your Uconnect system. Next, be sure to remove Uconnect from the list of connections in your device’s Bluetooth® settings.
Connecting To A Particular Mobile Phone Or Audio Device After Pairing
Connecting A Device
The Uconnect system will automatically connect to the highest priority, paired device within range. If you need to choose a particular phone or audio device follow these steps:
1. Press the Phone button in the Bottom Menu Bar.
2. Press “Device Manager”.
1 — Connect The Device With Phone Capabilities2 — Connect The Device With Media Capabilities3 — Connected Android Auto™ Or Apple CarPlay®
2
21_00_U5_EN_USC_t.book Page 47
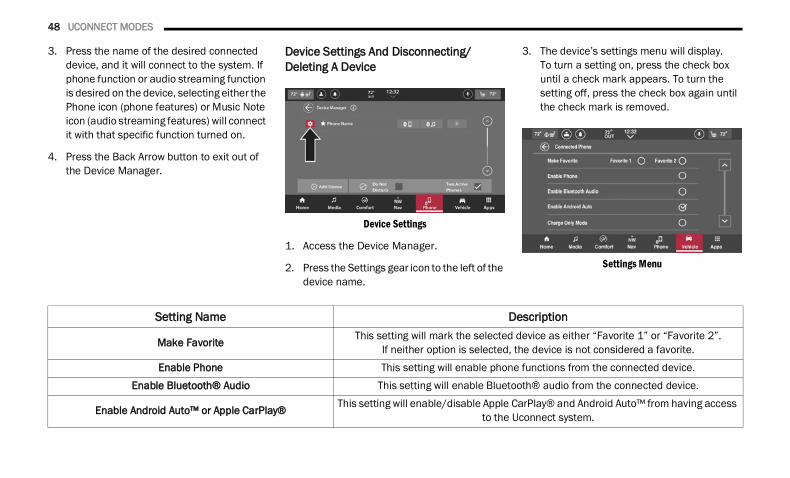
48 UCONNECT MODES
3. Press the name of the desired connected device, and it will connect to the system. If phone function or audio streaming function is desired on the device, selecting either the Phone icon (phone features) or Music Note icon (audio streaming features) will connect it with that specific function turned on.
4. Press the Back Arrow button to exit out of the Device Manager.
Device Settings And Disconnecting/Deleting A Device
Device Settings
1. Access the Device Manager.
2. Press the Settings gear icon to the left of the device name.
3. The device’s settings menu will display. To turn a setting on, press the check box until a check mark appears. To turn the setting off, press the check box again until the check mark is removed.
Settings Menu
Setting Name Description
Make Favorite This setting will mark the selected device as either “Favorite 1” or “Favorite 2”.If neither option is selected, the device is not considered a favorite.
Enable Phone This setting will enable phone functions from the connected device.Enable Bluetooth® Audio This setting will enable Bluetooth® audio from the connected device.
Enable Android Auto™ or Apple CarPlay® This setting will enable/disable Apple CarPlay® and Android Auto™ from having access to the Uconnect system.
21_00_U5_EN_USC_t.book Page 48
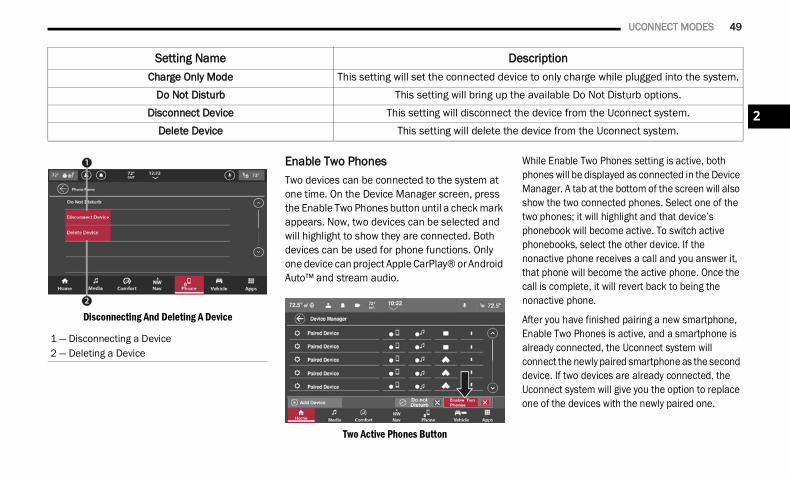
UCONNECT MODES 49
Disconnecting And Deleting A Device
Enable Two PhonesTwo devices can be connected to the system at one time. On the Device Manager screen, press the Enable Two Phones button until a check mark appears. Now, two devices can be selected and will highlight to show they are connected. Both devices can be used for phone functions. Only one device can project Apple CarPlay® or Android Auto™ and stream audio.
Two Active Phones Button
While Enable Two Phones setting is active, both phones will be displayed as connected in the Device Manager. A tab at the bottom of the screen will also show the two connected phones. Select one of the two phones; it will highlight and that device’s phonebook will become active. To switch active phonebooks, select the other device. If the nonactive phone receives a call and you answer it, that phone will become the active phone. Once the call is complete, it will revert back to being the nonactive phone.
After you have finished pairing a new smartphone, Enable Two Phones is active, and a smartphone is already connected, the Uconnect system will connect the newly paired smartphone as the second device. If two devices are already connected, the Uconnect system will give you the option to replace one of the devices with the newly paired one.
Charge Only Mode This setting will set the connected device to only charge while plugged into the system.Do Not Disturb This setting will bring up the available Do Not Disturb options.
Disconnect Device This setting will disconnect the device from the Uconnect system.Delete Device This setting will delete the device from the Uconnect system.
Setting Name Description
1 — Disconnecting a Device2 — Deleting a Device
2
21_00_U5_EN_USC_t.book Page 49

50 UCONNECT MODES
NOTE:A device set as Favorite 1 will have priority over a device set as Favorite 2 or any other paired devices. When using Voice Recognition (VR), the active phone will receive the VR commands.
Do Not Disturb With Do Not Disturb, you can disable notifications from incoming calls and texts, allowing you to keep your eyes on the road and hands on the wheel. For your convenience, there is a counter display to keep track of your missed calls and text messages while Do Not Disturb is active.
Do Not Disturb
1. Press the Gear icon next to the device name.
2. Press “Do Not Disturb” from the device settings list.
Do Not Disturb can automatically reply with a text message, a call, or both when declining an incoming call and send it to voicemail.
Automatic reply messages can be:
“I am driving right now, I will get back to you shortly.”
Create a custom auto reply message up to 160 characters.
NOTE:Only the first 25 characters can be seen on the touchscreen while typing a custom message.
While in Do Not Disturb, Conference Call can be selected so you can still place a second call without being interrupted by incoming calls.
NOTE:
If “Two Active Phones” is on and two devices are paired with the system, the Do Not Disturb All Phones setting will apply to both devices. In the Device Manager, each phone can be set to Do Not Disturb individually.
Reply with text message is not compatible with iPhones®.
Auto reply with text message is only available on phones that support Bluetooth® Message Access Profile (MAP).
KEYPAD
To dial a phone number using a keypad:
1. Press the Phone button.
2. Press the Keypad tab. The keypad will display.
3. Use the numbered buttons to enter a phone number. If a mistake is made, press the Back button (with an X symbol in the middle) to erase previously added numbers.
21_00_U5_EN_USC_t.book Page 50
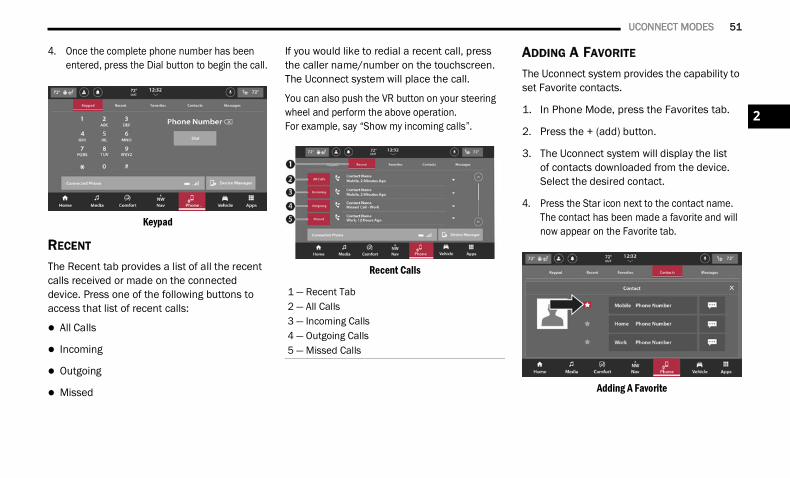
UCONNECT MODES 51
4. Once the complete phone number has been entered, press the Dial button to begin the call.
Keypad
RECENT The Recent tab provides a list of all the recent calls received or made on the connected device. Press one of the following buttons to access that list of recent calls:
All Calls
Incoming
Outgoing
Missed
If you would like to redial a recent call, pressthe caller name/number on the touchscreen. The Uconnect system will place the call.
You can also push the VR button on your steering wheel and perform the above operation. For example, say “Show my incoming calls”.
Recent Calls
ADDING A FAVORITE
The Uconnect system provides the capability to set Favorite contacts.
1. In Phone Mode, press the Favorites tab.
2. Press the + (add) button.
3. The Uconnect system will display the list of contacts downloaded from the device. Select the desired contact.
4. Press the Star icon next to the contact name. The contact has been made a favorite and will now appear on the Favorite tab.
Adding A Favorite
1 — Recent Tab2 — All Calls3 — Incoming Calls4 — Outgoing Calls5 — Missed Calls
2
21_00_U5_EN_USC_t.book Page 51

52 UCONNECT MODES
Favorites can also be added from the Contacts tab by finding the desired contact and pressing the Star icon next to the contact name.
To Remove A Favorite
1. To remove a Favorite, press the Contacts tab.
2. Find the desired Favorite contact name from the list.
3. Press the three vertical dots next to the contact name.
4. Press the illuminated Star icon to remove the contact from the Favorites list.
5. In the Favorites tab, the contact name will no longer appear in the list.
CONTACTS (AUTOMATIC PHONEBOOK TRANSFER FROM MOBILE PHONE) If supported by your phone, Uconnect Phone has the ability to download contact names and number entries from the mobile phone’s phonebook. Specific Bluetooth® Phones with Phonebook Access Profile may support this feature. Your mobile phone may receive a pop-up asking for permission for the Uconnect system to
access your messages and contacts. Selecting “Ok” or “Allow” will sync your contacts with the Uconnect system.
See Uconnect website, UconnectPhone.com, for supported phones.
Automatic download and update of a phonebook, if supported, begins as soon as the Bluetooth® wireless phone connec-tion is made to the Uconnect Phone, for example, after you start the vehicle.
Depending on the maximum number of entries downloaded, there may be a short delay before the latest downloaded names can be used. Until then, if available, the previously downloaded phonebook is available for use.
Only the phonebook of the currently connected mobile phone is accessible.
This downloaded phonebook cannot be edited or deleted on the Uconnect Phone. These can only be edited on the mobile phone. The changes are transferred and updated to Uconnect Phone on the next phone connection.
Contacts Tab
MESSAGES
The Messages tab provides a way to view text messages sent to your device while driving. When your device receives a message, the Uconnect system will prompt you to either view the message or have the system read it back to you. To see the message, press the View button. To have the message read back to you, press the Play button.
To access the Messages tab, press the Phone button in the Bottom Menu Bar. Then, press the Messages tab.
21_00_U5_EN_USC_t.book Page 52

UCONNECT MODES 53
On the Messages tab, you can view the current connected device’s text message inbox or only newly received message. To access the full inbox, press the Inbox button. To access only new messages, press the New Message button.
The text messages list will show latest messages first. The name of the contact and the date received will be provided as well as the option to either hear the message read to you or view the message on the screen.
Messages Tab
Messages With Two Active PhonesIf the Two Active Phones setting is active, the text messages notification will provide the name of the device receiving the message. The text message pop-up will display the total number of messages missed on each device. Press the Inbox button for the desired device to view those messages. If the selected device is not the active phone, it will become the active phone and switch phonebooks.
NOTE:If a call is in progress and a call is initiated through the Messages tab, a pop-up will display asking if you would like to end the current call and join the new call. Press “Yes” to end the call and start a new one. Feature may not be avail-able on all mobile phones.
PHONE OPERATION
Voice commands can be used to operate the Uconnect Phone and to navigate through its menu structure. Voice commands are required after most Uconnect Phone prompts. There are two general methods for how Voice Command works:
1. Say compound commands like “Call John Smith mobile”.
2. Say the individual commands and allow the system to guide you to complete the task.
You will be prompted for a specific command and then guided through the available options.
Prior to giving a voice command, one must wait for the beep, which follows the “Listen” prompt or another prompt.
For certain operations, compound commands can be used. For example, instead of saying “Call” and then “John Smith” and then “mobile”, the following compound command can be said: “Call John Smith mobile.”
For each feature explanation in this section, only the compound command form of the voice command is given. You can also break the commands into parts and say each part of the command when you are asked for it. For example, you can use the compound command form voice command “Search for John Smith,” or you can break the compound command form into two voice commands: “Search Contacts” and when asked, “John Smith.” Please remember, the Uconnect Phone works best when you talk in a normal conversa-tional tone, as if speaking to someone sitting a few feet/meters away from you.
1 — Inbox2 — New Messages3 — Messages Tab
2
21_00_U5_EN_USC_t.book Page 53

54 UCONNECT MODES
Natural SpeechYour Uconnect Phone Voice system uses a Natural Language Voice Recognition (VR) engine.
Natural speech allows the user to speak commands in phrases or complete sentences. The system filters out certain non-word utterances and sounds such as “ah” and “eh”. The system handles fill-in words such as “I would like to”.
The system handles multiple inputs in the same phrase or sentence such as “make a phone call” and “to Kelly Smith”. For multiple inputsin the same phrase or sentence, the system identifies the topic or context and provides the associated follow-up prompt such as “Who do you want to call?” in the case where a phone call was requested but the specific name was not recognized.
The system utilizes continuous dialog. When the system requires more information from the user, it will ask a question to which the user can respond without pushing the Voice Command button on the steering wheel.
Help CommandIf you need assistance at any prompt, or if you want to know your options at any prompt, say “Help” following the beep.
To activate the Uconnect Phone from idle, simply push the Phone button (if active) on your steering wheel and say a command or say “Help”. All Phone sessions begin with a push of the VR button or use of the vehicle “Wake Up” word.
Cancel CommandAt any prompt, after the beep, you can say “Cancel” and you will be returned to the main menu.
You can also push the VR button or Phone button on your steering wheel when the system is listening for a command and be returned to the main or previous menu.
Call ControlsThe touchscreen allows you to control the following call features:
Call Controls
Other phone call features include:
End Call
Hold/Unhold/Resume
Swap two active calls
1 — Answer2 — Ignore/Decline3 — Mute4 — Transfer To Handset
21_00_U5_EN_USC_t.book Page 54

UCONNECT MODES 55
Answer Or Ignore An Incoming Call — Call Currently In ProgressIf a call is currently in progress and you have another incoming call, you will hear the same network tones for call waiting that you normally hear when using your mobile phone. Push the Phone button on the steering wheel, press the Answer button on the touchscreen, or press the Caller ID box to place the current call on hold and answer the incoming call.
NOTE:Phones that are compatible with the Uconnect system in the market today do not support rejecting an incoming call when another call is in progress. Therefore, the user can only answer an incoming call or ignore it.
Answer Or Ignore An Incoming Call — No Call Currently In ProgressWhen you receive a call on your mobile phone, the Uconnect Phone will interrupt the vehicle audio system. Push the Phone button on the steering wheel, press the Answer button on the touchscreen.
You can also press the Caller ID box to place the current call on hold or answer the incoming call.
Place/Retrieve A Call From HoldDuring an active call, press the Hold or Call On Hold button on the Phone main screen.
In-Call Controls
Making A Second Call While Current Call Is In ProgressWith a call in progress, dial a number from the keypad, recent calls, messages’ inbox, or from the downloaded contacts.
Swap Between CallsIf two calls are in progress (one active and one on hold), press the Swap button on the phone main screen. Only one call can be placed on hold at a time.
You can also push the Phone button to toggle between the active and held phone call.
JoinWhen two calls are in progress (one active and one on hold), press the Join button the phone main screen to combine all calls into a Conference Call.
Transfer Call To And From Mobile PhoneThe Uconnect Phone allows ongoing calls to be transferred from your mobile phone without terminating the call. To transfer an ongoing call from your connected mobile phone to the Uconnect Phone or vice versa, press the Transfer To Handset button on the Phone main screen.
1 — Transfer To Handset2 — Swap Calls3 — Mute4 — Hold Current Call5 — Join Two Calls
2
21_00_U5_EN_USC_t.book Page 55

56 UCONNECT MODES
Call TerminationTo end a call in progress, momentarily press the End Call button on the touchscreen or the Phone End button on the steering wheel. Only the active call(s) will be terminated and if there is a call on hold, it will become the new active call.
RedialPress the Redial button on the touchscreen, or push the VR button and after the “Listening” prompt and the following beep, say “Redial”.
The Uconnect Phone will call the last number that was dialed from your mobile phone.
Call ContinuationCall continuation is the progression of a phone call on the Uconnect Phone after the vehicle ignition has been switched to OFF.
NOTE:The call will remain within the vehicle audio system until the phone becomes out of range for the Bluetooth® connection. It is recom-mended to press the Transfer button on the touchscreen when leaving the vehicle.
THINGS YOU SHOULD KNOW ABOUT UCONNECT PHONE
Voice CommandFor the best performance:
Always wait for the beep before speaking
Speak normally, without pausing, just as you would speak to a person sitting a few feet/meters away from you
Ensure that no one other than you is speaking during a voice command period
Low-To-Medium Blower Setting
Low-To-Medium Vehicle Speed
Low Road Noise
Smooth Road Surface
Fully Closed Windows
Dry Weather Conditions
Even though the system is designed for many languages and accents, the system may not always work for some.
NOTE:It is recommended that you do not store names in your Favorites phonebook while the vehicle is in motion.
Number and name recognition rate is optimized when the entries are not similar. You can say “O” (letter “O”) for “0” (zero).
Even though international dialing for most number combinations is supported, some shortcut dialing number combinations may not be supported.
WARNING!ALWAYS drive safely with your hands on the wheel. You have full responsibility and assume all risks related to the use of the Uconnect features and applications in this vehicle. Only use Uconnect when it is safe to do so. Failure to do so may result in an accident involving serious injury or death.
21_00_U5_EN_USC_t.book Page 56

UCONNECT MODES 57
Audio Performance
Audio quality is maximized under:
Low-To-Medium Blower Setting
Low-To-Medium Vehicle Speed
Low Road Noise
Smooth Road Surface
Fully Closed Windows
Dry Weather Conditions
Operation From The Driver's Seat
Performance such as audio clarity, echo, and loudness to a large degree rely on the phone and network, and not the Uconnect Phone.
Echo at the far end can sometimes be reduced by lowering the in-vehicle audio volume.
Phone Voice Commands — If EquippedMaking and answering hands-free phone calls is easy with Uconnect. When the Phonebook button is illuminated on your touchscreen, your system is ready. Check UconnectPhone.comfor mobile phone compatibility and pairing instructions.
Push the Phone button or say the system activation word. The system activation word can either be “Uconnect” or the brand name ofthe vehicle. This word can be altered in the Uconnect Settings.
Wait for the beep to say a command. See some examples below:
“Call John Smith”
“Dial 123 456 7890”
“Redial” (call previous outgoing phone number)
“Call back” (call previous incoming phone number)
Did You Know: When providing a Voice Command, push the Phone button and or say the system activation word and say “Call,” then pronounce the name exactly as it appears in your phonebook. When a contact has multiple phone numbers, you can say “Call John Smith work.”
Voice Text Reply — If EquippedUconnect can announce incoming text messages. Push the VR button , Phone button , or say the vehicle activation word and say:
1. “Listen” to have the system read an incoming text message. (Must have compatible mobile phone paired to Uconnect system.)
2. “Reply” after an incoming text message has been read.
Listen to the Uconnect prompts. After the beep, repeat one of the predefined messag-es and follow the system prompts.
PRE-DEFINED VOICE TEXT REPLY RESPONSES
Yes. Stuck in traffic. See you later.
No. Start without me. I’ll be late.
Okay. Where are you? I will be 5 <or 10, 15, 20, 25,
30, 45, 60> minutes late.
Call me. Are you there yet?
2
21_00_U5_EN_USC_t.book Page 57
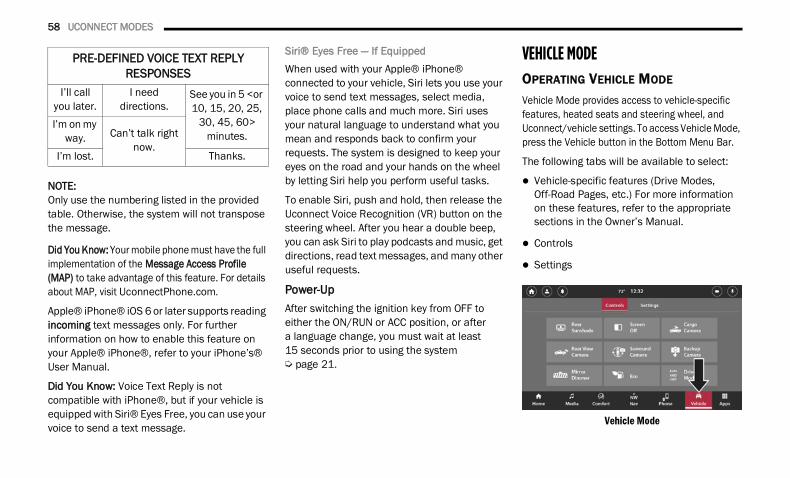
58 UCONNECT MODES
NOTE:Only use the numbering listed in the provided table. Otherwise, the system will not transpose the message.
Did You Know: Your mobile phone must have the full implementation of the Message Access Profile (MAP) to take advantage of this feature. For details about MAP, visit UconnectPhone.com.
Apple® iPhone® iOS 6 or later supports reading incoming text messages only. For further information on how to enable this feature on your Apple® iPhone®, refer to your iPhone’s® User Manual.
Did You Know: Voice Text Reply is not compatible with iPhone®, but if your vehicle is equipped with Siri® Eyes Free, you can use your voice to send a text message.
Siri® Eyes Free — If EquippedWhen used with your Apple® iPhone® connected to your vehicle, Siri lets you use your voice to send text messages, select media, place phone calls and much more. Siri uses your natural language to understand what you mean and responds back to confirm your requests. The system is designed to keep your eyes on the road and your hands on the wheel by letting Siri help you perform useful tasks.
To enable Siri, push and hold, then release the Uconnect Voice Recognition (VR) button on the steering wheel. After you hear a double beep, you can ask Siri to play podcasts and music, get directions, read text messages, and many other useful requests.
Power-UpAfter switching the ignition key from OFF to either the ON/RUN or ACC position, or after a language change, you must wait at least 15 seconds prior to using the system Ú page 21.
VEHICLE MODEOPERATING VEHICLE MODE
Vehicle Mode provides access to vehicle-specific features, heated seats and steering wheel, and Uconnect/vehicle settings. To access Vehicle Mode, press the Vehicle button in the Bottom Menu Bar.
The following tabs will be available to select:
Vehicle-specific features (Drive Modes, Off-Road Pages, etc.) For more information on these features, refer to the appropriate sections in the Owner’s Manual.
Controls
Settings
Vehicle Mode
I’ll call you later.
I need directions.
See you in 5 <or 10, 15, 20, 25,
30, 45, 60> minutes.
I’m on my way. Can’t talk right
now.I’m lost. Thanks.
PRE-DEFINED VOICE TEXT REPLY RESPONSES
21_00_U5_EN_USC_t.book Page 58
UCONNECT MODES 59
ControlsPress the Controls tab to access the Controls menu. From here, you can turn on and off the heated/vented seats (if equipped), heated steering wheel (if equipped), and turn on and off Stop/Start. If equipped, you can also view the Parkview Backup Camera or the Surround View Camera.
For more information of these features, refer to the appropriate section within the Owner’s Manual.
Settings Press the Settings tab to display the setting screen. In this mode, the Uconnect system allows you to access all of your programmable features.
NOTE:Depending on the vehicle’s options, available feature settings may vary.
When making a selection, press the desired menu on the touchscreen. Once in the desired menu, press and release the preferred setting until a check mark appears next to the setting, showing that setting has been selected. Once the selection is complete, press one of the other buttons on the touchscreen to exit “Settings”. Pressing the Up or Down Arrow button, or dragging your finger on the touchscreen, will allow you to scroll up or down through the available settings and menus.
Refer to “Uconnect Settings” in “Multimedia” in the Owner’s Manual for further information.
APPS MODE (APPS DRAWER)OPERATING APPS MODE
Apps Mode (Apps Drawer) provides a location where all the available apps (preinstalled or downloaded) are available for easy access. To enter Apps Mode, press the Apps button in the Bottom Menu Bar.
The following tabs are available:
Favorites: Apps set as a favorite will display under this tab.
Recent: Apps will display under this tab in the order in which they were used, starting with the newest first.
Categories: Apps will display under this tab, divided into categories based upon the apps function.
All: All available apps will display under this tab.
Apps Mode
2
21_00_U5_EN_USC_t.book Page 59
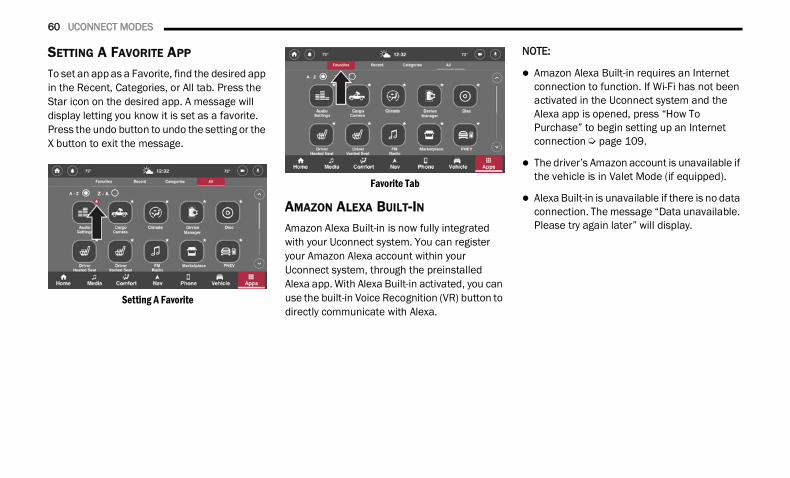
60 UCONNECT MODES
SETTING A FAVORITE APP
To set an app as a Favorite, find the desired app in the Recent, Categories, or All tab. Press the Star icon on the desired app. A message will display letting you know it is set as a favorite. Press the undo button to undo the setting or the X button to exit the message.
Setting A Favorite
Favorite Tab
AMAZON ALEXA BUILT-INAmazon Alexa Built-in is now fully integrated with your Uconnect system. You can register your Amazon Alexa account within your Uconnect system, through the preinstalled Alexa app. With Alexa Built-in activated, you can use the built-in Voice Recognition (VR) button to directly communicate with Alexa.
NOTE:
Amazon Alexa Built-in requires an Internet connection to function. If Wi-Fi has not been activated in the Uconnect system and the Alexa app is opened, press “How To Purchase” to begin setting up an Internet connection Ú page 109.
The driver’s Amazon account is unavailable if the vehicle is in Valet Mode (if equipped).
Alexa Built-in is unavailable if there is no data connection. The message “Data unavailable. Please try again later” will display.
21_00_U5_EN_USC_t.book Page 60

UCONNECT MODES 61
Linking Your Amazon Account To The Amazon Alexa AppTo begin using Alexa Built-in through your Uconnect system, an active Amazon account must be linked with the installed Alexa app.To begin linking the accounts:
Linking Alexa
1. Open the Amazon Alexa app by pressing “Apps” in the Bottom Menu Bar, and then selecting “All Apps”.
2. Press the Get Started button to begin this process.
3. The system will generate a code and instruct you to go to www.amazon.com/code on your smartphone, computer, or tablet.
4. Once at the website, log into your Amazon account.
5. Enter the code provided on the touchscreen and press “Enter”. The account will now be linked. It may take up to 10 seconds for the account to link to the vehicle.
6. Alexa will request access to your GPS location. Press “Share” to share GPS location or “Skip” to not share GPS location.
Location Request
NOTE:
Amazon account linking cannot be performed while the vehicle is in motion. While in motion, the vehicle will display the “Unavailable While Driving” message. To link the account, come to a complete stop and start the above procedure.
If the code remains inactive or there is an authentication error, press “Retry”, and Amazon will generate a new code.
Once the account is linked, the Voice button on the Accounts page will now open an Alexa Voice Recognition (VR) session.
Using The Amazon Alexa Voice SessionWhen an Amazon account is linked to the Alexa app, you can use the vehicle’s Voice Recognition (VR) button to activate an Alexa voice session. To begin, press the VR button and say “Alexa”. When “Alexa” is recognized during a voice session, an Alexa VR session is activated. Pressing the VR button on the Alexa app will also activate an Alexa VR session.
If you say “Alexa”, the Alexa session is opened. A “listening” tone is played, and the request can be spoken.
If you say “Alexa” and a request, the request will be sent to Alexa without a need to repeat the request.
While Alexa is responding, press the VR button to “barge-in” and interrupt the response. You can provide a new request while Alexa is listening.
2
21_00_U5_EN_USC_t.book Page 61

62 UCONNECT MODES
Media Mode And Amazon Alexa Built-InWith Alexa Built-in, you can stream music through your vehicle’s speakers and control the audio on the touchscreen. To begin, press the VR button and say “Alexa, play song/genre/artist/album/etc.”. The source being played through the Media Mode: Now Playing screen will change to Amazon Alexa. The screen will not automatically redirect you to the Media screen Ú page 26.
NOTE:
If an Amazon account is not linked, the Alexa source will not appear under the Media Sources.
Pressing the Alexa source will open the Alexa audio player.
If audio is playing from the Alexa audio player and you switch to another source, the audio stream will pause. Opening the Alexa audio player again will resume the audio stream.
The Steering Wheel Audio controls can be used with Amazon Alexa to increase or decrease volume or Seek Up or Seek Down between tracks.
Amazon Alexa Built-In LocationsThrough Amazon Alexa Built-in, you can use your voice to find certain locations and map it directly to the vehicle’s navigation system (if equipped). To begin, say “Alexa, find location name/type”. The touchscreen will display a list of search results. This screen will display the name of the location, the address, and the distance to the location (if available).
Press the Phone icon (if available) to call the location. A device must be paired to the system for the call to be placed.
Press the Map icon to display the location on the Navigation map. Your Uconnect system must be equipped with Navigation Ú page 71.
Amazon Alexa Built-In Lists And CalendarThrough the Amazon Alexa Built-in app, you can view your lists and events saved in your Alexa calendar. To begin, say “Alexa, show me list name/my calendar”.
You must have your calendar linked via the Alexa app to view the Calendar on the touchscreen. To add an event, say “Alexa, add an event”. To remove an event, say “Alexa, delete <name of event>”.
Amazon Alexa Built-In Settings And Disconnecting AccountsThrough the Amazon Alexa app Home Page, you can access the apps settings and disconnect your Amazon account from the vehicle. To enter Settings, press the Amazon Alexa app from the App Drawer. Then, press the Settings tab to enter Settings.
21_00_U5_EN_USC_t.book Page 62
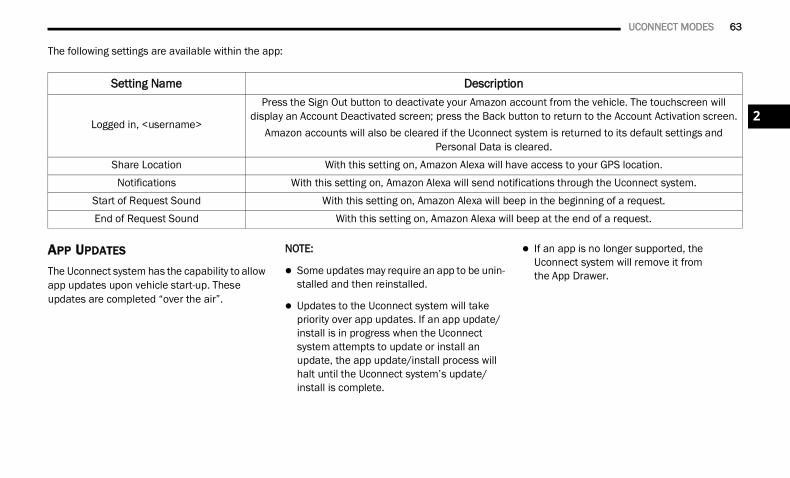
UCONNECT MODES 63
The following settings are available within the app:
APP UPDATES
The Uconnect system has the capability to allow app updates upon vehicle start-up. These updates are completed “over the air”.
NOTE:
Some updates may require an app to be unin-stalled and then reinstalled.
Updates to the Uconnect system will take priority over app updates. If an app update/install is in progress when the Uconnect system attempts to update or install an update, the app update/install process will halt until the Uconnect system’s update/install is complete.
If an app is no longer supported, the Uconnect system will remove it fromthe App Drawer.
Setting Name Description
Logged in, <username>
Press the Sign Out button to deactivate your Amazon account from the vehicle. The touchscreen will display an Account Deactivated screen; press the Back button to return to the Account Activation screen.
Amazon accounts will also be cleared if the Uconnect system is returned to its default settings and Personal Data is cleared.
Share Location With this setting on, Amazon Alexa will have access to your GPS location.Notifications With this setting on, Amazon Alexa will send notifications through the Uconnect system.
Start of Request Sound With this setting on, Amazon Alexa will beep in the beginning of a request.End of Request Sound With this setting on, Amazon Alexa will beep at the end of a request.
2
21_00_U5_EN_USC_t.book Page 63

64
ANDROID AUTO™ & APPLE CARPLAY®
ANDROID AUTO™ Android Auto™ is a feature of your Uconnect system, and your Android™ 5.0 or higher powered smartphone with a data plan, that allows you to project your smartphone and a number of its apps onto the touchscreen radio display. Android Auto™ brings you useful information, and organizes it into simple cards that appear just when they are needed. Android Auto™ can be used with speech technology, the steering wheel controls, the knobs and buttons on your radio faceplate, and the radio display’s touchscreen to control many of your apps.
NOTE:Feature availability depends on your carrier and mobile phone manufacturer. Some Android Auto™ features may or may not be availablein every region and/or language.
To use Android Auto™ follow the following procedure:
1. Download the Android Auto™ app from the Google Play store on your Android™-powered smartphone.
2. Connect your Android™-powered smartphone to one of the media USB ports in your vehicle.
NOTE:Be sure to use the factory-provided USB cable that came with your phone, as aftermarket cables may not work.
3. Or, press the Phone button and then “Device Manager”. If the smartphone is paired with the vehicle and app is installed on the smartphone, you can use Device Manager to wirelessly connect your smartphone to the Uconnect system. Press the Android Auto™ button in the device manager to wirelessly connect it.
NOTE:For more information about your device’s connectivity Ú page 45.
Android Auto™
1 — LTE Data Coverage2 — Android Auto™ Icon
21_00_U5_EN_USC_t.book Page 64

ANDROID AUTO™ & APPLE CARPLAY® 65
NOTE:To use Android Auto™, make sure you are in an area with cellular coverage. Android Auto™ may use cellular data and your cellular coverage is shown in the upper right corner of the radio screen. Data plan rates apply.
4. Once the device is connected and recognized, the Phone icon on the Bottom Menu Bar changes to the Android Auto™ icon. Android Auto™ launches immediately Ú page 69. You can also launch it by pressing the Android Auto™ icon on the touchscreen.
Once Android Auto™ is up and running on your Uconnect system, the following features can be utilized using your smartphone’s data plan:
Google Maps™ and Waze for navigation
Google Play Music, Spotify, iHeart Radio, etc. for music
Hands-free calling and texting for communi-cation
Various compatible apps
MAPS
Push and hold the Voice Recognition (VR) button on the steering wheel until a beep sounds, or tap the Microphone icon on your device/touchscreen to
ask Google to take you to a desired destination by voice. You can also touch the Navigation icon in Android Auto™ to access Google Maps™.
NOTE:If the VR button is not held, and is only pushed, the built-in Uconnect Navigation system (if equipped) will launch instead of the Android Auto’s™ Google Maps™.
While using Android Auto™, Google Maps™ provides voice-guided:
Navigation
Live traffic information
Lane guidance
NOTE:If you are using the built-in Uconnect Navigation system and start a new route using Android Auto™, your Uconnect Navigation route will be canceled and a new route will be started in Android Auto™. If you are already using the Android Auto™ navigation system, and attempt to start a new route using the built-in Uconnect Navigation system, a pop-up will appear asking if you would like to switch from smartphone naviga-tion to Uconnect Navigation. Selecting “Yes” switches the navigation type to the newly used method of navigation and a route is planned for the new destination. If “No” is selected the navi-gation type remains unchanged.
For further information, refer to www.android.com/auto/ (US) or https://www.android.com/intl/en_ca/auto/ (Canada).
For further information on the navigation function, please refer to https://support.google.com/android or https://support.google.com/androidauto/.
3
21_00_U5_EN_USC_t.book Page 65
66 ANDROID AUTO™ & APPLE CARPLAY®
MUSIC
Android Auto™ allows you to access and stream your favorite music with apps like Google Play Music, iHeartRadio, and Spotify. Using your
smartphone’s data plan, you can stream endless music on the road.
NOTE:Music apps, playlists, and stations must be set up on your smartphone prior to using Android Auto™ for them to work with Android Auto™.
NOTE:To see the track details for the music playing through Android Auto™, select the Uconnect system’s media screen.
For further information, refer to https://support.google.com/androidauto.
COMMUNICATION
With Android Auto™ connected, push and hold the VR button on the steering wheel to activate voice recognition specific to Android Auto™. This allows
you to send and reply to text messages, have incoming text messages read out loud, and place and receive hands-free calls.
APPS
The Android Auto™ App displays all the compatible apps that are available to use with Android Auto™, every time it is launched. You must have the compatible app downloaded, and you must be signed in to the app through your mobile device for it to work with Android Auto™.
Refer to https://play.google.com/store/app to see the latest list of available apps for Android Auto™.
ANDROID AUTO™ VOICE COMMAND Android Auto™ allows you to use your voice to interact with Android’s™ best-in-class speech technology through your vehicle’s voice recognition system, and use your smartphone’s data plan to project your Android™-powered smartphone and a number of its apps onto your Uconnect touchscreen. Connect your Android™ 5.0 or higher to one of the media USB ports, using the factory-provided USB cable, and press the new Android Auto™ icon that replaces your “Phone” icon on the main menu bar to begin Android Auto™.
NOTE:Feature availability depends on your carrier and mobile phone manufacturer. Some Android Auto™ features may or may not be available in every region and/or language.
Push and hold the VR button on the steering wheel, or say the system activation word, or press and hold the “Microphone” icon within Android Auto™, to activate Android’s™ VR, which recognizes natural voice commands, to use a list of your smartphone’s features:
Maps
Music
Phone
Text Messages
Additional Apps
NOTE:Requires compatible smartphone running Android™ 5.0 or higher and download app on Google Play. Android™, Android Auto™, and Google Play are trademarks of Google Inc. Android Auto™ may be downloaded automati-cally depending on the software version installed on your mobile device.
21_00_U5_EN_USC_t.book Page 66

ANDROID AUTO™ & APPLE CARPLAY® 67
APPLE CARPLAY®Uconnect works seamlessly with Apple CarPlay®, the smarter, more secure way to use your iPhone® in the car, and stay focused on the road. Use your Uconnect Touchscreen display, the vehicle's knobs and controls, and your voice with Siri to get access to Apple Music®, Maps, Messages, and more.
NOTE:Feature availability depends on your carrier and mobile phone manufacturer. Some Apple CarPlay® features may or may not be available in every region and/or language.
To use Apple CarPlay®, make sure you are using iPhone® 5 or later, have Siri enabled in Settings, ensure your iPhone® is unlocked for the very first connection only, and then use the following procedure:
1. Connect your iPhone® to one of the media USB ports in your vehicle.
NOTE:Be sure to use the factory-provided cable that came with your phone, as aftermarket cables may not work.
2. Or, press the Phone button and then “Device Manager”. If the smartphone is paired with the vehicle and the app is installed on the smartphone, you can use Device Manager to wirelessly connect your smartphone to the Uconnect system. Press the Apple CarPlay® button in the device manager to wirelessly connect it.
3. Once the device is connected and recognized, the Phone icon on the Bottom Menu Bar changes to the Apple CarPlay® Icon. Apple CarPlay® launches immediately Ú page 69. You can also press the Apple CarPlay® icon on the touchscreen to launch it.
Apple CarPlay®
NOTE:To use Apple CarPlay®, make sure that cellular data is turned on, and that you are in an area with cellular coverage. Your data and cellular coverage is shown on the left side of the radio screen. Data plan rates apply.
1 — LTE Data Coverage2 — Apple CarPlay® Icon
3
21_00_U5_EN_USC_t.book Page 67
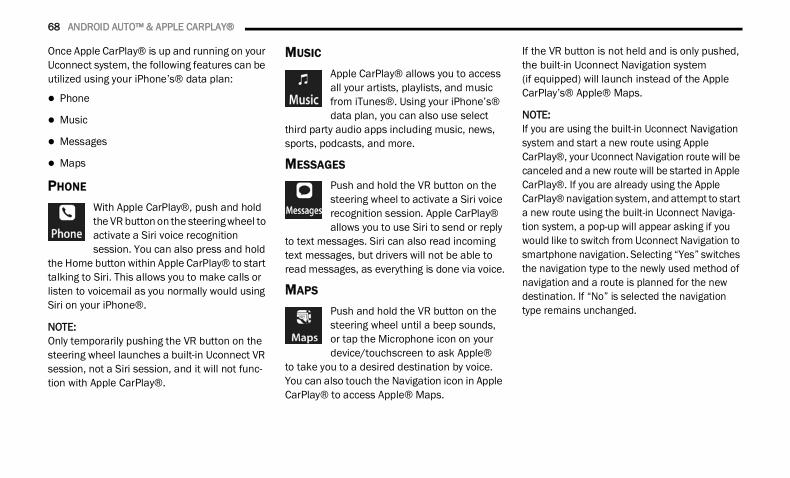
68 ANDROID AUTO™ & APPLE CARPLAY®
Once Apple CarPlay® is up and running on your Uconnect system, the following features can be utilized using your iPhone’s® data plan:
Phone
Music
Messages
Maps
PHONE
With Apple CarPlay®, push and hold the VR button on the steering wheel to activate a Siri voice recognition session. You can also press and hold
the Home button within Apple CarPlay® to start talking to Siri. This allows you to make calls or listen to voicemail as you normally would using Siri on your iPhone®.
NOTE:Only temporarily pushing the VR button on the steering wheel launches a built-in Uconnect VR session, not a Siri session, and it will not func-tion with Apple CarPlay®.
MUSIC
Apple CarPlay® allows you to access all your artists, playlists, and music from iTunes®. Using your iPhone’s® data plan, you can also use select
third party audio apps including music, news, sports, podcasts, and more.
MESSAGES
Push and hold the VR button on the steering wheel to activate a Siri voice recognition session. Apple CarPlay® allows you to use Siri to send or reply
to text messages. Siri can also read incoming text messages, but drivers will not be able to read messages, as everything is done via voice.
MAPS
Push and hold the VR button on the steering wheel until a beep sounds, or tap the Microphone icon on your device/touchscreen to ask Apple®
to take you to a desired destination by voice. You can also touch the Navigation icon in Apple CarPlay® to access Apple® Maps.
If the VR button is not held and is only pushed, the built-in Uconnect Navigation system (if equipped) will launch instead of the Apple CarPlay’s® Apple® Maps.
NOTE:If you are using the built-in Uconnect Navigation system and start a new route using Apple CarPlay®, your Uconnect Navigation route will be canceled and a new route will be started in Apple CarPlay®. If you are already using the Apple CarPlay® navigation system, and attempt to start a new route using the built-in Uconnect Naviga-tion system, a pop-up will appear asking if you would like to switch from Uconnect Navigation to smartphone navigation. Selecting “Yes” switches the navigation type to the newly used method of navigation and a route is planned for the new destination. If “No” is selected the navigation type remains unchanged.
21_00_U5_EN_USC_t.book Page 68

ANDROID AUTO™ & APPLE CARPLAY® 69
APPS
The Apple CarPlay® App plays all compatible apps that are available to use, every time it is launched. You must have the compatible app downloaded, and you must be signed in to the app through your mobile device for it to work with Apple CarPlay®.
Refer to http://www.apple.com/ios/carplay/ (US) or https://www.apple.com/ca/ios/carplay/ (Canada) to see the latest list of available apps for Apple CarPlay®.
APPLE CARPLAY® VOICE COMMAND Apple CarPlay® allows you to use your voice to interact with Siri through your vehicle’s voice recognition system, and use your smartphone’s data plan to project your iPhone® and a number of its apps onto your Uconnect touchscreen. Connect your iPhone® 5 or higher to one of the media USB ports, using the factory-provided Lightning cable, and press the new Apple CarPlay® icon that replaces your “Phone” icon on the main menu bar to begin Apple CarPlay®.
NOTE:Feature availability depends on your carrier and mobile phone maker. Some Apple CarPlay® features may not be available in every region and/or language.
Push and hold the VR button on the steering wheel, say the system activation word, or press and hold the Home button within Apple CarPlay®, to activate Siri, which recognizes natural voice commands to use a list of your iPhone’s® features:
Phone
Music
Messages
Maps — If Equipped
Additional Apps — If Equipped
NOTE:Apple CarPlay® is a trademark of Apple® Inc. iPhone® is a trademark of Apple® Inc., regis-tered in the US and other countries. Apple® terms of use and privacy statements apply.
ANDROID AUTO™ AND APPLE CARPLAY® TIPS AND TRICKSDevice Manager And Turning Off Android Auto™ And Apple CarPlay®
Automatic launching of Android Auto™ and Apple CarPlay® can be deactivated through the Device Manager. To access this setting:
1. Press the Phone button in the Bottom Menu Bar.
2. Then, press “Device Manager” to show a list of paired devices.
3. Press the Gear icon next to the desired device to open the paired device settings.
3
21_00_U5_EN_USC_t.book Page 69
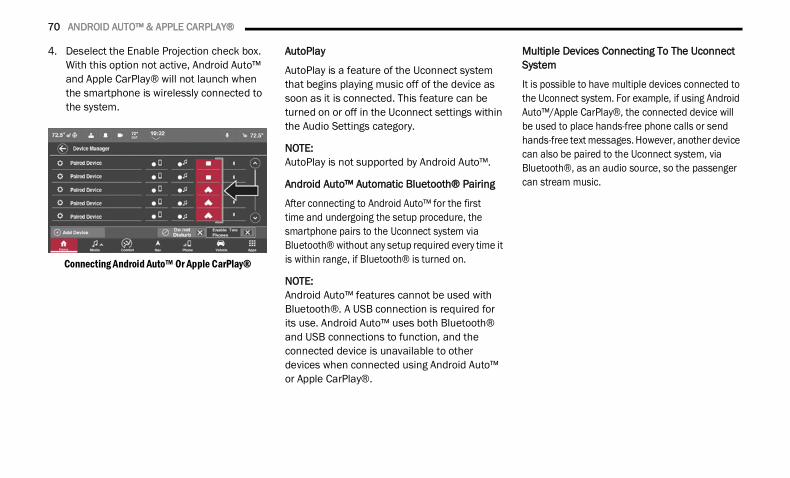
70 ANDROID AUTO™ & APPLE CARPLAY®
4. Deselect the Enable Projection check box. With this option not active, Android Auto™ and Apple CarPlay® will not launch when the smartphone is wirelessly connected to the system.
Connecting Android Auto™ Or Apple CarPlay®
AutoPlay
AutoPlay is a feature of the Uconnect system that begins playing music off of the device as soon as it is connected. This feature can be turned on or off in the Uconnect settings within the Audio Settings category.
NOTE:AutoPlay is not supported by Android Auto™.
Android Auto™ Automatic Bluetooth® Pairing
After connecting to Android Auto™ for the first time and undergoing the setup procedure, the smartphone pairs to the Uconnect system via Bluetooth® without any setup required every time it is within range, if Bluetooth® is turned on.
NOTE:Android Auto™ features cannot be used with Bluetooth®. A USB connection is required forits use. Android Auto™ uses both Bluetooth® and USB connections to function, and the connected device is unavailable to other devices when connected using Android Auto™ or Apple CarPlay®.
Multiple Devices Connecting To The Uconnect System
It is possible to have multiple devices connected to the Uconnect system. For example, if using Android Auto™/Apple CarPlay®, the connected device will be used to place hands-free phone calls or send hands-free text messages. However, another device can also be paired to the Uconnect system, via Bluetooth®, as an audio source, so the passenger can stream music.
21_00_U5_EN_USC_t.book Page 70
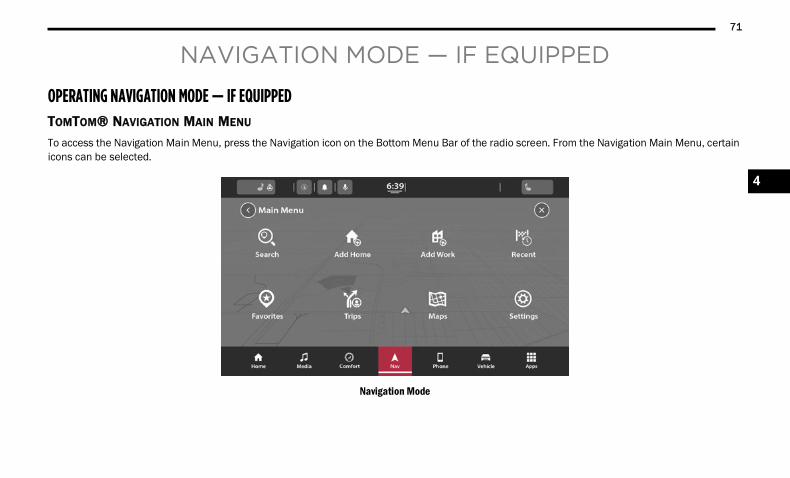
71
NAVIGATION MODE — IF EQUIPPED
OPERATING NAVIGATION MODE — IF EQUIPPEDTOMTOM® NAVIGATION MAIN MENU
To access the Navigation Main Menu, press the Navigation icon on the Bottom Menu Bar of the radio screen. From the Navigation Main Menu, certain icons can be selected.
Navigation Mode
4
21_00_U5_EN_USC_t.book Page 71

72 NAVIGATION MODE — IF EQUIPPED
Some of these icons may include:
Search
The Search function can either be accessed in the upper left side of the touchscreen or within the Navigation Main Menu. Press either of these
buttons to enter the name or address of a place to navigate to.
NOTE:This feature is not available if the vehicle is in motion, going 5 mph (8 km/h) or more.
Add/Drive HomePress this button to add a home location. When a home location is set, press this button again or the Favorites button and then select “Home” to navigate
to set home location.
Add/Drive To WorkPress this button to add a Work location. When a work location is set, press
this button again or the Favorites button and then select “Work” to navigate to set work location.
Recent Press this button to select recent locations.
Favorites Press this button to select saved favorites location.
Trips Press this button to select saved trips.
21_00_U5_EN_USC_t.book Page 72

NAVIGATION MODE — IF EQUIPPED 73
PLANNING A ROUTE
Using the search bar provides a wide range of ways to find favorites and then navigate to them. You can search your destination in different ways.
A specific address
A partial address
A zip code
A city center
A Point of Interest (POI)/a type of place near your current location
Using Search
Press the Search button in the main menuor in the Map View to start searching.
The search screen will open, displaying the keyboard and the following buttons:
Search
Back Arrow Button: Press the Back button to return to the previous screen.
Search Input Box: Enter your search term in the search input box. As you type, matching addresses and POIs are shown.
Type Of Search: Press this button to change the type of search to any of the following:
Whole Map: Select this option to search your current map with no limit to the search radius. Your current location is the center of the search. The results are ranked by exact match.
Near Me: Select this option to search with your current GPS location as the search center. The results are ranked by distance.
Maps Press this button to select different options for the map.
Settings Press this button to view all the available settings.
1 — Back Arrow Button2 — Search Input Box3 — Type Of Search Button
4
21_00_U5_EN_USC_t.book Page 73

74 NAVIGATION MODE — IF EQUIPPED
In Town or City: Select this option to use a town or city as the center of your search. Enter the town or city name using the keyboard on the touchscreen. When you have selected the town or city from the results list, you can search for an address or POI in that city.
Along Route: When a route has been planned, you can select this option to search along your route for a specific type of location, such as a POI category. When prompted, enter the type of location and then select it in the right-hand column to carry out the search.
NOTE:A route must already be programmed in order to access this feature.
Near Destination: When a route has been planned, you can select this option to use your destination as the center of your search.
NOTE:A route must already be programmed in order to access this feature.
Latitude/Longitude: Select this option to enter a pair of latitude and longitude coordinates.
View Button: Press this button to return to the Map View or Guidance View.
Show/Hide Keyboard: Press this button to show or hide the keyboard.
List/Map Button: Select this button to switch between showing the results in a list or showing the results on the map.
Keyboard Layout Button: Press this button to change your keyboard layout to another language.
ABC or 123?! Button: Press the ABC button to switch between an ABC or QWE keyboard. Press the !@# button to use numbers and symbols on your keyboard.
Planning A Route — Searching For A POI
You can search for a POI type, such as a restaurant or tourist attraction. Alternatively, you can search for a specific POI.
1. Use the keyboard to enter the name of the POI that you want to plan a route to. Or, press the three dots to view more POI categories and search your POI from there.
2. Select a POI category, such as “Restaurant” or an individual POI. If you select a POI category, only POIs from that category are shown. You can then select an individual POI. The location is shown on the map.
3. To see more information about the POI, select the POI on the map and then select the pop-up menu button. Select “More Information” on the pop-up menu.
4. To plan a route to this destination, select the Drive button Ú page 81.
21_00_U5_EN_USC_t.book Page 74
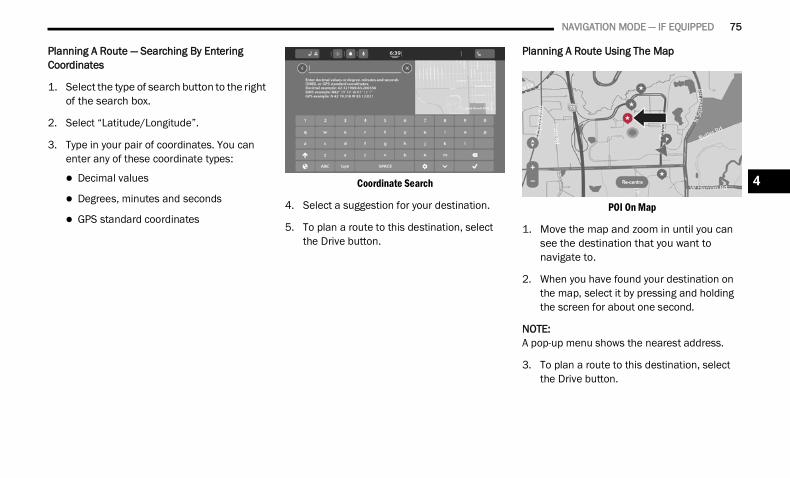
NAVIGATION MODE — IF EQUIPPED 75
Planning A Route — Searching By Entering Coordinates
1. Select the type of search button to the right of the search box.
2. Select “Latitude/Longitude”.
3. Type in your pair of coordinates. You can enter any of these coordinate types:
Decimal values
Degrees, minutes and seconds
GPS standard coordinates
Coordinate Search
4. Select a suggestion for your destination.
5. To plan a route to this destination, select the Drive button.
Planning A Route Using The Map
POI On Map
1. Move the map and zoom in until you can see the destination that you want to navigate to.
2. When you have found your destination on the map, select it by pressing and holding the screen for about one second.
NOTE:A pop-up menu shows the nearest address.
3. To plan a route to this destination, select the Drive button.
4
21_00_U5_EN_USC_t.book Page 75

76 NAVIGATION MODE — IF EQUIPPED
Planning A Route Using Favorites
1. Select the Main Menu button to open the Main Menu.
2. Select “Favorites”.
3. Select the saved location you want to navigate to, for example “Home”.
Saved Location
4. To plan a route to this location, select the Drive button.
ENDING A ROUTE
In the Map View, press the End Route button on the bottom left corner of the touchscreen to clear the currently planned route. The route will end, and the screen will return to the map view.
Ending A Route
CHANGING YOUR ROUTE
After you plan a route, you may want to change the route, the destination, or end navigation. There are various ways to change your route without the need to completely re-plan the entire journey.
Options Button
21_00_U5_EN_USC_t.book Page 76

NAVIGATION MODE — IF EQUIPPED 77
To change the active route, press the Options button in the Map View. The following options are available:
OPTIONS MENU
Setting Name Icon Description
Find Alternative
Press the Find Alternative button while driving on a planned route to show up to three alternative routes on the map view. Each alternative route shows the
difference in travel time.Select the new route by tapping the desired travel time.
Press “Drive”. Guidance to your destination will automatically begin, and the Map View appears as you begin driving.
Avoid Blocked Road
Press the Avoid Blocked Road button to avoid an unexpected obstacle on your route. A new route will be found that avoids blocked roads.
You may be shown a maximum of two alternatives depending on the road network between you and your destination.
The new route is shown on the map view with the difference in travel time.Select the new route by pressing on the new travel time. Guidance to your
destination will resume, avoiding blocked roads. The Map View will appear as you begin driving.
NOTE:It may not be possible to find an alternative route around the blocked road if none exists.
4
21_00_U5_EN_USC_t.book Page 77

78 NAVIGATION MODE — IF EQUIPPED
Avoid Part Of Route
Press the Avoid Part Of Route button to avoid part of the current route.You are shown a list of the sections that make up your current route.
Select the section of the route you want to avoid.To avoid the chosen section of the route, select “Avoid”. A new route is
planned that will avoid your chosen route sections.
NOTE:To avoid more sections of the route, repeat the steps above. It may not be possible to find an alternative route around the section if none exists.
Report Speed Trap Press the Report Speed Trap button to report a speed trap along your route that the police set up, which is designed to catch those driving over the speed limit.
Route Overview
Press the Route Overview button to show a full preview of the current route.The Map View will display the fully mapped out route as well as the navigation
instructions.
NOTE:This feature is not available while driving.
Setting Name Icon Description
21_00_U5_EN_USC_t.book Page 78
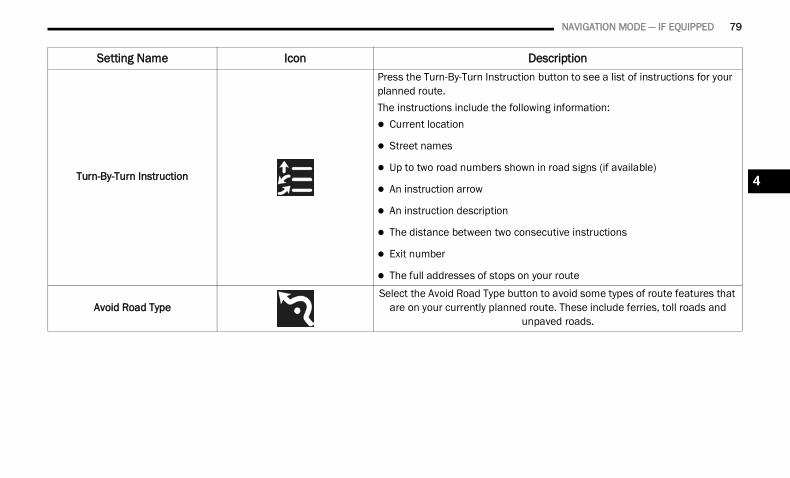
NAVIGATION MODE — IF EQUIPPED 79
Turn-By-Turn Instruction
Press the Turn-By-Turn Instruction button to see a list of instructions for your planned route.The instructions include the following information: Current location
Street names
Up to two road numbers shown in road signs (if available)
An instruction arrow
An instruction description
The distance between two consecutive instructions
Exit number
The full addresses of stops on your route
Avoid Road TypeSelect the Avoid Road Type button to avoid some types of route features that
are on your currently planned route. These include ferries, toll roads and unpaved roads.
Setting Name Icon Description
4
21_00_U5_EN_USC_t.book Page 79
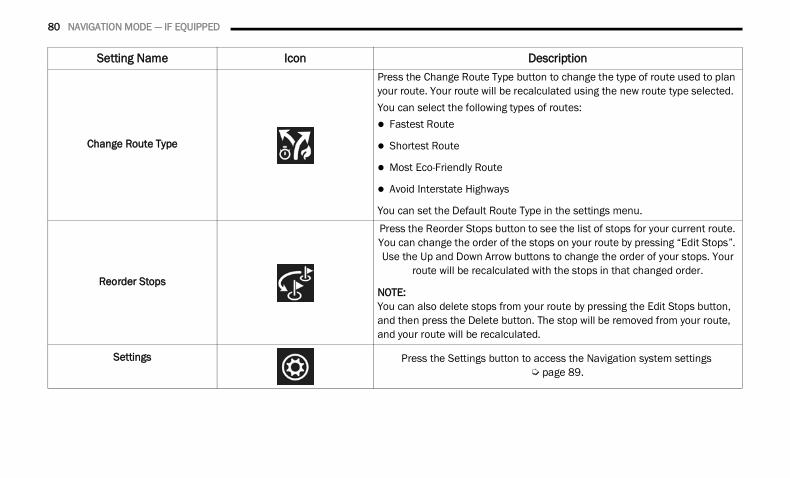
80 NAVIGATION MODE — IF EQUIPPED
Change Route Type
Press the Change Route Type button to change the type of route used to plan your route. Your route will be recalculated using the new route type selected.You can select the following types of routes: Fastest Route
Shortest Route
Most Eco-Friendly Route
Avoid Interstate Highways
You can set the Default Route Type in the settings menu.
Reorder Stops
Press the Reorder Stops button to see the list of stops for your current route. You can change the order of the stops on your route by pressing “Edit Stops”. Use the Up and Down Arrow buttons to change the order of your stops. Your
route will be recalculated with the stops in that changed order.
NOTE:You can also delete stops from your route by pressing the Edit Stops button, and then press the Delete button. The stop will be removed from your route, and your route will be recalculated.
Settings
Press the Settings button to access the Navigation system settings Ú page 89.
Setting Name Icon Description
21_00_U5_EN_USC_t.book Page 80
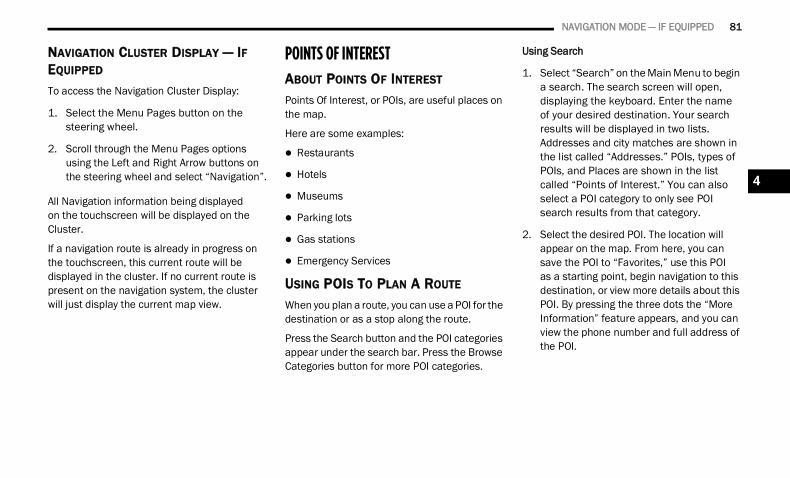
NAVIGATION MODE — IF EQUIPPED 81
NAVIGATION CLUSTER DISPLAY — IF EQUIPPED
To access the Navigation Cluster Display:
1. Select the Menu Pages button on the steering wheel.
2. Scroll through the Menu Pages options using the Left and Right Arrow buttons on the steering wheel and select “Navigation”.
All Navigation information being displayed on the touchscreen will be displayed on the Cluster.
If a navigation route is already in progress on the touchscreen, this current route will be displayed in the cluster. If no current route is present on the navigation system, the cluster will just display the current map view.
POINTS OF INTERESTABOUT POINTS OF INTEREST
Points Of Interest, or POIs, are useful places on the map.
Here are some examples:
Restaurants
Hotels
Museums
Parking lots
Gas stations
Emergency Services
USING POIS TO PLAN A ROUTE
When you plan a route, you can use a POI for the destination or as a stop along the route.
Press the Search button and the POI categories appear under the search bar. Press the Browse Categories button for more POI categories.
Using Search
1. Select “Search” on the Main Menu to begin a search. The search screen will open, displaying the keyboard. Enter the name of your desired destination. Your search results will be displayed in two lists. Addresses and city matches are shown in the list called “Addresses.” POIs, types of POIs, and Places are shown in the list called “Points of Interest.” You can also select a POI category to only see POI search results from that category.
2. Select the desired POI. The location will appear on the map. From here, you can save the POI to “Favorites,” use this POI as a starting point, begin navigation to this destination, or view more details about this POI. By pressing the three dots the “More Information” feature appears, and you can view the phone number and full address of the POI.
4
21_00_U5_EN_USC_t.book Page 81
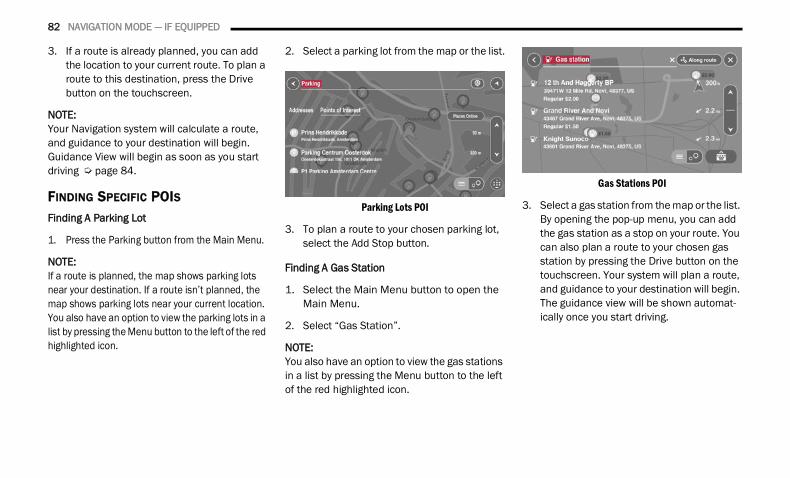
82 NAVIGATION MODE — IF EQUIPPED
3. If a route is already planned, you can add the location to your current route. To plan a route to this destination, press the Drive button on the touchscreen.
NOTE:Your Navigation system will calculate a route, and guidance to your destination will begin. Guidance View will begin as soon as you start driving Ú page 84.
FINDING SPECIFIC POISFinding A Parking Lot
1. Press the Parking button from the Main Menu.
NOTE:If a route is planned, the map shows parking lots near your destination. If a route isn’t planned, the map shows parking lots near your current location. You also have an option to view the parking lots in a list by pressing the Menu button to the left of the red highlighted icon.
2. Select a parking lot from the map or the list.
Parking Lots POI
3. To plan a route to your chosen parking lot, select the Add Stop button.
Finding A Gas Station
1. Select the Main Menu button to open the Main Menu.
2. Select “Gas Station”.
NOTE:You also have an option to view the gas stations in a list by pressing the Menu button to the left of the red highlighted icon.
Gas Stations POI
3. Select a gas station from the map or the list. By opening the pop-up menu, you can add the gas station as a stop on your route. You can also plan a route to your chosen gas station by pressing the Drive button on the touchscreen. Your system will plan a route, and guidance to your destination will begin. The guidance view will be shown automat-ically once you start driving.
21_00_U5_EN_USC_t.book Page 82

NAVIGATION MODE — IF EQUIPPED 83
VOICE COMMANDS — IF EQUIPPEDABOUT VOICE COMMAND
Instead of pressing the touchscreen to control your navigation system, you can use your voice to control navigation.
To view a list of available commands, press the “Help” button in the Main menu and then press “What can I say?”
USING VOICE CONTROL
The following example shows how to use voice control to plan a journey to your Home address:
1. Push the “Voice Recognition” (VR) button on the steering wheel, and after the beep, say a command. You can also say the system “Wake Up” word and then say a command. Or, say the system activation word to begin using Voice Commands.
NOTE:
The “Wake Up” word can be set through the Uconnect Settings. For further infor-mation, refer to “Uconnect Settings” within “Multimedia” in your Owner’s Manual.
You can interrupt the help message or system prompts by pushing the VR button and saying a Voice Command from the current category.
You can also interrupt the help message or system prompts by speaking. This feature is called “barge-in” and can be set through the Uconnect Settings. For further infor-mation, refer to “Uconnect Settings” within “Multimedia” in your Owner’s Manual.
A screen will pop up with examples of com-mands.
2. When you hear a beep, say a command of your choice. For example, you can say “Navigate home”.
NOTE:For accurate results, speak normally without trying to articulate words in an unnatural way.If there is excessive road noise, you may need to speak directly into the microphone.
3. If the command is correct, say “Yes”.
NOTE:If the command is incorrect, say “No” and repeat the command after you hear the prompt again. Your navigation system plans a route from your current location to your destination. To stop your navigation system from listening out for further commands, say “Cancel”.
4
21_00_U5_EN_USC_t.book Page 83

84 NAVIGATION MODE — IF EQUIPPED
GUIDANCE VIEWABOUT GUIDANCE VIEW
The Guidance View is used to guide you along the route to your destination. As soon as you start driving, your Navigation system will immediately start guiding you to your destination with spoken instructions and visual instructions on the touchscreen. You can also see your current location and details along your route, including 3D buildings in some cities. The Guidance View is normally in 3D. To show a 2D map with the map moving in your direction of travel, change the 2D and 3D default settings Ú page 89.
NOTE:When you have planned a route and the 3D guid-ance view is shown, select the Switch View button to change to the map view and use the interactive features. You can switch between 2D or 3D view by pressing the Arrow button on the left side of the touchscreen, above the mute icon.
Guidance View
1 — Switch View Button
Select the Switch View button to change between the Map View and the Guidance View.
2 — Current Location
This symbol shows your current location. Press this symbol, or the speed panel, to mark your current location.
3 — Route Bar
The Route Bar is shown when you have planned a route. The Route Bar contains arrival information, such as the estimated time of arrival, the length of time to drive to the destination from your current location, and information about the next stop, if you have stops on your route. The bottom of the Route Bar represents your current location and shows the distance to the next stop on your route.
4 — Speed Panel
Press this button to view the following information (if available):
The speed limit at your location
The name of the street you are driving on
NOTE:If you drive more than 3 mph (5 km/h) over the speed limit, the Speed Panel turns red. If you drive less than 3 mph (5 km/h) over the speed limit, the Speed Panel turns orange.
5 — Options Panel
Press this button to view the following information:
The direction of your next turn
The distance to your next turn
Lane guidance at some intersections
1 — Switch View Button2 — Current Location3 — Route Bar4 — Speed Panel5 — Options Button
21_00_U5_EN_USC_t.book Page 84

NAVIGATION MODE — IF EQUIPPED 85
ADVANCED LANE GUIDANCEABOUT LANE GUIDANCE
Your navigation system helps you prepare for highway exits and junctions by showing the correct driving lane for your planned route.
As you approach an exit or junction, the lane you need is shown on the screen and in the instruction panel.
NOTE:Lane guidance is not available for all intersec-tions or in all countries.
USING LANE GUIDANCE
There are two types of lane guidance:
Lane images
Instructions in the status bar
MAP VIEWABOUT MAP VIEW
The Map View is shown when you have no planned route. You can use Map View the same way as you might look at a traditional paper map. You can move around the map using gestures, and zoom using the zoom buttons. The map shows your current location and many other locations such as your Favorites Ú page 87.
Map View
Map View
1. Switch View ButtonPress the Switch View button to change be-tween the Map View and the Guidance View.1 — Switch View Button
2 — Map Symbols
3 — Selected Location4 — Your Route5 — Traffic Information6 — Current Location7 — Options Button
1 — Zoom Buttons2 — Re-center Button
4
21_00_U5_EN_USC_t.book Page 85

86 NAVIGATION MODE — IF EQUIPPED
2. Selected Location
Press and hold to select a location on the map. Select the Pop-Up menu button to show options for the location, or select the Drive button to plan a route to the location.
3. Map Symbols
Symbols are used on the map to show your destination and your saved places. Map symbols include:
Your destination
Your home location
A stop on your route
A location saved in Favorites
NOTE:For more information on how to set your home location or add locations to Favorites Ú page 87.
4. Your Route
If you have a planned route, it will appear on the map. You can select the route to clear it, change the route type, add a stop, or save changes to your route Ú page 76.
5. Traffic Information
Select the traffic incident to display informa-tion about the traffic delay.
6. Current Location
This symbol shows your current location on the map.
7. Options Button
Press this button to open the options.
8. Zoom Buttons
Select the zoom buttons to zoom in and out.
9. Re-center Button
If no route is planned, pressing this button moves the map to put your current location at the center.
DYNAMIC RANGE MAPPINGDynamic Range Mapping is a feature of your Uconnect TomTom® Navigation system that calculates the total number of miles to your destination against the total remaining fuel in your vehicle. If the system detects that you will be unable to reach the destination with the current fuel available, it will give you the option to add a gas station to the route.
1. Enter a destination into the navigation system using one of the ways shown in “Planning A Route” Ú page 73.
2. When the destination is entered and routing begins, the Uconnect system will calculate if the destination is reachable with the available fuel.
3. If enough fuel is present, navigation will start as normal. If the system detects that not enough fuel is present, a pop-up will display with one of the following:
“Low Fuel. Do you want to add a Fuel station?”: This pop-up will display if the fuel light is already on when a destination is entered.
“Insufficient fuel to reach destination. Do you want to add a Fuel station?”: This pop-up will display when the system determines there is not enough fuel to reach the desired destination.
“Upon reaching the destination, less than a quarter fuel level remaining. Do you want to add a Fuel station?”: This pop-up will display when the destination is reach-able, but the vehicle will have less than a quarter tank of fuel left.
21_00_U5_EN_USC_t.book Page 86
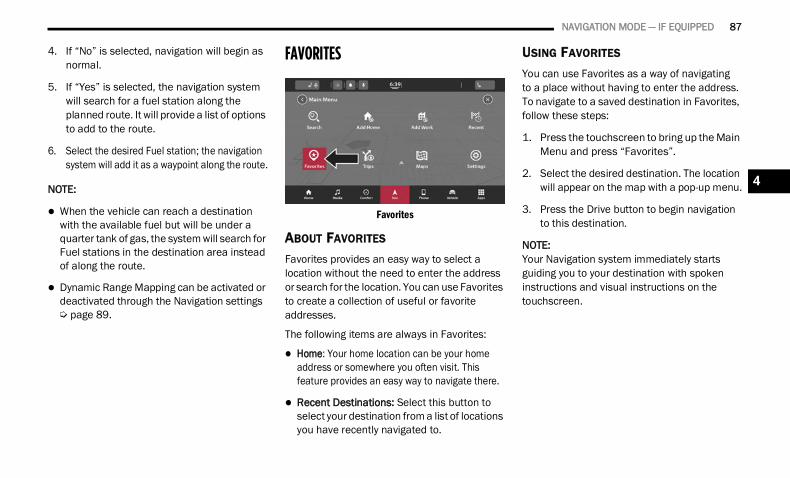
NAVIGATION MODE — IF EQUIPPED 87
4. If “No” is selected, navigation will begin as normal.
5. If “Yes” is selected, the navigation system will search for a fuel station along the planned route. It will provide a list of options to add to the route.
6. Select the desired Fuel station; the navigation system will add it as a waypoint along the route.
NOTE:
When the vehicle can reach a destination with the available fuel but will be under a quarter tank of gas, the system will search for Fuel stations in the destination area instead of along the route.
Dynamic Range Mapping can be activated or deactivated through the Navigation settings Ú page 89.
FAVORITES
Favorites
ABOUT FAVORITES
Favorites provides an easy way to select a location without the need to enter the address or search for the location. You can use Favorites to create a collection of useful or favorite addresses.
The following items are always in Favorites:
Home: Your home location can be your home address or somewhere you often visit. This feature provides an easy way to navigate there.
Recent Destinations: Select this button to select your destination from a list of locations you have recently navigated to.
USING FAVORITES
You can use Favorites as a way of navigating to a place without having to enter the address. To navigate to a saved destination in Favorites, follow these steps:
1. Press the touchscreen to bring up the Main Menu and press “Favorites”.
2. Select the desired destination. The location will appear on the map with a pop-up menu.
3. Press the Drive button to begin navigation to this destination.
NOTE:Your Navigation system immediately starts guiding you to your destination with spoken instructions and visual instructions on the touchscreen.
4
21_00_U5_EN_USC_t.book Page 87

88 NAVIGATION MODE — IF EQUIPPED
ADDING A LOCATION TO FAVORITES
Adding From Favorites
1. In the Main Menu, press “Favorites”.
2. Press “Add To Favorites”.
Add To Favorites
3. To select a location, do one of the following:
Zoom in on the map to the location you want to select. The location will appear on the map. Press and hold to select the location, then press the add location symbol.
Search for a location using the search function. Select “Show on Map,” then press the add location symbol.
Adding A Location From The Map
1. In Map View, move the map and zoom in until you can see the destination that you want to navigate to.
2. Press and hold the point on the map to select that location.
3. Press the three vertical dots to the right of the name to open the pop-up menu.
4. Press “Add to Favorites.”
5. The name of the location will appear in the edit screen. You can edit the name of the location for easy recognition.
6. Press “Done” to save your location in the Favorites list.
Adding A Location Using Search
1. In the Main Menu, press “Search”.
2. Enter the name or address of a location using the touchscreen keyboard.
3. Select the desired location, and then press “Show in map.”
4. The Map View will show the location. Press the pop-up menu button.
5. Press “Add to Favorites”.
6. The name of the location will appear in the edit screen. You can edit the name of the location for easy recognition.
7. Press “Done” to save your location in the Favorites list.
Setting Your Home Location
1. In the Main Menu, press “Favorites”.
2. Press “Add Home”.
3. To select a location for home, do one of the following:
Zoom in on the map to the location you want to select. Press and hold to select the location, then press the home icon next to the name of the location.
You can also search for a location using the search function. Select “Set home location”.
21_00_U5_EN_USC_t.book Page 88

NAVIGATION MODE — IF EQUIPPED 89
DELETING A LOCATION FROM FAVORITES
Deleting A Recent Destination From Favorites
1. In the Main Menu, select “Favorites”.
2. Press “Recent Destinations”.
3. Press “Delete”.
4. Select the destination(s) you want to delete.
5. Press the Delete button.
Deleting A Location From Favorites
1. In the Main Menu, select “Favorites”.
2. Press “Edit List”.
3. Select the destination(s) you want to delete.
4. Press the Delete button.
SETTINGSAbout Settings
You can change the way your navigation system looks and behaves. Most of the settings on your system can be accessed by pressing the Settings button in the Main Menu.
Settings Button
SHOW
To change how your Navigation screen looks, select “Show” in the settings menu. From here, you can change these features:
Traffic Flow: Turn this feature on or off to be able to see the traffic along your route to determine if traffic is light or heavier throughout your commute.
Points of Interest: Select this setting to see various POI categories along your route.
POI on Map
POI on Route
Fuel Prices
Arrival Time & Distance
Remaining Time: Select this setting to show the remaining time left to travel in the arrival information panel during navigation.
Show Arrival Information For: Select this setting to show the arrival information for your final destination and next stop destination.
Sidebar
Hide Sidebar: Select this setting to turn On or Off the sidebar feature.
Extra Large: Select this setting to turn On or Off the extra large size of the sidebar.
POI On Route: Select this setting to turn On or Off POI categories along your route which include parking lots, gas stations, stops, rest areas, toll zones, and ferries and car shuttle trains.
4
21_00_U5_EN_USC_t.book Page 89
90 NAVIGATION MODE — IF EQUIPPED
Show Vehicle Range
Select this setting to turn On or Off the range of your vehicle.
Show Preview On Highway Exits — If Equipped
Select this setting to control the full screen preview when you approach highway exits.
MAP VIEW
Auto Map Zoom
Select “Automatic Zoom” to change how your system zooms in Guidance
View when you approach a turn or intersection. Zooming in can make the turn or intersection easier to drive. The following options are available:
Zoom In At Intersections
Zoom Based On Road Type
No Auto Zoom
Map Orientation
Select this setting to set the map orientation to 3D, 2D, or 2D, North up.
Lane Guidance On Interstate Highways
Select this setting to turn On or Off lane guidance.
Select this setting to turn On or Off the range of your vehicle.
Prediction: Select this setting to turn On or Off the prediction of your set destination.
ROUTING
Select this setting to control how your system plans routes. The following options are available:
Preferred Route Type: Your navigation system can plan your routes based on certain route types. To set a default type, choose from these types of routes:
Fastest Route
Shortest Route
Most Eco-Friendly Route
Avoid Interstate Highways
Avoid: Set how your navigation system manages certain road features when a route is calculated. You can choose to avoid ferries, car shuttle trains, toll roads, carpool lanes, and unpaved roads on your route.
Reroute To Faster Route When Available: If a faster route is found while you are already driving on a planned route, your navigation system can re-plan your trip to use the faster route. If you want to change this setting, the following options are available:
Always take the fastest route
Ask me so I can choose
Don’t ask me
Send Destination to Phone: Select this feature on or off to send a destination directly to your mobile phone.
SOUNDS & ALERTS
About SoundYour Navigation system uses sound for some or all of the following:
Driving directions
Warnings that you set
21_00_U5_EN_USC_t.book Page 90

NAVIGATION MODE — IF EQUIPPED 91
To access the Sound menu, press “Settings” in the Main Menu, and then select “Sound”. Next, press “Sounds & Alerts” where you can change voice instruction settings. Instruction settings include the following:
Read Out Loud
Arrival Time: This setting allows you to hear when you have arrived to your destination. This setting can be turned on or off.
Early Instructions: This setting allows to you to hear early instructions. For example, an early instruction could be, “After two miles, take the exit right.”
Road Numbers: Use this setting to control whether road numbers are read out loud as part of navigation instructions.
Road Sign Info: Use this setting to control whether road sign information is read out loud as part of navigation instructions.
Street Names: Use this setting to control whether street names are read out loud as part of navigation instructions.
To locate the Sound category, press the Guidance Prompts button. The sound options are as follows:
Alert TypeVisual, Sound & Verbal Visual & Sound Visual
AlertWhen Speeding
Traffic Jam AheadRechargeable Range Too Low
4
21_00_U5_EN_USC_t.book Page 91
92 NAVIGATION MODE — IF EQUIPPED
OTHER
The Other feature within your vehicle’s Navigation system contains privacy and information about your Navigation system and software.
PrivacyRecord Trip History: Turn this feature On or Off if you want your Navigation system to track your trip history.
AboutThis feature tells you information about your Navigation system such as application version, map name, map version, and more.
COPYRIGHT NOTICES© 2020 TomTom®. All rights reserved. TomTom® and the "two hands" logo are registered trademarks of TomTom® N.V. or one of its subsidiaries. Please see www.tomtom.com/en_us/legal/ for warranties and end user license agreements applying to this product.
© 2020 TomTom®. All rights reserved. This material is proprietary and the subject of copyright protection and/or database rights protection and/or other intellectual property rights owned by TomTom® or its suppliers. The use of this material is subject to the terms of a license agreement. Any unauthorized copying or disclosure of this material will lead to criminal and civil liabilities.
Data Source © 2020 TomTom® All rights reserved.
The software included in this product contains copyrighted software that is licensed under the GPL. A copy of that license can be viewed in the License section. You can obtain the complete corresponding source code from us for a period of three years after our last shipment of this product. For more information, visit https://www.tomtom.com/en_gb/opensource or contact your local TomTom® customer support team via us.support.tomtom.com/app/answers/list. Upon request, we will send you a CD with the corresponding source code.
Linotype, Frutiger and Univers are trademarks of Linotype GmbH registered in the U.S. Patent and Trademark Office and may be registered in certain other jurisdictions. MHei is a trademark of The Monotype Corporation and may be registered in certain jurisdictions.
Amazon, Alexa Built-in and all related marks are trademarks of Amazon.com, Inc. or its affiliates.
21_00_U5_EN_USC_t.book Page 92

93
CONNECTED SERVICES
INTRODUCTION TO CONNECTED SERVICES One of the many benefits of your vehicle’s Uconnect system is that you can now take advantage of SiriusXM Guardian™ connected services. To unlock the full potential of SiriusXM Guardian™ in your vehicle, you first need to activate SiriusXM Guardian™ services.
NOTE:SiriusXM Guardian™ involves the collection, transmission and use of data from your vehicle Ú page 123.
WHAT IS SIRIUSXM GUARDIAN™?SiriusXM Guardian™ uses an embedded device in the Uconnect system installed in your vehicle, which receives GPS signals and communicates with the SiriusXM Guardian™ Customer Care center via wireless and landline communications networks. Depending on the type of device in your vehicle, some SiriusXM Guardian™ services require an operable LTE (voice/data) or 3G or 4G (data) network compatible with your device. SiriusXM Guardian™ is available only on equipped vehicles purchased within the continental United States, Alaska, Hawaii, Puerto Rico and Canada.
NOTE:
Certain SiriusXM Guardian™ services are dependent upon an operative telematics device, a cellular connection, navigation map data, and GPS satellite signal reception, which can limit the ability to reach the response center or reach emergency support.
Not all features of SiriusXM Guardian™ are available everywhere at all times, particularly in remote or enclosed areas.
Other factors outside the control of SiriusXM Guardian™ that may limit or prevent service delivery are hills, structures, buildings, tunnels, weather, damage to the electrical system or other important parts of your vehicle, network congestion, civil disturbances, actions of third parties or the government, Internet failure, and/or the physical location of your vehicle, such as in an underground parking structure or under a bridge.
Note that SiriusXM Guardian™ features may vary from one vehicle to another.
WARNING!ALWAYS obey traffic laws and pay attention to the road. ALWAYS drive safely with your hands on the steering wheel. You have full responsibility and assume all risks related to the use of the features and applications in this vehicle. Only use the features and applications when it is safe to do so. Failure to comply may result in an accident involving serious injury or death.
5
21_00_U5_EN_USC_t.book Page 93

94 CONNECTED SERVICES
SiriusXM Guardian™ provides:
The ability to remotely lock/unlock and remote start your vehicle from virtually anywhere by using the Uconnect App or your computer.
Send & Go capability with the Uconnect App. Use the Uconnect App to easily search, map and send your locations directly to your Uconnect Navigation.
The ability to locate your vehicle, when you forget where you parked, using the Vehicle Finder function of the Uconnect App.
Before you drive, familiarize yourself with the easy-to-use Uconnect system and SiriusXM Guardian™ services.
The ASSIST and SOS Call Buttons On Your Rearview Mirror Or Overhead Console
The ASSIST Button is used for contacting Roadside Assistance, Vehicle Care, Uconnect Care, and SiriusXM Guardian™ Customer Care. The SOS Call button connects you directly to SiriusXM Guardian™ Customer Care for assistance in an emergency.
ACTIVATION To unlock the full potential of SiriusXM Guardian™ in your vehicle, you must activate your SiriusXM Guardian™ services.
1. Press the Apps icon on the bottom of your in-vehicle touchscreen.
2. Select the Activate Services icon from your list of apps.
3. Select “Customer Care” to speak with a SiriusXM Guardian™ Customer Care agent who will activate services in your vehicle, or select “Enter Email” to receive an email with instructions and a link to complete activation online.
INCLUDED TRIAL PERIOD FOR NEW VEHICLES
Your new vehicle may come with an included trial period for use of the SiriusXM Guardian™ services starting on the date of vehicle purchase. To get started with your trial, enrollment in SiriusXM Guardian™ is required. The Uconnect 5/5 NAV includes a trial* of SiriusXM Guardian™ services from your date of purchase.
* Included trial applies to new vehicles only.
FEATURES AND PACKAGES
After the trial period, you must purchase a subscription to continue your services by calling a SiriusXM Guardian™ Customer Care agent.
SIRIUSXM GUARDIAN™ CONTACT INFORMATION AND BUSINESS HOURS
SiriusXM Guardian™/Care
US residents visit: https://www.driveucon-nect.com/sirius-xm-guardian.html or call 1-844-796-4827
Canadian residents visit: https://www.driveu-connect.ca/en/sirius-xm-guardian or call 1-877-324-9091
Uconnect Phone Customer Support
UconnectPhone.com or for US residents call: 1-877-855-8400.
Canadian residents call: 1-800-465-2001 (English) or call: 1-800-387-9983 (French).
Business Hours
Central Time
Monday through Friday – 7:00 am to 10:00 pm
Saturday – 8:00 am to 9:00 pm
21_00_U5_EN_USC_t.book Page 94

CONNECTED SERVICES 95
GETTING STARTED WITH CONNECTED VEHICLE SERVICES DOWNLOAD THE UCONNECT APP
Once you have activated your services, you’re only a few steps away from using connected services.
Uconnect Mobile App
Download the Uconnect app to your mobile device.
Use your Owner Account login and password to open the app and then set up a PIN.
1 — Settings2 — Vehicle Info3 — Location And Send & Go4 — Remote Commands
5
21_00_U5_EN_USC_t.book Page 95

96 CONNECTED SERVICES
For customers in the United States, visit https://www.mopar.com/en-us.html, and click the Sign In/Register button in the upper right hand corner to register your account online.
a. Click the Register button.
b. Select the correct country and email address then click “Register”.
c. You will then receive an email notification to confirm/verify your newly created account.
d. After clicking the email link, it will take you to a website and prompt you to assign your account with a password.
e. Once you have added a password, the website will direct you to your homepage where you can add in your VIN.
For customers in Canada, register your account via your vehicle.
a. Press the Apps button in the bottom menu bar.
b. Press the Activate Services button from the apps list.
c. Enter your email and press “OK”. A confir-mation email will be sent to the provided email address.
d. Press “Continue Activation” from the confirmation email. It may take a short time before remote services will be avail-able, but you will be able to log into the Uconnect App and the owner’s site.
Once on the Remote screen and you have set up your four-digit PIN, you can begin using Remote Door Lock/Unlock, Remote Vehicle Start, and activate your horn and lights remotely, if equipped.
Press the Location button on the bottom menu bar of the app to bring up a map to locate your vehicle or send a location to your Uconnect Navigation, if equipped.
Press the Settings side menu in the upper left corner of the app to bring up app settings and access the Assist Call Centers.
USING YOUR OWNER’S SITE
Your Owner’s Site website https://www.mopar.com/en-us.html (US Residents), or www.mopar.ca (Canadian Residents) provides you with all the information you need, all in one place. You can track your service history, find recommended accessories for your vehicle, watch videos about your vehicle's features, and easily access your manuals. It is also where you can manage your SiriusXM Guardian™ account. This section will familiarize you with the key elements of the website that will help you get the most of your SiriusXM Guardian™ system.
For customers in the United States, press the Sign In/Register button and enter your email address and password.
For customers in Canada, press the My Vehicle button. Select from “Dashboard”, “Vehicle Health Report”, or “Recalls”. The website will then prompt you to log-in using your email address and password.
21_00_U5_EN_USC_t.book Page 96

CONNECTED SERVICES 97
Edit Profile:
To manage the details of your SiriusXM Guardian™ account, such as your contact information, password and SiriusXM Guardian™ PIN, click on the Edit Profile button to access the details of your account.
Edit Profile
Connected Services Status:
This statement will indicate your SiriusXM Guardian™-equipped vehicle.
Remote Commands:
For vehicles with an active SiriusXM Guardian™ subscription, press one of these icons and enter your four-digit SiriusXM
Guardian™ Security PIN to remotely start (if equipped), lock/unlock doors or sound the horn and flash the lights.
Editing Your Notifications
Notifications are an important element of your SiriusXM Guardian™ account. For example, any time you use your remote services (such as Remote Door Unlock), you can elect to receive a text message, push notification, and/or E-mail to notify you of the event. To set up the notifications, please follow these instructions.
1. Log on to your Owner’s Account at https://www.mopar.com/en-us.html (US Residents), or www.mopar.ca (Canadian Residents).
2. Click the Edit Profile button.
3. Once there, you can edit Notification Preferences.
4. You can enter a mobile phone and/or E-mail address to notify you, and you can customize the types of messages.
USING SIRIUSXM GUARDIAN™ SOS CALL
WARNING!Some SiriusXM Guardian™ services, including SOS Call and Roadside Assistance Call will NOT work without an active subscription and operable LTE (voice/data) or 3G or 4G (data) network connection compatible with your device.
5
21_00_U5_EN_USC_t.book Page 97

98 CONNECTED SERVICES
Access To Emergency Services At The Push Of A Button
Buttons On The Rearview Mirror
Buttons On The Overhead Console
SiriusXM Guardian™ In-Vehicle Assistance Features
With SiriusXM Guardian™, your vehicle has onboard assistance features located on the rearview mirror or overhead console designed to enhance your driving experience if you should ever need assistance or support.
Description
SOS Call offers a convenient way to get in contact with a SiriusXM Guardian™ Customer Care agent in the event of an emergency. When the connection between the vehicle and the live agent is made, your vehicle will automatically transmit location information. In the event of a minor collision, medical or any other emergency, press the SOS button to be connected to a call center agent who can send emergency assistance to your vehicle’s location.
1 — SOS Button2 — Indicator Light3 — ASSIST Button
1 — ASSIST Button2 — Indicator Light3 — SOS Button
Center Light Status DescriptionOff No call activated
Green Active call in progressRed System error
21_00_U5_EN_USC_t.book Page 98

CONNECTED SERVICES 99
NOTE:Certain SiriusXM Guardian™ services are depen-dent on an operational Uconnect system, cellular network availability that is compatible with the device in your vehicle, and GPS network availability. Not all features of SiriusXM Guardian™ are avail-able everywhere at all times, particularly in remote or enclosed areas.
Incoming Emergency Call
How It Works
1. Push the SOS Call button; the indicator light will turn green indicating a call has been placed.
NOTE:
In case the SOS Call button is acciden-tally pushed, there is a 10-second delay before the SOS call is placed. The system will verbally alert you that a call is about to be made. To cancel the SOS Call connection, push the SOS Call button on the rearview mirror or press the Cancel button on the touchscreen within six seconds.
During an SOS Call, the Bluetooth® paired phone is disconnected so incoming or outgoing calls will go through your mobile device versus the hands-free system which is not available due to the SOS Call.
2. Once a connection between the vehicle and a SiriusXM Guardian™ Customer Care agent is made, the agent will stay on the line with you.
NOTE:Calls between the vehicle occupants and the SiriusXM Guardian™ Customer Care center may be recorded or monitored for quality assurance purposes. Through your enrollment in and use of the SiriusXM Guardian™ services, you consent to being recorded.
Emergency Call In Progress
SOS Call System Limitations
Vehicles that have been purchased in the US and that travel into Mexico and Canada may have limited services. In particular, responses to SOS calls or other emergency services may be unavailable or very limited. Vehicles purchased outside the United States and Canada are unable to receive SiriusXM Guardian™ services.
5
21_00_U5_EN_USC_t.book Page 99

100 CONNECTED SERVICES
(Continued)
If the SOS Call system detects a malfunction, any of the following may occur at the time the malfunction is detected:
The light will continuously be illuminated red.
The screen will display the following message “Vehicle phone requires service. Please contact your dealer.”
An in-vehicle audio message will state “Vehicle phone requires service. Please contact your dealer.”
Even if the SOS Call system is fully functional, factors beyond FCA US LLC’s control may prevent or stop SOS Call system operation. These include, but are not limited to, the following factors:
The ignition key is in OFF position.
The vehicle’s electrical systems are not intact.
The vehicle battery loses power or becomes disconnected during a vehicle crash.
The SOS Call system software and/or hard-ware is damaged during a vehicle crash.
LTE (voice/data) or 3G or 4G (data) coverage and/or GPS signals are unavailable or obstructed.
Network congestion.
Weather conditions.
Buildings, structures, geographic terrain, or tunnels.
If your vehicle loses battery power for any reason (including during or after an accident) the SOS Call system, among other vehicle systems, will not operate.
Requirements
This feature is available only on vehicles sold in the US or Canada.
Vehicle must be properly equipped with the SiriusXM Guardian™ system. Vehicle must be registered with SiriusXM Guardian™ and have an active subscription that includes the applicable feature.
Vehicle must have an operable LTE (voice/data) or 3G or 4G (data) network connection compatible with your device.
Vehicle must be powered in the ON/RUN or ACC (Accessory) position with a properly func-tioning electrical system.
WARNING! Never place anything on or near the vehicle’s
LTE (voice/data) or 3G or 4G (data) and GPS antennas. You could prevent LTE (voice/data) or 4G (data) and GPS signal reception, which can prevent your vehicle from placing an emergency call.
Do not add any aftermarket electrical equip-ment to the vehicle’s electrical system. This may prevent your vehicle from sending a signal to initiate an emergency call. To avoid interfer-ence that can cause the SOS Call system to fail, never add aftermarket equipment (e.g., two-way mobile radio, CB radio, data recorder, etc.) to your vehicle’s electrical system or modify the antennas on your vehicle. IF YOUR VEHICLE LOSES POWER FOR ANY REASON (IN- CLUDING DURING OR AFTER AN ACCIDENT), NEITHER THE UCONNECT APPS NOR THE SIRI-USXM GUARDIAN™ SERVICES WILL OPERATE.
21_00_U5_EN_USC_t.book Page 100

CONNECTED SERVICES 101
AUTOMATIC SOS — IF EQUIPPED
Automatic SOS is a hands-free safety service that can immediately connect you with help in the event that your vehicle’s airbags deploy. After an accident, a live agent will contact you through the Uconnect system and alert emergency services.
NOTE:An active SiriusXM Guardian™ subscription is required for this feature to function.
After a crash where the airbags deploy:
1. Automatic SOS will initiate a call with an agent.
2. An agent will receive the call and confirm the location of the emergency.
3. If needed, the agent will request the assistance of emergency services.
4. First responders will arrive on scene. The agent will remain on the call until emergency services arrive.
NOTE:
Agents are available 24/7 to assist you in the case of an emergency.
On your behalf, agents are able to notify family members about the collision.
Agents can brief first responders of the situa-tion before they arrive on scene.
In the event vehicle occupants are unable to speak, emergency services will be dispatched based on the last known GPS coordinates.
SiriusXM Guardian™ services are dependent upon an operative telematics device, a cellular connection, navigation map data, and GPS satellite reception, which can limit the ability to reach the response center or reach emergency support.
Terms of service of the Uconnect and the SiriusXM Guardian™ subscriber agreement apply. See terms of services for complete service limitation.
The Occupant Restraint Controller (ORC) turns on the Air Bag Warning Light on the instrument panel if a malfunction in any part of the air bag system is detected. If the Air Bag Warning Light is illuminated, the air bag system may not be working properly and the SOS Call system may not be able to send a signal to the SiriusXM Guardian™ Customer Care center. If the Air Bag Warning Light is illuminated, have an autho-rized dealer service your vehicle immediately.
Ignoring the Rearview Mirror Light could mean you will not have SOS Call services if needed. If the Rearview Mirror Light is illu-minated, have an authorized dealer service the SOS Call system immediately.
If anyone in the vehicle could be in danger (e.g., fire or smoke is visible, dangerous road conditions or location), do not wait for voice contact from a SiriusXM Guardian™ Customer Care agent. All occupants should exit the vehicle immediately and move to a safe location.
Failure to perform scheduled maintenance and regular inspection of your vehicle may result in vehicle damage, accident or injury.
WARNING! (Continued)
5
21_00_U5_EN_USC_t.book Page 101
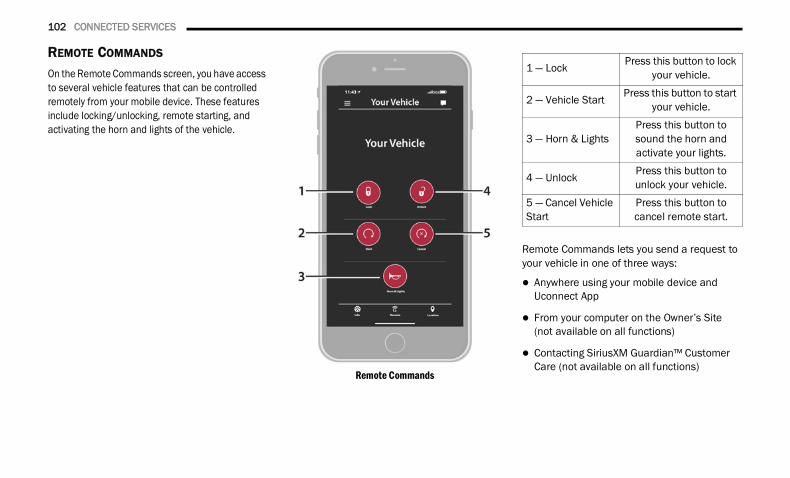
102 CONNECTED SERVICES
REMOTE COMMANDS
On the Remote Commands screen, you have access to several vehicle features that can be controlled remotely from your mobile device. These features include locking/unlocking, remote starting, and activating the horn and lights of the vehicle.
Remote Commands
Remote Commands lets you send a request to your vehicle in one of three ways:
Anywhere using your mobile device and Uconnect App
From your computer on the Owner’s Site (not available on all functions)
Contacting SiriusXM Guardian™ Customer Care (not available on all functions)
1 — Lock Press this button to lock your vehicle.
2 — Vehicle Start Press this button to start your vehicle.
3 — Horn & LightsPress this button to sound the horn and activate your lights.
4 — Unlock Press this button to unlock your vehicle.
5 — Cancel Vehicle Start
Press this button to cancel remote start.
21_00_U5_EN_USC_t.book Page 102

CONNECTED SERVICES 103
Using A Remote Command Through Your Mobile Device And The Uconnect App
1. Press the desired Remote Command icon on your mobile device.
2. A pop-up screen will appear asking for your SiriusXM Guardian™ Security PIN (this is the same four-digit code established when you activated your SiriusXM Guardian™ system). Enter the SiriusXM Guardian™ Security PIN on the keypad.
3. It may take 30 seconds or more for the command to go through to your vehicle.
4. A message will let you know if the command was received by your vehicle.
Using A Remote Command Through Your Owner’s Site
1. Log on to your Owner’s Site using the username and password you used when activating your SiriusXM Guardian™ services in your vehicle.
NOTE:If you forgot your username or password, links are provided on the website to help you retrieve them.
2. If you have more than one vehicle registered into your Owner’s Site, select the vehicle you want to send the command to by clicking on its image along the top.
3. Beneath the image of a vehicle like yours, you will see a row of icons. On your dashboard, you will see remote command icons. Press the desired icon to activate that feature.
4. You will then be asked to enter your SiriusXM Guardian™ Security PIN (this is the same four-digit code established when you activated your SiriusXM Guardian™ system). Please enter your SiriusXM Guardian™ Security PIN.
5. A message will appear on the screen to let you know if the command was received by your vehicle.
Contacting SiriusXM Guardian™ Customer Care (for example, in case of an accidental lock-out):
1. Contact SiriusXM Guardian™ Customer Care if you are unable to lock your vehicle through the Uconnect App or your key fob.
2. For security purposes, the SiriusXM Guardian™ Customer Care agent will verify
your identity by asking for your four-digit SiriusXM Guardian™ Security PIN.
3. After providing your SiriusXM Guardian™ Security PIN, you can ask them to perform a remote command.
NOTE:Anyone with access to your PIN may request Remote Door Lock/Unlock. It is your responsi-bility to protect your PIN appropriately.
REMOTE DOOR LOCK/UNLOCK Description
The Remote Door Lock/Unlock feature provides you the ability to lock or unlock the door on your vehicle without the keys and from virtually any distance.
Working Vehicle Conditions
The vehicle must in PARK or at a standstill.
The vehicle must be in an open area with cell tower reception.
Your mobile device must have a cellular or Wi-Fi connection.
5
21_00_U5_EN_USC_t.book Page 103

104 CONNECTED SERVICES
Requirements
Vehicle must be properly equipped with the SiriusXM Guardian™ system.
Vehicle must have an operable LTE (voice/data) or 3G or 4G (data) network connection.If using the Uconnect App to command your vehicle, your device must be compatible and be connected to an operable LTE (voice/data) or 3G or 4G (data) network connection.
Vehicle must be registered with SiriusXM Guardian™ and have an active subscription that includes the applicable feature.
An ignition cycle is required for some remote commands, such as Remote Vehicle Start and Remote Door Lock/Unlock if following a Remote Horn & Lights activation.
Your Remote Door Lock/Unlock request will not be processed if the vehicle is in motion, the ignition key is on or during an emergency call.
NOTE:All other remote services should be performed via your Owner’s Site or through the Uconnect App on your compatible device.
REMOTE VEHICLE START Description
The Remote Vehicle Start feature provides you with the ability to start the engine on your vehicle without the keys and from virtually any distance. Once started, the preset climate controls in your vehicle can warm up or cool down the interior.
You can also send a command to turn off an engine that has been started using Remote Vehicle Start. After 15 minutes, if you have not entered your vehicle with the key, the engine will shut off automatically.
This remote function requires your vehicle to be equipped with a factory-installed Remote Start system.
You can set up push notifications every time a command is sent to activate or cancel Remote Start.
Working Vehicle Conditions
The vehicle must be off.
The vehicle has been started with the key fob within the last 14 days.
The vehicle must be in PARK or at a standstill.
The vehicle’s security system has been armed and not triggered since the last vehicle start.
The doors, hood, and trunk/liftgate are closed.
The vehicle’s check engine light must be off.
The vehicle must have at least a quarter tank of fuel, along with oil and battery power.
The vehicle’s hazard lights must be off.
If equipped, the vehicle must have an auto-matic transmission.
The vehicle must be in an open area with cell tower reception.
Your mobile device must have a cellular or Wi-Fi connection.
If the Panic button has been pressed, the vehicle must be started at least once after alarming the system.
NOTE:The SiriusXM Guardian™ Customer Care agents are not authorized for Remote Vehicle Start services.
21_00_U5_EN_USC_t.book Page 104
CONNECTED SERVICES 105
REMOTE HORN & LIGHTS Description
It is easy to locate a vehicle in a dark, crowded or noisy parking area by activating the horn and lights. It may also help if you need to draw attention to your vehicle for any reason.
If you want, you can set up push notifications every time a command is sent to turn on the horn and lights.
Working Vehicle Conditions
The vehicle must in PARK or at a standstill.
The vehicle must be in an open area with cell tower reception.
Your mobile device must have a cellular or Wi-Fi connection.
NOTE:The Remote Horn & Lights feature is designed to be loud and get noticed. Please keep in mind the surroundings when using this feature. You are responsible for compliance with local laws, rules and ordinances in the location of your vehicle when using Remote Horn & Lights.
ROADSIDE ASSISTANCE CALL Description
Vehicles equipped with the SiriusXM Guardian™ system feature will contain an ASSIST button in the vehicle. Once your SiriusXM Guardian™ services have been activated, the ASSIST button can connect you directly to customer care call centers. You will be directed to one of the four services below:
Roadside Assist — If you get a flat tire or need a tow, you’ll be connected to someone who can help anytime.
Connected Services — Contact the SiriusXM Guardian™ Customer Care call center to activate your services, renew after your trial has expired, and for in-vehicle support for your SiriusXM Guardian™ system or help answering any general questions surrounding your connected services.
Uconnect Care — In-vehicle support for all non-connected Uconnect system features, such as radio and Bluetooth® connections.
Vehicle Care — Total support for your vehicle.
SiriusXM Guardian™ In-Vehicle Assistance Features
With SiriusXM Guardian™, your vehicle has onboard assistance features located on the rearview mirror or overhead console designed to enhance your driving experience if you should ever need assistance or support.
How It Works
Simply press the ASSIST button in the vehicle and you will be presented with your ASSIST options on the touchscreen. Make your selection by pressing the touchscreen.
Requirements
This feature is available only on vehicles sold in the US and Canada.
Vehicle must be properly equipped with the SiriusXM Guardian™ system.
Vehicle must have an operable LTE (voice/data) or 3G or 4G (data) network connection.
Vehicle must be registered with SiriusXM Guardian™ and have an active subscription that includes the applicable feature.
Vehicle must be powered in the ON/RUN or ACC (Accessory) position with a properly func-tioning electrical system.
5
21_00_U5_EN_USC_t.book Page 105

106 CONNECTED SERVICES
Disclaimers
If Roadside Assistance Call is provided to your vehicle, you agree to be responsible for any additional roadside assistance service costs that you may incur. In order to provide SiriusXM Guardian™ services to you, we may record and monitor your conversations with Roadside Assistance Call, Vehicle Care, Uconnect Care, or SiriusXM Guardian™ Customer Care, whether such conversations are initiated through the SiriusXM Guardian™ service in your vehicle, or via a landline or mobile device. We may share information obtained through such recording and monitoring in accordance with regulatory requirements. You acknowledge, agree and consent to any recording, monitoring or sharing of information obtained through any such call recordings.
SEND & GO Description
The Send & Go feature of the Uconnect App allows you to search for a destination on your mobile device, and then send the route to your vehicle’s navigation system.
Vehicle Finder Send & Go Input
21_00_U5_EN_USC_t.book Page 106

CONNECTED SERVICES 107
How It Works
1. Use the Uconnect App to find the destination.There are multiple ways to find a destination. Af-ter selecting the “Location” tab at the bottom of the App, browse through one of the categories provided, or type the name or keyword in the search box. You can also select categories such as Favorites or Contact List.
2. Select your destination from the list that appears. Location information will then be displayed on the map.
From this screen, you will be able to:
View the location on a map.
See the distance from your current location.
Send the address by selecting “Send to Vehicle” from the mobile app.
3. Send the destination to the Uconnect Navigation in your vehicle. You can also call the destination by pressing the Call button.
4. Confirm your destination inside your vehicle by pressing the Send To Vehicle option on the pop-up that appears on the radio touchscreen.
Requirements
Vehicle must be properly equipped with the Uconnect system.
Vehicle must have an operable LTE (voice/data) or 3G or 4G (data) network connection compatible with your device.
Vehicle must be registered with SiriusXM Guardian™ and have an active subscription that includes the applicable feature.
VEHICLE FINDER Description
The Vehicle Finder feature of the Uconnect App allows you to find the location of your stationary vehicle.
You can also sound the horn and flash the lights to make finding your vehicle even easier.
How It Works
Use the Uconnect App to find the location of your vehicle.
1. Select the “Location” tab at the bottom of the App. Then, touch the Vehicle icon to find your vehicle.
5
21_00_U5_EN_USC_t.book Page 107
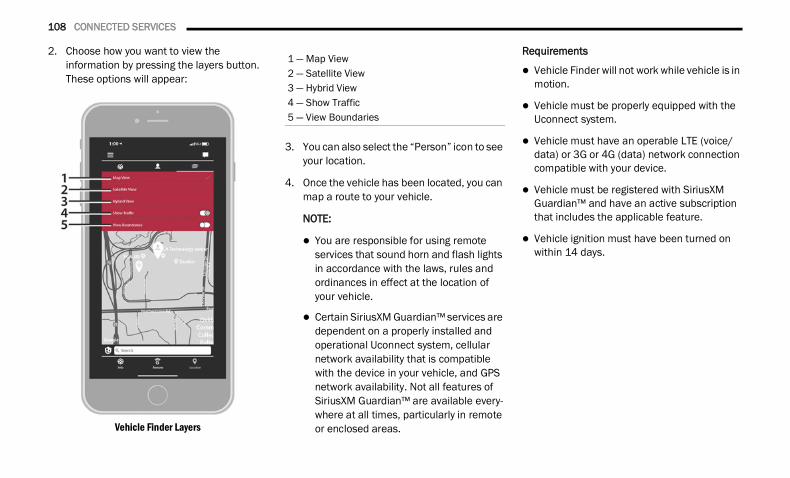
108 CONNECTED SERVICES
2. Choose how you want to view the information by pressing the layers button. These options will appear:
Vehicle Finder Layers
3. You can also select the “Person” icon to see your location.
4. Once the vehicle has been located, you can map a route to your vehicle.
NOTE:
You are responsible for using remote services that sound horn and flash lights in accordance with the laws, rules and ordinances in effect at the location of your vehicle.
Certain SiriusXM Guardian™ services are dependent on a properly installed and operational Uconnect system, cellular network availability that is compatible with the device in your vehicle, and GPS network availability. Not all features of SiriusXM Guardian™ are available every-where at all times, particularly in remote or enclosed areas.
Requirements
Vehicle Finder will not work while vehicle is in motion.
Vehicle must be properly equipped with the Uconnect system.
Vehicle must have an operable LTE (voice/data) or 3G or 4G (data) network connection compatible with your device.
Vehicle must be registered with SiriusXM Guardian™ and have an active subscription that includes the applicable feature.
Vehicle ignition must have been turned on within 14 days.
1 — Map View2 — Satellite View3 — Hybrid View4 — Show Traffic5 — View Boundaries
21_00_U5_EN_USC_t.book Page 108

CONNECTED SERVICES 109
4G WI-FI HOTSPOT — IF EQUIPPED Description
4G Wi-Fi Hotspot is an in-vehicle service that connects your device to an LTE (voice/data) or 4G (data) network that is ready to go wherever you are. After you've made your purchase, turn on your device’s Wi-Fi and connect your devices.
Enables all your passengers to be simultane-ously connected to the web.
Connect several devices at one time.
Any Wi-Fi-enabled device — such as a laptop or any other portable-enabled media — can connect over your private in-vehicle network.
A high-speed, secured connection lets anyone on your private network access the Web — great for working and relaxing.
Create A 4G Wi-Fi Hotspot For Use In Your Vehicle
How It Works
The 4G Wi-Fi Hotspot feature provides the vehicle passengers with an
internet access hotspot in the vehicle, using the radio as an access point. The hotspot will allow Wi-Fi-enabled in-vehicle devices (such as a laptop or any other portable-enabled media device) to wirelessly connect to the internet. Uconnect offers a complimentary 3-month trial period that includes 1GB of total data. The trial can be activated any time within the first year of new vehicle ownership.
Use one of these three ways to purchase a subscription to the 4G Wi-Fi Hotspot:
1. From your vehicle’s touchscreen, select the 4G Wi-Fi Hotspot App, and press the How To Purchase button and follow the instructions.
2. Log onto your Owner’s Site and click the link to the AT&T portal to get set up.
3. For existing Connect Car customers: Push the ASSIST button located on your rearview mirror (if equipped) to be routed to an AT&T Customer Care agent who will assist you.
Once the 4G Wi-Fi Hotspot is purchased, you can change its name and the password by selecting the 4G Wi-Fi App and pressing the Setup Wi-Fi Hotspot button. You can also view the connected devices from the app screen by pressing the View Connected Devices button.
NOTE:A SiriusXM Guardian™ subscription is not required in order to purchase and use the 4G Wi-Fi Hotspot.
WARNING!The driver should NEVER use the 4G Wi-Fi Hotspot while driving the vehicle. Failure to do so may result in an accident involving serious injury or death.
WARNING!Always drive safely with your hands on the steering wheel and obey all applicable laws. You have full responsibility and assume allrisks related to the use of the features and applications in this vehicle. Only use the features and applications in this vehicle when it is safe to do so. Failure to comply may result in an accident involving in serious injury or death.
5
21_00_U5_EN_USC_t.book Page 109

110 CONNECTED SERVICES
STOLEN VEHICLE ASSISTANCE Description
If your vehicle is stolen, the SiriusXM Guardian™ Customer Care agent may be able to locate the stolen vehicle and work with law enforcement to help recover it.
How It Works
1. If your vehicle is stolen, contact local law enforcement as soon as possible. They will work with you to file a stolen vehicle report.
2. Next, inform SiriusXM Guardian™ Customer Care that your vehicle has been stolen.
The SiriusXM Guardian™ Customer Care Agent will ask for the stolen vehicle report number (as issued by your local law enforcement). If you have downloaded the Uconnect App, you can push the “Settings” menu button on your de-vice, select “Help”, and then select “SiriusXM Guardian™ Customer Care” to make the call.
3. SiriusXM Guardian™ Customer Care will authenticate that you are the owner of the vehicle and contact the law enforcement with whom you filed the stolen vehicle report.
4. SiriusXM Guardian™ Customer Care will work with your local law enforcement to locate the vehicle. You will be contacted by law enforcement if your vehicle is recovered. While the investigation is ongoing, you should also contact your insurance company to inform it of the situation.
Requirements
Vehicle must be properly equipped with the Uconnect system.
Vehicle must have an operable LTE (voice/data) or 3G or 4G (data) network connection compatible with your device.
Vehicle must be registered with SiriusXM Guardian™ and have an active subscription that includes the applicable feature.
NOTE:Not all features of SiriusXM Guardian™ are available everywhere at all times, particularly in remote or enclosed areas.
MONTHLY VEHICLE HEALTH REPORT Description
Monthly Vehicle Health Report is a Uconnect service through which a summary of the performance of your vehicle’s key systems will be sent to you every month so you can stay on top of your vehicle’s maintenance needs. This is provided as a convenience to you and does not substitutefor regular maintenance to your vehicle.
In order to provide the monthly Vehicle Health Report, the Uconnect system in your vehicle may collect and transmit vehicle data to SiriusXM Guardian™ and to FCA, such as your vehicle’s health and performance, your vehicle’s location, your utilization of the features in your vehicle, and other data.
This data collection and transmission begins when you enroll in SiriusXM Guardian™ and will continue even if you cancel your SiriusXM Guardian™ subscription unless you call SiriusXM Guardian™ Customer Care and tell them to deactivate your Uconnect Services.
21_00_U5_EN_USC_t.book Page 110

CONNECTED SERVICES 111
Please see the Uconnect Privacy Policy for more information, located at www.driveuconnect.com/connectedservices/privacy.html (US Residents) or www.driveuconnect.ca (Canadian Residents).
For more information on SiriusXM Guardian™ private policy, see https://siriusxmcvs.com/privacy-policy.
VEHICLE HEALTH ALERT Description
Your vehicle will send you an email alert if it senses a problem with one of your vehicle’skey systems. For further information, go to www.mopar.com.
NOTE:Vehicle Health Alert emails require you to register and activate services. During this process you will be asked to provide an email address to which the reports will be sent.
IN-VEHICLE NOTIFICATIONS — IF EQUIPPED Description
Your vehicle will send you notifications to remind you when services are needed, orto alert you of other important information,such as recall notices. When you receive a notification through your touchscreen, press OK to dismiss the message, or press Call Care to speak with a SiriusXM Guardian™ Customer Care agent.
NOTE:Pressing “OK” or the X button on the pop-up screen will dismiss or close the pop-up, and the In-Vehicle Messages mailbox will display. In the Mailbox, you can reopen messages or delete messages.
AMAZON ALEXA SKILL — IF EQUIPPED
Enjoy the convenience of using your voice to command your vehicle with Amazon Alexa!
With Amazon Alexa, you can connect to your vehicle and remotely access key services and features.
If your vehicle is equipped with Uconnect TomTom® Navigation, you can send a destination directly to your vehicle using Alexa.
If you need assistance, you can always ask Alexa for help, or complete a list of commands by saying: “Alexa, ask <brand name> for help with my car.”
Here are a few of the many questions you can ask Alexa:
“Alexa, ask <vehicle brand> to start my <vehicle name> with PIN XXXX.”
“Alexa, ask <vehicle brand> to lock my <vehicle name> with PIN XXXX.”
“Alexa, ask <vehicle brand> to send 1000 Chrysler Drive, Auburn Hills, Michigan to my <vehicle name>.”
“Alexa, ask <vehicle brand> what is the fuel level of my <vehicle name>.”
An active subscription to SiriusXM Guardian™ is required. To use Amazon Alexa, first, register for SiriusXM Guardian™ Ú page 94.
5
21_00_U5_EN_USC_t.book Page 111
112 CONNECTED SERVICES
Next, link the Uconnect system on your vehicle to Amazon Alexa:
1. Download the Amazon Alexa app on your mobile device (Apple® or Android™).
2. Once in the app, tap MENU and go to SKILLS.
3. Search for <vehicle brand> skill, then tap Enable.
4. Tap SAVE SETTINGS when prompted.
5. Link the vehicle brand name to the <vehicle brand> Skill by tapping LINK ACCOUNT.
6. Log in using your Owner Account credentials. This will be the same user name and password you used when registering for SiriusXM Guardian™ connected services.
7. CONFIRM account to return to the <vehicle brand> Skill.
You can now begin using the <vehicle brand> Skill on Alexa!
GOOGLE ASSISTANT — IF EQUIPPED
With the Google Assistant, you can get help and keep tabs on your car. The Assistant is available across your devices, including Android™ phones, iPhone® devices, or voice-activated speakers, like Google Home. If you need assistance, ask Google for help, or for a complete list of commands by saying: “Hey Google, ask <brand name> for help with my car.”
Here are a few examples of commands:
“Hey Google, ask <vehicle brand> to start my <vehicle name> with PIN XXXX.”
“Hey Google, ask <vehicle brand> to lock my <vehicle name> with PIN XXXX.”
“Hey Google, ask <vehicle brand> to send 1000 Chrysler Drive, Auburn Hills, Michigan to my <vehicle name>.”
“Hey Google, ask <vehicle brand> what is the fuel level of my <vehicle name>.”
To link your Uconnect account with Google Assistant, follow these steps:
1. Download and install the Google Assistant app on your smart phone from the App Store® or Google Play.
2. After installation, log in to the Google Assistant app with your Gmail ID. Verify your account by pressing the icon in the upper right-hand corner.
3. Press the Discover button in the bottom left corner of the screen. Enter the vehicle brand name.
4. A prompt will appear to link your Uconnect account. Press “Link Uconnect to Google”.
5. Press “Sign In” and enter the email address and password you created when you activated SiriusXM Guardian™ connected services.
6. Lastly, press “Authorize” to complete the linking process.
21_00_U5_EN_USC_t.book Page 112

CONNECTED SERVICES 113
Now, you can ask Google Assistant to help you:
Remotely start the engine, or cancel a remote start
Send a destination to their vehicle’s built-in Uconnect TomTom® Navigation system
Monitor vehicle vitals, such as tire press, fuel level and oil life
And more!
FAMILY DRIVE ALERTS — IF EQUIPPED Description
Family Drive Alerts help promote safer driving and give you peace of mind when your loved ones are out on the road. You can set boundary limits, monitor driving speed, and pinpoint your vehicle’s location any time, any place. Use the Uconnect app to set alerts:
Boundary Alert
Receive a notification the moment your vehicle is driven either out of or into a geographic boundary that you set.
Curfew Alert
Receive a notification when your car is being driven outside of the curfew time.
Speed Alert
Receive a notification whenever your car exceeds a speed limit you set.
Valet Alert
Receive a notification if and when your vehicle is driven outside a quarter-mile radius of a valet drop-off zone.
SMARTWATCH INTEGRATION — IF EQUIPPED Description
SmartWatch Integration puts the Uconnect app right on your Apple® Watch or Android™ Wear. To get started, follow these steps:
1. Download the Uconnect app from the App Store® or Google Play.
2. Log onto the app from your smartphone using the username and password you created when you first set up your account.
3. Make sure your watch and smartphone are connected through Bluetooth®.
4. The Uconnect app should appear on your SmartWatch.
Once the app is downloaded on your SmartWatch, you can enjoy these features:
Lock or unlock your vehicle by tapping the remote lock button in the app and entering your security PIN.
Remote start or stop your vehicle.
View important vehicle stats, such as fuel level, vehicle location, tire pressure warning, and more.
For help, refer to the Uconnect YouTube channel for SmartWatch Integration.
UCONNECT MARKET
With Uconnect Market, you can enjoy seamless and secure transactions from the comfort of your vehicle. Make restaurant reservations, place food orders, or pay for other goods and services right from the vehicle’s touchscreen.
To get started with Uconnect Market on the touchscreen:
1. Press the Market button in the Uconnect App drawer.
2. Press “Get Started”.
5
21_00_U5_EN_USC_t.book Page 113

114 CONNECTED SERVICES
3. Press “Text Me A Link” and enter your phone number to receive a text message with instructions on how to set up Uconnect Market.
NOTE:If the text message does not come through, press the Resend Text button. It might take a minute to receive the text message.
4. Once you receive the text message, press the link provided. You will be directed to a sign-in screen. Enter your email and password. You will then be able to use Uconnect Market.
5. If you do not have an account, press “Register Now” to create one.
6. Accept the Uconnect market Terms of Service.
7. Enter your credit card information, and press “Next”.
8. Enter your phone number, and press “Next”.
9. The system will verify the phone number. Once verified, Uconnect Market will be available to use. Press the OK button.
From the online portal, https://market.mopar.com/home, you can link loyalty accounts and start receiving benefits from them while still using Uconnect Market and view your purchase history.
MANAGE MY SIRIUSXM GUARDIAN™ ACCOUNTHOW TO MANAGE MY SIRIUSXM GUARDIAN™ ACCOUNT To manage your SiriusXM Guardian™ account, press the ASSIST button in your vehicle, or call SiriusXM Guardian™ Customer Care at 1-844-796-4827.
NOTE:It is recommended, when selling your vehicle, or turning in your lease, to call SiriusXM Guardian™ Care to remove your personal data.
SOFTWARE UPDATESUSB UPDATES
The Uconnect 5/5 NAV has the ability to update software using a USB drive.
To begin the update, compatible software must be downloaded to the USB, and the USB must be plugged into the front console USB port.
NOTE:During updates, the backup camera, radio, SOS system, and several other driving assistance features will be unavailable. Vehicle should be at a standstill during updates.
For steps on how to perform a software update with a USB device, follow the steps below:
1. Insert the USB device with compatible software in the front USB port.
2. If the software is compatible, a pop-up will appear on the radio screen with options to “Update Now” or “Decline”. Press “Update Now” to proceed with the update.
21_00_U5_EN_USC_t.book Page 114

CONNECTED SERVICES 115
Software Update: When the software is be-ing downloaded, a pop-up will appear on the radio showing the time left for the update and also the percentage. The pop-up will also mention not to remove the USB device while the system is being updated.
3. When the software update is complete, a pop-up will appear on the radio stating that the software update was successful and to remove the USB device. It is safe at this point to remove the USB device from the front USB port.
USB Software Updates
The steps above may need to be repeated if an error pop-up appears on the radio during the steps stating that the update failed and to check the USB device. If error pop-ups continue after multiple attempts, the software may not be compatible with the Uconnect 5/5 NAV system.
SOFTWARE OVER THE AIR UPDATES
The Uconnect 5/5 NAV has the ability for over the air software updates to the system.
NOTE:Over the air software updates do not use Wi-Fi and use data provided from the vehicle.
When an over the air software update is available for the system, a pop-up will appear on the radio stating new software and features are ready for the Uconnect system.
NOTE:During updates, the backup camera, radio, SOS system, and several other driving assistance features will be unavailable. Vehicle should be at a standstill during updates.
Software Updates Message
Update Now
When the update software pop-up appears on the radio, press the Update Now button to update the software immediately.
Schedule Update
If the forced update occurs, you can eitherpress “Update Now” or “Schedule Update”. The Schedule Update option is used to set a different time for the update to take place. Use the Up and Down arrows on the touchscreen to input a desired time to set a scheduled update.
5
21_00_U5_EN_USC_t.book Page 115

116 CONNECTED SERVICES
NOTE:The Schedule Update option can only be used 20 times for each update. After the 20th time, the system will force the update when the vehicle is turned on. The only option for the Forced Software Update pop-up is to select “OK”.
During the update, the radio will display the percentage of the update completion with the time left.
Software Update Complete
Once the update is completed, the system will restart.
WI-FI UPDATES
The Uconnect 5/5 NAV has the ability for Wi-Fi updates to the system.
When a Wi-Fi update is available for the system, a pop-up will appear on the radio stating new software and features are ready for the Uconnect system.
NOTE:During updates, the backup camera, radio, SOS system, and several other driving assistance features will be unavailable. Vehicle should be at a standstill during updates.
For the system to be able to have a software update using Wi-Fi, follow the steps below:
1. Select “Settings” on the touchscreen.
2. Select “Wi-Fi” in the list of settings.
3. Select the correct Wi-Fi router connection from the list shown.
NOTE:If the Wi-Fi router is too far away from the vehicle, the router will not show up on the list of available routers.
4. If needed for router security, enter the web-key for the router, and then select “OK”.
For steps on how to enable software updates over Wi-Fi, follow the steps below:
1. On the Wi-Fi Settings page, select the “Enable Software Downloads Over Wi-Fi check box”.
2. Once a software update is available, a pop-up will appear on the radio stating that a new software update is available for your vehicle. “Would you like to connect to a local Wi-Fi network to download the update?” Select “Yes” to this message.
3. During the update, a pop-up will display time left for the update and the percentage. When the update is done select “OK”.
When a Wi-Fi update is available for the system, a pop-up will appear on the radio stating new software and features are ready for the Uconnect system.
Update Now
When the update software pop-up appears on the radio, press the Update Now button to update the software immediately.
21_00_U5_EN_USC_t.book Page 116

CONNECTED SERVICES 117
Schedule UpdateUse the Schedule Update option to set a different time for the update to take place using the touchscreen. Use the up and down arrows on the touchscreen to input a desired time to set a scheduled update.
NOTE:The Schedule Update option can only be used 20 times for each update. After the 20th time, the system will force the update when the vehicle is turned on. The only option for the Forced Software Update pop-up is to select “OK”.
During the update, the radio will display the percentage of the update completion with the time left.
Software Update Status
Once the update is completed, the system will restart.
MODULE UPDATESNOTE:Be sure to accept updates in a timely fashionto assure you are using the most up-to-date software.
MODULE OVER THE AIR UPDATES
The Uconnect 5/5 NAV has the ability for over the air module updates to the system.
NOTE:Over the air updates do not use Wi-Fi and use data provided from the vehicle.
When a module over the air update is available for the system, a pop-up will appear on the radio stating new module updates are ready for the Uconnect system.
NOTE:Updates for the modules of the vehicle can only take place when the vehicle is fully off.
Update Now
When the update software pop-up appears on the radio, press the Update Now button to update the software immediately. The update will take place when the vehicle is fully off.
Schedule Update
Use the Schedule Update option to set a different time for the update to take place using the touchscreen. Use the up and down arrows on the touchscreen to input a desired time to set a scheduled update. The update will happen during scheduled time when the vehicle is fully off.
NOTE:
The Schedule Update option can only be used 20 times for each update. After the 20th time, the system will force the update when the vehicle is turned fully off. The only option for the Forced Software Update pop-up is to select “OK”.
Once the update is completed, the system will restart.
5
21_00_U5_EN_USC_t.book Page 117
118
CONNECTED SERVICES FAQs For additional information about SiriusXM Guardian™, active subscribers can push the ASSIST button and then select SiriusXM Guardian™ Call on your in-vehicle touchscreen to contact SiriusXM Guardian™. Your call will be directed to a SiriusXM Guardian™ agent or held in a queue until an agent is available. If you do not have an active subscription, push the ASSIST button and click the Activate button on the touchscreen to activate services.
CONNECTED SERVICES SOS FAQS 1. What happens if I accidentally push the
SOS Call button on the mirror? You have10 seconds after pushing the SOS Call button to cancel the call. To cancel the call, either push the SOS Call button again, or press the Cancel button on the in-vehicle touchscreen.
2. What type of information is sent when I use the SOS Call button from my vehicle? Certain vehicle information, such as make and model, is transmitted along with the last known GPS location.
3. When could I use the SOS Call button? You can use the SOS Call button to make a call if you or someone else needs emergency assistance.
CONNECTED SERVICES REMOTE DOOR LOCK/UNLOCK FAQS 1. How long does it take to unlock or lock the
door? Depending on various conditions, it can take up to three minutes or more for the request to get to your vehicle.
2. Which is faster, my key fob or the Uconnect App? Your key fob will lock/unlock the door more quickly, however its range is limited and your Uconnect App comes in handy for these and other situations.
3. Will my vehicle be safe if I lose my device? People sometimes lose their mobile devices, which is why security measures have been engineered into the Uconnect App. Asking for your username, password
and SiriusXM Guardian™ Security PIN are required for the activation of Remote services through your mobile device.It is your responsibility to protect your passwords and PINs.
4. Why can’t all mobile devices use the Uconnect App? The Uconnect App is compatible with most devices with the Apple® and Android™ operating systems. The capabilities of these devices allow usto remotely command your vehicle. Other operating systems may be supported in the future.
5. Why is the Uconnect App running slow? The Uconnect App relies on a mobile network connection from your device to send commands to your vehicle which must have an operable LTE (voice/data) or 3G or 4G (data) network connection. If either your device or your vehicle is in an area with below average coverage, it may take longer to log in and send commands.
21_00_U5_EN_USC_t.book Page 118

CONNECTED SERVICES FAQS 119
CONNECTED SERVICES ROADSIDE ASSISTANCE FAQS 1. What is the phone number for roadside
assistance? The phone number is: US: 1-800-521-2779
Canada: 1-800-363-4869
2. If I am subscribed to SiriusXM Guardian™, does it cover towing or other expenses incurred by using roadside assistance? No, however your new vehicle may include Roadside Assistance Call services.
CONNECTED SERVICES SEND & GO FAQS 1. How long does it take to send the route
and destination to my vehicle? Depending on various conditions, it can take up to three minutes for the request to get through to your vehicle.
2. Can I cancel a route I sent to my vehicle? Yes, once you enter your vehicle, and start the engine, the pop-up message stating that you have a new route will appear. There is an exit button on the pop-up that will cancel the route if selected.
3. Can I select a different route than the most recent one I sent to my vehicle? Yes, once you enter the vehicle, and start the engine, the pop-message has a “Locations” option. Once “Locations” is selected, you can choose from a list of recently sent destinations.
CONNECTED SERVICES VEHICLE FINDER FAQS 1. Can someone else locate my vehicle? Your
vehicle may be located by anyone who has your PIN and access to your account. It is your responsibility to guard your PIN accordingly. See the Uconnect and SiriusXM Guardian™ terms of service for more information.
2. How long does it take to sound my horn and flash the lights? Depending on various conditions, it can take three minutes or more for the request to get through to your vehicle.
3. How do I turn off the horn and lights after I turn them on? If you are close enough to the vehicle, you can use the key fob to turn off the horn and lights by pressing the red Panic button. Depending on your vehicle, the horn will turn off after 29 seconds, 5 seconds between cycles, up to 8 cycles if the trigger remains active and then the vehicle security system will rearm itself.
CONNECTED SERVICES STOLEN VEHICLE ASSISTANCE FAQS 1. Can someone locate my vehicle? To
enhance your privacy, and the privacy of others using your vehicle, a stolen vehicle police report is required for you to activate this service. You must involve local law enforcement to have SiriusXM Guardian™ locate your vehicle. We may also locate the vehicle for other law enforcement or government agencies, subject to a valid court order telling SiriusXM Guardian™ to do so. We will also provide the service for FCA entities to locate a vehicle that you have purchased through them.
2. How will I know if my vehicle is recovered? After you provide the SiriusXM Guardian™ Customer Care agent with the stolen vehicle report, the agent will work together with law enforcement to try to locate your vehicle. If your vehicle is recovered, you will be contacted by law enforcement.
6
21_00_U5_EN_USC_t.book Page 119

120 CONNECTED SERVICES FAQS
3. Can SiriusXM Guardian™ lower my insurance rates? Some insurance providers offer lower rates on vehicles equipped with systems that can deter auto theft. When shopping for insurance, be sure to inform the insurance provider of your SiriusXM Guardian™ services subscription to find out if the insurance provider can offer you a lower rate.
NOTE:FCA is not an insurance company, and SiriusXM Guardian™ is not an insurance product. You are responsible for obtaining insurance coverage for your vehicle and yourself.
CONNECTED SERVICES REMOTE VEHICLE START FAQS 1. How long does it take to remotely start my
vehicle? Depending on various conditions, it can take three minutes or more for the request to get through to your vehicle.
2. Which is faster, my key fob or the Uconnect App? Your key fob will remote start your vehicle more quickly. However its range is limited. For example, when you are leaving the stadium after the game, you can use the
Uconnect App to remote start your vehicle and have the inside of your vehicle comfortable by the time you get to it.
3. Will my vehicle be safe if I lose my wireless device? People sometimes lose their wireless devices, which is why security measures have been engineered into the Uconnect App. Asking for your username, password and SiriusXM Guardian™ Security PIN help to ensure that nobody can start your vehicle if they happen to find your device.
4. Can someone drive off with my vehicle using the App? No. Driving your vehicle still requires the keys to be in the vehicle. The Remote Start feature simply starts the engine to warm up or cool down the interior before you arrive.
5. Can I stop a vehicle that is being driven with the cancel Remote Vehicle Start command? No. If the vehicle is in motion, the cancel Remote Vehicle Start button will not stop the vehicle.
6. Why can’t all mobile devices use the Uconnect App? The Uconnect App has been designed to work on most devices with the Apple® and Android™ operating systems.
The capabilities of these devices allow us to remotely command your vehicle. Other operating systems may be supported in the future.
CONNECTED SERVICES REMOTE HORN & LIGHTS FAQS1. How long does it take to sound my horn and
flash the lights? Depending on various conditions, it can take three minutes or more for the request to get through to your vehicle.
2. Which is faster, my key fob or the Uconnect App? Your key fob will sound the horn and flash the lights quicker; however its range is limited.
3. How do I turn off the horn and lights after I turn them on? If you are close enough to the vehicle, you can use the key fob to turn off the horn and lights by pressing the red Panic button. Otherwise, Remote Horn & Lights will continue for 20 seconds.
21_00_U5_EN_USC_t.book Page 120

CONNECTED SERVICES FAQS 121
4. Why can’t all mobile devices use the Uconnect App? The Uconnect App has been designed to work on most devices with the Apple® and Android™ operating systems. The capabilities of these devices allow us to remotely command your vehicle. Other operating systems may be supported in the future.
CONNECTED SERVICES ACCOUNT FAQS1. How do I register for my SiriusXM
Guardian™ account? There are three ways that you can register your SiriusXM Guardian™ Account: Push the ASSIST button. A call will be
placed to an agent who can assist in registering your new account.
Press the Activate Services icon in the Apps menu. Select the button to speak with an agent, who can assist in regis-tering your new account.
Press the Activate Services icon in the Apps menu. Enter your email on the touchscreen and then follow the prompts from the provided email. You will receive an email with an activation link that will
be good for 72 hours. Once you click the activation link, you will be prompted to fill out your information and accept Terms and Conditions. Then, you will be directed to the SiriusXM Guardian™ home page to complete your profile and demo the remote services.
2. Why do I need an email address? Without an email address, customers cannot register for SiriusXM Guardian™. Customers need to register so they can subscribe to receive additional services and create a SiriusXM Guardian™ Security PIN for remote command requests.
3. How do I create a SiriusXM Guardian™ security PIN? Set up your SiriusXM Guardian™ Security PIN during the registration process. The SiriusXM Guardian™ Security PIN will be required to authenticate you when accessing your account via SiriusXM Guardian™ Call or performing any remote services, such as Remote Door Lock/Unlock, Remote Horn & Lights, or Remote Vehicle Start.
4. What if I forgot my SiriusXM Guardian™ security PIN? If you’ve already activated services and forgot your SiriusXM Guardian™ Security PIN, you can reset the PIN by selecting Edit Profile on your Owner’s Site.
5. How do I update my SiriusXM Guardian™ payment account address? Your SiriusXM Guardian™ Payment Account address can be updated online, or by calling SiriusXM Guardian™ Customer Care from ASSIST in your vehicle. To update online: login to your Owner’s Site, and select Edit Profile > SiriusXM Guardian™ Payment Account.
6. How do I update my SiriusXM Guardian™ profile? Your name, home address, phone number, email address and SiriusXM Guardian™ Security PIN can be updated online on your Owner’s Site. Log in to your Owner’s Site then select Edit Profile to edit your personal information. Make your edits and click Save.
7. Can I try features or packages before I buy them? Your new vehicle purchase may have come with an included trial period for certain Apps and services.
6
21_00_U5_EN_USC_t.book Page 121
122 CONNECTED SERVICES FAQS
8. Can I access every App and service while driving? No, some applications and services are not available while driving. For your own safety, it is not possible to use some of the touchscreen features while the vehicle is in motion (e.g. key pad).
9. What happens when my subscription comes up for renewal? If you have added a credit card to your account information, your subscription will be automatically renewed for a term length in accordance with the service plan that you have selected at the then current subscription rate and on every renewal date thereafter, unless you cancel your subscription by calling SiriusXM Guardian™ Care. If you have not added a credit card to your account, SiriusXM Guardian™ will send you an email or letter in advance of your expiration date to remind you that your subscription is ending soon.
10. How do I manage my SiriusXM Guardian™ notification preferences? Contact SiriusXM Guardian™ Customer Care, or go to your Owner’s Site and then update your preferences on the SiriusXM Guardian™ customer web portal.
11. How do I purchase a subscription? Contact SiriusXM Guardian™ Customer Care by pushing the ASSIST button on your rearview mirror.
12. How do I update my credit card information? Login to your Owner’s Site, and select Edit Profile, then select SiriusXM Guardian™ Payment Account.
13. How do I find out how much longer I have on my subscription? Contact SiriusXM Guardian™ Customer Care.
You also can visit your Owner’s Site and choose a subscription to view its expiration date. When your subscription is about to ex-pire, you will receive an email or letter of no-tification.
14. Can I get a refund if I have not used the entire subscription? Prorated refunds are provided from the date of cancellation for annual plans or longer. Please see the Uconnect and SiriusXM Guardian™ Terms & Conditions for refunds related to billing plans of other lengths and other circum-stances.
15. Can I cancel a subscription before it expires? Yes. If you have an annual subscription, your subscription will be canceled the day you cancel. If you have a monthly subscription, your subscription will be canceled on the last day of the month in which you choose to cancel.
16. What should I do if I want to sell my vehicle? Before your vehicle is sold to a new owner, you’ll want to remove your account information. This process removes all personal information, returns the Uconnect system to its original factory settings, removes all SiriusXM Guardian™ services and account information. To remove your account information from the Uconnect system, contact SiriusXM Guardian™ Customer Care.
17. What if I forgot to remove my account information before I returned my lease vehicle or sold it? Contact SiriusXM Guardian™ Customer Care.
21_00_U5_EN_USC_t.book Page 122

CONNECTED SERVICES FAQS 123
18. What will happen if an operable LTE (voice/data) or 4G (data) network connection compatible with my device is temporarily unavailable? The SOS Call and ASSIST buttons will NOT function if you are not connected to an operable LTE (voice/data) or 3G or 4G (data) network. Services that required your smartphone only direct calls to Roadside Assistance Call may be functioning if you have an operable network.
DATA COLLECTION & PRIVACYThe Uconnect system collects and transmits data which may include information about your vehicle, your vehicle’s health and performance, your vehicle’s location, your utilization of the features in your vehicle, and other data. The collection, use and sharing of this information is required to provide the SiriusXM Guardian™ services and is further described by the Uconnect Privacy Policy, which can be found at www.driveuconnect.com/connectedservices/privacy.html (US Residents) or www.driveuconnect.ca (Canadian Residents). This information may be collected by and shared with FCA US LLC for the purposes stated in the Uconnect Privacy Policy. Vehicle health and diagnostic information including location data may be used by Uconnect to provide a Vehicle Health Report to you.
Even if you cancel your SiriusXM Guardian™ subscription, this vehicle diagnostic health information, including location data, may still be transmitted from your vehicle and you may still have a Vehicle Health Report sent to you.
Use of any of the Uconnect Connected Services including SiriusXM Guardian™ is deemed to be your consent to the collection, use and disclosure of this information in accordance with the Uconnect Privacy Policy. If you do not want this information to be collected, used, or shared, you must cancel your Uconnect services in their entirety by contacting us as referenced in the Uconnect Privacy Policy. 6
21_00_U5_EN_USC_t.book Page 123

124
INDEXAAndroid Auto............................................. 64, 66Apple CarPlay ........................................... 64, 69Audio Settings ................................................. 41
BBluetooth
Connecting To A Particular Mobile Phone Or Audio Device After Pairing ..................47
CCD....................................................................39Connected Services.........................................93Connected Services FAQ................................118Connected Services Features..........................97Connected Services, Getting Started...............95Connected Services, Introduction....................93Controls ...........................................................27Customer Programmable Features..................59Cybersecurity ................................................... 19
DDeleting A Phone ............................................. 48Disc Drive ........................................................39Disconnecting..................................................48
Disturb .............................................................50Driver Memory Presets ....................................38
FFamily Alerts ................................................. 113
GGeneral Information.........................................16
MMedia Mode..............................................26, 39
PPhone Mode ....................................................43Presets ............................................................38
RRadio
Presets ........................................................38Radio Controls .................................................27Radio Operation...............................................27Radio Remote Controls....................................22Registering SiriusXM Guardian ........................94Remote Features, Door Lock/Unlock... 103, 118
Remote Features, Horn And Lights ............... 105Remote Features, Starting ...................104, 120Remote Sound System (Radio) Control ............22Removing SiriusXM Guardian ....................... 114Roadside Assistance..................... 16, 105, 119
SSafety...............................................................16Safety Features................................................16Satellite Radio..................................................32Saved Radio Stations.......................................38Security Features .............................................19
Roadside Assistance ...................................16Send & Go............................................106, 119Settings, Audio .................................................41Sirius Satellite Radio........................................32
Favorites......................................................36Replay..........................................................35
SiriusXM 360 L ................................................33SiriusXM Satellite Radio
Browse in SXM.............................................37Favorites......................................................36Replay..........................................................35
Smart Watch ................................................. 113
21_00_U5_EN_USC_t.book Page 124

125
SOS Call...........................................16, 97, 118Steering Wheel Audio Controls ........................ 22Steering Wheel Mounted Sound System .........22Stolen Vehicle Assistance.................... 110, 119Store Radio Presets.........................................38
UUconnect
Things You Should Know About Your Uconnect Phone......................................56
Uconnect App ..................................................95Uconnect Phone ....................................... 45, 54
Answer Or Ignore An Incoming Call — Call Currently In Progress........................ 55
Answer Or Ignore An Incoming Call — No Call Currently In Progress ..................55
Call Continuation.........................................56Call Controls................................................ 54Call Termination.......................................... 56
Cancel Command........................................54Connecting To A Particular Mobile Phone
Or Audio Device After Pairing ..................47Help Command............................................54Join Calls .....................................................55Making A Phone Or Audio Device A
Favorite ...................................................51Making A Second Call While Current
Call Is In Progress....................................55Natural Speech............................................54Operation .............................................45, 53Overview......................................................43Pair (Link) Uconnect Phone To A Mobile
Phone......................................................45Phonebook Download .................................52Place/Retrieve A Call From Hold .................55Power-Up .....................................................58Recent Calls ................................................51Redial ..........................................................56To Remove A Favorite..................................52
Toggling Between Calls................................55Touch-Tone Number Entry ...........................50Transfer Call To And From Mobile Phone.....55Voice Command ..........................................56
Uconnect System ...............................................5
VVehicle Finder ......................................107, 119Vehicle Health Alert....................................... 111Vehicle Health Report ................................... 110Vehicle Notifications ..................................... 111Voice Command........................................66, 69
WWi-Fi .............................................................. 109
7
21_00_U5_EN_USC_t.book Page 125


P68499605AA Second Edition
©2020 FCA US LLC. All Rights Reserved.Chrysler, Dodge, Jeep, Ram, Mopar and Uconnect are trademarks of FCA US LLC.FIAT is a registered trademark of FCA Group Marketing S.p.A., used under license by FCA US LLC. App Store is a registered trademark of Apple Inc. Google Play Store is a registered trademark of Google.
10.1 inch Display
GET STARTED
Radio Instruction Manual


