Reconciliation Procedures Guide for Cardholders Corporate Account Reconciliation (CAR) 1. Log In: To log in to CAR, go to https://amex.iers.ihost.com Enter your user ID and password User ID will be your MEID Password is provided via an email from AMEX Click on Log In. You will see a screen with instructions to wait and a pop up box showing your connection status. 2. Navigation: The Accounts & Cycles tab screen is the landing page for CAR. CAR displays 13 months of available cycles, which include your current open cycle and the last 12 closed months. To see the Transaction Summary: User ID is your MEID Password is assigned (You will receive a n email with a temporary password)
Transcript
Reconciliation Procedures Guide for Cardholders
Corporate Account Reconciliation (CAR)
1. Log In: To log in to CAR, go to https://amex.iers.ihost.com
Enter your user ID and password
User ID will be your MEID
Password is provided via an email from AMEX
Click on Log In. You will see a screen with instructions to wait and a pop up box showing your
connection status.
2. Navigation: The Accounts & Cycles tab screen is the landing page for CAR. CAR displays 13 months of available cycles, which include your current open cycle and the last 12 closed months. To see the Transaction Summary:
User ID is your MEID
Password is assigned
(You will receive a n email with a temporary password)
Double click on the cycle (or click the Card Data tab) to see the transactions.
The Card Data tab allows you to drill down and view transactions for any available cycle.
3. Reconciliation: Cardholders must verify that the charges seen online are reflective of the charges processed.
Reconciliation consists of providing information for each transaction. The idea is to link the description/business purpose to the attached invoice.
Select the Additional Transaction Detail tab
Complete the following sections within this Tab:
Type in description and business purpose (40 characters max)
Type in account information in the Account Reallocation if you would like your
fiscal to change the account information for this transaction. (40 characters max)
If you have additional information that you would like to provide, place it in
the Cardmember Comments (250 characters max) - will be noted by a yellow icon
under the Notes column
Select SAVE button to save all information in this Tab
EXAMPLES
Description/Business Purpose: Groceries for FON241LL Nutrition Lab (36 characters) Account Reallocation: Charge Center 123456 (20 characters) Cardmember Comments: Supplies for dietary mini-lab (29 characters) Description/Business Purpose: Our Daily Bread – DVD (21 characters) Account Reallocation: Object Code 54100 (17 characters) Cardmember Comments: Film for FON100 – World Hunger (30 characters) Description/Business Purpose: Airfare for A. Jones EDUC Conf (30 characters) Account Reallocation: Object Code 56520 (17 characters) Cardmember Comments: A. Jones EDUC Conf 1/14/12-1/21/12 T#12345 (42 characters)
4. Receipt Imaging: Cardholders will be required to scan all receipts, invoices, or associated documentation and attach it
to the corresponding transaction.
Highlight transaction you would like to attach a receipt to.
Select the Attach icon from the top menu bar
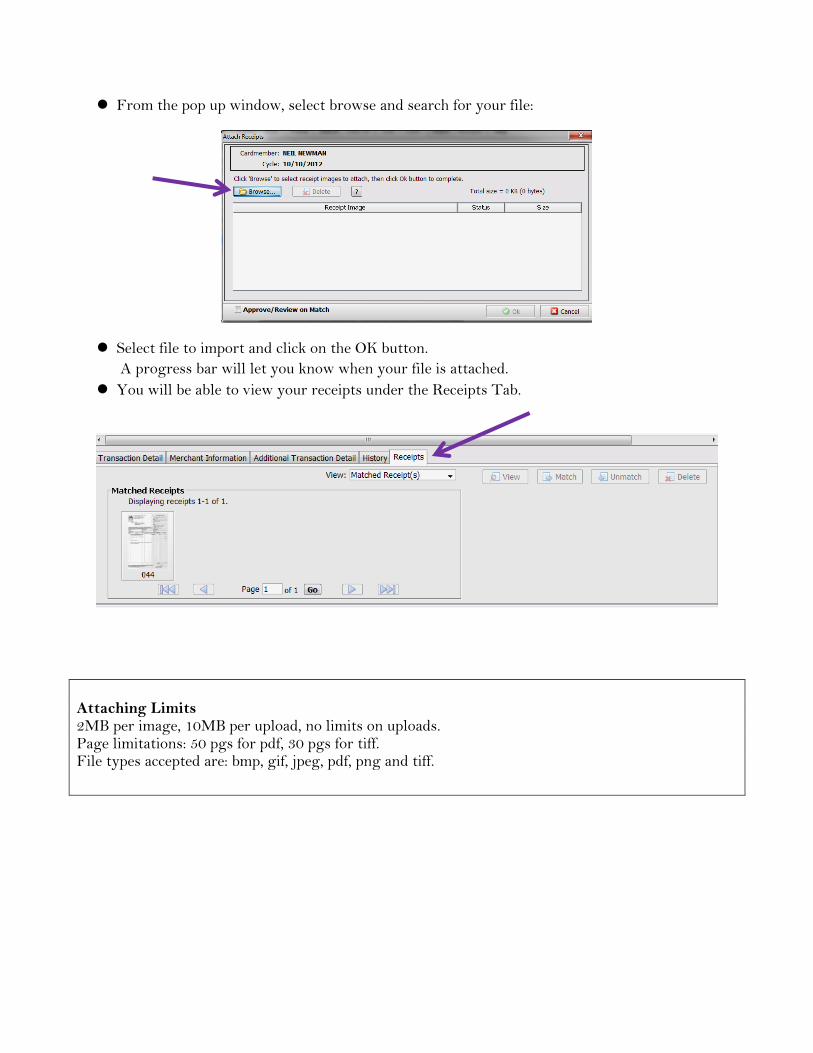
From the pop up window, select browse and search for your file:
Select file to import and click on the OK button.
A progress bar will let you know when your file is attached.
You will be able to view your receipts under the Receipts Tab.
Attaching Limits 2MB per image, 10MB per upload, no limits on uploads. Page limitations: 50 pgs for pdf, 30 pgs for tiff. File types accepted are: bmp, gif, jpeg, pdf, png and tiff.
If you would like to import several pages of documentation at once, you can click
on Accounts & Cycles tab. Then select the Attach icon from the top menu bar.
To match receipts to your transactions, select the Card Data tab and then click the Receipts tab.
Highlight the transactions that need to be matched, select the Unmatched Receipts and drag
them to the Matched Receipts box.
To increase the visibility of a receipt, you can double click or scroll over the image with your
cursor. You can also click View to see a full size image
.
If you do not have scanning capabilities, you can fax your receipts/invoices to AMEX
(703.726.7844). They will scan and upload the scanned images into CAR.
Select on the Print icon
Print the Transmittal form from the pop up, click on OK
You will fax the Transmittal page with your invoice/receipts/documentation to
the number indicated (703.726.7844) on the form.
You will see the documentation in the receipts tab in about an hour.
5. Approving Transactions: After you have finished attaching any necessary documentation and providing the required
information in the fields, you can proceed to approving each transaction. You will select the
Transaction Detail tab, and then select the Approve icon.
A will appear under the Cardmember column, signifying you have approved that transaction.
This completes your reconciliation of your Procard transactions. You can advise your reviewer that
all information has been inputted and can now be reviewed by them.
NOTE:
If you make any changes to your information at any time before we close the cycle, it will CLEAR all
approvals for that transaction, including the Reviewer and Fiscal approvals.