118
RSA RADIUS Server 6.1 Administrator’s Guide Powered by Steel-Belted Radius ®

RSA RADIUS Server 6.1Administrator’s Guide
Powered by Steel-Belted Radius®
Contact InformationSee our web site for regional Customer Support telephone and fax numbers.
RSA Security Inc. RSA Security Ireland Limitedwww.rsasecurity.com www.rsasecurity.ie
Copyright
Copyright © 2005 RSA Security, Inc. All rights reserved. No part of this document may be reproduced, modified, distributed, sold, leased, transferred, or transmitted, in any form or by any means, without the written permission of RSA Security, Inc. Information in this document is subject to change without notice.
Portions of this software copyright © 1995–2005 Funk Software, Inc. All rights reserved.
Portions of this software copyright © 1989, 1991, 1992 by Carnegie Mellon University Derivative Work - 1996, 1998-2000 Copyright 1996, 1998-2000 The Regents of the University of California All Rights Reserved Permission to use, copy, modify and distribute this software and its documentation for any purpose and without fee is hereby granted, provided that the above copyright notice appears in all copies and that both that copyright notice and this permission notice appear in supporting documentation, and that the name of CMU and The Regents of the University of California not be used in advertising or publicity pertaining to distribution of the software without specific written permission.
CMU AND THE REGENTS OF THE UNIVERSITY OF CALIFORNIA DISCLAIM ALL WARRANTIES WITH REGARD TO THIS SOFTWARE, INCLUDING ALL IMPLIED WARRANTIES OF MERCHANTABILITY AND FITNESS. IN NO EVENT SHALL CMU OR THE REGENTS OF THE UNIVERSITY OF CALIFORNIA BE LIABLE FOR ANY SPECIAL, INDIRECT OR CONSEQUENTIAL DAMAGES OR ANY DAMAGES WHATSOEVER RESULTING FROM THE LOSS OF USE, DATA OR PROFITS, WHETHER IN AN ACTION OF CONTRACT, NEGLIGENCE OR OTHER TORTIOUS ACTION, ARISING OUT OF OR IN CONNECTION WITH THE USE OR PERFORMANCE OF THIS SOFTWARE.
Portions of this software copyright © 2001-2002, Networks Associates Technology, Inc All rights reserved. Redistribution and use in source and binary forms, with or without modification, are permitted provided that the following conditions are met:
• Redistributions of source code must retain the above copyright notice, this list of conditions and the following disclaimer.
• Redistributions in binary form must reproduce the above copyright notice, this list of conditions and the following disclaimer in the documentation and/or other materials provided with the distribution.
• Neither the name of the Networks Associates Technology, Inc nor the names of its contributors may be used to endorse or promote products derived from this software without specific prior written permission.
THIS SOFTWARE IS PROVIDED BY THE COPYRIGHT HOLDERS AND CONTRIBUTORS ``AS IS'' AND ANY EXPRESS OR IMPLIED WARRANTIES, INCLUDING, BUT NOT LIMITED TO, THE IMPLIED WARRANTIES OF MERCHANTABILITY AND FITNESS FOR A PARTICULAR PURPOSE ARE DISCLAIMED. IN NO EVENT SHALL THE COPYRIGHT HOLDERS OR CONTRIBUTORS BE LIABLE FOR ANY DIRECT, INDIRECT, INCIDENTAL, SPECIAL, EXEMPLARY, OR CONSEQUENTIAL DAMAGES (INCLUDING, BUT NOT LIMITED TO, PROCUREMENT OF SUBSTITUTE GOODS OR SERVICES; LOSS OF USE, DATA, OR PROFITS; OR BUSINESS INTERRUPTION) HOWEVER CAUSED AND ON ANY THEORY OF LIABILITY, WHETHER IN CONTRACT, STRICT LIABILITY, OR TORT (INCLUDING NEGLIGENCE OR OTHERWISE) ARISING IN ANY WAY OUT OF THE USE OF THIS SOFTWARE, EVEN IF ADVISED OF THE POSSIBILITY OF SUCH DAMAGE.
Portions of this software are copyright © 2001-2002, Cambridge Broadband Ltd. All rights reserved. Redistribution and use in source and binary forms, with or without modification, are permitted provided that the following conditions are met:
• Redistributions of source code must retain the above copyright notice, this list of conditions and the following disclaimer.
• Redistributions in binary form must reproduce the above copyright notice, this list of conditions and the following disclaimer in the documentation and/or other materials provided with the distribution.
• The name of Cambridge Broadband Ltd. may not be used to endorse or promote products derived from this software without specific prior written permission.
THIS SOFTWARE IS PROVIDED BY THE COPYRIGHT HOLDER ``AS IS'' AND ANY EXPRESS OR IMPLIED WARRANTIES, INCLUDING, BUT NOT LIMITED TO, THE IMPLIED WARRANTIES OF MERCHANTABILITY AND FITNESS FOR A PARTICULAR PURPOSE ARE DISCLAIMED. IN NO EVENT SHALL THE COPYRIGHT HOLDER BE LIABLE FOR ANY DIRECT, INDIRECT, INCIDENTAL, SPECIAL, EXEMPLARY, OR CONSEQUENTIAL DAMAGES (INCLUDING, BUT NOT LIMITED TO, PROCUREMENT OF SUBSTITUTE GOODS OR SERVICES; LOSS OF USE, DATA, OR PROFITS; OR BUSINESS INTERRUPTION) HOWEVER CAUSED AND ON ANY THEORY OF LIABILITY, WHETHER IN CONTRACT, STRICT LIABILITY, OR TORT (INCLUDING NEGLIGENCE OR OTHERWISE) ARISING IN ANY WAY OUT OF THE USE OF THIS SOFTWARE, EVEN IF ADVISED OF THE POSSIBILITY OF SUCH DAMAGE.
Portions of this software copyright © 1995-2002 Jean-loup Gailly and Mark Adler This software is provided 'as-is', without any express or implied warranty. In no event will the authors be held liable for any damages arising from the use of this software. Permission is granted to anyone to use this software for any purpose, including commercial applications, and to alter it and redistribute it freely, subject to the following restrictions:
• The origin of this software must not be misrepresented; you must not claim that you wrote the original software. If you use this software in a product, an acknowledgment in the product documentation would be appreciated but is not required.
• Altered source versions must be plainly marked as such, and must not be misrepresented as being the original software.
• This notice may not be removed or altered from any source distribution.
HTTPClient package copyright © 1996-2001 Ronald Tschalär ([email protected]).
This library is free software; you can redistribute it and/or modify it under the terms of the GNU Lesser General Public License as published by the Free Software Foundation; either version 2 of the License, or (at your option) any later version.
This library is distributed in the hope that it will be useful, but WITHOUT ANY WARRANTY; without even the implied warranty of MERCHANTABILITY or FITNESS FOR A PARTICULAR PURPOSE. See the GNU Lesser General Public License for more details. For a copy of the GNU Lesser General Public License, write to the Free Software Foundation, Inc., 59 Temple Place, Suite 330, Boston, MA 02111-1307, USA.
StrutLayout Java AWT layout manager copyright © 1998 Matthew Phillips ([email protected]).
This library is free software; you can redistribute it and/or modify it under the terms of the GNU Library General Public License as published by the Free Software Foundation; either version 2 of the License, or (at your option) any later version.
This library is distributed in the hope that it will be useful, but WITHOUT ANY WARRANTY; without even the implied warranty of MERCHANTABILITY or FITNESS FOR A PARTICULAR PURPOSE. See the GNU Library General Public License for more details. For a copy of the GNU Lesser General Public License, write to the Free Software Foundation, Inc., 59 Temple Place, Suite 330, Boston, MA 02111-1307, USA.
Trademarks
ACE/Agent, ACE/Server, Because Knowledge is Security, BSAFE, ClearTrust, Confidence Inspired, e-Titlement, IntelliAccess, Keon, RC2, RC4, RC5, RSA, the RSA logo, RSA Secured, the RSA Secured logo, RSA Security, SecurCare, SecurID, SecurWorld, Smart Rules, The Most Trusted Name in e-Security, Transaction Authority, and Virtual Business Units are either registered trademarks or trademarks of RSA Security Inc. in the United States and/or other countries. All other goods and/or services mentioned are trademarks of their respective companies.
Microsoft, Windows, Windows 2000, Internet Explorer, and other Microsoft products referenced herein are either trademarks or registered trademarks of the Microsoft Corporation in the United States and other countries. Solaris is a registered trademark in the U.S. and other countries, licensed exclusively through X/Open Company Limited. Sun,
Sun Microsystems, Solaris, and all Sun-based trademarks and logos, Java, HotJava, JavaScript, the Java Coffee Cup Logo, and all Java-based trademarks and logos are trademarks or registered trademarks of Sun Microsystems, Inc. in the United States and other countries. Raima, Raima Database Manager and Raima Object Manager are trademarks of Birdstep Technology.
License agreement
This software and the associated documentation are proprietary and confidential to RSA Security, are furnished under license, and may be used and copied only in accordance with the terms of such license and with the inclusion of the copyright below. This software and any copies thereof may not be provided or otherwise made available to any other person.
Neither this software nor any copies thereof may be provided to or otherwise made available to any third party. No title to or ownership of the software or any intellectual property rights thereto is hereby transferred. Any unauthorized use or reproduction of this software may be subject to civil and/or criminal liability.
This software is subject to change without notice and should not be construed as a commitment by RSA Security.
Note on encryption technologies
This product may contain encryption technology. Many countries prohibit or restrict the use, import, or export of encryption technologies, and current use, import, and export regulations should be followed when exporting this product.
Distribution
Limit distribution of this document to trusted personnel.
RSA notice
The RC5™ Block Encryption Algorithm With Data-Dependent Rotations is protected by U.S. Patent #5,724,428 and #5,835,600.
First Printing: September 2005Part Number: M05917ADM

RSA RADIUS Server 6.1 Administrator’s Guide Contents v
Contents
About This GuideAudience .......................................................................................................................... ixWhat’s In This Manual................................................................................................... ixRelated Documentation................................................................................................. xi
Chapter 1 About RSA RADIUS ServerRSA RADIUS Server Features...................................................................................... 1RSA RADIUS Server Overview.................................................................................... 2
RADIUS Packets...................................................................................................... 4RADIUS Configuration .......................................................................................... 5Shared Secrets ........................................................................................................... 6RADIUS Ports.......................................................................................................... 8
Authentication.................................................................................................................. 8Accounting........................................................................................................................ 9
Accounting Sequence ............................................................................................10Attributes ........................................................................................................................12
Dictionaries .............................................................................................................12Attribute Lists .........................................................................................................13Attribute Values......................................................................................................14Default Values ........................................................................................................15
Centralized Configuration Management ....................................................................16Replacing a Replica RADIUS Server ..................................................................17Designating a New Primary RADIUS Server....................................................17Recovering a Replica After a Failed Download ................................................18Changing the Name or IP Address of a Server .................................................18

vi Contents September 2005
Chapter 2 Installing the RSA RADIUS ServerBefore You Begin.......................................................................................................... 19
Required Files......................................................................................................... 19Data Migration/Registration................................................................................ 19
Installing on Windows.................................................................................................. 20System Requirements ............................................................................................ 20Installing the RSA RADIUS Server.................................................................... 21Uninstalling the RSA RADIUS Server Software .............................................. 22
Installing on Solaris....................................................................................................... 23System Requirements ............................................................................................ 23Installer Syntax ....................................................................................................... 23Installing the RSA RADIUS Server Software ................................................... 25Stopping and Starting the RADIUS Daemon................................................... 27Uninstalling the RSA RADIUS Server Software .............................................. 27Migration Log File ................................................................................................. 28
Installing on Linux ........................................................................................................ 29System Requirements ............................................................................................ 29Installer Syntax ....................................................................................................... 29Installing the RSA RADIUS Server Software ................................................... 31Stopping and Starting the RADIUS Daemon................................................... 33Uninstalling the RSA RADIUS Server Software .............................................. 34
Chapter 3 Using RSA RADIUS AdministratorRunning RSA RADIUS Administrator...................................................................... 35Navigating in RSA RADIUS Administrator ............................................................. 36
RSA RADIUS Administrator Menus ................................................................. 36RSA RADIUS Administrator Toolbar ............................................................... 38RSA RADIUS Administrator Windows ............................................................ 39Using Context Menus ........................................................................................... 42
Accessing Online Help................................................................................................. 43Displaying Version Information ................................................................................. 43Adding a License Key................................................................................................... 43Exiting the RSA RADIUS Administrator ................................................................. 44
Chapter 4 Administering RADIUS ClientsRADIUS Clients Panel ................................................................................................. 45Adding a RADIUS Client ............................................................................................ 46Verifying a Shared Secret ............................................................................................. 48Deleting a RADIUS Client .......................................................................................... 49

RSA RADIUS Server 6.1 Administrator’s Guide Contents vii
Chapter 5 Administering ProfilesAbout Profiles ................................................................................................................51
Adding a Checklist or Return List Attribute for a Profile ...............................51Resolving Profile and User Attributes ................................................................52Default Profile ........................................................................................................52
Setting Up Profiles.........................................................................................................53Adding a Profile......................................................................................................53Removing a Profile ................................................................................................55
Chapter 6 Displaying StatisticsDisplaying Server Authentication Statistics ...............................................................57Displaying Server Accounting Statistics.....................................................................60Resetting Server Statistics .............................................................................................62Displaying RADIUS Client Statistics..........................................................................62
Chapter 7 Administering RADIUS ServersReplication Panel ...........................................................................................................66Adding a RADIUS Server Manually ...........................................................................66Enabling a RADIUS Server .........................................................................................68Deleting a RADIUS Server ..........................................................................................68Publishing Server Configuration Information ..........................................................69Notifying Replica RADIUS Servers ...........................................................................69Designating a New Primary RADIUS Server ...........................................................70Recovering a Replica After a Failed Download........................................................70Changing the Name or IP Address of a Server ........................................................71Regenerating a Node Secret .........................................................................................72Resetting the RADIUS Database ................................................................................73
Chapter 8 LoggingLogging Files ..................................................................................................................75Using the RADIUS System Log..................................................................................75
Level of Logging Detail.........................................................................................76Controlling Log File Size ......................................................................................76
Using the Accounting Log ...........................................................................................77Accounting Log File Format ................................................................................77First Line Headings................................................................................................78Comma Placeholders .............................................................................................78Standard RADIUS Accounting Attributes.........................................................79
viii Contents September 2005
Appendix A Using the LDAP Configuration InterfaceLDAP Configuration Interface File ........................................................................... 81About the LDAP Configuration Interface................................................................ 82
LDAP Utilities........................................................................................................ 82LDAP Requests ..................................................................................................... 83Downloading the LDAP Utilities........................................................................ 83LDAP Version Compliance ................................................................................. 84Configuring the LDAP TCP Port....................................................................... 84
LDAP Virtual Schema.................................................................................................. 85LDAP Command Examples ....................................................................................... 90
Searching for Records ........................................................................................... 90Modifying Records ................................................................................................ 91Adding Records ..................................................................................................... 93Deleting Records ................................................................................................... 94
Statistics Variables......................................................................................................... 95Counter Statistics ................................................................................................... 95Rate Statistics.......................................................................................................... 97
Glossary
Index
RSA RADIUS Server 6.1 Administrator’s Guide About This Guide ix
About This Guide
The RSA RADIUS Server 6.1 Administrator’s Guide describes how to install, configure, and administer the RSA RADIUS Server software on a server running the Solaris operating system, the Linux operating system, or the Windows 2000 or Windows Server 2003 operating systems.
AudienceThis manual is intended for network administrators responsible for implementing and maintaining authentication, authorization, and accounting services. This manual assumes that you are familiar with general RADIUS and networking concepts and the specific environment in which you are installing RSA RADIUS Server.
What’s In This ManualThis manual contains the following chapters and appendix:
Chapter 1, “About RSA RADIUS Server,” presents an overview of RSA RADIUS Server and summarizes important concepts relating to the operation of RSA RADIUS Server.
Chapter 2, “Installing the RSA RADIUS Server,” describes how to install and uninstall the RSA RADIUS Server software on a Solaris, Linux, or Windows computer.
Chapter 3, “Using RSA RADIUS Administrator,” describes how to use the RSA RADIUS Server Administrator to configure RSA RADIUS Server.
x About This Guide September 2005
Chapter 4, “Administering RADIUS Clients,” describes how to set up remote access server (RAS) devices as RSA RADIUS Server clients.
Chapter 5, “Administering Profiles,” describes how to set up user profiles to simplify user administration.
Chapter 7, “Administering RADIUS Servers,” describes how to manage RADIUS server replication.
Chapter 6, “Displaying Statistics,” describes how to use the monitoring capabilities in RSA RADIUS Server.
Chapter 8, “Logging,” describes how to set up and use logging functions in RSA RADIUS Server.
Appendix A, “Using the LDAP Configuration Interface,” describes how to use the optional LDAP Configuration Interface (LCI) add-on to RSA RADIUS Server.
The Glossary provides brief explanations for RADIUS terminology used in this and other RSA RADIUS Server manuals.
Syntax ConventionsThis manual uses the following conventions to present file and command line syntax.
radiusdir represents the directory into which RSA RADIUS Server has been installed. By default, this is C:\Program Files\RSA Security\ RSA RADIUS for Windows systems and /opt/rsa/radius on Linux and Solaris systems.
Brackets [ ] enclose optional items in format and syntax descriptions. In the following example, the first Attribute argument is required; you can include an optional second Attribute argument by entering a comma and the second argument (but not the square brackets) on the same line.
<add | replace> = Attribute [,Attribute]
In configuration files, brackets identify section headers:
the [Configuration] section of radius.ini
In screen prompts, brackets indicate the default value. For example, if you press ENTER without entering anything at the following prompt, the system uses the indicated default value (/opt).
Enter install path [/opt]:
RSA RADIUS Server 6.1 Administrator’s Guide About This Guide xi
Angle brackets < > enclose a list from which you must choose an item in format and syntax descriptions.
A vertical bar ( | ) separates items in a list of choices. In the following example, you must specify add or replace (but not both):
[AttributeName]<add | replace> = Attribute [,Attribute]
Related DocumentationThe following documents supplement the information in this manual.
RSA RADIUS Server DocumentationThe RSA RADIUS Server 6.1 Reference Guide describes configuration options for the RSA RADIUS Server software.
Vendor InformationYou can consult the online Vendor Information file for information about using RSA RADIUS Server with different remote access servers and firewalls. To access this file:
1 Start the RSA RADIUS Administrator application.
2 Choose Web > NAS Vendor Information.
You can access the same information by clicking the Web Info button on the Add RADIUS Client or Edit RADIUS Client window.
Requests for Comments (RFCs)The Internet Engineering Task Force (IETF) maintains an online repository of Request for Comments (RFC)s online at http://www.ietf.org/rfc.html.
RFC 2865, Remote Authentication Dial In User Service (RADIUS). C. Rigney, S. Willens, A. Rubens, W. Simpson. June 2000.
RFC 2866, RADIUS Accounting. C. Rigney. June 2000.
RFC 2869, RADIUS Extensions. C. Rigney, W. Willats, P. Calhoun. June 2000.
RFC 2882, Network Access Servers Requirements: Extended RADIUS Practices. D. Mitton. July 2000.
xii About This Guide September 2005
Internet-Draft, “The Protected One-Time Password Protocol (EAP-POTP)”, M. Nystrom, June 2005. ftp://ftp.rsasecurity.com/pub/otps/eap/draft-nystrom-eap-potp-02.html
Third-Party ProductsFor more information about configuring your access servers and firewalls, consult the manufacturer’s documentation provided with each device.
Getting Support and Service
Before You Call for Customer SupportMake sure you have direct access to the computer running the RSA Authentication Manager software. Have the following information available when you call:
Your RSA Security Customer/License ID. You can find this number on the license distribution medium or by running the Configuration Management application on Windows servers, or by issuing an sdinfo command on Linux or Solaris servers.
RSA Authentication Manager software version number.
The make and model of the machine on which the problem occurs.
The name and version of the operating system under which the problem occurs.
RSA SecurCare Online https://knowledge.rsasecurity.comCustomer Support Information www.rsasecurity.com/support

RSA RADIUS Server 6.1 Administrator’s Guide About RSA RADIUS Server 1
C h a p t e r 1About RSA RADIUS Server
RSA RADIUS Server is a complete implementation of the industry-standard RADIUS (Remote Authentication Dial-In User Service) protocols. RSA RADIUS Server is designed to meet the access control and policy management requirements of enterprises. It interfaces with a wide variety of network access servers—including virtual private networks (VPNs), dial-in servers, and wireless LAN (WLAN) access points (APs)—and authenticates remote and WLAN users against your existing security infrastructure. This lets you control who can access your network and what resources are available to them, and requires little administration beyond your current management of LAN users. RSA RADIUS Server then logs all access usage, so you can track and document usage statistics.
RSA RADIUS Server FeaturesCentralized management of user access control and security.
Support for a wide variety of 802.1X-compliant access points and other network access servers ensures compatibility in your network environment.
Support for a variety of authentication methods, including Tunneled Transport Layer Security (TTLS), Protected Extensible Authentication Protocol (PEAP), Generic Token Card, RSA Security EAP (EAP-15), and Protected One-Time Password (EAP-32).
Use of encryption keys eliminates the possibility of spoofing or masquerading as an “imposter agent.”

2 About RSA RADIUS Server September 2005
Centralized configuration management (CCM) provides simplified configuration management and automatic data distribution for multi-server environments.
Authentication logs provide a complete audit trail of user authentication activity and administrative transactions.
Encryption of communication between the RSA RADIUS Server and the RSA Authentication Manager prevents electronic eavesdropping.
RSA RADIUS Server OverviewRADIUS is an industry-standard protocol for providing authentication, authorization, and accounting services.
Authentication is the process of verifying a user’s identity and determining whether the user is allowed on the network.
Authorization is the process of controlling the network resources that the user can access on the protected network, such as privileges and time limits.
Accounting is the process of generating log files that record statistics describing each connection session, used for billing, system diagnosis, and usage planning.
Figure 1 illustrates a simple RSA RADIUS authentication and authorization sequence using a TTLS/PAP tunnel to facilitate communication between the access client and the RSA RADIUS server.
Note that some access clients may be configured to use RSA Security EAP or Protected One-Time Password (POTP) instead of a TTLS/PAP tunnel. In such cases, the sequence of transactions is similar, though the communication mechanics are different.
Note also that the RSA RADIUS server and the RSA Authentication Manager can reside on the same network host or on different network hosts.

RSA RADIUS Server 6.1 Administrator’s Guide About RSA RADIUS Server 3
Figure 1 RSA RADIUS Authentication
1 A RADIUS access client, who could be a dial-in user, a mobile user with wireless network access, or someone working at a remote office, sends an authentication request to a remote access server (RAS), which might be a wireless Access Point, an ISDN bridge, or a modem pool.
NOTE: The terms “remote access server” (RAS) and “network access server” (NAS) are interchangeable. This manual uses RAS, though some attribute names and parameters retain the older ‘NAS’ in their names.
2 When the RAS receives a user’s connection request, it performs an initial access negotiation with the user to establish connection information. It forwards this information to the RSA RADIUS server, which uses the information to create a tunnel between itself and the access client.
3 The RSA RADIUS server sends a request for the user’s credentials through the TTLS tunnel.
4 The access client sends a user ID and passcode (tokencode and personal identification number) to the RSA RADIUS server.
5 The RSA RADIUS server forwards the user’s user ID and passcode to the RSA Authentication Manager, which verifies that the user ID exists and that the passcode is correct for that user at that specific time.
6 If the user’s information is accepted, the RSA Authentication Manager returns a message indicating that the passcode is accepted (6a). The RSA Authentication Manager may also return the name of the profile associated with this user in the Access-Accept message.
AccessClient
RSARADIUSServer
RSAAuthentication
Manager
1. Connection Request Connection Notification
2. TTLS/PAP Tunnel Negotiation
5. User ID/Passcode
6a. Passcode Accepted (Profile Name)
6b. Passcode Rejected
7a. Access-Accept (Attributes)
7b. Access-Reject
8a. Connection Accepted
8b. Connection Refused
3. User ID/Passcode?
4. User ID/Passcode
RemoteAccessServer
TTLS/PAP Tunnel
4 About RSA RADIUS Server September 2005
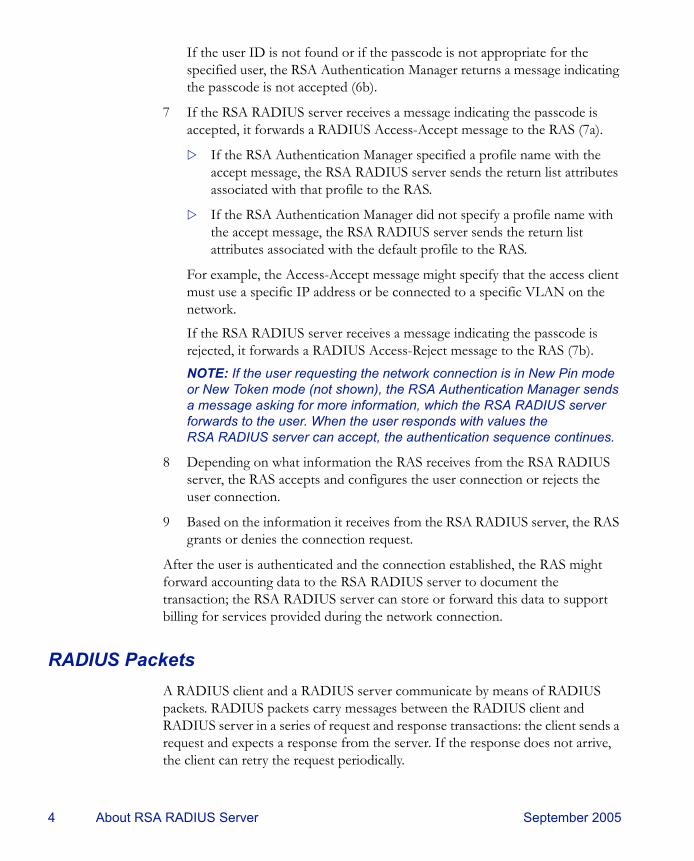
If the user ID is not found or if the passcode is not appropriate for the specified user, the RSA Authentication Manager returns a message indicating the passcode is not accepted (6b).
7 If the RSA RADIUS server receives a message indicating the passcode is accepted, it forwards a RADIUS Access-Accept message to the RAS (7a).
If the RSA Authentication Manager specified a profile name with the accept message, the RSA RADIUS server sends the return list attributes associated with that profile to the RAS.
If the RSA Authentication Manager did not specify a profile name with the accept message, the RSA RADIUS server sends the return list attributes associated with the default profile to the RAS.
For example, the Access-Accept message might specify that the access client must use a specific IP address or be connected to a specific VLAN on the network.
If the RSA RADIUS server receives a message indicating the passcode is rejected, it forwards a RADIUS Access-Reject message to the RAS (7b).NOTE: If the user requesting the network connection is in New Pin mode or New Token mode (not shown), the RSA Authentication Manager sends a message asking for more information, which the RSA RADIUS server forwards to the user. When the user responds with values the RSA RADIUS server can accept, the authentication sequence continues.
8 Depending on what information the RAS receives from the RSA RADIUS server, the RAS accepts and configures the user connection or rejects the user connection.
9 Based on the information it receives from the RSA RADIUS server, the RAS grants or denies the connection request.
After the user is authenticated and the connection established, the RAS might forward accounting data to the RSA RADIUS server to document the transaction; the RSA RADIUS server can store or forward this data to support billing for services provided during the network connection.
RADIUS PacketsA RADIUS client and a RADIUS server communicate by means of RADIUS packets. RADIUS packets carry messages between the RADIUS client and RADIUS server in a series of request and response transactions: the client sends a request and expects a response from the server. If the response does not arrive, the client can retry the request periodically.

RSA RADIUS Server 6.1 Administrator’s Guide About RSA RADIUS Server 5
Each RADIUS packet supports a specific purpose: authentication or accounting. A packet can contain values called attributes. The attributes found in each packet depend upon the type of packet (authentication or accounting) and the device that sent it (for example, the specific make and model of the RAS device acting as a RADIUS client).
For information on RADIUS authentication packet structures and attributes, see RFC 2865, Remote Authentication Dial In User Service (RADIUS). For information on RADIUS accounting packet structures and attributes, see RFC 2866, RADIUS Accounting.
RADIUS ConfigurationYou must configure a RADIUS client and a RADIUS server before they can communicate. If the client and server are on the same network, one administrator might be able to configure both sides of the RADIUS communication. If the client and server are on different networks, you might have to coordinate RADIUS configuration details with the administrators of other networks.
RADIUS Server ConfigurationYou must configure how a RADIUS server responds to each of its clients. To configure the RSA RADIUS Server, run the RSA RADIUS Administrator, (described in “Running RSA RADIUS Administrator” on page 35), open the RADIUS Clients panel (described in “RADIUS Clients Panel” on page 45), and enter the following information for each RADIUS client:
The IP address of the client device.
The authentication shared secret used by RSA RADIUS Server and the client device. For information on RADIUS shared secrets, see “Shared Secrets” on page 6.
The make and model of the client device, selected from a list of devices that RSA RADIUS Server supports. If a specific make and model is not listed, choose - Standard Radius -.
RADIUS Client ConfigurationYou must configure each RADIUS client to contact its RADIUS server. To configure a client to work with an RSA RADIUS Server, log on to the client device, run its administration program, and enter the following information:
The IP address of the RSA RADIUS Server.

6 About RSA RADIUS Server September 2005
The RADIUS shared secret to be used by the RSA RADIUS Server and the client device. For information on RADIUS shared secrets, see “Shared Secrets” on page 6.
The UDP ports on which to send and receive RADIUS authentication and accounting packets. RSA RADIUS Server uses UDP ports 1645 and 1812 for authentication and UDP ports 1646 and 1813 for accounting. For more information, see “RADIUS Ports” on page 8.
Shared SecretsA shared secret is a text string that serves as a password between hosts. RSA RADIUS Server uses three types of shared secrets:
RADIUS secret – Used to authenticate communication between a RADIUS server and a RADIUS client
Replication secret – Used to authenticate communication between a primary RADIUS server and a replica RADIUS server
Node secret – Used to authenticate communication between a RADIUS server and an RSA Authentication Manager server.
Figure 2 Shared Secrets
ReplicaRADIUSServer
ReplicaRADIUSServer
PrimaryRADIUSServer
RSAAuthenticationManager Server
AccessPoint
Remote AccessServer (RAS)
802.1X-CompatibleSwitch
Virtual PrivateNetwork
ReplicationSecret
RADIUSSecret
ReplicationSecret
NodeSecret

RSA RADIUS Server 6.1 Administrator’s Guide About RSA RADIUS Server 7
RADIUS SecretA RADIUS shared secret is a case-sensitive password used to validate communications between a RADIUS server, such as RSA RADIUS Server, and a RADIUS client, such as an Access Point (AP) or Remote Access Server (RAS). RSA RADIUS Server supports shared secrets of up to 127 alphanumeric characters, including spaces and the following special characters:
~!@#$%^&*()_+|\=-‘{}[]:”’;<>?/.,
Identical shared secrets must be configured on both sides of the RADIUS communication link.
NOTE: Not all RAS devices support shared secrets of up to 127 alphanumeric/special characters. You should select shared secrets that are fully supported by RADIUS devices in your network.
Most RADIUS clients allow you to configure different secrets for authentication and accounting. On the server side, the configuration interface allows you to create a list of known RADIUS clients (RAS devices). You should be able to identify the authentication shared secret and accounting shared secret that a server uses to communicate with each of the clients on this list.
During an authentication transaction, password information must be transmitted securely between the RADIUS client (RAS or AP) and the RSA RADIUS Server. RSA RADIUS Server uses the authentication shared secret to encrypt and decrypt password information.
No encryption is involved in transmitting accounting data between a RADIUS client and RADIUS server. However, the accounting shared secret is used by each device to verify that it can “trust” any RADIUS communications it receives from the other device.
Replication SecretA replication secret is a text string used to authenticate communications between a Primary RADIUS Server and a Replica RADIUS Server. You do not need to configure the replication secret for a realm: the Primary RADIUS Server generates it automatically, and each Replica RADIUS Server in a realm receives the replication secret as part of its configuration package.
Node SecretA node secret is a pseudorandom string known only to the RSA RADIUS Server and RSA Authentication Manager. Before the RSA RADIUS Server sends an authentication request to the RSA Authentication Manager, it encrypts the data using a symmetric node secret key.

8 About RSA RADIUS Server September 2005
The RSA Authentication Manager software views the RSA RADIUS Server service as a host agent. Communication between RSA RADIUS Server and RSA Authentication Manager uses specific UDP ports, which are configured during installation. To prevent “masquerading” by unauthorized hosts, you configure RSA Authentication Manager with the IP addresses of each RSA RADIUS Server host. Before RSA Authentication Manager accepts an authentication request, it verifies that the source address contained in the request matches an authorized host agent.
RADIUS PortsThe RADIUS standard initially used UDP ports 1645 and 1646 for RADIUS authentication and accounting packets. The RADIUS standards group later changed the port assignments to 1812 and 1813, but many organizations continue using the old 1645 and 1646 port numbers for RADIUS.
Any two devices that exchange RADIUS packets must use compatible UDP port numbers. If you are configuring a RAS to exchange authentication packets with a RADIUS server, you must find out which port the server uses to receive authentication packets from its clients (1812, for example). You must then configure the RAS to send authentication packets on the same port (1812). The same is true for RADIUS accounting.
RSA RADIUS Server can listen on multiple ports. For compatibility, the server listens to the old and new default RADIUS ports: ports 1645 and 1812 for authentication, and ports 1646 and 1813 for accounting.
AuthenticationTable 1 describes the conditions under which each type of RADIUS authentication message is issued, and the purpose of any RADIUS attributes the message contains.
Table 1. RADIUS Authentication Messages and Attributes
Message Conditions Purpose of Message AttributesWhen a RAS receives a connection request from a user, the RAS authenticates the request by sending an Access-Request to its RADIUS server.
Identify the user.Describe the type of connection the user is trying to establish.
RSA RADIUS Server 6.1 Administrator’s Guide About RSA RADIUS Server 9
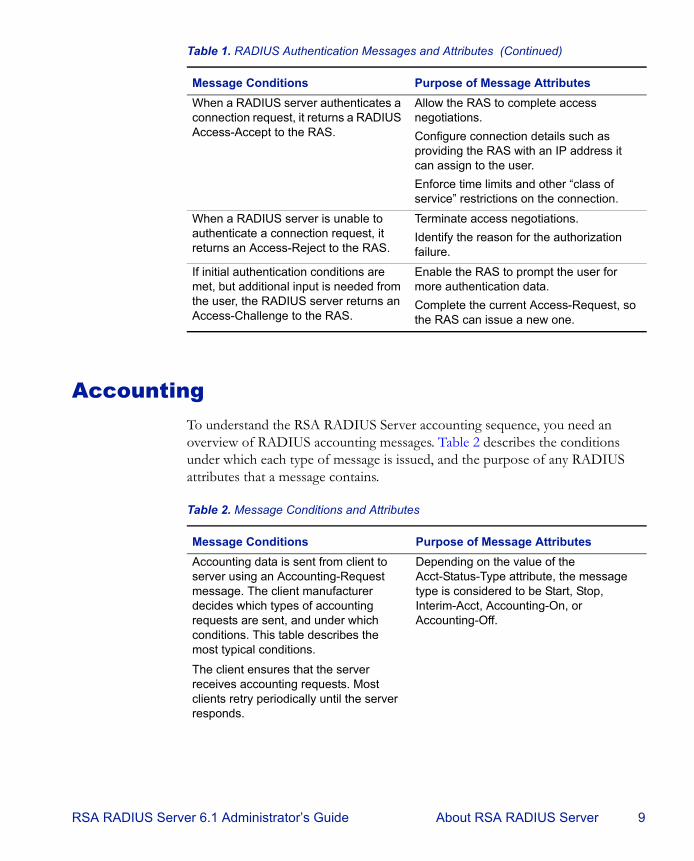
AccountingTo understand the RSA RADIUS Server accounting sequence, you need an overview of RADIUS accounting messages. Table 2 describes the conditions under which each type of message is issued, and the purpose of any RADIUS attributes that a message contains.
When a RADIUS server authenticates a connection request, it returns a RADIUS Access-Accept to the RAS.
Allow the RAS to complete access negotiations.Configure connection details such as providing the RAS with an IP address it can assign to the user.Enforce time limits and other “class of service” restrictions on the connection.
When a RADIUS server is unable to authenticate a connection request, it returns an Access-Reject to the RAS.
Terminate access negotiations.Identify the reason for the authorization failure.
If initial authentication conditions are met, but additional input is needed from the user, the RADIUS server returns an Access-Challenge to the RAS.
Enable the RAS to prompt the user for more authentication data.Complete the current Access-Request, so the RAS can issue a new one.
Table 1. RADIUS Authentication Messages and Attributes (Continued)
Message Conditions Purpose of Message Attributes
Table 2. Message Conditions and Attributes
Message Conditions Purpose of Message AttributesAccounting data is sent from client to server using an Accounting-Request message. The client manufacturer decides which types of accounting requests are sent, and under which conditions. This table describes the most typical conditions.
Depending on the value of the Acct-Status-Type attribute, the message type is considered to be Start, Stop, Interim-Acct, Accounting-On, or Accounting-Off.
The client ensures that the server receives accounting requests. Most clients retry periodically until the server responds.

10 About RSA RADIUS Server September 2005
Accounting SequenceA RAS can issue an Accounting-Request whenever it chooses, for example upon establishing a successful connection. Each time an Accounting-Request message arrives at the RSA RADIUS Server, an accounting transaction begins. During this transaction, the server handles the message by examining the Acct-Status-Type and other attributes within the message, and taking the appropriate action.
Comma-Delimited Log FilesWhen the RSA RADIUS Server accounting log is enabled, all of the RADIUS accounting attributes that the server receives are reformatted and logged to a Comma Separated Value (CSV) text file, which is easily imported into spreadsheets and database programs for report generation and billing.
After receiving an Access-Accept from the server, the RAS completes its access negotiation with the user. The RAS then sends a Start message to the server.
Record connection data such as user ID, RAS identifier, RAS port identifier, port type, and connection start time.
After a connection is terminated, the RAS sends a Stop message to the server.
Record statistics regarding the connection. One message contains the final value of every statistic that this RAS is capable of recording about this type of connection.
At intervals of approximately every six minutes, the RAS sends an Interim-Acct message to the server.
Record a “snapshot” of statistics regarding the connection. One message contains the current value of every statistic that this RAS is capable of recording about this type of connection.
Every time a client device comes online, whether after a failure or after an orderly shutdown, it sends an Accounting-On message to the server.
Identify the device that is going online and clear all session information.
Every time a client device experiences an orderly shutdown, before completing its shutdown sequence it sends an Accounting-Off message to the server.
Identify the device that is going offline and clear all session information.
Upon receipt of an Accounting-Request message, the server sends an Accounting-Response.
Complete the request/response cycle.
Table 2. Message Conditions and Attributes (Continued)
Message Conditions Purpose of Message Attributes
RSA RADIUS Server 6.1 Administrator’s Guide About RSA RADIUS Server 11
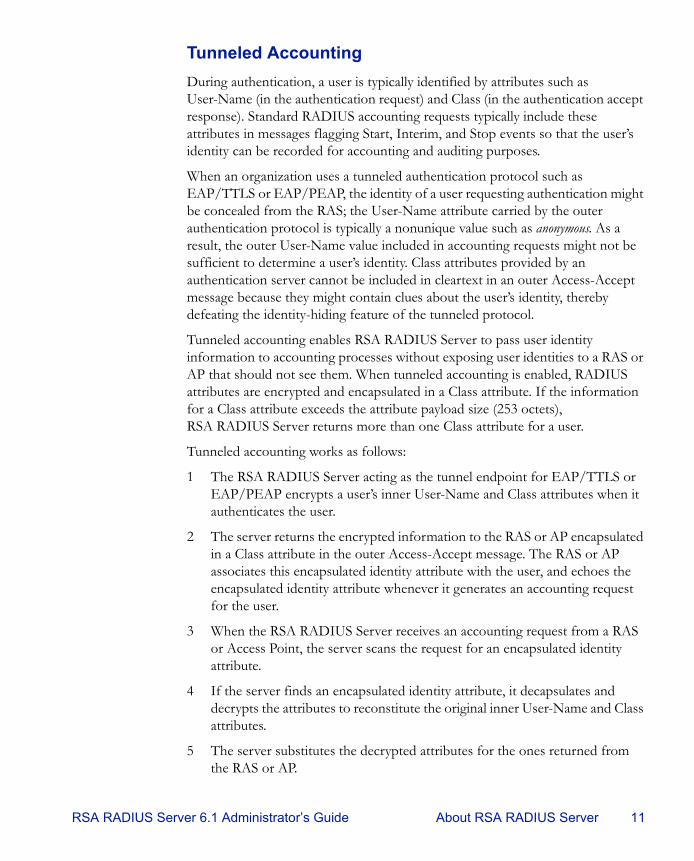
Tunneled AccountingDuring authentication, a user is typically identified by attributes such as User-Name (in the authentication request) and Class (in the authentication accept response). Standard RADIUS accounting requests typically include these attributes in messages flagging Start, Interim, and Stop events so that the user’s identity can be recorded for accounting and auditing purposes.
When an organization uses a tunneled authentication protocol such as EAP/TTLS or EAP/PEAP, the identity of a user requesting authentication might be concealed from the RAS; the User-Name attribute carried by the outer authentication protocol is typically a nonunique value such as anonymous. As a result, the outer User-Name value included in accounting requests might not be sufficient to determine a user’s identity. Class attributes provided by an authentication server cannot be included in cleartext in an outer Access-Accept message because they might contain clues about the user’s identity, thereby defeating the identity-hiding feature of the tunneled protocol.
Tunneled accounting enables RSA RADIUS Server to pass user identity information to accounting processes without exposing user identities to a RAS or AP that should not see them. When tunneled accounting is enabled, RADIUS attributes are encrypted and encapsulated in a Class attribute. If the information for a Class attribute exceeds the attribute payload size (253 octets), RSA RADIUS Server returns more than one Class attribute for a user.
Tunneled accounting works as follows:
1 The RSA RADIUS Server acting as the tunnel endpoint for EAP/TTLS or EAP/PEAP encrypts a user’s inner User-Name and Class attributes when it authenticates the user.
2 The server returns the encrypted information to the RAS or AP encapsulated in a Class attribute in the outer Access-Accept message. The RAS or AP associates this encapsulated identity attribute with the user, and echoes the encapsulated identity attribute whenever it generates an accounting request for the user.
3 When the RSA RADIUS Server receives an accounting request from a RAS or Access Point, the server scans the request for an encapsulated identity attribute.
4 If the server finds an encapsulated identity attribute, it decapsulates and decrypts the attributes to reconstitute the original inner User-Name and Class attributes.
5 The server substitutes the decrypted attributes for the ones returned from the RAS or AP.
12 About RSA RADIUS Server September 2005
6 The server processes the accounting request locally.
To implement tunneled accounting, you must configure the classmap.ini file to specify how attributes should be presented, and you must configure the spi.ini file to specify the keys that are used to encrypt and decrypt users’ identity information.
AttributesYou work with RADIUS attributes while setting up users, profiles, and RADIUS clients on the RSA RADIUS Server. The RSA RADIUS Server Administrator program allows you to choose RADIUS attributes by name from a predefined list. For each attribute, the RSA RADIUS Administrator prompts you to enter values using familiar data types such as string, integer, telephone number, or network address.
DictionariesRSA RADIUS Server uses dictionary files to store lists of RADIUS attributes. RSA RADIUS Server uses these dictionaries to parse authentication and accounting requests and generate responses.
The main RSA RADIUS Server dictionary file (radius.dct) lists attributes defined by the RADIUS standard. The radius.dct file resides in the same directory as the RSA RADIUS Server service (usually C:\Program Files \RSA Security\RSA RADIUS\Service on Windows computers and /opt/rsa/radius on Solaris and Linux computers).
Vendor-Specific AttributesIn addition to the standard attributes, many RAS devices use vendor-specific attributes (VSAs) to complete a connection. RSA RADIUS Server supports a large number of specific RAS devices by providing vendor-specific, proprietary dictionary files. These files also reside in the server directory and use the filename extension .dct.
Make/Model FieldDuring RSA RADIUS Server configuration, when you make a selection in the RADIUS client Make/model field, you are telling the server which dictionary file contains the VSAs for this client device. Thereafter, whenever the server receives a RADIUS packet from this client device, it can consult this dictionary file for any

RSA RADIUS Server 6.1 Administrator’s Guide About RSA RADIUS Server 13
nonstandard attributes that it encounters in the packet. Standard RADIUS attributes are always defined by the radius.dct file. If you do not know the make/model for a RADIUS client, choose the default option: - Standard Radius -.
For the most part, the selections currently available in the Make/model field are devices whose vendors have provided up-to-date attribute dictionaries. Documentation for these vendors and their products is available online by clicking the Web info button on the RADIUS Clients panel (described on page 45).
Updating Attribute InformationIf your RAS vendor announces a new product, a new attribute, or a new value for an attribute, you can add this information to your RSA RADIUS Server configuration. You can edit the dictionary file for that vendor to add new attributes or attribute values, or you can create a new vendor-specific dictionary file that contains new attributes and values.
For information on modifying vendor dictionary files, refer to the RSA RADIUS Server 6.1 Reference Guide.
Attribute ListsYou can use profiles to control authentication at finer levels of detail than simple user ID and password checking allow. Checklists and return lists provide powerful tools for the authentication and authorization of users.
Checklist AttributesA checklist is a list of attributes that must accompany the request for connection before the connection request can be authenticated. The RAS must send attributes that match the checklist associated with a user entry; otherwise, RSA RADIUS Server rejects the user even if the user’s name and password are valid.
By including appropriate attributes in the checklist, a variety of rules can be enforced. For example, only specific users might be permitted to use ISDN or dial-in connections to a particular RAS, or Caller ID might be used to validate a user against a list of acceptable originating telephone numbers.
A checklist is created by choosing attributes from a list of all RADIUS attributes known to the RSA RADIUS Server. This list can include a variety of vendor-specific attributes.

14 About RSA RADIUS Server September 2005
During authentication, RSA RADIUS Server filters the checklist based on the dictionary for the RADIUS client that sent the authentication request. The server ignores any checklist attribute that is not valid for this device.
Return List AttributesA return list is a list of attributes that RSA RADIUS Server must return to the RAS after authentication succeeds. The return list usually provides additional parameters that the RAS needs to complete the connection, typically as part of PPP negotiations. Return list attributes can be “authorization configuration parameters.”
By including appropriate attributes in the return list, you can create a variety of connection policies. Specific users can be assigned particular IP addresses or IPX network numbers; IP header compression can be turned on or off; or a time limit can be assigned to the connection.
You create a return list by choosing attributes from a list of all RADIUS attributes known to the RSA RADIUS Server. This list can include a variety of vendor-specific attributes.
During authentication, RSA RADIUS Server filters the return list based on the dictionary for the specific RADIUS client that sent the authentication request. The server omits any return list attribute that is not valid for this device.
Attribute ValuesThe value of each RADIUS attribute has a well-defined data type: numeric, string, IP or IPX address, time, or hexadecimal. For example, Callback-Number is of type string and contains a telephone number. RAS-Port-Type is an item from a list, and can be Sync, Async, and so forth.
Multi-Valued AttributesAttributes can be single- or multi-valued. Single-valued attributes appear at most once in the checklist or return list; multi-valued attributes might appear several times.
If an attribute appears more than once in the checklist, this means that any one of the values is valid. For example, you can set up a checklist to include both Sync and Async values for attribute RAS-Port-Type. This means that the user can dial into a Sync port or an Async port, but not one of the ISDN ports.
If an attribute appears more than once in the return list, each value of the attribute is sent as part of the response packet. For example, to enable both IP and IPX header compression for a user, you would configure the
RSA RADIUS Server 6.1 Administrator’s Guide About RSA RADIUS Server 15
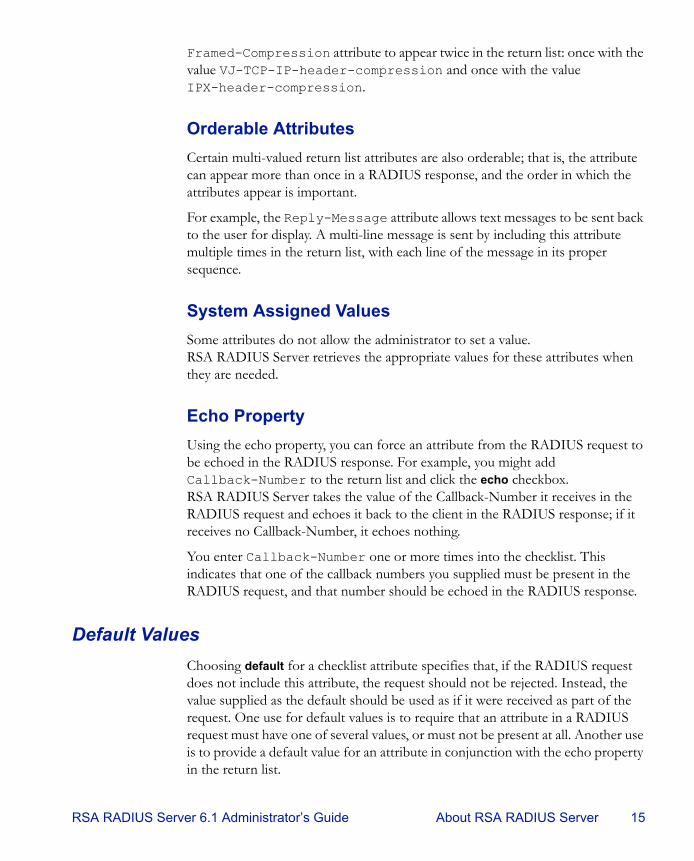
Framed-Compression attribute to appear twice in the return list: once with the value VJ-TCP-IP-header-compression and once with the value IPX-header-compression.
Orderable AttributesCertain multi-valued return list attributes are also orderable; that is, the attribute can appear more than once in a RADIUS response, and the order in which the attributes appear is important.
For example, the Reply-Message attribute allows text messages to be sent back to the user for display. A multi-line message is sent by including this attribute multiple times in the return list, with each line of the message in its proper sequence.
System Assigned ValuesSome attributes do not allow the administrator to set a value. RSA RADIUS Server retrieves the appropriate values for these attributes when they are needed.
Echo PropertyUsing the echo property, you can force an attribute from the RADIUS request to be echoed in the RADIUS response. For example, you might add Callback-Number to the return list and click the echo checkbox. RSA RADIUS Server takes the value of the Callback-Number it receives in the RADIUS request and echoes it back to the client in the RADIUS response; if it receives no Callback-Number, it echoes nothing.
You enter Callback-Number one or more times into the checklist. This indicates that one of the callback numbers you supplied must be present in the RADIUS request, and that number should be echoed in the RADIUS response.
Default ValuesChoosing default for a checklist attribute specifies that, if the RADIUS request does not include this attribute, the request should not be rejected. Instead, the value supplied as the default should be used as if it were received as part of the request. One use for default values is to require that an attribute in a RADIUS request must have one of several values, or must not be present at all. Another use is to provide a default value for an attribute in conjunction with the echo property in the return list.

16 About RSA RADIUS Server September 2005
If an attribute appears once in the checklist marked as default, and the same attribute appears in the return list marked as echo, the server echoes the actual value of the attribute in the RADIUS response if the attribute appears in the RADIUS request. If the attribute does not appear in the RADIUS request, the server echoes the default value (from the checklist) in the response.
If you add multiple values of the same attribute to the checklist, only one of them can be marked as default.
For example, an administrator adds several Callback-Number values to the checklist and marks one of them as default. The administrator adds Callback-Number to the return list and specifies it as echo.
If a Callback-Number value is present in the RADIUS request, it must match one of the checklist values or the user is rejected.
If it does match, the user is accepted and the value supplied is echoed in the RADIUS response.
If no Callback-Number is supplied in the request, the user is accepted and the default value is echoed in the response.
Other checklist attributes provide configuration for the user, such as time-of-day and concurrent-login-limit information.
Centralized Configuration ManagementThe RSA RADIUS Server supports the replication of RADIUS configuration data from a Primary RADIUS Server to a maximum of 10 Replica RADIUS Servers within a realm on a customer network. Replica servers help balance the load of authentication requests coming in from RADIUS clients, and ensure that authentication services are not interrupted if the Primary or other Replica RADIUS servers stops working.
All the servers within a realm reflect the current configuration specified by the network administrator: the network administrator modifies the configuration on the Primary RADIUS Server, and the Primary RADIUS Server propagates the new configuration to its Replica RADIUS Servers. For example, after a network administrator configures a new RADIUS client or profile on the Primary RADIUS Server, the network administrator tells the Primary RADIUS Server to publish a configuration package file (replica.ccmpkg) that contains the updated configuration information. After publication, the Primary RADIUS Server notifies each Replica RADIUS Server that a new configuration package is ready. Each Replica then downloads and installs the configuration package to update its settings.

RSA RADIUS Server 6.1 Administrator’s Guide About RSA RADIUS Server 17
The Primary RADIUS Server maintains a list of the Replica RADIUS Servers that have registered with it. The Primary RADIUS Server uses this list to track which servers to notify after it publishes an updated configuration package to resynchronize the configuration of Replica RADIUS Servers.
Figure 3 Primary and Replica RADIUS Servers
Replacing a Replica RADIUS ServerTo replace a failed Replica RADIUS Server, a network administrator shuts down the failed server, installs the RSA RADIUS Server software on a replacement server, and enables the Replica RADIUS Server. The Replica RADIUS Server then downloads and installs its configuration package from the Primary RADIUS Server.
Designating a New Primary RADIUS ServerYou can change which server within a realm is designated as the Primary RADIUS Server for that realm. For more information, see “Designating a New Primary RADIUS Server” on page 70.
RADIUSReplica 1
PrimaryRADIUSServer
RADIUSReplica 2
RADIUSReplica 10
18 About RSA RADIUS Server September 2005
Recovering a Replica After a Failed DownloadIf a Replica RADIUS Server fails during the download of a configuration package, its configuration may be corrupted or it may have a stale secret. For information on how to recover a Replica after a failed download, refer to “Recovering a Replica After a Failed Download” on page 70.
Changing the Name or IP Address of a ServerTo change the DNS name or IP address of a Primary or Replica RADIUS Server, you run the rsainstalltool (Windows) or the rsaconfiguretool (Solaris/Linux) utility. For more information, refer to “Changing the Name or IP Address of a Server” on page 71.
RSA RADIUS Server 6.1 Administrator’s Guide Installing the RSA RADIUS Server 19
C h a p t e r 2Installing the RSA RADIUS Server
The RSA RADIUS Server software package includes the server software and various dictionary and configuration files to support authentication and accounting. This chapter describes how to install the RSA RADIUS Server software on a Windows, Solaris, or Linux host.
Before You Begin
Required FilesThe RSA RADIUS Server software requires the path to four files (sdconf.rec, radius.cer, radius.key, and server.cer) to communicate with RSA Authentication Manager.
If you install the RSA RADIUS Server software on the host running RSA Authentication Manager (local installation), the installer obtains the path to these files automatically. If you install the RSA RADIUS Server software on a different host (remote installation), the installer asks you for the path to these files.
Data Migration/RegistrationWhen you install a Primary RADIUS Server on a host that previously ran an older version of RSA Authentication Manager configured to use RSA RADIUS Server, the installer provides an option to migrate your RADIUS data to the new RSA RADIUS Server. Information transferred during data migration includes RADIUS client names, IP addresses, and shared secrets; profile names, checklist
20 Installing the RSA RADIUS Server September 2005
attributes, and return list attributes; and RSA SecurID prompts used to format messages to users.
Data migration also registers the RSA RADIUS Server as an agent host with RSA Authentication Manager. Registration information includes the server type (Primary or Replica), fully qualified name, administrative port number, and IP address.
NOTE: If aliases are required to support network address translation (NAT), they must be configured manually on the RSA Authentication Manager host.
Data migration is not available for new RSA Authentication Manager installations.
Installing on WindowsThis section describes how to install the RSA RADIUS Server software on a Windows server.
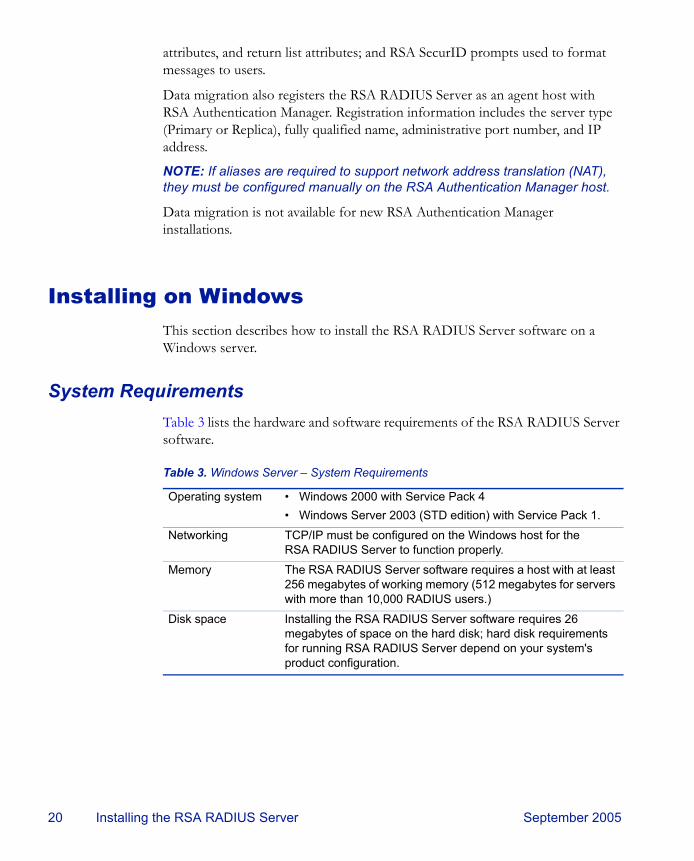
System RequirementsTable 3 lists the hardware and software requirements of the RSA RADIUS Server software.
Table 3. Windows Server – System Requirements
Operating system • Windows 2000 with Service Pack 4• Windows Server 2003 (STD edition) with Service Pack 1.
Networking TCP/IP must be configured on the Windows host for the RSA RADIUS Server to function properly.
Memory The RSA RADIUS Server software requires a host with at least 256 megabytes of working memory (512 megabytes for servers with more than 10,000 RADIUS users.)
Disk space Installing the RSA RADIUS Server software requires 26 megabytes of space on the hard disk; hard disk requirements for running RSA RADIUS Server depend on your system's product configuration.

RSA RADIUS Server 6.1 Administrator’s Guide Installing the RSA RADIUS Server 21
Installing the RSA RADIUS ServerTo install the RSA RADIUS Server software on a Windows host:
1 Log on to the Windows server.
2 Run the RSA RADIUS Server software installation from a CD or from a network server.
Using the CD-ROM installer – If you want to install the RSA RADIUS Server software from a CD, insert the RSA RADIUS Server installation CD-ROM, choose Start > Run, and enter the drive letter and setup command:D:\setup
Using the .msi file – Run the RSA RADIUS Server.msi file from the network server or CD-ROM, or copy the file to your computer and run it locally.
3 When the installer wizard window opens, click Next to continue.
4 When the Welcome window opens, click Next to continue.
5 When the Place of Purchase window opens, click the appropriate radio button and click Next to continue.
6 When the License Agreement window opens, click the I accept the terms in the license agreement radio button. Click Next to continue.
7 When the Setup Type window opens, click the Complete radio button if you want to install the RSA RADIUS Server files in the C:\Program Files\ RSA Security\RSA RADIUS directory.
If you want to install RSA RADIUS Server software in a directory other than the default C:\Program Files\RSA Security\RSA RADIUS directory, click the Custom radio button, then click the Change button. Select the directory in which you want to install the RSA RADIUS Server software. Click OK.
Click Next to continue.
8 If you are installing a Primary RADIUS Server, click the Install as Primary RSA RADIUS Server button.
If you are installing a Replica RSA RADIUS Server, click the Install as Replica RSA RADIUS Server button. If the RSA Authentication Manager application is not running on the server, you are prompted to specify the location of the Primary RSA RADIUS Server. You can specify the name, IP address(es), and replication secret of the Primary RADIUS Server, or you can

22 Installing the RSA RADIUS Server September 2005
click the Browse button to locate the directory containing the sdconf.rec, radius.cer, server.cer, and radius.key files on your network.
9 When the Primary RSA RADIUS Server window opens, specify the replication secret used to authenticate communications between the Primary RADIUS Server and Replica RADIUS Servers in the Primary Shared Secret field.
If you are upgrading from a previous release of the RSA Authentication Manager software and you want to import your profile information into RSA RADIUS Server, click the Migrate RSA RADIUS database checkbox.
10 When the Start Service window opens, click the Yes, start the RSA RADIUS service checkbox if you want your computer to run the RADIUS service at the end of the installation sequence.
Click Next to continue.
11 When the Ready to Install the Program window opens, click Install to begin the installation of the RSA RADIUS Server software.
12 When installation is completed, the InstallShield Wizard Completed window opens. Click Finish.
After you finish installing the RSA RADIUS Server software, run the RSA Authentication Manager application and launch the RSA RADIUS Administrator application to verify that it can communicate with the RADIUS server.
NOTE: After you install the RSA RADIUS Server software, you may need to modify the server configuration files. For more information, refer to the RSA RADIUS Server 6.1 Reference Guide.
Uninstalling the RSA RADIUS Server SoftwareTo uninstall the RSA RADIUS Server software from a Windows host, run the Add or Remove Programs Control Panel, choose RSA RADIUS Server, and click Remove.

RSA RADIUS Server 6.1 Administrator’s Guide Installing the RSA RADIUS Server 23
Installing on SolarisThis section describes how to install and uninstall the RSA RADIUS Server on a Solaris server.
System RequirementsThe RSA RADIUS Server software package includes the server daemon and various dictionary and database files to support user authentication.
Installer SyntaxTo run the Solaris version of the RSA RADIUS Server installer, you execute the following command:
install_rsa.sh [-dir directory] [-identity {PRIMARY | REPLICA}] [-port port-num}] [-path path] [-reppkg path] [-primary hostname] [-primary_ips ips] [-primary_secret secret] [-overwrite] [-migrate} [-silent] [-start_sbr] [-usage|-help|-h]
Table 5 explains the function of each command option.
Table 4. Solaris Server – System Requirements
Hardware Sun UltraSPARC workstation
Operating system Solaris 9
Memory At least 256 megabytes of working memory.
Disk space Installing the RSA RADIUS Server software requires at least 234 megabytes of space on the hard disk; hard disk requirements for running RSA RADIUS Server depend on your system's product configuration.
Networking TCP/IP must be configured on the Solaris host for the RSA RADIUS Server to function properly.
Table 5. Command Options for the install_rsa.sh Command
Option Function
-dir Specifies the top-level directory for installation of the RSA RADIUS Server files.Default value is /opt.

24 Installing the RSA RADIUS Server September 2005
-identity Specifies whether you are installing a Primary or Replica RADIUS Server.Valid values are PRIMARY and REPLICA.
Default value is PRIMARY.
-migrate Indicates you want to run the RSA RADIUS Server migration utility (rsainstalltool), which transfers RADIUS settings from an older version of RSA Authentication Manager and registers the RSA RADIUS Server as a host agent.For information on the migration utility, refer to “Data Migration/Registration” on page 19.
-overwrite Specifies that the tprsMigReg.log installation log file from a previous installation of RSA RADIUS Server can be overwritten.
-path Specifies the path to the radius.cer, server.cer, radius.key, and sdconf.rec files.
Default value is /opt.
-port Specifies the TCP port used for administration of the RSA RADIUS Server.Default value is 1813.
-primary Specifies the name of the Primary RADIUS Server. Use only when installing a Replica RADIUS Server. Do not use the -primary option if you are specifying the -reppkg option.
-primary_ips Specifies the IPv4 address or addresses of the Primary RADIUS Server. If your Primary RADIUS Server has more than one network interface, you can enter as many as four IP addresses separated by commas.Use only when installing a Replica RADIUS Server. Do not use the -primary_ips option if you are specifying the -reppkg option.
-primary_secret Specifies the CCM shared secret used to authenticate communications between the Primary RADIUS Server and Replica RADIUS Servers. Do not use the -primary_secret option if you are specifying the -reppkg option.
Table 5. Command Options for the install_rsa.sh Command (Continued)
Option Function

RSA RADIUS Server 6.1 Administrator’s Guide Installing the RSA RADIUS Server 25
Installing the RSA RADIUS Server SoftwareThe following procedure describes how to install the RSA RADIUS Server software on a Solaris server. Some of the steps in the procedure are omitted if you specify the -silent option for the install_rsa.sh command.
1 Log into the Solaris server as root.
2 Copy the RSA RADIUS Server installation files (RSARadius.pkg and install_rsa.sh) to the Solaris server.
The RSARadius.pkg and install_rsa.sh files must reside in the same directory on the server.
3 Change your current working directory to the location of the installation files you copied in Step 2.
4 Execute the following command to run the installation script.
# ./install_rsa.sh [options]
See Table 5 on page 23 for an explanation of the install_rsa.sh command options.
-reppkg Specifies the path to the replica.ccmpkg configuration file. Use only when installing a Replica RADIUS Server. Do not use the -reppkg option if you are specifying the -primary, -primary_ips, and -primary_secret options.
Default value is /opt.
-silent Specifies that, if all required information is supplied through command options, the installer does not display user prompts.If you use the -silent option and a required setting is missing, the installer prompts you for the missing setting.If you specify other command options and values and you do not specify the -silent option, the installer uses the values you specified as defaults and prompts you to confirm or override them.
-start_sbr Specifies that the installer should start the RADIUS daemon at the conclusion of the installation process.
-usage|-help|-h Displays help for the install_rsa.sh command.
Table 5. Command Options for the install_rsa.sh Command (Continued)
Option Function

26 Installing the RSA RADIUS Server September 2005
5 Specify the directory where you want to install the RSA RADIUS Server files.
By default, the installation script puts the /rsa/radius directory files in the /opt directory (that is, /opt/rsa/radius). Enter install path [/opt]:
6 If you are installing the RSA RADIUS Server software on a host that is not running the RSA Authentication Manager software (remote installation), specify the location of the radius.cer, server.cer, radius.key, and sdconf.rec files.
Enter path to RSA files [/export/home/opt/rsa]:
If you are installing the RSA RADIUS Server software on a host that is running the RSA Authentication Manager software (local installation), the installer copies the radius.cer, server.cer, radius.key, and sdconf.rec files automatically.
7 Specify the number of the TCP port used to administer RSA RADIUS Server.
The default port number is 1813. Enter RSA administration port [1813]:
8 Specify whether you are installing a Primary or Replica RADIUS Server.
Enter RADIUS identity (REPLICA or PRIMARY) [PRIMARY]:
9 If you are installing a Replica RADIUS Server, specify whether a configuration package generated by the Primary RADIUS Server is available.
Is replica.ccmpkg file present (y/n) [n]?
If you enter y, you are prompted to specify the path to the replica.ccmpkg file.Enter path to replica.ccmpkg [/opt/rsa]:
10 If you are installing a Replica RADIUS Server and a configuration package is not available, specify the name of the Primary RADIUS Server.
Enter primary host name:
11 If you are installing a Replica RADIUS Server and a configuration package is not available, specify the IP address or addresses of the Primary RADIUS Server. If the Primary RADIUS Server has more than one network interface (multi-homed), you can enter as many as four IP addresses, separating addresses with commas.
Enter primary host IP address list (max 4, comma separated):
12 Specify the host secret used to authenticate communication between the Primary RADIUS Server and Replica RADIUS Servers.

RSA RADIUS Server 6.1 Administrator’s Guide Installing the RSA RADIUS Server 27
Enter primary host secret:
13 If you are installing a Primary RADIUS Server on a host running an earlier version of the RSA Authentication Manager software, specify whether you want to migrate data to the current installation.
Do you want to migrate data from RSA Server (y/n) [n]?
If the installation succeeds, the installer displays the following message.
Configuring for use with generic databaseRSA RADIUS installation succeeded.
If the installation fails, the installer displays the following message and asks you whether you want to roll back the files that were installed.
Installation failed. Please see /opt/rsa/radius/tprsMigReg.log for details.Configuration of RSA Radius failed.The installation has failed, would you like it cleaned up (y/n) [y]? yCleaning up installation....Removing /etc/rc2.d/S90radius script.Removing /etc/rc2.d/K90radius script.
Stopping and Starting the RADIUS DaemonAfter the RADIUS daemon is installed on the server, it stops and starts automatically each time you shut down or restart the server. You can stop the RADIUS daemon at any time by issuing the following command:
/etc/rc2.d/S90radius stop
Use the following command to start the RADIUS daemon:
/etc/rc2.d/S90radius start
Uninstalling the RSA RADIUS Server SoftwareTo uninstall the RSA RADIUS Server software:
1 Stop the RADIUS daemon currently running on your server.
2 Back up your RSA RADIUS Server directory.
3 Log into the Solaris server as root.
4 Type the following command to uninstall the RSA RADIUS Server software:
# ./opt/rsa/radius/install/uninstall_rsa.sh

28 Installing the RSA RADIUS Server September 2005
5 Type y when you are asked to confirm that you want to uninstall the RSA RADIUS Server software.
Confirm removal of sbr-rsa_1.0-1 (y/n) [y]? yRemoving /etc/rc2.d/S90radius script.Removing /etc/rc2.d/K90radius script.Removal of <RSARadius> was successful.RSARadius removed.
Migration Log FileIf the RSA RADIUS Server migration utility (rsainstalltool) encounters a problem while it is running, it records the problem in the tprsMigReg.log file, which is stored in the RSA RADIUS Server directory (/opt/rsa/radius by default).
Log for RSA to SBR Install Utility.Install Date:07/15/2005 Install Time:12:52:55INFO: SBR Radius services directory is /opt/rsa/radius/INFO: Host Name phobos != DNS Name phobos.mars.com, Replacing Host NameINFO: SBR Radius server name is phobos.mars.comINFO: SBR Radius server IP Address is 192.168.21.137INFO: SBR Radius server port is 1813INFO: Attempting to Locate RSA ServerINFO: RSA Server is Remote. Attempting to Locate Key and Certificate Files.INFO: Copying RSA files from /export/home/ecarter/RSA/ to /opt/rsa/radius/ERROR: server.cer not found

RSA RADIUS Server 6.1 Administrator’s Guide Installing the RSA RADIUS Server 29
Installing on LinuxThis section describes how to install and uninstall the RSA RADIUS Server software on a Linux server.
System RequirementsThe RSA RADIUS Server software package includes the server daemon and various dictionary and database files to support authentication.
Installer SyntaxTo run the Linux version of the RSA RADIUS Server installer, you execute the following command:
install_rsa.sh [-dir directory] [-identity {PRIMARY | REPLICA}] [-port port-num}] [-path path] [-reppkg path] [-primary hostname] [-primary_ips ips] [-primary_secret secret] [-overwrite] [-migrate} [-silent] [-start_sbr] [-usage|-help|-h]
Table 7 explains the function of each command option.
Table 6. Linux Server – System Requirements
Hardware X86 workstation
Operating system RedHat Enterprise 3.0
Memory At least 256 megabytes of working memory(512 megabytes for servers with more than 10,000 RADIUS users.)
Disk space Installing the RSA RADIUS Server software requires at least 234 megabytes of space on the hard disk; hard disk requirements for running RSA RADIUS Server depend on your system's product configuration.
Networking TCP/IP must be configured on the Linux host for the RSA RADIUS Server to function properly.
Table 7. Command Options for the install_rsa.sh Command
Option Function
-dir Specifies the top-level directory for installation of the RSA RADIUS Server files.Default value is /opt.
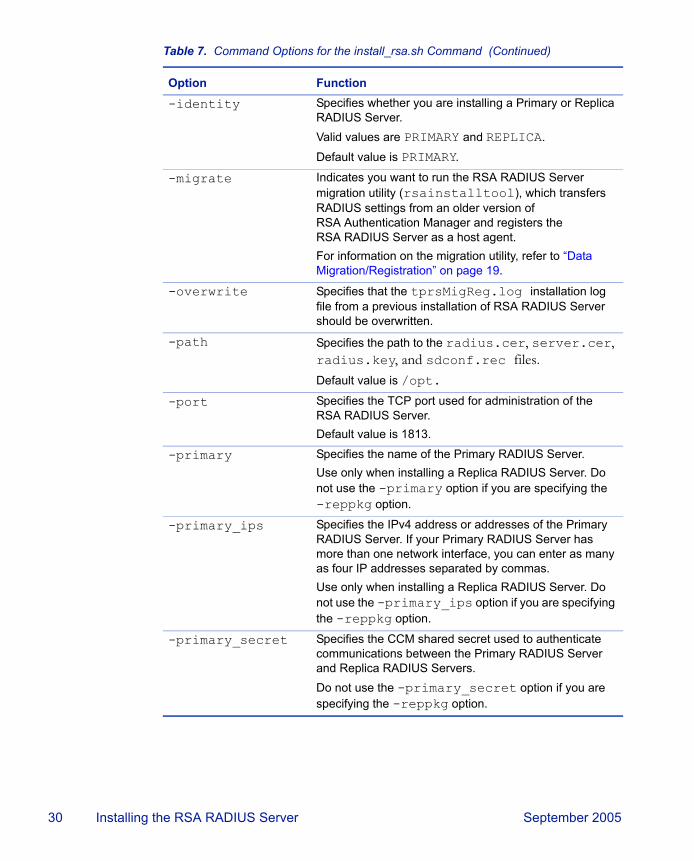
30 Installing the RSA RADIUS Server September 2005
-identity Specifies whether you are installing a Primary or Replica RADIUS Server.Valid values are PRIMARY and REPLICA.
Default value is PRIMARY.
-migrate Indicates you want to run the RSA RADIUS Server migration utility (rsainstalltool), which transfers RADIUS settings from an older version of RSA Authentication Manager and registers the RSA RADIUS Server as a host agent.For information on the migration utility, refer to “Data Migration/Registration” on page 19.
-overwrite Specifies that the tprsMigReg.log installation log file from a previous installation of RSA RADIUS Server should be overwritten.
-path Specifies the path to the radius.cer, server.cer, radius.key, and sdconf.rec files.
Default value is /opt.
-port Specifies the TCP port used for administration of the RSA RADIUS Server.Default value is 1813.
-primary Specifies the name of the Primary RADIUS Server. Use only when installing a Replica RADIUS Server. Do not use the -primary option if you are specifying the -reppkg option.
-primary_ips Specifies the IPv4 address or addresses of the Primary RADIUS Server. If your Primary RADIUS Server has more than one network interface, you can enter as many as four IP addresses separated by commas.Use only when installing a Replica RADIUS Server. Do not use the -primary_ips option if you are specifying the -reppkg option.
-primary_secret Specifies the CCM shared secret used to authenticate communications between the Primary RADIUS Server and Replica RADIUS Servers. Do not use the -primary_secret option if you are specifying the -reppkg option.
Table 7. Command Options for the install_rsa.sh Command (Continued)
Option Function

RSA RADIUS Server 6.1 Administrator’s Guide Installing the RSA RADIUS Server 31
Installing the RSA RADIUS Server SoftwareThe following procedure describes how to install the RSA RADIUS Server software on a Linux server. Some of the steps in the procedure are omitted if you specify the -silent option for the install_rsa.sh command.
1 Log into the Linux server as root.
2 Copy the RSA RADIUS Server installation files (sbr-rsa-1.0-1.i386.rpm and install_rsa.sh) to the Linux server.
The sbr-rsa-1.0-1.i386.rpm and install_rsa.sh files must reside in the same directory on the server.
3 Change your current working directory to the location of the installation files you copied in Step 2.
4 Execute the following command to run the installation script.
# ./install_rsa.sh [options]
See Table 7 on page 29 for an explanation of the install_rsa.sh command options.
-reppkg Specifies the path to the replica.ccmpkg configuration file. Use only when installing a Replica RADIUS Server. Do not use the -reppkg option if you are specifying the -primary, -primary_ips, and -primary_secret options.
Default value is /opt.
-silent Specifies that, if all required information is supplied through command options, the installer does not display user prompts.If you use the -silent option and a required setting is missing, the installer prompts you for the missing setting.If you specify other command options and values and you do not specify the -silent option, the installer uses the values you specified as defaults and prompts you to confirm or override them.
-start_sbr Specifies that the installer should start the RADIUS daemon at the conclusion of the installation process.
-usage|-help|-h Displays help for the install_rsa.sh command.
Table 7. Command Options for the install_rsa.sh Command (Continued)
Option Function

32 Installing the RSA RADIUS Server September 2005
5 Specify the directory where you want to install the RSA RADIUS Server files.
By default, the installation script puts the /rsa/radius directory files in the /opt directory (that is, /opt/rsa/radius). Enter install path [/opt]:
6 If you are installing the RSA RADIUS Server software on a host that is not running the RSA Authentication Manager software (remote installation), specify the location of the radius.cer, server.cer, radius.key, and sdconf.rec files.
Enter path to RSA files [/export/home/opt/rsa]:
If you are installing the RSA RADIUS Server software on a host that is running the RSA Authentication Manager software (local installation), the installer copies the radius.cer, server.cer, radius.key, and sdconf.rec files automatically.
7 Specify number of the TCP port used to administer RSA RADIUS Server.
The default port number is 1813. Enter RSA administration port [1813]:
8 Specify whether you are installing a Primary or Replica RADIUS Server.
Enter RADIUS identity (REPLICA or PRIMARY) [PRIMARY]:
9 If you are installing a Replica RADIUS Server, specify whether a configuration package generated by the Primary RADIUS Server is available.
Is replica.ccmpkg file present (y/n) [n]?
If you enter y, you are prompted to specify the path to the replica.ccmpkg file.Enter path to replica.ccmpkg [/opt/rsa]:
10 If you are installing a Replica RADIUS Server and a configuration package is not available, specify the name of the Primary RADIUS Server.
Enter primary host name:
11 If you are installing a Replica RADIUS Server and a configuration package is not available, specify the IP address or addresses of the Primary RADIUS Server. If the Primary RADIUS Server has more than one network interface (multi-homed), you can enter as many as four IP addresses, separating addresses with commas.
Enter primary host IP address list (max 4, comma separated):

RSA RADIUS Server 6.1 Administrator’s Guide Installing the RSA RADIUS Server 33
12 Specify the host secret used to authenticate communication between the Primary RADIUS Server and Replica RADIUS Servers.
Enter primary host secret:
13 If you are installing a Primary RADIUS Server on a host running an earlier version of the RSA Authentication Manager software, specify whether you want to migrate data to the current installation.
Do you want to migrate data from RSA Server (y/n) [n]?
If the installation succeeds, the installer displays the following message.
Configuring for use with generic databaseRSA RADIUS installation succeeded.
If the installation fails, the installer displays the following message and asks you whether you want to roll back the installation.
Installation failed. Please see /opt/rsa/radius/tprsMigReg.log for details.Configuration of RSA Radius failed.The installation has failed, would you like it cleaned up (y/n) [y]? yCleaning up installation....Removing /etc/init.d/sbrd script.
Stopping and Starting the RADIUS DaemonAfter the RADIUS daemon is installed on the server, it stops and starts automatically each time you shut down or restart the server. You can stop the RADIUS daemon on a Linux server at any time by issuing the following command:
/etc/init.d/sbrd stop
When you execute the sbrd stop command, RSA RADIUS Server allows its subsystems to complete outstanding work, release resources, and then stops the mkded (btrieve) daemon and the radius service gracefully.
If the RADIUS daemon fails to stop after you issue an sbrd stop command, you can use the optional force argument to terminate all subsystems immediately.
/etc/init.d/sbrd stop force
Use the following command to start the RADIUS daemon:
/etc/init.d/sbrd start
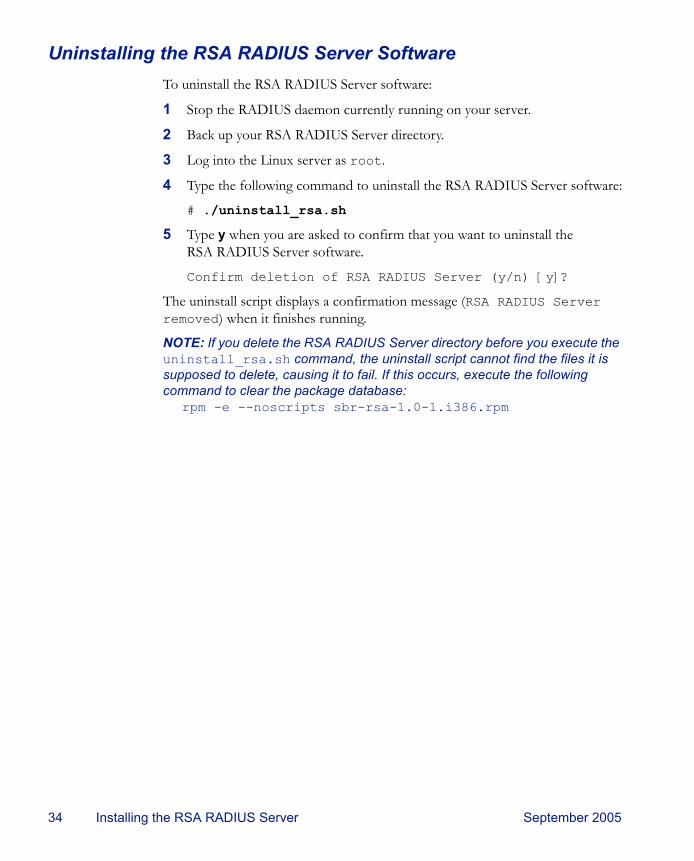
34 Installing the RSA RADIUS Server September 2005
Uninstalling the RSA RADIUS Server SoftwareTo uninstall the RSA RADIUS Server software:
1 Stop the RADIUS daemon currently running on your server.
2 Back up your RSA RADIUS Server directory.
3 Log into the Linux server as root.
4 Type the following command to uninstall the RSA RADIUS Server software:
# ./uninstall_rsa.sh
5 Type y when you are asked to confirm that you want to uninstall the RSA RADIUS Server software.
Confirm deletion of RSA RADIUS Server (y/n) [y]?
The uninstall script displays a confirmation message (RSA RADIUS Server removed) when it finishes running.
NOTE: If you delete the RSA RADIUS Server directory before you execute the uninstall_rsa.sh command, the uninstall script cannot find the files it is supposed to delete, causing it to fail. If this occurs, execute the following command to clear the package database:
rpm -e --noscripts sbr-rsa-1.0-1.i386.rpm

RSA RADIUS Server 6.1 Administrator’s Guide Using RSA RADIUS Administrator 35
C h a p t e r 3Using RSA RADIUS Administrator
The RSA RADIUS Administrator is a Java-based application that enables you to configure settings for the RSA RADIUS Server. This chapter presents an overview of how to use the RSA RADIUS Administrator.
Running RSA RADIUS AdministratorNOTE: The RSA RADIUS Administrator will not start unless the “Administrator” user in the RSA Authentication Manager application has been configured with a token or password. For information on how to configure the Administrator user with a token or password, refer to the RSA Authentication Manager 6.1 Administrator’s Guide.
To run the RSA RADIUS Administrator:
1 Choose Start > All Programs > RSA Security > RSA Authentication Manager Host Mode.
2 When the RSA Authentication Manager 6.1 Administration window opens, choose RADIUS > Manage RADIUS Server.

36 Using RSA RADIUS Administrator September 2005
Navigating in RSA RADIUS AdministratorFigure 4 illustrates the RSA RADIUS Administrator user interface. This section describes how to use the RSA RADIUS Administrator menus and toolbar.
Figure 4 RSA RADIUS Administrator User Interface
RSA RADIUS Administrator MenusThe main RSA RADIUS Administrator window has four menus: File, Panel, Web, and Help.
File MenuTable 8 describes the functions of each entry in the File menu in the RSA RADIUS Administrator.
Menu BarToolbar
Navigation Frame
Content Frame
Table 8. File Menu Options
Menu Entry FunctionLicense Opens the Add a License for Server window, which lets you
add a license string for your RSA RADIUS Server software. For more information, see “Adding a License Key” on page 43.
Page Setup Opens the Page Setup window, which lets you configure your printer settings.
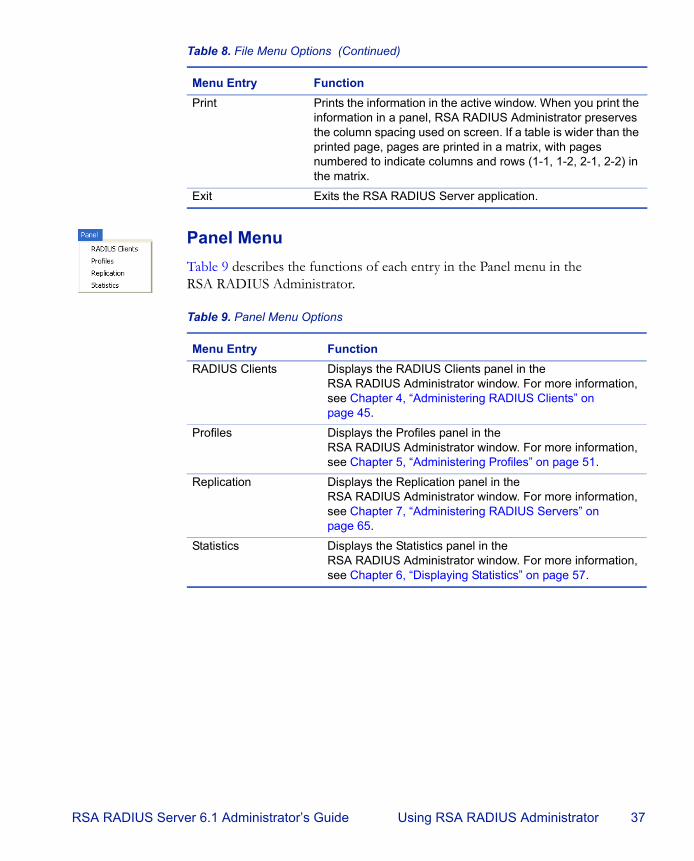
RSA RADIUS Server 6.1 Administrator’s Guide Using RSA RADIUS Administrator 37
Panel MenuTable 9 describes the functions of each entry in the Panel menu in the RSA RADIUS Administrator.
Print Prints the information in the active window. When you print the information in a panel, RSA RADIUS Administrator preserves the column spacing used on screen. If a table is wider than the printed page, pages are printed in a matrix, with pages numbered to indicate columns and rows (1-1, 1-2, 2-1, 2-2) in the matrix.
Exit Exits the RSA RADIUS Server application.
Table 9. Panel Menu Options
Menu Entry FunctionRADIUS Clients Displays the RADIUS Clients panel in the
RSA RADIUS Administrator window. For more information, see Chapter 4, “Administering RADIUS Clients” on page 45.
Profiles Displays the Profiles panel in the RSA RADIUS Administrator window. For more information, see Chapter 5, “Administering Profiles” on page 51.
Replication Displays the Replication panel in the RSA RADIUS Administrator window. For more information, see Chapter 7, “Administering RADIUS Servers” on page 65.
Statistics Displays the Statistics panel in the RSA RADIUS Administrator window. For more information, see Chapter 6, “Displaying Statistics” on page 57.
Table 8. File Menu Options (Continued)
Menu Entry Function
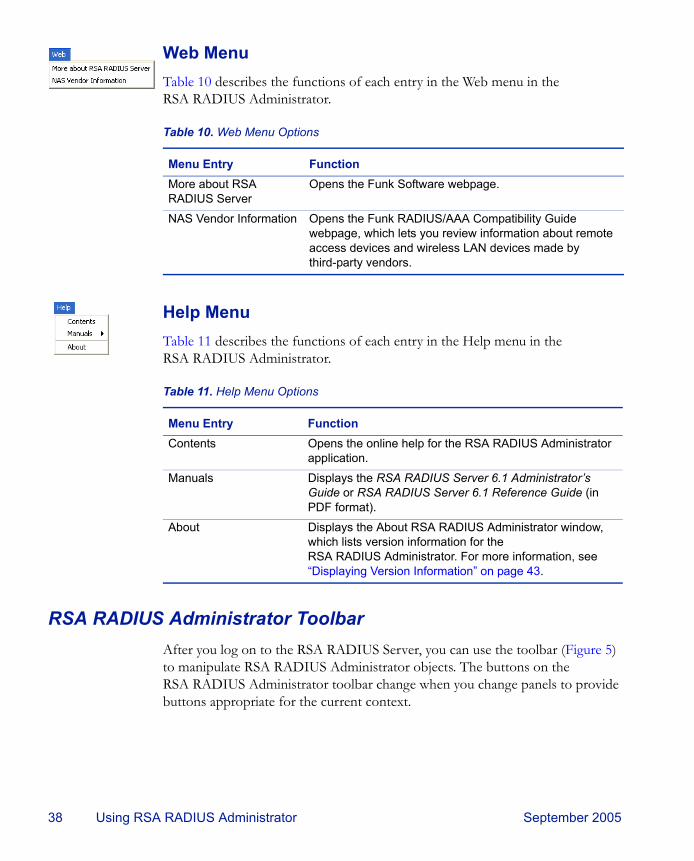
38 Using RSA RADIUS Administrator September 2005
Web MenuTable 10 describes the functions of each entry in the Web menu in the RSA RADIUS Administrator.
Help MenuTable 11 describes the functions of each entry in the Help menu in the RSA RADIUS Administrator.
RSA RADIUS Administrator ToolbarAfter you log on to the RSA RADIUS Server, you can use the toolbar (Figure 5) to manipulate RSA RADIUS Administrator objects. The buttons on the RSA RADIUS Administrator toolbar change when you change panels to provide buttons appropriate for the current context.
Table 10. Web Menu Options
Menu Entry FunctionMore about RSA RADIUS Server
Opens the Funk Software webpage.
NAS Vendor Information Opens the Funk RADIUS/AAA Compatibility Guide webpage, which lets you review information about remote access devices and wireless LAN devices made by third-party vendors.
Table 11. Help Menu Options
Menu Entry FunctionContents Opens the online help for the RSA RADIUS Administrator
application.
Manuals Displays the RSA RADIUS Server 6.1 Administrator’s Guide or RSA RADIUS Server 6.1 Reference Guide (in PDF format).
About Displays the About RSA RADIUS Administrator window, which lists version information for the RSA RADIUS Administrator. For more information, see “Displaying Version Information” on page 43.

RSA RADIUS Server 6.1 Administrator’s Guide Using RSA RADIUS Administrator 39
Figure 5 RSA RADIUS Administrator Toolbar
RSA RADIUS Administrator WindowsThis section summarizes how to use RSA RADIUS Administrator windows and controls.
Adding an EntryTo add an entry to the RSA RADIUS Server database, open the appropriate panel and click the Add button on the RSA RADIUS Administrator toolbar. The
Table 12. RSA RADIUS Administrator Toolbar
Toolbar Button FunctionRefresh Refreshes the displayed list of items in the
RSA RADIUS Administrator window.
Print Prints the contents of the active panel.
Add Adds an object to the RSA RADIUS Server database.
Edit Edits an existing object in the RSA RADIUS Server database. Active only when an object is selected in the active panel.
Cut Deletes an existing object from the RSA RADIUS Server database and copies its information to the Clipboard. Active only when an object is selected in the active panel.
Copy Copies settings for the selected object from the RSA RADIUS Server database to the Clipboard. Active only when an object is selected in the active panel.
Paste Pastes an object from the Clipboard to the RSA RADIUS Server database. Active only after a Cut or Copy command has been used.
Delete Deletes an existing object from the RSA RADIUS Server database.
Publish (Replication panel only)
Initiates creation of replication package on the Primary RADIUS Server.
Notify (Replication panel only)
Initiates download of replication package by Replica RADIUS Servers.
Reset (Statistics panel only)
In the Statistics panel, resets statistics to zero.

40 Using RSA RADIUS Administrator September 2005
RSA RADIUS Administrator displays an Add window. A sample Add window appears in Figure 6.
Figure 6 Sample Add Window
Every object of the same type must have a unique name. If the name you assign to an item is already being used by another item of the same type, the RSA RADIUS Administrator displays a warning.
Editing an EntryTo edit an existing entry to the RSA RADIUS Server database, open the appropriate panel and double-click the item you want to change (or choose the item and click the Edit button on the RSA RADIUS Administrator toolbar). The RSA RADIUS Administrator displays the settings for the item you selected in an Edit window. A sample Edit window appears in Figure 7. The Save button is disabled until the contents of a field in the Edit window changes.
NOTE: You cannot change the name associated with an item in the Edit window. To change an item’s name, you must cut and paste the item and assign the cut/copied item its new name.

RSA RADIUS Server 6.1 Administrator’s Guide Using RSA RADIUS Administrator 41
Figure 7 Sample Edit Window
Cutting/Copying/Pasting RecordsPanels displaying tables of items have Cut, Copy, and Paste buttons in the toolbar. You can choose an item from the display and cut or copy it to the Clipboard, and then add a new record to the display by pasting it from the Clipboard.
The Clipboard can contain one item of each type, such as one RADIUS client or one user. If you copy an item to the Clipboard and then copy another item of the same type, the information for the second item overwrites the information for the first item. Clipboard contents are preserved until you exit the RSA RADIUS Administrator.
When you paste an item, the RSA RADIUS Administrator displays a window similar to the Add window with the pasted record’s contents. The Name field is cleared; you must enter a unique name to save the pasted information as a new record. Canceling from a Paste operation does not change the contents of the Clipboard.

42 Using RSA RADIUS Administrator September 2005
Figure 8 Sample Paste Window
Resizing ColumnsYou can resize columns in an RSA RADIUS Administrator table by dragging the column header boundary to the left or right.
Changing Column SequenceYou can change the sequence of columns in an RSA RADIUS Administrator table by dragging the column headers left or right.
Sorting InformationBy default, items in RSA RADIUS Administrator tables are sorted by name. You can sort items in any order by clicking a column header.
Previously sorted tables retain their order when the table is sorted on another column. If you want to sort a table by more than one column, click the less significant column, and then click the more significant column.
Using Context MenusYou can right-click an object in RSA RADIUS Administrator windows to display a context menu for that object. The contents of the context menu depends on the type of item; for example, if you right-click a RADIUS client entry, the context menu provides options for copying, cutting, pasting, and deleting items.

RSA RADIUS Server 6.1 Administrator’s Guide Using RSA RADIUS Administrator 43
If you right-click a blank area in an RSA RADIUS Administrator window, the context menu displays a different set of options. For example, if you right-click a blank space in the RADIUS Client panel, the context menu provides options for refreshing the display and for adding, pasting, or printing information.
Accessing Online HelpTo access help with the RSA RADIUS Server Administrator, click the ? (Help) button on an RSA RADIUS Administrator window, press F1, or choose Help > Contents.
To view the PDF version of the RSA RADIUS Server manuals, choose Help > Manuals and choose the manual you want to open.
Displaying Version InformationTo identify the current version of the RSA RADIUS Administrator, choose Help > About to open the About RSA RADIUS Server window (Figure 9).
Figure 9 About RSA RADIUS Server Window
Adding a License KeyYou must add a license key if you want to use the LDAP Configuration Interface (LCI), which is described in Appendix A, “Using the LDAP Configuration Interface.”
To add a license key to an RSA RADIUS Server installation:
1 Start the RSA RADIUS Administrator application.
2 Choose File > License.
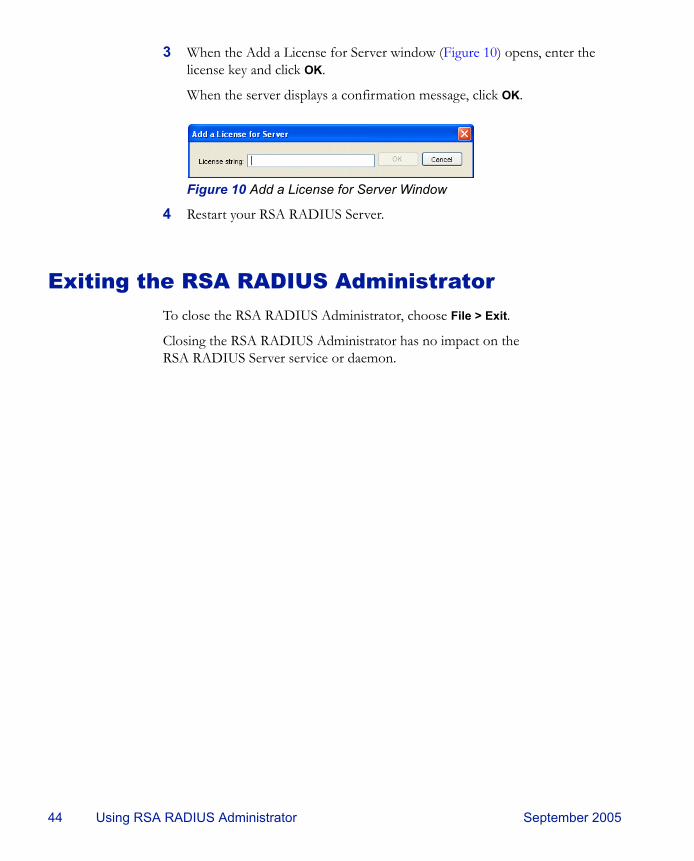
44 Using RSA RADIUS Administrator September 2005
3 When the Add a License for Server window (Figure 10) opens, enter the license key and click OK.
When the server displays a confirmation message, click OK.
Figure 10 Add a License for Server Window
4 Restart your RSA RADIUS Server.
Exiting the RSA RADIUS AdministratorTo close the RSA RADIUS Administrator, choose File > Exit.
Closing the RSA RADIUS Administrator has no impact on the RSA RADIUS Server service or daemon.

RSA RADIUS Server 6.1 Administrator’s Guide Administering RADIUS Clients 45
C h a p t e r 4Administering RADIUS Clients
A RADIUS client is a network device or software application that interfaces with the RSA RADIUS Server when it needs to authenticate a user or to record accounting information about a network connection.
This chapter describes how to set up RADIUS clients.
RADIUS Clients PanelThe RADIUS Clients panel (Figure 11) lets you identify the devices that you want to define as clients of the RSA RADIUS Server.
Figure 11 RADIUS Clients Panel

46 Administering RADIUS Clients September 2005
Adding a RADIUS ClientTo add a RADIUS client:
1 Open the RADIUS Clients panel.
2 Click the Add button.
The Add RADIUS Client window (Figure 12) opens.
Figure 12 Add RADIUS Client Window
3 Enter the name of the RADIUS client in the Name field.
Although you can assign any name to a RADIUS client entry, you should use the device's hostname to avoid confusion.
You can create a special RADIUS client entry called <ANY> by clicking the Any RADIUS Client checkbox (Figure 13). The <ANY> RADIUS client enables RSA RADIUS Server to accept requests from any RAS, as long as the shared secret is correct.
Figure 13 Creating an <ANY> RADIUS Client
Note that the IP Address field for an <ANY> RADIUS client cannot be edited. <ANY> implies that the server accepts requests from any IP address, provided that the shared secret is correct.
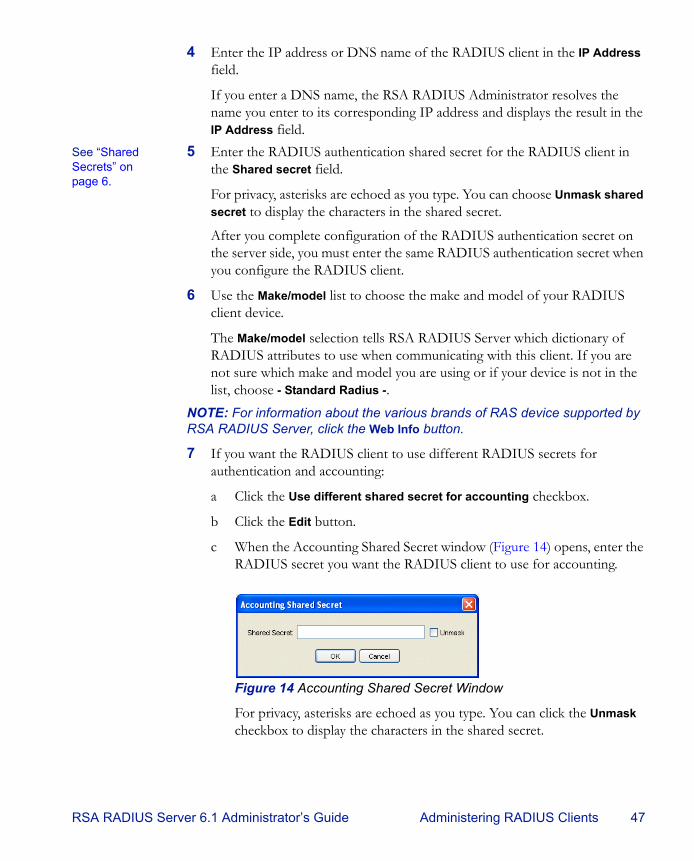
RSA RADIUS Server 6.1 Administrator’s Guide Administering RADIUS Clients 47
4 Enter the IP address or DNS name of the RADIUS client in the IP Address field.
If you enter a DNS name, the RSA RADIUS Administrator resolves the name you enter to its corresponding IP address and displays the result in the IP Address field.
See “Shared Secrets” on page 6.
5 Enter the RADIUS authentication shared secret for the RADIUS client in the Shared secret field.
For privacy, asterisks are echoed as you type. You can choose Unmask shared secret to display the characters in the shared secret.
After you complete configuration of the RADIUS authentication secret on the server side, you must enter the same RADIUS authentication secret when you configure the RADIUS client.
6 Use the Make/model list to choose the make and model of your RADIUS client device.
The Make/model selection tells RSA RADIUS Server which dictionary of RADIUS attributes to use when communicating with this client. If you are not sure which make and model you are using or if your device is not in the list, choose - Standard Radius -.
NOTE: For information about the various brands of RAS device supported by RSA RADIUS Server, click the Web Info button.
7 If you want the RADIUS client to use different RADIUS secrets for authentication and accounting:
a Click the Use different shared secret for accounting checkbox.
b Click the Edit button.
c When the Accounting Shared Secret window (Figure 14) opens, enter the RADIUS secret you want the RADIUS client to use for accounting.
Figure 14 Accounting Shared Secret Window
For privacy, asterisks are echoed as you type. You can click the Unmask checkbox to display the characters in the shared secret.

48 Administering RADIUS Clients September 2005
d Click OK.
You must enter the same accounting shared secret when you configure the RADIUS client.
8 Optionally, indicate whether you want to enable keepalive processing and specify how long the server waits for RADIUS packets from the client before assuming connectivity has been lost.
If you click the Assume down if no keepalive packets after checkbox, you can enter a value in the (seconds) field. If the server does not receive any RADIUS packets from this client after the specified number of seconds, the server assumes that the connection to the client is lost or that the client device has failed. When this happens, RSA RADIUS Server gracefully closes any user it has authenticated for the client. RSA RADIUS Server adjusts the counts of concurrent user connections appropriately.
NOTE: If the value you enter in the (seconds) field is too low, valid user or tunnel connections can be lost. For example, during low usage periods, a RAS device might not send any RADIUS packets to the RSA RADIUS Server, even though the device is still functioning.
Verifying a Shared SecretTo verify a shared secret on the RSA RADIUS Server:
1 Open the RADIUS Clients panel.
2 Select the RADIUS client whose shared secret you want to verify and click the Edit button (or double-click the RADIUS client entry).
The Edit RADIUS Client window opens.
3 Enter the shared secret you think is assigned to the RADIUS client in the Shared secret field.
4 Click the Validate button.
If you entered the correct shared secret, the Validation Successful window opens. Click OK.
Deleting a RADIUS ClientTo delete a RADIUS client:
1 Open the RADIUS Clients panel.

RSA RADIUS Server 6.1 Administrator’s Guide Administering RADIUS Clients 49
2 Select the RADIUS client entry you want to delete.
3 Click the Delete button on the RSA RADIUS Administrator toolbar.
4 When you are prompted to confirm the deletion request, click Yes.

50 Administering RADIUS Clients September 2005
RSA RADIUS Server 6.1 Administrator’s Guide Administering Profiles 51
C h a p t e r 5Administering Profiles
This chapter describes how to set up and administer user profiles.
About ProfilesRSA RADIUS Server lets you define default templates of checklist and return list attributes called profiles. A profile provides specific attributes for one or both lists. You can define as many profiles as you require. Profiles provide a powerful means of managing and configuring accounts. To change attributes settings across many users immediately, edit the profile that you have assigned to these users.
Adding a Checklist or Return List Attribute for a ProfileA checklist attribute is an item of information that must accompany a RADIUS Access-Request for a connection before the connection can be authenticated.
A return list attribute is an item of information that the RSA RADIUS Server includes in the RADIUS Access-Accept message when a user is authenticated and a connection request is approved.

52 Administering Profiles September 2005
Resolving Profile and User AttributesIf user-specific attributes are stored in the RSA Authentication Manager database, RSA RADIUS Server determines the final set of attributes for a user by merging the attributes stored in the user’s profile with user-specific attributes from the RSA Authentication Manager database. This calculation is performed as follows:
1 The attributes from the profile assigned to the user are retrieved.
2 These attributes are then merged with the user-specific attributes in the following manner:
If an attribute is multi-valued, then the user-specific attribute is added to the overall list of attributes.
If an attribute is single-valued, then the user-specific attribute replaces the attribute of the same name that was provided by the profile.
If the attribute is orderable, then the user-specific attribute replaces the attribute of the same name that was provided by the profile.
Default ProfileAfter RSA Authentication Manager authenticates a user, it can return the profile name associated with that user to RSA RADIUS Server. The profile name specified by RSA Authentication Manager identifies a profile configured on RSA RADIUS Server; that profile specifies the return list attributes to send back to the RADIUS client as part of the Access-Accept message for that user.
If RSA Authentication Manager does not return a profile name for a user, RSA RADIUS Server returns the attributes specified in the Default profile. You can use the Default profile to create a default set of return list attributes for users.

RSA RADIUS Server 6.1 Administrator’s Guide Administering Profiles 53
Setting Up ProfilesThe Profiles panel (Figure 15) lets you define standard sets of checklist and return list attributes. You can then associate these profiles with users in the RSA Authentication Manager to simplify user administration.
Figure 15 Profiles Panel
Adding a ProfileTo add a profile:
1 Open the Profiles panel.
2 Click the Add button on the RSA RADIUS Administrator toolbar.
The Add Profile window (Figure 16) opens.
Figure 16 Add Profile Window
3 Enter a name for the new profile in the Name field.
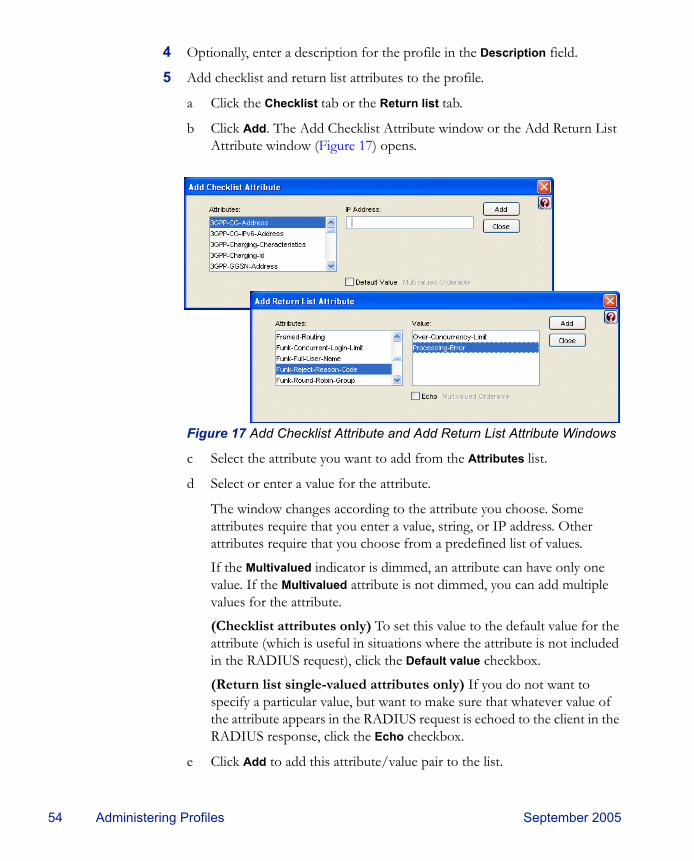
54 Administering Profiles September 2005
4 Optionally, enter a description for the profile in the Description field.
5 Add checklist and return list attributes to the profile.
a Click the Checklist tab or the Return list tab.
b Click Add. The Add Checklist Attribute window or the Add Return List Attribute window (Figure 17) opens.
Figure 17 Add Checklist Attribute and Add Return List Attribute Windows
c Select the attribute you want to add from the Attributes list.
d Select or enter a value for the attribute.
The window changes according to the attribute you choose. Some attributes require that you enter a value, string, or IP address. Other attributes require that you choose from a predefined list of values.
If the Multivalued indicator is dimmed, an attribute can have only one value. If the Multivalued attribute is not dimmed, you can add multiple values for the attribute.
(Checklist attributes only) To set this value to the default value for the attribute (which is useful in situations where the attribute is not included in the RADIUS request), click the Default value checkbox.
(Return list single-valued attributes only) If you do not want to specify a particular value, but want to make sure that whatever value of the attribute appears in the RADIUS request is echoed to the client in the RADIUS response, click the Echo checkbox.
e Click Add to add this attribute/value pair to the list.

RSA RADIUS Server 6.1 Administrator’s Guide Administering Profiles 55
f When you are finished adding attribute/value pairs, click Close to return to the Add Profile window.
6 Click OK to save the profile.
Removing a ProfileTo remove a profile:
1 Open the Profiles panel.
2 Select the entry for the profile you want to remove.
3 Click the Delete button on the RSA RADIUS Administrator toolbar (or right-click the profile entry and choose Delete from the context menu).
4 When you are prompted to confirm the deletion, click Yes.

56 Administering Profiles September 2005
RSA RADIUS Server 6.1 Administrator’s Guide Displaying Statistics 57
C h a p t e r 6Displaying Statistics
The Statistics panel lets you display statistics for authentication and accounting transactions by a RADIUS server or RADIUS client. You can also use the Statistics panel to see how long RSA RADIUS Server has been running.
Displaying Server Authentication StatisticsAuthentication statistics (Figure 18) summarize the number of authentication acceptances and rejections, with summary totals for each type of rejection or retry.
To display authentication statistics for the RSA RADIUS server:
1 Open the Statistics panel.
2 Select the server for which you want to display statistics in the Server list.
3 Click the System tab.
4 Click the View list and choose Authentication.
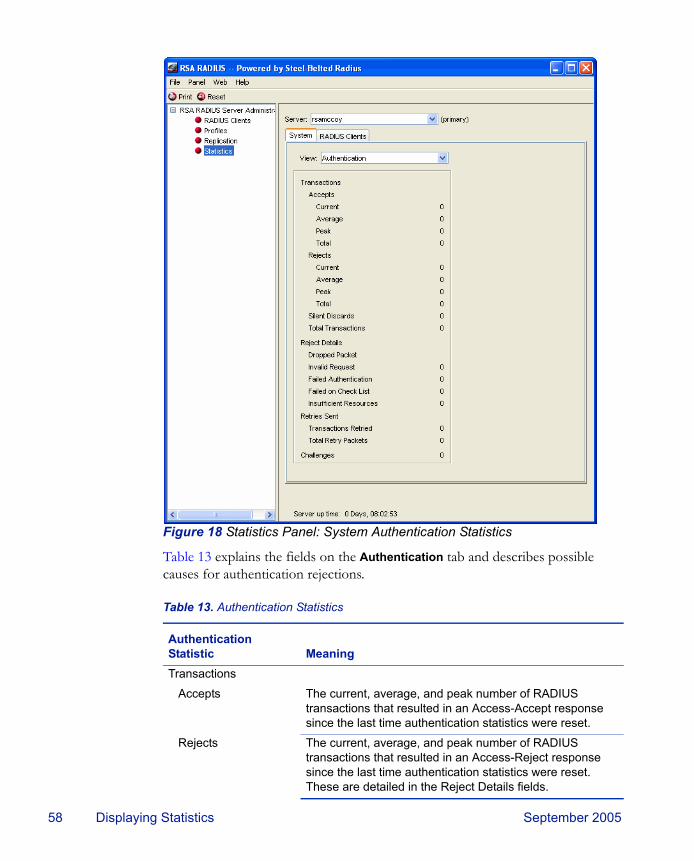
58 Displaying Statistics September 2005
Figure 18 Statistics Panel: System Authentication Statistics
Table 13 explains the fields on the Authentication tab and describes possible causes for authentication rejections.
Table 13. Authentication Statistics
Authentication Statistic MeaningTransactions
Accepts The current, average, and peak number of RADIUS transactions that resulted in an Access-Accept response since the last time authentication statistics were reset.
Rejects The current, average, and peak number of RADIUS transactions that resulted in an Access-Reject response since the last time authentication statistics were reset. These are detailed in the Reject Details fields.
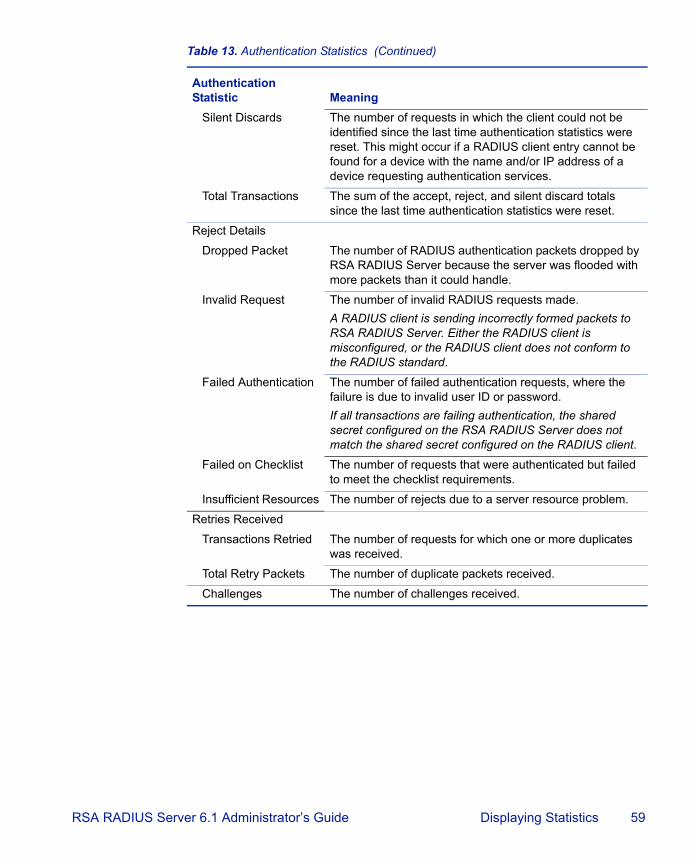
RSA RADIUS Server 6.1 Administrator’s Guide Displaying Statistics 59
Silent Discards The number of requests in which the client could not be identified since the last time authentication statistics were reset. This might occur if a RADIUS client entry cannot be found for a device with the name and/or IP address of a device requesting authentication services.
Total Transactions The sum of the accept, reject, and silent discard totals since the last time authentication statistics were reset.
Reject Details
Dropped Packet The number of RADIUS authentication packets dropped by RSA RADIUS Server because the server was flooded with more packets than it could handle.
Invalid Request The number of invalid RADIUS requests made.A RADIUS client is sending incorrectly formed packets to RSA RADIUS Server. Either the RADIUS client is misconfigured, or the RADIUS client does not conform to the RADIUS standard.
Failed Authentication The number of failed authentication requests, where the failure is due to invalid user ID or password.If all transactions are failing authentication, the shared secret configured on the RSA RADIUS Server does not match the shared secret configured on the RADIUS client.
Failed on Checklist The number of requests that were authenticated but failed to meet the checklist requirements.
Insufficient Resources The number of rejects due to a server resource problem.
Retries Received
Transactions Retried The number of requests for which one or more duplicates was received.
Total Retry Packets The number of duplicate packets received.
Challenges The number of challenges received.
Table 13. Authentication Statistics (Continued)
Authentication Statistic Meaning

60 Displaying Statistics September 2005
Displaying Server Accounting StatisticsAccounting statistics provide information such as the number of transaction starts and stops and the reasons for rejecting attempted transactions. The transaction start and stop numbers rarely match, as many transactions can be in progress at any given time.
To display accounting statistics for the RSA RADIUS server:
1 Open the Statistics panel.
2 Select the server for which you want to display statistics in the Server list.
3 Click the System tab.
4 Click the View list and choose Accounting.
Figure 19 Statistics Panel: System Accounting Statistics
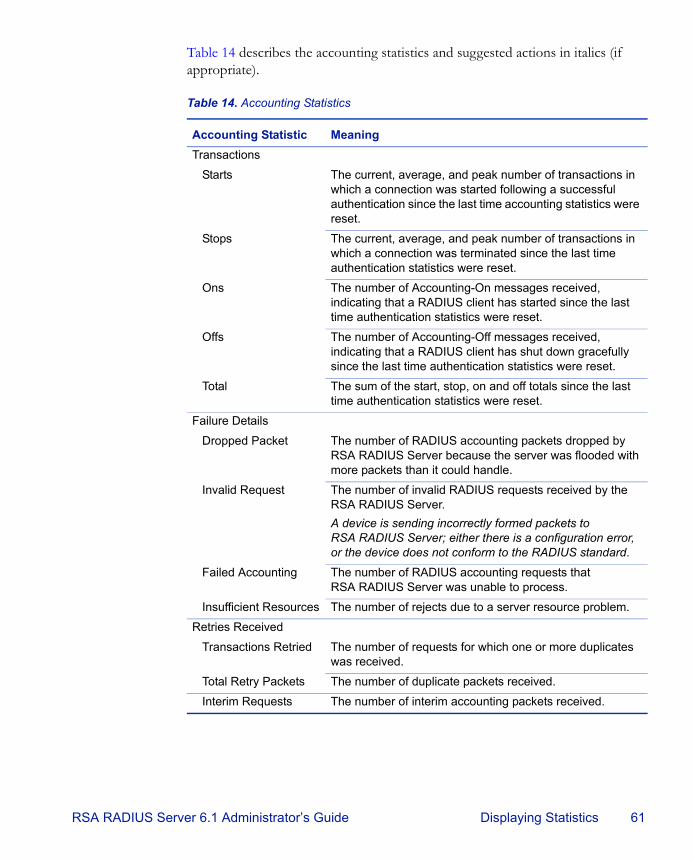
RSA RADIUS Server 6.1 Administrator’s Guide Displaying Statistics 61
Table 14 describes the accounting statistics and suggested actions in italics (if appropriate).
Table 14. Accounting Statistics
Accounting Statistic MeaningTransactions
Starts The current, average, and peak number of transactions in which a connection was started following a successful authentication since the last time accounting statistics were reset.
Stops The current, average, and peak number of transactions in which a connection was terminated since the last time authentication statistics were reset.
Ons The number of Accounting-On messages received, indicating that a RADIUS client has started since the last time authentication statistics were reset.
Offs The number of Accounting-Off messages received, indicating that a RADIUS client has shut down gracefully since the last time authentication statistics were reset.
Total The sum of the start, stop, on and off totals since the last time authentication statistics were reset.
Failure Details
Dropped Packet The number of RADIUS accounting packets dropped by RSA RADIUS Server because the server was flooded with more packets than it could handle.
Invalid Request The number of invalid RADIUS requests received by the RSA RADIUS Server.A device is sending incorrectly formed packets to RSA RADIUS Server; either there is a configuration error, or the device does not conform to the RADIUS standard.
Failed Accounting The number of RADIUS accounting requests that RSA RADIUS Server was unable to process.
Insufficient Resources The number of rejects due to a server resource problem.
Retries Received
Transactions Retried The number of requests for which one or more duplicates was received.
Total Retry Packets The number of duplicate packets received.
Interim Requests The number of interim accounting packets received.
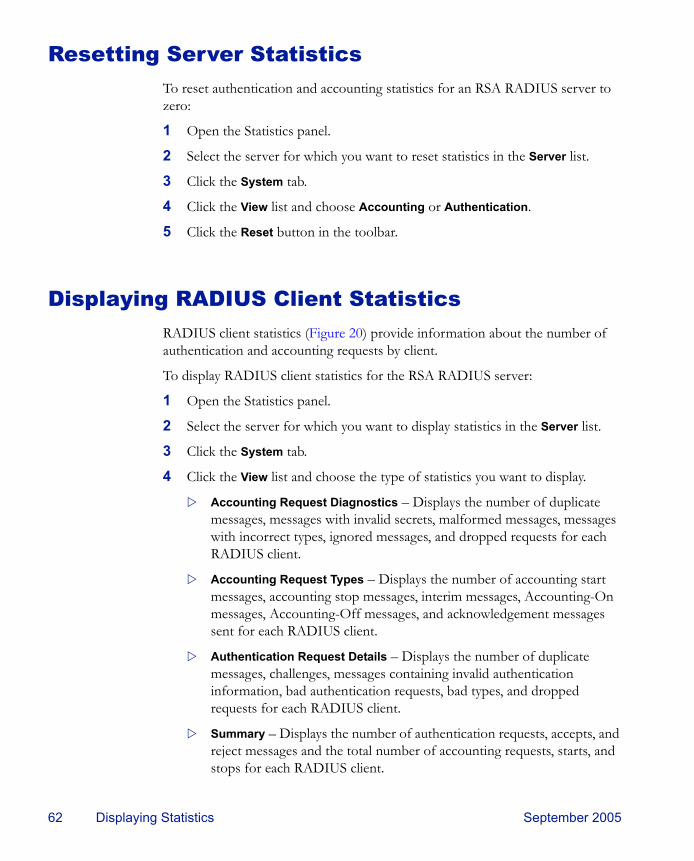
62 Displaying Statistics September 2005
Resetting Server StatisticsTo reset authentication and accounting statistics for an RSA RADIUS server to zero:
1 Open the Statistics panel.
2 Select the server for which you want to reset statistics in the Server list.
3 Click the System tab.
4 Click the View list and choose Accounting or Authentication.
5 Click the Reset button in the toolbar.
Displaying RADIUS Client StatisticsRADIUS client statistics (Figure 20) provide information about the number of authentication and accounting requests by client.
To display RADIUS client statistics for the RSA RADIUS server:
1 Open the Statistics panel.
2 Select the server for which you want to display statistics in the Server list.
3 Click the System tab.
4 Click the View list and choose the type of statistics you want to display.
Accounting Request Diagnostics – Displays the number of duplicate messages, messages with invalid secrets, malformed messages, messages with incorrect types, ignored messages, and dropped requests for each RADIUS client.
Accounting Request Types – Displays the number of accounting start messages, accounting stop messages, interim messages, Accounting-On messages, Accounting-Off messages, and acknowledgement messages sent for each RADIUS client.
Authentication Request Details – Displays the number of duplicate messages, challenges, messages containing invalid authentication information, bad authentication requests, bad types, and dropped requests for each RADIUS client.
Summary – Displays the number of authentication requests, accepts, and reject messages and the total number of accounting requests, starts, and stops for each RADIUS client.

RSA RADIUS Server 6.1 Administrator’s Guide Displaying Statistics 63
5 Optionally, sort the messages by clicking a column header.
NOTE: The RADIUS client statistics are not displayed dynamically. To see the most recent statistics for a RADIUS client, click the Refresh button in the toolbar.
Figure 20 Statistics Panel: RADIUS Client Statistics

64 Displaying Statistics September 2005

RSA RADIUS Server 6.1 Administrator’s Guide Administering RADIUS Servers 65
C h a p t e r 7Administering RADIUS Servers
RSA RADIUS Server supports the replication of RADIUS configuration data from a Primary RADIUS Server to a maximum of 10 Replica RADIUS Servers within a realm on a customer network. All the servers within a realm reflect the current configuration specified by the network administrator: the network administrator modifies the configuration on the Primary RADIUS Server, and the Primary RADIUS Server propagates the new configuration to its Replica RADIUS Servers.
This chapter describes how to manage your Primary and Replica RADIUS servers.
NOTE: Settings in RSA RADIUS Server configuration (*.ini) files are not copied as part of the replication process. If you change a setting in an RSA RADIUS Server configuration file, you must copy the file manually to each server (Primary and Replica) in a realm to keep them synchronized. Refer to the RSA RADIUS Server 6.1 Reference Guide for information on the configuration files.
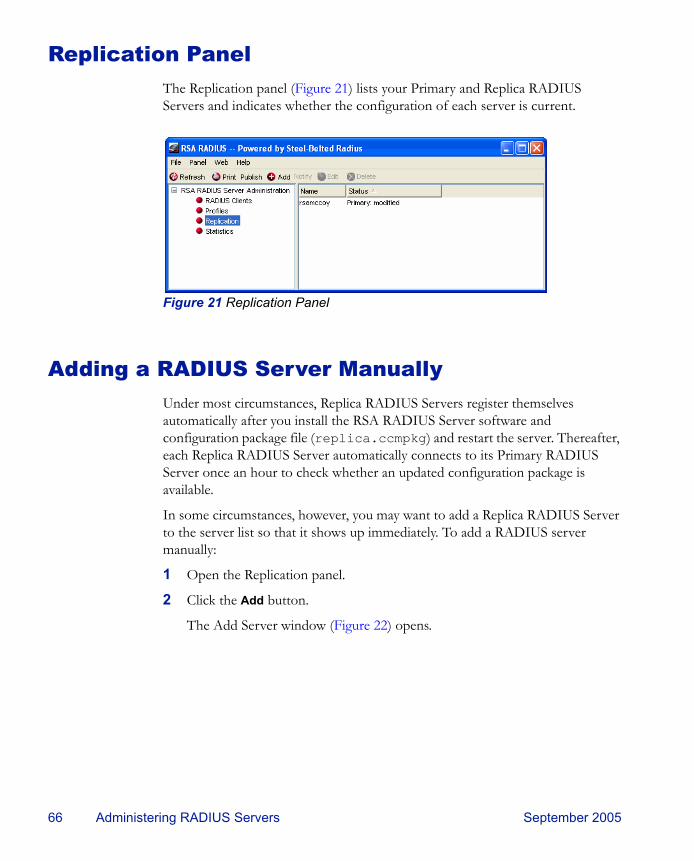
66 Administering RADIUS Servers September 2005
Replication PanelThe Replication panel (Figure 21) lists your Primary and Replica RADIUS Servers and indicates whether the configuration of each server is current.
Figure 21 Replication Panel
Adding a RADIUS Server ManuallyUnder most circumstances, Replica RADIUS Servers register themselves automatically after you install the RSA RADIUS Server software and configuration package file (replica.ccmpkg) and restart the server. Thereafter, each Replica RADIUS Server automatically connects to its Primary RADIUS Server once an hour to check whether an updated configuration package is available.
In some circumstances, however, you may want to add a Replica RADIUS Server to the server list so that it shows up immediately. To add a RADIUS server manually:
1 Open the Replication panel.
2 Click the Add button.
The Add Server window (Figure 22) opens.
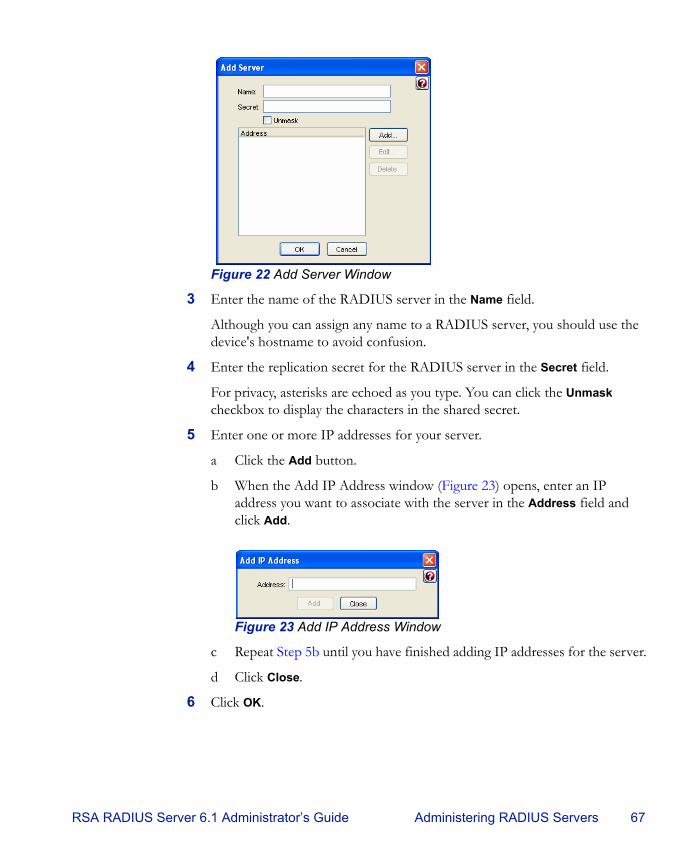
RSA RADIUS Server 6.1 Administrator’s Guide Administering RADIUS Servers 67
Figure 22 Add Server Window
3 Enter the name of the RADIUS server in the Name field.
Although you can assign any name to a RADIUS server, you should use the device's hostname to avoid confusion.
4 Enter the replication secret for the RADIUS server in the Secret field.
For privacy, asterisks are echoed as you type. You can click the Unmask checkbox to display the characters in the shared secret.
5 Enter one or more IP addresses for your server.
a Click the Add button.
b When the Add IP Address window (Figure 23) opens, enter an IP address you want to associate with the server in the Address field and click Add.
Figure 23 Add IP Address Window
c Repeat Step 5b until you have finished adding IP addresses for the server.
d Click Close.
6 Click OK.

68 Administering RADIUS Servers September 2005
Enabling a RADIUS ServerTo enable a RADIUS server:
1 Open the Replication panel.
2 Select the RADIUS server you want to enable and click the Edit button (or double-click the RADIUS server entry).
The Edit Server window (Figure 24) opens.
Figure 24 Edit Server Window
3 Click the Enabled checkbox.
4 Click the Save button.
Deleting a RADIUS ServerTo delete a RADIUS server:
1 Open the Replication panel.
2 Select the RADIUS server entry you want to delete.
3 Click the Delete button on the RSA RADIUS Administrator toolbar.
4 When you are prompted to confirm the deletion request, click Yes.

RSA RADIUS Server 6.1 Administrator’s Guide Administering RADIUS Servers 69
Publishing Server Configuration InformationIf you change the configuration of your Primary RADIUS Server, you must publish the modified configuration so that your Replica RADIUS Servers can download the modified settings.
To publish server configuration information:
1 Open the Replication panel.
2 Click the Publish button on the toolbar.
This creates a file called ../rsa radius/packages/timestamp_RSA.ccmpkg (Solaris/Linux) or ..\RSA Radius\Service\packages\timestamp_RSA.ccmpkg (Windows), where timestamp reflects the date and time the package was created.
Notifying Replica RADIUS ServersA network administrator can manually notify a Replica RADIUS Server to download and install the current configuration package from the Primary RADIUS Server. Manual notification is useful when network issues prevent the automatic download and installation of a configuration package when it is first published, and the configuration on the Replica no longer matches the configuration on the Primary RADIUS Server.
To notify Replica RADIUS Servers that new configuration information has been published:
1 Open the Replication panel.
2 Select the Replica RADIUS Server you want to notify.
3 Click the Notify button on the toolbar.
The Replica RADIUS Server downloads and installs its configuration package from the Primary RADIUS Server. After the package is installed, the Replica RADIUS Server is resynchronized with the Primary RADIUS Server.

70 Administering RADIUS Servers September 2005
Designating a New Primary RADIUS ServerYou can change which server within a realm is designated as the Primary RADIUS Server for that realm.
To designate a new Primary RADIUS Server:
1 Stop the RADIUS service/daemon on the Replica RADIUS Server.
2 Log into the Replica RADIUS Server as root (Solaris/Linux) or administrator (Windows).
3 Navigate to the ..RSA Radius\Service (Windows) or /opt/rsa/radius (Solaris/Linux) directory.
4 Run the rsainstalltool (Windows) or rsaconfiguretool (Solaris/Linux) utility with the promote option.
# ./rsaconfiguretool -promote
The utility creates a configuration package to change this server to the Primary server.
5 Restart the updated Replica RADIUS Server to make it the new Primary RADIUS Server.
6 Publish a new configuration package administratively to configure all Replica RADIUS Servers to use the new Primary RADIUS Server.
After you designate a new Primary RADIUS Server for a realm, you can configure the old Primary RADIUS Server as a Replica RADIUS Server by downloading a configuration package published by the new Primary RADIUS Server.
NOTE: If your old Primary RADIUS Server used aliases to handle authentication requests, you must configure aliases on the new Primary RADIUS Server after you promote it, and you must define an alias on the corresponding Agent Host record in the RSA Authentication Manager (Agent Host > Edit Agent Host > RADIUS Configuration).
Recovering a Replica After a Failed DownloadIf a Replica RADIUS Server fails during the download of a configuration package, its configuration may be corrupted or it may have a stale secret.
To recover after a failed download:
1 Stop the RSA RADIUS service/daemon on the Replica RADIUS Server.

RSA RADIUS Server 6.1 Administrator’s Guide Administering RADIUS Servers 71
2 Log into the Replica RADIUS Server as root (Solaris/Linux) or administrator (Windows).
3 Navigate to the ..RSA Radius\Service (Windows) or /opt/rsa/radius (Solaris/Linux) directory.
4 Run the rsainstalltool (Windows) or rsaconfiguretool (Solaris/Linux) utility with the identity option and information on where to download configuration information.
To obtain configuration from a configuration package, issue the following command:# ./rsaconfiguretool -identity REPLICA -reppkg pathname
where pathname specifies the path to a replica.ccmpkg package.
To obtain configuration from the Primary RADIUS Server for the realm, issue the following command:# ./rsaconfiguretool -identity REPLICA -primary name
address secret
where name specifies the DNS name of the Primary RADIUS Server, address specifies the IP address of the Primary RADIUS Server, and secret specifies the shared secret used to authenticate configuration downloads.
5 Restart the updated Replica RADIUS Server so that it can load its new configuration.
After the Replica RADIUS Server is restarted, it will be re-synchronized with the current Primary RADIUS Server.
Changing the Name or IP Address of a ServerYou may need to change the DNS name or IP address assigned to a Primary or backup RADIUS server if your network changes.
To change the DNS name or IP address of a Primary or Replica RADIUS Server:
1 Stop the RSA RADIUS service/daemon on the RADIUS server you want to change.
2 Log into the RADIUS server as root (Solaris/Linux) or administrator (Windows).
3 Navigate to the ..RSA Radius\Service (Windows) or /opt/rsa/radius (Solaris/Linux) directory.
72 Administering RADIUS Servers September 2005
4 Run the rsainstalltool (Windows) or rsaconfiguretool (Solaris/Linux) utility with the identity option.
To rename a Primary RADIUS Server, enter the following command:# ./rsaconfiguretool -identity PRIMARY
To rename a Replica RADIUS Server, enter the following command:# ./rsaconfiguretool -identity REPLICA
5 Restart the updated server so that it can load its new configuration.
6 Run the RSA RADIUS Administrator and modify the DNS name or IP address for the server you want to rename. Verify that the secret on the renamed server is correct.
You may need to use the Replication panel to delete the old server name from the list of servers in the realm.
NOTE: After you change the name or IP address of a Primary or Replica RADIUS Server, use RSA Authentication Manager to change the Agent Host record in the Authentication Manager database.
7 Publish the modified configuration to propagate the name change to the Replica RADIUS Servers.
Regenerating a Node SecretYou can regenerate the node secret used to authenticate communication between the RSA Authentication Manager and RSA RADIUS Server at any time.
To regenerate a node secret:
1 Stop the RSA RADIUS service/daemon on the RADIUS server.
2 Log into the RADIUS server as root (Solaris/Linux) or administrator (Windows).
3 Navigate to the ..RSA Radius\Service (Windows) or /opt/rsa/radius (Solaris/Linux) directory.
4 Run the rsainstalltool (Windows) or rsaconfiguretool (Solaris/Linux) utility with the identity option.
To regenerate the node secret for a Primary RADIUS Server, enter the following command:# ./rsaconfiguretool -identity PRIMARY

RSA RADIUS Server 6.1 Administrator’s Guide Administering RADIUS Servers 73
To regenerate the node secret for a a Replica RADIUS Server, enter the following command:# ./rsaconfiguretool -identity REPLICA
5 Restart the RSA RADIUS service.
Resetting the RADIUS DatabaseIf the RSA RADIUS Server fails, the RADIUS database may remain running. If this happens, the RSA RADIUS Server may refuse to run. To resolve this problem, execute the following command to stop the mkded (btrieve) daemon.
/etc/init.d/sbrd stop force
After the mkded (btrieve) daemon is stopped, you can start the RADIUS service and the database by executing the following command:
/etc/init.d/sbrd start

74 Administering RADIUS Servers September 2005
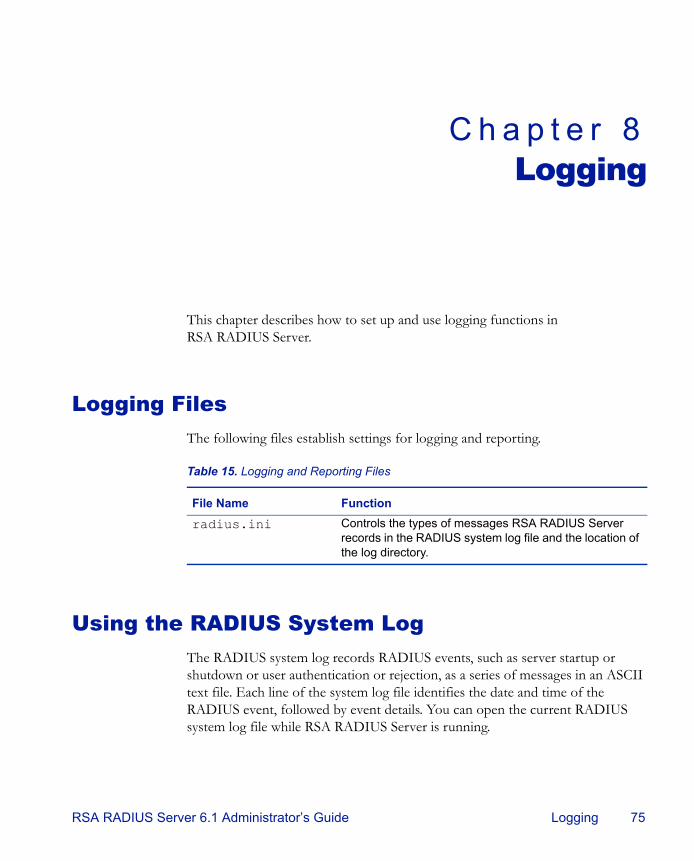
RSA RADIUS Server 6.1 Administrator’s Guide Logging 75
C h a p t e r 8Logging
This chapter describes how to set up and use logging functions in RSA RADIUS Server.
Logging FilesThe following files establish settings for logging and reporting.
Using the RADIUS System LogThe RADIUS system log records RADIUS events, such as server startup or shutdown or user authentication or rejection, as a series of messages in an ASCII text file. Each line of the system log file identifies the date and time of the RADIUS event, followed by event details. You can open the current RADIUS system log file while RSA RADIUS Server is running.
Table 15. Logging and Reporting Files
File Name Function
radius.ini Controls the types of messages RSA RADIUS Server records in the RADIUS system log file and the location of the log directory.

76 Logging September 2005
Level of Logging DetailYou can control the level of detail recorded in the system log files with LogLevel, LogAccept, and LogReject settings.
The LogLevel setting determines the level of detail given in the RADIUS system log file. The LogLevel can be 0, 1, or 2, where 0 is the least amount of information, 1 is intermediate, and 2 is the most verbose. It is specified in the [Configuration] section of radius.ini file.
The LogAccept and LogReject flags allow you to turn on or off the logging of Access-Accept and Access-Reject messages in the log file. These flags are set in the [Configuration] section of radius.ini: a value of 1 (the default) causes these messages to be logged, and a value of 0 causes the messages to be omitted. An Accept or Reject is logged only if LogAccept or LogReject, respectively, is enabled and the LogLevel is “verbose” enough for the message to be recorded.
The TraceLevel setting specifies whether packets should be logged when they are received and being processed, and what level of detail should be recorded in the log.
Controlling Log File SizeOptionally, you can specify a maximum size for a RADIUS system log file by entering a non-zero value for the LogfileMaxMBytes setting in the [Configuration] section of the radius.ini file.
If a maximum file size is set, the name of the RADIUS system log file identifies the date and time it was opened (YYYYMMDD_HHMM.log). When the current RADIUS system log file approaches the specified number of megabytes (1024 x 1024 bytes), the current log file is closed and a new one is opened. The closed file will be slightly smaller than the specified maximum file size.
If the maximum file size is set to 0 (or if the LogfileMaxMBytes setting is absent), the RADIUS system log file size is ignored and log file names are datestamped to identify when they were opened (YYYYMMDD.log).
NOTE: If LogFileMaxMBytes is configured for a small non-zero number, the log file may exceed the specified maximum file size in less than a minute. To avoid file name collisions (two log files created during the same minute interval), the log info does not roll over more than once per minute. Instead, the log file size is ignored until the minute precision clock changes to ensure that log files have unique file names. No log data is lost.
RSA RADIUS Server 6.1 Administrator’s Guide Logging 77
By default, RADIUS system log files are located in the RADIUS database directory. You can specify an alternate destination directory in the [Configuration] section of the radius.ini file.
Using the Accounting LogRADIUS accounting events are recorded in the accounting log file. Accounting events include START messages, which indicate the beginning of a connection; STOP messages, which indicate the termination of a connection; and INTERIM messages, which indicate a connection is ongoing.
Accounting log files use comma-delimited, ASCII format, and are intended for import into a spreadsheet or database program. Accounting log files are located in the RADIUS database directory area by default, although you can specify an alternate destination directory in the [Configuration] section of the account.ini file. Accounting log files are named yyyymmdd.act, where yyyy is the four-digit year, mm is the month, and dd is the day on which the log file was created.
The current log file can be opened while RSA RADIUS Server is running.
Accounting Log File FormatThe first six fields in every accounting log entry are provided by RSA RADIUS Server for your convenience in reading and sorting the file:
Date - the date when the event occurred
Time - the time when the event occurred
RAS-Client - the name or IP address of the RADIUS client sending the accounting record
Record-Type - START, STOP, INTERIM, ON, or OFF, the standard RADIUS accounting packet types
Full-Name - the fully distinguished name of the user, based on the authentication performed by the RADIUS server
Auth-Type - a number that indicates the class of authentication performed:
By default, the standard RADIUS attributes follow the Auth-Type identifier. See “Standard RADIUS Accounting Attributes” on page 79.
You can include vendor-specific attributes if the device sending the accounting packet supports them. For more information on using vendor-specific attributes, refer to the RSA RADIUS Server 6.1 Reference Guide.
78 Logging September 2005
You can edit the account.ini initialization file to add, remove or reorder the standard RADIUS or vendor-specific attributes that are logged. For more information on the account.ini file, refer to the RSA RADIUS Server 6.1 Reference Guide.
First Line HeadingsThe first line of the accounting log file is a file header that lists the attributes that have been enabled for logging in the order in which they are logged. The following example of a first line shows required headings in bold italic, standard RADIUS headings in bold, and vendor-specific headings in regular text:
"Date","Time", "RAS-Client", "Record-Type", "Full-Name", "Auth-Type", "User-Name", "NAS-Port", "Acct-Status-Type", "Acct-Delay-Time", "Acct-Input-Octets", "Acct-Output-Octets", "Acct-Session-Id", "Acct-Authentic","Acct-Session-Time", "Acct-Input-Packets", "Acct-Output-Packets", "Acct-Termination-Cause", "Acct-Multi-Session-Id", "Acct-Link-Count","Acc-Err-Message","Nautica-Acct-SessionId","Nautica-Acct-Direction","Nautica-Acct-CauseProtocol","Nautica-Acct-CauseSource","Telebit-Accounting-Info","Last-Number-Dialed-Out","Last-Number-Dialed-In-DNIS","Last-Callers-Number-ANI","Channel","Event-Id","Event-Date-Time","Call-Start-Date-Time","Call-End-Date-Time","Default-DTE-Data-Rate","Initial-Rx-Link-Data-Rate","Final-Rx-Link-Data-Rate","Initial-Tx-Link-Data-Rate","Final-Tx-Link-Data-Rate","Sync-Async-Mode","Originate-Answer-Mode","Modulation-Type","Equalization-Type","Fallback-Enabled","Characters-Sent","Characters-Received","Blocks-Sent","Blocks-Received","Blocks-Resent","Retrains-Requested","Retrains-Granted","Line-Reversals","Number-Of-Characters-Lost","Number-of-Blers","Number-of-Link-Timeouts","Number-of-Fallbacks","Number-of-Upshifts","Number-of-Link-NAKs","Back-Channel-Data-Rate","Simplified-MNP-Levels","Simplified-V42bis-Usage","PW_VPN_ID"
Comma PlaceholdersRSA RADIUS Server writes accounting events to the accounting log file. If an event recorded in the accounting log file does not have data for every attribute, a comma “placeholder” marks the empty entry, so that all entries remain correctly

RSA RADIUS Server 6.1 Administrator’s Guide Logging 79
aligned with their headings. For example, based on the “first line” of headings described above, the following is a valid accounting log entry, in which the value of the Acct-Status-Type attribute is 7:
"12/23/1997","12:11:55","RRAS","Accounting-On",,,,,7,,,,,,,,,,,,,,,,,,,,,,,,,,,,,,,,,,,,,,,,,,,,,,,,,,,,,,,,,,,,
Standard RADIUS Accounting AttributesTable 16 lists the standard RADIUS accounting attributes defined in RFC 2866, “RADIUS Accounting.”
Table 16. Standard RADIUS Accounting Attributes
User-Name The name of the user as received by the client.
NAS-Port The port number on the client device.
Acct-Status-Type A number that indicates the beginning or ending of the user service:1 - Start2 - Stop3 - Interim-Acct7 - Accounting-On8 - Accounting-Off
Acct-Delay-Time Indicates how many seconds the client has been trying to send this record, which can be subtracted from the time of arrival on the server to find the approximate time of the event generating this request.
Acct-Input-Octets Number of octets (bytes) received by the port over the connection; present only in STOP records.
Acct-Output-Octets Number of octets (bytes) sent by the port over the connection; present only in STOP records.
Acct-Session-Id Identifier used to match START and STOP records in a log file.
Acct-Authentic indicates how the user was authenticated by RADIUS, the RAS itself, or another remote authentication protocol:1 - RADIUS2 - Local3 - Remote
Acct-Session-Time Elapsed time of connection in seconds; present only in STOP records.
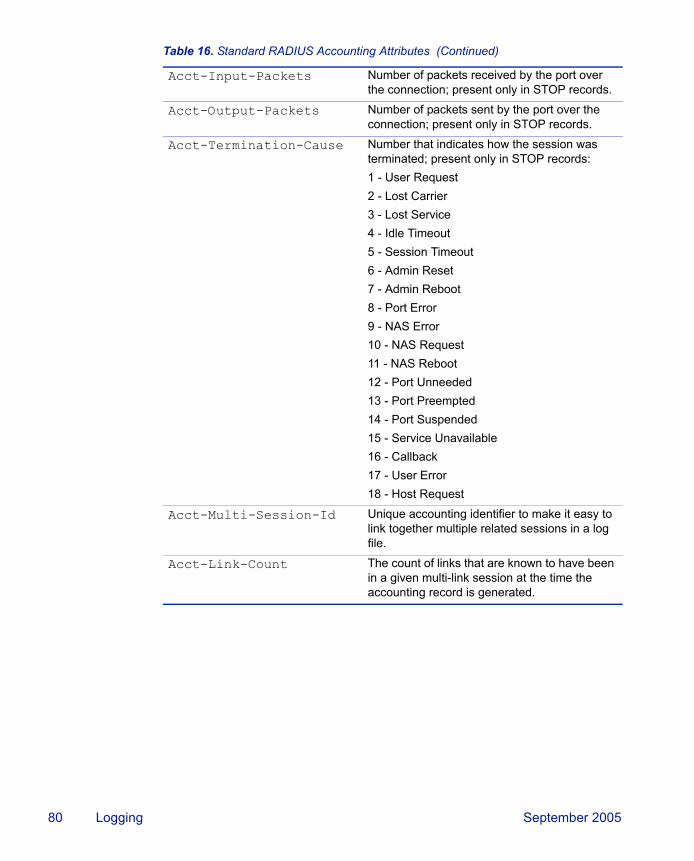
80 Logging September 2005
Acct-Input-Packets Number of packets received by the port over the connection; present only in STOP records.
Acct-Output-Packets Number of packets sent by the port over the connection; present only in STOP records.
Acct-Termination-Cause Number that indicates how the session was terminated; present only in STOP records:1 - User Request2 - Lost Carrier 3 - Lost Service4 - Idle Timeout5 - Session Timeout6 - Admin Reset7 - Admin Reboot8 - Port Error9 - NAS Error10 - NAS Request11 - NAS Reboot12 - Port Unneeded13 - Port Preempted14 - Port Suspended15 - Service Unavailable16 - Callback17 - User Error18 - Host Request
Acct-Multi-Session-Id Unique accounting identifier to make it easy to link together multiple related sessions in a log file.
Acct-Link-Count The count of links that are known to have been in a given multi-link session at the time the accounting record is generated.
Table 16. Standard RADIUS Accounting Attributes (Continued)
RSA RADIUS Server 6.1 Administrator’s Guide Using the LDAP Configuration Interface 81
A p p e n d i x AUsing the LDAP Configuration
Interface
The LDAP Configuration Interface (LCI) is an optional add-on to RSA RADIUS Server. You must enter a separate license number and restart RSA RADIUS Server to activate LCI functions. After the license key is registered, you can edit the settings in the configuration files. For information on adding license numbers, see “Adding a License Key” on page 43.
This appendix provides:
The file used to enable and configure the LDAP configuration interface (LCI)
An overview of the LCI and LDAP utilities
A description of the LDAP virtual schema
Information about how to use LDAP utilities to configure the RSA RADIUS Server database
Sample LDIF files that control the execution of LDAP utilities
Information about how to view rate statistics variables with LCI utilities
LDAP Configuration Interface FileThe radius.ini file specifies (among other things) the interfaces on which RSA RADIUS Server listens for LCI requests. If a specification is not present, RSA RADIUS Server listens for LCI requests on all bound IP ports.

82 Using the LDAP Configuration Interface September 2005
About the LDAP Configuration InterfaceThe LDAP Configuration Interface (LCI) consists of an LDAP interface in the RSA RADIUS Server and an LDAP virtual schema. The LDAP virtual schema enables the LDAP interface to translate LDAP requests into a format that can be understood by the RSA RADIUS Server database.
Figures 25 illustrates the relationship between LDAP components.
Figure 25 LDAP Components
LDAP UtilitiesFreeware LDAP utilities, such as ldapsearch, ldapmodify, and ldapdelete, act as clients of the LDAP interface. LDAP utilities let you read and modify an LDAP database.
ldapsearch – The ldapsearch utility locates and retrieves LDAP directory entries. The ldapsearch utility opens a connection to an LDAP interface using the specified distinguished name and password, binds, and locates entries based on the specified search filter. A search can return a single entry, an entry's immediate subentries, or an entire tree or subtree. Search results are returned in LDIF format.
ldapmodify – The ldapmodify utility adds or modifies entries in an existing LDAP directory. ldapmodify opens a connection to an LDAP interface using the distinguished name and password you supply, binds, and adds or modifies the entries based on the LDIF update statements contained
Core RADIUS Modules
EmbeddedRADIUS
DatabaseProprietaryHTTPS
LDAP CommandLine Utility
VirtualSchema
LDAPInterface
JavaAdministration
Program
RSA RADIUS Server 6.1 Administrator’s Guide Using the LDAP Configuration Interface 83
in a specified file. Because ldapmodify uses LDIF update statements, ldapmodify can do everything ldapdelete can do.
ldapdelete – The ldapdelete utility deletes entries from an existing LDAP directory. ldapdelete opens a connection to the specified server using the distinguished name and password you provide, binds, and deletes the entry or entries.
LDAP RequestsLDAP requests are submitted in two ways:
By specifying options on the LDAP command line.
By placing instructions and data into an LDAP Data Interchange Format (LDIF) file, which you then invoke on the command line by using the -f option.
Because communication between the LDAP client and server must occur in the clear (unencrypted), run the LDAP utilities on the same computer as RSA RADIUS Server.
Downloading the LDAP UtilitiesTo use the LCI, you need the freeware ldapsearch, ldapmodify, and ldapdelete utilities. You can download the free LDAP utilities as follows:
1 Use a browser to navigate to http://www.sun.com/download/products.xml?id=/3ec28dbd.
2 When the Sun ONE Directory SDK (software development kit) download page appears, click the Download link at the bottom of the page.
3 If you are prompted to register yourself, complete the registration form.
4 When you are prompted to accept the license agreement, click the Accept button and then click Continue.
5 Download the SDK by clicking the link for the version of the SDK that is appropriate for your computer.
Versions of the SDK are available for Solaris, Linux, and Windows.
6 When the download is completed, extract the following files from the compressed image to a directory on your computer:
ldapsearch.exe
ldapmodify.exe
ldapdelete.exe

84 Using the LDAP Configuration Interface September 2005
nsldapssl32v30.dll (if you are on a Windows host)
libldap30.so (if you are on a Solaris host)
To run the LDAP utilities, execute them from this directory. If you set the path environment variable to point to this directory, you can run them any location on the system.
NOTE: The examples that follow assume you are using the LDAP utilities provided as part of the Sun ONE Directory SDK. If you are using LDAP utilities from another source, the command options you use may be different. Consult the documentation for your LDAP utilities for more information.
LDAP Version ComplianceThe LDAP server software that has been incorporated into RSA RADIUS Server is compliant with version 2 of the LDAP specification. Therefore, we suggest using the -V 2 command line option to direct the utilities to use version 2 features. For example:
ldapmodify -c -V 2 -p 354 -D "cn=admin,o=radius"-w radius -f filename
Configuring the LDAP TCP PortTo avoid conflicts with LDAP services that may already be installed, the default TCP port number for communication between RSA RADIUS Server and the LDAP client is 667. If you are certain that there will not be any conflicts, you can change this port number to 389, the standard LDAP TCP port.
You can configure RSA RADIUS Server to use a different TCP port to communicate with the LDAP client. In the following example, port 354 is assigned.
1 In the radius.ini configuration file, create an [LDAP] section if one does not exist, and set the TCPPort field to the port number you want to use. For example:
[LDAP]Enable = 1TCPPort = 354
2 If you want to specify the interfaces on which you want RSA RADIUS Server to listen for LCI requests, add a [LDAPAddresses] section to the radius.ini file. This section should contain a list of IP addresses, one per line:
[LDAPAddresses]

RSA RADIUS Server 6.1 Administrator’s Guide Using the LDAP Configuration Interface 85
199.198.197.196196.197.198.199
If the [LDAPAddresses] section is omitted or empty, RSA RADIUS Server listens for LCI requests on all bound IP interfaces.
3 Specify the same port number using the -p option on the LDAP command line. For example:
ldapsearch -V 2 -p 354 -D "cn=admin,o=radius" -w radius -s sub -T -b "radiusclass=Client,o=radius" radiusname=*
LDAP Virtual SchemaThe LDAP server uses the virtual schema (illustrated in Figures 26–29) to format configuration data so that this data can be understood by the RSA RADIUS Server database.
NOTE: radiusstatus items can be read, but they cannot be modified.
Figure 26 LDAP Schema (Slide 1 of 4)
1...n
1...n
Available Attributes:Login-Limit <number>Profile <string>
Available Child Objects:radiuslist=replyradiuslist=check
radiusclass=profile
radiusname=MYPROFILE
1...n
radiusclass=securid-user
radiusname=MYPROFILE
radiusclass=server
Available Attributes:Server-Password <string>Server-Password-Enabled 0|1Default-Reject-Msg <string>Unknown-User-Msg <string>Lists-Mismatch-Msg <string>Invalid-Lists-Msg <string>Auth-Methods <meth1>; <meth2>; ...Log-Max-Days <number>
radiusclass=rsa_cached_passwords
(read-only)
Available Attribute:cached-password
Available CheckAttributes:All check list attributesfrom dictionaries
Available ReplyAttributes:All reply list attributesfrom dictionaries
radiusclass=client
radiusname=MYRASCLIENT
Available Attributes:Shared-Secret <string>Acct-Shared-Secret <string>IP-Address nnn.nnn.nnn.nnnProduct <string>Inactivity-Timeout <seconds>

86 Using the LDAP Configuration Interface September 2005
Figure 27 LDAP Schema (Slide 2 of 4)
cn=admin
radiusstatus=sessions_by_calling_station
calling-station-id=<dialing number>
called-station-id=<dialed number>
radiusstatus=sessions_by_called_station
username=<user name>
radiusstatus=sessions_by_user
radiusstatus=sessions
framed-ip-address=<aaa.bbb.ccc.ddd>
radiusstatus=sessions_by_ipaddress
Available Attributes:client <string>acct-session-id <number>nas-ip-address <string>nas-port <string>nas-port-type <string>acct-multi-session-id <number>framed-ip-address <string>session-start-time <time>fullname <string>username <string>called-station-id <string>calling-station-id <string>elapsed <number>
acct-session-id=<sessionid>
client=NASCLIENT
o=radius
Root

RSA RADIUS Server 6.1 Administrator’s Guide Using the LDAP Configuration Interface 87
Figure 28 LDAP Schema (Slide 3 of 4)
Available Attributes:accept <number>reject <number>silent-discard <number>total-transactions <number>invalid-request <number>failed-authentication <number>failed-on-check-list <number>insufficient-resources <number>transactions-retried <number>total-retry-packets <number>
stattype=authentication
Available Attributes:start <number>stop <number>interim <number>on <number>off <number>total-transactions <number>invalid-request <number>invalid-client <number>invalid-shared-secret <number>insufficient-resources <number>transactions-retried <number>total-retry-packets <number>
stattype=accounting
stattype=server
Available Attributes:start-time <yyyy/mm/dd hh:mm:ss>up-time <seconds>ip-address <aaa.bbb.ccc.ddd>version <major minor rev>authentication-threads <number>accounting-threads <number>total-threads <number>max-acct-threads <number>max-auth-threads <number>max-total-threads <number>high-acct-threads <number>high-auth-threads <number>high-total-threads <number>high-acct-threads-since-reset <number>high-auth-threads-since-reset <number>high-total-threads-since-reset <number>
radiusstatus=statistics
stattype=rate
Available Attributes:rate-statistics-seconds-per-interval <number>auth-request-current-rate <number>auth-request-average-rate <number>auth-request-peak-rate <number>auth-accept-current-rate <number>auth-accept-average-rate <number>auth-accept-peak-rate <number>auth-reject-current-rate <number>auth-reject-average-rate <number>auth-reject-peak-rate <number>acct-start-current-rate <number>acct-start-average-rate <number>acct-start-peak-rate <number>acct-stop-current-rate <number>acct-stop-average-rate <number>acct-stop-peak-rate <number>
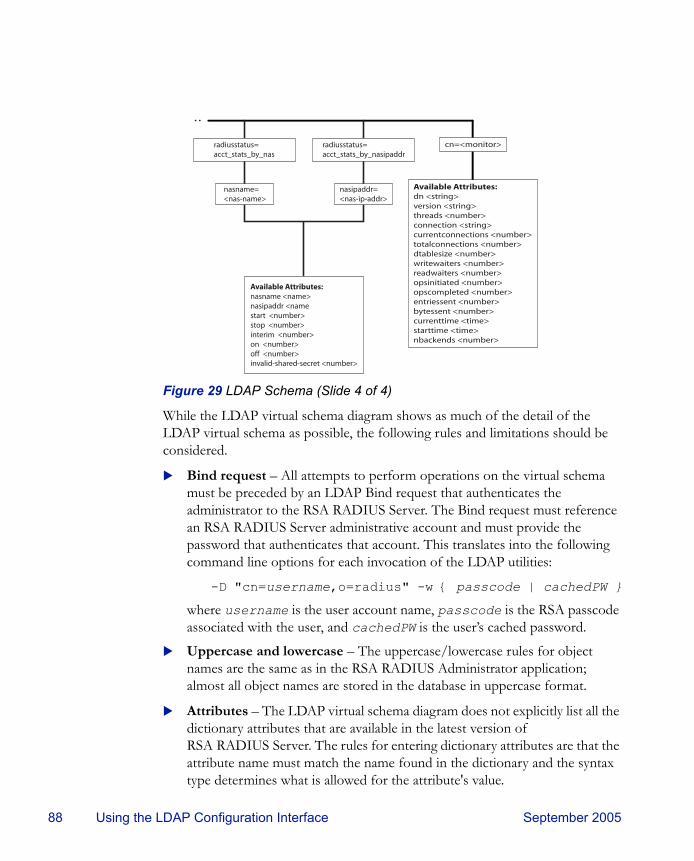
88 Using the LDAP Configuration Interface September 2005
Figure 29 LDAP Schema (Slide 4 of 4)
While the LDAP virtual schema diagram shows as much of the detail of the LDAP virtual schema as possible, the following rules and limitations should be considered.
Bind request – All attempts to perform operations on the virtual schema must be preceded by an LDAP Bind request that authenticates the administrator to the RSA RADIUS Server. The Bind request must reference an RSA RADIUS Server administrative account and must provide the password that authenticates that account. This translates into the following command line options for each invocation of the LDAP utilities:
-D "cn=username,o=radius" -w { passcode | cachedPW }
where username is the user account name, passcode is the RSA passcode associated with the user, and cachedPW is the user’s cached password.
Uppercase and lowercase – The uppercase/lowercase rules for object names are the same as in the RSA RADIUS Administrator application; almost all object names are stored in the database in uppercase format.
Attributes – The LDAP virtual schema diagram does not explicitly list all the dictionary attributes that are available in the latest version of RSA RADIUS Server. The rules for entering dictionary attributes are that the attribute name must match the name found in the dictionary and the syntax type determines what is allowed for the attribute's value.
nasname=<nas-name>
radiusstatus=acct_stats_by_nas
nasipaddr=<nas-ip-addr>
radiusstatus=acct_stats_by_nasipaddr
cn=<monitor>
Available Attributes:dn <string>version <string>threads <number>connection <string>currentconnections <number>totalconnections <number>dtablesize <number>writewaiters <number>readwaiters <number>opsinitiated <number>opscompleted <number>entriessent <number>bytessent <number>currenttime <time>starttime <time>nbackends <number>
Available Attributes:nasname <name>nasipaddr <namestart <number>stop <number>interim <number>on <number>off <number>invalid-shared-secret <number>
RSA RADIUS Server 6.1 Administrator’s Guide Using the LDAP Configuration Interface 89
Substrings – There are several places where a list of strings is the value of an attribute. The rule for specifying the data portion for these lists is that semicolons must delimit the substrings. For example, a DNIS list for a tunnel entry might be specified as 555-1212;5551212. If a semicolon needs to appear inside a substring, it can be escaped by placing a backslash character (\) before it.
Hexadecimal values – Hexadecimal numbers (for attributes of syntax type hex1, hex2 or hex4) require a 0x prefix in front of the hexadecimal digits; for example 0x0000149a.
Profiles, checklists, and return lists – Checklists associated with profiles can include default attributes, which allows you to mark a checklist attribute as optional. To signal that a checklist attribute is a default attribute, preface the attribute value with the string %default%.
Return lists associated with profiles can include attributes whose contents are the value of received attribute. This feature is referred to as “echoing” the attribute. To signal that a return list attribute must be treated as an echo attribute, specify the attribute value as the string %echo%.
Unspecified or 0.0.0.0 RAS IP address – When you display acct_stats_by_nasipaddr information, any RAS entries with an unspecified IP address or an IP address of 0.0.0.0 are omitted. Similarly, when you display acct_stats_by_nas information, RAS entries with an unspecified IP address or an IP address of 0.0.0.0 have nasipaddr attribute omitted.
Duplicate RAS IP addresses – When displaying acct_stats_by_nasipaddr information, two RAS entries that contain the same (non-zero) IP address cause information about one of the entries to be displayed twice. This is the result of the ambiguity of the query and is not a bug.
RADIUS client information displayed after deletion – If you define a RADIUS client entry, send some accounting traffic to it, and then delete the entry, the output of ldapsearch queries continues to list the deleted RADIUS client so that the per-RAS statistics add up to the total RAS statistics.

90 Using the LDAP Configuration Interface September 2005
LDAP Command ExamplesThis section explains how to use the LDAP commands ldapdelete, ldapmodify, and ldapsearch to configure the server. Each example describes the LDAP command line options in detail.
Note that a space must appear between each LDAP command option (for example, -p) and its value (for example, 354). Command syntax is case sensitive.
Searching for RecordsYou can use the ldapsearch command to dump information out of the LDAP tree. The following ldapsearch command dumps out information about all RADIUS clients.
ldapsearch -V 2 -p 354 -D "cn=oper,o=radius"-w radadmin -s sub -T -b "radiusclass=Client,o=radius" radiusname=*
Table 17. Searching for Records Using the ldapsearch Command
ldapsearch Option Meaning-V 2 LDAP Version 2 is used to communicate with the
server.
NOTE: This option is not required, but specifying it improves the performance of the transaction.
-p 354 TCP port 354 is used to communicate with the LDAP interface of the server.
NOTE: This option is not required, but specifying it improves the performance of the transaction.
-D "cn=oper,o=radius" The command is authenticated using an administrative account called oper.
NOTE: Any administrative account name may be used in place of oper in this example. o=radius may not be changed.
-w radadmin The command is providing an authentication password of radadmin.
NOTE: The -w parameter value (in this case, radadmin) must match the passcode or cached password of the account named by the -D parameter.

RSA RADIUS Server 6.1 Administrator’s Guide Using the LDAP Configuration Interface 91
Modifying RecordsYou can use the ldapmodify command to modify the RSA RADIUS Server configuration.
ldapmodify -c -V2 -h hostname -p 354-D "cn=oper,o=radius" -w radadmin -f filename
-s sub Recursion is to be used starting at the base.
-T To make the output more readable, long output lines are not continued on the next line.
-b "radiusclass=Client,o=radius"
This is the base at which the search operation is to begin.
radiusname=* This is the criterion which matched objects must satisfy.
Table 17. Searching for Records Using the ldapsearch Command (Continued)
ldapsearch Option Meaning
Table 18. Modifying Records Using the ldapmodify Command
ldapmodify Option Meaning-c The command is to run in continuous mode; do not stop
on errors.
-V2 The version 2 dialect of LDAP is to be used to communicate with the server.
NOTE: This option is not required, but specifying it improves the performance of the transaction.
-h hostname The name of the host to which this command applies. If none is given, the command is applied to the local database.
-p 354 TCP port 354 is to be used to communicate with the LDAP interface of the server. The -p value must match the TCPPort setting in the [LDAP] section of radius.ini. If the -p option is not specified, the default port number for the RSA RADIUS Server and the LDAP utilities is used (port 389).
-D "cn=oper,o=radius" The command is authenticated using an administrative account called oper.
NOTE: Any administrative account name may be used in place of oper in the preceding example. o=radius may not be changed.
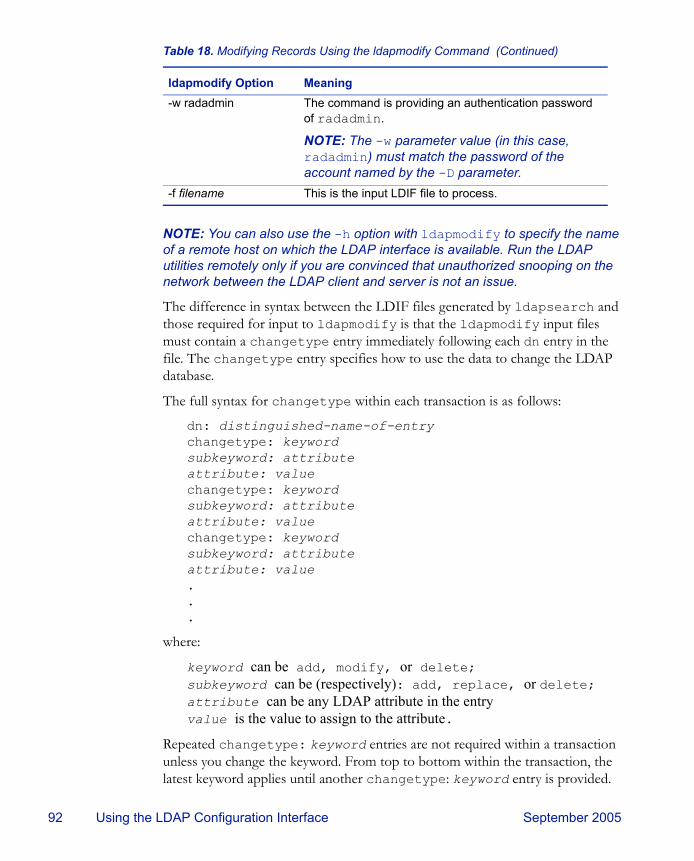
92 Using the LDAP Configuration Interface September 2005
NOTE: You can also use the -h option with ldapmodify to specify the name of a remote host on which the LDAP interface is available. Run the LDAP utilities remotely only if you are convinced that unauthorized snooping on the network between the LDAP client and server is not an issue.
The difference in syntax between the LDIF files generated by ldapsearch and those required for input to ldapmodify is that the ldapmodify input files must contain a changetype entry immediately following each dn entry in the file. The changetype entry specifies how to use the data to change the LDAP database.
The full syntax for changetype within each transaction is as follows:
dn: distinguished-name-of-entrychangetype: keywordsubkeyword: attributeattribute: valuechangetype: keywordsubkeyword: attributeattribute: valuechangetype: keywordsubkeyword: attributeattribute: value...
where:
keyword can be add, modify, or delete;subkeyword can be (respectively): add, replace, or delete;attribute can be any LDAP attribute in the entryvalue is the value to assign to the attribute.
Repeated changetype: keyword entries are not required within a transaction unless you change the keyword. From top to bottom within the transaction, the latest keyword applies until another changetype: keyword entry is provided.
-w radadmin The command is providing an authentication password of radadmin.
NOTE: The -w parameter value (in this case, radadmin) must match the password of the account named by the -D parameter.
-f filename This is the input LDIF file to process.
Table 18. Modifying Records Using the ldapmodify Command (Continued)
ldapmodify Option Meaning

RSA RADIUS Server 6.1 Administrator’s Guide Using the LDAP Configuration Interface 93
The following syntax is valid if the same keyword applies throughout the transaction:
dn: distinguished-name-of-entrychangetype: keywordsubkeyword: attributeattribute: valuesubkeyword: attributeattribute: valuesubkeyword: attributeattribute: value...
subkeyword: attribute entries are optional and indicate that you want to apply the change to a specific attribute within the entry. If there are no subkeyword: attribute entries in the transaction, the change applies to the entire entry. For example, it is faster to delete an entire entry:
dn: radiusname=TINYCO.COM,radiusclass=client,o=radiuschangetype: delete
but if you want to delete only a few attributes from the entry, you may do so:
dn: radiusname=TINYCO.COM,radiusclass=client,o=radiuschangetype: deletedelete: acct-shared-secret
If the subkeyword is add or replace, an attribute: value entry must appear immediately following the subkeyword: attribute entry. If the subkeyword is delete, the attribute: value entry does not apply and should be omitted.
Adding RecordsYou can populate an LDAP database by creating an LDIF file that imports entries from one LDAP database into another. You can search the first database for the entries you want, then add them to the second database. You can even use the search operation to filter out attributes from the first database that you do not want in the second database. You can search the first database using ldapsearch. This creates an LDIF file which you can then input to ldapmodify.
To import entries from one LDAP database into another, run the ldapsearch command on the first database. Request only the attributes you want for the new database. When ldapsearch completes processing, edit the output LDIF file. After each line that begins with dn:, add a single line containing the text

94 Using the LDAP Configuration Interface September 2005
changetype: add. Once your editing is complete, run an ldapmodify -f command that references the new LDIF file. When the ldapmodify command finishes processing, your new database is populated with the records you extracted from the old database.
Deleting RecordsYou can use the ldapdelete command to remove records from the LDAP database. For example, to delete entries names PROFILE1 through PROFILE5, you would create a file called deletexample.ldf.
You would then pass this file to the command as follows:
ldapdelete -V2 -h hostname -p 667 -D"cn=admin,o=radius" -w password -f deletexample.ldf
Warning: Verify that the dn: values that usually appear in these entries are not a part of the entries in your file, because this causes the command to fail.
You can use ldapdelete to remove records from the LDAP database without supplying a file. For example, to delete the profile record identified as PROFILE1, you would enter the following:
ldapdelete -V2 -h hostname -p 667 -D"cn=admin,o=radius" -w password "radiusname=PROFILE1,radiusclass=profile,o=radius"
You can delete records with the ldapmodify command if the entries in the text file contain the line changetype: delete. Consider the following sample LDIF file, named deletemodify.ldf:
radiusname=PROFILE1,radiusclass=Profile,o=radiusradiusname=PROFILE2,radiusclass=Profile,o=radiusradiusname=PROFILE3,radiusclass=Profile,o=radiusradiusname=PROFILE4,radiusclass=Profile,o=radiusradiusname=PROFILE5,radiusclass=Profile,o=radius
dn: radiusname=PROFILE2,radiusclass=Profile,o=radiuschangetype: deletedn: radiusname=PROFILE3,radiusclass=Profile,o=radiuschangetype: deletedn: radiusname=PROFILE4,radiusclass=Profile,o=radiuschangetype: delete
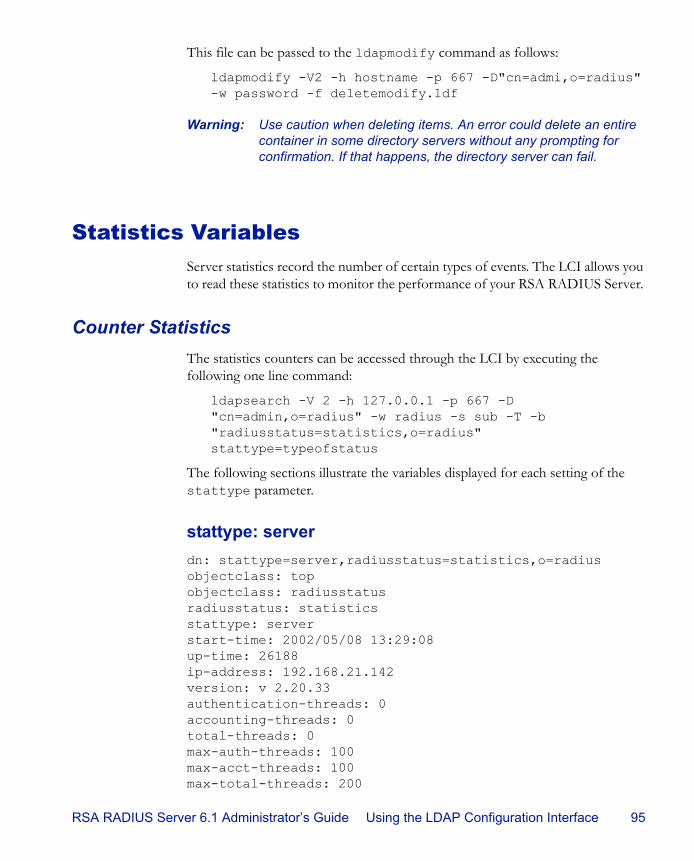
RSA RADIUS Server 6.1 Administrator’s Guide Using the LDAP Configuration Interface 95
This file can be passed to the ldapmodify command as follows:
ldapmodify -V2 -h hostname -p 667 -D"cn=admi,o=radius"-w password -f deletemodify.ldf
Warning: Use caution when deleting items. An error could delete an entire container in some directory servers without any prompting for confirmation. If that happens, the directory server can fail.
Statistics VariablesServer statistics record the number of certain types of events. The LCI allows you to read these statistics to monitor the performance of your RSA RADIUS Server.
Counter StatisticsThe statistics counters can be accessed through the LCI by executing the following one line command:
ldapsearch -V 2 -h 127.0.0.1 -p 667 -D "cn=admin,o=radius" -w radius -s sub -T -b "radiusstatus=statistics,o=radius" stattype=typeofstatus
The following sections illustrate the variables displayed for each setting of the stattype parameter.
stattype: serverdn: stattype=server,radiusstatus=statistics,o=radiusobjectclass: topobjectclass: radiusstatusradiusstatus: statisticsstattype: serverstart-time: 2002/05/08 13:29:08up-time: 26188ip-address: 192.168.21.142version: v 2.20.33authentication-threads: 0accounting-threads: 0total-threads: 0max-auth-threads: 100max-acct-threads: 100max-total-threads: 200
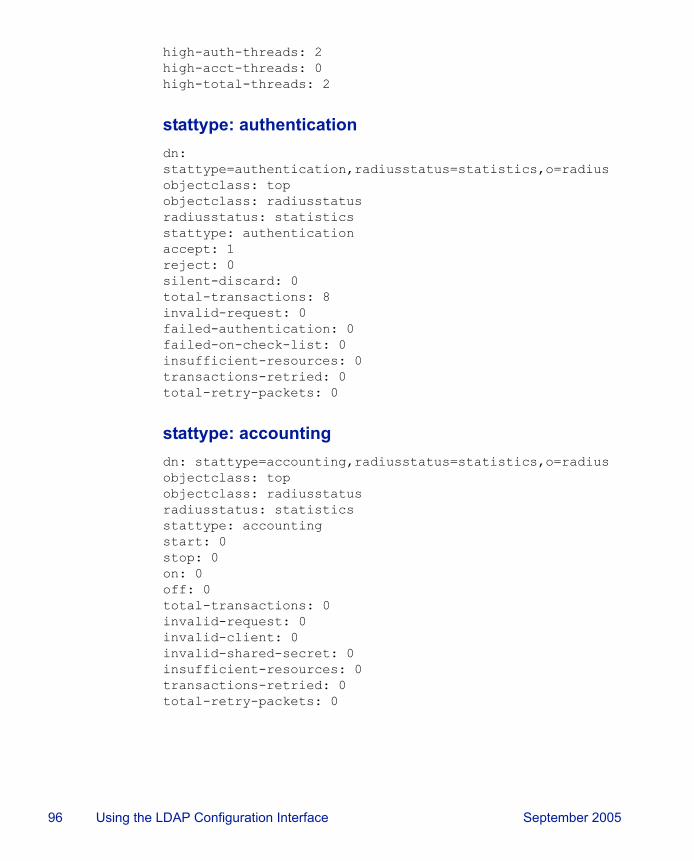
96 Using the LDAP Configuration Interface September 2005
high-auth-threads: 2high-acct-threads: 0high-total-threads: 2
stattype: authenticationdn: stattype=authentication,radiusstatus=statistics,o=radiusobjectclass: topobjectclass: radiusstatusradiusstatus: statisticsstattype: authenticationaccept: 1reject: 0silent-discard: 0total-transactions: 8invalid-request: 0failed-authentication: 0failed-on-check-list: 0insufficient-resources: 0transactions-retried: 0total-retry-packets: 0
stattype: accountingdn: stattype=accounting,radiusstatus=statistics,o=radiusobjectclass: topobjectclass: radiusstatusradiusstatus: statisticsstattype: accountingstart: 0stop: 0on: 0off: 0total-transactions: 0invalid-request: 0invalid-client: 0invalid-shared-secret: 0insufficient-resources: 0transactions-retried: 0total-retry-packets: 0

RSA RADIUS Server 6.1 Administrator’s Guide Using the LDAP Configuration Interface 97
Rate StatisticsRate statistics are derived from other statistics by taking time into consideration. Three types of rate values are calculated for each of these counter statistics:
Current rate statistics identify the rate measured over the most recent rate interval. The seconds-per-interval value identifies the number of seconds in the interval over which the rate statistics are gathered.
Average rate statistics identify the rate measured since startup, or the most recent statistics reset command.
Peak rate statistics identify the highest rate observed since startup, or the most recent statistics reset command.
To read rate statistics from the LCI, you must set stattype: rate. This results in output such as the following:
rate-statistics-seconds-per-interval: 1auth-request-current-rate: 0auth-request-average-rate: 0auth-request-peak-rate: 7auth-accept-current-rate: 0auth-accept-average-rate: 0auth-accept-peak-rate: 1auth-reject-current-rate: 0auth-reject-average-rate: 0auth-reject-peak-rate: 0acct-start-current-rate: 0acct-start-average-rate: 0acct-start-peak-rate: 0acct-stop-current-rate: 0acct-stop-average-rate: 0acct-stop-peak-rate: 0
98 Using the LDAP Configuration Interface September 2005

RSA RADIUS Server 6.1 Administrator’s Guide Glossary 99
Glossary
802.1X The IEEE 802.1X standard defines a mechanism that allows a supplicant (client) to connect to a wireless access point or wired switch (authenticator) so that the supplicant can provide authentication credentials that can be verified by an authentication server.
AAA Authentication, authorization, and accounting.
accounting The process of recording and aggregating resource use statistics and log files for a user, connection session, or function for billing, system diagnosis, and usage planning.
AP Access Point. A device that serves as a communication hub to connect 802.1X wireless clients to a wired network.
attribute RADIUS attributes carry the specific authentication, authorization, and accounting.
authentication The process of verifying the identity of a person or file system and whether the person is allowed on a protected network.
authentication server
A back-end database server that verifies, from the credentials provided by an access client, whether the access client is authorized to use network resources.
authorization The process of controlling the network access, such as privileges or time limits, that the user can exercise on the protected network.
AVP Attribute-value pair. An attribute and its corresponding value.; for example, User-Name = admin.

100 Glossary September 2005
CA Certificate authority. A trusted entity that registers the digital identity of a site or individual and issues a digital certificate that guarantees the binding between the the identity and the data items in a certificate.
CCM Centralized configuration management. The process by which information is shared between a Primary RADIUS server and one or more Replica RADIUS servers in a multi-server environment.
certificate A digital file signed by a CA that guarantees the binding between an identity and the contents of the certificate.
CHAP Challenge Handshake Authentication Protocol.
checklist attribute
An attribute that must be sent from a RAS to a RADIUS server as part of an authentication request. If a required checklist attribute is not present, the RADIUS server returns an Access-Reject message to the RAS.
credentials Data that is verified when presented to an authenticator, such as a password or a digital certificate.
CRL Certificate Revocation List. A data structure that identifies the digital certificates that have been invalidated by the certificates’ issuing CA prior to their expiration date.
dictionary Text file that stores the lists of RADIUS attributes used to parse authentication/accounting requests and generate responses.
DHCP Dynamic Host Configuration Protocol. Protocol by which a server automatically assigns (leases) a network address to a client temporarily or permanently.
DNIS Dialed number identification service. A telephone service that identifies what number was dialed by a caller.
DNS Domain Name Service.
EAP Extensible Authentication Protocol. An IETF-standard authentication protocol for network access that acts as a transport for multiple authentication methods or types. Defined by RFC 2284.
EAP-TTLS Authentication method that uses EAP (Extensible Authentication Protocol) and TTLS (Tunneled Transport Layer Security).
IEEE Institute of Electrical and Electronics Engineers, Inc.

RSA RADIUS Server 6.1 Administrator’s Guide Glossary 101
IETF Internet Engineering Task Force. Technical subdivision of the Internet Architecture Board that coordinates the development of Internet standards.
MIB Management Information Base.
NAS Network Access Server. Network device that accepts connection requests from remote users, authenticates users through RADIUS, and routes users onto the network. Identical in meaning to RAS.
New Pin mode Status assigned to a user’s token when its PIN has been compromised or when the authorized user has forgotten the PIN. If the administrator clears the PIN, the old PIN can no longer be used for authentication, and the next authentication attempt with the token initiates the New PIN procedure. If the administrator does not clear the PIN, the old PIN can be used one more time.
Next Tokencode mode
Status assigned to a user’s token if the token has drifted out of synch with the RSA Authentication Manager’s system clock or if there has been a series of unsuccessful authentication attempts. Requiring that the user enter two consecutive tokencodes ensures that the user has possession of the token.
node secret Symmetric key used to encrypt communication between RSA RADIUS Server and RSA Authentication Manager.
PAP Password Authentication Protocol.
passcode A one-time authentication string consisting of a user’s PIN followed by the user’s tokencode.
PEAP Protected Extensible Authentication Protocol. A two-phase authentication protocol where (1) an authentication server is authenticated to a supplicant using a digital certificate and a secure channel is established; and (2) the supplicant is authenticated to the authentication server through the secure channel.
PIN Personal Identification Number. The numeric or alphanumeric string that identifies a user as being authorized for a specific RSA SecurID token.
Primary RADIUS Server
A RADIUS server that acts as the hub for database replication. Compare Replica RADIUS Server.
profile A record in the RADIUS database describing the checklist attributes and return list attributes that should be associated with a user or group of users.
RADIUS Remote Authentication Dial-In User Service. A security administration standard that functions as an information clearinghouse, storing authentication

102 Glossary September 2005
information about users and administering multiple security systems across complex networks.
RAS Remote Access Server. Network device that accepts connection requests from remote users, authenticates users through RADIUS, and routes users onto the network. Identical in meaning to NAS.
realm A logical grouping of authentication servers (Primary RADIUS Server and Replica RADIUS Servers).
Replica RADIUS Server
A server that participates in balancing the load of user authentication requests within a realm. A Replica RADIUS Server’s database is periodically synchronized with the database on the Primary RADIUS Server. Compare Primary RADIUS Server.
return list attribute
An attribute that RSA RADIUS Server returns to a RAS in an Access-Accept message when a user is authenticated. Return list attributes provide additional parameters, such as VLAN assignment or IP address assignment, that the RAS needs to connect the user.
RSA Authentication Manager
A host running RSA Security proprietary RSA SecurID software, which identifies and authenticates users by validating their RSA SecurID passcodes.
SecurID Security token system that allows remote-access users to generate a pseudo-random value they can forward as part of an authentication sequence.
session ID Session Identifier. A string of characters uniquely identifying the session.
shared secret An encryption key known only to the sender and receiver of data.
SNMP Simple Network Management Protocol.
software token A software utility running on a computer or digital assistant that generates a tokencode. Compare token.
supplicant The client in an 802.1X-authenticated network.
time drift The process by which two clocks that are initially synchronized gradually display different times.
token A physical device, such as an RSA SecurID card or key fob, that displays a tokencode. A user’s token is one of the factors in the RSA SecurID authentication system. See PIN.
RSA RADIUS Server 6.1 Administrator’s Guide Glossary 103
tokencode The pseudorandom number that is displayed on the LCD of a hardware token or generated by a software token during logon.
TLS Transport Layer Security.
TTLS Tunneled Transport Layer Security.
UTC Universal Time Coordinated. Also known as Greenwich Mean Time (GMT) or Zulu time. RSA SecurID tokens are synchronized to UTC to provide a standard time basis for tokencode calculation.
VSA Vendor Specific Attribute. VSAs allow vendors to support proprietary RADIUS attributes that are not defined in RFCs 2865 and 2866.
WLAN Wireless Local Area Network.

104 Glossary September 2005

RSA RADIUS Server 6.1 Administrator’s Guide Index 105
Index
Numerics802.1X 1
Aaccess client 3accounting 2Acct-Authentic 79Acct-Delay-Time 79Acct-Status-Type 79Acct-Termination-Cause 80angle brackets, in syntax xiattributes 5authentication 2authorization 2
Bbrackets, in syntax x
Ccentralized configuration management, see CCMChallenges 59checklist attributes 13
DDropped Packet 59, 61
EEAP-15, see RSA Security EAPEAP-32, see Protected One-Time Password
(POTP) 1echo property 15
FFailed Authentication 59Failed on Checklist 59
Framed-Compression 15
GGeneric Token Card 1
Hhost agent 8
IInsufficient Resources 59Invalid Request 59
Llog files 10LogAccept 76LogLevel 76LogReject 76
Mmake of RAS 5Make/model field 12model of RAS 5multi-valued attributes 14
Nnetwork access server (NAS), see RAS
Oorderable attributes 15
Ppasscode 3personal identification number 3POTPprofiles 51

106 Index September 2005
Protected Extensible Authentication Protocol (PEAP) 1
Protected One-Time Password (POTP) 1Protected One-Time Password, see POTP
RRADIUS daemon, starting and stopping 27, 33radius.dct 12radiusdir xRAS 3remote access server, see RASReplication panel 66return list attributes 14RSA Authentication Manager 2, 3, 4, 21, 22, 35, 53RSA Security EAP 1, 2rsaconfiguretool 18, 70, 71, 72rsainstalltool 18, 28, 30, 70, 71, 72
Sshared secret 5, 7Silent Discards 59Statistics panel 57system assigned values 15
Ttokencode 3Total Retry Packets 59TraceLevel 76Transactions Retried 59TTLS/PAP 2tunnel 2Tunneled Transport Layer Security (TTLS) 1
Vvendor-specific attributes 12


