32
SAFE OPERATION FOR MAGNETIC DRILLS A General Guide for Safe Operating Procedures

SAFE OPERATION FOR MAGNETIC DRILLS
A General Guide for SafeOperating Procedures

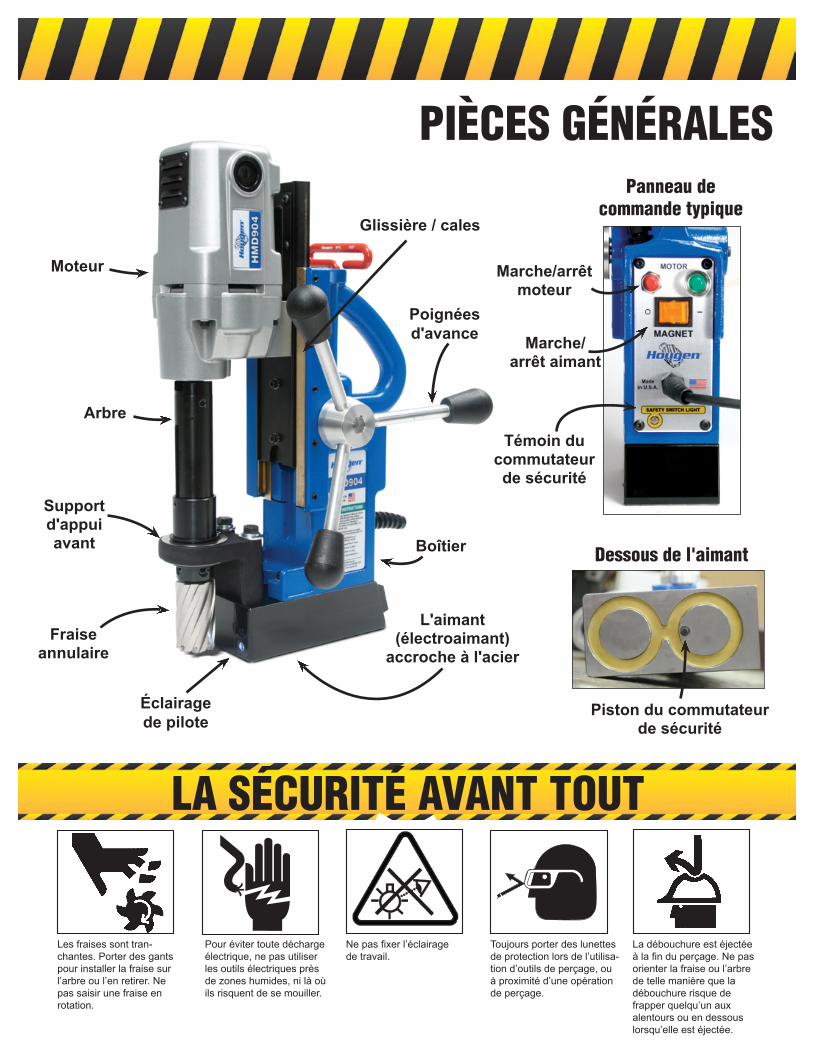
Always wear eye protection while using cutting tools, or in the vicinity of cutting.
The slug is ejected at the end of the cut. Do not aim cutter or arbor so that ejected slug may hit someone around, or below you.
To prevent electric shock, do not use power tools near wet areas, or where power tool may become wet.
Do not stare at operating light.
Cutters are sharp. Wear gloves when installing or removing cutter from arbor. Do not grab a rotating cutter.
Magnet (Electromagnet) magnetizes to
the steelAnnular Cutter
Feed Handles
Arbor
Motor
Housing
Slide / Gibs
Front Support Bracket
Typical Control Panel
MotorOff/On
MagnetOff/On
Safety Switch Light
Pilot Light
SAFETY FIRST
General Parts
Safety Switch Plunger
Bottom of Magnet

General Parts A magnetic drill can be a very useful tool for holemaking. Please read and follow all safety procedures outlined in your operator’s manual
and according to company policy.
IMPORTANT SAFETY INSTRUCTIONS
WARNING:
1. Work Area Safetya) Keep your work area clean and well lit. Cluttered or
dark areas invite accidents.b) Do not operate power tools in explosive atmospheres,suchasinthepresenceofflammable
liquids, gases or dust. Power tools create sparks which may ignite the dust or fumes.
c) Keep children and bystanders away while operating a power tool. Distractions can cause you to lose control.
2. Electrical Safetya) Power tool plugs must match the outlet. Never modify
the plug in any way. Do not use any adapter plugs with earthed (grounded) power tools. Unmodified plugs and matching outlets will reduce risk of electrical shock.
b) Avoid body contact with earthed or grounded surfaces such as pipes, radiators, ranges and refrigerators. There is an increased risk of electric shock
if your body is earthed or grounded.c) Don’t expose power tools to rain or wet conditions.
Water entering a power tool will increase the risk of electric shock.d) Do not abuse the cord. Never use the cord for carrying or unplugging the power tool. Keep cord
away from heat, oil, sharp edges or moving parts. Damaged or entangled cords increase the risk of electric shock.
e) When operating a power tool outdoors, use an outdoor extension cord suitable for outdoor use. Use of a cord suitable for outdoor use reduces the risk
of electric shock.f) If operating a power tool in a damp location is
unavoidable, use a residual current device (RCD) protected supply. Use of an RCD reduces the risk of electric shock.
3. Personal Safetya) Stay alert, watch what you are doing and use common sense when operating a power tool. Do not
use a power tool while you are tired or under the influenceofdrugs,alcohol,ormedication.A moment of inattention while operating power tools may result in serious personal injury.
b) Use personal protective equipment. Always wear eye protection. Protective equipment such as dust mask, non-skid shoes, hard hat or hearing protection used for appropriate conditions will reduce personal injuries.
c) Prevent unintentional starting. Ensure the switch is in the off-position before connecting to power source and/or battery pack, picking up or
carrying the tool. Carrying power tools with your finger on the switch or energizing power tools that
have the switch on invites accidents.d) Remove any adjusting keys or wrenches before turning the power tool on. A wrench or a key that is left attached to a rotating part of the power tool may result in personal injury.e) Do not overreach. Keep proper footing and balance at all times. This enables better control of the power tool in unexpected situations.f) Dress properly. Do not wear loose clothing or
jewelry. Keep your hair and clothing away from moving parts. Loose clothes, jewelry or long hair
can be caught in moving parts.g) If devices are provided for the connection of dust extraction and collection facilities, ensure
these are connected and properly used. Use of dust collection can reduce dust-related hazards.h) Do not let familiarity gained from frequent use of tools allow you to become complacent and
ignore tool safety principles. A careless action can cause severe injury within a fraction of a second.i) Always use a safety chain. Mounting can release.
4. Power Tool Use and Carea) Do not force the power tool. Use the correct power tool for your application. The correct power
tool will do the job better and safer at the rate for which it is designed.b) Do not use the power tool if the switch does not turn it on or off. Any power tool that cannot be controlled with the switch is dangerous and must be repaired.c) Disconnect the plug from the power source and/or remove the battery pack, if detachable, from the power tool before making any adjustments, changing accessories or storing
power tools. Such preventative safety measures reduce the risk of starting the tool accidentally.
(Continued on page 4)
Save all warnings and instructions for future reference.
Readallsafetywarnings,instructions,illustrationsandspecificationsprovidedwiththis power tool. Failure to follow all instructions listed below may result in electric shock, fire and/or serious injury.

A safety chain should ALWAYS be used whenever operating the drill. The safety chain prevents the drill unit from falling, in the event of a power failure or if the magnet breaks loose from the work surface. The safety chain attaches to the drill by running the chain thru the D-Ring on the back of the unit and then continuing around the material and/or work surface. Adjust the chain so it is tight and secure.
SAFETY CHAIN INSTRUCTIONS
IMPORTANT SAFETY INSTRUCTIONS
Outdoor Extension Cord UseWhen a tool is used outdoors, use only extension cords intended for use outdoors and so marked.
Additional Safety PrecautionsThe Arbor and cutter should never be used as a handhold or handle. Keep hands and clothing away from all moving parts. Do not use Hougen Cutters where ejected slug might cause injury (slug ejected at end of cut). Also, adhere to all operating instructions. Do not drill through any surface that may contain live electrical wiring. Drilling into a live wire could cause exposed metal parts of the drill to be made live. Remove chips wrapped around the cutter and arbor after each hole. With the motor off and power disconnected, grasp chips with leather gloved hand or pliers and pull while rotatingcounterclockwise. Should the cutter become jammed in the work, stop the unit immediately to prevent personal injury. Disconnect the drill from the power supply and loosen the jammed cutter by turning the arbor counterclockwise. Never attempt to free the jammed cutter by starting the motor. Service at an authorized repair center only.
Operating Near Welding EquipmentDO NOT operate this unit on the same work surface that welding is being performed on. Severe damage to the unit, particularly the power cord, could occur. This could alsoresult in personal injury to the operator.
Circuit Breaker (If Applicable)Changing of the circuit breaker to a higher amp ratedbreaker, or bypassing the circuit breaker is notrecommended and will void the product warranty.
Circuit Breaker Operation (If Applicable) The circuit breaker is a thermal breaker. When it reaches the higher temperature rating it will trip and cause the unit to shut down. This is a protective device and can be reset after 5 to 10 minutes. To reset the breaker, press the breakerbutton back in. If it does not reset, let the unit cool a littlelonger until you can push the button in and it stays in position.
Save all warnings and instructions for future reference.
LENGTHOF CORD,
FEET
RECOMMENDEDWIRE GAUGE
RECOMMENDEDWIRE GAUGE
115V MOTOR10 - 12 AMPS
230V MOTOR5 - 6 AMPS
Up to 25 16 18
26 - 50 14 18
51 - 100 10 16
101 - 200 8 14
201 - 300 6 12
301 - 500 4 10
d) Store idle power tools out of the reach of children and do not allow persons unfamiliar with the
power tool or these instructions to operate the power tool. Power tools are dangerous in the hands of untrained users.
e) Maintain power tools and accessories. Check for misalignment or binding of moving parts, breakage
of parts and any other condition that may affect the power tool’s operation. If damaged, have the power tool repaired before use. Many accidents are caused by poorly maintained power tools.
f) Keep cutting tools sharp and clean. Proper maintained cutting tools with sharp cutting edges are
less likely to bind and are easier to control.g) Use the power tool, accessories and tool bits etc.
in accordance with the instructions, taking into account the working conditions and the work to be performed. Use of the power tool for operations different from those intended could result in a
hazardous situation.h) Keep handles and grasping surfaces, clean and
free from oil and grease. Slippery handles and grasping surfaces do not allow for safe handling and
control of the tool in unexpected situations.
5. Servicea) Haveyourpowertoolservicedbyaqualified repair person using only identical replacement
parts. This will ensure that the safety of the power tool is maintained.
Safe Electrical ConnectionYour Drill is rated for use on 115VAC or 230V at 50-60Hz. Do not attempt to use the drill on power sources rated other than this.
Plugs and Receptacles
Wet electrical connections are shock hazards.To prevent the cutting fluid from traveling along the cord and contacting the plug or power outlet,tie a drip loop as shown. Also elevate extensioncords or gang box connections.
Extension CordsUse only 3-wire extension cords that have a 3-prong grounding type plug and 3-pole receptacles that accept the tool’s plug. Replace or repair damaged cords. Make sure the conductor size is large enough to prevent excessive voltage drop which will cause loss of power and possible motor damage.
Safe Electrical Connection Your Mag Drill is rated for use on 115VAC or 230V at 50-60Hz. Do not attempt to use drill on power sources rated other than this.
Extension Cords Use only 3-wire extension cords that have 3-prong grounding type plugs and 3-pole receptacles that accept the tool’s plug. Replace or repair damaged cords. Make sure the conductor size is large enough to prevent excessive voltage drop which will cause loss of power and possible motor damage.
Outdoor Use Extension Cords When tool is used outdoors, use only extension cords intended for use outdoors and so marked.
Additional Safety Precautions Arbor and cutter should never be used as a hand- hold. Keep hands and clothing away from all moving parts. Do not use Hougen Cutters where ejected slug might cause injury (slug ejected at end of cut). Also, adhere to all operating instructions. Do not drill through any surface that may contain live electrical wiring. Drilling into a live wire could cause exposed
metal parts of the drill to be made live. Remove chips wrapped around Cutter and arbor after each hole. With motor off and power disconnected, grasp chips with leather gloved hand or pliers and pull while rotating counterclockwise. Should the cutter become jammed in the work, stop the unit immediately to prevent personal injury. Disconnect the drill from the power supply and loosen jammed cutter by turning the arbor counterclock- wise. Never attempt to free the jammed cutter by starting the motor. Service at authorized repair center only.
Extension Cord Table
Plugs and Receptacles
HTGNEL,DROCFO
TEEF
DEDNEMMOCERERIWEGUAG
DEDNEMMOCERERIWEGUAG
ROTOMV511SPMA21-01
ROTOMV032SPMA6-5
52OTPU 61 81
05-62 41 81
001-15 01 61
002-101 8 41
003-102 6 21
005-103 4 01
I
Operating Near Welding EquipmentDO NOT operate this unit on the same work surface that welding is being performed on. Severe damage to the unit, particularly the power cord, could occur. This could also result in personal injury to the operator.
Circuit Breaker (If Applicable)Changing of the circuit breaker to a higher amp rated breaker, orbypassing the circuit breaker is not recommended and will void
product warranty.
Circuit Breaker Operation (If Applicable)The circuit breaker is a thermal breaker. When it reaches the higher temperature rating it will trip and cause the unit to shut down. This is a protective device and can be reset after 5 to 10. To reset the breaker, press the breaker button back in. If it does not reset, let the unit cool a little longer until you can push the button in and it stays in position.
Save these Instructions.
Important Safety Instructions - ContinuedWARNING: Read and understand all instructions. Failure to follow all instructions listed below,
may result in electrical shock, fire and/or serious personal injury.
Typical USA 120v Typical USA 230v
230v Type Plug
Wet electrical connections are shock hazards. To prevent the cutting fluid from traveling along the cord and contacting the plug or power outlet, tie a drip loop as shown. Also elevate extension cords or gang box connections.
Typical USA 115V Typical USA 230V 230V Type I Plug
ADDITIONAL SAFETY INSTRUCTIONS

IMPORTANT: Before turning on the machine, it is important that the operator understands the interrelated functions of the SAFETY SWITCH, MAGNET SWITCH, AND MOTOR SWITCHES. READ SAFETY SWITCH INDICATOR LIGHT INSTRUCTIONS.
SAFETY SWITCH — Located in base of drill. Enables motor operation only when magnet is properly seated on a clean and flat work surface. Turns motor off if switch detects lift of unit. (See page 2 for location of safety switch)
MAGNET ON/OFF SWITCH — Energizes and De-energizes the magnetic base and activates the safety switch. Motor can now be started by pushing the motor START switch.
MOTOR START/STOP SWITCHES — Starts and stops the motor.
TYPICALCONTROL PANEL
1. Place Magnetic Drill on clean, flat steel plate that is at least 3/8" thick.
2. Plug unit into proper AC power source. DO NOT use with DC Power.
3. Locate the Magnet ON and OFF switch and the motor STOP and START switch.
4. NOTE: A loss of power will de-energize the magnetic base and deactivate the motor. When power is restored, the magnet will re-energize, however, the motor START switch must be depressed before the motor will start.
CONTROL PANEL OPERATION
The Safety Switch Indicator Light is a Standard Safety Feature on Hougen portable magnetic drills. Its purpose is to inform the user that the lift detector switch is activated.
If light is Green:
In normal operation the safety switch light will be green. Motor "On" and "Off" Switchesfunction normally.
If light is Red:
A condition with the safety switch exists that needs to be corrected. Possible causes:
• Safety Switch is defective. Have drill serviced.
• Uneven work surface or material. Check work surface for flatness.
• Dirt or chips under magnet. Clean work surface.
Testing Safety Switch:
Before operating the drill always test the safety switch. To test switch... place drill on work surface and plug into the outlet. Rock drill so magnet lifts off work surface. Safety Switch Light should change from green to red. If light stays green or red, a problem exists with the safety switch that must be corrected. (ie... safety switch defective, safety plunger in the base of magnet is stuck in position, etc) Please correct and retest before operating drill.
SAFETY SWITCH INDICATOR LIGHT
Material must be a least 3/8" thick. Material thinner than 3/8" will cause a "weak" magnet condition.
HOUGEN MANUFACTURING RECOMMENDS THAT CONDITIONS ARE CORRECTED SO LIGHT IS GREEN.THIS ALLOWS FOR THE UNIT TO BE OPERATED IN A SAFE MANNER.
For any questions please contact Hougen Manufacturing’s Technical Service at (810) 635-7111.
CONTROL PANEL SWITCH PLATE
PILOT LIGHT SWITCH
The Pilot Light is a Standard Feature onHougen portable magnetic drills. Its purpose is to illuminate the work surface area for easier viewing of the pilot.
** SAFETY SWITCH LIGHT WILL COME ON AND REMAIN ON WHILE DRILL IS PLUGGED IN **

1. Disconnect from the power source and remove T-Handle wrench from holder at top of drill.
2. Lay drill on its side with the feed handles up or be sure the Arbor clears table if unit is in normal operating position.
3. Turn the Feed Handles until the cutter mounting set screws are exposed and completely remove the set screws.
4. Insert proper pilot in shank end of the Hougen Cutter.
5. Insert the Hougen Cutter until the flat on the cutter shank is aligned with the set screw holes and is exactly perpendicular to axis of the set screw holes.
6. Insert the set screws and tighten. Check to be certain that the cutter is secure.
INSTALLING THE HOUGEN CUTTER IN THE ARBOR
Set Screwsgo here
"12,000-Series" Hougen Cutter
Pilot
1. With Magnetic Drill in the operating position, turn the feed handles so that the cutter and pilot are above the work surface.
2. With the magnet turned ON & motor OFF,
A) For non-coolant bottle drills... fill the arbor reservoir by introducing RotaMagic™ cutting fluid through the slots in Arbor.Cuttingfluid should not leak out. B) For drills with a Coolant bottle... attach the coolant bottle per diagram and fill with coolant.
3. Test metering capabilities of the Arbor/Cutter/Pilot assembly (magnet ON - motor OFF) by feeding the Arbor gently toward the work surface until the pilot is pushed up into the Cutter, thus allowing fluid to filter down onto the work surface through the groove in the pilot.
Non-Coolant Bottle Drills.....
4. For proper lubrication, all fluid in the reservoir should empty onto the work surface in no less than 15 seconds and no longer than 30 seconds.
5. The Arbor Reservoir holds enough coolant for cutting approximately one hole. * This method of using coolant can also be used for an attached coolant bottle if the bottle is lost.
6. For drills with a coolant bottle, use the coolant bottle on/off lever to adjust the flow of the coolant.
7. For horizontal or drilling overhead holes, use Slick-Stik™ Lubricant.
OPERATION OF THE CUTTING FLUID RESERVOIR
AddCoolant
Here
CoolantReservoir
WrenchHolder
AttachCoolantBottle
CoolantFlow On / Off
Slide Vinyl Tube overthe Brass Barb Fitting
Non-Coolant Bottle Drills
Fill with RotaMagic™
Coolant
Drills with Coolant Bottle
FOR BEST RESULTS ALWAYS USE COOLANT
A
B

Always remember that the magnet’s holding power is directly related to the workpiece thickness and surface condition. Since magnetic attraction diminishes with thinner material or rough surfaces, mechanical clamping of drill unit to the workpiece should be used when cutting thin material (3/8" or less) or material with uneven surfaces.
1. Make sure the workpiece and bottom of the magnet are free of chips, oil, etc.
2. Verify that the Safety Switch works properly (See Safety Switch Indicator Light Section)
3. Position the drill by sliding it and gently feeding the Arbor so that pilot point is touching the center of hole to be drilled.
4. Secure the unit to the workpiece with a safety chain.
5. Turn the magnet "ON" by pressing the magnet ON switch.
6. Turn the Feed Handle, raising the cutter until the pilot is above the work surface.
7. Fill the coolant reservoir or fill the attached coolant bottle if applicable.
8. Make certain that the cutter is clear of the workpiece and turn the motor "ON" by pressing the motor START switch.
9. Feed the Hougen Cutter slowly into the workpiece. Only after a cutting path is established to a depth of about 1/16" can the full force be applied to the feed handles.
10. Ease up on the feed pressure as the cutter starts breaking through.
11. At the conclusion of cut, turn the motor "OFF" by pressing the motor STOP switch. Turn the Feed Handles to raise the Arbor thereby ejecting the slug, if it hasn’t already fallen free.
12. Turn the magnet "OFF" by pressing the magnet OFF switch.
13. Disconnect from the power source.
14. If necessary, remove the chips from the cutter and magnet, preferably wearing leather work gloves and/or with pliers. Disconnect the safety chain and you are ready to move the unit to the new drilling position.
OPERATING INSTRUCTIONS
In order to minimize wear on moving parts and to insure smoother operation and longer life for your magnetic drill, the following maintenance should be done periodically, based on use.
1. Regularly tighten all fasteners and replace all worn parts.
2. Check the motor brushes and replace if worn.
3. Check the power cord and cord from panel to motor and, if cracked or frayed, return to an authorized repair center for replacement.
4. Apply grease to the slide dovetails, brass gibs, and the feed gear rack. For best results use Shell Cyprina-RA or equivalent.
5. Remove the arbor and pack the bearing in the front support bracket with grease. Use Shell Cyprina-RA or equivalent.
6. The safety switch plunger should be cleaned and lubricated with penetrating oil periodically. As necessary remove the magnet from the drill and remove the safety switch assembly from magnet. Push the plunger out of the magnet. Clean out any debris from inside and around the plunger hole in the magnet. Coat the plunger with anti-seize. Replace the plunger and the safety switch assembly and tighten down the screws. Replace the magnet onto the drill housing.
MAINTENANCE
When drilling, especially in horizontal or overhead positions, always apply feed pressure toward the work surface. Never pull away from the work surface as this can weaken the magnetic holding power.
Use handles to feed toward
the work surface
Never pull handles away from the work
surface

HOUGEN MANUFACTURING, INC.3001 Hougen Drive • Swartz Creek, MI 48473 USA
Ph: (810) 635-7111 • Fax: (810) [email protected] • www.hougen.com
When in Doubt, Give Us a Call... We’ll be Happy to Help!
(810) [email protected]
1. Keep the inside of the Hougen Cutter clear of chips. Chips will interfere with cutting to maximum depth, maybe impede the free oil flow and can cause cutter breakage.
2. Keep the work, machine, arbor and the Hougen Cutter free of chips and dirt.3. Tighten all bolts and fasteners regularly.4. We highly recommend using a light viscosity cutting fluid (preferably Hougen Cutting Fluid.5. Occasionally check metering of cutting fluid flow. Lack of cutting fluid may cause the Hougen Cutter to freeze in the cut, slug to stick and may result in poor cutter life.6. Always start the cut with light feed pressure and then increase sufficiently to achieve the maximum cutting rate.7. Ease off on the pressure as the cutter begins to break through at the end of the cut.8. Keep the slide dovetails, brass gibs and feed rack lubricated and free from chips and dirt. 9. When the slug hangs up in cutter, turn off the motor and bring the cutter down on a flat surface. This will normally straighten a cocked slug, allowing it to be ejected. 10. When cutting large diameter or deep holes it may be necessary to stop in the middle of the cut to add cutting fluid and remove the
chips from around the arbor. (When doing this DO NOT raise the cutter out of the hole. Doing so can allow chips to get under the teeth of the cutter. This will make it difficult to restart the cut.)
"Babying" the cutter through the cut will only decrease tool life.
#1 cause of cutter breakage and
prematurely dull teeth is too little
feed pressure
HINTS FOR SMOOTHER OPERATION

OPERACIÓN SEGURA PARA TALADROS MAGNÉTICOS
Una guía general de procedimiento para operación segura
Español

Siempre utilice protección ocular al manejar herramientas de corte o cuando se encuentre cerca del área de corte.
El bocado central sólido se expulsa al finalizar el corte. No deje que el cortador anular o el árbol apunten hacia ningún lugar donde el bocado central sólido, una vez expulsado, pueda golpear a alguien que se encuentre cerca o debajo de usted.
Para evitar descargas eléctricas, no utilice herramientas motorizadas cerca de áreas que se encuentren mojadas o donde las herramientas puedan mojarse.
No mire fijamente a la luz de funcionamiento.
Los cortadores anulares son filosos. Utilice guantes parainstalar o sacar el cortador anular del árbol. No agarre un cortador anular en movimiento.
Imán Electroimán
magnetiza al aceroCortador anular
Manijas de avanhe
Arbol
Motor
Caja
Deslizamento / Guias
Suporto delantero
Panel de control típico
Motor Encender /
apagar
ImánEncender /
apagar
Luz de Interruptor de
seguridad
Luz de piloto
LA SEGURIDAD ANTE TODO
PARTES GENERALES
Interruptor de seguridad
Fondo del imán

Interruptor de seguridad
Un taladro magnético puede ser una herramienta muy útil para creando agujeros. Por favor lea y siga todas las procedimientos indicados en su
manual de operación y de acuerdo con la política de empresa.
Español
INSTRUCCIONES IMPORTANTES PARA LA SEGURIDAD
ADVERTENCIA:Leatodaslasadvertenciasdeseguridad,instrucciones,ilustracionesyespecificacionessuministradas con esta herramienta motorizada. Hacer caso omiso de las siguientes instrucciones puede ocasionar descargas eléctricas, incendios y/o lesiones físicas graves.
1. Seguridad en el área de trabajoa) Mantenga el área de trabajo limpia y bien iluminada. Si hay demasiados objetos o se trabaja en zonas oscuras, habrá mayor
riesgo de accidentes.b) No opere herramientas motorizadas donde haya riesgo de
explosión (por ejemplo, en presencia de líquidos, gases o polvos inflamables). Las herramientas motorizadas generan chispas que pueden encender el polvo o los gases.
c) Asegúrese de que no haya niños ni otras personas cerca de la zona donde esté utilizando la herramienta motorizada. Las distracciones pueden hacer que pierda el control de la máquina.
2. Seguridad eléctricaa) Los enchufes de la herramienta motorizada deben correspon-
deralostomacorrientes.Norealiceningunamodificación al enchufe. No utilice enchufes adaptadores con herramientas motorizadas conectadas a tierra. Los enchufes sin modificar y que correspondan a los tomacorrientes reducen el riesgo de descargas eléctricas.
b)Eviteelcontactofísicoconsuperficiesconectadasatierra,como tuberías, radiadores, cocinas y refrigeradores. El riesgo de recibir una descarga eléctrica será mayor si su cuerpo está haciendo conexión a tierra.
c) No exponga la herramienta motorizada a la lluvia o a condiciones de humedad. El ingreso de agua en una herramienta
motorizada aumentará el riesgo de descargas eléctricas.d) No maltrate el cable. Nunca utilice el cable para transportar o
desconectar la herramienta motorizada. Mantenga el cable alejadodelcalor,elaceite,losbordesfilososylaspiezas
móviles. Los cables dañados o enredados aumentan el riesgo de descargas eléctricas.
e) Si planea utilizar una herramienta motorizada al aire libre, utilice un cable de extensión adecuado para uso en exteriores. Utilizar un cable adecuado para uso en exteriores reduce el riesgo de
descargas eléctricas.f) Si no puede evitarse el uso de la herramienta motorizada en un
lugar húmedo, es necesario utilizar una fuente de alimentación protegida con un dispositivo de corriente residual (RCD). Utilizar un RCD reduce el riesgo de descargas eléctricas.
3. Seguridad personala) Preste atención a lo que hace y obre con sentido común al
utilizar una herramienta motorizada. No use la herramienta motorizada si está cansado o se encuentra bajo los efectos de drogas, alcohol o medicamentos. Una leve distracción durante el manejo de una herramienta motorizada podría ocasionar lesiones físicas graves.
b) Use los equipos de protección personal. Siempre debe usar protección ocular. La utilización de los equipos de protección personal, como máscara antipolvo, calzado de seguridad
antideslizante, casco o protección auditiva, cuando sean necesarios, reduce las lesiones físicas.
c) Evite que la herramienta arranque accidentalmente. Asegúrese de que el interruptor esté en la posición de apagado antes de conectar la fuente de alimentación y/o el
paquete de baterías, y de levantar o transportar la herramienta. Si transporta herramientas motorizadas con el dedo
sobre el interruptor o las enchufa con el interruptor activado, puede producirse un accidente.d) Retire cualquier cuña o llave de ajuste antes de encender la
herramienta motorizada. Si una llave o cuña quedan sujetas a una pieza giratoria de la herramienta motorizada, pueden producirse lesiones físicas.e) No intente realizar movimientos forzados. Mantenga la estabilidad y el equilibrio en todo momento. Esto permite un
mejor control de la herramienta motorizada en una situación inesperada.f) Use la vestimenta adecuada. No utilice ropa suelta ni alhajas.
Mantenga el cabello y la ropa alejados de las piezas en movimiento. La ropa suelta, las alhajas y el cabello largo pueden quedar atrapados en las piezas en movimiento.
g) Si se proporcionan dispositivos para conectar elementos para la extracción y recolección de polvo, asegúrese de que se conecten y usen correctamente. El uso de elementos para la recolección de polvo puede reducir los riesgos relacionados con el polvo.
h)Nodejequelaconfianzaqueseadquiereporeluso frecuente de la herramienta le haga disminuir la atención que debe tener e ignorar los principios de seguridad de la herramienta. Una acción descuidada puede causar lesiones
graves en una fracción de segundo.i) Siempre utilice la cadena de seguridad. El montaje puede
desprenderse.
4. Uso y cuidado de la herramienta motorizada
a) No fuerce la herramienta motorizada. Utilice la herramienta motorizada adecuada para el trabajo. La herramienta
motorizada correcta funciona mejor y más rápido si se utiliza a la velocidad prevista.b) No utilice la herramienta motorizada si el interruptor no la enciende ni la apaga. Las herramientas motorizadas que no
pueden controlarse con el interruptor son peligrosas y deben repararse.
c) Desconecte el enchufe de la fuente de alimentación y/o retire el paquete de baterías, si es desmontable, de la herramienta motorizada antes de realizar cualquier ajuste, cambiar
accesorios o almacenar la herramienta motorizada. Estas medidas preventivas reducirán el riesgo de que la herramienta se encienda accidentalmente. (Continúa en la página 4) Guarde todas las advertencias e instrucciones para
consultas futuras.
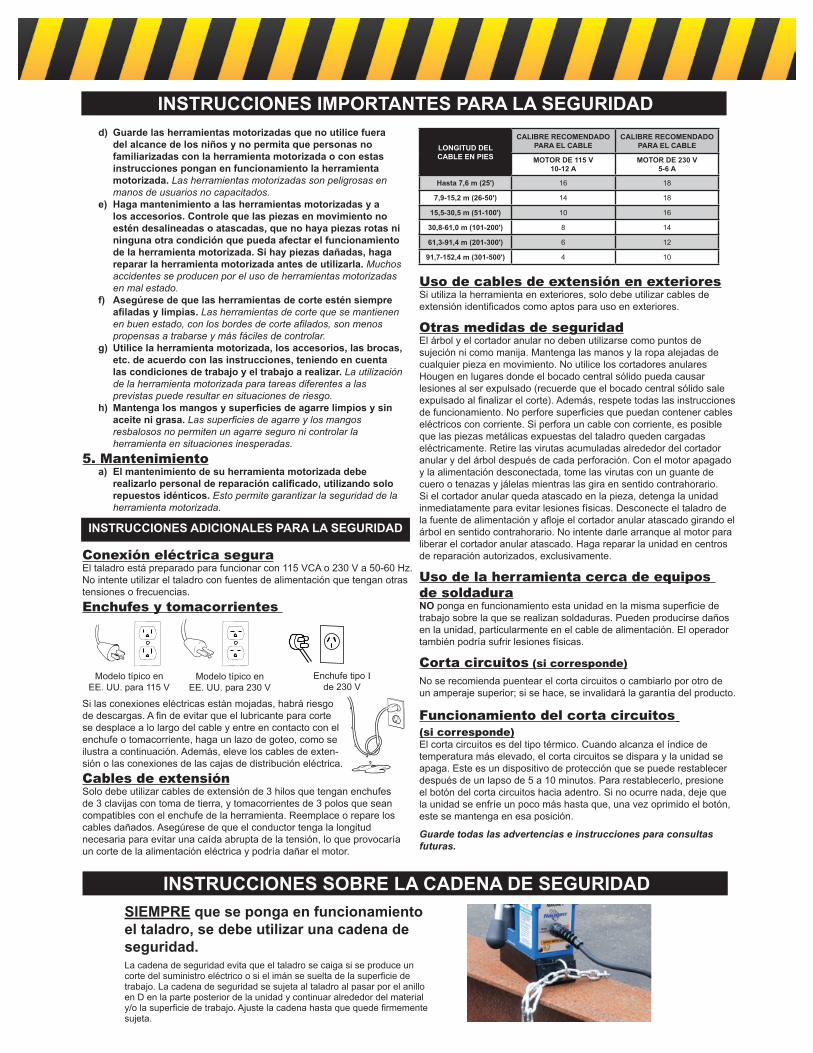
SIEMPRE que se ponga en funcionamiento el taladro, se debe utilizar una cadena de seguridad. La cadena de seguridad evita que el taladro se caiga si se produce un corte del suministro eléctrico o si el imán se suelta de la superficie de trabajo. La cadena de seguridad se sujeta al taladro al pasar por el anillo en D en la parte posterior de la unidad y continuar alrededor del material y/o la superficie de trabajo. Ajuste la cadena hasta que quede firmemente sujeta.
INSTRUCCIONES SOBRE LA CADENA DE SEGURIDAD
INSTRUCCIONES IMPORTANTES PARA LA SEGURIDAD
Uso de cables de extensión en exterioresSi utiliza la herramienta en exteriores, solo debe utilizar cables de extensión identificados como aptos para uso en exteriores.
Otras medidas de seguridadEl árbol y el cortador anular no deben utilizarse como puntos de sujeción ni como manija. Mantenga las manos y la ropa alejadas de cualquier pieza en movimiento. No utilice los cortadores anulares Hougen en lugares donde el bocado central sólido pueda causar lesiones al ser expulsado (recuerde que el bocado central sólido sale expulsado al finalizar el corte). Además, respete todas las instrucciones de funcionamiento. No perfore superficies que puedan contener cables eléctricos con corriente. Si perfora un cable con corriente, es posible que las piezas metálicas expuestas del taladro queden cargadas eléctricamente. Retire las virutas acumuladas alrededor del cortador anular y del árbol después de cada perforación. Con el motor apagado y la alimentación desconectada, tome las virutas con un guante de cuero o tenazas y jálelas mientras las gira en sentido contrahorario. Si el cortador anular queda atascado en la pieza, detenga la unidad inmediatamente para evitar lesiones físicas. Desconecte el taladro de la fuente de alimentación y afloje el cortador anular atascado girando el árbol en sentido contrahorario. No intente darle arranque al motor para liberar el cortador anular atascado. Haga reparar la unidad en centros de reparación autorizados, exclusivamente.
Uso de la herramienta cerca de equipos de soldaduraNO ponga en funcionamiento esta unidad en la misma superficie de trabajo sobre la que se realizan soldaduras. Pueden producirse daños en la unidad, particularmente en el cable de alimentación. El operador también podría sufrir lesiones físicas.
Corta circuitos (si corresponde)No se recomienda puentear el corta circuitos o cambiarlo por otro de un amperaje superior; si se hace, se invalidará la garantía del producto.
Funcionamiento del corta circuitos (si corresponde)El corta circuitos es del tipo térmico. Cuando alcanza el índice de temperatura más elevado, el corta circuitos se dispara y la unidad se apaga. Este es un dispositivo de protección que se puede restablecer después de un lapso de 5 a 10 minutos. Para restablecerlo, presione el botón del corta circuitos hacia adentro. Si no ocurre nada, deje que la unidad se enfríe un poco más hasta que, una vez oprimido el botón, este se mantenga en esa posición.
Guarde todas las advertencias e instrucciones para consultas futuras.
LONGITUD DEL CABLE EN PIES
CALIBRE RECOMENDADO PARA EL CABLE
CALIBRE RECOMENDADO PARA EL CABLE
MOTOR DE 115 V10-12 A
MOTOR DE 230 V5-6 A
Hasta 7,6 m (25') 16 18
7,9-15,2 m (26-50') 14 18
15,5-30,5 m (51-100') 10 16
30,8-61,0 m (101-200') 8 14
61,3-91,4 m (201-300') 6 12
91,7-152,4 m (301-500') 4 10
d) Guarde las herramientas motorizadas que no utilice fuera del alcance de los niños y no permita que personas no
familiarizadas con la herramienta motorizada o con estas instrucciones pongan en funcionamiento la herramienta motorizada. Las herramientas motorizadas son peligrosas en manos de usuarios no capacitados.
e) Haga mantenimiento a las herramientas motorizadas y a los accesorios. Controle que las piezas en movimiento no estén desalineadas o atascadas, que no haya piezas rotas ni ninguna otra condición que pueda afectar el funcionamiento de la herramienta motorizada. Si hay piezas dañadas, haga reparar la herramienta motorizada antes de utilizarla. Muchos accidentes se producen por el uso de herramientas motorizadas en mal estado.
f) Asegúrese de que las herramientas de corte estén siempre afiladasylimpias. Las herramientas de corte que se mantienen en buen estado, con los bordes de corte afilados, son menos
propensas a trabarse y más fáciles de controlar.g) Utilice la herramienta motorizada, los accesorios, las brocas,
etc. de acuerdo con las instrucciones, teniendo en cuenta las condiciones de trabajo y el trabajo a realizar. La utilización de la herramienta motorizada para tareas diferentes a las
previstas puede resultar en situaciones de riesgo.h) Mantengalosmangosysuperficiesdeagarrelimpiosysin
aceite ni grasa. Las superficies de agarre y los mangos resbalosos no permiten un agarre seguro ni controlar la herramienta en situaciones inesperadas.
5. Mantenimientoa) El mantenimiento de su herramienta motorizada debe
realizarlopersonaldereparacióncalificado,utilizandosolorepuestos idénticos. Esto permite garantizar la seguridad de la herramienta motorizada.
Conexión eléctrica seguraEl taladro está preparado para funcionar con 115 VCA o 230 V a 50-60 Hz. No intente utilizar el taladro con fuentes de alimentación que tengan otras tensiones o frecuencias.
Enchufes y tomacorrientes
Si las conexiones eléctricas están mojadas, habrá riesgo de descargas. A fin de evitar que el lubricante para corte se desplace a lo largo del cable y entre en contacto con el enchufe o tomacorriente, haga un lazo de goteo, como se ilustra a continuación. Además, eleve los cables de exten-sión o las conexiones de las cajas de distribución eléctrica.
Cables de extensiónSolo debe utilizar cables de extensión de 3 hilos que tengan enchufesde 3 clavijas con toma de tierra, y tomacorrientes de 3 polos que sean compatibles con el enchufe de la herramienta. Reemplace o repare los cables dañados. Asegúrese de que el conductor tenga la longitudnecesaria para evitar una caída abrupta de la tensión, lo que provocaría un corte de la alimentación eléctrica y podría dañar el motor.
Safe Electrical Connection Your Mag Drill is rated for use on 115VAC or 230V at 50-60Hz. Do not attempt to use drill on power sources rated other than this.
Extension Cords Use only 3-wire extension cords that have 3-prong grounding type plugs and 3-pole receptacles that accept the tool’s plug. Replace or repair damaged cords. Make sure the conductor size is large enough to prevent excessive voltage drop which will cause loss of power and possible motor damage.
Outdoor Use Extension Cords When tool is used outdoors, use only extension cords intended for use outdoors and so marked.
Additional Safety Precautions Arbor and cutter should never be used as a hand- hold. Keep hands and clothing away from all moving parts. Do not use Hougen Cutters where ejected slug might cause injury (slug ejected at end of cut). Also, adhere to all operating instructions. Do not drill through any surface that may contain live electrical wiring. Drilling into a live wire could cause exposed
metal parts of the drill to be made live. Remove chips wrapped around Cutter and arbor after each hole. With motor off and power disconnected, grasp chips with leather gloved hand or pliers and pull while rotating counterclockwise. Should the cutter become jammed in the work, stop the unit immediately to prevent personal injury. Disconnect the drill from the power supply and loosen jammed cutter by turning the arbor counterclock- wise. Never attempt to free the jammed cutter by starting the motor. Service at authorized repair center only.
Extension Cord Table
Plugs and Receptacles
HTGNEL,DROCFO
TEEF
DEDNEMMOCERERIWEGUAG
DEDNEMMOCERERIWEGUAG
ROTOMV511SPMA21-01
ROTOMV032SPMA6-5
52OTPU 61 81
05-62 41 81
001-15 01 61
002-101 8 41
003-102 6 21
005-103 4 01
I
Operating Near Welding EquipmentDO NOT operate this unit on the same work surface that welding is being performed on. Severe damage to the unit, particularly the power cord, could occur. This could also result in personal injury to the operator.
Circuit Breaker (If Applicable)Changing of the circuit breaker to a higher amp rated breaker, orbypassing the circuit breaker is not recommended and will void
product warranty.
Circuit Breaker Operation (If Applicable)The circuit breaker is a thermal breaker. When it reaches the higher temperature rating it will trip and cause the unit to shut down. This is a protective device and can be reset after 5 to 10. To reset the breaker, press the breaker button back in. If it does not reset, let the unit cool a little longer until you can push the button in and it stays in position.
Save these Instructions.
Important Safety Instructions - ContinuedWARNING: Read and understand all instructions. Failure to follow all instructions listed below,
may result in electrical shock, fire and/or serious personal injury.
Typical USA 120v Typical USA 230v
230v Type Plug
Wet electrical connections are shock hazards. To prevent the cutting fluid from traveling along the cord and contacting the plug or power outlet, tie a drip loop as shown. Also elevate extension cords or gang box connections.
Modelo típico en EE. UU. para 115 V
Modelo típico en EE. UU. para 230 V
Enchufe tipo I de 230 V
INSTRUCCIONES ADICIONALES PARA LA SEGURIDAD

Español
IMPORTANTE: antes de encender la máquina, es importante que el operador sepa cómo interactúa el INTERRUPTOR DE SEGURIDAD con el INTERRUPTOR DEL IMÁN y los INTERRUPTORES DEL MOTOR. LEA LAS INTRUCCIONES DE LA LUZ INDICADORA DEL INTERRUPTOR DE SEGURIDAD.
INTERRUPTOR DE SEGURIDAD: está ubicado en la base del taladro. Solo permitirá que el motor funcione cuando el imán esté correctamente asentado en una superficie de trabajo limpia y plana. Si de-tecta la separación de la unidad, este interruptor apagará el motor. (Vea página 2 ubicación de interruptor de seguridad)
INTERRUPTOR DE ENCENDIDO/APAGADO DEL IMÁN: activa y desactiva la base magnética y enciende el interruptor de seguridad. Una vez hecho esto, se puede presionar el interruptor de arranque del motor para encenderlo.
INTERRUPTORES DE ARRANQUE/PARADA DEL MOTOR: arrancan y detienen el motor.
1. Coloque el taladro magnético sobre una placa de acero limpia y plana, que tenga un grosor mínimode de 3/8".
2. Conecte la unidad a una fuente de alimentación de CA adecuada. NO utilice el taladro con alimentación de CC.
3. Localice el interruptor de encendido y apagado del imán y el interruptor de arranque y parada del motor.
4. NOTA: todo corte de la alimentación eléctrica desactivará la base magnética y apagará el motor. Cuando se restablezca el suministro eléctrico, el imán volverá a activarse, pero el motor solo se encenderá si se presiona el interruptor de arranque.
PLACA DE INTERRUPTORES DEL PANEL DE CONTROL
FUNCIONAMIENTO DE LOS CONTROLES ANTES DE LA INSTALACIÓN DEL CORTADOR HOUGEN
La luz indicadora del interruptor de seguridad es una característica de seguridad estándar en los taladros magnéticos portátiles de Hougen. Su función consiste en advertirle al usuario que se ha presentado una situación poco segura. Su objetivo es para informar al usuario que el interruptor detector de elevación está activo.
Si la luz es verde:El interruptor de seguridad muestra una luz de color verde durante el funcionamiento normal. Los interruptores de “encendido” y “apagado” del motor funcionan normalmente.
Si la luz es roja:Se ha producido un problema en el interruptor de seguridad que debe solucionarse. Causas posibles: • El interruptor de seguridad tiene una falla. Haga reparar el taladro. • La superficie o el material de trabajo son desiguales. Revise la superficie de
trabajo para controlar que no sea irregular. • Hay suciedad o virutas debajo del imán. Limpie la superficie de trabajo.
LUZ INDICADORA DEL INTERRUPTOR DE SEGURIDAD
El material debe tener un grosor mínimo de 3/8”. Si es más delgado, el “agarramiento” del imán disminuirá.
HOUGEN MANUFACTURING RECOMIENDA SOLUCIONAR ESTOS PROBLEMAS PARA QUE SE PONGA LA LUZ VERDE. ESTO INDICARÁ QUE LA UNIDAD FUNCIONA DE MANERA SEGURA.
Si desea formular alguna pregunta, comuníquese con el Servicio Técnico de Hougen Manufacturing al (810) 635-7111.
PLACA DE INTERRUPTORES DEL PANEL DE CONTROL
INTERRUPTOR DE LA LUZ DEL PILOTO
La luz del piloto es una característica estándar en los taladros magnéticos portátiles de Hougen. Su propósito es iluminar el área de la superficie de trabajo para facilitar la visualización del piloto.
** LA LUZ DEL INTERRUPTOR DE SEGURIDAD SE ENCENDERÁ Y SE MANTENDRÁ ENCENDIDA MIENTRAS EL TALADRO PERMANECE ENCHUFADO **
La prueba de un interruptor de seguridad:Antes de operando el taladro siempre probar el interruptor de seguridad. Para probarlo… ponga el taladro sobre la superficie de trabajo y enchúfelo a un toma de corriente. Mueve el taladro para que el imán se levante del superficie de trabajo. La luce del interruptor de seguridad debe cambiarse de verde a rojo. Si la luz se queda verde o rojo un problema existe con el interruptor de seguridad que tiene que estar corregido. (Por ejemplo… el interruptor es defectuoso, el embolo de seguridad en la base del imán esta trancada en posición, etc) Por favor corrija en hace la prueba de nuevo antes de usar el taladro.

1. Con el taladro magnético in posición de operación, gire los mangos de alimentación para que el cortado y piloto estén sobre la superficie de trabajo.
2. Con el imán ENCENDIDO y el motor APAGADO A) Para taladros sin botellas … llene el deposito en el árbol mediante la introducción de líquido de corte ROTAMAGIC por los ranuras en el árbol. El REFRIGERANTE NO DEBE ESCAPARSE AFUERA. B) Para taladros con botella de refrigerante… adjuntar botella como instruye diagrama y llene con refrigerante.
3. Prueba capacidades de medición del arbol/cortador/ piloto conjunto (imán INCENDIDO- motor APAGA DO) alimentando el árbol suavemente hacia la su perficie de trabajo hasta que el piloto esta empujado en el cortador, así permitiendo que el líquido salga hacia la superficie de trabajo por la ranura en el piloto.
Taladros sin bottellas de refrigerante…
4. Para lubricación correcta, todo el líquido en el deposito debe vaciar afuera sobre la superficie de trabajo en nada menos de 15 segundos y no más rápido de 30 segundos.
5. El deposito en el árbol agarra suficiente refrigerante para cortando aproximadamente un agujero . * Este metido de usando el refrigerante también se puede usar si la botella se pierde.
6. Para taladros con botella de refrigerante usa la palanca de encendido/apagado para ajustar la corriente de refrigerante
7. Para perforaciones horizontal o encima la cabeza use Slick-Stick™ lubricante.
FUNCIONAMIENTO DEL DEPÓSITO DE LUBRICANTE PARA CORTE
Taladros sin botella de refrigerante
Llene con refrigerante
RotaMagic™
Aladros con botella de
refrigerante
Para resultados mejores siempre use refrigerante
A
B
1. Desconecte el taladro de la fuente de alimentación y retire la llave con mango en T del orificio de inserción que está situado en la parte superior de la herramienta.
2. Apoye el taladro sobre uno de los laterales, con las manijas de avance hacia arriba, o asegúrese de que el árbol no toque la mesa si la unidad se encuentra en la posición de funcionamiento normal.
3. Gire las manijas de avance hasta que los tornillos prisioneros de montaje del cortador anular queden a la vista, y retire los tornillos.
4. Inserte el piloto adecuado en el extremo del vástago del cortador anular Hougen.
5. Inserte el cortador anular Hougen hasta que la cara plana del vástago esté alineada con los orificios de los tornillos prisioneros y quede totalmente perpendicular al eje de los orificios de los tornillos prisioneros.
6. Inserte los tornillos de retención y ajuste. Revise para asegurarse que el cortador está asegurado.
INSTALACIÓN DEL CORTADOR ANULAR HOUGEN EN EL ÁRBOL
Set Screwsgo here
"12,000-Series" Hougen Cutter
PilotPiloto
Colocar los tornillos
prisioneros aquí
Cortador anular Hougen “serie
12000”
Orificio de inserción de la llave
Agregarlubricante
aquí
Depósito del lubricante
Sujetar el recipiente de lubricante
Encendido/ apagado del flujo de lubricante
Deslizar la manguera de vinilo sobre el accesorio con púa de bronce

Cuando perforando, especialmente horizontalmente o sobre la cabeza, siempre apliquepresiónhacelasuperficiedetrabajo.Nuncajalelejosdelasuperficiedetrabajo como esto puede debilitar la potencia de sujeción del imán.
Use manijas para mover
hacesuperficiede trabajo
Nunca jale las manijas lejos delasuperficie
de trabajo
Español
Siempre recuerde que la fuerza de atracción del imán está directamente relacionada con el grosor de la pieza de trabajo y el estado de la superficie. Dado que la atracción magnética disminuye con materiales más delgados o superficies desiguales, se debe sujetar el taladro a la pieza de trabajo mecánicamente para cortar materiales finos (de un grosor de 3/8" o menos) o sobre superficies desparejas.
1. Asegúrese de que la pieza de trabajo y la parte inferior del imán no contengan virutas, aceite, etc.
2. Verifique interruptor de seguridad trabaja correctamente (vea luce indicador de interruptor de seguridad secion).3. Posición la perforación deslizándolo y suavemente alimentando el árbol para que la punta del piloto está tocando el centro de donde el agujero ser.
4. Sujete la unidad a la pieza de trabajo con la cadena de seguridad.
5. Presione el interruptor de encendido del imán.
6. Gire la manija de avance para elevar el cortador anular hasta que el piloto quede encima de la superficie de trabajo.
7. Llene el depósito de refrigerante o la botella de refrigerante adjunta, según corresponda.
8. Cerciórese de que el cortador anular no esté en contacto con la pieza de trabajo y presione el interruptor de arranque del motor para encenderlo.
9. Mueva el cortador anular Hougen lentamente en dirección a la pieza de trabajo. Solo deberá aplicar plena fuerza en las manijas de avance una vez que la trayectoria de perforación haya quedado establecida a una profundidad de 1/16", aproximadamente.
10. Disminuya la presión de avance cuando el cortador anular esté a punto de atravesar la pieza de trabajo.
11. Una vez terminado el corte, presione el interruptor de parada del motor para apagarlo. Gire las manijas de avance para levantar el árbol y expulsar así el bocado central sólido, si aún no se soltó.
12. Presione el interruptor de apagado del imán.
13. Desconecte el taladro de la fuente de alimentación.
14. De ser necesario, retire las virutas del cortador anular y del imán, preferentemente con guantes de cuero y/o tenazas. Desconecte la cadena de seguridad para mover la unidad a otra posición de perforación.
INSTRUCCIONES DE OPERACIÓN
Para minimizar el desgaste de las piezas móviles, asegurarse de que el taladro magnético funcione sin problemas y prolongar su vida útil, se debe realizar el siguiente procedimiento de mantenimiento periódicamente, según el uso.
1. Ocúpese regularmente de apretar todos los sujetadores y reemplazar las piezas gastadas.
2. Revise las escobillas del motor y reemplácelas si están gastadas.
3. Revise el cable de alimentación y el cable que conecta el panel con el motor. Si están agrietados o pelados, llévelos a un centro de reparación para reemplazarlos.
4. Aplique grasa en las colas de milano deslizantes, los retenedores de bronce y la cremallera del engranaje de avance. Para obtener mejores resultados, utilice el lubricante Cyprina-RA de Shell u otro similar.
5. Retire el árbol y aplique grasa en el cojinete de la escuadra de soporte delantera. Utilice el lubricante Cyprina-RA de Shell u otro similar.
6. El embolo de seguridad siempre debe estar limpio y periódicamente lubricado con aceite de penetración. Si necesario quite el imán del taladro y saque el conjunto del interruptor de seguridad del imán. Empuje el embolo afuera del imán. Limpie suciedad de lo adentro a alrededor del agujero del embolo en el imán. Cubrir el embolo con antiadherente. Remplace el embolo en el conjunto de interruptor de seguridad y ajuste los tornillos. Recoloque el imán al cuerpo del taladro.
MANTENIMIENTO

HOUGEN MANUFACTURING, INC.3001 Hougen Drive • Swartz Creek, MI 48473 USA
Ph: (810) 635-7111 • Fax: (810) [email protected] • www.hougen.com
Cuando tengan duda, llámanos… Estaremos
encantados de ayudarle!(810) 635-7111
1. Mantenga el interior del cortador Hougen libre de virutas; ya que estas interferi-rán en la profundidad máxima del corte, podrían obstaculizar el flujo de lubrican-te y hacer que se rompa el cortador.
2. Asegúrese de que la pieza de trabajo, la máquina, el árbol y el cortador Hougen permanezcan limpios y sin virutas.
3. Apriete todos los pernos y sujetadores regularmente.4. Recomendamos utilizar un lubricante para corte liviano, de baja viscosidad
(preferentemente, lubricante para corte Hougen).5. Revise ocasionalmente el nivel de lubricante para corte. La falta de lubricante
para corte podría hacer que el cortador Hougen se congele durante la perfora-ción, se atasque el bocado central sólido y se reduzca la vida útil del cortador.
6. Siempre comience el corte aplicando poca presión de avance, para luego ir incrementándola gradualmente hasta lograr la máxima velocidad de corte.
7. Reduzca la presión cuando el cortador anular esté a punto de atravesar la pieza, al finalizar el corte.8. Asegúrese de que las colas de milano deslizantes, los retenedores de bronce y la cremallera de avance estén siempre lubricados,
limpios y sin virutas. 9. Si el bocado central sólido cuelga del cortador anular, apague el motor y apoye el cortador anular sobre una superficie plana.
Normalmente, esto hace que el bocado central sólido ladeado se enderece y sea expulsado. 10. Al realizar perforaciones de grandes diámetros u orificios profundos, posiblemente sea necesario detenerse en la mitad del pro-
cedimiento a fin de agregar lubricante para corte y retirar las virutas del área del árbol. (Cuando lo haga, NO levante el cortador anular para retirarlo del orificio, ya que podrían ingresar virutas debajo de los dientes del cortador anular y esto hará difícil el reinicio del corte).
Sinoaplicasuficientepresiónalcortadoranulardurantelaoperacióndecorte, se reducirá la vida útil de la herramienta.
La causa principal de desgaste prematuro
de los cortadores anulares es
insuficiente presión durante el corte.
CONSEJOS PARA UN MEJOR FUNCIONAMIENTO

UTILISATION DES PERCEUSES MAGNÉTIQUES EN TOUTE
SÉCURITÉ
Un guide général des procédures d’utilisation en
toute sécurité
Français
LA SÉCURITÉ AVANT TOUT
PIÈCES GÉNÉRALESPanneau de
commande typique
Dessous de l'aimant
Piston du commutateur de sécurité
Fraise annulaire
Arbre
Moteur
Support d'appui avant
Éclairage de pilote
L'aimant (électroaimant)
accroche à l'acier
Poignées d'avance
Boîtier
Glissière / cales
Marche/arrêt moteur
Marche/arrêt aimant
Témoin du commutateur de sécurité
Toujours porter des lunettes de protection lors de l’utilisa-tion d’outils de perçage, ou à proximité d’une opération de perçage.
La débouchure est éjectée à la fin du perçage. Ne pas orienter la fraise ou l’arbre de telle manière que la débouchure risque de frapper quelqu’un aux alentours ou en dessous lorsqu’elle est éjectée.
Pour éviter toute décharge électrique, ne pas utiliser les outils électriques près de zones humides, ni là où ils risquent de se mouiller.
Ne pas fixer l’éclairage de travail.
Les fraises sont tran-chantes. Porter des gants pour installer la fraise sur l’arbre ou l’en retirer. Ne pas saisir une fraise en rotation.

Une perceuse magnétique peut être un outil très utile pour percer des trous. Lire et respecter toutes les procédures de sécurité décrites dans le manuel
d’utilisation et conformément à la politique de l’entreprise.
Français
CONSIGNES DE SÉCURITÉ IMPORTANTES
AVERTISSEMENT :
1. Sécurité de la zone de travaila) Maintenir la zone de travail propre et bien éclairée. Les établis
encombrés et les zones sombres sont propices aux accidents.b) Ne pas utiliser d’outils électriques s’il y a risque d’explosion,
par exemple en présence de liquides, de gaz ou de poussières inflammables. Les outils électriques génèrent des étincelles qui risquent d’enflammer les poussières ou les émanations.
c) Maintenir les enfants et les curieux à l’écart lors de l’utilisation d’un outil électrique. Les distractions peuvent faire perdre la
maîtrise de l’outil.
2. Sécurité électriquea) Lesfichesdel’outilélectriquedoiventcorrespondreàlaprise.
Nejamaismodifierlafichedequelquemanièrequecesoit.Nepas utiliser d’adaptateurs avec les outils électriques mis à la terre. Les fiches et prises correspondantes non modifiées réduiront le risque de décharge électrique.
b) Éviter tout contact corporel avec les surfaces mises à la terre telles que les tuyaux, les radiateurs, les cuisinières et les
réfrigérateurs. Le risque de décharge électrique augmente si le corps est relié à la terre.
c) Ne pas exposer les outils électriques à la pluie ou à l’humidi-té. L’eau pénétrant dans un outil électrique augmente le risque de décharge électrique.
d) Ne pas malmener le cordon. Ne jamais se servir du cordon pour porter ou débrancher l’outil électrique. Tenir le cordon à l’écart de la chaleur, de l’huile, des arêtes tranchantes et des pièces en mouvement. Les cordons endommagés ou emmêlés augmentent le risque de décharge électrique.
e) Pour utiliser un outil électrique à l’extérieur, se servir d’une rallonge d’extérieur conçue pour être employée à l’extérieur. L’utilisation d’un cordon conçu pour l’extérieur réduit le risque de décharge électrique.
f) S’il est inévitable d’utiliser un outil électrique dans un endroit humide, utiliser une alimentation protégée par un disjoncteur différentiel de fuite à la terre (DDFT). L’utilisation d’un DDFT réduit le risque de décharge électrique.
3. Sécurité personnellea) Rester vigilant, faire attention et faire preuve de bon sens lors
de l’utilisation d’un outil électrique. Ne pas utiliser un outil électrique en étant fatigué ou sous l’effet de drogues, de l’alcool
ou de médicaments. Un instant d’inattention lors de l’utilisation d’outils électriques peut entraîner des blessures graves.
b) Utiliser un équipement de protection individuelle. Toujours porter des lunettes de protection. Un équipement de protection
tel qu’un masque antipoussière, des chaussures à semelle antidérapante, un casque de sécurité ou une protection auditive
utilisé dans les conditions appropriées réduira les blessures.
c) Prévenir les démarrages involontaires. S’assurer que le commutateur est désactivé avant de brancher l’outil à la
source d’alimentation ou au bloc-batterie, de le ramasser ou de le porter. Porter des outils électriques avec le doigt sur le commutateur ou brancher ces outils avec le commutateur activé invite les accidents.
d) Retirer les clés de réglage avant de mettre l’outil électrique sous tension. Une clé qui reste attachée à une pièce rotative de l’outil électrique peut entraîner des blessures.
e) Ne pas trop étendre les bras. Toujours maintenir l’appui et l’équilibre corrects. Cela donne une meilleure maîtrise de l’outil électrique dans des situations imprévues.
f) Porter des vêtements adaptés. Ne pas porter de vêtements amples ni de bijoux. N’approcher ni les cheveux ni les
vêtements des pièces en mouvement. Les vêtements amples, les bijoux et les cheveux longs peuvent être pris dans les pièces en mouvement.
g) Si des appareils sont fournis pour le raccordement d’équipements d’extraction et de captage des poussières,
s’assurer qu’ils sont branchés et utilisés correctement. L’utilisation d’un dispositif de captage des poussières peut réduire les risques liés aux poussières.h) Ne pas laisser la familiarité due à un usage fréquent des
outils mener au relâchement et à la négligence des principes de sécurité. Une action négligente peut causer des blessures graves en une fraction de seconde.
i) Toujours utiliser une chaîne de sécurité. La monture peut céder.
4. Utilisation et entretien des outils électriquesa) Ne pas forcer l’outil électrique. Utiliser l’outil électrique adap-
té à l’application. L’outil électrique correct permet de mieux faire le travail, en plus grande sécurité, à la vitesse pour laquelle il est prévu.
b) Ne pas utiliser l’outil électrique si le commutateur ne permet pas de le mettre sous ou hors tension. Tout outil électrique ne pouvant pas être commandé par le commutateur est dangereux et doit être réparé.
c) Débrancherlafichedelasourced’alimentationouretirerlebloc-batterie, s’il est détachable, de l’outil électrique avant d’effectuer tout réglage, de changer d’accessoire ou de remiser les outils électriques. De telles mesures de sécurité préventives réduisent le risque de démarrage accidentel de l’outil. (Suite page 4) Conserver tous les avertissements et consignes pour future référence.
Lire tous les avertissements, consignes, illustrations et caractéristiques techniques fournis avec cet outil électrique. Si toutes les consignes énumérées ci-dessous ne sont pas suivies, il y a risque de décharge électrique, d’incendie ou de blessures graves.

Il faut TOUJOURS se servir d'une chaîne de sécurité à chaque utilisation de la perceuse. La chaîne de sécurité évite à la perceuse de chuter, dans le cas d'une panne de courant ou si l'aimant se détache de la surface de travail. La chaîne de sécurité se fixe à la perceuse en s'introduisant dans la bague en D à l'arrière de l'unité, puis en continuant à s'enrouler autour du matériau et/ou de la surface de travail. Régler la chaîne de sorte qu'elle soit tendue et immobilisée.
INSTRUCTIONS RELATIVES À LA CHAÎNE DE SÉCURITÉ
CONSIGNES DE SÉCURITÉ IMPORTANTES
Utilisation des rallonges d’extérieurLorsque l’outil est utilisé à l’extérieur, se servir uniquement de rallonges prévues pour un usage extérieur et marquées comme telles.
Consignes de sécurité supplémentairesL’arbre et la fraise ne doivent jamais être employés comme main courante ou poignée. N’approcher les mains et les vêtements d’aucune pièce en mouvement. Ne pas utiliser les fraises Hougen là où la débouchure éjectée risque de causer des blessures (débouchure éjectée à la fin du perçage). Suivre également toutes les instructions d’utilisation. Ne pas percer de surface qui pourrait renfermer un câblage électrique sous tension. L’entrée en contact avec un fil sous tension lors du perçage risque de mettre sous tension les pièces métalliques exposées de la perceuse. Retirer les copeaux enroulés autour de la fraise et de l’arbre après chaque trou. Après avoir arrêté le moteur et coupé l’alimentation, saisir les copeaux avec des gants en cuir ou des pinces et tirer tout en faisant tourner dans le sens inverse des aiguilles d’une montre. Si la fraise se coince dans la pièce à traiter, arrêter immédiatement l’unité pour éviter les blessures. Débrancher la perceuse de la source d’alimentation et libérer la fraise coincée en faisant tourner l’arbre dans le sens inverse des aiguilles d’une montre. Ne jamais essayer de libérer la fraise coincée en démarrant le moteur. Confier l’entretien exclusivement à un centre de réparations agréé.
Utilisation près d’un équipement de sou-dageNE PAS utiliser cette unité sur une surface de travail où une opération de soudage est en cours. L’unité risquerait d’être gravement endommagée, en particulier le cordon d’alimentation. L’opérateur pourrait aussi être blessé.
Disjoncteur (le cas échéant)Le remplacement du disjoncteur par un autre d’intensité nominale plus élevée ou le contournement du disjoncteur est déconseillé et annulera la garantie du produit.
Fonctionnement du disjoncteur (le cas échéant)Le disjoncteur est un disjoncteur thermique. Lorsqu’il atteint la température nominale supérieure, il se déclenche et cause l’arrêt de l’unité. Il s’agit d’un dispositif de protection, qui peut être réarmé après 5 à 10 minutes. Pour réarmer le disjoncteur, renfoncer son bouton. S’il ne se réarme pas, laisser l’unité refroidir un peu plus longtemps, jusqu’à ce que le bouton puisse être enfoncé et reste en place.
Conserver tous les avertissements et consignes pour future référence.
LONGUEUR DE CORDON
CALIBRE DE FIL RECOMMANDÉ
CALIBRE DE FIL RECOMMANDÉ
MOTEUR 115 V10 À 12 A
MOTEUR 230 V5 À 6 A
Jusqu’à 7,6 m (25') 16 18
De 7,9 à 15,2 m (26 à 50') 14 18
De 15,5 à 30,5 m (51 à 100') 10 16
De 30,8 à 61,0 m (101 à 200') 8 14
De 61,3 à 91,4 m (201 à 300') 6 12
De 91,7 à 152,4 m (301 à 500') 4 10
d) Remiser les outils électriques non utilisés hors de portée des enfants et ne laisser personne non familiarisée avec l’outil électrique ou ces consignes utiliser l’outil électrique. Les outils électriques sont dangereux aux mains des utilisateurs non formés.
e) Entretenirlesoutilsélectriquesetlesaccessoires.Vérifierlaprésence d’un mauvais alignement ou de pièces en mou-vement qui se coincent, la rupture des pièces et toute autre situation risquant de nuire au fonctionnement des outils. En cas de dommages, faire réviser l’outil électrique avant son utilisation. De nombreux accidents sont causés par des outils électriques mal entretenus.
f) Maintenir les outils de perçage affûtés et propres. Les outils de perçage bien entretenus avec des bords tranchants affûtés sont moins susceptibles de se coincer et sont plus faciles à maîtriser.
g) Utiliser l’outil électrique, les accessoires, les forets et toute autre pièce conformément aux consignes, en tenant compte des conditions de travail et de la tâche à effectuer. L’utilisation de l’outil électrique pour un usage autre que celui prévu peut entraîner des situations dangereuses.
h) Maintenir les poignées et surfaces de préhension propres et exemptes d’huile et de graisse. Des poignées ou surfaces de préhension glissantes ne permettent pas de manier et de contrôler l’outil de manière sécuritaire dans les situations inattendues.
5. Entretiena) Confierl’entretiendel’outilélectriqueàdupersonnelde
réparationqualifiéquin’utiliseraquedespiècesderechangeidentiques. Cela assurera la préservation de la sécurité de l’outil électrique.
Sécurité du branchement électriqueCette perceuse magnétique est conçue pour être utilisée sur du 115 V c.a. ou du 230 V à 50–60 Hz. Ne pas essayer de se servir de la perceuse sur des sources d’alimentation ayant d’autres caractéristiques nominales que celles-ci.
Fiches et prises
Des raccordements électriques humides présentent un risque d’électrocution. Pour empêcher le fluide de perçage de couler le long du cordon et d’entrer en contact avec la fiche ou la prise d’alimentation, réaliser une boucle d’égouttement comme illustré. Surélever également les rallonges ou les branchements aux coffrets électriques.
RallongesUtiliser uniquement des rallonges à 3 fils munies d’une fiche à 3 contacts avec mise à la terre et de prises tripolaires compatibles avec la fiche de l’outil. Remplacer ou réparer les cordons endommagés. S’assurer que le conducteur est d’un calibre suffisant pour éviter une chute de tension excessive qui entraînerait une coupure de courant et risquerait d’endommager le moteur.
Safe Electrical Connection Your Mag Drill is rated for use on 115VAC or 230V at 50-60Hz. Do not attempt to use drill on power sources rated other than this.
Extension Cords Use only 3-wire extension cords that have 3-prong grounding type plugs and 3-pole receptacles that accept the tool’s plug. Replace or repair damaged cords. Make sure the conductor size is large enough to prevent excessive voltage drop which will cause loss of power and possible motor damage.
Outdoor Use Extension Cords When tool is used outdoors, use only extension cords intended for use outdoors and so marked.
Additional Safety Precautions Arbor and cutter should never be used as a hand- hold. Keep hands and clothing away from all moving parts. Do not use Hougen Cutters where ejected slug might cause injury (slug ejected at end of cut). Also, adhere to all operating instructions. Do not drill through any surface that may contain live electrical wiring. Drilling into a live wire could cause exposed
metal parts of the drill to be made live. Remove chips wrapped around Cutter and arbor after each hole. With motor off and power disconnected, grasp chips with leather gloved hand or pliers and pull while rotating counterclockwise. Should the cutter become jammed in the work, stop the unit immediately to prevent personal injury. Disconnect the drill from the power supply and loosen jammed cutter by turning the arbor counterclock- wise. Never attempt to free the jammed cutter by starting the motor. Service at authorized repair center only.
Extension Cord Table
Plugs and Receptacles
HTGNEL,DROCFO
TEEF
DEDNEMMOCERERIWEGUAG
DEDNEMMOCERERIWEGUAG
ROTOMV511SPMA21-01
ROTOMV032SPMA6-5
52OTPU 61 81
05-62 41 81
001-15 01 61
002-101 8 41
003-102 6 21
005-103 4 01
I
Operating Near Welding EquipmentDO NOT operate this unit on the same work surface that welding is being performed on. Severe damage to the unit, particularly the power cord, could occur. This could also result in personal injury to the operator.
Circuit Breaker (If Applicable)Changing of the circuit breaker to a higher amp rated breaker, orbypassing the circuit breaker is not recommended and will void
product warranty.
Circuit Breaker Operation (If Applicable)The circuit breaker is a thermal breaker. When it reaches the higher temperature rating it will trip and cause the unit to shut down. This is a protective device and can be reset after 5 to 10. To reset the breaker, press the breaker button back in. If it does not reset, let the unit cool a little longer until you can push the button in and it stays in position.
Save these Instructions.
Important Safety Instructions - ContinuedWARNING: Read and understand all instructions. Failure to follow all instructions listed below,
may result in electrical shock, fire and/or serious personal injury.
Typical USA 120v Typical USA 230v
230v Type Plug
Wet electrical connections are shock hazards. To prevent the cutting fluid from traveling along the cord and contacting the plug or power outlet, tie a drip loop as shown. Also elevate extension cords or gang box connections.
115 V typique aux É.-U.
230 V typique aux É.-U.
Fiche 230 V de type I
CONSIGNES DE SÉCURITÉ SUPPLÉMENTAIRES

Français
IMPORTANT : Avant d'allumer la machine, il est important que l'opérateur comprenne les fonctions interdépendantes du COMMUTATEUR DE SÉCURITÉ, du COMMUTATEUR D'AIMANT et des COMMUTATEURS DE MOTEUR. LIRE LES INSTRUCTIONS SUR LE TÉMOIN LUMINEUX DE COMMUTATEUR DE SÉCURITÉ.
COMMUTATEUR DE SÉCURITÉ — Situé dans la base de la perceuse. Permet au moteur de fonctionner uniquement lorsque l'aimant est correctement installé sur une surface de travail propre et plate. Coupe le moteur si le commutateur détecte que l'unité est soulevée. (Voir la page 2 pour l'emplacement du commutateur de sécurité.)
COMMUTATEUR DE MISE SOUS TENSION/MISE HORS TENSION D'AIMANT — Met sous tension et met hors tension la base magnétique et active le commutateur de sécurité. Le moteur peut maintenant être démarré en appuyant sur le commutateur de DÉMARRAGE de moteur.
COMMUTATEURS DE DÉMARRAGE/ARRÊT DE MOTEUR — Démarre et arrête le moteur.
1. Placer la perceuse magnétique sur une plaque d'acier propre et plate, épaisse d'au moins 9,5 mm (3/8").
2. Brancher l'unité à une source d'alimentation c.a. appropriée. NE PAS utiliser d'alimentation c.c.
3. Repérer le commutateur de MISE SOUS TENSION et de MISE HORS TENSION d'aimant et le commutateur d'ARRÊT et de DÉMARRAGE de moteur.
4. REMARQUE : Une coupure de courant met la base magnétique hors tension et désactive le moteur. Lorsque le courant est rétabli, l'aimant se remet sous tension mais il faut appuyer sur le commutateur de DÉMARRAGE de moteur pour que le moteur démarre.
PLAQUE DE COMMUTATEURS DU
PANNEAU DE COMMANDE
FONCTIONNEMENT DES COMMANDES AVANT L'INSTALLATION DE LA FRAISE HOUGEN
Le témoin lumineux de commutateur de sécurité est un dispositif de sécurité standard sur les per-ceuses magnétiques portatives Hougen. Il a pour rôle d'informer l'utilisateur de l'existence d'une situation dangereuse. Son rôle est d’informer l’utilisateur que le détecteur de levée est activé.
Si le témoin est vert :Dans les conditions normales de fonctionnement, le témoin de commutateur de sécurité est vert. Les commutateurs de « marche » et d'« arrêt » du moteur fonctionnent normalement.
Si le témoin est rouge :Le commutateur de sécurité présente un problème qui doit être corrigé. Causes possibles : • Le commutateur de sécurité est défectueux. Faire réparer la perceuse. • Surface de travail ou matériau irrégulier. Vérifier que la surface de travail est plate. • Saleté ou copeaux sous l'aimant. Nettoyer la surface de travail.
TÉMOIN LUMINEUX DE COMMUTATEUR DE SÉCURITÉ
Le matériau doit être épais d'au moins 9,5 mm (3/8"). Si le matériau est épais de moins de 9,5 mm (3/8"), l'aimant ne « tiendra » pas bien.
HOUGEN MANUFACTURING RECOMMANDE DE CORRIGER LES PROBLÈMES DE SORTE QUE LE TÉMOIN SOIT VERT. AINSI, L'UNITÉ POURRA ÊTRE UTILISÉE EN TOUTE SÉCURITÉ.
Pour toute question, prière de s'adresser au service technique de Hougen Manufacturing au (810) 635-7111.
** LE TÉMOIN DE COMMUTATEUR DE SÉCURITÉ S'ALLUME ET RESTE ALLUMÉ PENDANT QUE LA PERCEUSE EST BRANCHÉE **
Test du commutateur de sécurité :Avant d’utiliser la perceuse, toujours tester le commutateur de sécurité. Pour tester le commutateur, placer la perceuse sur une surface de travail et la brancher à la prise. Basculer la perceuse de façon à ce que l’aimant se soulève de la surface de travail. Le témoin du commutateur de sécurité doit passer du vert au rouge. Un témoin qui reste vert ou rouge indique un problème de com-mutateur de sécurité qu’il est nécessaire de corriger. (p. ex. commutateur de sécurité défectueux, piston de sécurité dans la base de l’aimant bloqué, etc.) Corriger et refaire un test avant d’utiliser la perceuse.
L'éclairage de pilote est un dispositif standard sur les perceuses magnétiques portatives Hougen. Il a pour rôle d'illuminer la zone de la surface de travail pour mieux voir le pilote.
COMMUTATEUR D'ÉCLAIRAGE DE PILOTE
PLAQUE DE COMMUTATEURS DU PANNEAU DE COMMANDE

Perceuses sans bouteille de fluidede refroidissement
1. Débrancher l'unité de la source d'alimentation et retirer la clé à poignée en T du support, en haut de la perceuse.
2. Coucher la perceuse sur le côté avec les poignées d'avance vers le haut ou s'assurer que l'arbre est dégagé du socle si l'unité est en position normale de fonctionnement.
3. Tourner les poignées d'avance jusqu'à ce que les vis d'arrêt de montage de fraise soient exposées et retirer complètement ces vis.
4. Introduire le pilote approprié dans le côté tige de la fraise Hougen.
5. Insérer la fraise Hougen jusqu'à ce que le méplat de sa tige soit aligné avec les trous des vis d'arrêt et soit exactement perpendiculaire à l'axe de ces trous.
6. Introduire les vis d'arrêt et les serrer. Vérifier que la fraise est bien fixée.
INSTALLATION DE LA FRAISE HOUGEN DANS L'ARBRE
Set Screwsgo here
"12,000-Series" Hougen Cutter
Pilot
Support de clé
Pilote
Les vis d'arrêt vont ici
Fraise Hougen « série 12 000 »
UTILISATION DU RÉSERVOIR DE FLUIDE DE PERÇAGE
1. La perceuse magnétique étant en position de fonctionnement, tourner les poignées d’avance de sorte que la fraise et le pilote se trouvent au-dessus de la surface de travail.
2. L’aimant étant SOUS TENSION et le moteur ARRÊTÉ,
A) Sur les perceuses sans bouteille de fluide de refroidissement, remplir le réservoir d’arbre en introduisant le fluide de perçage RotaMagic™ par les fentes de l’arbre. Lefluidedeperçagenedoitpasfuiràl’extérieur.
B) Sur les perceuses avec bouteille de fluide de refroidissement, attacher la bouteille de fluide de refroidissement comme indiqué sur le schéma et la remplir de fluide de refroidissement.
3. Tester le débit de l’ensemble arbre/fraise/pilote (aimant SOUS TENSION - moteur ARRÊTÉ) en faisant avancer l’arbre doucement vers la surface de travail jusqu’à ce que le pilote soit poussé vers le haut dans la fraise, permettant ainsi au fluide de s’écouler lentement sur la surface de travail à travers la rainure du pilote.
Perceusessansbouteilledefluidederefroidissement
4. Pour que la lubrification soit correcte, tout le fluide présent dans le réservoir doit se vider sur la surface de travail en au moins 15 secondes et au plus 30 secondes.
5. Le réservoir de l’arbre contient suffisamment de fluide de refroidissement pour le perçage d’un trou environ. * Cette méthode d’utilisation du fluide de refroidissement peut
aussi être employée dans la version avec bouteille de fluide de refroidissement fixée, si la bouteille est perdue.
6. Sur les perceuses avec bouteille de fluide de refroidissement, utiliser le levier d’activation/désactivation de la bouteille de fluide de refroidissement pour régler le débit du fluide de refroidissement.
7. Pour le perçage de trous à l’horizontale ou en surplomb, utiliser du lubrifiant Slick-Stik™.
POUR DES RÉSULTATS OPTIMAUX, TOUJOURS UTILISER DU FLUIDE DE REFROIDISSEMENT.
Réservoir de fluide de refroidissement
Ajouter du fluide de
refroidissement ici
Fixer la bouteille de fluide de
refroidissement
Déclenchement / arrêt de la circulation
de fluide de refroidissement
Glisser le tube en vinyle par-dessus le raccord cannelé
en laiton
Remplir de fluide de refroidissement
RotaMagic™
Perceuses avec bouteilledefluidede refroidissement
A
B

Lors du perçage, en particulier à l’horizontale ou en surplomb, toujours appliquer la pression d’avance vers la surface de travail. Ne jamais la retirer de la surface de travail car cela peut réduire la puissance de maintien magnétique.
Français
Ne jamais oublier que la puissance d'attraction de l'aimant est directement liée à l'épaisseur de la pièce à traiter et à l'état de sa surface. Sachant que l'attraction magnétique diminue si le matériau est fin ou si la surface est rugueuse, la perceuse doit être fixée mécaniquement à la pièce à traiter lorsqu'un matériau fin (9,5 mm [3/8"] ou moins) ou présentant une surface irrégulière va être percé.
1. S'assurer que la pièce à traiter et le dessous de l'aimant sont exempts de copeaux, d'huile, etc.
2. Vérifier que le commutateur de sécurité fonctionne correctement. (Voir la section relative au témoin du commutateur de sécurité.)3. Positionner la perceuse en la faisant glisser et en faisant avancer l’arbre doucement de sorte que la pointe du pilote touche le centre du trou à percer.
4. Fixer l'unité à la pièce à traiter à l'aide de la chaîne de sécurité.
5. Mettre l'aimant « SOUS TENSION » en appuyant sur le commutateur de MISE SOUS TENSION d'aimant.
6. Tourner la poignée d'avance, en relevant la fraise jusqu'à ce que le pilote se trouve au-dessus de la surface de travail.
7. Remplir le réservoir de fluide de refroidissement ou la bouteille de fluide de refroidissement fixée, le cas échéant.
8. S'assurer que la fraise est dégagée de la pièce à traiter et mettre le moteur en « MARCHE » en appuyant sur le commutateur de DÉMARRAGE de moteur.
9. Avancer la fraise Hougen lentement dans la pièce à traiter. Attendre que le perçage soit amorcé sur une profondeur d'environ 1,6 mm (1/16") avant d'appliquer la pleine puissance aux poignées d'avance.
10. Relâcher quelque peu la pression d'avance lorsque la fraise commence à ressortir.
11. Lorsque le perçage est terminé, « ARRÊTER » le moteur en appuyant sur le commutateur d'ARRÊT de moteur. Tourner les poignées d'avance pour relever l'arbre et ainsi éjecter la débouchure si elle n'est pas déjà tombée en se détachant.
12. Mettre l'aimant « HORS TENSION » en appuyant sur le commutateur de MISE HORS TENSION d'aimant.
13. Débrancher l'unité de la source d'alimentation.
14. Si nécessaire, retirer les copeaux de la fraise et de l'aimant, de préférence à l'aide de gants de travail en cuir et/ou de pinces. Déta-cher la chaîne de sécurité. L'unité est alors prête à être déplacée vers une nouvelle position de perçage.
INSTRUCTIONS D'UTILISATION
Afin de minimiser l'usure des pièces en mouvement et d'améliorer le fonctionnement et la durée de service de cette perceuse magnétique, les opérations d'entretien suivantes doivent être effectuées périodiquement, en fonction de l'utilisation.
1. Serrer régulièrement toutes les fixations et remplacer toutes les pièces usées.
2. Vérifier les balais du moteur et les remplacer s'ils sont usés.
3. Vérifier le cordon d'alimentation et le cordon qui relie le panneau au moteur et, s'ils sont craquelés ou effilochés, les renvoyer à un centre de réparations agréé pour qu'ils soient remplacés.
4. Appliquer de la graisse sur les queues d'aronde de la coulisse, les cales en laiton et la crémaillère d'avance. Pour obtenir les meilleurs résultats, utiliser de la graisse Shell Cyprina-RA ou l'équivalent.
5. Retirer l'arbre et garnir le roulement du support d'appui avant de graisse. Utiliser de la graisse Shell Cyprina-RA ou l'équivalent.
6. Le piston du commutateur de sécurité doit être propre et lubrifié régulièrement avec de l’huile pénétrante. Selon les besoins, séparer l’aimant de la perceuse et enlever l’ensemble commutateur de sécurité de l’aimant. Sortir le piston de l’aimant en poussant. Nettoyer tous les débris qui se trouvent à l’intérieur et autour du trou de piston dans l’aimant. Enduire le piston de produit antigrippant. Remettre le piston et l’ensemble commutateur de sécurité, puis serrer les vis. Remettre l’aimant sur le boîtier de la perceuse.
ENTRETIEN
Avancer vers la surface de travail à l'aide des poignées.
Ne jamais éloigner les poignées de la surface de
travail.

HOUGEN MANUFACTURING, INC.3001 Hougen Drive • Swartz Creek, MI 48473 USA
Ph: (810) 635-7111 • Fax: (810) [email protected] • www.hougen.com
En cas de doute, appelez-nous... Nous serons ravis de vous aider !
(810) 635-7111 [email protected]
1. Garder l'intérieur de la fraise Hougen exempt de copeaux. Les copeaux gênent le perçage jusqu'à la profondeur maximum, peuvent empêcher l'huile de s'écouler librement et peuvent entraîner une cassure de la fraise.
2. Garder la pièce à traiter, la machine, l'arbre et la fraise Hougen exempts de copeaux et de saleté.
3. Serrer régulièrement tous les boulons et fixations.4. Il est fortement recommandé d'utiliser un fluide de perçage à faible viscosité (de
préférence du fluide de perçage Hougen).5. Vérifier de temps en temps le débit d'écoulement du fluide de perçage. L'absence
de fluide de perçage peut entraîner un blocage de la fraise Hougen en cours de perçage, provoquer un coincement de la débouchure et réduire fortement la durée de service de la fraise.
6. Toujours démarrer le perçage en exerçant une pression d'avance légère, puis l'augmenter suffisamment pour atteindre la vitesse maximum de perçage.
7. Relâcher quelque peu la pression lorsque la fraise commence à ressortir à la fin du perçage.
8. Garder les queues d'aronde de la coulisse, les cales en laiton et la crémaillère d'avance lubrifiées et exemptes de copeaux et de saleté. 9. Lorsque la débouchure reste accrochée dans la fraise, arrêter le moteur et descendre la fraise sur une surface plate. Normalement, cela
remet droite une débouchure mal positionnée, ce qui lui permet d'être éjectée. 10. Lors du perçage de trous de grand diamètre ou profonds, il peut falloir s'arrêter au milieu de l'opération pour ajouter du fluide de perçage
et retirer les copeaux des alentours de l'arbre. (Pour ce faire, NE PAS relever la fraise ni la sortir du trou, sous peine de faire passer des copeaux sous ses dents, ce qui rendrait difficile le redémarrage du perçage.)
Trop limiter la pression sur la fraise lors du perçage ne fait que raccourcir la durée de service de l'outil.
La cause nº 1 de cassure de la fraise et d'émoussement
prématuré des dents est une pression
d'avance trop faible
CONSEILS POUR AMÉLIORER LE FONCTIONNEMENT

OPERAÇÃO SEGURA PARA FURADEIRAS MAGNÉTICAS
Um guia geral dos procedimentos de operação
segura
Português

Use sempre proteção para os olhos ao utilizar ferramentas de corte ou nas proximidades da área de corte.
O biscoito é ejetado ao final do corte. Não direcione o cortador ou a árvore de for-ma que o biscoito ejetado possa atingir alguém que esteja por perto, ou abaixo de você.
Para evitar choque elétrico, não utilize ferramentas elétricas perto de áreas molhadas ou em locais onde a ferramenta elétrica possa ficar molhada.
Não olhe para a luz de operação.
Os cortadores são pontia-gudos. Use luvas quando for instalar ou remover o cortador da árvore. Não segure um cortador em rotação.
SEGURANÇA EM PRIMEIRO LUGAR
PEÇAS GERAIS
Ímã (eletromagnético) magnetiza para aço
Cortador anular
Alavancas de Alimentação
Árvore
Motor
Carcaça
Lâmina / Chavetas
Suporte Frontal
Luz Piloto
Painel de controle típico
Parte inferior do ímã
Motor ligado/desligado
Ímã ligado/desligado
Luz do interruptor de
segurança
Êmbolo do interruptor de segurança

PEÇAS GERAIS Uma furadeira magnética pode ser bastante útil para abertura de furos. Leia e siga todos os procedimentos de segurança descritos no manual
do operador e de acordo com a política da empresa.
Português
INSTRUÇÕES DE SEGURANÇA IMPORTANTES
AVISO:Leiatodosplacasdeatençãodesegurança,instruções,ilustraçõeseespecificaçõesfornecidascom esta ferramenta elétrica. A falha em seguir todas as instruções listadas abaixo pode resultar em choque elétrico, incêndio e/ou acidente pessoal grave.
1. Segurança da área de trabalhoa) Mantenha a área de trabalho limpa e bem iluminada. Áreas de trabalho desorganizadas ou escuras são mais propensas à ocorrência de acidentes pessoais.b) Não opere ferramentas elétricas em atmosferas explosivas,
comonapresençadelíquidosinflamáveis,gasesoupoeira. Ferramentas elétricas geram faíscas que podem inflamar a poeira
ou os vapores.c) Mantenha as crianças e pessoas presentes afastadas ao utilizar
uma ferramenta elétrica. Distrações podem fazer você perder o controle da ferramenta.
2. Segurança elétricaa) Os plugues da tomada elétrica devem corresponder à tomada.
Nuncamodifiqueopluguedenenhumaforma.Nãoutilize plugues adaptadores com ferramentas elétricas aterradas.
Plugues sem modificações e as tomadas correspondentes reduzem o risco de choque elétrico.
b) Evite o contato com superfícies aterradas, como tubos, radiadores, fogões e geladeiras. Existe um risco maior de choque
elétrico se o seu corpo estiver aterrado.c) Não exponha as ferramentas elétricas à chuva ou ambientes
molhados. A entrada de água na ferramenta aumentará o risco de choque elétrico.
d) Não force o cabo de alimentação. Nunca utilize o cabo de alimentação para transportar ou desconectar a ferramenta elétrica. Mantenha o cabo afastado do calor, óleo, bordas
afiadasoupeçasmóveis.Cabos de alimentação emaranhados ou danificados aumentam o risco de choque elétrico.
e) Quando utilizar uma ferramenta elétrica em ambiente externo, utilize um cabo de extensão adequado para uso externo. O uso de um cabo de alimentação adequado para uso externo reduz o risco de choque elétrico.
f) Se operar uma ferramenta elétrica em local molhado for inevitável, utilize uma fonte protegida por um dispositivo de corrente residual (RCD). O uso de um RCD reduz o risco de choque elétrico.
3. Segurança pessoala) Fique atento, olhe o que está fazendo e use o bom senso ao utilizar uma ferramenta elétrica. Não use uma ferramenta
elétricaquandoestivercansadoousobainfluênciadedrogas,álcool ou medicamentos. Um momento de desatenção durante a operação de ferramentas elétricas pode resultar em acidentes pessoais graves.
b) Use equipamento de proteção individual. Use sempre proteção para os olhos. Equipamentos de proteção tais como máscaras contra poeira, sapatos antiderrapantes, capacete e proteção auditiva utilizados para condições adequadas reduzem a ocorrência de acidentes pessoais.
c) Evite ligar a ferramenta acidentalmente. Assegure-se de que o interruptor esteja na posição desligada antes de conectar à alimentação e/ou ao conjunto de baterias, apanhar ou transportar a ferramenta. Transportar ferramentas com o dedo no interruptor ou ligá-las na tomada com o interruptor ligado aumentam a probabilidade de ocorrência de acidentes pessoais.
d) Remova as chaves ou ferramentas de ajuste antes de ligar a ferramenta. Uma chave inglesa ou uma chave de fenda que
permanecer encaixada a uma peça rotativa da ferramenta elétrica pode resultar em acidente pessoal grave.e) Nãoseestique.Mantenhasempreospésfirmeseo equilíbrio. Isso permite ter melhor controle da ferramenta em
situações inesperadas.f) Vista-se adequadamente. Não use roupas folgadas ou joias.
Mantenha o cabelo, a roupa e as roupas afastados das peças móveis. Roupas folgadas, joias ou cabelo comprido podem ficar presos nas peças móveis.
g) Se houver dispositivos para a conexão de extração de poeiraeinstalaçõesdecoleta,certifique-sedequeesses
dispositivos estejam conectados e sejam usados corretamente. O uso da coleta de poeira pode diminuir os riscos associados à poeira.h) Não permita que a familiaridade adquirida com o uso frequente de ferramentas faça com que você se torne complacente ou ignore os princípios de segurança de ferramentas. Uma ação descuidada pode causar acidente pessoal grave em uma fração de segundo.i) Sempre use a corrente de segurança. O conjunto montado
pode se soltar.
4. Uso da ferramenta elétrica e cuidadosa) Não force a ferramenta elétrica. Use a ferramenta correta
para a sua aplicação. A ferramenta elétrica correta realizará o trabalho com mais eficiência e segurança na velocidade para a qual foi projetada.b) Não use a ferramenta se o interruptor não ligar ou desligar
a ferramenta. Qualquer ferramenta elétrica que não possa ser controlada com o interruptor é perigosa e deve ser reparada.
c) Desconecte o plugue da alimentação e/ou remova o conjunto de baterias, se for removível, da ferramenta elétrica antes de fazer qualquer ajuste, trocar acessórios ou armazenar ferramentas elétricas. Essas medidas preventivas reduzem o risco de ligar a ferramenta acidentalmente. (Continua na página 4) Guarde todas as placas de atenção e instruções
para referência futura.

Uma corrente de segurança deve ser SEMPRE usada quando a furadeira estiver em operação. A corrente de segurança impede que a unidade da furadeira caia em caso de falta de energia ou caso o ímã se solte da superfície de trabalho. A corrente de segurança se conecta à furadeira passando a corrente pelo Anel D na parte de trás da unidade e continuar em volta do material e/ou da superfície de trabalho. Ajuste a corrente de modo que ela fique presa e segura.
INSTRUÇÕES DA CORRENTE DE SEGURANÇA
INSTRUÇÕES DE SEGURANÇA IMPORTANTES
Uso de cabos de extensão em ambiente externoQuando uma ferramenta é usada em ambiente externo, use somente cabos de extensão destinados e marcados para uso em ambiente externo.
Precauções de segurança adicionaisA árvore e o cortador nunca devem ser usados como alavanca ou apoio. Mantenha as mãos e a roupa afastadas de todas as peças móveis. Não use os cortadores Hougen onde a ejeção do biscoito possa causar acidente pessoal (o biscoito é ejetado no final do corte). Além disso, siga à risca todas as instruções de operação. Não perfure nenhuma superfície que possa conter fiação elétrica energizada. Perfurar um fio energizado pode fazer com que as peças metálicas expostas da furadeira fiquem energizadas. Remova os cavacos presos ao redor do cortador e da árvore após cada furo. Com o motor desli-gado, a alimentação desconectada e usando uma luva de couro, retire os cavacos manualmente ou com um alicate e puxe enquanto gira no sentido anti-horário. Se o cortador ficar preso durante o trabalho, para imediatamente a unidade para evitar acidentes pessoais graves. Des-conecte a furadeira da fonte de alimentação e afrouxe o cortador preso girando a árvore no sentido anti-horário. Nunca tente soltar o cortador ligando o motor. Faça reparos somente em centros de assistência técnica autorizados.
Operação próxima a equipamentos de soldaNÃO utilize esta unidade sobre a mesma superfície de trabalho naqual está sendo executada uma operação de solda. Podem ocorrer danos severos a unidade, particularmente ao cabo de alimentação. Isso também pode resultar em acidente pessoal ao operador.
Disjuntor (se aplicável)Alterar o disjuntor para outro de maior amperagem ou ignorar odisjuntor não é recomendado e anulará a garantia do produto.
Operação do disjuntor (se aplicável)O disjuntor é um interruptor térmico. Quando ele atinge a temperatura nominal mais alta, ele desarma e faz com que a unidade seja desligada. Este é um dispositivo protetor e pode ser reiniciado após 5 a 10 minutos. Para reiniciar o disjuntor, pressione novamente o botão do disjuntor. Se ele não reiniciar, deixe a unidade esfriar por mais algum tempo até que o botão fique para dentro depois de você apertá-lo.
Guarde todas as placas de atenção e instruções parareferência futura.
TAMANHO DO CABO, PÉS
BITOLA DO FIO RECOMENDADA
BITOLA DO FIO RECOMENDADA
MOTOR 115 V10–12 A
MOTOR 230 V5–6 A
Até 25 16 18
26–50 14 18
51–100 10 16
101–200 8 14
201–300 6 12
301–500 4 10
d) Armazene ferramentas elétricas ociosas fora do alcance de crianças e não permita que pessoas não familiarizadas com a ferramenta elétrica ou com estas instruções a utilizem.
Ferramentas são perigosas nas mãos de usuários sem treinamento.e) Faça a manutenção de ferramentas elétricas e acessórios.
Verifiquesehádesalinhamentooutravamentodaspeçasmóveis, peças quebradas e qualquer outra condição que possa afetar a operação da ferramenta. Se houver danos, repare a ferramenta para antes de usá-la novamente. Muitos acidentes são causados por ferramentas sem manutenção.
f) Mantenhaasferramentasdecortesempreafiadaselimpas. As ferramentas de corte com manutenção adequada, com bordas afiadas, são menos propensas a travar e mais fáceis de controlar.
g) Use ferramenta elétrica, acessórios e brocas etc conforme as instruções, considerando as condições de trabalho e o trabalho a ser executado. O uso da ferramenta elétrica em
operações diferentes das designadas pode resultar em uma situação perigosa.
h) Mantenha limpas e sem óleo ou graxa as alavancas e su-perfícies para segurar. Alavancas e superfícies para segurar escorregadias não permitem o manuseio e controle seguros da ferramenta em situações inesperadas.
5. Reparoa) A manutenção de sua ferramenta elétrica deve ser feita por
pessoaldereparoqualificadoeusandosomentepeçasdereposição idênticas. Isso garante a manutenção da segurança da ferramenta elétrica.
Conexão elétrica seguraSua furadeira está classificada para uso em 115 V CA ou 230 V em 50–60 Hz. Não tente usar a furadeira em fontes de alimentação com outra classificação.
Plugues e tomadas
Conexões elétricas molhadas apresentam risco de choque. Para evitar que o fluido de corte escorra pelo cabo e entre em contato com o plugue ou a tomada de alimentação, amarre uma alça de gotejamento como mostrado abaixo. Além disso, eleve os cabos de extensão ou as conexões da caixa de distribuição.
Cabos de extensãoUtilize apenas cabos de extensão de 3 fios que tenham plugue de 3 pinos do tipo com aterramento e tomadas de 3 pinos que aceitem o plugue da ferramenta. Substitua ou conserte os cabos danificados. Verifique se o condutor é longo o suficiente para evitar a queda excessiva de tensão, que causará a perda de potência e possíveis danos ao motor.
Safe Electrical Connection Your Mag Drill is rated for use on 115VAC or 230V at 50-60Hz. Do not attempt to use drill on power sources rated other than this.
Extension Cords Use only 3-wire extension cords that have 3-prong grounding type plugs and 3-pole receptacles that accept the tool’s plug. Replace or repair damaged cords. Make sure the conductor size is large enough to prevent excessive voltage drop which will cause loss of power and possible motor damage.
Outdoor Use Extension Cords When tool is used outdoors, use only extension cords intended for use outdoors and so marked.
Additional Safety Precautions Arbor and cutter should never be used as a hand- hold. Keep hands and clothing away from all moving parts. Do not use Hougen Cutters where ejected slug might cause injury (slug ejected at end of cut). Also, adhere to all operating instructions. Do not drill through any surface that may contain live electrical wiring. Drilling into a live wire could cause exposed
metal parts of the drill to be made live. Remove chips wrapped around Cutter and arbor after each hole. With motor off and power disconnected, grasp chips with leather gloved hand or pliers and pull while rotating counterclockwise. Should the cutter become jammed in the work, stop the unit immediately to prevent personal injury. Disconnect the drill from the power supply and loosen jammed cutter by turning the arbor counterclock- wise. Never attempt to free the jammed cutter by starting the motor. Service at authorized repair center only.
Extension Cord Table
Plugs and Receptacles
HTGNEL,DROCFO
TEEF
DEDNEMMOCERERIWEGUAG
DEDNEMMOCERERIWEGUAG
ROTOMV511SPMA21-01
ROTOMV032SPMA6-5
52OTPU 61 81
05-62 41 81
001-15 01 61
002-101 8 41
003-102 6 21
005-103 4 01
I
Operating Near Welding EquipmentDO NOT operate this unit on the same work surface that welding is being performed on. Severe damage to the unit, particularly the power cord, could occur. This could also result in personal injury to the operator.
Circuit Breaker (If Applicable)Changing of the circuit breaker to a higher amp rated breaker, orbypassing the circuit breaker is not recommended and will void
product warranty.
Circuit Breaker Operation (If Applicable)The circuit breaker is a thermal breaker. When it reaches the higher temperature rating it will trip and cause the unit to shut down. This is a protective device and can be reset after 5 to 10. To reset the breaker, press the breaker button back in. If it does not reset, let the unit cool a little longer until you can push the button in and it stays in position.
Save these Instructions.
Important Safety Instructions - ContinuedWARNING: Read and understand all instructions. Failure to follow all instructions listed below,
may result in electrical shock, fire and/or serious personal injury.
Typical USA 120v Typical USA 230v
230v Type Plug
Wet electrical connections are shock hazards. To prevent the cutting fluid from traveling along the cord and contacting the plug or power outlet, tie a drip loop as shown. Also elevate extension cords or gang box connections.
Típica EUA 115 V Típica EUA 230 V Plugue Tipo I 230 V
INSTRUÇÕES DE SEGURANÇA ADICIONAIS

Português
IMPORTANTE: Antes de ligar a máquina, é importante que o operador compreenda as funções inter-relacionadas do INTERRUPTOR DE SEGURANÇA, INTERRUPTOR DO ÍMÃ E INTERRUPTORES DO MOTOR. LEIA AS INSTRUÇÕES DA LUZ INDICADORA DO INTERRUPTOR DE SEGURANÇA.
INTERRUPTOR DE SEGURANÇA — Localizado na base da furadeira. Permite a operação do motor somente quando o ímã estiver corretamente posicionado sobre uma superfície de trabalho limpa e plana. Desliga o motor caso o interruptor detecte levantamento da unidade. (Consulte a página 2 para saber a localização do interruptor de segurança)
INTERRUPTOR LIGAR/DESLIGAR DO ÍMÃ — Energiza e desenergiza a base magnética e ativa o interruptor de segurança. O motor agora pode ser ligado, pressionando o interruptor INICIAR do motor.
INTERRUPTORES INICIAR/PARAR DO MOTOR — Inicia e para o motor
1. Posicione a Furadeira Magnética sobre uma placa de aço plana e limpa que possua espessura mínima de 3/8".
2. Plugue a unidade em uma fonte de alimentação AC adequada. NÃO utilize com Alimentação DC.
3. Localize o interruptor LIGAR e DESLIGAR do ímã e os interruptores PARAR e INICIAR do motor.
4. OBSERVAÇÃO: Uma perda de energia irá desenergizar a base magnética e desativar o motor. Quando a energia for restaurada, o ímã será reenergizado; contudo, o interruptor INICIAR do motor deverá ser solto antes que o motor seja ligado.CHAPA DO INTERRUPTOR
DO PAINEL DE CONTROLE
OPERAÇÃO DOS CONTROLES ANTES DE INSTALAR O CORTADOR HOUGEN
A luz indicadora do interruptor de segurança é um recurso de segurança padrão nas furadeiras magnéticas portáteis Hougen. Sua função é informar o usuário sobre a existência de uma con-dição de risco à segurança. Seu objetivo é informar o usuário de que o interruptor detector de elevação está ativado.
Se a luz estiver Verde:
Na operação normal, a luz do interruptor de segurança estará verde. Os Interruptores de "Ligar" e "Desligar" do motor funcionam normalmente.
Se a luz estiver Vermelha:
Há um problema com o interruptor de segurança que precisa ser corrigido. Possíveis causas: • O Interruptor de Segurança está com defeito. Leve a furadeira para o conserto. • Material ou superfície irregular. Verifique o nivelamento da superfície de trabalho. • Sujeira ou cavacos sob o ímã. Limpe a superfície de trabalho.
LUZ INDICADORA DO INTERRUPTOR DE SEGURANÇA
O material deve ter uma espessura mínima de 0,95 cm (3/8"). Materialmaisfinodoque0,95cm(3/8")causaráumcondiçãodeimã"fraco".
A HOUGEN MANUFACTURING RECOMENDA QUE AS CONDIÇÕES SEJAM CORRIGIDAS PARA LUZ FICAR VERDE. ISSO PERMITE QUE A UNIDADE SEJA OPERADA DE FORMA SEGURA.
Em caso de dúvidas, entre em contato com a Assistência técnica da Hougen Manufacturing pelo telefone (810) 635-7111.
CHAPA DO INTERRUPTOR DO PAINEL DE CONTROLE
** LUZ DO INTERRUPTOR DE SEGURANCA ACENDERÁ E PERMANECERÁ ACESA ENQUANTO A FURADEIRA ESTIVER CONECTADA **
Teste do interruptor de segurança:Antes de operar a furadeira sempre teste o interruptor de segurança. Para testar o interruptor... coloque a furadeira na superfície de trabalho e conecte a tomada. Mexa a furadeira de forma que o ímã saia da superfície de trabalho. A luz do interruptor de segurança deve mudar de verde para vermelho. Se a luz ficar verde ou vermelha, há um problema com o interruptor de segurança que precisa ser corrigido. (ou seja, interruptor de segurança com defeito, êmbolo de segurança na base do ímã está preso etc.) Corrija e teste novamente antes de operar a furadeira.
INTERRUPTOR DA LUZ PILOTO
A Luz Piloto é um recurso de segurança padrão nas furadeiras magnéticas portáteis Hougen. Seu objetivo é iluminar a superfície de trabalho para uma fácil visualização do piloto.
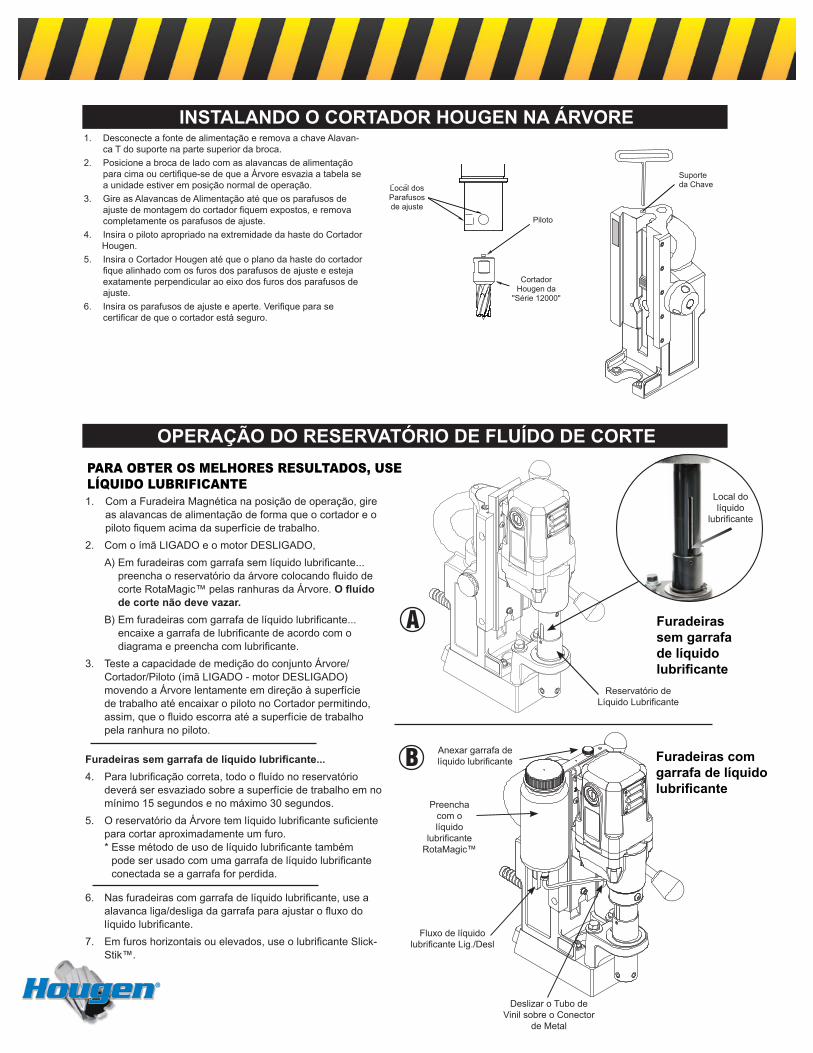
1. Com a Furadeira Magnética na posição de operação, gire as alavancas de alimentação de forma que o cortador e o piloto fiquem acima da superfície de trabalho.
2. Com o ímã LIGADO e o motor DESLIGADO,
A) Em furadeiras com garrafa sem líquido lubrificante...preencha o reservatório da árvore colocando fluido de corte RotaMagic™ pelas ranhuras da Árvore.Ofluídode corte não deve vazar.
B) Em furadeiras com garrafa de líquido lubrificante...encaixe a garrafa de lubrificante de acordo com o diagrama e preencha com lubrificante.
3. Teste a capacidade de medição do conjunto Árvore/Cortador/Piloto (ímã LIGADO - motor DESLIGADO) movendo a Árvore lentamente em direção à superfície de trabalho até encaixar o piloto no Cortador permitindo, assim, que o fluido escorra até a superfície de trabalho pela ranhura no piloto.
Furadeirassemgarrafadelíquidolubrificante...
4. Para lubrificação correta, todo o fluído no reservatório deverá ser esvaziado sobre a superfície de trabalho em no mínimo 15 segundos e no máximo 30 segundos.
5. O reservatório da Árvore tem líquido lubrificante suficiente para cortar aproximadamente um furo. * Esse método de uso de líquido lubrificante também
pode ser usado com uma garrafa de líquido lubrificante conectada se a garrafa for perdida.
6. Nas furadeiras com garrafa de líquido lubrificante, use a alavanca liga/desliga da garrafa para ajustar o fluxo do líquido lubrificante.
7. Em furos horizontais ou elevados, use o lubrificante Slick-Stik™.
Furadeiras sem garrafa de líquido lubrificante
PARA OBTER OS MELHORES RESULTADOS, USE LÍQUIDO LUBRIFICANTE
A
B
1. Desconecte a fonte de alimentação e remova a chave Alavan-ca T do suporte na parte superior da broca.
2. Posicione a broca de lado com as alavancas de alimentação para cima ou certifique-se de que a Árvore esvazia a tabela se a unidade estiver em posição normal de operação.
3. Gire as Alavancas de Alimentação até que os parafusos de ajuste de montagem do cortador fiquem expostos, e remova completamente os parafusos de ajuste.
4. Insira o piloto apropriado na extremidade da haste do Cortador Hougen.
5. Insira o Cortador Hougen até que o plano da haste do cortador fique alinhado com os furos dos parafusos de ajuste e esteja exatamente perpendicular ao eixo dos furos dos parafusos de ajuste.
6. Insira os parafusos de ajuste e aperte. Verifique para se certificar de que o cortador está seguro.
INSTALANDO O CORTADOR HOUGEN NA ÁRVORE
Set Screwsgo here
"12,000-Series" Hougen Cutter
Pilot
Suporte da Chave
Piloto
Local dos Parafusos de ajuste
Cortador Hougen da
"Série 12000"
Reservatório de Líquido Lubrificante
Anexar garrafa de líquido lubrificante
Fluxo de líquido lubrificante Lig./Desl
Deslizar o Tubo de Vinil sobre o Conector
de Metal
Local do líquido
lubrificante
Preencha com o líquido
lubrificante RotaMagic™
OPERAÇÃO DO RESERVATÓRIO DE FLUÍDO DE CORTE
Furadeiras com garrafa de líquido lubrificante
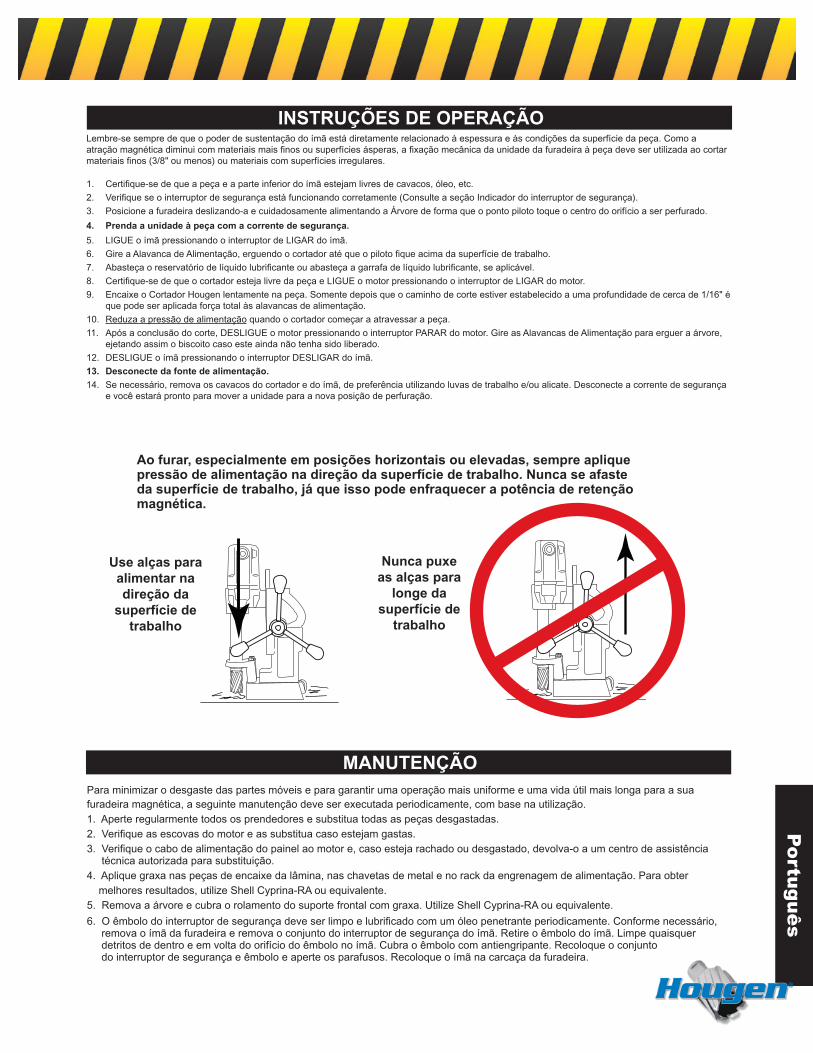
Português
Lembre-se sempre de que o poder de sustentação do ímã está diretamente relacionado à espessura e às condições da superfície da peça. Como a atração magnética diminui com materiais mais finos ou superfícies ásperas, a fixação mecânica da unidade da furadeira à peça deve ser utilizada ao cortar materiais finos (3/8" ou menos) ou materiais com superfícies irregulares.
1. Certifique-se de que a peça e a parte inferior do ímã estejam livres de cavacos, óleo, etc.
2. Verifique se o interruptor de segurança está funcionando corretamente (Consulte a seção Indicador do interruptor de segurança).
3. Posicione a furadeira deslizando-a e cuidadosamente alimentando a Árvore de forma que o ponto piloto toque o centro do orifício a ser perfurado.
4. Prenda a unidade à peça com a corrente de segurança.
5. LIGUE o ímã pressionando o interruptor de LIGAR do ímã.
6. Gire a Alavanca de Alimentação, erguendo o cortador até que o piloto fique acima da superfície de trabalho.
7. Abasteça o reservatório de líquido lubrificante ou abasteça a garrafa de líquido lubrificante, se aplicável.
8. Certifique-se de que o cortador esteja livre da peça e LIGUE o motor pressionando o interruptor de LIGAR do motor.
9. Encaixe o Cortador Hougen lentamente na peça. Somente depois que o caminho de corte estiver estabelecido a uma profundidade de cerca de 1/16" é que pode ser aplicada força total às alavancas de alimentação.
10. Reduza a pressão de alimentação quando o cortador começar a atravessar a peça.
11. Após a conclusão do corte, DESLIGUE o motor pressionando o interruptor PARAR do motor. Gire as Alavancas de Alimentação para erguer a árvore, ejetando assim o biscoito caso este ainda não tenha sido liberado.
12. DESLIGUE o ímã pressionando o interruptor DESLIGAR do ímã.
13. Desconecte da fonte de alimentação.
14. Se necessário, remova os cavacos do cortador e do ímã, de preferência utilizando luvas de trabalho e/ou alicate. Desconecte a corrente de segurança e você estará pronto para mover a unidade para a nova posição de perfuração.
INSTRUÇÕES DE OPERAÇÃO
Para minimizar o desgaste das partes móveis e para garantir uma operação mais uniforme e uma vida útil mais longa para a sua furadeira magnética, a seguinte manutenção deve ser executada periodicamente, com base na utilização.1. Aperte regularmente todos os prendedores e substitua todas as peças desgastadas.2. Verifique as escovas do motor e as substitua caso estejam gastas. 3. Verifique o cabo de alimentação do painel ao motor e, caso esteja rachado ou desgastado, devolva-o a um centro de assistência
técnica autorizada para substituição.4. Aplique graxa nas peças de encaixe da lâmina, nas chavetas de metal e no rack da engrenagem de alimentação. Para obter melhores resultados, utilize Shell Cyprina-RA ou equivalente.5. Remova a árvore e cubra o rolamento do suporte frontal com graxa. Utilize Shell Cyprina-RA ou equivalente.
6. O êmbolo do interruptor de segurança deve ser limpo e lubrificado com um óleo penetrante periodicamente. Conforme necessário, remova o ímã da furadeira e remova o conjunto do interruptor de segurança do ímã. Retire o êmbolo do ímã. Limpe quaisquer detritos de dentro e em volta do orifício do êmbolo no ímã. Cubra o êmbolo com antiengripante. Recoloque o conjunto do interruptor de segurança e êmbolo e aperte os parafusos. Recoloque o ímã na carcaça da furadeira.
MANUTENÇÃO
Ao furar, especialmente em posições horizontais ou elevadas, sempre aplique pressão de alimentação na direção da superfície de trabalho. Nunca se afaste da superfície de trabalho, já que isso pode enfraquecer a potência de retenção magnética.
Use alças para alimentar na direção da
superfície de trabalho
Nunca puxe as alças para
longe da superfície de
trabalho

HOUGEN MANUFACTURING, INC.3001 Hougen Drive • Swartz Creek, MI 48473 USA
Ph: (810) 635-7111 • Fax: (810) [email protected] • www.hougen.com
Se tiver dúvidas, entre em contato, ficaremos felizes em ajudar!
08353 4/21
(810) [email protected]
1. Mantenha a partes interna do Cortador Hougen livres de cavacos. Cavacos vão interferir com a profundidade máxima, talvez impeçam o fluxo livre do óleo e podem causar quebras no cortador.
2. Mantenha o trabalho, a máquina, a árvore e o Cortador Hougen livres de cavacos e sujeira.
3. Aperte todos os parafusos e prendedores regularmente.4. Recomendamos fortemente o uso de um fluído de corte com viscosidade leve (de
preferência o Fluido de Corte Hougen).5. Ocasionalmente, verifique a medição do fluxo de fluído de corte. A falta de fluido
de corte pode fazer com que o Cortador Hougen fique imobilizado durante o corte, prendendo o biscoito, o que pode resultar na redução da vida útil do cortador.
6. Sempre inicie o corte com pressão de alimentação leve e depois aumente a pres-são o suficiente para obter um índice de corte máximo.
7. Reduza a pressão conforme o cortador comece a penetrar ao final do corte.8. Mantenha as peças de encaixe da lâmina, as chavetas de metal e o rack de alimentação lubrificados e livres de cavacos e sujeira. 9. Quando o biscoito ficar pendurado no cortador, desligue o motor e traga o cortador para baixo sobre uma superfície plana. Isto normal-
mente endireitará um biscoito inclinado, permitindo que ele seja ejetado. 10. Quando for cortar furos profundos ou de grande diâmetro, pode ser necessário parar no meio do corte para acrescentar fluido de corte
e remover os cavacos que estão em torno da árvore. (Quando for fazer isso, NÃO levante o cortador do furo. Fazer isso pode fazer com que os cavacos fiquem sob os dentes do cortador. Isso dificultará a retomada do corte.)
Segurar o cortador como a um bebê durante o corte apenas diminuirá a vida útil da ferramenta.
Causa número 1 de avaria no cortador e de desgaste prema-turo dos dentes é a
pressão de alimenta-ção muito pequena.
DICAS PARA UM MELHOR FUNCIONAMENTO


