SHOOTING FOCUS Cambridge HotShots Basketball 0790 406 2735 * www.cambridgehotshots.com LUNCHTIME Shooting Focus: POINTS2COACH The basics of shooting: * Learn when to shoot and when not to shoot. * Take shots from a distance that is comfortable and easy - don’t strain. * Have good balance before you start to shoot. * A shot is a pass to yourself. Always go and get the rebound! * Aim at a target - the front of the rim, the back of the rim, the center of the rim, or the backboard. Whatever target you choose you must stick with it and not change every week. Keep your eye on the target through the whole shot. Do not watch the ball. * Practice the shots you’ll take in a game. Practice with a friend guarding you when you can. It’s easier to shoot when you’re alone, but you’re never alone in a game. * Consistency and concentration are the keys to shooting. Spot Shooting: Set spots out on different goals for individual Around the World on the big goals. Spread players out on all goals. Make two baskets at each goal before moving on to the next goal. Move in a clock-wise manner. Make two goals at the first goal you shot at. Run to centre court and sit down. WARM UP DRILLS 1. Reverse Spin – Pivot – Shoot: With back to basket, spin ball, catch, pivot squaring up to basket then shoot, rebounding ball. 2. Receive Pass – Pivot – Shoot – Rebound – Find another Space: Have one person as rebounder, One as passer, one as shooter. Shooter finds a place to shoot from (million pound shot). They then find another space, letting rebounder get the ball. Person passing the ball makes a good pass when shooter is looking and in position. Rotate after 5 shots. 3. V-Cut – Pivot – Shoot: One person as the passer, one as the rebounder and the shooter set up on the post position. Make a sharp cut to wing, catch the ball then pivot and drive to post for shot. Might want to put a spot down. 4. Partner Shooting: First shooter shoots ball, rebounds own shot then dribbles out to take another shot. Emphasis pivot and squaring up to bas- ket. Take 5 shots then switch with partner. 6. Mikan Drill: Shooter has 30 seconds to see how many shots they can make. Start directly under the basket. Without travelling, take one step to the right and shoot off the board, collect ball before it bounces and shoot a shot from the left side. Might be a good time to emphasis shooting with the left hand. 7. Shooting over a Wall: One person the shooter, one person the wall with hands up (they are not play- ing defense just standing there. The other person is the rebounder. 8. Million Pound Shots - Have children split up around court shooting shots 2 ft away from the goal, making 25 million pound shots. 9. Jump Stop Shots - Place spots on either side of goal at a 45 degree angle. Have four groups, two at each end. Player dribbles the length of the court, overexagerates the jump stop on the spot and shoots. He then goes to the back of the line. Emphasis dribbling with right and left hands. ALL STAR CHALLENGE Place spots within close range of the basket. Once you have made 10 baskets from one spot, move to another spot.
Transcript
SHOOTING FOCUSCambridge HotShots Basketball
0790 406 2735 * www.cambridgehotshots.com
LUNCHTIMEShooting Focus:
POINTS2COACHThe basics of shooting:* Learn when to shoot and when not to shoot.* Take shots from a distance that is comfortable and easy - don’t strain.* Have good balance before you start to shoot.* A shot is a pass to yourself. Always go and get the rebound!* Aim at a target - the front of the rim, the back of the rim, the center of the rim, or the backboard. Whatever target you choose you must stick with it and not change every week. Keep your eye on the target through the whole shot. Do not watch the ball.* Practice the shots you’ll take in a game. Practice with a friend guarding you when you can. It’s easier to shoot when you’re alone, but you’re never alone in a game.* Consistency and concentration are the keys to shooting.
Spot Shooting: Set spots out on different goals for individual Around the World on the big goals. Spread players out on all goals. Make two baskets at each goal before moving on to the next goal. Move in a clock-wise manner. Make two goals at the first goal you shot at. Run to centre court and sit down.
WARM UP
DRILLS1. Reverse Spin – Pivot – Shoot: With back to basket, spin ball, catch, pivot squaring up to basket then shoot, rebounding ball.
2. Receive Pass – Pivot – Shoot – Rebound – Find another Space: Have one person as rebounder, One as passer, one as shooter. Shooter finds a place to shoot from (million pound shot). They then find another space, letting rebounder get the ball. Person passing the ball makes a good pass when shooter is looking and in position. Rotate after 5 shots.
3. V-Cut – Pivot – Shoot: One person as the passer, one as the rebounder and the shooter set up on the post position. Make a sharp cut to wing, catch the ball then pivot and drive to post for shot. Might want to put a spot down.
4. Partner Shooting: First shooter shoots ball, rebounds own shot then dribbles out to take another shot. Emphasis pivot and squaring up to bas-ket. Take 5 shots then switch with partner.
6. Mikan Drill: Shooter has 30 seconds to see how many shots they can make. Start directly under the basket. Without travelling, take one step to the right and shoot off the board, collect ball before it bounces and shoot a shot from the left side. Might be a good time to emphasis shooting with the left hand.
7. Shooting over a Wall: One person the shooter, one person the wall with hands up (they are not play-ing defense just standing there. The other person is the rebounder.
8. Million Pound Shots - Have children split up around court shooting shots 2 ft away from the goal, making 25 million pound shots.
9. Jump Stop Shots - Place spots on either side of goal at a 45 degree angle. Have four groups, two at each end. Player dribbles the length of the court, overexagerates the jump stop on the spot and shoots. He then goes to the back of the line. Emphasis dribbling with right and left hands.
ALL STAR CHALLENGE
Place spots within close range of the basket. Once you have made 10 baskets from one spot, move toanother spot.
SHOOTING FOCUSCambridge HotShots Basketball
0790 406 2735 * www.cambridgehotshots.com
GAMES2 or More - Two players shooting a ball at each end, trying to be the first to score. Make two lines of players at the half court corners with a coach at center court. Each player at the front of the line has a ball. The coach yells go. Each player attempts a long 3 point shot. The first player to score a three pointer gets 5 points for his team. If both players miss, they must rebound their shots and attempt a closer in outside shot (no lane shots yet). The first player to score gets 3 points for his team. If both players miss again, they must rebound their balls and the first player to score a lay-up gets one point for his team. The game is great fun for the players and the scores get real high real fast which the kids love. Also a team that is get-ting smoked can catch up quickly with a couple of 5 pointers. The pressure comes from trying to take a good shot but before your opponent can get his shot off. When both players have missed the 5 point and 3 point shot and race to the basket for the token lay-up it gets real frantic and a lot of fun.
3V3 - Make a short court and put children in teams of 3. Play a mini tournament where all children have to touch the ball before a shot can be taken. Even out the teams so there is a mixture OR make a division of higher ability and a division of lower ability. the children seem to really like this with fewer participants as they feel more like they are involved in the game.
50 - The game is played five vs. five, full court. One point is awarded for every pass complet-ed and five points for a made shot. Five points are subtracted for a missed shot and the score returns to zero if a player dribbles. The first team to reach fifty points wins. You will need several scorers as this is a fast paced game.
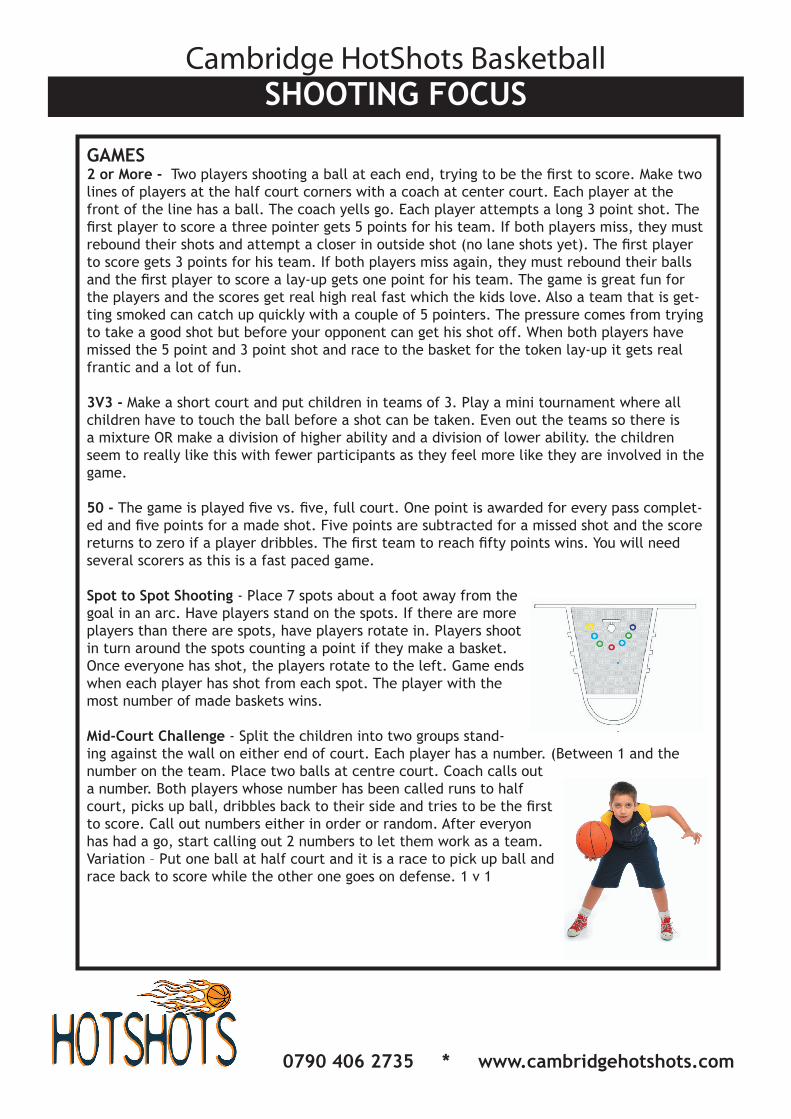
Spot to Spot Shooting - Place 7 spots about a foot away from the goal in an arc. Have players stand on the spots. If there are more players than there are spots, have players rotate in. Players shoot in turn around the spots counting a point if they make a basket. Once everyone has shot, the players rotate to the left. Game ends when each player has shot from each spot. The player with the most number of made baskets wins.
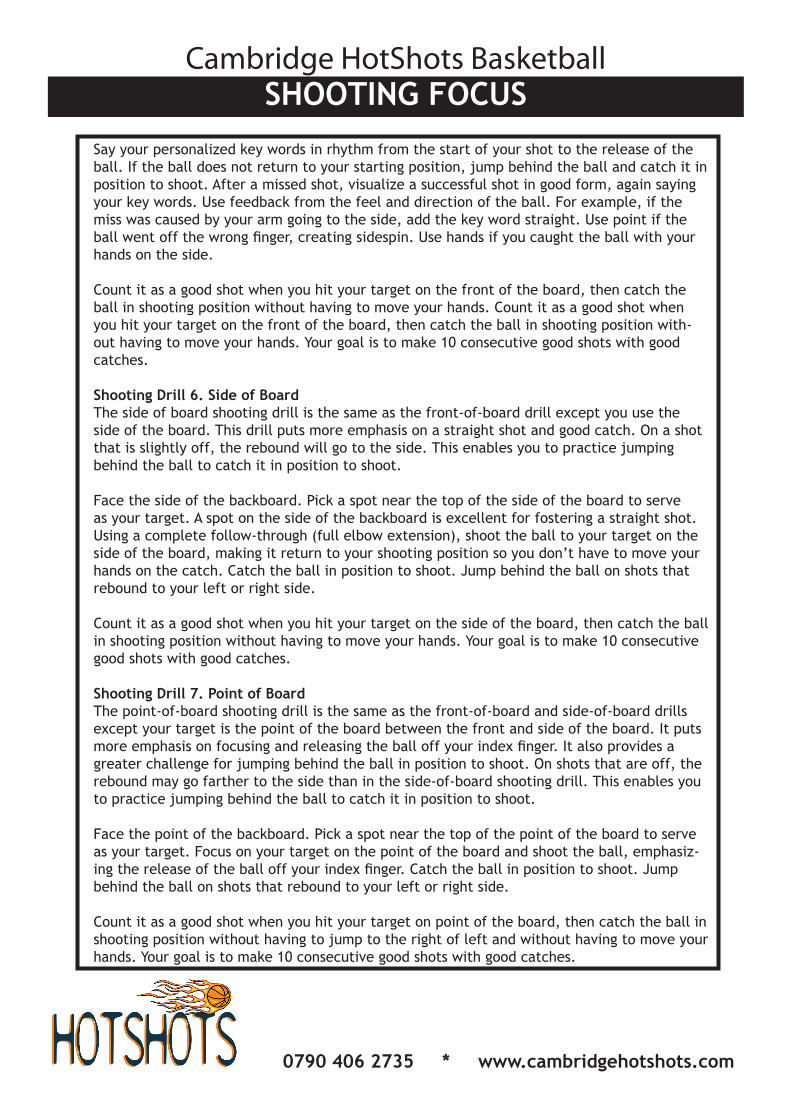
Mid-Court Challenge - Split the children into two groups stand-ing against the wall on either end of court. Each player has a number. (Between 1 and the number on the team. Place two balls at centre court. Coach calls out a number. Both players whose number has been called runs to half court, picks up ball, dribbles back to their side and tries to be the first to score. Call out numbers either in order or random. After everyon has had a go, start calling out 2 numbers to let them work as a team. Variation – Put one ball at half court and it is a race to pick up ball and race back to score while the other one goes on defense. 1 v 1
SHOOTING FOCUSCambridge HotShots Basketball
0790 406 2735 * www.cambridgehotshots.com
SHOOTING COMPETITIONS21 Up - A game for any number and can be player individually or as a team. A player shoots from a set spot e.g. free throw line, and then collects rebound, without allowing the ball to taouch the floor and shoots again. They receive two points for a successful first shot and one point for scoring off the rebound. The first person or team to reach twenty-one is the winner. When played individually the turn finishes when a rebound is missed.
3 Point Shoot Out - Participants have one minute to shoot 5 racks of balls (4 balls total per rack, 3 regular and one money ball) from behind the three point arc. Each regular ball is worth one point and each money ball is worth two points. Each participant’s score will be totaled after their round of shooting and the participant with the highest score will be desig-nated the winner. In the event of a tie, the participants involved will shoot another round to determine the winner.
Around the World: Pick seven spots around the basket. Children individually, in pairs or in a group take shots from each spot. They can move on after each shot or alternatively they must remain at a spot until they score before moving on. Variation: Shoot five shots from each position before moving on.
Fire - 3/5 positions to shoot from, 4 to 10 players line up filling each position. One or more balls used; maximum of one ball at each position. In a given time, e.g. 1 minute, how many points can be scored? Rebound own shot, pass and follow to next position. Alternatively have 2-3 rebounders; take turns to rebound.
Free Throw Shoot out - • best out of 10 free throws made. Single elimination brackets. Champion from each bracket will advance to free throw shoot-off.• in the result of a tie, a sudden death format will be used. If the first player makes 1, the second player must make a shot to stay alive. If both make their free throws, the process is repeated and the order of shooters will be switched.
Golf - Basketball golf is played like golf, using “pars” to keep score. In basketball golf, one station is set up on each half of a basketball court. Each station has nine positions to shoot from. Divide students into groups of four, with each group receiving a score card and a pencil. Beginning at the first position, each student shoots until he/she makes the shot or misses five shots. Another student in the group records the number of shots taken, no more than 5 (students should take turns recording the scores). After students have completed the first position, then they move on to position #2 and so on. After students have completed all nine positions, they may tally their scores to see who came closest to “par.” Time permitting, students can switch stations and repeat the score keeping process.
SHOOTING FOCUSCambridge HotShots Basketball
0790 406 2735 * www.cambridgehotshots.com
SHOOTING COMPETITIONSGotcha - All players lined up behind 3 point line. 2 balls. Designate a close up shot by placing a spot on the ground. First person dribble to spot to shoot. If the player makes it, they are safe and goes to the back of the line. If they miss it, they stand on the green spot. If the next person misses it, they are safe and go to the back of the line. If the next player makes the basket, the person on the green spot is out and sits along the sidelines.
Head Teacher’s Office - Two teams line up on opposite sides of the court. Each side takes turns shooting from the designated spot. If they make the basket, they are safe and go to the back of the line. If they miss the basket, they are sent to the head teacher’s office which is marked off in the centre of the court. Once there is someone in the head teacher’s office, a made basket allows the first person to go in, to come out. The game continues until all play-ers are located in the head teacher’s office. The winning team must make a final basket in order to win the game. Can be played with four groups using two baskets.
HORSE: Two or more players can play. The first player shoots any kind of shot from any point on the court. If the ball goes in the basket the next player must shoot exactly the same shot from the same point. If the second player misses, he or she takes the letter H. The game continues until players miss enough shots to spell HORSE. The last player to miss enough shots wins.
See Ya - Same as Gotcha except players dribble from half-court to play shooting knock-out game. All players have a ball. First player dribbles to spot, takes shot. (don’t let them dribble on the run, encourage proper jump stop). If they make it, they are safe, and go to the back of the line. If they miss it, they quickly collect their ball and continue shooting trying to make a basket before the person behind them makes theirs. This knockout game is between 2 peo-ple, thus 2 balls. 2nd person cannot leave half-court until first person has shot their ball. 3rd person cannot dribble down for shot until either the 1st person makes their shot or is knocked out. (ONLY 2 people shooting at a time.)
On The Line - Split your children into two even teams. The regulation “game” has ended in a tie score. It will be decided by free throws. Each player shoots two free throws: first a player from team A, then one from team B. Each team can determine its own shooting order. Continue in this fashion until all players have shot their two free throws, and total the points to determine the winner. If the game is still tied, keep the same order of players and have a “sudden-death” shoot-off, with the first player from team A shooting one free throw, followed by the first player from team B. The first time the tie is broken after a player from team B has shot in this shoot-off, the game is over.
SHOOTING FOCUSCambridge HotShots Basketball
0790 406 2735 * www.cambridgehotshots.com
SHOOTING COMPETITIONSOverload - A number of players stand in a semi-circle around the basket, a smaller number, 2 or 3, stand close to the basket. The attackers have one ball, which can be passed around until one player is free to shoot. If a shooter misses he exchanges with a defender.
Two Ball - Shooting positions are marked on court, e.g. free throw, close range set shot left, set shot right (6-8 positions). Each position is given a value 1 point, 2 points etc. A pair have 1 minute to score as many points as possible by shooting baskets from the positions. They shoot alternatively and have to move to a different position for each shot. They can pass and dribble between shots.
Set shot steps - Children stand in front of the target and take set shots. Then step back a step. Introduce a target competition. (score in 30 seconds)
Dribble and shoot - Work individually in pairs or groups. Practise dribbling in, stop-ping and shooting, use left and right side. Give a challenge. How many baskets can be scored in 30 seconds?
Pass and Shoot - In a pair start from a point away from the basket. Children individu-ally, in pairs or in a group take shots from each spot. They can either move on after each shot or alternatively they must remain at a spot until they score before moving on. Variation: Shoot 5 shots from each position before moving on.
Quick Fire Shooting - Each player is given 30 seconds in which to score as many close range shots as possible. For jump shots the children must jump off the ground. Where there are not enough baskets then some improvisation will be required with targets drawn on a wall. Alternatively use the shooting circuit.
Two player Hotshots - One player shoots at the basket, rebounds the ball and passes to the other player. The other player then shoots, rebounds and passes. Set a 30 sec-ond challenge. Variation: After the pass is made the player moves to a different spot to take next shot.
Groove the Spot - Players choose spot then take turns in shooting five shots in a row and their partners rebound the shot for them so they have no need to move from the spot.
Jump shot from a bench - The children step onto a bench and jump and make a shot at the basket. This will give them the experience of shooting at the top of a jump.
SHOOTING FOCUSCambridge HotShots Basketball
0790 406 2735 * www.cambridgehotshots.com
SHOOTING COMPETITIONSBlind shooting - make five set shots, can be from free-throw line then shoot five with eyes closed. Partner provides feedback such as “shoot higher” or “shoot more to the right”. Change roles.
HotShot Blitz - This is a timed event to see how many points can be accumulated from vari-ous hot spots on the court. In one minute a competitor attempts to score as many points as possible. Starting at half court, the competitor dribbles into shooting range and shoots lay-ups or shoots from one of the designated hot spots. The competitor may shoot in any se-quence he or she prefers.
Two lay-up scores are allowed but all other shots must be taken from any or all five hot spots marked on the court. Each spot has a separate point value. Bonus points are awarded if players choose to shoot from all five hot spots. Competitors must dribble the ball when proceeding from spot to spot. Scoring: Lay-up (only two are allowed) 2 points Spot 1 (12 feet from left corner) 2 points Spot 2 (21 feet from left of key) 4 points Spot 3 (24 feet from top of the key) 5 points Spot 4 (15 feet from the right of key) 3 points Spot 5 (15 feet from the right corner) 3 points Bonus (shoot from all spots) 3 points In the event of a tie, the competitors will shoot again for an additional 30 seconds. Hot Shot ties will be broken according to who made the most fives, and secondly by the most fours, etc.
SHOOTING FOCUSCambridge HotShots Basketball
0790 406 2735 * www.cambridgehotshots.com
Basketball Training: Drills to work on your Jump Shot
Shooting Drill 1. Strong Hand Warm-up One-hand shooting, using either the strong hand or the weak hand, is an excellent way to develop your ability to start and complete a shot with your shooting hand facing the front of the rim. This helps eliminate side rotation. It also fosters lifting the ball to the basket rather than throwing the ball. This drill is particularly beneficial if your non-shooting hand tends to interfere with your shot (for example, if you thumb the ball with your non-shooting hand).
The one-hand shooting drill allows you to focus on having the shooting hand in the correct position facing the front of the rim. Keep your shooting elbow in. When your shooting elbow is in, the ball is aligned with the basket. Some players do not have the flexibility to keep the shooting hand facing the front of the rim while keeping the elbow in. In this case, first put your shooting hand facing the front of the rim, and then move the elbow in as far as your flexibility allows.
Start about nine feet from the basket with your shooting hand facing the front of the rim while keeping your elbow in as far as your flexibility allows. Your shooting hand is above your shoulder between your ear and shoulder. Use your non-shooting hand to place the ball in your shooting hand. Do not reach for the ball with your shooting hand. Now lower your non-shoot-ing hand to your side. Balance the ball in your shooting hand with your index finger at the ball’s midpoint. Check that your forearm is at a right angle to the floor and that it forms an L with your upper arm. This position helps you lift the ball to the basket rather than throw it.
Use your personalized key words in rhythm with your shot or when you are correcting your shot. If you tend to bring the ball back and throw it rather than lift it to the basket empha-size the key word Front! If your shot misses to your strong-hand side of the rim, because your elbow is out, consider using the key word In!
After making five consecutive shots from 9 feet, increase the distance to 12 feet. After mak-ing five consecutive shots from 12 feet, move back to the foul line (15 feet from the back-board).
Shooting Drill 2. Weak Hand Warm-up Perform the drill in the same way as the Strong Hand Warm-up, but use your weak hand. When using your weak hand, you may have a tendency to shove the ball and miss toward the opposite side of the rim. Emphasize the down-and-up movement of your legs, which will help your range and ability to lift the ball straight to the basket. Consider using the key words down and up!
After making five consecutive shots from 9 feet, increase the distance to 12 feet. After mak-ing five consecutive shots from 12 feet, move back to the foul line (15 feet from the back-board).
SHOOTING FOCUSCambridge HotShots Basketball
0790 406 2735 * www.cambridgehotshots.com
Shooting Drill 3. Jump Shot Warm-Up The objectives of this drill are to develop confidence, form, rhythm, and range for making jump shots. Start in a balanced stance about nine feet in front of the basket. Perform jump shots from that distance, using correct form for each shot. For a jump shot, the ball is held higher than for a one-hand set shot. The height of your jump depends on the range. When close to the basket, you should release the ball at the top of your jump, with your arm, wrist, and fingers providing most of the force. On long-range outside jump shots, you don’t need to jump as high, allowing you to use more force from your legs for the shot. Strive for a balanced jump so you can follow through until the ball hits the floor. Say your three person-alized words in rhythm from the start of your shot to the release of the ball.
After making five consecutive shots 9 feet from the backboard, take a giant step back until you are 12 feet from the backboard. After making five consecutive shots from 12 feet, take a giant step back until you are 15 feet from the backboard (free throw distance). After mak-ing five consecutive shots from 15 feet, take a giant step back until you are 18 feet from the backboard. After making five consecutive shots from 18 feet, take a giant step back until you are 21 feet from the backboard. (top of circle). After making five consecutive shots from 21 feet, take a giant step back until you are at NBA 3 point distance.
Shooting Drill 4. Bank Jump Shot Warm-Up The bank jump shot warm-up drill is the same as the regular jump shot warm-up drill except that you shoot from a 45-degree angle on each side of the basket. Start in a balanced stance at a 45-degree angle to the backboard, within the distance between the box and the mid-dle hash mark on the lane. The distance of the bank angle, which widens as you move out, is called the 45-degree funnel. For bank shots, aim for the top near corner of the box on the backboard, saying your key words in rhythm from the start of your shot to the release of the ball. Shoot from both the right and left sides of the basket.
After making five consecutive bank jump shots from 9 feet on both the right and left sides of the basket, take a giant step back to 12 feet. After making five consecutive bank jump shots from 12 feet on both the right and left sides of the basket, take a giant step back to 15 feet. After making five consecutive bank jump shots from 15 feet on both the right and left sides of the basket, take a giant step back to 18 feet.
Shooting Drill 5. Front of Board The front of board shooting drill focuses on the fundamentals: shooting hand behind the ball, elbow-in alignment, release off the index finger, follow-through, and catching the ball in position to shoot. Face the backboard. Pick a spot near the top corner of the front of the board to serve as your target. A spot on the front of the backboard is excellent for fostering a straight shot. Begin with the ball in shooting position above your shooting shoulder. Place your shooting hand behind the ball with your index finger at the ball’s midpoint. Check for elbow-in alignment. Using a complete follow-through (full elbow extension), shoot the ball to your target on the front of the board, making it return to your shooting position so you don’t have to move your hands on the catch.
SHOOTING FOCUSCambridge HotShots Basketball
0790 406 2735 * www.cambridgehotshots.com
Say your personalized key words in rhythm from the start of your shot to the release of the ball. If the ball does not return to your starting position, jump behind the ball and catch it in position to shoot. After a missed shot, visualize a successful shot in good form, again saying your key words. Use feedback from the feel and direction of the ball. For example, if the miss was caused by your arm going to the side, add the key word straight. Use point if the ball went off the wrong finger, creating sidespin. Use hands if you caught the ball with your hands on the side.
Count it as a good shot when you hit your target on the front of the board, then catch the ball in shooting position without having to move your hands. Count it as a good shot when you hit your target on the front of the board, then catch the ball in shooting position with-out having to move your hands. Your goal is to make 10 consecutive good shots with good catches.
Shooting Drill 6. Side of Board The side of board shooting drill is the same as the front-of-board drill except you use the side of the board. This drill puts more emphasis on a straight shot and good catch. On a shot that is slightly off, the rebound will go to the side. This enables you to practice jumping behind the ball to catch it in position to shoot.
Face the side of the backboard. Pick a spot near the top of the side of the board to serve as your target. A spot on the side of the backboard is excellent for fostering a straight shot. Using a complete follow-through (full elbow extension), shoot the ball to your target on the side of the board, making it return to your shooting position so you don’t have to move your hands on the catch. Catch the ball in position to shoot. Jump behind the ball on shots that rebound to your left or right side.
Count it as a good shot when you hit your target on the side of the board, then catch the ball in shooting position without having to move your hands. Your goal is to make 10 consecutive good shots with good catches.
Shooting Drill 7. Point of Board The point-of-board shooting drill is the same as the front-of-board and side-of-board drills except your target is the point of the board between the front and side of the board. It puts more emphasis on focusing and releasing the ball off your index finger. It also provides a greater challenge for jumping behind the ball in position to shoot. On shots that are off, the rebound may go farther to the side than in the side-of-board shooting drill. This enables you to practice jumping behind the ball to catch it in position to shoot.
Face the point of the backboard. Pick a spot near the top of the point of the board to serve as your target. Focus on your target on the point of the board and shoot the ball, emphasiz-ing the release of the ball off your index finger. Catch the ball in position to shoot. Jump behind the ball on shots that rebound to your left or right side.
Count it as a good shot when you hit your target on point of the board, then catch the ball in shooting position without having to jump to the right of left and without having to move your hands. Your goal is to make 10 consecutive good shots with good catches.
SHOOTING FOCUSCambridge HotShots Basketball
0790 406 2735 * www.cambridgehotshots.com
Shooting Drill 8. Chair Drill Shooting from a chair fosters consistency in lifting the ball to the basket and extending the elbow completely on the follow-through. This drill develops shooting range and helps a player who has the tendency to throw the ball. Shooting while sitting in a chair requires you to use your back, shoulders, and full arm extension to generate force for the shot. Set the chair nine feet in front of the basket. Sit on the front edge of the chair with your shoulders front, your feet aligned with the legs of the chair and your toes straight. Center yourself both mentally and physically. When you are physically centered, you are in a state of readiness; your muscles relax and you breathe a little deeper and more slowly than usual. Being physi-cally centered also involves balancing your weight evenly for the skill you will be performing, which is particularly helpful for gaining power. When you are physically centered it helps you become mentally centered. When you are centered you are more alert, focused and confi-dent. Centering allows you to raise your center of gravity and transfer your force from back to shoulders to generate full power for the shot.
Start with your shooting hand facing the front of the rim while keeping your elbow in as far as your flexibility allows. Your shooting hand is above your shoulder between your ear and shoul-der. Use your non-shooting hand to place the ball in your shooting hand. Do not reach for the ball with your shooting hand. The index finger of your shooting hand should be at the ball’s midpoint. Check that your forearm is at a right angle to the floor and that it forms an L with your upper arm. This position helps you lift the ball to the basket rather than throw it.
Use your personalized key words in rhythm with your shot or when you are correcting your shot. If you tend to bring the ball back and throw it rather than lift it to the basket empha-size the key word Front! If your shot misses to your strong-hand side of the rim, because your elbow is out, consider using the key word In!
Work for the sequential build-up of force from your back, shoulders, arm, wrist, and fingers as you shoot. Say your personalized key words in the rhythm of your shot from the start of the shot to the release of the ball. Visualize a successful shot with good form. Use feedback from the feel of the shot and its distance, direction, and reaction on the rim. If the shot was short, emphasize the key word through!. To increase distance, use a sequential buildup of force using the key words back-shoulder-through!
After making five consecutive shots 9 feet from the backboard, move the chair back until you are 12 feet from the backboard. After making five consecutive shots from 12 feet, move the chair back until you are 15 feet from the backboard (free throw distance). After making five consecutive shots from 15 feet, move the chair back until you are 18 feet from the back-board. After making five consecutive shots from 18 feet, move the chair back until you are 21 feet from the backboard. (top of circle).
SHOOTING FOCUSCambridge HotShots Basketball
0790 406 2735 * www.cambridgehotshots.com
Shooting Drill 9. Toss to Left Elbow Start with the ball at the left box outside the lane, your back to the basket. Pass to your self by tossing the ball high so it bounces high at the left elbow of the court. Run outside the lane to the left elbow and quickly jump behind the ball, turning your body in to face the basket. Land in balance with a jump stop. Have your hands and feet ready with your hands above your shoulders and your knees slightly flexed. Catch the ball with your shooting hand high and facing the front of the rim. Catch and shoot in one motion. Your knees should lower just before the catch and extend upward on the catch in a quick rhythmical down-and-up motion.
Shoot 10 shots from the left elbow. Your goal is to make 10 consecutive shots from the left elbow.
Shooting Drill 10. Toss to Right Elbow Perform the same drill starting at the right box and tossing the ball to the right elbow. Shoot 10 shots from the right elbow. Your goal is to make 10 consecutive shots from the right elbow.
Shooting Drill 11. On-Your-Back Shooting Lie on your back with the ball between your ear and shooting shoulder. Place your shooting hand facing straight up with your index finger at the midpoint of the ball. Check for elbow-in alignment. Shoot the ball up into the air with complete follow-through (full elbow exten-sion). You want the ball to return straight back to you so that you do not have to move your hands to catch it. Say your key words in rhythm with your shot. If the ball does not return to you, visualize a successful shot and good form, again saying your key words, and use feed-back from the feel of your shot and the direction of the ball. Emphasize the key word you feel will produce a successful shot. For example, if your shot is off to the side, concentrate on making your arm go straight and say straight! If the ball goes off the wrong finger, produc-ing sidespin, you might say point!
A good shot is one that goes straight up and comes straight back to your shooting hand so that you are able to catch it in position to shoot without reaching for the ball or adjusting your hand on the ball. If you catch the ball with your hand on its side, consider using the key words hand or catch. Start by shooting the ball straight up one foot high.
After making five consecutive shots with good catches shooting the ball one foot high, use a full follow-through on your shot. After making five consecutive shots with good catches using a full follow-through, shoot the ball ten feet high or the level of the rim. After making five consecutive shots with good catches shooting the ball ten feet high, lie down with your head about eight feet in front of the rim and shoot the ball into the basket.
Shooting Drill 12. Mental Practice by Viewing a Video or DVD of Your Own Perfect Shot Mentally practice your shot by viewing a video of your own perfect shot. Video your shooting until you get a perfect shot. Copy the perfect shot onto a second video or DVD 100 times. You can then insert the video or DVD into your video or DVD player and watch your 100 perfect shots each day. It will take about 10 minutes.
SHOOTING FOCUSCambridge HotShots Basketball
0790 406 2735 * www.cambridgehotshots.com
Basketball Training: Drills to work on your Free Throws
Free Throw Practice - Shoot 100 free throws by performing 10 sets of 10 each. Your goal is to improve the number of free throws made out of 100 attempts. To be a 70 percent free throw shooter you goal is to make 80 out of 100. To be an 80 percent free throw shooter, your goal is to make 90 out of 100. To be a 90 percent free throw shooter, you goal is to make 100 consecutive free throws.
Free Throw Shooting - Eyes Open, Eyes Closed- Eyes Open Shoot five free throws with your eyes open, then five free throws with your eyes closed. Shoot 100 free throws by performing 10 sets of 10 each. Your goal is to improve the number of free throws made out of 100 attempts.
Basketball Training: Drills to work on Shooting off the Dribble
Shooting off the Dribble Drill 1. Straight Drive One-Dribble Jump Shot This drill leads up to shooting jump shots off the dribble going to your strong-hand side and weak-hand side. Start with the ball at the left box outside the lane, your back to the basket. Pass to your self by tossing the ball high so it bounces high at the left elbow of the court. Run to the left elbow and catch the ball, your back to the basket, using a one-two stop, land-ing on your inside (left) foot first. Pivot on your inside (left) foot, using a front turn toward the middle and face the basket. Make a jab step with your right foot, while making a shot fake, showing the ball high. Be in triple-threat stance and in position to shoot first. Create space by dribbling once with your right hand toward the middle of the free throw line. Jump behind the ball. Pick up the ball in front of your shooting knee with your shooting hand on top and your balance hand under the ball. Jump straight up and shoot a jump shot. Land in balance.
Now perform the drill, starting from the right box and tossing the ball to the right elbow. Catch the ball while landing on your inside (right) foot first and pivot on your inside (right) foot, using a front turn toward the middle. Create space by dribbling once with your left hand toward the middle of the free throw line.
Note: A right-handed player will have farther to jump when going to the left. A left-handed player will have farther to jump when going to the right in order to pick up the ball in front of the shooting knee.
Record the number of one-dribble jump shots made out of 10 attempts, driving to the right from the left elbow. Record the number of one-dribble jump shots made out of 10 attempts, driving to the left from the right elbow.
Shooting off the Dribble Drill 2. Crossover One-Dribble Jump Shot This drill develops the ability to shoot jump shots off a crossover dribble while going to your strong-hand side and weak-hand side. The drill begins the same way as the previous drill. Begin with the ball at the right box outside the lane. Toss the ball to the right elbow. Catch the ball with your back to the basket using a one-two stop, landing on your inside (right)
SHOOTING FOCUSCambridge HotShots Basketball
0790 406 2735 * www.cambridgehotshots.com
foot and pivoting toward the middle. Face the basket, making a jab step with your left foot, while making a shot fake, showing the ball high. Be in triple-threat stance, a threat to shoot first. Make a crossover step with your left foot to the outside. Create space with a long dribble with your outside (right) hand toward a 45-degree angle with the backboard. Jump behind the ball. Pick up the ball in front of your shooting knee with your shooting hand on top and your balance hand under the ball. Jump straight up and shoot a jump shot. Land in balance.
Now perform the drill, starting from the left box and tossing the ball to the left elbow. Catch the ball while landing on your inside (left) foot first and pivot on your inside (left) foot, using a front turn toward the middle. Make a crossover step with your right foot to the outside. Create space with a long dribble with your outside (left) hand toward a 45-degree angle with the backboard.
When dribbling to your weak-hand side, you can practice using two dribbles making a crosso-ver dribble on the last dribble to pick up the ball in front of your shooting knee.
Record the number made out of ten attempts using a crossover one-dribble jump shot from the right elbow, driving right toward a 45-degree angle with the backboard. Record the number made out of ten attempts using a crossover one-dribble jump shot from the left elbow, driving left toward a 45-degree angle with the backboard.
Shooting off the Dribble Drill 3. Step-Back One-Dribble Jump Shot This drill develops the ability to shoot jump shots off a step-back dribble. The drill begins the same way as the previous drill. Begin with the ball at the right box outside the lane. Toss the ball to the right elbow. Catch the ball with your back to the basket using a one-two stop, landing on your inside (right) foot and pivoting toward the middle. Face the basket, making a jab step with your left foot, while making a shot fake, showing the ball high. Be in triple-threat stance, a threat to shoot first. Stop and read the defender. If the defender makes a retreat step, take a quick step-back away from your defender with your jab-step foot and at the same time dribble back with your strong hand. Jump behind the ball and pick it up in front of your shooting knee with your shooting hand on top. Shoot a jump shot. Maintain bal-ance by picking the ball up at your knee and exaggerating the follow-through of your shoul-ders, head and shooting hand toward the basket to counter any tendency to lean your head and shoulders back on your shot.
Now perform the drill, starting from the left box and tossing the ball to the left elbow. Catch the ball while landing on your inside (left) foot first and pivot on your inside (left) foot, using a front turn toward the middle.
Record the number of step-back one-dribble jump shots made out of 10 attempts from the left elbow. Record the number of step-back one-dribble jump shots made out of 10 attempts from the right elbow.
SHOOTING FOCUSCambridge HotShots Basketball
0790 406 2735 * www.cambridgehotshots.com
Shooting off a Step-Through Drill 4. Shot Fake Step-Through Jump Shot This drill develops the ability to shoot jump shots off a shot fake and step-through. The drill begins the same way as the previous drill. Begin with the ball at the right box outside the lane. Toss the ball to the right elbow. Catch the ball with your back to the basket using a one-two stop, landing on your inside (right) foot and pivoting toward the middle. Face the basket, making a jab step with your left foot, while making a shot fake, showing the ball high. Be in triple-threat stance, a threat to shoot first. Stop and read the defender’s hand position. If the defender’s hand is up on the same side as your jab step, step-through with your jab-step foot past your defender’s lead foot moving your head and shoulders under your defender’s arm. If the defender’s hand is up on the side away from your jab step, crossover and step-through with your jab-step foot past your defender’s lead foot moving your head and shoulders under your defender’s arm. Protect the ball with your head and shoulders and move it away from the defender’s reach as you shoot a jump shot.
Now perform the drill, starting from the left box and tossing the ball to the left elbow. Catch the ball while landing on your inside (left) foot first and pivot on your inside (left) foot, using a front turn toward the middle.
Record the number of step-through jump shots made out of 10 attempts from the left el-bow. Record the number of step-through jump shots made out of 10 attempts from the right elbow.
SHOOTING FOCUSCambridge HotShots Basketball
0790 406 2735 * www.cambridgehotshots.com
BEEF is good way to learn to become a better shooter.
B – Balance: get your balance. make sure you are steady. Feet should be shoulder-width apart, shooting leg slightly in front of the other (if you are right-handed this is your right leg and vice-versa). Hips should be turned towards the basket.
E – Eyes: Think of yourself as having 7 eyes on your body and every eye needs to be looking at the basket. 2 on your shoes, 2 on your hips, 2 your eyes and 1 on your shooting elbow. Do not take your eyes off the focal point and do not follow your hand or the flight of the basket-ball through the air.
E – Elbow: make sure your elbow is in line with the basketball hoop. The ball should be lightly resting on your fingers with your index finger on the centre of the ball. Place your guide hand on the side of the ball. This will not be used to shoot but simply to steady the ball in your shooting hand. The all important elbow of the shooting arm should be directly underneath the basketball and this is what will give it a clean, straight flight through your line of sight.
F - Follow thru: an essential part of all shooting. Make sure you follow thru when releasing your shot. This is vital to the placement of a good basketball shot. A clever tip is to imagine that you are placing your hand into the basket as you shoot the basketball towards it.
Center of GravityObtaining a good center of gravity is critical to the shooter and again is achieved with proper foot work. This is obtained when the feet are properly placed, the shoulders are square to the basket, and the shooter’s body is in proper relation to placement of their feet. This, like all other areas of the player’s game, has to happen instantaneously. The athlete does not have the time to pre-think and sort all of this out during live game play. If all of this differ-ent footwork is firmly locked into the athlete’s muscle memory (like playing the piano), their mind and body will instantaneously work together to execute whatever footwork is neces-sary to obtain a good center of gravity and proper balance to execute whichever shot they choose. As always there is only one way to get all this information locked into the athlete’s muscle memory, and that is with repetition.
SHOOTING FOCUSCambridge HotShots Basketball
0790 406 2735 * www.cambridgehotshots.com
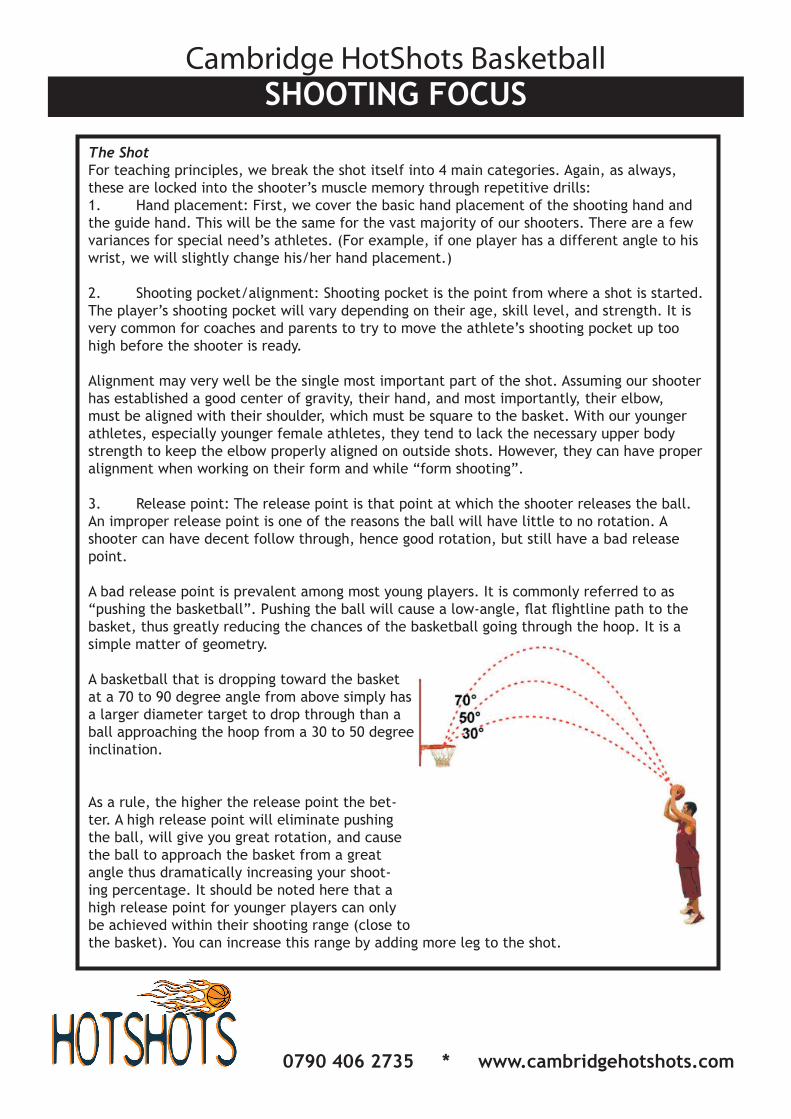
The ShotFor teaching principles, we break the shot itself into 4 main categories. Again, as always, these are locked into the shooter’s muscle memory through repetitive drills:1. Hand placement: First, we cover the basic hand placement of the shooting hand and the guide hand. This will be the same for the vast majority of our shooters. There are a few variances for special need’s athletes. (For example, if one player has a different angle to his wrist, we will slightly change his/her hand placement.) 2. Shooting pocket/alignment: Shooting pocket is the point from where a shot is started. The player’s shooting pocket will vary depending on their age, skill level, and strength. It is very common for coaches and parents to try to move the athlete’s shooting pocket up too high before the shooter is ready. Alignment may very well be the single most important part of the shot. Assuming our shooter has established a good center of gravity, their hand, and most importantly, their elbow, must be aligned with their shoulder, which must be square to the basket. With our younger athletes, especially younger female athletes, they tend to lack the necessary upper body strength to keep the elbow properly aligned on outside shots. However, they can have proper alignment when working on their form and while “form shooting”. 3. Release point: The release point is that point at which the shooter releases the ball. An improper release point is one of the reasons the ball will have little to no rotation. A shooter can have decent follow through, hence good rotation, but still have a bad release point. A bad release point is prevalent among most young players. It is commonly referred to as “pushing the basketball”. Pushing the ball will cause a low-angle, flat flightline path to the basket, thus greatly reducing the chances of the basketball going through the hoop. It is a simple matter of geometry. A basketball that is dropping toward the basket at a 70 to 90 degree angle from above simply has a larger diameter target to drop through than a ball approaching the hoop from a 30 to 50 degree inclination. As a rule, the higher the release point the bet-ter. A high release point will eliminate pushing the ball, will give you great rotation, and cause the ball to approach the basket from a great angle thus dramatically increasing your shoot-ing percentage. It should be noted here that a high release point for younger players can only be achieved within their shooting range (close to the basket). You can increase this range by adding more leg to the shot.