Navigating and using software ................................................................. 3
Importing Data ......................................................................................... 4
Initial set up of data ................................................................................. 6 General Options .............................................................................................. 6 Membership types ........................................................................................... 6 Styles & Programs (professional version only) ................................................ 7 Grades & Levels ............................................................................................. 7 Age Groups ..................................................................................................... 8 Class Types ..................................................................................................... 8 Locations ........................................................................................................ 9 Custom Data ................................................................................................... 9
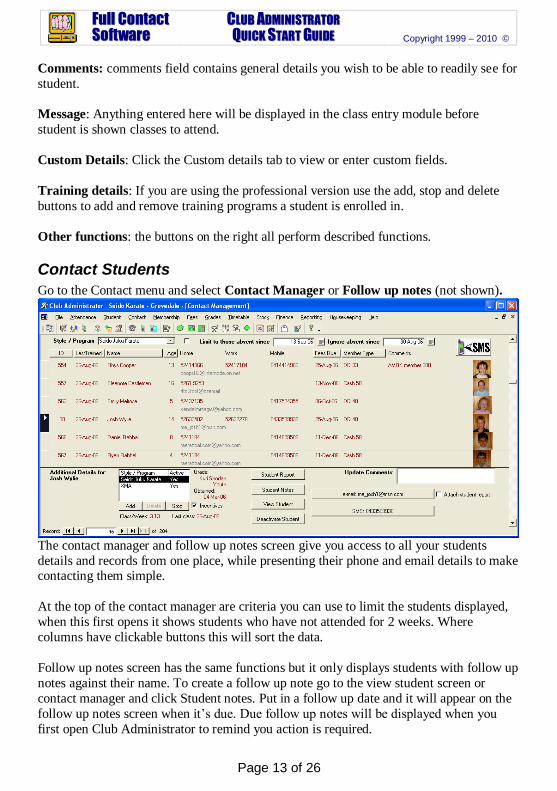
Students .................................................................................................. 11 Add Students ................................................................................................. 11 Manage Student details ................................................................................. 12 Contact Students ........................................................................................... 13
Navigating and using software Club administrator is designed to be user friendly and easy to navigate and use. If you
have used other software packages you should find this a breeze. For those of you who
may be newer to computing here are some simple tips on how the software works.
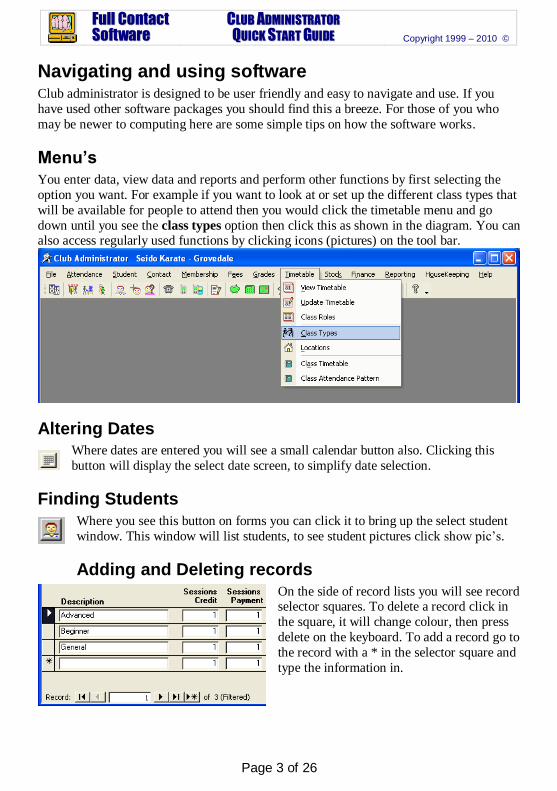
Menu’s
You enter data, view data and reports and perform other functions by first selecting the
option you want. For example if you want to look at or set up the different class types that
will be available for people to attend then you would click the timetable menu and go
down until you see the class types option then click this as shown in the diagram. You can also access regularly used functions by clicking icons (pictures) on the tool bar.
Altering Dates Where dates are entered you will see a small calendar button also. Clicking this
button will display the select date screen, to simplify date selection.
Finding Students
Where you see this button on forms you can click it to bring up the select student
window. This window will list students, to see student pictures click show pic‟s.
Adding and Deleting records
On the side of record lists you will see record selector squares. To delete a record click in
d. Membership details, all students will be assigned a membership type, if you
wish to load all students with the same membership type initially set this up in
Club Administrator Member Types then select this membership as the default value. Alternately if you have different membership types in your records eg.
Child, Adult, Concession etc. then you should set these up, making sure that the
description in Club Administrator matches that in your file perfectly. If you will
be loading all to one membership type you may want to call it something like
„Initial Load‟. If you have different payment amounts that members may be
paying then specify this amount in training fee and this will override the standard
amount for a membership type. You can load members as active or inactive or
can make this conditional on a field in the file being loaded.
e. Family Memberships, if you have memberships where more than one student
are associated with the same payment then these can be loaded to the same
membership. The paying students number needs to be specified in the „Add to Student ID‟ field when initially loading other family members.
f. Grades, only one style / program can be loaded in one load. You must set up this
style in club administrator along with any grades and age group information you
will be loading prior to loading it. To load a member against a style they must
have an age group and grade assigned so select a default value for these to be
used where none is found in the file. You must also make sure that your
descriptions match those in club administrator exactly.
g. Grade / Promotion history, you can load promotion history with this load
process. To do this grades must be loaded in the order they where obtained. The
following is an example of a file that could be used to load past promotions. Most
recent grade must be last one loaded. If a column is added with number of classes
since grading this figure will be loaded against each promotion also.
StudentID Obtained Grade
901 1/02/2009 4th Kyu
901 1/07/2009 3rd Kyu
901 1/10/2009 2nd Kyu
901 1/01/2010 1st Kyu h. Multiple styles, If you have data for more than one style you must load these
separately, additional Style / Program files would only need to contain the
student number and the Style / Program information.
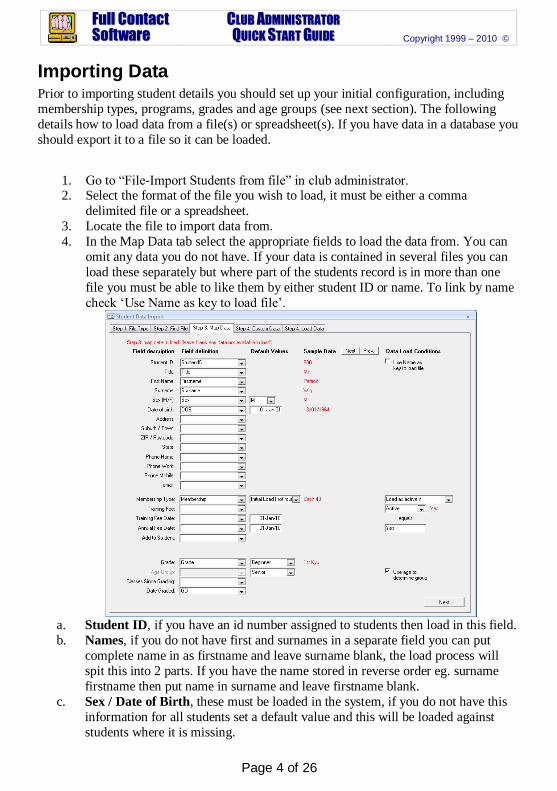
A preview of the data to be loaded is displayed in the Sample Data column so you can check that these have been correctly mapped.
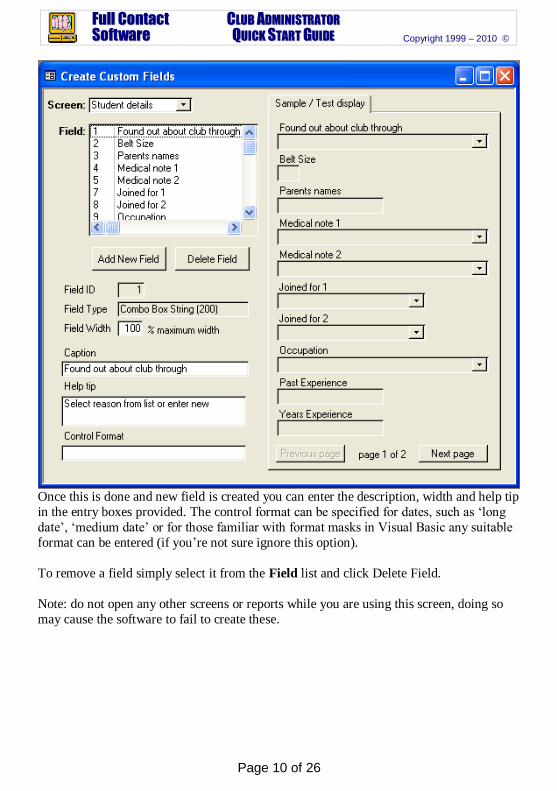
5. Select any custom data fields you wish to load and map where the data loads
Initial set up of data Some sample configuration data is entered in the database ready for you to use. You can
immediately start adding students, recording attendance and experimenting to see how the
software functions. Alternately you can go through and set up the configuration data to
meet your requirements.
General Options
Tax Options When you first install the software the Tax Options are on and a default Tax of 10%
is set. If you are not going to be recording Goods and Services Taxes or if the amount is different to 10% then you should update this setting now. Go to the File
menu and select options, Then the Tax tab and enter the correct configuration.
Other Options You will see many other tabs in the options screen, you can set up these options now
if you wish or do so later at any time.
School details To display your schools name and details in various places, go to the File menu and
select Club Details. Enter your school name and address, then select the Club Logo
tab to load your club logo so this can be displayed also.
Membership types
Go to the Membership menu and select Member Types. You set up membership types
that you can then assign to students as they are entered. Several sample membership types
are already set up when you initially install the software.
There are several types of membership supported. Use as many of these as you require.
Annual Fees: Enter the amount for annual fee in „Annual Fee‟
Annual membership fees are available to be used in conjunction with all other fee types,
this is for recording an annually occurring fee (can be used for insurance).
Training Fees: The amount entered in this column will be the recurring training fee
amount. It will fall due at the period stated in the Training Fee Period. If this is set to sessional then it will fall due every time a student attends class.
Period Contract: If the membership is to be a fixed term, normally 6 or 12 monthly then
check this box and enter the number of contract payments in the following field. If the
membership has a minimum period, eg, 6 payments then do not check this box.
External Collection: Check this box if membership fees will be collected by an external
company or by a automated collection system. This also includes if you are going to put
through credit card transactions on a bulk basis.
Free Gradings: Select this if membership type entitles students to free promotions.
Classes: This field is used to limit the number of classes a student can attend. If they are
only permitted to attend 10 classes per month enter 10 in this field, set membership to
monthly and check Expire classes each period. Classes can also be used for multi class
passes where a student pays for a number of classes, in this case do not check expire
classes each period, the training period will be show the length of time until the multi-
class pass expires.
Styles & Programs (professional version only)
Go to the Grades menu and select Styles & Programs to set up multiple styles and
programs. If the style you are setting up will have different grades or levels check the
multi level option.
Grades & Levels
Go to the Grades menu and select Grades & Levels to set up Grades and levels for each
program. Select the program in the Select Style Program box then enter it‟s levels.
Enter Student details. You must enter a Name, Sex and DOB for every student then select
a membership type. In the initial Training Details you must select a style or program for
the student, if they will be doing multiple styles you can add them later. The start date to
enter is the date the new student will be paying fees. For existing students do not use the
day they started training, otherwise it will prompt you to collect fees from then. You can enter their actual start date later, along with their promotion history if you decide to.
Family Memberships: If you have family memberships where one person pays for
multiple members then you can attach them all to the one membership (you will need to
set up family membership types with the total fees that need to be payed). To do this click
the Add to existing button then select the person from the list whose membership you
wish to add them to. If you have created a student and not done this, you will need to
deactivate them and activate them, when you activate them you will now have this option.
The Activate Student and Deactivate Student screens are also under the student menu.
The view student screen is one of the most useful in the whole system, from this screen you can perform almost all functions related to a student. To get to this screen go to the
Student menu and select View Student, Click on the face icon or if you are in any screen
that has the Student status display (the green bar with „Current Student‟ shown above),
double click on this and it will open the View Student screen.
Student Pictures: There are several ways to manage student pictures. If you click in the
box „click to insert student picture‟ you will be prompted „Insert Picture‟:
1. Click „no‟ then press shift + insert and paste a picture you previously copied to the
clip board.
2. On the options screen (See General Options) is a „Student Pics‟ tab. If you have the
„Use Microsoft Photo editor‟ option checked clicking yes opens Microsoft photo
editor to manage your pictures (note: this comes with Microsoft office though it is no longer available in Office 2003).
3. If you don‟t have Photo Editor then do not check this option, instead you will be
prompted for the document type you should choose „Bitmap Image‟ or another
appropriate image type.
SMS: Click the phone icon to initiate an SMS to this student.
Email: Double click on the email address to open an email to this student.
fees can work. Select the Affiliation Types tab on this screen to set up affiliation types.
You will see a check box, Pay by Club this determine how affiliation fees will be handled.
They can either be paid by the club, in this scenario the student may not even be aware of them, the club pays for the student. Alternately they are paid by the student and will
appear as another fee students pay. If affiliation fees are paid by the student they are
received in the Receive fees screen. If they are paid by the club the are collected in this
screen also, click Club report and update tab to access these functions.
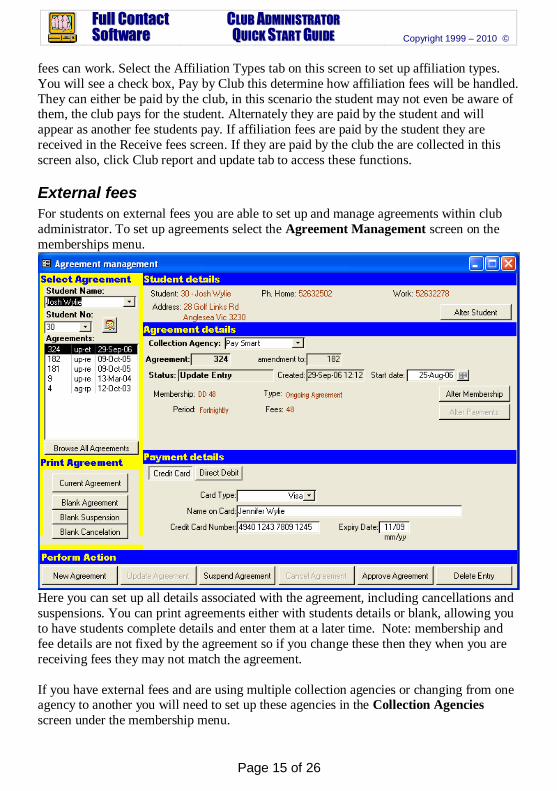
External fees
For students on external fees you are able to set up and manage agreements within club
administrator. To set up agreements select the Agreement Management screen on the
memberships menu.
Here you can set up all details associated with the agreement, including cancellations and
suspensions. You can print agreements either with students details or blank, allowing you
to have students complete details and enter them at a later time. Note: membership and
fee details are not fixed by the agreement so if you change these then they when you are
receiving fees they may not match the agreement.
If you have external fees and are using multiple collection agencies or changing from one agency to another you will need to set up these agencies in the Collection Agencies
Most of this screen is related to receiving files from these agencies, above are the format
configuration for 2 commonly used companies.
If memberships are flagged for external collection you have several ways these can be
managed and processed.
Manual Statement entry
This is the simplest method. When you receive a statement of what has been collected
from the external company open the Receive External Payments screen under the Fees menu.
All students on external memberships will appear sorted in alphabetical order, simply enter in all amounts received and click process payments. If you click the + Part Payments
button it will finalize payments where the full amount was not received. Doing this is only
You can add and update existing classes through the timetable menu „Update timetable‟
option. When setting up classes use age groups and level requirements to only have
classes displayed to students eligible to attend them.
If you wish to limit classes to specific students you can use the class role function under
the timetable menu to achieve this. When using the attendance entry screen this allows
you to record required payments for all students not in class.
Attendance Entry
Go to the Attendance menu and select Attendance Entry.
This screen is designed to allow reception staff record students attending classes. Classes
on the timetable for that day are listed on the left. Simply click a class to make it active.
Then enter the student number or make to locate students, once located click Add to class. You can record instructors by clicking on Alter Instructors. This screen also allows you to
send bulk SMS‟s to all students in a class or produce a report of students in class.
If there is a Class Role for this class then 2 additional buttons will appear, Click Class
Role to get a listing of all those on role and Not in Class button to make it simpler to add
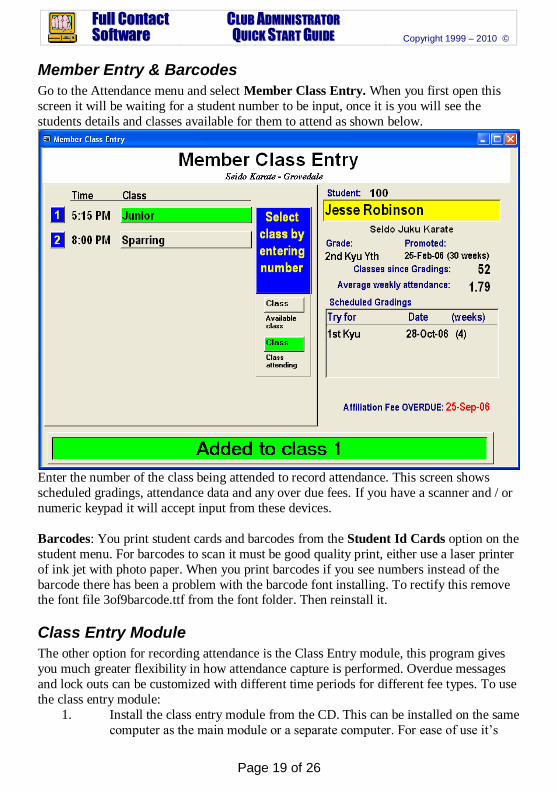
Go to the Attendance menu and select Member Class Entry. When you first open this
screen it will be waiting for a student number to be input, once it is you will see the
students details and classes available for them to attend as shown below.
Enter the number of the class being attended to record attendance. This screen shows
scheduled gradings, attendance data and any over due fees. If you have a scanner and / or
numeric keypad it will accept input from these devices.
Barcodes: You print student cards and barcodes from the Student Id Cards option on the
student menu. For barcodes to scan it must be good quality print, either use a laser printer
of ink jet with photo paper. When you print barcodes if you see numbers instead of the
barcode there has been a problem with the barcode font installing. To rectify this remove the font file 3of9barcode.ttf from the font folder. Then reinstall it.
Class Entry Module
The other option for recording attendance is the Class Entry module, this program gives
you much greater flexibility in how attendance capture is performed. Overdue messages
and lock outs can be customized with different time periods for different fee types. To use
the class entry module:
1. Install the class entry module from the CD. This can be installed on the same
computer as the main module or a separate computer. For ease of use it‟s
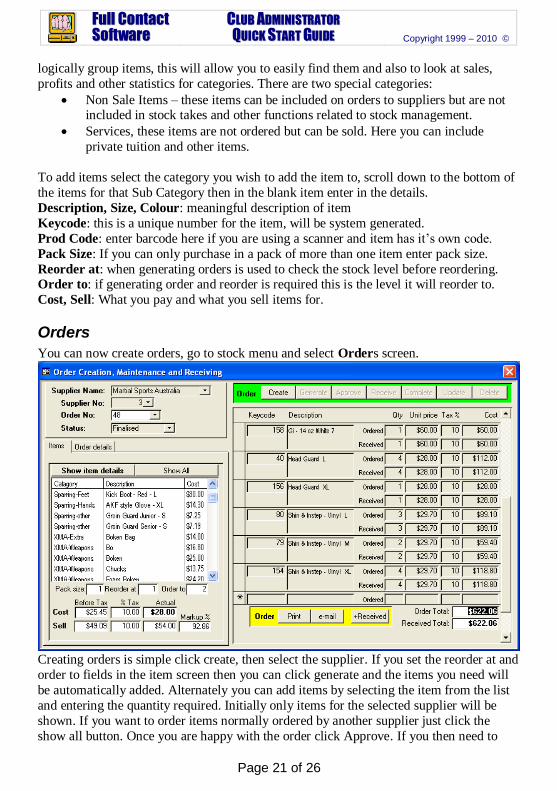
logically group items, this will allow you to easily find them and also to look at sales,
profits and other statistics for categories. There are two special categories:
Non Sale Items – these items can be included on orders to suppliers but are not included in stock takes and other functions related to stock management.
Services, these items are not ordered but can be sold. Here you can include
private tuition and other items.
To add items select the category you wish to add the item to, scroll down to the bottom of
the items for that Sub Category then in the blank item enter in the details.
Description, Size, Colour: meaningful description of item
Keycode: this is a unique number for the item, will be system generated.
Prod Code: enter barcode here if you are using a scanner and item has it‟s own code.
Pack Size: If you can only purchase in a pack of more than one item enter pack size.
Reorder at: when generating orders is used to check the stock level before reordering. Order to: if generating order and reorder is required this is the level it will reorder to.
Cost, Sell: What you pay and what you sell items for.
Orders
You can now create orders, go to stock menu and select Orders screen.
Creating orders is simple click create, then select the supplier. If you set the reorder at and
order to fields in the item screen then you can click generate and the items you need will
be automatically added. Alternately you can add items by selecting the item from the list
and entering the quantity required. Initially only items for the selected supplier will be
shown. If you want to order items normally ordered by another supplier just click the
show all button. Once you are happy with the order click Approve. If you then need to
I have been using Full Contact Software now for almost 4 years, it just keeps
on getting better. Having wasted a whole lot of money on several programs I
am so glad we found "full contact".
Having stats at your finger tips is an essential element to achieving good
business success, it does it all from student management to stock
management. It really is the A to Z of software that no serious school owner
can do without.
In fact one of my first recommendations as a professional martial arts
business consultant is to buy this program. It is the only program I
recommend or use.
Master Fari Salievski
KMA Black Belt Success Schools
It's been almost a year since we began using Club Administrator and it has
been a great help to our organization. We are the headquarters to a worldwide organisation and we oversee over 500 students at our location alone. With so
many options and capabilities, Club Administrator is a must for any size
school. We've been through other check-in/administrative programs, but
Club Admin is the best and the technical support is by far incomparable.
I recommend this program, to anyone.
Kyoshi Akira Nakamura
World Seido Juku Karate Organisation Honbu, New York, USA
I have been using club admin software for five years now. During this time I
have been given free trials of other software all promising to be better to do
this or that. However they have all failed to perform. Club Administrator
does what I want. It is easy to navigate and update, Malcolm is great with
upgrades and support (never more than a phone call or email away) Club
admin tracks attendance, gives me usable stats on retention growth, birthdays,
new students starting stopping tracks my stock it is a complete package.
I fully endorse full contact software it has helped me get to where i am (over
300 active students) and without this software I don't think that would