Steam Distributors Installation and Operation Manual Includes installation, operation maintenance and troubleshooting information for your ASD, BSD, CSD, and RSD distributors. 2556592-C| 23/11/2018 Important: Read and save these instructions. This guide to be left with equipment owner.
Transcript
Steam Distributors Installation and Operation Manual Includes installation, operation
maintenance and troubleshooting
information for your ASD, BSD, CSD,
and RSD distributors.
2556592-C| 23/11/2018
Important: Read and save these instructions. This guide to be left with equipment owner.
Thank you for choosing Condair.
Proprietary Notice
This document and the information disclosed herein are proprietary data of Condair LTD. Neither this
document nor the information contained herein shall be reproduced, used, or disclosed to others without the
written authorization of Condair LTD., except to the extent required for installation or maintenance of
recipient’s equipment. All references to the Condair name should be taken as referring to Condair LTD.
Liability Notice
Condair does not accept any liability for installations of humidity equipment installed by unqualified personnel
or the use of parts/components/equipment that are not authorized or approved by Condair.
Copyright Notice
Copyright 2018, Condair LTD. All rights reserved.
INSTALLATION DATE (MM/DD/YYYY)
MODEL #
SERIAL #
CYLINDER #
Contents
2 Installation
2 Receiving and Unpacking
Equipment
2 Pre-Installation Check
2 Steam Line Installation
4 Condensate Return Guidelines for
Main Steam Lines
1 | Steam Distributors Installation Manual
Introduction
CAUTION: Servicing
Disconnect main power before any servicing.
The plumbing and electrical compartments contain high voltage components and wiring. Access should be limited to authorized personnel only.
During and following operation of the humidifier, the steam and components in contact with the steam such as the blower pack, steam lines, steam distributors, and condensate lines can become hot and can burn if touched.
Condair does not accept any liability for installations of humidity equipment installed by unqualified personnel or the use of parts/components/equipment that are not authorized or approved by Condair.
CAUTION: Electrical
All electrical work should be done according to local and national electrical code.
Electrical connection to be performed by a licensed electrician.
CAUTION: Plumbing
Plumbing to be performed by a licensed plumber.
Drain water from humidifier can be very hot. Do not drain to public sink.
All plumbing work should be done according to local plumbing code.
CAUTION: Installation
Do not mount on hot surfaces.
Do not mount in area where freezing can occur.
Do not mount on vibrating surface.
Do not mount on floor.
Humidifiers produce steam at atmospheric pressure no devices which could block steam output should be connected to the steam outlet.
Steam lines must be installed so that no restriction can produce backpressure in the humidifier.
Regardless of selecting on/off or modulating control method, Condair humidifiers must have a closed circuit across its on/off security loop control terminal to operate. Condair highly recommends the use of a duct high limit humidistat.
Steam Distributors Installation Manual | 2
Installation
Receiving and Unpacking Equipment
1. Check packing slip to ensure all material has been delivered.
2. All material shortages are to be reported to Condair within 48 hours from receipt of goods.
Condair assumes no responsibility for any material shortages beyond this period.
3. Inspect shipping boxes for damage and note on shipping waybill accordingly.
4. After unpacking, inspect equipment for damage and if damage is found, notify the shipper
promptly.
5. All Condair products are shipped on an f.o.b. factory basis. Any and all damage, breakage or
loss claims are to be made directly to the shipping company.
6. Each distributor is provided with: installation manual, one hose cuff, and two hose clamps.
Pre-installation Check
1. Ensure the total capacity of the humidifier is not higher than the allowable maximum steam
capacity of the distributors used.
ASD/RSD 10: 22 lbs/hr (10 kg/hr)
ASD: 25 lbs/hr (11.3 kg/hr)
BSD: 35 lbs/hr (15.9 kg/hr)
CSD: 115 lbs/hr (52.5 kg/hr)
SSD: 10 lbs/hr (4.5 kg/hr)
Steam Line Installation
1. Condair steam hose should only be used on short steam runs below 10 feet.
2. Ensure that no condensate produced in the steam line will remain trapped. Steam naturally
flows upward and condensate naturally flows downward.
3. See material recommended for use in the chart below. To eliminate the metal corrosion,
Condair does not recommend the use of steel piping.
4. Consult the following pages for step by step distributor installation starting with figure 1.
5. Consult the charts below for steam and condensate sizing guidelines when using steam
distributors.
3 | Steam Distributors Installation Manual
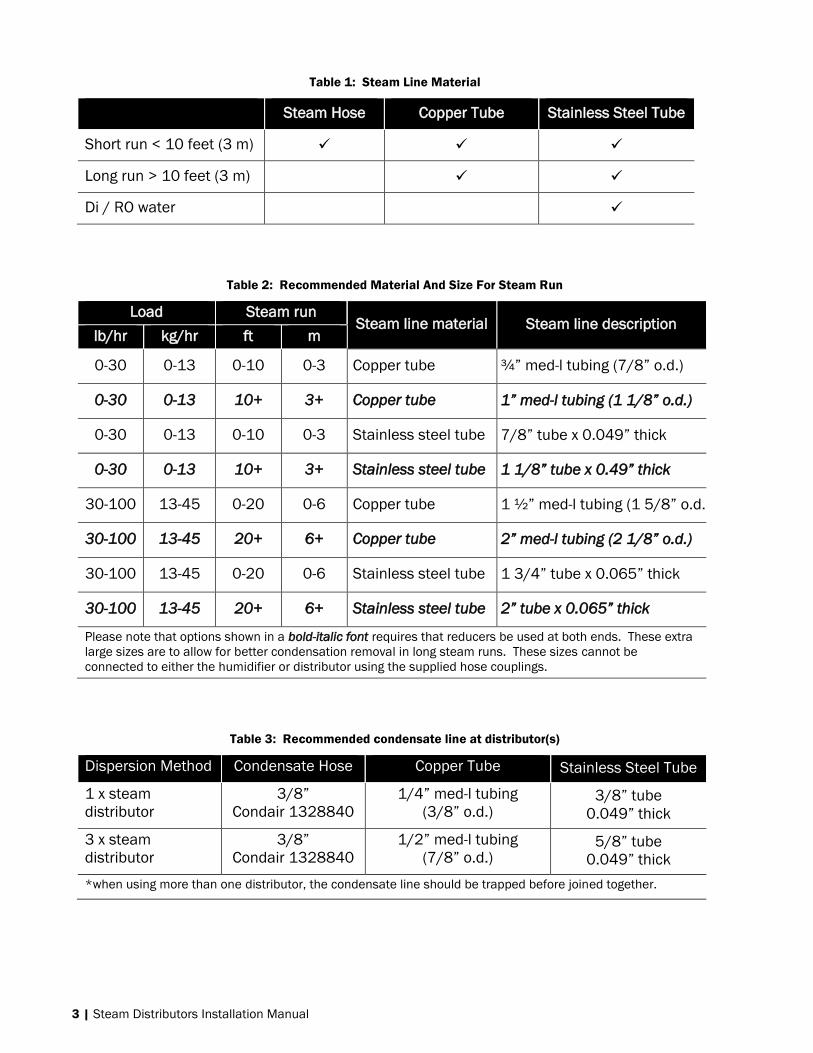
Table 1: Steam Line Material
Steam Hose Copper Tube Stainless Steel Tube
Short run < 10 feet (3 m)
Long run > 10 feet (3 m)
Di / RO water
Table 2: Recommended Material And Size For Steam Run
Load Steam run Steam line material Steam line description
*when using more than one distributor, the condensate line should be trapped before joined together.
Steam Distributors Installation Manual | 4
Condensate Return Guidelines For Main Steam Lines
1. Use vertical condensate leg of distributor only. Do not over-tighten clamp.
2. Condensate traps on steam mains must be located at all low points in the system, at each
elevation change and or directional change.
3. Horizontal runs of steam must rise 2” per foot (10º) when flow is going upwards away from
condensate trap, and fall ½” per foot (2º) when flow is going downwards towards a
condensate trap.
4. In a horizontal run of the steam main, condensate traps must be located at regular intervals
of 20 feet.
5. The condensate trap itself is a section of piping connected to the bottom of the main. A full
size tee must be used to create a condensate trap to allow the condensate to fall away from
the steam flow.
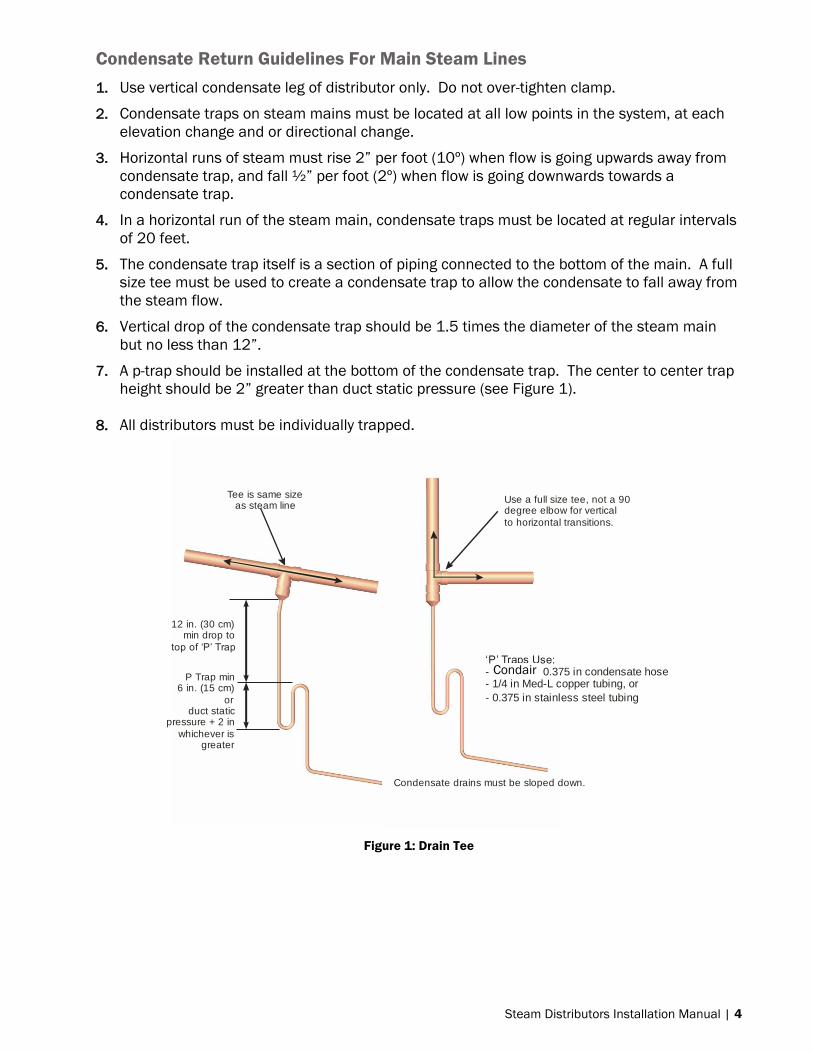
6. Vertical drop of the condensate trap should be 1.5 times the diameter of the steam main
but no less than 12”.
7. A p-trap should be installed at the bottom of the condensate trap. The center to center trap
height should be 2” greater than duct static pressure (see Figure 1).
8. All distributors must be individually trapped.
12 in. (30 cm) min drop to
top of ‘P’ Trap
P Trap min 6 in. (15 cm)
or duct static
pressure + 2 in
whichever is greater
Tee is same size as steam line
Use a full size tee, not a 90degree elbow for vertical
to horizontal transitions.
‘P’ Traps Use:- NORTEC 0.375 in condensate hose- 1/4 in Med-L copper tubing, or
- 0.375 in stainless steel tubing
Condensate drains must be sloped down.
Figure 1: Drain Tee
Condair
5 | Steam Distributors Installation Manual
NHTC, NHPC, andRH ONLY
To be 2” (50mm) longer then duct static pressure or minimum.
C1 B
6” min (150 mm)
12
”(3
00
mm
)
Rm
in.
12”(3
00
mm
)
min. 2º min. 10º
NortecHumidifier
min. 10º
GO TO GO TO
A
HORIZONTAL FLOW VERTICAL FLOW
NHTC, NHPC, andRH ONLY
6”min( 150 mm)
min. 2º min. 10º
12
”(3
00
mm
)
Rm
in.
12”(3
00
mm
)
min. 10º
NortecHumidifier
Use vertical condensate legonly.
Use vertical condensate legonly.
36”
min
.(9
14
mm
)
36”
min
.(9
14
mm
)
Figure 2: Distributor Above Humidifier
To be 2” (50mm) longer then duct static pressure or minimum.
6”min
(150
mm)
12”
(300
mm
)
12”(3
00m
m)
min. 2º min. 10º
Nortec
HumidifiersAll Models
min. 10º
Rm
in.
6”min
(150 m
m)
12”
(300
mm
)
min. 10ºmin. 2º
12”(3
00m
m)
min. 10ºNortec
HumidifiersAll Models
Use vertical condensate legonly.
Use vertical condensate legonly. 3
6”m
in.(9
14
mm
)
36”
min
.(9
14
mm
)
Figure 3: Distributor Below Humidifier
C1 B
Rm
in.
min. 10ºmin. 2º
min. 20 %
min. 20 %
Rm
in.
min. 20 %
GO TO GO TO
12
”(3
00
mm
)
12”(3
00
mm
)
6” min (150 mm)
36
”m
in.
(91
4m
m)
6” min(150 mm)
6” min(150 mm)
6” min(150 mm)
min. 10ºmin. 2º
12
”(3
00
mm
)
12”
(300
mm
)
min. 10º
Nortec HumidifiersAll Models
Nortec HumidifiersAll Models
Use vertical condensate legonly.
Use vertical condensate legonly.
36
”m
in.
(91
4m
m)
Figure 4: Distributor Under Obstruction
Steam Distributors Installation Manual | 6
Figure 5: Long Steam Run
GO TO C2
- 45º
2
+ 45º
1
1 turn
3
B
Always align distributor holes so that steam is discharged upwards to ensure condensate will
remain in the distributor.
Figure 6: Vertical Airflow
1 ft (30 cm)min before turn
Condensate tee every
15-20 ft(4.5 - 6 m)
Condensatetee at low
points
Individually trap multiple condensatereturns before joining on common line.
To Drain
Install condensate teebefore distributor
Method for Longer Runs With Limited Vertical Space
1 ft (30 cm)min.
7 | Steam Distributors Installation Manual
Figure 7: Horizontal Airflow
Steam Distributors Installation Manual | 8
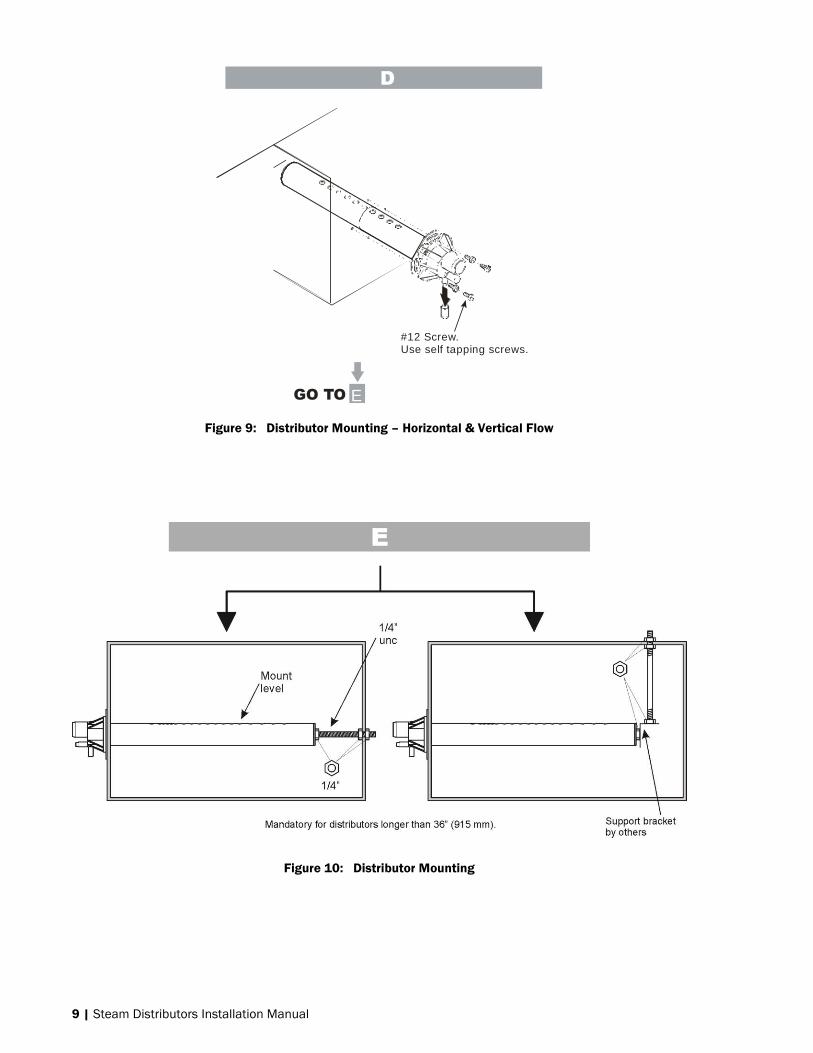
C2
DGO TO
Always align distributor holes so that steam is discharged upwards to ensure condensate will remain in the distributor.
H
1/3W2/3W
W
1/3W1/3W 1/3W 1/3W
Min. W = 8” (203 mm)
Figure 8: Vertical Airflow
* SSD distributors can only be installed with upward airflow in vertical duct applications.
Warning
These installation guidelines apply for duct velocities under 2000 ft/min
(610 m/min), please consult factory for higher velocities.
Please make sure no obstacles (elbow, filter, or diffuser) are located after the distributor in the direction of the airflow closer than the absorption distance calculated for your application.
Unless the exact absorption distance required for the steam absorption into the air stream is known, the distributor should be located at least 8-10 ft (2-3 m) away from any obstacle it may condense on (elbow, diffuser, filter, etc.).