59
Merchant Guide TD Mobile POS *Android paired screen shown
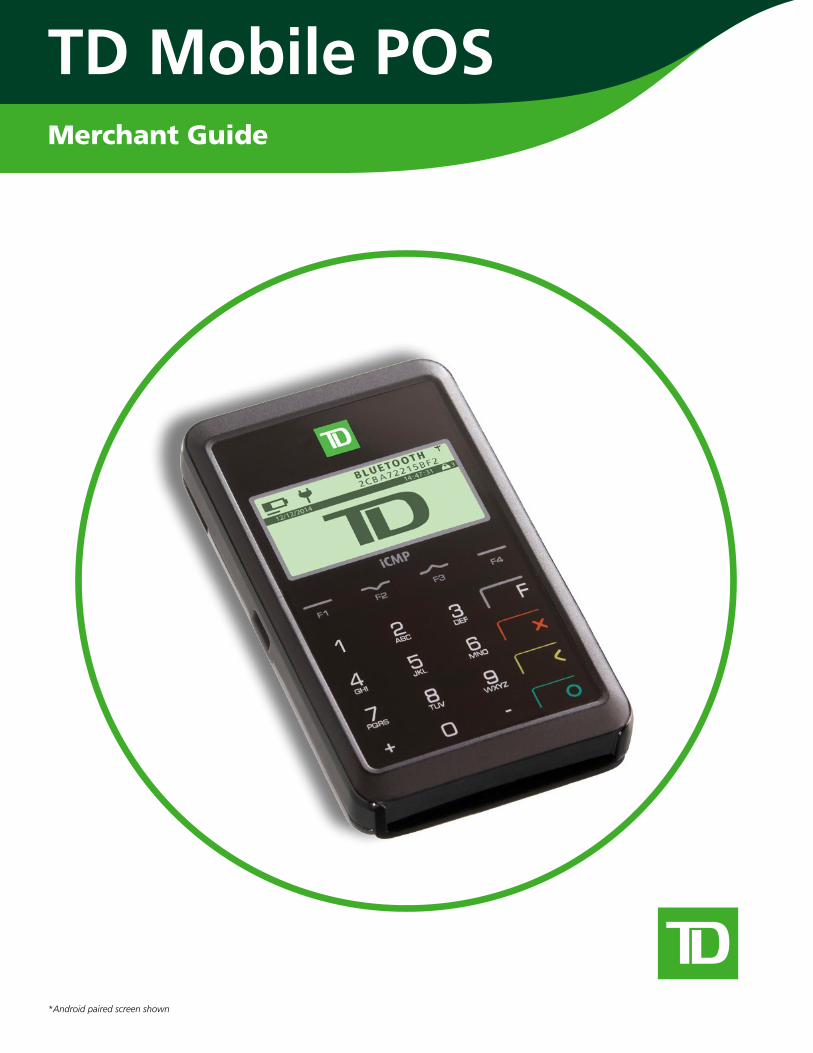
Merchant Guide
TD Mobile POS
* Android paired screen shown
COPYRIGHT © 2014 by The Toronto-Dominion Bank
This publication is confidential and proprietary to The Toronto-Dominion Bank and is intended solely for the use of
merchant customers of TD Merchant Solutions.
This publication may not be reproduced or distributed, in whole or in part, for any other purpose without the written permission
of an authorized representative of The Toronto-Dominion Bank.
The TD logo and other trademarks are the property of the Toronto-Dominion Bank.
Android, Chrome and Google Play are trademarks of Google Inc.
Apple, the Apple logo, Safari and iTunes are trademarks of Apple Inc., registered in the U.S. and other countries.
The Bluetooth® word mark and logos are registered trademarks owned by Bluetooth SIG, Inc. and any use of such marks by TD
is under license. Other trademarks and trade names are those of their respective owners.
Opera is a trademark of Opera Software A.S.A.
Firefox is a registered trademark of Mozilla Foundation.
Internet Explorer is a registered trademark of Microsoft Corporation in the United States and/or other countries.
Adobe and Flash are either registered trademarks or trademarks of Adobe Systems Incorporated in the United States and/or
other countries.
NOTICE
The Toronto-Dominion Bank reserves the right to make changes to specifications at any time and without notice. The infor-
mation furnished in this publication is believed to be accurate and reliable; however, The Toronto-Dominion Bank assumes no
responsibility for its use, including without limitation for infringements of intellectual property rights or other rights of third
parties resulting from its use.
MERCHANT INFORMATION
Merchant Name . . . . . . . . . . . . . . . . . . . . . . . . . . . . . . . . . . . . . . . . . . . . .
Merchant Number . . . . . . . . . . . . . . . . . . . . . . . . . . . . . . . . . . . . . . . . . . .
Terminal ID . . . . . . . . . . . . . . . . . . . . . . . . . . . . . . . . . . . . . . . . . . . . . . . . .
Table o
f Co
nten
tsWelcome Kit and Setup .............................................1
About the TD Mobile POS Solution ...........................6
Financial Transactions ..............................................15
Administration and Configuration ..........................25
Merchant Portal .......................................................31
Troubleshooting .......................................................41
Table of Contents

1
Section
1Overview of the TD Mobile POS Solution ..................2
The Purpose of this Guide . . . . . . . . . . . . . . . . . . . . . . . . . . . . . . . . . . . . . . . . . . . . . . . . . . . . . . . . . .2
What is the TD Mobile POS solution? . . . . . . . . . . . . . . . . . . . . . . . . . . . . . . . . . . . . . . .2
The Smartphone App and the PINPad ............................2The Merchant Portal ........................................................2
Welcome Kit Contents ..............................................3What is provided? . . . . . . . . . . . . . . . . . . . . . . . . . . . . . . . . . . . . . . . . . . . . . . . . . . . . . . . . . . . . . . . . . . . . . . .3
What do I need to do to use the TD Mobile POS solution? . . . . .3
Missing any components? . . . . . . . . . . . . . . . . . . . . . . . . . . . . . . . . . . . . . . . . . . . . . . . . . . . . . . . . . .3
Setting up the TD Mobile POS ...................................3Activate your account . . . . . . . . . . . . . . . . . . . . . . . . . . . . . . . . . . . . . . . . . . . . . . . . . . . . . . . . . . . . . . . .3
Charge your PINPad . . . . . . . . . . . . . . . . . . . . . . . . . . . . . . . . . . . . . . . . . . . . . . . . . . . . . . . . . . . . . . . . . . . .3
Download and install the smartphone app . . . . . . . . . . . . . . . . . . . . . . . . . . . . . .3
Enable Bluetooth® on your smartphone . . . . . . . . . . . . . . . . . . . . . . . . . . . . . . . . . .4
Pair your Android smartphone to the PINPad . . . . . . . . . . . . . . . . . . . . . . . . . .4
Pair your iOS smartphone to the PINPad . . . . . . . . . . . . . . . . . . . . . . . . . . . . . . . . . .4
Confirm pairing is complete . . . . . . . . . . . . . . . . . . . . . . . . . . . . . . . . . . . . . . . . . . . . . . . . . . . . . .4
Initialize your PINPad . . . . . . . . . . . . . . . . . . . . . . . . . . . . . . . . . . . . . . . . . . . . . . . . . . . . . . . . . . . . . . . . .5
How can I secure my product? .................................5
Summary ....................................................................5
Section 1Welcome Kit and Setup
TD MOBILE POS MERCHANT GUIDE
Welcome Kit and Setup 1
2
Overview of the TD Mobile POS Solution
The Purpose of this GuideThis guide will provide helpful information about the equipment, its features and TD Merchant Solutions. Please ensure you read this guide so that you become familiar with the capabilities of the TD Mobile POS and how it can support your business needs.
This guide provides instruction on the use and functionality of the TD Mobile POS solution. The provision of Visa®, MasterCard®, Discover®, American Express® and/or Interac® Direct Payment merchant services to you (the user) by TD Merchant Solutions is governed by the Merchant Services Agreement and any other agreement(s) that govern the services that we may provide to you.
The use of the TD Mobile POS solution with respect to the provision of merchant services by a third party is governed by any agreement(s) with such third party.
What is the TD Mobile POS solution?The TD Mobile POS solution is comprised of three components. They are the:
1. Smartphone app that allows you to: » Enter financial transactions » Review transactions
2. PINPad that allows customers to: » Pay for their transactions with credit or
debit cards
3. Merchant portal website that allows you to: » Review prior transactions » Configure your receipts » Manage card readers and sub-merchants
The SmarTphone app and The pInpadThe smartphone app and the PINPad work together as one solution.
• The smartphone app is like your electronic cashregister where you enter the total dollar value(including tax) of the customer’s purchase.
• The PINPad is the payment device where thecustomer pays for their purchase with theircredit or debit card.
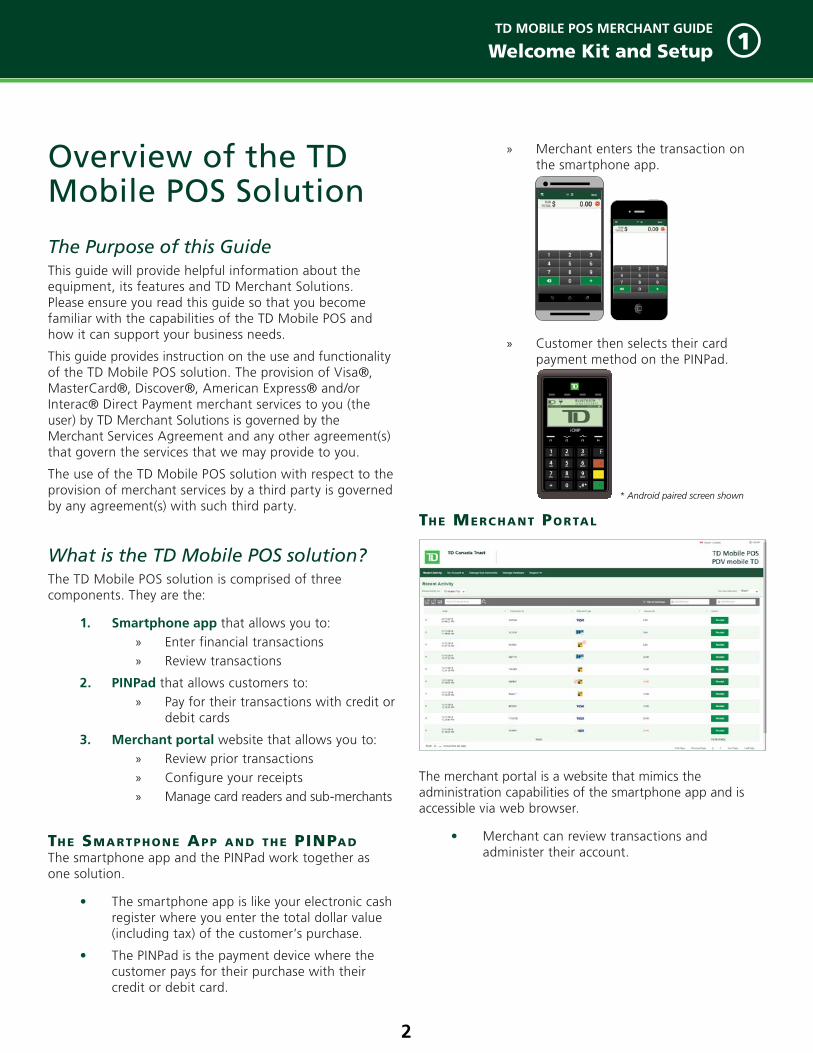
» Merchant enters the transaction on the smartphone app.
» Customer then selects their card payment method on the PINPad.
The merc hanT porTal
The merchant portal is a website that mimics the administration capabilities of the smartphone app and is accessible via web browser.
• Merchant can review transactions andadminister their account.
iCMP
F1 F4F2 F3
4GHI
BLUETOOTH
14 : 47 : 3112/12/20142CBA72215BF2
3
F
x
<
o
QZ1
* Android paired screen shown
TD MOBILE POS MERCHANT GUIDE
Welcome Kit and Setup 1
3
Welcome Kit Contents
What is provided?The physical kit has a:
• TD Mobile POS PINPad
• Installation guide and
• USB Cable (Black)
What do I need to do to use the TD Mobile POS solution?
1. Provide an Android™ smartphone that:a. Has an operating system version 2.3.6
or higherb. Has a data plan and connectivity to an
active cellular network or Wi-Fic. Is Bluetooth® wireless technology
capable
OR
1. Provide an iPhone™ mobile digital device that:a. Is a 4, 4S, 5, 5C, 5S or 6 modelb. Has iOS operating system version 6.1.3
or higherc. Has a data plan and connectivity to an
active cellular or Wi-Fi networkd. Is Bluetooth wireless technology capable
2. Download and install the TD Mobile POS appfrom the Google Play™ or iTunes stores ontoyour smartphone.
3. (Optional) Provide a computer with:a. Internet accessb. Acrobat® Reader® software (most
current version)c. An Internet browser (Chrome®,
Firefox®, Safari or Opera®) or InternetExplorer® (version 9 or higher)
d. Adobe® Flash® platforme. A screen resolution 1024 x 768 or greater
Missing any components?If something is missing from your welcome kit please contact TD Merchant Solutions Help Desk at 1-877-375-7331.
Setting up the TD Mobile POS
Activate your accountBy now, you will have received a welcome email with: instructions how to download the smartphone app, your username, and temporary password.
First you must activate your TD Mobile POS account from the Merchant Portal so that you can link it to your PINPad.
1. Go to the URL in your Welcome Email.
If you don't see the email in your inbox check yourspam folder.
2. Enter the username and password provided inthe email and select Login. The Terms andConditions screen appears.
3. Read the terms and conditions, check I haveread and accept the above Terms &Conditions, and click Activate Account. TheAccount Setup screen appears.
4. Enter your personal email, create your password,security questions and click Submit.
5. Click on the Manage Hardware tab. TheManage Readers screen appears.
6. Write down the Terminal ID under theNickname column. You will need this toinitialize your PINPad.
Charge your PINPad
1. Take the provided USB cable plug it into a USBpower source such as a computer or a powerbar with a USB charging port.
2. Plug the other end into the mini-USB port onthe right side of the PINPad.
Your PINPad is now powered on and charging.
Download and install the smartphone app
1. Download and install the TD Mobile POS appfrom Google Play or the App Store onto yoursmartphone.
TD MOBILE POS MERCHANT GUIDE
Welcome Kit and Setup 1
4
Enable Bluetooth® on your smartphone
1. Tap Settings -> Bluetooth -> Enable Bluetooth. Refer to the owner’s manual if your settings aren’t located here. Remain on the Bluetooth screen as you will need it for pairing your smartphone.
Pair your Android smartphone to the PINPad
1. On the PINPada. Press F1 /F1 -> 2 (Android) -> 2 (Display
Pairing Info).b. A Waiting for Pairing... message
appears with your device information.
2. On your smartphonea. Your Bluetooth screen should be open
from the last step. Tap the iCMP PINPad under the Available Devices list when it appears.
b. If you don’t see the PINPad, tap Scan for devices and tap it when iCMP appears.
3. Confirm your pairing informationa. PINPad - A six-digit passkey appears.
Confirm it is identical to the one displayed on your smartphone and press the F1 /F1 key.
b. Android - A six-digit passkey appears. Confirm it is identical to the one displayed on your PINPad and tap Pair.
c. PINPad - Press the x /Cancel button until you return to the Main screen - it’s the one with the TD logo.
4. Complete the pairinga. Log in to the TD Mobile POS app.b. Tap the icon in the top-left corner
to access the Settings screen.c. Tap Manage card readers. The
Manage card readers screen appears.
d. Tap the card reader you want to connect to via Bluetooth.
e. A green check mark appears beside the PINPad name.
f. PINPad Main Screen - A code appears beneath BLUETOOTH line and the icon stops flashing.
Pair your iOS smartphone to the PINPad
1. On the PINPada. Press F1 /F1 -> 1 (iOS Device) -> 1
(Device Discovery). The Searching... message appears.
b. Your iOS device will appear on the screen after about five seconds. Select it and press o/OK.
2. On your smartphonea. Your Bluetooth screen should be open
from the last step.
3. Confirm your pairing informationa. PINPad - A six-digit passkey appears.
Confirm it is identical to the one displayed on your smartphone and press the F1 /F1 key.
b. iOS - A pop-up message appears with the six-digit passkey. Confirm it is identical to the one displayed on your PINPad and tap Pair.
c. iOS - The PINPad name will appear under the devices list, and be labelled Connected.
d. PINPad - Press the x /Cancel button until you return to the Main screen - which has a TD logo.
e. iOS - Log onto the TD Mobile POS app.
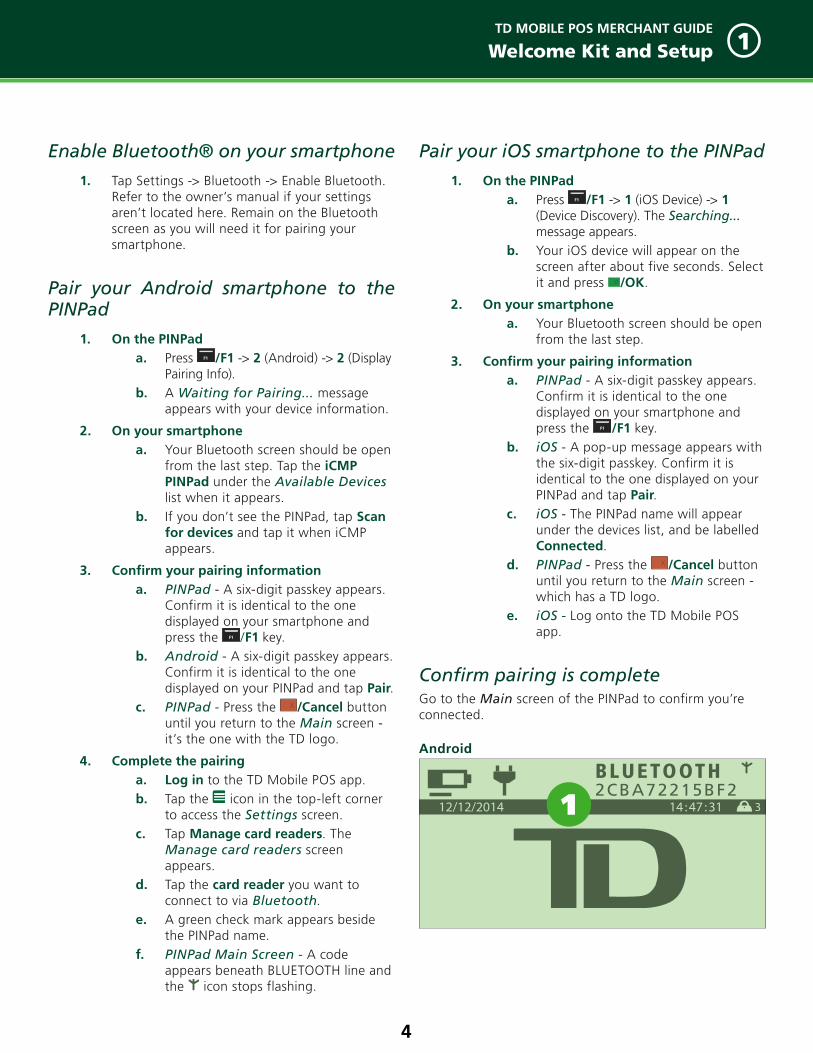
Confirm pairing is completeGo to the Main screen of the PINPad to confirm you’re connected.
Android
2CBA72215BF2BLUETOOTH
14 : 47 : 3112/12/2014 31

TD MOBILE POS MERCHANT GUIDE
Welcome Kit and Setup 1
5
1. Bluetooth
A line of code appears beneath the BLUETOOTH label and the wireless connectivity symbol ( ) stops flashing.
On the phone app the icon and the �
icon appear.
iOS
1. Bluetooth
Two computer icons appear to the left of the BLUETOOTH label and the wireless connectivity symbol ( ) flashes.
On the phone app the icon and the �
icon appear.
Initialize your PINPad
1. Please go to the Merchant Portal. To do this use the URL provided in your Welcome Email.
2. Once there, go to Manage Hardware and in the nickname column record the terminal ID.
3. On the PINPad press F4 /F4.
4. It will prompt you to enter the terminal ID. It always starts with GR. See below how to enter alpha-numeric characters.
a. To enter the G, press 4GHI and then the
F /F key. The 4 will change to a G.b. To enter the R press 7
PRS and then the F /F key. The 7 will change to a R.
c. The balance of the terminal ID is numbers. Finish entering the terminal ID and press o /OK.
BLUETOOTH
14 : 47 : 3112/12/2014 31
How can I secure my product? The TD Mobile POS PINPad is able to perform unauthorized transactions including debits to the merchant’s account due to fraudulent usage. It’s the merchant’s responsibility to take whatever steps are necessary to secure the PINPad, any usernames or passwords and to prevent unauthorized use. In any event, the merchant will be liable for any unauthorized use of the PINPad or any usernames or passwords.
You can create a PIN for the TD Mobile POS app by going to -> App PIN.
For more information see "How do I secure the app?" on page 29.
SummaryAfter reading this section you now know:
• The overall working relation of the smartphone app, PINPad and Merchant Portal
• The contents of the Welcome Kit
• The Welcome Email with your login information
• How to setup and pair the smartphone app and the PINPad
• How to protect cardholder security
• How to secure your smartphone app
In the next section you’ll learn more about each of the components mentioned in this section as well as their functions.
6
Section
2Section 2About the TD Mobile POS Solution
Legend .......................................................................8
The App ......................................................................8The Screens . . . . . . . . . . . . . . . . . . . . . . . . . . . . . . . . . . . . . . . . . . . . . . . . . . . . . . . . . . . . . . . . . . . . . . . . . . . . . . . . .8
Log In Screen ....................................................................8Transaction Screen ...........................................................9Settings Screen .................................................................9Transaction History ..........................................................9Tip Screen .........................................................................9Merchant Profile ..............................................................9Application PIN ..............................................................10Change Password ...........................................................10Troubleshoot ..................................................................10Manage card readers .....................................................10Choose Language ..........................................................10View Terms and Conditions ...........................................10FAQs ................................................................................10Sign Out ..........................................................................10
The PINPad ...............................................................11Front of PINPad . . . . . . . . . . . . . . . . . . . . . . . . . . . . . . . . . . . . . . . . . . . . . . . . . . . . . . . . . . . . . . . . . . . . . . . . .11
Bottom of PINPad . . . . . . . . . . . . . . . . . . . . . . . . . . . . . . . . . . . . . . . . . . . . . . . . . . . . . . . . . . . . . . . . . . . . .11
Right side of PINPad . . . . . . . . . . . . . . . . . . . . . . . . . . . . . . . . . . . . . . . . . . . . . . . . . . . . . . . . . . . . . . . . .11
Contactless Light . . . . . . . . . . . . . . . . . . . . . . . . . . . . . . . . . . . . . . . . . . . . . . . . . . . . . . . . . . . . . . . . . . . . . . .12
Screen, Icons and Contactless card reader . . . . . . . . . . . . . . . . . . . . . . . . . . . . . .12
Standby Screen ...............................................................12Ecomode Screen .............................................................12Main Screen ....................................................................12Contactless card reader .................................................13
Function Keys . . . . . . . . . . . . . . . . . . . . . . . . . . . . . . . . . . . . . . . . . . . . . . . . . . . . . . . . . . . . . . . . . . . . . . . . . . . .13
Alpha-numeric / Command Keypad . . . . . . . . . . . . . . . . . . . . . . . . . . . . . . . . . . . . . . . .13
Power Button . . . . . . . . . . . . . . . . . . . . . . . . . . . . . . . . . . . . . . . . . . . . . . . . . . . . . . . . . . . . . . . . . . . . . . . . . . . .13
Mini-USB Port . . . . . . . . . . . . . . . . . . . . . . . . . . . . . . . . . . . . . . . . . . . . . . . . . . . . . . . . . . . . . . . . . . . . . . . . . . . .13
Continued on next page

7
Sect
ion
2Admin Menu . . . . . . . . . . . . . . . . . . . . . . . . . . . . . . . . . . . . . . . . . . . . . . . . . . . . . . . . . . . . . . . . . . . . . . . . . . . . .13
Card Readers . . . . . . . . . . . . . . . . . . . . . . . . . . . . . . . . . . . . . . . . . . . . . . . . . . . . . . . . . . . . . . . . . . . . . . . . . . . . .14
The Merchant Portal ................................................14
Summary ..................................................................14
TD MOBILE POS MERCHANT GUIDE
About the Mobile POS Solution 2
8
Sub-Merchant This is the term used for an employee that works for the merchant’s business.
Smartphone AppThis is the TD Mobile POS smartphone app that you download and use on your smartphone. It is also referred to as the smartphone app or app.
The AppThe smartphone app is used by the merchant to initiate financial transactions, configure the receipts and perform various other functions.
The smartphone app includes:
• Transaction software
• Administration and configuration settings for the smartphone app
The ScreensThe app has four main screens. They are the:
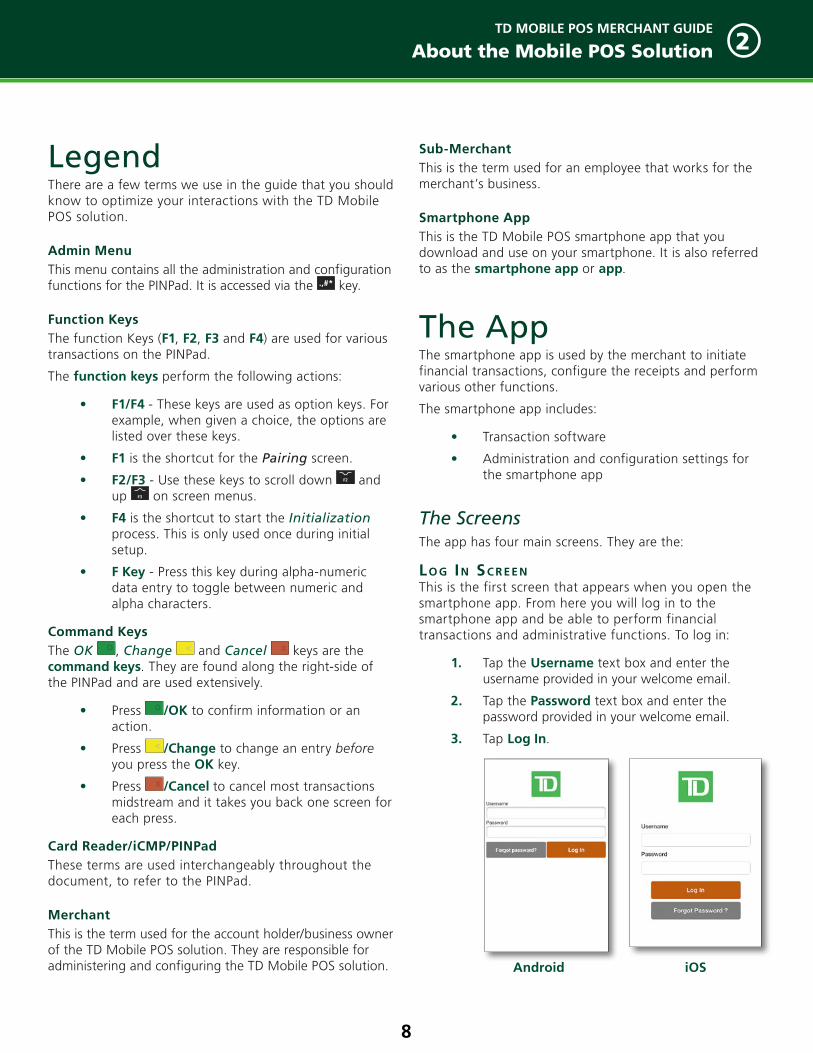
Lo g In Sc r eenThis is the first screen that appears when you open the smartphone app. From here you will log in to the smartphone app and be able to perform financial transactions and administrative functions. To log in:
1. Tap the Username text box and enter the username provided in your welcome email.
2. Tap the Password text box and enter the password provided in your welcome email.
3. Tap Log In.
Android iOS
LegendThere are a few terms we use in the guide that you should know to optimize your interactions with the TD Mobile POS solution.
Admin MenuThis menu contains all the administration and configuration functions for the PINPad. It is accessed via the key.
Function KeysThe function Keys (F1, F2, F3 and F4) are used for various transactions on the PINPad.
The function keys perform the following actions:
• F1/F4 - These keys are used as option keys. For example, when given a choice, the options are listed over these keys.
• F1 is the shortcut for the Pairing screen.
• F2/F3 - Use these keys to scroll down F2 and up F3 on screen menus.
• F4 is the shortcut to start the Initialization process. This is only used once during initial setup.
• F Key - Press this key during alpha-numeric data entry to toggle between numeric and alpha characters.
Command KeysThe OK o , Change < and Cancel x keys are the command keys. They are found along the right-side of the PINPad and are used extensively.
• Press o /OK to confirm information or an action.
• Press < /Change to change an entry before you press the OK key.
• Press x /Cancel to cancel most transactions midstream and it takes you back one screen for each press.
Card Reader/iCMP/PINPadThese terms are used interchangeably throughout the document, to refer to the PINPad.
Merchant This is the term used for the account holder/business owner of the TD Mobile POS solution. They are responsible for administering and configuring the TD Mobile POS solution.

TD MOBILE POS MERCHANT GUIDE
About the Mobile POS Solution 2
9
Tr a n Sac T I o n Sc r eenOnce you log in to the app you will be taken to the Transaction screen. From this screen you can initiate financial transactions or access the Settings screen on the app.
• Pairing status between your smartphone app and the PINPad is displayed along the top bar via two icons. The Android or the iOS icon indicates that your smartphone device’s Internet connection is active. Otherwise this icon will appear.
The solid �
icon indicates that your PINPad is paired with your smartphone as in the example below. If it’s shaded it means they are unpaired.
• Initiate financial transactions by entering a dollar amount and then tap the + button to add another amount for another item or tap Next to proceed to the next step.
You can enter a total amount for the entire purchase, but remember each dollar entry has its own entry on the receipt. This amount must be the total amount including tax.
• Tap the icon in the top-left corner to access the Settings screen for administrative functions.
* Android version shown
Se T T I n gS Sc r eenFrom this screen you can configure and administer the following:
• Transaction History
• Tip
• Merchant Profile
• App PIN
• Change Password
• Troubleshoot
• Manage card readers (Android only)
• Choose Language
• View Terms and Conditions
• FAQs
• Sign Out
Transaction History
This option shows you a list of up to the last 1000 transactions done on the smartphone app and PINPad.
Tip Screen
From this screen you can enable or disable tips on your TD Mobile Solution.
Merchant Profile
From here you can manage the following receipt information:
• Logo image
• Banner message
• Business email
* Android version shown
TD MOBILE POS MERCHANT GUIDE
About the Mobile POS Solution 2
10
• Phone number
• Business website URL
• Business Facebook info
• Business Twitter account
Application PIN
This allows you to protect your app with a PIN after thirty seconds, one minute or five minutes of inactivity.
Change Password
From here you can change your smartphone app / web portal password.
Troubleshoot
From here you can:
• Retrieve your last card transaction
• Clear or send your application logs to the TD Help Desk for troubleshooting
Manage card readers
This is used when you must pair your PINPad with your phone.
Choose Language
This option allows you to select English or French for the smartphone app. The PINPad has its own setting.
View Terms and Conditions
Review the terms and conditions attached to this product.
FAQs
Use this option to access the FAQs.
Sign Out
Select this option and you are returned to the Log In screen.
This option is not available on iOS.

TD MOBILE POS MERCHANT GUIDE
About the Mobile POS Solution 2
11
The PINPadThe PINPad is used by the merchant to accept the customer debit and credit card payments. It includes the following:
1. Contactless light
2. Screen, Icons and Contactless card reader
3. Function Keys
4. Alpha-numeric/command keypad
5. Magnetic stripe reader
6. Power button
7. Mini-USB/Power port
8. Chip card readeriCMP
F1 F4F2 F3
4
+ 0 .,#*
5JKL
6MNOGHI
8TUV
9WXY
7PRS
BLUETOOTH
14 : 47 : 3112/12/20142CBA72215BF2
3
F
x
<
o
QZ1 2
ABC3DEF
Right side of PINPad
5
6
7iCMP
F1 F4F2 F3
4
+ 0 .,#*
5JKL
6MNOGHI
8TUV
9WXY
7PRS
BLUETOOTH
14 : 47 : 3112/12/20142CBA72215BF2
3
F
x
<
o
QZ1 2
ABC3DEF
Bottom of PINPad
8
* Android version shown
iCMP
F1 F4F2 F3
4
+ 0 .,#*
5JKL
6MNOGHI
8TUV
9WXY
7PRS
BLUETOOTH
14 : 47 : 3112/12/20142CBA72215BF2
3
F
x
<
o
QZ1 2
ABC3DEF
Front of PINPad
2
4
3
1
TD MOBILE POS MERCHANT GUIDE
About the Mobile POS Solution 2
12
1. Battery is charging
The battery icon has a pulsing line beneath it and the plug icon beside it to show when it is charging. The battery icon is always visible; charging or not.
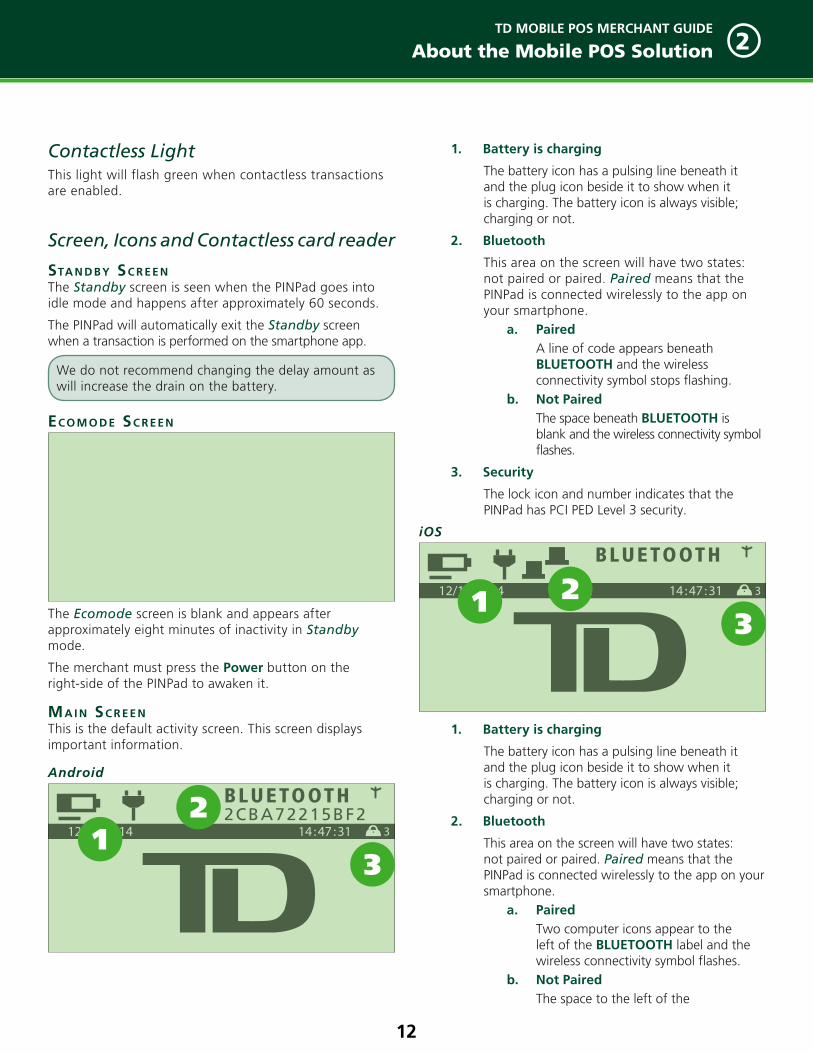
2. Bluetooth
This area on the screen will have two states: not paired or paired. Paired means that the PINPad is connected wirelessly to the app on your smartphone.
a. Paired A line of code appears beneath BLUETOOTH and the wireless connectivity symbol stops flashing.
b. Not Paired The space beneath BLUETOOTH is blank and the wireless connectivity symbol flashes.
3. Security
The lock icon and number indicates that the PINPad has PCI PED Level 3 security.
iOS
1. Battery is charging
The battery icon has a pulsing line beneath it and the plug icon beside it to show when it is charging. The battery icon is always visible; charging or not.
2. Bluetooth
This area on the screen will have two states: not paired or paired. Paired means that the PINPad is connected wirelessly to the app on your smartphone.
a. Paired Two computer icons appear to the left of the BLUETOOTH label and the wireless connectivity symbol flashes.
b. Not Paired The space to the left of the
New iOS screens needed
BLUETOOTH
14 : 47 : 3112/12/2014 31 23
Contactless LightThis light will flash green when contactless transactions are enabled.
Screen, Icons and Contactless card reader
STa n dby Sc r eenThe Standby screen is seen when the PINPad goes into idle mode and happens after approximately 60 seconds.
The PINPad will automatically exit the Standby screen when a transaction is performed on the smartphone app.
eco m o de Sc r een
The Ecomode screen is blank and appears after approximately eight minutes of inactivity in Standby mode.
The merchant must press the Power button on the right-side of the PINPad to awaken it.
ma I n Sc r eenThis is the default activity screen. This screen displays important information.
Android
We do not recommend changing the delay amount as will increase the drain on the battery.
2CBA72215BF2BLUETOOTH
14 : 47 : 3112/12/2014 312
3

TD MOBILE POS MERCHANT GUIDE
About the Mobile POS Solution 2
13
BLUETOOTH label is blank and the wireless connectivity symbol flashes.
3. Security
The lock icon and number indicates that the PINPad has PCI PED Level 3 security.
co n Tac T L eSS c a r d r e a de rThis is located under the PINPad screen. To make a contactless payment the customer must tap their card against the screen. See Card Readers on page 14 for more information.
Function Keys These keys are used to access certain screens and make on screen selections.
F1 Key F1
Select the left option on the screen and this is the shortcut key for the pairing menu.
F3 Key F3
Scroll up one menu selection.
F2 Key F2
Scroll down one menu selection.
F4 Key F4
Select the right option on the screen.
To start the initialization process.
Alpha-numeric / Command KeypadThe command keys allow you to cancel, correct and confirm actions. The keys are:
• F KEY F
• CANCEL x
• CHANGE <
• OK o
Power ButtonThis button is used to power the PINPad on. You can reboot your PINPad by holding down the power button until the screen starts the reboot process.
To power it off, press and hold both the < /Change and buttons simultaneously.
Mini-USB Port Use this port to charge your PINPad with a USB power source such as a computer and the cable provided.
Admin MenuPress the key to access the Admin Menu. The function-ality available on this menu is further described in Section 6 - Administration and Configuration.
Menu Sub-menu OptionSetup Menu Customization Language Options
Transaction Options
Hardware Options
Idle Timer
Bluetooth Pair Device
Unpair Device
Paired Device
Security Mode
Maintenance Menu
Host 1 Param DL
Host 2 Param DL
Reset Menu
System Info
--
--
Reset Invoice #
--
Other Functions
Service Menu
EMV Reports
Recent Error Rep.
--
TD MOBILE POS MERCHANT GUIDE
About the Mobile POS Solution 2
14
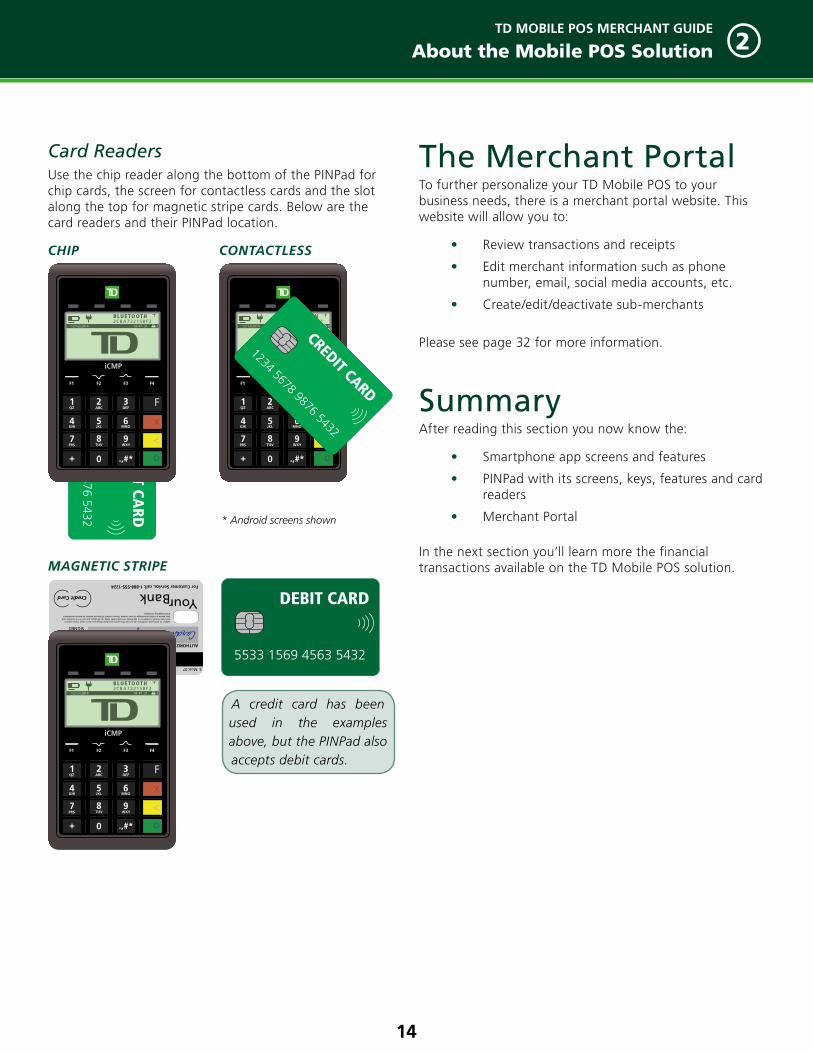
Card Readers Use the chip reader along the bottom of the PINPad for chip cards, the screen for contactless cards and the slot along the top for magnetic stripe cards. Below are the card readers and their PINPad location.
1234 5678 9876 5432
CREDIT CA
RD
iCMP
F1 F4F2 F3
4GHI
BLUETOOTH
14 : 47 : 3112/12/20142CBA72215BF2
3
F
x
<
o
QZ1
CHIP CONTACTLESS
iCMP
F1 F4F2 F3
4GHI
BLUETOOTH
14 : 47 : 3112/12/20142CBA72215BF2
3
F
x
<
o
QZ1
1234 5678 9876 5432
CREDIT CARD
* Android screens shown
MAGNETIC STRIPE
AUTHORIZED SIGNATURE9793 238 NOT VALID
UNLESSSIGNED
YourBank
Subject to terms and conditions, do not use this card to purchase things you don’t need. If you want to have lots of stuff, budget for it. Otherwise it’s called debt. Debt can be good, but not if it is excessive and rises above a certain percentage of your income. Please contact a financial advisor to discuss investment and budgeting strategies.
For Customer Service, call: 1-888-555-1224
Credit Card
For account information, go to www.yourbank.com S. Moss 070855490560
Cardholder Signature
iCMP
F1 F4F2 F3
4GHI
BLUETOOTH
14 : 47 : 3112/12/20142CBA72215BF2
3
F
x
<
o
QZ1
A credit card has been used in the examples above, but the PINPad also accepts debit cards.
5533 1569 4563 5432
DEBIT CARD
The Merchant PortalTo further personalize your TD Mobile POS to your business needs, there is a merchant portal website. This website will allow you to:
• Review transactions and receipts
• Edit merchant information such as phone number, email, social media accounts, etc.
• Create/edit/deactivate sub-merchants
Please see page 32 for more information.
SummaryAfter reading this section you now know the:
• Smartphone app screens and features
• PINPad with its screens, keys, features and card readers
• Merchant Portal
In the next section you’ll learn more the financial transactions available on the TD Mobile POS solution.
Section
3
15
Section 3Financial Transactions
Protecting Cardholder Privacy .................................16How should I store cardholder receipts? . . . . . . . . . . . . . . . . . . . . . . . . . . . . . . . . .16
Financial Transactions ..............................................16Accepted Card Types . . . . . . . . . . . . . . . . . . . . . . . . . . . . . . . . . . . . . . . . . . . . . . . . . . . . . . . . . . . . . . . .16
Payment Methods . . . . . . . . . . . . . . . . . . . . . . . . . . . . . . . . . . . . . . . . . . . . . . . . . . . . . . . . . . . . . . . . . . . . .16
Purchase ..................................................................17Cash . . . . . . . . . . . . . . . . . . . . . . . . . . . . . . . . . . . . . . . . . . . . . . . . . . . . . . . . . . . . . . . . . . . . . . . . . . . . . . . . . . . . . . . . . . .17
Credit Card (Insert) . . . . . . . . . . . . . . . . . . . . . . . . . . . . . . . . . . . . . . . . . . . . . . . . . . . . . . . . . . . . . . . . . . .17
Credit Card (Contactless) . . . . . . . . . . . . . . . . . . . . . . . . . . . . . . . . . . . . . . . . . . . . . . . . . . . . . . . . . .18
Credit Card (Swipe) . . . . . . . . . . . . . . . . . . . . . . . . . . . . . . . . . . . . . . . . . . . . . . . . . . . . . . . . . . . . . . . . . . .18
Credit Card (Manual Entry) . . . . . . . . . . . . . . . . . . . . . . . . . . . . . . . . . . . . . . . . . . . . . . . . . . . . . .19
Debit Card (Insert) . . . . . . . . . . . . . . . . . . . . . . . . . . . . . . . . . . . . . . . . . . . . . . . . . . . . . . . . . . . . . . . . . . . .20
Debit Card (Contactless) . . . . . . . . . . . . . . . . . . . . . . . . . . . . . . . . . . . . . . . . . . . . . . . . . . . . . . . . . . .20
Debit Card (Swipe) . . . . . . . . . . . . . . . . . . . . . . . . . . . . . . . . . . . . . . . . . . . . . . . . . . . . . . . . . . . . . . . . . . . .21
What do I if there is a dispute over a debit transaction? . . . . .21
Refunds ....................................................................21Cash and Credit . . . . . . . . . . . . . . . . . . . . . . . . . . . . . . . . . . . . . . . . . . . . . . . . . . . . . . . . . . . . . . . . . . . . . . . . .21
Void Last Transaction ...............................................22Credit and Debit . . . . . . . . . . . . . . . . . . . . . . . . . . . . . . . . . . . . . . . . . . . . . . . . . . . . . . . . . . . . . . . . . . . . . . .22
Receipts ...................................................................22HTML and PDF Copies . . . . . . . . . . . . . . . . . . . . . . . . . . . . . . . . . . . . . . . . . . . . . . . . . . . . . . . . . . . . . .22
Merchant Receipts .........................................................23Customer Receipts .........................................................23
Receipt Types . . . . . . . . . . . . . . . . . . . . . . . . . . . . . . . . . . . . . . . . . . . . . . . . . . . . . . . . . . . . . . . . . . . . . . . . . . .23
Purchase Receipts ...........................................................23Refund Receipt ...............................................................23Last Transaction Void Receipt .......................................24Declined Receipt ............................................................24
Day Close .................................................................24Close the business day . . . . . . . . . . . . . . . . . . . . . . . . . . . . . . . . . . . . . . . . . . . . . . . . . . . . . . . . . . . . . .24
Summary ..................................................................24
TD MOBILE POS MERCHANT GUIDE
Financial Transactions 3
16
Protecting Cardholder PrivacyAs a merchant, you have a responsibility to protect your customers from possible credit card fraud by maintaining the confidentiality of their personal information. The industry requires that merchants protect card holder’s account and transaction information including:
• Names
• Account numbers, CVD/CID/CVV, etc. CVD arethe three-digit data printed on the back ofVisa® and MasterCard® or the four-digit dataappearing on the front of an Amex card®
• Information embossed, encoded or appearingon Visa cards (“information”) in accordancewith the Visa Account Information SecurityStandards
You may not use this information for any purpose except to complete transactions authorized by the card issuer.
All information must be:
• Stored in a secure area
• Accessible by only authorized staff
• Destroyed and rendered unreadable before itis discarded
If you make arrangements with any third party for the purpose of collecting, processing or storing of printed information you must have a written contract with the third party that is in compliance with the Visa Account Information Security Standards.
You must allow TD Merchant Solutionsor Visa/MasterCard to inspect your premises and ensure that we can inspect the premises of any third party to verify that printed information is securely stored and processed. The Visa Account Information Security Standards Manual is available at www.visa.com, while the equivalent for MasterCard is available under Security Information at www.mastercard.com. For further information, please contact TD Merchant Solutions.
How should I store cardholder receipts?The following are guidelines that you should use when storing cardholder receipts:
• Users are responsible for retaining all receiptsto respond to cardholder inquiries.
Note: The Merchant Portal retains the most recent 1000 receipts.
Financial TransactionsThe TD Mobile POS solution allows you to do the following transactions:
• Purchases (Cash, Credit, Debit)
• Refunds (Cash, Credit)
• Void Last Transaction (Credit, Debit)
• End of Day or Close Business Day
Accepted Card TypesThe card types accepted by the TD Mobile POS solution are:
• American Express®
• American Express® Pay
• Discover®
• Interac® Direct payment
• Interac® Flash™
• MasterCard®
• MasterCard® PayPass™
• VISA®
• Visa® Debit
• Visa payWave®
Payment MethodsThere are three types of credit/debit card readers on the PINPad:
• Insert chipped card,
• Tap contactless card,
• Swipe the card’s magnetic stripe or
• Manually enter the credit card information
See Section 2 - About the TD Mobile POS Solution - Card Readers on page 14 for more information.
This is not a definitive list as TD regularly updates the PINPads to accept new cards and payment methods.
The swipe option is generally used when the PINPad cannot read the credit/debit card’s chip.
TD MOBILE POS MERCHANT GUIDE
Financial Transactions 3
17
Purchase
CashYou would use these instructions whenever a customer wants to pay for their purchase with cash.
Step 1 - Smartphone App Navigation:
1. Enter the dollar amount for each item or one total for the purchase and tap Next.
2. Review the Subtotal and Total amounts and tap Next if everything is correct.
3. Select Cash and tap Next.
4. Optional - Select the desied tip option and tap Next.
5. Enter the amount of cash that the customer gave you and tap Next.
Provide change to the customer if necessary.
6. Enter the customer’s email address for their receipt and tap Done.
Be sure to ask if they still want a receipt. If the client doesn’t want to provide an email address tap Skip.
Hand written receipts are acceptable, but ensure that all the information from the phone receipt is transferred to the written receipt.
7. Tap Continue and the Additional Details screen appears.
8. Enter purchase notes, the invoice number and whether or not to include the invoice number on the receipt.
Tap Skip to not enter this information.
9. Tap Done when finished entering the information.
The transaction is now fully completed and the smartphone app returns to the Transaction screen.
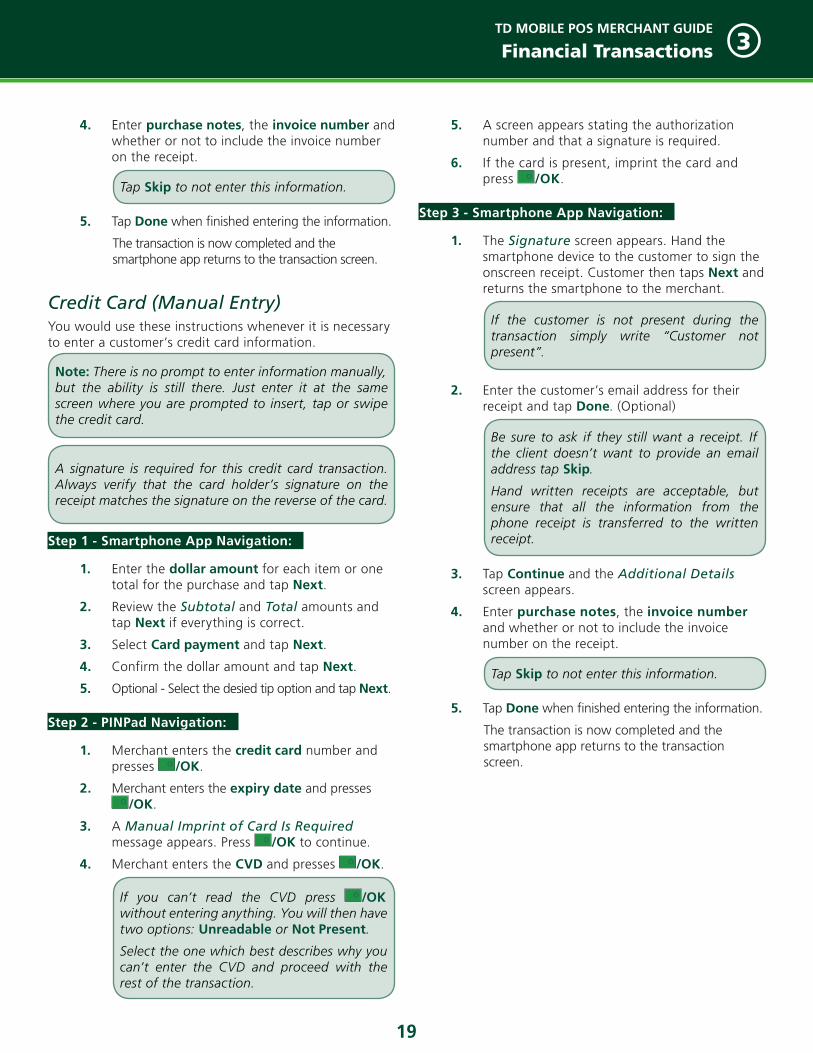
Credit Card (Insert)You would use these instructions whenever a customer wants to insert their credit card to make a purchase.
Step 1 - Smartphone App Navigation:
1. Enter the dollar amount for each item or one total for the purchase and tap Next.
2. Review the Subtotal and Total amounts and tap Next if everything is correct.
3. Select Card payment and tap Next.
4. Confirm the dollar amount and tap Next.
5. Optional - Select the desied tip option and tap Next.
Step 2 - PINPad Navigation:
1. Customer inserts their credit card.
2. Customer confirms the amount and presses o /OK.
3. Customer enters their PIN and presses o /OK.
4. Approved.
Step 3 - Smartphone App Navigation:
1. Enter the customer’s email address for their receipt and tap Done. (Optional)
Be sure to ask if they still want a receipt. If the client doesn’t want to provide an email address tap Skip.
Hand written receipts are acceptable, but ensure that all the information from the phone receipt is transferred to the written receipt.
2. Tap Continue. The Additional Details screen appears.
3. Enter purchase notes, the invoice number and whether or not to include the invoice number on the receipt.
Tap Skip to not enter this information.
4. Tap Done when finished entering the information.
The transaction is now fully completed and the smartphone app returns to the transaction screen.
TD MOBILE POS MERCHANT GUIDE
Financial Transactions 3
18
the smartphone app returns to the transaction screen.
Credit Card (Swipe)You would use these instructions whenever a customer wants to swipe their credit card to make a purchase.
A signature is required for this credit card transaction. Always verify that the card holder’s signature on the receipt matches the signature on the reverse of the card.
Step 1 - Smartphone App Navigation:
1. Enter the dollar amount for each item or one total for the purchase and tap Next.
2. Review the Subtotal and Total amounts and tap Next if everything is correct.
3. Select Card payment and tap Next.
4. Confirm the dollar amount and tap Next.
5. Optional - Select the desied tip option and tap Next.
Step 2 - PINPad Navigation:
1. Customer swipes their credit card.
Customer is requested to return the PINPad to the merchant.
2. Merchant verifies the card info. If correct, presses o /OK.
3. A screen appears stating the authorization number and that a signature is required.
Step 3 - Smartphone App Navigation:
1. The Signature screen appears. Hand the smartphone device to the customer to sign the onscreen receipt. Customer then taps Next and returns the smartphone to the merchant.
2. Enter the customer’s email address for their receipt and tap Done. (Optional)
Be sure to ask if they still want a receipt. If the client doesn’t want to provide an email address tap Skip.
Hand written receipts are acceptable, but ensure that all the information from the phone receipt is transferred to the written receipt.
3. Tap Continue and the Additional Details screen appears.
Credit Card (Contactless)You would use these instructions whenever a customer wants to tap their credit card to make a purchase.
The total transaction amount must be equal to or less than the maximum Contactless Dollar Value. If it doesn’t, the customer will must insert their card and enter their PIN.
Step 1 - Smartphone App Navigation:
1. Enter the dollar amount for each item or one total for the purchase and tap Next.
2. Review the Subtotal and Total amounts and tap Next if everything is correct.
3. Select Card payment and tap Next.
4. Confirm the dollar amount and tap Next.
5. Optional - Select the desied tip option and tap Next.
Step 2 - PINPad Navigation:
1. Customer taps their credit card against the PINPad screen.
The customer may be prompted to insert their credit card and enter their PIN if the amount of the purchase is higher than the upper limit for a contactless purchase.
Step 3 - Smartphone App Navigation:
1. Enter the customer’s email address for their receipt and tap Done. (Optional)
Be sure to ask if they still want a receipt. If the client doesn’t want to provide an email address tap Skip.
Hand written receipts are acceptable, but ensure that all the information from the phone receipt is transferred to the written receipt.
2. Tap Continue. The Additional Details screen appears.
3. Enter purchase notes, the invoice number and whether or not to include the invoice number on the receipt.
Tap Skip to not enter this information.
4. Tap Done when finished entering the information.
The transaction is now fully completed and
TD MOBILE POS MERCHANT GUIDE
Financial Transactions 3
19
4. Enter purchase notes, the invoice number and whether or not to include the invoice number on the receipt.
Tap Skip to not enter this information.
5. Tap Done when finished entering the information.
The transaction is now completed and the smartphone app returns to the transaction screen.
Credit Card (Manual Entry)You would use these instructions whenever it is necessary to enter a customer’s credit card information.
A signature is required for this credit card transaction. Always verify that the card holder’s signature on the receipt matches the signature on the reverse of the card.
Step 1 - Smartphone App Navigation:
1. Enter the dollar amount for each item or one total for the purchase and tap Next.
2. Review the Subtotal and Total amounts and tap Next if everything is correct.
3. Select Card payment and tap Next.
4. Confirm the dollar amount and tap Next.
5. Optional - Select the desied tip option and tap Next.
Step 2 - PINPad Navigation:
1. Merchant enters the credit card number and presses o /OK.
2. Merchant enters the expiry date and presses o /OK.
3. A Manual Imprint of Card Is Required message appears. Press o /OK to continue.
4. Merchant enters the CVD and presses o /OK.
If you can’t read the CVD press o /OK without entering anything. You will then have two options: Unreadable or Not Present.
Select the one which best describes why you can’t enter the CVD and proceed with the rest of the transaction.
5. A screen appears stating the authorization number and that a signature is required.
6. If the card is present, imprint the card and press o /OK.
Step 3 - Smartphone App Navigation:
1. The Signature screen appears. Hand the smartphone device to the customer to sign the onscreen receipt. Customer then taps Next and returns the smartphone to the merchant.
2. Enter the customer’s email address for their receipt and tap Done. (Optional)
Be sure to ask if they still want a receipt. If the client doesn’t want to provide an email address tap Skip.
Hand written receipts are acceptable, but ensure that all the information from the phone receipt is transferred to the written receipt.
3. Tap Continue and the Additional Details screen appears.
4. Enter purchase notes, the invoice number and whether or not to include the invoice number on the receipt.
Tap Skip to not enter this information.
5. Tap Done when finished entering the information.
The transaction is now completed and the smartphone app returns to the transaction screen.
If the customer is not present during the transaction simply write “Customer not present”.
Note: There is no prompt to enter information manually, but the ability is still there. Just enter it at the same screen where you are prompted to insert, tap or swipe the credit card.
TD MOBILE POS MERCHANT GUIDE
Financial Transactions 3
20
Debit Card (Insert)You would use these instructions whenever a customer wants to insert their debit card to make a purchase.
Step 1 - Smartphone App Navigation:
1. Enter the dollar amount for each item or one total for the purchase and tap Next.
2. Review the Subtotal and Total amounts and tap Next if everything is correct.
3. Select Card payment and tap Next.
4. Confirm the dollar amount and tap Next.
5. Optional - Select the desied tip option and tap Next.
Step 2 - PINPad Navigation:
1. Customer inserts their debit card.
2. Customer confirms the amount and presses YES.
3. Customer selects account CHQ (F1) or SAV (F4).
4. Customer enters their PIN and presses o /OK.
Step 3 - Smartphone App Navigation:
1. Enter the customer’s email address for their receipt and tap Done. (Optional)
Be sure to ask if they still want a receipt. If the client doesn’t want to provide an email address tap Skip.
Hand written receipts are acceptable, but ensure that all the information from the phone receipt is transferred to the written receipt.
2. Tap Continue and the Additional Details screen appears.
3. Enter purchase notes, the invoice number and whether or not to include the invoice number on the receipt.
Tap Skip to not enter this information.
4. Tap Done when finished entering the information.
The transaction is now fully completed and the smartphone app returns to the transaction screen.
Debit Card (Contactless)You would use these instructions whenever a customer wants to tap their debit card to make a purchase.
Step 1 - Smartphone App Navigation:
1. Enter the dollar amount for each item or one total for the purchase and tap Next.
2. Review the Subtotal and Total amounts and tap Next if everything is correct.
3. Select Card payment and tap Next.
4. Confirm the dollar amount and tap Next.
5. Optional - Select the desied tip option and tap Next.
Step 2 - PINPad Navigation:
1. Customer taps their debit card against the PINPad screen.
The customer may be prompted to insert their credit card and enter their PIN if the amount of the purchase is higher than the upper limit for a contactless purchase.
Step 3 - Smartphone App Navigation:
1. Enter the customer’s email address for their receipt and tap Done. (Optional)
Be sure to ask if they still want a receipt. If the client doesn’t want to provide an email address tap Skip.
Hand written receipts are acceptable, but ensure that all the information from the phone receipt is transferred to the written receipt.
2. Tap Continue. The Additional Details screen appears.
3. Enter purchase notes, the invoice number and whether or not to include the invoice number on the receipt.
Tap Skip to not enter this information.
4. Tap Done when finished entering the information.
The transaction is now fully completed and the smartphone app returns to the transaction screen.
The total transaction amount must be less than the maximum allowed Contactless Dollar Value. If it exceeds it, the customer must insert their card and enter their PIN to verify their identity.
TD MOBILE POS MERCHANT GUIDE
Financial Transactions 3
21
institution to correct the problem. The merchant will be responsible for any attempt to make debit card account corrections and will not be reimbursed if a cash refund is provided to the customer.
RefundsYou would use these instructions whenever a customer wants to return a purchase.
You cannot refund a transaction that was declined/cancelled XX or already refunded .
Cash and Credit
On the app -> Transaction History
Step 1 - Smartphone App Navigation:
1. Tap the transaction that you want to refund. The Transaction screen appears.
2. Tap Refund. The Refund Amount screen appears.
3. Enter the amount to refund and tap Refund.
You cannot refund more than the total amount of the purchase, but partial refunds are allowed.
4. Select the appropriate refund payment type from below.
Step 2 - CASH Refund PINPad Navigation:
1. There are no steps on the PINPad for a cash refund as cash from your register drawer is being used.
Step 2 - CREDIT Refund PINPad Navigation:
1. Take the credit card used in the transaction and: » Manually enter the credit card number
and expiry date » Swipe the credit card » Insert the credit card or » Tap the credit card.
Step 3 - Smartphone App Navigation:
1. You will see Refund for $XX.XX Approved. Tap OK to continue.
a. If the refund is for cash, refund the cash to the customer now.
b. An updated receipt is emailed to the
Debit Card (Swipe)You would use these instructions whenever a customer wants to swipe their debit card to make a purchase.
Step 1 - Smartphone App Navigation:
1. Enter the dollar amount for each item or one total for the purchase and tap Next.
2. Review the Subtotal and Total amounts and tap Next if everything is correct.
3. Select Card payment and tap Next.
4. Confirm the dollar amount and tap Next.
5. Optional - Select the desied tip option and tap Next.
Step 2 - PINPad Navigation:
1. Customer swipes their debit card.
2. Customer confirms the amount and presses YES.
3. Customer selects account CHQ (F1) or SAV (F4).
4. Customer enters their PIN and presses o /OK.
Step 3 - Smartphone App Navigation:
1. Enter the customer’s email address for their receipt and tap Done. (Optional)
Be sure to ask if they still want a receipt. If the client doesn’t want to provide an email address tap Skip.
Hand written receipts are acceptable, but ensure that all the information from the phone receipt is transferred to the written receipt.
2. Tap Continue and the Additional Details screen appears.
3. Enter purchase notes, the invoice number and whether or not to include the invoice number on the receipt.
Tap Skip to not enter this information.
4. Tap Done when finished entering the information.
The transaction is now fully completed and the smartphone app returns to the transaction screen.
What do I if there is a dispute over a debit transaction? If a customer questions an alleged erroneous debit card transaction, you must refer them to their financial
TD MOBILE POS MERCHANT GUIDE
Financial Transactions 3
22
ReceiptsWhen a transaction is completed, receipts are generated for the merchant and for the customer, if the customer opted to receive one. Please use the chart below to determine what receipts are sent out.
Purchase Type HTML PDFCash -
Credit
Debit
HTML and PDF CopiesThe merchant and customer receive two receipts copies each via email: an HTML copy and a PDF copy.
The HTML copy is displayed in the body of the email and has the following information:
• Business name, contact information and logo
• Date of the transaction and transaction ID
• Payment method (Cash, Credit or Debit) and amount
• The map with the transaction location
• Purchase notes
• List of items purchased or the total dollar amount
• Receipt banner if it is being used
• SubTotal and Total
The PDF copy contains more transaction information than the HTML version. It contains the following:
• Transaction type
• Transaction information
• Total
• The signature required field appears on the merchant receipt if the payment method was a swiped or manually entered credit card. The digital signature will not appear on the electronic receipts, but it is stored on the Merchant Portal copy of the receipt.
• Approval
customer if an email was previously entered for the refunded purchase.
c. The Transaction History screen will be updated with a refunded transaction for the amount that you entered.
Void Last TransactionThis option allows you to void the last credit/debit card transaction that was successfully performed. This must be performed before the End of Day process takes place otherwise the transaction cannot be voided.
Credit and Debit
On the app -> Transaction History
Step 1 - Smartphone App Navigation:
1. Tap the last credit/debit transaction. The Transaction screen appears.
2. Tap the Void button. The Void Transaction message appears.
3. Tap Yes.
Step 2 - PINPad Navigation:
1. If it was a debit transaction, the customer will be prompted to insert/swipe or tap their debit card.
2. Customer selects Yes to confirm the amount of the transaction. The Void screen appears.
3. Customer selects Void to proceed.
If the transaction was on a debit card, the customer selects the account the transaction came from (CHQ or SAV), enters the PIN presses
o /OK.
Step 3 - Smartphone App Navigation:
1. The Void approved message appears. Tap Continue.
2. If an email address was provided initially, an updated receipt is sent to the customer and the Transaction History screen will be updated with the transaction showing a on the payment type icon.
If an email was not provided initially, retrieve refund transaction from transaction history and enter their email address and email the receipt.
Please note that there is a finite amount of space on the receipt. Receipt banners, individual items with photos, etc. all take up room. To ensure that you and the customer receive legible receipts, be aware of how much information you are adding to your receipts.
TD MOBILE POS MERCHANT GUIDE
Financial Transactions 3
23
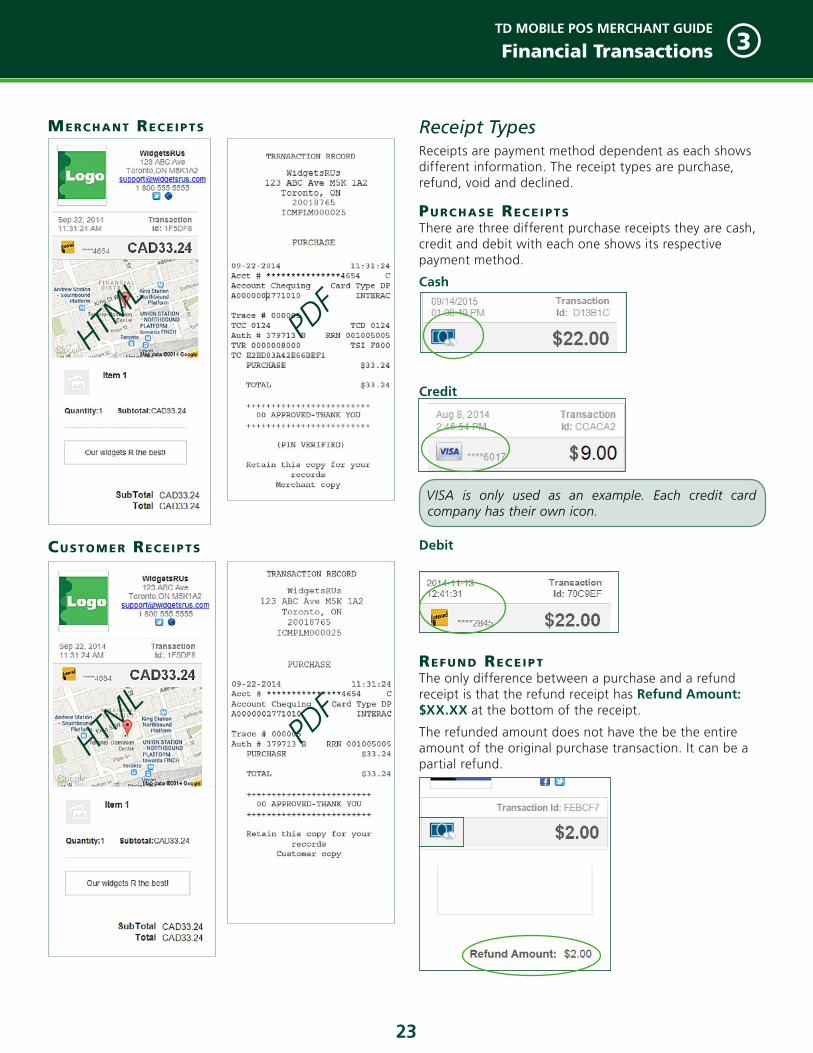
merc hanT rec eIp TS
cuSTom er rec eIp TS
HTML
Receipt Types Receipts are payment method dependent as each shows different information. The receipt types are purchase, refund, void and declined.
pu rc haSe rec eIp TSThere are three different purchase receipts they are cash, credit and debit with each one shows its respective payment method.
Cash
Credit
Debit
refund rec eIp TThe only difference between a purchase and a refund receipt is that the refund receipt has Refund Amount: $XX.XX at the bottom of the receipt.
The refunded amount does not have the be the entire amount of the original purchase transaction. It can be a partial refund.
VISA is only used as an example. Each credit card company has their own icon.
HTML

TD MOBILE POS MERCHANT GUIDE
Financial Transactions 3
24
la ST Tr anSac TIon VoId rec eIp TVoid receipts are identical to the refund receipt with the line Refund Amount: $XX.XX at the bottom of the receipt. This amount will be for the entire original purchase amount. See the example under Refund Receipt.
dec lIned rec eIp TDeclined transactions will have a red box at the top of the receipt with white text.
Day CloseIn order for you to settle your transactions on the TD Mobile POS solution, you must close your business day on your smartphone app.
Close the business day
On the app -> Transaction History
Step 1 - Smartphone App Navigation:
1. Tap Close sales. The Close Sales confirmation pop-up appears.
2. Tap OK to continue. A Closing sales/Closing Batch message appears.
Step 2 - PINPad Navigation:
1. The Close Batch/Closing Batch message appears. Select Yes to continue.
2. The batch/business day is closed. Press o /OK to continue.
If you don’t close your day, the card companies will not settle your accounts.
Step 3 - Smartphone App Navigation:
1. The Closed sales success/Closing Batch message appears. Tap OK to continue.
The closed transactions still appear on the Merchant Portal and your smartphone app for record keeping.
SummaryAfter reading this section you should be able to:
• Understand the different card purchase types (insert, contactless, swipe and manual entry)
• Understand the different roles that the smartphone app and PINPad play in financial transactions
• Perform a cash, credit and debit purchases
• Perform refunds and voids
Now that you know how to perform transactions you can now learn how to administer and configure the TD Mobile POS solution.

25
Section
4Pairing......................................................................26
What is pairing? . . . . . . . . . . . . . . . . . . . . . . . . . . . . . . . . . . . . . . . . . . . . . . . . . . . . . . . . . . . . . . . . . . . . . . . .26
How do I pair the PINPad to my Android Smartphone? . . . . . . . .26
How do I pair the PINPad to my iOS Smartphone? . . . . . . . . . . . . . . . .26
How do I unpair my smartphone from the PINPad? . . . . . . . . . . . . . .26
How do I verify the smartphone is paired to my PINPad? . . . . .26
PINPad Administration .............................................26How do I download the PINPad Host 1 or 2 parameters? . . . .26
How do I verify the PINPad’s system information? . . . . . . . . . . . . . . . . .27
PINPad Customization .............................................27How do I select my PINPad language? . . . . . . . . . . . . . . . . . . . . . . . . . . . . . . . . . . . .27
How can I prevent duplicate transactions? . . . . . . . . . . . . . . . . . . . . . . . . . . . .27
How do I turn on/off key beeps? . . . . . . . . . . . . . . . . . . . . . . . . . . . . . . . . . . . . . . . . . . . . .27
How do I set the idle timer? . . . . . . . . . . . . . . . . . . . . . . . . . . . . . . . . . . . . . . . . . . . . . . . . . . . .27
How do I set the PINPad sleep timer? . . . . . . . . . . . . . . . . . . . . . . . . . . . . . . . . . . . . .27
Receipts ...................................................................28How do I view a customer receipt? . . . . . . . . . . . . . . . . . . . . . . . . . . . . . . . . . . . . . . . .28
How do I resend a customer receipt? . . . . . . . . . . . . . . . . . . . . . . . . . . . . . . . . . . . . .28
How do I change the receipt information? . . . . . . . . . . . . . . . . . . . . . . . . . . .28
App Administration .................................................29How do I view the transaction history? . . . . . . . . . . . . . . . . . . . . . . . . . . . . . . . . . .29
App Customization ..................................................29How do I select the language? . . . . . . . . . . . . . . . . . . . . . . . . . . . . . . . . . . . . . . . . . . . . . . . .29
How do I manage my card readers? (Android Only) . . . . . . . . . . . . . .29
How do I secure the app? . . . . . . . . . . . . . . . . . . . . . . . . . . . . . . . . . . . . . . . . . . . . . . . . . . . . . . . .29
How do I change the password? . . . . . . . . . . . . . . . . . . . . . . . . . . . . . . . . . . . . . . . . . . . . .29
How do I enable tips? . . . . . . . . . . . . . . . . . . . . . . . . . . . . . . . . . . . . . . . . . . . . . . . . . . . . . . . . . . . . . . .29
How do I view terms and conditions? . . . . . . . . . . . . . . . . . . . . . . . . . . . . . . . . . . . . .30
How do I view the FAQs? . . . . . . . . . . . . . . . . . . . . . . . . . . . . . . . . . . . . . . . . . . . . . . . . . . . . . . . . .30
Summary ..................................................................30
Section 4Administration and Configuration
TD MOBILE POS MERCHANT GUIDE
Administration and Customization 4
26
1. Scroll to the device you wish to unpair and press o /OK or press the number that corresponds to your smartphone.
2. Your smartphone device will display SUCCEEDED when they are unpaired.
3. You may have to unpair the Android or iOS smartphone before it can be paired with the PINPad. This process will vary from smartphone to smartphone so refer to the device’s owner’s manual to learn how to unpair a Bluetooth wireless technology enabled device.
How do I verify the smartphone is paired to my PINPad?Allows you to view the name of the paired device and its address.
On the PINPad -> Setup Menu -> Bluetooth -> Paired Device Info
1. Scroll to the device you wish to review and press o /OK or press the number that corresponds to the on screen device.
2. Your smartphone’s name and MAC address will be displayed. Verify that the wireless icon and the PINPad icon at the top of the app screen are white to show that they are connected.
PINPad Administration
How do I download the PINPad Host 1 or 2 parameters?
On the PINPad -> Maintenance Menu -> Host 1 Param.DL or Host 2 Param.DLThis option downloads parameters from the TD Hosts for the operation of the PINPad. This function is also automatically performed during the end of day process.
Host 1 Params.DL
Use this option if you want to update anything dealing with financial information such as:
• Transaction types
• Interac keys
Host 2 Params.DL
Use this option if you want to update anything dealing with non-financial information such as:
• Card types
• PINPad settings
Pairing
What is pairing?Pairing is an essential step that connects your smartphone to the PINPad via Bluetooth so that they can communicate with one another. There are different steps for connecting an Android smartphone versus an iOS iPhone.
How do I pair the PINPad to my Android Smartphone?Allows you to set up an Android smartphone device to be linked via Bluetooth to the PINPad. In order to use this product you must have it paired with a smartphone device.
On the PINPad F1 /F1 -> Android Device -> Display Pairing Info
1. Pairing info is displayed on the screen. The information of note is the Bluetooth PIN code. It will display as PIN: followed by nine digits. This is the information that you must enter on your Android smartphone device to pair the two devices.
Your smartphone device will then state when it and the PINPad are paired.
How do I pair the PINPad to my iOS Smartphone?Allows you to set up an iOS smartphone device to be linked via Bluetooth to the PINPad. In order to use this product you must have it paired with a smartphone device.
On the PINPad F1 /F1 -> iOS Device
1. Device Discovery. Searching...
How do I unpair my smartphone from the PINPad?Allows you to remove a paired device from the PINPad’s Bluetooth address book. When you unpair a phone from the PINPad, unpair the PINPad from your smartphone as well.
On the PINPad -> Setup Menu -> Bluetooth -> Unpair Device If your PINPad has been paired with a device it will appear here.
TD MOBILE POS MERCHANT GUIDE
Administration and Customization 4
27
1. Select one of the following options: AllOff,AllOn or InvalidOnly and press o /OK.
Default is AllOn.
How do I set the idle timer?Allows a user to dictate how long a PINPad will sit unused before going to the Standby screen.
On the PINPad -> Setup Menu -> Customization -> Idle Timer
This setting dictates how long a PINPad will sit unused before returning to the idle screen. We recommend that this be set to 60 seconds, otherwise you may experience more transactions timing out which will require you to restart from the beginning.
1. Enter the number of seconds before the PINPadgoes into idle mode. The default is 2 minutes.
This setting will be overwritten every time you do a Host 2 Download. If you want this to be permanent, please call TD Merchant Solutions Help Desk at 1-877-375-7331.
How do I set the PINPad sleep timer?Allows a user to dictate how long a PINPad will sit unused before going to sleep.
We recommend that you don’t change your timers as they are set to maximize your battery life.
On the PINPad -> Setup Menu -> Customization -> Hardware Options -> Sleep Timer
1. Enter the number of seconds before the PINPadgoes into sleep mode.
We recommend that you don’t change your timers as they are set to maximize your battery life.
If you never want it to enter sleep mode, enter 999. The default is 45 seconds.
How do I verify the PINPad’s system information?Allows a user to verify the PINPad’s system information such as operating system version. You would only need this information when contacting TD Merchant Solutions Help Desk and they would guide you through this. On the PINPad -> Maintenance Menu -> System Info
1. Displays the following device information: SDKVersion, OS Version, Manager Version andTDAPP Version.
PINPad Customization
How do I select my PINPad language?
On the PINPad -> Setup Menu -> Customization -> Language OptionsYou can select the language that is used to display messages on the PINPad.
1. Select the language option you want for yourPINPad. It is either Eng/French or French/Eng.
This setting will be overwritten every time you do a Host 2 Download. If you want this to be permanent, please call TD Merchant Solutions Help Desk at 1-877-375-7331.
How can I prevent duplicate transactions? When activated, this option helps prevent duplicate transactions from occurring on the PINPad due to user errors.
On the PINPad -> Setup Menu -> Customization -> Transaction Options -> Duplicate Trans Check
1. Turn this option ON or Off.
How do I turn on/off key beeps?Allows a user to enable or disable the beeps when keys are pressed or when certain conditions are met.
On the PINPad -> Setup Menu -> Customization -> Hardware Options -> Key Beep
TD MOBILE POS MERCHANT GUIDE
Administration and Customization 4
28
How do I change the receipt information? This option changes certain information that is displayed on your business’ HTML receipts.
If you don’t have anything to include in some of the entries, such as a Twitter account for your business, just leave them blank and they won’t appear on the receipt.
On the app -> Merchant Profile
1. Tap your logo/image placeholder.
2. Tap new photo or existing photo. Either take a new photo or select one from your smartphone.
The image must be a PNG or JPG file, no greater than 100 pixels high and 600 pixels in width and smaller than 5 MB in size. Your logo can only be 100 pixels by 100 pixels but can be cropped from a larger image.
3. Crop the image until the portion of the image that you want to use is fully enclosed in the cropping area.
4. Click Save. The cropped image is now saved as your new logo.
5. Edit the message.
Be sure to spell check it before you save it as any spelling mistakes here will be displayed on every receipt until the message is changed again.
The message content has a 140 character limit.
6. Edit your: a. Email Address Supportb. Contact Phone Numberc. Website URLd. Facebook page e. Twitter account
7. Tap Save. You will receive an email confirming a change has been made.
Receipts
How do I view a customer receipt? This option allows you to review an existing receipt on the phone app.
On the app -> Transaction History
1. Tap on the transaction that you want to view the receipt for. The Transaction Information screen appears.
2. Tap Send Receipt. The Choose a Receipt pop-up screen appears.
3. Tap Display Card Receipt Info. The Card Receipt screen appears with the transaction receipt.
4. Tap Back to exit the screen. The Transaction Information screen appears.
How do I resend a customer receipt? This option allows you to resend the customer’s receipt to the email previously sent to or a new address.
On the app -> Transaction History
1. Tap on the transaction that you want to resend the receipt for. The Transaction Information screen appears.
2. Tap Send Receipt. The Choose a Receipt pop-up screen appears.
3. Tap Issue E-mail Receipt. The Send Receipt pop-up screen appears.
4. Enter the email address where the receipt is to be sent and tap Send. The Receipt Sent screen appears.
If an email address has already been provided, the field will already contain that address. It can be modified if the customer wants it sent to a different address.
5. Tap OK. You are returned to the Transaction Information screen and the receipt has been resent.
TD MOBILE POS MERCHANT GUIDE
Administration and Customization 4
29
Every time you deactivate and reactivate this option you must create and re-enter your PIN. The software will not remember your past PINs.
On the app -> App PIN
1. The switch flips to ON and the Set/Change App PIN screen appears.
2. Select the time delay before the app locks. Your options are:
a. After 30 secondsb. After 1 minutec. After 5 minutes
3. Enter a 4-digit PIN.
4. Re-enter a 4-digit PIN. If the PINs match, a �appears.
5. Tap Done to save your changes.
How do I change the password?This allows you to change the smartphone app password.
On the app -> Change Password
1. Enter your Current Password.
2. Enter the New Password.
The new password must be 5 to 64 characters in length, no spaces and is case sensitive.
3. Re-enter the password and tap Submit.
4. You will receive an email informing you of the change. Your new password is not included in the email. Ensure that the password is something you can easily remember.
How do I enable tips?
On the app -> TipThis allows you to enable/disable tips on your TD Mobile POS solution.
1. Turn the tip option On or Off.
App Administration
How do I view the transaction history?
On the app -> Transaction History
1. The Transaction History screen appears. You will see up to the last 1000 transactions that have occurred. They’re organized by:
a. Date (most recent first)b. Transaction type iconsc. Refunds have a beside itd. Declined/cancelled transactions have a
XX on it
e. Voided transactions have a beside them
f. Dollar amount
2. Tap a transaction to get more information.
Tap the Refunds button to only show refunds which are indicated with a .
App Customization
How do I select the language?This allows you to change the language displayed on the smartphone app.
On the app -> Choose Language
1. The Choose Language screen appears.
2. Tap an available language option.
How do I manage my card readers? (Android Only)This function is necessary for you to pair your smartphone to your PINPad.
How do I secure the app?This allows you set your app to lock after 30 seconds, one minute or five minutes of inactivity. The app is then protected by a four-digit PIN.
TD MOBILE POS MERCHANT GUIDE
Administration and Customization 4
30
How do I view terms and conditions?This allows you to review the terms and conditions for using the TD Mobile POS smartphone app.
On the app -> Terms and Conditions1. The Terms and Conditions screen appears.
You may review them at your leisure.
2. Tap Done to return to the Settings screen.
How do I view the FAQs?
On the app -> FAQsThis option will provide answers to some of your questions. Just tap on the appropriate question to view its answer.
SummaryAfter reading this section you should be able to:
• View, resend and modify receipts
• Configure and administer the PINPad’s settings In the next section, you will learn how to use the online Merchant Portal.
31
Section
5The Merchant Portal ................................................32
Recent Activity Tab ..................................................33How do I search for a specific transaction? . . . . . . . . . . . . . . . . . . . . . . . . . . . .34
How do I export transaction records? . . . . . . . . . . . . . . . . . . . . . . . . . . . . . . . . . . . . .34
What do all payment type icons mean? . . . . . . . . . . . . . . . . . . . . . . . . . . . . . . . . . .34
How do I review a transaction? . . . . . . . . . . . . . . . . . . . . . . . . . . . . . . . . . . . . . . . . . . . . . . .34
How do I review or resend a receipt? . . . . . . . . . . . . . . . . . . . . . . . . . . . . . . . . . . . . .34
My Account Tab ........................................................35Edit User Information . . . . . . . . . . . . . . . . . . . . . . . . . . . . . . . . . . . . . . . . . . . . . . . . . . . . . . . . . . . . . . .35
Edit Email Receipt . . . . . . . . . . . . . . . . . . . . . . . . . . . . . . . . . . . . . . . . . . . . . . . . . . . . . . . . . . . . . . . . . . . . .35
How do I edit the receipt information? .......................35Edit Business Information . . . . . . . . . . . . . . . . . . . . . . . . . . . . . . . . . . . . . . . . . . . . . . . . . . . . . . . .36
How do I edit business information? ...........................36
Manage Sub-Merchants Tab ....................................37How do I add a sub-merchant? . . . . . . . . . . . . . . . . . . . . . . . . . . . . . . . . . . . . . . . . . . . . . . .37
What can sub-merchants see on the Merchant Portal? . . . . . . . .38
How do I edit a sub-merchant’s level of access? . . . . . . . . . . . . . . . . . . . .38
How do I change a sub-merchant password? . . . . . . . . . . . . . . . . . . . . . . . . .38
How do I edit a sub-merchant? . . . . . . . . . . . . . . . . . . . . . . . . . . . . . . . . . . . . . . . . . . . . . . .39
How do I deactivate or reactivate a sub-merchant? . . . . . . . . . . . . .39
Manage Hardware Tab .............................................40How do I deactivate a stolen or lost PINPad? . . . . . . . . . . . . . . . . . . . . . . . .40
What does the Nickname column signify? . . . . . . . . . . . . . . . . . . . . . . . . . . . . . .40
Support Tab .............................................................40
Summary .................................................................40
Section 5Merchant Portal
TD MOBILE POS MERCHANT GUIDE
Merchant Portal 5
32
The Merchant PortalThe Merchant Portal is an online website is another way for merchants to make monitor and update their account. It has similar functionality to the smartphone app, just via the web. Some of the things you can do are:
• Review transactions and their receipts - merchant receipts are only available on the portal
• Edit merchant information such as phone number, email, social media accounts, etc.
• Create/edit/deactivate sub-merchants or other users The information is arranged into tabs and they are the:
• Recent Activity tab
• My Account tab
• Manage Sub-Merchants tab
• Manage Hardware tab and
• Support tab
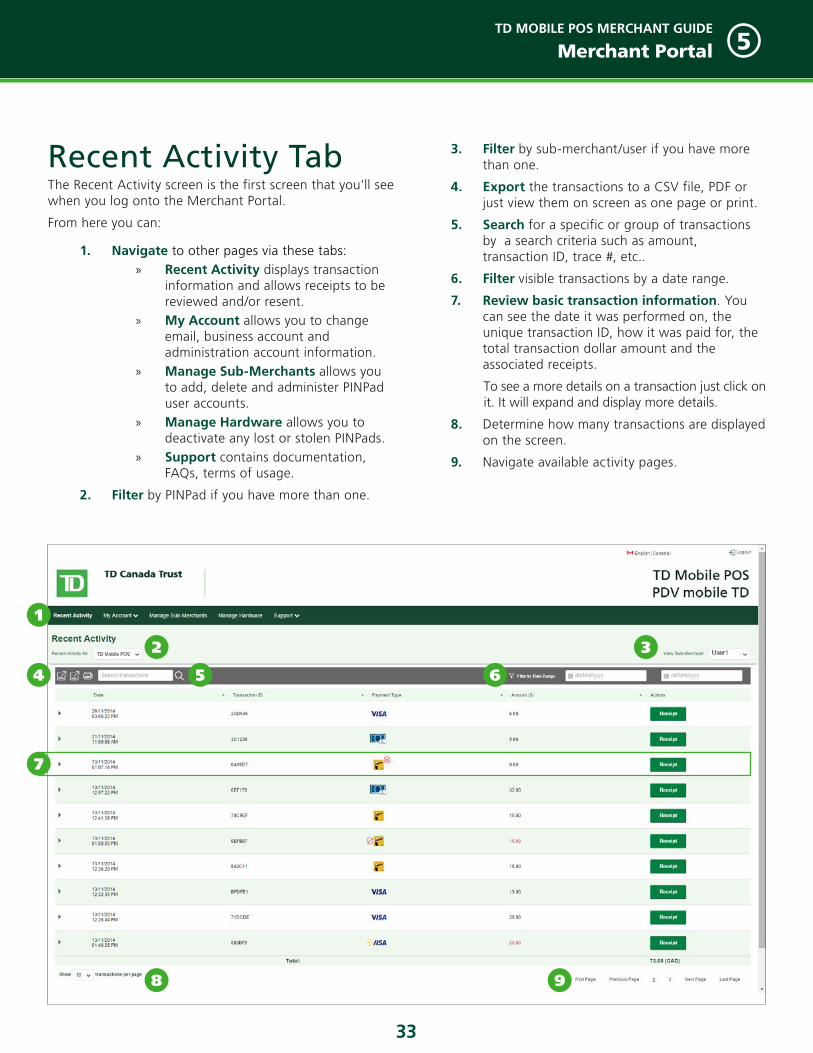
TD MOBILE POS MERCHANT GUIDE
Merchant Portal 5
33
Recent Activity TabThe Recent Activity screen is the first screen that you’ll see when you log onto the Merchant Portal.
From here you can:
1. Navigate to other pages via these tabs: » Recent Activity displays transaction
information and allows receipts to be reviewed and/or resent.
» My Account allows you to change email, business account and administration account information.
» Manage Sub-Merchants allows you to add, delete and administer PINPad user accounts.
» Manage Hardware allows you to deactivate any lost or stolen PINPads.
» Support contains documentation, FAQs, terms of usage.
2. Filter by PINPad if you have more than one.
3. Filter by sub-merchant/user if you have more than one.
4. Export the transactions to a CSV file, PDF or just view them on screen as one page or print.
5. Search for a specific or group of transactions by a search criteria such as amount, transaction ID, trace #, etc..
6. Filter visible transactions by a date range.
7. Review basic transaction information. You can see the date it was performed on, the unique transaction ID, how it was paid for, the total transaction dollar amount and the associated receipts.
To see a more details on a transaction just click on it. It will expand and display more details.
8. Determine how many transactions are displayed on the screen.
9. Navigate available activity pages.
2 3
4 65
8 9
1
7
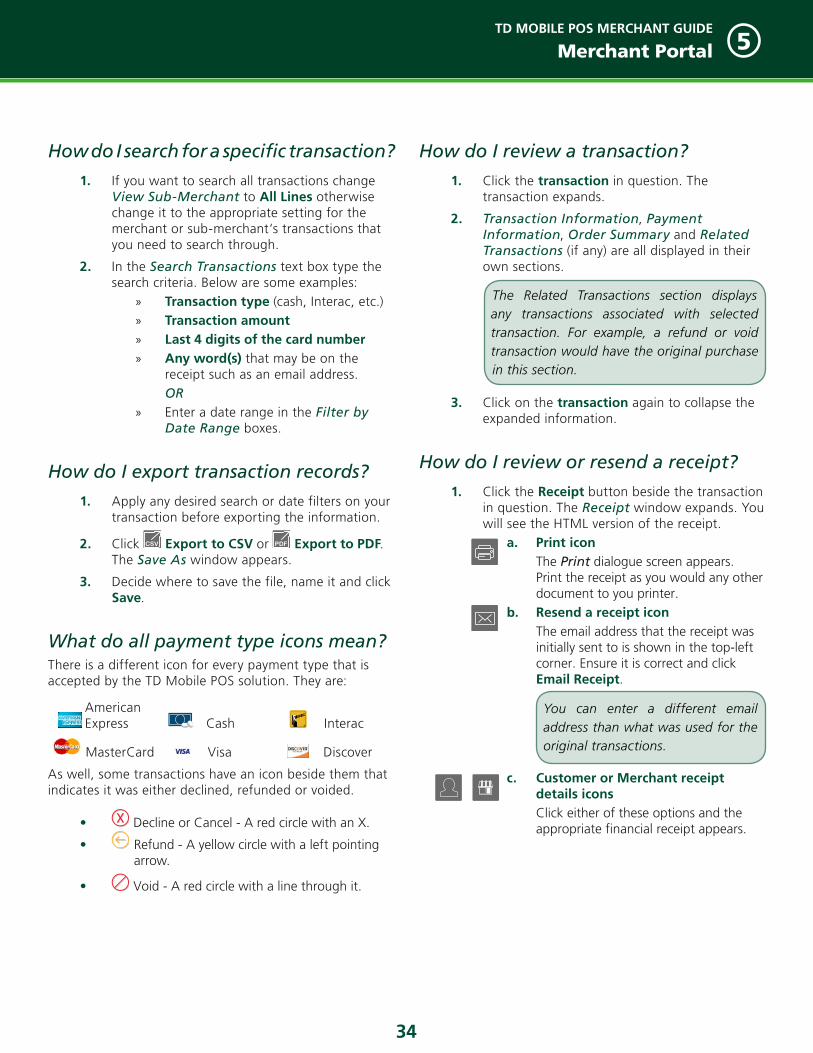
TD MOBILE POS MERCHANT GUIDE
Merchant Portal 5
34
How do I review a transaction?
1. Click the transaction in question. The transaction expands.
2. Transaction Information, Payment Information, Order Summary and Related Transactions (if any) are all displayed in their own sections.
The Related Transactions section displays any transactions associated with selected transaction. For example, a refund or void transaction would have the original purchase in this section.
3. Click on the transaction again to collapse the expanded information.
How do I review or resend a receipt?
1. Click the Receipt button beside the transaction in question. The Receipt window expands. You will see the HTML version of the receipt.
a. Print icon The Print dialogue screen appears. Print the receipt as you would any other document to you printer.
b. Resend a receipt icon The email address that the receipt was initially sent to is shown in the top-left corner. Ensure it is correct and click Email Receipt.
c. Customer or Merchant receipt details icons Click either of these options and the appropriate financial receipt appears.
You can enter a different email address than what was used for the original transactions.
How do I search for a specific transaction?
1. If you want to search all transactions change View Sub-Merchant to All Lines otherwise change it to the appropriate setting for the merchant or sub-merchant‘s transactions that you need to search through.
2. In the Search Transactions text box type the search criteria. Below are some examples:
» Transaction type (cash, Interac, etc.) » Transaction amount » Last 4 digits of the card number » Any word(s) that may be on the
receipt such as an email address.OR
» Enter a date range in the Filter by Date Range boxes.
How do I export transaction records?
1. Apply any desired search or date filters on your transaction before exporting the information.
2. Click CSV Export to CSV or PDF Export to PDF. The Save As window appears.
3. Decide where to save the file, name it and click Save.
What do all payment type icons mean?There is a different icon for every payment type that is accepted by the TD Mobile POS solution. They are:
American Express Cash Interac
MasterCard Visa Discover
As well, some transactions have an icon beside them that indicates it was either declined, refunded or voided.
• XX Decline or Cancel - A red circle with an X.
• Refund - A yellow circle with a left pointing arrow.
• Void - A red circle with a line through it.
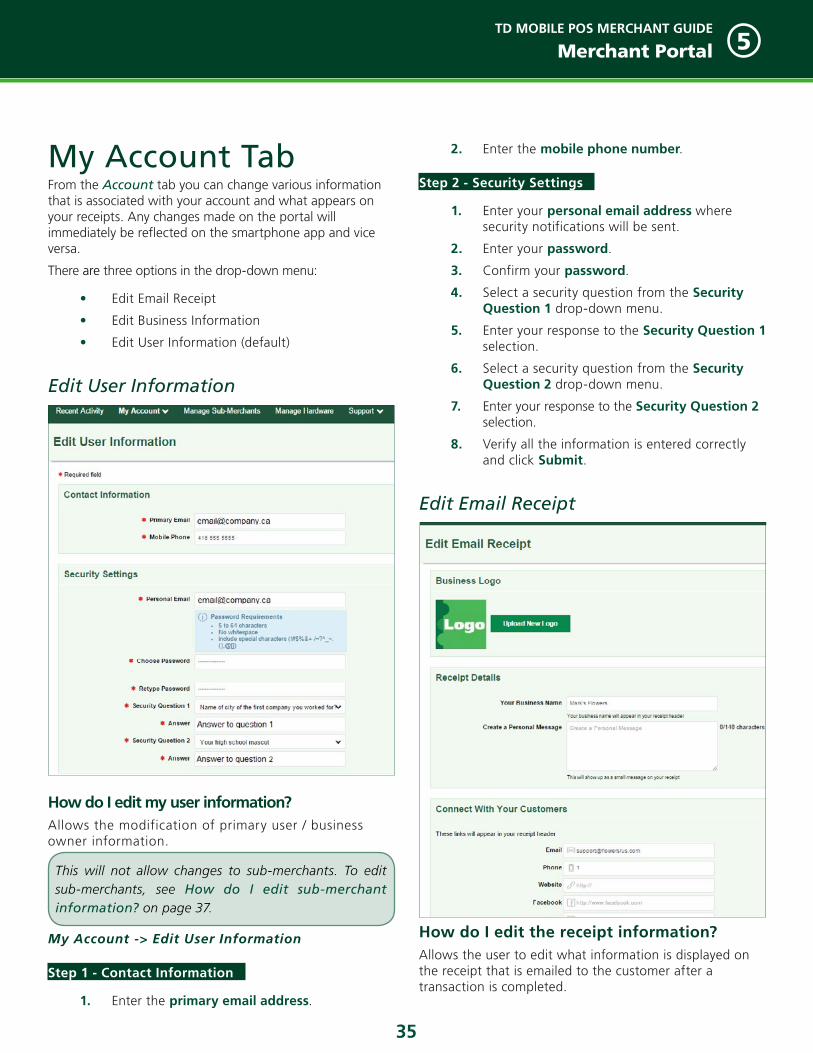
TD MOBILE POS MERCHANT GUIDE
Merchant Portal 5
35
My Account TabFrom the Account tab you can change various information that is associated with your account and what appears on your receipts. Any changes made on the portal will immediately be reflected on the smartphone app and vice versa.
There are three options in the drop-down menu:
• Edit Email Receipt
• Edit Business Information
• Edit User Information (default)
Edit User Information
How do I edit my user information? Allows the modification of primary user / business owner information.
This will not allow changes to sub-merchants. To edit sub-merchants, see How do I edit sub-merchant information? on page 37.
My Account -> Edit User Information
Step 1 - Contact Information
1. Enter the primary email address.
2. Enter the mobile phone number.
Step 2 - Security Settings
1. Enter your personal email address where security notifications will be sent.
2. Enter your password.
3. Confirm your password.
4. Select a security question from the Security Question 1 drop-down menu.
5. Enter your response to the Security Question 1 selection.
6. Select a security question from the Security Question 2 drop-down menu.
7. Enter your response to the Security Question 2 selection.
8. Verify all the information is entered correctly and click Submit.
Edit Email Receipt
How do I edit the receipt information?Allows the user to edit what information is displayed on the receipt that is emailed to the customer after a transaction is completed.
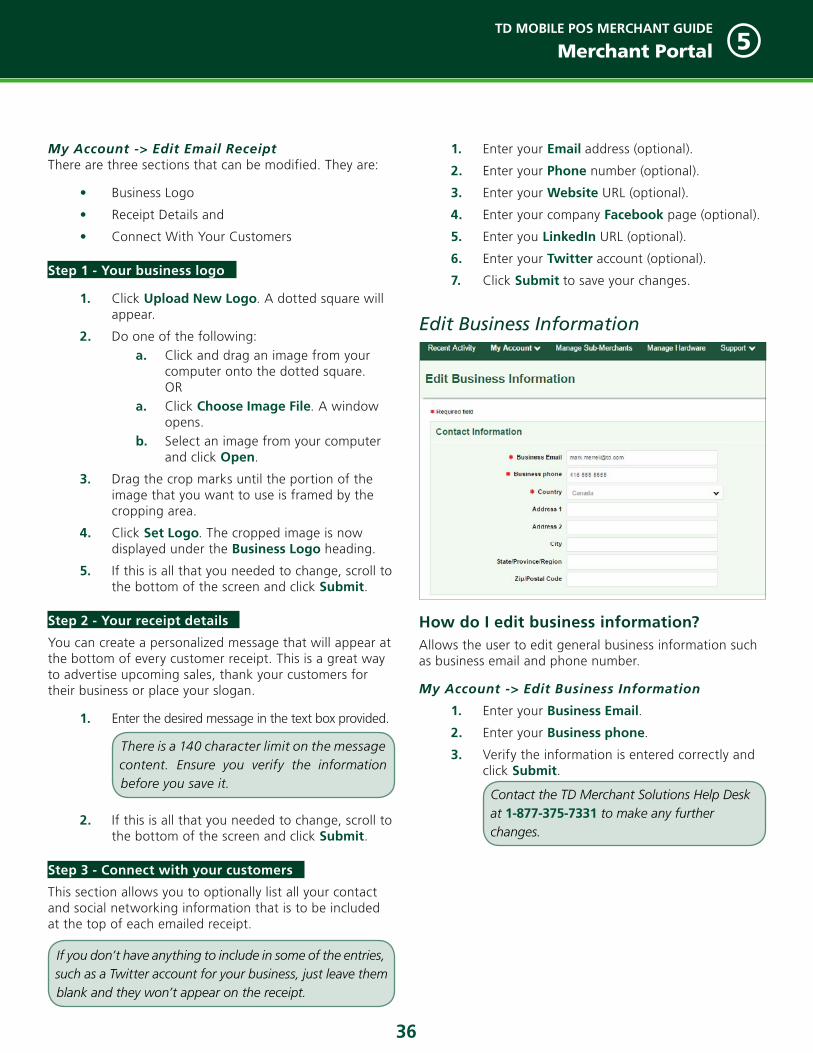
TD MOBILE POS MERCHANT GUIDE
Merchant Portal 5
36
My Account -> Edit Email Receipt There are three sections that can be modified. They are:
• Business Logo
• Receipt Details and
• Connect With Your Customers
Step 1 - Your business logo
1. Click Upload New Logo. A dotted square willappear.
2. Do one of the following:a. Click and drag an image from your
computer onto the dotted square.OR
a. Click Choose Image File. A windowopens.
b. Select an image from your computerand click Open.
3. Drag the crop marks until the portion of theimage that you want to use is framed by thecropping area.
4. Click Set Logo. The cropped image is nowdisplayed under the Business Logo heading.
5. If this is all that you needed to change, scroll tothe bottom of the screen and click Submit.
Step 2 - Your receipt details
You can create a personalized message that will appear at the bottom of every customer receipt. This is a great way to advertise upcoming sales, thank your customers for their business or place your slogan.
1. Enter the desired message in the text box provided.
2. If this is all that you needed to change, scroll tothe bottom of the screen and click Submit.
Step 3 - Connect with your customers
This section allows you to optionally list all your contact and social networking information that is to be included at the top of each emailed receipt.
There is a 140 character limit on the message content. Ensure you verify the information before you save it.
If you don’t have anything to include in some of the entries, such as a Twitter account for your business, just leave them blank and they won’t appear on the receipt.
1. Enter your Email address (optional).
2. Enter your Phone number (optional).
3. Enter your Website URL (optional).
4. Enter your company Facebook page (optional).
5. Enter you LinkedIn URL (optional).
6. Enter your Twitter account (optional).
7. Click Submit to save your changes.
Edit Business Information
How do I edit business information? Allows the user to edit general business information such as business email and phone number.
My Account -> Edit Business Information
1. Enter your Business Email.
2. Enter your Business phone.
3. Verify the information is entered correctly andclick Submit.
Contact the TD Merchant Solutions Help Desk at 1-877-375-7331 to make any further changes.
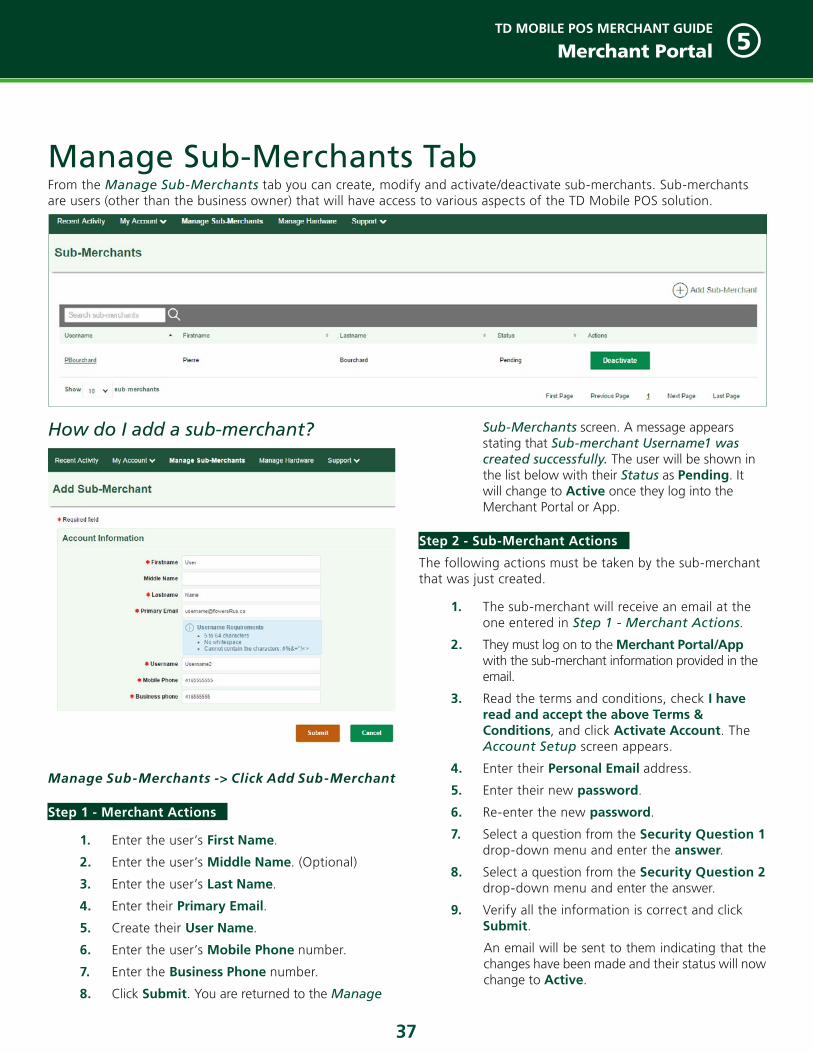
TD MOBILE POS MERCHANT GUIDE
Merchant Portal 5
37
How do I add a sub-merchant?
Manage Sub-Merchants -> Click Add Sub-Merchant
Step 1 - Merchant Actions
1. Enter the user’s First Name.
2. Enter the user’s Middle Name. (Optional)
3. Enter the user’s Last Name.
4. Enter their Primary Email.
5. Create their User Name.
6. Enter the user’s Mobile Phone number.
7. Enter the Business Phone number.
8. Click Submit. You are returned to the Manage
Manage Sub-Merchants TabFrom the Manage Sub-Merchants tab you can create, modify and activate/deactivate sub-merchants. Sub-merchants are users (other than the business owner) that will have access to various aspects of the TD Mobile POS solution.
Sub-Merchants screen. A message appears stating that Sub-merchant Username1 was created successfully. The user will be shown in the list below with their Status as Pending. It will change to Active once they log into the Merchant Portal or App.
Step 2 - Sub-Merchant Actions
The following actions must be taken by the sub-merchant that was just created.
1. The sub-merchant will receive an email at the one entered in Step 1 - Merchant Actions.
2. They must log on to the Merchant Portal/App with the sub-merchant information provided in the email.
3. Read the terms and conditions, check I have read and accept the above Terms & Conditions, and click Activate Account. The Account Setup screen appears.
4. Enter their Personal Email address.
5. Enter their new password.
6. Re-enter the new password.
7. Select a question from the Security Question 1 drop-down menu and enter the answer.
8. Select a question from the Security Question 2 drop-down menu and enter the answer.
9. Verify all the information is correct and click Submit.
An email will be sent to them indicating that the changes have been made and their status will now change to Active.

TD MOBILE POS MERCHANT GUIDE
Merchant Portal 5
38
What can sub-merchants see on the Merchant Portal? Once the sub-merchant has activated their account they can log in to the Merchant Portal and see the following tabs:
1. Recent Activity Tab - Sub-merchants can review their transaction history but cannot view anyone else’s activities. For more information see page 33
2. My Account Tab -> Edit User Information - Sub-merchants can modify their own basic account information. For more information see page 35.
3. Support Tab - Sub-merchants can view all options under this tab. For more information see page 40.
How do I edit a sub-merchant’s level of access? You can provide or restrict access to certain features for existing sub-merchants by clicking on their username.
Manage Sub-Merchants -> Click Sub-Merchant Username
1. Go to the Sub-Merchant Settings section.
2. You have three options: » Can Access TD Mobile POS
The sub-merchant can access the Merchant Portal. The default is ON.
» Can Use Virtual TerminalNot currently available.
» Send Receipt to Sub-Merchant The sub-merchant will receive an emailed transaction receipt (PDF) for each transaction they complete. The default is OFF.
» Send Receipt to Merchant The merchant will receive an emailed transaction receipt (PDF) for each transaction the sub-merchant completes. The default is OFF.
How do I change a sub-merchant password?Allows you to change a sub-merchants password.
Manage Sub-Merchants -> Click Sub-Merchant Username
TD MOBILE POS MERCHANT GUIDE
Merchant Portal 5
39
1. Go to the Password section.
2. Reset the password automatically or manually:
Automaticallya. Click Reset Password. A confirmation
pop-up appears.b. Confirm the request. A pop-up
appears stating that the password has been changed and an email has been sent to the sub-merchant with a new temporary password. They must click the link in the email as if they were a new sub-merchant.
Manuallya. Enter a new password.b. Retype the password.c. Click Submit. Your changes are now saved.
The sub-merchant will not receive an email but can now log on with the password you just created.
How do I edit a sub-merchant?
Manage Sub-Merchants -> Click the Sub-Merchant Username
1. Go to the Account Information section.
2. Edit any of the following sub-merchant information:
a. First nameb. Middle name (Optional)c. Last name d. Primary Emaile. Mobile Phone f. Business phone.
3. Click Submit.
How do I deactivate or reactivate a sub-merchant?
Manage Sub-Merchants -> Click Sub-Merchant Username
1. Go to the Sub-Merchant Settings section.
2. Click the appropriate box to Deactivate or Activate the sub-merchant. A confirmation pop-up appears.
3. Confirm the request. The sub-merchant and merchant will receive emails confirming the changes have been made.
Once the sub-merchant is deactivated you will no longer be able to edit their profile.
You can also reactivate/deactivate sub-merchants from the Manage Sub-Merchant landing page.
If a sub-merchant is being reactivated, they will have to reply to the activation email before they are fully active.

TD MOBILE POS MERCHANT GUIDE
Merchant Portal 5
40
Summary After reading this section you now know:
• How to use the Merchant Portal / App
• How to administer and customize your account
• How to create sub-merchants
In the next section, you will learn how to troubleshoot the Mobile POS solution.
Manage Hardware TabFrom the Manage Hardware tab you can deactivate your PINPad(s) in case they are lost or stolen.
How do I deactivate a stolen or lost PINPad?
Manage Hardware
1. In the Actions column for the PINPad to be deleted, click Deactivate. A Notes pop-up appears.
2. Enter the reason why you’re deactivating the PINPad and click Deactivate. You will now see that the PINPad status shows as Deactivated.
What does the Nickname column signify?The Nickname column represents your unique terminal ID. You need this information when initializing your PINPad.
Support TabFrom the Support tab you can access:
• Helpful Documents
• Terms of Usage
• FAQs

41
Section
6Section 6Troubleshooting
Troubleshooting Bluetooth ......................................42Why can’t I pair my smartphone with the PINPad? . . . . . . . . . . . . . . . .42
What can interfere with Bluetooth connectivity? . . . . . . . . . . . . . . . . . .42
Pair your Android smartphone to the PINPad . . . . . . . . . . . . . . . . . . . . . . . .43
Pair your iOS smartphone to the PINPad . . . . . . . . . . . . . . . . . . . . . . . . . . . . . . . .43
Confirm pairing is complete . . . . . . . . . . . . . . . . . . . . . . . . . . . . . . . . . . . . . . . . . . . . . . . . . . . .43
Troubleshooting the App .........................................44
Troubleshooting Your PINPad .................................47What PINPad hardware problems could I experience? . . . . . . . . . .53
Contacting Help Desk .............................................53
Summary ..................................................................54
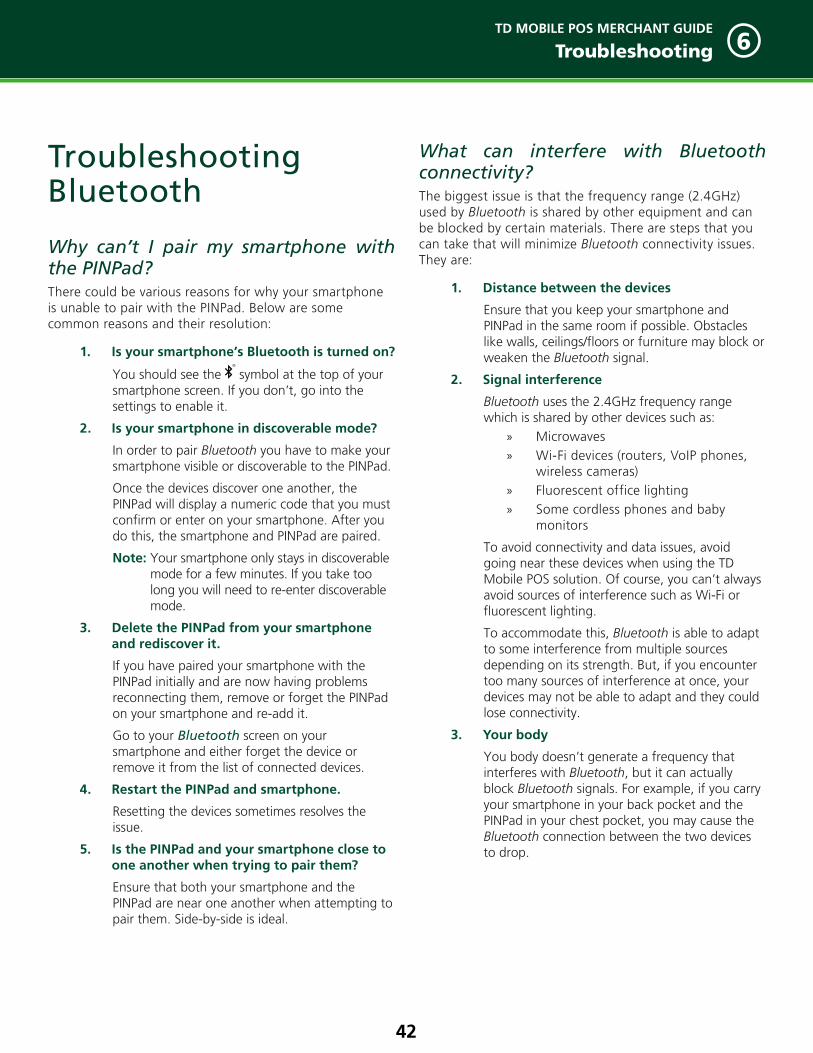
TD MOBILE POS MERCHANT GUIDE
Troubleshooting 6
42
Troubleshooting Bluetooth
Why can’t I pair my smartphone with the PINPad?There could be various reasons for why your smartphone is unable to pair with the PINPad. Below are some common reasons and their resolution:
1. Is your smartphone’s Bluetooth is turned on?
You should see the ®
symbol at the top of your smartphone screen. If you don’t, go into the settings to enable it.
2. Is your smartphone in discoverable mode?
In order to pair Bluetooth you have to make your smartphone visible or discoverable to the PINPad.
Once the devices discover one another, the PINPad will display a numeric code that you must confirm or enter on your smartphone. After you do this, the smartphone and PINPad are paired.
Note: Your smartphone only stays in discoverable mode for a few minutes. If you take too long you will need to re-enter discoverable mode.
3. Delete the PINPad from your smartphone and rediscover it.
If you have paired your smartphone with the PINPad initially and are now having problems reconnecting them, remove or forget the PINPad on your smartphone and re-add it.
Go to your Bluetooth screen on your smartphone and either forget the device or remove it from the list of connected devices.
4. Restart the PINPad and smartphone.
Resetting the devices sometimes resolves the issue.
5. Is the PINPad and your smartphone close to one another when trying to pair them?
Ensure that both your smartphone and the PINPad are near one another when attempting to pair them. Side-by-side is ideal.
What can interfere with Bluetooth connectivity?The biggest issue is that the frequency range (2.4GHz) used by Bluetooth is shared by other equipment and can be blocked by certain materials. There are steps that you can take that will minimize Bluetooth connectivity issues. They are:
1. Distance between the devices
Ensure that you keep your smartphone and PINPad in the same room if possible. Obstacles like walls, ceilings/floors or furniture may block or weaken the Bluetooth signal.
2. Signal interference
Bluetooth uses the 2.4GHz frequency range which is shared by other devices such as:
» Microwaves » Wi-Fi devices (routers, VoIP phones,
wireless cameras) » Fluorescent office lighting » Some cordless phones and baby
monitors
To avoid connectivity and data issues, avoid going near these devices when using the TD Mobile POS solution. Of course, you can’t always avoid sources of interference such as Wi-Fi or fluorescent lighting.
To accommodate this, Bluetooth is able to adapt to some interference from multiple sources depending on its strength. But, if you encounter too many sources of interference at once, your devices may not be able to adapt and they could lose connectivity.
3. Your body
You body doesn’t generate a frequency that interferes with Bluetooth, but it can actually block Bluetooth signals. For example, if you carry your smartphone in your back pocket and the PINPad in your chest pocket, you may cause the Bluetooth connection between the two devices to drop.
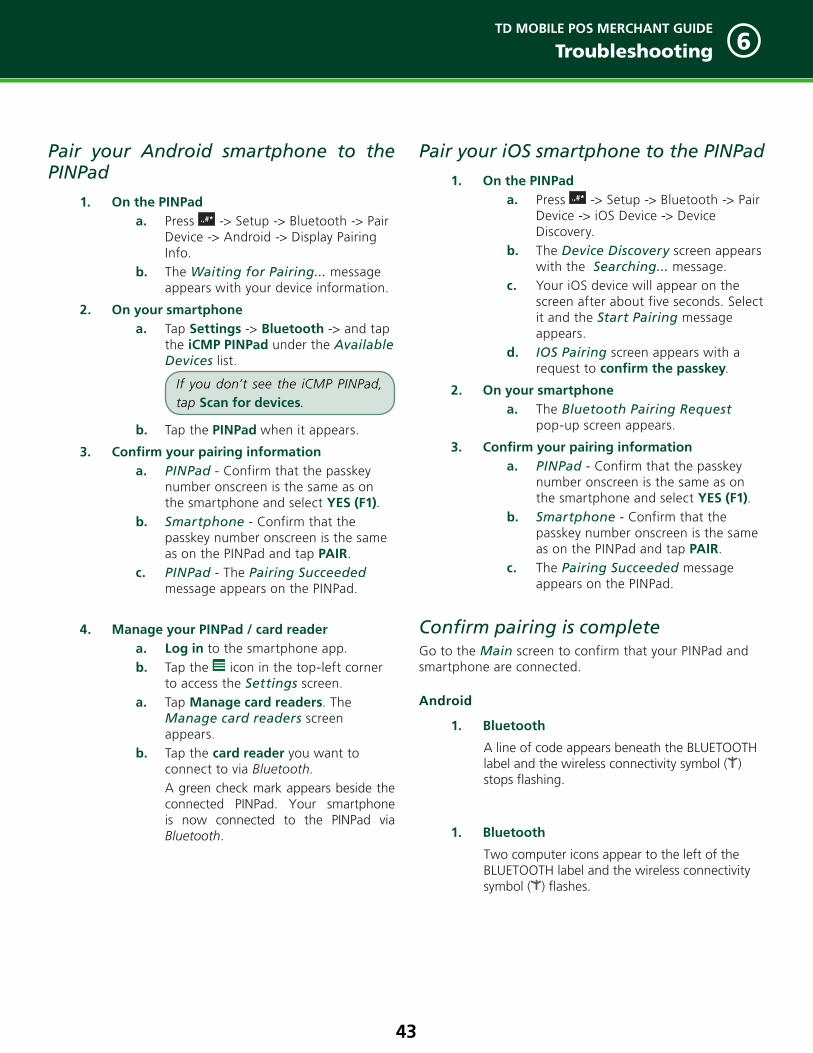
TD MOBILE POS MERCHANT GUIDE
Troubleshooting 6
43
Pair your Android smartphone to the PINPad
1. On the PINPada. Press -> Setup -> Bluetooth -> Pair
Device -> Android -> Display Pairing Info.
b. The Waiting for Pairing... message appears with your device information.
2. On your smartphonea. Tap Settings -> Bluetooth -> and tap
the iCMP PINPad under the Available Devices list.
If you don’t see the iCMP PINPad, tap Scan for devices.
b. Tap the PINPad when it appears.
3. Confirm your pairing informationa. PINPad - Confirm that the passkey
number onscreen is the same as on the smartphone and select YES (F1).
b. Smartphone - Confirm that the passkey number onscreen is the same as on the PINPad and tap PAIR.
c. PINPad - The Pairing Succeeded message appears on the PINPad.
4. Manage your PINPad / card readera. Log in to the smartphone app. b. Tap the icon in the top-left corner
to access the Settings screen.a. Tap Manage card readers. The
Manage card readers screen appears.
b. Tap the card reader you want to connect to via Bluetooth. A green check mark appears beside the connected PINPad. Your smartphone is now connected to the PINPad via Bluetooth.
Pair your iOS smartphone to the PINPad
1. On the PINPada. Press -> Setup -> Bluetooth -> Pair
Device -> iOS Device -> Device Discovery.
b. The Device Discovery screen appears with the Searching... message.
c. Your iOS device will appear on the screen after about five seconds. Select it and the Start Pairing message appears.
d. IOS Pairing screen appears with a request to confirm the passkey.
2. On your smartphonea. The Bluetooth Pairing Request
pop-up screen appears.
3. Confirm your pairing informationa. PINPad - Confirm that the passkey
number onscreen is the same as on the smartphone and select YES (F1).
b. Smartphone - Confirm that the passkey number onscreen is the same as on the PINPad and tap PAIR.
c. The Pairing Succeeded message appears on the PINPad.
Confirm pairing is completeGo to the Main screen to confirm that your PINPad and smartphone are connected.
Android
1. Bluetooth
A line of code appears beneath the BLUETOOTH label and the wireless connectivity symbol ( ) stops flashing.
1. Bluetooth
Two computer icons appear to the left of the BLUETOOTH label and the wireless connectivity symbol ( ) flashes.
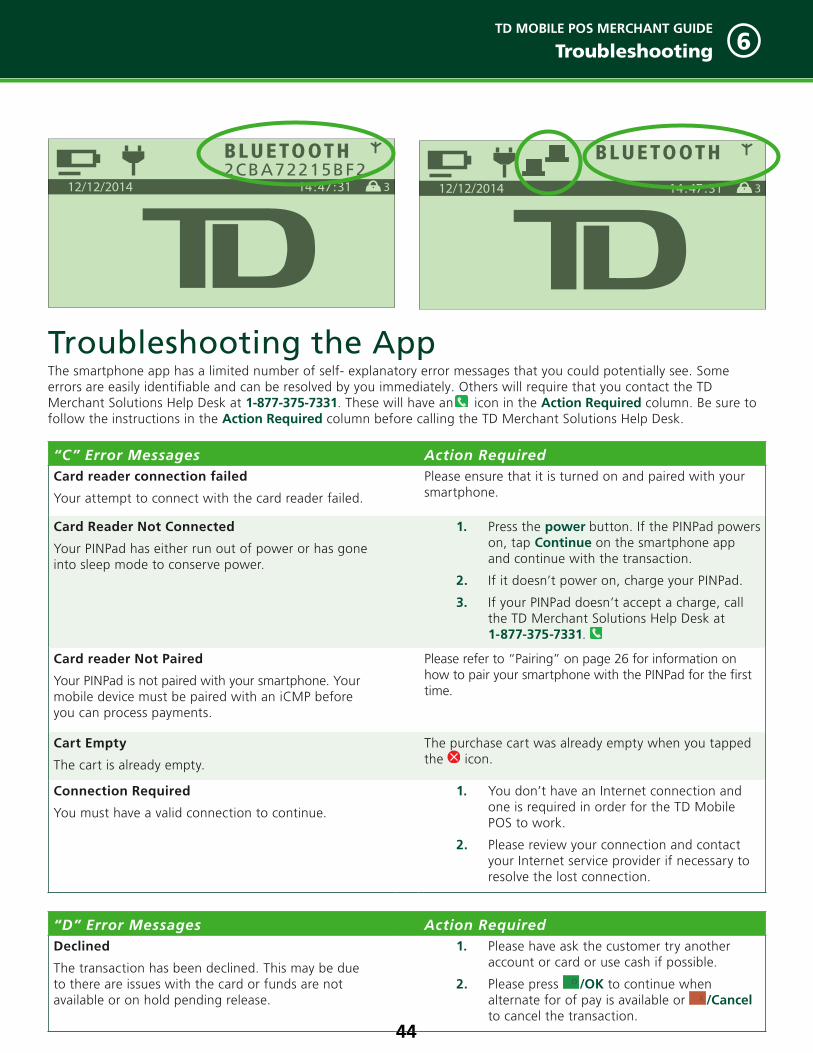
TD MOBILE POS MERCHANT GUIDE
Troubleshooting 6
44
2CBA72215BF2BLUETOOTH
14 : 47 : 3112/12/2014 3
Troubleshooting the AppThe smartphone app has a limited number of self- explanatory error messages that you could potentially see. Some errors are easily identifiable and can be resolved by you immediately. Others will require that you contact the TD Merchant Solutions Help Desk at 1-877-375-7331. These will have an icon in the Action Required column. Be sure to follow the instructions in the Action Required column before calling the TD Merchant Solutions Help Desk.
“C” Error Messages Action Required Card reader connection failed
Your attempt to connect with the card reader failed.
Please ensure that it is turned on and paired with your smartphone.
Card Reader Not Connected
Your PINPad has either run out of power or has gone into sleep mode to conserve power.
1. Press the power button. If the PINPad powerson, tap Continue on the smartphone appand continue with the transaction.
2. If it doesn’t power on, charge your PINPad.
3. I f your PINPad doesn’t accept a charge, call the TD Merchant Solutions Help Desk at1-877-375-7331.
Card reader Not Paired
Your PINPad is not paired with your smartphone. Your mobile device must be paired with an iCMP before you can process payments.
Please refer to “Pairing” on page 26 for information on how to pair your smartphone with the PINPad for the first time.
Cart Empty
The cart is already empty.
The purchase cart was already empty when you tapped the icon.
Connection Required
You must have a valid connection to continue.
1. You don’t have an Internet connection andone is required in order for the TD MobilePOS to work.
2. Please review your connection and contactyour Internet service provider if necessary toresolve the lost connection.
“D” Error Messages Action Required Declined
The transaction has been declined. This may be due to there are issues with the card or funds are not available or on hold pending release.
1. Please have ask the customer try anotheraccount or card or use cash if possible.
2. Please press o /OK to continue whenalternate for of pay is available or x /Cancelto cancel the transaction.
BLUETOOTH
14 : 47 : 3112/12/2014 3
TD MOBILE POS MERCHANT GUIDE
Troubleshooting 6
45
“E” Error Messages Action Required Error
At least one field must have information provided.
1. You must enter either a message for the purchase or an invoice number to press Next.
2. If you want to skip this step tap Skip.
“I” Error Messages Action Required Invalid E-mail Address
Your e-mail address must contain a minimum 5 characters. Please enter a valid e-mail address.
If you’re sending the customer a receipt via email, the email address must follow the proper email format and greater than five characters in length:
Email_Name@Service_Provider.Domain
Invalid E-mail Address
Your e-mail address must contain a minimum of five characters. Please enter a valid e-mail address.
The email address must have at least five characters.
Invalid E-mail Address
A valid e-mail address is required to send a receipt.
If you’re sending the customer a receipt via email, the email address must follow the proper email format and greater than five characters in length.
Email_Name@Service_Provider.Domain
Invalid image format
Please try again.
Your company logo must be a PNG or JPG.
“L” Error Messages Action Required
Login Failed
Action cannot be completed. Please check your connectivity and try again.
Please check that your smartphone is connected to your service provider. Some things that can prevent this are:
• Airplane mode is engaged.
• Your data connection is engaged and the smartphone cannot connect to the Internet.
• You’re in a location with no service. If you can’t create a connection, power cycle your phone. If that does not resolve the issue, contact your smartphone service carrier.
Login Failed
Invalid username / password combination. Please try again.
You have entered an incorrect username and/or password.
Please recheck your username is correct and ensure that you enter the correct password. Please check that you do not have the CAPS lock on. The password is case sensitive.
If you are unable to remember your username or password, please follow username and password reset procedure.
TD MOBILE POS MERCHANT GUIDE
Troubleshooting 6
46
“M” Error Messages Action Required Message Too Long
Customer message too long.
The message must be 140 characters or less.
Missing Credentials
Please enter a password.
A valid password is expected and must be entered at the Mobile POS app logon screen.
Please ensure you are entering the correct password for the username in the correct field on the logon screen.
Missing Credentials
Please enter a username and password.
A valid user name and password is required for logon to the Mobile POS app.
Please ensure you have entered both the valid username and password in the correct fields on the app logon screen.
“N” Error Messages Action Required No Connection Detected
It seems that you’ve lost connectivity. You must have a network connection in order to continue. Please check your network settings and try again.
Please check that you have a connection to your service provider, i.e. airplane mode is not engaged, data connection is engaged and that the smart phone can connect to the Internet. If there is no connection:
• Please check that isn’t disabled on your smartphone. If it is disabled, re-enable and see if there is signal.
• If there still isn’t a signal, please power cycle your smartphone.
• If there still isn’t a signal, move to an area that you are receiving signal or check with your carrier for any issues they may be experiencing.
No Network Connection
Passwords cannot be changed in offline mode. Please try again later.
Please connect to the Internet and try again.
“P” Error Messages Action Required Please enter a valid username.
Please click Try Again and then enter a valid username to continue.
Please ensure you have entered a valid username in the correct field on the app logon screen.
Password Error
The password entered does not match the password on file. Please re-enter your current password.
Enter the correct password. If you have forgotten your password you will have to request that it be reset from the app.
“R” Error Messages Action Required Reader Not Paired
Your mobile device must be paired with an iCMP before you can process payments.
You have tried to do a card payment transaction and your smartphone isn’t paired with the PINPad.
Please pair your smartphone with the PINPad.
TD MOBILE POS MERCHANT GUIDE
Troubleshooting 6
47
“S” Error Messages Action Required Security Question Error
Please select two different security questions from the menu.
You cannot choose the same Security Question for the first and the second question.
Session Expired
You have been logged out due to inactivity.
Your smartphone app has been idle too long. The server has logged you out. You will have to log back in using valid username and password.
“U” Error Messages Action Required Unauthorized Reader
You are not authorized to use the reader that is connected. Please connect to a different reader or contact technical support.
Please connect to a different reader. If you don’t have another reader, or the problem persists, call the TD Merchant Solutions Help Desk at 1-877-375-7331.
“V” Error Messages Action Required Void Transaction Declined
Your void request cannot be completed because the transaction has already been settled.
You cannot void the last transaction after it has been settled. You must now perform a refund.
Troubleshooting Your PINPad With any equipment, sometimes there will be a problem. With the TD Mobile POS PINPad, error messages are displayed on screen. Below is a list of error messages that you could see and the actions required to resolve them.
Some errors are easily identifiable and can be resolved by you immediately. Others will require that you contact the TD Merchant Solutions Help Desk at 1-877-375-7331. These will have an icon in the Action Required column. Be sure to follow the instructions in the Action Required column before calling TD Merchant Solutions Help Desk.
“A” Error Codes Action Required Amount $0.00Not Allowed
Amount entered was $0.00.
Please enter a new amount that is greater than zero and press o /OK.
“B” Error Codes Action Required Bad Communication
A communication failure was detected after the transaction was initiated.
Please press x /Cancel and try the transaction again.
If the problem persists, ensure your internet connection is working correctly.

TD MOBILE POS MERCHANT GUIDE
Troubleshooting 6
48
“C” Error Codes Action Required Card ErrorPlease Try Again
The PINPad failed to read the chip on the inserted card.
Please remove the card and try inserting it again. Allow three consecutive attempts of the card insertion before asking for another payment method.
Card ErrorUse Magnetic Stripe
The PINPad failed to read the chip on the inserted card.
Please remove the card from the chip reader and swipe it through the magnetic strip reader.
Card Removed Too Soon Try Again
The chip card was removed from the PINPad before the transaction was completed.
Please process the transaction again, while instructing the cardholder not to remove the card until indicated by the PINPad.
Close Batch Failed End Of Business Day Not Complete
The PINPad failed to complete a Batch Close transaction during the End of Business Day.
Please retry the End of Business Day transaction.
Close Batch Now
The PINPad has reached the maximum number of transactions that can be stored before the business day must be closed.
Please perform a Day Close immediately. See “Day Close” on page 24 for more information.
Close Batch Soon
The PINPad has almost reached the maximum number of transactions (1000) that can be accumulated for a batch.
A Batch Close must be processed before the next 20 transactions to allow the PINPad to continue processing.
Please perform a Day Close immediately. See “Day Close” on page 24 for more information.
Customer to InsertChip Card
The cardholder attempted to swipe a chip card on the PINPad.
Please press x /Cancel or o /OK to cancel the display and Insert the card into the chip reader on the PINPad.
“D” Error Codes Action Required DownloadHost 1 ParameterFirst
The PINPad requires a Host 1 Parameter Download.
Please perform a Host 1 Parameter Download. See page 26 for more information.
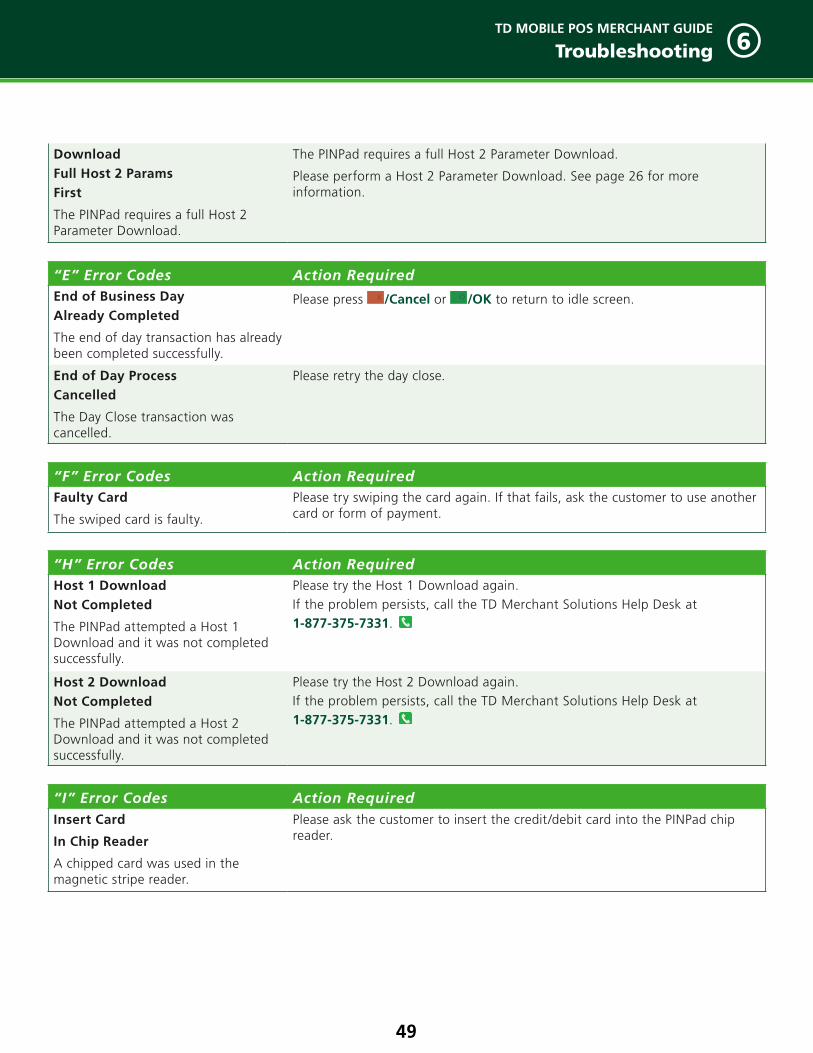
TD MOBILE POS MERCHANT GUIDE
Troubleshooting 6
49
DownloadFull Host 2 ParamsFirst
The PINPad requires a full Host 2 Parameter Download.
The PINPad requires a full Host 2 Parameter Download.
Please perform a Host 2 Parameter Download. See page 26 for more information.
“E” Error Codes Action Required End of Business DayAlready Completed
The end of day transaction has already been completed successfully.
Please press x /Cancel or o /OK to return to idle screen.
End of Day ProcessCancelled
The Day Close transaction was cancelled.
Please retry the day close.
“F” Error Codes Action Required Faulty Card
The swiped card is faulty.
Please try swiping the card again. If that fails, ask the customer to use another card or form of payment.
“H” Error Codes Action Required Host 1 DownloadNot Completed
The PINPad attempted a Host 1 Download and it was not completed successfully.
Please try the Host 1 Download again. If the problem persists, call the TD Merchant Solutions Help Desk at 1-877-375-7331.
Host 2 DownloadNot Completed
The PINPad attempted a Host 2 Download and it was not completed successfully.
Please try the Host 2 Download again.If the problem persists, call the TD Merchant Solutions Help Desk at 1-877-375-7331.
“I” Error Codes Action Required Insert Card
In Chip Reader
A chipped card was used in the magnetic stripe reader.
Please ask the customer to insert the credit/debit card into the PINPad chip reader.

TD MOBILE POS MERCHANT GUIDE
Troubleshooting 6
50
“I” Error Codes Action Required Internal ErrorCall Help DeskAAAAAAAAAAAAANNNNNNNNNNNNNCCCCCCCCCCCCC
The system has encountered a serious error.
AA…… stands for component name
NN…… stands for app information
CC……. stands for error code
Call the TD Merchant Solutions Help Desk at 1-877-375-7331.
Invalid Date
You have entered an invalid date in the Service menu.
Please enter a correct date.
Invalid Expiry Date
The customer’s card has expired.
Please have the customer provide a valid card or different for of payment.
Invalid Password
The password entered is incorrect.
Please re-enter and try again.If the problem persists, call the TD Merchant Solutions Help Desk at 1-877-375-7331.
Invalid Time
You have entered an invalid time in the Service menu.
Please enter a correct time.
“M” Error Codes Action Required Merchant Setup Incomplete
Occurs when attempting a financial transaction when the Host 1 Parameters have not been successfully downloaded.
Please perform a Host 1 Parameters download.
Must Close Business Day
A Host 1 download cannot be performed if there are outstanding transactions.
Please perform an end of day/business day close.
“N” Error Codes Action Required No Match
An Interac card was used and the account type selected (CHQ or SAV) does not match what exists on the account.
Please retry the transaction with the correct account type or another form of payment.
No Response From host
The PINPad has timed out while trying to contact the host.
Please resubmit the transaction.
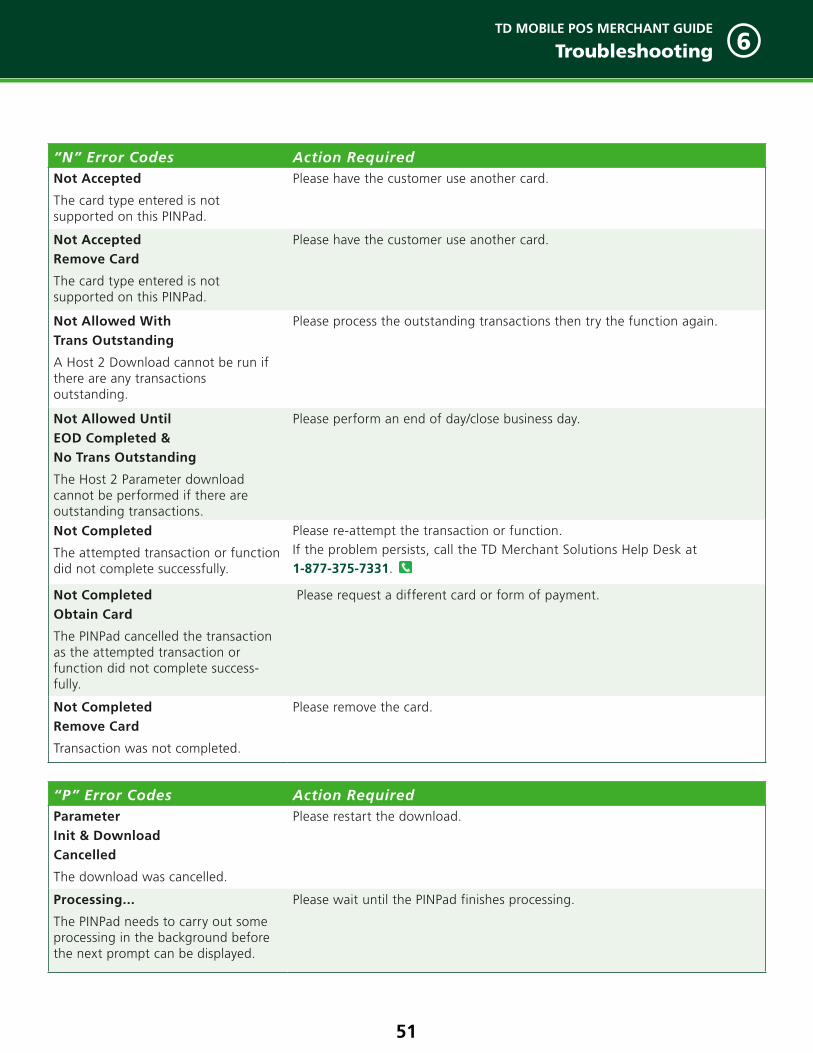
TD MOBILE POS MERCHANT GUIDE
Troubleshooting 6
51
“N” Error Codes Action Required Not Accepted
The card type entered is not supported on this PINPad.
Please have the customer use another card.
Not AcceptedRemove Card
The card type entered is not supported on this PINPad.
Please have the customer use another card.
Not Allowed WithTrans Outstanding
A Host 2 Download cannot be run if there are any transactions outstanding.
Please process the outstanding transactions then try the function again.
Not Allowed UntilEOD Completed &No Trans Outstanding
The Host 2 Parameter download cannot be performed if there are outstanding transactions.
Please perform an end of day/close business day.
Not Completed
The attempted transaction or function did not complete successfully.
Please re-attempt the transaction or function.If the problem persists, call the TD Merchant Solutions Help Desk at 1-877-375-7331.
Not CompletedObtain Card
The PINPad cancelled the transaction as the attempted transaction or function did not complete success-fully.
Please request a different card or form of payment.
Not CompletedRemove Card
Transaction was not completed.
Please remove the card.
“P” Error Codes Action Required ParameterInit & DownloadCancelled
The download was cancelled.
Please restart the download.
Processing...
The PINPad needs to carry out some processing in the background before the next prompt can be displayed.
Please wait until the PINPad finishes processing.
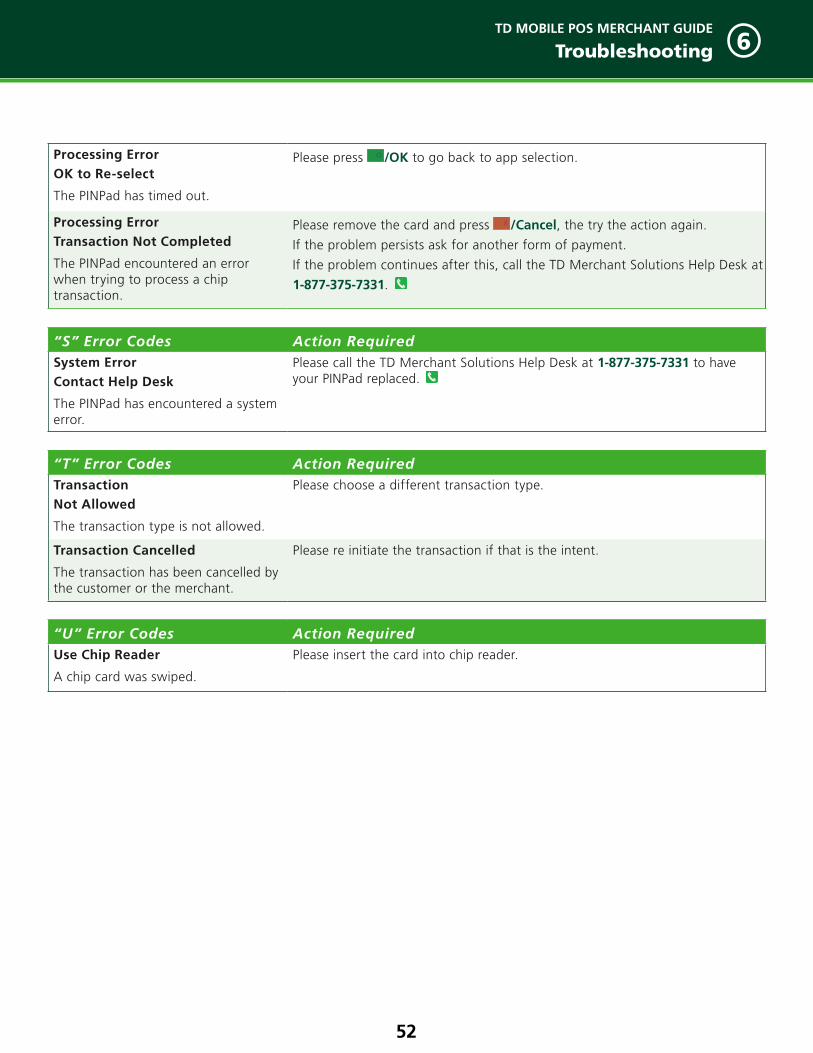
TD MOBILE POS MERCHANT GUIDE
Troubleshooting 6
52
Processing ErrorOK to Re-select
The PINPad has timed out.
Please press o /OK to go back to app selection.
Processing ErrorTransaction Not Completed
The PINPad encountered an error when trying to process a chip transaction.
Please remove the card and press x /Cancel, the try the action again.
If the problem persists ask for another form of payment.
If the problem continues after this, call the TD Merchant Solutions Help Desk at
1-877-375-7331.
“S” Error Codes Action Required System ErrorContact Help Desk
The PINPad has encountered a system error.
Please call the TD Merchant Solutions Help Desk at 1-877-375-7331 to have your PINPad replaced.
“T” Error Codes Action Required TransactionNot Allowed
The transaction type is not allowed.
Please choose a different transaction type.
Transaction Cancelled
The transaction has been cancelled by the customer or the merchant.
Please re initiate the transaction if that is the intent.
“U” Error Codes Action Required Use Chip Reader
A chip card was swiped.
Please insert the card into chip reader.
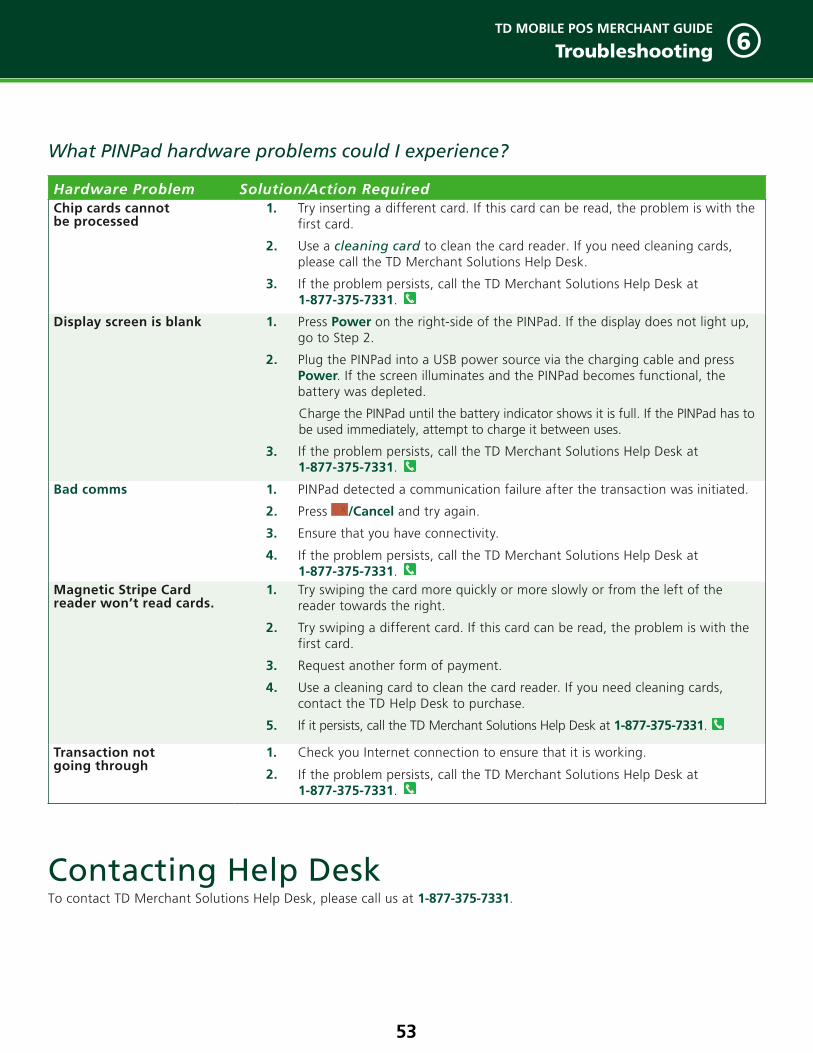
TD MOBILE POS MERCHANT GUIDE
Troubleshooting 6
53
What PINPad hardware problems could I experience?
Hardware Problem Solution/Action RequiredChip cards cannot be processed
1. Try inserting a different card. If this card can be read, the problem is with thefirst card.
2. Use a cleaning card to clean the card reader. If you need cleaning cards, please call the TD Merchant Solutions Help Desk.
3. I f the problem persists, call the TD Merchant Solutions Help Desk at 1-877-375-7331.
Display screen is blank 1. Press Power on the right-side of the PINPad. If the display does not light up,go to Step 2.
2. Plug the PINPad into a USB power source via the charging cable and pressPower. If the screen illuminates and the PINPad becomes functional, thebattery was depleted.
Charge the PINPad until the battery indicator shows it is full. If the PINPad has tobe used immediately, attempt to charge it between uses.
3. I f the problem persists, call the TD Merchant Solutions Help Desk at 1-877-375-7331.
Bad comms 1. PINPad detected a communication failure after the transaction was initiated.
2. Press x /Cancel and try again.
3. Ensure that you have connectivity.
4. I f the problem persists, call the TD Merchant Solutions Help Desk at 1-877-375-7331.
Magnetic Stripe Card reader won’t read cards.
1. Try swiping the card more quickly or more slowly or from the left of thereader towards the right.
2. Try swiping a different card. If this card can be read, the problem is with thefirst card.
3. Request another form of payment.
4. Use a cleaning card to clean the card reader. If you need cleaning cards,contact the TD Help Desk to purchase.
5. I f it persists, call the TD Merchant Solutions Help Desk at 1-877-375-7331.
Transaction not going through
1. Check you Internet connection to ensure that it is working.
2. I f the problem persists, call the TD Merchant Solutions Help Desk at 1-877-375-7331.
Contacting Help Desk To contact TD Merchant Solutions Help Desk, please call us at 1-877-375-7331.
TD MOBILE POS MERCHANT GUIDE
Troubleshooting 6
54
SummaryAfter reading this section you now know:
• Smartphone app error codes
• PINPad error codes
• Hardware problems and their solutions
• How to use the TD Mobile POS solution in your day-to-day business

534844 V1.2 10/15 (EN)


