The Pocket Guide Broiler Stock Management The Pocket Guide Introduction This Pocket Guide should be used as a quick and practical reference for broiler stock management. This Guide intended to draws attention to important management practices which, if overlooked, may reduce flock performance. Performance This Pocket Guide summarizes best management practice for broilers kept under good nutritional, management, and health conditions, and are considered to be the most appropriate for achieving good broiler performance (live and through processing), health, and welfare. However, the information within this Pocket Guide cannot wholly protect against performance variations which may occur for a wide variety of reasons. 2
Transcript
The Pocket Guide Bro
ile
r S
toc
k M
an
ag
em
en
t The Pocket Guide
Introduction
This Pocket Guide should be used as a quick and practical reference for broiler stock management.
This Guide intended to draws attention to important management practices which, if overlooked, may reduce flock performance.
Performance
This Pocket Guide summarizes best management practice for broilers kept under good nutritional, management, and health conditions, and are considered to be the most appropriate for achieving good broiler performance (live and through processing), health, and welfare.
However, the information within this Pocket Guide cannot wholly protect against performance variations which may occur for a wide variety of reasons.
2
Contents
Contents
05 Stockmanship
Section 1 Chick Management
08 Chick Management
12 Brooding Management
Section 2 Provision of Feed and Water
18 Feeding Program
19 Feed Form and Physical Quality
23 Whole Grain Feeding
23 Feeding Under Hot Environmental Conditions
24 Drinking Systems
25 Feeding Systems
Section 3 Health and Biosecurity
27 Bird Health and Biosecurity
31 Decreasing the Risk of Disease
32 Disease Investigation
35 Disease Recognition
Section 4 Housing and Environment
36 Air Contaminants
36 Housing and Ventilation Systems
42 Lighting
43 Litter Management
43 Stocking Density
3
Contents
Section 5 Monitoring Live Weight and Uniformity of
Performance
44 Manual Weighing
46 Automatic Weighing Systems
46 Inconsistent Weight Data
Section 6 Pre-Processing Management
47 Preparation for Catching
49 Catch
50 Transport
Appendices Appendices
51 Appendix 1 - Production Records
54 Appendix 2 - Key Performance Parameters
58 Appendix 3 - Problem Solving
4
Stockmanship
Stockmanship
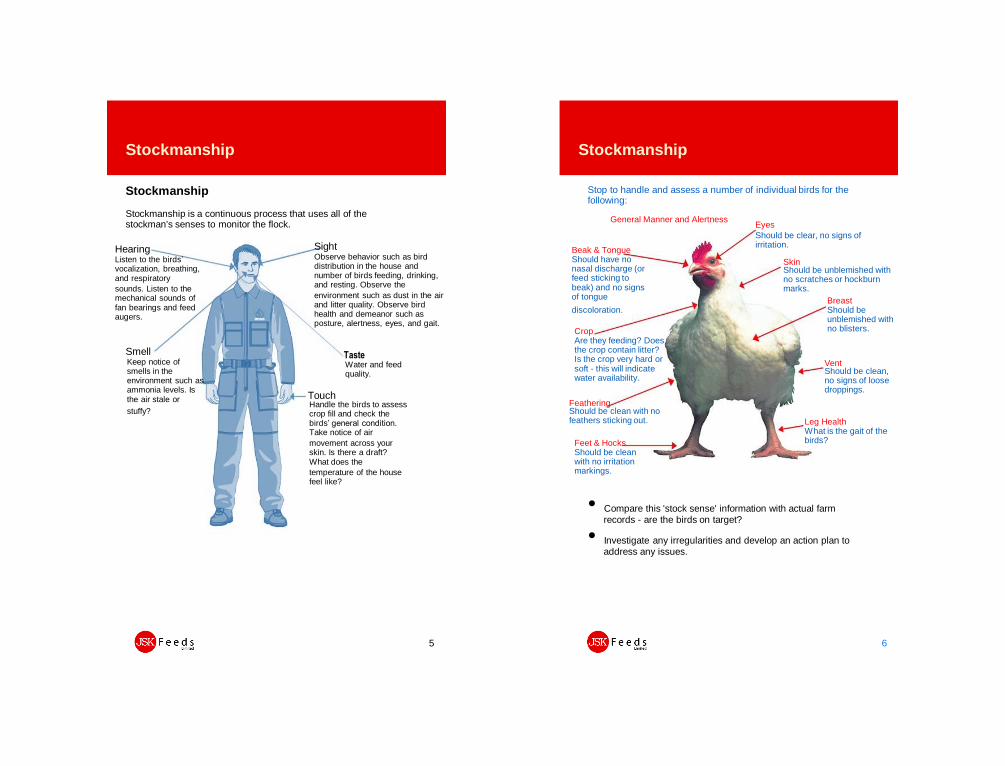
Stockmanship is a continuous process that uses all of the stockman's senses to monitor the flock.
Hearing Listen to the birds’ vocalization, breathing, and respiratory
sounds. Listen to the mechanical sounds of fan bearings and feed augers.
Smell Keep notice of smells in the environment such as ammonia levels. Is the air stale or
stuffy?
Sight Observe behavior such as bird distribution in the house and number of birds feeding, drinking, and resting. Observe the
environment such as dust in the air and litter quality. Observe bird health and demeanor such as posture, alertness, eyes, and gait.
Taste Water and feed quality.
Touch Handle the birds to assess crop fill and check the birds’ general condition. Take notice of air
movement across your skin. Is there a draft? What does the
temperature of the house feel like?
5
Stockmanship
Stop to handle and assess a number of individual birds for the following:
General Manner and Alertness
Beak & Tongue Should have no nasal discharge (or feed sticking to beak) and no signs of tongue
discoloration.
Crop Are they feeding? Does the crop contain litter? Is the crop very hard or soft - this will indicate water availability.
Feathering Should be clean with no feathers sticking out.
Feet & Hocks Should be clean with no irritation markings.
Eyes
Should be clear, no signs of irritation.
Skin Should be unblemished with no scratches or hockburn marks.
Breast Should be unblemished with no blisters.
Vent Should be clean, no signs of loose droppings.
Leg Health What is the gait of the birds?
• Compare this 'stock sense' information with actual farm records - are the birds on target?
• Investigate any irregularities and develop an action plan to address any issues.
6
Stockmanship
BIRD HANDLING
It is important that all birds are handled in a calm and
correct way at all times. All people handling birds (for
catching, weighing, and physical assessment) should be
experienced and appropriately trained so that they can
handle the birds with the care that is appropriate for the
purpose and age of the bird.
7
Section 1
Chick Management
Objective
To promote early development of feeding and drinking behavior. This will allow the target body-weight profile to
be achieved with maximum uniformity and good welfare.
Pages Contents HandbookReference Page
08 Chick Management 14
12 Brooding Management 14
Chick Management
Chick Management
Farm Preparation
• Clean and disinfect housing prior to chick arrival. • Houses should be preheated for a minimum of 24 hours prior to chick arrival. • Recommended environmental conditions at placement are:
-- Air temperature: 30°C (86°F) measured at chick height in the area where feed and water are positioned.
• Make feed and water available to the chicks immediately.
8
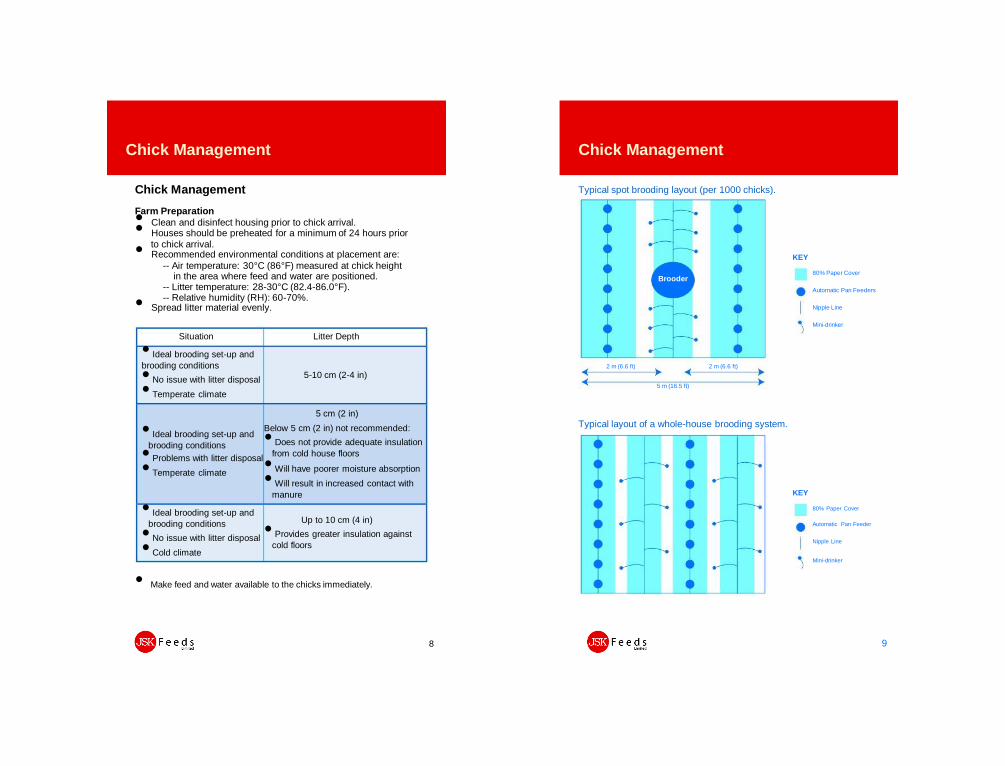
Chick Management
Typical spot brooding layout (per 1000 chicks).
KEY
80% Paper Cover Brooder
Automatic Pan Feeders
Nipple Line
Mini-drinker
2 m (6.6 ft) 2 m (6.6 ft)
5 m (16.5 ft)
Typical layout of a whole-house brooding system.
KEY
80% Paper Cover
Automatic Pan Feeder
Nipple Line
Mini-drinker
9
Chick Management
• Install nipple lines at 12 birds per nipple and bell drinkers at a minimum of 6 drinkers per 1,000 chicks. • Provide feed as a dust-free crumble or mini-pellet on feeder trays (1 per 100 chicks) and/or on paper (occupying at least 80% of the brooding area). • Chicks from different parent sources should be brooded in separate areas within the house.
Chick Placement
• Unload chicks and place them quickly onto paper in the brooding area. • Leave chicks to settle for 1-2 hours with access to feed and water. • Check feed, water, temperature, and humidity after 1-2 hours and adjust where necessary. • Approximately 40 g (1.5 oz) of feed per bird should be placed in
flat trays or on paper and automatic feeding systems flooded with feed.
Chick Quality Example of good quality chicks.
• Clean after hatch.
• Stand firmly and walk
well.
• Alert and active.
• Free of deformities with the yolk sac fully retracted and have a healed navel.
• Vocalize contentedly.
10
Chick Management
Chick Vent Temperature
PROCEDURE Measuring Chick Vent Temperature
1. Measure vent temperature on at least 5 chicks from at least 3 different locations of the house for the first 4-5 days after placement.
2. Pay attention to cold or hot areas of the house (for examplewalls or under brooders).
3. Gently pick the chick up and hold it so that the vent is exposed, put the tip of the ThermoScan® thermometer onto the bare skin and record the temperature.
4. Do not take the vent temperature of chicks with wet or dirty vents.
The ideal chick body temperature for the first 4-5 days after hatching is 39.4-40.8°C (103-105°F).
11
Chick Management
Brooding Management
The First 10 Days • If paper does not disintegrate naturally it should be removed from the house from day 3 onwards. • Brooding rings, if used, should gradually be expanded from 3 days of age and removed completely by 5-7 days of age. • Top up the feed on the paper/feed trays at regular intervals during the first 3-4 days of age. • Birds should be on the main feeding system by 6-7 days of age. • Gradually change to a good quality pellet once transfer to the main feeding system is complete. Do not give full pellets (3-4 mm) before 18 days of age.
MANAGEMENT FUNDAMENTAL
Monitor chick behavior to ensure brooding
conditions are correct.
Monitor Chick Behavior Environmental conditions correct: chicks will spread evenly throughout the brooding area - NO ACTION REQUIRED.
12
Chick Management
Environmental conditions are too cold: chicks grouped together under heaters or within the brooding area - INCREASE TEMPERATURE AND/OR RELATIVE HUMIDITY.
Environmental conditions are too hot: chicks are crowded near the house walls or brooding surrounds, away from heating sources and/or they are panting - DECREASE TEMPERATURE AND/OR RELATIVE HUMIDITY.
13
Chick Management
Environment The following table shows the dry bulb temperatures required to achieve equivalent temperatures at varying RH. Dry bulb temperatures at the ideal RH at an age are colored red.
*Temperature calculations based on a formula from Dr. Malcolm Mitchell (Scottish Agricultural College). Note: Chicks from donor flocks of less than 30 weeks will require a start temperature +1°C or 2°F warmer than the given temperature profile in the table above.
• Monitor temperature and relative humidity regularly (twice daily in the first 5 days and daily thereafter) and check automatic equipment with manual measurements at chick level. • Calibrate automatic equipment at least once per crop.
14
Chick Management
MANAGEMENT FUNDAMENTAL
Establish a minimum ventilation rate from day
one to provide fresh air and remove waste
gases and help maintain temperatures and RH
at the correct level.
Avoid drafts.
Use chick behavior and chick vent
temperatures to determine if environmental
conditions are correct.
15
Chick Management
Chick Start Assessment
PROCEDURE Crop Fill
1. Collect 30-40 chicks at 3-4 different places in the house (or surround where spot brooding is used).
2. Gently feel the crop of each chick: -- Full soft and rounded - chicks have found feed and water. -- Full but hard with original feed and texture felt - chicks have found feed but little or no water.
The chick on the left has a full, rounded crop while the chick on the right has an empty crop.
Target crop fill assessment guidelines.
Time of Crop Fill Check Target Crop FillAfter Placement (% of Chicks with Full Crops)
2 hours 75
8 hours >80
12 hours >85
24 hours >95
48 hours 100
16
Chick Management
MANAGEMENT FUNDAMENTAL
Crop fill should be assessed and monitored
during the first 48 hours, but achieving the
correct crop fill in the first 24 hours is most
critical.
If target levels of crop fill are not being
achieved then something is preventing the
chicks from feeding and drinking and action
must be taken.
17
Section 2
Provision of Feed and Water
Objective
To provide the broiler’s lifetime nutrient requirements through appropriate broiler nutrition and broiler feeding programs so that the biological performance is maximized without compromising bird welfare or the environment.
Pages Contents HandbookReference Page
18 Feeding Program 27
19 Feed Form and Physical 28
Quality
22 Whole Grain Feeding 31
22 Feeding Under Hot 32
Environmental Conditions
23 Drinking Systems 34
24 Feeding Systems 37
Provision of Feed and Water
Feeding Program
Feed Age Fed Comments
A good quality starter feed will support early0-10 days growth and physiological development,
(but can be fed for ensuring target weights, good health and
Starter up to 14 days if welfare are achieved. Starter formulations
target weights not should be based primarily on promoting good
achieved) biological performance and profitability, not
feed costs.
Transition from starter to grower feed
Grower 11-25 days involves a change in texture and nutrient
density and needs to be managed carefully to
avoid loss of performance.
Finisher feeds account for most of the total
feed intake and cost of feeding a broiler, and
Finisher After 25 days must be designed to optimize financial return
of age for the type of product mix being produced.
Broilers fed beyond 42 days of age will
require an additional finisher feed.
• Diets should be regularly sampled and the samples analyzed to
ensure that the diets are as they should be.
Withdrawal Periods
• A Withdrawal feed will be required when regulated
pharmaceutical feed additives are used.
• Refer to local legislation to determine the withdrawal time
required.
• Extreme dietary nutrient reductions are not recommended during
the withdrawal period.
18
Provision of Feed and Water
Separate Feeding of Male and Female Broilers
• Feed the same feed to both sexes.
• Keep the duration of starter feed the same for both sexes.
• Shorten the feeding period of grower and finisher for females.
Feed Form and Physical Feed Quality
Ideal physical feed form and size are given in the table below.
Age Feed Type Feed Form and Size
Sieved crumble: 1.5-3.0 mm diameter
0-10 days Starter or
Mini-pellets: 1.6-2.4 mm diameter,
1.5-3.0 mm length
11-18 days
Grower Sieved crumble: 1.5-3.0 mm diameter
(this is normally or
the first delivery of Mini-pellets: 1.6-2.4 mm diameter,
grower feed) 4.0-7.0 mm length
19-24 days Grower Pellets: 3.0-4.0 mm diameter,
5.0-8.0 mm length
25 days to Pellets: 3.0-4.0 mm diameter,
processing Finisher5.0-8.0 mm length
19
Provision of Feed and Water
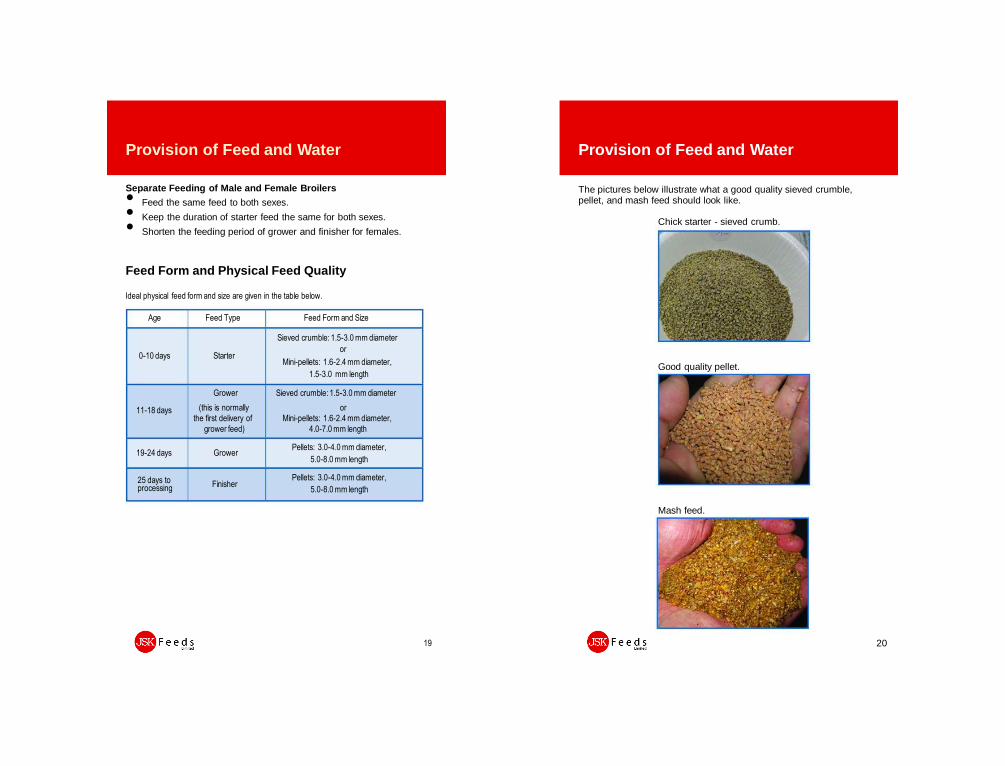
The pictures below illustrate what a good quality sieved crumble, pellet, and mash feed should look like.
Chick starter - sieved crumb.
Good quality pellet.
Mash feed.
20
Provision of Feed and Water
MANAGEMENT FUNDAMENTAL
Poor physical feed form will have a negative
impact on broiler performance.
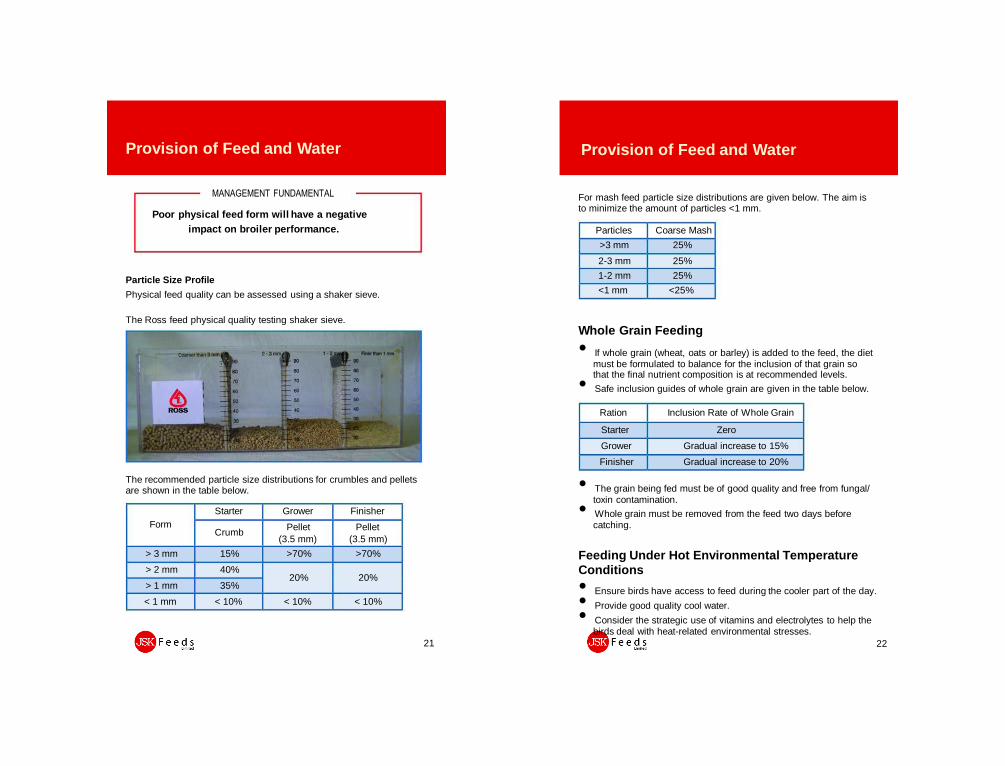
Particle Size Profile
Physical feed quality can be assessed using a shaker sieve.
The Ross feed physical quality testing shaker sieve.
The recommended particle size distributions for crumbles and pellets are shown in the table below.
Starter Grower Finisher
FormCrumb
Pellet Pellet
(3.5 mm) (3.5 mm)
> 3 mm 15% >70% >70%
> 2 mm 40%20% 20%
> 1 mm 35%
< 1 mm < 10% < 10% < 10%
21
Provision of Feed and Water
For mash feed particle size distributions are given below. The aim is to minimize the amount of particles <1 mm.
Particles Coarse Mash
>3 mm 25%
2-3 mm 25%
1-2 mm 25%
<1 mm <25%
Whole Grain Feeding
• If whole grain (wheat, oats or barley) is added to the feed, the diet must be formulated to balance for the inclusion of that grain so that the final nutrient composition is at recommended levels.
• Safe inclusion guides of whole grain are given in the table below.
Ration Inclusion Rate of Whole Grain
Starter Zero
Grower Gradual increase to 15%
Finisher Gradual increase to 20%
• The grain being fed must be of good quality and free from fungal/ toxin contamination.
• Whole grain must be removed from the feed two days before catching.
Feeding Under Hot Environmental Temperature
Conditions
• Ensure birds have access to feed during the cooler part of the day.
• Provide good quality cool water.
• Consider the strategic use of vitamins and electrolytes to help the birds deal with heat-related environmental stresses.
22
Provision of Feed and Water
Drinking Systems
Drinker Type Requirements
<3 kg (6.6 lbs) 12 birds per nippleNipple Drinkers
>3 kg (6.6 lbs) 9 birds per nipple
Bell Drinkers 10 drinkers (40 cm / 17 in) per 1000 birds
•Birds should have access to clean, fresh, good quality drinkingwater 24 hours a day.
•Monitor the feed to water ratio daily.
•At 21°C (70°F), birds are consuming sufficient water when the ratioof water volume (l) to feed weight (kg) remains close to:
-- 1.8:1 for bell drinkers.
-- 1.7:1 for nipple drinkers with cups.
-- 1.6:1 for nipple drinkers without cups.
-- The water to feed ratio may be higher than this for the first few days.
•Ideal water temperature should be between 15°C (59°F) and 21°C(70°F).
•Provide supplementary drinkers for the first 4 days of a flock's life.
•Adjust drinker heights daily.
Correct nipple drinker height adjustment with bird age.
Initially, the back of the chick As the bird grows, an angle ofshould form an angle of approximately 75-85° with the
35-45° with the floor. floor is correct.23
Provision of Feed and Water
Correct height of bell drinker.
› Place bell drinkers throughout the house.
› Broilers should not have to travel more than 2 m (6.6 ft) to get water.
› Water level should be 0.6 cm (0.2 in) below the top of the drinker until ten days of age.
› After ten days there should be
0.6 cm (0.2 in) of water in the
base of the drinker.
• Keep drinkers well-maintained and clean.
• In hot weather, water consumption will be increased and drinker lines should be flushed at regular intervals to keep water cool.
Feeding Systems
Feeding space per bird for different feeder types.
Feeder Type
Pan feeders
Flat chain/auger
Tube feeders
Feeder Space
45-80 birds per pan
(the lower ratio for bigger birds)
2.5 cm/bird (40 birds/m of track) 1 in/bird (24 birds/ft of track)
70 birds/tube (for a 38 cm/15 in diameter feeder)
24
Provision of Feed and Water
• Adjust feeder height daily so that the birds' breasts are level with the base of the feeder.
Correct height of feeders.
• Feed must be distributed equally and uniformly throughout the feeding system.
• Allow the birds to clear the feeders once daily.
• Feeder space may need to be increased if the lighting program is modified.
25
Section 3
Health and Biosecurity
Objective
To achieve hygienic conditions within the poultry house,
and to minimize the adverse effects of disease. To attain
optimum performance and bird welfare, and to provide
assurance on food safety issues.
Pages Contents HandbookReference Page
26 Bird Health and 55Biosecurity
30 Decreasing the Risk of 64Disease
31 Disease Investigation 66
35 Disease Recognition 69
Health and Biosecurity
Bird Health and Biosecurity
Potential routes of disease exposure.
Feed
Litter Housing Wild Birds
Chicks People
Insects
Rodents
Equipment & Water Hatchery
Vehicles Other Poultry,
Livestock & Pets
26
Health and Biosecurity
Cleaning
PROCEDURESite Cleaning
1. Plan - dates, times, labor, and equipment requirements.2. Insect control - spray litter, equipment, and all surfaces
with a locally recommended insecticide as soon as theflock has depleted or 2 weeks prior to depletion. A secondtreatment should be completed prior to fumigation.
3. Remove dust.4. Pre-spray throughout the inside of the house with a
detergent solution.5. Remove equipment.6. Remove and dispose of litter.7. Wash using a pressure washer with foam detergent and
rinse with hot water.8. Thoroughly clean staff facilities and staff equipment as well.9. Ensure all external areas are thoroughly cleaned.
PROCEDURECleaning the Water System
1. Drain pipes and header tanks.2. Flush lines with clean water.3. Scrub header tanks to remove scale and biofilm deposit
and drain to the exterior of the house. 4. Make up header tank to normal operating level with
additional sanitizer solution at appropriate strength. Replace lid.
5. Run a sanitizer solution through the drinker lines from theheader tank ensuring there are no air locks.
6. Allow disinfectant to remain for a minimum of 4 hours.7. Drain and rinse with fresh water.8. Refill with fresh water prior to chick arrival.
27
Health and Biosecurity
PROCEDURE Cleaning the Feeding System
1. Empty, wash, and disinfect all feeding equipment.2. Empty bulk bins and connecting pipes, and brush-out
where possible. Clean out and seal all openings.
3. Fumigate wherever possible.
Disinfection
• Disinfection should take place once all cleaning and repairs are done.
• Use an approved disinfectant and follow manufacturers' instructions at all times.
• Apply disinfectant using either a pressure-washer or a backpack sprayer.
• If using a selective coccidial treatment, this should be applied to all clean internal surfaces and be used by suitably trained staff only.
Formalin Fumigation
• Fumigation is hazardous to animals and humans and is not permitted in all countries. Where it is permitted it must be conducted by trained personnel following local safety legislation and guidelines.
• Fumigation should be undertaken as soon as possible after disinfection has been completed.
• Surfaces should be damp, the house warmed to a minimum of 21°C (70°F) and RH greater than 65%.
• After fumigation, keep the house sealed for 24 hours with NO ENTRY signs clearly displayed.
• The house must be thoroughly ventilated before anyone enters. Formalin levels must be less than 2 ppm before anyone enters the house.
• After clean litter has been spread, fumigation should be repeated.
28
Health and Biosecurity
Evaluation of Farm Cleaning and Disinfection Efficiency
• Bacterial counts and salmonella isolations should be completed at least once a flock to determine the effectiveness of cleaning.
Water Quality
Ideal water quality criteria for poultry.
Criteria Concentration (ppm)
Total Dissolved Solids 0-1000
pH 6.5-8.5
Sulphates 50-200
Chloride 250
Potassium <300
Magnesium 50-125
Nitrate Nitrogen 10 (maximum level)
Nitrates trace
Iron <0.3
Fluoride 2 (maximum level)
Bacterial Coliforms 0 cfu/ml
Calcium 600 (maximum level)
Sodium 50-300
• Test water quality at least once a year (more often if there are perceived water quality issues or performance problems).
• Chlorination - to give between 3 and 5 ppm free chlorine at the drinker level is usually effective in controlling bacteria but this is dependent on the type of chlorine component used.
• Where hard water is a problem (iron levels > 3 mg/l), water should be filtered using a 40-50 micron filter.
•It is a good idea to routinely check the water supply on farmduring a flock:
-- Run water out of the end of each line.
-- If there is a high level of particulate matter visible to the eye, action should be taken.
29
Health and Biosecurity
Decreasing the Risk of Disease
Preventing Diseases Transmitted by Humans
• Prevent unauthorized access to the farm.
• Shower on to the farm and change clothing.
• Maintain a record of visitors.
• Wash and sanitize hands and boots when entering and leaving houses.
• Clean and disinfect all equipment before bringing in to the house.
• Visit youngest flocks first.
Preventing Diseases Transmitted by Animals
• Whenever possible, use an “all in/all out” placement cycle.
• Downtime between flocks will reduce contamination of the farm.
• Do not leave equipment, building materials or litter lying around.
• Clean-up feed spills as soon as they occur.
• Store litter material in bags or inside a storage building or bin.
• Ensure all buildings are adequately sealed against access by wild birds or vermin.
• Maintain an effective rodent/vermin control program.
Vaccination
• Vaccination programs must be based on local disease challenges and vaccine availability.
• Vaccination alone cannot protect flocks against overwhelming disease challenges and/or poor management and biosecurity practices.
• Every bird must receive the intended dose of vaccine.
30
Health and Biosecurity
Disease Investigation
The tables below highlight examples of mortality parameters possibly related to bird quality and bird health giving potential investigative actions.
Troubleshooting common issues in the 0-7 day brooding phase.
Increased dead on Source flock health andInadequate diet of source flockarrivals (D.O.A.) hygiene status
Health and hygiene status of sourceChicks inactive and Egg handling, storage,flock, hatchery, and equipmentslow to respond, and transportlacking energy Incorrect parameters for egg
Hatchery sanitation, storage, relative humidity,General chick incubation, and temperatures, and equipmentappearance: management management
--Unhealed navels Chick processing, Incorrect moisture loss during--Red hocks/beaks handling, and transportincubation--Dark wrinkled legs --Discolored or Incorrect incubation temperaturemalodorous yolks or navels Dehydration caused by excessive
spread of hatch time or late removal of chicks
Continued
31
Health and Biosecurity
Observe Investigate Likely Causes
Small Chicks Days Feed, Light, Air, Water,1-4 and Space:
Crop fill at 24 hours Less than 95% of chicks withpost chick placement adequate crop fill by 24 hours
Post placementAvailability andaccessibility to feed Weak chicksand water Inadequate feeders and drinkers
Bird comfort and welfare
Inadequate feed and waterlevelsEquipment location and maintenance issues
Inappropriate broodingtemperature and environment
Runted and Stunted Feed, Light, Litter,Chicks: Air, Water, Space,
Sanitation, andSecurity:
Small birds, as early as
Flock source Chicks sourced from widely
4-7 days
different flock agesHydration status ofchicks Chicks unable to find or reach
Bacterial Local disease challengeHigh disease challenge
Viral Vaccination and disease Low disease protectionprevention strategies
Fungal Inadequate or improperFeed quality and supply implementation of disease
Protozoal preventionLighting and ventilation
Parasitic Poor feed qualityPoor bird access to feed
ToxinsExcessive or insufficientventilation
Stress Potential stressors:
Temperature Inadequate farm management
Management Inadequate equipment
Immunosuppressive disorders
Inadequate bird comfort andwelfare
Continued
33
Health and Biosecurity
Observe Investigate Likely Causes
High Number Feed, Light, Litter, Air, Water,of Birds D.O.A. Space, Sanitation, and Security:Processing Plant:
High plant Flock records and data Health issues during grow-outcondemnation rate
Health status of flock Management of relevanthistorical events affecting bird History of flock during the grow- health and welfare
out period (such as feed, water or power outages) Improper bird handling and
hauling by crewsPotential equipment hazardsOn the farm Harsh conditions (weather
or equipment related) duringBird handling by the catchers, handling, catching, or handlers, and transporters transport to the processing
plantExperience and training level of individuals handling and transporting birds
Conditions during catching and transporting (such as weather and equipment)
34
Health and Biosecurity
Disease Recognition
The table below highlights some of the ways in which signs of disease can be recognized.
Observations by Farm Farm and Laboratory Data and TrendPersonnel Monitoring Analysis
Daily assessment of bird Regular farm visitation Daily and weekly mortalitybehavior
Routine post-mortem Water and feedBird appearance (such as examinations of normal consumptionfeathering, size, uniformity, and diseased birdscoloring) Temperature trends
Proper sample collectionEnvironmental changes size and type D.O.A. after placement on(such as litter quality, heat the farm or after arrival ator cold stress, ventilation Proper choice of the processing plantissues) subsequent analysis
and actions following Condemnation atClinical signs of illness post-mortem examinationprocessing(such as respiratory noise - needs validation/or distress, depression, clarificationfecal droppings, vocalization) Routine microbiological
testing of farms, feed, Flock uniformity litter, birds, and other
appropriate material
Appropriate diagnostic testing
Appropriate serology
35
Section 4
Housing and Environment
Objective
To provide an environment that permits the bird to achieve optimum performance in growth rate, uniformity,
feed efficiency and yield, while ensuring that the health
and welfare of the bird are not compromised.
Pages Contents HandbookReference Page
36 Air Contaminants 71
37 Housing and 72
Ventilation Systems
42 Lighting 88
43 Litter Management 94
43 Stocking Density 96
Housing and Environment
Air Contaminants
Effects of common broiler house air contaminants.
Observe Investigate
Ammonia Ideal level < 10 ppm
Can be detected by smell at 20 ppm or above.
>10 ppm will damage lung surface.
>20 ppm will increase susceptibility to respiratory diseases.
>25 ppm may reduce growth rate depending upon
temperature and age.
Carbon Dioxide Ideal level <3,000 ppm
>3,500 ppm causes ascites. Carbon dioxide is fatal at high
levels.
Carbon Monoxide Ideal level 10 ppm
>50 ppm affects bird health. Carbon monoxide is fatal at
high levels.
Dust Damage to respiratory tract lining and increased susceptibility
to disease. Dust levels within the house should be kept to a
minimum.
Humidity Ideal level 50-60% after brooding
Effects vary with temperature. At >29°C (84.2°F) and >70%
relative humidity, growth will be affected. Relative humidity
<50%, particularly during brooding, will affect growth.
• Monitor both ambient conditions and the conditions within the house.
• Adjust curtains or sidewall flaps in response to any changes in environment.
• During periods of cold weather, use circulation fans to enhance temperature control but beware of too much air movement at bird level.
• During hot weather, use circulation fans mounted near the side walls to draw cooler, less humid air into the house.
• When using a fogging system:
-- Monitor humidity levels closely to ensure they do not become too high.
-- Ensure good air movement is maintained.
Controlled Environment Housing
• Closed environment broiler houses should be equipped to meet the demands of the 3 stages of ventilation.
-- Minimum ventilation.
-- Transitional ventilation.
-- Tunnel ventilation.
37
Housing and Environment
Negative pressure ventilation systems (controlled environment housing).
Achieve good airflow and volume
• If incoming airflow
speed and volume
is too low:
• Cold air will drop directly on to the
birds/litter • Litter will become wet and birds may get chilled
Ensure house is tightly sealed
• Ventilation only works effectively
if the house is adequately sealed.
• This ensures the speed at which air
enters the house is controlled.
• Avoid air leaks.
Air leaks.
37.0°C
36
34
32
2830
26
36
34
32
30
28
26
25.0°C
38
Housing and Environment
Uniform air inlet openings
• Open air inlets must • At lower ventilationbe evenly distributed rates close some
through the house and inlets to force the
be opened equally. same volume of air
through fewer inlets.
• This will createuniform:• Volume of airflow • Speed of airflow • Direction of airflow • Distribution of airflow
Monitor and evaluate regularly
•Monitor house
pressure & air speed:
• Pressure should be 30-40 Pa (0.12-0.16 inches of
water column) depending on house width
• Air speed around 4 m/sec (800 ft/min)
measured at air inlet
• Use smoke tests to
confirm if airflow
direction and inlet
settings are correct.
• Monitor bird behavior
and litter quality.
• Complete regular
evaluation of: • Air quality • RH • Signs of condensation • Dust levels
39
Housing and Environment
PROCEDURE Evaluating Negative Pressure of Controlled
Environment Housing
1. Close all doors and inlets in the house.2. Switch on one 122 cm/127 cm (48 in/50 in) fan, or two 91
cm (36 in) fans.3. The pressure within the house should measure about 37.5
Pa (0.15 inches of water column).
Minimum Ventilation
• A minimum amount of ventilation must be given at all times.
• Minimum ventilation is used for young chicks’, nighttime, or cool weather ventilation.
• Minimum ventilation should be timer not temperature driven.
• Ensure negative pressure is high enough to direct cold incoming air up to the apex of the house roof so it can warm and circulate before dropping to bird level.
• Air inlets should be opened a minimum of 5 cm (2 in) to ensure adequate air movement.
Transitional Ventilation
• Total side wall inlet capacity should be enough to allow 40-50% of the total tunnel fan capacity to be used.
40
Housing and Environment
Tunnel Ventilation
• Only use in warm to hot weather or where large birds are being grown.
• Ensure side wall fans are turned off (if they were used during transitional ventilation).
• Ensure side wall inlets are closed.
-- All air entering the house should enter through the tunnel inlets only.
• Installation of migration fences every 33 m (100 ft) should be considered.
Evaporative Cooling
•Keep fans, foggers, evaporators, and inlets clean.
•Too much water on a cooling pad in the initial stages of use willdecrease house temperature too quickly.
•The cooling pump should be run on a cycle (On/Off) to allowbetter control of temperature.
•Ensure that the correct pressure is achieved for the type offogging system used:
-- Low Pressure, 7-15 bar (102-218 psi); droplet size up to 30 microns.
-- High pressure, 28-41 bar (406-595 psi); droplet size 10-15 microns.
-- Ultra high pressure (misting), 48-69 bar (696-1001 psi); droplet size 5 microns.
• Evaporative cooling adds moisture to the air and increases relative humidity. To ensure bird welfare, operate the system based on relative humidity as well as dry bulb temperature.
• Ensure that the correct air speed is maintained when using an evaporative type cooling system.
41
Housing and Environment
Lighting
• The exact lighting program given will depend on local legislation, individual flock circumstances, and market requirements, but the following recommendations will benefit bird welfare and biological performance:
-- From 0-7 days of age, chicks should have 23 hours light and 1 hour dark.
-- After 7 days, a period of darkness of 4-6 hours will be beneficial.
• Changes to the lighting program should be made over a period of 2-3 days.
• Dawn to dusk programs will result in less crowding at the feeder.
• Intermittent lighting programs should be simple providing at least one continuous block of 4 hours darkness. Adequate feeder and drinker space must be provided.
• Local legislation for light intensity must be followed but as a minimum:
-- Provide 30-40 lux (3-4 foot candles) to 7 days of age.
-- Provide at least 5-10 lux (0.5-1.0 foot candles) after 7 days of age.
• During the dark period, light intensity must be less than 0.4 lux (0.04 foot candles).
• Light must be uniformly distributed throughout the house and light seepage into the house prevented.
42
Housing and Environment
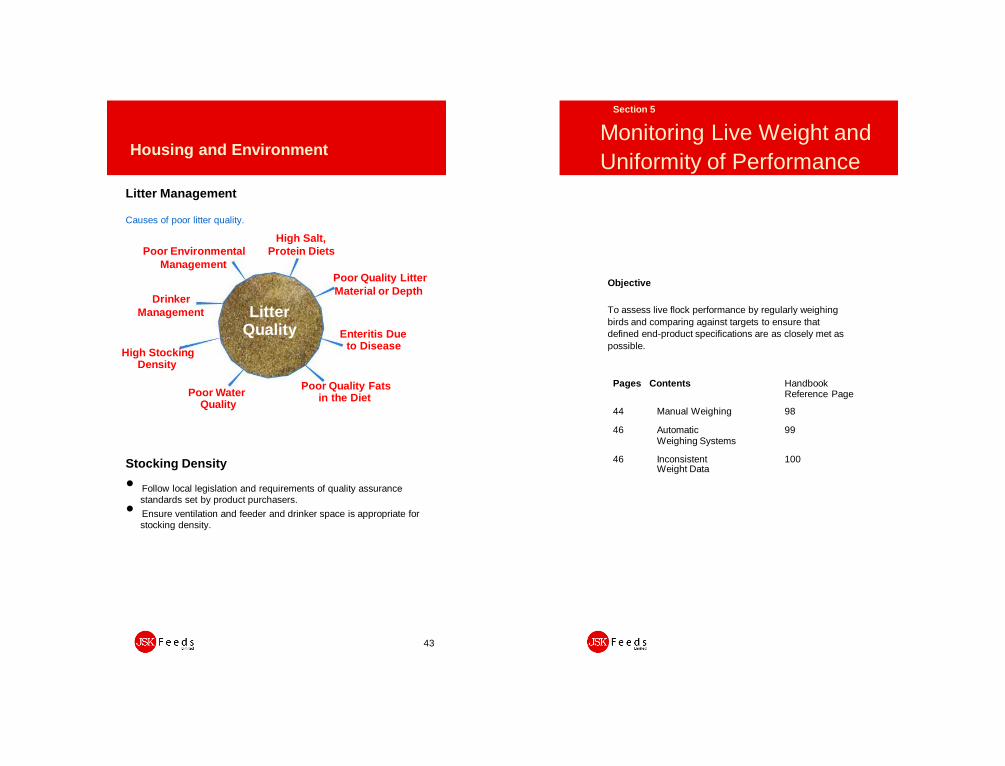
Litter Management
Causes of poor litter quality.
High Salt,
Poor Environmental Protein Diets
Management
Poor Quality Litter
Material or DepthDrinker
Management LitterQuality
High Stocking Density
Poor Water Quality
Stocking Density
Enteritis Due to Disease
Poor Quality Fats in the Diet
• Follow local legislation and requirements of quality assurance standards set by product purchasers.
• Ensure ventilation and feeder and drinker space is appropriate for stocking density.
43
Section 5
Monitoring Live Weight and
Uniformity of Performance
Objective
To assess live flock performance by regularly weighing
birds and comparing against targets to ensure that
defined end-product specifications are as closely met as
possible.
Pages Contents HandbookReference Page
44 Manual Weighing 98
46 Automatic 99Weighing Systems
46 Inconsistent 100Weight Data
Monitoring Live Weight and Uniformity
of Performance
Manual Weighing
• When weighing birds manually, birds should be weighed regularly and at the same time of day.
• On each occasion, equal sized samples of birds should be taken from at least 3 locations in each house or pen.
Bulk Bird Weighing
• Between 0 and 21 days, birds should be weighed as a bulk population.
• A minimum of 100 birds (or 1% of the population, whichever is larger) should be weighed each time.
44
Monitoring Live Weight andUniformity of Performance
PROCEDUREBulk Bird Weighing
1. Suspend the scales with bucket or weighing vesselattached above the pen in a secure place and set to
“zero”.2. Sample birds from at least 3 evenly distributed locations throughout each house, sample points should be away from doors and walls.
Example of bird sample points for weighing. The red circles show where a sample of birds should be taken.
3. Calmly and correctly handle birds, count and place them into the weighing vessel until it has the desired number of birds in it (10-20 birds depending on the size of the vessel).
4. Place the weighing vessel back onto the scales, wait until it is still, and record the bulk weight from the scale and bird count before releasing the birds back into the main house area.
5. Repeat this process until ALL birds in the sample within the catching pen have been weighed (this will eliminate any selective bias).
6. When all sample birds in the house have been weighed, add all recorded weights together and divide by the total number of birds weighed to give the average bird weight for that house.
45
Monitoring Live Weight and Uniformity of Performance
Individual Bird Weighing
• Individual birds should be weighed from 21-28 days onwards, depending on age of processing.
• Birds should be caught using a catching frame or pen.
PROCEDURE Individual Bird Weighing
1. Scales should be suspended above the pen in a secure place and set to “zero” with a ‘shackle’ in place for holding the birds firmly during the weighing process.
2. A minimum of 100 birds (or 1% of the populationwhichever is larger) should be weighed each time.
3. All birds in the catching pen must be weighed to eliminateselective bias.
4. Once all sample birds have been weighed in the house, calculate average live-weight and CV% for each house.
Automatic Weighing Systems
• Readings from any auto-weigher should be regularly checked for usage rate (number of completed weights per day) and the mean live weights achieved should be cross-checked by manual weighing at least once per week.
• Inaccurate live weight estimation will result from small sample sizes:
-- Check weigher location.
Inconsistent Weight Data
If a sample weighing produces data that are inconsistent with the previous weights or expected gains, a second sample of birds should be weighed immediately. This will confirm whether or not there is a problem and identify potential issues (e.g. improper sampling procedures, drinker failures, or disease) needing to be resolved.
46
Section 6
Pre-Processing Management
Objective
To manage the final phase of the production process so that
broilers are transferred to the processor in optimum condition,
ensuring that the processing requirements are met and high
standards of bird welfare are maintained.
Pages Contents Handbook
Reference Page
47 Preparation for 105Catching
49 Catch 107
50 Transport 110
Pre-Processing Management
Preparation for Catching
• Allow 3 days on 23 hours light and 1 hour dark at a minimum of 5-10 lux (0.5-1.0 foot candles) prior to catching.
• It is recommended that feed is removed from the birds 8-12 hours before processing.
• Feed withdrawal period = time in house without feed + catching time + transport time + holding (lairage) time.
• The presence of watery droppings from broilers awaiting processing, watery fluid in the small intestine, and litter in the crop and gizzard all indicate excessive withdrawal times (more than 12 hours).
• The presence of feed in the crop or fecal contamination at the processing plant indicates that the feed withdrawal period has been inadequate (less than 8 hours).
• Delay the removal of drinkers for as long as possible.
• Follow statutory withdrawal periods for pharmaceutical products.
47
Pre-Processing Management
Pre-Catch
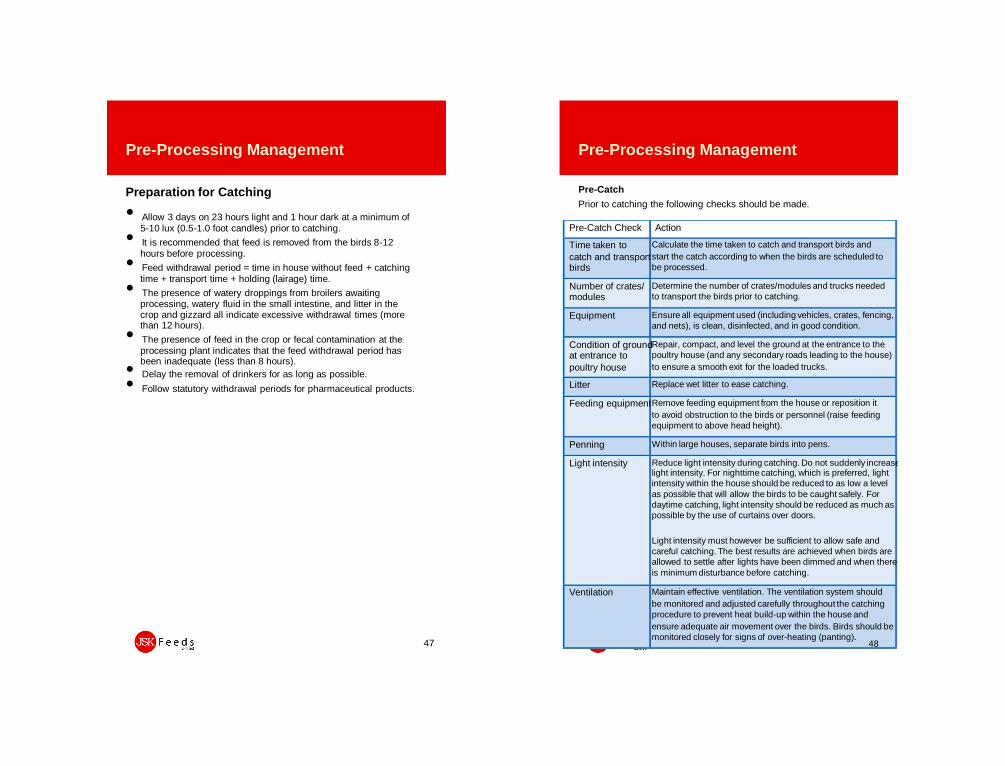
Prior to catching the following checks should be made.
Pre-Catch Check Action
Time taken to Calculate the time taken to catch and transport birds and
catch and transportstart the catch according to when the birds are scheduled to
birds be processed.
Number of crates/ Determine the number of crates/modules and trucks needed
modules to transport the birds prior to catching.
Equipment Ensure all equipment used (including vehicles, crates, fencing,
and nets), is clean, disinfected, and in good condition.
Condition of groundRepair, compact, and level the ground at the entrance to the
at entrance to poultry house (and any secondary roads leading to the house)
poultry house to ensure a smooth exit for the loaded trucks.
Litter Replace wet litter to ease catching.
Feeding equipmentRemove feeding equipment from the house or reposition it
to avoid obstruction to the birds or personnel (raise feeding
equipment to above head height).
Penning Within large houses, separate birds into pens.
Light intensity Reduce light intensity during catching. Do not suddenly increaselight intensity. For nighttime catching, which is preferred, light
intensity within the house should be reduced to as low a level
as possible that will allow the birds to be caught safely. For
daytime catching, light intensity should be reduced as much as
possible by the use of curtains over doors.
Light intensity must however be sufficient to allow safe and
careful catching. The best results are achieved when birds are
allowed to settle after lights have been dimmed and when there
is minimum disturbance before catching.
Ventilation Maintain effective ventilation. The ventilation system should
be monitored and adjusted carefully throughout the catching
procedure to prevent heat build-up within the house and
ensure adequate air movement over the birds. Birds should be
monitored closely for signs of over-heating (panting).48
Pre-Processing Management
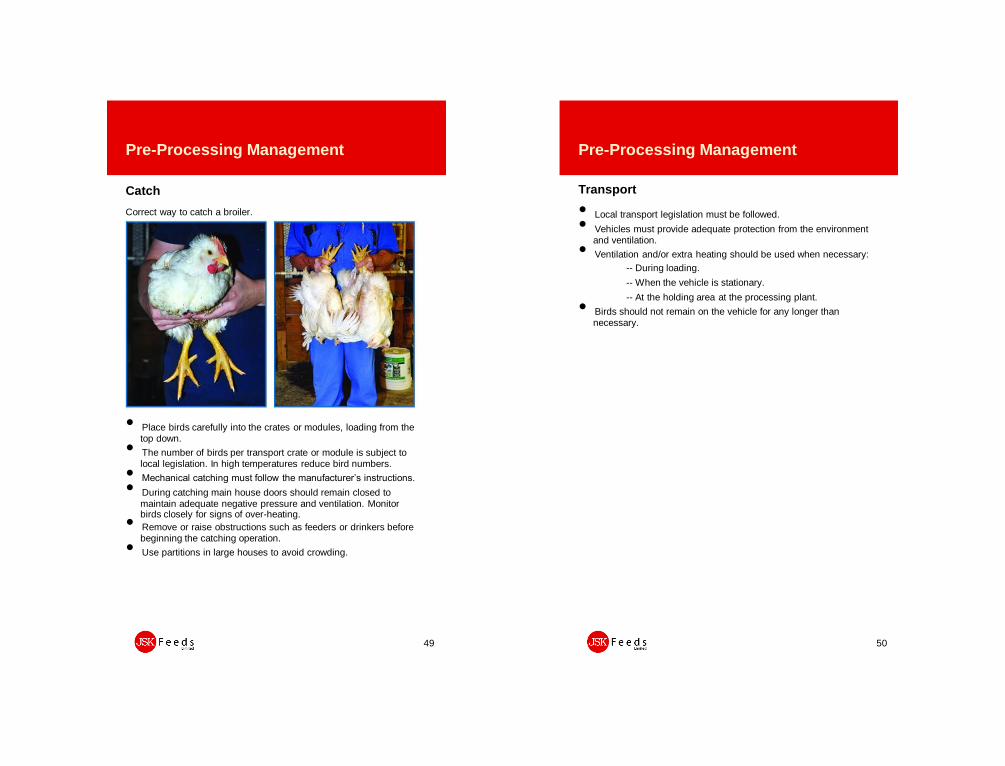
Catch
Correct way to catch a broiler.
• Place birds carefully into the crates or modules, loading from the top down.
• The number of birds per transport crate or module is subject to local legislation. In high temperatures reduce bird numbers.
• Mechanical catching must follow the manufacturer’s instructions.
• During catching main house doors should remain closed to maintain adequate negative pressure and ventilation. Monitor birds closely for signs of over-heating.
• Remove or raise obstructions such as feeders or drinkers before beginning the catching operation.
• Use partitions in large houses to avoid crowding.
49
Pre-Processing Management
Transport
• Local transport legislation must be followed.
• Vehicles must provide adequate protection from the environment and ventilation.
• Ventilation and/or extra heating should be used when necessary:
-- During loading.
-- When the vehicle is stationary.
-- At the holding area at the processing plant.
• Birds should not remain on the vehicle for any longer than necessary.
50
Appendices
Appendices
Pages Contents Handbook
Reference Page
51 Appendix 1 - 113Production Records
54 Appendix 2 - Key 118Performance Parameters
58 Appendix 3 - Problem 122Solving
Appendix 1 - Production Records
Production Records
Records required in broiler production.
Event Records Comment
Chick placement
Number of day-olds
Flock of origin and flock age
Date and time of arrival
Chick quality
Crop fill
Live weight, uniformity, number of dead
on arrival
Check crop fill percentage for age
Mortality Daily
Weekly
Cumulative
Record by sex if possible
Record culls and reason for culling
separately
Post-mortem records of excessive mortality
Scoring of coccidial lesions will indicate
level of coccidial challenge
Record actual numbers and percentages
Pay particular attention to 7-day mortality
Medication Date As per veterinary instruction
Amount
Batch number
Vaccination Date of vaccination
Vaccine type
Batch number
Expiry date
Any unexpected vaccine reaction should
be recorded
Continued
51
Appendix 1 - Production Records
Event Records Comment
Live weight Weekly average live weight
Weekly uniformity (CV%)
Feed Date of delivery
Quantity
Feed type
Feed form
Date of starting feed withdrawal prior to catching
More frequent measurement is required
when predicting processing weight
Accurate measurement of feed consumed
is essential to measure FCR and to
determine cost effectiveness of broiler
operation
Check feed quality
Water Daily consumption Plot daily consumption in graph form,
preferably per house
Water to feed ratio Sudden fluctuation in water consumption is
an early indicator of problems
Water quality Mineral and/or bacteriological especially
where bore holes or open water reservoirs
are used
Level of chlorination
Environment Temperature: • Floor temperature as well as litter temperature
- daily minimum - daily maximum - during brooding, 4-5 times per day - litter during brooding - external temperature (daily) • Relative Humidity (daily)
Air quality
Litter quality
Last calibration of equipment and by whom
Multiple locations should be monitored,
especially in chick litter area
Automatic systems should be cross-checked
manually each day
Ideally record dust, CO2, NH3 or as a
minimum observe levels of dust and NH3
Continued
52
Appendix 1 - Production Records
Event Records Comment
Depletion Number of birds removed
Time and date of removal
Information from processing plant
Carcass quality
Health inspection
Carcass composition
Type and % condemnations
Cleaning out Total bacterial counts After disinfection, salmonella,staphylococcus or E. coli may be monitored if required
House inspection
Lighting program
Record time of daily checks
Make note of any bird observations
Dark and light period
Time on and time off
Behavior and environmental conditions
Intermittent or not
Visitors Who
Why
Date and reason for visit
Previous farm visits (place and date)
Should be completed for every visitorto ensure traceability
53
Appendix 2 - Key Performance Parameters
Key Performance Parameters
Production Efficiency Factor (PEF)+
Livability x Live Weight in kg
Age in Days x FCRx 100
e.g. Age 42 days, live weight 2,652 g, mortality 2.80%, FCR 1.75
97.20 x 2.652 x 100 = 351
42 x 1.75
e.g. Age 46 days, live weight 3006 g, mortality 3.10%, FCR 1.83
96.90 x 3.006 x 100 = 346
46 x 1.83
NOTES: The higher the value, the better the technical performance.
This calculation is heavily biased by daily gain. When comparing across different environments, comparisons should be made at similar ages at processing.
+ Also referred to as European Production Efficiency Factor (EPEF)
54
Appendix 2 - Key Performance
Parameters
Coefficient of Variation % (CV%)
Standard Deviation
CV% = x 100Average Body Weight
e.g. A flock has an average body weight of 2550 g (5.62 lb) with a standard deviation around that average weight of 250 g (0.55 lb).
250 g (0.55 lb)
CV% = x 100 = 9.80
2550 g (5.62 lb)
NOTES: The lower the CV%, the more uniform and less variable the
flock. CV% is an important tool to estimate the live weight of the flock.
Feed Conversion Ratio (FCR)
Total Feed Consumed
FCR =
Total Live Weight
e.g. A sample of 10 birds has a total live weight of 31480 g (69.34 lb) and they have consumed a total feed amount of 36,807 g (81.07 lb). The
average feed conversion for this sample set would be calculated as follows:
36807 g (81.07 lb)
FCR = = 1.16931480 g (69.34 lb)
NOTES: The lower the FCR, the more efficient a bird (or sample of birds) is at converting the feed consumed into live body weight. It is especially important for broilers to have good FCR because they are often processed at a targeted live weight and customers want to get as much saleable meat as possible.
55
Appendix 2 - Key PerformanceParameters
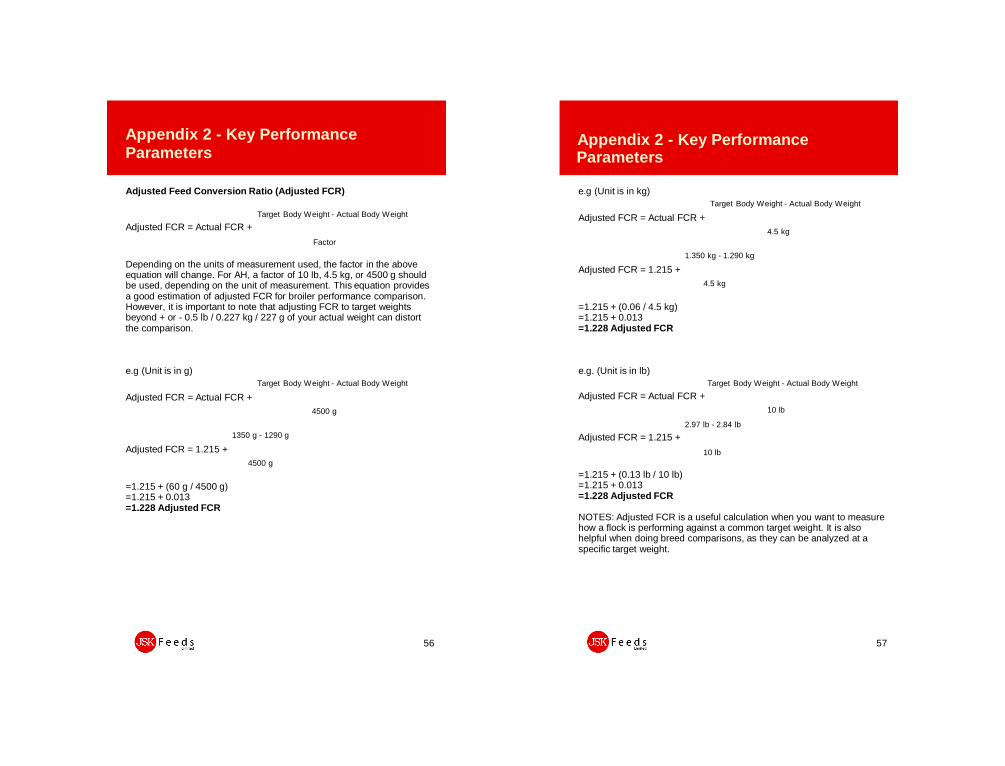
Adjusted Feed Conversion Ratio (Adjusted FCR)
Target Body Weight - Actual Body Weight
Adjusted FCR = Actual FCR +
Factor
Depending on the units of measurement used, the factor in the above equation will change. For AH, a factor of 10 lb, 4.5 kg, or 4500 g should be used, depending on the unit of measurement. This equation provides a good estimation of adjusted FCR for broiler performance comparison. However, it is important to note that adjusting FCR to target weights beyond + or - 0.5 lb / 0.227 kg / 227 g of your actual weight can distort the comparison.
NOTES: Adjusted FCR is a useful calculation when you want to measure how a flock is performing against a common target weight. It is also helpful when doing breed comparisons, as they can be analyzed at a specific target weight.
57
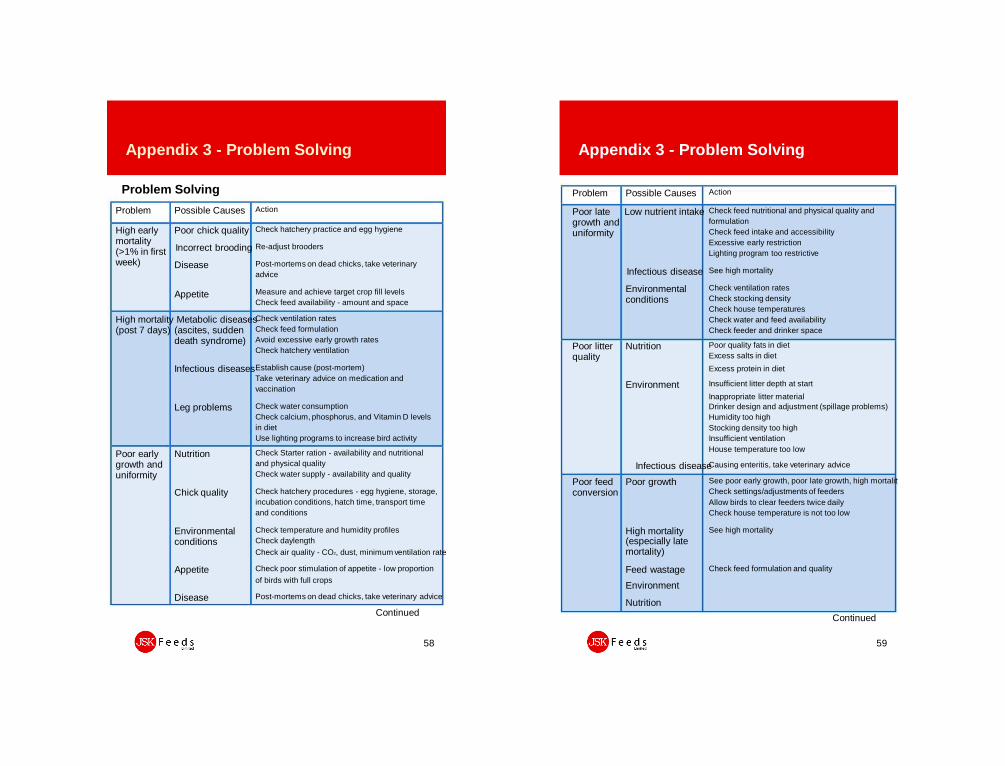
Appendix 3 - Problem Solving
Problem Solving
Problem Possible Causes Action
High early Poor chick quality Check hatchery practice and egg hygiene
mortality(>1% in first Incorrect brooding Re-adjust brooders
week) Disease Post-mortems on dead chicks, take veterinary
advice
Appetite Measure and achieve target crop fill levels
Check feed availability - amount and space
High mortality Metabolic diseasesCheck ventilation rates