Ribbon Star ThinLux LED Strip Light - 24VDC SKU: RL-DX-TL EcolocityLED.com [email protected]775-636-6060 Product SKU : LED Size : LED Quan�ty : Input Power : Wa�s : Max Serial Connec�on : Opera�ng Temp : Beam Angle : Ra�ng : Warranty Period : RL-DX-TL 2014 SMD 6 LEDs per 1.97" 24VDC Constant Voltage 4.4W per foot 20� -4° ~ 113°F 120° Dry 2 Years Input Power: 24VDC Constant Voltage Power supply equa�on X * 4.4 = Y X = linear strip light footage Y = minimum transformer waage Copper Pads for Connections. Connections can be made at any point strip light. Never cut outside of cut lines!! 24VDC 8.3mm 1.97” (5.0cm) Cut Lines 0.15” (3.5mm) TOP SMD 2014 LEDs + - + - + - + - + - + - DC + DC - 22AWG Stranded Wire SPECIFICATIONS PRECAUTIONS 255 Distribution Dr. #104 Sparks, NV 89441, USA ECOLOCITYLED.COM 775-636-6060 ! 24VDC 24VDC 3M VHB 3M VHB 3M VHB 3M VHB 3M VHB 3M VHB 3M VHB 3M VHB 120VAC Use 24VDC Input Only! DO NOT use AC Input! WARNING – This product should be installed, cut and connected only by a qualified professional. This product is not designed to be installed in wet or damp environments. NEVER cut, connect, or join wires while product is connected to a live power source. DO NOT bend or crease the strip in a manner that will damage the conduc- tivity of the circuit board. DO NOT use in direct sunlight. DO NOT use in environments over 113°F. DO install on a metal heat sink. DO NOT exceed 20ft serial connection! BE CERTAIN your 24VDC source and wire gauge is suffice for powered load.
Transcript
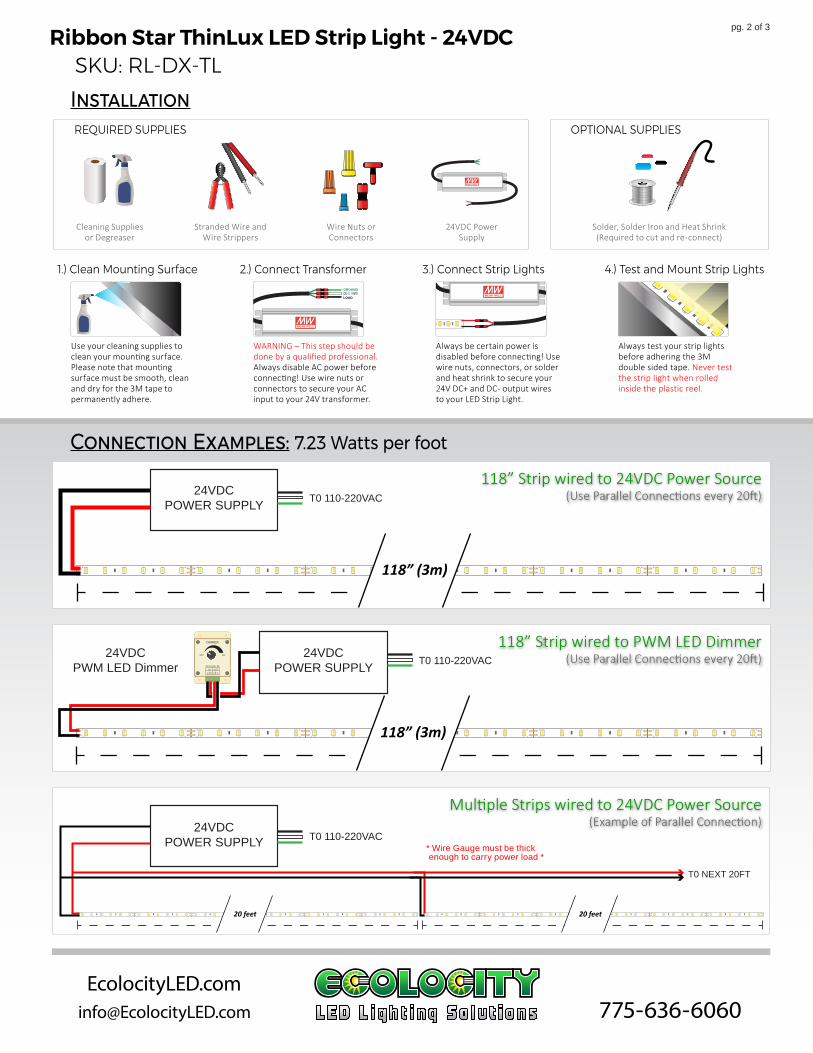
Ribbon Star ThinLux LED Strip Light - 24VDCSKU: RL-DX-TL
118” Strip wired to 24VDC Power Source(Use Parallel Connec�ons every 20�)
+
-
+
-
+
-
+
-
+
-
+
-
+
-
+
-
+
-
+
-
+
-
+
-118” (3m)
24VDCPOWER SUPPLY T0 110-220VAC
Mul�ple Strips wired to 24VDC Power Source(Example of Parallel Connec�on)
+
-
+
-
+
-
+
-
+
-
+
-
+
-
+
-
+
-
+
-
+
-
+
-20 feet +
-
+
-
+
-
+
-
+
-
+
-
+
-
+
-
+
-
+
-
+
-
+
-20 feet
24VDCPOWER SUPPLY T0 110-220VAC
* Wire Gauge must be thickenough to carry power load *
T0 NEXT 20FT
118” Strip wired to PWM LED Dimmer(Use Parallel Connec�ons every 20�)
DC 12-24V. 8A
OFF ON
DIMMER
IN
V- V+ V+ V-
OUT
+
-
+
-
+
-
+
-
+
-
+
-
+
-
+
-
+
-
+
-
+
-
+
-118” (3m)
24VDCPOWER SUPPLY T0 110-220VAC
24VDCPWM LED Dimmer
Ribbon Star ThinLux LED Strip Light - 24VDCSKU: RL-DX-TLINSTALLATIONREQUIRED SUPPLIES OPTIONAL SUPPLIES
Cleaning Suppliesor Degreaser
Stranded Wire andWire Strippers
Wire Nuts orConnectors
24VDC PowerSupply
Solder, Solder Iron and Heat Shrink(Required to cut and re-connect)
pg. 2 of 3
1.) Clean Mounting Surface
Use your cleaning supplies to clean your moun�ng surface. Please note that moun�ng surface must be smooth, clean and dry for the 3M tape to permanently adhere.
2.) Connect Transformer
WARNING – This step should be done by a qualified professional. Always disable AC power before connec�ng! Use wire nuts or connectors to secure your AC input to your 24V transformer.
NEUTRALNEUTRALLOAD
GROUND
3.) Connect Strip Lights
Always be certain power is disabled before connec�ng! Use wire nuts, connectors, or solder and heat shrink to secure your 24V DC+ and DC- output wires to your LED Strip Light.
+
-
+
-
4.) Test and Mount Strip Lights
Always test your strip lights before adhering the 3M double sided tape. Never test the strip light when rolled inside the plastic reel.