32
TIBCO Statistica™ Installation Instructions TIBCO Statistica™ Installation Instructions Software Release 13.3 June 2017

2
TIBCO Statistica™ Installation Instructions
TIBCO Statistica™
Installation Instructions
Software Release 13.3
June 2017
2
TIBCO Statistica™ Installation Instructions
Important Information
SOME TIBCO SOFTWARE EMBEDS OR BUNDLES OTHER TIBCO SOFTWARE. USE OF SUCH
EMBEDDED OR BUNDLED TIBCO SOFTWARE IS SOLELY TO ENABLE THE FUNCTIONALITY (OR
PROVIDE LIMITED ADD-ON FUNCTIONALITY) OF THE LICENSED TIBCO SOFTWARE. THE
EMBEDDED OR BUNDLED SOFTWARE IS NOT LICENSED TO BE USED OR ACCESSED BY ANY
OTHER TIBCO SOFTWARE OR FOR ANY OTHER PURPOSE.
USE OF TIBCO SOFTWARE AND THIS DOCUMENT IS SUBJECT TO THE TERMS AND
CONDITIONS OF A LICENSE AGREEMENT FOUND IN EITHER A SEPARATELY EXECUTED
SOFTWARE LICENSE AGREEMENT, OR, IF THERE IS NO SUCH SEPARATE AGREEMENT, THE
CLICKWRAP END USER LICENSE AGREEMENT WHICH IS DISPLAYED DURING DOWNLOAD OR
INSTALLATION OF THE SOFTWARE (AND WHICH IS DUPLICATED IN THE LICENSE FILE) OR IF
THERE IS NO SUCH SOFTWARE LICENSE AGREEMENT OR CLICKWRAP END USER LICENSE
AGREEMENT, THE LICENSE(S) LOCATED IN THE “LICENSE” FILE(S) OF THE SOFTWARE. USE OF
THIS DOCUMENT IS SUBJECT TO THOSE TERMS AND CONDITIONS, AND YOUR USE HEREOF
SHALL CONSTITUTE ACCEPTANCE OF AND AN AGREEMENT TO BE BOUND BY THE SAME.
This document contains confidential information that is subject to U.S. and international copyright laws
and treaties. No part of this document may be reproduced in any form without the written authorization
of TIBCO Software Inc.
TIBCO, Better Decisioning, Data Health Check, Data Science, Decisioning Platform, Electronic Statistics
Textbook, Information Bus, Live Score, Making the World Productive, Messaging Appliance, Predictive
Claims Flow, Process Data Explorer, Process Tree Viewer, Rendezvous, Statistica, Statsoft, Statsoft
Iberica, The Power of Now, TIB, TIBCO Rendezvous, and Two-Second Advantage are either registered
trademarks or trademarks of TIBCO Software Inc. in the United States and/or other countries.
Enterprise Java Beans (EJB), Java Platform Enterprise Edition (Java EE), Java 2 Platform Enterprise
Edition (J2EE), and all Java-based trademarks and logos are trademarks or registered trademarks of
Oracle Corporation in the U.S. and other countries.
All other product and company names and marks mentioned in this document are the property of their
respective owners and are mentioned for identification purposes only.
THIS SOFTWARE MAY BE AVAILABLE ON MULTIPLE OPERATING SYSTEMS. HOWEVER, NOT
ALL OPERATING SYSTEM PLATFORMS FOR A SPECIFIC SOFTWARE VERSION ARE RELEASED
AT THE SAME TIME. SEE THE README FILE FOR THE AVAILABILITY OF THIS SOFTWARE
VERSION ON A SPECIFIC OPERATING SYSTEM PLATFORM.
THIS DOCUMENT IS PROVIDED “AS IS” WITHOUT WARRANTY OF ANY KIND, EITHER EXPRESS
OR IMPLIED, INCLUDING, BUT NOT LIMITED TO, THE IMPLIED WARRANTIES OF
MERCHANTABILITY, FITNESS FOR A PARTICULAR PURPOSE, OR NON-INFRINGEMENT.
THIS DOCUMENT COULD INCLUDE TECHNICAL INACCURACIES OR TYPOGRAPHICAL
ERRORS. CHANGES ARE PERIODICALLY ADDED TO THE INFORMATION HEREIN; THESE
CHANGES WILL BE INCORPORATED IN NEW EDITIONS OF THIS DOCUMENT. TIBCO
SOFTWARE INC. MAY MAKE IMPROVEMENTS AND/OR CHANGES IN THE PRODUCT(S)
AND/OR THE PROGRAM(S) DESCRIBED IN THIS DOCUMENT AT ANY TIME.
THE CONTENTS OF THIS DOCUMENT MAY BE MODIFIED AND/OR QUALIFIED, DIRECTLY OR
INDIRECTLY, BY OTHER DOCUMENTATION WHICH ACCOMPANIES THIS SOFTWARE,
INCLUDING BUT NOT LIMITED TO ANY RELEASE NOTES AND "READ ME" FILES.
Copyright © 2017 TIBCO Software Inc. All rights reserved. TIBCO Software Inc. Confidential
Information
3
TIBCO Statistica™ Installation Instructions
Table of Contents
TIBCO Documentation and Support Services..................................................................................................... 4
How to Contact TIBCO Support ....................................................................................................................... 4
How to Join TIBCO Community ....................................................................................................................... 4
Sections in this Guide.......................................................................................................................................... 5
1. Named User Installation .................................................................................................................................... 6
Pre-installation Checklist.................................................................................................................................... 7
Installing ............................................................................................................................................................... 7
Uninstalling .......................................................................................................................................................... 8
Failed Registration .............................................................................................................................................. 8
2. Statistica Server ...................................................................................................................................................... 10
Pre-installation Checklist.................................................................................................................................. 11
Server Installation .............................................................................................................................................. 13
Workstation Installation ................................................................................................................................... 16
Server Uninstall ................................................................................................................................................. 18
Workstation Uninstall ....................................................................................................................................... 18
User Accounts .................................................................................................................................................... 18
Accessing the Web Server ................................................................................................................................ 19
Notes on Failed Registration ............................................................................................................................ 19
Using Additional Cores .................................................................................................................................... 20
3. Monitoring and Alerting Server (MAS) Installation ........................................................................................ 22
Pre-installation Checklist.................................................................................................................................. 23
Diagram of MAS Server & Statistica Server & License Server .................................................................... 24
MAS Server Installation .................................................................................................................................... 24
Server Uninstall ................................................................................................................................................. 25
Notes on Failed Registration ............................................................................................................................ 25
4. Live Score Server Installation .............................................................................................................................. 27
Pre-installation Checklist.................................................................................................................................. 28
Server Installation .............................................................................................................................................. 29
Server Uninstall ................................................................................................................................................. 30
Using Additional Cores .................................................................................................................................... 30
4
TIBCO Statistica™ Installation Instructions
TIBCO Documentation and Support Services Documentation for this and other TIBCO products is available on the TIBCO
Documentation site. This site is updated more frequently than any documentation
that might be included with the product. To ensure that you are accessing the latest
available help topics, visit: https://docs.tibco.com
How to Contact TIBCO Support
For comments or problems with this manual or the software it addresses, contact
TIBCO Support:
For an overview of TIBCO Support, and information about getting started
with TIBCO Support, visit this site:
http://www.tibco.com/services/support
If you already have a valid maintenance or support contract, visit this site:
https://support.tibco.com
Entry to this site requires a user name and password. If you do not have a
user name, you can request one.
How to Join TIBCO Community
TIBCOmmunity is an online destination for TIBCO customers, partners, and resident
experts. It is a place to share and access the collective experience of the TIBCO
community.
TIBCOmmunity offers forums, blogs, and access to a variety of resources. To register,
go to the following web address:
https://www.tibcommunity.com
TIBCO Community is an online destination for TIBCO customers, partners, and
resident experts. It is a place to share and access the collective experience of the
TIBCO community.
TIBCO Community offers forums, blogs, and access to a variety of resources. To
register, go to the following web address:
https://community.tibco.com
5
TIBCO Statistica™ Installation Instructions
Sections in this Guide
Each of the sections included in this guide are required for specific installations.
If you have purchased the Named User Installation without any add-ons, refer to
section 1. In the past this may have been labeled “per user” or “desktop”
installation instructions.
If you have purchased an add-on, please refer to the section that corresponds with
the add-on that you have purchased. Do not use Section 1.
There are four sections:
1. Named User Installation
2. Statistica Server Installation
3. Monitoring and Server Installation
4. Live Score Server Installation
6
TIBCO Statistica™ Installation Instructions
1. Named User Installation
7
TIBCO Statistica™ Installation Instructions
Pre-installation Checklist
1. Users on their client machines must log on with Administrator permissions to
complete the client installation. The installation makes necessary changes to
the system. If you are prompted to reboot during the installation, you must log
on with Administrator permissions after rebooting to complete the installation
successfully.
2. If you have a previous version of Statistica on your computer, uninstall the
program (see the Uninstalling section for uninstall instructions). Note that this
method of removing Statistica will not affect or delete any data files created
with previous installations. Once this is complete, proceed with the installation
instructions.
Installing
1. Ensure that no other applications are running.
2. Download the program from https://support.tibco.com, unzip the file and then
double-click setup.exe to begin the installation process. The installation process
should begin automatically, and the Statistica installation dialog box will be
displayed. Click the Install Statistica button.
3. The Welcome dialog box will displayed. Click the Next button.
4. In the Serial Number/Product Key dialog box, enter the Serial Number and 20-
character CD Key in the respective boxes.
Note: It is important to use the complete keyset as provided by Statistica. Click
the Next button to continue.
5. In the Network ID/Install Code dialog box, enter the Install Code. A Single
User Installation does not require a Network ID. Click the Next button to
continue.
6. In the License Agreement dialog box, read the software license agreement.
Select the I accept the terms in the license agreement option button, and click
the Next button if you agree with the terms and want to continue the
installation process.
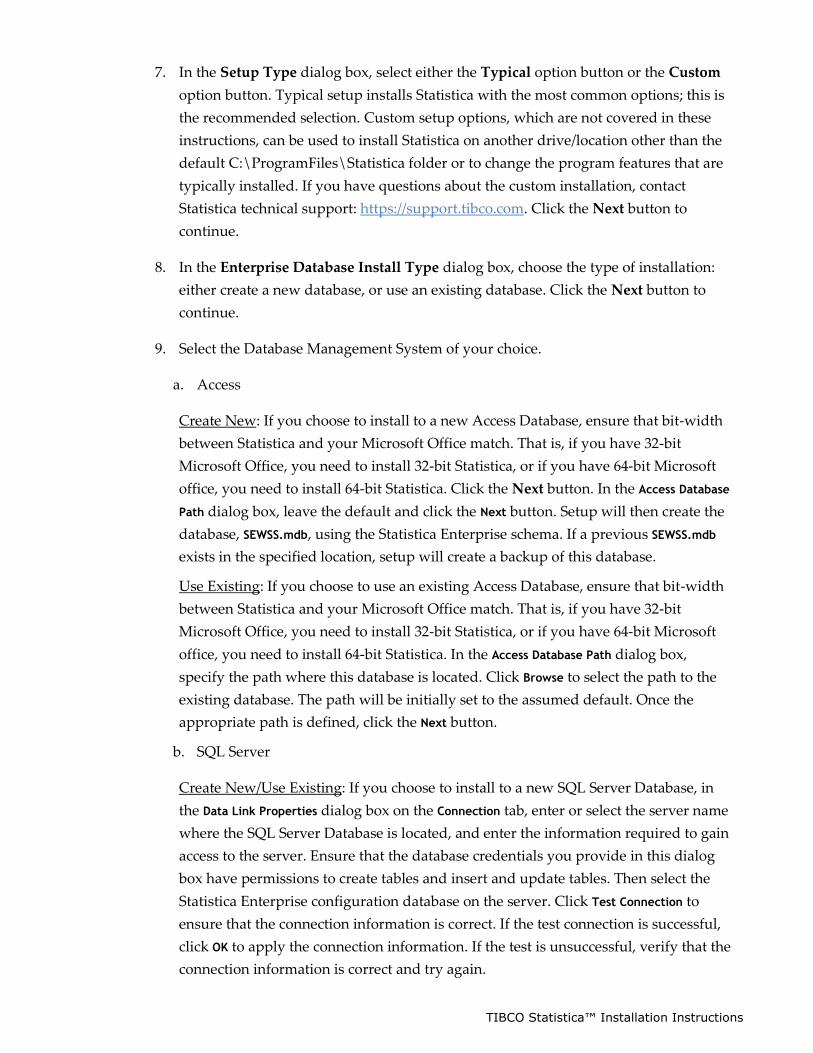
7. In the Setup Type dialog box, select either the Typical option button or the
Custom option button.
Typical setup installs Statistica with the most common options; this is the
recommended selection.
Custom setup options are not covered in these instructions. If you have
questions about the custom installation, contact Statistica for Technical
support: https://support.tibco.com.
8. Click the Next button to continue.
9. In the Start Menu Folder dialog box, enter the Start Menu Folder Name. The
default name is Statistica X.
10. If you want to create a desktop shortcut to Statistica, select the check box. Click
8
TIBCO Statistica™ Installation Instructions
the Next button to continue.
11. In the Register with Statistica dialog box, enter the requested information in
the appropriate boxes. This information is required to obtain the final licensing
file for your software. Click the Next button to continue.
12. In the next dialog box, select a method of software registration. Note that all
Statistica products must be registered to obtain the full license. An Internet
connection is needed to automatically register, which is the recommended
option.
13. Click the Next button to continue.
14. A message is displayed that prompts you to enable your wireless network
adaptor. If your computer has a wireless network adaptor, enable it until
installation is complete in order to ensure proper licensing of the software.
15. Once it is enabled, click the OK button.
16. Statistica will now attempt to register your software automatically. A dialog
box stating that your license has been successfully registered is displayed.
Click the OK button. If the registration process fails, a different dialog box will
be displayed, indicating the failure. See the Notes on failed registration
section for additional details of failed registration.
17. Statistica is ready to install. To begin copying files to your machine, click the
Install button.
18. You should receive a message stating that the installation is complete. You
may be prompted to reboot now or reboot later, depending on the components
that were installed on your machine. If you are prompted, you will need to
reboot before you run Statistica.
19. Click the Finish button to complete the installation process.
Uninstalling
To uninstall Statistica, follow these steps:
1. Ensure that no other applications are running.
2. In the Control Panel, select Uninstall a program located under Programs.
3. Scroll down through the list of programs and select Statistica. Click Uninstall
to uninstall the program.
4. A message will be displayed to confirm that you want to uninstall Statistica
from your computer. Click the Yes button, and Statistica files will be
uninstalled.
5. When the uninstall process is complete, click the Yes button to notify the
registration server. This enables you to install Statistica on another computer.
Failed Registration
The software registration process can fail for several reasons including: exceeding the
allowed number of installations for a serial number, lack of internet connection on the
installed machine, incorrect serial number, or other technical difficulties.
9
TIBCO Statistica™ Installation Instructions
1. If you want Statistica installed on an additional computer, contact Statistica for
information on our policy and additional pricing.
2. If some other issue has affected your registration, ensure that the computer is
connected to the Internet, and verify your serial number. Start Statistica.
If the Statistica Licensing dialog box is displayed, click the Register button. If
the Statistica Licensing dialog box is not displayed, select the File tab. In the
left panel, click Help/Support. In the right panel, under the Support heading,
click Register.
If the registration process still cannot be completed, contact Statistica for
technical support at https://support.tibco.com/.
1
0
TIBCO Statistica™ Installation Instructions
2. Statistica Server
1
1
TIBCO Statistica™ Installation Instructions
Pre-installation Checklist
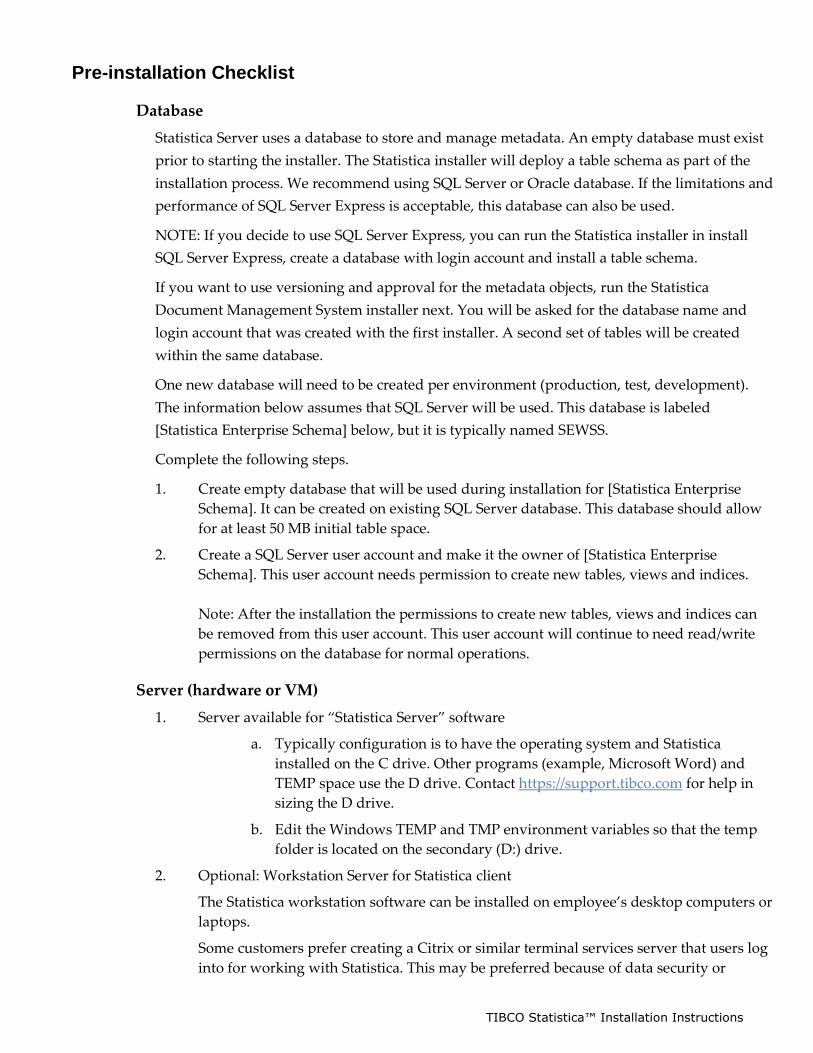
Database
Statistica Server uses a database to store and manage metadata. An empty database must exist
prior to starting the installer. The Statistica installer will deploy a table schema as part of the
installation process. We recommend using SQL Server or Oracle database. If the limitations and
performance of SQL Server Express is acceptable, this database can also be used.
NOTE: If you decide to use SQL Server Express, you can run the Statistica installer in install
SQL Server Express, create a database with login account and install a table schema.
If you want to use versioning and approval for the metadata objects, run the Statistica
Document Management System installer next. You will be asked for the database name and
login account that was created with the first installer. A second set of tables will be created
within the same database.
One new database will need to be created per environment (production, test, development).
The information below assumes that SQL Server will be used. This database is labeled
[Statistica Enterprise Schema] below, but it is typically named SEWSS.
Complete the following steps.
1. Create empty database that will be used during installation for [Statistica Enterprise
Schema]. It can be created on existing SQL Server database. This database should allow
for at least 50 MB initial table space.
2. Create a SQL Server user account and make it the owner of [Statistica Enterprise
Schema]. This user account needs permission to create new tables, views and indices.
Note: After the installation the permissions to create new tables, views and indices can
be removed from this user account. This user account will continue to need read/write
permissions on the database for normal operations.
Server (hardware or VM)
1. Server available for “Statistica Server” software
a. Typically configuration is to have the operating system and Statistica
installed on the C drive. Other programs (example, Microsoft Word) and
TEMP space use the D drive. Contact https://support.tibco.com for help in
sizing the D drive.
b. Edit the Windows TEMP and TMP environment variables so that the temp
folder is located on the secondary (D:) drive.
2. Optional: Workstation Server for Statistica client
The Statistica workstation software can be installed on employee’s desktop computers or
laptops.
Some customers prefer creating a Citrix or similar terminal services server that users log
into for working with Statistica. This may be preferred because of data security or
1
2
TIBCO Statistica™ Installation Instructions
regulatory compliance.
3. Optional: File server
Some customers have processes that require the use of a file server. Their data is in text
or Excel files. For example, datasets might be published and shared between users on a
file share. This file sharing can also be done via Enterprise Manager Application or a
“workstation server”.
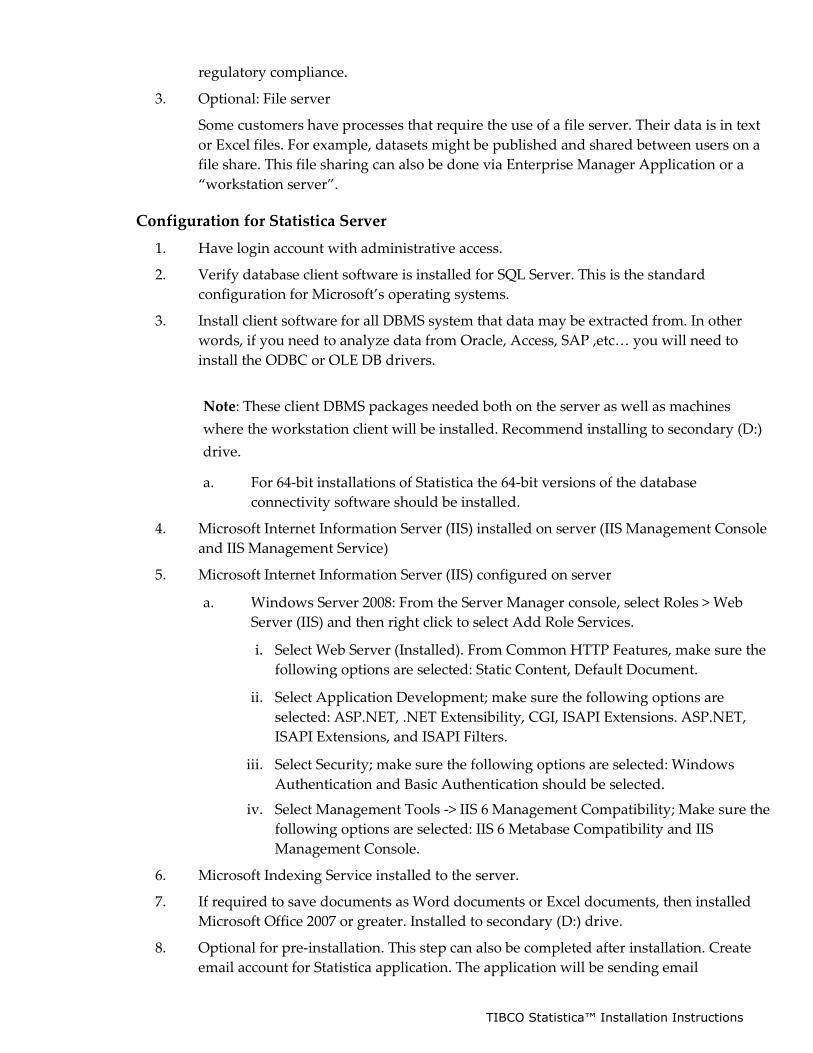
Configuration for Statistica Server
1. Have login account with administrative access.
2. Verify database client software is installed for SQL Server. This is the standard
configuration for Microsoft’s operating systems.
3. Install client software for all DBMS system that data may be extracted from. In other
words, if you need to analyze data from Oracle, Access, SAP ,etc… you will need to
install the ODBC or OLE DB drivers.
Note: These client DBMS packages needed both on the server as well as machines
where the workstation client will be installed. Recommend installing to secondary (D:)
drive.
a. For 64-bit installations of Statistica the 64-bit versions of the database
connectivity software should be installed.
4. Microsoft Internet Information Server (IIS) installed on server (IIS Management Console
and IIS Management Service)
5. Microsoft Internet Information Server (IIS) configured on server
a. Windows Server 2008: From the Server Manager console, select Roles > Web
Server (IIS) and then right click to select Add Role Services.
i. Select Web Server (Installed). From Common HTTP Features, make sure the
following options are selected: Static Content, Default Document.
ii. Select Application Development; make sure the following options are
selected: ASP.NET, .NET Extensibility, CGI, ISAPI Extensions. ASP.NET,
ISAPI Extensions, and ISAPI Filters.
iii. Select Security; make sure the following options are selected: Windows
Authentication and Basic Authentication should be selected.
iv. Select Management Tools -> IIS 6 Management Compatibility; Make sure the
following options are selected: IIS 6 Metabase Compatibility and IIS
Management Console.
6. Microsoft Indexing Service installed to the server.
7. If required to save documents as Word documents or Excel documents, then installed
Microsoft Office 2007 or greater. Installed to secondary (D:) drive.
8. Optional for pre-installation. This step can also be completed after installation. Create
email account for Statistica application. The application will be sending email
1
3
TIBCO Statistica™ Installation Instructions
notifications.
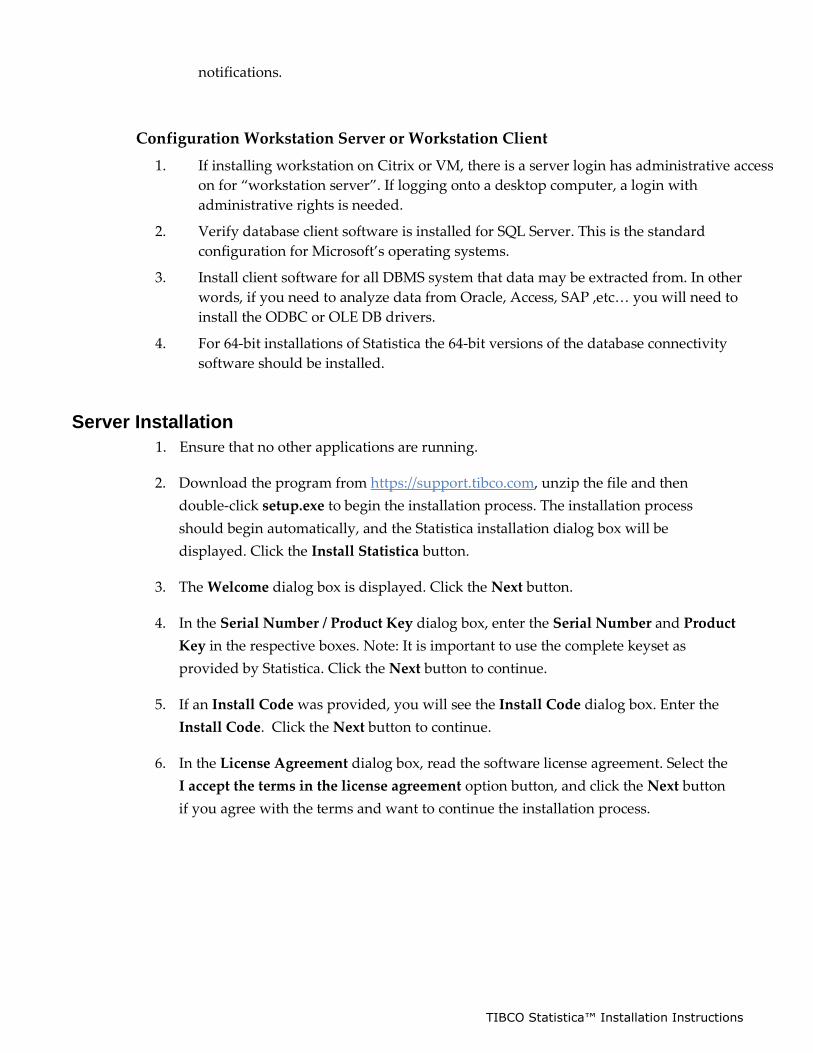
Configuration Workstation Server or Workstation Client
1. If installing workstation on Citrix or VM, there is a server login has administrative access
on for “workstation server”. If logging onto a desktop computer, a login with
administrative rights is needed.
2. Verify database client software is installed for SQL Server. This is the standard
configuration for Microsoft’s operating systems.
3. Install client software for all DBMS system that data may be extracted from. In other
words, if you need to analyze data from Oracle, Access, SAP ,etc… you will need to
install the ODBC or OLE DB drivers.
4. For 64-bit installations of Statistica the 64-bit versions of the database connectivity
software should be installed.
Server Installation
1. Ensure that no other applications are running.
2. Download the program from https://support.tibco.com, unzip the file and then
double-click setup.exe to begin the installation process. The installation process
should begin automatically, and the Statistica installation dialog box will be
displayed. Click the Install Statistica button.
3. The Welcome dialog box is displayed. Click the Next button.
4. In the Serial Number / Product Key dialog box, enter the Serial Number and Product
Key in the respective boxes. Note: It is important to use the complete keyset as
provided by Statistica. Click the Next button to continue.
5. If an Install Code was provided, you will see the Install Code dialog box. Enter the
Install Code. Click the Next button to continue.
6. In the License Agreement dialog box, read the software license agreement. Select the
I accept the terms in the license agreement option button, and click the Next button
if you agree with the terms and want to continue the installation process.
1
4
TIBCO Statistica™ Installation Instructions
7. In the Setup Type dialog box, select either the Typical option button or the Custom
option button. Typical setup installs Statistica with the most common options; this is
the recommended selection. Custom setup options, which are not covered in these
instructions, can be used to install Statistica on another drive/location other than the
default C:\ProgramFiles\Statistica folder or to change the program features that are
typically installed. If you have questions about the custom installation, contact
Statistica technical support: https://support.tibco.com. Click the Next button to
continue.
8. In the Enterprise Database Install Type dialog box, choose the type of installation:
either create a new database, or use an existing database. Click the Next button to
continue.
9. Select the Database Management System of your choice.
a. Access
Create New: If you choose to install to a new Access Database, ensure that bit-width
between Statistica and your Microsoft Office match. That is, if you have 32-bit
Microsoft Office, you need to install 32-bit Statistica, or if you have 64-bit Microsoft
office, you need to install 64-bit Statistica. Click the Next button. In the Access Database
Path dialog box, leave the default and click the Next button. Setup will then create the
database, SEWSS.mdb, using the Statistica Enterprise schema. If a previous SEWSS.mdb
exists in the specified location, setup will create a backup of this database.
Use Existing: If you choose to use an existing Access Database, ensure that bit-width
between Statistica and your Microsoft Office match. That is, if you have 32-bit
Microsoft Office, you need to install 32-bit Statistica, or if you have 64-bit Microsoft
office, you need to install 64-bit Statistica. In the Access Database Path dialog box,
specify the path where this database is located. Click Browse to select the path to the
existing database. The path will be initially set to the assumed default. Once the
appropriate path is defined, click the Next button.
b. SQL Server
Create New/Use Existing: If you choose to install to a new SQL Server Database, in
the Data Link Properties dialog box on the Connection tab, enter or select the server name
where the SQL Server Database is located, and enter the information required to gain
access to the server. Ensure that the database credentials you provide in this dialog
box have permissions to create tables and insert and update tables. Then select the
Statistica Enterprise configuration database on the server. Click Test Connection to
ensure that the connection information is correct. If the test connection is successful,
click OK to apply the connection information. If the test is unsuccessful, verify that the
connection information is correct and try again.
1
5
TIBCO Statistica™ Installation Instructions
c. Oracle
Create New/Use Existing: If you choose to install to a new Oracle Database, in the
Data Link Properties dialog box on the Connection tab, enter the name of the server where
the Oracle Database is located and enter the information required to gain access to the
database. Ensure that the database credentials you provide in this dialog box have
permissions to create tables and insert and update tables. Click the Test Connection
button to ensure that the connection information is correct. If the test connection is
successful, click OK to apply the connection information. If the test is unsuccessful,
verify that the connection information is correct and try again. Note that Statistica
assumes the Oracle client software is installed on the server and workstations.
d. Other
If you choose to install to another database, contact Statistica technical support:
https://support.tibco.com/s/.
e. SQL Express Direct Install
Create New: Choosing this option will Install SQL Express 2008 R2 and will set up the
Statistica database automatically.
10. In the Statistica Server Reports dialog box, click the Next button to continue. This will
create a shared drive to the web directory in which reports will be placed (by default
C:\WebStatisticaPub\ wwwroot\WebStatistica Enterprise\WSReports). It will also
configure your Statistica Enterprise database for Web report creation.
11. In the Start Menu Folder dialog box, enter the Start Menu folder name; the default name
is Statistica 13. If you want to create a desktop shortcut to Statistica, select the check
box. Click the Next button to continue.
12. In the Register with Statistica dialog box, enter the requested information in the
appropriate boxes. This information is required to obtain the final licensing file for
your software. Click the Next button to continue.
13. In the next dialog box, select a method of software registration. Note that all Statistica
products must be registered to obtain the full license. An Internet connection is
needed to Automatically register, which is the recommended option. Click the Next
button to continue.
14. Statistica will now attempt to register your software automatically. A dialog box
stating that your license has been successfully registered is displayed. Click the OK
button. If the registration process fails, a different dialog box is displayed indicating
the failure. See the Notes on failed registration section for additional details of failed
registration.
1
6
TIBCO Statistica™ Installation Instructions
15. Statistica is ready to install. To begin copying files to your machine, click the Install
button. This may take several minutes.
16. You will briefly see a DOS command window that states that the web service was
started successfully.
17. You should receive a message stating that the installation is complete. If a reboot is
required, you may be prompted to reboot now or reboot later, depending on the
components that are installed on your machine. If you are prompted, it will be
necessary to reboot before you run Statistica. Click the Finish button to complete the
installation process.
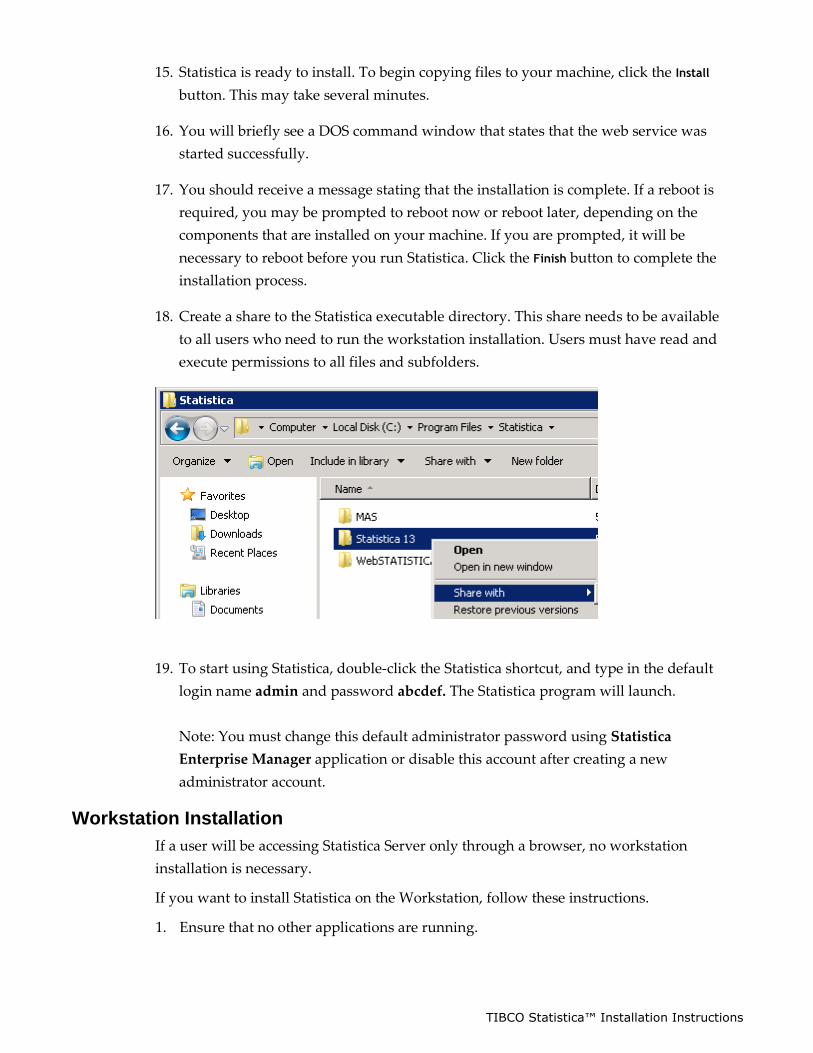
18. Create a share to the Statistica executable directory. This share needs to be available
to all users who need to run the workstation installation. Users must have read and
execute permissions to all files and subfolders.
19. To start using Statistica, double-click the Statistica shortcut, and type in the default
login name admin and password abcdef. The Statistica program will launch.
Note: You must change this default administrator password using Statistica
Enterprise Manager application or disable this account after creating a new
administrator account.
Workstation Installation
If a user will be accessing Statistica Server only through a browser, no workstation
installation is necessary.
If you want to install Statistica on the Workstation, follow these instructions.
1. Ensure that no other applications are running.
1
7
TIBCO Statistica™ Installation Instructions
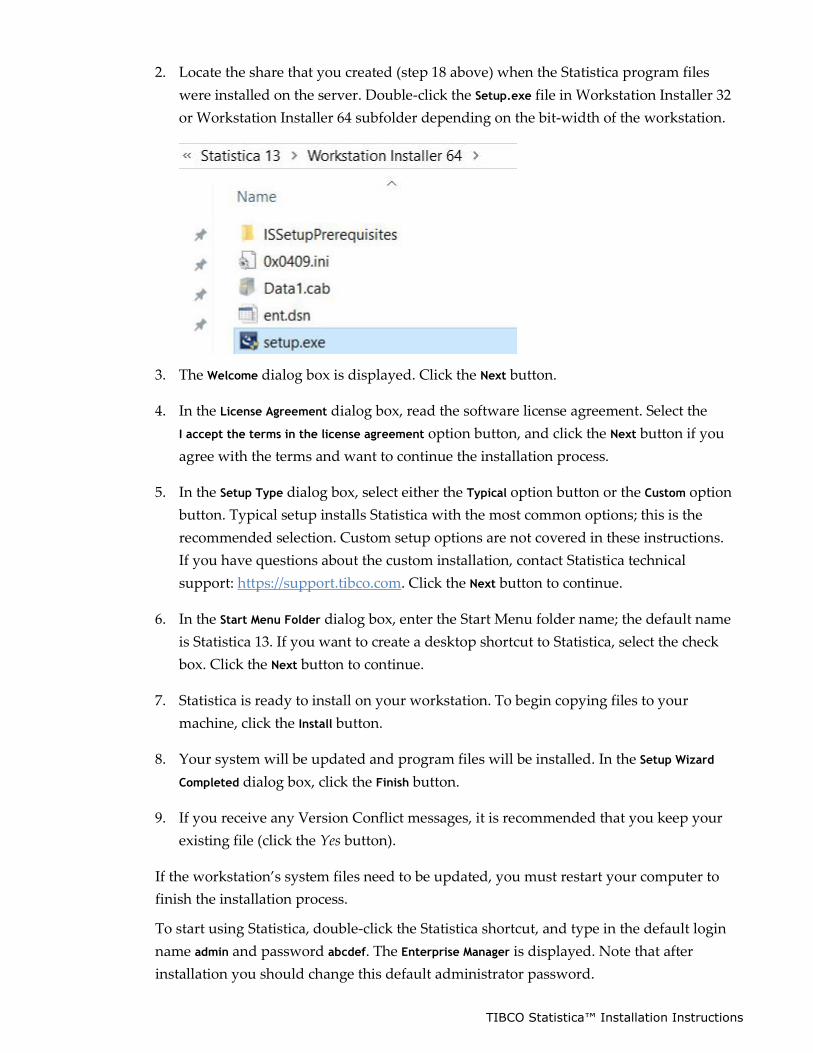
2. Locate the share that you created (step 18 above) when the Statistica program files
were installed on the server. Double-click the Setup.exe file in Workstation Installer 32
or Workstation Installer 64 subfolder depending on the bit-width of the workstation.
3. The Welcome dialog box is displayed. Click the Next button.
4. In the License Agreement dialog box, read the software license agreement. Select the
I accept the terms in the license agreement option button, and click the Next button if you
agree with the terms and want to continue the installation process.
5. In the Setup Type dialog box, select either the Typical option button or the Custom option
button. Typical setup installs Statistica with the most common options; this is the
recommended selection. Custom setup options are not covered in these instructions.
If you have questions about the custom installation, contact Statistica technical
support: https://support.tibco.com. Click the Next button to continue.
6. In the Start Menu Folder dialog box, enter the Start Menu folder name; the default name
is Statistica 13. If you want to create a desktop shortcut to Statistica, select the check
box. Click the Next button to continue.
7. Statistica is ready to install on your workstation. To begin copying files to your
machine, click the Install button.
8. Your system will be updated and program files will be installed. In the Setup Wizard
Completed dialog box, click the Finish button.
9. If you receive any Version Conflict messages, it is recommended that you keep your
existing file (click the Yes button).
If the workstation’s system files need to be updated, you must restart your computer to
finish the installation process.
To start using Statistica, double-click the Statistica shortcut, and type in the default login
name admin and password abcdef. The Enterprise Manager is displayed. Note that after
installation you should change this default administrator password.
1
8
TIBCO Statistica™ Installation Instructions
Server Uninstall
1. To uninstall the Statistica Server, follow these steps:
2. Ensure that no other applications are running.
3. In the Control Panel, Programs and Features, scroll down through the list of programs
and select Statistica. Right-click and select Uninstall to uninstall the program.
4. A message will be displayed to confirm that you want to uninstall Statistica from
your computer. Click the Yes button, and Statistica files will be uninstalled.
5. When the uninstall process is complete, click the Yes button to notify the registration
server. This makes it possible for you to install the server on another computer.
Workstation Uninstall
To uninstall a Statistica workstation, follow these steps:
1. Ensure that no other applications are running.
2. In the Control Panel, select Uninstall a program located under Programs.
3. Scroll down through the list of programs and select Statistica. Click Uninstall to
uninstall the program.
User Accounts
Statistica Server validates users based on groups defined on the Statistica Server
computer. These groups are:
SWS_USER
SWS_DOWNLOADFILES
SWS_UPLOADDATA
SWS_UPLOADSCRIPTS
SWS_BATCHABLE
SWS_PORTAL
SWS_PORTALINTERACTIVE
SWS_ADMIN
The minimum requirement for authentication on the web server is to be a member of the
SWS_USER group.
1
9
TIBCO Statistica™ Installation Instructions
Your installation procedure for Statistica Server will attempt to automatically create these
groups for you. If this was not successful, you can create these groups on the Statistica
Server using the Administrative Tools. You can achieve this by opening the Computer
Management dialog box from the Control Panel - Administrative Tools menu. Navigate the tree
to find Local Users and Groups listed. In the Groups folder, create the groups listed
above.
Next, add Users to these Groups. Add all Statistica Server users to the SWS_USER group
(Statistica Server administrators as well as Statistica Server users); then add the
administrators to the SWS_ADMIN group, and so on. For customers using active
directory, a best practice is to define global domain groups that correspond to the
Statistica Server groups. Then add the global domain group to the corresponding local
groups on the Statistica Server. For example, you can define a global domain group called
GLOBAL_SWS_USER, and add this global domain group to the local SWS_USER created
during Statistica Server install. Now you can control users to Statistica Server by using
Active Directory tools to add/remove users to/from the GLOBAL_SWS_USER group.
For more details, consult the WebStatistica Administrator’s Guide.
Accessing the Web Server
Note: You must have the latest version of Java installed before you log on. Start your
browser and type in the web address. If you did not change the destination Web
directory during installation, the address will be http://your-server-name/WebStatistica.
Chrome, Firefox and Internet Explorer browsers are supported.
Notes on Failed Registration
The software registration process can fail for several reasons including exceeding the
allowed number of installations for a serial number, lack of internet connection on the
installed machine, incorrect serial number, or other technical difficulties.
1. If you want Statistica installed on an additional computer, contact Statistica for
information on our policy and additional pricing.
2. If some other issue has affected your registration, ensure that the computer is
connected to the Internet, and verify your serial number. Start Statistica. If the
Statistica Licensing dialog box is displayed, click the Register button. If the Statistica
Licensing dialog box is not displayed, select the File tab. In the left panel, click
Help/Support. In the right panel, under the Support heading, click Register.
3. If the registration process still cannot be completed, contact Statistica technical
support at https://support.tibco.com/.
2
0
TIBCO Statistica™ Installation Instructions
Using Additional Cores
Statistica Server is able to distribute the processing of large jobs across multiple processor
cores on the server. By default, an installation is configured to utilize two cores. You can
purchase an additional license feature that allows more cores to be used, and then you
must manually configure your Statistica Server installation to use those extra cores. This
means you must increase the number of processes in the pool used to execute analyses on
the server.
Statistica Server starts multiple processes that are standing by to handle tasks. There are
two types of processes: short-term processes that handle UI activities and long-term
processes that handle analyses.
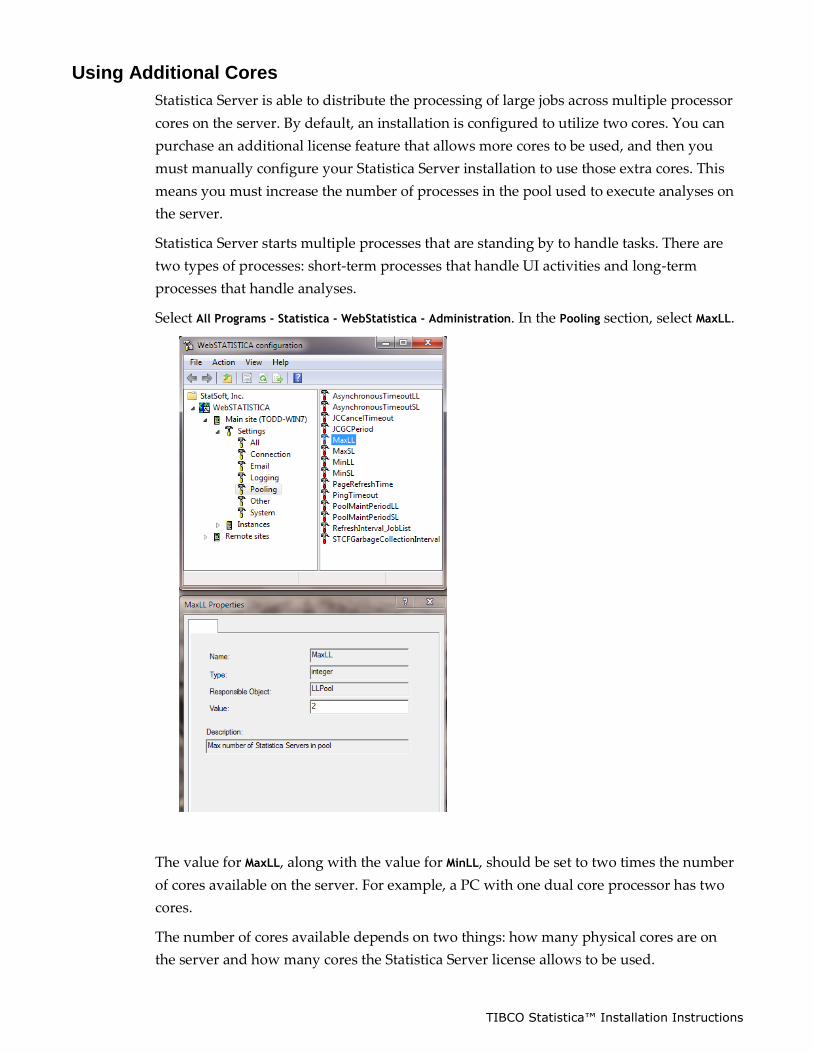
Select All Programs - Statistica - WebStatistica - Administration. In the Pooling section, select MaxLL.
The value for MaxLL, along with the value for MinLL, should be set to two times the number
of cores available on the server. For example, a PC with one dual core processor has two
cores.
The number of cores available depends on two things: how many physical cores are on
the server and how many cores the Statistica Server license allows to be used.
2
1
TIBCO Statistica™ Installation Instructions
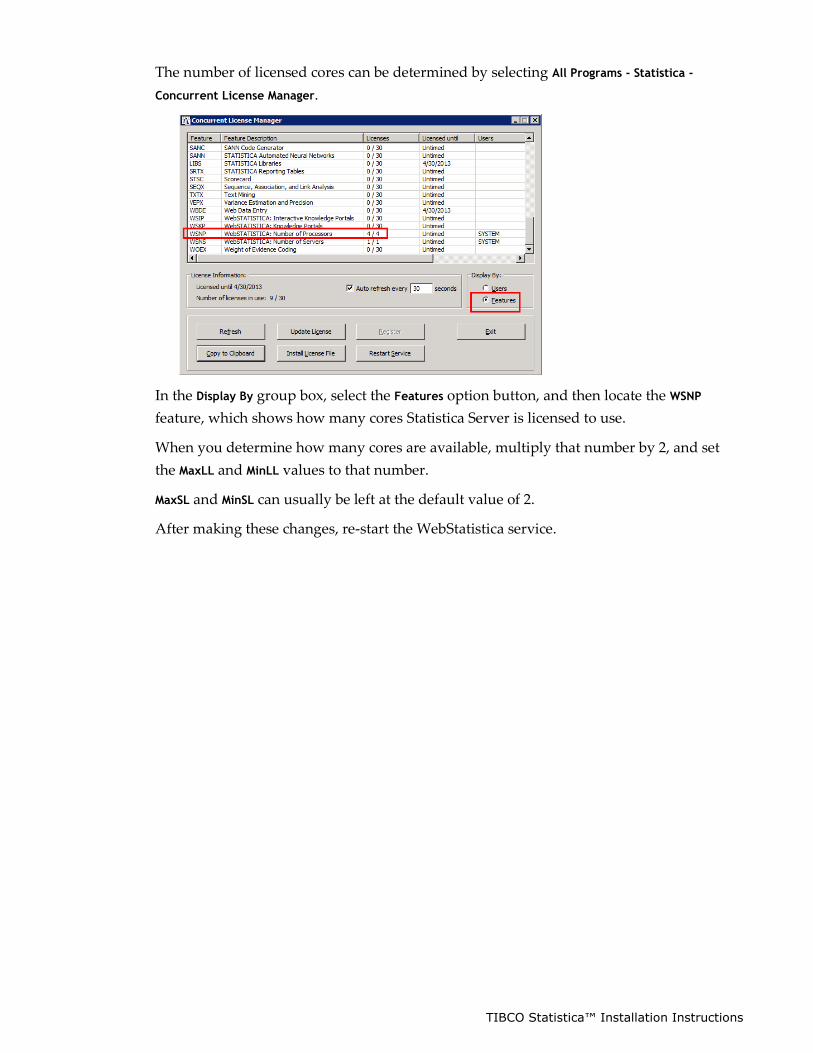
The number of licensed cores can be determined by selecting All Programs - Statistica -
Concurrent License Manager.
In the Display By group box, select the Features option button, and then locate the WSNP
feature, which shows how many cores Statistica Server is licensed to use.
When you determine how many cores are available, multiply that number by 2, and set
the MaxLL and MinLL values to that number.
MaxSL and MinSL can usually be left at the default value of 2.
After making these changes, re-start the WebStatistica service.
2
2
TIBCO Statistica™ Installation Instructions
3. Monitoring and Alerting
Server (MAS) Installation
2
3
TIBCO Statistica™ Installation Instructions
Pre-installation Checklist
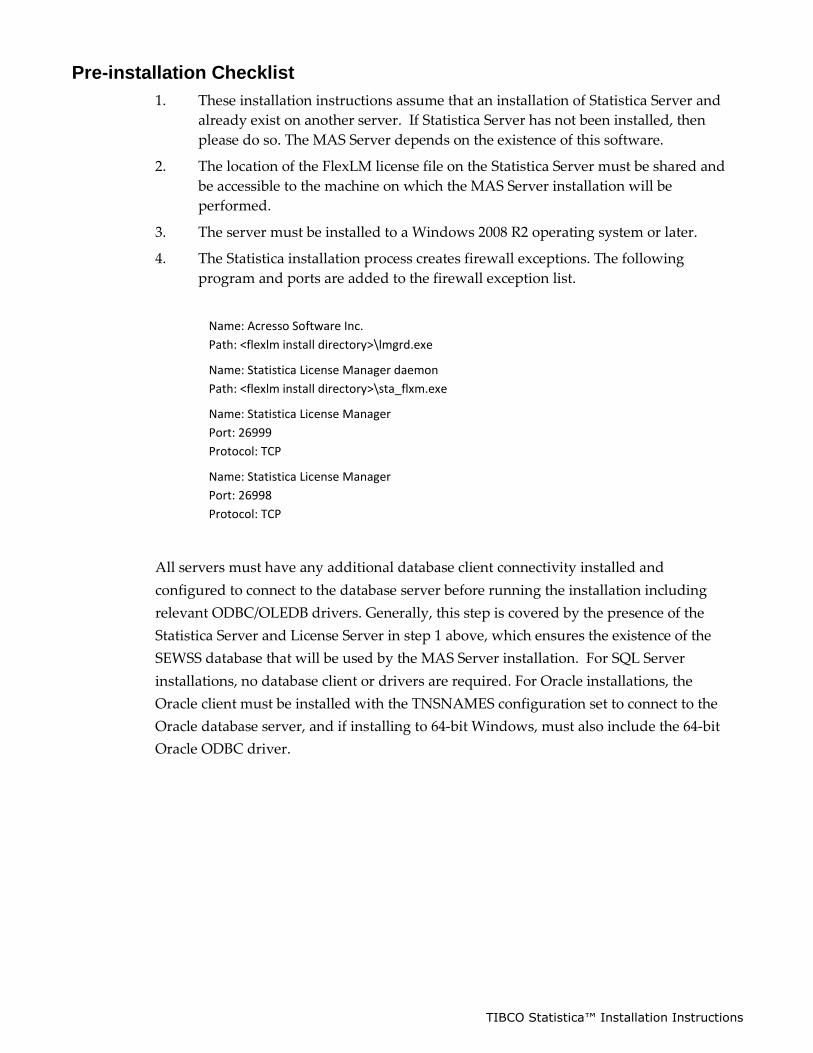
1. These installation instructions assume that an installation of Statistica Server and
already exist on another server. If Statistica Server has not been installed, then
please do so. The MAS Server depends on the existence of this software.
2. The location of the FlexLM license file on the Statistica Server must be shared and
be accessible to the machine on which the MAS Server installation will be
performed.
3. The server must be installed to a Windows 2008 R2 operating system or later.
4. The Statistica installation process creates firewall exceptions. The following
program and ports are added to the firewall exception list.
Name: Acresso Software Inc.
Path: <flexlm install directory>\lmgrd.exe
Name: Statistica License Manager daemon
Path: <flexlm install directory>\sta_flxm.exe
Name: Statistica License Manager
Port: 26999
Protocol: TCP
Name: Statistica License Manager
Port: 26998
Protocol: TCP
All servers must have any additional database client connectivity installed and
configured to connect to the database server before running the installation including
relevant ODBC/OLEDB drivers. Generally, this step is covered by the presence of the
Statistica Server and License Server in step 1 above, which ensures the existence of the
SEWSS database that will be used by the MAS Server installation. For SQL Server
installations, no database client or drivers are required. For Oracle installations, the
Oracle client must be installed with the TNSNAMES configuration set to connect to the
Oracle database server, and if installing to 64-bit Windows, must also include the 64-bit
Oracle ODBC driver.
2
4
TIBCO Statistica™ Installation Instructions
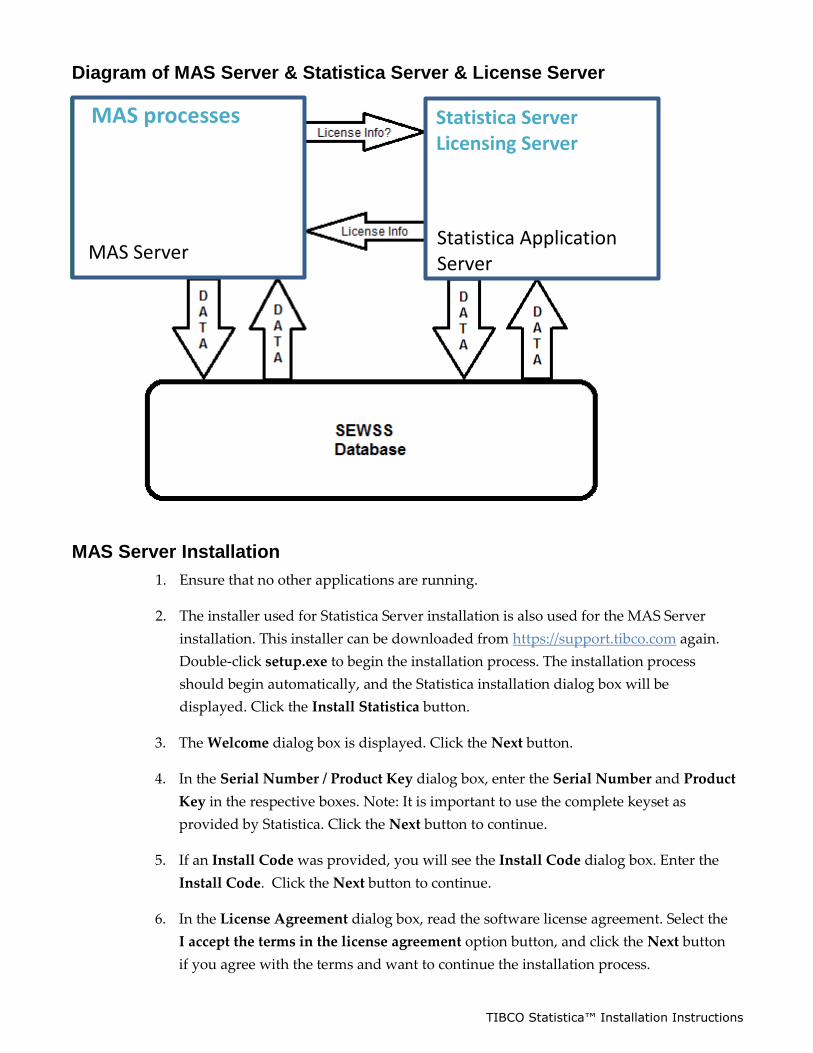
Diagram of MAS Server & Statistica Server & License Server
MAS Server Installation
1. Ensure that no other applications are running.
2. The installer used for Statistica Server installation is also used for the MAS Server
installation. This installer can be downloaded from https://support.tibco.com again.
Double-click setup.exe to begin the installation process. The installation process
should begin automatically, and the Statistica installation dialog box will be
displayed. Click the Install Statistica button.
3. The Welcome dialog box is displayed. Click the Next button.
4. In the Serial Number / Product Key dialog box, enter the Serial Number and Product
Key in the respective boxes. Note: It is important to use the complete keyset as
provided by Statistica. Click the Next button to continue.
5. If an Install Code was provided, you will see the Install Code dialog box. Enter the
Install Code. Click the Next button to continue.
6. In the License Agreement dialog box, read the software license agreement. Select the
I accept the terms in the license agreement option button, and click the Next button
if you agree with the terms and want to continue the installation process.
MAS processes
MAS Server
Statistica Server
Licensing Server
Statistica Application
Server

2
5
TIBCO Statistica™ Installation Instructions
7. Select a Custom install type. You may receive a message regarding WebStatistica.
Ignore this message.
8. Deselect the License Manager, WebStatistica, Workstation Installer, Web Data Entry,
and Multimedia features.
9. When prompted for the location of the ClientStat.tmp file, enter the shared directory
location of the FlexLM license file on the Statistica Server.
10. In the Enterprise Database Install Type dialog box, choose the type of installation:
use an existing database. This is the database that was created during the Statistica
Server installation. Click the Next button to continue.
11. Enter the database credentials, including Allow Saving Password. Click Test
Connection to verify the information.
12. Select Yes when prompted to install the Concurrent Session Manager.
13. In the Start Menu Folder dialog box, enter the Start Menu folder name; the default name
is Statistica 13. If you want to create a desktop shortcut to Statistica, select the check
box. Click the Next button to continue.
14. Click the Install button to begin the installation.
15. Your system will be updated and program files will be installed. Click the Finish
button in the Setup Wizard Completed dialog box.
Server Uninstall
To uninstall the Statistica MAS Server, follow these steps:
1. Ensure that no other applications are running.
2. From the Control Panel, select Programs and Features and scroll down through
the list of programs and select Statistica. Click Uninstall
3. A message will be displayed to confirm that you want to uninstall Statistica from
your computer. Click the Yes button, and Statistica files will be uninstalled.
4. When the uninstall process is complete, click the Yes button to notify the Statistica
registration server. This will allow you to install the server on another computer.
Notes on Failed Registration
The software registration process can fail for several reasons including: exceeding the
allowed number of installations for a serial number, lack of internet connection on the
installed machine, incorrect serial number, or other technical difficulties.
1. If you want Statistica installed on an additional computer, contact Statistica for
information on our policy and additional pricing.
2
6
TIBCO Statistica™ Installation Instructions
2. If some other issue has affected your registration, ensure that the computer is
connected to the internet, and verify your serial number. Start Statistica. On the
Help tab in the Support group, click Register.
3. If the registration process still cannot be completed, follow the instructions in the
Statistica start-up dialog boxes, or contact Statistica for Technical support
https://support.tibco.com/s/.
TIBCO Statistica™ Installation Instructions
4. Live Score Server
Installation
TIBCO Statistica™ Installation Instructions
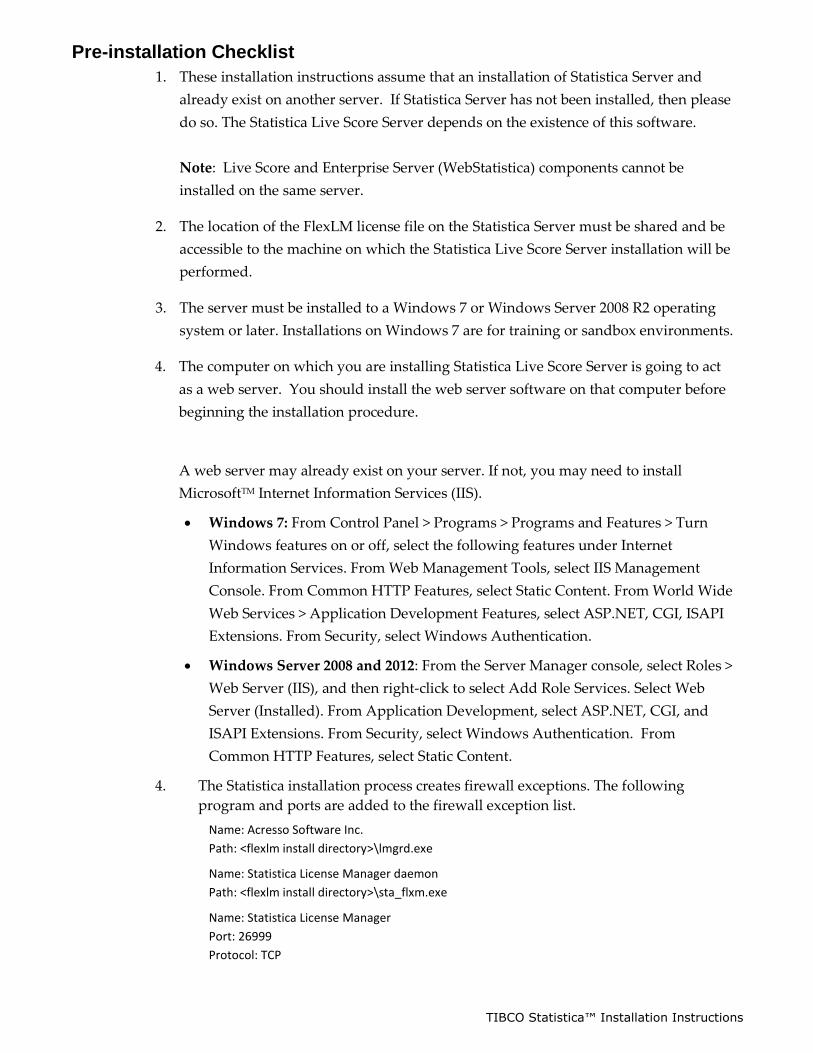
Pre-installation Checklist
1. These installation instructions assume that an installation of Statistica Server and
already exist on another server. If Statistica Server has not been installed, then please
do so. The Statistica Live Score Server depends on the existence of this software.
Note: Live Score and Enterprise Server (WebStatistica) components cannot be
installed on the same server.
2. The location of the FlexLM license file on the Statistica Server must be shared and be
accessible to the machine on which the Statistica Live Score Server installation will be
performed.
3. The server must be installed to a Windows 7 or Windows Server 2008 R2 operating
system or later. Installations on Windows 7 are for training or sandbox environments.
4. The computer on which you are installing Statistica Live Score Server is going to act
as a web server. You should install the web server software on that computer before
beginning the installation procedure.
A web server may already exist on your server. If not, you may need to install
MicrosoftTM Internet Information Services (IIS).
Windows 7: From Control Panel > Programs > Programs and Features > Turn
Windows features on or off, select the following features under Internet
Information Services. From Web Management Tools, select IIS Management
Console. From Common HTTP Features, select Static Content. From World Wide
Web Services > Application Development Features, select ASP.NET, CGI, ISAPI
Extensions. From Security, select Windows Authentication.
Windows Server 2008 and 2012: From the Server Manager console, select Roles >
Web Server (IIS), and then right-click to select Add Role Services. Select Web
Server (Installed). From Application Development, select ASP.NET, CGI, and
ISAPI Extensions. From Security, select Windows Authentication. From
Common HTTP Features, select Static Content.
4. The Statistica installation process creates firewall exceptions. The following
program and ports are added to the firewall exception list.
Name: Acresso Software Inc.
Path: <flexlm install directory>\lmgrd.exe
Name: Statistica License Manager daemon
Path: <flexlm install directory>\sta_flxm.exe
Name: Statistica License Manager
Port: 26999
Protocol: TCP

TIBCO Statistica™ Installation Instructions
Name: Statistica License Manager
Port: 26998
Protocol: TCP
Name: WebStatistica Service (also known as Statistica Server)
Port: 8081
Protocol: TCP
Server Installation
1. Ensure that no other applications are running.
2. The installer used for Statistica Server installation is also used for the Statistica Live
Score Server installation. This installer can be downloaded from
https://support.tibco.com again. Double-click setup.exe to begin the installation
process. The installation process should begin automatically, and the Statistica
installation dialog box will be displayed. Click the Install Statistica button.
3. The Welcome dialog box is displayed. Click the Next button.
4. In the Serial Number / Product Key dialog box, enter the Serial Number and Product
Key in the respective boxes. Note: It is important to use the complete keyset as
provided by Statistica. Click the Next button to continue.
5. If an Install Code was provided, you will see the Install Code dialog box. Enter the
Install Code. Click the Next button to continue.
6. In the License Agreement dialog box, read the software license agreement. Select the
I accept the terms in the license agreement option button, and click the Next button
if you agree with the terms and want to continue the installation process.
7. In the Setup Type dialog box, select the Custom option button. Typical setup installs
Statistica with the most common options. However, for Live Score, de-select every
option except the Statistica option and the Live Score option. If WebStatistica was
purchased, the components for it are automatically included to install and Live Score
will automatically be de-selected.
8. Click the drop down arrow next to the WebStatistica component and select This
feature will not be available.
9. Then click the drop down arrow next to Live Score and select This feature, and all
subfeatures, will be installed on local hard drive. If you have questions about the
custom installation, contact Statistica technical support: https://support.tibco.com.
10. Click the Next button to continue.
11. In the Enterprise Database Install Type dialog box, choose the type of installation:
use an existing database. This is the database that was created during the Statistica
Server installation. Click the Next button to continue.
TIBCO Statistica™ Installation Instructions
12. Enter the database credentials, including Allow Saving Password. Click Test
Connection to verify the information.
13. Select Yes when prompted to install the Concurrent Session Manager.
14. Statistica is ready to install. To begin copying files to your machine, click the Install
button. This may take several minutes.
15. You will briefly see a DOS command window that states that the web service was
started successfully.
16. You should receive a message stating that the installation is complete. If a reboot is
required, you may be prompted to reboot now or reboot later, depending on the
components that are installed on your machine. If you are prompted, it will be
necessary to reboot before you run Statistica. Click the Finish button to complete the
installation process.
Server Uninstall
To uninstall Statistica Live Score, follow these steps:
5. Ensure that no other applications are running.
6. Open Programs and Features and scroll down through the list of programs and select
Statistica. Right-click and select Uninstall.
7. A message will be displayed to confirm that you want to uninstall Statistica from
your computer. Click the Yes button, and Statistica files will be uninstalled.
8. When the uninstall process is complete, click the Yes button to notify the
registration server. This makes it possible for you to install the server on another
computer.
Using Additional Cores
Statistica Live Score Server is able to distribute the processing of large jobs across
multiple processor cores on the server. By default, an installation is configured to utilize
two cores. You can purchase an additional license feature that allows more cores to be
used, and then you must manually configure your Statistica Live Score Server installation
to use those extra cores. This means you must increase the number of processes in the
pool used to execute analyses on the server.
Statistica Live Score Server starts multiple processes that are standing by to handle tasks.
There are two types of processes: short-term processes that handle UI activities and long-
term processes that handle analyses.
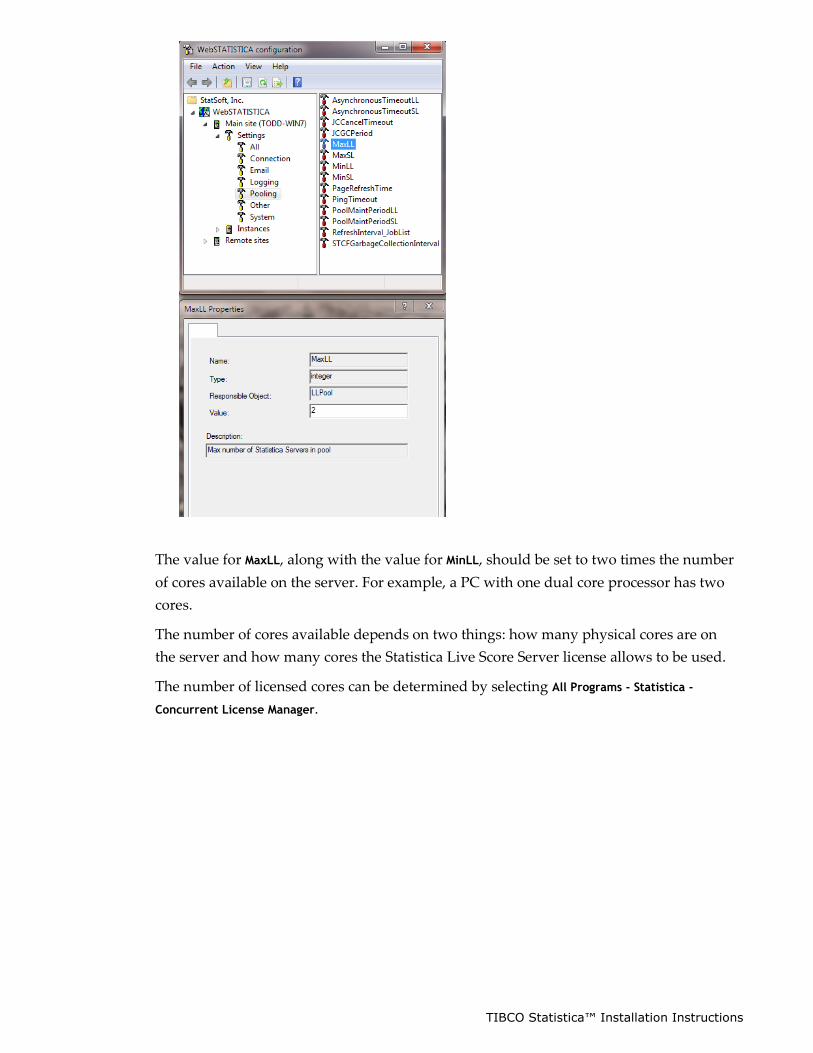
Select All Programs - Statistica - WebStatistica - Administration. In the Pooling section, select MaxLL.
TIBCO Statistica™ Installation Instructions
The value for MaxLL, along with the value for MinLL, should be set to two times the number
of cores available on the server. For example, a PC with one dual core processor has two
cores.
The number of cores available depends on two things: how many physical cores are on
the server and how many cores the Statistica Live Score Server license allows to be used.
The number of licensed cores can be determined by selecting All Programs - Statistica -
Concurrent License Manager.
TIBCO Statistica™ Installation Instructions
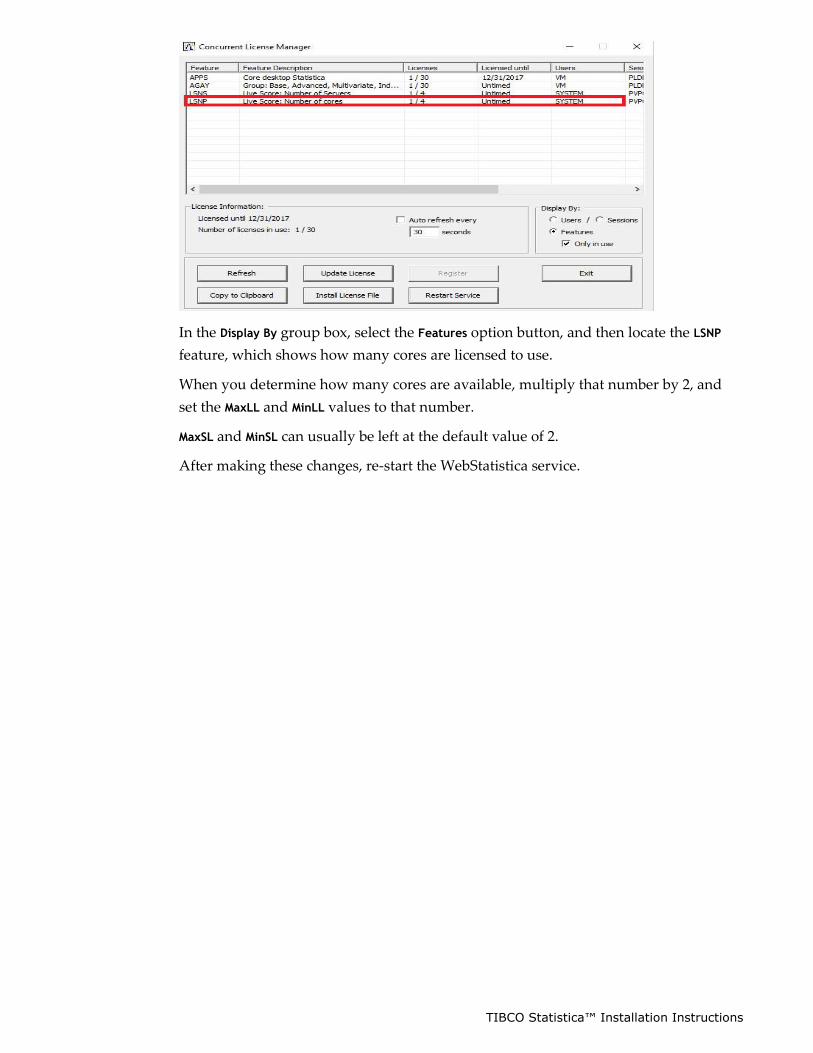
In the Display By group box, select the Features option button, and then locate the LSNP
feature, which shows how many cores are licensed to use.
When you determine how many cores are available, multiply that number by 2, and
set the MaxLL and MinLL values to that number.
MaxSL and MinSL can usually be left at the default value of 2.
After making these changes, re-start the WebStatistica service.


