Transcoder Version 3.0 for Raspberry Pi now renamed to "rtranscode" to avoid conflicts with the Debian transcode package User Manual Illustrated version of the README file (c) 2015-2017 by Guenter Kreidl
Transcript
Transcoder Version 3.0 for Raspberry Pi
now renamed to "rtranscode" to avoid conflicts with the Debian transcode package
User Manual
Illustrated version of the README file
(c) 2015-2017 by Guenter Kreidl
Table of ContentsI Introduction...................................................................................................................................3II Using rtranscode..........................................................................................................................5
A) Simple mode...........................................................................................................................51) Using 4 or 5 arguments and any number of options...............................................52) Getting arguments from a file.......................................................................................63) Starting with a named channel.....................................................................................64) Analyze stream uri...........................................................................................................65) Analyze stream uri and start the stream....................................................................76) Add channels to a channel database from a text file containig stream URLs. .77) Getting help.........................................................................................................................7
B) Menu mode.............................................................................................................................81) Main and streaming menu.............................................................................................82) Recording transcoded streams......................................................................................93) Sub-menus........................................................................................................................10
C) Program Options..................................................................................................................111) Selecting a configuration file.......................................................................................112) Selecting a channel database.......................................................................................113) Set audio bitrate..............................................................................................................124) Set video bitrate...............................................................................................................125) Set output image size for SD videos...........................................................................136) Set output image size for HD videos..........................................................................137) Path for stream URL.......................................................................................................148) Selecting the audio output format..............................................................................149) Pre-run original stream.................................................................................................1410) Set recording directory...............................................................................................1411) Run in quiet mode........................................................................................................14
III Channel Databases..................................................................................................................15A) The default database..........................................................................................................15B) Adding groups......................................................................................................................15C) Create your own channel databases..............................................................................16
IV The Configuration File............................................................................................................17A) Setting default values.........................................................................................................17B) The really heavy stuff........................................................................................................19C) Adding modes.......................................................................................................................20
V Create a web interface for kweb...........................................................................................22VI Remote Control.........................................................................................................................25VII Using http-launch Directly...................................................................................................26VIII Copyright, License and Source Code................................................................................27
2
I Introduction
My transcoder package contains tools to transcode HTTP TS video streams from a local TV server to a lower bitrate (video and audio) h264 encoded HTTP MKV stream(optionally using lower image size as well), suitable for sending across a low bandwidth connection (through your internet connection, for example). You might use it to watch your home TV from your working place or on your smartphone or let your friends share your TV viewing pleasure. You can also use it to record transcoded streams.
I have successfully used it with mumudvb unicast HTTP streams. It should also work with VDR, but I couldn't get it to work with tvheadend, which doesn't seem to be compatible with the souphttpsrc module of gstreamer.
Note: I know that a lot of people are using tvheadend and may be disappointedthat my transcoder package doesn't work with it. I believe it is caused by the crappy way which tvheadend uses to register clients (I've seen a lot of “Cookie synflood warnings” in the messages log, caused by tvheadend). The gstreamer souphttpscr module, which I have to use to access http streams seems to hang during the registration process and never reaches the DVB stream. At the moment there is nothing I can do about it.
This version also has experimental support for UDP (multicast) streams, but I had no chance to test it myself. It might work with HDHOMERUN or similar hardware.
The transcoder uses the GPU of the Raspberry and gstreamer-1.0 modules and requires a Rasbpian Jessie installation. It installs the following components:
1) a slightly extended version of Sebastian Droege's http-launch2) a binary "rtranscode" which really simplifies working with http-launch (written in Python and compiled with nuitka)3) a script "bg_rtranscode.sh" to start rtranscode in quiet mode, suitable for use from other applications.4) a configuration file and an empty "channels.dat" in /usr/local/share/rtranscode
If you have my kweb suite (Minimal Kiosk Browser, omxplayerGUI) installed, an additional binary "create_kpages" will be installed, which can create a local web interface (HTML files) from a channel database.
Run "sudo ./install" for installation.
3
Requirements:
rtranscode needs the whole set of gstreamer-1.0 modules including gst-omx. To make sure you have everything in place, runsudo apt-get updatesudo apt-get install gstreamer1.0-libav gstreamer1.0-omx gstreamer1.0-plugins-bad gstreamer1.0-plugins-base gstreamer1.0-plugins-base-apps gstreamer1.0-plugins-good gstreamer1.0-plugins-ugly gstreamer1.0-tools.
To transcode MPEG2 encoded streams you have to buy the MPEG2 License from the Raspberry Pi Foundation.
For best performance you should overclock the GPU. I usegpu_freq=500in /boot/config.txtUsingh264_freq=500should also work.
The GPU memory should be set to at least 128 MB.
To use all features you will need a Raspberry Pi 2 or 3. On earlier models it will work, at least for SD channels, but you should avoid audio conversion if the CPU runs too high.
Get the latest official kernel and firmware (using apt-get!).
Limits:
SD channels can be transcoded to any size up to 720x576.1080i25 can be transcoded up to 720p25720p50 streams cannot be transcoded to 720p50 reliably; maximal output size for 720p50 streams is 1024x576@50Hz.
If you have interlace artifacts in your output stream, reduce the image size to half size of the original stream or less.
4
II Using rtranscode
The utility "rtranscode" can be used in a number of ways, using different modes.
A) Simple mode
In simple mode rtranscode will set up the arguments and then start http-launch, replacing its own process by it. Once the stream is running, entering "CTRL+c" is the only way to stop it.rtranscode also offers some utility functions, like analyzing a stream and providing the arguments required for a stream. It can also create a channel database from a text file (e. g. an m3u playlist file) containing stream URLs.
1) Using 4 or 5 arguments and any number of options
rtranscode [options] uri videomode audiomode audiopid [vo]
uri = URL of your local TV http server stream (MPEG TS streams only!)
videomode must be one of the following:sd1 for MPEG2 576i25 SD videosd2 for H264 576i25 SD videohd1 for H264 720p50 HD videohd2 for H264 1080i25 HD video
audiomode must be either 'mpeg', 'ac3' or 'aac' (experimental)
audiopid must match a valid audio pid from your TS stream (decimal number or hexadecimal starting with '0x'). The selected audio pid must match the format set in audio mode. If the stream only contains one audio pid, you can also use "-1".
If the optional fifth parameter "vo" (= video only) is added, audio will not be transcoded and the original audio track (selected by audiopid) will be included.
The transcoding server will be started immediately, if the original stream is available. To stop transcoding, press CTRL+c.
5
2) Getting arguments from a file
rtranscode [options] -f=file_pathfile_path must either be an absolute path or the name of a file in the current directory. If the path name contains spaces, it must be quoted. The file must be a text file containing one line of text like thisuri videomode audiomode audiopid [vo](arguments like in 1)
The transcoding server will be started immediately, if the original stream is available. To stop transcoding, press CTRL+c.
3) Starting with a named channel
rtranscode [options] -n=channel_nameThis requires a channel database. By default it uses /usr/local/share/rtranscode/channels.dat, but you can set another database file with the -d option (see below). If the channel name contains spaces, it must be quoted.
Example:rtranscode [options] -n="ZDF HD"
If the channel name is found in the database, the transcoding server will be started immediately, if the original stream is available. To stop transcoding, press CTRL+c.
4) Analyze stream uri
rtranscode [options] -g=URIwhere URI is the URL of your original stream.
rtranscode will analyze the output of "omxplayer -i URI" and if successfull, will printthe results like this:channel_name=uri videomode audiomode audiopidsuitable for inclusion into a database file.
Note: You can use a redirection to append the result to a channel database:rtranscode -g=http://localhost:9082/bysid/11110 >> /home/pi/mychannels.dat
5) Analyze stream uri and start the stream
rtranscode [options] -t=URIwhere URI is the URL of your original stream.
rtranscode will analyze the output of "omxplayer -i URI" and if successfull, will printthe results like this:channel_name=uri videomode audiomode audiopidsuitable for inclusion into a database file. It will also start the transcoding server immediately. To stop transcoding, press CTRL+c.
6) Add channels to a channel database from a text file containig stream URLs
rtranscode [options] -i=infile -o=outfile
infile must be the path to a text file containing stream links. This can also be an m3ufile with stream links. infile must be either a complete path starting with '/' or a file in your current directory. If the path contains spaces, it must be quoted.
outfile must be the path to a channel database file. If it doesn't exist, it will be created. outfile must be either a complete path starting with '/' or a file in your current directory. If the path contains spaces, it must be quoted.
rtranscode will try to analyse any stream URL found in infile and add the channel tooutfile, if successfull.
will print a simple usage page, showing all different modes and option.
7
B) Menu mode
1) Main and streaming menu
rtranscode [options]
If started without arguments, rtranscode will run in menu mode. This requires a working channel database. By default it uses /usr/local/share/rtranscode/channels.dat, but you can set another database file with the -d option, e. g.rtranscode -d=/home/pi/mychannels.dat
rtranscode uses a curses menu and falls back to a simple menu, if certain problems occur (e .g. too many channels in the database without using grouping).
Note: executing commands always requires a text entry followed by hitting the Return or Enter key.
Here is an example of the menu as you might see it in your terminal:
ABR: 64K (a) VBR: medium (v) SD-Size: 360x288 (s) HD-Size: 768x432 (h)Group: ARD ZDF HD (g) Channels:Das Erste HD (0) ZDF HD (1) zdf_neo HD (2)ZDFinfo HD (3) 3sat HD (4) tagesschau24 HD (5)ONE HD (6) KiKA HD (7) SWR BW HD (8)SWR RP HD (9) NDR FS NDS HD (10) NDR FS HH HD (11)NDR FS SH HD (12) NDR FS MV HD (13) hr-fernsehen HD (14)MDR S-Anhalt HD (15) MDR Sachsen HD (16) MDR Thueringen HD (17)rbb Berlin HD (18) rbb Brandenburg HD (19) BR Sued HD (20)BR Nord HD (21) PHOENIX HD (22) arte HD (23)WDR HD Koeln (24)Enter a channel number, 'a','v','s','h', 'g' or 'q' to quit:
The first line shows the active settings:
ABR = current audio bit rate for the output streamenter 'a' and hit "Return" to select another one from a separate menu page.
VBR = currrent video bit rate for the output streamenter 'v' and hit "Return" to select another one from a separate menu page.
SD-Size = current output size for SD channels (video modes sd1 and sd2).enter 's' and hit "Return" to select another one from a separate menu page.
HD-Size = current output size for HD channels (video modes hd1 and hd2).enter 'h' and hit "Return" to select another one from a separate menu page.
8
The "Group:" entry in the second line will only be shown, if you use grouping in your channel database.Enter 'g' and hit "Return" to select another group of channels from a separate menu page.
To quit the program enter 'q' in the main menu and hit "Return".
To start transcoding a channel, enter the channel number and hit "Return". The stream menu will be shown. It might look like this:
Streaming ZDF HD to http://127.0.0.1:9080/xyz.mkvSize: 910x512 VBR: 1.85M ABR: 64K AACRecording time: Unlimited
Commands:'s' = stop , 'x' = restart transcoding'r' = record stream, 't' = set recording time
Enter command and hit Return:
If the stream blocks for some reason, you can enter 'x' and hit "Return" to restart it with the same settings. Entering 's' will stop the stream and return to the main menu.
2) Recording transcoded streams
It's also possible to record the transcoded stream by entering the "r" command. If you want to record for a specific duration, you can set this using the 't' command (before you start recording), which will open a submenu:
Current recording time is set to: 0 = unlimited
You can set the new recording time in secondsor as 'h:m', e. g. '1:30'or set it to '0' for unlimited recording
Enter new recording time:
If you have started recording, the streaming menu will change and may look like this:
Streaming ZDF HD to http://127.0.0.1:9080/xyz.mkvSize: 910x512 VBR: 1.85M ABR: 64K AACRecording 2017-02-23-14-39-19-ZDF-HD.mkv until Thu Feb 23 16:09:19 2017
Enter 's' to stop recording:
You can stop the recording at any time by entering 's' and hitting Return.
9
Note: If you have set up a recording time, the menu will not change when the recording stops. By entering an empty command (just hit Return) you can check, if the program is still recording. If not, it will show the stream menu again.
3) Sub-menus
Groups menu (example):Current Group = ARD ZDF HD
Available Groups:ARD ZDF HD (0) ARD ZDF SD (1) News (2)Privat TV DE (3) Sport (4)
Available SD video sizes:120x96 (0)180x144 (1)240x192 (2)360x288 (3)480x384 (4)600x480 (5)720x576 (6)
Enter a new SD video size number and hit 'Enter':
10
HD video sizes:Current HD video size = 768x432
Available HD video sizes:256x144 (0)512x288 (1)768x432 (2)910x512 (3)1024x576 (4)1280x720 (5)
Enter a new HD video size number and hit 'Enter':
C) Program Options
1) Selecting a configuration file
-c=config_file
By default rtranscode will use '/usr/local/share/rtranscode/config.py' for configuration. You can create your own configuration files and use this option to use one of them instead of the default configuration file.
Note:config_file must be a valid python file, which will be executed, when the program starts. See chapter IV for details if you want to create your own configuration file(s).
config_file must be either a complete file path or simply a file name. In the second case it will be first searched in '/usr/local/share/rtranscode' and then in your currentworking directory. If found, rtranscode will try to use it instead of the default configuration file.
2) Selecting a channel database
-d=channels_file
By default rtranscode uses '/usr/local/share/rtranscode/channels.dat' for menu modeor when used with the '-n=channel_name' command line option. This file is empty atinstallation and you have to add channels by editing it.
You may also create your own channel database files and use the '-d' option to selectthem.
channels_file must be either a complete file path or simply a file name. In the second case it will be first searched in '/usr/local/share/rtranscode' and then in your
11
current working directory. If found, rtranscode will try to use it instead of the default channel database.
See chapter III for more details about channel database files.
3) Set audio bitrate
-a=audio bitrate numbersets the audio bit rate for the stream or the default audio bit rate in menu modenumber = 0..12, default = 2 (64K)
-v=video bitrate number sets the video bit rate for the stream or the default video bit rate in menu modenumber = 0..22, default = 1 (calculate medium quality)
-s=SD video size numberSets the output image size for SD video (modes sd1 and sd2)number = 0..6, default = 3 (360x288)
SD Video Sizes:0 120x961 180x1442 240x1923 360x2884 480x3845 600x4806 720x576
6) Set output image size for HD videos
-h=HD video size numberSets the output image size for HD video (modes hd1 and hd2)number = 0..5, default = 2 (768x432)HD Video Sizes:0 256x1441 512x2882 768x4323 910x5124 1024x5765 1280x720
13
7) Path for stream URL
-p=path
Sets output path for stream URL, must start with a '/' and end with '.mkv', default = "/xyz.mkv"
8) Selecting the audio output format
-u=audio_output_format
allowed values are 'aac', 'ac3' or 'both'If audio transcoding is enabled, transcode to this format. If using 'both', AAC will be used for MPEG and AAC audio input, AC3 for for AC3 input.
If 'ac3' is selected, the stream analyzer will prefer AC3 channels to MPEG audio channels.
9) Pre-run original stream
-r=delaydelay = 0..10, default = 0
If not zero, access the original stream for 'delay' seconds to make up for tuning time.This will be used for streaming and analyzing.
10) Set recording directory
-l=record_pathMust be a full path to an existing directory, default = current directory
11) Run in quiet mode
-qBoth rtranscode and http-launch will not print anything to the command line. Cannot be used for menu mode. Useful if you call rtranscode from other applications and want to run it in the background.
14
III Channel Databases
A) The default database
For menu mode and for named streams (-n=name) you need a channel database. By default '/usr/local/share/rtranscode/channels.dat' will be used. This file is created during installation and does not contain anything yet.
Channel database files are simple text files, which are easy to create and edit. To usethe default channel database, you have to add some content first (as root). Using nano:sudo nano /usr/local/share/transcode/channels.datIf you prefer a desktop program:gksudo leafpad /usr/local/share/transcode/channels.dat
Enter lines of the following form:channel name=uri videomode audiomode audiopid [vo]for example:ZDF HD=http://192.168.0.34:9082/bysid/11110 hd1 mpeg 6120(adding "vo" at the end, if you never want to transcode the audio track).
You can use rtranscode's analyze function to get the content of the lines:rtranscode -g=uribut perhaps you want to use another audio channel. To see all channels, runomxplayer -i uri.
The channel names should only contain standard ASCII characters (or the curses menu may break).
Empty lines or lines starting with a '#' (comments) are ignored.
After saving the file it can be used and the channels will appear in the main menu.
B) Adding groups
To make the menu more comfortable to use, you can group your channels. This is really required if your database file contains more than 60 channels (because the curses menu will break otherwise and will be replaced by a simple menu which might require scrolling).
To add a group, add a line like this:[group name]
15
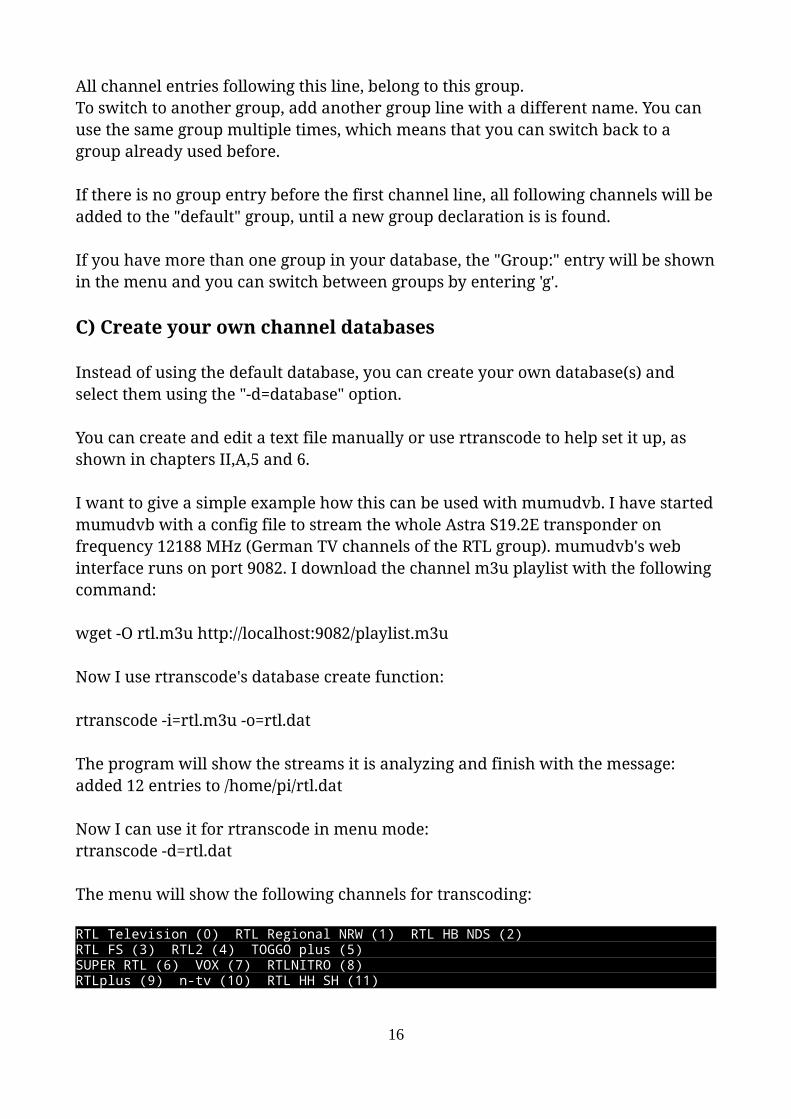
All channel entries following this line, belong to this group.To switch to another group, add another group line with a different name. You can use the same group multiple times, which means that you can switch back to a group already used before.
If there is no group entry before the first channel line, all following channels will beadded to the "default" group, until a new group declaration is is found.
If you have more than one group in your database, the "Group:" entry will be shownin the menu and you can switch between groups by entering 'g'.
C) Create your own channel databases
Instead of using the default database, you can create your own database(s) and select them using the "-d=database" option.
You can create and edit a text file manually or use rtranscode to help set it up, as shown in chapters II,A,5 and 6.
I want to give a simple example how this can be used with mumudvb. I have startedmumudvb with a config file to stream the whole Astra S19.2E transponder on frequency 12188 MHz (German TV channels of the RTL group). mumudvb's web interface runs on port 9082. I download the channel m3u playlist with the following command:
rtranscode (and also create_kpages) use a configuration file to overwrite all global settings. The default configuration file is '/usr/local/share/rtranscode/config.py'. You can edit it (as root!) or create a copy of this file and modify this copy.
Note: The configuration file is a Python file which will be executed by the main programs. If you break the Python syntax, it will not work any more and it may even crash the main programs. Therefore I recommend to create your own config file in the following way:
Create a copy in your user directory, e. g.cp /usr/local/share/rtranscode/config.py /home/pi/myconfig.py
Open this file with Idle for editing. After you have finished editing it, run "Check module" from Idle's "Run" menu. This will first save the file and then show the result (nothing) in the Python console window. If the Python syntax has been broken by your editing it will throw an error and show you the line with the error in the program window.
If no errors are reported, you can test your config filertranscode -c=/home/pi/myconfig.py ...
If all runs well, cou can make it your default configuration:sudo cp /home/pi/myconfig.py /usr/local/share/rtranscode/config.py
A) Setting default values
The configuration file consists of two parts: The first part contains some heavy stuff which may deeply influence the way the program works (and also break everything). This part should only be modified by people who really know what they are doing. The second part contains some default settings which are easy to modify and can be changed by anyone. We will start with this part.
rt_port = '9080'
This is the port on which the streaming server runs. It must be a string (included within single quotes). You may not use a value below '1024'.
rt_path = '/xyz.mkv'
http-launch will reject any access which doesn't use the right URL, which is created
17
by the path value. If you make your streams accessible from the internet (using portforwarding in your router), you will prevent anybody else besides you and your friends from accessing the stream. The only way to do this is to use a long and cryptic path, something like'/rvh6uw87hkj37.mkv'It must start with a slash and end with ".mkv" (included within single quotes).
rt_video_bitrate = '1'rt_sd_video_size = '3'rt_hd_video_size = '2'rt_audio_bitrate = '2'These values set the default values for video bit rate, audio bit rate, SD video size and HD video size. The values are index values (numbers as text within single quotes) of the dictionaries in part 1. Run "rtranscode -h" to get a list of allowed values.
Note: setting a non-existant key may even break the program!
rt_ch6limit = '9'Start value for using 6ch ac3 audio out, by default '9' (384K) and should not be lowerthan '6' (192K). This value is an index value (numbers as text within single quotes) of the audio_bitrates dictionary in part 1. Run "rtranscode -h" to get a list of allowed values for audio bitrates.
Use 6 channels for AAC output too, if Truert_aac_6ch = FalseThis value (Boolean) may be either 'True' or 'False' (without quotes!). If set to 'True', 6 channel output will also be used for AAC output, depending on the value of ch6limit above.
rt_audiooutput = 'both'The value may be either 'both', 'aac' or 'ac3' (within single quotes). If set to 'both', audio output format will be AC3 if the input format is AC3 and AAC otherwise.
rt_delayed_start = FalseThis value (Boolean) may be either 'True' or 'False' (without quotes!). If set to "True",the streaming pipeline will start when the first client connects, otherwise it will start immediately (default),
rt_prerun = 0The value must a number between 0 and 10 (no quotes!). If greater than 0, the stream will be accessed by a dummy module for n seconds (n = value), before
18
starting the transcoder or the stream analyzer. This may be helpful, if the original stream is not immediately accessible, because the application needs some time to tune the channel.
rt_channels_per_line = 3The value must a number greater 0 (no quotes!). It defines how many channels per line are shown in the menu. Values between 1 and 6 may be uselful (depending on the length of the channel names in your database.
rt_simple_menu = FalseThis value (Boolean) may be either 'True' or 'False' (without quotes!). If set to "True",the simple menu (not the curses menu) will be used.
rt_stop_delay = 0.2rt_start_delay = 0.5These values (floating point without quotes) are used internally and should be left unchanged.
rt_channels_dat = '/usr/local/share/rtranscode/channels.dat'If you want to use another channel database file by default, enter its full path here, included within single quotes.
rt_record_path = ''By default this is empty, which means that all recordings go to the current working directory. You can set a full path to an existing directory instead, e. g. on a hard disk or a network share.
B) The really heavy stuff
The data structures in part 1 of the config file (mostly dictionaries) define how the gstreamer pipelines for http-launch are built. Changing anything here requires a deeper understanding of both Python data structurs and of building gstreamer pipelines. I won't go into too many details here, just give some hints and examples for experiments.
The pipelines are built from two templates, rt_av_template (for both video and audio conversion) and rt_v_template (video concersion only, using one of the original audio streams). Both templates include a lot of variables, included between "$" characters, which are replaced by the program at run time, depending on the mode (SD or HD modes), audio and video bit rates and other settings. The av_template, for example looks like this:
The bulding of the real pipeline depends on the following structures: rt_sources, rt_sd_modes, rt_hd_modes, rt_audio_decoders, rt_aac_encoder, rt_ac3_encoder, rt_video_bitrates, rt_audio_bitrates, rt_sd_video_sizes and rt_hd_video_sizes.
This is the result of two years of experiments and experience with HW accelerated transcoding using gstreamer on the Raspberry Pi. Changing something will often result in disaster.
C) Adding modes
rtranscode by default supports SD and HD modes used by most European standards.If you have access to NTSC based SD streams, for example, you will have to add SD mode(s) and matching resolutions. I will show one example here. We will add a mode for an MPEG encoded video stream using 720x480i30 as "sd3". The sd_modes structure with the new mode added would look like this;
Every mode must contain a matching video parser and video decoder and the framerate. The check list contains keywords for the analyze function (video codec, image size, fps).
This mode also requires different SD video sizes to get an undistorted image in the player. We will add them to rt_sd_video_sizes starting with key '7' like this:
Note: The number of lines of the video output size MUST be a multiple of 16!
Now you can use mode "sd3" in your channel database and this mode should also bediscovered by the analyze function.
21
V Create a web interface for kweb
rtranscode is a command line program with an optional simple curses menu running in a terminal. If you want a more comfortable desktop application, you can use tools from my kweb suite (Minimal Kiosk Browser, omxplayerGUI) and the program create_kpages to build a web interface running in kweb or kweb3. Both kweb and kweb3 are simple, but fully functional web browsers with a unique feature: they can execute any kind of program from links, buttons or web forms inside a (local) HTML file without having to run a server backend.
create_kpages creates one or more (if you use groups) HTML files from an existing channel database:
create_kpages [options] [channels database]
Without any options and arguments, this will create a channels.htlm file from the default database /usr/local/share/rtranscode/channels.dat in your current working directory. If your channel database contains groups, a separate page for each channel will also be created and the mainpage (channels.html) will contain a group menu.
This image shows an example with omxplayerGUI running on top playing the transcoded stream:
To create a web interface for another channel database, just add the file name or
22
complete path as argument, e. g.create_kpages [options] mychannels.datIf you do not use a full path, the file is first searched in /usr/local/share/rtranscode and afterwards in the current working directory, The resulting (main) HTML file will always have the name of the channel database file with the extension ".html" instead of ".dat".
-p=pathoutput path for stream URL, must start with a '/' and end with '.mkv', default = "/xyz.mkv"
-s=stylefile name of a css file from /usr/local/share/kweb, default = "about.css"
Now open the main HTML file from kweb(3). If your channel database contains groups, you will see a button for each group in the top line and the first group will be shown below. Each group page (or the main page, if you don't use groups) presents a web form with the following options:A menu button to select the video bit rate.A menu button to select the audio bit rate.A menu button to select the size for SD video.A menu button to select the size for HD video.A menu button to select the pre-run time (if required).
Inside a larger, scrollable menu box you will see all the channels from your database file (or group). Select a channel and click the "Transcode" button to start transcoding. A terminal will pop up showing nothing (because the transcoder is running in silent mode). I'll show you later, how to get rid of it, but for testing it is nice to have. If the terminal closes again after a moment, the source stream is not available.
If you click the "Play Transcoded Stream" button, omxplayerGUI will open and showthe stream.
To stop transcoding, click the "Stop Transcoding" button.
23
Note: you can start a new transcoding without clicking on "Stop Transcoding"first (the old instance will be closed automatically).
To get rid of the termial, open kweb's menu page, click on "Settings" and scroll downto the direct_commands list. Add a new line at the bottombg_rtranscode.shand click the save button beside the list.
24
VI Remote Control
rtranscode runs in a terminal (command line, lxterminal, SSH connection). If you close the terminal, all programs started from it will be closed and this will also stop transcoding.
If you want to manage manage transcoding from the internet, you must establish anSSH connection first. You can run the transcoder, but it will be stopped, if you close the SSH connection. This may not be what you want, but there is a simple solution.
To continue the programs started from a terminal or SSH connection even when theconnection is closed, you can use an application named “screen”. You may have to install it first:
sudo apt-get install screen.
Now you can start rtranscode in the following way:screen rtranscode [options]
You can use the program as usual. To detach from the program, press “CTRL+a”, followed by 'd'. The screen session is closed and the program will continue to run in the background. You can now safely close the terminal or SSH connection.
To connect to the running program again later on (from a new terminal or SSH connection), enter:screen -r
If you stop the program, the screen application will also close.
Note: I plan to add a (Python based) web frontend to control transcoding in the future, which will be available as a separate package.
25
VII Using http-launch Directly
You may want to experiment with using http-launch directly. It can be called with:http-launch PORT PATH MIMETYPE RUNMODE <launch line>
PORT = http server portPATH = URL path, e. g. "/xyz.mkv"MIMETYPE = the mime type matching your streamRUNMODE must be one of the following:default|silent|delayed|silent-delayed
<launch line> must be a gstreamer1.0 tool chain as you can use it with gst-launch-1.0 with two specialties:The final muxer must be named "stream" and the final argument should be "stream." Here is an example from rtranscode itself:
http-launch:Copyright (C) 2013 Sebastian Dröge <[email protected]>Modifications by Guenter Kreidl <[email protected]> Copyright (C) 2015-2017
rtranscode and create_kpages:Copyright (C) 2017 Guenter Kreidl <[email protected]>
Documentation (README and manual):Copyright (C) 2017 Guenter KreidlIt may be distributed without charge in digital form, but not modified in any way.
These programs are free software; you can redistribute them and/or modify them under the terms of the GNU Library General Public License as published by the FreeSoftware Foundation; either version 2 of the License, or (at your option) any later version.
These programs are distributed in the hope that they will be useful, but WITHOUT ANY WARRANTY; without even the implied warranty of MERCHANTABILITY or FITNESS FOR A PARTICULAR PURPOSE. See the GNU Library General Public License for more details.
The source codes are part of the distribution. You will find them in the "sources" directory.
rtranscode and create_kpages are written in Python and compiled with nuitka. You can use the compile script to compile modified versions (nuitka required).
http-launch.c contains my modifications to the original program by Sebastian Droege. You cannot compile it directly.
Clone from https://github.com/sdroege/http-launch up to commit 5e7b8a936bfcbb2f86f6e78c69929d5ace617dc7. Replace the file http-launch.c with the version I supplied. Run "./configure" and then "make".