29
USB AUDIO INTERFACE EN DE FR ES JA IT
USB AUDIO INTERFACE
EN
DE
FR
ES
JA
IT

2
1. IMPORTANT NOTICE: regulations does not guarantee that interference
FCC INFORMATION (U.S.A.)
DO NOT MODIFY THIS UNIT!This product, when installed as indicated in the instructions contained in this manual, meets FCC requirements. Modifications not expressly approved by Yamaha may void your authority, granted by the FCC, to use the product.2. IMPORTANT: When connecting this product to accessories and/or another product use only high quality shielded cables. Cable/s supplied with this product MUST be used. Follow all installation instructions. Failure to follow instructions could void your FCC authorization to use this product in the USA.
3. NOTE: This product has been tested and found to comply with the requirements listed in FCC Regulations, Part 15 for Class “B” digital devices. Compliance with these requirements provides a reasonable level of assurance that your use of this product in a residential environment will not result in harmful interference with other electronic devices. This equipment generates/uses radio frequencies and, if not installed and used according to the instructions found in the users manual, may cause interference harmful to the operation of other electronic devices. Compliance with FCC
will not occur in all installations. If this product is found to be the source of interference, which can be determined by turning the unit “OFF” and “ON”, please try to eliminate the problem by using one of the following measures:
Relocate either this product or the device that is being affected by the interference.
Utilize power outlets that are on different branch (circuit breaker or fuse) circuits or install AC line filter/s.
In the case of radio or TV interference, relocate/reorient the antenna. If the antenna lead-in is 300 ohm ribbon lead, change the lead-in to co-axial type cable.
If these corrective measures do not produce satisfactory results, please contact the local retailer authorized to distribute this type of product. If you can not locate the appropriate retailer, please contact Yamaha Corporation of America, Electronic Service Division, 6600 Orangethorpe Ave, Buena Park, CA90620
The above statements apply ONLY to those products distributed by Yamaha Corporation of America or its subsidiaries.
* This applies only to products distributed by YAMAHA CORPORATION OF AMERICA. (class B)
COMPLIANCE INFORMATION STATEMENT(DECLARATION OF CONFORMITY PROCEDURE)
Responsible Party : Yamaha Corporation of AmericaAddress : 6600 Orangethorpe Ave., Buena Park, Calif. 90620
Telephone : 714-522-9011Type of Equipment : USB AUDIO INTERFACE
Model Name : UR28M
This device complies with Part 15 of the FCC Rules.Operation is subject to the following two conditions:
1) this device may not cause harmful interference, and2) this device must accept any interference received including interference that may cause undesired
operation.
See user manual instructions if interference to radio reception is suspected.
* This applies only to products distributed by YAMAHA CORPORATION OF AMERICA.
UR28M Getting Started
(class b korea)
(FCC DoC)

UR28M Getting Started 3
En
glis
hContents
PRECAUTIONS............................................4
Introduction .................................................7A Message From the Development Team......... 7Included Accessories ........................................ 7How to Read the Manual................................... 8
Panel Controls and Terminals .................10Rear Panel ...................................................... 10Front Panel...................................................... 11
Setup ..........................................................121. Setting up the Power Supply ....................... 122. Installing Cubase AI .................................... 133. Installing TOOLS for UR28M....................... 144. Downloading the Licenses (Activation) ....... 16
Basic Operations ......................................17Introduction...................................................... 17Connection Example ....................................... 17Configuring Audio Driver Settings on the DAW Software........................................... 17
Troubleshooting........................................19
Appendix....................................................21Contents of the Operation Manual .................. 21Uninstalling TOOLS for UR28M ...................... 21Specifications .................................................. 23

4
En
glish
PRECAUTIONSPLEASE READ CAREFULLY
BEFORE PROCEEDING
* Please keep this manual in a safeplace for future reference.
WARNINGAlways follow the basic precautions listed below to avoid the possibility of serious injury or even death from electrical shock, short-circuiting, damages, fire or other hazards. These precautions include, but are not limited to, the following:
• Do not place the power cord near heat sources such as heaters or radiators, and do not excessively bend or otherwise damage the cord, place heavy objects on it, or place it in a position where anyone could walk on, trip over, or roll anything over it.
• Only use the voltage specified as correct for the device. The required voltage is printed on the name plate of the device.
• Use the specified adaptor (PA-130 or an equivalent recommended by Yamaha) only. Using the wrong adaptor can result in damage to the device or overheating.
• Check the electric plug periodically and remove any dirt or dust which may have accumulated on it.
• This device contains no user-serviceable parts. Do not open the device or attempt to disassemble the internal parts or modify them in any way. If it should appear to be malfunctioning, discontinue use immediately and have it inspected by qualified Yamaha service personnel.
• Do not expose the device to rain, use it near water or in damp or wet conditions, or place on it any containers (such as vases, bottles or glasses) containing liquids which might spill into any openings. If any liquid such as water seeps into the device, turn off the power immediately and unplug the power cord from the AC outlet. Then have the device inspected by qualified Yamaha service personnel.
• Never insert or remove an electric plug with wet hands.
• Do not put burning items, such as candles, on the unit. A burning item may fall over and cause a fire.
• When one of the following problems occur, immediately turn off the power and disconnect the electric plug from the outlet. Then have the device inspected by Yamaha service personnel.- The power cord or plug becomes frayed or damaged.- It emits unusual smells or smoke.- Some object has been dropped into the device.- There is a sudden loss of sound during use of the device.
• If this device or the AC power adaptor should be dropped or damaged, immediately turn off the power, disconnect the electric plug from the outlet, and have the device inspected by qualified Yamaha service personnel.
CAUTIONAlways follow the basic precautions listed below to avoid the possibility of physical injury to you or others, or damage to the device or other property. These precautions include, but are not limited to, the following:
• Do not cover or wrap the AC power adaptor with a cloth or blanket.
Power supply/AC power adaptor
Do not open
Water warning
Fire warning
If you notice any abnormality
Power supply/AC power adaptor
PA_en_1 1/2
UR28M Getting Started

En
glis
h
• When removing the electric plug from the device or an outlet, always hold the plug itself and not the cord. Pulling by the cord can damage it.
• Remove the electric plug from the outlet when the device is not to be used for extended periods of time, or during electrical storms.
• Do not place the device in an unstable position where it might accidentally fall over.
• Do not place the device in a location where it may come into contact with corrosive gases or salt air. Doing so may result in malfunction.
• Before moving the device, remove all connected cables.• When setting up the device, make sure that the AC outlet
you are using is easily accessible. If some trouble or malfunction occurs, immediately turn off the power and disconnect the plug from the outlet. Even when the power is turned off, electricity is still flowing to the product at the minimum level. When you are not using the product for a long time, make sure to unplug the power cord from the wall AC outlet.
• Before connecting the device to other devices, turn off the power for all devices.Before turning the power on or off for all devices, set all volume levels to minimum.
• Remove the power plug from the AC outlet when cleaning the device.
• Do not rest your weight on the device or place heavy objects on it, and avoid use excessive force on the buttons, switches or connectors.
• Do not use the headphones for a long period of time at a high or uncomfortable volume level, since this can cause permanent hearing loss. If you experience any hearing loss or ringing in the ears, consult a physician.
Always turn the power off when the device is not in use.Even when the power is in standby status, electricity is still flowing to the device at the minimum level. When you are not using the device for a long time, make sure you unplug the power cord from the wall AC outlet.
Location
Connections
Maintenance
Handling caution
Yamaha cannot be held responsible for damage caused by improper use or modifications to the device, or data that is lost or destroyed.
PA_en_1 2/2
UR28M Getting Started 5

6
En
glish
NOTICETo avoid the possibility of malfunction/ damage to the product, damage to data, or damage to other property, follow the notices below.
• Do not use the device in the vicinity of a TV, radio, stereo equipment, mobile phone, or other electric devices. Otherwise, the device, TV, or radio may generate noise.
• Do not expose the device to excessive dust or vibrations, or extreme cold or heat (such as in direct sunlight, near a heater, or in a car during the day) to prevent the possibility of panel disfiguration, damage to the internal components or unstable operation.
• Do not place vinyl, plastic or rubber objects on the device, since this might discolor the panel.
• When cleaning the device, use a soft, dry/dry or slightly damp cloth. Do not use paint thinners, solvents, cleaning fluids, or chemical-impregnated wiping cloths.
• This disk containing the software is not meant for use with an audio/visual system (CD player, DVD player, etc.). Do not attempt to use the disk on equipment other than a computer.
Information• The software included in the Cubase AI DVD-ROM and the
copyrights thereof are under exclusive ownership by Steinberg Media Technologies GmbH.
• The software included in the TOOLS for UR28M CD-ROM and the copyrights thereof are under exclusive ownership by Yamaha.
• This manual is the exclusive copyrights of Yamaha Corporation.
• Copying of the software or reproduction of this manual in whole or in part by any means is expressly forbidden without the written consent of the manufacturer.
• Steinberg Media Technologies GmbH and Yamaha Corporation make no representations or warranties with regard to the use of the software and documentation and cannot be held responsible for the results of the use of this manual and the software.
• The screen displays as illustrated in this manual are for instructional purposes, and may appear somewhat different from the screens which appear on your computer.
• Copying of the commercially available musical data including but not limited to MIDI data and/or audio data is strictly prohibited except for your personal use.
• This product incorporates and bundles computer programs and contents in which Steinberg Media Technologies GmbH and Yamaha Corporation own copyrights or with respect to which it has license to use others' copyrights. Such copyrighted materials include, without limitation, all computer software, style files, MIDI files, WAVE data, musical scores and sound recordings. Any unauthorized use of such programs and contents outside of personal use is not permitted under relevant laws. Any violation of copyright has legal consequences. DON'T MAKE, DISTRIBUTE OR USE ILLEGAL COPIES.
• Windows is a registered trademark of Microsoft® Corporation in the United States and other countries.
• Apple, Mac and Macintosh are trademarks of Apple Inc., registered in the U.S. and other countries.
• Steinberg and Cubase are registered trademarks of Steinberg Media Technologies GmbH.
• The company names and product names in this manual are the trademarks or registered trademarks of their respective companies.
• Software may be revised and updated without prior notice.
UR28M Getting Started

Introduction
En
glis
h
IntroductionA Message From the Development TeamThank you for choosing the UR28M USB Audio Interface. The UR28M brings the sum total of our experience and know-how together with invaluable feedback from our customers throughout the world. Throughout the Yamaha n-series and Steinberg MR series our focus has been on integrating consistently outstanding sonic design with features and software that are truly useful from a musician’s perspective. The UR28M carries on this uncompromising approach, offering refined sound and functionality in a compact unit.
With the goal of creating a product that would be of maximum value for the longest time in mind, the development process began with in-depth review of the many comments received from users as a starting point for the design and basic specifications. Visual design, the feel of buttons and knobs, trial-and-error sonic evaluation of parts, and seamless software integration are just some of the elements to which every member of the development team devoted their full attention and passion. The entire team is rightly proud of the results, and we are delighted to be able to offer this product to our valued customers.
But this is just the beginning. The most important chapter unfolds when our customers use the product to support and augment their creativity, making it a part of their musical lives. Our greatest hope is that we are able to contribute in some way to the creation and expression of new music that will bring our customers’ artistic vision to life.
The Steinberg Hardware Development Team
Included Accessories
Accessories• AC power adaptor
(PA-130 or equivalent)
• Getting Started (this book)
• ESSENTIAL PRODUCT LICENSE INFORMATION card
• TOOLS for UR28M CD-ROM
• Cubase AI DVD-ROM
• USB cable
NOTICEIf the ESSENTIAL PRODUCT LICENSE INFORMATION card is lost or stolen, Steinberg Media Technologies GmbH and Yamaha Corporation cannot reissue it.
Disk Contents
TOOLS for UR28M CD-ROM• Operation Manual
This is the Operation Manual in PDF file format. For details, refer to the section “How to Read the Manual” (page 8).
• TOOLS for UR28MTOOLS for UR28M is necessary when connecting the device to a computer. When you install the TOOLS for UR28M, the following two software programs will be installed. For instructions on installation, refer to the section “Setup” (page 12).
UR28M Getting Started 7

Introduction
8
En
glish
- Yamaha Steinberg USB DriverThis software allows communication between the device and a computer.
- Steinberg UR28M ApplicationsThis software allows setting the parameters of the device from a computer or using the Link function between the device and Cubase series. The software consists of the following four software components.
• dspMixFx UR28MThis software lets you set the device when using it with a DAW (Digital Audio Workstation) software other than Cubase series.
• UR28M ExtensionThis software allows you to link the device with Cubase series (for versions which supports the link function).To use this Link function, you will need to install Cubase series version 5.5 or higher.
• Sweet Spot Morphing Channel Strip (VST Plug-in version)This processing effect is a multi-effect that combines compressor and equalizer. This is the VST Plug-in version (VST3.0) of the DSP effect equipped with the device.
• REV-X (VST Plug-in version)This processing effect is a digital reverb platform developed by Yamaha for professional audio devices. This is the VST Plug-in version (VST3.0) of the DSP effect equipped with the device.
Cubase AI DVD-ROMCubase AI
Cubase AI is an entry-level program modeled on the flagship Cubase DAW software made by Steinberg, and provides basic function for the music recording/production. For instructions on installation, refer to the section “Setup” (page 12).
NOTEFor the latest information on the software contained in the accessory disk, please see the Steinberg web site below. Future upgrades of application and system software and any changes in specifications are announced separately on the website.http://www.steinberg.net
How to Read the Manual
Types and Contents
Getting Started (this book)Read this manual when setting up the device. After finishing the setup as indicated in this manual, read the Operation Manual.
UR28M Getting Started

Introduction
En
glis
h
Operation Manual (PDF file)This manual provides instructions on how to use the device and gives detailed information on specific functions. It is included in the TOOLS for UR28M CD-ROM.NOTE• For contents of the operation manual,
refer to the section “Contents of the Operation Manual” (page 21).
• To view PDF files, you will need to install Adobe Reader on you computer. You can download the latest Adobe Reader at the following web site.http://www.adobe.com
Conventions
Windows or MacWhen the procedures or explanations are specific to only one of the platforms, Windows or Mac, this is properly indicated in the manual. When the platforms do not appear, procedures or explanations are for both Windows and Mac.
Procedures“ ” appears on some procedures in the manual. For example, the string [Devices] [Device Setup] [Control Panel] indicates that you should perform the procedures in the following order.
1. Click the [Devices] menu.
2. Select the [Device Setup] option.
3. Click the [Control Panel] button.
Keyboard Shortcuts[Windows modifier key]/[Mac modifier key]+[key] shows the shortcut keys. For example, [Ctrl]/[command]+[Z] means “press [Ctrl] under Windows or [command] under Mac, then press [Z].”
Different Cubase ProgramsThe phrase “Cubase series” applies to all Cubase programs and versions (except Cubase LE). If the instructions are only for Cubase, “Cubase only” appears in the manual.
ScreensThis manual predominantly uses screenshots of Windows. However, Mac screenshots are used when instructions of the function apply only to the Mac.
UR28M Getting Started 9

Panel Controls and Terminals
10
En
glish
Panel Controls and Terminals
Rear Panel
1 DC IN 12V
2 Grounding screw
3 2TR IN (3.5mm, stereo)
4 USB2.0 (USB port)
5 S/PDIF IN/OUT (coaxial)
6 PHONES 1/2 (phone type, stereo)
7 LINE OUTPUT A–C (phone type, balanced/unbalanced)
8 LINE INPUT 3/4 (phone type, balanced/unbalanced)
9 MIC/LINE/HI-Z 1/2 (XLR/phone type, balanced/unbalanced)
UR28M Getting Started

Panel Controls and Terminals
En
glis
h
Front Panel1 HI-Z switch
2 PAD switch
3 +48V button
4 INPUT GAIN knob 1/2
5 PHONES knob 1/2
6 2TR IN LEVEL knob
7 2TR IN ON button
8 INPUT meter
9 OUTPUT meter
) OUTPUT buttons A–C
! SOURCE SELECT button
@ MIX 1–3 lamp
# DIM button
$ MONO MIX button
% OUTPUT LEVEL knob
^ MUTE button
& Power button
*Word clock source lamp
UR28M Getting Started 11

Setup
12
En
glish
Setup
1. Setting up the Power Supply
Connecting the AC Power Adaptor
1. Insert the plug of the AC power adaptor into the DC IN 12V jack on the device.To prevent accidental unplugging of the cable during operation, wrap the cable of AC power adaptor around the cable clip.
2. Insert the plug of the AC power adaptor into the proper AC outlet on the wall.
WARNINGOnly use the included AC power adaptor (or an equivalent recommended by Yamaha). Using the wrong adaptor can result in damage to the device or overheating.
CAUTIONRemove the electric plug from the outlet when the device is not be used for extended periods of time, or during electrical storms.
NOTICE• To avoid generating unwanted noise,
make sure there is adequate distance between the power adaptor and the device.
• Avoid tightening the cord more than necessary or pulling on the cord strongly while it is wrapped around the cable clip, in order to prevent wear on the cord or possible breakage of the clip.
Turning the Power On and Off
Power onPress the power button ( ). The power button will light.
Power offHold down the power button ( ) for over one second. The power button will light dimly.
If one of the following actions is performed, the power of the device will turn off automatically after thirty minutes elapses. The power button will flash during the thirty-minute interval.
• Turning off the computer.
• Disconnecting the USB cable between the device and the computer.
For instructions on enabling/disabling this automatic power off function, refer to the section “Control Panel of the Audio Driver” in the Operation Manual.
AC outlet
UR28M Getting Started

Setup
En
glis
h
CAUTIONBefore you connect external devices to the device, turn off the power to all devices after setting all volume levels to minimum. Otherwise, electrical shock, hearing loss, or damage to the components may occur.NOTICEEven when the device is turned off, electricity is still flowing to the device at the minimum level. When you are not using the device for a long time, make sure you unplug the AC power adaptor from the wall AC outlet.
2. Installing Cubase AINOTE• You are only permitted to use this
software pursuant to the terms and conditions of the “End User License Agreement” shown during the installation.
• If you have already installed a version of Cubase series that is compatible with operation with the device (page 8), the instructions on Installing Cubase AI described below are not necessary.
Installation
1. Start the computer and log on to the Administrator account.
2. Insert the Cubase AI DVD-ROM into the DVD-ROM drive.
3. When the “WELCOME TO CUBASE AI” window appears, click the corresponding national flag icon to choose your preferred language.
NOTEIf this window does not appear automatically, open the DVD-ROM then double-click the file “Start Center.”
4. Follow the on-screen instructions to install the software.Installation may take a few minutes.
User Registration and Product RegistrationRegister your personal information and products on “MySteinberg” in the Steinberg web site. For details, refer to the following web site.http://www.steinberg.net/en/mysteinberg.html
The installation for Cubase AI is now completed.
UR28M Getting Started 13

Setup
14
En
glish
3. Installing TOOLS for UR28MNOTEYou are only permitted to use this software pursuant to the terms and conditions of the “License Agreement” shown during the installation.
Windows.................................page 14Mac .........................................page 15
Windows
PreparationIf the following warning messages appear during the installation, click [Continue Anyway], [Yes], or [Install].
Example warning message on Windows XP
Example warning messages on Windows Vista/Windows 7
Installation
1. Turn off the computer and device.
2. Disconnect all USB devices other than the mouse and keyboard from the computer.
3. Start the computer and log on to the Administrator account.
4. Insert the TOOLS for UR28M CD-ROM into the CD-ROM drive.
5. Open the CD-ROM then double-click the file “setup.exe.”
6. Follow the on-screen instructions to install the software.Install the following software in order.-Yamaha Steinberg USB Driver-Steinberg UR28M Applications
UR28M Getting Started
Setup
En
glis
h
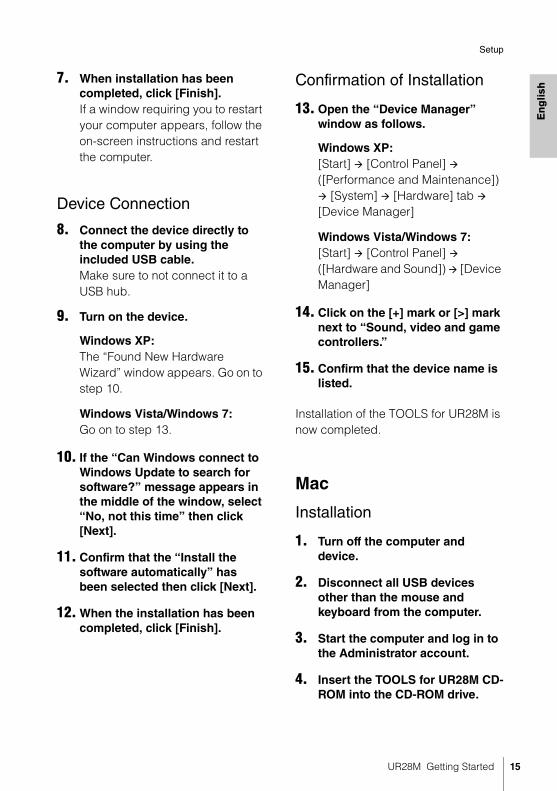
7. When installation has been completed, click [Finish].If a window requiring you to restart your computer appears, follow the on-screen instructions and restart the computer.Device Connection
8. Connect the device directly to the computer by using the included USB cable.Make sure to not connect it to a USB hub.
9. Turn on the device.
Windows XP:The “Found New Hardware Wizard” window appears. Go on to step 10.
Windows Vista/Windows 7:Go on to step 13.
10. If the “Can Windows connect to Windows Update to search for software?” message appears in the middle of the window, select “No, not this time” then click [Next].
11. Confirm that the “Install the software automatically” has been selected then click [Next].
12. When the installation has been completed, click [Finish].
Confirmation of Installation
13. Open the “Device Manager” window as follows.
Windows XP:[Start] [Control Panel] ([Performance and Maintenance]) [System] [Hardware] tab [Device Manager]
Windows Vista/Windows 7:[Start] [Control Panel] ([Hardware and Sound]) [Device Manager]
14. Click on the [+] mark or [>] mark next to “Sound, video and game controllers.”
15. Confirm that the device name is listed.
Installation of the TOOLS for UR28M is now completed.
Mac
Installation
1. Turn off the computer and device.
2. Disconnect all USB devices other than the mouse and keyboard from the computer.
3. Start the computer and log in to the Administrator account.
4. Insert the TOOLS for UR28M CD-ROM into the CD-ROM drive.
UR28M Getting Started 15

Setup
16
En
glish
5. Open the CD-ROM then double-click the file “TOOLS for UR28M.mpkg.”
6. Follow the on-screen instructions to install the software.
7. When installation has been completed, click [Restart] to restart the computer.
Device Connection
8. Connect the device directly to the computer by using a USB cable.Make sure to not connect it to a USB hub.
9. Turn on the device.
Confirmation of Installation
10. Open the “Audio MIDI Setup” window as follows.[Macintosh HD] [Applications] [Utilities] [Audio MIDI Setup]
11. Confirm that the device name is listed in the following.
Mac OS X 10.5:In “Properties For:”
Mac OS X 10.6:In the left column
Installation of the TOOLS for UR28M is now completed.
4. Downloading the Licenses (Activation)To use the Sweet Spot Morphing Channel Strip (VST Plug-in version) and REV-X (VST Plug-in version) which are installed in Step 3 in “Installing TOOLS for UR28M” (page 14), download their licenses via the Internet by using the activation code described on the ESSENTIAL PRODUCT LICENSE INFORMATION card.
1. Launch the “eLicenser Control Center” as follows.
Windows:[Start] [All Programs] [eLicenser] [eLicenser Control Center]
Mac:[Macintosh HD] [Applications] [eLicenser Control Center]
2. Click [Enter Activation Code].
3. Enter the Activation Code described on the included ESSENTIAL PRODUCT LICENSE INFORMATION card.
4. Follow the on-screen instructions to download the licenses.
NOTEIf you connect a USB-eLicenser (USB protection device) to your computer, a window requiring you to select the destination of the license appears. Follow the on-screen instructions to select the device.
The download licenses are now completed.
UR28M Getting Started

Basic Operations
En
glis
h
Basic OperationsIntroductionThis section explains the connection examples and audio driver settings on DAW software. For more detailed usage, refer to the section “Usage Examples” in the Operation Manual.
CAUTIONMake sure to set all volume levels to minimum before connecting or disconnecting the external device. Otherwise, high-volume output may damage your hearing or equipment.
NOTICEBe sure to observe the following points when connecting to the computer’s USB interface. Failing to do so may result in the computer freezing or shutting down, as well as corruption or even loss of data.
• Before turning on/off the device or plugging/unplugging the USB cable, quit any open application software on the computer.
• Before turning on the device, exit from any power-saving mode of the computer (such as suspend, sleep, standby).
• Before turning on the device, connect the device to the computer.
• Wait for six seconds or more between these operations: (1) when turning off the device then on again, or (2) when alternately connecting/disconnecting the USB cable.
Connection Example
Configuring Audio Driver Settings on the DAW Software
Cubase Series Programs
1. Make sure that all applications have been quit.
2. Connect the device directly to the computer by using the included USB cable.
NOTE(Windows only) Make sure to use the same USB port as the one used in the installation procedure when you connect the device to the computer again. If you connect them to a different USB port, you will have to install the driver again.
3. Turn on the device.
Computer
Headphones Guitar Microphone
Monitor speakers
Portable audio player
UR28M Getting Started 17
Basic Operations
18
En
glish
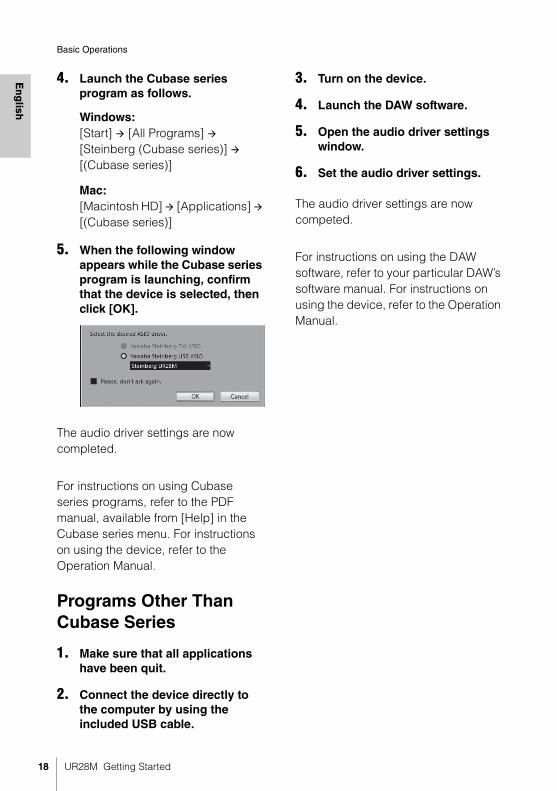
4. Launch the Cubase series program as follows.
Windows:[Start] [All Programs] [Steinberg (Cubase series)] [(Cubase series)]
Mac:[Macintosh HD] [Applications] [(Cubase series)]
5. When the following window appears while the Cubase series program is launching, confirm that the device is selected, then click [OK].
The audio driver settings are now completed.
For instructions on using Cubase series programs, refer to the PDF manual, available from [Help] in the Cubase series menu. For instructions on using the device, refer to the Operation Manual.
Programs Other Than Cubase Series
1. Make sure that all applications have been quit.
2. Connect the device directly to the computer by using the included USB cable.
3. Turn on the device.
4. Launch the DAW software.
5. Open the audio driver settings window.
6. Set the audio driver settings.
The audio driver settings are now competed.
For instructions on using the DAW software, refer to your particular DAW’s software manual. For instructions on using the device, refer to the Operation Manual.
UR28M Getting Started

Troubleshooting
En
glis
h
TroubleshootingTurning Off the Power Automatically, or Flashing the Power Button• The automatic power off function isenabled. Refer to the section “Control Panel of the Audio Driver” in the Operation Manual to disable this function.
No Sound• Are the volume controls of the
device set to appropriate levels?Confirm the OUTPUT LEVEL knob and PHONES knob.
• Are the microphones and monitor speakers connected to the device properly?Refer to the section “Connection Examples” (page 17) to confirm the connection.
• Are the audio driver settings on DAW software set properly?Refer to the section “Configuring the Audio Driver Settings on DAW Software” (page 17) to set it.
• Is the “ASIO Driver” setting on the Cubase series program set properly?From the Cubase series menu, open the [Devices] [Device Setup] [VST Audio System], then confirm that the “Yamaha Steinberg USB ASIO” (Windows) or “Steinberg UR28M” (Mac) is selected on the “ASIO Driver.”
• Was the power of the device turned on before starting the DAW software?Before starting the DAW software, connect the device to a computer and turn on the power of the device.
• Is the device connected to a computer via a USB hub?Connect it directly without using a USB hub.
• Has TOOLS for UR28M been installed properly?Refer to Step 3 in “Installing TOOLS for UR28M” (page 14) to confirm it.
• Are any USB devices you are not using connected to the computer?Remove them then confirm the sound.
• Are any other applications running at the same time?Quit all applications you are not using then confirm the sound.
Unusual Sound (noise, interruption, or distortion)• Is the INPUT meter lit in red?
Lower the INPUT GAIN level, or turn on the PAD switch.
• Is the buffer size set too low?Refer to the section “Control Panel of the Audio Driver” in the Operation Manual to confirm the buffer size.
• Is the Clock Source lamp flashing?The Clock Source lamp flashes when the word clock is not synchronized to the clock source. Refer to the section “Control Panel of the Audio Driver” in the Operation Manual to set it.
UR28M Getting Started 19

Troubleshooting
20
En
glish
• Does your computer satisfy the system requirements?Confirm the system requirements. For the latest information, see the Steinberg web site below.http://www.steinberg.net
• Are you recording or playing long continuous sections of audio?The audio data processing capabilities of your computer will depend on a number of factors including CPU speed and access to external devices. Reduce the audio tracks then confirm the sound.
• Is a network adaptor for wired/wireless LAN running?Disable the suspected network adaptor. Some network adaptors can cause noise.
Noise Occurs When Turning Off the Power, or Settings are Not Saved to the Device• Is the power of the device turned
off by some means other than using the power button?Turn off the power of the device by using the power button.
UR28M Getting Started
Appendix
En
glis
h
AppendixContents of the Operation ManualIntroduction
Contents in this Operation ManualFeatures
Panel Controls and Terminals (Details)Rear PanelFront Panel
Panel Controls for the Software ProgramsControl Panel of the Audio DriverdspMixFx UR28MDedicated Windows for Cubase SeriesSweet Spot Morphing Channel Strip (Channel Strip)REV-X
Usage ExamplesIntroductionRecording with the Channel Strip and REV-XControlling the Monitor SoundUsing the Device Without a Computer
AppendixGlossaryContents of the Getting Started SectionSignal FlowBlock Diagrams
Uninstalling TOOLS for UR28M
Windows.................................page 21Mac .........................................page 22
WindowsRemove the following two software components.
• Yamaha Steinberg USB Driver
• Steinberg UR28M Applications
1. Turn off the computer.
2. Disconnect all USB devices other than the mouse and keyboard from the computer.
3. Start the computer and log on to the Administrator account.
4. Open the window for the uninstall operation as follows.
Windows XP:[Start] [Control Panel] [Add or Remove Programs]
Windows Vista/Windows 7:[Start] [Control Panel] [Uninstall a Program]
5. Select one of the software components from the list.
6. Uninstall them as follows.
Windows XP:Click [Change/Remove]/[Remove]. Follow the on-screen instructions to remove the software.
Windows Vista/Windows 7:Click [Uninstall]/[Uninstall/Change]. Follow the on-screen instructions to remove the software.
Uninstallation of TOOLS for UR28M is now completed.
UR28M Getting Started 21

Appendix
22
En
glish
MacRemove the folders and files of the following five software components.
• Yamaha Steinberg USB Driver
• dspMixFx UR28M
• UR28M Extension
• Sweet Spot Morphing Channel Strip
• REV-X
Yamaha Steinberg USB Driver
[System] [Library] Extensions]YamahaSteinbergUSBAudio.kext
[Applications] [Yamaha] [USBDriver]
Yamaha Steinberg USB Control Panel.app
[Library] [PreferencePanes]Yamaha Steinberg USB.prefPane
[Library] [Preferences]com.yamaha.YamahaSteinbergUSBDriver.plist
[Library] [Audio] [MIDI Drivers]YamahaSteinbergUSBMIDI.plugin
[Library] [Audio] [MIDI Devices] [Yamaha] [Images]
USB_1500.tiffUSB_1502.tiffUSB_1503.tiff
[Library] [Receipts]YamahaSteinbergUSBAudioDriver.pkgYamahaSteinbergUSBControlPanel.pkgYamahaSteinbergUSBDriverplist.pkgYamahaSteinbergUSBMIDIPlugIn.pkgYamahaSteinbergUSBMIDIIcon.pkgYamahaSteinbergUSBPrefPane.pkg
dspMixFx UR28M
[Applications]dspMixFx_UR28M.app
UR28M Extension
[Library] [Application Support] [Steinberg] [Components]
ur28m_extension.bundle
[Library] [Receipts]Steinberg UR28M Extension.pkg
Sweet Spot Morphing Channel Strip
[Library] [Audio] [Plug-Ins] [VST3] [Steinberg] [UR]
UR-ChStrip_m.vst3UR-ChStrip_s.vst3UR28M-ChStrip_m.vst3UR28M-ChStrip_s.vst3
REV-X
[Library] [Audio] [Plug-Ins] [VST3] [Steinberg] [UR]
UR-REV-X_HALL.vst3UR-REV-X_ROOM.vst3UR-REV-X_PLATE.vst3UR28M-REV-X_HALL.vst3UR28M-REV-X_ROOM.vst3UR28M-REV-X_PLATE.vst3
Uninstallation of TOOLS for UR28M is now completed.
UR28M Getting Started

Appendix
En
glis
h
SpecificationsTechnical Specifications MIC/LINE INPUT 1/2 (Balanced)
Frequency Response +0.1/-0.2dB, 20Hz to 22kHz
Dynamic Range 101dB, A-Weighted
THD+N 0.002%, 1kHz, -1dBFS, 22Hz/22kHz BPF
Crosstalk >114dB, 1kHz
Maximum Input Level +22dBu
Input Impedance 4k Ohm
Maximum Gain 60dB
Adjustable Gain 44dB
Pad -26dB
HI-Z INPUT 1/2 (Unbalanced)
Maximum Input Level +9.8dBV
Input Impedance 500k Ohm
LINE INPUT 3/4 (Balanced)
Frequency Response +0.1/-0.1dB, 20Hz to 22kHz
Dynamic Range 102dB, A-Weighted
THD+N 0.001%, 1kHz, -1dBFS, 22Hz/22kHz BPF
Crosstalk >110dB, 1kHz
Maximum Input Level+16dBu (balanced)+13.8dBV (unbalanced)
Input Impedance20k Ohm (balanced)10k Ohm (unbalanced)
2TR IN
Maximum Input Level +3.5dBV
Input Impedance 10k Ohm
LINE OUTPUT A–C (Balanced)
Frequency Response +0.1/-0.2dB, 20Hz to 22kHz
Dynamic Range 106dB, A-Weighted
UR28M Getting Started 23

Appendix
24
En
glish
General Specifications
Specifications and descriptions in this manual are for information purposes only. Steinberg/Yamaha Corp. reserves the right to change or modify products or specifications at any time without prior notice. Since specifications, equipment or options may not be the same in every locale, please check with your Steinberg/Yamaha dealer.
Inrush Current based on EN 55103-1:20090.5A (on initial switch-on)0.5A (after a supply interruption of 5s)Conforms to Environments: E1, E2, E3 and E4
THD+N 0.001%, 1kHz, -1dBFS, 22Hz/22kHz BPF
Crosstalk >129dB, 1kHz
Maximum Output Level +16dBu
Output Impedance 75 Ohm
PHONES 1/2
Maximum Output Level 35mW+35mW, @40 Ohm
USB
Specification USB2.0, 24bit, 44.1kHz/48kHz/88.2kHz/96kHz
XLR INPUT
PolarityPin 1: GroundPin 2: Hot (+)Pin 3: Cold (-)
Power Requirements 8.4 W (PA-130)
Dimensions (H x D x W) 59 x 164 x 291 mm
Net Weight 1.4 kg
Operating Free-air Temperature Range
0 to +40 °C
Included Accessories
AC power adaptor (PA-130 or equivalent)Getting Started (this book)ESSENTIAL PRODUCT LICENSE INFORMATION cardTOOLS for UR28M CD-ROMCubase AI DVD-ROMUSB cable
UR28M Getting Started

OBSERVERA!Apparaten kopplas inte ur växelströmskällan (nätet) så länge som den ar ansluten till vägguttaget, även om själva apparaten har stängts av.
ADVARSEL: Netspændingen til dette apparat er IKKE afbrudt, sålænge netledningen sidder i en stikkontakt, som er tændt — også selvom der er slukket på apparatets afbryder.
VAROITUS: Laitteen toisiopiiriin kytketty käyttökytkin ei irroita koko laitetta verkosta.
(standby)
* This applies only to products distributed by Yamaha Music U.K. Ltd.
IMPORTANT NOTICE FOR THE UNITED KINGDOMConnecting the Plug and Cord
IMPORTANT. The wires in this mains lead are coloured in accordance with the following code:
BLUE : NEUTRALBROWN : LIVE
As the colours of the wires in the mains lead of this apparatus may not correspond with the coloured makings identifying the terminals in your plug proceed as follows:
The wire which is coloured BLUE must be connected to the terminal which is marked with the letter N or coloured BLACK.
The wire which is coloured BROWN must be connected to the terminal which is marked with the letter L or coloured RED.
Making sure that neither core is connected to the earth terminal of the three pin plug.
(2 wires)

Information for Users on Collection and Disposal of Old EquipmentThis symbol on the products, packaging, and/or accompanying documents means that used electrical and electronic products should not be mixed with general household waste.For proper treatment, recovery and recycling of old products, please take them to applicable collection points, in accordance with your national legislation and the Directives 2002/96/EC.By disposing of these products correctly, you will help to save valuable resources and prevent any potential negative effects on human health and the environment which could otherwise arise from inappropriate waste handling.For more information about collection and recycling of old products, please contact your local municipality, your waste disposal service or the point of sale where you purchased the items.
[For business users in the European Union]If you wish to discard electrical and electronic equipment, please contact your dealer or supplier for further information.
[Information on Disposal in other Countries outside the European Union]This symbol is only valid in the European Union. If you wish to discard these items, please contact your local authorities or dealer and ask for the correct method of disposal.
Verbraucherinformation zur Sammlung und Entsorgung alter ElektrogeräteBefindet sich dieses Symbol auf den Produkten, der Verpackung und/oder beiliegenden Unterlagen, so sollten benutzte elektrische Geräte nicht mit dem normalen Haushaltsabfall entsorgt werden.In Übereinstimmung mit Ihren nationalen Bestimmungen und den Richtlinien 2002/96/EC bringen Sie alte Geräte bitte zur fachgerechten Entsorgung, Wiederaufbereitung und Wiederverwendung zu den entsprechenden Sammelstellen.Durch die fachgerechte Entsorgung der Elektrogeräte helfen Sie, wertvolle Ressourcen zu schützen, und verhindern mögliche negative Auswirkungen auf die menschliche Gesundheit und die Umwelt, die andernfalls durch unsachgerechte Müllentsorgung auftreten könnten.Für weitere Informationen zum Sammeln und Wiederaufbereiten alter Elektrogeräte kontaktieren Sie bitte Ihre örtliche Stadt- oder Gemeindeverwaltung, Ihren Abfallentsorgungsdienst oder die Verkaufsstelle der Artikel.
[Information für geschäftliche Anwender in der Europäischen Union]Wenn Sie Elektrogeräte ausrangieren möchten, kontaktieren Sie bitte Ihren Händler oder Zulieferer für weitere Informationen.
[Entsorgungsinformation für Länder außerhalb der Europäischen Union]Dieses Symbol gilt nur innerhalb der Europäischen Union. Wenn Sie solche Artikel ausrangieren möchten, kontaktieren Sie bitte Ihre örtlichen Behörden oder Ihren Händler und fragen Sie nach der sachgerechten Entsorgungsmethode.
Information concernant la Collecte et le Traitement des déchets d’équipements électriques et électroniques.Le symbole sur les produits, l’emballage et/ou les documents joints signifie que les produits électriques ou électroniques usagés ne doivent pas être mélangés avec les déchets domestiques habituels.Pour un traitement, une récupération et un recyclage appropriés des déchets d’équipements électriques et électroniques, veuillez les déposer aux points de collecte prévus à cet effet, conformément à la réglementation nationale et aux Directives 2002/96/EC.En vous débarrassant correctement des déchets d’équipements électriques et électroniques, vous contribuerez à la sauvegarde de précieuses ressources et à la prévention de potentiels effets négatifs sur la santé humaine qui pourraient advenir lors d’un traitement inapproprié des déchets.Pour plus d’informations à propos de la collecte et du recyclage des déchets d’équipements électriques et électroniques, veuillez contacter votre municipalité, votre service de traitement des déchets ou le point de vente où vous avez acheté les produits.
[Pour les professionnels dans l'Union Européenne]Si vous souhaitez vous débarrasser des déchets d’équipements électriques et électroniques veuillez contacter votre vendeur ou fournisseur pour plus d’informations.
[Information sur le traitement dans d'autres pays en dehors de l'Union Européenne]Ce symbole est seulement valable dans l'Union Européenne. Si vous souhaitez vous débarrasser de déchets d’équipements électriques et électroniques, veuillez contacter les autorités locales ou votre fournisseur et demander la méthode de traitement appropriée.
Información para Usuarios sobre Recolección y Disposición de Equipamiento ViejoEste símbolo en los productos, embalaje, y/o documentación que se acompañe significa que los productos electrónicos y eléctricos usados no deben ser mezclados con desechos hogareños corrientes.Para el tratamiento, recuperación y reciclado apropiado de los productos viejos, por favor llévelos a puntos de recolección aplicables, de acuerdo a su legislación nacional y las directivas 2002/96/EC.Al disponer de estos productos correctamente, ayudará a ahorrar recursos valiosos y a prevenir cualquier potencial efecto negativo sobre la salud humana y el medio ambiente, el cual podría surgir de un inapropiado manejo de los desechos.Para mayor información sobre recolección y reciclado de productos viejos, por favor contacte a su municipio local, su servicio de gestión de residuos o el punto de venta en el cual usted adquirió los artículos.
[Para usuarios de negocios en la Unión Europea]Si usted desea deshacerse de equipamiento eléctrico y electrónico, por favor contacte a su vendedor o proveedor para mayor información.
[Información sobre la Disposición en otros países fuera de la Unión Europea]Este símbolo sólo es válido en la Unión Europea. Si desea deshacerse de estos artículos, por favor contacte a sus autoridades locales y pregunte por el método correcto de disposición.
Informazioni per gli utenti sulla raccolta e lo smaltimento di vecchia attrezzaturaQuesto simbolo sui prodotti, sull’imballaggio, e/o sui documenti che li accompagnano significa che i prodotti elettriche e elettroniche non dovrebbero essere mischiati con i rifiuti domestici generici.Per il trattamento, recupero e riciclaggio appropriati di vecchi prodotti, li porti, prego, ai punti di raccolta appropriati, in accordo con la Sua legislazione nazionale e le direttive 2002/96/CE.Smaltendo correttamente questi prodotti, Lei aiuterà a salvare risorse preziose e a prevenire alcuni potenziali effetti negativi sulla salute umana e l’ambiente, che altrimenti potrebbero sorgere dal trattamento improprio dei rifiuti.Per ulteriori informazioni sulla raccolta e il riciclaggio di vecchi prodotti, prego contatti la Sua amministrazione comunale locale, il Suo servizio di smaltimento dei rifiuti o il punto vendita dove Lei ha acquistato gli articoli.
[Per utenti imprenditori dell’Unione europea]Se Lei desidera disfarsi di attrezzatura elettrica ed elettronica, prego contatti il Suo rivenditore o fornitore per ulteriori informazioni.
[Informazioni sullo smaltimento negli altri Paesi al di fuori dell'Unione europea]Questo simbolo è validi solamente nell’Unione europea. Se Lei desidera disfarsi di questi articoli, prego contatti le Sue autorità locali o il rivenditore e richieda la corretta modalità di smaltimento.
►Warranty Terms and Conditions
available as printed PDF file at
www.steinberg.net/warranty
The Warranty Terms and Conditions available as printed PDF file at www.steinberg.net/warranty apply only for countries of the European Economic Area (EEA) and Switzerland.
►Gewährleistungsbestimmungen
finden Sie als druckbare PDF Datei unter
www.steinberg.de/warranty
Die Gewährleistungsbestimmungen in Schriftform sind als PDF-Datei unter www.steinberg.de/warranty erhältlich und gelten nur für den Europäischen Wirtschaftsraum (EWR) und die Schweiz.
►Les conditions de garantie
se trouvent dans le document PDF imprimable sous
www.steinberg.net/warranty
Les conditions de garantie disponibles au format PDF à la page www.steinberg.net/warranty s’appliquent uniquement aux pays de l’Espace économique européen (EEE) et à la Suisse.
►Las condiciones de garantía
se encuentran en el documento PDF en
www.steinberg.net/warranty
Los términos y condiciones de la garantía como archivo PDF para su impresión en www.steinberg.net/ warranty sólo están disponible en países del Espacio Económico Europeo (EEE) y Suiza.
►Termini e Condizioni di Garanzia
disponibili su file PDF stampabile all’indirizzo web
www.steinberg.net/warranty
I termini e le condizioni della garanzia, disponibili in formato PDF all’indirizzo www.steinberg.net/warranty, sono validi soltanto per I paesi dell’Area Economica Europea (EEA) e per la Svizzera.

If you need support or further product information please contact the distributor in your country. A list of distributors is available at this website:http://www.steinberg.net/en/company/distributor.htmlFor assistance in determining who to contact, please contact “Headquarter SMTG.”
Wenn Sie Unterstützung oder weitere Produktinformationen benötigen, wenden Sie sich bitte an den Vertrieb in Ihrem Land. Eine Liste der Vertriebspartner finden Sie auf dieser Website:http://www.steinberg.net/en/company/distributor.htmlWenn Sie Hilfe benötigen, an wen Sie sich wenden sollten, kontaktieren Sie bitte „Headquarter SMTG“.
Pour toute demande d'assistance ou d’information supplémentaire sur les produits, veuillez contacter le distributeur agréé dans votre pays. La liste des distributeurs agréés est disponible sur le site Web suivant :http://www.steinberg.net/en/company/distributor.htmlPour obtenir de l’aide sur les ressources à contacter, adressez-vous au « Siège de SMTG ».
Para solicitar asistencia o más información sobre el producto, póngase en contacto con el distribuidor de su país. Encontrará una lista de distribuidores en el siguiente sitio web:http://www.steinberg.net/en/company/distributor.htmlPara consultas sobre el contacto adecuado, diríjase a “Headquarter SMTG.”
Per ottenere assistenza o avere ulteriori informazioni sul prodotto, contattare il distributore locale. L’elenco dei distributori è disponibile sul sito Web al seguente indirizzo:http://www.steinberg.net/en/company/distributor.htmlPer individuare il distributore da contattare, rivolgersi alla sede centrale SMTG.
如需更多支持和深层产品信息,请联系您所在国家的代理商。
代理商列表请浏览下列网址:
http://www.steinberg.net/en/company/distributor.html如需帮助决定联系哪方代理商,请联系" SMTG总公司"。
HEAD OFFFICESteinberg Media Technologies GmbH
Frankenstraße 18b, 20097 Hamburg, GermanyTel: +49-(0)40-210 35 0

Steinberg Web Sitehttp://www.steinberg.net
C.S.G., Pro Audio Division© 2011 Yamaha Corporation
104MWAP*.*-01A0
WW71460


