46
DOC022.53.90072 BODTrak™ II USER MANUAL August 2008, Edition 1 © Hach Company, 2008. All rights reserved. Printed in China.

DOC022.53.90072
BODTrak™ II
USER MANUAL
August 2008,Edition 1
© Hach Company, 2008. All rights reserved. Printed in China.

Table of contents
Section 1 Specifications .................................................................................. 5
Section 2 General information ....................................................................... 72.1 Safety information ....................................................................................... 7
2.1.1 Use of hazard information ................................................................ 72.1.2 Precautionary labels ......................................................................... 7
2.2 Theory of operation ..................................................................................... 82.2.1 Oxygen transfer to sample ............................................................... 82.2.2 Pressure sensor function .................................................................. 92.2.3 Removing carbon dioxide ................................................................. 9
Section 3 Installation ...................................................................................... 113.1 Component list .......................................................................................... 113.2 Electrical installation ................................................................................. 12
Section 4 Operation ........................................................................................ 134.1 Operational controls .................................................................................. 13
4.1.1 Channel selection keys ................................................................... 144.1.2 The arrow keys ............................................................................... 144.1.3 The ON key .................................................................................... 144.1.4 The OFF key ................................................................................... 14
4.2 Bottle connections .................................................................................... 144.3 Setting the clock ....................................................................................... 154.4 RS232 Interface ........................................................................................ 154.5 Downloading test results ........................................................................... 16
4.5.1 Import data ..................................................................................... 164.5.2 Data format ..................................................................................... 174.5.3 Printing test results ......................................................................... 18
Section 5 BODTrak™ II procedures .......................................................... 195.1 General Information .................................................................................. 195.2 Simplified procedure ................................................................................. 205.3 Hach GGA (glucose/glutamic acid) procedure .......................................... 225.4 Hach Standard Method procedure ............................................................ 245.5 Completion steps for all procedures ......................................................... 27
5.5.1 Determination of results .................................................................. 305.6 Typical curves ........................................................................................... 325.7 Special considerations .............................................................................. 33
5.7.1 Sample dilution ............................................................................... 335.7.2 Sample seeding .............................................................................. 335.7.3 Sample temperature ....................................................................... 335.7.4 Toxic materials ............................................................................... 335.7.5 Chlorine .......................................................................................... 345.7.6 pH effect ......................................................................................... 345.7.7 Supersaturation .............................................................................. 34
3

Table of contents
Section 6 Maintenance ...................................................................................356.1 Cleaning the instrument .............................................................................35
6.1.1 Sample bottles ................................................................................356.1.2 Stir bars and seal cups ....................................................................356.1.3 Bottle fences ...................................................................................35
Section 7 Troubleshooting ............................................................................377.1 High oxygen demand .................................................................................387.2 Nitrification .................................................................................................387.3 Excessive time lag .....................................................................................387.4 Sample temperature ..................................................................................387.5 Bottle leak ..................................................................................................39
Section 8 Replacement parts and accessories ......................................418.1 Replacement parts ....................................................................................418.2 Reagents ...................................................................................................418.3 Optional reagents ......................................................................................418.4 Accessories ...............................................................................................42
Section 9 Contact Information ......................................................................45
4

Section 1 Specifications
Specifications are subject to change without notice.
Table 1 Specifications
General
Range Selectable, 0 to 35, 0 to 70, 0 to 350, 0 to 700 mg/L
Dimensions 28.9 x 26 x 9.8 cm (11 3/8 x 10 ¼ x 3 7/8 inches)
External power supply Input: 110 to 240 V, 50/60 Hz, Output: 24 V, UL CSA, and TUV approved
Capacity Six 492 mL bottles
Shipping weight 4 kg (8.8 lb)
Operating temperature 20 ºC (68 ºF)
Storage temperature 0 to 40 ºC (104 ºF)
Method performance specifications
Precision
On a standard containing 150 mg/L each of glucose and glutamic acid, a single analyst using 6 BODTrak™ II instruments and testing 44 samples obtained a mean of 235 mg/L BOD with a 95% confidence limit of distribution of 11 mg/L or a range of 224 to 246 mg/L BOD.
Drift Less than 3 mg/L BOD in 5 days
Resolution 1 mg/L BOD
Table 2 Certification
Certification
Hach Company certifies this instrument was tested thoroughly, inspected and found to meet its published specifications when it was shipped from the factory. The BODTrak II has been tested and is certified as indicated to the following instrumentation standards:FCC Part 15, Sub-Part B, Class A Limits: Supporting test records by Intellistor, certified compliance by Hach CompanyCanadian Interference-Causing Equipment Regulation, ICES-003, Class A: Supporting test records by Intellistor, certified compliance by Hach CompanyEN 55011/CISPR 11(EMI) “B” Limits per 89/336/EEC EMC: Supporting test records by Intellistor, certified compliance by Hach CompanyEN 50082-1 (Immunity) per 89/336/EEC EMC: Supporting test records by Hach Company, certified compliance by Hach Company. Standards include:• IEC 801-2 and EN 61000-4-2 (ESD)• IEC 801-3 and EN V50140 (RF & EM Field)• IEC 801-4 and EN 61000-4-4 (Fast Transient)
• EN 61000-4-5 (Surge)
Warranty: US 1 year; EU 2 year
5
Specifications
Radio frequency interference
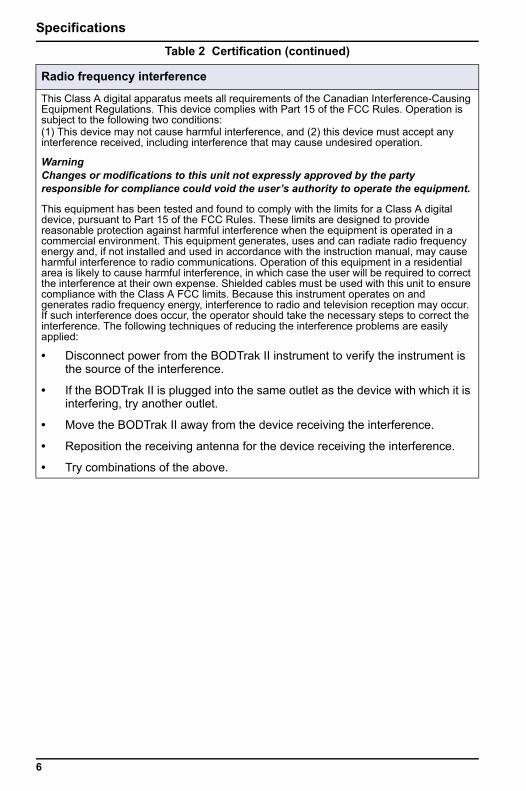
This Class A digital apparatus meets all requirements of the Canadian Interference-Causing Equipment Regulations. This device complies with Part 15 of the FCC Rules. Operation is subject to the following two conditions:(1) This device may not cause harmful interference, and (2) this device must accept any interference received, including interference that may cause undesired operation.
WarningChanges or modifications to this unit not expressly approved by the party responsible for compliance could void the user’s authority to operate the equipment. This equipment has been tested and found to comply with the limits for a Class A digital device, pursuant to Part 15 of the FCC Rules. These limits are designed to provide reasonable protection against harmful interference when the equipment is operated in a commercial environment. This equipment generates, uses and can radiate radio frequency energy and, if not installed and used in accordance with the instruction manual, may cause harmful interference to radio communications. Operation of this equipment in a residential area is likely to cause harmful interference, in which case the user will be required to correct the interference at their own expense. Shielded cables must be used with this unit to ensure compliance with the Class A FCC limits. Because this instrument operates on and generates radio frequency energy, interference to radio and television reception may occur. If such interference does occur, the operator should take the necessary steps to correct the interference. The following techniques of reducing the interference problems are easily applied:
• Disconnect power from the BODTrak II instrument to verify the instrument is the source of the interference.
• If the BODTrak II is plugged into the same outlet as the device with which it is interfering, try another outlet.
• Move the BODTrak II away from the device receiving the interference.
• Reposition the receiving antenna for the device receiving the interference.
• Try combinations of the above.
Table 2 Certification (continued)
6

Section 2 General information
2.1 Safety informationPlease read this entire manual before unpacking, setting up or operating this equipment. Pay attention to all danger and caution statements. Failure to do so could result in serious injury to the operator or damage to the equipment.
Make sure that the protection provided by this equipment is not impaired, do not use or install this equipment in any manner other than that specified in this manual.
2.1.1 Use of hazard informationDANGERIndicates a potentially or imminently hazardous situation which, if not avoided, will result in death or serious injury.
WARNINGIndicates a potentially or imminently hazardous situation which, if not avoided, could result in death or serious injury.
CAUTIONIndicates a potentially hazardous situation that may result in minor or moderate injury.
Important Note: Indicates a situation which, if not avoided, may cause damage to the instrument. Information that requires special emphasis.Note: Information that supplements points in the main text.
2.1.2 Precautionary labelsRead all labels and tags attached to the instrument. Personal injury or damage to the instrument could occur if not observed. A symbol, if noted on the instrument, will be included with a danger or caution statement in the manual.
This symbol, if noted on the instrument, references the instruction manual for operation and/or safety information.
Electrical equipment marked with this symbol may not be disposed of in European public disposal systems after 12 August of 2005. In conformity with European local and national regulations (EU Directive 2002/96/EC), European electrical equipment users must now return old or end-of life equipment to the Producer for disposal at no charge to the user. Note: For return for recycling, please contact the equipment producer or supplier for instructions on how to return end-of-life equipment, producer-supplied electrical accessories, and all auxiliary items for proper disposal.
7
General information
2.2 Theory of operationRespirometric Biochemical Oxygen Demand (BOD) is a test done at 20 °C (68 °F) in a controlled environment. The test period can be 5, 7 or 10 days, contingent on the analysis or protocol. The BOD test measures the quantity of oxygen consumed by bacteria that oxidize organic matter in a water sample. The test is used to measure waste loadings at wastewater treatment plants and to examine the efficiency of wastewater treatment.
BOD test results help find general oxygen uptake patterns. This lets operators estimate plant operating efficiency and find correct treatment procedures.
Advantages to the BODTrak™ II as an alternative to the dilution method are:
• Minimal time to prepare a sample.
• Decreased total test time.
• The BODTrak II method gives results comparable to the diluton method (BOD5) in 2 to 3 days.
• Calibration and dissolved oxygen measurement are not necessary.
• The BODTrak II test is easy to monitor.
• The sample is stirred constantly and kept in natural conditions. This makes the BODTrak II results similar to occurrences found in a natural environment. The dilution method supplies no additional oxygen to the sample. This causes a higher percentage of oxygen depletion and possible retardation of biochemical reactions.
• The BOD can be monitored at any time because the instrument continuously shows the BOD result. Pressure changes in the closed BODTrak II system are shown graphically in milligrams per liter (mg/L) on an LCD. The system supplies 360 uniform data points over the selected time period.
• The BODTrak II system continuously removes carbon dioxide from the system so that the pressure difference monitored is proportional to the quantity of oxygen used.
• Degassing can cause negative errors when heat is applied to a sample to achieve experimental temperature. The BODTrak II adjusts for this occurrence. The BODTrak II does not start the test until the temperature gets to equilibrium.
2.2.1 Oxygen transfer to sampleBacteria in the sample use oxygen while consuming organic matter in the sample bottles. The air in the bottle above the sample contains 21% oxygen and replenishes the dissolved oxygen used by the bacteria. During the test period, stir bars continually mix the sample in each bottle. This moves oxygen from the air to the sample and helps simulate natural conditions.
8

General information
2.2.2 Pressure sensor function The BODTrak II is sealed to prevent external atmospheric pressure changes in the test bottle. Pressure sensors monitor air pressure in the sample bottles. When oxygen is consumed, the pressure in the bottle head space drops. The pressure drop correlates directly to BOD.
2.2.3 Removing carbon dioxideCarbon dioxide is made when microorganisms oxidize organic matter in the sample. The carbon dioxide must be removed from the system so it does not interfere with the measurement. Potassium hydroxide pellets put in the seal cup of each sample bottle before the test remove the carbon dioxide.
9

10

Section 3 Installation
3.1 Component listCompare each item below to the items in the shipment. If an item is missing or damaged, refer to the manufacturer.
• BODTrak™ II instrument
• Power cords, 115 and 230 V
• A UL/CSA approved 115 VAC power cord with a NEMA 5-15P style plug
• A 230 VAC harmonized power cord with a continental European plug
• Power supply, auto–switching between 115 V and 230 V
• 6 seal cups
• 6 BODTrak II amber sample bottles
• 6 BODTrak II magnetic stir bars
• Spatula scoop
• One package nutrient buffer solution pillows
• One container potassium hydroxide pellets
11
Installation
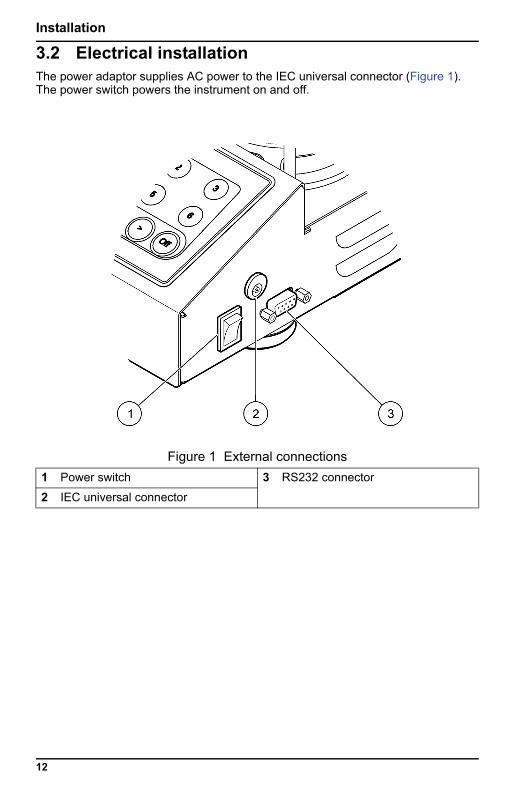
3.2 Electrical installationThe power adaptor supplies AC power to the IEC universal connector (Figure 1). The power switch powers the instrument on and off.
Figure 1 External connections1 Power switch 3 RS232 connector
2 IEC universal connector
12
Section 4 Operation
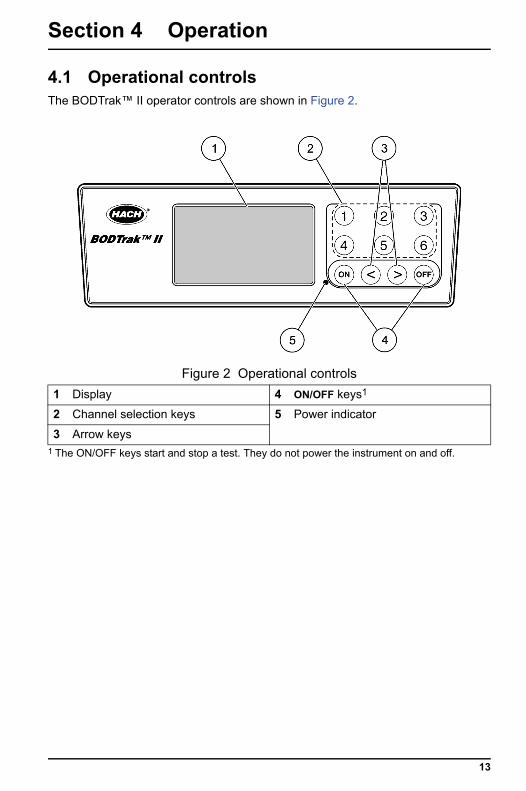
4.1 Operational controlsThe BODTrak™ II operator controls are shown in Figure 2.
Figure 2 Operational controls1 Display 4 ON/OFF keys1
1 The ON/OFF keys start and stop a test. They do not power the instrument on and off.
2 Channel selection keys 5 Power indicator
3 Arrow keys
13

Operation
4.1.1 Channel selection keysPush the related channel selection key to show data for one of the 6 bottles.
The channel selection keys are also used in the instrument setup menu to choose a parameter to be edited (Table 3).
4.1.2 The arrow keysThe display shows a graph of BOD values on the vertical axis and time in days on the horizontal axis. Push the left and right arrow keys to move the cursor along the BOD curve to show the approximate coordinates (time, BOD) of the selected data point.
The time interval and BOD value of the data point are shown in the lower right of the display. The cursor is automatically placed at the most recently collected data point in a channel display.
Push and hold the two arrow keys at the same time to go into the instrument setup menu. The arrow keys are also used to change the time, date, test length and range.
4.1.3 The ON keyTo access the range selection menu, push the ON key from a channel display screen. Then push and hold the ON key to start the test for the selected channel.
4.1.4 The OFF keyWhen a test is in DELAY or RUN modes, pushing and holding the OFF key manually ends the test. The instrument will display END. The OFF key is also used to exit the instrument setup menu or range selection menu. Any changes made prior to exit will be saved.
4.2 Bottle connectionsEach bottle position/channel has the applicable tube numbered with a plastic sleeve. The bottle positions are numbered 1 though 6 with number 1 in the back left corner of the chassis. Use the channel selection keys as a guide.
Table 3 Channel key setup parameters
Channel Parameter
1 Year (0-99)
2 Month (1-12)
3 Day (1-31)
4 Hour (0-24)
5 Minute (0-59)
6 Test Length (5, 7, or 10 days)
14

Operation
4.3 Setting the clockAll channels must show END or CLEAR before the clock can be set. Push and hold the two arrow keys at the same time until the instrument setup menu is shown. Select the clock parameter to be adjusted by pushing the applicable channel key (Table 3 on page 14). Use the arrow keys to edit the chosen parameter. Adjust each parameter in the same manner. When all time adjustments are complete, push the OFF key to save and go back to the data display screen.
4.4 RS232 InterfaceAll RS232 connections are made through the Serial I/O port (Figure 1 on page 12). Connect the 9-pin D connector of a computer interface cable to the Serial I/O port on the instrument. Connect the opposite end of the cable to the computer Serial I/O port (Com 1 or Com 2).
The BODTrak II instrument is equipped as Data Communication Equipment (DCE). The BODTrak II operates at 9600 baud with 8 data bits, no parity and one stop bit. The computer or printer will not receive complete transmissions if the device cannot continuously receive at 9600 baud.
Note: Use of the specified cable or an equivalent shielded cable is mandatory to meet Radio Frequency Emissions requirements.
15

Operation
4.5 Downloading test resultsTo transfer test results to a PC:
1. Choose PROGRAMS, ACCESSORIES, COMMUNICATIONS, HYPERTERMINAL.2. In the Connection Description window, type in a name for the connection and
choose an icon to represent it. Click OK.3. In the Connect To window, use the drop-down menu to choose the COM port
connected to the BODTrak II instrument. Click OK.4. Configure the COM port properties:
BPS = 9600, Data Bits = 8, Parity = None, Stop Bits = 1, Flow Control = None.
5. Click OK. The connect indicator will be shown. 6. Choose TRANSFER, CAPTURE TEXT. 7. In the Capture Text window, click BROWSE to choose a specific save location.
Name the file and click SAVE. 8. In the Capture Text window click START. 9. Power on the BODTrak II. Push the applicable channel key for the data to be
downloaded. 10. Type GA in the HyperTerminal window, then push ENTER. The transfer is
complete when the screen stops adding new data. 11. Choose TRANSFER, CAPTURE TEXT, STOP. 12. Choose CALL, DISCONNECT. The disconnected indicator will be shown. 13. To end the HyperTerminal session, choose FILE, EXIT. 14. Click YES to save the session and all instrument/port configuration settings.
4.5.1 Import data To import the data from the captured text file:
1. Open a new or existing spreadsheet. Choose DATA, IMPORT EXTERNAL DATA, IMPORT DATA.
2. Select the text file captured in HyperTerminal. Click IMPORT.3. In the Text Import Wizard, choose Delimited as the file type, the start row in
the spreadsheet, and Windows (ANSI) as the file origin. Click NEXT.4. Check the Space delimiter and Treat consecutive delimiters as one check
boxes. Click NEXT.5. Choose General as the Column data format then click FINISH.6. In the Import Data window, choose Existing worksheet. Choose the starting cell
then click OK. The data will appear in your spreadsheet.7. Choose File, Save As to save the spreadsheet. The spreadsheet data cannot be edited or formatted in HyperTerminal or with the BODTrak II.
16

Operation
4.5.2 Data formatWhen a result array is downloaded to HyperTerminal, all data from the test are sent without pause. The data flow cannot be stopped or paused.
Figure 3 shows channel number, start date, start time, and the format of the downloaded data. BOD values in mg/L follow. Only the first data points, of a maximum of 360 equal distance points, are shown in this example. Each line ends with a carriage return and a line feed. The end of the data stream is shown by a message such as “Test Run to Completion” and a dollar symbol ($).
If small negative BOD values are seen at the start of a test, refer to Troubleshooting on page 37.
BOD Log for Ch 1Status: ENDFull Scale: 700 mg/LTst length: 7 daysStart Date: 3/3/08Time: 13:04
Days, Reading (mg/L)
0.00, 00.05, 100.11, 120.16, 120.22, 140.27, 140.33, 120.38, 80.44, 100.50, 120.55, 120.61, 14---Test Run to Completion$
Figure 3 Downloaded test data
17

Operation
4.5.3 Printing test resultsThe BODTrak II is compatible with the Citizen PD-24 printer, which is available as an optional accessory (Section 8 on page 41). Connect the printer cable to the serial port on the BODTrak II using the gender adapter provided with the printer. Make sure the printer interface settings are correct (section 4.4 on page 15).
Power on the BODTrak II instrument. Push and hold the applicable channel number for approximately 5 seconds at any time during a test. This moves the test results from the BODTrak II to the printer. The instrument will send a copy of the graphical display and a truncated data stream (127 data points).
18

Section 5 BODTrak™ II procedures
5.1 General InformationThere are three BODTrak II procedure variations. Choose the procedure that meets the application requirements.
The Simplified procedure (section 5.2 on page 20) is recommended when sample seeding, extra nutrients or buffers are not necessary. It is also recommended when accuracy requirements are not stringent.
The Hach GGA (glucose/glutamic acid) procedure (section 5.3 on page 22) is recommended for all accuracy and performance checks using seeded GGA. It is also recommended when test accuracy is important.
The Hach Standard Method procedure (section 5.4 on page 24) is recommended when samples are seeded or extra nutrients or reagents are added. Use this procedure when following Standard Methods for the Examination of Water and Wastewater, 21st Edition, Method 5210 D Respirometric Method.
All procedure variations are followed by completion steps for all procedures (section 5.5 on page 27). It is possible to use a combination of these procedures with one instrument, but in different bottles. Only one test length can be chosen.
Before starting the test:
Use the applicable sample volume tables for each procedure.
If power is interrupted when the instrument is in DELAY status, the test will stop and the status will change to CLEAR when power returns. Start the test again.If power is interrupted when the instrument is in RUN status, the test will resume when power returns.
Keep deionized water overnight in an incubator at 20 ºC. Shake the deionized water to saturate with air.
Settle the seed overnight in the BOD incubator at a temperature of 20 ºC. Be careful not to disturb the settled solution. Pipet seed solution from the top.
Dilution is necessary if samples have BOD values more than 700 mg/L (5.7 on page 33).
At elevations higher than 5000 feet above sea level the 0 to 35 mg/L BOD range is decreased to 0 to 25 mg/L BOD. Adjustment is not necessary for other test ranges.
Refer to section 5.7 on page 33 for special considerations including sample seeding and pretreatment.
Use only BODTrak II stir bars and bottles. They are designed specifically for use with the BODTrak II.
19
BODTrak™ II procedures
5.2 Simplified procedureRequired apparatus:
BODTrak II bottle
Thermometer
Blender (optional)
Graduated cylinder
Required reagents:
2 nutrient buffer pillows
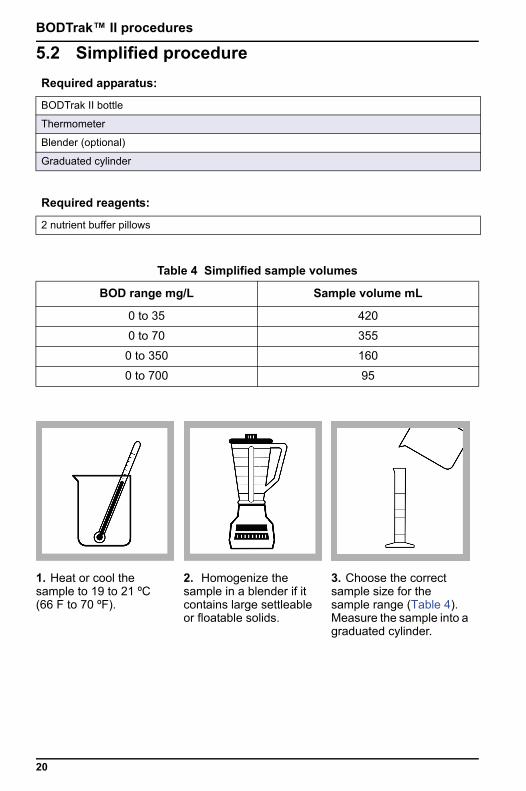
Table 4 Simplified sample volumes
BOD range mg/L Sample volume mL
0 to 35 420
0 to 70 355
0 to 350 160
0 to 700 95
1. Heat or cool the sample to 19 to 21 ºC (66 F to 70 ºF).
2. Homogenize the sample in a blender if it contains large settleable or floatable solids.
3. Choose the correct sample size for the sample range (Table 4). Measure the sample into a graduated cylinder.
20

BODTrak™ II procedures
4. Add the contents of 2 nutrient buffer pillows to the graduated cylinder.
5. Transfer the contents of the graduated cylinder to a BODTrak II bottle. Repeat steps 1 to 5 for additional samples.
6. Continue to the completion steps for all procedures (section 5.5 on page 27).
21
BODTrak™ II procedures
5.3 Hach GGA (glucose/glutamic acid) procedureRequired apparatus:
BODTrak II bottle
Graduated cylinder
Volumetric pipet and pipet filler
Tensette® pipet and pipet tips
Wash water bottle
Ampule breaker
Required reagents:
Deionized water
Hach GGA solution
2 nutrient buffer pillows
Before starting the test:
Use Hach BOD Standard Solution Ampules for Manometric Method (3000 mg/L Glucose, 3000 mg/L Glutamic acid).
On a standard containing 150 mg/L each of glucose and glutamic acid, a single analyst using 6 BODTrak II instruments and testing 44 samples obtained a mean of 235 mg/L BOD with a 95% Confidence Limit of Distribution of 11 mg/L or a range of 224 to 246 mg/L BOD after 5 days.
Always prepare the seed blank before the GGA samples. Use the same amount of seed for all GGA samples and seed blank.
Refer to section 5.7 on page 33 for special considerations.
Prepare seed blankUse steps 1, 3 to 7.
Prepare sampleUse steps 1 to 7.
22

BODTrak™ II procedures
Table 5 GGA sample volumes
BOD range (mg/L)
GGA volume (mL)
Seed volume (mL)
Final Volume (mL)
0 to 350 8.0 10 to 35 160Note: If seed strength is unknown, use 20 mL. Adjust seed volume as necessary to achieve optimum GGA results. Use the same amount of seed for all GGA samples and seed blank.
1. Add approximately 30 mL of deionized water to a 200 mL graduated cylinder.
2. Use a volumetric pipet to transfer 8.0 mL of Hach GGA solution to the graduated cylinder. Note: Skip this step when preparing the seed blank.
3. Add the contents of 2 nutrient buffer pillows to the graduated cylinder.
4. Use a tensette pipet to add the correct quantity of seed to the graduated cylinder (Table 5).
5. Dilute to the sample to 160 mL using a deionized water wash bottle.
6. Transfer the prepared sample from the graduated cylinder to a BODTrak II bottle.Note: For additional GGA samples, repeat steps 1 to 6.
7. Continue to the completion steps for all procedures (section 5.5 on page 27).
23

BODTrak™ II procedures
5.4 Hach Standard Method procedureRequired apparatus:
Thermometer
BODTrak II bottle
Blender (optional)
Graduated cylinder
Tensette pipet and pipet tips
Wash water bottle
Required reagents:
2 nutrient buffer pillows
Additional nutrient or buffer (optional)
Deionized water
Before starting the test:
Use the sample volume table to choose the correct sample size (Table 6).
If seeding samples, prepare a seed blank before preparing a sample. Treat the seed blank the same as any other sample and omit step 5.
Refer to section 5.7 on page 33 for special considerations.
Table 6 Hach Standard Method sample volumes
BOD range (mg/L)
Sample volume (mL)
Seed volume (mL)
Final volume (mL)
Dilution factor
0 to 35 370 10 to 35 420 1.14
0 to 70 305 10 to 35 355 1.16
0 to 350 110 10 to 35 160 1.45
0 to 700 45 10 to 35 95 2.11Note: If seed strength is unknown, use 20 mL. Adjust seed volume as necessary to achieve optimum results.
24

BODTrak™ II procedures
1. Heat or cool the sample to 19 to 21 ºC(66 to 70 ºF).
2. Homogenize the sample in a blender if it contains large settleable or floatable solids.
3. Choose the correct sample size for the sample range (Table 6 on page 24). Measure the sample into a graduated cylinder.
4. Add the contents of 2 nutrient buffer pillows to the graduated cylinder.
5. If seeding the sample, use a tensette pipet to add the correct quantity of seed to the graduated cylinder (Table 6 on page 24).
6. If necessary, add more nutrient or buffer. Do not add more than a total volume of 50 mL (seed, nutrient, buffer).
25

BODTrak™ II procedures
7. Fill to the final test range volume, if necessary, with a deionized wash water bottle (Table 6 on page 24).
8. Transfer the prepared sample from the graduated cylinder to a BODTrak II bottle. Note: Repeat steps 1 to 8 for additional samples.
9. Continue to the completion steps for all procedures (section 5.5 on page 27).
26
BODTrak™ II procedures
5.5 Completion steps for all proceduresRequired apparatus:
BODTrak II
Spatula scoop
BOD incubator
Seal cup
Stir bar
Required reagents:
2 potassium hydroxide pellets
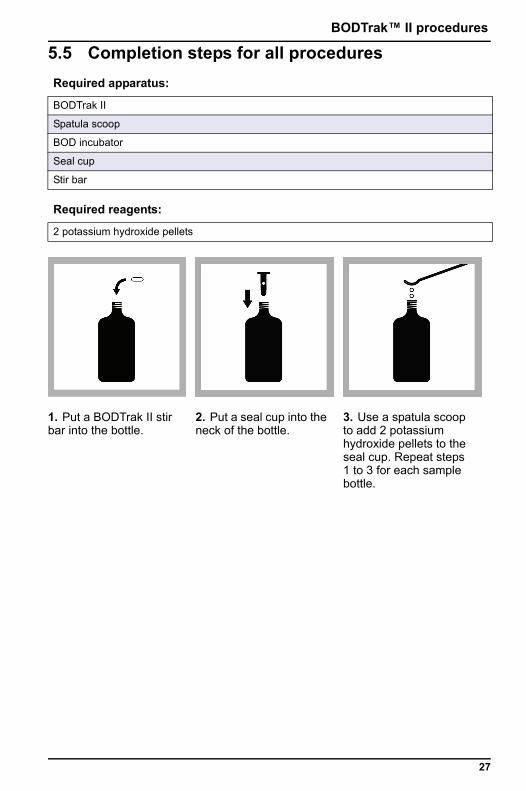
1. Put a BODTrak II stir bar into the bottle.
2. Put a seal cup into the neck of the bottle.
3. Use a spatula scoop to add 2 potassium hydroxide pellets to the seal cup. Repeat steps 1 to 3 for each sample bottle.
27

BODTrak™ II procedures
4. Put the bottles on the BODTrak II chassis. Connect the applicable tube to the sample bottle and tighten the cap.
5. Put the instrument in the incubator. The incubator temperature must be 20 ± 1 ºC (68 ± 1 ºF). Note: Instrument performance has not been tested at other temperatures.
6. Plug in and power on the instrument. Make sure all stir bars are rotating. If not, lift the bottle up and set down again.
7. Push and hold the left and right arrow keys at the same time to access the instrument setup menu. Note: Set the time and date, if necessary (section 4.3 on page 15).
8. Push the Channel 6 key to access the test length parameter. Use the arrow keys to choose a 5, 7 or 10 day test. Note: The selected test length is for all 6 channels.
9. Push OFF to save selections and exit the menu.
28

BODTrak™ II procedures
10.To start the test, push the channel number applicable to the bottle.
11.Push the ON key. The range selection menu is shown.
12.Use the arrow keys to choose the test range. Note: Use the left arrow key for the 0 to 35 and 0 to 70 mg/L ranges. Use the right arrow key for the 0 to 350 and 0 to 700 mg/L ranges.
13.Push and hold the ON key to start a test. A graph will be displayed. Note: To cancel a test push and hold the OFF key.
Note: There is a built-in 1 hour instrument/sample equilibration period before data collection. The display will show DELAY during this period.
14.Do steps 10 through 13 again to set the test range and start each of the 6 channels. It is not necessary to operate all 6 channels if less than 6 samples are available.
29

BODTrak™ II procedures
5.5.1 Determination of resultsAfter the end of the chosen test period (5, 7 or 10 days), END is shown on the display. The procedure that is done dictates the determination of the results. The results are determined based on the selected procedure: Simplified, Hach GGA or Hach Standard Method.
5.5.1.1 Simplified sample results
The Simplified Procedure results are shown on the BODTrak II display. Push the applicable channel selection key to show the results.
Note: If the sample was pre-diluted, apply a dilution factor to the instrument reading (section 5.7.1 on page 33).
5.5.1.2 Hach GGA (glucose/glutamic acid) results
The seed blank and seeded GGA sample results are necessary for the Hach GGA procedure results.
1. Push the channel selection key for the seed blank bottle. The results are shown.
2. Push the channel selection key for the seeded GGA sample bottle. The results are shown.
3. Calculate the results: BOD mg/L = seeded GGA sample result - seed blank result
5.5.1.3 Hach Standard Method results
1. Push the channel selection key for the Hach Standard Method sample bottle. The results are shown.
Note: Treat the seed blank the same as all other samples.
Note: If the sample was pre-diluted, apply a dilution factor to the instrument reading (section 5.7.1 on page 33).
2. Find the dilution factor based on the selected range (Table 6 on page 24).
Example: If the sample range selected was 0 to 350 mg/L BOD, the dilution factor is 1.45.
3. Calculate the corrected results: BOD mg/L = BOD mg/L (instrument reading) x dilution factor
Example: Instrument Reading = 200 mg/L, BOD dilution factor = 1.45200 mg/L x 1.45 = 290 mg/L BOD (Corrected Result)
30

BODTrak™ II procedures
4. When samples are seeded, calculate the results using this equation and the corrected results:
Where:
A = corrected BOD of the seeded sampleB = corrected BOD of the seed blankSA = volume of seed in sample (sample can also be GGA)SB = volume of seed in seed blank
Example: A= 290 mg/L BODB= 120 mg/L BODSA= 20 mLSB= 110 mL
BOD mg/L = 268 mg/L
BOD mg/L( ) A B x SASB--------⎝ ⎠⎛ ⎞–=
BOD mg/L( ) 290mg/L 120mg/L x 20mL110mL-------------------⎝ ⎠⎛ ⎞–=
31

BODTrak™ II procedures
5.6 Typical curvesTypical curves through a 10 day test period are shown in Figure 4. For incorrect curves refer to Figure 5 on page 37.
Figure 4 Typical curves1 Typical with substrate variation 3 Typical with time lag
2 Typical
32

BODTrak™ II procedures
5.7 Special considerations5.7.1 Sample dilutionUnknown sample BOD effluent is typically in the 0 to 70 mg/L range. Unknown sample BOD influent is typically in the 0 to 700 mg/L range. When the oxygen requirement of a sample is more than 700 mg/L, dilute the sample with high-quality distilled or deionized water.
Calculate the results to include the additional dilution factor. Example: If the BOD of the sample is 1000 mg/L, dilute the sample 1:1 with distilled or deionized water. The estimated BOD is now 500 mg/L. Use the sample volume specified in the table for the 0 to 700 mg/L range of the chosen procedure. Multiply the instrument reading result by 2. If using the Hach Standard Method procedure, continue with remaining calculations.
5.7.2 Sample seedingSome types of BOD samples do not contain sufficient bacteria to oxidize the organic matter in the sample. Many industrial wastes are of this type. Some sewage treatment plant effluents are chlorinated and essentially sterile. A BOD test cannot be done in the absence of viable bacteria. To test such samples, seed each bottle from a source known to contain a viable bacterial population.
Settled domestic wastewater plant influent or primary clarifier effluent are the preferred sources of seed for most samples. Mixed liquor or undisinfected effluent can be used for seed, but it is recommended to include a nitrification inhibitor. Commercial seed sources are sometimes suitable. To prepare, see the instructions from the manufacturer.
5.7.3 Sample temperatureStandard Methods for the Examination of Water and Wastewater, 21st Ed., 2005, 5210 D recommends an incubation temperature of 20 ±1 °C (68 °F) for the BOD test. Put the BODTrak II instrument in an incubator that is adjusted to 20 ±1 °C. An applicable BOD incubator is available from Hach (section 8.1 on page 41). Warm or cool samples to 20 ± 1 °C.
Note: Instrument performance has not been validated at temperatures other than 20 °C.
5.7.4 Toxic materialsIndustrial and chlorinated samples often contain toxic substances and require special considerations when running BOD tests. Toxic materials in the sample will cause decreased BOD values. Dilute the sample to minimize the toxic materials or their effects. Refer to Standard Methods for the Examination of Water and Wastewater, 21st edition, 5210 D.
33
BODTrak™ II procedures
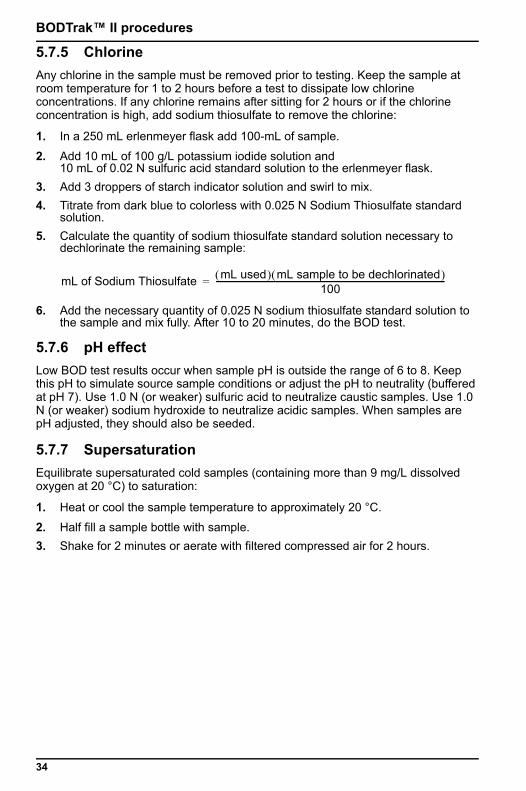
5.7.5 ChlorineAny chlorine in the sample must be removed prior to testing. Keep the sample at room temperature for 1 to 2 hours before a test to dissipate low chlorine concentrations. If any chlorine remains after sitting for 2 hours or if the chlorine concentration is high, add sodium thiosulfate to remove the chlorine:
1. In a 250 mL erlenmeyer flask add 100-mL of sample.
2. Add 10 mL of 100 g/L potassium iodide solution and 10 mL of 0.02 N sulfuric acid standard solution to the erlenmeyer flask.
3. Add 3 droppers of starch indicator solution and swirl to mix.4. Titrate from dark blue to colorless with 0.025 N Sodium Thiosulfate standard
solution.5. Calculate the quantity of sodium thiosulfate standard solution necessary to
dechlorinate the remaining sample:
6. Add the necessary quantity of 0.025 N sodium thiosulfate standard solution to the sample and mix fully. After 10 to 20 minutes, do the BOD test.
5.7.6 pH effectLow BOD test results occur when sample pH is outside the range of 6 to 8. Keep this pH to simulate source sample conditions or adjust the pH to neutrality (buffered at pH 7). Use 1.0 N (or weaker) sulfuric acid to neutralize caustic samples. Use 1.0 N (or weaker) sodium hydroxide to neutralize acidic samples. When samples are pH adjusted, they should also be seeded.
5.7.7 SupersaturationEquilibrate supersaturated cold samples (containing more than 9 mg/L dissolved oxygen at 20 °C) to saturation:
1. Heat or cool the sample temperature to approximately 20 °C.
2. Half fill a sample bottle with sample.3. Shake for 2 minutes or aerate with filtered compressed air for 2 hours.
mL of Sodium Thiosulfate mL used( ) mL sample to be dechlorinated( )100
-------------------------------------------------------------------------------------------------------------------=
34

Section 6 Maintenance
DANGEROnly qualified personnel should conduct the tasks described in this section of the manual.
6.1 Cleaning the instrumentClean spills on the BODTrak™ II instrument with a soft cloth which has been dampened with deionized or distilled water.
6.1.1 Sample bottlesAfter each test, empty the sample bottles and flush them thoroughly with hot water. Use a brush, hot water and soap to remove residue. Residue creates a BOD. Flush the bottles thoroughly with tap water and finally with distilled or deionized water to remove all detergent.
6.1.2 Stir bars and seal cupsClean the stir bars with hot water and soap. Use a brush to remove deposits. Flush with tap water and finally with distilled or deionized water to remove all detergent. Carefully empty and rinse the seal cups with water. Invert to dry.
6.1.3 Bottle fencesThe bottle fences prevent tipping of the bottles and provide tubing management during storage. For storage, put the tubing into the opening in the bottle fence. Wind the tubing counter-clockwise and secure the bottle cap inside the fence.
35

36

Section 7 Troubleshooting
Incorrect BOD curves through a 10 day test period are shown in Figure 5. For typical curves refer to Figure 4 on page 32.
Figure 5 Incorrect BOD curves1 High oxygen demand 4 Initial sample temperature below
20 ºC or supersaturated with oxygen
2 Nitrification 5 Bottle leak
3 Excessive time lag
37

Troubleshooting
7.1 High oxygen demandSamples that are above range (for example, a BOD over 350 mg/L when a 160-mL sample is taken) will cause results as shown in Curve 1 (Figure 5 on page 37). Dilute the sample (section 5.7 on page 33) or use a higher BOD range and a different sample volume (Table 4 on page 20, Table 5 on page 23 or Table 6 on page 24).
When the BOD range of a sample is unknown:
• Use the results from the Chemical Oxygen Demand (COD) test. An estimated BOD value can be obtained by multiplying the COD by 0.68.
• Use the results from a series of BOD tests using the same sample but different volumes.
• Or use dilution ratios to choose an applicable BOD range.
Typically, effluent is in the 0-70 mg/L range while influent is in the 0-700 mg/L range. When the BOD of the sample is more than 700 mg/L, prepare a sample dilution (section 5.7 on page 33).
7.2 NitrificationThe condition shown by Curve 2 is an example of nitrification (Figure 5 on page 37). Deviation from the typical curve (shown as the dashed line) is apparent by the concave increase near the end of the test period.
Biological oxidation of organic nitrogen usually occurs after 5 days with typical domestic waste. Nitrifying bacteria develop more slowly than other types of bacteria.
However, some samples contain a high concentration of nitrifying bacteria and nitrification results can occur sooner. Control nitrification problems with Hach Nitrification Inhibitor. Dispense the inhibitor powder into an empty sample bottle and then add the sample. With the Hach Dispenser cap, dispense 6 shots (approximately 0.48 grams) into the empty bottle. Refer to replacement parts and accessories (Section 8 on page 41).
7.3 Excessive time lagCurve 3 (Figure 5 on page 37) shows a test that did not start with sufficient bacteria during the incubation period. To do a test on a sample without sufficient bacteria, seed the sample (section 5.7.2 on page 33).
Bacteria acclimation also causes conditions that could cause Curve 3. This sometimes occurs with standards and added seed. Add more seed or choose a different seed source.
7.4 Sample temperatureThe initial negative results of Curve 4 (Figure 5 on page 37) show that the initial sample temperature was below the specified range of 20 ± 1 ºC. A sample supersaturated with oxygen will also display this type of curve (section 5.7.3 on page 33 and section 5.7.7 on page 34).
38

Troubleshooting
7.5 Bottle leakCurve 5 (Figure 5 on page 37) shows a bottle leak. A bottle leak can also cause no response from the system. If such a response occurs, check the seal cup and bottle cap for contamination or damage.
39

40
Section 8 Replacement parts and accessories
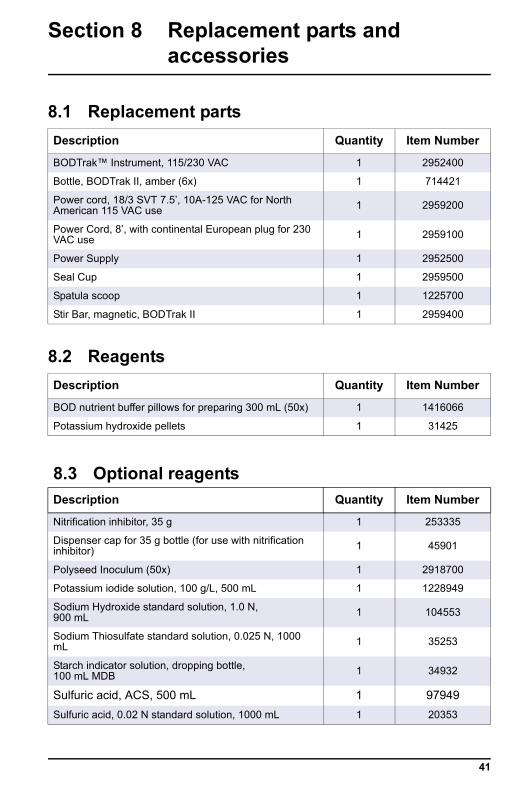
8.1 Replacement partsDescription Quantity Item Number
BODTrak™ Instrument, 115/230 VAC 1 2952400
Bottle, BODTrak II, amber (6x) 1 714421
Power cord, 18/3 SVT 7.5’, 10A-125 VAC for North American 115 VAC use 1 2959200
Power Cord, 8’, with continental European plug for 230 VAC use 1 2959100
Power Supply 1 2952500
Seal Cup 1 2959500
Spatula scoop 1 1225700
Stir Bar, magnetic, BODTrak II 1 2959400
8.2 ReagentsDescription Quantity Item Number
BOD nutrient buffer pillows for preparing 300 mL (50x) 1 1416066
Potassium hydroxide pellets 1 31425
8.3 Optional reagentsDescription Quantity Item Number
Nitrification inhibitor, 35 g 1 253335
Dispenser cap for 35 g bottle (for use with nitrification inhibitor) 1 45901
Polyseed Inoculum (50x) 1 2918700
Potassium iodide solution, 100 g/L, 500 mL 1 1228949
Sodium Hydroxide standard solution, 1.0 N, 900 mL 1 104553
Sodium Thiosulfate standard solution, 0.025 N, 1000 mL 1 35253
Starch indicator solution, dropping bottle, 100 mL MDB 1 34932
Sulfuric acid, ACS, 500 mL 1 97949Sulfuric acid, 0.02 N standard solution, 1000 mL 1 20353
41

Sulfuric acid, 1.0 N standard solution, 1000 mL 1 127053
Voluette ampule standard for BOD, 3000 mg/L for manometric, 10-mL/ampule, 16 ampules 1 1486610
8.4 AccessoriesDescription Quantity Item Number
Ampule breaker kit for voluette ampules 1 2196800
Bottle, wash, 500 mL 1 62011
Bottle, polyethylene, with spigot, 4 L 1 1486817
Brush, cylinder, size 2 1 68700
Buret, straight stopcock, Teflon plug, 25 mL 1 1405940
Clamp, buret, double 1 32800
Computer cable for data transfer to PC 1 2959300
Cylinder, graduated, 10 mL 1 50838
Cylinder, graduated, 25 mL 1 50840
Cylinder, graduated, 50 mL 1 50841
Cylinder, graduated, 100 mL 1 50842
Cylinder, graduated, 250 mL 1 50846
Cylinder, graduated, 500 mL 1 58049
Cylinder, graduated, 1000 mL 1 50853
Flask, erlenmeyer 1 50546
Incubator, BOD, Model 205, 110 V 1 2616200
Incubator, BOD, Model 205, 220/240 V 1 2616202
Pipet, Tensette®, 0.1 to 1.0 mL 1 1970001
Pipet, Tensette, 1 to 10 mL 1 1970010
Pipet tips, 0.1 to 1.0 mL (50x) 1 2185696
Pipet tips, 0.1 to 1.0 mL (1000x) 1 2185628
Pipet tips, 1 to 10 mL (50x) 1 2199796
Pipet tips, 1 to 10 mL (250x) 1 2199725
Pipet filler, 3 valve 1 1218900
Pipet, serological, glass, 10 mL 1 53238
Printer, Citizen PD-24 with cable 1 2960100
Standard Methods for the Examination of Water and Wastewater 1 2270800
Support stand, buret 1 32900
8.3 Optional reagents (continued)Description Quantity Item Number
42

Replacement parts and accessories
Thermometer, Mercury, -20 to 110 °C 1 56601
Thermometer, non-Mercury, -20 to 110 °C 1 2635702
Water Still, 120 V 1 2615900
Water Still, 220 V 1 2615902
Water System, Ultrapure, Millipore Direct -Q 3 1 2512100
DQ3 purification pack 1 2512201
8.4 Accessories (continued)Description Quantity Item Number
43

44

Section 9 Contact InformationHACH Company World HeadquartersP.O. Box 389Loveland, Colorado80539-0389 U.S.A.Tel (800) 227-HACH(800) 227-4224(U.S.A. only)Fax (970) [email protected]
Repair Service in the United States:HACH CompanyAmes Service100 Dayton AvenueAmes, Iowa 50010Tel (800) 227-4224(U.S.A. only)Fax (515) 232-3835
Repair Service in Canada:Hach Sales & ServiceCanada Ltd.1313 Border Street, Unit 34Winnipeg, ManitobaR3H 0X4Tel (800) 665-7635(Canada only)Tel (204) 632-5598Fax (204) [email protected]
Repair Service in Latin America, the Caribbean, the Far East, Indian Subcontinent, Africa, Europe, or the Middle East:Hach Company WorldHeadquarters,P.O. Box 389Loveland, Colorado,80539-0389 U.S.A.Tel +001 (970) 669-3050Fax +001 (970) [email protected]
HACH LANGE GMBHWillstätterstraße 11D-40549 DüsseldorfTel. +49 (0)2 11 52 88-320Fax +49 (0)2 11 52 [email protected]
HACH LANGE LTDPacific WaySalfordGB-Manchester, M50 1DLTel. +44 (0)161 872 14 87Fax +44 (0)161 848 73 [email protected]
HACH LANGE LTDUnit 1, Chestnut RoadWestern Industrial EstateIRL-Dublin 12Tel. +353(0)1 46 02 5 22Fax +353(0)1 4 50 93 [email protected]
HACH LANGE GMBHHütteldorferstr. 299/Top 6A-1140 WienTel. +43 (0)1 9 12 16 92Fax +43 (0)1 9 12 16 [email protected]
DR. BRUNO LANGE AGJuchstrasse 1CH-8604 HegnauTel. +41(0)44 9 45 66 10Fax +41(0)44 9 45 66 [email protected]
HACH LANGE FRANCE S.A.S.33, Rue du BallonF-93165 Noisy Le GrandTél. +33 (0)1 48 15 68 70Fax +33 (0)1 48 15 80 [email protected]
HACH LANGE SAMotstraat 54B-2800 MechelenTél. +32 (0)15 42 35 00Fax +32 (0)15 41 61 [email protected]
DR. LANGE NEDERLAND B.V.Laan van Westroijen 2aNL-4003 AZ TielTel. +31(0)344 63 11 30Fax +31(0)344 63 11 [email protected]
HACH LANGE APSÅkandevej 21DK-2700 BrønshøjTel. +45 36 77 29 11Fax +45 36 77 49 [email protected]
HACH LANGE ABVinthundsvägen 159ASE-128 62 SköndalTel. +46 (0)8 7 98 05 00Fax +46 (0)8 7 98 05 [email protected]
HACH LANGE S.R.L.Via Riccione, 14I-20156 MilanoTel. +39 02 39 23 14-1Fax +39 02 39 23 [email protected]
45

Contact Information
HACH LANGE S.L.U.Edif. Arteaga CentrumC/Larrauri, 1C- 2ª Pl.E-48160 Derio/VizcayaTel. +34 94 657 33 88Fax +34 94 657 33 [email protected]HACH LANGE LDAAv. do Forte nº8Fracção MP-2790-072 CarnaxideTel. +351 214 253 420Fax +351 214 253 [email protected]
HACH LANGE SP.ZO.O.ul. Opolska 143 aPL-52-013 WrocławTel. +48 (0)71 342 10-83Fax +48 (0)71 342 [email protected]
HACH LANGE S.R.O.Lešanská 2a/1176CZ-141 00 Praha 4Tel. +420 272 12 45 45Fax +420 272 12 45 [email protected]
HACH LANGE KFT.Hegyalja út 7-13.H-1016 BudapestTel. +36 (06)1 225 7783Fax +36 (06)1 225 [email protected]
HACH LANGE S.R.L.Str. Leonida, nr. 13Sector 2RO-020555 BucurestiTel. +40 (0) 21 201 92 43Fax +40 (0) 21 201 92 [email protected]
HACH LANGE8, Kr. Sarafov str.BG-1164 SofiaTel. +359 (0)2 963 44 54Fax +359 (0)2 866 04 [email protected]
HACH LANGE SU ANALİZ SİSTEMLERİ LTD.ŞTİ.Hilal Mah. 75. SokakArman Plaza No: 9/ATR-06550 Çankaya/ANKARATel. +90 (0)312 440 98 98Fax +90 (0)312 442 11 [email protected]
HACH LANGE D.O.O.Fajfarjeva 15SI-1230 DomžaleTel. +386 (0)59 051 000Fax +386 (0)59 051 [email protected]
ΗΑCH LANGE E.Π.Ε.Αυλίδος 27GR-115 27 ΑθήναΤηλ. +30 210 7777038Fax +30 210 [email protected]
HACH LANGE E.P.E.27, Avlidos strGR-115 27 AthensTel. +30 210 7777038Fax +30 210 [email protected]
46


