Page 1
E-Jet series CIJ Inkjet Printer
User Operational Manual
ROTTWEIL® INKJET PRINTER
Metronic-Handyware Shanghai Ltd.
MFG:
T15-1-4, No.999, Ningqiao Rd., Pudong New District
Shanghai 201206 P.R.China
T: +86-21-5834-8225 F: +86-21-5834-8193
E-mail: [email protected]
Website: www.rottweilglobal.com
Version 12-2-4
Updated, Feb. 2012
Page 2
User Operational Manual Rottweil® E-Jet series CIJ Inkjet Printer
V 12-2-4 / Feb 2012 2
Appreciates Thank you for purchasing of Rottweil® E-Jet series CIJ inkjet printer. It is a perfect integrity of
reliable performance and easiest operation with German technology. This manual provides you
information for correct and smooth running of Rottweil® E-Jet inkjet.
To the best of our knowledge, the information contained in this manual was correct at the time of
printing. However, continual enhancement of our products can result in some differences
between instructions represented in this manual and your Rottweil® E-Jet printer.
Warranty Rottweil® E-Jet series inkjet printer comprises of high-quality components and has been tested to
ensure quality conformity. We provide warranty on this equipment for a period of one year from
the date of delivery from our factory unless specified otherwise.
Spare Parts and Consumables Only original Rottweil® spare parts and consumables can be used for Rottweil® E-Jet inkjet printer.
Should foreign parts and consumables used, any direct or indirect damage will not be covered by
the warranty obligations.
Intellectual Property The copy-right to this manual is owned by Metronic-Handyware Shanghai Ltd. Reproducing this
manual in whole or in part without written permission is expressly prohibited.
The manufacturer reserves the right to make changes in specifications and other information
contained in this document without prior notice. The reader should in all cases consult the
manufacturer to determine whether any such changes have been made.
Acknowledgements “Rottweil®”, “E-Jet” name, logo and “Easy Coding” are trademarks of Metronic-Handyware
Shanghai Ltd.
Contact Information ROTTWEIL® INKJET PRINTER
Metronic-Handyware Shanghai Ltd.
T15-1-4, No.999, Ningqiao Rd., Pudong New District
Shanghai 201206 P.R.China
T: +86-21-5834-8225 F: +86-21-5834-8193
E-mail: [email protected]
Website: www.rottweilglobal.com
© Copyright Rottweil® 2012 - 2015
PREFACE
Page 3
User Operational Manual Rottweil® E-Jet series CIJ Inkjet Printer
V 12-2-4 / Feb 2012 3
Section 1: Brief introduction -------------------------------------- 6
1.1 Working principle of continuous ink jet printer ---------------------------- 6
1.2 Applications ---------------------------------------------------------------------- 7
Section 2: Physical data --------------------------------------------- 9
2.1 General drawing -------------------------------------------------------------- 9
2.2 Physical data—In general --------------------------------------------------- 9
2.3 Physical data—Cabinet ------------------------------------------------------ 10
2.4 Physical data—Print head --------------------------------------------------- 11
2.5 Inkjet labeling -------------------------------------------------------------- 12
Section 3: Safety Instruction -------------------------------------- 15
3.1 Safety symbols ------------------------------------------------------------------- 15
3.2 General advice ------------------------------------------------------------------- 16
3.3 Ink and solvent ------------------------------------------------------------------- 17
3.4 First aid ---------------------------------------------------------------------------- 18
3.5 Safety anti-explosion cover for ink system ------------------------------- 18
3.6 CE approvals ---------------------------------------------------------------------- 19
Section 4: Packaging Kit ------------------------------------------- 20
Section 5: Installation ---------------------------------------------- 21
5.1 Preparation ----------------------------------------------------------------------- 21
5.2 Connection ----------------------------------------------------------------------- 21
5.3 Mounting of print head ------------------------------------------------------- 22
5.4 First fill ----------------------------------------------------------------------------- 23
5.4.1 Adding ink and solvent ------------------------------------------------- 23
5.4.2 Turn on inkjet ------------------------------------------------------------- 23
5.4.3 First fill to the hydraulic system -------------------------------------- 25
5.5 Adjustment -------------------------------------------------------------------------- 27
5.5.1 Default settings ---------------------------------------------------------- 27
5.5.2 Ink drop breaking shape adjustment ------------------------------- 28
5.5.3 Phase/modulation adjustment ------------------------------------- 28
5.5.4 Desirable ink stream entry position to the gutter --------------- 29
5.5.5 HV adjustment ------------------------------------------------------------ 30
TABLE OF CONTENTS
Page 4
User Operational Manual Rottweil® E-Jet series CIJ Inkjet Printer
V 12-2-4 / Feb 2012 4
Section 6: Inkjet Operation --------------------------------------- 31
6.1 General information on inkjet operation ------------------------------------- 31
6.1.1 Operating panel ----------------------------------------------------------- 31
6.1.2 Power supply and external signal connection --------------------- 32
6.1.3 Print head ------------------------------------------------------------------ 34
6.2 Start inkjet --------------------------------------------------------------------------- 35
6.2.1 Start inkjet ----------------------------------------------------------------- 35
6.2.2 Shut down inkjet ---------------------------------------------------------- 36
Section 7: Software ------------------------------------------------- 37
7.1 Interface Intro ----------------------------------------------------------------------- 37
7.1.1 Default start page -------------------------------------------------------- 37
7.1.2 Hot keys on keyboard --------------------------------------------------- 38
7.2 Print Menu --------------------------------------------------------------------------- 39
7.2.1 Print menu page ---------------------------------------------------------- 39
7.2.2 Counter page -------------------------------------------------------------- 40
7.3 Info ------------------------------------------------------------------------------------- 41
7.3.1 Information page --------------------------------------------------------- 41
7.3.2 Error list page -------------------------------------------------------------- 42
7.3.3 Error list --------------------------------------------------------------------- 43
7.4 Text ------------------------------------------------------------------------------------- 44
7.4.1 Menu tree ------------------------------------------------------------------ 44
7.4.2 Text manager page ------------------------------------------------------- 45
7.4.3 New/Copy page ----------------------------------------------------------- 46
7.4.4 Editor page ----------------------------------------------------------------- 47
7.4.5 Specials page -------------------------------------------------------------- 49
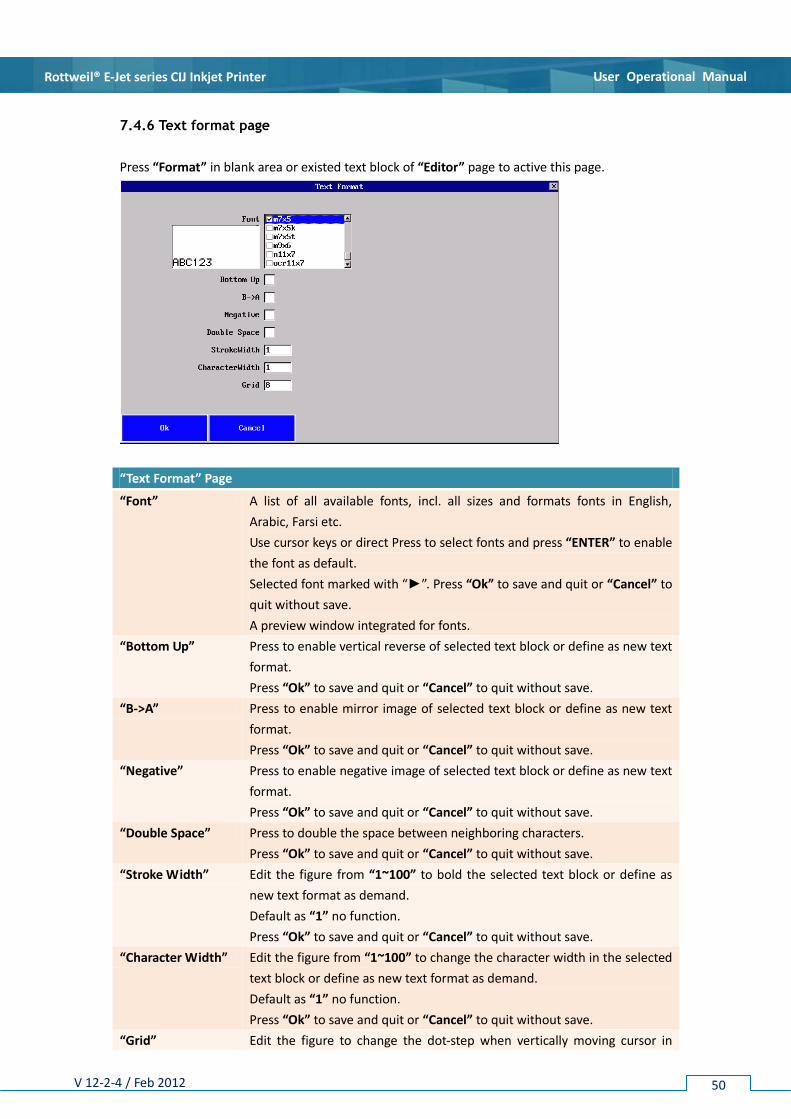
7.4.6 Text format page ---------------------------------------------------------- 50
7.4.7 Logo format page --------------------------------------------------------- 52
7.4.8 Date/Time format page ------------------------------------------------- 53
7.4.9 Counter page -------------------------------------------------------------- 54
7.4.10 Shift page ----------------------------------------------------------------- 55
7.4.11 Barcode page ------------------------------------------------------------- 56
7.4.12 Data matrix page --------------------------------------------------------- 59
7.4.13 Save text page ------------------------------------------------------------ 60
7.5 Config ----------------------------------------------------------------------------------- 66
7.5.1 Menu tree ------------------------------------------------------------------ 66
7.5.2 Configuration manager page ------------------------------------------- 67
7.5.3 New/Copy page ----------------------------------------------------------- 68
7.5.4 Configuration page ------------------------------------------------------- 69
7.5.5 Sensor page ---------------------------------------------------------------- 72
7.5.6 Counter page -------------------------------------------------------------- 73
Page 5
User Operational Manual Rottweil® E-Jet series CIJ Inkjet Printer
V 12-2-4 / Feb 2012 5
7.6 Service --------------------------------------------------------------------------------- 74
7.6.1 Menu tree ------------------------------------------------------------------ 74
7.6.2 Jet service page ------------------------------------------------------------ 75
7.6.3 Ink system control page ------------------------------------------------- 76
7.6.4 Status page ----------------------------------------------------------------- 78
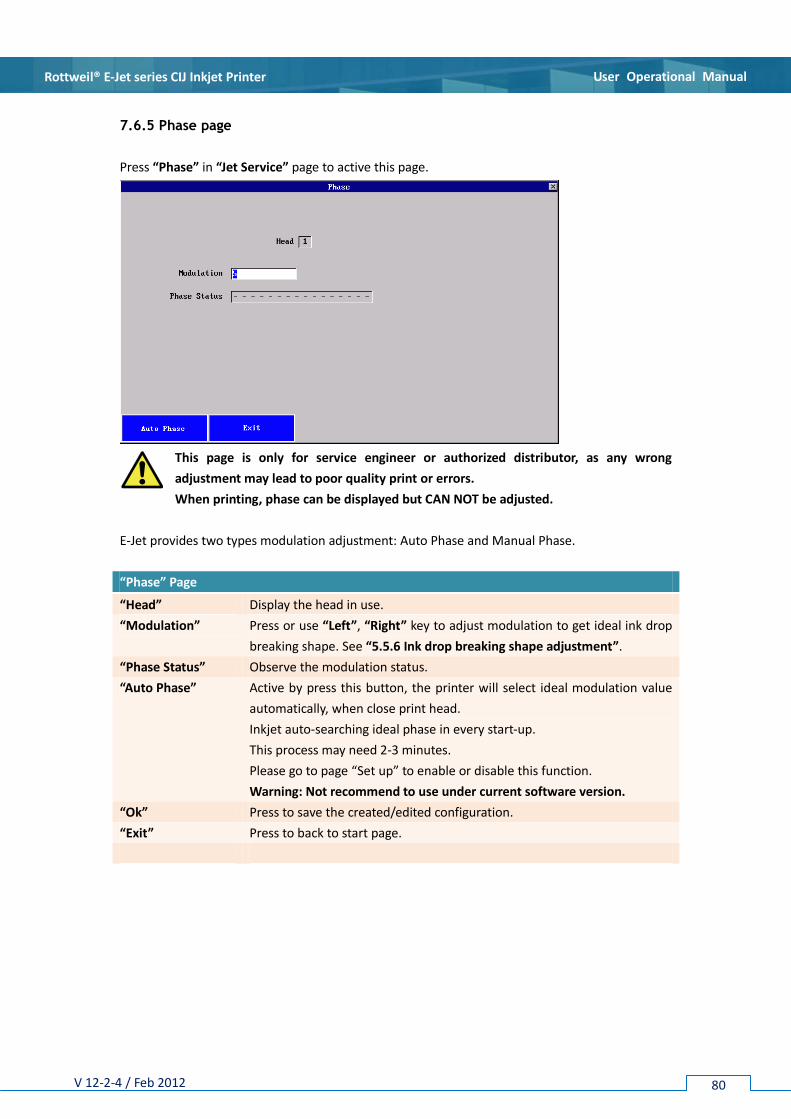
7.6.5 Phase page ----------------------------------------------------------------- 80
7.6.6 Set up page ----------------------------------------------------------------- 82
7.7 System --------------------------------------------------------------------------------- 85
7.7.1 Menu tree ------------------------------------------------------------------ 85
7.7.2 System page ---------------------------------------------------------------- 86
7.7.3 Line page -------------------------------------------------------------------- 87
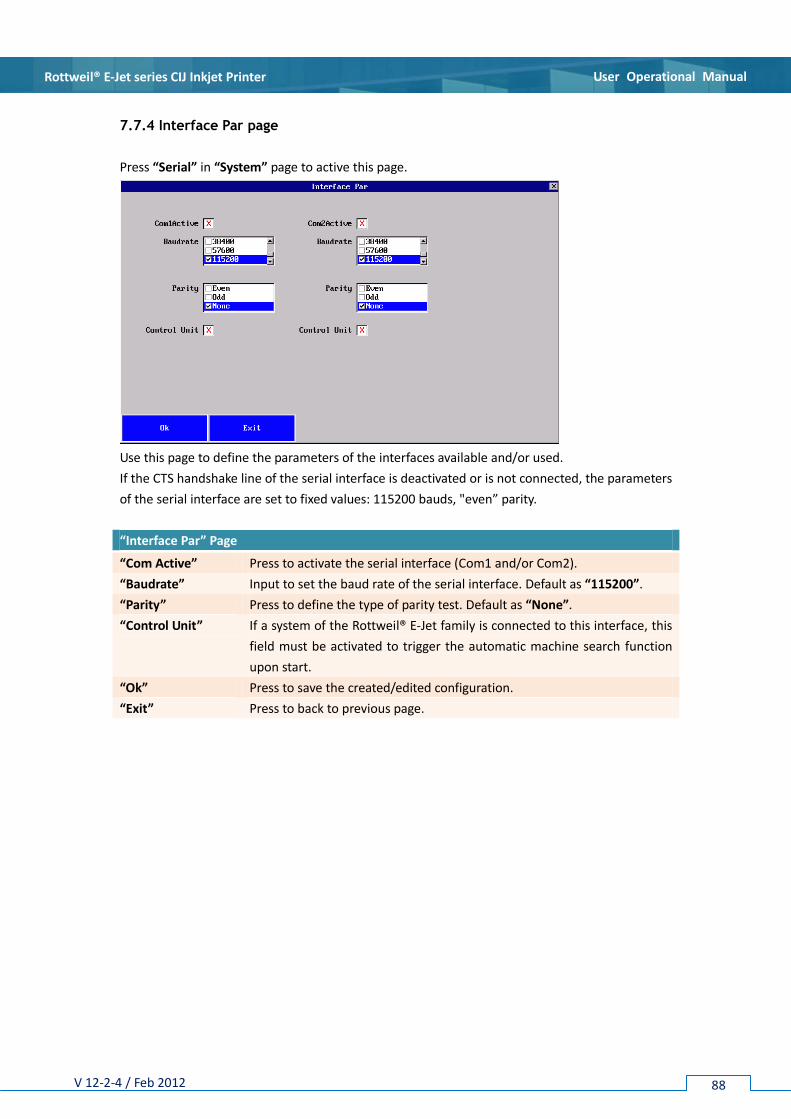
7.7.4 Interface par page --------------------------------------------------------- 88
7.7.5 Password page ------------------------------------------------------------- 89
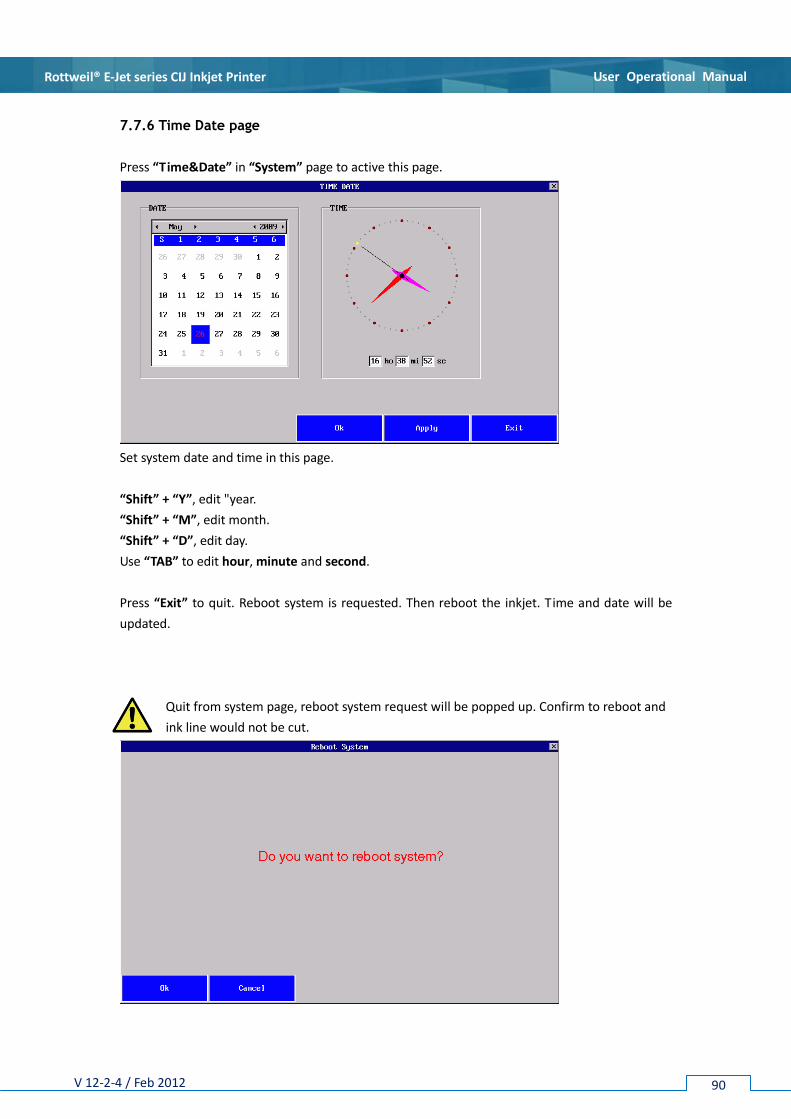
7.7.6 Time Date page ------------------------------------------------------------ 90
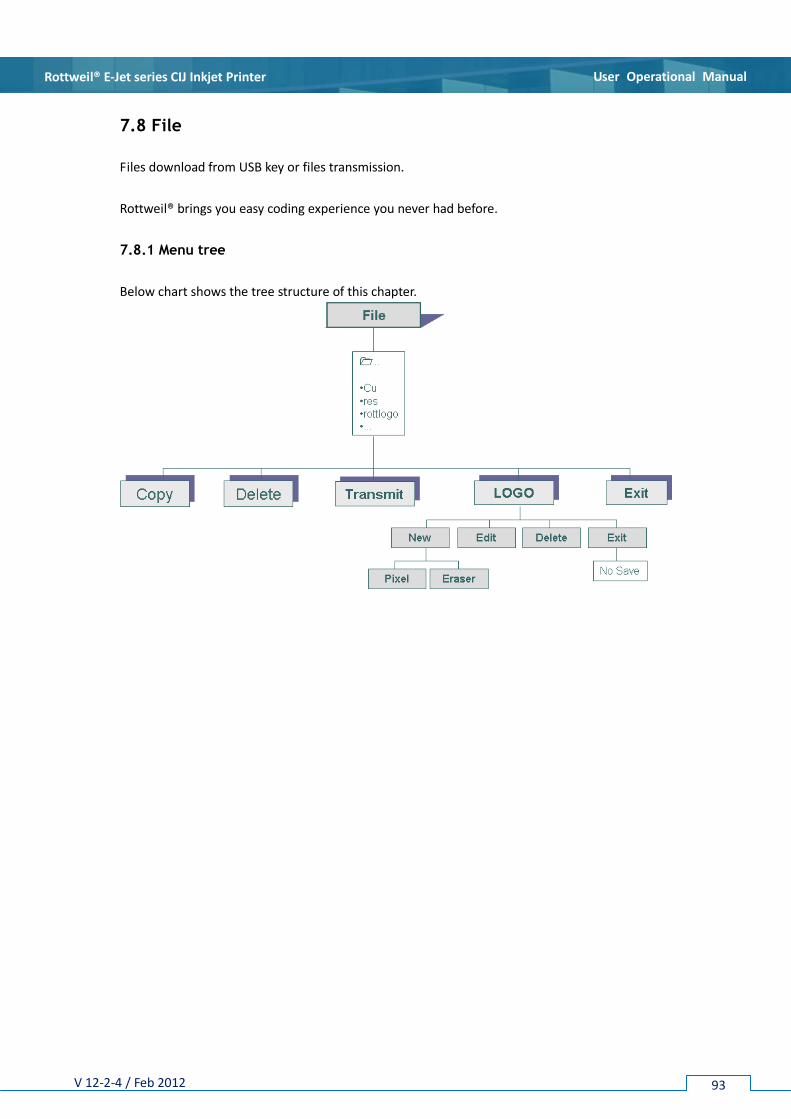
7.8 File -------------------------------------------------------------------------------------- 93
7.8.1 Menu tree ------------------------------------------------------------------ 93
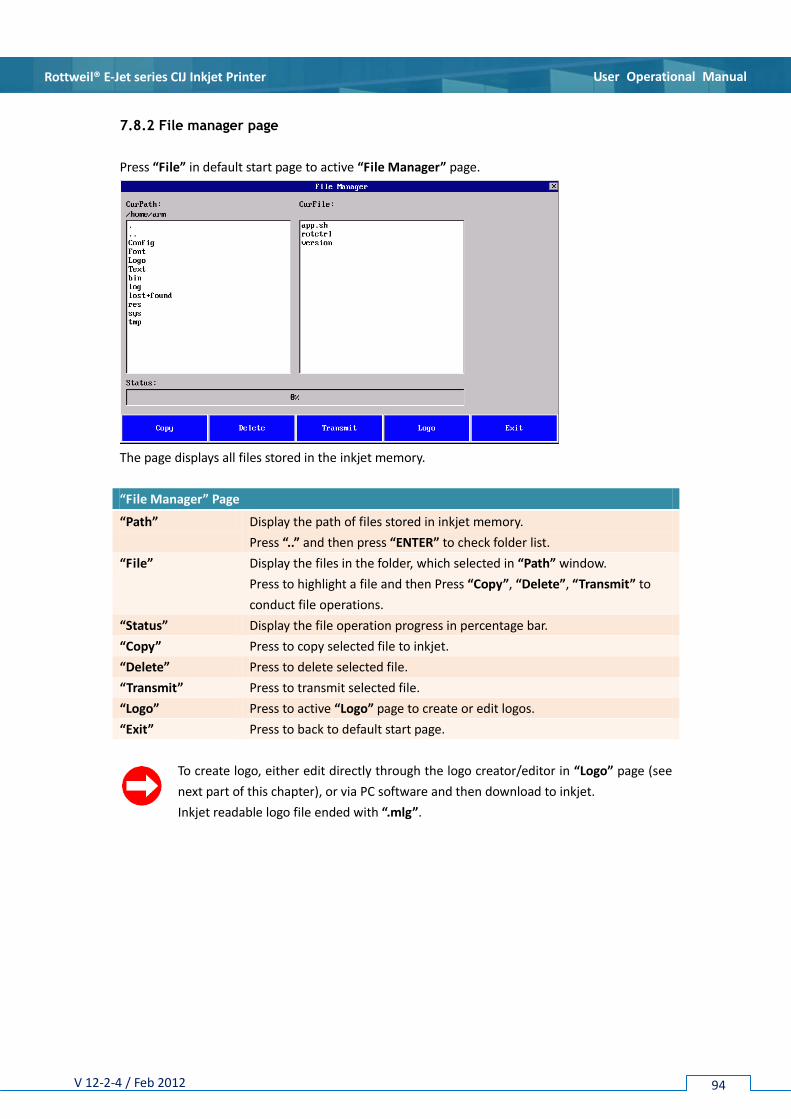
7.8.2 File manager page -------------------------------------------------------- 94
7.8.3 Logo page ------------------------------------------------------------------- 96
7.8.4 Logo editor page ---------------------------------------------------------- 97
Section 8: Maintenance -------------------------------------------- 98
8.1 Illustration ---------------------------------------------------------------------------- 98
8.1.1 Ink system ------------------------------------------------------------------ 98
8.1.2 Electrical boards ----------------------------------------------------------- 99
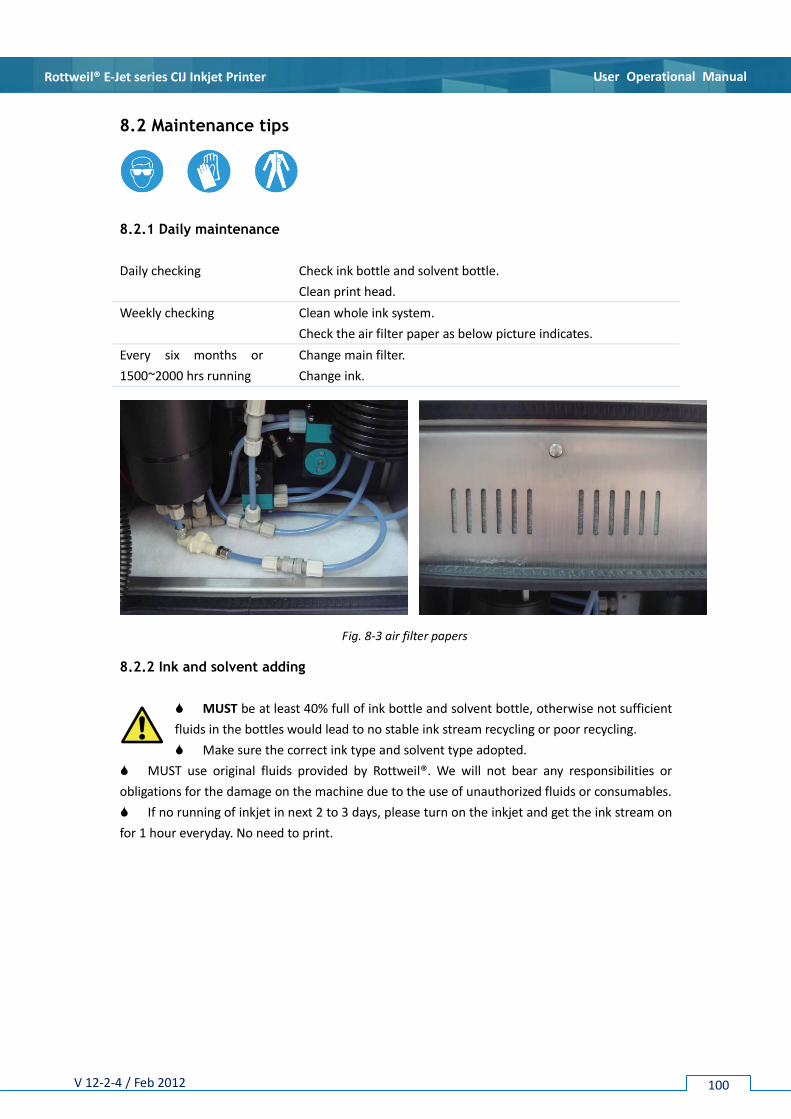
8.2 Maintenance Tips ------------------------------------------------------------------ 100
8.2.1 Daily maintenance -------------------------------------------------------- 100
8.2.2 Ink and solvent adding --------------------------------------------------- 100
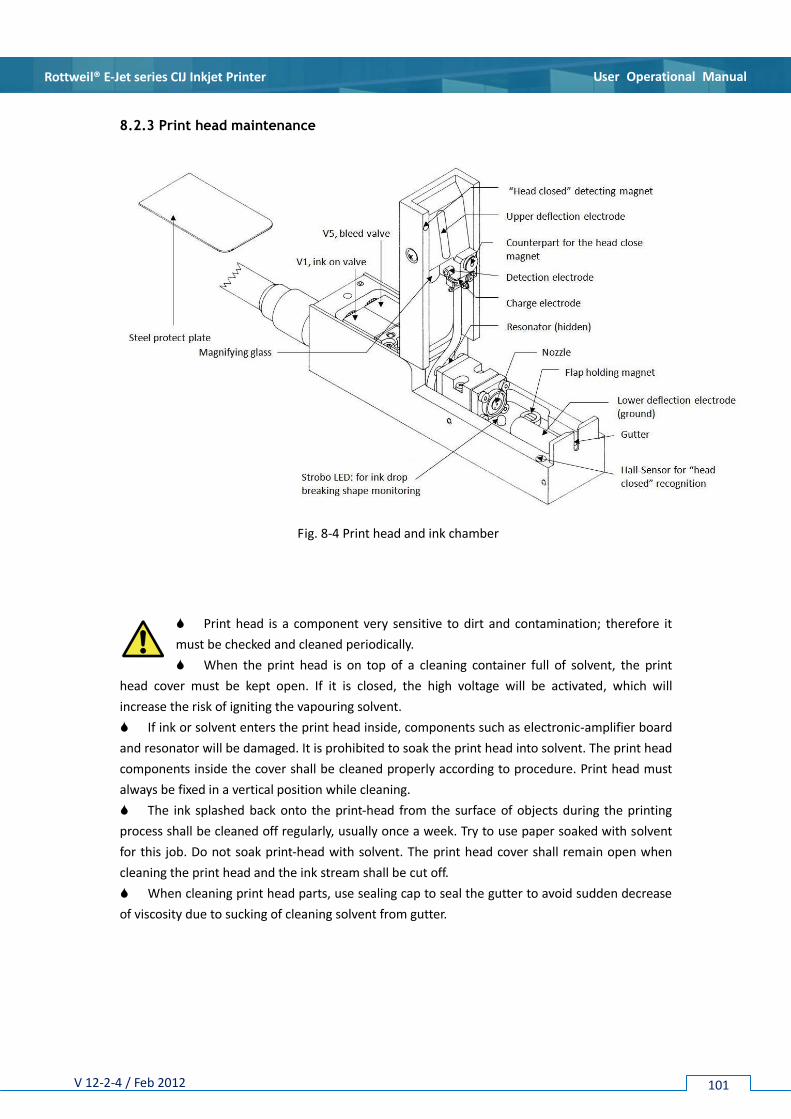
8.2.3 Print head maintenance ------------------------------------------------- 101
8.2.4 Empty ink system and change new ink ------------------------------- 102
8.2.5 Change main filter -------------------------------------------------------- 102
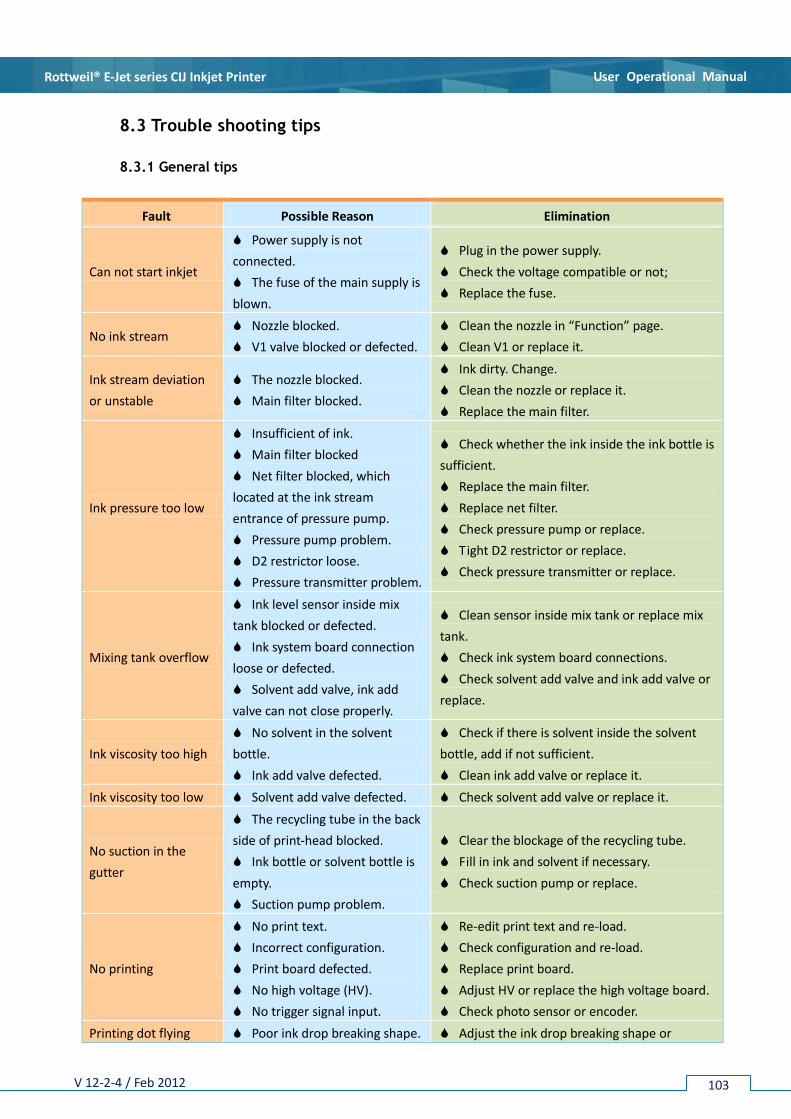
8.3 Trouble Shooting Tips -------------------------------------------------------------- 103
8.3.1 General tips ----------------------------------------------------------------- 103
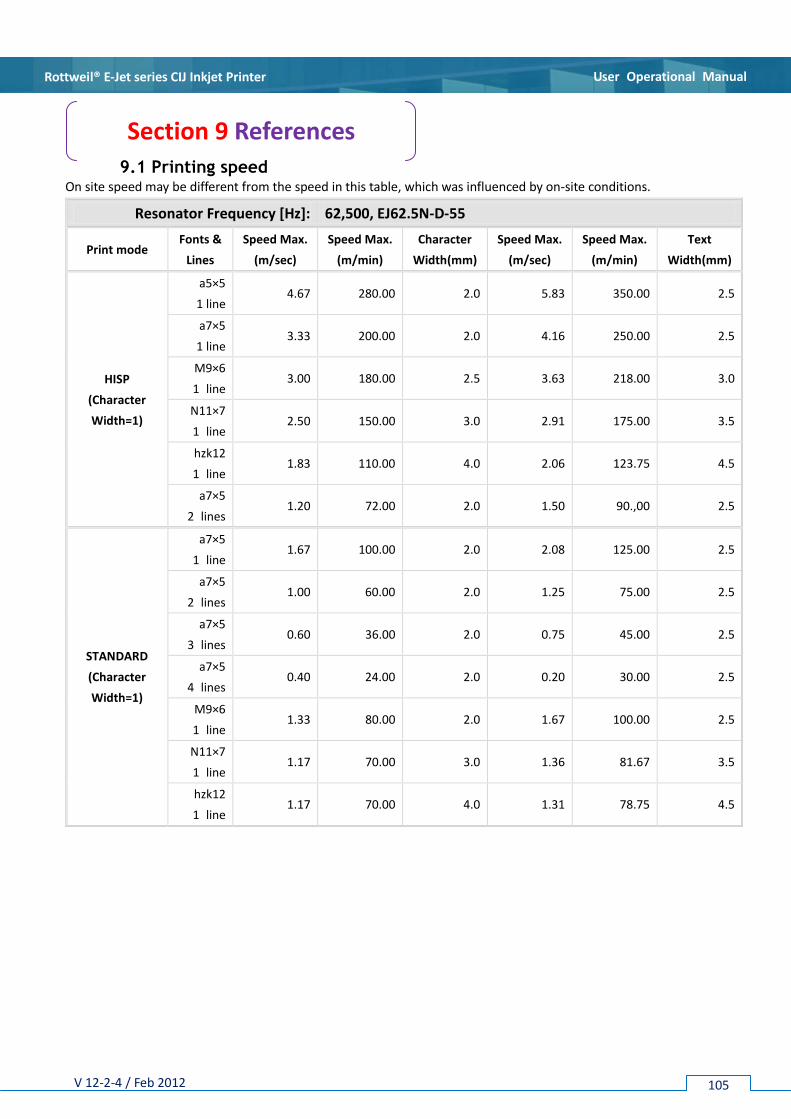
Section 9: References ----------------------------------------------- 105
9.1 Printing Speed ------------------------------------------------------------------------ 105
9.2 Daily Running Cost Calculation -------------------------------------------------- 106
Key Index
How to print Arabic/Farsi --------------------------------------------------------------- 51
Backup/Restore of text & config ------------------------------------------------------ 61
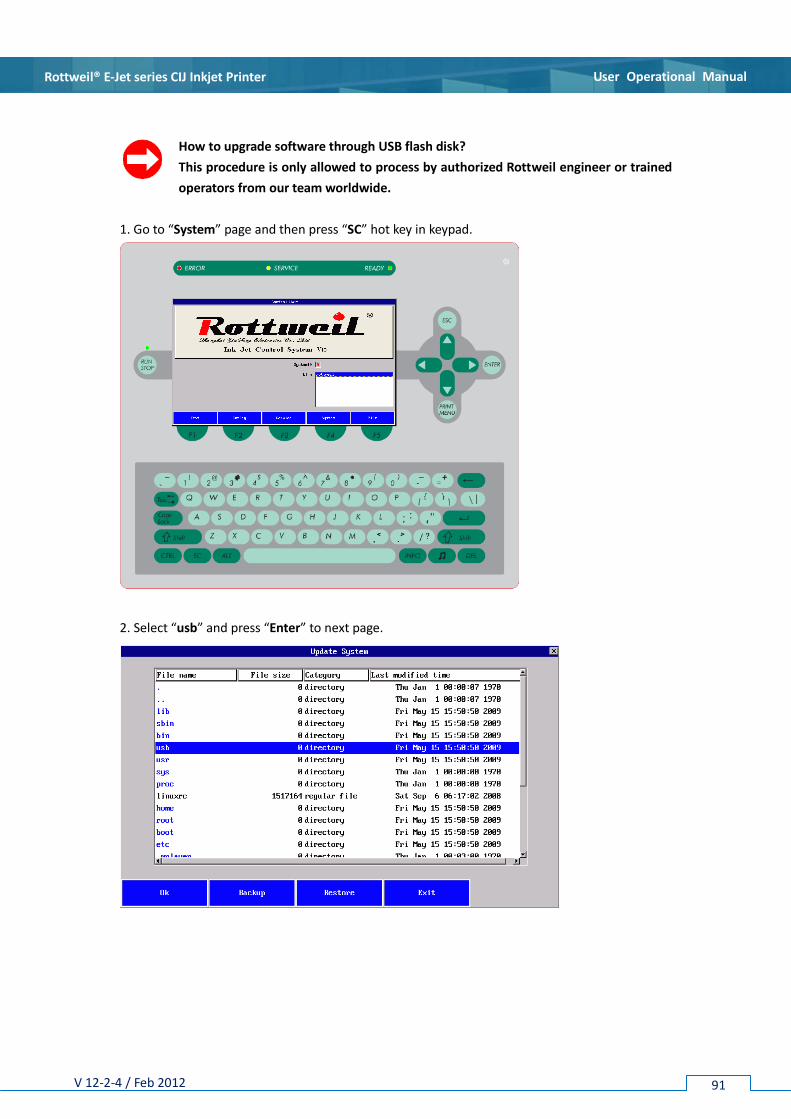
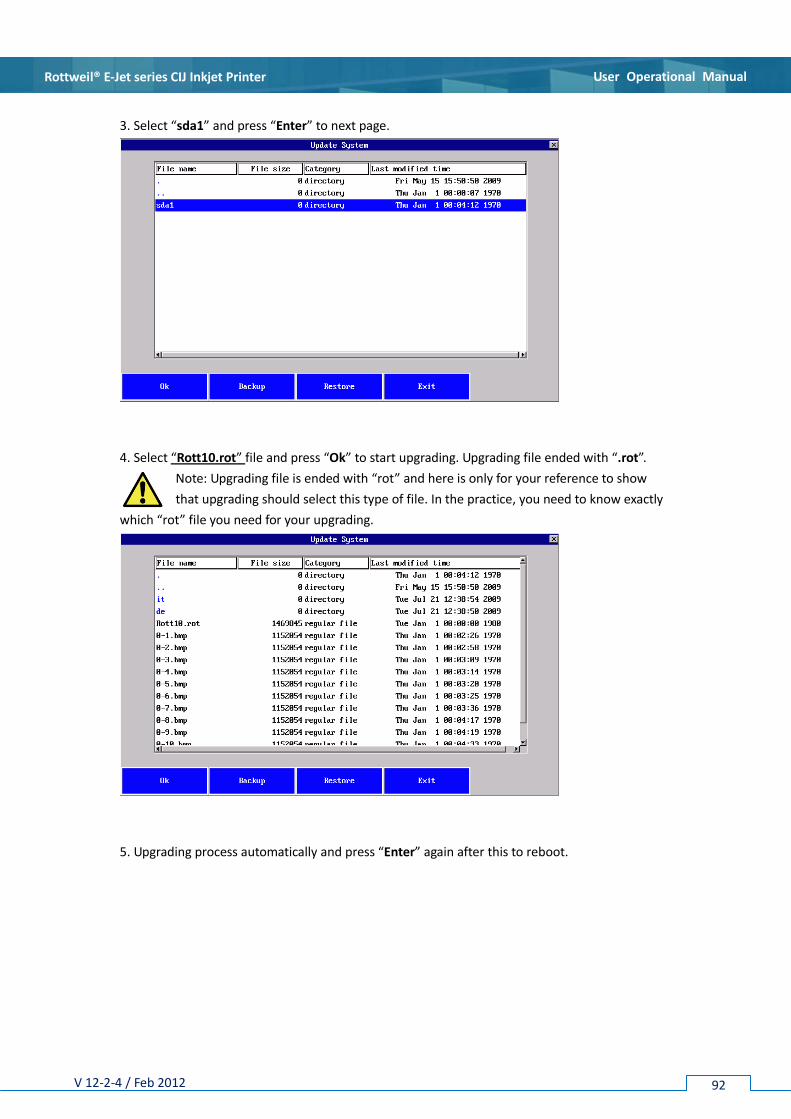
Upgrade software via USB disk -------------------------------------------------------- 91
Load logo MLG file to printer ---------------------------------------------------------- 95
Page 6
User Operational Manual Rottweil® E-Jet series CIJ Inkjet Printer
V 12-2-4 / Feb 2012 6
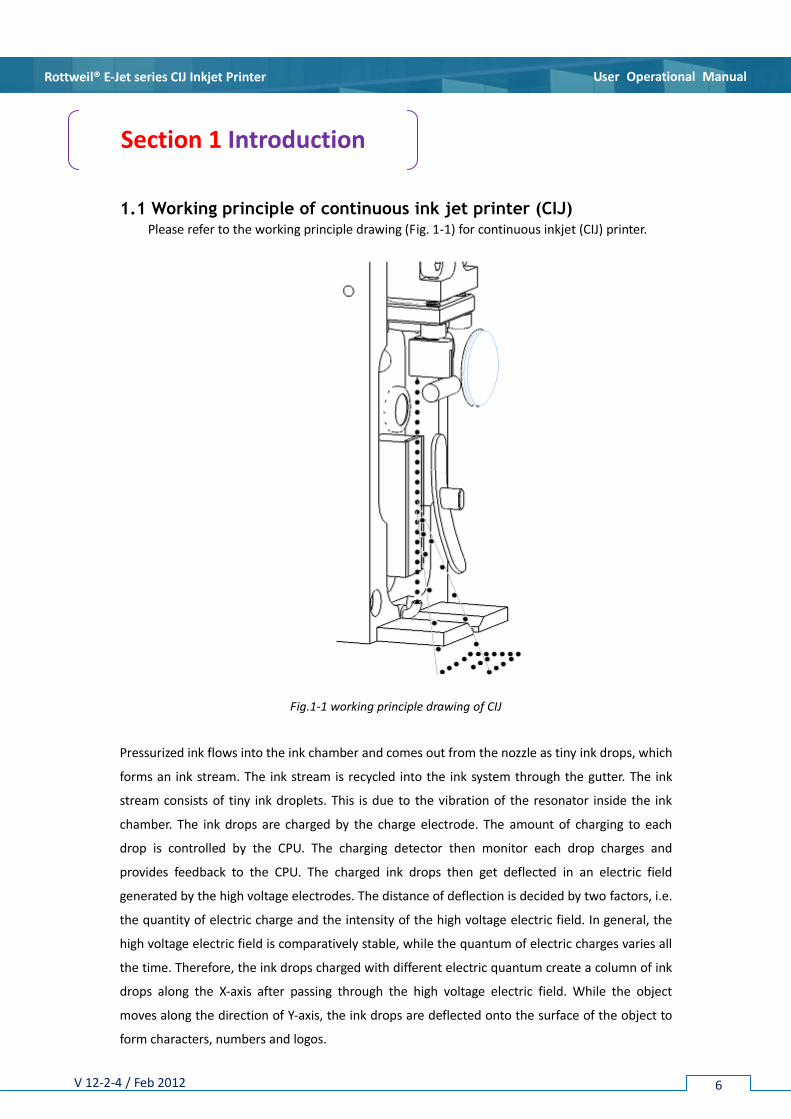
1.1 Working principle of continuous ink jet printer (CIJ) Please refer to the working principle drawing (Fig. 1-1) for continuous inkjet (CIJ) printer.
Fig.1-1 working principle drawing of CIJ
Pressurized ink flows into the ink chamber and comes out from the nozzle as tiny ink drops, which
forms an ink stream. The ink stream is recycled into the ink system through the gutter. The ink
stream consists of tiny ink droplets. This is due to the vibration of the resonator inside the ink
chamber. The ink drops are charged by the charge electrode. The amount of charging to each
drop is controlled by the CPU. The charging detector then monitor each drop charges and
provides feedback to the CPU. The charged ink drops then get deflected in an electric field
generated by the high voltage electrodes. The distance of deflection is decided by two factors, i.e.
the quantity of electric charge and the intensity of the high voltage electric field. In general, the
high voltage electric field is comparatively stable, while the quantum of electric charges varies all
the time. Therefore, the ink drops charged with different electric quantum create a column of ink
drops along the X-axis after passing through the high voltage electric field. While the object
moves along the direction of Y-axis, the ink drops are deflected onto the surface of the object to
form characters, numbers and logos.
Section 1 Introduction
Page 7
User Operational Manual Rottweil® E-Jet series CIJ Inkjet Printer
V 12-2-4 / Feb 2012 7
1.2 Applications
Rottweil® E-Jet is an inkjet printer (abbreviated as inkjet or printer hereinafter) for industrial use.
The printing messages or logos can be edited on demand, and printing is done continuously onto
the product surface without contact. There are different colors of printing ink are available.
Multiple language menu interfaces are available, like Spanish, Portugal, Turkish, German, Italian,
Russian and Korean etc.
Rottweil® E-Jet series CIJ Inkjet Printer provides you the easiest operation through the query
keypad to print as demand, i.e. the integration of letters, numbers, date, time, logos, counters,
shifts, database, bar code, 2D matrix, variety language fonts (Arabic, Farsi, Russian etc.) and so
on.
Rottweil® brings you easy coding experience you never had before.
Rottweil® E-Jet uses fast-dry printing ink with good adhesion. It is applicable on many kinds of
materials such as film, glass, metal, plastic, paper, etc. With the optimal designed print head, it
can be easily installed from any direction. Maximum 8 lines of message can be printed on
irregular object surface in high quality. The fonts of different matrix include M5, M7x5, M11x7,
M15, M23, M32x24 and so on. All kinds of fonts, counters, shifts, logos can be mixed in one
message.
Rottweil® is the latest integrity of technology and user friendly operation to code easily what you
want. Flexible combination of coding content makes you simplest control on inkjet by a simple
press on keypad.
Rottweil® E-Jet must be operated according to the procedures in this User’s Manual so as to
achieve the best printing quality, functional stability as well as maximum safety.
Rottweil® E-Jet and its consumable materials (ink and solvent) are not suitable for
printing on life objects and explosive objects.
Printing ink and solvent are not suitable for painting, drawing or cleaning.
Rottweil® E-Jet works with moving objects (such as object on conveying belt).
During operation or maintenance, all protective equipment and objects must be utilized.
This manual shall be put in a safe place and easily available.
Only qualified staff may operate or repair the machine. They shall follow instructions with
regards to protection as well as environmental safety. User must be familiar with this manual
especially on the aspects on safety.
All safety and warning symbols on the machine must not be removed.
Page 8
User Operational Manual Rottweil® E-Jet series CIJ Inkjet Printer
V 12-2-4 / Feb 2012 8
Any parts or components available for purchasing we quote the code number after it
respectively, ONLY for the first time it appears in this manual.
Board keys, incl. “RUN/STOP”, “INFO”, “PRINT MENU”, “ESC” etc. we use BOLD
CAPITAL LETTERS and a quotation mark “” in this manual.
Software menu buttons on the screen, like “Text”, “Config”, “Service”, “System”, “File” etc. and
appeared column name of each options, like “Character Width”, “Ink drop”, “Re print Num” etc.
we use BOLD NORMAL LETTERS and a quotation mark “” in this manual.
Press keys on keyboard is regulated in this manual.
Use “TAB” key to select edit area, while use “ENTER” key to active changes.
Fig.1-2 Keys on panel and buttons on menu
Readable only, edit not allowed.
Value figure, changeable. Need press
“ENTER” to active.
Text, changeable. Need to confirm by
pressing keys on pad.
List of options. Need to press “TAB” key
to highlight this option and use circus
“UP” and “DOWN” keys to select. Then
press “ENTER” to active.
Active one with while another one
with with circus “RIGHT” or
“ENTER”.
Active it or disable it with circus “RIGHT”
or “ENTER”.
Page 9
User Operational Manual Rottweil® E-Jet series CIJ Inkjet Printer
V 12-2-4 / Feb 2012 9
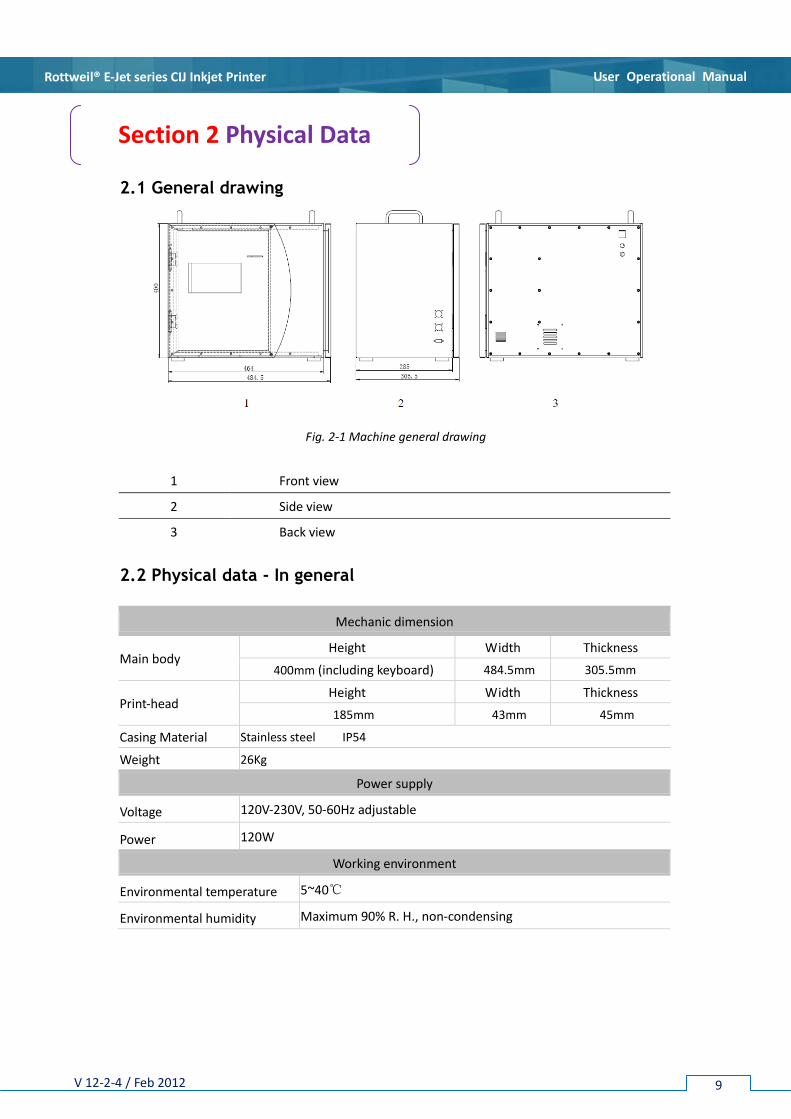
2.1 General drawing
Fig. 2-1 Machine general drawing
1 Front view
2 Side view
3 Back view
2.2 Physical data - In general
Mechanic dimension
Main body Height Width Thickness
400mm (including keyboard) 484.5mm 305.5mm
Print-head Height Width Thickness
185mm 43mm 45mm
Casing Material Stainless steel IP54
Weight 26Kg
Power supply
Voltage 120V-230V, 50-60Hz adjustable
Power 120W
Working environment
Environmental temperature 5~40℃
Environmental humidity Maximum 90% R. H., non-condensing
Section 2 Physical Data
Page 10
User Operational Manual Rottweil® E-Jet series CIJ Inkjet Printer
V 12-2-4 / Feb 2012 10
2.3 Physical data – cabinet
Fig. 2-2 Dimension drawing of the cabinet
Height 400mm (including the keyboard control part)
Width 484.5mm
Thickness 305.5mm
Casing door (rotating radius) 305mm
Weight 26Kg(NET)
Protective grade IP54
Casing material Stainless steel
Noise level <60 d B(A)
Page 11
User Operational Manual Rottweil® E-Jet series CIJ Inkjet Printer
V 12-2-4 / Feb 2012 11
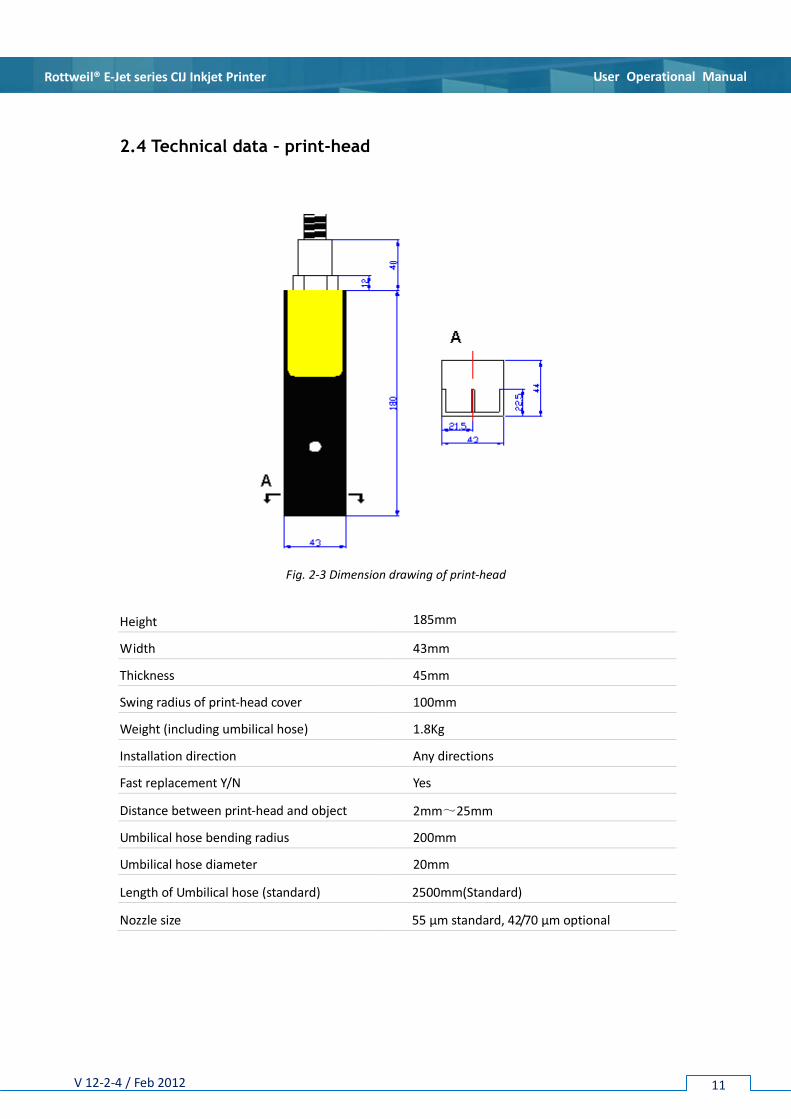
2.4 Technical data – print-head
Fig. 2-3 Dimension drawing of print-head
Height 185mm
Width 43mm
Thickness 45mm
Swing radius of print-head cover 100mm
Weight (including umbilical hose) 1.8Kg
Installation direction Any directions
Fast replacement Y/N Yes
Distance between print-head and object 2mm~25mm
Umbilical hose bending radius 200mm
Umbilical hose diameter 20mm
Length of Umbilical hose (standard) 2500mm(Standard)
Nozzle size 55 μm standard, 42/70 μm optional
Page 12
User Operational Manual Rottweil® E-Jet series CIJ Inkjet Printer
V 12-2-4 / Feb 2012 12
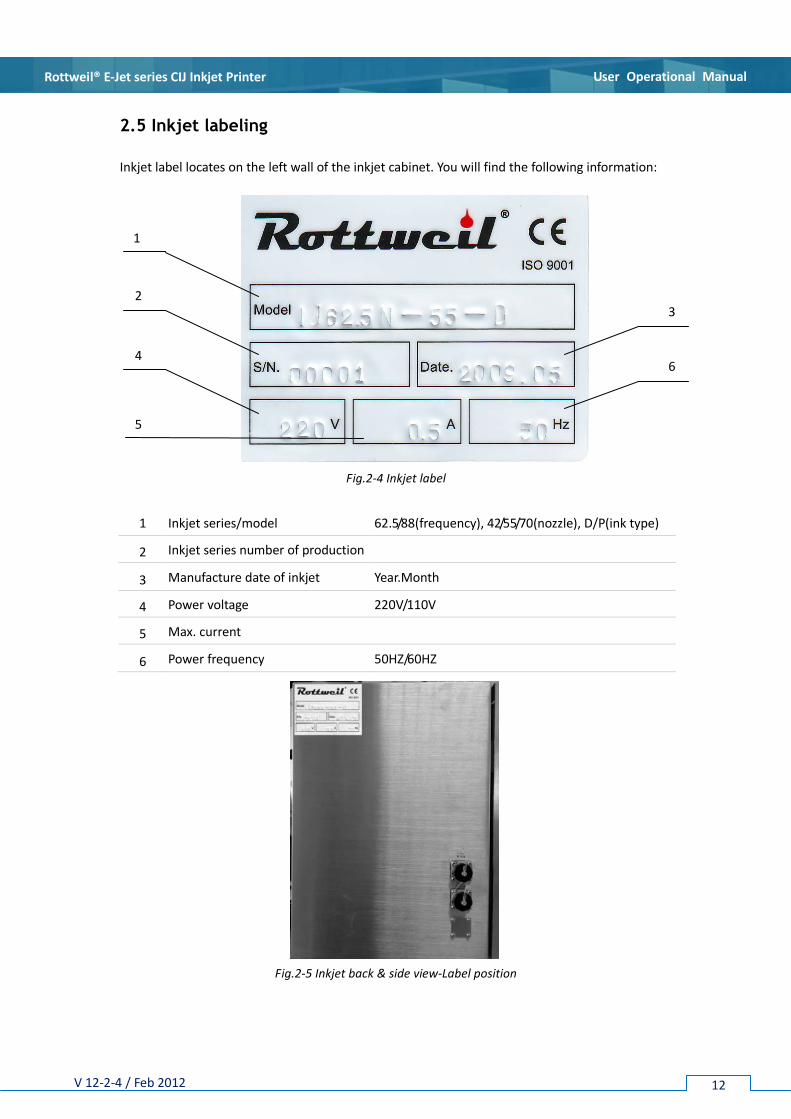
2.5 Inkjet labeling
Inkjet label locates on the left wall of the inkjet cabinet. You will find the following information:
Fig.2-4 Inkjet label
1 Inkjet series/model 62.5/88(frequency), 42/55/70(nozzle), D/P(ink type)
2 Inkjet series number of production
3 Manufacture date of inkjet Year.Month
4 Power voltage 220V/110V
5 Max. current
6 Power frequency 50HZ/60HZ
Fig.2-5 Inkjet back & side view-Label position
1
2
4
5
3
6
Page 13
User Operational Manual Rottweil® E-Jet series CIJ Inkjet Printer
V 12-2-4 / Feb 2012 13
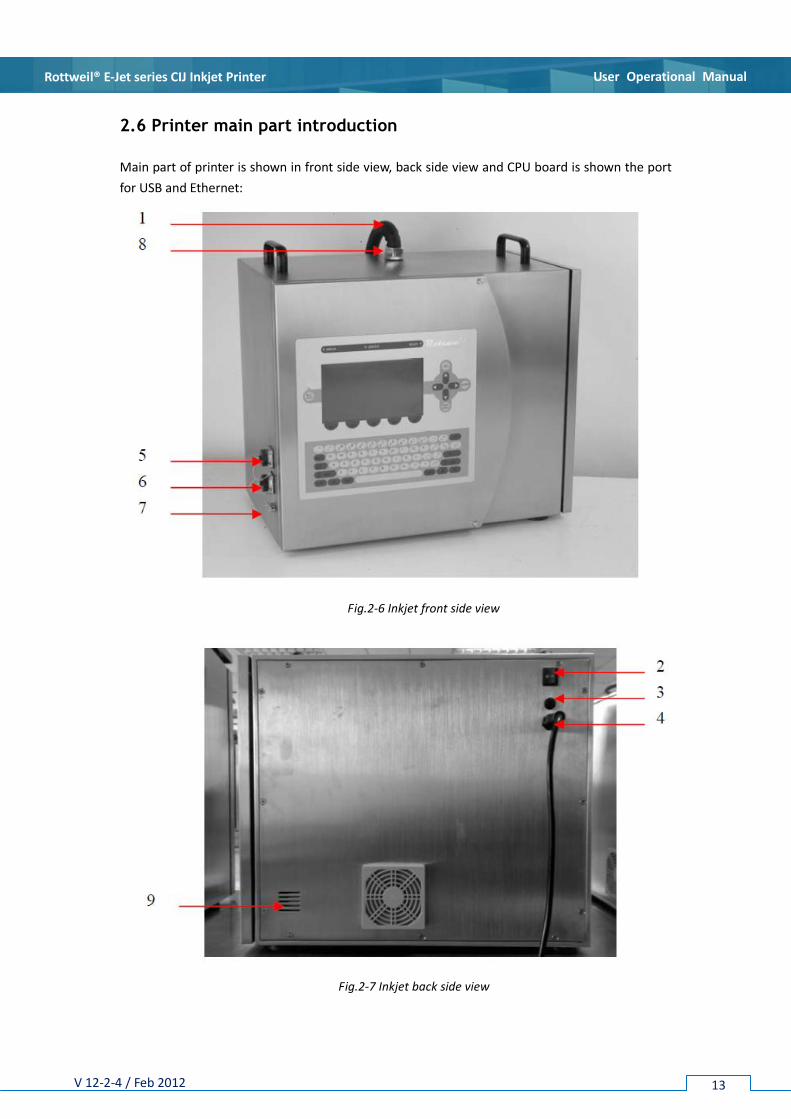
2.6 Printer main part introduction
Main part of printer is shown in front side view, back side view and CPU board is shown the port
for USB and Ethernet:
Fig.2-6 Inkjet front side view
Fig.2-7 Inkjet back side view
Page 14
User Operational Manual Rottweil® E-Jet series CIJ Inkjet Printer
V 12-2-4 / Feb 2012 14
1 Umbilical
2 Main switch
3 Main fuse, 2A, can be changed under off printer status
4 Power cord
5 Encoder socket
6 Photo sensor socket
7 RS232 port
8 Positive air connection, from compressed air to keep print head clean and dry
9 Air bleeding hole, air from mix tank
10 USB port
11 Ethernet port
Fig.2-8 CPU port position
Page 15
User Operational Manual Rottweil® E-Jet series CIJ Inkjet Printer
V 12-2-4 / Feb 2012 15
WARNING: SAFETY. IRRESPECTIVE OF THE LEVEL OF PERCEIVED HAZARD, THE SAFETY
PROCEDURES OUTLINED IN THIS MANUAL MUST BE FOLLOWED.
3.1 Safety symbols Below is some safety symbols used in this manual. Please read carefully in order to ensure
safety during the use of this machine.
General warning
Danger of electric shock
Damage to machine or components or danger of explosion
Danger of flammable liquid
Wear safety glasses when there is a risk of exposure to ink or solvent
Wear safety gloves when there is a necessity in maintenance on hydraulic system
Wear safety overalls when there is a necessity in maintenance on hydraulic system
To be grounded.
Notes-important information and references
Section 3 Safety Instruction
Page 16
User Operational Manual Rottweil® E-Jet series CIJ Inkjet Printer
V 12-2-4 / Feb 2012 16
3.2 General advice Good ventilation for machine installation place.
This manual and safety instructions on health and safety shall be kept beside the machine.
The machine must be well grounded. Make sure your power supply is compatible with the
inkjet.
User’s maintenance staffs must be well trained. Attention must be paid towards
maintenance of machine and use of consumables.
Confirm the correct type of consumables before refilling.
Page 17
User Operational Manual Rottweil® E-Jet series CIJ Inkjet Printer
V 12-2-4 / Feb 2012 17
3.3 Ink and solvent
WARNING: HAZARDOUS SUBSTANCES. MANY OF THE INKS USED WITH THIS PRINTER
ARE SOLVENT BASED AND AS SUCH CAN BE HAZARDOUS. THEY ARE HIGHLY
FLAMMABLE AND IRRITATING TO THE EYES AND RESPIRATORY SYSTEM.
MAKE SURE YOU KNOW THE RELEVANT HAZARDS, SAFETY PRECAUTIONS AND FIRST AID
PROCEDURES BEFORE YOU USE A HAZARDOUS SUBSTANCE. READ THE MATERIAL SAFETY DATA
SHEET APPLICABLE TO THE SUBSTANCE TO OBTAIN THIS INFORMATION. ENSURE YOU HAVE ALL
THE RELEVANT SAFETY DATA SHEETS AND THAT THEY ARE AVAILABLE ON SITE; IF NOT, CONTACT
YOUR DISTRIBUTOR.
It is essential that the following precautions are observed:
Read the relevant ink and solvent Material Safety Data Sheets.
Do not smoke or use naked flames near the printer or ink and solvent storage areas and
containers.
CO2 fire extinguisher shall be put nearby the machine.
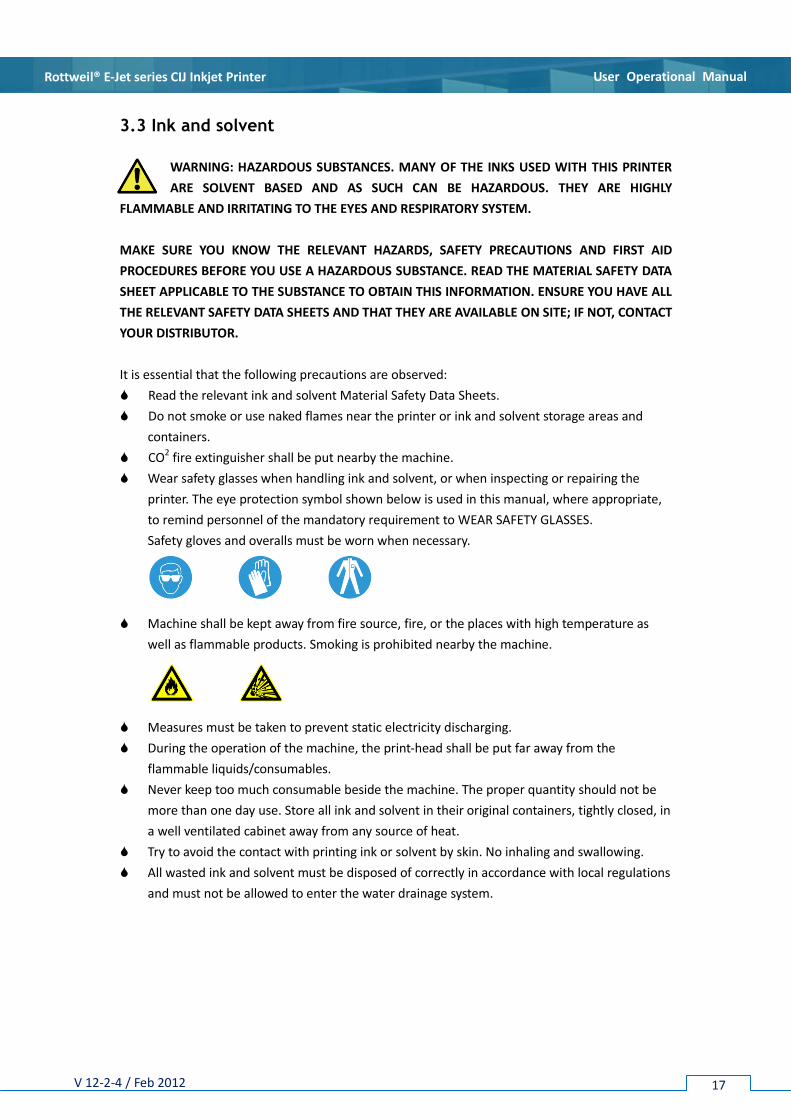
Wear safety glasses when handling ink and solvent, or when inspecting or repairing the
printer. The eye protection symbol shown below is used in this manual, where appropriate,
to remind personnel of the mandatory requirement to WEAR SAFETY GLASSES.
Safety gloves and overalls must be worn when necessary.
Machine shall be kept away from fire source, fire, or the places with high temperature as
well as flammable products. Smoking is prohibited nearby the machine.
Measures must be taken to prevent static electricity discharging.
During the operation of the machine, the print-head shall be put far away from the
flammable liquids/consumables.
Never keep too much consumable beside the machine. The proper quantity should not be
more than one day use. Store all ink and solvent in their original containers, tightly closed, in
a well ventilated cabinet away from any source of heat.
Try to avoid the contact with printing ink or solvent by skin. No inhaling and swallowing.
All wasted ink and solvent must be disposed of correctly in accordance with local regulations
and must not be allowed to enter the water drainage system.
Page 18
User Operational Manual Rottweil® E-Jet series CIJ Inkjet Printer
V 12-2-4 / Feb 2012 18
3.4 First aid
The following are summaries of the applicable first aid procedures for exposure to ink and
solvent.
Eye contact
If contact lenses are worn, remove these first. Use an approved emergency eyewash solution as
directed on the bottle label. Alternatively, irrigate eyes copiously with clean running water and
continue doing so for at least 10 minutes holding the eyelids apart. Obtain medical attention
immediately.
Skin contact
Remove any contaminated clothing. Wash the affected area thoroughly with soap and water, or
use a proprietary skin cleaner. Do NOT use solvents or thinners.
Inhalation
Remove the affected person to fresh air immediately. Keep the affected person warm and at rest.
If breathing is irregular or has stopped, administer artificial respiration and obtain immediate
medical attention. Give nothing by mouth. If unconscious, place the affected person in the
recovery position and seek medical advice.
Ingestion
If accidentally swallowed, obtain immediate medical attention. Wash out mouth with water and
give 200 to 300 ml (half a pint) of water to drink. Keep at rest. Do NOT induce vomiting.
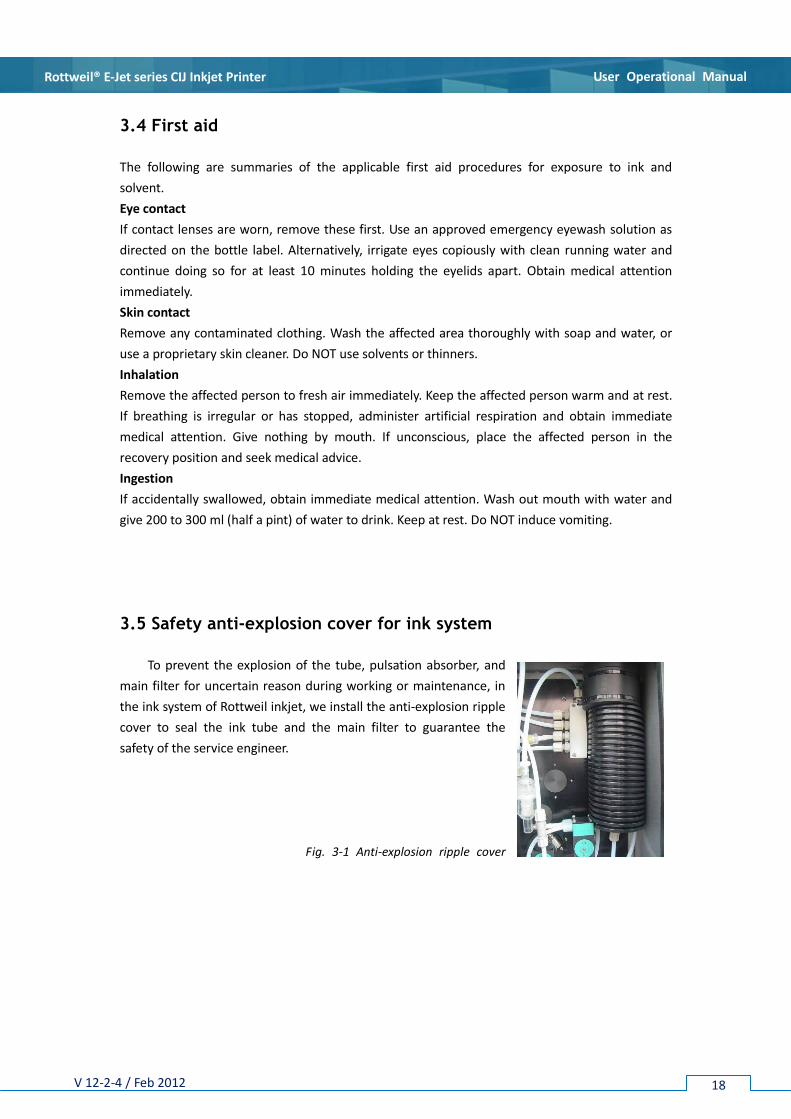
3.5 Safety anti-explosion cover for ink system
To prevent the explosion of the tube, pulsation absorber, and
main filter for uncertain reason during working or maintenance, in
the ink system of Rottweil inkjet, we install the anti-explosion ripple
cover to seal the ink tube and the main filter to guarantee the
safety of the service engineer.
Fig. 3-1 Anti-explosion ripple cover
Page 19
User Operational Manual Rottweil® E-Jet series CIJ Inkjet Printer
V 12-2-4 / Feb 2012 19
3.6 CE approvals
Safety
Approved in accordance with CE requirements
Machinery directive
98/37/EC
Low voltage directive
2006/95/EC
Standard code: EN ISO 12100-1:2003,
EN ISO 12100-2:2003,
EN60204-1:2006,
EN 1050:1996.
Electromagnetic compatibility
92/31/EEC, 93/68/EEC
Standard code: EN 61000-6-1:2001,
EN 61000-6-3:2001+A11:2004,
EN61000-3-2:2000+A2:2005,
EN 61000-3-3:1995+A1:2001+A2:2005
Fig. 3-2 CE Approvals
Page 20
User Operational Manual Rottweil® E-Jet series CIJ Inkjet Printer
V 12-2-4 / Feb 2012 20
In package, you will find below items generally. Each area may be slightly different but below
items are the basic parts in kit.
Item Code
Nozzle key, for dismantle nozzle from ink chamber LJZ-66-RW
Cleaning bottle SP17-1
Rubber air blower XRQ
User Manual E-JET-EN
Plug, for photo sensor /alarm system
(*For connection hub type, no plug in package.) FQN18-7TK-10-C
Section 4 Packaging Kit
Page 21
User Operational Manual Rottweil® E-Jet series CIJ Inkjet Printer
V 12-2-4 / Feb 2012 21
5.1 Preparation
Installation MUST be carried out by Rottweil® authorized engineer, who sent by either
Rottweil® or Rottweil® distributor locally. If you possess experienced staff on
installation of inkjet, please read this manual well and contact Rottweil® or our local
distributor for any technical support in case you need.
Check the appearance of package if there is any damage in transportation.
The site for inkjet installation must be of a solid base to eliminate vibration.
Emergency measures and preventive equipment and materials shall be prepared in case that
breach of safety happens and accident occurs.
Confirm that power supply wire and umbilical hose shall be well positioned. No bending, no
crushing.
Operation panel like keyboard and query keypad, and whole cabinet shall be as far as
possible from heat, dampness, dust, water and any possible impact.
Cabinet door shall be open as wide as possible during the refilling or replacement of
consumables.
Ink and solvent are highly flammable materials, so the safety measures must be
followed. CO2 fire extinguisher shall be placed beside the machine.
Static electric current may damage the electronic components as well as the
software.
Only qualified electrician or service engineer is allowed to open the top cover of
the machine, otherwise there might be danger of electric shock in high voltage.
5.2 Connection
Make sure power connected and grounded.
UPS is a MUST for unstable electricity.
110 V 60 HZ ~ 240V 50 HZ changeable. Please switch the one you need, on Power Supply
Module inside the cabinet.
During the transportation, the connection of CPU board or other board connections may be
loosen; please check again before start the inkjet.
Select correct trigger accessories, either by photo sensor (Code: CDD11-N) / shaft encoder
(Code: SP12-11) or both and make sure well connected with inkjet cabinet through plug (Code:
FQM8-7TK-10). Encoder requires 12 pins plug (Code: FQM8-12TK-C).
Section 5 Installation
Page 22
User Operational Manual Rottweil® E-Jet series CIJ Inkjet Printer
V 12-2-4 / Feb 2012 22
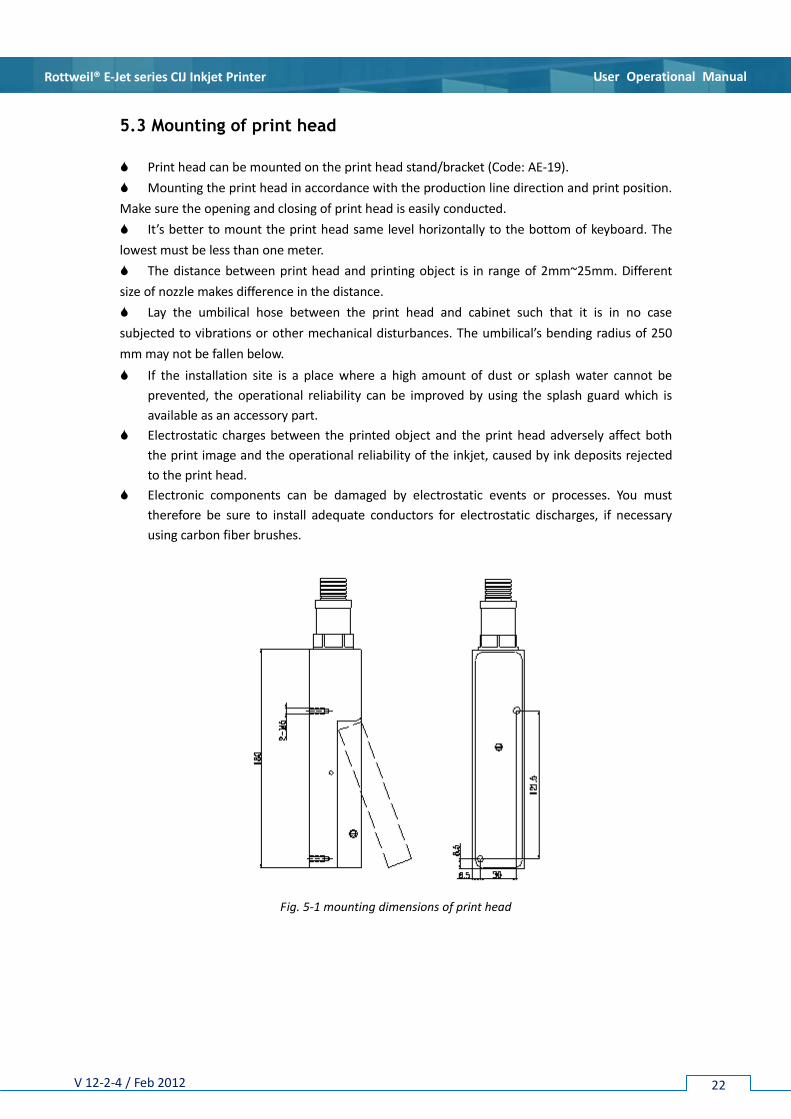
5.3 Mounting of print head
Print head can be mounted on the print head stand/bracket (Code: AE-19).
Mounting the print head in accordance with the production line direction and print position.
Make sure the opening and closing of print head is easily conducted.
It’s better to mount the print head same level horizontally to the bottom of keyboard. The
lowest must be less than one meter.
The distance between print head and printing object is in range of 2mm~25mm. Different
size of nozzle makes difference in the distance.
Lay the umbilical hose between the print head and cabinet such that it is in no case
subjected to vibrations or other mechanical disturbances. The umbilical’s bending radius of 250
mm may not be fallen below.
If the installation site is a place where a high amount of dust or splash water cannot be
prevented, the operational reliability can be improved by using the splash guard which is
available as an accessory part.
Electrostatic charges between the printed object and the print head adversely affect both
the print image and the operational reliability of the inkjet, caused by ink deposits rejected
to the print head.
Electronic components can be damaged by electrostatic events or processes. You must
therefore be sure to install adequate conductors for electrostatic discharges, if necessary
using carbon fiber brushes.
Fig. 5-1 mounting dimensions of print head
Page 23
User Operational Manual Rottweil® E-Jet series CIJ Inkjet Printer
V 12-2-4 / Feb 2012 23
5.4 First fill
5.4.1 Adding ink and solvent
Open original Rottweil® ink and solvent bottle.
Fill in the ink bottle and solvent bottle after opening front
door of inkjet.
Make sure the fluid level is above the 2/3 of the bottle.
Store the rest ink in original bottle and tightly cap the bottle.
Comply with the regulations of keeping method in this manual.
The ink and solvent MUST be supplied from
Rottweil® originally. Please ensure that the
right types of ink and solvent are to be used. Ink or
solvent of different series number MUST NOT be mixed,
otherwise chemical reaction will occur thereby clogging
may occur. This may then seriously damage the
hydraulic system. It will also be very costly to do such
repair. DO NOT fills the ink or solvent to the wrong
bottle. The bottles are marked with “INK” and “SOLV”
respectively.
5.4.2 Turn on inkjet
Make sure the power and other facilities are complied with the requirements for
running inkjet.
Plug on the power supply. If the plug is not compatible, please use adaptor for the inkjet.
Turn on the machine by “MAIN SWITCH” power back of inkjet firstly, and press the
“RUN/STOP” the yellow light becomes twinkling. After initializing, the light becomes green
without twinkling. The ink stream will be on and ready for printing.
After initializing of software successfully, keeping the print head cover open.
Fig. 5-2 Fluids package
Fig. 5-3 Solvent bottle & ink bottle in machine
Fig. 5-4 position of “Power switch” and “RUN/STOP”
Main Switch
Main Fuse
Power Cord
Air bleeding hole
Page 24
User Operational Manual Rottweil® E-Jet series CIJ Inkjet Printer
V 12-2-4 / Feb 2012 24
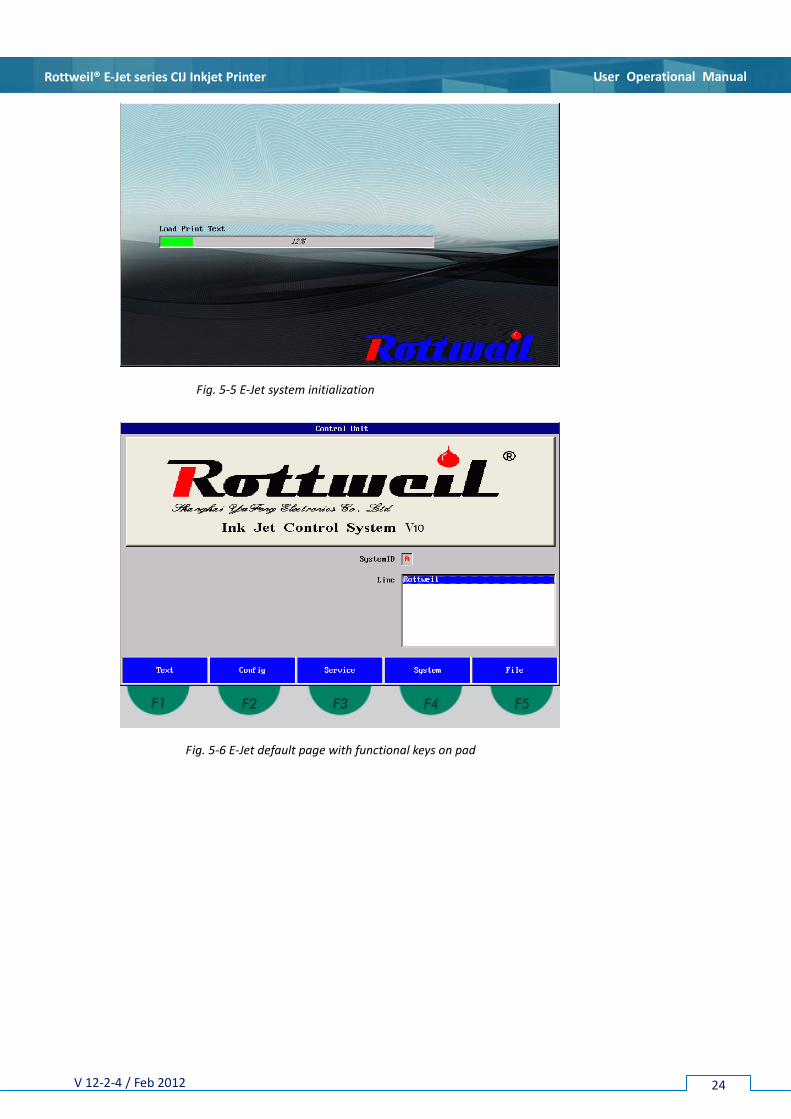
Fig. 5-5 E-Jet system initialization
Fig. 5-6 E-Jet default page with functional keys on pad
Page 25
User Operational Manual Rottweil® E-Jet series CIJ Inkjet Printer
V 12-2-4 / Feb 2012 25
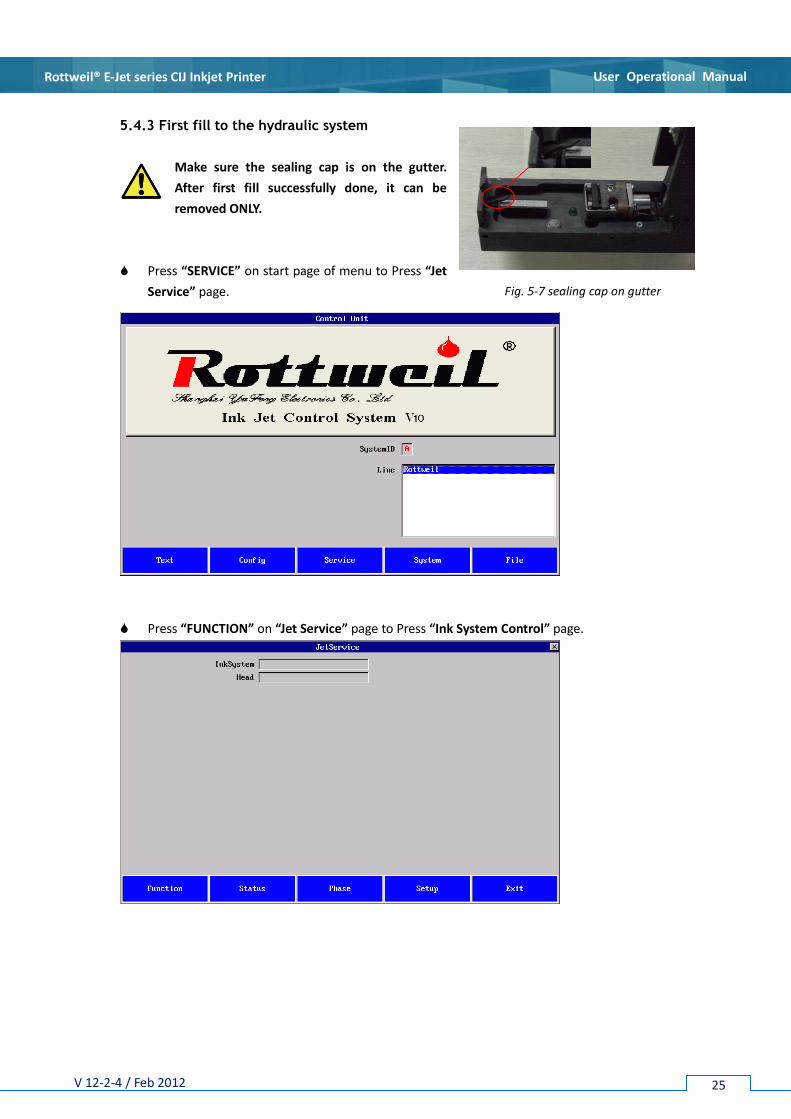
5.4.3 First fill to the hydraulic system
Make sure the sealing cap is on the gutter.
After first fill successfully done, it can be
removed ONLY.
Press “SERVICE” on start page of menu to Press “Jet
Service” page.
Press “FUNCTION” on “Jet Service” page to Press “Ink System Control” page.
Fig. 5-7 sealing cap on gutter
Page 26
User Operational Manual Rottweil® E-Jet series CIJ Inkjet Printer
V 12-2-4 / Feb 2012 26
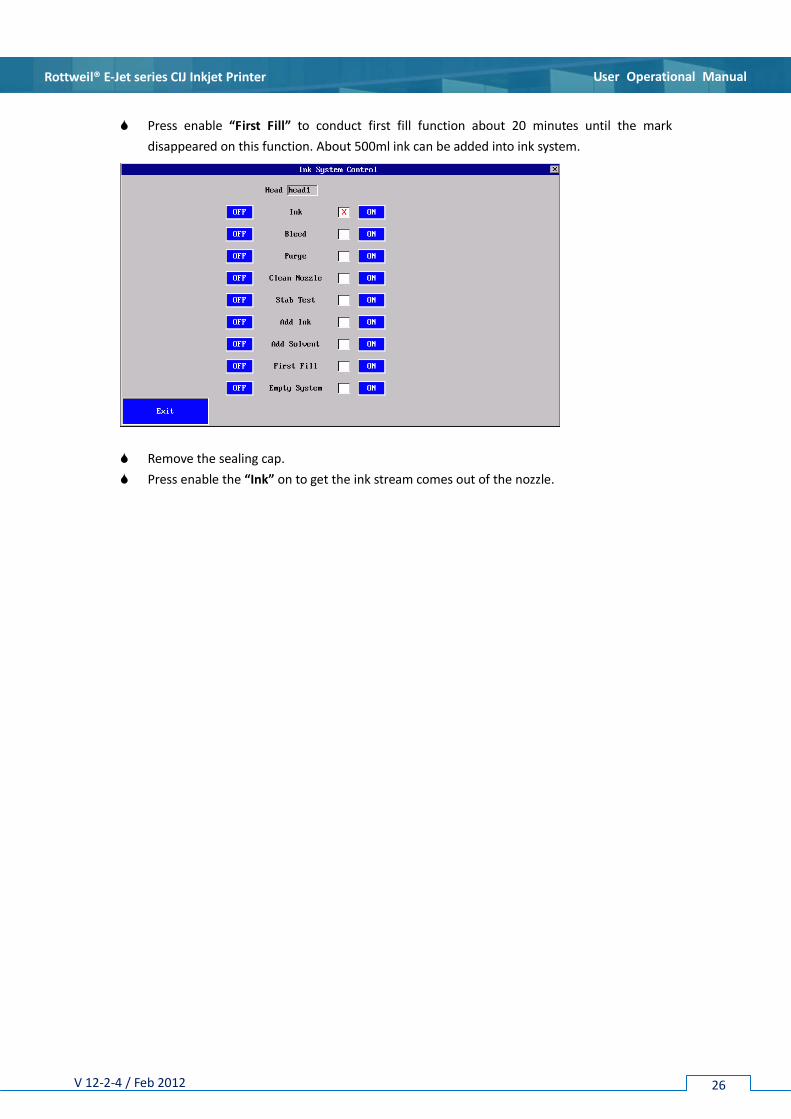
Press enable “First Fill” to conduct first fill function about 20 minutes until the mark
disappeared on this function. About 500ml ink can be added into ink system.
Remove the sealing cap.
Press enable the “Ink” on to get the ink stream comes out of the nozzle.
Page 27
User Operational Manual Rottweil® E-Jet series CIJ Inkjet Printer
V 12-2-4 / Feb 2012 27
5.5 Adjustment
FOUR FACTORS for jet adjustment and maintenance.
1-Pressure 2-Viscosity 3-Ink drop breaking shape 4-Phase/Modulation
Any maintenance MUST follow up the above orders in checking.
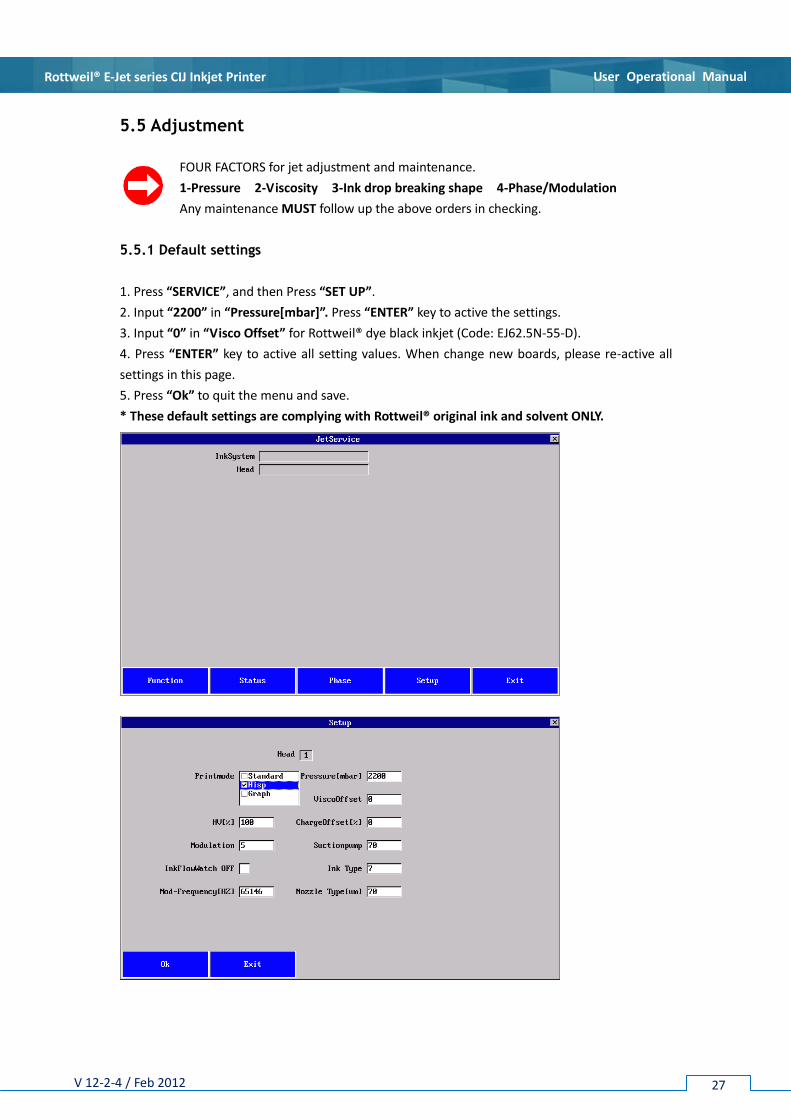
5.5.1 Default settings
1. Press “SERVICE”, and then Press “SET UP”.
2. Input “2200” in “Pressure[mbar]”. Press “ENTER” key to active the settings.
3. Input “0” in “Visco Offset” for Rottweil® dye black inkjet (Code: EJ62.5N-55-D).
4. Press “ENTER” key to active all setting values. When change new boards, please re-active all
settings in this page.
5. Press “Ok” to quit the menu and save.
* These default settings are complying with Rottweil® original ink and solvent ONLY.
Page 28
User Operational Manual Rottweil® E-Jet series CIJ Inkjet Printer
V 12-2-4 / Feb 2012 28
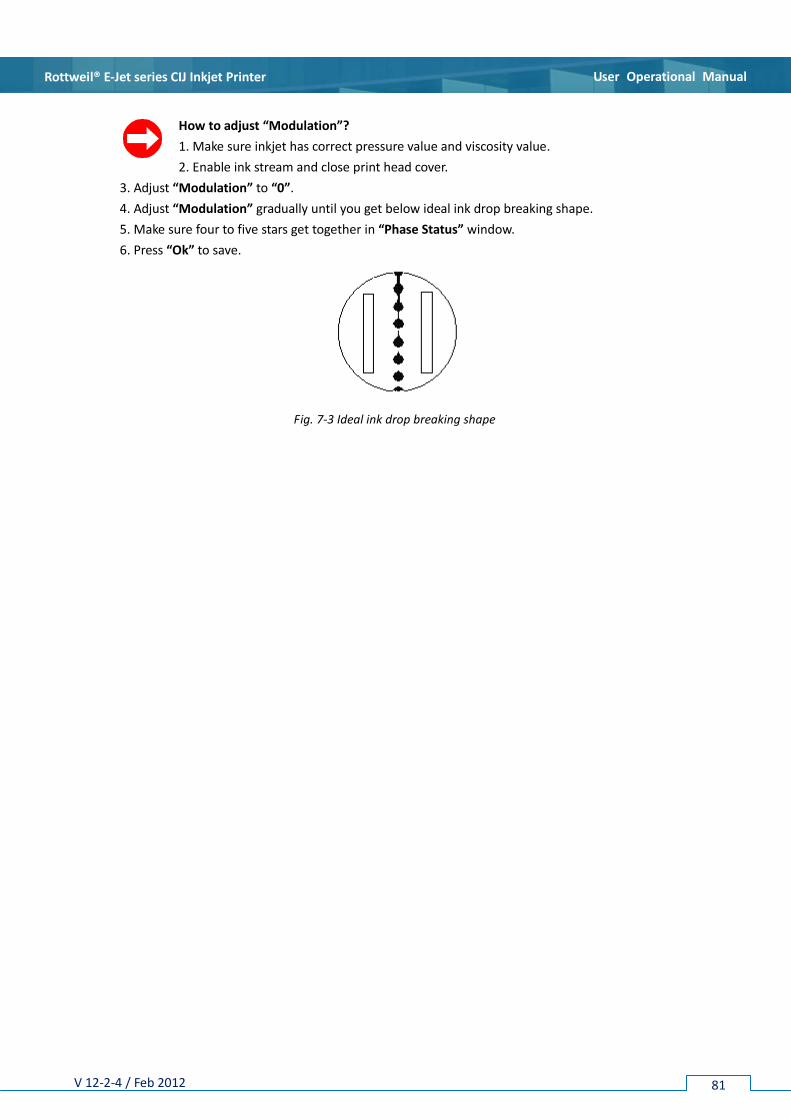
5.5.2 Ink drop breaking shape adjustment
Through the magnifying glass on print head, check the ink drop shape. Desirable shape as below
picture indicates which ensure the best and most stable printing quality.
Below factors can influence the ink drop breaking shape: pressure, viscosity, no blocking in
hydraulic system, ink quality, no blocking in nozzle etc.
5.5.3 Phase/modulation adjustment
Only under normal pressure and viscosity, Phase/modulation adjustment be done.
Press “SERVICE” on menu, and Press “PHASE”.
Change the “Modulation” by pressing cursor keys “LEFT” and “RIGHT” key on the panel and
check the “Phase Status” to ideal condition: getting 1~2 continuous “*” together. See below
pictures. The stars should be continuous, no intermitting allowed. In the phase status
window, the far left star and far right are deemed as continued.
Make sure the print head cover closed and printing stopped. When printing, “PHASE” can
not be modified.
Fig. 5-6 ideal ink drop breaking shape
Page 29
User Operational Manual Rottweil® E-Jet series CIJ Inkjet Printer
V 12-2-4 / Feb 2012 29
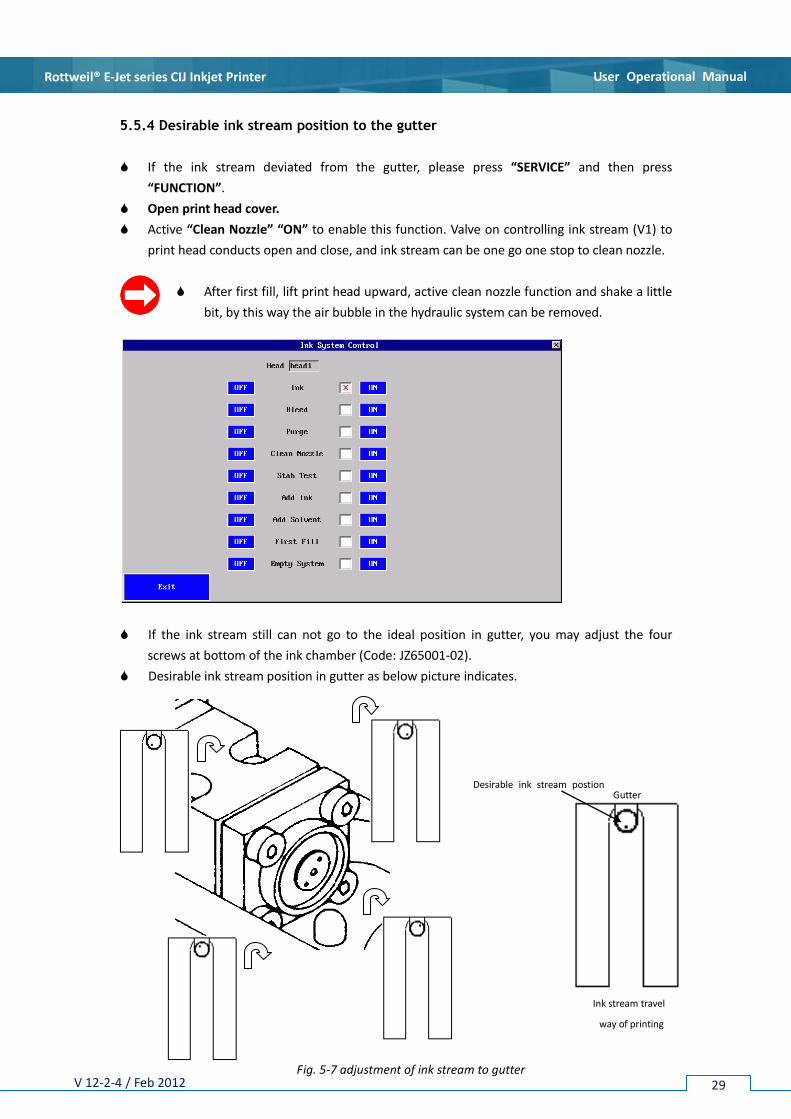
5.5.4 Desirable ink stream position to the gutter
If the ink stream deviated from the gutter, please press “SERVICE” and then press
“FUNCTION”.
Open print head cover.
Active “Clean Nozzle” “ON” to enable this function. Valve on controlling ink stream (V1) to
print head conducts open and close, and ink stream can be one go one stop to clean nozzle.
After first fill, lift print head upward, active clean nozzle function and shake a little
bit, by this way the air bubble in the hydraulic system can be removed.
If the ink stream still can not go to the ideal position in gutter, you may adjust the four
screws at bottom of the ink chamber (Code: JZ65001-02).
Desirable ink stream position in gutter as below picture indicates.
Gutter Desirable ink stream postion
Ink stream travel
way of printing
Fig. 5-7 adjustment of ink stream to gutter
Page 30
User Operational Manual Rottweil® E-Jet series CIJ Inkjet Printer
V 12-2-4 / Feb 2012 30
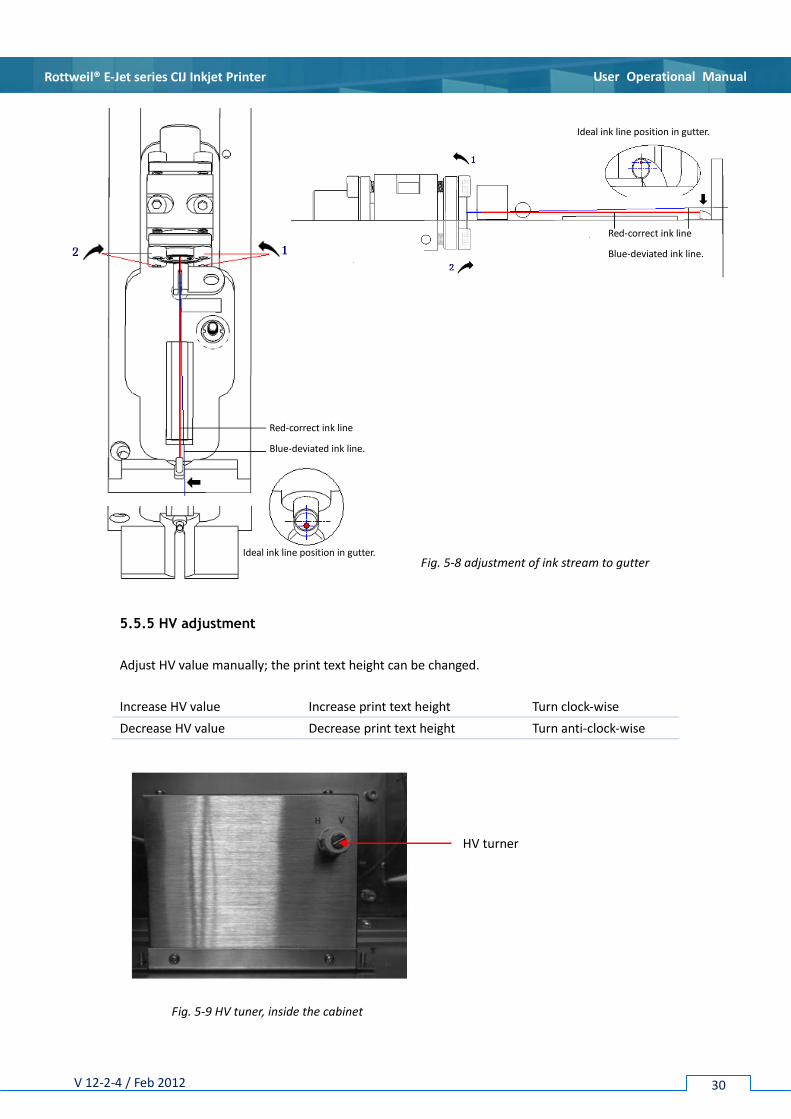
5.5.5 HV adjustment
Adjust HV value manually; the print text height can be changed.
Increase HV value Increase print text height Turn clock-wise
Decrease HV value Decrease print text height Turn anti-clock-wise
Fig. 5-9 HV tuner, inside the cabinet
Fig. 5-8 adjustment of ink stream to gutter
Red-correct ink line
Blue-deviated ink line.
Ideal ink line position in gutter.
Ideal ink line position in gutter.
Red-correct ink line
Blue-deviated ink line.
HV turner
Page 31
User Operational Manual Rottweil® E-Jet series CIJ Inkjet Printer
V 12-2-4 / Feb 2012 31
6.1 General information on inkjet operation 6.1.1 Operating panel
Fig. 6-1 Inkjet operating panel
NO ITEM FUNTION
1 Status-LED ERROR LED, in red, indicating the errors of inkjet.
SERVICE LED, in yellow, indicating services need to be taken.
READY LED, in green, indicating inkjet ready for printing.
2 Color screen Display for software interface, operation diagnostics, data and message
editing.
3 RUN/STOP Turn on/off inkjet, after power switch on, back of cabinet.
4 TAB Move highlighted editing area on menu. Use “Shift+Tab” to move the
highlighted area backwards.
5 SC Special functional key.
6 ESC Quit without saving and back to previous page.
7 Cursor keys Move cursor and select edit subject in printing text.
8 ENTER Confirmation on applications.
9 PRINT MENU Hot key as access to print menu instantly.
10 Input keys Input alphabetic and numeric characters when editing text.
11 INFO Hot key to list fault history.
12 Media Optional for movie clips play
Please Press “7.3.3 Error List” checking error list.
Int’l standard QWERT keyboards adopted.
Section 6 Inkjet Operation
1
2
3
4
5
6
7
8
9
10
11
Page 32
User Operational Manual Rottweil® E-Jet series CIJ Inkjet Printer
V 12-2-4 / Feb 2012 32
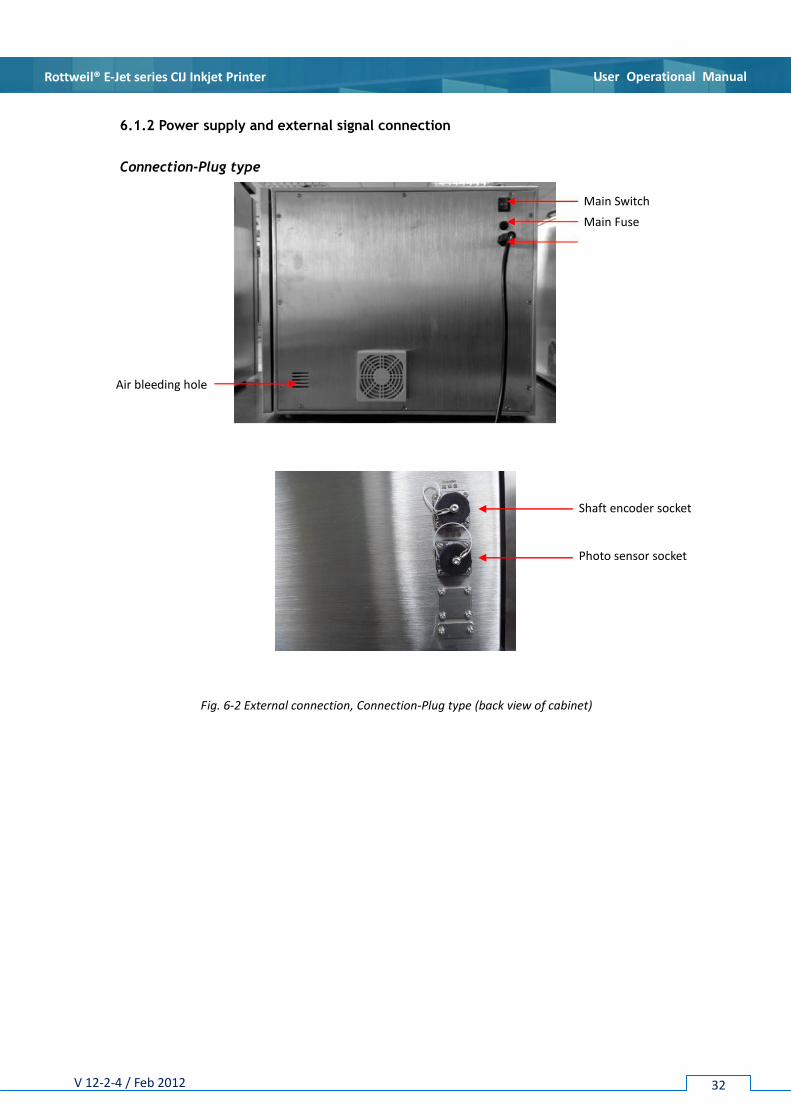
6.1.2 Power supply and external signal connection
Connection-Plug type
Fig. 6-2 External connection, Connection-Plug type (back view of cabinet)
Main Switch
Main Fuse
Shaft encoder socket
Air bleeding hole
Photo sensor socket
Page 33
User Operational Manual Rottweil® E-Jet series CIJ Inkjet Printer
V 12-2-4 / Feb 2012 33
NO ITEM FUNTION
1 Umbilical hose Connect print head to the hydraulic system inside cabinet
2 Power switch The shutdown procedure shall be implemented by
pressing “RUN/STOP” firstly. The power supply can be
switched off only after the completion of this procedure.
3 Main fuse Main fuse of inkjet can be changed directly without open cabinet.
4 Power wire Must be grounded.
5 Shaft encoder port Connect encoder with inkjet by plug. See fig. 6-4.
6 Photo sensor port Connect photo sensor/alarm with inkjet by plug. See fig. 6-5.
7 Serial port Communicate port RS232.
8 Compressed air hole Compressed air to print head to keep positive air pressure.
9 Air-bleed hole Air out hole from hydraulic system, and bleeding only without
solvent recovery system.
10 USB port Software upgrading, logo/text downloading and saving.
11 Ethernet port Communication with PC or other Rottweil® inkjet.
Text/configuration back/restore, please go to page 62.
Communication please refer to communication user manual.
Photo sensor/Alarm output socket Shaft encoder socket – 12 pin
1 +UB int. (12VDC) 1 +UB int. (12VDC)
2 GND int. 2 GND int.
3 NC-close 3 Encoder phase A
4 Photo sensor input 4 No connection
5 No connection 5 No connection
6 NC-open 6 Encoder phase B
7 Alarm output, 24VDC output 7 Encoder phase A(A-)
8 No connection
9 No connection
10 Encoder phase B(B-)
11 Reset switch signal
12 Reset switch GND
Fig. 6-5 Shaft encoder socket Fig. 6-4 Photo sensor/Alarm output socket
Page 34
User Operational Manual Rottweil® E-Jet series CIJ Inkjet Printer
V 12-2-4 / Feb 2012 34
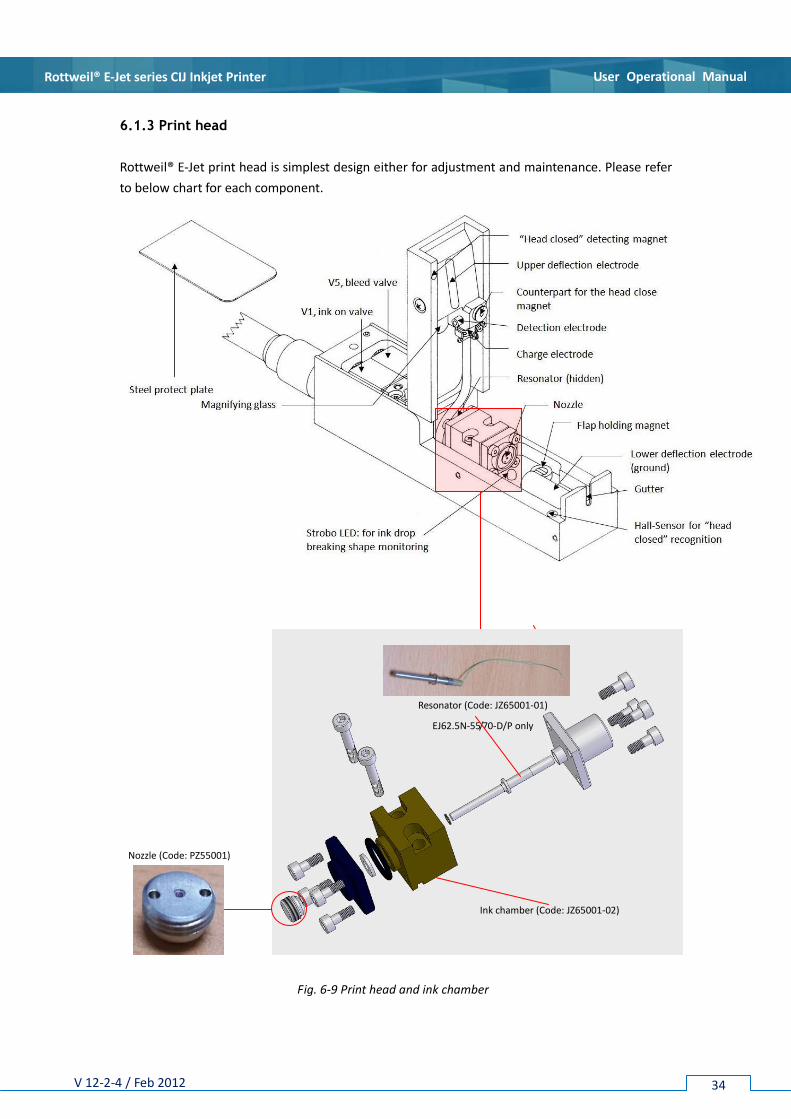
6.1.3 Print head
Rottweil® E-Jet print head is simplest design either for adjustment and maintenance. Please refer
to below chart for each component.
Fig. 6-6 Print head and ink chamber
Resonator (Code: JZ65001-01)
EJ62.5N-55/70-D/P only
Ink chamber (Code: JZ65001-02)
Nozzle (Code: PZ55001)
Fig. 6-9 Print head and ink chamber
Page 35
User Operational Manual Rottweil® E-Jet series CIJ Inkjet Printer
V 12-2-4 / Feb 2012 35
6.2 Start inkjet
6.2.1 Start inkjet
Make sure the power and other facilities are complied with the requirements for
running inkjet.
Plug on the power supply. If the plug is not compatible, please use adaptor for the inkjet.
Open the print-head cover to clean the print head. Make sure ink and solvent bottle are not
empty.
Use cleaning bottle (Code: SP-17), full of solvent, to clean nozzle, detection electrode,
charge electrode.
Clean upper deflection electrode and lower deflection electrode.
Clean gutter. Use sealing cap to block the gutter to avoid solvent sucking back to hydraulic
system when cleaning, which would bring dramatically down on viscosity value.
Use air blower (Code: XRQ) to dry all cleaned parts.
Turn on the machine by “SWITCH” power back of inkjet firstly, and press the “RUN/STOP”
the yellow light becomes twinkling. After initializing, the light becomes green without
twinkling. The ink stream will be on and ready for printing.
Fig. 6-10 clean as instructed
Fig. 6-11 gutter sealing cap
Fig. 6-12 position of “Power switch” and “RUN/STOP”
Page 36
User Operational Manual Rottweil® E-Jet series CIJ Inkjet Printer
V 12-2-4 / Feb 2012 36
After initializing of software successfully, close the print head cover.
Do “FIRST FILL” for first time starting inkjet (Directly Press “5.4.3 First fill to the hydraulic
system” for more information), otherwise press “PRINT MENU” hot key to enter print menu
instantly. READY LED light up. Press “START PRINT” on screen to start printing.
Press “SECTION 7 SOFTWARE” for more information.
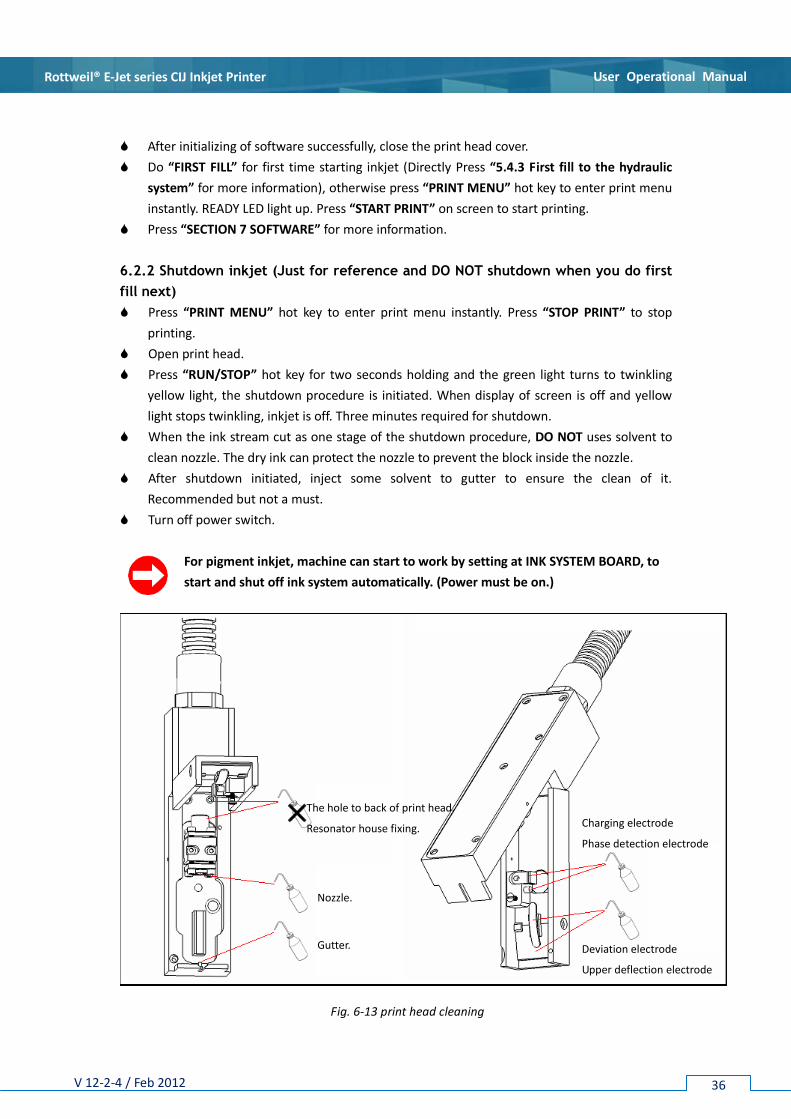
6.2.2 Shutdown inkjet (Just for reference and DO NOT shutdown when you do first
fill next)
Press “PRINT MENU” hot key to enter print menu instantly. Press “STOP PRINT” to stop
printing.
Open print head.
Press “RUN/STOP” hot key for two seconds holding and the green light turns to twinkling
yellow light, the shutdown procedure is initiated. When display of screen is off and yellow
light stops twinkling, inkjet is off. Three minutes required for shutdown.
When the ink stream cut as one stage of the shutdown procedure, DO NOT uses solvent to
clean nozzle. The dry ink can protect the nozzle to prevent the block inside the nozzle.
After shutdown initiated, inject some solvent to gutter to ensure the clean of it.
Recommended but not a must.
Turn off power switch.
For pigment inkjet, machine can start to work by setting at INK SYSTEM BOARD, to
start and shut off ink system automatically. (Power must be on.)
The hole to back of print head.
Resonator house fixing.
Nozzle.
Gutter.
Charging electrode
Phase detection electrode
Deviation electrode
Upper deflection electrode
Fig. 6-13 print head cleaning
Page 37
User Operational Manual Rottweil® E-Jet series CIJ Inkjet Printer
V 12-2-4 / Feb 2012 37
7.1 Interface intro
7.1.1 Default start page
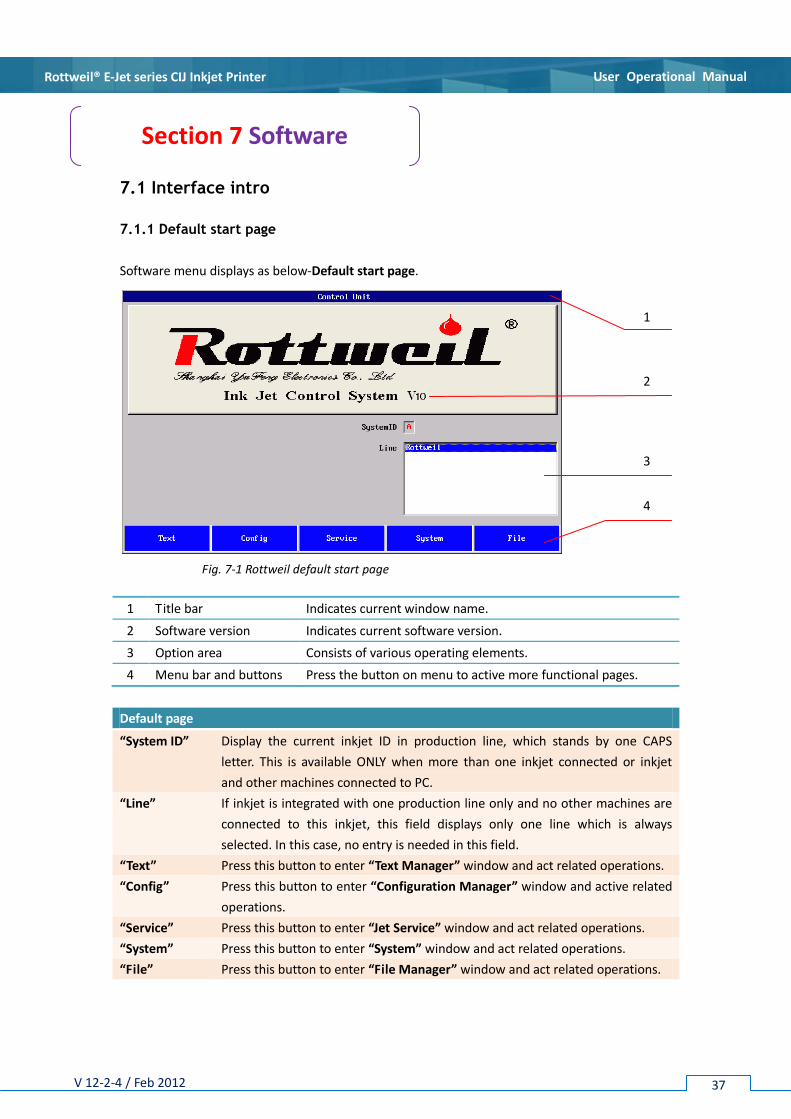
Software menu displays as below-Default start page.
1 Title bar Indicates current window name.
2 Software version Indicates current software version.
3 Option area Consists of various operating elements.
4 Menu bar and buttons Press the button on menu to active more functional pages.
Default page
“System ID” Display the current inkjet ID in production line, which stands by one CAPS
letter. This is available ONLY when more than one inkjet connected or inkjet
and other machines connected to PC.
“Line” If inkjet is integrated with one production line only and no other machines are
connected to this inkjet, this field displays only one line which is always
selected. In this case, no entry is needed in this field.
“Text” Press this button to enter “Text Manager” window and act related operations.
“Config” Press this button to enter “Configuration Manager” window and active related
operations.
“Service” Press this button to enter “Jet Service” window and act related operations.
“System” Press this button to enter “System” window and act related operations.
“File” Press this button to enter “File Manager” window and act related operations.
Section 7 Software
Fig. 7-1 Rottweil default start page
1
2
3
4
Page 38
User Operational Manual Rottweil® E-Jet series CIJ Inkjet Printer
V 12-2-4 / Feb 2012 38
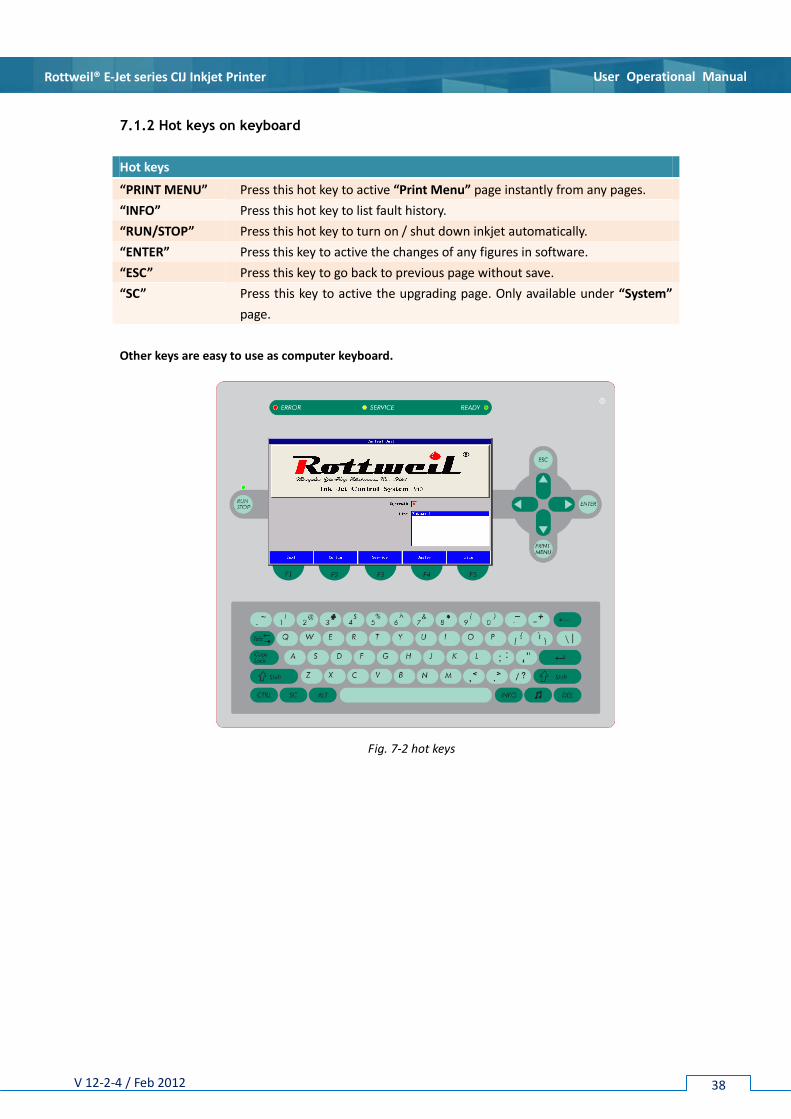
7.1.2 Hot keys on keyboard
Hot keys
“PRINT MENU” Press this hot key to active “Print Menu” page instantly from any pages.
“INFO” Press this hot key to list fault history.
“RUN/STOP” Press this hot key to turn on / shut down inkjet automatically.
“ENTER” Press this key to active the changes of any figures in software.
“ESC” Press this key to go back to previous page without save.
“SC” Press this key to active the upgrading page. Only available under “System”
page.
Other keys are easy to use as computer keyboard.
Fig. 7-2 hot keys
Page 39
User Operational Manual Rottweil® E-Jet series CIJ Inkjet Printer
V 12-2-4 / Feb 2012 39
7.2 Print menu
7.2.1 Print Menu page
Press “PRINT MENU” hot key to active this page.
“Print Menu” Page
“System ID” Display the current inkjet ID in production line.
“Line” Display current connected production line.
“Print Config” Display current printing configuration file name.
“Print Text” Display current printing text.
“Print Status” Display “Printing……” or “Print stopped”.
“Print stopped” indicates the inkjet is ready for starting print.
“Head Status” “Ready”, indicates printer is okay with a ready loaded message to be
printed.
“Service”, indicates print head is open for service purpose.
“Error”, indicates printer error or print head not closed properly.
“Counter Number” Display completed numbers of print.
“Sum Total” Display total counting numbers in this printing. Can be reset to zero when
restart inkjet.
“Paper Print” Display total printing numbers since installation/adjustment. CAN NOT be
reset permanently.
“Exit” Press this button to back to previous page.
“Start Print” Press this button to enable print, when head is ready and no errors.
“Stop Print” Press this button to stop printing.
“Counter” Press this button to set counter value as demand.
When you receive the inkjet and install it, you may find the “Paper Print” has certain
figures already. Actually this figure is coming from the adjustment after production and
before delivery. This is NOT means we provide you a used machine.
Page 40
User Operational Manual Rottweil® E-Jet series CIJ Inkjet Printer
V 12-2-4 / Feb 2012 40
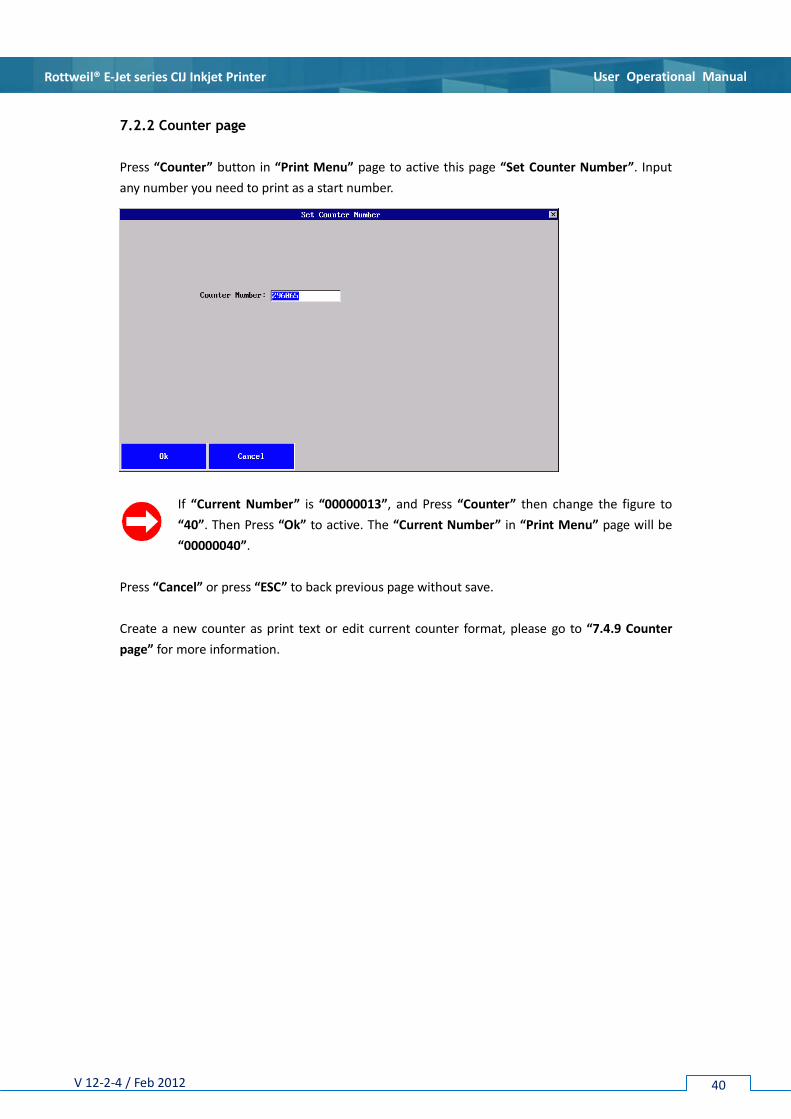
7.2.2 Counter page
Press “Counter” button in “Print Menu” page to active this page “Set Counter Number”. Input
any number you need to print as a start number.
If “Current Number” is “00000013”, and Press “Counter” then change the figure to
“40”. Then Press “Ok” to active. The “Current Number” in “Print Menu” page will be
“00000040”.
Press “Cancel” or press “ESC” to back previous page without save.
Create a new counter as print text or edit current counter format, please go to “7.4.9 Counter
page” for more information.
Page 41
User Operational Manual Rottweil® E-Jet series CIJ Inkjet Printer
V 12-2-4 / Feb 2012 41
7.3 Info
7.3.1 Information page
Press “INFO” hot key to active this “Information” page.
Whenever the “SERVICE” LED (Yellow) or “ERROR” LED (Red) on the operation panel is twinkling,
new information is pending.
“Information” Page
“Error” A list of current error information.
“Class” Display error information type.
“Code” Explanations of error.
“Date” Display error date.
“Time” Display error time.
“Run Time” Display the running time of inkjet totally. Can reset.
“Ok” Press to quit.
“Clear” Press to remove current error information.
“Error” Press to active “Error List” page.
Page 42
User Operational Manual Rottweil® E-Jet series CIJ Inkjet Printer
V 12-2-4 / Feb 2012 42
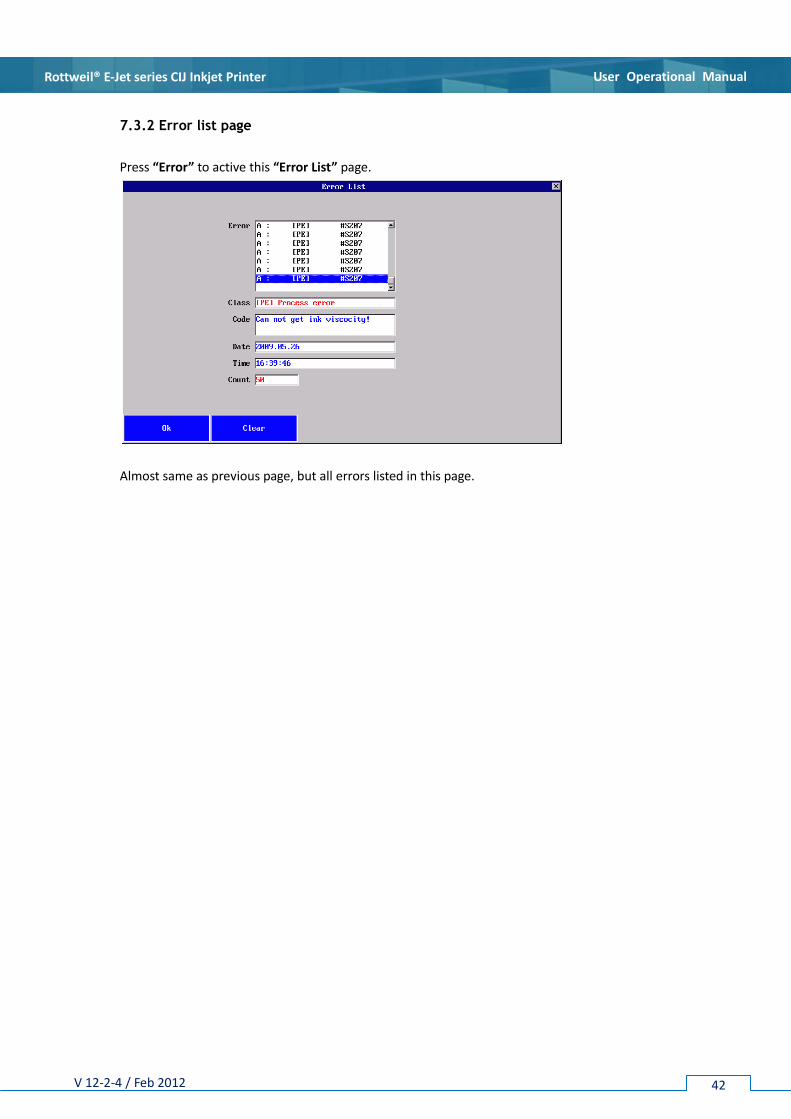
7.3.2 Error list page
Press “Error” to active this “Error List” page.
Almost same as previous page, but all errors listed in this page.
Page 43
User Operational Manual Rottweil® E-Jet series CIJ Inkjet Printer
V 12-2-4 / Feb 2012 43
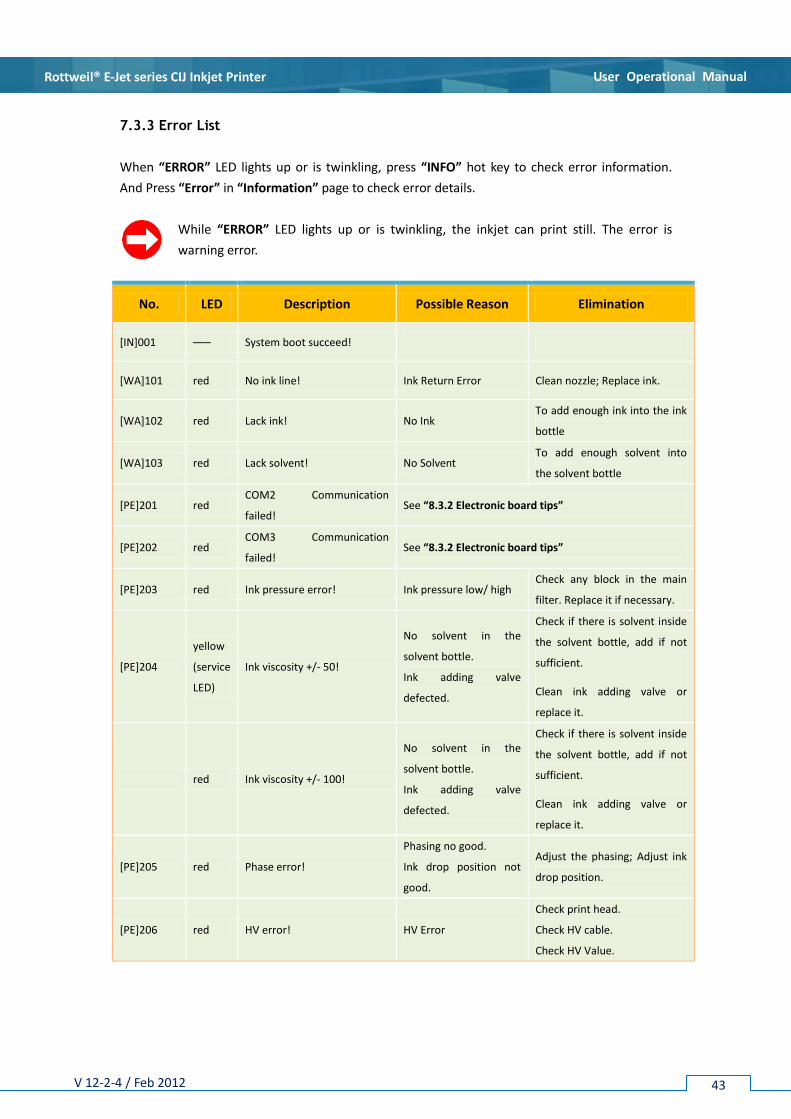
7.3.3 Error List
When “ERROR” LED lights up or is twinkling, press “INFO” hot key to check error information.
And Press “Error” in “Information” page to check error details.
While “ERROR” LED lights up or is twinkling, the inkjet can print still. The error is
warning error.
No. LED Description Possible Reason Elimination
[IN]001 ––– System boot succeed!
[WA]101 red No ink line! Ink Return Error Clean nozzle; Replace ink.
[WA]102 red Lack ink! No Ink To add enough ink into the ink
bottle
[WA]103 red Lack solvent! No Solvent To add enough solvent into
the solvent bottle
[PE]201 red COM2 Communication
failed! See “8.3.2 Electronic board tips”
[PE]202 red COM3 Communication
failed! See “8.3.2 Electronic board tips”
[PE]203 red Ink pressure error! Ink pressure low/ high Check any block in the main
filter. Replace it if necessary.
[PE]204
yellow
(service
LED)
Ink viscosity +/- 50!
No solvent in the
solvent bottle.
Ink adding valve
defected.
Check if there is solvent inside
the solvent bottle, add if not
sufficient.
Clean ink adding valve or
replace it.
red Ink viscosity +/- 100!
No solvent in the
solvent bottle.
Ink adding valve
defected.
Check if there is solvent inside
the solvent bottle, add if not
sufficient.
Clean ink adding valve or
replace it.
[PE]205 red Phase error!
Phasing no good.
Ink drop position not
good.
Adjust the phasing; Adjust ink
drop position.
[PE]206 red HV error! HV Error
Check print head.
Check HV cable.
Check HV Value.
Page 44
User Operational Manual Rottweil® E-Jet series CIJ Inkjet Printer
V 12-2-4 / Feb 2012 44
7.4 Text
Inkjet storage for texts, configurations, logos etc. is 10Mbytes.
Rottweil® E-Jet series CIJ Inkjet Printer provides you the easiest operation through the query
keypad to print as demand, i.e. the integrity of letters, numbers, date, time, logos, counters, shifts,
database, bar code, 2D matrix, variety language fonts (Arabic, Farsi, Russian etc.) and so on.
Rottweil® brings you easy coding experience you never had before.
7.4.1 Menu tree
Below chart shows the tree structure of this chapter.
Page 45
User Operational Manual Rottweil® E-Jet series CIJ Inkjet Printer
V 12-2-4 / Feb 2012 45
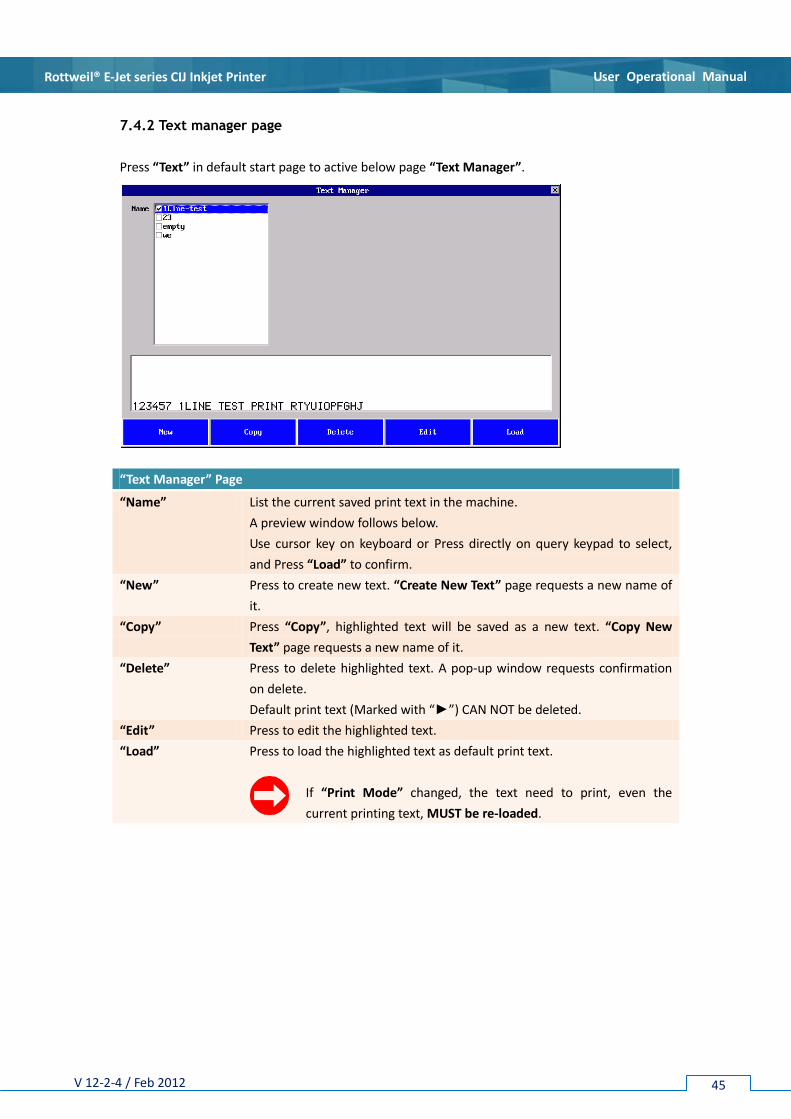
7.4.2 Text manager page
Press “Text” in default start page to active below page “Text Manager”.
“Text Manager” Page
“Name” List the current saved print text in the machine.
A preview window follows below.
Use cursor key on keyboard or Press directly on query keypad to select,
and Press “Load” to confirm.
“New” Press to create new text. “Create New Text” page requests a new name of
it.
“Copy” Press “Copy”, highlighted text will be saved as a new text. “Copy New
Text” page requests a new name of it.
“Delete” Press to delete highlighted text. A pop-up window requests confirmation
on delete.
Default print text (Marked with “►”) CAN NOT be deleted.
“Edit” Press to edit the highlighted text.
“Load” Press to load the highlighted text as default print text.
If “Print Mode” changed, the text need to print, even the
current printing text, MUST be re-loaded.
Page 46
User Operational Manual Rottweil® E-Jet series CIJ Inkjet Printer
V 12-2-4 / Feb 2012 46
7.4.3 New/Copy page
Press “New” in “Text Manager” page to active this page “Create New Text”.
Input a customized name after “New text”.
Press “Ok” to confirm and save.
Press “Cancel” or press “ESC” to abandon.
Page 47
User Operational Manual Rottweil® E-Jet series CIJ Inkjet Printer
V 12-2-4 / Feb 2012 47
7.4.4 Editor page
Press “Edit” in “Text Manager” page to active this page “Editor” from existed text or new saved
text.
Editing objects:
1. Text block: one text, displayed with one outer red rectangle, when move the cursor to the
bottom of this text.
2. Special object block: incl. date, time, logos, counters, shifts, database, bar code, 2D matrix etc.
Each of them displayed with one outer red rectangle, when move the cursor to this object.
When you move the cursor to blank area, incl. the area which is not the bottom of existed text
block, a new text block or new special object can be input or created.
When you move the cursor to either left or right in one existed text block, letters or numbers or
punctuation can be added as demand easily.
Editing area:
Preview of editing text. WYSIWYG.
Coordinates origins “[Row:0, Col:0]” is located in left-bottom corner of preview window. Use
cursor key on keyboard to move.
Cursor can be moved one dot by one dot, or any dots below 24 dots, which can be
changed in “Format”. Input “1” or other figures after “Grid” and Press “Ok”.
Coordinates origins “[Row:0, Col:0]”
Editing text name
Editing area (Vertical 48 dots)
Coordinates position of cursor
Page 48
User Operational Manual Rottweil® E-Jet series CIJ Inkjet Printer
V 12-2-4 / Feb 2012 48
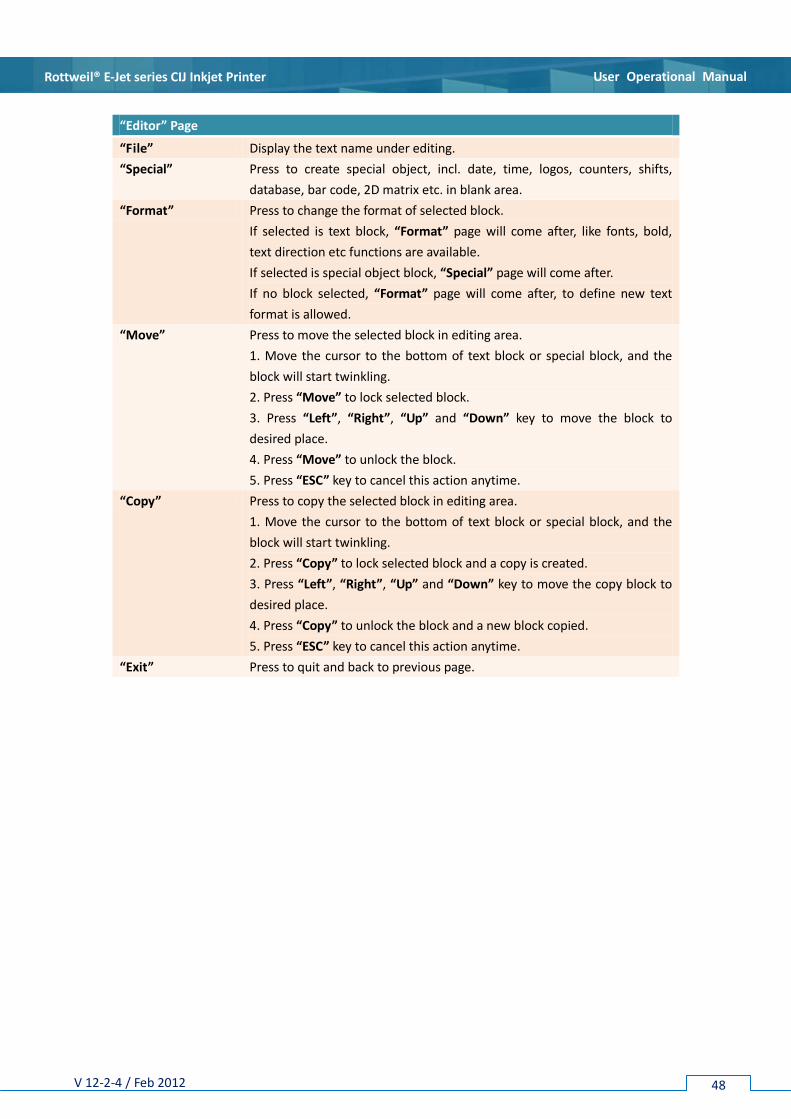
“Editor” Page
“File” Display the text name under editing.
“Special” Press to create special object, incl. date, time, logos, counters, shifts,
database, bar code, 2D matrix etc. in blank area.
“Format” Press to change the format of selected block.
If selected is text block, “Format” page will come after, like fonts, bold,
text direction etc functions are available.
If selected is special object block, “Special” page will come after.
If no block selected, “Format” page will come after, to define new text
format is allowed.
“Move” Press to move the selected block in editing area.
1. Move the cursor to the bottom of text block or special block, and the
block will start twinkling.
2. Press “Move” to lock selected block.
3. Press “Left”, “Right”, “Up” and “Down” key to move the block to
desired place.
4. Press “Move” to unlock the block.
5. Press “ESC” key to cancel this action anytime.
“Copy” Press to copy the selected block in editing area.
1. Move the cursor to the bottom of text block or special block, and the
block will start twinkling.
2. Press “Copy” to lock selected block and a copy is created.
3. Press “Left”, “Right”, “Up” and “Down” key to move the copy block to
desired place.
4. Press “Copy” to unlock the block and a new block copied.
5. Press “ESC” key to cancel this action anytime.
“Exit” Press to quit and back to previous page.
Page 49
User Operational Manual Rottweil® E-Jet series CIJ Inkjet Printer
V 12-2-4 / Feb 2012 49
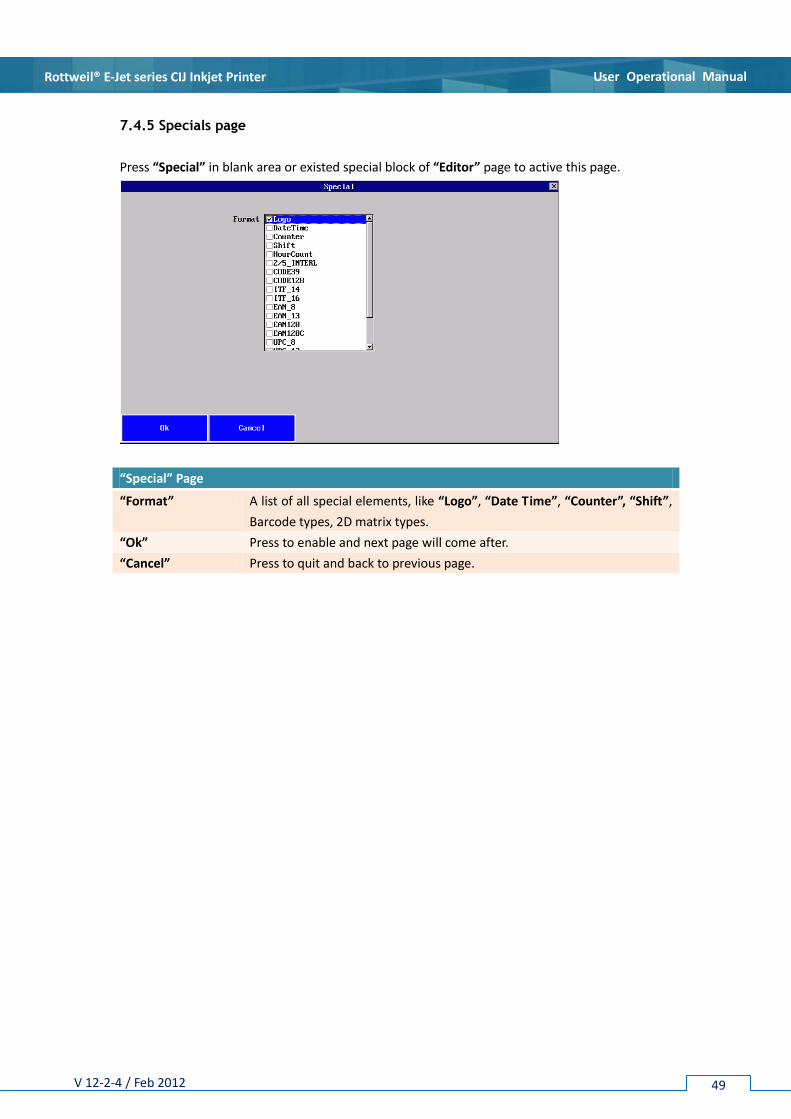
7.4.5 Specials page
Press “Special” in blank area or existed special block of “Editor” page to active this page.
“Special” Page
“Format” A list of all special elements, like “Logo”, “Date Time”, “Counter”, “Shift”,
Barcode types, 2D matrix types.
“Ok” Press to enable and next page will come after.
“Cancel” Press to quit and back to previous page.
Page 50
User Operational Manual Rottweil® E-Jet series CIJ Inkjet Printer
V 12-2-4 / Feb 2012 50
7.4.6 Text format page
Press “Format” in blank area or existed text block of “Editor” page to active this page.
“Text Format” Page
“Font” A list of all available fonts, incl. all sizes and formats fonts in English,
Arabic, Farsi etc.
Use cursor keys or direct Press to select fonts and press “ENTER” to enable
the font as default.
Selected font marked with “►”. Press “Ok” to save and quit or “Cancel” to
quit without save.
A preview window integrated for fonts.
“Bottom Up” Press to enable vertical reverse of selected text block or define as new text
format.
Press “Ok” to save and quit or “Cancel” to quit without save.
“B->A” Press to enable mirror image of selected text block or define as new text
format.
Press “Ok” to save and quit or “Cancel” to quit without save.
“Negative” Press to enable negative image of selected text block or define as new text
format.
Press “Ok” to save and quit or “Cancel” to quit without save.
“Double Space” Press to double the space between neighboring characters.
Press “Ok” to save and quit or “Cancel” to quit without save.
“Stroke Width” Edit the figure from “1~100” to bold the selected text block or define as
new text format as demand.
Default as “1” no function.
Press “Ok” to save and quit or “Cancel” to quit without save.
“Character Width” Edit the figure from “1~100” to change the character width in the selected
text block or define as new text format as demand.
Default as “1” no function.
Press “Ok” to save and quit or “Cancel” to quit without save.
“Grid” Edit the figure to change the dot-step when vertically moving cursor in
Page 51
User Operational Manual Rottweil® E-Jet series CIJ Inkjet Printer
V 12-2-4 / Feb 2012 51
editing area.
Default is “8”, which means the step is 8 dots when move the cursor up or
down once.
Press “Ok” to save and quit or “Cancel” to quit without save.
“Ok” Press to enable and new/edited text will be added in cursor position.
“Cancel” Press to quit and back to previous page without save.
How to print Arabic/Farsi?
*The printer with special software version, with Arabic/Farsi input, is customized and
installed before shipment. Make sure your printer is installed the Arabic/Farsi language
version, if not, please contact your sales for further information.
1. Go to “System” page and then select “From right to left” as the default for text “Edit”.
2. Reboot.
3. Go to “Text” page and select the font in “Text Format” page.
4. Enable “Compact” after font selection.
5. Then start to input Arabic/Farsi text.
Page 52
User Operational Manual Rottweil® E-Jet series CIJ Inkjet Printer
V 12-2-4 / Feb 2012 52
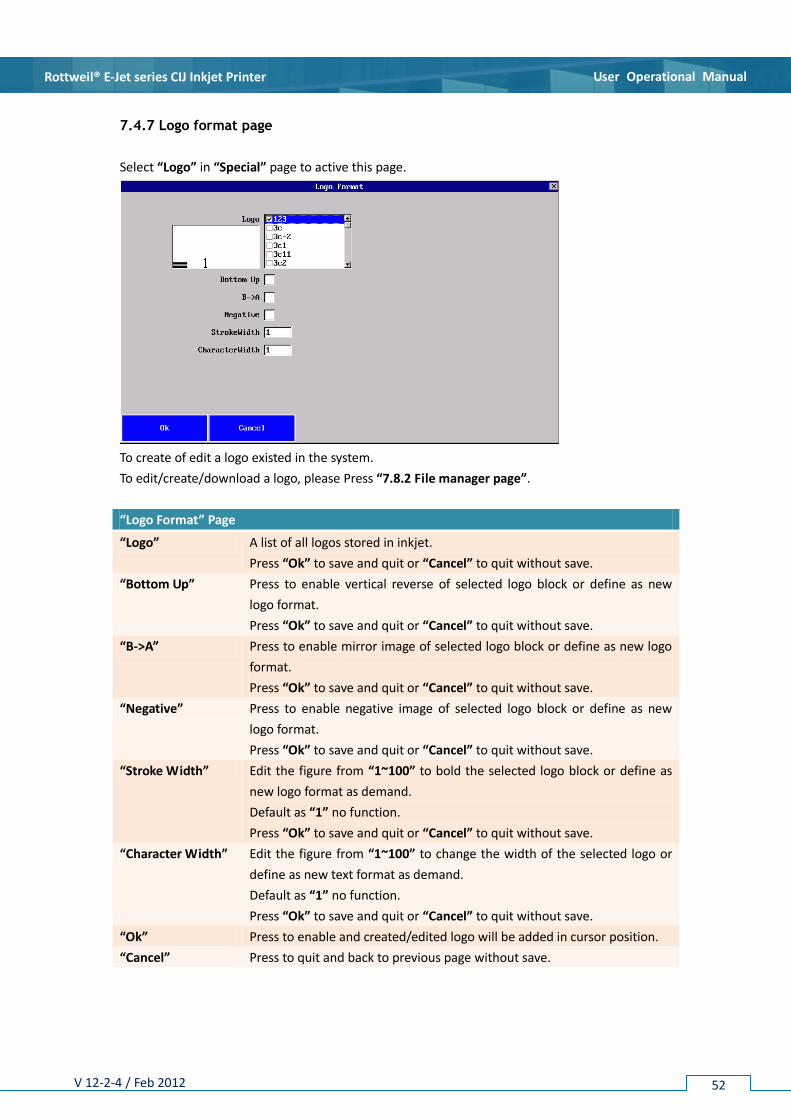
7.4.7 Logo format page
Select “Logo” in “Special” page to active this page.
To create of edit a logo existed in the system.
To edit/create/download a logo, please Press “7.8.2 File manager page”.
“Logo Format” Page
“Logo” A list of all logos stored in inkjet.
Press “Ok” to save and quit or “Cancel” to quit without save.
“Bottom Up” Press to enable vertical reverse of selected logo block or define as new
logo format.
Press “Ok” to save and quit or “Cancel” to quit without save.
“B->A” Press to enable mirror image of selected logo block or define as new logo
format.
Press “Ok” to save and quit or “Cancel” to quit without save.
“Negative” Press to enable negative image of selected logo block or define as new
logo format.
Press “Ok” to save and quit or “Cancel” to quit without save.
“Stroke Width” Edit the figure from “1~100” to bold the selected logo block or define as
new logo format as demand.
Default as “1” no function.
Press “Ok” to save and quit or “Cancel” to quit without save.
“Character Width” Edit the figure from “1~100” to change the width of the selected logo or
define as new text format as demand.
Default as “1” no function.
Press “Ok” to save and quit or “Cancel” to quit without save.
“Ok” Press to enable and created/edited logo will be added in cursor position.
“Cancel” Press to quit and back to previous page without save.
Page 53
User Operational Manual Rottweil® E-Jet series CIJ Inkjet Printer
V 12-2-4 / Feb 2012 53
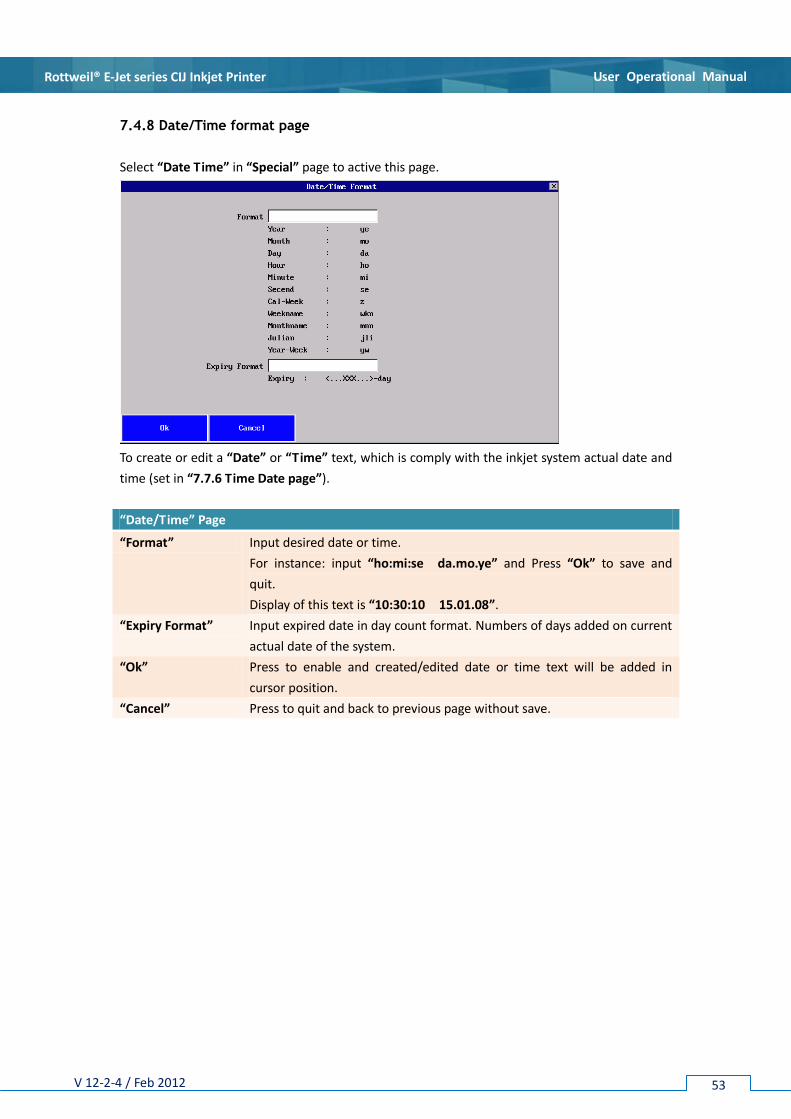
7.4.8 Date/Time format page
Select “Date Time” in “Special” page to active this page.
To create or edit a “Date” or “Time” text, which is comply with the inkjet system actual date and
time (set in “7.7.6 Time Date page”).
“Date/Time” Page
“Format” Input desired date or time.
For instance: input “ho:mi:se da.mo.ye” and Press “Ok” to save and
quit.
Display of this text is “10:30:10 15.01.08”.
“Expiry Format” Input expired date in day count format. Numbers of days added on current
actual date of the system.
“Ok” Press to enable and created/edited date or time text will be added in
cursor position.
“Cancel” Press to quit and back to previous page without save.
Page 54
User Operational Manual Rottweil® E-Jet series CIJ Inkjet Printer
V 12-2-4 / Feb 2012 54
7.4.9 Counter page
Select “Counter” in “Special” page to active this page.
To create or edit a “Counter” text, which is used for a continuous or regular counting on
products.
If need to count from “0”, just press “PRINT MENU” hot key to edit the counter start figure. See
“7.2.2 Counter page”.
“Counter” Page
“Start Number” Input start figure. For instance, input “0000”.
“End Number” Input end figure. For instance, input “9999”.
“Repeat” Input repeat times so called batch no printing. For instance, input “10”
indicates that the same counting will be repeatedly printed 10 times
before switch to the next counting, which is related to the value of “step”.
“Step” Input the regular counting base. For instance, input “2”, the counting is
“0002”, “0004”, “0006”, “0008”…
“Digit” Input the digit of counter.
“Leading” Press to enable the leading zero before actual numbers.
“Ok” Press to enable and created/edited counter text will be added in cursor
position.
“Cancel” Press to quit and back to previous page without save.
Page 55
User Operational Manual Rottweil® E-Jet series CIJ Inkjet Printer
V 12-2-4 / Feb 2012 55
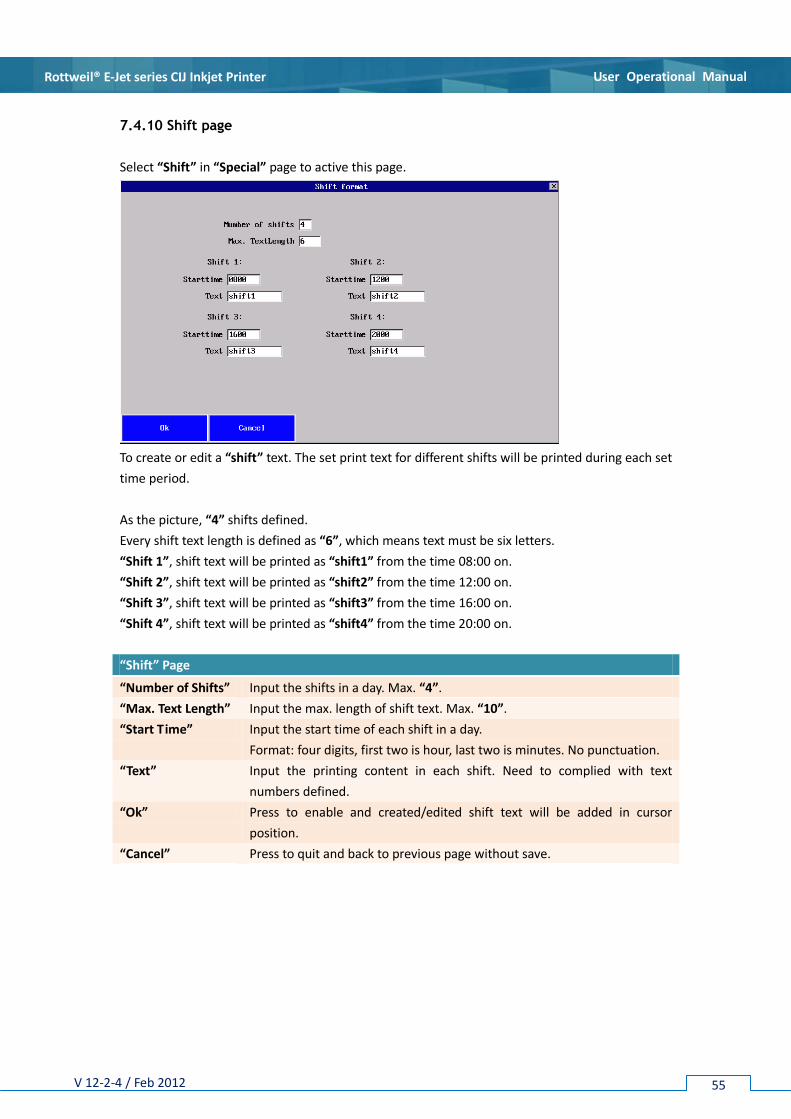
7.4.10 Shift page
Select “Shift” in “Special” page to active this page.
To create or edit a “shift” text. The set print text for different shifts will be printed during each set
time period.
As the picture, “4” shifts defined.
Every shift text length is defined as “6”, which means text must be six letters.
“Shift 1”, shift text will be printed as “shift1” from the time 08:00 on.
“Shift 2”, shift text will be printed as “shift2” from the time 12:00 on.
“Shift 3”, shift text will be printed as “shift3” from the time 16:00 on.
“Shift 4”, shift text will be printed as “shift4” from the time 20:00 on.
“Shift” Page
“Number of Shifts” Input the shifts in a day. Max. “4”.
“Max. Text Length” Input the max. length of shift text. Max. “10”.
“Start Time” Input the start time of each shift in a day.
Format: four digits, first two is hour, last two is minutes. No punctuation.
“Text” Input the printing content in each shift. Need to complied with text
numbers defined.
“Ok” Press to enable and created/edited shift text will be added in cursor
position.
“Cancel” Press to quit and back to previous page without save.
Page 56
User Operational Manual Rottweil® E-Jet series CIJ Inkjet Printer
V 12-2-4 / Feb 2012 56
7.4.11 Barcode pages
Select “2/5_INTERL”, “CODE39”, “CODE128”, “ITF_14”, “ITF_16”, “EAN_8”, “EAN_13”, “EAN128”,
“EAN128C”, “UPC_8”, “UPC_12”, “EXT_2”, “EXT_5” in “Special” page to active barcode page
respectively.
“EAN_13” barcode:
Page 57
User Operational Manual Rottweil® E-Jet series CIJ Inkjet Printer
V 12-2-4 / Feb 2012 57
“ITF_16” barcode without frame:
“ITF_16” barcode with frame:
Page 58
User Operational Manual Rottweil® E-Jet series CIJ Inkjet Printer
V 12-2-4 / Feb 2012 58
Barcode pages
“Value” Input value of barcode.
“Stroke Width” Edit the figure to bold the barcode as demand.
Default as “1” no function.
Press “Ok” to save and quit or “Cancel” to quit without save.
“Character Width” Edit the figure to increase the space between every two neighboring
print-scannings as demand.
Default as “1” no function.
Press “Ok” to save and quit or “Cancel” to quit without save.
“Mode Height” Edit barcode printing height.
Press “Ok” to save and quit or “Cancel” to quit without save.
“Up Down” Press to enable vertical reverse of barcode.
Press “Ok” to save and quit or “Cancel” to quit without save.
“B->A” Press to enable mirror of barcode.
Press “Ok” to save and quit or “Cancel” to quit without save.
“Negative” Press to enable negative of barcode.
Press “Ok” to save and quit or “Cancel” to quit without save.
“Left Blank” Edit to add blank line in the far left of barcode, in case of readable
barcode.
Press “Ok” to save and quit or “Cancel” to quit without save.
“Right Blank” Edit to add blank line in the far right of barcode, in case of readable
barcode.
Press “Ok” to save and quit or “Cancel” to quit without save.
“Check Char” Check input numbers validity. This function has been integrated
automatically. No need to enable this.
“Text Information” Press to display the value of barcode along with it, and put the value of
printing barcode at different position.
“Scale” Press to select the size format of barcode. “1:2” or “1:3”.
“Ok” Press to enable and created/edited barcode will be added in cursor
position.
“Cancel” Press to quit and back to previous page without save.
Page 59
User Operational Manual Rottweil® E-Jet series CIJ Inkjet Printer
V 12-2-4 / Feb 2012 59
7.4.12 Data matrix page
Select “Data Matrix” in “Special” page to active this page.
“Data Matrix” Page
“Type” Select required type of “Data Matrix” with direct Press or cursor keys.
Three types are available.
Press “Ok” to save and quit or “Cancel” to quit without save.
“Size” Select required size of “Data Matrix” with direct Press or cursor keys.
Press “Ok” to save and quit or “Cancel” to quit without save.
“Value” Input the value of “Data Matrix”.
“Ok” Press to enable and created/edited shift text will be added in cursor
position.
“Cancel” Press to quit and back to previous page without save.
Page 60
User Operational Manual Rottweil® E-Jet series CIJ Inkjet Printer
V 12-2-4 / Feb 2012 60
7.4.13 Save Text page
When you finish the text editing in “Editor”, Press “EXIT” or press “ESC” below page will come
out.
Press “Save” to save and back to “Text Manager” page.
Press “Cancel” to quit without save and back to “Text Manager” page.
Press “Back” to back to “Editor” page.
Page 61
User Operational Manual Rottweil® E-Jet series CIJ Inkjet Printer
V 12-2-4 / Feb 2012 61
How to backup/restore “Text” & “Config” through USB flash disk?
Sometimes, change the electrical boards or other unexpected reasons may request
saving “Text” & “Config” to a USB flash disk, and then restore it to this printer or other
printers. Here below is the instructions for bakeup and restore.
1. Go to “System” page and then press “SC” hot key in keypad. Select storage place, either at
Core Arm(“home”), or at USB flash disk(“usb”).
If not select storage place for save, below window will pop-up.
Page 62
User Operational Manual Rottweil® E-Jet series CIJ Inkjet Printer
V 12-2-4 / Feb 2012 62
2. Bakeup & restore locally, at Core Arm.
Select “home” and press “Enter” to go next page.
Select “arm” and press “Enter” to go next page.
Select “arm” and press “Enter” to go next page.
Page 63
User Operational Manual Rottweil® E-Jet series CIJ Inkjet Printer
V 12-2-4 / Feb 2012 63
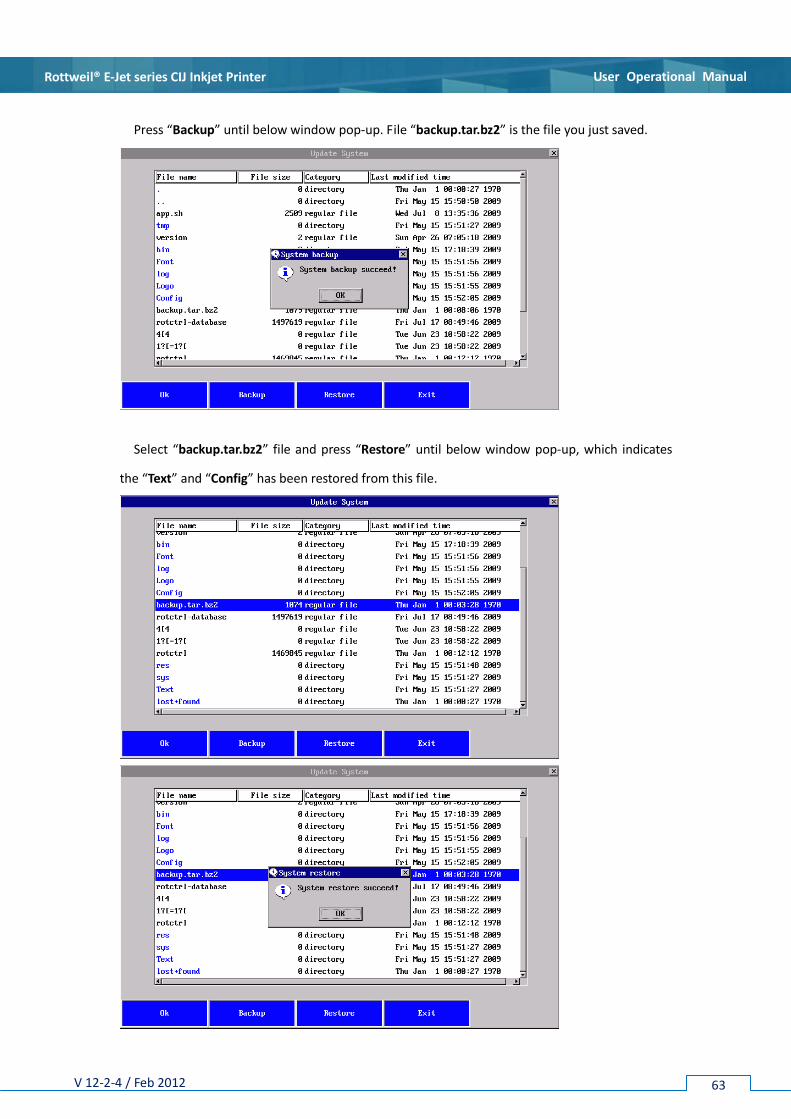
Press “Backup” until below window pop-up. File “backup.tar.bz2” is the file you just saved.
Select “backup.tar.bz2” file and press “Restore” until below window pop-up, which indicates
the “Text” and “Config” has been restored from this file.
Page 64
User Operational Manual Rottweil® E-Jet series CIJ Inkjet Printer
V 12-2-4 / Feb 2012 64
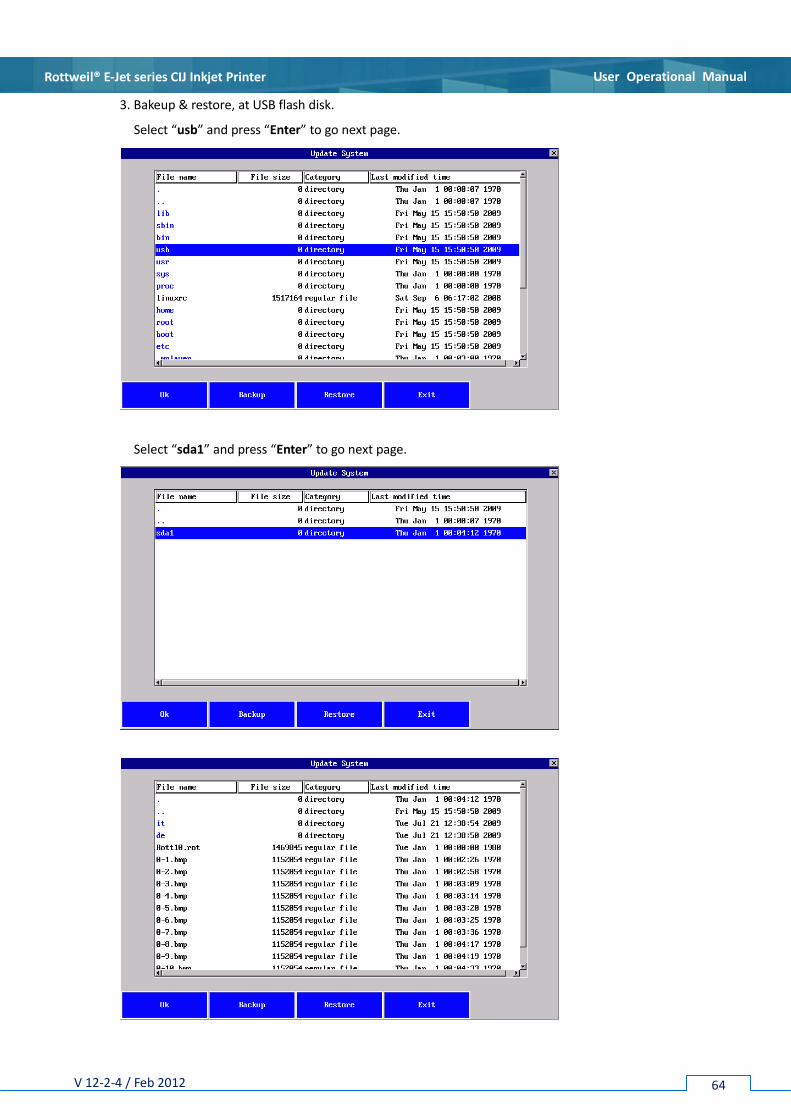
3. Bakeup & restore, at USB flash disk.
Select “usb” and press “Enter” to go next page.
Select “sda1” and press “Enter” to go next page.
Page 65
User Operational Manual Rottweil® E-Jet series CIJ Inkjet Printer
V 12-2-4 / Feb 2012 65
Press “Backup” until below window pop-up. File “backup.tar.bz2” is the file you just saved.
Select “backup.tar.bz2” file and press “Restore” until below window pop-up, which indicates
the “Text” and “Config” has been restored from this file.
Page 66
User Operational Manual Rottweil® E-Jet series CIJ Inkjet Printer
V 12-2-4 / Feb 2012 66
7.5 Config
Create or edit customized configuration for print, incl. “Print Mode” (Trigger type), printing
direction, “print position”/delay, print speed control etc.
Rottweil® brings you easy coding experience you never had before.
7.5.1 Menu tree
Below chart shows the tree structure of this chapter.
Page 67
User Operational Manual Rottweil® E-Jet series CIJ Inkjet Printer
V 12-2-4 / Feb 2012 67
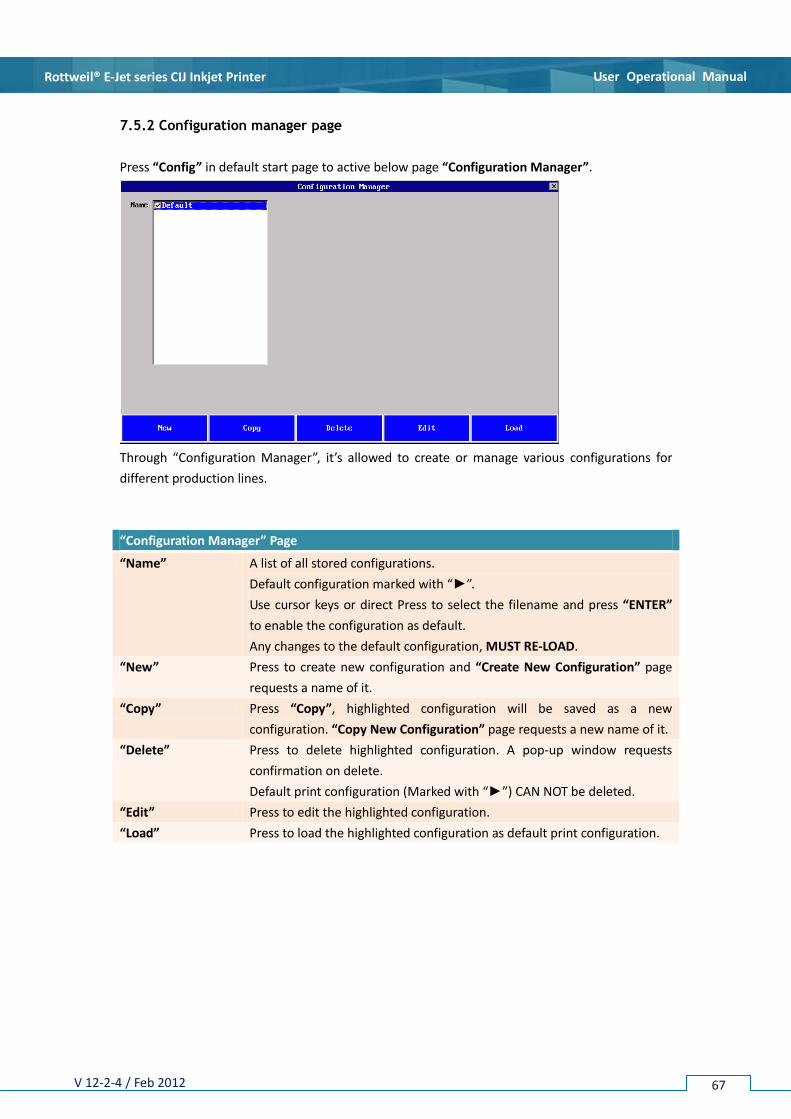
7.5.2 Configuration manager page
Press “Config” in default start page to active below page “Configuration Manager”.
Through “Configuration Manager”, it’s allowed to create or manage various configurations for
different production lines.
“Configuration Manager” Page
“Name” A list of all stored configurations.
Default configuration marked with “►”.
Use cursor keys or direct Press to select the filename and press “ENTER”
to enable the configuration as default.
Any changes to the default configuration, MUST RE-LOAD.
“New” Press to create new configuration and “Create New Configuration” page
requests a name of it.
“Copy” Press “Copy”, highlighted configuration will be saved as a new
configuration. “Copy New Configuration” page requests a new name of it.
“Delete” Press to delete highlighted configuration. A pop-up window requests
confirmation on delete.
Default print configuration (Marked with “►”) CAN NOT be deleted.
“Edit” Press to edit the highlighted configuration.
“Load” Press to load the highlighted configuration as default print configuration.
Page 68
User Operational Manual Rottweil® E-Jet series CIJ Inkjet Printer
V 12-2-4 / Feb 2012 68
7.5.3 New/Copy page
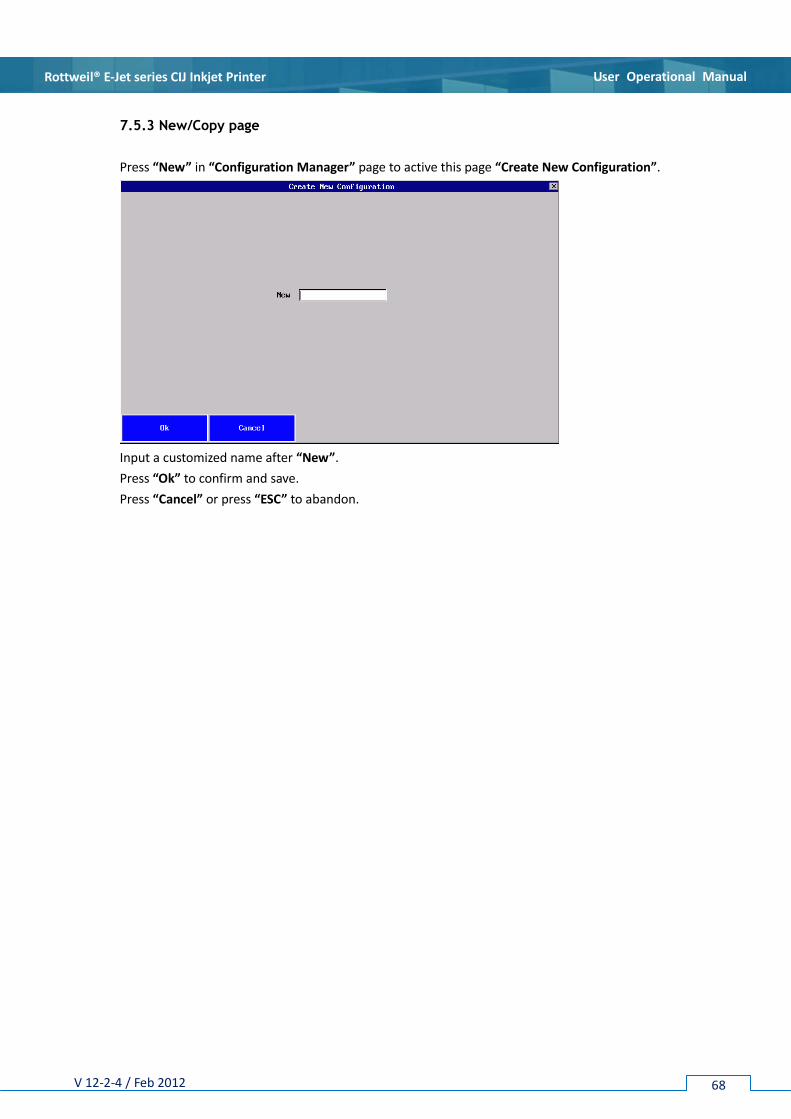
Press “New” in “Configuration Manager” page to active this page “Create New Configuration”.
Input a customized name after “New”.
Press “Ok” to confirm and save.
Press “Cancel” or press “ESC” to abandon.
Page 69
User Operational Manual Rottweil® E-Jet series CIJ Inkjet Printer
V 12-2-4 / Feb 2012 69
7.5.4 Configuration page
Press “Config” in default start page to active below page “Configuration”.
“Configuration” Page
“Print Mode” -
Trigger Type
Press or use cursor keys to select desired trigger type as demand.
“Continuous” – Continuous printing without trigger. In “Print Menu”, Press
“Start Print” to print. “Print Position” value decides two neighboring prints
interval.
“Encoder” – Triggered by shaft encoder. Interval is even and subject to the
“Counter” setting. See “7.5.6 Counter page”.
“ProdSensor” – Triggered by sensor (photo sensor/fiber sensor etc.). One
trigger, one print.
“ProdSensor/Encoder” – Triggered by shaft encoder and sensor. One trigger
one print. Print speed is controlled by encoder.
“Ps-Continuous” – Triggered by sensor and repeat printing. “ReprintNum”
defines the repeat print times. One trigger, print defined repeat times of
print.
Press “Ok” / “Apply” to save and quit or “Cancel” to quit without save.
“CharacterWidth” Edit to define the printing width between characters. Normally use to
control the printing speed finely. For those speed not even line, encoder is
suggested.
“Density[Strokes]
”
Edit the value to bold the printing text.
Press “Ok” / “Apply” to save and quit or “Cancel” to quit without save.
“Print Position” Different definitions for each trigger type.
“Continuous” / “Ps-Continuous” – Define the time interval of two prints.
“ProdSensor” / “ProdSensor/Encoder” – Define the delay time before
printing triggered by sensor.
“Encoder” – Define the time interval of two neighboring prints.
“MS”, “UM” – “MS” is a larger unit compared to “UM” to adjust the delay.
Press “Ok” / “Apply” to save and quit or “Cancel” to quit without save.
Page 70
User Operational Manual Rottweil® E-Jet series CIJ Inkjet Printer
V 12-2-4 / Feb 2012 70
“Bottom Up” Press to enable the printing text vertical reverse print, which is subject to
the moving direction of print object.
Press “Ok” / “Apply” to save and quit or “Cancel” to quit without save.
“Ink Drop” For “GRAF” print mode, to adjust print quality, mainly for multiple lines
printing. Normally the default value is “0”.
Press “Ok” / “Apply” to save and quit or “Cancel” to quit without save.
Under “Standard” print mode, no function.
Only work with “GRAF” print mode. If your printer has no “GRAF”
print mode, please ignore this setting.
“ReprintNum” Edit the value to define the repeat print times in one sensor trigger, under
“Ps-Continuous” mode.
Press “Ok” / “Apply” to save and quit or “Cancel” to quit without save.
“Always Count” Press to enable keep counting and printing even when fatal error reported,
like viscosity error, phase error, or print head maintenance etc.
Press “Ok” / “Apply” to save and quit or “Cancel” to quit without save.
“Bi Direction Pri.” Press to enable bi-direction printing. Working together with encoder, the
print head moves backward to print and then, forward to print, the two
prints are exactly the same.
Press “Ok” / “Apply” to save and quit or “Cancel” to quit without save.
“Always Count” Press to enable keep counting and printing even when fatal error reported,
like viscosity error, phase error, or print head maintenance etc.
Press “Ok” / “Apply” to save and quit or “Cancel” to quit without save.
“Segment Delay” Edit the value to define the repeated prints interval.
Only under “Ps-Continuous” trigger mode.
“Date&Shift
Sync”
Press to enable the synchronization of time against shift.
Day changes only when shift completed, even define shift cross the
mid-night.
“Program” “Standard”—Set as default.
“External Trigger”—By receiving external signal to change print text.
Active this program by press “Ok” / “Apply”. Then quit to default config
page to re-load this config.
Press “ENTER” in keypad to edit the “External Trigger Text” as below.
Then select the required text triggered by external signal.
External Trigger Text
Page 71
User Operational Manual Rottweil® E-Jet series CIJ Inkjet Printer
V 12-2-4 / Feb 2012 71
“Text List”—By storing texts to be printed in a list, and print in sequence.
Active this program by press “Ok” / “Apply”. Then quit to default config
page to re-load this config.
Press “ENTER” in keypad to edit the “Text List” as below.
“No.of Text” defines the test list numbers.
“Auto Cut”, disabled without “x” as default.
“Text 1-6”, maximum active 6 texts in the list.
“Text”, select required text.
“Config”, select required config.
“RePrintNo.”, defined the print times of this text.
“Signal”, enabled with “x” requires a trigger signal to print this text, while
disabled does not require trigger signal and print automatically.
“Ok” / “Apply” Press to save the created/edited configuration.
“Cancel” Press to quit and back to previous page without save.
Page 72
User Operational Manual Rottweil® E-Jet series CIJ Inkjet Printer
V 12-2-4 / Feb 2012 72
7.5.5 Sensor page
Press “Sensor” in “Configuration” page to active this page.
Setting this page, when installation. All changes after save will be active.
“Sensor” Page
“Shaft-Encoder” Select encoder type. Generally use “2 Phase”.
“Left->Right” Define the moving direction of conveyor, left to right, when be front of the
print head cover opening side.
“Right->Left” Define the moving direction of conveyor, right to left, when be front of the
print head cover opening side.
“Direction Inv.” Installation with encoder, the inkjet may not print. The reason is defined
encoder can only recognize one direction. If cannot print with this be
active, please disable it. If cannot print with this be disabled, please
enable it.
“Reverse Equalize” Using encoder to print, a reverse movement during forward printing can
stop printing, until compensated forward movement to the stop point,
then printing starts.
“Ok” / “Apply” Press to save the created/edited configuration.
“Cancel” Press to quit and back to previous page without save.
Page 73
User Operational Manual Rottweil® E-Jet series CIJ Inkjet Printer
V 12-2-4 / Feb 2012 73
7.5.6 Counter page
Press “Counter” in “Configuration” page to active this page.
“Counter” Page
“SetLength[mm]” Input desirable counter printing distance from start point of previous
print to the start point of current print.
“MeasureLength[mm]” Input measured distance of two prints after printing once.
Actual “Pulses” value will be generated automatically.
“Pulses” Automatically generated, which can be fine tuned manually.
“>>>>>>>” Estimated actual print text length calculated by inkjet itself. If this value
is bigger than “SetLength”, the counting prints can’t work properly.
“Ok” / “Apply” Press to save the created/edited configuration.
“Cancel” Press to quit and back to previous page without save.
How to set counting pulses?
1. Input desirable counter printing distance from start point of previous print to the
start point of current print in “SetLength[mm]”.
2. Input “pulses” “10000”, when adopting 2500 pulses encoder and clamping wheel perimeter is
250mm. (10000=2500x4)
3. Press “Ok” or “Apply” to save.
4. Press “PRINT MENU” and Press “Start Print”.
5. Get print sample and measure distance of two prints.
6. Input actual measuring distance in “MeasureLength[mm]”.
7. Press “Ok” or “Apply” to save. Automatically generated “pulses” comes out.
8. In order to ensure the accuracy, please do two times.
If not selected encoder trigger mode, please do not edit the default value “1000” in
this page.
Any incorrect settings of this page may lead speed declined when using encoder printing.
Page 74
User Operational Manual Rottweil® E-Jet series CIJ Inkjet Printer
V 12-2-4 / Feb 2012 74
7.6 Service
Maintain the inkjet or observe inkjet status in this chapter.
Rottweil® brings you easy coding experience you never had before.
7.6.1 Menu tree
Below chart shows the tree structure of this chapter.
Page 75
User Operational Manual Rottweil® E-Jet series CIJ Inkjet Printer
V 12-2-4 / Feb 2012 75
7.6.2 Jet Service page
Press “Service” in default start page to active below page “Jet Service”.
“Jet Service” Page
“Ink System” Display the status of ink system.
“Head” Display each head status. Now only one head available.
“Function” Press to active “Function” page to conduct “Ink System Control”.
“Status” Press to active “Status” page to observe “Ink System Status” and “Head
Status”.
“Phase” Press to enter “Phase” maintenance page.
“Setup” Press to active “Setup” page to select print mode and input pressure,
viscosity, HV control etc. parameters.
“Exit” Press to back to start page.
Page 76
User Operational Manual Rottweil® E-Jet series CIJ Inkjet Printer
V 12-2-4 / Feb 2012 76
7.6.3 Ink system control page
Press “function” in “Jet Service” page to active this page.
Press to enable or disable each function.
indicates the function is enabled.
indicates the function is disabled.
A twinkling indicates the function is under carrying out but not completed.
“Ink System Control” Page
“Head” Display the default head number. Only one available now.
“Ink” Press to turn on or off or disable the ink stream to the print head.
“Bleed” Enable this function to accelerate the recycling of entire ink system, in
order to remove the air bubble in the system or to increase the viscosity
by increasing solvent volatilization.
“Purge” Enable to clean the nozzle manually.
1. Seal the gutter with sealing cap.
2. Disable ink stream at “Ink” function. Ink stream MUST be off.
3. Handle print head up.
4. Enable “Purge” while squeeze solvent onto nozzle.
5. Solvent and dusty can be sucked through nozzle.
“Clean Nozzle” Enable to open and close the ink valves, and ink stream comes out
intermittently.
Print head cover MUST be open in advance.
“Stab Test” Enable to open and close two ink valves (Ink stream on/off valve and clean
nozzle valve) to test nozzle blocked or not. If nozzle got blocked, ink
stream is not stable.
“Add Ink” Enable to test add ink valve.
Conduct this function many times may lead to mixing tank
overflow.
“Add Solvent” Enable to add solvent manually, in order to low the viscosity quickly.
Conduct this function many times may lead to mixing tank
overflow.
“First Fill” Enable to fill the ink and solvent to the system in first time.
See “5.4 First fill” for more information.
Page 77
User Operational Manual Rottweil® E-Jet series CIJ Inkjet Printer
V 12-2-4 / Feb 2012 77
“Empty System” Enable to empty the hydraulic system manually when shipment long time
suspending of the inkjet.
See “8.2.4 Empty ink system and change new ink” for more information.
“Exit” Press to back to start page.
Page 78
User Operational Manual Rottweil® E-Jet series CIJ Inkjet Printer
V 12-2-4 / Feb 2012 78
7.6.4 Status page
Press “Status” in “Jet Service” page to active this page.
This page CAN NOT be edited and displays the status of ink system and print head.
“Status” Page
“Ink Pressure[mbar]” Display current pressure value of ink system.
“Temperature[℃]” Set as ideal default temperature by manufacturer.
“Viscosity” Display current viscosity value of ink system.
“Ink level” Display the ink level in mix tank.
“100” indicates adequate ink in mix tank, while less than “100” ink and
solvent is about to be filled automatically.
“Fill time[s]” Display filling time in how many seconds, which to be used to calculate
viscosity.
“Ink-Watch” Display if ink level exceeds max. Volume of mix tank.
If there is “X” after this, indicates the mix tank overflow.
Need to drain out ink manually from drain-out pipe.
“Visco Top” Display the ink top level through detection in mix tank.
“Visco Bottom” Display the ink bottom level through detection in mix tank.
“Add Ink” Display if the system is filling with ink.
“Add Solvent” Display if the system is filling with solvent.
“Ink flow” Display the value of recycled ink stream through gutter in print head.
If no ink stream goes to gutter or not smoothly, the value is low.
If the actual value is below the min. value, ink stream will be cut
automatically (when “Ink Flow Watch OFF” is enabled only).
“HV[V]” Display the high voltage between two deflection electrodes in print
head.
Adjust the “HV” value, the print message height is changed accordingly.
“Ink” Display if the ink stream is on or not.
“Bleed” Display the bleed valve is open or closed.
“Head Open” Display the print head cover is open or closed.
If head cover is open, the “SERVICE” LED is on in operating panel.
“Exit” Press to back to start page.
Page 79
User Operational Manual Rottweil® E-Jet series CIJ Inkjet Printer
V 12-2-4 / Feb 2012 79
How to adjust “HV”?
1. No necessary to adjust “HV” in general.
2. See “5.5.5 HV adjustment”.
Viscosity changing & reading in “Status” page.
Viscosity measuring follows below changes, which could be read on display in “Status”
page. If you can get below circle, it indicates the measuring of viscosity is okay.
The whole circle time is the “Fill Time”.
Page 80
User Operational Manual Rottweil® E-Jet series CIJ Inkjet Printer
V 12-2-4 / Feb 2012 80
7.6.5 Phase page
Press “Phase” in “Jet Service” page to active this page.
This page is only for service engineer or authorized distributor, as any wrong
adjustment may lead to poor quality print or errors.
When printing, phase can be displayed but CAN NOT be adjusted.
E-Jet provides two types modulation adjustment: Auto Phase and Manual Phase.
“Phase” Page
“Head” Display the head in use.
“Modulation” Press or use “Left”, “Right” key to adjust modulation to get ideal ink drop
breaking shape. See “5.5.6 Ink drop breaking shape adjustment”.
“Phase Status” Observe the modulation status.
“Auto Phase” Active by press this button, the printer will select ideal modulation value
automatically, when close print head.
Inkjet auto-searching ideal phase in every start-up.
This process may need 2-3 minutes.
Please go to page “Set up” to enable or disable this function.
Warning: Not recommend to use under current software version.
“Ok” Press to save the created/edited configuration.
“Exit” Press to back to start page.
Page 81
User Operational Manual Rottweil® E-Jet series CIJ Inkjet Printer
V 12-2-4 / Feb 2012 81
How to adjust “Modulation”?
1. Make sure inkjet has correct pressure value and viscosity value.
2. Enable ink stream and close print head cover.
3. Adjust “Modulation” to “0”.
4. Adjust “Modulation” gradually until you get below ideal ink drop breaking shape.
5. Make sure four to five stars get together in “Phase Status” window.
6. Press “Ok” to save.
Fig. 7-3 Ideal ink drop breaking shape
Page 82
User Operational Manual Rottweil® E-Jet series CIJ Inkjet Printer
V 12-2-4 / Feb 2012 82
7.6.6 Setup page
Press “Setup” in “Jet Service” page to active this page.
Any changes in this page MUST press “ENTER” key to active.
“Setup” Page
“Head” Display the head in use.
“Print mode” Press to select print mode as demand for different speed in
applications.
“Hisp” mode – High speed print, standard print quality, print distance to
object should be less than 5mm.
“Graf” mode – High quality print, comparatively slow speed. Not
available in E-Jet, 24 dots version.
“Standard” mode – In between of above two print modes. Available
only below 32 dots vertically. Change “Ink Drop” value can not adjust
the printing speed under “Standard” mode.
“MultiLine HISP” mode– Used for 3~4 lines high speed printing, within
32 dots vertically.
See print speed chart in “9.1 Printing speed”.
1. The matrix of print text vertically is below 16 dots (incl.
16dots), “Hisp” is available, while over 16 dots the print mode
will be automatically switch to “Graf” only. If needs to print
over 16 dots with high speed, use “MultiLine HISP” mode.
2. Change the print mode from one to another, MUST RE-LOAD the text.
“HV%” Set as default high voltage deflection value percentage by manufacturer.
Not adjustable.
“Modulation” Display modulation value and not adjustable here.
“InkFlowWatch OFF” Press to enable this function to prevent ink stream cut automatically.
“Mod-Frequency[HZ]” Display resonator vibration frequency. Not adjustable.
EJ62.5N-55-D indicates as “65146”.
“Pressure[mbar]” Input default pressure value.
Page 83
User Operational Manual Rottweil® E-Jet series CIJ Inkjet Printer
V 12-2-4 / Feb 2012 83
EJ62.5N-55-D is suggested to set at “2200”.
EJ62.5N-70-D/P is suggested to set at “2000”.
“ViscoOffSet” Input default viscosity value.
EJ62.5N-55-D is suggested to set at “0”.
This value is subject to the ink/solvent of Rottweil®. If you use
ink from other channels, the inkjet must be strictly test and find out the
proper settings.
“0~200” represents fill time in theory is from 35” to longer time period,
if the ink is thinner, use a bigger value in this range.
“201~250” represents fill time in theory is from 34.9” to shorter time
period, if the ink is thicker, use a bigger value in this range.
“ChargeOffSet[%]” Input the charging value offset, accordingly the whole printing is moved
upward by the percentage.
Adjustable. Default at “0”. Max. “100”.
“Suction pump” Input suction pump voltage value. Default set at “60”. If not work
proper, may increase slightly.
“Ink Type” Set ink type to match its own setups automatically.
Not available at moment.
“Nozzle Type[μm]” Input different options for nozzle size.
“Auto Phase” Enabled with “x” indicates the printer will automatically select the ideal
phase during running. Disable this is recommended under current
software version.
“Ok” Press to save the created/edited configuration.
“Exit” Press to back to start page.
Page 84
User Operational Manual Rottweil® E-Jet series CIJ Inkjet Printer
V 12-2-4 / Feb 2012 84
This page is only for service engineer or authorized distributor, as any wrong
adjustment may lead to poor quality print or errors.
Input FULLFUNCTION when password page pops up when start up, “SpecialSetup” can
be displayed on this page.
Please also Press “Status” page to check the “InkFlow” update value and set the “InkFlowValue”
in “SpecialSetup” page the value smaller than that.
When “InkFlow” value in “Status” page is below the set up value in “SpecialSetup” page, the ink
stream would be cut automatically.
Page 85
User Operational Manual Rottweil® E-Jet series CIJ Inkjet Printer
V 12-2-4 / Feb 2012 85
7.7 System
System settings are available in this chapter.
Rottweil® brings you easy coding experience you never had before.
7.7.1 Menu tree
Below chart shows the tree structure of this chapter.
Page 86
User Operational Manual Rottweil® E-Jet series CIJ Inkjet Printer
V 12-2-4 / Feb 2012 86
7.7.2 System page
Press “System” in default start page to active this “System” page.
System values have been set by manufacturer, which NO necessary to edit in general
situation. Any changes in this chapter, please contact service engineer or authorized
local distributor.
“System” Page
“System ID” Display the system ID.
“Language” Press to select menu interface language and Press “Exit”.
A pop-up window request for reboot inkjet.
“Editor Height” Input to define the vertical editing dots in editing area of “Editor” page.
Max. 24 dots vertically.
“LabelViewHeight” Edit to change the view window of default start page.
“DummyFields” Input to define the number of data fields to be additionally assigned to the
print labels. These special fields are mainly used by special print programs.
Default is “128”.
“Load Text Quickly” Enable to load text without completion of previous text print.
“Load Config
Quickly”
Enable to load config without completion of previous config.
“Line” Press to active “Line” page, which enables to change name of product line
and define device type.
“Serial” Press to active “Interface Par” page which enables to define serial port for
communications.
“Password” Press to active “Password” page to manage users and passwords.
“Date&Time” Press to active “Time Date” page to set system time and date.
“Exit” Press to back to previous page.
Page 87
User Operational Manual Rottweil® E-Jet series CIJ Inkjet Printer
V 12-2-4 / Feb 2012 87
7.7.3 Line page
Press “Line” in “System” page to active this page.
“Line” Page
“Name” Input to define the line name, which is displayed in default start page.
“Device” Press to select the type of printing system connected to this line (UPIF).
“Line Merge” Press to activate this function, the second line becomes the “slave line” of
the first line. As a consequence, line commands, such as load print text or
load configuration, are transmitted to both lines at the same time. Both
lines will then be comprised to work as one line. First line trigger signal
commands two lines printing and speed.
“Ok” Press to save the created/edited configuration.
“Exit” Press to back to previous page.
Page 88
User Operational Manual Rottweil® E-Jet series CIJ Inkjet Printer
V 12-2-4 / Feb 2012 88
7.7.4 Interface Par page
Press “Serial” in “System” page to active this page.
Use this page to define the parameters of the interfaces available and/or used.
If the CTS handshake line of the serial interface is deactivated or is not connected, the parameters
of the serial interface are set to fixed values: 115200 bauds, "even” parity.
“Interface Par” Page
“Com Active” Press to activate the serial interface (Com1 and/or Com2).
“Baudrate” Input to set the baud rate of the serial interface. Default as “115200”.
“Parity” Press to define the type of parity test. Default as “None”.
“Control Unit” If a system of the Rottweil® E-Jet family is connected to this interface, this
field must be activated to trigger the automatic machine search function
upon start.
“Ok” Press to save the created/edited configuration.
“Exit” Press to back to previous page.
Page 89
User Operational Manual Rottweil® E-Jet series CIJ Inkjet Printer
V 12-2-4 / Feb 2012 89
7.7.5 Password page
Press “Password” in “System” page to active this page. Administrative password is service
Press the “Active” to active password function. The system is controlled by a start up page, which
requires password as a welcome screen.
Only the password is active, you may have the access to each user, whom has been entrusted
different user licenses. Otherwise, only use the Administrator password service to have the
access to all functions.
If you do not enter this password, the system will automatically start up and the user only has
basic license T and C, as basic operator who has the access to print only.
The core concept of password control is to give license to different users and use password to
control when start up.
License definition is as below:
License Code Authority to Users
T Access to “TEXT” and “Load” selected print message only.
E Create “New”/“Copy”/“Delete”/“Edit” text messages.
C Access to “CONFIG” and “Load” selected configuration file only.
K Create “New”/“Copy”/“Delete”/“Edit” configurations.
S Access to “SERVICE”.
I Access to “Sensor” page.
N Access to “Counter” page.
P Access to “Phase” page.
Y Access to “SYSTEM”. Without this, only reboot pages pops up.
F Access to “FILE”.
W Access to “Password” page.
Another password is available for senior engineer only, or well-trained qualified service
staff for the inkjet. Input fullfunction, which enables user to the access to edit the
InkFlowValue in SpecialSetup page. Press “7.6.6 Setup page” for more information.
Page 90
User Operational Manual Rottweil® E-Jet series CIJ Inkjet Printer
V 12-2-4 / Feb 2012 90
7.7.6 Time Date page
Press “Time&Date” in “System” page to active this page.
Set system date and time in this page.
“Shift” + “Y”, edit "year.
“Shift” + “M”, edit month.
“Shift” + “D”, edit day.
Use “TAB” to edit hour, minute and second.
Press “Exit” to quit. Reboot system is requested. Then reboot the inkjet. Time and date will be
updated.
Quit from system page, reboot system request will be popped up. Confirm to reboot and
ink line would not be cut.
Page 91
User Operational Manual Rottweil® E-Jet series CIJ Inkjet Printer
V 12-2-4 / Feb 2012 91
How to upgrade software through USB flash disk?
This procedure is only allowed to process by authorized Rottweil engineer or trained
operators from our team worldwide.
1. Go to “System” page and then press “SC” hot key in keypad.
2. Select “usb” and press “Enter” to next page.
Page 92
User Operational Manual Rottweil® E-Jet series CIJ Inkjet Printer
V 12-2-4 / Feb 2012 92
3. Select “sda1” and press “Enter” to next page.
4. Select “Rott10.rot” file and press “Ok” to start upgrading. Upgrading file ended with “.rot”.
Note: Upgrading file is ended with “rot” and here is only for your reference to show
that upgrading should select this type of file. In the practice, you need to know exactly
which “rot” file you need for your upgrading.
5. Upgrading process automatically and press “Enter” again after this to reboot.
Page 93
User Operational Manual Rottweil® E-Jet series CIJ Inkjet Printer
V 12-2-4 / Feb 2012 93
7.8 File
Files download from USB key or files transmission.
Rottweil® brings you easy coding experience you never had before.
7.8.1 Menu tree
Below chart shows the tree structure of this chapter.
Page 94
User Operational Manual Rottweil® E-Jet series CIJ Inkjet Printer
V 12-2-4 / Feb 2012 94
7.8.2 File manager page
Press “File” in default start page to active “File Manager” page.
The page displays all files stored in the inkjet memory.
“File Manager” Page
“Path” Display the path of files stored in inkjet memory.
Press “..” and then press “ENTER” to check folder list.
“File” Display the files in the folder, which selected in “Path” window.
Press to highlight a file and then Press “Copy”, “Delete”, “Transmit” to
conduct file operations.
“Status” Display the file operation progress in percentage bar.
“Copy” Press to copy selected file to inkjet.
“Delete” Press to delete selected file.
“Transmit” Press to transmit selected file.
“Logo” Press to active “Logo” page to create or edit logos.
“Exit” Press to back to default start page.
To create logo, either edit directly through the logo creator/editor in “Logo” page (see
next part of this chapter), or via PC software and then download to inkjet.
Inkjet readable logo file ended with “.mlg”.
Page 95
User Operational Manual Rottweil® E-Jet series CIJ Inkjet Printer
V 12-2-4 / Feb 2012 95
How to download logo files with USB key?
1. Insert USB key to CPU board. Click “..” to highlight it and press “ENTER” to check next folder
list.
2. Click “..” to highlight it and press “ENTER” to check next folder list.
3. Click “usb” to highlight it and press “ENTER” to check next folder list.
4. Click “sda1” of one folder in USB key, to highlight it and press “ENTER” to check files stored in
it in “File” window.
5. A list of “.mlg” files listed in “File” window. Click files needs to be copied or transmitted to
highlight them with “Space” key.
6. Click “Copy” and the files selected will be copied to the inkjet memory. “Status” bar indicates
“Succeed”.
7. Click “Text” in default start page and edit the text you need to add logo. Then click “Special” in
blank area to active “Logo Format” page.
8. Click desired logo to add to text.
Fig. 7-4 USB port
Page 96
User Operational Manual Rottweil® E-Jet series CIJ Inkjet Printer
V 12-2-4 / Feb 2012 96
7.8.3 Logo page
Press “Logo” in “File” page to active this page.
“Logo” Page
“Logo” Display a list of all logo files stored in memory of inkjet.
“New” Press to create new logo text. A pop-up window requests a new name of
it.
Then “Logo Editor” page will be active.
“Edit” Press to edit highlighted logos in “Logo Editor” page.
“Delete” Press to delete selected logos.
“Exit” Press to back to “File Manager” page.
Page 97
User Operational Manual Rottweil® E-Jet series CIJ Inkjet Printer
V 12-2-4 / Feb 2012 97
7.8.4 Logo editor page
Press “New” or “Edit” in “Logo” page to active this page.
Use circus key “LEFT”, “RIGHT”, “UP”, “DOWN” to move circus and press “ENTER” key to write or
erase.
Below the pixel grid area, coordinates of cursor displayed.
“Logo Editor” Page
“Eraser” / “Pixel” Default to write the dot as “Eraser” displayed.
Press “Eraser” to erase the dot as “Pixel” displayed.
“Save” Press to save the changes.
“Exit” Press without save and back to “Logo” page.
Page 98
User Operational Manual Rottweil® E-Jet series CIJ Inkjet Printer
V 12-2-4 / Feb 2012 98
8.1 Illustrations
8.1.1 Ink system part
Section 8 Maintenance
Fig. 8-1 ink system, front view
D1 restrictor (Code: JLG-004)
Quick coupling socket complete (Code: EZKU0004/5)
Pressure pump (Code: LYB-PML001)
Suction pump (Code: NF30KTDC)
Return filter (Code: XFI0001800)
Main filter 10U (Code: PQ-010)
D2 restrictor (Code: JLG-005)
Ink add valve (Code: PVE10AL1)
Solvent add valve (Code: PVE10AL1)
D3 restrictor (Code: JLG-006)
Drain out pipe with cap
Pressure damper
Solvent filter (Code: PWF0002)
Mesh filter
Mesh filter
Mesh filter
Page 99
User Operational Manual Rottweil® E-Jet series CIJ Inkjet Printer
V 12-2-4 / Feb 2012 99
8.1.2 Electrical boards
Fig. 8-2 Electrical parts
Print Board
(Code: R03PRINT-A)
CPU Card
(Code: R03ROT-EXT-V3-A)
Ink System Board
(Code: R03INKCTRL-1) Core Arm Card
(Code: R01-Rottweil-V2PCBA)
Screen Card
(Code: R01-LCD-800PCBA04)
Page 100
User Operational Manual Rottweil® E-Jet series CIJ Inkjet Printer
V 12-2-4 / Feb 2012 100
8.2 Maintenance tips
8.2.1 Daily maintenance
Daily checking Check ink bottle and solvent bottle.
Clean print head.
Weekly checking Clean whole ink system.
Check the air filter paper as below picture indicates.
Every six months or
1500~2000 hrs running
Change main filter.
Change ink.
8.2.2 Ink and solvent adding
MUST be at least 40% full of ink bottle and solvent bottle, otherwise not sufficient
fluids in the bottles would lead to no stable ink stream recycling or poor recycling.
Make sure the correct ink type and solvent type adopted.
MUST use original fluids provided by Rottweil®. We will not bear any responsibilities or
obligations for the damage on the machine due to the use of unauthorized fluids or consumables.
If no running of inkjet in next 2 to 3 days, please turn on the inkjet and get the ink stream on
for 1 hour everyday. No need to print.
Fig. 8-3 air filter papers
Page 101
User Operational Manual Rottweil® E-Jet series CIJ Inkjet Printer
V 12-2-4 / Feb 2012 101
8.2.3 Print head maintenance
Print head is a component very sensitive to dirt and contamination; therefore it
must be checked and cleaned periodically.
When the print head is on top of a cleaning container full of solvent, the print
head cover must be kept open. If it is closed, the high voltage will be activated, which will
increase the risk of igniting the vapouring solvent.
If ink or solvent enters the print head inside, components such as electronic-amplifier board
and resonator will be damaged. It is prohibited to soak the print head into solvent. The print head
components inside the cover shall be cleaned properly according to procedure. Print head must
always be fixed in a vertical position while cleaning.
The ink splashed back onto the print-head from the surface of objects during the printing
process shall be cleaned off regularly, usually once a week. Try to use paper soaked with solvent
for this job. Do not soak print-head with solvent. The print head cover shall remain open when
cleaning the print head and the ink stream shall be cut off.
When cleaning print head parts, use sealing cap to seal the gutter to avoid sudden decrease
of viscosity due to sucking of cleaning solvent from gutter.
Fig. 8-4 Print head and ink chamber
Page 102
User Operational Manual Rottweil® E-Jet series CIJ Inkjet Printer
V 12-2-4 / Feb 2012 102
8.2.4 Empty ink system and change new ink
Press “Service” in default start page, and then Press “Function”. Disable the ink stream by
Pressing “OFF” of “Ink”.
Remove the cap from the drain out pipe and put the pipe into one empty bottle.
The ink bottle pipe must be out of the ink bottle to prevent to suck the ink into the ink
system during the processing.
Press “Service” in default start page, and then Press “Function”. Press “ON” to enable
“Empty System”. Ink will be automatically drained out.
Seal the drain out pipe with cap.
If need to fill new ink, please conduct “First Fill”.
The ink inside the machine is suggested to be replaced every SIX months.
8.2.5 Change main filter
The main filter shall be replaced every 1500~2000 hours of running, or when white cracks
can be found on the above surface of the main filter.
MUST shut down inkjet and wait around 15 minutes till no pressure in hydraulic system
before this replacement. During the replacement process, dust must be prevented from entering
the ink system.
Page 103
User Operational Manual Rottweil® E-Jet series CIJ Inkjet Printer
V 12-2-4 / Feb 2012 103
8.3 Trouble shooting tips
8.3.1 General tips
Fault Possible Reason Elimination
Can not start inkjet
Power supply is not
connected.
The fuse of the main supply is
blown.
Plug in the power supply.
Check the voltage compatible or not;
Replace the fuse.
No ink stream Nozzle blocked.
V1 valve blocked or defected.
Clean the nozzle in “Function” page.
Clean V1 or replace it.
Ink stream deviation
or unstable
The nozzle blocked.
Main filter blocked.
Ink dirty. Change.
Clean the nozzle or replace it.
Replace the main filter.
Ink pressure too low
Insufficient of ink.
Main filter blocked
Net filter blocked, which
located at the ink stream
entrance of pressure pump.
Pressure pump problem.
D2 restrictor loose.
Pressure transmitter problem.
Check whether the ink inside the ink bottle is
sufficient.
Replace the main filter.
Replace net filter.
Check pressure pump or replace.
Tight D2 restrictor or replace.
Check pressure transmitter or replace.
Mixing tank overflow
Ink level sensor inside mix
tank blocked or defected.
Ink system board connection
loose or defected.
Solvent add valve, ink add
valve can not close properly.
Clean sensor inside mix tank or replace mix
tank.
Check ink system board connections.
Check solvent add valve and ink add valve or
replace.
Ink viscosity too high
No solvent in the solvent
bottle.
Ink add valve defected.
Check if there is solvent inside the solvent
bottle, add if not sufficient.
Clean ink add valve or replace it.
Ink viscosity too low Solvent add valve defected. Check solvent add valve or replace it.
No suction in the
gutter
The recycling tube in the back
side of print-head blocked.
Ink bottle or solvent bottle is
empty.
Suction pump problem.
Clear the blockage of the recycling tube.
Fill in ink and solvent if necessary.
Check suction pump or replace.
No printing
No print text.
Incorrect configuration.
Print board defected.
No high voltage (HV).
No trigger signal input.
Re-edit print text and re-load.
Check configuration and re-load.
Replace print board.
Adjust HV or replace the high voltage board.
Check photo sensor or encoder.
Printing dot flying Poor ink drop breaking shape. Adjust the ink drop breaking shape or
Page 104
User Operational Manual Rottweil® E-Jet series CIJ Inkjet Printer
V 12-2-4 / Feb 2012 104
Phasing no good.
Ink stream position too close
to the rear side of the gutter.
Ink expired or was
contaminated.
Main filter blocked.
replace resonator.
Adjust phase.
Adjust the ink stream position to gutter
properly.
Change ink.
Replace main filter.
Ink accumulated on
the gutter
Nozzle blocked.
Poor ink drop breaking shape.
Pressure fluctuation or ink
drop moves up and down.
Phase problem.
Clean nozzle.
Adjust ink drop breaking shape.
Replace main filter or pressure damper.
Adjust phase.
Ink accumulated on
upper deflection
electrode
Upper deflection electrode
polluted by dry ink.
Too high HV.
Viscosity over the correct
range ±50.
Clean upper deflection electrode and dry it
with blower.
Adjust HV.
Adjust viscosity to the range.
Ink drops from print
head
Deviation of ink stream from
gutter.
No suction from gutter.
Suction pump defected.
Clean nozzle and adjust ink stream position.
Sufficient ink and solvent in each bottle.
Check suction pump or replace.
Page 105
User Operational Manual Rottweil® E-Jet series CIJ Inkjet Printer
V 12-2-4 / Feb 2012 105
9.1 Printing speed
Resonator Frequency [Hz]: 62,500, EJ62.5N-D-55
Print mode Fonts &
Lines
Speed Max.
(m/sec)
Speed Max.
(m/min)
Character
Width(mm)
Speed Max.
(m/sec)
Speed Max.
(m/min)
Text
Width(mm)
HISP
(Character
Width=1)
a5×5
1 line 4.67 280.00 2.0 5.83 350.00 2.5
a7×5
1 line 3.33 200.00 2.0 4.16 250.00 2.5
M9×6
1 line 3.00 180.00 2.5 3.63 218.00 3.0
N11×7
1 line 2.50 150.00 3.0 2.91 175.00 3.5
hzk12
1 line 1.83 110.00 4.0 2.06 123.75 4.5
a7×5
2 lines 1.20 72.00 2.0 1.50 90.,00 2.5
STANDARD
(Character
Width=1)
a7×5
1 line 1.67 100.00 2.0 2.08 125.00 2.5
a7×5
2 lines 1.00 60.00 2.0 1.25 75.00 2.5
a7×5
3 lines 0.60 36.00 2.0 0.75 45.00 2.5
a7×5
4 lines 0.40 24.00 2.0 0.20 30.00 2.5
M9×6
1 line 1.33 80.00 2.0 1.67 100.00 2.5
N11×7
1 line 1.17 70.00 3.0 1.36 81.67 3.5
hzk12
1 line 1.17 70.00 4.0 1.31 78.75 4.5
Section 9 References
On site speed may be different from the speed in this table, which was influenced by on-site conditions.
Page 106
User Operational Manual Rottweil® E-Jet series CIJ Inkjet Printer
V 12-2-4 / Feb 2012 106
9.2 Daily running cost calculation
Calculation condition:
1. 55 μm nozzle;
2. The calculation is only for your reference and the results may be changed along with the
circumstance.
3. Rottweil® reserves the right on further explanation.
4. Print example: 7x5 matrix, “EXP 11 10 2010”, total 11 characters in this text.
5. Below table shows the factors, some are fixed; some are variable in different inkjet
manufacturer/brands, while others depend on applications in end user line. The price for ink and
solvent is just for example.
Calculation factors:
ITEM CONTENT EXAMPLE
A Number of ink drops 2,000,000,000 dots/liter Fixed
B Solvent operational time *150 hours/liter Variable in brands
C Number of print 150 text/minute Variable in brands
D Working day 26 days/month Depends on user
E 1 shift 8 hours/shift Depends on user
F Number of shift 3 shifts/day Depends on user
G Wash up operational, with solvent 50 times/liter Fixed
H Number of wash up 4 times/month Fixed
P1 Ink price USD /liter Variable in brands
P2 Solvent price USD /liter Variable in brands
L Average dots for one character 40% x (7x5 matrix) Depends on matrix
M Number of character 11/text Depends on user
Calculation formula:
Ink cost per day = C x L x M x 60 x E x F x P1 / A
Solvent cost per day = (E x F / B) x P2 + [H / (D x G)] x P2
Solvent consumption:
With solvent recovery system/condenser: 150 hours/liter
Without solvent recovery system/condenser: 80 hours/liter
The figure here is calculated in general condition and maybe differed from various regions, only for
reference. Test environment is under 20 Cent-degree as normal condition. The value may change in
various temperature and humidity.