46
Using the DB2 Web Query Spreadsheet Client Add-in

Using the DB2 Web QuerySpreadsheet Client Add-in

Cactus, EDA, EDA/SQL, FIDEL, FOCUS, Information Builders, the Information Builders logo, iWay, iWay Software,Parlay, PC/FOCUS, RStat, TableTalk, Web390, and WebFOCUS are registered trademarks, and DataMigrator andMagnify are trademarks of Information Builders, Inc.
Adobe, the Adobe logo, Acrobat, Adobe Reader, Flash, Adobe Flash Builder, Flex, and PostScript are either registeredtrademarks or trademarks of Adobe Systems Incorporated in the United States and/or other countries.
Due to the nature of this material, this document refers to numerous hardware and software products by theirtrademarks. In most, if not all cases, these designations are claimed as trademarks or registered trademarks by theirrespective companies. It is not this publisher’s intent to use any of these names generically. The reader is thereforecautioned to investigate all claimed trademark rights before using any of these names other than to refer to theproduct described.
Copyright © 2010, by Information Builders, Inc. and iWay Software. All rights reserved. Patent Pending. This manual,or parts thereof, may not be reproduced in any form without the written permission of Information Builders, Inc.
IBM
Contents
Using the DB2 Web Query Spreadsheet Client Add-in.........................................5Spreadsheet Client Features..............................................................................................6
Configuring Spreadsheet Client..........................................................................................6
Configuring a Default DB2 Web Query Environment..............................................................8
Installing and Setting Up the Spreadsheet Client.................................................................9
Accessing Spreadsheet Client..........................................................................................14
Defining Web Server Connection Settings..........................................................................19
Advanced Connection Options Dialog .......................................................................21
Logging into DB2 Web Query............................................................................................21
Selecting a Master File....................................................................................................23
Creating Report Queries With the Report Assistant Tool.....................................................24
Editing Report Queries in Report Assistant................................................................30
Creating Report Queries From Structured Ad hoc Forms.....................................................34
Creating Structured Ad hoc Forms in Developer Workbench................................................38
Setting Query Properties..................................................................................................44
Defining Data Formatting and Layout.........................................................................45
Using the DB2 Web Query Spreadsheet Client Add-in 3

4 IBM
Contents
Using the DB2 Web Query Spreadsheet Client Add-in
Topics:DB2 Web Query Spreadsheet Client is aMicrosoft Office add-in that enables youto connect Microsoft Excel directly toDB2 Web Query reporting tools whereyou can access and analyze your dataon IBM i. Connecting Excel to the DB2Web Query reporting engine allowsSpreadsheet Client to leverage all theavailable adapters to DB2 Web Query.
Spreadsheet Client Features
Configuring Spreadsheet Client
Configuring a Default DB2 Web QueryEnvironment
Installing and Setting Up theSpreadsheet Client
You can install the Spreadsheet ClientAdd-in on your desktop, where you cancreate and edit queries by accessingpredefined data sources. Queries can besaved in an Excel document andrefreshed at any time.
Accessing Spreadsheet Client
Defining Web Server ConnectionSettings
Logging into DB2 Web QueryBecause all DB2 Web Query report andconnection information can be saved inan Excel workbook, users with the propersecurity and access rights can sharespreadsheets throughout anorganization. This functionality lets youspend less time recreating reports andmore time analyzing information foreffective decision-making. SpreadsheetClient also enhances Excel’s data-privacyfeatures and better addressescompliance concerns. When reports arebuilt directly within Excel, you can lockall or some of the cells and passwordprotect the worksheet. Locking cells canbe useful to protect data and querieswhen sharing workbooks, but in Excel,locked cells cannot be refreshed oredited.
Selecting a Master File
Creating Report Queries With theReport Assistant Tool
Creating Report Queries FromStructured Ad hoc Forms
Creating Structured Ad hoc Forms inDeveloper Workbench
Setting Query Properties
Using the DB2 Web Query Spreadsheet Client Add-in 5

Spreadsheet Client FeaturesWhen using Spreadsheet Client from within the familiar Excel environment, you can utilizemany powerful features including, but not limited to, the following:
Build Excel applications with real-time information fed by Spreadsheet Client.
Create dashboards and scorecards in Excel by combining multiple data sources in asingle worksheet.
Ensure data integrity in your spreadsheets by using named ranges and formulas that areautomatically generated and updated with Spreadsheet Client.
Create queries from scratch using DB2 Web Query's simple, yet powerful ad hoc reportingcapabilities.
Use your own custom guided ad hoc forms to populate the workbook.
Output computations and totals as native Excel formulas.
Style output, add data filtering, and include drill-downs.
Configuring Spreadsheet Client
How to:
Configure Spreadsheet Client
The DB2 Web Query Administration Console is used to configure the Spreadsheet Client.By default, the Spreadsheet Client is configured to use DB2 Web Query MR Security. Thisleverages the security defined in DB2 Web Query and provides secure access to all dataavailable through the DB2 Web Query environment. Additional optional settings in the consolecan be configured to provide you with the ability to create queries by accessing SAFs(Structured Ad hoc Forms) stored in the Managed Reporting repository. A SAF is an HTMLform containing a report procedure that is already connected to a data source, which enablesyou to select from a series of parameters to build a data set for analysis in Excel.
Note: Run-time enablement users are not permitted to use the Report Assistant tool andmust use SAFs.
How to Configure Spreadsheet ClientProcedure:
1. Log on to the DB2 Web Query Administration Console using valid DB2 Web Queryadministrator's credentials.
2. Click the Configuration button in the main menu, then click Spreadsheet Client.
6 IBM
Spreadsheet Client Features

The DB2 Web Query Spreadsheet Client panel appears with the quick_data_securitysetting set to MR by default. Do not change this setting.
3. To utilize MR Authorization and access SAFs (Structured Ad hoc Forms) stored in theManaged Reporting repository, click the drop-down menu next to either thequick_data_domain_desc or quick_data_folder_desc setting.
The Managed Reporting Logon menu appears below the DB2 Web Query SpreadsheetClient settings, as shown in the following image.
4. Provide valid credentials for a Managed Reporting administrator in the User ID andPassword fields, then click Logon.
The Managed Reporting Logon menu closes and you are not prompted again to provideManaged Reporting credentials during the same console session.
Note: The log on credentials should be for a Managed Reporting administrator who hasthe authority to access all of the domains in the Managed Reporting repository.
5. Use the quick_data_domain_desc drop-down menu to select the DB2 Web Query Domainthat contains the Reports folder where the SAFs will reside.
Using the DB2 Web Query Spreadsheet Client Add-in 7
Using the DB2 Web Query Spreadsheet Client Add-in

This Domain is also used to store Synonyms that are not in the baseapp folder but arerequired by the Spreadsheet Client Report Assistant user interface. The Domain'sapplication path property must be enabled to include the additional application folder(s).Refer to DB2 Web Query documentation for details on how to set up a domain'sapplication path.
6. Use the quick_data_folder_desc drop-down menu to select a Domain Reports folderwhere the SAFs will reside.
SAFs can reside within the top-level Reports folder or within a subfolder. Note that theconsole displays only the top-level Reports folder, but Spreadsheet Client has thecapability to search for any subfolder.
Tip: Since all HTML files in the selected Reports folder can be accessed by SpreadsheetClient, it is recommended that this folder be dedicated for storing only SAFs.
7. Click Save to save your configuration settings.
Configuring a Default DB2 Web Query EnvironmentA configuration file is provided with the Spreadsheet Client Add-In as a template for theadministrator to design a default DB2 Web Query environment. The configuration file definessuch items as the DB2 Web Query Web server port number, alias, and client path. Theseitems provide the user with a default DB2 Web Query environment allowing them to bypassthe additional step of manually defining these parameters in order to use Spreadsheet Client.
The configuration file is named wqsclient.cfg and is located in
/QIBM/proddata/webquery/ibi/webfocus77/utilities
The configuration file can contain multiple DB2 Web Query configurations. Keep in mind thatif the configuration file contains more than one DB2 Web Query configuration, then the lastone appearing in the file is the configuration that is used when opening Spreadsheet Client.
The configuration file provided as a template with Spreadsheet Client Add-in containsexamples of configurations and instructions to help you create your own configuration. Thefollowing is an example of a DB2 Web Query configuration in the configuration file:
SERVER_START PROTOCOL="http" HOST="wq_hostname" PORT="11331" HTML_ALIAS="/webquery_html" CLIENT_PATH="/webquery/WFServlet"SERVER_END
Use the following guidelines and rules to create the configuration file:
The configuration file must have the same name as the Spreadsheet Add-In file and theextension: .cfg
8 IBM
Configuring a Default DB2 Web Query Environment
For example:
wqsclient.cfg
The configuration file must reside on the machine running the Spreadsheet Client, in thesame directory as the .xla file.
Each DB2 Web Query configuration must be contained by the delimiters, SERVER_STARTand SERVER_END.
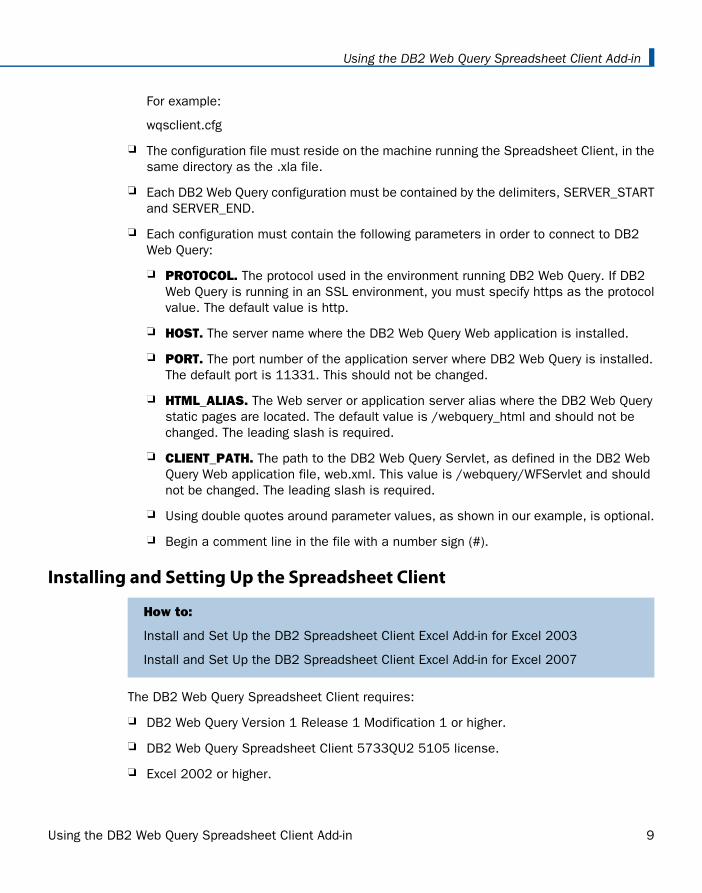
Each configuration must contain the following parameters in order to connect to DB2Web Query:
PROTOCOL. The protocol used in the environment running DB2 Web Query. If DB2Web Query is running in an SSL environment, you must specify https as the protocolvalue. The default value is http.
HOST. The server name where the DB2 Web Query Web application is installed.
PORT. The port number of the application server where DB2 Web Query is installed.The default port is 11331. This should not be changed.
HTML_ALIAS. The Web server or application server alias where the DB2 Web Querystatic pages are located. The default value is /webquery_html and should not bechanged. The leading slash is required.
CLIENT_PATH. The path to the DB2 Web Query Servlet, as defined in the DB2 WebQuery Web application file, web.xml. This value is /webquery/WFServlet and shouldnot be changed. The leading slash is required.
Using double quotes around parameter values, as shown in our example, is optional.
Begin a comment line in the file with a number sign (#).
Installing and Setting Up the Spreadsheet Client
How to:
Install and Set Up the DB2 Spreadsheet Client Excel Add-in for Excel 2003
Install and Set Up the DB2 Spreadsheet Client Excel Add-in for Excel 2007
The DB2 Web Query Spreadsheet Client requires:
DB2 Web Query Version 1 Release 1 Modification 1 or higher.
DB2 Web Query Spreadsheet Client 5733QU2 5105 license.
Excel 2002 or higher.
Using the DB2 Web Query Spreadsheet Client Add-in 9
Using the DB2 Web Query Spreadsheet Client Add-in

How to Install and Set Up the DB2 Spreadsheet Client Excel Add-in for Excel 2003Procedure:
The Spreadsheet Client Add-in and configuration files are located in
/QIBM/proddata/webquery/ibi/webfocus77/utilities
1. Copy the wqsclient.xla add-in and wqsclient.cfg file to the following directory on yourhard drive:
For Windows XP, C:\Documents and Settings\userid\Application
Data\Microsoft\AddIns\
For Windows Vista, C:\Users\userid\AppData\Roaming\Microsoft\AddIns\
where:
userid
Is the user name used to log on to the PC.
After the Spreadsheet Client Add-in is in the proper directory location, you must openExcel and select the DB2 Web Query Spreadsheet Client option in the Add-Ins dialogbox.
2. Launch Microsoft Excel.
3. Select Tools, then Add-Ins.
10 IBM
Installing and Setting Up the Spreadsheet Client
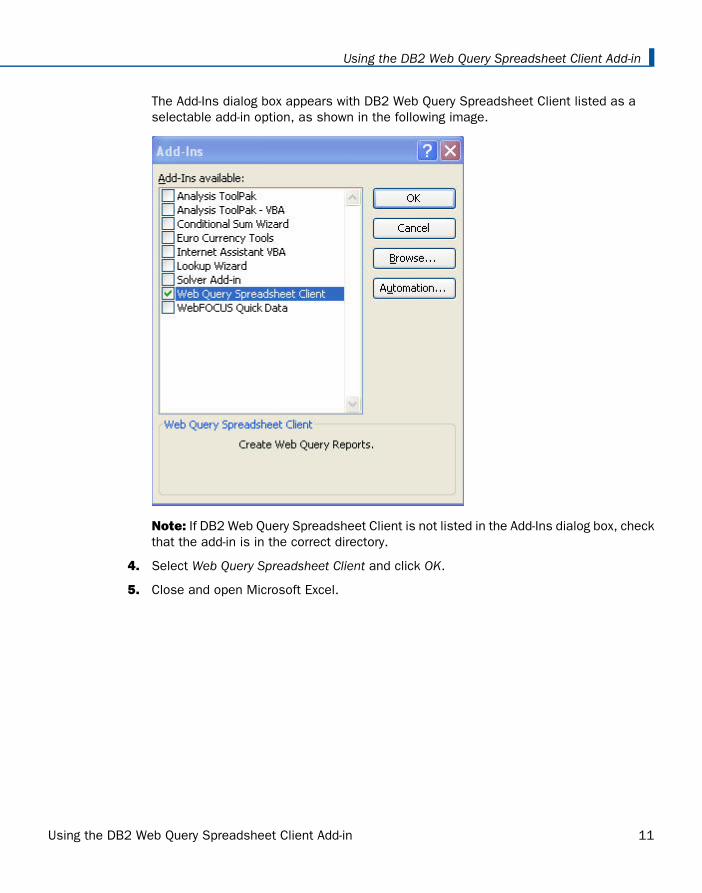
The Add-Ins dialog box appears with DB2 Web Query Spreadsheet Client listed as aselectable add-in option, as shown in the following image.
Note: If DB2 Web Query Spreadsheet Client is not listed in the Add-Ins dialog box, checkthat the add-in is in the correct directory.
4. Select Web Query Spreadsheet Client and click OK.
5. Close and open Microsoft Excel.
Using the DB2 Web Query Spreadsheet Client Add-in 11
Using the DB2 Web Query Spreadsheet Client Add-in

A new menu, labeled Web Query, is enabled in Excel, as shown in the following image.
How to Install and Set Up the DB2 Spreadsheet Client Excel Add-in for Excel 2007Procedure:
The Spreadsheet Client Add-in and configuration files are located in
/QIBM/proddata/webquery/ibi/webfocus77/utilities
1. Copy the wqsclient.xla add-in and wqsclient.cfg file to the following directory on yourhard drive:
For Windows XP, C:\Documents and Settings\userid\Application
Data\Microsoft\AddIns\
For Windows Vista, C:\Users\userid\AppData\Roaming\Microsoft\AddIns\
where:
userid
Is the user name used to log on to the PC.
After the Spreadsheet Client Add-in is in the proper directory location, you must openExcel and select the DB2 Web Query Spreadsheet Client option in the Add-Ins dialogbox.
2. Launch Microsoft Excel.
3. Click the Office button.
12 IBM
Installing and Setting Up the Spreadsheet Client
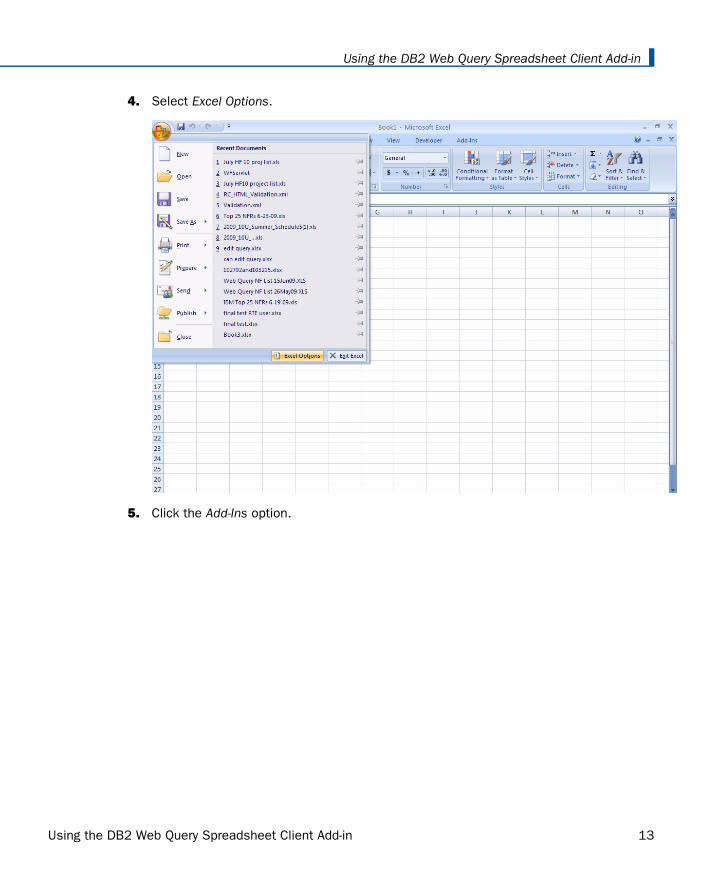
4. Select Excel Options.
5. Click the Add-Ins option.
Using the DB2 Web Query Spreadsheet Client Add-in 13
Using the DB2 Web Query Spreadsheet Client Add-in
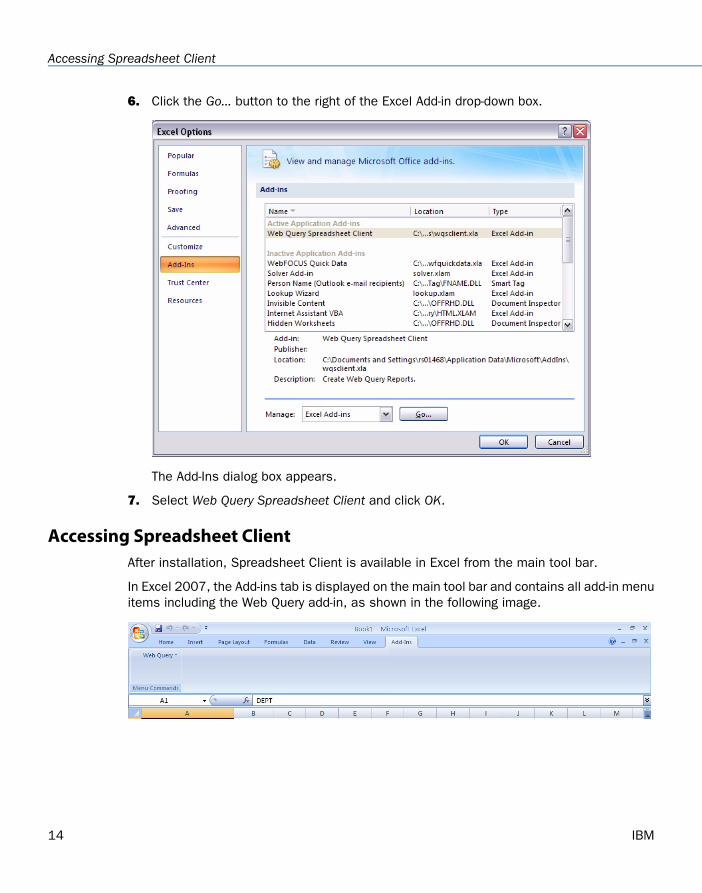
6. Click the Go... button to the right of the Excel Add-in drop-down box.
The Add-Ins dialog box appears.
7. Select Web Query Spreadsheet Client and click OK.
Accessing Spreadsheet ClientAfter installation, Spreadsheet Client is available in Excel from the main tool bar.
In Excel 2007, the Add-ins tab is displayed on the main tool bar and contains all add-in menuitems including the Web Query add-in, as shown in the following image.
14 IBM
Accessing Spreadsheet Client
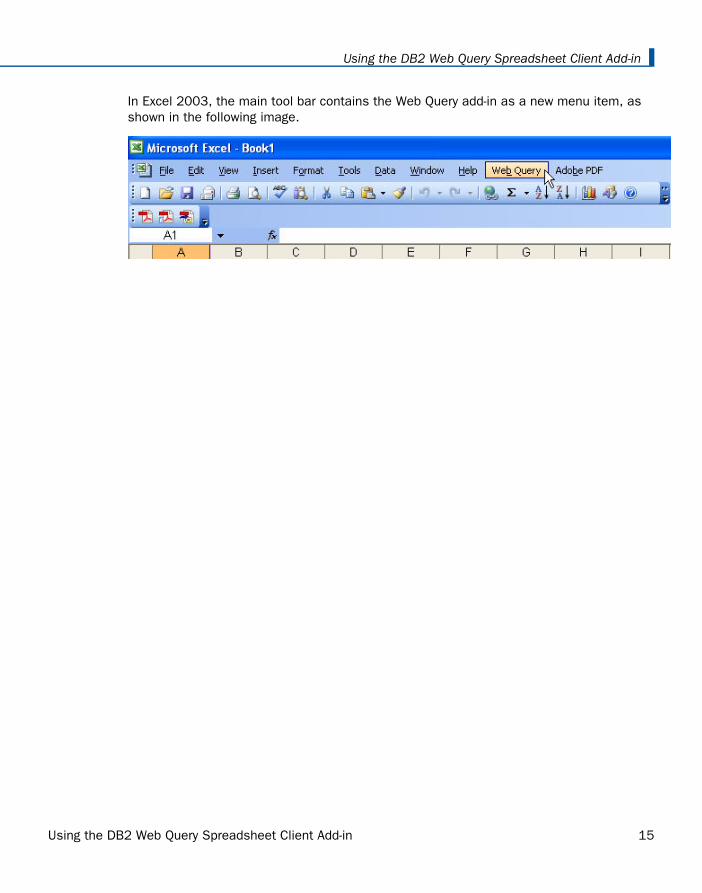
In Excel 2003, the main tool bar contains the Web Query add-in as a new menu item, asshown in the following image.
Using the DB2 Web Query Spreadsheet Client Add-in 15
Using the DB2 Web Query Spreadsheet Client Add-in
From Excel, click Web Query to view a drop-down menu with all of the necessary options forworking with queries. The following options, except for Settings, are also available from Excelright-click context menus in cells containing any part of a query.
Create Query - Available for new queries only, this option opens the Web ServerConnection dialog box so you can connect to a Reporting Server. It continues by openingthe Data Source Selection dialog box so you can select a Master File, and then opensthe Report Assistant tool where you can create the query.
Edit Query - Available for existing queries only, this option opens the Report Assistanttool where you can edit the query.
Note: Edit Query is not enabled for password protected cells.
Edit Connection - Available for existing queries only, this option opens the Web ServerConnection dialog box, where you can edit the connection settings, including the WebServer URL, the HTML Alias, the Client Path, and the Reporting Server. The ability to editconnection information saves time when reusing reports and helps facilitate the sharingof workbooks across an organization.
Data Range Properties - Available for existing queries only, this option opens theExternal Data Range Properties dialog box, where you can set Excel query properties. Formore information, see Setting Query Properties on page 44.
Refresh Data - Available for existing queries only, this option opens the Refresh Datadialog box where you can update the data in the report query.
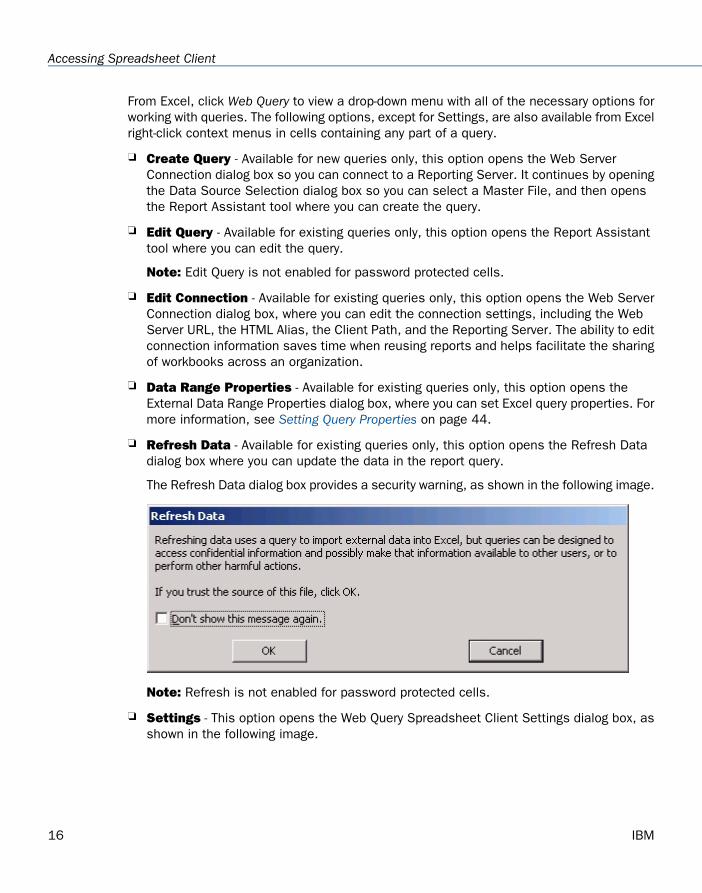
The Refresh Data dialog box provides a security warning, as shown in the following image.
Note: Refresh is not enabled for password protected cells.
Settings - This option opens the Web Query Spreadsheet Client Settings dialog box, asshown in the following image.
16 IBM
Accessing Spreadsheet Client
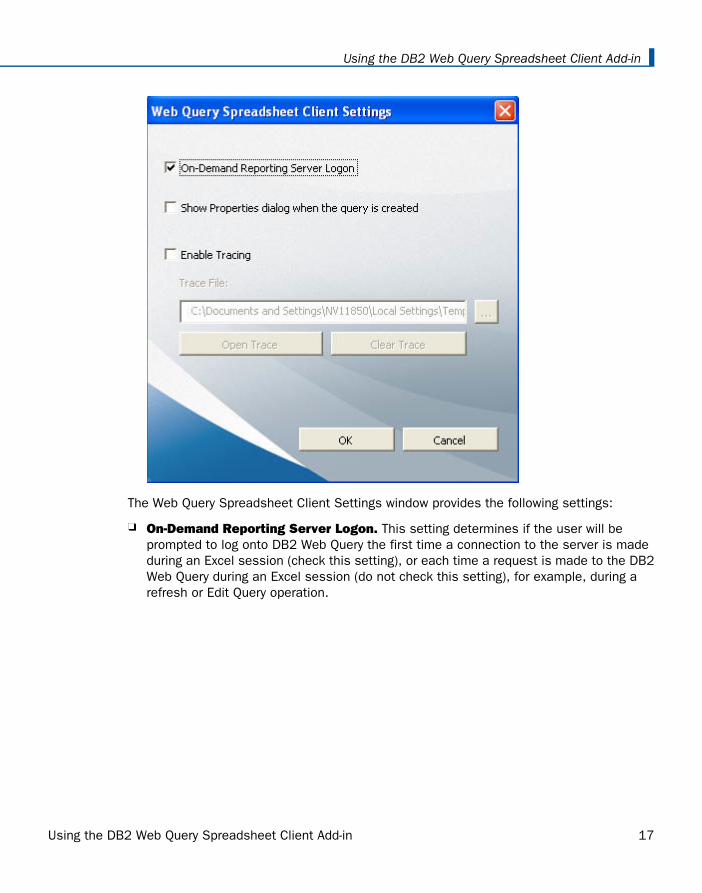
The Web Query Spreadsheet Client Settings window provides the following settings:
On-Demand Reporting Server Logon. This setting determines if the user will beprompted to log onto DB2 Web Query the first time a connection to the server is madeduring an Excel session (check this setting), or each time a request is made to the DB2Web Query during an Excel session (do not check this setting), for example, during arefresh or Edit Query operation.
Using the DB2 Web Query Spreadsheet Client Add-in 17
Using the DB2 Web Query Spreadsheet Client Add-in

Show Properties dialog when the query is created. When this setting is selected,a dialog box with options on how to insert data into Excel opens each time a new queryis executed. The following image shows this Properties dialog box.
The options to control how the results from the query will be inserted into the Excelworksheet are:
Insert cells for new data. This option allows you to retain results from multiplequeries in the same Excel worksheet. Depending on where new data will be inserted,data from an earlier request may shift.
Overwrite existing cells with new data. This option will overwrite existing data toplace results with those from the new request.
Once a query is generated, users can also control how data from new reports will bedisplayed in the Excel worksheet by right-clicking on a cell from an existing query andselecting Data Range Properties. For more information on this dialog box, see SettingQuery Properties on page 44.
18 IBM
Accessing Spreadsheet Client

Enable Tracing. This option allows you to capture DB2 Web Query Spreadsheet Clientinformation in a trace file to troubleshoot communication problems and issues that occurwhen attempting to create and run report requests.
The captured information includes tasks performed by the tool when it attempts to connectto the Web Server and Reporting Server, when requests are made for data, and whendata is retrieved. The default name of the trace file is wqsclient.txt and it is created inthe same directory as the DB2 Web Query Spreadsheet Client add-in file, for example:
C:\Users\userid\AppData\Roaming\Microsoft\Addins\
Note: Traces are captured for the duration of a single active Excel session. Tracing isautomatically turned off when you close an Excel session. The trace file content iscumulative, adding trace information from each session where tracing is enabled.
When you select Enable Trace, the Trace File field is automatically populated with thefull path to the trace file. The path includes the trace file name. You can change thelocation and name of the trace file by either typing the changes in this field or by clickingthe ellipses and browsing to a new trace file location.
To view the current trace file, click Open Trace.
To delete the contents of the current trace file, click Clear Trace.
Defining Web Server Connection Settings
In this section:
Advanced Connection Options Dialog
Building, running, and accessing a query requires an HTTP connection to a DB2 Web Queryreporting environment. The Web Server Connection dialog box opens when a new query iscreated, as shown in the following image.
Using the DB2 Web Query Spreadsheet Client Add-in 19
Using the DB2 Web Query Spreadsheet Client Add-in

The Spreadsheet Client configuration file, wqsclient.cfg, should have been updated by youradministrator to include the correct Web Server URL for your environment. For moreinformation, see Configuring a Default DB2 Web Query Environment on page 8. A newlycreated query will use this connection by default.
Web Server Connection Usage Notes for QueriesReference:
For query data connections, the following are supported:
Anonymous Web servers.
HTTP and HTTPS.
20 IBM
Defining Web Server Connection Settings
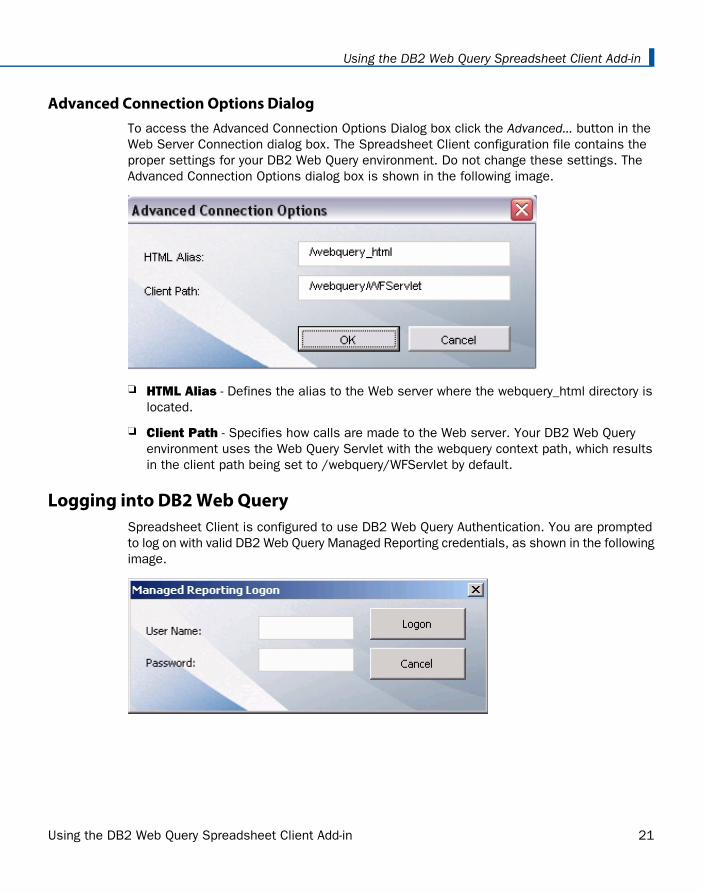
Advanced Connection Options DialogTo access the Advanced Connection Options Dialog box click the Advanced... button in theWeb Server Connection dialog box. The Spreadsheet Client configuration file contains theproper settings for your DB2 Web Query environment. Do not change these settings. TheAdvanced Connection Options dialog box is shown in the following image.
HTML Alias - Defines the alias to the Web server where the webquery_html directory islocated.
Client Path - Specifies how calls are made to the Web server. Your DB2 Web Queryenvironment uses the Web Query Servlet with the webquery context path, which resultsin the client path being set to /webquery/WFServlet by default.
Logging into DB2 Web QuerySpreadsheet Client is configured to use DB2 Web Query Authentication. You are promptedto log on with valid DB2 Web Query Managed Reporting credentials, as shown in the followingimage.
Using the DB2 Web Query Spreadsheet Client Add-in 21
Using the DB2 Web Query Spreadsheet Client Add-in

If your environment is not properly licensed, an error message appears.
If your environment is properly licensed, the Report Type dialog box appears.
22 IBM
Logging into DB2 Web Query

Selecting a Master FileIf Report Assistant is selected as the Report Type, you are presented with a list of availableMaster Files in the Data Source Selection dialog box, as shown in the following image.
Scroll through the Data Source list and select the desired Master File. When you click Finish,the associated data fields are loaded into the Report Assistant tool that opens.
Note:
The only time you can select a Master File is when you are creating a new query. TheData Source Selection dialog box is not available for you to change Master Files whenediting an existing query.
By default, only Master Files residing in the baseapp folder are accessible to the WebQuery Spreadsheet Client. To enable Master files outside of the baseapp folder, refer toConfiguring Spreadsheet Client on page 6.
Using the DB2 Web Query Spreadsheet Client Add-in 23
Using the DB2 Web Query Spreadsheet Client Add-in
Creating Report Queries With the Report Assistant Tool
In this section:
Editing Report Queries in Report Assistant
How to:
Create a New Report Query in Report Assistant
You can create a new report query directly from Excel by accessing the Spreadsheet ClientAdd-in. Multiple queries can be placed within the same worksheet or spread out over multipleworksheets within a workbook.
Note that there are limitations with queries that overlap, however there are data layoutoptions available in the Query properties of Excel that can assist with overlapping queries.This behavior is governed by Excel, not Spreadsheet Client.
How to Create a New Report Query in Report AssistantProcedure:
1. Open an Excel file.
2. Select a cell in which to place the query.
3. Click the Web Query option in the Excel menu, then select Create Query.
You can also right-click any cell and select Create Web Query Report.
4. Specify the desired Web Server URL when the Web Server Connection dialog box opens.
When the desired connection settings have been specified, click Next.
If Spreadsheet Client is configured to use MR Authentication, you are prompted to logon with valid DB2 Web Query credentials unless you are already logged on and have theon-demand Reporting Server Logon option checked under Web Query settings.
24 IBM
Creating Report Queries With the Report Assistant Tool
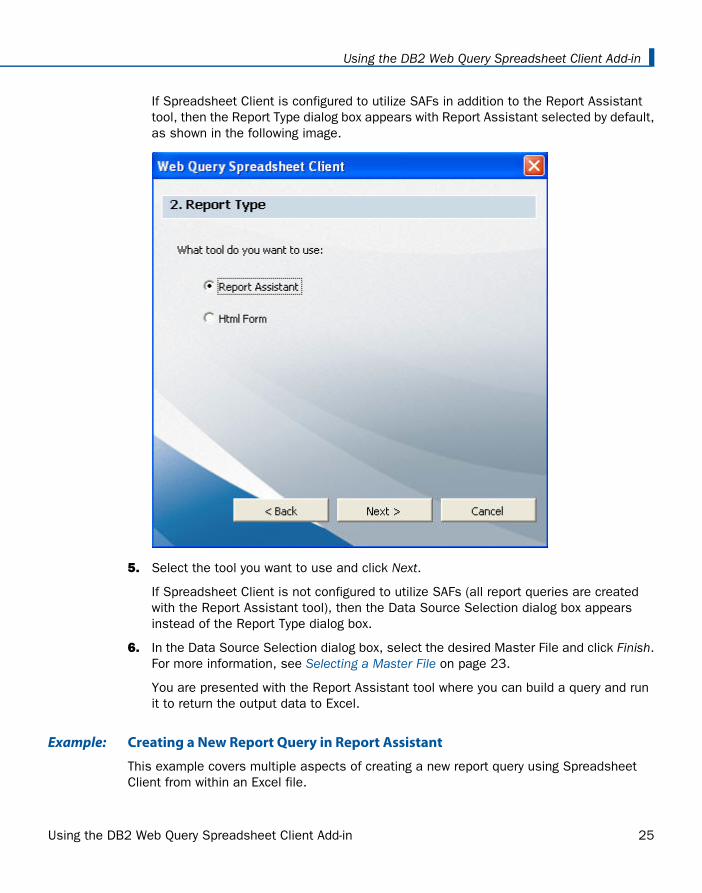
If Spreadsheet Client is configured to utilize SAFs in addition to the Report Assistanttool, then the Report Type dialog box appears with Report Assistant selected by default,as shown in the following image.
5. Select the tool you want to use and click Next.
If Spreadsheet Client is not configured to utilize SAFs (all report queries are createdwith the Report Assistant tool), then the Data Source Selection dialog box appearsinstead of the Report Type dialog box.
6. In the Data Source Selection dialog box, select the desired Master File and click Finish.For more information, see Selecting a Master File on page 23.
You are presented with the Report Assistant tool where you can build a query and runit to return the output data to Excel.
Creating a New Report Query in Report AssistantExample:
This example covers multiple aspects of creating a new report query using SpreadsheetClient from within an Excel file.
Using the DB2 Web Query Spreadsheet Client Add-in 25
Using the DB2 Web Query Spreadsheet Client Add-in

1. Open an Excel file, click the Web Query option in the Excel menu, then select CreateQuery.
2. Specify http://hostname:11331 in the Web Server URL field in the Web Server Connectiondialog box that opens, then click Next.
Note: Specify any Web Server URL that works in your reporting environment.
3. If the Report Type dialog box appears, select Report Assistant and click Next.
The Report Type dialog box appears only if Spreadsheet Client is configured to utilizeSAFs. (The HTML form option is for using SAFs.)
4. In the Data Source Selection dialog box that opens, select CEN_ORDERS from the DataSource list, then click Finish.
The Report Assistant tool opens.
5. Drag and drop PRODUCTTYPE from the Available fields list to the Sort by fields box.
6. Drag and drop QUANTITY and LINETOTAL from the Available fields list to the Sum/Printfields box and make sure the Sum button is selected for both.
7. Select the Add grand totals check box in the Report fields area.
26 IBM
Creating Report Queries With the Report Assistant Tool
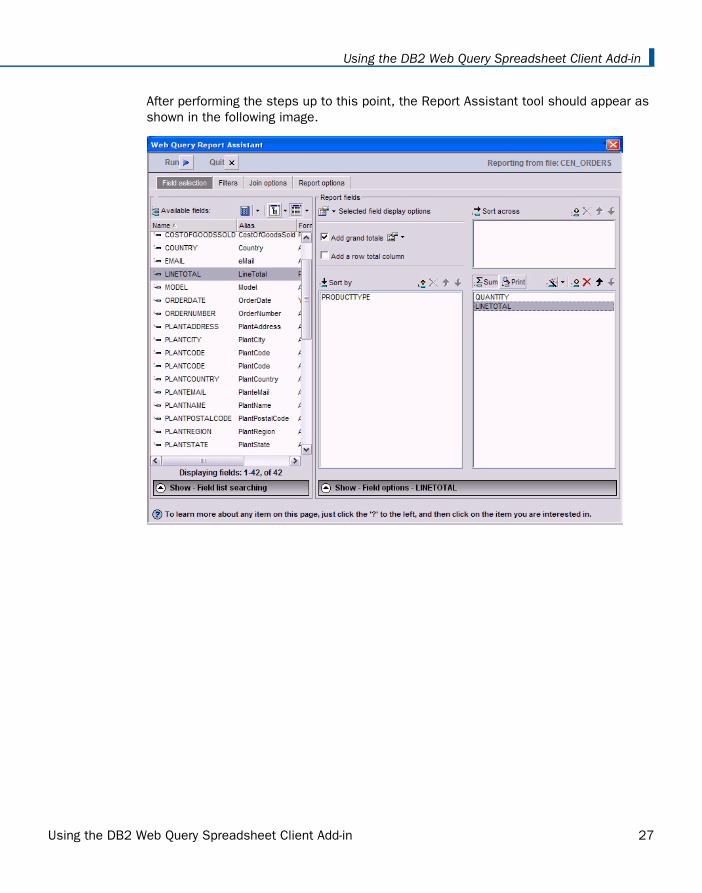
After performing the steps up to this point, the Report Assistant tool should appear asshown in the following image.
Using the DB2 Web Query Spreadsheet Client Add-in 27
Using the DB2 Web Query Spreadsheet Client Add-in

8. Click the Run button. The Properties dialog box appears. Select how the new data shouldbe inserted, then click the OK button.
The report query data is returned to the Excel file, as shown in the following image.
28 IBM
Creating Report Queries With the Report Assistant Tool
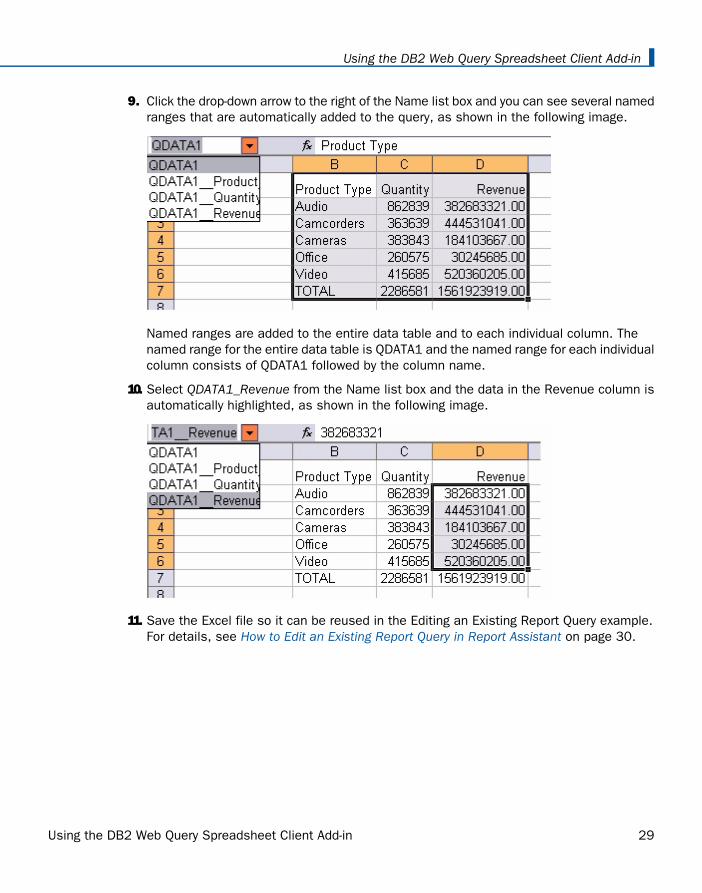
9. Click the drop-down arrow to the right of the Name list box and you can see several namedranges that are automatically added to the query, as shown in the following image.
Named ranges are added to the entire data table and to each individual column. Thenamed range for the entire data table is QDATA1 and the named range for each individualcolumn consists of QDATA1 followed by the column name.
10. Select QDATA1_Revenue from the Name list box and the data in the Revenue column isautomatically highlighted, as shown in the following image.
11. Save the Excel file so it can be reused in the Editing an Existing Report Query example.For details, see How to Edit an Existing Report Query in Report Assistant on page 30.
Using the DB2 Web Query Spreadsheet Client Add-in 29
Using the DB2 Web Query Spreadsheet Client Add-in
Editing Report Queries in Report Assistant
How to:
Edit an Existing Report Query in Report Assistant
You can edit an existing query with Spreadsheet Client in an Excel file. The Edit Query optionautomatically launches the Report Assistant tool using the same connection attributes anddata source selected when the query was first created or last saved. If you want to edit theconnection attributes, prior to editing the query, right-click any cell in the existing query, andselect Edit Connection to open the Web Server Connection dialog box.
Note:
You cannot select a new Master File when editing an existing query.
You cannot edit password protected cells.
How to Edit an Existing Report Query in Report AssistantProcedure:
1. Open the desired Excel file that contains the existing query.
2. Rest the cursor over any cell in the existing query data and select the Edit Query optionusing the Excel right-click context menu.
If there is only one query in the Excel file, you can also use the Web Query menu in the maintoolbar to select the Edit Query option.
Selecting Edit Query launches the Report Assistant tool where you can edit the existingquery.
Note that any cell that contains data from the query is a part of that query, so you can clickanywhere within that range of data to edit the query.
Editing an Existing Report Query in Report AssistantExample:
This example covers multiple aspects of editing an existing report query using SpreadsheetClient from within an Excel file.
1. Open the existing Excel file created in the previous Creating a New Report Query example.To review see How to Create a New Report Query in Report Assistant on page 24.
2. Right-click any cell in the data area of the existing report query and select Edit Query.
The Report Assistant tool opens displaying the query.
3. To change the format of the LINETOTAL measure, select LINETOTAL in the Sum/Printfields box, then open the Field options dialog box by clicking the Show arrow.
30 IBM
Creating Report Queries With the Report Assistant Tool

4. In the Field options dialog box, click the browse (...) button to the right of the “Format inreport as” text box.
The WebFOCUS change format dialog box opens.
5. Set the formatting options in the Select options list box to Comma inclusion and Floatingcurrency. Click the OK button.
The WebFOCUS change format dialog box should appear as shown in the following image.
6. Select PRODUCTTYPE in the Sort by fields box, then click the X (Sort By Remove) buttonto delete this field.
7. Drag and drop PRODUCTCATEGORY from the Available fields list to the Sort by fields boxto replace the PRODUCTTYPE field you deleted in the previous step.
8. Click the Run button, then click the Quit button to exit Report Assistant.
Using the DB2 Web Query Spreadsheet Client Add-in 31
Using the DB2 Web Query Spreadsheet Client Add-in
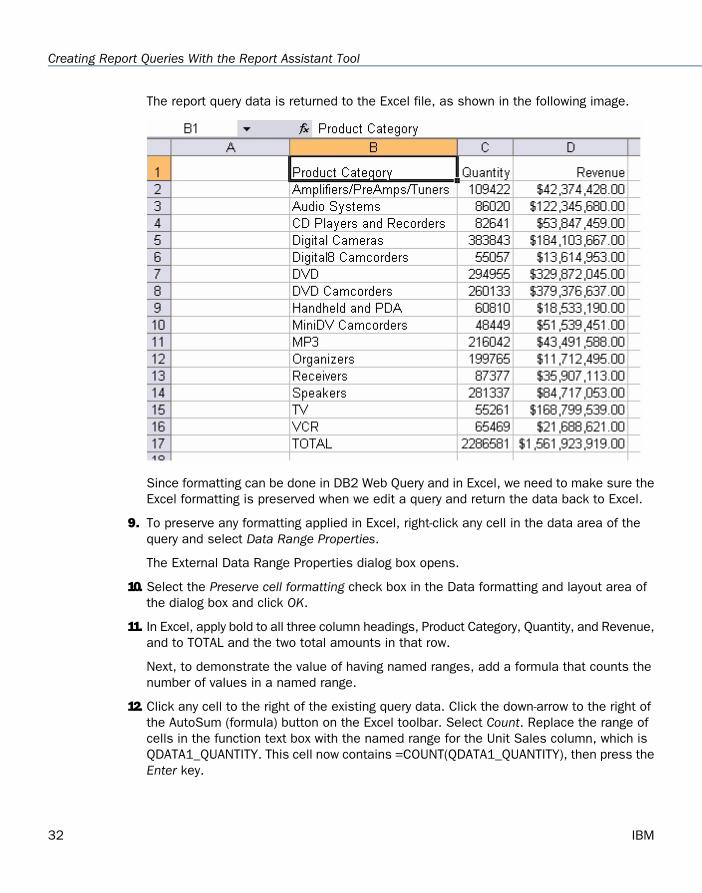
The report query data is returned to the Excel file, as shown in the following image.
Since formatting can be done in DB2 Web Query and in Excel, we need to make sure theExcel formatting is preserved when we edit a query and return the data back to Excel.
9. To preserve any formatting applied in Excel, right-click any cell in the data area of thequery and select Data Range Properties.
The External Data Range Properties dialog box opens.
10. Select the Preserve cell formatting check box in the Data formatting and layout area ofthe dialog box and click OK.
11. In Excel, apply bold to all three column headings, Product Category, Quantity, and Revenue,and to TOTAL and the two total amounts in that row.
Next, to demonstrate the value of having named ranges, add a formula that counts thenumber of values in a named range.
12. Click any cell to the right of the existing query data. Click the down-arrow to the right ofthe AutoSum (formula) button on the Excel toolbar. Select Count. Replace the range ofcells in the function text box with the named range for the Unit Sales column, which isQDATA1_QUANTITY. This cell now contains =COUNT(QDATA1_QUANTITY), then press theEnter key.
32 IBM
Creating Report Queries With the Report Assistant Tool
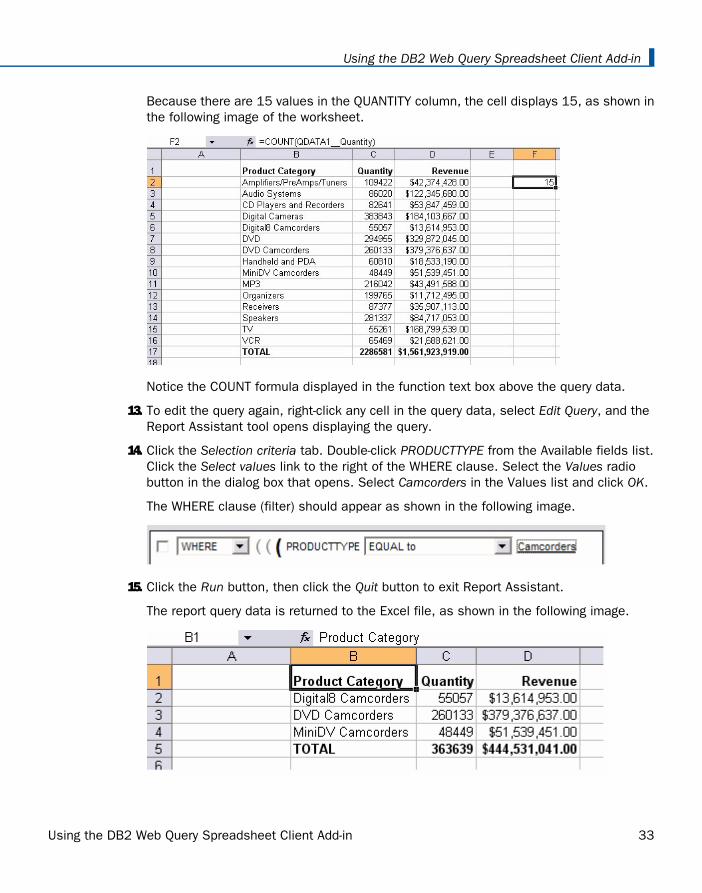
Because there are 15 values in the QUANTITY column, the cell displays 15, as shown inthe following image of the worksheet.
Notice the COUNT formula displayed in the function text box above the query data.
13. To edit the query again, right-click any cell in the query data, select Edit Query, and theReport Assistant tool opens displaying the query.
14. Click the Selection criteria tab. Double-click PRODUCTTYPE from the Available fields list.Click the Select values link to the right of the WHERE clause. Select the Values radiobutton in the dialog box that opens. Select Camcorders in the Values list and click OK.
The WHERE clause (filter) should appear as shown in the following image.
15. Click the Run button, then click the Quit button to exit Report Assistant.
The report query data is returned to the Excel file, as shown in the following image.
Using the DB2 Web Query Spreadsheet Client Add-in 33
Using the DB2 Web Query Spreadsheet Client Add-in

16. Save the Excel file.
Creating Report Queries From Structured Ad hoc Forms
How to:
Create a Report Query From a Structured Ad hoc Form
You can create a new report query directly from Excel by accessing existing SAFs (StructuredAd hoc Forms). A SAF is an HTML form containing a report procedure that is already connectedto a data source, which enables you to select from a series of parameters to create outputthat is added to the active worksheet in Excel. You can analyze the output data in Excel andrerun the query to refresh the data as needed.
Note: SAFs are created in the Developer Workbench HTML Composer, which references anexisting parameterized report.
How to Create a Report Query From a Structured Ad hoc FormProcedure:
1. Open an Excel file.
2. Select a cell in which to place the query.
3. Click the Web Query option in the Excel menu, then select Create Query.
You can also right-click any cell and select Create Web Query Query.
4. If connection information was not specified during the creation of a previous query, youmust specify the desired Reporting Server URL when the Web Server Connection dialogbox opens. When the desired connection settings have been specified, click Next. Formore information, see Defining Web Server Connection Settings on page 19.
If Spreadsheet Client is configured to use MR Authentication, you are prompted to logon with valid DB2 Web Query credentials (unless you are already logged on).
34 IBM
Creating Report Queries From Structured Ad hoc Forms
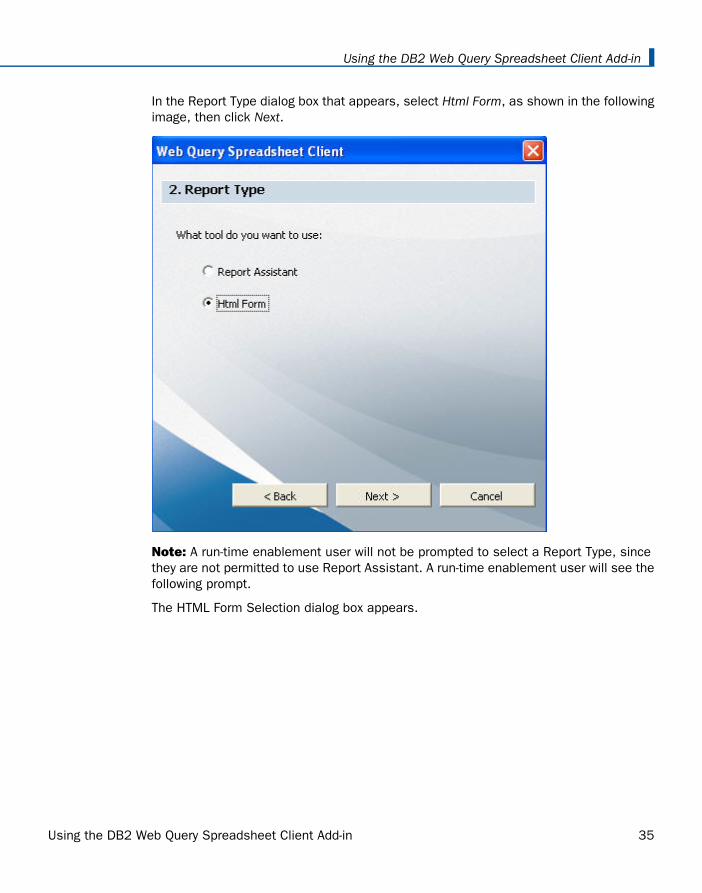
In the Report Type dialog box that appears, select Html Form, as shown in the followingimage, then click Next.
Note: A run-time enablement user will not be prompted to select a Report Type, sincethey are not permitted to use Report Assistant. A run-time enablement user will see thefollowing prompt.
The HTML Form Selection dialog box appears.
Using the DB2 Web Query Spreadsheet Client Add-in 35
Using the DB2 Web Query Spreadsheet Client Add-in

5. Select the desired SAF form, then click Finish as shown in the following image.
36 IBM
Creating Report Queries From Structured Ad hoc Forms

6. Select a parameter in the Web Query HTML Form dialog box that appears, as shown inthe following image. Next, click the Run button to populate the Excel file with data fromthe report.
Using the DB2 Web Query Spreadsheet Client Add-in 37
Using the DB2 Web Query Spreadsheet Client Add-in

The output data is added to the Excel file, as shown in the following image.
You can edit the query to select different parameter values, or just rerun the sameparameter values to refresh the data, by right-clicking any cell in the query and selectingEdit Query.
Creating Structured Ad hoc Forms in Developer Workbench
How to:
Create a Structured Ad hoc Form
Hide a Report Frame
SAFs (Structured Ad hoc Forms) are created in the Developer Workbench Managed Reportingenvironment using the HTML Composer, by referencing an existing parameterized DB2 WebQuery report. A parameter must be added to a report to make it a valid SAF.
38 IBM
Creating Structured Ad hoc Forms in Developer Workbench

How to Create a Structured Ad hoc FormProcedure:
1. Insert a parameterized report into your HTML Layout by referencing an existing reportas shown in the following image.
Using the DB2 Web Query Spreadsheet Client Add-in 39
Using the DB2 Web Query Spreadsheet Client Add-in

2. Select the desired options in the New Parameters dialog box that appears.
40 IBM
Creating Structured Ad hoc Forms in Developer Workbench

The completed report that will be used as a SAF in Spreadsheet Client is shown in thefollowing image.
When a SAF is called from Excel, Spreadsheet Client automatically bypasses the reportframe in the HTML page and returns the data to Excel. This allows forms to be used inthe browser and in Excel.
How to Hide a Report FrameProcedure:
If a form is to be used only in Excel, then you can hide the frame by changing the visibilityproperty to hidden in the Layout window of the Style Composer in the HTML Composer.
1. Highlight the report frame.
2. In the Properties panel, select the Styling Advance ellipses button.
Using the DB2 Web Query Spreadsheet Client Add-in 41
Using the DB2 Web Query Spreadsheet Client Add-in

The Style Composer appears as shown in the following image.
3. Select the Layout option.
4. Select Hidden in Flow Control Visibility drop down.
5. Click OK.
42 IBM
Creating Structured Ad hoc Forms in Developer Workbench
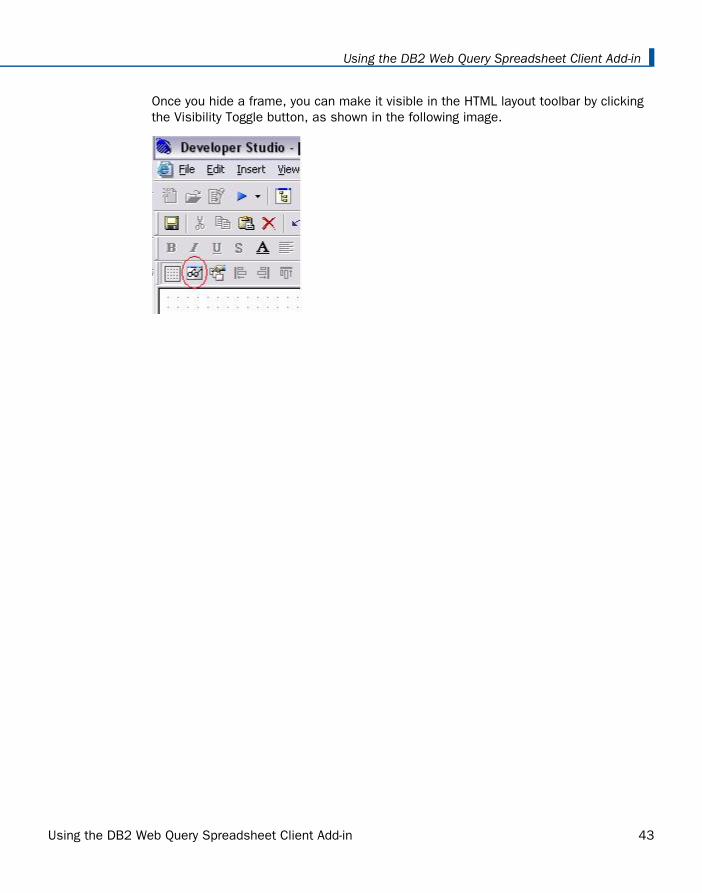
Once you hide a frame, you can make it visible in the HTML layout toolbar by clickingthe Visibility Toggle button, as shown in the following image.
Using the DB2 Web Query Spreadsheet Client Add-in 43
Using the DB2 Web Query Spreadsheet Client Add-in
Setting Query Properties
In this section:
Defining Data Formatting and Layout
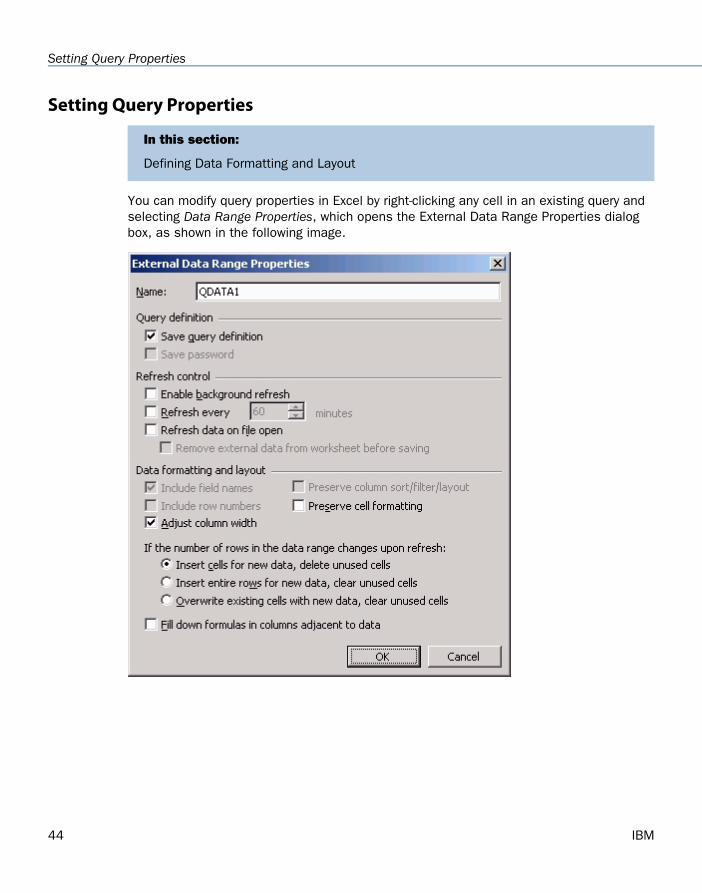
You can modify query properties in Excel by right-clicking any cell in an existing query andselecting Data Range Properties, which opens the External Data Range Properties dialogbox, as shown in the following image.
44 IBM
Setting Query Properties

Some of the External Data Range Properties options you can control include:
Name - You can change the name that is automatically assigned to the named range.
Spreadsheet Client automatically adds a named range to the entire data table and alsoto each individual column. Named ranges are useful when referencing data as a sourcefor analysis or within an advanced Excel application.
Query definition - Unchecking this option will remove the query from the worksheet.The data remains but is no longer tied to a Spreadsheet Client query.
Refresh control - You can enable background refresh, set the refresh interval, andenable the file to refresh data when opened. If applicable, you can also remove externaldata from the worksheet before saving.
Defining Data Formatting and LayoutThe report layout determines how the data returned from the server interacts with the existingworksheet and any existing content within the worksheet. The following are options you canselect in the Data formatting and layout section of the External Data Range Properties dialogbox.
Preserve cell formatting - This option affects how data is returned to the worksheetwhen refreshed. If this option is checked, the existing formatting in the worksheet ispreserved. If this option is unchecked, the existing formatting is removed when the queryis refreshed.
Auto adjustment of existing data - These options determine how existing data ishandled when new data is returned from the query. In some instances, the number ofrows returned from the query is more or less than the original data set, and the followingoptions determine what happens when this occurs.
Insert cells for new data, delete unused cells.
Insert entire rows for new data, clear unused cells.
Overwrite existing cells with new data, clear unused cells.
For more information on specifying external data range properties for a query, see yourMicrosoft Excel documentation.
Using the DB2 Web Query Spreadsheet Client Add-in 45
Using the DB2 Web Query Spreadsheet Client Add-in

46 IBM
Setting Query Properties


