Page 1
3-7 September 2012 SARPROZ (c) tutorial, Daniele Perissin 1/150
http://ihome.cuhk.edu.hk/~b122066/index_files/download.htm
Tutorial on SAR, Tutorial on SAR, InSARInSAR, , PSInSARPSInSAR
SARPROZSARPROZ
The SAR processing tool by The SAR processing tool by PeriZPeriZ
PetronasPetronas University of Technology UTPUniversity of Technology UTP
Part IPart I
Page 2
3-7 September 2012 SARPROZ (c) tutorial, Daniele Perissin 2/150
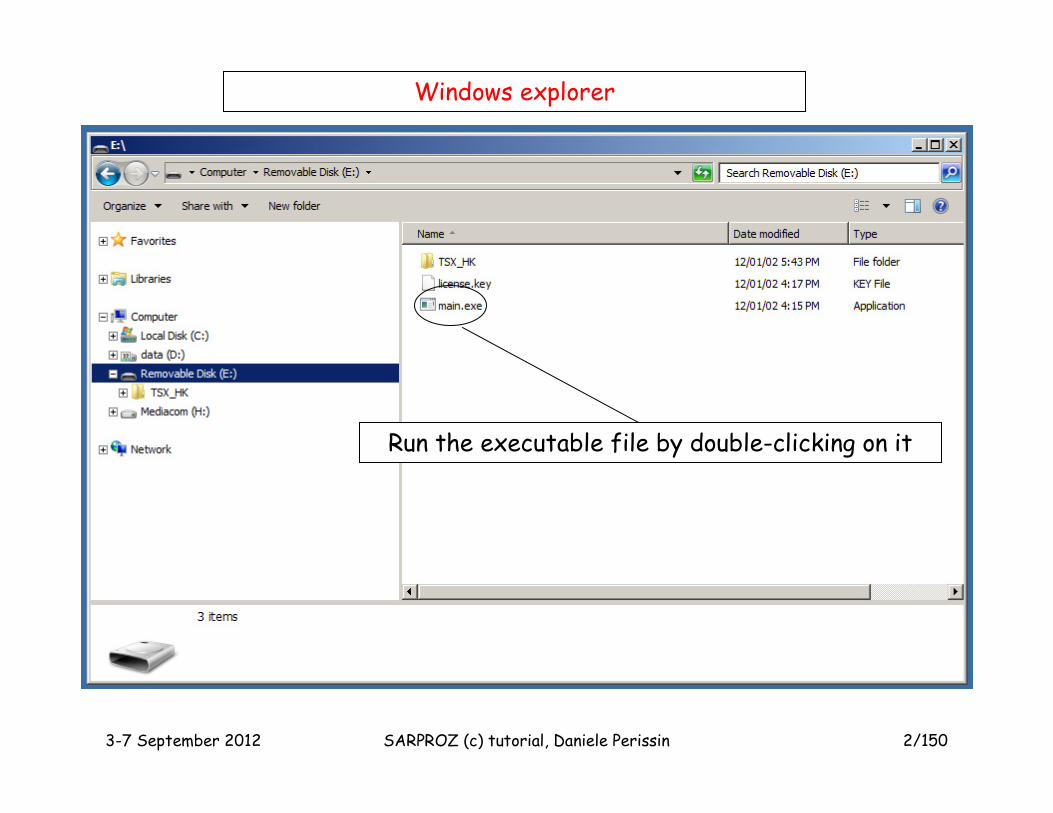
Run the executable file by double-clicking on it
Windows explorer
Page 3
3-7 September 2012 SARPROZ (c) tutorial, Daniele Perissin 3/150
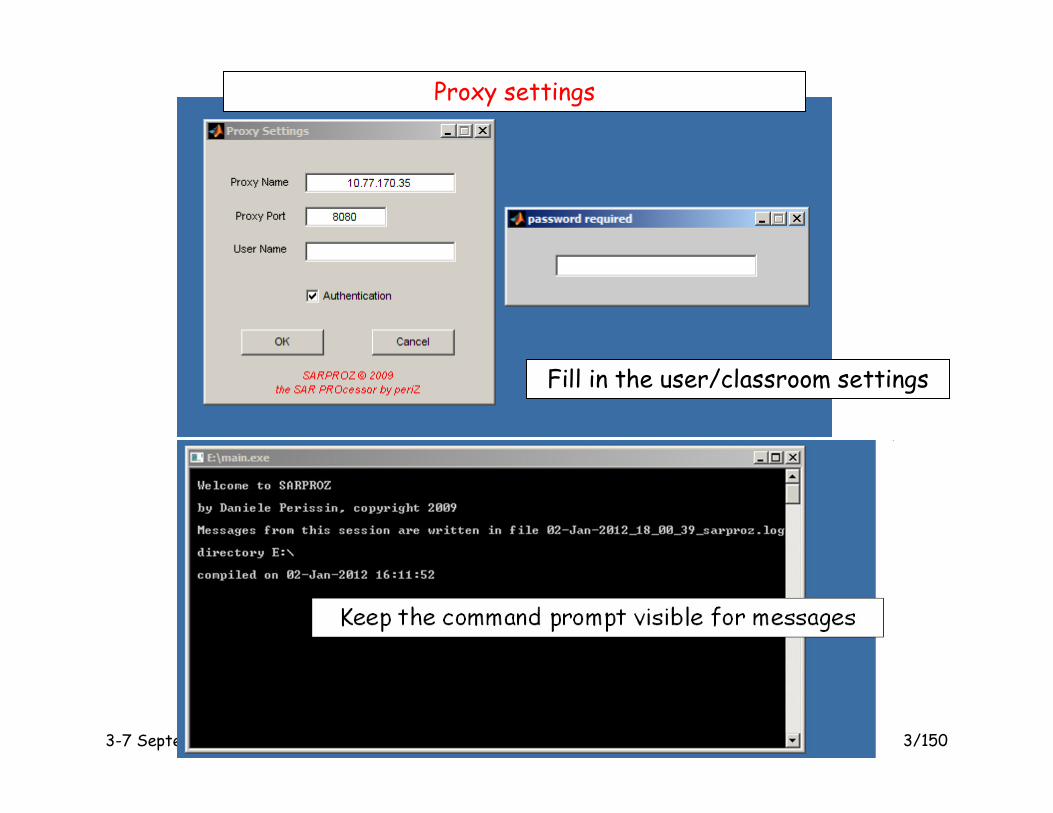
Proxy settings
Fill in the user/classroom settings
Page 4
3-7 September 2012 SARPROZ (c) tutorial, Daniele Perissin 4/150
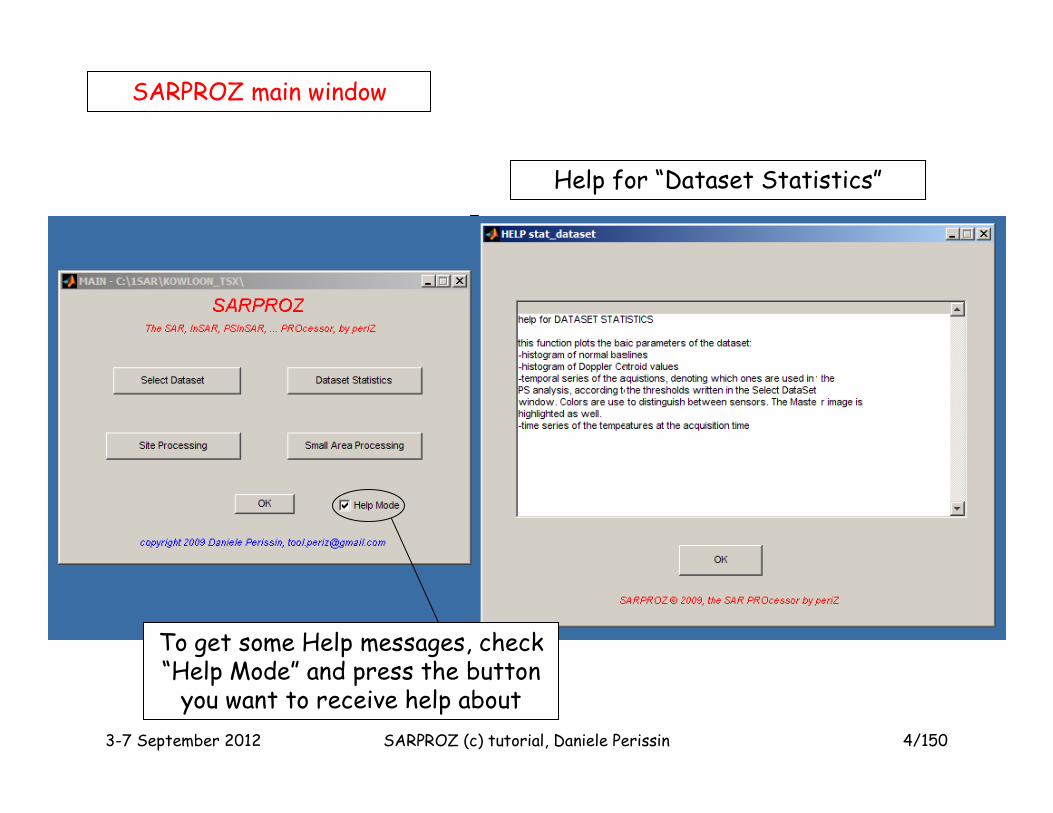
To get some Help messages, check “Help Mode” and press the button you want to receive help about
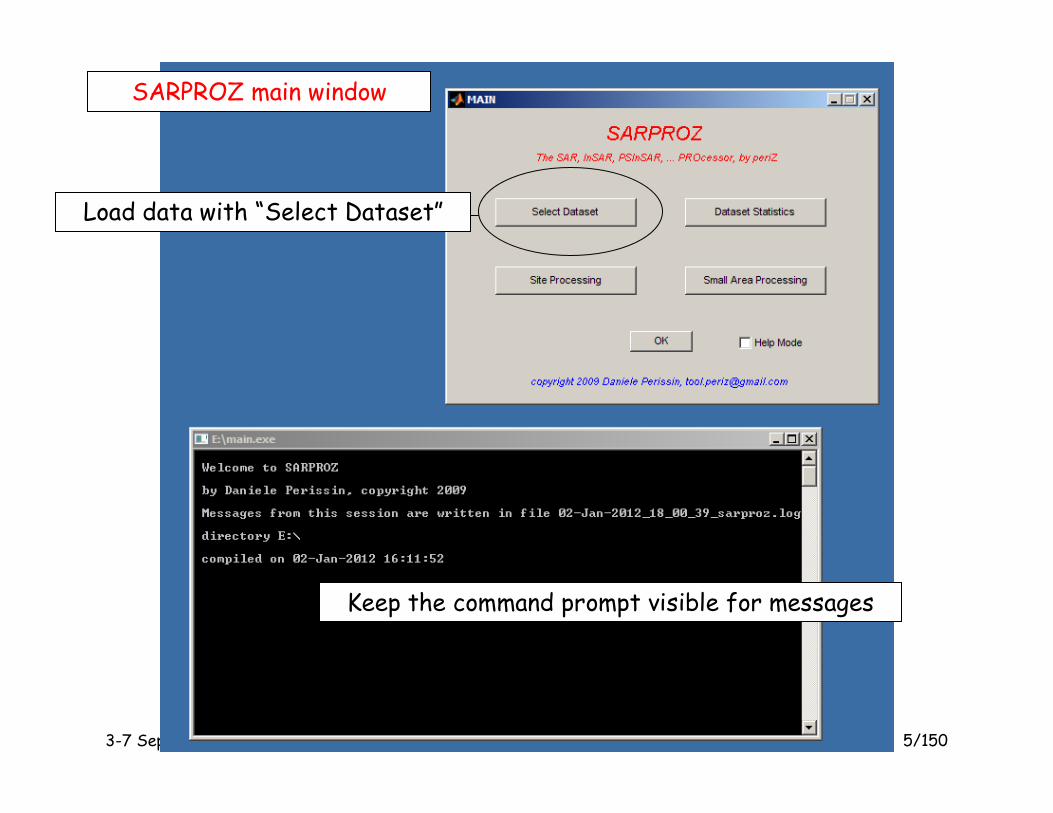
SARPROZ main window
Help for “Dataset Statistics”
Page 5
3-7 September 2012 SARPROZ (c) tutorial, Daniele Perissin 5/150
Keep the command prompt visible for messages
Load data with “Select Dataset”
SARPROZ main window
Page 6
3-7 September 2012 SARPROZ (c) tutorial, Daniele Perissin 6/150
Dataset Selection
Pick up the directory “TSX_HK” via “Select” button in “Site Directory”
Page 7
3-7 September 2012 SARPROZ (c) tutorial, Daniele Perissin 7/150
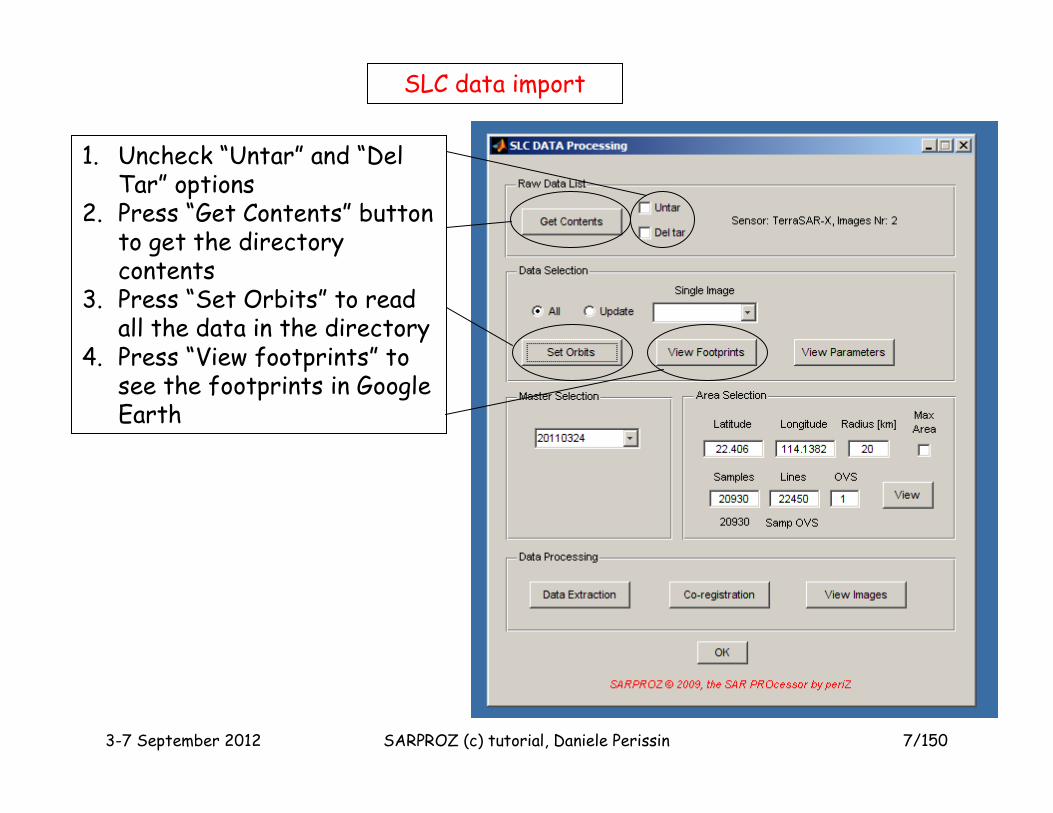
SLC data import
1. Uncheck “Untar” and “Del Tar” options
2. Press “Get Contents” button to get the directory contents
3. Press “Set Orbits” to read all the data in the directory
4. Press “View footprints” to see the footprints in Google Earth
Page 8
3-7 September 2012 SARPROZ (c) tutorial, Daniele Perissin 8/150
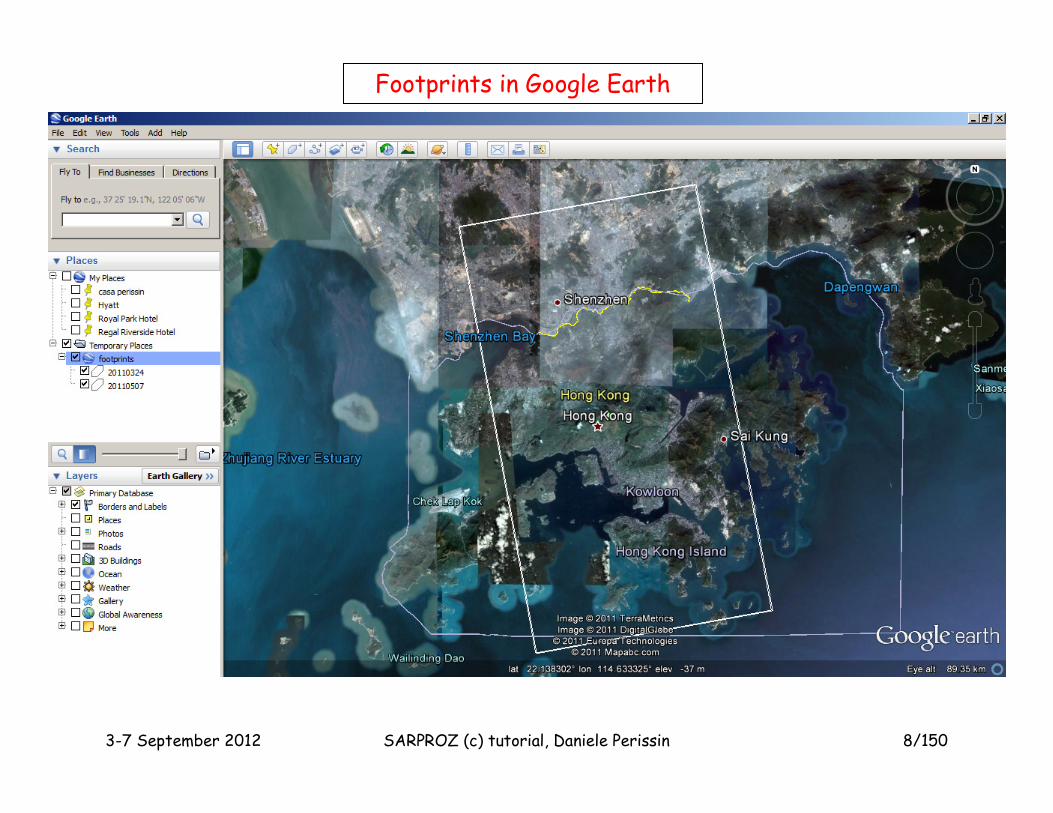
Footprints in Google Earth
Page 9
3-7 September 2012 SARPROZ (c) tutorial, Daniele Perissin 9/150
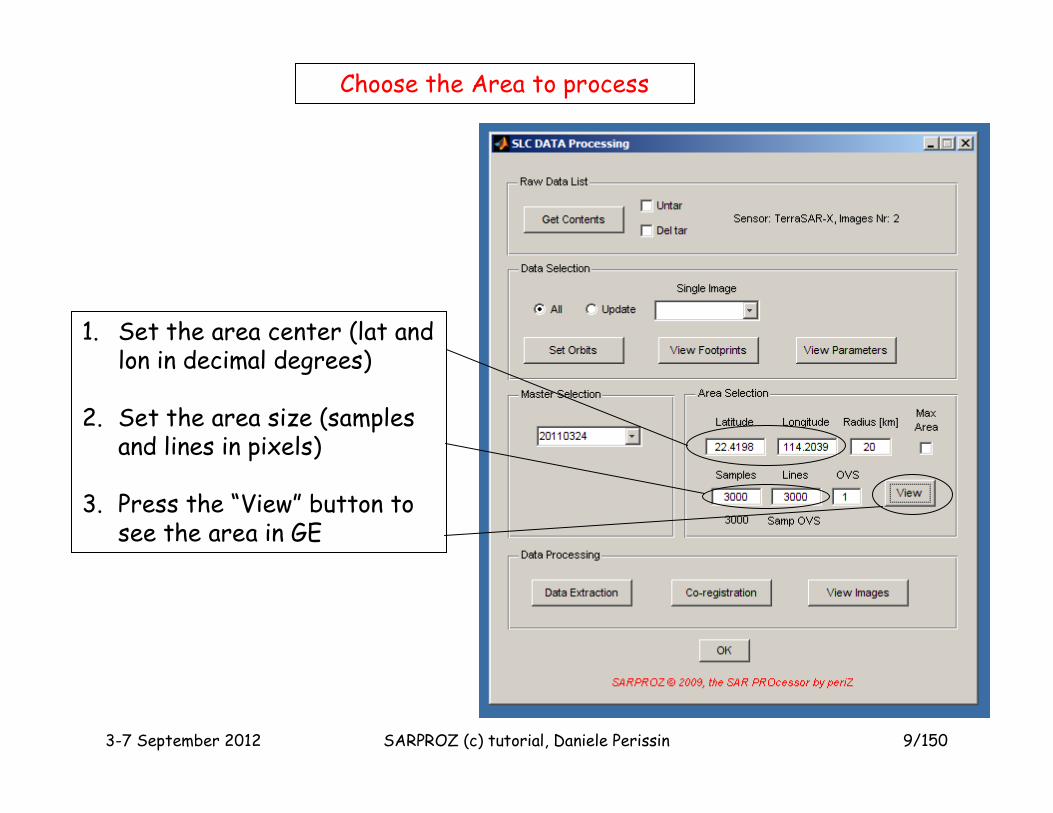
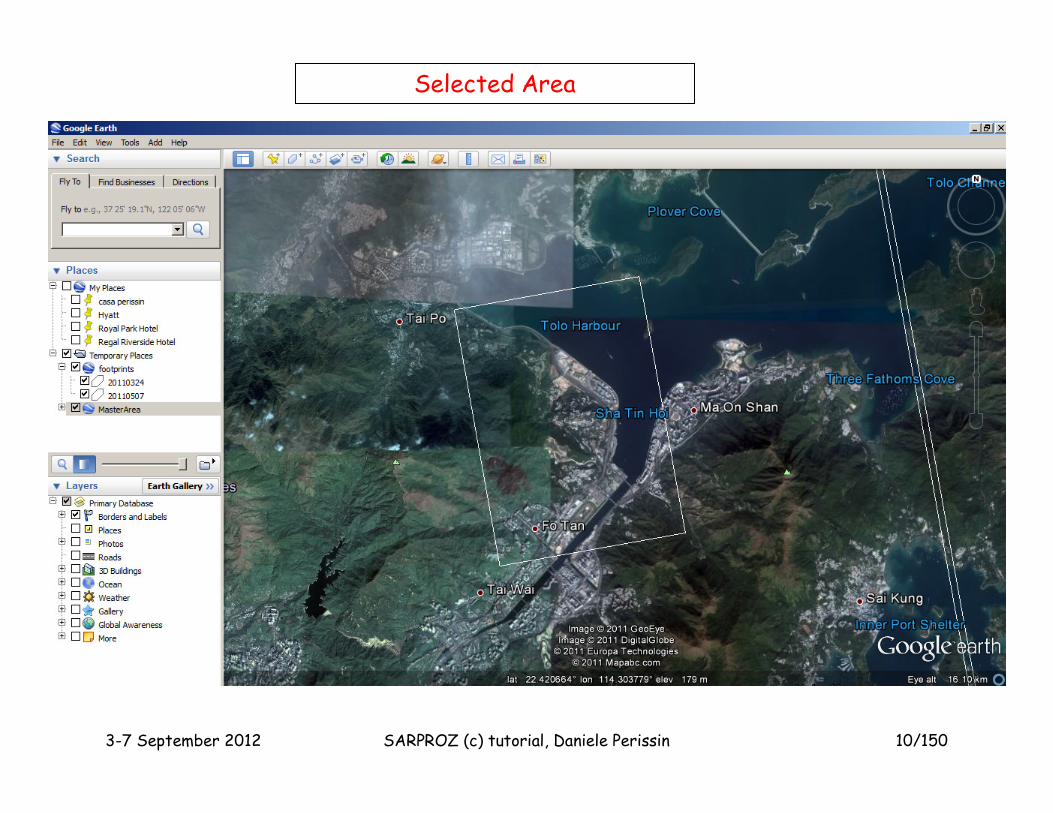
Choose the Area to process
1. Set the area center (lat and lon in decimal degrees)
2. Set the area size (samples and lines in pixels)
3. Press the “View” button to see the area in GE
Page 10
3-7 September 2012 SARPROZ (c) tutorial, Daniele Perissin 10/150
Selected Area
Page 11
3-7 September 2012 SARPROZ (c) tutorial, Daniele Perissin 11/150
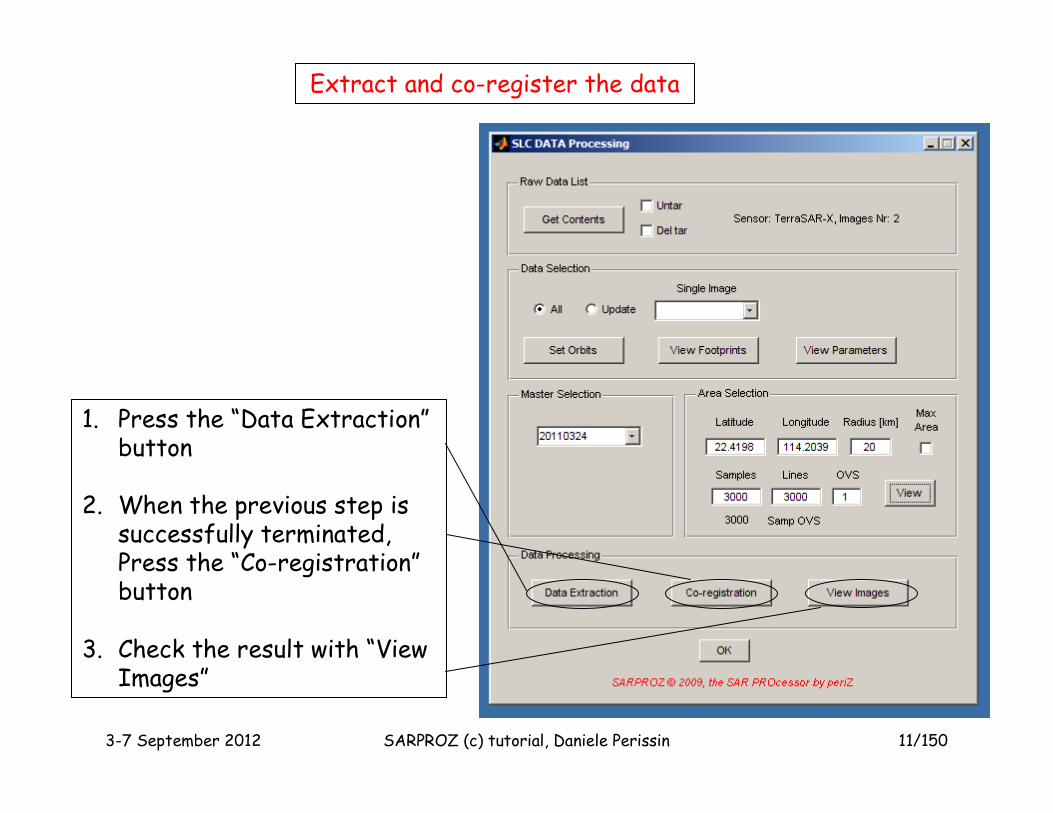
Extract and co-register the data
1. Press the “Data Extraction”button
2. When the previous step is successfully terminated, Press the “Co-registration”button
3. Check the result with “View Images”
Page 12
3-7 September 2012 SARPROZ (c) tutorial, Daniele Perissin 12/150
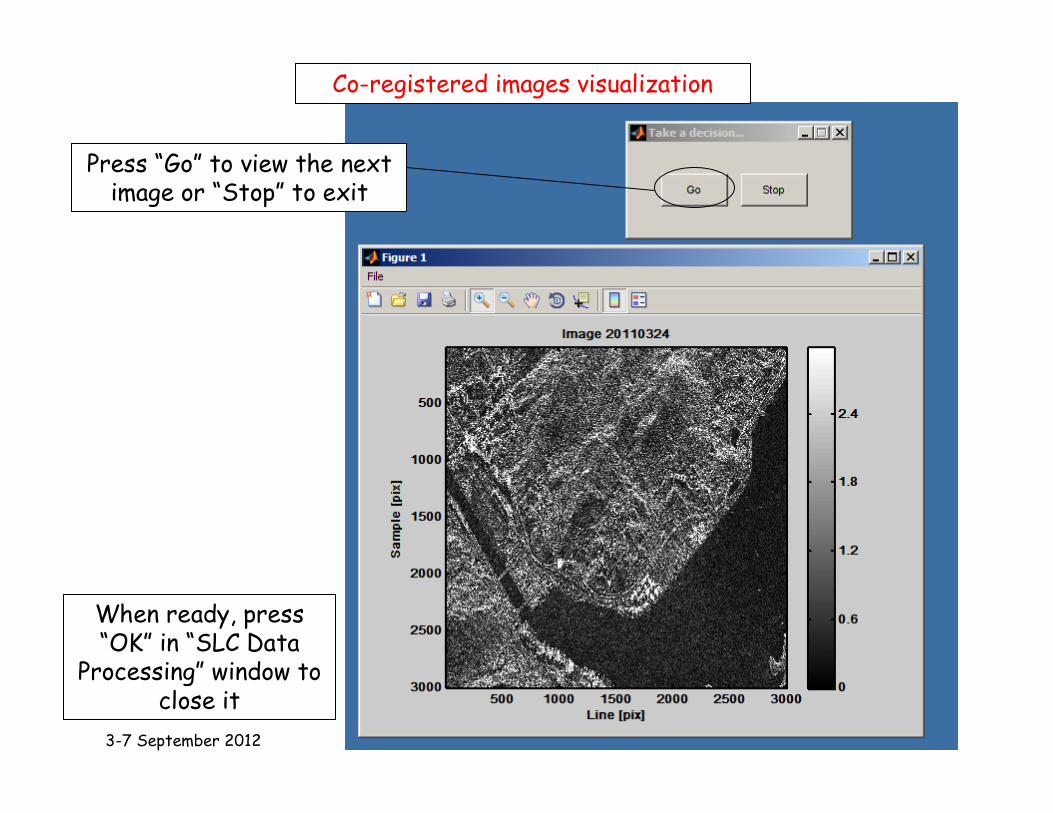
Co-registered images visualization
Press “Go” to view the next image or “Stop” to exit
When ready, press “OK” in “SLC Data
Processing” window to close it
Page 13
3-7 September 2012 SARPROZ (c) tutorial, Daniele Perissin 13/150
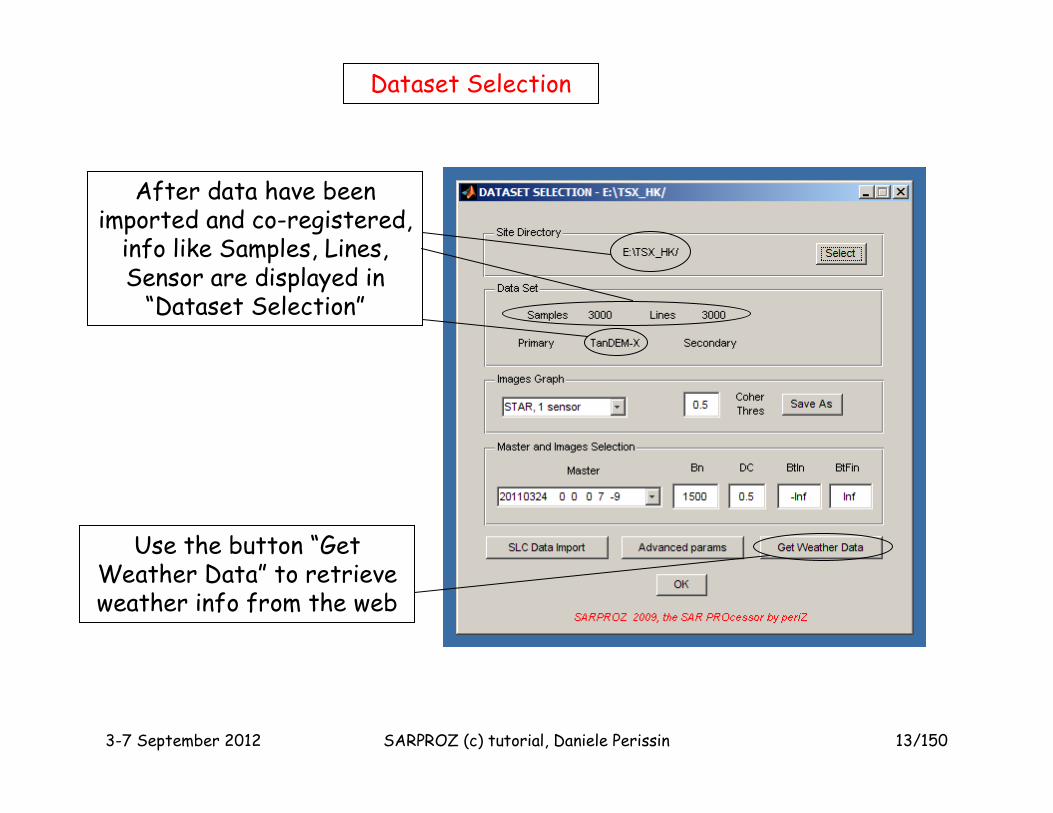
Dataset Selection
Use the button “Get Weather Data” to retrieve weather info from the web
After data have been imported and co-registered, info like Samples, Lines, Sensor are displayed in “Dataset Selection”
Page 14
3-7 September 2012 SARPROZ (c) tutorial, Daniele Perissin 14/150
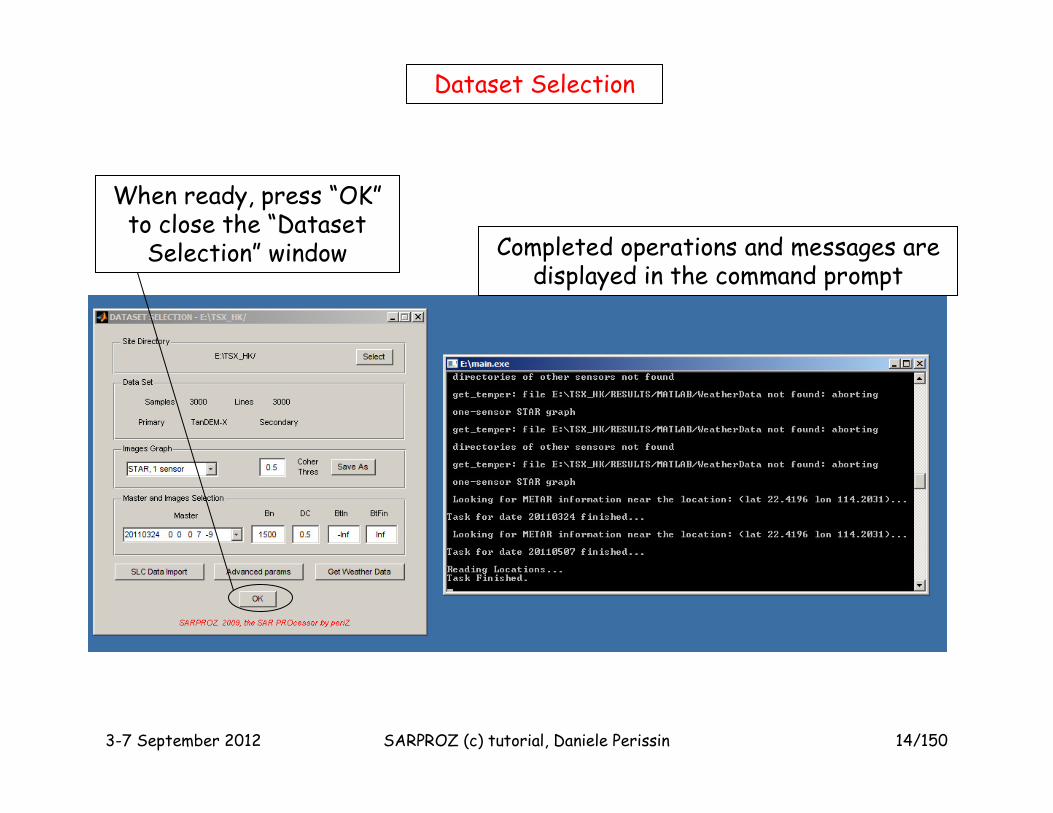
When ready, press “OK”to close the “Dataset Selection” window Completed operations and messages are
displayed in the command prompt
Dataset Selection
Page 15
3-7 September 2012 SARPROZ (c) tutorial, Daniele Perissin 15/150
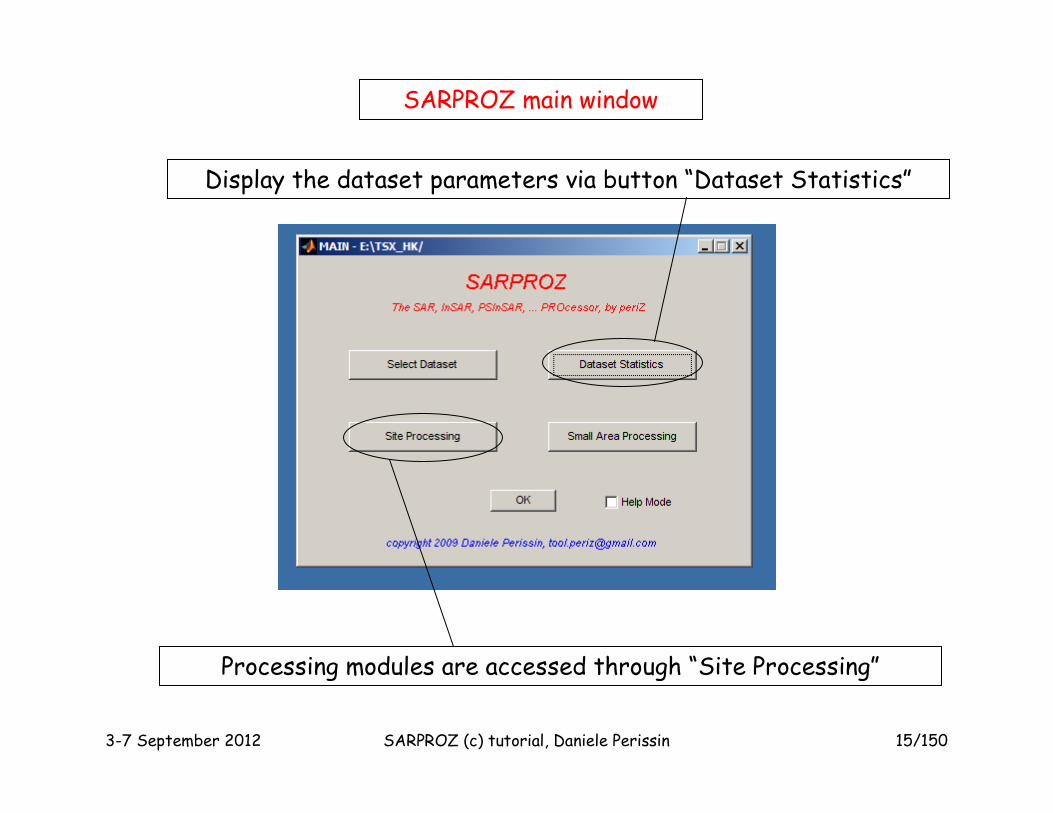
Display the dataset parameters via button “Dataset Statistics”
SARPROZ main window
Processing modules are accessed through “Site Processing”
Page 16
3-7 September 2012 SARPROZ (c) tutorial, Daniele Perissin 16/150
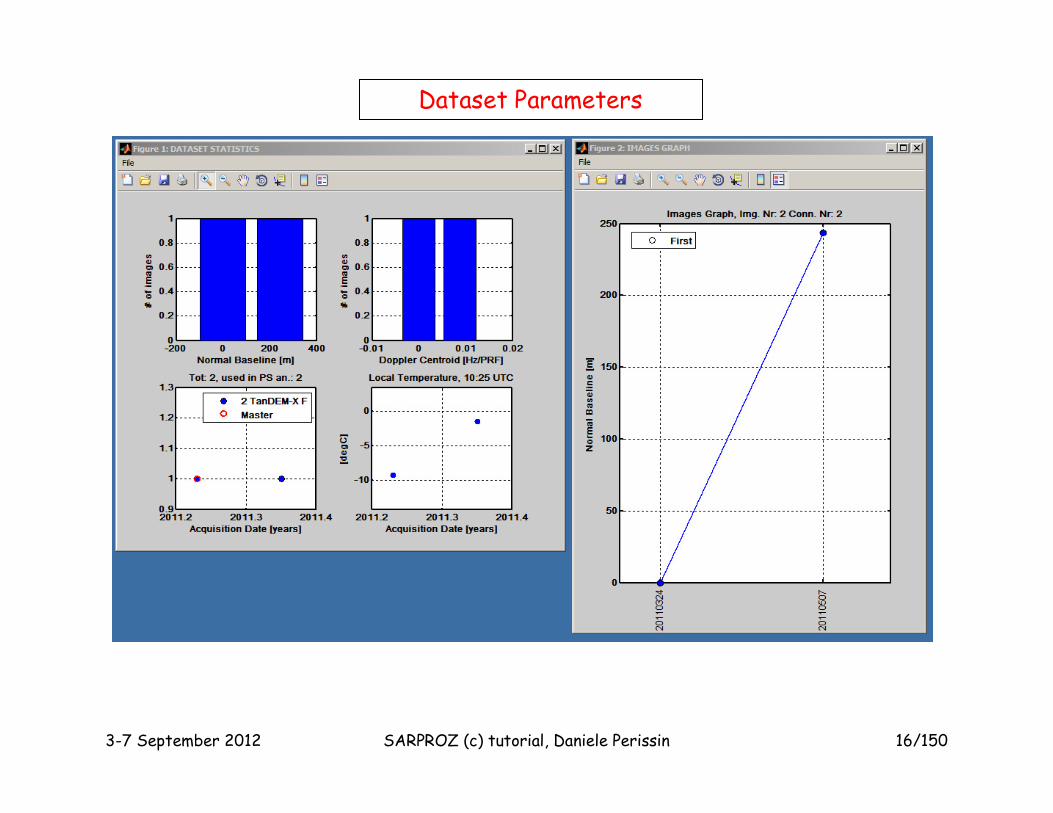
Dataset Parameters
Page 17
3-7 September 2012 SARPROZ (c) tutorial, Daniele Perissin 17/150
Generating the Reflectivity mapGenerating the Reflectivity map
Page 18
3-7 September 2012 SARPROZ (c) tutorial, Daniele Perissin 18/150
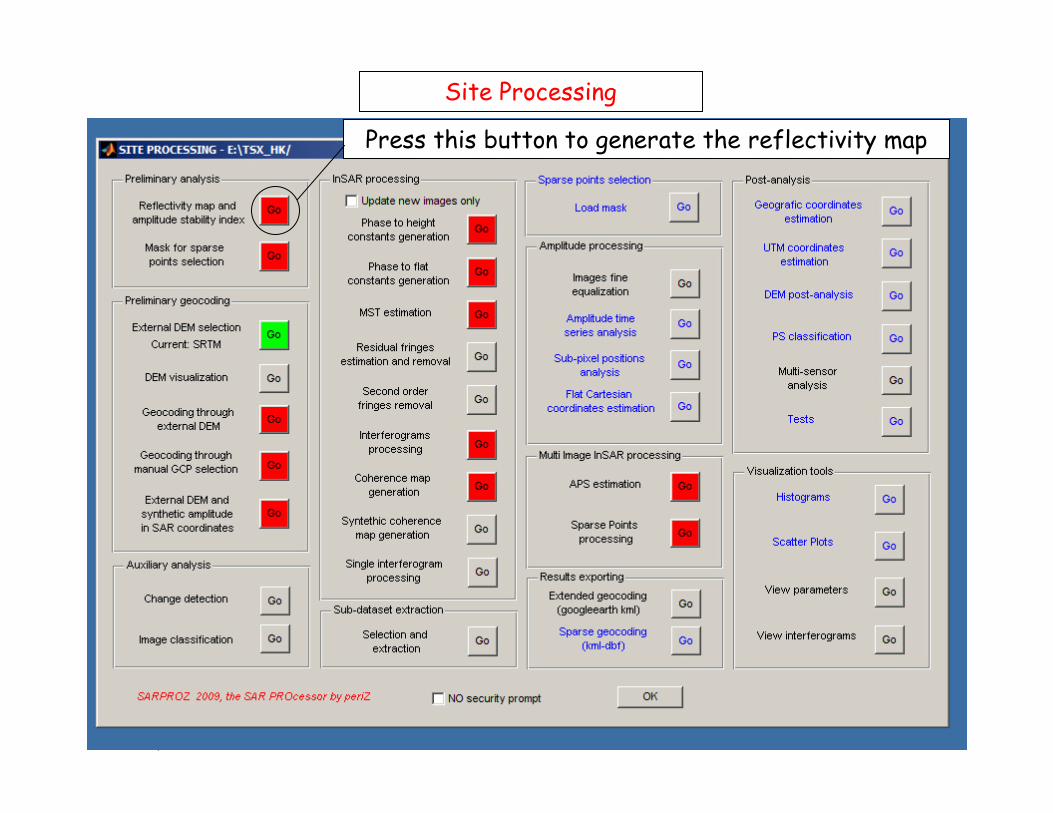
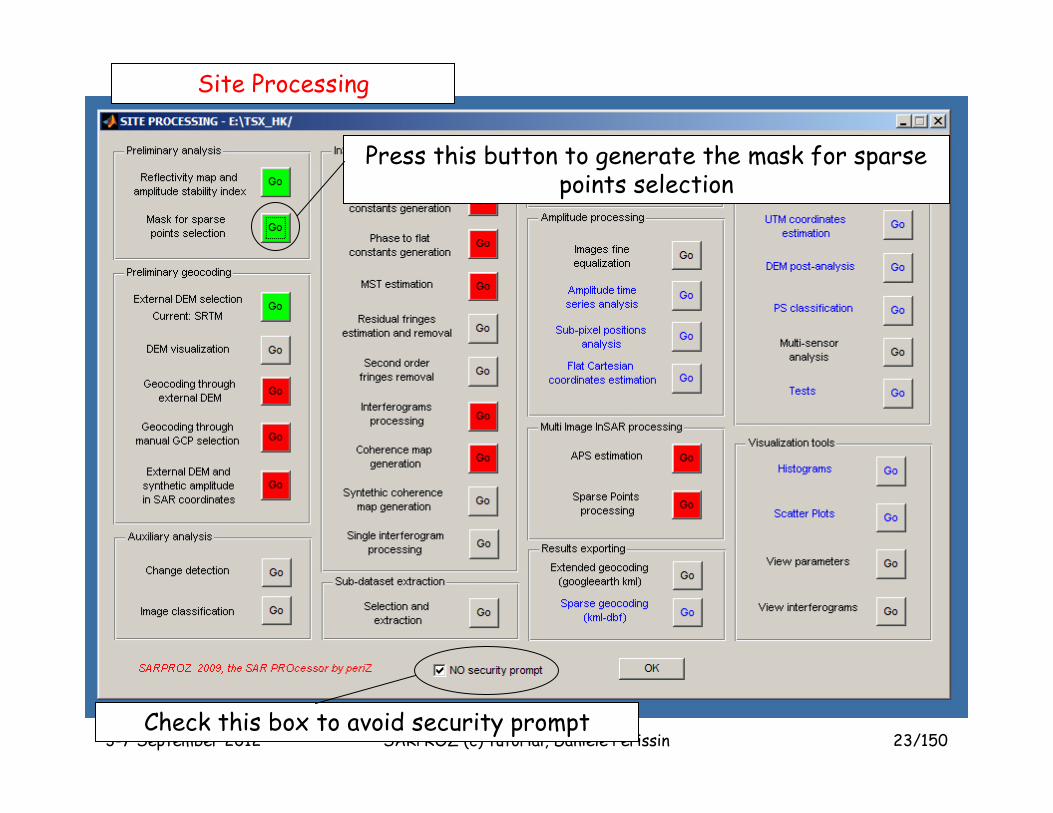
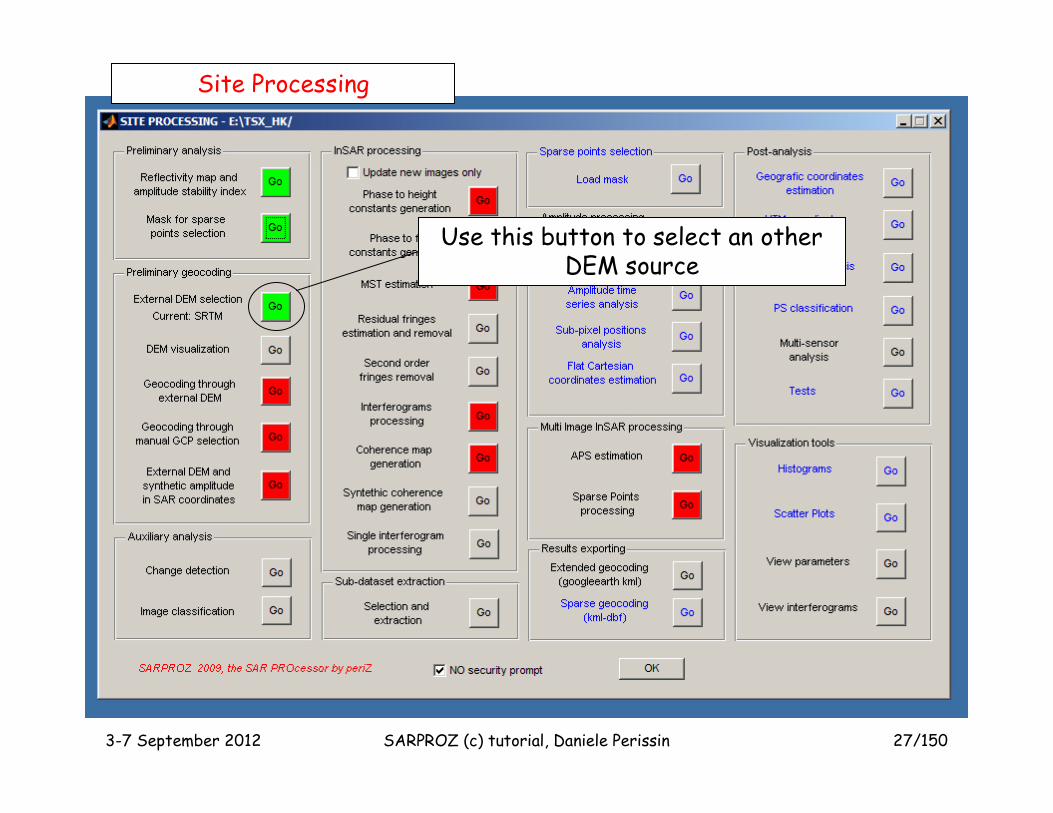
Site Processing
Press this button to generate the reflectivity map
Page 19
3-7 September 2012 SARPROZ (c) tutorial, Daniele Perissin 19/150
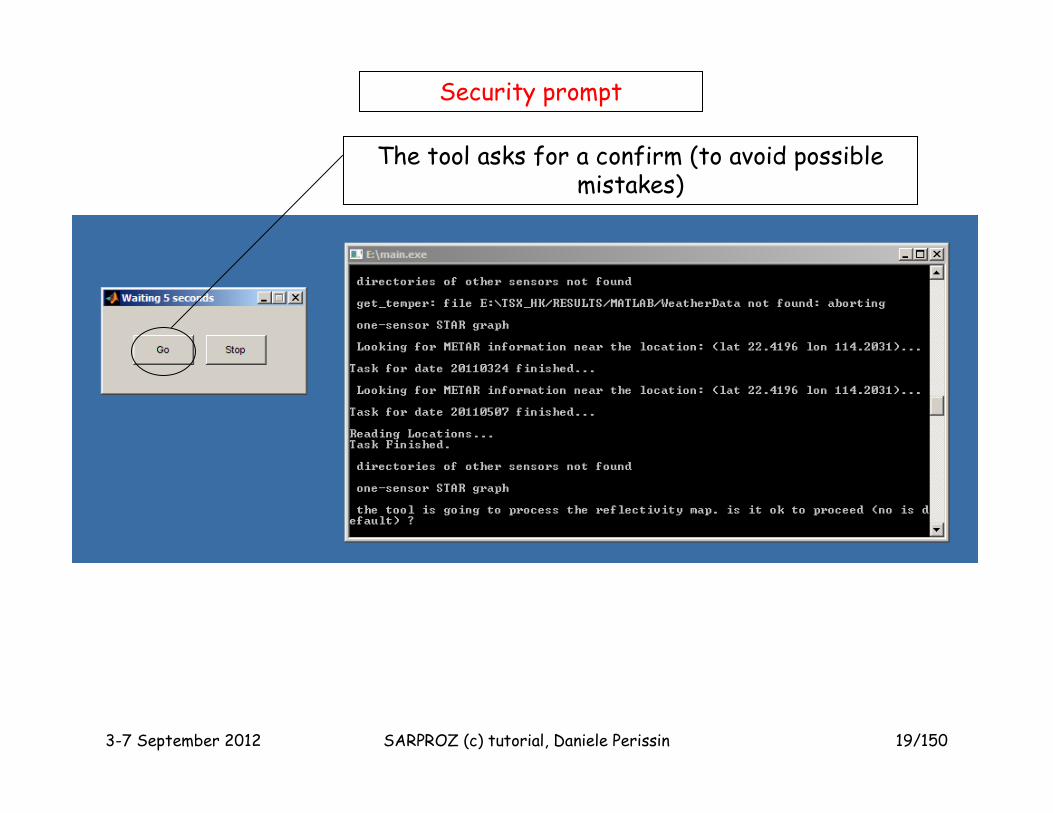
The tool asks for a confirm (to avoid possible mistakes)
Security prompt
Page 20
3-7 September 2012 SARPROZ (c) tutorial, Daniele Perissin 20/150
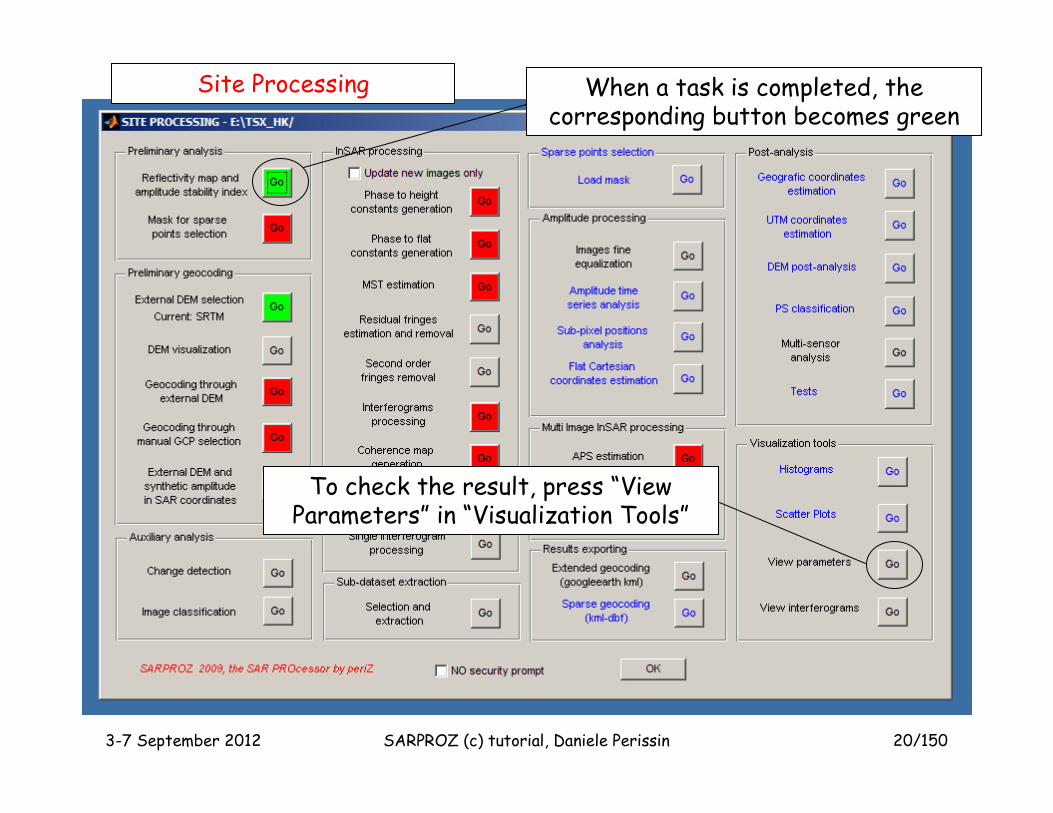
When a task is completed, the corresponding button becomes green
Site Processing
To check the result, press “View Parameters” in “Visualization Tools”
Page 21
3-7 September 2012 SARPROZ (c) tutorial, Daniele Perissin 21/150
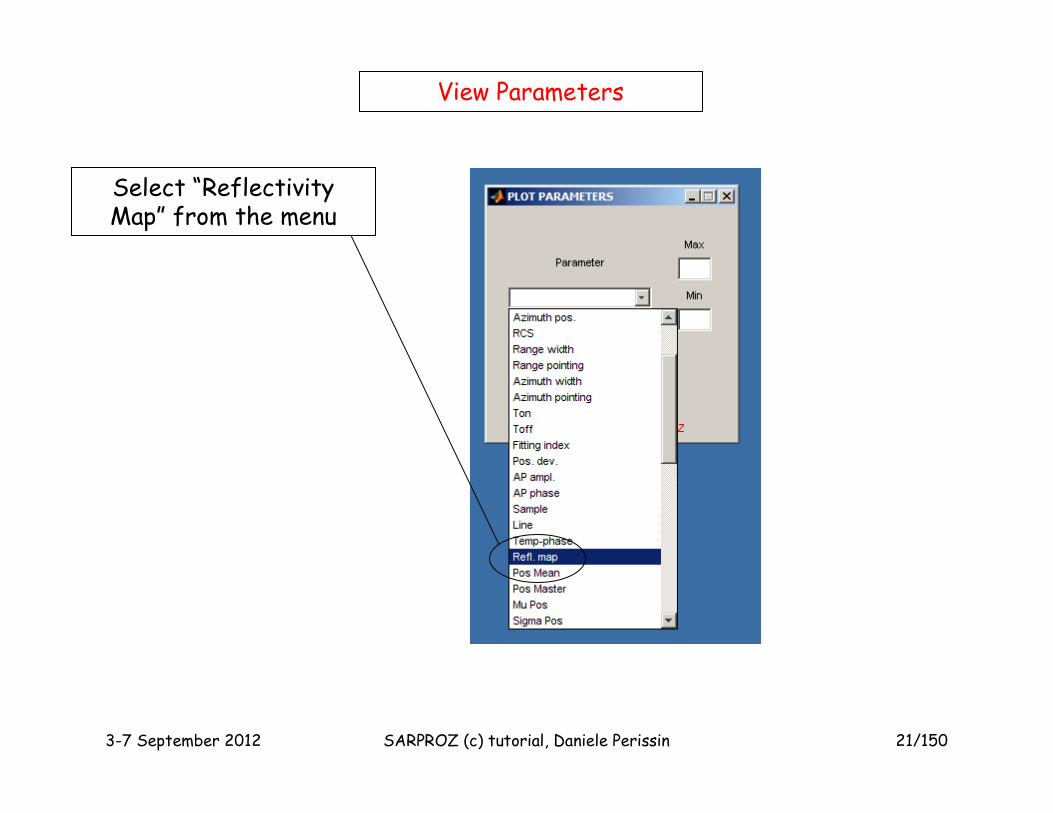
View Parameters
Select “Reflectivity Map” from the menu
Page 22
3-7 September 2012 SARPROZ (c) tutorial, Daniele Perissin 22/150
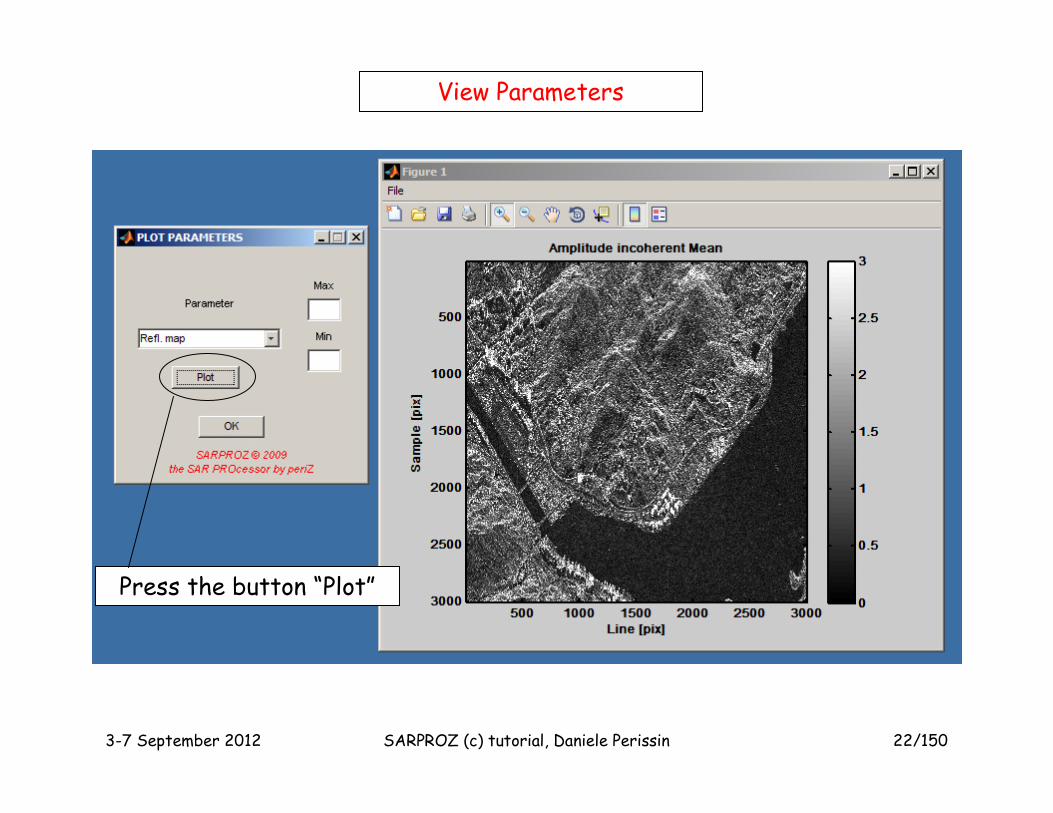
View Parameters
Press the button “Plot”
Page 23
3-7 September 2012 SARPROZ (c) tutorial, Daniele Perissin 23/150
Site Processing
Check this box to avoid security prompt
Press this button to generate the mask for sparse points selection
Page 24
3-7 September 2012 SARPROZ (c) tutorial, Daniele Perissin 24/150
The external DEMThe external DEM
Page 25
3-7 September 2012 SARPROZ (c) tutorial, Daniele Perissin 25/150
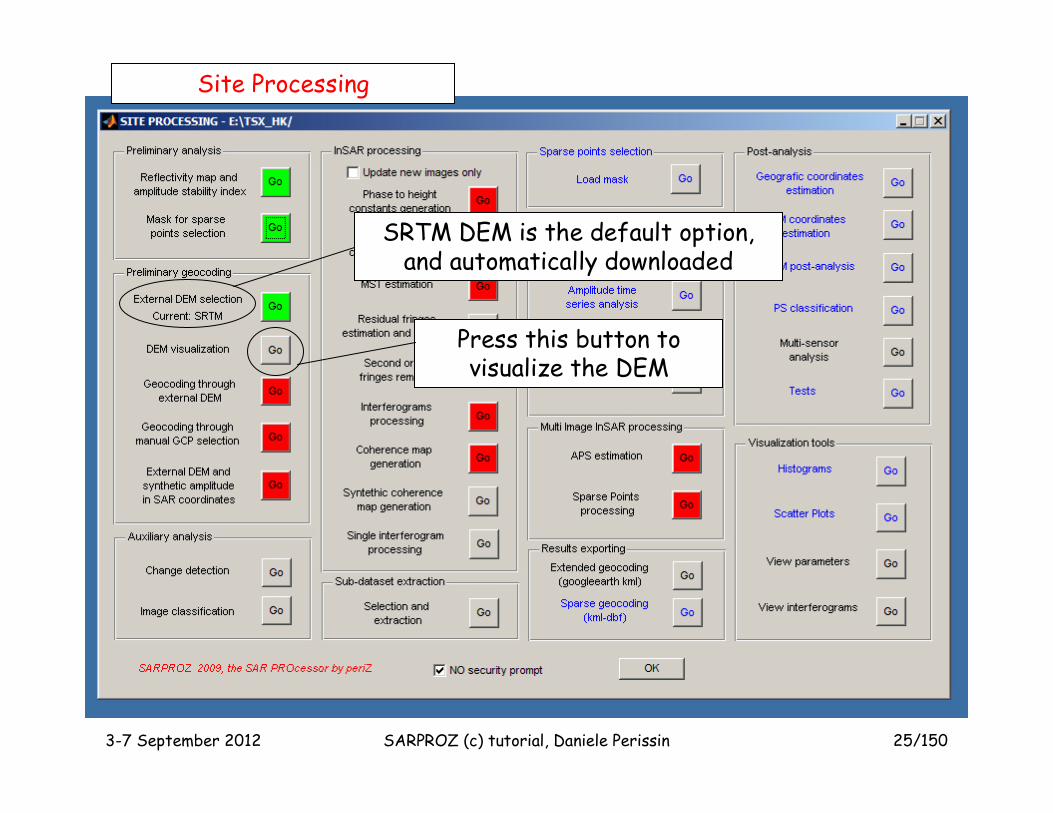
Site Processing
SRTM DEM is the default option, and automatically downloaded
Press this button to visualize the DEM
Page 26
3-7 September 2012 SARPROZ (c) tutorial, Daniele Perissin 26/150
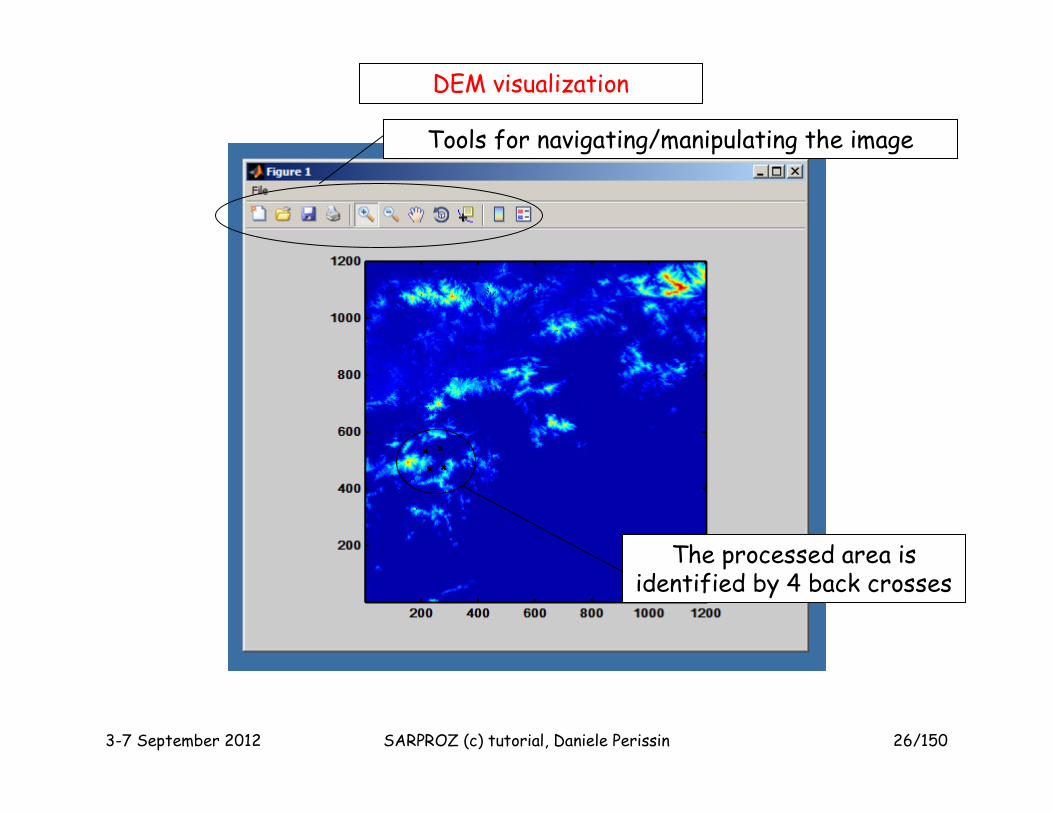
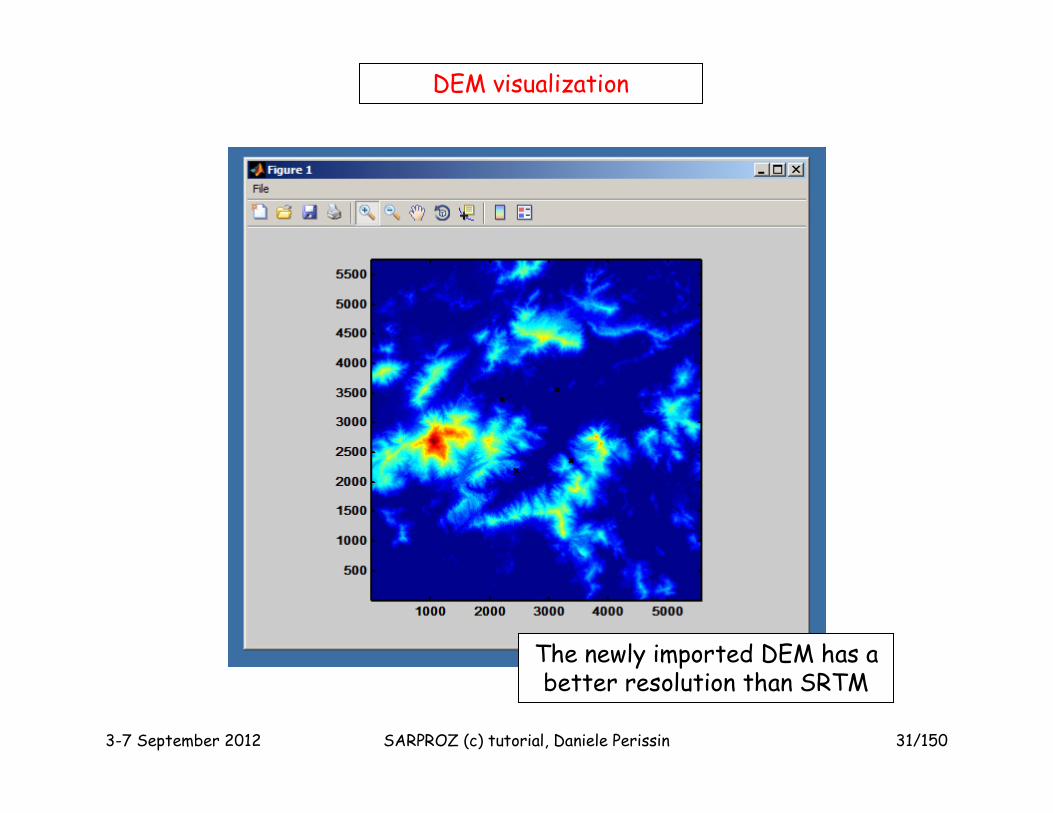
DEM visualization
The processed area is identified by 4 back crosses
Tools for navigating/manipulating the image
Page 27
3-7 September 2012 SARPROZ (c) tutorial, Daniele Perissin 27/150
Site Processing
Use this button to select an other DEM source
Page 28
3-7 September 2012 SARPROZ (c) tutorial, Daniele Perissin 28/150
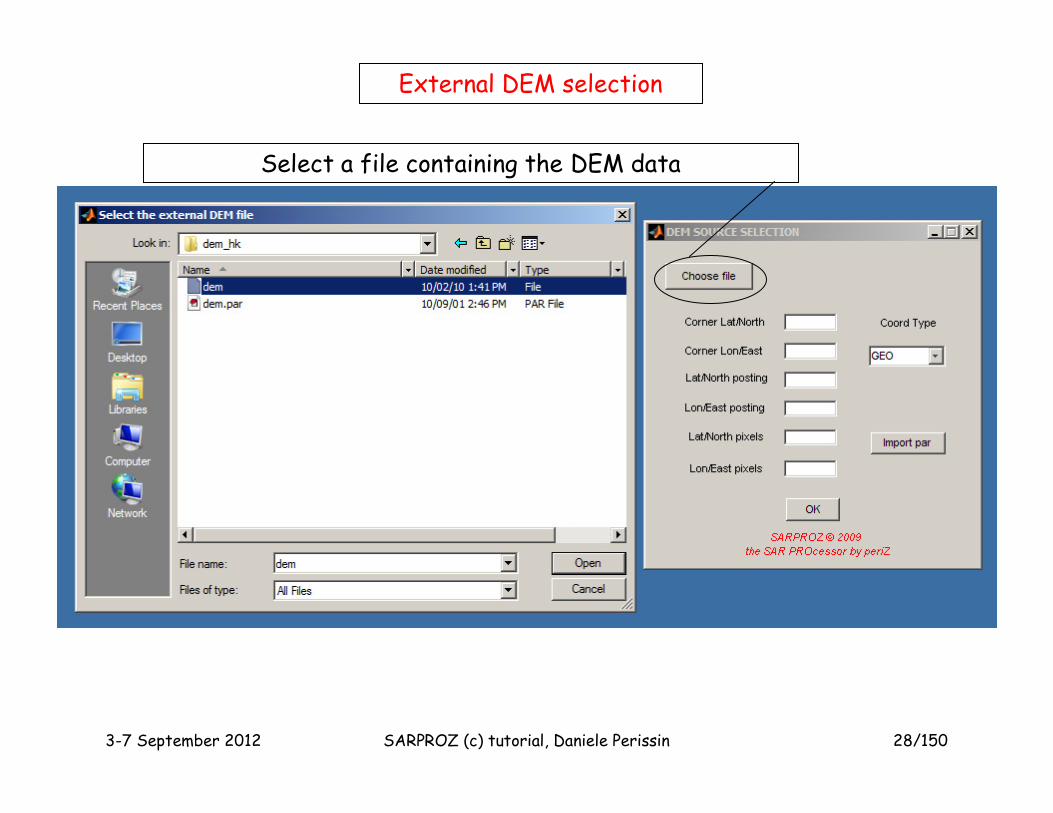
External DEM selection
Select a file containing the DEM data
Page 29
3-7 September 2012 SARPROZ (c) tutorial, Daniele Perissin 29/150
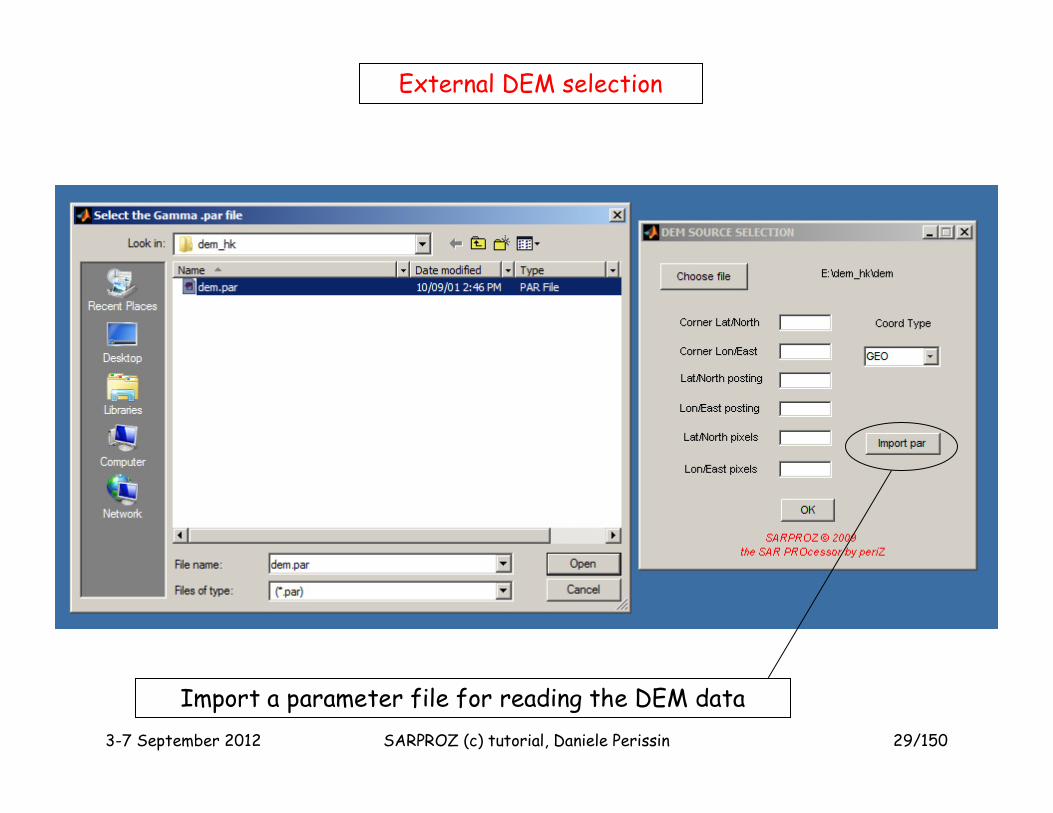
External DEM selection
Import a parameter file for reading the DEM data
Page 30
3-7 September 2012 SARPROZ (c) tutorial, Daniele Perissin 30/150
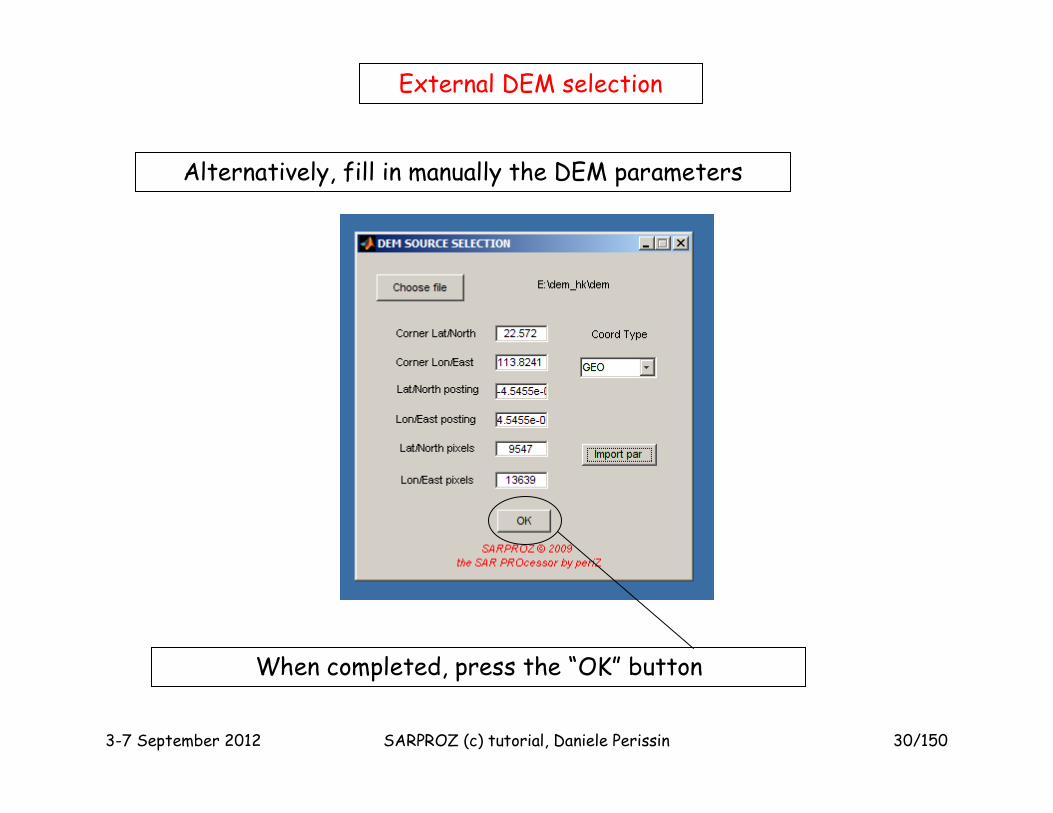
External DEM selection
Alternatively, fill in manually the DEM parameters
When completed, press the “OK” button
Page 31
3-7 September 2012 SARPROZ (c) tutorial, Daniele Perissin 31/150
DEM visualization
The newly imported DEM has a better resolution than SRTM
Page 32
3-7 September 2012 SARPROZ (c) tutorial, Daniele Perissin 32/150
Preliminary Preliminary geocodinggeocoding
Page 33
3-7 September 2012 SARPROZ (c) tutorial, Daniele Perissin 33/150
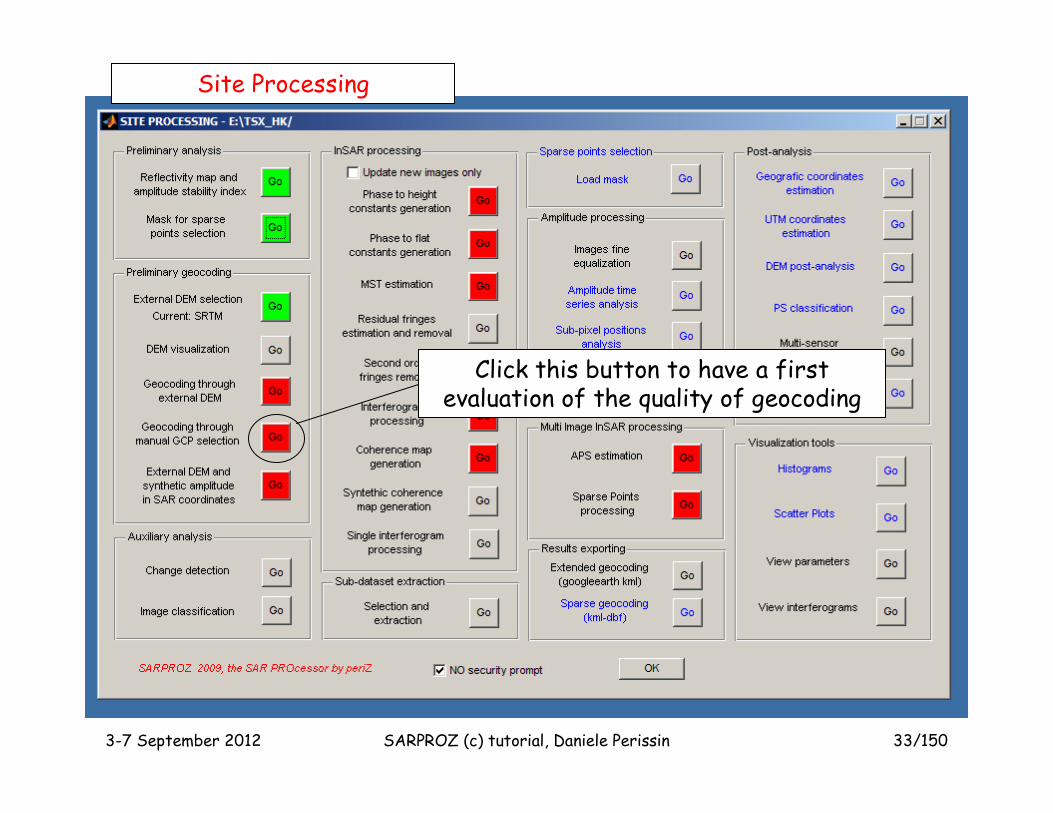
Site Processing
Click this button to have a first evaluation of the quality of geocoding
Page 34
3-7 September 2012 SARPROZ (c) tutorial, Daniele Perissin 34/150
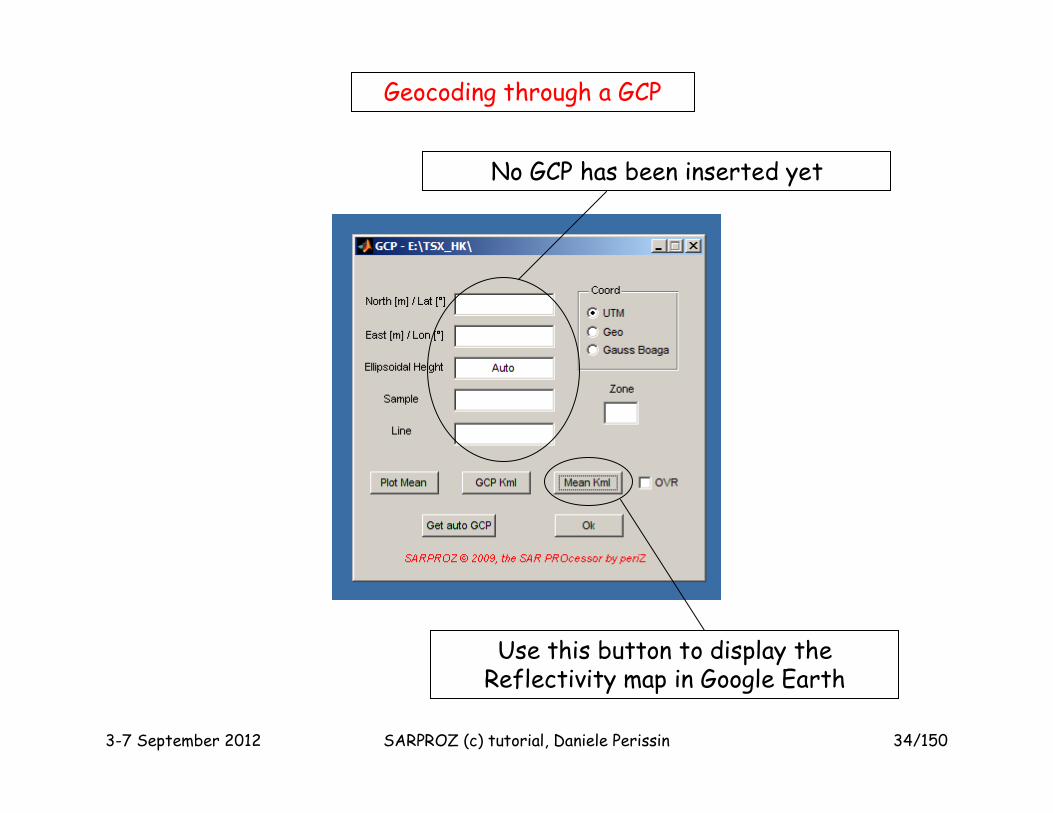
Geocoding through a GCP
No GCP has been inserted yet
Use this button to display the Reflectivity map in Google Earth
Page 35
3-7 September 2012 SARPROZ (c) tutorial, Daniele Perissin 35/150
The Reflectivity Map in GE
If you browse the result, you can notice a low quality geocoding
Transparency
Page 36
3-7 September 2012 SARPROZ (c) tutorial, Daniele Perissin 36/150
Site Processing
Use this button to geocode by means of the external DEM
When the processing is concluded, click again the manual GCP selection
Page 37
3-7 September 2012 SARPROZ (c) tutorial, Daniele Perissin 37/150
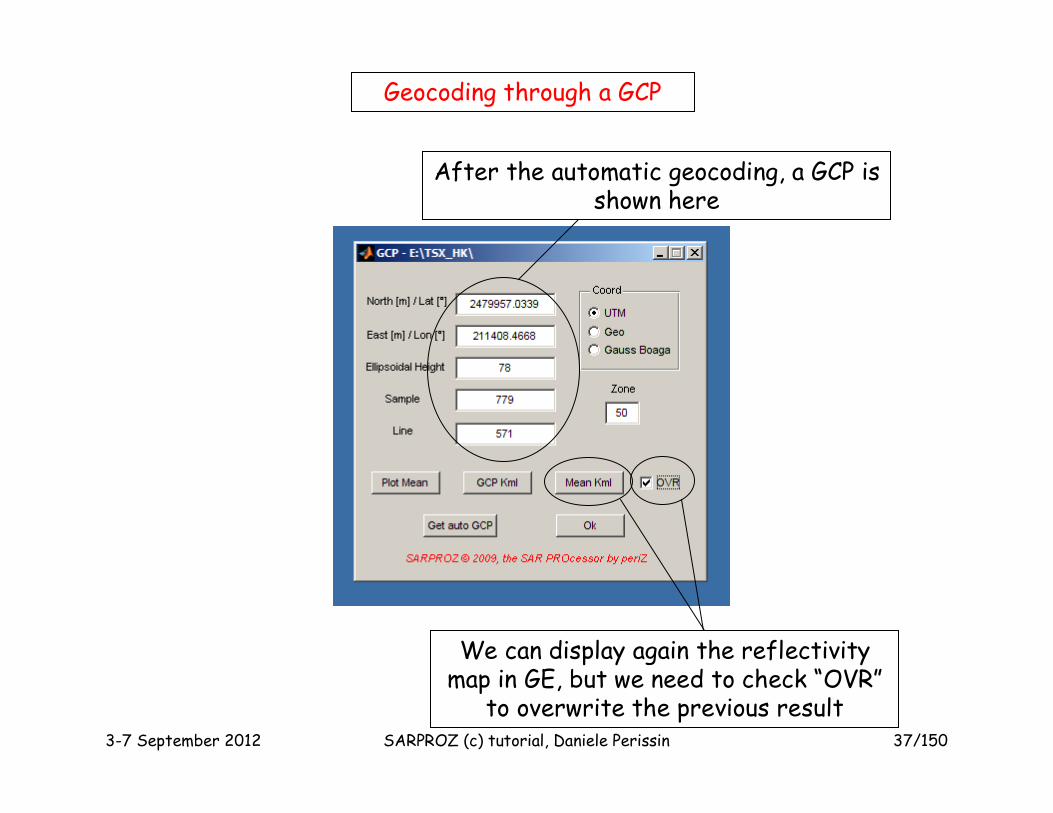
Geocoding through a GCP
After the automatic geocoding, a GCP is shown here
We can display again the reflectivity map in GE, but we need to check “OVR”
to overwrite the previous result
Page 38
3-7 September 2012 SARPROZ (c) tutorial, Daniele Perissin 38/150
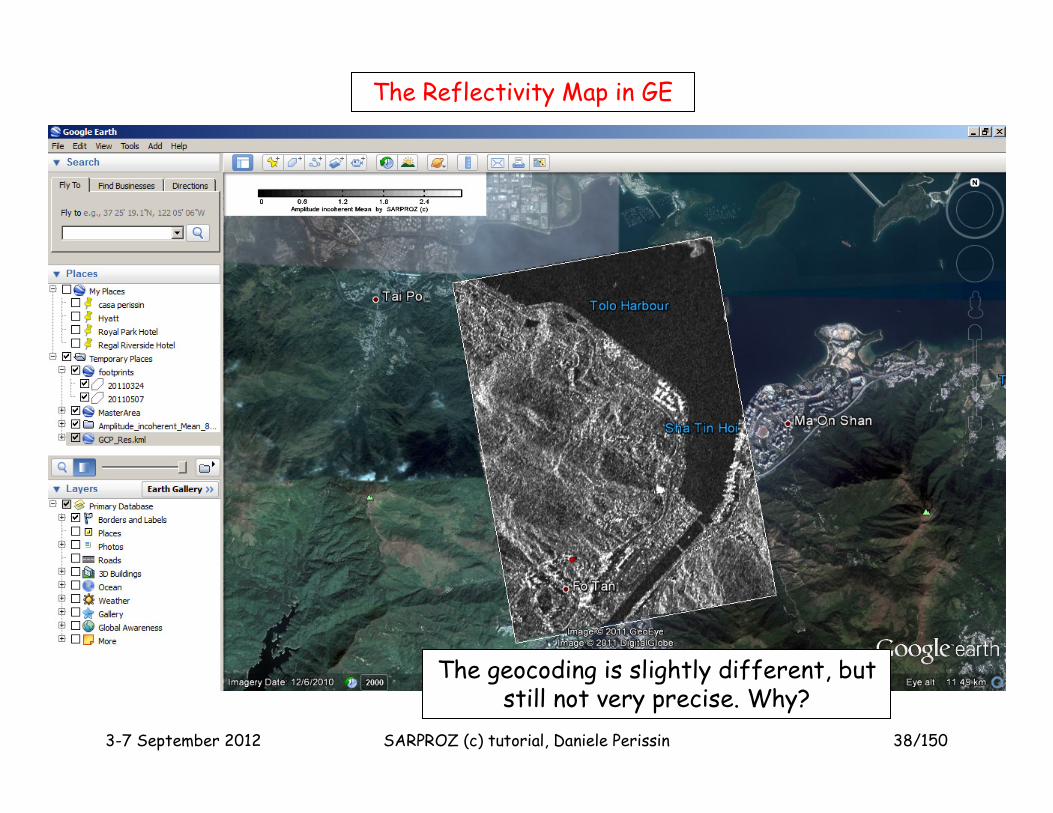
The Reflectivity Map in GE
The geocoding is slightly different, but still not very precise. Why?
Page 39
3-7 September 2012 SARPROZ (c) tutorial, Daniele Perissin 39/150
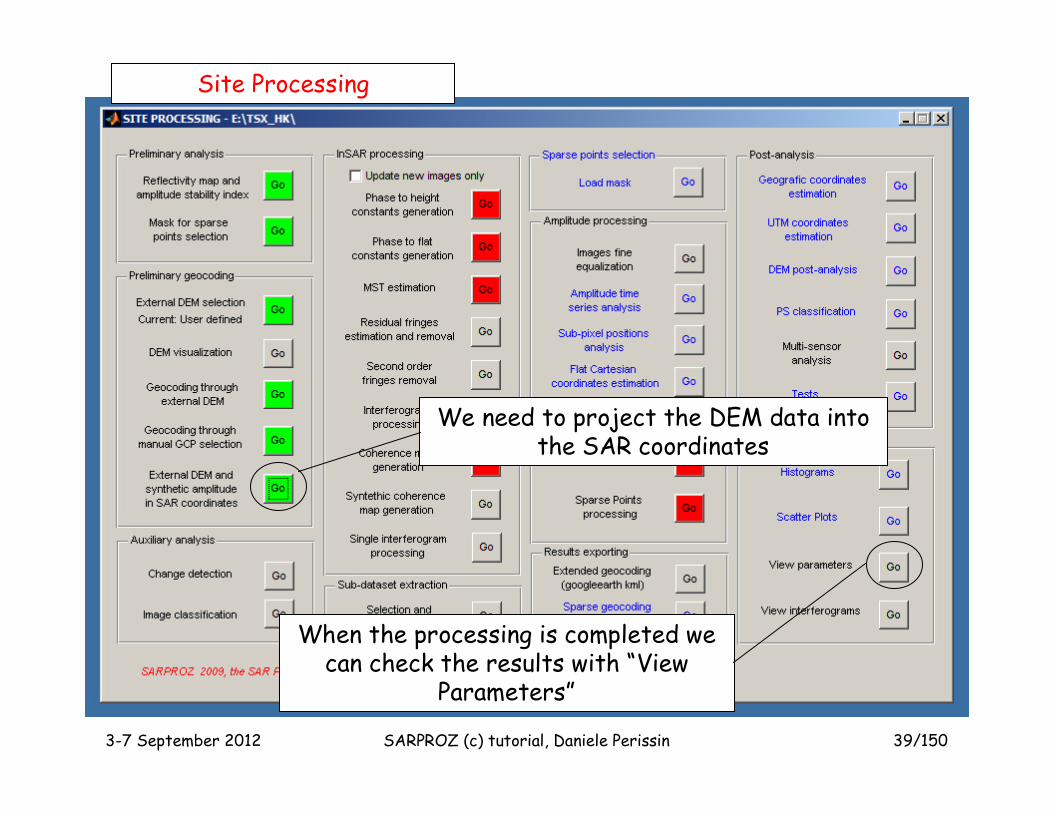
Site Processing
We need to project the DEM data into the SAR coordinates
When the processing is completed we can check the results with “View
Parameters”