132
Veritas Access 7.2 Installation Guide Linux April 2017

Veritas Access 7.2Installation Guide
Linux
April 2017

Veritas Access Installation GuideLast updated: 2017-04-17
Document version: 7.2 Rev 2
Legal NoticeCopyright © 2016 Veritas Technologies LLC. All rights reserved.
Veritas, the Veritas Logo, Veritas InfoScale, and NetBackup are trademarks or registeredtrademarks of Veritas Technologies LLC or its affiliates in the U.S. and other countries. Othernames may be trademarks of their respective owners.
This product may contain third party software for which Veritas is required to provide attributionto the third party (“Third Party Programs”). Some of the Third Party Programs are availableunder open source or free software licenses. The License Agreement accompanying theSoftware does not alter any rights or obligations you may have under those open source orfree software licenses. Refer to the third party legal notices document accompanying thisVeritas product or available at:
https://www.veritas.com/about/legal/license-agreements
The product described in this document is distributed under licenses restricting its use, copying,distribution, and decompilation/reverse engineering. No part of this document may bereproduced in any form by any means without prior written authorization of Veritas TechnologiesLLC and its licensors, if any.
THE DOCUMENTATION IS PROVIDED "AS IS" AND ALL EXPRESS OR IMPLIEDCONDITIONS, REPRESENTATIONS AND WARRANTIES, INCLUDING ANY IMPLIEDWARRANTY OF MERCHANTABILITY, FITNESS FOR A PARTICULAR PURPOSE ORNON-INFRINGEMENT, ARE DISCLAIMED, EXCEPT TO THE EXTENT THAT SUCHDISCLAIMERS ARE HELD TO BE LEGALLY INVALID. VERITAS TECHNOLOGIES LLCSHALL NOT BE LIABLE FOR INCIDENTAL OR CONSEQUENTIAL DAMAGES INCONNECTION WITH THE FURNISHING, PERFORMANCE, OR USE OF THISDOCUMENTATION. THE INFORMATION CONTAINED IN THIS DOCUMENTATION ISSUBJECT TO CHANGE WITHOUT NOTICE.
The Licensed Software and Documentation are deemed to be commercial computer softwareas defined in FAR 12.212 and subject to restricted rights as defined in FAR Section 52.227-19"Commercial Computer Software - Restricted Rights" and DFARS 227.7202, et seq."Commercial Computer Software and Commercial Computer Software Documentation," asapplicable, and any successor regulations, whether delivered by Veritas as on premises orhosted services. Any use, modification, reproduction release, performance, display or disclosureof the Licensed Software and Documentation by the U.S. Government shall be solely inaccordance with the terms of this Agreement.
Veritas Technologies LLC500 E Middlefield RoadMountain View, CA 94043

http://www.veritas.com
Technical SupportTechnical Support maintains support centers globally. All support services will be deliveredin accordance with your support agreement and the then-current enterprise technical supportpolicies. For information about our support offerings and how to contact Technical Support,visit our website:
https://www.veritas.com/support
You can manage your Veritas account information at the following URL:
https://my.veritas.com
If you have questions regarding an existing support agreement, please email the supportagreement administration team for your region as follows:
[email protected] (except Japan)
DocumentationMake sure that you have the current version of the documentation. Each document displaysthe date of the last update on page 2. The document version appears on page 2 of eachguide. The latest documentation is available on the Veritas website:
https://sort.veritas.com/documents
Documentation feedbackYour feedback is important to us. Suggest improvements or report errors or omissions to thedocumentation. Include the document title, document version, chapter title, and section titleof the text on which you are reporting. Send feedback to:
You can also see documentation information or ask a question on the Veritas community site:
http://www.veritas.com/community/
Veritas Services and Operations Readiness Tools (SORT)Veritas Services and Operations Readiness Tools (SORT) is a website that provides informationand tools to automate and simplify certain time-consuming administrative tasks. Dependingon the product, SORT helps you prepare for installations and upgrades, identify risks in yourdatacenters, and improve operational efficiency. To see what services and tools SORT providesfor your product, see the data sheet:
https://sort.veritas.com/data/support/SORT_Data_Sheet.pdf

Chapter 1 Introducing Veritas Access ............................................... 7
About Veritas Access ...................................................................... 7
Chapter 2 System requirements ....................................................... 10
Important release information .......................................................... 10System requirements .................................................................... 10
Linux requirements ................................................................. 11Veritas InfoScale Operations Management Server requirements
..................................................................................... 17Veritas InfoScale Operations Management Server Console
requirements ................................................................... 17Management Server Web browser support .................................. 17Supported NetBackup versions ................................................. 18Supported OpenStack versions ................................................. 18Supported Oracle versions and host operating systems .................. 19Supported IP version 6 Internet standard protocol ........................ 19
Network and firewall requirements ................................................... 19NetBackup ports .................................................................... 22CIFS protocols and firewall ports .............................................. 22
Maximum configuration limits .......................................................... 23
Chapter 3 Preparing to install Veritas Access ............................... 25
Overview of the installation process ................................................. 25Hardware requirements for the nodes ............................................... 27About using LLT over the RDMA network for Veritas Access ................. 27
RDMA over InfiniBand networks in the Veritas Access clusteringenvironment .................................................................... 28
How LLT supports RDMA for faster interconnections betweenapplications ..................................................................... 28
Configuring LLT over RDMA for Veritas Access ............................ 29How the Veritas Access installer configures LLT over RDMA ........... 30LLT over RDMA sample /etc/llttab .............................................. 30
Connecting the network hardware ................................................... 31About obtaining IP addresses ......................................................... 33
Contents

About calculating IP address requirements ........................................ 34About checking the storage configuration .......................................... 37
Chapter 4 Installing and configuring a cluster ............................. 39
Installation overview ...................................................................... 39Summary of the installation steps .................................................... 40Before you install .......................................................................... 41Installing the operating system on each node of the cluster ................... 42
About the driver node .............................................................. 42Installing the operating system on the target Veritas Access cluster
..................................................................................... 43Registering your cluster to RHSM to get yum updates .................... 45Configuring your own yum repository on each node of the cluster
..................................................................................... 46Installing Veritas Access on the target cluster nodes ............................ 47
Installing the required Red Hat Enterprise Linux operating systemRPMs ............................................................................ 47
Installing and configuring the Veritas Access software on thecluster ............................................................................ 48
Veritas Access 7.2 Graphical User Interface (GUI) ........................ 54About NIC bonding and NIC exclusion .............................................. 55
Excluding a NIC ..................................................................... 56Including a NIC ...................................................................... 60Creating a new NIC bond ......................................................... 62Removing a NIC bond ............................................................. 68Removing a NIC from the bond list ............................................. 71
Replacing an Ethernet interface card ................................................ 73Configuring I/O fencing .................................................................. 74About configuring Veritas NetBackup ............................................... 75About enabling kdump during an Veritas Access configuration ............... 75Reconfiguring the Veritas Access cluster name and network ................. 76
Chapter 5 Automating Veritas Access installation andconfiguration using response files .......................... 78
About response files ..................................................................... 78Performing a silent Veritas Access installation .................................... 79Response file variables to install and configure Veritas Access .............. 79Sample response file for Veritas Access installation and configuration
........................................................................................... 88
5Contents

Chapter 6 Displaying and adding nodes to a cluster .................. 92
About the Veritas Access installation states and conditions ................... 92Displaying the nodes in the cluster ................................................... 93Before adding new nodes in the cluster ............................................. 95Adding a node to the cluster ........................................................... 97Deleting a node from the cluster .................................................... 100Shutting down the cluster nodes .................................................... 102
Chapter 7 Upgrading Veritas Access ............................................. 103
About types of Veritas Access patches ............................................ 103Downloading Veritas Access 7.2 release ......................................... 104Upgrading to Veritas Access 7.2 release .......................................... 105About upgrading Veritas Access patches ......................................... 105Displaying the current version of Veritas Access ................................ 106Displaying upgrade history of Veritas Access .................................... 106Downloading an Veritas Access patch release .................................. 106Displaying all Veritas Access releases that are available in the
repository ............................................................................ 107About installing patches ............................................................... 108Installing Veritas Access patches ................................................... 108Automatically execute your customized script before or after upgrade
.......................................................................................... 114Uninstalling patches .................................................................... 115Synchronizing software upgrades on a node .................................... 115
Chapter 8 Uninstalling Veritas Access .......................................... 116
Before you uninstall Veritas Access ................................................ 116Uninstalling Veritas Access using the installer ................................... 118
Removing Veritas Access 7.2 RPMs ......................................... 118Running uninstall from the Veritas Access 7.2 disc ...................... 119
Appendix A Installation reference ...................................................... 120
Installation script options .............................................................. 120
Appendix B Configuring the secure shell for communications.......................................................................................... 122
Manually configuring passwordless secure shell (ssh) ........................ 122Setting up ssh and rsh connection using the pwdutil.pl utility ................ 125
Index .................................................................................................................. 130
6Contents

Introducing Veritas AccessThis chapter includes the following topics:
■ About Veritas Access
About Veritas AccessVeritas Access is a software-defined scale-out network-attached storage (NAS)solution for unstructured data that works on commodity hardware. Veritas Accessprovides resiliency, multi-protocol access, and data movement to and from thepublic cloud based on policies.
Table 1-1 describes the features of Veritas Access.
Table 1-1 Veritas Access key features
DescriptionFeature
CLI interface that provides a single point of administration for theentire cluster.
GUI interface that provides a centralized dashboard with operationsfor creating file systems, shares, and storage pools.
Simple administrationthrough a CLI or a GUIinterface
Veritas Access includes support for the following protocols:
■ Amazon S3■ CIFS■ FTP■ NFS■ Oracle Direct NFS■ SMB 3
Multi-protocol access
Enables cluster-wide network sharing of local storage.Flexible Storage Sharing(FSS)
1Chapter

Table 1-1 Veritas Access key features (continued)
DescriptionFeature
The following functionality is provided for a scale-out file system:
■ File system that manages a single namespace spanning overboth on-premises storage as well as cloud storage, whichprovides better fault tolerance for large data sets.
■ Highly available NFS shares.
Scale-out file system
Veritas Access supports adding a cloud service as a storage tierfor a scale-out file system. You can move data between the tiersbased on file name patterns and when the files were last accessedor modified. Use scheduled policies to move data between thetiers on a regular basis.
Cloud as a tier for ascale-out file system
Veritas Access supports read caching on solid state drives (SSDs)for applications running on Veritas Access file systems.
SmartIO
Veritas Access's built-in SmartTier feature can reduce the cost ofstorage by moving data to lower-cost storage. Veritas Accessstorage tiering also facilitates the moving of data between differentdrive architectures.
SmartTier
Periodic replication of data over IP networks.Replication
Veritas Access supports snapshots for recovering from datacorruption. If files, or an entire file system, are deleted or becomecorrupted, you can replace them from the latest uncorruptedsnapshot.
Snapshot
You can run post-process periodic deduplication in a file system,which eliminates duplicate data without any continuous cost.
Deduplication
You can compress files to reduce the space used, while retainingthe accessibility of the files and having the compression betransparent to applications. Compressed files look and behavealmost exactly like uncompressed files: the compressed files havethe same name, and can be read and written as withuncompressed files.
Compression
Built-in NetBackup client for backing up your file systems to aNetBackup master or media server. Once data is backed up, astorage administrator can delete unwanted data from VeritasAccess to free up expensive primary storage for more data.
NetBackup integration
8Introducing Veritas AccessAbout Veritas Access

Table 1-1 Veritas Access key features (continued)
DescriptionFeature
Integration with OpenStack:
■ OpenStack Cinder integration that allows OpenStack instancesto use the storage hosted by Veritas Access.
■ OpenStack Manila integration that lets you share VeritasAccess file systems with virtual machines on OpenStackManila.
OpenStack plug-in
Support for setting file system quotas, user quotas, and hardquotas.
Quotas
Veritas Access uses the Lightweight Directory Access Protocol(LDAP) for user authentication.
Support for LDAP, NIS,and AD
With support for partitioned directories, directory entries areredistributed into various hash directories. These hash directoriesare not visible in the name-space view of the user or operatingsystem. For every new create, delete, or lookup, this featureperforms a lookup for the respective hashed directory and performsthe operation in that directory. This leaves the parent directoryinode and its other hash directories unobstructed for access, whichvastly improves file system performance.
By default this feature is not enabled. See the storage_fs(1)manual page to enable this feature.
Partition Directory
Enables you to create an isolated storage pool, which contains itsown configuration files. An isolated storage pool protects the poolfrom losing the associated metadata if a disk in another storagepool fails.
Isolated storage pools
Workload-based tuning for the following workloads:
■ Media server■ Virtual machine
Performance and tuning
9Introducing Veritas AccessAbout Veritas Access

System requirementsThis chapter includes the following topics:
■ Important release information
■ System requirements
■ Network and firewall requirements
■ Maximum configuration limits
Important release informationReview the Veritas Access Release Notes for the latest information before youinstall the product.
The hardware compatibility list contains information about supported hardware andis updated regularly. You can use any commodity hardware that is certified andmentioned in the hardware compatibility list. For the latest information on supportedhardware, visit the following URL:
http://www.veritas.com/docs/000019707
For important updates regarding this release, review the Late-Breaking NewsTechNote on the Veritas Technical Support website:
http://www.veritas.com/docs/000116052
System requirementsTable 2-1 lists the per-node system requirements for running the Veritas Accesssystem software.
2Chapter

Table 2-1 System requirements for Veritas Access
RecommendedMinimum
Two nodes of dual or quad core processors at 2.0 GHzor above for optimal performance.
Each Veritas Access node using a64-bit Intel-based serverarchitecture that is compatible withRedhat Enterprise Linux 6 Update6 and Update 7 for AMD64 andIntel EMT. Itanium is notsupported.
The recommended values depend on the expectedworkload.
32 GB error-correcting code (ECC)random-access memory (RAM).
Dual drivers each with size of RAM + 60GB or morecapacity. In the FSS-based environment, more numberof the internal drives (SSD + HDD) are recommended.
One internal drive with size equalto size of RAM + 60GB.
Embedded Ethernet interfaces are recommended.Two gigabit Ethernet interfaces
N/ATwo additional gigabit Ethernetinterfaces (embedded or Ethernetadapters for the peripheralcomponent interconnect (PCI)bus).
Two Fibre Channel Host Bus Adapters (HBAs) arerecommended, but only one is required. Having onlyone Fibre Channel HBA enables all the operations ofthe Fibre Channel (except high availability).
One Fibre Channel Host BusAdapters (HBA).
N/AInternal/external USB DVD-ROMDVD drive.
Recommended, but not required.Redundant power supply.
Recommended to have a PCI based SSD card if youwant to use the SmartIO caching feature.
SmartIO caching feature
Linux requirementsVeritas does not support any operating systems on which Veritas Access runs.There are strict operating system versioning requirements for each release of VeritasAccess.
The Veritas Access 7.2 release requires Red Hat Enterprise Linux. It supports bothRHEL 6 Update 6 and RHEL 6 Update 7. The minimum operating systemrequirements are enforced during the Veritas Access installation. A Kickstart file is
11System requirementsSystem requirements

also available on request for Veritas Access 7.2 to assist partners with the operatingsystem installation requirements. Operating system patches, including securityvulnerability patches, can be installed without requiring certification from Veritas.However, operating system Kernel RPMs should not be patched without specificapproval from Veritas.
The certification of the Red Hat Enterprise Linux (RHEL) operating system updatescan require a new minor version of Veritas Access. RHEL operating system updatescannot be installed without prior agreement with Veritas.
Veritas Access can be integrated into a network that consists of computers runningthe following:
VersionVersionRequirement
RHEL 6 Update 7RHEL 6 Update 6Red HatEnterprise Linuxversion
2.6.32-573.el6
See “Kernel RPMs that arerequired to be installed with exactpredefined RPM versions”on page 13.
2.6.32-504.el6
See “Kernel RPMs that are requiredto be installed with exact predefinedRPM versions” on page 13.
Kernel version
See “Required Red Hat EnterpriseLinux operating system RPMs forRHEL 6.7” on page 15.
See “Required Red Hat EnterpriseLinux operating system RPMs forRHEL 6.6” on page 14.
Other requiredRPMs
Operating system RPM installation requirements andoperating system patching limitationsVeritas has categorized the operating system RPMs that are required before youinstall Veritas Access into four groups:
Category 1
■ This set of RPMs are kernel RPMs that are required to be installed with exactpredefined RPM versions only.
■ The required RPM versions are different for RHEL6.6 and RHEL6.7.
■ The RPMs in this category should not be patched without specific approval fromVeritas.
■ See “Kernel RPMs that are required to be installed with exact predefined RPMversions” on page 13.
Category 2
12System requirementsSystem requirements

■ This set of RPMs include the OS libs and OS packages that must be installedwith minimum predefined RPM versions.
■ The required RPM versions are different for RHEL6.6 and RHEL6.7.
■ The RPMs in this category can be patched using official Red Hat patches.
■ An approval or certification from Veritas is not required to patch these RPMs.
■ See “Required Red Hat Enterprise Linux operating system RPMs for RHEL 6.6”on page 14.
■ See “Required Red Hat Enterprise Linux operating system RPMs for RHEL 6.7”on page 15.
Category 3
■ This set of RPMs are required by Category 2 RPMs as dependencies, theirinstallation is enforced by Red Hat.
■ Veritas Access does not require any specific versions of these RPMs to beinstalled.
■ The versions of these RPMs are determined by Red Hat.
■ The RPMs in this category can be patched using official Red Hat patches.
■ An approval or certification from Veritas is not required to patch these RPMs.
■ Veritas does not document these RPMs as required RPMs for Veritas Access.
Category 4
■ This set of RPMs are third-party RPMs that are included in the Veritas AccessISO.
■ These RPMs are not operating system RPMs. It includes Samba, Ganesha,and other third party products.
■ The RPMs in this category should not be patched without specific approval fromVeritas.
■ Veritas installs these RPMs as they are included in the Veritas Access ISO.
Kernel RPMs that are required to be installed with exactpredefined RPM versionsAfter you install Red Hat Enterprise Linux operating system, install the followingRPMs and then restart the system. Use the specified links to download the RPMsfrom the Red Hat site. The links require a Red Hat registration ID (user name andpassword).
The RHEL 6 Update 6 kernel packages:
13System requirementsSystem requirements

■ kernel-2.6.32-504.el6.x86_64https://rhn.redhat.com/rhn/software/packages/details/Overview.do?pid=1006010
■ kernel-debuginfo-2.6.32-504.el6.x86_64.rpmhttps://rhn.redhat.com/rhn/software/packages/details/Overview.do?pid=1005367
■ kernel-debuginfo-common-x86_64-2.6.32-504.el6.x86_64.rpmhttps://rhn.redhat.com/rhn/software/packages/details/Overview.do?pid=1006274
■ kernel-headers-2.6.32-504.el6.x86_64.rpmhttps://rhn.redhat.com/rhn/software/packages/details/Overview.do?pid=1006768
■ kernel-firmware-2.6.32-504.el6.noarch.rpmhttps://rhn.redhat.com/rhn/software/packages/details/Overview.do?pid=1005320
The RHEL 6 Update 7 kernel packages:
■ kernel-2.6.32-573.el6.x86_64https://rhn.redhat.com/rhn/software/packages/details/Overview.do?pid=1072387.
■ kernel-debuginfo-2.6.32-573.18.1.el6.x86_64https://rhn.redhat.com/rhn/software/packages/details/Overview.do?pid=1072442
■ kernel-debuginfo-common-x86_64-2.6.32-573.18.1.el6.x86_64https://rhn.redhat.com/rhn/software/packages/details/Overview.do?pid=1072385
■ kernel-firmware-2.6.32-573.el6.noarchhttps://rhn.redhat.com/rhn/software/packages/details/Overview.do?pid=1012920
■ kernel-headers-2.6.32-573.el6.x86_64https://rhn.redhat.com/rhn/software/packages/details/Overview.do?pid=1072371
RequiredRedHat Enterprise Linux operating systemRPMsfor RHEL 6.6The RPM version numbers specified in these lists are the minimum required versionnumbers for these operating system RPMs.
Required OS lib rpms for RHEL6.6:
coreutils-8.4-37.el6.x86_64 ed-1.1-3.3.el6.x86_64
findutils-4.4.2-6.el6.x86_64 glibc-2.12-1.166.el6_7.7.i686
glibc-2.12-1.166.el6_7.7.x86_64 ksh-20120801-21.el6.x86_64
libacl-2.2.49-6.el6.x86_64 libgcc-4.4.7-11.el6.i686
libgcc-4.4.7-11.el6.x86_64 libstdc++-4.4.7-11.el6.i686
libstdc++-4.4.7-11.el6.x86_64 libudev-147-2.57.el6.i686
mksh-39-9.el6_4.1.x86_64 module-init-tools-3.9-24.el6_4.x86_64
ncurses-libs-5.7-3.20090208.el6.x86_64 nss-softokn-freebl-3.14.3-17.el6.i686
openssl-1.0.1e-48.el6_8.1.x86_64 parted-2.1-25.el6.x86_64
perl-5.10.1-136.el6.x86_64 policycoreutils-2.0.83-19.47.el6.x86_64
14System requirementsSystem requirements

readline-6.0-4.el6.x86_64
Required OS packages for RHEL6.6:
apr-devel 1.3.9-5.el6_2 apr-util-devel 1.3.9-3.el6_0.1
bash 4.1.2-29.el6 glibc-common 2.12-1.166.el6_7.7
glibc-devel.x86_64 2.12-1.166.el6_7.7 glibc-headers 2.12-1.166.el6_7.7
glibc-utils 2.12-1.166.el6_7.7 glibc.i686 2.12-1.166.el6_7.7
glibc.x86_64 2.12-1.166.el6_7.7 hal 0.5.14-14.el6
httpd 2.2.15-54.el6_8 httpd-devel 2.2.15-54.el6_8
httpd-manual 2.2.15-54.el6_8 httpd-tools 2.2.15-54.el6_8
infiniband-diags 1.0.0 iscsi-initiator-utils 6.2.0.873-13.el6
libibumad 1.3.9-1.el6 libibverbs-devel 1.1.8-3.el6
libibverbs-utils 1.1.8-3.el6 libpcap 1.4.0
libtirpc 0.2.1-10.el6 libyaml 0.1.3-4
lsscsi 0.23 memcached 1.4.4-3.el6
mod_ssl 2.2.15-39.el6_5 mod_wsgi 3.2-7.el6
nc 1.84-22.el6 net-snmp 5.5-49.el6
net-snmp-libs 5.5-49.el6 net-snmp-utils 5.5-49.el6
nfs-utils 1.2.3-54.el6 nscd 2.12-1.166.el6_7.7
nss-pam-ldapd 0.7.5-18.2.el6_4 openldap 2.4.39-8.el6
openldap-clients 2.4.39-8.el6 opensm 3.3.5
opensm-libs 3.3.5 openssh 5.3p1-111.el6
openssh-askpass 5.3p1-111.el6 openssh-clients 5.3p1-111.el6
openssh-server 5.3p1-111.el6 openssl 1.0.1e-48.el6_8.1
openssl-devel 1.0.1e-48.el6_8.1 perl 5.10.1
perl-Net-Telnet 3.03 python-backports 1.0-5.el6
python-backports-ssl_match_hostname 3.4.0.2-2.el6
python-chardet 2.2.1-1.el6 python-memcached 1.43-6.el6
python-paramiko 1.7.5-2.1.el6 python-requests 2.6.0-3.el6
python-six 1.9.0-2.el6 python-urllib3 1.10.2-1.el6
rdma 1.0 rrdtool 1.3.8-7.el6
sg3_utils 1.28-6.el6 sg3_utils-libs 1.28-6.el6
sysstat 9.0.4-27.el6 telnet 0.17-48.el6
vsftpd 2.2.2-12.el6 wireshark 1.8.10-7.el6
RequiredRedHat Enterprise Linux operating systemRPMsfor RHEL 6.7The RPM versions numbers specified in these lists are the minimum required versionnumbers for these operating system RPMs.
Required OS lib rpms for RHEL6.7:
coreutils-8.4-37.el6.x86_64 ed-1.1-3.3.el6.x86_64
findutils-4.4.2-6.el6.x86_64 glibc-2.12-1.166.el6_7.7.i686
15System requirementsSystem requirements

glibc-2.12-1.166.el6_7.7.x86_64 ksh-20120801-28.el6.x86_64
libacl-2.2.49-6.el6.x86_64 libgcc-4.4.7-16.el6.i686
libgcc-4.4.7-16.el6.x86_64 libstdc++-4.4.7-16.el6.i686
libstdc++-4.4.7-16.el6.x86_64 libudev-147-2.63.el6.i686
mksh-39-9.el6.x86_64 mksh-39-9.el6_4.1.x86_64
module-init-tools-3.9-25.el6.x86_64 ncurses-libs-5.7-4.20090207.el6.x86_64
nss-softokn-freebl-3.14.3-22.el6_6.i686 openssl-1.0.1e-48.el6_8.1.x86_64
parted-2.1-29.el6.x86_64 perl-5.10.1-141.el6.x86_64
policycoreutils-2.0.83-24.el6.x86_64 readline-6.0-4.el6.x86_64
Required OS packages for RHEL6.7:
apr-devel 1.3.9-5.el6_2 apr-util-devel 1.3.9-3.el6_0.1
bash 4.1.2-33.el6 glibc-common 2.12-1.166.el6_7.7
glibc-devel.x86_64 2.12-1.166.el6_7.7 glibc-headers 2.12-1.166.el6_7.7
glibc-utils 2.12-1.166.el6_7.7 glibc.i686 2.12-1.166.el6_7.7
glibc.x86_64 2.12-1.166.el6_7.7 hal 0.5.14-14.el6
httpd 2.2.15-54.el6_8 httpd-devel 2.2.15-54.el6_8
httpd-manual 2.2.15-54.el6_8 httpd-tools 2.2.15-54.el6_8
infiniband-diags 1.0.0 iscsi-initiator-utils 6.2.0.873-14.el6
libibumad 1.3.9-1.el6 libibverbs-devel 1.1.8-4.el6
libibverbs-utils 1.1.8-4.el6 libpcap 1.4.0
libtirpc 0.2.1-10.el6 libyaml 0.1.3-4
lsscsi 0.23 memcached 1.4.4-3.el6
mod_ssl 2.2.15-45.el6 mod_wsgi 3.2-7.el6
nc 1.84-24.el6 net-snmp 5.5-54.el6
net-snmp-libs 5.5-54.el6 net-snmp-utils 5.5-54.el6
nfs-utils 1.2.3-64.el6 nscd 2.12-1.166.el6_7.7
nss-pam-ldapd 0.7.5-20.el6_6.3 openldap 2.4.40-5.el6
openldap-clients 2.4.40-5.el6 opensm 3.3.17-1.el6
opensm-libs 3.3.17-1.el6 openssl 1.0.1e-48.el6_8.1
openssl-devel 1.0.1e-48.el6_8.1 perl 5.10.1
perl-Net-Telnet 3.03 python-backports 1.0-5.el6
python-backports-ssl_match_hostname 3.4.0.2-2.el6
python-chardet 2.2.1-1.el6 python-memcached 1.43-6.el6
python-paramiko 1.7.5-2.1.el6 python-requests 2.6.0-3.el6
python-six 1.9.0-2.el6 python-urllib3 1.10.2-1.el6
rdma 1.0 rrdtool 1.3.8-7.el6
sg3_utils 1.28-8.el6 sg3_utils-libs 1.28-8.el6
sysstat 9.0.4-27.el6 telnet 0.17-48.el6
vsftpd 2.2.2-14.el6 wireshark 1.8.10-17.el6
16System requirementsSystem requirements

Veritas InfoScale Operations Management Server requirementsThis section lists the amount of CPU cores, memory, and disk space that VeritasInfoScale Operation Manager requires.
Table 2-2 For a management server
Disk spaceMemoryCPU coresEnvironment Size
5 GB4 GB4Small (up to 300 managed hosts)
20 GB16 GB8Medium (up to 1500 managed hosts)
40 GB32 GB16Large (up to 3500 managed hosts)
Table 2-3 For a managed host
Disk spaceMemoryCPU cores
2 GB1 GB1
Veritas InfoScale Operations Management Server Consolerequirements
Veritas Access Add-on is supported only on the Linux platform.
Management Server Web browser supportThe following are the supported Web browsers for Veritas Access:
Table 2-4
CommentsVersionBrowser
JavaScript: Enabled
Cookies: Enabled
■ IE 8■ IE 9■ IE 10■ IE 11
Internet Explorer
JavaScript: Enabled
Cookies: Enabled
FireFox 4.x and laterFireFox
JavaScript: Enabled
Cookies: Enabled
Chrome 10 and later versionChrome
Additional considerations for supported Web browsers:
17System requirementsSystem requirements

■ Your browser must support JavaScript 1.2, or later.
■ If you use pop-up blockers (including Yahoo Toolbar or Google Toolbar), eitherdisable them or configure them to accept pop-ups from the Veritas InfoscaleOperations Manager Web server to which you connect.
■ For Internet Explorer 8.0 on Windows Server 2003, download and install thehot fix from the following location:http://support.microsoft.com/kb/938397/en-gb
■ If you are unable to download the gendeploy script using Internet Explorer 9.0,visit the following location to resolve the issue:http://support.microsoft.com/kb/2549423
■ For Internet Explorer, enable the play animations in web pages option in themultimedia category of Advanced Internet options.
■ For Internet Explorer, when popup-blocker is turned on, make sure that the filterLevel is set to Medium or lower.
■ For Internet Explorer, ensure that the site is included in the list of trusted sites.
■ If you cannot add the site to the list of trusted sites, enable the Binary and scriptBehaviors option in security settings.
■ You must install Adobe Flash plug-in version 10, or later.
Supported NetBackup versionsVeritas Access supports NetBackup versions 7.6 and 7.7.
Supported OpenStack versionsThe OpenStack drivers, Cinder and Manila, are supported on the Red Hat EnterpriseLinux (RHEL) 7 OS and the OpenStack Kilo release.
The Cinder and Manila drivers were tested with the following:
■ OpenStack Kilo version from the DevStack repository
■ OpenStack RDO
Note: The Manila driver works only with kernel NFS. It will not work withNFS-Ganesha.
18System requirementsSystem requirements

Supported Oracle versions and host operating systemsVeritas Access supports Oracle using Direct NFS. Veritas Access Direct NFSsupports only NFS protocol version 3.
Veritas Access supports Oracle single instance only. OracleRAC is not supported.
The following are the supported Oracle versions for Veritas Access:
■ Oracle version 11gR2 (11.2.0.4 or above)
■ Oracle 12c (12.1.0.1)
The following are the supported Oracle host operating systems in the order ofimportance for Veritas Access:
■ Linux
■ AIX
■ Solaris
■ HP-UX
■ Oracle Linux
Supported IP version 6 Internet standard protocolTable 2-5 describes the IP version 6 (IPv6) Internet standard protocol.
Table 2-5 IPv6 Internet standard protocol
Example formatDescription
ABCD:EF01:2345:6789:ABCD:EF01:2345:6789Preferred form
FF01::101Compressed form
0:0:0:0:0:FFFF:129.144.52.38Mixed form
Network and firewall requirementsTable 2-6 displays the default ports that Veritas Access uses to transfer information.
19System requirementsNetwork and firewall requirements

Table 2-6 Default Veritas Access ports
Impact if blockedPurposeProtocol orService
Port
FTP features areblocked.
Port where the FTPserver listens forconnections.
Note: Users canconfigure another portif desired.
FTP21
Veritas Access is notaccessible.
Secure access to theVeritas Access server
SSH22
The SMTP messagesthat are sent fromVeritas Access areblocked.
Sending SMTPmessages.
SMTP25
Domain namemapping fails.
Communication withthe DNS server
DNS queries53
RPC services fail.RPC portmapperservices
rpcbind111
Server clocks are notsynchronized acrossthe cluster.NTP-reliant features(such as DAR) arenot available.
Communication withthe NTP server
NTP123
CIFS clients cannotaccess the VeritasAccess cluster
CIFS client to servercommunication
CIFS139
SNMP alerts cannotbe broadcast.
Sending SNMP alertsSNMP161
CIFS clients cannotaccess the VeritasAccess cluster.
CIFS client to servercommunication
CIFS445
Syslog messages arenot recorded.
Logging programmessages
syslog514
20System requirementsNetwork and firewall requirements

Table 2-6 Default Veritas Access ports (continued)
Impact if blockedPurposeProtocol orService
Port
NFS v3 protocolcannot functioncorrectly.
NFS statd portstatd756, 757, 755
NFS clients cannotaccess the VeritasAccess cluster.
NFS client to servercommunication
NFS2049
ServerView cannotwork.
ServerView portServerView3172, 3173
NFS clients cannotmount file systems inthe Veritas Accesscluster.
NFS mount protocolmountd4001
File locking servicesare not available.
Processes the lockrequests
lockd4045
Web GUI may not beaccessible.
Management Serverconnectivity
HTTPS5634
Veritas Accessreplication daemon isblocked. Replicationcannot work.
File synchronization,Veritas Accessreplication
Replication56987
REST client cannotaccess REST API ofVeritas Access.
REST client to servercommunication
REST server8088
CLISH cannotfunction correctly, andcluster configurationmay get corrupted.
CLISH frameworkMemcached port11211
FTP passive modefails.
FTP passive portFTP30000:4000
User is unable toaccess VeritasAccess GUI
Access VeritasAccess GUI
HTTPS14161
LLT is not working.LLT over RDMAUDP51001
21System requirementsNetwork and firewall requirements

Table 2-6 Default Veritas Access ports (continued)
Impact if blockedPurposeProtocol orService
Port
LLT is not working.LLT over RDMAUDP51002
NetBackup portsNetBackup uses TCP/IP connections to communicate between one or more TCP/IPports. Depending on the type of operation and configuration on the environment,different ports are required to enable the connections. NetBackup has differentrequirements for operations such as backup, restore, and administration.
Table 2-7 shows some of the most-common TCP and UDP ports that Veritas AccessNetBackup uses to transfer information. For more information, see the NetBackupSecurity and Encryption Guide.
Table 2-7 Default NetBackup TCP and UDP ports
ProtocolPort Range
TCP, UDP1556
TCP13701-13702, 13705-13706
TCP13711, 13713, 13715-13717, 13719
TCP, UDP13720-13722
TCP13723
TCP, UDP13724
TCP, UDP13782-13783
TCP13785
CIFS protocols and firewall portsFor the CIFS service to work properly in an Active Directory (AD) domainenvironment, the following protocols and firewall ports need be allowed or openedto enable the CIFS server to communicate smoothly with Active Directory DomainControllers and Windows/CIFS clients.
Internet Control Message Protocol (ICMP) protocol must be allowed through thefirewall from the CIFS server to the domain controllers. Enable "Allow incomingecho request" is required for running the CIFS service.
22System requirementsNetwork and firewall requirements

Table 2-8 lists additional CIFS ports and protocols.
Table 2-8 Additional CIFS ports and protocols
PurposeProtocolPort
DNSTCP, UDP53
KerberosTCP, UDP88
DFSN, NetBIOS Session Service, NetLogTCP139
SMB, CIFS, SMB2, DFSN, LSARPC, NbtSS,NetLogonR, SamR, SrvSvc
TCP, UDP445
Kerberos change or set a passwordTCP, UDP464
LDAP GCTCP3268
CTDB in CIFSTCP4379
Table 2-9 lists the ports that are required for LDAP with SSL.
Table 2-9 LDAP with SSL ports
PurposeProtocolPort
LDAP SSLTCP636
LDAP GC SSLTCP3269
Maximum configuration limitsThe maximum configuration limits for configuring the Veritas Access system softwareare as follows:
Table 2-10 Maximum configuration limits
Configuration limitVeritas Accesssystem software
512 TBFile system size
16
Note: Flexible Storage Sharing (FSS) only supports clusterconfigurations with up to 8 nodes.
Veritas Access nodes
23System requirementsMaximum configuration limits

Table 2-10 Maximum configuration limits (continued)
Configuration limitVeritas Accesssystem software
The maximum number of disks is theoretically limited to the numberthat can be attached to the operating system. However, it has onlybe tested in the thousands.
Supported LUNs
500Supported file systems
2 (primary tier and secondary tier)Tiers within a file system
24System requirementsMaximum configuration limits

Preparing to install VeritasAccess
This chapter includes the following topics:
■ Overview of the installation process
■ Hardware requirements for the nodes
■ About using LLT over the RDMA network for Veritas Access
■ Connecting the network hardware
■ About obtaining IP addresses
■ About calculating IP address requirements
■ About checking the storage configuration
Overview of the installation processThe Veritas Access cluster is a set of connected servers called "nodes." Togetherthese nodes form a unified entity called a cluster.
Figure 3-1 shows an example of an Veritas Access cluster.
3Chapter

Figure 3-1 Sample of Veritas Access cluster overview
Fibre channel switch
Public network
Client Client
Node 1 Node 2
Storage array
Private network
eth3
eth2
eth3eth1
eth0 eth0eth1
eth2
Note: The NIC names mentioned in Figure 3-1 are only for examples. You needto determine the usage of your NICs during the installation.
An overview of the Veritas Access software installation includes the following steps:
■ Gather network information from your network administrator.
■ Connect your network hardware.
■ Install the operating system on each of the nodes.
■ Install Veritas Access on the node. If the driver node is one of the nodes of thecluster, you must start the installer from the console of the node. If the drivernode is not part of the cluster, the installer can be run from the driver node toinstall and configure the cluster over an ssh connection.From the Veritas Access 7.2 release, the installer can be run from any node ofthe cluster.See “Installing and configuring the Veritas Access software on the cluster”on page 48.See “About the driver node” on page 42.
26Preparing to install Veritas AccessOverview of the installation process

■ Run the installation and configuration on the node to configure the entire cluster.Installation times may vary depending on your configuration.
Hardware requirements for the nodesThe following table summarizes the hardware requirements for each node.
Table 3-1 Hardware requirements for the nodes
RequirementsItem
At least four NICs are required for each node.
Two NICs connected to a private network.
■ For a two-node cluster, either cross connect two private NICson each node or use a switch.
■ If there are more than two nodes in the cluster, make sure thatyou have a dedicated switch (or a public or private switch witha dedicated VLAN) and that all the private NICs are connectedto the switch.
Connect two public NICs from each node to the public network.The gateway must be reachable to each public NIC.
Network interface card(NIC)
For a two-node cluster, make sure that you have nine IP addressesavailable.
■ Four IP addresses are used to configure physical IPs.■ Four IP addresses are used to configure virtual IPs.■ One IP address is used to configure the Veritas InfoScale
Operations Manager console.■ One IP address is used for replication, which is optional.
Make sure that these nine IP addresses are different from the IPaddresses that are already assigned to the target cluster nodesto install Veritas Access over Secure Shell (ssh).
IP address
About using LLT over the RDMA network forVeritas Access
Remote direct memory access (RDMA) allows server-to-server data movementdirectly between application memories with minimal CPU involvement. RDMAprovides fast interconnection between user-space applications or file systemsbetween nodes over InfiniBand networks with RDMA-enabled network cards and
27Preparing to install Veritas AccessHardware requirements for the nodes

switches. In a clustering environment, RDMA allows applications on separate nodesto transfer data at a faster rate with low latency and less CPU usage.
RDMA over InfiniBand networks in the Veritas Access clusteringenvironment
Veritas Access uses Low Latency Transport (LLT) for data transfer betweenapplications on nodes. LLT functions as a high-performance, low-latencyreplacement for the IP stack, and is used for all cluster communications. It distributes(load balances) internode communication across all available private network links.This distribution means that all cluster communications are evenly distributed acrossall private network links (maximum eight) for performance and fault resilience. If alink fails, traffic is redirected to the remaining links. LLT is also responsible forsending and receiving heartbeat traffic over network links. Using LLT data transferover an RDMA network boosts performance of both file system data transfer andI/O transfer between nodes.
Network interface cards (NICs) and network switches that support RDMA arerequired to enable the faster application data transfer between nodes. You alsoneed to configure the operating system and LLT for RDMA.
See “Configuring LLT over RDMA for Veritas Access” on page 29.
How LLT supports RDMA for faster interconnections betweenapplications
Low Latency Transport (LLT) maintains two channels (RDMA and non-RDMA) foreach of the configured RDMA links. Both RDMA and non-RDMA channels cantransfer data between the nodes. LLT provides separate Application ProgramInterfaces (APIs) to the clients (such as CFS and CVM) to use these channels. TheRDMA channel is mainly used for data transfer by the client; while the non-RDMAchannel is created over the UDP layer, and LLT uses it mainly for sending andreceiving heartbeats. Group Membership Services/Atomic Broadcast (GAB) decidescluster membership for the cluster according to the health of the non-RDMA channel.The connections of the RDMA and non-RDMA channels are under separatemanagement, while the connect and disconnect operations for the RDMA channelare triggered based on the status of the non-RDMA channel.
If the non-RDMA channel is up while the RDMA channel is down, the data istransferred over the non-RDMA channel with lower performance until the RDMAchannel is fixed. The system logs display a message when the RDMA channel isup or down.
LLT uses the Open Fabrics Enterprise Distribution (OFED) layer and the driverson the operating system to communicate with the hardware. LLT over RDMA allows
28Preparing to install Veritas AccessAbout using LLT over the RDMA network for Veritas Access

applications running on one node to directly access the memory of an applicationrunning on another node over an RDMA-enabled network. While over a non-RDMAnetwork, LLT clients have to create intermediate data copies to complete the reador write operation on the application. RDMA network brings low latency, higherthroughput, and minimized CPU host usage, and boosts application performance.LLT and GAB clients CFS and CVM can use LLT over RDMA.
Configuring LLT over RDMA for Veritas AccessDuring the Veritas Access installation, the installer automatically configures LLTover RDMA if there are InfiniBand NICs on the cluster nodes, unless the InfiniBandNICs are excluded.
This section describes the required hardware and configuration for LLT to supportRDMA for Veritas Access. The high-level steps to configure LLT over RDMA areas follows:
1. Choose NICs, network switches, and cables that support RDMA.
Table 3-2 RDMA-enabled hardware
ReferenceSupported typesHardware
For detailed installationinformation, refer to the hardwarevendor documentation.
Mellanox-based Host Channel Adapters(HCAs) (VPI, ConnectX, ConnectX-2 and3)
Networkcard
For detailed installationinformation, refer to the hardwarevendor documentation.
Mellanox, InfiniBand switches
Ethernet switches must be Data CenterBridging (DCB) capable
Networkswitch
For detailed installationinformation, refer to the hardwarevendor documentation.
Copper and Optical Cables, InfiniBandcables
Cables
2. Connect the first two non-excluded InfiniBand NICs as private NICs.
Note: Cross-links connection is not supported for private NICs in an RDMAenvironment.
3. Make sure that the required packages to enable RDMA, InfiniBand drivers, andutilities are installed with the base operating system. Or they can be installed fromthe yum repository.
See “Registering your cluster to RHSM to get yum updates” on page 45.
29Preparing to install Veritas AccessAbout using LLT over the RDMA network for Veritas Access
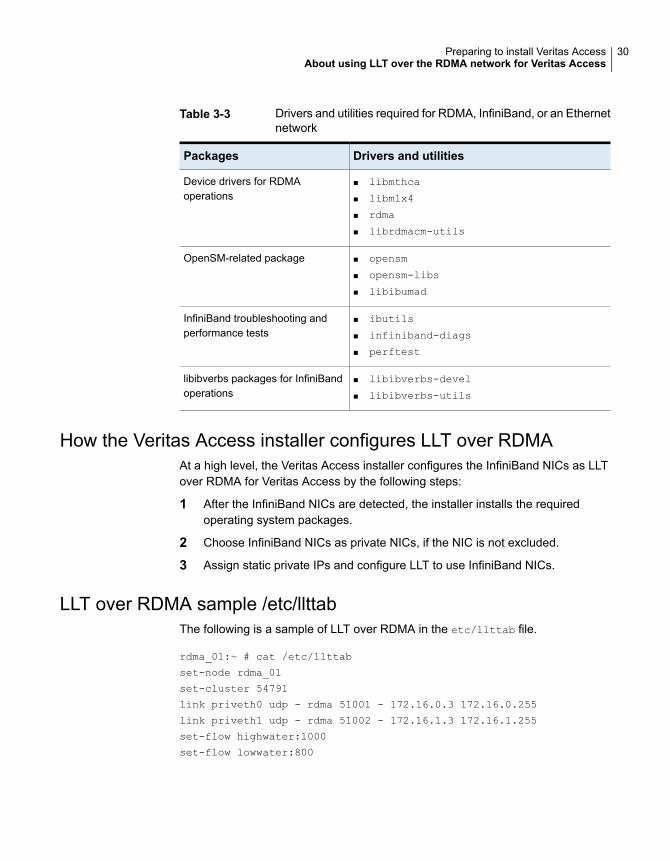
Table 3-3 Drivers and utilities required for RDMA, InfiniBand, or an Ethernetnetwork
Drivers and utilitiesPackages
■ libmthca
■ libmlx4
■ rdma
■ librdmacm-utils
Device drivers for RDMAoperations
■ opensm
■ opensm-libs
■ libibumad
OpenSM-related package
■ ibutils
■ infiniband-diags
■ perftest
InfiniBand troubleshooting andperformance tests
■ libibverbs-devel
■ libibverbs-utils
libibverbs packages for InfiniBandoperations
How the Veritas Access installer configures LLT over RDMAAt a high level, the Veritas Access installer configures the InfiniBand NICs as LLTover RDMA for Veritas Access by the following steps:
1 After the InfiniBand NICs are detected, the installer installs the requiredoperating system packages.
2 Choose InfiniBand NICs as private NICs, if the NIC is not excluded.
3 Assign static private IPs and configure LLT to use InfiniBand NICs.
LLT over RDMA sample /etc/llttabThe following is a sample of LLT over RDMA in the etc/llttab file.
rdma_01:~ # cat /etc/llttab
set-node rdma_01
set-cluster 54791
link priveth0 udp - rdma 51001 - 172.16.0.3 172.16.0.255
link priveth1 udp - rdma 51002 - 172.16.1.3 172.16.1.255
set-flow highwater:1000
set-flow lowwater:800
30Preparing to install Veritas AccessAbout using LLT over the RDMA network for Veritas Access

Connecting the network hardwareBefore you install the Veritas Access software, you must assemble a cluster byconfiguring all the nodes with the required network hardware, and connecting theEthernet interfaces to the private and the public networks.
To assemble the cluster, do the following:
■ Determine a preferred location for the cluster.
■ Make sure that each node has at least two redundant Ethernet interfaces (gigabitEthernet) to connect to a private network for cluster internal control.
■ Make sure that each node has at least two additional Ethernet interfaces (gigabitEthernet) to connect to the public network. You can use the public Ethernetinterfaces from the embedded interfaces on the motherboard or from the add-on(PCI) network adapter interfaces.
■ To connect the public NICs, connect one end of the Ethernet cables to theEthernet interfaces on the back of the nodes. Connect the other end of theEthernet cables to your corporate network so that they can reach the gateway.At least two public interfaces are required for each node.
■ To connect the private NICs, use the first two available NICs when sorted byNIC name. An available NIC is not connected to the public network or excludedfrom the node.For example,if your NICs are eth1, eth2, eth3, and eth4, and none of the NICsare connected to the public network or excluded, then use eth1 and eth2 as theprivate NICs.Connect one end of the Ethernet cables to Ethernet interface 1 and 2 on theback of the nodes. For a 2-node cluster, connect the other end of the Ethernetcables to the corresponding Ethernet interfaces on the second node. For acluster with more than 2 nodes, connect the other end of the Ethernet cablesto a dedicated switch or VLAN.
Note: It is recommended to use InfiniBand NICs to configure LLT over RDMAfor Veritas Access. Connect InfiniBand NICs as private or exclude the NICswhen you install Veritas Access.
See “About using LLT over the RDMA network for Veritas Access” on page 27.
See “Excluding a NIC” on page 56.
■ Ask your network administrator for a range of IP addresses to use in the VeritasAccess installation. The number of IP addresses you need depends on thenumber of nodes and number of network interface cards in your cluster. You
31Preparing to install Veritas AccessConnecting the network hardware

need two IP addresses per node per public interface (one for the physical IPaddresses, one for the virtual IP addresses), and one IP address for the consoleIP per cluster.Veritas Access supports both Internet Protocol version 4 (IPv4) or InternetProtocol version 6 (IPv6), but they cannot be mixed.
An IP address that is associated with a specific Ethernet interfaceaddress and cannot automatically be failed over.
Physical IPaddress
An IP address whose association to a specific Ethernet interface(VIP) can be failed over to other interfaces on other nodes by theVeritas Access software.
Virtual IP address(VIP)
A dedicated virtual IP address that is used to communicate with theVeritas Access cluster Management Console. This virtual IP addressis assigned to the master node. If the master node fails, the VeritasAccess software automatically selects a new master node from thecluster and fails the console IP address over to it.
Console IPaddress
Figure 3-2 shows a diagram of a four-node cluster.
32Preparing to install Veritas AccessConnecting the network hardware

Figure 3-2 Private network setups: four-node cluster
Public network
Client Client
Storage array
Private network
Client
Fibre channel switch
Node4
Node1
Node2
Node3
Ethernet switch
About obtaining IP addressesThe Veritas Access installation process lets you configure IP addresses for 1 to 8nodes. The default is two nodes.
Note: You can configure either IPv4 addresses or IPv6 addresses (depending onwhat you use when installing Veritas Access), but not both. Do not use IP addressesstarting with 172.16.0.X either as physical IP addresses or virtual IP addressessince this range of IP addresses are used for the private network.
You need to obtain a contiguous range of physical IP addresses, a contiguousrange of virtual IP addresses, and a netmask for the chosen public network fromthe network administrator in charge of the facility where the cluster is located. All
33Preparing to install Veritas AccessAbout obtaining IP addresses

IP addresses (both physical and virtual) must be part of the same subnet and usethe same netmask as the node's access IP.
By design, the installer does not support the use of the localhost (127.0.0.1) IPaddress during installation
Note: Netmask is used for IPv4 addresses. Prefix is used for IPv6 addresses.Accepted ranges for prefixes are 0-128 (integers) for IPv6 addresses.
The information you obtained from the network administrator is used to configurethe following:
■ Physical IP addresses
■ Virtual IP addresses
■ Console IP address
■ Replication IP address (optional)
■ IP address for the default gateway
■ IP address for the Domain Name System (DNS) server
■ DNS domain name
■ IP address for the Network Time Protocol (NTP) server (optional)
■ Virtual IP address for Veritas NetBackup (optional)
About calculating IP address requirementsThis section provides an example of how to calculate IP addresses for a two-nodecluster. In this example, all the nodes in the cluster have the same hardwareconfiguration. Therefore, the number of network interface cards (NICs) is the samefor all the nodes in the cluster.
■ Two private NICs and two public NICs should be connected to respectivenetworks.
■ One public IP address should be assigned to one of the public interface forinstallation over ssh. None of the private interfaces should have the IP addressin the same network segment.
■ The public IP address must be made permanent by writing it to the networkconfiguration file /etc/sysconfig/network-scripts/ifcfg-ethX.
Consider the cluster configuration that is shown in Table 3-4.
34Preparing to install Veritas AccessAbout calculating IP address requirements
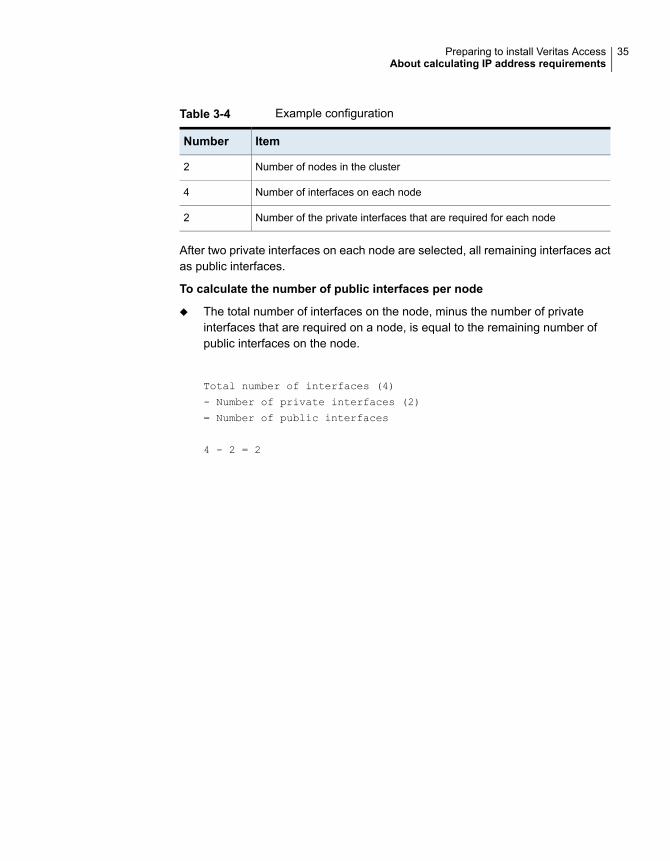
Table 3-4 Example configuration
ItemNumber
Number of nodes in the cluster2
Number of interfaces on each node4
Number of the private interfaces that are required for each node2
After two private interfaces on each node are selected, all remaining interfaces actas public interfaces.
To calculate the number of public interfaces per node
◆ The total number of interfaces on the node, minus the number of privateinterfaces that are required on a node, is equal to the remaining number ofpublic interfaces on the node.
Total number of interfaces (4)
- Number of private interfaces (2)
= Number of public interfaces
4 - 2 = 2
35Preparing to install Veritas AccessAbout calculating IP address requirements

To calculate the physical and the virtual IP addresses for the cluster
1 The total number of physical IP addresses that are required for the clusterinstallation is equal to the number of nodes in the cluster multiplied by thenumber of public interfaces on each node:
Total number of nodes (2)
x Number of public interfaces per node (2)
= Total number of physical IP addresses
= 2 x 2 = 4
2 The number of nodes in the cluster multiplied by the number of public interfaceson each node is equal to the total number of virtual IP addresses that arerequired for the cluster installation:
Total number of nodes (2)
x Number of public interfaces per node (2)
= Total number of virtual IP addresses
= 2 x 2 = 4
3 The number of IP addresses required for the Veritas Access OperationsManager is equal to one (1).
To calculate the total number of public IP addresses for the cluster
◆ The number of physical IP addresses for the cluster, plus the number of virtualIP addresses for the cluster, plus the number of IP addresses for the OperationsManager is equal to the total number of public IP addresses that are requiredfor the cluster.
Total number of physical IP addresses/cluster (4)
+ Total number of virtual IP addresses/cluster (4)
+ Number of IP addresses for the Management Console (1)
= Total number of public IP addresses required for the cluster
= 4 + 4 + 1 = 9
36Preparing to install Veritas AccessAbout calculating IP address requirements

To request and specify IP addresses
1 Request the public IP addresses that you need from your Network Administrator.
2 For example, if the Network Administrator provides you with IP addresses10.209.105.120 through 10.209.105.128, you can allocate the resources inthe following manner:
Start of Physical IP address: 10.209.105.120
Start of Virtual IP address: 10.209.105.124
Management Console IP:"10.209.105.128"
This entry gives you four physical IP addresses (10.209.105.120 to10.209.105.123), four virtual IP addresses (10.209.105.124 to10.209.105.127), and one IP address for the Operations Manager(10.209.105.128).
10.209.105.120 and 10.209.105.121 are assigned to pubeth0 and pubeth1as physical IP addresses on the first node.
10.209.105.122 and 10.209.105.123 are assigned to pubeth0 and pubeth1as physical IP addresses on the second node.
10.209.105.124 to 10.209.105.127 are assigned to pubeth0 and pubeth1 asvirtual IP addresses on the two nodes.
About checking the storage configuration
Warning: Do not connect the Fibre Channel HBAs until you finish installing theoperating system. If the local disks are bad, connecting the Fibre Channel HBAsprevents the operating system from being installed on the local disks. Because thedisk is scanned, it takes longer to install the software on a local disk.
Veritas Access supports Flexible Storage Sharing (FSS), which allows the usersto configure and manage direct-attached storage on the Veritas Access appliance.
After you install the operating system, check the storage configuration. If you don'twant to use FSS, make sure that each node has the following:
■ One or two Fibre Channel Host Bus Adapters (HBAs) for connection to theStorage Area Network (SAN) switch.Two Fibre Channel HBAs are recommended, but only one is required. Havingonly one Fibre Channel HBA enables all the operations of the Fibre Channel(except high availability).
37Preparing to install Veritas AccessAbout checking the storage configuration

■ An internal boot disk. Make sure that one is in place before you install the VeritasAccess software.
If you want to use FSS, make sure that each node has attached at least two extralocal data disks besides the internal boot disk.
38Preparing to install Veritas AccessAbout checking the storage configuration

Installing and configuringa cluster
This chapter includes the following topics:
■ Installation overview
■ Summary of the installation steps
■ Before you install
■ Installing the operating system on each node of the cluster
■ Installing Veritas Access on the target cluster nodes
■ About NIC bonding and NIC exclusion
■ Replacing an Ethernet interface card
■ Configuring I/O fencing
■ About configuring Veritas NetBackup
■ About enabling kdump during an Veritas Access configuration
■ Reconfiguring the Veritas Access cluster name and network
Installation overviewInitially, you can install a two-node Veritas Access cluster. You can increase thecluster by adding nodes up to the maximum of 8 nodes. The recommended minimumvalue is two nodes. Adding nodes to the cluster does not disrupt service.
4Chapter

Summary of the installation stepsThe Veritas Access software installation consists of two main pieces:
■ Operating system installation.Veritas Access requires Red Hat Enterprise Linux.See See “System requirements” on page 10.
■ Veritas Access software installation.
Table 4-1 provides a brief summary of the installation steps. The summary includescross references to where you can find more information about each task.
Table 4-1 Summary of installation steps
For more informationStepsTask
See “Installing the operatingsystem on the target VeritasAccess cluster” on page 43.
See “Configuring your ownyum repository on each nodeof the cluster” on page 46.
Steps include:
■ Automatic systemdiscovery of USB devices,hard disk controllers, andso on.
■ Select the installationdevice.
■ Set the clock and the timezone.
■ System preparation forautomated installation.
■ Automatic diskpartitioning.
■ Automatic packageinstallation.
■ Install the Red HatEnterprise Linux kernelupdate.
■ Configuration of yum afterthe operating system isinstalled successfully.
Task 1: Install the operatingsystem on each node of thecluster.
40Installing and configuring a clusterSummary of the installation steps

Table 4-1 Summary of installation steps (continued)
For more informationStepsTask
See “Installing the requiredRed Hat Enterprise Linuxoperating system RPMs”on page 47.
See “Installing andconfiguring the VeritasAccess software on thecluster” on page 48.
Steps include:
■ Install the required RedHat Enterprise Linuxoperating system RPMs.If yum is configured, thenthe installer helps to installthe required RPMs duringthe precheck.
■ Extract the Veritas Accesstar file and run theinstaller.
■ Enter networkconfiguration information(cluster name, IPaddresses, bond interfaceinformation, DNSinformation, and so on).
■ Verify installation on thenode.
Task 2: Install the VeritasAccess software on thecluster.
Before you installBefore you install the Veritas Access software:
■ Make sure that no DHCP servers are running in the private network.
■ Disable the USB Ethernet interface in BIOS for all nodes in the cluster.
■ Make sure that there are at least two private and two or more public links betweencluster nodes.
■ Connect the Fibre Channel cable before installing Veritas Access on any nodein the cluster.
■ Prepare one public IP address for each cluster node. This IP address is usedby the installer, so it should not be in the public or virtual IP pool that is used forthe Veritas Access cluster later.
Note: The public IP addresses are not available after the configuration of VeritasAccess, as they get replaced with the physical IP addresses provided at theconfiguration level.
41Installing and configuring a clusterBefore you install

■ Configure the newly prepared IP on the public NIC and in the network configfile, /etc/sysconfig/network-scripts/ifcfg-XX to make it as persistent.For example:
TYPE=Ethernet
HWADDR=00:50:56:3d:f1:3e
DEVICE=eth2
BOOTPROTO=none
IPADDR=10.200.56.214
NETMASK=255.255.252.0
NM_CONTROLLED=no
ONBOOT=yes
Installing the operating system on each node ofthe cluster
Before you install the Veritas Access software, you must install the Red HatEnterprise Linux operating system and kernel version. The following procedureincludes the instructions and download links.
To install the Red Hat Enterprise Linux operating system on each node of thecluster
1 Meet the requisite system requirements. Ensure that you have the correctversion of the Red Hat Linux operating system and the kernel version.
2 Use the following information to install Red Hat Enterprise Linux operatingsystem:
Refer to Chapter 1. Obtaining Red Hat Enterprise Linux in the Red HatEnterprise Linux 6 Install guide:
https://access.redhat.com/downloads/
https://access.redhat.com/documentation/en-US/Red_Hat_Enterprise_Linux/6/pdf/Installation_Guide/Red_Hat_Enterprise_Linux-6-Installation_Guide-en-US.pdf
About the driver nodeIf you do not plan to install Veritas Access from the console of the nodes in thecluster (the local management console of your nodes), you need another serverthat is not a target node in the Veritas Access cluster to use in the Veritas Accessinstallation. This server is called the driver node.
42Installing and configuring a clusterInstalling the operating system on each node of the cluster

When you run the Veritas Access installation script, the Veritas Access installerhelps set up the ssh connection between the driver node and the target VeritasAccess cluster nodes.
The driver node platform can be: RHEL 6, SLES 11 SP2, and SLES 11 SP3.
Installing the operating system on the target Veritas Access clusterThis first task in the installation process is to install the Red Hat Enterprise Linuxoperating system on each node of the cluster.
To install the operating system
1 Insert the Red Hat Enterprise Linux operating system installation DVD, andboot the server from the DVD.
See See “Linux requirements” on page 11.
You can also use an external USB DVD-ROM.
2 Disable the consistent network device naming feature when installing the RedHat Enterprise operating system.
Note: By default, the consistent network device naming feature is enabled onDell systems. To disable the feature, enter the following option on the bootcommand line: linux biosdevname=0
3 At the boot prompt, select the Install and upgrade an existing system option.Press Enter.
4 The installer asks you if you want to perform a media check or if you want toskip this option. Select Skip and continue with the installation.
5 The installation starts with the Red Hat Enterprise Linux banner, click Next tocontinue installation.
6 The installation displays a language selection screen. Veritas Access onlysupports English. Select English. English is used for the installation and as thesystem default. Click Next to continue.
7 Select the correct layout type for the keyboard you would prefer to use for theinstallation and as the system default. Once you have made your selection,click Next to continue.
8 You can install Red Hat Enterprise Linux on a large variety of storage devices.This screen lets you select either basic or specialized storage devices. ClickNext to continue.
43Installing and configuring a clusterInstalling the operating system on each node of the cluster

9 The installer automatically detects any existing installations of Red HatEnterprise Linux. It asks you to choose whether you want to perform a FreshInstallation or Upgrade an Existing Installation.
If your system contains a Red Hat Enterprise Linux installation, a dialog appearsasking whether you want to upgrade that installation. To perform an upgradeof an existing system, choose the appropriate installation from the drop-downlist and select Next.
10 The installer prompts you to set the host name for the root user. It also asks ifyou want to configure the network. Set the IP address to a proper public NICso that you can access the NIC through that IP after a restart. Click Next toproceed.
11 In the Time Zone Configuration screen, set your time zone by selecting thecity closest to your computer's physical location. Click Next to proceed.
12 The installer prompts you to set a root password for your system. You cannotproceed to the next stage of the installation process without entering a rootpassword. Enter the root password into the Root Password field. Red HatEnterprise Linux displays the characters as asterisks for security. Type thesame password into the Confirm field to ensure that it is set correctly. Afteryou set the root password, select Next to proceed.
13 The installer asks you to choose the type of installation. Depending on yourneed, select the layout for installation.
14 In the Disk Partitioning Setup screen, you can choose to create the defaultpartition layout in one of four different ways. Or you can choose to partitionstorage devices manually to create a custom layout.
15 If you selected the Encrypt System option, the installer prompts you for a passphrase with which to encrypt the partitions on the system.
16 If you selected more than one storage device on the storage devices selectionscreen, the installer asks you to select which of these devices should beavailable for installation of the operating system, and which should only beattached to the file system for data storage. If you selected only one storagedevice, the installer does not present you with this screen. During installation,the devices that you identify as being for data storage only are mounted aspart of the file system, but are not partitioned or formatted. When you havefinished identifying devices to be used for installation, click Next to continue.
17 If no readable partition tables are found on existing hard disks, the installationprogram asks to initialize the hard disk. Click Re-initialize drive.
44Installing and configuring a clusterInstalling the operating system on each node of the cluster

18 The installer prompts you to create a custom layout or modify the default layout.The installer also prompts you to confirm the partitioning options that youselected. Click Write changes to disk to allow the installer to partition yourhard drive and install Red Hat Enterprise Linux.
19 The Package Installation Defaults screen appears and details the defaultpackages for your Red Hat Enterprise Linux installation. This screen variesdepending on the version of Red Hat Enterprise Linux you want to install.
Configure the boot loader (GRUB) and select the installation packages as perthe requirements. The installer searches for the required packages from theinstallation media and installs those packages. Select the Basic Server optionfor installation.
20 Once the package installation gets completed, you have to restart your systemfor post-installation tasks. Remove the install media and click on Reboot tocontinue.
21 Your Red Hat Enterprise Linux installation is now complete. You can followthe same steps that are shown in this section to install the operating systemon other nodes of the cluster.
See the Red Hat Enterprise Linux documentation for the detailed procedure.
22 Disable SELinux on all nodes in the cluster.
Registering your cluster to RHSM to get yum updatesAfter you install the operating system on all the nodes of the cluster, register yourcluster to Red Hat Subscription Manager (RHSM) to get the packages update fromthe official yum repository. The yum repository configuration file/etc/yum.repos.d/rhel-source.repo is configured by default after the operatingsystem installation.
To register your cluster to RHSM
1 Enter the following command:
# subscription-manager register
2 After you input the user name and the password as prompted, enter thefollowing command:
# subscription-manager subscribe --auto
45Installing and configuring a clusterInstalling the operating system on each node of the cluster

Configuring your own yum repository on each node of the clusterAfter you install the operating system on all the nodes of the cluster, you canconfigure your own yum repository on each target node of the Veritas Access cluster.Veritas recommends that you configure the local repository, which reduces half ofthe installation time.
Before you configure yum, set up a package repository for use by yum. You canuse the release server of Red Hat Enterprise Linux or your own yum repositoryserver. If the you use the Red Hat Enterprise Linux release server, then you musthave the registered credentials from Red Hat Enterprise Linux. Otherwise, set upa yum repository server before you configure the yum client. Make sure that youhave Veritas Access required rpms or higher versions in your yum repository.
To configure yum on each node
1 Add a .repo file to your yum configuration on each target node of the VeritasAccess cluster.
Create a new file in /etc/yum.repos.d/ on the node where you want to usethis repository.
The file can have any name but the file needs to be named with the suffix.repo. For example: myrepo.repo.
2 In the new .repo file, include the following:
[myrepo]
name = This is my repo
baseurl = url://to/get/to/srv/my/repo/
where the baseurl line is the path that the system uses to get to the repository.If the node has direct access to it or mounts it as a file system, you can use abaseurl line like:
baseurl = file:///srv/my/repo/
If you access the file using an HTTP or https server, you can use a baseurlline like the following:
baseurl = http://servername/my/repo
For more information on the client-side repository configuration, see theyum.conf man page.
46Installing and configuring a clusterInstalling the operating system on each node of the cluster

Installing Veritas Access on the target clusternodes
Installing the cluster is a one-time activity. You can install up to a 8-node cluster.
Before you continue, be aware of the following parameters:
■ If you do not allocate enough IP addresses for the cluster, the installation cannotproceed.
Note: You cannot mix IPv4 and IPv6 addresses; new IP addresses must be ofthe same version that you initially used when installing Veritas Access.
See “About obtaining IP addresses” on page 33.
It takes about 40 minutes to install a two-node cluster. Installation times may varydepending on your configuration and the number of nodes.
Installing the required Red Hat Enterprise Linux operating systemRPMs
You have to install the required RPMs.
47Installing and configuring a clusterInstalling Veritas Access on the target cluster nodes

To install the required RPMs
1 Install the required RPMs that cannot be found in the RHN yum repository.
You need to manually install some RPMs that cannot be found in the RHNrepository.
For RHEL 6 Update 6, install:
kernel-debuginfo-common-x86_64 2.6.32-504.el6.x86_64.rpm
kernel-debuginfo 2.6.32-504.el6
For RHEL 6 Update 7, install:
kernel-debuginfo-common-x86_64 2.6.32-573.el6.x86_64.rpm
kernel-debuginfo 2.6.32-573.el6
2 Install other operating system RPMs required by the installer.
If you configured yum correctly, the installer automatically installs the requiredoperating system RPMs which can be found in the yum repository. If you useyour own yum repository, add all the required RPMs into your yum repository.
The installer also installs the RPMs that Veritas Access provides. For example,third-party RPMs, like the Samba [SMB] RPMs.
See “Required Red Hat Enterprise Linux operating system RPMs for RHEL 6.6”on page 14.
Installing and configuring the Veritas Access software on the clusterTo install and configure Veritas Access, you can either run the installer from thedriver node, or any node of the cluster, or the cluster node's console.
See “To run the installer from the cluster node's console” on page 48.
A driver node refers to a node that is not one of the cluster nodes on which youwant to install Veritas Access. You have to ensure that the driver node can ssh toall the cluster nodes.
To run the installer from the cluster node's console
1 Log into the cluster node's console.
2 From the console, log into the cluster node.
48Installing and configuring a clusterInstalling Veritas Access on the target cluster nodes

3 Mount the ISO image manually using these commands:
# mkdir /accessmnt
# mount -o loop ACCESS-7.2-<image> /accessmnt
4 Enter the directory in which the installer is located.
# cd /accessmnt/
To run the installer from a driver node or any node in the cluster
1 Use the root user and password to log into the node on which you want toinstall the ISO image.
2 Mount the ISO image manually using these commands:
# mkdir /accessmnt
# mount -o loop ACCESS-7.2-<image> /accessmnt
3 Enter the directory in which the installer is located.
# cd /accessmnt/
To install and configure the cluster
Note: During the installation, the installer log is located at /var/tmp.
49Installing and configuring a clusterInstalling Veritas Access on the target cluster nodes

1 Enter the following command to start the installation.
# ./installaccess node1_ip node2_ip
Where node1_ip and node2_ip are the public physical IP addresses that arealready assigned to the target cluster nodes to install Veritas Access over ssh.
These are the current IPs assigned to the nodes for installation communication.
The example is used to install two nodes. To install another target node cluster,add node3_ip to the command line that is used in this step.
2 The installer prompts you to choose how you want to install OS rpms – eitherusing native methods, like yum, or manually install the OS rpms. Some of therequired OS rpms only exist on Red Hat public YUM repositories, and you arerequired to set up Red Hat subscription first to install these OS rpms.
1) Install the required OS rpms with yum. If yum repository is not
configured on the systems, set up Red Hat subscription first
2) Install the required OS rpms manually
3) Do not install the required OS rpms and quit
How do you want to install the required OS rpms? [1-3,q,?] (1) 1
3 The installer checks the operating system dependencies and automaticallyinstalls the required operating system RPMs and any missing third-party RPMs.
4 The installer installs the Veritas Access RPMs.
50Installing and configuring a clusterInstalling Veritas Access on the target cluster nodes

5 The installer displays the firewall ports to be opened after the configuration,and asks if you want to open them:
Veritas Access needs to open the following ports:
111 Rpcbind (NFS)
11211 Memcached Port
123 NTP Service
139 CIFS Service
161 SNMP Service
2049 NFS Service
21 FTP Port
22 SSH Service
25 SMTP Port
30000:40000 FTP Passive Port Range
3172,3173 Server View Ports
4001 Mountd (NFS)
4045 NLM (NFS)
4379 CTDB Port
445 CIFS TCP Service
51001,51002 RDMA Service
514 Syslog Service
53 DNS Service
5634 VIOM
56987 Replication Service
756,757,755 Statd (NFS)
8088 REST Server
8143 Object Access Gateway
Do you want to proceed? [y,n,q] (y)
6 The installer automatically configures the RDMA environment on the clusternodes if there are InfiniBand NICs.
51Installing and configuring a clusterInstalling Veritas Access on the target cluster nodes

7 The installer asks the following information to configure the cluster:
The Veritas Access Cluster name:
The public IP starting address:
The netmask for public IP address
The virtual IP starting address:
The number of VIPs per interface:
The default gateway IP address:
The DNS server IP address:
The DNS server domain name:
The console virtual IP address:
Do you want to use the separate console port?
Note: The cluster name can contain only alpha characters, numbers, orunderscores. The cluster name must start with a letter of the alphabet and canhave a length of maximum 15 characters. Also, if a separate console port ischosen, the first public NIC is chosen to work exclusively as a console port.
8 The installer asks if you want to configure the Network Time Protocol (NTP)server.
Do you want to configure the Network Time Protocol(NTP) server to
synchronize the system clocks? [y,n,q] y
Enter the Network Time Protocol server: [q,?]
If you enter y, you can type in your NTP server. If you enter n, the NTP serveris not configured.
9 The installer detects the network devices. The installer asks if you want toconfigure NIC bonding or exclude NICs.
Do you want to configure NIC bonding or exclude NICs? [y,n,q] (n)
If you do not want to configure NIC bonding or exclude NICs, enter n. Go tostep 10.
If you do want to configure NIC bonding or exclude NICs, enter y.
See “Excluding a NIC” on page 56.
See “Creating a new NIC bond” on page 62.
Note: After this step, the temporary IP addresses assigned to the target VeritasAccess nodes are no longer accessible. You should access the nodes usingthe new set of IP addresses assigned during Veritas Access installation.
52Installing and configuring a clusterInstalling Veritas Access on the target cluster nodes
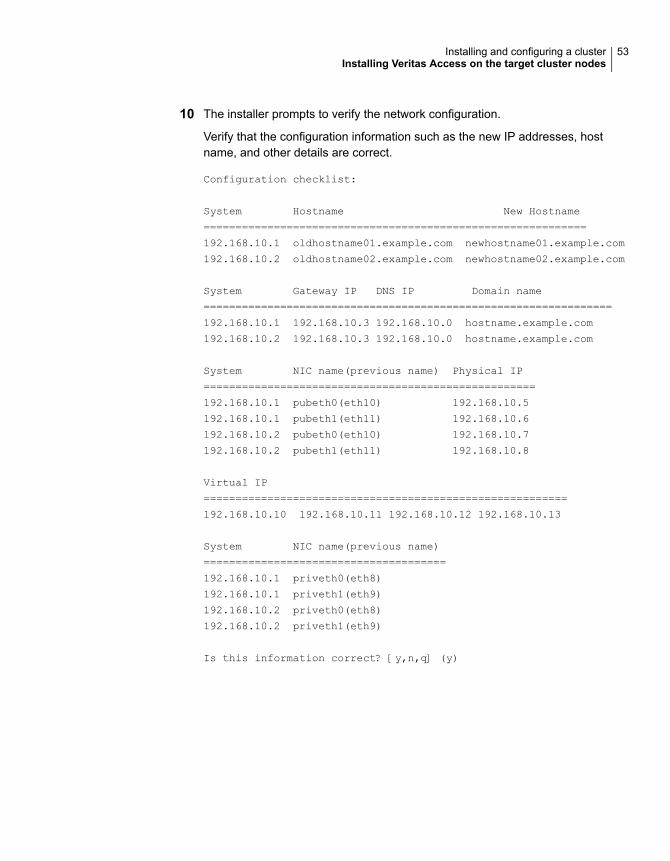
10 The installer prompts to verify the network configuration.
Verify that the configuration information such as the new IP addresses, hostname, and other details are correct.
Configuration checklist:
System Hostname New Hostname
============================================================
192.168.10.1 oldhostname01.example.com newhostname01.example.com
192.168.10.2 oldhostname02.example.com newhostname02.example.com
System Gateway IP DNS IP Domain name
================================================================
192.168.10.1 192.168.10.3 192.168.10.0 hostname.example.com
192.168.10.2 192.168.10.3 192.168.10.0 hostname.example.com
System NIC name(previous name) Physical IP
====================================================
192.168.10.1 pubeth0(eth10) 192.168.10.5
192.168.10.1 pubeth1(eth11) 192.168.10.6
192.168.10.2 pubeth0(eth10) 192.168.10.7
192.168.10.2 pubeth1(eth11) 192.168.10.8
Virtual IP
=========================================================
192.168.10.10 192.168.10.11 192.168.10.12 192.168.10.13
System NIC name(previous name)
======================================
192.168.10.1 priveth0(eth8)
192.168.10.1 priveth1(eth9)
192.168.10.2 priveth0(eth8)
192.168.10.2 priveth1(eth9)
Is this information correct? [y,n,q] (y)
53Installing and configuring a clusterInstalling Veritas Access on the target cluster nodes
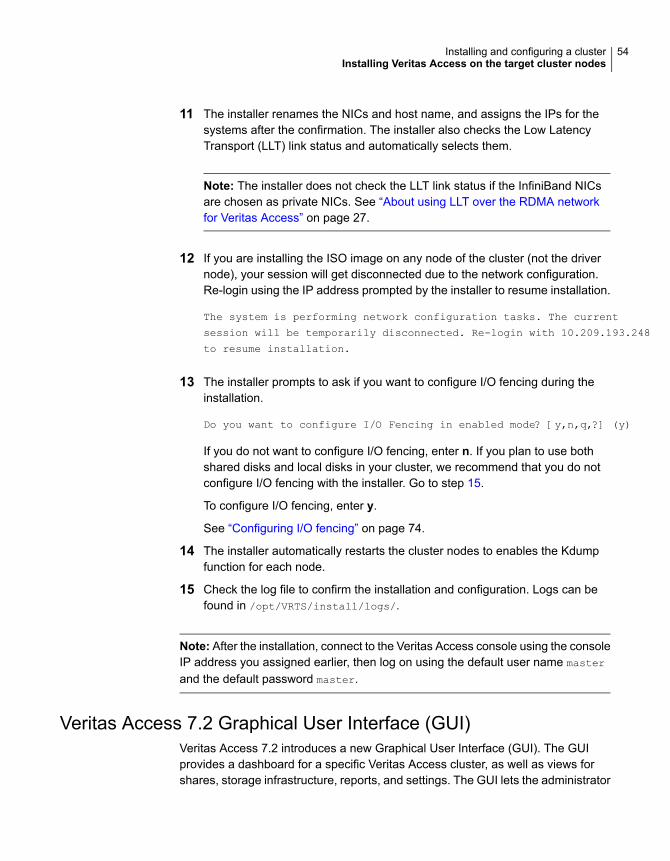
11 The installer renames the NICs and host name, and assigns the IPs for thesystems after the confirmation. The installer also checks the Low LatencyTransport (LLT) link status and automatically selects them.
Note: The installer does not check the LLT link status if the InfiniBand NICsare chosen as private NICs. See “About using LLT over the RDMA networkfor Veritas Access” on page 27.
12 If you are installing the ISO image on any node of the cluster (not the drivernode), your session will get disconnected due to the network configuration.Re-login using the IP address prompted by the installer to resume installation.
The system is performing network configuration tasks. The current
session will be temporarily disconnected. Re-login with 10.209.193.248
to resume installation.
13 The installer prompts to ask if you want to configure I/O fencing during theinstallation.
Do you want to configure I/O Fencing in enabled mode? [y,n,q,?] (y)
If you do not want to configure I/O fencing, enter n. If you plan to use bothshared disks and local disks in your cluster, we recommend that you do notconfigure I/O fencing with the installer. Go to step 15.
To configure I/O fencing, enter y.
See “Configuring I/O fencing” on page 74.
14 The installer automatically restarts the cluster nodes to enables the Kdumpfunction for each node.
15 Check the log file to confirm the installation and configuration. Logs can befound in /opt/VRTS/install/logs/.
Note: After the installation, connect to the Veritas Access console using the consoleIP address you assigned earlier, then log on using the default user name master
and the default password master.
Veritas Access 7.2 Graphical User Interface (GUI)Veritas Access 7.2 introduces a new Graphical User Interface (GUI). The GUIprovides a dashboard for a specific Veritas Access cluster, as well as views forshares, storage infrastructure, reports, and settings. The GUI lets the administrator
54Installing and configuring a clusterInstalling Veritas Access on the target cluster nodes

perform tasks for the cluster and monitor the results. In this release, the GUI is partof Veritas Access.
After you complete I/O fencing configuration successfully, the link to the GUI appearson the screen.
Open the https://<console IP>:14161 URL
in your browser to start the Veritas Access GUI application.
About NIC bonding and NIC exclusionWhen you install Veritas Access on a cluster, you can perform the followingoperations using the NICs:
■ Exclude a NICSee “Excluding a NIC” on page 56.
■ Include a NICSee “Including a NIC” on page 60.
■ Create a new NIC bond and add a NIC to a bondSee “Creating a new NIC bond” on page 62.
■ Remove a bondSee “Removing a NIC bond” on page 68.
■ Remove a NIC from the bond listSee “Removing a NIC from the bond list” on page 71.
Note: The NIC bonding and NIC exclusion configuration options support both asingle NIC or bond, and multiple NICs or bonds.
Note: When using the NIC exclusion feature, you can exclude any NIC on the firstnode. But if you want to exclude any NIC on the other nodes, you can choose toexclude NICs per node.
See “Excluding a NIC” on page 56.
Note: If you want to use the NIC bonding feature, make sure that the PCI IDs ofthe slave bond NICs of the first node is the same as the PCI IDs of the slave bondNICs of the other nodes.
55Installing and configuring a clusterAbout NIC bonding and NIC exclusion

Excluding a NICWhen you install Veritas Access on a cluster, you may want to use some of theNICs for other storage purposes. You can use the Exclude a NIC functionality toexclude some NICs that you do not want to use for Veritas Access.
Note: The NIC bonding/NIC exclusion configuration options support both a singleNIC or bond, and multiple NICs or bonds.
56Installing and configuring a clusterAbout NIC bonding and NIC exclusion

To exclude a NIC
1 During Veritas Access installation, the installer asks if you want to configureNIC bonding or exclude NICs. Enter y if you want to exclude a NIC.
Do you want to configure NIC bonding or exclude NICs? [y,n,q] (n) y
2 The installer prompts you to enter your selection. Enter 1 to exclude a NIC.
Veritas Access 7.2 Configure Program
10.200.114.45 10.200.114.46
NIC bonding/NIC exclusion configuration
NIC bonding supports only public NICs. Make sure the NICs you choose
are connected to public network.
NIC PCI ID bond status If excluded
=============================================
eth2 0000:02:03.0 (physical NIC) N
eth3 0000:02:04.0 (physical NIC) N
eth4 0000:02:05.0 (physical NIC) N
eth5 0000:02:06.0 (physical NIC) N
eth6 0000:02:07.0 (physical NIC) N
eth7 0000:02:08.0 (physical NIC) N
1) Exclude NICs
2) Include NICs
3) Create a new bond
4) Add NICs to a bond
5) Remove bonds
6) Remove NICs from the bond list
7) Save and Continue
Select the NIC option to be configured in this Cluster: [1-7,q] 1
57Installing and configuring a clusterAbout NIC bonding and NIC exclusion

3 The installer prompts you to select the NIC that you want to exclude. Enteryour choice.
Choose NICs for exclusion
1) eth2 0000:02:03.0 (physical NIC)
2) eth3 0000:02:04.0 (physical NIC)
3) eth4 0000:02:05.0 (physical NIC)
4) eth5 0000:02:06.0 (physical NIC)
5) eth6 0000:02:07.0 (physical NIC)
6) eth7 0000:02:08.0 (physical NIC)
7) Exclude NICs per node
b) Back to previous menu
Choose NICs: [1-7,b,q] 1 2(1,2)
58Installing and configuring a clusterAbout NIC bonding and NIC exclusion
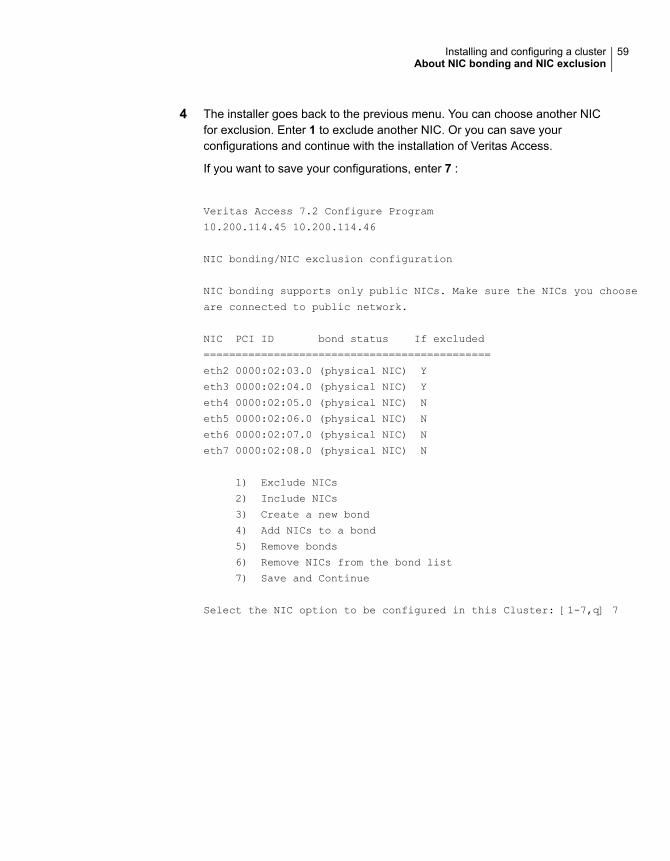
4 The installer goes back to the previous menu. You can choose another NICfor exclusion. Enter 1 to exclude another NIC. Or you can save yourconfigurations and continue with the installation of Veritas Access.
If you want to save your configurations, enter 7 :
Veritas Access 7.2 Configure Program
10.200.114.45 10.200.114.46
NIC bonding/NIC exclusion configuration
NIC bonding supports only public NICs. Make sure the NICs you choose
are connected to public network.
NIC PCI ID bond status If excluded
=============================================
eth2 0000:02:03.0 (physical NIC) Y
eth3 0000:02:04.0 (physical NIC) Y
eth4 0000:02:05.0 (physical NIC) N
eth5 0000:02:06.0 (physical NIC) N
eth6 0000:02:07.0 (physical NIC) N
eth7 0000:02:08.0 (physical NIC) N
1) Exclude NICs
2) Include NICs
3) Create a new bond
4) Add NICs to a bond
5) Remove bonds
6) Remove NICs from the bond list
7) Save and Continue
Select the NIC option to be configured in this Cluster: [1-7,q] 7
59Installing and configuring a clusterAbout NIC bonding and NIC exclusion

5 If you want to exclude NICs per node, in Step 3 enter 7. The NICs withinconsistent PCI IDs are listed:
Choose NICs for exclusion
1) eth2 0000:02:03.0 (physical NIC)
2) eth3 0000:02:04.0 (physical NIC)
3) eth4 0000:02:05.0 (physical NIC)
4) eth5 0000:02:06.0 (physical NIC)
5) eth6 0000:02:07.0 (physical NIC)
6) eth7 0000:02:08.0 (physical NIC)
7) Exclude NICs per node
b) Back to previous menu
Choose NICs: [1-7,b,q] 7
Choose items: [1-1,b,q] 1
1 0000:02:00.0 (10.198.95.214)
2 0000:02:01.0 (10.198.95.214)
3 0000:02:06.0 (10.198.95.212)
4 0000:02:09.0 (10.198.95.214)
5 0000:02:14.0 (10.198.95.212)
6 0000:02:15.0 (10.198.95.212)
b) Back to previous menu
Choose NICs: [1-6,b,q] 1 2 3 4 5 6
Note: NIC exclusion function is supported on InfiniBand NICs, but all the NICs withthe same PCI ID are excluded during the exclusion operation. See “About usingLLT over the RDMA network for Veritas Access” on page 27.
Including a NICWhen you install Veritas Access on a cluster, you may want to include one or moreNICs that you had previously excluded. You can use the Include a NIC functionalityto include NICs that you want to use for Veritas Access.
60Installing and configuring a clusterAbout NIC bonding and NIC exclusion

To include a NIC
1 If you have excluded some NICs and not saved your configuration, it is possibleto include a NIC again. When the installer asks you to select the NIC optionthat you want to configure in the cluster, enter 2 if you want to include a NIC.
Veritas Access 7.2 Configure Program
10.200.114.45 10.200.114.46
NIC bonding/NIC exclusion configuration
NIC bonding supports only public NICs. Make sure the NICs you choose
are connected to public network.
NIC PCI ID bond status If excluded
=============================================
eth2 0000:02:03.0 (physical NIC) Y
eth3 0000:02:04.0 (physical NIC) Y
eth4 0000:02:05.0 (physical NIC) N
eth5 0000:02:06.0 (physical NIC) N
eth6 0000:02:07.0 (physical NIC) N
eth7 0000:02:08.0 (physical NIC) N
1) Exclude NICs
2) Include NICs
3) Create a new bond
4) Add NICs to a bond
5) Remove bonds
6) Remove NICs from the bond list
7) Save and Continue
Select the NIC option to be configured in this Cluster: [1-7,q] 2
2 The installer prompts you to select the NIC that you want to include. Enter yourchoice.
Choose NICs for inclusion
1) eth2 0000:02:03.0 (excluded NIC)
2) eth3 0000:02:04.0 (excluded NIC)
3) Include NICs per node
b) Back to previous menu
Choose NICs: [1-6,b,q] 1
61Installing and configuring a clusterAbout NIC bonding and NIC exclusion

3 The installer goes back to the previous menu. You can choose another NICfor inclusion. Enter 2 to include another NIC. Or you can save yourconfigurations and continue with the installation of Veritas Access.
If you want to save your configurations, enter 7
Veritas Access 7.2 Configure Program
10.200.114.45 10.200.114.46
NIC bonding/NIC exclusion configuration
NIC bonding supports only public NICs. Make sure the NICs you choose
are connected to public network..
NIC PCI ID bond status If excluded
=============================================
eth2 0000:02:03.0 (physical NIC) N
eth3 0000:02:04.0 (physical NIC) Y
eth4 0000:02:05.0 (physical NIC) N
eth5 0000:02:06.0 (physical NIC) N
eth6 0000:02:07.0 (physical NIC) N
eth7 0000:02:08.0 (physical NIC) N
1) Exclude NICs
2) Include NICs
3) Create a new bond
4) Add NICs to a bond
5) Remove bonds
6) Remove NICs from the bond list
7) Save and Continue
Select the NIC option to be configured in this Cluster: [1-7,q]
4 If you want to include NICs per node, in Step 2 enter 3.
Note: NIC inclusion function is supported on InfiniBand NICs, but all the NICs withsame PCI ID are included during the include operation. See “About using LLT overthe RDMA network for Veritas Access” on page 27.
Creating a new NIC bondAn administrator can create a bond NIC interface from a given list of public NICinterfaces during Veritas Access installation. This feature allows an administrator
62Installing and configuring a clusterAbout NIC bonding and NIC exclusion

to save a number of physical IP addresses that are used for installation andpost-installation bond creation.
■ The bond interface feature is available for network interface card (NIC) bondingof public interfaces only. Bonding of private interfaces is not supported.
■ You cannot bond InfiniBand NICs since the PCI IDs are identical. See “Aboutusing LLT over the RDMA network for Veritas Access” on page 27.
■ You can create a bond interface for public NICs only if the PCI IDs of the publicNICs are correspondingly same among the nodes.
If you do not want to create a bond interface, continue with the installation.
See “About obtaining IP addresses” on page 33.
See “About calculating IP address requirements” on page 34.
63Installing and configuring a clusterAbout NIC bonding and NIC exclusion
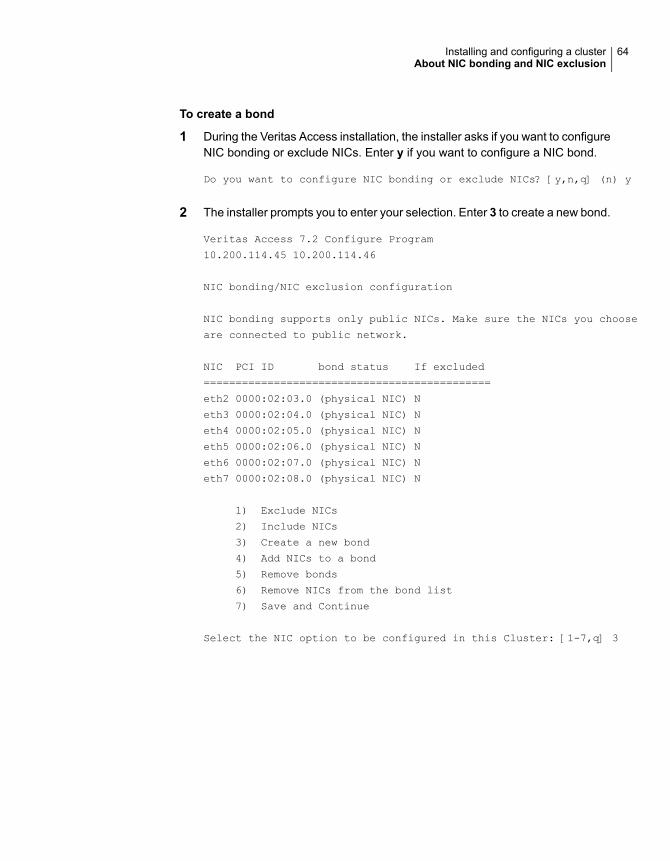
To create a bond
1 During the Veritas Access installation, the installer asks if you want to configureNIC bonding or exclude NICs. Enter y if you want to configure a NIC bond.
Do you want to configure NIC bonding or exclude NICs? [y,n,q] (n) y
2 The installer prompts you to enter your selection. Enter 3 to create a new bond.
Veritas Access 7.2 Configure Program
10.200.114.45 10.200.114.46
NIC bonding/NIC exclusion configuration
NIC bonding supports only public NICs. Make sure the NICs you choose
are connected to public network.
NIC PCI ID bond status If excluded
=============================================
eth2 0000:02:03.0 (physical NIC) N
eth3 0000:02:04.0 (physical NIC) N
eth4 0000:02:05.0 (physical NIC) N
eth5 0000:02:06.0 (physical NIC) N
eth6 0000:02:07.0 (physical NIC) N
eth7 0000:02:08.0 (physical NIC) N
1) Exclude NICs
2) Include NICs
3) Create a new bond
4) Add NICs to a bond
5) Remove bonds
6) Remove NICs from the bond list
7) Save and Continue
Select the NIC option to be configured in this Cluster: [1-7,q] 3
64Installing and configuring a clusterAbout NIC bonding and NIC exclusion

3 The installer prompts you to select the bond mode of the new bond. Enter yourchoice.
Configure the mode for the NIC bonding:
1) balance-rr
2) active-backup
3) balance-xor
4) broadcast
5) 802.3ad
b) Back to previous menu
Select the mode of bond: [1-5,b,q] 3
bond0 is created.
Press [Enter] to continue
4 If you choose 3 or 5, the installer prompts you to choose the bond option forthe bond mode:
1) layer2
2) layer3+4
3) default
Select the bonding option: [1-3,b,q] 1
65Installing and configuring a clusterAbout NIC bonding and NIC exclusion

5 The installer prompts you to select the NIC option that you want to configurein the cluster.
Veritas Access 7.2 Configure Program
10.200.114.45 10.200.114.46
NIC bonding/NIC exclusion configuration
NIC bonding supports only public NICs. Make sure the NICs you choose
are connected to public network.
NIC PCI ID bond status If excluded
=============================================
eth2 0000:02:03.0 (physical NIC) N
eth3 0000:02:04.0 (physical NIC) N
eth4 0000:02:05.0 (physical NIC) N
eth5 0000:02:06.0 (physical NIC) N
eth6 0000:02:07.0 (physical NIC) N
eth7 0000:02:08.0 (physical NIC) N
1) Exclude NICs
2) Include NICs
3) Create a new bond
4) Add NICs to a bond
5) Remove bonds
6) Remove NICs from the bond list
7) Save and Continue
Select the NIC option to be configured in this Cluster: [1-7,q] 4
6 The installer prompts you to select the NIC.
1) eth2 0000:02:03.0 (physical NIC)
2) eth3 0000:02:04.0 (physical NIC)
3) eth4 0000:02:05.0 (physical NIC)
4) eth5 0000:02:06.0 (physical NIC)
5) eth6 0000:02:07.0 (physical NIC)
6) eth7 0000:02:08.0 (physical NIC)
b) Back to previous menu
Choose NICs: [1-6,b,q] 1
66Installing and configuring a clusterAbout NIC bonding and NIC exclusion

7 The installer prompts you to choose a bond name to which you want to addthe NIC.
1) bond0
b) Back to previous menu
Choose a bond: [1-1,b,q] 1
Adding 0000:02:03.0 to bond0 was successful
Press [Enter] to continue:
8 The installer prompts you to select the NIC option that you want to configurein the cluster.
Enter 4 if you want to add another NIC to the bond . Or you can enter 7 to saveyour configurations and continue with the installation of Veritas Access.
Veritas Access 7.2 Configure Program
10.200.114.45 10.200.114.46
NIC bonding/NIC exclusion configuration
NIC bonding supports only public NICs. Make sure the NICs you choose
are connected to public network.
NIC PCI ID bond status If excluded
===============================================
eth2 0000:02:03.0 (Slave of bond0) N
eth3 0000:02:04.0 (Slave of bond0) N
eth4 0000:02:05.0 (physical NIC) N
eth5 0000:02:06.0 (physical NIC) N
eth6 0000:02:07.0 (physical NIC) N
eth7 0000:02:08.0 (physical NIC) N
1) Exclude NICs
2) Include NICs
3) Create a new bond
4) Add NICs to a bond
5) Remove bonds
6) Remove NICs from the bond list
7) Save and Continue
Select the NIC option to be configured in this Cluster: [1-7,q] 7
67Installing and configuring a clusterAbout NIC bonding and NIC exclusion

Removing a NIC bondAn administrator can remove a bond that has been already created.
68Installing and configuring a clusterAbout NIC bonding and NIC exclusion

To remove a NIC bond
1 During the Veritas Access installation, the installer prompts you to enter yourselection. Enter 5 to remove an existing bond.
Veritas Access 7.2 Install Program
10.200.114.45 10.200.114.46
NIC bonding/NIC exclusion configuration
NIC bonding supports only public NICs. Make sure the NICs you choose
are connected to public network.
NIC PCI ID BOND status If excluded
===============================================
eth0 0000:02:01.0 (physical NIC) N
eth1 0000:02:02.0 (physical NIC) N
eth2 0000:02:03.0 (Slave of bond0) N
eth3 0000:02:04.0 (Slave of bond0) N
eth4 0000:02:05.0 (Slave of bond2) N
eth5 0000:02:06.0 (Slave of bond1) N
eth6 0000:02:07.0 (Slave of bond1) N
eth7 0000:02:08.0 (Slave of bond2) N
1) Exclude NICs
2) Include NICs
3) Create a new bond
4) Add NICs to a bond
5) Remove bonds
6) Remove NICs from the bond list
7) Save and Continue
Select the NIC option to be configured in this Cluster: [1-7,q] 5
69Installing and configuring a clusterAbout NIC bonding and NIC exclusion

2 The installer prompts you to select the bond which you want to remove. Enteryour choice.
1) bond0
2) bond1
3) bond2
b) Back to previous menu
Choose bonds: [1-3,b,q] 3
Deleting NIC bonding bond2 succeeded
Press [Enter] to continue:
70Installing and configuring a clusterAbout NIC bonding and NIC exclusion

3 The installer prompts you to select the NIC option that you want to configurein the cluster. Enter 5 if you want to remove another bond . Or you can enter7 to save your configurations and continue with the installation of VeritasAccess.
Veritas Access 7.2 Install Program
10.200.114.45 10.200.114.46
NIC bonding/NIC exclusion configuration
NIC bonding supports only public NICs. Make sure the NICs you choose
are connected to public network.
NIC PCI ID BOND status If excluded
===============================================
eth0 0000:02:01.0 (physical NIC) N
eth1 0000:02:02.0 (physical NIC) N
eth2 0000:02:03.0 (Slave of bond0) N
eth3 0000:02:04.0 (Slave of bond0) N
eth4 0000:02:05.0 (physical NIC) N
eth5 0000:02:06.0 (Slave of bond1) N
eth6 0000:02:07.0 (Slave of bond1) N
eth7 0000:02:08.0 (physical NIC) N
1) Exclude NICs
2) Include NICs
3) Create a new bond
4) Add NICs to a bond
5) Remove bonds
6) Remove NICs from the bond list
7) Save and Continue
Select the NIC option to be configured in this Cluster: [1-7,q]
Removing a NIC from the bond listDuring installation, an administrator can remove a NIC which is already a slave ofa bond before the configuration is saved.
71Installing and configuring a clusterAbout NIC bonding and NIC exclusion

To remove a NIC from the bond list
1 During the Veritas Access installation, the installer prompts you to enter yourselection. Enter 6 to remove a NIC from the bond list.
Note: The NIC bonding/NIC exclusion configuration options support both asingle NIC or bond, and multiple NICs or bonds.
Veritas Access 7.2 Install Program
10.200.114.45 10.200.114.46
NIC bonding/NIC exclusion configuration
NIC bonding supports only public NICs. Make sure the NICs you choose
are connected to public network.
NIC PCI ID BOND status If excluded
===============================================
eth0 0000:02:01.0 (physical NIC) N
eth1 0000:02:02.0 (physical NIC) N
eth2 0000:02:03.0 (Slave of bond0) N
eth3 0000:02:04.0 (Slave of bond0) N
eth4 0000:02:05.0 (Slave of bond0) N
eth5 0000:02:06.0 (Slave of bond1) N
eth6 0000:02:07.0 (Slave of bond1) N
eth7 0000:02:08.0 (physical NIC) N
1) Exclude NICs
2) Include NICs
3) Create a new bond
4) Add NICs to a bond
5) Remove bonds
6) Remove NICs from the bond list
7) Save and Continue
Select the NIC option to be configured in this Cluster: [1-7,q] 6
72Installing and configuring a clusterAbout NIC bonding and NIC exclusion

2 The installer prompts you to select the NIC that you want to delete from theNIC bonding. Enter your choice.
Choose a NIC to be deleted from the NIC bonding
1) eth2 0000:02:03.0 (Slave of bond0)
2) eth3 0000:02:04.0 (Slave of bond0)
3) eth4 0000:02:05.0 (Slave of bond0)
4) eth5 0000:02:06.0 (Slave of bond1)
5) eth6 0000:02:07.0 (Slave of bond1)
b) Back to previous menu
Choose a NIC: [1-8,b,q] 5
The NICs with the PCI id 0000:02:05.0 has been removed from /
the NIC bonding
Press [Enter] to continue:
3 The installer prompts you to select the NIC option that you want to configurein the cluster. Enter 6 if you want to remove another NIC from the bond list .Or you can enter 7 to save your configurations and continue with the installationof Veritas Access.
Replacing an Ethernet interface cardIn some cases, you may need to replace an Ethernet interface card on a node. Thissection describes the steps to replace the card.
Note: This procedure works for replacing an existing Ethernet interface card. Itdoes not work for adding an Ethernet interface card to the cluster. If the Ethernetinterface card you add needs a new device driver, install the new device driverbefore installing the Ethernet interface card on the node.
73Installing and configuring a clusterReplacing an Ethernet interface card

To replace an Ethernet interface card
1 Use the Cluster> shutdown command to shut down the node.
For example:
Cluster> shutdown access_03
Stopping Cluster processes on access_03.......done
Sent shutdown command to access_03
2 Use the Cluster> del command to delete the node from the cluster.
For example:
Cluster> del access_03
3 Install the replacement Ethernet interface card on the node.
4 Turn on the node.
5 Make sure that the Ethernet interface card is active and online.
6 Use the Cluster> add command to add the node back into the cluster.
For example:
Cluster> add 172.16.113.118
For details on the Cluster> add and Upgrade> commands that are described inthis section, see the Veritas Access Command-Line Administrator’s Guide.
Configuring I/O fencingVeritas Access supports two fencing modes: disk-based fencing for a cluster withshared disks, and majority-based fencing for a cluster with local DAS disks.
If you intend to use both shared disks (SAN) and local disks, majority-based fencingmust be used. Veritas recommends that you do not configure I/O fencing throughthe installer.
For more information about FSS and configuring I/O fencing, see the Veritas AccessCommand-Line Administrator’s Guide.
1 During the Veritas Access configuration, after the product is started, the installerasks whether to configure fencing:
Do you want to configure I/O Fencing in enabled mode? [y,n,q,?] (y)
2 Enter y to configure fencing.
74Installing and configuring a clusterConfiguring I/O fencing

■ If the cluster does not include initialized shared disks, majority-based fencingmode is configured.
The I/O fencing would be configured in majority mode.
■ If shared disks are connected and initialized, disk-based I/O fencing isconfigured. You are prompted to choose disks.
Note: You can choose three available VxVM disks or initialize three disksas VxVM disks to form the fencing disk group. You must choose exactlythree disks.
3 The installer stops the product, and applies the fencing configuration beforerestart.
About configuring Veritas NetBackupIf you use Veritas NetBackup, to comply with the NetBackup End-User LicenseAgreement (EULA), you have to purchase and enter valid license keys on theexternal NetBackup master server before you configure NetBackup to work withVeritas Access. For more information on entering the NetBackup license keys onthe NetBackup master server, see the Veritas NetBackup Installation Guide.
If you use NetBackup, configure the virtual IP address using the Backup>
virtual-ip command so that it is different from all of the virtual IP addresses,including the console server IP address and the physical IP addresses that areused to install the Veritas Access software.
See the Veritas Access Command-Line Administrator's Guide for more informationon this feature.
About enabling kdump during an Veritas Accessconfiguration
During the Veritas Access configuration, the Veritas Access installer tries to enablekdump on your cluster node. To meet the Veritas Access software requirements,the installer modifies the /etc/kdump.conf and /boot/grub/grub.conf files byusing the following options:
■ /boot/grub/grub.conf
crashkernel = 512M-2G:64M, 2G-:256M
75Installing and configuring a clusterAbout configuring Veritas NetBackup

■ /etc/kdump.conf
path /opt/SYMCsnas/core/kernel/
core_collector makedumpfile -c --message-level 1 -d 31
Reconfiguring the Veritas Access cluster nameand network
After you install and configure Veritas Access, you can reconfigure the cluster nameand network, if required.
Before you reconfigure the cluster, you have to enable the support user for thenodes because the root user access authority is forbidden. The support user defaultpassword is veritas. You can change the password after you log on the first time.
To reconfigure the Veritas Access cluster name and network
1 Log on to the host console using the support user name and password.
2 Ensure that all the service groups are offline. Enter the following command:
/opt/VRTS/install/installaccess72 -updateparameter
76Installing and configuring a clusterReconfiguring the Veritas Access cluster name and network

3 Enter the private IPs of the systems.
172.16.0.3 172.16.0.4
Note: Only the private IPs of the systems must be entered. Public IPs shouldnot be used here.
4 Enter the cluster name and network information.
The Veritas Access Cluster name:
The public IP starting address:
The netmask for public IP address
The virtual IP starting address:
The number of VIPs per interface:
The default gateway IP address:
The DNS server IP address:
The DNS server domain name:
The console virtual IP address:
Do you want to use the separate console port?
Do you want to configure the Network Time Protocol(NTP)
server to synchronize the system clocks? [y,n,q] (n)
The installer confirms that the information that you entered is correct. Theconfiguration is completed and the new cluster and IPs are configured on thecluster.
The installer displays the location of the log and summary files. If required,view the files to confirm the configuration status.
Note: The cluster name can contain only alpha characters, numbers, orunderscores. The cluster name must start with a letter of the alphabet and canhave a length of maximum 15 characters. Also, if a separate console port ischosen, the first public NIC is chosen to work exclusively as a console port.
Note: If your cluster has FSS disks, limit the cluster name to 10 characters.
After formatting the FSS disks, do not change the cluster name.
77Installing and configuring a clusterReconfiguring the Veritas Access cluster name and network

Automating Veritas Accessinstallation andconfiguration usingresponse files
This chapter includes the following topics:
■ About response files
■ Performing a silent Veritas Access installation
■ Response file variables to install and configure Veritas Access
■ Sample response file for Veritas Access installation and configuration
About response filesThe installer script generates a response file during any installation, configuration,upgrade, or uninstall procedure. The response file contains the configurationinformation that you entered during the procedure. When the procedure completes,the installation script displays the location of the response files.
You can use the response file for future installation procedures by invoking aninstallation script with the -responsefile option. The response file passesarguments to the script to automate an installation or uninstallation.
See “Installation script options” on page 120.
5Chapter

Performing a silent Veritas Access installationA silent installation and configuration is based on a response file that you prepareso that the Veritas Access software can be installed without prompts. This featureis useful if you want to install the Veritas Access software on a large number ofnodes.
Before performing a silent Veritas Access installation and configuration, you haveto manually configure a secure shell (ssh) communication between the nodes.
See “Manually configuring passwordless secure shell (ssh)” on page 122.
You can get the Veritas Access example response file from the root directory ofthe ISO image.
To use the Veritas Access silent installation feature
◆ Enter the following command:
# ./installaccess -responsefile access.responsefile
To generate the access.response example file
1 Install and configure the Veritas Access software without any errors.
2 Get the access.response example file from the log directory.
To use the access.response example file
1 Rename the Veritas Access example response file to access.responsefile.
2 Modify the file by changing the cluster name, IP address ranges, and otherparameters, as necessary for your configuration.
Installation times may vary depending on your configuration.
See “Installing and configuring the Veritas Access software on the cluster”on page 48.
Response file variables to install and configureVeritas Access
Table 5-1 lists the response file variables that you can define to install and configureVeritas Access.
79Automating Veritas Access installation and configuration using response filesPerforming a silent Veritas Access installation

Table 5-1 Response file variables for installing Veritas Access
DescriptionVariable
Defines the bond modes for BOND.
List or scalar: list
Optional or required: optional
CFG{bondmode}{bond<n>}
List of bond names for BOND.
List or scalar: list
Optional or required: optional
CFG{bondname}
List of the PCI IDs of the slave NICs.
List or scalar: list
Optional or required: optional
CFG{bondpool}{bond<n>}
Enables majority fencing. The value is 1. Itcannot be used with I/O fencing variables'fencing_scsi3_disk_policy','fencing_newdg_disks', and'fencing_dgname'.
List or scalar: scalar
Optional or required: required formajority-based fencing
CFG{config_majority_based_fencing}
List of PCI IDs of exlcluded NICs.
List or scalar: list
Optional or required: optional
CFG{exclusion}
Specifies the disk group for I/O fencing. Thevalue is sfscoorddg.
List or scalar: scalar
Optional or required: required for I/O fencing
CFG{fencing_dgname}
Defines the fencing disks.
List or scalar: list
Optional or required: required for I/O fencing
CFG{fencing_newdg_disks}
80Automating Veritas Access installation and configuration using response filesResponse file variables to install and configure Veritas Access

Table 5-1 Response file variables for installing Veritas Access (continued)
DescriptionVariable
Specifies the I/O fencing configuration mode.The value is 2 for disk-based I/O fencing.
List or scalar: scalar
Optional or required: required for I/O fencing
CFG{fencing_option}
Specifies the SCSI-3 disk policy to use I/Ofencing. The value is dmp.
List or scalar: scalar
Optional or required: required for I/O fencing
CFG{fencing_scsi3_disk_policy}
Defines whether fencing is enabled. Thevalue is 1 if enabled.
List or scalar: scalar
Optional or required: required for I/O fencing
CFG{fencingenabled}
Specifies the Veritas Access license for eachnode.
List or scalar: scalar
Optional or required: required
CFG{keys}{"node_ip"}
Specifies the new access IP for the clusternodes. The value should be the first publicIP address for each node.
List or scalar: list
Optional or required: required
CFG{newnodes}
Cleans up the ssh connection that is addedby the installer after the configuration. Thevalue is 1.
List or scalar: scalar
Optional or required: required
CFG{opt}{comcleanup}
Performs the NIC configuration with all thenetwork variable values. The value is 1.
List or scalar: scalar
Optional or required: required
CFG{opt}{confignic}
81Automating Veritas Access installation and configuration using response filesResponse file variables to install and configure Veritas Access
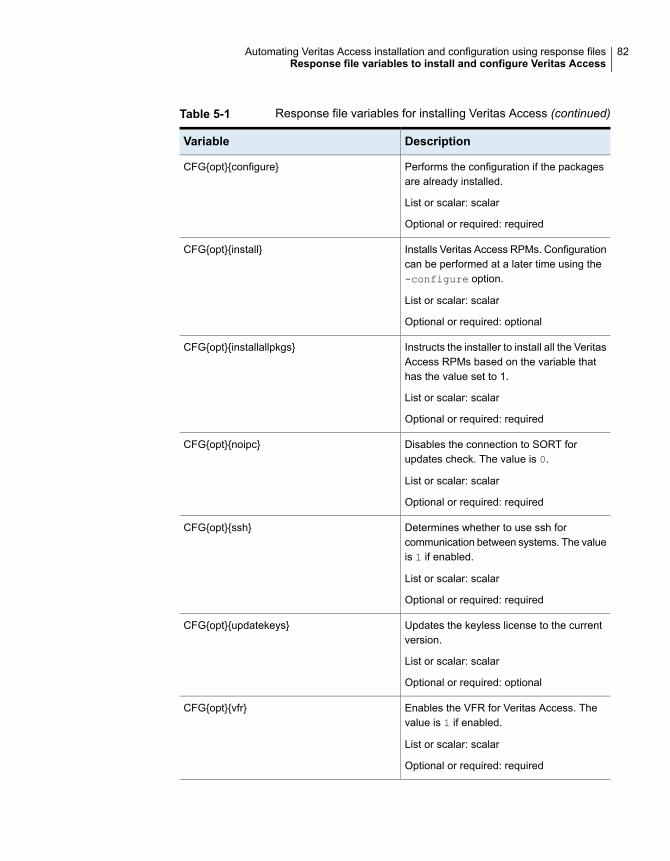
Table 5-1 Response file variables for installing Veritas Access (continued)
DescriptionVariable
Performs the configuration if the packagesare already installed.
List or scalar: scalar
Optional or required: required
CFG{opt}{configure}
Installs Veritas Access RPMs. Configurationcan be performed at a later time using the-configure option.
List or scalar: scalar
Optional or required: optional
CFG{opt}{install}
Instructs the installer to install all the VeritasAccess RPMs based on the variable thathas the value set to 1.
List or scalar: scalar
Optional or required: required
CFG{opt}{installallpkgs}
Disables the connection to SORT forupdates check. The value is 0.
List or scalar: scalar
Optional or required: required
CFG{opt}{noipc}
Determines whether to use ssh forcommunication between systems. The valueis 1 if enabled.
List or scalar: scalar
Optional or required: required
CFG{opt}{ssh}
Updates the keyless license to the currentversion.
List or scalar: scalar
Optional or required: optional
CFG{opt}{updatekeys}
Enables the VFR for Veritas Access. Thevalue is 1 if enabled.
List or scalar: scalar
Optional or required: required
CFG{opt}{vfr}
82Automating Veritas Access installation and configuration using response filesResponse file variables to install and configure Veritas Access
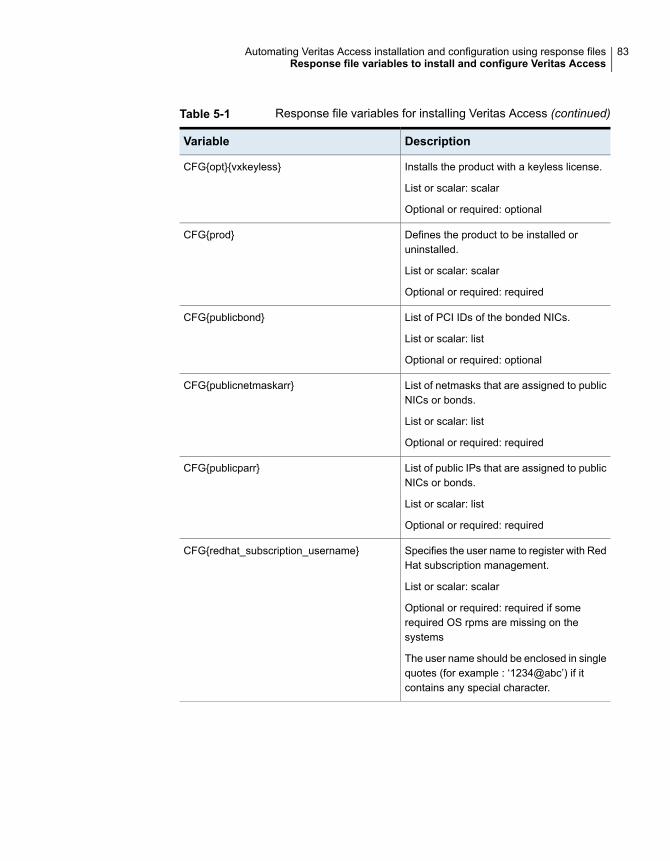
Table 5-1 Response file variables for installing Veritas Access (continued)
DescriptionVariable
Installs the product with a keyless license.
List or scalar: scalar
Optional or required: optional
CFG{opt}{vxkeyless}
Defines the product to be installed oruninstalled.
List or scalar: scalar
Optional or required: required
CFG{prod}
List of PCI IDs of the bonded NICs.
List or scalar: list
Optional or required: optional
CFG{publicbond}
List of netmasks that are assigned to publicNICs or bonds.
List or scalar: list
Optional or required: required
CFG{publicnetmaskarr}
List of public IPs that are assigned to publicNICs or bonds.
List or scalar: list
Optional or required: required
CFG{publicparr}
Specifies the user name to register with RedHat subscription management.
List or scalar: scalar
Optional or required: required if somerequired OS rpms are missing on thesystems
The user name should be enclosed in singlequotes (for example : ‘1234@abc’) if itcontains any special character.
CFG{redhat_subscription_username}
83Automating Veritas Access installation and configuration using response filesResponse file variables to install and configure Veritas Access

Table 5-1 Response file variables for installing Veritas Access (continued)
DescriptionVariable
Specifies the password to register with RedHat subscription management.
List or scalar: scalar
Optional or required: required if somerequired OS rpms are missing on thesystems
The password should be enclosed in singlequotes (for example : ‘1234@abc’) if itcontains any special character.
CFG{redhat_subscription_password}
Defines the cluster name of the product.
List or scalar: scalar
Optional or required: required
CFG{snas_clustername}
Defines the console IP of the product.
List or scalar: scalar
Optional or required: required
CFG{snas_consoleip}
Defines the gateway of the product.
List or scalar: scalar
Optional or required: required
CFG{snas_defgateway}
Defines the DNS domain name of theproduct.
List or scalar: scalar
Optional or required: required
CFG{snas_dnsdomainname}
Defines the DNS IP of the product.
List or scalar: scalar
Optional or required: required
CFG{snas_dnsip}
Defines the NTP server name of the product.
List or scalar: scalar
Optional or required: required
CFG{snas_ntpserver}
84Automating Veritas Access installation and configuration using response filesResponse file variables to install and configure Veritas Access

Table 5-1 Response file variables for installing Veritas Access (continued)
DescriptionVariable
Defines the number of VIPs on each NIC.
List or scalar: scalar
Optional or required: required
CFG{snas_nvip}
Defines the prefix of public IPs (only in IPV6environments).
List or scalar: scalar
Optional or required: required
CFG{snas_pipprefix}
Defines the the initial IP of the public IPs.
List or scalar: scalar
Optional or required: required
CFG{snas_pipstart}
Defines the netmask of public IPs (only inIPV4 environments).
List or scalar: scalar
Optional or required: required
CFG{snas_pnmaskstart}
Defines if use of separate console port. 1for yes, 0 for no.
List or scalar: scalar
Optional or required: required
CFG{snas_sepconsoleport}
Defines the prefix of virtual IPs (only in IPV6environments).
List or scalar: scalar
Optional or required: required
CFG{snas_vipprefix}
Defines the the initial IP of the virtual IPs.
List or scalar: scalar
Optional or required: required
CFG{snas_vipstart}
Defines the netmask of virtual IPs (only inIPV4 environments).
List or scalar: scalar
Optional or required: required
CFG{snas_vnmaskstart}
85Automating Veritas Access installation and configuration using response filesResponse file variables to install and configure Veritas Access

Table 5-1 Response file variables for installing Veritas Access (continued)
DescriptionVariable
List of systems on which the product is tobe installed or uninstalled.
List or scalar: list
Optional or required: required
CFG{systems}
Indicates whether to start LLT or GAB whenthe user wants to set up a single nodecluster.
List or scalar: scalar
Optional or required: required
CFG{vcs_allowcomms}
Defines the unique cluser ID with a stringnumber.
List or scalar: scalar
Optional or required: required
CFG{vcs_clusterid}
Defines the cluster name with a string.
List or scalar: scalar
Optional or required: required
CFG{vcs_clustername}
Defines the NIC name for the first heartbeatlink.
List or scalar: scalar
Optional or required: required
CFG{vcs_lltlink<n>}{"new_node_ip"}
Specifies the RDMA private link1 IP address,the value follows that node_01 is172.17.0.3, node_02 is 172.17.0.4,and so on.
List or scalar: scalar
Optional or required: required for RDMANICs as private NICs
CFG{vcs_rdmalink1_address}{"new_node_ip"}
Specifies the RDMA private link1 IPnetmask, the value is 255.255.255.0.
List or scalar: scalar
Optional or required: required for RDMANICs as private NICs
CFG{vcs_rdmalink1_netmask}{"new_node_ip"}
86Automating Veritas Access installation and configuration using response filesResponse file variables to install and configure Veritas Access
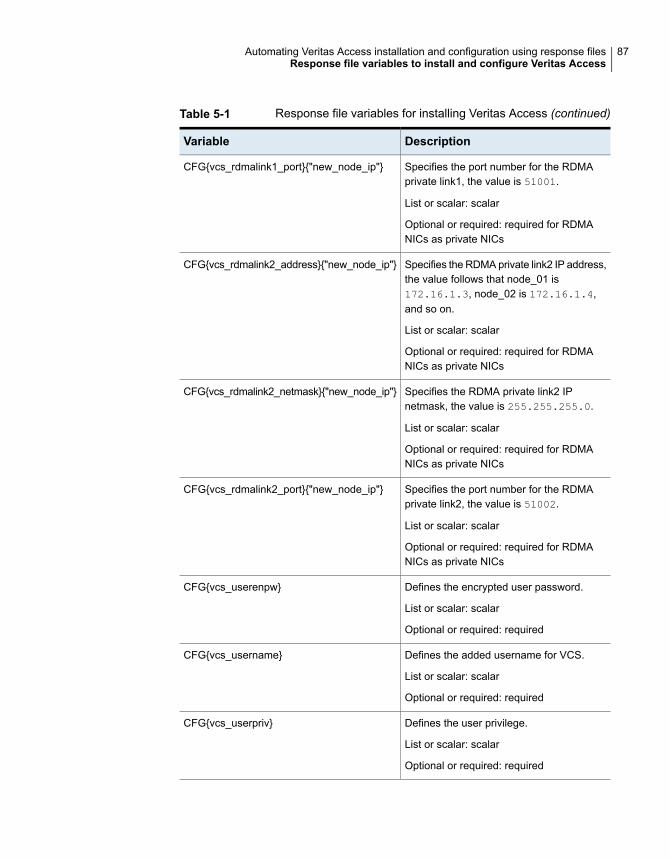
Table 5-1 Response file variables for installing Veritas Access (continued)
DescriptionVariable
Specifies the port number for the RDMAprivate link1, the value is 51001.
List or scalar: scalar
Optional or required: required for RDMANICs as private NICs
CFG{vcs_rdmalink1_port}{"new_node_ip"}
Specifies the RDMA private link2 IP address,the value follows that node_01 is172.16.1.3, node_02 is 172.16.1.4,and so on.
List or scalar: scalar
Optional or required: required for RDMANICs as private NICs
CFG{vcs_rdmalink2_address}{"new_node_ip"}
Specifies the RDMA private link2 IPnetmask, the value is 255.255.255.0.
List or scalar: scalar
Optional or required: required for RDMANICs as private NICs
CFG{vcs_rdmalink2_netmask}{"new_node_ip"}
Specifies the port number for the RDMAprivate link2, the value is 51002.
List or scalar: scalar
Optional or required: required for RDMANICs as private NICs
CFG{vcs_rdmalink2_port}{"new_node_ip"}
Defines the encrypted user password.
List or scalar: scalar
Optional or required: required
CFG{vcs_userenpw}
Defines the added username for VCS.
List or scalar: scalar
Optional or required: required
CFG{vcs_username}
Defines the user privilege.
List or scalar: scalar
Optional or required: required
CFG{vcs_userpriv}
87Automating Veritas Access installation and configuration using response filesResponse file variables to install and configure Veritas Access

Table 5-1 Response file variables for installing Veritas Access (continued)
DescriptionVariable
List of virtual IPs that will be assigned topublic NICs or bonds.
List or scalar: list
Optional or required: required
CFG{virtualiparr}
List of netmasks that will be assigned topublic NICs or bonds.
List or scalar: list
Optional or required: required
CFG{virtualnetmaskarr}
Sample response file for Veritas Accessinstallation and configuration
The following example shows a response file for installing and configuring VeritasAccess.
####################################################
our %CFG;
#Installs Product packages.
$CFG{opt}{install}=1;
$CFG{opt}{installallpkgs}=1;
$CFG{opt}{updatekeys}=1;
$CFG{opt}{comsetup}=1;
$CFG{opt}{noipc}=1;
$CFG{opt}{ssh}=1;
$CFG{opt}{vxkeyless}=1;
$CFG{opt}{vfr}=1;
$CFG{prod}="SNAS72";
#Performs the configuration if the packages are already installed
$CFG{opt}{configure}=1;
#the PCI IDs of slave NICs
$CFG{bondpool}{bond0}=[ qw(0000:02:09.0 0000:02:07.0) ];
$CFG{bondpool}{bond1}=[ qw(0000:02:04.0 0000:02:08.0) ];
#mode of each bond
$CFG{bondmode}{bond0}=5;
88Automating Veritas Access installation and configuration using response filesSample response file for Veritas Access installation and configuration

$CFG{bondmode}{bond1}=6;
#names of bond
$CFG{bondname}=[ qw(bond0 bond1) ];
#the PCI IDs of excluded NICs
$CFG{exclusion}=[ qw(0000:02:03.0 0000:02:0a.0) ];
#the PCI IDs of all the bonded NICs
$CFG{publicbond}=[ qw(0000:02:03.0 0000:02:04.0 0000:02:07.0
0000:02:08.0) ];
#public IPs
$CFG{publiciparr}=[ qw(10.200.58.100 10.200.58.101 10.200.58.102
10.200.58.103 10.200.58.104 10.200.58.105 10.200.58.106 10.200.58.107) ];
#netmask for public IPs
$CFG{publicnetmaskarr}=[ qw(255.255.255.0 255.255.255.0 255.255.255.0
255.255.255.0 255.255.255.0 255.255.255.0 255.255.255.0 255.255.255.0) ];
#the user name to register with Red Hat subscription management
$CFG{redhat_subscription_username}="rhel_user";
#the password to register with Red Hat subscription management
$CFG{redhat_subscription_password}="rhel_password";
#clustername of SNAS
$CFG{snas_clustername}="testsnas";
#console IP of SNAS
$CFG{snas_consoleip}="10.200.58.220";
#default gateway of SNAS
$CFG{snas_defgateway}="10.200.58.1";
#domain name of DNS
$CFG{snas_dnsdomainname}="cdc.veritas.com";
#IP of DNS
$CFG{snas_dnsip}="10.200.58.3";
#NTP server name
$CFG{snas_ntpserver}="ntp.veritas.com";
89Automating Veritas Access installation and configuration using response filesSample response file for Veritas Access installation and configuration
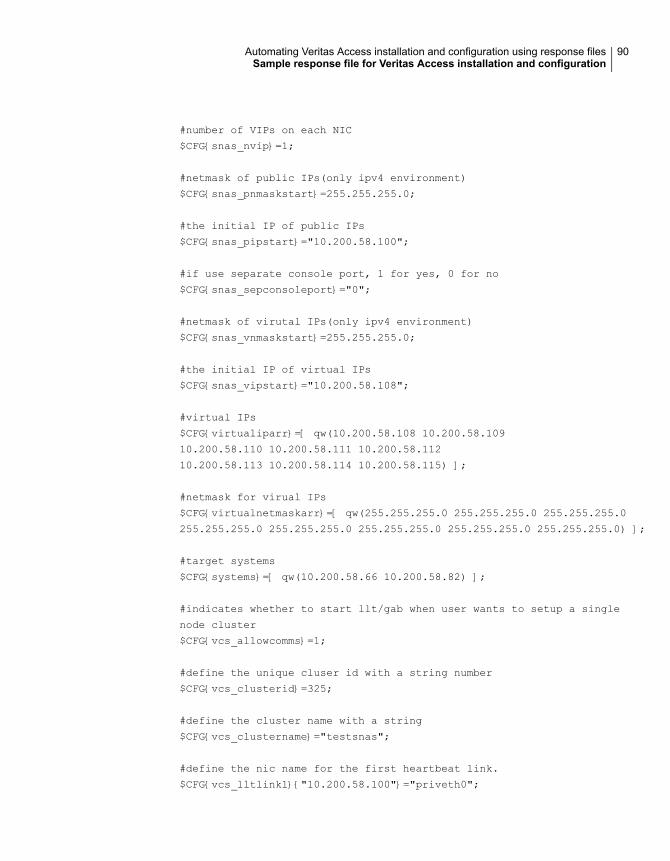
#number of VIPs on each NIC
$CFG{snas_nvip}=1;
#netmask of public IPs(only ipv4 environment)
$CFG{snas_pnmaskstart}=255.255.255.0;
#the initial IP of public IPs
$CFG{snas_pipstart}="10.200.58.100";
#if use separate console port, 1 for yes, 0 for no
$CFG{snas_sepconsoleport}="0";
#netmask of virutal IPs(only ipv4 environment)
$CFG{snas_vnmaskstart}=255.255.255.0;
#the initial IP of virtual IPs
$CFG{snas_vipstart}="10.200.58.108";
#virtual IPs
$CFG{virtualiparr}=[ qw(10.200.58.108 10.200.58.109
10.200.58.110 10.200.58.111 10.200.58.112
10.200.58.113 10.200.58.114 10.200.58.115) ];
#netmask for virual IPs
$CFG{virtualnetmaskarr}=[ qw(255.255.255.0 255.255.255.0 255.255.255.0
255.255.255.0 255.255.255.0 255.255.255.0 255.255.255.0 255.255.255.0) ];
#target systems
$CFG{systems}=[ qw(10.200.58.66 10.200.58.82) ];
#indicates whether to start llt/gab when user wants to setup a single
node cluster
$CFG{vcs_allowcomms}=1;
#define the unique cluser id with a string number
$CFG{vcs_clusterid}=325;
#define the cluster name with a string
$CFG{vcs_clustername}="testsnas";
#define the nic name for the first heartbeat link.
$CFG{vcs_lltlink1}{"10.200.58.100"}="priveth0";
90Automating Veritas Access installation and configuration using response filesSample response file for Veritas Access installation and configuration

$CFG{vcs_lltlink1}{"10.200.58.104"}="priveth0";
$CFG{vcs_lltlink2}{"10.200.58.100"}="priveth1";
$CFG{vcs_lltlink2}{"10.200.58.104"}="priveth1";
#define the encrypted user password
$CFG{vcs_userenpw}=[ qw(GPQiPKpMQlQQoYQkPN) ];
#define the added username for VCS
$CFG{vcs_username}=[ qw(admin) ];
#define the user privilege
$CFG{vcs_userpriv}=[ qw(Administrators) ];
1;
####################################################
91Automating Veritas Access installation and configuration using response filesSample response file for Veritas Access installation and configuration

Displaying and addingnodes to a cluster
This chapter includes the following topics:
■ About the Veritas Access installation states and conditions
■ Displaying the nodes in the cluster
■ Before adding new nodes in the cluster
■ Adding a node to the cluster
■ Deleting a node from the cluster
■ Shutting down the cluster nodes
About the Veritas Access installation states andconditions
Table 6-1 describes the Veritas Access installation states.
Table 6-1 Veritas Access installation states
DescriptionInstallationstate
Node is part of the cluster and the Veritas Access processes are runningon it.
RUNNING
Node is down and/or the Veritas Access processes are not running onit.
FAULTED
Node is leaving the cluster gracefullyLEAVING
6Chapter

Table 6-1 Veritas Access installation states (continued)
DescriptionInstallationstate
Node has exited the cluster gracefullyEXITED
Exact state of the node cannot be determinedUNKNOWN
Depending on the cluster condition as described in Table 6-2, output for theCluster> show command changes.
Table 6-2 Cluster conditions and states
DescriptionCondition
State displays as FAULTED, and there is no installation stateor network statistics.
If the node is configured andpart of the cluster, but thenode is powered off.
State displays as FAULTED, and there is no installation stateor network statistics.
If the node is configured andpart of the cluster, but thenode is physically removedfrom the cluster.
State changes from LEAVING to EXITED.If the node is configured andpart of the cluster, but thenode is shutdown using theCluster> shutdowncommand.
Node is deleted from the cluster, and information about thedeleted node is no longer available.
If the node is configured andpart of the cluster, and youuse the Cluster> delcommand.
Displaying the nodes in the clusterYou can display all the nodes in the cluster, their states, CPU load, and networkload during the past 15 minutes.
If you use the Cluster> show currentload option, you can display the CPU andnetwork loads collected from now to the next five seconds.
93Displaying and adding nodes to a clusterDisplaying the nodes in the cluster

To display a list of nodes in the cluster
1 To display a list of nodes that are part of a cluster, and the systems that areavailable to add to the cluster, enter the following:
Cluster> show
Command output includes the following information. See examples below.
Displays the node name if the node has already been added tothe cluster. Displays the IP address of the node if it is still in theprocess of being added to the cluster.
Example:
node_01
or
10.200.58.202
Node
Displays the state of the node or the installation state of the systemalong with an IP address of the system if it is installed.
See “About the Veritas Access installation states and conditions”on page 92.
State
Indicates the CPU load.CPU
Indicates the network load for the Public Interface X.pubethX
Indicates the network load for bond NIC X.bondX
2 For nodes already in the cluster, the following is displayed:
Node State CPU(15 min) pubeth0(15 min) pubeth1(15 min)
% rx(MB/s) tx(MB/s) rx(MB/s) tx(MB/s)
------ ------- ----------- -------- -------- -------- --------
snas_01 RUNNING 1.35 0.00 0.00 0.00 0.00
snas_02 RUNNING 1.96 0.00 0.00 0.00 0.00
94Displaying and adding nodes to a clusterDisplaying the nodes in the cluster

3 For the nodes that are being added to the cluster, for the nodes that are beingdeleted from the cluster, and for the nodes that is getting upgraded, the followingprogress is displayed:
Nodes in Transition
Node/IP Operation State Description
------ --------- ----- -----------
10.200.58.202 Add node FAILED Installing packages
snas_03 Delete node ONGOING Removing node
snas_01,snas_02 Rolling upgrade ONGOING Rolling upgrade phase 2
Note: The add node and delete node operations cannot be performed at thesame time.
4 To display the CPU and network loads collected from now to the next fiveseconds, enter the following:
Cluster> show currentload
Example output:
Node State CPU(5 sec) pubeth0(5 sec) pubeth1(5 sec)
% rx(MB/s) tx(MB/s) rx(MB/s) tx(MB/s)
---- ----- ---------- -------- -------- -------- --------
snas_01 RUNNING 0.26 0.01 0.00 0.01 0.00
snas_02 RUNNING 0.87 0.01 0.00 0.01 0.00
snas_03 RUNNING 10.78 27.83 12.54 0.01 0.00
Statistics for network interfaces are shown for each public interface availableon the cluster nodes.
Before adding new nodes in the clusterAfter you have installed the operating system, you can install and configure a multiplenode Veritas Access cluster at one time. If you want to add additional nodes to thecluster after that, you need to complete the following procedures:
95Displaying and adding nodes to a clusterBefore adding new nodes in the cluster

■ Install the appropriate operating system software on the additional nodes.See “Installing the operating system on each node of the cluster” on page 42.
■ Disable SELinux on the new node.
■ You do not need to install the Veritas Access software on the additional nodebefore you add the node. The Veritas Access software is installed when youadd the nodes. If the Veritas Access software is already installed, it is uninstalledand the product (same version as the cluster) is installed after that. The reasonto uninstall and then install the product is to make sure that the new node isinstalled with exactly the same version, and patch level (if any) as the othercluster nodes. The packages are stored in the cluster nodes so the productimage is not needed during the addition of the new node.
■ Verify that the existing cluster has sufficient physical IP addresses for the newnodes. You can add additional IP addresses with the CLISH command: .
Network> ip addr add command
For example:
Network> ip addr add 10.200.58.107 255.255.252.0 physical
ACCESS ip addr SUCCESS V-288-1031 ip addr add successful.
Network> ip addr show
IP Netmask/Prefix Device Node Type Status
-- -------------- ------ ---- ---- ------
10.200.58.101 255.255.252.0 pubeth0 snas_01 Physical
10.200.58.102 255.255.252.0 pubeth1 snas_01 Physical
10.200.58.103 255.255.252.0 pubeth0 snas_02 Physical
10.200.58.104 255.255.252.0 pubeth1 snas_02 Physical
10.200.58.105 255.255.252.0 ( unused ) Physical
10.200.58.107 255.255.252.0 ( unused ) Physical
10.200.58.231 255.255.252.0 pubeth0 snas_01 Virtual ONLINE (Con IP)
10.200.58.62 255.255.252.0 pubeth1 snas_01 Virtual ONLINE
10.200.58.63 255.255.252.0 pubeth1 snas_01 Virtual ONLINE
10.200.58.64 255.255.252.0 pubeth1 snas_01 Virtual
In the example the unused IP addresses 10.200.58.105, and 10.200.58.107can be used by the new node as physical IP addresseses.
■ If you want to add nodes to a cluster that has RDMA-based LLT links, disableiptables on the cluster nodes using the service iptables stop command.For example:
# service iptables stop
iptables: Setting chains to policy ACCEPT: filter [ OK ]
96Displaying and adding nodes to a clusterBefore adding new nodes in the cluster

iptables: Flushing firewall rules: [ OK ]
iptables: Unloading modules: [ OK ]
Note: Before proceeding, make sure that all of the nodes are physicallyconnected to the private and public networks.
■ Add the node to your existing cluster.See “Adding a node to the cluster” on page 97.
Adding a node to the clusterThe operating system has to be installed on the nodes before you add nodes to acluster.
If you use disk-based fencing, the coordinator disks must be visible on the newlyadded node as a prerequisite for I/O fencing to be configured successfully. Withoutthe coordinator disks, I/O fencing will not load properly and the node will not beable to obtain cluster membership.
If you use majority-based fencing, the newly added node doesn't have to haveshared disks.
If you want to add a new node and want to exclude some unique PCI IDs, add theunique PCI IDs to the /opt/SYMCsnas/conf/net_exclusion_dev.conf file on eachcluster node manually. For example:
[root@bob_01 ~]# cat /opt/SYMCsnas/conf/net_exclusion_dev.conf
0000:42:00.0 0000:42:00.1
Note: Writeback cache is supported for two-node clusters only, so adding nodesto a two-node cluster changes the caching to read-only.
Note: Newly added nodes should have the same configuration of InfiniBand NICs.See “About using LLT over the RDMA network for Veritas Access” on page 27.
If your cluster has a configured the FSS pool, and the FSS pool's node group ismissing a node, then the newly added node is added into the FSS node group, andthe installer adds the new node's local data disks into the FSS pool.
To add the new node to the cluster
1 Log in to Veritas Access using the master or the system-admin account.
2 In CLISH, enter the Cluster command to enter the Cluster> mode.
97Displaying and adding nodes to a clusterAdding a node to the cluster

3 To add the new nodes to the cluster, enter the following:
Cluster> add node1ip, node2ip.....
where node1ip, node2ip, .... are the IP address list of the additional nodes forthe ssh connection.
It is important to note that:
■ The node IPs should not be the IPs which are allocated to the new nodesas physical IPs or virtual IPs.
■ The physical IPs of new nodes are usable IPs found from the configuredpublic IP starting addresses.
■ The virtual IPs are re-balanced to the new node but additional virtual IPsare not assigned.Go to step 7 to add new virtual IP addresses to the cluster after adding anode.
■ The IPs that are accessible to the new nodes should be given.
■ The accessible IPs of the new nodes should be in the public network, theyshould be able to ping the public network's gateway successfully.
For example:
Cluster> add 10.200.114.56
4 When you add nodes to a two-node cluster and writeback caching is enabled,the installer asks the following question before adding the node:
CPI WARNING V-9-30-2164 Adding a node to a two-node cluster
that has writeback caching enabled will change the caching
to read-only. Writeback caching is only supported for two nodes.
Do you want to continue adding new node(s)? [y,n,q](n)
Enter y to continue adding the node. Enter n to exit from the add nodeprocedure.
5 If a cache exists on the original cluster, the installer prompts you to choose thessd disks to create cache on the new node when CFS is mounted.
1) emc_clariion1_242
2) emc_clariion1_243
b) Back to previous menu
Choose disks separate by spaces to create cache on 10.198.89.164
[1-2,b,q] 1
Create cache on snas_02 .....................Done
98Displaying and adding nodes to a clusterAdding a node to the cluster

6 If the cluster nodes have created FSS pool, and there are more than two localdata disks on the new node, the installer asks you to select the disks to addinto the FSS pool. Make sure that you select at least two disks for stripe volumelayout. The total selected disk size should be no less than the FSS pool’scapacity size.
Following storage pools need to add disk from the new node:
1) fsspool1
2) fsspool2
3) Skip this step
Choose a pool to add disks [1-3,q] 1
1) emc_clariion0_1570 (5.000 GB)
2) installres_03_sdc (5.000 GB)
3) installres_03_sde (5.000 GB)
4) sdd (5.000 GB)
b) Back to previous menu
Choose at least 2 local disks with minimum capacity of 10 GB [1-4,b,q] 2 4
Format disk installres_03_sdc,sdd ................................ Done
The disk name changed to installres_03_sdc,installres_03_sdd
Add disk installres_03_sdc,installres_03_sdd to storage pool fsspool1 Done
7 If required, add the virtual IP addresses to the cluster. Adding the node doesnot add new virtual IP addresses or service groups to the cluster.
To add additional virtual IP addresses, use the following command in theNetwork mode:
Network> ip addr add ipaddr virtual
For example:
Network> ip addr add 10.200.58.66 255.255.252.0 virtual
ACCESS ip addr SUCCESS V-288-1031 ip addr add successful.
If a problem occurs while you are adding a node to a cluster (for example, if thenode is temporarily disconnected from the network), do the following to fix theproblem:
To recover the node:
■ Power off the node.
99Displaying and adding nodes to a clusterAdding a node to the cluster

■ Use the Cluster> del nodename command to delete the node from the cluster.
■ Power on the node.
■ Use the Cluster> add nodeip command to add the node to the cluster.
Deleting a node from the clusterThis command deletes a node from the cluster. Use the node name that is displayedin the Cluster> show command.
Note: This command is not supported in a single-node cluster.
If the deleted node was in the RUNNING state prior to deletion, after you rebootthe node, that node is assigned to the original IP address that can be used to addthe node back to the cluster. The original IP address of the node is the IP addressthat the node used before it was added into the cluster.
If your cluster has configured a FSS pool, you cannot use the installer to deletenodes that would result in a single node in the node group of the FSS pool.
Deleting a node from a two-node cluster that has writeback caching enabled changesthe caching to read-only. Writeback caching is only supported for two nodes.
The IP address that was used by the node before it was deleted from the clusteris still accessible until you perform a restart operation.
After the node is deleted from the cluster and you perform a reboot operation, theIP addresses associated with the node are free for use by the cluster for new nodes.
100Displaying and adding nodes to a clusterDeleting a node from the cluster

To delete a node from the cluster
1 To show the current state of all nodes in the cluster, enter the following:
Cluster> show
2 To delete a node from a cluster, enter the following:
Cluster> del nodename
where nodename is the node name that appeared in the listing from theCluster> show command. You cannot specify a node by its IP address.
For example:
Cluster> del snas_01
3 After a node is deleted from the cluster, the physical IP addresses that it usedare marked as unused physical IP addresses. The IP addresses are availablefor use if you add new nodes. The virtual IP addresses used by a node whichhas been deleted are not removed. Deleting a node moves the virtual IPaddresses on the deleted node to the remaining nodes in the cluster.
For example:
Network> ip addr show
IP Netmask/Prefix Device Node Type Status
-- -------------- ------ ---- ---- ------
10.209.86.232 255.255.252.0 pubeth0 source_30a_01 Physical
10.209.86.233 255.255.252.0 pubeth1 source_30a_01 Physical
10.209.86.234 255.255.252.0 ( unused ) Physical
10.209.86.235 255.255.252.0 ( unused ) Physical
10.209.86.240 255.255.252.0 pubeth0 source_30a_01 Virtual ONLINE (Con IP)
10.209.86.236 255.255.252.0 pubeth0 source_30a_01 Virtual ONLINE
10.209.86.237 255.255.252.0 pubeth0 source_30a_01 Virtual ONLINE
10.209.86.238 255.255.252.0 pubeth1 source_30a_01 Virtual ONLINE
10.209.86.239 255.255.252.0 pubeth1 source_30a_01 Virtual ONLINE
If the physical or virtual IP addresses are not going to be used, they can beremoved using the following command:
Network> ip addr del ipaddr
For example:
Network> ip addr del 10.209.86.234
ACCESS ip addr SUCCESS V-288-1031 ip addr del successful.
101Displaying and adding nodes to a clusterDeleting a node from the cluster

Note: If the cluster has configured NIC bonding, you also need to delete theconfiguration of the deleted node on the switch.
Shutting down the cluster nodesYou can shut down a single node or all of the nodes in the cluster. Use the nodename that is displayed in the Cluster> show command.
To shut down a node or all the nodes in a cluster
1 To shut down a node, enter the following:
Cluster> shutdown nodename
nodename indicates the name of the node you want to shut down. You cannotspecify a node by its IP address.
For example:
Cluster> shutdown snas_04
Stopping Cluster processes on snas_04
Sent shutdown command to snas_04. SSH sessions to
snas_04 may terminate.
2 To shut down all of the nodes in the cluster, enter the following:
Cluster> shutdown all
Use all as the nodename to shut down all of the nodes in the cluster.
For example:
Cluster> shutdown all
Stopping Cluster processes on all
SSH sessions to all nodes may terminate.
Sent shutdown command to snas_02
Sent shutdown command to snas_03
Sent shutdown command to snas_04
Sent shutdown command to snas_01
102Displaying and adding nodes to a clusterShutting down the cluster nodes
Upgrading Veritas AccessThis chapter includes the following topics:
■ About types of Veritas Access patches
■ Downloading Veritas Access 7.2 release
■ Upgrading to Veritas Access 7.2 release
■ About upgrading Veritas Access patches
■ Displaying the current version of Veritas Access
■ Displaying upgrade history of Veritas Access
■ Downloading an Veritas Access patch release
■ Displaying all Veritas Access releases that are available in the repository
■ About installing patches
■ Installing Veritas Access patches
■ Automatically execute your customized script before or after upgrade
■ Uninstalling patches
■ Synchronizing software upgrades on a node
About types of Veritas Access patchesDepending on whether a patch requires a restart of the cluster or not, the VeritasAccess patches can be divided into two types:
■ Patches that do not require a cluster restart.These patches upgrade the Veritas Access packages and non-critical packagesusing the direct upgrade method. The direct upgrade method does not bring
7Chapter

down any nodes or resources while the patch is applied. The upgrade appliesthe patch on all the nodes in parallel. The cluster remains in a RUNNING stateand clients are served while the upgrade process is running.
■ Patches that require a cluster restart.These patches upgrade the critical packages that require a one-time clusterrestart using the rolling upgrade method. You can use the rolling upgrade methodto install the Veritas Access releases in a guided manner on all the clustersnodes. The rolling upgrade minimizes downtime for highly available clusters bylimiting the upgrade time to the amount of time that it takes to perform a servicegroup failover
Note:Updating these patches on a single node cluster causes service downtime,because both the kernel RPMs and VCS agent RPMs are upgraded in a singlephase.
The rolling upgrade has two main phases. The installer upgrades kernel RPMsin phase 1 and VCS agent RPMs in phase 2. The upgrade process divides thecluster into two subclusters, called the first subcluster and the second subcluster.First, the upgrade is performed on the first subcluster. The upgrade processstops all services and resources on the nodes of the first subcluster. All services(including the VIP groups) fail over to the second subcluster. During the failoverprocess, the clients that are connected to the VIP groups of the first subclusternodes are intermittently interrupted. For those clients that do not time out, theservice is resumed after the VIP groups become online on one of the nodes ofthe second subcluster.While the upgrade process is running on the nodes of the first subcluster, thenodes of the second subcluster nodes continue to serve the clients. After thefirst subcluster node has been upgraded, it restarts the services and resourceson first stage nodes. Immediately after the first subcluster comes up, the upgradeprocess stops the services and resources on the remaining nodes. All servicesand resources are online and serve clients. Meanwhile, the rolling upgrade startsthe upgrade process on the remaining nodes. After the upgrade is complete onthe remaining nodes, the cluster recovers and services are balanced across thecluster.
Downloading Veritas Access 7.2 releaseYou can download Veritas Access 7.2 and store it in the repository using theUpgrade> get command. To download Veritas Access 7.2 and place it in therepository:
104Upgrading Veritas AccessDownloading Veritas Access 7.2 release

■ To download the Veritas Access patch release and place it in the repository,enter the following:Upgrade> get URL
where URL is the URL location from where you can download the software. TheURL supports HTTP, FTP, and SCP protocols for download. The user nameand password for the HTTP and FTP protocols are also supported.For example:You can download the Veritas Access release from an HTTP server withauthentication from http://[email protected]/VA7.2.0.0.tar.gz.Upgrade> get http://[email protected]/VA7.2.0.0.tar.gz
Upgrading to Veritas Access 7.2 releaseYou can use the Upgrade> install 7.2.0.0 to upgrade to Veritas Access 7.2from older release on your system.
To Upgrade to Veritas Access 7.2 on your system
1 Make sure that the Veritas Access 7.2 is available in the repository. You canuse the Upgrade> repository command to view the release that are availableon the cluster node.
See “Displaying all Veritas Access releases that are available in the repository”on page 107.
2 If Veritas Access 7.2 does not display, download it. You can use the Upgrade>
get command to download the Veritas Access 7.2 and place it in the repository.
See “Downloading Veritas Access 7.2 release” on page 104.
About upgrading Veritas Access patchesThe Veritas Access Upgrade> mode commands perform a direct upgrade or aguided rolling upgrade on all of the cluster nodes based on the patch type. Beforeyou perform an upgrade, ensure that all the cluster nodes are in RUNNING state andhave the same Veritas Access software version. If one of the nodes has a lowerversion, you need to upgrade the software version for that node. To upgrade theversion, delete the node from the cluster, upgrade the node, and add it back to thecluster.
See “Adding a node to the cluster” on page 97.
See “Deleting a node from the cluster” on page 100.
To access the Upgrade> mode commands, log into the administrative console (formaster or system-admin) and enter the Upgrade> mode.
105Upgrading Veritas AccessUpgrading to Veritas Access 7.2 release

Note: To avoid potential upgrade issues, stop all workloads from clients, and thenre-initiate the upgrade.
Displaying the current version of Veritas AccessYou can display the current version of Veritas Access and the patch level using theUpgrade> version command.
To display the current version of Veritas Access
◆ To display the current version of Veritas Access and the patch level, enter thefollowing:
Upgrade> version
For example:
Upgrade> version
ACCESS 7.2.0.0 (Mon Apr 18 07:04:07 2016)
Displaying upgrade history of Veritas AccessYou can display the upgrade history of Veritas Access using the Upgrade> history
command.
To display the upgrade history of Veritas Access
◆ To display the upgrade history of Veritas Access, enter the following:
Upgrade> history
For example:
Upgrade> history
ACCESS 7.1.0.0 (Mon Apr 18 07:04:07 2016),
Installed on Sat May 14 19:24:17 EDT 2016
Downloading an Veritas Access patch releaseYou can download an Veritas Access patch release and store it in the repositoryaccording to the patch type using the Upgrade> get command.
106Upgrading Veritas AccessDisplaying the current version of Veritas Access

To download the Veritas Access patch release and place it in the repository
◆ To download the Veritas Access patch release and place it in the repository,enter the following:
Upgrade> get URL
where URL is the URL location from where you can download the softwarepatch. The URL supports HTTP, FTP, and SCP protocols for download. Theuser name and password for the HTTP and FTP protocols are also supported.
For example:
You can download the Veritas Access release from an HTTP server withauthentication from http://[email protected]/VA7.2.0.0.tar.gz
Upgrade> get http://[email protected]/VA7.2.0.0.tar.gz
Note: The patch release is distributed to all RUNNING nodes in the cluster afterthe patch is downloaded.
Displaying all Veritas Access releases that areavailable in the repository
You can display all the patch releases that are available in the repository using theUpgrade> repository command.
To display all Veritas Access releases that are available in the repository
◆ To display all Veritas Access releases that are available in the repository, enterthe following:
Upgrade> repository
For example:
Upgrade> repository
ACCESS VERSION| INSTALLED(y/n)| UPGRADABLE(y/n)
7.2.0.0 n y
7.1.0.0 y n
107Upgrading Veritas AccessDisplaying all Veritas Access releases that are available in the repository

About installing patchesTable 7-1 Patch commands
DefinitionCommand
Downloads the patch from a specified URL and install it on all of thenodes. The Upgrade> patch install command first synchronizesthe nodes that have different software versions compared to the othernodes.
Note: After you have installed, uninstalled, or synchronized a newVeritas Access patch into your cluster, the list of available commandsmay have changed. Please re-login to the CLI to access the updatedfeatures.
See “Installing Veritas Access patches” on page 108.
patch install
Uninstalls the software upgrade from all of the nodes up to the specifiedversion. You must specify the versions of software up to the versionthat you want to uninstall. This command first synchronizes the nodesthat have different software versions compared to other nodes in thecluster.
See “Installing Veritas Access patches” on page 108.
patchuninstall-upto
Forcefully synchronizes the specified node, bringing it up to the currentlyinstalled software version of the remaining nodes in the cluster.
You only need to install the patch on one node, and then run theUpgrade> patch sync command to synchronize all of the nodes.
See “Installing Veritas Access patches” on page 108.
patch sync
Installing Veritas Access patchesYou can use the Upgrade> install to install the latest Veritas Access patch onyour system.
108Upgrading Veritas AccessAbout installing patches

To install the latest patches on your system
1 Make sure that the patch you want to install is available in the repository. Youcan use the Upgrade> repository command to view the patch releases thatare available on the cluster node
See “Displaying all Veritas Access releases that are available in the repository”on page 107.
2 If the release you want to install does not display, download the patch release.You can use the Upgrade> get command to download the Veritas Accesspatch release and place it in the repository.
See “Downloading an Veritas Access patch release” on page 106.
109Upgrading Veritas AccessInstalling Veritas Access patches

3 To install the latest patches, enter the following:
Upgrade> install version
where <version> is the Veritas Access patch version you want to install. Thepatch should be already downloaded and stored in the repository.
An example of a patch upgrade that does not require a cluster restart:
Upgrade> install 7.2.0.0
Veritas Access 7.2 Upgrade Program
Copyright (c) 2016 Veritas Technologies LLC. All rights reserved. Veritas
and the Veritas Logo are trademarks or registered trademarks of Veritas
Technologies LLC or its affiliates in the U.S. and other countries. Other
names may be trademarks of their respective owners.
The Licensed Software and Documentation are deemed to be "commercial
computer software" and "commercial computer software documentation" as
defined in FAR Sections 12.212 and DFARS Section 227.7202.
Logs are being written to /var/tmp/installaccess-201610031759uxY while
installaccess is in progress.
Veritas Access 7.2 Upgrade Program
isaA_01 isaA_02
Logs are being written to /var/tmp/installaccess-201610031759uxY while
installaccess is in progress
Verifying systems: 100%
Estimated time remaining: (mm:ss) 0:00 7 of 7
Checking system communication ................................. Done
Checking release compatibility ................................ Done
Checking installed product .................................... Done
Checking platform version ..................................... Done
Checking prerequisite patches and rpms ...................... Failed
Checking file system free space ............................... Done
Performing product prechecks .................................. Done
System verification checks completed
110Upgrading Veritas AccessInstalling Veritas Access patches

The systems give the following warnings:
CPI WARNING V-9-30-1650 The supported version of openssl is
1.0.1e-48.el6_8.1. Its current version on isaA_01 is 1.0.1e-42.el6. Upgrade
the openssl version before you proceed
CPI WARNING V-9-30-1650 The supported version of openssl-devel is
1.0.1e-48.el6_8.1. Its current version on isaA_01 is 1.0.1e-42.el6. Upgrade
the openssl-devel version before you proceed
CPI WARNING V-9-30-1650 The supported version of httpd is 2.2.15-54.el6_8.
Its current version on isaA_01 is 2.2.15-45.el6. Upgrade the httpd version
before you proceed
CPI WARNING V-9-30-1650 The supported version of httpd-devel is
2.2.15-54.el6_8. Its current version on isaA_01 is 2.2.15-45.el6. Upgrade
the httpd-devel version before you proceed
CPI WARNING V-9-30-1650 The supported version of httpd-manual is
2.2.15-54.el6_8. Its current version on isaA_01 is 2.2.15-45.el6. Upgrade
the httpd-manual version before you proceed
CPI WARNING V-9-30-1650 The supported version of httpd-tools is
2.2.15-54.el6_8. Its current version on isaA_01 is 2.2.15-45.el6. Upgrade
the httpd-tools version before you proceed
CPI WARNING V-9-30-1650 The supported version of mod_ssl is 2.2.15-54.el6_8.
Its current version on isaA_01 is 2.2.15-45.el6. Upgrade the mod_ssl version
before you proceed
CPI WARNING V-9-30-1651 The following required OS rpms were not found on
isaA_01:
openssl-1.0.1e-48.el6_8.1 openssl-devel-1.0.1e-48.el6_8.1
httpd-2.2.15-54.el6_8 httpd-devel-2.2.15-54.el6_8
httpd-manual-2.2.15-54.el6_8 httpd-tools-2.2.15-54.el6_8
mod_ssl-2.2.15-54.el6_8
CPI WARNING V-9-30-1652 The following required third party rpms or their
higher version were not found on isaA_01:
ctdb samba-common samba-libs samba-client samba-winbind samba
samba-winbind-clients samba-winbind-krb5-locator samba-winbind-modules
nfs-ganesha nfs-ganesha-vxfs psutil python-crontab libuv
111Upgrading Veritas AccessInstalling Veritas Access patches

CPI WARNING V-9-30-1650 The supported version of openssl is
1.0.1e-48.el6_8.1. Its current version on isaA_02 is 1.0.1e-42.el6. Upgrade
the openssl version before you proceed
CPI WARNING V-9-30-1650 The supported version of openssl-devel is
1.0.1e-48.el6_8.1. Its current version on isaA_02 is 1.0.1e-42.el6. Upgrade
the openssl-devel version before you proceed
CPI WARNING V-9-30-1650 The supported version of httpd is 2.2.15-54.el6_8.
Its current version on isaA_02 is 2.2.15-45.el6. Upgrade the httpd version
before you proceed
CPI WARNING V-9-30-1650 The supported version of httpd-devel is
2.2.15-54.el6_8. Its current version on isaA_02 is 2.2.15-45.el6. Upgrade
the httpd-devel version before you proceed
CPI WARNING V-9-30-1650 The supported version of httpd-manual is
2.2.15-54.el6_8. Its current version on isaA_02 is 2.2.15-45.el6. Upgrade
the httpd-manual version before you proceed
CPI WARNING V-9-30-1650 The supported version of httpd-tools is
2.2.15-54.el6_8. Its current version on isaA_02 is 2.2.15-45.el6. Upgrade
the httpd-tools version before you proceed
CPI WARNING V-9-30-1650 The supported version of mod_ssl is 2.2.15-54.el6_8.
Its current version on isaA_02 is 2.2.15-45.el6. Upgrade the mod_ssl version
before you proceed
CPI WARNING V-9-30-1651 The following required OS rpms were not found on
isaA_02:
openssl-1.0.1e-48.el6_8.1 openssl-devel-1.0.1e-48.el6_8.1
httpd-2.2.15-54.el6_8 httpd-devel-2.2.15-54.el6_8
httpd-manual-2.2.15-54.el6_8 httpd-tools-2.2.15-54.el6_8
mod_ssl-2.2.15-54.el6_8
CPI WARNING V-9-30-1652 The following required third party rpms or their
higher version were not found on isaA_02:
ctdb samba-common samba-libs samba-client samba-winbind samba
samba-winbind-clients samba-winbind-krb5-locator samba-winbind-modules
nfs-ganesha nfs-ganesha-vxfs psutil python-crontab libuv
The installer provides some guidance on installing OS rpms using native
112Upgrading Veritas AccessInstalling Veritas Access patches

methods, like yum, and manually installing the required OS rpms.
Some of the required OS rpms only exist on Red Hat public YUM repositories,
it is required to set up Red Hat subscription first to install these OS
rpms.
The installation may take a few minutes.
Installing the required OS rpms ............................... Done
System verification checks completed successfully
The systems discovered the following information:
CPI NOTE V-9-30-1405 ACCESS version 7.1.0.0 will be upgraded to ACCESS
version 7.2.0.000 on isaA_01
CPI NOTE V-9-30-1405 ACCESS version 7.1.0.0 will be upgraded to ACCESS
version 7.2.0.000 on isaA_02
Checking release compatibility on isaA_01 ..................... Done
Checking rolling upgrade prerequisites on isaA_01 ............. Done
Checking service group status on isaA_01 ...................... Done
Checking release compatibility on isaA_02 ..................... Done
Checking rolling upgrade prerequisites on isaA_02 ............. Done
Checking service group status on isaA_02 ...................... Done
The following service group(s) are online in the cluster:
Service Groups Online on isaA_01: CanHostConsole CanHostNLM
ManagementConsole Phantomgroup_pubeth0 Phantomgroup_pubeth1 RESTgroup
ReconfigGroup TCPConnTrack VIPgroup1 VIPgroup3 cvm iSCSI_INIT
Service Groups Online on isaA_02: CanHostConsole CanHostNLM NLMGroup
Phantomgroup_pubeth0 Phantomgroup_pubeth1 ReconfigGroup TCPConnTrack
VIPgroup2 VIPgroup4 cvm iSCSI_INIT
The upgrade has started. Run 'cluster show' to see the progress of the
upgrade. Upgrade details are saved at /opt/SYMCsnas/log/upgrade_output.
installaccess log files and summary file are saved at:
/opt/VRTS/install/logs/installaccess-201610031759uxY
113Upgrading Veritas AccessInstalling Veritas Access patches

Automatically execute your customized scriptbefore or after upgrade
An interface is provided to automatically perform customized script before or afterthe upgrade. Put your executable script in the specified folder for the auto-execution.
If you want the script to be run before the upgrade
1 Create a folder /var/tmp/prestop on the master node.
2 Copy the script into the folder.
3 If the script exits with error (exit code of the script executing is not zero), youare prompted to confirm whether to continue the upgrade:
CPI WARNING V-9-0-0 Prestop script /var/tmp/prestop/test.sh failed \
to be executed on test_02, the return code is 2.
Do you want to continue? [y,n,q]
If you want the script to be run after the upgrade
1 Create a folder /var/tmp/poststart on the master node.
2 Copy the script into the folder.
3 If the script exits with error (exit code of the script executing is not zero), youcan see a warning message similar to the following:
CPI WARNING V-9-0-0 Poststart script /var/tmp/poststart/test.sh \
failed to be executed on test_02, the return code is 2.
The script would be automatically copied to other nodes and executed on eachnode.
Note that there should be only one executable script in the /var/tmp/prestop or/var/tmp/poststart folder, otherwise the upgrade fails with the following errormessages:
CPI ERROR V-9-0-0 Don't know how to execute prestop or poststart \
script, please check the scripts.
Only 1 script is supported and it should be executable.
114Upgrading Veritas AccessAutomatically execute your customized script before or after upgrade

Note: Make sure there is no node rebooting operations in the customized script,because Veritas Access doesn’t support node rebooting during upgrade.
Uninstalling patchesTo uninstall patches
◆ To uninstall the software upgrades, enter the following:
Upgrade> patch uninstall-upto version
where version specifies the versions of software up to the version that youwant to uninstall.
For example:
Upgrade> patch uninstall-upto 7.2P1
OK Completed
Synchronizing software upgrades on a nodeThe Upgrade> patch sync command checks that all the nodes are on the samepatch level or not. If not, Veritas Access brings the nodes that are on different patchlevels to the same patch level as for the console node.
To forcefully synchronize software upgrades on a node
◆ To forcefully synchronize software upgrades on a node, enter the following:
Upgrade> patch sync nodename
where nodename specifies the node that needs to be synchronized to the samesoftware version as the one currently installed in the cluster.
For example:
Upgrade> patch sync node2
...............
Syncing software upgrades on node2...
SFS patch SUCCESS V-288-122 Patch sync completed.
115Upgrading Veritas AccessUninstalling patches

Uninstalling VeritasAccess
This chapter includes the following topics:
■ Before you uninstall Veritas Access
■ Uninstalling Veritas Access using the installer
Before you uninstall Veritas AccessPerform the following steps before uninstalling Veritas Access:
■ Before you remove Veritas Access from any node (but not in all the nodes) ina cluster, make sure the node has already been deleted from the running cluster.You can use the Cluster> show command to view the cluster node state, anduse the Cluster> delete command to delete a running node from the VeritasAccess cluster.See the Veritas Access Command-Line Administrator's Guide for moreinformation on the Cluster> show and Cluster> delete commands.
■ Stop all the applications that access the file system over NFS, CIFS, or FTP.
■ Destroy all the replication jobs from the cluster.Use the Replication> job show command to list all the replication jobs on thecluster.
Replication> job show
Job Name Role Job Type Encryption Debug Schedule
======== ====== ======== ========== ===== ========
job1 SOURCE DATA OFF ON sch1
State CKPT Count Exclunit Source repunit Target repunit(s)
======== ========== ======== ============== =================
8Chapter

ENABLED 1 -- scr1 trg1
Link name(s)
============
link1
Use the Replication> job destroy command to destroy the replication jobs.
Replication> job destroy job1
ACCESS replication SUCCESS V-288-0 Removing bandwidth limit on the
link: link1
ACCESS replication SUCCESS V-288-0 Job 'job1' disabled successfully.
ACCESS replication SUCCESS V-288-0 Job 'job1' deleted successfully.
■ Stop the NFS, CIFS, FTP, GUI, and the replication service on the cluster usingthe appropriate CLISH command.
CLISH> cifs server stop
Stopping CIFS Server.....Success.
CLISH>
CLISH> nfs server stop
Success.
CLISH>
CLISH> ftp server stop
Success.
CLISH>
CLISH.Support> gui server stop
GUI service is OFFLINE.
CLISH>
CLISH> replication service stop
ACCESS replication SUCCESS V-288-0 Replication service stopped
CLISH>
■ Run the following command to stop AMF:
# /etc/init.d/amf stop
Stopping AMF...
AMF: Module unloaded
■ Run the following command and wait for a couple of minutes:
# /opt/VRTS/bin/hastop -all
■ Run the following command and verify that you only see Port a and Port b:
117Uninstalling Veritas AccessBefore you uninstall Veritas Access

# gabconfig -a
GAB Port Memberships
==================================
Port a gen 7f2d0a membership 01
Port b gen 7f2d09 membership 01
Uninstalling Veritas Access using the installerYou can perform an uninstallation of Veritas Access. The Veritas Access uninstallprogram lets you uninstall Veritas Access without requiring a reinstallation of theoperating system. You can also use the uninstall program in cases where therewas an incomplete installation of Veritas Access.
Before you use the uninstall program to uninstall Veritas Access on all nodes in thecluster at the same time, make sure that communication exists between the nodes.By default, Veritas Access cluster nodes can communicate with each other usingssh.
If the nodes cannot communicate with each other, then you must run the uninstallprogram on each node in the cluster. The uninstall program removes all VeritasAccess RPMs.
Removing Veritas Access 7.2 RPMsThe uninstall program stops the Veritas Access processes that are currently runningduring the uninstallation process.
To uninstall Veritas Access 7.2
1 Log in as the support user from the node where you want to uninstall VeritasAccess.
2 Start the uninstall program.
# cd /opt/VRTS/install
# ./uninstallaccess72
The program specifies the directory where the logs are created. The programdisplays a copyright notice and a description of the cluster.
118Uninstalling Veritas AccessUninstalling Veritas Access using the installer

3 Enter the IP addresses of the nodes from which you want to uninstall VeritasAccess.
The program performs node verification checks and asks to stop all runningVeritas Access processes.
4 Enter y to stop all the Veritas Access processes.
The program stops the Veritas Access processes and uninstalls the software.
The uninstall program does the following tasks:
■ Verifies the communication between nodes.
■ Checks the installations on each node to determine the RPMs to beuninstalled.
■ Unloads kernel modules, and removes the RPMs.
Review the output as the uninstaller stops processes, .
You can make a note of the location of the summary, response, and log filesthat the uninstaller creates after removing all the RPMs.
Running uninstall from the Veritas Access 7.2 discYou may need to use the uninstall program on the Veritas Access 7.2 disc in oneof the following cases:
■ You need to uninstall Veritas Access after an incomplete installation.
■ The uninstall program is not available in /opt/VRTS/install.
If you mounted the installation media to /mnt, access the uninstall program bychanging the directory.
cd /mnt/
./uninstallaccess
119Uninstalling Veritas AccessUninstalling Veritas Access using the installer

Installation referenceThis appendix includes the following topics:
■ Installation script options
Installation script optionsTable A-1 lists the available command line options for the Veritas Access installationscript. For an initial install or upgrade, options are not usually required.
Table A-1 Available command line options
FunctionCommand Line Option
Configures an unconfigured product after itis installed.
-configure
Performs checks to confirm that systems havemet the products installation requirementsbefore installing the product.
-precheck
Displays the required operating systemversion, required patches, file system space,and other system requirements to install theproduct.
-requirements
Performs automated installations oruninstallations using information stored in afile rather than prompting for the information.response_file is the full path of the file thatcontains the configuration definitions.
-responsefile response_file
Executes the customized script provided byuser on each host before stop processesduring the upgrade procedure.
-prestop_script
AAppendix

Table A-1 Available command line options (continued)
FunctionCommand Line Option
Executes the customized script provided byuser on each host after start processes duringthe upgrade procedure.
-poststart_script
Updates the network parameter for a runningcluster.
-updateparameter
121Installation referenceInstallation script options

Configuring the secureshell for communications
This appendix includes the following topics:
■ Manually configuring passwordless secure shell (ssh)
■ Setting up ssh and rsh connection using the pwdutil.pl utility
Manually configuring passwordless secure shell(ssh)
The secure shell (ssh) program enables you to log into and execute commands ona remote system. ssh enables encrypted communications and an authenticationprocess between two untrusted hosts over an insecure network.
In this procedure, you first create a DSA key pair. From the key pair, you appendthe public key from the source system to the authorized_keys file on the targetsystems.
BAppendix
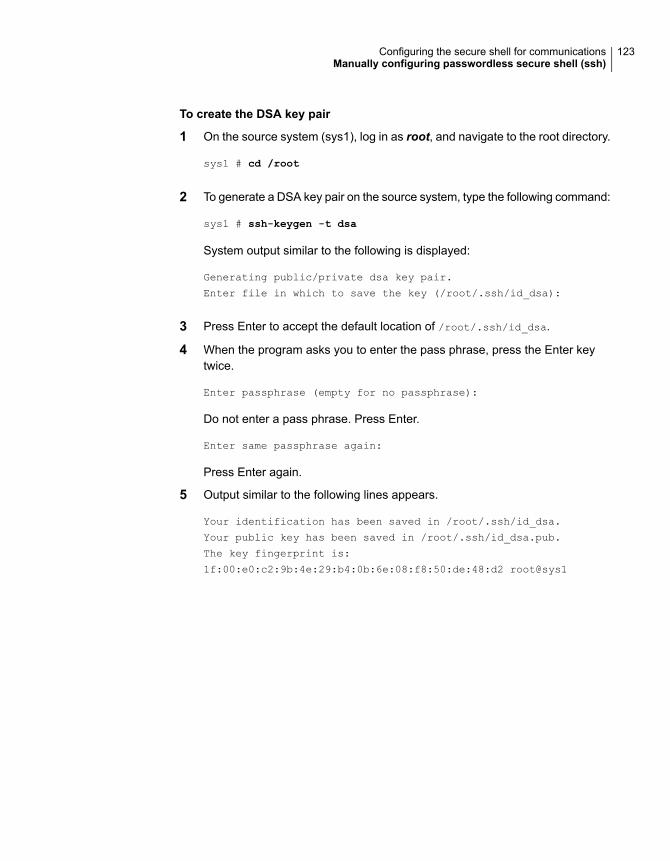
To create the DSA key pair
1 On the source system (sys1), log in as root, and navigate to the root directory.
sys1 # cd /root
2 To generate a DSA key pair on the source system, type the following command:
sys1 # ssh-keygen -t dsa
System output similar to the following is displayed:
Generating public/private dsa key pair.
Enter file in which to save the key (/root/.ssh/id_dsa):
3 Press Enter to accept the default location of /root/.ssh/id_dsa.
4 When the program asks you to enter the pass phrase, press the Enter keytwice.
Enter passphrase (empty for no passphrase):
Do not enter a pass phrase. Press Enter.
Enter same passphrase again:
Press Enter again.
5 Output similar to the following lines appears.
Your identification has been saved in /root/.ssh/id_dsa.
Your public key has been saved in /root/.ssh/id_dsa.pub.
The key fingerprint is:
1f:00:e0:c2:9b:4e:29:b4:0b:6e:08:f8:50:de:48:d2 root@sys1
123Configuring the secure shell for communicationsManually configuring passwordless secure shell (ssh)

To append the public key from the source system to the authorized_keys fileon the target system using secure file transfer
1 From the source system (sys1), move the public key to a temporary file on thetarget system (sys2).
Use the secure file transfer program.
In this example, the file name id_dsa.pub in the root directory is the name forthe temporary file for the public key.
Use the following command for secure file transfer:
sys1 # sftp sys2
If the secure file transfer is set up for the first time on this system, output similarto the following lines is displayed:
Connecting to sys2 ...
The authenticity of host 'sys2 (10.182.00.00)'
can't be established. DSA key fingerprint is
fb:6f:9f:61:91:9d:44:6b:87:86:ef:68:a6:fd:88:7d.
Are you sure you want to continue connecting (yes/no)?
2 Enter yes.
Output similar to the following is displayed:
Warning: Permanently added 'sys2,10.182.00.00'
(DSA) to the list of known hosts.
root@sys2 password:
3 Enter the root password of sys2.
4 At the sftp prompt, type the following command:
sftp> put /root/.ssh/id_dsa.pub
The following output is displayed:
Uploading /root/.ssh/id_dsa.pub to /root/id_dsa.pub
5 To quit the SFTP session, type the following command:
sftp> quit
124Configuring the secure shell for communicationsManually configuring passwordless secure shell (ssh)

6 Add the id_dsa.pub keys to the authorized_keys file on the target system.To begin the ssh session on the target system (sys2 in this example), type thefollowing command on sys1:
sys1 # ssh sys2
Enter the root password of sys2 at the prompt:
password:
Type the following commands on sys2:
sys2 # cat /root/id_dsa.pub >> /root/.ssh/authorized_keys
sys2 # rm /root/id_dsa.pub
7 Run the following commands on the source installation system. If your sshsession has expired or terminated, you can also run these commands to renewthe session. These commands bring the private key into the shell environmentand make the key globally available to the root user.
sys1 # exec /usr/bin/ssh-agent $SHELL
sys1 # ssh-add
Identity added: /root/.ssh/id_dsa
This shell-specific step is valid only while the shell is active. You must executethe procedure again if you close the shell during the session.
To verify that you can connect to a target system
1 On the source system (sys1), enter the following command:
sys1 # ssh -l root sys2 uname -a
where sys2 is the name of the target system.
2 The command should execute from the source system (sys1) to the targetsystem (sys2) without the system requesting a pass phrase or password.
3 Repeat this procedure for each target system.
Setting up ssh and rsh connection using thepwdutil.pl utility
The password utility, pwdutil.pl, is bundled in the 6.2 release under the scripts
directory. The users can run the utility in their script to set up the ssh and rshconnection automatically.
125Configuring the secure shell for communicationsSetting up ssh and rsh connection using the pwdutil.pl utility

# ./pwdutil.pl -h
Usage:
Command syntax with simple format:
pwdutil.pl check|configure|unconfigure ssh|rsh <hostname|IP addr>
[<user>] [<password>] [<port>]
Command syntax with advanced format:
pwdutil.pl [--action|-a 'check|configure|unconfigure']
[--type|-t 'ssh|rsh']
[--user|-u '<user>']
[--password|-p '<password>']
[--port|-P '<port>']
[--hostfile|-f '<hostfile>']
[--keyfile|-k '<keyfile>']
[-debug|-d]
<host_URI>
pwdutil.pl -h | -?
Table B-1 Options with pwdutil.pl utility
UsageOption
Specifies action type, default is 'check'.--action|-a 'check|configure|unconfigure'
Specifies connection type, default is 'ssh'.--type|-t 'ssh|rsh'
Specifies user id, default is the local user id.--user|-u '<user>'
Specifies user password, default is the userid.
--password|-p '<password>'
Specifies port number for ssh connection,default is 22
--port|-P '<port>'
Specifies the private key file.--keyfile|-k '<keyfile>'
Specifies the file which list the hosts.--hostfile|-f '<hostfile>'
Prints debug information.-debug
Prints help messages.-h|-?
126Configuring the secure shell for communicationsSetting up ssh and rsh connection using the pwdutil.pl utility

Table B-1 Options with pwdutil.pl utility (continued)
UsageOption
Can be in the following formats:
<hostname>
<user>:<password>@<hostname>
<user>:<password>@<hostname>:
<port>
<host_URI>
You can check, configure, and unconfigure ssh or rsh using the pwdutil.plutility.For example:
■ To check ssh connection for only one host:
pwdutil.pl check ssh hostname
■ To configure ssh for only one host:
pwdutil.pl configure ssh hostname user password
■ To unconfigure rsh for only one host:
pwdutil.pl unconfigure rsh hostname
■ To configure ssh for multiple hosts with same user ID and password:
pwdutil.pl -a configure -t ssh -u user -p password hostname1
hostname2 hostname3
■ To configure ssh or rsh for different hosts with different user ID and password:
pwdutil.pl -a configure -t ssh user1:password1@hostname1
user2:password2@hostname2
■ To check or configure ssh or rsh for multiple hosts with one configuration file:
pwdutil.pl -a configure -t ssh --hostfile /tmp/sshrsh_hostfile
■ To keep the host configuration file secret, you can use the 3rd party utility toencrypt and decrypt the host file with password.For example:
127Configuring the secure shell for communicationsSetting up ssh and rsh connection using the pwdutil.pl utility

### run openssl to encrypt the host file in base64 format
# openssl aes-256-cbc -a -salt -in /hostfile -out /hostfile.enc
enter aes-256-cbc encryption password: <password>
Verifying - enter aes-256-cbc encryption password: <password>
### remove the original plain text file
# rm /hostfile
### run openssl to decrypt the encrypted host file
# pwdutil.pl -a configure -t ssh `openssl aes-256-cbc -d -a
-in /hostfile.enc`
enter aes-256-cbc decryption password: <password>
■ To use the ssh authentication keys which are not under the default $HOME/.sshdirectory, you can use --keyfile option to specify the ssh keys. For example:
### create a directory to host the key pairs:
# mkdir /keystore
### generate private and public key pair under the directory:
# ssh-keygen -t rsa -f /keystore/id_rsa
### setup ssh connection with the new generated key pair under
the directory:
# pwdutil.pl -a configure -t ssh --keyfile /keystore/id_rsa
user:password@hostname
You can see the contents of the configuration file by using the following command:
# cat /tmp/sshrsh_hostfile
user1:password1@hostname1
user2:password2@hostname2
user3:password3@hostname3
user4:password4@hostname4
# all default: check ssh connection with local user
hostname5
The following exit values are returned:
0 Successful completion.
1 Command syntax error.
2 Ssh or rsh binaries do not exist.
3 Ssh or rsh service is down on the remote machine.
128Configuring the secure shell for communicationsSetting up ssh and rsh connection using the pwdutil.pl utility

4 Ssh or rsh command execution is denied due to password is required.
5 Invalid password is provided.
255 Other unknown error.
129Configuring the secure shell for communicationsSetting up ssh and rsh connection using the pwdutil.pl utility

Symbols/etc/llttab
sample 30
Aabout
installing patches 108NIC bonding 55NIC exclusion 55types of patches 103
Bbond
creating 62bond interface
creating 62
Ccalculating
IP address 34checking
storage configuration 37cluster
adding the new node to 97configuring 48deleting a node from 100displaying a list of nodes 93including new nodes 95installing 48shutting down a node or all nodes in a cluster 102
cluster installationoverview 39
ConfigurationLLT 29
configuration limits 23configuring
NetBackup (NBU) 75on the cluster 48yum 46
configuring passwordless ssh 122
connectingnetwork hardware 31
Ddeleting
a node from the cluster 100displaying
current version 106list of nodes in a cluster 93patches in repository 107upgrade history 106
displaying current version 106displaying patches in repository 107displaying upgrade history 106downloading
patch 106downloading patch 106driver node 42
Eexcluding
NIC 56
HHardware requirements
Veritas Access 27
Iincluding
new nodes in the cluster 95NIC 60
installsilent 79
installationresponse files 78response files variables 79
installation script options 120installation states and conditions
about 92
Index

Installerconfigure 30
installingcluster 39cluster node's console 48driver node 48on the cluster 48operating system on each node of the cluster 42operating system on Veritas Access cluster 43operating system package 47prerequisites 41steps 40target cluster nodes 47
installing patches 108about 108
IP addresscalculation 34
IP addressescalculate 62obtain 33
IPv6 48IPv6 protocol 19
LLinux requirements
Veritas Access 11list of nodes
displaying in a cluster 93LLT
RDMA 28, 30
MManagement Server requirements
Veritas Access 17
NNetBackup (NBU)
configuring 75network and firewall requirements
Veritas Access 19network hardware
connecting 31network interface card (NIC) bonding 62NIC
excluding 56including 60
nodeadding to the cluster 95, 97
Oobtain
IP addresses 33operating system
installing 43installing on each node of the cluster 42
overviewVeritas Access installation 25
Ppatches
installing 108synchronizing 115types of 103uninstalling 115upgrading 105
RRDMA
Hardware 29InfiniBand 28LLT 27
reconfiguringVeritas Access cluster name and network 76
release information 10removing
bond 68NIC from bond list 71
replacingEthernet interface card 73
Ssample response file 88server requirements
Veritas Access 17shutting down
node or all nodes in a cluster 102silent installation and configuration 79storage configuration
checking 37supported IPv6 protocol 19synchronizing patches 115system requirements
Veritas Access 10
131Index

Uuninstalling
patches 115uninstalling Veritas Access
before 116upgrading
patches 105
VVeritas Access
about 7key features 7Linux requirements 11network and firewall requirements 19server requirements 17system requirements 10web browser requirements 17
Veritas Access cluster name and networkreconfigure 76
Veritas Access installationoverview 25
Yyum
configuration 46
132Index


