104
July 2002 N08835F VERITAS Volume Manager ™ 3.5 Installation Guide Solaris

VERITAS Volume Manager™ 3.5
Installation Guide
Solaris
July 2002N08835F

Disclaimer
The information contained in this publication is subject to change without notice.VERITAS Software Corporation makes no warranty of any kind with regard to thismanual, including, but not limited to, the implied warranties of merchantability andfitness for a particular purpose. VERITAS Software Corporation shall not be liable forerrors contained herein or for incidental or consequential damages in connection with thefurnishing, performance, or use of this manual.
Copyright
Copyright © 2002 VERITAS Software Corporation. All rights reserved. VERITAS,VERITAS SOFTWARE, the VERITAS logo and all other VERITAS product names andslogans are trademarks or registered trademarks of VERITAS Software Corporation in theUSA and/or other countries. Other product names and/or slogans mentioned herein maybe trademarks or registered trademarks of their respective companies.
VERITAS Software Corporation350 Ellis StreetMountain View, CA 94043Phone 650–527–8000Fax 650-527-2908www.veritas.com

Contents
Preface . . . . . . . . . . . . . . . . . . . . . . . . . . . . . . . . . . . . . . . . . . . . . . . . . . . . . . . . . . . . . .vii
Introduction . . . . . . . . . . . . . . . . . . . . . . . . . . . . . . . . . . . . . . . . . . . . . . . . . . . . . . . . . . . . . .vii
Audience . . . . . . . . . . . . . . . . . . . . . . . . . . . . . . . . . . . . . . . . . . . . . . . . . . . . . . . . . . . . . . . . .vii
Organization . . . . . . . . . . . . . . . . . . . . . . . . . . . . . . . . . . . . . . . . . . . . . . . . . . . . . . . . . . . . . .vii
Conventions . . . . . . . . . . . . . . . . . . . . . . . . . . . . . . . . . . . . . . . . . . . . . . . . . . . . . . . . . . . . . viii
Getting Help . . . . . . . . . . . . . . . . . . . . . . . . . . . . . . . . . . . . . . . . . . . . . . . . . . . . . . . . . . . . . . ix
Downloading and Running VRTSexplorer . . . . . . . . . . . . . . . . . . . . . . . . . . . . . . . . . ix
Chapter 1. Introduction . . . . . . . . . . . . . . . . . . . . . . . . . . . . . . . . . . . . . . . . . . . . . . . . . .1
Where to Go Next . . . . . . . . . . . . . . . . . . . . . . . . . . . . . . . . . . . . . . . . . . . . . . . . . . . . . . . . . . 1
VxVM Basics . . . . . . . . . . . . . . . . . . . . . . . . . . . . . . . . . . . . . . . . . . . . . . . . . . . . . . . . . . . . . . . 1
Easier Storage Management . . . . . . . . . . . . . . . . . . . . . . . . . . . . . . . . . . . . . . . . . . . . . . 1
Physical Disks . . . . . . . . . . . . . . . . . . . . . . . . . . . . . . . . . . . . . . . . . . . . . . . . . . . . . . . . . . . 2
The VxVM Connection . . . . . . . . . . . . . . . . . . . . . . . . . . . . . . . . . . . . . . . . . . . . . . . . . . . 2
VM Disks . . . . . . . . . . . . . . . . . . . . . . . . . . . . . . . . . . . . . . . . . . . . . . . . . . . . . . . . . . . . . . 2
Disk Groups . . . . . . . . . . . . . . . . . . . . . . . . . . . . . . . . . . . . . . . . . . . . . . . . . . . . . . . . . . . . 3
Subdisks . . . . . . . . . . . . . . . . . . . . . . . . . . . . . . . . . . . . . . . . . . . . . . . . . . . . . . . . . . . . . . . 3
Plexes . . . . . . . . . . . . . . . . . . . . . . . . . . . . . . . . . . . . . . . . . . . . . . . . . . . . . . . . . . . . . . . . . . 4
Volumes . . . . . . . . . . . . . . . . . . . . . . . . . . . . . . . . . . . . . . . . . . . . . . . . . . . . . . . . . . . . . . . 4
Storage Layouts . . . . . . . . . . . . . . . . . . . . . . . . . . . . . . . . . . . . . . . . . . . . . . . . . . . . . . . . . 4
Arrays . . . . . . . . . . . . . . . . . . . . . . . . . . . . . . . . . . . . . . . . . . . . . . . . . . . . . . . . . . . . . . . . . 5
Pre-installation Instructions . . . . . . . . . . . . . . . . . . . . . . . . . . . . . . . . . . . . . . . . . . . . . . . . . 5
New VERITAS Product Distribution Method . . . . . . . . . . . . . . . . . . . . . . . . . . . . . . . . 5
Verify Disk Space Requirements . . . . . . . . . . . . . . . . . . . . . . . . . . . . . . . . . . . . . . . . . . . 5
iii
Set the PATH and MANPATH Variables . . . . . . . . . . . . . . . . . . . . . . . . . . . . . . . . . . . 7
Verify Directories and Permissions . . . . . . . . . . . . . . . . . . . . . . . . . . . . . . . . . . . . . . . . 7
Product Licensing . . . . . . . . . . . . . . . . . . . . . . . . . . . . . . . . . . . . . . . . . . . . . . . . . . . . . . . 7
Using the VERITAS vLicense Website to Obtain a License . . . . . . . . . . . . . . . . . . . . 8
Add or Upgrade Licenses . . . . . . . . . . . . . . . . . . . . . . . . . . . . . . . . . . . . . . . . . . . . . . . . 9
Take a Disk Inventory . . . . . . . . . . . . . . . . . . . . . . . . . . . . . . . . . . . . . . . . . . . . . . . . . . . 10
Verify Disk Contents . . . . . . . . . . . . . . . . . . . . . . . . . . . . . . . . . . . . . . . . . . . . . . . . . . . . 10
Hot-Relocation . . . . . . . . . . . . . . . . . . . . . . . . . . . . . . . . . . . . . . . . . . . . . . . . . . . . . . . . . 12
Solaris Patches for VxVM . . . . . . . . . . . . . . . . . . . . . . . . . . . . . . . . . . . . . . . . . . . . . . . . 13
VERITAS Enterprise Administrator (VEA) . . . . . . . . . . . . . . . . . . . . . . . . . . . . . . . . . 13
A5x00 Devices . . . . . . . . . . . . . . . . . . . . . . . . . . . . . . . . . . . . . . . . . . . . . . . . . . . . . . . . . 13
DMP and Alternate Pathing . . . . . . . . . . . . . . . . . . . . . . . . . . . . . . . . . . . . . . . . . . . . . 14
Claiming Devices in the SENA Category . . . . . . . . . . . . . . . . . . . . . . . . . . . . . . . . . . 14
Cluster Environment Requirements . . . . . . . . . . . . . . . . . . . . . . . . . . . . . . . . . . . . . . . . . 14
Set up your SAN Configuration . . . . . . . . . . . . . . . . . . . . . . . . . . . . . . . . . . . . . . . . . . . . . 15
Adding Disks After Installation . . . . . . . . . . . . . . . . . . . . . . . . . . . . . . . . . . . . . . . . . . . . . 15
Chapter 2. Installing VERITAS Volume Manager . . . . . . . . . . . . . . . . . . . . . . . . . . . 17
Installation and Upgrade Overview . . . . . . . . . . . . . . . . . . . . . . . . . . . . . . . . . . . . . . . . . . 17
Important Software Patch Information . . . . . . . . . . . . . . . . . . . . . . . . . . . . . . . . . . . . . . . 18
Solaris Patches for VxVM . . . . . . . . . . . . . . . . . . . . . . . . . . . . . . . . . . . . . . . . . . . . . . . . 18
Installing or Upgrading VxVM with Alternate Pathing Enabled . . . . . . . . . . . . . . . . . 20
Loading the Software from CD-ROM . . . . . . . . . . . . . . . . . . . . . . . . . . . . . . . . . . . . . . . . 21
The Packages . . . . . . . . . . . . . . . . . . . . . . . . . . . . . . . . . . . . . . . . . . . . . . . . . . . . . . . . . . 21
Mounting the CD-ROM with Solaris Volume Management . . . . . . . . . . . . . . . . . . 21
Mounting the CD-ROM from the Command Line . . . . . . . . . . . . . . . . . . . . . . . . . . . 23
Installing VxVM Using the Installation Menu . . . . . . . . . . . . . . . . . . . . . . . . . . . . . . 23
Running the vxinstall Program . . . . . . . . . . . . . . . . . . . . . . . . . . . . . . . . . . . . . . . . . . . . . . 24
Quick Installation . . . . . . . . . . . . . . . . . . . . . . . . . . . . . . . . . . . . . . . . . . . . . . . . . . . . . . . . . 29
Custom Installation . . . . . . . . . . . . . . . . . . . . . . . . . . . . . . . . . . . . . . . . . . . . . . . . . . . . . . . 35
iv VERITAS Volume Manager Installation Guide

Prevent Multipathing/Suppress Devices from VxVM’s View . . . . . . . . . . . . . . . . . . . . 40
Rebooting After vxinstall . . . . . . . . . . . . . . . . . . . . . . . . . . . . . . . . . . . . . . . . . . . . . . . . 45
Setting Up and Starting VEA . . . . . . . . . . . . . . . . . . . . . . . . . . . . . . . . . . . . . . . . . . . . . . . . 46
VMSA and VEA Co-Existence . . . . . . . . . . . . . . . . . . . . . . . . . . . . . . . . . . . . . . . . . . . . 46
VEA Installation Overview . . . . . . . . . . . . . . . . . . . . . . . . . . . . . . . . . . . . . . . . . . . . . . . 47
Installing the VEA Server and/or Client (Solaris) . . . . . . . . . . . . . . . . . . . . . . . . . . . 47
Installing the VEA Client (Windows) . . . . . . . . . . . . . . . . . . . . . . . . . . . . . . . . . . . . . . 48
Starting VEA . . . . . . . . . . . . . . . . . . . . . . . . . . . . . . . . . . . . . . . . . . . . . . . . . . . . . . . . . . . 49
Starting the VEA Client . . . . . . . . . . . . . . . . . . . . . . . . . . . . . . . . . . . . . . . . . . . . . . . . . 49
Enabling Cluster Support in VxVM (Optional) . . . . . . . . . . . . . . . . . . . . . . . . . . . . . . . . 50
Configuring Shared Disks . . . . . . . . . . . . . . . . . . . . . . . . . . . . . . . . . . . . . . . . . . . . . . . 51
Disk Controller Reservation . . . . . . . . . . . . . . . . . . . . . . . . . . . . . . . . . . . . . . . . . . . . . . 53
Upgrading to VxVM Release 3.5 . . . . . . . . . . . . . . . . . . . . . . . . . . . . . . . . . . . . . . . . . . . . . 54
Before You Upgrade . . . . . . . . . . . . . . . . . . . . . . . . . . . . . . . . . . . . . . . . . . . . . . . . . . . . 54
VxVM and Solaris Release Support Matrix . . . . . . . . . . . . . . . . . . . . . . . . . . . . . . . . . 56
VxVM and Solaris Upgrade Paths . . . . . . . . . . . . . . . . . . . . . . . . . . . . . . . . . . . . . . . . . 57
Upgrading VxVM on an Encapsulated Root Disk . . . . . . . . . . . . . . . . . . . . . . . . . . . . . . 58
Upgrading VxVM and Solaris . . . . . . . . . . . . . . . . . . . . . . . . . . . . . . . . . . . . . . . . . . . . . . . 63
Upgrading VxVM Only . . . . . . . . . . . . . . . . . . . . . . . . . . . . . . . . . . . . . . . . . . . . . . . . . . . . 66
Upgrading Solaris Only . . . . . . . . . . . . . . . . . . . . . . . . . . . . . . . . . . . . . . . . . . . . . . . . . . . . 71
Checking VxVM Processes . . . . . . . . . . . . . . . . . . . . . . . . . . . . . . . . . . . . . . . . . . . . . . . . . . 72
Starting and Enabling the Configuration Daemon vxconfigd . . . . . . . . . . . . . . . . . . . . 73
Starting the Volume I/O Daemon vxiod . . . . . . . . . . . . . . . . . . . . . . . . . . . . . . . . . . . 74
System Setup Guidelines . . . . . . . . . . . . . . . . . . . . . . . . . . . . . . . . . . . . . . . . . . . . . . . . . . . 74
Disabling Hot-Relocation . . . . . . . . . . . . . . . . . . . . . . . . . . . . . . . . . . . . . . . . . . . . . . . . 75
Hot-Relocation Guidelines . . . . . . . . . . . . . . . . . . . . . . . . . . . . . . . . . . . . . . . . . . . . . . . 75
Striping Guidelines . . . . . . . . . . . . . . . . . . . . . . . . . . . . . . . . . . . . . . . . . . . . . . . . . . . . . 77
Mirroring Guidelines . . . . . . . . . . . . . . . . . . . . . . . . . . . . . . . . . . . . . . . . . . . . . . . . . . . . 78
Dirty Region Logging (DRL) Guidelines . . . . . . . . . . . . . . . . . . . . . . . . . . . . . . . . . . . 78
Mirroring and Striping Guidelines . . . . . . . . . . . . . . . . . . . . . . . . . . . . . . . . . . . . . . . . 79
Contents v

RAID-5 Guidelines . . . . . . . . . . . . . . . . . . . . . . . . . . . . . . . . . . . . . . . . . . . . . . . . . . . . . 79
Protecting Your System and Data . . . . . . . . . . . . . . . . . . . . . . . . . . . . . . . . . . . . . . . . . . . 80
Uninstalling VxVM . . . . . . . . . . . . . . . . . . . . . . . . . . . . . . . . . . . . . . . . . . . . . . . . . . . . . . . . 82
Moving Volumes From an Encapsulated Root Disk . . . . . . . . . . . . . . . . . . . . . . . . . 82
Moving Volumes To Disk Partitions . . . . . . . . . . . . . . . . . . . . . . . . . . . . . . . . . . . . . . 82
Shutting Down VxVM . . . . . . . . . . . . . . . . . . . . . . . . . . . . . . . . . . . . . . . . . . . . . . . . . . 84
Removing the VERITAS Volume Manager Packages . . . . . . . . . . . . . . . . . . . . . . . . 84
Restoring VERITAS Volume Manager 3.5 Configuration . . . . . . . . . . . . . . . . . . . . . 86
Chapter 3. Moving Volumes onto Partitions - Example . . . . . . . . . . . . . . . . . . . . . . 87
Index . . . . . . . . . . . . . . . . . . . . . . . . . . . . . . . . . . . . . . . . . . . . . . . . . . . . . . . . . . . . . . . 93
vi VERITAS Volume Manager Installation Guide

Preface
IntroductionThis document provides information on installing and initializing the VERITAS® VolumeManager (VxVM®) and the VERITAS Enterprise Administrator® (VEA®) graphical userinterface. This document also contains information on how to upgrade to the currentrelease of VxVM.
AudienceThis guide is for system administrators who configure and maintain UNIX systems withVxVM, and assumes that you have:
◆ An understanding of system administration.
◆ A working knowledge of the UNIX operating system.
◆ A general understanding of file systems.
OrganizationThis guide is organized with the following chapters:
◆ Introduction
◆ Installing VERITAS Volume Manager
◆ Moving Volumes onto Partitions - Example
For information about technical support, product licensing, software updates, and otheruseful links, see the section called “Getting Help” on page ix.
vii

Conventions
ConventionsThe following table describes the typographic conventions used in this guide.
Note “Dynamic Disk Groups" were formerly known as "Disk Groups." They are stillsometimes referred to as "Disk Groups" in documentation, menu displays, and theCLI.
Typeface Usage Examples
monospace Computer output, file contents,files, directories, softwareelements such as commandoptions, function names, andparameters
Read tunables from the/etc/vx/tunefstab file.
See the ls(1) manual page for moreinformation.
italic New terms, book titles,emphasis, variables to bereplaced by a name or value
See the User’s Guide for details.
The variable ncsize determines thevalue of...
monospace(bold)
User input; the “#” symbolindicates a command prompt
# mount -F vxfs /h/filesys
monospace(bold and italic)
Variables to be replaced by aname or value in user input
# mount -F fstype mount_point
Symbol Usage Examples
% C shell prompt
$ Bourne/Korn/Bash shellprompt
# Superuser prompt (all shells)
\ Continued input on thefollowing line
# mount -F vxfs \/h/filesys
[] In a command synopsis, bracketsindicates an optional argument
ls [ -a ]
| In a command synopsis, avertical bar separates mutuallyexclusive arguments
mount [suid | nosuid ]
viii VERITAS Volume Manager Installation Guide
Getting Help
Getting HelpIf you have any comments or problems with VERITAS products, contact VERITASTechnical Support:
◆ U.S. and Canadian Customers: 1-800-342-0652
◆ International Customers: +1 (650) 527-8555
◆ Email: [email protected]
For license information (U.S. and Canadian Customers):
◆ Phone: 1-925-931-2464
◆ Email: [email protected]
◆ Fax: 1-925-931-2487
For software updates:
◆ Email: [email protected]
For information on purchasing VERITAS products:
◆ Phone: 1-800-258-UNIX (1-800-258-8649) or 1-650-527-8000
◆ Email: [email protected]
For additional technical support information, such as TechNotes, product alerts, andhardware compatibility lists, visit the VERITAS Technical Support Web site at:
◆ http://support.veritas.com
For additional information about VERITAS and VERITAS products, visit the Web site at:
◆ http://www.veritas.com
Downloading and Running VRTSexplorer
If you have access to the Internet, you can use the VRTSexplorer program to assistTechnical Support in diagnosing the cause of your problem. Refer to the README file inthe support directory on the VERITAS Installation CD, and the VERITAS VolumeManager Release Notes for information on using the VRTSexplorer program.
Preface ix

Getting Help
x VERITAS Volume Manager Installation Guide

Introduction
1 This manual explains how to install (or initialize) VERITAS Volume Manager (VxVM).Although terms and basic concepts are introduced in this manual, refer to the VERITASVolume Manager Administrator’s Guide for more details.After completing installation, there will be three utilities you can use: the Command LineInterface (CLI), the vxdiskadm menu, and the VERITAS Enterprise Administrator (VEA)interface. These utilities are explained in more detail in the VERITAS Volume ManagerAdministrator’s Guide.
Where to Go NextIf you are a new VERITAS user, go to “VxVM Basics”.
If you have used VERITAS Volume Manager products before, refer to “Pre-installationInstructions” on page 5.
If you are upgrading VxVM, go to “Upgrading to VxVM Release 3.5” on page 54.
VxVM BasicsThis section introduces the basic features of VxVM. If you are a new user, read thefollowing brief descriptions before proceeding. Details of the features are described in theVERITAS Volume Manager Administrator’s Guide.
Easier Storage ManagementVxVM is a storage management subsystem that allows you to manage physical disks aslogical devices, which do not have the limitations that physical disks do.
VxVM enhances data storage management by controlling these aspects:
◆ space—allocation and use
◆ performance— enhanced data delivery
1

VxVM Basics
◆ data availability—continuous operation and multisystem access
◆ device installation—centralized and optimized support
◆ system—multisystem support and monitoring of private/shared systems
Physical DisksA physical disk is the basic storage device (media) where the data is ultimately stored. Aphysical disk can be divided into one or more partitions, also known as slices.
When placed under VxVM control, a physical disk transforms to a virtual disk, or avolume that can be easier to monitor.
The VxVM ConnectionThe connection between physical objects and VxVM objects is made when you place aphysical disk under VxVM control.
VxVM creates virtual objects and makes logical connections between the objects. Thevirtual objects are then used by VxVM to perform storage management tasks.
VxVM objects include the following:
◆ VM Disks
◆ Disk Groups
◆ Subdisks
◆ Plexes
◆ Volumes
VM Disks
VM Disk Example
When active, the VM disk is associated with an underlying physical disk. VxVM logicalobjects map to physical objects and store data on stable storage.
Physical Disk VM Disk
devname disk01
2 VERITAS Volume Manager Installation Guide

VxVM Basics
A VM disk typically includes a public region and a private region. The public region on aphysical disk is a region managed by VxVM and contains available space that is used forallocating subdisks. The private region contains VxVM internal configurationinformation.
Disk GroupsA VxVM volume is a logical object. VxVM creates other objects that you can operate,control, monitor, and query to optimize storage management.
To configure and maintain a volume for use, VxVM places physical disks under its controland collects the disk space into disk groups. A disk group is a collection of claimed disksorganized into logical volumes. VxVM then allocates the space on those disks to logicalvolumes.
A disk group is a collection of VxVM disks that share a common configuration. A diskgroup configuration is a set of records with detailed information about related VxVMobjects, their attributes, and their connections. The default disk group is rootdg (the rootdisk group).
You can create additional disk groups as necessary. Disk groups allow you to group disksinto logical collections. A disk group and its components can be moved as a unit from onehost machine to another.
Volumes are created within a disk group. A given volume must be configured from disksin the same disk group.
Subdisks
Subdisk Example
Subdisks are the smallest unit of storage in VxVM. They are like partitions on a physicaldisk and are used to build plexes.
disk01
disk01-01
SubdiskVM Disk with One Subdisk
disk01-01
Chapter 1, Introduction 3
VxVM Basics
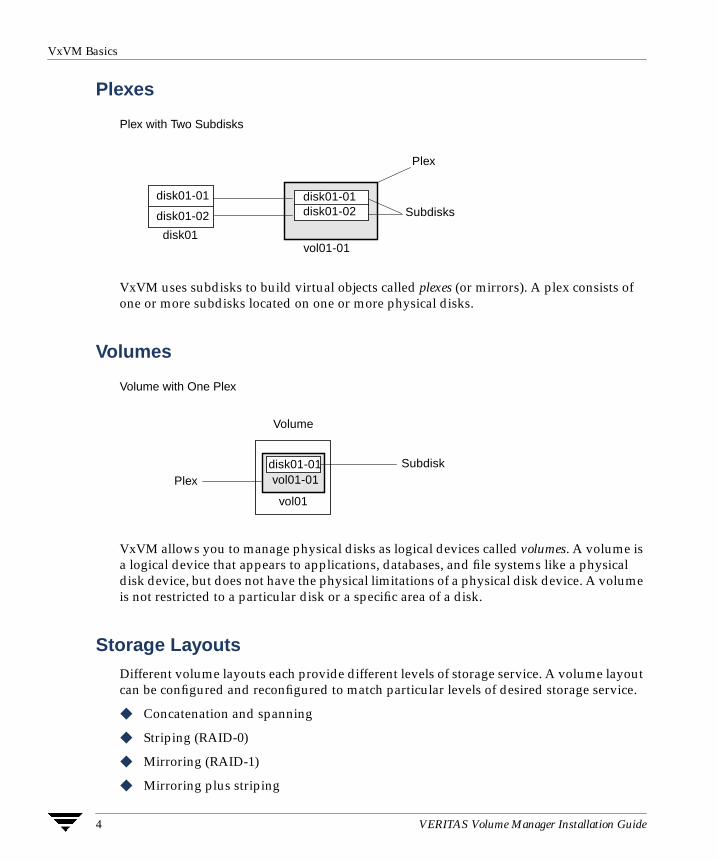
Plexes
Plex with Two Subdisks
VxVM uses subdisks to build virtual objects called plexes (or mirrors). A plex consists ofone or more subdisks located on one or more physical disks.
Volumes
Volume with One Plex
VxVM allows you to manage physical disks as logical devices called volumes. A volume isa logical device that appears to applications, databases, and file systems like a physicaldisk device, but does not have the physical limitations of a physical disk device. A volumeis not restricted to a particular disk or a specific area of a disk.
Storage LayoutsDifferent volume layouts each provide different levels of storage service. A volume layoutcan be configured and reconfigured to match particular levels of desired storage service.
◆ Concatenation and spanning
◆ Striping (RAID-0)
◆ Mirroring (RAID-1)
◆ Mirroring plus striping
disk01vol01-01
disk01-01disk01-02
disk01-01
disk01-02
Plex
Subdisks
Subdisk
Plex vol01-01
vol01
Volume
disk01-01
4 VERITAS Volume Manager Installation Guide

Pre-installation Instructions
◆ Striping plus mirroring
◆ RAID-5 (striping with parity)
ArraysA disk array is a collection of disks that appears to the system as one or more volumes.
Data is spread across several disks within an array, which allows the disks to share I/Ooperations. The use of multiple disks for I/O improves I/O performance by increasing thedata transfer speed and the overall throughput for the array.
Pre-installation Instructions
New VERITAS Product Distribution MethodThe VERITAS products CD has an automated installation and licensing procedure thatallows you to install packages using an Installation Menu rather than installing from thecommand line. VERITAS has also introduced a website from which you can quickly andeasily obtain a license key for the prodcuts that you have purchased. The VERITAS StorageSolutions 3.5 Product License and Installation Guide, included as the liner notes with theVERITAS product CD, provides complete information. You should review the VERITASStorage Solutions 3.5 Product License and Installation Guide before installing VxVM..
Verify Disk Space RequirementsThe following table indicates the suggested minimum space allowances for each package.
Package Contents Size
VRTSvxvm Driver and Utilities 59 MB
VRTSvlic Licensing Utilities 2MB
VRTSvmman Manual Pages 1 MB
VRTSvmdoc Documentation 30 MB
VRTSob,VRTSobgui
VEA Service
VEA Administrator
33 MB
Chapter 1, Introduction 5
Pre-installation Instructions
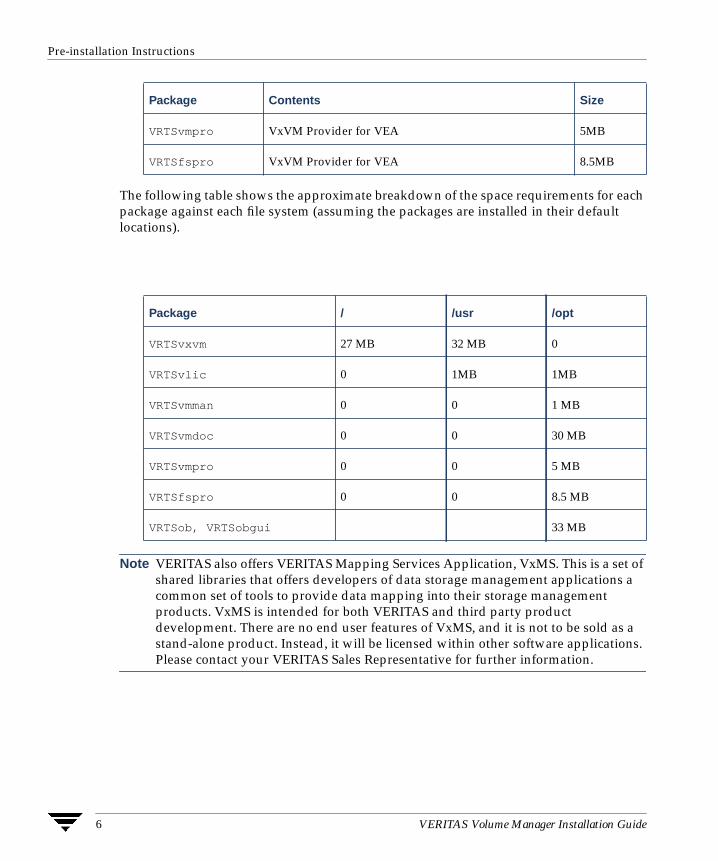
The following table shows the approximate breakdown of the space requirements for eachpackage against each file system (assuming the packages are installed in their defaultlocations).
Note VERITAS also offers VERITAS Mapping Services Application, VxMS. This is a set ofshared libraries that offers developers of data storage management applications acommon set of tools to provide data mapping into their storage managementproducts. VxMS is intended for both VERITAS and third party productdevelopment. There are no end user features of VxMS, and it is not to be sold as astand-alone product. Instead, it will be licensed within other software applications.Please contact your VERITAS Sales Representative for further information.
VRTSvmpro VxVM Provider for VEA 5MB
VRTSfspro VxVM Provider for VEA 8.5MB
Package / /usr /opt
VRTSvxvm 27 MB 32 MB 0
VRTSvlic 0 1MB 1MB
VRTSvmman 0 0 1 MB
VRTSvmdoc 0 0 30 MB
VRTSvmpro 0 0 5 MB
VRTSfspro 0 0 8.5 MB
VRTSob, VRTSobgui 33 MB
Package Contents Size
6 VERITAS Volume Manager Installation Guide

Pre-installation Instructions
Set the PATH and MANPATH VariablesMost of the commands used in the installation are in the /usr/sbin directory or /sbindirectory. You should add these directories to your PATH environment variable, makingsure that /usr/sbin precedes /sbin in the path.
Similarly, set the path of your MANPATH environment variable to include/opt/VRTS/man.
Examples:
If you are using a shell such as sh or ksh, use the following commands:
$ PATH=/usr/sbin:/sbin:/opt/VRTS/bin:/etc/vx/bin:\/usr/lib/vxvm/bin:$PATH$ export PATH$ MANPATH=/opt/VRTS/man:$MANPATH$ export MANPATH
If you are using a shell such as csh or tcsh, use the following commands:
% setenv PATH /usr/sbin:/sbin:/opt/VRTS/bin:/etc/vx/bin:\/usr/lib/vxvm/bin:$PATH
% setenv MANPATH /opt/VRTS/man:$MANPATH
Verify Directories and PermissionsIf any of the documentation, developer kit, or manual page packages are to be installed,the directory /opt must exist and be writable. Also, /opt must not be a symbolic link.This is because the volumes not temporarily converted by the upgrade_start will beunavailable during the upgrade process. If you have a symbolic link from /opt to one ofthe unconverted volumes, the symbolic link will not function during the upgrade anditems in /opt will not be installed.
Product LicensingThe VERITAS Volume Manager is a licensed product. Before you install VxVM, obtain alicense key from VERITAS. If you have a temporary license key, you must obtain apermanent license key when you purchase the product. A License Key Request Form(LKRF) is included in the product package. The LKRF has all the information required toestablish a user account on the VERITAS vLicense™ website and generate your license key.If you do not receive a License Key Request Form, contact your sales representative, orsend an email with your sales order number to [email protected].
Chapter 1, Introduction 7

Pre-installation Instructions
To obtain a product license, use the vLicense website (see below) or complete the LicenseKey Request Form, including your system’s host ID and model type. Sign and date thecompleted form and fax it to VERITAS. You will receive a license key by email within afew business days. Retain the License Key Request Form for your records.
Using the VERITAS vLicense Website to Obtain a LicenseYou can access the vLicense website at:
http://www.veritas.com/vlicense
To obtain a license from the website, provide the following information shown on theLicense Key Request Form:
◆ Your customer number
◆ Your order number
◆ Your serial number
To determine the host ID of your system, enter:
# hostid
To determine the machine type, enter:
# uname -i
After receiving a license key, record the number somewhere other than on the systemwhere it is installed so that you can access it if the system becomes inoperable or theproduct requires reinstallation.
During the installation procedure, you must enter a license key. If you are replacing atemporary license with a permanent license, follow the instructions that accompany thelicense key to replace the old license with the new one.
The VERITAS licensing commands are provided in the software package VRTSvlic. TheVRTSvlic package must be installed for the licensing process to work.
If you have any questions concerning licensing, contact VERITAS at the licenseinformation numbers listed under “Getting Help” on page ix.
8 VERITAS Volume Manager Installation Guide

Pre-installation Instructions
Add or Upgrade LicensesVxVM 3.5 introduces a new licensing package, VRTSvlic, that is common to all newVERITAS products. The VRTSvlic package replaces the functionality of the VRTSlicpackage that was used in VxVM 3.2 and earlier releases. The following table listsequivalency between licensing commands in VRTSlic and VRTSvlic:
Any existing valid VxVM license keys are accepted for backward compatibility onupgrading to VxVM 3.5. The new licensing package silently converts the old key to a newvalue. However, you may need to obtain additional licenses for features that are new inVxVM 3.5. You should retain the old VRTSlic package on your system if it is required byany installed VERITAS products other than VxVM. If you choose to remove the VRTSlicpackage to free up disk space, this does not delete the existing license key files.
If you are upgrading to VxVM 3.5 and have not yet added the VRTSvlic package to yoursystem, you can use the following commands to view the currently installed licenses:
# vxlicense -p# /usr/lib/vxvm/bin/vxliccheck -pv
If you need to add new licenses to support features in VxVM 3.5, you must add the newlicensing package, VRTSvlic, as described in the sections on upgrading VxVM in thechapter “Installing VERITAS Volume Manager” on page 17.
After the VRTSvlic package has been installed, you can view the currently installedlicenses (for both VRTSlic and VRTSvlic) with the following command:
# vxlicrep
To add new licenses to VxVM and to other VERITAS products that use the VRTSvlicpackage for licensing, enter the following command:
# vxlicinst
For any installed VERITAS products that use the VRTSlic package for licensing, use thefollowing command to add new licenses:
# vxlicense -c
For more information about the new licensing commands in the VRTSvlic package, referto the vxlicinst(1), vxlicrep(1) and vxlictest(1) manual pages.
VRTSlic command VRTSvlic command Description
vxlicense -c vxlicinst Installs a license.
vxlicense -p vxlicrep Reports installed licenses.
vxlicense -t vxlictest Tests a license.
Chapter 1, Introduction 9

Pre-installation Instructions
Take a Disk Inventory
Disk Types
Decide which disks you want to place under VxVM control. The other disks in yourconfiguration will not be affected. There are two types of disks:
◆ Encapsulated disks—Data in all existing file systems and partitions on the disk arepreserved while running the vxinstall program.
◆ Initialized disks—Data on the disks are removed while running the vxinstallprogram.
Boot Disk
You cannot grow or shrink any volume associated with an encapsulated boot disk(rootvol, usr, var, opt, swapvol, etc.) because these map to a physical underlyingpartition on the disk and must be contiguous.
Verify Disk ContentsVerify the disk contents. Answer the following questions and list the data for yourconvenience.
1. Make sure you are aware of the contents of each disk. Determine which disks can beencapsulated (data is preserved) or initialized (data is removed).
2. Do you want to place the system root disk under VxVM control? (This is necessary inthe case of a one-disk system or when you wish to mirror the root disk.)_________________________________________________________________________
3. Do you want to either encapsulate or initialize all disks on a controller together?Identify the controllers.___________________________________________________________________________________________________________________________________________________________________________________________________________________________
10 VERITAS Volume Manager Installation Guide

Pre-installation Instructions
4. Identify the disks to encapsulate, initialize, or to be excluded in the following table.
5. Verify that the disks to be managed by VxVM have two free partitions and a smallamount of free space (2048 sectors).
The free space must be at the beginning or end of the disk and must not belong to apartition. This space is used for storing disk group configurations and a disk label thatensures VxVM can identify the disk, even if it is moved to a different address orcontroller. It is also used to keep track of disk configuration and to ensure correctrecovery. VxVM allocates approximately 2048 sectors from each disk for the diskgroup configurations and the disk label. This space is sufficient to handle normal diskgroup configurations for up to approximately 100 disks.
The boot disk is a special case. If no other space is available, VxVM attempts toallocate space usually reserved for swap by shrinking the swap partition. This processis known as swap relocation and, if necessary, happens automatically during root diskencapsulation.
Note Although it is possible to put disks with no free space under VxVM control, this isonly used as a migration strategy. Many VxVM capabilities based on disk identityare available only for disks with the required free space. See the vxdisk(1M)manual page for information on the nopriv disk type.
6. If you are encapsulating the boot (root) disk:
a. Before encapsulating your boot disk, set the EEPROM variable use-nvramrc? totrue to take advantage of VxVM boot disk aliases to identify the mirror of theboot disk if a replacement is needed. If this variable is set to false, you mustdetermine which disks are bootable yourself. Set this variable to true as follows:
eeprom “use-nvramrc?=true”
Disk ID Encapsulate, Initialize, Exclude
Chapter 1, Introduction 11

Pre-installation Instructions
b. Use the prtvtoc(1M) command to record the layout of the partitions on theunencapsulated boot disk (/dev/rdsk/c0t0d0s2 in this example):
# prtvtoc /dev/rdsk/c0t0d0s2
Record the output from this command for future reference.
c. To encapsulate the boot disk, tag the swap partition as swap so that it is possibleto dump to that partition later.
Note If the path to an aliased boot device is different from the path in the /devicesdirectory, aliases may not function correctly. This might happen if the pathname isincorrectly entered at the command line, or if the device’s pathname changes at alater date.
7. If you have disks that will be encapsulated, they must meet the following criteria:
- contain the required minimum free space (2048 sectors)
- contain an s2 slice that represents the full disk—this s2 slice cannot contain a filesystem at the beginning or at the end of the disk
- contain two free partitions
8. DMP considerations:
- If your system uses Sun’s AP software, this release of VxVM requires an APupgrade and a Solaris patch. See “DMP and Alternate Pathing” on page 14.
- If you are upgrading from VxVM 3.1 or an older version, DMP is automaticallyenabled in VxVM 3.5. You can use vxinstall or vxdiskadm to prevent DMP, ifyou choose.
- If you are upgrading from VxVM 3.1.1, and you had prevented or suppressedDMP, VxVM 3.5 retains your DMP setting. Your new installation will have DMPprevented or suppressed. Use vxinstall option #3 to enable DMP if youchoose.
Hot-RelocationHot-relocation automatically restores redundancy and access to mirrored and RAID-5volumes when a disk fails. This is done by relocating the affected subdisks to disksdesignated as spares and/or free space in the same disk group.
The hot-relocation feature is enabled by default. The associated daemon, vxrelocd, isautomatically started during system startup.
Follow these recommendations:
12 VERITAS Volume Manager Installation Guide

Pre-installation Instructions
1. Leave the VxVM hot-relocation feature enabled to detect disk failures automatically. Itwill notify you of the nature of the failure, attempt to relocate any affected subdisksthat are redundant, and initiate recovery procedures.
2. Configure at least one hot-relocation spare disk in each disk group. This will allowsufficient space for relocation in the event of a failure.
If you decide to disable hot-relocation, prevent vxrelocd from running after you loadthe VxVM software. See “Disabling Hot-Relocation” on page 75 for details.
Solaris Patches for VxVMVxVM requires Solaris patches to work properly. See “Important Software PatchInformation” on page 18 for details about required patches.
VERITAS Enterprise Administrator (VEA)For a machine to be administered by VEA, the following software must be installed andrunning:
◆ Solaris 2.6 or higher.
Note To install VEA on Solaris 2.6, 7, or 8, you must download and install the appropriateJAVA 1.3.1 patches for Solaris 2.6, 7, or 8 fromhttp://java.sun.com/j2se/1.3/install-solaris-patches.html
◆ VERITAS Volume Manager Release 3.5. The vxconfigd and VEA service (vxsvc)must be running on the machine to be administered.
◆ The VEA server. See “Setting Up and Starting VEA” on page 46 on how to install theserver.
◆ If a VERITAS Storage Administrator (VMSA) package is installed on the machine,refer to “VMSA and VEA Co-Existence” on page 46 before installing the new GUI.
A5x00 DevicesWhether or not you have A5x00 devices connected to your system, you must add theSolaris patches, shown in “Solaris Patches for VxVM” on page 18, to this release of VxVM.If you have A5x00 devices attached to your system, you need this patch to use them; ifyou don’t have A5x00 devices attached to your system, you still need the patches becausethey are used in the process of discovering whether such devices exist.
Chapter 1, Introduction 13

Cluster Environment Requirements
DMP and Alternate PathingVxVM 3.5 allows Dynamic Multipathing (DMP) to co-exist with Sun’s Alternate Pathing(AP) software. If your system uses Sun’s AP software, this release of VxVM requires APversion 2.3.1 and Sun patch 110722 (latest version). Upgrade AP to 2.3.1 as described in“Installing or Upgrading VxVM with Alternate Pathing Enabled” on page 20. Then installthe patch before installing or upgrading to this release of VxVM. See “Solaris Patches forVxVM” on page 18 for patch information.
DMP is described in more detail in the VERITAS Volume Manager Administrator’s Guide.
Use the new interfaces provided through the utilities vxinstall and vxdiskadm toprevent DMP from multipathing certain or all devices connected to the system. Theseinterfaces can also be used to suppress devices from VxVM.
Claiming Devices in the SENA CategoryThe A5x00 disk arrays will be claimed by DMP under the SENA category only if therequired libraries are present on the system at the time of installation/upgrade of VxVM.
These libraries are present by default on Solaris 8. For Solaris 2.6 and Solaris 7, see “SolarisPatches for VxVM”to find the appropriate patch. These patches must be installed beforeinstalling or upgrading VxVM.
Cluster Environment RequirementsIf your configuration has a cluster, which is a set of hosts that share a set of disks, followthese steps:
1. Obtain a license for the optional VxVM cluster feature from your Customer Supportchannel.
2. Decide where to place the rootdg disk group for each node in the cluster. A systemusing VxVM has one or more disk groups, including the rootdg. The rootdg mustexist, and it cannot be shared between systems. At least one disk must exist within therootdg while VxVM is running.
3. Decide on the layout of shared disk groups. There may be one or more shared diskgroups. Determine how many you wish to use.
4. If you plan to use Dirty Region Logging (DRL) with VxVM in a cluster, leave a smallamount of space on the disk for these logs. The log size is proportional to the volumesize and the number of nodes. Each log has one recovery map plus one active map pernode.
14 VERITAS Volume Manager Installation Guide

Set up your SAN Configuration
For a two-gigabyte volume in a two-node cluster, a log size of three blocks (one blockper map) is sufficient. For every additional two gigabytes of volume size, the log sizeincreases by approximately one block per map (for example, a four-gigabyte volumewith two nodes has a log size of six blocks) up to a maximum of 96 blocks. For largervolumes, DRL changes the log granularity to accommodate the increased size withoutexceeding the maximum log size. A four-node cluster requires larger logs.
5. Refer to the VERITAS Volume Manager Administrator’s Guide for more information onDRL.
Set up your SAN ConfigurationIf you have a SAN configuration, follow these general guidelines before you installVxVM.
◆ You must place at least one disk into the rootdg.
◆ If some disks in your SAN will not be under VxVM control, create a file called/etc/vx/cntrls.exclude or /etc/vx/disks.exclude. (See “Running thevxinstall Program” on page 24 for more information.)
Adding Disks After InstallationDisks that are not initially placed under VxVM control by the vxinstall program can beadded later using another VxVM interface (such as the VEA or the vxdiskadm program).
Chapter 1, Introduction 15

Adding Disks After Installation
16 VERITAS Volume Manager Installation Guide

Installing VERITAS Volume Manager
2 This section describes how to install and set up VERITAS Volume Manager (VxVM) andVERITAS Enterprise Administrator (VEA). This also describes how to upgrade an existingversion of VxVM and VMSA. Installation or upgrade and setup consists of the followingprocedures:◆ VxVM installation - see “Installation and Upgrade Overview” on page 17
◆ VxVM upgrade - see “Upgrading to VxVM Release 3.5” on page 54
◆ VxVM configuration and setup
◆ VEA setup
◆ Shared disk setup (for cluster environments only)
◆ Removing VxVM
Note Only users with superuser privileges can install and initialize VxVM and VEA.
Installation and Upgrade Overview
Note The VERITAS products CD has an automated installation and licensing procedurethat allows you to install packages using an Installation Menu rather than installingfrom the command line. For more information, refer to “Using the InstallationMenu to Install” on page 17, and the VERITAS Storage Solutions 3.5 Product Licenseand Installation Guide, included as the liner notes with the VERITAS product CD.
1. For installations and upgrades, install the required patches. Refer to “ImportantSoftware Patch Information” on page 18.
2. For installations and upgrades, you may need to upgrade Sun’s Alternate Pathing(AP) driver to version 2.3.1. Refer to “Installing or Upgrading VxVM with AlternatePathing Enabled” on page 20.
17

Important Software Patch Information
3. For new installations, load the software packages onto the system to be administeredas described in the section “Loading the Software from CD-ROM” on page 21.
4. For upgrades, you need to determine if your root disk is encapsulated, as thisdetermines which upgrade process you should use. See “Upgrading to VxVM Release3.5” for more information.
5. For new installations, install VxVM as described in “Running the vxinstall Program”on page 24.
6. Set up and start VEA as described in “Setting Up and Starting VEA” on page 46.
7. If you are planning to use VxVM in a cluster environment, follow the instructions in“Enabling Cluster Support in VxVM (Optional)” on page 50.
8. After installation, add any disk arrays that are unsupported by VERITAS to the JBODcategory as described in the section “Hot-Relocation Guidelines” on page 75.
Important Software Patch Information
Caution Please read this section completely before you install VERITAS Volume Manager(VxVM) 3.5. You must reboot your system after installing these patches.
Solaris Patches for VxVM
Caution Do not install VxVM until you have installed the following mandatory patches.The patches must be installed on your system for VxVM to work properly.
Check for Existing Patches
Some required system patches may already be present in your operating system. Todisplay a list of patches that are already installed on your system, enter:
# showrev -p
For more information, see showrev(1M).
18 VERITAS Volume Manager Installation Guide

Important Software Patch Information
Download Required Patches
If the patches shown in the required list are not already installed, go tohttp://sunsolve.Sun.com to download them. You need to install the appropriate patchesand then reboot.
DISCLAIMER: Patch version and information is determined at the time of productrelease. For the most current patch version and information, please contact your vendor.
Required Solaris Patches
For SolarisVersion
Sun Patch ID Number Notes
Solaris 9 None
Solaris 8 1. SUNWsan package(see your vendor toobtain)
2. 109529 (-06 or higher)
3. 111413 (-06 or higher)
Regardless of whether you have an A5k driveconnected, you must install these A5k patchesfor VxVM to function. You must install theSUNWsan package and patch 109529 beforeinstalling patch 111413. You can then installVxVM. This order of these steps is important.
108827 (-19 or higher)
108528 (-14 or higher)
110722 (-01 or higher) If you have Sun’s Alternate Pathing (AP), youmust install Solaris patch 110722-01 for VxVM3.5 to co-exist with the AP driver version 2.3.1.However, you must also upgrade AP. Please see“DMP and Alternate Pathing” before installingVxVM.
Solaris 7 107473 (-07 or higher) Regardless of whether you have an A5k driveconnected, you must install an A5k patch forVxVM to function. You should install this patchbefore installing VxVM.
110722 (-01 or higher) If you have Sun’s Alternate Pathing (AP), youmust install Solaris patch 110722-01 for VxVM3.5 to co-exist with the AP driver version 2.3.1.However, you must also upgrade AP. Please see“DMP and Alternate Pathing” before installingVxVM.
106541 (-19 or higher) If you are running Solaris 7, you must installSun patch ID 106541.
Chapter 2, Installing VERITAS Volume Manager 19

Installing or Upgrading VxVM with Alternate Pathing Enabled
Note If 'patchadd -p' gives error as:#patchadd -p | grep 111413/usr/sbin/patchadd[193]: PatchArrElem: subscript out of range, then please installthe patch 108987-08 (or later).
Installing or Upgrading VxVM with Alternate PathingEnabled
Dynamic Multipathing (DMP) on VxVM 3.5 co-exists with Sun’s Alternate Pathing (AP)driver 2.3.1. For VxVM 3.5 to function, the DMP driver (vxdmp) must always be presenton the system. Upgrading to this version of VxVM automatically enables the DMP driver.
If you do not know which version of AP is installed, run the following command:
# pkginfo -l SUNWapdv | grep VERSION
For VxVM to co-exist with AP successfully, you must upgrade AP before installing orupgrading to VxVM 3.5.
If AP is installed and the AP version is prior to 2.3.1, installation is aborted and you areinstructed to upgrade your AP package to version 2.3.1.
Solaris 2.6 110722 (-01 or higher) If you have Sun’s Alternate Pathing (AP), youmust install Solaris patch 110722-01 for VxVM3.5 to co-exist with the AP driver version 2.3.1.However, you must also upgrade AP. Please see“DMP and Alternate Pathing” before installingVxVM.
105375 (-26 or higher) Regardless of whether you have an A5k driveconnected, it is recommended that you installA5k patch for VxVM to function. Install thispatch before installing VxVM.
105181 (-31 or higher)
Required Solaris Patches
For SolarisVersion
Sun Patch ID Number Notes
20 VERITAS Volume Manager Installation Guide

Loading the Software from CD-ROM
Loading the Software from CD-ROM
The PackagesThe VERITAS packages are found on the CD-ROM in the volume_manager/pkgsdirectory:.
CD-ROM Contents
◆ VRTSvxvm—VERITAS Volume Manager and Volume Replicator software.
◆ VRTSvlic—VERITAS Licensing Utilities.
◆ VRTSvmdoc—online copies of VERITAS Volume Manager guides.
◆ VRTSvrdoc—online copies of VERITAS Volume Replicator guides.
◆ VRTSvmman—VxVM manual pages.
◆ VRTSob—VERITAS Enterprise Administrator Service
◆ VRTSobgui—VERITAS Enterprise Administrator
◆ VRTSvmpro—VERITAS Virtual Disk Management Services Provider (required if youinstall VRTSob and VRTSobgui)
◆ VRTSfspro—VERITAS File System Provider (required even if you are not installingthe VERITAS File System software)
The following related packages are also in the volume_manager/pkgs directory, but areinstalled by other VERITAS products:
◆ VRTSvrw—VERITAS Volume Replicator Web Console Package.
◆ VRTSweb—VERITAS Web GUI Common Web Server Package
Note The VxVM and VVR Release Notes are also contained on the CD-ROM.
Mounting the CD-ROM with Solaris Volume ManagementFollow these steps. When a default response is displayed in parentheses, press Return toaccept that default.
1. Log in as superuser.
2. Insert the CD-ROM into a CD-ROM drive connected to your system.
Chapter 2, Installing VERITAS Volume Manager 21

Loading the Software from CD-ROM
Once the CD-ROM is inserted, the Solaris volume management softwareautomatically mounts the CD-ROM as /cdrom/CD_name.
3. After the CD-ROM is mounted, install the packages. Enter:
# cd /cdrom/volume_manager/pkgs# pkgadd -d . VRTSvlic VRTSvxvm VRTSvmdoc VRTSvmman# pkgadd -a ../scripts/VRTSobadmin -d . VRTSob VRTSobgui# pkgadd -d . VRTSfspro VRTSvmpro
Note The order in which the packages are listed is significant. The VRTSvlic packagemust be listed first, followed by the VRTSvxvm package, then the remainingpackages.
Removing Previous Licensing Packages
If you add the VRTSvlic package and see the following message, you must first removethe existing VRTSvlic package:
Current administration requires that a unique instance of the<VRTSvlic> package be created. However, the maximum number ofinstances of the package which may be supported at one time on thesame system has already been met.
1. To de-install the old package, enter the following command:
# pkgrm VRTSlic
2. During de-install, if you see the following message, enter y:
WARNING: The VRTSvxvm package depends on the package currentlybeing removed. Dependency checking failed.Do you want to continue with the removal of this package [y,n,?,q]
3. Use pkgadd to install the latest VRTSvlic package.
Note VRTSvxvm does not lose its package dependency when the latest VRTSvlic isinstalled later in this process.
The system prints out a series of status messages as the installation progresses. Noerrors should be reported, and the process takes about five minutes.
If the installed version of AP is earlier than 2.3.1, a warning appears and installation isaborted.
If AP 2.3.1 is installed on the system but Solaris patch 110722-01 or later is notinstalled, a warning appears and installation is aborted.
22 VERITAS Volume Manager Installation Guide

Loading the Software from CD-ROM
Mounting the CD-ROM from the Command LineIf the Solaris volume management software is not available to mount the CD-ROMautomatically, mount the CD-ROM manually. The following instructions assume thatyour CD driver is on controller 0.
When a default response is displayed in parentheses, press Return to accept that default.
Follow these steps:
1. Log in as superuser.
2. Insert the CD-ROM into a CD-ROM drive connected to your system.
3. To mount the CD-ROM manually, use the following command:
# mount -F hsfs -o ro /dev/dsk/c0t6d0s2 /cdrom
where c0t6d0s2 is the default address for the CD-ROM.
4. After the CD-ROM is mounted, use the following commands to install the packages:
# cd /cdrom/volume_manager/pkgs# pkgadd -d . VRTSvlic VRTSvxvm VRTSvmdoc VRTSvmman# pkgadd -a ../scripts/VRTSobadmin -d . VRTSob VRTSobgui# pkgadd -d . VRTSfspro VRTSvmpro
Note The order in which the packages are listed is significant. The VRTSvlic packagemust be listed first, followed by the VRTSvxvm package, then the remainingpackages.
If you added the VRTSvlic and see a message that says no changes were made to thesystem, follow the instructions in “Removing Previous Licensing Packages” onpage 22.
The system prints a series of status messages as the installation progresses. No errorsshould be reported, and the process takes about five minutes.
If the AP version is prior to 2.3.1, a warning appears and installation is aborted.
If AP 2.3.1 is installed on the system, but the Solaris patch 110722-01 is not installed, awarning appears and installation is aborted.
Installing VxVM Using the Installation MenuYou can install the VxVM Solaris products using an installation menu provided on CD1:
Chapter 2, Installing VERITAS Volume Manager 23

Running the vxinstall Program
1. Put the CD in the CD-ROM drive.
2. Enter /cdrom/storage_solutions_solaris_3.5cd1/installer and press Return.
Depending on whether the VRTSlic application is installed, one of the following is displayed:
- A message asking if you want to install VRTSlic
If it is not installed, follow the instructions for installation.
- The Product Status page, which shows:
- Products available for installation
- Whether a version of any of the products is currently installed
- Whether any of the installed products are licensed
- Options for operations you can initiate
3. At the prompt on the Product Status page, enter 1 to add a license key, and then press Return tobegin.
4. At the next prompt, enter the license key and press Return.
5. At the Product Status page, enter 2 for the Installation Menu, and then press Return.
The Installation Menu is displayed.
6. At the Installation Menu, enter the number of the product you want to install, and then pressReturn.
The product installation begins automatically. When the operation finishes, the InstallationMenu is displayed again.
Running the vxinstall ProgramFor new installations, use the vxinstall command. This installation has two options,Quick and Custom. See these sections for more information.
This section describes how to initialize VxVM using the vxinstall program, whichplaces all specified disks under VxVM control. These disks are automatically placed in thedefault disk group, rootdg.
Disks selected for configuration are encapsulated or initialized at the end of thevxinstall procedure. If you quit vxinstall before it initializes or encapsulates thedisks, all disks are left as they were before the vxinstall program was started.
Required Reboots
The software initialization may require several reboots. You are usually asked forpermission to reboot when the reboots are needed. If you do not reboot, the initializationcannot complete. After the first reboot, the initialization process takes control of thesystem until the installation is complete.
24 VERITAS Volume Manager Installation Guide

Running the vxinstall Program
Rootdg
You must initialize at least one disk into rootdg with the vxinstall program. At leastone disk must remain in rootdg at all times while VxVM is running.
Placing Disks in another Disk Group
To place some disks in another disk group, use VEA or the vxdiskadm program aftercompleting the vxinstall program. Refer to the VERITAS Volume ManagerAdministrator’s Guide for information on how to create other disk groups for your disks.
Run the vxinstall Program
Initialize VxVM using the following procedure:
1. Log in as superuser.
2. Identify controllers, disks and enclosures to exclude from being configured as VxVMdevices by the vxinstall and vxdiskadm utilities. If there are no devices toexclude, continue to step 4.
Note These files do not exclude enclosures, controllers and disks from access by any otherVxVM commands. See the vxdiskadm(1M) manual pages for more information.
If the vxinstall program does not find any exclude files, it prompts you about eachdisk in the system.
3. To exclude devices from VxVM control, create or edit the/etc/vx/cntrls.exclude, /etc/vx/disks.exclude and/etc/vx/enclr.exclude files. You can:
- exclude one or more disks from VxVM control.
- exclude all disks on certain controllers from VxVM control.
- exclude all disks in specific enclosures from VxVM control.
Note The vxinstall and vxdiskadm utilities use the exclude files to avoidconfiguring the specified disks as VxVM devices. These files do not exclude disksfrom use by any other VxVM commands.
The following section shows examples of each exclude file.
❖ To exclude one or more disks from VxVM control, create or edit the/etc/vx/disks.exclude file, and add the names of the disks to this file.
Chapter 2, Installing VERITAS Volume Manager 25

Running the vxinstall Program
The following is an example of the contents of a disks.exclude file:
c0t1d0
❖ To exclude all disks on certain controllers from VxVM control, create or edit the/etc/vx/cntrls.exclude file, and add the names of the controllers to this file.
The following is an example of the contents of a cntrls.exclude file:
c0c1
❖ To exclude all disks in specific enclosures from VxVM control, create or edit the/etc/vx/enclr.exclude file, and add the names of the enclosures to this file.
The following is an example of the contents of an enclr.exclude file:
sena0emc1
If these files exist on a system prior to upgrading to this release of VxVM, their effectwill still be visible. However, in release 3.1.1 of VxVM, a new set of interfaces has beenadded to the utilities vxinstall and vxdiskadm that can be used to hide devicesfrom VxVM or prevent them from being multipathed by DMP.
4. Start the vxinstall program. Type:
# vxinstall
The vxinstall program first runs the vxlicinst command to initialize the VxVMlicense key file. The vxlicinst command displays licensing information and thenprompts you for a key. You must obtain and enter a valid key in order to proceed withthe initialization.
Note The presence of certain hardware arrays (for example, A5x00) automaticallygenerates a key. The vxinstall program does not prompt for another key.
5. The vxinstall program then examines all controllers attached to the system andlists them. You are asked if you want to use enclosure-based naming. If you do notwant to use enclosure-based names, enter n, and proceed to step 9 on page 28.
Generating list of attached enclosures....
VxVM will use the following format to name disks on the host:
<enclosurename>_<diskno>
In the above format, <enclosurename> is the logical name of theenclosure to which the disk belongs. VxVM assigns default enclosurenames which can be changed according to the user requirements.
26 VERITAS Volume Manager Installation Guide

Running the vxinstall Program
Some examples would be:
hitachi0_2 - second disk detected in enclosure’hitachi0’
enggdept_2 - second disk detected in enclosure’enggdept’
dgc1_1 - first disk detected in enclosure ’dgc1’jbod_1 - first disk detected in the jbod category
For non-public loop disks (Ex. FC disks directly connected to thehost or through hubs), you could choose to use the c#t#d#s# namingformat.Do you want to use enclosure based names for all disks ? [y,n,q,?](default: n) n
6. If you want to use enclosure-based names for the disks on the system, enter y.vxinstall detects and displays a list of disk arrays connected to your system.
Volume Manager InstallationMenu: VolumeManager/Install
The Volume Manager has detected the following categories of storageconnected to your system:
Enclosures: enc01 sena0 sena1 sena3sena4 sena5
Others: others0
Do you want to rename the enclosures [y,n,q,?] (default: y) Y
7. Enter y to assign a new name to the enclosures. This helps to identify their physicallocation. Enclosure names cannot exceed 31 characters in length.
Rename an enclosureMenu: VolumeManager/Install/Rename enclosure
Enter an enclosure name: [list,q,?] test1
Enter the name of an enclosure you wish to rename.
Enter the new name for enclosure test1: enc0
The enclosure name test1 has been changed to enc0
Hit RETURN to continue.
Chapter 2, Installing VERITAS Volume Manager 27

Running the vxinstall Program
8. Enter y at the following prompt to rename more enclosures or n to continue with theinstallation.
Do you wish to rename more enclosures ? [y,n,q,?] (default: n) n
9. The vxinstall program displays a brief introduction to the installation process, asfollows:
Volume Manager InstallationMenu: VolumeManager/Install
You will now be asked if you wish to use Quick Installation orCustom Installation. Custom Installation allows you to selecthow the Volume Manager will handle the installation of each diskattached to your system.
Quick Installation examines each disk attached to your systemand attempts to create volumes to cover all disk partitions thatmight be used for file systems or for other similar purposes.
If you want to exclude any devices from being seen by VxVM or notbe multipathed by vxdmp then use the Preventmultipathing/Suppress devices from VxVM’s view option, before youchoose Custom Installation or Quick Installation.
If you do not wish to use some disks with the Volume Manager,or if you wish to reinitialize some disks, use the CustomInstallation option. Otherwise, we suggest that you use theQuick Installation option.Hit RETURN to continue.
10. Press Return to continue.
The vxinstall program displays a menu with the following options:
1 Quick Installation2 Custom Installation3 Prevent multipathing/Suppress devices from VxVM’s view
? Display help about menu?? Display help about menuing systemq Exit from menus
Select an operation to perform:
The options are defined as follows:
- 1 (Quick Installation) uses default options for installation.
28 VERITAS Volume Manager Installation Guide

Quick Installation
- 2 (Custom Installation) allows you to control whether and how each diskwill be brought under VxVM control.
- 3 (Prevent multipathing/Suppress devices from VxVM’s view)excludes devices from VxVM or prevents them from being multipathed by DMP.
- ? displays a help file describing the current operation or menu choices.
- ?? displays general information about using the vxinstall program.
- q exits from the current operation, or from the vxinstall program.
11. Select an option.
- If you choose 1, see “Quick Installation” on page 29.
- If you choose 2, see “Custom Installation” on page 35.
- If you choose 3, see “Prevent Multipathing/Suppress Devices from VxVM’sView” on page 40.
Quick InstallationThe Quick Installation option is the easiest to use. For each controller, Quick Installationgives you the option of either initializing or encapsulating all disks. Encapsulationpreserves existing data; initialization removes the data.
Initialization and Encapsulation Notes
◆ Quick Installation allows you to initialize disks in a disk array, even if valid partitionsare found on those disks. However, avoid selecting the initialize option for any diskscontaining valid data.
◆ Quick Installation places every disk attached to your system under VxVM control,unless you have chosen to exclude those disks. Chose disks for exclusion using thedisks.exclude, cntrls.exclude or enclr.exclude file or by using theinterface for suppressing devices as described earlier. If you have any disks on yoursystem that you do not want placed under VxVM control, either exclude them usingthe Prevent multipathing/Suppress devices from VxVM’s view invxinstall option or Custom Installation option (which allows you to omitcertain disks from installation).
◆ To encapsulate some disks in a given disk array and initialize others, use CustomInstallation instead. (See “Custom Installation” on page 35.)
◆ With encapsulation, the /etc/vfstab file is updated to ensure that file systemspreviously mounted on disk partitions are mounted on volumes instead.
Chapter 2, Installing VERITAS Volume Manager 29

Quick Installation
◆ Disks are encapsulated or initialized (according to your instructions) at the end of thevxinstall procedure. If you quit the vxinstall program before it enters the finalphase of initializing or encapsulating the disks, all disks are left as they were beforethe vxinstall program started.
Run Quick Installation
At any of the vxinstall prompts, you can select q to completely abandon theinitialization and start over.
To use the Quick Installation option, follow these steps:
1. Select menu item 1 (Quick Installation) from the vxinstall main menu.
The vxinstall program prompts for each disk array and disk connected to yoursystem. To accept a default response displayed in parentheses, press Return.
2. Indicate whether to encapsulate your boot disk at the following prompt. (In thisexample, the boot disk name is c0t3d0.)
The c0t3d0 disk is your Boot Disk. You can not add it as a newdisk. If you encapsulate it, you will make your root file systemand other system areas on the Boot Disk into volumes. This isrequired if you wish to mirror your root file system or system swaparea.
Encapsulate Boot Disk [y,n,q,?] (default: n)
- If you enter n, your root and other file systems are left unaltered.
- If you enter y, the vxinstall program encapsulates your root file system as avolume, along with your swap device, the /usr, /opt, and /var file systems,and all other disk partitions found on your boot disk.
The vxinstall program goes through each disk array and asks you how to handlethe disks contained in that disk array. The vxinstall program begins this processfor each disk array by identifying the disk array and generating a list of its disks, asfollows:
Volume Manager InstallationMenu: VolumeManager/Install
Volume Manager Quick InstallationMenu: VolumeManager/Install/QuickInstall/enc0
Disk array serial number : 60020f20000005bd0000
Generating list of disks in disk array enc0....
30 VERITAS Volume Manager Installation Guide

Quick Installation
Volume Manager has detected the following disks in disk array enc0:
enc0_0 enc0_1 enc0_2 enc0_3
Hit RETURN to continue.
If any disks are listed in the /etc/vx/disks.exclude,/etc/vx/cntrls.exclude or /etc/vx/enclr.exclude files, the disks arelisted here separately as excluded disks.
3. Press Return to continue.
4. The following message displays. Indicate whether you want to initialize all of thedisks on the disk array.
Caution Initializing a disk destroys all data on that disk.
Volume Manager Quick Installation For Disk Array enc0Menu:VolumeManager/Install/QuickInstall/enc0
Initialize all disks on this disk array? (destroys data on thesedisks) [y,n,q,?] (default: n)
- If you enter n, the vxinstall program assumes that you want to encapsulate alldisks on the disk array instead and displays the following:
Volume Manager will now try to encapsulate all the disks on thisdisk array.Disks not having valid partitions will be initialized.Hit RETURN to continue.
Press Return to continue.
- If you enter y, the vxinstall program prompts you for confirmation andwarns you that this destroys any existing data on the disks, as follows:
Are you sure (destroys data on these disks)[y,n,q,?] (default: n)
Enter y to continue with the disk initialization. The following message displays:
Volume Manager will now initialize all the disks on thisdisk array including disks having valid partitions.Hit RETURN to continue.
Chapter 2, Installing VERITAS Volume Manager 31

Quick Installation
Press Return to continue.
5. Indicate whether you want default disk names to be assigned to all of the disks on thedisk array at the following prompt:
Use default disk names for these disks? [y,n,q,?] (default: y)
- If you enter y, the vxinstall program automatically assigns and lists defaultdisk names for each disk, as follows:
The enc0_0 disk will be given disk name disk02
The enc0_0 disk appears to be empty. Adding as a new disk.The enc0_1 disk will be given disk name disk05The enc0_1 disk appears to be empty. Adding as a new disk.The enc0_2 disk will be given disk name disk06The enc0_2 disk appears to be empty. Adding as a new disk.The enc0_3 disk will be given disk name disk07The enc0_3 disk appears to be empty. Adding as a new disk.The c1t0d0 disk will be given disk name disk01The c1t1d0 disk will be given disk name disk02The c1t2d0 disk will be given disk name disk03The c1t3d0 disk will be given disk name disk04
Hit RETURN to continue.
- If you selected encapsulation earlier, this listing also includes a message for eachdisk that can be encapsulated, as follows:
The c1t0d0 disk has been configured for encapsulation.
- If you did not select encapsulation, a message for empty disks to be initializedinstead of encapsulated appears, as follows:
The c3t2d0 disk appears to be empty. Adding as a new disk.
- If you enter n, the vxinstall program prompts you for a disk name for eachdisk on the disk array individually, as follows:
Enter disk name for c1t0d0 [<name>,q,?](default: disk01)
6. For each disk, respond with the desired disk name and press Return.
32 VERITAS Volume Manager Installation Guide

Quick Installation
7. When all of the disks on the current disk array have been named, press Return andrepeat step 5 and step 6 for the remaining controllers on your system.
When you have completed the vxinstall procedure for all disk arrays on yoursystem, the vxinstall program displays a summary of the disks designated forinitialization (New Disk) or encapsulation (Encapsulate) on each controller, asfollows:
The following is a summary of your choices.
c0t5d0 New Diskc1t0d0 New Diskc1t1d0 New Diskc1t2d0 New Diskc2t2d3 New Diskc3t0d0 Encapsulatec3t1d0 Encapsulatec3t2d0 New Disk
Is this correct [y,n,q,?] (default: y)
8. This is your last chance to review and alter your choices for any of the disks to beplaced under VxVM control.
- If you enter y, the vxinstall program encapsulates all disks listed withEncapsulate and initializes (destroying any existing data) all disks listed withNew Disk.
- If you enter n, the vxinstall program prompts you for the name of a disk to beremoved from the list and excluded from VxVM control:
Enter disk to be removed from your choices. Hit return whendone.[<name>,q,?]
9. Enter the name of the disk to be removed from the list and press Return.
10. Repeat these steps for each disk to be removed and then press Return again. Thevxinstall program displays an updated summary
11. the disks chosen for removal. If you are satisfied with the summary, enter y.
12. Depending on your input during the vxinstall program, you may be requested toshut down and reboot your machine. If this happens, shut down and reboot yourmachine immediately or at the earliest convenient opportunity. For more information,see “Rebooting After vxinstall” on page 45.
A reboot is necessary if any disks are to be encapsulated.
Chapter 2, Installing VERITAS Volume Manager 33

Quick Installation
Caution Do not make any changes to your disk or file system configurations beforeshutting down and rebooting your system.
34 VERITAS Volume Manager Installation Guide

Custom Installation
Custom InstallationCustom Installation allows you to control which disks are placed under VxVM controland how they are added. This is important if you do not want all your disks placed underVxVM control. Custom Installation also provides the option of initializing all disks in adisk array, encapsulating all disks in a disk array, or initializing some disks in a disk arrayand encapsulating others.
At any of the vxinstall prompts, you can select q to completely abandon theinitialization and then start over.
All disks are encapsulated or initialized at the end of the vxinstall procedure. If youquit vxinstall before it initializes or encapsulates the disks, all disks are left as theywere before the vxinstall program was started.
To use the Custom Installation option, perform the following procedure:
1. Select menu item 2 (Custom Installation) from the vxinstall main menu.
The vxinstall program asks you a series of questions for each disk array and diskconnected to your system. To accept a default response displayed in parentheses,press Return.
2. Indicate whether to encapsulate your boot disk. (In this example, your boot disk isnamed c0t3d0.)
The c0t3d0 disk is your Boot Disk. You can not add it as a newdisk. If you encapsulate it, you will make your root file systemand other system areas on the Boot Disk into volumes. This isrequired if you wish to mirror your root file system or system swaparea.
Encapsulate Boot Disk [y,n,q,?] (default: n)
- If you enter n, your root and other file systems are left unaltered.
- If you enter y, the vxinstall program encapsulates your root file system as avolume, along with your swap device, the /usr, /opt, and /var file systems,and all other disk partitions found on your boot disk.
The vxinstall program now goes through each disk array and asks you how tohandle the disks contained on that disk array. The vxinstall program begins thisprocess for each disk array by identifying the disk array’s controller and generating alist of its disks, as follows:
Volume Manager Custom InstallationMenu: VolumeManager/Install/Custom/enc0
Disk array serial number : 60020f20000005bd0000
Chapter 2, Installing VERITAS Volume Manager 35

Custom Installation
Generating list of disks in disk array enc0....
The Volume Manager has detected the following disks in enclosureenc0:
enc0_0 enc0_1 enc0_2 enc0_3
Hit RETURN to continue.
If any disks are listed in the /etc/vx/disks.exclude,/etc/vx/cntrls.exclude, or /etc/vx/enclr.exclude files, the disks arelisted here separately as excluded disks.
3. Press Return to continue.
4. Indicate how you want the disks on this disk array to be handled at the followingprompt:
Installation options for enclosure enc0Menu: VolumeManager/Install/Custom/enc0
1 Install all disks as pre-existing disks. (encapsulate) 2 Install all disks as new disks.(discards data on disks!) 3 Install one disk at a time. 4 Leave these disks alone.
? Display help about menu ?? Display help about the menuing system q Exit from menus
Select an operation to perform:
Encapsulating All Disks
1. To encapsulate all disks in the disk array, select 1.
Volumes are created to encapsulate any partitions on all disks on this controller. The/etc/vfstab file is updated to ensure that file systems previously mounted on diskpartitions are mounted as volumes instead.
2. At the following prompt, indicate whether you want default disk names to beassigned to all of the disks on the controller.
Use default disk names for these disks? [y,n,q,?] (default: y)
- If you enter y, the vxinstall program automatically assigns and lists defaultdisk names for each disk, as follows:
36 VERITAS Volume Manager Installation Guide

Custom Installation
The c1t0d0 disk will be given disk name disk01
The c1t0d0 disk has been configured for encapsulation.The c1t1d0 disk will be given disk name disk02The c1t1d0 disk has been configured for encapsulation.Hit RETURN to continue.
- If any disks are found to be empty, they are initialized instead of encapsulated, asdescribed in the following message:
The c3t2d0 disk appears to be empty. Adding as a new disk.
- If you enter n, the vxinstall program prompts for a disk name for each disk inthe disk array individually:
Enter disk name for c1t0d0 [<name>,q,?](default: disk01)
3. For each disk, accept the default name or enter the desired disk name and pressReturn.
4. When all of the disks on the current disk array are named, press Return to move on tothe next disk array.
Initializing All Disks
1. To initialize all disks in the disk array, select 2.
Caution Initializing a disk destroys all data on that disk.
All disks in the disk array are initialized. This destroys all data and partitions on eachdisk and makes the disk available as free space for allocating new volumes, or mirrorsof existing volumes. If you are running the vxinstall program on new disks thathave never been placed under VxVM control before, choose this option.
2. Indicate whether you want default disk names to be assigned to all of the disks in thedisk array at the following prompt:
Use default disk names for these disks? [y,n,q,?] (default: y)
- If you enter y, the vxinstall program automatically assigns and listsdefault disk names for each disk, as follows:
The c1t0d0 disk will be given disk name disk01The c1t1d0 disk will be given disk name disk02
Hit RETURN to continue.
Chapter 2, Installing VERITAS Volume Manager 37

Custom Installation
- If you enter n, the vxinstall program prompts you for a disk name for eachdisk on the controller, as follows:
Enter disk name for c1t0d0 [<name>,q,?](default: disk01)
For each disk, enter the desired disk name and press Return.
3. When all of the disks in the current disk array have been named, press Return tomove on to the next controller.
Installing Individual Disks
1. To install one disk at a time, select 3.
Each disk is handled separately and you are prompted for information on a per-diskbasis. This allows you to install a disk as a pre-existing disk, install it as a new disk, orleave it alone.
2. At the following prompt, indicate how you want this disk to be handled:
Installation options for disk enc0Menu: VolumeManager/Install/Custom/enc/enc0_0
1 Install as a pre-existing disk. (encapsulate)2 Install as a new disk.(discards data on disks!)3 Leave this disk alone.
? Display help about menu?? Display help about the menuing systemq Exit from menus
Select an operation to perform:
These options are similar to those in the Custom Installation main menu. Once youhave determined how to handle this disk, see step 4 on page 36.
3. Press Return to move on to the next disk. Repeat the previous step for the remainingdisks on the current disk array.
4. When all of the disks on the current controller have been named, press Return tomove on to the next disk array.
38 VERITAS Volume Manager Installation Guide

Custom Installation
Leaving All Disks Unaltered
1. To leave all disks in the disk array unaltered, select 4.
No changes are made to the disks and they are not placed under VxVM control. Ifapplications are currently using these disks and you do not want to upgrade theseapplications to use VxVM, use this option to ensure that your applications continue touse the disks without modification.
2. Repeat step 4 on page 36 for each of the remaining disk arrays on your system.
When you have completed the vxinstall procedure for all disk arrays on yoursystem, the vxinstall program displays a summary of the disks you havedesignated for initialization (New Disk) or encapsulation (Encapsulate) on eachcontroller, as follows:
The following is a summary of your choices.
c0t5d0New Diskc1t0d0New Diskc1t1d0New Diskc1t2d0New Diskc2t2d3New Diskc3t0d0Encapsulatec3t1d0Encapsulatec3t2d0New Disk
Is this correct [y,n,q,?] (default: y)
3. This is your last chance to review and alter your choices for any of the disks to beplaced under VxVM control.
- If you enter y, the vxinstall program proceeds to encapsulate all disks listedwith Encapsulate and initialize (destroying any existing data) all disks listedwith New Disk.
- If you enter n, the vxinstall program prompts you for the name of a disk to beremoved from the list and excluded from VxVM control, as follows:
Enter disk to be removed from your choices. Hit return whendone.[<name>,q,?]
4. Enter the name of the disk to be removed from the list and press Return. Repeat foreach disk to be removed and then press Return once more. The vxinstall programdisplays an updated summary without the disks chosen for removal. If you aresatisfied with the summary, enter y.
Chapter 2, Installing VERITAS Volume Manager 39

Prevent Multipathing/Suppress Devices from VxVM’s View
5. Depending on your input during the vxinstall procedure, you may be requested toshut down and reboot your machine. If this happens, shut down and reboot yourmachine immediately or at the earliest convenient opportunity. For more information,see “Rebooting After vxinstall” on page 45.
Caution Do not make any changes to your disk or file system configurations beforeshutting down and rebooting your system.
If a shutdown is not required, the vxinstall program indicates successful completion ofthe installation:
Installation is complete.
Prevent Multipathing/Suppress Devices from VxVM’s ViewThis section describes how to exclude a device which is under VxVM or DynamicMultipathing control. Follow these steps to prevent multipathing or suppress devices.
1. Select menu item 3 (Prevent Multipathing/Suppress devices fromVxVM’s view) from the vxinstall main menu.
The following message displays:
Volume Manager InstallationMenu: VolumeManager/Install/Exclude Devices
This operation might lead to some devices being suppressed fromVxVM’s view or prevent them from being multipathed by vxdmp. (Thisoperation can be reversed using the vxdiskadm command).
Do you want to continue? [y,n,q,?] (default: n) y
2. Enter y.
3. The following message displays. Select an operation.
Volume Manager Device OperationsMenu: VolumeManager/Install/Exclude Devices
1 Suppress all paths through a controller from VxVM’s view2 Suppress a path from VxVM’s view3 Suppress disks from VxVM’s view by specifying a VID:PIDcombination4 Suppress all but one path to a disk5 Prevent multipathing of all disks on a controller by VxVM6 Prevent multipathing of a disk by VxVM7 Prevent multipathing of disks by specifying a VID:PID combination8 List currently suppressed/non-multipathed devices
40 VERITAS Volume Manager Installation Guide

Prevent Multipathing/Suppress Devices from VxVM’s View
? Display help about menu??Display help about the menuing systemq Exit from menus
Select an operation to perform:
- If you select option 1, the following message displays:
Exclude controllers from VxVMMenu: VolumeManager/Install/ExcludeDevices/CTLR-VXVM
Use this operation to exclude all paths through a controller fromVxVM.
This operation can be reversed using the vxdiskadm command.
You can specify a controller name at the prompt. A controller nameis of the form c#, example c3, c11 etc. Enter ’all’ to exclude allpaths on all the controllers on the host. To see the list ofcontrollers on the system, type ’list’.
Enter a controller name:[ctlr_name,all,list,list-exclude,q,?]
Enter the controller name. The operation completes and the controller is disabled.
- If you select option 2, the following prompt displays:
Exclude paths from VxVMMenu: VolumeManager/Install/ExcludeDevices/PATH-VXVM
Use this operation to exclude one or more paths from VxVM.
As a result of this operation, the specified paths will be excludedfrom the view of VxVM. This operation can be reversed using thevxdiskadm command.
You can specify a pathname or a pattern at the prompt. Here aresome path selection examples:
all:all paths c4t2:all paths on controller 4, target 2 c3t4d2:a single path list:list all paths on the system
Enter a pathname or pattern:[<Pattern>,all,list,list-exclude,q?]
The path specified here will be excluded from VxVM control.
- If you select option 3, you are required to enter the VID:PID combination of thedevice to be excluded from VxVM.
Exclude VID:PID from VxVMMenu: VolumeManager/Install/ExcludeDevices/VIDPID-VXVM
Chapter 2, Installing VERITAS Volume Manager 41

Prevent Multipathing/Suppress Devices from VxVM’s View
Use this operation to exclude disks returning a specifiedVendorID:ProductID combination from VxVM.
As a result of this operation, all disks that returnVendorID:ProductID matching the specified combination will beexcluded from the view of VxVM. This operation can be reversedusing the vxdiskadm command.
You can specify a VendorID:ProductID pattern at the prompt. Thespecification can be as follows :
VID:PID where VID stands for Vendor ID PID stands for Product ID
(The command vxdmpinq in /etc/vx/diag.d can beused to obtain the Vendor ID and Product ID.)
Both VID and PID can have an optional ’*’ (asterisk) followingthem.If a ’*’ follows VID, it will result in the exclusion of all disksreturning Vendor ID starting with VID. The same is true for ProductID as well. Both VID and PID should be non NULL. The maximumallowed length for VendorID and ProductID are 8 and 16 charactersrespectively.
Some examples of VID:PID specification are:
all- Exclude all disksaaa:123- Exclude all disks having VID ‘aaa’ and PID ‘123’aaa*:123- Exclude all disks having VID starting with ‘aaa’ and
PID ‘123’aaa:123*- Exclude all disks having VID ‘aaa’ and PID starting
with ‘123’aaa:*- Exclude all disks having VID ‘aaa’ and any PID
Enter a VID:PID combination:[<Pattern>,all,list,exclude,q,?]
The disks that match the VID:PID combination will be excluded from VxVM. TheVendor ID and Product ID can be obtained from the Standard SCSI inquiry datareturned by the disk.
For example, the VID:PID combination for Sun’s T3 disk array can be specified asSUN:T3. The Vendor ID and Product ID of the disk can be obtained by the command/usr/lib/vxvm/diag.d/vxdmpinq.
- Option 4 defines a pathgroup for disks which are not multipathed by VxVM.Only one pathgroup is made visible from the group. Specify the paths to beincluded in the pathgroup.
Exclude all but one paths to a diskMenu: VolumeManager/Install/ExcludeDevices/PATHGROUP-VXVM
42 VERITAS Volume Manager Installation Guide
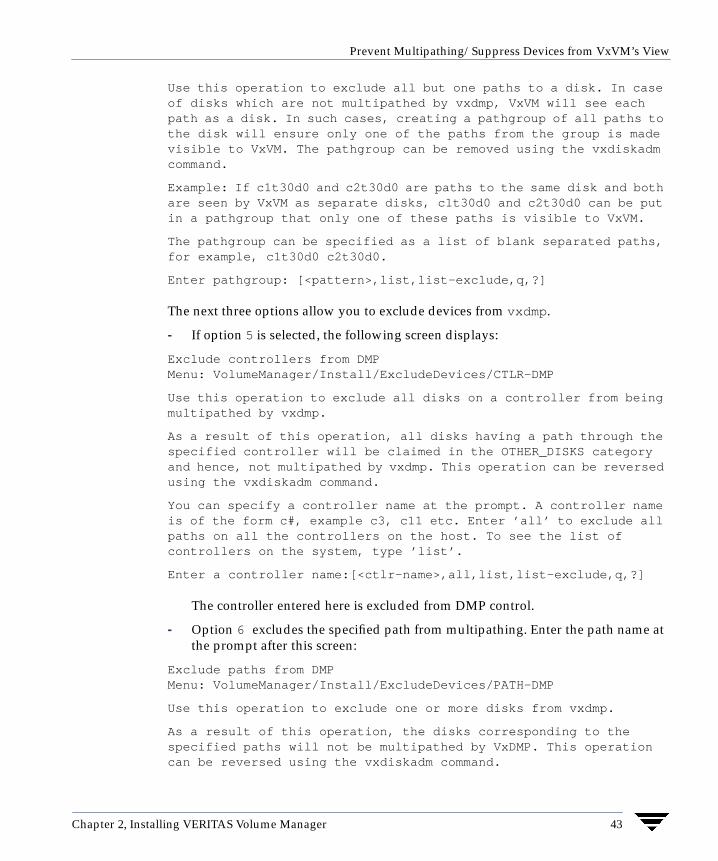
Prevent Multipathing/Suppress Devices from VxVM’s View
Use this operation to exclude all but one paths to a disk. In caseof disks which are not multipathed by vxdmp, VxVM will see eachpath as a disk. In such cases, creating a pathgroup of all paths tothe disk will ensure only one of the paths from the group is madevisible to VxVM. The pathgroup can be removed using the vxdiskadmcommand.
Example: If c1t30d0 and c2t30d0 are paths to the same disk and bothare seen by VxVM as separate disks, c1t30d0 and c2t30d0 can be putin a pathgroup that only one of these paths is visible to VxVM.
The pathgroup can be specified as a list of blank separated paths,for example, c1t30d0 c2t30d0.
Enter pathgroup: [<pattern>,list,list-exclude,q,?]
The next three options allow you to exclude devices from vxdmp.
- If option 5 is selected, the following screen displays:
Exclude controllers from DMPMenu: VolumeManager/Install/ExcludeDevices/CTLR-DMP
Use this operation to exclude all disks on a controller from beingmultipathed by vxdmp.
As a result of this operation, all disks having a path through thespecified controller will be claimed in the OTHER_DISKS categoryand hence, not multipathed by vxdmp. This operation can be reversedusing the vxdiskadm command.
You can specify a controller name at the prompt. A controller nameis of the form c#, example c3, c11 etc. Enter ’all’ to exclude allpaths on all the controllers on the host. To see the list ofcontrollers on the system, type ’list’.
Enter a controller name:[<ctlr-name>,all,list,list-exclude,q,?]
The controller entered here is excluded from DMP control.
- Option 6 excludes the specified path from multipathing. Enter the path name atthe prompt after this screen:
Exclude paths from DMPMenu: VolumeManager/Install/ExcludeDevices/PATH-DMP
Use this operation to exclude one or more disks from vxdmp.
As a result of this operation, the disks corresponding to thespecified paths will not be multipathed by VxDMP. This operationcan be reversed using the vxdiskadm command.
Chapter 2, Installing VERITAS Volume Manager 43

Prevent Multipathing/Suppress Devices from VxVM’s View
You can specify a pathname or a pattern at the prompt. Here aresome path selection examples:
all:all pathsc4t2:all paths on controller 4, target 2c3t4d2:a single pathlist:list all paths on the system
Enter a pathname or pattern:[<pattern>,all,list,list-exclude,q,?]
If a path is specified, the corresponding disks will be claimed in theOTHER_DISKS category and will not be multipathed.
- Selecting option 7 excludes the disk corresponding to the VIP:PID specified.Enter the VID:PID combination at the prompt that follows this screen:
Exclude VID:PID from DMPMenu: VolumeManager/Install/ExcludeDevices/VIDPID-DMP
Use this operation to prevent vxdmp from multipathing devicesreturning a specific VID:PID combination.
As a result of this operation, all disks that return VID:PIDmatching the specified combination will be claimed in theOTHER_DISKS category(i.e. they will not be multipathed by vxdmp).This operation can be reversed using the vxdiskadm command.
You can specify a VendorID:ProductID combination at the prompt. Thespecification can be as follows:
VID:PID where VID stands for Vendor ID PID stands for Product ID
Both VID and PID can have an optional ’*’ (asterisk) followingthem.If a ’*’ follows VID, it will result in the exclusion of all disksreturning Vendor ID starting with VID. The same is true for ProductID as well. Both VID and PID should be non NULL.
Some examples of VID:PID specification are:
all- Exclude all disksaaa:123- Exclude all disks having VID ‘aaa’ and PID ‘123’aaa*:123- Exclude all disks having VID starting with ‘aaa’ and
PID ‘123’aaa:123*- Exclude all disks having VID ‘aaa’ and PID starting
with ‘123’aaa:* - Exclude all disks having VID ‘aaa’ and any PID
Enter a VID:PID combination:[<pattern>,all,list,list-exclude,q,?]
44 VERITAS Volume Manager Installation Guide

Prevent Multipathing/Suppress Devices from VxVM’s View
All disks returning a VID:PID combination will be claimed in the OTHER_DISKScategory and will not be multipathed.
Note If you selected any one of the options, reboot the system for device exclusion to takeeffect and re-run vxinstall. After the reboot for menu item #3 (PreventMultipathing/Suppress devices)run vxinstall again to complete theinstallation.
Rebooting After vxinstallAfter the vxinstall program processes the disks attached to your system, you mayhave to reboot the system to make changes to your disks. The way in which you chose tohandle your disks during the vxinstall session determines whether a reboot isrequired. If you chose to encapsulate any disks, a reboot is necessary.
The vxinstall program informs you when a shutdown and reboot is necessary. Rebootas soon as possible.
Note The setup you choose can require several reboots.
When it is necessary to reboot your system, the vxinstall program displays a messagesimilar to the following:
The system now must be shut down and rebooted in order to continuethe reconfiguration.Shutdown and reboot now [y,n,q,?] (default: n)
If this message is displayed, respond in one of the following ways:
- Enter y to begin an immediate shutdown.
- Enter n to cause the vxinstall program to exit without starting a shutdown. Ifyou select this option, reboot as soon as possible.
Note During the next one or more reboots, you may be asked several times to continue anoperation. Press the Return key at each of these prompts to accept the defaultanswers. If you select a different answer from the default for any of these promptsor press q, the initialization may fail.
Chapter 2, Installing VERITAS Volume Manager 45

Setting Up and Starting VEA
Setting Up and Starting VEATo use VEA, the following packages need to be installed and running on the server:
◆ VERITAS Enterprise Administrator Service (VRTSob)
◆ VERITAS Volume Manager Service Provider (VRTSvmpro)
◆ VERITAS File System Service Provider (VRTSfspro)
Note All these packages are dependent on one another, and all must be present on theserver for VEA to run. Furthermore, VRTSob must already be installed before youcan install VRTSvmpro. Once installed, you cannot remove VRTSob beforeremoving (deinstalling) VRTSvmpro.
In addition, one of the following packages needs to be installed and running on the client:
◆ VERITAS Enterprise Administrator (VRTSobgui)
This is the client package for Solaris.
◆ VERITAS Enterprise Administrator for Windows® (win32/VRTSobgui.msi)
This is the client package for Windows.
Note To install VEA on Solaris 2.6, 7, or 8, you must install the appropriate java 1.3.1patches for Solaris 2.6, 7, or 8.
This section describes how to install and set up VEA. The VEA server must be installedand run on a Solaris machine running VxVM 3.5. The VEA client can be installed and runon a Solaris or Windows machine that supports the Java 1.1 Runtime Environment.
Note This release of VEA requires VxVM Release 3.5. Before you install and run VEA,you must install VxVM and run the vxinstall program to initialize VxVM.
The following are minimum system recommendations for the VEA client:
VMSA and VEA Co-ExistenceIf you do not plan to use VMSA to administer other (pre-VxVM 3.5) machines, then youshould uninstall this package before installing VEA.
Solaris: SPARCstation 5 with 64M memory
Windows: 100MHz Pentium with 32M memory
46 VERITAS Volume Manager Installation Guide
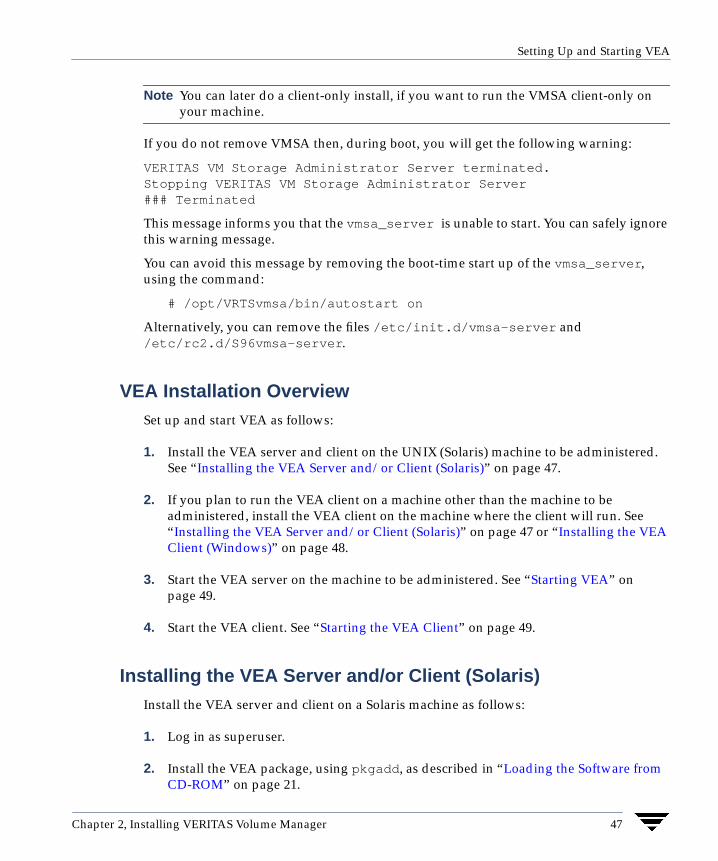
Setting Up and Starting VEA
Note You can later do a client-only install, if you want to run the VMSA client-only onyour machine.
If you do not remove VMSA then, during boot, you will get the following warning:
VERITAS VM Storage Administrator Server terminated.Stopping VERITAS VM Storage Administrator Server### Terminated
This message informs you that the vmsa_server is unable to start. You can safely ignorethis warning message.
You can avoid this message by removing the boot-time start up of the vmsa_server,using the command:
# /opt/VRTSvmsa/bin/autostart on
Alternatively, you can remove the files /etc/init.d/vmsa-server and/etc/rc2.d/S96vmsa-server.
VEA Installation OverviewSet up and start VEA as follows:
1. Install the VEA server and client on the UNIX (Solaris) machine to be administered.See “Installing the VEA Server and/or Client (Solaris)” on page 47.
2. If you plan to run the VEA client on a machine other than the machine to beadministered, install the VEA client on the machine where the client will run. See“Installing the VEA Server and/or Client (Solaris)” on page 47 or “Installing the VEAClient (Windows)” on page 48.
3. Start the VEA server on the machine to be administered. See “Starting VEA” onpage 49.
4. Start the VEA client. See “Starting the VEA Client” on page 49.
Installing the VEA Server and/or Client (Solaris)Install the VEA server and client on a Solaris machine as follows:
1. Log in as superuser.
2. Install the VEA package, using pkgadd, as described in “Loading the Software fromCD-ROM” on page 21.
Chapter 2, Installing VERITAS Volume Manager 47

Setting Up and Starting VEA
The VEA client can be installed with or without the VEA server. To install the VEAserver, answer y at the appropriate prompt.
Note VEA 3.5 is not compatible with earlier versions of VMSA, the previous VERITASVolume Manager GUI. You cannot run VMSA with VxVM version 3.5.
The VEA package for UNIX contains the following directories:
Installing the VEA Client (Windows)The VEA client runs on Windows XP, Windows NT, Windows 2000, Windows ME,Windows 98, and Windows 95 machines. If you plan to run VEA from a Windowsmachine, install the optional Windows package after you have installed the VEA serveron a UNIX (Solaris) machine.
Before you install VEA on a Windows machine, you must uninstall any existing VERITASVolume Manager Storage Administrator (VMSA) packages and remove the oldsetup.exe from that machine. Only one VEA package can be installed on a Windowsmachine at any given time.
Note If you plan to install the VEA client on Windows NT 4.0, Windows Installer must beupgraded to version 2.0. For more information about upgrading Windows Installer,visit http://www.microsoft.com. If you are using Windows NT 4.0, it is alsorecommended that you use Windows NT 4.0 Service Pack 6.
Install the VEA client on a Windows machine as follows:
1. Log in as administrator.
2. Insert the CD-ROM containing VEA.
3. Using Windows Explorer or a DOS Command window, go to the win32 directory andexecute the vrtsobgui.msi program with Windows installer.
Directory Contents
/opt/VRTS/jre/ Java Runtime Environment (JRE)
/opt/VRTS/bin/ vxsvc—VEA server startup and stop script
vea—VEA startup script
/opt/VRTS/man/ VEA manual pages
48 VERITAS Volume Manager Installation Guide

Setting Up and Starting VEA
4. Follow the instructions presented by the Windows installer program.
5. After installation is complete, ensure environment changes made during installationtake effect by performing one of the following procedures:
- For Windows NT or Windows 2000, log out and then log back in.
- For Windows XP, ME, Windows 98 or Windows 95, restart the computer.
Starting VEAAfter installing the VEA packages, the VEA service needs to be stopped and restarted.
To stop the VEA backend service, enter:
# /opt/VRTSob/bin/vxsvc -k
You can also stop the VEA backend service manually by killing this process.
Note The VEA backend service is automatically started on a reboot.
To start the VEA backend service, enter:
# /opt/VRTSob/bin/vxsvc
To check the state of the VEA backend service, enter:
# /opt/VRTSob/bin/vxsvc -m
Starting the VEA ClientOnly users with appropriate privileges can run VEA. VEA can administer the localmachine or a remote machine. However, VxVM and the VEA server must be installed onthe machine to be administered. The VxVM vxconfigd daemon and the VEA servermust be running on the machine to be administered.
After installing VxVM and VEA and starting the server, start VEA in one of the followingways.
UNIX (Solaris)
To administer the local UNIX machine, use the following command:
# /opt/VRTSob/bin/vea &
To administer a remote UNIX machine, use the following command:
# /opt/VRTSob/bin/vea -host remote_machine_name
Chapter 2, Installing VERITAS Volume Manager 49

Enabling Cluster Support in VxVM (Optional)
Note You might want to set your DISPLAY variable when administering a remotemachine.
Windows
To administer a remote UNIX machine, select Start > Programs > VERITASEnterprise Administrator > VERITAS Enterprise Administrator.
Enabling Cluster Support in VxVM (Optional)
Note This section assumes that you are using SunCluster as the cluster monitor on yoursystem.
This release includes an optional cluster feature that enables VxVM to be used in a clusterenvironment. The cluster functionality in VxVM allows multiple hosts to simultaneouslyaccess and manage a set of disks under VxVM control. A cluster is a set of hosts sharing aset of disks; each host is referred to as a node in the cluster.
Note The VxVM cluster feature requires a license, which can be obtained from yourCustomer Support channel. (The presence of a SPARCstorage™ Array may serve asa license, but it limits what can be done to private disk groups.)
To enable the cluster functionality in VxVM, use the following procedure
1. Obtain a license for the VxVM cluster feature.
2. Install the software packages onto each system (node) to be included in the cluster asdescribed in “Loading the Software from CD-ROM” on page 21.
3. Initialize VxVM using the vxinstall procedure as described in “Running thevxinstall Program” on page 24.
4. Set up and start VEA as described in “Setting Up and Starting VEA” on page 46.
5. Configure shared disks as described in “Configuring Shared Disks” on page 51.
50 VERITAS Volume Manager Installation Guide

Enabling Cluster Support in VxVM (Optional)
Configuring Shared DisksThis section describes how to configure shared disks. If you are installing VxVM for thefirst time or adding disks to an existing cluster, you need to configure new shared disks. Ifyou are upgrading VxVM, verify that your shared disks still exist.
The shared disks should be configured from one node only. Since the VxVM softwarecannot tell whether a disk is shared or not, you must specify which are the shared disks.
Make sure that the shared disks are not being accessed from another node while you areperforming the configuration. If you start the cluster on the node where you perform theconfiguration only, you can prevent disk accesses from other nodes because the quorumcontrol reserves the disks for the single node (see “Disk Controller Reservation” onpage 53).
Configuring New Disks
If you are installing and setting up VxVM for the first time, configure the shared disksusing the following procedure:
1. Start the cluster on at least one node.
2. On one node, run the vxdiskadm program and choose option 1 to initialize newdisks. When asked to add these disks to a disk group, choose none to leave the disksfor future use.
3. On other nodes in the cluster, run vxdctl enable to see the newly initialized disks.
4. From the master node, create disk groups on the shared disks. To determine if a nodeis a master or slave, run vxdctl -c mode.
Use the vxdg program or VEA to create disk groups. In the vxdg program, use the -soption to create shared disk groups.
5. From the master node only, use vxassist or VEA to create volumes in the diskgroups.
Note The volumes must be of type gen. Do not create RAID-5 volumes. Before creatingany log subdisks, read the section on DRL in the VERITAS Volume ManagerAdminstrator’s Guide.
6. If the cluster is only running with one node, bring up the other cluster nodes. Enterthe vxdg list command on each node to display the shared disk groups.
Chapter 2, Installing VERITAS Volume Manager 51
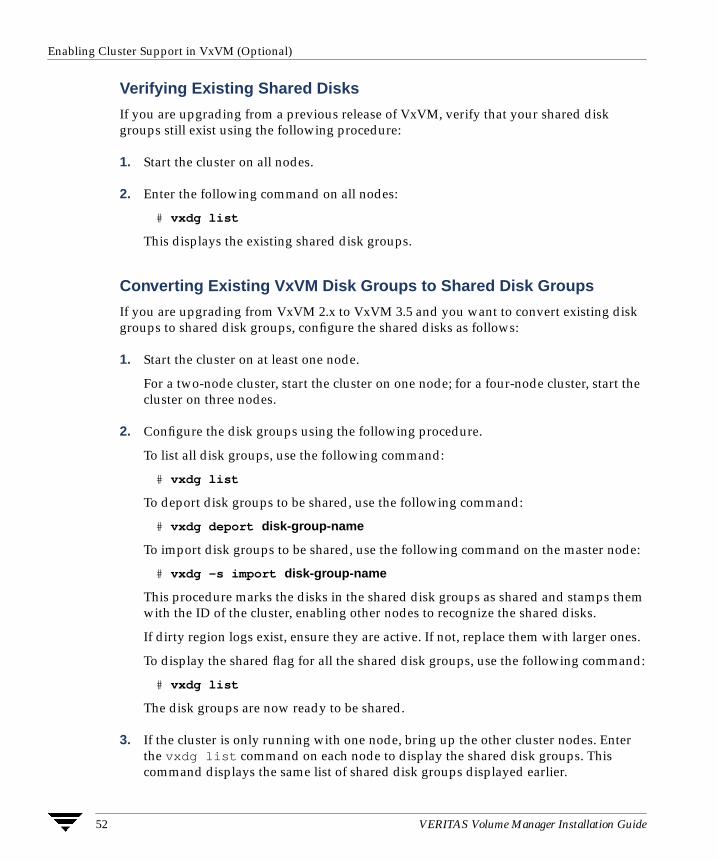
Enabling Cluster Support in VxVM (Optional)
Verifying Existing Shared Disks
If you are upgrading from a previous release of VxVM, verify that your shared diskgroups still exist using the following procedure:
1. Start the cluster on all nodes.
2. Enter the following command on all nodes:
# vxdg list
This displays the existing shared disk groups.
Converting Existing VxVM Disk Groups to Shared Disk Groups
If you are upgrading from VxVM 2.x to VxVM 3.5 and you want to convert existing diskgroups to shared disk groups, configure the shared disks as follows:
1. Start the cluster on at least one node.
For a two-node cluster, start the cluster on one node; for a four-node cluster, start thecluster on three nodes.
2. Configure the disk groups using the following procedure.
To list all disk groups, use the following command:
# vxdg list
To deport disk groups to be shared, use the following command:
# vxdg deport disk-group-name
To import disk groups to be shared, use the following command on the master node:
# vxdg -s import disk-group-name
This procedure marks the disks in the shared disk groups as shared and stamps themwith the ID of the cluster, enabling other nodes to recognize the shared disks.
If dirty region logs exist, ensure they are active. If not, replace them with larger ones.
To display the shared flag for all the shared disk groups, use the following command:
# vxdg list
The disk groups are now ready to be shared.
3. If the cluster is only running with one node, bring up the other cluster nodes. Enterthe vxdg list command on each node to display the shared disk groups. Thiscommand displays the same list of shared disk groups displayed earlier.
52 VERITAS Volume Manager Installation Guide

Enabling Cluster Support in VxVM (Optional)
Disk Controller ReservationAs part of its quorum control, the Sun Cluster cluster manager reserves the shared diskcontrollers when only one node is active. This prevents “rogue” hosts from accessing theshared disks. When this happens, the vxdisk list command used on a node that hasleft the cluster may show all disks on such a controller as having an error status. Themore detailed options of the vxdisk command show the flag unavailable. When anew node joins the cluster, the Sun Cluster software releases the controllers. VxVMattempts to access these disks, and if that is successful, the disks return to an onlinestatus. (See the Sun Cluster documentation for further details.) If one system boots whilethe other system has the disks reserved, the disks can be invisible to the booting system,and the vxdisk command may not display any of the shared disks. When the systemjoins the cluster, the shared disks become visible.
Chapter 2, Installing VERITAS Volume Manager 53

Upgrading to VxVM Release 3.5
Upgrading to VxVM Release 3.5If you are running a release earlier than 3.5, you can upgrade your system and retain yourexisting VxVM configuration. After upgrading, you can resume using VxVM as before(without running the vxinstall program again). Unless your license has expired, nonew license is required for upgrading. However, you must install the new licensingpackage, which uses the existing license information.
Before You UpgradeBefore you upgrade, do the following:
1. Log in as superuser.
2. Install required patches.
3. Determine if the root disk is encapsulated by running the following command:
# mount | grep “/ on”
If the output from this command includes a pathname containing vx and rootvol, as in/dev/vx/dsk/rootvol, then your root disk is encapsulated. See “Upgrading VxVM on anEncapsulated Root Disk” on page 58.
Caution Use only the appropriate upgrade process to upgrade your system.Doing a pkgrm and pkgadd of VxVM does not support the process ofupgrading from a previous version of VxVM to VxVM 3.5. You can only usepkgrm to remove VxVM packages when you are using theupgrade_start/upgrade_finish procedures.
Caution Do not run vxinstall during or after the upgrade.
To upgrade, you can use one of the following processes:
To upgrade Where See
VxVM only On an encapsulated root disk “Upgrading VxVM on an EncapsulatedRoot Disk” on page 58.
VxVM only On an unencapsulated root disk “Upgrading VxVM Only” on page 66.
VxVM and Solaris On an encapsulated orunencapsulated root disk
“Upgrading VxVM and Solaris” onpage 63.
54 VERITAS Volume Manager Installation Guide

Upgrading to VxVM Release 3.5
Note Importing a pre-3.5 VxVM disk group does not automatically upgrade the diskgroup version to the VxVM 3.5 level. You may need to manually upgrade each ofyour disk groups following a VxVM upgrade. See “Upgrading a Disk Group” in theVERITAS Administrator’s Guide for information on how to upgrade a disk group.
Solaris only On an encapsulated orunencapsulated root disk
“Upgrading Solaris Only” on page 71.
To upgrade Where See
Chapter 2, Installing VERITAS Volume Manager 55
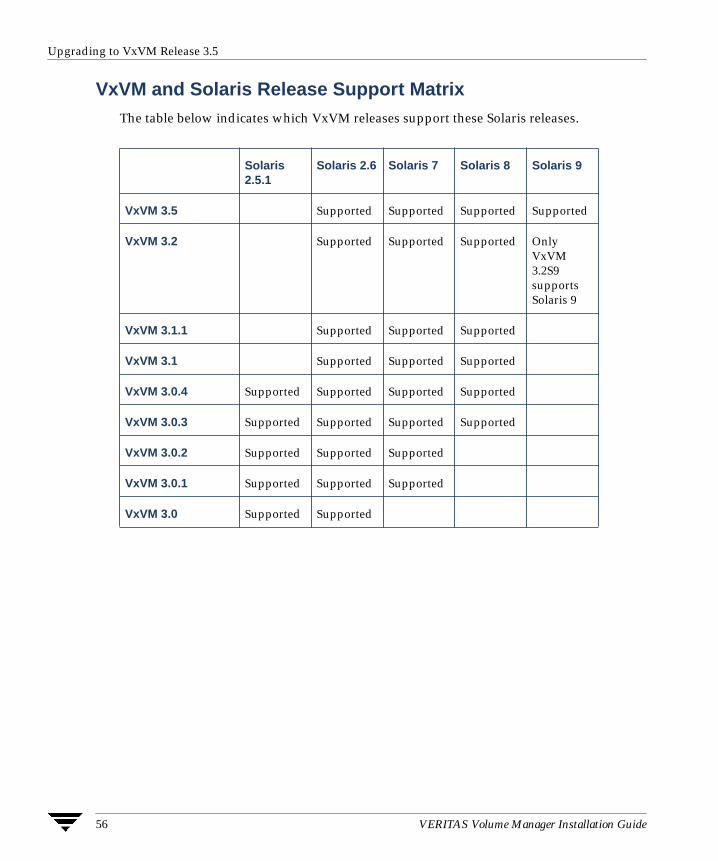
Upgrading to VxVM Release 3.5
VxVM and Solaris Release Support MatrixThe table below indicates which VxVM releases support these Solaris releases.
Solaris2.5.1
Solaris 2.6 Solaris 7 Solaris 8 Solaris 9
VxVM 3.5 Supported Supported Supported Supported
VxVM 3.2 Supported Supported Supported OnlyVxVM3.2S9supportsSolaris 9
VxVM 3.1.1 Supported Supported Supported
VxVM 3.1 Supported Supported Supported
VxVM 3.0.4 Supported Supported Supported Supported
VxVM 3.0.3 Supported Supported Supported Supported
VxVM 3.0.2 Supported Supported Supported
VxVM 3.0.1 Supported Supported Supported
VxVM 3.0 Supported Supported
56 VERITAS Volume Manager Installation Guide

Upgrading to VxVM Release 3.5
VxVM and Solaris Upgrade Paths
Possible Upgrade Paths for VxVM and/or Solaris Upgrades
The following table shows possible VxVM/Solaris upgrade paths.
Note The upgrade_start function will currently fail if it detects enclosure-basedrootdisk names. You should run vxdiskadm, option 20 (Change the disk namingscheme), to change enclosure-based rootdisk names to regular names before usingupgrade_start.
Upgrade Paths
You can upgrade VxVM andSolaris versions:
To VxVM and Solarisversions:
Notes (see alsoNote, below)
VxVM 2.0 to 3.0 & Solaris 2.3 to 7 VxVM 3.5 & Solaris 2.6, 7, 8, 9 See “UpgradingVxVM and Solaris”on page 63VxVM 3.1 or 3.1.1 & Solaris 2.6, 7, 8 VxVM 3.5 & Solaris 7, 8, 9
VxVM 3.2 & Solaris 2.6 ,7, 8 VxVM 3.5 & Solaris 7, 8, 9
You can upgrade VxVM on thefollowing Solaris versions:
To VxVM and Solarisversions:
VxVM 2.4 to 3.0 & Solaris 2.6 VxVM 3.5 & Solaris 2.6 For encapsulatedroot disks, see“Upgrading VxVMon an EncapsulatedRoot Disk” onpage 58. Forunencapsulated rootdisks, see“Upgrading VxVMOnly” on page 66
VxVM 3.0.x & Solaris 2.6, 7, 8 VxVM 3.5 & Solaris 2.6, 7, 8, 9
VxVM 3.1 & Solaris 2.6, 7, 8 VxVM 3.5 & Solaris 2.6, 7, 8, 9
VxVM 3.1.1 & Solaris 2.6, 7, 8 VxVM 3.5 & Solaris 2.6, 7, 8, 9
VxVM 3.2 & Solaris 2.6, 7, 8 VxVM 3.5 & Solaris 2.6, 7, 8, 9
You can upgrade Solaris only: To Solaris versions:
VxVM 3.5 & Solaris 2.6 VxVM 3.5 & Solaris 7, 8, 9 “Upgrading SolarisOnly” on page 71
VxVM 3.5 & Solaris 7 VxVM 3.5 & Solaris 8, 9
VxVM 3.5 & Solaris 8 VxVM 3.5 & Solaris 9 “Upgrading SolarisOnly” on page 71
Chapter 2, Installing VERITAS Volume Manager 57

Upgrading VxVM on an Encapsulated Root Disk
Upgrading VxVM on an Encapsulated Root DiskThis section explains how to upgrade VxVM if the root disk is encapsulated. Refer to the“VxVM and Solaris Release Support Matrix” to determine if upgrading the operatingsystem is required.
The process for upgrading VxVM on an encapsulated root disk has changed since VxVM3.2. You now have two choices of tools to use for upgrading. You can use either:
◆ The pkgadd command on top of your existing software.
◆ The upgrade_start/upgrade_finish method to install VxVM 3.5.
Both methods have advantages and disadvantages, as shown in the following:
Using pkgadd Using upgrade_start/upgrade_finish
Advantages Usually requires only 1 reboot 1. There will be only a singleVRTSvxvm package displayed bypkginfo.
2. VxVM configuration data is backedup.
3. The root disk is unencapsulated.Therefore, there is no risk of notbeing able to boot up the system.
4. VRTSlic can be deinstalled, if thereare no other packages that requireit.
Disadvantages 1. In the highly unlikely event that asystem failure occurs during thepkgadd process, it is possible thatthe encapsulated rootdisk maybecome unbootable.
2. The new package is displayed bypkginfo as VRTSvxvm.2.
Note You can avoid having multipleinstances by specifying the -aadmin option withinstance=overwrite. Seepkgadd(1M) for more details.
3. You may not be able to removeVRTSlic if another installedVRTSvxvm package is still usingthe license.
This process usually requires threereboots.
58 VERITAS Volume Manager Installation Guide

Upgrading VxVM on an Encapsulated Root Disk
Caution If your root disk is not encapsulated, refer to “Upgrading VxVM Only” onpage 66.
These procedures follow.
Upgrade with pkgadd command
1. If you have not already obtained and installed a VxVM 3.5 license key, do so now. See“Product Licensing” on page 7 for details.
2. Bring the system down to single-user mode using the following command:
# init S
3. Stop the vxconfigd daemon:
# vxdctl stop
4. Stop the vxiod daemon:
# vxiod -f set 0
5. (Optional) Remove the VMSA software with the following command:
# pkgrm VRTSvmsa
Note If you still have clients running previous versions of VxVM, you can skip this step.change Step 7 to:
6. Add the VxVM 3.5 licensing package with the following:
# cd /cdrom/volume_manager/pkgs# pkgadd -d . VRTSvlic
Note VxVM 3.5 requires the 3.5 licensing package. You do not need to remove theprevious versions of VRTSlic.
7. Add the VxVM 3.5 package with the following:
# pkgadd -d . VRTSvxvm
If warnings are displayed that include the string /etc/vx, ignore them and continue.
8. Using the pkgadd command, install the additional packages:
# pkgadd -d . VRTSvmdoc VRTSvmman# pkgadd -a ../scripts/VRTSobadmin -d . VRTSob VRTSobgui
Chapter 2, Installing VERITAS Volume Manager 59
Upgrading VxVM on an Encapsulated Root Disk
# pkgadd -d . VRTSfspro VRTSvmpro
Note It is recommended that you install both VRTSfspro and VRTSvmpro if you intendto use the VEA GUI.
9. Perform a reconfiguration reboot:
# cd /; shutdown -g0 -y -i6
or
# reboot -- -r
10. Importing a pre-3.5 VxVM disk group does not automatically upgrade the disk groupversion to the VxVM 3.5 level. You may need to manually upgrade each of your diskgroups following a VxVM upgrade. See “Administering Disks” in the VERITASVolume Manager Administrator’s Guide for information on how to upgrade a diskgroup.
11. See “Setting Up and Starting VEA” on page 46 to set up and restart VEA.
Upgrade with upgrade_start/upgrade_finish commands
Follow these steps:
1. If you have not already obtained and installed a VxVM 3.5 license key, do so now. See“Product Licensing” on page 7 for details.
2. If any of the file systems /, /usr, /var, /opt, /export/home, /var/adm or/usr/kvm are defined on volumes, make sure that at least one plex for each of thosevolumes is created from a single subdisk that begins on a cylinder boundary.
This makes these file systems accessible during the upgrade process by temporarilyconverting file systems on volumes back to using direct disk partitions. Solarisrequires that disk partitions start on cylinder boundaries. The upgrade scriptsautomatically convert file systems on volumes back to using regular disk partitions,as necessary. If the upgrade scripts detect any problems (such as lack of cylinderalignment), they display an explanation of the problem and the upgrade does notproceed.
Note If any of the documentation, developer kit, or manual page packages are to beinstalled, the directory /opt must exist, be writable, and must not be a symboliclink. This is because the volumes not temporarily converted by the
60 VERITAS Volume Manager Installation Guide

Upgrading VxVM on an Encapsulated Root Disk
upgrade_start will be unavailable during the upgrade process. If you have asymbolic link from /opt to one of the unconverted volumes, the symbolic link willnot function during the upgrade and items in /opt will not be installed.
3. Bring the system down to single-user mode using the following command.
# init S
4. Load and mount the CD-ROM by starting the volmgt daemon. After starting thedaemon, the path is /cdrom/CD_name.
# /etc/init.d/volmgt start
5. Run the upgrade_start -check script to find any problems that exist whichcould prevent a successful upgrade. This script reports errors if found. Otherwise, itreports success and you can proceed with running the upgrade_start script.
# ./upgrade_start -check
6. Run the upgrade_start script to prepare the previous release of VxVM for itsremoval using the following command:
# /cdrom/volume_manager/scripts/upgrade_start
The upgrade_start script searches for volumes containing file systems.
7. Reboot to single-user mode.
# reboot -- -s
Caution The root disk partitions should not be modified: this will causeupgrade_start/upgrade_finish to fail. If you change the root diskpartitions, you cannot upgrade VxVM.
Note You need to mount /opt manually before you can run pkgrm to remove VxVMpackages if /opt is on its own partition.
8. Remove the old VxVM packages by entering:
# pkgrm VRTSvmsa VRTSvmdoc VRTSvmdev VRTSvmman VRTSvxvm VRTSlic
Note If you still have clients running old versions of VxVM, you can skip removingVMSA.
Note VxVM 3.5 requires the 3.5 licensing package. You do not need to remove theprevious versions of VRTSlic.
Chapter 2, Installing VERITAS Volume Manager 61

Upgrading VxVM on an Encapsulated Root Disk
9. Reboot to single-user mode.
# reboot -- -s
10. Load and mount the CD-ROM by starting the volmgt daemon. After starting thedaemon, the path is /cdrom/CD_name.
# /etc/init.d/volmgt start
11. Add the VxVM 3.5 licensing package with the following:
# cd /cdrom/volume_manager/pkgs# pkgadd -d . VRTSvlic
12. Add the VxVM 3.5 package with the following:
# pkgadd -d . VRTSvxvm
If warnings are displayed that include the string /etc/vx, ignore them and continue.
13. Complete the upgrade using the following command:
# ../scripts/upgrade_finish
14. Perform reconfiguration reboot:
# reboot -- -r
15. Using the pkgadd command, install the additional packages:
# cd /cdrom/volume_manager/pkgs# pkgadd -d . VRTSvmdoc VRTSvmman# pkgadd -a ../scripts/VRTSobadm -d . VRTSob VRTSobgui# pkgadd -d . VRTSfspro VRTSvmpro
16. Importing a pre-3.5 VxVM disk group does not automatically upgrade the disk groupversion to the VxVM 3.5 level. You may need to manually upgrade each of your diskgroups following a VxVM upgrade. See “Administering Disks” in the VERITASVolume Manager Administrator’s Guide for information on how to upgrade a diskgroup.
17. See “Setting Up and Starting VEA” on page 46 to set up and restart VEA.
62 VERITAS Volume Manager Installation Guide

Upgrading VxVM and Solaris
Upgrading VxVM and SolarisThis section explains how to upgrade both Solaris and VxVM. (Refer to the “VxVM andSolaris Release Support Matrix” to determine if upgrading the operating system isrequired.)
Follow these steps:
1. If you have not already obtained and installed a VxVM 3.5 license key, do so now. See“Product Licensing” on page 7 for details.
2. If any of the file systems /, /usr, /var, /opt, /export/home, /var/adm or /usr/kvmare defined on volumes, make sure that at least one plex for each of those volumes iscreated from a single subdisk that begins on a cylinder boundary.
This makes these file systems accessible during the upgrade process by temporarilyconverting file systems on volumes back to using direct disk partitions. Solarisrequires that disk partitions start on cylinder boundaries. The upgrade scriptsautomatically convert file systems on volumes back to using regular disk partitions,as necessary. If the upgrade scripts detect any problems (such as lack of cylinderalignment), they display an explanation of the problem and the upgrade does notproceed.
Note If any of the documentation, developer kit, or manual page packages are to beinstalled, the directory /opt must exist, be writable, and must not be a symboliclink. This is because the volumes not temporarily converted by the upgrade_startwill be unavailable during the upgrade process. If you have a symbolic link from/opt to one of the unconverted volumes, the symbolic link will not function duringthe upgrade and items in /opt will not be installed.
3. Bring the system down to single-user mode using the following command:
# init S
4. Load and mount the CD-ROM by starting the volmgt daemon. After starting thedaemon, the path is /cdrom/CD_name.
# /etc/init.d/volmgt start
5. Run the upgrade_start -check script to find any problems that exist whichcould prevent a successful upgrade. This script reports errors if found. Otherwise, itreports success and you can proceed with running the upgrade_start script.
# ./upgrade_start -check
6. Run the upgrade_start script to prepare the previous release of VxVM for itsremoval using the following command:
Chapter 2, Installing VERITAS Volume Manager 63

Upgrading VxVM and Solaris
# /cdrom/volume_manager/scripts/upgrade_start
The upgrade_start script searches for volumes containing file systems.
7. Reboot to single-user mode.
# reboot -- -s
Note You need to mount /opt manually before you can run pkgrm to remove VxVMpackages if /opt is on its own partition.
8. Remove the old VxVM packages by entering:
# pkgrm VRTSvmsa VRTSvmdoc VRTSvmdev VRTSvmman VRTSvxvm VRTSlic
Note If you still have clients running old versions of VxVM, you can skip removingVMSA.
Note Licensing in VxVM 3.5 requires the new VRTSvlic package.You do not need toremove the existing VRTSlic package.
9. If Sun Volume Manager is installed:
- Remove any SUNWvxvm related patches.
Refer to the Sun documentation for the procedure.
- Remove SUNWvxvm:
# pkgrm SUNWvxvm SUNWvmdoc SUNWvmdev
Note If you have made any additional modifications or have applied any patches, theymust be removed before removing the SUNvxvm package.
10. Reboot the machine to single-user mode by running the following command:
# reboot -- -s
11. If you are upgrading Solaris, upgrade the operating system to Solaris 2.6, 7, 8, or 9.Refer to the Solaris installation documentation for instructions on how to upgradeSolaris.
12. If you upgraded Solaris, boot up in single-user mode.
# reboot -- -s
13. Load and mount the CD-ROM by starting the volmgt daemon.
64 VERITAS Volume Manager Installation Guide

Upgrading VxVM and Solaris
# /etc/init.d/volmgt start
14. Add the VxVM 3.5 licensing package using the following commands:
# cd /cdrom/volume_manager/pkgs# pkgadd -d . VRTSvlic
15. Add the VxVM 3.5 package using the following command:
# pkgadd -d . VRTSvxvm
If warnings are displayed that include the string /etc/vx, ignore them and continue.
16. Complete the upgrade using the following command:
# ../scripts/upgrade_finish
17. Perform reconfiguration reboot:
# reboot -- -r
18. Using the pkgadd command, install additional packages:
# cd /cdrom/volume_manager/pkgs# pkgadd -d . VRTSvmdoc VRTSvmman# pkgadd -a ../scripts/VRTSobadmin -d . VRTSob VRTSobgui# pkgadd -d . VRTSfspro VRTSvmpro
19. Importing a pre-3.5 VxVM disk group does not automatically upgrade the disk groupversion to the VxVM 3.5 level. You may need to manually upgrade each of your diskgroups following a VxVM upgrade. See “Administering Disks” in the VERITASVolume Manager Administrator’s Guide for information on how to upgrade a diskgroup.
20. See “Setting Up and Starting VEA” on page 46 to set up and restart VEA.
Chapter 2, Installing VERITAS Volume Manager 65

Upgrading VxVM Only
Upgrading VxVM OnlyThis section explains how to upgrade VxVM if the root disk is NOT encapsulated. Refer tothe “VxVM and Solaris Release Support Matrix” to determine if upgrading the operatingsystem is required.
The process for upgrading VxVM on a non-encapsulated root disk has changed sinceVxVM 3.2. You now have two choices of tools to use for upgrading. You can use either:
◆ The pkgadd command on top of your existing software.
◆ The upgrade_start/upgrade_finish method to install VxVM 3.5.
Both methods have advantages and disadvantages, as shown in the following:
Caution If your root disk is encapsulated, refer to “Upgrading VxVM on anEncapsulated Root Disk” on page 58.
These procedures follow.
Using pkgadd Using upgrade_start/upgrade_finish
Advantages Usually requires only 1 reboot 1. There will be only a singleVRTSvxvm package displayed bypkginfo.
2. VxVM configuration data is backedup.
3. VRTSlic can be deinstalled, if thereare no other packages that requireit.
Disadvantages 1. The new package is displayed bypkginfo as VRTSvxvm.2.
Note You can avoid having multipleinstances by specifying the -aadmin option withinstance=overwrite. Seepkgadd(1M) for more details.
2. You may not be able to removeVRTSlic if another installedVRTSvxvm package is still usingthe license.
66 VERITAS Volume Manager Installation Guide
Upgrading VxVM Only
Upgrade with pkgadd command
1. If you have not already obtained and installed a VxVM 3.5 license key, do so now. See“Product Licensing” on page 7 for details.
2. Bring the system down to single-user mode using the following command:
# init S
3. Stop the vxconfigd daemon:
# vxdctl stop
4. Stop the vxiod daemon:
# vxiod -f set 0
5. (Optional) Remove the VMSA software with the following command:
# pkgrm VRTSvmsa
Note You need to mount /opt manually before you can run pkgrm to remove VxVMpackages if /opt is on its own partition.
Note If you still have clients running previous versions of VxVM, you can skip this step.
6. Add the VxVM 3.5 licensing package with the following commands:
# cd /cdrom/volume_manager/pkgs# pkgadd -d . VRTSvlic
Note VxVM 3.5 requires the 3.5 licensing package. You do not need to remove theprevious versions of VRTSlic.
7. Add the VxVM 3.5 package with the following:
# pkgadd -d . VRTSvxvm
If warnings are displayed that include the string /etc/vx, ignore them and continue.
8. Using the pkgadd command, install the additional packages:
# pkgadd -d . VRTSvmdoc VRTSvmman# pkgadd -a ../scripts/VRTSobadmin -d . VRTSob VRTSobgui# pkgadd -d . VRTSfspro VRTSvmpro
Chapter 2, Installing VERITAS Volume Manager 67

Upgrading VxVM Only
Note It is recommended that you install both VRTSfspro and VRTSvmpro if you intendto use the VEA GUI.
9. Perform a reconfiguration reboot:
# cd /; shutdown -g0 -y -i6
or
# reboot -- -r
10. Importing a pre-3.5 VxVM disk group does not automatically upgrade the disk groupversion to the VxVM 3.5 level. You may need to manually upgrade each of your diskgroups following a VxVM upgrade. See “Administering Disks” in the VERITASVolume Manager Administrator’s Guide for information on how to upgrade a diskgroup.
11. See “Setting Up and Starting VEA” on page 46 to set up and restart VEA.
Upgrade with upgrade_start/upgrade_finish commands
Follow these steps:
1. If you have not already obtained and installed a VxVM 3.5 license key, do so now. See“Product Licensing” on page 7 for details.
2. Bring the system down to single-user mode using the following command.
# init S
3. Load and mount the CD-ROM by starting the volmgt daemon. After starting thedaemon, the path is /cdrom/CD_name.
# /etc/init.d/volmgt start
Note You need to mount /opt manually if /opt is on its own partition.
4. Run the upgrade_start -check script to find any problems that exist whichcould prevent a successful upgrade. This script reports errors if found. Otherwise, itreports success and you can proceed with running the upgrade_start script.
# ./upgrade_start -check
5. Run the upgrade_start script to prepare the previous release of VxVM for itsremoval using the following command:
68 VERITAS Volume Manager Installation Guide

Upgrading VxVM Only
# /cdrom/volume_manager/scripts/upgrade_start
The upgrade_start script searches for volumes containing file systems.
6. Remove the old VxVM packages by entering:
# pkgrm VRTSvmsa VRTSvmdoc VRTSvmdev VRTSvmman VRTSvxvm VRTSlic
Note If you still have clients running old versions of VxVM, you can skip removingVMSA.
Note VxVM 3.5 requires the 3.5 licensing package. You do not need to remove theprevious versions of VRTSlic.
7. Load and mount the CD-ROM by starting the volmgt daemon. After starting thedaemon, the path is /cdrom/CD_name.
# /etc/init.d/volmgt start
8. Add the VxVM 3.5 licensing package with the following:
# cd /cdrom/volume_manager/pkgs# pkgadd -d . VRTSvlic
9. Add the VxVM 3.5 package with the following:
# pkgadd -d . VRTSvxvm
If warnings are displayed that include the string /etc/vx, ignore them and continue.
10. Complete the upgrade using the following command:
# ../scripts/upgrade_finish
11. Perform reconfiguration reboot:
# reboot -- -r
12. Using the pkgadd command, install the additional packages:
# cd /cdrom/volume_manager/pkgs# pkgadd -d . VRTSvmdoc VRTSvmman# pkgadd -a ../scripts/VRTSobadmin -d . VRTSob VRTSobgui# pkgadd -d . VRTSfspro VRTSvmpro
Chapter 2, Installing VERITAS Volume Manager 69

Upgrading VxVM Only
13. Importing a pre-3.5 VxVM disk group does not automatically upgrade the disk groupversion to the VxVM 3.5 level. You may need to manually upgrade each of your diskgroups following a VxVM upgrade. See “Administering Disks” in the VERITASVolume Manager Administrator’s Guide for information on how to upgrade a diskgroup.
14. See “Setting Up and Starting VEA” on page 46 to set up and restart VEA.
70 VERITAS Volume Manager Installation Guide

Upgrading Solaris Only
Upgrading Solaris OnlyIf you are running VxVM 3.5 with Solaris 2.6 or 7, you can upgrade Solaris using thefollowing procedure.
Caution The root disk partitions should not be modified: this will causeupgrade_start/upgrade_finish to fail. If you change the root diskpartitions, you cannot upgrade VxVM.
1. If the boot disk is mirrored, detach the mirror. You can use VEA and the vxplexcommand.
2. If any of the file systems /, /usr, /var, /opt, /export/home, /var/adm or /usr/kvmare defined on volumes, ensure that at least one plex for each of those volumes isformed from a single subdisk that begins on a cylinder boundary. This is necessarybecause part of the upgrade process involves temporarily converting file systems onvolumes back to using direct disk partitions, and Solaris requires that disk partitionsstart on cylinder boundaries.
The upgrade scripts (located in the /scripts directory on the CD) automaticallyconvert file systems on volumes back to using regular disk partitions, as necessary. Ifthe upgrade scripts detect any problems (such as lack of cylinder alignment), theydisplay an explanation of the problem and the upgrade does not proceed.
Note If any of the documentation, developer kit, or manual page packages are to beinstalled, the directory /opt must exist, be writable, and must not be a symboliclink. This is because the volumes not temporarily converted by the upgrade_startwill be unavailable during the upgrade process. If you have a symbolic link from/opt to one of the unconverted volumes, the symbolic link will not function duringthe upgrade and items in /opt will not be installed.
3. Bring the system down to single-user mode using the following command:
# init S
Note You need to mount /opt manually if /opt is on its own partition.
4. Load and mount the CD-ROM by starting the volmgt daemon. After starting thedaemon, the path is /cdrom/CD_name.
# /etc/init.d/volmgt start
5. Run the upgrade_start -check script to find any problems that exist whichcould prevent a successful upgrade. This script reports errors if found. Otherwise, itreports success and you can proceed with running the upgrade_start script.
Chapter 2, Installing VERITAS Volume Manager 71

Checking VxVM Processes
# ./upgrade_start -check
6. Run the upgrade_start script to prepare the previous release of VxVM for itsremoval.
# /cdrom/volume_manager/scripts/upgrade_start
The upgrade_start script searches for volumes containing file systems. If certainkey file systems must be converted back to partitions, the script indicates that a rebootis necessary. If so, reboot to single-user mode before proceeding to the next step. If anyvolumes are in use, either unmount those volumes or reboot to single-user mode.
7. Reboot to single user mode:
# reboot -- -s
8. Upgrade the operating system to Solaris 7 or 8. Refer to the Solaris installationdocumentation for instructions on how to upgrade Solaris. After installing Solaris,install the required patches shown in “Solaris Patches for VxVM” on page 18.
9. Reboot to single-user mode:
# reboot -- -s
10. Load and mount the CD-ROM by starting the volmgt daemon. After starting thedaemon, the path is /cdrom/CD_name.
# /etc/init.d/volmgt start
11. Complete the upgrade by entering:
# /cdrom/volume_manager/scripts/upgrade_finish
12. Reboot to multi-user mode using a command such as the /etc/shutdowncommand.
Checking VxVM ProcessesAfter VxVM has been successfully installed and you have rebooted your system, confirmthat key VxVM processes (vxconfigd, vxnotify, and vxrelocd) are running.
Note If you have disabled hot-relocation, only the vxconfigd process is running.
Use the following command:
# ps -ef | grep vx
72 VERITAS Volume Manager Installation Guide

Starting and Enabling the Configuration Daemon vxconfigd
Output similar to the following displays:
root 458 180 10:23:34? 0:00 vxrelocd rootroot 414 180 10:23:06? 0:03 vxconfigdroot 478 414 10:23:37? 0:00 vxrelocd rootroot 479 478 5 10:23:37? 0:00 vxnotify -f -w 15
Starting and Enabling the Configuration Daemon vxconfigdThe VxVM configuration daemon (vxconfigd) maintains VxVM disk and disk groupconfigurations. The vxconfigd communicates configuration changes to the kernel andmodifies configuration information stored on disk.
Startup scripts usually invoke vxconfigd at system boot time. The vxconfigd daemonmust be running for VxVM to operate properly.
The following procedures describe how to check vxconfigd has been started, whether itis enabled or disabled, how to start it manually, or how to enable it as required.
To determine whether vxconfigd is enabled, use the following command:
# vxdctl mode
The following message indicates that the vxconfigd daemon is running and enabled:
mode: enabled
This message indicates that vxconfigd is not running:
mode: not-running
To start the vxconfigd daemon, enter the following command:
# vxconfigd
This message indicates that vxconfigd is running, but not enabled:
mode: disabled
To enable the volume daemon, enter the following command:
# vxdctl enable
Once started, vxconfigd automatically becomes a background process.
By default, vxconfigd writes error messages to the console. However, you can configureit to write errors to a log file. For more information, see the vxconfigd(1M) andvxdctl(1M) manual pages.
Chapter 2, Installing VERITAS Volume Manager 73

System Setup Guidelines
Starting the Volume I/O Daemon vxiodThe volume I/O daemon (vxiod) provides extended I/O operations without blockingcalling processes. Several vxiod daemons are usually started at system boot time afteryour initial installation, and they should be running at all times. The procedure belowdescribes how to verify that the vxiod daemons are running, and how to start them ifnecessary.
To verify that vxiod daemons are running, enter the following command:
# vxiod
Note The vxiod daemon is a kernel thread and is not visible using the ps command.
If any vxiod daemons are running, the following message displays:
N volume I/O daemons running
where N is the number of vxiod daemons currently running.
If no vxiod daemons are currently running, start some by entering this command:
# vxiod set N
where N equals the desired number of vxiod daemons. It is recommended that at leastone vxiod daemon should be run for each CPU in the system.
For more information, see the vxiod(1M) manual page.
System Setup GuidelinesThis section contains information to help you set up your system for efficient storagemanagement. For specific setup tasks, refer to the VERITAS Volume Manager StorageAdministrator Administrator’s Guide.
The following system setup sequence is typical and is used as an example. Your systemrequirements may differ. The system setup guidelines provide helpful information forspecific setup configurations.
▼ Initial Setup
1. Place disks under VxVM control.
2. Create new disk groups (if you do not want to use rootdg or you require additionaldisk groups).
3. Create volumes.
74 VERITAS Volume Manager Installation Guide

System Setup Guidelines
4. Put file systems on volumes.
▼ Options
❖ Encapsulate the boot/root disk and mirror it to create an alternate boot disk.
❖ Designate hot-relocation spare disks.
❖ Add mirrors to volumes.
▼ Maintenance
❖ Resize volumes and file systems.
❖ Add more disks or disk groups.
❖ Create snapshots.
The following general guidelines are to help you understand and plan an efficient storagemanagement system. See the cross-references in each section for more information aboutthe featured guideline.
Disabling Hot-RelocationThe hot-relocation feature detects disk failures automatically and notifies you of thenature of the failure, attempts to relocate any affected subdisks that are redundant, andinitiates recovery procedures. The hot-relocation feature is enabled by default and it isrecommended that you leave it on.
However, you can disable it by preventing the vxrelocd daemon from starting upduring system startup. This should be done after the VxVM packages have been installed.
To disable hot-relocation, comment out the vxrelocd line in the startup file/etc/rc2.d/S95vxvm-recover, as follows:
# vxrelocd root &
Hot-Relocation GuidelinesRefer to the following guidelines when using hot-relocation.
◆ The hot-relocation feature is enabled by default. Although it is possible to disablehot-relocation, it is advisable to leave it enabled.
Chapter 2, Installing VERITAS Volume Manager 75

System Setup Guidelines
◆ Although hot-relocation does not require you to designate disks as spares, designateat least one disk as a spare within each disk group. This gives you some control overwhich disks are used for relocation. If no spares exist, VxVM uses any available freespace within the disk group. When free space is used for relocation purposes, it ispossible to have performance degradation after the relocation.
◆ After hot-relocation occurs, designate one or more additional disks as spares toaugment the spare space. Some of the original spare space may be occupied byrelocated subdisks.
◆ If a given disk group spans multiple controllers and has more than one spare disk, setup the spare disks on different controllers (in case one of the controllers fails).
◆ For a mirrored volume, configure the disk group so that there is at least one disk thatdoes not already contain a mirror of the volume. This disk should either be a sparedisk with some available space or a regular disk with some free space and the disk isnot excluded from hot-relocation use.
◆ For a mirrored and striped volume, configure the disk group so that at least one diskdoes not already contain one of the mirrors of the volume or another subdisk in thestriped plex. This disk should either be a spare disk with some available space or aregular disk with some free space and the disk is not excluded from hot-relocationuse.
◆ For a RAID-5 volume, configure the disk group so that at least one disk does notalready contain the RAID-5 plex (or one of its log plexes) of the volume. This diskshould either be a spare disk with some available space or a regular disk with somefree space and the disk is not excluded from hot-relocation use.
◆ If a mirrored volume has a DRL log subdisk as part of its data plex, you cannotrelocate the data plex. Instead, place log subdisks in log plexes that contain no data.
◆ Hot-relocation does not guarantee to preserve the original performance characteristicsor data layout. Examine the locations of newly-relocated subdisks to determinewhether they should be relocated to more suitable disks to regain the originalperformance benefits.
◆ Hot-relocation is capable of creating a new mirror of the root disk if the root disk ismirrored and it fails. The rootdg should contain sufficient contiguous spare or freespace to accommodate the volumes on the root disk. (rootvol and swapvol requirecontiguous disk space.)
◆ Although it is possible to build VxVM objects on spare disks (using vxmake or theVEA interface), it is recommended that you use spare disks for hot-relocation only.
76 VERITAS Volume Manager Installation Guide

System Setup Guidelines
Striping GuidelinesRefer to the following guidelines when using striping. See VERITAS Volume ManagerAdministrator’s Guide for more information.
◆ Do not place more than one column of a striped plex on the same physical disk.
◆ Calculate stripe unit sizes carefully. In general, a moderate stripe unit size (forexample, 64 kilobytes, which is also the default used by vxassist) is recommended.
◆ If it is not feasible to set the stripe unit size to the track size, and you do not know theapplication I/O pattern, use 64 kilobytes for the stripe unit size.
Note Many modern disk drives have variable geometry. This means that the track sizediffers between cylinders, so that outer disk tracks have more sectors than innertracks. It is therefore not always appropriate to use the track size as the stripe unitsize. For these drives, use a moderate stripe unit size (such as 64 kilobytes), unlessyou know the I/O pattern of the application.
◆ Volumes with small stripe unit sizes can exhibit poor sequential I/O latency if thedisks do not have synchronized spindles. Generally, striping over disks withoutsynchronized spindles yields better performance when used with larger stripe-unitsizes and multi-threaded, or largely asynchronous, random I/O streams.
◆ Typically, the greater the number of physical disks in the stripe, the greater theimprovement in I/O performance; however, this reduces the effective mean timebetween failures of the volume. If this is an issue, combine striping with mirroring tocombine high-performance with improved reliability.
◆ If only one plex of a mirrored volume is striped, set the policy of the volume toprefer for the striped plex. (The default read policy, select, does thisautomatically.)
◆ If more than one plex of a mirrored volume is striped, configure the same stripe-unitsize for each striped plex.
◆ Where possible, distribute the subdisks of a striped volume across drives connected todifferent controllers and buses.
◆ Avoid the use of controllers that do not support overlapped seeks. (Such controllersare rare.)
The vxassist command automatically applies and enforces many of these rules when itallocates space for striped plexes in a volume.
Chapter 2, Installing VERITAS Volume Manager 77
System Setup Guidelines
Mirroring GuidelinesRefer to the following guidelines when using mirroring. See VERITAS Volume ManagerAdministrator’s Guide for more information.
◆ Do not place subdisks from different plexes of a mirrored volume on the samephysical disk. This action compromises the availability benefits of mirroring anddegrades performance. Using the vxassist command precludes this fromhappening.
◆ To provide optimum performance improvements through the use of mirroring, atleast 70 percent of physical I/O operations should be read operations. A higherpercentage of read operations results in even better performance. Mirroring may notprovide a performance increase or may even result in performance decrease in awrite-intensive workload environment.
Note The UNIX operating system implements a file system cache. Read requests canfrequently be satisfied from the cache. This can cause the read/write ratio forphysical I/O operations through the file system to be biased toward writing (whencompared to the read/write ratio at the application level).
◆ Where possible, use disks attached to different controllers when mirroring or striping.Most disk controllers support overlapped seeks. This allows seeks to begin on twodisks at once. Do not configure two plexes of the same volume on disks that areattached to a controller that does not support overlapped seeks. This is important forolder controllers or SCSI disks that do not cache on the drive. It is less important formodern SCSI disks and controllers. Mirroring across controllers allows the system tosurvive a failure of one of the controllers. Another controller can continue to providedata from a mirror.
◆ A plex exhibits superior performance when striped or concatenated across multipledisks, or when located on a much faster device. Set the read policy to prefer the fasterplex. By default, a volume with one striped plex is configured to prefer reading fromthe striped plex.
Dirty Region Logging (DRL) GuidelinesDirty Region Logging (DRL) can speed up recovery of mirrored volumes following asystem crash. When DRL is enabled, VxVM keeps track of the regions within a volumethat have changed as a result of writes to a plex. VxVM maintains a bitmap and stores thisinformation in a log subdisk. Log subdisks are defined for and added to a volume toprovide DRL. Log subdisks are independent of plexes, are ignored by plex policies, andare only used to hold the DRL information.
78 VERITAS Volume Manager Installation Guide

System Setup Guidelines
Note Using Dirty Region Logging can impact system performance in a write-intensiveenvironment.
Refer to the following guidelines when using DRL:
◆ For DRL to be in effect, the volume must be mirrored.
◆ At least one log subdisk must exist on the volume for DRL to work. However, onlyone log subdisk can exist per plex.
◆ The subdisk that is used as the log subdisk should not contain necessary data.
◆ Mirror log subdisks by having more than one log subdisk (but only one per plex) inthe volume. This ensures that logging can continue, even if a disk failure causes onelog subdisk to become inaccessible.
◆ Log subdisks must be configured with an even number of sectors. (The last sector in alog subdisk with an odd number of sectors is not used.) The log subdisk size shouldusually be configured as 33 sectors per 2 GB of volume. A log subdisk of 33 sectors issufficient for a volume larger than 2 GB. In general, the default log subdisk lengthconfigured by the vxassist command is suitable for use.
◆ Do not place the log subdisk on a heavily-used disk, if possible.
◆ Use persistent (non-volatile) storage disks for log subdisks.
Mirroring and Striping GuidelinesRefer to the following guidelines when using mirroring and striping together. For moreinformation, see the VERITAS Volume Manager Administrator’s Guide for details.
◆ Make sure enough disks are available for the striped and mirrored configuration. Atleast two disks are required for the striped plex and one or more additional disks areneeded for the mirror.
◆ Never place subdisks from one plex on the same physical disk as subdisks from theother plex.
RAID-5 GuidelinesRefer to the following guidelines when using RAID-5. For more information, see VERITASVolume Manager Administrator’s Guide.
In general, the guidelines for mirroring and striping together also apply to RAID-5. Thefollowing guidelines should also be observed with RAID-5:
◆ Only one RAID-5 plex can exist per RAID-5 volume (but there can be multiple logplexes).
Chapter 2, Installing VERITAS Volume Manager 79

Protecting Your System and Data
◆ The RAID-5 plex must be derived from at least two subdisks on two or more physicaldisks. If any log plexes exist, they must belong to disks other than those used for theRAID-5 plex.
◆ RAID-5 logs can be mirrored and striped.
◆ If the volume length is not explicitly specified, it is set to the length of any RAID-5plex associated with the volume; otherwise, it is set to zero. If you specify the volumelength, it must be a multiple of the stripe unit size of the associated RAID-5 plex, ifany.
◆ If the log length is not explicitly specified, it is set to the length of the smallest RAID-5log plex that is associated, if any. If no RAID-5 log plexes are associated, it is set tozero.
◆ Sparse RAID-5 log plexes are not valid.
Protecting Your System and DataA disk failure can cause loss of data on the failed disk and loss of access to your system.Loss of access is due to the failure of a key disk used for system operations. VxVM canprotect your system from these problems.
To maintain system availability, data important to running and booting your system mustbe mirrored. The data must be preserved so it can be used in case of failure.
The following are suggestions for protecting your system and data:
◆ Place the disk containing the root file system (the root or boot disk) under VxVMcontrol through encapsulation. Encapsulation converts the root and swap devices tovolumes (rootvol and swapvol).
◆ Mirror the root disk so that an alternate root disk exists for booting purposes. Bymirroring disks critical to booting, you ensure that no single disk failure leaves yoursystem unbootable and unusable.
For maximum availability of the system, create mirrors for the rootvol, swapvol,usr, and var volumes. For more information, see the VERITAS Volume ManagerTroubleshooting Guide.
◆ Use mirroring to protect data against loss from a disk failure. To preserve data, createand use mirrored volumes that have at least two data plexes. The plexes must be ondifferent disks. If a disk failure causes a plex to fail, the data in the mirrored volumestill exists on the other disk.
When you use the vxassist mirror command to create mirrors, it locates themirrors so the loss of one disk does not result in a loss of data. By default, thevxassist command does not create mirrored volumes; edit the file
80 VERITAS Volume Manager Installation Guide

Protecting Your System and Data
/etc/default/vxassist to set the default layout to mirrored. For information onthe vxassist defaults file, see VERITAS Volume Manager Administrator’s Guide andthe vxassist(1M) manual page.
◆ Leave the VxVM hot-relocation feature enabled to detect disk failures automatically. Itwill notify you of the nature of the failure, attempt to relocate any affected subdisksthat are redundant, and initiate recovery procedures. Configure at least onehot-relocation spare disk in each disk group. This will allow sufficient space forrelocation in the event of a failure.
If the root disk is mirrored, hot-relocation can automatically create another mirror ofthe root disk if the original root disk fails. The rootdg must contain enoughcontiguous spare or free space for the volumes on the root disk (rootvol andswapvol volumes require contiguous disk space).
◆ Use the DRL feature to speed up recovery of mirrored volumes after a system crash.Make sure that each mirrored volume has at least one log subdisk.
Note rootvol, swapvol, and usr volumes cannot be DRL volumes.
◆ Use logging to prevent corruption of recovery data in RAID-5 volumes. Make surethat each RAID-5 volume has at least one log plex.
◆ Perform regular backups to protect your data. Backups are necessary if all copies of avolume are lost or corrupted. Power surges can damage several (or all) disks on yoursystem. Also, typing a command in error can remove critical files or damage a filesystem directly. Performing regular backups ensures that lost or corrupted data isavailable to be retrieved.
Chapter 2, Installing VERITAS Volume Manager 81

Uninstalling VxVM
Uninstalling VxVMBefore uninstalling, you should move volumes from VxVM control. If the root volume isencapsulated, use the procedures in“Moving Volumes From an Encapsulated Root Disk”on page 82. If your root disk is not encapsulated, you can start with the procedures in“Moving Volumes To Disk Partitions.”
Moving Volumes From an Encapsulated Root DiskIf root, swap, usr, or var is a volume under VxVM control, use the following procedure.
1. Ensure that the rootvol, swapvol, usr, and var volumes have only one associatedplex each. The plex must be contiguous, non-striped, non-spanned, and non-sparse.
For information about the plex, use the following command:
# vxprint -ht rootvol swapvol usr var
If any of these volumes have more than one associated plex, remove the unnecessaryplexes using the following command:
# vxplex -o rm dis plex_name
It is important that the plex remaining for the rootvol volume has been createdusing the vxrootmir program, which guarantees that underlying subdisks start oncylinder boundaries and that partitions are created for them.
2. Run the vxunroot program using the following command:
# /etc/vx/bin/vxunroot
This command changes the volume entries in /etc/vfstab to the underlying diskpartitions of the rootvol, swapvol, usr, and var volumes. The command alsomodifies /etc/system and prompts for a reboot so that disk partitions are mountedinstead of volumes for the root, swapvol, usr, opt, home and var volumes.
Continue to“Moving Volumes To Disk Partitions” on page 82 to complete theremoval.
Moving Volumes To Disk Partitions
1. All volumes must be moved to disk partitions. This can be done using one of theseprocedures:
- Back up the system fully onto tape and then recover from it.
82 VERITAS Volume Manager Installation Guide

Uninstalling VxVM
- Back up each file system individually and then recover them all after creating newfile systems on disk partitions.
- Use VxVM to move volumes incrementally onto disk partitions. Use thefollowing instructions to do this.
Move Volumes onto Disk Partitions Using VxVM
1. Evacuate disks using the vxdiskadm program, VEA, or the vxevac script. Youshould consider the amount of target disk space required for this before you begin.
Evacuation moves subdisks from the specified disks to target disks. The evacuateddisks provide the initial free disk space for volumes to be moved to disk partitions.
2. Remove the evacuated disks from VxVM control using the following commands:
# vxdg rmdisk disk _name# vxdisk rm devname
3. Decide which volume to move first. If the volume to be moved is mounted, unmountit.
4. If the volume is being used as a raw partition for database applications, make surethat the application is not updating the volume and that data on the volume is synced.
5. Create a partition on free disk space of the same size as the volume. If there is notenough free space for the partition, a new disk must be added to the system for thefirst volume removed. Subsequent volumes can use the free space generated by theremoval of this volume.
6. Copy the data on the volume onto the newly created disk partition using a commandsimilar to the following:
# dd if=/dev/vx/dsk/lhome of=/dev/dsk/c2t2d2s7
where c2t2d2 is the disk outside of VxVM and s7 is the newly created partition.
7. Replace the entry for that volume (if present) in /etc/vfstab with an entry for thenewly created partition.
8. Mount the disk partition if the corresponding volume was previously mounted.
9. Remove the volume from the VxVM using the following command:
# vxedit -rf rm volume_name
Chapter 2, Installing VERITAS Volume Manager 83

Uninstalling VxVM
10. Remove any disks that have become free (those having no subdisks defined on them)by removing the volumes from VERITAS Volume Manager control.
To check if there are still some subdisks remaining on a particular disk, use thecommand:
# vxprint -F '%sdnum' diskname
If the output is not 0, there are still some subdisks on this disk that you need toremove. If the output is 0, remove the disk from VERITAS Volume Manager control asfollows:
# vxdg rmdisk diskname# vxdisk rm devname
Use the free space created for adding the data from the next volume you want toremove.
11. After you successfully convert all volumes into disk partitions, reboot the system.
12. After the reboot, make sure none of the volumes are open by using the followingcommand:
# vxprint -Aht -e v_open
If any volumes remain open, repeat the steps 4 to 12, above.
“Moving Volumes onto Partitions - Example” on page 75 is an example showing how tomove the data on a volume to a disk partition.
Shutting Down VxVMTo shut down VxVM, use the following commands:
# vxdctl stop# vxiod -f set 0
Removing the VERITAS Volume Manager PackagesBefore removing the packages, you should determine if any other VERITAS products areinstalled on your system. These products may depend on the VRTSvlic package licensethat you may be removing.
To check for other installed VERITAS products:
pkginfo | grep -i vrts
You get a warning when you try to remove VRTSvlic if other products are using thatlicense.
84 VERITAS Volume Manager Installation Guide
Uninstalling VxVM
Removing the VERITAS Volume Manager
To remove the VxVM installed packages, use the following command:
# pkgrm VRTSvmdoc VRTSvmman VRTSvxvm VRTSvlic
If VxVM 2.x is still installed and you want to remove VxVM 3.5, it is necessary to removethe VxVM 2.x package first. To determine whether both packages are present, use thefollowing command:
# pkginfo | grep vxvm
Output is displayed that lists both the VRTSvxvm and VRTSvxvm.2 packages. To removeboth packages, use the following command:
# pkgrm VRTSvmdoc VRTSvmman \ VRTSvxvm.2 VRTSvxvm VRTSlic VRTSvlic
Removing the VERITAS Provider Packages
To remove the VERITAS Virtual Disk Management Services Provider and VERITAS FileSystem Provider packages, use the following commands:
# pkgrm VRTSvmpro# pkgrm VRTSfspro
Removing the VERITAS Enterprise Administrator
To remove the VERITAS Enterprise Administrator packages, use the followingcommands:
# pkgrm VRTSob# pkgrm VRTSobgui
Removing the Windows Client Software Package
To remove the Windows Client software, you:
Click Start > Settings > Control Panel > Add/Remove Software
Choose VERITAS Enterprise Administrator for removal.
Verifying Removal
To verify the removal of the packages:
# pkginfo | grep VRTS
Chapter 2, Installing VERITAS Volume Manager 85

Uninstalling VxVM
If you do not have any other VERITAS products installed on the system, you can removethe /etc/vx directory, the /usr/lib/vxvm directory and the /opt/VRTS*directories.
This should complete the removal of VERITAS Volume Manager.
Restoring VERITAS Volume Manager 3.5 ConfigurationYou can restore VxVM configuration information from the backup directory/VXVM-CFG-BAK after VxVM 3.5 has been removed by pkgrm.
Note This feature applies only to VxVM 3.5. If you used pkgrm to remove versionsVxVM prior to 3.5, the configuration information is not saved by pkgrm.
Note This feature is available only when VxVM is removed using the stand-alone pkgrmcommand. That is, it is not available whenpkgrm is used as part of theupgrade_start script.
The following files are available for restoration (using pkgadd) from directory/VXVM-CFG-BAK:
- /etc/vx/volboot
- /etc/vx/array.info
- /kernel/drv/vxdmp.conf
- /kernel/drv/vxio.conf
- /etc/vx/jbod.info
- /etc/vx/ddl.support
- /etc/vx/vxddl.exclude
- /etc/vx/vxvm.exclude
- /etc/vx/vxdmp.exclude
- /etc/vx/vvrports
86 VERITAS Volume Manager Installation Guide

Moving Volumes onto Partitions - Example
3 This example shows how to move the data on a volume to a disk partition. In the example,there are three disks: disk1 and disk2 are subdisks on volume vol01 and disk3 is afree disk. The data on vol01 is copied to disk3 using vxevac.1. Diskgroup voldg content before the data on vol01 is copied to disk3.
# vxprint -g voldg -htDG NAME NCONFIG NLOG MINORS GROUP-IDDM NAME DEVICE TYPE PRIVLEN PUBLEN STATERV NAME RLINK_CNT KSTATE STATE PRIMARY DATAVOLS SRLRL NAME RVG KSTATE STATE REM_HOST REM_DG REM_RLNKV NAME RVG KSTATE STATE LENGTH READPOL PREFPLEXUTYPEPL NAME VOLUME KSTATE STATE LENGTH LAYOUT NCOL/WIDMODESD NAME PLEX DISK DISKOFFS LENGTH [COL/]OFF DEVICEMODESV NAME PLEX VOLNAME NVOLLAYR LENGTH [COL/]OFF AM/NMMODEDC NAME PARENTVOL LOGVOLSP NAME SNAPVOL DCO
dg voldg default default 1150001017856044.1141.hostname.veritas.com
dm disk1 c1t12d0s2 sliced 2591 17900352 -dm disk2 c1t14d0s2 sliced 2591 17899056 -dm disk3 c1t3d0s2 sliced 2591 17899056 -
v vol1 - ENABLED ACTIVE 4196448 ROUND -fsgenpl pl1 vol1 ENABLED ACTIVE 4196448 CONCAT -RWsd sd1 pl1 disk1 0 2098224 0 c1t12d0ENAsd sd2 pl1 disk2 0 2098224 2098224 c1t14d0ENA
2. Evacuate disk1 to disk3.
# /etc/vx/bin/vxevac -g voldg disk1 disk3
87

# vxprint -g voldg -ht
DG NAME NCONFIG NLOG MINORS GROUP-IDDM NAME DEVICE TYPE PRIVLEN PUBLEN STATERV NAME RLINK_CNT KSTATE STATE PRIMARY DATAVOLS SRLRL NAME RVG KSTATE STATE REM_HOST REM_DG REM_RLNKV NAME RVG KSTATE STATE LENGTH READPOL PREFPLEXUTYPEPL NAME VOLUME KSTATE STATE LENGTH LAYOUT NCOL/WIDMODESD NAME PLEX DISK DISKOFFS LENGTH [COL/]OFF DEVICEMODESV NAME PLEX VOLNAME NVOLLAYR LENGTH [COL/]OFF AM/NMMODEDC NAME PARENTVOL LOGVOLSP NAME SNAPVOL DCO
dg voldg default default 1150001017856044.1141.hostname.veritas.com
dm disk1 c1t12d0s2 sliced 2591 17900352 -dm disk2 c1t14d0s2 sliced 2591 17899056 -dm disk3 c1t3d0s2 sliced 2591 17899056 -
v vol1 - ENABLED ACTIVE 4196448 ROUND -fsgenpl pl1 vol1 ENABLED ACTIVE 4196448 CONCAT -RWsd disk3-01 pl1 disk3 0 2098224 0 c1t3d0ENAsd sd2 pl1 disk2 0 2098224 2098224 c1t14d0ENA
3. Evacuate disk2 to disk3.
# /etc/vx/bin/vxevac -g voldg disk2 disk3# vxprint -g voldg -ht
DG NAME NCONFIG NLOG MINORS GROUP-IDDM NAME DEVICE TYPE PRIVLEN PUBLEN STATERV NAME RLINK_CNT KSTATE STATE PRIMARY DATAVOLS SRLRL NAME RVG KSTATE STATE REM_HOST REM_DG REM_RLNKV NAME RVG KSTATE STATE LENGTH READPOL PREFPLEXUTYPEPL NAME VOLUME KSTATE STATE LENGTH LAYOUT NCOL/WIDMODESD NAME PLEX DISK DISKOFFS LENGTH [COL/]OFF DEVICEMODESV NAME PLEX VOLNAME NVOLLAYR LENGTH [COL/]OFF AM/NMMODEDC NAME PARENTVOL LOGVOLSP NAME SNAPVOL DCO
dg voldg default default 115000
88 VERITAS Volume Manager Installation Guide

1017856044.1141.hostname.veritas.com
dm disk1 c1t12d0s2 sliced 2591 17900352 -dm disk2 c1t14d0s2 sliced 2591 17899056 -dm disk3 c1t3d0s2 sliced 2591 17899056 -
v vol1 - ENABLED ACTIVE 4196448 ROUND -fsgenpl pl1 vol1 ENABLED ACTIVE 4196448 CONCAT -RWsd disk3-01 pl1 disk3 0 2098224 0 c1t3d0ENAsd disk3-02 pl1 disk3 2098224 2098224 2098224 c1t3d0ENA
4. Remove the evacuated disks from VERITAS Volume Manager control.
# vxdisk -g voldg listDEVICE TYPE DISK GROUP STATUSc1t3d0s2 sliced disk3 voldg onlinec1t12d0s2 sliced disk1 voldg onlinec1t14d0s2 sliced disk2 voldg online
# vxdg rmdisk disk1# vxdg rmdisk disk2# vxdisk rm c1t12d0# vxdisk rm c1t14d0
5. Verify that the evacuated disks have been removed from VERITAS Volume Managercontrol.
# vxdisk -g voldg listDEVICE TYPE DISK GROUP STATUSc1t3d0s2 sliced disk3 voldg online
6. Check to see whether the volume you want to move first is mounted.
# mount | grep vol1/vol1 on /dev/vx/dsk/voldg/vol1read/write/setuid/log/nolargefiles/dev=12dc138 on Wed Apr 310:13:11 2002
7. Create a partition on free disk space of the same size as the volume. In this example, a2G partition is created on disk1 (c1t12d0s1).
# formatSearching for disks...done
AVAILABLE DISK SELECTIONS:
Chapter 3, Moving Volumes onto Partitions - Example 89

0. c0t0d0 <SUN9.0G cyl 4924 alt 2 hd 27 sec 133> /sbus@1f,0/SUNW,fas@e,8800000/sd@0,0 1. c1t3d0 <QUANTUM-ATLASIV9SCA-0808 cyl 13814 alt 2 hd 4 sec 324> /sbus@1f,0/SUNW,fas@2,8800000/sd@3,0 2. c1t9d0 <QUANTUM-ATLASIV9SCA-0808 cyl 13814 alt 2 hd 4 sec 324> /sbus@1f,0/SUNW,fas@2,8800000/sd@9,0 3. c1t10d0 <QUANTUM-ATLASIV9SCA-0808 cyl 13814 alt 2 hd 4 sec 324> /sbus@1f,0/SUNW,fas@2,8800000/sd@a,0 4. c1t11d0 <QUANTUM-ATLASIV9SCA-0808 cyl 13814 alt 2 hd 4 sec 324> /sbus@1f,0/SUNW,fas@2,8800000/sd@b,0 5. c1t12d0 <QUANTUM-ATLASIV9SCA-0808 cyl 13814 alt 2 hd 4 sec 324> /sbus@1f,0/SUNW,fas@2,8800000/sd@c,0 6. c1t14d0 <QUANTUM-ATLASIV9SCA-0808 cyl 13814 alt 2 hd 4 sec 324> /sbus@1f,0/SUNW,fas@2,8800000/sd@e,0 7. c1t15d0 <QUANTUM-ATLASIV9SCA-0808 cyl 13814 alt 2 hd 4 sec 324> /sbus@1f,0/SUNW,fas@2,8800000/sd@f,0Specify disk (enter its number): 5selecting c1t12d0[disk formatted]
FORMAT MENU: disk - select a disk type - select (define) a disk type partition - select (define) a partition table current - describe the current disk format - format and analyze the disk repair - repair a defective sector label - write label to the disk analyze - surface analysis defect - defect list management backup - search for backup labels verify - read and display labels save - save new disk/partition definitions inquiry - show vendor, product and revision volname - set 8-character volume name !<cmd> - execute <cmd>, then return quitformat> p
PARTITION MENU: 0 - change `0' partition 1 - change `1' partition 2 - change `2' partition 3 - change `3' partition 4 - change `4' partition 5 - change `5' partition 6 - change `6' partition 7 - change `7' partition select - select a predefined table modify - modify a predefined partition table name - name the current table print - display the current table label - write partition map and label to the disk !<cmd> - execute <cmd>, then return
90 VERITAS Volume Manager Installation Guide

quitpartition> 1Part Tag Flag Cylinders Size Blocks 1 unassigned wm 0 0 (0/0/0) 0Enter partition id tag[unassigned]:Enter partition permission flags[wm]:Enter new starting cyl[0]:Enter partition size[0b, 0c, 0.00mb, 0.00gb]: 2.00gbpartition> lReady to label disk, continue? y
partition> pCurrent partition table (unnamed):Total disk cylinders available: 13814 + 2 (reserved cylinders)
Part Tag Flag Cylinders Size Blocks 0 unassigned wm 0 0 (0/0/0) 0 1 unassigned wm 0 - 3236 2.00GB (3237/0/0) 4195152partition> q
8. Copy the data on vol01 to the newly created disk partition.
# dd if=/dev/vx/dsk/voldg/vol01 of=/dev/dsk/c1t12d0s1
9. In the /etc/vfstab file, remove the following entry.
/dev/vx/dsk/voldg/vol1 /dev/vx/rdsk/voldg/vol1 /vol1 vxfs 4 yes rw
10. Replace it with an entry for the newly created partition.
/dev/dsk/c1t12d0s1 /dev/rdsk/c1t12d0s1 /vol01 vxfs 4 yes rw
11. Mount the disk partition.
# mount -F vxfs /dev/dsk/c1t12d0s1 /vol01
12. Remove vol01 from VERITAS Volume Manager.
# vxedit -rf rm /dev/vx/dsk/voldg/vol01
13. Remove any disks that have become free (those having no subdisks defined on them)by removing the volumes from VERITAS Volume Manager control.
To check if there are still some subdisks remaining on a particular disk, use thecommand:
# vxprint -F '%sdnum' diskname
If the output is not 0, there are still some subdisks on this disk that you need toremove. If the output is 0, remove the disk from VERITAS Volume Manager control asfollows:
# vxdg rmdisk diskname
Chapter 3, Moving Volumes onto Partitions - Example 91

# vxdisk rm devname
Use the free space created for adding the data from the next volume you want toremove.
14. After you successfully convert all volumes into disk partitions, reboot the system.
15. After the reboot, make sure none of the volumes are open by using the followingcommand:
# vxprint -Aht -e v_open
92 VERITAS Volume Manager Installation Guide

Index
AA5x00 devices 13AP (alternate pathing) 14arrays 5
Bboot disk 25
encapsulated 29encapsulation requirements 11restrictions 10
Ccluster functionality
enabling 50environment requirements 14shared disks 51
cluster requirements 14configuration daemon (vxconfigd),
starting 73configuring
new disks 51shared disks 51
controllers, mirroring guidelines 78custom installation method 35
Ddaemons, checking 72data
protecting 80deleting VxVM packages 84devices
suppress devices 40disk arrays 5disk drives
variable geometry 77disk groups 3disks
initializing all 29initializing selected 35placing in other disk group 25
rootdg 25stripe unit size 77types of 10
DMPprevent multipathing 40
DMP (dynamic multipathing)AP co-existence 14preventing 40SENA category devices 14
driver, VxDMP 20DRL guidelines 78
Eencapsulated disks 10encapsulating
all disks 36boot disks 29
Gguidelines
DRL 78mirroring 78mirroring and striping 79RAID-5 79
Hhot-relocation 12, 75
II/O daemon (vxiod), starting 74initialized disks 10initializing
all disks 37installing
individual disks 38VEA client (Windows) 48VEA server (UNIX) 47
Llayouts, types of 4license keys, obtaining 7
93

license, viewing 9log subdisks 78logical objects 3
MMANPATH variable 7mirroring
and striping guidelines 79guidelines 78root disk 80
mirroring controllers 78
Nnew disks, configuring 51
Ooverlapped seeks 78
Ppatches
A5x00 devices 13PATH variable 7pkgadd 58, 59, 66pkgrm command 84plexes 4Prevent Multipathing/Suppress Devices
from VxVM’s view 40preventive maintenance 80private region 3processes, checking 72protecting data 80public region 2
Qquick installation method 29
RRAID-5
guidelines 79removing VxVM packages 84restoring VxVM configuration 86root disk
alternate 80rootdg 25rootdg (root disk group) 3
SSANs, configuring 15shared disks, configuring 51
shutting down VxVM 84Solaris upgrade 57starting vxconfigd configuration daemon 73starting vxiod daemon 74storage layouts 4storage management 1stripe unit size recommendations 77striping guidelines 77subdisks 3
physical disk placement 79RAID-5 plex, configuring 80
suppress devices 40swap relocation 11
Uupgrade_finish 66, 71upgrade_start 60, 71upgrading
VxVM and Solaris 58, 63VxVM only 66VxVM with AP 20
upgrading to 3.5 54
VVEA 46
client, starting 49VEA client (UNIX), installing 47VEA client (Windows), installing 48VM disks 2volume length, RAID-5 guidelines 80volumes 4
DRL 78VRTSexplorer ixvxassist mirror command 81vxconfigd configuration daemon,
starting 73vxdctl mode command 73VxDMP driver 20vxinstall program 26vxinstall program, running 25vxiod I/O daemon, starting 74VxVM
obtaining system information ixVxVM configuration
restoring 86VxVM packages, removing 84
94 VERITAS Volume Manager Installation Guide


