249
Revision 291-20150225 WAREHOUSE & DISTRIBUTION DIVISION POLICY & PROCEDURE HANDBOOK

Revision 291-20150225
WAREHOUSE & DISTRIBUTION
DIVISION
POLICY & PROCEDURE HANDBOOK

Page 2
AUTHORITY .............................................................................................................................................................. 4
DEFINITIONS AND SYMBOLS USED IN THIS MANUAL ................................................................................ 5
INTRODUCTION ....................................................................................................................................................... 6
OUR COMMITMENT TO SERVICE ................................................................................................................................. 6 MISSION STATEMENT ................................................................................................................................................. 6 OUR GOALS ................................................................................................................................................................ 6
WAREHOUSE CONTACTS & FACILITIES ......................................................................................................... 7
BUSINESS LOCATIONS: ............................................................................................................................................... 7
MATERIAL REPLENISHMENT ............................................................................................................................. 8
MATERIAL REPLENISHMENT GENERAL: ..................................................................................................................... 8 MATERIAL REPLENISHMENT PLANNER (SAP): ........................................................................................................... 8 MATERIAL REPLENISHMENT PURCHASE ORDERS ..................................................................................................... 12 MATERIAL REPLENISHMENT PRINT REQUESTS ......................................................................................................... 13
SUPPLIER SHIPPING AND RECEIVING GUIDELINES .................................................................................. 16
WAREHOUSE LOCATION AND APPOINTMENT INFORMATION .................................................................................... 17 RECEIVING POLICY ................................................................................................................................................... 18 SHIPMENT PREPARATION .......................................................................................................................................... 20 PALLETIZING, PACKAGING & LABELING GUIDELINES .............................................................................................. 22 INBOUND REVIEW PROCESS ..................................................................................................................................... 26
INVENTORY MANAGEMENT / PHYSICAL INVENTORY ............................................................................. 36
GOODS ISSUES/PICKING AND PACKING ........................................................................................................ 39
SHIPPING .................................................................................................................................................................. 45
UPS PROCEDURES .................................................................................................................................................... 46 END OF DAY REPORTS ............................................................................................................................................. 51
FILE RETENTION ................................................................................................................................................... 66
EXCESS RETRIEVAL AND DISPOSITION INSTRUCTIONS ......................................................................... 67
METRICS & REPORTS .......................................................................................................................................... 74
WAREHOUSE INVENTORY PROCEDURE FOR PLCB GIFT CARDS ......................................................... 76
BASIC CARD INFORMATION ...................................................................................................................................... 76 RECEIVE CARDS ....................................................................................................................................................... 76 STORE CARDS ........................................................................................................................................................... 76 PICK CARDS ............................................................................................................................................................. 76 INVENTORY RECORD ................................................................................................................................................ 76
PENDOT ORDER PROCESSING FOR BMV ....................................................................................................... 78
EMERGENCY RESPONSE PLAN .................................................................................................................................. 78 RECEIVING ............................................................................................................................................................... 81 PICK AND PACK PROCEDURES .................................................................................................................................. 83
SAP PROCEDURE DETAILS ............................................................................................................................... 100
CREATING AN ORDER IN SRM ............................................................................................................................... 101 MATERIAL REPLENISHMENT PLANNING ( MRP RUN) ............................................................................................. 115 CREATE A PURCHASE ORDER................................................................................................................................. 121 RECEIVING STD FORMS FROM PRINT SHOP ............................................................................................................ 143 RECEIVING COMMODITIES ...................................................................................................................................... 147 RECEIVING HEALTH FORMS FROM PRINT SHOP ..................................................................................................... 152 CREATE A STOCK TRANSPORT ORDER (STO) ......................................................................................................... 157 VIEW AND PRINT ORDERS ...................................................................................................................................... 165 PRINT ORDERS USING MB90 ................................................................................................................................. 169
Page 3
PRINT ORDERS USING ZMMPPS............................................................................................................................ 175 HARDCOPIES .......................................................................................................................................................... 181 PRINT GOODS ISSUE IN ZMMPPS FOR HARDCOPIES .............................................................................................. 186 INVOICING FOR HARDCOPIES ................................................................................................................................. 188 INVOICE PRINTING .................................................................................................................................................. 193 CREDITS/STOCK DENIALS/RETURNS ...................................................................................................................... 195 INVENTORY TRANSACTIONS ................................................................................................................................... 208 CHANGE OR DELETE ORDER AMOUNT ................................................................................................................... 233 CHECK STOCK ........................................................................................................................................................ 237 CHECK STOCK AND LOCATION .............................................................................................................................. 239 TRACK BY MATERIAL NUMBER ............................................................................................................................. 241 REPRINT AN ORDER ............................................................................................................................................... 243 TO ENTER ANOTHER SCREEN FROM THE ONE YOU ARE IN ................................................................................... 245 VIEW DESCRIPTION/UNIT OF MEASURE ................................................................................................................. 246

Revision 291-20150225
Authority
Lori has authority

Revision 291-20150225
Definitions and Symbols used in this Manual As used in this handbook, the following definitions and words shall have the meanings provided in this chapter unless otherwise noted.
Plant Number: Assigned number, which identifies each Department, utilizing the SAP System.
Customer Number: Assigned number, which identifies each Customer utilizing the STD 174 Supplies & Encumbrance Form.
Material Number: Assigned, six Digit Number, which identifies each specific item available for purchase at the Distribution Center.
Purchase Order (PO): The created document to a vendor stating the specific information of supplies needed to replenish the stock in the Distribution Center
Stock Transport Order (STO): The created document placed by a plant requesting specific supplies from the Distribution Center.
Goods Issue Slip: This is the document stating a specific STO has been pulled off the system and will be sent to the warehouse to be picked/packed/shipped.
Material Document Number: This is the systems assigned number, usually starting with “49”, which names the Goods Issue Slip.
EB Pro System: On-line Website.
R3 Core System: Actual SAP Software BOL: Bill of Lading MRB: Material Review Boards MRP: Material Requirements Planning LTL: Less Than Transfer Load TL: Transfer Load
Revision 291-20150225
Introduction The Department of General Services recognizes its responsibility as a provider of quality services. To this end, we have voluntarily developed and documented ISO 9000- based control system. This manual provides comprehensive evidence to all customers, suppliers and employees of what specific controls are implemented to ensure service quality.
Our Commitment to Service The Warehouse and Distribution Division accepts responsibility for complete satisfaction of its customers. We exercise this responsibility through the adequate training of our employees, adherence to policy and procedures, the use of quantifiable metrics and total commitment to meeting and exceeding customer expectations. We will also maintain an organizational culture that is unyielding in respect for our employees and safety, embraces diversity and fosters continuous improvement.
Mission Statement Our Mission is to anticipate our customer’s needs and exceed their expectations with regard to prompt delivery of goods, courteous service, and diligence in inventory management. The Warehouse and distribution Division accepts full responsibility for our customer’s total satisfaction.
Our Goals Quality Management System: Ensuring that all resources are needed to achieve the objectives are identified and planned. Standard Operating Procedures: DGS has established and maintains documented policies and procedures to ensure the sequence of processes is conducted in a controlled manner. Concern Resolution Process: This process applies suitable methodologies for measurements and monitoring of customer requirements and standard industry metrics. These metrics are accomplished using Six Sigma doctrine. Management Commitment: We recognize the importance of making substantial contributions to the success and growth of the organization. We will continue our success with sound fundamentals; supporting employees in all their endeavors and ensuring our customer service and customer relationships remain strong.
Page 7
Warehouse Contacts & Facilities
Business Locations: The DGS Warehouse and Distribution Division operates from the following locations: DGS1 – Forms, Publications, Bulk, and Secure 905 Elmerton Ave
Harrisburg, PA 17110 Fax: 717-214-7050 Manager: 717-214-7054 Storekeeper: 717-214-7053 Warehouse: 717-214-7058
DGS2 – Excess Property / Customer Service / Facilities Management Storeroom 2221 Forster St.
Harrisburg, PA 17125 Fax: 717-787-0934 Manager: 717-525-5809 Excess Warehouse: 717-525-5812 Customer Service Reps can be reached at the following numbers: 717-525-5812 or 717-585-5810
Customer Service Hours: The DGS Warehouse and Distribution Division will be staffed during the hours 7:00 AM to 4:00 PM – Monday through Friday – Except State Holidays. Warehouse Hours of Operation: The DGS Warehouse and Distribution Division’ Centers will be operational during the hours 7:00 AM to 4:00 PM – Monday through Friday – Except State Holidays. Access to DGS Distribution Center Other than Normal Business Hours: In the event of an emergency, or for afterhours access, please contact: DGS1 - 717-602-5777 Hayes Kelly DGS2 - 717-418-9651 Ken Clemence DGS5 - 717-991-5679 Bill Archibald DGS Warehouse Security:
All agency representatives visiting any of the DGS Distribution sites must:
1. Make an appointment with the appropriate warehouse Manager before the visitation
2. Provide positive Commonwealth Identification. 3. Sign-In upon entering and exiting 4. Be escorted at all times while visiting the DGS Distribution Center

Revision 291-20150225
Material Replenishment
Material Replenishment General: Each agency will be responsible for managing their inventory. At minimum, this includes a weekly review/assessment of inventory.
All agency’s managing their inventory in a computer data base will be required to review, update and maintain the stock replenishment data. Reviewing and updating should be performed on a frequent basis in order to ensure best business practices for inventory management. Agency’s who are manually managing their inventory will be required to review their inventory to ensure best business practices for their inventory management. One method of reviewing your inventory is to use the Material Replenishment Planning (MRP) in the SAP system. MRP will identify your inventory replenishment needs based on your minimum/maximum re-order quantities and the consumption of each inventory item.
Material Replenishment Planner (SAP): In MRP, when you are setting up your Material Master for each of your inventory items, you can define your minimum and maximum reorder levels as well as you can choose whether you want the system to create a Planned Order or a Purchase Requisition. A Planned Order is a “suggestion” that it is time to reorder. You have the ability to:
1. Convert the Planned Order “as is” to a Purchase Requisition for processing 2. Modify the Planned Order before converting to a Purchase Requisition 3. Delete the Planned Order in its entirety
A Purchase Requisition will go to directly to the Purchase Group for processing. For SAP procedures detailing the MRP run, please follow the link below: Material Replenishment Planning ( Mrp Run) – Section 16
Page 9
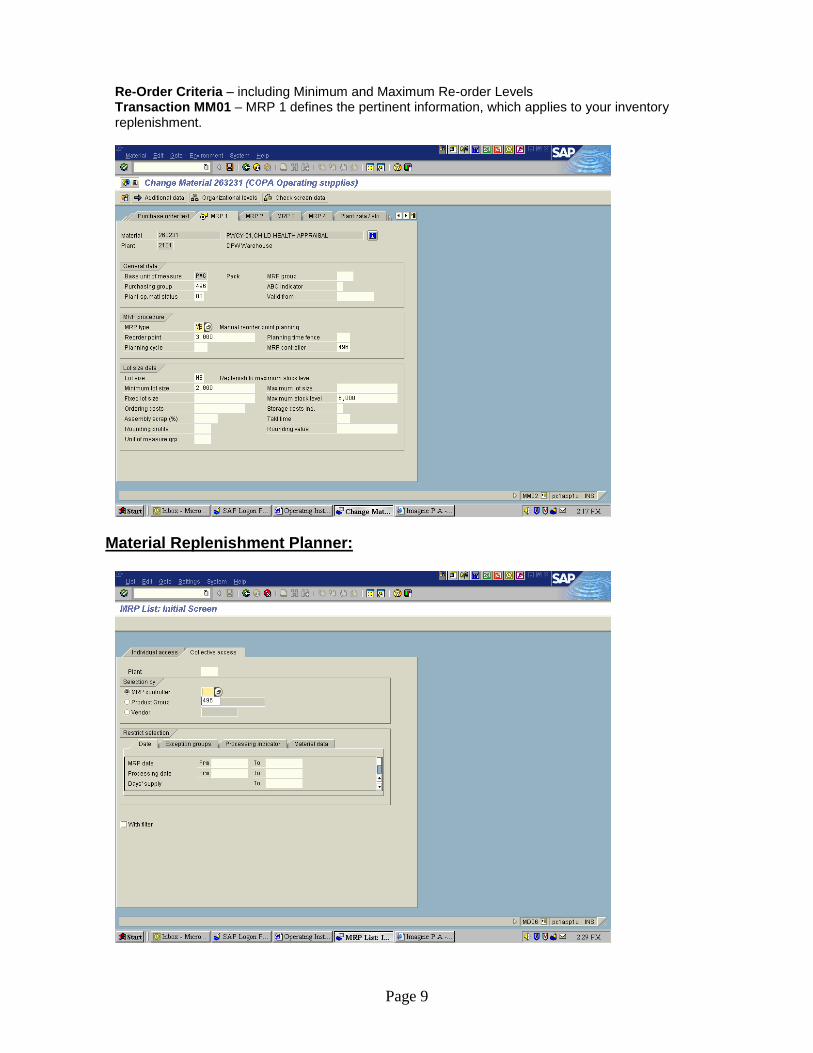
Re-Order Criteria – including Minimum and Maximum Re-order Levels Transaction MM01 – MRP 1 defines the pertinent information, which applies to your inventory replenishment.
Material Replenishment Planner:
Page 10
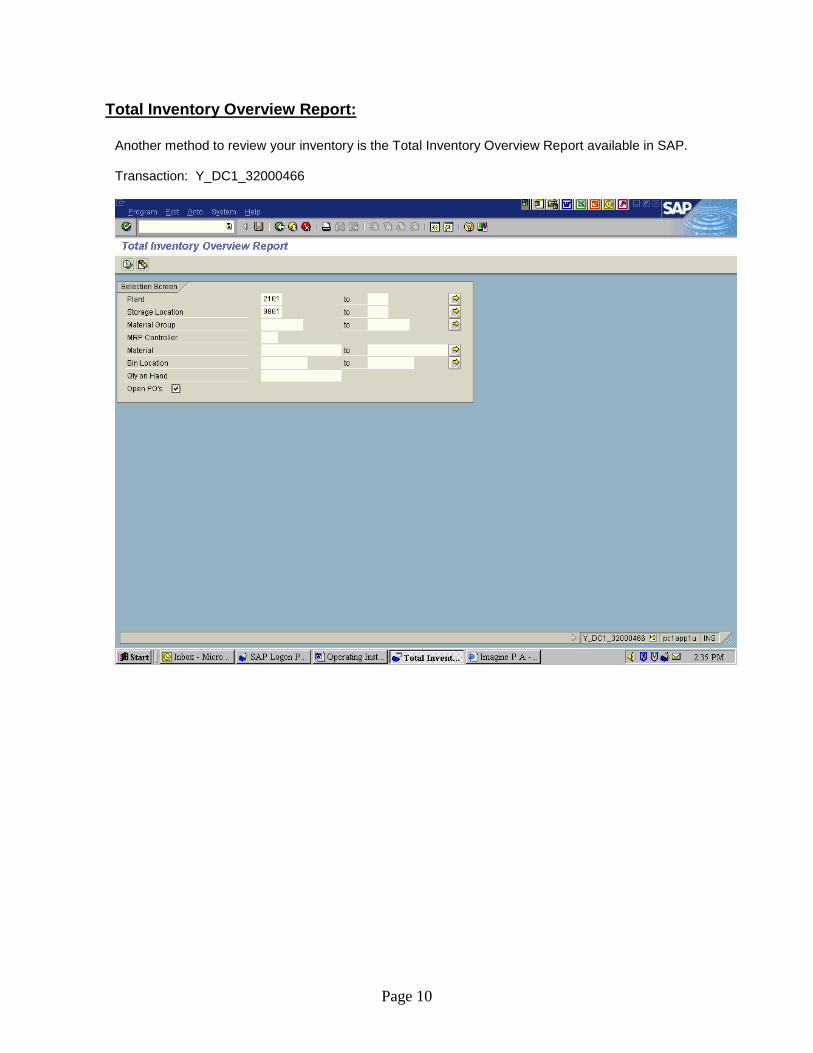
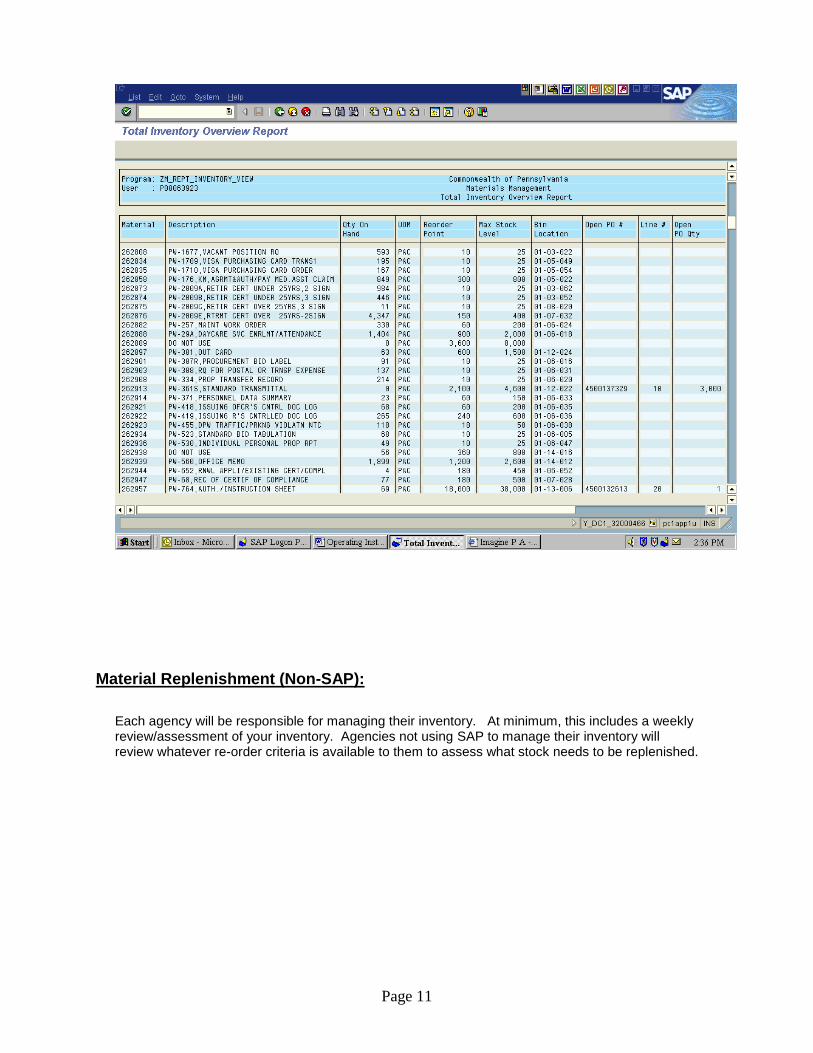
Total Inventory Overview Report:
Another method to review your inventory is the Total Inventory Overview Report available in SAP. Transaction: Y_DC1_32000466
Page 11
Material Replenishment (Non-SAP):
Each agency will be responsible for managing their inventory. At minimum, this includes a weekly review/assessment of your inventory. Agencies not using SAP to manage their inventory will review whatever re-order criteria is available to them to assess what stock needs to be replenished.

Page 12
Material Replenishment Purchase Orders
General Information:
Each agency is required to prepare documentation to replenish their inventory. This includes: 1. Preparing Purchase Orders to private vendors in accordance with Act 57 of 1998 – The
Procurement Code. Purchase order to include: a. Purchase Order Number b. Vendor’s Name c. DGS Distribution Center delivery address d. Material Number(s) of Inventory Item(s) e. Nomenclature(s) of Inventory Item(s) f. Notation to print vendor indicating each carton received must be properly marked with
appropriate purchase order number, material number, nomenclature, packaging and appropriate print number
g. DGS Distribution Center Pallet Specifications h. DGS Distribution Center Delivery Hours i. Quantities and Unit of Measure of item(s) j. Fund, Cost Center and G/L Code k. If applicable, special delivery instructions l. Contact Person and telephone number
2. Promptly providing an approved copy of the Purchase Order to the DGS Distribution Center for inventory receipt
3. Fiscally managing the purchase order until all funds have been expended For SAP procedures detailing the MRP/Purchase Orders, please follow the link below: Create A Purchase Order – Section 16
Material Replenishment Purchase Order - Damaged Items:
It is the responsibility of the DGS Distribution Center to inspect all stock replenishment orders being received for damages. Prior to the receipt of the shipment, if the item(s) appear to be damaged, the receiving clerk will immediately contact the designated person from that agency for instructions. Notations to be made on the packing slip regarding the damage, date/time, person contacted and any instructions. If damages are discovered after the receipt of an item(s), DGS Distribution staff person will contact the designated person from that agency for instructions. The agency is asked to provide a prompt verbal response and confirm in writing to the DGS Distribution staff person.
Page 13
Material Replenishment Purchase Order – Discrepancies:
DGS Warehouse and Distribution Division staff person will contact the designated person from that agency for instructions. The agency is asked to provide a prompt verbal response and confirm in writing to the DGS Warehouse and Distribution Division person. In certain circumstances, overages or shortages are allowable industry practices. If this is the condition with a particular item number, indicate the allowed percentage in the material master record. This will avoid delay in receipt.
Material Replenishment Purchase Order - Receipts:
DGS Warehouse and Distribution Division will be responsible for inspecting deliveries and comparing them to the Stock Replenishment Order for reviewing for accuracy and quality. DGS Warehouse and Distribution Division will promptly process all Goods Receipts/Receiving Reports to confirm all partial and final goods receipts. A copy of the Bill of Lading/Packing Slip will be retained at the DGS Distribution Center. The original Bill of Lading/Packing Slip will be forwarded to agency’s designated contact person. For SAP Processes Related To Receiving, Select a link below: Receiving Commodities – Section 16
Material Replenishment Print Requests
Print Requests – DGS or Agency Print Shop:
Based on inventory stock replenishment needs, agencies are required to process the required documentation for printed material from either the DGS or Agency Print Shop. The agency is required to forward a copy of the Print Request to the DGS Distribution Center for record of receipt. The Print Request must contain the following information:
1. Form ______ using sequential print request numbers 2. Identification of appropriate Print Shop (DGS or Agency) 3. Material Number(s) of item(s) being requested 4. Nomenclature(s) of item(s) being requested 5. Notation to print shop that each carton received must be properly marked with
appropriate purchase order number, material number, nomenclature, packaging and appropriate print number
6. Quantity(s) of item(s) being requested 7. Unit of Measure(s) of item(s) being requested which corresponds to the Inventory
Unit of Measure 8. Fund, Cost Center and G/L Code 9. Agency Contact Person and Phone Number
A notation on the order regarding DGS or Agency Print Shops, for EACH Print Request delivery, will be required to provide an itemized TOTAL COST for each shipment.
Page 14
Print Request - Damaged Items:
It is the responsibility of the DGS Distribution Center to inspect all Print Requests being received for damages. Prior to the receipt of the shipment, if the item(s) appear to be damaged, the receiving clerk will immediately contact the designated person from that agency for instructions. Notations to be made on the packing slip regarding the damage, date/time, person contacted and any instructions. If damages are discovered after the receipt of an item(s), DGS Distribution staff person will contact the designated person from that agency for instructions. The agency is asked to provide a prompt verbal response and confirm in writing to the DGS Distribution staff person.
Print Request - Discrepancies:
DGS Distribution staff person will contact the designated person from that agency for instructions. The agency is asked to provide a prompt verbal response and confirm in writing to the DGS Distribution staff person.
Print Request – Receipts:
DGS Distribution Center will promptly process partial and final goods receipts from DGS or Agency Print Shops. Delivery will be inspected and reviewed to verify it corresponds with Print Request. DGS or Agency Print Shops, for EACH Print Request delivery, will be required to provide an itemized TOTAL COST for each shipment. DGS Distribution Center will maintain a copy of corresponding paperwork with the records. Original paperwork will be forwarded to appropriate person as identified by each agency. For SAP Processes Related To Receiving, Select a link below: Receiving STD Forms from a print shop – Section 16 Receiving Health forms from a print shop – Section 16
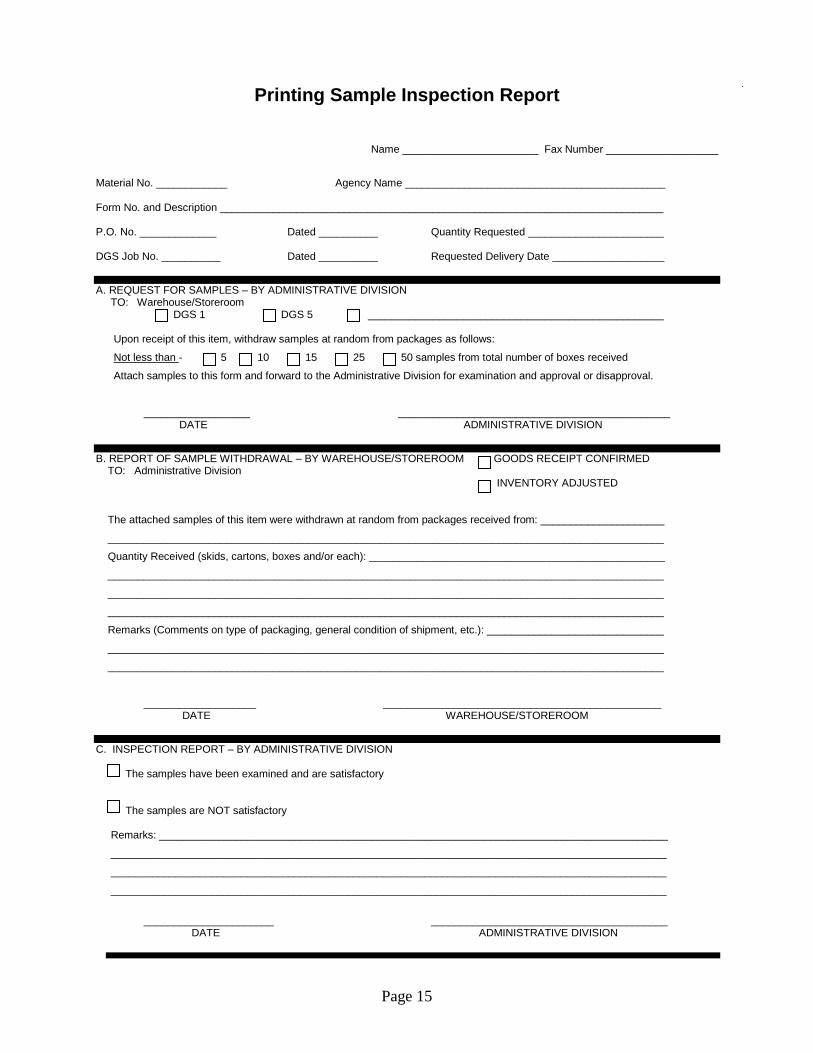
Print Request - Requests For Samples
Any agency requesting samples of printed forms must use the: Printing Sample Inspection Report. Agencies requesting samples must attach a copy of the Purchase Order to the print request and send to the appropriate warehouse. Upon completion of form, DGS Distribution Center will maintain these forms at a central location at the DGS Distribution Center. Click here to access a printable copy of this form:
Page 15
Printing Sample Inspection Report
Name _______________________ Fax Number ___________________
Material No. ____________ Agency Name ____________________________________________ Form No. and Description ___________________________________________________________________________ P.O. No. _____________ Dated __________ Quantity Requested _______________________ DGS Job No. __________ Dated __________ Requested Delivery Date ___________________
A. REQUEST FOR SAMPLES – BY ADMINISTRATIVE DIVISION TO: Warehouse/Storeroom DGS 1 DGS 5 __________________________________________________ Upon receipt of this item, withdraw samples at random from packages as follows:
Not less than - 5 10 15 25 50 samples from total number of boxes received
Attach samples to this form and forward to the Administrative Division for examination and approval or disapproval. __________________ ______________________________________________ DATE ADMINISTRATIVE DIVISION
B. REPORT OF SAMPLE WITHDRAWAL – BY WAREHOUSE/STOREROOM GOODS RECEIPT CONFIRMED TO: Administrative Division INVENTORY ADJUSTED
The attached samples of this item were withdrawn at random from packages received from: _____________________
______________________________________________________________________________________________
Quantity Received (skids, cartons, boxes and/or each): __________________________________________________
______________________________________________________________________________________________
______________________________________________________________________________________________
______________________________________________________________________________________________
Remarks (Comments on type of packaging, general condition of shipment, etc.): ______________________________
______________________________________________________________________________________________
______________________________________________________________________________________________
___________________ _______________________________________________ DATE WAREHOUSE/STOREROOM
C. INSPECTION REPORT – BY ADMINISTRATIVE DIVISION The samples have been examined and are satisfactory The samples are NOT satisfactory Remarks: ______________________________________________________________________________________
______________________________________________________________________________________________
______________________________________________________________________________________________
______________________________________________________________________________________________
______________________ ________________________________________
DATE ADMINISTRATIVE DIVISION

Revision 291-20150225
Supplier Shipping and Receiving Guidelines
01/15/2014 Dear Supplier, In the following pages, you will find the standard packaging and receiving instructions for shipping your products to The Commonwealth of PA, Department of General Services. We encourage you to share this information by distributing it internally throughout your organization. By using these instructions, you will ensure that you are receiving the most efficient processing of your products and invoices, as well as intact delivery to our internal customers. It is the pathway for improved service – providing information that can help improve your throughput velocity and reduce overall supply chain costs. These guidelines are effective immediately and are an integral part of our supplier agreement. Any previous instructions, written or oral, are superseded by this document. Thank you for your cooperation in helping us to maximize our efficiencies and for your continued support to The Commonwealth of PA, Department of General Services. Should you have any questions or concerns about any part of this document, please feel free to contact us at 717-783-6471 Sincerely,
Department of General Services

Page 17
Warehouse Location and Appointment Information
The Commonwealth of PA Warehouse Locations
DGS1 – Forms, publications, Bulk and Secure 905 Elmerton Ave
Harrisburg, PA 17110 Fax: 717-214-7050 Manager: 717-214-7054 Storekeeper: 717-214-7053 Warehouse: 717-214-7058
DGS3 – Excess Property / Customer Service / Facilities Management Storeroom 2221 Forster St.
Harrisburg, PA 17125 Fax: 717-787-0934 Manager: 717-783-1557 Excess Warehouse: 717-525-5810 Customer Service Reps can be reached at the following numbers: 717-525-5812 or 717-585-5810
Warehouse Hours of Operation: SHIPPING AND RECEIVING at the warehouse is scheduled between 8:00 AM and 3:00 PM - Monday through Friday - Except State Holidays The DGS Warehouse and Distribution Division’ Centers will be operational during the hours 7:00 AM to 4:00 PM – Monday through Friday – Except State Holidays. * All Times Are Local
Delivery Appointment Information
The Commonwealth of PA requires the following information via fax or telephone call to schedule a receiving appointment:
Carrier's Name
Pallet Count and Piece Count
The Commonwealth of PA Purchase Order Number
Person's name and telephone number who is requesting appt.
Shipper's Name
Trailer Number, Tracking Number and/or Pro Number * Delivery Appointments are required for ALL LTL and Truckload shipments * If all of the required information is not provided a delivery appointment will not be made.
Page 18
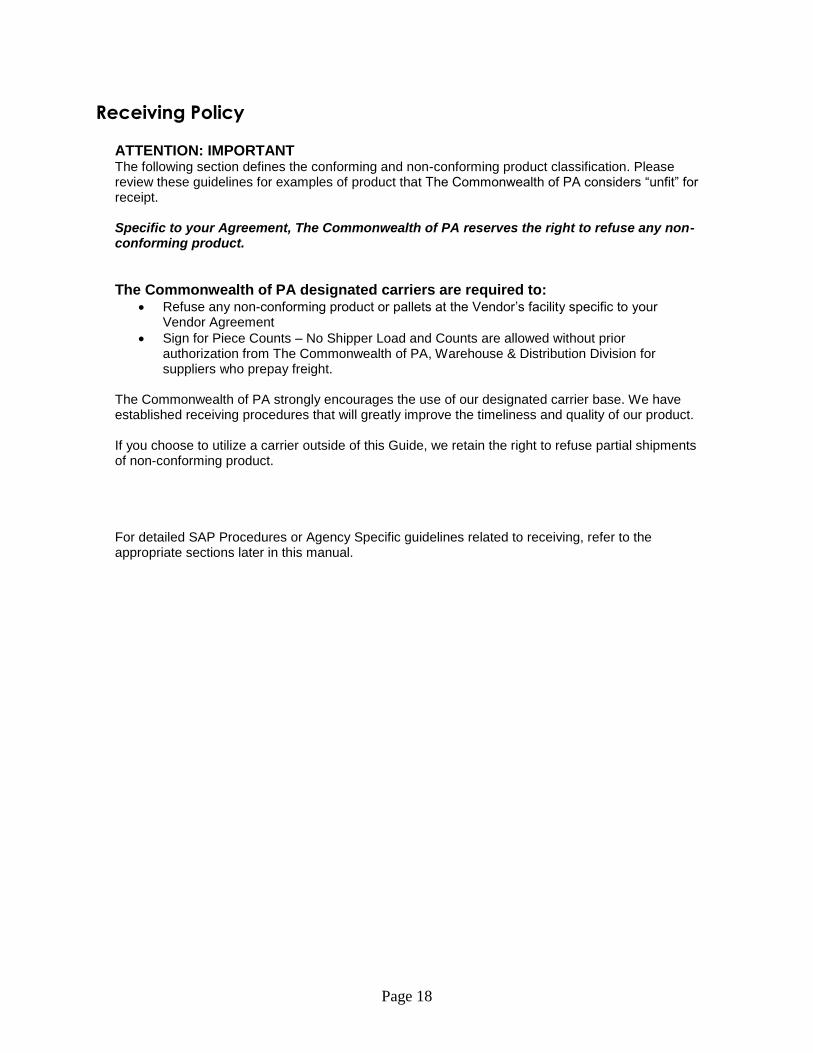
Receiving Policy
ATTENTION: IMPORTANT The following section defines the conforming and non-conforming product classification. Please review these guidelines for examples of product that The Commonwealth of PA considers “unfit” for receipt. Specific to your Agreement, The Commonwealth of PA reserves the right to refuse any non-conforming product.
The Commonwealth of PA designated carriers are required to: Refuse any non-conforming product or pallets at the Vendor’s facility specific to your
Vendor Agreement
Sign for Piece Counts – No Shipper Load and Counts are allowed without prior authorization from The Commonwealth of PA, Warehouse & Distribution Division for suppliers who prepay freight.
The Commonwealth of PA strongly encourages the use of our designated carrier base. We have established receiving procedures that will greatly improve the timeliness and quality of our product. If you choose to utilize a carrier outside of this Guide, we retain the right to refuse partial shipments of non-conforming product. For detailed SAP Procedures or Agency Specific guidelines related to receiving, refer to the appropriate sections later in this manual.

Page 19
Non-Compliance Charges
MIS-ROUTED – OR USE OF NON-Commonwealth of PA CARRIER Full amount of Freight Invoice plus $100.00 Administrative Fee
USE OF NON-AUTHORIZED AIRFREIGHT Full amount of Freight Invoice plus $100.00 Administrative Fee
SMALL PARCEL UTILITIZATION VERSUS LTL $25.00 per carton over 9 carton limit plus $100.00 Administrative Fee
MISCONFIGURED PALLETS A. Incorrect Standard Pallet - $175.00 per pallet plus $100.00 Administrative Fee B. Height over maximum 60”- $175.00 per pallet plus $100.00 Administrative Fee C. Overhang - $175.00 per pallet plus $100.00 Administrative Fee D. Improper Wrapping or Banding - $175.00 plus $100.00 Administrative Fee E. Inferior/Damaged Pallets - $175.00 per pallet plus $100.00 Administrative Fee
DAMAGED CARTONS A. $75.00 per carton charge for damaged product. If the Carrier is a The Commonwealth of PA PREFERRED carrier, and the freight is COLLECT, a claim will be filed against our CARRIER. B. If the carrier is a The Commonwealth of PA PREFERRED carrier, and the freight is pre-paid, a charge back will be filed against the VENDOR. C. In example A and B, if The Commonwealth of PA is allowed to refuse non-conforming freight at the point of receipt due to the terms and conditions with the vendor, then a damage charge back will NOT be assessed. D. If the freight is COLLECT or PREPAID and the carrier is NOT a Commonwealth of PA approved carrier, a charge back for carton damage will be filed against the VENDOR.
FAILURE TO CONSOLIDATE POs Full amount of freight charges plus $100.00 Administrative Fee
FAILURE TO PROVIDE CORRECT P.O. NUMBER $1.00 per box plus $100.00 Administrative Fee
MISSING LABELS $1.00 per box plus $100.00 Administrative Fee
NON-COMPLIANCE WITH BILL OF LADING INSTRUCTIONS $100.00 per non-compliance plus $100.00 - Administrative Fee
FAILURE TO PROVIDE PACKING SLIP $100.00 Administrative Fee *NON-COMPLIANCE CHARGES ARE CUMULATIVE **MULTIPLE CHARGES PER SHIPMENT MAY OCCUR.
Page 20
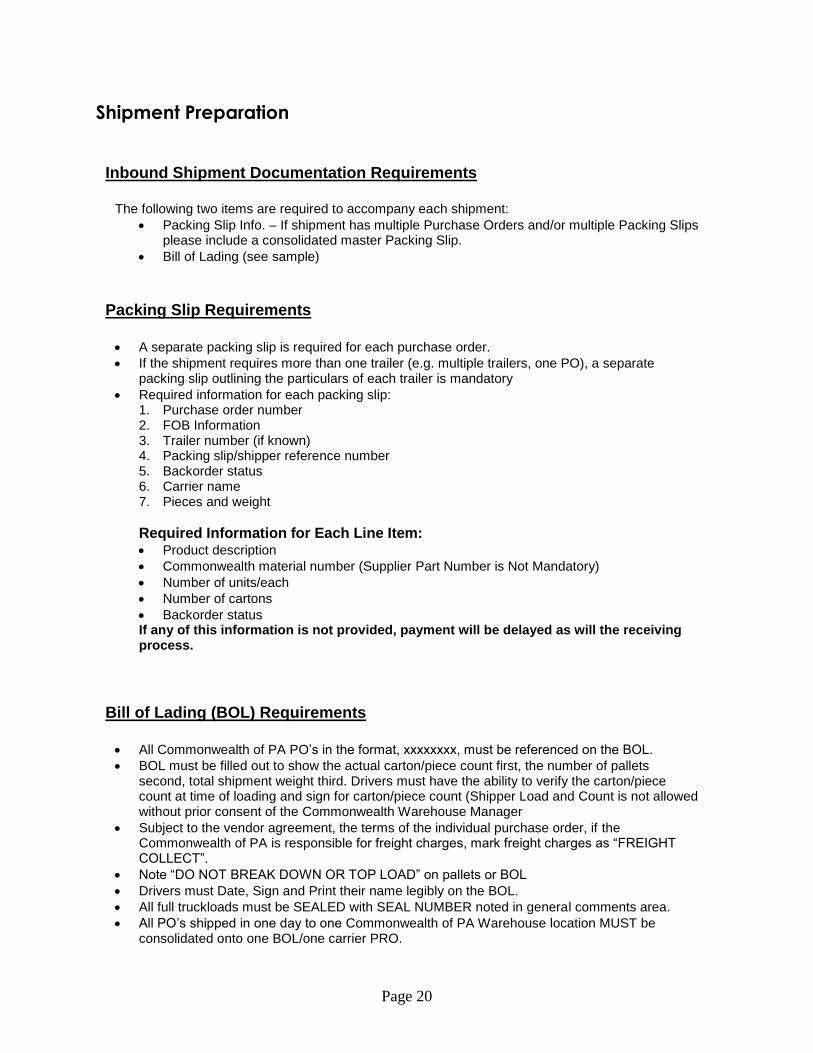
Shipment Preparation
Inbound Shipment Documentation Requirements
The following two items are required to accompany each shipment:
Packing Slip Info. – If shipment has multiple Purchase Orders and/or multiple Packing Slips please include a consolidated master Packing Slip.
Bill of Lading (see sample)
Packing Slip Requirements
A separate packing slip is required for each purchase order.
If the shipment requires more than one trailer (e.g. multiple trailers, one PO), a separate packing slip outlining the particulars of each trailer is mandatory
Required information for each packing slip: 1. Purchase order number 2. FOB Information 3. Trailer number (if known) 4. Packing slip/shipper reference number 5. Backorder status 6. Carrier name 7. Pieces and weight
Required Information for Each Line Item: Product description
Commonwealth material number (Supplier Part Number is Not Mandatory)
Number of units/each
Number of cartons
Backorder status If any of this information is not provided, payment will be delayed as will the receiving process.
Bill of Lading (BOL) Requirements
All Commonwealth of PA PO’s in the format, xxxxxxxx, must be referenced on the BOL.
BOL must be filled out to show the actual carton/piece count first, the number of pallets second, total shipment weight third. Drivers must have the ability to verify the carton/piece count at time of loading and sign for carton/piece count (Shipper Load and Count is not allowed without prior consent of the Commonwealth Warehouse Manager
Subject to the vendor agreement, the terms of the individual purchase order, if the Commonwealth of PA is responsible for freight charges, mark freight charges as “FREIGHT COLLECT”.
Note “DO NOT BREAK DOWN OR TOP LOAD” on pallets or BOL
Drivers must Date, Sign and Print their name legibly on the BOL.
All full truckloads must be SEALED with SEAL NUMBER noted in general comments area.
All PO’s shipped in one day to one Commonwealth of PA Warehouse location MUST be consolidated onto one BOL/one carrier PRO.
Page 21
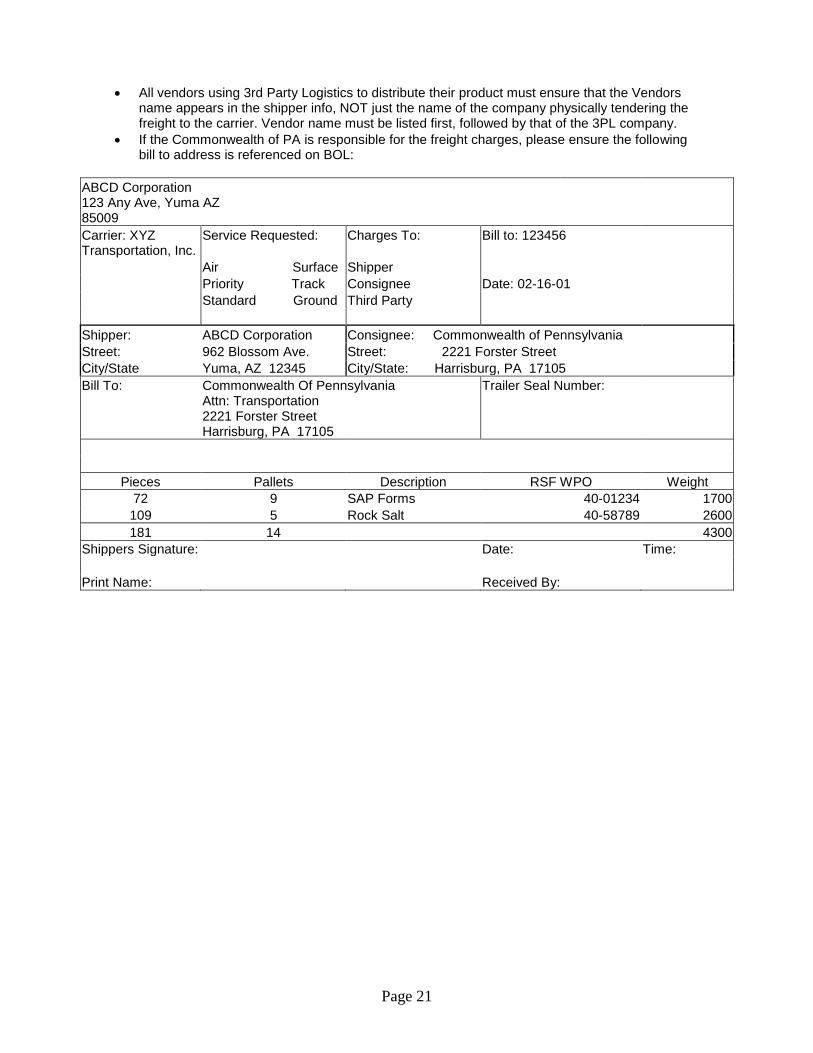
All vendors using 3rd Party Logistics to distribute their product must ensure that the Vendors name appears in the shipper info, NOT just the name of the company physically tendering the freight to the carrier. Vendor name must be listed first, followed by that of the 3PL company.
If the Commonwealth of PA is responsible for the freight charges, please ensure the following bill to address is referenced on BOL:
ABCD Corporation 123 Any Ave, Yuma AZ 85009
Carrier: XYZ Transportation, Inc.
Service Requested: Charges To: Bill to: 123456
Air Surface Shipper
Priority Track Consignee Date: 02-16-01
Standard Ground Third Party
Shipper: ABCD Corporation Consignee: Commonwealth of Pennsylvania
Street: 962 Blossom Ave. Street: 2221 Forster Street
City/State Yuma, AZ 12345 City/State: Harrisburg, PA 17105
Bill To: Commonwealth Of Pennsylvania Attn: Transportation 2221 Forster Street Harrisburg, PA 17105
Trailer Seal Number:
Pieces Pallets Description RSF WPO Weight
72 9 SAP Forms 40-01234 1700
109 5 Rock Salt 40-58789 2600
181 14 4300
Shippers Signature: Date: Time:
Print Name: Received By:
Page 22
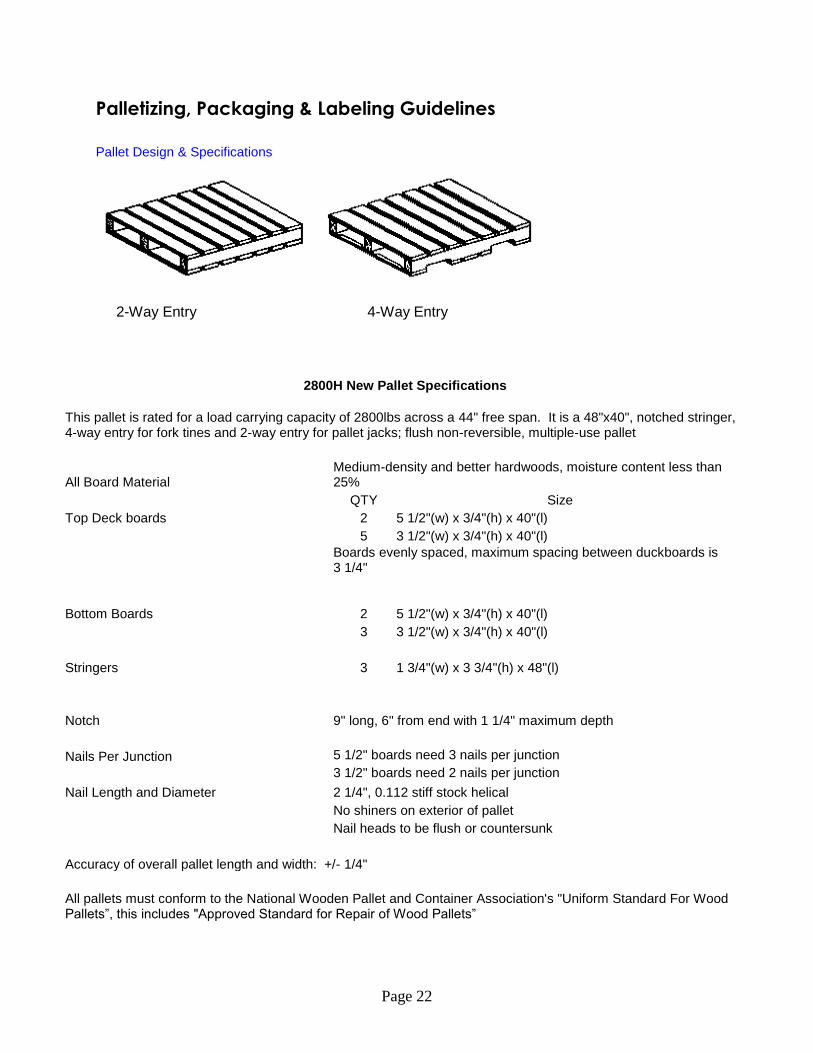
Palletizing, Packaging & Labeling Guidelines
Pallet Design & Specifications
2-Way Entry 4-Way Entry
2800H New Pallet Specifications
This pallet is rated for a load carrying capacity of 2800lbs across a 44" free span. It is a 48"x40", notched stringer, 4-way entry for fork tines and 2-way entry for pallet jacks; flush non-reversible, multiple-use pallet
All Board Material Medium-density and better hardwoods, moisture content less than 25%
QTY Size
Top Deck boards 2 5 1/2"(w) x 3/4"(h) x 40"(l)
5 3 1/2"(w) x 3/4"(h) x 40"(l)
Boards evenly spaced, maximum spacing between duckboards is 3 1/4"
Bottom Boards 2 5 1/2"(w) x 3/4"(h) x 40"(l)
3 3 1/2"(w) x 3/4"(h) x 40"(l)
Stringers 3 1 3/4"(w) x 3 3/4"(h) x 48"(l)
Notch 9" long, 6" from end with 1 1/4" maximum depth
Nails Per Junction 5 1/2" boards need 3 nails per junction
3 1/2" boards need 2 nails per junction
Nail Length and Diameter 2 1/4", 0.112 stiff stock helical
No shiners on exterior of pallet
Nail heads to be flush or countersunk
Accuracy of overall pallet length and width: +/- 1/4"
All pallets must conform to the National Wooden Pallet and Container Association's "Uniform Standard For Wood Pallets”, this includes "Approved Standard for Repair of Wood Pallets”
Page 23
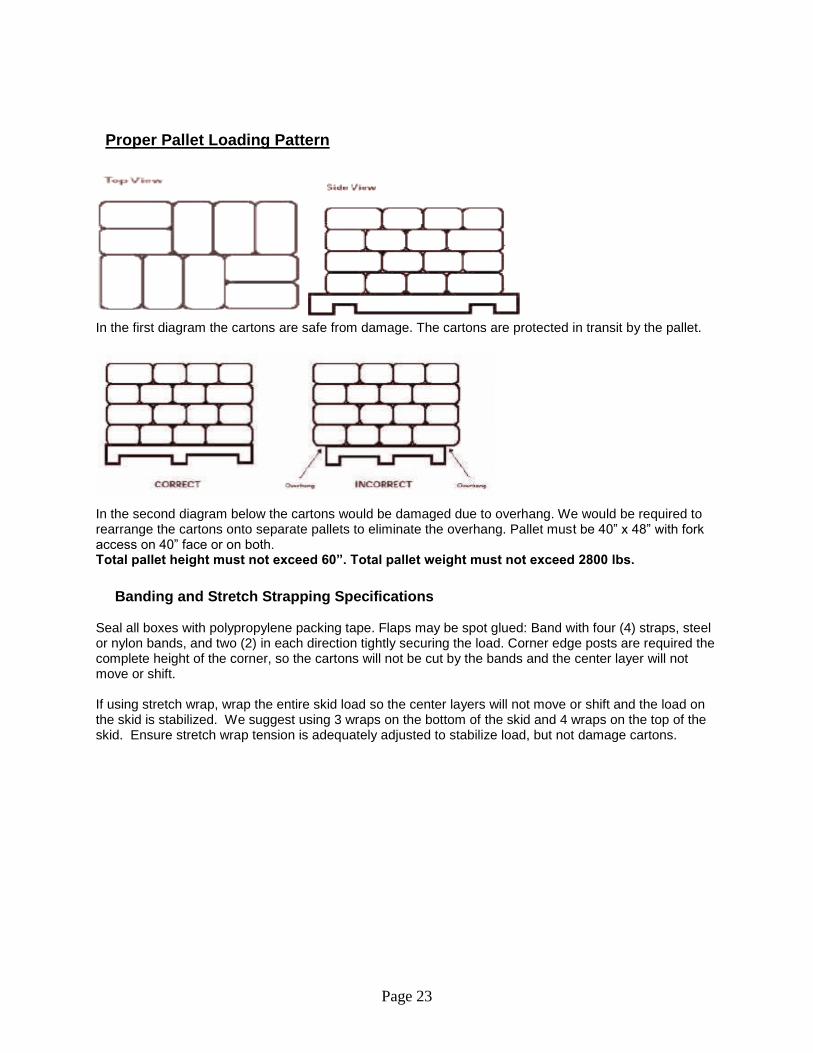
Proper Pallet Loading Pattern
In the first diagram the cartons are safe from damage. The cartons are protected in transit by the pallet.
In the second diagram below the cartons would be damaged due to overhang. We would be required to rearrange the cartons onto separate pallets to eliminate the overhang. Pallet must be 40” x 48” with fork access on 40” face or on both. Total pallet height must not exceed 60”. Total pallet weight must not exceed 2800 lbs.
Banding and Stretch Strapping Specifications
Seal all boxes with polypropylene packing tape. Flaps may be spot glued: Band with four (4) straps, steel or nylon bands, and two (2) in each direction tightly securing the load. Corner edge posts are required the complete height of the corner, so the cartons will not be cut by the bands and the center layer will not move or shift. If using stretch wrap, wrap the entire skid load so the center layers will not move or shift and the load on the skid is stabilized. We suggest using 3 wraps on the bottom of the skid and 4 wraps on the top of the skid. Ensure stretch wrap tension is adequately adjusted to stabilize load, but not damage cartons.

Page 24
Carton Guidelines and Product Protection
The physical appearance and structural integrity of the shippable carton is as important to our customer’s as the commodity itself. Product will be refused and disposition costs will escalate if product is not sufficiently packaged for transit. The Commonwealth of PA maintains that proper packaging is required to protect product as it moves through the supply-chain. Individual cartons can weigh no more than 50lbs each, with the exception of printed products. Cartons for printed products are to weigh no more than 40 lbs. and the printed product must be packed in consistent quantities. Cartons must be constructed and packed so they will not collapse when two pallets of similar materials are stacked on top of the pallet. The vendor is responsible to ensure product packaging meets industry standards as outlined by the International Safe Transit Association (ISTA). If The Commonwealth of PA experiences a high rate of damage with your product(s), we reserve the right to have your packaging tested by industry-recognized professionals. The supplier may bear responsibility for any expense involved. Two organizations focused on proper packaging are the ISTA www.ista.org and ASTM International (Formerly known as American Society for Testing and Materials) www.ASTM.org Proper packaging specifications for your products can be found on these organizations web sites. Taking a leadership position, The Commonwealth of PA has established guidelines for conforming and non-conforming product as it relates to damage in transit. This standard can be found in the “Receiving Policy” section of this standard.
Page 25
Labeling Guidelines and Shipping Label Placement
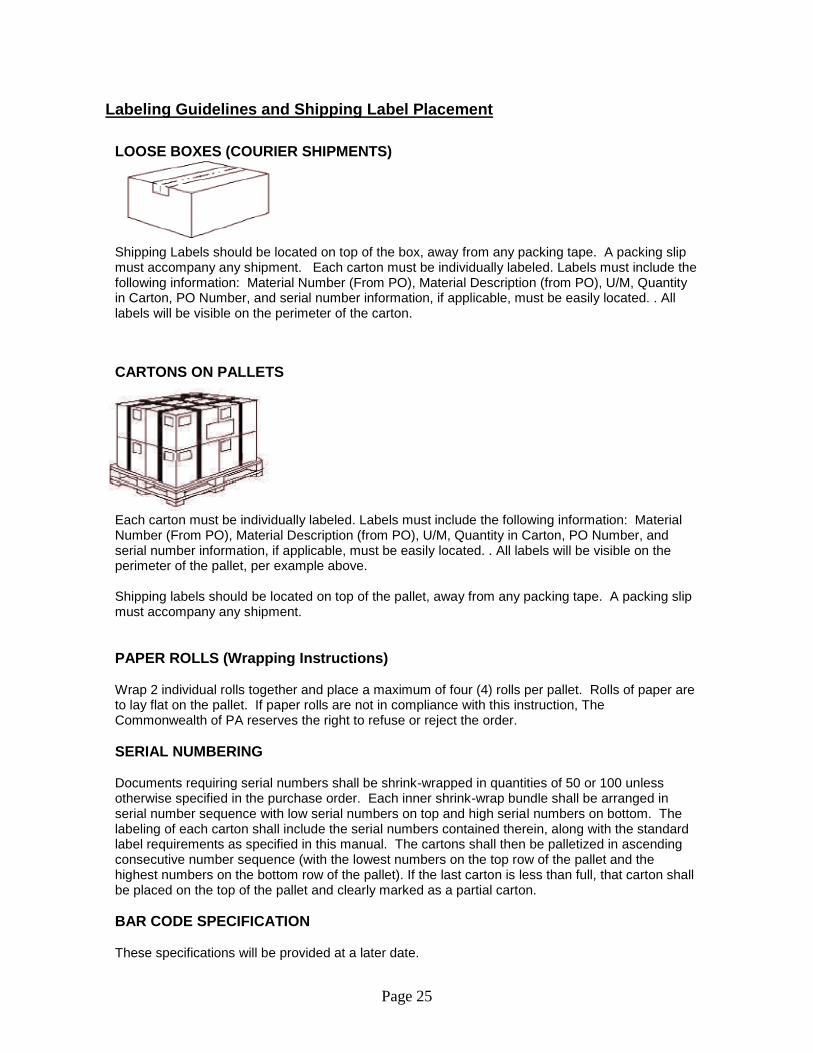
LOOSE BOXES (COURIER SHIPMENTS)
Shipping Labels should be located on top of the box, away from any packing tape. A packing slip must accompany any shipment. Each carton must be individually labeled. Labels must include the following information: Material Number (From PO), Material Description (from PO), U/M, Quantity in Carton, PO Number, and serial number information, if applicable, must be easily located. . All labels will be visible on the perimeter of the carton.
CARTONS ON PALLETS
Each carton must be individually labeled. Labels must include the following information: Material Number (From PO), Material Description (from PO), U/M, Quantity in Carton, PO Number, and serial number information, if applicable, must be easily located. . All labels will be visible on the perimeter of the pallet, per example above. Shipping labels should be located on top of the pallet, away from any packing tape. A packing slip must accompany any shipment.
PAPER ROLLS (Wrapping Instructions) Wrap 2 individual rolls together and place a maximum of four (4) rolls per pallet. Rolls of paper are to lay flat on the pallet. If paper rolls are not in compliance with this instruction, The Commonwealth of PA reserves the right to refuse or reject the order.
SERIAL NUMBERING Documents requiring serial numbers shall be shrink-wrapped in quantities of 50 or 100 unless otherwise specified in the purchase order. Each inner shrink-wrap bundle shall be arranged in serial number sequence with low serial numbers on top and high serial numbers on bottom. The labeling of each carton shall include the serial numbers contained therein, along with the standard label requirements as specified in this manual. The cartons shall then be palletized in ascending consecutive number sequence (with the lowest numbers on the top row of the pallet and the highest numbers on the bottom row of the pallet). If the last carton is less than full, that carton shall be placed on the top of the pallet and clearly marked as a partial carton.
BAR CODE SPECIFICATION These specifications will be provided at a later date.
Page 26
Inbound Review Process
Inbound Review Process General:
The Material Review Process ensures that non-conforming material is reviewed on a timely basis and properly dispositioned. It shall be the responsibility of the Warehouse Superintendent and the agency representatives to review non-conforming material. During normal order processing, defective product may be discovered that does not meet customer specifications. This product will be marked with a hold tag as non-conforming material and placed in the MRB area. Agency personnel will be notified immediately. For non-conforming material: a hold tag will be completed and affixed to the part. The part will be placed in a non-conforming material area, if space permits. Disposition of the material will be made by purchasing agency personnel. The person making the disposition will initial the tag. The tag will stay affixed to the product until it is scrapped or returned to the vendor after which the warehouse personnel will file it. For scrapped material: the warehouse will adjust the information in SAP to reflect removal of the defective material as scrap.
Receiving Inspection
It will be the responsibility of receiving personnel to perform receiving inspection and forward the results of this inspection to the proper personnel for verification of conformance to requirements. All drivers with incoming material must report to the receiving/shipping office. Upon receipt of the vendor bill of lading, the driver will be given instruction as to where to unload. The material will be visually inspected prior to off-loading. The driver reports to the proper location and forwards all paperwork to receiving. Receiving will verify that the material documented on the bill of lading matches the COPA purchase order. Receiving performs the receiving inspection, signs the packing slip and attaches it to the bill of lading. If all areas meet the material specifications the received product is entered into the computer database as transient inventory. The carrier is given his copy of the delivery receipt, which indicates receiver’s name and any discrepancies in the receipt of material. If material does not conform to specified requirements, it may be rejected back to the vendor. If the material has to be unloaded, the non-conforming material will be placed into the non-conforming material area and a claim will be entered with the vendor. Once the disposition on the material has been made, arrangements will be made to either scrap or return the material. Supplier on-site verification is currently not necessary at COPA warehouses due to supplier capabilities.
Page 27
Receiving Inspection Reporting
This instruction ensures that the Division of Warehouse and Distribution implements a formal process for inspection of all incoming material. Verification of conformance to specified requirements will be required. It is the responsibility of receiving personnel, supervisors, and shipping warehouse personnel to perform the required inspections. Paperwork received from the driver must be checked for consistency by the receiving department by comparing it to the original order prior to unloading. Paperwork should contain a Bill of Lading and Packing Slip. Material conforming to specified requirements will be received in and the information will be entered into the computer database. The material will then be tagged for proper identification. Should material be entirely or partially rejected, the purchasing agency and the supplier will be notified. The warehouse superintendent should be notified to re-inspect the material and confirm disposition. All material will be dispositioned to the designated MRB area pending outcome from agency personnel. For documentation purposes, the BOL must be marked accordingly to all discrepancies and a copy provided to the agency. For SAP procedures related to refusals and credits, please follow the link below: CREDITS/STOCK DENIALS/RETURNS – Section 16
Page 28
Damages to Cartons
Conforming Material
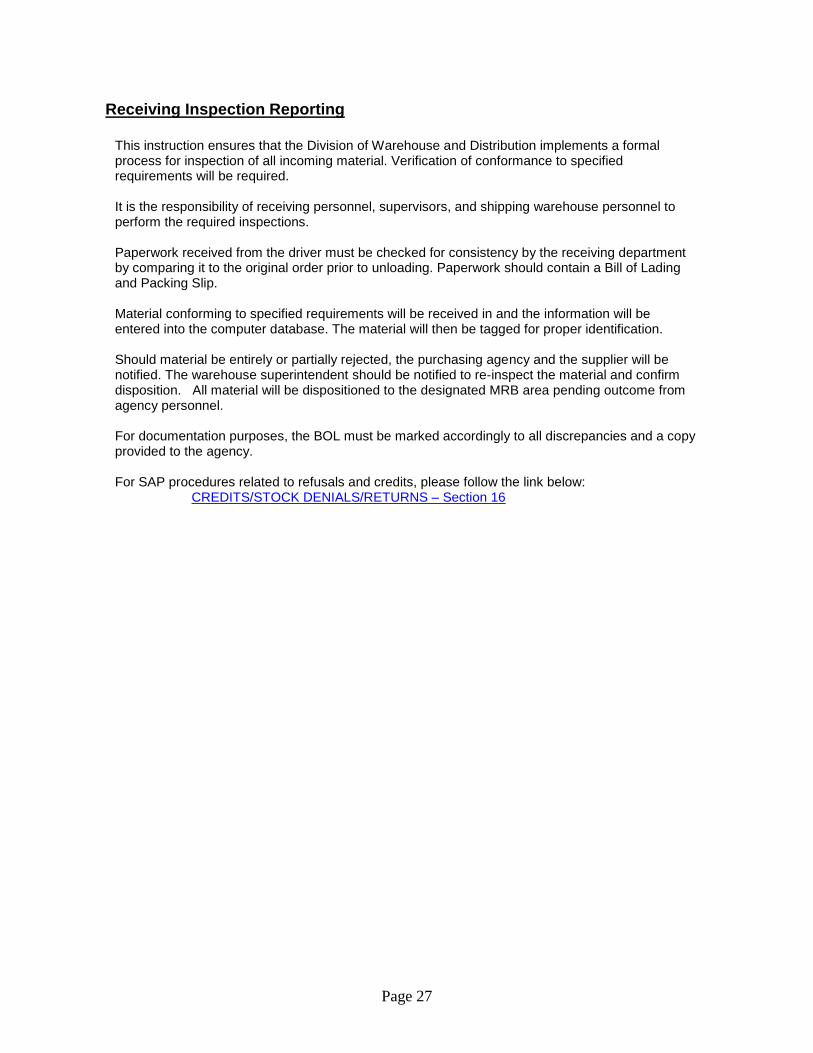
Torn Handle
The carton is not damaged other than a torn carrying handle. This damage was a result of improper lifting. The internal contents are intact and unaffected.
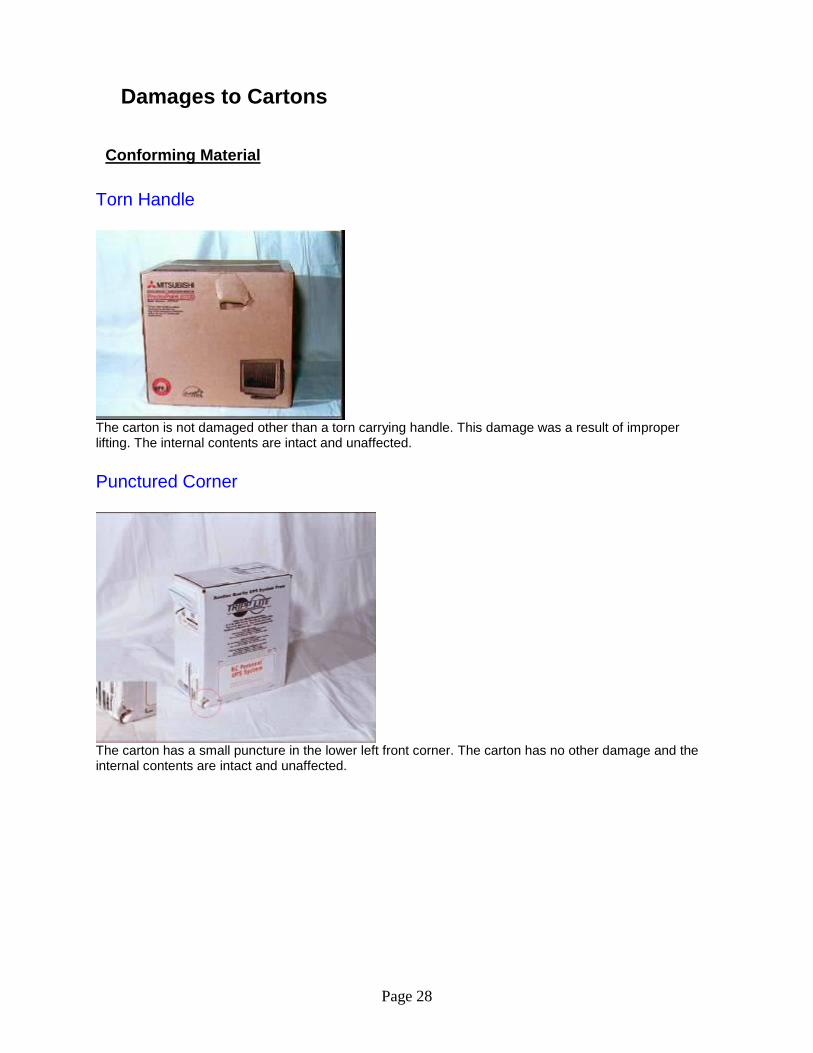
Punctured Corner
The carton has a small puncture in the lower left front corner. The carton has no other damage and the internal contents are intact and unaffected.
Page 29
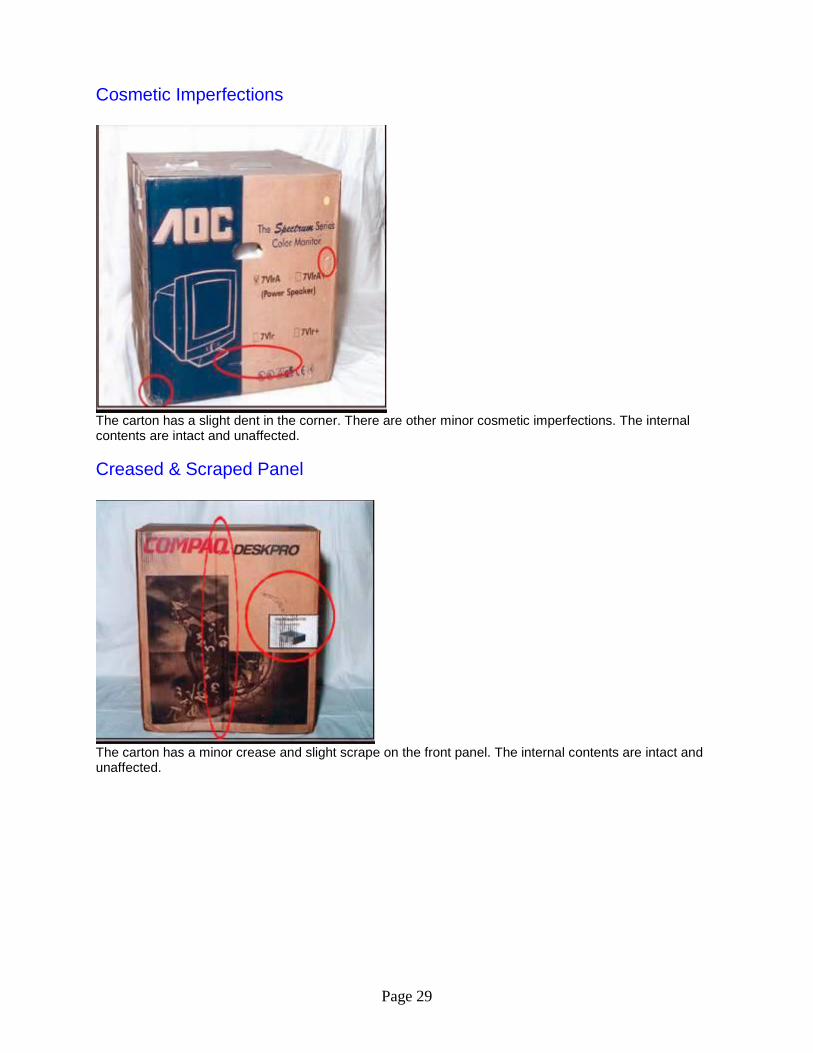
Cosmetic Imperfections
The carton has a slight dent in the corner. There are other minor cosmetic imperfections. The internal contents are intact and unaffected.
Creased & Scraped Panel
The carton has a minor crease and slight scrape on the front panel. The internal contents are intact and unaffected.
Page 30
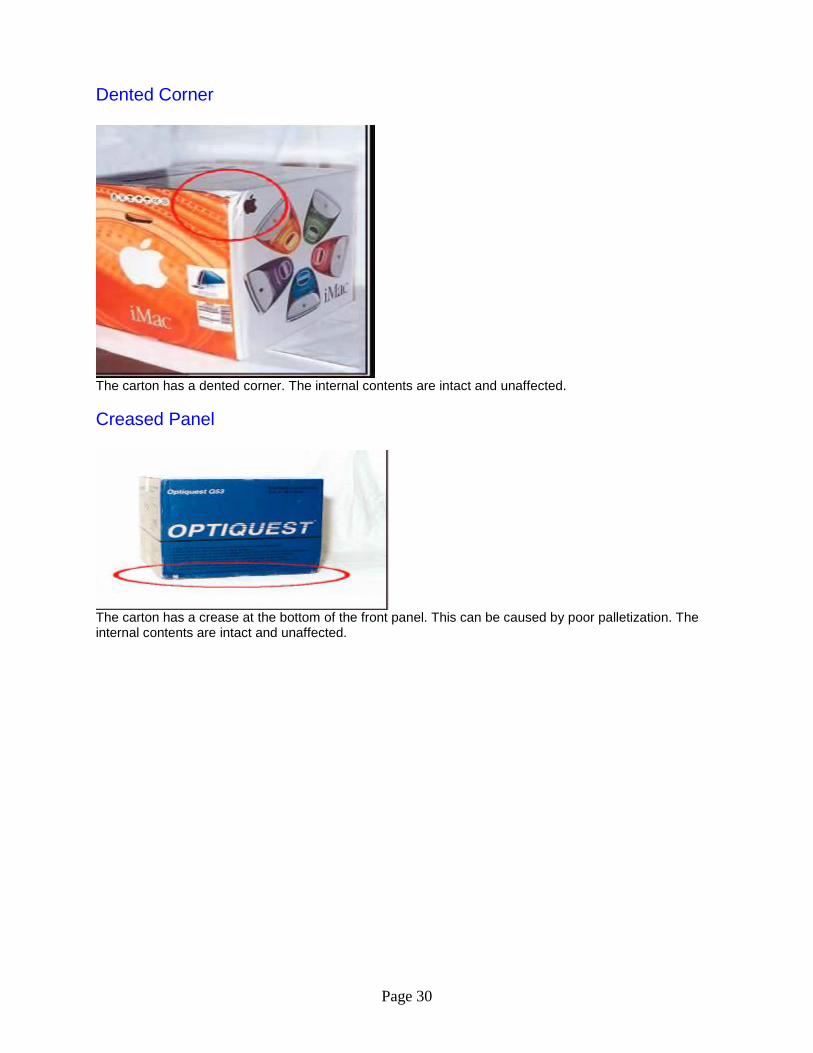
Dented Corner
The carton has a dented corner. The internal contents are intact and unaffected.
Creased Panel
The carton has a crease at the bottom of the front panel. This can be caused by poor palletization. The internal contents are intact and unaffected.

Page 31
Non-Conforming Material
Compressed Panels
This carton has been compressed. The resulting damage may have comprised the internal contents.
Compressed Carton
This carton has been compressed. The resulting damage may have comprised the internal contents.
Page 32
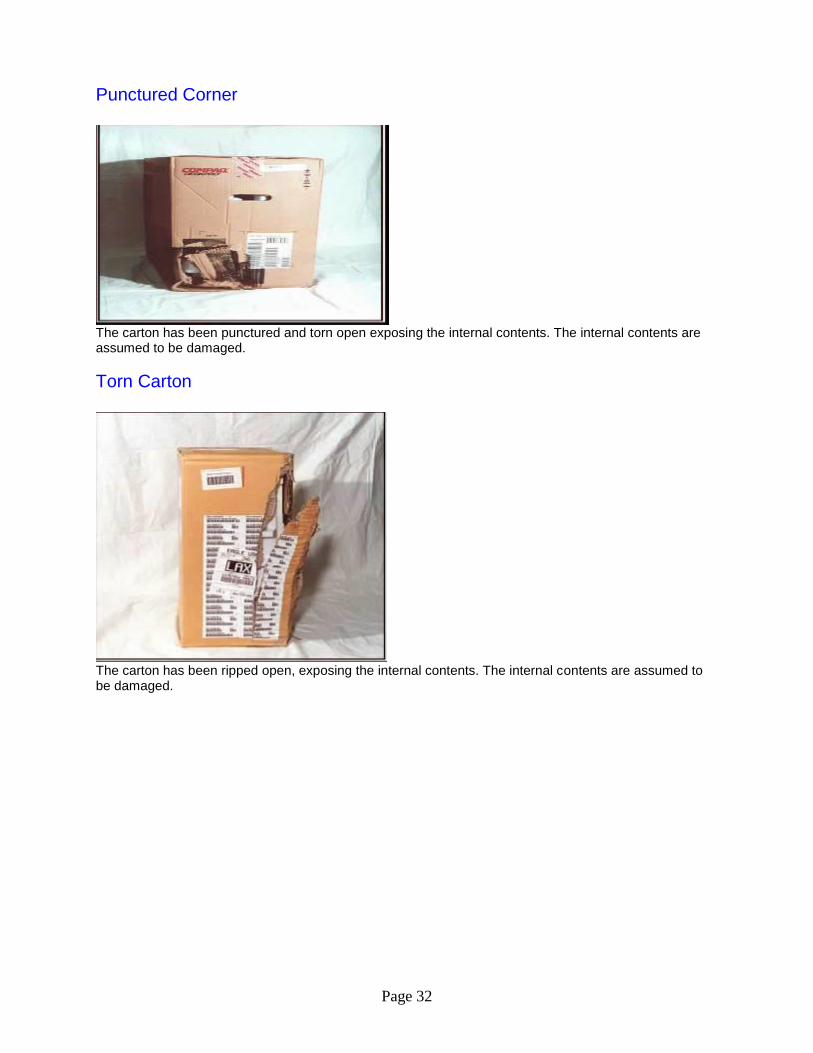
Punctured Corner
The carton has been punctured and torn open exposing the internal contents. The internal contents are assumed to be damaged.
Torn Carton
The carton has been ripped open, exposing the internal contents. The internal contents are assumed to be damaged.
Page 33
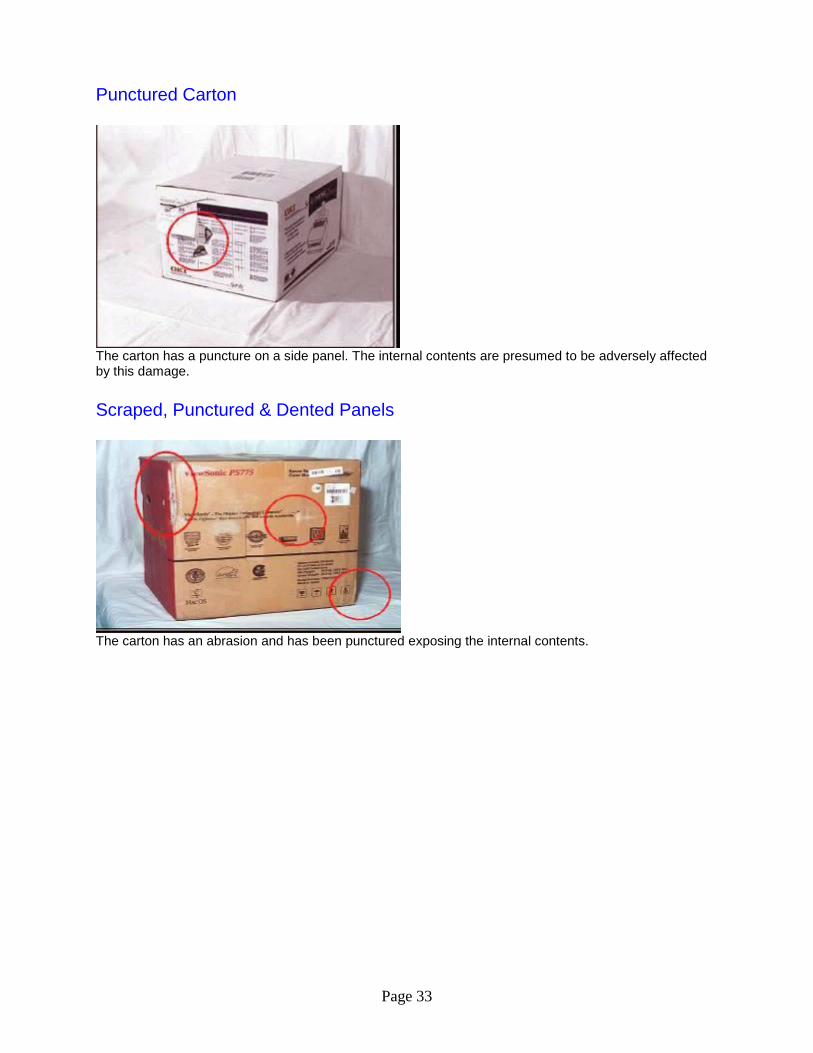
Punctured Carton
The carton has a puncture on a side panel. The internal contents are presumed to be adversely affected by this damage.
Scraped, Punctured & Dented Panels
The carton has an abrasion and has been punctured exposing the internal contents.

Page 34
Crushed Carton
The carton has been crushed on the top panel. The internal contents are presumed to be adversely affected by this damage.
Creased & Ripped Carton
The carton has been torn and creased. The internal contents are presumed to be adversely affected by this damage.
Page 35
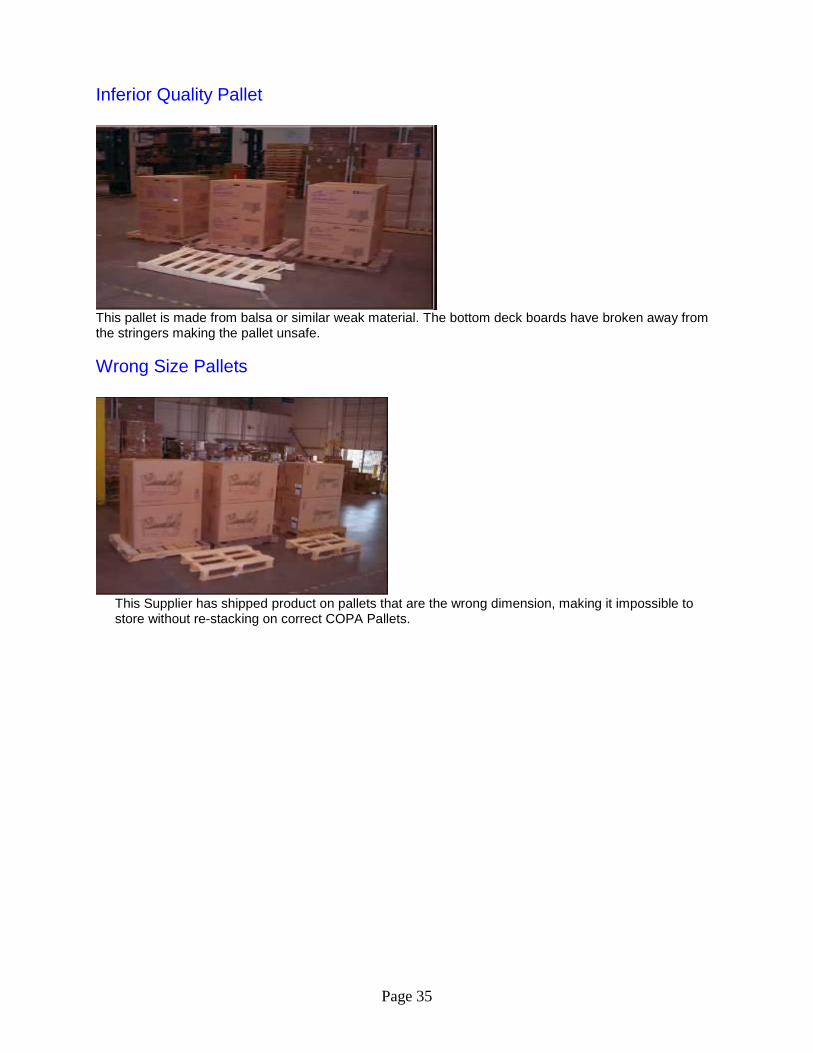
Inferior Quality Pallet
This pallet is made from balsa or similar weak material. The bottom deck boards have broken away from the stringers making the pallet unsafe.
Wrong Size Pallets
This Supplier has shipped product on pallets that are the wrong dimension, making it impossible to store without re-stacking on correct COPA Pallets.
Revision 291-20150225
Inventory Management / Physical Inventory
Inventory – General:
All inventory items under the responsibility of the DGS Distribution Center will be counted a minimum of one (1) time per year. The inventory will be counted using the ABC methodology for inventory classification. This can be found in General Plant Data/Storage 1 tab, CC Phys Inv. Ind (Cycle-Count Physical Inventory Indicator). The code is generated by material number strictly from an inventory movement history standpoint. There will be 4 codes associated with this indicator: A = top 56% of inventory movement, B = next 28% of inventory movement, C = 14% of inventory movement and D = last 2% of inventory movement. This breakdown is automatically calculated in SAP and we transferred the results. We will compare usage rates every 6 months to ensure we have the correct cycle counting code in place. Based on the new CC codes, we will cycle count in the following manner: A Items = monthly, B Items = Every 2 months, C Items = quarterly and D Items = yearly. Metrics will be compiled monthly to report results by agency and warehouse. A formal cycle-counting program will be established and inventory accuracy will be counted as a “hit” if count and location is accurate. Inventory accuracy for all distribution centers will have a goal of 98%+, by warehouse. If this goal is maintained for 2 consecutive quarters, no annual physical inventory will be accomplished.
Inventory – Spot Counts – DGS Distribution Center:
DGS Distribution Center will perform inventory spot counts as required to maintain accurate inventory. These counts will be in addition to the formal cycle-counting program.
Inventory – Spot Counts – Agency:
Agencies may visit any designated DGS Distribution Center to perform material inventory as desired/required. It is required that agency contact person schedule appointment with the appropriate warehouse.
Inventory – Posting:
Agencies will coordinate with the DGS Distribution Center the “posting” of inventory in a timely manner.

Page 37
Inventory – Discrepancies/Errors:
DGS Distribution Center will work with appropriate agency to resolve any discrepancies and/or errors. The DGS Distribution Center will not make any inventory adjustments without consent from the affected agency. This consent may include, but is not limited to:
1. Telephone contact 2. Written notification of discrepancy/error 3. Re-counting of items by DGS Distribution Center 4. Counting of items by Agency Personnel 5. Written statement of occurrence signed by appropriate DGS Distribution Center and
Agency staff person
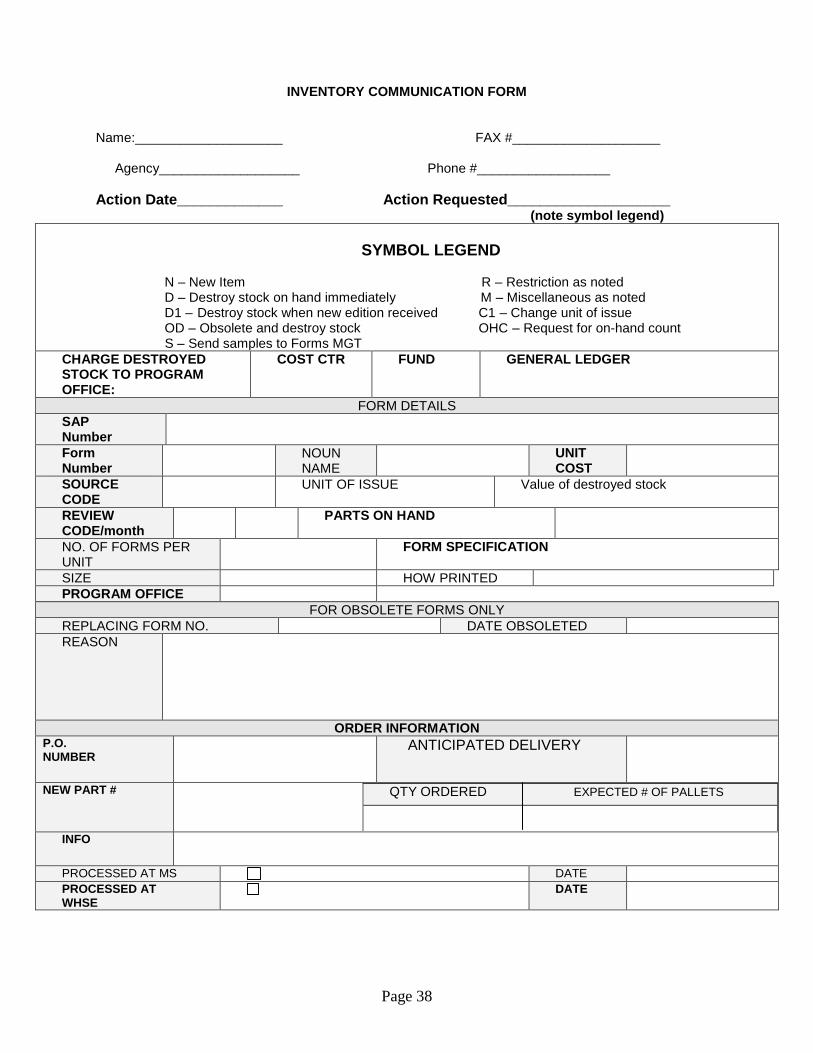
Inventory Adjustments
Agency is responsible for determining any actions regarding their inventory. This includes, but is not limited to, all additions, deletions and changes. Agency is responsible to notify DGS Distribution Center of all inventory additions, deletions and changes. This notification must occur in a timely manner to allow DGS Distribution Center adequate time to manage agency’s inventory. Agency must use the Inventory Communication Form regarding all notifications. A signed copy of this form must be promptly provided to DGS Distribution Center. The agency can e-mail this form or fax this form to the appropriate warehouse. Upon completion of form, DGS Distribution Center will maintain these forms at a central location at the DGS Distribution Center. For additional details regarding Inventory count processes, please follow a link below: SAP Inventory Transactions – Section 16
Page 38
INVENTORY COMMUNICATION FORM Name:____________________ FAX #____________________
Agency___________________ Phone #__________________
Action Date_____________ Action Requested____________________ (note symbol legend)
SYMBOL LEGEND N – New Item R – Restriction as noted D – Destroy stock on hand immediately M – Miscellaneous as noted D1 – Destroy stock when new edition received C1 – Change unit of issue OD – Obsolete and destroy stock OHC – Request for on-hand count S – Send samples to Forms MGT
CHARGE DESTROYED STOCK TO PROGRAM OFFICE:
COST CTR
FUND
GENERAL LEDGER
FORM DETAILS
SAP Number
Form Number
NOUN NAME
UNIT COST
SOURCE CODE
UNIT OF ISSUE Value of destroyed stock
REVIEW CODE/month
PARTS ON HAND
NO. OF FORMS PER UNIT
FORM SPECIFICATION
SIZE HOW PRINTED
PROGRAM OFFICE
FOR OBSOLETE FORMS ONLY
REPLACING FORM NO. DATE OBSOLETED
REASON
ORDER INFORMATION P.O. NUMBER
ANTICIPATED DELIVERY
NEW PART #
QTY ORDERED EXPECTED # OF PALLETS
INFO
PROCESSED AT MS DATE
PROCESSED AT WHSE
DATE
Revision 291-20150225
Goods Issues/Picking and Packing
Goods Issues/Pick Slips – General:
The DGS Distribution Center will process all Goods Issues and Pick Slips on a daily basis. Unless otherwise noted or there is an emergency need, agency requisitioners will be required to process their requisitions to the DGS Distribution Center. Goods Issues/Pick Slips will be delivered within two (2) business days from the date of order. Agency’s will be required to notify their requisitioners of backorder, deleted and/or modified. Detailed Information on Pik/Pack and GI Procedures by selecting a link below: SAP View And Print Orders – Section 16 SAP Hardcopies - Section 16 SAP Print Goods Issue For Hardcopy - Section 16 SAP Invoicing For Hardcopies - Section 16 SAP Invoice Printing - Section 16 Warehouse General Picking/Packing Procedures - Section 16 PLCB - Pick Cards – Section 13 MORRIS - Order Filling – Section 14 TOPICS - Pick and Pack Procedures – Section 15
Non-Controlled, Non-Restricted Items (SAP): If an agency’s inventory for non-controlled, non-restricted items is managed in SAP: Requisitioners will be required to use EB Pro Requisitioners in MyWorkPlace – THIS INCLUDES EMERGENCY REQUESTS A Goods Issue will be processed Unless there are unusual quantities ordered, requisitions would not be reviewed for items and/or quantities ordered. Backorders will accumulate until there is stock replenishment of the material or the item is deleted as an inventory item. Backordered items will be the responsibility of the agency to ensure these orders are satisfied by new purchase orders or expedited delivery dates.
Controlled, Restricted and Secured Items (SAP): If an agency’s inventory for controlled and/or restricted items is managed in SAP: Requisitions will be processed in a method that is within the guidelines of the agency. SAP will be the controlling system for ordering restricted items. It will be the Agency’s responsibility to establish guidelines for ordering within the Agency. A Goods Issue will be processed Backorders will accumulate based on guidelines of the agency The new material group 099999 for restricted inventory materials is in production. This will identify inventory materials with restrictions on ‘who’ can obtain from inventory plants: forms, formula, dog tags… Material group 099999 will be used throughout all plants in SAP. When these materials are created in SAP, the material master MUST have material group 099999 identified with those materials. EBPro will have an approval process to capture material group 099999 and forward those orders to an approver(s) within the plant. Once the order is approved, it forwards to the inventory plant for processing and shipment.

Page 40
Agencies must contact IES to establish materials for restricted ordering and access.
All Non-SAP Inventory: If an agency’s inventory is NOT managed in SAP, for non-controlled, non-secure, controlled and/or secure requisitioners will be required to use whatever method is currently in place to request items from your inventory.
Requisitioner - Goods Issues/Pick Slips Agencies will designate a liaison person who will act as central point of contact for their requisitioners. Questions: Agency requisitioners will be directed to contact the DGS Distribution Center – Customer Service Unit regarding any questions or concerns. DGS Distribution Center – Customer Service Unit business hours are 7:00 AM to 4:30 PM Phone: (717) 787-6159 Ext. 3234 or 787-6159 Ext. 3244; Fax: (717) 787-0934
DGS Distribution Center will provide a Customer Service Website located on the Department of General Services website: www.dgs.state.pa.us/surp_prop/site/default.asp.
Goods Issue - Discrepancies:
Discrepancies will be managed on a case-by-case basis. This may require DGS Distribution Center to:
1. Work with Requisitioner to resolve discrepancy 2. Work with agency liaison to resolve discrepancy 3. Require written statement from requisitioner, agency or supplier. 4. Require electronic and/or faxed information from Requisitioner, agency or supplier. 5. Contact shipping company and/or shipping tracer regarding proof of delivery
Goods Issue - Returns:
Returns will be managed on a case-by-case basis. This may require DGS Distribution Center to:
Work with Requisitioner to coordinate return
Work with agency liaison to coordinate return
Require written statement from either Requisitioner and/or agency
Require electronic and/or faxed information from Requisitioner and/or agency
Goods Issue - Credits:
Credits will be managed on a case-by-case basis. This may require DGS Distribution Center to: Work with Requisitioner regarding credit Work with agency liaison regarding credit Require written statement from either Requisitioner and/or agency

Page 41
Require electronic and/or faxed information from Requisitioner and/or agency NOTE: Due to fiscal or data base restrictions, DGS Distribution Center may be limited to how credits are processed.
Goods Issue - Quality Assurance Check
The DGS Distribution Center is responsible for providing a quality assurance check for Goods Issues and Picking Slips. DGS Distribution Center initial and date the inspected Goods Issues/Picking Slips.
Controlled Documents and Secure Inventory:
Controlled Documents and Secure inventory items will be managed as indicated by the appropriate agency. DGS Distribution Center will provide a quality assurance check to ensure shipments and any required written documentation is properly maintained.
Inventory Management:
DGS Distribution Center will provide quality assurance to ensure inventory is properly rotated in accordance with agency and/or manufacturer’s requirements – such as: expiration dates, lot numbers, serial number control, etc.
Page 42
Picking/Packing/Shipping Materials
1. Picking Materials
a. Equipment Operator pulls each material listed on Goods Issue Slip
1. Locations and Quantity of each material is listed on Goods Issue Slip
2. Materials are placed in Packing Area a. Materials are grouped on skids b. Equipment Operator signs/dates Goods Issue Slip c. Goods Issue Slip is placed with materials in visual, secure
location. b. Storekeeper double checks materials have been pulled accurately
1. Incorrectly pulled items: a. Items are returned to accurate warehouse location. b. Equipment Operator is informed of his mistake. c. Correct Items are pulled and re-checked by Storekeeper
2. Correctly pulled items: a. Storekeeper signs/dates Goods Issue Slip b. Materials placed in packing area
2. Packing Materials
a. Stock Clerk locates packing box (es)
1. Ensure box (es) is adequate for amount of materials. b. Items are strategically placed in box (es) for best fit. c. Stuffing material is placed in all empty spaces. d. Ensure all materials are packed securely
1. Box (es) should be shaken without hearing any items shifting. e. STO Number is listed on box (es) f. Stock Clerk completes proper information on Goods Issue Slip
1. Name and Date 2. Carton Count
g. Items are ready for shipment 3. Shipping Materials
a. Local Shipments:
1. Envelope prepared with proper information: a. Write Information on Envelope
1. STO Number 2. Address
b. Insert 2nd Copy of Goods Issue Slip 1. This is the Customers Packing Slip
2. Envelope is taped on box in a visible location 3. 1st Copy of Goods Issue Slip is folded and placed under the
envelope

Page 43
a. This copy is to be signed/dated by requesting agency, upon delivery, for delivery verification, and returned to warehouse.
4. STO Number is placed on all boxes, unless shrink-wrapped 5. Box (es) are placed in Local Shipment Location
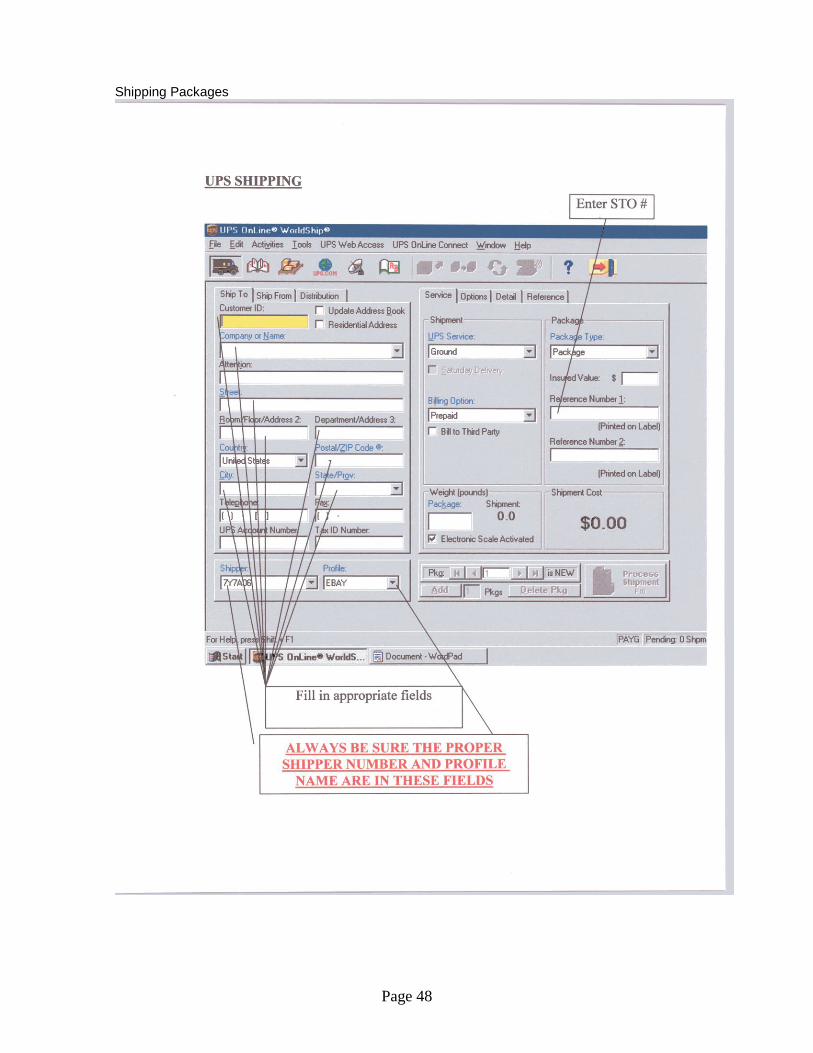
b. UPS Shipments:
1. Place Box on UPS Scale for weight 2. Address: Enter Delivery Address 3. Reference: Enter STO Number
a. For multi-box shipments: 1. Click on ‘Use on all Packages’ 2. Click Back (to address screen) 3. Place carton on scale and select ‘ADD’ 4. Change carton on scale and select ‘ADD’
a. Repeat process until all cartons have been weighed
4. Select ‘Process Shipment’ a. Labels and End of Day Reports:
1. Click on Computer Icon 2. Select ‘Yes’
a. Generates label for UPS Driver and Report for Billing
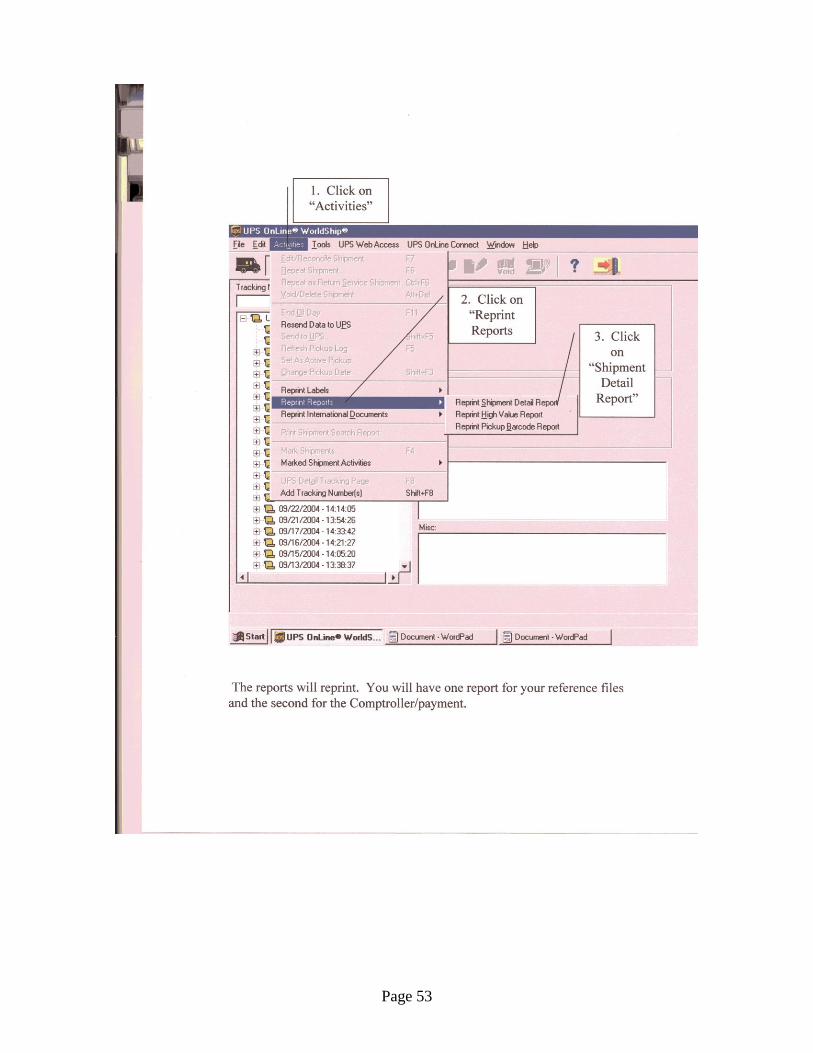
3. Reprint Report for file:
a. Click on ‘Log Book’ b. Click on Pick up Date c. Go into Activities d. Select “Reprint Reports’ e. Click on ‘Detail Report’
5. STO Number is placed on all boxes, unless shrink-wrapped 6. Box (es) are placed in UPS Shipment Location
c. Common Carrier Shipments:
1. All boxes are stacked on pallet a. Ensure boxes aren’t hanging over pallet
2. Order prepared for typing of Bill of Lading a. Information written on Goods Issue Slip
1. Non-Hazmat Materials: a. Number of Pallets (Number of Cartons) FAK
Weight Example: 1 pallet (40 crtns) FAK 2040
2. Hazmat Materials: a. Number of Pallets (Number of Cartons) FAK
Weight Specific Hazmat Information
Page 44
Example: 1 pallet (40 bags) FAK 2000 Corrosive, Sodium Hydroxide, Solid, 8, UN1823, II
b. Hazmat Information Sheet is to be attached
3. Bill of Lading, Packing Slip and Shipping Address taped on carton, in a visible location
4. Pallet is shrink wrapped and weighed (weight entered as shown above)
5. Paperwork is given to Storekeeper to collect quotes for the most economical trucking company
6. Goods Issue Slip is given to Clerk Typist to type Bill of Lading a. Typed Bill of Lading is returned to Storekeeper
7. Pallets are placed in Common Carrier Location
d. PennDot (Pony) Shipments:
1. Envelope prepared with proper information: a. Write Information on Envelope
1. STO Number 2. District Number
b. Insert 2nd Copy of Goods Issue Slip
1. This is the Customers Packing Slip 2. Envelope is taped on box in a visible location 3. 1st Copy of Goods Issue Slip is folded and placed under the
envelope a. This copy is to be signed/dated by Pony Driver, upon pick-
up, for pick-up verification, and returned to warehouse. 4. STO Number is placed on all boxes, unless shrink-wrapped
5. Box(es) are placed in Pony Location
Revision 291-20150225
Shipping
General:
Unless otherwise noted by agency’s service requirements, DGS Distribution Center will determine the most cost efficient method of shipment.
United Parcel Service (UPS):
Agencies are required to process all administrative and fiscal documentation required to maintain an active United Parcel Service (UPS) Shipping Account. DGS Distribution Center uses the UPS Ground as their primary method for out of town shipments. Agencies have the ability to review their UPS account through their Agency’s UPS Liaison. Agency will have the ability to back charge to the appropriate Fund and Cost Centers. DGS Distribution Center will monitor all shipments via UPS and will establish reporting and delivery exception procedures as described in www.ups.com.
Local Deliveries:
DGS Distribution Center will deliver to all agencies facilities in the Harrisburg Area on a daily basis. Note: All DGS Distribution Center staff will be required to wear correct Commonwealth Employee Picture Identification.
Agency Mailroom:
If it is determined by the DGS Distribution Center, the most cost effective method is to mail shipments the DGS Distribution Center will drop off items to be mailed to respective agency mailrooms for processing.
Less Than Truckload or Truckload Shipments
If “Less Than Truckload” (LTL) or truckload shipments are required for shipment to a customer outside the Harrisburg area, DGS Distribution Center, DGS will obtain 3 quotes from outside carriers. This procedure will be accomplished using Attachment 3.
Page 46
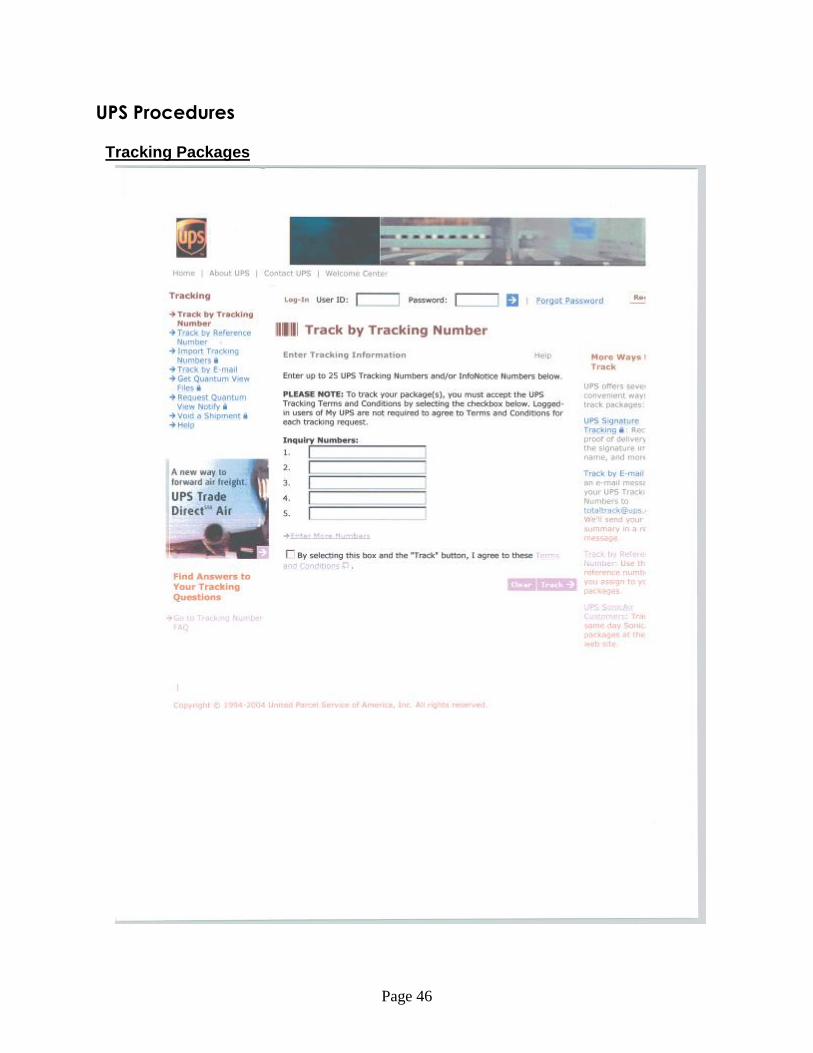
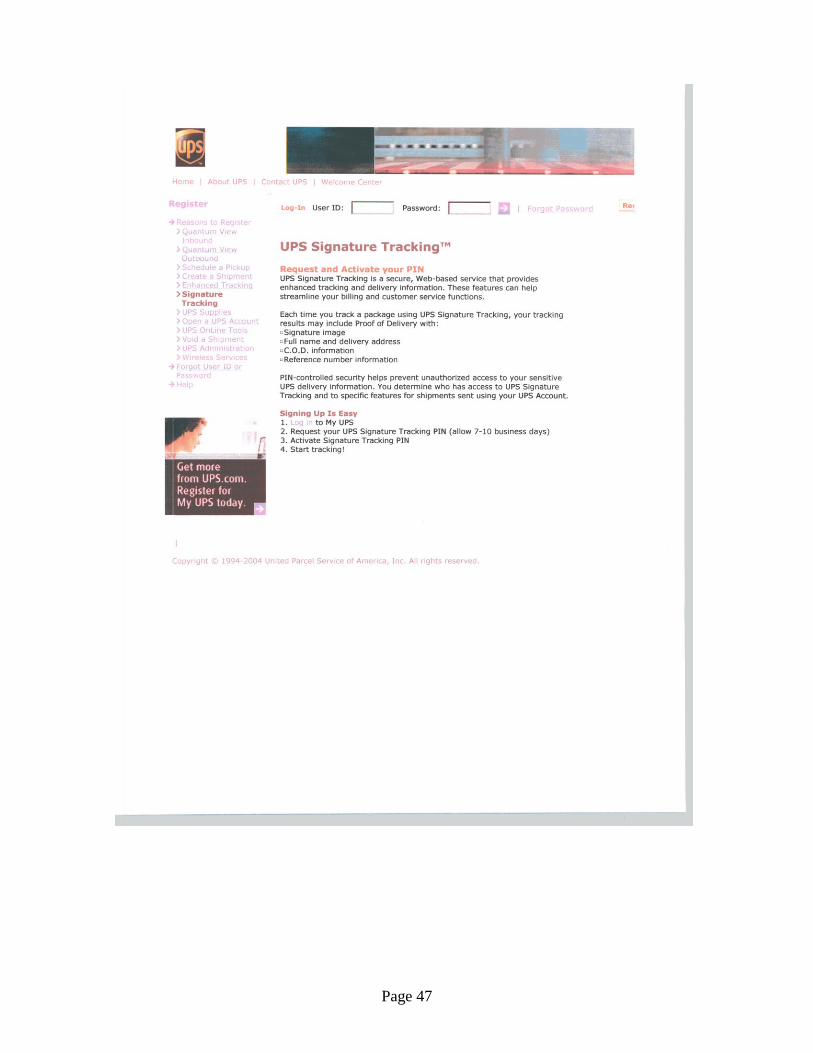
UPS Procedures
Tracking Packages
Page 47
Page 48
Shipping Packages
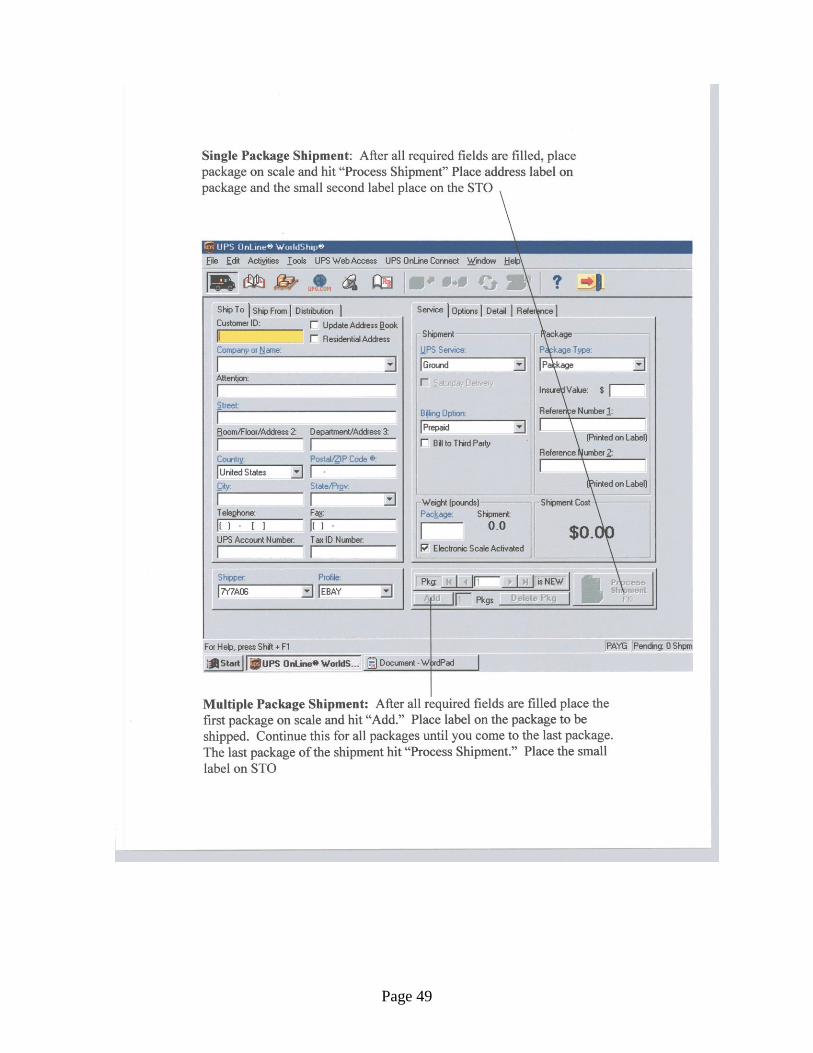
Page 49
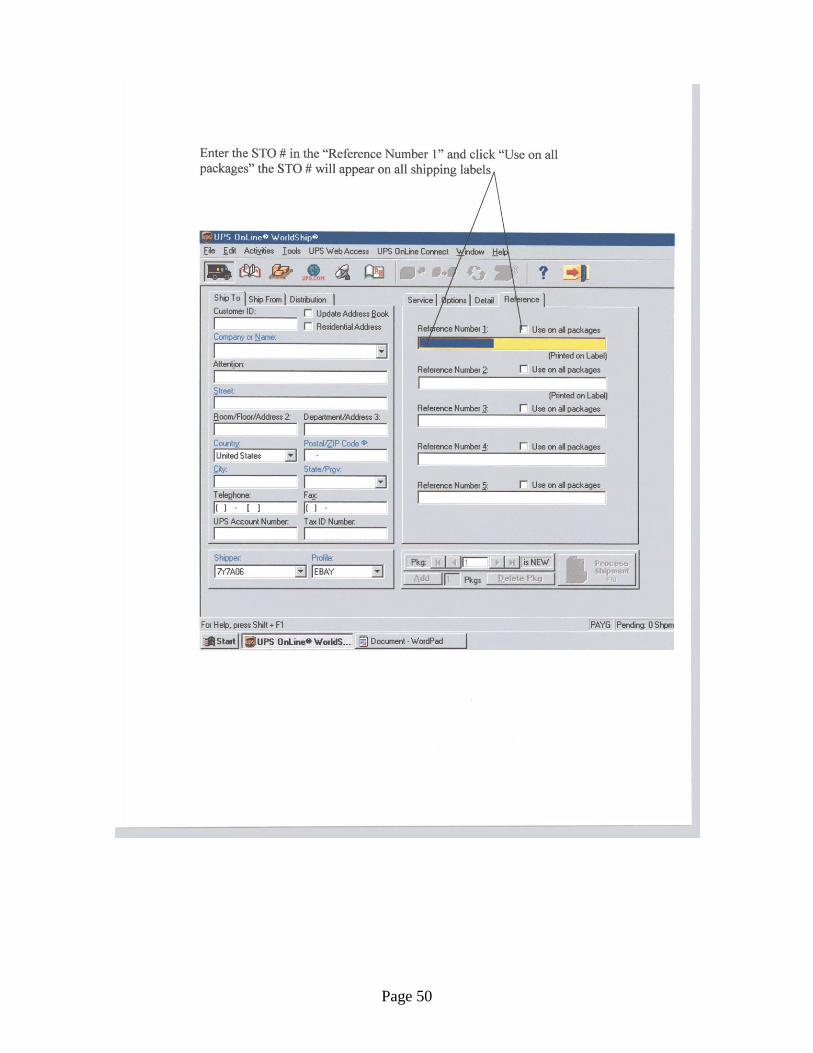
Page 50
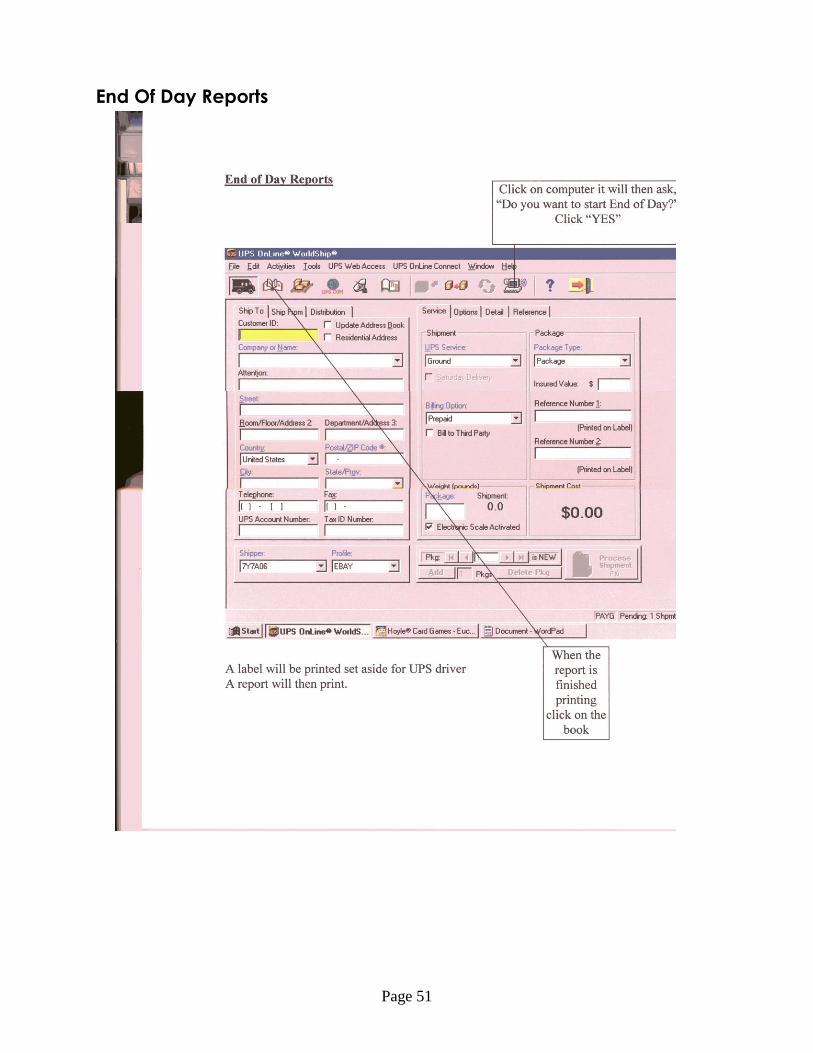
Page 51
End Of Day Reports
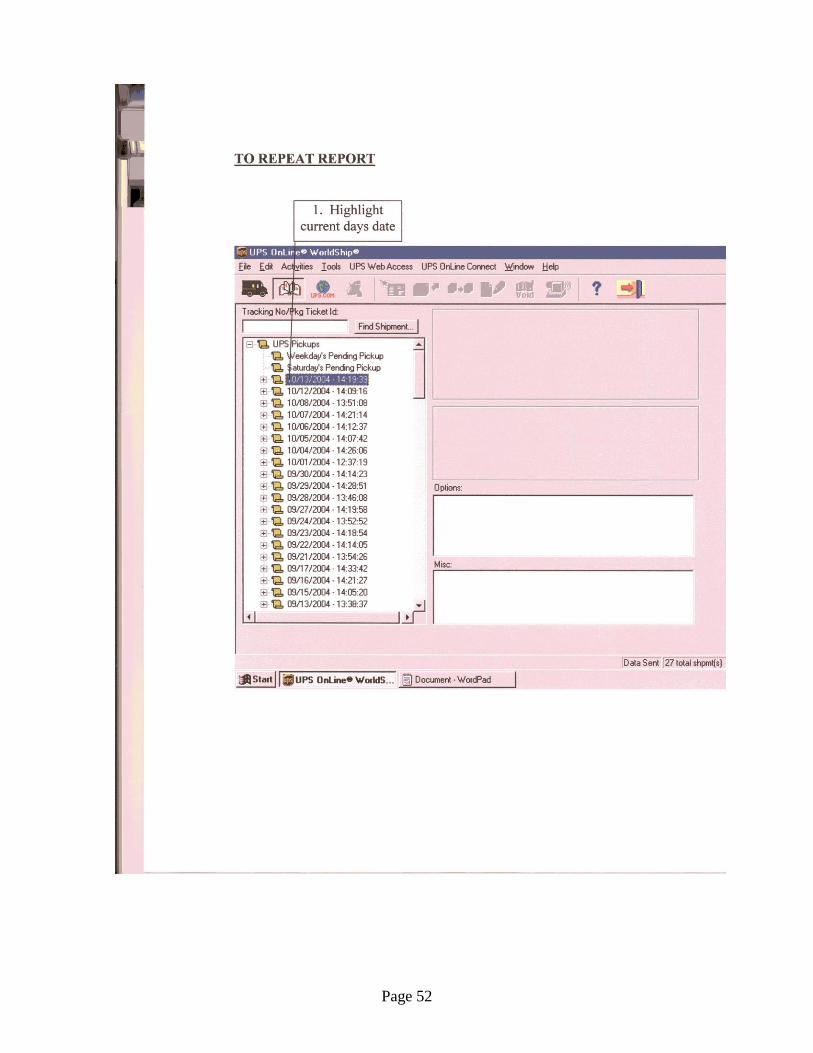
Page 52
Page 53

Page 54
Which Common Carrier to Use

Page 55
Use for shipments under 10,000 pounds
Click hers for Customer Options then click “Logon”
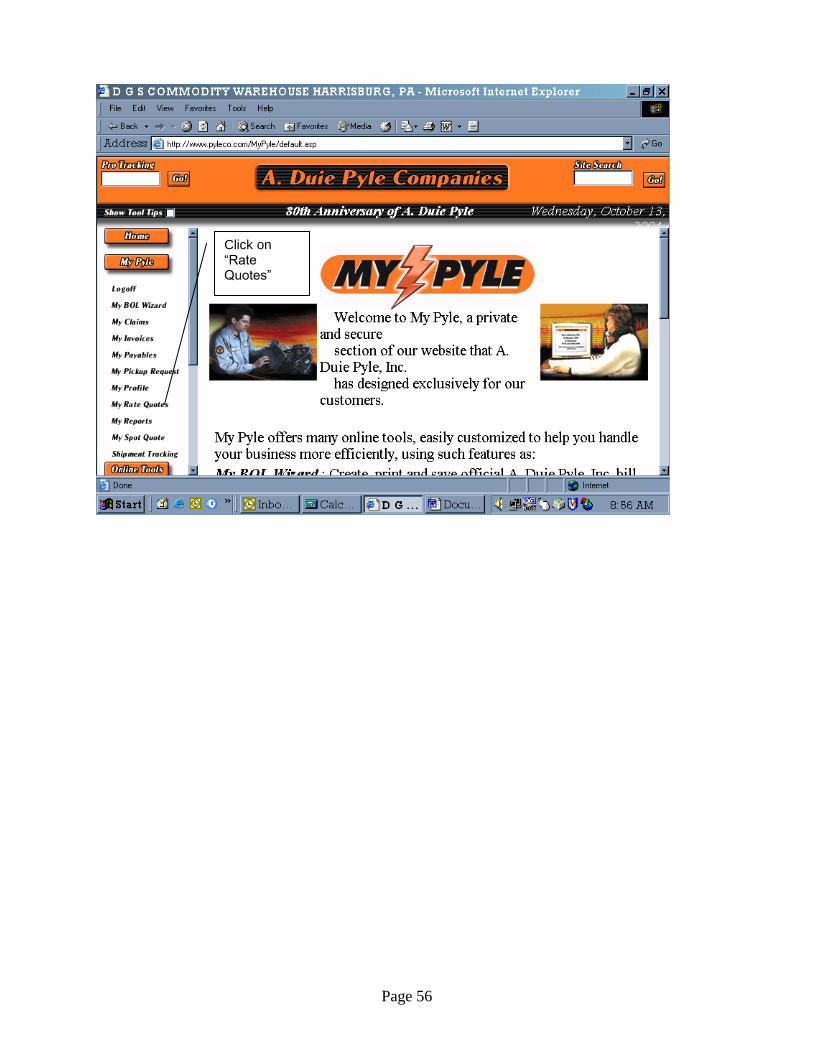
Page 56
Click on “Rate Quotes”

Page 57
Scroll down to complete Quote information
Enter Zip Code
Class of Material
Weight of Material acquired from STO
Page 58
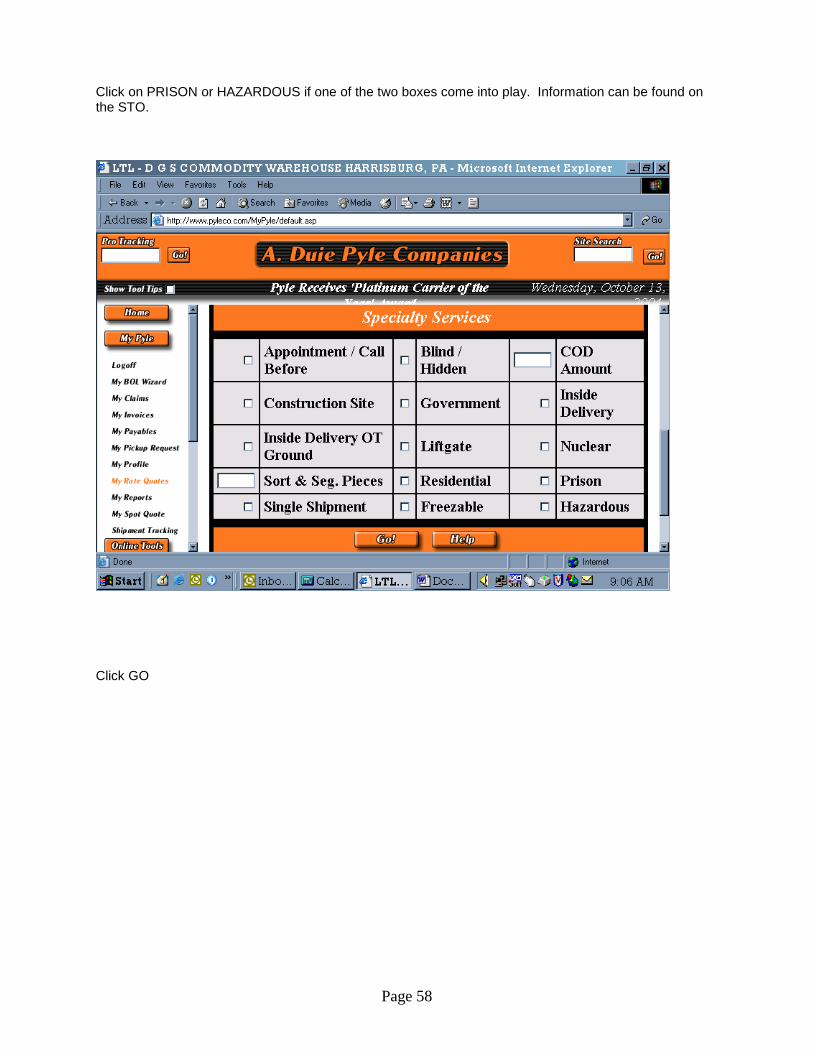
Click on PRISON or HAZARDOUS if one of the two boxes come into play. Information can be found on the STO.
Click GO
Page 59
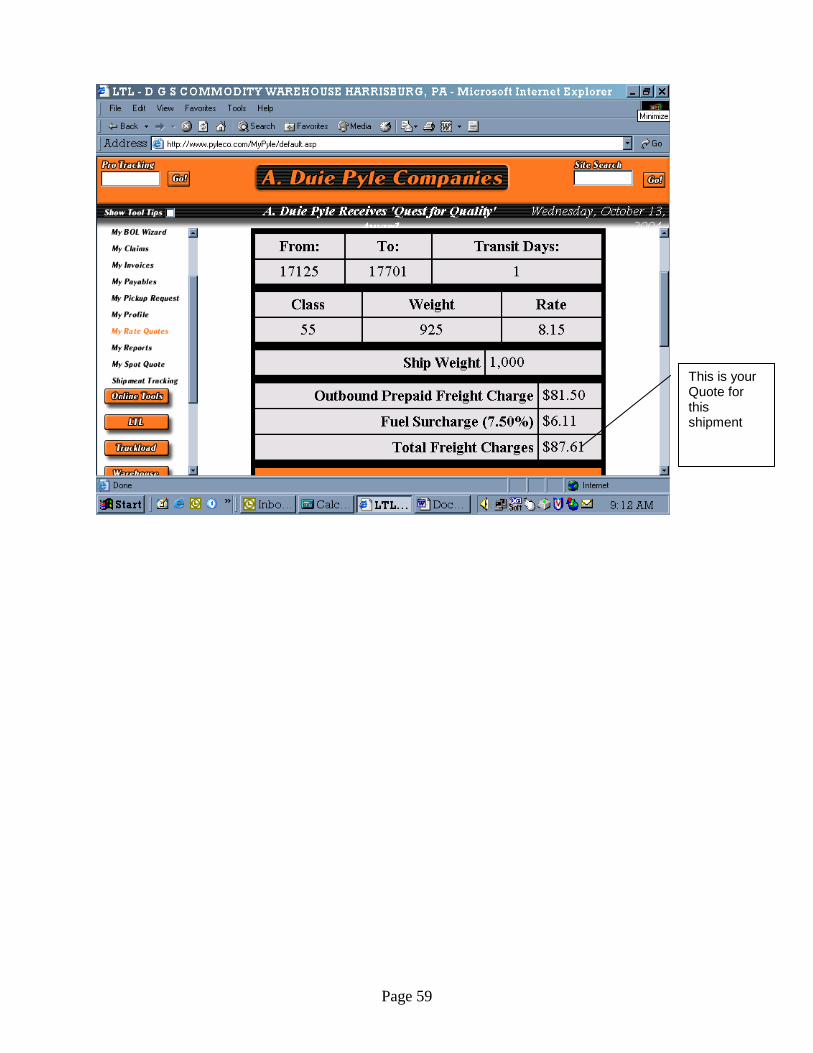
This is your Quote for this shipment

Page 60
Enter “Username” and “Password”
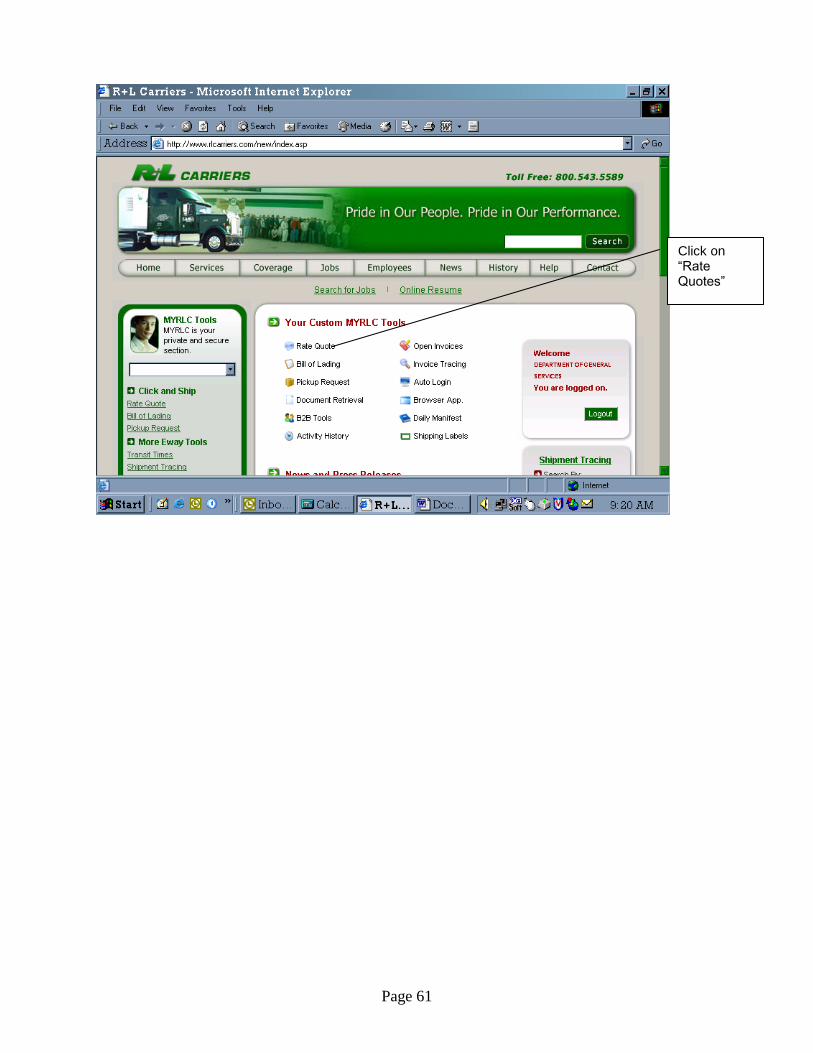
Page 61
Click on “Rate Quotes”
Page 62
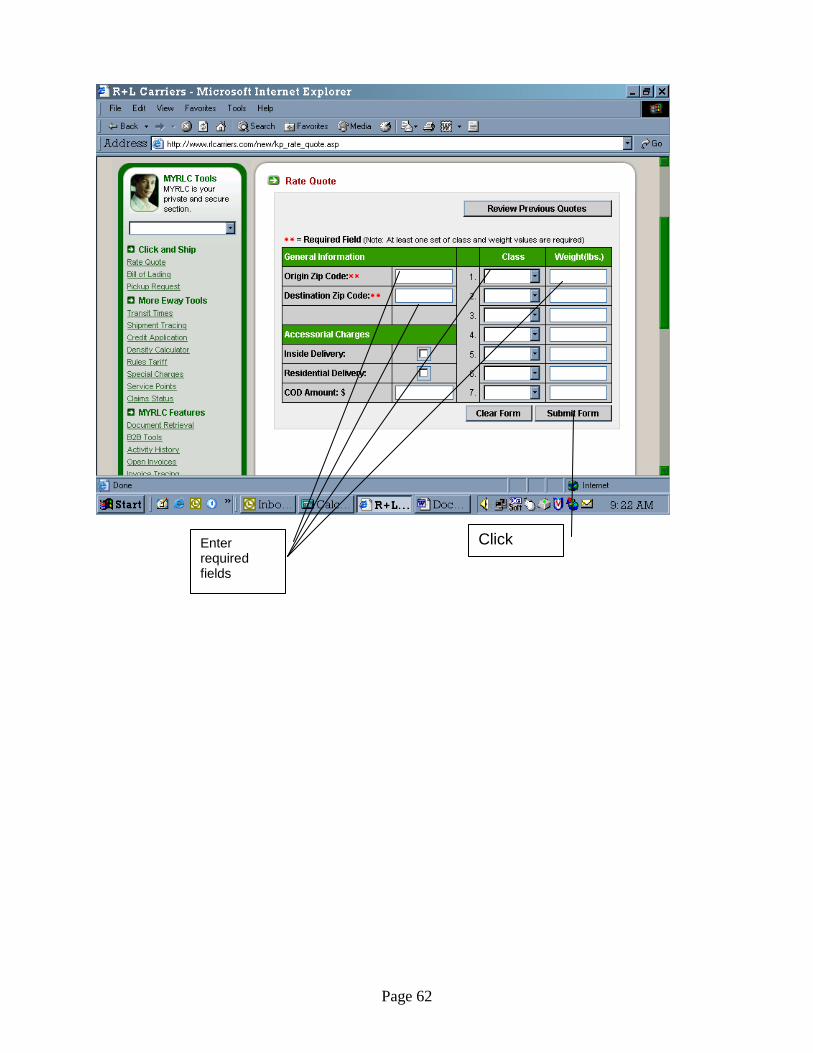
Enter
required fields
Click

Page 63
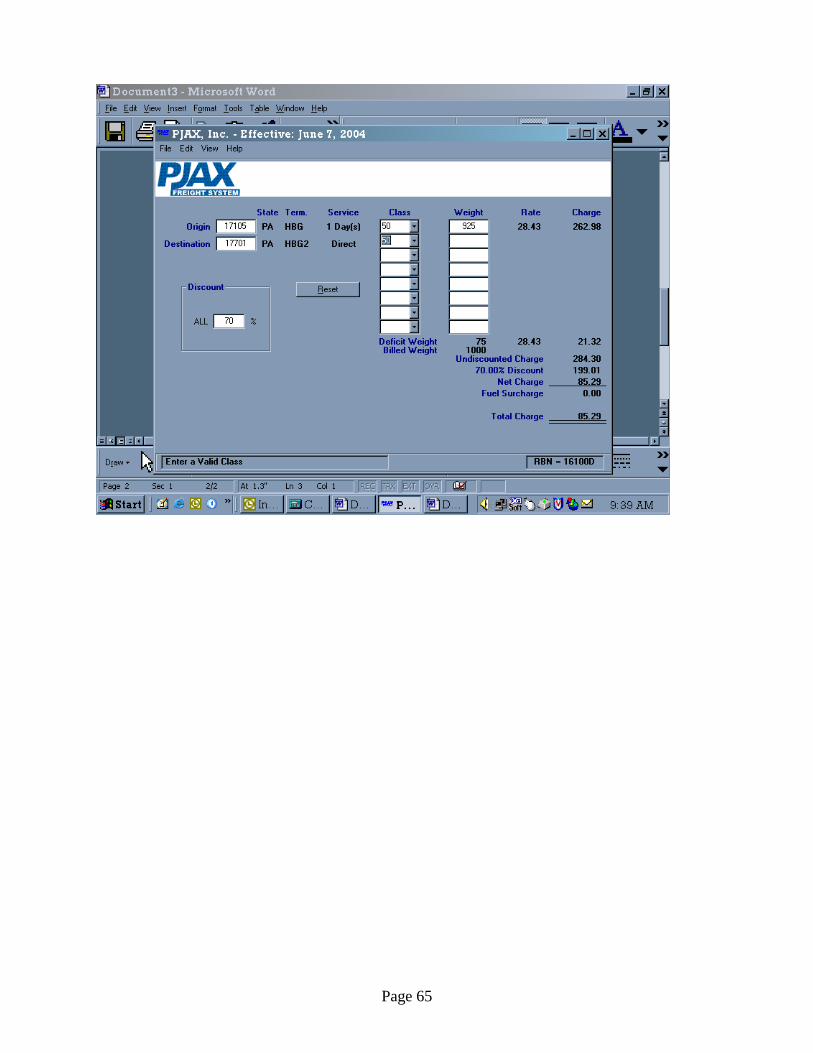
This is the Quote for this Shipment
Page 64
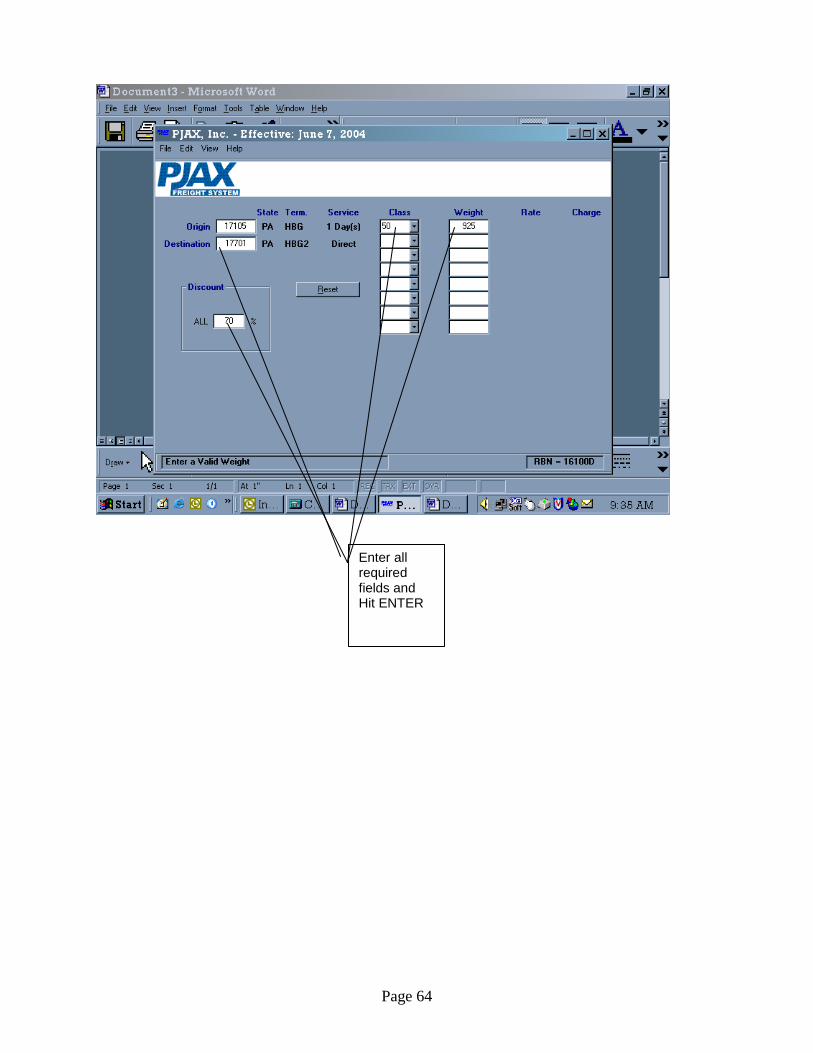
Enter all required fields and Hit ENTER
Page 65
Revision 291-20150225
File Retention
Non-Secure/Non-Controlled Goods Issues/Picking Slips:
Completed Non-Secure/Non-Controlled Goods Issues/Picking Slips will be maintained on file for twelve (12) months from date of issue at the DGS Distribution Center.
Secure/Controlled Goods Issue/Picking Slips including any extra documentation:
Completed Secure/Controlled Goods Issue/Picking Slips, which includes any logs or special documentation, will be maintained at the DGS Distribution Center on a retention schedule identified in the Agency’s Service Requirements.
United Parcel Service (UPS) Shipping Reports:
United Parcel Service (UPS) daily shipping reports will be retained for a twelve (12) month period from issue date at the DGS Distribution Center.
Daily Local Shipping Log:
The Daily Local Shipping Log will be retained for a twelve (12) month period from date of log at the DGS Distribution Center.
Revision 291-20150225
Excess Retrieval and Disposition Instructions
Submitting Material For Storage
Instructions For Excess Identification Tag Enter appropriate information onto the tag.
Plant
Dept.
Description
Date Attach it to the excess property. Ensure method of attachment does not damage the property.
Instructions for Completing Excess Packing Slip Complete the following information
Date
From:
Plant #:
Page __ of __
1. Enter appropriate information from the tag onto the packing slip. 2. Complete all required fields on the packing slip:
a. Tag number b. Bureau c. Item Number (note: Select from “Standard Item Descriptions” tab) d. Item Description (note: Automatically populates based on Item Number) e. Item description 2 f. Color (if applicable) g. Quantity
3. After the packing slip is complete, print out 2 copies and bring with material to Excess warehouse.
4. Call the Excess warehouse and schedule delivery appointment. 717-525-5812 5. Electronically send the packing slip using Microsoft Excel to, the Excess warehouse
resource account at RA-Whs&[email protected] (internal: GS, Whs&Dist) 6. After material is delivered, shipper and receiver will sign and date delivery for validation of
contents and proof of delivery. 7. Shipper will receive one signed copy of packing slip for records. 8. Excess warehouse will add contents of packing slip to master inventory (from electronic
packing slip) and will file hardcopy Packing Slip. 9. Notify Customer Service at 717-525-5812 approximately 48 hours in advance of all
deliveries and retrievals. This is needed due to an ever increasing need for space and due to the fact we have two different warehouses at two different locations storing excess.
State Surplus Property
Follow 551 Disposition Report System
Note: Please call 717-787-4085 to schedule delivery appointment

Page 68
Retrieval of Items from the Excess Warehouse
Review of Property
If you need to review or look at the items stored for your bureau, please contact the warehouse manager to establish an appointment. Hours of operation are 7:00am-4:00pm. An appointment is necessary to ensure personnel are available to escort you through the warehouse. The escort is necessary to ensure the security of everyone’s property.
To retrieve an item(s) from the Excess Warehouse
1. E-mail the warehouse manager with the tag number and the description. 2. Make arrangements for pick-up/delivery. 3. Upon receipt of the item, the receiver will sign for the item using the “Retrieval from Excess
Packing Slip”. 4. Receiver will provide signed packing to the property control officer, as verification of receipt and
a deletion transaction from the Bureau’s inventory. 5. Excess warehouse will transact the deletion from the master inventory.
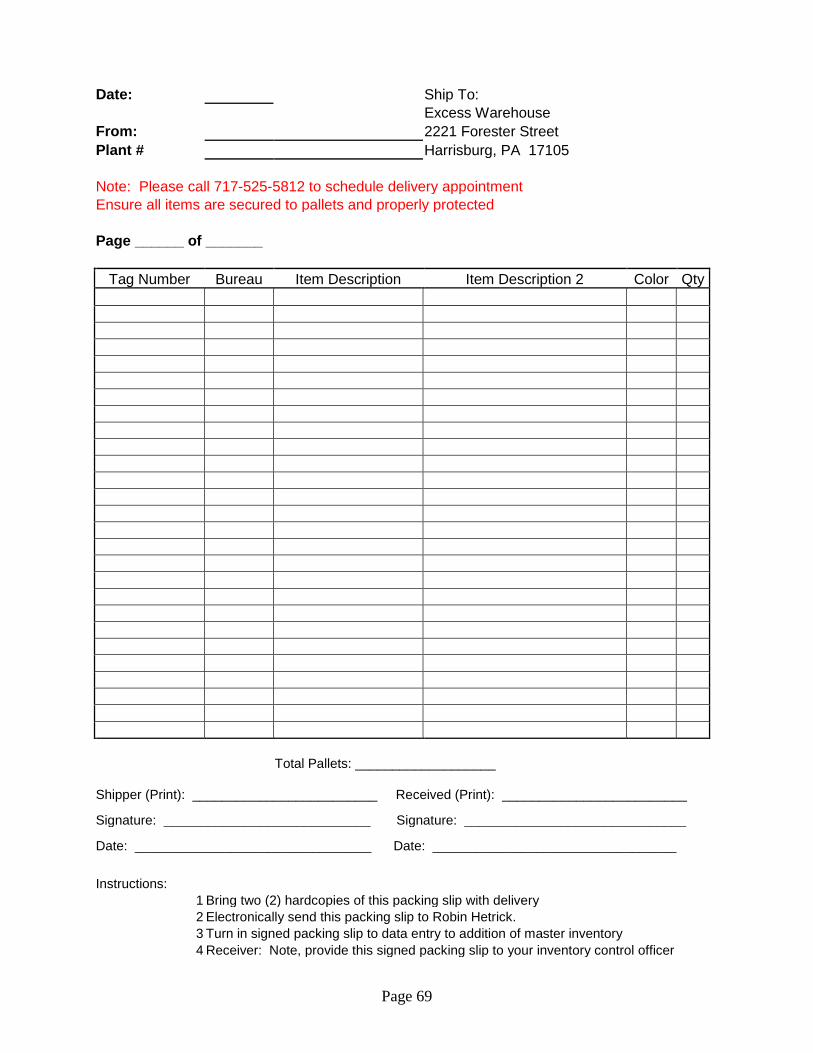
Excess Packing Slip
Page 69
Date: Ship To:
Excess Warehouse
From: 2221 Forester Street
Plant # Harrisburg, PA 17105
Note: Please call 717-525-5812 to schedule delivery appointment
Ensure all items are secured to pallets and properly protected
Page ______ of _______
Tag Number Bureau Item Description Item Description 2 Color Qty
Total Pallets: ___________________
Shipper (Print): _________________________ Received (Print): _________________________
Signature: ____________________________ Signature: ______________________________
Date: ________________________________ Date: _________________________________
Instructions:
1 Bring two (2) hardcopies of this packing slip with delivery
2 Electronically send this packing slip to Robin Hetrick.
3 Turn in signed packing slip to data entry to addition of master inventory
4 Receiver: Note, provide this signed packing slip to your inventory control officer
Page 70
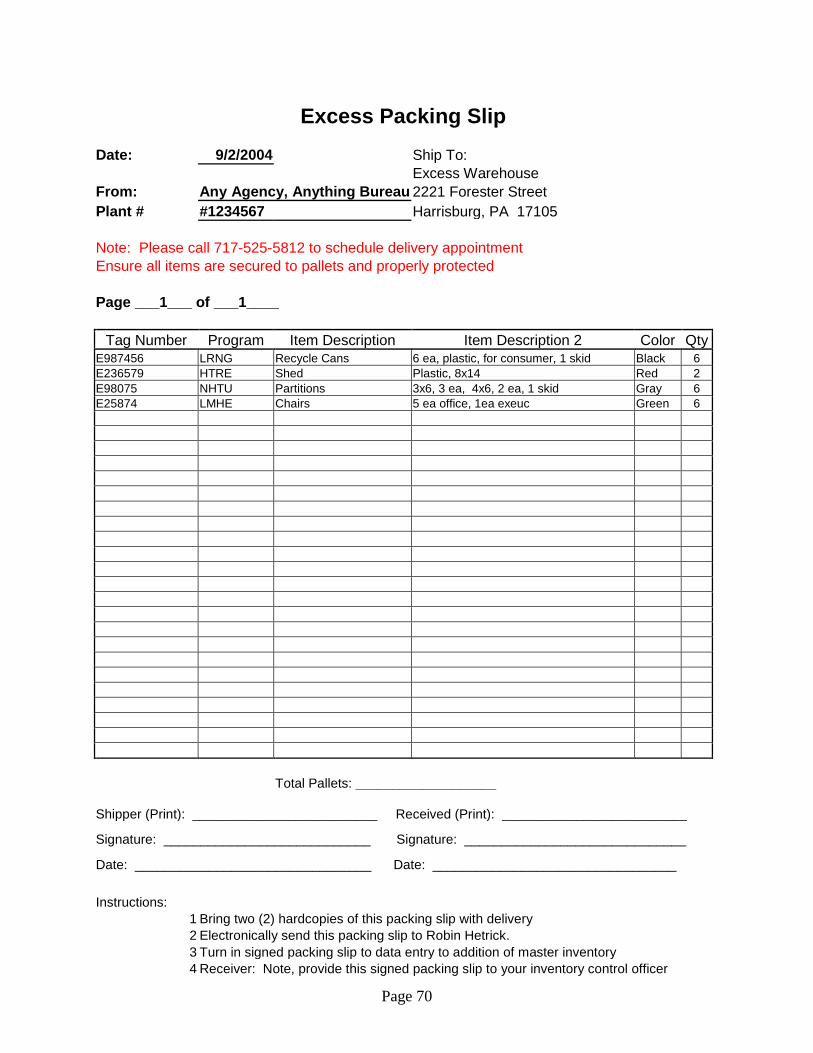
Excess Packing Slip
Date: 9/2/2004 Ship To:
Excess Warehouse
From: Any Agency, Anything Bureau 2221 Forester Street
Plant # #1234567 Harrisburg, PA 17105
Note: Please call 717-525-5812 to schedule delivery appointment
Ensure all items are secured to pallets and properly protected
Page ___1___ of ___1____
Tag Number Program Item Description Item Description 2 Color Qty
E987456 LRNG Recycle Cans 6 ea, plastic, for consumer, 1 skid Black 6
E236579 HTRE Shed Plastic, 8x14 Red 2
E98075 NHTU Partitions 3x6, 3 ea, 4x6, 2 ea, 1 skid Gray 6
E25874 LMHE Chairs 5 ea office, 1ea exeuc Green 6
Total Pallets: ___________________
Shipper (Print): _________________________ Received (Print): _________________________
Signature: ____________________________ Signature: ______________________________
Date: ________________________________ Date: _________________________________
Instructions:
1 Bring two (2) hardcopies of this packing slip with delivery
2 Electronically send this packing slip to Robin Hetrick.
3 Turn in signed packing slip to data entry to addition of master inventory
4 Receiver: Note, provide this signed packing slip to your inventory control officer
Page 71
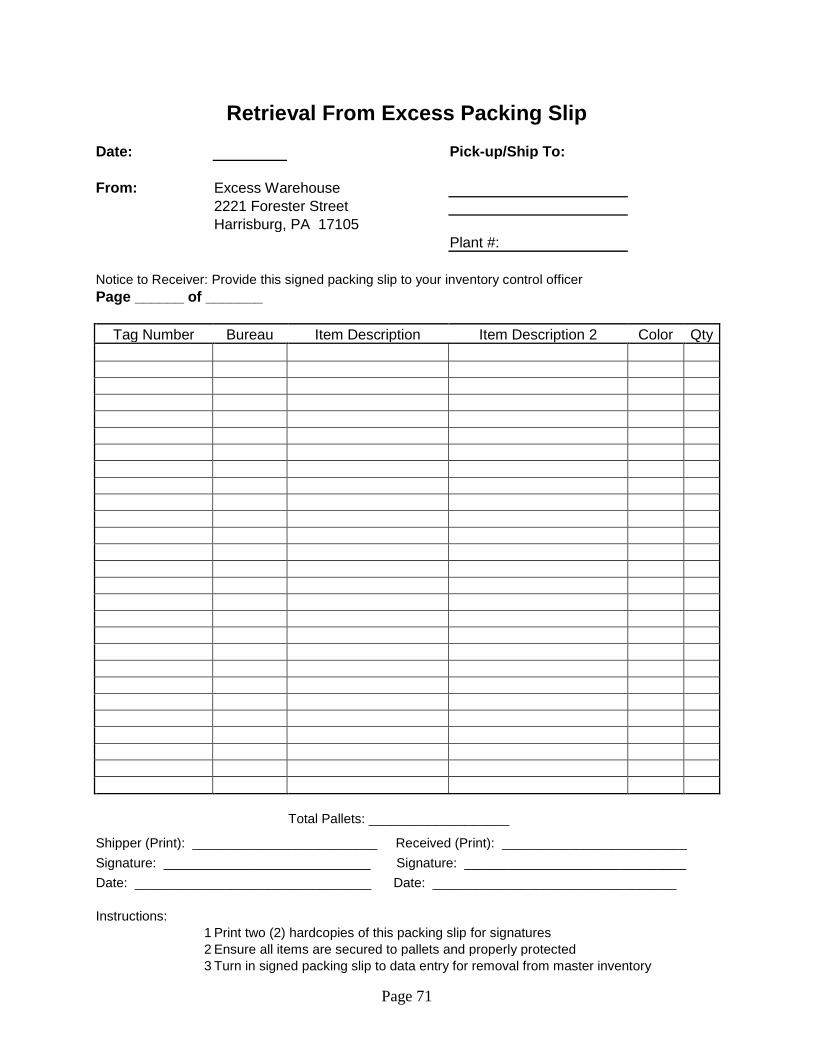
Retrieval From Excess Packing Slip
Date: Pick-up/Ship To:
From: Excess Warehouse
2221 Forester Street
Harrisburg, PA 17105
Plant #:
Notice to Receiver: Provide this signed packing slip to your inventory control officer
Page ______ of _______
Tag Number Bureau Item Description Item Description 2 Color Qty
Total Pallets: ___________________
Shipper (Print): _________________________ Received (Print): _________________________
Signature: ____________________________ Signature: ______________________________
Date: ________________________________ Date: _________________________________
Instructions:
1 Print two (2) hardcopies of this packing slip for signatures
2 Ensure all items are secured to pallets and properly protected
3 Turn in signed packing slip to data entry for removal from master inventory
Page 72
4 Receiver: Note, provide this signed packing slip to your inventory control officer
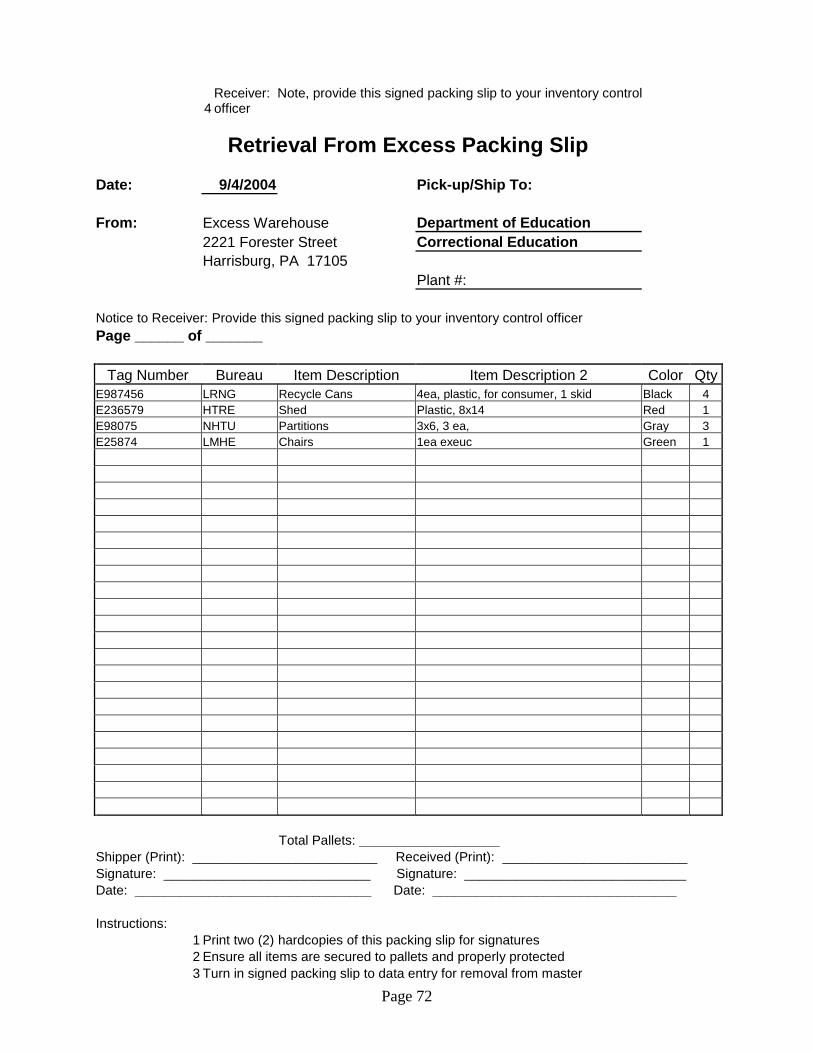
Retrieval From Excess Packing Slip
Date: 9/4/2004 Pick-up/Ship To:
From: Excess Warehouse Department of Education
2221 Forester Street Correctional Education
Harrisburg, PA 17105
Plant #:
Notice to Receiver: Provide this signed packing slip to your inventory control officer
Page ______ of _______
Tag Number Bureau Item Description Item Description 2 Color Qty
E987456 LRNG Recycle Cans 4ea, plastic, for consumer, 1 skid Black 4
E236579 HTRE Shed Plastic, 8x14 Red 1
E98075 NHTU Partitions 3x6, 3 ea, Gray 3
E25874 LMHE Chairs 1ea exeuc Green 1
Total Pallets: ___________________
Shipper (Print): _________________________ Received (Print): _________________________
Signature: ____________________________ Signature: ______________________________
Date: ________________________________ Date: _________________________________
Instructions:
1 Print two (2) hardcopies of this packing slip for signatures
2 Ensure all items are secured to pallets and properly protected
3 Turn in signed packing slip to data entry for removal from master

Page 73
inventory
4 Receiver: Note, provide this signed packing slip to your inventory control officer

Revision 291-20150225
Metrics & Reports Metrics will be maintained by each distribution center and reported on monthly to DGS Management.
Inventory Turns: 12/year by agency
Inventory Accuracy: 98%+
Inventory Location Accuracy: 98%+
OTP Supplier Inbound: 95%
Shipment Accuracy: 99%+
Picking Accuracy, 1st pick: 98%
Picking Accuracy, Check: 100%
OTP Shipments: 99%
OTP Delivery: 99%
Inventory Loss by Center: >3%
Carrier Loss by Center: >1%
Concealed Damage by Center: >1% The following reports will be maintained on a monthly or as needed basis:
STO Report
STO Values
Inventory Issue Reports
Percent of Inventory Issued
Previous Months Receipts/Issues
Inventory Issues Analysis
Issues from Inventory
Issues from Storage Location
Average Inventory Turn Over
Percent of Inventory Usage Current Inventory Reports
Current Inventory with Turnover Total Quantity and Value of Inventory Inventory On-Hand Report Storage Location, Inv. On-Hand Qty Inventory Analysis Material usage ABC Analysis (12 Months) 12 Month On-Hand Material ABC Analysis
Inventory Issue Reports
Percent of Inventory Issued Previous Months Receipts/Issues Inventory Issues Analysis Issues from Inventory Average Inventory Turnover (months to turn) Percent inventory Usage (Consumption)
Receiving Reports
% Of Received Qty
Page 75
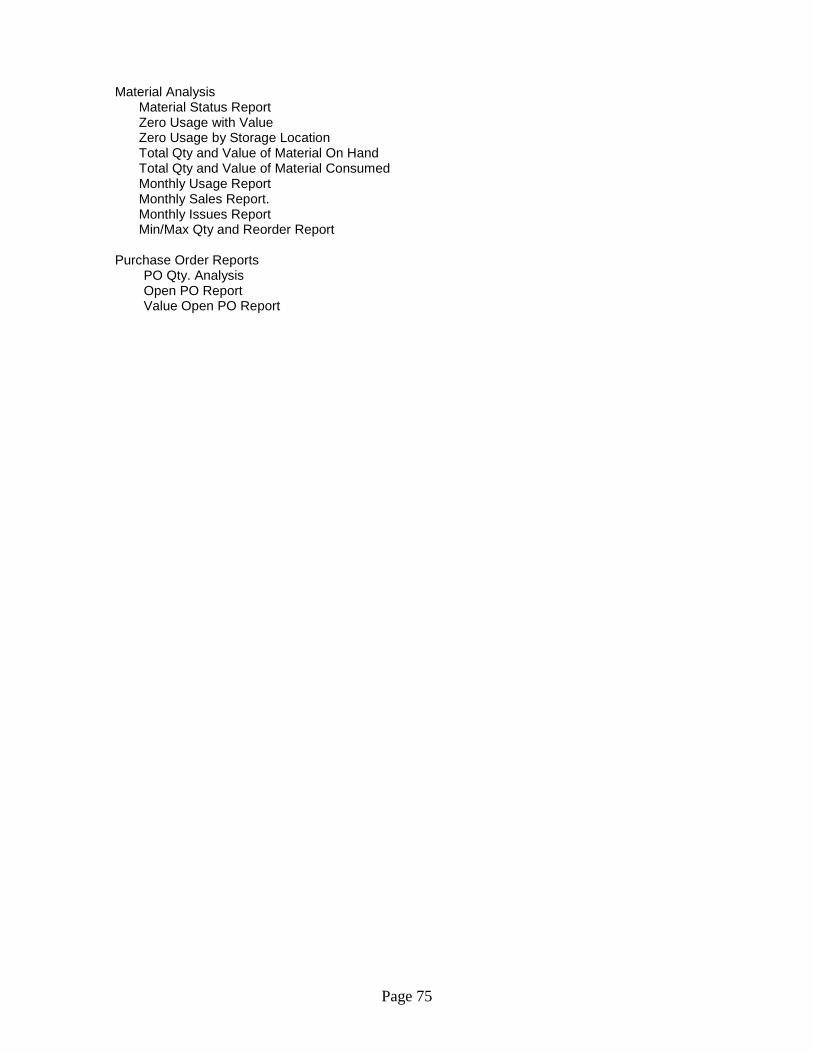
Material Analysis Material Status Report Zero Usage with Value Zero Usage by Storage Location Total Qty and Value of Material On Hand Total Qty and Value of Material Consumed Monthly Usage Report Monthly Sales Report. Monthly Issues Report Min/Max Qty and Reorder Report
Purchase Order Reports
PO Qty. Analysis Open PO Report Value Open PO Report
Revision 291-20150225
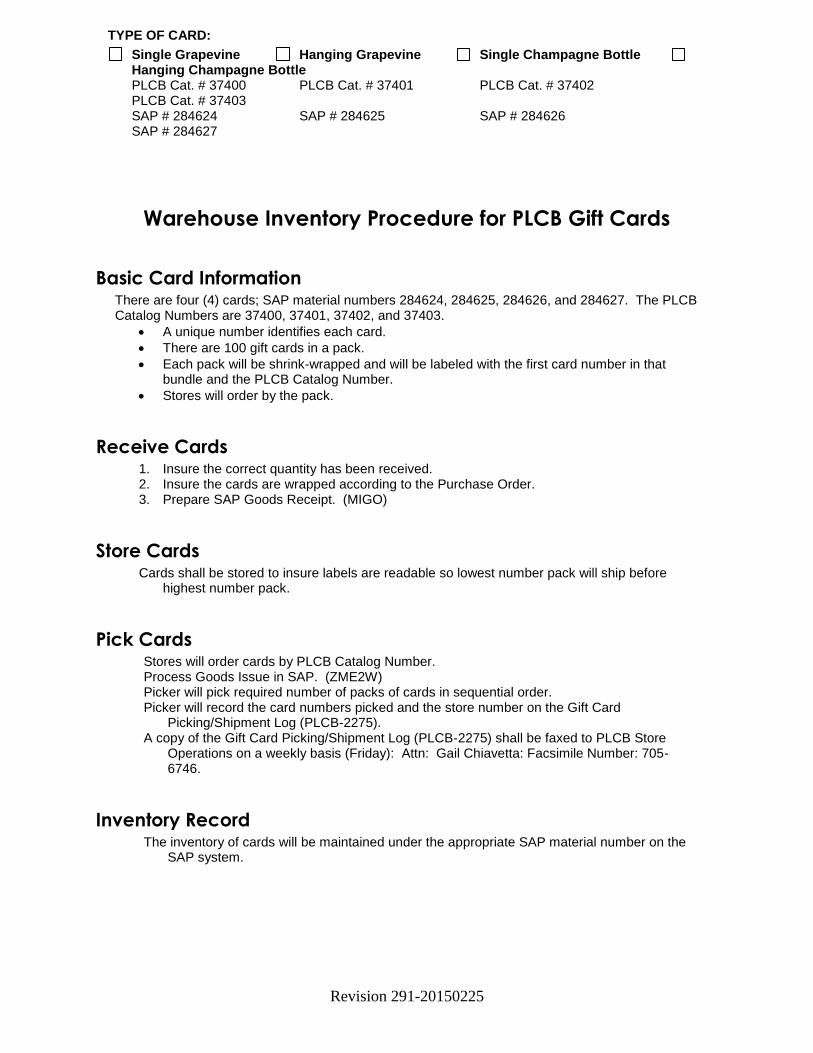
Warehouse Inventory Procedure for PLCB Gift Cards
Basic Card Information There are four (4) cards; SAP material numbers 284624, 284625, 284626, and 284627. The PLCB Catalog Numbers are 37400, 37401, 37402, and 37403.
A unique number identifies each card.
There are 100 gift cards in a pack.
Each pack will be shrink-wrapped and will be labeled with the first card number in that bundle and the PLCB Catalog Number.
Stores will order by the pack.
Receive Cards 1. Insure the correct quantity has been received. 2. Insure the cards are wrapped according to the Purchase Order. 3. Prepare SAP Goods Receipt. (MIGO)
Store Cards Cards shall be stored to insure labels are readable so lowest number pack will ship before
highest number pack.
Pick Cards Stores will order cards by PLCB Catalog Number. Process Goods Issue in SAP. (ZME2W) Picker will pick required number of packs of cards in sequential order. Picker will record the card numbers picked and the store number on the Gift Card
Picking/Shipment Log (PLCB-2275). A copy of the Gift Card Picking/Shipment Log (PLCB-2275) shall be faxed to PLCB Store
Operations on a weekly basis (Friday): Attn: Gail Chiavetta: Facsimile Number: 705-6746.
Inventory Record The inventory of cards will be maintained under the appropriate SAP material number on the
SAP system.
TYPE OF CARD:
Single Grapevine Hanging Grapevine Single Champagne Bottle Hanging Champagne Bottle PLCB Cat. # 37400 PLCB Cat. # 37401 PLCB Cat. # 37402 PLCB Cat. # 37403 SAP # 284624 SAP # 284625 SAP # 284626 SAP # 284627

Page 77
STORE # CARD #
PACKS PICKED (100 PER PACK)
Revision 291-20150225
PENDOT Order Processing For BMV NOTE: As of 7/1/2008, All reference to TOPICS in this section are outdated. PENDOT is in the process of converting all TOPICS inventory to .Centric. Future Updates will contain supporting documentation for the inventory management system.
Emergency Response Plan This guidance is intended as a reference and to aid sound judgment and common sense. All media inquiries should be referred to the Community Relations Coordinator.
Fire Emergencies
In the event of an obvious fire and/or smoke hazard or gas odor: The person identifying the threat will pull the fire alarm located next to the exit door in the UPS area. Evacuate the premises immediately according to the designated evacuation plan. The Supervisor or designee on site, Fred Bender, should immediately call the local law enforcement agency or emergency number (9-911) to inform them of the emergency. The person who reported the fire should also arrange to meet with the fire department upon arrival to inform them of the location of fire and any other pertinent information. Employees, visitors, drivers, etc. should evacuate to the designated safe assembly area located at: The front right corner of the building. Supervisor or if not available, the designee should account for employees and guests after being evacuated. An attendance sheet will be used to assist in accounting for the employees and guest. It is necessary to call-out loudly and clearly “here” when your name is called.
In the event of a reported fire, smoke, or a gas odor: Supervisor should send one member of the evacuation team and at least one other individual to investigate further. Should the threat be determined to be manageable, the fire team and any other appropriate personnel utilizing readily available resources should immediately address it If the threat is unmanageable, follow the instructions previously given.
Follow-up procedures after an emergency evacuation has occurred: Contact local utility companies that may have been affected by the emergency to determine if utility services should be shut off for reasons of safety. No one may reenter facility until the local police or fire authorities have determined that it is safe for re-entry. For further information, please refer to guidelines covered under the Emergency Response Plan in PPIM # Z-01-026. (See Appendix F)
Emergency Phone #’s of Police and Utilities, Etc.: Emergency Number 911 Non –Emergency Number 558-6900 Management Notification: Barry Williams (BOS) 787-9209 Dennis Balbac (BMV) 783-6474

Page 79
BMV Contact Information
License Plates, Renewal Registration Stickers, Weight Class Decals, and Rear Window Permits. Contact person: Dee Krehling Output Control Staff Office Riverfront Office Center 1101 S Front Street – 1
st Floor
Harrisburg PA 17133 (717) 787-2680 Handicap Placards. Contact person: Dawn Barwell Customer Service Division Unit Research and Support Riverfront Office Center 1101 S Front Street – 3
rd Floor
Harrisburg PA 17133 (717) 787-9720 Safety Inspection Inserts/Emissions Inspection Inserts Contact person: Chadd Weikert Inspection Sticker Processing Unit Riverfront Office Center 1101 S Front Street – 3
rd Floor
Harrisburg PA 17133 (717) 705-2411 Organ Donor Brochure Contact person: Bill Neal Department of Health 7th & Forster Street, Health & Welfare Bldg, Room 1000 Harrisburg PA 17120 (717) 787 5900 TAP Flyers. Contact person: Kathleen Mcgrath Treasury Department 218 Finance Bldg Harrisburg PA 17120 (717) 772 5000

Page 80
Title Certificates and Salvage Certificates. Contact person: Penni Bernard Angel Martin Customer Service Division Customer Service Division Research and Support Unit Research and Support Unit Riverfront Office Center Riverfront Office Center 1101 S Front Street-3
rd Floor 1101 S Front Street-3
rd Floor
Harrisburg PA 17133 Harrisburg PA 17133 (717)772-3337 (717) 787-9720 Transporters. Contact person: Paula Stubbs, BMV Receiving & Depositing Unit Riverfront Office Center 1101 S Front Street-2
nd Floor
Harrisburg PA 17133 (717) 787-7852 DL800CN’s (Address Change cards for Drivers License) Contact person: Barry Williams Materials & Services Mgmt Division
Keystone Building 400 North Street Harrisburg PA 17105-3451 (717) 787-9209
Page 81
Receiving
Receiving Products Housed in the BMV Warehouse
The procedure for receiving shipments, excluding title shipments, is done the same way for all of the products housed in the warehouse. The warehouse employees are notified two days in advance of the delivery by the supervisor of Miscellaneous Processing. Once the shipment has arrived at the warehouse, a BMV employee will unload the shipment from the back of the truck and then verify what was delivered accordingly to the packing list and Bill of Lading. Once it is established that everything was received, the employee will sign for the shipment. Copies are made of the Bill of Lading and Packing Slips and filed in the warehouse. The originals are hand carried to the Supervisor of the Miscellaneous Processing Unit located in Output Control. The supervisor will distribute the original paper work to the proper contact person that ordered the shipment. Attached are several examples of some of the shipments that are received in the BMV warehouse.
Example A: Packing Slip for a shipment of Emergency License Plates Example A1: Bill of Laden for a shipment of Emergency License Plates Example B: Packing Slip for a shipment of “NO PERMIT” Renewal Stickers. Example B1: Bill of Laden for a shipment of “NO PERMIT” Renewal Stickers. Example C: Packing Slip for a shipment of Safety Emissions Inspection Inserts. Example C1: Bill of Laden for a shipment of Safety Emissions Inspection Inserts. Example D: Invoice for a shipment of Organ Donor Brochures and TAP Flyers. Example E: Packing Slip for a shipment of Transporters. Example E1: Bill of Laden for a shipment of Transporters.
Receiving Titles and Salvage Certificates Housed in the BMV Warehouse
Titles and Salvage Certificates Shipments The staff in the warehouse will be notified by the supervisor of Miscellaneous Processing a week in advance of a title and salvage certificate shipment. Titles and salvage certificates are shipped from the vendor (Moores) in a sealed truck. Only employees of the BMV warehouse are permitted to cut the seal once the truck has arrived at the warehouse. The shipment is verified and placed inside the cage area. Two photocopies are made of the Seal, Packing Slip and Bill of Laden.
Attached are examples of shipments that are received in the BMV warehouse.
Example F: Packing Slip for a Title shipment Example F1: Bill of Laden for a Title Shipment. Example G: Packing Slip for a Salvage Certificate shipment. Example G1: Bill of Lading for a Salvage Certificate shipment. Example H: A copy of the Seal that is cut from the back of the truck upon receipt of shipment.

Page 82
One copy is kept in the warehouse for inventory purposes. The other copy goes to the Supervisor of the Miscellaneous Processing Unit also for title inventory purposes. The original invoice and seal are hand carried by a BMV driver to the Administrative Assistant in the Output Control Staff office.
The Titles and Salvage Certificates come on skids already shrink - wrapped and banded together. There can be anywhere from 40 to 80 cartons on a skid. Each carton is number 1 thru 1000, listing the beginning and ending serial numbers of the titles or salvage certificated in each box. Label sheets are made by the BMV warehouse employees and placed on each skid by the order the come in. (See example of Label sheet). This type of label is made for each skid of titles and salvage certificates that were received in for that delivery. For security purposes, the titles are kept in the cage area at all times. The skids remain sealed in the shrink - wrap and banded.
Example of Label Sheet for Title and Salvage Certificate Skids
PALLET # 1 CARTON #1 to CARTON# 80
Beginning Serial #
23500001 Ending Serial #
23660000
Date 3/30/04
Example of Label for Title and Salvage Certificate Skids
PALLET # 2 CARTON #81 to CARTON # 160
Beginning Serial #
23660001 Ending Serial #
23820000
Date 3/30/04

Page 83
Pick and Pack Procedures
Logging onto “TOPICS”
On your desk top there should be an icon for the PENNDOT Mainframe…click on it. Making sure you are on Session A, enter IMS in the field provided and then Enter. (see screen below)
PENNSYLVANIA DEPARTMENT OF TRANSPORTATION BUREAU OF INFORMATION SYSTEMS
WARNING: PENNDOT COMPUTER SYSTEMS SHALL BE USED FORDEPARTMENT AUTHORIZED PURPOSES ONLY. PERSONAL OR UNAUTHORIZED USE MAY SUBJECT
USER TO DISCIPLINARY ACTION.
IMS
PENNDOT HELPDESK: (717) 783-8330 KEY PA1 TO RETURN TO TELNET CONTROL
In the next screen, type in your User-d and Password and press enter.
Pennsylvania Department of Transportation Information Management System
Please Sign-on To PAIMS Dynamic Node PDT05805 Enter User-ID-> _____________ Enter Password--> ____________ Enter New Password--> SIGNON: Please enter your USERID and PASSWORD
Press Enter. The next screen will display the following message. Type in the word “topics”, space twice and press enter.
topics sp sp
Press Enter.
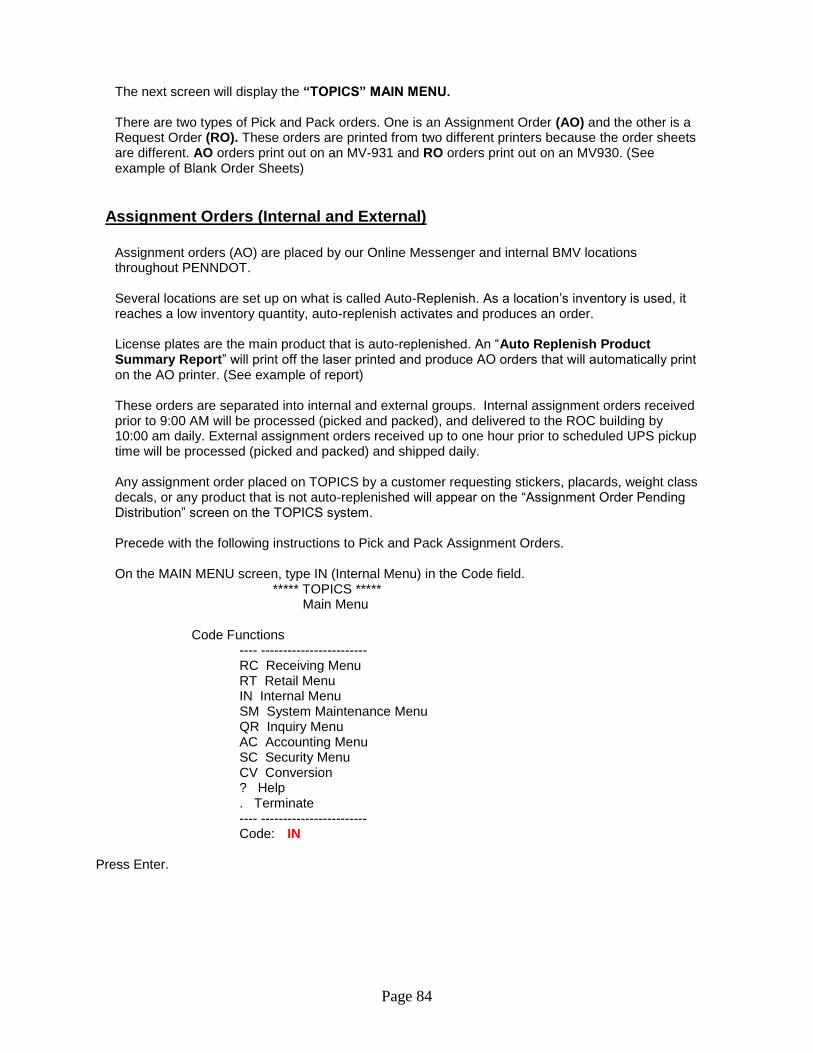
Page 84
The next screen will display the “TOPICS” MAIN MENU. There are two types of Pick and Pack orders. One is an Assignment Order (AO) and the other is a Request Order (RO). These orders are printed from two different printers because the order sheets are different. AO orders print out on an MV-931 and RO orders print out on an MV930. (See example of Blank Order Sheets)
Assignment Orders (Internal and External)
Assignment orders (AO) are placed by our Online Messenger and internal BMV locations throughout PENNDOT. Several locations are set up on what is called Auto-Replenish. As a location’s inventory is used, it reaches a low inventory quantity, auto-replenish activates and produces an order. License plates are the main product that is auto-replenished. An “Auto Replenish Product Summary Report” will print off the laser printed and produce AO orders that will automatically print on the AO printer. (See example of report) These orders are separated into internal and external groups. Internal assignment orders received prior to 9:00 AM will be processed (picked and packed), and delivered to the ROC building by 10:00 am daily. External assignment orders received up to one hour prior to scheduled UPS pickup time will be processed (picked and packed) and shipped daily. Any assignment order placed on TOPICS by a customer requesting stickers, placards, weight class decals, or any product that is not auto-replenished will appear on the “Assignment Order Pending Distribution” screen on the TOPICS system.
Precede with the following instructions to Pick and Pack Assignment Orders. On the MAIN MENU screen, type IN (Internal Menu) in the Code field.
***** TOPICS ***** Main Menu Code Functions ---- ------------------------ RC Receiving Menu RT Retail Menu IN Internal Menu SM System Maintenance Menu QR Inquiry Menu AC Accounting Menu SC Security Menu CV Conversion ? Help . Terminate ---- ------------------------ Code: IN Press Enter.
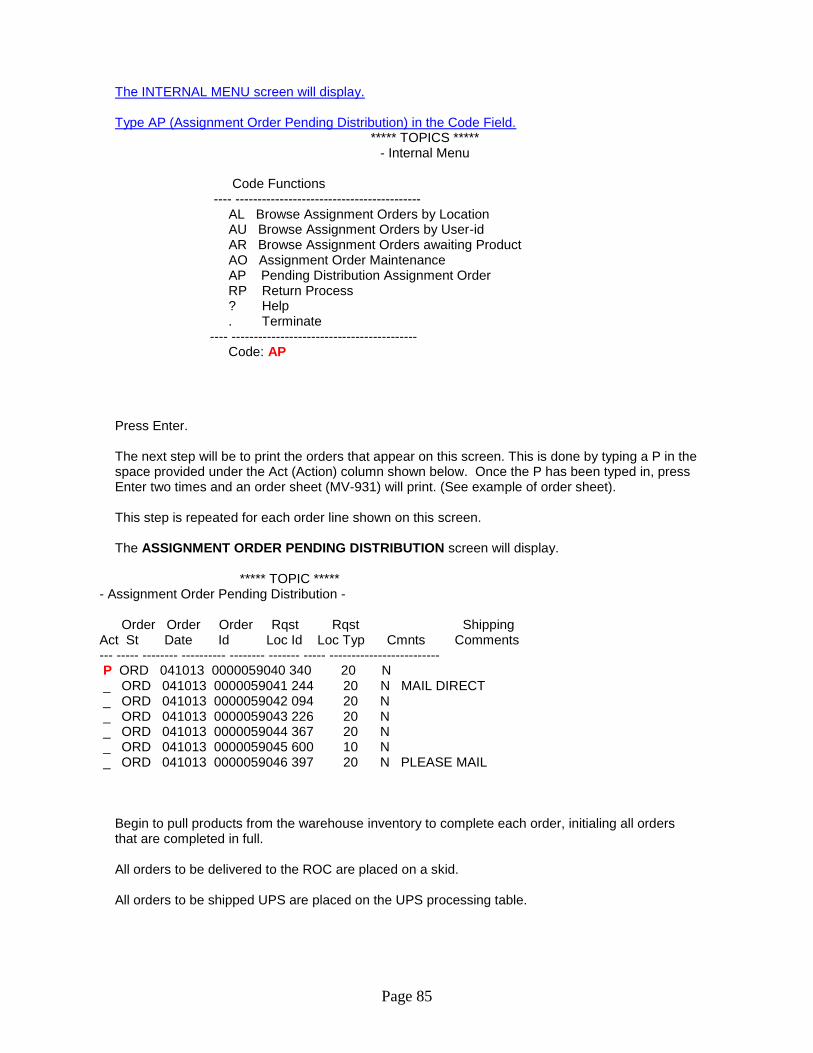
Page 85
The INTERNAL MENU screen will display. Type AP (Assignment Order Pending Distribution) in the Code Field.
***** TOPICS ***** - Internal Menu
Code Functions ---- ------------------------------------------ AL Browse Assignment Orders by Location AU Browse Assignment Orders by User-id AR Browse Assignment Orders awaiting Product AO Assignment Order Maintenance AP Pending Distribution Assignment Order RP Return Process ? Help . Terminate ---- ------------------------------------------ Code: AP
Press Enter. The next step will be to print the orders that appear on this screen. This is done by typing a P in the space provided under the Act (Action) column shown below. Once the P has been typed in, press Enter two times and an order sheet (MV-931) will print. (See example of order sheet). This step is repeated for each order line shown on this screen. The ASSIGNMENT ORDER PENDING DISTRIBUTION screen will display.
***** TOPIC ***** - Assignment Order Pending Distribution - Order Order Order Rqst Rqst Shipping Act St Date Id Loc Id Loc Typ Cmnts Comments --- ----- -------- ---------- -------- ------- ----- ------------------------- P ORD 041013 0000059040 340 20 N _ ORD 041013 0000059041 244 20 N MAIL DIRECT _ ORD 041013 0000059042 094 20 N _ ORD 041013 0000059043 226 20 N _ ORD 041013 0000059044 367 20 N _ ORD 041013 0000059045 600 10 N _ ORD 041013 0000059046 397 20 N PLEASE MAIL
Begin to pull products from the warehouse inventory to complete each order, initialing all orders that are completed in full.
All orders to be delivered to the ROC are placed on a skid. All orders to be shipped UPS are placed on the UPS processing table.

Page 86
Request Orders
Request Orders are processed on the TOPICS system by the Temp Tag Mail Unit, located at the ROC. These orders are for dealers that receive plates to be issued to the public. This location is known on TOPICS as location 072. Precede with the following instructions to Pick and Pack Request Orders. On the Main Menu screen, type RT (Retail Menu) in the Code Field.
***** TOPICS *****
- Main Menu - Code Functions ---- ------------------------ RC Receiving Menu RT Retail Menu IN Internal Menu SM System Maintenance Menu QR Inquiry Menu AC Accounting Menu SC Security Menu CV Conversion ? Help . Terminate ---- ------------------------ Code: RT
Press Enter. The Retail Menu screen will display. The next step will be to print the orders that appear on this screen. This is done by typing a P in the space provided under the Act (Action) column shown above. Once the P has been typed in, press Enter two times and an order sheet (MV-930) will print. (See example of order sheet). This step is repeated for each order line shown on this screen. Type RP (Pending Distribution Request Order) in the Code Field.
***** TOPIC *****
- Request Order Pending Distribution - Order Order Order Rqst Rqst Shipping Act St Date Id Loc Id Loc Typ Cmnts Comments --- ----- -------- ---------- -------- ------- ----- ------------------------- P ORD 041009 0000372037 831300 83 N _ ORD 041009 0000372038 8612580 86 N _ ORD 041009 0000372039 859131 85 N _ ORD 041009 0000372040 834677 83 N
Make a copy of the first page of each order. This copy is used later on for the UPS tracking label.
Count each order and write down the amount on the daily production sheet to be logged into the Pick and Pack Production report at the end of the day. ( See example of sheet)
Keeping track of Daily Orders Processed
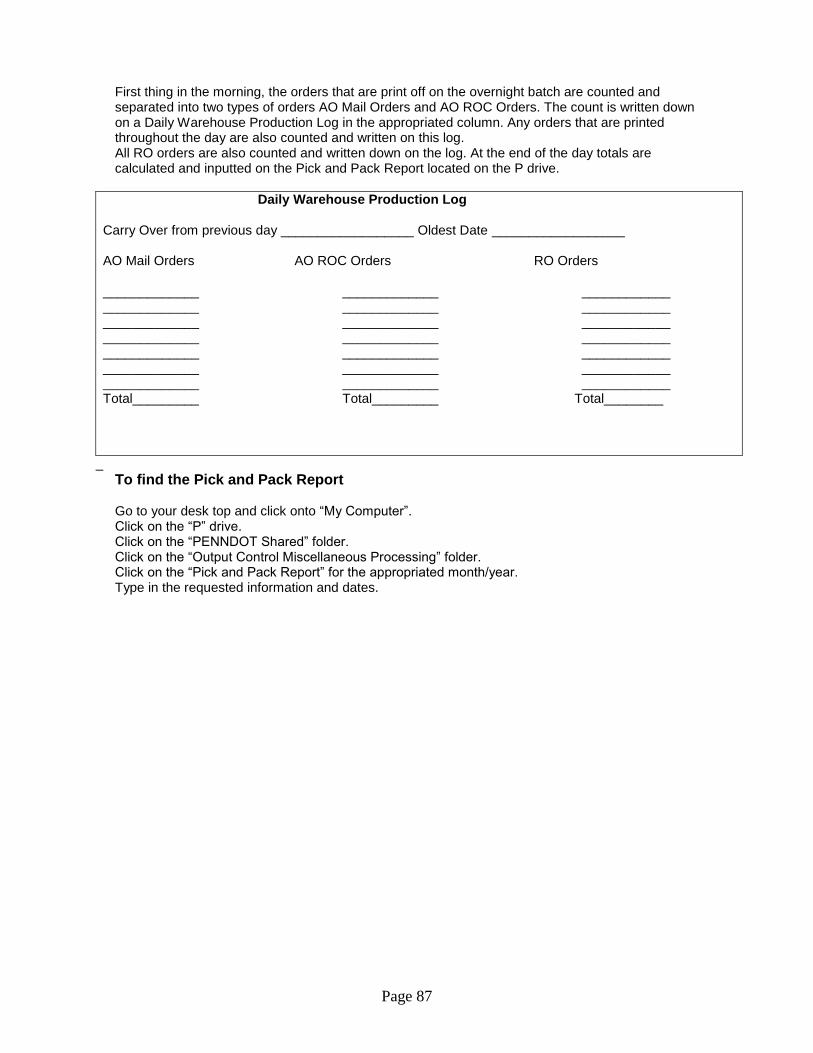
Page 87
First thing in the morning, the orders that are print off on the overnight batch are counted and separated into two types of orders AO Mail Orders and AO ROC Orders. The count is written down on a Daily Warehouse Production Log in the appropriated column. Any orders that are printed throughout the day are also counted and written on this log. All RO orders are also counted and written down on the log. At the end of the day totals are calculated and inputted on the Pick and Pack Report located on the P drive.
Daily Warehouse Production Log
Carry Over from previous day __________________ Oldest Date __________________ AO Mail Orders AO ROC Orders RO Orders _____________ _____________ ____________ _____________ _____________ ____________ _____________ _____________ ____________ _____________ _____________ ____________ _____________ _____________ ____________ _____________ _____________ ____________ _____________ _____________ ____________ Total_________ Total_________ Total________
_
To find the Pick and Pack Report
Go to your desk top and click onto “My Computer”. Click on the “P” drive. Click on the “PENNDOT Shared” folder. Click on the “Output Control Miscellaneous Processing” folder. Click on the “Pick and Pack Report” for the appropriated month/year. Type in the requested information and dates.

Page 88
Procedures for Ordering Product for the Temp Tag Unit (Mail) Location 072
Within the warehouse is a mini warehouse that request orders products are pulled from. This mini warehouse is called the Temp Tag Unit (Mail) location 072. To replenish location 072 with products, an assignment order is done and products are moved to this location. Begin to pull products from location 072’s (TEMP TAG UNIT-MAIL) inventory to complete each order, initialing each order that is completed in full and process thru the UPS system for shipping. Location 072 receives its inventory from location 001’s inventory. This inventory is monitored daily due to large volume of orders that are processed. As request orders are processed on the TOPICS system, it pulls and reserves products from the inventory, decreasing the inventory of products available. Follow the procedures listed to move inventory into location 072.
On the Main Menu of the TOPICS system, type SM (System Maintenance Menu) in the Code Field.
***** TOPICS ***** Main Menu
Code Functions ---- ------------------------ RC Receiving Menu RT Retail Menu IN Internal Menu SM System Maintenance Menu QR Inquiry Menu AC Accounting Menu SC Security Menu CV Conversion ? Help . Terminate ---- ------------------------ Code: SM Press Enter.
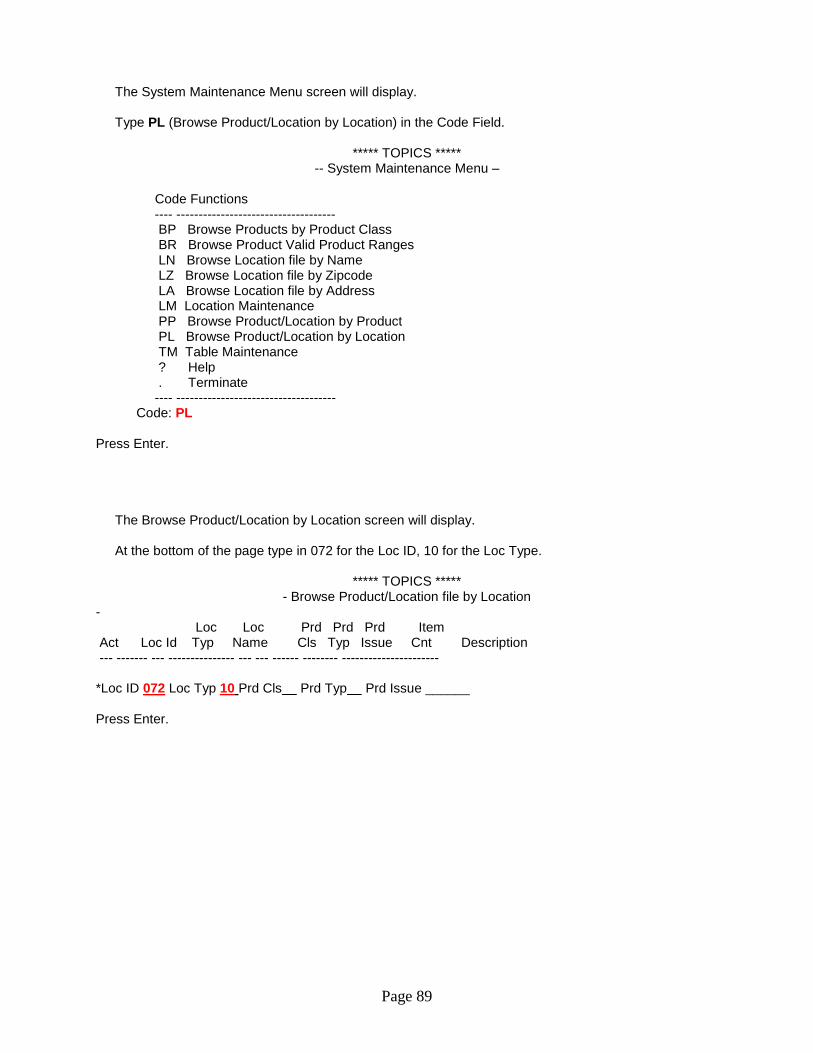
Page 89
The System Maintenance Menu screen will display. Type PL (Browse Product/Location by Location) in the Code Field.
***** TOPICS *****
-- System Maintenance Menu – Code Functions ---- ------------------------------------ BP Browse Products by Product Class BR Browse Product Valid Product Ranges LN Browse Location file by Name LZ Browse Location file by Zipcode LA Browse Location file by Address LM Location Maintenance PP Browse Product/Location by Product PL Browse Product/Location by Location TM Table Maintenance ? Help . Terminate ---- ------------------------------------ Code: PL Press Enter.
The Browse Product/Location by Location screen will display. At the bottom of the page type in 072 for the Loc ID, 10 for the Loc Type.
***** TOPICS *****
- Browse Product/Location file by Location - Loc Loc Prd Prd Prd Item Act Loc Id Typ Name Cls Typ Issue Cnt Description --- ------- --- --------------- --- --- ------ -------- ---------------------- *Loc ID 072 Loc Typ 10 Prd Cls Prd Typ Prd Issue ______ Press Enter.

Page 90
The Browse Product/Location by Location screen will display the inventory available for location 072.
***** TOPICS *****
- Browse Product/Location file by Location - Loc Loc Prd Prd Prd Item Act Loc Id Typ Name Cls Typ Issue Cnt Description --- ------- --- --------------- --- --- ------ -------- ---------------------- _ 072 10 TEMP TAG UNIT ( 01 K8 222 PERMANENT TRAILER D 072 10 TEMP TAG UNIT ( 01 01 26169 PASSENGERS _ 072 10 TEMP TAG UNIT ( 01 02 4046 TRUCK PLATE _ 072 10 TEMP TAG UNIT ( 01 03 5361 TRAILERS _ 072 10 TEMP TAG UNIT ( 01 04 1868 MOTORCYCLES _ 072 10 TEMP TAG UNIT ( 01 05 701 MOTOR HOME _ 072 10 TEMP TAG UNIT ( 01 06 371 SCHOOL BUS _ 072 10 TEMP TAG UNIT ( 01 07 37 MOPED _ 072 10 TEMP TAG UNIT ( 01 09 134 BUS _ 072 10 TEMP TAG UNIT ( 01 19 78 IMPLEMENT OF HUSBAND _ 072 10 TEMP TAG UNIT ( 01 20 1125 IN TRANSIT _ 072 10 TEMP TAG UNIT ( 01 21 183 MUNICIPAL GOVT. _ 072 10 TEMP TAG UNIT ( 01 22 MUNICIPAL MOTORCYCLE _ 072 10 TEMP TAG UNIT ( 01 23 500 COMMONWEALTHCOMMERC _ 072 10 TEMP TAG UNIT ( 01 26 122 SPECIAL MOBILE EQUIP _ 072 10 TEMP TAG UNIT ( 01 33 200 COMMONWEALTH PASSENG _ 072 10 TEMP TAG UNIT ( 01 35 82 OMNIBUS _ 072 10 TEMP TAG UNIT ( 08 01 24850 REAR WINDOW PERMITS
*** End of Data ***
The screen will show an ITEM COUNT for each product, however, due to the large volume of orders that are processed; this is not the exact item count. Each time an order is processed, TOPICS reserves that amount from the inventory count. To determine if product should be ordered for this location, follow the next step shown. Type a D in the Action Field next to the product in question. Press Enter.
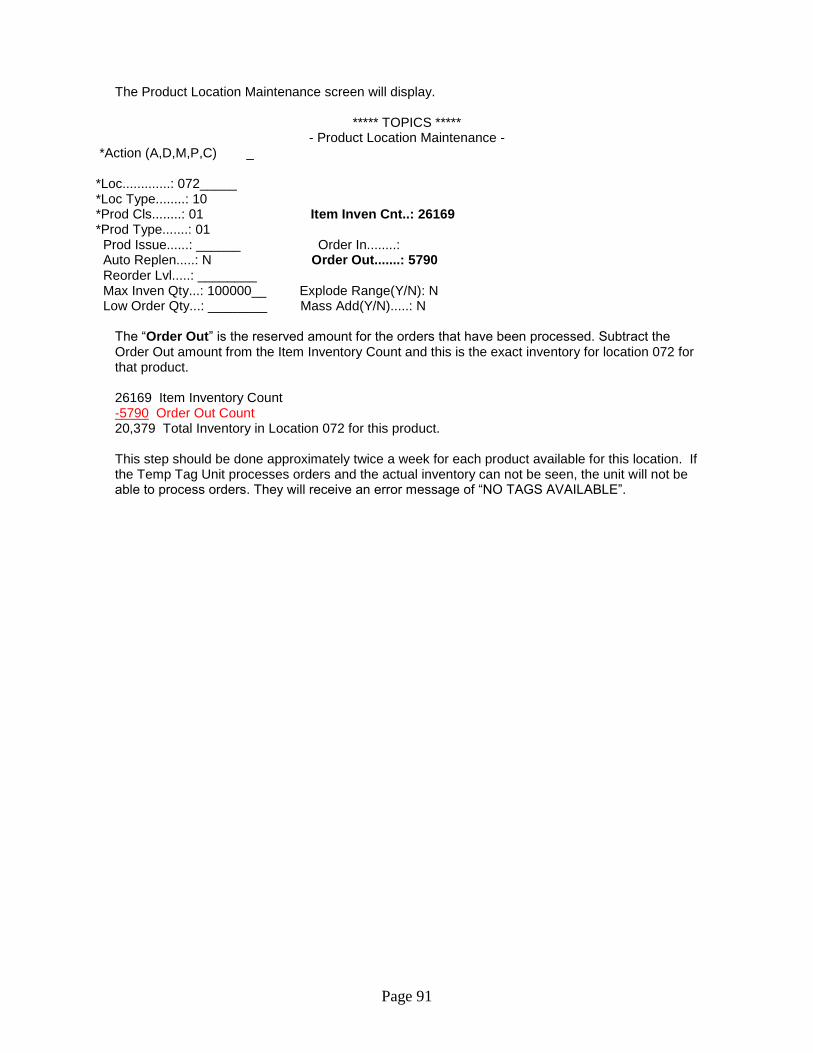
Page 91
The Product Location Maintenance screen will display.
***** TOPICS ***** - Product Location Maintenance -
*Action (A,D,M,P,C) _ *Loc.............: 072_____ *Loc Type........: 10 *Prod Cls........: 01 Item Inven Cnt..: 26169 *Prod Type.......: 01 Prod Issue......: ______ Order In........: Auto Replen.....: N Order Out.......: 5790 Reorder Lvl.....: ________ Max Inven Qty...: 100000__ Explode Range(Y/N): N Low Order Qty...: ________ Mass Add(Y/N).....: N
The “Order Out” is the reserved amount for the orders that have been processed. Subtract the Order Out amount from the Item Inventory Count and this is the exact inventory for location 072 for that product. 26169 Item Inventory Count -5790 Order Out Count 20,379 Total Inventory in Location 072 for this product. This step should be done approximately twice a week for each product available for this location. If the Temp Tag Unit processes orders and the actual inventory can not be seen, the unit will not be able to process orders. They will receive an error message of “NO TAGS AVAILABLE”.
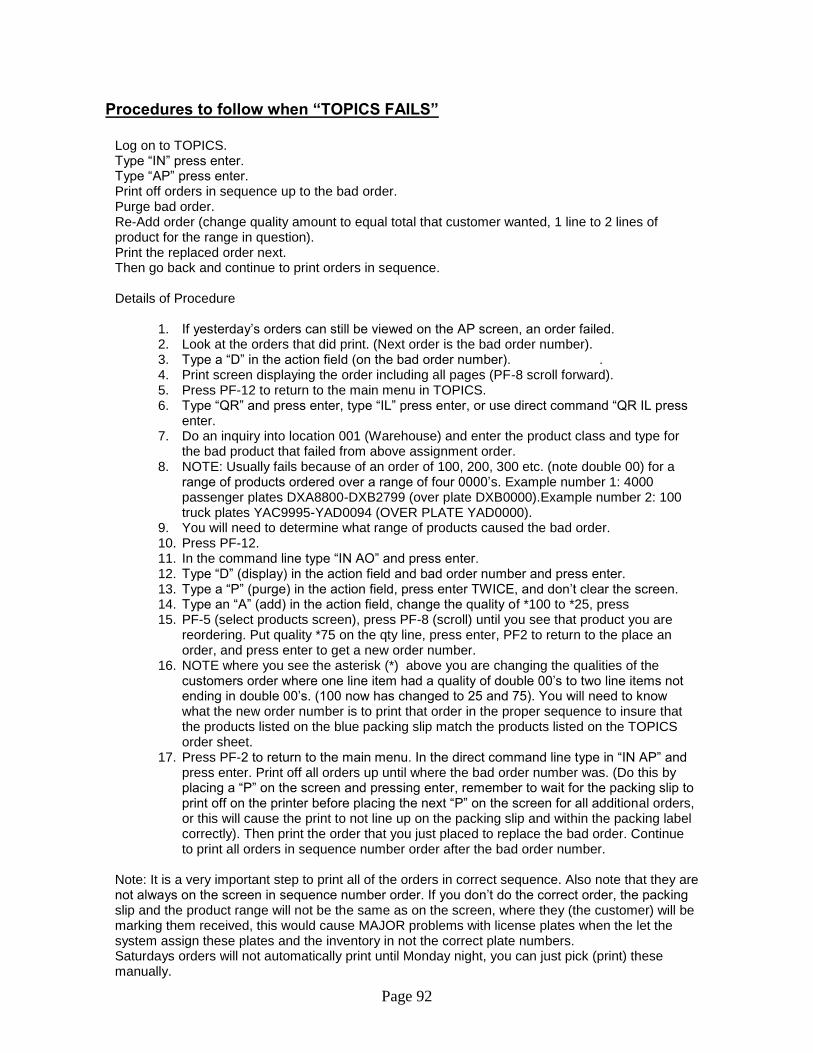
Page 92
Procedures to follow when “TOPICS FAILS”
Log on to TOPICS. Type “IN” press enter. Type “AP” press enter. Print off orders in sequence up to the bad order. Purge bad order. Re-Add order (change quality amount to equal total that customer wanted, 1 line to 2 lines of product for the range in question). Print the replaced order next. Then go back and continue to print orders in sequence. Details of Procedure
1. If yesterday’s orders can still be viewed on the AP screen, an order failed. 2. Look at the orders that did print. (Next order is the bad order number). 3. Type a “D” in the action field (on the bad order number). . 4. Print screen displaying the order including all pages (PF-8 scroll forward). 5. Press PF-12 to return to the main menu in TOPICS. 6. Type “QR” and press enter, type “IL” press enter, or use direct command “QR IL press
enter. 7. Do an inquiry into location 001 (Warehouse) and enter the product class and type for
the bad product that failed from above assignment order. 8. NOTE: Usually fails because of an order of 100, 200, 300 etc. (note double 00) for a
range of products ordered over a range of four 0000’s. Example number 1: 4000 passenger plates DXA8800-DXB2799 (over plate DXB0000).Example number 2: 100 truck plates YAC9995-YAD0094 (OVER PLATE YAD0000).
9. You will need to determine what range of products caused the bad order. 10. Press PF-12. 11. In the command line type “IN AO” and press enter. 12. Type “D” (display) in the action field and bad order number and press enter. 13. Type a “P” (purge) in the action field, press enter TWICE, and don’t clear the screen. 14. Type an “A” (add) in the action field, change the quality of *100 to *25, press 15. PF-5 (select products screen), press PF-8 (scroll) until you see that product you are
reordering. Put quality *75 on the qty line, press enter, PF2 to return to the place an order, and press enter to get a new order number.
16. NOTE where you see the asterisk (*) above you are changing the qualities of the customers order where one line item had a quality of double 00’s to two line items not ending in double 00’s. (100 now has changed to 25 and 75). You will need to know what the new order number is to print that order in the proper sequence to insure that the products listed on the blue packing slip match the products listed on the TOPICS order sheet.
17. Press PF-2 to return to the main menu. In the direct command line type in “IN AP” and press enter. Print off all orders up until where the bad order number was. (Do this by placing a “P” on the screen and pressing enter, remember to wait for the packing slip to print off on the printer before placing the next “P” on the screen for all additional orders, or this will cause the print to not line up on the packing slip and within the packing label correctly). Then print the order that you just placed to replace the bad order. Continue to print all orders in sequence number order after the bad order number.
Note: It is a very important step to print all of the orders in correct sequence. Also note that they are not always on the screen in sequence number order. If you don’t do the correct order, the packing slip and the product range will not be the same as on the screen, where they (the customer) will be marking them received, this would cause MAJOR problems with license plates when the let the system assign these plates and the inventory in not the correct plate numbers. Saturdays orders will not automatically print until Monday night, you can just pick (print) these manually.

Page 93
UPS Proceedures
UPS End of the Day Summary Report
At the end of each day a UPS Summary Report is printed. A copy of this report along with a pink card is sent in to the Supervisor of the Mail Room in Output Control.
Warehouse Date ____/_____/______ ____________Pieces ____________Total Pieces
Warehouse Date _____/______/_____ ___________Dee _________________Pieces _________________DV _________________Total Pieces
Procedure to Issue a UPS Return Package Service (Call Tag)
When a package is shipped in error or needs to be returned to the warehouse a request for Return Package Service (Call Tag) is issued. The request is sent to UPS with the shipment date the next time an End of the Day report is completed. Once UPS receives the request, the service center serving that area will be alerted to pick up the package and return it to the warehouse.

Page 94
To Request a RETURN PACKAGE SERVICE: (Call Tag)
Using the UPS Computer System click on the ship form tag, type the name and address of the person or company from who UPS should pick up package. On the Service Tab, click on the UPS service box and select Ground. On the Service Tab, type the weight of the package in the Package Weight box. On the Options tab, select the Return Service box and select the appropriate return service, type in a description of the package (ex. 10 license plates) in the Merchandise Description of Package box. Repeat steps 2 thru 4 if there is more than one package being recalled. Click on the Process Shipment box. The return service information will be included with the other package information to be transmitted to UPS during the next End of the Day processing.
Note: When displaying the return services shipment in the Pickup Log, each shipment is marked with a 0S icon to identify it and the option is detailed under Options.
Remember: The End of the Day process must be completed before the UPS driver arrives for the daily pickup.
Quality Check Procedure on License Plates and Registration Stickers
Quality checks are done on products that are being picked and packed to complete orders on a daily basis. However, there are two days a month that a random check is completed and the errors found are used to complete a Quality Check report. (See copy of report) The supervisor will complete a worksheet that will assign two days a month that a count will be taken on all license plates and stickers that are pulled that day to complete orders. The count and all discrepancies found are recorded on this report, showing the percentage rate of a quality check. This report is completed and handed in to the Output Control manager. All discrepancies are reported to the Administrative Assistant in Output Control at the time discrepancy is detected.
Dee Krehling Output Control Staff Office Riverfront Office Center 1101 S Front Street Harrisburg PA 17133 (717) 787-2680
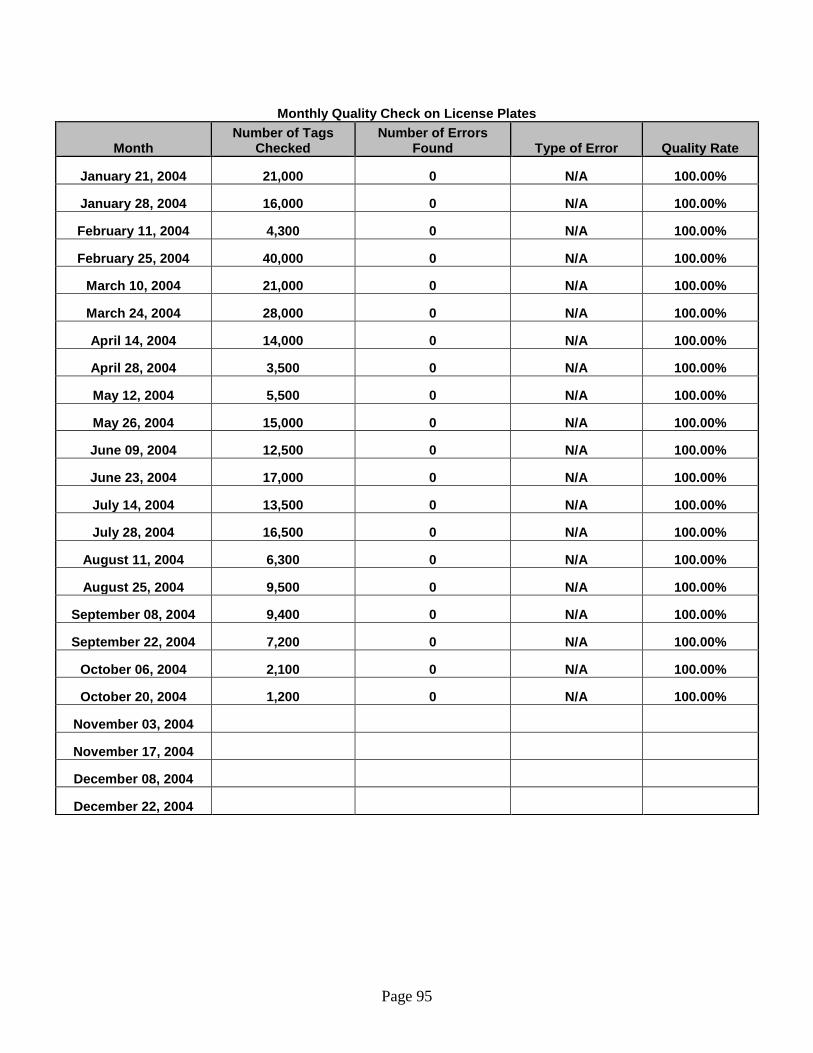
Page 95
Monthly Quality Check on License Plates
Month Number of Tags
Checked Number of Errors
Found Type of Error Quality Rate
January 21, 2004 21,000 0 N/A 100.00%
January 28, 2004 16,000 0 N/A 100.00%
February 11, 2004 4,300 0 N/A 100.00%
February 25, 2004 40,000 0 N/A 100.00%
March 10, 2004 21,000 0 N/A 100.00%
March 24, 2004 28,000 0 N/A 100.00%
April 14, 2004 14,000 0 N/A 100.00%
April 28, 2004 3,500 0 N/A 100.00%
May 12, 2004 5,500 0 N/A 100.00%
May 26, 2004 15,000 0 N/A 100.00%
June 09, 2004 12,500 0 N/A 100.00%
June 23, 2004 17,000 0 N/A 100.00%
July 14, 2004 13,500 0 N/A 100.00%
July 28, 2004 16,500 0 N/A 100.00%
August 11, 2004 6,300 0 N/A 100.00%
August 25, 2004 9,500 0 N/A 100.00%
September 08, 2004 9,400 0 N/A 100.00%
September 22, 2004 7,200 0 N/A 100.00%
October 06, 2004 2,100 0 N/A 100.00%
October 20, 2004 1,200 0 N/A 100.00%
November 03, 2004
November 17, 2004
December 08, 2004
December 22, 2004
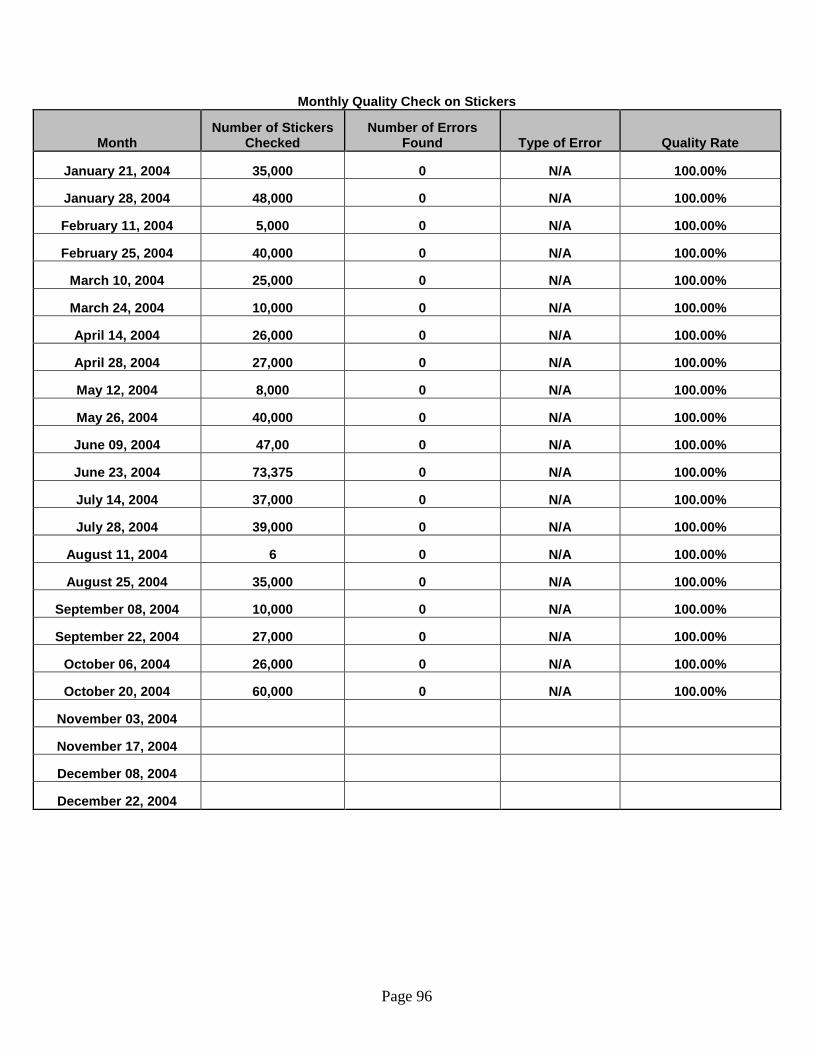
Page 96
Monthly Quality Check on Stickers
Month Number of Stickers
Checked Number of Errors
Found Type of Error Quality Rate
January 21, 2004 35,000 0 N/A 100.00%
January 28, 2004 48,000 0 N/A 100.00%
February 11, 2004 5,000 0 N/A 100.00%
February 25, 2004 40,000 0 N/A 100.00%
March 10, 2004 25,000 0 N/A 100.00%
March 24, 2004 10,000 0 N/A 100.00%
April 14, 2004 26,000 0 N/A 100.00%
April 28, 2004 27,000 0 N/A 100.00%
May 12, 2004 8,000 0 N/A 100.00%
May 26, 2004 40,000 0 N/A 100.00%
June 09, 2004 47,00 0 N/A 100.00%
June 23, 2004 73,375 0 N/A 100.00%
July 14, 2004 37,000 0 N/A 100.00%
July 28, 2004 39,000 0 N/A 100.00%
August 11, 2004 6 0 N/A 100.00%
August 25, 2004 35,000 0 N/A 100.00%
September 08, 2004 10,000 0 N/A 100.00%
September 22, 2004 27,000 0 N/A 100.00%
October 06, 2004 26,000 0 N/A 100.00%
October 20, 2004 60,000 0 N/A 100.00%
November 03, 2004
November 17, 2004
December 08, 2004
December 22, 2004

Page 97
Title Inventory Report
The title inventory report is due the first business day of each month for the previous month. The report indicates the Beginning Inventory for each month. The amount supplied to Output Control and the amount received from the vendor and any that may be returned to the warehouse for whatever the case may be. A report is done for each type of title kept in the warehouse inventory. 1. Titles 2000 to a box 2.Title 1000 to a box, and 3.Salvage Certificated 2000 to a box. 4. A partial skid of American Bank Note titles are report as well. This skid will be reported and kept in the warehouse until given the word to destroy or release. This report is completed and sent to:
BMV Business Manager River Front Office Center 1101 South Front St. 4
th Floor
Harrisburg PA 17033 See the example of one of the four types of title inventories reported for the BMV Warehouse each month.
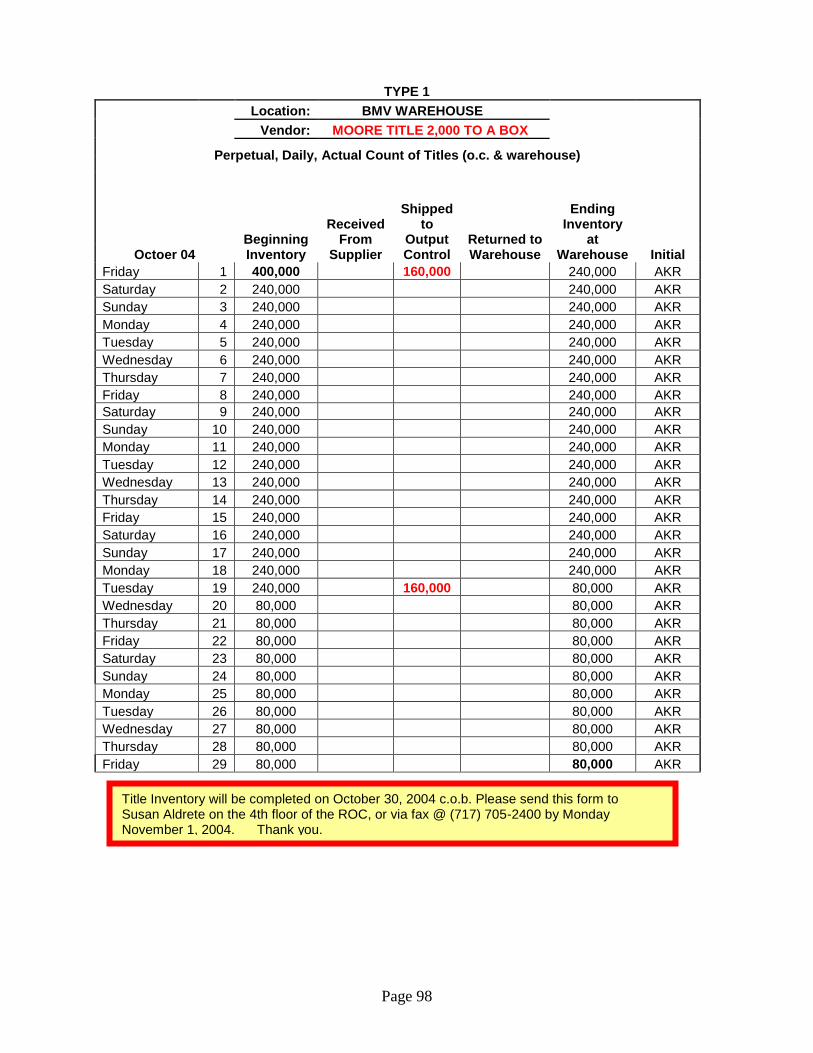
Page 98
TYPE 1
Location: BMV WAREHOUSE
Vendor: MOORE TITLE 2,000 TO A BOX
Perpetual, Daily, Actual Count of Titles (o.c. & warehouse)
Octoer 04 Beginning Inventory
Received From
Supplier
Shipped to
Output Control
Returned to Warehouse
Ending Inventory
at Warehouse Initial
Friday 1 400,000 160,000 240,000 AKR
Saturday 2 240,000 240,000 AKR
Sunday 3 240,000 240,000 AKR
Monday 4 240,000 240,000 AKR
Tuesday 5 240,000 240,000 AKR
Wednesday 6 240,000 240,000 AKR
Thursday 7 240,000 240,000 AKR
Friday 8 240,000 240,000 AKR
Saturday 9 240,000 240,000 AKR
Sunday 10 240,000 240,000 AKR
Monday 11 240,000 240,000 AKR
Tuesday 12 240,000 240,000 AKR
Wednesday 13 240,000 240,000 AKR
Thursday 14 240,000 240,000 AKR
Friday 15 240,000 240,000 AKR
Saturday 16 240,000 240,000 AKR
Sunday 17 240,000 240,000 AKR
Monday 18 240,000 240,000 AKR
Tuesday 19 240,000 160,000 80,000 AKR
Wednesday 20 80,000 80,000 AKR
Thursday 21 80,000 80,000 AKR
Friday 22 80,000 80,000 AKR
Saturday 23 80,000 80,000 AKR
Sunday 24 80,000 80,000 AKR
Monday 25 80,000 80,000 AKR
Tuesday 26 80,000 80,000 AKR
Wednesday 27 80,000 80,000 AKR
Thursday 28 80,000 80,000 AKR
Friday 29 80,000 80,000 AKR
Title Inventory will be completed on October 30, 2004 c.o.b. Please send this form to Susan Aldrete on the 4th floor of the ROC, or via fax @ (717) 705-2400 by Monday November 1, 2004. Thank you.
Page 99
Chopped Plates Procedure
Two empty Gaylord boxes (Very large boxes) are placed in the Mailing Process Unit of Output Control. These boxes are filled with license plates that have been chopped for scrap material. When these boxes become full, the BMV warehouse truck driver is notified and he/she will bring two more empty boxes to the Mailing Unit and picked up the full boxes and take them to the warehouse for storing until the boxes can be placed inside the secured trailer used to dispose of the destroyed license plates located at the rear of the warehouse. The supervisor of the warehouse contacts Commercial Alloys, Brian Silver, once the trailer becomes full and is ready for pickup. At that time arrangements are made between Commercial Alloys and the supervisor for a drop off of an empty trailer and the pickup of the full one.
When the empty trailer arrives, one of the BMV warehouse employees will go along with the truck driver to Pennsy Supply to verify the weight of the full trailer that is being removed. The completed paper work is hand carried to the supervisor over the warehouse and then forwarded to DGS, Bonnie O’Leary. Note: Commercial Alloys replenishes the empty Gaylord boxes that are used for the chopped plates.
Revision 291-20150225
SAP PROCEDURE DETAILS
CREATING AN ORDER IN SRM ............................................................................................................................... 101
MATERIAL REPLENISHMENT PLANNING ( MRP RUN) ............................................................................................. 115
CREATE A PURCHASE ORDER................................................................................................................................. 121
RECEIVING STD FORMS FROM PRINT SHOP ............................................................................................................ 143
RECEIVING COMMODITIES ...................................................................................................................................... 147
RECEIVING HEALTH FORMS FROM PRINT SHOP ..................................................................................................... 152
CREATE A STOCK TRANSPORT ORDER (STO) ......................................................................................................... 157
VIEW AND PRINT ORDERS ...................................................................................................................................... 165
PRINT ORDERS USING MB90 ................................................................................................................................. 169
PRINT ORDERS USING ZMMPPS............................................................................................................................ 175
HARDCOPIES .......................................................................................................................................................... 181
PRINT GOODS ISSUE IN ZMMPPS FOR HARDCOPIES .............................................................................................. 186
INVOICING FOR HARDCOPIES ................................................................................................................................. 188
INVOICE PRINTING .................................................................................................................................................. 193
CREDITS/STOCK DENIALS/RETURNS ...................................................................................................................... 195
INVENTORY TRANSACTIONS ................................................................................................................................... 208
CHANGE OR DELETE ORDER AMOUNT ................................................................................................................... 233
CHECK STOCK ........................................................................................................................................................ 237
CHECK STOCK AND LOCATION .............................................................................................................................. 239
TRACK BY MATERIAL NUMBER ............................................................................................................................. 241
REPRINT AN ORDER ............................................................................................................................................... 243
TO ENTER ANOTHER SCREEN FROM THE ONE YOU ARE IN ................................................................................... 245
VIEW DESCRIPTION/UNIT OF MEASURE ................................................................................................................. 246
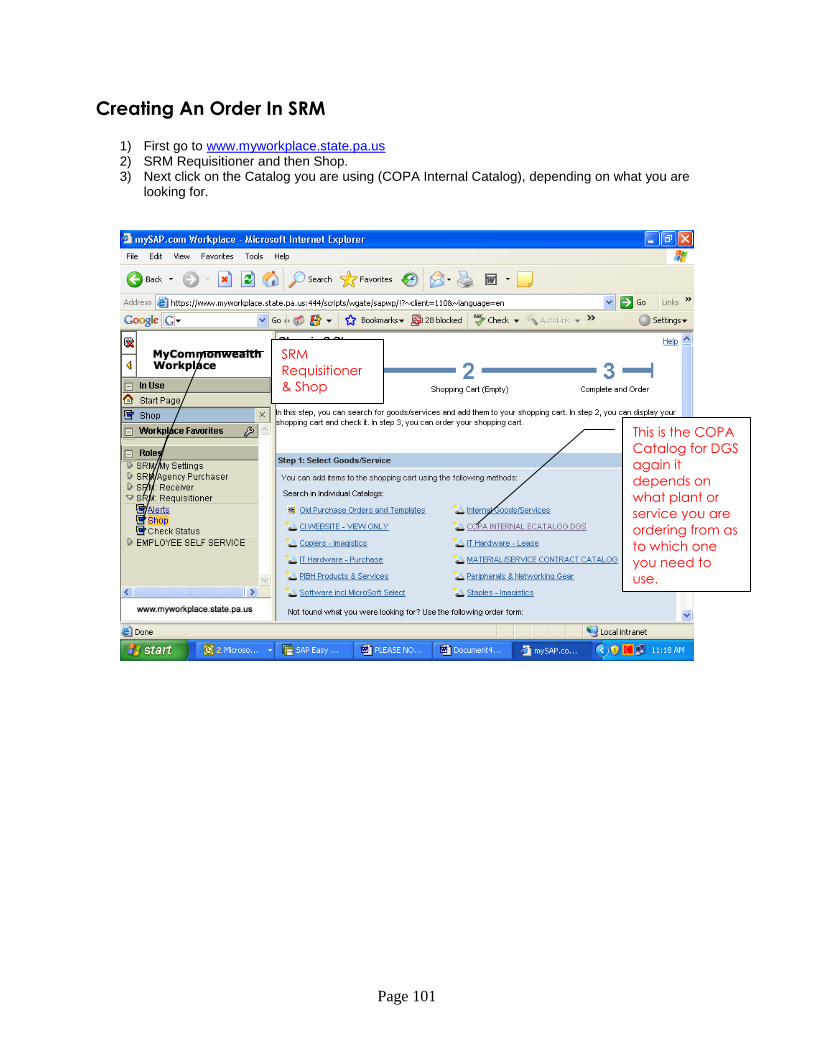
Page 101
Creating An Order In SRM 1) First go to www.myworkplace.state.pa.us 2) SRM Requisitioner and then Shop. 3) Next click on the Catalog you are using (COPA Internal Catalog), depending on what you are
looking for.
This is the COPA
Catalog for DGS
again it
depends on
what plant or
service you are
ordering from as
to which one
you need to
use.
SRM
Requisitioner
& Shop
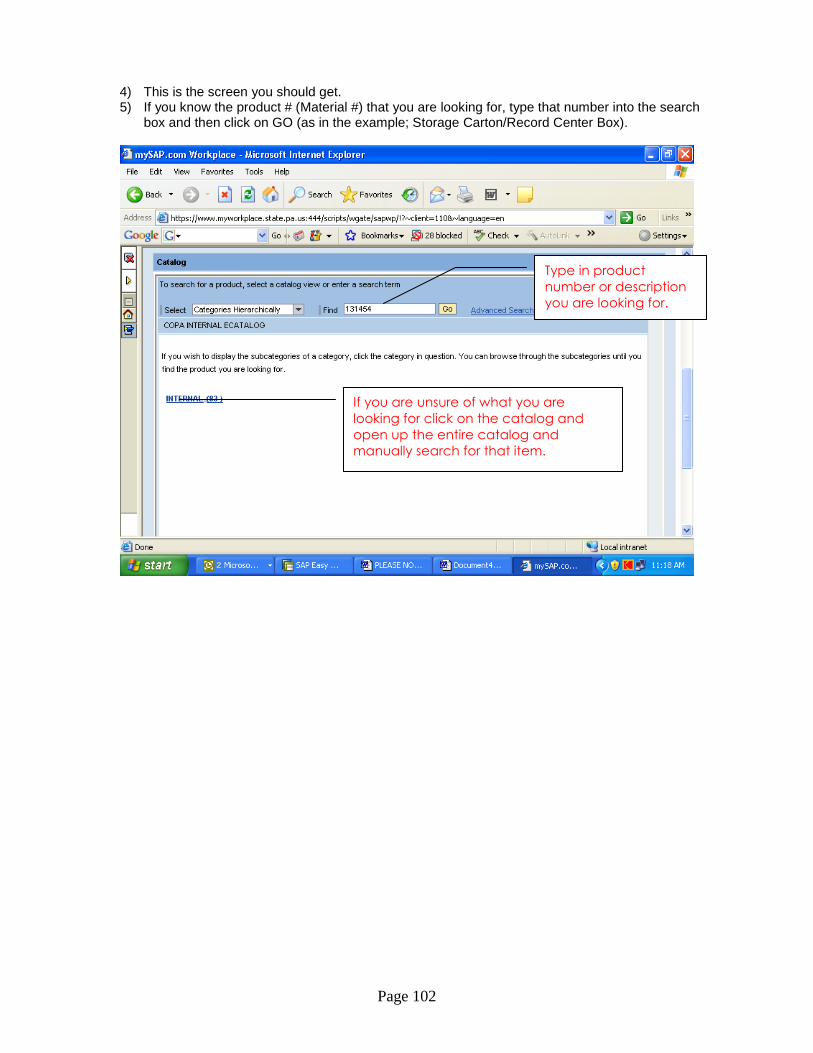
Page 102
4) This is the screen you should get. 5) If you know the product # (Material #) that you are looking for, type that number into the search
box and then click on GO (as in the example; Storage Carton/Record Center Box).
Type in product
number or description
you are looking for.
If you are unsure of what you are
looking for click on the catalog and
open up the entire catalog and
manually search for that item.
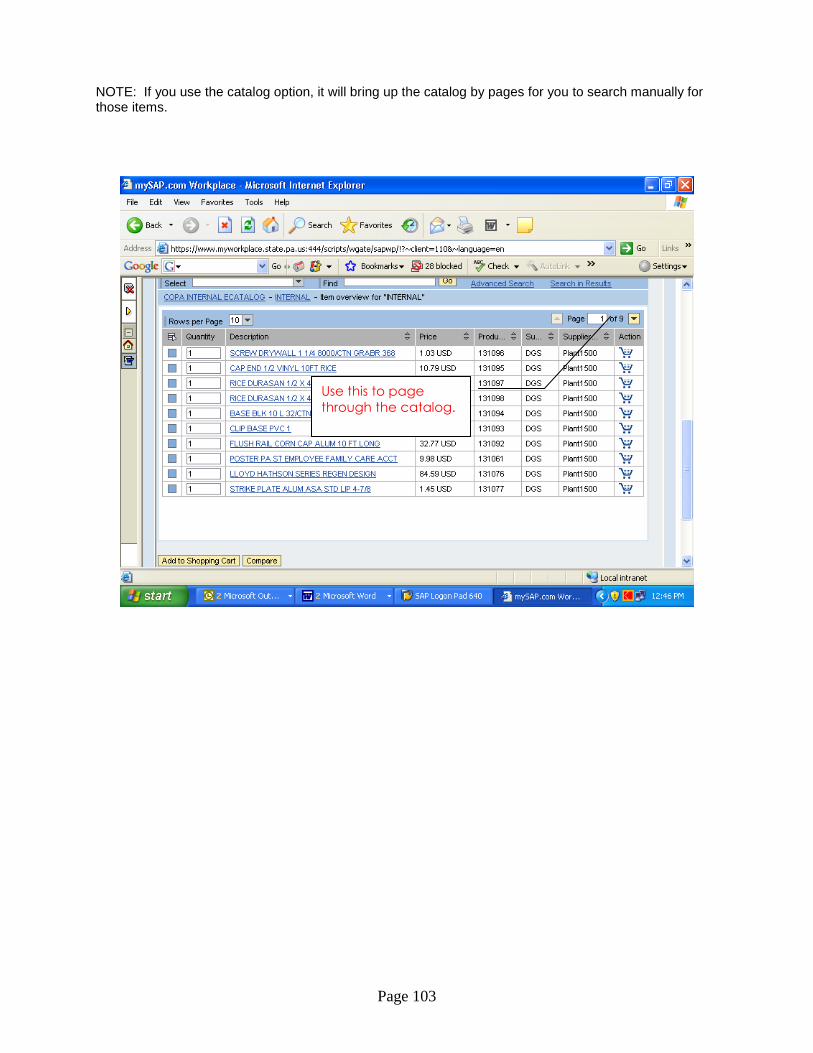
Page 103
NOTE: If you use the catalog option, it will bring up the catalog by pages for you to search manually for those items.
Use this to page
through the catalog.
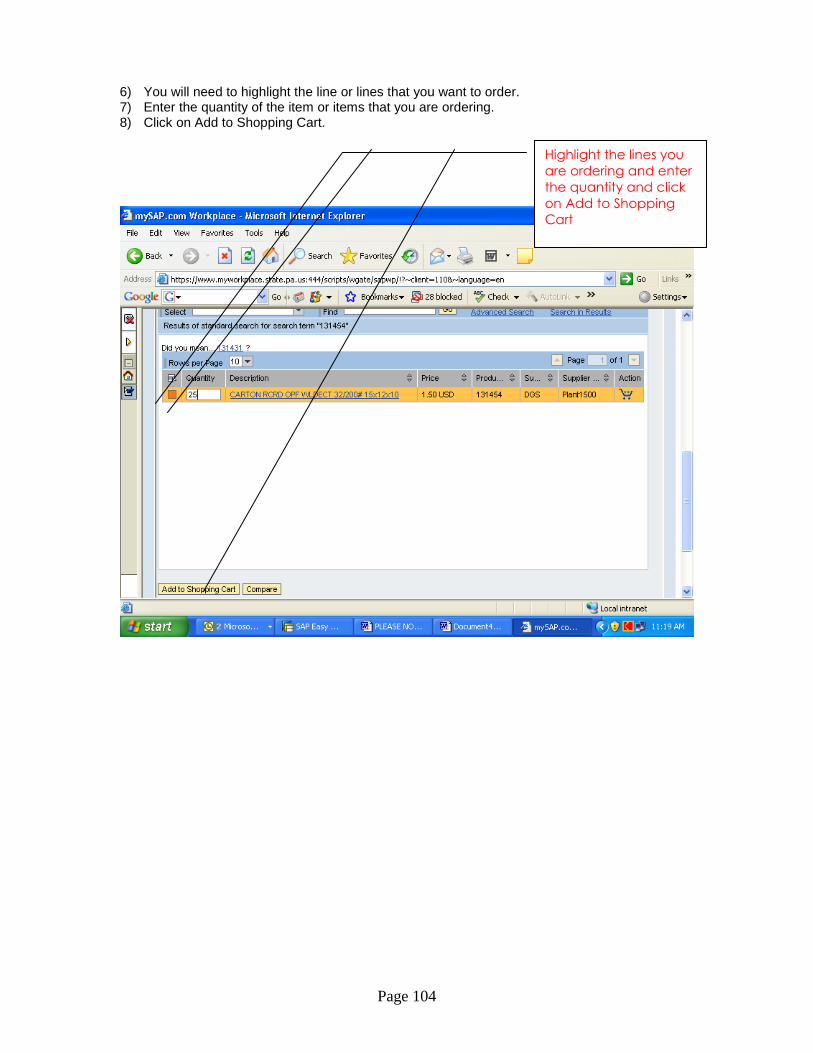
Page 104
6) You will need to highlight the line or lines that you want to order. 7) Enter the quantity of the item or items that you are ordering. 8) Click on Add to Shopping Cart.
Highlight the lines you
are ordering and enter
the quantity and click
on Add to Shopping
Cart

Page 105
9) This is the screen you get. Do not be too alarmed about the error messages at the top, as you input information they will go away as long as the information you input is correct.
10) Now click on the Details button.
Details
Button

Page 106
11) This is the screen you get. 12) Here make sure you select the drop down on Purchasing Group and pick the one you need.
Purchasing
Group
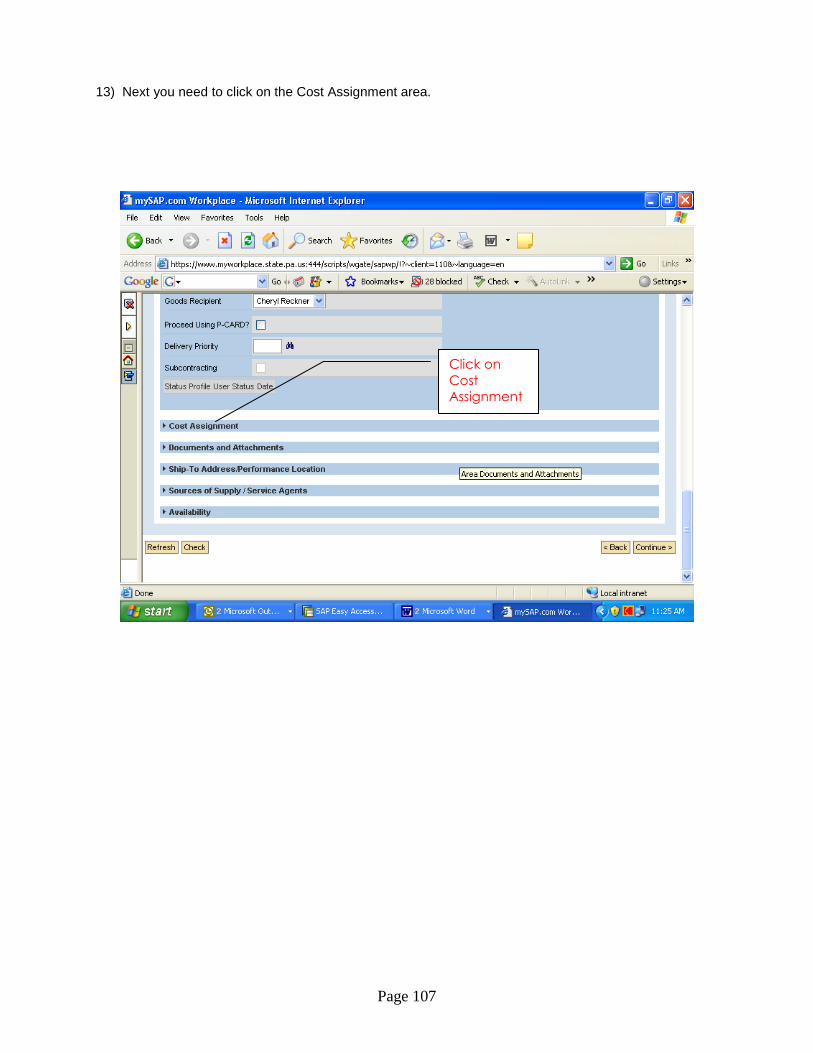
Page 107
13) Next you need to click on the Cost Assignment area.
Click on
Cost
Assignment
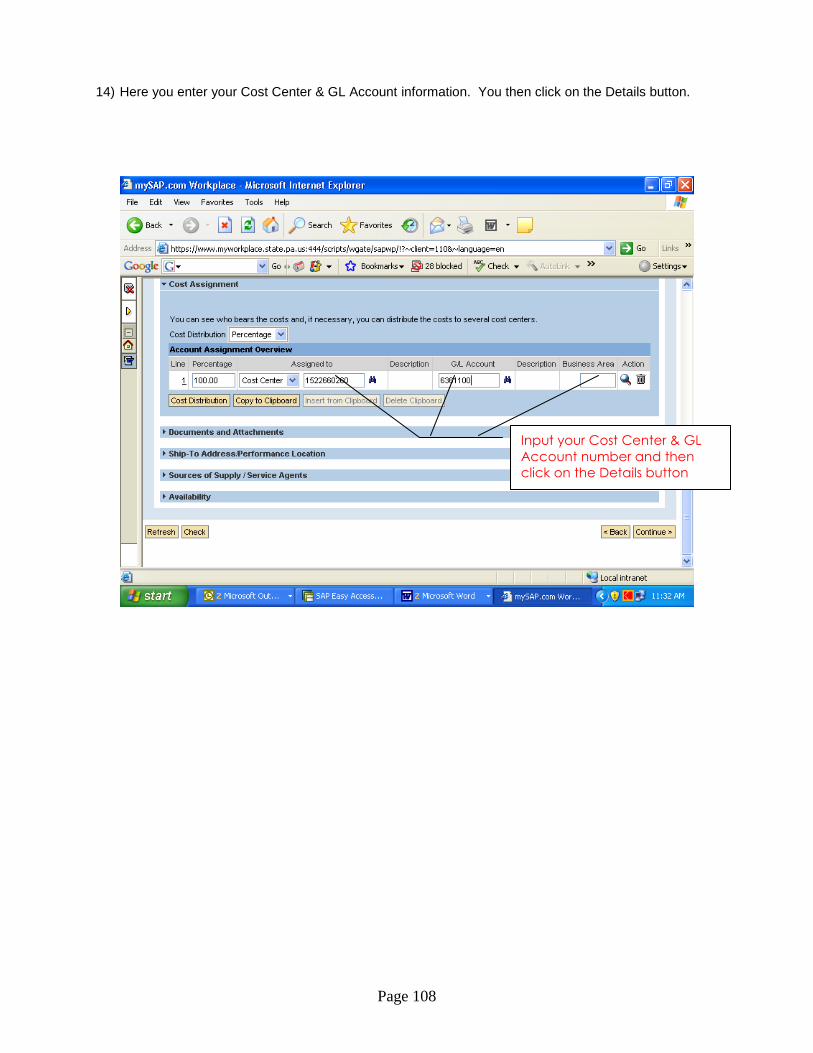
Page 108
14) Here you enter your Cost Center & GL Account information. You then click on the Details button.
Input your Cost Center & GL
Account number and then
click on the Details button
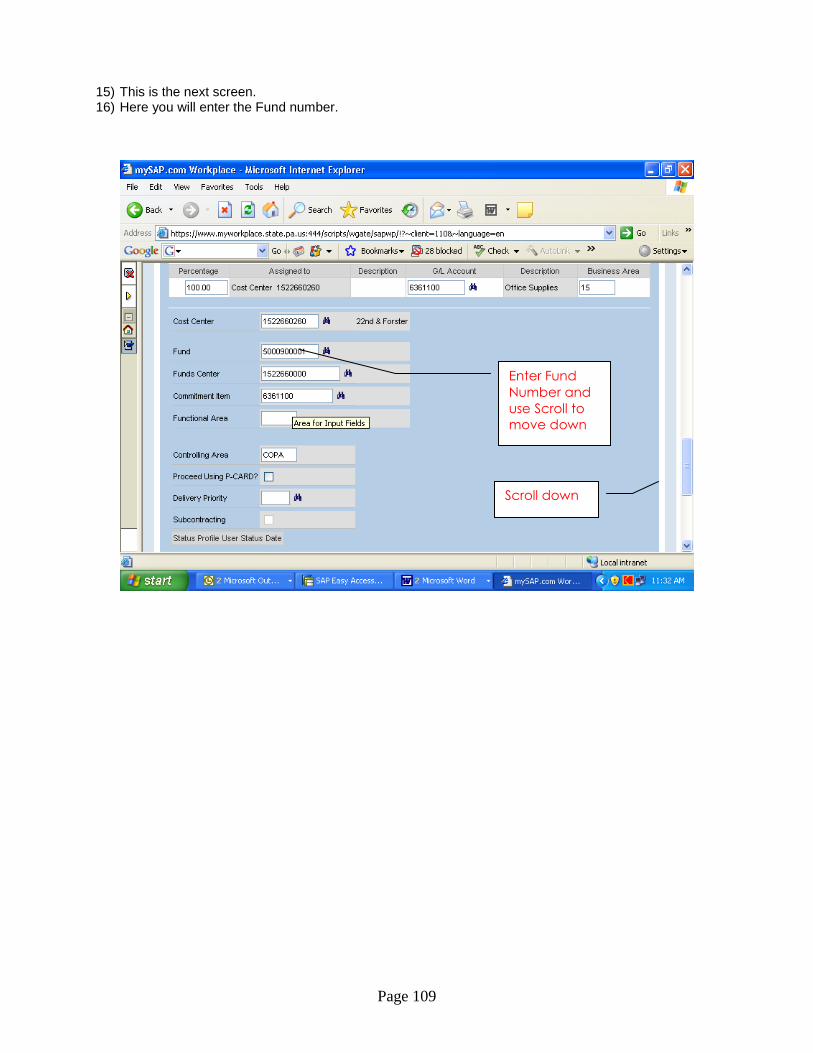
Page 109
15) This is the next screen. 16) Here you will enter the Fund number.
Enter Fund
Number and
use Scroll to
move down
Scroll down
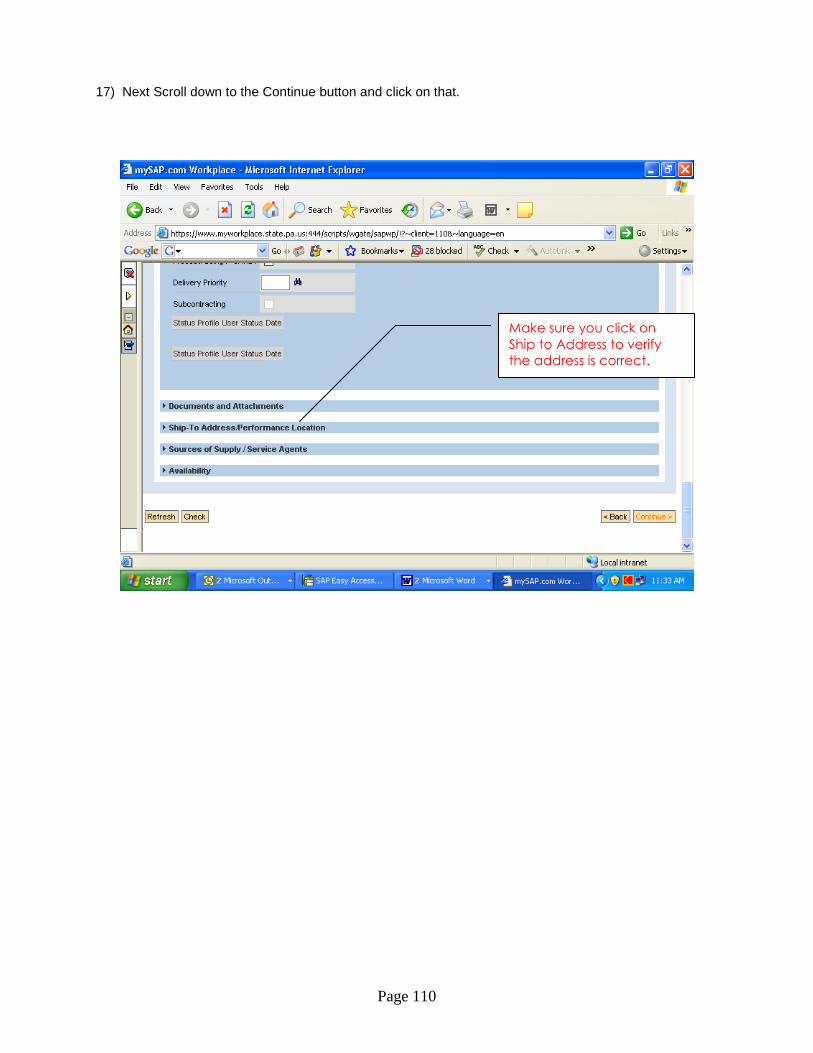
Page 110
17) Next Scroll down to the Continue button and click on that.
Make sure you click on
Ship to Address to verify
the address is correct.
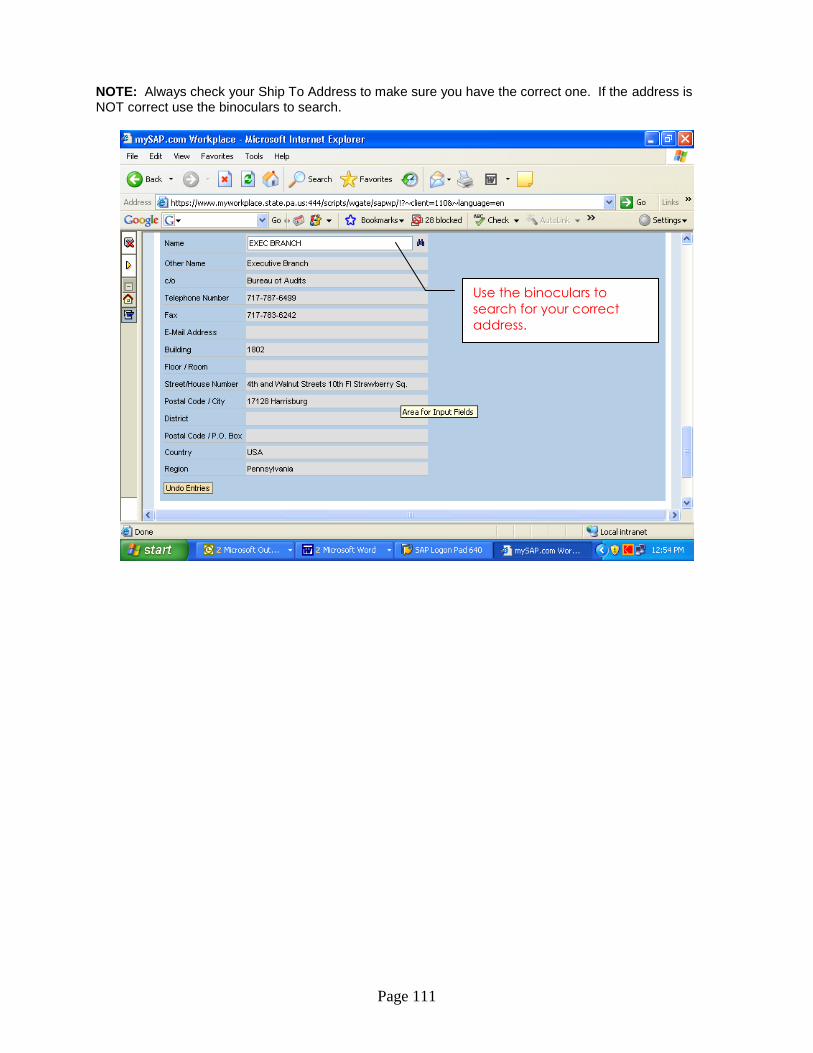
Page 111
NOTE: Always check your Ship To Address to make sure you have the correct one. If the address is NOT correct use the binoculars to search.
Use the binoculars to
search for your correct
address.
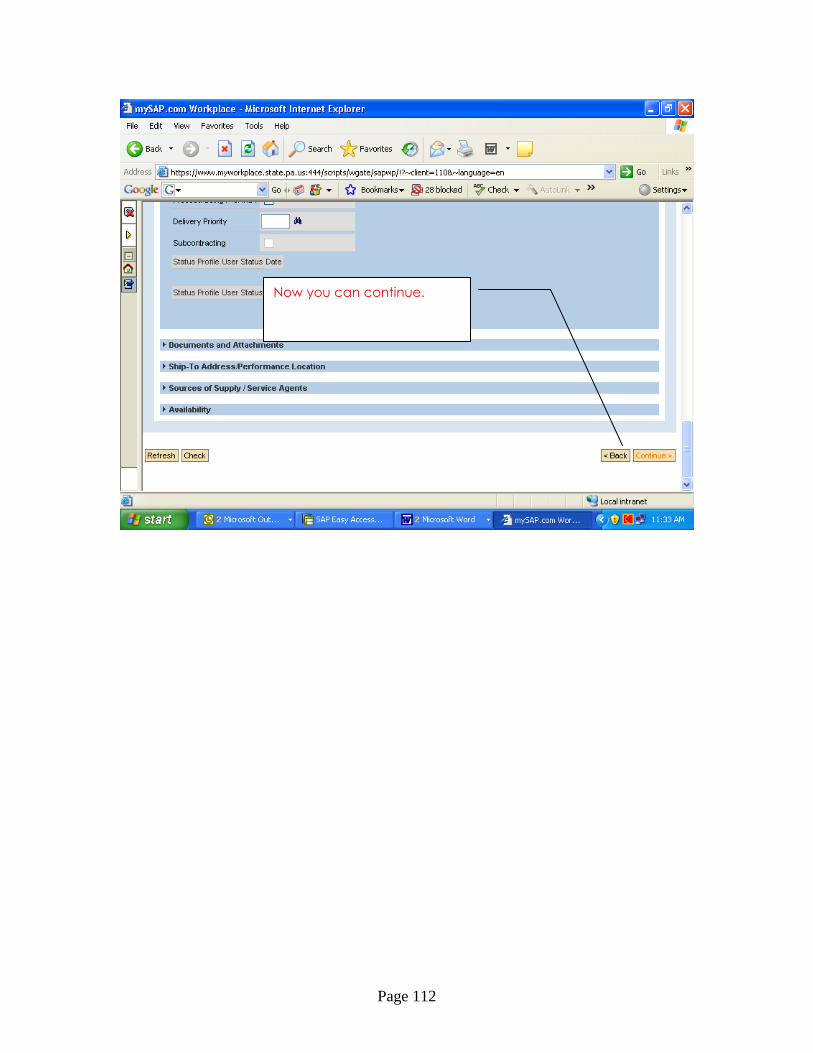
Page 112
Now you can continue.
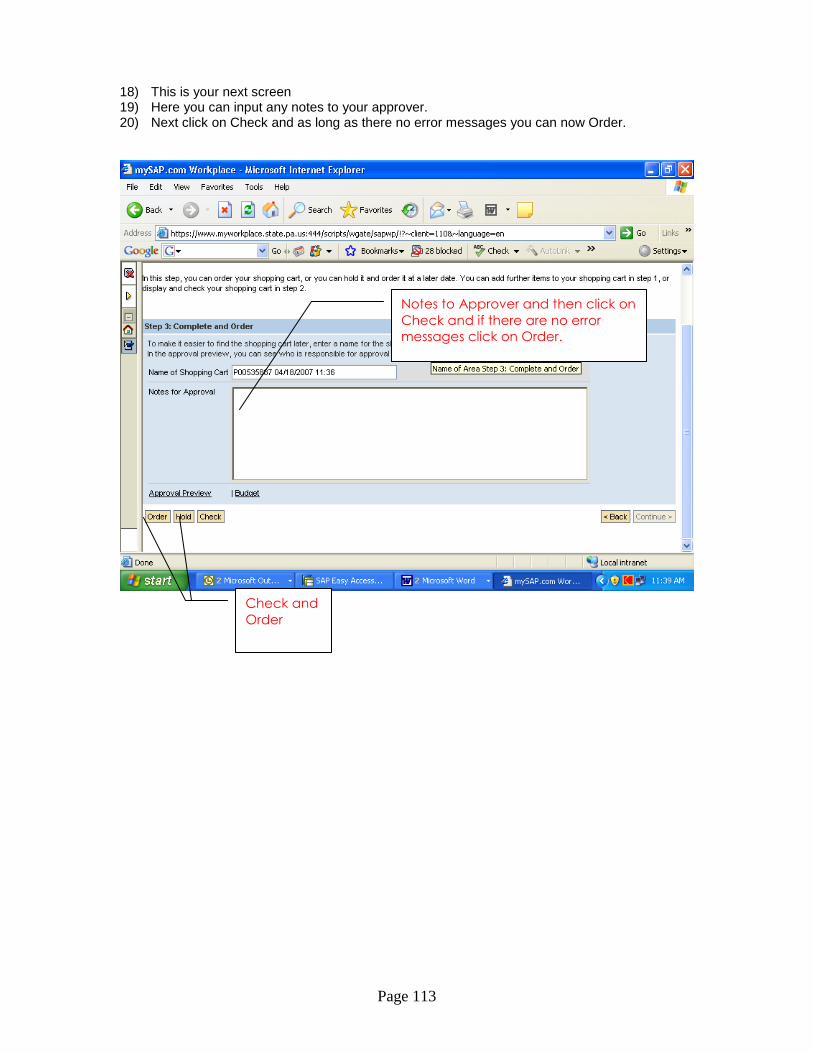
Page 113
18) This is your next screen 19) Here you can input any notes to your approver. 20) Next click on Check and as long as there no error messages you can now Order.
Notes to Approver and then click on
Check and if there are no error
messages click on Order.
Check and
Order
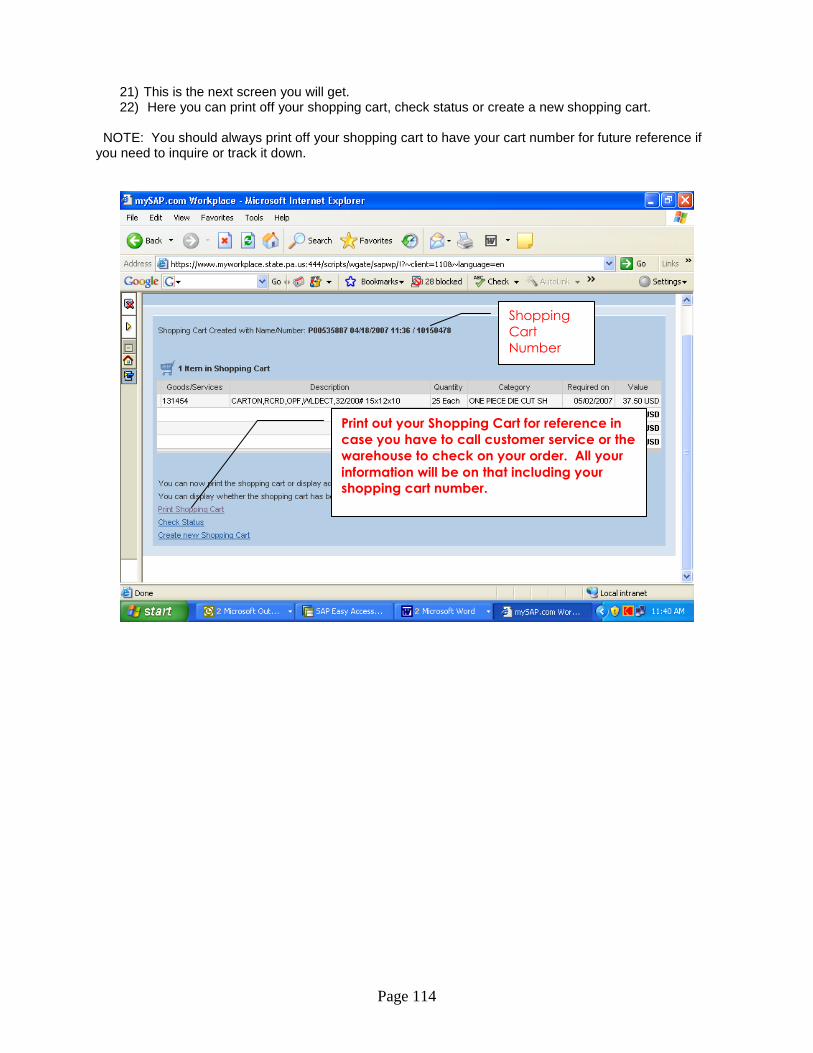
Page 114
21) This is the next screen you will get. 22) Here you can print off your shopping cart, check status or create a new shopping cart.
NOTE: You should always print off your shopping cart to have your cart number for future reference if you need to inquire or track it down.
Print out your Shopping Cart for reference in
case you have to call customer service or the
warehouse to check on your order. All your
information will be on that including your
shopping cart number.
Shopping
Cart
Number
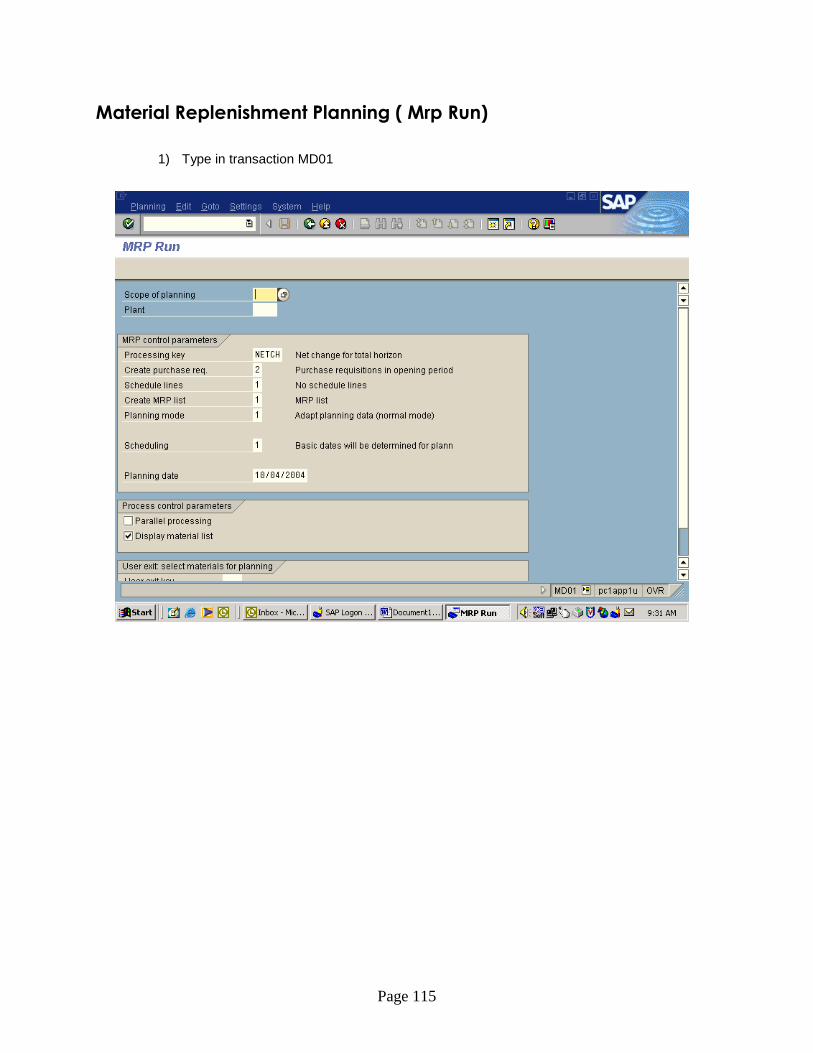
Page 115
Material Replenishment Planning ( Mrp Run)
1) Type in transaction MD01
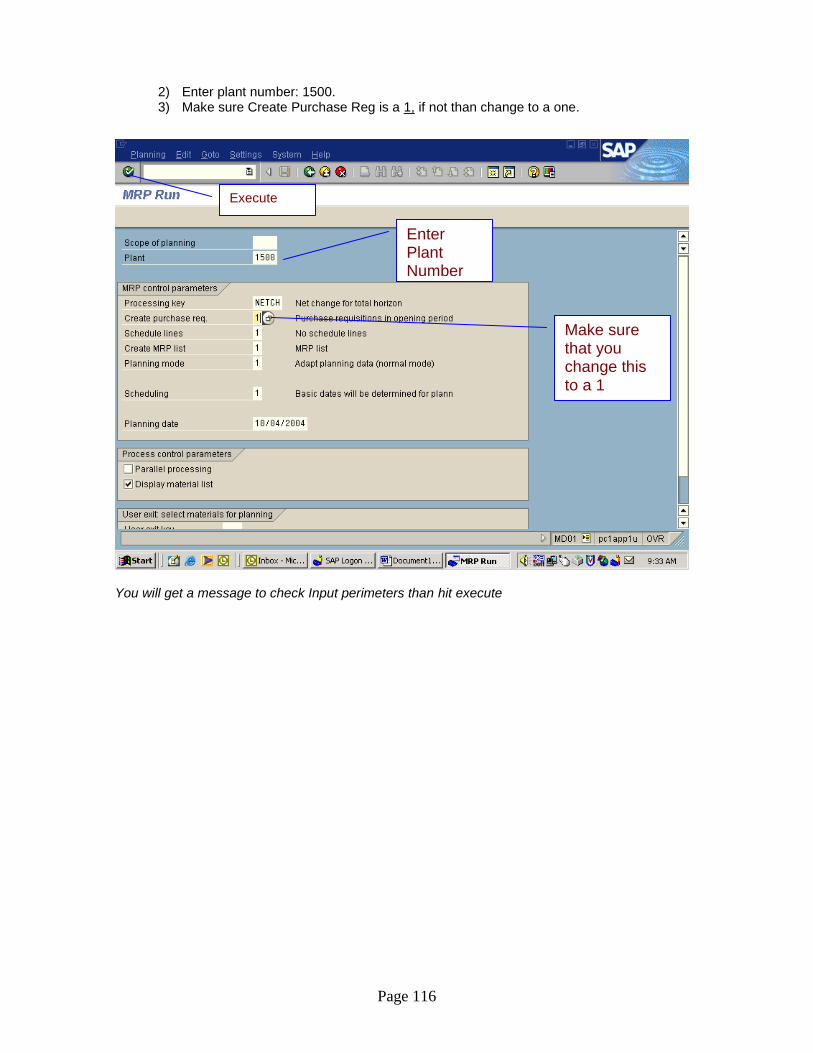
Page 116
2) Enter plant number: 1500. 3) Make sure Create Purchase Reg is a 1, if not than change to a one.
You will get a message to check Input perimeters than hit execute
Enter Plant Number
Execute
Make sure that you change this to a 1
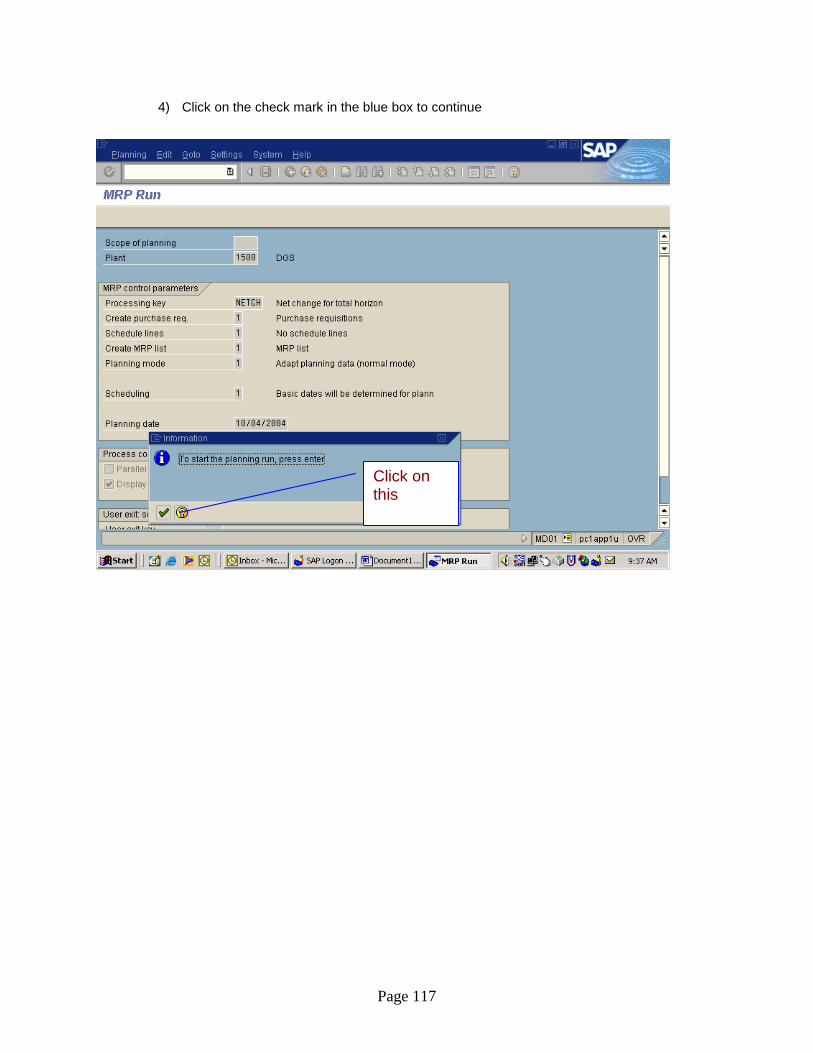
Page 117
4) Click on the check mark in the blue box to continue
Click on this
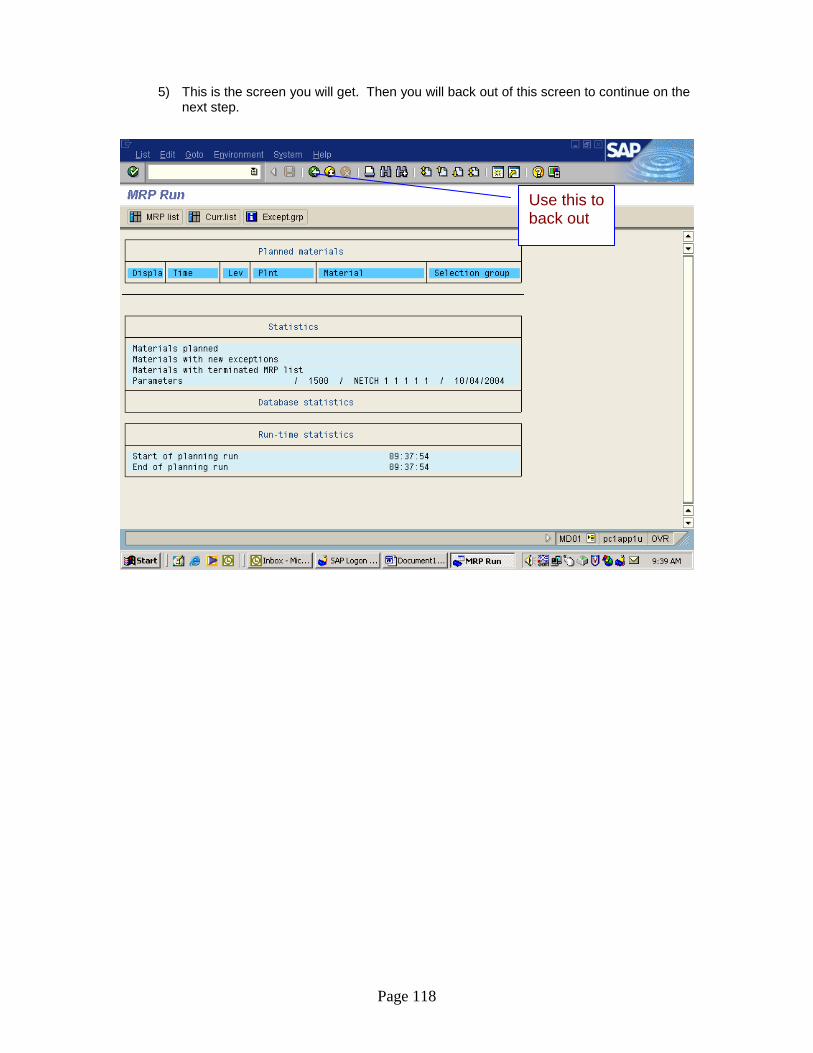
Page 118
5) This is the screen you will get. Then you will back out of this screen to continue on the next step.
Use this to back out
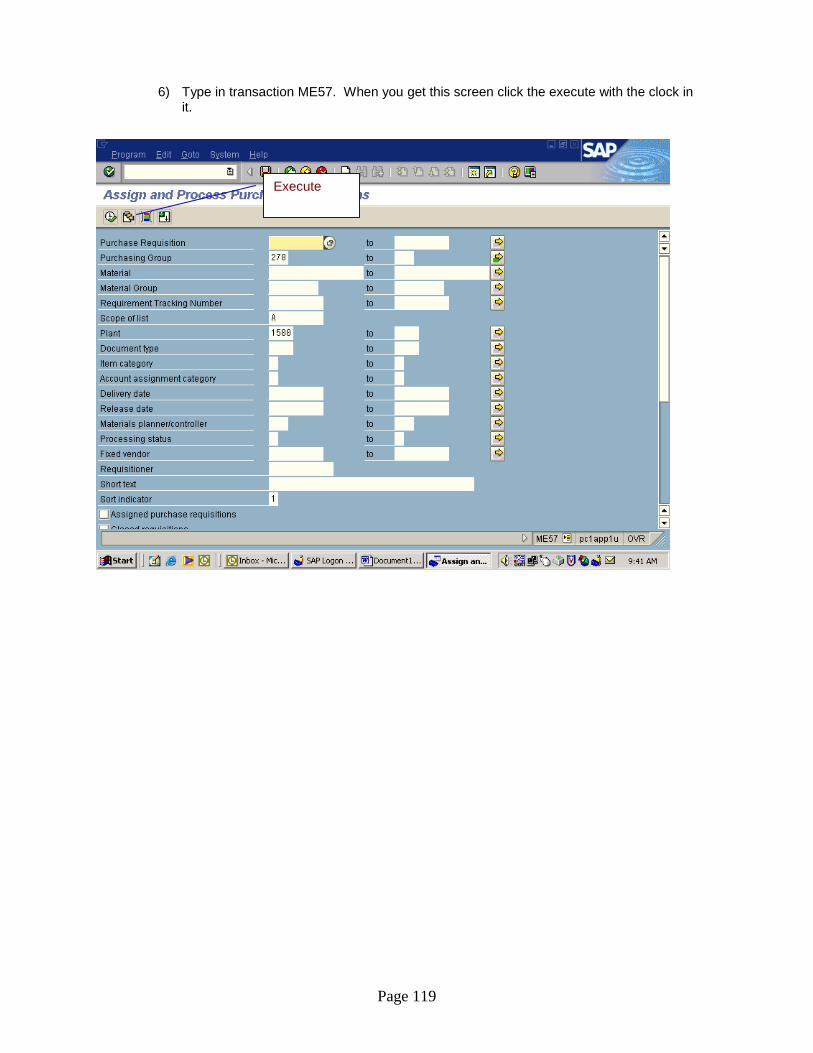
Page 119
6) Type in transaction ME57. When you get this screen click the execute with the clock in it.
Execute
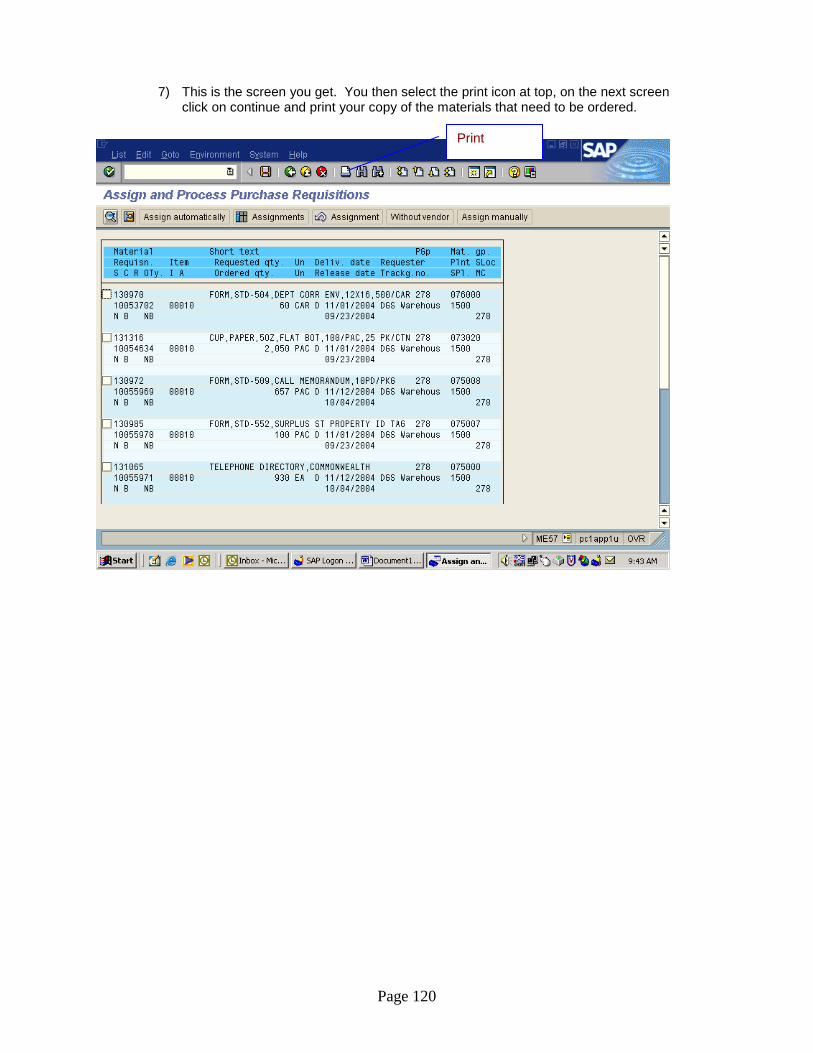
Page 120
7) This is the screen you get. You then select the print icon at top, on the next screen click on continue and print your copy of the materials that need to be ordered.
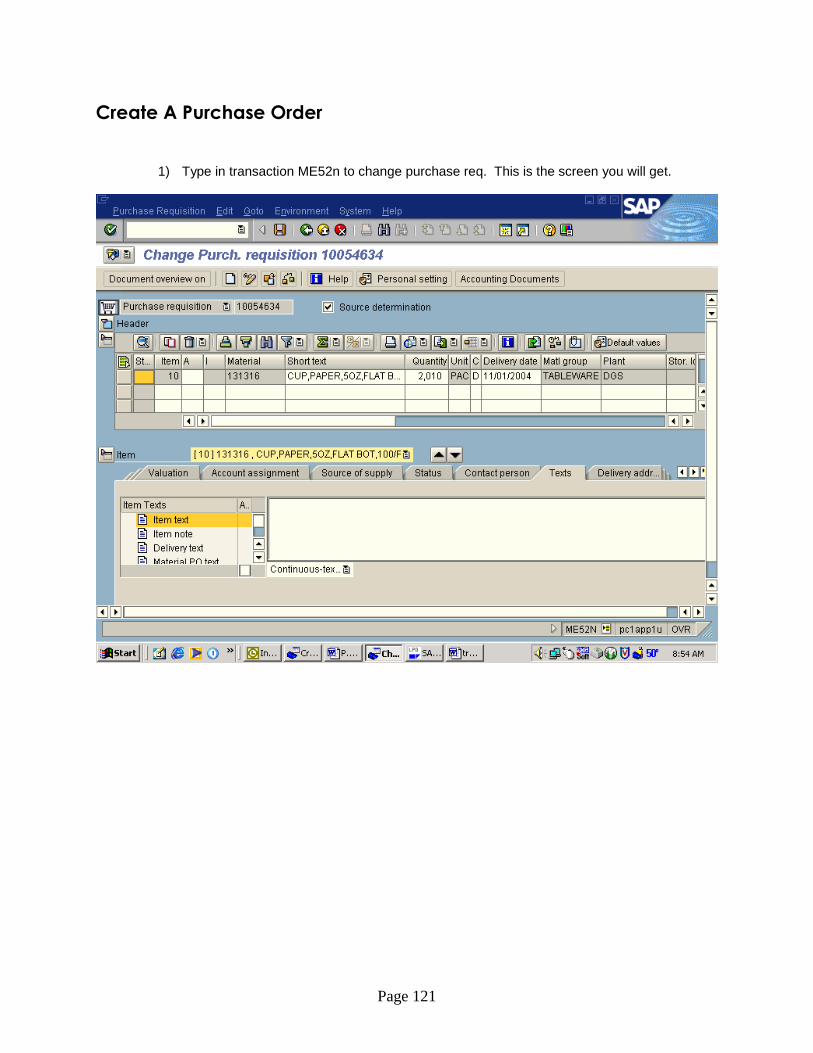
Page 121
Create A Purchase Order
1) Type in transaction ME52n to change purchase req. This is the screen you will get.

Page 122
2) Select purchase req at top and choose other requestion.
Select to get drop down
Other Requestion
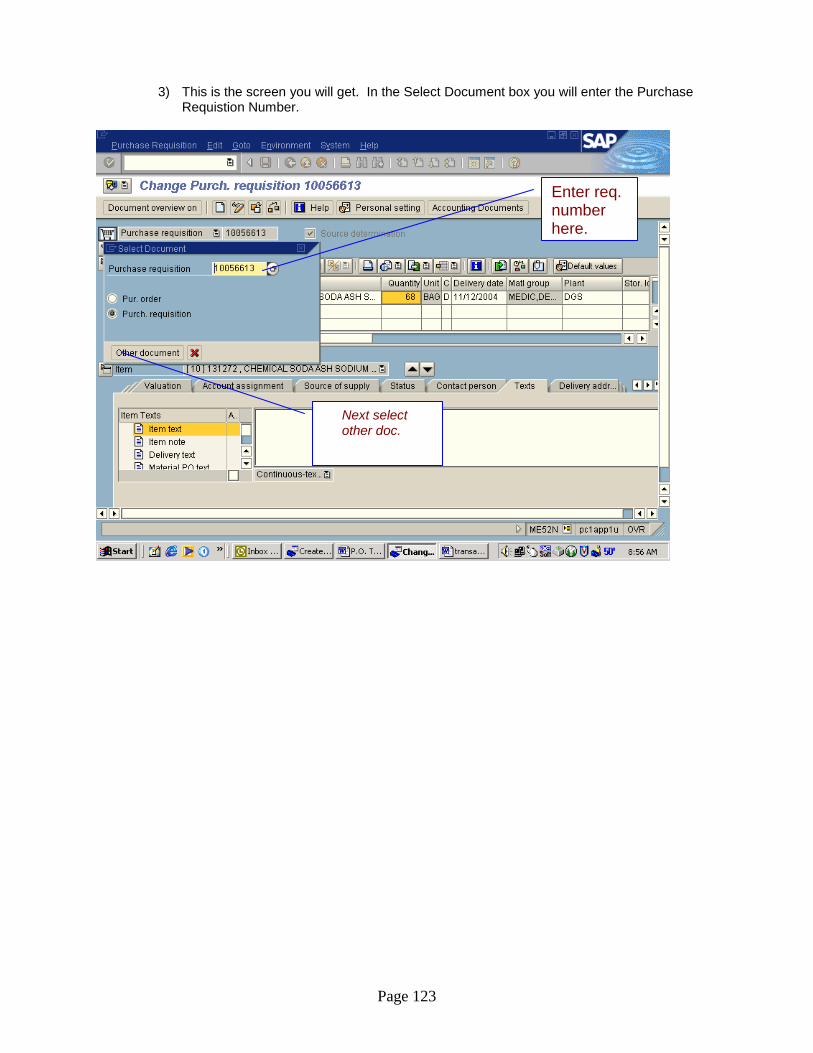
Page 123
3) This is the screen you will get. In the Select Document box you will enter the Purchase Requistion Number.
Enter req. number here.
Next select other doc.
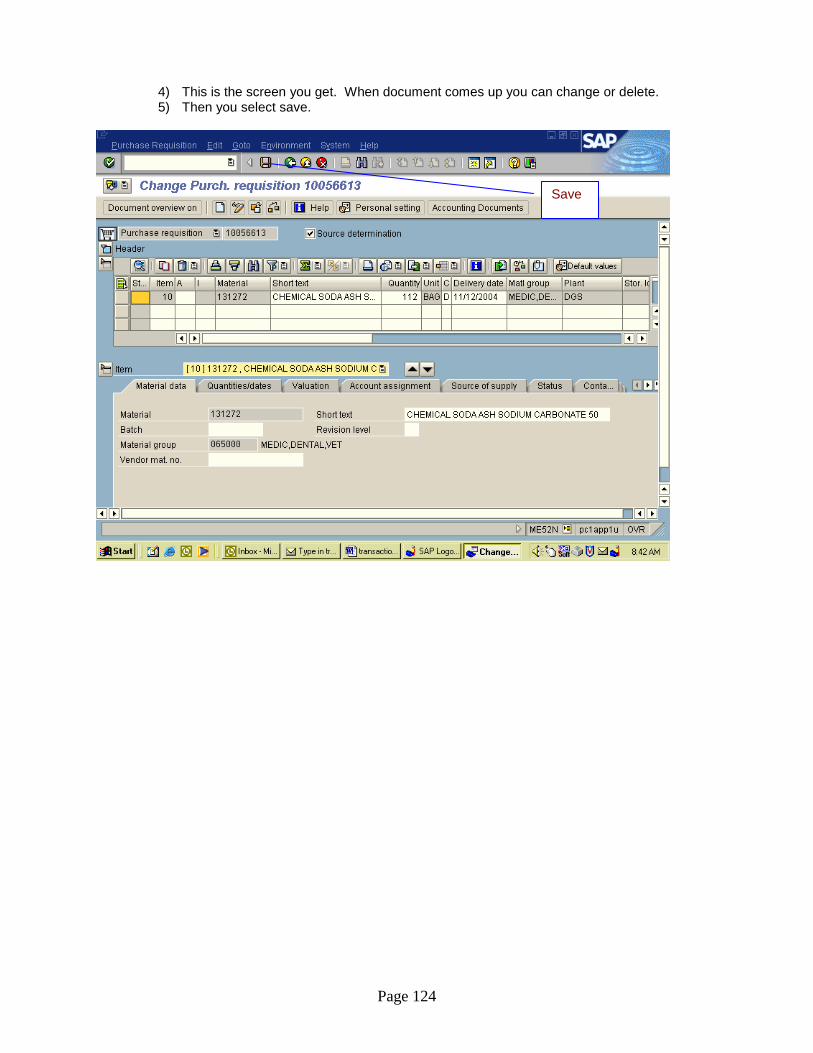
Page 124
4) This is the screen you get. When document comes up you can change or delete. 5) Then you select save.
Save

Page 125
6) Type in transactionME21n for OFF CONTRACT PO’s. This is the screen that you will get.
7) Click Document Overview on
Document Overview

Page 126
8) Click on the Balloons
Balloons

Page 127
9) Select Purchase Req.
Select Purchase Req.
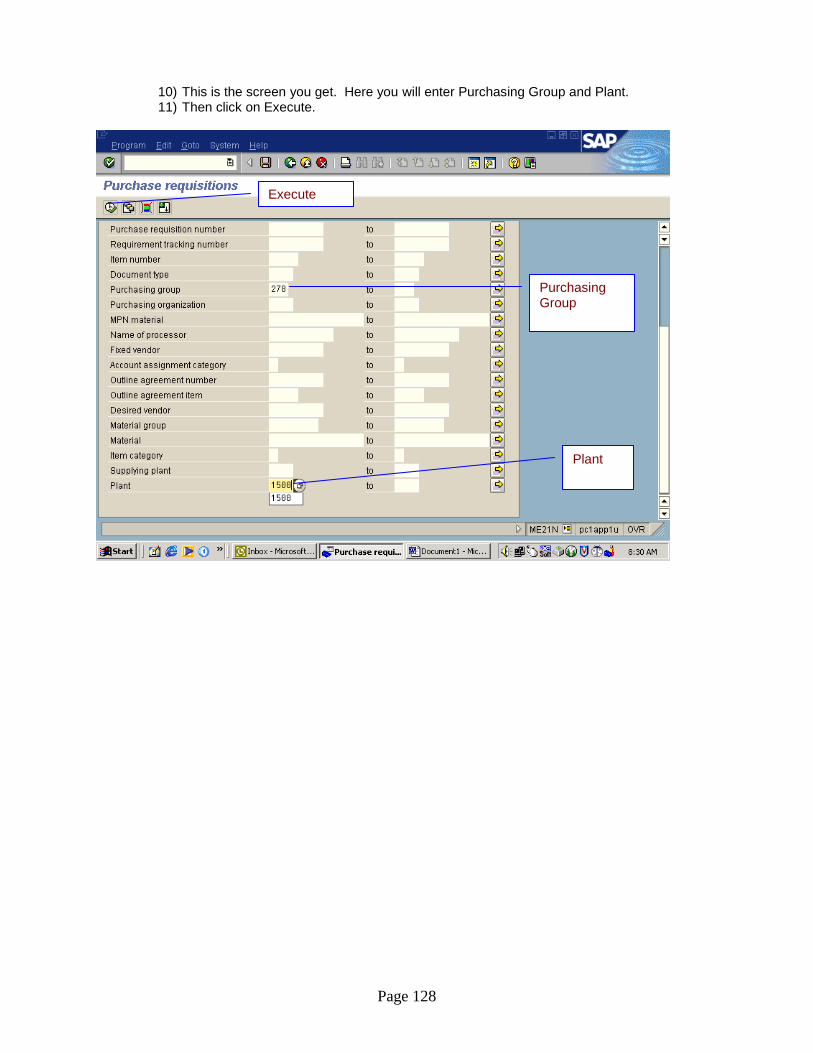
Page 128
10) This is the screen you get. Here you will enter Purchasing Group and Plant. 11) Then click on Execute.
Purchasing Group
Plant
Execute
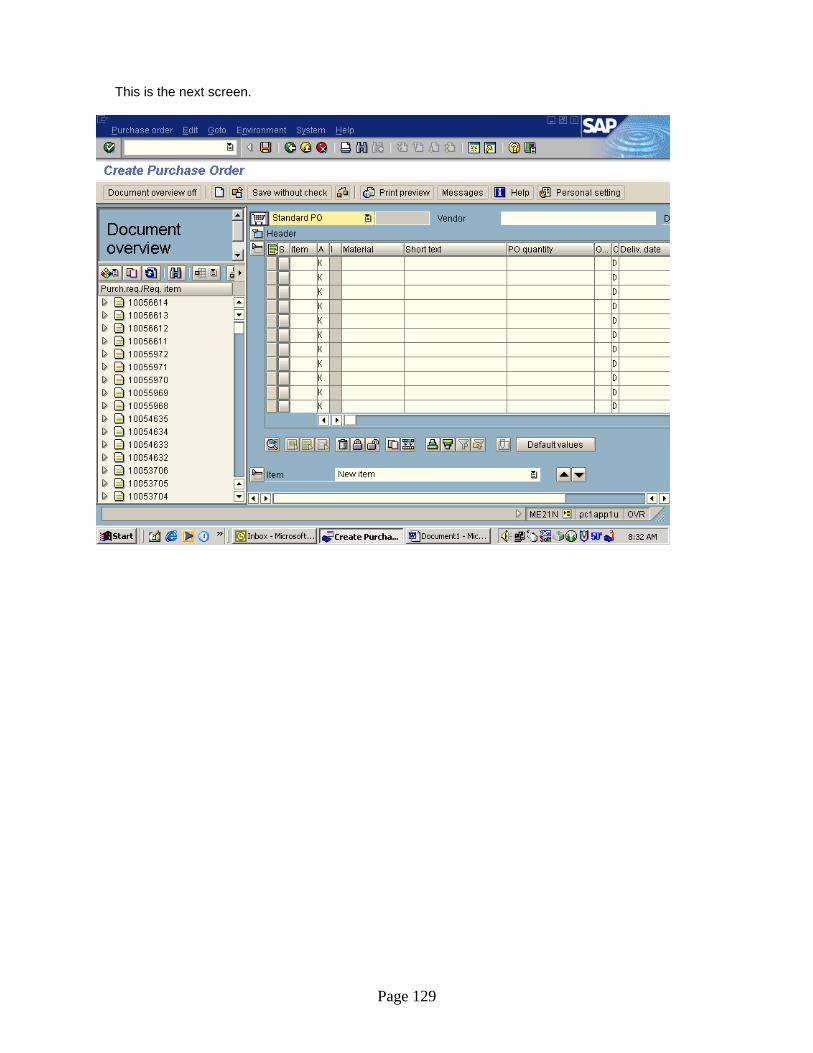
Page 129
This is the next screen.
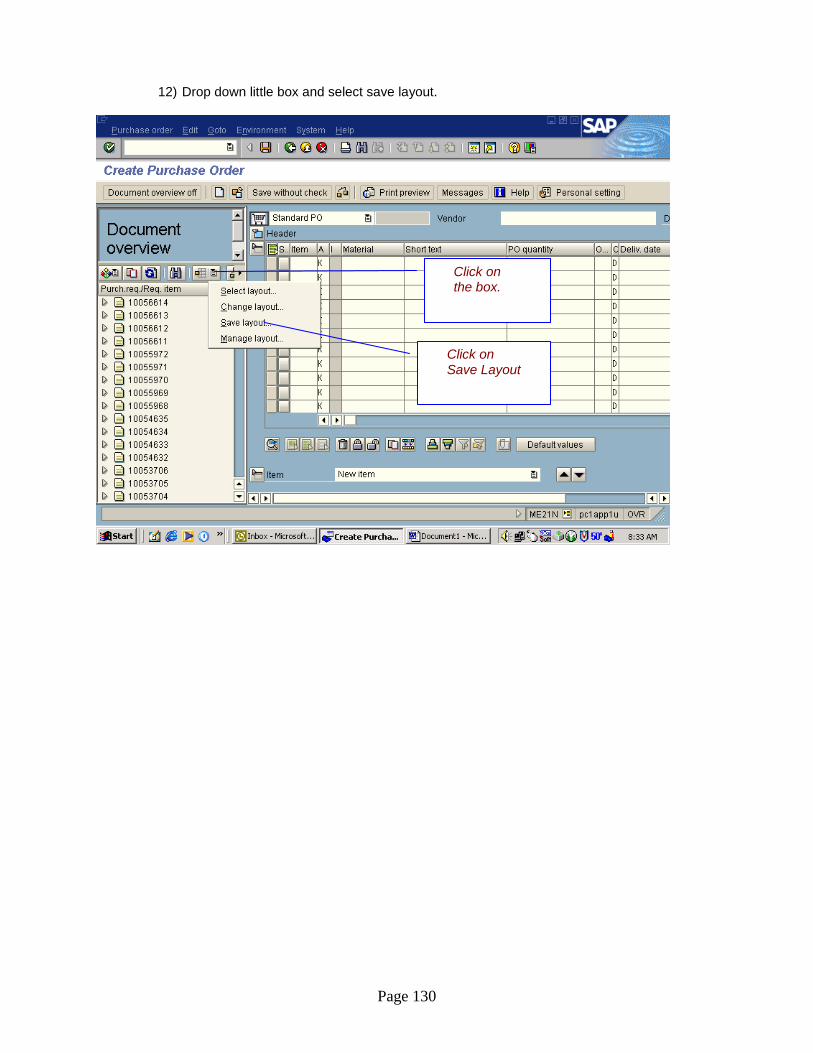
Page 130
12) Drop down little box and select save layout.
Click on the box.
Click on Save Layout
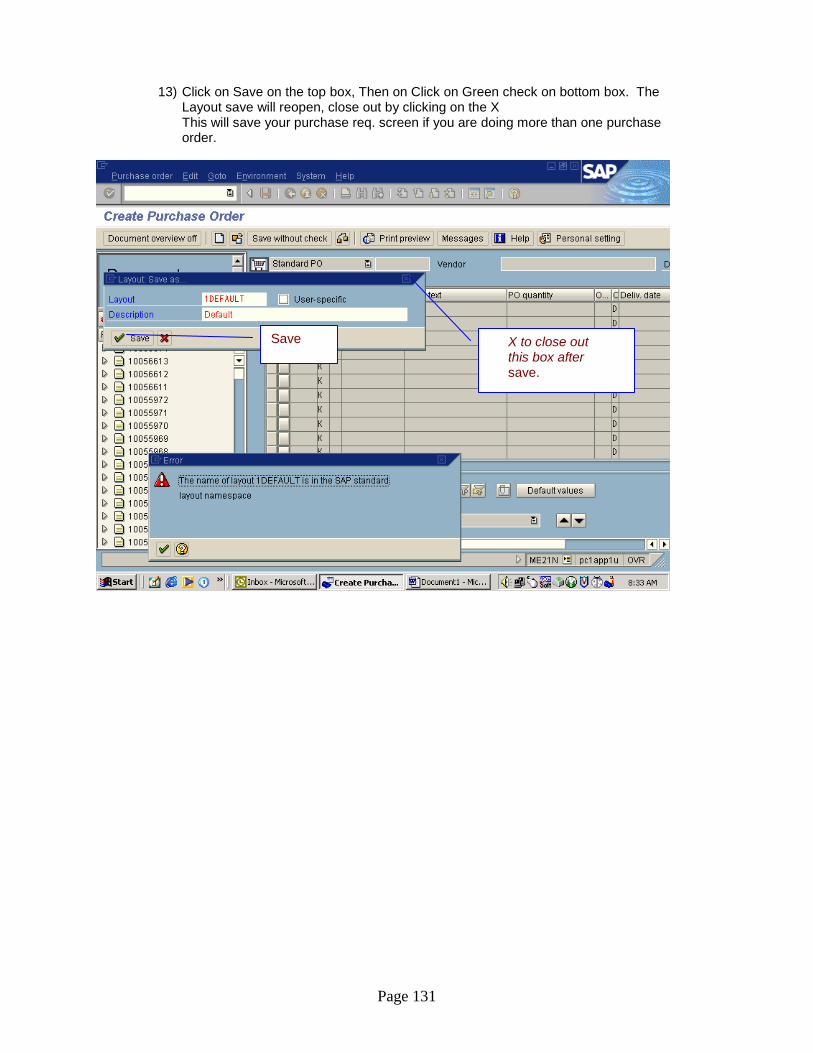
Page 131
13) Click on Save on the top box, Then on Click on Green check on bottom box. The Layout save will reopen, close out by clicking on the X This will save your purchase req. screen if you are doing more than one purchase order.
Save X to close out this box after save.
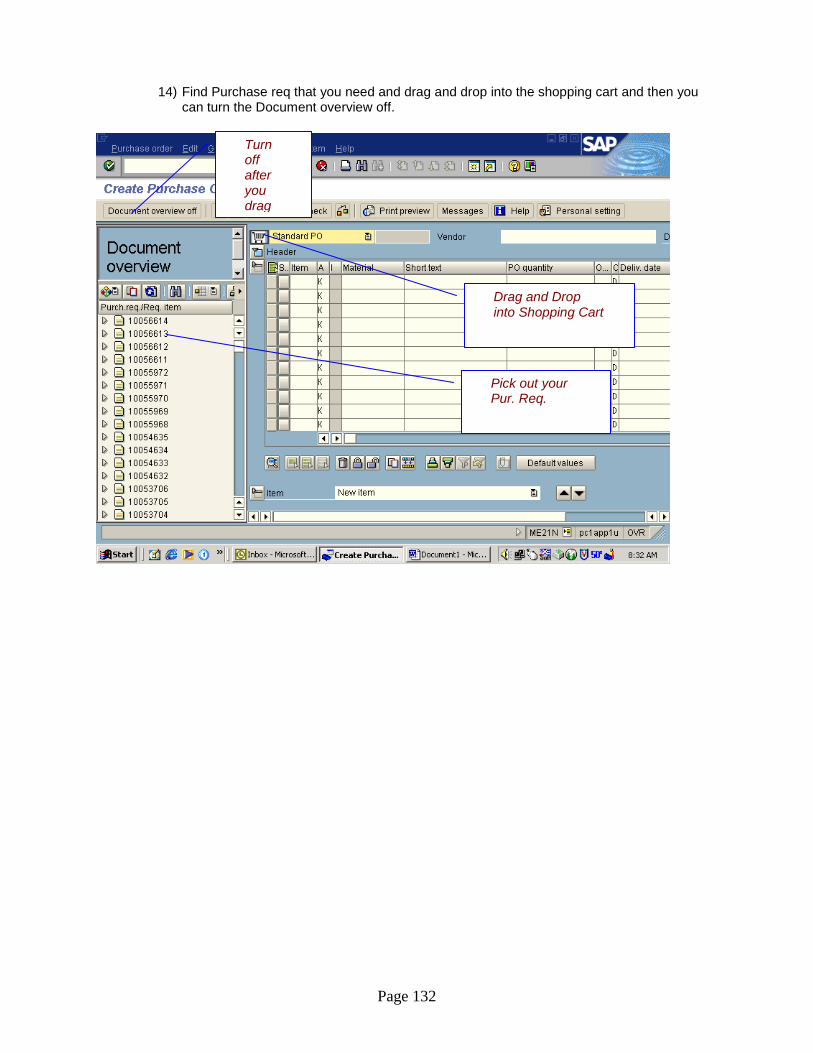
Page 132
14) Find Purchase req that you need and drag and drop into the shopping cart and then you can turn the Document overview off.
Pick out your Pur. Req.
Drag and Drop into Shopping Cart
Turn off after you drag and drop

Page 133
15) Enter Vendor Number, Price, Currency and Per Pack Quantity.
Vendor Number
Price
Currency

Page 134
16) Under Delivery Tab, Enter 10%
Delivery Tab Enter 10%
Here

Page 135
17) Under text enter Delivery Instructions.
Delivery Instructions

Page 136
18) Enter the correct Delivery Address.
Delivery Address Tab
Enter Correct Delivery Address

Page 137
19) Do a print preview and make sure all your information is correct. 20) Hit the go back arrow and then click on save.
Go back one screen
Click on save in next screen (when you back out of this screen)

Page 138
21) Your Purchase order number is on the bottom of your screen. 22) You will then open up a new session and go to ME9f
Purchase Order Number
Creates a new session
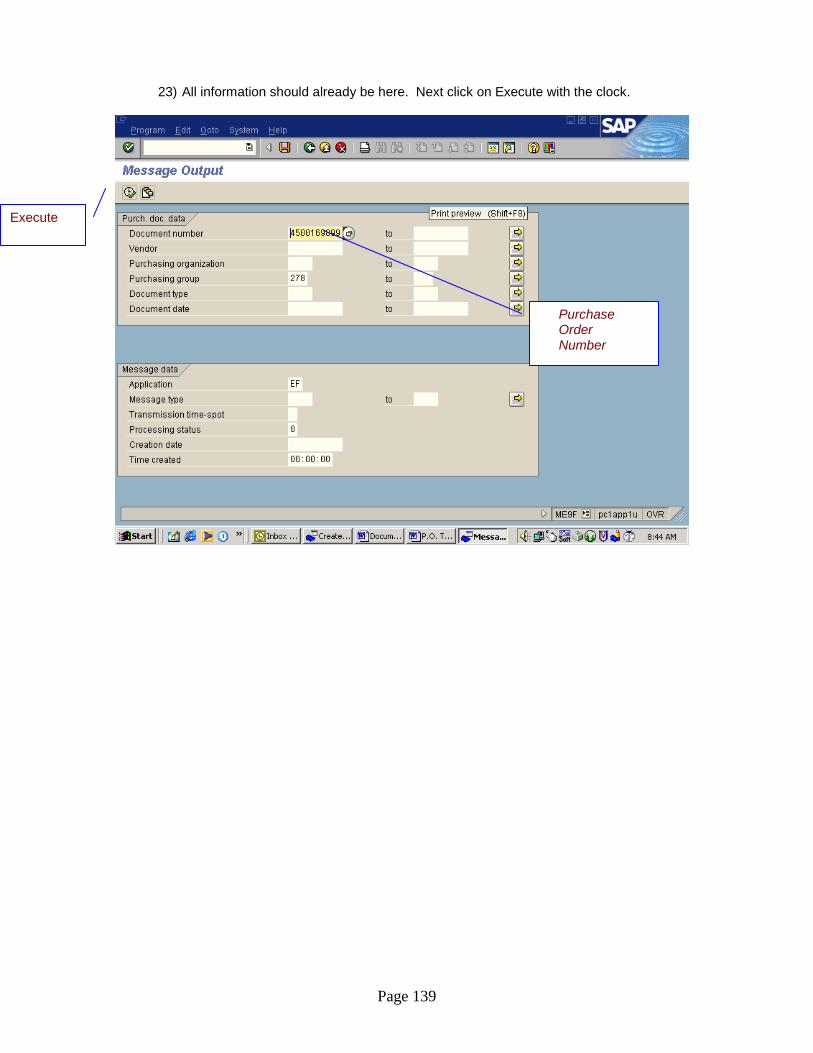
Page 139
23) All information should already be here. Next click on Execute with the clock.
Execute
Purchase Order
Number
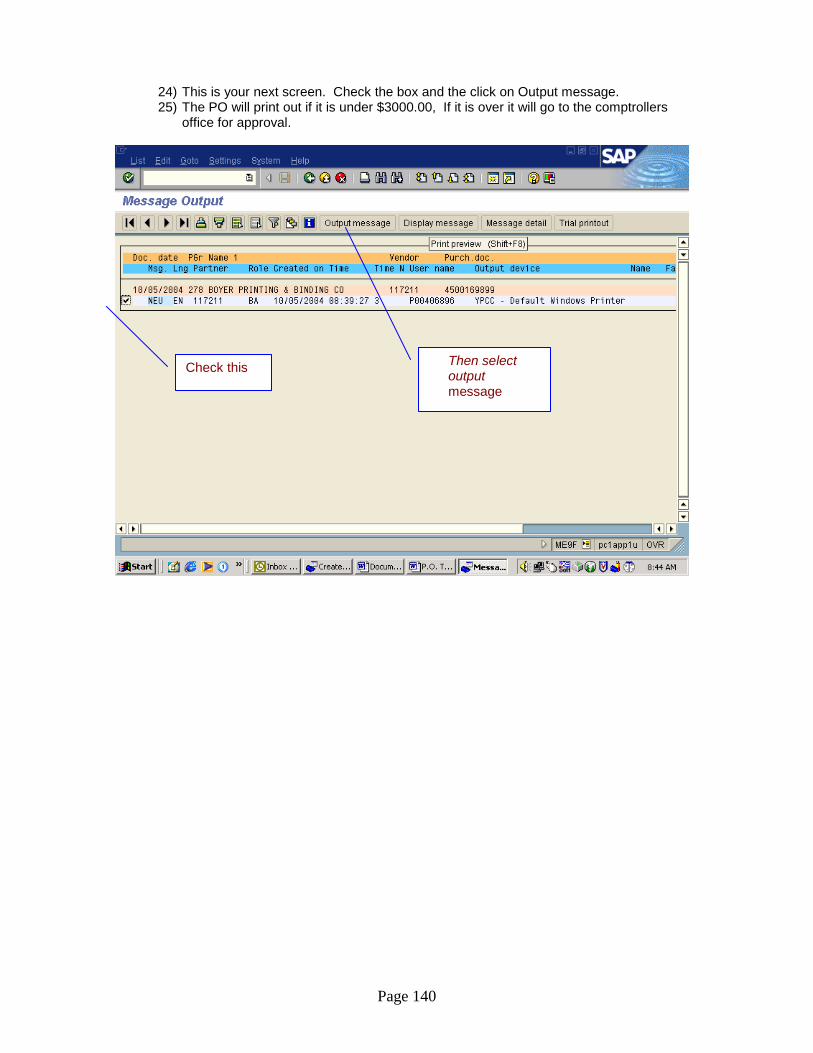
Page 140
24) This is your next screen. Check the box and the click on Output message. 25) The PO will print out if it is under $3000.00, If it is over it will go to the comptrollers
office for approval.
Check this Then select output message

Page 141
26) If your PO is over $3000.00, go to ME23n and take a screen shot of this for in the file until it comes back from comptrollers office approved.
Drop down and select Hardcopy to print screen shot
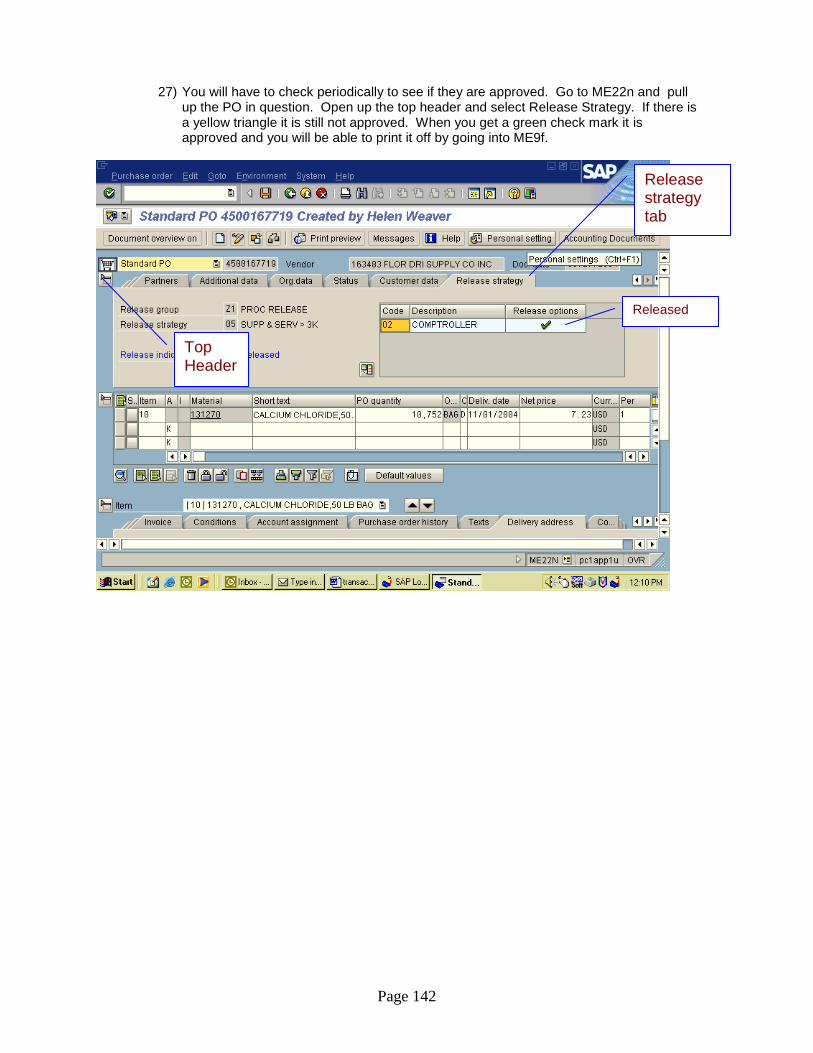
Page 142
27) You will have to check periodically to see if they are approved. Go to ME22n and pull up the PO in question. Open up the top header and select Release Strategy. If there is a yellow triangle it is still not approved. When you get a green check mark it is approved and you will be able to print it off by going into ME9f.
Released
Top Header
Release strategy tab
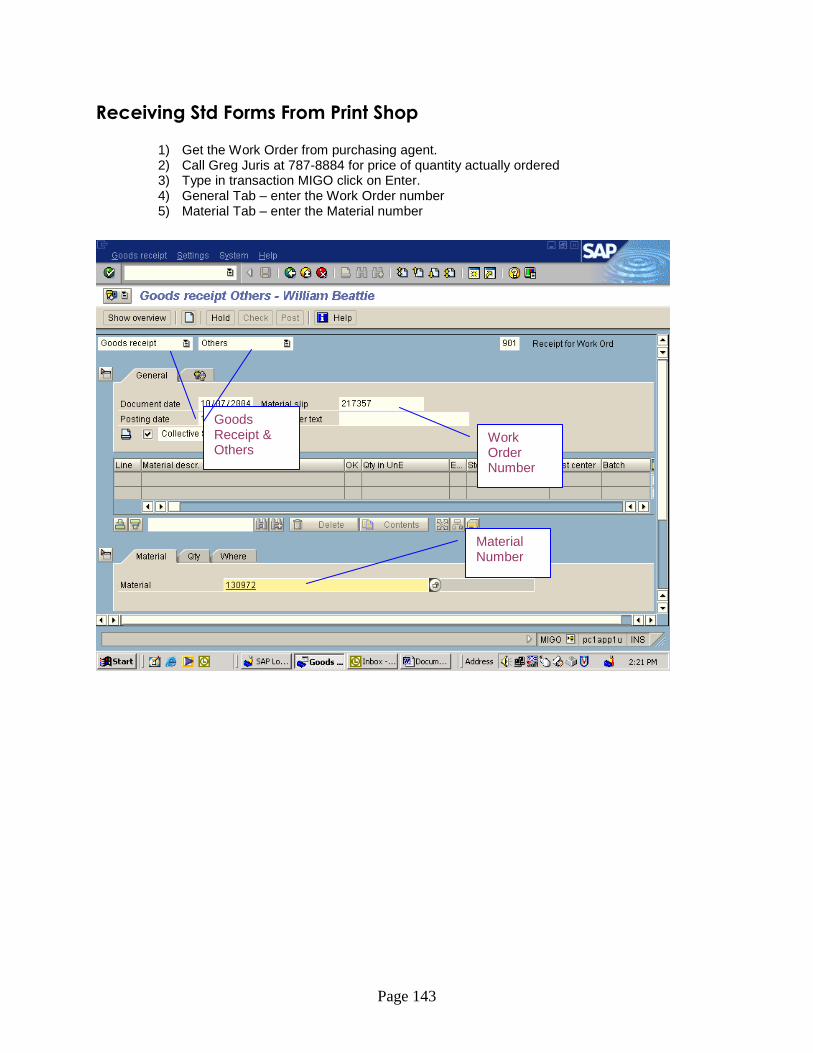
Page 143
Receiving Std Forms From Print Shop
1) Get the Work Order from purchasing agent. 2) Call Greg Juris at 787-8884 for price of quantity actually ordered 3) Type in transaction MIGO click on Enter. 4) General Tab – enter the Work Order number 5) Material Tab – enter the Material number
Material Number
Work Order Number
Goods Receipt & Others
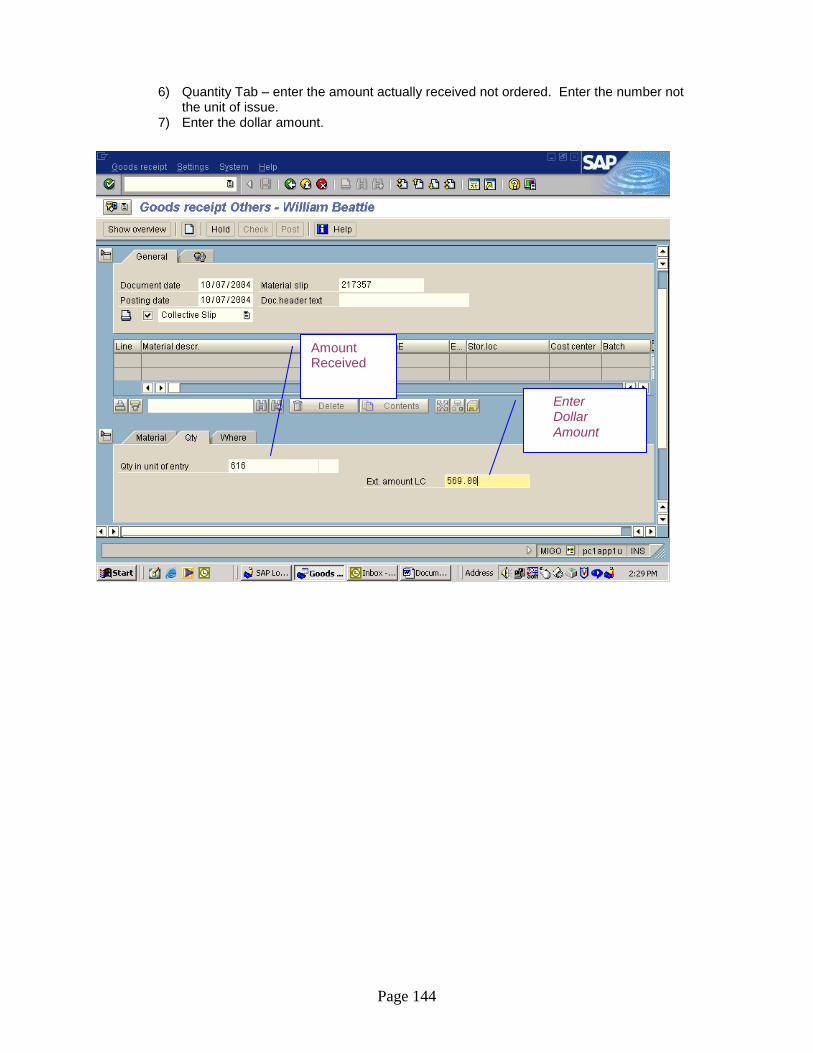
Page 144
6) Quantity Tab – enter the amount actually received not ordered. Enter the number not the unit of issue.
7) Enter the dollar amount.
Amount Received
Enter Dollar Amount
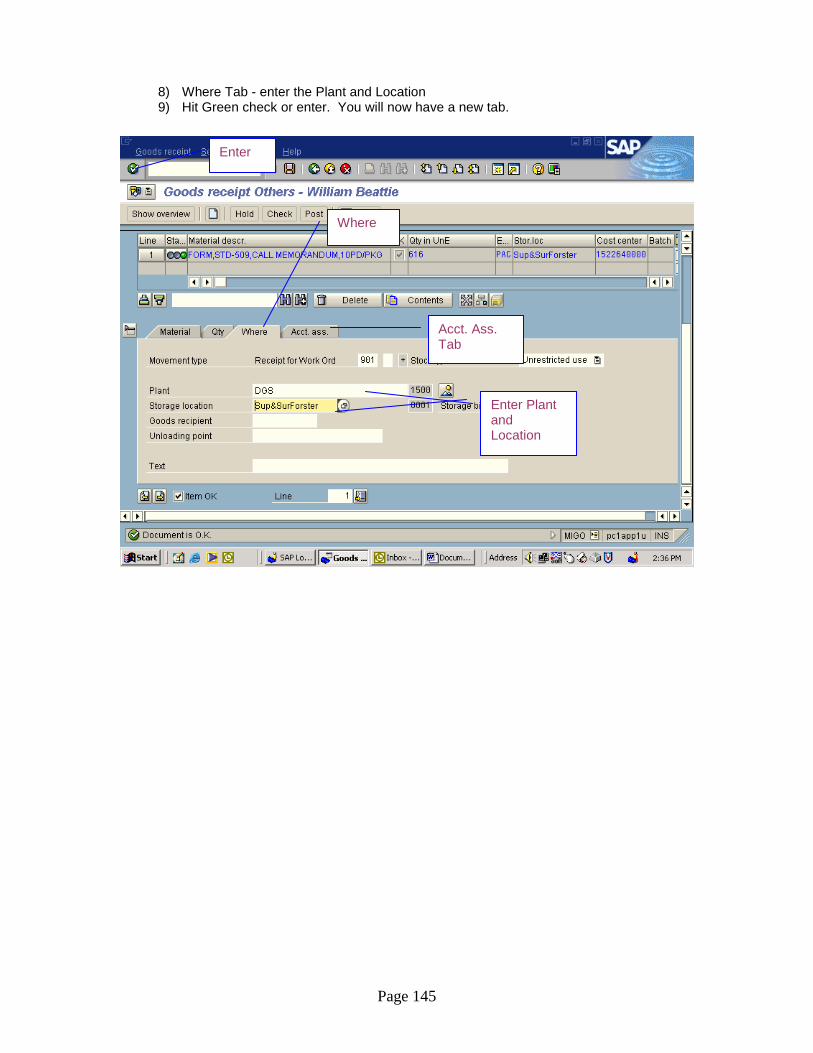
Page 145
8) Where Tab - enter the Plant and Location 9) Hit Green check or enter. You will now have a new tab.
Where
Enter
Acct. Ass. Tab
Enter Plant and Location

Page 146
10) Acct. Ass. Tab – Here you will put your Funds Center, Cost Center and Fund. 11) Make sure the Item OK box is checked. 12) Click on Check. In the lower left corner of your screen you will get a message of
Document OK. If there are any red stops you must correct these before completing. 13) Click on Save. Your Material Document number will be on the lower left of your screen.
In red write the Material Document number, sign and date the Work order and return to Purchasing Agent.
Check Item Ok
Funds Center Cost Center Fund
Material Number will be here
Check
Save

Page 147
Receiving Commodities
1) Type in transaction MIGO and click enter. 2) Type in PO Number and click on enter.
Type in PO number
Enter

Page 148
This is the screen that you will get. 3) On the Qty. tab, enter the amount that was actually received.
Enter the amount received

Page 149
4) Click on the Where tab, here you check to see the if the storage location is correct. If not, change to correct plant.
5) Click Item OK, then click on Check.
Item OK
Check
Storage Location

Page 150
This is the screen that you will get. 6) You can just X out of this. You will get green or yellow light. If you get red stop you
will receive message at the lower left hand corner telling you what needs to be corrected.
X out Yellow Stop
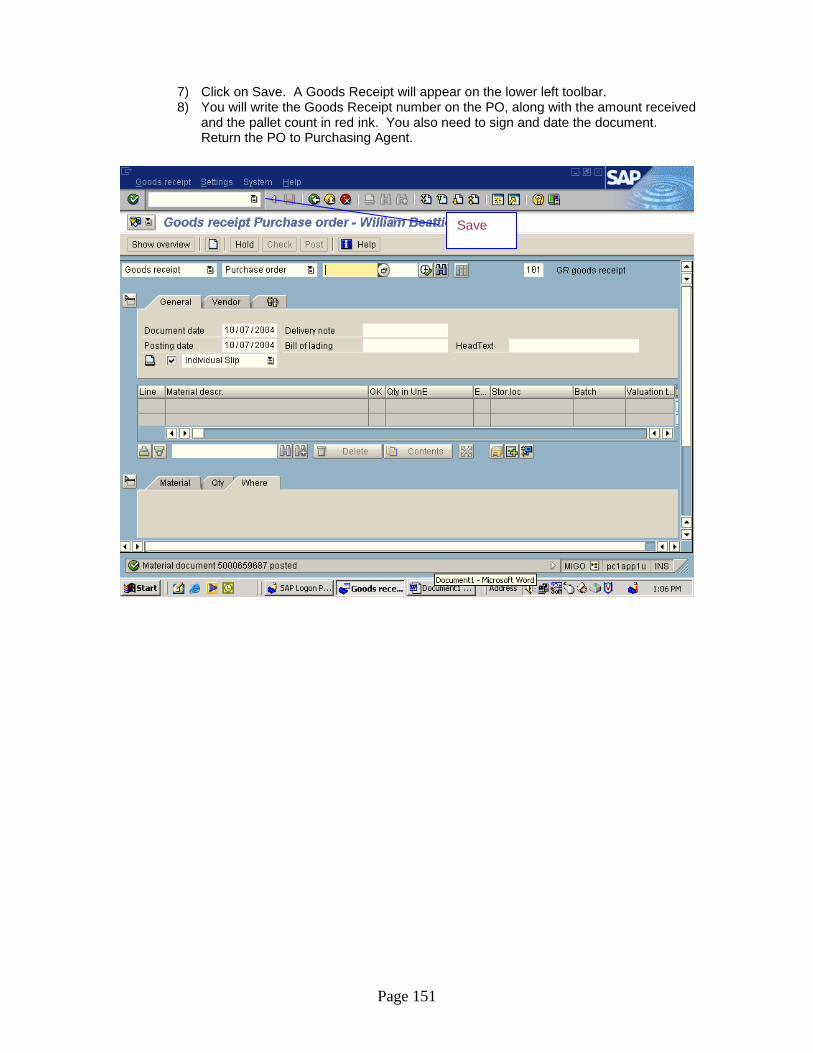
Page 151
7) Click on Save. A Goods Receipt will appear on the lower left toolbar. 8) You will write the Goods Receipt number on the PO, along with the amount received
and the pallet count in red ink. You also need to sign and date the document. Return the PO to Purchasing Agent.
Save
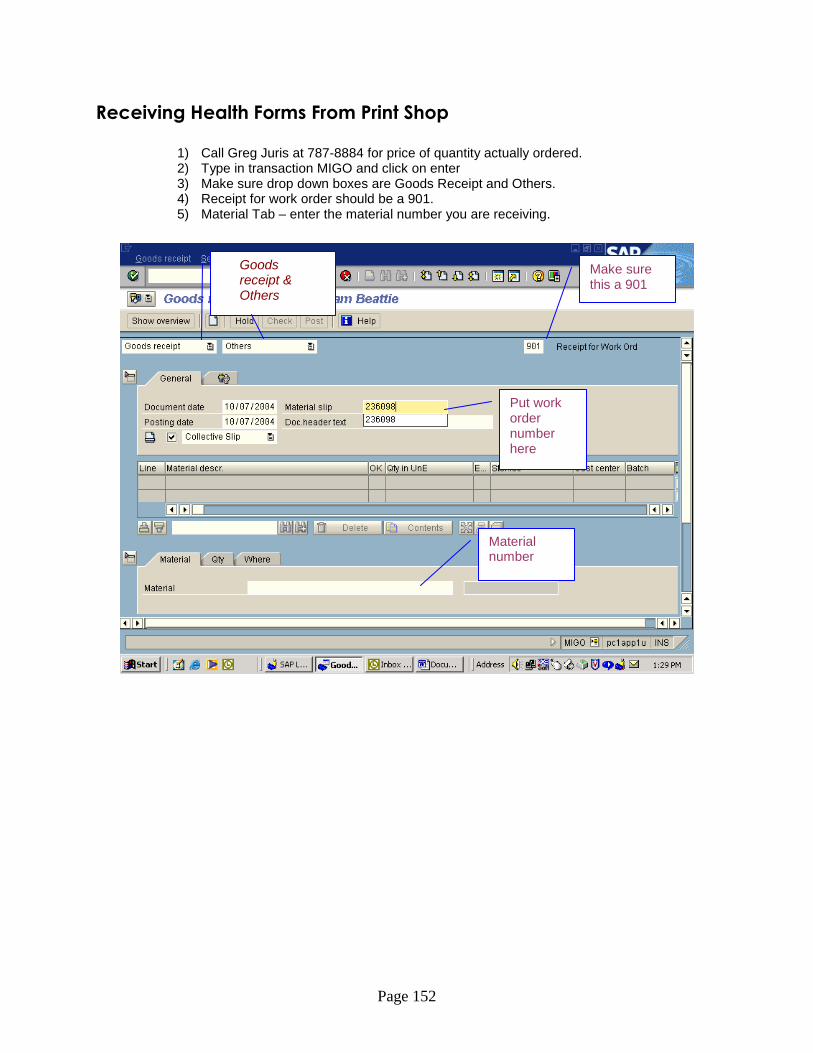
Page 152
Receiving Health Forms From Print Shop
1) Call Greg Juris at 787-8884 for price of quantity actually ordered. 2) Type in transaction MIGO and click on enter 3) Make sure drop down boxes are Goods Receipt and Others. 4) Receipt for work order should be a 901. 5) Material Tab – enter the material number you are receiving.
Goods receipt & Others
Make sure this a 901
Put work order number here
Material number
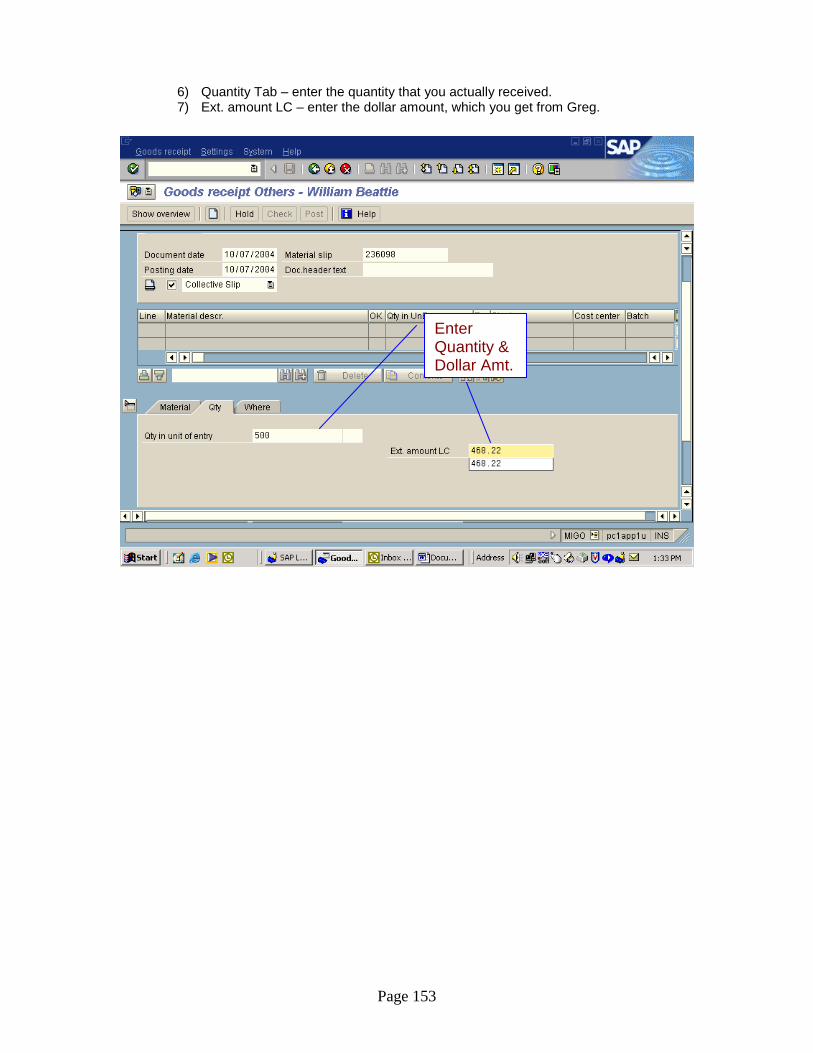
Page 153
6) Quantity Tab – enter the quantity that you actually received. 7) Ext. amount LC – enter the dollar amount, which you get from Greg.
Enter Quantity & Dollar Amt.

Page 154
8) Where Tab – enter the plant number and the storage location. 9) Click on enter.
Plant and Storage Location
Enter
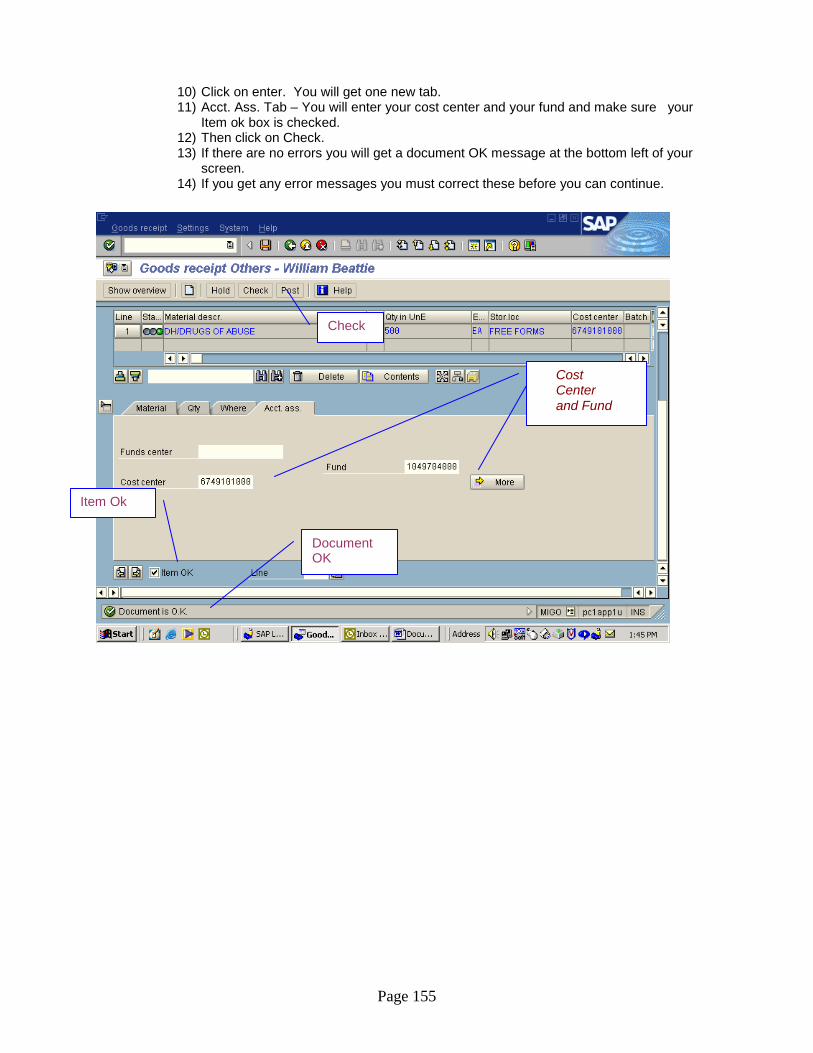
Page 155
10) Click on enter. You will get one new tab. 11) Acct. Ass. Tab – You will enter your cost center and your fund and make sure your
Item ok box is checked. 12) Then click on Check. 13) If there are no errors you will get a document OK message at the bottom left of your
screen. 14) If you get any error messages you must correct these before you can continue.
Cost Center and Fund
Check
Document OK
Item Ok
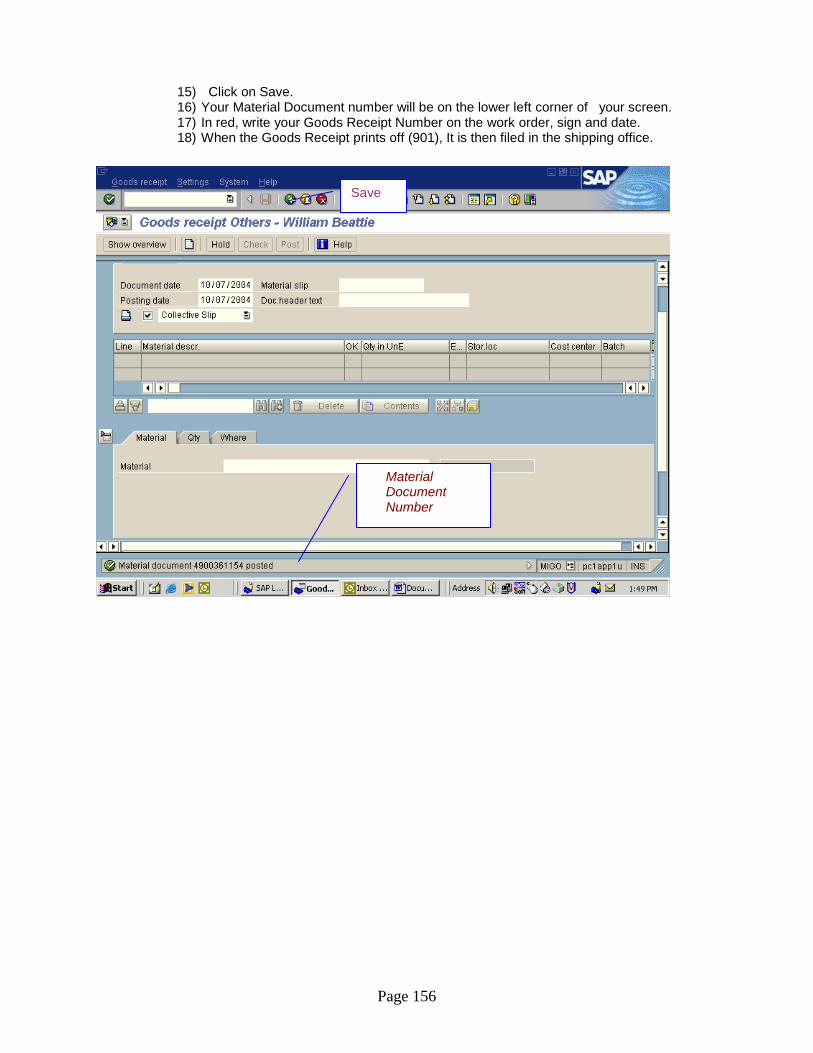
Page 156
15) Click on Save. 16) Your Material Document number will be on the lower left corner of your screen. 17) In red, write your Goods Receipt Number on the work order, sign and date. 18) When the Goods Receipt prints off (901), It is then filed in the shipping office.
Save
Material Document Number

Page 157
Create A Stock Transport Order (Sto)
1) Type in transaction ME21N. 2) Open the top header and put in Purchasing group and Supplying plant.
Purchase Group & Plant No.
Close when done with group & plant

Page 158
3) Close the top header and begin to put the material numbers and quantity amount for order.
Input Material #’s and quantity
Close this header when all material and quantity are input
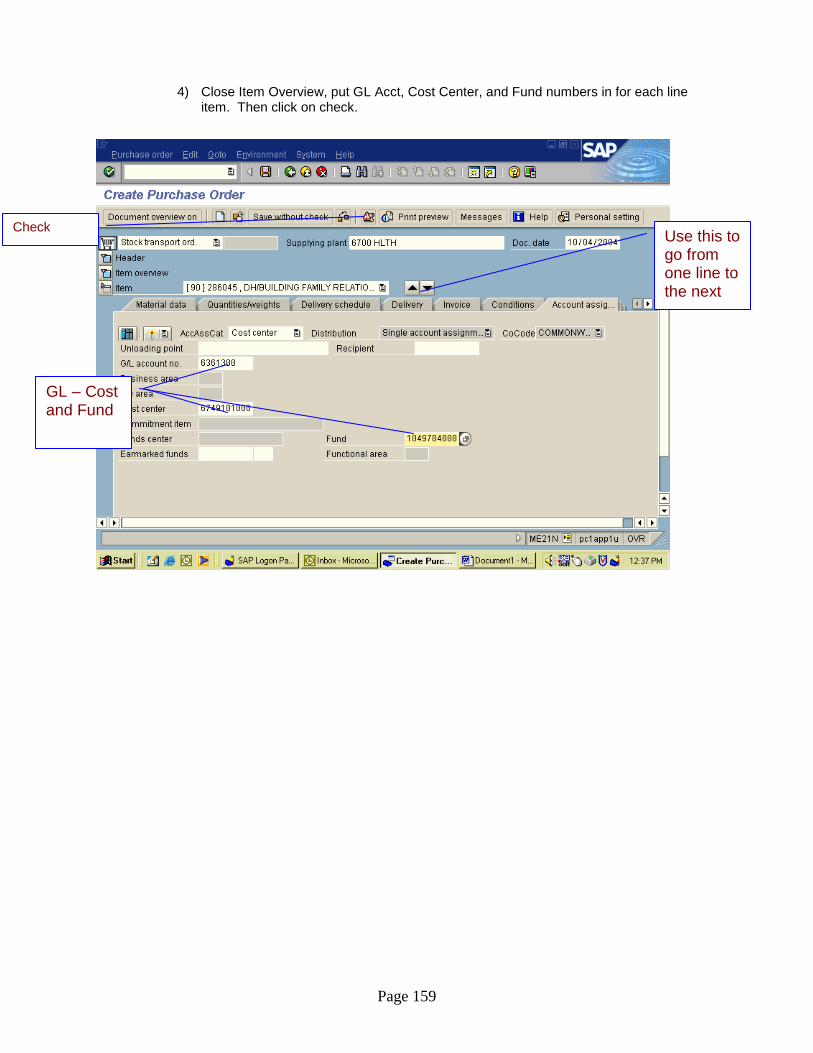
Page 159
4) Close Item Overview, put GL Acct, Cost Center, and Fund numbers in for each line item. Then click on check.
Use this to go from one line to the next
GL – Cost and Fund
Check
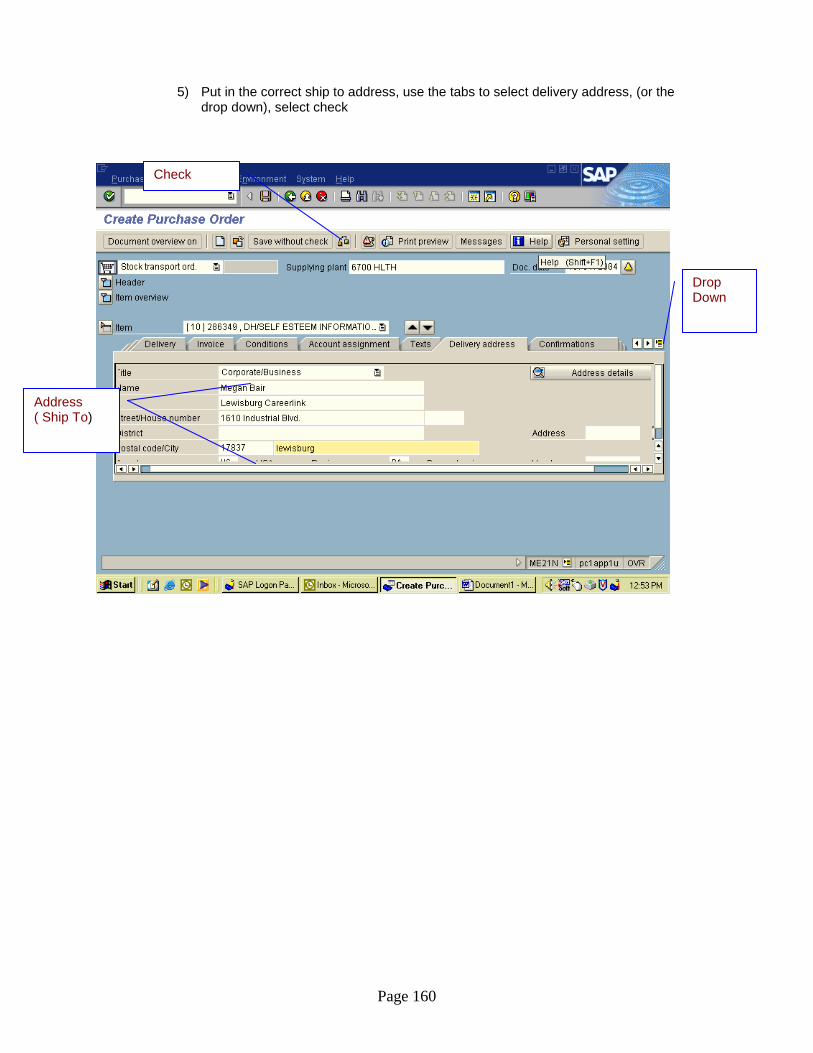
Page 160
5) Put in the correct ship to address, use the tabs to select delivery address, (or the drop down), select check
Drop Down
Address ( Ship To)
Check
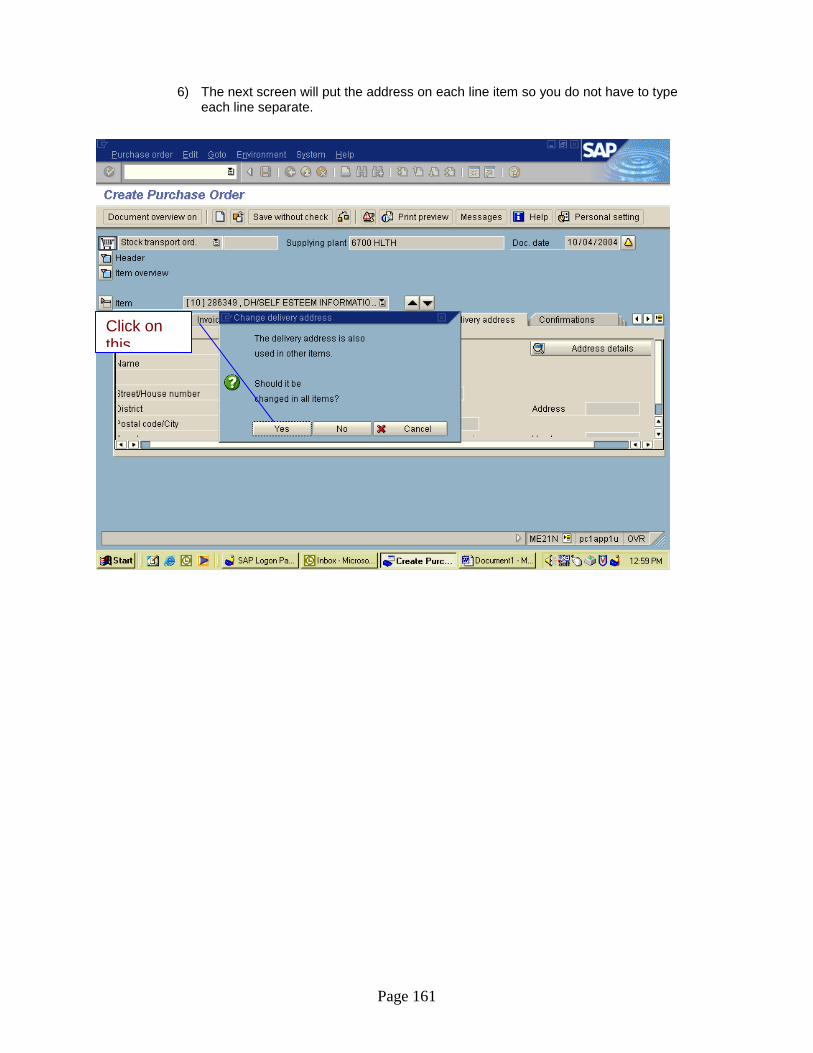
Page 161
6) The next screen will put the address on each line item so you do not have to type each line separate.
Click on this

Page 162
7) The next screen will tell you if you are missing any GL or acct numbers. Just click on the green check
Click on This
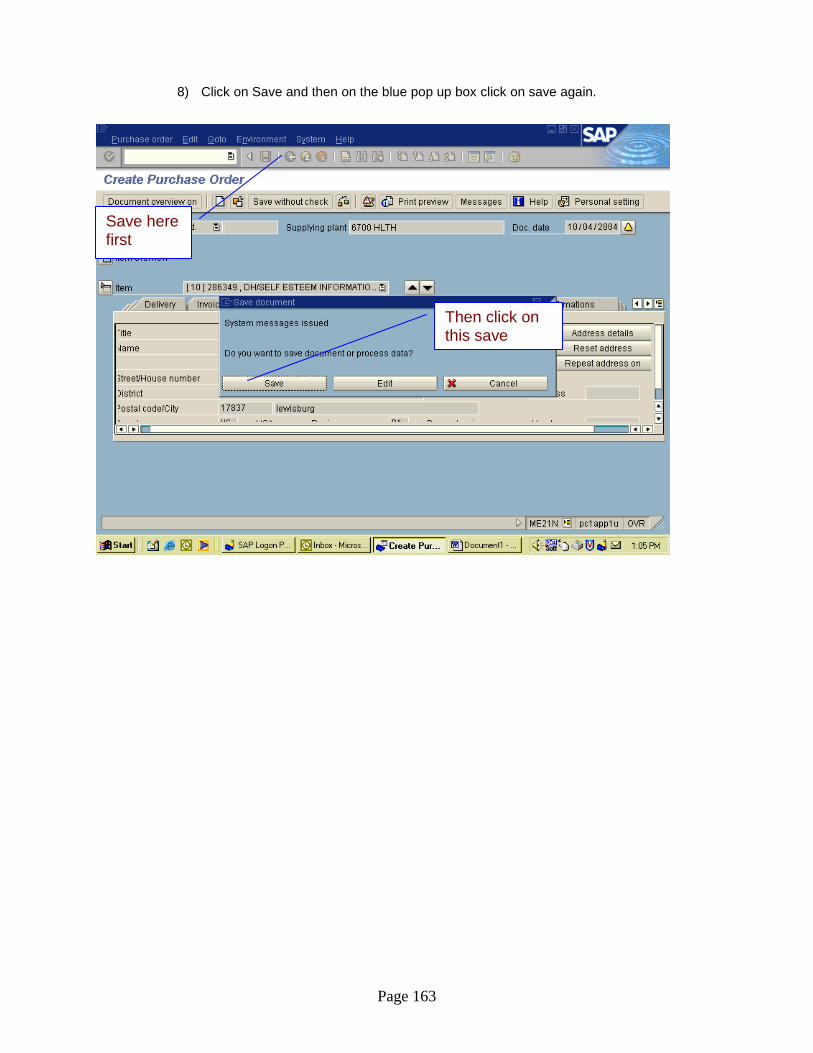
Page 163
8) Click on Save and then on the blue pop up box click on save again.
Save here first
Then click on this save
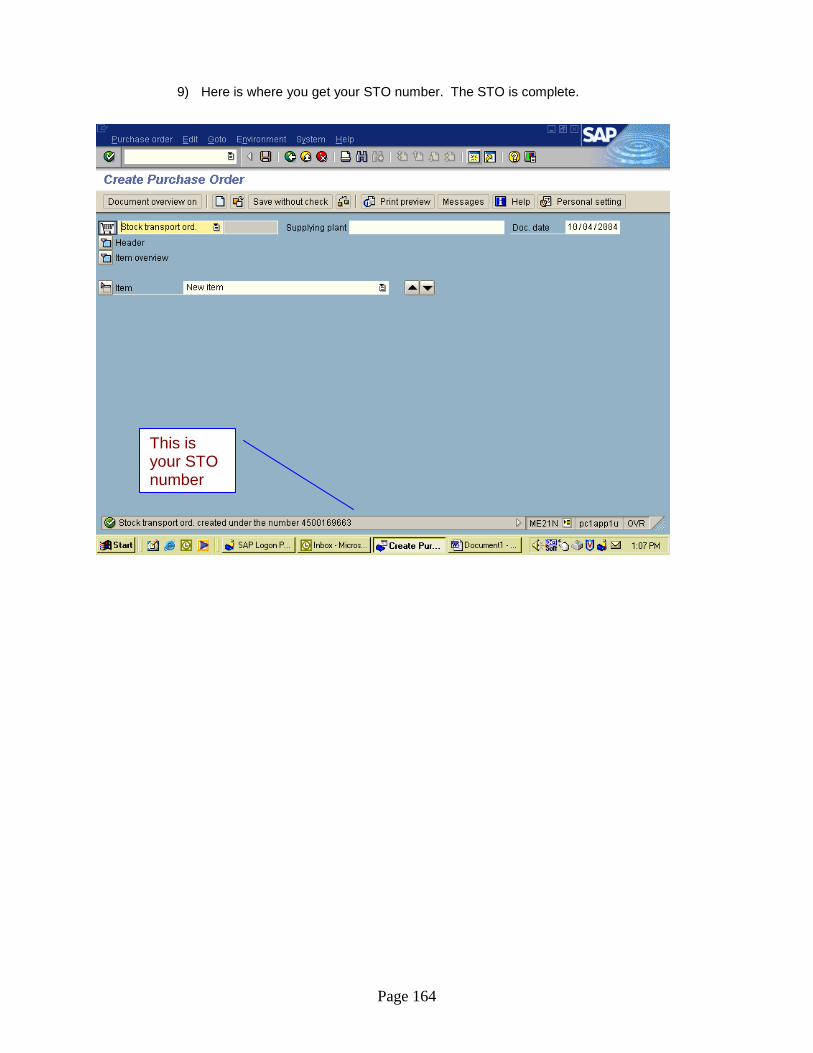
Page 164
9) Here is where you get your STO number. The STO is complete.
This is your STO number
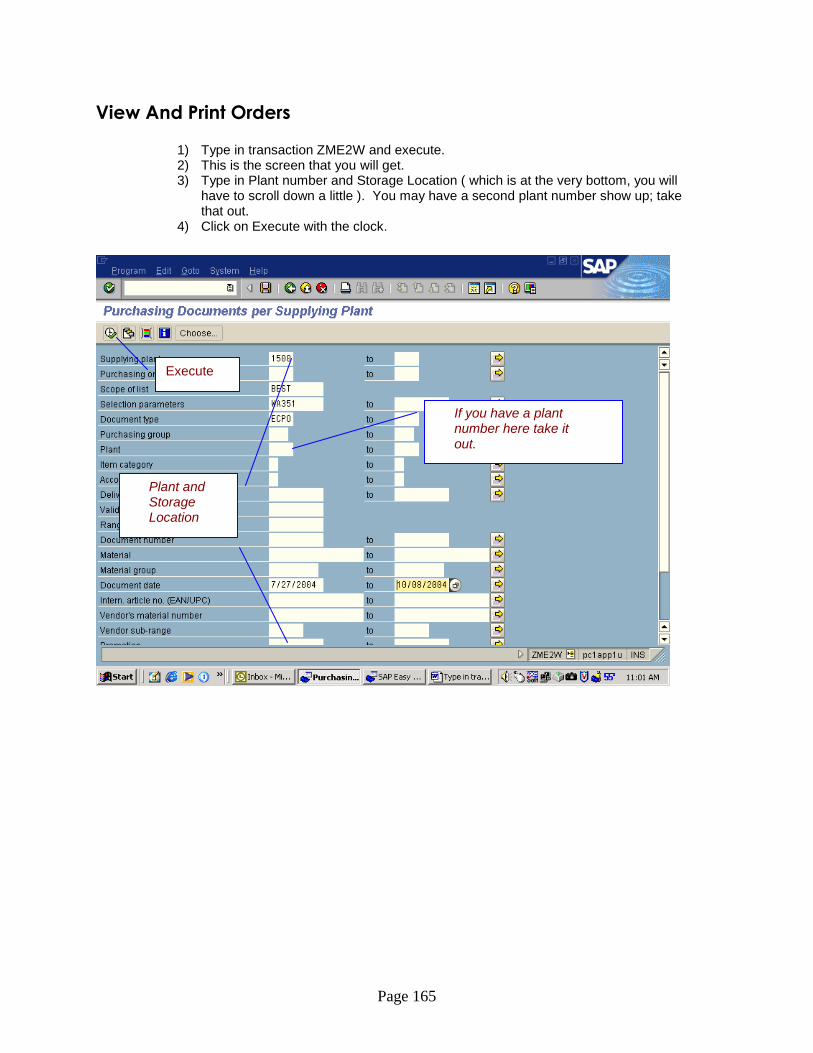
Page 165
View And Print Orders
1) Type in transaction ZME2W and execute. 2) This is the screen that you will get. 3) Type in Plant number and Storage Location ( which is at the very bottom, you will
have to scroll down a little ). You may have a second plant number show up; take that out.
4) Click on Execute with the clock.
Plant and Storage Location
Execute
If you have a plant number here take it out.
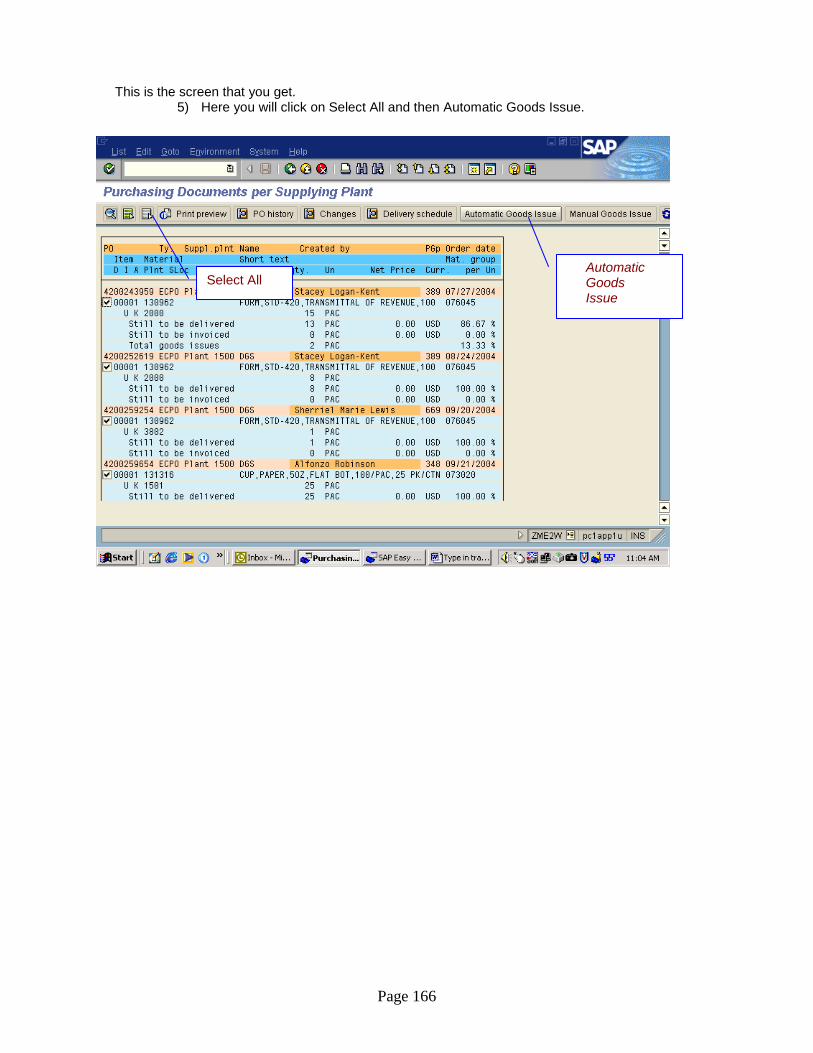
Page 166
This is the screen that you get. 5) Here you will click on Select All and then Automatic Goods Issue.
Select All Automatic Goods Issue
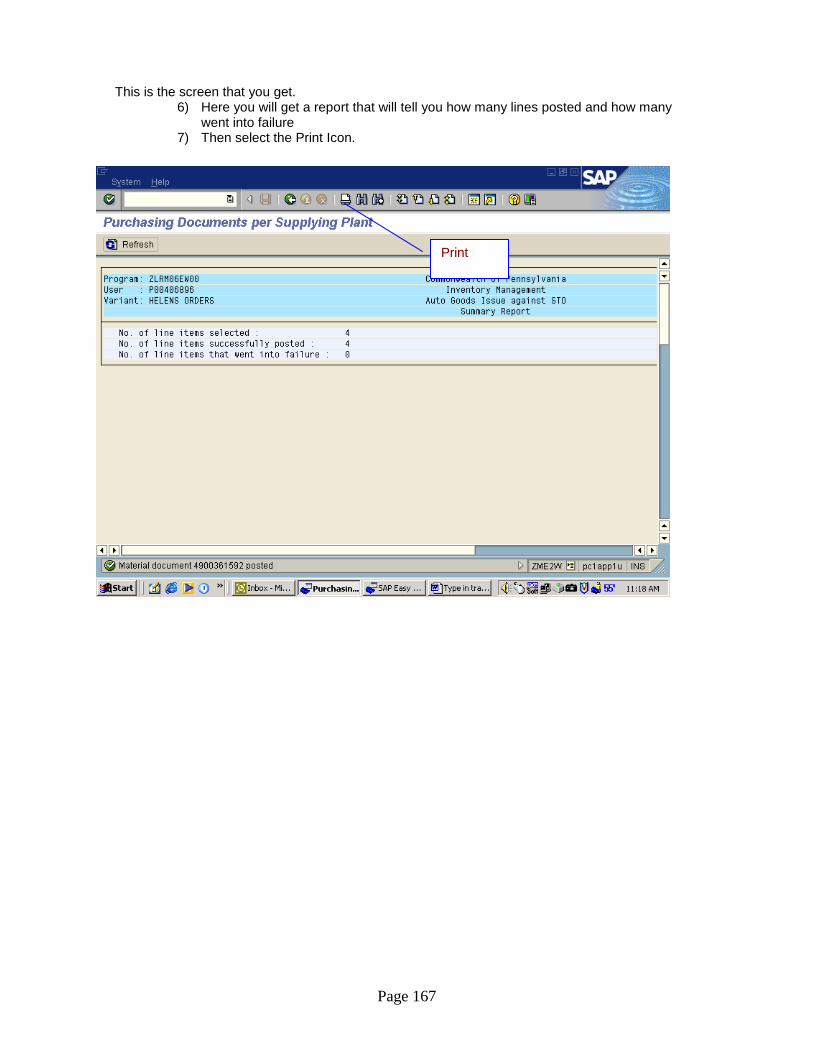
Page 167
This is the screen that you get. 6) Here you will get a report that will tell you how many lines posted and how many
went into failure 7) Then select the Print Icon.
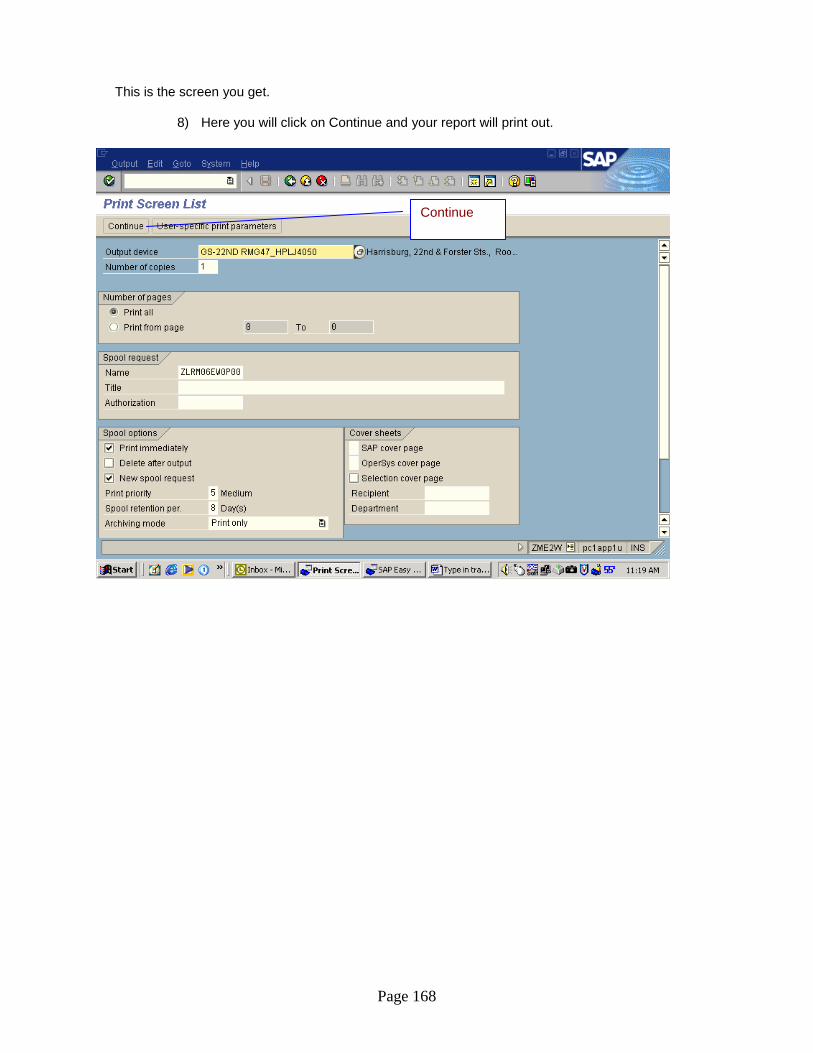
Page 168
This is the screen you get.
8) Here you will click on Continue and your report will print out.
Continue
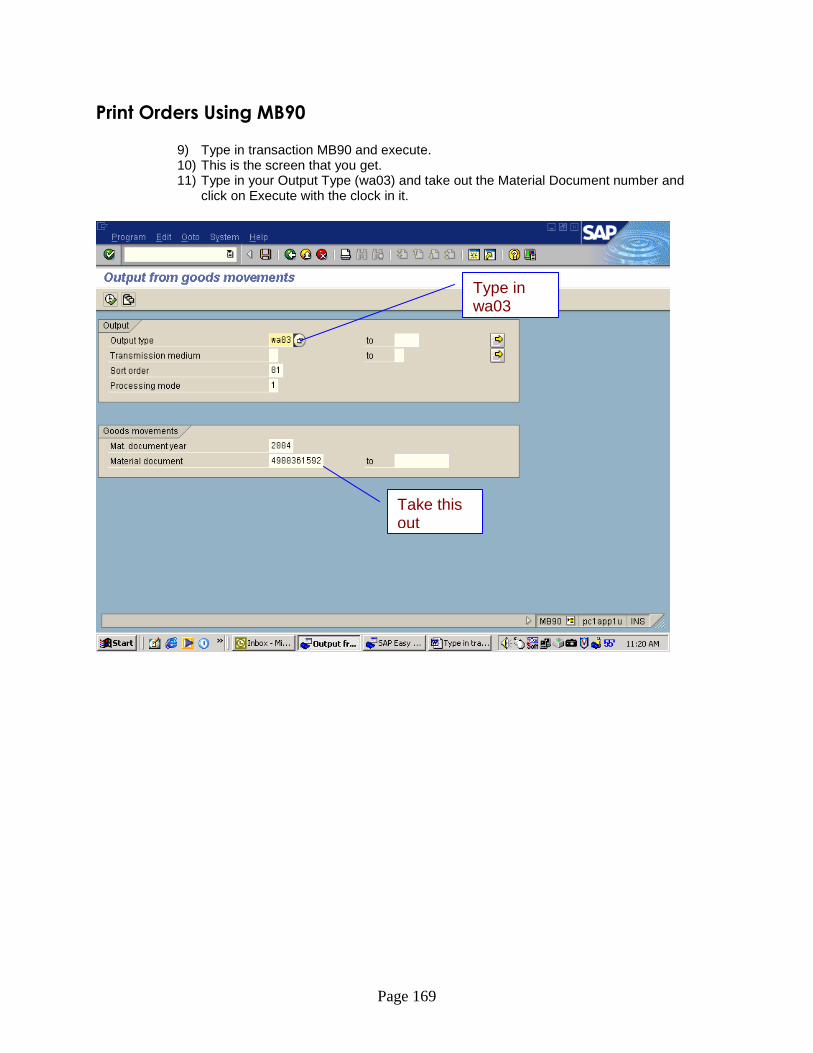
Page 169
Print Orders Using MB90
9) Type in transaction MB90 and execute. 10) This is the screen that you get. 11) Type in your Output Type (wa03) and take out the Material Document number and
click on Execute with the clock in it.
Type in wa03
Take this out
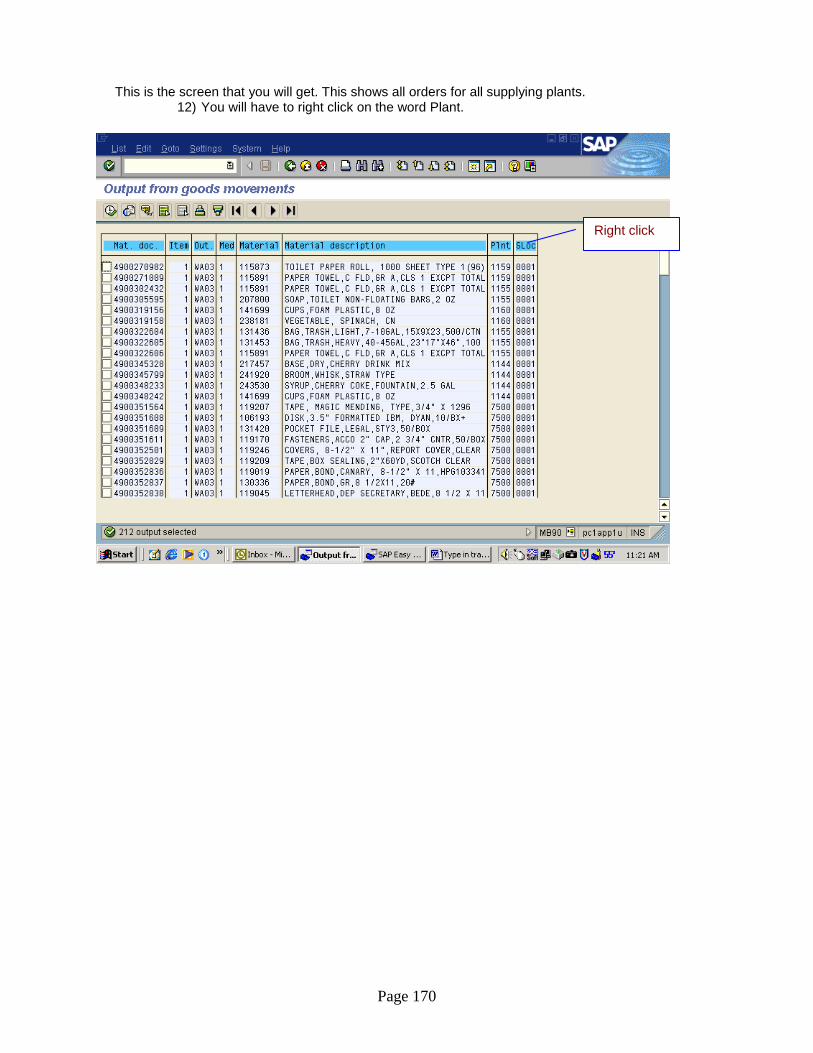
Page 170
This is the screen that you will get. This shows all orders for all supplying plants. 12) You will have to right click on the word Plant.
Right click
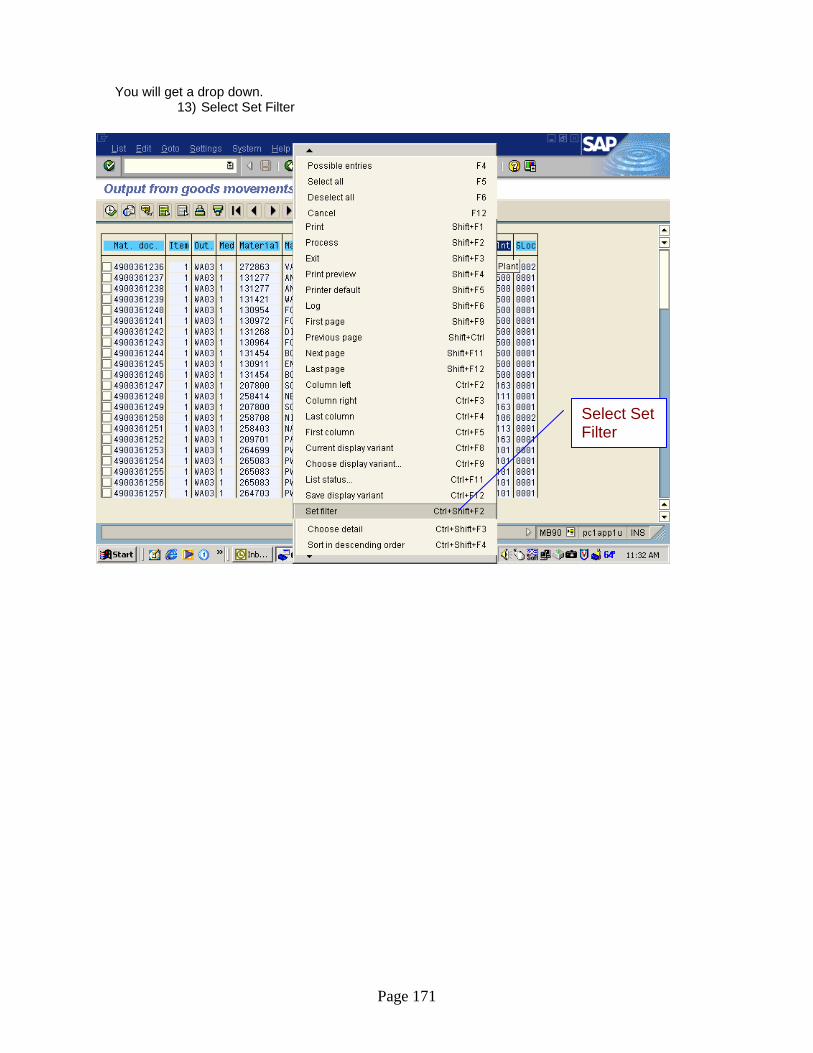
Page 171
You will get a drop down. 13) Select Set Filter
Select Set Filter
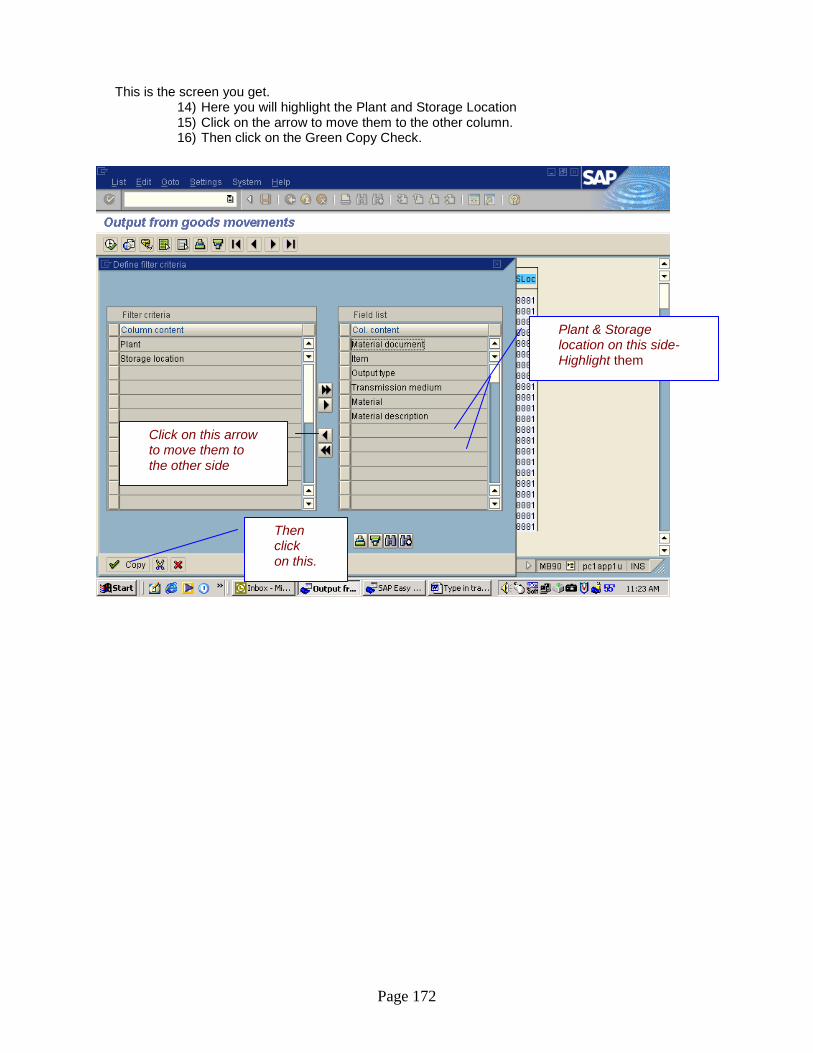
Page 172
This is the screen you get. 14) Here you will highlight the Plant and Storage Location 15) Click on the arrow to move them to the other column. 16) Then click on the Green Copy Check.
Plant & Storage location on this side-Highlight them
Click on this arrow to move them to the other side
Then click on this.
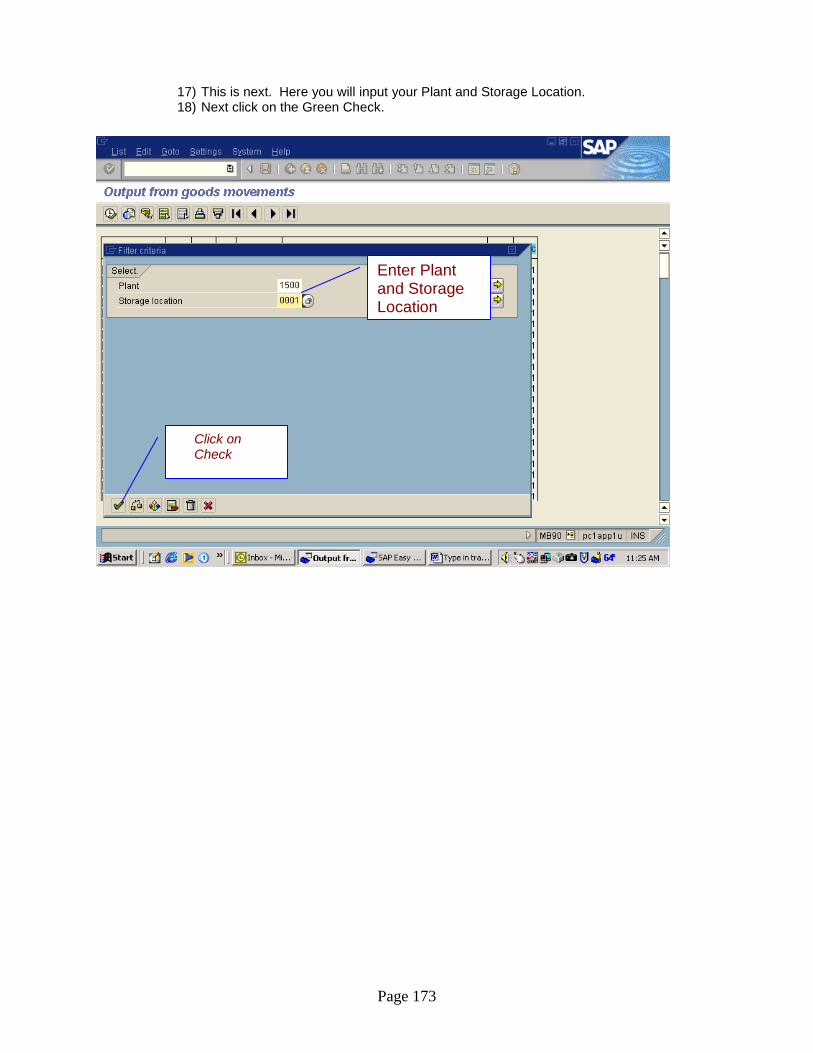
Page 173
17) This is next. Here you will input your Plant and Storage Location. 18) Next click on the Green Check.
Enter Plant and Storage Location
Click on Check

Page 174
This is the screen you get. 19) Here you will click on the Print Icon – this will print out a report of the orders you are
posting. 20) Next you will click on Select All and then execute. This will print your orders out of
the system.
Select All
Execute

Page 175
Print Orders Using ZMMPPS
Change Collective Box
You will only need to use this if you are going to use ZMMPPS to print orders.
1) You will need to go to MIGO.
Type in
MIGO
Execute
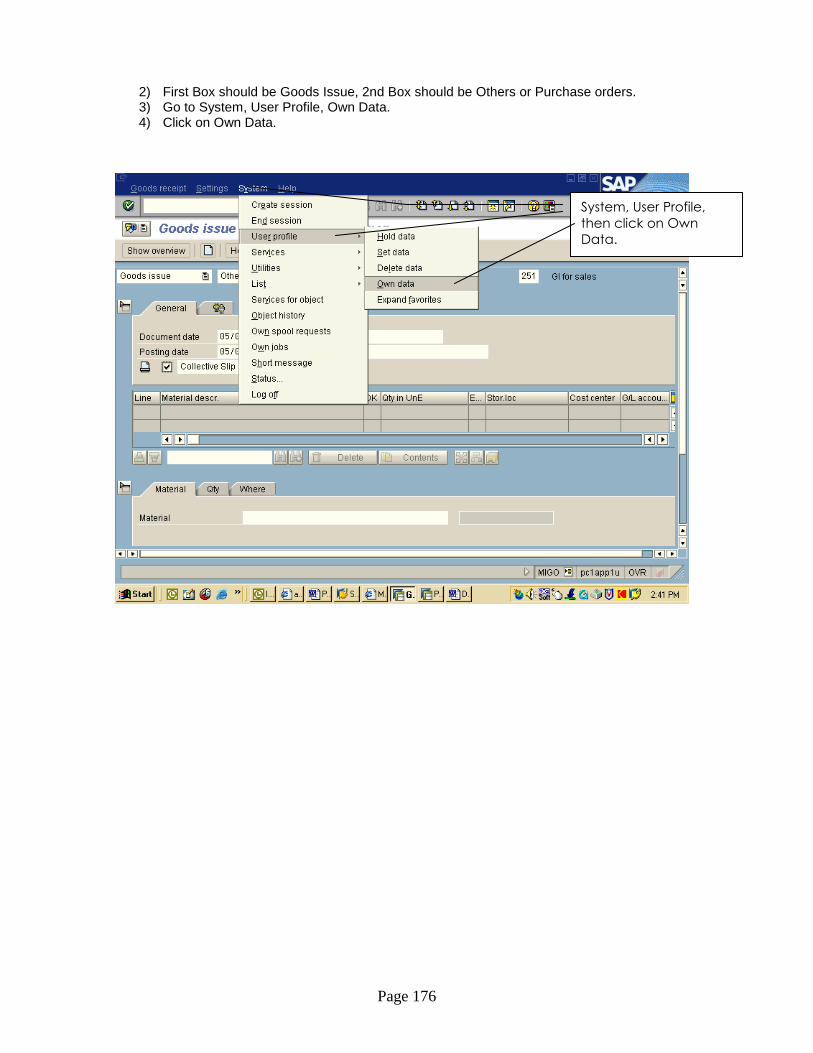
Page 176
2) First Box should be Goods Issue, 2nd Box should be Others or Purchase orders. 3) Go to System, User Profile, Own Data. 4) Click on Own Data.
System, User Profile,
then click on Own
Data.
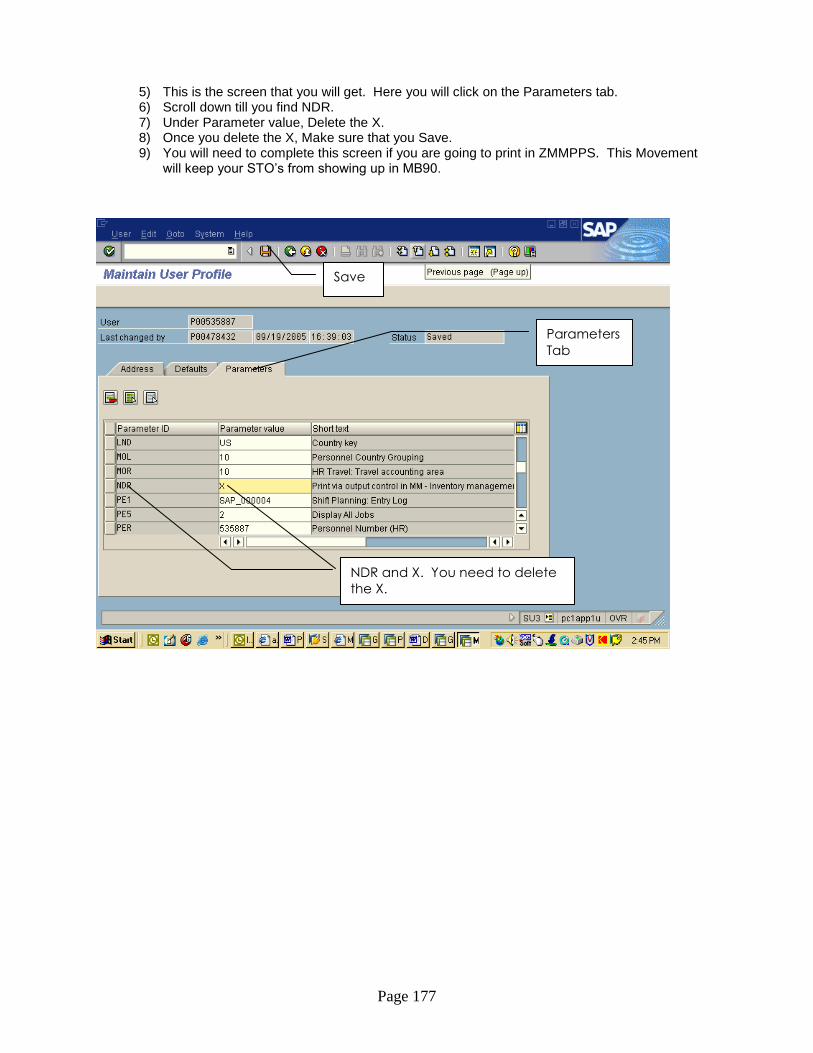
Page 177
5) This is the screen that you will get. Here you will click on the Parameters tab. 6) Scroll down till you find NDR. 7) Under Parameter value, Delete the X. 8) Once you delete the X, Make sure that you Save. 9) You will need to complete this screen if you are going to print in ZMMPPS. This Movement
will keep your STO’s from showing up in MB90.
Parameters
Tab
NDR and X. You need to delete
the X.
Save
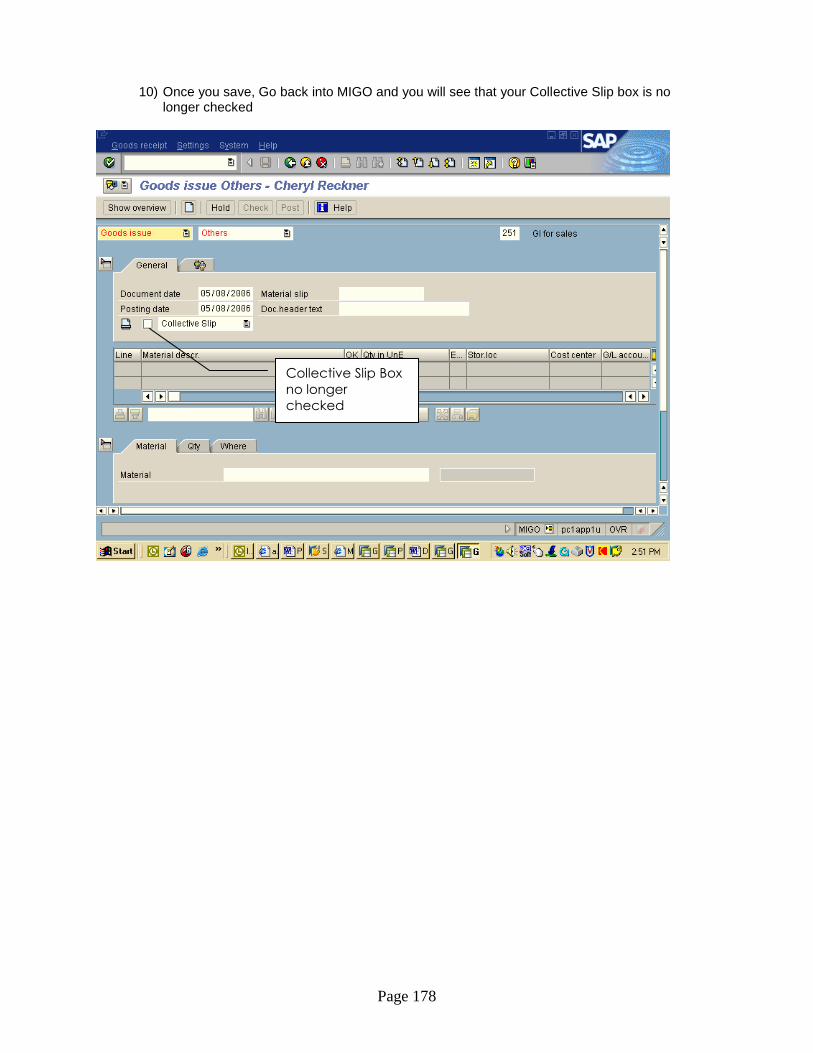
Page 178
10) Once you save, Go back into MIGO and you will see that your Collective Slip box is no longer checked
Collective Slip Box
no longer
checked
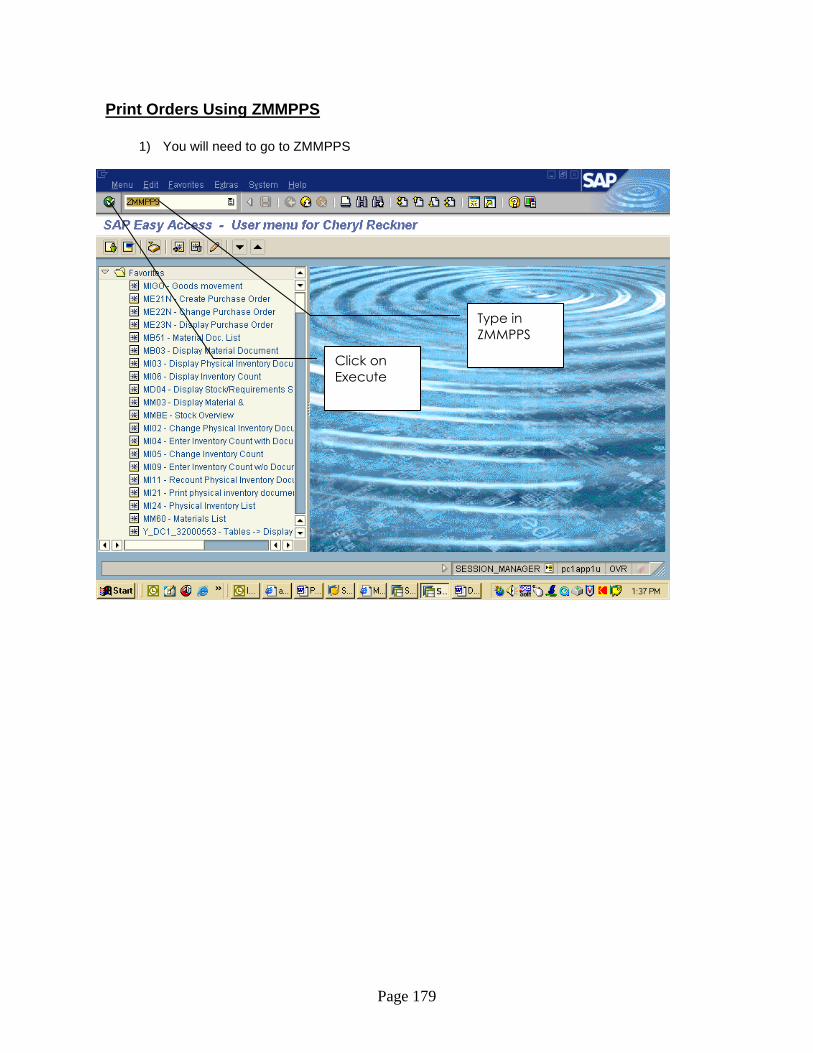
Page 179
Print Orders Using ZMMPPS
1) You will need to go to ZMMPPS
Type in
ZMMPPS
Click on
Execute

Page 180
2) This is the screen you will get. 3) The Goods Issue Date will be there( the current date ) 4) Type in Supplying Plant and Storage Location 5) Type in Goods Issue Numbers ( From and To ) 6) Example: 4500325698 to 4500325705 7) Click Execute 8) You will get a message at bottom that says “Printing will begin”
Current date should be
already there. Type in
Supplying Plant, Storage
location and Goods
Issue Numbers that you
are going to print. Execute
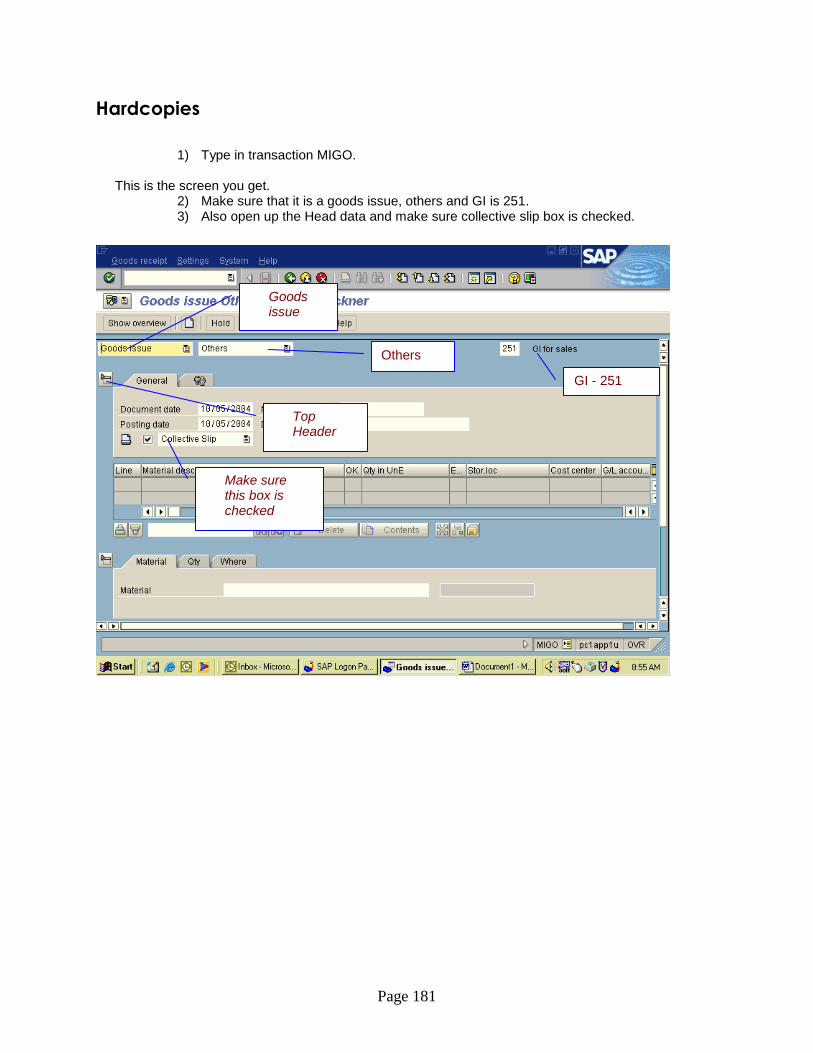
Page 181
Hardcopies
1) Type in transaction MIGO.
This is the screen you get.
2) Make sure that it is a goods issue, others and GI is 251. 3) Also open up the Head data and make sure collective slip box is checked.
Make sure this box is checked
Goods issue
Others
GI - 251
Top Header
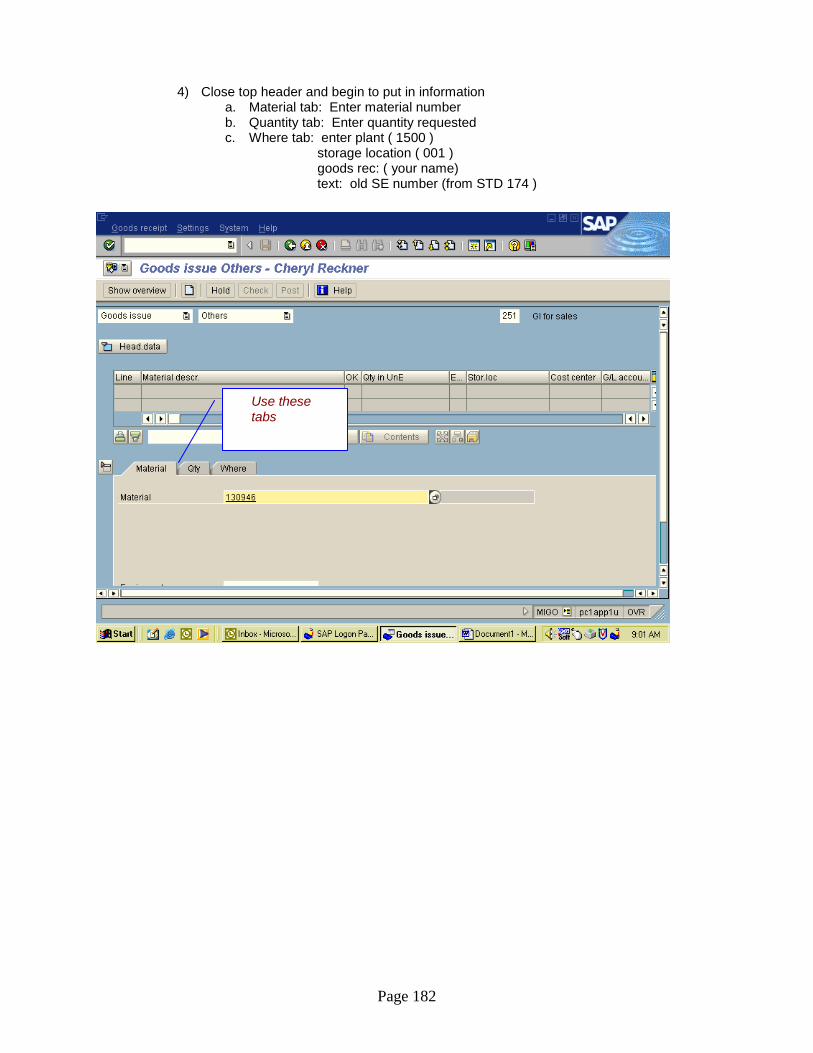
Page 182
4) Close top header and begin to put in information a. Material tab: Enter material number b. Quantity tab: Enter quantity requested c. Where tab: enter plant ( 1500 ) storage location ( 001 ) goods rec: ( your name) text: old SE number (from STD 174 )
Use these tabs

Page 183
5) Hit enter and two new tabs appear d. Partner tab: enter customer number ( you get this from list) e. Account tab: GL – 5104000
Cost Center – 1522640266 Fund: 5000904001( the 4 changes with the current year )
Two new tabs
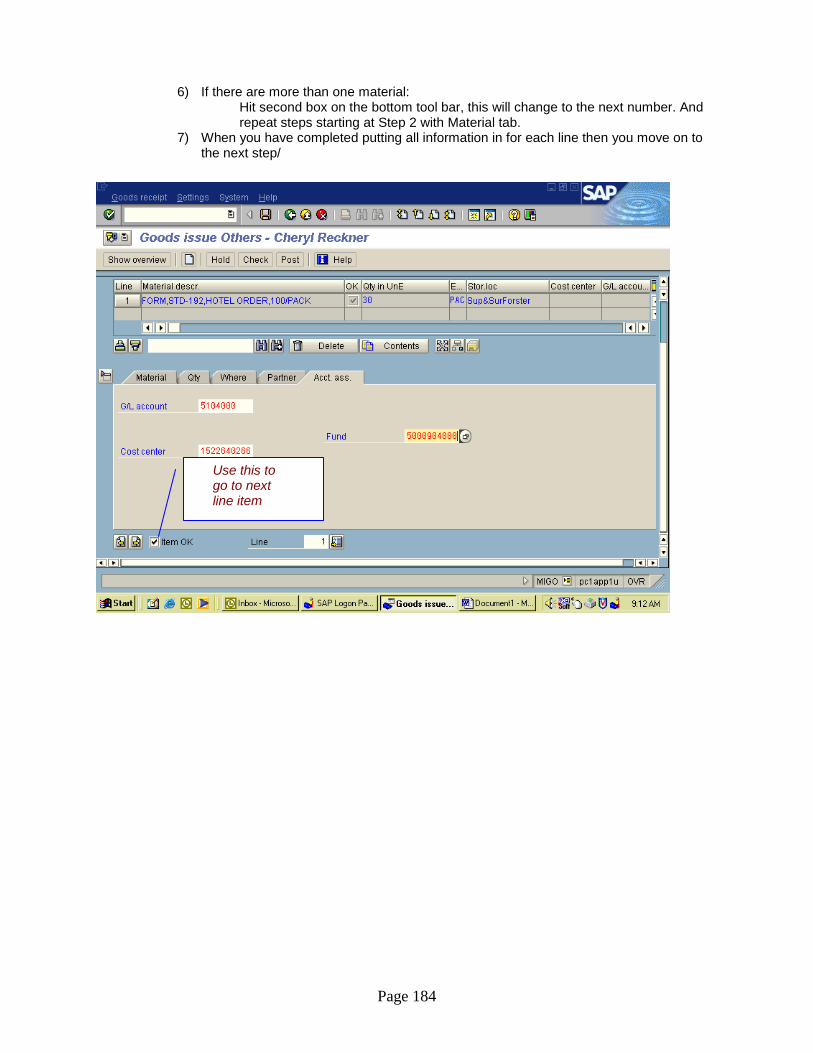
Page 184
6) If there are more than one material: Hit second box on the bottom tool bar, this will change to the next number. And repeat steps starting at Step 2 with Material tab.
7) When you have completed putting all information in for each line then you move on to the next step/
Use this to go to next line item
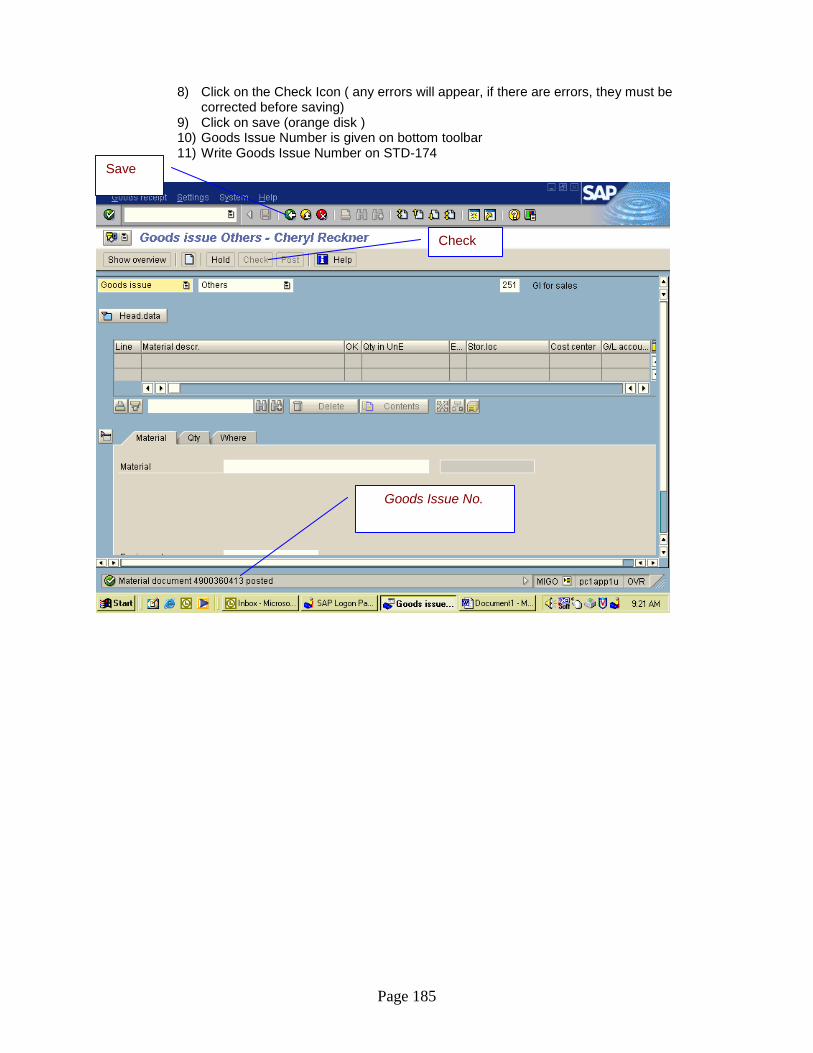
Page 185
8) Click on the Check Icon ( any errors will appear, if there are errors, they must be corrected before saving)
9) Click on save (orange disk ) 10) Goods Issue Number is given on bottom toolbar 11) Write Goods Issue Number on STD-174
Check
Save
Goods Issue No.

Page 186
Print goods Issue in ZMMPPS For Hardcopies
1) You will need to go to ZMMPPS
Type in
ZMMPPS
Click on
Execute
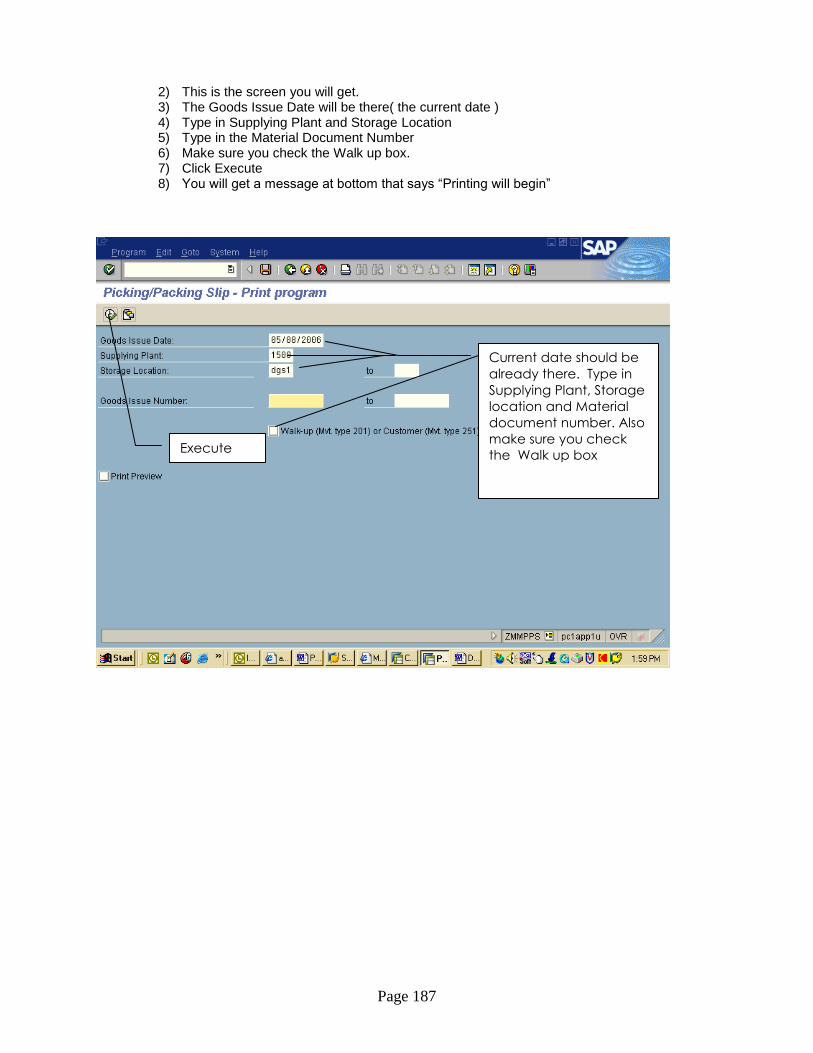
Page 187
2) This is the screen you will get. 3) The Goods Issue Date will be there( the current date ) 4) Type in Supplying Plant and Storage Location 5) Type in the Material Document Number 6) Make sure you check the Walk up box. 7) Click Execute 8) You will get a message at bottom that says “Printing will begin”
Current date should be
already there. Type in
Supplying Plant, Storage
location and Material
document number. Also
make sure you check
the Walk up box Execute
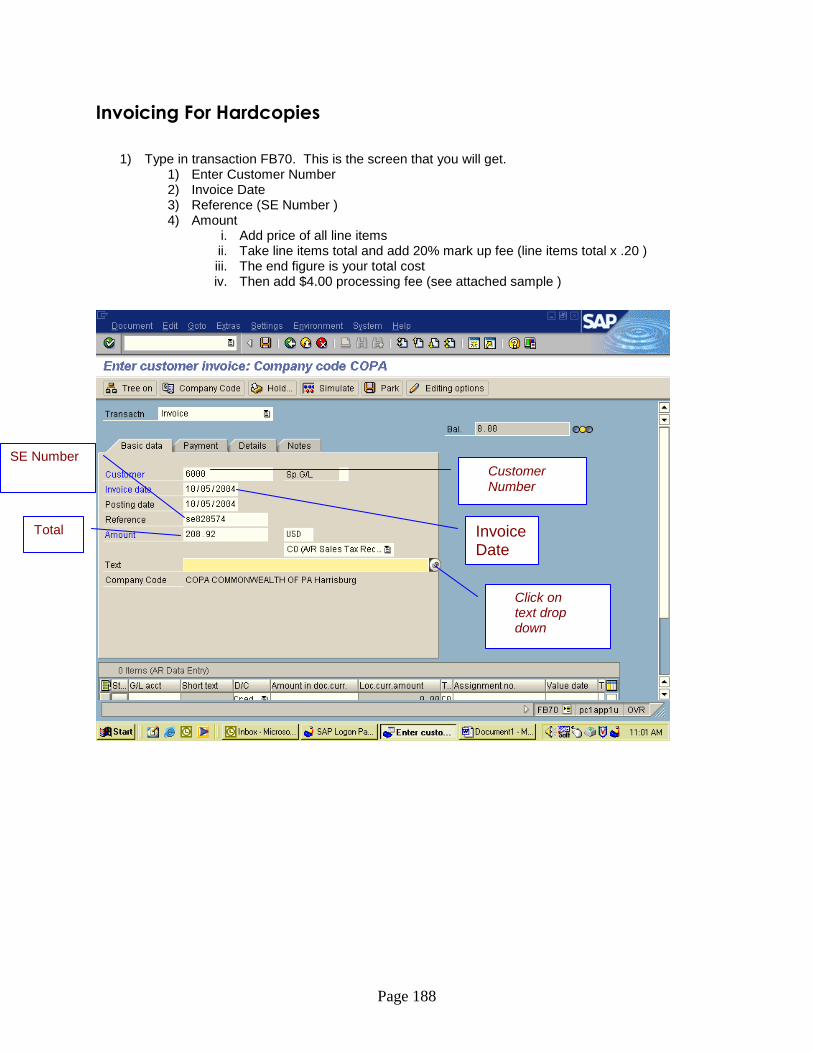
Page 188
Invoicing For Hardcopies
1) Type in transaction FB70. This is the screen that you will get.
1) Enter Customer Number 2) Invoice Date 3) Reference (SE Number ) 4) Amount
i. Add price of all line items ii. Take line items total and add 20% mark up fee (line items total x .20 ) iii. The end figure is your total cost iv. Then add $4.00 processing fee (see attached sample )
Customer Number
Invoice Date
SE Number
Total
Click on text drop down
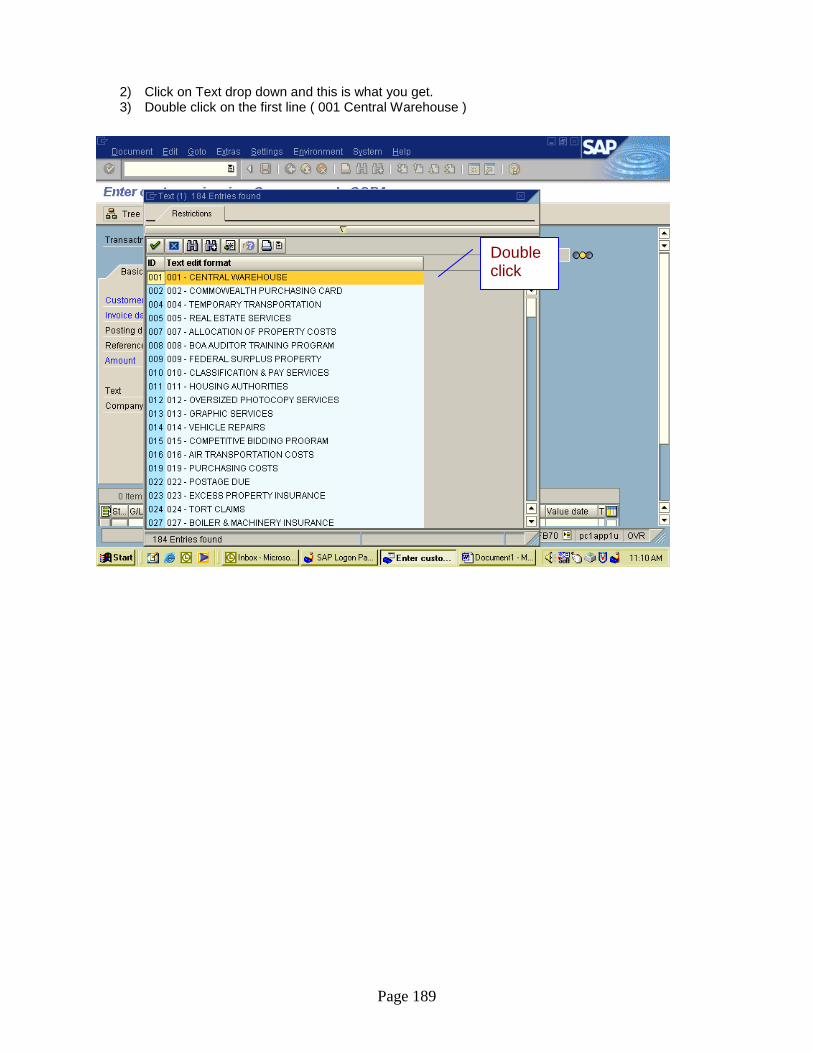
Page 189
2) Click on Text drop down and this is what you get. 3) Double click on the first line ( 001 Central Warehouse )
Double click

Page 190
4) This is the screen you get next. Click on Tree on.
Tree on
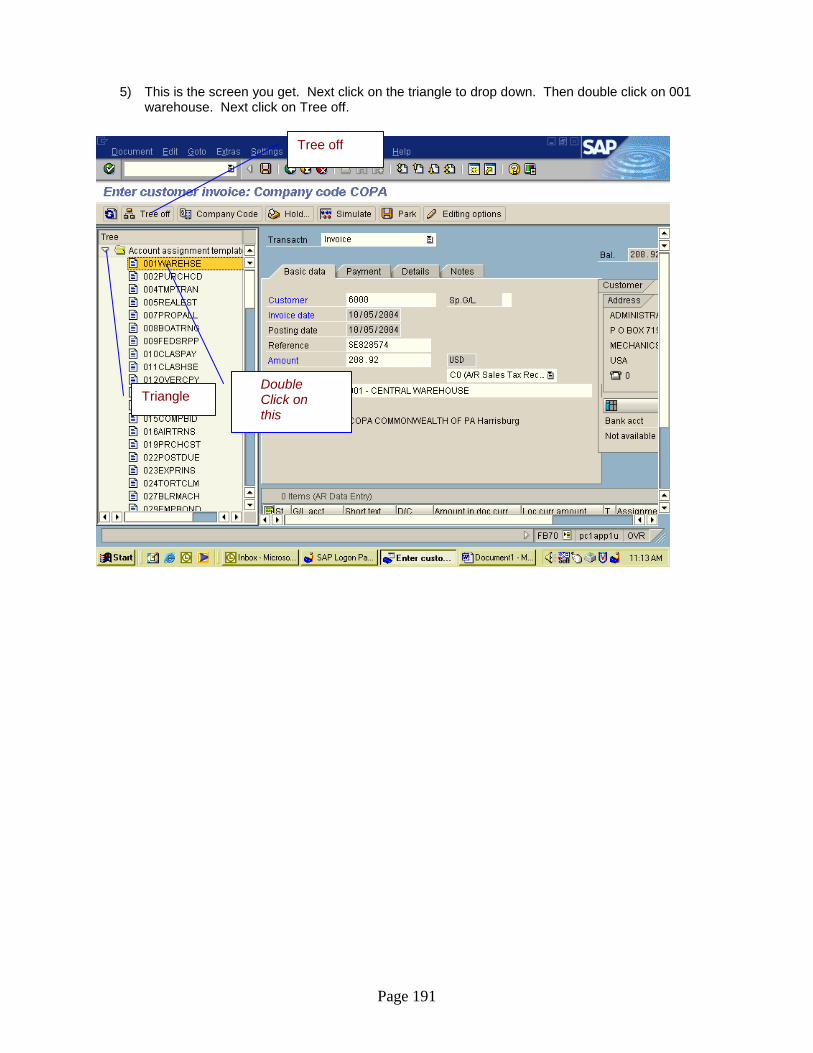
Page 191
5) This is the screen you get. Next click on the triangle to drop down. Then double click on 001 warehouse. Next click on Tree off.
Tree off
Triangle Double Click on this

Page 192
6) This is your next screen. Put your total amount in the Amount of currency column. Make sure it says credit. Then select save. Your invoice will be on the lower left.
Total Amount
Invoice Number
Credit
Save
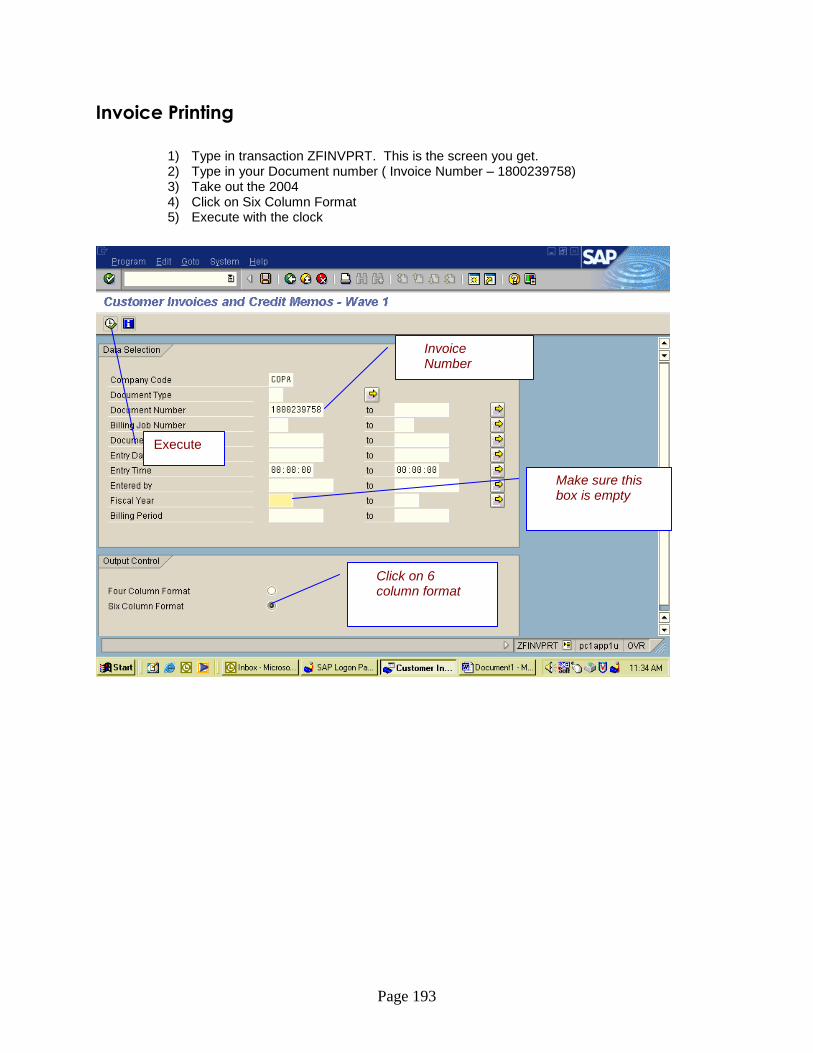
Page 193
Invoice Printing
1) Type in transaction ZFINVPRT. This is the screen you get. 2) Type in your Document number ( Invoice Number – 1800239758) 3) Take out the 2004 4) Click on Six Column Format 5) Execute with the clock
Make sure this box is empty
Invoice Number
Click on 6 column format
Execute

Page 194
6) This is the screen you get. 7) Click on Print Immediately and then on Print. 8) Attach a copy for entire packet, which should include the following:
i. Original Invoice ii. Copy of STD-174 iii. Copy of Goods Issue Slip
9) Send packet to Agency’s Comptroller Office for further processing
Check this box
Click on this.

Page 195
Credits/Stock Denials/Returns
1) Type in transaction ME23n and click enter. 2) This is the screen that you get. Here you will do the drop down for Purchase Order,
select other purchase order.
Purchase Order
Other Purchase Order
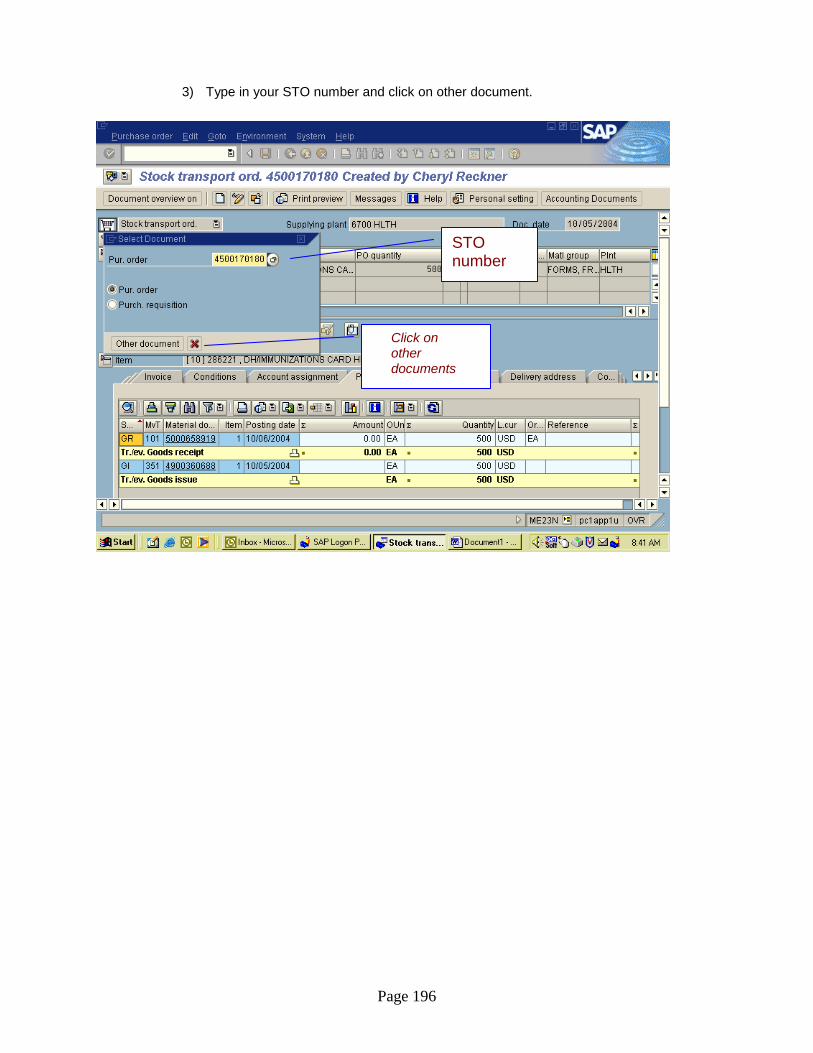
Page 196
3) Type in your STO number and click on other document.
STO number
Click on other documents
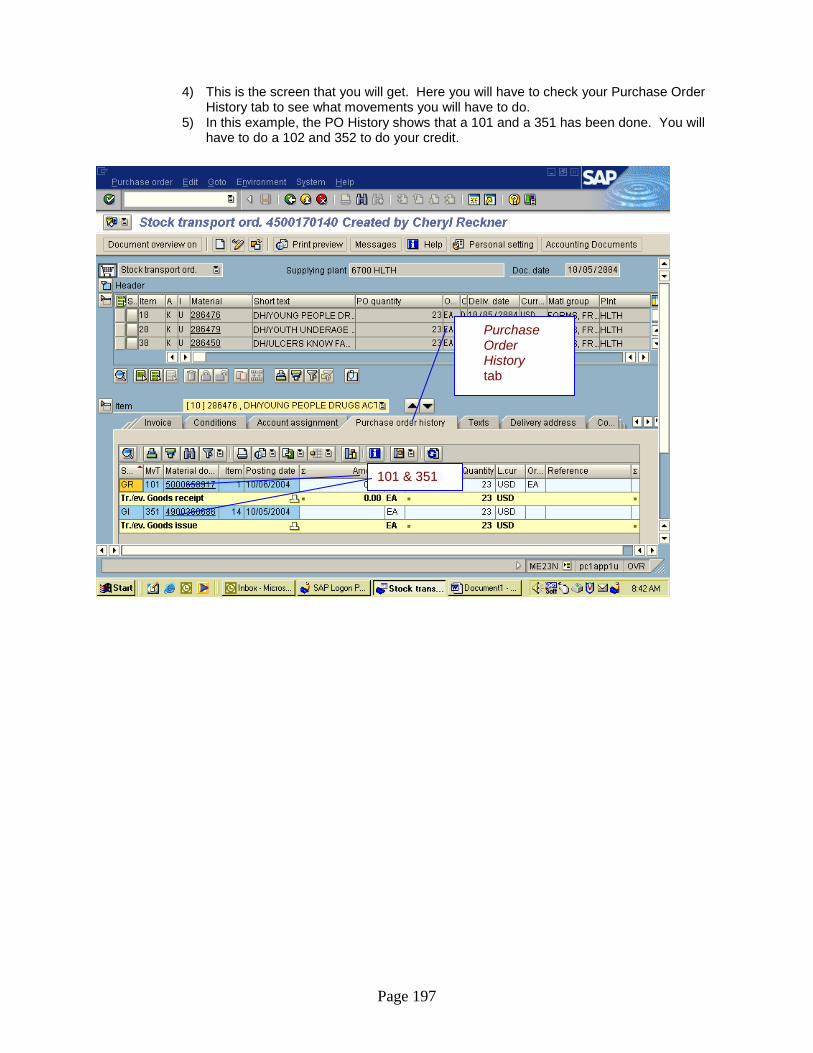
Page 197
4) This is the screen that you will get. Here you will have to check your Purchase Order History tab to see what movements you will have to do.
5) In this example, the PO History shows that a 101 and a 351 has been done. You will have to do a 102 and 352 to do your credit.
Purchase Order History tab
101 & 351
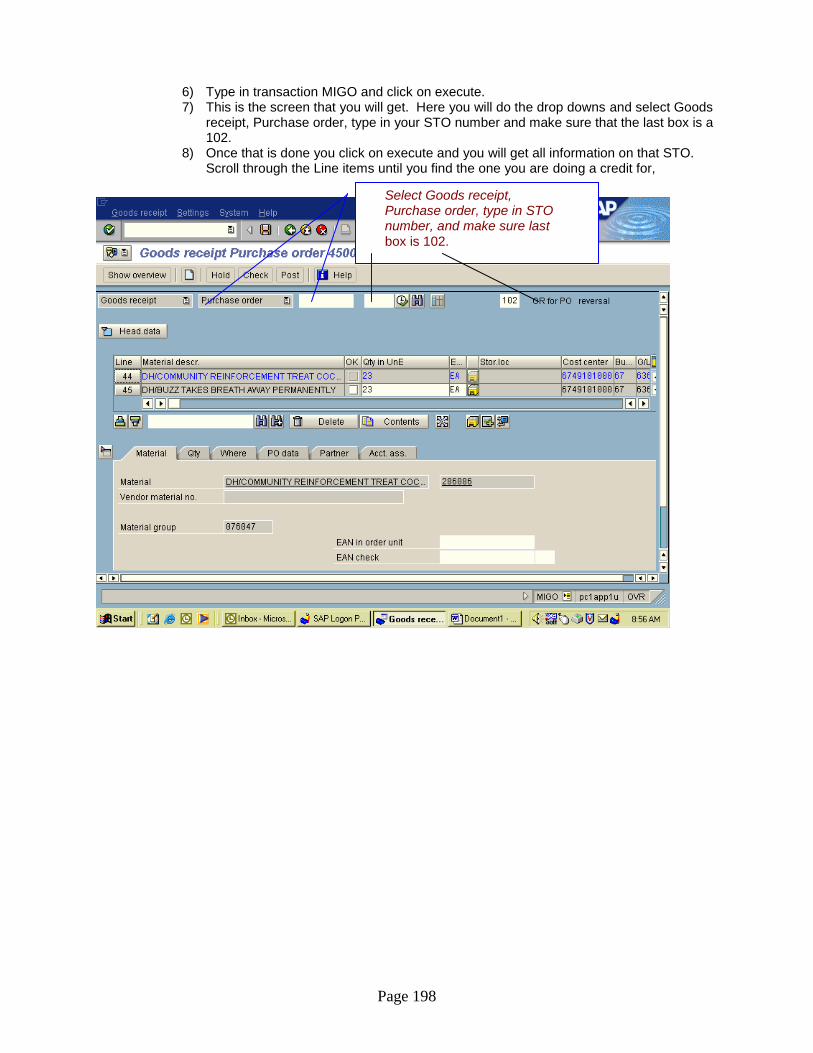
Page 198
6) Type in transaction MIGO and click on execute. 7) This is the screen that you will get. Here you will do the drop downs and select Goods
receipt, Purchase order, type in your STO number and make sure that the last box is a 102.
8) Once that is done you click on execute and you will get all information on that STO. Scroll through the Line items until you find the one you are doing a credit for,
Select Goods receipt, Purchase order, type in STO number, and make sure last box is 102.

Page 199
9) Here you will Highlight the line item that you are doing the credit for. Then you will check item OK at bottom left. If there are multiple lines do this step for each line. (Only lines that you are doing a credit for).
10) Select Check, if there are no errors you will receive a document OK message at bottom left, if there are errors you will get a message and must be corrected before continuing. Then, click on Save.
Highlight line item to do credit for and check Item Ok.
Check Save
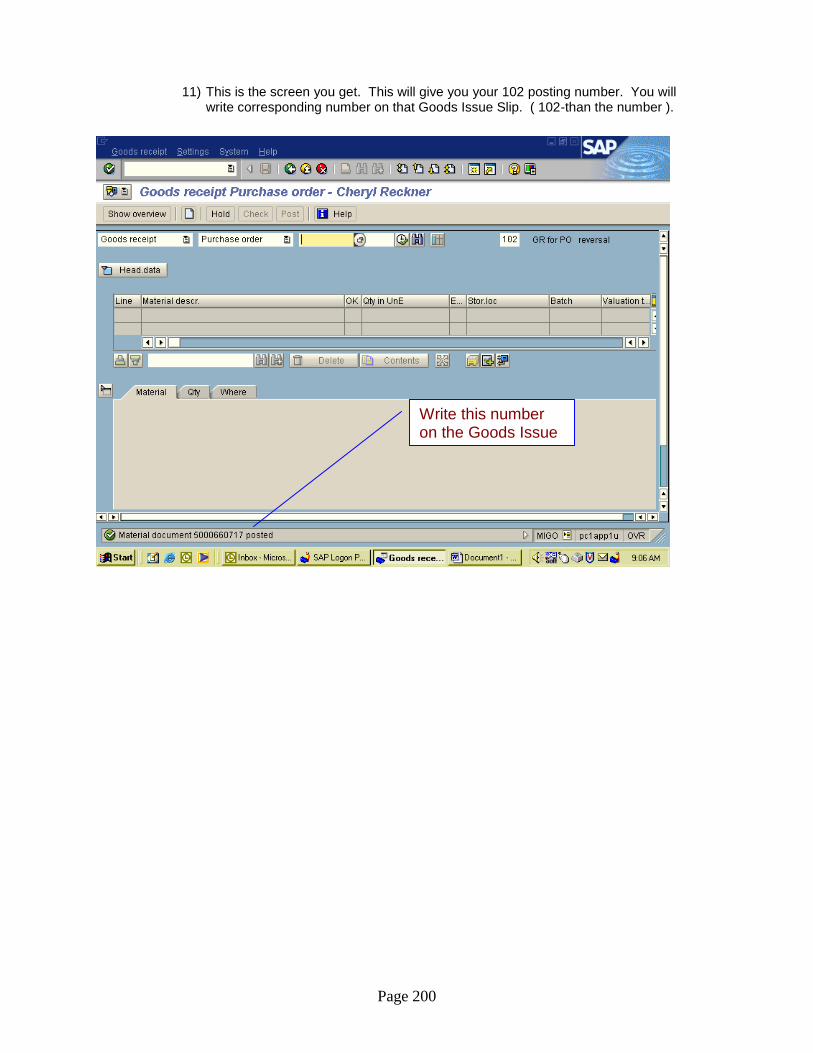
Page 200
11) This is the screen you get. This will give you your 102 posting number. You will write corresponding number on that Goods Issue Slip. ( 102-than the number ).
Write this number on the Goods Issue Slip.
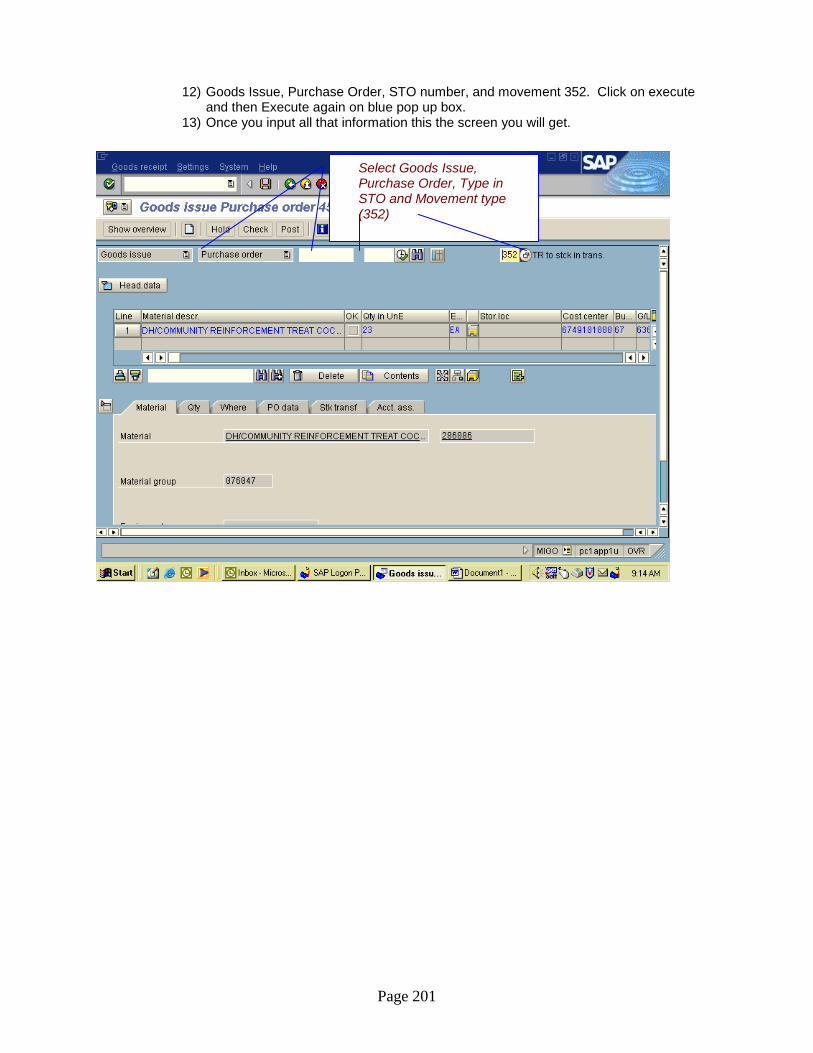
Page 201
12) Goods Issue, Purchase Order, STO number, and movement 352. Click on execute and then Execute again on blue pop up box.
13) Once you input all that information this the screen you will get.
Select Goods Issue, Purchase Order, Type in STO and Movement type (352)
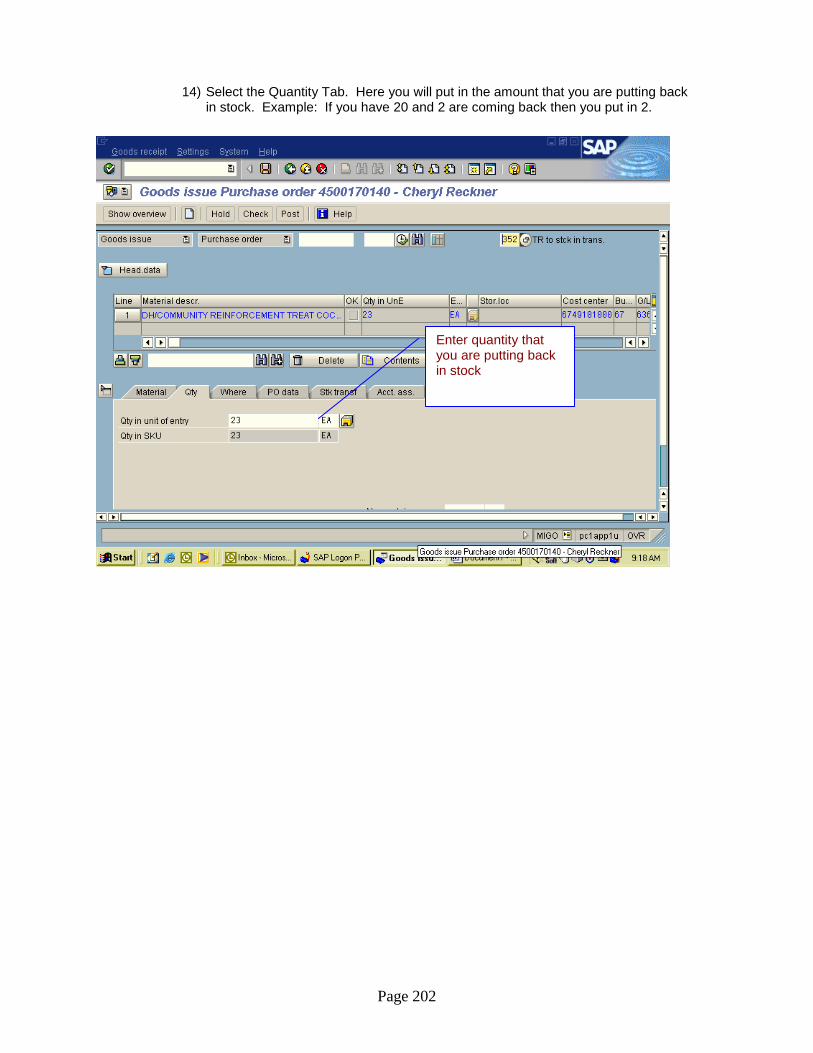
Page 202
14) Select the Quantity Tab. Here you will put in the amount that you are putting back in stock. Example: If you have 20 and 2 are coming back then you put in 2.
Enter quantity that you are putting back in stock
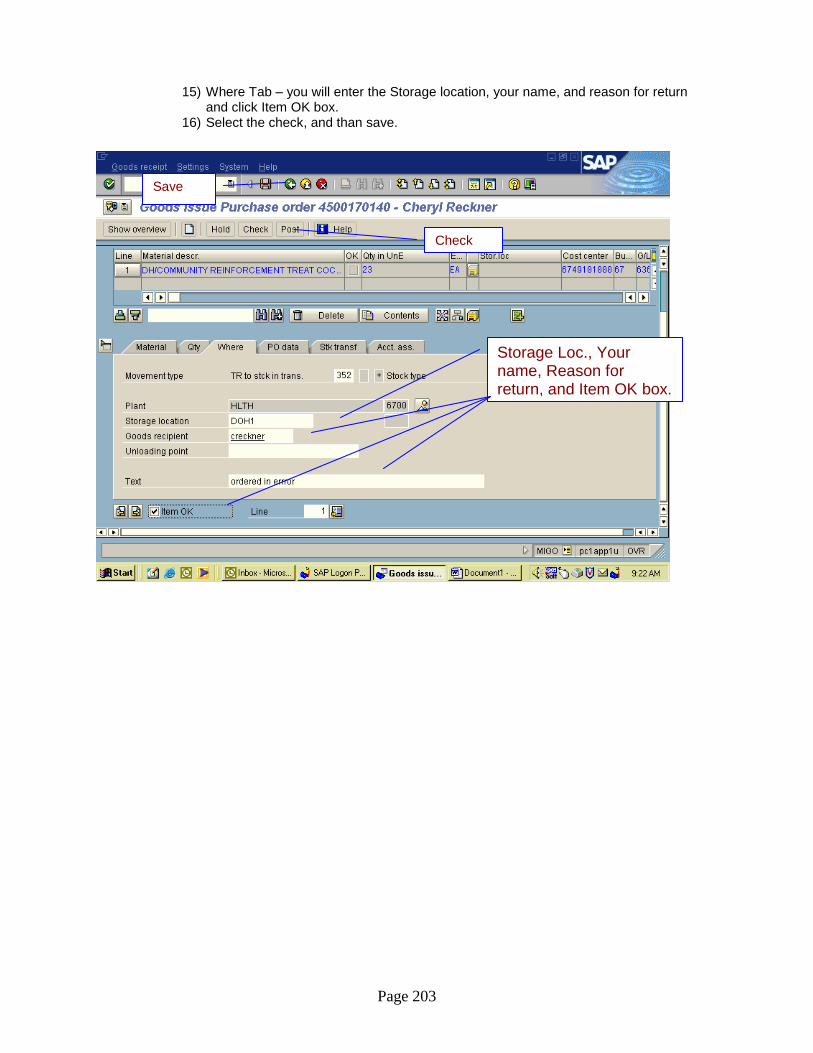
Page 203
15) Where Tab – you will enter the Storage location, your name, and reason for return and click Item OK box.
16) Select the check, and than save.
Storage Loc., Your name, Reason for return, and Item OK box.
Check
Save
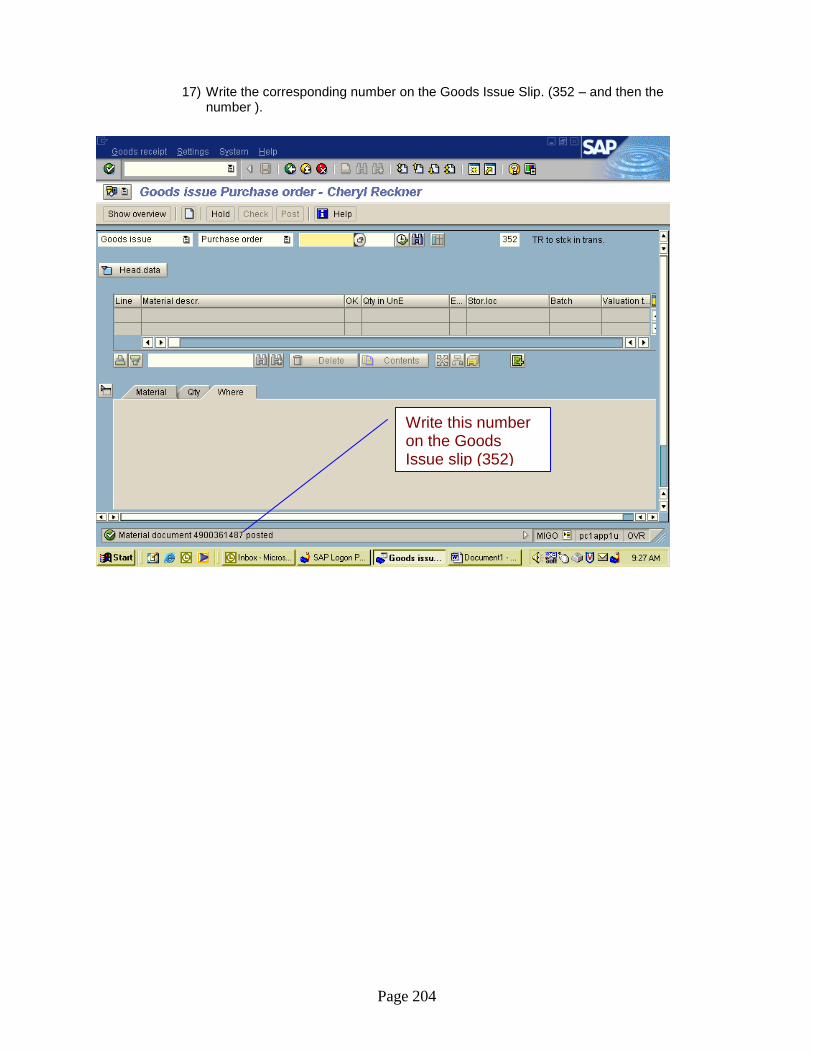
Page 204
17) Write the corresponding number on the Goods Issue Slip. (352 – and then the number ).
Write this number on the Goods Issue slip (352)

Page 205
18) Type in transaction ME22n and execute. 19) This is the screen you get. Here is where you will make your changes. If you are going to
change quantity, find the line to change and click in that box. Change quantity and save. 20) If you are going to trashcan a line, you highlight the line you are going to trash, and click on
trashcan. You will get a blue pop up box asking if you if you want to do this, click yes
Click on box to change quantity and change quantity
Save
Trashcan
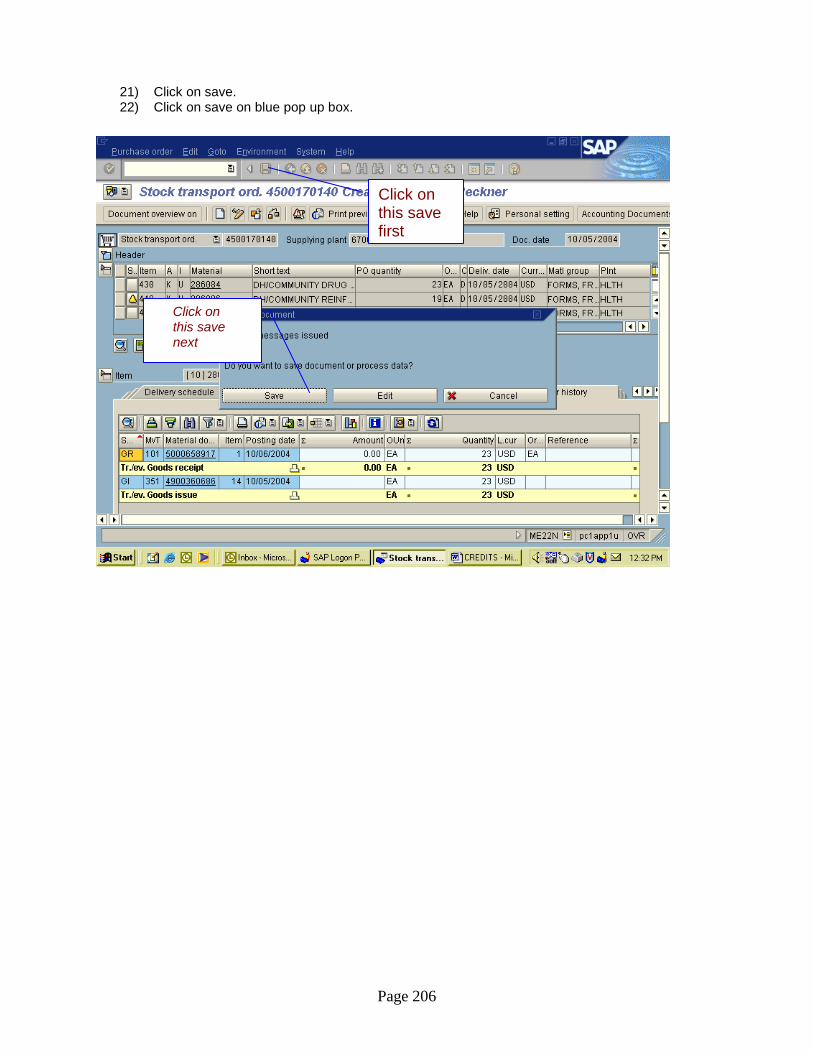
Page 206
21) Click on save. 22) Click on save on blue pop up box.
Click on this save first
Click on this save next
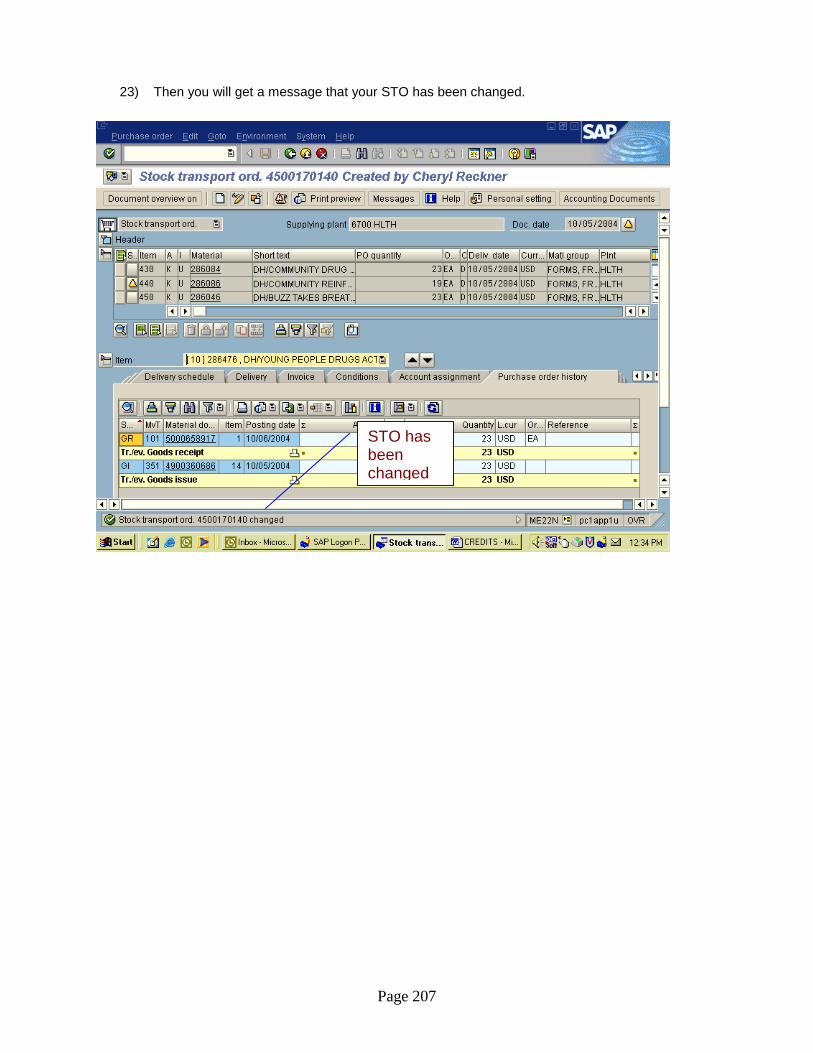
Page 207
23) Then you will get a message that your STO has been changed.
STO has been changed

Page 208
Inventory Transactions
Create Inventory Document
1) Type in transaction Mi01 and execute. 2) This is the screen that you will get. Here you want to type in your Plant number and Storage
Location. Then click on execute.
Plant & Storage Location
Execute
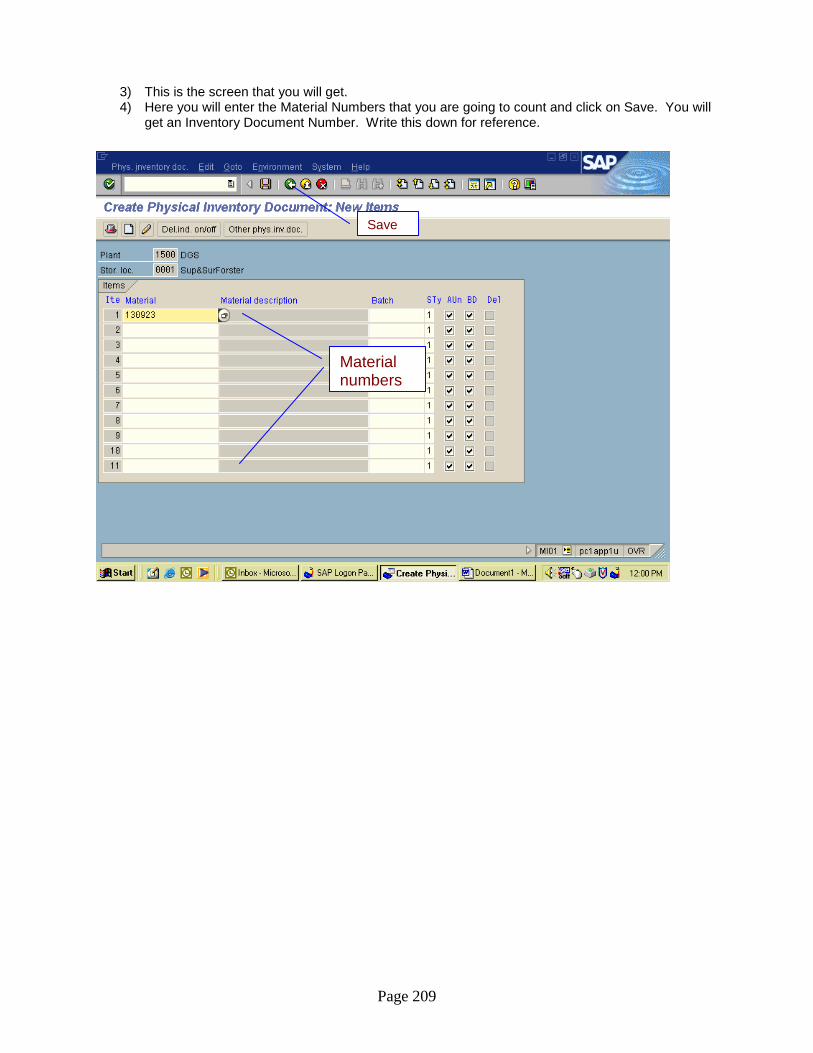
Page 209
3) This is the screen that you will get. 4) Here you will enter the Material Numbers that you are going to count and click on Save. You will
get an Inventory Document Number. Write this down for reference.
Material numbers
Save
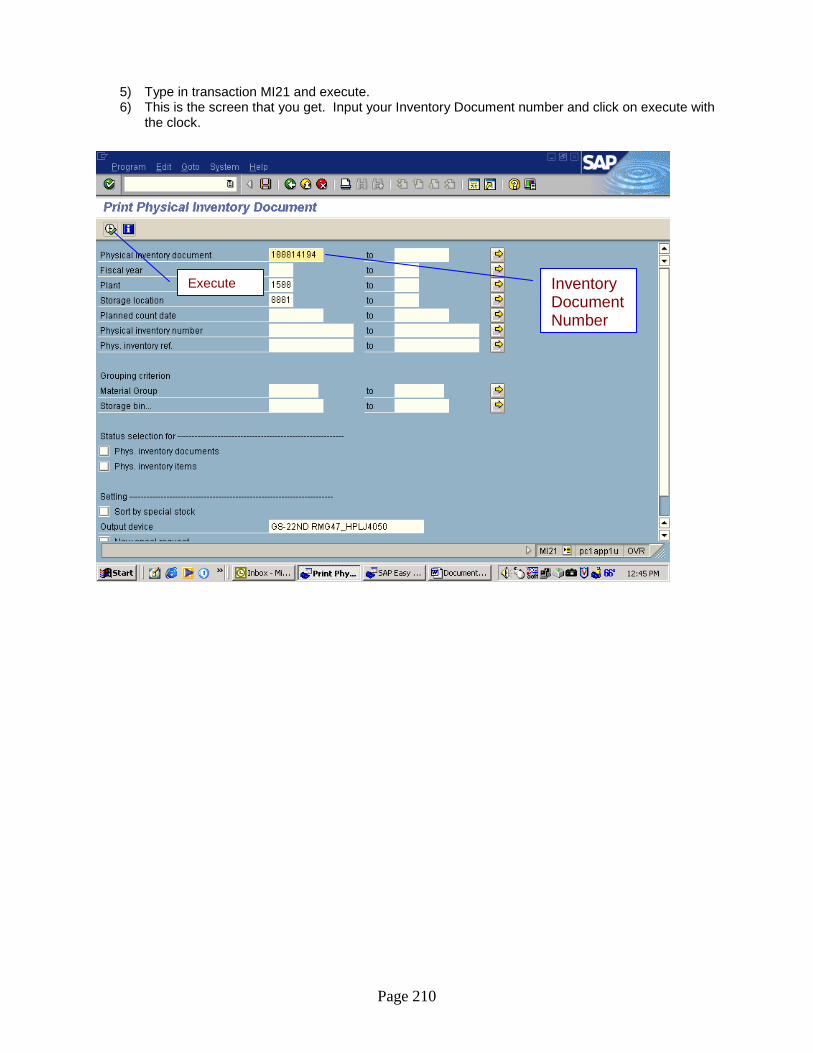
Page 210
5) Type in transaction MI21 and execute. 6) This is the screen that you get. Input your Inventory Document number and click on execute with
the clock.
Inventory Document Number
Execute
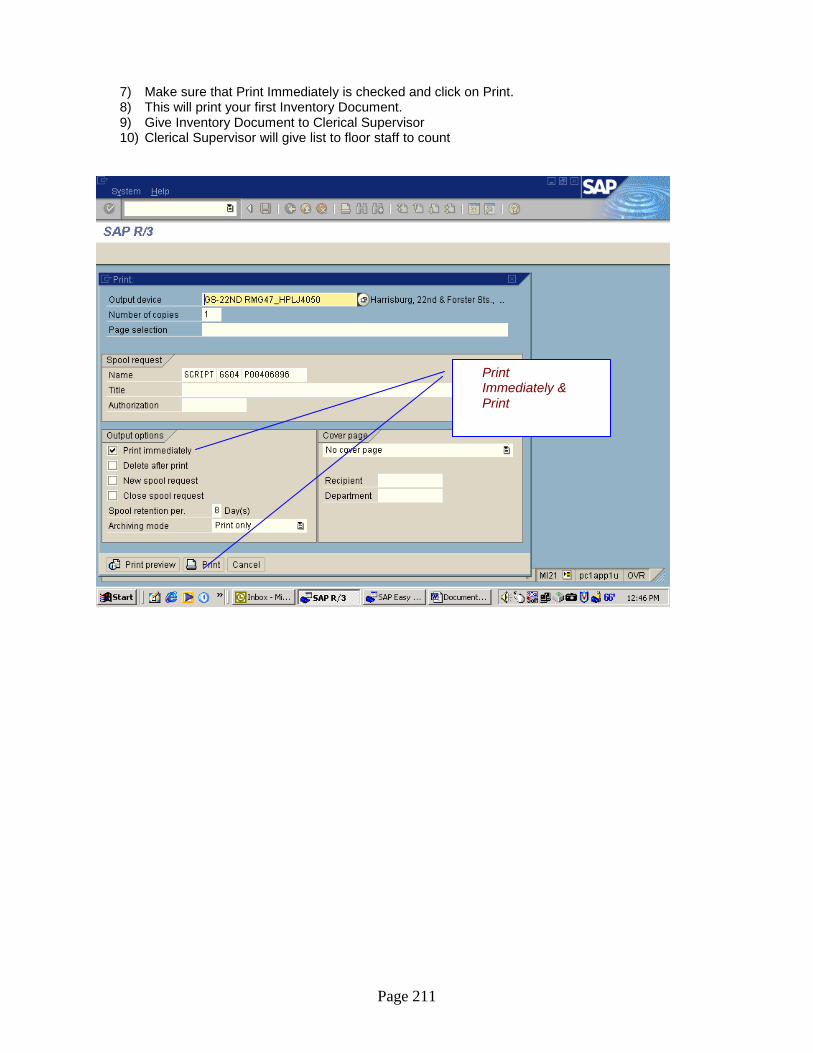
Page 211
7) Make sure that Print Immediately is checked and click on Print. 8) This will print your first Inventory Document. 9) Give Inventory Document to Clerical Supervisor 10) Clerical Supervisor will give list to floor staff to count
Print Immediately & Print
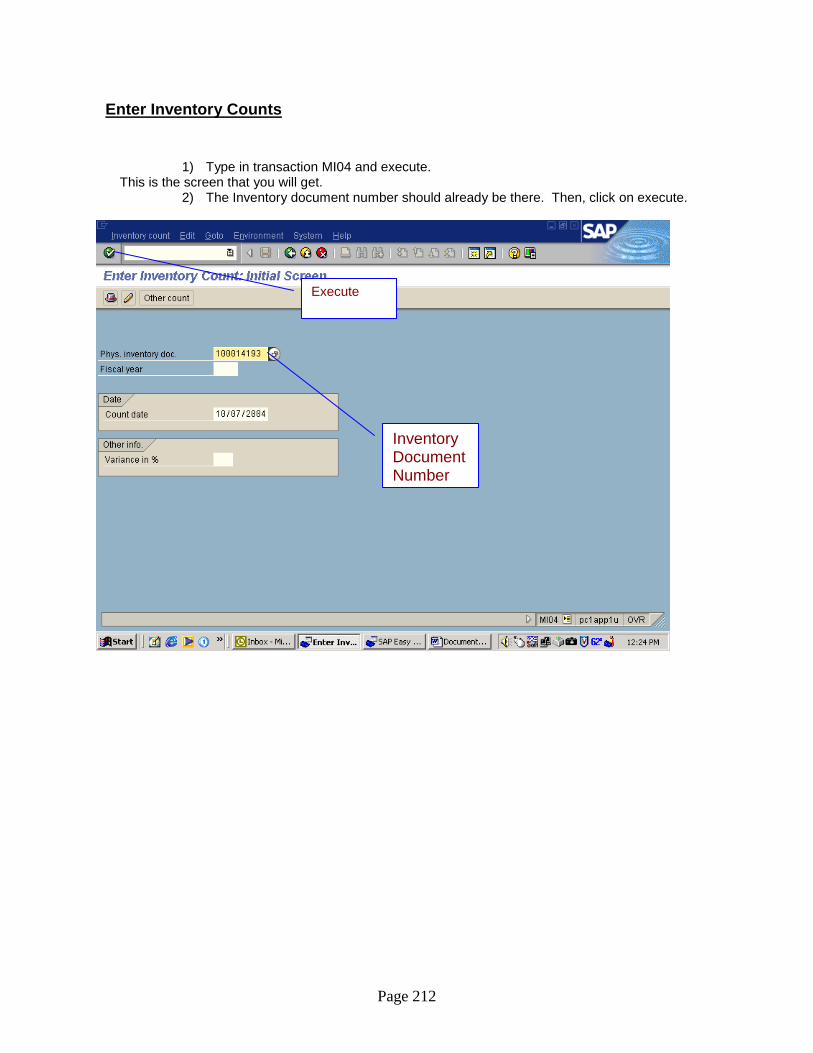
Page 212
Enter Inventory Counts
1) Type in transaction MI04 and execute.
This is the screen that you will get. 2) The Inventory document number should already be there. Then, click on execute.
Inventory Document Number
Execute

Page 213
This is the screen that you will get. 3) Here you will enter your quantities. If there are zeros (0), check mark the ZC Box.
You may have to page down if you have more than one page of numbers. 4) Click on Save.
Enter Quantities if zeros check the ZC box. Save

Page 214
5) Type in transaction MI20 and execute. 6) Take out the Material Number and execute.
Take out material number
Execute
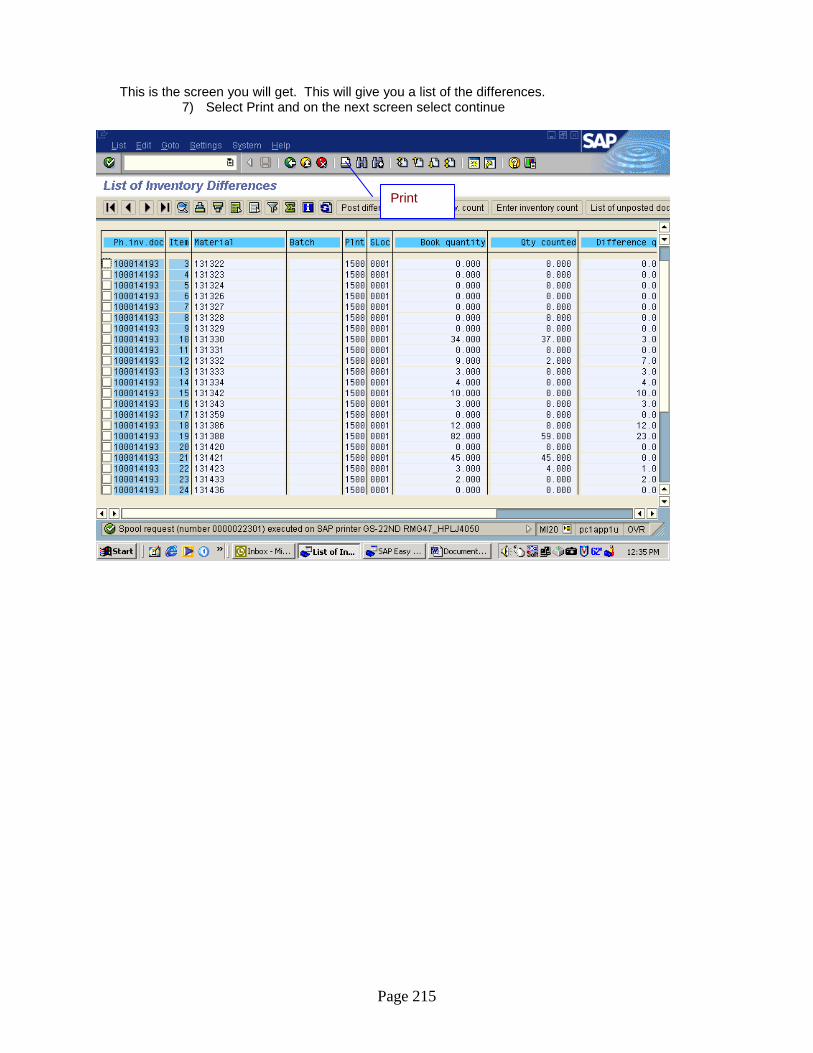
Page 215
This is the screen you will get. This will give you a list of the differences. 7) Select Print and on the next screen select continue
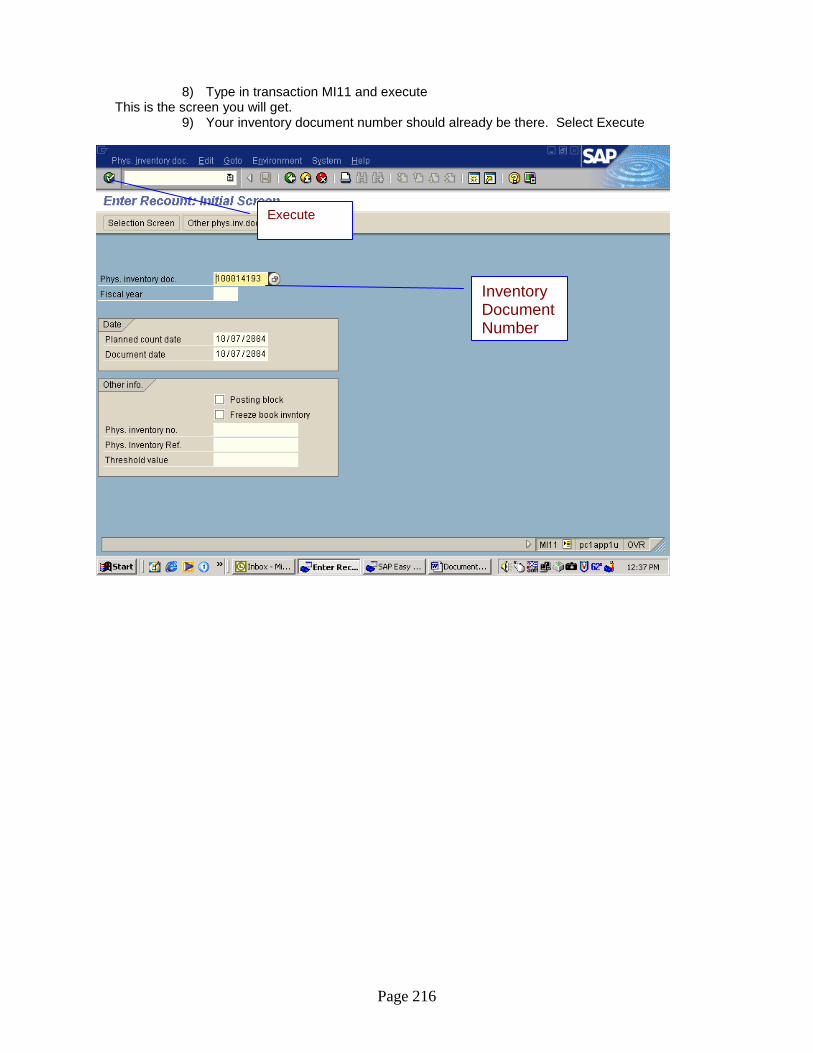
Page 216
8) Type in transaction MI11 and execute This is the screen you will get.
9) Your inventory document number should already be there. Select Execute
Inventory Document Number
Execute
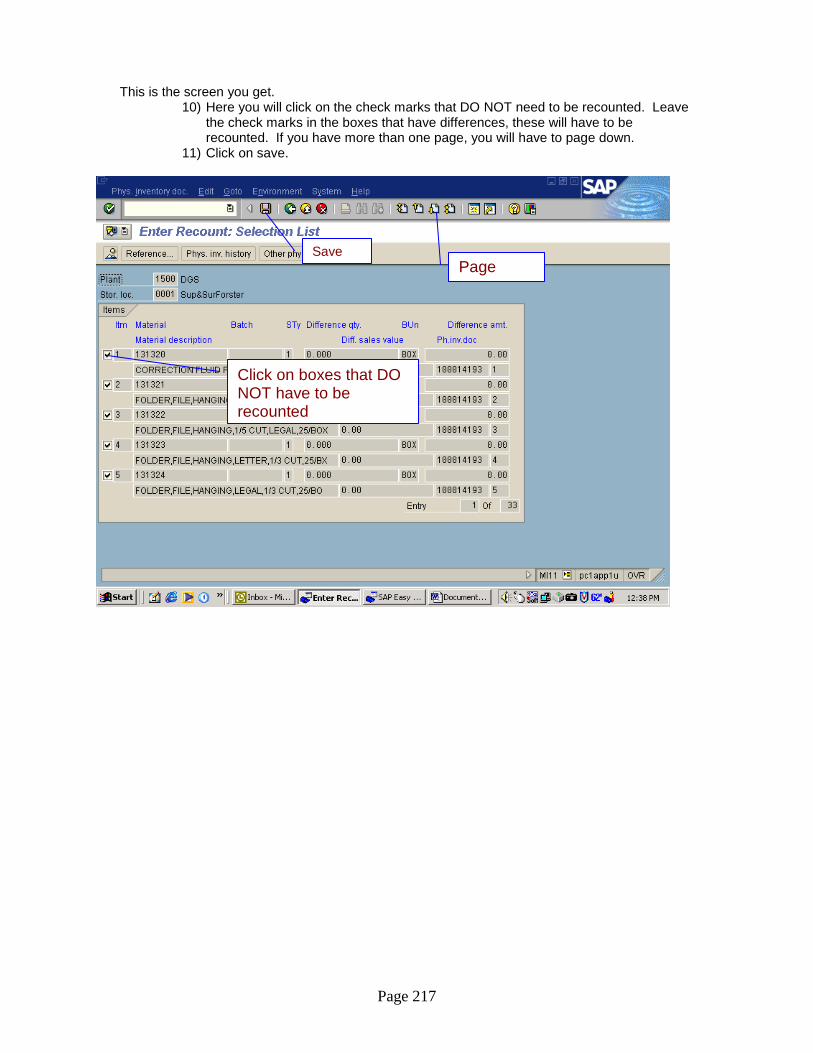
Page 217
This is the screen you get. 10) Here you will click on the check marks that DO NOT need to be recounted. Leave
the check marks in the boxes that have differences, these will have to be recounted. If you have more than one page, you will have to page down.
11) Click on save.
Click on boxes that DO NOT have to be recounted
Page down
Save
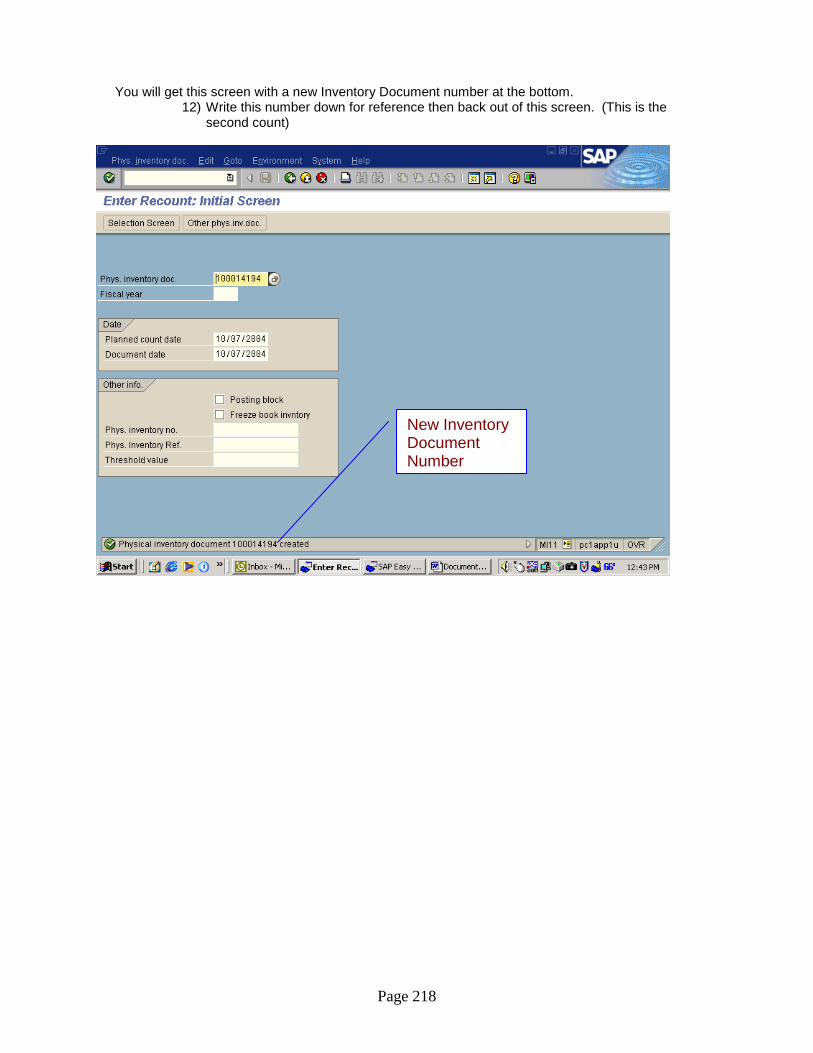
Page 218
You will get this screen with a new Inventory Document number at the bottom. 12) Write this number down for reference then back out of this screen. (This is the
second count)
New Inventory Document Number
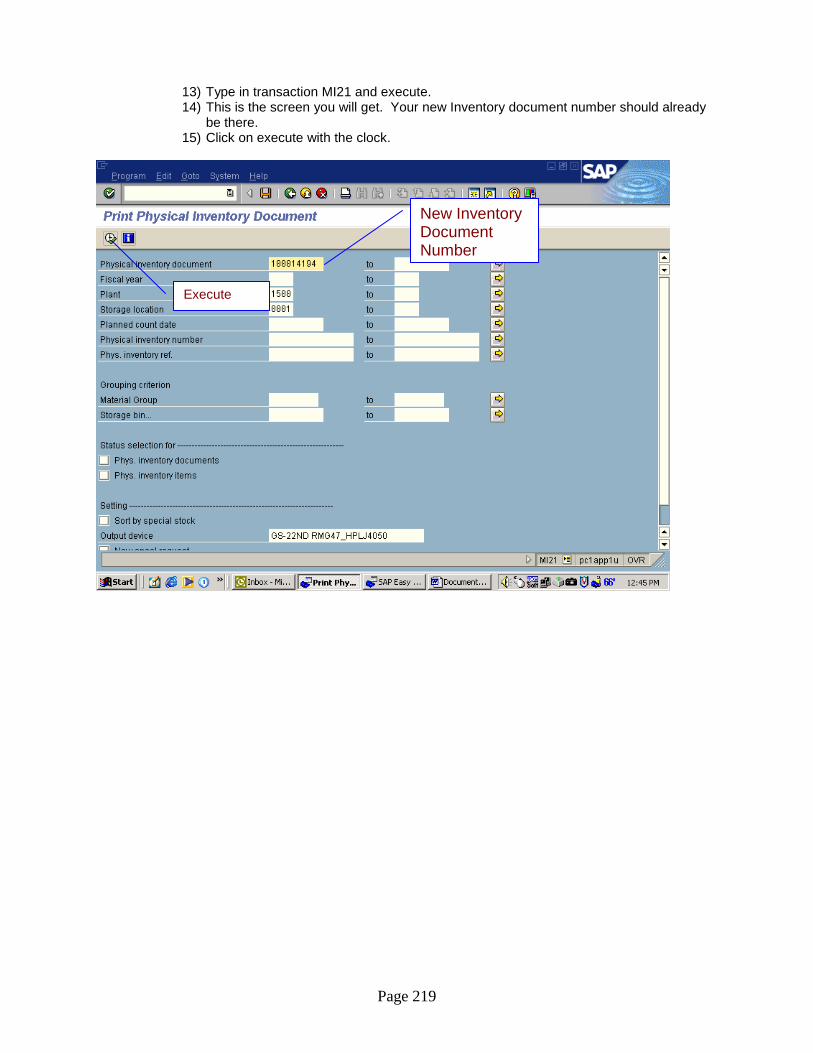
Page 219
13) Type in transaction MI21 and execute. 14) This is the screen you will get. Your new Inventory document number should already
be there. 15) Click on execute with the clock.
New Inventory Document Number
Execute
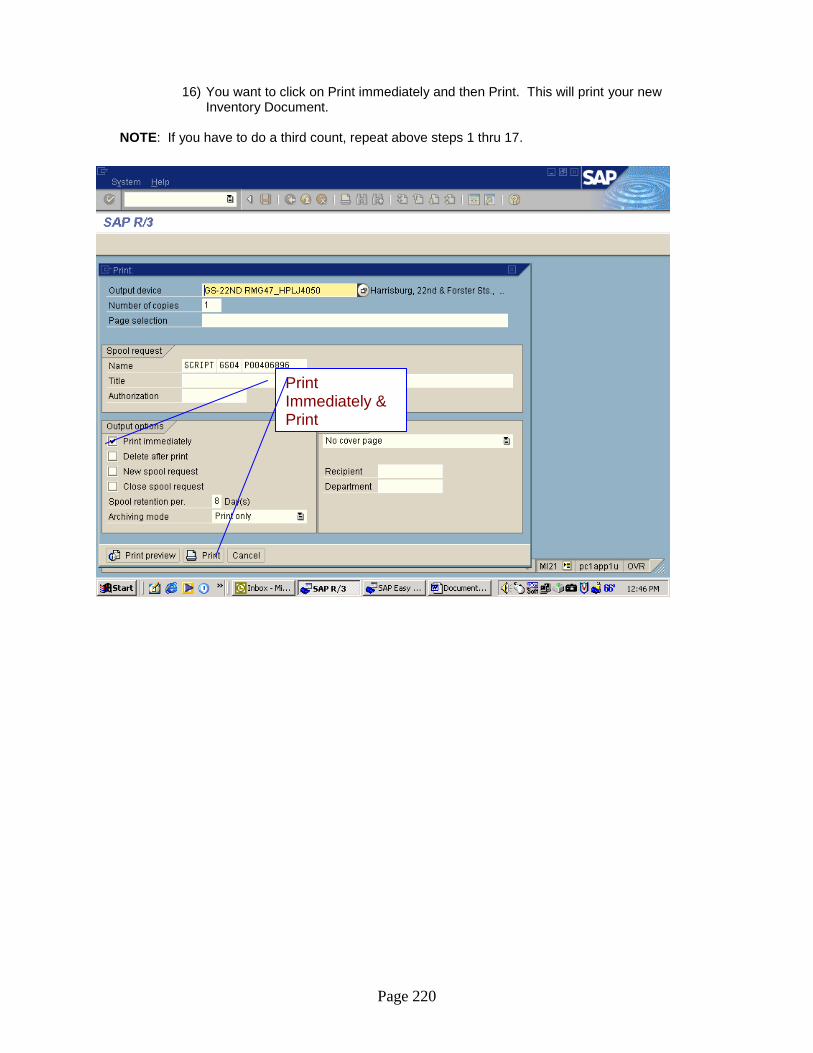
Page 220
16) You want to click on Print immediately and then Print. This will print your new Inventory Document.
NOTE: If you have to do a third count, repeat above steps 1 thru 17.
Print Immediately & Print
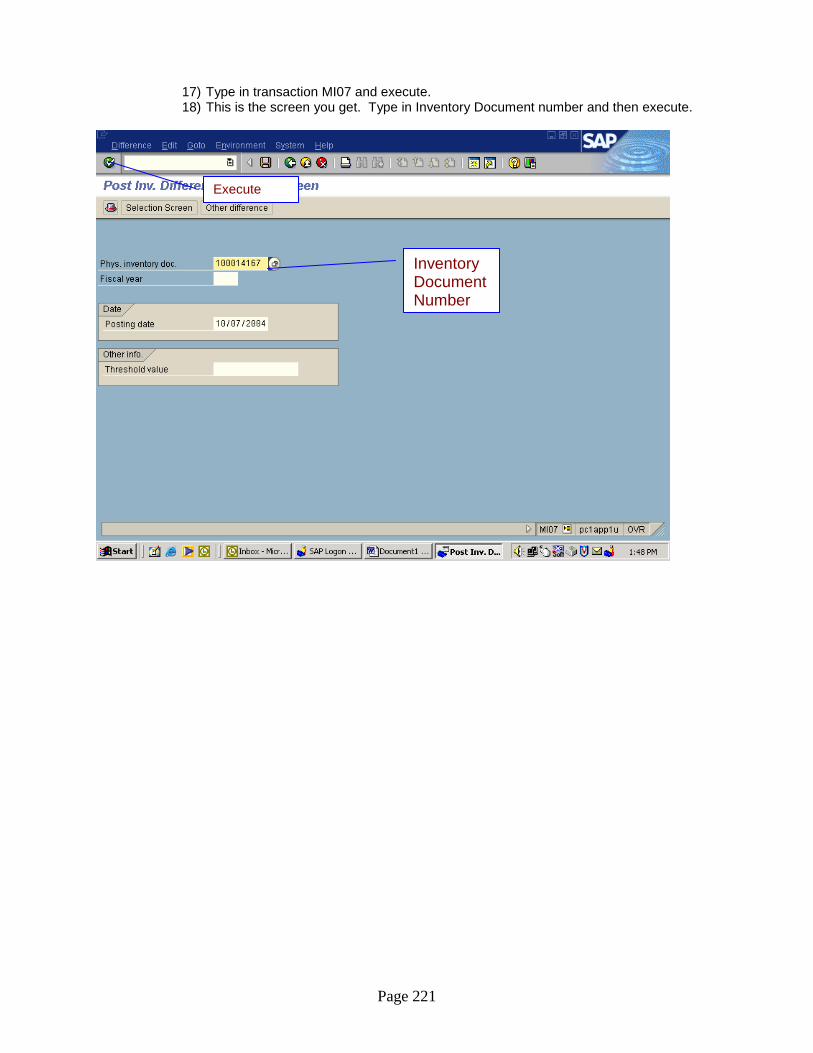
Page 221
17) Type in transaction MI07 and execute. 18) This is the screen you get. Type in Inventory Document number and then execute.
Inventory Document Number
Execute
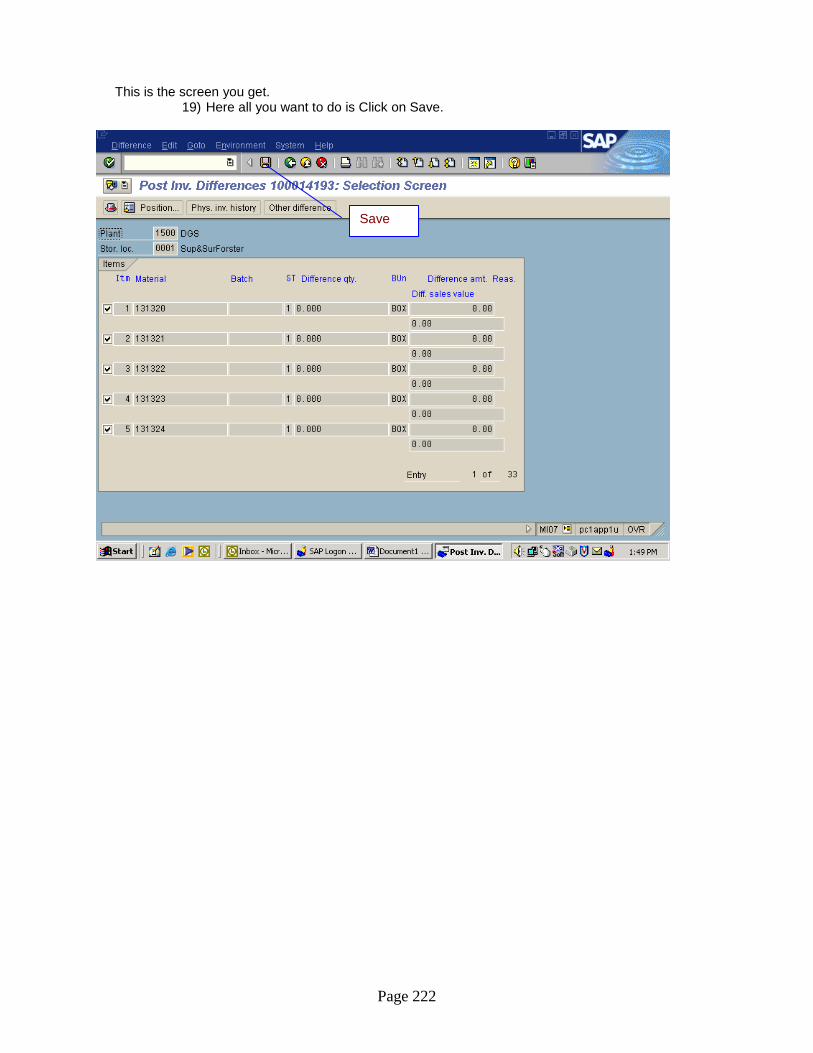
Page 222
This is the screen you get. 19) Here all you want to do is Click on Save.
Save

Page 223
20) You will get a message that Inventory was posted.
Inventory Posted Message
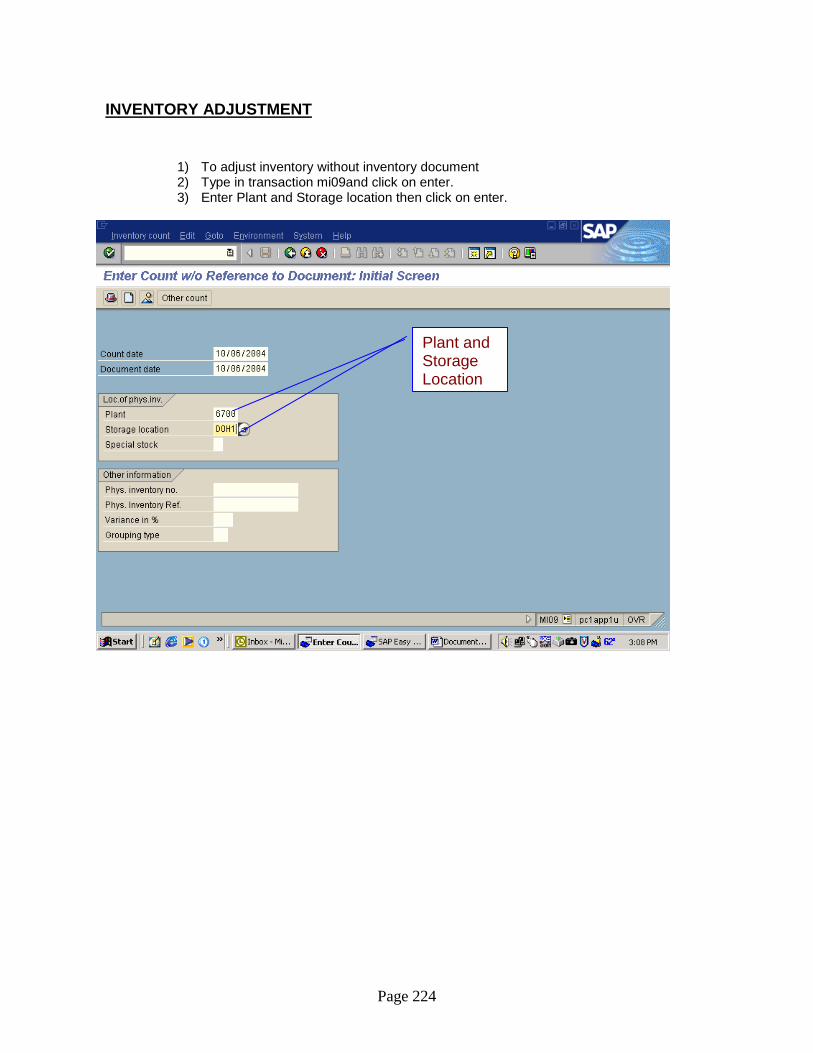
Page 224
INVENTORY ADJUSTMENT
1) To adjust inventory without inventory document 2) Type in transaction mi09and click on enter. 3) Enter Plant and Storage location then click on enter.
Plant and Storage Location
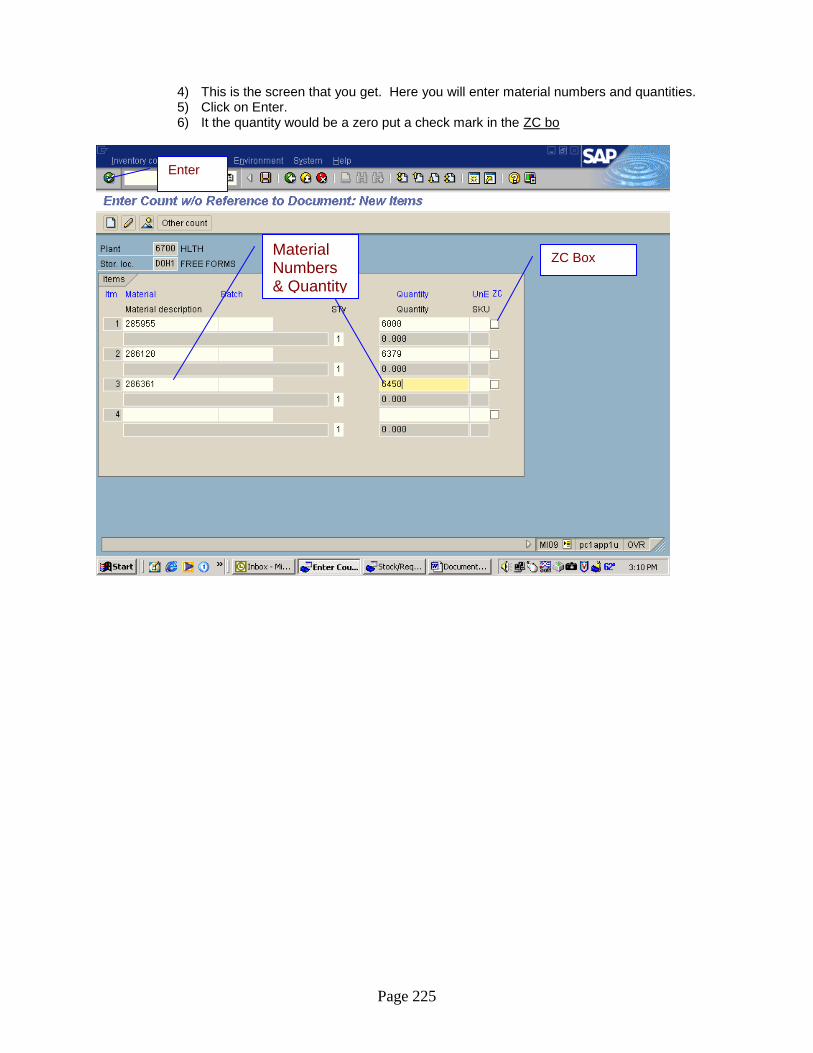
Page 225
4) This is the screen that you get. Here you will enter material numbers and quantities. 5) Click on Enter. 6) It the quantity would be a zero put a check mark in the ZC bo
Material Numbers & Quantity
Enter
ZC Box

Page 226
7) You will get an Inventory document at the bottom left of your screen. Write this number down to reference to.
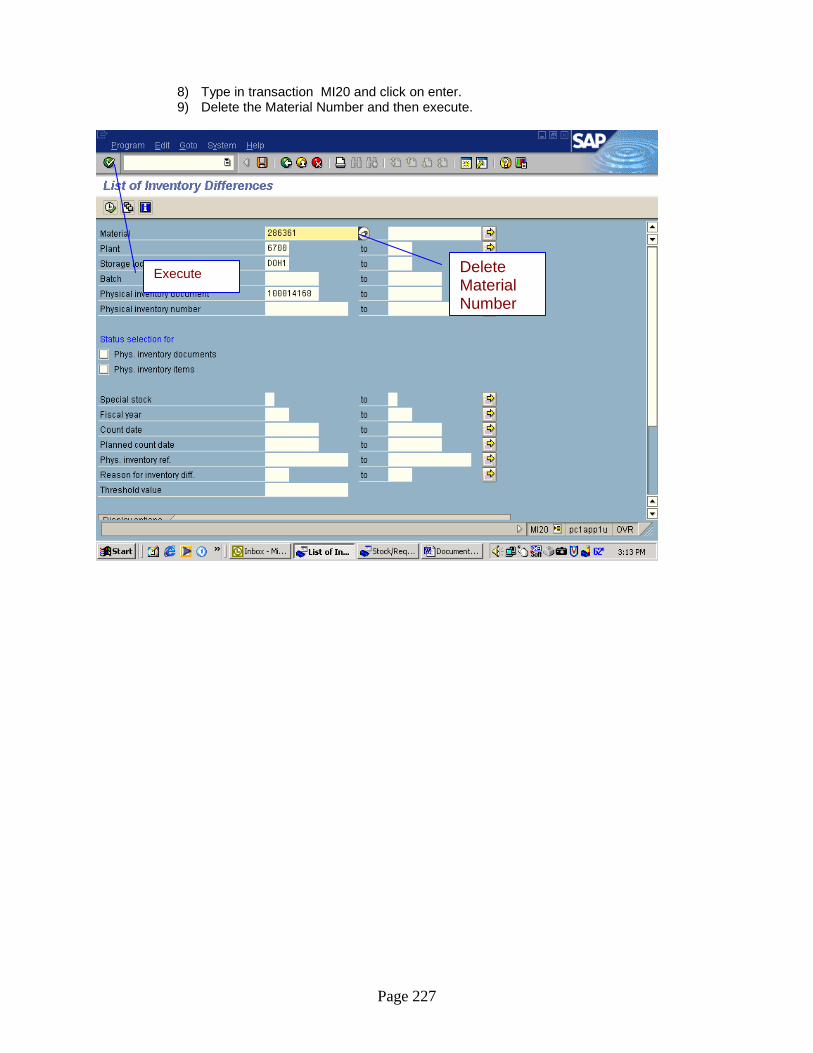
Page 227
8) Type in transaction MI20 and click on enter. 9) Delete the Material Number and then execute.
Delete Material Number
Execute
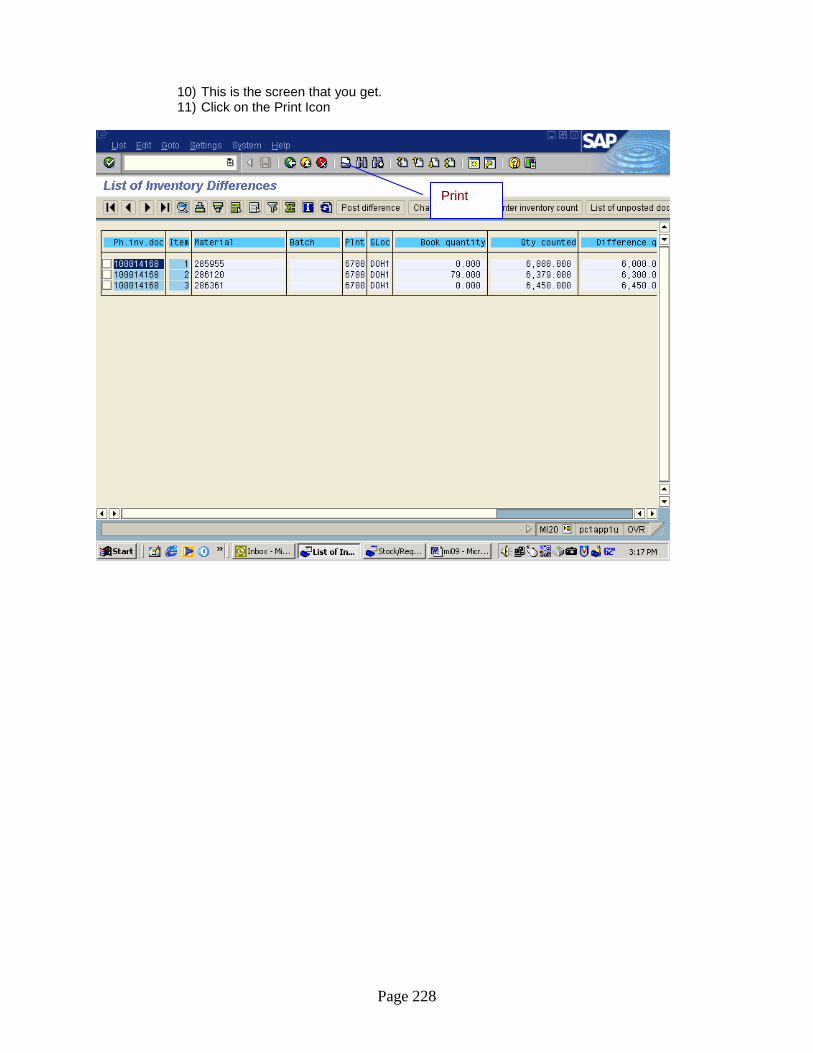
Page 228
10) This is the screen that you get. 11) Click on the Print Icon
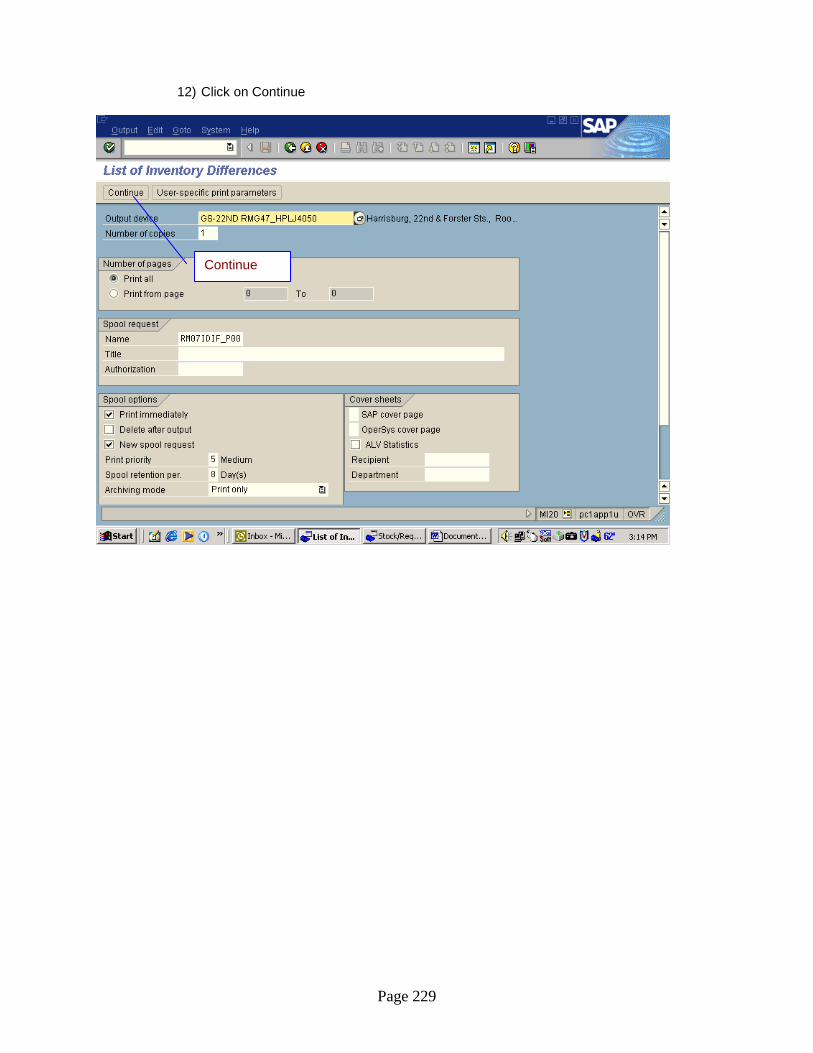
Page 229
12) Click on Continue
Continue

Page 230
13) You will come back to this screen, just back out of it.
Go Back

Page 231
14) Type in transaction MI07 and click enter. 15) Enter Inventory document number and execute.
Inventory Document Number
Execute
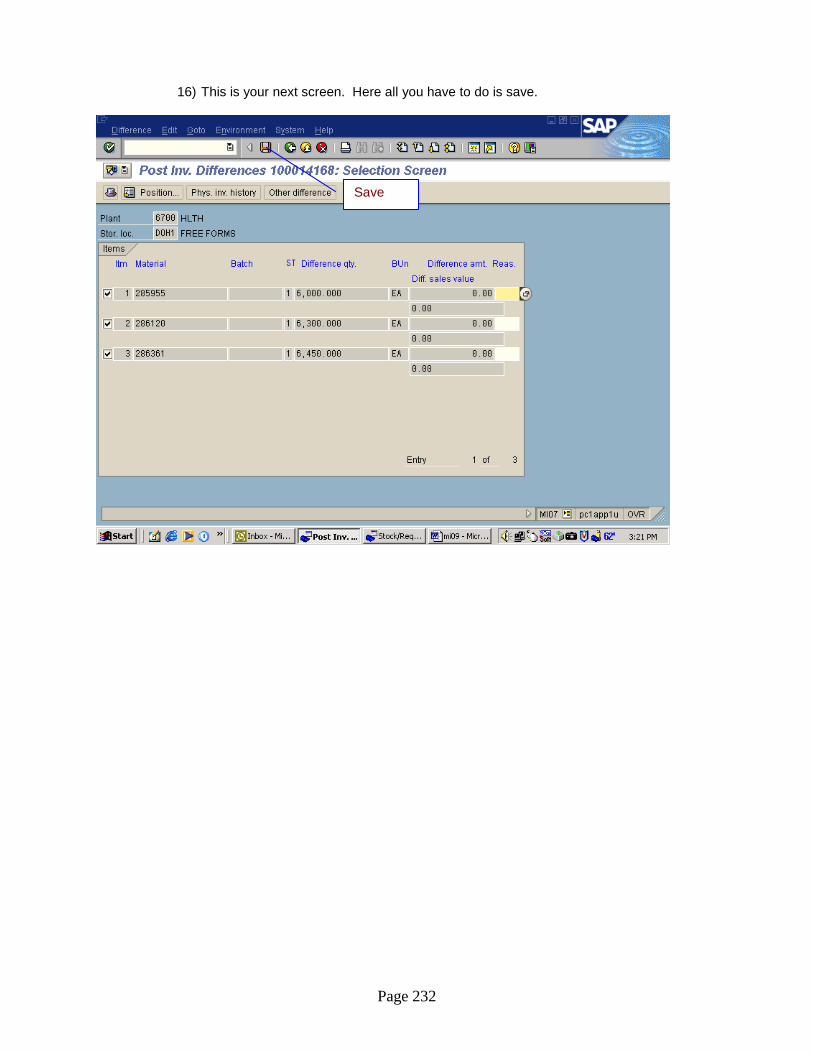
Page 232
16) This is your next screen. Here all you have to do is save.
Save
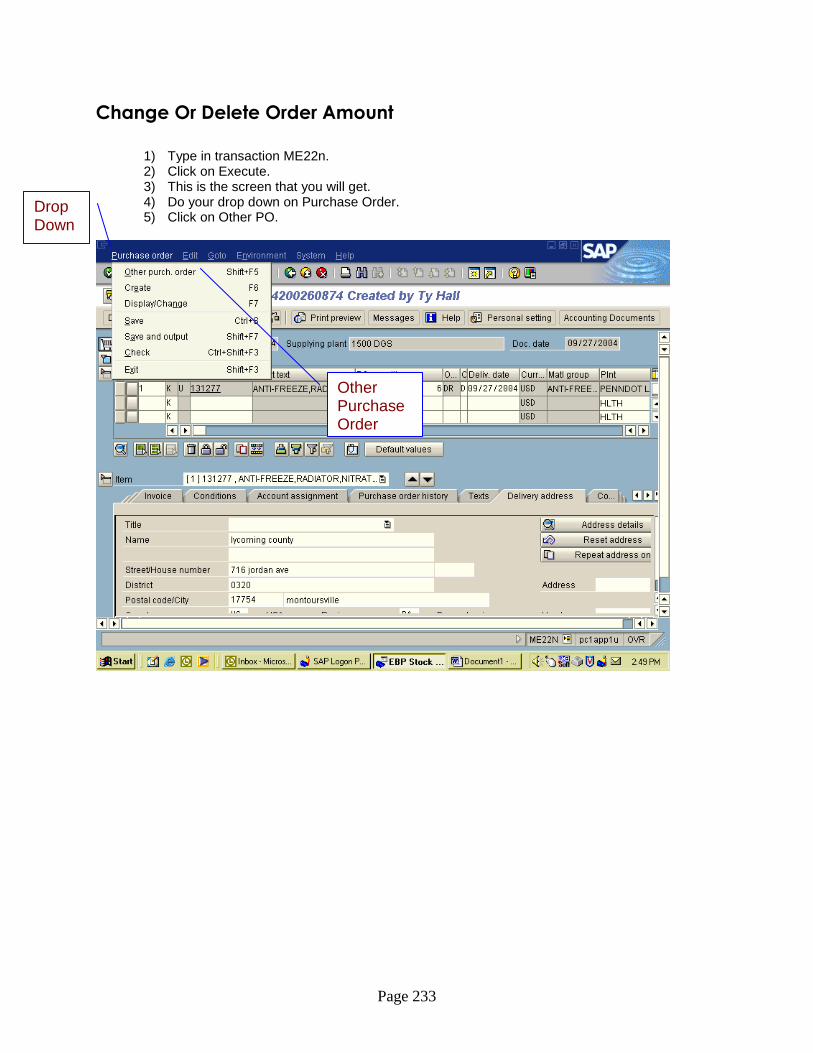
Page 233
Change Or Delete Order Amount
1) Type in transaction ME22n. 2) Click on Execute. 3) This is the screen that you will get. 4) Do your drop down on Purchase Order. 5) Click on Other PO.
Drop Down
Other Purchase Order

Page 234
6) Type in your STO Number and click on other document.
Type STO number here and click on other document
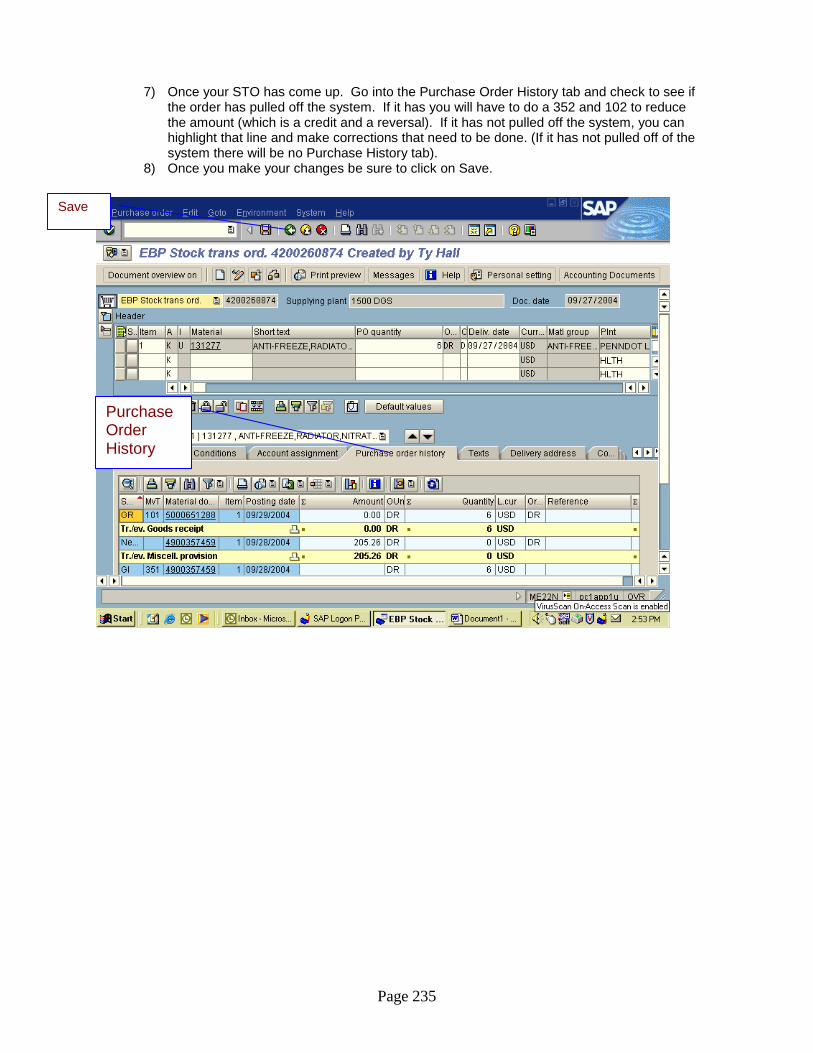
Page 235
7) Once your STO has come up. Go into the Purchase Order History tab and check to see if the order has pulled off the system. If it has you will have to do a 352 and 102 to reduce the amount (which is a credit and a reversal). If it has not pulled off the system, you can highlight that line and make corrections that need to be done. (If it has not pulled off of the system there will be no Purchase History tab).
8) Once you make your changes be sure to click on Save.
Save
Purchase Order History
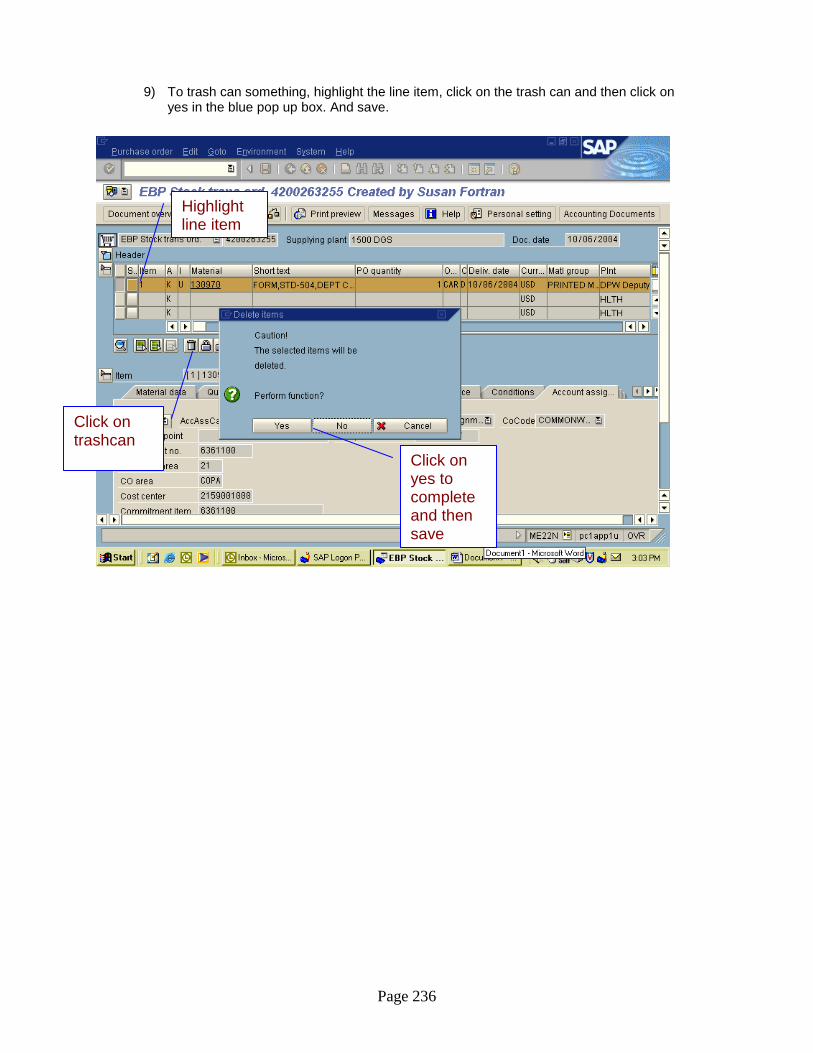
Page 236
9) To trash can something, highlight the line item, click on the trash can and then click on yes in the blue pop up box. And save.
Highlight line item
Click on trashcan
Click on yes to complete and then save

Page 237
Check Stock
1) Type in transaction MD04. This is the screen you will get. 2) Type in Material and Plant Number 3) Click on execute.
Execute
Material & Plant Numbers

Page 238
4) This is the screen you get.
Material Number
Available Stock
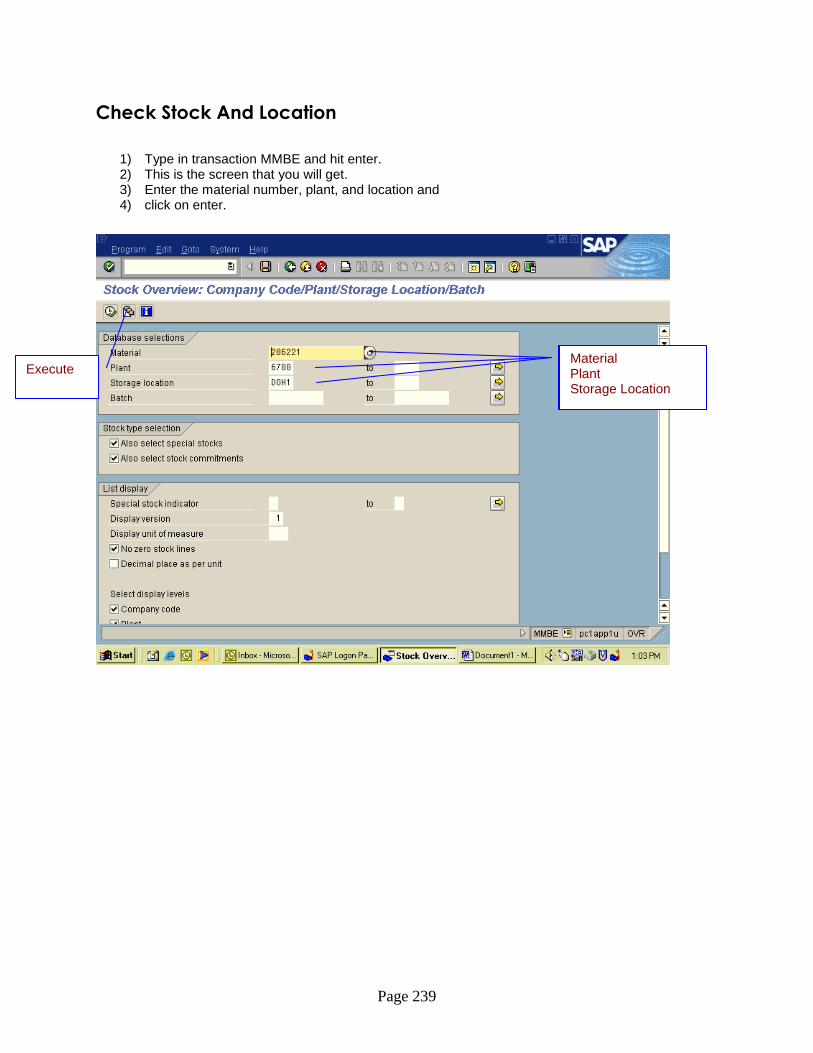
Page 239
Check Stock And Location
1) Type in transaction MMBE and hit enter. 2) This is the screen that you will get. 3) Enter the material number, plant, and location and 4) click on enter.
MM Material Plant Storage Location
Execute
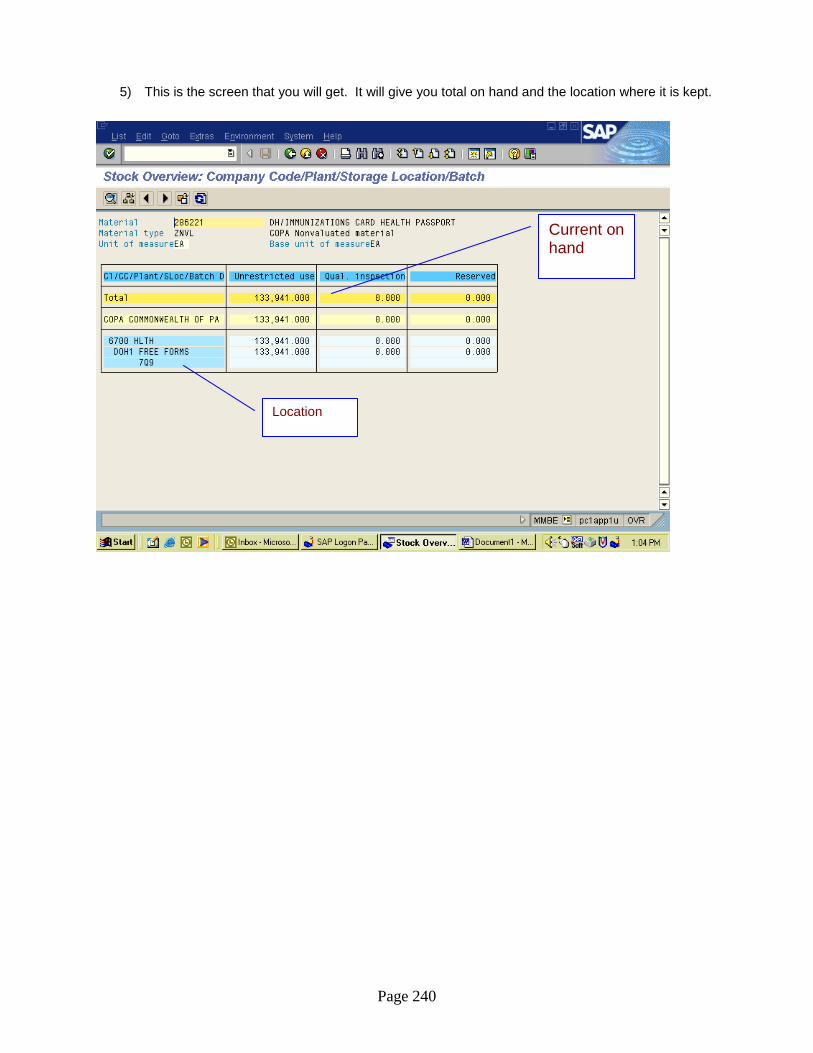
Page 240
5) This is the screen that you will get. It will give you total on hand and the location where it is kept.
Current on hand
Location

Page 241
Track By Material Number
1) Type in transaction MIGO and hit enter. This is the screen you get. 2) Enter the Material Document Number and execute. 3) You will get the same screen but you will get all your tab information. 4) Click on the PO Tab and then Double click on the Purchase order number and it will take you
to the STO in ME23n.
Material Document Number
Execute
Purchase Order Tab
Double Click to go to ME23n
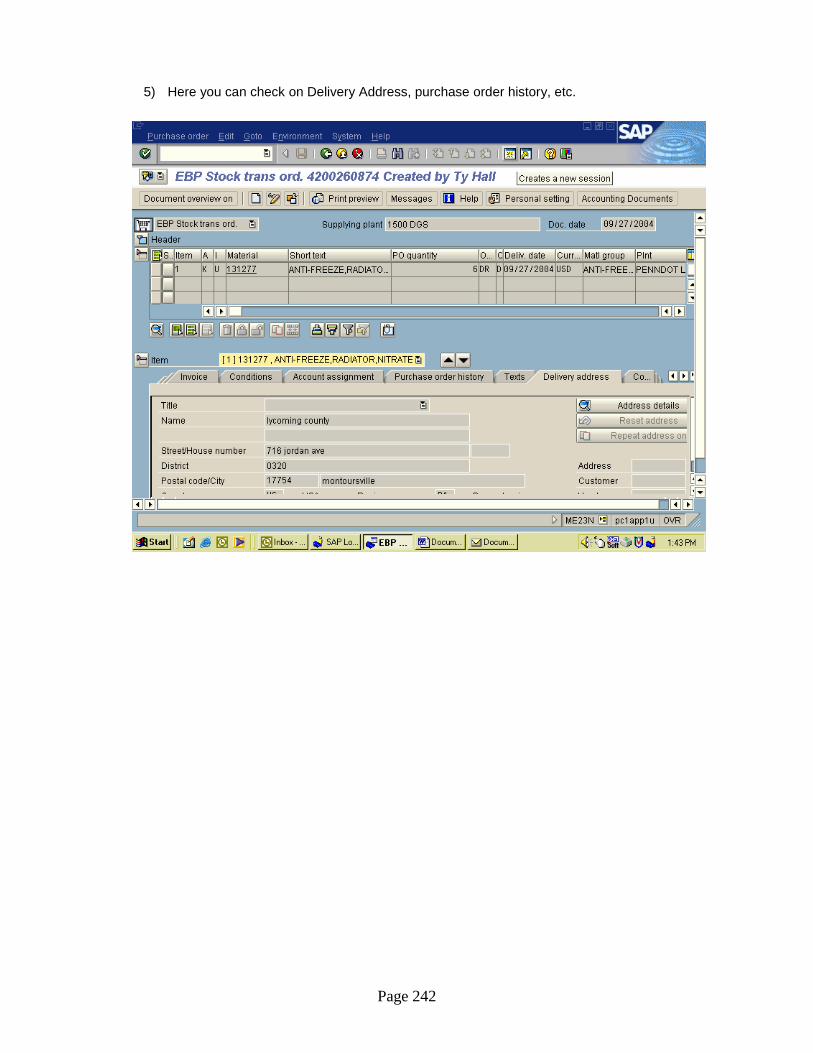
Page 242
5) Here you can check on Delivery Address, purchase order history, etc.
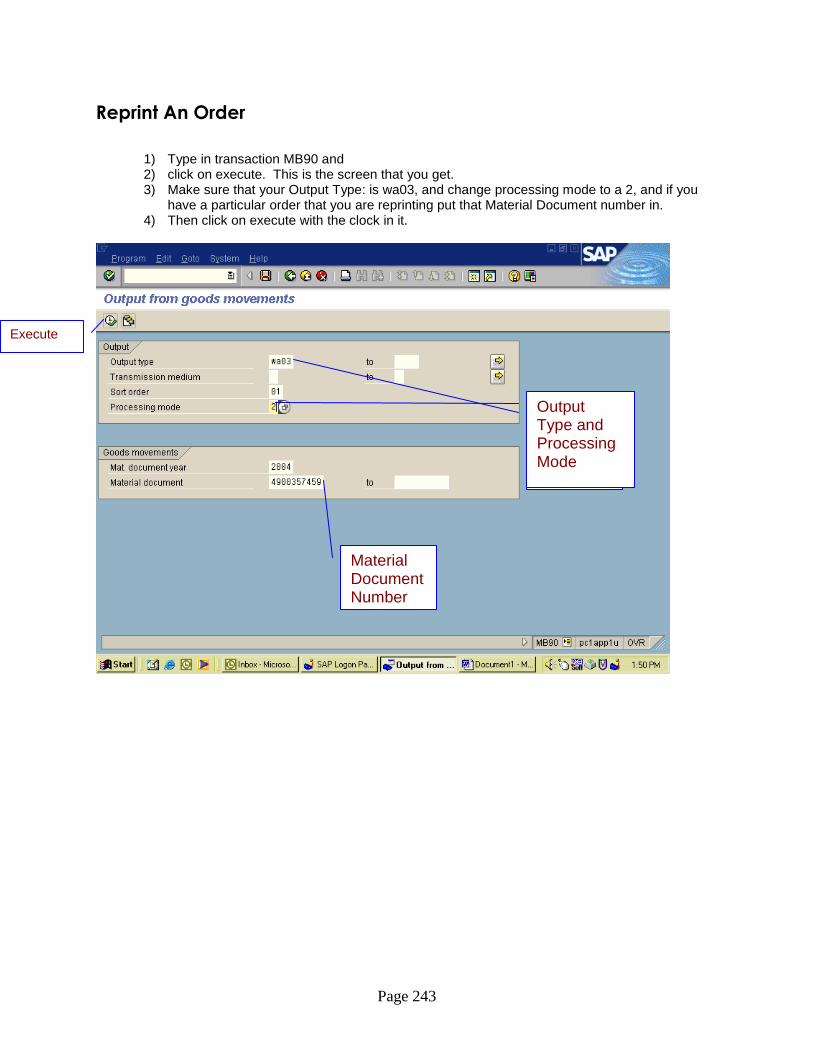
Page 243
Reprint An Order
1) Type in transaction MB90 and 2) click on execute. This is the screen that you get. 3) Make sure that your Output Type: is wa03, and change processing mode to a 2, and if you
have a particular order that you are reprinting put that Material Document number in. 4) Then click on execute with the clock in it.
Execute
Material Document Number
Output Type and Processing Mode

Page 244
5) This is the screen that you get. Check the box for the Material Document and click on execute with the clock. Your copy of that order will print out.
Check this Box
Execute

Page 245
To Enter Another Screen From The One You Are In
1) If you are in ( example ) MMBE and you need to go to zme2w, In the search bar at top left, type
in the following: /nzme2w. This will take you to that screen.
/n plus screen will take you to that screen
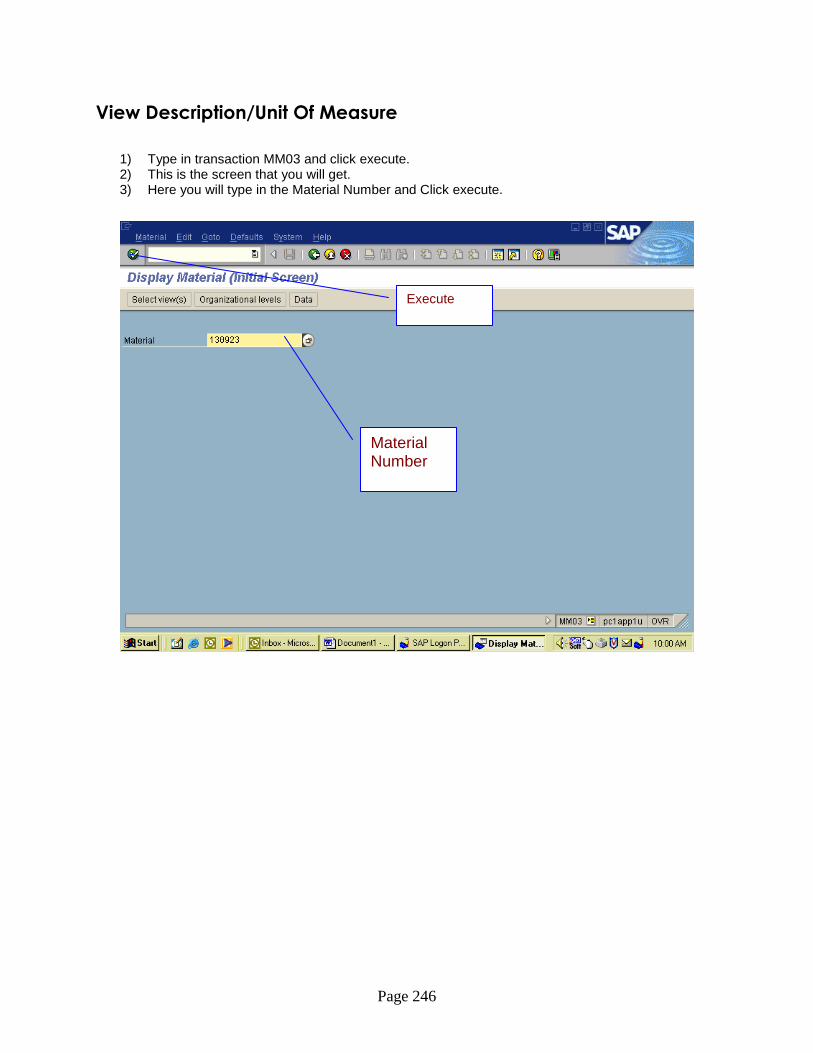
Page 246
View Description/Unit Of Measure
1) Type in transaction MM03 and click execute. 2) This is the screen that you will get. 3) Here you will type in the Material Number and Click execute.
Material Number
Execute
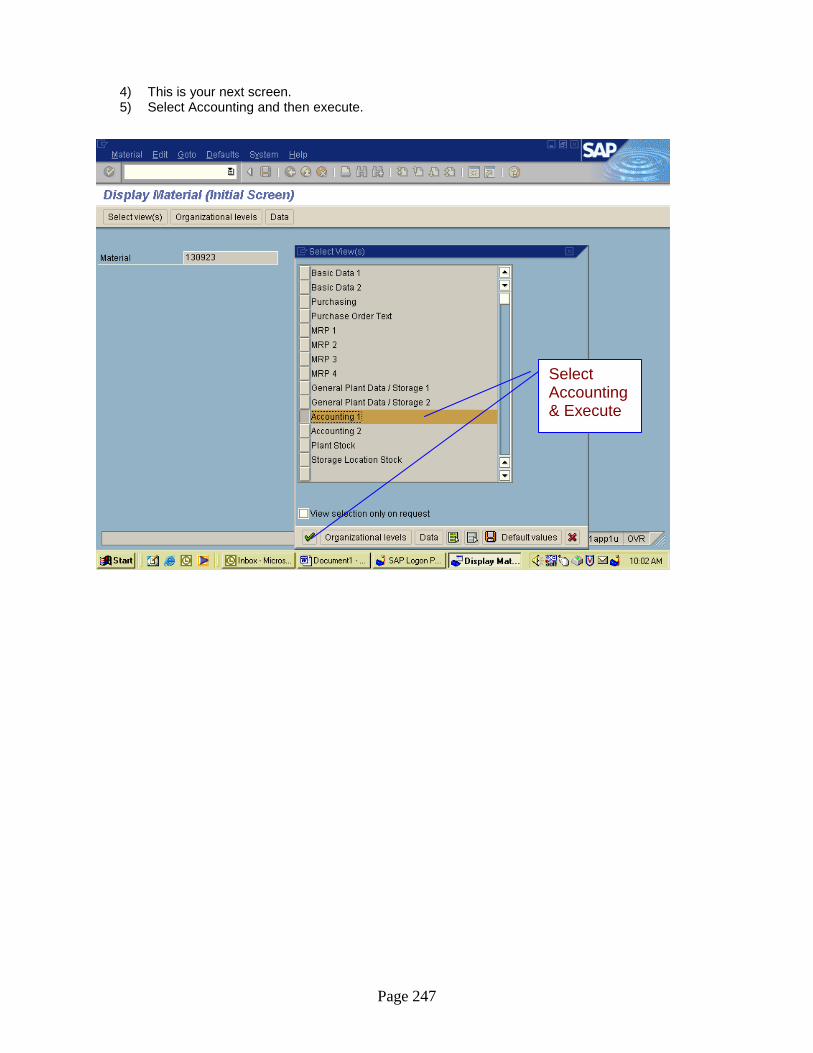
Page 247
4) This is your next screen. 5) Select Accounting and then execute.
Select Accounting & Execute

Page 248
6) Type in the plant Number and execute.
Plant Number
Execute
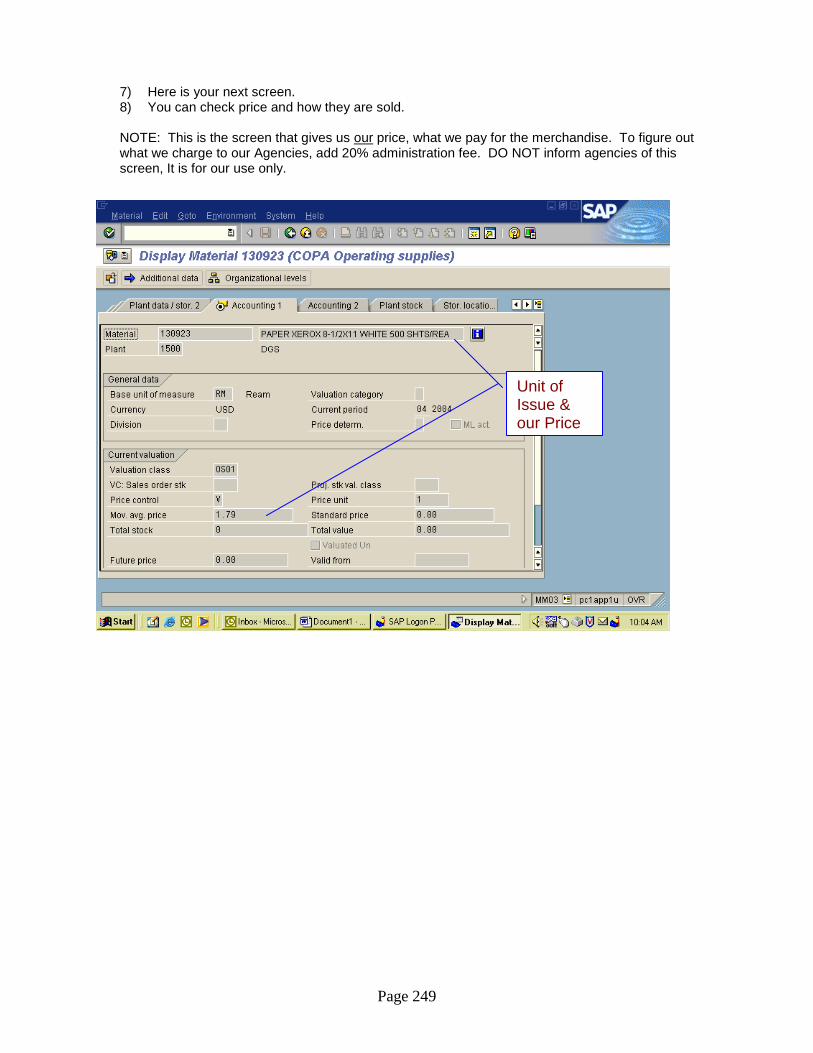
Page 249
7) Here is your next screen. 8) You can check price and how they are sold. NOTE: This is the screen that gives us our price, what we pay for the merchandise. To figure out what we charge to our Agencies, add 20% administration fee. DO NOT inform agencies of this screen, It is for our use only.
Unit of Issue & our Price


