104
Cover Page Oracle© Universal Content Management Web Form Editor 10g Release 3 (10.1.3.3.2) September 2007

Cover Page
Oracle© Universal Content ManagementWeb Form Editor10g Release 3 (10.1.3.3.2)
September 2007

Web Form Editor, 10g Release 3 (10.1.3.3.2)Copyright © 2007, Oracle. All rights reserved.
Contributing Authors: Ron van de Crommert, Karen Johnson
Contributors: Eva Cordes
The Programs (which include both the software and documentation) contain proprietary information; they are provided under a license agreement containing restrictions on use and disclosure and are also protected by copyright, patent, and other intellectual and industrial property laws. Reverse engineering, disassembly, or decompilation of the Programs, except to the extent required to obtain interoperability with other independently created software or as specified by law, is prohibited.
The information contained in this document is subject to change without notice. If you find any problems in the documentation, please report them to us in writing. This document is not warranted to be error-free. Except as may be expressly permitted in your license agreement for these Programs, no part of these Programs may be reproduced or transmitted in any form or by any means, electronic or mechanical, for any purpose.
If the Programs are delivered to the United States Government or anyone licensing or using the Programs on behalf of the United States Government, the following notice is applicable:
U.S. GOVERNMENT RIGHTS Programs, software, databases, and related documentation and technical data delivered to U.S. Government customers are "commercial computer software" or "commercial technical data" pursuant to the applicable Federal Acquisition Regulation and agency-specific supplemental regulations. As such, use, duplication, disclosure, modification, and adaptation of the Programs, including documentation and technical data, shall be subject to the licensing restrictions set forth in the applicable Oracle license agreement, and, to the extent applicable, the additional rights set forth in FAR 52.227-19, Commercial Computer Software--Restricted Rights (June 1987). Oracle USA, Inc., 500 Oracle Parkway, Redwood City, CA 94065.
The Programs are not intended for use in any nuclear, aviation, mass transit, medical, or other inherently dangerous applications. It shall be the licensee's responsibility to take all appropriate fail-safe, backup, redundancy and other measures to ensure the safe use of such applications if the Programs are used for such purposes, and we disclaim liability for any damages caused by such use of the Programs.
Oracle, JD Edwards, PeopleSoft, and Siebel are registered trademarks of Oracle Corporation and/or its affiliates. Other names may be trademarks of their respective owners.
The Programs may provide links to Web sites and access to content, products, and services from third parties. Oracle is not responsible for the availability of, or any content provided on, third-party Web sites. You bear all risks associated with the use of such content. If you choose to purchase any products or services from a third party, the relationship is directly between you and the third party. Oracle is not responsible for: (a) the quality of third-party products or services; or (b) fulfilling any of the terms of the agreement with the third party, including delivery of products or services and warranty obligations related to purchased products or services. Oracle is not responsible for any loss or damage of any sort that you may incur from dealing with any third party.

T a b l e o f C o n t e n t s
Chapter 1: IntroductionOverview . . . . . . . . . . . . . . . . . . . . . . . . . . . . . . . . . . . . . . . . . . . . . . . . . . .1-1
About This Guide . . . . . . . . . . . . . . . . . . . . . . . . . . . . . . . . . . . . . . . . . . . . .1-1
About Content Server Forms . . . . . . . . . . . . . . . . . . . . . . . . . . . . . . . . . . . .1-2
About the Web Form Editor . . . . . . . . . . . . . . . . . . . . . . . . . . . . . . . . . . . . .1-3
File Formats . . . . . . . . . . . . . . . . . . . . . . . . . . . . . . . . . . . . . . . . . . . . . . . . .1-4HCSW Files . . . . . . . . . . . . . . . . . . . . . . . . . . . . . . . . . . . . . . . . . . . . . .1-4HCSF Files . . . . . . . . . . . . . . . . . . . . . . . . . . . . . . . . . . . . . . . . . . . . . .1-5HCSP Files . . . . . . . . . . . . . . . . . . . . . . . . . . . . . . . . . . . . . . . . . . . . . .1-5IDOC Files . . . . . . . . . . . . . . . . . . . . . . . . . . . . . . . . . . . . . . . . . . . . . . .1-5
Supplementary Documentation . . . . . . . . . . . . . . . . . . . . . . . . . . . . . . . . . .1-6
Chapter 2: Installing the Web Form EditorOverview . . . . . . . . . . . . . . . . . . . . . . . . . . . . . . . . . . . . . . . . . . . . . . . . . . .2-1
Installation Requirements and Considerations. . . . . . . . . . . . . . . . . . . . . . .2-1
Installing the Software . . . . . . . . . . . . . . . . . . . . . . . . . . . . . . . . . . . . . . . . .2-2Installing the FCKEditor Component . . . . . . . . . . . . . . . . . . . . . . . . . . .2-2Installing the FormEditor Component . . . . . . . . . . . . . . . . . . . . . . . . . .2-3
Checking the Installation . . . . . . . . . . . . . . . . . . . . . . . . . . . . . . . . . . . . . . .2-4
Chapter 3: Creating Content Server FormsOverview . . . . . . . . . . . . . . . . . . . . . . . . . . . . . . . . . . . . . . . . . . . . . . . . . . .3-1
About Creating Forms . . . . . . . . . . . . . . . . . . . . . . . . . . . . . . . . . . . . . . . . .3-2
Advanced Forms . . . . . . . . . . . . . . . . . . . . . . . . . . . . . . . . . . . . . . . . . . . . .3-2
Launching the Web Form Editor . . . . . . . . . . . . . . . . . . . . . . . . . . . . . . . . .3-3
Selecting a Template . . . . . . . . . . . . . . . . . . . . . . . . . . . . . . . . . . . . . . . . . .3-4
Adding a Form Framework. . . . . . . . . . . . . . . . . . . . . . . . . . . . . . . . . . . . . .3-4
Web Form Editor iii

Table of Contents
Editing a Form Framework. . . . . . . . . . . . . . . . . . . . . . . . . . . . . . . . . . . . . .3-5
Formatting the Form. . . . . . . . . . . . . . . . . . . . . . . . . . . . . . . . . . . . . . . . . . .3-5
Previewing a Web Form. . . . . . . . . . . . . . . . . . . . . . . . . . . . . . . . . . . . . . . .3-6
Viewing the Source Code of a Web Form . . . . . . . . . . . . . . . . . . . . . . . . . .3-6
Checking In a Web Form . . . . . . . . . . . . . . . . . . . . . . . . . . . . . . . . . . . . . . .3-7
Revising a Web Form. . . . . . . . . . . . . . . . . . . . . . . . . . . . . . . . . . . . . . . . . .3-7
Design Tips and Considerations . . . . . . . . . . . . . . . . . . . . . . . . . . . . . . . . .3-8
Main Editor Screen. . . . . . . . . . . . . . . . . . . . . . . . . . . . . . . . . . . . . . . . . . .3-10
Editor Toolbars. . . . . . . . . . . . . . . . . . . . . . . . . . . . . . . . . . . . . . . . . . . . . .3-11
Content Templates Dialog . . . . . . . . . . . . . . . . . . . . . . . . . . . . . . . . . . . . .3-13
Form Properties Dialog . . . . . . . . . . . . . . . . . . . . . . . . . . . . . . . . . . . . . . .3-14
Content Check In Form Dialog. . . . . . . . . . . . . . . . . . . . . . . . . . . . . . . . . .3-16
Chapter 4: Working With Form ElementsOverview . . . . . . . . . . . . . . . . . . . . . . . . . . . . . . . . . . . . . . . . . . . . . . . . . . .4-1
About Form Elements . . . . . . . . . . . . . . . . . . . . . . . . . . . . . . . . . . . . . . . . .4-2
Advanced Form Elements . . . . . . . . . . . . . . . . . . . . . . . . . . . . . . . . . . . . . .4-3
Adding a Form Element . . . . . . . . . . . . . . . . . . . . . . . . . . . . . . . . . . . . . . . .4-4
Editing a Form Element . . . . . . . . . . . . . . . . . . . . . . . . . . . . . . . . . . . . . . . .4-5
Form Element Properties Dialogs . . . . . . . . . . . . . . . . . . . . . . . . . . . . . . . .4-5Checkbox. . . . . . . . . . . . . . . . . . . . . . . . . . . . . . . . . . . . . . . . . . . . . . . .4-6Radio Button . . . . . . . . . . . . . . . . . . . . . . . . . . . . . . . . . . . . . . . . . . . . .4-8Text Field . . . . . . . . . . . . . . . . . . . . . . . . . . . . . . . . . . . . . . . . . . . . . . .4-11Text Area . . . . . . . . . . . . . . . . . . . . . . . . . . . . . . . . . . . . . . . . . . . . . . .4-14Hidden Field. . . . . . . . . . . . . . . . . . . . . . . . . . . . . . . . . . . . . . . . . . . . .4-16Advanced Element Options . . . . . . . . . . . . . . . . . . . . . . . . . . . . . . . . .4-19
Data Binding Dialog . . . . . . . . . . . . . . . . . . . . . . . . . . . . . . . . . . . . . . . . . .4-21
Chapter 5: Working With Form TablesOverview . . . . . . . . . . . . . . . . . . . . . . . . . . . . . . . . . . . . . . . . . . . . . . . . . . .5-1
About Form Tables. . . . . . . . . . . . . . . . . . . . . . . . . . . . . . . . . . . . . . . . . . . .5-2
Advanced Form Tables . . . . . . . . . . . . . . . . . . . . . . . . . . . . . . . . . . . . . . . .5-2Advanced Tables Linked to Result Sets . . . . . . . . . . . . . . . . . . . . . . . .5-2Advanced Conditional Tables . . . . . . . . . . . . . . . . . . . . . . . . . . . . . . . .5-3
Adding a Table . . . . . . . . . . . . . . . . . . . . . . . . . . . . . . . . . . . . . . . . . . . . . . .5-3
iv Web Form Editor

Table of Contents
Editing a Table . . . . . . . . . . . . . . . . . . . . . . . . . . . . . . . . . . . . . . . . . . . . . . .5-3
Formatting a Table . . . . . . . . . . . . . . . . . . . . . . . . . . . . . . . . . . . . . . . . . . . .5-4
Making a Table Conditional . . . . . . . . . . . . . . . . . . . . . . . . . . . . . . . . . . . . .5-4
Making a Table Row Conditional . . . . . . . . . . . . . . . . . . . . . . . . . . . . . . . . .5-5
Table Options Dialogs . . . . . . . . . . . . . . . . . . . . . . . . . . . . . . . . . . . . . . . . .5-5Basic Table Options Dialog . . . . . . . . . . . . . . . . . . . . . . . . . . . . . . . . . .5-6Advanced Options Dialog: Type . . . . . . . . . . . . . . . . . . . . . . . . . . . . . .5-9Advanced Options Dialog: Actions . . . . . . . . . . . . . . . . . . . . . . . . . . .5-11Advanced Options Dialog: Variables . . . . . . . . . . . . . . . . . . . . . . . . . .5-13Advanced Options Dialog: Wrapper . . . . . . . . . . . . . . . . . . . . . . . . . .5-15
Table Row Dialog. . . . . . . . . . . . . . . . . . . . . . . . . . . . . . . . . . . . . . . . . . . .5-16
Condition Clause Dialog. . . . . . . . . . . . . . . . . . . . . . . . . . . . . . . . . . . . . . .5-17
Chapter 6: Working With Web ActionsOverview . . . . . . . . . . . . . . . . . . . . . . . . . . . . . . . . . . . . . . . . . . . . . . . . . . .6-1
About Web Actions. . . . . . . . . . . . . . . . . . . . . . . . . . . . . . . . . . . . . . . . . . . .6-1
Adding a Web Action . . . . . . . . . . . . . . . . . . . . . . . . . . . . . . . . . . . . . . . . . .6-2
Editing a Web Action . . . . . . . . . . . . . . . . . . . . . . . . . . . . . . . . . . . . . . . . . .6-3
Web Action Dialog . . . . . . . . . . . . . . . . . . . . . . . . . . . . . . . . . . . . . . . . . . . .6-3
Chapter 7: Working With Dynamic IncludesOverview . . . . . . . . . . . . . . . . . . . . . . . . . . . . . . . . . . . . . . . . . . . . . . . . . . .7-1
About Dynamic Includes . . . . . . . . . . . . . . . . . . . . . . . . . . . . . . . . . . . . . . .7-2
Creating an IDOC Resource . . . . . . . . . . . . . . . . . . . . . . . . . . . . . . . . . . . .7-2
Checking In an IDOC Resource. . . . . . . . . . . . . . . . . . . . . . . . . . . . . . . . . .7-2
Inserting an IDOC Reference to a Form . . . . . . . . . . . . . . . . . . . . . . . . . . .7-3
Revising an IDOC Resource . . . . . . . . . . . . . . . . . . . . . . . . . . . . . . . . . . . .7-4
Dynamic Include Dialog . . . . . . . . . . . . . . . . . . . . . . . . . . . . . . . . . . . . . . . .7-4
Idoc Resource Search Dialog . . . . . . . . . . . . . . . . . . . . . . . . . . . . . . . . . . .7-6
Appendix A: Standard FCKeditor Toolbar IconsStandard FCKeditor Toolbar Icons. . . . . . . . . . . . . . . . . . . . . . . . . . . . . . . A-1
Appendix B: Uninstalling the Web Form EditorUninstalling the Software . . . . . . . . . . . . . . . . . . . . . . . . . . . . . . . . . . . . . . B-1
Web Form Editor v

Table of Contents
Appendix C: Third Party LicensesOverview . . . . . . . . . . . . . . . . . . . . . . . . . . . . . . . . . . . . . . . . . . . . . . . . . . C-1
Apache Software License . . . . . . . . . . . . . . . . . . . . . . . . . . . . . . . . . . . . . C-1
W3C® Software Notice and License . . . . . . . . . . . . . . . . . . . . . . . . . . . . . C-2
Zlib License . . . . . . . . . . . . . . . . . . . . . . . . . . . . . . . . . . . . . . . . . . . . . . . . C-4
General BSD License. . . . . . . . . . . . . . . . . . . . . . . . . . . . . . . . . . . . . . . . . C-5
General MIT License . . . . . . . . . . . . . . . . . . . . . . . . . . . . . . . . . . . . . . . . . C-5
Unicode License. . . . . . . . . . . . . . . . . . . . . . . . . . . . . . . . . . . . . . . . . . . . . C-6
Miscellaneous Attributions . . . . . . . . . . . . . . . . . . . . . . . . . . . . . . . . . . . . . C-7
Index
vi Web Form Editor

C h a p t e r
1.INTRODUCTION
OVERVIEWThis section contains the following topics:
About This Guide (page 1-1)
About Content Server Forms (page 1-2)
About the Web Form Editor (page 1-3)
File Formats (page 1-4)
Supplementary Documentation (page 1-6)
ABOUT THIS GUIDEThis guide is intended for web developers and experienced users who use the Web Form Editor, which is an optional add-on to Oracle Content Server that provides a visual design environment for Hypertext Content Server Files (HCSFs) and IDOC resource files. This document assumes that you are familiar with the standard file formats that are used by Content Server to render pages. In particular, it assumes familiarity with HCST, HCSF, HCSP, and IDOC files and how Idoc Script is used in them.
Note: See Supplementary Documentation (page 1-6) for more information about dynamic server pages such as HCST, HCSF, HCSP, and IDOC files.
Web Form Editor 1-1

Introduction
ConventionsThe following conventions are used throughout this guide:
The notation [Install_Dir]/ is used to refer to the location on your system where the content server instance is installed.
Forward slashes (/) are used to separate the directory levels in a path name. A forward slash will always appear after the end of a directory name.
Notes, technical tips, important notices, and cautions use these conventions:
ABOUT CONTENT SERVER FORMSForms are used to submit information to the content server for storage and/or processing. Content Server has a number of built-in forms to provide content management and search features, such as a content check-in form, content information update form, and search form.
Users can define their own web forms that can be checked into the content server and opened and completed by other users, who can submit information conveniently through form elements such as checkboxes, text fields, dropdown lists, etc.
Various file formats are involved with content server forms, including HCSW, HCSF, HCSP, and IDOC. See page 1-4 for further details.
Symbols Description
This is a note. It is used to bring special attention to information.
This is a technical tip. It is used to identify information that can be used to make your tasks easier.
This is an important notice. It is used to identify a required step or required information.
This is a caution. It is used to identify information that might cause loss of data or serious system problems.
1-2 Web Form Editor

Introduction
ABOUT THE WEB FORM EDITORWeb Form Editor is an optional add-on to Oracle Content Server that provides a cross-platform, browser-based visual design environment to create Hypertext Web Form Editor Files (HCSFs) and associated IDOC resource files.
HCSFs can be used to create HTML forms with XML-formatted Idoc Script and/or other script code that can be checked into the content server and completed by content consumers. The XML data set of each completed form is checked into the content server as a separate content item (HCSP file with the submitted data embedded in XML). These HCSP files are full-text indexed and can be processed further (for example, using workflows or subscriptions).
IDOC files contain HTML and Idoc Script resources that can be loaded and displayed on HCSF files.
The Web Form Editor is tightly integrated into Content Server, which enables you to select metadata fields for presentation on the form and save the form definition into the content server from the editor interface. In addition, Content Server includes can be used to display both XML data island fields and Content Server metadata fields. The Web Form Editor uses the includes normally used on check-in, update, info and search pages. This means that if a Content Server field is used on a form, it will be displayed according to Content Server rules. For example, if a field is associated with a view, it will be displayed with its view.
FCKeditorThe Web Form Editor uses a modified version of FCKeditor, a JavaScript-based open-source HTML editor that is lightweight and does not require any kind of installation on the client computer.
Note: Go to http://www.fckeditor.net for more information about FCKeditor, including web browser compatibility.
Web Form Editor 1-3

Introduction
FILE FORMATSSeveral file formats are associated with content server forms created with the Web Form Editor:
HCSW Files (page 1-4)
HCSF Files (page 1-5)
HCSP Files (page 1-5)
IDOC Files (page 1-5)
HCSW FilesHypertext Content Server Web Forms (HCSWs) are specific to the Web Form Editor. It is an intermediate format used between the form editor (FCKeditor) and Content Server. When a web form or IDOC resource created in the Web Form Editor is checked into the content server, its native file is an HCSW file. This file contains valid HTML code and does not contain any Idoc Script code. It does, however, designate fields as advanced and these advanced fields are parsed by a content server conversion and turned into appropriate Idoc Script includes.
The ‘[[’ and ‘]]’ surrounding tags in an HCSW form are used in place of the standard Idoc Script demarcations of ‘<$’ and ‘$>’, respectively. This keeps the HCSW form HTML-pure.
HCSW files can be reopened in the Web Form Editor from the file’s content information page (using the Content Actions dropdown menu).
Note: For more information about these file formats, see the Dynamic Server Pages Guide and The Definitive Guide to Content Server Development. See Supplementary Documentation (page 1-6) for further details.
Tech Tip: See the readme.doc file installed with the Web Form Editor software (in the [Install_Dir]/custom/FormEditor directory) for details on the conversions between these file formats.
1-4 Web Form Editor

Introduction
Figure 1-1 Content Actions dropdown list on content information page for HCSW files
HCSF FilesWhen a web form definition created in the Web Form Editor is checked into the content server, its native HCSW file is run through a conversion process, which parses the tag elements, finds the advanced tags, and replaces them with resource includes. The result is a Hypertext Content Server File (HCSF), which is stored as the form’s web-viewable file. This is the file that content consumers can open to complete the form.
HCSP FilesEvery time a form is submitted, a Hypertext Content Server Page (HCSP) is checked into the content server as a separate item. An HCSP file is a representation of its associated HCSF form, along with the submitted form data embedded in XML. When you open an HCSP file, you see the original form with the previously submitted data contained in it.
HCSPs are included in the full-text index, which means their contents are fully searchable.
IDOC FilesThe Web Form Editor can also be used to create IDOC files, which contain HTML and Idoc Script resources that can be loaded and displayed on HCSF files. You can check IDOC files into the content server directly from the Web Form Editor interface, so they can be called in HCSF files that are also checked in. The native file format of checked-in IDOC files is HCSW (see page 1-4) and the web-viewable file is an IDOC file. The IDOC file is the file that can be called in HCSFs.
Web Form Editor 1-5

Introduction
SUPPLEMENTARY DOCUMENTATIONThe following documents may be useful for the Web Form Editor in addition to the current guide:
Dynamic Server Pages Guide, which provides information about files that are checked into the content server and then used to generate web pages dynamically (including HCSF forms that can be created with the Web Form Editor). This document is included in the developer section of the Content Server administrator online help, and is also available as a PDF file at [Install_Dir]/weblayout/help/documentation/ developer/dynamic_server_pages_10en.pdf.
The Definitive Guide to Stellent Content Server Development (ISBN 1-59059-684-6) by Brian “Bex” Huff. This book, which is available from Amazon.com and Apress.com, provides an in-depth explanation of Stellent’s core architecture and includes developer-oriented information about customizing Web Form Editor. Chapters 5 and 6 specifically deal with HCSPs, HCSFs, and IDOC resources.
The Web Form Editor’s readme.doc file, which is installed with the FormEditor component file in [Install_Dir]/custom/FormEditor. This Microsoft Word document provides technical background information about Content Server forms in general and the Web Form Editor in particular (including information about how the content server stores and converts web forms and IDOC resources created with the Web Form Editor).
http://www.w3.org/TR/html4/interact/forms.html on the website of the World Wide Web Consortium (W3C), which explains the general HTML code involved in web forms and also provides guidelines for creating HTML forms.
1-6 Web Form Editor

C h a p t e r
2.INSTALLING THE WEB FORMEDITOR
OVERVIEWThis section covers the following topics:
Installation Requirements and Considerations (page 2-1)
Installing the Software (page 2-2)
Checking the Installation (page 2-4)
INSTALLATION REQUIREMENTS AND CONSIDERATIONS
This section lists the software requirements and other considerations that apply to the Web Forms Editor component:
Content Server 10gR3 must be installed and functioning properly.
The Web Form Editor should be installed on the content server. It requires no installation of any kind on client computers.
The Web Form Editor uses FCKeditor, a JavaScript-based open-source HTML editor, to provide a visual design environment for Content Server HCSF and IDOC files. Make sure that you use the FCKEditor component provided by Oracle and install it
Web Form Editor 2-1

Installing the Web Form Editor
following the procedure in this section. Do not install FCKeditor from a different source or using a different method.
INSTALLING THE SOFTWAREInstalling the Web Form Editor software consists of two steps:
1. Installing the FCKEditor component (page 2-2)
2. Installing the FormEditor component (page 2-3)
Installing the FCKEditor ComponentTo install the FCKEditor component, complete the following steps:
1. Make sure the Content Server software is installed and functioning properly.
2. Log in to the content server as an administrator.
3. Go to the Administration page of the content server, and click Admin Server.
The Administration for Servers page is displayed.
4. Click the button for the content server instance on which you want to install the component.
The options and status page of the selected content server instance is displayed.
5. Click Component Manager in the menu on the left.
The Component Manager page is displayed.
6. Click Browse next to the Install New Component field.
A file selection dialog is displayed.
7. Browse to the component file (typically called FCKEditor.zip), select it, and close the file selection dialog.
8. Click Install.
A page is displayed listing what will be installed.
Important: Make sure that you install the FCKEditor component first. You cannot install the FormEditor component if the FCKEditor is not already installed and enabled.
2-2 Web Form Editor

Installing the Web Form Editor
9. Click Continue.
All required files are now installed. After this process is completed, a page is displayed stating that the component was uploaded and installed successfully.
10. Click the link to enable the component and restart the content server.
The options and status page of the content server instance is displayed again.
11. Click the icon to restart the content server.
Installing the FormEditor ComponentTo install the FormEditor component, complete the following steps:
1. Log in to the content server as an administrator.
2. Go to the Administration page of the content server, and click Admin Server.
The Administration for Servers page is displayed.
3. Click the button for the content server instance on which you want to install the component.
The options and status page of the selected content server instance is displayed.
4. Click Component Manager in the menu on the left.
The Component Manager page is displayed.
5. Click Browse next to the Install New Component field.
A file selection dialog is displayed.
6. Browse to the component file (typically called FormEditor.zip), select it, and close the file selection dialog.
7. Click Install.
A page is displayed listing what will be installed.
Important: You must enable the FCKEditor component and restart the content server before installing the FormEditor component. If you do not and you attempt to install the FormEditor component, an error message is displayed.
Note: The component files are all located in [Install_Dir]/custom/FCKEditor on the content server.
Web Form Editor 2-3

Installing the Web Form Editor
8. Click Continue.
All required files are now installed. After this process is completed, a page is displayed stating that the component was uploaded and installed successfully.
9. Click the link to enable the component and restart the content server.
The options and status page of the content server instance is displayed again.
10. Click the icon to restart the content server.
CHECKING THE INSTALLATIONTo check whether the Web Form Editor was installed correctly, complete the following steps:
1. Open a new browser window.
2. Log in to the content server.
3. Go to the Content Management tray or menu.
4. Check that this tray or menu now includes an option called “Web Form Editor.” If it does, the Web Form Editor was installed correctly.
Important: You must enable the FormEditor component and restart the content server before you can use the Web Form Editor.
Note: The component files are all located in [Install_Dir]/custom/FormEditor on the content server.
2-4 Web Form Editor

C h a p t e r
3.CREATING CONTENT SERVERFORMS
OVERVIEWThis section covers the following topics:
ConceptsAbout Creating Forms (page 3-2)
Advanced Forms (page 3-2)
TasksLaunching the Web Form Editor (page 3-3)
Selecting a Template (page 3-4)
Adding a Form Framework (page 3-4)
Editing a Form Framework (page 3-5)
Formatting the Form (page 3-5)
Previewing a Web Form (page 3-6)
Viewing the Source Code of a Web Form (page 3-6)
Checking In a Web Form (page 3-7)
Web Form Editor 3-1

Creating Content Server Forms
Revising a Web Form (page 3-7)
Design Tips and Considerations (page 3-8)
InterfaceMain Editor Screen (page 3-10)
Editor Toolbars (page 3-11)
Content Templates Dialog (page 3-13)
Form Properties Dialog (page 3-14)
Content Check In Form Dialog (page 3-16)
ABOUT CREATING FORMSWeb developers and experienced users can use the Web Form Editor to define web forms that can be checked into the content server and opened and completed by other users, who can submit information conveniently through form elements such as checkboxes, text fields, dropdown lists, etc. (see chapter 4).
The web forms created in the Web Form Editor can include all standard HTML form elements, as well as any other HTML code. In addition, they can be designated as “advanced” (see below), which provides extra functionality and allows them to be tied in to the content server.
ADVANCED FORMSYou will generally want to designate forms that you design in the Web Form Editor as “advanced.” This creates all the standard JavaScript includes that automatically take care of a lot of functionality in the background. It sets up the buttons (and underlying code) that allow the form to be submitted to the content server, and also enables advanced form elements (see page 4-3) and advanced form tables (see page 5-2) to work properly.
Note: See File Formats (page 1-4) for more information about the various file formats associated with Web Form Editor web forms.
Note: See http://www.w3.org/TR/html4/interact/forms.html for general information about HTML forms.
3-2 Web Form Editor

Creating Content Server Forms
You can create functional HCSF web forms in the Web Form Editor without using any of the advanced features, but that generally requires a lot more work on your part as you need to provide all the required information and code yourself. For example, you would manually need to add a Submit button with all required IdcService information.
Figure 3-1 Advanced form
LAUNCHING THE WEB FORM EDITORTo launch the Web Form Editor, complete the following steps:
1. Log in to the content server.
2. If you want to create a new Content Server form, click Web Form Editor under Content Management. The Web Form Editor is then started as a full screen in a new browser window.
If you want to modify an existing Content Server form, search for its checked-in form definition file (HCSW) and open the item’s content information page. Then, choose the Web Form Editor option in the Content Actions dropdown menu. The Web Form Editor is then started within the Content Server interface.
The editor main screen is displayed (see page 3-10).
Note: If you start a new form using the standard content template (see page 3-13), then the form is already set up to be advanced.
Tech Tip: Once a form has been designated as advanced, it is presented using the fe_display_form_tag_begin include, which initializes the IDOC environment for an HCSF form.
Web Form Editor 3-3

Creating Content Server Forms
SELECTING A TEMPLATEYou can create a form from scratch, but you can also select a template that you can use as a starting point. To open a template in the editor, complete the following steps:
1. Click the Templates icon in the toolbar ( ).
The Content Templates dialog is opened (see page 3-13).
2. Click the template that you want to open.
The selected template is opened in the main editor screen.
ADDING A FORM FRAMEWORKTo add a form framework to the web form, complete the following steps:
1. Move the mouse cursor to the location in the web form where you want to insert the form framework.
2. Click the Form icon in the toolbar ( ).
The Form Properties dialog is opened (see page 3-14).
Caution: When you open an existing Content Server web form from its content information page, it is not checked out of the content server, which means another user could potentially open and modify the same file.
Note: If you select the standard Web Form Editor form template, the form is automatically set up to be advanced (see page 3-2).
Caution: When you click a template in the Content Templates dialog, the current contents in the main Web Form Editor screen are immediately replaced with the template content, without any further warning, even if the current form was not yet saved.
Tech Tip: If you are an administrator, you can add or modify templates by editing the [Install_Dir]/custom/FormEditor/templates/fe_templates.xml file. Each template definition is enclosed in <template> and </template> tags. After modifying the XML file, you do not need to restart the content server, but you do need to republish the dynamic files by running the “Publish dynamic layout files” action (either from the Administration page or in Configuration Manager).
3-4 Web Form Editor

Creating Content Server Forms
3. Specify all properties, as required, and click OK when you are done.
The form framework is added to the web form.
EDITING A FORM FRAMEWORKTo edit an existing form framework in the web form, complete the following steps:
1. Move the mouse cursor to anywhere within the existing form framework whose properties you want to modify.
2. Right-click, and choose the Form Properties option from the popup menu.
The Form Properties dialog is opened (see page 3-14).
3. Modify the properties, as required, and click OK when you are done.
The form framework is updated in the web form.
FORMATTING THE FORMThe Web Form Editor is a full-fledged HTML editor, which means that you can format your web form like any other HTML page. The editor toolbars offer a variety of layout and text formatting features, and you can also insert graphics, links, bulleted or numbered lists, etc.
See Appendix A (Standard FCKeditor Toolbar Icons) for an overview of FCKeditor’s standard toolbar features.
Note: If you start a new form using the standard content template (see page 3-13), then the form framework is already there and you do not need to add it again.
Important: If you are planning to add advanced form elements (see page 4-3) to the form, make sure that you make the form framework advanced (see page 3-2). Otherwise the form elements will not function properly.
Note: You cannot add form buttons to an existing form framework; you can do that only when you initially create a form framework.
Web Form Editor 3-5

Creating Content Server Forms
PREVIEWING A WEB FORMIf you have access to a content server, you can preview the web form in a new browser window to check the form’s presentation from a client’s perspective. Preview mode displays the web form as it would appear if it were checked into the content server. A web form in preview mode cannot submit information, so clicking the Submit button does not check any form data into the content server.
To preview the current web form in a new browser window, click the Web Form Preview icon in the toolbar ( ).
VIEWING THE SOURCE CODE OF A WEB FORMTo view the source code of a web form, click the icon in the editor toolbar. The screen then turns to text mode and displays the source code of the current web form in its current state.
Figure 3-2 Source code of web form
Caution: Do not use the Preview icon ( ) to preview a Content Server web form. This mode displays the form layout correctly, but is not “Content Server aware,” which means that information derived from the content server is not rendered correctly.
3-6 Web Form Editor

Creating Content Server Forms
You can freely modify or add code in this screen. This may be useful if you want to fine-tune the code or add something that cannot be added in WYSIWYG mode (for example, some custom script code).
If you want to return to WYSIWYG mode, click the Source icon in the toolbar again.
CHECKING IN A WEB FORMOnce you have completed your web form in the Web Form Editor, you need to check it into the content server, so it becomes available for further use.
To check a web form into the content server, complete the following steps:
1. When you are done defining your web form, click the Save icon in the toolbar ( ).
The Content Check In dialog is displayed (see page 3-16).
2. Provide metadata, as required, and click Form Checkin when you are done.
The web form is checked into the content server and is now available for further use.
ConsiderationsPlease note the following with regard to checking in a web form:
Each defined web form is checked into the content server in two formats: HCSW (as the native format) and HCSF (as the web-viewable format):
In addition, each completed form data set is checked in as an HCSP file. See File Formats (page 1-4) for more information on these file formats.
If you opened an existing native web form (HCSW) in the Web Form Editor and you save it, a new revision of that form is checked into the content server.
Please also note the general design tips and considerations on page 3-8.
REVISING A WEB FORMTo revise an existing web form that is already checked into the content server, complete the following steps:
1. Use Content Server’s search features to find the web form that you want to revise.
Web Form Editor 3-7

Creating Content Server Forms
2. Open the item’s content information page.
3. Choose Web Form Editor from the Content Actions dropdown menu.
The Web Form Editor is launched with the web form available for editing.
ConsiderationsPlease note the following with regard to revising a web form:
You can open checked-in web forms only if they were created using the Web Form Editor (that is, if they have an HCSW file as the native format).
If you check in the modified web form, a new revision of that form is checked into the content server.
If you open a checked-in web form, the Web Form Editor does not launch in a new browser window, but within the Content Server user interface.
DESIGN TIPS AND CONSIDERATIONSPlease note the following tips and considerations with regard to creating Content Server forms using the Web Form Editor:
Keep the forms as simple and free of code as possible. Strive to have only HTML includes in your forms, with all code and conditionals in an IDOC file. This is especially helpful for HCSF pages, where submitted forms will also reflect changes made to the IDOC file.
Whenever you are customizing the content server, you should isolate your development efforts from your production system. Keep in mind that frequent revisions to dynamic server pages can result in a large number of obsolete content items. You should do as much work on a development system as possible before deploying to a production instance, and you may need to delete out-of-date pages regularly.
When you develop a website using dynamic server pages, think of the development and contribution processes in terms of ownership:
• Structure, including site design and navigation, is owned by the webmaster. When you use dynamic server pages, structure is contained in and controlled with includes that are defined in IDOC files.
3-8 Web Form Editor

Creating Content Server Forms
• Content—the actual text of the web pages—is owned by the contributors. When you use dynamic server pages, content is contained primarily in HCSP files that make use of the includes in the IDOC files.
You can copy and paste an existing HTML web page into the editor as a starting point.
All advanced form elements need to be contained in an advanced form to function properly.
If you want to bind a form element to a Content Server metadata field, make sure that the name of that field is at least three characters long. Otherwise an error is displayed when you attempt to add the field to a form. This is an XML limitation; for a field to be put into the XML data island, it needs to be longer than two characters.
As a form designer, you have the ability to link any form element to any content server metadata field. However, keep in mind that it does not always make sense to link particular form elements to particular metadata fields, depending on their characteristics or purpose.
When designing a form, make sure that all required Content Server metadata fields are populated before submitting a form. Otherwise the form cannot be checked in successfully and an error message is displayed. For example, if the content server is not set up to automatically assign content IDs upon check-in, then the form needs to provide some mechanism to set the content ID of a submitted form (either entered manually by the user or created in the background).
You need to launch a new instance of the Web Form Editor to start a new form. If an existing form is open in the editor, you cannot start a new form by deleting all content from the existing form or clicking the New Page icon ( ). You cannot check this new form into the content server by clicking the Save icon ( ) as it would be considered a new revision of the existing form that was originally opened in the Web Form Editor.
Web Form Editor 3-9

Creating Content Server Forms
MAIN EDITOR SCREEN
After launching the Web Form Editor, you see its main screen. The toolbar icons on the main screen that were modified or added compared to the standard FCKeditor interface are marked with red boxes in this figure. See Editor Toolbars (page 3-11) for more information.
You can start the Web Form Editor in either of two ways:
To create a new Content Server form, click Web Form Editor under Content Management. The Web Form Editor is then started full screen in a new browser window.
To modify an existing Content Server form, search for its checked-in form definition file and open the item’s content information page. Then, choose the Web Form Editor option in the Content Actions dropdown menu. The Web Form Editor is then started within the Content Server interface.
Note: See Appendix A (Standard FCKeditor Toolbar Icons) for more information on the standard FCKeditor toolbar icons.
Caution: When you open an existing Content Server web form from its content information page, it is not checked out of the content server, which means another user could potentially open and modify the same file.
3-10 Web Form Editor

Creating Content Server Forms
EDITOR TOOLBARSThe Web Form Editor toolbars are essentially the same as for the standard FCKeditor interface (see page 1-3). The toolbars contain icons for various functions typical of an HTML editor, including icons for HTML page layout, text formatting, images, multimedia elements, form features, links, lists, and the like.
The Web Form Editor includes a number of new toolbar icons as well as some standard FCKeditor icons whose function has been modified to provide Content Server integration, as shown in the table below.
Note: See Appendix A (Standard FCKeditor Toolbar Icons) for an explanation of the standard FCKeditor toolbar icons.
Modification Description
Editor Actions
(Save) Click this toolbar icon to display the Content Check In dialog (see page 3-16), where you can check the defined HCSF form or IDOC resource into the content server.
(Web Form Preview) Click this toolbar icon to open a new browser window that shows what the checked-in Content Server form will look like from a client’s perspective.
Important: Make sure that you use this icon to preview Content Server forms. The FCKeditor’s standard preview (using the icon) displays the form layout correctly, but is not “Content Server aware,” which means that information derived from the content server is not rendered correctly.
(Templates) Click this toolbar icon to display the Content Templates dialog (see page 3-13), where you can select a template that can be used as a starting point for your Content Server form.
Web Form Editor 3-11

Creating Content Server Forms
(Web Form Action) Click this toolbar icon to display the Web Form Action dialog (see page 6-3), where you can add a web form action to a form element that supports these actions.
(Dynamic Include) Click this toolbar icon to display the Create Dynamic Include dialog (see page 7-4), where you can define a dynamic include (IDOC resource) for use with your Content Server form.
(Idoc Search) Click this toolbar icon to display the Idoc Resource Search dialog (see page 7-6), which lists all detected IDOC resource files in the content server. You can then insert a reference to an IDOC file in your Content Server form.
Form Elements
(Form) Click this toolbar icon to add a form framework to your Content Server form (see page 3-14).
(Checkbox) Click this toolbar icon to add a checkbox to your Content Server form (see page 4-6).
(Radio Button) Click this toolbar icon to add a radio button to your Content Server form (see page 4-8).
(Text) Click this toolbar icon to add a text field to your Content Server form (see page 4-11).
(Text Area) Click this toolbar icon to add a text area to your Content Server form (see page 4-14).
(Hidden Field) Click this toolbar icon to add a hidden field to your Content Server form (see page 4-16).
Table Elements
(Table) Click this toolbar icon to add a table to your Content Server form (see chapter 5).
Modification Description
3-12 Web Form Editor

Creating Content Server Forms
CONTENT TEMPLATES DIALOG
Use the Content Templates dialog to select a template for use as a starting point for your Content Server form.
To open this dialog, click the Templates icon on the FCKeditor toolbar: .
Caution: When you click on a template in this dialog, the current contents in the main Web Form Editor screen are immediately replaced with the template content, without any further warning, even if the current form was not yet saved.
Tech Tip: If you are an administrator, you can add or modify templates by editing the [Install_Dir]/custom/FormEditor/templates/fe_templates.xml file. Each template definition is enclosed in <template> and </template> tags. After modifying the XML file, you do not need to restart the content server, but you do need to republish the dynamic files by running the “Publish dynamic layout files” action (either from the Administration page or in Configuration Manager).
Web Form Editor 3-13

Creating Content Server Forms
FORM PROPERTIES DIALOG
Use this dialog to view or modify the properties of a form framework in your Content Server web form (that is, the standard HTML <FORM></FORM> tag structure).
To open this dialog, do either of the following:
To add a new form framework at the current cursor position in the web form, click the Form icon on the FCKeditor toolbar: .
To edit an existing form framework, place the cursor anywhere within the form framework, right-click, and choose Form Properties from the popup menu.
Note: If you start a new form using the standard content template (see page 3-13), then the form framework is already there and you do not need to add it again.
3-14 Web Form Editor

Creating Content Server Forms
Feature Description
Enable Advanced Functionality checkbox
Select this checkbox to indicate that the form is “advanced”—that is, controlled by the content server.
Important: If you are planning to use advanced form elements (see page 4-3), make sure that they are contained in an advanced form (see page 3-2). Otherwise the form elements will not function properly.
Include Form Buttons checkbox
This checkbox is available only if the Enable Advanced Functionality checkbox is selected and only for new forms.Select this checkbox to add predefined Submit and Reset buttons to your web form.
Note: You can automatically add buttons to the form only when the form framework is initially created. After the form framework has been created, you need to add and configure buttons manually (using the Button icon: ).
Name field This field specifies the name of your web form that the content server uses to identify the form.
Required if the Enable Advanced Functionality checkbox is selected.
Action field This field is ignored for advanced forms since the required action is provided by a Content Server include.For non-advanced forms, this field specifies the script that should process the web form input.
Method This option specifies the way in which the data transfer between the form and the content server is handled. The two options are the standard HTML GET and POST methods.
Web Form Editor 3-15

Creating Content Server Forms
CONTENT CHECK IN FORM DIALOG
The Content Check In Form dialog enables you to check a defined web form or IDOC resource into the content server.
This dialog is essentially the same as Content Server’s standard content check-in screen.
OK button If you click this button, the form framework is added to the web form or, in the case of an existing form, the properties of the form framework are updated.
Cancel button If you click this button, no form framework is added to the web form or all changes to an existing form framework are canceled.
Feature Description
Note: For more information about the standard content check-in screen, refer to the Content Server User Guide.
3-16 Web Form Editor

Creating Content Server Forms
After you click Form Checkin, the web form or IDOC resource is checked into the content server. The native file is an HCSW file and the web-viewable file an HCSF file (web forms) or IDOC file (IDOC resources). See File Formats (page 1-4) for more information about these file formats.
By default, the title of a submitted web form is [User_Login] - [Content_Type] - [Date/Time_Stamp],for example:jsmith - FORMS - 8/29/06 3:34 PM
Web Form Editor 3-17


C h a p t e r
4.WORKING WITH FORM ELEMENTS
OVERVIEWThis section covers the following topics:
ConceptsAbout Form Elements (page 4-2)
Advanced Form Elements (page 4-3)
TasksAdding a Form Element (page 4-4)
Editing a Form Element (page 4-5)
InterfaceForm Element Properties Dialogs (page 4-5)
• Checkbox (page 4-6)
• Radio Button (page 4-8)
• Text Field (page 4-11)
• Text Area (page 4-14)
• Hidden Field (page 4-16)
• Advanced Element Options (page 4-19)
Data Binding Dialog (page 4-21)
Web Form Editor 4-1

Working With Form Elements
ABOUT FORM ELEMENTSForm elements are the controls that you add to a form and enable users to enter data into the form. The Web Form Editor provides the tools to add all standard HTML form input elements to your web form:
Note: See http://www.w3.org/TR/html4/interact/forms.html for general information about HTML form elements.
Toolbar icon Description
Click this toolbar icon to add a checkbox to your Content Server form (see page 4-6).
Click this toolbar icon to add a radio button to your Content Server form (see page 4-8).
Click this toolbar icon to add a text field to your Content Server form (see page 4-11).
Click this toolbar icon to add a text area to your Content Server form (see page 4-14).
Click this toolbar icon to add a standard HTML selection field to your Content Server form.
Click this toolbar icon to add a standard HTML button to your Content Server form.
Click this toolbar icon to add a standard HTML image button to your Content Server form.
Important: The Upload and Browse Server features for image buttons are not tied in to Content Server, which means that you cannot use these features to manage images in the content server.
Click this toolbar icon to add a hidden field to your Content Server form (see page 4-16).
4-2 Web Form Editor

Working With Form Elements
Most of these form elements can be “advanced,” which means that they can tie in to the content server (see next page).
ADVANCED FORM ELEMENTSWhen designing forms in the Web Form Editor, you can set up a number of form elements to have “advanced” functionality.
Figure 4-1 Advanced functionality for form element
The following HTML form elements can be defined to have advanced functionality:
Checkboxes (see page 4-6)
Radio buttons (see page 4-8)
Text fields (see page 4-11)
Text areas (see page 4-14)
Hidden fields (see page 4-16)
Advanced form elements can be bound to a metadata field in the content server and are rendered by the standard Content Server includes. For example, if you define a text field as advanced and link it to a content server metadata field, that field is presented as it would normally appear on a content server page. If the field is linked to a view and is a DCL field, then that is how the field is presented in the form. Similarly, if the content server metadata field is set up to be an option list, then its associated form element will be displayed accordingly (for example, as a dropdown list with the options defined for the metadata field).
You can also define an advanced field to be an XML field. In that case, the field is added to the form in a manner allowing it to populate, and later be populated by, the XML data island in the form.
Web Form Editor 4-3
Working With Form Elements
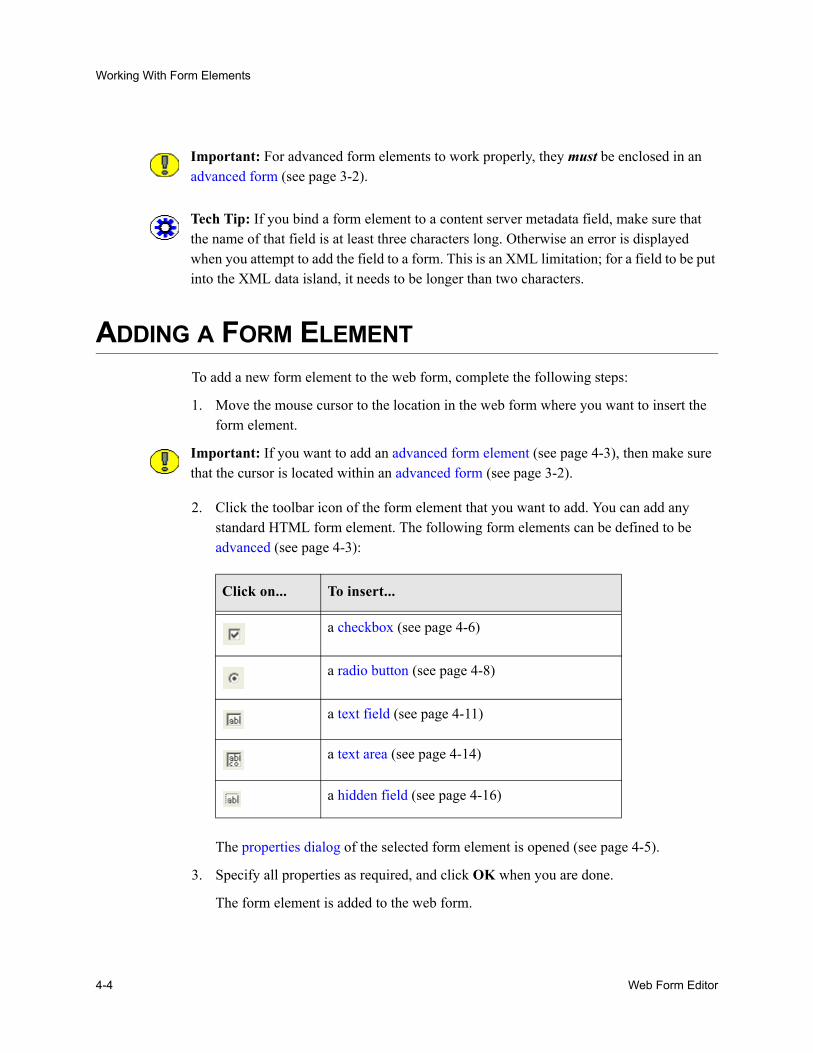
ADDING A FORM ELEMENTTo add a new form element to the web form, complete the following steps:
1. Move the mouse cursor to the location in the web form where you want to insert the form element.
2. Click the toolbar icon of the form element that you want to add. You can add any standard HTML form element. The following form elements can be defined to be advanced (see page 4-3):
The properties dialog of the selected form element is opened (see page 4-5).
3. Specify all properties as required, and click OK when you are done.
The form element is added to the web form.
Important: For advanced form elements to work properly, they must be enclosed in an advanced form (see page 3-2).
Tech Tip: If you bind a form element to a content server metadata field, make sure that the name of that field is at least three characters long. Otherwise an error is displayed when you attempt to add the field to a form. This is an XML limitation; for a field to be put into the XML data island, it needs to be longer than two characters.
Important: If you want to add an advanced form element (see page 4-3), then make sure that the cursor is located within an advanced form (see page 3-2).
Click on... To insert...
a checkbox (see page 4-6)
a radio button (see page 4-8)
a text field (see page 4-11)
a text area (see page 4-14)
a hidden field (see page 4-16)
4-4 Web Form Editor

Working With Form Elements
EDITING A FORM ELEMENTTo edit an existing form element in the web form, complete the following steps:
1. Click the form element in the web form whose properties you want to modify.
A box is displayed around the form element to indicate that it is selected.
2. Right-click, and choose the [Form_Element] Properties option from the popup menu.
The properties dialog of the selected form element is opened (see page 4-5).
3. Modify the properties, as required, and click OK when you are done.
The form element is updated in the web form.
FORM ELEMENT PROPERTIES DIALOGSThis section covers the properties dialogs for the following form elements:
Checkbox (page 4-6)
Radio Button (page 4-8)
Text Field (page 4-11)
Text Area (page 4-14)
Hidden Field (page 4-16)
Advanced Element Options (page 4-19)
Note: This section only describes the HTML form elements that can be defined to have advanced functionality. You can add all standard HTML form elements to your web form, including selection fields and buttons.
Web Form Editor 4-5

Working With Form Elements
Checkbox
Use this dialog to view or modify the properties of a checkbox in your Web Form Editor web form.
To open this dialog, do either of the following:
To add a new checkbox at the current cursor position in the web form, click the Checkbox icon on the FCKeditor toolbar: .
To edit an existing check box, select the item, right-click, and choose Checkbox Properties from the popup menu.
Feature Description
Enable Advanced Functionality checkbox
Select this checkbox to indicate that the checkbox is “advanced”—that is, bound to an XML field or content server metadata field and rendered by the standard Content Server includes.
Important: An advanced checkbox must be contained in an advanced form (see page 3-2) to function properly.
4-6 Web Form Editor

Working With Form Elements
Advanced Options button This button is available only if the Enabled Advanced Functionality checkbox is selected.Click this button to open the Advanced dialog (see page 4-19), where you can set custom attributes and wrapper code for the checkbox.
Name field This field specifies the name of the check box that the content server uses to identify the item.You can bind the checkbox to a field, which means that the value of the checkbox is assigned to the specified XML field or content server metadata field when the form is submitted.
Required if the Enable Advanced Functionality checkbox is selected.
Bind to Data button (Name) This button is available only if the Enable Advanced Functionality checkbox is selected.Click this button to open the field selection dialog (see page 4-21), where you can specify the XML field or content server metadata field that should be bound to the checkbox.
Value field This field specifies the value that is submitted if the checkbox is selected. You can link the value to an XML field or content server metadata field, which means that the value submitted is controlled by the value of the specified field.
Note: It is recommended that you use a meaningful, “binary” value for a checkbox such as “on,” “yes”, or “1.”
Off Value field This field specifies the value that is submitted if the checkbox is not selected.
Note: It is recommended that you use a meaningful, “binary” value for a checkbox such as “off,” “no”, “0,” or “n/a.”
Feature Description
Web Form Editor 4-7

Working With Form Elements
Radio Button
Use this dialog to view or modify the properties of a radio button in your Content Server web form.
To open this dialog, do either of the following:
To add a new radio button at the current cursor position in the web form, click the Radio Button icon on the FCKeditor toolbar: .
Selected checkbox Select this checkbox to specify that the checkbox on the web form is selected by default.
OK button If you click this button, a new checkbox is added to the web form or, in the case of an existing checkbox, its properties are updated.
Cancel button If you click this button, no checkbox is added to the web form or all changes to an existing checkbox are canceled.
Feature Description
4-8 Web Form Editor

Working With Form Elements
To edit an existing radio button, select the item, right-click, and choose Radio Button Properties from the popup menu.
Feature Description
Enable Advanced Functionality checkbox
Select this checkbox to indicate that the radio button is “advanced”—that is, bound to an XML field or content server metadata field and rendered by the standard Content Server includes.
Important: An advanced radio button must be contained in an advanced form (see page 3-2) to function properly.
Advanced Options button This button is available only if the Enable Advanced Functionality checkbox is selected.Click this button to open the Advanced Options dialog (see page 4-19), where you can set custom attributes and wrapper code for the radio button.
Name field This field specifies the name of the radio button that the content server uses to identify the item.You can bind the radio button to a field, which means that the value of the radio button is assigned to the specified XML field or content server metadata field when the form is submitted.
Required if the Enable Advanced Functionality checkbox is selected.Each radio button in a set must have the same name (or be bound to the same field), or they will not work properly.
Web Form Editor 4-9

Working With Form Elements
Bind to Data button This button is available only if the Enable Advanced Functionality checkbox is selected.Click this button to open the field selection dialog (see page 4-21), where you can specify the following for the radio button.
Each radio button in a set must be bound to the same field (that is, have the same name), or they will not work properly.The XML field or content server metadata field that sets the “selected” value of the radio button.
Value field This field specifies the value that is submitted if the radio button is selected. You can link the value to an XML field or content server metadata field, which means that the value submitted is controlled by the value of the specified field.
Selected checkbox Select this checkbox to specify that the radio button on the web form is selected by default. Only one radio button in a set can be selected at any given time.
OK button If you click this button, a new radio button is added to the web form or, in the case of an existing radio button, its properties are updated.
Cancel button If you click this button, no radio button is added to the web form or all changes to an existing radio button are canceled.
Feature Description
4-10 Web Form Editor

Working With Form Elements
Text Field
Use this dialog to view or modify the properties of a text field in your Content Server web form.
To open this dialog, do either of the following:
To add a new text field at the current cursor position in the web form, click the Text Field icon on the FCKeditor toolbar: .
To edit an existing text field, select the item, right-click, and choose Text Field Properties from the popup menu.
Feature Description
Enable Advanced Functionality checkbox
Select this checkbox to indicate that the text field is “advanced”—that is, bound to an XML field or Content Server metadata field and rendered by the standard Web Form Editor includes.
Important: An advanced text field must be contained in an advanced form (see page 3-2) to function properly.
Web Form Editor 4-11

Working With Form Elements
Advanced Options button This button is available only if the Enable Advanced Functionality checkbox is selected.Click this button to open the Advanced Options dialog (see page 4-19), where you can set custom attributes and wrapper code for the text field.
Name field This field specifies the name of the text field that the content server uses to identify the item.You can bind the text field to a field, which means that the value of the text field is assigned to the specified XML field or content server metadata field when the form is submitted.
Required if the Enable Advanced Functionality checkbox is selected.
Bind to Data button This button is available only if the Enable Advanced Functionality checkbox is selected.Click this button to open the field selection dialog (see page 4-21), where you can specify the following:
The field that should be bound to the text field. In other words, the value of the specified XML or metadata field will be set to the value of the text field in the form.
Tech Tip: You can make a text field behave (and be displayed) as a Content Server option list (multiselect, edit and select, and so forth) by linking it to a corresponding metadata field in the content server.
The XML field or content server metadata field that should control the default text field value.
Tech Tip: If you linked the Name field to a Web Form Editor option list of some sort, the Value field is ignored, even if you specify a value. After all, the field display, and therefore the default value, is handled by the linked option list.
Feature Description
4-12 Web Form Editor

Working With Form Elements
Value field This field defines what will appear in the text field as the default value.
Character Width field This field specifies the width of the text field (that is, how many visible characters the field can contain).If you do not specify a value, the default of 30 is assumed.
Maximum Characters field This field specifies the maximum length of the text field (that is, how many characters can be entered in the field).If you do not specify a value, the default of 30 is assumed.
Tech Tip: Make sure that the text field is set up to hold enough text. This is especially important for multiselect list fields, which may contain multiple selected items. If they exceed the specified maximum number of characters, the form cannot be submitted and an error message is displayed (unless you add logic to handle this situation).
Type dropdown list Select this checkbox to select the type of text that will be entered in the text field. There are two options:• Text—The text is displayed normally in the text
field.• Password—The text is displayed as dots in the
text field to conceal what is being entered.
OK button If you click this button, a new text field is added to the web form or, in the case of an existing text field, its properties are updated.
Cancel button If you click this button, no text field is added to the web form or all changes to an existing text field are canceled.
Feature Description
Web Form Editor 4-13

Working With Form Elements
Text Area
Use this dialog to view or modify the properties of a text area in your Content Server web form. A text area is essentially a text field that can span several lines.
To open this dialog, do either of the following:
To add a new text area at the current cursor position in the web form, click the Text Area icon on the FCKeditor toolbar: .
To edit an existing text area, select the item, right-click, and choose Text Area Properties from the popup menu.
Feature Description
Enable Advanced Functionality checkbox
Select this checkbox to indicate that the text area is “advanced”—that is, bound to an XML field or Content Server metadata field and rendered by the standard Content Server includes.
Important: An advanced text area must be contained in an advanced form (see page 3-2) to function properly.
4-14 Web Form Editor

Working With Form Elements
Advanced Options button This button is available only if the Enable Advanced Functionality checkbox is selected.Click this button to open the Advanced Options dialog (see page 4-19), where you can set custom attributes and wrapper code for the text area.
Name field This field specifies the name of the text area that the content server uses to identify the item.You can bind the text area to a field, which means that the value of the text field is assigned to the specified XML field or content server metadata field when the form is submitted.
Required if the Enable Advanced Functionality checkbox is selected.
Tech Tip: If you link the text area to a content server metadata field, the field will behave (and be displayed) as that metadata field. This means that the form field may, in effect, no longer be a text area (but rather, say, a dropdown list).
Bind to Data button This button is available only if the Enable Advanced Functionality checkbox is selected.Click this button to open the field selection dialog (see page 4-21), where you can specify the following:
The field that should be bound to the text area.The XML field or content server metadata field that should control the default text area value.
Value field This field defines what will appear in the text area as the default value.
Columns field This field specifies the width of the text area (as the number of text columns).
Rows field This field specifies the height of the text area (as the number of text rows).
Feature Description
Web Form Editor 4-15

Working With Form Elements
Hidden Field
Use this dialog to view or modify the properties of a hidden field in your Content Server web form. Hidden fields are not displayed on the web form. This enables you to submit information that is not entered on the web form by the user and populate metadata fields without forcing the user to enter them. For example, you could use a hidden field to automatically set the content type (dDocType) of submitted forms (HCSP files). Hidden field can also be useful to store information between client/server exchanges that would otherwise be lost due to the stateless nature of HTTP.
OK button If you click this button, a new text area is added to the web form or, in the case of an existing text area, its properties are updated.
Cancel button If you click this button, no text area is added to the web form or all changes to an existing text area are canceled.
Feature Description
4-16 Web Form Editor

Working With Form Elements
To open this dialog, do either of the following:
To add a new hidden field at the current cursor position in the web form, click the Hidden Field icon on the FCKeditor toolbar: .
To edit an existing hidden field, select the item, right-click, and choose Hidden Field Properties from the popup menu.
Feature Description
Enable Advanced Functionality checkbox
Select this checkbox to indicate that the hidden field is “advanced”—that is, bound to an XML field or Content Server metadata field and rendered by the standard Content Server includes.
Important: An advanced hidden field must be contained in an advanced form (see page 3-2) to function properly.
Advanced Options button This button is available only if the Enable Advanced Functionality checkbox is selected.Click this button to open the Advanced Options dialog (see page 4-19), where you can set custom attributes and wrapper code for the hidden field.
Name field This field specifies the name of the hidden field that the content server uses to identify the item.You can bind the hidden field to a field, which means that the value of the hidden field is assigned to the specified XML field or content server metadata field when the form is submitted.
Required if the Enable Advanced Functionality checkbox is selected.
Web Form Editor 4-17

Working With Form Elements
Bind to Data button This button is available only if the Enable Advanced Functionality checkbox is selected.Click this button to open the field selection dialog (see page 4-21), where you can specify the following:
The field that should be bound to the hidden field. In other words, the value of the specified XML or metadata field will be set to the value of the hidden field in the form.The XML field or content server metadata field that should control the default value of the hidden field.
Value field This field defines what will appear in the hidden field as the default value.
OK button If you click this button, a new hidden field is added to the web form or, in the case of an existing hidden field, its properties are updated.
Cancel button If you click this button, no hidden field is added to the web form or all changes to an existing hidden field are canceled.
Feature Description
4-18 Web Form Editor

Working With Form Elements
Advanced Element Options
Use this dialog to view or modify the advanced options of a form element on your Content Server web form.
To open this dialog, click the Advanced Options... button on the dialog of a web form element.
Note: This button is available only if the Enable Advanced Functionality checkbox is selected.
Web Form Editor 4-19

Working With Form Elements
Feature Description
Variables Tab
Variables box Here you can specify any custom attributes for the form element, which can be used to further control the display of the form element. They are name/value pairs separated by ‘=’ with one pair per line, for example:showOnPage=1changeColor=0
These name/value pairs or variables appear as attributes to the advproperties tag of the form element in the HTML source.
Tech Tip: It is up to the person designing the form to take advantage of these name/value pairs by overwriting the feh_display_field include. This can be done either by writing a component that does it globally or using the setResourceInclude Idoc Script function to temporarily provide an alternative during page rendering.
Wrapper Tab
Before box This field shows any HTML and/or Idoc Script code that is evaluated before the form element is rendered.This may be useful in situations where certain display conditions apply to the form element. For example, if you want a horizontal line to be displayed above the form element, but only if the element is actually present, you can add the standard HTML <hr> tag to this box.
After box This field shows any HTML and/or Idoc Script code that is evaluated after the form element is rendered.
OK button If you click this button, the web form properties are modified.
4-20 Web Form Editor

Working With Form Elements
DATA BINDING DIALOG
Use this dialog to specify an XML field or Content Server metadata field that the form element should be bound to. In other words, the value of the form element is assigned to the specified XML field or Content Server metadata field when the form is submitted.
Cancel button If you click this button, any changes to the web form properties are canceled.
Feature Description
Tech Tip: If you bind a form element to a Content Server metadata field, make sure that the name of that field is at least three characters long. Otherwise an error is displayed when you attempt to add the field to a form. This is an XML limitation; for a field to be put into the XML data island, it needs to be longer than two characters.
Web Form Editor 4-21

Working With Form Elements
To open this dialog, click the Bind to data... button for the Name field on the properties dialog of the form element (see page 4-5).
Feature Description
Bind to XML Data checkbox Select this to bind (define) the field in the HCSF’s XML data island.
Bind to Server Metadata checkbox
Select this to bind the field to metadata on the content server.
Field Name field and dropdown list
Specify the name of the field to which the form element will be bound. The field can be a Content Server metadata field or a field in the XML data island (embedded into the HCSF file). If it is in the XML data island, make sure you select the “Is XML field” checkbox.You can manually enter a field name or use the dropdown list to select a Content Server metadata field. The list shows all available metadata fields in the content server (both standard and custom).
Table Name field Optional. Specify the name of the table to which the form element will be bound. If no table is specified for XML data, the field will become an independent element within the XML data island. The table name is set by default if the form element is inside an advanced display table that is bound to a data source.
Set Value checkbox Select this to set a value for the field. A value can be bound to a field by specifying the name of the field in the following box.
Use Default radio button Check this to use a default value for the field.
Use Custom radio button Check this to use a custom value for the field.
4-22 Web Form Editor

Working With Form Elements
Value field The Value field specifies the XML field or Content Server metadata field whose value should (initially) be used for the form element. You can manually enter a field name for a custom value. The script must be enclosed in double square brackets and be of the form [[field]].
OK button If you click this button, the data binding specifications are applied.
Cancel button If you click this button, any data binding specifications are canceled.
Feature Description
Web Form Editor 4-23


C h a p t e r
5.WORKING WITH FORM TABLES
OVERVIEWThis section covers the following topics:
ConceptsAbout Form Tables (page 5-2)
Advanced Form Tables (page 5-2)
TasksAdding a Table (page 5-3)
Editing a Table (page 5-3)
Formatting a Table (page 5-4)
Making a Table Conditional (page 5-4)
Making a Table Row Conditional (page 5-5)
InterfaceTable Options Dialogs (page 5-5)
Table Row Dialog (page 5-16)
Condition Clause Dialog (page 5-17)
Web Form Editor 5-1

Working With Form Tables
ABOUT FORM TABLESTables are very useful to help you align and position text and graphics in a web form. You may want to design part or all of your web form within a table. You can format the table in such a way that the rows and columns are invisible in the finished product by turning off the borders.
In addition to these tables that are used for layout purposes, you can also use “Advanced Form Tables (page 5-2), which can be used to display result sets or make the display of a table or its rows conditional.
ADVANCED FORM TABLESIn addition to their customary use as a form or page layout tool, tables in Content Server forms can also be “advanced,” which means that they can be linked to Content Server result sets or be defined to be conditional.
Advanced Tables Linked to Result SetsIf an advanced HTML table is used to display a Content Server result set, this result set can either be defined as an XML table or as a database table. If it is defined as an XML table, it will reside in the XML data island of the form. In the case of a database table, it is up to the person designing the form to provide the Idoc Script that loads the database table for use in the form.
If a result set is displayed in an advanced table, there are some strict conventions. The table element will be designed as having up to three rows:
The first row is used to present column headers.
The second row is used to display a row from the result set.
The third row is optionally displayed when the result set is empty. It is not used when the table contents are editable.
The table can be defined to allow edits—that is, you may choose to allow users to add, edit, and/or delete rows in the table.
Important: Table manipulation such as adding, editing, and deleting of rows does not work unless the table resides in an advanced form (see page 3-2).
5-2 Web Form Editor

Working With Form Tables
Advanced Conditional TablesIf an advanced HTML table is defined to be conditional, then an Idoc Script condition needs to be met before the content of the table is displayed. Conditional tables are useful if you want to hide a group of elements (for example, a field and its caption).
ADDING A TABLETo add a new table to the web form, complete the following steps:
1. Move the mouse cursor to the location in the web form where you want to insert the table.
2. Click the Table icon in the toolbar ( ).
The Table dialog is opened (see page 5-5).
3. Specify all properties, as required, and click OK when you are done.
The table is added to the web form.
EDITING A TABLETo edit an existing table in the web form, complete the following steps:
1. Move the mouse cursor to anywhere within the existing table whose properties you want to modify.
2. Right-click, and choose the Table Properties option from the popup menu.
The Table dialog is opened (see page 5-5).
3. Modify the properties, as required, and click OK when you are done.
The table is updated in the web form.
Note: If you want to link the table to a Content Server result set or define it to be conditional, make sure that you select the Enable Advanced Functionality checkbox and specify the table’s advanced options (see page 5-9).
Web Form Editor 5-3

Working With Form Tables
FORMATTING A TABLEThe Web Form Editor is a full-fledged HTML editor, which means that you can format your form table using the customary HTML table layout and formatting features.
You can insert and delete rows and columns, split and merge cells, etc. You can access most table formatting features by right-clicking anywhere in the table, row, column, or cell and choosing an option from the popup menu. A number of display options are also accessible on the basic table dialog (see page 5-6).
MAKING A TABLE CONDITIONALTo make the display of a table conditional (that is, only if an Idoc Script clause evaluates to true), complete the following steps:
1. Move the mouse cursor to anywhere in the table that you want to make conditional.
2. Right-click, and choose the Table Properties option from the popup menu.
The Table dialog is opened (see page 5-5).
3. Select the Enable Advanced Functionality button.
4. Click the Advanced Options... button.
The advanced table dialog is opened (see page 5-9).
5. Select the Conditional Display Table radio button.
6. Add or modify the Idoc Script code in the text area, or click Add Clause... to open the Condition Clause dialog (see page 5-17), where you can specify the condition(s) that should be met for the table and its contents to be displayed in the form.
7. Click OK twice to close all table dialogs.
The table is displayed in the web form only if the specified Idoc Script code evaluates to true.
5-4 Web Form Editor

Working With Form Tables
MAKING A TABLE ROW CONDITIONALTo make the display of a table row conditional (that is, only if an Idoc Script clause evaluates to true), complete the following steps:
1. Move the mouse cursor to anywhere in the table row that you want to make conditional.
2. Right-click, and choose the Row > Row Properties option from the popup menu.
The Table Row dialog is opened (see page 5-16).
3. Add or modify the Idoc Script code in the text area, or click Add Clause... to open the Condition Clause dialog (see page 5-17), where you can specify the condition(s) that should be met for the table row and its contents to be displayed in the form.
4. Click OK when you are done.
The table row is displayed in the web form only if the specified Idoc Script code evaluates to true.
TABLE OPTIONS DIALOGSThe following dialogs are related to tables in a Content Server web form:
Basic Table Options Dialog (page 5-6)
Advanced Options Dialog: Type (page 5-9)
Advanced Options Dialog: Actions (page 5-11)
Advanced Options Dialog: Variables (page 5-13)
Advanced Options Dialog: Wrapper (page 5-15)
Web Form Editor 5-5

Working With Form Tables
Basic Table Options Dialog
Use this dialog to view or modify the basic HTML properties of a table in a Content Server web form.
To open this dialog, do either of the following:
To add a new table at the current cursor position in the web form, click the Table icon on the FCKeditor toolbar: .
To edit an existing table, move the mouse cursor to anywhere in the table, right-click, and choose Table Properties from the popup menu.
Feature Description
Enable Advanced Functionality checkbox
Select this checkbox to indicate that the table is to be controlled by the content server. It can either be bound to a result set or be conditional.
Important: An advanced table must be contained in an advanced form (see page 3-2) to function properly.
5-6 Web Form Editor

Working With Form Tables
Advanced Options button This button is available only if the Enable Advanced Functionality checkbox is selected.Click this button to open the Advanced Options dialog (see page 5-9), where you can set a number of additional properties for the table.
Rows field This field specifies the number of rows of the table.
Note: When the table is an advanced table (see page 5-9) that is bound to a result set, the number of rows is automatically set to 3 and this number cannot be edited.•The first row is used to present column headers.•The second row is used to display a row from the result set.•The third row is optionally displayed when the result set is empty.The third row is not used when the table contents are editable.
Columns field This field specifies the number of columns of the table.
Note: When the table is an advanced table (see page 5-9) that is bound to a result set, the number of columns is automatically set to 2 and this number cannot be edited.
Width field This field specifies the width of the table (in pixels or percentage of the screen width).
Height field This field specifies the height of the table (in pixels). If you do not specify a value, the table height is controlled by the number of rows and their contents.
Feature Description
Web Form Editor 5-7

Working With Form Tables
Border Size field This field specifies the thickness of the table and cell borders (in pixels). If you specify zero (0), no borders are displayed.
Cell Spacing field This field specifies the distance between the cells in the table (in pixels).
Alignment dropdown list This dropdown list enables you to select how the table should be aligned horizontally on the page: left, centered, or right.
Cell Padding field This field specifies the distance between the cell border and the cell content (in pixels).
Caption field This field specifies the caption of the table. If you provide a caption, it is displayed centered immediately above the table.
Summary field This field specifies a summary of the purpose and structure of the table. This summary is not displayed on the web form, but can be used by agents that process the web form.
OK button If you click this button, a new table is added to the web form or, in the case of an existing table, its properties are updated.
Cancel button If you click this button, no table is added to the web form or all changes to an existing table are canceled.
Feature Description
5-8 Web Form Editor

Working With Form Tables
Advanced Options Dialog: Type
Use this dialog to view or modify the Type tab for advanced options of a table in a Content Server web form.
To open this dialog, click the Advanced Options... button on the Basic Table Options Dialog (page 5-6).
Feature Description
Type Tab
Multi-line Data Table radio button
Select this radio button to generate an HTML table, which will be bound to a specified data table.
Bind to Table field Specify a data table to which the HTML table will be bound.
Web Form Editor 5-9

Working With Form Tables
Table is XML Data checkbox Select this checkbox if the table is an XML table. The table will reside in the XML data island of the form. If the table is not an XML table, then Idoc Script must be provided to load the database table for use in the form.
Conditional Display Table radio button and text area
Select this radio button to indicate that the table and its contents will only be displayed if one or more conditions (Idoc Script clauses) are met. The text area shows all currently defined conditions. If you want, you can manually edit these conditions.
Add Clause button Click this button to open the Condition Clause dialog (page 5-17), where you can specify the condition that must evaluate to true for the Conditional Display table and its contents to be displayed.
Feature Description
5-10 Web Form Editor

Working With Form Tables
Advanced Options Dialog: Actions
Use this dialog to view or modify the Actions tab for advanced options of a table in a Content Server web form.
To open this dialog, click the Advanced Options... button on the Basic Table Options Dialog (page 5-6).
Note: The Actions tab is visible only if the Table Is XML Data checkbox on the Type tab is selected.
Feature Description
Actions Tab
Edit Row Link checkbox Select this checkbox to add an “edit” link to the table, which enables users to edit a row in the table.
Web Form Editor 5-11

Working With Form Tables
Delete Row Link checkbox Select this checkbox to add a “delete” link to the table, which enables users to delete a row from the table.
Add New Row Button checkbox
Select this checkbox to add an “Add row” button to the table, which enables users to add a row to the table.
Reset Table Button checkbox Select this checkbox to add a “Reset Table” button to the table, which enables users to reset the table to its initial values.
Add Templated Actions to the Table checkbox
Check this checkbox to add the specified actions to the table.
Note: You can automatically add actions to the table only when the table is initially created. After the table has been created, you can add actions by adding buttons and links and then using the Web Form Action icon ( ) to properly configure the action.
Feature Description
5-12 Web Form Editor

Working With Form Tables
Advanced Options Dialog: Variables
Use this dialog to view or modify the Variables tab for advanced options of a table in a Content Server web form.
To open this dialog, click the Advanced Options... button on the Basic Table Options Dialog (page 5-6).
Web Form Editor 5-13

Working With Form Tables
Feature Description
Variables Tab
Variables field Here you can specify any variables for the table, which can be used to further control the display of the table. They are name/value pairs separated by ‘=’ with one pair per line, for example:showOnPage=1changeColor=0
These variables appear as attributes to the advproperties tag of the table element in the HTML source.
Tech Tip: It is up to the person designing the form to take advantage of these variables by overwriting the feh_display_field include. This can be done either by writing a component that does it globally or using the setResourceInclude Idoc Script function to temporarily provide an alternative during page rendering.
5-14 Web Form Editor

Working With Form Tables
Advanced Options Dialog: Wrapper
Use this dialog to view or modify the Wrapper tab for advanced options of a table in a Content Server web form.
To open this dialog, click the Advanced Options... button on the Basic Table Options Dialog (page 5-6).
Feature Description
Wrapper Tab
Before box This field shows any HTML and/or Idoc Script code that is evaluated before the table is rendered.This may be useful in situations where certain display conditions apply to the table. For example, if you want a horizontal line to be displayed above the table, but only if it is actually present, you can add the standard HTML <hr> tag to this box.
Web Form Editor 5-15

Working With Form Tables
TABLE ROW DIALOG
Use this dialog to add or modify Idoc Script code that is evaluated to determine if the table row should be rendered. The text area shows all current Idoc Script code for the table row.
To open this dialog, complete the following steps:
1. Move the mouse cursor to anywhere in the table row for which you want to specify Idoc Script code.
2. Right-click, and choose the Row > Row Properties option from the popup menu.
After box This field shows any HTML and/or Idoc Script code that is evaluated after the table is rendered.
Feature Description
Feature Description
Text area The text area shows all current Idoc Script code for the table row. You can manually edit or add code, or use the Add Clause button to construct a conditional clause.
Add Clause button Click this button to open the Condition Clause dialog (page 5-17), where you can specify the condition that must evaluate to true for the table row and its contents to be displayed.
5-16 Web Form Editor

Working With Form Tables
CONDITION CLAUSE DIALOG
Use this dialog to add or modify a conditional clause, which determines whether a table or table row should be displayed based on the existence of a specific field.
To open this dialog, click the Add Clause... button on the Type tab of the Advanced Table dialog or on the Table Row dialog (see page 5-16).
OK button If you click this button, the specified Idoc Script code will be evaluated for the table row.
Cancel button If you click this button, any changes made to this dialog are reversed.
Feature Description
Feature Description
Tag Visible dropdown list This dropdown list specifies whether or not the table or table row and its contents will be displayed if the specified field is present.
Field field This field specifies the table field that the conditional clause is processed on. If the field is present, the conditional clause evaluates to true.
Web Form Editor 5-17

Working With Form Tables
Clause Separator dropdown list If there are multiple condition clauses, this field specifies whether all of the clauses must be true for the entire statement to be true (“and”) or whether one true clause is sufficient (“or”).
OK button If you click this button, the specified conditional clause is added to the list of conditions for the table or table row.
Cancel button If you click this button, no conditional clause is added to the list of conditions for the table or table row.
Feature Description
5-18 Web Form Editor

C h a p t e r
6.WORKING WITH WEB ACTIONS
OVERVIEWThis section covers the following topics:
ConceptsAbout Web Actions (page 6-1)
TasksAdding a Web Action (page 6-2)
Editing a Web Action (page 6-3)
InterfaceWeb Action Dialog (page 6-3)
ABOUT WEB ACTIONSWeb actions are links or buttons associated with advanced forms (see page 3-2) or advanced form tables (see page 5-2) that are bound to result sets. Form and table actions can be added at the time the form framework or form table is created, or you can create them later (using the Web Form Action icon on the toolbar: ).
Web Form Editor 6-1
Working With Web Actions
Web Actions for Advanced FormsThe Web Form Editor recognizes the following actions for forms:
Submit form
Reset form
Web Actions for Advanced Form TablesThe Web Form Editor recognizes the following actions for form tables:
Edit row
Delete row
Add new row
Reset table
The ‘Add new row’ and ‘Reset table’ actions are usually presented in their own table outside of the table they are acting on. Consequently, you must designate their associated advanced table for these actions.
The ‘Edit row’ and ‘Delete row’ actions are placed in a column of the table they are acting on, and are controlled by the table presentation logic.
ADDING A WEB ACTIONTo add a new web action to an advanced form or advanced form table, complete the following steps:
1. Select the item that you want to add a web action to.
2. Click the Web Form Action icon in the FCKeditor toolbar ( ).
The Action dialog is opened (see page 6-3).
3. Provide all required information, and click OK when you are done.
The web action is added.
6-2 Web Form Editor

Working With Web Actions
EDITING A WEB ACTIONTo edit an existing web action in an advanced form or advanced form table, complete the following steps:
1. Select the item whose web action you want to modify.
2. Click the Web Form Action icon in the FCKeditor toolbar ( ).
The Action dialog is opened (see page 6-3).
3. Modify the properties as required, and click OK when you are done.
The web action is updated.
WEB ACTION DIALOG
Use this dialog to specify a web action for an advanced form framework or advanced form table.
To open this dialog, select the item that you want to add the web action to, and click the Web Form Action icon on the FCKeditor toolbar: .
Note: Depending on the element that you add the web action to, the Action dialog may look somewhat different than the screenshot above.
Web Form Editor 6-3

Working With Web Actions
Feature Description
Tag dropdown list The dropdown list shows all available web actions for the selected item in the form.
The available options for advanced form tables are:• Submit form• Reset formThe available options for advanced forms are:• Edit row• Delete row• Add new row• Reset table
Table field and dropdown list This field and dropdown list are displayed only for the “Add new row” and “Reset table” actions.This field enables you to specify the table that these actions are linked to. This is necessary because these actions are normally presented in their own table outside the table they are acting on, so you need to specifically designate the advanced table for the action.The dropdown list shows all detected advanced tables in the current form.
Form field This field and dropdown list are displayed only for the “Submit form” and “Reset form” actions.This field enables you to specify the form that these actions are acting on.
OK button If you click this button, the selected web action is assigned to the advanced form.
Cancel button If you click this button, no web action is assigned to the advanced form, and any changes are canceled.
6-4 Web Form Editor

C h a p t e r
7.WORKING WITH DYNAMICINCLUDES
OVERVIEWThis section covers the following topics:
ConceptsAbout Dynamic Includes (page 7-2)
TasksCreating an IDOC Resource (page 7-2)
Checking In an IDOC Resource (page 7-2)
Inserting an IDOC Reference to a Form (page 7-3)
Revising an IDOC Resource (page 7-4)
InterfaceDynamic Include Dialog (page 7-4)
Idoc Resource Search Dialog (page 7-6)
Web Form Editor 7-1

Working With Dynamic Includes
ABOUT DYNAMIC INCLUDESYou can use the Web Form Editor to define dynamic includes and check them into the content server for use with Content Server forms. Dynamic includes are IDOC files that contain HTML and Idoc Script resources which can be loaded and displayed on HCSF web form.
CREATING AN IDOC RESOURCEYou can use the Web Form Editor to create IDOC files (dynamic includes), which contain HTML and Idoc Script resources that can be loaded and displayed on HCSF files.
To create an IDOC resource file, complete the following steps:
1. Make sure the current editor screen is empty. If it is not, you can click the New Page icon on the toolbar ( ).
2. Click the Create Dynamic Include icon in the toolbar ( ).
The Create Dynamic Include dialog is displayed (see page 7-4).
3. Provide a name for the dynamic include.
An empty framework for a dynamic include is displayed, with the start and end tags marked yellow.
4. Add all required elements in between the yellow tags.
When you are ready, you can check in the IDOC resource (see next page).
CHECKING IN AN IDOC RESOURCEOnce you have completed your IDOC resource in the Web Form Editor, you need to check it into the content server, so it becomes available for further use.
To check an IDOC resource into the content server, complete the following steps:
1. When you are done defining your IDOC resource, click the Save icon in the toolbar ( ).
The Content Check In dialog is displayed (see page 3-16).
7-2 Web Form Editor

Working With Dynamic Includes
2. Provide metadata as required, and click Form Checkin when you are done.
The IDOC resource is checked into the content server and is now available for further use.
ConsiderationsPlease note the following with regard to checking in an IDOC resource:
Each defined IDOC resource is checked into the content server in two formats: HCSW (as the native format) and IDOC (as the web-viewable format). See File Formats (page 1-4) for more information on these file formats.
If you opened an existing native IDOC resource (HCSW) in the Web Form Editor and you save it, a new revision of that item is checked into the content server.
Please also note the general design tips and considerations on page 3-8.
INSERTING AN IDOC REFERENCE TO A FORMTo insert a reference to a checked-in IDOC resource to the web form, complete the following steps:
1. Move the mouse cursor to the location in the web form where you want to insert the reference to a checked-in IDOC resource.
2. Click the Idoc Search icon in the toolbar ( ).
The Idoc Resource Search dialog is opened (see page 7-6).This dialog lists all IDOC resources that are currently checked into the content server.
3. Click the Select button of the IDOC resource that you want to reference.
A reference to the selected IDOC resource is added to the web form.
Web Form Editor 7-3

Working With Dynamic Includes
REVISING AN IDOC RESOURCETo revise an existing IDOC resource that is already checked into the content server, complete the following steps:
1. Use Content Server’s search features to find the IDOC resource that you want to revise.
2. Open the item’s content information page.
3. Choose Web Form Editor from the Actions dropdown menu.
The Web Form Editor is launched with the IDOC resource available for editing.
ConsiderationsPlease note the following with regard to revising an IDOC resource:
You can open checked-in IDOC resources only if they were created using the Web Form Editor (that is, if they have an HCSW file as the native format).
If you check in the modified IDOC resource, a new revision of that resource is checked into the content server.
If you open a checked-in IDOC resource, the Web Form Editor does not launch in a new browser window, but within the Content Server user interface.
DYNAMIC INCLUDE DIALOG
Use this dialog to define a dynamic include (IDOC resource) that can be used in Content Server forms.
7-4 Web Form Editor

Working With Dynamic Includes
To open this dialog, click the Create Dynamic Include icon on the FCKeditor toolbar: .
After you specify a name for the dynamic include (IDOC resource) and click OK, an empty framework for the new dynamic include is inserted in the editor.
Figure 7-1 Dynamic include framework in Web Form Editor
You can then define the dynamic include in between the dynamichtml designation tags (marked yellow), and check it into the content server once you are done (by clicking the Save icon: ).
Note: It is recommended that you start with an empty page in the editor. You can use the New Page icon ( ) to create an empty page.
Important: Once an include has been defined on a page and the item is checked into the content server, it is converted to an IDOC file, which makes any HTML code that is outside of the dynamichtml designation tags irrelevant.
Web Form Editor 7-5

Working With Dynamic Includes
IDOC RESOURCE SEARCH DIALOG
This dialog shows a list of all IDOC resources that are currently stored in the content server (with .idoc file extension). IDOC files contain HTML and Idoc Script resources that can be loaded and displayed on HCSF files.
This is essentially a standard Content Server search results page, with a Select button for each item in the list. When you click the Select button of an IDOC resource, a reference to that resource is inserted in the web form at the current cursor position.
7-6 Web Form Editor

A p p e n d i x
STANDARD FCKEDITORTOOLBAR ICONS
STANDARD FCKEDITOR TOOLBAR ICONSFCKeditor is a full-fledged HTML editor and provides a variety of features that enable you to format HTML pages.
Table A-1 Standard FCKeditor toolbar icons
Note: See Editor Toolbars (page 3-11) for more information about new icons that were added to the standard FCKeditor toolbar, or standard icons whose functionality was modified.
Icon What It Does
Show the properties of the current HTML page.
Erase the current page and open a new, blank page.
Preview what the HTML page will look like for users.
Important: Do not use this icon to preview a Content Server web form. It displays the form layout correctly, but is not “Content Server aware,” which means that information derived from the content server is not rendered correctly. Instead, use the Web Form Preview icon ( ).
Web Form Editor A-1

Standard FCKeditor Toolbar Icons
Cut the highlighted text.
Copy the highlighted text.
Paste the text you copied (with or without formatting).
Copy content from Microsoft Word, then paste it into the HTML editor using the pop-up accessed from this icon.
Print the HTML page.
Spell check the HTML page.
Undo or redo the most recent action taken.
Find a word or phrase within the text of the HTML page.
Find and replace a word or phrase within the text.
Select all of the text in the HTML page (usually used before copy or cut or to apply a style or format to the whole page).
Remove the formatting from highlighted text.
Bold, italic, underscore or strikethrough highlighted text.
Superscript or subscript the highlighted text.
Add numbering or bullets to highlighted text lines.
Increase or decrease the highlighted text's indentation.
Align highlighted text (left, centered, right, justified).
Add or remove a hyperlink from highlighted text.
Add or remove an anchor in the HTML page.
Icon What It Does
A-2 Web Form Editor

Standard FCKeditor Toolbar Icons
Insert an image into the HTML page.
Important: The Upload and Browse Server features for images are not tied in to Oracle content server, which means that you cannot use these features to manage images in the content server.
Insert a Flash object into the HTML page.
Insert divider line (horizontal rule).
Insert symbols and special characters (trademarks, currency, and so forth).
Online keyboard for certain non-roman character languages.
Insert a selection field into the HTML page.
Insert a button into the HTML page.
Insert an image button into the HTML page.
Important: The Upload and Browse Server features for images are not tied in to Content Server, which means that you cannot use these features to manage images in the content server.
Styles & formatting determine the appearance of HTML text. You may also use the drop down boxes to style specific elements (such as headings), or set overrides for font face, font size, and so forth.
Change the color of the highlighted text.
Change the background color behind the highlighted text.
Icon What It Does
Web Form Editor A-3


A p p e n d i x
UNINSTALLING THEWEB FORM EDITOR
UNINSTALLING THE SOFTWARETo uninstall the Web Form Editor software, complete the following steps:
1. Log in to the content server as an administrator.
2. Go to the Administration page of the content server, and click Admin Server.
The Administration for Servers page is displayed.
3. Click the button for the content server instance that you want to uninstall the software from.
The options and status page of the selected content server instance is displayed.
4. Click Component Manager in the menu on the left.
The Component Manager page is displayed.
5. Select FCKEditor in the list of enabled components (left box), and use the Disable button to move it to the list of disabled components (right box).
6. Restart the content server.
7. Return to the Component Manager page.
8. Select FCKEditor from the dropdown list next to the Uninstall Component field, and click Uninstall.
Web Form Editor B-1

Uninstalling the Web Form Editor
9. You are prompted to confirm the uninstallation action. Click OK.
The component is uninstalled.
10. At the end of the uninstallation process, a page is displayed stating that the component was successfully uninstalled. Click on the link to return to the Component Manager page.
11. Restart the content server.
12. Return to the Component Manager page.
13. Select FormEditor in the list of enabled components (left box), and use the Disable button to move it to the list of disabled components (right box).
14. Restart the content server.
15. Return to the Component Manager page.
16. Select FormEditor from the dropdown list next to the Uninstall Component field, and click Uninstall.
17. You are prompted to confirm the uninstallation action. Click OK.
The component is uninstalled.
18. At the end of the uninstallation process, a page is displayed stating that the component was successfully uninstalled. Click the link to return to the Component Manager page.
19. Restart the content server.
Note: Uninstalling a component means that the content server no longer recognizes the component, but the component files are not deleted from the file system.
B-2 Web Form Editor

A p p e n d i x
C.THIRD PARTY LICENSES
OVERVIEWThis appendix includes a description of the Third Party Licenses for all the third party products included with this product.
Apache Software License (page C-1)
W3C® Software Notice and License (page C-2)
Zlib License (page C-4)
General BSD License (page C-5)
General MIT License (page C-5)
Unicode License (page C-6)
Miscellaneous Attributions (page C-7)
APACHE SOFTWARE LICENSE* Copyright 1999-2004 The Apache Software Foundation.
* Licensed under the Apache License, Version 2.0 (the "License");
* you may not use this file except in compliance with the License.
* You may obtain a copy of the License at
* http://www.apache.org/licenses/LICENSE-2.0
*
Web Form Editor C-1

Third Party Licenses
* Unless required by applicable law or agreed to in writing, software
* distributed under the License is distributed on an "AS IS" BASIS,
* WITHOUT WARRANTIES OR CONDITIONS OF ANY KIND, either express or implied.
* See the License for the specific language governing permissions and
* limitations under the License.
W3C® SOFTWARE NOTICE AND LICENSE* Copyright © 1994-2000 World Wide Web Consortium,
* (Massachusetts Institute of Technology, Institut National de
* Recherche en Informatique et en Automatique, Keio University).
* All Rights Reserved. http://www.w3.org/Consortium/Legal/
*
* This W3C work (including software, documents, or other related items) is
* being provided by the copyright holders under the following license. By
* obtaining, using and/or copying this work, you (the licensee) agree that
* you have read, understood, and will comply with the following terms and
* conditions:
*
* Permission to use, copy, modify, and distribute this software and its
* documentation, with or without modification, for any purpose and without
* fee or royalty is hereby granted, provided that you include the following
* on ALL copies of the software and documentation or portions thereof,
* including modifications, that you make:
*
* 1. The full text of this NOTICE in a location viewable to users of the
* redistributed or derivative work.
*
* 2. Any pre-existing intellectual property disclaimers, notices, or terms
C-2 Web Form Editor

Third Party Licenses
* and conditions. If none exist, a short notice of the following form
* (hypertext is preferred, text is permitted) should be used within the
* body of any redistributed or derivative code: "Copyright ©
* [$date-of-software] World Wide Web Consortium, (Massachusetts
* Institute of Technology, Institut National de Recherche en
* Informatique et en Automatique, Keio University). All Rights
* Reserved. http://www.w3.org/Consortium/Legal/"
*
* 3. Notice of any changes or modifications to the W3C files, including the
* date changes were made. (We recommend you provide URIs to the location
* from which the code is derived.)
*
* THIS SOFTWARE AND DOCUMENTATION IS PROVIDED "AS IS," AND COPYRIGHT HOLDERS
* MAKE NO REPRESENTATIONS OR WARRANTIES, EXPRESS OR IMPLIED, INCLUDING BUT
* NOT LIMITED TO, WARRANTIES OF MERCHANTABILITY OR FITNESS FOR ANY PARTICULAR
* PURPOSE OR THAT THE USE OF THE SOFTWARE OR DOCUMENTATION WILL NOT INFRINGE
* ANY THIRD PARTY PATENTS, COPYRIGHTS, TRADEMARKS OR OTHER RIGHTS.
*
* COPYRIGHT HOLDERS WILL NOT BE LIABLE FOR ANY DIRECT, INDIRECT, SPECIAL OR
* CONSEQUENTIAL DAMAGES ARISING OUT OF ANY USE OF THE SOFTWARE OR
* DOCUMENTATION.
*
* The name and trademarks of copyright holders may NOT be used in advertising
* or publicity pertaining to the software without specific, written prior
* permission. Title to copyright in this software and any associated
* documentation will at all times remain with copyright holders.
*
Web Form Editor C-3

Third Party Licenses
ZLIB LICENSE* zlib.h -- interface of the 'zlib' general purpose compression library
version 1.2.3, July 18th, 2005
Copyright (C) 1995-2005 Jean-loup Gailly and Mark Adler
This software is provided 'as-is', without any express or implied
warranty. In no event will the authors be held liable for any damages
arising from the use of this software.
Permission is granted to anyone to use this software for any purpose,
including commercial applications, and to alter it and redistribute it
freely, subject to the following restrictions:
1. The origin of this software must not be misrepresented; you must not
claim that you wrote the original software. If you use this software
in a product, an acknowledgment in the product documentation would be
appreciated but is not required.
2. Altered source versions must be plainly marked as such, and must not be
misrepresented as being the original software.
3. This notice may not be removed or altered from any source distribution.
Jean-loup Gailly [email protected]
Mark Adler [email protected]
C-4 Web Form Editor

Third Party Licenses
GENERAL BSD LICENSECopyright (c) 1998, Regents of the University of California
All rights reserved.
Redistribution and use in source and binary forms, with or without modification,
are permitted provided that the following conditions are met:
"Redistributions of source code must retain the above copyright notice, this
list of conditions and the following disclaimer.
"Redistributions in binary form must reproduce the above copyright notice, this
list of conditions and the following disclaimer in the documentation and/or other
materials provided with the distribution.
"Neither the name of the <ORGANIZATION> nor the names of its contributors may be
used to endorse or promote products derived from this software without specific
prior written permission.
THIS SOFTWARE IS PROVIDED BY THE COPYRIGHT HOLDERS AND CONTRIBUTORS "AS IS" AND ANY
EXPRESS OR IMPLIED WARRANTIES, INCLUDING, BUT NOT LIMITED TO, THE IMPLIED
WARRANTIES OF MERCHANTABILITY AND FITNESS FOR A PARTICULAR PURPOSE ARE DISCLAIMED.
IN NO EVENT SHALL THE COPYRIGHT OWNER OR CONTRIBUTORS BE LIABLE FOR ANY DIRECT,
INDIRECT, INCIDENTAL, SPECIAL, EXEMPLARY, OR CONSEQUENTIAL DAMAGES (INCLUDING, BUT
NOT LIMITED TO, PROCUREMENT OF SUBSTITUTE GOODS OR SERVICES; LOSS OF USE, DATA, OR
PROFITS; OR BUSINESS INTERRUPTION) HOWEVER CAUSED AND ON ANY THEORY OF LIABILITY,
WHETHER IN CONTRACT, STRICT LIABILITY, OR TORT (INCLUDING NEGLIGENCE OR OTHERWISE)
ARISING IN ANY WAY OUT OF THE USE OF THIS SOFTWARE, EVEN IF ADVISED OF THE
POSSIBILITY OF SUCH DAMAGE.
GENERAL MIT LICENSECopyright (c) 1998, Regents of the Massachusetts Institute of Technology
Permission is hereby granted, free of charge, to any person obtaining a copy of this
software and associated documentation files (the "Software"), to deal in the
Software without restriction, including without limitation the rights to use, copy,
modify, merge, publish, distribute, sublicense, and/or sell copies of the Software,
and to permit persons to whom the Software is furnished to do so, subject to the
following conditions:
Web Form Editor C-5

Third Party Licenses
C-6 Web Form Editor
The above copyright notice and this permission notice shall be included in all
copies or substantial portions of the Software.
THE SOFTWARE IS PROVIDED "AS IS", WITHOUT WARRANTY OF ANY KIND, EXPRESS OR IMPLIED,
INCLUDING BUT NOT LIMITED TO THE WARRANTIES OF MERCHANTABILITY, FITNESS FOR A
PARTICULAR PURPOSE AND NONINFRINGEMENT. IN NO EVENT SHALL THE AUTHORS OR COPYRIGHT
HOLDERS BE LIABLE FOR ANY CLAIM, DAMAGES OR OTHER LIABILITY, WHETHER IN AN ACTION OF
CONTRACT, TORT OR OTHERWISE, ARISING FROM, OUT OF OR IN CONNECTION WITH THE SOFTWARE
OR THE USE OR OTHER DEALINGS IN THE SOFTWARE.
UNICODE LICENSEUNICODE, INC. LICENSE AGREEMENT - DATA FILES AND SOFTWARE
Unicode Data Files include all data files under the directories
http://www.unicode.org/Public/, http://www.unicode.org/reports/, and
http://www.unicode.org/cldr/data/ . Unicode Software includes any source code
published in the Unicode Standard or under the directories
http://www.unicode.org/Public/, http://www.unicode.org/reports/, and
http://www.unicode.org/cldr/data/.
NOTICE TO USER: Carefully read the following legal agreement. BY DOWNLOADING,
INSTALLING, COPYING OR OTHERWISE USING UNICODE INC.'S DATA FILES ("DATA FILES"),
AND/OR SOFTWARE ("SOFTWARE"), YOU UNEQUIVOCALLY ACCEPT, AND AGREE TO BE BOUND BY,
ALL OF THE TERMS AND CONDITIONS OF THIS AGREEMENT. IF YOU DO NOT AGREE, DO NOT
DOWNLOAD, INSTALL, COPY, DISTRIBUTE OR USE THE DATA FILES OR SOFTWARE.
COPYRIGHT AND PERMISSION NOTICE
Copyright © 1991-2006 Unicode, Inc. All rights reserved. Distributed under the
Terms of Use in http://www.unicode.org/copyright.html.
Permission is hereby granted, free of charge, to any person obtaining a copy of the
Unicode data files and any associated documentation (the "Data Files") or Unicode
software and any associated documentation (the "Software") to deal in the Data
Files or Software without restriction, including without limitation the rights to
use, copy, modify, merge, publish, distribute, and/or sell copies of the Data Files
or Software, and to permit persons to whom the Data Files or Software are furnished
to do so, provided that (a) the above copyright notice(s) and this permission notice
appear with all copies of the Data Files or Software, (b) both the above copyright
notice(s) and this permission notice appear in associated documentation, and (c)
there is clear notice in each modified Data File or in the Software as well as in
the documentation associated with the Data File(s) or Software that the data or
software has been modified.

Third Party Licenses
THE DATA FILES AND SOFTWARE ARE PROVIDED "AS IS", WITHOUT WARRANTY OF ANY KIND,
EXPRESS OR IMPLIED, INCLUDING BUT NOT LIMITED TO THE WARRANTIES OF MERCHANTABILITY,
FITNESS FOR A PARTICULAR PURPOSE AND NONINFRINGEMENT OF THIRD PARTY RIGHTS. IN NO
EVENT SHALL THE COPYRIGHT HOLDER OR HOLDERS INCLUDED IN THIS NOTICE BE LIABLE FOR
ANY CLAIM, OR ANY SPECIAL INDIRECT OR CONSEQUENTIAL DAMAGES, OR ANY DAMAGES
WHATSOEVER RESULTING FROM LOSS OF USE, DATA OR PROFITS, WHETHER IN AN ACTION OF
CONTRACT, NEGLIGENCE OR OTHER TORTIOUS ACTION, ARISING OUT OF OR IN CONNECTION WITH
THE USE OR PERFORMANCE OF THE DATA FILES OR SOFTWARE.
Except as contained in this notice, the name of a copyright holder shall not be used
in advertising or otherwise to promote the sale, use or other dealings in these Data
Files or Software without prior written authorization of the copyright holder.
________________________________________Unicode and the Unicode logo are trademarks
of Unicode, Inc., and may be registered in some jurisdictions. All other trademarks
and registered trademarks mentioned herein are the property of their respective
owners
MISCELLANEOUS ATTRIBUTIONSAdobe, Acrobat, and the Acrobat Logo are registered trademarks of Adobe Systems Incorporated.
FAST Instream is a trademark of Fast Search and Transfer ASA.
HP-UX is a registered trademark of Hewlett-Packard Company.
IBM, Informix, and DB2 are registered trademarks of IBM Corporation.
Jaws PDF Library is a registered trademark of Global Graphics Software Ltd.
Kofax is a registered trademark, and Ascent and Ascent Capture are trademarks of Kofax Image Products.
Linux is a registered trademark of Linus Torvalds.
Mac is a registered trademark, and Safari is a trademark of Apple Computer, Inc.
Microsoft, Windows, and Internet Explorer are registered trademarks of Microsoft Corporation.
MrSID is property of LizardTech, Inc. It is protected by U.S. Patent No. 5,710,835. Foreign Patents Pending.
Oracle is a registered trademark of Oracle Corporation.
Portions Copyright © 1994-1997 LEAD Technologies, Inc. All rights reserved.
Portions Copyright © 1990-1998 Handmade Software, Inc. All rights reserved.
Portions Copyright © 1988, 1997 Aladdin Enterprises. All rights reserved.
Web Form Editor C-7

Third Party Licenses
Portions Copyright © 1997 Soft Horizons. All rights reserved.
Portions Copyright © 1995-1999 LizardTech, Inc. All rights reserved.
Red Hat is a registered trademark of Red Hat, Inc.
Sun is a registered trademark, and Sun ONE, Solaris, iPlanet and Java are trademarks of Sun Microsystems, Inc.
Sybase is a registered trademark of Sybase, Inc.
UNIX is a registered trademark of The Open Group.
Verity is a registered trademark of Autonomy Corporation plc
C-8 Web Form Editor

I n d e x
#[[ and ]] in HCSW files, 1-4
Aactions, 6-1adding a form framework, 3-4adding form elements, 4-4adding tables, 5-3adding web actions, 6-2advanced form elements, 4-3advanced forms, 3-2advanced options
form elements, 4-19tables, 5-9
advanced tables, 5-2
Bbasic properties
form elements, 4-5tables, 5-6
buttons, 4-2see also ’icons’
Ccheckbox
icon, 3-12, 4-2properties, 4-6
checking in a form, 3-7, 3-16, 7-2checking in an IDOC resource, 3-7, 7-2checking the installation, 2-4components
FCKEditor, 2-2FormEditor, 2-3
conditional clauses, 5-17Conditional Display (tables), 5-10conditional table rows, 5-5conditional tables, 5-3, 5-4Content Check In Form dialog, 3-16content ID, 3-9Content Server
metadata fields, 4-21supported versions of --, 2-1
Content Templates dialog, 3-13create dynamic include dialog, 7-4Create Dynamic Include icon, 3-12creating an IDOC resource, 7-2creating forms, 3-2
Ddata binding dialog, 4-21database table, 5-2Definitive Guide to Stellent Content Server
Development, 1-6design tips and considerations, 3-8documentation, supplementary --, 1-6dynamic includes
checking --, 7-2creating --, 7-2inserting references to forms, 7-3overview, 7-2revising --, 7-4
Dynamic Server Pages Guide, 1-6
Eediting a form, 3-7, 7-4editing a form framework, 3-5editing form elements, 4-5editing tables, 5-3
Web Form Editor I-1

Index
editing web actions, 6-3Enable Advanced Functionality
form elements, 4-3forms, 3-2tables, 5-2
FFCKeditor, 1-3, 3-11
standard toolbar icons, A-1FCKEditor component, 2-2file formats
HCSF, 1-5HCSP, 1-5HCSW, 1-4IDOC, 1-5
form element optionsadvanced, 4-19
form element propertiesbasic, 4-5data binding, 4-21
form elementsadding --, 4-4advanced --, 4-3advanced options, 4-19basic properties, 4-5button, 4-2checkbox, 4-6editing --, 4-5hidden field, 4-16image buttons, 4-2overview, 4-2radio button, 4-8selection fields, 4-2text area, 4-14text field, 4-11wrapper, 4-20
form framework, 3-14adding --, 3-4editing --, 3-5
Form icon, 3-12form properties, 3-14formatting
forms, 3-5tables, 5-4
FormEditor component, 2-3forms
advanced --, 3-2checking in --, 3-7, 3-16, 7-2dynamic includes, 7-2editing --, 3-7, 7-4formatting --, 3-5inserting IDOC references, 7-3
native file, 1-4, 3-7overview, 1-2, 3-2previewing --, 3-6properties, 3-14revising --, 3-7, 7-4tips and considerations, 3-8title of submitted --, 3-17viewing source code, 3-6web actions, 6-1, 6-3web-viewable file, 1-5, 3-7
HHCSFs, 1-3, 1-5, 3-7HCSPs, 1-3, 1-5HCSWs, 1-4, 3-7hidden field
icon, 3-12, 4-2properties, 4-16
Hypertext Content Server Files, see ’HCSFs’Hypertext Content Server Pages, see ’HCSPs’Hypertext Content Server Web Forms, see ’HCSWs’
Iicons
Checkbox, 3-12, 4-2Create Dynamic Include, 3-12Form, 3-12Hidden Field, 3-12, 4-2Idoc Resource Search, 3-12Radio Button, 3-12, 4-2Save, 3-11standard FCKeditor icons, A-1Table, 3-12Templates, 3-11Text Area, 3-12, 4-2Text Field, 3-12, 4-2Web Form Action, 3-12Web Form Preview, 3-11
IDOC files, 1-3, 1-5Idoc Resource Search icon, 3-12IDOC resources, 7-6
checking in --, 3-7, 7-2creating --, 7-2inserting -- to forms, 7-3native file, 1-4, 7-3overview, 7-2web-viewable file, 1-5, 7-3
image buttons, 4-2images, A-3inserting IDOC resource references, 7-3
I-2 Web Form Editor

Index
installation of Web Form Editorchecking the installation, 2-4installing the FCKEditor component, 2-2installing the FormEditor component, 2-3requirements, 2-1
Llaunching the Web Form Editor, 3-3
Mmain editor screen, 3-10
Nnative file
form definitions, 1-4, 3-7IDOC resources, 1-4, 7-3submitted forms, 1-5
Ooptions
form elements, 4-19table (advanced), 5-9
overview of Web Form Editor, 1-3
Ppreviewing forms, 3-6properties
checkbox, 4-6form elements, 4-5forms, 3-14hidden field, 4-16radio button, 4-8table (basic), 5-6text area, 4-14text field, 4-11
Rradio button
icon, 3-12, 4-2properties, 4-8
readme.doc, 1-6requirements for Web Form Editor, 2-1result sets, advanced tables linked to --, 5-2
revising a form, 3-7, 7-4row properties, 5-16rows in result set table, 5-2
SSave icon, 3-11searching for IDOC resources, 7-6selecting a template, 3-4selection fields, 4-2source code, 3-6starting the Web Form Editor, 3-3
TTable icon, 3-12table options
advanced, 5-9table properties
basic, 5-6Table Row dialog, 5-16tables
adding --, 5-3advanced --, 5-2advanced options, 5-9basic properties, 5-6conditional clause, 5-17conditional rows, 5-5conditional tables, 5-3, 5-4editing --, 5-3formatting --, 5-4linked to result sets, 5-2overview, 5-2properties, 5-5row properties, 5-16wrapper, 5-15
templates, 3-13adding or modifying --, 3-13selecting --, 3-4
Templates icon, 3-11text area
icon, 3-12, 4-2properties, 4-14
text fieldicon, 3-12, 4-2properties, 4-11
tips and considerations, 3-8title of submitted forms, 3-17toolbar icons, see ’icons’toolbars, 3-11
Web Form Editor I-3

Index
Uuninstalling Web Form Editor, A-1, B-1user interface
advanced options dialog (form elements), 4-19advanced options dialog (tables), 5-9checkbox properties dialog, 4-6condition clause dialog, 5-17content check-in form dialog, 3-16content templates dialog, 3-13create dynamic include dialog, 7-4data binding dialog, 4-21form element properties dialog, 4-5form properties dialog, 3-14hidden field properties dialog, 4-16Idoc Resource Search dialog, 7-6main editor screen, 3-10radio button properties dialog, 4-8table properties dialog, 5-6table row dialog, 5-16text area properties dialog, 4-14text field properties dialog, 4-11toolbars, 3-11web action dialog, 6-3
Vviewing form source code, 3-6
Wweb actions
adding --, 6-2dialog, 6-3editing --, 6-3overview, 6-1
Web Form Action icon, 3-12Web Form Editor
adding a form framework, 3-4
adding form elements, 4-4adding tables, 5-3checking in forms, 3-7, 7-2checking in IDOC resources, 3-7, 7-2creating an IDOC resource, 7-2editing a form framework, 3-5editing form elements, 4-5editing forms, 3-7, 7-4editing tables, 5-3formatting forms, 3-5formatting tables, 5-4inserting IDOC references to forms, 7-3installing --, 2-2launching --, 3-3main screen, 3-10overview, 1-3previewing forms, 3-6readme.doc, 1-6requirements, 2-1revising forms, 3-7, 7-4templates, 3-4, 3-13tips and considerations, 3-8toolbars, 3-11uninstalling --, A-1, B-1viewing form source code, 3-6web actions, 6-1
Web Form Preview icon, 3-11web forms, see ’forms’web-viewable file
form definitions, 1-5, 3-7IDOC resources, 1-5, 7-3submitted forms, 1-5
wrapperform elements, 4-20tables, 5-15
XXML tables, 5-2
I-4 Web Form Editor


![New ABAP Editor Presentation[1]](https://static.documents.pub/doc/80x56/54fdc0f24a7959422b8b483f/new-abap-editor-presentation1.jpg)

