16
WebAccess Dashboard Widget Development Tutorial Version: 1.0.0 Author:WebAccess Team Advantech Co., Ltd

WebAccess Dashboard Widget Development Tutorial
Version: 1.0.0
Author:WebAccess Team
Advantech Co., Ltd

Contents
CONTENTS ......................................................................................................................... 2
1. OVERVIEW .................................................................................................................. 3
2. PRELIMINARY AND WIDGET OPERATION DESCRIPTION ............................................... 3
2.1. WIDGET METADATA ........................................................................................................ 3
2.2. INTERFACEOBJ.JS AND THE INTERFACE WORK FLOW ............................................................... 4
2.2.1. Operational Description of Dashboard Editor .................................................. 4
2.2.2. Operational Description of Dashboard Viewer ................................................. 7
3. PLUGGABLE WIDGET INTERFACE IMPLEMENTATION ................................................... 8
3.1. FIRST TIME ADD A WIDGET INTO DASHBOARD ........................................................................ 8
3.2. APPLY PROPERTY SETTING INTO WIDGET ............................................................................ 14
3.3. OPEN A WIDGET IN DASHBOARD VIEWER ........................................................................... 14

1. Overview In this document, we will show you how to create a simple Tag-information Widget (which named: helloWorld_1, shown in Figure 1.1) by using Pluggable widget interface. You can find this sample code in helloWorld_1.zip.
Figure 1.1 – Tag-information Widget (helloWorld_1)
Before start to develop a widget, you need to prepare the following files: {WidgetName}.widgetInfo.xml – widget metadata, specify the widget’s configuration {WidgetName}.interfaceObj.js – interface implementation of this widget {WidgetName}.property.html – HTML structure of this widget’s properties {WidgetName}.png – image of this widget displayed in Widget Explorer {WidgetName}Hov.png – image of this widget (while mouse hover) And also, some additional files will be needed in this example: layout.html – HTML structure of this widget displayed in dashboard example.css – CSS style definition of this widget mappingRule.js – support function for widget to load and save data into Browser cache
2. Preliminary and Widget Operation description 2.1. Widget Metadata
For the detail configuration structure, please refer to “Pluggable Widget Interface Programming Guide”. In this example, you need to configure the following parameters: - WidTypeId
Configure the unique widget ID and follow the naming rule :

W_{Developer ID}_{Widget Type}_{sequence Number}
- WidTitle Default widget display name
- TitleLangs:
Specify the MUI value for WidTitle(listed above). In this example:
<TitleLangs>
<en>Hello world!</en>
<zh_cn>第一个Widget</zh_cn>
<zh_tw>第一個Widget</zh_tw>
</TitleLangs>
- WidObjRef Namespace of this widget. Please follow the rule that described in “Pluggable Widget Interface Programming Guide”.
- WidgetFolder: Specify the widget folder path which your widget resides.
- PrivateLibs Specify the paths of used libraries
- PropertyPagePaths: Specify the Widget Property Page path of this widget
- ImagePath: Specify the Preview Image path of this widget. The image would be displayed in widget explorer in Dashboard Editor and looked like:
- ImagePathHov: Specify the Hovered Preview Image path of this widget. (This image will be displayed while mouse hovers on.)
2.2. InterfaceObj.js and the interface work flow 2.2.1. Operational Description of Dashboard Editor
While first time the widget been added into Dashboard, Dashboard will execute the following interfaces sequentially: getInitStructure、showPropertyItems、

loadPropertyValues、drawWidChart
Figure 2.1 – Workflow of adding widget into dashboard
Click on different widget in the same dashboard
Dashboard will execute the following interfaces sequentially: openSavedWidget、
showPropertyItems、loadPropertyValues、drawWidChart
Figure 2.2 – Workflow of clicking on different widget
interfaceObj.js getInitStructure
showPropertyItems
loadPropertyValues
drawWidChart
{WidgetName}.property.html
layout.html
interfaceObj.js
showPropertyItems
loadPropertyValues
drawWidChart
{WidgetName}.property.html
layout.html
cache
openSavedWidget

After changing the preference of a widget and add this widget into Dashboard.
Dashboard will execute the following interfaces sequentially: openSavedWidget、
showPropertyItems、loadPropertyValues、drawWidChart
Figure 2.3 – Workflow of adding a widget that its preference has been changed.
Apply Widget Properties. Dashboard will read the property values and save these into
cache. Dashboard will execute the following interfaces sequentially: validatePropertyValues、getWidgetStructure、applyPropertyValues、drawWidChart
interfaceObj.js
showPropertyItems
loadPropertyValues
drawWidChart
{WidgetName}.property.html
layout.html
cache
openSavedWidget

Figure 2.4 – Workflow of applying widget properties.
2.2.2. Operational Description of Dashboard Viewer Open a widget in Dashboard Viewer. Dashboard will execute the following interfaces
sequentially: openSavedWidget、drawWidChart、refreshWidValue
Figure 2.5 – Workflow of opening a widget in dashboard viewer.
Scan time change / Update value from Real-time Communication Layer
Dashboard will execute the following interfaces sequentially: refreshWidValue
interfaceObj.js
getWidgetStructure
applyPropertyValues
drawWidChart
layout.html
UI
validatePropertyValues
interfaceObj.js
drawWidChart
refreshWidValue
layout.html
cache
openSavedWidget

Resize / Rotate event has been triggered in Mobile Phone Mode.
Dashboard will execute the following interfaces sequentially: drawWidChart、
refreshWidValue
3. Pluggable Widget Interface Implementation
In this section, we will show you about: - How to implement a widget - How to select a WebAccess Tag in Dashboard Editor - How to update tag value in Dashboard Viewer The Preview of the hellowWorld_1 widget is shown in Figure 3.1.
Figure 3.1 – The helloWorld_1 widget displayed in Dashboard Viewer
3.1. First time add a widget into dashboard
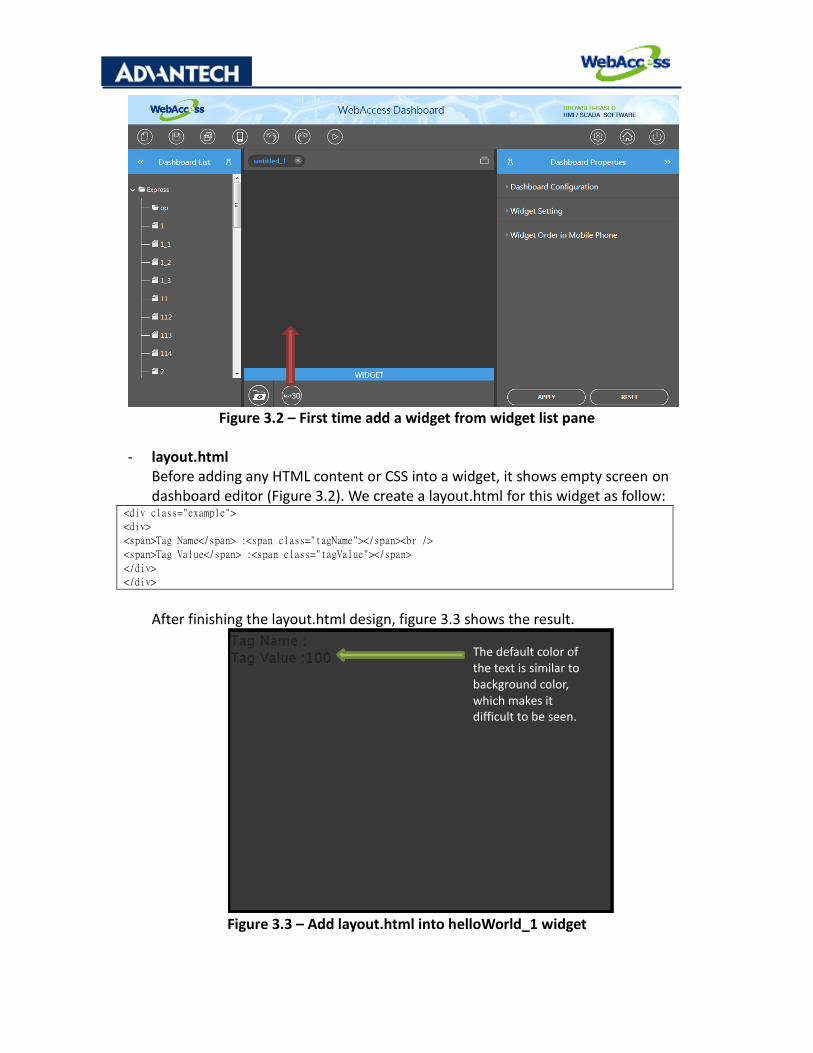
Figure 3.2 – First time add a widget from widget list pane
- layout.html
Before adding any HTML content or CSS into a widget, it shows empty screen on dashboard editor (Figure 3.2). We create a layout.html for this widget as follow:
<div class="example">
<div>
<span>Tag Name</span> :<span class="tagName"></span><br />
<span>Tag Value</span> :<span class="tagValue"></span>
</div>
</div>
After finishing the layout.html design, figure 3.3 shows the result.
Figure 3.3 – Add layout.html into helloWorld_1 widget
The default color of the text is similar to background color, which makes it difficult to be seen.

- example.css As you can see, the default color of the text is similar to background color, which makes it difficult to be seen. Therefore, the next step is to add an example.css for the style adjustment of this widget.
.example { position:relative; width:100%; height:100%; overflow:auto; color:#FFF; /*font-size:26px;*/ text-align:center; } .example > div { position:absolute; top:40%; text-align:center; }
After adding the example.css for this widget, the result is shown in Figure 3.4. The text color property can be opened for user to adjust (will be introduced in the following article).
Figure 3.4 – After CSS style adjustment
- getInitStructure() in helloWorld.interfaceObj.js:
Construct an initial structure of this widget. Need to specify the initial values of variables or objects for this widget.
tempObj.getInitStructure = function (lid, widProperty, params) { var layoutStruct = commonUtil.loadFileToPage(docRoot, "/widget/plugin/example/helloWord_1/layout.html"); var tag = { "tagName": "" }; var option = widget.plugin.example.helloWord.helloWord_1.util.objUtil.getWidOptions(); return { "layoutStruct": layoutStruct, "tag": tag, "option": option }; };
We use commonUtil.loadFileToPage API to load the layout.html file as the widget’s

base HTML structure. The return value would be an object. This object will be stored in “structObj” in Dashboard and be loaded and utilized by other widget interfaces.
In the sample code of helloWorld_1 widget, we implement some utility functions in objUtil.js file. Create a getWidOptions() function in objUtil.js for defining widget’s initial properties.
tempObj.getWidOptions = function () {
var option = {
size: 20
};
return option;
}; - helloWorld.property.html
Based on the properties in structObj, you can decide which property should be opened for end user and design the UI in property pane (Figure 3.5)
Figure 3.5 – Property Pane for HelloWorld_1 widget
For defining the layout of property pane, you need to implement the “helloWorld.property.html”
<h3><a href="#" >tag</a></h3> <div> <table> <tr> <td> <label for=" "> <span >tag list</span> : </label> </td> <td> <select id="taglist_test">

</select> </td> </tr> <tr> <td> <label for=" "> <span >font size</span> : </label> </td> <td> <input id="size_test" type=text /> </td> </tr> </table> </div> The accordion is defined based on the structure of: <h3>”Title”</h3><div>”Content of property”</div>
Figure 3.6 – After configuring the “tag” property of helloWorld_1 widget
- showPropertyItems in helloWorld.interfaceObj.js: tempObj.showPropertyItems = function (lid, propertyPagePaths, structObj, params) {
//Insert propert Html structure.
for (var i = 0; i < propertyPagePaths.length; i++) {
$("#daProperties").append(commonUtil.loadFileToPage(docRoot, propertyPagePaths[i]));
}
//get tag list and insert to UI
var tagArray = dataSourceUtil.getWATagList("1", {});
var tempTagHtml = '<option value="" jql>t_0064_Select</option>';
var i;
for (i = 0; i < tagArray.length; i++) {
tempTagHtml += "<option value='" + tagArray[i].tagName + "'>";
tempTagHtml += tagArray[i].tagName;
tempTagHtml += "</option>";
}
structObj.tagsListHTML = tempTagHtml;
$("#taglist_test").html(tempTagHtml);

}; Dashboard will call this interface to load the property structure (defined in helloWord.property.html) into Property Pane. Two things need to be noted: The input variable: “propertyPagePaths” will carry the path of
“helloWord.property.html”. You can use commonUtil.loadFileToPage() API to load the HTML structure into property pane.
Use dataSourceUtil.getWATagList() API to get the tag list of this project.
- loadPropertyValues in helloWorld.interfaceObj.js: tempObj.loadPropertyValues = function (lid, structObj, params) {
var option = structObj.option;
dashboardProperty.htmlCacheMapping(widget.plugin.example.helloWord.helloWord_1.util.mappingRule.getRuleObj(),
"toHtml", option);
$("#taglist_test ").val(structObj.tag.tagName);
}; Load all the property values in structObj into Property structure of this widget. You can use dashboardProperty.htmlCacheMapping() API to simplify code implementation. (Cooperate with mappingRule.js, which define the MAP structure of the property name/value pairs。
- mappingRule.js tempObj.getRuleObj = function () { var MapArray = []; MapArray.push(dashboardProperty.setMapObj("size", "size_test", "text")); return MapArray; }; - drawWidChart in helloWorld.interfaceObj.js:
tempObj.drawWidChart = function (lid, dashName, widLid, widProperty, widObj, needSel, structObj, refreshCBObj, params) { $("#" + widLid).append(structObj.layoutStruct); $("#" + widLid).find(".tagName").text(structObj.tag.tagName); if (!isVMode) { structObj.tagValue = Math.round(100*Math.random()); $("#" + widLid).find(".tagValue").text(structObj.tagValue); } $("#" + widLid).css("fontSize", structObj.option.size + "px"); return structObj; }; Specify how to draw your widget in Dashboard. Use the global variable – “isVMode” to determine if this interface is called in dashboard viewer or not. If this interface is called in Editor, we display the tag value with random number.

3.2. Apply property setting into Widget - validatePropertyValues in helloWorld.interfaceObj.js: tempObj.validatePropertyValues = function (lid, params) { if (!$.isNumeric($("#size_test").val()) || ($("#size_test").val() * 1 % 1) > 0 || $("#size_test").val() * 1 < 0) { var range = dashboardMui.muiFunctions.convert("t_0086_Size"); errObj = validateUtil.composeExp("e_0001_COMMON_NOT_NUMBER", [range]); throw errObj; }; };
Define the validation function of the property values in Property Pane. If the value is not valid, you can assign a warning message and display it with a warning dialog. Figure 3.6 shows a warning dialog of the font size error.
Figure 3.7 – warning dialog of Font size error
- getWidgetStructure in helloWorld.interfaceObj.js: tempObj.getWidgetStructure = function (lid, structObj, params) { structObj.tagValue = null; structObj.tagsListHTML = null; return structObj; };
Remove temporary data from StructObj to make this object clear.
- applyPropertyValues in helloWorld.interfaceObj.js: tempObj.applyPropertyValues = function (lid, structObj, params) { dashboardProperty.htmlCacheMapping(widget.plugin.example.helloWord.helloWord_1.util.mappingRule.getRuleObj(), "toCache", structObj.option); structObj.tag.tagName = $("#taglist_test").val(); return structObj; };
Apply the property values from Property Pane to the cache in dashboard framework. This cache will be stored in browser until the user decide to save this dashboard. In this interface, you can user mappingRule.js or assign the value directly from the Property Pane to structObj. - drawWidChart in helloWorld.interfaceObj.js:
(Refer to the description in 3.1)
3.3. Open a Widget in dashboard viewer
- openSavedWidget tempObj.openSavedWidget = function (lid, structObj, params) {
return structObj; };

While the widget be opened, openSavedWidget() interface will be called at the beginning to handle the initial stage of structObj. We can use this interface to adjust the compatibility of structObj between different version, or running some function that only need to be executed once.
- drawWidChart in helloWorld.interfaceObj.js:
(Refer to the description in 3.1)
- refreshWidValue in helloWorld.interfaceObj.js: tempObj.refreshWidValue = function (dashName, lid, structObj, params) {
var widLid = widgetUtil.getDrawingRegionId(lid); var cbObj = {}; cbObj[waDashboardConstants.CB_ATTR_NAME_FUNC] = widget.plugin.example.helloWord.helloWord_1.util.objUtil.drawAndRefresh; cbObj[waDashboardConstants.CB_ATTR_NAME_PARAMS] = [lid, structObj]; //WARTCommunication if (params["tagInfos"] != undefined) { if (params["tagInfos"]) { //only collect data structObj.tagValue = dataSourceUtil.updateTagValues(structObj.tagValue, params["tagInfos"]); widget.plugin.example.helloWord.helloWord_1.util.objUtil.drawAndRefresh(lid, structObj, structObj.tagValue); } } else { //case: //1.AJAX //2.safari //3.first time open if (params.isFopen || (commonUtil.isIOSSafari() && !params.commanderId)) { var tagArray = []; tagArray.push(structObj.tag.tagName); dataSourceUtilCombo.getTagValuesAndRefresh(!commonUtil.isIOSSafari(), tagArray, true, lid, cbObj); } else {
//WARTCommunication //no updated value + time request ended widget.plugin.example.helloWord.helloWord_1.util.objUtil.drawAndRefresh(lid, structObj, structObj.tagValue); } }
};
This interface let you define how to refresh your widget values in Dashboard Viewer. Dashboard framework will call this interface by the time interval set in Dashboard editor. You can only specify the update part of this widget to improve the efficiency of screen updating.
The code structure is introduced as follow: if (params["tagInfos"] != undefined)
This interface is called by server pushing message (WARTCommunication). params["tagInfos"] object contains the newest tag information pushed from server. We define a drawAndRefresh() function in objUtil.js to process the value refreshing in the screen.
Else This interface is called by other cases. First, you need to access the WebAccess Web Service directly for updating tag

value in the following two cases: params.isFopen: This interface is called when this widget is opened. (commonUtil.isIOSSafari() && !params.commanderId): determine if the
client is a iOS device or not. Since the iOS device cannot support WARTCommunication (push message), we need to use ajax to update the data.
We define a “drawAndRefresh()” function in objUtil and set it as the call-back function in dataSourceUtilCombo.getTagValuesAndRefresh() API (used for update the tag values by ajax). When WebAccess Dashboard finishing get WebAccess Tag values, it will call drawAndRefresh () to process the value refreshing in the screen.
Otherwise, this interface is called while the time interval fired. Simply to call the “drawAndRefresh()” function in objUtil to process the value refreshing in the screen.


