Data ONTAP® 7.3 Upgrade Guide Network Appliance, Inc. 495 East Java Drive Sunnyvale, CA 94089 USA Telephone: +1 (408) 822-6000 Fax: +1 (408) 822-4501 Support telephone: +1 (888) 4-NETAPP Documentation comments: [email protected]Information Web: http://www.netapp.com Part number 210-04185_A0 June 2008
Copyright information...................................................................................9Trademark information...............................................................................13About this guide............................................................................................15
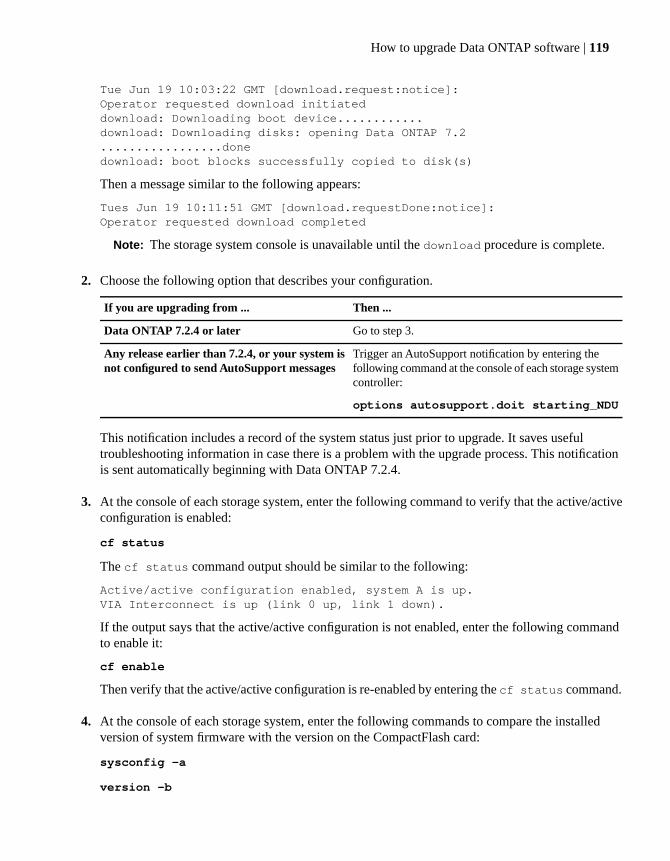
FilerView as an alternative to the command-line interface.........................................18
Command, keyboard, and typographic conventions....................................................18
Special messages.........................................................................................................19
Overview of the upgrade process................................................................21Decisions to make before you upgrade........................................................23
Using the Upgrade Advisor to plan your upgrade.......................................................23
System requirements....................................................................................................25
Updating BMC firmware using the standard method .....................................87
How to upgrade Data ONTAP software.....................................................91Prerequisites to software upgrade................................................................................91
What you need for the upgrade........................................................................91
Preparing for the upgrade................................................................................92
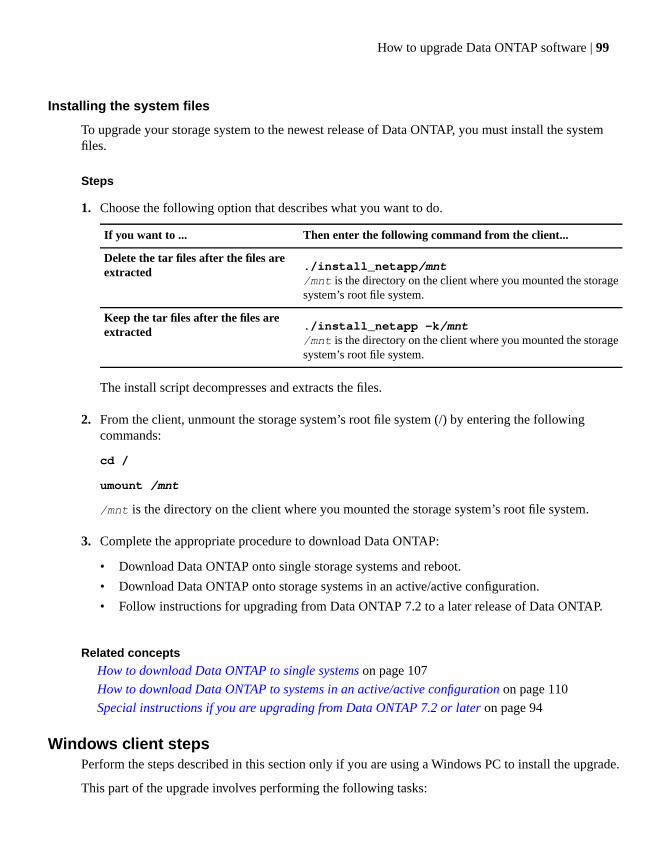
How to install Data ONTAP system files....................................................................93
Special instructions if you are upgrading from Data
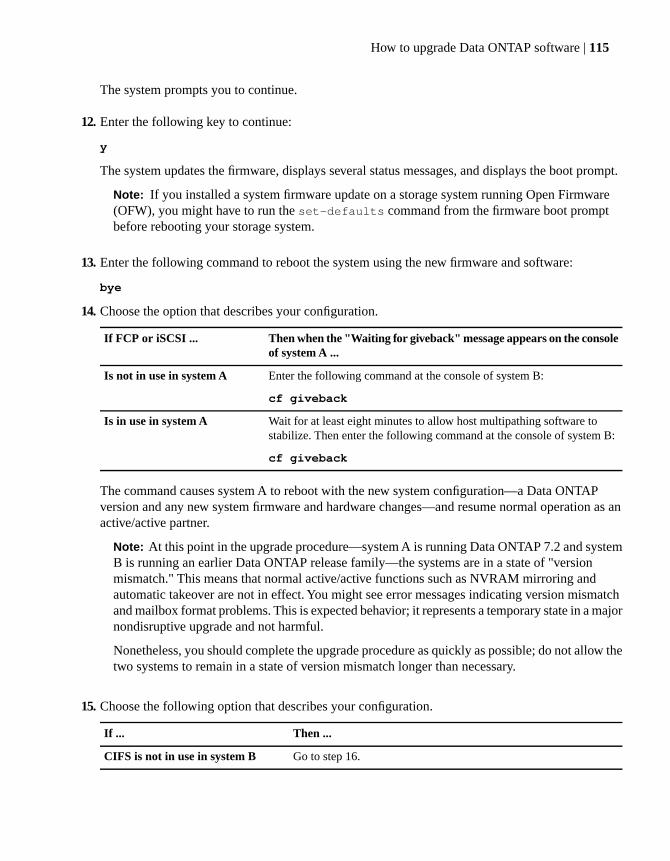
ONTAP 7.2 or later....................................................................................94
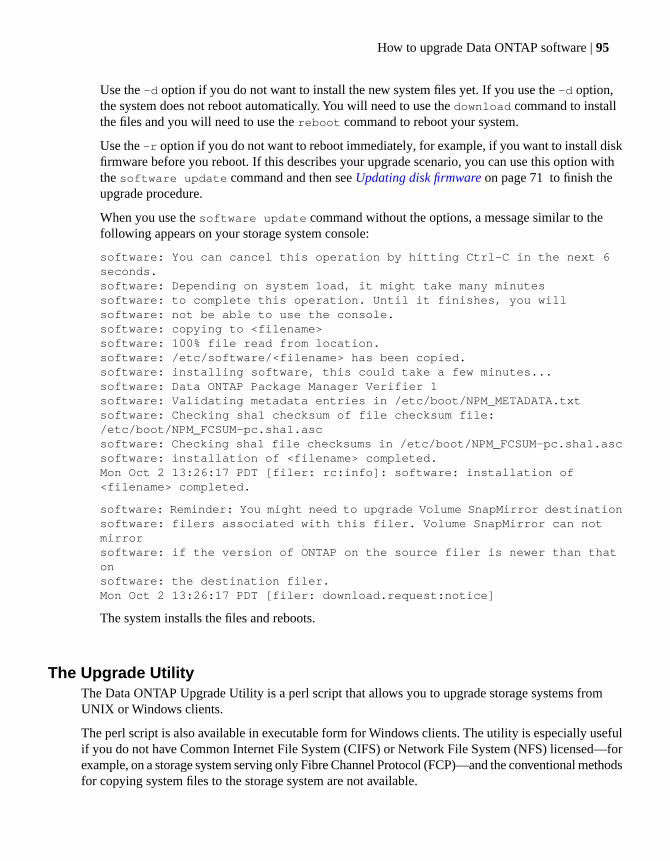
The Upgrade Utility.........................................................................................95
Upgrading your active/active configuration from an earlier
release family nondisruptively.................................................................112
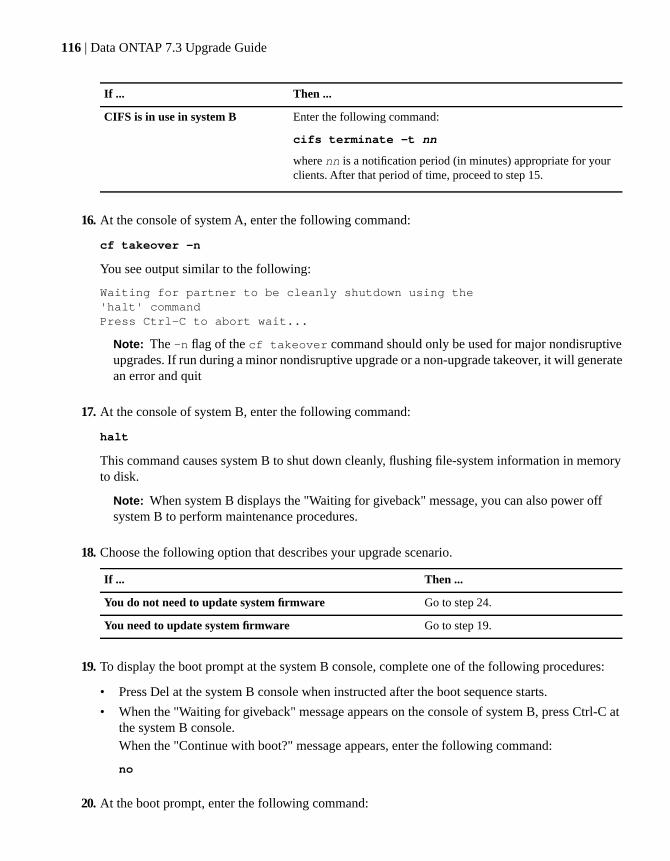
Upgrading your active/active configuration within a
release family nondisruptively.................................................................118
Upgrading your active/active configuration using the
standard method.......................................................................................123
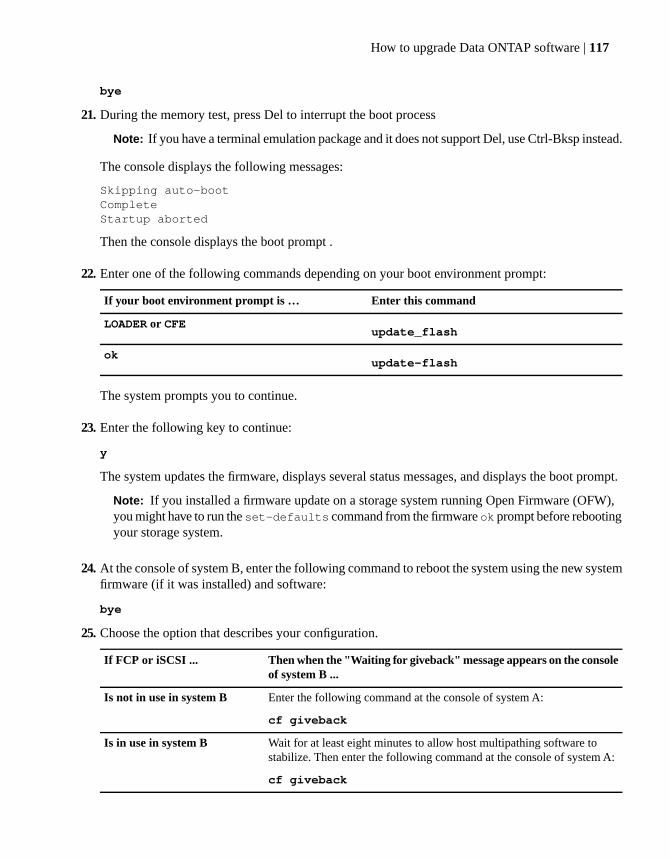
Table of Contents | 5
Upgrading your FAS900 series storage system in an
active/active configuration using the standard method............................126
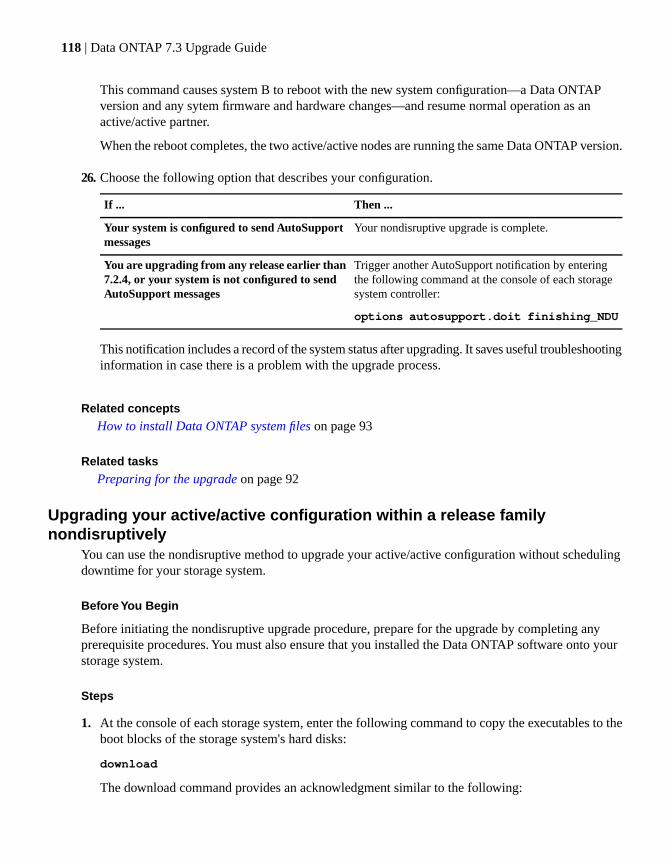
Guidelines for reverting to a previous release..........................................129Why there might be issues.........................................................................................129
General guidelines for reverting from the Data ONTAP 7.3
Decisions to make before reverting to Data ONTAP 6.5...........................................134
Flexible root volumes cannot be reverted......................................................135
FlexVol volumes and data cannot be reverted...............................................135
FlexCache volumes cannot be reverted.........................................................135
Full administrative access privileges after reversion.....................................135
Changes to vol status and aggr status command output
after reversion..........................................................................................136
SSL must be reenabled after reversion..........................................................136
Connections requiring SMB signing not available after reversion................136
Connections requiring LDAP signing not available after reversion..............137
6 | Data ONTAP 7.3 Upgrade Guide
Storage system domain accounts must be recreated after
reverting to releases earlier than Data ONTAP 6.5.3...............................137
Optimizing service availability during upgrades.....................................139How upgrades impact service availability ................................................................139
Service and protocol considerations..........................................................................140
Considerations for stateless protocols...........................................................140
Considerations for session-oriented protocols...............................................141
No part of this document covered by copyright may be reproduced in any form or by any means—graphic,electronic, or mechanical, including photocopying, recording, taping, or storage in an electronic retrievalsystem—without prior written permission of the copyright owner.
Portions of this product are derived from the Berkeley Net2 release and the 4.4-Lite-2 release, whichare copyrighted and publicly distributed by The Regents of the University of California.
Permission to use, copy, modify, and distribute this software and its documentation is hereby granted,provided that both the copyright notice and its permission notice appear in all copies of the software,derivative works or modified versions, and any portions thereof, and that both notices appear insupporting documentation.
CARNEGIE MELLON ALLOWS FREE USE OF THIS SOFTWARE IN ITS “AS IS” CONDITION.CARNEGIE MELLON DISCLAIMS ANY LIABILITY OF ANY KIND FOR ANY DAMAGESWHATSOEVER RESULTING FROM THE USE OF THIS SOFTWARE.
Software derived from copyrighted material of The Regents of the University of California and CarnegieMellon University is subject to the following license and disclaimer:
Redistribution and use in source and binary forms, with or without modification, are permitted providedthat the following conditions are met:
Redistributions of source code must retain the above copyright notices, this list of conditions, and thefollowing disclaimer.
Redistributions in binary form must reproduce the above copyright notices, this list of conditions, andthe following disclaimer in the documentation and/or other materials provided with the distribution.
All advertising materials mentioning features or use of this software must display this text:
This product includes software developed by the University of California, Berkeley and its contributors.
Neither the name of the University nor the names of its contributors may be used to endorse or promoteproducts derived from this software without specific prior written permission.
THIS SOFTWARE IS PROVIDED BY THE REGENTS AND CONTRIBUTORS “AS IS” AND ANYEXPRESS OR IMPLIED WARRANTIES, INCLUDING, BUT NOT LIMITED TO, THE IMPLIEDWARRANTIES OF MERCHANTABILITY AND FITNESS FOR A PARTICULAR PURPOSE AREDISCLAIMED. IN NO EVENT SHALL THE REGENTS OR CONTRIBUTORS BE LIABLE FORANY DIRECT, INDIRECT, INCIDENTAL, SPECIAL, EXEMPLARY, OR CONSEQUENTIAL
Copyright information | 9
DAMAGES (INCLUDING, BUT NOT LIMITED TO, PROCUREMENT OF SUBSTITUTE GOODSOR SERVICES; LOSS OF USE, DATA, OR PROFITS; OR BUSINESS INTERRUPTION) HOWEVERCAUSED AND ON ANY THEORY OF LIABILITY, WHETHER IN CONTRACT, STRICTLIABILITY, OR TORT (INCLUDING NEGLIGENCE OR OTHERWISE) ARISING IN ANY WAYOUT OF THE USE OF THIS SOFTWARE, EVEN IF ADVISED OF THE POSSIBILITY OF SUCHDAMAGE.
This software contains materials from third parties licensed to NetApp Inc. which is sublicensed, andnot sold, and title to such material is not passed to the end user. All rights reserved by the licensors.You shall not sublicense or permit timesharing, rental, facility management or service bureau usage ofthe Software.
Redistribution and use in source and binary forms are permitted provided that the above copyrightnotice and this paragraph are duplicated in all such forms and that any documentation, advertisingmaterials, and other materials related to such distribution and use acknowledge that the software wasdeveloped by the University of Southern California, Information Sciences Institute. The name of theUniversity may not be used to endorse or promote products derived from this software without specificprior written permission.
Portions of this product are derived from version 2.4.11 of the libxml2 library, which is copyrightedby the World Wide Web Consortium.
NetApp modified the libxml2 software on December 6, 2001, to enable it to compile cleanly on Windows,Solaris, and Linux. The changes have been sent to the maintainers of libxml2. The unmodified libxml2software can be downloaded from http://www.xmlsoft.org/.
Software derived from copyrighted material of the World Wide Web Consortium is subject to thefollowing license and disclaimer:
Permission to use, copy, modify, and distribute this software and its documentation, with or withoutmodification, for any purpose and without fee or royalty is hereby granted, provided that you includethe following on ALL copies of the software and documentation or portions thereof, includingmodifications, that you make:
The full text of this NOTICE in a location viewable to users of the redistributed or derivative work.
Notice of any changes or modifications to the W3C files, including the date changes were made.
THIS SOFTWARE AND DOCUMENTATION IS PROVIDED “AS IS,” AND COPYRIGHTHOLDERS MAKE NO REPRESENTATIONS OR WARRANTIES, EXPRESS OR IMPLIED,INCLUDING BUT NOT LIMITED TO, WARRANTIES OF MERCHANTABILITY OR FITNESSFOR ANY PARTICULAR PURPOSE OR THAT THE USE OF THE SOFTWARE ORDOCUMENTATION WILL NOT INFRINGE ANY THIRD PARTY PATENTS, COPYRIGHTS,TRADEMARKS OR OTHER RIGHTS.
COPYRIGHT HOLDERS WILL NOT BE LIABLE FOR ANY DIRECT, INDIRECT, SPECIAL ORCONSEQUENTIAL DAMAGES ARISING OUT OF ANY USE OF THE SOFTWARE ORDOCUMENTATION.
The name and trademarks of copyright holders may NOT be used in advertising or publicity pertainingto the software without specific, written prior permission. Title to copyright in this software and anyassociated documentation will at all times remain with copyright holders.
Software derived from copyrighted material of NetApp, Inc. is subject to the following license anddisclaimer:
NetApp reserves the right to change any products described herein at any time, and without notice.NetApp assumes no responsibility or liability arising from the use of products described herein, exceptas expressly agreed to in writing by NetApp. The use or purchase of this product does not convey alicense under any patent rights, trademark rights, or any other intellectual property rights of NetApp.
The product described in this manual may be protected by one or more U.S.A. patents, foreign patents,or pending applications.
RESTRICTED RIGHTS LEGEND: Use, duplication, or disclosure by the government is subject torestrictions as set forth in subparagraph (c)(1)(ii) of the Rights in Technical Data and Computer Softwareclause at DFARS 252.277-7103 (October 1988) and FAR 52-227-19 (June 1987).
Copyright information | 11
Trademark information
All applicable trademark attribution is listed here.
NetApp, the Network Appliance logo, the bolt design, NetApp-the Network Appliance Company,Cryptainer, Cryptoshred, DataFabric, DataFort, Data ONTAP, Decru, FAServer, FilerView, FlexClone,FlexVol, Manage ONTAP, MultiStore, NearStore, NetCache, NOW NetApp on the Web, SANscreen,SecureShare, SnapDrive, SnapLock, SnapManager, SnapMirror, SnapMover, SnapRestore,SnapValidator, SnapVault, Spinnaker Networks, SpinCluster, SpinFS, SpinHA, SpinMove, SpinServer,StoreVault, SyncMirror, Topio, VFM, and WAFL are registered trademarks of NetApp, Inc. in theU.S.A. and/or other countries. gFiler, Network Appliance, SnapCopy, Snapshot, and The evolution ofstorage are trademarks of NetApp, Inc. in the U.S.A. and/or other countries and registered trademarksin some other countries. The NetApp arch logo; the StoreVault logo; ApplianceWatch; BareMetal;Camera-to-Viewer; ComplianceClock; ComplianceJournal; ContentDirector; ContentFabric; EdgeFiler;FlexShare; FPolicy; Go Further, Faster; HyperSAN; InfoFabric; Lifetime Key Management, LockVault;NOW; ONTAPI; OpenKey, RAID-DP; ReplicatorX; RoboCache; RoboFiler; SecureAdmin; ServingData by Design; SharedStorage; Simplicore; Simulate ONTAP; Smart SAN; SnapCache; SnapDirector;SnapFilter; SnapMigrator; SnapSuite; SohoFiler; SpinMirror; SpinRestore; SpinShot; SpinStor; vFiler;VFM Virtual File Manager; VPolicy; and Web Filer are trademarks of NetApp, Inc. in the U.S.A. andother countries. NetApp Availability Assurance and NetApp ProTech Expert are service marks ofNetApp, Inc. in the U.S.A.
IBM, the IBM logo, AIX, and System Storage are trademarks and/or registered trademarks ofInternational Business Machines Corporation.
Apple is a registered trademark and QuickTime is a trademark of Apple, Inc. in the U.S.A. and/or othercountries. Microsoft is a registered trademark and Windows Media is a trademark of MicrosoftCorporation in the U.S.A. and/or other countries. RealAudio, RealNetworks, RealPlayer, RealSystem,RealText, and RealVideo are registered trademarks and RealMedia, RealProxy, and SureStream aretrademarks of RealNetworks, Inc. in the U.S.A. and/or other countries.
All other brands or products are trademarks or registered trademarks of their respective holders andshould be treated as such.
NetApp, Inc. is a licensee of the CompactFlash and CF Logo trademarks. NetApp, Inc. NetCache iscertified RealSystem compatible.
Trademark information | 13
About this guide
Here you can learn what this document describes and who it is intended for, what special terminologyis used in the document, what command, keyboard, and typographic conventions this document usesto convey information, and other details about finding and using information.
This document describes how to upgrade storage systems that run Data ONTAP to the latest release offirmware and software.
To determine whether your system is supported for the latest version of Data ONTAP, see the latestRelease Notes and system requirements.
Note: Upgrade procedures for V-Series systems, formerly known as gFiler systems, are covered inV-Series documentation.
Next topics
Audience on page 15
Accessing Data ONTAP man pages on page 16
Terminology on page 16
FilerView as an alternative to the command-line interface on page 18
Command, keyboard, and typographic conventions on page 18
Special messages on page 19
AudienceHere you can learn who this document is written for and the assumptions that were made about thepreexisting knowledge and experience you have.
This document is for system administrators who are familiar with operating systems such as UNIX®
and Windows®, that run on the storage system's clients.
This guide assumes that you are familiar with how to configure the storage system and how NetworkFile System (NFS), Common Internet File System (CIFS), Hypertext Transport Protocol (HTTP), FileTransport Protocol (FTP), and Web-based Distributed Authoring and Versioning (WebDAV) are usedfor file sharing or transfers. This guide does not cover basic system or network administration topics,such as IP addressing, routing, and network topology; it emphasizes the characteristics of the storagesystem.
About this guide | 15
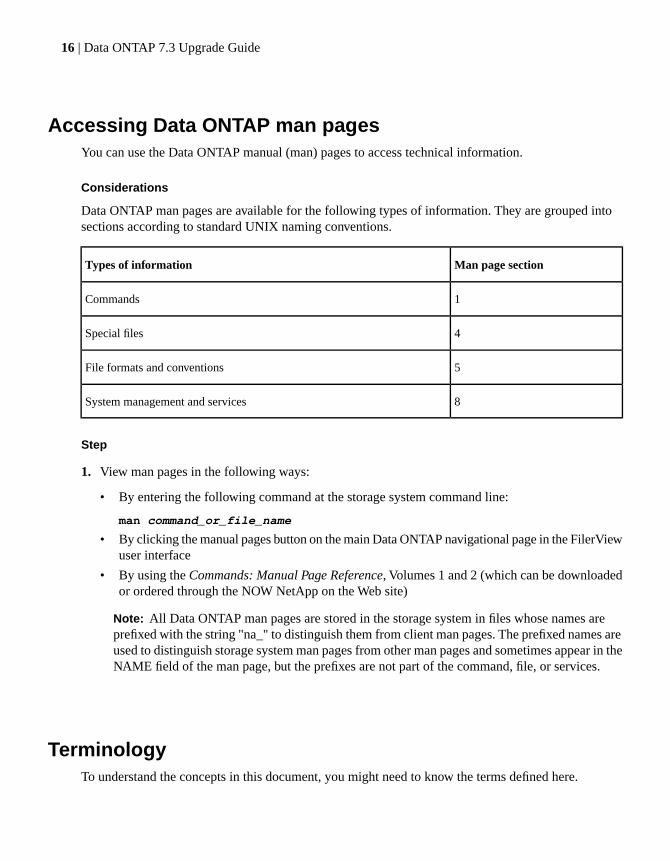
Accessing Data ONTAP man pagesYou can use the Data ONTAP manual (man) pages to access technical information.
Considerations
Data ONTAP man pages are available for the following types of information. They are grouped intosections according to standard UNIX naming conventions.
Man page sectionTypes of information
1Commands
4Special files
5File formats and conventions
8System management and services
Step
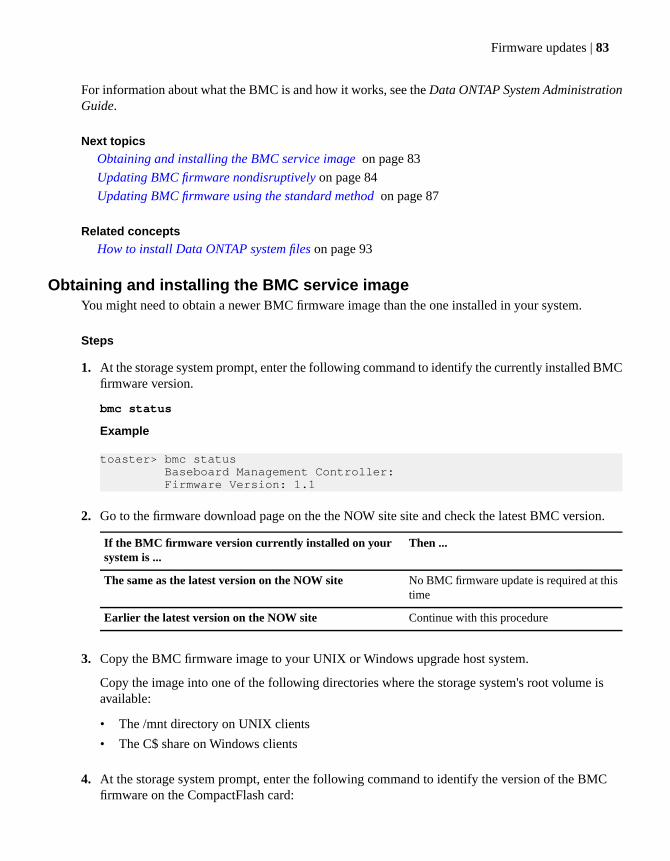
1. View man pages in the following ways:
• By entering the following command at the storage system command line:
man command_or_file_name
• By clicking the manual pages button on the main Data ONTAP navigational page in the FilerViewuser interface
• By using the Commands: Manual Page Reference, Volumes 1 and 2 (which can be downloadedor ordered through the NOW NetApp on the Web site)
Note: All Data ONTAP man pages are stored in the storage system in files whose names areprefixed with the string "na_" to distinguish them from client man pages. The prefixed names areused to distinguish storage system man pages from other man pages and sometimes appear in theNAME field of the man page, but the prefixes are not part of the command, file, or services.
TerminologyTo understand the concepts in this document, you might need to know the terms defined here.
16 | Data ONTAP 7.3 Upgrade Guide
General storage system terminology
• Storage systems that run Data ONTAP are sometimes referred to as filers, appliances, storageappliances, or systems. The name of the FilerView graphical user interface for Data ONTAP reflectsone of these common usages.
• Controller or storage controller refers to the component of a storage system that runs the DataONTAP operating system and controls its disk subsystem. Controllers or storage controllers arealso sometimes called storage appliances, appliances, storage engines, heads, CPU modules, orcontroller modules.
Active/active configuration terminology
• An active/active configuration is a pair of storage systems configured to serve data for each otherif one of the two systems becomes impaired. In Data ONTAP documentation and other informationresources, active/active configurations are sometimes also referred to as clusters or active/activepairs.
• When in an active/active configuration, systems are often called nodes. One node is sometimescalled the local node, and the other node is called the partner node or remote node.
• Standard active/active configuration refers to a configuration set up so that one node automaticallytakes over for its partner when the partner node becomes impaired.
• Mirrored active/active configuration is similar to the standard active/active configuration, exceptthat there are two copies, or plexes, of the data. This is also called data mirroring.
• Fabric-attached MetroCluster refers to an active/active configuration running the syncmirror_localand cluster_remote licenses, where the nodes are attached to two pairs of Fibre Channel switches,and they are separated by more than 500 meters.
• Stretch MetroCluster refers to an active/active configuration running the syncmirror_local andcluster_remote licenses, where the nodes are separated by up to 500 meters, and no switches areused between the nodes. This configuration is also sometimes called a nonswitched MetroCluster.
• Controller failover, also referred to as cluster failover or CFO, refers to the technology that enablestwo storage systems to take over each other's data, thus improving data availability.
• Remote storage refers to the storage that is accessible to the local node, but is at the location of theremote node.
Storage hardware terminology
• FC HBA for Disk or FC HBA refers to the Fibre Channel host bus adapter that connects the nodeto the switch or to the disks.
• Disk shelf refers to a unit of the disk subsystem component of the storage system.
• LRC (Loop Resiliency Circuit) disk shelf module refers to a component that keeps the FibreChannel-Arbitrated Loop (FC-AL) intact during the addition and removal of disks within a diskshelf. It also contains the enclosure services processor, which communicates the environmental dataof the disk shelf.
About this guide | 17
• ESH (Embedded Switching Hub) disk shelf module refers to a component that provides a means ofmanaging an FC-AL loop in an intelligent manner, such that a single drive failure does not takedown the loop. It also contains the enclosure services processor, which communicates theenvironmental data of the disk shelf.
• ESH2 disk shelf module refers to a second-generation ESH module.
• ESH4 disk shelf module refers to a third-generation ESH module.
• AT-FCX refers to an enhanced FC-AL to Serial ATA (SATA) bridge used in some disk shelves.
General terms
• The term type means pressing one or more keys on the keyboard.
• The term enter mean pressing one or more keys on the keyboard and then pressing the Enter key,or clicking in a field in a graphical interface and typing information into it.
FilerView as an alternative to the command-line interface
Use the FilerView graphical user interface to perform many common tasks, as well as to view andmanage a storage system from a Web browser.
Your tasks as a Data ONTAP administrator can be performed by entering commands at the storagesystem console, in configuration files, or through a Telnet session or Remote Shell connection.
Another method of performing many common tasks is to use FilerView. FilerView comes with everystorage system, is easy to use, and includes Help that explains Data ONTAP features and how to workwith them in FilerView.
For more information about accessing a storage system with FilerView, and about FilerView Help, seethe System Administration Guide.
Command, keyboard, and typographic conventionsThis document uses command, keyboard, and typographic conventions that help you enter commands.
Command conventions
In examples that illustrate commands executed on a UNIX workstation, the command syntax and outputmight differ, depending on your version of UNIX.
18 | Data ONTAP 7.3 Upgrade Guide
Keyboard conventions
• When describing key combinations, this document uses the hyphen (-) to separate individual keys.For example, "Ctrl-D" means pressing the "Control" and "D" keys simultaneously.
• This document uses the term "Enter" to refer to the key that generates a carriage return, althoughthe key is named "Return" on some keyboards.
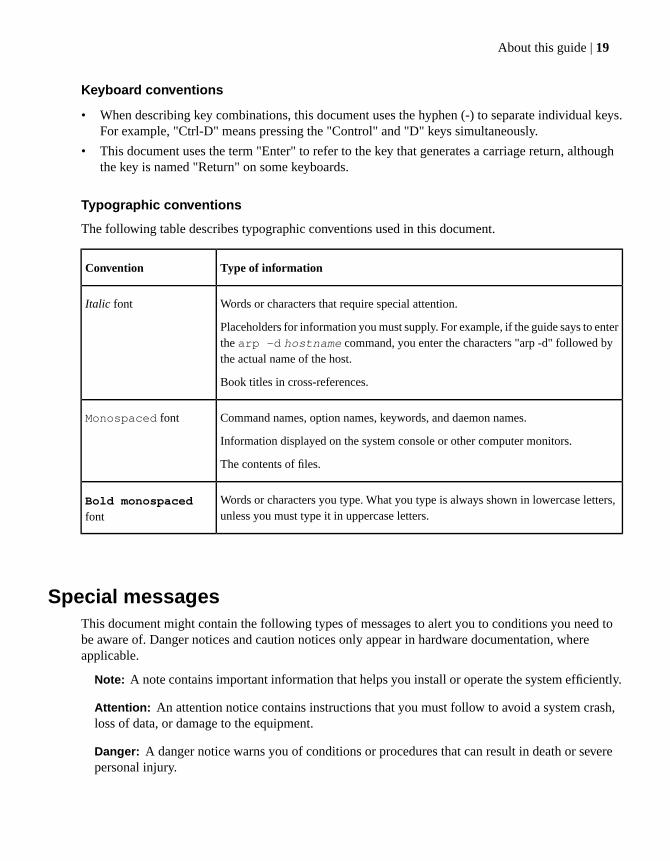
Typographic conventions
The following table describes typographic conventions used in this document.
Type of informationConvention
Words or characters that require special attention.
Placeholders for information you must supply. For example, if the guide says to enterthe arp -d hostname command, you enter the characters "arp -d" followed bythe actual name of the host.
Book titles in cross-references.
Italic font
Command names, option names, keywords, and daemon names.
Information displayed on the system console or other computer monitors.
The contents of files.
Monospaced font
Words or characters you type. What you type is always shown in lowercase letters,unless you must type it in uppercase letters.
Bold monospaced
font
Special messagesThis document might contain the following types of messages to alert you to conditions you need tobe aware of. Danger notices and caution notices only appear in hardware documentation, whereapplicable.
Note: A note contains important information that helps you install or operate the system efficiently.
Attention: An attention notice contains instructions that you must follow to avoid a system crash,loss of data, or damage to the equipment.
Danger: A danger notice warns you of conditions or procedures that can result in death or severepersonal injury.
About this guide | 19
Caution: A caution notice warns you of conditions or procedures that can cause personal injury thatis neither lethal nor extremely hazardous.
20 | Data ONTAP 7.3 Upgrade Guide
Overview of the upgrade process
The upgrade process for your storage system requires several steps.
Steps
1. Plan your upgrade by familiarizing yourself with requirements and issues before you upgrade.
Plan to do the following:
• Review the Release Notes for this Data ONTAP release.
• Understand any requirements for upgrading to the current release from your existing software.
Attention: You should use the Upgrade Advisor tool (if available in your environment) toassess your upgrade conditions and generate an upgrade plan.
• Note any potential changes to your system after the upgrade.
• If you have storage systems in an active/active configuration, select the appropriate upgrademethod.
• If your storage system is in a SAN environment, verify that all components of your SANconfiguration are compatible with the upgraded Data ONTAP release by consulting the TheCompatibility and Configuration Guide for NetApp FCP and iSCSI Products on the NOW site.
• If you run the SnapMirror® software, identify storage systems with destination and sourcevolumes.
2. If necessary, perform any required preliminary procedures before upgrading to Data ONTAP thecurrent release.
Required procedures might include the following:
• Resolving upgrade issues, including performing an intermediate upgrade
• Upgrading storage system firmware
• Updating disk firmware
• Updating disk shelf firmware
3. Obtain the Data ONTAP system files from the NOW NetApp on the Web site or from the DataONTAP CD-ROM.
4. Upgrade Data ONTAP system files.
Install the Data ONTAP the current release system files and download them to your storage system.
Related concepts
Decisions to make before you upgrade on page 23
Overview of the upgrade process | 21
Decisions to make about upgrade issues on page 40
Firmware updates on page 65
Updating disk firmware on page 71
Updating disk shelf firmware on page 76
How to upgrade Data ONTAP software on page 91
Guidelines for reverting to a previous release on page 129
Related information
Upgrade Advisor -- now.netapp.com/NOW/asuphome/
The Compatibility and Configuration Guide for NetApp FCP and iSCSI Products --now.netapp.com/NOW/knowledge/docs/san/fcp_iscsi_config/
Because new features are introduced in each release of Data ONTAP, you must understand new featuresand upgrade requirements, and decide how they might impact your current configuration. You are morelikely to encounter issues if you are upgrading from a release earlier than the immediately previousversion of Data ONTAP.
Next topics
Using the Upgrade Advisor to plan your upgrade on page 23
System requirements on page 25
Upgrade host requirements on page 27
Decisions to make about release family upgrades on page 29
Decisions to make about the upgrade method for active/active configurations on page 31
Upgrade requirements for SnapMirror on page 37
Decisions to make about upgrade issues on page 40
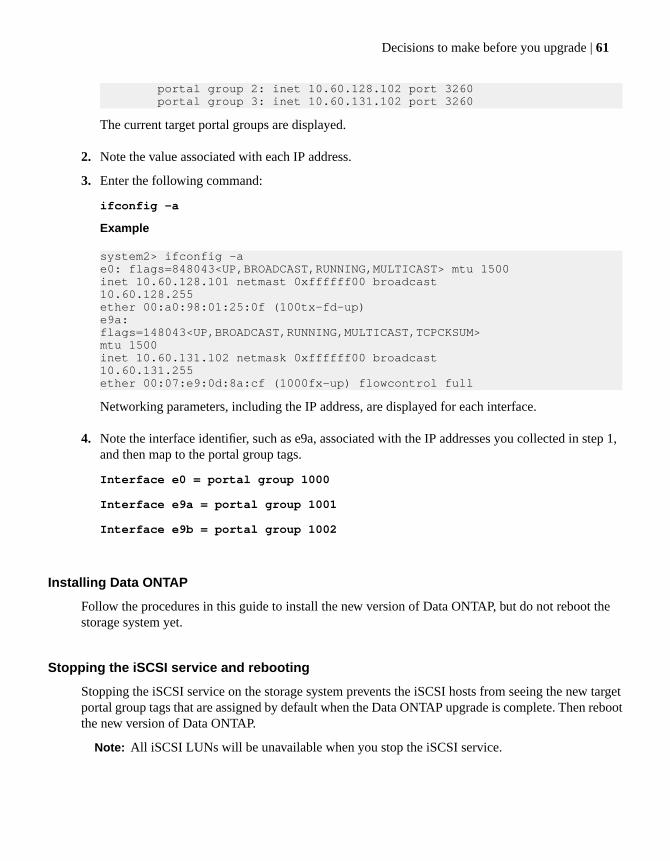
Considerations for upgrading iSCSI hosts on page 59
Using the Upgrade Advisor to plan your upgradeYou should use the Upgrade Advisor tool (if it is available in your environment) to ensure that youhave met the requirements for upgrading to the current release and to generate an upgrade plan.
Before You Begin
To use the Upgrade Advisor tool, your system must meet the following requirements:
• It must have a valid support contract.
• It must be enabled to send AutoSupport messages to NetApp.
Attention: If your system does not meet these requirements, you should consult the Release Notesand Upgrade Guide for this Data ONTAP release to prepare a detailed upgrade plan.
Considerations
The Upgrade Advisor is an online tool available on the NOW site. When you submit your systemidentification and target release, the Upgrade Advisor compares AutoSupport data about your systemto known requirements and limitations of the target release. It then generates an upgrade plan withrecommended preparation and execution procedures.
Decisions to make before you upgrade | 23
To generate an upgrade plan, you must know your system hostname, system ID, or serial number andyou must have selected a target upgrade release. You can also select other options, including thefollowing:
• Create a plan for an active/active configuration, including nondisruptive upgrades
• Create a back-out plan
• Compare upgrade scenarios
For more information about the Upgrade Advisor, see the Upgrade Advisor help screens.
Steps
1. Locate and record the system hostname, system ID, or serial number of your system by entering thefollowing command at the command line:
sysconfig
The system indentification information is near the top of the display.
2. From a Web browser, log in to the Premium AutoSupport home page on NOW at the followingURL:
http://now.netapp.com/NOW/asuphome/
3. Click the Premium AutoSupport link.
4. Enter the hostname, system ID, or serial number of your system when prompted.
5. Select the desired system from those listed.
6. Select the latest AutoSupport record from the ASUPs row.
7. Select the Upgrade Advisor tab.
8. Select a Data ONTAP release from the Target Versions menu.
9. Select the upgrade method and the warnings you would like included in your upgrade plan.
When you click Continue, an upgrade plan is generated.
After You Finish
When you are satisfied with your upgrade plan, begin the upgrade process as recommended. For moreinformation about individual parts of the plan, see the corresponding sections of this Upgrade Guide.
System requirementsBefore you upgrade, make sure your system meets the minimum requirements.
Next topics
Making sure your system supports the current Data ONTAP release on page 25
Making sure there is adequate free space in every volume containing LUNs on page 25
Checking for the latest versions of system firmware for your system on page 26
Determining the required firmware for your disks on page 26
Determining the required firmware for your disk shelves on page 27
Making sure your system supports the current Data ONTAP releaseYou can check the Data ONTAP versions available for your system to determine if your storage systemsupports this Data ONTAP release.
Considerations
To determine whether your storage system supports this Data ONTAP release, use a Web browser togo to the NOW site.
Steps
1. Use a Web browser to go to the NOW Web site.
2. Click Service & Support.
3. Click Download Software.
4. In the Select Platform list box in the Data ONTAP product row, select your storage system type.
5. Click Go.
You see a list of the versions of Data ONTAP supported by your storage system platform. If this releaseis listed, you can upgrade to it.
Making sure there is adequate free space in every volume containing LUNsBefore upgrading a storage system in a SAN environment, you must ensure that every volume containingLUNs includes at least 1 MB of free space. The space is needed to accommodate changes in the on-diskdata structures used by the new version of Data ONTAP.
Decisions to make before you upgrade | 25
Steps
1. Check free space in a volume containing LUNs by entering the following command at the storagesystem command line:
df
2. If the volume does not have at least 1 MB (1024 KB) of free space, create free space in the fullvolume either by deleting unnecessary data or by growing the size of the volume.
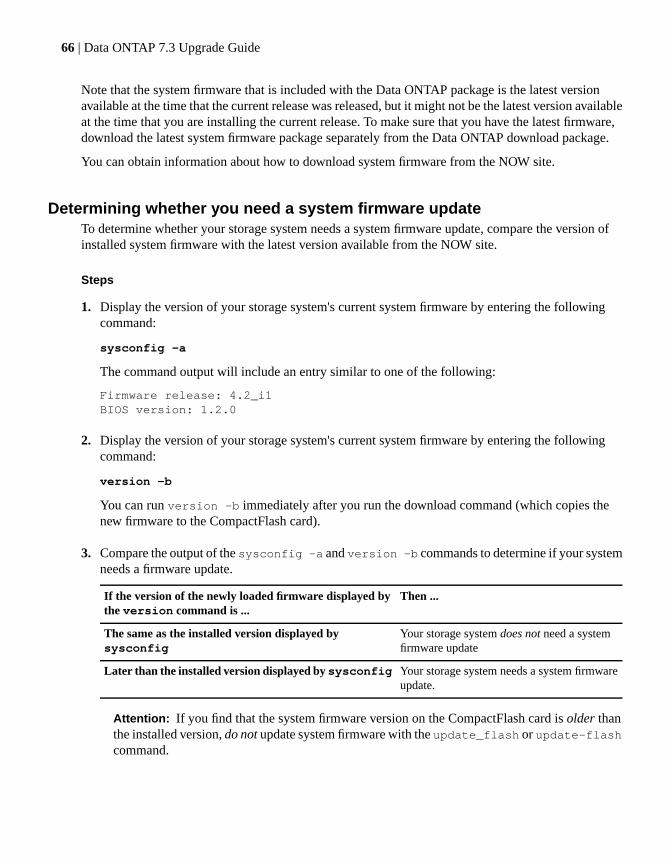
Checking for the latest versions of system firmware for your systemYou can check the system firmware versions available for your system to determine if a system firmwareupdate is required.
Steps
1. Use a Web browser to go to the NOW Web site.
2. Click Service & Support.
3. Click Download Software.
4. Scroll down to Firmware & MIBs.
5. Click System Firmware/Diagnostics for CompactFlash-based Filers, gFilers, & NearStores.
You see a list of the system firmware versions available for your storage system.
Related concepts
Firmware updates on page 65
Determining the required firmware for your disksIf you view the latest required firmware revisions for Fibre Channel and SAS disk drives, you candetermine if you need to update the disk firmware for your system.
Steps
1. Use a Web browser to go to http://now.netapp.com/.
2. Click Service & Support.
3. Click Disk.
The Disk Drive & Firmware matrix appears, where you can click the link to the firmware revisionneeded for your drives.
26 | Data ONTAP 7.3 Upgrade Guide
Related concepts
Firmware updates on page 65
Determining the required firmware for your disk shelvesIf you view the latest required firmware revisions for disk shelves, you can determine if you need toupdate the disk shelf firmware for your system.
Steps
1. Use a Web browser to go to http://now.netapp.com/.
2. Click Service & Support.
3. Click Shelf.
The Disk Shelf & ESH Firmware Matrix appears, where you can click the link to the firmware revisionneeded for your shelves.
Related concepts
Firmware updates on page 65
Upgrade host requirementsAn upgrade host is the client system or server from which you upgrade Data ONTAP. You can upgradeData ONTAP from a Windows or UNIX client, or from an HTTP server.
The host from which you upgrade your storage system must have access to at least one of the followingitems.
• The NOW site
• A CD-ROM drive
• An HTTP server containing Data ONTAP updates
You can install Data ONTAP system files after you prepare the upgrade host.
Next topics
Requirements when upgrading from a Windows or UNIX client using the CIFS or NFSprotocols on page 28
Requirements when upgrading from a Windows or UNIX client using the UpgradeUtility on page 28
Requirements when upgrading from an HTTP server on page 28
Decisions to make before you upgrade | 27
Related concepts
How to install Data ONTAP system files on page 93
Requirements when upgrading from a Windows or UNIX client using the CIFSor NFS protocols
If the CIFS or NFS protocols are licensed on your storage system, you can upgrade from a Windowsor UNIX client using those protocols. You must be able to administer the storage system from the UNIXor Windows client . This client is usually the storage system's administration (admin) host.
UNIX and Windows clients must meet these requirements.
• A UNIX client can be running any available version of UNIX.
• A Windows client can be running any version of Windows unless you are running Windows NT.
• A Windows NT client requires Windows NT version 3.51 or later.
For information about admin hosts, see the Data ONTAP System Administration Guide.
Note: The iSCSI protocol provides limited CIFS functionality that is not sufficient to allow you toupgrade using this method. With this limited functionality, you cannot create shares on the storagesystem for the upgrade package and you cannot use Windows client commands to unpack the upgradepackage.
Related concepts
Considerations for upgrading iSCSI hosts on page 59
Requirements when upgrading from a Windows or UNIX client using theUpgrade Utility
The Data ONTAP Upgrade Utility is a perl script that helps you upgrade storage systems from a Windowsor UNIX client.
You can use the Upgrade Utility if you do not have CIFS or NFS licensed on your storage system—forexample, if you are serving data using the FCP or iSCSI protocol.
Note: You must be running Java on the storage system to use the Upgrade Utility.
Related concepts
The Upgrade Utility on page 95
Requirements when upgrading from an HTTP serverUpgrading from an HTTP server is a good choice for configurations that meet certain requirements.
To upgrade from an HTTP server, you must be able to serve the upgrade package from the HTTP serverand you must know the exact URL (including any necessary host and port information) to enter at thestorage system console.
28 | Data ONTAP 7.3 Upgrade Guide
Using an HTTP server is a good choice in these circumstances:
• The storage system does not have a CIFS or NFS license.
• You want to distribute Data ONTAP upgrade packages to multiple storage systems.
• You want to use installation scripts.
For information about the console, see the Data ONTAP System Administration Guide.
Related concepts
HTTP server steps on page 103
Decisions to make about release family upgradesEach Data ONTAP release family introduces new features. Most issues are resolved automatically inthe Data ONTAP software, but a few issues require manual configuration.
When you upgrade and there are one or more intermediate release families between your source andtarget release, the latest release usually includes any automatic upgrade software included in previousreleases (unless otherwise specified). However, you might need to review and resolve upgrade issuesassociated with intermediate release families before upgrading to the new release.
Next topics
Differentiating among types of upgrades on page 29
Upgrading within a release family on page 30
Upgrading between release families on page 30
Differentiating among types of upgradesData ONTAP upgrades can be within a release family or between release families.
A release family is a set of releases that have the same feature release name denoted by the first twodigits of the release number. For example, 7.1, 7.1.0.1, 7.1.1, and 7.1.1.1 are all releases within thesame family
An upgrade within a release family is one in which the release number x.y.z does not change in the xor y components, only in the z components, when comparing the original to the target release. Thefollowing are examples of upgrades within release families:
• 7.3 to 7.3.1
• 7.2 to 7.2.5
• 7.1 to 7.1.1
• 7.2 to 7.2P1
Decisions to make before you upgrade | 29
An upgrade between release families is one in which the release number x.y.z changes in the x or ycomponents from the original to the target release. For example, an upgrade from 7.1 to 7.2.4 is anupgrade between release families.
The following are examples of upgrades between release families:
• 7.2.4 to 7.3
• 7.1 to 7.2.5
• 7.0 to 7.2.5
• 6.5 to 7.2.5
Upgrading within a release familyUpgrades within a release family are usually simpler and involve less service disruption than upgradesbetween release families.
This is because major changes are not usually introduced within a release family, and updates to thesystem and disk firmware are not usually required when you upgrade. Rather, these releases usuallyinclude bug fixes and minor feature enhancements.
Upgrading between release familiesA new release family usually includes major changes in infrastructure and subsystems.
When you upgrade from one release family to another, one or more of the following might have beenintroduced on your platform:
• Fundamental infrastructure changes—for example, changes to WAFL or RAID operation
• Version number changes requiring a file system upgrade—for example, in RAID, WAFL,Non-Volatile LOG (NVLOG) or Java subsystems
• New system firmware
Such feature changes and requirements are cumulative between succeeding release families. You donot have to upgrade sequentially to each new release family—in other words, you can skip releasefamilies—but you must comply with the requirements of any intermediate release and you should beaware of any new system behavior introduced in an intermediate release. For example, if you areupgrading from 6.4.1 to the current release, you must satisfy the upgrade requirements of the 6.5, 7.0,and 7.1 release families.
For these reasons, upgrades between release families sometimes take longer, involve more steps, andinterrupt storage system services longer than upgrades within a release family.
30 | Data ONTAP 7.3 Upgrade Guide
Decisions to make about the upgrade method for active/activeconfigurations
The nondisruptive active/active configuration upgrade procedure ensures better storage system availabilitythan the standard upgrade procedure but requires more planning. The standard upgrade is generally thebest choice if you can schedule downtime.
When planning for your upgrade, evaluate the advantages and disadvantages of each method.
Note: You cannot use the nondisruptive method to upgrade active/active configurations to DataONTAP 7.2 or later from a Data ONTAP release earlier than 7.0. To upgrade from releases earlierthan 7.0, you must use the standard method of upgrading.
The Upgrade Advisor tool can help you determine which method is most appropriate in yourenvironment.
Next topics
Overview of standard active/active upgrades on page 31
Overview of nondisruptive active/active upgrades on page 32
The Cluster Configuration Checker on page 36
Related tasks
Using the Upgrade Advisor to plan your upgrade on page 23
Overview of standard active/active upgradesA standard upgrade can be peformed on any active/active configuration, but downtime is required.
In a standard upgrade, downtime is required because the active/active configuration is disabled andeach node is updated. When the active/active configuration is disabled, each node behaves as asingle-node storage system; in other words, system services associated with the node are interruptedfor as long as it takes the system to reboot.
When to use standard active/active upgrades
In general, standard upgrades are best when you can schedule downtime for your storage system.
You can also complete other maintenance upgrades, such as system firmware and hardware, as part ofthe standard upgrade. These can also take place when the active/active configuration is disabled.
Standard active/active configuration upgrades must be used for upgrades to Data ONTAP 7.2 or laterfrom releases earlier than Data ONTAP 7.0.
Decisions to make before you upgrade | 31
Overview of nondisruptive active/active upgradesNondisruptive upgrades do not require downtime, and are available on some active/active configurations.
In a nondisruptive upgrade (also called a rolling upgrade), active/active technology is used to enablea takeover storage system to assume the functions of the “failed” partner while it is being upgraded.There is a takeover and giveback operation for each active/active node (storage system that is part ofan active/active relationship). Because the partner node fulfills service requests during the "failed"storage system's upgrade, no disruption in service is experienced by the clients.
In addition, because the takeover storage system assures continuous availability of the "failed" system'sdisks, more extensive upgrades requiring a system halt—such as system firmware updates and hardwareadapter replacements—can be performed without disrupting services based on stateless protocols.
Next topics
When to use nondisruptive active/active upgrades on page 32
When not to use nondisruptive upgrades on page 33
Requirements for nondisruptive upgrades on all systems on page 33
Requirements for nondisruptive upgrades on systems with FCP and iSCSI hosts on page 35
Preparing for nondisruptive upgrades on page 35
When to use nondisruptive active/active upgrades
You can use the nondisruptive upgrade method on active/active configurations that meet certain DataONTAP requirements.
You can use the nondisruptive method when one or more of the following is being performed:
• Upgrades to the Data ONTAP 7.3 release family from an immediately preceding release family (forexample, from 7.2.3 to 7.3)
Note: To upgrade nondisruptively to the 7.3 release family, you must be running Data ONTAP7.2.3 or a later release in the 7.2 family.
If you need to upgrade to the most recent 7.2 release before upgrading to the 7.3 release family,you can upgrade nondisruptively to Data ONTAP 7.2.3 or later from the following earlier releases:
• 7.1.2 or later (in the 7.1 release family)
• 7.0.6 or later (in the 7.0 release family)
• Data ONTAP upgrades within a release family
• System firmware updates
• Certain hardware upgrades
Note: See the Active/Active Installation and Administration Guide for more information aboutchanging system hardware nondisruptively.
32 | Data ONTAP 7.3 Upgrade Guide
When not to use nondisruptive upgrades
You cannot use the nondisruptive upgrade method in all circumstances.
Upgrades might be disruptive if any of the following conditions are true:
• You have storage systems actively serving CIFS to clients.Because CIFS is session-oriented, sessions must be terminated before upgrade procedures to preventdata loss.
• You have storage systems actively serving File Transfer Protocol (FTP) or Network Data ManagementProtocol (NDMP) clients that cannot be postponed.Because these protocols are session-oriented, outstanding sessions must complete, and these servicesmust be disabled in order to use nondisruptive upgrades.
• You have storage systems configured for fabric-attached MetroClusters and you are upgrading toa new release family.For fabric-attached MetroClusters, nondisruptive upgrades are supported within release familiesbut not between release families. For stretch MetroClusters, nondisruptive upgrades are supportedboth within and between release families.
• You need to update firmware for SAS-based, AT-FC-based, AT-FC2-based, or AT-FCX-based diskshelves on your system.Client services might encounter delays accessing data when disk shelf firmware is updated to SAS,AT-FC, AT-FC2, or AT-FCX modules. To prevent data loss, all session-oriented services must beterminated before you begin an update procedure.
• You need to update disk firmware and you have RAID4 aggregates on your system.Standard disk firmware updates automatically take disks in RAID4 aggregates offline until theupdate is complete. Services and data are unavailable until they are back online.
Note: If you upgrade RAID protection to RAID-DP, disk firmware updates take place in thebackground and are nondisruptive.
• Your configuration does not meet the nondisruptive requirement for FCP or iSCSI hosts.
For these conditions, standard upgrades are recommended.
Related concepts
Updating disk shelf firmware on page 76
Updating disk firmware on page 71
Service availability during disk firmware updates on page 72
Requirements for nondisruptive upgrades on systems with FCP and iSCSI hosts on page 35
Requirements for nondisruptive upgrades on all systems
You must ensure that your systems meet configuration and utilization requirements before beginninga nondisruptive upgrade process.
Decisions to make before you upgrade | 33
Attention: Be sure to use the Upgrade Advisor tool (if it is available in your environment) to helpyou determine nondisruptive upgrade requirements.
To use the nondisruptive upgrade procedure, you must have an active/active storage system configurationin which a partner controller takes over I/O during the upgrade process.
Major nondisruptive upgrades (nondisruptive upgrades between release families) to Data ONTAP 7.3.xreleases are supported from Data ONTAP 7.2.2 and later Data ONTAP 7.2.x releases.
Note: If you are running a release in the Data ONTAP 7.2 family that is lower than 7.2.2 and youwant to upgrade nondisruptively to a Data ONTAP 7.3 release, you must first upgrade nondisruptivelyto the latest Data ONTAP 7.2.x release.
If you are running a release in the Data ONTAP 7.0 or 7.1 release family and you want to upgradenondisruptively to Data ONTAP 7.3 or later, you must first upgrade to the latest 7.0.x or 7.1.xrelease, then upgrade to the latest Data ONTAP 7.2.x release.
Minor nondisruptive upgrades (nondisruptive upgrades within release families) are supported from allprevious Data ONTAP 7.3 releases.
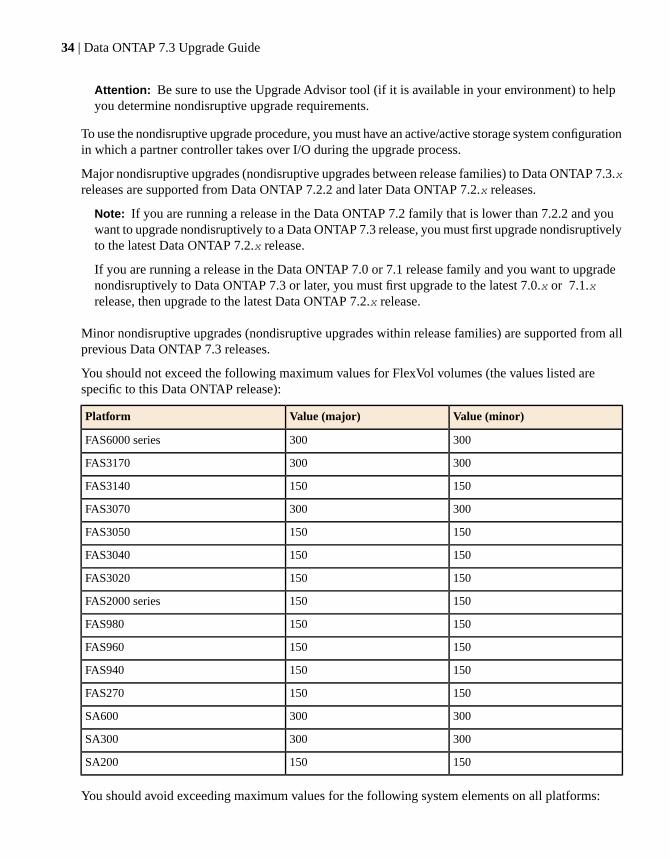
You should not exceed the following maximum values for FlexVol volumes (the values listed arespecific to this Data ONTAP release):
Value (minor)Value (major)Platform
300300FAS6000 series
300300FAS3170
150150FAS3140
300300FAS3070
150150FAS3050
150150FAS3040
150150FAS3020
150150FAS2000 series
150150FAS980
150150FAS960
150150FAS940
150150FAS270
300300SA600
300300SA300
150150SA200
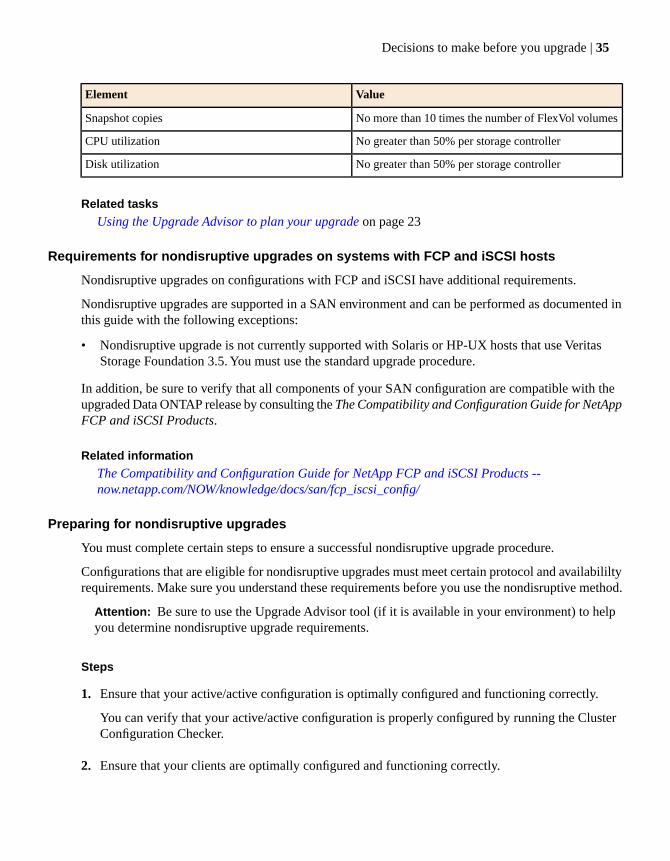
You should avoid exceeding maximum values for the following system elements on all platforms:
34 | Data ONTAP 7.3 Upgrade Guide
ValueElement
No more than 10 times the number of FlexVol volumesSnapshot copies
No greater than 50% per storage controllerCPU utilization
No greater than 50% per storage controllerDisk utilization
Related tasks
Using the Upgrade Advisor to plan your upgrade on page 23
Requirements for nondisruptive upgrades on systems with FCP and iSCSI hosts
Nondisruptive upgrades on configurations with FCP and iSCSI have additional requirements.
Nondisruptive upgrades are supported in a SAN environment and can be performed as documented inthis guide with the following exceptions:
• Nondisruptive upgrade is not currently supported with Solaris or HP-UX hosts that use VeritasStorage Foundation 3.5. You must use the standard upgrade procedure.
In addition, be sure to verify that all components of your SAN configuration are compatible with theupgraded Data ONTAP release by consulting the The Compatibility and Configuration Guide for NetAppFCP and iSCSI Products.
Related information
The Compatibility and Configuration Guide for NetApp FCP and iSCSI Products --now.netapp.com/NOW/knowledge/docs/san/fcp_iscsi_config/
Preparing for nondisruptive upgrades
You must complete certain steps to ensure a successful nondisruptive upgrade procedure.
Configurations that are eligible for nondisruptive upgrades must meet certain protocol and availabililtyrequirements. Make sure you understand these requirements before you use the nondisruptive method.
Attention: Be sure to use the Upgrade Advisor tool (if it is available in your environment) to helpyou determine nondisruptive upgrade requirements.
Steps
1. Ensure that your active/active configuration is optimally configured and functioning correctly.
You can verify that your active/active configuration is properly configured by running the ClusterConfiguration Checker.
2. Ensure that your clients are optimally configured and functioning correctly.
Check service protocols and configure client timeout settings to ensure availability meets requirementsfor a nondisruptive upgrade.
3. If the automatic giveback setting, cf.giveback.auto.enable option is on, disable automaticgiveback by entering the following command on one of your storage systems in the active/activeconfiguration:
options cf.giveback.auto.enable off
After the upgrade procedure, reset this option to on (if desired).
4. For major nondisruptive upgrades in SAN environments, ensure that thelun.use_partner.major_ndu_compatibility option is set to on.
5. Ensure that you have no failed disks on either node.
If either node has failed disks, giveback can fail. To avoid this issue, remove any failed disks beforeentering the giveback command.
6. If you need disk firmware updates in addition to the Data ONTAP upgrade, ensure that all disks onyour system are in RAID-DP™ or mirrored RAID4 aggregates.
Disk firmware updates take place automatically in the background when RAID-DP protection isconfigured. Services and data continue to be available during the disk firmware update.
Note: RAID4 volumes can be upgraded nondisruptively (temporarily or permanently) to RAID-DPto automatically enable the background firmware update capability.
7. If you are upgrading to this Data ONTAP release from an earlier release family, ensure that yourdisk firmware and disk shelf firmware are current. If they are not, you must upgrade to the latestdisk firmware and disk shelf firmware before starting the nondisruptive upgrade procedure.
Related concepts
Updating disk firmware on page 71
Updating disk shelf firmware on page 76
Related tasks
Using the Upgrade Advisor to plan your upgrade on page 23
The Cluster Configuration CheckerThe Cluster Configuration Checker is a Perl script that detects errors in the configuration of a pair ofactive/active NetApp storage systems.
Before upgrading your active/active configuration, you must verify that it is properly configured. Youcan use the Cluster Configuration Checker to identify and resolve any active/active configuration issuesbefore continuing with the upgrade. The script is available on the NOW site.
36 | Data ONTAP 7.3 Upgrade Guide
For more information, see the chapter on active/active management in the Active/Active ConfigurationGuide.
Upgrade requirements for SnapMirrorSpecial consideration must be given to storage systems running SnapMirror when you are upgradingto the newest version of Data ONTAP.
If you are upgrading Data ONTAP on storage systems that are running the SnapMirror® software, youmust upgrade the systems that have SnapMirror destination volumes before you upgrade the systemsthat have SnapMirror source volumes. For SnapMirror volume replication, the destination volume mustrun under a version of Data ONTAP equal to or later than that of the SnapMirror source volume. If youupgrade the source volumes first, SnapMirror volume replication is disabled. To reenable SnapMirrorvolume replication, you must downgrade the source system or upgrade the destination system, so thatthe version of Data ONTAP on the source system is earlier than or the same as that on the destinationsystem.
The requirement to upgrade SnapMirror destination volumes first applies to both asynchronous andsynchronous SnapMirror for volume replication.
The requirement does not apply to SnapMirror for qtree replication, SnapVault, or data restoration fortape using the restore command. However, when you upgrade systems that use these features, youshould upgrade your SnapMirror destination systems, SnapVault® secondary systems and restorationtarget systems before the corresponding source systems to maintain backward compatibility.
For more information about running SnapMirror on storage systems configured for network-attachedstorage (NAS), see the Data Protection Online Backup and Recovery Guide.
Next topics
Why you must plan for SnapMirror upgrades on page 37
Identifying SnapMirror destination volumes on page 38
Upgrading SnapMirror for volume replication on page 38
SnapMirror synchronous and asynchronous mode during upgrade on page 39
Upgrade requirements for systems mirroring each other on page 39
Why you must plan for SnapMirror upgradesWhen you upgrade Data ONTAP on storage systems that have a mirrored relationship with each otherusing SnapMirror, the order in which you upgrade the storage systems is critical. If you do not upgradein the correct order, you can cause a lapse in SnapMirror replication coverage.
A SnapMirror transfer is possible only when the destination storage system can read a Snapshot copyof data on the source system. Therefore, the destination system must be upgraded first, so that it canread the Snapshot copies of the earlier release. If the source system is upgraded first, the destinationsystem cannot read the source system’s file system, so SnapMirror does not work.
Identifying SnapMirror destination volumesYou need to identify all the destination volumes and upgrade those storage systems before upgradingthe systems where the source volumes reside.
Considerations
SnapMirror source volumes can be replicated to single or multiple destination volumes. Replication tomultiple destination volumes is also referred to as cascading destinations. When you upgrade DataONTAP, you must identify all destination volumes and then upgrade the storage systems on which theyreside before upgrading the systems where the source volumes resides. In addition, when you upgradestorage systems in a cascading series, you should upgrade the systems in order, beginning with thedestination systems furthest in your topology from the source system.
Note: Upgrading to Data ONTAP 7.0 or later preserves volumes created with earlier release familiesas traditional volumes. With the Data ONTAP 7.0 and later release families, you can also createFlexVol® (flexible) volumes. When running SnapMirror software, the source and destination volumesmust be of the same type, either traditional or flexible. For information about traditional and FlexVolvolumes, see the Storage Management Guide.
Step
1. On the storage system with the source volume, enter the following command:
snapmirror destinations
The snapmirror command lists all destination volumes, including cascaded destinations.
Related concepts
Traditional volumes are preserved when you upgrade to Data ONTAP 7.0 on page 55
Upgrading SnapMirror for volume replicationUpgrading SnapMirror for volume replication requires several steps.
Considerations
If you need to upgrade Data ONTAP on a system that is running asynchronous or synchronousSnapMirror for volume replication, you must upgrade systems with destination volumes before youupgrade systems that have source volumes.
38 | Data ONTAP 7.3 Upgrade Guide
Steps
1. Identify any destination volumes.
2. Upgrade the storage systems that have destination volumes, beginning with the furthest system inthe topology (that is, the last system in a series of cascading destinations).
3. Upgrade the storage system that has the source volume.
Attention: You must upgrade the storage systems that have SnapMirror destination volumesbefore upgrading those that have source volumes. If you upgrade the source volumes first,SnapMirror volume replication is disabled. To reenable SnapMirror volume replication, you mustdowngrade the source system or upgrade the destination system, so that the version of DataONTAP on the source system is earlier than or the same as that on the destination system.
SnapMirror synchronous and asynchronous mode during upgradeWhen you upgrade Data ONTAP on a destination storage system running on a synchronous mirror,SnapMirror goes into asynchronous mode.
Synchronous SnapMirror requires that the source and destination run the same version of Data ONTAP.Therefore, when you upgrade a destination storage system in a synchronous mirror, SnapMirror goesinto asynchronous mode. When SnapMirror is in asynchronous mode, the source system replicates datato the destination system every minute until a synchronous replication can be reestablished—that is,when the source system is upgraded so that the same Data ONTAP version is running on destinationand source systems.
Related tasks
Upgrading SnapMirror for volume replication on page 38
Upgrade requirements for systems mirroring each otherTo upgrade Data ONTAP on storage systems that are mirroring volumes to each other, you must disablethe mirror, upgrade each system, and reenable the mirror.
SnapMirror can be configured to enable two storage systems to mirror each other's volumes. In thiscase, each storage system is both a source system and a destination system. For example, System A canmirror volumes to System B, and System B can mirror volumes to System A.
In this configuration, there is logically no way to update both destinations before the correspondingsource systems. Therefore, to upgrade Data ONTAP on storage systems that are mirroring volumes toeach other, you must disable the mirror, upgrade each system, and reenable the mirror.
Decisions to make before you upgrade | 39
Decisions to make about upgrade issuesEvery Data ONTAP release family has unique requirements concerning upgrades that you mustunderstand and resolve before you decide to upgrade. Depending on your version of Data ONTAP, youmight have to upgrade to an intermediate release before upgrading to the current release.
Before you decide to upgrade, you need to understand the following:
• Issues you must resolve before upgrading to the new release
• New system behavior after upgrading to the new release
Because significant new features are introduced in each new Data ONTAP release family, you mightencounter issues when upgrading to a new release family, especially if you are not upgrading from theimmediately previous version of Data ONTAP.
For example, if you are upgrading from a release in the 6.4 family to the current release, you mustreview and resolve upgrade issues associated with the 6.5, 7.0, and 7.1 release families (but not 6.4 orearlier) before upgrading to Data ONTAP 7.2 or later.
Next topics
Required intermediate upgrades on page 40
Decisions to make to upgrade to the Data ONTAP 7.3 release family on page 40
Decisions to make to upgrade from releases earlier than Data ONTAP 7.2 on page 47
Decisions to make to upgrade from releases earlier than Data ONTAP 7.1 on page 49
Decisions to make to upgrade from releases earlier than Data ONTAP 7.0 on page 53
Required intermediate upgrades
If your storage system is running Data ONTAP 6.4.1 or earlier, you must upgrade to the latest releasein the 6.4 family before upgrading to the current release.
Decisions to make to upgrade to the Data ONTAP 7.3 release family
Review these upgrade issues and new behaviors before upgrading to Data ONTAP 7.3 and later releases.
Attention: If you have SnapLock Compliance volumes or copies of SnapLock Compliance volumeson your system, do not upgrade to Data ONTAP 7.3. The only releases that currently support SnapLockCompliance technology are Data ONTAP 7.2.5, 7.1.3, and 7.0.7.
Next topics
Recommendations for all systems upgrading to this release on page 41
Issues to resolve before upgrading to the Data ONTAP 7.3 release family on page 41
Changes to behavior in the Data ONTAP 7.3 release family on page 45
40 | Data ONTAP 7.3 Upgrade Guide
Recommendations for all systems upgrading to this release
Follow these simple guidelines to ensure your storage system upgrade goes smoothly:
• Review the "Important cautions" section of the Release Notes for this Data ONTAP release. Itcontains important information that could affect the behavior of your system during and afterupgrading.
• Upgrade during non-peak hours.
• Avoid performing a quota initialization prior to upgrading. If a quota initialization is in processprior to upgrading, wait for the initialization to complete.
Issues to resolve before upgrading to the Data ONTAP 7.3 release family
You must understand and resolve these issues before you upgrade to Data ONTAP 7.3 and later releases.
Next topics
More free space required in Data ONTAP 7.3 on page 41
Revised aggregate capacity for FAS2020 systems on page 44
License changes for the FlexCache feature on page 45
More free space required in Data ONTAP 7.3
Data ONTAP 7.3 includes an improvement to free space accounting. As a result, existing FlexVolvolumes reserve additional space, resulting in a loss of 0.5 percent of free space. Upgrading to DataONTAP 7.3 or later from an earlier release will cause existing FlexVol volumes to require more freespace from their containing aggregates. If there is insufficient free space in an aggregate to satisfy theincreased requirement from its FlexVol volumes, the space guarantee for one or more volumes in thataggregate might be disabled.
Next topics
Determining system capacity and space guarantees on page 41
Using the aggrSpaceCheck tool to prepare your upgrade to Data ONTAP 7.3 or later on page 42
Determining system capacity and space guaranteesIf you suspect that your system has almost used all of its free space, or if you use thin provisioning,you should check the amount of space in use by each aggregate. If any aggregate is 97 percent full ormore, do not proceed with the upgrade until you have used the Upgrade Advisor or aggrSpaceChecktools to determine your system capacity and plan your upgrade.
Steps
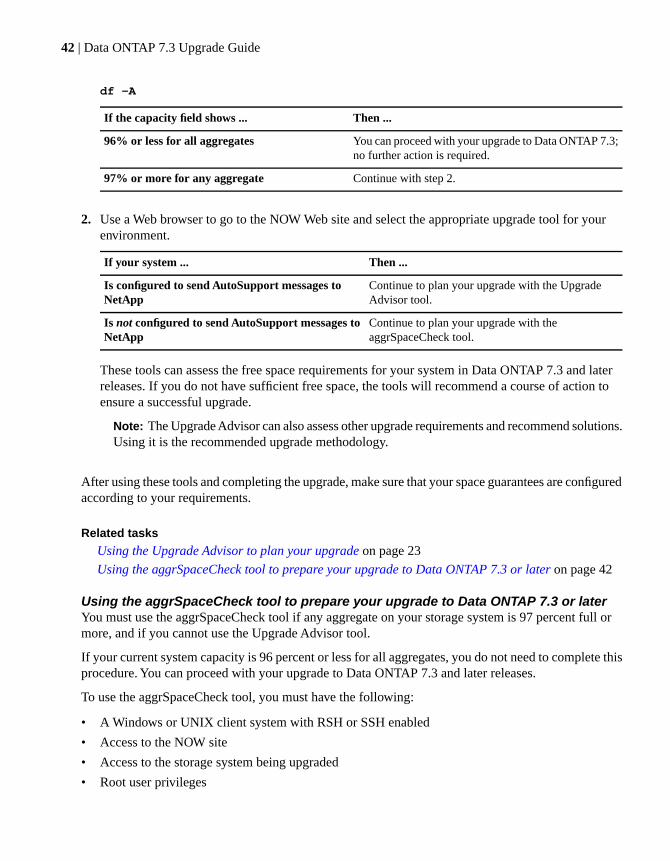
1. Check your system's capacity by entering the following command:
Decisions to make before you upgrade | 41
df -A
Then ...If the capacity field shows ...
You can proceed with your upgrade to Data ONTAP 7.3;no further action is required.
96% or less for all aggregates
Continue with step 2.97% or more for any aggregate
2. Use a Web browser to go to the NOW Web site and select the appropriate upgrade tool for yourenvironment.
Then ...If your system ...
Continue to plan your upgrade with the UpgradeAdvisor tool.
Is configured to send AutoSupport messages toNetApp
Continue to plan your upgrade with theaggrSpaceCheck tool.
Is not configured to send AutoSupport messages toNetApp
These tools can assess the free space requirements for your system in Data ONTAP 7.3 and laterreleases. If you do not have sufficient free space, the tools will recommend a course of action toensure a successful upgrade.
Note: The Upgrade Advisor can also assess other upgrade requirements and recommend solutions.Using it is the recommended upgrade methodology.
After using these tools and completing the upgrade, make sure that your space guarantees are configuredaccording to your requirements.
Related tasks
Using the Upgrade Advisor to plan your upgrade on page 23
Using the aggrSpaceCheck tool to prepare your upgrade to Data ONTAP 7.3 or later on page 42
Using the aggrSpaceCheck tool to prepare your upgrade to Data ONTAP 7.3 or laterYou must use the aggrSpaceCheck tool if any aggregate on your storage system is 97 percent full ormore, and if you cannot use the Upgrade Advisor tool.
If your current system capacity is 96 percent or less for all aggregates, you do not need to complete thisprocedure. You can proceed with your upgrade to Data ONTAP 7.3 and later releases.
To use the aggrSpaceCheck tool, you must have the following:
• A Windows or UNIX client system with RSH or SSH enabled
• Access to the NOW site
• Access to the storage system being upgraded
• Root user privileges
42 | Data ONTAP 7.3 Upgrade Guide
The aggrSpaceCheck tool is a perl script that runs on the administration host client system. It is availablefor download from the ToolChest area on the NOW site. When installed on the client system, it connectsto the storage system using RSH or SSH protocols and checks whether there is enough free space toenable Data ONTAP 7.3. It does so by executing several Data ONTAP commands, parsing the result,and performing calculations to assess space requirements. The results and recommended actions aredisplayed immediately.
Steps
1. From a Web browser, log in to the ToolChest page on NOW at the following URL:
https://now.netapp.com/eservice/toolchest
2. In the Data ONTAP area, locate the aggrSpaceCheck tool. Follow the instructions to download andunzip it on your local client system.
Then ...If you connect to the storage system with ...
Continue with step 3.SSH
Continue with step 4.RSH
3. Configure SSH as described in the instructions.
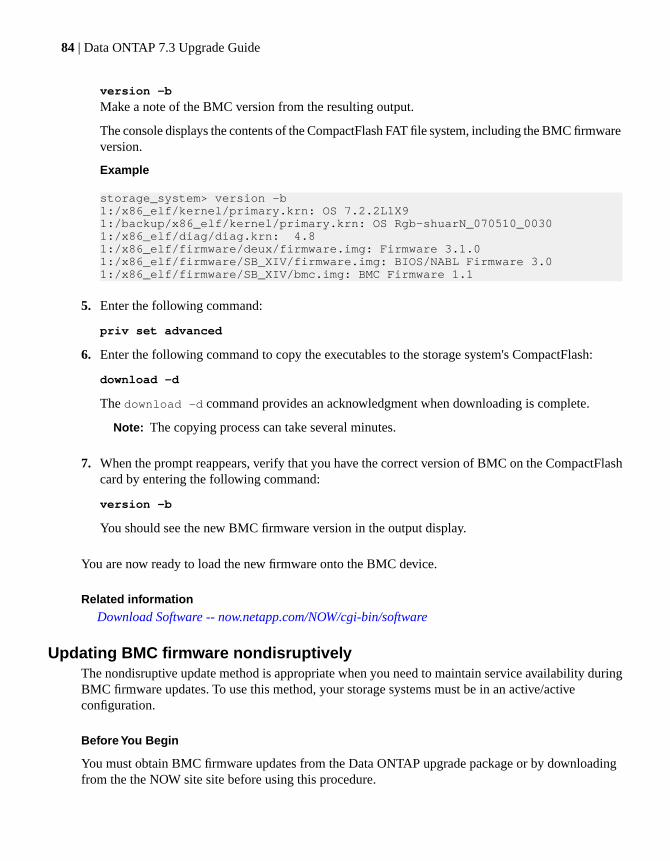
If you use SSH, you must generate keys, edit and test the keys, and configure them for the storagesystem. This procedure takes approximately 15 minutes to complete.
4. Enter the following command at the Windows DOS prompt or UNIX command line:
Beginning with Data ONTAP 7.2.4L1, there is a revised aggregate limit of 8 TB raw capacity onFAS2020 systems. If you have a FAS2020 storage system running Data ONTAP 7.2.2L1 that you areconsidering upgrading to Data ONTAP 7.2.4L1 or later, you should determine the used capacity foreach aggregate on your system, and contact technical support if any of them are using 8 TB or more.
Attention: If you have a FAS2020 storage system running Data ONTAP 7.2.2L1 and it includes anaggregate whose raw capacity is 8 TB or larger in size, do not upgrade to any later Data ONTAPrelease. Upgrading to Data ONTAP 7.2.4L1 or later will cause the aggregate that is 8 TB or largerto stay offline. If the aggregate that is kept offline is the root aggregate, the system will not boot.
The 8 TB size limit refers to raw capacity, where 1 TB = 10^12 bytes. Usable aggregate capacity, asreported by storage system utilities such as the df command, might be significantly less dependingon your system configuration.
For more information, see the Knowledgebase article FAS2020 Maximum Aggregate Size: Revisedfrom 16TB to 8TB.
For more information about the FAS2020 system's capacity, see the System Configuration Guide.
Related information
FAS2020 Maximum Aggregate Size - Revised from 16TB to 8TB:now.netapp.com/Knowledgebase/solutionarea.asp?id=kb34728
System Configuration Guide: now.netapp.com/NOW/knowledge/docs/hardware/NetApp/syscfg/
Determining aggregate capacity limits for FAS2020 systemsUse the df -Ah and the aggr status commands, then consult the "Maximum number of disk drivesper aggregate " table to determine whether your FAS2020 aggregate configuration is within supportedlimits.
Steps
1. To display aggregate capacities and usage, enter the following command:
df -Ah
If the used column in the resulting output shows 5.34 TB or less for each aggregate on the system,your system is within supported limits.
2. To display information about disks in your aggregates, enter the following command:
aggr status -r
If the values for disk drives in a given aggregate are the same or lower than those listed in thefollowing table, your system is within supported limits.
Maximum number of disk drives per aggregateDisk drive typeDisk drive capacity
46FC or SAS144 GB
23300 GB
29 (RAID 4) / 29 (RAID-DP)SATA250 GB
14500 GB
9750 GB
71 TB
If your system exceeds these limits, do not upgrade your system, contact technical support.
License changes for the FlexCache feature
If you are currently using the FlexCache feature, you will need to take action to continue to use thisfeature when you update to Data ONTAP 7.3 and later.
The current FlexCache license, flex_cache, has been replaced by a new license, flexcache_nfs. The oldlicense is supported for the Data ONTAP 7.2 release family, but is no longer supported for Data ONTAP7.3 and later. See your sales representative to install the new flexcache_nfs license if it is not alreadypresent on your system.
Attention: If you upgrade to Data ONTAP 7.3 or later and the new license is not installed, you willnot be able to access data in FlexCache volumes after the upgrade. As soon as you install the newlicense, the FlexCache data will become accessible.
Changes to behavior in the Data ONTAP 7.3 release family
Be aware of these changes in Data ONTAP behavior that might occur if you upgrade to Data ONTAP7.3 or later.
Next topics
The NetBackup application can no longer manage SnapVault relationships to NetBackupdata on page 46
Physical reallocation of volumes will slow the reversion process on page 46
SnapMirror and SnapVault restart checkpoints deleted during upgrade on page 46
Deduplication requires additional free space in aggregates after upgrading on page 46
FPolicy compatibility issue in NFSv4 environments on page 47
Decisions to make before you upgrade | 45
The NetBackup application can no longer manage SnapVault relationships to NetBackupdata
Beginning with Data ONTAP 7.3, the use of Symantec NetBackup for configuring and managingSnapVault transfers between NetApp primary and secondary storage systems is no longer supported.If you are currently using the NetBackup SnapVault Management option from Symantec, you canmigrate to NetApp Operations Manager or Protection Manager, or to management using thecommand-line interface (CLI).
Physical reallocation of volumes will slow the reversion process
Data ONTAP 7.3 and later releases support physical reallocation, which allows you to optimize thephysical layout of volumes in an aggregate, leaving the virtual location of the volumes untouched.However, once volumes have been physically reallocated, reverting to an earlier release family willtake significantly longer.
For more information about physical reallocation, see the Data ONTAP System Administration Guide.
SnapMirror and SnapVault restart checkpoints deleted during upgrade
Starting with Data ONTAP 7.3, when you upgrade to Data ONTAP 7.3 or later, all aborted qtreeSnapMirror and SnapVault transfers with restart checkpoints will restart from the beginning becauseall restart checkpoints will be deleted during the upgrade process.
Deduplication requires additional free space in aggregates after upgrading
If you use deduplication, you must ensure that there is adequate free space in the aggregates containingdeduplicated volumes after upgrading to Data ONTAP 7.3 or later.
In earlier Data ONTAP releases, the deduplication fingerprint database was stored in the deduplicatedvolume. In Data ONTAP 7.3 and later releases, the deduplication fingerprint database is automaticallymoved to the containing aggregate when deduplication is run for the first time on a volume afterupgrading. Before running deduplication for the first time, you should ensure that the aggregate hasfree space that is at least 3 percent of the total data usage for all volumes in the aggregate. This enablesadditional storage savings by deduplicating any new blocks with those that existed before the upgrade.
If there is not sufficient space available in the aggregate, the deduplication operation will fail with anerror message. If this happens, there will be no data loss and the volume is still available for read/writeoperations. If you receive this error message, add space to the aggregate (depending on the limits ofyour configuration) and run deduplication again.
For example, if an aggregate contains 3 FlexVol volumes and each volume has 5 TB of data (1 TB isphysical usage and 4 TB is deduplication savings), the total data in this aggregate is 15 TB, and 450GB (3 percent of 15 TB) must be available after the upgrade.
46 | Data ONTAP 7.3 Upgrade Guide
For more information about deduplication, see the Data ONTAP Data Protection Online Backup andRecovery Guide.
FPolicy compatibility issue in NFSv4 environments
If you are running an application that uses the FPolicy engine and the application is running in an NFSv4environment, you must upgrade the application to support NFSv4.
Beginning in Data ONTAP 7.3, FPolicy supports NFSv4. Previously, FPolicy did not support NFSv4and NFSv4 requests were not passed on to any FPolicy-based application.
Although FPolicy now supports NFSv4, the FPolicy-based application might not. If an applicationwithout NFSv4 support receives notice of NFSv4 file operations (such as file OPEN and CLOSE events),these file operations might appear as UNKNOWN events to the application and generate error messages.
To avoid these compatibility problems, you should upgrade any FPolicy-based applications to supportNFSv4.
Decisions to make to upgrade from releases earlier than Data ONTAP 7.2
Review these upgrade issues and new behaviors before upgrading from releases earlier than DataONTAP 7.2.
Next topics
Issues to resolve before upgrading from releases earlier than Data ONTAP 7.2 on page 47
Behavior changes when upgrading from a release earlier than Data ONTAP 7.2 on page 48
Issues to resolve before upgrading from releases earlier than Data ONTAP 7.2
You must understand and resolve these issues before you upgrade from a release earlier than DataONTAP 7.2.
Next topics
Solaris iSCSI targets need to be reconfigured before upgrading to Data ONTAP 7.2 orlater on page 47
If you use a vif that is named "vip" on page 48
Solaris iSCSI targets need to be reconfigured before upgrading to Data ONTAP 7.2 or later
In Data ONTAP 7.1, the iSCSI target portal group tags changed from the values used in previousreleases. When upgrading to Data ONTAP 7.1, you needed to reconfigure Linux and HP-UX hostsbefore upgrading. Before upgrading to Data ONTAP 7.2, you must reconfigure any iSCSI Solaris hoststhat use these tags or the hosts will not be able identify the iSCSI target provided by the storage system.
Attention: Solaris hosts must be reconfigured before upgrading to Data ONTAP 7.2 or later.
Decisions to make before you upgrade | 47
Related concepts
Considerations for upgrading iSCSI hosts on page 59
If you use a vif that is named "vip"
Beginning in Data ONTAP 7.2, the string "vip" is reserved for private virtual interfaces. If you haveconfigured a vif (a feature that implements link aggregation) named "vip" on your storage system inan earlier release, you must rename that vif before upgrading your system to Data ONTAP 7.2.1 orhigher.
If you do not rename the vif, the interface status of the vif named "vip" will be set to down and theinterface will be unavailable for network traffic.
To ensure continued network connectivity over the vif, complete the following steps before upgradingto Data ONTAP 7.2.
Steps
1. Bring down the vif with the ifconfig command.
2. Destroy the vif using the vif destroy command.
3. Re-create the vif using the vif create command and a different unique name.
For more information about vif administration, see the Network Management Guide.
Behavior changes when upgrading from a release earlier than Data ONTAP 7.2
You should understand the changes in Data ONTAP behavior that might occur if you upgrade from arelease earlier than Data ONTAP 7.2.
Next topics
DAFS column is no longer displayed in sysstat output on page 48
Change in logging for NULL RPC mountd requests on page 48
Aggregate reallocation will retard the reversion process on page 49
DAFS column is no longer displayed in sysstat output
In Data ONTAP 7.2 and later releases, the DAFS column is no longer displayed in the sysstat -xcommand output. Scripts that use the DAFS column will be off by one column.
Change in logging for NULL RPC mountd requests
If you use the /etc/messages file to trace NULL RPC mountd requests, note that the process has changedin Data ONTAP 7.2 and later releases.
48 | Data ONTAP 7.3 Upgrade Guide
In earlier releases, NULL RPC mountd requests were automatically logged to /etc/messages. Beginningwith Data ONTAP 7.2, you must specify that you want to be notified of NULL RPC mountd requestsby adding a *.debug entry to the /etc/syslog.conf file.
For more information, see the section on tracing mountd requests in the File Access and ProtocolsManagement Guide.
Aggregate reallocation will retard the reversion process
Data ONTAP 7.2.2 and later releases support aggregate reallocation. This allows you to optimize thelocation of physical blocks in the aggregate, which increases contiguous free space. However, onceaggregates have been reallocated, reverting to an earlier release family will take significantly longer.
For more information about aggregate reallocation, see the Data ONTAP System Administration Guide.
Decisions to make to upgrade from releases earlier than Data ONTAP 7.1
Review these upgrade issues and new behaviors before upgrading from releases earlier than DataONTAP 7.1.
Next topics
Issues to resolve before upgrading from releases earlier than Data ONTAP 7.1 on page 49
Behavior changes when upgrading from a release earlier than Data ONTAP 7.1 on page 51
Issues to resolve before upgrading from releases earlier than Data ONTAP 7.1
You must understand and resolve these issues before you upgrade from a release earlier than DataONTAP 7.1.
Next topics
iSCSI targets unavailable after upgrading to Data ONTAP 7.1 or later on page 49
Transitioning DAFS to other protocols on page 50
FlexClone license update on page 50
Space guarantees now enabled on FlexClone volumes on page 51
Upgrading SnapDrive for Windows versions earlier than 3.1.1 on page 51
iSCSI targets unavailable after upgrading to Data ONTAP 7.1 or later
In Data ONTAP 7.1 and later, the iSCSI target portal group tags changed from the values used inprevious releases. You must reconfigure any iSCSI hosts that use these tags or they will not be ableidentify the iSCSI target provided by the storage system.
Attention: HP-UX and Linux hosts must be reconfigured before upgrading to Data ONTAP 7.1 orlater.
Decisions to make before you upgrade | 49
Related concepts
Considerations for upgrading iSCSI hosts on page 59
Transitioning DAFS to other protocols
Because Data ONTAP 7.1 and later does not support Direct Access File System (DAFS), you musttransition critical data services from DAFS to other protocols before upgrading.For more information about configuring and managing DAFS, see the File Access Management Guideand dafs man pages for the Data ONTAP release on which you originally configured DAFS services.
Steps
1. Identify volumes and qtrees exported with DAFS by entering the dafs export list command.
2. For each entity identified with the dafs export command, reassign the export to another service(such as CIFS or NFS).
For current information about data access services, see the File Access and Protocol ManagementGuide.
3. Identify VI NIC interfaces that use the DAFS service by entering the dafs status -n command.
4. Halt the DAFS service by entering the dafs stop command.
5. For each VI NIC interface identified with the dafs status command, detach the interface fromthe DAFS service by entering the dafs detach interface_name command.
6. Make appropriate changes on DAFS client systems to ensure continuity of data access.
FlexClone license update
If you created FlexClone volumes (clones of FlexVol volumes) in a Data ONTAP 7.0.x release andyou are upgrading to Data ONTAP 7.1 or later, you must obtain a unique FlexClone license code fromthe Protocol Licenses page. The Protocol Licenses page is located on the NOW site.
The FlexClone license was not enforced in Data ONTAP 7.0.0.x releases (you could create FlexClonevolumes without a license). However, the license is enforced in Data ONTAP 7.0.1 and later releases.When you upgrade to Data ONTAP 7.1 or later, you do not need a license to access FlexClone volumescreated in previous releases, but you cannot create new FlexClone volumes without a license.
For more information about FlexClone volumes, see the Storage Management Guide.
If you created FlexClone volumes in releases of Data ONTAP earlier than 7.1 and you specified spaceguarantees in the parent volumes, these guarantees were inherited but not enabled. Beginning with DataONTAP 7.1, space guarantees are enabled in FlexClone volumes, including FlexClone volumes thatwere created in earlier releases.
To ensure that existing FlexClone volumes can obtain guaranteed space when they are mounted afteruprade, you are advised to review the volume guarantees of any existing FlexClone volumes beforeyou upgrade to Data ONTAP 7.1 or later.
You can change space guarantees to enable or disable aggregate overcommitment using the voloptions guarantee command. For more information about FlexClone volumes and space guarantees,see the Storage Management Guide.
Upgrading SnapDrive for Windows versions earlier than 3.1.1
Versions of SnapDrive® for Windows earlier than 3.1.1 are incompatible with Data ONTAP 7.0.0.1and later. If you are upgrading to Data ONTAP 7.1 or later and you are using an earlier SnapDriveversion, you must upgrade SnapDrive for Windows to version 3.1.1 or later.Upgrade SnapDrive on your Windows host before upgrading your storage system to Data ONTAP 7.1or later.
Steps
1. Use a Web browser to go to the NOW Web site.
2. Click Service & Support.
3. Click Download Software.
4. In the Select Platform list box in the SnapDrive product row, select Windows and click Go.
You see a list of the versions of SnapDrive for Windows. Click the 3.1.1 version link for moreinformation and to download software.
Behavior changes when upgrading from a release earlier than Data ONTAP 7.1
You should understand the changes in Data ONTAP behavior that might occur if you upgrade from arelease earlier than Data ONTAP 7.1.
Next topics
Change in CIFS SMB signing default behavior on page 52
Upgrade from Data ONTAP 7.0 and earlier could take longer than usual on page 52
Slow data replication and backup transfers after upgrade on page 52
Decisions to make before you upgrade | 51
Change in CIFS SMB signing default behavior
By default, Server Messaging Block (SMB) signing is disabled in Data ONTAP 7.0.2 and later releases;it was enabled by default in Data ONTAP 7.0.1. If you are upgrading to Data ONTAP 7.1 or later from7.0.1 and if you have configured CIFS clients in your environment to require SMB signing, you mustenable SMB signing by setting the cifs.signing.enable option to on.
For more information, see the options(1) man page and the File Access and Protocols ManagementGuide .
Note: Enabling SMB signing in a Windows environment can affect the performance of both Windowsclients and storage systems running Data ONTAP. For more information, see the File Access andProtocols Management Guide.
Upgrade from Data ONTAP 7.0 and earlier could take longer than usual
When you upgrade from a release earlier than Data ONTAP 7.1, Inode to Pathname (I2P) informationis written to each existing volume. Depending on the number of volumes on your system and the numberof files in each volume, this could cause the upgrade to take more time than previous Data ONTAPupgrades.
After upgrading to Data ONTAP 7.1 or later from an earlier release, new I2P (Inode to Pathname)mappings are created for all files and directories in the volume. This is done by a WAFL scan utilitythat updates small amounts of metadata for all files and directories in the volume.
The I2P updates are done in the background; the scan has minimal impact on your system's performance.The time to complete the I2P scan on a volume is dependent on the volume size and the number of filesin the volume.
Note: Beginning in Data ONTAP 7.0, quota initialization is terminated when you halt, reboot, orupgrade your storage system. For more information, see the Storage Management Guide.
Slow data replication and backup transfers after upgrade
After upgrading to Data ONTAP 7.1 or later from an earlier release, data replication and backup featureswill require significantly more time because all updated I2P data needs to be transferred. After the initialtransfer with I2P mappings, subsequent transfers will be accomplished within normal time periods.
The metadata that is updated and added by the I2P scan affects the data replication and backup featuresof Data ONTAP, including volume SnapMirror, qtree SnapMirror, SnapVault, and dump operations.This is because the extra data that is updated and added on the source system is sent to the destinationor backup system. Any SnapMirror updates than occur while the I2P scan is running on the sourcesystem, and the first SnapMirror update that occurs after the I2P scans are completed will result in thetransfer of a larger amount of data and therefore might require significantly more time. Also, any dumpoperations that are performed when the I2P scans are in progress, and the first dump operation that isperformed after the I2P scans are completed will be larger than normal.
52 | Data ONTAP 7.3 Upgrade Guide
After upgrading Data ONTAP on the source system, these large data transfers will occur only until allthe I2P data is sent to the destination system or is part of a dump. Any subsequent SnapMirror updatesand dumps will be of regular size, and will therefore be accomplished in a normal time period.
Decisions to make to upgrade from releases earlier than Data ONTAP 7.0
Review these upgrade issues and new behaviors before upgrading from releases earlier than DataONTAP 7.0.
Next topics
Issue to resolve before upgrading from releases earlier than Data ONTAP 7.0 on page 53
Behavior changes when upgrading from a release earlier than Data ONTAP 7.0 on page 54
Issue to resolve before upgrading from releases earlier than Data ONTAP 7.0
You must consider the following issues before you upgrade from releases earlier than Data ONTAP7.0.
Upgrading storage systems with FC-AL adapters
When you upgrade to Data ONTAP 7.0 or later, you should configure your Fibre Channel-ArbitratedLoop (FC-AL) adapters to run in 1-Gb and 2-Gb mode by changing the jumpers on the adapter. Youshould also upgrade system firmware to Open Firmware (OFW) 4.3 or later in order to be compatiblewith the new 1-Gb and 2-Gb setting, if required.
Complete the following procedure if your FC-AL adapters have the following marketing and spare partnumbers:
• X2050A (SP-2050A)—Connects to storage
• X2051A (SP-2051A)—Connects to a tape backup device
Note: Do not apply any configuration changes to FCP target-mode adapters.
FC-AL adapters configured for 1-Gb mode will continue to work in a Data ONTAP 7.2 environmentwithout resetting the jumpers or Updating firmware. However, 1-Gb and 2-Gb mode is recommendedfor best performance of these adapters.
If you are upgrading from 4.2.2 or 4.2.3 to 4.3 firmware, you must run the set-defaults commandfrom the firmware boot prompt before rebooting your storage system. For more information, see BugID105365 on the NOW site.
FC-AL adapters can be installed on the following storage systems:
• R200
• FAS960
Decisions to make before you upgrade | 53
• FAS940
Before upgrading storage systems with FC-AL adapters, perform the following procedure.
Steps
1. Upgrade the system firmware to OFW 4.3 or later.
You can find system firmware on the Service Image page on the NOW site. Follow the instructionsgiven there to download and install system firmware 4.3 or later.
2. Upgrade Data ONTAP to the current release.
3. Remove any FC-AL adapters from your system chassis and verify that jumpers J3 and J4 are set inthe 1-2 position.
Reposition the jumpers if necessary. Consult your hardware storage system guide before openingthe system and removing adapters.
To learn about removing FC-AL adapters, see “Configuring new and existing FC-AL adapters” onthe NOW site.
Related concepts
Firmware upgrade requirements on page 65
How to upgrade Data ONTAP software on page 91
Behavior changes when upgrading from a release earlier than Data ONTAP 7.0
You should understand the changes in Data ONTAP behavior that might occur if you upgrade from arelease earlier than Data ONTAP 7.0.
Next topics
Traditional volumes are preserved when you upgrade to Data ONTAP 7.0 on page 55
Space reservation changes for traditional volumes on page 55
Changes to automatic editing for /etc/exports on page 55
Requirements for transferring files larger than 4 TB on page 56
Requirements for managing administrative access privileges after upgrading on page 57
User name case sensitivity on page 57
Changes to the vol status command output on page 57
Changes to vol commands on page 58
Quotas off during upgrade on page 58
SSL must be reenabled after upgrade on page 58
Setting the virus scan default timeout option on page 59
54 | Data ONTAP 7.3 Upgrade Guide
Traditional volumes are preserved when you upgrade to Data ONTAP 7.0
When you upgrade to Data ONTAP 7.0 or later, any existing volumes are preserved as traditionalvolumes. Although traditional and FlexVol volumes are supported in Data ONTAP 7.2; you are notrequired to use FlexVol volumes.
If you want to take advantage of FlexVol volume technology, you must first create new FlexVol volumesand aggregates, and then migrate your data from existing traditional volumes to the new FlexVol volumesusing the ndmpcopy command.
Note: Snapshot copies on the original volume are unaffected by the migration, but they are not validfor the new volume.
See the ...For more information about ...
Storage Management GuideMigrating data to FlexVol volumes
Data Protection Tape Backup and Recovery GuideUsing the ndmpcopy command to migrate data
Storage Management GuidePlanning and configuring aggregates and volumes
Note: In the Data ONTAP 7.0 and later release families, the storage system root volume can beeither a traditional or a FlexVol volume. However, because you have more control over the size ofFlexVol volumes than you do over traditional volumes, changing the traditional root volume to aflexible root volume allows you to organize your storage more efficiently. For more informationabout changing the root volume to a FlexVol volume, see the System Administration Guide.
Space reservation changes for traditional volumes
To provide space reservation for traditional volumes in the Data ONTAP 7.0 and later release families,you must assign file reservation after each file is created.
If your system includes volumes with default file space reservation enabled (using the create_reservedoption of the vol options command), default space reservation is no longer available in thecorresponding traditional volume after upgrading to the Data ONTAP 7.0 and later release families.Any files created in the volume after upgrading will not have space reservation enabled unless specifiedon a per-file basis. However, space reservation will remain enabled for any files created before upgrading.
For more information about space reservation and guarantees, see the Storage Management Guide.
Changes to automatic editing for /etc/exports
Beginning with the Data ONTAP 6.5 release family, several vol command options cause automaticupdates to the /etc/exports file.
Decisions to make before you upgrade | 55
In the Data ONTAP 7.0 and later release families, the following additional operations cause the exportsfile to be edited:
• vol clone
When a clone is created from a FlexVol volume, a new clone volume is created in the exports file.The cloned volume has the same export rules as the parent.
• vfiler migrate
If a vFiler™ unit is migrated to a new physical storage system, the exports file is modified to reflectany changes to volume configuration.
Requirements for transferring files larger than 4 TB
The Data ONTAP 7.0 and later release families support files with up to 16 TB of data. However, transfersof data to systems running earlier versions of Data ONTAP fail if the file system being transferredcontains a file larger than 4 TB.
The following features can be affected by this issue.
• SnapMirror for qtree replicationA qtree replication from a SnapMirror source system running Data ONTAP 7.0 or later will fail ifany mirrored qtree includes a file larger than 4 TB and the qtree SnapMirror destination system isrunning a version of Data ONTAP earlier than 7.0.
• SnapVaultSnapVault transfers from a primary storage system fail if the qtree or directory to be backed upincludes a file larger than 4 TB and the SnapVault secondary system is running a version of DataONTAP earlier than 7.0.
• The restore commandData restorations from a tape created with the dump command on a storage system running DataONTAP 7.0 or later fail if the tape archive includes a file larger than 4 TB and the restoration targetsystem is running a version of Data ONTAP earlier than 7.0.
Note: It is not a requirement for qtree SnapMirror destination systems, SnapVault secondary systems,or restoration target systems to run a version of Data ONTAP that is the same as or later than theversion the source system is running. The requirement to upgrade destination systems before sourcesystem applies only to SnapMirror for volume replication. Nonetheless, if you upgrade systems withthese configurations to Data ONTAP 7.0 or later before upgrading the corresponding source systems,you will not encounter problems transferring files up to 16 TB.
For more information about SnapMirror and SnapVault, see the Data Protection Online Backup andRecovery Guide.
For more information about the restore command, see the Data Protection Tape Backup and RecoveryGuide
56 | Data ONTAP 7.3 Upgrade Guide
Requirements for managing administrative access privileges after upgrading
The Data ONTAP 7.0 and later release families provide enhanced capabilities for access control andadministrative account management. When you upgrade to Data ONTAP 7.0 or later, any existing localusers who are not root users are granted full privileges. To manage or reduce those privileges, you mustfirst create one or more groups with defined roles and capabilities, and then place the users in groups.
For more information about user account management, see the System Administration Guide.
User name case sensitivity
In the Data ONTAP 7.0 and later release families, user names are no longer case-sensitive. For example,in previous releases the names “admin” and “Admin” could stand for two different users, but in DataONTAP 7.0 and later, the second name is a duplicate of the first.
When you upgrade to Data ONTAP 7.0 or later, account names are scanned, an error message is displayedif such duplicate user names are detected, and the second name is given a suffix; for example, theduplicate “Admin” would become “admin-a”.
In this case, any user attempting to log in to the storage system with the Admin account name andpassword would be denied. To correct this situation, you must give the user the modified account nameor assign a new account name with appropriate privileges.
For more information about user account management, see the System Administration Guide.
Changes to the vol status command output
The vol status command has been modified in the Data ONTAP 7.0 and later release families todistinguish between flexible and traditional volumes. If you created scripts in earlier releases, somecommand output has changed, which might affect the behavior of your script.
Specifically, the Status column of the vol status command output is now a comma-separated listincluding RAID type and storage container type (flexible or traditional), as shown in the followingexample:
For more information about the vol status command and output, see the NetApp vol(1) manualpage.
Decisions to make before you upgrade | 57
Changes to vol commands
Except as noted, the vol commands continue to function as they have in previous releases. However,the Data ONTAP 7.0 and later release families also have the aggr command set, which is used tomanage the physical layer of storage management presented in aggregates. If you use a vol commandto manage physical storage components, such as disks or RAID, you will see an advisory error messagesimilar to the following recommending that you use the appropriate aggr command.
vol mirror fv1 -d v-25 -dv0.26vol mirror:"fv1' is a flexible volume.Consider using the 'vol container fv1' command to find itscontaining aggregate, then 'aggr mirror' to mirror it
For more information about aggregate and volume management commands, see the following:
• aggr(1) man page
• vol(1) man pages
• Storage Management Guide
Quotas off during upgrade
Quotas are turned off during an upgrade to the Data ONTAP 7.0 and later release families. This isbecause the online quota format is changed in this release and the quota database must be rebuilt. Aspart of the upgrade, quotas are automatically turned back on when the database has been rebuilt andthe upgrade is complete.
If you have set quotas, and you want to verify that the quota database has been rebuilt and quotas areback on, enter the quota command without options. For more information about using the command,see the quota(1) man page.
SSL must be reenabled after upgrade
The Data ONTAP 7.0 and later release families include built-in SecureAdmin functionality with SSL(Secure Socket Layer) protocol. It is no longer necessary to install and license it as a separate product.
If you installed and licensed the SecureAdmin product in earlier Data ONTAP releases, your existingSSL certificates are converted as part of the upgrade. However, you must reenable SSL after the upgradefor the new certificates to take effect. To do so, enter the following command after the upgrade iscomplete:
secureadmin enable ssl
For more information about SSL and SecureAdmin functionality in the Data ONTAP 7.0 and laterrelease families, see the System Administration Guide.
58 | Data ONTAP 7.3 Upgrade Guide
Setting the virus scan default timeout option
Beginning with Data ONTAP 6.4.4, the vscan timeout option had a default setting of 10 seconds.If your storage system has been upgraded at any time from Data ONTAP 6.4.3 or earlier and you havenot explicitly reset this option, the original default value of 30 seconds is still in effect.
The vscan timeout option controls how long the scanning client waits before checking the status ofa virus scan request. By setting a lower value, you enable the storage system to determine more quicklyif there is a problem with a virus scan request. You are therefore advised to set this option to 10 secondsor less.
For more information about virus scanning in the Data ONTAP 7.0 and later release families, see theData Protection Online Backup and Recovery Guide and the vscan(1) man page.
Steps
1. To view the current setting of the vscan timeout, enter the following at the storage system console:
vscan timeout
2. To set the vscan timeout option to a new value, enter the following:
vscan options timeout set nn
nn is the new value in seconds.
Considerations for upgrading iSCSI hostsWhen upgrading iSCSI hosts from a release earlier than 7.1, special consideration must be given totarget portal group tags.
Storage systems running Data ONTAP 7.0.x or earlier that provide iSCSI LUNs to hosts running anyversion of a Linux, Solaris, HP-UX, or VMware ESX software initiator are affected.
Next topics
Changes to target portal group tags in Data ONTAP 7.1 and later on page 59
Required steps before upgrading an iSCSI host on page 60
Changes to target portal group tags in Data ONTAP 7.1 and laterIn Data ONTAP 7.1, the iSCSI target portal group tags changed from the values used in previousreleases. These tags are used by some iSCSI hosts as a way of identifying the iSCSI target provided bythe storage system.
The Linux, Solaris, HP-UX iSCSI, and VMware ESX software initiators create a persistent associationbetween the target portal group tag value and the target.
Decisions to make before you upgrade | 59
If the target portal group tag changes, the LUNs from the target become unavailable because the initiatorsrecognize the LUNs as new devices.
Required steps before upgrading an iSCSI hostYou must complete this procedure before installing the new version of Data ONTAP software on youriSCSI hosts.
Considerations
To upgrade from Data ONTAP 7.0.x or earlier with iSCSI hosts running Linux, Solaris, HP-UX, orVMware ESX, record the target portal group tags used by the storage system before the upgrade andthen configure the interface to use the old tag values after the upgrade.
Attention: You must complete the first steps of this procedure before installing the new version ofData ONTAP software.
You must complete the following procedures in the order shown.
Recording existing portal group tags on page 601.Installing Data ONTAP on page 612.Stopping the iSCSI service and rebooting on page 613.Target portal groups values on page 624.Starting the iSCSI service on page 645.
Recording existing portal group tags
Before upgrading, you must collect and record the portal group tags for each Ethernet interface on thestorage system.
You perform this procedure on the command line.
Steps
1. On the storage system console, enter the following command:
iscsi show adapter
Example
system2> iscsi show adapterAdapter: iswtaSlot: N/ADescription: Software ImplementationStatus: OnlineTarget Portal Groups: portal group 1: inet 10.60.128.101 port 3260
60 | Data ONTAP 7.3 Upgrade Guide
portal group 2: inet 10.60.128.102 port 3260 portal group 3: inet 10.60.131.102 port 3260
The current target portal groups are displayed.
2. Note the value associated with each IP address.
Networking parameters, including the IP address, are displayed for each interface.
4. Note the interface identifier, such as e9a, associated with the IP addresses you collected in step 1,and then map to the portal group tags.
Interface e0 = portal group 1000
Interface e9a = portal group 1001
Interface e9b = portal group 1002
Installing Data ONTAP
Follow the procedures in this guide to install the new version of Data ONTAP, but do not reboot thestorage system yet.
Stopping the iSCSI service and rebooting
Stopping the iSCSI service on the storage system prevents the iSCSI hosts from seeing the new targetportal group tags that are assigned by default when the Data ONTAP upgrade is complete. Then rebootthe new version of Data ONTAP.
Note: All iSCSI LUNs will be unavailable when you stop the iSCSI service.
Decisions to make before you upgrade | 61
Next topics
Stopping the iSCSI service using the command line on page 62
Stopping the iSCSI service using FilerView on page 62
Stopping the iSCSI service using the command line
You can stop the iSCSI service on the storage system using the iscsi stop command on the commandline.
Steps
1. On the storage system console, enter the following command:
iscsi stop
2. Reboot the storage system.
The storage system reboots with the new version of Data ONTAP, but the iSCSI service is notenabled.
Stopping the iSCSI service using FilerView
You can stop the iSCSI service on the storage system using FilerView.
Steps
1. Click LUNs ➤ Enable/Disable.
2. Clear the Enable check box for iSCSI.
3. Click Apply.
4. Reboot the storage system.
The storage system reboots with the new version of Data ONTAP, but the iSCSI service is notenabled.
Target portal groups values
Because the upgrade to the new version of Data ONTAP changed the target portal group tag values,you must change the new values back to the values you recorded before the upgrade.
Data ONTAP 7.1 and later support user-created target portal groups with user-defined tag values. Youneed to create a new target portal group for each interface and assign a new tag value to the group.
62 | Data ONTAP 7.3 Upgrade Guide
Next topics
Changing target portal group tags using the command line on page 63
Changing target portal group tags using FilerView on page 63
Changing target portal group tags using the command line
You can change target portal group tags to their original values using the command line.
Steps
1. View the new target portal groups and their tag values by entering the following command on thestorage system console:
iscsi tpgroup show
Examplesystem2> iscsi tpgroup show TPGTag Name Member Interfaces1000 e0_default e0 1001 e9a_default e9a 1002 e9b_default e9b
2. Create a new target portal group for the first interface in the list by entering the following command:
iscsi tpgroup create -t tag name interface
-t tag is the target portal group tag you recorded for the interface before upgrading Data ONTAP.
name is the name of the new target portal group.
interface is the identifier of the interface for this group.
Exampleiscsi tgroup create -t 1 e0_old e0
3. Repeat the previous step for each interface in the list.
4. Verify the new values match the old values you recorded by entering the following command:
iscsi tpgroup show
Examplesystem2> iscsi tpgroup show TPGTag Name Member Interfaces1 e0_old e0 2 e9a_old e9a 3 e9b_old e9b 1000 e0_default (none) 1001e9a_default (none) 1002 e9b_default (none)
Changing target portal group tags using FilerView
You can change target portal group tags to their original values using FilerView.
Steps
1. Click LUNs ➤ iSCSI ➤ Manage Portal Groups.
A list of target portal groups is displayed.
Decisions to make before you upgrade | 63
2. Click Add Portal Group.
The Add iSCSI Portal Group page is displayed.
3. For the first target portal group in the list you recorded before the upgrade, enter a name for the newportal group, enter the tag value from the list, and select the interface.
4. Click Add and then click OK.
5. Repeat for each target portal group in the list.
6. Verify the new values match the old values you recorded by clicking LUNs ➤ iSCSI ➤ ManagePortal Groups again.
Starting the iSCSI service
Once you have configured all of the original portal group tags, you can restart the iSCSI service on thestorage system.
Next topics
Starting the iSCSI service using the command line on page 64
Starting the iSCSI service using FilerView on page 64
Starting the iSCSI service using the command line
You can start the iSCSI service on the storage system using the iscsi start command on the commandline.
Step
1. On the storage system console, enter the following command:
iscsi start
Starting the iSCSI service using FilerView
You can start the iSCSI service on the storage system using FilerView.
Steps
1. Click LUNs ➤ Enable/Disable.
2. Select the Enable check box for iSCSI.
3. Click Apply.
For more information, see the Block Access Management Guide.
64 | Data ONTAP 7.3 Upgrade Guide
Firmware updates
Make sure you update your system with the latest firmware versions when you upgrade Data ONTAP.
Attention: Be sure to use the Upgrade Advisor tool (if it is available in your environment) to helpyou determine firmware upgrade requirements.
Next topics
Firmware upgrade requirements on page 65
Updating disk firmware on page 71
Updating disk shelf firmware on page 76
About RLM firmware updates on page 80
About BMC firmware updates on page 82
Related tasks
Using the Upgrade Advisor to plan your upgrade on page 23
Firmware upgrade requirementsIn some upgrade scenarios, system firmware updates are mandatory. Make sure that you update to thelatest system firmware version when you upgrade Data ONTAP.
There are special system firmware requirements that must be satisfied if you are upgrading to the currentrelease from a release earlier than 6.5.
To update system firmware, you must have access to the storage system's console and the current releasesystem files.
Next topics
How to obtain system firmware updates on page 65
Determining whether you need a system firmware update on page 66
Firmware updates on single systems on page 67
Firmware updates on systems in an active/active configuration on page 67
How to obtain system firmware updatesSystem firmware updates are included with distribution files for Data ONTAP upgrades.
When you perform a Data ONTAP software upgrade, the firmware service image included with theData ONTAP upgrade package is copied to your storage system’s CompactFlash card.
Firmware updates | 65
Note that the system firmware that is included with the Data ONTAP package is the latest versionavailable at the time that the current release was released, but it might not be the latest version availableat the time that you are installing the current release. To make sure that you have the latest firmware,download the latest system firmware package separately from the Data ONTAP download package.
You can obtain information about how to download system firmware from the NOW site.
Determining whether you need a system firmware updateTo determine whether your storage system needs a system firmware update, compare the version ofinstalled system firmware with the latest version available from the NOW site.
Steps
1. Display the version of your storage system's current system firmware by entering the followingcommand:
sysconfig -a
The command output will include an entry similar to one of the following:
Firmware release: 4.2_i1BIOS version: 1.2.0
2. Display the version of your storage system's current system firmware by entering the followingcommand:
version -b
You can run version -b immediately after you run the download command (which copies thenew firmware to the CompactFlash card).
3. Compare the output of the sysconfig -a and version -b commands to determine if your systemneeds a firmware update.
Then ...If the version of the newly loaded firmware displayed bythe version command is ...
Your storage system does not need a systemfirmware update
The same as the installed version displayed bysysconfig
Your storage system needs a system firmwareupdate.
Later than the installed version displayed by sysconfig
Attention: If you find that the system firmware version on the CompactFlash card is older thanthe installed version, do not update system firmware with the update_flash or update-flashcommand.
66 | Data ONTAP 7.3 Upgrade Guide
Related tasks
Checking for the latest versions of system firmware for your system on page 26
Firmware updates on single systemsThe update_flash command (or the update-flash command, with a hyphen instead of an underscore,on the FAS900 series systems) loads the system firmware from the CompactFlash card into your storagesystem’s flash Programmable ROM (PROM).
The command must be run from the boot environment prompt (CFE, LOADER, or ok, depending on yourstorage system) and the system must be rebooted after the command is run.
Use this command to update system firmwareIf your boot environment prompt is …
update_flash>LOADER
• FAS2000 series
• FAS3040
• FAS3070
• FAS3140
• FAS3170
• FAS6000 series
• SA models
update_flash>CFE
• FAS200 series
• FAS3020
• FAS3050
update-flash>ok
• FAS900 series
• R200
For more information about your boot environment, see your Data ONTAP System AdministrationGuide.
Firmware updates on systems in an active/active configurationIf you are upgrading storage systems in an active/active configuration, there are two methods availablefor updating system firmware:
• NondisruptiveThe nondisruptive update method is appropriate when you need to maintain service availabilityduring system firmware updates.
Firmware updates | 67
• StandardThe standard update method is appropriate when you can schedule downtime for system firmwareupdates.
Note that you can also update your firmware when you download Data ONTAP onto a single oractive/active configuration.
Next topics
Updating firmware nondisruptively on page 68
Updating firmware using the standard method on page 70
Related concepts
Upgrade host requirements on page 27
How to download Data ONTAP to single systems on page 107
How to download Data ONTAP to systems in an active/active configuration on page 110
Updating firmware nondisruptively
The nondisruptive update method is appropriate when you need to maintain service availability duringfirmware updates.
You must download firmware from the NOW site on your Windows or UNIX client before you beginthis procedure.
Steps
1. On each storage system, referred to as system A and system B in the following steps, enter thefollowing command:
priv set advanced
The prompt now displays an asterisk (*) after the storage system name to indicate that you are inadvanced mode.
2. On each storage system, enter the download -d command in priv set advanced mode as directed.
If necessary, format the service partition according to the instructions.
3. Take one of the following actions:
Then...If ...
Go to step 4.CIFS is not in use in system A.
68 | Data ONTAP 7.3 Upgrade Guide
Then...If ...
Enter the following command:
cifs terminate -t nn
where nn is a notification (in seconds) appropriate for your clients.After that period of time proceed to step 4.
CIFS is in use in system A.
4. If the automatic giveback option (cf.giveback.auto.enable) is set to on, disable automaticgiveback by entering the following command on one of your storage system in the active/activeconfiguration:
options cf.giveback.auto.enable off
After the upgrade procedure, reset this option to on (if desired).
5. At the console of system B, enter the following command:
cf takeover
This command causes system A to shut down gracefully and leaves system B in takeover mode.
6. To display the boot prompt at the system A console, complete one of the following procedures:
• Press Delete at the system A console when instructed after the boot sequence starts.
• When the "Waiting for giveback" message appears on the console of system A, press Ctrl-C atthe system A console.
• Enter the following command when the "Continue with boot?" message appears:
no
7. At the boot prompt, enter the following command:
bye
8. During the memory test, press Del to interrupt the boot process.
Note: If you have a terminal emulation package and it does not support Del, use Ctrl-Bksp instead.
The console displays the following messages:
Skipping auto-bootCompleteStartup aborted
Then the console displays the boot prompt (CFE, LOADER, or ok).
9. Enter one of the following commands depending on your boot environment prompt:
Firmware updates | 69
Enter this commandIf your boot environment prompt is …
update_flashLOADER or CFE
update-flashok
10. If prompted, enter the following key to continue:
y
The system updates the firmware, displays several status messages, and displays the boot prompt.
11. Enter the following command to reboot the storage system using the new firmware and software:
bye
12. When the "Waiting for giveback" message appears on the console of system B, enter the followingcommand:
cf giveback
This command causes system A to reboot with the new firmware and resume normal operation asactive/active configuration partner.
13. Repeat Step 5 through Step 12 to update the partner system; in other words, bring down and updatesystem B with partner A in takeover mode.
Updating firmware using the standard method
The standard firmware update method is appropriate when you can schedule downtime for systemfirmware updates.
You must obtain the system firmware from the NOW site on your Windows or UNIX client before youbegin this procedure.
Steps
1. On each system, referred to as system A and system B in the following steps, enter the followingcommand:
priv set advanced
The prompt now displays an asterisk (*) after the storage system name to indicate that you are inadvanced mode.
2. On each storage system, enter the download -d command in priv set advanced mode asdirected.
If necessary, format the service partition according to the instructions.
70 | Data ONTAP 7.3 Upgrade Guide
3. On either storage system, disable the active/active configuration by entering the following command:
cf disable
4. Continue installing the firmware on each storage system by following directions from the NOWsite.
5. Reenable the active/active configuration by entering the following command on one of the storagesystems:
cf enable
Related concepts
How to obtain system firmware updates on page 65
Updating disk firmwareMake sure that you update to the latest disk firmware version when you upgrade Data ONTAP. In someupgrade scenarios, disk firmware updates are mandatory.
Next topics
About disk firmware updates on page 71
Service availability during disk firmware updates on page 72
Detecting outdated disk firmware on page 74
When to update disk firmware manually on page 75
Command for updating disk firmware on page 75
About disk firmware updatesDisk firmware is automatically updated in certain circumstances.
Disk firmware is updated automatically when one of the following is true:
• You add new disks or a disk shelf.
• Data ONTAP detects disk firmware updates in the /etc/disk_fw directory.Data ONTAP scans the /etc/disk_fw directory for new disk firmware every two minutes.
Each storage system is shipped with an /etc/disk_fw directory that contains the latest firmwarerevisions at that time.
Disk firmware updates can be added to this directory at the following times:
• During a Data ONTAP upgradeDisk firmware updates are often included with an upgrade to a new release family. Disk firmwareupdates are occasionally included in Data ONTAP upgrades within release families. This is the mostcommon way to update disk firmware.
Firmware updates | 71
• During a manual firmware updateYou might be directed to download a disk firmware update from the NOW site in the event that youencounter problems with certain disk types or you receive a notice from NetApp.
Each disk drive manufacturer has its own disk drive firmware. Therefore, disk firmware updates caninclude updates to firmware for one or more disk drive types. Because your storage system might usedrives from multiple drive manufacturers, whether you are affected by a disk firmware update dependson the types and numbers of drives on your system.
Service availability during disk firmware updatesWhen you upgrade to the current release, the availability of storage system services during a diskfirmware update depends on the type of RAID protection on aggregates containing the disks.
Disk firmware updates can take place in two ways:
• Background (nondisruptive) disk firmware updateNondisruptive disk firmware updates take place automatically in the background when the disksare members of aggregates of the following types:
• RAID-DP
• Mirrored RAID-DP (RAID-DP with SyncMirror® software)
• Mirrored RAID4 (RAID4 with SyncMirror software)
• Standard disk firmware updateIn Data ONTAP 7.2 and later, disk firmware updates for RAID4 aggregates must complete beforethe new Data ONTAP version can finish booting. Storage system services are not available untilthe disk firmware update completes.
For example, if a storage system contains a RAID-DP and a RAID4 aggregate and disks in bothaggregates require a disk firmware update, the storage system cannot service requests until the RAID4aggregate's disk firmware is updated, even though the RAID-DP aggregate's disks are updating firmwarein the background.
Next topics
Verifying RAID protection type on page 72
About background disk firmware updates on page 73
About standard disk firmware updates on page 74
Verifying RAID protection type
Be sure to check the RAID type of your root volume before you update its firmware, because if anyvolume, including the root volume, is configured with RAID4 protection, a standard disk firmwareupdate (interrupting storage system services) will take place at the next reboot when new disk firmwareis present on the system.
72 | Data ONTAP 7.3 Upgrade Guide
Step
1. At the storage system command line, enter the following command:
aggr status
You see output similar to the following:
Aggr State Status Options data2_vol online raid-dp, flex data1_vol online raid-dp, flex vol0 online raid4, flex root
Note: In some storage systems, RAID4 is configured on the root volume by default. Be sure tocheck the RAID type of your root volume before you update its firmware, and reconfigure it ifnecessary, if you require a nondisruptive disk firmware update.
About background disk firmware updates
There are many important issues to consider when performing a background disk firmware update.
When a storage system configured with RAID-DP or SyncMirror reboots and there is a new diskfirmware present, the affected drives are automatically and sequentially taken offline, and the storagesystem responds normally to read and write requests. If any request affects an offline drive, the readrequests are satisfied by reconstructing data from other disks in the RAID group, while write requestsare written to a log. When the disk firmware update is complete, the drive is brought back online afterresynchronizing any write operations that took place while the drive was offline.
During a background disk firmware update, the storage system functions normally. You will see statusmessages as disks are taken offline to update firmware and brought back online when the firmwareupdate is complete. Background disk firmware updates proceed sequentially for active data disks andfor spare disks. Sequential disk firmware updates ensure that there will be no data loss throughdouble-disk failure.
Offline drives are marked with the annotation "offline" in the vol status -r command output. Whilea spare disk is offline, it cannot be added to a volume or selected as a replacement drive for reconstructionoperations. However, a disk would normally remain offline for a very short time (a few minutes atmost) and therefore would not interfere with normal system operation.
The background disk firmware update will be completed unless the following conditions are encountered:
• Degraded volumes are on the storage system.
• Disks needing a firmware update are present in a volume or plex that is in an offline state.
Automatic background disk firmware updates will resume when these conditions are addressed. Formore information about determining volume status and state, see the Storage Management Guide.
Automatic background disk firmware updates are overridden when the disk_fw_update commandis issued.
Firmware updates | 73
Note: Automatic background disk firmware updates are enabled by theraid.background_disk_fw_update.enable option, which is set to on by default. The valueof this option can be overridden during an active/active takeover, when the disk_fw_updatecommand is issued, or when a disk firmware update is required for disks in a RAID4 aggregate. Youare advised not to change the default value unless you are directed to by technical support.
Related concepts
Command for updating disk firmware on page 75
About standard disk firmware updates
There are important issues to consider when performing a standard disk firmware update.
In Data ONTAP 7.0.1 and later RAID4 aggregates (as well as in all volume and aggregate configurationsin earlier Data ONTAP releases), standard disk updates take place automatically during the first rebootafter the appearance of new disk firmware on the system. Because disk drives must be spun down andspun back up to install new firmware, disk firmware updates can take many minutes depending on thenumber of drive types and disk drives per type on your storage system. During a disk firmware update,the disks of the affected drive types are not available.
Note: If you upgrade RAID protection to RAID-DP, disk firmware updates take place in thebackground and are nondisruptive.
Detecting outdated disk firmwareAutoSupport messages include information about disk firmware installed on your storage system. TheNOW Installed Product pages use these messages to monitor the firmware versions on your storagesystem and to post notices when installed disk firmware in the /etc/disk_fw directory has beensuperseded.
Before You Begin
To use the NOW Installed Products service to monitor disk firmware versions, your storage systemmust meet the following requirements:
• AutoSupport must be enabled on your storage system.For more information about AutoSupport, see the System Administration Guide.
• You must have registered your NetApp products.
Considerations
These notices indicate that the disk firmware on at least some of your disks will be updated during yournext Data ONTAP upgrade, which can help you plan your upgrade.
74 | Data ONTAP 7.3 Upgrade Guide
Steps
1. Use a Web browser to go to http://now.netapp.com.
2. Click My Installed Products.
3. Display the product details for the storage system you are upgrading by entering search criteria fora specific system or displaying a list of systems at your company.
4. In the AutoSupport Status category, click Health Check Details.
If there is a firmware update available for your storage system, you will see a message with a link to aFirmware Analysis page. If there is a notice on the Firmware Analysis page that newer disk firmwareis available for your storage system, a disk firmware update will take place with your next Data ONTAPupgrade. If there is no disk firmware notice, the disk firmware on your system is up to date.
After You Finish
Determine if you should update your disk firmware now.
Related concepts
When to update disk firmware manually on page 75
Related information
Product Registration on NOW -- now.netapp.com/Self-Service/Forms/frmProductReg.asp
When to update disk firmware manuallyIf you receive error messages about firmware compatibility, you must manually update your diskfirmware.
• Manually update disk firmware with the disk_fw_update command.
• Download the new disk firmware from the NOW site, then enter the following command at thestorage system prompt:
disk_fw_update
Note: When you upgrade the storage system software, disk firmware is updated automatically aspart of the storage system software upgrade process. A manual update is not necessary unless thenew firmware is not compatible with the storage system disks.
Related concepts
Command for updating disk firmware on page 75
Command for updating disk firmwareUse the disk_fw_update command from the storage system console to update firmware on all disksor a specified disk on a storage system.
The disk_fw_update command updates disks for which firmware files are present in the/etc/disk_fw directory and which need to be updated. It does not update other disks.
The disk_fw_update command is applicable to SCSI, Fibre Channel, SATA, and SAS disks.
For more information, see the disk_fw_update(1) man page.
Attention: This command makes disks inaccessible for up to two minutes, so network sessions usingthe storage system should be terminated before running the command. This is particularly true forCIFS sessions, which otherwise are terminated while this command executes.
This command overrides any background disk firmware update that is in progress.
Updating disk shelf firmwareMake sure that you update to the latest disk shelf firmware version when you upgrade Data ONTAP.In some upgrade scenarios, disk shelf firmware updates are mandatory.
Next topics
About disk shelf firmware updates on page 76
Service availability during disk shelf firmware updates on page 77
Detecting outdated disk shelf firmware on page 78
Updating disk shelf firmware manually on page 79
About disk shelf firmware updatesWhen you upgrade Data ONTAP, disk shelf firmware (firmware for modules on disk shelves) is updatedautomatically if the firmware on the shelves is older than the firmware that is bundled with the DataONTAP system files. You can also update disk shelf firmware by downloading the most recent firmwarefor your shelf modules from the NOW site and installing the files.
The module (AT series, ESH series, LRC, or SAS) in a disk shelf maintains the integrity of the loopwhen disks are swapped and provides signal retiming for enhanced loop stability. In AT- and ESH-basedshelves, there are two modules in the middle of the rear of the disk shelf, one for Channel A and onefor Channel B. SAS modules are internal components in FAS2000 series and SA200 systems. Updatedfirmware for these modules is made available periodically.
Each storage system is shipped with an /etc/shelf_fw directory that contains the latest disk shelffirmware versions available at that time.
Disk shelf firmware updates can be added to this directory at the following times:
• After a Data ONTAP upgradeDisk shelf firmware updates are often included in Data ONTAP upgrade packages. If the versionin /etc/shelf_fw is higher than the installed version, the new version will be downloaded and installedduring the reboot or cf giveback phase as part of the Data ONTAP upgrade process.
76 | Data ONTAP 7.3 Upgrade Guide
• During a manual firmware updateYou might need to download a disk shelf firmware update from the NOW site if you plan to performa nondisruptive upgrade of Data ONTAP software, or if you receive a notice from NetApp.
Data ONTAP scans the /etc/shelf_fw directory for new firmware every two minutes (on systems withsoftware-based disk ownership). If new disk shelf firmware is detected -- that is, if there is a disk shelffirmware file in the /etc/shelf_fw directory that has a higher revision number than the current firmwareon the shelf module -- the new firmware is automatically downloaded to the disk shelf module.
The following events in Data ONTAP can also trigger an automatic disk shelf firmware update whenthere is new firmware in the /etc/shelf_fw directory:
• The reboot command is issued.
• The cf giveback command is issued.
• New disk drives are inserted.
• New shelf modules are inserted.
• NetApp Health Trigger (NHT) AutoSupport messages are sent.
Note: If your system does not use software-based disk ownership, Data ONTAP does not scan thethe /etc/shelf_fw directory for new disk shelf firmware. However, the other trigger events are stillapplicable if software-based disk ownership is not used. For more information about software-baseddisk ownership, see the Data ONTAP Storage Management Guide.
For more information about disk shelves and disk shelf modules, see the Data ONTAP Active/ActiveConfiguration Guide and the Hardware and Service Guide for your shelves.
Service availability during disk shelf firmware updatesWhen you upgrade to the current Data ONTAP release, the availability of storage system services duringa disk shelf firmware update depends on the type of shelf modules.
During firmware updates to disk shelves controlled by ESH series or LRC modules, the data on thedisk shelf remains accessible.
During firmware updates for disk shelves controlled by AT-FCX, AT-FC, AT-FC2, or SAS modules,the data on the disk shelf cannot be accessed until the firmware update is complete.
The following table summarizes Data ONTAP service availability during disk shelf firmware updatesfor these modules:
DisruptionDisk shelf modelModule
about 70 seconds per module *DS14mk2 ATAT-FCX
AT-FC2
AT-FC
Firmware updates | 77
DisruptionDisk shelf modelModule
noneDS14mk4 FC or DS14mk2 FCESH4
DS14 or DS14mk2 FCESH2
DS14 or DS14mk2 FCESH
noneDS14, DS14mk2 FC, FC7, FC8, orFC9
LRC
about 40 seconds per module *FAS2000 series and SA200 internalshelves only
SAS
* "Per module" means that updates for the A module cause a disruption, then several minutes lateranother disruption occurs while updates for the B module are taking place.
Attention: You cannot use the nondisruptive method to upgrade Data ONTAP if you have AT-FCX,AT-FC, AT-FC2, or SAS-based disk shelves in an active/active configuration, and if the firmwarefor these modules is outdated.
Detecting outdated disk shelf firmwareIf you want to perform a nondisruptive upgrade of Data ONTAP software when there are AT- orSAS-based disk shelves attached to your system, or if you are directed to update disk shelf firmware,you must find out what firmware is installed on disk shelves attached to your system.
Before You Begin
You should use the Upgrade Advisor (if it is available in your environment) to assess the status of yourdisk shelf firmware before upgrading.
Steps
1. At the storage system command line, enter the following command:
sysconfig -v
2. Locate the shelf information in the sysconfig -voutput.
3. Go to the disk shelf firmware information the NOW site and determine the most recent firmwareversion for your shelves.
4. Take the appropriate action.
78 | Data ONTAP 7.3 Upgrade Guide
Then ...If the disk shelf firmware version in the sysconfig -voutput is ...
No disk shelf firmware update is required atthis time
The same as the most recent version on the NOW site
Update your disk shelf firmware manually.Earlier than the most recent version on the NOW site
Related information
Disk Shelf Firmware on NOW -- now.netapp.com/NOW/download/tools/diskshelf/
Updating disk shelf firmware manuallyYou must run the storage download shelf command after downloading new disk shelf firmwarefrom the NOW site.
Considerations
By running the storage download shelf command once, you upgrade all eligible modulesconnected to both controllers in an active/active configuration. The command updates the modulessequentially: first all A modules, then all B modules. In addition, the process pauses I/O to all loops onthe controllers (both FCP and SATA).
Attention: Do not place firmware files for AT-FCX or SAS modules in the /etc/shelf_fw directoryunless you intend to update disk shelf firmware immediately. Several events in Data ONTAP cantrigger an automatic disk shelf firmware update if there is a disk shelf firmware file in the /etc/shelf_fwdirectory that has a higher revision number than the current firmware on the shelf module.
Do not use the nondisruptive method (that is, using the cf takeover and cf giveback commands)to update disk shelf firmware. Doing so will prevent access to data on disk shelves for a much longerperiod than using the storage download shelf command.
Steps
1. Find and download the most recent firmware for your shelves on the NOW site.
2. Follow the instructions on the NOW site to extract your firmware files to the /etc/shelf_fwdirectory in the root volume of your storage system.
3. Enter the following command at the storage system console to access the advanced administrativecommands:
priv set advanced
The prompt now displays an asterisk (*) after the storage system name to indicate that you are inthe advanced mode:filername*>
4. Depending on your upgrade scenario, enter one of the following commands to upgrade the diskshelf firmware.
Then enter the following command at the storagesystem console:
If you want to upgrade the disk shelf firmware on...
storage download shelfAll the disk shelves in your storage system
storage download shelf adapter_nameThe shelves attached to a specific adapter
5. To confirm that you want to upgrade the firmware, enter the following key:
y
6. Enter the following command to verify the new disk shelf firmware:
sysconfig -v
7. Enter the following command to return to the standard administrative console prompt:
priv set
The prompt returns to the standard console prompt:filername>
Related information
Disk Shelf Firmware on NOW -- now.netapp.com/NOW/download/tools/diskshelf/
About RLM firmware updatesYou upgrade the Remote LAN Module (RLM) firmware by downloading and updating the RLMfirmware using the Data ONTAP CLI or the RLM CLI.
Attention: Do not use Telnet or Remote Shell (RSH) sessions to update RLM firmware.
For information about what the RLM is and how it works, see the Data ONTAP System AdministrationGuide.
Next topics
Using the Data ONTAP CLI to update the RLM firmware on page 80
Using the RLM CLI to update the RLM firmware on page 81
Using the Data ONTAP CLI to update the RLM firmwareYou can update the RLM firmware at the storage system prompt.
1. Go to Firmware Instructions for the Remote LAN Module at the NOW site.
2. Click the RLM_FM.tar.zip link to download the file from the Web site to the Web server on anetwork that is accessible to your storage system.
3. Log in to the RLM by entering the following command at the administration host:
ssh username@RLM_IP_address
4. Enter the following command at the RLM prompt:
rlm update http://Web_server_addr/RLM.FW.tar.gz
Web_server_addr is the IP address of the Web server on a network accessible to your storagesystem.
Messages inform you of the progress of the update.
5. When you are prompted to reboot the RLM, enter the following command at the RLM prompt:
rlm reboot
Note: If your console connection is through the RLM, you lose your console connection to thestorage system. In approximately one minute, the RLM reboots and automatically re-establishesthe connection.
Related information
Remote LAN Module (RLM) Firmware -- now.netapp.com/NOW/download/tools/rlm_fw/
About BMC firmware updatesYou upgrade the Baseboard Management Controller (BMC) firmware by obtaining and updating theBMC firmware from the Data ONTAP software image or from the NOW site.
The Baseboard Management Controller (BMC) firmware is bundled with the Data ONTAP softwareimage. When you perform a Data ONTAP software upgrade, the BMC firmware included with the DataONTAP upgrade package is copied to your storage system's CompactFlash card.
The BMC firmware that is included with the Data ONTAP package is the latest version available at thetime that the current release was released. Nonetheless, you might be directed to download more recentversions from the NOW site by NetApp support staff.
Whether you obtain BMC firmware updates from the Data ONTAP upgrade package or from the NOWsite, you must run the update_bmc boot-loader macro to load the new BMC firmware on the BMCdevice. You can load the BMC firmware using the nondisruptive method in active/active configurations,or you can use the standard method in both active/active and single-system configurations.
Updating BMC firmware nondisruptivelyThe nondisruptive update method is appropriate when you need to maintain service availability duringBMC firmware updates. To use this method, your storage systems must be in an active/activeconfiguration.
Before You Begin
You must obtain BMC firmware updates from the Data ONTAP upgrade package or by downloadingfrom the the NOW site site before using this procedure.
1. At the storage system prompt, enter the following command to identify the currently installed BMCfirmware version.
bmc status
Example
toaster> bmc status Baseboard Management Controller: Firmware Version: 1.1
2. At the storage system prompt, enter the following command to identify the version of the BMCfirmware on the CompactFlash card:
version -b
The console displays the contents of the CompactFlash FAT file system, including the BMC firmwareversion.
Example
storage_system> version -b1:/x86_elf/kernel/primary.krn: OS 7.2.2L1X91:/backup/x86_elf/kernel/primary.krn: OS Rgb-shuarN_070510_00301:/x86_elf/diag/diag.krn: 4.81:/x86_elf/firmware/deux/firmware.img: Firmware 3.1.01:/x86_elf/firmware/SB_XIV/firmware.img: BIOS/NABL Firmware 3.01:/x86_elf/firmware/SB_XIV/bmc.img: BMC Firmware 1.1
3. Compare the output of the bmc status and version -b commands.
Then ...If ...
No BMC firmware update is required at thistime
The commands show the same BMC firmware version
Continue with this procedureThe BMC firmware version in the version -b output islater than the version in the bmc status status
4. On each storage system, referred to as system A and system B in the following steps, enter thefollowing command:
priv set advanced
The prompt now displays an asterisk (*) after the storage system name to indicate that you are inadvanced mode.
5. Take one of the following actions:
Firmware updates | 85
Then...If ...
Go to step 4.CIFS is not in use in system A.
Enter the following command:
cifs terminate -t nn
where nn is a notification (in seconds) appropriate for your clients.After that period of time proceed to step 4.
CIFS is in use in system A.
6. If the automatic giveback option (cf.giveback.auto.enable) is set to on, disable automaticgiveback by entering the following command on one of your storage system in the active/activeconfiguration:
options cf.giveback.auto.enable off
After the upgrade procedure, reset this option to on (if desired).
7. At the console of system B, enter the following command:
cf takeover
This command causes system A to shut down gracefully and leaves system B in takeover mode.
8. To display the boot prompt at the system A console, complete one of the following procedures:
• Press Delete at the system A console when instructed after the boot sequence starts.
• When the "Waiting for giveback" message appears on the console of system A, press Ctrl-C atthe system A console.
• Enter the following command when the "Continue with boot?" message appears:
no
9. At the LOADER prompt, enter the following command:
bye
10. During the memory test, press Del to interrupt the boot process.
Note: If you have a terminal emulation package and it does not support Del, use Ctrl-Bksp instead.
The console displays the following messages:
Skipping auto-bootCompleteStartup aborted
Then the console displays the LOADER prompt.
11. Enter the following command from the LOADER prompt:
86 | Data ONTAP 7.3 Upgrade Guide
update_bmc
The update_bmc macro updates the BMC firmware from the image on the CompactFlash card anddisplays a message on the console.
Example
LOADER> update_bmcBMC firmware version: 1.2Programming: this might take up to 120 seconds to complete...
pre-init time [bmc.reset.power:notice]: Hard reset by external power-cycle.BMC Release 1.2Press ^G to enter BMC command shell
Important: In order for the BMC firmware changes to fully take effect, it is necessary to reboot using the "bye" command before starting ONTAP
If the new BMC firmware also has a new non-volatile memory management (NVMEM) batteryfirmware image, the battery firmware is updated automatically.
12. Enter the following command to reboot the storage system using the new firmware and software:
bye
13. When the "Waiting for giveback" message appears on the console of system B, enter the followingcommand:
cf giveback
This command causes system A to reboot with the new firmware and resume normal operation asactive/active configuration partner.
14. Repeat Step 5 through Step 13 to update the partner system; in other words, bring down and updatesystem B with partner A in takeover mode.
Updating BMC firmware using the standard methodThe standard firmware update method is appropriate when you can schedule downtime for systemfirmware updates.
Before You Begin
You must obtain BMC firmware updates from the Data ONTAP upgrade package or by copying fromthe the NOW site site before using this procedure.
Firmware updates | 87
Steps
1. At the storage system prompt, enter the following command to identify the currently installed BMCfirmware version.
bmc status
Example
toaster> bmc status Baseboard Management Controller: Firmware Version: 1.1
2. At the storage system prompt, enter the following command to identify the version of the BMCfirmware on the CompactFlash card:
version -b
The console displays the contents of the CompactFlash FAT file system, including the BMC firmwareversion.
Example
storage_system> version -b1:/x86_elf/kernel/primary.krn: OS 7.2.2L1X91:/backup/x86_elf/kernel/primary.krn: OS Rgb-shuarN_070510_00301:/x86_elf/diag/diag.krn: 4.81:/x86_elf/firmware/deux/firmware.img: Firmware 3.1.01:/x86_elf/firmware/SB_XIV/firmware.img: BIOS/NABL Firmware 3.01:/x86_elf/firmware/SB_XIV/bmc.img: BMC Firmware 1.0
3. Compare the output of the bmc status and version -b commands.
Then ...If ...
No BMC firmware update is required at thistime
The commands show the same BMC firmware version
Continue with this procedureThe BMC firmware version in the version -b output islater than the version in the bmc status status
4. Enter the following command at the storage system prompt:
halt
The storage system console displays the boot environment prompt.
5. Enter the following command from the LOADER prompt:
update_bmc
The update_bmc macro updates the BMC firmware from the image on the CompactFlash card anddisplays a message on the console.
88 | Data ONTAP 7.3 Upgrade Guide
Example
LOADER> update_bmcBMC firmware version: 1.2Programming: this might take up to 120 seconds to complete...
pre-init time [bmc.reset.power:notice]: Hard reset by external power-cycle.BMC Release 1.2Press ^G to enter BMC command shell
Important: In order for the BMC firmware changes to fully take effect, it is necessary to reboot using the "bye" command before starting ONTAP
If the new BMC firmware also has a new non-volatile memory management (NVMEM) batteryfirmware image, the battery firmware is updated automatically.
6. After the BMC firmware is updated, enter the following command from the LOADER prompt torestart the system:
bye
Firmware updates | 89
How to upgrade Data ONTAP software
Upgrading Data ONTAP software to the latest release requires several prerequisites, installing systemfiles, and downloading the software to the system CompactFlash.
Next topics
Prerequisites to software upgrade on page 91
How to install Data ONTAP system files on page 93
How to download Data ONTAP to single systems on page 107
How to download Data ONTAP to systems in an active/active configuration on page 110
Prerequisites to software upgradeYou need to acquire the new software and firmware and perform some tasks before upgrading to thenew release of Data ONTAP.
Next topics
What you need for the upgrade on page 91
Preparing for the upgrade on page 92
What you need for the upgradeTo upgrade the storage system to the latest release of Data ONTAP, you need system files and thelastest firmware version.
System files and firmware are available at the following locations.
• System files
• On the NOW site
• On the CD-ROM (can be ordered separately)
• Firmware version information and the latest firmware for your storage system model is availableon the NOW site
Note: The system files package includes the latest version of system firmware that was availablewhen this version of Data ONTAP was released.
To access utilities that can help ensure an efficient upgrade, go to the ToolChest page on the NOW site.
How to upgrade Data ONTAP software | 91
Related information
Available Firmware Versions on NOW -- now.netapp.com/NOW/tools/releasetable.shtml
Tools and Utilities on NOW -- now.netapp.com/NOW/cgi-bin/toolsutils/
Preparing for the upgradeBefore installing the latest Data ONTAP release on your storage system you need to verify informationand complete some tasks.
Steps
1. Verify that you have resolved any upgrade issues.
2. Verify whether you need to update storage system firmware.
3. Verify whether you need to update disk or disk shelf firmware.
Note: You should ensure that any required disk firmware and disk shelf firmware updates havecompleted before beginning a nondisruptive upgrade. In particular, you should upgrade diskfirmware at least one day before beginning a nondisruptive Data ONTAP upgrade, becauseautomatic background disk firmware updates can take a long time in large-capacity systems.
4. If you have storage systems in an active/active configuration, verify that they are correctly configuredusing the Cluster Configuration Checker.
5. If you are running SnapMirror, identify storage systems with destination volumes and upgrade thembefore upgrading storage systems with source volumes.
6. Check whether you need to perform one or both of the procedures described in the following table.
Complete the procedure if ...Procedure
You are running CIFS on the storage system and are using aWindows NT 4.0 domain controller for authentication. In this case,the storage system must have a domain account.
Verify that the storage system has adomain account
You are running CIFS on the storage system and are using aWindows 2000 domain controller for authentication.
Enable DSN with Windows 2000 nameserver addresses
Next topics
Enabling DNS with Windows 2000 name server addresses on page 93
Verifying that you have a domain account on page 93
Related concepts
Decisions to make about upgrade issues on page 40
The Cluster Configuration Checker on page 36
Why you must plan for SnapMirror upgrades on page 37
Determining whether you need a system firmware update on page 66
Detecting outdated disk firmware on page 74
Enabling DNS with Windows 2000 name server addresses
Before upgrading, enable DNS with Windows 2000 name server addresses.
Steps
1. Using a text editor, create or open the /etc/resolv.conf file in the root volume. Enter up to three lines,each specifying a Windows 2000 name server host in the following format:
nameserver ip_address
Examplenameserver 192.9.200.10
2. Save the file.
3. Enter the following command at the storage system console to enable DNS:
options dns.enable on
Verifying that you have a domain account
If you are running CIFS and using a Windows 2000 domain controller for authentication, verify thatyour storage system has a domain account.
Step
1. From the storage system console, enter the following command:
cifs lookup
How to install Data ONTAP system filesThe procedure for installing system files depends on the type of upgrade host from which you areinstalling the files.
Next topics
Special instructions if you are upgrading from Data ONTAP 7.2 or later on page 94
The Upgrade Utility on page 95
UNIX client steps on page 96
Windows client steps on page 99
How to upgrade Data ONTAP software | 93
HTTP server steps on page 103
Special instructions if you are upgrading from Data ONTAP 7.2 or laterIn Data ONTAP 7.2, the commands to install Data ONTAP, download the software, and reboot yoursystem were consolidated into one command. If you are upgrading from Data ONTAP 7.2 or later, usethe software update command to upgrade your system files.
In this guide, when you are instructed to use the three-step method in the following table to upgradeData ONTAP software, you can use the software update command to accomplish the three taskswith one command.
Use this command instead ...When you are instructed to use this method to upgrade DataONTAP ...
Use software update to accomplishall three tasks with one command.
1. Enter software install to install the Data ONTAP systemfiles.
2. Enter download to copy the system files to Compact Flash card.3. Enter reboot to reboot your system after you have installed and
downloaded the software.
The software update command has the following syntax:
software update url [-f][-d] [-r]
• url is the HTTP location from which you want to download Data ONTAP.
• -f overwrites the destination file.
• -d prevents the automatic download of the software to the Compact Flash. This option implies the-r option.
• -r prevents the automatic reboot.
Note: If you are upgrading using the nondisruptive method, the -r flag is required.
Using the software update command
Use the software update command to install the Data ONTAP system files on a Data ONTAP 7.2or later system, to download the files to CompactFlash, and to reboot your system with one command.You must know the location of and have access to the new Data ONTAP system files.
Step
1. From the storage system prompt, enter the following command:
software update url [-f] [-d] [-r]
Use the -f option to overwrite the destination file.
94 | Data ONTAP 7.3 Upgrade Guide
Use the -d option if you do not want to install the new system files yet. If you use the -d option,the system does not reboot automatically. You will need to use the download command to installthe files and you will need to use the reboot command to reboot your system.
Use the -r option if you do not want to reboot immediately, for example, if you want to install diskfirmware before you reboot. If this describes your upgrade scenario, you can use this option withthe software update command and then see Updating disk firmware on page 71 to finish theupgrade procedure.
When you use the software update command without the options, a message similar to thefollowing appears on your storage system console:
software: You can cancel this operation by hitting Ctrl-C in the next 6seconds.software: Depending on system load, it might take many minutessoftware: to complete this operation. Until it finishes, you willsoftware: not be able to use the console.software: copying to <filename>software: 100% file read from location.software: /etc/software/<filename> has been copied.software: installing software, this could take a few minutes...software: Data ONTAP Package Manager Verifier 1software: Validating metadata entries in /etc/boot/NPM_METADATA.txtsoftware: Checking sha1 checksum of file checksum file:/etc/boot/NPM_FCSUM-pc.sha1.ascsoftware: Checking sha1 file checksums in /etc/boot/NPM_FCSUM-pc.sha1.ascsoftware: installation of <filename> completed.Mon Oct 2 13:26:17 PDT [filer: rc:info]: software: installation of<filename> completed.
software: Reminder: You might need to upgrade Volume SnapMirror destinationsoftware: filers associated with this filer. Volume SnapMirror can notmirrorsoftware: if the version of ONTAP on the source filer is newer than thatonsoftware: the destination filer.Mon Oct 2 13:26:17 PDT [filer: download.request:notice]
The system installs the files and reboots.
The Upgrade UtilityThe Data ONTAP Upgrade Utility is a perl script that allows you to upgrade storage systems fromUNIX or Windows clients.
The perl script is also available in executable form for Windows clients. The utility is especially usefulif you do not have Common Internet File System (CIFS) or Network File System (NFS) licensed—forexample, on a storage system serving only Fibre Channel Protocol (FCP)—and the conventional methodsfor copying system files to the storage system are not available.
How to upgrade Data ONTAP software | 95
For more information about acquiring and using the Upgrade Utility, see the NOW site.
Note: You must be running Java on the storage system to use the Upgrade Utility.
The Upgrade Utility does not currently support FAS6000 series systems. For more information, seeBug ID 289057.
Related information
Upgrade Utility on NOW -- now.netapp.com/NOW/download/tools/upgrade_ontap/
Bug ID 289057: now.netapp.com/NOW/cgi-bin/bol?Type=Detail&Display=289057
UNIX client stepsPerform the steps described in this section only if you are using a UNIX client to install the upgrade.
Considerations
Note: To perform the upgrade, you need access to both the storage system's console and a clientsystem.
Complete the following tasks in the order shown.
Mounting the storage system on your client on page 961.Downloading and installing Data ONTAP system files on page 972.Installing the system files on page 993.
Mounting the storage system on your client
Before you upgrade your storage system, you must mount the system on your UNIX client.
Steps
1. Mount the storage system’s root file system to the client’s /mnt directory, using the followingcommand:
mount system:/mnt
system is the name of the storage system.
/mnt is the directory on the client where you want to mount the storage system’s root file system.
2. Change to the /mnt directory using the following command on your UNIX client console:
cd /mnt
/mnt is the directory on the client where you mounted the storage system’s root file system.
3. To acquire Data ONTAP files, choose one of the following options.
Download Data ONTAP files using a Web browser from the NOW site.•
• Copy the Data ONTAP files from the CD-ROM.
Related tasks
Downloading Data ONTAP using a Web browser on page 97
Copying the system files from the CD-ROM on page 98
Downloading and installing Data ONTAP system files
You must transfer the system files from the NOW site or from the Data ONTAP CD-ROM.
Next topics
Downloading Data ONTAP using a Web browser on page 97
Copying the system files from the CD-ROM on page 98
Downloading Data ONTAP using a Web browser
You can use a Web browser to download the system files from the NOW site to your UNIX client.
Steps
1. Use a Web browser to log in to the NOW site.
2. Click Service & Support.
3. Click Download Software.
4. In the Software Download table, click the Select Platform list box in the Data ONTAP productrow.
5. Select your storage system type from the list and click Go.
6. Follow the prompts to reach the software download page.
7. Choose the desired UNIX system files software and download it to the mountpoint that you chosepreviously, when you mounted the storage system on your client.
8. From the client, extract the files with the following command:
tar -xvf /mnt/filename
/mnt is the directory on the client where you want to mount the storage system's root file system.
filename is the name of the file you downloaded from the NOW site.
The tar command extracts files and reports the names. They are tar_image.Z and install_netapp.
9. Install the system files.
How to upgrade Data ONTAP software | 97
Related tasks
Mounting the storage system on your client on page 96
Installing the system files on page 99
Copying the system files from the CD-ROM
Before you upgrade your system, you must copy the system files to your client. You can copy the systemfiles from the Data ONTAP CD-ROM.
Steps
1. Mount the Data ONTAP CD-ROM onto your client.
2. From the client, extract the files by entering the following command:
tar -xvf /cd-rom_mnt_pt/ontap/release/type/sysfiles.tar
cd-rom_mnt_pt is the name of your CD-ROM mount point.
release is the release number on the CD-ROM.
type is one of the following values depending on your storage system model :
TypeStorage system
x86-64FAS6000 series
x86-64FAS3140 and FAS3170
x86-64FAS3040 and FAS3070
pc_elfFAS3020 and FAS3050
pc_elfFAS2000 series
x86FAS900 series
mipsFAS270
x86NearStore R200
x86-64SA600
x86-64SA300
pc_elfSA200
The tar command extracts the files and reports the names; they are tar_image.Z and install_netapp.
3. Install the system files.
98 | Data ONTAP 7.3 Upgrade Guide
Installing the system files
To upgrade your storage system to the newest release of Data ONTAP, you must install the systemfiles.
Steps
1. Choose the following option that describes what you want to do.
Then enter the following command from the client...If you want to ...
./install_netapp/mnt/mnt is the directory on the client where you mounted the storagesystem’s root file system.
Delete the tar files after the files areextracted
./install_netapp -k/mnt/mnt is the directory on the client where you mounted the storagesystem’s root file system.
Keep the tar files after the files areextracted
The install script decompresses and extracts the files.
2. From the client, unmount the storage system’s root file system (/) by entering the followingcommands:
cd /
umount /mnt
/mnt is the directory on the client where you mounted the storage system’s root file system.
3. Complete the appropriate procedure to download Data ONTAP:
• Download Data ONTAP onto single storage systems and reboot.
• Download Data ONTAP onto storage systems in an active/active configuration.
• Follow instructions for upgrading from Data ONTAP 7.2 to a later release of Data ONTAP.
Related concepts
How to download Data ONTAP to single systems on page 107
How to download Data ONTAP to systems in an active/active configuration on page 110
Special instructions if you are upgrading from Data ONTAP 7.2 or later on page 94
Windows client stepsPerform the steps described in this section only if you are using a Windows PC to install the upgrade.
This part of the upgrade involves performing the following tasks:
How to upgrade Data ONTAP software | 99
Mapping the storage system to a drive on page 1001.Downloading and installing Data ONTAP system files on page 1002.
Mapping the storage system to a drive
Before you upgrade your storage system, you must map the root directory of the system to your Windowsclient.
Make sure that the CIFS service is running and that that the Administrator user is defined in CIFS ashaving authority to access the C$ directory.
For each storage system that you plan to upgrade, map the root directory of the storage system to yourWindows client, using the following procedure.
Steps
1. Log in to your client as Administrator or log in using an account that has full control on the storagesystem C$ directory.
2. Map a drive to the C$ directory of your storage system.
Note: On some computers, if there is an installed firewall, the firewall software might not permityou to map a drive to the C$ directory of a storage system. In order to complete the upgradeprocedure, disable the firewall until you no longer need access to the storage system through yourlaptop.
3. Choose the following option that describes what you want to do.
• Download system files from the NOW site
• Copy system files from the CD-ROM
Related tasks
Downloading and installing Data ONTAP using a Web browser on page 101
Copying and installing Data ONTAP from the CD-ROM on page 102
Downloading and installing Data ONTAP system files
You must transfer the system files to your client from the NOW site or CD-ROM and install them onthe storage system.
Next topics
Downloading and installing Data ONTAP using a Web browser on page 101
Copying and installing Data ONTAP from the CD-ROM on page 102
100 | Data ONTAP 7.3 Upgrade Guide
Downloading and installing Data ONTAP using a Web browser
You can use a Web browser to download the Data ONTAP system files from the NOW site and installthem onto your storage system.
Steps
1. Use a Web browser to log in to the NOW site.
2. Click Service & Support.
3. Click Download Software.
4. In the Software Download table, click the Select Platform list box in the Data ONTAP productrow.
5. Select your storage system type from the list and click Go.
6. Follow the prompts to reach the software download page.
7. Choose the desired Windows system files software and download it to the drive to which youpreviously mapped the storage system.
8. Go to the drive to which you downloaded the software.
9. Double-click the files that you downloaded.
A dialog box appears.
10. In the WinZip dialog box, enter the letter of the drive to which you mapped the storage system.
For example, if you chose drive N, replace DRIVE :\ETC with the following path:
N:\ETC
11. Ensure that the following check boxes are selected:
• Overwrite Files Without Prompting
• When Done Unzipping Open ...
Leave the options as they are.
12. Click the Unzip button.
In the dialog box's lower panel, confirmation messages are displayed as files are decompressed.
13. Complete the appropriate procedure to download Data ONTAP.
• Download Data ONTAP onto single storage systems and reboot.
• Download Data ONTAP onto storage systems in an active/active configuration.
• Special instructions for upgrading from Data ONTAP 7.2 to a later release of Data ONTAP.
How to upgrade Data ONTAP software | 101
Related concepts
How to download Data ONTAP to single systems on page 107
How to download Data ONTAP to systems in an active/active configuration on page 110
Special instructions if you are upgrading from Data ONTAP 7.2 or later on page 94
Related tasks
Mapping the storage system to a drive on page 100
Copying and installing Data ONTAP from the CD-ROM
You can copy the Data ONTAP system files from the Data ONTAP CD-ROM and install them ontoyour storage system.
Steps
1. Insert the Data ONTAP CD-ROM into your CD-ROM drive.
2. Go to one of the following folders on the Data ONTAP CD-ROM depending on your storage systemmodel:
FolderStorage system
ONTAP\release\x86-64FAS6000 series
ONTAP\release\x86-64FAS3140 and FAS3170
ONTAP\release\x86-64FAS3040 and FAS3070
ONTAP\release\pc_elfFAS3020 and FAS3050
ONTAP\release\pc_elfFAS2000 series
ONTAP\release\x86FAS900 series
ONTAP\release\mipsFAS270
ONTAP\release\x86NearStore R200
ONTAP\release\x86-64SA600
ONTAP\release\x86-64SA300
ONTAP\release\pc_elfSA200
release is the release number on the CD-ROM.
3. Double-click setup.exe.
The setup program displays a dialog box.
4. Make sure that you followed the steps described in the dialog box, then click OK.
The WinZip dialog box appears.
102 | Data ONTAP 7.3 Upgrade Guide
5. Follow the WinZip prompts to unzip the file that you downloaded onto the drive to which youmapped the storage system. When appropriate, ensure that the following check boxes are selected:
• Overwrite Files Without Prompting
• When Done Unzipping Open...
Leave the other options as they are.
In the dialog box’s lower panel, confirmation messages are displayed as files are decompressed.
6. Complete the appropriate procedure to download Data ONTAP.
• Download Data ONTAP onto single storage systems and reboot.
• Download Data ONTAP onto storage systems in an active/active configuration.
• Special instructions for upgrading from Data ONTAP 7.2 to a later release of Data ONTAP.
Related concepts
How to download Data ONTAP to single systems on page 107
How to download Data ONTAP to systems in an active/active configuration on page 110
Special instructions if you are upgrading from Data ONTAP 7.2 or later on page 94
HTTP server stepsIf you have an HTTP server with the latest Data ONTAP upgrades accessible to your storage system,you can use the software command to download and install Data ONTAP to your storage system.
Note: You can also use HTTPS connections when SecureAdmin is installed and enabled on thestorage system.
When you use HTTP to download Data ONTAP, you do not have to mount the storage system to aUNIX administration host or map a drive to the storage system using Windows to perform the installation.
You can download Data ONTAP upgrades to both single systems and storage systems in an active/activeconfiguration.
For more information, see the software (1) man page.
This part of the upgrade involves performing the following tasks:
Copying the setup.exe file on page 1041.Copying Data ONTAP without installing on page 1042.Installing Data ONTAP using HTTP on page 1053.Installing a file that has already been downloaded on page 1064.Listing software files in the /etc/software directory on page 1065.Deleting software files in the /etc/software directory on page 1076.
How to upgrade Data ONTAP software | 103
Copying the setup.exe file
You must copy the setup.exe file to the HTTP server before continuing with the upgrade.
To prepare the HTTP server, copy the setup.exe file (for example, 72_setup_i.exe) from the NOW siteor another system to the directory on the HTTP server from which you will serve the file.
Copying Data ONTAP without installing
You can copy a Data ONTAP upgrade to your storage system without immediately installing it, forinstance, if you want to perform the installation at a later time.
Step
1. Enter the following command from the storage system console:
software get url -f filename
url is the HTTP location from which you want to download Data ONTAP.
Use the following URL syntax if you need to specify a username, password, host or port to accessfiles on the HTTP server using Basic Access Authentication (RFC2617):
http://username:password@host:port/path
Use the -f flag to overwrite an existing software file of the same name in the storage system's/etc/software directory. If a file of the same name exists and you do not use the -f flag, the downloadwill fail and you will be prompted to use -f.
filename is the file name you specify for the software file being downloaded to your storagesystem. If no destination file name is specified, Data ONTAP uses the file name listed in the URLfrom which you are downloading and places the copy in the /etc/software directory on the storagesystem.
ExampleThe following is an example of the software get command using a new destination file name.
software: copying to /etc/software/722_setup_i.exesoftware: 100% file read from location.software: /etc/software/722_setup_i.exe has been copied.
104 | Data ONTAP 7.3 Upgrade Guide
Installing Data ONTAP using HTTP
You can use the software install command to copy and install the Data ONTAP upgrade files toyour storage system simultaneously.
If you are upgrading from Data ONTAP 7.2, read the special instructions for upgrading to this releasebefore you update your system files.
Steps
1. Enter the following command:
software install url
url is the HTTP location from which you want to download Data ONTAP.
Use the following URL syntax if you need to specify a username, password, host or port to accessfiles on the HTTP server using Basic Access Authentication (RFC2617).
http://username:password@host:port/path
The software is downloaded and installed on your storage system, and you see a message similarto the following:
Important: If you are upgrading from a Data ONTAP version before 6.5, review the informationabout upgrading from releases earlier than Data ONTAP 6.5, and do not type download asinstructed by the system software.
system> software installhttp://www.myserver.com/example/R72/pc/72_setup_i.exesoftware: installing software, this could take a few minutes ...software: installation completed.Please type "download" to load the new software and"reboot" subsequently for changes to take effect.system>
2. Choose the following option that describes what you want to do.
Then choose the following option ...If you are upgrading ...
Upgrade to Data ONTAP on a single system.A single storage system
Upgrade to Data ONTAP on an active/active configuration.Storage systems in an active/activeconfiguration
Related concepts
Special instructions if you are upgrading from Data ONTAP 7.2 or later on page 94
How to download Data ONTAP to single systems on page 107
How to download Data ONTAP to systems in an active/active configuration on page 110
How to upgrade Data ONTAP software | 105
Installing a file that has already been downloaded
If you previously downloaded Data ONTAP using the software get command, you can install thesoftware by completing the procedure from the storage system console.
If you are upgrading from Data ONTAP 7.2, read the special instructions for upgrading to this releasebefore you update your system files.
Steps
1. Enter the following command:
software install software_filename
software_filename is the name of the file you downloaded using the software get command.
The software is downloaded and installed on your storage system, and you see a message similarto the following:
system> software install 72_setup_i.exesoftware: installing software, this could take a few minutes ...software: installation completed.Please type "download" to load the new software and"reboot" subsequently for changes to take effect.system>
2. Choose the following option that describes what you want to do.
Then choose the following option ...If you are upgrading ...
Upgrade to Data ONTAP on a single system.A single storage system
Upgrade to Data ONTAP on an active/active configuration.Storage systems in an active/activeconfiguration
Related concepts
Special instructions if you are upgrading from Data ONTAP 7.2 or later on page 94
How to download Data ONTAP to single systems on page 107
How to download Data ONTAP to systems in an active/active configuration on page 110
Listing software files in the /etc/software directory
You can use the software list command to list the files that have been downloaded to the/etc/software directory.
Step
1. Enter the following command from the storage system console:
106 | Data ONTAP 7.3 Upgrade Guide
software list
Deleting software files in the /etc/software directory
You can use the software delete command to remove files in the /etc/software directory.
Step
1. Enter the following command from the storage system console:
software delete software_file1 software_file2
software_file1 and software_file2 are the names of the files you want to delete.
How to download Data ONTAP to single systemsUpgrading your single system requires different procedures, depending on the model of your storagesystem.
Next topics
Upgrading single systems on page 107
Upgrading Data ONTAP on a single FAS900 series or NearStore system on page 109
Upgrading single systemsUse this procedure to upgrade Data ONTAP on single FAS270c, FAS2000 series, FAS30xx series,FAS3140/FAS3170, FAS6000 series, or SA systems.
Before You Begin
Before initiating this download procedure, verify that you have prepared for the upgrade by completingthe prerequisite procedures. You must also install the Data ONTAP files to your storage system.
Steps
1. Enter the following command to copy the kernel and firmware data files to the CompactFlash card:
download
The download command provides a status message similar to the following:
download: Depending on system load, it might take manydownload: minutes to complete this operation. Until itdownload: finishes, you will not be able to use thedownload: console. You can cancel this operation bydownload: hitting Ctrl-C in the next 6 seconds.
How to upgrade Data ONTAP software | 107
Tue Jul 15 10:03:22 GMT [download.request:notice]:Operator requested download initiateddownload: Downloading boot device............Mon Apr 21 15:30:24 PDT [nbns_timer:info]:All CIFS name registrations complete for local server....download: Downloading boot device (Service Area)
Then the following storage system message appears:
Note: If your system does not require a firmware update, continue to step 5.
4. Enter the following key to continue:
y
The system updates the firmware, displays several status messages, and displays the firmwareenvironment boot prompt.
5. At the firmware environment boot prompt, enter the following command to reboot the system usingthe new software and, if applicable, the new firmware:
bye
108 | Data ONTAP 7.3 Upgrade Guide
Related concepts
How to install Data ONTAP system files on page 93
Related tasks
Preparing for the upgrade on page 92
Upgrading Data ONTAP on a single FAS900 series or NearStore systemDownloading Data ONTAP to some systems requires a slightly different procedure because you arecopying the system files from the CompactFlash card to the boot blocks of the system hard disks. Usethis procedure only if you are upgrading a single FAS900 series or NearStore system.
Before You Begin
Before initiating this download procedure, verify that you have prepared for the upgrade by completingany prerequisite procedures. You must also install the Data ONTAP files to the storage system system.
Steps
1. Enter the following command to copy the executables to the boot blocks of the storage system'shard disks:
download
The download command provides a status message similar to the following:
2. Enter the following command to shut down the storage system:
halt
After the storage system shuts down, the firmware boot environment prompt appears.
Note: For more information about the firmware boot environment and commands, see the SystemAdministration Guide.
3. Enter the following command to reboot the system:
How to upgrade Data ONTAP software | 109
bye
The storage system begins the boot process.
Note: If your system does not require a firmware update, you are done.
4. If your system requires a firmware update, press Del when the memory test begins to interrupt theboot process, and then enter the following command at the firmware boot prompt:
update-flash
Note: If you are using a terminal emulation package and it does not support Del, useCtrl-Backspace instead.
The system prompts you to continue.
5. Enter the following key to continue:
y
The system updates the firmware, displays several status messages, and displays the firmwareenvironment boot prompt.
Note: If you installed a system firmware update, you might have to run the set-defaultscommand from the firmware boot prompt before rebooting your storage system.
6. Enter the following command to reboot the system using the new firmware and software:
bye
Related concepts
How to install Data ONTAP system files on page 93
Related tasks
Preparing for the upgrade on page 92
How to download Data ONTAP to systems in an active/activeconfiguration
The upgrade method you use for an active/active configuration depends on the system type and thekind of upgrade.
Next topics
Decisions to make about your active/active configuration upgrade procedure on page 111
110 | Data ONTAP 7.3 Upgrade Guide
Upgrading your active/active configuration from an earlier release familynondisruptively on page 112
Upgrading your active/active configuration within a release family nondisruptively on page 118
Upgrading your active/active configuration using the standard method on page 123
Upgrading your FAS900 series storage system in an active/active configuration using the standardmethod on page 126
Decisions to make about your active/active configuration upgrade procedureThe procedure you use to download Data ONTAP to storage systems in an active/active configurationdepends on the storage system type and the kind of upgrade—nondisruptive or standard.
Attention: Be sure to use the Upgrade Advisor tool (if it is available in your environment) to helpyou determine the upgrade procedure that is most appropriate for your system.
• Nondisruptive upgrades are most appropriate for the following circumstances:
• You are upgrading to the Data ONTAP 7.3 release family from Data ONTAP 7.1 or later or youare upgrading within the Data ONTAP 7.3 release family (for example, from Data ONTAP 7.3to 7.3.1).
• You are using RAID-DP or there is no disk firmware update associated with the software upgrade.
• High availability of storage system services is critical.
Note: If you are planning to perform a nondisruptive upgrade on a system that does not sendAutoSupport messages, you should nonetheless trigger AutoSupport notifications using theautosupport.doit option at the beginning and end of the upgrade. This allows you to preservea local copy of information about the state of your system before the upgrade.
• Standard upgrades are most appropriate when you can schedule downtime for major softwarechanges.Use standard upgrade procedures when you upgrade to the Data ONTAP 7.3 release family fromreleases earlier than Data ONTAP 7.0.6.
You might also wish to upgrade system firmware or disk firmware when you download Data ONTAP.
Related tasks
Using the Upgrade Advisor to plan your upgrade on page 23
Upgrading your active/active configuration from an earlier release familynondisruptively on page 112
Upgrading your active/active configuration within a release family nondisruptively on page 118
Upgrading your active/active configuration using the standard method on page 123
Determining whether you need a system firmware update on page 66
How to upgrade Data ONTAP software | 111
Upgrading your active/active configuration from an earlier release familynondisruptively
On some configurations you can use the nondisruptive method to upgrade your active/active configurationfrom the 7.0 and later release families without scheduling downtime for your storage system.
Before You Begin
Before initiating the nondisruptive upgrade procedure, verify that you have prepared for the upgradeby completing any prerequisite procedures. You must also ensure that you have installed Data ONTAPsoftware onto your storage system.
Steps
1. At the console of each storage system, enter the following command to copy the executables to theboot blocks of the storage system's hard disks:
download
The download command provides an acknowledgment similar to the following:
Tue Jun 19 10:03:22 GMT [download.request:notice]:Operator requested download initiateddownload: Downloading boot device............download: Downloading disks: opening Data ONTAP 7.2......................donedownload: boot blocks successfully copied to disk(s)
Then a message similar to the following appears:
Tues Jun 19 10:11:51 GMT [download.requestDone:notice]:Operator requested download completed
Note: The storage system console is unavailable until the download procedure is complete.
2. Choose the following option that describes your configuration.
Then ...If you are upgrading from ...
Go to step 3.Data ONTAP 7.2.4 or later
Trigger an AutoSupport notification by entering thefollowing command at the console of each storage systemcontroller:
options autosupport.doit starting_NDU
Any release earlier than 7.2.4, or your system isnot configured to send AutoSupport messages
This notification includes a record of the system status just prior to upgrade. It saves usefultroubleshooting information in case there is a problem with the upgrade process. This notificationis sent automatically beginning with Data ONTAP 7.2.4.
112 | Data ONTAP 7.3 Upgrade Guide
3. At the console of each storage system, enter the following command to verify that the active/activeconfiguration is enabled:
cf status
The cf status command output should be similar to the following:
Cluster enabled, systemA is up.VIA Interconnect is up (link 0 up, link 1 down).
If the output indicates that the active/active configuration is not enabled, enter the following commandto enable it:
cf enable
Then verify that the active/active configuration is reenabled by entering the cf status command.
4. At the console of each storage system, enter the following commands to compare the installedversion of system firmware with the version on the CompactFlash card:
sysconfig -a
version -b
The sysconfig command output contains an entry similar to the following:
Firmware release: 4.3_i1
The version command output contains an entry similar to the following:1:/x86/firmware/xfiler/firmware.img: Firmware 4.3.1_i2
If the version of the newly loaded firmware displayed by the version command is
• The same as the installed firmware version displayed by sysconfig, your storage system doesnot need a system firmware update.
• Later than the installed firmware displayed by sysconfig, your storage system needs a systemfirmware update.
• Earlier than the installed firmware displayed by sysconfig, do not update system firmwarewith the update_flash or update-flash command.
5. Choose the following option that describes your configuration.
Then ...If ...
Go to step 6.CIFS is not in use in system A
Enter the following command:
cifs terminate -t nn
where nn is a notification period (in minutes) appropriate for yourclients. After that period of time, proceed to step 5.
CIFS is in use in system A
How to upgrade Data ONTAP software | 113
6. At the console of system B, enter the following command:
cf takeover
This command causes system A to shut down gracefully and leaves system B in takeover mode.
Note: When system A displays the "Waiting for giveback" message, you can also halt and poweroff system A to perform maintenance procedures.
7. Choose the following option that describes your configuration.
Then ...If ...
Go to step 13.You do not need to update system firmware
Go to step 8.You need to update system firmware
8. To display the boot prompt (CFE, LOADER, or ok, depending on your storage system) at the systemA console, complete one of the following procedures:
• Press Del at the system A console when instructed after the boot sequence starts.
• When the "Waiting for giveback" message appears at the console of system A, press Ctrl-C atthe system A console.When the "Continue with boot?" message appears, enter the following command:
no
9. At the boot prompt, enter the following command:
bye
10. During the memory test, press Del to interrupt the boot process.
Note: If you have a terminal emulation package and it does not support Del, use Ctrl-Bksp instead.
The console displays the following messages:
Skipping auto-bootCompleteStartup aborted
Then the console displays the boot prompt.
11. Enter one of the following commands depending on your boot environment prompt:
Enter this commandIf your boot environment prompt is …
update_flashLOADER or CFE
update-flashok
114 | Data ONTAP 7.3 Upgrade Guide
The system prompts you to continue.
12. Enter the following key to continue:
y
The system updates the firmware, displays several status messages, and displays the boot prompt.
Note: If you installed a system firmware update on a storage system running Open Firmware(OFW), you might have to run the set-defaults command from the firmware boot promptbefore rebooting your storage system.
13. Enter the following command to reboot the system using the new firmware and software:
bye
14. Choose the option that describes your configuration.
Then when the "Waiting for giveback" message appears on the consoleof system A ...
If FCP or iSCSI ...
Enter the following command at the console of system B:
cf giveback
Is not in use in system A
Wait for at least eight minutes to allow host multipathing software tostabilize. Then enter the following command at the console of system B:
cf giveback
Is in use in system A
The command causes system A to reboot with the new system configuration—a Data ONTAPversion and any new system firmware and hardware changes—and resume normal operation as anactive/active partner.
Note: At this point in the upgrade procedure—system A is running Data ONTAP 7.2 and systemB is running an earlier Data ONTAP release family—the systems are in a state of "versionmismatch." This means that normal active/active functions such as NVRAM mirroring andautomatic takeover are not in effect. You might see error messages indicating version mismatchand mailbox format problems. This is expected behavior; it represents a temporary state in a majornondisruptive upgrade and not harmful.
Nonetheless, you should complete the upgrade procedure as quickly as possible; do not allow thetwo systems to remain in a state of version mismatch longer than necessary.
15. Choose the following option that describes your configuration.
Then ...If ...
Go to step 16.CIFS is not in use in system B
How to upgrade Data ONTAP software | 115
Then ...If ...
Enter the following command:
cifs terminate -t nn
where nn is a notification period (in minutes) appropriate for yourclients. After that period of time, proceed to step 15.
CIFS is in use in system B
16. At the console of system A, enter the following command:
cf takeover -n
You see output similar to the following:
Waiting for partner to be cleanly shutdown using the'halt' commandPress Ctrl-C to abort wait...
Note: The -n flag of the cf takeover command should only be used for major nondisruptiveupgrades. If run during a minor nondisruptive upgrade or a non-upgrade takeover, it will generatean error and quit
17. At the console of system B, enter the following command:
halt
This command causes system B to shut down cleanly, flushing file-system information in memoryto disk.
Note: When system B displays the "Waiting for giveback" message, you can also power offsystem B to perform maintenance procedures.
18. Choose the following option that describes your upgrade scenario.
Then ...If ...
Go to step 24.You do not need to update system firmware
Go to step 19.You need to update system firmware
19. To display the boot prompt at the system B console, complete one of the following procedures:
• Press Del at the system B console when instructed after the boot sequence starts.
• When the "Waiting for giveback" message appears on the console of system B, press Ctrl-C atthe system B console.When the "Continue with boot?" message appears, enter the following command:
no
20. At the boot prompt, enter the following command:
116 | Data ONTAP 7.3 Upgrade Guide
bye
21. During the memory test, press Del to interrupt the boot process
Note: If you have a terminal emulation package and it does not support Del, use Ctrl-Bksp instead.
The console displays the following messages:
Skipping auto-bootCompleteStartup aborted
Then the console displays the boot prompt .
22. Enter one of the following commands depending on your boot environment prompt:
Enter this commandIf your boot environment prompt is …
update_flashLOADER or CFE
update-flashok
The system prompts you to continue.
23. Enter the following key to continue:
y
The system updates the firmware, displays several status messages, and displays the boot prompt.
Note: If you installed a firmware update on a storage system running Open Firmware (OFW),you might have to run the set-defaults command from the firmware ok prompt before rebootingyour storage system.
24. At the console of system B, enter the following command to reboot the system using the new systemfirmware (if it was installed) and software:
bye
25. Choose the option that describes your configuration.
Then when the "Waiting for giveback" message appears on the consoleof system B ...
If FCP or iSCSI ...
Enter the following command at the console of system A:
cf giveback
Is not in use in system B
Wait for at least eight minutes to allow host multipathing software tostabilize. Then enter the following command at the console of system A:
cf giveback
Is in use in system B
How to upgrade Data ONTAP software | 117
This command causes system B to reboot with the new system configuration—a Data ONTAPversion and any sytem firmware and hardware changes—and resume normal operation as anactive/active partner.
When the reboot completes, the two active/active nodes are running the same Data ONTAP version.
26. Choose the following option that describes your configuration.
Then ...If ...
Your nondisruptive upgrade is complete.Your system is configured to send AutoSupportmessages
Trigger another AutoSupport notification by enteringthe following command at the console of each storagesystem controller:
options autosupport.doit finishing_NDU
You are upgrading from any release earlier than7.2.4, or your system is not configured to sendAutoSupport messages
This notification includes a record of the system status after upgrading. It saves useful troubleshootinginformation in case there is a problem with the upgrade process.
Related concepts
How to install Data ONTAP system files on page 93
Related tasks
Preparing for the upgrade on page 92
Upgrading your active/active configuration within a release familynondisruptively
You can use the nondisruptive method to upgrade your active/active configuration without schedulingdowntime for your storage system.
Before You Begin
Before initiating the nondisruptive upgrade procedure, prepare for the upgrade by completing anyprerequisite procedures. You must also ensure that you installed the Data ONTAP software onto yourstorage system.
Steps
1. At the console of each storage system, enter the following command to copy the executables to theboot blocks of the storage system's hard disks:
download
The download command provides an acknowledgment similar to the following:
118 | Data ONTAP 7.3 Upgrade Guide
Tue Jun 19 10:03:22 GMT [download.request:notice]:Operator requested download initiateddownload: Downloading boot device............download: Downloading disks: opening Data ONTAP 7.2.................donedownload: boot blocks successfully copied to disk(s)
Then a message similar to the following appears:
Tues Jun 19 10:11:51 GMT [download.requestDone:notice]:Operator requested download completed
Note: The storage system console is unavailable until the download procedure is complete.
2. Choose the following option that describes your configuration.
Then ...If you are upgrading from ...
Go to step 3.Data ONTAP 7.2.4 or later
Trigger an AutoSupport notification by entering thefollowing command at the console of each storage systemcontroller:
options autosupport.doit starting_NDU
Any release earlier than 7.2.4, or your system isnot configured to send AutoSupport messages
This notification includes a record of the system status just prior to upgrade. It saves usefultroubleshooting information in case there is a problem with the upgrade process. This notificationis sent automatically beginning with Data ONTAP 7.2.4.
3. At the console of each storage system, enter the following command to verify that the active/activeconfiguration is enabled:
cf status
The cf status command output should be similar to the following:
Active/active configuration enabled, system A is up.VIA Interconnect is up (link 0 up, link 1 down).
If the output says that the active/active configuration is not enabled, enter the following commandto enable it:
cf enable
Then verify that the active/active configuration is re-enabled by entering the cf status command.
4. At the console of each storage system, enter the following commands to compare the installedversion of system firmware with the version on the CompactFlash card:
sysconfig -a
version -b
How to upgrade Data ONTAP software | 119
The sysconfig command output contains an entry similar to the following:
Firmware release: 4.3_i1
The version command output contains an entry similar to the following:
If the version of the newly loaded firmware displayed by the version command is
• The same as the installed firmware version displayed by sysconfig, your storage system doesnot need a system firmware update.
• Later than the installed firmware displayed by sysconfig, your storage system needs a systemfirmware update.
• Earlier than the installed firmware displayed by sysconfig, do not update system firmwarewith the update_flash or update-flash command.
5. Choose the following option that describes your configuration.
Then ...If ...
Go to step 6.CIFS is not in use in system A
Enter the following command:
cifs terminate -t nn
where nn is a notification period (in minutes) appropriate for yourclients. After that period of time, proceed to step 5.
CIFS is in use in system A
6. At the console of system B, enter the following command:
cf takeover
This command causes system A to shut down gracefully and leaves system B in takeover mode.
Note: When system A displays the "Waiting for giveback" message, you can also halt and poweroff system A to perform maintenance procedures.
7. Choose the following option that describes your configuration.
Then ...If ...
Go to step 14.You do not need to update system firmware
Go to step 8.You need to update system firmware
8. To display the boot prompt (CFE, LOADER, or ok, depending on your storage system) at the systemA console, complete one of the following procedures:
• Press Del at the system A console when instructed after the boot sequence starts.
120 | Data ONTAP 7.3 Upgrade Guide
• When the "Waiting for giveback" message appears at the console of system A, press Ctrl-C atthe system A console.When the "Continue with boot?" message appears, enter the following command:
no
9. At the boot prompt, enter the following command:
bye
10. During the memory test, press Del to interrupt the boot process.
Note: If you have a terminal emulation package and it does not support Del, use Ctrl-Bksp instead.
The console displays the following messages:
Skipping auto-bootCompleteStartup aborted
Then the console displays the boot prompt (CFE, LOADER, or ok).
11. Enter one of the following commands depending on your boot environment prompt:
Enter this commandIf your boot environment prompt is …
update_flashLOADER or CFE
update-flashok
The system prompts you to continue.
12. Enter the following key to continue:
y
The system updates the firmware, displays several status messages, and displays the boot prompt.
Note: If you installed a system firmware update on a storage system running Open Firmware(OFW), you might have to run the set-defaults command from the firmware boot promptbefore rebooting your storage system.
13. Enter the following command to reboot the system using the new firmware and software:
bye
14. Choose the option that describes your configuration.
Then ...If ...
Go to step 16.CIFS is not in use in system A
How to upgrade Data ONTAP software | 121
Then ...If ...
Enter the following command:
cifs terminate -t nn
where nn is a notification period (in minutes) appropriate for yourclients. After that period of time, proceed to step 15.
CIFS is in use in system A
15. Choose the option that describes your configuration.
Then when the "Waiting for giveback" message appears on the console ofsystem A ...
If FCP or iSCSI ...
Enter the following command at the console of system B:
cf giveback
The command causes system A to reboot with the new system configuration—aData ONTAP version or other system firmware and hardware changes—and resumenormal operation as an active/active partner.
Is not in use in systemA
Wait for at least eight minutes to allow host multipathing software to stabilize. Thenenter the following command at the console of system B:
cf giveback
This command causes system A to reboot with the new system configuration—aData ONTAP version or other system firmware and hardware changes—and resumenormal operation as an active/active partner.
Is in use in system A
16. Choose the following option that describes your configuration.
Then ...If FCP or iSCSI ...
Repeat step 4 through step 15 to update the partner storage system; in otherwords, bring down and update system B with partner A in takeover mode.
Is not in use in system A
After system A resumes normal operation as an active/active partner, wait forat least eight minutes to allow host multipathing software to stabilize. Thenrepeat step 4 through step 15 to update the partner storage system; in otherwords, bring down and update system B with system A in takeover mode.
Is in use in system A
17. Choose the following option that describes your configuration.
Then ...If ...
Your nondisruptive upgrade is complete.Your system is configured to send AutoSupportmessages
122 | Data ONTAP 7.3 Upgrade Guide
Then ...If ...
Trigger another AutoSupport notification by enteringthe following command at the console of each storagesystem controller:
options autosupport.doit finishing_NDU
You are upgrading from any release earlier than7.2.4, or your system is not configured to sendAutoSupport messages
This notification includes a record of the system status after upgrading. It saves useful troubleshootinginformation in case there is a problem with the upgrade process.
Related concepts
How to install Data ONTAP system files on page 93
Related tasks
Preparing for the upgrade on page 92
Upgrading your active/active configuration using the standard methodUse this procedure to upgrade Data ONTAP on FAS270c, FAS2000 series, FAS30xx series,FAS3140/FAS3170, FAS6000 series, or SA systems in an active/active configuration using the standardupgrade procedure.
Before You Begin
Before initiating the standard upgrade procedure, prepare for the upgrade by completing any prerequisiteprocedures. You must also ensure that you installed the Data ONTAP software onto the storage systemsystem.
Steps
1. Disable the active/active configuration by entering the following command at the console of one ofthe storage systems:
cf disable
2. Enter the following command on each node of your storage system in an active/active configuration:
download
The download command copies the executables to the boot blocks of the storage system's harddisks and provides a status message similar to the following:
download: Depending on system load, it might take manydownload: minutes to complete this operation. Until itdownload: finishes, you will not be able to use thedownload: console. You can cancel this operation bydownload: hitting Ctrl-C in the next 6 seconds.
Note: If your system does not require a firmware update, continue to step 8.
7. Enter the following key to continue:
y
The system updates the firmware, displays several status messages, and displays the boot loaderprompt.
8. At the boot loader prompt, enter the following command to reboot the system using the new softwareand, if applicable, the new firmware:
bye
9. While the active/active configuration is disabled, repeat step 4 through step 8 at the storage systemconsole of the partner storage system.
Attention: Do not proceed to step 10 until both storage systems in the active/active configurationhave been rebooted with the new version of Data ONTAP.
10. Reenable the active/active configuration by entering the following command on one of the storagesystems:
cf enable
11. Update the disk firmware by entering the following command first at the console of one of thestorage systems in an active/active configuration and then at the console of the partner storagesystem:
disk_fw_update
Related concepts
How to install Data ONTAP system files on page 93
How to upgrade Data ONTAP software | 125
Related tasks
Preparing for the upgrade on page 92
Upgrading your FAS900 series storage system in an active/active configurationusing the standard method
Use this procedure only if you are upgrading a FAS900 series system in an active/active configurationusing the standard method.
Before You Begin
Before initiating the standard upgrade procedure, prepare for the upgrade by completing any prerequisiteprocedures. You must also ensure that you installed the Data ONTAP software onto the storage system.
Steps
1. Disable the active/active configuration by entering the following command at the console of one ofthe storage systems:
cf disable
2. Enter the following command on each node of your storage system in an active/active configuration:
download
The download command copies the executables to the boot blocks of the storage system's harddisks and provides a status message similar to the following:
Tue Jun 19 10:03:22 GMT [download.request:notice]:Operator requested download initiateddownload: Downloading boot device .........download: Downloading disks: opening Data ONTAP 7.2..............................donedownload: boot blocks successfully copied to disk(s)
If the version of the newly loaded firmware displayed by the version command is
• The same as the installed firmware version displayed by sysconfig, your storage system doesnot need a system firmware update.
• Later than the installed firmware displayed by sysconfig, your storage system needs a systemfirmware update.
• Earlier than the installed firmware displayed by sysconfig, do not update system firmwarewith the update-flash command.
4. Enter the following command to shut down the storage system:
halt
After the storage system shuts down, the firmware prompt appears.
5. Enter the following command:
bye
6. During the memory test, press Del to interrupt the boot process.
Note: If you have a terminal emulation package and it does not support Del, use Ctrl-Bksp instead.
The console displays the following messages:
Skipping auto-bootCompleteStartup aborted
Then the console displays the firmware prompt.
7. Choose the following option that describes your configuration.
Then ...If ...
Go to step 10.You do not need to update system firmware
Go to step 8.You need to update system firmware
8. At the firmware prompt, enter the following command:
update-flash
The system prompts you to continue.
9. Enter the following key to continue:
y
How to upgrade Data ONTAP software | 127
The system updates the firmware, displays several status messages, and displays the firmwareprompt.
Note: If you installed a system firmware update, you might have to run the set-defaultscommand from the firmware prompt before rebooting your storage system.
10. At the boot loader prompt, enter the following command to reboot the system using the new softwareand, if applicable, the new firmware:
bye
11. While the active/active configuration is disabled, repeat steps 2 through step 10 at the storage systemconsole of the partner storage system.
Attention: Do not proceed to step 12 until both storage systems in the active/active configurationhave been rebooted with the new version of Data ONTAP.
12. Choose the following option that describes your configuration.
Then ...If a Troika card ...
Reenable the active/active configuration by entering the followingcommand on one of the storage systems:
cf enable
Is not used as the active/activeconfiguration interconnect
Wait for the console to display theTroika firmare download completeandResetting Troika NICmessages. Then reenable the active/active configuration by enteringthe following command on one of the storage systems:
cf enable
Is used as the storage systeminterconnect
13. Update the disk firmware by entering the following command first at the console of one of thestorage systems in an active/active configuration and then at the console of the partner storagesystem:
disk_fw_update
Related concepts
How to install Data ONTAP system files on page 93
Related tasks
Preparing for the upgrade on page 92
128 | Data ONTAP 7.3 Upgrade Guide
Guidelines for reverting to a previous release
You should contact technical support if you need to revert to a previous release of Data ONTAP.
EmailFAXTelephone
[email protected]+1-(408)-822-4501For US customers:+1-(888)-463-8277
[email protected]+1-(408)-822-4501For international customers: +1(408)-822-6000
Note: In some cases, you cannot revert to an earlier version of Data ONTAP.
Next topics
Why there might be issues on page 129
General guidelines for reverting from the Data ONTAP 7.3 release family on page 130
Decisions to make before reverting to Data ONTAP 7.2 on page 131
Decisions to make before reverting to Data ONTAP 7.1 on page 133
Decisions to make before reverting to Data ONTAP 7.0 on page 133
Decisions to make before reverting to Data ONTAP 6.5 on page 134
Why there might be issuesBefore you revert to a previous release of Data ONTAP, you must understand and resolve any reversionissues.
You might encounter issues if you upgrade and then decide to revert to a previous version of DataONTAP, because features introduced in a new release might be incompatible with features of theprevious release. This is especially true if you are reverting to a release earlier than the immediatelyprevious Data ONTAP release family.
For example, if you are reverting to a release in the Data ONTAP 7.0 family from a release in the 7.2family, you must review and resolve reversion issues associated with the 7.0 and 7.1 release families(but not 6.5 or earlier) before reverting from the release in the 7.2 release family.
Guidelines for reverting to a previous release | 129
General guidelines for reverting from the Data ONTAP 7.3release family
You must follow some guidelines before you revert to a previous Data ONTAP version.
The following guidelines apply when you plan to revert from the 7.3 release family to an earlier version:
• You must disable any 7.3 release family features before reverting.
• You cannot directly revert to a release earlier than Data ONTAP 7.1.To revert the storage system to an earlier release of Data ONTAP, you must first revert to a DataONTAP 7.1 family release and then revert to an earlier version.
• You cannot revert if an upgrade is in progress. You must complete the upgrade before reverting.
• Before reverting to an earlier release family, you must delete any Snapshot copies made on DataONTAP release families later than the target release.You can keep the Snapshot data, but you need to reinitialize all your SnapVault relationships.
• If you are reverting on storage systems that are running SnapMirror software, you must revert thesystems that have SnapMirror source volumes before you revert the systems that have SnapMirrordestination volumes.This requirement applies to both asynchronous and synchronous SnapMirror for volume replication.It does not apply to SnapMirror for qtree replication.
Note: Before reverting a storage system with SnapMirror source volumes, you must also disableany features not supported in the earlier release. This means that after reverting, you will no longerbe able to mirror certain volumes or their contents to the destination storage system, even if thedestination storage system supports that feature.
For example, you must disable FlexVol volumes before reverting a SnapMirror source system toa release earlier than Data ONTAP 7.0. Although mirrored FlexVol volumes continue to exist onthe destination system after the source system has been reverted, you cannot resynchronize themirrored FlexVol volume on the destination system.
• In some cases, the file system identifiers (FSIDs) of volumes on your storage system are rewrittenduring a revert to be compatible with the version to which you are reverting. Volumes with FSIDsthat were rewritten need to be remounted.
• FlexVol volumes must be online before reverting.If you are reverting to an earlier Data ONTAP release that supports FlexVol volumes, you cannotcomplete the reversion if there are FlexVol volumes in an offline or restricted state. You must bringthese volumes online or destroy them before continuing with the reversion process.
Note: Space guarantees are honored only for online volumes. If you take a volume offline, anycommitted but unused space for that volume becomes available for other volumes in that aggregate.When you bring that volume back online, there might not be sufficient available space in theaggregate to fulfill its space guarantees.
130 | Data ONTAP 7.3 Upgrade Guide
For more information about space guarantees, see the Storage Management Guide.
• Space guarantees do not persist through reversions to earlier Data ONTAP software versions thatsupport FlexVol volumes. When you revert to an earlier release, writes to a specified FlexVol volumeor writes to files with space reservations enabled could fail if there is not sufficient space in theaggregate.For more information about space guarantees, see the Storage Management Guide.
Related tasks
Using the Upgrade Advisor to plan your upgrade on page 23
Decisions to make before reverting to Data ONTAP 7.2You must understand and resolve issues before you revert to the Data ONTAP 7.2 release family.
Next topics
Flexcache reversion limitations on page 131
Deduplication requires additional free space in volumes after reverting on page 132
SnapMirror and SnapVault restart checkpoints deleted during reversion on page 132
SnapVault licenses might need to be removed before reverting on page 132
SnapVault restore processes must be complete before reverting on page 132
Large NFSv4 ACLs removed when reverting from Data ONTAP 7.3 on page 133
FPolicy file extension length limits on revert on page 133
Flexcache reversion limitationsIf your storage system has FlexCache volumes, you must ensure that the appropriate license is installedafter reverting to a supported release.
FlexCache configurations in Data ONTAP 7.3 and later releases require the new flexcache_nfs license.If you revert to Data ONTAP 7.2.4 or later, the new flexcache_nfs license remains valid. However, ifyou revert to a Data ONTAP release earlier than 7.2.4, you will not be able to access data in FlexCachevolumes unless the old flex_cache license is enabled.
The following Data ONTAP releases support FlexCache volumes:
• 7.3 release family; all releases
• 7.2 release family; Data ONTAP 7.2.1 and later (7.2.4 and later is recommended)
• 7.0 release family; Data ONTAP 7.0.1 and later
Attention: If you need FlexCache, do not revert to any release earlier than 7.2.1 in the 7.2 releasefamily, or to any release in the Data ONTAP 7.1 release family. You will not be able to access dataon FlexCache volumes after reverting to any of these releases.
Guidelines for reverting to a previous release | 131
Deduplication requires additional free space in volumes after revertingIf you use deduplication, you must ensure that there is adequate free space in the deduplicated volumesand reenable deduplication after reverting to a Data ONTAP 7.2.x release.
In Data ONTAP 7.3 and later releases, the deduplication fingerprint database for a volume is stored inthe the containing aggregate. When you revert to an earlier supported release, you must ensure there isat least 3 percent of total data usage that is available for the database in deduplicated volumes. Ifsufficient space is not available in the volume, it is not possible to deduplicate new blocks with onesthat existed before the reversion.
For example, if a FlexVol volume has 5 TB of data (1 TB is physical usage and 4 TB is deduplicationsavings), 150 GB (3 percent of 5 TB) must be available after the upgrade. After ensuring that this spaceis available, you must run the sis start -s command on every deduplicated volume to rebuild thefingerprint database and reenable deduplication.
For more information about deduplication, see the Data ONTAP Data Protection Online Backup andRecovery Guide.
SnapMirror and SnapVault restart checkpoints deleted during reversionStarting with Data ONTAP 7.3, when you revert from Data ONTAP 7.3 to an earlier version, all abortedqtree SnapMirror and SnapVault transfers with restart checkpoints will restart from the beginningbecause all restart checkpoints will be deleted during the reversion process.
SnapVault licenses might need to be removed before revertingBeginning with Data ONTAP 7.3, you can enable both primary and secondary licenses for SnapVaulton the same active/active system node or on a single-node system. However, if both primary andsecondary licenses are installed on the same storage system, be aware that SnapVault will stop functioningafter reverting to a Data ONTAP release earlier that 7.3. To continue using SnapVault, you must removeone of the two licenses before reverting.
SnapVault restore processes must be complete before revertingIf you are running SnapVault on Data ONTAP 7.3 or later, you must ensure that any SnapVault restoreprocess has completed before reverting to a Data ONTAP release earlier than 7.3. If a SnapVault restoreprocess is detected, the revert operation will not be allowed to proceed.
To ensure that no restore process is running, enter the following command on the SnapVault secondarystorage system:
snapvault abort -h
The snapvault abort process should be allowed to complete before initiating the revert procedure.
Note: The SnapVault restore process cannot be restarted after reverting. If an ongoing SnapVaultrestore process is critical, allow it to complete before initiating the revert process.
132 | Data ONTAP 7.3 Upgrade Guide
Large NFSv4 ACLs removed when reverting from Data ONTAP 7.3Beginning with Data ONTAP 7.3, the number of Access Control Entries (ACEs) in an Access ControlList (ACL) is increased from 192 to 400. If you revert to a release earlier than 7.3, any NFSv4 ACLswith more than 192 ACEs will be removed. Files and directories that were created with any of the largeACLs will not have their permissions changed (mode bits are preserved).
Note: If you revert a SnapMirror source system where large NFSv4 ACLs were set on mirrored filesor directories, the corresponding files and directories on the destination system will have restrictiveACLs set, which allow only the owner to access them. For more information about revertingSnapMirror systems, see the general guidelines for reverting.
Related concepts
General guidelines for reverting from the Data ONTAP 7.3 release family on page 130
FPolicy file extension length limits on revertStarting with Data ONTAP 7.3, the file name extension length supported by FPolicy for file screeningis increased to 260 characters. However, if you added longer extensions to the list of extensions to bescreened in Data ONTAP 7.3 and you then revert to an earlier version, the file names with the longextensions will not be screened by FPolicy after reverting. It is recommended that you check yourFPolicy extension list before reverting.
Decisions to make before reverting to Data ONTAP 7.1You must understand and resolve issues before you revert to the Data ONTAP 7.1 release family.
Related concepts
Upgrade requirements for SnapMirror on page 37
FlexVol volumes and data cannot be reverted on page 135
Volumes in excess of 200 must be destroyed before reverting to Data ONTAP7.1.x or earlier.
Data ONTAP 7.2 introduced support for up to 500 FlexVol volumes. If you are reverting to any releaseearlier than Data ONTAP 7.2 and there are more than 200 volumes in your system, you must destroysome of the volumes to bring the number of volumes to 200 or fewer.
Decisions to make before reverting to Data ONTAP 7.0You must understand and resolve issues before you revert to the Data ONTAP 7.0 release family.
Guidelines for reverting to a previous release | 133
Next topics
Reversion cannot take place during I2P initialization on page 134
Reversion to Data ONTAP 7.0.x removes root from administrator group on page 134
Reversion cannot take place during I2P initializationWhen you upgrade to Data ONTAP 7.1 or later, Inode To Pathname (I2P) information is written toeach existing volume. You cannot revert to an earlier release while the system is being scanned toinitialize I2P.
Considerations
You must do one of the following before proceeding with the reversion:
• Wait until the I2P scan completes.An I2P scan can take many hours, depending on the number of inodes and volumes on your system.
• Abort the I2P scan.
Note: Because any I2P information is removed during a reversion, reverting to an earlier releasecan take several hours, depending on the number of inodes and volumes on your system, andwhether the I2P scan completed.
To abort the I2P scan, complete the following for every volume on the storage system:
Step
1. Enter the following command:
vol options vol_name no_i2p on
Inode to pathname translation is disabled immediately and the reversion can proceed.
Reversion to Data ONTAP 7.0.x removes root from administrator groupReverting from the current release to the Data ONTAP 7.0 release family causes the root account to bedeleted from the Administrator group.
After you complete the revert, see the Data ONTAP System Administrators Guide for information abouthow to add the root account back to the Administrator group.
Decisions to make before reverting to Data ONTAP 6.5You must understand and resolve issues before you revert to the Data ONTAP 6.5 release family.
134 | Data ONTAP 7.3 Upgrade Guide
Next topics
Flexible root volumes cannot be reverted on page 135
FlexVol volumes and data cannot be reverted on page 135
FlexCache volumes cannot be reverted on page 135
Full administrative access privileges after reversion on page 135
Changes to vol status and aggr status command output after reversion on page 136
SSL must be reenabled after reversion on page 136
Connections requiring SMB signing not available after reversion on page 136
Connections requiring LDAP signing not available after reversion on page 137
Storage system domain accounts must be recreated after reverting to releases earlier than DataONTAP 6.5.3 on page 137
Flexible root volumes cannot be revertedIf you created a flexible root volume in Data ONTAP 7.0 or later, you must convert it to a traditionalroot volume and destroy the FlexVol volume and any aggregate that contains it before reverting to anearlier release.
For information about changing the root volume to a traditional volume, see the System AdministrationGuide.
Note: The reversion procedure will not allow you to proceed while there are FlexVol volumes,including clones, on the system.
FlexVol volumes and data cannot be revertedIf you created and populated FlexVol volumes in Data ONTAP 7.0 or later, you must migrate the datato traditional volumes, and destroy the FlexVol volumes, any clones of FlexVol volumes (any FlexClonevolumes), and any aggregates containing those volumes before you revert to an earlier release.
For information about migrating data between volume types, see the Storage Management Guide.
Note: The reversion procedure will not allow you to proceed while there are FlexVol volumes orFlexClone volumes on the system.
FlexCache volumes cannot be revertedIf you created a FlexCache volume in Data ONTAP 7.0.1 or later, you must destroy it before revertingto an earlier release.
For information about FlexCache volumes, see the Storage Management Guide.
Full administrative access privileges after reversionIf you created user accounts in Data ONTAP 7.0 or later with groups, roles, and capabilities, theirspecific privilege levels will not be preserved if you revert to an earlier release. The user accounts and
Guidelines for reverting to a previous release | 135
names will be preserved during the reversion, but each account will have full privileges in the earlierrelease.
Changes to vol status and aggr status command output after reversionThe vol status command has been modified in the Data ONTAP 7.0 and later release families todistinguish between flexible and traditional volumes. If you created scripts for Data ONTAP 7.0 orlater that rely on vol status command output, the scripts might not work when you revert to anearlier release.
Specifically, the Status field in Data ONTAP 7.0 or later includes comma-separated entries that indicatevolume type, but in earlier releases the entries are not comma-separated and do not contain volumetype information.
Similarly, if you created scripts for Data ONTAP 7.0 or later that rely on aggr status commandoutput, these scripts must be rewritten to support pre-7.0 vol status command output.
For more information about the vol status command and output, see the vol (1) man page.
SSL must be reenabled after reversionIf you installed and licensed the SecureAdmin product with an earlier Data ONTAP release, yourexisting SSL (Secure Socket Layer) protocol certificates are converted when you upgrade to DataONTAP 7.0 or later and copies of the old certificates are preserved.
If you then revert to a release of Data ONTAP earlier than 7.0, you can continue to use the old SSLcertificates as before; the new certificates are no longer valid after reversion. However, you mustreenable SSL after the reversion for the old certificates to take effect. For more information about SSLand SecureAdmin, see your SecureAdmin documentation.
Note: If you want to continue using SecureAdmin with SSL after reverting to an earlier Data ONTAPrelease, you must have the SecureAdmin product installed and licensed on your system. For moreinformation about SecureAdmin, see the SecureAdmin Administrator's Guide .
Connections requiring SMB signing not available after reversionSMB signing support was introduced in Data ONTAP 7.0.1. If any clients have been configured torequire SMB signing (security signatures) and you revert your storage system to a Data ONTAP releaseearlier than 7.0.1, the clients will refuse to connect to the storage system after reverting.
In addition, if your storage system authenticates with a Windows Domain Controller that requires SMBsigning and you revert to a Data ONTAP release earlier than 7.0.1, you cannot connect to the DomainController after reverting.
For more information about SMB signing, see the File Access and Protocols Management Guide.
136 | Data ONTAP 7.3 Upgrade Guide
Connections requiring LDAP signing not available after reversionLDAP signing support was introduced in Data ONTAP 7.0.1. If your storage system communicateswith a Windows Domain Controller that requires LDAP signing and you revert to an earlier DataONTAP release, you cannot connect to the Domain Controller after reverting.
For more information about LDAP signing, see the File Access and Protocols Management Guide.
Storage system domain accounts must be recreated after reverting to releasesearlier than Data ONTAP 6.5.3
Data ONTAP 6.5.3 and later releases correct a problem with storage system domain accounts, the ActiveDirectory domain accounts created for your storage system. If you create a storage system domainaccount and then revert to a Data ONTAP release earlier than 6.5.3, you must run CIFS setup after thereversion to recreate the storage system domain account.
For more information about creating storage system domain accounts, see the Software Setup Guidefor the Data ONTAP release to which you are reverting.
Guidelines for reverting to a previous release | 137
Optimizing service availability during upgrades
Service availability during Data ONTAP can be optimized through planning and configuration. In manycases, upgrades can be completely nondisruptive from the clients' perspective.
Next topics
How upgrades impact service availability on page 139
Service and protocol considerations on page 140
How upgrades impact service availabilityYou can review the factors that can affect the availability of storage system services before you beginthe upgrade.
The following factors impact service availability.
• Whether the system being upgraded (upgrade host) is a single node or an active/active configurationpartnerSystems in an active/active configuration are designed to provide optimal service availability.
• The types of protocols used and services licensed, and their susceptibility to timeout errors
• Whether you need to make decisions about Data ONTAP issues and new features between or withinrelease familiesUpgrading between Data ONTAP release families involves more steps and is potentially moredisruptive than upgrades within a release family.
• Whether a system firmware update is requiredSystem firmware updates requires a system halt and reboot. This can disrupt services in singlestorage systems and standard active/active configuration upgrades but do not affect services innondisruptive active/active configuration upgrades.
• Whether disk firmware updates are required and what type of RAID protection applies to thosedisks
• The types of applications in use and their susceptibility to timeout errorsThe availability of client applications during upgrades depends on features, protocols, andconfiguration. See your application documentation for more information.
Note: All hardware and software upgrades in any storage solution are potentially at least somewhatdisruptive to storage system services. Make sure that you review upgrade options carefully to determinethe best method of upgrading for maintaining optimal service availability.
Optimizing service availability during upgrades | 139
Related conceptsUpgrade host requirements on page 27
Service and protocol considerations on page 140
Decisions to make about upgrade issues on page 40
Firmware updates on page 65
Updating disk firmware on page 71
Service and protocol considerationsIn general, services based on stateless protocols—such as NFS, FCP, and iSCSI--are less susceptibleto service interruptions during upgrades than session-oriented protocols—such as CIFS, FTP, NDMP,and HTTP.
During an upgrade, the storage system must be rebooted (by issuing the reboot command or byinitiating an active/active configuration takeover and giveback) to load the new software. Services basedon stateless protocols usually remain available during nondisruptive upgrades of systems in anactive/active configuration.
Stateless protocols usually include a timeout procedure. For example, if a message is sent and receiptis not acknowledged within a timeout period, a transmission error is assumed to have occurred. In astorage system environment, if the client's timeout period is greater than the disruption period on thestorage system (for example, the amount of time a reboot or active/active configuration giveback takes),the client does not perceive a disruption of storage system services.
In session-oriented protocols, there is no concept of timeout to protect the service from disruption. Ifsession-oriented storage system services are disrupted, state information about any operation in progressis lost and the user must restart the operation.
Next topics
Considerations for stateless protocols on page 140
Considerations for session-oriented protocols on page 141
Considerations for stateless protocolsConfigurations that include stateless protocols might exhibit unexpected behavior in the some areasduring upgrades.
Configurations that include the following are impacted.
• NFS hard mountsNo adverse behavior on the clients. Clients might receive some messages similar to the followinguntil the Storage system reboots:NFS server not responding, retrying
• NFS soft mountsYou are advised not to use soft mounts for NFS traffic.
140 | Data ONTAP 7.3 Upgrade Guide
When the host is fabric-attached to a storage system that is not in an active/active configuration,the recommended value for these parameters is 255 seconds.
• FCP, Direct AttachedNo adverse behavior on the clients if the reboot takes less than the user-configurable node and linktimeouts on the following hosts:
• For Windows 2000 hosts, the host parameters are called NodeTimeout, HLinkTimeout, andLinkTimeout.
• For Solaris hosts, the host parameter is called nodev-tmo, which is set in the/kernel/drv.lpfrc.conf file.
The recommended value for these parameters for non-multipathed FCP configuration is 255 seconds.(Check the NOW site for the latest values.)
• FCP, Fabric AttachedNo adverse behavior on the clients if the reboot takes less than the user-configurable node timeoutson the following hosts:
• For Windows 2000 hosts, the parameter is called NodeTimeout.
• For Solaris hosts, the parameter is called nodev-tmo.
When the host is fabric-attached to a storage system that is not multipathed the recommended valuefor these parameters is 255 seconds.
• iSCSIAs noted, iSCSI targets might be unavailable after upgrading to Data ONTAP 7.1.Also, clientsmight receive some messages similar to the following message, until the storage system reboots.Server not responding, retrying
For more information, see The Compatibility and Configuration Guide for FCP and iSCSI Products,on the NOW site.
Related concepts
iSCSI targets unavailable after upgrading to Data ONTAP 7.1 or later on page 49
Considerations for session-oriented protocolsStorage systems and session-oriented protocols might exhibit unexpected behavior in the followingareas during upgrades.
• Configurations that include the following are impacted.CIFSClient sessions are terminated. Inform users to end their sessions before you upgrade. To do so,issue the following command before the active/active configuration takeover:
cifs terminate -t
or issue the following command before the reboot:
reboot -t
Optimizing service availability during upgrades | 141
• FTP, NDMP, and HTTPState is lost and the client user must retry the operation.
• Backups and restoresState is lost and the client user must retry the operation.
Attention: Do not initiate a backup or restore during or immediately before an upgrade. Doingso might result in data loss.
• Applications (for example, Oracle or Exchange)Effects depend on the applications. For timeout-based applications, you might be able to changethe timeout setting to longer than the data ONTAP reboot time to minimize adverse effects.
142 | Data ONTAP 7.3 Upgrade Guide
Index
/etc/exportsautomatic editing 60
/etc/exports fileautomatic editing 55
A
active/active configurationabout upgrading 31selecting an upgrade method 111
administrative access privilegesmanaging after upgrade 57
B
BMC firmware 82
C
CIFSrequires standard upgrade 33SMB signing behavior changes 52
Cluster Configuration Checker 36
D
DAFSnot displayed in sysstat output 48transitioning to other protocols 50
Data ONTAPdownloading single systems and rebooting 107guidelines for reverting to 7.3 130preparing for the upgrade 92reverting to a previous release 129reverting to Data ONTAP 6.5 134reverting to Data ONTAP 7.0 134reverting to Data ONTAP 7.1 133reverting to Data ONTAP 7.2 131upgrade prerequisites 91upgrading an active/active configuration (standard)123, 126upgrading an active/active configuration from the 7.0and later release families (nondisruptive) 112
Data ONTAP (continued)upgrading an active/active configuration within arelease family (nondisruptive) 118version supported 25
Data ONTAP 6.5 and earlier/etc/exports file editing 60
Data ONTAP 7.0 and earlierabout volume types after upgrade 55changes to automatic editing in /etc/exports file 55changes to the vol status command output 57managing administrative access privileges 57quotas 58setting the virus scan default timeout option 59space reservation for traditional volumes 55transferring files larger than 4 TB 56, 58upgrading FC-AL adapters 53upgrading from 53user name case sensitivity 57vol command 58
Data ONTAP 7.1 and earlierchange in CIFS SMB signing default behavior 52data replication and backup transfers after upgrade 52iSCSI targets unavailable after upgrade 49space guarantees enabled on FlexClone 51transitioning DAFS to other protocols 50updating the FlexClone license 50upgrade could take longer than usual 52upgrading from 49upgrading SnapDrive for Windows versions earlierthan 3.1.1 51
Data ONTAP 7.2 and laterchange in logging for NULL RPC mountd requests 48DAFS not displayed in sysstat output 48Solaris iSCSI targets need to be reconfigured 47upgrading to 47
Data ONTAP system filescopy system files without installing 104copying and installing from CD-ROM and Windowsclient 102copying from CD-ROM 98copying the setup.exe to the HTTP server 104deleting from the /etc/software directory 107downloading and installing from NOW and Windowsclient 101
Index | 143
Data ONTAP system files (continued)downloading from NOW 97installation overview 93installation procedure for HTTP 105installation procedure for UNIX client 99installing from a UNIX client 96installing from a Windows client 99installing from an HTTP server 103installing system files that are downloaded 106installing using the software update command 94listing system files 106mapping to the client drive 100
data replication and backup, performance after upgrade 52disk firmware upgrades
about 71background 73standard 74
disk shelf firmware upgradesabout 76determining firmware versions 78manual update procedure 79service availability during 77
iSCSI hostschanging target portal group tags 63requirements for upgrading 60target portal group tags 59
iSCSI hosts (continued)upgrading 59
iSCSI servicestarting using command line 64starting using FilerView 64stopping 61
iSCSI targets unavailable after upgrade 49
M
module firmware, disk shelf 76mountd
change in logging for NULL RPC requests 48
N
nondisruptive upgradesabout 32Data ONTAP software 35disk shelf firmware, not supported 79major 33minor 33preparing 35requirements 33system firmware 67, 68using Upgrade Advisor tool 33when not to use 33
NULL RPC mountd requestschange in logging 48
Q
quotas off during upgrade 58
R
release familiesdifferentiating among 29overview 29upgrading between 30upgrading within 30
reversion issueschanges to vol status and aggr status output after 6.5reversions 136enabling SSL after 6.5 reversions 136FlexCache volumes in 6.5 reversions 135flexible root volumes in 6.5 reversions 135FlexVol vomues and data in 6.5 reversions 135full administrative access after 6.5 reversions 136
144 | Data ONTAP 7.3 Upgrade Guide
reversion issues (continued)LDAP signing connections after 6.5 reversions 137reversion during I2P initialization in 7.0 reversions134root account deleted when reverting to 7.0 134SMB signing connections after 6.5 reversions 136storage system domain accounts after 6.5 reversions137
reverting to a previous releasereverting to Data ONTAP 6.5 134reverting to Data ONTAP 7.0 134reverting to Data ONTAP 7.1 133reverting to Data ONTAP 7.2 131reverting to Data ONTAP 7.3 130technical support 129
RLM firmware 80rolling upgrade 32
S
shelf, disk 76SMB signing
behavior changes 52SnapDrive for Windows
upgrading versions earlier than 3.1.1 51SnapMirror
identifying destination volumes 38issues for systems with synchronous SnapMirror 39planning upgrades 37upgrade requirements 37upgrading for volume replication 38upgrading systems that are mirroring volumes to eachother 39
about 65availability 26determining if you need an upgrade 66nondisruptive upgrade 68obtaining 65standard firmware update procedure 70
system firmware (continued)upgrade procedures 67upgrading on single systems 67
T
target portal group tagschanging using changing using FilerView 63changing using command line 63
traditional volumesspace reservation 55
U
UNIXmounting the system 96
upgradeenabling DNS with Windows 2000 name addresses 93iSCSI host 59maintaining service 139overview 21overview of requirements 23planning 23preparing for 92required intermediate upgrades 40resolving issues 40system requirements 25verifying system domain account 93with session oriented protocols 141with stateless protocols 140
Upgrade Advisor toolabout 23use in upgrade planning 31