17
) AMANO ,iCINCINNATI ELECTRONICTIMERECORDER EX6000 SERIES
)AMANO
,i CINCINNATI
ELECTRONIC TIME RECORDER
EX 6000 SERIES
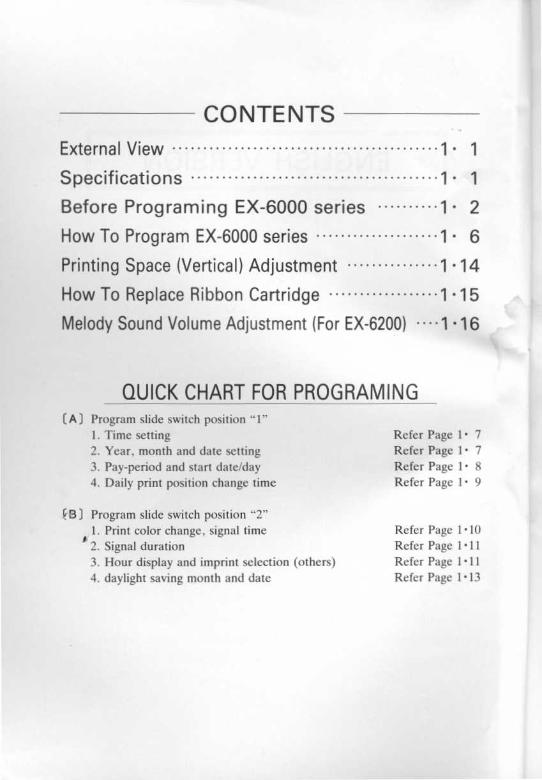
CONTENTS
External View 1 . 1
Specifications • 1Before Programing EX-6000 series1 • 2How To Program EX-6000 series1 • 6Printing Space (Vertical) Adjustment1 •1 4How To Replace Ribbon Cartridge1 •1 5Melody Sound Volume Adjustment (For EX-6200) . . . . 1 •1 6
QUICK CHART FOR PROGRAMING(A) Program slide switch position "1"
1 . Time setting Refer Page 1 . 72. Year, month and date setting Refer Page 1 . 73. Pay-period and start date/day Refer Page 1 . 84. Daily print position change time
Refer Page 1 . 9
G B) Program slide switch position "2"1 . Print color change, signal time
Refer Page 1 . 10: 2 . Signal duration Refer Page 1 . 113. Hour display and imprint selection (others) Refer Page 1 . 114. daylight saving month and date
Refer Page 1 . 13
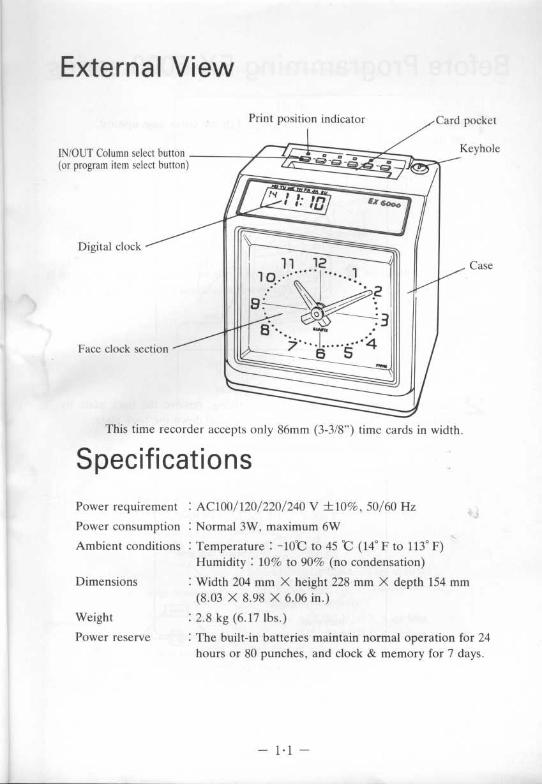
External View
IN/OUT Column select button(or program item select button)
Digital clock
Face clock section
Print position indicator
Card pocket
11 1210 . • • • • . . .
1
37 .6 . . .5 • • 4
46
This time recorder accepts only 86mm (3-3/8") time cards in width .
Specifications
Power requirement : AC100/120/220/240 V ±10%, 50/60 Hz
Power consumption : Normal 3W, maximum 6W
Ambient conditions : Temperature : -10 °C to 45 C (14 ° F to 113 ° F)Humidity : 10% to 90% (no condensation)
Dimensions
: Width 204 mm X height 228 mm X depth 154 mm(8.03 X 8.98 X 6.06 in .)
Weight
: 2.8 kg (6 .17 lbs .)
Power reserve
: The built-in batteries maintain normal operation for 24hours or 80 punches, and clock & memory for 7 days .
Keyhole
Case
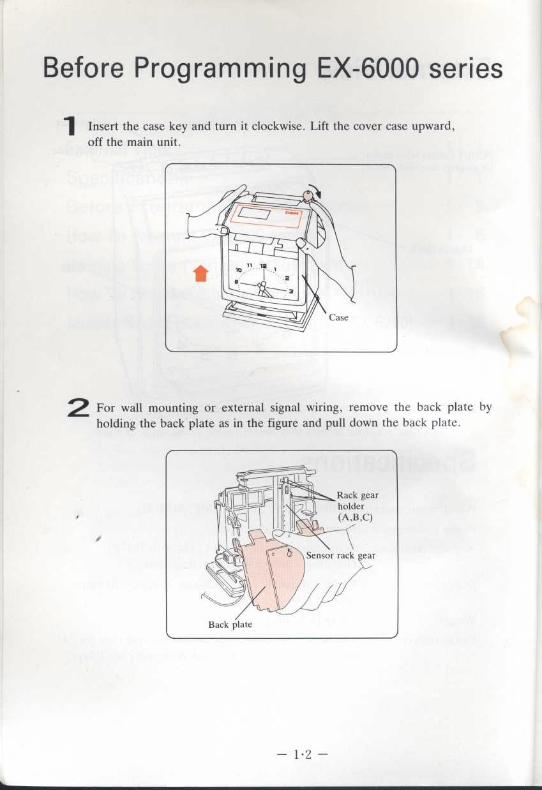
Before Programming EX-6000 series
l Insert the case key and turn it clockwise . Lift the cover case upward,off the main unit .
2 For wall mounting or external signal wiring, remove the back plate byholding the back plate as in the figure and pull down the back plate .
lid Rack gear~.
1w
holdera I
(A,B,C)
Back plate
Sensor rack gear
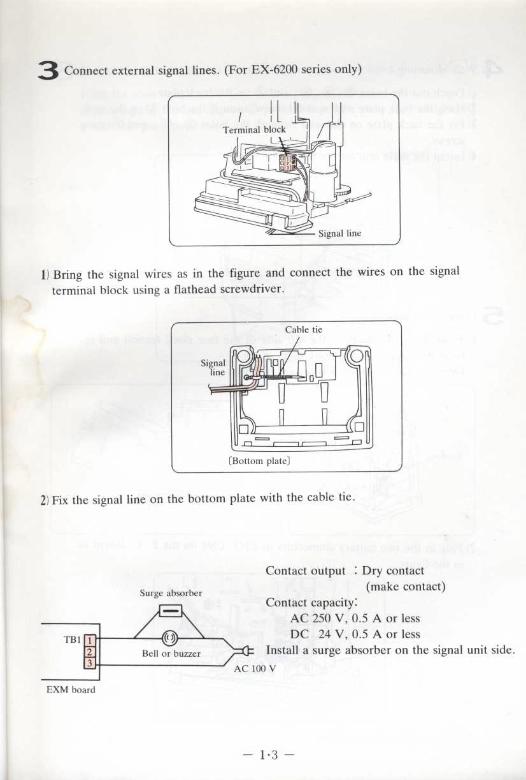
3 Connect external signal lines . (For EX-6200 series only)
Surge absorber
TBI plN
Bell
EXM board
or buzzer
1) Bring the signal wires as in the figure and connect the wires on the signal
terminal block using a flathead screwdriver .
Signalline
(Bo out pla e)
Cable tie
2) Fix the signal line on the bottom plate with the cable tie .
Contact output : Dry contact(make contact)
Contact capacity :AC 250 V, 0 .5 A or lessDC 24 V, 0.5 A or less
4
Install a surge absorber on the signal unit side .
AC 100V
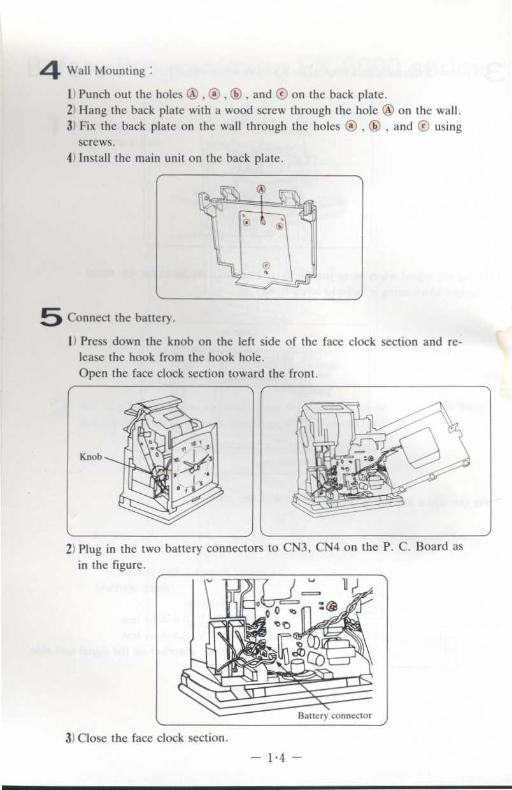
4 Wall Mounting
1) Punch out the holes (
©, and ® on the back plate .2) Hang the back plate with a wood screw through the hole ( on the wall .3) Fix the back plate on the wall through the holes ® , ® , and ® using
screws .4) Install the main unit on the back plate .
Knob
3 ) Close the face clock section .
OO
5 Connect the battery .
1) Press down the knob on the left side of the face clock section and re-lease the hook from the hook hole .Open the face clock section toward the front .
2) Plug in the two battery connectors to CN3, CN4 on the P . C. Board asin the figure .
u0
0 1 OO
u~
Battery connector
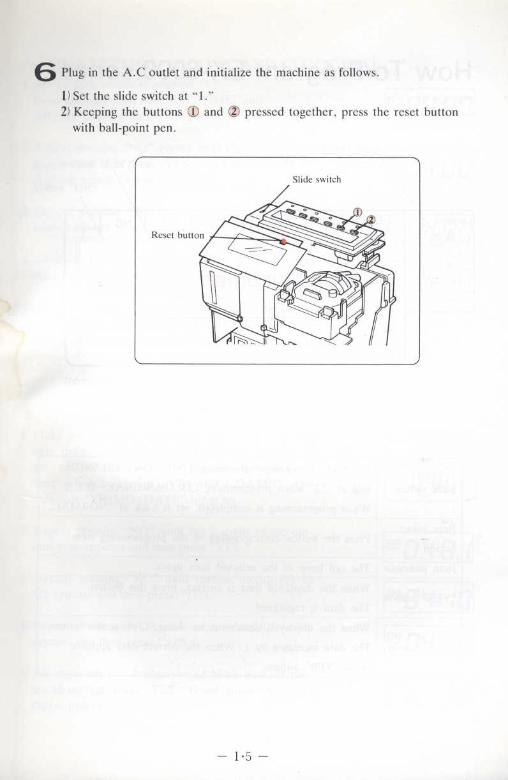
V Plug in the A.C outlet and initialize the machine as follows .
1) Set the slide switch at "1 ."2) Keeping the buttons El and (2 pressed together, press the reset button
with ball-point pen .
Slide switch

How To Program EX-6000 series
21
Slide switch
COLORSIGNAL
TIME
DURATION OTHERSYR-MO
RrJNG
Item indicator
Item select button
D .L .S .
DAY YES
"YES" button
NO
"NO" button
[EX 62001
I
Slide switchSet it at "1" when programming TIME-DAY CHANGE,and at "2" when programming COLOR/SIGNAL-D .L.S .When programming is completed, set it back at "NORMAL ."
Item selectbutton Press the button corresponding to the programming item .
Item indicator The red lamp of the selected item lights .
"YES" button When the displayed data is correct, press this button .The data is registered .
"NO" buttonWhen the displayed data must be changed, press this button .The data increases by 1 . When the correct data appears,press "YES" button .
IN0
OUT
0
IN0
OUT OU
~~ ff~
~) f ~
~l l
l
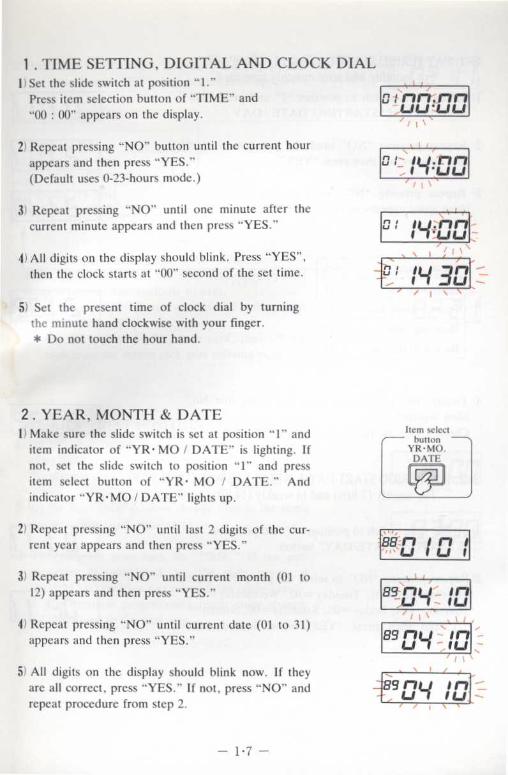
1 . TIME SETTING, DIGITAL AND CLOCK DIAL1) Set the slide switch at position "1 ."Press item selection button of "TIME" and"00 : 00" appears on the display .
2) Repeat pressing "NO" button until the current hourappears and then press "YES ."(Default uses 0-23-hours mode .)
3) Repeat pressing "NO" until one minute after thecurrent minute appears and then press "YES ."
4) All digits on the display should blink. Press "YES",then the clock starts at "00" second of the set time .
L01 I 1Ilt . rHLI LI 'LI LI
ul, I 1~ULI
u i 1~ 1171 ~_Iu
i-emu 1
nON5) Set the present time of clock dial by turning
the minute hand clockwise with your finger .* Do not touch the hour hand .
2 . YEAR, MONTH & DATE1) Make sure the slide switch is set at position "1" and Item select
item indicator of "YR • MO / DATE" is lighting . Ifnot, set the slide switch to position "1" and press
buttonYR•MO .DATE
LL01]item select button of "YR • MO / DATE ." Andindicator "YR • MO / DATE" lights up .
2) Repeat pressing "NO" until last 2 digits of the cur-rent year appears and then press "YES ."
3) Repeat pressing "NO" until current month (01 to
88 f f IP7 1
12) appears and then press "YES ." 8 :L-I1 1_ I Ll4) Repeat pressing "NO" until current date (01 to 31)
appears and then press "YES ." 88LIi _ 1L I
5) All digits on the display should blink now . If theyare all correct, press "YES ." If not, press "NO" andrepeat procedure from step 2 .
=84 i Iu
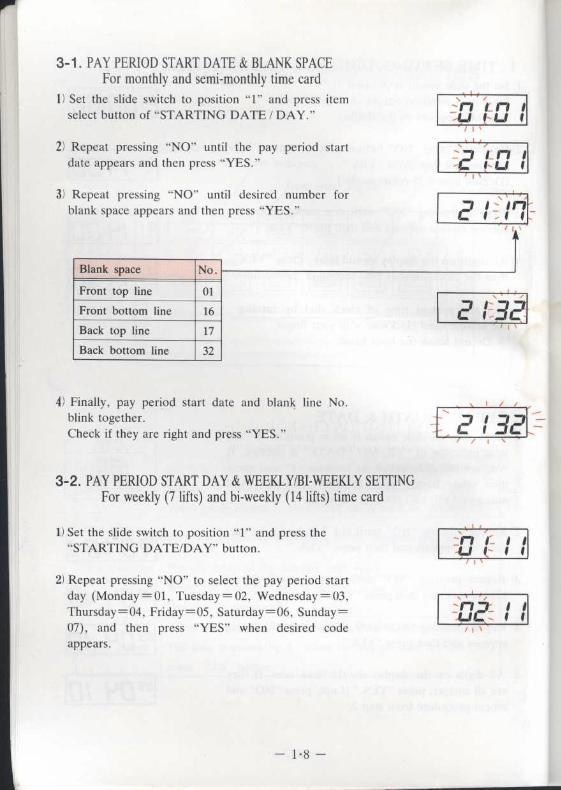
3-1 . PAY PERIOD START DATE & BLANK SPACEFor monthly and semi-monthly time card
1) Set the slide switch to position "1" and press itemselect button of "STARTING DATE / DAY ."
2) Repeat pressing "NO" until the pay period startdate appears and then press "YES ."
3) Repeat pressing "NO" until desired number forblank space appears and then press "YES ."
4) Finally, pay period start date and blank line No .blink together .Check if they are right and press "YES."
3-2 . PAY PERIOD START DAY & WEEKLY/BI-WEEKLY SETTINGFor weekly (7 lifts) and bi-weekly (14 lifts) time card
1) Set the slide switch to position "1" and press the"STARTING DATE/DAY" button .
2) Repeat pressing "NO" to select the pay period startday (Monday = 01, Tuesday = 02, Wednesday = 03,Thursday=04, Friday=05, Saturday=06, Sunday=07), and then press "YES" when desired codeappears .
-rl t rl I-s_•
f h LI I
, I ,
Lsins1 L I I
=r• l C 1 I. I ( I I
r• l~ I Ia•1C, I I
Blank space No .
Front top line 01
Front bottom line 16
Back top line 17
Back bottom line 32
3) Press the "NO" button to select the pay periodtype, then press "YES" when desired code appears .
4) Both selections will begin to blink on/off .Press "YES" to enter the date into memory andprogram moves automatically to next .Press "NO", if date is not correct and restart fromthe above 2nd step .** For Bi-weekly (14 lift) time card, peel off the
tape from the sensor rack gear refering page 2 .
4 . DAILY PRINT POSITION CHANGE TIME1) Set the slide switch at position "1" and press item
select button of "DAY CHANGE ."
The display shows "05 : 00 ."
3) The program goes back to "TIME ." If the pro-gramming is completed, set the slide switch at"NORMAL" position and reinstall the cover case .If you continue programming (print color change,etc.), proceed to the next step .
r1~ 1 1'0-11i 1
_L 12'LIl1//
v ~
2) Set the daily print position change time in the sameway as setting clock (section 1) .
_LI 1'1 1LI -~1
No .Pay period type
Weekly [7 lifts] 11
Bi-weekly [14 lifts](now in the first week)
21
Bi-weekly [14 lifts](now in the second week)
22

5 . PROGRAMMING OF COLOR CHANGE / SIGNAL / MELODY (For EX-6200 series only)
1) Set the slide switch at position "2 ."There are 20 "times" that can be programmed inthis area for an entire week .
2) Select day(s) of week . Press "YES" to select the daywhich is indicated by a blinking triangular mark,and press "NO" to skip the day .
3) When day(s) of week is set, a number appears atupper left of the display. Refer to the chart for codeNo. to select print color and/or signals .
Repeat pressing "NO" until the desired numberappears and then press "YES ."
4) Refer to chart for code No . to select melody .
No . Melody
0 (No melody output)
1
Greensleeves
2
For Elise
Repeat pressing "NO" until the desired numberappears and then press "YES ."
5) Then the display shows "00 : 00." Designate thetime in the same way as setting clock .
, MO TU WE TH FR SA SU
MO TU WE TH FR SA,SU .
MO TU WE TH FR SA SU
If time signal and melody are outputat the same time, enter "3" or "5"even if print color does not need tobe changed .Code No .0, 2, and 4 can be used foronly melody output .
MO TU WE TH FR SA SU
3
MO TU WE TH FR SA SU
3^
MO TU WE TH FR SA SU
3(
MO TU WE TH FR SA SU
No . Print color Signal
No change Not output
1 No change output
Black Not Output
Black Output
4** Red Not output
5* Red Output
6) The display goes back to step 2 . If you continue
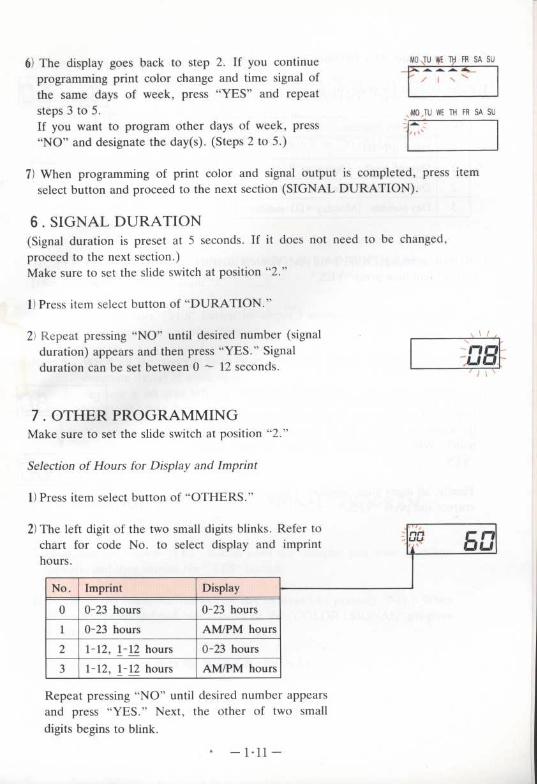
programming print color change and time signal ofthe same days of week, press "YES" and repeatsteps 3 to 5 .If you want to program other days of week, press"NO" and designate the day(s) . (Steps 2 to 5 .)
7) When programming of print color and signal output is completed, press itemselect button and proceed to the next section (SIGNAL DURATION) .
6 . SIGNAL DURATION(Signal duration is preset at 5 seconds . If it does not need to be changed,
proceed to the next section .)Make sure to set the slide switch at position "2 ."
1) Press item select button of "DURATION."
2) Repeat pressing "NO" until desired number (signal
duration) appears and then press "YES ." Signal
duration can be set between 0 - 12 seconds .
7 . OTHER PROGRAMMINGMake sure to set the slide switch at position "2 ."
Selection of Hours for Display and Imprint
1) Press item select button of "OTHERS ."
2) The left digit of the two small digits blinks . Refer to
nnchart for code No . to select display and imprint
"4'
Shours .
Repeat pressing "NO" until desired number appears
and press "YES ." Next, the other of two small
digits begins to blink .
MO BTU WE Ty FR SA SU
MO TU WE TH FR SA SU
I
IQ
No . Imprint Display
0 0-23 hours 0-23 hours
1 0-23 hours AM/PM hours
2 1-12, 1-12 hours 0-23 hours
3 1-12, 1-12 hours AM/PM hours

Selection of Date / Day Imprint
1) Refer to chart for code No . to select date or day imprint .
2) Repeat pressing "NO" until the desired numberappears and then press "YES ."
Imprint of Minutes
1) Press "NO" until desired number appears .Imprint of minutes can be selected among 60 (regu-lar minutes), 100 (1 / 100 of hour), and 10 (1 / 10 ofhour). When the desired number appears, press"YES ."
Finally, all digits blink together . Check if they arecorrect and press "YES ."
l2-T-0lot
l2
1111I LI LI ~_
No . Date/day imprint
0 Date (01-31)
1 Day of week (Japanese . A - 8 )
2 Day of week (English. MO-SU)
Day number (Monday= D1-sunday=D7)
8 . DAYLIGHT SAVINGS TIMEIn the similar way as setting date, set the month (01 12) and date thedaylight savings time starts when "0" appears at upper left . Press "YES,"then "1" appears to set ending month and date .
When programing is complete, reset the slide switch to "NORMAL" and re-place the case upon the main unit .
9 . TO REVIEW THE "COLOR / SIGNAL" PROGRAM1) Set the slide switch at position "2."
2) Press and hold down "YES" button for about 3 seconds . The programmedtimes will be displayed one after another .
Note 1 : When all the contents have been displayed, display prompts you todesignate day(s) of week again .
Note 2 : If there is no area left for "COLOR / SIGNAL," the display goesback to the first data .
10 . TO CHANGE THE "COLOR/ SIGNAL" PROGRAM1) Set the slide switch at position "2."
2) Press and hold down "YES" button until the contents you want to deleteappears, and then release the "YES" button .
3) Delete all the triangular marks (for day of week) by pressing "NO ." Whenall the marks are deleted, this content of the "COLOR / SIGNAL" programis deleted .
4) Re-input the correct data for "COLOR / SIGNAL ."

11 . PRINTING SPACE (VERTICAL) ADJUSTMENTAfter all programming is done, check the imprints if they were in theright spaces of the time card following the procedure described below .
1) Set the pay period start Month & Date by refering Year, Month, Datesetting program . Set the slide switch back to normal position and insert atime card making a sample imprint . The imprint should be in the top spaceprovided for printing of the time card .
2) Set pay-ending Month & Date by refering Year, Month, Date settingprogram. Set the slide switch back to normal position and insert the sametime card for printing . The imprint should be in the bottom space providedfor printing of the time card .
3) In case both sample imprints were out of space, the adjustment can be doneto some extent which is described below .
(a) Refering page 1 . 2, remove cover case and back plate .
(b) Locate the sensor rack gear almost in the center installed vertically .
(c) Break plastic rack gear holders (A. B. & C) at the top part of the rackgear .
(d) Set the rack gear with set screw utilizing either one of the 2 holes onthe machine body at desired position .
(e) Make sure Pay-start day imprint is at the top space and the Pay-endingday imprint is at the bottom space of the time card .
(f) Install the back plate and the cover case back to the position .

How To Replace Ribbon Cartridge
When the print becomes too light, replace the ribbon cartridge .
1) Insert the case key and turn it clockwise .Lift the case upward,off the main unit .
2) Set the slide switch at position"1 ."(The ribbon cartridge moves to the right .)
3) Pull the catches © of the cartridge towardyou and remove the ribbon cartridge .
4) Set the new ribbon cartridge .Turn the knob on the cartridge clockwiseto take up the slack in the ribbon .
5) Set the slide switch to "NORMAL" andput the case .
6) Check the printing .
Ribbon cartridge
knob
NORMAL


