26
March 2017 Employee User Guide Hour Bank Online Enrolment
March 2017
Employee User Guide Hour Bank
Online Enrolment
1
TABLE OF CONTENTS
1 OVERVIEW .......................................................................................................................................................................................... 2
2 EMPLOYEE ONLINE ENROLMENT PROCESS ...................................................................................................................................... 3
3 EMPLOYEE WEBSITE REGISTRATION/ENROLMENT INITIATION ......................................................................................................... 4
4 EMPLOYEE ONLINE ENROLMENT PROCESS ...................................................................................................................................... 5
4.1 Create Website Account ......................................................................................................................................................... 5
4.2 Enter Employee Enrolment Information .............................................................................................................................. 11
4.2.1 Enter Employee Information ............................................................................................................................................... 11
4.2.2 Complete Dependent Information ...................................................................................................................................... 13
4.2.3 Complete Beneficiary Information ...................................................................................................................................... 15
4.2.4 Complete Personal Release Information .......................................................................................................................... 17
4.2.5 Authorization and Consent ..................................................................................................................................................19
4.2.6 Submit, Print, and Sign Enrolment Form ..........................................................................................................................19
4.2.7 Send Signed Benefit Forms to Mercon Benefit Services .............................................................................................. 20
4.3 Update Employee Benefit Enrolment Information ............................................................................................................. 21
4.3.1 Update Employee Benefit Enrolment Information ..................................................................................................... 21
4.4 Common Issues & Errors ..................................................................................................................................................... 24
4.4.1 Employee Out of Benefit Range .................................................................................................................................. 24
4.4.2 Registration Issues ........................................................................................................................................................ 24
4.4.3 Incorrect Date of Birth ................................................................................................................................................... 24
5 SUPPORT AND CONTACT INFORMATION .......................................................................................................................................... 25

2
1 OVERVIEW
This User Guide is for Merit member company employees. Employees are responsible for enrolling in the Merit Contractors Association Benefit Plan.
The online enrolment self-service features are for participating Hour Bank employers and employees to provide the required enrolment information. The URL for the portal is https://www.merconbenefits.com.
To capture benefit-related information, the employee registration and enrolment process involves action by both employers and employees. When submitted, this process will integrate the information directly into the Mercon Benefit Services’ systems.
In addition to employers and employees, there are two other roles in the employee enrolment process. Those are the Mercon Benefit Services support staff and the Merit IT resources that will provide user and technical support.
3
2 EMPLOYEE ONLINE ENROLMENT PROCESS
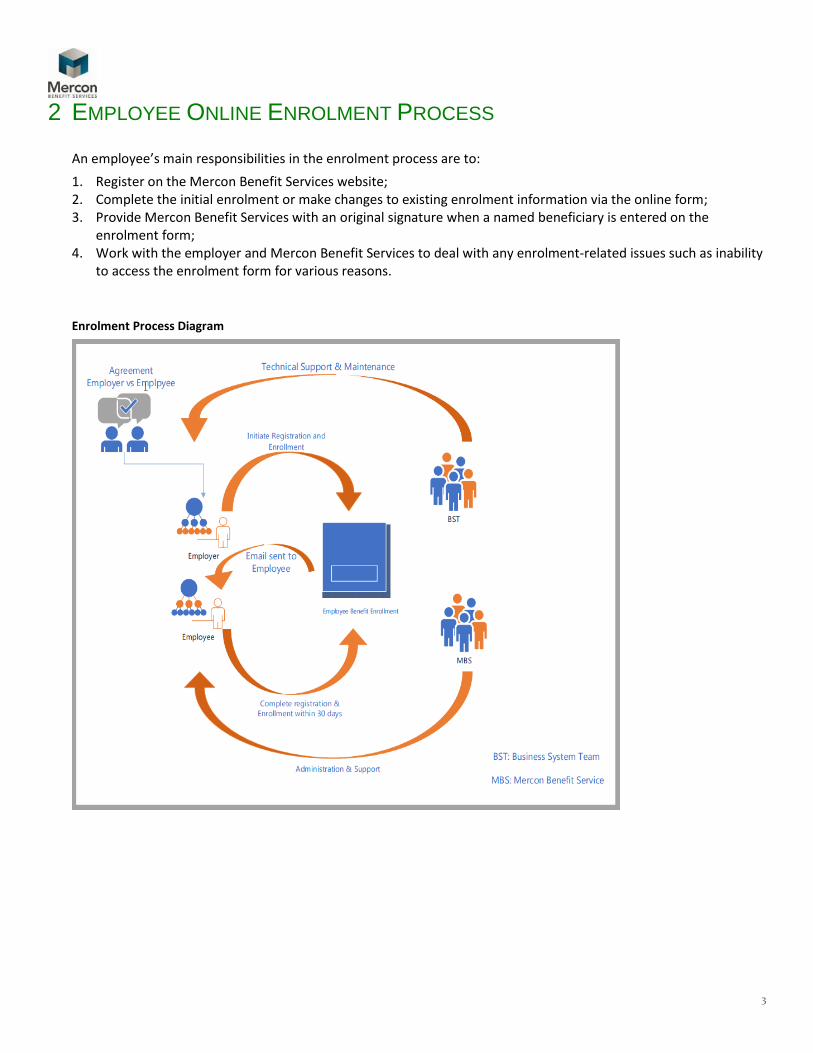
An employee’s main responsibilities in the enrolment process are to:
1. Register on the Mercon Benefit Services website;2. Complete the initial enrolment or make changes to existing enrolment information via the online form;3. Provide Mercon Benefit Services with an original signature when a named beneficiary is entered on the
enrolment form;4. Work with the employer and Mercon Benefit Services to deal with any enrolment-related issues such as inability
to access the enrolment form for various reasons.
Enrolment Process Diagram
4
3 EMPLOYEE WEBSITE REGISTRATION/ENROLMENT INITIATION
Merit employers will initiate the employee benefit registration and enrolment process via the Mercon website’s Employer Portal. This will create new accounts for new employee(s) or validate information for existing/returning employees.
The initiation process generates an email to employees requesting that they:
1. Register as a user on the Mercon Benefit Services website; and2. Proceed to the enrolment form once the registration process is complete.
5
4 EMPLOYEE ONLINE ENROLMENT PROCESS
4.1 Create Website Account
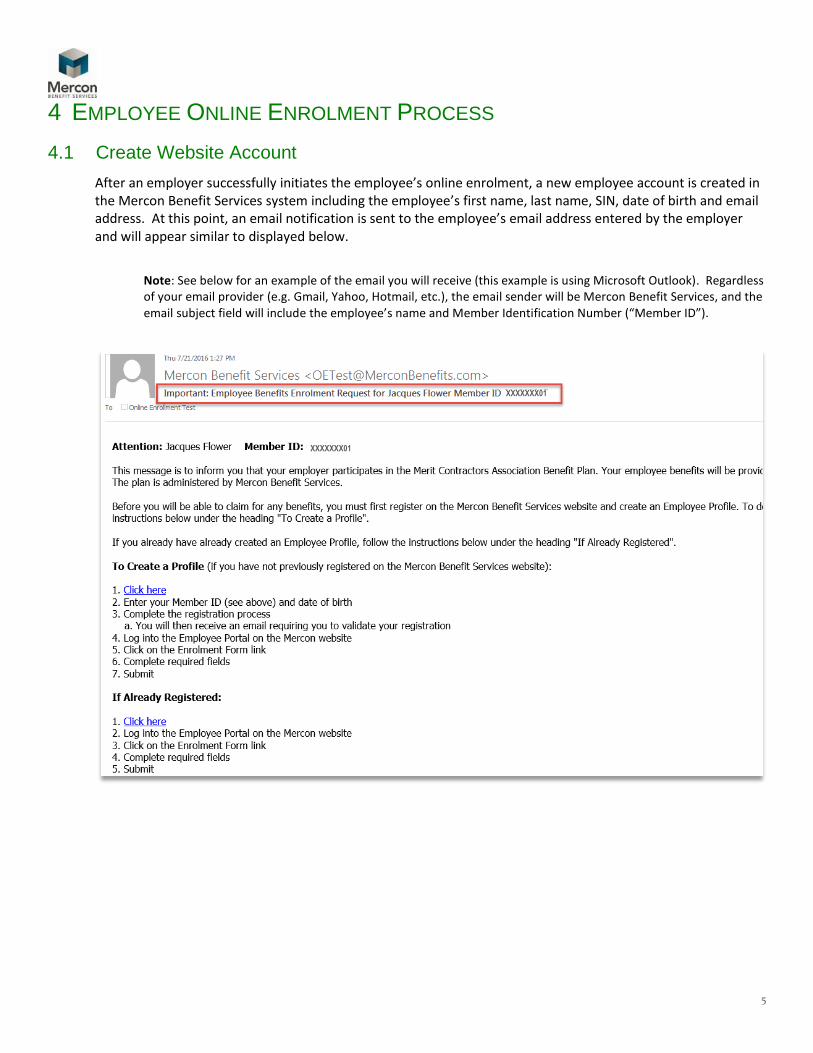
After an employer successfully initiates the employee’s online enrolment, a new employee account is created in the Mercon Benefit Services system including the employee’s first name, last name, SIN, date of birth and email address. At this point, an email notification is sent to the employee’s email address entered by the employer and will appear similar to displayed below.
Note: See below for an example of the email you will receive (this example is using Microsoft Outlook). Regardless of your email provider (e.g. Gmail, Yahoo, Hotmail, etc.), the email sender will be Mercon Benefit Services, and the email subject field will include the employee’s name and Member Identification Number (“Member ID”).
XXXXXXX01
XXXXXXX01
6
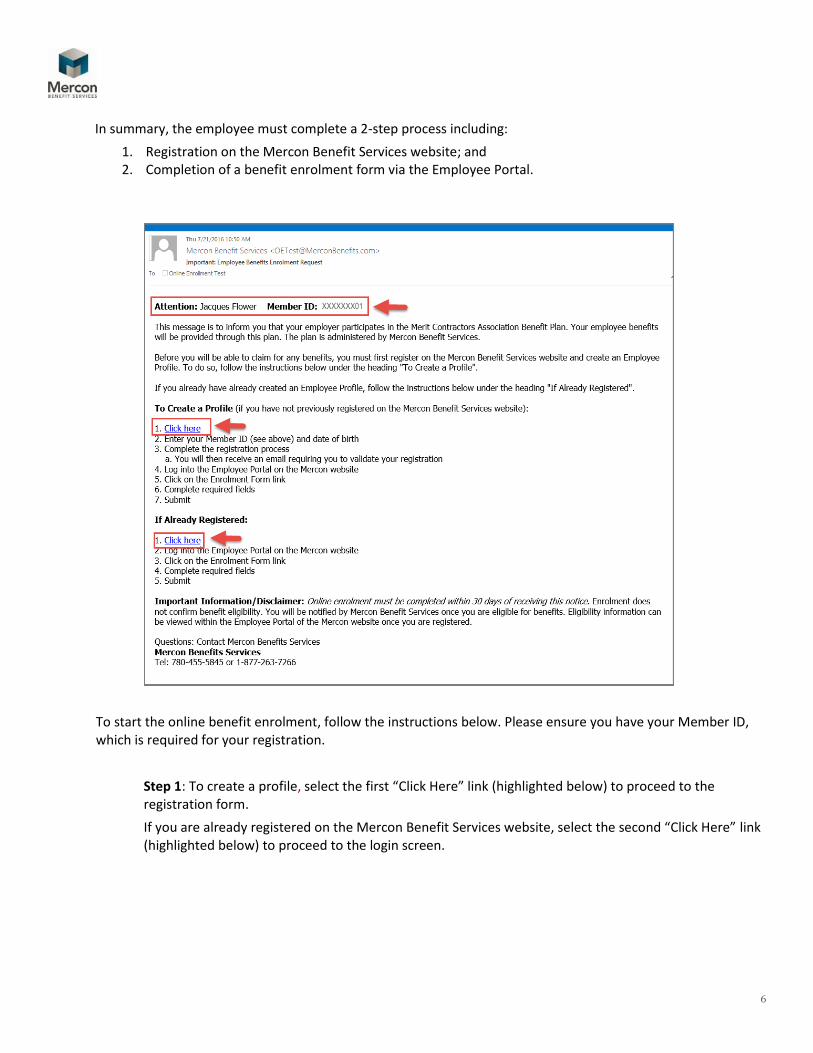
In summary, the employee must complete a 2-step process including:
1. Registration on the Mercon Benefit Services website; and2. Completion of a benefit enrolment form via the Employee Portal.
To start the online benefit enrolment, follow the instructions below. Please ensure you have your Member ID, which is required for your registration.
Step 1: To create a profile, select the first “Click Here” link (highlighted below) to proceed to the registration form.
If you are already registered on the Mercon Benefit Services website, select the second “Click Here” link (highlighted below) to proceed to the login screen.
XXXXXXX01
7
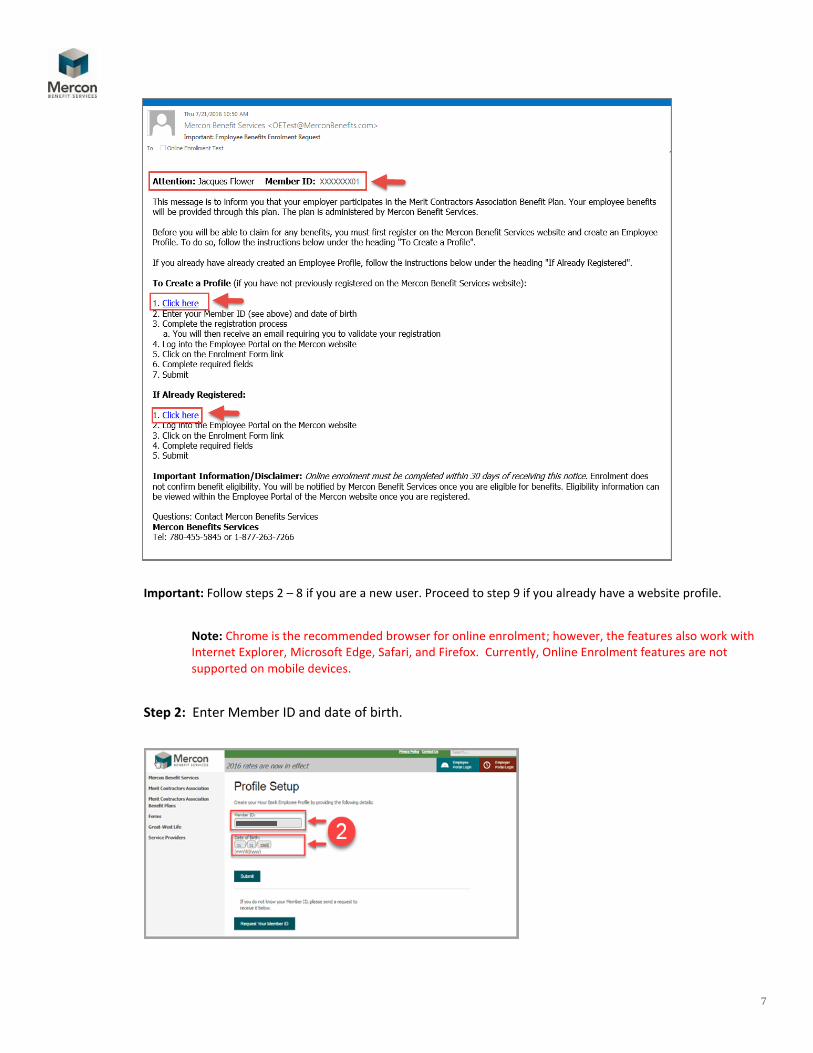
Important: Follow steps 2 – 8 if you are a new user. Proceed to step 9 if you already have a website profile.
Note: Chrome is the recommended browser for online enrolment; however, the features also work with Internet Explorer, Microsoft Edge, Safari, and Firefox. Currently, Online Enrolment features are not supported on mobile devices.
Step 2: Enter Member ID and date of birth.
8
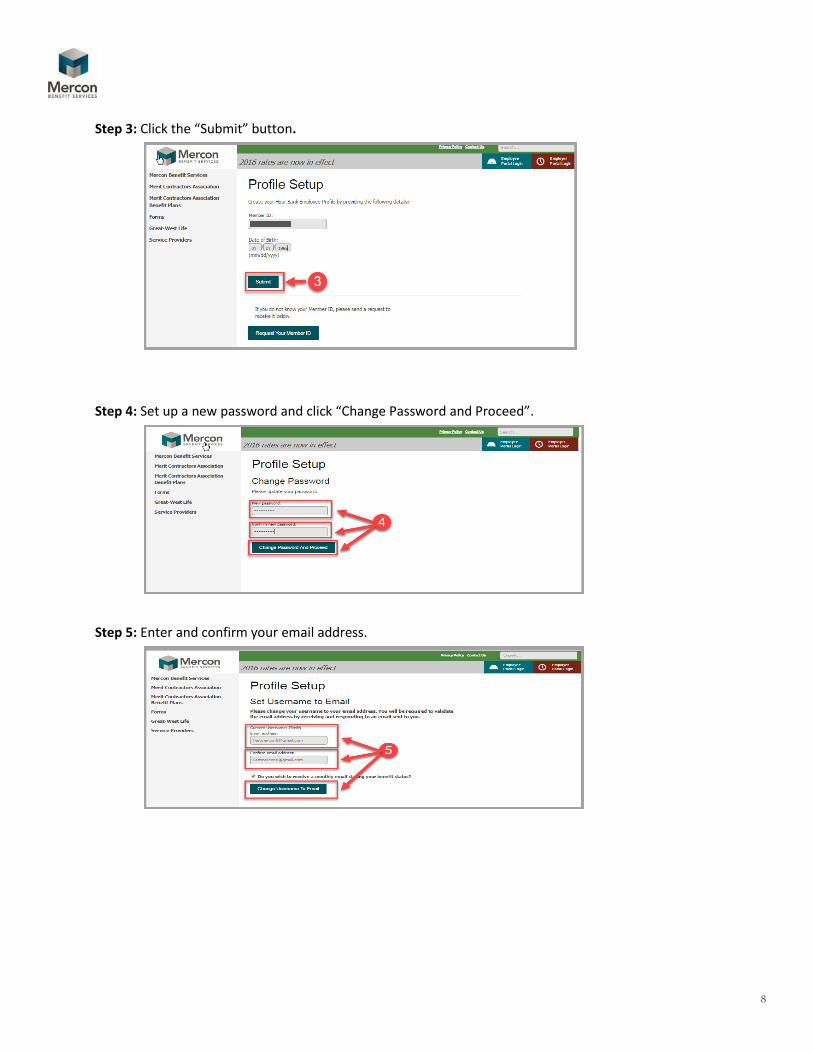
Step 3: Click the “Submit” button.
Step 4: Set up a new password and click “Change Password and Proceed”.
Step 5: Enter and confirm your email address.
9
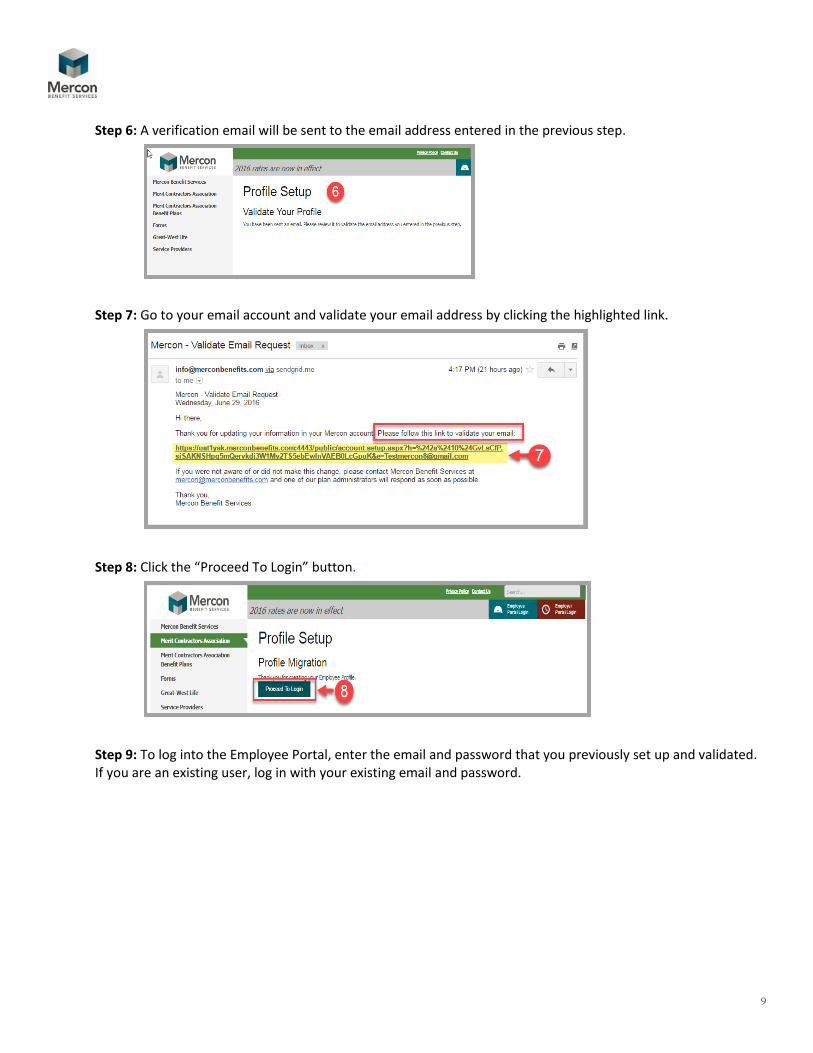
Step 6: A verification email will be sent to the email address entered in the previous step.
Step 7: Go to your email account and validate your email address by clicking the highlighted link.
Step 8: Click the “Proceed To Login” button.
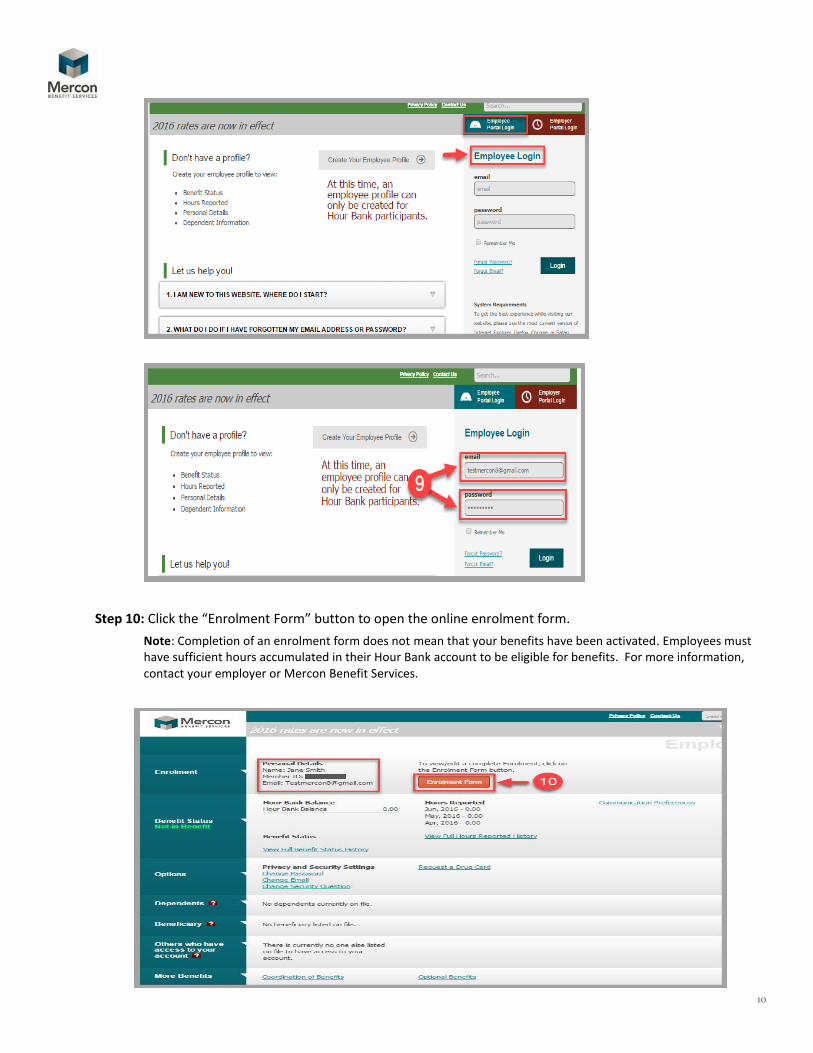
Step 9: To log into the Employee Portal, enter the email and password that you previously set up and validated. If you are an existing user, log in with your existing email and password.
10
Step 10: Click the “Enrolment Form” button to open the online enrolment form.
Note: Completion of an enrolment form does not mean that your benefits have been activated. Employees must have sufficient hours accumulated in their Hour Bank account to be eligible for benefits. For more information, contact your employer or Mercon Benefit Services.
11
4.2 Enter Employee Enrolment Information
4.2.1 Enter Employee Information
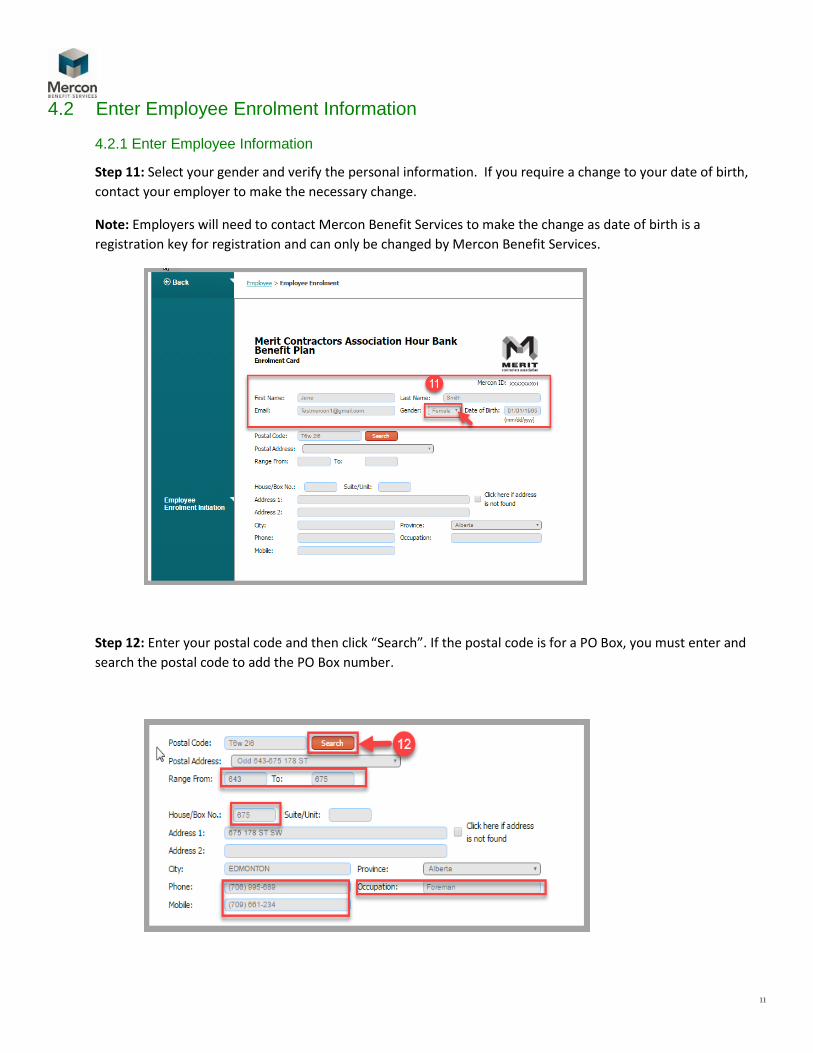
Step 11: Select your gender and verify the personal information. If you require a change to your date of birth,
contact your employer to make the necessary change.
Note: Employers will need to contact Mercon Benefit Services to make the change as date of birth is a
registration key for registration and can only be changed by Mercon Benefit Services.
Step 12: Enter your postal code and then click “Search”. If the postal code is for a PO Box, you must enter and
search the postal code to add the PO Box number.
12
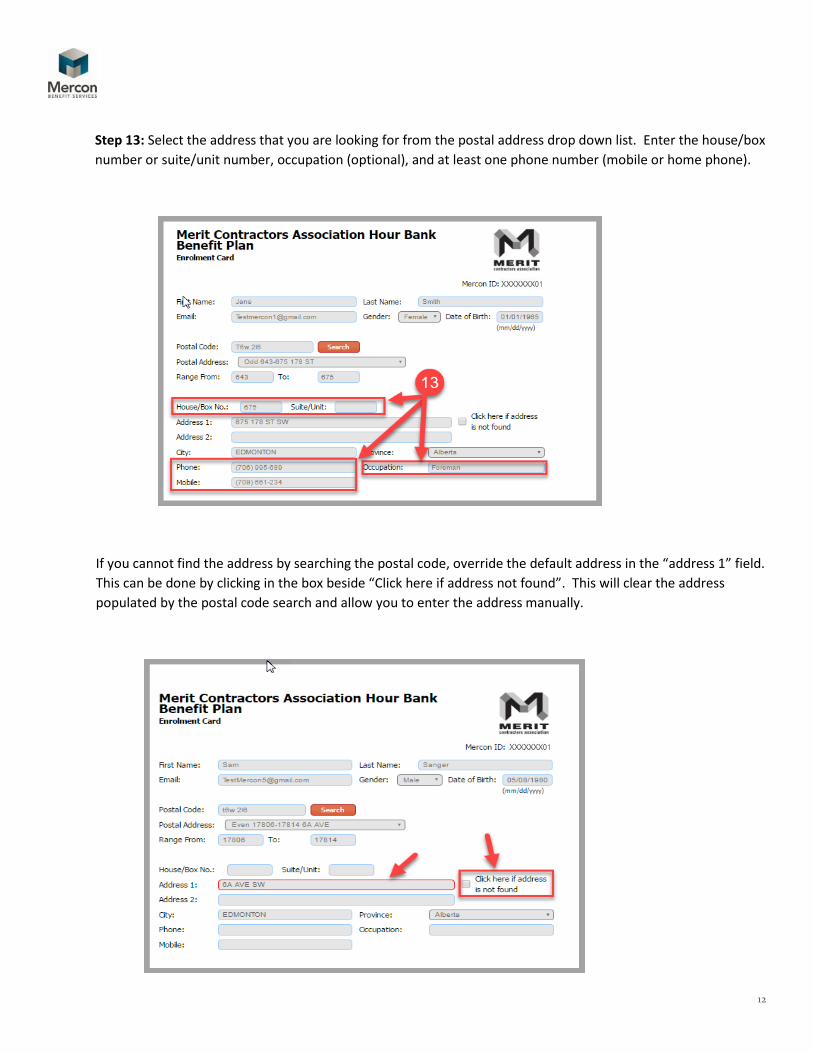
Step 13: Select the address that you are looking for from the postal address drop down list. Enter the house/box
number or suite/unit number, occupation (optional), and at least one phone number (mobile or home phone).
If you cannot find the address by searching the postal code, override the default address in the “address 1” field.
This can be done by clicking in the box beside “Click here if address not found”. This will clear the address
populated by the postal code search and allow you to enter the address manually.
13
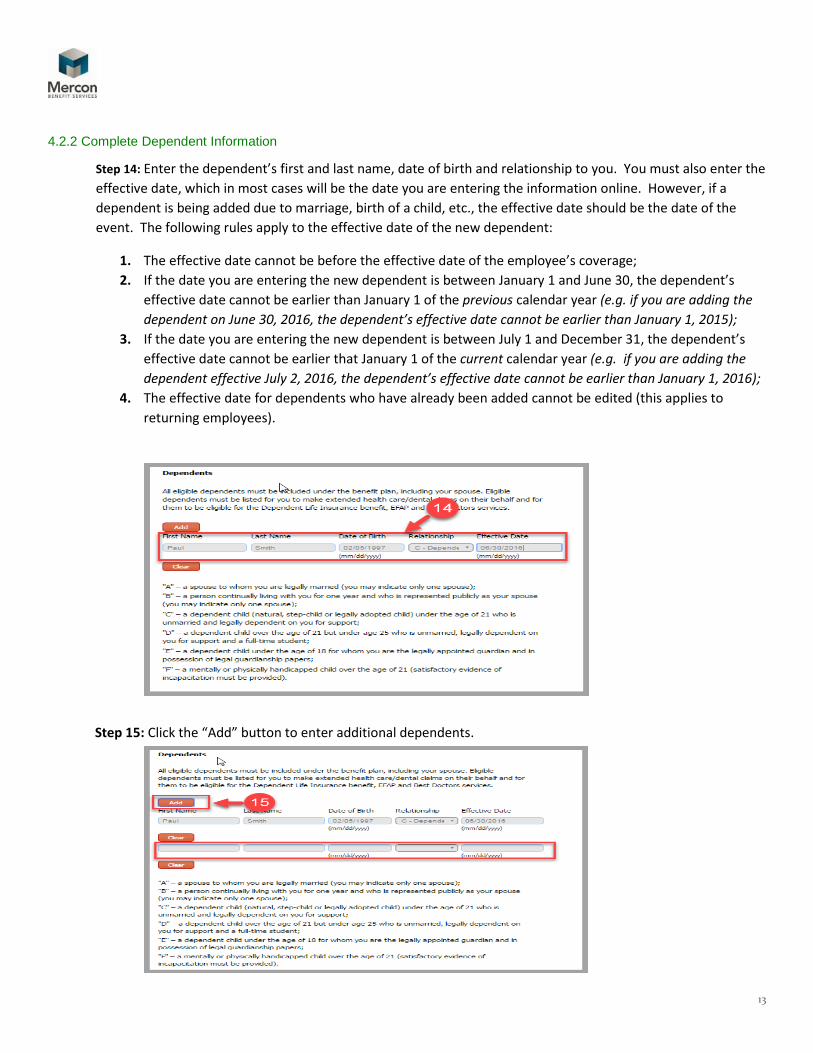
4.2.2 Complete Dependent Information
Step 14: Enter the dependent’s first and last name, date of birth and relationship to you. You must also enter the
effective date, which in most cases will be the date you are entering the information online. However, if a
dependent is being added due to marriage, birth of a child, etc., the effective date should be the date of the
event. The following rules apply to the effective date of the new dependent:
1. The effective date cannot be before the effective date of the employee’s coverage;
2. If the date you are entering the new dependent is between January 1 and June 30, the dependent’s
effective date cannot be earlier than January 1 of the previous calendar year (e.g. if you are adding the
dependent on June 30, 2016, the dependent’s effective date cannot be earlier than January 1, 2015);
3. If the date you are entering the new dependent is between July 1 and December 31, the dependent’s
effective date cannot be earlier that January 1 of the current calendar year (e.g. if you are adding the
dependent effective July 2, 2016, the dependent’s effective date cannot be earlier than January 1, 2016);
4. The effective date for dependents who have already been added cannot be edited (this applies to
returning employees).
Step 15: Click the “Add” button to enter additional dependents.
14
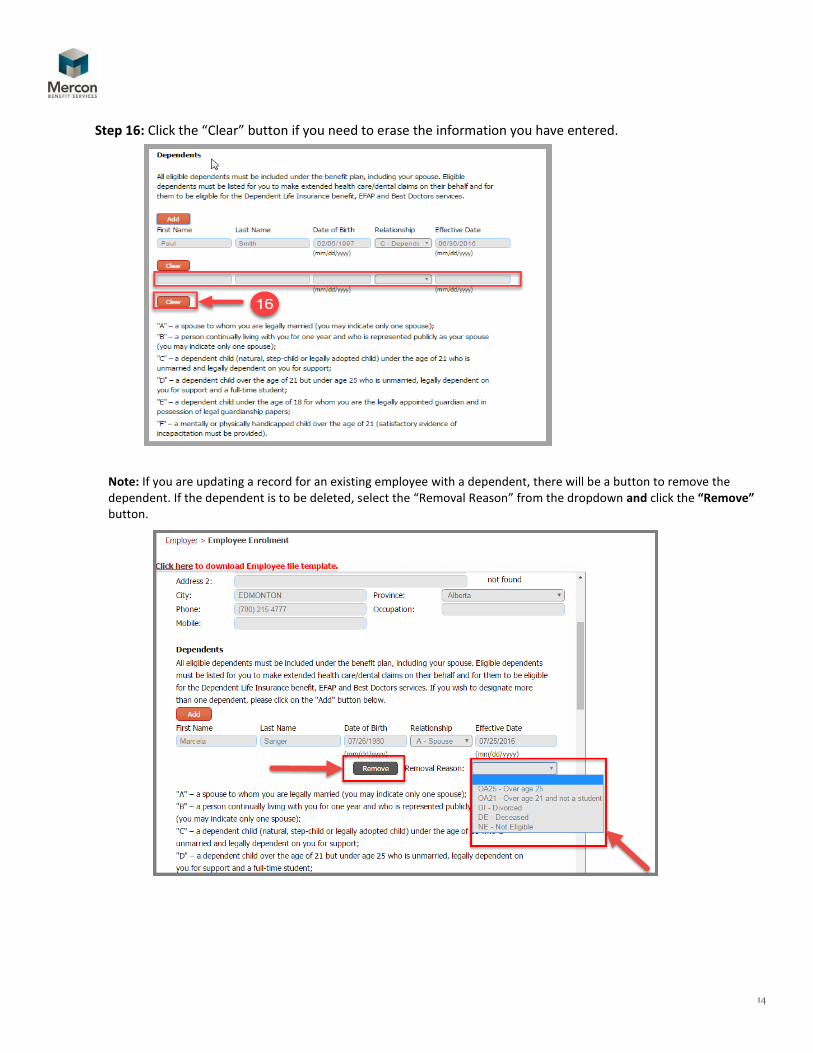
Step 16: Click the “Clear” button if you need to erase the information you have entered.
Note: If you are updating a record for an existing employee with a dependent, there will be a button to remove the dependent. If the dependent is to be deleted, select the “Removal Reason” from the dropdown and click the “Remove” button.
15
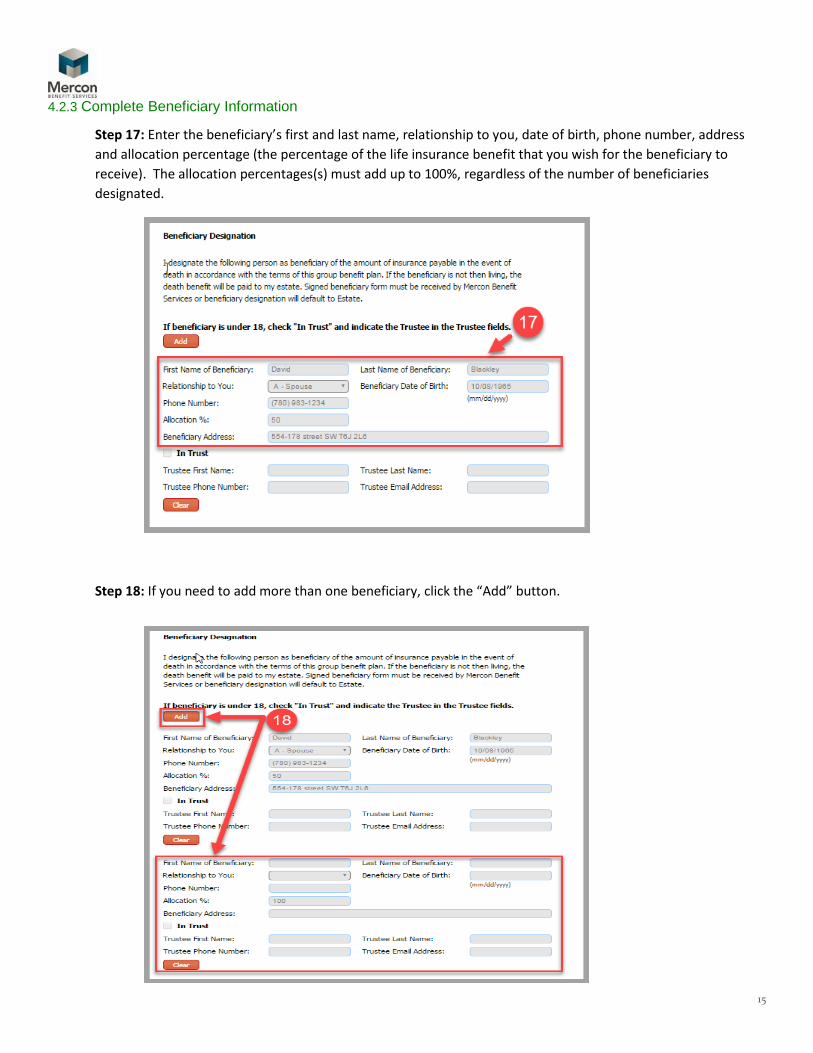
4.2.3 Complete Beneficiary Information
Step 17: Enter the beneficiary’s first and last name, relationship to you, date of birth, phone number, address
and allocation percentage (the percentage of the life insurance benefit that you wish for the beneficiary to
receive). The allocation percentages(s) must add up to 100%, regardless of the number of beneficiaries
designated.
Step 18: If you need to add more than one beneficiary, click the “Add” button.
16
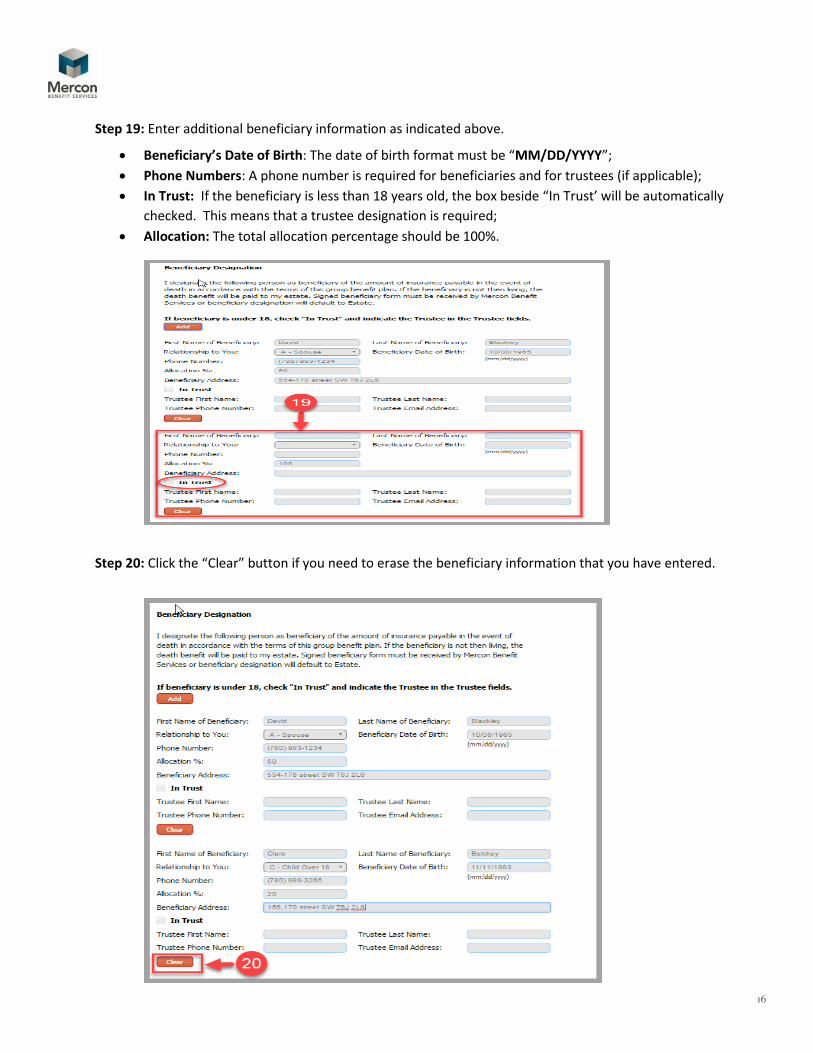
Step 19: Enter additional beneficiary information as indicated above.
Beneficiary’s Date of Birth: The date of birth format must be “MM/DD/YYYY”;
Phone Numbers: A phone number is required for beneficiaries and for trustees (if applicable);
In Trust: If the beneficiary is less than 18 years old, the box beside “In Trust’ will be automatically
checked. This means that a trustee designation is required;
Allocation: The total allocation percentage should be 100%.
Step 20: Click the “Clear” button if you need to erase the beneficiary information that you have entered.

17
Note: If you have already enrolled and you are updating your existing record, there will be a “Remove” button to remove the existing beneficiary (if needed).
4.2.4 Complete Personal Release Information
Step 21: The Personal Release Information section enables you to authorize other individuals to have access to your personal information (including dependent and beneficiary designations, details of claims, etc.) To enable that access, enter the name of the individual and his or her relationship to you.
18
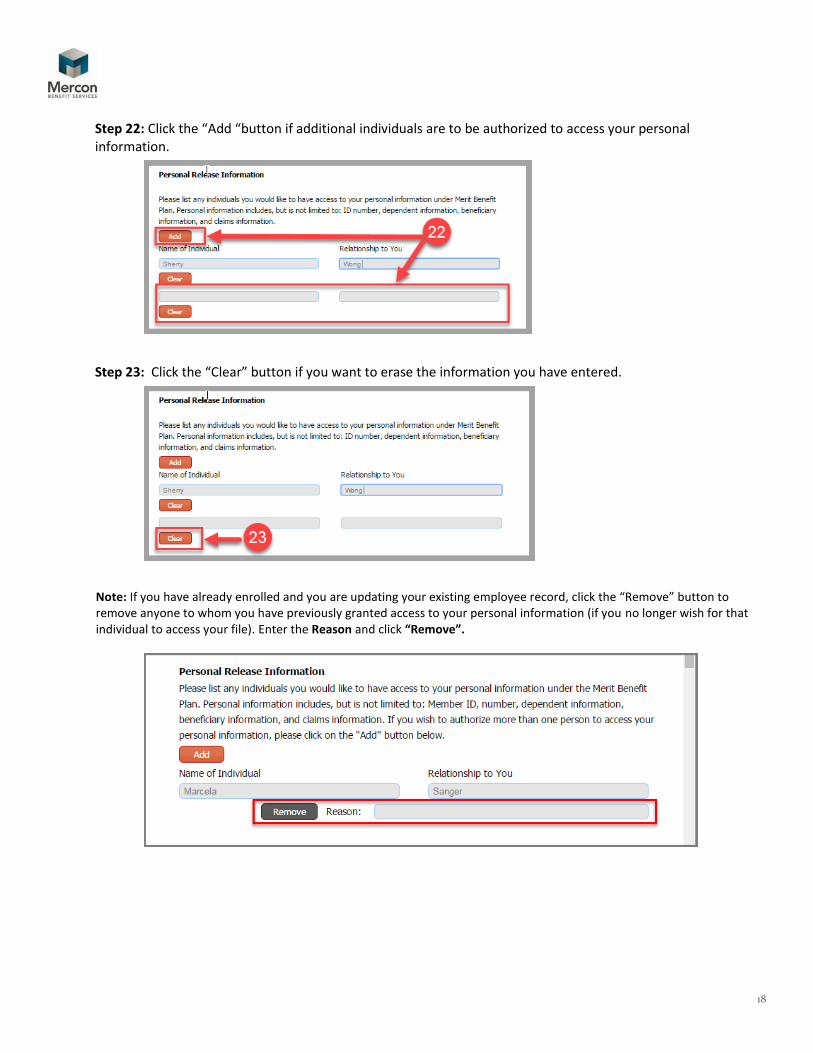
Step 22: Click the “Add “button if additional individuals are to be authorized to access your personal information.
Step 23: Click the “Clear” button if you want to erase the information you have entered.
Note: If you have already enrolled and you are updating your existing employee record, click the “Remove” button to remove anyone to whom you have previously granted access to your personal information (if you no longer wish for that individual to access your file). Enter the Reason and click “Remove”.
19
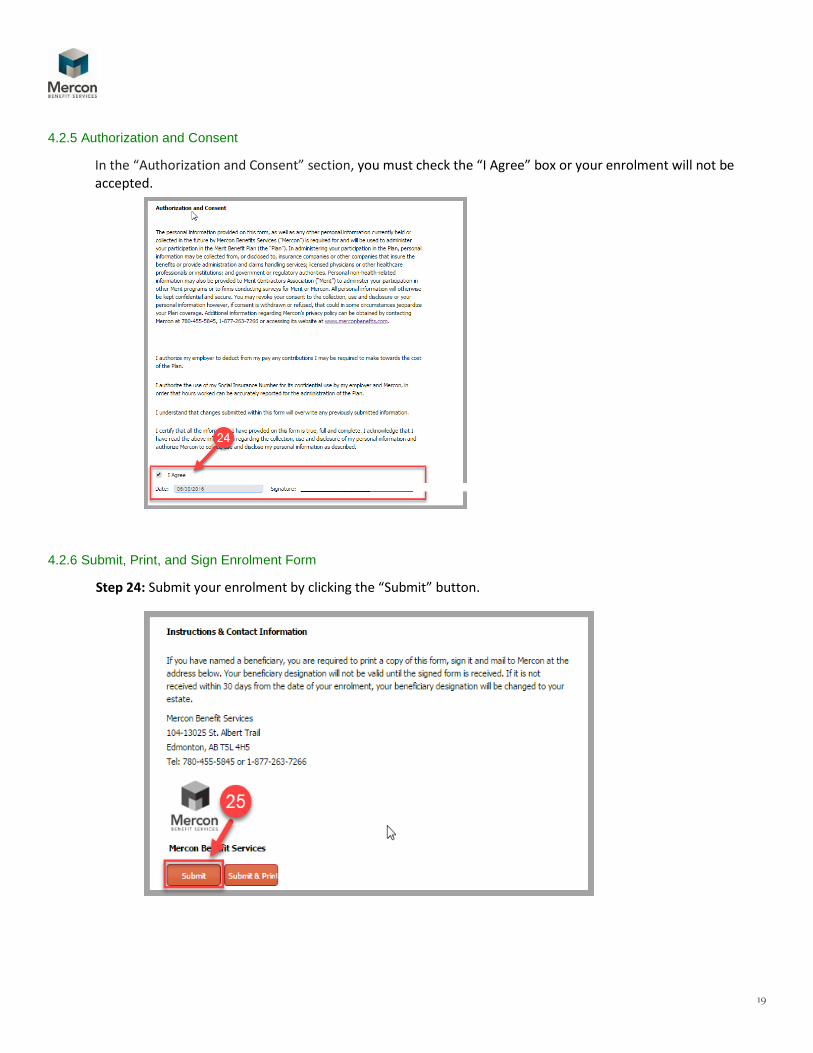
4.2.5 Authorization and Consent
In the “Authorization and Consent” section, you must check the “I Agree” box or your enrolment will not be accepted.
4.2.6 Submit, Print, and Sign Enrolment Form
Step 24: Submit your enrolment by clicking the “Submit” button.
20
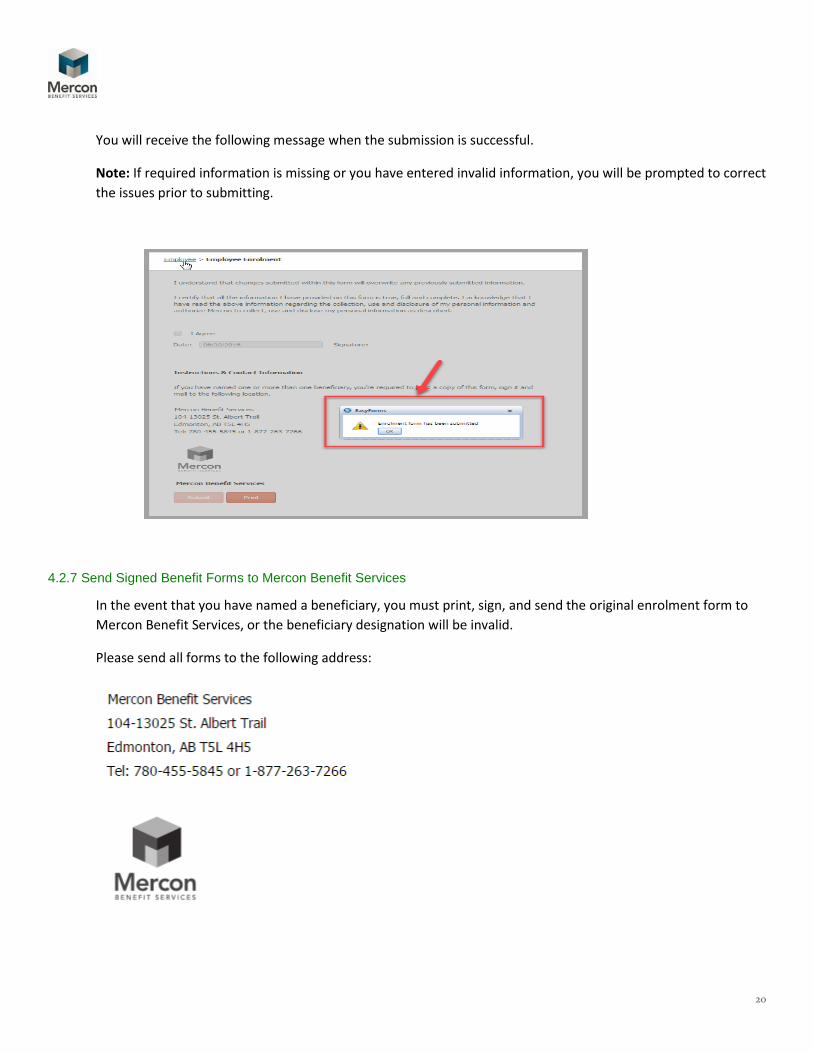
You will receive the following message when the submission is successful.
Note: If required information is missing or you have entered invalid information, you will be prompted to correct
the issues prior to submitting.
4.2.7 Send Signed Benefit Forms to Mercon Benefit Services
In the event that you have named a beneficiary, you must print, sign, and send the original enrolment form to
Mercon Benefit Services, or the beneficiary designation will be invalid.
Please send all forms to the following address:
21
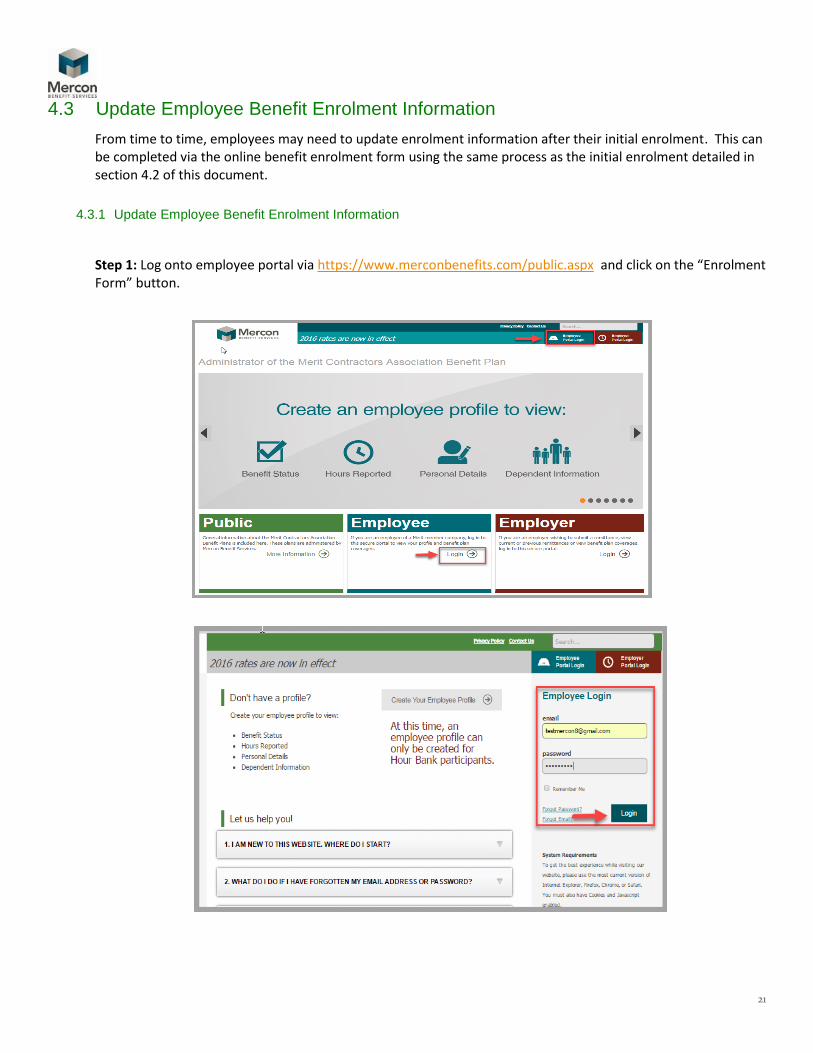
4.3 Update Employee Benefit Enrolment Information
From time to time, employees may need to update enrolment information after their initial enrolment. This can be completed via the online benefit enrolment form using the same process as the initial enrolment detailed in section 4.2 of this document.
4.3.1 Update Employee Benefit Enrolment Information
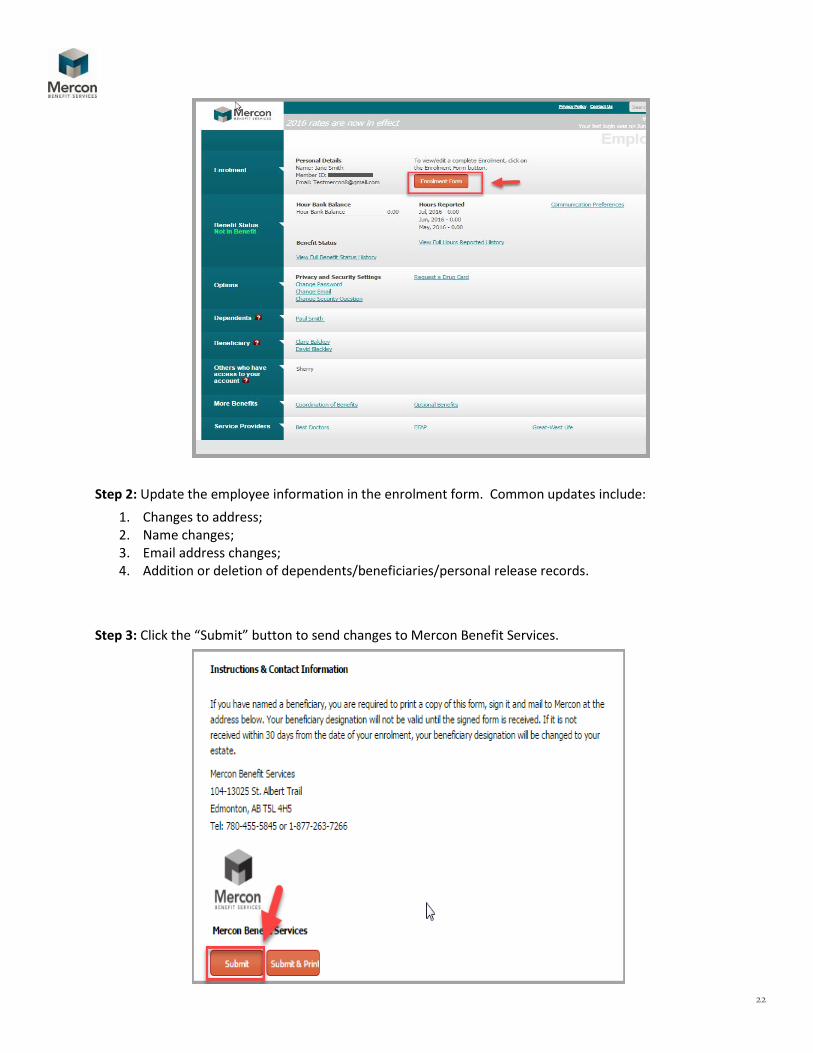
Step 1: Log onto employee portal via https://www.merconbenefits.com/public.aspx and click on the “Enrolment Form” button.
22
Step 2: Update the employee information in the enrolment form. Common updates include:
1. Changes to address;2. Name changes;3. Email address changes;4. Addition or deletion of dependents/beneficiaries/personal release records.
Step 3: Click the “Submit” button to send changes to Mercon Benefit Services.
23
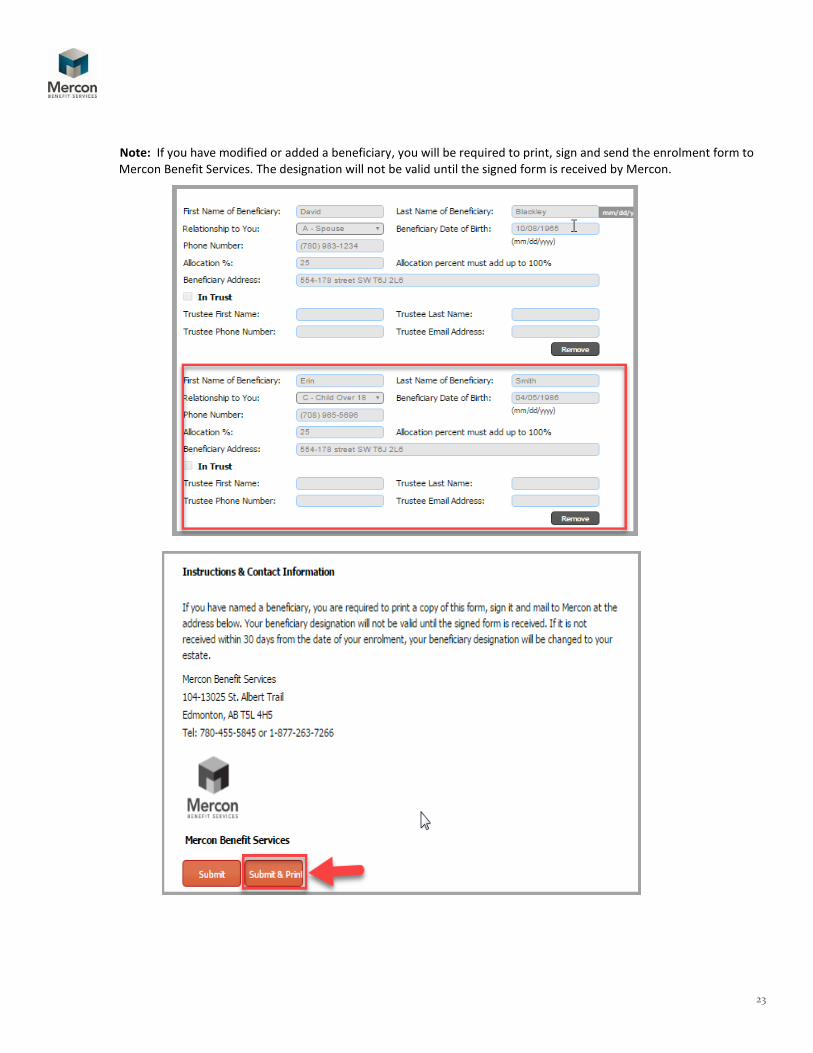
Note: If you have modified or added a beneficiary, you will be required to print, sign and send the enrolment form to Mercon Benefit Services. The designation will not be valid until the signed form is received by Mercon.
24
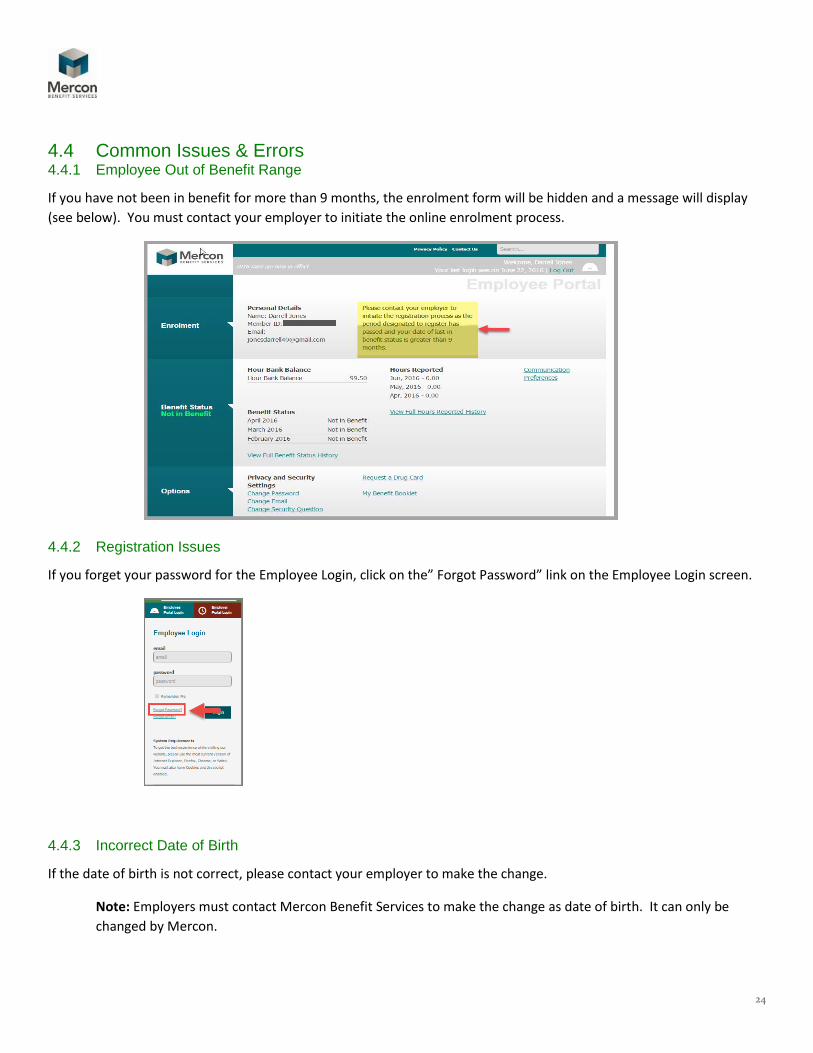
4.4 Common Issues & Errors 4.4.1 Employee Out of Benefit Range
If you have not been in benefit for more than 9 months, the enrolment form will be hidden and a message will display
(see below). You must contact your employer to initiate the online enrolment process.
4.4.2 Registration Issues
If you forget your password for the Employee Login, click on the” Forgot Password” link on the Employee Login screen.
4.4.3 Incorrect Date of Birth
If the date of birth is not correct, please contact your employer to make the change.
Note: Employers must contact Mercon Benefit Services to make the change as date of birth. It can only be
changed by Mercon.
25
5 SUPPORT AND CONTACT INFORMATION


