114
Integrated National Education Information System (iNEIS TM ) Academic Year 2016 Preparation Clinic Session
| Date post: | 20-Jan-2016 |
| Category: |
Documents |
| Upload: | beatrix-edwards |
| View: | 213 times |
| Download: | 0 times |

Integrated National EducationInformation System
(iNEISTM)
Academic Year 2016 Preparation
Clinic Session
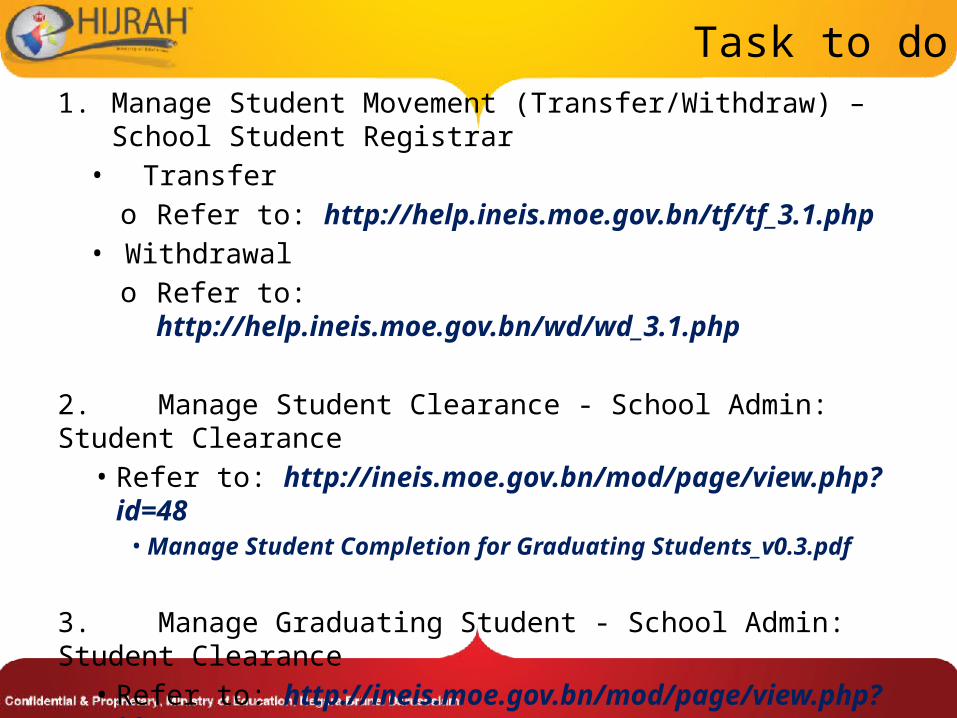
Task to do1. Manage Student Movement (Transfer/Withdraw) – School
Student Registrar• Transfero Refer to: http://help.ineis.moe.gov.bn/tf/tf_3.1.php
• Withdrawalo Refer to: http://help.ineis.moe.gov.bn/wd/wd_3.1.php
2. Manage Student Clearance - School Admin: Student Clearance• Refer to: http://ineis.moe.gov.bn/mod/page/view.php?id=48
• Manage Student Completion for Graduating Students_v0.3.pdf
3. Manage Graduating Student - School Admin: Student Clearance
• Refer to: http://ineis.moe.gov.bn/mod/page/view.php?id=48• Manage Student Completion for Graduating Students_v0.3.pdf
Task to do
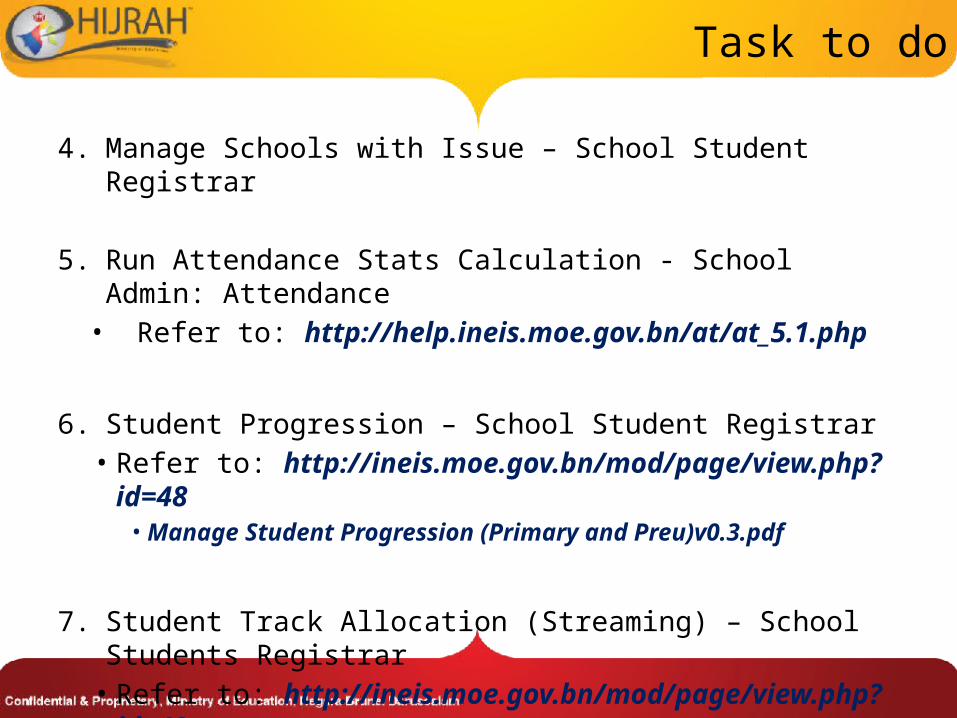
4. Manage Schools with Issue – School Student Registrar
5. Run Attendance Stats Calculation - School Admin: Attendance• Refer to: http://help.ineis.moe.gov.bn/at/at_5.1.php
6. Student Progression – School Student Registrar• Refer to: http://ineis.moe.gov.bn/mod/page/view.php?id=48
• Manage Student Progression (Primary and Preu)v0.3.pdf
7. Student Track Allocation (Streaming) – School Students Registrar
• Refer to: http://ineis.moe.gov.bn/mod/page/view.php?id=48• Manage Student Progression (Secs and Sprt)v0.3

Reminder
• School Student Registrar need to upload new student intake:o Preschool 2016 studento Year 1 2016 studento Year 7 2016 studento Lower 6th 2016 studento Student from Private School
• Refer to Online Help for student upload process:o http://help.ineis.moe.gov.bn/ad/ad_1.1.php

Instructions SetDownload the following documents from iNEIS portal:
http://ineis.moe.gov.bn/mod/page/view.php?id=48
• Manage Student Completion for Graduating Studentso Preschool, Year 6, Year 10(Express), Year 11, SAP Diploma,
Upper Sixth, and CCA (Prim, Secs, Preu)
• Manage Student Progression (Primary and Preu)o Primary 1 to Primary 5, Year 7, Year 9, Year 10, and Lower Sixtho The book include instructions for Student Movement
(Transfer/Withdrawal)
• Manage Student Progression (Secs and Sprt)o Year 8, and Year 11o The book include instructions for Student Movement
(Transfer/Withdrawal)
Manage Student Movement(Transfer and Withdrawal)
School Student Registrar

Student Movement 2015 - 2016
• Descriptiono There are two types of Student Movement which is Transfer and
Withdrawal Process. This step should be done before student is progress to the next level.
• Granted Role: o Transfer/Withdrawal
School Student Registrar Class Teacher
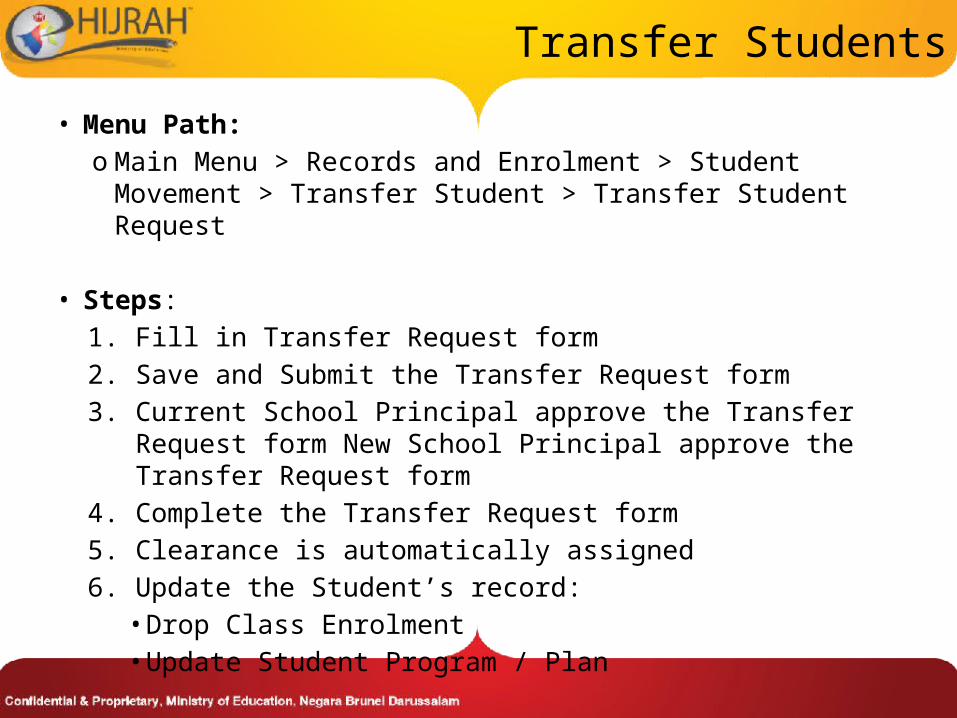
Transfer Students
• Menu Path:o Main Menu > Records and Enrolment > Student Movement >
Transfer Student > Transfer Student Request
• Steps:
1. Fill in Transfer Request form
2. Save and Submit the Transfer Request form
3. Current School Principal approve the Transfer Request form New School Principal approve the Transfer Request form
4. Complete the Transfer Request form
5. Clearance is automatically assigned
6. Update the Student’s record: • Drop Class Enrolment• Update Student Program / Plan

Withdrawal Students
• Menu Path:o Main Menu > Records and Enrolment > Student Movement >
Student Withdrawals > Withdrawal Request
• Steps:
1. Fill in Withdrawal Request form
2. Save and Submit the Withdrawal Request form
3. Current School Principal approve the Withdrawal Request form
4. Complete the Withdraw Request form
5. Clearance is automatically assigned
6. Update the Student’s record:• Drop Class Enrolment• Term Withdraw• Update Student Program/Plan

Manage Student Clearance
School Admin - Student Clearance

Manage Student Clearance
• Descriptiono It allows to create clearance checklist for students who are eligible
to go to clearance.
• Granted Role: o Clearance
School Admin – Student Clearance Class Teacher
o Graduating Students School Admin – Student Clearance

Create Clearance Checklist
Flow Chart for Clearance Process
Update the status of the Clearance Checklist Items
View the created Clearance Checklist
Batch
START
Custom
Population Selection –
External File
Population Selection – PS Query
Individually BatchIndividually

Create Clearance Checklist - Individually
• Description:o It allows to create for a student who is transferring-out of school or
who is withdrawing from school.o For example, if the Registrar/Class Teacher didn’t completed a
request form for the Student therefore there is no clearance checklist automatically assigned. So, the Registrar/Class Teacher will create the clearance for the student manually by batch or individually.
• Menu Path: o Main Menu > Campus Community > Checklists > Person Checklist
> Checklist Management – Person

• Description:o It allows to create for students who have completed their
Academic Programs and will be ready for ‘graduating’.o For example, creating clearance checklists for all students from
SCGEEY10 (General Education Program – Express Track Year 10)
• Menu Path:o Main Menu > Records and Enrolment > Student Movement >
Clearance > Assign Clearance Checklist
Create Clearance Checklist – Batch
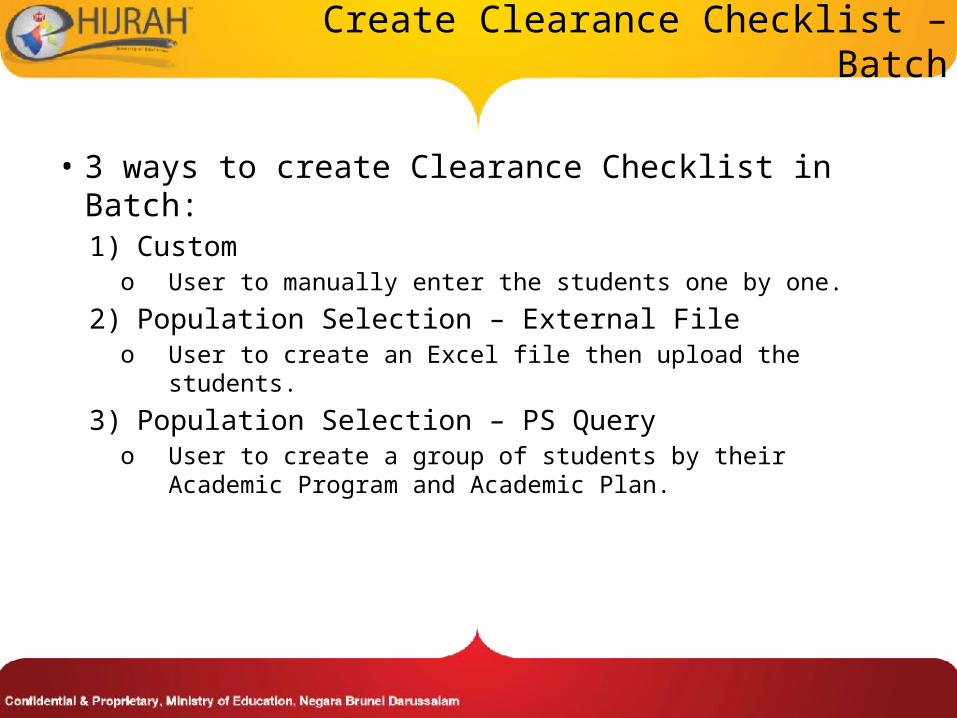
Create Clearance Checklist – Batch
• 3 ways to create Clearance Checklist in Batch:1) Custom
o User to manually enter the students one by one.
2) Population Selection – External Fileo User to create an Excel file then upload the students.
3) Population Selection – PS Queryo User to create a group of students by their Academic Program and
Academic Plan.

View Created Clearance Checklist
• Description:o It allows the user to view the created Clearance Checklist of a
student.
• Menu Path:o Main Menu > Campus Community > Checklists > Person
Checklist > Checklist Management – Person.
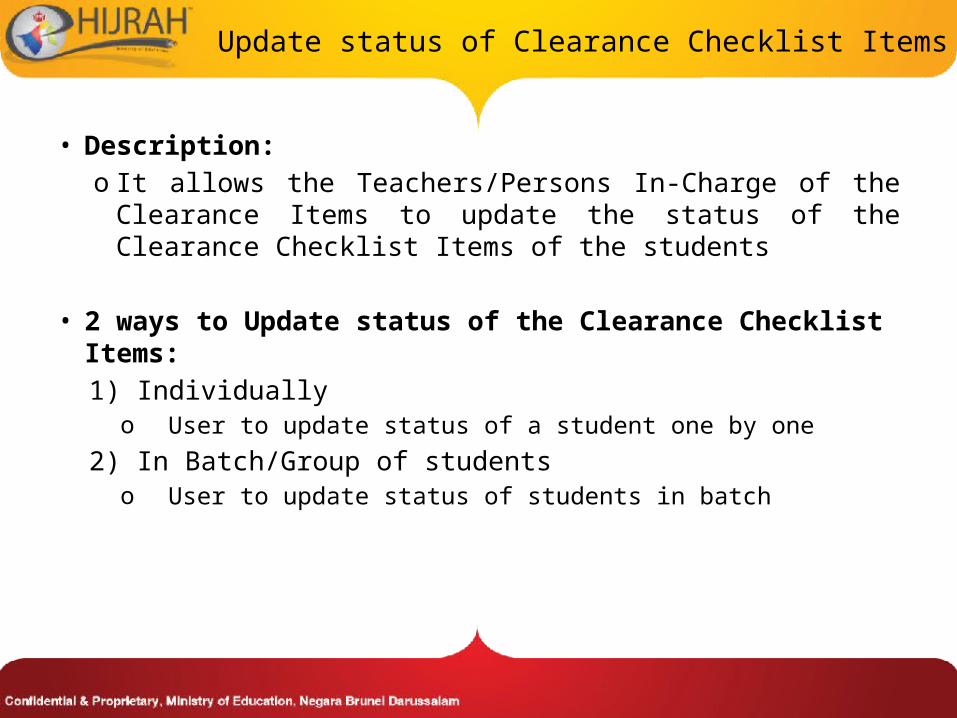
Update status of Clearance Checklist Items
• Description:o It allows the Teachers/Persons In-Charge of the Clearance Items
to update the status of the Clearance Checklist Items of the students
• 2 ways to Update status of the Clearance Checklist Items:
1) Individuallyo User to update status of a student one by one
2) In Batch/Group of studentso User to update status of students in batch

Update status of Clearance Checklist Items
• Menu Path:o Individually
Main Menu > Campus Community > Checklists > Person Checklist > Checklist Management – Person
o In Batch/Group of Students Main Menu > Records and Enrollment > Student Movement >
Clearance > Student Clearance Checklists

Manage Graduating Student
School Admin: Student Clearance

Flow Chart for Graduating Students
Graduating Students Process
View Student Certificate
View Student Program/Plan
Batch
START
Manually
Graduating Students Process
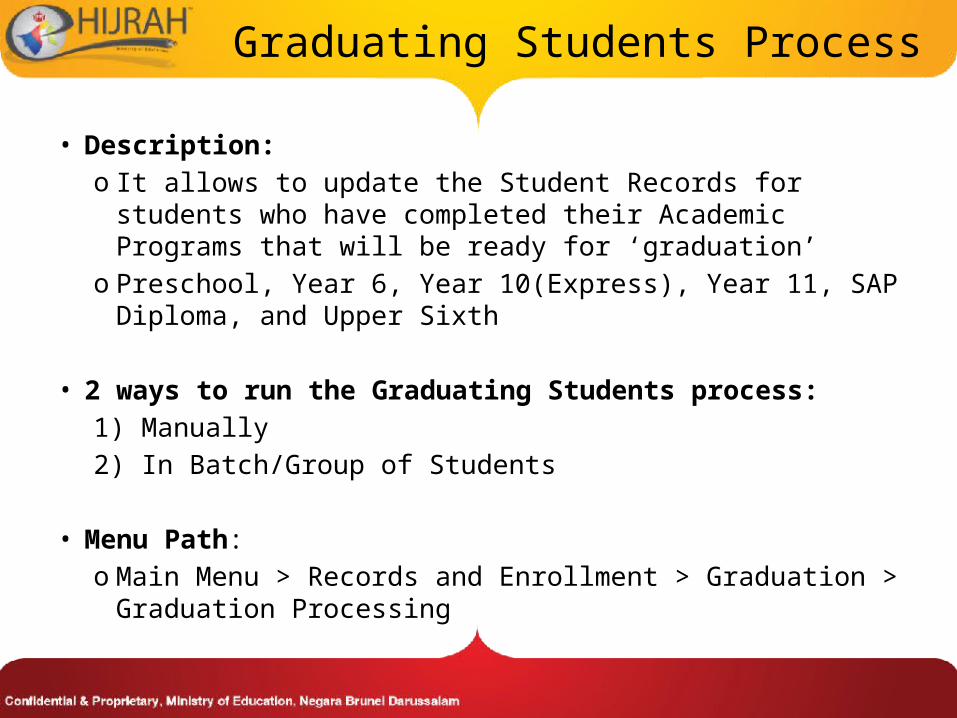
• Description: o It allows to update the Student Records for students who have
completed their Academic Programs that will be ready for ‘graduation’
o Preschool, Year 6, Year 10(Express), Year 11, SAP Diploma, and Upper Sixth
• 2 ways to run the Graduating Students process:
1) Manually
2) In Batch/Group of Students
• Menu Path:o Main Menu > Records and Enrollment > Graduation > Graduation
Processing

Manually• Run Control ID format
o SchoolCode_Year_AcademicProgram/Plano For example, 3001_2015_SCGEEY10
• Steps:– Unchecked the Population Selection checkbox– It is used for only a few students to process and also allows the
user to manually enter the student one by one
Graduating Students Process

Batch/Group of Students• Run Control ID format
o SchoolCode_Year_AcademicProgram/Plano For example, 3001_2015_SCGEEY10
• Steps:– Check the Population Selection checkbox– It is used to process many students where it allows the user to
select the PS Query option.– Query Name: MOE_CL_CHK_QRY_GRAD
Graduating Students Process

View Updated Student Program/Plan
• Description: o It allows to view the updated Student Program/Plan once the
Graduating Students process is successfully completed.
• Menu Path:oMain Menu > Records and Enrollment > Career and Program
Information > Student Program/Plan
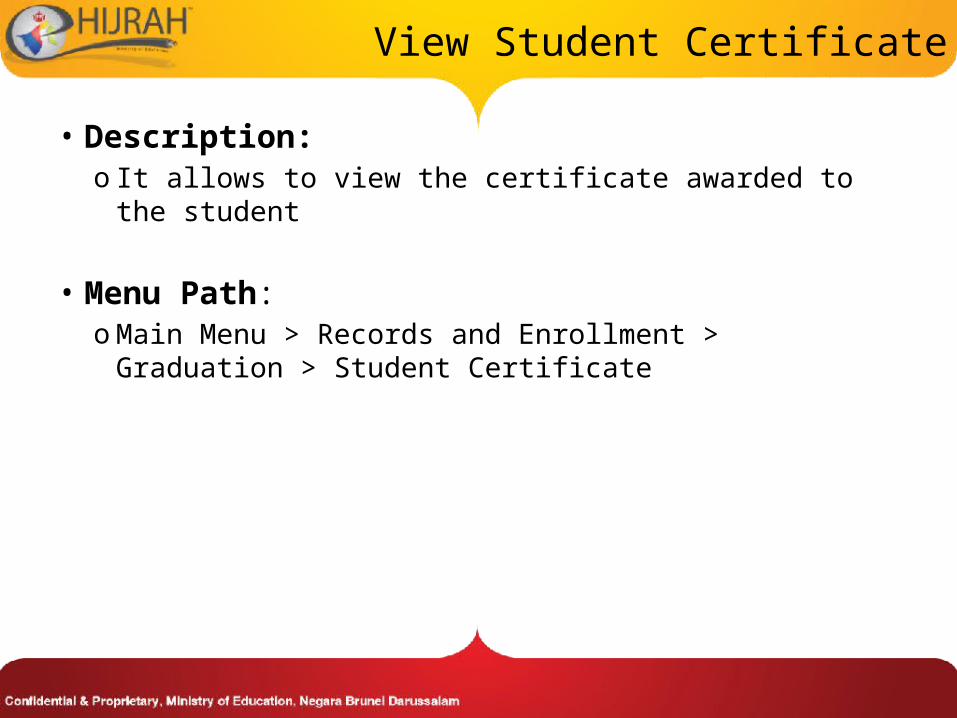
View Student Certificate
• Description: o It allows to view the certificate awarded to the student
• Menu Path:oMain Menu > Records and Enrollment > Graduation > Student
Certificate

View Student Certificate
• List of Student Certificates that will be awarded:o Pre-School
PRESo Primary School
Year 6 - PSR Year 6 - CCA Primary Completion
o Secondary School Year 10(Express), Year 11 - GCE O’ Level Year 11 - IGCSE Year 11 - BTEC EDEXCEL – Extended Year 12 - BTEC EDEXCEL – Diploma CCA Secondary Completion
o Sixth Form Upper Sixth - GCE A’ Level CCA Sixth Form Completion

Manage Student Progression

Flow Chart
Run Attendance Stats Calculation
Student Progression
Student Track Allocation (Streaming)
START

Run Attendance Stats Calculation
School Admin: Attendance

Attendance Stats Calculation
• As a prerequisite, user will need to run Attendance Statistics Calculation Process before proceeding to progressing students
• This is to calculate the overall attendance of student throughout the year. Only student with Attendance Statistics of 85% and above will be progressed.
• Granted Role: o School Admin: Attendance
• Navigation:o Curriculum Management > Attendance Roster > Process > Attendance
Stats Calculation
• Refer to Online Help for more details:o http://help.ineis.moe.gov.bn/at/at_5.1.php

Student Progression
School Student Registrar

Student Progression• Description:
o This function allows the teacher to progress student where there is no changes in Academic Program but changes in Academic Plan.
o It is only applicable for Primary, Sixth Form, Year 7, Year 9, and Year 10 students.
• Granted Role: o School Student Registrar
• Menu Path: o Records and Enrollment > Term Processing > Manage Student Progressiono Records and Enrollment > Career and Program Information > Student
Program/Plan
• Refer to:o Hand out Manage Student Progression (Primary and Preu)v0.3.pdf or
Manage Student Progression (Secs and Sprt)v0.3

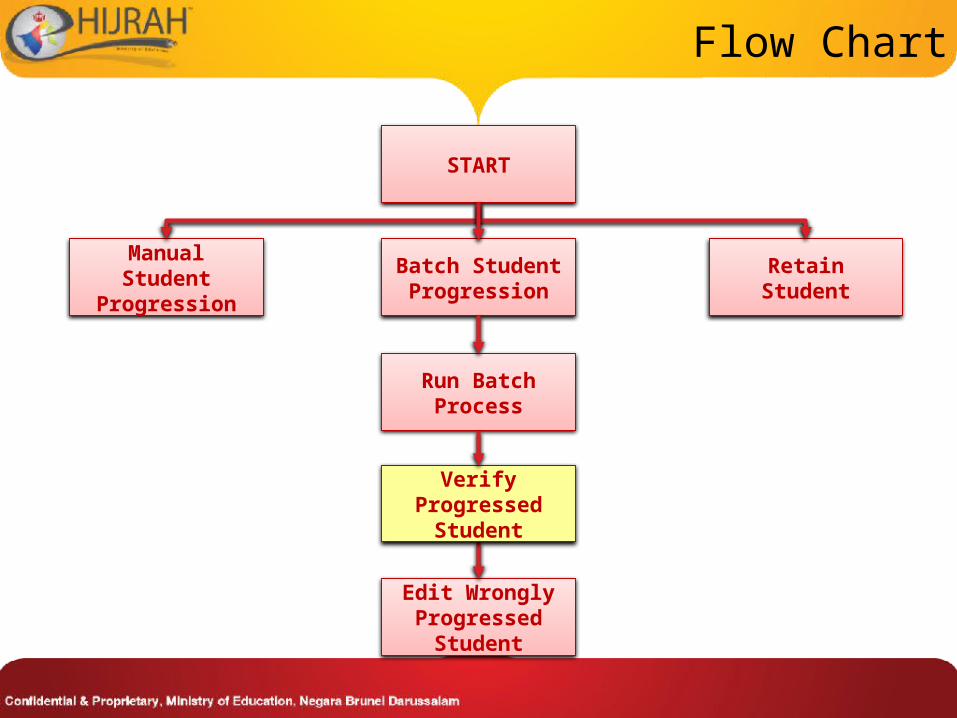
Manual Student Progression
Flow Chart
Run Batch Process
Retain StudentBatch Student Progression
Verify Progressed
Student
Edit Wrongly Progressed
Student
START
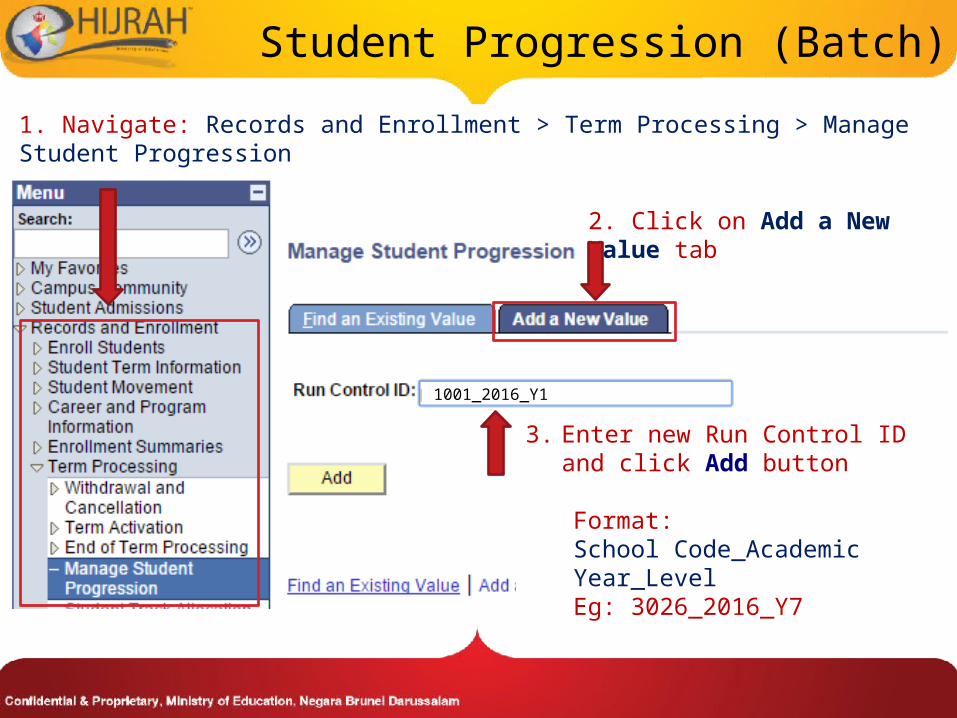
1001_2016_Y1
Student Progression (Batch)
3. Enter new Run Control ID and click Add button
Format: School Code_Academic Year_LevelEg: 3026_2016_Y7
2. Click on Add a New Value tab
1. Navigate: Records and Enrollment > Term Processing > Manage Student Progression

Student Progression (Batch)
4. Click the Academic Career look-up button to select the career that need to be progress

Student Progression (Batch)
5. Click the Campus look-up button to select your campus

Student Progression (Batch)6. Click the Term look-up button and select the end of term as students are only
progressed at the end of the term.
Note: Term entered should be the final term of the current academic year. i.e 1530 for progressing students to year 2016
Student Progression (Batch)
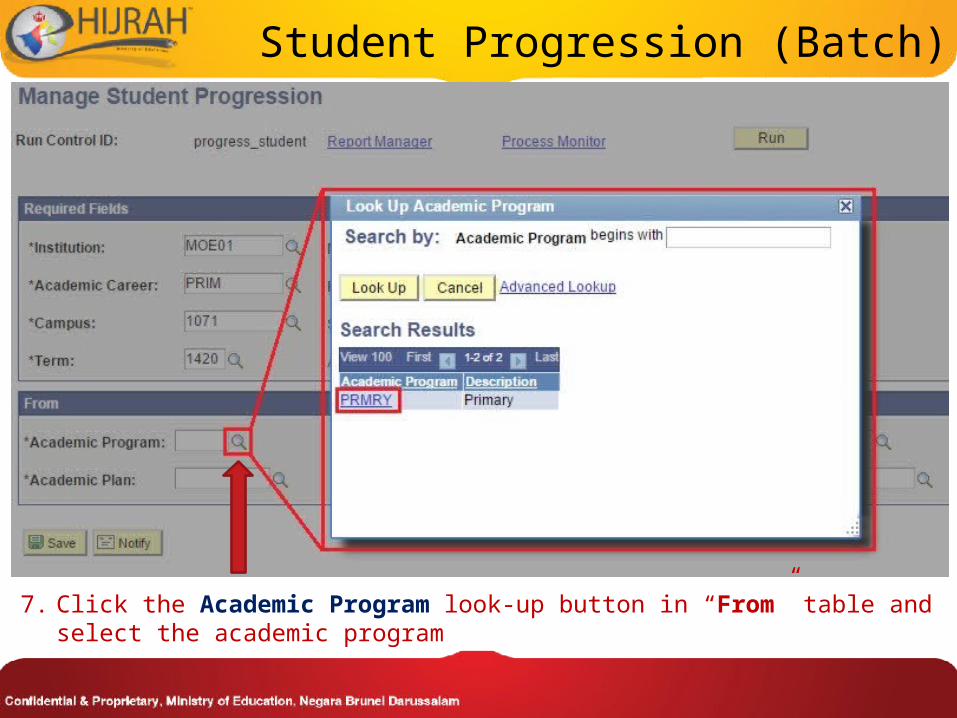
7. Click the Academic Program look-up button in “From” table and select the academic program

Student Progression (Batch)
8. Click the Academic Plan look-up button in “From” table and select the current academic plan that need to be progress

Student Progression (Batch)
9. Click the Academic Program look-up button in “To” table and select the academic program

Student Progression (Batch)
10.Click the Academic Plan look-up button in “To” table and select the new academic plan for next term

Student Progression (Batch)

Student Progression (Batch)
11. Click on “Run” button to run the student progression process

Student Progression (Batch)
12. Ensure the “Student Progression PRCS” is checked and click on “OK” button

Student Progression (Batch)
13. Click on “Process Monitor” link to view the status of student progression process
Student Progression (Batch)
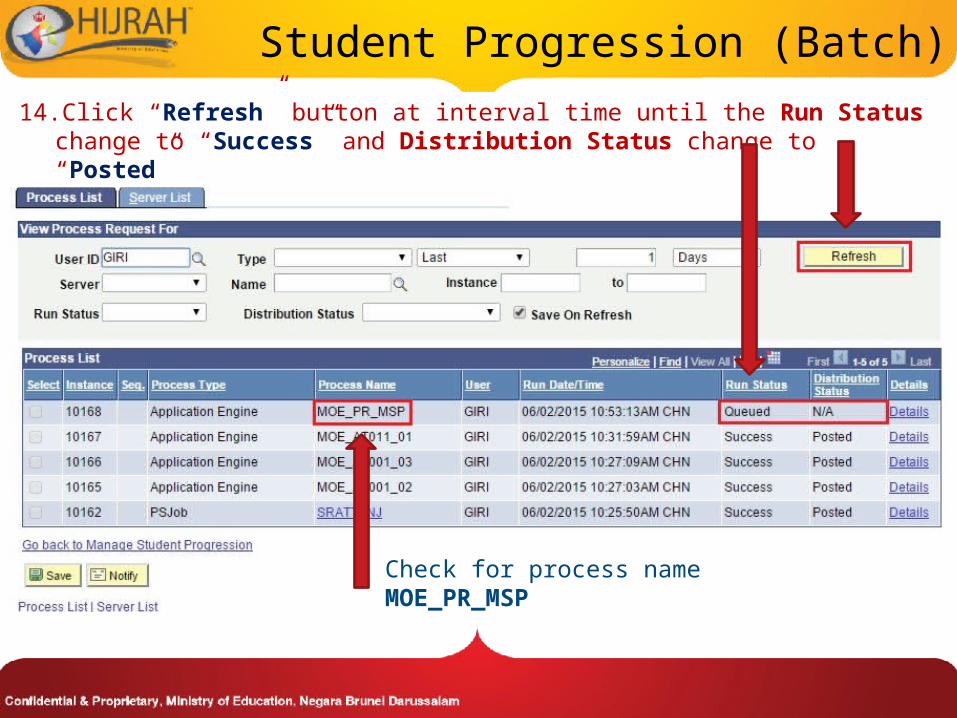
Check for process name MOE_PR_MSP
14.Click “Refresh” button at interval time until the Run Status change to “Success” and Distribution Status change to “Posted”
Student Progression (Batch)
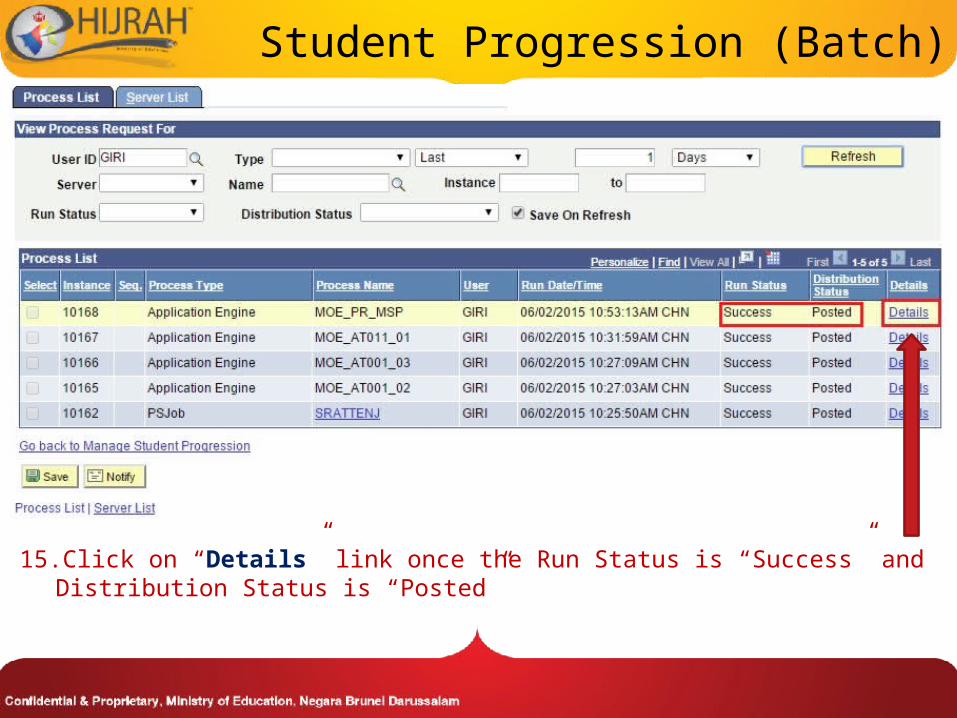
15.Click on “Details” link once the Run Status is “Success” and Distribution Status is “Posted”
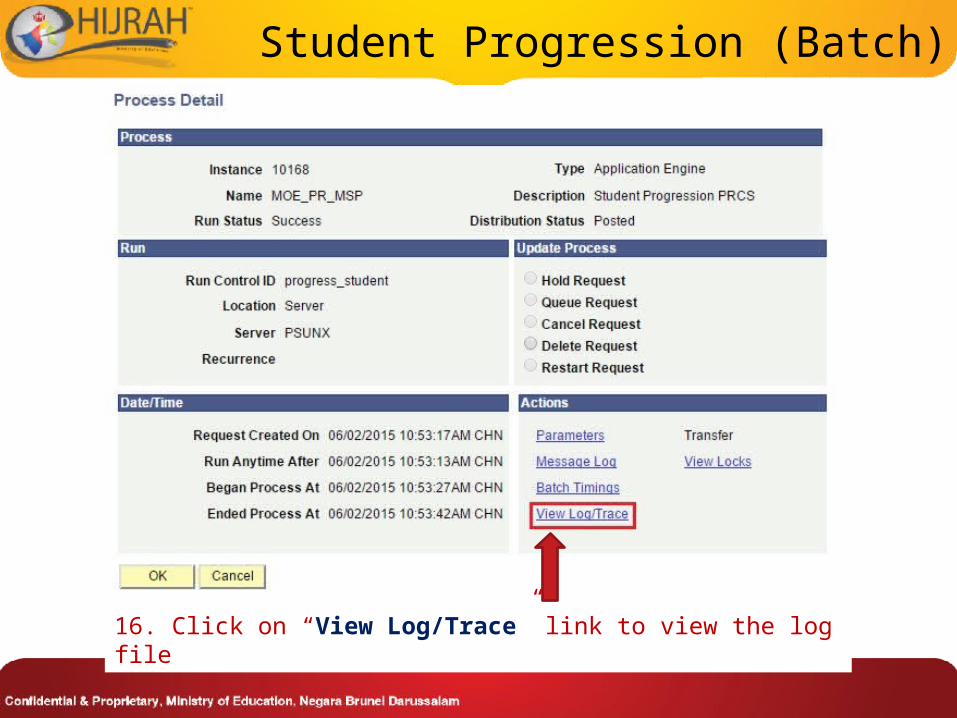
Student Progression (Batch)
16. Click on “View Log/Trace” link to view the log file

Student Progression (Batch)
17. Click on .log link to view the progression result

Student Progression (Batch)18.This is the progression
result page. It shows the number of student that is successfully progress and unsuccessful number of student with its reason.
Manual Student Progression
Flow Chart
Retain StudentBatch Student Progression
Run Batch Process
Edit Wrongly Progressed
Student
START
Verify Progressed
Student

Verify Student Progression1. Navigate: Records and Enrollment > Career and Program Information > Student Program/Plan
2. Search using the Student’s ID and click the Search button

Verify Student Progression
3. Ensure that:- Effective Date should be a day before the start of the term- Program Action should be PLNC (Plan Change)- Academic Program should be the same program
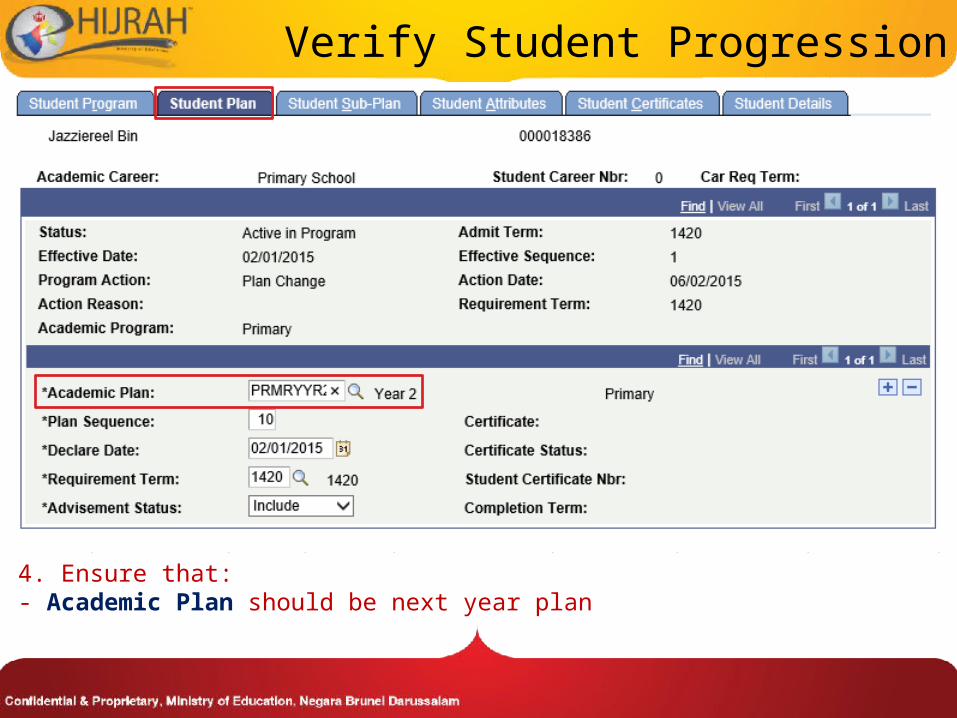
Verify Student Progression
4. Ensure that:- Academic Plan should be next year plan

Manual Student Progression
Flow Chart
Retain StudentBatch Student Progression
Run Batch Process
Verify Progressed
Student
START
Edit Wrongly Progressed
Student

Edit Wrongly Progressed Student
• This process is done because student is wrongly progressed
• For example:oStudent is supposed to be in Year 4 but being
progressed to Year 5oRegistrar will need to update the Student
Program/Plan
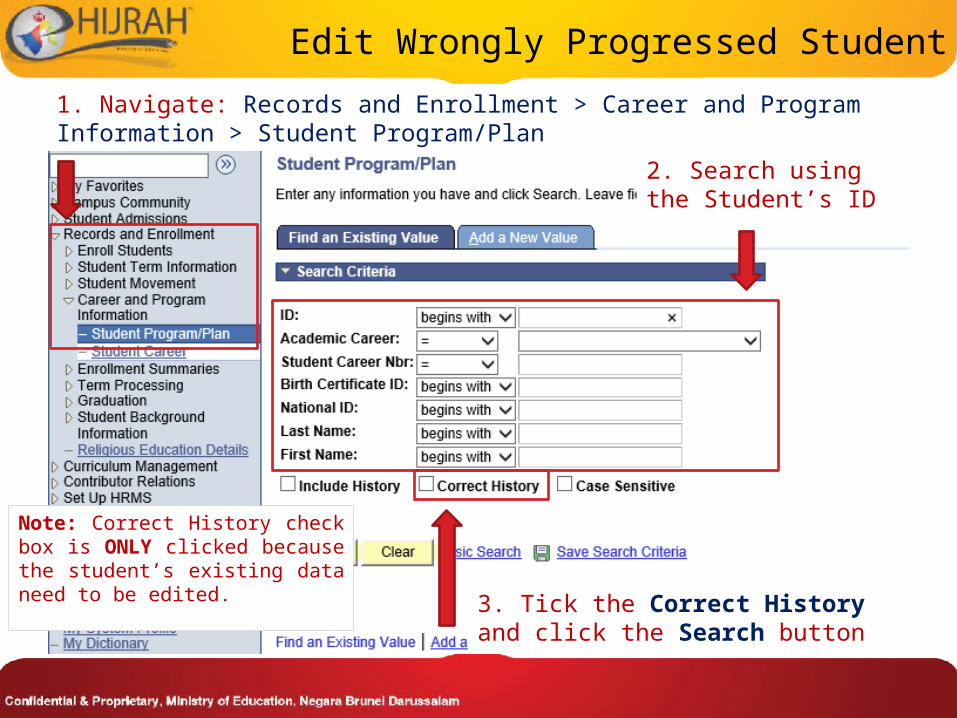
Edit Wrongly Progressed Student1. Navigate: Records and Enrollment > Career and Program Information > Student Program/Plan
2. Search using the Student’s ID
3. Tick the Correct History and click the Search button
Note: Correct History check box is ONLY clicked because the student’s existing data need to be edited.

Edit Wrongly Progressed Student4. Change Program Action from “PLNC” to “DATA”
5. Click Student Plan tab
Note: Make sure the Academic Program is correct

Edit Wrongly Progressed Student6. Change Academic Plan to the actual plan. From the new plan to the previous plan. E.g: From Year 5 to Year 4, Year 8 to Year 7.
7. Click Save button

Flow Chart
Retain StudentBatch Student Progression
Run Batch Process
Verify Progressed
Student
START
Manual Student Progression
Edit Wrongly Progressed
Student

Student Progression (Manual)
• Scenarios:
1. Student attendance falls below 85% but school wants to progress the student
2. Student transfer to new school but:
i. Student have not been progress
ii. New school already done batch progression

Student Progression (Manual)1. Navigate: Records and Enrollment > Career and Program Information > Student Program/Plan
2. Search using the Student’s ID
3. Click Search button

Student Progression (Manual)
4. Click the “+” button
5. Change the Effective Date to the day before the term 1610 start
6. Change Program Action to “PLNC”
7. Click Student Plan tab

Student Progression (Manual)
8. Change the Academic Plan
9. Click Save button

Flow Chart
Batch Student Progression
Run Batch Process
Verify Progressed
Student
START
Edit Wrongly Progressed
Student
Retain StudentManual Student
Progression

Student Retain
1. Navigate: Records and Enrollment > Career and Program Information > Student Program/Plan
2. Search using the Student’s ID
3. Click Search button

Student Retain
4. Click the “+” button5. Change the Effective Date to the day before the term 1610 start
6. Change Program Action to “DATA”
7. Click Student Plan tab

Student Retain
8. Verify the Academic Plan
9. Click Save button

Student Track Allocation
School Student Registrar
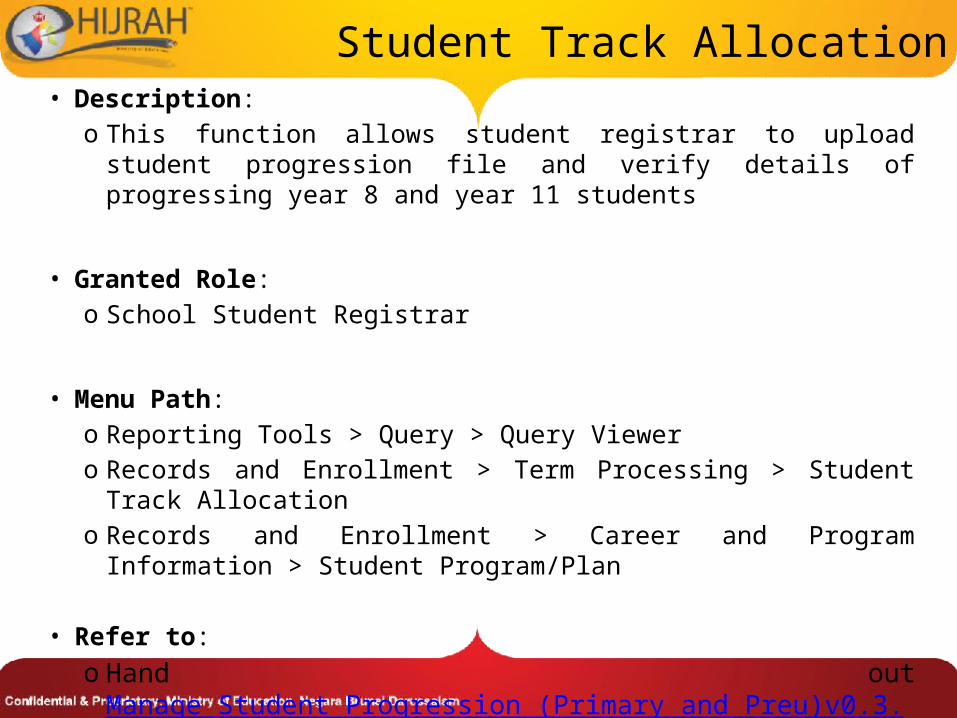
Student Track Allocation• Description:
o This function allows student registrar to upload student progression file and verify details of progressing year 8 and year 11 students
• Granted Role: o School Student Registrar
• Menu Path:o Reporting Tools > Query > Query Viewero Records and Enrollment > Term Processing > Student Track Allocationo Records and Enrollment > Career and Program Information > Student
Program/Plan
• Refer to:o Hand out Manage Student Progression (Primary and Preu)v0.3.pdf
or Manage Student Progression (Secs and Sprt)v0.3

Upload Students Track Allocation File
Verify Student Track Allocation
Details
Flow ChartGenerate List of Year 8 Students
Create CSV File
Edit Wrong Progression

Generate List of Year 8 Students
1. Navigate: Reporting Tools > Query > Query Viewer
2. Enter:• MOE_PR_SECS for Secondary
schools Year 8 students’ list• MOE_PR_SAPY11 for Secondary
schools Year 11 students’ list• MOE_PR_SPRT for Sport schools
Year 8 students’ listthen click on Search button

Generate List of Year 8 Students
3. Click on Excel to download the list

Generate List of Year 8 Students
4. Select the Academic Institution, Campus, and Term then click View Results
Note: Term entered should be the final term of the current academic year. i.e 1530 for progressing students to year 2016

Generate List of Year 8 Students
5. Select the Open With Microsoft Excel and click on OK

Upload Students Track Allocation File
Verify Student Track Allocation
Details
Flow Chart
Create CSV File
Generate List of Year 8/ Year 11
Students
Edit Wrong Progression

Create CSV File
1. Delete the entire row for the retain students:
a. Select the entire row by clicking on the number to the most left of the retaining student
b. Right click and select Delete from the dropdown list
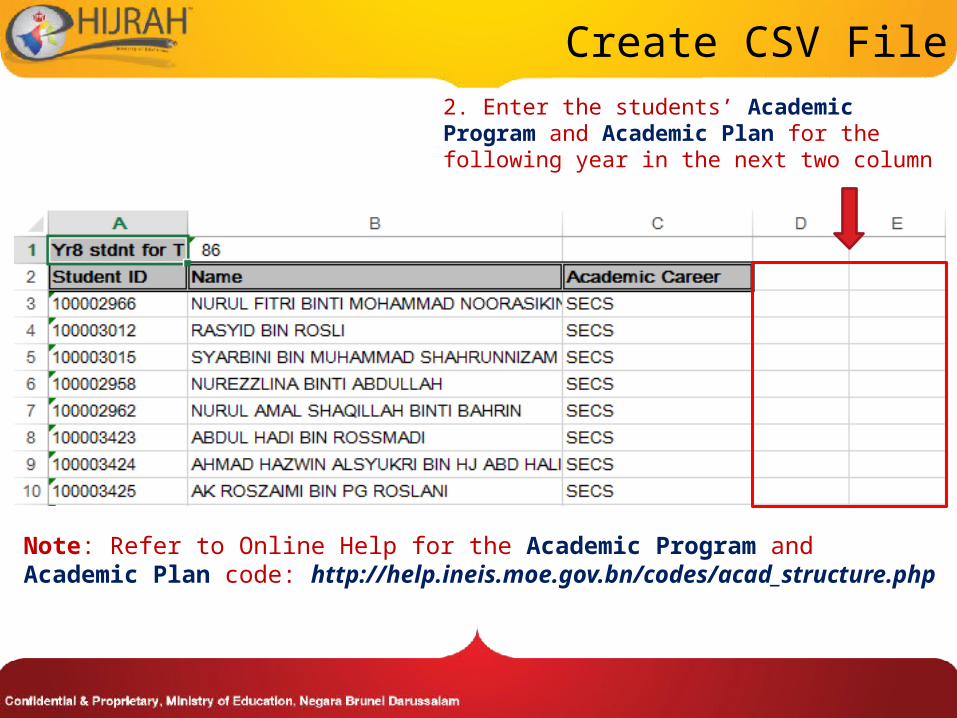
2. Enter the students’ Academic Program and Academic Plan for the following year in the next two column
Create CSV File
Note: Refer to Online Help for the Academic Program and Academic Plan code: http://help.ineis.moe.gov.bn/codes/acad_structure.php
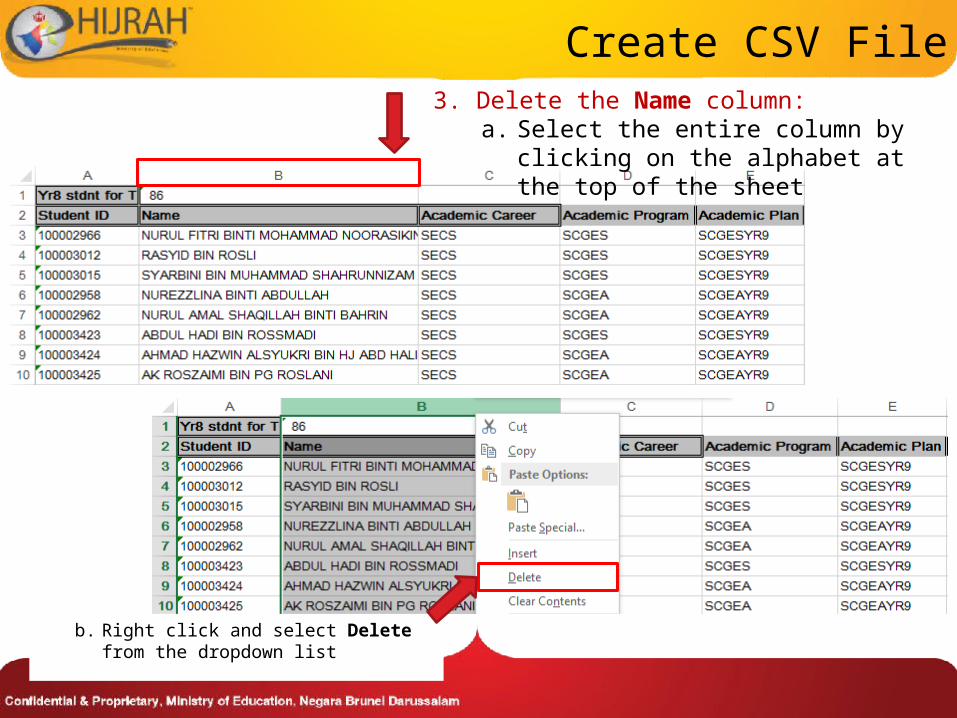
Create CSV File3. Delete the Name column:
a. Select the entire column by clicking on the alphabet at the top of the sheet
b. Right click and select Delete from the dropdown list
Create CSV File
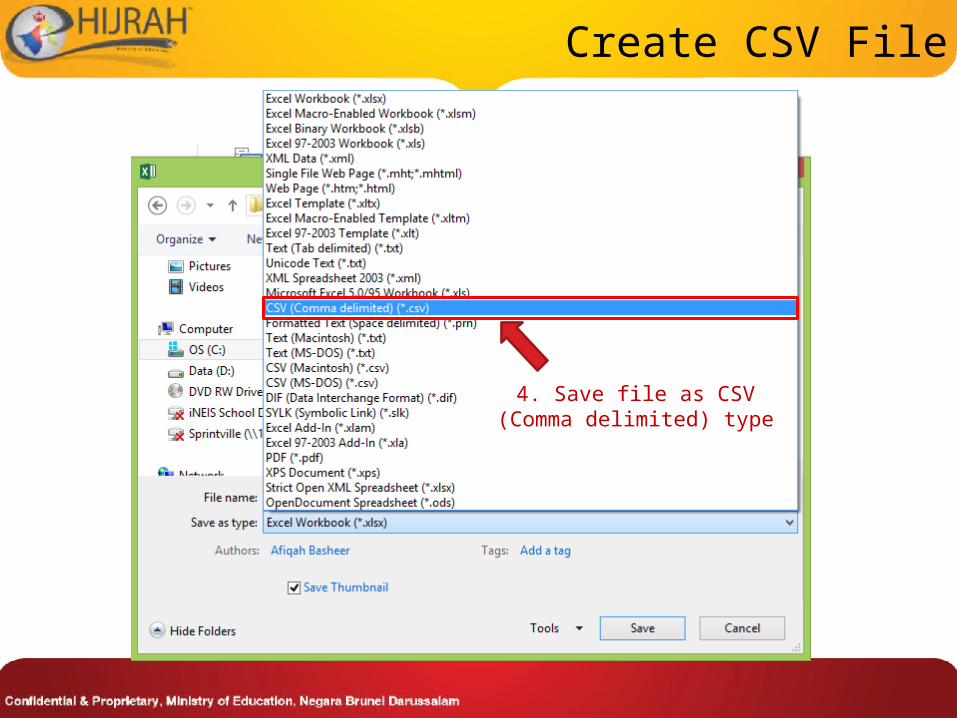
4. Save file as CSV (Comma delimited) type

Create CSV File
Verify Student Track Allocation
Details
Flow ChartGenerate List of Year 8/ Year 11
Students
Edit Wrong Progression
Upload Students Track Allocation File

1. Navigate: Records and Enrollment > Term Processing > Student Track Allocation 2. Click on Add a New Value tab
3. Enter a new Run Control ID then click on add.Format: School Code_Academic Year_LevelEg: 3026_2016_Y8
Upload Students Track Allocation File (Batch)
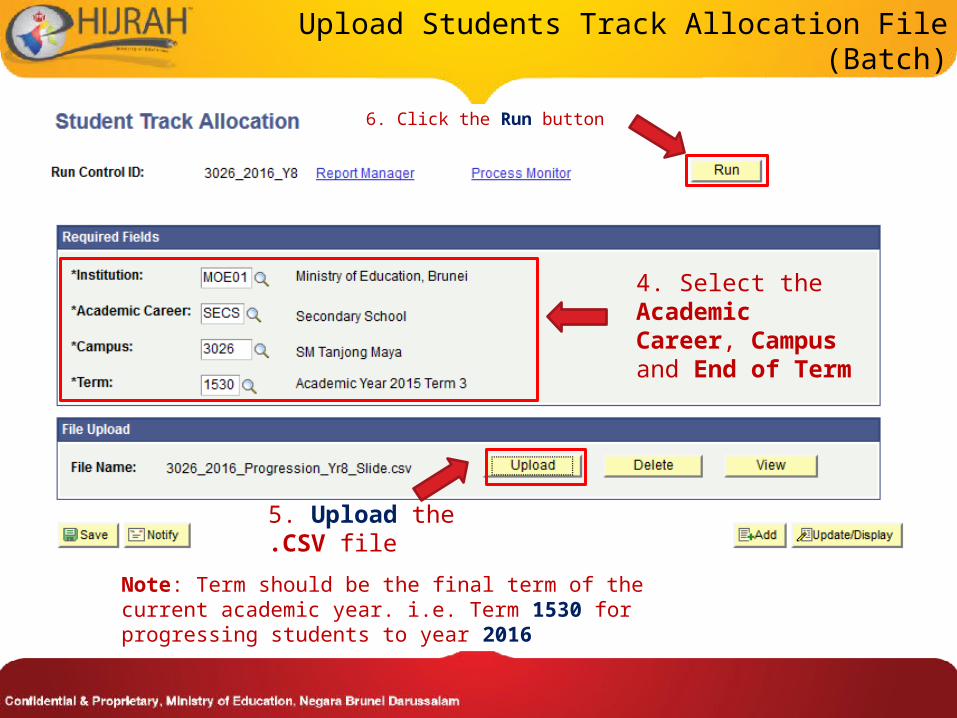
4. Select the Academic Career, Campus and End of Term
5. Upload the .CSV file
6. Click the Run button
Note: Term should be the final term of the current academic year. i.e. Term 1530 for progressing students to year 2016
Upload Students Track Allocation File (Batch)

7. Ensure the box is checked, then click on OK
Upload Students Track Allocation File (Batch)
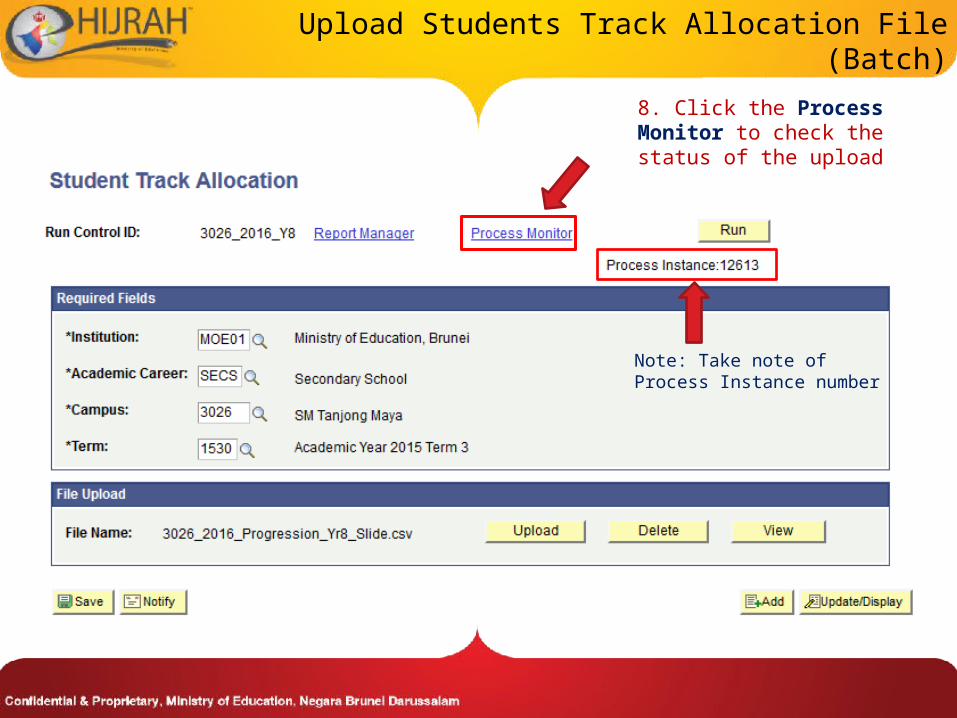
8. Click the Process Monitor to check the status of the upload
Note: Take note of Process Instance number
Upload Students Track Allocation File (Batch)

10. Click Refresh at interval times
9. You should see that:i. Run Status: Processing
or Queued and ii. Distribution Status: N/A
Upload Students Track Allocation File (Batch)

12. Click on the Details link
11. Click Refresh at interval times until
i. Run Status: Success and ii. Distribution Status:
Posted
Upload Students Track Allocation File (Batch)

13. Click on the View Log/Trace link
Upload Students Track Allocation File (Batch)

14. Click on the .log file to view the summary of the uploads of students
Upload Students Track Allocation File (Batch)

15. Summary of processed, success and error rows
Upload Students Track Allocation File (Batch)

Example of the Uploaded File With Error
Note: If there is error in the file, the entire list of students will not go through although the results stated, there exist successfully progressed students
The .log file showing the summary of the result and the student with the error

• This process is to update the Student Program/Plan records for Year 8 and Year 11 retaining student, whose name have been deleted from the list of student extracted from the query.
Upload Students Track Allocation File (Manual)

Upload Students Track Allocation File (Manual)
1. Navigate: Records and Enrollment > Career and Program Information > Student Program/Plan
2. Search using the Student’s ID

Upload Students Track Allocation File (Manual)
3. Select the student’s Secondary Academic Career

Upload Students Track Allocation File (Manual)
4. Click on the “+” button
5. Change the Effective Date to the day before the term 1610 start
6. Enter Data in Program Action

Upload Students Track Allocation File (Manual)
7. Select the Student Plan tab
8. Verify the Academic Plan
9. Click on the Save button

Create CSV File
Upload Students Track Allocation File
Flow ChartGenerate List of Year 8/ Year 11
Students
Edit Wrong Progression
Verify Student Track Allocation
Details

Verify Student Track Allocation Details
1. Navigate: Records and Enrollment > Career and Program Information > Student Program/Plan
2. Search using the Student’s ID

3. Select any one of the student’s Secondary Academic Career
Verify Student Track Allocation Details
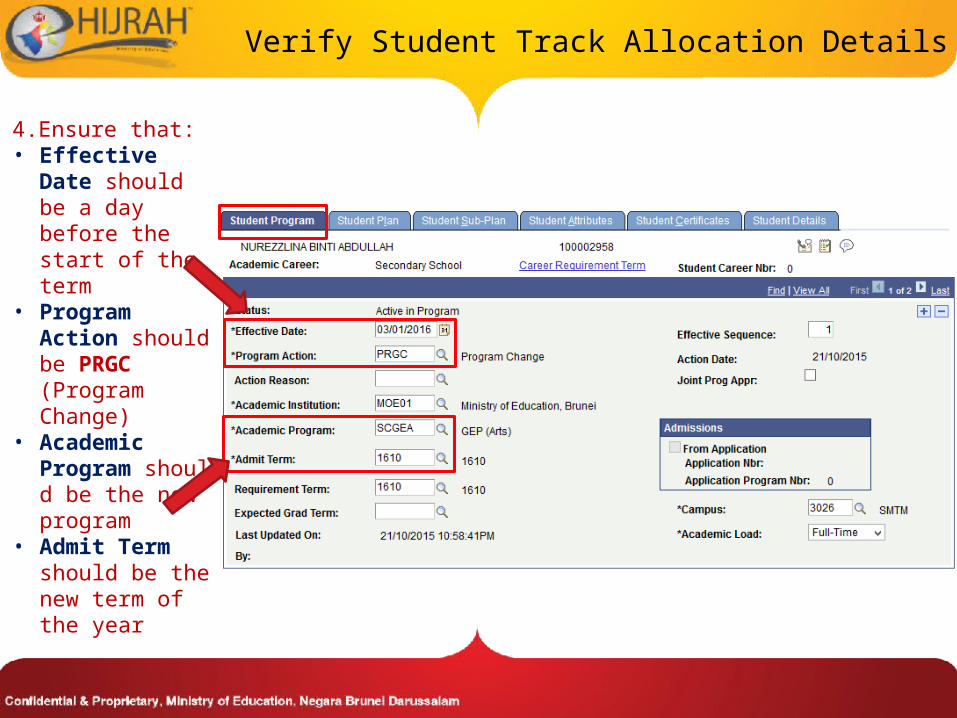
4.Ensure that:• Effective Date
should be a day before the start of the term
• Program Action should be PRGC (Program Change)
• Academic Program should be the new program
• Admit Term should be the new term of the year
Verify Student Track Allocation Details

5. Ensure that: • Academic Plan should be:
• Year 9 plan (Progress from Year 8)• Year 12 plan (Progress from Year 11)
Verify Student Track Allocation Details

Create CSV File
Upload Students Track Allocation File
Flow ChartGenerate List of Year 8/ Year 11
Students
Verify Student Track Allocation
Details
Edit Wrong Progression

Edit Wrongly Progressed Student
• This process is to edit the Student Program/Plan when student, who should retain, has been progressed by mistake
• For example:– Student is supposed to retain in Year 8 for year 2016,
but registrar has progressed the student to Year 9– School Student Registrar will need to demote the
student back to Year 8
Edit Wrongly Progressed Student
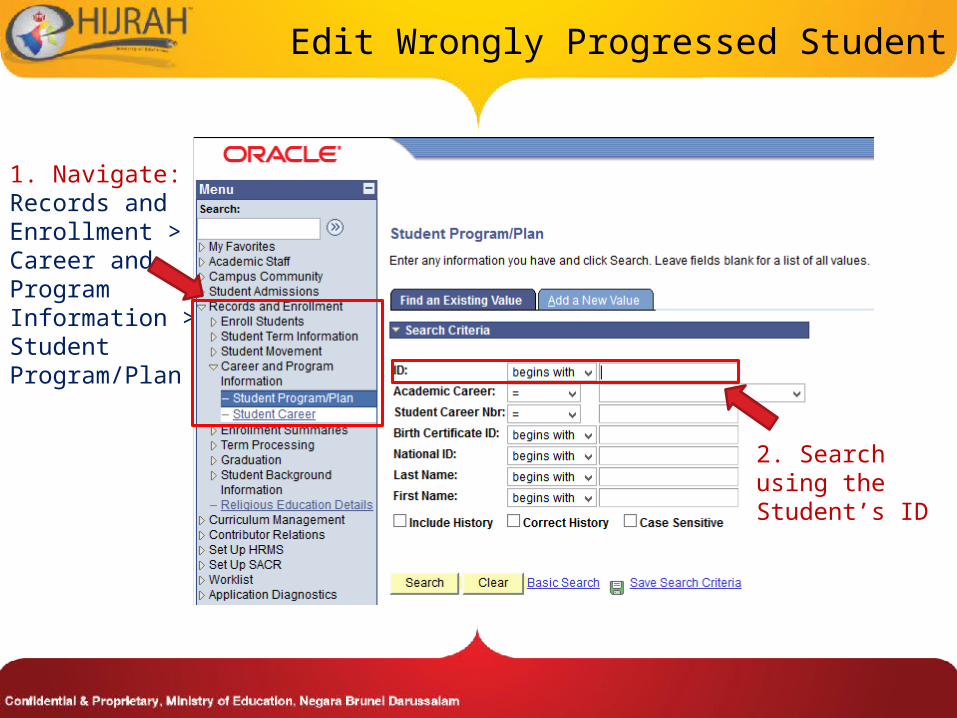
1. Navigate: Records and Enrollment > Career and Program Information > Student Program/Plan
2. Search using the Student’s ID

Edit Wrongly Progressed Student
4. Select any one of the student’s Secondary Academic Career
3. Click on the Correct History checkbox

Edit Wrongly Progressed Student
5. Change the Program Action from PRGC to DATA
6. Change the Academic Program, Admit Term and Requirement Term back to the previous record

Edit Wrongly Progressed Student7. Select the Student Plan tab
8. Enter the student’s previous Academic Plan and Requirement Term, then click the Save button

How to View Student’s Previous Records
Note: Click on the “Next Row” button to view the previous record
In the Student Program tab, Check the Academic Program, Admit Term, and Requirement Term

How to View Student’s Previous Records
In the Student Plan tab, Check the Academic Plan

Manage Schools with Issues
School Students Registrar

Important
• Please ensure schools resolve the following issues before proceeding to student progression.

School Issues
• Student not Enrolled– Student is not enrolled into any classes
• Student enrolled to Wrong Campus– Student has been transferred to new Campus without dropping student
from previous school– Student has been transferred to the wrong Campus by previous
Campus
• Student in Wrong Level– Student enrolled into wrong level, for e.g. student is Year 5 but enrolled
to Year 6 class.– Student not progressed, for e.g. student is Year 6 but Academic Plan is
Year 5
• No Citizenship details• Wrong Citizenship
– Citizenship status is not Brunei, ONLY Brunei citizenship is captured.

Check list
Before you leave, please make sure you:
• Sign Attendance
• Correct Students with IssueoLook for iNEIS team to check for your school’s
issue
• Sign Tracker
End of Presentation
Thank You


