4. Configuring the GIGABYTE Ultra TPM Utility .......................................................... 16
- 2 -
TPM Configuration ProcedureTo enable the TPM, follow the steps below in sequence:
1. Configuring the system BIOS2. Installing the Infineon TPM driver and the GIGABYTE Ultra TPM utility3. Initializing the TPM chip4. Configuring the GIGABYTE Ultra TPM utility
1. Configuring the System BIOS
To use the TPM functionality, first enter the system BIOS Setup to activate the TPM chip.
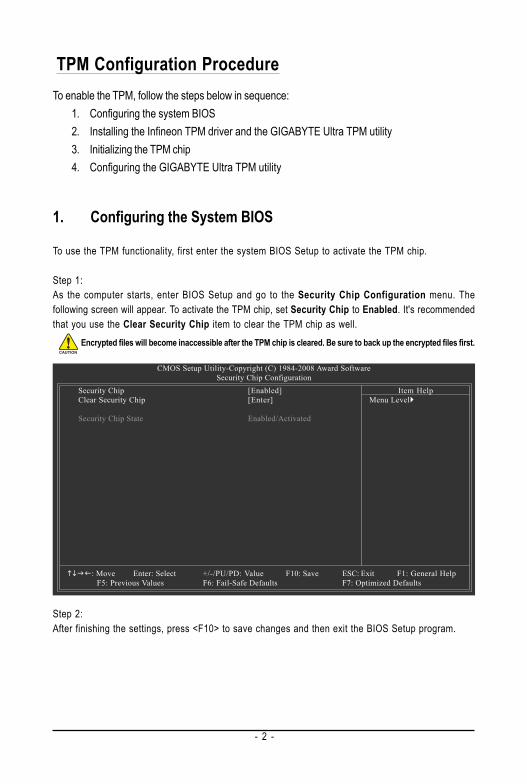
Step 1:As the computer starts, enter BIOS Setup and go to the Security Chip Configuration menu. Thefollowing screen will appear. To activate the TPM chip, set Security Chip to Enabled. It's recommendedthat you use the Clear Security Chip item to clear the TPM chip as well.
CMOS Setup Utility-Copyright (C) 1984-2008 Award SoftwareSecurity Chip Configuration
: Move Enter: Select +/-/PU/PD: Value F10: Save ESC: Exit F1: General HelpF5: Previous Values F6: Fail-Safe Defaults F7: Optimized Defaults
Item HelpMenu Level
Step 2:After finishing the settings, press <F10> to save changes and then exit the BIOS Setup program.
Encrypted files will become inaccessible after the TPM chip is cleared. Be sure to back up the encrypted files first.
- 3 -
2. Installing the Infineon TPM Driver and the GIGABYTE Ultra TPM Utility
To use GIGABYTE's Ultra TPM, ensure that the Infineon TPM driver and the GIGABYTE Ultra TPMutility have been installed in your system.
Method 1:Insert the GIGABYTE motherboard driver disk. "Xpress Install" will automatically scan your system andlist all the drivers that are recommended for installation. Click the Install All button. "Xpress Install" willinstall all of the selected drivers, including the Infineon TPM driver and the GIGABYTE Ultra TPM utility.
Method 2:To individually install the Infineon TPM driver and the GIGABYTE Ultra TPM utility, go to the InstallSingle Items menu and click the Install buttons on the right of the Infineon TPM Driver and GIGABYTEUltra TPM items.
Install the Infineon TPM driver. Install the GIGABYTE Ultra TPM utility.
- 4 -
3. Initializing the TPM Chip
After configuring the system BIOS and installing the driver software, a small Infineon Security Platformicon (This icon indicates that the Infineon Security Platform is not yet initialized.) will appear in yoursystem tray. Double-click the icon to enter "Easy Mode" (refer to the instructions in Section 3.1) orselect "Advanced Mode" (refer to the instructions in Chapter 3.2) and then begin to initialize andconfigure the Infineon Security Platform.
3.1. Easy Mode
Double-click the Infineon Security Platform icon in the system tray to launch the GIGABYTEInitialization Wizard, which is the "Easy Mode" of the Security Platform. "Easy Mode" is an easy-to-useuser interface of the Security Platform that allows users to quickly initialize the TPM chip and set up aPersonal Secure Drive (PSD).
• "Easy Mode" simplifies the configuration procedure of the Infineon Security Platform initialization andits functions. To make further settings, please select "Advanced Mode."
• "Easy Mode" provides the "File and folder encryption with Personal Secure Drive (PSD)" settings only.To use the "File and folder encryption with Encryption File System (EFS)" or "Secure e-mail" functions,please select "Advanced Mode."
Step 1: Set up a PasswordLaunch the GIGABYTE Initialization Wizard. This wizard will request you to set up a password. After enteringthe password, click OK to begin the initialization of the Infineon Security Platform.
This password incorporates the functionalities of the "Owner Password", "User Password", "EmergencyRecovery Token Password" and "Password Reset Token Password" of the Infineon Security Platform. Besure to memorize this password to administrate and use the Security Platform in the future. For details onthe rules of the Infineon Security Platform passwords and their usage, please refer to the Infineon SecurityPlatform accompanying documentation.
- 5 -
Step 3: Set up a Personal Secure Drive (PSD)
Step 2: Infineon Security Platform InitializationBegin the initialization of the Infineon Security Platform. The "TPM initialization successful!" message appearsupon completion of the initialization. Click Next to proceed with setting up a Personal Secure Drive (PSD).
Do not log off, shutdown, enter a power-saving state, or unplug the power cord before the wizard has completed.
3-1. Specify a drive letter and label for your Personal Secure DriveTo specify the drive letter for your Personal Secure Drive, select an unused letter from the My PSD will be mapped to drive:drop-down list of available letters. To specify the drive label, enter the label in the Drive label for my PSD: box. The labelshould be no more than 32 characters in length.
3-2. Specify your Personal Secure Drive size and a local drive on which your Personal Secure Drive will be savedSelect a local drive from the My PSD will be saved on drive: drop-down list for saving your Personal Secure Drive andenter the Personal Secure Drive size in the Storage space of my PSD: box.
Your Personal Secure Drive size cannot be changed after setup, so please ensure that the size youspecify is large enough to meet your needs. Please note that you cannot use the full drive size, since thefile system allocates some space. This depends on the operating system and may be significant for smalldrive sizes. Please also note that the maximum PSD drive size is limited:The maximum PSD drive size on FAT16 volumes is 2 GB.The maximum PSD drive size on FAT32 volumes is 4 GB.
Step 4: Complete the SettingsClick Exit to complete the initialization of the TPM chip and setup of the Personal Secure Drive (PSD).You can then access the GIGABYTE Ultra TPM utility to set up a Portable User Key.
- 6 -
3.2. Advanced Mode
When the GIGABYTE Initialization Wizard is launched (by double-clicking the Infineon Security Platformicon in the system tray), if you wish to configure further settings, click Advanced Mode to accessthe Infineon Security Platform Initialization Wizard.
A. Infineon Security Platform Initialization Wizard - OwnerClick Advanced Mode to launch the Infineon Security Platform Initialization Wizard. Follow the on-screen instructions to initialize the Security Platform Owner and to configure Security Platform Features(backup including Emergency Recovery, Password Reset, Enhanced Authentication, BitLocker). Thiswizard provides the basis for all further activities on the Infineon Security Platform.
A-1. When the Infineon Security Platform Initialization Wizard appears, click Next to continue.
- 7 -
A-2. Select Security Platform initialization and click Next to create the Security Platform OwnerPassword.
The Infineon Security Platform Owner key is created and stored in the Infineon Trusted Platform Moduletogether with the Infineon Security Platform Owner secret. This key is protected by the Owner Password thatmust be defined here. You must memorize this password in order to administrate the Security Platform.
- 8 -
A-3. Select Security Platform Features, which comprises Automatic Backup (includes EmergencyRecovery) and Password Reset. Click Next.
Details on FeaturesAutomatic Backup (includes Emergency Recovery)Check this feature, if you want to configure automatic Security Platform backups. Configuring Backupis strongly recommended. Otherwise all user data will be lost in case of emergency.
Password ResetCheck this feature, if you want to create a Password Reset Token for all users. Configuring PasswordReset is strongly recommended. Otherwise Basic User Passwords can not be reset.
You cannot uncheck this feature, if the policy Enforce configuration of Backup including EmergencyRecovery is enabled.
You cannot uncheck this feature, if the policy Enforce configuration of Password Reset is enabled. Thisfeature can be configured only once. The selection is disabled, if Password Reset has already been configured.
A-4. With this page you can configure automatic Security Platform backups. The Security Platformbackups comprise the Security Platform Credentials and Settings and the PSD encrypted data, etc. Thiscan prevent if a hardware or storage media failure occur, the backups could restore for the certain userssettings. Click Next.
- 9 -
A-5. Select Create a new Recovery Token. Then enter a new token password to be used forEmergency Recovery.
A-6. Select Create a new Token to create a Password Reset Token. Then enter a new token password.
A-7. Make sure you have selected all the functions you want to perform. Click Next to continue.
Do not log off, shutdown, enter a power-saving state, or unplug the power cord before the wizard has completed.
- 10 -
A-8. Click Finish to complete the initialization and configuration of the Infineon Security Platform. Thenaccess the Infineon Security Platform User Initialization Wizard (select the Start Security PlatformUser Initialization Wizard check box).
B. Infineon Security Platform Initialization Wizard - UserThe Infineon Security Platform User Initialization Wizard is used to initialize the Security Platform Usersand to configure the user-specific features (secure e-mail, file and folder encryption with EFS and PSD,Enhanced Authentication). This wizard has to be started for each computer user, who is intended to usethe personalized Infineon Security Platform Features (i.e., who will be Infineon Security Platform User).
B-1. Launch the Infineon Security Platform User Initialization Wizard. Click Next to continue.
- 11 -
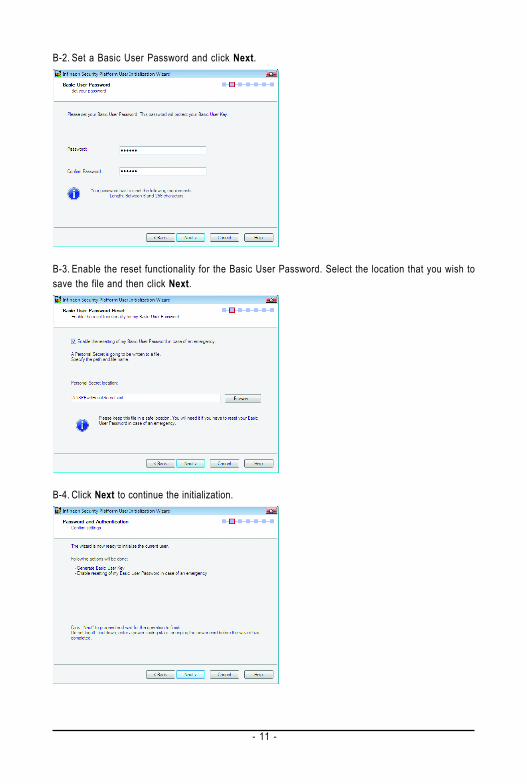
B-2. Set a Basic User Password and click Next.
B-3. Enable the reset functionality for the Basic User Password. Select the location that you wish tosave the file and then click Next.
B-4. Click Next to continue the initialization.
- 12 -
B-5. Select the Security Platform Features you want to configure and click Next to continue.
Details on FeaturesSecure e-mailUser-specific e-mail encryption and/or signing to prevent unauthorized persons from reading or chang-ing your e-mails. Using this feature guarantees that only the e-mail creator and the specified recipientswill be able to decrypt and read the message or validate the identity of the sender.If you chose to configure this feature, you can request a certificate for secure e-mail (if a certificaterequest web address is set in your policy settings). The wizard will provide information how toconfigure secure e-mail. The configuration of your mail client is not part of this wizard. Thus the statuscannot be displayed here.
File and folder encryption with Encrypting File System (EFS)The operating system incorporates the functionality to perform user-specific encryption of the content offolders and files on the local computer using the Microsoft Encrypting File System (EFS). Only the userwho created a file in these folders can access the content of this file. Other users have to be grantedaccess rights to an EFS folder in an explicit administrative operation to enable them to use files in it.If you chose to configure this feature, you can select a certificate for EFS. You can also request or createa new certificate.
File and folder encryption with Personal Secure Drive (PSD)Personal Secure Drive features file and folder encryption similar to EFS. Unlike EFS, PSD is supportedin Windows Vista Home Basic, Vista Home Premium and XP Home Editions.A logical drive is provided to permitted users. This drive offers access protection and encryption for allcontent in it. The encryption is performed automatically. A PSD cannot be accessed via its UNCidentifier to get readable data and can be installed only on the local computer. Network access is notpossible. If you chose to configure this feature, you can set up, modify or delete your PSD. Like EFSconfiguration, you can select a certificate for PSD. You can also request or create a new certificate.
EFS is not supported in Windows Vista Home Basic, Vista Home Premium and XP Home Editions.
- 13 -
B-5-1. Use the File and folder encryption with Personal Secure Drive (PSD) as the example:To configure "Encryption Certificate", click Select.
B-5-2. Click Create to create the certificate. After the certificate appears, click the certificate and click Select.
B-5-3. The certificate has been selected. Click Next.
- 14 -
B-6. Set up a Personal Secure Drive (PSD)B-6-1. Specify a drive letter and label for your Personal Secure Drive
To specify the drive letter for your Personal Secure Drive, select an unused letter from the drop-down list of available letters.To specify the drive label, enter the label in the field provided. The label should be no more than 32 characters in length.Select the Load my Personal Secure Drive at logon check box, if you want to load your PSD at logon. Click Next.
B-6-2. Specify your Personal Secure Drive size and a local drive on which your Personal Secure Drive will be saved.Click Next.
Your Personal Secure Drive size cannot be changed after setup, so please ensure that the size youspecify is large enough to meet your needs. Please note that you cannot use the full drive size, since thefile system allocates some space. This depends on the operating system and may be significant for smalldrive sizes.Please also note that the maximum PSD drive size is limited:The maximum PSD drive size on FAT16 volumes is 2 GB.The maximum PSD drive size on FAT32 volumes is 4 GB.
- 15 -
B-7. Click Next to continue.
Do not logoff, shutdown, enter a power-saving state, or unplug the power cord before the wizard has completed.
B-8. Click Finish to finish the user initialization and features configuration of the Infineon Security Platform.
C. Infineon Security Platform Settings ToolWith the Security Platform Settings Tool you can get various information about the Trusted Platform Moduleof your system. Also, you are able to carry out several administrative tasks, such as to change Basic UserPassword, perform backups, export/import Security Platform User keys and certificates, etc.
- 16 -
4. Configuring the GIGABYTE Ultra TPM Utility
GIGABYTE's unique Ultra TPM (Trusted Platform Module) supports the industry's most advanced TPMhardware-based encryption. With the easy-to-use Ultra TPM user interface, users can store/back uptheir digital signature keys on a USB flash drive or in the system BIOS. The key(s) will be erased fromthe computer after being stored on a USB flash drive (or in the system BIOS), preventing unauthorizedaccess to the computer. By simply plugging or unplugging the USB flash drive, users are able toaccess their PSD files without the hassles of complicated configurations. In addition, Ultra TPM's keybackup function allows users to still have a way to access their data in case the keys are lost.
• After creating the password(s) and key(s) associated the TPM, be sure to store them in a secure locationand back them up. Loss of the password(s) or the key(s) will render the files encrypted via the TPM unableto be cracked or read.
• Though the TPM delivers the latest data security technology, it does not guarantee data integrity or givehardware protection. GIGABYTE is not liable for loss of encrypted data as a result of hardware damage.
4.1. Instructions for Using Ultra TPM
Before launching the Ultra TPM utility, make sure the TPM chip has been initialized and you haveencrypted the files you want. (You have to at least set up a Personal Secure Drive (PSD). Refer to3. Initializing the TPM Chip to see how to set up a PSD.)
A. Initialize...Step 1:After installing the Ultra TPM utility, the Ultra TPM icon will appear in your system tray.To create a Portable User Key, right-click on the icon and select Initialize.
Step 2:When the Initialize Ultra TPM dialog box appears, select a USB flash drive and click the EnableBackup to BIOS check box, or select at least two USB flash drives. Click OK to continue.
When more than one user stores their keys in the BIOS, the latter key will overwrite the former key.
- 17 -
Step 3:Enter the User Password created in "Easy Mode" or "Advanced Mode." Click OK to continue.
If you incorrectly enter the password three times, Ultra TPM will be locked. To be able to enter the password again,go to the "Security Chip Configuration" menu in BIOS Setup and then set "Security Chip" to "Enabled/Activate."
DO NOT turn off or restart the computer when a user key is being generated.
Step 4:Click OK to exit and complete the creation of the Portable User Key. You are able to load or unload yourPSD by simply plugging or unplugging the USB flash drive.
After completing the settings and when removing the USB flash drive(s), the InfineonSecurity Platform Settings Tool will give the following warning message, whichis normal.
B. Duplicate...Step 1:To duplicate the key to another USB flash drive, right-click on the Ultra TPM icon and select Duplicate.
Step 2:When the Duplicate USB Key dialog box appears, select the drive letter of the source USB flash driveand then select the drive letter of the destination USB flash drive. Click OK to continue.
Step 3:Click OK to complete the duplication of the key.
If you want to uninstall the Ultra TPM software, be sure to insert the USB flash drive containing the PortableUser Key into your computer before the uninstallation.


![[Eng1]tpm guidebook(1 4)v1-sample_hd_trien_khai-tpm](https://static.documents.pub/doc/80x56/58eec0431a28ab3b018b45d7/eng1tpm-guidebook1-4v1-samplehdtrienkhai-tpm.jpg)
