14
Model No. JSM-0599 Pro Series 6 in 1 powerstation / jumpstart OWNER'S MANUAL Customer Service Tel: 1-800-268-3319 © Superex Canada Limited, Toronto M2H 3B8 Made in China
| Date post: | 02-Apr-2018 |
| Category: |
Documents |
| Upload: | vuongxuyen |
| View: | 222 times |
| Download: | 1 times |

Model No. JSM-0599
Pro Series 6 in 1
powerstation / jumpstart
OWNER'S MANUAL
Customer Service Tel: 1-800-268-3319©Superex Canada Limited, Toronto M2H 3B8Made in China

1. SAVE THESE INSTRUCTIONS - This manual contains important safety and operating instructions for this Jumpstart.
2. Before using Jumpstart, read all instructions and cautionary markings on Jumpstart and in this instruction manual.
3. CAUTION - To reduce risk of injury, charge only with AC adaptor and charging cord supplied. Other chargers may cause battery to burst causing injury to persons and damage.
4. Do not expose Jumpstart or chargers to rain, moisture, or snow.5. Use of an attachment not recommended or sold by the manufacturer may result in a risk of fire,
electric shock, or injury to persons.6. To reduce risk of damage to cigarette lighter connector and cord, pull by cigarette lighter connector
rather than cord when disconnecting charger.7. Make sure cord is located so that it will not be stepped on, tripped over, or otherwise subjected to
damage or stress.8. Do not operate charger with damaged cord or cigarette lighter connector - replace it immediately.9. Do not operate Jumpstart or charger if it has received a sharp blow, been dropped, or otherwise
damaged in any way; take it to a qualified serviceperson.10. Do not disassemble Jumpstart or charger; take it to a qualified serviceperson when service or repair
is required. Incorrect reassembly may result in a risk of electric shock or fire.11. To reduce risk of electric shock, unplug charger before attempting any maintenance or cleaning.
Turning off controls will not reduce this risk.12. The Power unit is intended to be correctly orientated in a vertical or floor position.
13. WARNING - RISK OF EXPLOSIVE GASES.a) WORKING IN VICINITY OF A LEAD-ACID BATTERY IS DANGEROUS. BATTERIES GENERATE
EXPLOSIVE GASES DURING NORMAL BATTERY OPERATION. FOR THIS REASON, IT IS OF UTMOST IMPORTANCE THAT EACH TIME BEFORE USING YOUR JUMPSTARTER, YOU READ THIS MANUAL AND FOLLOW THE INSTRUCTIONS EXACTLY.
b) To reduce risk of battery explosion, follow these instructions and those published by vehicle or battery manufacturer and manufacturer of any equipment you intend to use in vicinity of battery. Review cautionary marking on these products and on engine.
c) DO NOT EXPOSE JUMPSTART OR BATTERY TO FIRE OR INTENSE HEAT AS IT MAY EXPLODE.
14. PERSONAL PRECAUTIONSa) Someone should be within range of your voice or close enough to come to your aid when you work
near a lead-acid battery.b) Have plenty of fresh water and soap nearby in case battery acid contacts skin, clothing, or eyes.c) Wear complete eye protection and clothing protection. Avoid touching eyes while working near
battery.d) If battery acid contacts skin or clothing, wash immediately with soap and water. If acid enters eye,
immediately flood eye with running cold water for at least 10 minutes and get medical attention immediately.
e) NEVER smoke or allow a spark or flame in vicinity of battery or engine.f) Be extra cautious to reduce risk of dropping a metal tool onto battery. It might spark or short-circuit
battery or other electrical part that may cause explosion.g) Remove personal metal items such as rings, bracelets, necklaces, and watches when working with a
lead-acid battery. A lead-acid battery can produce a short-circuit current high enough to weld a ring or the like to metal, causing a severe burn.
h) Use Jumpstarter on a 12 volt LEAD-ACID battery only. Do not connect to a 6 volt or 24 volt battery system. Use DC outlet socket to operate 12 volt appliances equipped with a cigarette lighter plug.
i) NEVER jumpstart a frozen batteryj) This system is not designed to be used as a replacement for a vehicular battery. Do not attempt to
operate a vehicle that does not have a battery installed.
IMPORTANT SAFETY INSTRUCTIONS

15. WARNING - FOLLOW THESE STEPS WHEN JUMPSTARTING A VEHICLE. A SPARK NEAR BATTERY MAY CAUSE BATTERY EXPLOSION. TO REDUCE RISK OF A SPARK NEAR BATTERY OR INJURY, FOLLOW PRECAUTIONS BELOW.
a) Always store battery clamps on clamp holder tabs on back of unit when not in use. Never touch battery clamps together, this can cause dangerous sparks, power arcing and/ or explosion.
b) Jump-start procedures should only be performed in a safe, dry, well-ventilated area.c) When using this unit in proximity to the vehicle's battery and engine, stand the unit on a flat, stable
surface, and be sure to keep all clamps, cords, clothing and body parts away from moving vehicle components.
d) Check polarity of battery posts. POSITIVE(POS, P,+) battery post usually has larger diameter than NEGATIVE (NEG, N, -) post.
e) Determine which post of battery is grounded (connected) to the chassis. If negative post is grounded to chassis, (as in most vehicles), see (f). If positive post is grounded to the chassis, see (g).
f) For negative-grounded vehicle, connect POSITIVE (RED) clip from Jumpstart to POSITIVE (POS, P, +) ungrounded post of battery. Connect NEGATIVE (BLACK) clip to vehicle chassis or engine block away from battery. Do not connect clip to carburetor, fuel lines, or sheet-metal body parts. Connect to a heavy gauge metal part of the frame or engine block.
g) For positive-grounded vehicle, connect NEGATIVE (BLACK) clip from Jumpstart to NEGATIVE (NEG, N, -) ungrounded post of battery. Connect POSITIVE (RED) clip to vehicle chassis or engine block away from battery. Do not connect clip to carburetor, fuel lines, or sheet-metal body parts. Connect to a heavy gauge metal part of the frame or engine block.
h) When disconnecting cables, disconnect clamp from vehicle chassis first and then remove clip from battery terminal.
I) Store in a cool, dry place. Keep out of reach of children.
16. CAUTIONS -a) Vehicles that have on-board computerized systems may be damaged if vehicle battery is jump started. Before jump-starting, read the vehicle's owners manual to confirm that external-starting assistance is advised.b) Excessive engine cranking can damage a vehicle's starter motor. If the engine fails to start after the
recommended number of attempts, discontinue jump-start procedures and look for other problems that may need to be corrected.
FIRST AID:SKIN: If battery acid comes in contact with skin, rinse immediately with running water, then wash
thoroughly with soap and water. If redness, pain or irritation occurs, seek immediate medical attention.
EYES: If battery acid comes in contact with eyes, flush eyes immediately - for minimum of 10 minutes - seek immediate medical attention.
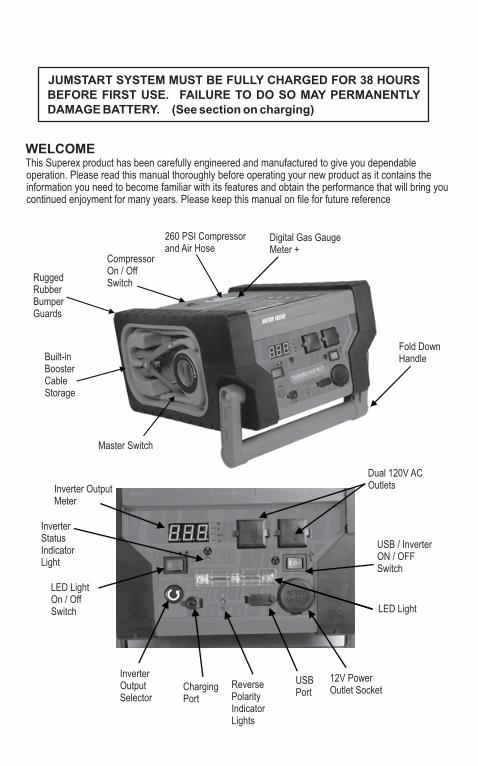
Rugged Rubber Bumper Guards
Compressor On / Off Switch
260 PSI Compressor and Air Hose
Digital Gas Gauge Meter +
Fold DownHandle
Master Switch
Built-in Booster Cable Storage
Inverter Output Meter
Inverter Status Indicator Light
LED Light On / Off Switch
Inverter Output Selector
Charging Port
Reverse Polarity Indicator Lights
USBPort
LED Light
USB / InverterON / OFF Switch
Dual 120V ACOutlets
12V PowerOutlet Socket
WELCOMEThis Superex product has been carefully engineered and manufactured to give you dependable operation. Please read this manual thoroughly before operating your new product as it contains the information you need to become familiar with its features and obtain the performance that will bring you continued enjoyment for many years. Please keep this manual on file for future reference
JUMSTART SYSTEM MUST BE FULLY CHARGED FOR 38 HOURS BEFORE FIRST USE. FAILURE TO DO SO MAY PERMANENTLY DAMAGE BATTERY. (See section on charging)

OPERATING AS A POWER SUPPLY
The Portable Power Station is capable of supplying power for 110V AC household products and 12V DC products up to the rated capacity of the unit. The length of time the product will operate will depend on the condition of the battery and the current draw of the appliance. Low wattage appliances can be operated for several hours while higher wattage products will operate for less time. A reference chart with some typical operating times is enclosed for your reference.
INVERTER SPECIFICATIONS: Maximum continuous Output Power - 200W Output Surge Capacity - 400W
DC 12 VOLT SOCKET SPECIFICATIONS : Maximum Output Power - 10A *Actual wattage of different models may vary.**Approximate running time for reference only based on fully charged battery and model used. Actual running
time may vary based on model load and battery condition.
FOR 110V AC HOUSEHOLD PRODUCTS 1.1 Introduction The Portable Power Station is equipped with a 200 watt power inverter that converts the power from the internal battery to standard 110 volt AC household power. The Power Inverter supplies 200 watts of continuous power with 400 watts of surge power. When you turn on an appliance or a tool that operates using a motor or tubes, it requires an initial surge of power to start up. This surge of power is referred to as the “starting load” or “peak load”. Once started, the tool or appliance requires less power to continue to operate. This is referred to as the “continuous load” in terms of power requirements.
You will need to determine how much power your tool or appliance requires to start up and its continued running power requirements. Power consumption is rated either in wattages (watts) or in amperes (amps).Multiply: AMPS X 110 (AC voltage) = WATTS This formula yields a close approximation of the continuous load of your appliances.Multiply: WATTS x 2 = Starting Load This formula yields a close approximation of the starting load of your appliances.Most often the start up load of the appliance or power tool determines whether the inverter has the capability to power it.
Cordless TelephoneClock RadioPortable StereoTable Lamp13" Color TVJigsaw
30 hours16,5 hours12 hours2 hours
1,9 hours25 minutes
Cell PhoneFluorescent LanternCar FanPortable 12 Volt CoolerSpotlightCar Vacuum
30 hours30 hours14 hours3 hours2 hours1,5 hours
AC Powered Products Typical Watts * Approx. Running Time**
58
104050200
449
485580
DC Powered Products Typical Watts * Approx. Running Time**

CAUTIONKnow the wattage requirements of your appliances. Use only those appliances that do not exceed the capacity of this unit.
The output waveform of this inverter is a MODIFIED SINE WAVE. It has a total harmonic distortion of 28% and maximum single harmonic of 18%. If you choose to measure the AC output voltage, you must use a TRUE RMS VOLT METER such as a Fluke 8060A, Fluke 87, Triplett 4200, Beckman 4410 or any “True RMS” multimeter. Using any other type of voltage measuring device will result in an AC voltage reading of 20 to 30 volts lower than the rated value.
CAUTIONSome equipment including the types listed below may be damaged by the inverter's modified sine wave output (non-sinusoidal).
Do not use the following with this Power Station: · Electronics that modulate RF (radio frequency) signals on the AC line will not work and may be damaged.· Speed controllers found in some fans, power tools, kitchen appliances, and other loads may be damaged.· Some chargers for small rechargeable batteries can be damaged.· Small battery-operated appliances like flashlights, razors, and night lights that can be plugged directly into an AC receptacle to recharge.· Some chargers for battery packs used in hand power tools. These affected chargers display a warning label stating that dangerous voltages are present at the battery terminals.· Metal halide arc (MHI) lights can be damaged.
Note: If you are unsure about powering any device with the inverter, contact the equipment manufacturer to determine the appliance's compatibility with the modified sine wave (non-sinusoidal) AC waveform.
1.2 Operating instructions
Before using the inverter, ensure that the battery of your Power Station is fully charged. Place the inverter power switch in the on position. The green LED light will come on to confirm that the AC outlet is powered. If the AC product you are operating has a power switch, we recommend that it be put in the “off” position. Plug product into the AC outlet and proceed to use according to the directions on the product. The Power Station will operate most devices rated up to 200 watts. The AC Power supply is equipped with a low battery alarm and an automatic shut down feature to protect the unit if the battery power drops below the safe recharging level. If the alarm sounds while you are operating an AC product, shut off the device immediately and discontinue use until the Power Station battery can be recharged. Turn inverter off and disconnect the AC product. Recharge battery as soon as possible and before further use. If you ignore the warning alarm, the power supply will automatically shut down and your AC product will instantly lose power.
The AC power supply function is also protected against overloads and overheating. If either of these conditions should occur, the red LED fault indicator light will go on and the power supply will automatically shut down.
!
!

NOTE 1: Operating a TV When operating a TV monitor or TV/VCR combo, please note that picture tubes have a degaussing coil, which uses a high initial surge of power to light up the screen from a “cold start”. If the TV does not start up on the first try, switch the TV on every 2-3 seconds until the screen comes on. Some screens may take 2-5 tries before starting.
NOTE 2: Operating with an extension cord We recommend that you use an extension cord no longer that 100 ft. Between the AC output and AC appliance. A longer cord may result in reduced output.
NOTE 3: Extended Operating with an external battery.
You can extend the Power Station operating times by connecting it to a larger external battery. For example, an external 60 Ah battery gives approximately four times the operating time of the Power Station's internal battery.
Make sure the Booster Cable safety switch is in the off position. Remove cables from holder and connect the red positive (+) clip of the cables to the red positive (+) terminal of the external battery. Connect the black negative (-) clip of the cables to the black negative(-) terminal of the external battery. Turn cable safety switch to the on position for supplemental power.
WARNING! SPARKING & EXPLOSION · Never allow boosting cables' red and black clamps to touch each other or another common metal
conductor. This action could cause damage to the unit and/or create a sparking/explosion hazard.· Boosting cable clamps must be connected positive to positive (red clamp to battery “+”) and negative to
negative (black clamp to battery “-” ). A reverse polarity connection (positive to negative) may cause damage to the unit and/or create a sparking/explosion hazard.
WARNING! ACID· Use a sealed, non-spillable battery for indoor use. Common auto and marine batteries are not suitable for
indoor use unless their fumes are vented outdoors. Common auto and marine batteries contain acid, which is hazardous if spilled.
· Always wear eye protection when working with batteries.· If battery acid comes into contact with eyes, flush the eyes with water for at least 10 minutes. Seek
medical attention immediately.· If skin or clothing comes into contact with battery acid, immediately wash the affected area with soap and
water. Seek medical attention. After use is completed, turn cable switch off and disconnect unit from the external battery. Remove black
negative (-) clip first, then remove red positive (+) clip. Restore cables in storage compartment and recharge Power Station battery as soon as possible and before next use.
CAUTION
Do not recharge Power Station battery while it is connected to an external battery.
1.3 Inverter Specifications Output Power Continuous: 200W Output Power Surge: 400W AC Output Voltage (RMS Meter): 110V ±10% Output Wave Form: Filtered Modified Sine WaveLow Battery alarm: DC 10.5V ±0.5V Low Battery Shut Down: DC 9.5V ±0.5V Frequency: 60 Hz Efficiency: 90%No Load Current Draw: < 0.65A Over temperature Protection: 150 F
!
!
!
CHARGING THE JUMPSTART SYSTEM
CAUTIONThis unit has maintenance free, built in sealed lead acid battery. Although the Jumpstart Systemarrives partially charged from the factory, it MUST BE FULLY CHARGED FOR 38 HOURSBEFORE FIRST USE, even if the battery digital gas gauge meter+ indicates a “99%” charge. Thisinitial charge pre-conditions the battery. Failure to follow this procedure may permanently damage the battery.
CHARGING WITH AC ADAPTORPlug the AC adaptor cord into the input charging jack on the front of the unit and the adaptor intoany 110 Volt AC wall outlet. The digital gas gauge meter+ will begin to flash to indicate the unit ischarging. Charge for 38 hours or until battery is full. In the final stages of the charging procedure,the digital gas gauge meter+ will flash “FL”. For full capacity, allow unit to continue charging for 2-3 hours. Once the AC adaptor input jack is removed from the unit, the digital gas gauge meter+ will remain illuminated for approximately 30 seconds.
CHARGING WITH DC ADAPTORDue to safety circuits built into the input charging jack, DC charging through this location will notfully charge the battery. Plug input of DC adapter plug into charging port of Jumpstart and theother end into the cigarette lighter socket of your vehicle. Green light on DC adapter outlet willilluminate and the digital gas gauge meter+ will begin to flash to indicate the unit is charging.Vehicle should be running for full charging to take place.
Note: This method allows battery to be topped up during a journey but may not fully charge theunit. Disconnect charging cord before turning off engine. NEVER leave vehicle running in anenclosed or poorly ventilated space.
CHARGING TIPS AND WARNINGSKeep battery power topped up, ready for emergencies. Unlike some rechargeable batteries,frequent charging will not harm and in fact, will improve the performance of the internal battery.Recharge battery as soon as possible after each use to prolong battery life. Frequent heavydischarges between recharging will reduce battery life. Do not leave Jumpstart in a totaldischarged state for an extended period of time as this can cause battery failure.All lead acid batteries suffer from self-discharge over time, especially under extreme temperatures.Store in a cool dry place.Recharge every 3 months when not in use and more frequently in warmer or colder storageconditions.Do not continuously charge the Jumpstart system for more than 40 hours. Use only the chargingadaptors provided with this unit.DO NOT OPERATE ANY OF THIS UNITS FUNCTIONS WHILE CHARGING IS IN PROCESS.
BATTERY STATUSPress the Battery Test button. The digital gas gauge meter+ will illuminate to show the amount ofpower remaining in the Jumpstart System. Digital gas gauge meter+ will remain illuminated forapproximately 30 seconds. Pressing the battery test button a second time will illuminate the PSIportion of the digital gas gauge meter+. To turn the digital gas gauge meter+ off, press the batterytest button twice, the digital gas gauge meter+ will go out.1. When the battery is fully charged, the digital gas gauge meter+ will display 99%.2. When the battery is at about 50% capacity it should be recharged as soon as possible It will be able to
operate the LED light and most 12 Volt Accessories for a limited time but will be inadequate for the Boosting function. Take care to not let the
battery deep discharge as it may damage the battery.3. When the digital gas gauge meter+ displays 25%, the battery is low and usage must be discontinued
immediately. Recharge battery as soon as possible and before further use.
!

JUMPSTARTING AN ENGINE
CAUTIONMAKE SURE THE ROTARY MASTER SWITCH IS IN THE “O” OFF POSITION.JUMPSTART MUST BE FULLY CHARGED TO JUMPSTART AN ENGINE.Do not attempt to Jumpstart an engine if the digital gas gauge meter+ does not display 99% when you press the battery test button as this could permanently damage the battery.Turn off ignition and all accessories (lights, radio, heater, air conditioning, etc.) in the vehicle with weak battery that will not start.Place vehicle in park and set hand brake.For maximum power, turn off all switches on your Jumpstart system and disconnect any accessories plugged into the 12 Volt power outlets.Check that vehicle is negatively grounded (most vehicles). Remove the cables from the side of the jumpstart channels by squeezing the clamp handle and pulling out.Securely connect the red positive clamp to the positive (+) terminal of the vehicle battery. Then, securely connect the black clamp to a grounding point on the vehicle such as the metal frame, as far away from the battery as possible. DO NOT connect it to the negative battery terminal. Make sure both clamps have good contact.Jumpstart is equipped with a Reverse Polarity indicator light. If the cables are hooked up incorrectly the red light will illuminate to provide a visual warning. If this happens, disconnect the cables and reconnect in the opposite direction. Green light should illuminate to indicate a correct hookup.NOTE: DO NOT PLACE JUMPSTART WHERE IT COULD FALL WHEN VEHICLE STARTS UP.
MAKE SURE THAT CABLES ARE ROUTED AWAY FROM MOTOR FAN OR BELTS.Turn rotary switch to the " " on position and start your vehicle.Once vehicle starts, turn rotary switch to "off" position and disconnect black clamp first and then, red clamp. Restore cables in Jumpstart System and recharge unit at first opportunity.NOTE: WHEN STARTING VEHICLE, CRANK ENGINE IN 5-6 SECOND BURSTS.IF VEHICLE DOES NOT START UP WITHIN 2-3 ATTEMPTS. ALLOW THE JUMPSTART TO COOL FOR 3 MINUTES BEFORE ATTEMPTING TO START VEHICLE AGAIN. RETRY ONLY IF BATTERY CONDITION IS GREEN.
WARNINGS! EXPLOSION HAZARD
Do not allow the positive and negative booster clamps of the Jumpstart System to come into contact with each other (or a common piece of metal) at any time. Sparking, an explosion, or damage to the unit may result.When jumpstarting a vehicle, make sure that the positive and negative booster clamps are properly connected to the vehicle and battery. Failure to connect the clamps properly may cause sparking, an explosion or damage to the unit.Always wear eye protection when working with batteries.If battery acid comes into contact with eyes, flush the eyes with water for at least 10 minutes. Seek medical attention immediately.If skin or clothing comes into contact with battery acid, immediately wash the affected area with soap and water. Seek medical attention.Be sure to remove all metal items (watches, necklaces, rings, etc.) before using the Jumpstart System. Always turn the Jumpstart System off when not in use. Store in a cool, dry place.
OPERATING USBThe Jumpstart is equipped with a 2.1A 10W power port. To operate the USB port, plug adapter in, connect device and push the rocker switch to the USB “ ” ONposition.
OPERATING LED LIGHTThe Jumpstart is equipped with an LED work light built in to the front of the unit to provide illumination of the work area for night time repairs or emergency light in case of a power failure. These lights operate using the rocker switch located to the left of the light. Turn off lights to conserve battery power when not required. LED lights are not replaceable, however they will provide many hours of operation under normal working conditions. To turn the lights on, push the switch to the “-” ON position. To turn off, push the switch to the “O” OFF position.
!
I
.
.
.
.
.
.
.

USING THE AIR COMPRESSOR
The Air Compressor operates from the internal battery of the Jumpstart System.Check battery condition to make sure it is satisfactory before operating compressor.Fully charged condition is best but you may be able to perform a short inflating jobin 50% condition. If operating under this condition, check battery during operationand discontinue immediately if battery condition falls below 25%. Recharge unit assoon as possible and before further use.To use the Compressor, remove hose from the storage compartment on the bottomof the unit. With thumb lock lever in the raised position, push connector firmly overvalve stem and press down lever to lock it in place. Push the 3 way rocker switch tothe compressor “O” ON position. Digital gas gauge meter+ will automaticallyilluminate. Monitor the digital gas gauge meter+ while inflating. When desiredpressure is reached, turn unit off and disconnect connector by unlocking lever.Disconnect hose and place in storage compartment. Digital gas gauge meter+ willshut off automatically after approximately 30 seconds.Included with your Jumpstart with Compressor are adaptors for inflating athleticballs, and small inflatables. For inflating these objects, select the appropriateadaptor and insert it into the hose connector. Press lever down to lock in place.Inflate object as above. For athletic balls, moisten needle before inserting it into theball valve. For pneumatic articles, the tapered nozzle should be inserted into thevalve and held tightly to insure a good seal.
WARNINGThis compressor is capable of inflating objects to high pressures. It will typically take approximately 6-8 minutes to inflate a regular car tire to 30 PSI. Do not over inflate objects beyond their rated capacity. Never leave compressor unattended while in use.This Compressor is designed for periodic use only. Operation over an extended period of time will overheat the unit and damage the motor. Do not operate continuously for over 15 minutes. If you require more than 15 minutes of use, turn off and let it cool for approximately 30 minutes before resuming operation. Do not operate for more than 5 minutes at pressure exceeding 99 PSI, hose failure may result. Pressure gauge on this unit is designed to monitor inflation only and readings may be +/- 2 PSI up to 99 PSI. For readings requiring tighter accuracy, please employ a separate gauge designed for measuring pressure to check reading.
!

USE AS A 12 VOLT DC PORTABLE POWER SUPPLYThe Jumpstart System is equipped with an outlet socket and can be used to operate most 12 volt auto accessories and appliances (11 AMP maximum) equipped with a cigarette lighter plug. Simply lift up cover on socket and plug in appliance. NOTE: socket is live so appliance will be instantaneously powered. Length of time appliance will operate will depend on condition of battery and current draw of appliance. Periodically check battery status during operation and discontinue use immediately if battery condition falls to 25%. Recharge unit as soon as possible and before further use.
Power outlet is protected by an internal circuit breaker to prevent damage to unit in case appliance has a short circuit or exceeds 11 AMPS. If circuit breaker is tripped, disconnect appliance and have it checked. Circuit breaker will automatically reset once it cools down (approx. 15-20 minutes). DO NOT PLUG A CIGARETTE LIGHTER INTO THE OUTLET OF THE JUMPSTART. BATTERY
MAINTENANCE INSTRUCTIONSAll batteries lose charge with time. AC recharge is recommended after each use or every two months when not in frequent use. Use the AC charger and charge for the recommended time.
If the unit gets dirty, gently clean the outer surfaces with a soft cloth moistened with a mild solution of water and detergent. Do not use solvents or other chemical cleaners. Periodically inspect the condition of charging adapters, connectors, and wires. Replace any components that may have become worn or broken. These parts are not serviceable. Do not open or disassemble. Service on Jumpstart is confined to replaceable parts only. All other servicing should be performed by a qualified service personnel only.
MOVING AND STORAGE INSTRUCTIONSAlways turn the master switch to the “O” OFF position when not in use.Store in a cool, dry place.
Fuse Replacement - 12 volt adapter plug
This 12 volt plug is fitted with a 2A fuse in the tip. Should the fuse need replacing, unscrew end cap and replace with a new 2A fuse.
BATTERY This unit is equipped with a 12 Volt 17 Amp-hour maintenance free, sealed lead acidrechargeable battery, which has a normal life expectancy of up to 1000 charging cyclesand will give many years of dependable service if properly cared for following thedirections above. In the event that the battery needs replacement in the future, the unitwill need to be opened up; this service should be performed by a qualified serviceprofessional.Replacement batteries may be purchased from an electrical supply store. Oldbattery should be disposed of properly and safely. Some states require recycling.Please contact your local solid waste authority for recycling information.
WARNING! EXPLOSION HAZARDDO NOT EXPOSE BATTERY TO FIRE OR INTENSE HEAT AS IT MAY EXPLODE. BATTERY CONTAINS ACID: IF CASE SHOULD BECOME CRACKED, DISPOSE OF IMMEDIATELY TAKING ADEQUATE SAFETY PRECAUTIONS TO PREVENT INJURIES OR DAMAGE TO PERSONS OR PROPERTY.
! CAUTION
FOR CONTINUED PROTECTION AGAINST RISK OF FIRE, REPLACE ONLY WITH SAME TYPE AND
RATING OF FUSE
LE
AD
RE
TU
RN
RECYCLE
Pb
CONTAINS NON-SPILLABLESEALED LEAD ACID BATTERY.BATTERY MUST BE RECYCLEDOR DISPOSED OF PROPERLY.

TROUBLE SHOOTING GUIDEBuzz in Audio Equipment
Some inexpensive stereo systems have inadequate internal power-supply filtering and may buzz slightly when powered by the Power Station. The best solution to eliminate the buzzing is to use an audio system with a good quality filter.
Television Interference The Power Station is shielded to minimize interference with TV signals. If TV signals are weak, you may see interference in the form of lines scrolling across the TV screen. Try one of the following suggestions to minimize or eliminate the interference.
· Use an extension cord to increase the distance between Power Station and the TV, antenna, and cables.
· Adjust the orientation of the Power Station, television, antenna, and cables.
· Maximize TV signal strength by using a better antenna. Use a shielded antenna cable where possible.
· Try a different TV. Different models vary considerably in their susceptibility to interference.
AC Power Supply Problems
Problem Possible Cause Solution
AC product could not operate
AC product is drawing more than 200W
AC product is rated at less than 200W, but the highstarting surge has tripped the safety overload.
Battery has discharged to9.5V ± 0.5V
Inverter fuse is blown
Use only AC product with a power rating less than 200W.
Use only AC product with a starting surge within 400W surge rating of the Power Station
Turn the AC outlet off and recharge the Power Station
Replace with new 30A blade fuse
Overload shutdown Appliance power requirements exceed the capability of the Power Station
Unplug the appliance and confirm that the appliance's power requirement is 200W or less before attempting to restart the appliance.
Over temperature shutdown
Inverter has overheated due to poor ventilation or excessively warm environmental conditions.
Turn the AC Outlet On/Off switch off and allow Power Station to cool for 15 minutes or more. Clear blocked fan opening or remove objects covering the unit. Move to a cooler environment.
Alarm sounds Internal battery is nearly discharged (10.5V ± 0.5V) If you ignore this warning, the Power Station will automatically shut down when the battery reaches 9.5 V ± 0.5V
Recharge the Power Station

Run time is less than expected
Internal battery was not fully charged
AC product power consumption is higher than expected
Recharge using the AC Charger, until Charging Status light turns green
Check AC product power or wattage rating (or current draw for 12 V DC appliances) and compare with chart.NOTE: Start up load will affect running time of appliance
Problem Possible Cause Solution
Problem Possible Cause Solution
Jumpstart Problems
The engine being boosted will not start
Power Station battery is not fully charged
The engine condition is poor.
The engine start capacity exceeds the boosting capability of the Power Station
Recharge the battery.
Have the engine serviced.
Charging Problems
Problem Possible Cause SolutionCharging Status light is off when AC charger is connected
Power Station has been charging for more than 24 hours but Charging Status light has still not turned green
No AC power at the AC wall outlet.
AC Charger is faulty
Status L.E.D. May have temporarily malfunctioned.
Ensure power is available at the AC wall outlet. Replace the AC Charger.
Disconnect charger and allow Power Station to rest for 15 minutes.Recheck battery voltage
WARNING! ELECTRIC SHOCK HAZARD
Do not remove the housing or disassemble the Power Station except to replace the internal battery. The Power Station does not contain any internal user-serviceable parts and attempting to service the unit yourself could result in electrical shock or burn.
Limited WarrantySuperex warrants to the original purchaser that this product is free from defects in material or workmanship for a period of 1 year from the date of purchase. This warranty does not extend to subsequent purchasers or users. Superex will, during the warranty period, repair or replace the product free of charge. A defective unit may be replaced with a new or reconditioned unit of same or similar design. Superex will, at its option, use new or reconditioned parts in performing warranty repairs.This product is not intended for commercial use and, if so used, will immediately void the warranty.Superex Canada Ltd. assumes no obligation to pay the consumer a cash refund. This Warranty does not cover the failure of, or damage to the product that results from accident, alteration, abuse, misuse, neglect, normal wear and tear (e.g. scratches, chips, dents or discoloration) or failure to follow operating instructions, nor does this Warranty cover damage caused by the use of any attachment not originally equipped with this product.Superex Canada Ltd. Disclaims any liability for any damages resulting from delay or loss of use and service, or repair, or for any incidental or consequential damages arising out of this expressed Warranty, or any implied Warranty, even though it may be caused by negligence or other fault on the part of the Distributor or others. The implied Warranties on this product shall be in effect only for the duration of the expressed Warranties, either expressed or implied. Local laws may vary respecting the limitation on incidental, consequential or other damages, or the length of implied Warranties, so the above limitations may not apply to you.
TO OBTAIN WARRANTY SERVICE:In order to qualify for the warranty, a dated proof of purchase must be provided. If your product requires service within 30 days of purchase, please return it along with your original dated sales receipt or other proof of purchase to the original merchant. Otherwise, contact Superex directly at:
By phone: 1-800-268-3319By fax: (416) 497-4943
By e-mail: [email protected]
TO RETURN THE PRODUCT:You must obtain a Return Merchandise Authorization Number (RMA) and a shipping address from Superex prior to returning the product. Please be prepared to provide the Customer Service Agent with your name, address, phone number, model number and a brief description of the problem.
Safely package the unit, preferably in its original packing and box, along with a copy of your dated proof of purchase and a short note with your name, address, phone number and a brief description of the problem. Ship the unit PREPAID to the address supplied to you. Do not include any accessories (e.g. cables) with your unit. Make sure to clearly mark the RMA number on the outside of the shipping carton.
Superex will examine your unit and at its option, either repair or replace the unit. In either case, the unit will be returned to you freight prepaid within 4 weeks of receipt. Superex Canada Limited, Toronto, M2H 3B8


