330
Lotus® Sametime Administrator’s Guide Version 7.0 for Windows, AIX, Solaris, and i5/OS G210-2082-00

Lotus® Sametime
Administrator’s Guide
Version 7.0
for Windows, AIX, Solaris, and i5/OS
G210-2082-00
���


Lotus® Sametime
Administrator’s Guide
Version 7.0
for Windows, AIX, Solaris, and i5/OS
G210-2082-00
���

Note
Before using this information and the product it supports, read the information in “Notices,” on page 307.
Eighth Edition (August 2005)
This edition applies to version 7.0 of IBM Lotus Sametime (product number L-GHUS-5Z7NTN) and to all
subsequent releases and modifications until otherwise indicated in new editions.
This edition replaces G210-1821-00.
© Copyright International Business Machines Corporation 2005. All rights reserved.
US Government Users Restricted Rights – Use, duplication or disclosure restricted by GSA ADP Schedule Contract
with IBM Corp.

Contents
Chapter 1. Introduction to IBM Lotus
Sametime (Instant Messaging Limited
Use version) . . . . . . . . . . . . . 1
What is the IBM Lotus Instant Messaging Limited
Use version of Sametime? . . . . . . . . . . 1
Install Sametime on a Domino server . . . . . . 3
Sametime basics . . . . . . . . . . . . . 3
End user features . . . . . . . . . . . . 4
Sametime administration terms and features . . . 5
Sametime clients . . . . . . . . . . . . 11
Sametime services . . . . . . . . . . . 12
Starting and stopping the Sametime server . . . . 13
Sametime on a Windows NT server . . . . . 13
Starting the Sametime server . . . . . . . 13
Stopping the Sametime server . . . . . . . 13
Sametime on a Windows 2000 server . . . . . 13
Starting the Sametime server . . . . . . . 13
Stopping the Sametime server . . . . . . . 14
Chapter 2. Using the Sametime
Administration Tool . . . . . . . . . 15
Starting the Sametime Administration Tool . . . . 15
User name and password requirements . . . . 15
Details: Starting the Sametime Administration
Tool . . . . . . . . . . . . . . . . 15
Overview of the Sametime Administration Tool
features . . . . . . . . . . . . . . . . 16
Server Overview . . . . . . . . . . . . 16
Message From Administrator . . . . . . . 16
Monitoring . . . . . . . . . . . . . 16
Logging . . . . . . . . . . . . . . 16
Directory . . . . . . . . . . . . . . 16
Configuration . . . . . . . . . . . . 17
Server Overview feature . . . . . . . . . 17
Message From Administrator feature . . . . . 18
Monitoring the Sametime server . . . . . . 18
Logging Sametime activity . . . . . . . . 18
Managing users and Domino Directories . . . 19
Managing users and LDAP directories . . . . 19
Configuring ports and network connectivity . . 20
Configuring Community Services . . . . . . 20
Additional administrative tasks . . . . . . . . 21
Deploying multiple Sametime servers . . . . 21
Managing security . . . . . . . . . . . 21
Adding a new Sametime administrator . . . . . 22
Allowing others to access the Sametime
Administration Tool . . . . . . . . . . 22
Using individual names instead of an
Administrators Group . . . . . . . . . . 23
Create a Person document for the administrator 23
Create an Administrators Group document . . . 24
Add the Administrators Group document to
Sametime database ACLs . . . . . . . . . 24
Modifying the Server document of the Sametime
server . . . . . . . . . . . . . . . 26
Adding and removing names from an
Administrators Group document . . . . . . 27
Roles in Sametime database ACLs . . . . . . . 27
Roles in the Sametime Configuration database
(stconfig.nsf) . . . . . . . . . . . . . 28
Roles in the Domino Directory (names.nsf) . . . 28
Roles in the Domino Web Administration
database (webadmin.nsf) . . . . . . . . . 29
Chapter 3. Using Domino Directories 31
Managing the Domino Directory . . . . . . . 31
Basic Domino Directory requirements . . . . 31
Managing multiple Domino Directories with
Sametime . . . . . . . . . . . . . . 32
Directory security considerations . . . . . . 34
Using an LDAP directory instead of a Domino
Directory . . . . . . . . . . . . . . 34
Managing users in the Domino Directory . . . . 35
Adding users . . . . . . . . . . . . . 35
Using Sametime self-registration . . . . . . 36
Managing Sametime users with the Sametime
Administration Tool . . . . . . . . . . 38
How Sametime uses Domino Directory information 41
Person documents . . . . . . . . . . . 41
Group documents . . . . . . . . . . . 42
The Server document . . . . . . . . . . 42
Directory views used by Sametime features . . . 43
Managing users in buddy lists and privacy lists . . 43
Chapter 4. Using LDAP Directories with
Sametime . . . . . . . . . . . . . 45
Using LDAP with the Sametime server . . . . . 45
How LDAP is used with Sametime . . . . . . 47
Authentication . . . . . . . . . . . . 47
Searches . . . . . . . . . . . . . . 47
Connectivity . . . . . . . . . . . . . 48
Administration and user management . . . . 48
Setting up an LDAP connection . . . . . . . 49
Selecting the appropriate LDAP options during
the server installation . . . . . . . . . . 49
Alter the Directory Assistance document for the
LDAP directory . . . . . . . . . . . . 50
Configure the LDAP Directory settings . . . . 51
LDAP directory settings . . . . . . . . . . 54
Connectivity . . . . . . . . . . . . . 54
Basics . . . . . . . . . . . . . . . 55
Authentication . . . . . . . . . . . . 55
Searching . . . . . . . . . . . . . . 55
Group Contents . . . . . . . . . . . . 55
Add Administrator . . . . . . . . . . . 55
Access Control . . . . . . . . . . . . 55
LDAP knowledge required to configure the
LDAP Directory settings . . . . . . . . . 55
Configuring LDAP Connectivity settings . . . 56
Configuring the LDAP Basics settings . . . . 60
© Copyright IBM Corp. 2005 iii

Configuring LDAP Authentication settings . . . 69
Configuring the LDAP Searching setting . . . . 71
Configuring the LDAP Group Contents setting 73
Using SSL to encrypt connections between the
Sametime and LDAP servers . . . . . . . . 74
Using SSL to encrypt all data transmitted
between the Sametime and LDAP servers . . . 75
Using SSL to encrypt only user passwords
passing between the Sametime and LDAP servers 75
Allowing all data to pass unencrypted between
the Sametime and LDAP servers . . . . . . 77
Modifying the Directory Assistance document of
the LDAP server to encrypt the connection
between the Sametime server and the LDAP
servers . . . . . . . . . . . . . . . 78
Ensuring that the Sametime server trusts the
LDAP server certificate (Windows and
AIX/Solaris servers) . . . . . . . . . . 79
Ensuring that the Sametime server trusts the
LDAP server certificate (i5/OS servers) . . . . 83
Adding a new administrator in the LDAP
environment . . . . . . . . . . . . . . 85
Access Control Lists and LDAP User Names . . . 85
Setting up an LDAP connection after selecting the
Domino directory during the server installation . . 86
Shut down the Sametime services but keep the
Domino services active . . . . . . . . . 87
Set up a Directory Assistance database . . . . 87
Identify the Directory Assistance database on the
Sametime server . . . . . . . . . . . . 88
Create a Directory Assistance document that
enables the Sametime server to access the LDAP
server . . . . . . . . . . . . . . . 88
Create an LDAP document in the Configuration
database . . . . . . . . . . . . . . 91
Copy and rename the .DLL files, edit the
Notes.ini file, or edit the Sametime.ini file . . . 92
Run the Lotus Sametime Name Conversion
Utility . . . . . . . . . . . . . . . 93
Configuring the LDAP directory settings . . . 94
Restart the Sametime services on your Domino
server . . . . . . . . . . . . . . . 94
Using Java classes to customizing LDAP directory
searches . . . . . . . . . . . . . . . 94
Using a Java class to control directory searches
for people and groups . . . . . . . . . . 94
Using a Java class to control the format of user
names returned in LDAP directory searches . . 98
Solving token authentication problems in mixed
server and multiple LDAP directory environments . 102
Solving the token authentication problem . . . 103
Managing users in buddy lists and privacy lists in
an LDAP environment . . . . . . . . . . 104
Chapter 5. Configuring Ports and
Network Connectivity . . . . . . . . 105
Ports used by the Sametime server . . . . . . 105
HTTP Services, Domino Services, LDAP
Services, and Sametime intraserver ports . . . 105
Community Services ports . . . . . . . . 106
Proxy support for Sametime clients . . . . . . 107
Overview of Sametime client connectivity . . . . 108
Configuring Sametime ″Networks and Ports″
settings . . . . . . . . . . . . . . . 108
HTTP Services settings . . . . . . . . . 108
Community Services Network settings . . . . 109
Community Services connectivity and the home
Sametime server . . . . . . . . . . . . 117
Sametime Connect and the home Sametime
server . . . . . . . . . . . . . . . 118
Assigning users to a home Sametime server . . 118
Home Sametime servers and self-registration 118
Sametime Connect client connection processes . . 119
Basic Sametime Connect client connection
process . . . . . . . . . . . . . . 119
Sametime Connect client connection process
using the Java Plug-in settings . . . . . . . 119
Basic Sametime Connect client connection
process . . . . . . . . . . . . . . 119
Sametime Connect client connection processes
using the Java Plug-in connectivity settings . . 125
Changing the default connectivity settings of the
Sametime Connect for browsers client . . . . . 132
Specifying the default configuration settings of
the Sametime Connect for browsers client . . . 133
Creating the ConnectivityMethod applet
parameter . . . . . . . . . . . . . 133
Syntax of the ConnectivityMethod applet
parameter . . . . . . . . . . . . . 134
Complete examples of the ConnectivityMethod
applet parameter . . . . . . . . . . . 135
Adding the ConnectivityMethod parameter to
the STSrc.nsf database . . . . . . . . . 136
Example of custom HTML code required to
launch the Sametime Connect for browsers
client . . . . . . . . . . . . . . . 136
About HTTP tunneling . . . . . . . . . . 137
What is HTTP tunneling on port 80? . . . . 137
Configuring HTTP-tunneling settings on a
server that uses a single IP address . . . . . 139
Configuring HTTP tunneling on a server that
uses multiple IP addresses . . . . . . . . 140
Notes about client connection processes using
HTTP tunneling on port 80 . . . . . . . . 143
Assigning IP addresses to multiple Sametime
servers installed on a single server machine . . . 144
Connecting to other Sametime servers . . . . . 144
Extending a Sametime server to the Internet . . . 144
Using reverse proxy or portal servers with the
Sametime server . . . . . . . . . . . . 145
What is a reverse proxy server? . . . . . . 145
Requirements and limitations of Sametime 7.0
reverse proxy support . . . . . . . . . 146
Configuring mapping rules on a reverse proxy
server to support Sametime . . . . . . . 149
Configuring a Sametime server to operate with
a reverse proxy server . . . . . . . . . 152
Sametime client connectivity and reverse proxy
servers . . . . . . . . . . . . . . 153
Chapter 6. Configuring the
Community Services . . . . . . . . 155
iv Sametime Administrator’s Guide

About the Community Services . . . . . . . 155
Community Services configuration settings . . . 156
General settings . . . . . . . . . . . 156
Server Features settings . . . . . . . . . 156
Sametime Connect for browsers settings . . . 157
Community Services connectivity settings . . . 157
Community Services server clusters . . . . . 157
Number of entries on each page in dialog boxes
that show names in the directory . . . . . . 157
How often to poll for new names added to the
Sametime Community directory . . . . . . 158
How often to poll for new servers added to the
Sametime Community . . . . . . . . . 158
Maximum user and server connections to the
Community server . . . . . . . . . . 159
Allow users to authenticate using either LTPA
or Sametime Tokens (stauths.nsf and stautht.nsf) 160
Allow users to transfer files to each other . . . 160
Allow users to send announcements . . . . . 161
Allow Connect users to save their user name,
password, and proxy information (automatic
login) . . . . . . . . . . . . . . . 162
Display the ″Launch Sametime Connect for
browsers″ link . . . . . . . . . . . . 163
Anonymous Access Settings for Community
Services . . . . . . . . . . . . . . . 163
Anonymous users can enter virtual places . . . 164
Users of Sametime applications can specify a
display name so that they do not appear online
as ″anonymous.″ . . . . . . . . . . . 165
Directory Searching and Browsing options . . . 166
Allowing users to control the default screen
location and size of chat windows . . . . . . 167
One-to-one chat windows and n-way chat
windows . . . . . . . . . . . . . . 168
Enabling users to select the default location and
size of chat windows . . . . . . . . . . 169
Prohibiting logins from insecure clients to the
server . . . . . . . . . . . . . . . . 169
Specifying the security level (minimum allowed
client version) . . . . . . . . . . . . 170
Allowing logins from clients that do not
conform to the security level . . . . . . . 171
Configuring the server to send instant messages
to clients that do not conform to the security
level . . . . . . . . . . . . . . . 172
Specifying the name to display in the title bar of
instant messages sent by the server . . . . . 173
Chat Logging . . . . . . . . . . . . . 173
Deploying a Community Services multiplexer on a
separate machine . . . . . . . . . . . . 174
Performance improvements with a separate
multiplexer . . . . . . . . . . . . . 175
Installing and setting up a separate Community
Services multiplexer . . . . . . . . . . 175
Community Services multiplexer preinstallation
considerations . . . . . . . . . . . . 176
Install the Community Services multiplexer . . 176
Configure security settings in the Configuration
database on the Sametime server . . . . . . 176
Configure settings in the Sametime.ini file on
the multiplexer machine . . . . . . . . . 177
Configuring client connectivity to the
Community Services multiplexer machine . . . 178
(Optional) Dynamically load balancing client
connection to the multiplexers . . . . . . . 179
Enabling Sametime Connect for browsers to
function in kiosk mode . . . . . . . . . . 180
Enabling the kiosk mode . . . . . . . . 180
Enabling the kiosk mode by adding an applet
parameter to the HTML in the STSrc.nsf
database . . . . . . . . . . . . . . 181
Example of custom HTML code that loads the
Sametime Connect for browsers client . . . . 182
Chapter 7. Monitoring the Sametime
Server . . . . . . . . . . . . . . 183
Accessing the Monitoring charts . . . . . . . 183
General Server Status . . . . . . . . . . . 183
Total Community Logins . . . . . . . . 183
Logins . . . . . . . . . . . . . . . . 184
Miscellaneous . . . . . . . . . . . . . 184
Memory . . . . . . . . . . . . . . 185
Disk Space . . . . . . . . . . . . . 185
Web Statistics . . . . . . . . . . . . 185
Domino HTTP Requests . . . . . . . . . 185
Domino HTTP Commands . . . . . . . . 185
Chapter 8. Logging Sametime Activity 187
Community Logins/Logouts . . . . . . . . 187
Community Login/Logout information . . . . 187
Community Statistics . . . . . . . . . . . 188
Community Statistics information . . . . . 188
Community Events . . . . . . . . . . . 189
Community Events information . . . . . . 190
Place Login Failures . . . . . . . . . . . 190
Place Login Failure information . . . . . . 191
Domino log . . . . . . . . . . . . . . 192
Content of the Domino log . . . . . . . . 192
Views in the Domino log . . . . . . . . 192
Sametime log General settings . . . . . . . . 194
General log settings . . . . . . . . . . 194
Chapter 9. Managing Security . . . . 197
Getting started with Sametime security . . . . . 197
The required fully qualified server name . . . 197
Basic password authentication and
authentication by token . . . . . . . . . 197
User requirements for basic password
authentication . . . . . . . . . . . . 198
Changing a user’s password . . . . . . . 201
Domino security and the Web browser connection 201
Using database ACLs for identification and
authentication . . . . . . . . . . . . . 202
Using database ACLs . . . . . . . . . . 203
Maximum Internet name & password setting 203
Adding a name to a database Access Control
List (ACL) . . . . . . . . . . . . . 203
Database ACL settings . . . . . . . . . 204
Anonymous access and database ACLs . . . . 208
Contents v

Basic password authentication and database
ACLs . . . . . . . . . . . . . . . 209
Authentication by token using LTPA and Sametime
tokens . . . . . . . . . . . . . . . . 211
Authentication by token using the Domino
Single Sign-On (SSO) feature . . . . . . . 213
Altering the Domino Web SSO configuration
following the Sametime server installation . . . 214
Manually enabling the Domino SSO feature . . 217
Using the Sametime custom logon form for SSO 219
Authentication by token using Secrets and
Tokens databases . . . . . . . . . . . 221
Security recommendations for self-registration . . 223
Using SSL with Sametime . . . . . . . . . 224
Encrypting Web browser connections . . . . 224
Ensuring access to Sametime servlets when
Domino requires SSL for all connections . . . 224
Encrypting connections to an LDAP server . . 225
Setting up SSL for Sametime on Windows . . . 225
Setting up SSL for Sametime on Solaris/AIX 228
Ensuring Sametime servlet access when Domino
requires SSL for all connections . . . . . . . 232
Obtaining the appropriate SSL trusted root or
SSL server certificate . . . . . . . . . . 233
Import the SSL certificate into the STKeys.jks
key database . . . . . . . . . . . . 236
Configure the Sametime.ini file on the Sametime
server . . . . . . . . . . . . . . . 238
Chapter 10. Deploying Multiple Lotus
Sametime Servers . . . . . . . . . 241
About Sametime server clusters . . . . . . . 241
Advantages of using multiple Sametime servers 241
Integrating a Sametime server into an existing
Sametime community . . . . . . . . . . 242
Installing a Sametime server into an existing
Sametime community . . . . . . . . . 242
Configuring ports for server-to-server
connections . . . . . . . . . . . . . 244
Synchronizing the Sametime server with other
Sametime servers . . . . . . . . . . . 245
Extending Sametime to Internet users . . . . . 247
Positioning a Sametime server in the network
DMZ . . . . . . . . . . . . . . . 247
Opening ports on the internal firewall . . . . 248
Opening ports on the external firewall . . . . 249
Extending a single Sametime community across
multiple Domino domains . . . . . . . . . 250
Example of extending a single Sametime
community across two Domino domains . . . 250
Chapter 11. Setting up a Community
Services cluster . . . . . . . . . . 259
Overview of Community Services clustering . . . 259
Differences between the clustering and
single-server approaches . . . . . . . . . 259
Load balancing and failover in Community
Services clusters . . . . . . . . . . . 262
Community Services cluster setup procedures . . 262
Community Services clustering preparations . . 263
Deploying an LDAP directory server . . . . 263
Installing the Sametime servers for the
Community Services cluster . . . . . . . 264
Creating a Domino server cluster . . . . . . 267
Setting up replication of Sametime databases 268
Deploying separate Community Services
multiplexers (optional) . . . . . . . . . 270
Set up the load-balancing mechanism (rotating
DNS or Network Dispatcher) . . . . . . . 274
Creating a cluster document in the
Configuration database (stconfig.nsf) . . . . 276
Creating a cluster document on other Sametime
servers in the community . . . . . . . . 277
Configuring client connectivity for the
Community Services cluster . . . . . . . 278
Adding another server to the Community Services
cluster . . . . . . . . . . . . . . . . 280
Creating multiple Community Services clusters in a
single Sametime community . . . . . . . . 281
Creating multiple Community Services clusters 281
Create the Community Services clusters . . . 281
Copy the Cluster Information documents to all
servers in the community . . . . . . . . 281
Rotating DNS Limitations with cached DNS
resolve requests . . . . . . . . . . . . 282
Sametime Connect for the desktop . . . . . 282
Sametime Connect for browsers . . . . . . 283
Chapter 12. Using the
StdebugTool.exe utility . . . . . . . 285
Running the StdebugTool.exe utility . . . . . . 285
Trace file location . . . . . . . . . . . 286
Step-by-step example of running the
StdebugTool.exe utility . . . . . . . . . 286
Chapter 13. Using the Name
Conversion Utility . . . . . . . . . 289
When to run the Name Conversion Utility . . . 289
Preparing to run the Name Conversion Utility . . 290
Managing the vpuserinfo.nsf database . . . . 290
Editing the text files that control the operation
of the utility . . . . . . . . . . . . . 290
Running the Name Conversion Utility . . . . . 292
Converting buddy lists and privacy lists from
the Domino directory format to the LDAP
directory format . . . . . . . . . . . 292
Changing user names and group names . . . 294
Changing organizational unit names . . . . . 297
Debug and trace file information . . . . . . . 300
Known issues and limitations . . . . . . . . 300
Chapter 14. Using the IBM Lotus
Instant Messaging Limited Use
version of Sametime with standard
Sametime servers . . . . . . . . . 303
Assign users to an appropriate home Sametime
server . . . . . . . . . . . . . . . . 303
Preventing instant messaging-only users from
creating or attending meetings . . . . . . . 303
vi Sametime Administrator’s Guide

Disable Anonymous access and Default access
in the ACL of the Sametime Meeting Center
database . . . . . . . . . . . . . . 304
Create directory Groups for the standard
Sametime server users . . . . . . . . . 305
Add the groups of standard Sametime server
users to the Sametime Meeting Center database
ACL . . . . . . . . . . . . . . . 305
End user issues in a mixed environment . . . . 306
Appendix. Notices . . . . . . . . . 307
Trademarks . . . . . . . . . . . . . . 308
Third Party Notices . . . . . . . . . . . 309
Index . . . . . . . . . . . . . . . 315
Contents vii

viii Sametime Administrator’s Guide

Chapter 1. Introduction to IBM Lotus Sametime (Instant
Messaging Limited Use version)
This chapter provides network administrators with an overview of the IBM®
Lotus®
Instant Messaging LImited Use version of the IBM®
Lotus®
Sametime®
server. This
chapter introduces the Sametime collaborative features, clients, services,
applications, and administrative features available with this version of Sametime.
What is the IBM Lotus Instant Messaging Limited Use version of
Sametime?
The IBM Lotus Instant Messaging Limited Use version of Sametime is a limited
version of the full IBM Sametime product. The full version of Sametime supports
presence, instant messaging, and Web conferencing functionality. The IBM Lotus
Instant Messaging Limited Use version of Sametime supports presence and instant
messaging capabilities, but does not support Web conferences. The IBM Lotus
Instant Messaging Limited Use version of Sametime ships with all Domino 7.0
servers.
With the IBM Lotus Instant Messaging Limited Use version of Sametime, client
and server applications interact to enable a community of users to collaborate in
real-time through presence and instant messaging.
Sametime presence technology enables members who have logged in to the
Sametime server to see all other members who are online (logged in). The names
of online users display in ″presence lists″ in Sametime applications. From these
presence lists, members of the community can converse through instant messaging
sessions. Instant messaging sessions can be two-way sessions involving only two
users or chat conferences involving three or more users.
The primary client application provided with this version of Sametime is the
Sametime Connect for browsers client. This client is a JavaTM applet that runs in a
user’s Web browser. Sametime Connect includes a presence list that displays
selected members of the community who are online. From Sametime Connect, a
user can collaborate with other members of the community by sending instant
messages. The client also includes directory browsing capabilities and privacy
features. Users load this client to their Web browser by selecting a link on the
Sametime server home page.
This version of Sametime can also be integrated with a Domino 7.0 server to
provide instant messaging and presence functionality to Domino applications such
as Domino Web Access. When Domino and Sametime are integrated, client
applications residing on the Domino server connect to the Sametime server to
access presence and instant messaging capabilities. For more information about
integrating Sametime with Domino servers, see the Domino Administration
documentation available at www.lotus.com/ldd/doc.
The Sametime clients interact with the Community Services on the Sametime
server to access presence and instant messaging functionality. The Community
Services support all presence and instant messaging capabilities of Sametime. The
IBM Lotus Instant Messaging Limited Use version of Sametime installs on a
© Copyright IBM Corp. 2005 1

Domino server and uses the HTTP Services, Domino Web Application Services,
and Domino directory provided with the Domino server.
This Sametime server can also be configured to operate as a client to a Lightweight
Directory Access Protocol (LDAP) server containing an LDAP directory. You can
use an LDAP directory as your community user repository if LDAP directories are
used in your environment.
Sametime administrators use the Web-based Sametime Administration Tool. This
tool runs in a Web browser and is available from the ″Administer the Server″ link
on the Sametime server home page. Managing the directory, ensuring that
Sametime clients can connect to the Sametime server, configuring the Sametime
services, and monitoring the server are some of the primary administrative tasks
associated with the Sametime server.
The IBM Lotus Instant Messaging Limited Use version of Sametime also supports
the concept of Community Services clustering. A Community Services cluster
consists of multiple Sametime servers that are configured to operate together to
support server failover and user load balancing for large user populations.
You can expand your real-time collaboration capabilities by purchasing the full
version of the Sametime server. The full version of the Sametime server adds Web
conferencing capabilities and a richer instant messaging client to your
environment. The full version of the Sametime server includes all of the
capabilities of the IBM Lotus Instant Messaging Limited Use version of Sametime,
and offers these additional features:
v Online meetings - The full version of the Sametime server enables users to
collaborate in real-time meetings using features such as screen sharing, a shared
whiteboard, IP audio/video, instant messaging and presence. Online meetings
can either by scheduled in advance from a Meeting Center application on the
Sametime server or started on the spur of the moment from a presence list in a
Sametime client.
v Sametime Meeting Room client - Users attend online meetings using the
Sametime Meeting Room client. The Sametime Meeting Room client is a Java
applet that loads and runs in a user’s Web browser whenever the user attends a
meeting. The Sametime Meeting Room client contains various components that
support the full range of Sametime collaborative activities, including interactive
audio and video.
v Sametime Connect for the desktop client - The full version of Sametime includes
the Sametime Connect for the desktop client. This client supports instant
messaging and presence and includes a richer feature set than the Sametime
Connect for browsers client provided with the IBM Lotus Instant Messaging
LImited Use version of Sametime. A user downloads the Sametime Connect for
the desktop client from the home page of the Sametime server and the client
runs as a standalone Windows application on a user’s desktop.
v Broadcast Meetings - The full version of Sametime supports broadcast meeting
technology. Broadcast technology enables a large number of view-only users (or
audience members) to watch a small number of users (or presenters) interact in
a meeting. The broadcast technology is especially useful for meetings in which
one person, or a small group of people, make presentations to a large audience.
Audience members watch a broadcast meeting using a separate receive-only
Java client called the Sametime Broadcast client.
2 Sametime Administrator’s Guide

Install Sametime on a Domino server
A Sametime server must be installed on a Domino server. Sametime can be
installed on a Domino server running on a Windows, IBM iSeriesTM, or IBM
pSeriesTM server. This documentation uses the term ″Sametime server″ to refer to
the server that includes both Domino and Sametime.
Note: For detailed information about system requirements, installation procedures,
and the version of Domino on which Sametime must be installed, see the
Lotus Sametime Server 7.0 Installation Guide (stinstall.nsf or stinstall.pdf) that
is shipped with the Sametime server. Separate installation guides are
provided for each platform.
Sametime uses the Directory, security, and replication features of Domino servers.
It is best if the Sametime server is dedicated to supporting the real-time, interactive
communication services of Sametime. A Sametime server should not be used for
other high-demand Domino services such as mail storage and routing, application
and database storage, or centralized Directory and administration services.
Note: An IBM i5/OS or IBM pSeries server can run multiple partitioned servers on
the same Domino system. While it is possible to add Sametime to an
existing production Domino server, this configuration is not recommended.
Instead, consider creating a new Domino server for running Sametime. The
new Domino server can reside on the same system as your existing
production server.
Users must access the Sametime server with a Web browser. IBM Lotus Notes®
client access to the Sametime server home page (stcenter.nsf) or the Sametime
Meeting Center database (stconf.nsf) is not supported. A user accesses the
Sametime server home page to load the Sametime Connect for browsers client to
the Web browser.
You can install more than one Sametime server in a Domino environment.
Installing multiple Sametime servers provides several advantages related to load
balancing and network usage and can enhance server performance. For more
information, see Advantages of using multiple Sametime servers.
If you install multiple Sametime servers, the administrator has the option of
clustering the Sametime servers. Clustering Sametime servers provides failover and
load balancing capabilities, and can increase the reliability and scalability of
Sametime. For more information, see Setting up a Community Services cluster .
The Web-based Sametime Administration Tool is the recommended administration
tool for the Sametime components of the Sametime server. The Sametime
Administration Tool should be used for most administrative tasks. See Sametime
Administration Tool for more information about tasks that are not performed with
the Sametime Administration Tool.
Sametime basics
This section introduces Sametime administrators to basic Sametime terms,
concepts, and features that appear throughout this administrator’s guide. The
terms, concepts, and features are grouped into four basic categories:
v End-user features
v Administration terms and features
Chapter 1. Introduction to IBM Lotus Sametime (Instant Messaging Limited Use version) 3

v Sametime clients
v Sametime services
End user features
This section provides brief descriptions of Sametime end-user features that are
referred to throughout this administrator’s guide. Sametime administrators should
be familiar with these terms.
The Sametime end-user features include:
v Presence
v Chat
v Transfer files
v Sametime server home page
Presence
Presence refers to the ability of a user to detect when other users are online. A user
can view a presence list in a Sametime client or application that displays the names
of other online users. Presence is sometimes called ″awareness″ or ″online
awareness.″
The Sametime Connect for browsers client includes a contact list that can display
the names of all users in the community who are online. The names of online users
display in bold green text in the contact list. Instant messaging sessions can be
started immediately from a contact list by right-clicking on an online user’s name.
A user logs in to the Community Services on the Sametime server to become
available in the contact list of the Sametime Connect client.
Presence lists (or contact lists) can be incorporated nto applications other than
Sametime Connect by software developers. Domino applications such as Domino
Web Access contain presence lists that connect to the Community Services on the
Sametime server.
Chat
Sametime supports text-based chat and instant messaging. A chat session can
consist of two (or more) users exchanging instant messages. Chat or instant
messaging sessions can be initiated from any contact list in a Sametime client.
The Sametime Connect client includes a contact list from which instant messaging
sessions can be started with any other member in the community who is online.
Additional community members can be invited into instant messaging sessions to
form group chat conferences (or ″n-way chats″ consisting of three or more users).
All instant messaging and chat activity is supported by Community Services on
the Sametime server.
Transfer files
Transferring files is a Sametime collaborative activity that enables users to send a
file to another user via a contact list in the Sametime Connect client. Users must
transfer one file at a time to one person at a time. File transfers are automatically
encrypted.
The administrator can enable or disable this feature. When you enable this feature,
both authenticated and anonymous users can transfer files.
4 Sametime Administrator’s Guide

CAUTION:
To protect against viruses that might be spread through file transfers, users
should have current anti-virus software. The software’s real-time protection
settings should be enabled and set to scan all files.
For more information about enabling, disabling, and setting size limits for file
transfers, see Allow users to transfer files to each other.
Note: The file transfer feature does not work with Sametime Links. For more
information about Sametime Links, see the the Sametime Directory and
Database Access Toolkit documentation available from IBM DeveloperWorks
(http://www.ibm.com/developerworks/lotus/products/instantmessaging/.
Follow the link for ″Toolkits and Drivers.″
Sametime server home page (stcenter.nsf)
The Sametime server home page is an HTML page that exists in the Sametime
Center database (stcenter.nsf). The Sametime server home page can only be
accessed by a Web browser and is the end-user entry point to the Sametime server.
After installing the Sametime server on the Domino server, you must set
stcenter.nsf as the Home URL for the server. To do this, open the Server document
for the Domino server that includes Sametime, select the Internet Protocols tab,
select the HTTP tab, and enter stcenter.nsf in the Home URL field of the Mapping
section of the Server document.
As the user entry point to the Sametime server, the Sametime server home page
contains links to the following important Sametime entities:
v Sametime Connect client (Users select a link on the home page to load the
Sametime Connect for browsers client)
v Self-registration feature
v Sametime Administration Tool
v End-user documentation
v Sametime Developers Web site
Sametime administration terms and features
This section provides brief descriptions of general Sametime administration terms
that appear throughout this administrator’s guide. Sametime administrators should
be familiar with these terms and features. Issues and administrative procedures
associated with these terms are discussed in greater detail in subsequent chapters
and topics of this administrator’s guide.
Some basic Sametime administration terms and features include:
v Sametime server
v Sametime Administration Tool
v Community
v Domino Directory
v LDAP directory
v Self-registration
v Connectivity (firewall and proxy support)
v Monitoring and logging
v Security
v Reverse proxy and portal server support
Chapter 1. Introduction to IBM Lotus Sametime (Instant Messaging Limited Use version) 5

v Chat logging
v Sametime server clusters
v Name Conversion Utility
v StdebugTool.exe Utility
Sametime server
The term ″Sametime server″ is used throughout the documentation to refer to a
server that has both Sametime and Domino installed.
Sametime Administration Tool
The Sametime Administration Tool is an HTML and XML based application that
runs in a Web browser. You open the Sametime Administration Tool by clicking
″Administer the Server″ on the Sametime server home page. The Sametime
Administration Tool is the primary administration tool for the Sametime server.
For more information about the Sametime Administration Tool, see Overview of
the Sametime Administration Tool features.
During the Sametime installation, one user is specified as the administrator of the
Sametime server. This administrator has access to the Sametime Administration
Tool and all of its administrative features. The administrator specified during the
installation can provide other administrators with access to the Sametime
Administration Tool as needed.
The Sametime Administration Tool should be used to perform all administrative
procedures on the Sametime server with the following exceptions:
v Replication and creation of new Lotus Notes databases - If a Sametime
procedure requires you to replicate a database or create a new database, you
must use a Lotus Notes or Domino Administrator client. The Sametime
Administration Tool does not provide the functionality required to create
one-time replicas (replica stubs) or other new databases, or set up replication
schedules.
v Managing LDAP users - If you have configured Sametime to operate as a client
to an LDAP server, you cannot use the Sametime Administration Tool to add or
delete users in the LDAP directory on the LDAP server. Use the software
provided with the LDAP server for management of the LDAP directory.
Note: Although you cannot use the Sametime Administration Tool to manage
users in an LDAP directory on a third-party server, you must use the
Sametime Administration Tool to configure the Sametime server to access
the LDAP directory on the third-party LDAP server.
v Setting up Secure Sockets Layer (SSL) on the Sametime server - If you want to
configure the Sametime server so that all Web browser clients use the SSL
protocol when connecting to the Sametime server, you must use a Lotus Notes
client or the Domino Administrator client to set up SSL on the server.
v Implementing chat logging - The chat logging feature can capture all chat
conversations that occur on the Sametime server, including instant messages and
chat conferences (chats involving more than two people). For more information
about chat logging, see the Sametime Directory and Database Access Toolkit
documentation available from IBM DeveloperWorks
(http://www.ibm.com/developerworks/lotus/products/instantmessaging/.
Follow the link for ″Toolkits and Drivers.″
v Creating Community Services clusters - A Community Services cluster consists
of multiple Sametime servers configured to operate together, providing failover
6 Sametime Administrator’s Guide

and load balancing for the Sametime instant messaging and presence
functionality. For more information see Overview of Community Services
clustering.
v Starting or stopping Sametime services - You must use the Services settings in
the Windows NT Control Panel or Windows 2000 Administrative Tools to start
or stop a Sametime service.
Community
The Sametime community refers to all users that have Web browser access to a
Sametime server (or servers) and all Sametime servers that support those users.
The Sametime community can be maintained in the Domino Directory on the
Sametime Server or in an LDAP Directory on a third-party LDAP-compliant server.
Specifically, the Sametime community can be described as follows:
v A shared directory, or set of directories, that lists the people and groups of the
community
v One or more Sametime servers that each have access to the shared directory or
set of directories
For information on integrating multiple Sametime servers into a single community,
see Deploying multiple Sametime servers.
Domino Directory
The Sametime server uses the Domino Directory of the Domino server on which
Sametime is installed.
The Domino Directory is a database that serves as a central repository for
information about Sametime users (or members of the Sametime community). The
Domino Directory contains a separate Person document for each Sametime user.
The Person document contains the User Name and Internet password required for
authentication with the Sametime server. The Person document also contains a
″Sametime server″ field that is used to specify a user’s home Sametime server. The
home ″Sametime server″ is the Sametime server a user connects to when logging in
to the Community Services for presence and chat activity.
The Domino Directory also contains Group documents that hold lists of users that
perform similar tasks. Group documents also define the Public Groups that end
users can add to the Sametime Connect client presence list.
Other information stored in the Domino Directory includes server configuration
information in the Server document, database configuration settings, and Access
Control Lists (ACLs).
Person and Group documents, and ACLs within the Domino Directory, can be
accessed from the Sametime Administration Tool.
Sametime administrators have the option of using the Domino Directory for user
management or configuring Sametime to connect to an LDAP directory on an
LDAP server for user management.
To maintain current information about users, groups, and servers in the Sametime
community, the Community Services must receive periodic updates from the
Domino Directory.
Chapter 1. Introduction to IBM Lotus Sametime (Instant Messaging Limited Use version) 7

For more information about the Domino Directory, see Managing the Domino
Directory.
LDAP directory
The administrator can configure the Sametime server to connect to a Lightweight
Directory Access Protocol (LDAP) server. This capability enables an administrator
to integrate Sametime into an environment in which LDAP servers and LDAP
directories are already deployed.
When Sametime is configured to connect to an LDAP server, the Sametime server
searches and authenticates user names against entries in the LDAP directory on the
third-party LDAP server. The LDAP directory replaces the Domino Directory as the
user repository in the community. The community is defined by the users in the
LDAP directory.
Sametime can access LDAP directories on multiple LDAP servers.
For more information, see Using LDAP with the Sametime server.
Self-registration
The Sametime server includes a self-registration feature. This feature allows an end
user to create a Person document that contains a User Name and Internet
password in the Domino Directory on the Sametime server.
The self-registration feature is available to end users from the Register link of the
Sametime server home page.
The administrator has the option of allowing or not allowing self-registration.
Self-registration can reduce the workload for the administrator because it enables
users to add themselves to the Domino Directory (create a Person document in the
directory containing a User Name and Internet password). Allowing
self-registration can involve security risks because it enables anonymous users to
create records in the Domino Directory. These records permit anonymous users to
authenticate with databases on the server.
Self-registration is not allowed by default. Also, self-registration cannot be used if
Sametime is configured to operate with an LDAP directory.
For more information, see Using Sametime self-registration.
Connectivity (firewall and proxy support)
To engage in collaborative activities, the Sametime clients must connect to different
services on the Sametime server, as described below:
v Web browsers connect to the HTTP Services on the Sametime server.
v The Sametime Connect client connects to the Community Services on the
Sametime server.
The HTTP Services and Community Services on the Sametime server listen for
connections from clients on different TCP/IP ports. Sametime includes
specially-designed connectivity features that enable Sametime clients to establish
connections with these services through firewalls and proxy servers.
Generally, the Sametime connectivity features enable Sametime clients to establish
connections through HTTP and SOCKS proxy servers, or by using the HTTP
connection method. If necessary, Sametime can be configured to listen for HTTP
8 Sametime Administrator’s Guide

connections from all clients on port 80 to enable Sametime clients behind restrictive
firewalls to connect to the Sametime server.
Note: The Sametime Connect client can also establish connections to the
Community Services through an HTTPS proxy server.
For more information about enabling Sametime clients to connect through firewalls
and proxy servers, see Configuring Sametime Connectivity.
For information about enabling Sametime servers to operate behind a reverse
proxy server, see Using reverse proxy or portal servers with the Sametime server.
Monitoring and logging
The Sametime server provides monitoring and logging features that enable you to
monitor the current status of the server and record (or log) information about
server events and activities.
Monitoring: The Sametime server includes charts that allow you to monitor
current Sametime server statistics. The monitoring charts, which are presented as
tables, provide up-to-the-second information about Community Services activity,
Web statistics, and free disk space on the server.
For more information, see Using the Monitoring charts.
Logging: The Sametime server logging tools include the Sametime log and the
Domino log. The Sametime log records events in the Sametime log database
(stlog.nsf). The Sametime Administration Tool includes logging settings that enable
you to control whether activities are logged to a database or to text files and to
determine which activities are logged. If you log Sametime information to a
database, you can view the Sametime log from the Sametime Administration Tool.
The Sametime Administration Tool also allows an administrator to launch the
Domino Web Administration Tool to view the Domino log. The Domino log
includes information about available memory and disk space, server performance,
and databases that need maintenance.
For more information, see Viewing the Sametime log .
Security
The Sametime server uses the Internet and intranet security features that are
available on the Domino server on which it is installed. Generally, you use the
Access Control Lists (ACLs) of the Sametime Center database (stcenter.nsf) on the
Sametime server to provide users with anonymous access or basic password
authentication to the Sametime server home page. Users can access the Sametime
server home page to load the Sametime Connect for browsers client in a Web
browser.
To authenticate with the Sametime server, users must have a Person document that
contains a User Name and Internet password in the Domino Directory on the
Sametime server. The user is prompted for these credentials when logging in to the
Sametime Connect client or accessing the Sametime Center database if that
database requires basic password authentication.
Note: If you have configured Sametime to connect to an LDAP server, users are
authenticated using names and passwords stored in LDAP directory entries.
Chapter 1. Introduction to IBM Lotus Sametime (Instant Messaging Limited Use version) 9

In addition to the Domino Internet and intranet security features, the Sametime
server requires ″authentication by token″ security mechanisms to ensure that
Domino Web applications that establish connections to the Sametime Community
Services are authenticated. These security mechanisms include the Sametime
Secrets and Tokens authentication databases and the Domino Single Sign-On (SSO)
authentication feature.
You can also use Secure Sockets Layer (SSL) to encrypt Sametime HTTP traffic.
For more information, see Working with Sametime security.
Reverse proxy and portal server support
A Sametime server can be deployed behind a reverse proxy server or a portal
server. When a Sametime server is deployed on an internal network behind a
reverse proxy server, the reverse proxy server operates as an intermediary between
the Sametime server and the Sametime clients. All Sametime data flowing between
the Sametime server and its clients passes through the reverse proxy server.
To accomplish its security objectives, a reverse proxy server manipulates the data
that passes through it. The manipulation of Sametime data by the reverse proxy
server imposes specific requirements and limitations on the use of reverse proxy
servers with the Sametime server.
These limitations and requirements are discussed in detail in Using reverse proxy
or portal servers with the Sametime server.
Sametime server clusters
The Sametime server supports Sametime server clustering. Sametime server
clusters:
v Enhance server scalability and reliability to enable Sametime to meet the
demands of large user populations.
v Provide load balancing and failover capabilities for Sametime Community
Services instant messaging and presence functionality
For more information about server clusters, see Setting up a Community Services
cluster .
Name Conversion Utility
The names that appear in Sametime Connect client buddy lists and privacy lists
are stored in a Domino database (vpuserinfo.nsf) on the Sametime server. If you
change the user or group names that appear in the Domino or LDAP directory
accessed by the Sametime server, you must run the Name Conversion Utility to
make these same user and group name changes in the vpuserinfo.nsf database on
the Sametime server. Running this utility ensures that the names that appear in
buddy lists and privacy lists stay synchronized with the latest changes made to the
directory. For more information, see Using the Name Conversion Utility.
StdebugTool.exe utility
You can use the StdebugTool.exe utility to produce trace files and create new trace
file sets for troubleshooting purposes. These trace files contain debug messages
that aid IBM Technical Support in troubleshooting Sametime server problems. If
you have never worked with Sametime trace files before, you should use the
StdebugTool.exe utility only under the guidance of IBM Technical Support. For
more information, see Using the StdebugTool.exe utility.
10 Sametime Administrator’s Guide

The StdebugTool.exe utility is only available with Sametime servers that operate on
the Windows platform.
Sametime clients
The collaborative activities in Sametime are accomplished through the interactions
of client applications installed on users’ local machines with services on the
Sametime server.
Administrators should be familiar with the following Sametime client applications:
v Web browsers
v Lotus Notes clients
v Sametime Connect for browsers client
Web browsers
For information about Web browsers supported by the Sametime 7.0 server, see the
Lotus Sametime Server 7.0 Installation Guide.
Lotus Notes clients
Users cannot access the Sametime server home page (stcenter.nsf) or the Sametime
Meeting Center (stconf.nsf) with a Lotus Notes client. These databases are designed
for Web browser access only.
Sametime Connect for browsers client
The Sametime Connect for browsers client is a java applet that is launched from a
link on the Sametime server home page. The Sametime Connect for browsers client
runs in the user’s Web browser instead of on the Windows operating system.
The Sametime Connect client contains a presence list (or contact list) displays the
name of any user that is online in the Sametime community. From the presence
list, a user can select another user’s name to initiate an instant messaging session, a
file transfer, or an n-way chat (a chat session involving three or more users). Other
users can be invited to join an existing instant messaging session or n-way chat.
The Sametime Connect client contains features that enable a user to browse or
search the Domino Directory on the Sametime server to add users or groups of
users to the presence list.
Sametime Connect also includes privacy features that can prevent selected users
from seeing you or contacting you when you are online. Records for the Sametime
Connect privacy features are maintained in the Privacy (vpuserinfo.nsf) database
on the Sametime server.
The Sametime Connect client includes its own Sametime Connectivity settings.
Sametime Connect connects to the Community Services using TCP/IP on the
default port 1533. Sametime Connect can also establish connections with the
Community Services through HTTP, HTTPS, or SOCKS proxy servers. Sametime
Connect clients can also use connectivity settings defined in a user’s web browser
to establish connections to the Community Services on the Sametime server.
To log in to Sametime Connect, a user must enter the User Name and Internet
password that has been specified in the user’s Person document in the Domino
Directory. A Sametime Connect user is always logged into the server specified as
the ″home″ Sametime server.
Chapter 1. Introduction to IBM Lotus Sametime (Instant Messaging Limited Use version) 11

The Sametime Connect presence, instant messaging, privacy, directory browsing,
and connectivity features are supported by the Community Services on the
Sametime server.
Sametime services
End users can engage in chat and presence activities through the interactions of
Sametime client applications with the services on the Sametime server. This section
briefly describes the Domino Services and Sametime Community Services that
support chat and presence.
The services include:
v Domino Services
v Community Services
Domino Services
Sametime uses the infrastructure and services of the Domino server on which it is
installed. The following are the primary Domino services used by a Sametime
server:
v Web server
v Directory
v Security
v Replication
v Database storage
Note: For information about the version of Domino on which Sametime must be
installed, see the Lotus Sametime Server 7.0 Installation Guide.
The Domino server on which Sametime is installed should not be used as a
Domino mail or application server. If Sametime is installed on its own Domino
server, the real-time, interactive communication services of Sametime will not
compete for resources with other high-demand Domino services.
In this documentation, the term ″Sametime server″ refers to the server that
includes both Domino and Sametime.
Community Services
The Sametime Community Services support all presence (or awareness), text chat,
and file transfer activity in a Sametime community. Any Sametime client that
contains a presence list must connect to the Community Services. The Community
Services clients include the Sametime Connect client, Participant List and public
chat components of the Sametime Meeting Room client, or presence and chat
applications developed from the Sametime Software Development Kit.
Basic functionality supported by the Community Services includes:
v Handling client login requests.
v Handling connections from clients that access the Sametime server through a
direct TCP/IP connection, or through HTTP, HTTPS, or SOCKS proxy servers.
v Providing directory access for user name search and display purposes.
v Providing directory access to compile lists of all Sametime servers and users in
the community.
v Dissemination of presence, chat, and file transfer data to all users connected to
Community Services.
12 Sametime Administrator’s Guide

v Maintenance and storage of privacy information, user preference settings, and
presence lists for online users.
v Handling connections from the Community Services on other Sametime servers
when multiple servers are installed. Server-to-server connections for the
Community Services occur on default TCP/IP port 1516.
v Logging of Community Services events to the Sametime log (stlog.nsf).
v Enabling a name entry prompt to appear when the ACL settings of a Domino
database enabled with IBM Lotus instant messaging technology allows
anonymous access. This name entry prompt ensures that the presence list in the
Sametime database can display a name for the user.
v Capturing chat conversations that occur on the Sametime server for later
retrieval. Developers must implement a chat logging feature to capture and
retrieve chat conversations.
Starting and stopping the Sametime server
The Sametime server is configured as a set of Windows services that stop and start
automatically when the Domino server is stopped or started.
The procedure for starting and stopping a Sametime server is slightly different
depending on whether Sametime is running on a Windows NT or Windows 2000
server.
Note: For information about starting and stopping a Sametime server that is
installed on an IBM eServer i5 or IBM pSeries server, see the installation
guide (stinstall.nsf or stinstall.pdf) that shipped with the Sametime server.
Sametime on a Windows NT server
Follow the instructions below to start and stop a Sametime server that is running
on a Windows NT server.
Starting the Sametime server
To manually start and stop the server from the Windows NT desktop:
1. Select Start - Settings - Control Panel - Services.
2. In the Services dialog box, select Sametime Server and click Start.
Stopping the Sametime server
To manually stop the Sametime server from the Windows NT desktop:
1. Select Start - Settings - Control Panel - Services.
2. In the Services dialog box, select Sametime Server and click Stop.
Sametime on a Windows 2000 server
Follow the instructions below to start and stop a Sametime server that is running
on a Windows 2000 server.
Starting the Sametime server
To manually start and stop the server from the Windows 2000 desktop:
1. Select Start - Administrative Tools - Component Services.
2. In the Services dialog box, select Services (Local).
3. Right-click ″Sametime server″ and select start.
Chapter 1. Introduction to IBM Lotus Sametime (Instant Messaging Limited Use version) 13

Stopping the Sametime server
To manually stop the Sametime server from the Windows 2000 desktop:
1. Select Start - Administrative Tools - Component Services.
2. In the Services dialog box, select Services (Local).
3. Right-click ″Sametime server″ and select Stop.
14 Sametime Administrator’s Guide

Chapter 2. Using the Sametime Administration Tool
This chapter describes the administrative features available from the IBM Lotus
Sametime server administration tool (or Sametime Administration Tool) and
provides step-by-step instructions for giving others access to the Administration
Tool.
Starting the Sametime Administration Tool
The Sametime Administration Tool is an HTML and XML based application that
enables you to administer the Sametime server using a Web browser.
Start the Sametime Administration Tool from the ″Administer the Server″ link of
the Sametime server home page. You must enable Java applets and JavaScriptTM or
ActiveX®
Controls in your browser to use the Sametime Administration Tool.
To start the Sametime Administration Tool from the Sametime server home page:
1. Start your browser.
2. Enter the URL for the Sametime server:
http://hostname
where hostname is the fully qualified Domain Name Service (DNS) name or the
IP address of the Sametime server you want to administer.
3. From the Sametime server home page (Sametime Welcome page), click
″Administer the Server.″
4. Enter the administrator name and password specified during the Sametime
server installation. The Sametime Administration Tool opens in its own Web
browser window.
User name and password requirements
To access the Sametime Administration Tool, an administrator enters the user name
and the Internet password specified on the administrator’s Person document in the
Domino Directory on the Sametime server. The installation automatically creates a
Person document containing a user name and Internet password for the person
specified as the administrator.
The administrator specified during the installation can provide other
administrators with access to the Sametime Administration Tool. To allow other
users to access the Sametime Administration Tool, see Adding a new Sametime
administrator.
Details: Starting the Sametime Administration Tool
To run the Sametime Administration Tool in Microsoft Internet Explorer, make the
following changes in your browser. You must make these changes regardless of
whether Microsoft Internet Explorer is installed on a client or server computer.
1. Select Tools - Internet Options.
2. Select the Advanced tab.
3. Clear the check mark from the ″Use HTTP 1.1″ option.
© Copyright IBM Corp. 2005 15

Set the default font in your browser to a small font size to ensure that all
Command Group and Command names display in the space provided in the
Sametime Administration Tool.
To view multiple versions of the Sametime Administration Tool at the same time
(for example, to simultaneously monitor Community Services and Meeting Services
connections), start additional copies of the browser and open the Sametime
Administration Tool in each copy of the browser. Arrange the windows so all
copies display on the screen.
Overview of the Sametime Administration Tool features
The Sametime Administration Tool includes six command groups: Server
Overview, Message From Administrator, Monitoring, Logging, Directory, and
Configuration. You can use the command groups to perform a variety of
administrative tasks. The basic command groups and their features are briefly
described below.
Server Overview
Use the Server Overview feature to ensure that the Sametime services are
functioning as expected. For more information, see Server Overview feature.
Message From Administrator
The Message From Administrator command group enables the Sametime
administrator to send a message to all users who are currently logged in to the
Community Services from a Sametime client. For more information, see Message
From Administrator feature.
Monitoring
The Sametime server includes charts that allow you to monitor current Sametime
server statistics. The monitoring charts provide up-to-the-second information about
Community Services usage, Web statistics, and free disk space on the server. For
more information, see Monitoring the Sametime server.
Logging
The Sametime logging command group enables the Sametime administrator to log
information about Sametime activity to a database on the server or to a text file.
The administrator can also configure logging parameters to determine the types of
events and activities that are recorded in the Sametime log. For more information,
see Logging Sametime activity.
Directory
The available Directory group features depend on whether the Sametime server
uses a Domino Directory or an LDAP directory on an LDAP server.
If the Sametime server is using a Domino Directory, the Directory features enable
the administrator to manage users by creating, editing, and deleting Person and
Group documents in the Domino Directory on the Sametime server. The
administrator can also open the Access Control Lists (ACLs) of databases on the
Sametime server from the Domino Directory settings of the Sametime
Administration Tool. The ACLs are used to manage security for databases on the
Sametime server. For more information about using the Domino Directory, see
16 Sametime Administrator’s Guide
Managing Users and Domino Directories. For more information about ACLs and
Sametime security, see Managing Security.
If the Sametime server is operating in an LDAP environment, the administrator can
use the LDAP Directory settings of the Sametime Administration Tool to configure
the Sametime server to operate as a client to an LDAP server. In this environment,
the Sametime users are managed in an LDAP directory on an LDAP server. The
Sametime server establishes a connection to the LDAP server and accesses LDAP
directory entries to perform search and authentication operations on behalf of
Sametime clients. The administrator can also open the Access Control Lists (ACLs)
of databases on the Sametime server from the LDAP Directory settings of the
Sametime Administration Tool. For more information, see Managing Users and
LDAP Directories.
Configuration
The Configuration command group allows the Sametime administrator to control
the operation of the Sametime services and the connection ports and processes of
Sametime clients. The Configuration features include:
v Connectivity - The Connectivity configuration settings control the ports on
which the Sametime Community Services listen for connections from clients. The
Connectivity settings also provide features that enable Sametime clients to
connect to the Sametime server through restrictive firewalls and proxy servers.
For more information, see Configuring Sametime connectivity.
v Community Services - The Community Services configuration settings enable
the administrator to ensure that the Community Services receive timely updates
from the Directory. These updates are necessary to ensure that Community
Services have recent information concerning new users and servers that have
been added to the Directory. The administrator can specify the time intervals in
which the Community Services receive updates from the Directory.
The Community Services settings also enable the administrator to hide the link
on the Sametime server home page that users click on to load the Sametime
Connect for browsers client to a Web browser.
The administrator also uses the Community Services configuration settings to set
the maximum number of connections to Community Services, to allow or
prevent end users from using Sametime to transfer files to one another, to set the
maximum size allowed for file transfers, and to allow or prevent users from
sending announcements (one-way unencrypted instant messages)..
The Community Services Anonymous Access settings force a name entry dialog
box to appear when anonymous access is allowed to a Sametime database by the
database ACL. This name entry dialog box enables the user to enter a name so
that the user can be individually identified in presence lists. (Normally, a name
entry dialog box does not appear when the ACL settings of a database allow
anonymous access.) The Community Services Anonymous Access settings also
determine whether anonymous users can search and browse the Directory. For
more information, see Anonymous Access Settings for Community Services.
Server Overview feature
Use the Server Overview feature to ensure that the Sametime services are
functioning as expected.
Services Status
The Services Status list includes all Sametime services and their current status:
Running or Not Running. You cannot start or stop any Sametime service from the
Sametime Administration Tool. Use the Services settings in the Windows Control
Chapter 2. Using the Sametime Administration Tool 17
Panel or Windows Administrative Tools to start or stop a Sametime service. The
names of the services in the Control Panel or Administrative Tools are identical to
the names of the services in the Sametime Administration Tool.
Refresh your browser to get current statistics. The Overview lists do not update
until you click Refresh. The date and time of the last update are listed above the
Services Status table.
To access the Server Overview feature, click Server Overview in the Sametime
Administration Tool.
Message From Administrator feature
Use the Sametime Administration Tool to simultaneously send a single message to
all users currently logged in to Community Services from any Sametime client.
To send a message to all users currently logged in to Community Services:
1. From the Sametime server home page, click ″Administer the Server.″
2. Select Message From Administrator.
3. Enter the message in the text box provided.
4. Click Send. You receive a confirmation that your message was sent.
Monitoring the Sametime server
Sametime includes a variety of monitoring tools that provide up-to-the-second
information about server activity and statistics. The Sametime monitoring tools
display information about:
v General Server Status
v Logins
For more information on the Sametime Monitoring tools, see Monitoring tools.
Logging Sametime activity
Sametime provides a variety of logging capabilities that enable the administrator to
record information about Sametime server activity and statistics. You can record
the following information in the Sametime log:
v Community Logins/Logouts
v Community Statistics
v Community Events
You can also view the Domino log from the Sametime Administration Tool. Use
the Domino log to monitor:
v Available server disk space
v Available server memory
v Server load
v Server performance
v Databases that need maintenance
You can determine the format for the Sametime log and the content of the log in
the logging settings. For more information about the Sametime log, see Using the
Sametime logging features.
18 Sametime Administrator’s Guide

Managing users and Domino Directories
Sametime uses the Domino Directory of the Domino server on which it is installed.
Sametime can also use Domino Directory Assistance or the Domino Extended
Server Directory Catalog feature to access secondary Domino Directories in the
Domino environment.
To ensure that Sametime can successfully access the Domino Directory or
Directories and interoperate in the Domino domain, review the following topics:
v Managing the Domino Directory
v Managing users in the Domino Directory
v How Sametime uses Domino Directory information
Managing users and LDAP directories
Sametime can be configured to connect to a third-party LDAP server and access an
LDAP directory on the LDAP server. This capability enables you to integrate
Sametime into an environment in which LDAP servers are already operating.
The Sametime LDAP Directory Settings ensure that the Sametime server can access
the LDAP directory (or directories) on behalf of Sametime clients.
For detailed information on the procedures required to configure Sametime to
operate as a client to an LDAP server, see:
v Using LDAP with the Sametime server
v Setting up an LDAP connection
Note: For information on using LDAP with a Sametime server that operates on a
platform other than Windows (such as the IBM i5/OS or IBM pSeries
servers), see the installation guide (stinstall.nsf or stinstall.pdf) that shipped
with the Sametime server.
Sametime Administration Tool and LDAP environments
If the Sametime server is configured to operate as a client to an LDAP server,
Sametime administrators are authenticated using Person documents in the Domino
Directory.
Note: In the LDAP environment, only Sametime administrators (or users that
access the Sametime Administration Tool) are authenticated against the
Domino Directory. All other users are authenticated against an LDAP
directory on a third-party server.
If you have configured Sametime to operate in an LDAP environment, you must
maintain Person documents in the Domino Directory on the Sametime server for
the administrators. When accessing the Sametime Administration Tool, the
administrator must enter the last name or user name and the Internet password
from the administrator’s Person document in the Domino Directory. For
information on adding administrators in the LDAP environment, see Adding a
new Sametime administrator.
When operating in an LDAP environment, administrators cannot use the Sametime
Administration Tool to add or modify users and groups in the LDAP directory on
the third-party server. User accounts must be added and modified using the
software and procedures required by the LDAP directory on the third-party server.
Chapter 2. Using the Sametime Administration Tool 19

Configuring ports and network connectivity
If you have installed the Sametime server behind a firewall and all clients that will
access the server are also behind the firewall, configuring network ports and
connectivity might not be an issue.
However, if clients are required to cross firewalls or access the Sametime server
through proxy servers, you might need to make adjustments to the Sametime
Networks and Ports settings available from the Configuration - Connectivity
options of the Sametime Administration Tool.
For detailed information about the ports used by the Sametime server and how
Sametime clients connect through firewalls and proxy servers, review the list of
topics in About Sametime Connectivity.
For additional information about connectivity, see Extending Sametime to Internet
users.
Configuring Community Services
The Sametime Administration Tool includes several features that enable the
administrator to control the behavior of the Community Services.
The Community Services administration features enable the administrator to:
v Configure the number of user names that appear on a page when users search
or browse the Directory.
v Configure the time intervals at which the Community Services receive updates
from a Domino or LDAP Directory. The Community Services must receive
updates from the Directory at periodic intervals to ensure that users recently
added to the directory can be displayed in presence lists. The Community
Services must also maintain an updated list of all Sametime servers operating in
the community.
v Configure the maximum number of client and server connections to Community
Services.
v Allow users to authenticate using either Lightweight Third Party Authentication
(LTPA) or Sametime tokens.
v Determine whether the links that enable users to access the Java version of
Sametime Connect (Sametime Connect for browsers) and the Windows version
of Sametime Connect (Sametime Connect for the desktop) are available.
v Allow users to transfer files to each other and set a maximum file size for
transfers.
v Allow users to send announcements (unencrypted one-way instant messages).
v Determine whether end users can use the automatic login feature of Sametime
Connect.
v Configure Anonymous Access:
– Allow anonymous users to participate in meetings and enter virtual places.
– Force a name entry dialog box to appear when anonymous access is allowed
to a Sametime database by the database ACL. This name entry dialog box
enables the user to enter a name so that the user can be individually
identified in presence lists.
– Set the default name that appears for anonymous users who do not use the
name entry dialog box.
– Determine the level of access that anonymous users have to the Directory.
20 Sametime Administrator’s Guide

For more information about the Community Services configuration settings, see
Community Services configuration settings.
For information about connecting to the Community Services, see Community
Services Network settings.
Additional administrative tasks
The following administrative tasks require you to use a combination of command
groups in the Sametime Administration Tool or to use tools other than the
Sametime Administration Tool.
v Deploying multiple Sametime servers
v Managing users and LDAP Directories
v Managing Security
v Chat logging
Note: If a Sametime procedure requires you to replicate a database or create a new
database, you must use a Lotus Notes or Domino Administrator client. The
Sametime Administration Tool does not provide the functionality required to
create one-time replicas (replica stubs) or other new databases or set up
replication schedules.
Deploying multiple Sametime servers
A Sametime community can include more than one Sametime server. If you have a
large number of Sametime users, you can install multiple Sametime servers for
load balancing and to reduce network bandwidth usage. You can also install
multiple Sametime servers to securely allow Internet clients to chat with users on
your internal corporate network.
Before adding another Sametime server to your Sametime community, you should
review the information in the Deploying multiple Sametime servers section of this
documentation. This documentation contains information about:
v Installing multiple Sametime servers
v Synchronizing multiple Sametime servers to operate as a single community
v Enabling Internet clients to chat with users on your internal network
v Techniques that can be used to extend a single Sametime community across
multiple Domino domains
For more information, see Advantages of using multiple Sametime servers.
Managing security
After you have installed and set up the Sametime server, you might want to
review the available security features and default security settings of the Sametime
server.
Sametime offers several features to enhance security. Some of the administrative
tasks associated with enhancing security include:
v Administering the Domino Single Sign-On (SSO) feature - The Domino SSO
feature is enabled by default during a Sametime installation. The authentication
tokens created by this feature are required to authenticate client connections to
the Sametime services. In some cases, it may be necessary for the administrator
to perform additional configurations following the Sametime server installation
Chapter 2. Using the Sametime Administration Tool 21

to ensure the Domino SSO feature is configured correctly. For more information,
see Authentication by token using LTPA and Sametime tokens.
v Enabling the SametimeSecretsGenerator Agent - For added protection against
hackers or other outside attacks, the administrator can enable the
SametimeSecretsGenerator in the Secrets database. Before taking this step, the
administrator should review Authentication by token using LTPA and Sametime
tokens.
v Setting up SSL - The Secure Sockets Layer (SSL) can be used to encrypt
information passing over the initial connection between the Web browser and
the Sametime server. This information includes the user names and Internet
passwords that members of the Sametime community use to access Sametime
Connect and protected databases on the server. A Lotus Notes client is required
to set up SSL for the initial Web browser connection. For more information, see
About SSL and Sametime.
Adding a new Sametime administrator
A Sametime administrator name and password is specified during the Sametime
installation and setup process. The administrator specified during the Sametime
server installation and setup can access all features of the Sametime Administration
Tool and can provide other administrators with access to the Sametime
Administration Tool.
The recommended method for adding new administrators is to create an
Administrators Group document. Add this Administrators Group to the ACLs of
the appropriate Sametime databases and to the appropriate fields in the Server
document of the Sametime server.
After you have added the Administrators Group document to the appropriate
database ACLs and the appropriate fields on the Server document, you can add or
remove an administrator by adding or removing a name from the Administrators
Group document.
Allowing others to access the Sametime Administration Tool
To allow others to access the Sametime Administration Tool, perform the following
tasks:
1. Create a Person document for the administrator (if necessary).
2. Create an Administrators Group document.
3. Add the Administrators Group document to Sametime database ACLs.
Generally, you provide the Administrators Group with the Manager access level
in the ACL of all Sametime databases, and provide the Administrators Group
with all roles available in the database ACL.
4. Modify the Server document of the Sametime server. You must add the
Administrators Group to the ″Administrators″ and ″Run unrestricted methods
and operations″ fields in the Server document of the Sametime server.
5. Edit the Administrators Group document to allow or revoke access to the
Sametime Administration Tool.
Note: If the new administrator uses Microsoft Internet Explorer to access the
Sametime Administration Tool, the administrator must disable the ″Use
HTTP 1.1″ setting in the Tools - Internet Options - Advanced tab of the Web
browser.
22 Sametime Administrator’s Guide

Using individual names instead of an Administrators Group
You can also use the instructions in steps 1, 3 and 4 above to add individual user
names to the database ACLs and the fields of the Server document.
Note: If the Sametime server is configured to use SSL for Web browser connections
to the HTTP server, you must use the individual names of administrators in
the database ACLs. If SSL is enabled, and the administrator is listed only as
a member of a group in database ACLs, the administrator will be unable to
log in to the Sametime Administration Tool.
If you use individual names instead of a Group document, you must repeat steps
1, 3, and 4 for each user. This is a more cumbersome method of providing access
for administrators, but it allows you to use database roles to control the types of
administrative tasks that each administrator can perform. If you use a Group
document, every administrator entered in the Administrators Group document will
have the same level of access to the Sametime Administration Tool.
Create a Person document for the administrator
This procedure is the first of five required when adding a new Sametime
administrator. In this procedure, you create a Person document in the Domino
Directory for the Sametime administrator. If the administrator whom you are
adding already has a Person document that contains a last name, user name, and
Internet password, skip this procedure.
To create a Person document from the Sametime Administration Tool:
1. From the Sametime server home page, click ″Administer the Server.″
2. From the Sametime Administration Tool:
v If you are using a Domino Directory with the Sametime server, select
Domino Directory - Domino.
v If you are using an LDAP directory with the Sametime server, select LDAP
Directory.3. Choose ″Add Sametime Administrators - Create a record for each person who
will be an administrator.″
4. Choose Add Person.
5. In the Person document, select the Basics tab.
6. Enter the user’s first, middle, and last name in the appropriate fields. Only the
last name is required.
7. Enter a name for the user in the User Name field. An entry in this field is
required for the user to authenticate with the Sametime server.
You can use any of the following characters in a user name: A - Z, 0 - 9,
ampersand (&), dash (-), period (.), underscore (_), apostrophe (’), and space.
Using other characters can cause unexpected results.
8. Enter an Internet password for the person in the ″Internet password″ field. An
entry in this field is required for the user to authenticate when accessing the
Sametime Administration Tool. There are no restrictions on the number of
characters used in the Internet password.
9. Click ″Save & Close.″ The Person document is added to the Directory.
Next step
After creating the Person document for the administrator, create an Administrators
Group document.
Chapter 2. Using the Sametime Administration Tool 23

Create an Administrators Group document
This procedure is the second of five required when adding a new Sametime
administrator. In this procedure, you create a group document to hold the names
of Sametime administrators.
To create an Administrators Group document:
1. From the Sametime server home page, click ″Administer the Server.″
2. From the Sametime Administration Tool:
v If you are using a Domino Directory with the Sametime server, select
Domino Directory - Domino.
v If you are using an LDAP directory with the Sametime server, select LDAP
Directory. 3. Choose ″Add Sametime Administrators -Create a group for the
administrators.″
4. Click Add Group.
5. Enter a name for the group in the ″Group name″ field (for example,
″Administrators″ or ″Sametime Administrators″).
6. For group type, select Multipurpose.
7. (Optional) Enter a description of the group in the Description field.
8. In the Members field, list the names of users you want to access the Sametime
Administration Tool.
Make sure to enter the name exactly as it is entered in the topmost entry of
the ″User name″ field of a user’s Person document.
9. Select Administration at the top of the Group document.
10. Enter the names of the group owners in the Owners field. Generally, the
group owner is the administrator creating the group. Only the administrator
listed in the Owners field can modify this Group document. If the Owners
field is blank, any administrator can modify this Group document.
11. Click ″Save & Close.″
Next step
After creating the Administrators Group document, add the Administrators Group
document to the ACLs of the appropriate Sametime databases.
Add the Administrators Group document to Sametime
database ACLs
This procedure is the third of five required when adding a new Sametime
administrator. In this procedure, you add the Administrators Group document (or
the name of an individual user) to Sametime database Access Control Lists (ACLs)
and provide the Manager access level to the Group (or individual user).
In addition to ACL access levels, you must also specify the ACL privileges and
roles that the Administrators Group (or an individual user) has in each database.
Generally, for an Administrators Group, select all ACL privileges and roles
available when adding the Group to a Sametime database ACL. Selecting all ACL
privileges and roles provides any administrator listed in the Administrators Group
document with access to the full range of administrative features available from
the Sametime Administration Tool.
24 Sametime Administrator’s Guide

Note: If you are adding individual user names to Sametime database ACLs instead
of a group name, database roles can be used to prevent or allow access to
specific features of the Sametime Administration Tool. For more information,
see Roles in Sametime database ACLs.
Add the Administrators Group to the ACLs of the following Sametime databases.
v Sametime Configuration (stconfig.nsf) - Stores the configuration parameters
that are set from the Sametime Administration Tool.
v Domino Directory or Address Book (names.nsf) - Stores Person and Group
documents, ACL settings, and other configuration information for the
Domino/Web Application Services.
v Sametime Online Meeting Center (stconf.nsf) - Provides a central meeting
place on the Sametime server.
v Sametime Log (stlog.nsf) - Stores logging information.
v Sametime Self Registration (streg.nsf) - Enables end users to add Person
documents to the Domino Directory. These Person documents contain the
credentials required to authenticate with the Sametime server.
v Domino Web Administration (webadmin.nsf) - Contains the Domino Web
Administration client, which includes monitoring features for the HTTP Services
and free disk space. This is the full Domino Web Administration client that is
included with Domino servers.
Follow the instructions below to add the Administrators Group document (or an
individual user’s name) to the ACLs of the Sametime databases and make the
appropriate ACL settings in each database.
1. From the Sametime Administration Tool:
v If you are using the Domino Directory with the Sametime server, choose
Domino Directory - Domino.
v If you are using an LDAP Directory with the Sametime server, choose
LDAP Directory. 2. Choose ″Add Sametime Administrators -Give the administrator group
Manager access for all appropriate databases, such as stconf.nsf and
stcenter.nsf.″ The Access Control options appear.
3. From the Databases list, select Sametime Configuration (stconfig.nsf).
Note The database filename appears below the Databases list.
4. Click the Access button.
5. Click the Add button. Enter the Administrators Group document name in the
dialog box (for example, ″Administrators″ or ″Sametime Administrators″).
If you are adding individual user names, enter the person’s user name in the
dialog box. Enter the name as it is entered in the top entry of the ″User name″
field on the user’s Person document.
6. Click OK.
7. Select the Administrators Group name (or individual person’s name) from the
list in the Database Security window.
8. In the User Type drop-down list, select Group (or Person if you are adding an
individual user’s name).
9. In the Access drop-down list, select Manager.
10. Make sure that all ACL privileges, such as ″Create documents″ and ″Delete
documents,″ are selected.
11. Click the Roles button.
Chapter 2. Using the Sametime Administration Tool 25

12. If you want the Administrators Group to have access to the full range of
administrative functions, select all roles. Click OK.
The roles determine which administration tasks the members of the group can
perform. If you are adding individual user names to the ACLs, you can use
the roles to control the administrative features that are available to individual
administrators. For more information, see Roles in Sametime databases ACLs.
13. Click Submit.
14. After adding the Administrators Group to the ACL of the Sametime
Configuration database (stconfig.nsf), repeat steps 4 through 14 to add the
Administrators Group to the ACL of each of the Sametime databases listed
below:
v Domino Address Book or Domino Directory (names.nsf)
v Sametime Online Meeting Center (stconf.nsf)
v Sametime Log (stlog.nsf)
v Sametime Self Registration (streg.nsf)
v Domino Web Administration (webadmin.nsf)If you are adding an Administrators Group document, for each of the
databases above, be sure to select the Manager access level and all ACL
privileges and roles as described in steps 9 through 12.
If you are adding individual user names, you can specify different roles for
each user.
Next step
After adding the Administrators Group document (or individual user names) to
the database ACLs, you must modify the Server document of the Sametime server.
Modifying the Server document of the Sametime server
This procedure is the fourth of five required when adding a new Sametime
administrator. In this procedure, you add the Administrators Group document (or
the name of an individual user) to two fields on the Server document. The two
fields are the ″Administrators″ field and ″Run unrestricted methods and
operations″ field in the Security section of the Server document.
To add users to the fields on the Server document of the Sametime server:
1. From the Sametime Administration Tool:
v If you are using the Domino Directory with the Sametime server, choose
Domino Directory - Domino.
v If you are using an LDAP Directory with the Sametime server, choose LDAP
Directory.2. Choose ″Add Sametime Administrators - Edit the Server document.″
3. Click Security.
4. In the ″Administrators″ field of the Administrators section, type the name of
the Administrators Group (or enter the name of an individual user).
Note Type a group name exactly as it appears in the Group document. If you
are entering an individual user name in this field, type the user name exactly
as it is entered in the topmost entry of the ″User name″ field on the Person
document. Separate multiple entries in the ″Administer the server from a
browser″ field with commas.
5. In the ″Run unrestricted methods and operations″ field of the Programmability
Restrictions section, type the Administrators Group name (or an individual
user’s name). Separate multiple entries in this field with commas.
26 Sametime Administrator’s Guide

6. Click ″Save & Close.″
Next step
The fifth procedure explains how to edit the Administrators Group document (add
or remove a user’s name from the Group document) to allow or revoke access to
the Sametime Administration Tool.
Adding and removing names from an Administrators Group
document
This procedure is the last of five required when adding a new Sametime
administrator. If you created an Administrators Group document to provide others
with access to the Sametime Administration Tool, you can control access to the
Sametime Administration Tool by editing the Group document. Adding a user’s
name to the Administrators Group document provides the user with access to the
Sametime Administration Tool. Removing a user’s name from the Group document
revokes the user’s access to the Sametime Administration Tool.
To add or remove a user’s name from the Administrators Group document:
1. From the Sametime server home page, click ″Administer the Server.″
2. From the Sametime Administration Tool:
v If you are using the Domino Directory with the Sametime server, choose
Domino Directory - Domino.
v If you are using an LDAP Directory with the Sametime server, choose LDAP
Directory.3. Choose ″Add Sametime Administrators - Create a group for the
administrators.″
4. Double-click a group name.
5. Select Edit Group.
6. In the Members field, add or remove a user’s name from the Group document.
If you add a user’s name, the user must have a Person document in the
Domino Directory that contains a last name, user name, and Internet password.
Make sure to enter the name exactly as it is entered in the top entry of the
″User name″ field of a user’s Person document.
The user must enter a last name or user name and the Internet password from
the Person document to access the Sametime Administration Tool.
7. Click ″Save & Close.″
Roles in Sametime database ACLs
Roles provide a way to define the access an administrator has to the features and
settings of the Sametime Administration Tool. For example, the Sametime
Configuration database (stconfig.nsf) ACL contains three roles: ServerMonitor,
ServerAdmin, or DatabaseAdmin. If you assign only the ServerMonitor role to an
administrator, the administrator can monitor server memory, disk space, and other
server statistics but cannot perform any other administrative functions. Assign all
roles to an administrator if you want the administrator to have full access to all
administrative functions.
Access Control List (ACL) roles are defined in the following Sametime databases:
v Sametime Configuration database (stconfig.nsf)
v Domino Directory or Address Book (names.nsf)
v Domino Web Administration (webadmin.nsf)
Chapter 2. Using the Sametime Administration Tool 27

Roles in the Sametime Configuration database (stconfig.nsf)
The Sametime Configuration database (stconfig.nsf) stores the values for
parameters that are available from the Sametime Administration Tool. The roles in
this database affect the administrative tasks that an administrator can perform
from the Sametime Administration Tool.
The following table lists the commands and features available with the Sametime
Administration Tool and the roles that an administrator must be assigned in the
stconfig.nsf database to use the Sametime Administration Tool commands and
features. If an administrator does not have the appropriate roles, the Sametime
Administration Tool does not display the command.
Note: The SametimeAdmin role allows the administrator to perform all tasks in
the Sametime Administration Tool.
Command Group Command or feature Role required
Message From
Administrator
Sends message to all users logged
into Community Services
None
Monitoring All monitoring features [ServerMonitor] or
[SametimeAdmin]
Logging All logging features [ServerMonitor] or
[SametimeAdmin]
Directory Add Users, People, Groups [SametimeAdmin] or
[DatabaseAdmin]
Directory Access Control Lists (ACL) [DatabaseAdmin] or
[SametimeAdmin]
Configuration Connectivity, Community
Services, Meeting Services,
Audio/Video Services
[SametimeAdmin] or
[ServerMonitor]
A user with the ServerMonitor role
can view settings available from
these commands but cannot
change the settings.
Help Online help for administrators No roles required
Roles in the Domino Directory (names.nsf)
The Domino Directory (or Address Book) contains the Person and Group
documents that you create and edit when you use the Sametime Administration
Tool. The roles in the Domino Directory determine who can create or edit a
particular type of document in the Directory.
The Domino Directory also contains the Server document that you access to
provide another user with administrative privileges to the Sametime
Administration Tool.
Note: If you use Sametime in a Domino environment, the Domino Directory roles
function the same as they do on Domino servers.
The Domino Directory contains eight roles. The privileges for each role are listed in
this table:
28 Sametime Administrator’s Guide

Role Description
UserCreator Allows an administrator to create Person documents in the Domino
Directory
UserModifier Allows an administrator to edit all Person documents in the Domino
Directory
GroupCreator Allows an administrator to create Group documents in the Domino
Directory
GroupModifier Allows an administrator to edit all Group documents in the Domino
Directory
ServerCreator Allows an administrator to create Server documents in the Domino
Directory
ServerModifier Allows an administrator to edit all Server documents in the Domino
Directory
NetCreator Not used by Sametime
NetModifier Not used by Sametime
Roles in the Domino Web Administration database
(webadmin.nsf)
The Domino Web Administration database is available on the Sametime server to
enable administrators to monitor the HTTP server and access logging information
about the Domino Application Services.
The following table defines the roles in the Domino Web Administration database:
Role Description
ServerAdmin A Sametime administrator requires this role to access the Server
document when providing other users with access to the Sametime
Administration Tool.
ServerMonitor A Sametime administrator requires this role to access the Monitoring -
Miscellaneous functions of the Sametime Administration Tool. These
monitoring functions enable the administrator to monitor HTTP
commands and requests, server memory usage, and free disk space.
The Sametime administrator also requires this role to access the
Logging - Domino Log functions of the Sametime Administration
Tool, which report information about the Domino Application
Services.
DatabaseAdmin A Sametime administrator requires this role to change database ACLs
from the Sametime Administration Tool.
FileRead This feature provides access to the Configuration - System Files
(read-only) command of the Domino Web Administration Tool. This
feature is usually not used with Sametime.
FileModify This feature provides access to the Configuration - System Files
(read/write) command. This feature is usually not used with
Sametime.
Chapter 2. Using the Sametime Administration Tool 29

30 Sametime Administrator’s Guide

Chapter 3. Using Domino Directories
This chapter discusses issues pertaining to using Domino Directories with the IBM
Lotus Sametime server.
If you have configured the Sametime server to operate as a client to an LDAP
server, the Domino Directory is not used for user management. For information
about using Sametime in an LDAP environment, see Chapter 4, ″Using LDAP
Directories with Sametime.″
Managing the Domino Directory
The Sametime community consists of users and Sametime servers that are
registered in the Domino Directory (or Directories) in use in the Domino domain in
which Sametime is installed.
This section includes the following information concerning Domino Directory
management:
v Basic Domino Directory requirements
v Managing multiple Directories with Sametime
v Directory security considerations
v Using an LDAP directory instead of a Domino Directory
Basic Domino Directory requirements
Every Domino server has a primary Directory in which the server is registered.
When you install Sametime on a Domino server, Sametime uses the primary
Directory of that Domino server. The primary Directory must always exist on the
Sametime server.
Note: The primary Directory must exist on the Sametime server even if you set up
Directory Assistance or an Extended Server Directory Catalog to access
secondary Directories in the environment.
Sametime administrators should be aware of the following basic issues concerning
Directory management:
v The Person document for each user in the Directory must contain entries in the
″User name,″ ″Internet password,″ and ″Sametime server″ fields. For more
information, see Person documents.
v Group documents in the Directory can be used to simplify the process of adding
users to the contact list in the Sametime Connect client. For more information,
see Group documents.
v The Server document for the Sametime server requires specific values for the
″Server name,″ ″Is this a Sametime server,″ ″Port,″ and ″Net Address″ fields to
support online presence. For more information, see The Server document.
v You must ensure that Sametime agents can access the Domino Directory and run
unrestricted methods and operations on the Sametime server. For more
information, see Directory security considerations.
For more information, see How Sametime uses Domino Directory information.
© Copyright IBM Corp. 2005 31

Managing multiple Domino Directories with Sametime
Every Domino server has a primary Directory in which the server is registered.
When you install Sametime on a Domino server, Sametime uses the primary
Directory of that Domino server. The primary Directory must always exist on the
Sametime server.
If the Sametime server is installed into a Domino environment that uses multiple
Directories, the administrator should replicate the primary Directory to the
Sametime server.
To access additional Domino Directories of interest in the environment, use either
Directory Assistance or an Extended Directory Catalog. For more information, see
either of the following topics:
v Using Directory Assistance with the Sametime server
v Using Extended Server Directory Catalogs with the Sametime server
Note: Multiple Directory environments generally indicate a large or geographically
distributed user population. It might be necessary to install multiple
Sametime servers to adequately support a large or distributed user
population. For more information, see Advantages of using multiple
Sametime servers.
Using Directory Assistance with the Sametime server
To access other Directories of interest in the Domino environment, the
administrator can set up Directory Assistance on the Sametime server. The
Sametime server can use Directory Assistance to obtain all needed Directory
information in environments that include multiple Domino Directories. Ideally, the
Directory Assistance database should point to a Directory server that is dedicated
to providing Directory services. However, a Directory server is not required in a
Sametime community that includes multiple Sametime servers.
For information about setting up Directory Assistance, see your Domino server
administration documentation, that is provided with the Domino server. You can
also access the Domino server administration documentation at
http:/www.lotus.com/ldd/doc.
Using an Extended Server Directory Catalog on the Sametime
server
You can use an Extended Server Directory Catalog to share Directory information
when the Sametime server operates in an environment that includes multiple
Directories.
Follow the procedures in the Lotus Domino 7 Administration Help to set up an
Extended Server Directory Catalog for the Sametime server. This documentation is
available at http://www.lotus.com/ldd/doc and also provided with the Domino
server.
When setting up the Extended Server Directory Catalog to use with Sametime,
note the following:
v You must include specific fields in the ″Additional fields to include″ list on the
Configuration document for the Extended Server Directory Catalog.
v If you only want to use the Directory documents that Sametime requires, you
can include a selection formula in the Configuration document for the Extended
Server Directory Catalog.
32 Sametime Administrator’s Guide

″Additional fields to include″ list requirements: The Configuration document
includes an ″Additional fields to include″ list in the Basics tab. The following field
name entries must exist in the ″Additional fields to include″ list to ensure all
information needed by Sametime is available in the Extended Server Directory
Catalog:
Field Name Description
ServerName ″Server name″ field in the Basics section of the Server
document.
ServerTitle ″Server title″ field in the Basics section of the Server
document.
Domain ″Domain name″ field in the Basics section of the Server
document.
ServerBuildNumber ″Server build″ number field in the Basics section of the Server
document.
Administrator ″Administrator field″ in the Basics section of the Server
document.
ServerPlatformDisplay ″Operating system″ field in the Basics section of the Server
document.
Sametime ″Is this a Sametime server?″ field in the Basics section of the
Server document.
Port_0 - Port_7 Ports fields in the Ports - Notes Network Ports section of the
Server document. The Port_0 field is required. For
completeness it is recommended that you list seven port
fields (for example Port_0, Port_1, Port_2, and so on ).
Protocol_0 - Protocol_7 Protocol fields in the Ports - Notes Network Ports section of
the Server document. For completeness, it is recommended
that you list seven protocol fields (for example, Protocol_0,
Protocol_1, Protocol_2 and so on).
NetName_0 - NetName_7 Notes Network fields in the Ports - Notes Network Ports
section of the Server document. For completeness, it is
recommended that you list seven Notes Network fields (for
example, NetName_0, NetName_1, NetName_2, and so on.
NetAddr_0 - NetAddr_7 Net Address fields in the Ports - Notes Network Ports section
of the Server document. The NetAddr_0 field is required. For
completeness, it is recommended that you list seven Net
Address fields.
Enabled_0 - Enabled_7 Enabled fields in the Ports - Notes Network Ports section of
the Server document. The Enabled_0 field is required. For
completeness, it is recommended that you list seven Enabled
fields.
Sametime Server ″Sametime server″ field in the Administration section of the
Person document.
Selection formula: The Advanced tab of the Configuration document provides a
″Selection formula (do not include form)″ setting that enables you to specify a
selection formula that ensures only the Directory documents required by Sametime
are used when the Dircat task creates the Directory Catalog. The selection formula
for selecting only the documents required by Sametime is (Type = ″Person″) |
(Type = ″Group″) | (Type = ″Server″ and Sametime = ″1″).
Note: The (Type = ″Server″ and Sametime = ″1″) selection criteria select Server
documents that have the ″Is this a Sametime server?″ field set to Yes.
Chapter 3. Using Domino Directories 33

Directory security considerations
Some Sametime databases contain agents that must access the Domino Directory to
perform specific functions. The signature of these agents must be allowed to:
v Access the primary Domino Directory. (Reader Access level is required.)
v Run unrestricted methods and operations on the Sametime server.
If the Default ACL setting of the Domino Directory is No Access, the Sametime
agents cannot access the Domino Directory, and Sametime cannot function
properly. Adjust the Domino Directory ACL and the ″Run unrestricted methods
and operations″ setting in the Server document for the Sametime server as
described below.
Agent access to the Domino Directory
The default Sametime agent signer is ″Sametime Development/Lotus Notes
Companion Products.″ If the Default entry in the Domino Directory ACL is set to
No Access, you must:
1. Enter ″Sametime Development/Lotus Notes Companion Products″ in the
Directory (names.nsf) ACL.
2. Provide the Sametime Development/Lotus Notes Companion Products ID with
the Reader access level in the Directory ACL.
Note: If your organization re-signs databases with a different signer, such as an
administrator or server signature, enter that signer in the Directory ACL and
provide it with the Reader access level.
Run unrestricted methods and operations
The signature that is used to sign the Sametime agents must be allowed to run
unrestricted methods and operations on the Sametime server.
To ensure that the Sametime agent signer can run unrestricted methods and
operations on the Sametime server:
1. Open the Server document for the Sametime server.
2. Select the Security tab.
3. Enter the Sametime agent signer (for example, Sametime Development/Lotus
Notes Companion Products) in the ″Run unrestricted methods and operations″
field.
4. Save the changes to the Server document.
Using an LDAP directory instead of a Domino Directory
Sametime can be configured to connect to an LDAP directory on a third-party
server. When Sametime is configured to connect to an LDAP directory, Sametime
users are managed in an LDAP directory on another server.
The Domino Directory must exist on the Sametime server to store Domino server
configuration information. The Sametime administrator must also have a Person
document in the Domino Directory to authenticate when accessing the Sametime
Administration Tool. All other user information is maintained in the LDAP
Directory. For information about using Sametime in an LDAP environment, see
Using LDAP with the Sametime server.
34 Sametime Administrator’s Guide

Managing users in the Domino Directory
This section discusses managing Sametime users in the Domino Directory. The
topics discussed include:
v Adding users
v Using Sametime self-registration
v Managing Sametime users with the Sametime Administration Tool
– Adding users (from the Sametime Administration Tool)
– Deleting users
– Changing a user’s password or editing a Person document
– Creating a group
– Deleting a group
– Editing a group
Note: If you make changes to user names or group names in the Domino
directory, you must run the Name Conversion Utility to ensure these same
name changes are made in the buddy lists and privacy lists that display in
the Sametime Connect client. The buddy list and privacy list names are
stored in a Domino database (vpuserinfo.nsf) on the Sametime server and
must be managed separately from the names in the directory. For more
information, see the appendix Using the Name Conversion Utility.
Adding users
You can add users to the Domino Directory in any of three ways. You can:
v Add users with a Domino Administrator client - Follow the standard procedure
for registering a new Lotus Notes user into a Domino Directory. Ensure that
each user has an entry in the ″User name″ and ″Internet password″ fields on a
Person document. For more information, see Adding users with a Domino
Administrator client.
v Add users from the Sametime Administration Tool - This method enables you
to create a Person document containing the credentials that provide Web
browser and Sametime Connect client access to the Sametime server. This
method does not create a Lotus Notes ID. Web browser access to Domino
servers in the domain is also provided if the Domino Directory is replicated
from the Sametime server to the Domino servers. For more information, see
Adding users (from the Sametime Administration Tool) in the ″Managing users
with the Sametime Administration Tool″ section of this documentation.
v Use the Sametime server self-registration feature - If you enable the Sametime
self-registration feature, anonymous users can create Person documents in the
Domino Directory. The Person documents contain the credentials required for
Web browser access to the Sametime server. Users can access the Sametime
server with a Web browser to load the Sametime Connect client. Lotus Notes IDs
are not created by the Sametime self-registration feature.
If the directory is replicated from the Sametime server to Domino servers in the
domain, the self-registered user also has Web browser access to the Domino
servers. For more information, see Using Sametime self-registration in a Domino
environment.
Adding users with a Domino Administrator client
To add a Sametime user from the Domino Administrator client, follow the normal
Domino procedure for adding a new user. Use a Domino Administrator client to
Chapter 3. Using Domino Directories 35

register the user into the Directory. The Directory replication schedule should
ensure that the user eventually appears in the Directory on each server (including
the Sametime server) in the domain.
When you register a new user into the Domino Directory, you should ensure that
the Person document for each user includes the information required to
authenticate with and connect to a Sametime server. This information includes:
v A user name entered in the ″User name″ field in the Basics tab of the Person
document.
v An Internet password entered in the ″Internet password″ field in the Basics tab
of the Person document.
v A home Sametime server specified in the ″Sametime server″ field in the Basics
tab of the Person document. This field is required when you have installed
multiple Sametime servers in the Domino domain.
The ″User name″ and ″Internet password″ fields in a Person document are required
to authenticate with the Sametime server with a Web browser and to log in to the
Sametime Connect client. The Sametime server uses the same Internet and intranet
authentication scheme provided by the Domino server on which it is installed. The
Community Services also use this information to authenticate Sametime Connect
users. The home Sametime server ensures that a client is connected to a specific
Sametime server for presence and chat functionality. For more information, see
Connecting to the Home Sametime server.
Using Sametime self-registration
The Sametime server includes a self-registration feature. This feature allows any
anonymous user who can access the server with a Web browser to create their own
Person document containing a last name, user name, and Internet password in the
Domino Directory on the Sametime server.
A self-registered user can access the Sametime server with a Web browser to load
the Sametime Connect client. If the Domino Directory is replicated from the
Sametime server to Domino servers in the domain, the self-registered user might
also be able to access the protected areas of the Domino servers in the domain
with a Web browser.
Note: Generally, the Sametime self-registration feature provides an easy way to
populate a Domino Directory with Sametime users. Because an existing
Domino domain usually has a Directory populated with users,
self-registration is disabled by default when Sametime is installed on the
Domino server. Administrators should also consider the security
implications of allowing anonymous users to create Person documents in the
Domino Directory before allowing self-registration on the Sametime server.
To enable the self-registration feature on a Sametime server, perform the following
three procedures. Each of these procedures is described in a separate topic.
1. Enable self-registration from the Sametime Administration Tool.
2. Add the Sametime signer ID to the Domino Directory (names.nsf) ACL.
3. Review the security recommendations for the self-registration feature.
Note: If you have integrated multiple Sametime servers into a single community,
and you are using the self-registration feature, self-registration should be
enabled on only one of the Sametime servers. In multiple Sametime server
environments, the Domino Directory is replicated among the Sametime
36 Sametime Administrator’s Guide
servers. If self-registration is enabled on multiple Sametime servers, multiple
groups named ″Sametime Web Users″ will be created in the Directory. For
more information on multiple server environments, see Advantages of using
multiple Sametime servers.
Enable self-registration from the Sametime Administration Tool
This procedure is the first of three required to use the Sametime self-registration
feature. To enable self-registration from the Sametime Administration Tool:
1. From the Sametime server home page, click the ″Administer the Server″ link to
open the Sametime Administration Tool.
2. Select Domino Directory - Domino.
3. In the User Registration settings, place a check mark in the ″Allow users to
register themselves in the Domino Directory″ check box.
4. You must click the Update button and restart the Sametime server for this
change to take effect.
Next, ensure that the Sametime agent signer is added to the Domino Directory
ACL and has the appropriate access level in the ACL.
Add the Sametime signer ID to the Domino Directory ACL
This procedure is the second of three required to use the Sametime self-registration
feature. In this procedure you must add a signer ID to the Domino Directory ACL.
The Sametime self-registration feature is supported by a self-registration database
(streg.nsf) on the Sametime server. Agents within the self-registration database
must access the Domino Directory on the Sametime server to create and modify
Person documents in the Directory. The default signature on these agents is
″Sametime Development/Lotus Notes Companion Products.″ To ensure that the
agents in the self-registration database can operate in the Domino Directory, do the
following:
1. Add the ″Sametime Development/Lotus Notes Companion Products″ signer to
the ACL of the Domino Directory.
2. Provide the Sametime Development/Lotus Notes Companion Products signer
with the following Access level and Roles in the Domino Directory ACL:
v Access level: Author
v Roles: [Group Creator], [Group Modifier], [User Creator], [User Modifier]3. Ensure that the ″Create Documents″ privilege is selected in the Domino
Directory ACL.
Note: Administrators can also sign the self-registration database with another
signer. Normally, an administrator uses the administrator signature or server
signature for this purpose. If you use a different signer, you must add that
signer to the Directory ACL and provide it with the Access level and Roles
specified above.
Next, review the security recommendations for self-registration.
Review the security recommendations for self-registration
This procedure is the last of three required to use the Sametime self-registration
feature. If you are using the self-registration feature, you should review the
security recommendations for self-registration.
Chapter 3. Using Domino Directories 37
The specific recommendations for securing your server when using self-registration
are described in the Security recommendations for self-registration topic in the
Security section of this documentation.
Managing Sametime users with the Sametime Administration
Tool
The Sametime Administration Tool provides access to Person and Group
documents in the Domino Directory on the Sametime server. You can use the
Sametime Administration Tool or a Lotus Notes client to delete and edit Person
and Group documents in the Domino Directory on the Sametime server.
For information about using a Lotus Notes client to manage users in a Domino
Directory, see your existing Domino documentation. If you use a Lotus Notes client
or the Domino Administrator to manage Sametime users, you should review the
topics in How Sametime uses Domino Directory information.
For information about using the Sametime Administration Tool to manage users in
the Domino Directory on the Sametime server, see the topics listed below.
v Adding users (from the Sametime Administration Tool)
v Deleting users
v Changing a user’s password or editing a Person document
v Creating a group
v Deleting a group
v Editing a group
Adding users (from the Sametime Administration Tool)
You can add users to the Directory using the Sametime Administration Tool. To
add a user, you create a Person document for the user in the Directory and specify
a last name, user name, and Internet password. A Lotus Notes user ID is not
created by this process. The Sametime server is designed for Web browser access
only.
When adding users with the Sametime Administration Tool, the new user might
not be immediately visible in the Directory. A small refresh interval must pass
before the user’s name is visible in the Directory. Also, a recently added user
cannot appear in a Sametime presence list until the Community Services receive an
updated list of users from the Domino Directory. For more information, see How
often to poll for new names added to the Sametime Community directory.
To add a user from the Sametime Administration Tool:
1. From the Sametime server home page, click the ″Administer the Server″ link to
open the Sametime Administration Tool.
2. Choose Domino Directory - Domino.
3. Choose Manage People.
4. Select Add Person. The Person document appears. If necessary, select the Basics
section.
5. In the Basics section of the Person document, enter the user’s first, middle, and
last name in the appropriate fields. Only the last name is required.
6. Enter a name for the user in the ″User name″ field. An entry in this field is
required for the user to authenticate with the Sametime server.
38 Sametime Administrator’s Guide

A user can enter this name when logging in to Sametime Connect or accessing
a database on the Sametime server that requires basic password authentication.
User names are case-sensitive.
You can also enter multiple names in the ″User name″ field. If you enter
multiple names, ensure that each name is separated by a carriage return. (Press
the Enter key after entering each name.)
Note The name that appears in the top line in the ″User name″ field is the
name that displays in presence lists in Sametime clients.
7. Enter an Internet password for the person in the ″Internet password″ field. An
entry in this field is required for the user to authenticate with the Sametime
server. The user is prompted for this password when logging in to Sametime
Connect or accessing any database on the Sametime server that requires basic
password authentication. Internet passwords are case-sensitive.
Write down the Internet passwords as you assign them. After it is entered the
first time, the Internet password is encrypted on the Person document and
cannot be viewed.
8. Click ″Save and Close.″ The Person document is added to the Directory.
Deleting users
You can use the Sametime Administration Tool to delete a user from the Domino
Directory on the Sametime server. Deleting a user’s Person document removes the
user from the Sametime community and prevents the user from accessing
Sametime Connect or databases on the server that require basic password
authentication.
To delete a user:
1. From the Sametime server home page, click the ″Administer the Server″ link to
open the Sametime Administration Tool.
2. Choose Domino Directory - Domino.
3. Choose Manage People.
4. Double-click the name of the user you want to delete. The user’s Person
document opens.
5. Select Delete Person. The Person document is deleted from the Domino
Directory.
Changing a user’s password or editing a Person document
You can use the Sametime Administration Tool to change a user’s Internet
password. To change a user’s Internet password, you must edit the user’s Person
document.
To change a password or edit the Person document:
1. From the Sametime server home page, click the ″Administer the Server″ link to
open the Sametime Administration Tool.
2. Choose Domino Directory - Domino.
3. Choose Manage People.
4. Double-click the name of a user.
5. Select Edit Person. The Person document changes to edit mode.
6. If necessary, select the Basics tab.
7. In the ″Internet password″ field, delete the existing Internet password and enter
the new Internet password.
8. While the Person document is in edit mode, you can edit any other field of the
Person document.
Chapter 3. Using Domino Directories 39

9. Click ″Save and Close.″
Creating a group
You can use the Sametime Administration Tool to create a group document. Each
user that you add to a group document must have a Person document that
contains information in the ″Last name,″ ″User name,″ and ″Internet password″
fields in the Domino Directory on the Sametime server.
Note: Groups larger than 400 members might not display correctly in Sametime
presence lists. If you are creating a group that Sametime Connect users will
add to Sametime Connect contact lists, do not include more than 400 names
in the group. For more information on how Sametime uses groups, see
Group documents.
1. From the Sametime server home page, click the ″Administer the Server″ link
to open the Sametime Administration Tool.
2. Choose Domino Directory - Domino.
3. Choose Manage Groups.
4. Click Add Group.
5. Enter a name for the group in the ″Group name″ field (for example,
Administrators).
6. Select a group type (Multipurpose, Access Control List, Deny List, Mail Only,
and Servers Only). Select Multipurpose if you are creating a Public Group that
users will add to the Sametime Connect client presence list or a group that
will serve more than one purpose.
Note You can also select the Mail Only group type when creating Public
Groups that users will add to the Sametime Connect client presence list. Select
Access Control List if the purpose of the group is to allow or deny access to
databases on the Sametime server. Do not select the Access Control List, Deny
List, or Servers Only group types when creating Public Groups for Sametime
Connect users. The Sametime Connect client does not display the contents of
groups that have a group type of Access Control List, Deny List, or Servers
Only. Deny List groups are usually used only when you have integrated
Sametime into a Domino environment.
7. (Optional) Enter a description of the group in the Description field.
8. List the members of the group in the Members field. Make sure to enter a
name exactly as it is entered in the top line of the ″User name″ field of the
user’s Person document.
For example, assume a person’s name is listed in the ″User name″ field of the
Person document as:
Tom Smith/West/Acme Tom Smith
When adding the person’s name to the Members field of the Group document,
you should enter the name as Tom Smith/West/Acme because this name
appears in the top line in the ″User name″ field of the Person document. If the
name entered in the Members field of the Group document is not identical to
the name in the top line in the ″User name″ field of the Person document, the
user will always appear to be off line when the Group document is opened in
a Sametime client presence list. For example, the user will always appear off
line in the group if you enter Tom Smith instead of Tom Smith/West/Acme.
9. Select the Administration link at the top of the Group document.
10. Enter the names of the group owners in the Owners field. Generally, the
group owner is the administrator creating the group.
11. Click ″Save and Close.″
40 Sametime Administrator’s Guide

Deleting a group
You can use the Sametime Administration Tool to delete a group from the Domino
Directory on the Sametime server.
1. From the Sametime server home page, click the ″Administer the Server″ link to
open the Sametime Administration Tool.
2. Choose Domino Directory - Domino.
3. Choose Manage Groups.
4. Double-click the name of the group you want to delete.
5. When the Group document opens, select Delete Group. The Group document is
deleted from the Domino Directory.
Editing a group
To add or delete users from a group or change any other fields in a Group
document, you must use the Sametime Administration Tool to edit the Group
document. To edit a Group document:
1. From the Sametime server home page, click the ″Administer the Server″ link to
open the Sametime Administration Tool.
2. Choose Domino Directory - Domino.
3. Choose Manage Groups.
4. Double-click the name of a group.
5. Select Edit Group and make the appropriate changes.
6. Click ″Save and Close.″
How Sametime uses Domino Directory information
This section discusses the Domino Directory information that is used by Sametime.
The topics in this section include:
v Person documents
v Group documents
v The Server document
v Directory views used by Sametime features
Person documents
The Domino Directory maintains a Person document for each user in the Sametime
community (or Domino domain). Each member of the Sametime community must
have a Person document in the Directory to log into the Sametime Connect client
or authenticate with the Sametime server.
A Person document includes many different fields that contain descriptive
information about a user. Most of the fields are optional for Sametime users. The
four most important fields on a Person document for a Sametime user are the ″Last
name,″ ″User name,″ ″Internet password,″ and ″Sametime server″ fields.
The ″Last name,″ ″User name,″ and ″Internet password″ fields in the Basics section
of a Person document are required for authentication. For more information about
how these fields are used by the authentication process, see Person document, User
names, and Internet passwords in the Security section of this documentation.
″Sametime server″ field (home Sametime server)
The ″Sametime server″ field in the Administration tab of a user’s Person document
specifies a user’s ″home″ Sametime server. You must enter the name of a Sametime
Chapter 3. Using Domino Directories 41
server in this field for every Sametime user when multiple Sametime servers are
installed and integrated into a single community.
The home Sametime server stores a user’s Community Services preferences and
other data. When a Sametime server is specified in the ″Sametime server″ field of a
user’s Person document, Sametime ensures that the user always logs in to that
Sametime server to receive the Community Services presence and chat
functionality. For more information, see Connecting to the Home Sametime server.
Group documents
The Domino Directory stores Group documents. A Group document contains a list
of multiple users and appears as a single entry in the Domino Directory. Group
documents can simplify administrative tasks and the process of adding users to the
Sametime Connect client.
Generally, a Group document contains a list of users who perform similar tasks.
For example, all employees in the Marketing department might be listed in a
″Marketing″ Group document. All employees in the Engineering department might
be listed in an ″Engineering″ Group document.
In the Sametime Connect client, groups that are defined by Group documents in
the Directory are referred to as ″Public Groups.″ Any Sametime Connect user can
browse the Domino Directory to add these Public Groups to the Sametime Connect
contact list. Public groups can greatly simplify the process of adding users to the
Sametime Connect contact list. For example, the administrator can create a Group
document called ″Technical Support″ that lists all 40 employees in the Technical
Support department. With a single mouse click, a Sametime Connect user can add
the Technical Support Public group to the Sametime Connect contact list to have
presence (or online awareness) and chat capabilities with all 40 employees in the
Technical Support Group document. Without the Group document, the user must
add the 40 employees to the Sametime Connect contact list one at a time.
Note: Generally, Sametime Connect cannot use a Group document that contains
more than 400 members. For a group that is larger than 400 members, create
a Group document that contains other Group documents and add up to 400
members to each of the subgroups.
Using groups can also simplify administrative tasks. For example, if you create a
group called ″Administrators″ that lists all users who can perform administrative
tasks, you can add this group to the appropriate database Access Control Lists
(ACLs) and fields on the Server document. If you want to add an administrator,
you can edit the Administrators Group document. For more information about
using Group documents to control access for administrators, see Allowing others to
access the Sametime Administration Tool.
For more information about working with Group documents, see Creating a group,
Deleting a group, or Editing a group.
The Server document
The following fields in the Server document are needed for each Sametime server
to support online presence:
v Server name - This field in the Basics tab of the Server document must contain
the name of the Sametime server.
42 Sametime Administrator’s Guide

v Is this a Sametime server? - This field in the Basics tab of the Server document
must be set to Yes to indicate the Server document describes a Sametime server.
v Port - This field in the Ports-Notes Network Ports tab of the Server document
must be set to TCPIP.
v Net Address - This field in the Ports-Notes Network Ports tab must contain the
TCP/IP address of the Sametime server.
Note: The settings in the ″Sametime″ tab of the Server document are not used by
Sametime. Configuration values for the settings available from the Sametime
Administration Tool are stored in the Configuration database (stconfig.nsf)
and the Sametime.ini file on the Sametime server. Changing settings in the
Sametime tab of the Server document has no affect on the Sametime server.
Directory views used by Sametime features
Online presence for individual users and users listed in groups requires the use of
specific views in the Domino Directory. Each Directory in the Sametime
community must contain the views listed here according to Sametime feature:
Sametime Feature Views used
Expand a group to list all the unique members in
the group
$People
$VIMGroups
Determine which groups a user is a member of $MailGroups
$People
$ServerAccess
Determine which servers are Sametime servers $Servers
Authenticate a user $Users
Browse the Directory for users and groups $PeopleGroupsFlat
Managing users in buddy lists and privacy lists
If you make changes to user names or group names in the Domino directory, you
must run the Name Conversion Utility to ensure these same name changes are
made in the buddy lists and privacy lists that display in the Sametime Connect
client. The buddy list and privacy list names are stored in a Domino database
(vpuserinfo.nsf) on the Sametime server and must be managed separately from the
names in the directory. For more information, see the appendix Using the Name
Conversion Utility.
Chapter 3. Using Domino Directories 43

44 Sametime Administrator’s Guide

Chapter 4. Using LDAP Directories with Sametime
This chapter explains how the IBM Lotus Sametime server can be configured to
connect to a Lightweight Directory Access Protocol (LDAP) server and access an
LDAP directory. You can use this capability to integrate Sametime into an
environment in which LDAP-compliant servers and directories are already
deployed. This chapter discusses the following topics:
v Using LDAP with the Sametime server
v Setting up an LDAP connection
v LDAP Connectivity settings
v LDAP Basics settings
v LDAP Authentication settings
v LDAP Searching settings
v LDAP Group Contents settings
v Using SSL to encrypt connections between a Sametime and LDAP server
v Adding new administrators in the LDAP environment
v Access Control Lists and LDAP user names
v Setting up an LDAP connection after selecting the Domino directory during the
server installation
v Customizing LDAP directory searches
v Solving token authentication problems in mixed server and multiple directory
environments.
Using LDAP with the Sametime server
Using LDAP with the IBM Lotus Sametime server allows you to integrate
Sametime into an environment in which other LDAP-compliant servers and
directories are already deployed. Sametime can be used with LDAPv2 and
LDAPv3.
Note: For information on using LDAP with a Sametime server that operates on a
platform other than Windows (such as the IBM i5/OS and pSeries servers),
see the installation guide (stinstall.nsf or stinstall.pdf) that shipped with the
Sametime server.
Sametime users and groups can be maintained in an existing LDAP directory on
an LDAP server. When Sametime users and groups are maintained in an existing
LDAP directory, it is not necessary to populate the Domino Directory on the
Sametime server with every user and group in the organization.
To use Sametime in an LDAP environment, you must configure the Sametime
server to connect to an LDAP server. When connected to an LDAP server,
Sametime can search and authenticate against the LDAP directory on the LDAP
server on behalf of Sametime clients.
This section includes the following topics related to using Sametime with LDAP:
v How LDAP is used with Sametime - Provides basic information about using
LDAP with Sametime.
© Copyright IBM Corp. 2005 45

v Setting up an LDAP connection - Describes the procedures required to set up a
connection with an LDAP server.
v LDAP Directory Settings - Provides an overview of the LDAP configuration
settings available in the Sametime Administration Tool and describes the level of
LDAP knowledge required to configure the Sametime LDAP Directory settings.
The administrator must configure the LDAP Connectivity, Basics, Authentication,
Searching, and Group contents settings located within the LDAP Directory
settings of the Sametime Administration Tool.
v Configuring LDAP Connectivity settings - Provides detailed information about
the configuration settings that enable the Sametime server to connect to an
LDAP server, including information on using SSL for authentication and
encryption of the connection between the Sametime and LDAP server. This
section also explains the configuration settings that enable a Sametime server to
access multiple LDAP servers when searching for and authenticating users.
v Configuring LDAP Basics settings - Provides detailed information about the
basic LDAP settings that support searching person and group entries in an
LDAP directory. These settings ensure that user and group names maintained in
an LDAP directory can be displayed in Sametime user interfaces.
v Configuring LDAP Authentication settings - Provides detailed information about
the LDAP search filter required to enable users to authenticate against entries in
an LDAP directory. Also explains how to specify a home Sametime server when
Sametime is functioning in an LDAP environment.
v Configuring LDAP Searching settings - Provides detailed information on the
LDAP search filters required to conduct searches for people and groups in an
LDAP directory.
v Configuring LDAP Group Contents settings - Provides detailed information
about the LDAP Group Contents setting required to enable Sametime to examine
groups in an LDAP directory. Sametime uses these settings to resolve the names
within a group entry to person or group entries in an LDAP directory.
v Using SSL to encrypt connections between the Sametime and LDAP servers -
Provides information on how to encrypt all data transmitted between the
Sametime and LDAP servers.
v Access Control Lists and LDAP User Names - Briefly describes rules for entering
LDAP user names in database Access Control Lists (ACLs).
v Adding new administrators in the LDAP environment - Discusses adding new
Sametime administrators when Sametime is configured to connect to an LDAP
server.
v Setting up an LDAP connection after selecting the Domino directory during the
server installation - Discusses how to set up a connection to an LDAP server if
you did not choose the LDAP Directory option during the Sametime server
installation.
v Using Java classes to customize LDAP directory searches - Explains how you can
write a Java class to customize the way in which Sametime searches the LDAP
directory for users and groups. You can also write a Java class that changes the
format of user names returned from LDAP directory searches.
v Solving token authentication problems in mixed server and multiple LDAP
directory environments - Explains how to solve token authentication problems
that occur when a Sametime server operates in an environment that includes
other application servers that issue authentication tokens (such as portal
servers). These problems occur when Sametime connects to a different LDAP
directory than the other application servers.
46 Sametime Administrator’s Guide

How LDAP is used with Sametime
The administrator can configure the Sametime server to connect to one or more
LDAP servers. When Sametime connects to an LDAP server, the following support
is provided for Authentication, Searches, Connectivity, Administration, and User
Management.
Authentication
Sametime supports authentication against an LDAP directory in the following
ways:
v Sametime Connect, Sametime Meeting Room, and Sametime Broadcast clients
can authenticate using user names and passwords stored in an LDAP directory
on an LDAP server.
v Only users that are entered in the LDAP directory on the LDAP server can
authenticate with the Sametime server.
The Sametime administrator is an exception. A Sametime administrator is always
authenticated against the Domino Directory when accessing the Sametime
Administration Tool. A Sametime administrator must have a Person document in
the Domino Directory on the Sametime server to access the Sametime
Administration Tool.
v End users use existing Sametime client interfaces when entering user names and
passwords for authentication purposes. The end user does not know whether
they are authenticating against an LDAP directory or a Domino directory.
v Authentication to individual databases on the Sametime server is still controlled
by database ACLs. For information on entering names from an LDAP directory
in a database ACL, see Access Control Lists and LDAP User Names.
v The Sametime server connects to the LDAP server to perform search and
authentication procedures on behalf of Sametime clients. The Sametime
administrator can specify whether the Sametime server binds to the LDAP
server as an anonymous or authenticated user when making this connection. For
more information, see Administrator distinguished name and password for
authenticated binding.
v The Sametime server can be configured to use SSL for authentication and
encryption when connecting to the LDAP server. For more information, see Use
SSL to authenticate and encrypt the connection between the Sametime server
and the LDAP server.
Searches
Sametime supports searches of the LDAP directory in the following ways:
v Users can search the LDAP directory on an LDAP server to add people and
groups to the Sametime Connect client presence list or privacy list. Users can
also search the LDAP directory when adding users to the ″Restrict To″ list
available from the New Meeting form in the Sametime Meeting Center.
v End users use existing Sametime client interfaces when searching for other users.
v Searches of the LDAP directory are conducted according to parameters specified
in the Sametime LDAP Directory Settings in the Sametime Administration Tool.
The administrator must configure the LDAP Directory Settings to ensure the
searches are conducted using search filter and schema settings consistent with
the schema of the LDAP directory to be searched.
v You can write Java classes to more precisely control the manner in which
Sametime searches for users and groups and formats user names returned from
LDAP directory searches.
Chapter 4. Using LDAP Directories with Sametime 47

Connectivity
Sametime supports connectivity with the LDAP server in the following ways:
v Sametime clients connect to the Sametime server. The Sametime server
establishes a network connection to the LDAP server and performs searches and
authentication on behalf of the Sametime clients. Sametime clients do not
connect directly to the LDAP server.
The Sametime server connects to the LDAP server using the LDAP protocol. By
default, this connection occurs on TCP/IP port 389.
v The Sametime Administrator specifies whether the Sametime server binds to the
LDAP server as an anonymous or authenticated user when connecting to the
LDAP server. For more information, see Administrator distinguished name and
password for authenticated binding.
v The Sametime server can be configured to access multiple LDAP servers when
searching for and authenticating Sametime users. The Sametime server can
access one LDAP directory per LDAP server.
v The Sametime server can be configured to use SSL when accessing the LDAP
server.
Administration and user management
Sametime supports administration and user management with LDAP in the
following ways:
v When using LDAP, Sametime server administrators are authenticated against the
Domino Directory on the Sametime server when accessing the Sametime
Administration Tool. All other users are authenticated against the LDAP
directory on the LDAP server. For more information, see Sametime
Administration Tool and LDAP environments.
v The person entries in the LDAP directory must contain a field to hold the name
of a user’s home Sametime server. This field does not exist in the LDAP
directory, so the administrator can either add a new field to the person entries in
the LDAP directory or use an existing field such as the e-mail attribute. Once
this field is added to the person entries in the LDAP directory, the administrator
must enter the name of the user’s home Sametime server in the new field in
each user’s person entry in the LDAP directory. The administrator must also
specify the name of the field in the LDAP directory that contains the name of
the Sametime server in the LDAP Authentication settings of the Sametime
Administration Tool.
v Sametime server administrators cannot use the Sametime Administration Tool to
add or modify users and groups in the LDAP directory on an LDAP server. User
accounts must be added and modified using the software and procedures
required by the LDAP directory on the LDAP server.
The Sametime Administration Tool can be used to perform all other Sametime
administrative procedures when Sametime is configured to connect to an LDAP
server.
v If you make changes to user names or group names in the LDAP directory, you
must run the Name Conversion Utility to ensure these same name changes are
made in the buddy lists and privacy lists that display in the Sametime Connect
client. The buddy list and privacy list names are stored in a Domino database
(vpuserinfo.nsf) and must be managed separately from the names in the
directory. For more information, see the appendix Using the Name Conversion
Utility.
48 Sametime Administrator’s Guide

v The Sametime self-registration feature cannot be used when Sametime connects
to an LDAP server. The self-registration feature cannot access the LDAP
directory to create person entries in the LDAP directory.
Note: Generally, Netscape servers contain LDAP-native directories, and it is not
necessary to configure those servers for access by LDAP clients. In other
cases, it might be necessary to configure the LDAP server to process LDAP
requests from an LDAP client. Consult the documentation for the LDAP
server for this information.
Setting up an LDAP connection
The three procedures associated with setting up an LDAP connection from
Sametime to an LDAP server are:
1. Select the appropriate LDAP options during the server installation.
2. Alter the Directory Assistance document for the LDAP directory.
3. Configure the LDAP Directory settings in the LDAP document. You can use
either a Lotus Notes client or the Sametime Administration Tool to configure
these settings.
Selecting the appropriate LDAP options during the server
installation
This procedure is the first of three associated with setting up an LDAP connection
from Sametime to an LDAP server.
During the installation and setup of the Sametime server, you must provide
information that is needed by Sametime to connect to the LDAP server. The
Sametime installation prompts you with a ″Select Directory type″ dialog box. In the
″Select Directory type″ dialog box, you must select ″LDAP Directory″ from the
drop-down list. After selecting the ″LDAP Directory″ option, the setup procedure
prompts you for the following information:
v LDAP Server Name - Enter the fully-qualified DNS name or IP address of the
LDAP server that contains the LDAP directory that Sametime will access.
v Port Number for LDAP - Specify the TCP/IP port number on which the LDAP
server listens for LDAP connections. The default port number for LDAP
connections is port 389.
Note: The Lotus Sametime Server 7.0 Installation Guide provides step-by-step
instructions for selecting these options during a Sametime installation. If you
did not select these options during the installation, you can either reinstall
the Sametime server and select the appropriate LDAP options during the
reinstallation or perform the procedures described in Setting up an LDAP
connection after selecting the Domino directory during the server
installation.
About selecting the LDAP directory during the server installation
When you select ″LDAP Directory″ as the directory type during a Sametime
installation, the installation makes the configuration changes necessary to enable
the Domino components used by Sametime to connect to the LDAP directory.
Specifically, the following occurs when you select the ″LDAP Directory″ option
during the Sametime installation:
v A Directory Assistance database (da.nsf) is created by the Sametime installation
on the Domino server on which Sametime resides.
Chapter 4. Using LDAP Directories with Sametime 49

A Directory Assistance document is created in this da.nsf database. This
document is configured by default to enable the Sametime server to connect to
the LDAP directory. It may be necessary to alter the ″Base DN for search″ setting
in the Directory Assistance document to ensure Sametime can connect to the
LDAP server. This configuration is described in the next procedure.
v The filename da.nsf is written in the ″Directory Assistance database name″ field
in the Server document of the Domino server on which Sametime is installed.
This entry must exist in the Server document to enable the Domino server to use
directory assistance.
Note: If an entry exists in the ″Directory Assistance database name″ field in the
Server document of the Domino server at the time the Sametime server is
installed, the Sametime server installation will create a Directory
Assistance document in the database specified in the ″Directory Assistance
database name″ field. This Directory Assistance document points to the
LDAP server specified during the Sametime installation.
For example, if the ″Directory Assistance database name″ field in the Server
document specifies the name ″da.nsf″ (or any other filename) when Sametime is
installed, the Sametime installation creates a Directory Assistance document
within the existing ″da.nsf″ database (or other database specified in the
″Directory Assistance database name″ field). This Directory Assistance document
points to the LDAP server specified during the Sametime installation. The
Sametime installation does not overwrite the existing da.nsf database or attempt
to create a new directory assistance database if a directory assistance database is
already specified in the ″Directory Assistance database name″ field of the Server
document.
Next step
After specifying the correct LDAP options during the installation, you must alter
the Directory Assistance document for the LDAP directory.
Alter the Directory Assistance document for the LDAP
directory
This procedure is the second of three associated with setting up an LDAP
connection from the Sametime server to an LDAP server.
The Sametime server installation creates a Directory Assistance database (da.nsf) on
the Sametime server. This database contains a Directory Assistance document that
enables Sametime to connect to the LDAP server to authenticate Web browser
users.
You must ensure the ″Base DN for search″ setting in this Directory Assistance
document is set appropriately for the LDAP directory used in your environment.
To alter the ″Base DN for search″ setting in the Directory Assistance document:
1. From a Lotus Notes client, open the Directory Assistance database on the
Sametime server.
v Choose File - Database - Open.
v Select the Local server.
v Select the Directory Assistance database (da.nsf).
v Click Open.2. Double-click the name of the Directory Assistance document for the LDAP
server to open the document.
3. Click the LDAP tab.
50 Sametime Administrator’s Guide

4. In the ″Base DN for Search″ field, make one of the following entries. The entry
you make depends on the type of LDAP directory used in your environment.
v Domino directory - An example value is ″O=DomainName,″ where
″DomainName″ is the Lotus Notes domain (for example O=Acme).
v Microsoft Exchange 5.5 directory - An example value is ″CN= recipients,
OU=ServerName,O=NTDomainName,″ where ServerName is the Windows
server name and NTDomainName is the Windows NT Domain (for example,
CN=recipients,OU=Acmeserver1,O=NTAcmedomain).
v The Microsoft Exchange 5.5 example above assumes that the directory is
using the default directory schema. If you have changed the schema of the
Microsoft Exchange 5.5 directory, the entry in the ″Base DN for Search″ field
must reflect the new schema.
v Microsoft Active Directory - An example value is ″CN=users,
DC=DomainName, DC=com.″
v Netscape LDAP directory - Use the format O= followed by the
organizational unit that was specified during the Netscape server setup. If
you are uncertain about this entry, use the administrative features of the
Netscape server to determine the appropriate entry.
v IBM SecureWay directory - An example value is ″DC=DomainName,
DC=com.″5. Click Save and Close to save the Directory Assistance document.
Next step
After altering the Directory Assistance document, you must configure the LDAP
Directory settings.
Configure the LDAP Directory settings
This procedure is the last of three associated with setting up an LDAP connection
from Sametime to an LDAP server.
You must configure the LDAP Directory settings on the LDAP document in the
Configuration database to ensure that the Sametime server can search and
authenticate against entries in the LDAP directory.
You can configure the LDAP Directory settings using either a Lotus Notes client or
the Sametime Administration Tool.
If you use a Notes client, you enter the LDAP Directory settings directly into the
fields in the LDAP document in the Configuration database.
If you use the Sametime Administration Tool, you complete the ″LDAP Directory″
settings available from the user interface of the Sametime Administration Tool. The
administration tool writes the values to the LDAP document in the Configuration
database.
Procedures for using either the Sametime Administration Tool or the Lotus Notes
client to configure the LDAP Directory settings are included below. Refer to the
help topics for either procedure in the LDAP Directory Settings section of this
documentation for help on individual settings.
Note: Configuring the LDAP Directory settings requires previous experience with
LDAP. For more information, see LDAP knowledge required to configure
the LDAP Directory settings.
Chapter 4. Using LDAP Directories with Sametime 51

Configuring LDAP Directory settings from the Sametime
Administration Tool
To configure the LDAP settings using the Sametime Administration Tool:
1. Open the Sametime Administration Tool from the ″Administer the Server″ link
of the Sametime server home page.
2. Select ″LDAP Directory.″
The LDAP Directory options are listed below. The LDAP Directory options
contain settings that must be consistent with your LDAP environment.
Connectivity - Includes settings that ensure the Sametime server can connect to
the LDAP server. For more information, see Configuring the LDAP
Connectivity settings.
Basics - Includes settings that ensure that the Sametime server can search
person and group entries in the LDAP directory. For more information, see
Configuring the LDAP Basics settings.
Authentication - Includes settings that ensure that users can authenticate
against entries in an LDAP directory and provides settings that enable you to
specify home Sametime servers when Sametime connects to an LDAP server.
For more information, see Configuring LDAP Authentication settings.
Note: If you have deployed more than one Sametime server, you must add a
″Sametime server″ field to the Person entries in the LDAP directory and
then specify the name of this field in the Authentication settings of the
Sametime Administration Tool. For more information on this
requirement, see Setting the Home Sametime Server setting for LDAP.
Searching - Includes search filter settings that resolve searches for person or
group entries in the LDAP directory. For more information, see Configuring
LDAP Searching settings.
Group Contents - Includes settings that resolve searches for person or group
entries that are contained within another group entry. For more information,
see Configuring LDAP Group Contents settings.
Configuring LDAP Directory settings using a Lotus Notes client
Use the instructions below to configure the LDAP Directory settings using a Lotus
Notes client.
1. Use the Lotus Notes client on the Sametime server to open the Sametime
Configuration database (stconfig.nsf) on the Sametime server.
v Choose File - Database - Open.
v Select the Local server.
v Select the Sametime Configuration database (stconfig.nsf).
v Click Open.2. Open the LDAP document in the Configuration database that is associated with
the LDAP server. To open the LDAP document:
v In the right pane of the Configuration database, locate the LDAP server entry
in the Form Name column of the Configuration database.
v Each LDAP Server document is listed to the right and beneath the LDAP
Server entry under the Last Modified Date column. The date represents the
last time the LDAP server document was modified.
v To open an LDAP Server document, double-click the date in the Last
Modified Date column that represents the document.
v When the LDAP Server document opens, double-click the document to put it
in edit mode.
52 Sametime Administrator’s Guide

3. To configure the LDAP Directory settings, you can enter values directly into the
editable fields in the LDAP Server document.
The LDAP Directory settings that are available from the LDAP document in the
Configuration database are the same LDAP settings that are available from the
Sametime Administration Tool. However, some LDAP Directory settings in the
LDAP document are worded differently and arranged in a different order from
the LDAP Directory settings in the Sametime Administration Tool. This
documentation assumes that the administrator is using the Sametime
Administration Tool to configure these settings. Consult the lists below to locate
the documentation in this chapter for individual LDAP Directory settings that
appear in the LDAP document of the Configuration database.
Connection settings
The Connection settings in an LDAP document in the Configuration database
include:
v Network Address of LDAP Connection - For more information, see Host name
or IP address of the LDAP server.
v Port number for LDAP Connection - For more information, see Port.
v Login Name for LDAP Connection - For more information, see Administrator
distinguished name and password for authenticated binding. Note that if this
field is left blank, the Sametime server binds to the LDAP server as an
anonymous user.
v Password for LDAP Connection - For more information, see Administrator
distinguished name and password for authenticated binding.
v SSL Enabled - For more information, see Use SSL to authenticate and encrypt
the connection between the Sametime server and the LDAP server.
v SSL Port - For more information, see Use SSL to authenticate and encrypt the
connection between the Sametime server and the LDAP server.
v Search Order - For more information, see Position of this server in the search
order.
Search Filter settings
For information on any of the Search Filter settings below, see the topic later in this
chapter that has the same name as the setting. The Search Filter settings and the
help topic for each setting are:
v Search filter for resolving person names.
v Search filter to use when resolving a user name to a distinguished name.
v Search filter for resolving group names.
Search Base and Scope settings
The Base Objects settings are worded differently in the LDAP document in the
Configuration database than in the Sametime Administration Tool. The settings
and the help topics for each setting are listed below.
v Base object when searching for person entries - For more information, see Where
to start searching for people.
v Base object when searching for group entries - For more information, see Where
to start searching for groups.
The Scope settings are worded the same in the LDAP document in the
Configuration database as in the Sametime Administration Tool. The Scope settings
and the help topics for each setting are:
v Scope for searching for a person
Chapter 4. Using LDAP Directories with Sametime 53

v Scope for searching for groups
Schema settings
The Schema settings are worded the same in the LDAP document in the
Configuration database as in the Sametime Administration Tool. The Schema
settings and the help topic for each setting are:
v The attribute of the person entry that defines the person’s name.
v Attribute used to distinguish between two similar person names.
v The person object class used to determine if an entry is a person
v Attribute of a person entry that defines a person’s e-mail address
The Groups settings are worded the same in the LDAP document in the
Configuration database as in the Sametime Administration Tool. The Groups
settings and the help topics for each are:
v Attribute used to distinguish between two similar group names
v Attribute in the group object class that has the names of the group members
v The group object class used to determine if an entry is a group
Home server
If you have deployed more than one Sametime server, you must add a ″Sametime
server″ field to the Person entries in the LDAP directory and then specify the name
of this field in the Home Server field in the LDAP document in the Configuration
database. For more information on this setting, see Setting the Home Sametime
Server setting for LDAP and Connecting to the Home Sametime server.
LDAP directory settings
The Sametime Administration Tool includes the LDAP Directory settings that
enable the Sametime server to operate as a client to an LDAP server. These settings
enable the Sametime server to search the LDAP directory on the LDAP server and
authenticate Sametime users against entries in the LDAP directory.
The LDAP Directory configuration settings are available from the Directory -
LDAP Directory Settings option of the Sametime Administration Tool.
Before configuring the LDAP Directory settings, the administrator must perform
the procedures described in Setting up the LDAP connection.
Note: The administrator must have some experience with LDAP to properly
configure the LDAP Directory settings. For more information on the LDAP
knowledge required, see LDAP knowledge required to configure the LDAP
Directory settings.
The available Sametime LDAP Directory configuration settings are:
Connectivity
The Connectivity settings enable the administrator to provide the IP address and
ports the Sametime server uses when connecting to the LDAP server, and to
specify whether the Sametime server binds to the LDAP server as an anonymous
or authenticated user. These settings also enable the Sametime server to connect to
multiple LDAP servers, and to use SSL when connecting to the LDAP server.
54 Sametime Administrator’s Guide
Basics
The Basics settings enable the administrator to specify the basic LDAP parameters
required to conduct searches for people and group entries in an LDAP directory.
Some of these parameters are also required to display the names of users in
Sametime user interfaces. The Basics settings include parameters that specify the
level of a directory from which a search begins, the scope of a search, and
attributes of LDAP directory entries that define person and group names.
Authentication
The Authentication settings ensure that Sametime users can be authenticated
against entries in an LDAP directory. The administrator must specify an LDAP
search filter that can resolve a name provided by a user to a Distinguished Name
(DN) in an LDAP directory.
The Authentication settings also enable the administrator to specify the field in the
LDAP directory person entries that contains the name of each user’s home
Sametime server.
Note: The administrator must add a field to the person entries in the LDAP
directory to hold the name of each user’s home Sametime server or use an
existing field in the person entries for this purpose.
Searching
The Searching setting enables the administrator to specify the search filters
required to resolve the names of people and groups to specific entries in an LDAP
directory.
Group Contents
The Group Contents setting enable the administrator to specify the attribute of a
group entry that contains the names of group members.
Add Administrator
The Add Administrator settings are used to enable additional administrators to
access the Sametime Administration Tool.
Access Control
The Access Control settings enable the administrator to work with Access Control
Lists.
LDAP knowledge required to configure the LDAP Directory
settings
Before configuring the LDAP Directory Settings for Sametime, the administrator
should have experience with the Lightweight Directory Access Protocol (LDAP)
and should be familiar with the following LDAP concepts and procedures:
v The structure (directory tree) of the LDAP directory the Sametime server will
access
v The schema of Person and Group entries in the LDAP directory
v How to construct LDAP search filters to access the attributes of Person and
Group entries in the LDAP directory
Chapter 4. Using LDAP Directories with Sametime 55
Note: LDAP defines a standard way to search for and manage entries in a
directory. A detailed discussion of the LDAP standard is outside the scope of
this documentation.
Configuring LDAP Connectivity settings
The LDAP Connectivity settings enable the Sametime server to connect to one or
more LDAP servers. The Sametime server can be configured to search and
authenticate against one LDAP directory on each LDAP server to which it
connects.
Accessing LDAP Connectivity settings
To access the LDAP Connectivity settings, select LDAP Directory - Connectivity
from the Sametime Administration Tool.
If you change a Connectivity setting, you must restart the server for the change to
take effect.
LDAP Connectivity settings
The individual Connectivity settings are listed below. Detailed information on each
setting is provided in subsequent topics. The LDAP Connectivity settings include:
v Host name or IP address of the LDAP server
v Position of this server in the search order
v Port
v Administrator distinguished name and password for authenticated binding
v Use SSL to authenticate and encrypt the connection between the Sametime
server and the LDAP server
v Adding or removing an LDAP server
Host name or IP address of the LDAP server
Use the ″Host name or IP address of the LDAP server″ setting to select the IP
address (or fully qualified DNS name) of the LDAP server for which you want to
change LDAP Connectivity settings. After selecting the Host name or IP address of
the LDAP server, you can change any of the LDAP Connectivity settings listed
below:
v Position of this server in the search order
v Port
v Administrator distinguished name and password for authenticated binding
v Use SSL to authenticate and encrypt the connection between the Sametime
server and the LDAP server
v Adding or removing an LDAP server
Position of this server in the search order
If you have configured the Sametime server to connect to multiple LDAP servers,
use the ″Position of this server in the search order″ setting to specify the order in
which Sametime will connect to the LDAP servers.
Note: To configure Sametime to connect to multiple servers, see Adding or
removing an LDAP server.
For example, if you select ″1″ for this setting, Sametime will search the LDAP
directory on the specified LDAP server before searching any other LDAP
directories available to Sametime.
56 Sametime Administrator’s Guide

Configuring the ″Position of this server in the search order″ setting:
1. From the Sametime server home page, click the ″Administer the Server″ link to
open the Sametime Administration Tool.
2. Choose LDAP Directory - Connectivity.
3. In the ″Host name or IP address of the LDAP server″ drop-down list, select the
name of the LDAP server for which you want to change the search order.
4. In the ″Position of this server in the search order″ text box, enter the
search-order setting.
5. Click Update and restart the server for the change to take effect.
Port
Use the Port setting to specify the port over which the Sametime server connects to
the LDAP server containing the LDAP directory. Set this port to the port number
on which the LDAP server listens for TCP/IP connections. The default port for
LDAP access and recommended setting is TCP/IP port 389.
Configuring the Port setting:
1. From the Sametime server home page, click the ″Administer the Server″ link to
open the Sametime Administration Tool.
2. Choose LDAP Directory - Connectivity.
3. In the ″Host name or IP address of the LDAP server″ drop-down list, select the
name of the LDAP server for which you want to change the LDAP connection
port.
4. In the Port setting, enter the port over which the Sametime server connects to
the LDAP server. The default port number is 389.
5. Click Update and restart the server for the change to take effect.
Administrator distinguished name and password for
authenticated binding
When the Sametime server connects to the LDAP server, the Sametime server can
bind to the LDAP server as either an anonymous or authenticated user. The
″Administrator distinguished name″ and ″Administrator password″ settings
determine whether the Sametime server binds to the LDAP server as an
anonymous or authenticated user.
Binding to the LDAP server as an anonymous user: If the ″Administrator
distinguished name″ and ″Administrator password″ settings do not contain entries,
the Sametime server binds to the LDAP server as an anonymous user.
In this case, you must ensure the LDAP server is configured appropriately for
anonymous access from a Sametime server. The LDAP server must allow
anonymous binding and allow anonymous access to the attributes of the LDAP
directory entries as described in Required LDAP directory access.
Note: If you are using SSL to encrypt connections between the Sametime and
LDAP servers, and you want to encrypt only the passwords transmitted
between the Sametime and LDAP servers, you must allow Sametime to bind
to the LDAP server as an anonymous user. For more information, see Using
SSL to encrypt connections between the Sametime and LDAP servers.
Binding to the LDAP server as an authenticated user: If you want the Sametime
server to bind to the LDAP server as an authenticated user, you must enter an
appropriate user name and password in the ″Administrator distinguished name″
and ″Administrator password″ fields. The Sametime server will transmit this user
Chapter 4. Using LDAP Directories with Sametime 57

name and password to the LDAP server when making its initial connection to the
LDAP server. The LDAP server verifies this user name and password against an
entry in the LDAP directory to authenticate the connection from the Sametime
server. Some notes about the ″Administrator distinguished name″ and
″Administrator password″ settings are included below:
v Administrator distinguished name - Use this setting to specify the
Distinguished name of an LDAP directory entry that the Sametime server uses
when binding to the LDAP directory.
IBM Lotus software recommends that you create a unique directory entry that is
used only for the purpose of authenticating connections from the Sametime
server to the LDAP server.
After creating the directory entry, you must ensure this directory entry has the
appropriate access rights on the LDAP server. This directory entry must have at
least read access to the attributes of the LDAP directory entries. For more
information on the level of LDAP directory access required for the Administrator
distinguished name directory entry, see ″Required LDAP directory access″ below.
v Administrator password - Use this setting to specify the password associated
with the ″Administrator distinguished name″ directory entry described above.
Required LDAP directory access: When accessing the LDAP directory, the
Sametime server must have access to specific attributes of the LDAP directory
entries. If you leave the ″Administrator distinguished name″ and ″Administrator
password″ settings blank to allow anonymous binding to the LDAP directory, the
Sametime server must be able to access the LDAP directory entry attributes listed
below as an anonymous user.
If you place entries in the ″Administrator distinguished name″ and ″Administrator
password″ fields to enable authenticated binding to the LDAP server, the
″Administrator distinguished name″ directory entry you specify must be able to
access LDAP directory entry attributes as described below.
For Person and Group entries, the Sametime server must have access to the
following LDAP directory attribute entries:
v ObjectClass
v Any LDAP directory entry attribute that is specified in any search filter defined
in the LDAP Directory Settings in the Sametime Administration Tool (or on the
LDAP document in the Configuration database on the Sametime server)
For Person entries, the Sametime server must have access to the following
attributes:
v The attribute used as the person name
v The attribute used as the person description
v The attribute used to define the home Sametime server
For Group entries, the Sametime server must have access to the following
attributes:
v The attribute used as the group name
v The attribute used as the group description (if this setting is not empty)
v The attribute used to hold names of the group’s members
Enabling authenticated or anonymous binding to the LDAP server:
1. From the Sametime server home page, click the ″Administer the Server″ link to
open the Sametime Administration Tool.
58 Sametime Administrator’s Guide

2. Choose LDAP Directory - Connectivity.
3. In the ″Host name or IP address of the LDAP server″ drop-down list, select the
LDAP server for which you want to enable authenticated or anonymous
binding.
4. To enable authenticated binding to the LDAP server:
v Enter a user name in the ″Administrator distinguished name″ field.
Note This user name must meet the requirements discussed in the ″Binding
to the LDAP server as an authenticated user″ and ″Required LDAP directory
access″ sections of this topic.
v Enter the password associated with the administrator distinguished name in
the ″Administrator password″ field.To enable anonymous binding to the LDAP server, delete any entries that
appear in the ″Administrator distinguished name″ or ″Administrator password″
fields. If these fields are blank, the Sametime server binds to the LDAP server
as an anonymous user.
If you allow anonymous binding, review the information in the ″Binding to the
LDAP server as an anonymous user″ and ″Required LDAP directory access″
sections of this topic.
5. Click Update and restart the server for the change to take effect.
Use SSL to authenticate and encrypt the connection between the
Sametime server and the LDAP server
For tighter security, the Sametime administrator can use SSL to encrypt the
connections between the Sametime and LDAP servers.
The administrator selects the ″Use SSL to authenticate and encrypt the connections
between the Sametime server and the LDAP server″ setting to encrypt the
connections between the Sametime server and the LDAP server. For more
information, see Using SSL to encrypt connections between the Sametime and
LDAP servers later in this chapter.
If this setting is not selected, the directory information and passwords transmitted
between the Sametime and LDAP servers are not encrypted.
Adding or removing an LDAP server
Sametime can connect to multiple LDAP servers. Use the ″Adding another LDAP
server″ setting to enable the Sametime server to connect to a new LDAP server.
Sametime can access one LDAP directory on each LDAP server to which it
connects.
If you no longer want the Sametime server to access an LDAP server, you can
remove the LDAP server from the list of available servers.
When adding an LDAP directory server, you must also specify a position for the
server in the search order.
To remove an LDAP server: To remove the LDAP server from the list of available
servers:
1. From the Sametime server home page, click the ″Administer the Server″ link to
open the Sametime Administration Tool.
2. Choose LDAP Directory - Connectivity.
3. In the ″Host name or IP address of the LDAP server″ drop-down list, select the
name of the LDAP server you want to remove.
Chapter 4. Using LDAP Directories with Sametime 59

4. Click the Remove button.
5. Restart the Sametime server.
To add a new LDAP server:: To enable the Sametime server to connect to a new
LDAP server, you must perform two procedures:
1. Add the new LDAP server in the Sametime Administration Tool.
2. Create a Directory Assistance document for the new LDAP server.
Instructions for each of these procedures are included below.
Adding a new LDAP server in the Sametime Administration Tool: To add a
new LDAP server in the Sametime Administration Tool:
1. From the Sametime server home page, click the ″Administer the Server″ link to
open the Sametime Administration Tool.
2. Choose LDAP Directory - Connectivity.
3. Below the ″Adding an LDAP Server″ heading, type the host name or IP address
of the new LDAP server.
4. In the Port field below the ″Adding an LDAP Server″ heading, specify the port
on which you want to connect to the new LDAP server.
5. Configure the LDAP Directory Settings (Connectivity, Basics, Authentication,
Searching, and Group Contents) that enable Sametime to search and
authenticate against the LDAP directory on the new LDAP server.
6. After you have set and updated all Sametime LDAP configuration options,
restart the Sametime server.
Create a Directory Assistance document for the new LDAP server: The Directory
Assistance database on the Sametime server must contain a Directory Assistance
document that enables the Sametime server to access the LDAP server. To create
the Directory Assistance document, use the procedure described in Create a
Directory Assistance document that enables the Sametime server to access the
LDAP server later in this chapter.
Configuring the LDAP Basics settings
The LDAP Basics settings enable the administrator to specify the basic LDAP
parameters required to conduct searches for people and group entries in an LDAP
directory. The administrator specifies one set of parameters for people searches and
a separate set of parameters for group searches.
Accessing the LDAP Basics settings
To access the LDAP Basics settings, select LDAP Directory - Basics from the
Sametime Administration Tool.
Configuring LDAP Basics settings for People
The LDAP Basics settings for People are listed below. Detailed information on each
setting is provided in subsequent topics. The LDAP Basics settings for People are:
v Where to start searching for people
v Scope for searching for a person
v The attribute of the person entry that defines the person’s name
v Attribute used to distinguish between two similar person names
v The object class used to determine if an entry is a person
v Attribute of a person entry that defines the person’s e-mail address
60 Sametime Administrator’s Guide

Configuring LDAP Basics settings for Groups
The LDAP Basics settings for Groups are listed below. The LDAP Basics settings
for Groups are:
v Where to start searching for groups
v Scope for searching for groups
v Attribute used to distinguish between two similar group names
v The group object class used to determine if an entry is a group
Where to start searching for people
The Sametime client user interfaces allow a user to search for individual users in
the LDAP directory.
Use the ″Where to start searching for people″ setting to specify the base object of
the directory (or level of the directory) from which to start a search for person
entries in the LDAP directory.
The default setting of ″″ begins the search from the root of the directory.
Note: Before accepting the default setting (″″), be aware that some LDAP directory
servers allow the ″″ value only for searching the LDAP directory root DSE
(Directory Server Entry, or entry with directory server properties) and only
when the search scope is confined to ″One level″ below the ″Where to start
searching for people″ setting. Also, searching from the root of an LDAP
directory generally results in a less efficient search than specifying a specific
base object such as ou=west, o=acme.
The setting you specify for the ″Where to start searching for people″ setting is
entirely dependent on the directory schema of the LDAP directory the Sametime
server is accessing. Example settings are:
v ou=west, o=acme
or
v o=acme
In the first example, the search for the person entry begins from the LDAP
directory base object ou=west, o=acme. In the second example, the search for the
person entry begins from the base object o=acme.
The extent of the search for person entries is further controlled by the Scope for
searching for a person setting.
Suggested values for this setting are:
v Microsoft Active Directory - cn=users, dc=domain, dc=com
v Netscape Directory - o=organizational unit/(i.e. computer name)
v Microsoft Exchange 5.5 Directory - cn=Recipients, ou=computername,
o=domain
v Domino Directory - o=organizational unit.
v SecureWay Directory - dc=domain, dc=com
Configuring the ″Where to start searching for people″ setting:
1. From the Sametime server home page, click the ″Administer the Server″ link to
open the Sametime Administration Tool.
2. Choose LDAP Directory - Basics.
Chapter 4. Using LDAP Directories with Sametime 61

3. In the ″Basics settings for server″ drop-down list, select the LDAP server that
contains the LDAP directory for which you want to modify the ″Where to start
searching for people″ setting.
4. In the ″Where to start searching for people″ setting, enter the base object of the
LDAP directory from which to start the search for a person entry (for example,
ou=west, o=acme).
5. Click Update and restart the server for the change to take effect.
Scope for searching for a person
Use the ″Scope for searching for a person″ setting to specify how many LDAP
directory levels below the Where to start searching for people setting to search
when resolving a search for a person entry.
The two available settings are Recursive and One level. Recursive is the default
value.
Recursive: Type recursive to search the entire subtree of directory entries beneath
the ″Where to start searching for people″ setting (or the base object of the search).
For example, assume the ″Where to start searching for people″ setting has the
value ″ou=west, o=acme″ and the ″Scope for searching for a person″ setting has the
value ″recursive.″
Now assume the user searches on the name ″John Smith.″ The search begins at the
ou=west, o=acme directory level and searches the entire subtree of the directory
beneath that level.
Such a search might return the following names, depending on the organization of
the directory:
v cn=John Smith, ou=managers, ou=marketing, ou=west, o=acme
v cn=John Smith, ou=engineering, ou=west, o=acme
v cn=John Smith, ou=west, o=acme
The search would fail to turn up the following directory entries because the
″Where to start searching for people″ setting in this example begins the search at
the ou=west, o=acme level of the directory:
v cn=John Smith, o=acme
v cn=John Smith, ou=engineering, ou=east, o=acme
Note: The Search filter for resolving person names setting provides the search filter
that resolves the user’s input (John Smith) to a specific person entry in the
LDAP directory.
One level: Type one level to search only the level immediately below the ″Where
to start searching for people″ setting.
For example, assume the ″Where to start searching for people″ setting has the
value ou=west, o=acme and the ″Scope for searching for a person″ setting has the
value ″one level.″
Now assume the user searches on the name ″John Smith.″ The search begins at the
ou=west, o=acme level and searches only one directory level beneath that level.
62 Sametime Administrator’s Guide

Such a search might return the following names, depending on the organization of
the directory:
v cn=John Smith, ou=west, o=acme
v cn=John Smithson, ou=west, o=acme
The search would fail to find the following directory entries because the entries are
more than one level below the ″Where to start searching for people″ setting or are
not found beneath the ″Where to start searching for people″ setting:
v cn=John Smith, ou=marketing, ou=west, o=acme
v cn=John Smith, ou=engineering, ou=east, o=acme.
To configure the ″Scope for searching for a person″ setting:
1. From the Sametime server home page, click the ″Administer the Server″ link to
open the Sametime Administration Tool.
2. Choose LDAP Directory - Basics.
3. In the ″Basics settings for server″ drop-down list, select the LDAP server that
contains the LDAP directory for which you want to set the ″Scope for searching
for a person″ setting.
4. In the ″Scope for searching for a person″ setting, type recursive or one level.
Recursive is the default setting.
5. Click Update and restart the server for the change to take effect.
The attribute of the person entry that defines the person’s name
The ″The attribute of the person entry that defines the person’s name″ setting
specifies the attribute of an LDAP directory person entry that is used to display a
user’s name in the Sametime end-user interfaces (as the result of a search or in a
privacy or presence list).
The value of this setting can be any attribute of the LDAP directory person entry,
such as cn (common name), sn (surname), givenname, or mail (e-mail address).
For example, consider an LDAP person entry containing the following attributes:
v cn - James Lock
v givenname - James
v sn - Lock
v mail - [email protected]
In this example, if the ″The attribute of the person entry that defines the person’s
name″ setting is ″cn,″ the search result displays the user’s name as James Lock. If
the ″The attribute of the person entry that defines the person’s name″ setting is
mail, the user’s name displays as [email protected].
The suggested value for Microsoft Exchange 5.5 Directory, Microsoft Active
Directory, Netscape Directory, Domino Directory servers, and SecureWay servers is
″cn.″
Note: You can also write a Java class to control the format of user names returned
from LDAP directory searches. This capability is useful if you want user
names to display in a format that is not specified by an LDAP directory
entry attribute. For more information, see Using a custom Java class to
control the format of user names returned in LDAP directory searches later
in this chapter.
Chapter 4. Using LDAP Directories with Sametime 63

To configure the ″The attribute of the person entry that defines the person’s
name″ setting:
1. From the Sametime server home page, click the ″Administer the Server″ link to
open the Sametime Administration Tool.
2. Choose LDAP Directory - Basics.
3. In the ″Basics settings for server″ drop-down list, select the LDAP server that
contains the LDAP directory for which you want to modify the ″The attribute
of the person entry that defines the person’s name″ setting.
4. In the ″The attribute of the person entry that defines the person’s name″
setting, enter the appropriate attribute.
5. Click Update and restart the server for the change to take effect.
Attribute used to distinguish between two similar person names
Use the ″Attribute used to distinguish between two similar person names″ setting
to specify the attribute of a person entry that is used to differentiate between two
users that have the same common name (cn) attribute.
This setting can specify any attribute of a person entry that can differentiate one
person from another person that has the same name. An example value for this
setting is the mail attribute. The mail attribute contains the e-mail address of an
LDAP directory person entry.
To illustrate, assume that a search on the name John Smith returns two person
entries with the common name (cn) John Smith. Since the two John Smiths will
have different e-mail addresses, the mail attribute can be displayed to enable the
user to determine which John Smith is the correct one.
Suggested values for this setting are:
v Microsoft Exchange 5.5 Directory, Netscape Directory, Domino Directory,
SecureWay Directory: mail
v Microsoft Active Directory: user principal name
To configure the ″Attribute used to distinguish between two similar person
names″ setting:
1. From the Sametime server home page, click the ″Administer the Server″ link to
open the Sametime Administration Tool.
2. Choose LDAP Directory - Basics.
3. In the ″Basics settings for server″ drop-down list, select the LDAP server that
contains the LDAP directory for which you want to modify the ″Attribute used
to distinguish between two similar person names″ setting.
4. In the ″Attribute used to distinguish between two similar person names″
setting, enter the appropriate attribute.
5. Click Update and restart the server for the change to take effect.
The object class used to determine if an entry is a person
In some situations, Sametime must determine whether a person entry returned by
a search is a person or group entry. Use the ″The object class used to determine if
an entry is a person″ setting to specify the attribute of a directory entry that
identifies the entry as a person.
64 Sametime Administrator’s Guide

Sametime assumes that individual users are represented by entries with a unique
objectclass. Sametime compares the name of the objectclass specified in this setting
to the objectclass values of each entry to decide whether the entry is a person or a
group.
Enter the objectclass attribute used for people in the LDAP schema of the LDAP
directory in your environment.
The suggested value for Microsoft Exchange 5.5 Directory, Microsoft Active
Directory, Netscape Directory, Domino Directory, and SecureWay Directory is
″organizationalPerson.″
To change this setting: To set the ″The object class used to determine if an entry
is a person″ setting:
1. From the Sametime server home page, click the ″Administer the Server″ link to
open the Sametime Administration Tool.
2. Choose LDAP Directory - Basics.
3. In the ″Basic settings for server″ drop-down list, select the LDAP server that
contains the LDAP directory for which you want to modify the ″The object
class used to determine if an entry is a person″ setting.
4. In the ″The object class used to determine if an entry is a person″ setting, enter
the objectclass value that identifies a directory entry as a person (for example,
″organizationalPerson″).
5. Click Update and restart the server for the change to take effect.
Attribute of a person entry that defines a person’s e-mail
address
Use the ″Attribute of a person entry that defines a person’s e-mail address″ setting
to specify the attribute of a person entry that contains the user’s e-mail address.
This setting is required by components of the Sametime server that use the Session
Initiation Protocol (SIP), such as the SIP Gateway. SIP entities are identified by
their e-mail addresses.
Suggested values for this setting are:
v Microsoft Exchange 5.5 Directory, Netscape Directory, Domino Directory,
SecureWay Directory: mail
v Microsoft Active Directory: user principal name
To configure the ″Attribute of a person entry that defines a person’s e-mail
address″ setting:
1. From the Sametime server home page, click the ″Administer the Server″ link to
open the Sametime Administration Tool.
2. Choose LDAP Directory - Basics.
3. In the ″Basics settings for server″ drop-down list, select the LDAP server that
contains the LDAP directory for which you want to modify the ″Attribute of a
person entry that defines a person’s e-mail address″ setting.
4. In the ″Attribute of a person entry that defines a person’s e-mail address″
setting, enter the appropriate attribute.
5. Click Update and restart the server for the change to take effect.
Chapter 4. Using LDAP Directories with Sametime 65

Where to start searching for groups
The Sametime client user interfaces allow a user to search for groups in the LDAP
directory.
Use the ″Where to start searching for groups″ setting to specify the base object of
the directory (or level of the directory) from which to start a search for group
entries in the LDAP directory.
The default setting of ″″ begins the search from the root of the directory.
Note: Before accepting the default setting (″″), be aware that some LDAP Directory
servers allow the ″″ value only for searching the LDAP directory root DSE
(Directory Server Entry, or entry with directory server properties) and only
when the search scope is confined to ″One level″ below the ″Where to start
searching for groups″ setting. Also, searching from the root of an LDAP
directory generally results in a less efficient search than setting a specific
base object (such as ou=west, o=acme) for the search.
The setting you specify in the ″Where to start searching for groups″ setting is
entirely dependent on the directory schema of the LDAP directory in your
environment. Example settings are:
v ou=west, o=acme
or
v o=acme
In the first example, the search for the group entry begins from the LDAP directory
base object ou=west, o=acme. In the second example, the search for the group
entry begins from the base object o=acme.
The extent of the search for group entries is further controlled by the Scope for
searching for groups setting.
Suggested values for this setting are:
v Microsoft Active Directory - cn=users, dc=domain, dc=com
v Netscape Directory - o=organizational unit/(i.e. computer name)
v Microsoft Exchange 5.5 Directory - cn=Recipients, ou=computername,
o=domain
v Domino Directory - o=organizational unit.
v SecureWay Directory - dc=domain, dc=com
To configure the ″Where to start searching for groups″ setting:
1. From the Sametime server home page, click the ″Administer the Server″ link to
open the Sametime Administration Tool.
2. Choose LDAP Directory - Basics.
3. In the ″Basics settings for server″ drop-down list, select the LDAP server that
contains the LDAP directory for which you want to modify the ″Where to start
searching for groups″ setting.
4. In the ″Where to start searching for groups″ setting, enter the base object of the
LDAP directory from which to start the search for a group entry (for example,
ou=west, o=acme).
5. Click Update and restart the server for the change to take effect.
66 Sametime Administrator’s Guide

Scope for searching for groups
Use the ″Scope for searching for groups″ setting to specify how many levels below
the ″Where to start searching for groups″ setting to search when resolving a search
for a group entry in the LDAP directory.
The two available settings are Recursive and One level. Recursive is the default
value.
Recursive: Type recursive to search the entire subtree of directory entries beneath
the ″Where to start searching for groups″ setting.
For example, assume the ″Where to start searching for groups″ setting has the
value ou=west, o=acme, and the ″Scope for searching for groups″ setting has the
value ″recursive.″
Now assume the user searches on the name ″Marketing.″ The search begins at the
ou=west, o=acme level and searches the entire subtree of the directory beneath that
level. Such a search might return the following group names, depending on the
organization of the directory:
v cn=Marketing, ou=Los Angeles, ou=west, o=acme
v cn=Marketing, ou=San Diego, ou=west, o=acme
v cn=Marketing, ou=west, o=acme
The search would fail to turn up directory entries such as:
v cn=Marketing, o=acme
v cn=Marketing, ou=Pittsburgh, ou=east, o=acme
Note: The Search filter for resolving group names setting provides the search filter
that resolves the user’s input (Marketing) to a specific group entry in the
LDAP directory.
One level: Type one level to search only the level of directory entries
immediately below the ″Where to start searching for groups″ setting.
For example, assume the ″Where to start searching for groups″ setting has the
value ou=west, o=acme, and the ″Scope for searching for groups″ setting has the
value ″one level.″
Now assume the user searches on the name Marketing. The search begins at the
ou=west, o=acme level and searches only one level beneath that level.
Such a search might locate a group entry such as:
v cn=Marketing, ou=west, o=acme
The search would fail to turn up a directory entry such as:
v cn=Marketing, ou=Los Angeles, ou=west, o=acme
To configure the ″Scope for searching for groups″ setting:
1. From the Sametime server home page, click the ″Administer the Server″ link to
open the Sametime Administration Tool.
2. Choose LDAP Directory - Basics.
3. In the ″Basics settings for server″ drop-down list, select the LDAP server that
contains the LDAP directory for which you want to modify the ″Scope for
searching for groups″ setting.
Chapter 4. Using LDAP Directories with Sametime 67

4. In the ″Scope for searching for groups″ setting, type recursive or one level.
Recursive is the default setting.
5. Click Update and restart the server for the change to take effect.
Attribute used to distinguish between two similar group names
Use the ″Attribute used to distinguish between two similar group names″ setting
to specify the attribute of a group entry that is used to differentiate between two
groups that have the same common name (cn) attribute.
An example of a value for this setting is the ″info″ attribute of an LDAP group
entry. In many LDAP directories, the ″info″ attribute contains descriptive
information about a group.
For example, assume that a search on the name ″Marketing″ returns two group
entries with the common name Marketing. The information contained in the info
attribute (such as ″West region″ or ″East region″) of the group entry can be used to
distinguish between the two groups.
Suggested values for this setting are:
v Microsoft Exchange 5.5 Directory - info
v Netscape Directory, Domino Directory, Microsoft Active Directory, SecureWay
Directory - description
To configure the ″Attribute used to distinguish between two similar group
names″ setting:
1. From the Sametime server home page, click the ″Administer the Server″ link to
open the Sametime Administration Tool.
2. Choose LDAP Directory - Basics.
3. In the ″Basics settings for server″ drop-down list, select the LDAP server that
contains the LDAP directory for which you want to modify the ″Attribute used
to distinguish between two similar group names″ setting.
4. In the ″Attribute used to distinguish between two similar group names″ setting,
enter the appropriate attribute.
5. Click Update and restart the server for the change to take effect.
The group object class used to determine if an entry is a group
In some situations, Sametime must determine whether a directory entry returned
by a search is a person or group entry. Use the ″The group object class used to
determine if an entry is a group″ setting to specify the attribute of a directory entry
that identifies the entry as a group.
Sametime assumes that groups are represented by entries with a unique
objectclass. Sametime compares the name of the objectclass specified in this setting
to the objectclass values of each entry to decide whether the entry is a group or a
person.
Enter the objectclass attribute used for groups in the LDAP schema of the LDAP
directory in your environment.
Suggested values for the setting are:
v Microsoft Active Directory - group
v Netscape Directory - groupOfUniqueNames
v Microsoft Exchange 5.5 and Domino Directories - groupOfNames
68 Sametime Administrator’s Guide

v SecureWay Directory - groupOfUniqueNames
To change ″The group object class used to determine if an entry is a group″
setting:
1. From the Sametime server home page, click the ″Administer the Server″ link to
open the Sametime Administration Tool.
2. Choose LDAP Directory - Basics.
3. In the ″Basic settings for server″ drop-down list, select the LDAP server that
contains the LDAP directory for which you want to modify the ″The group
object class used to determine if an entry is a group″ setting.
4. In the ″The group object class used to determine if an entry is a group″ setting,
enter the objectclass value that identifies a directory entry as a group (for
example, ″groupOfNames″ or ″groupOfUniqueNames″).
5. Click Update and restart the server for the change to take effect.
Configuring LDAP Authentication settings
The LDAP Authentication settings are listed below. Detailed information on each
setting is provided in subsequent topics. The LDAP Authentication settings are:
v Search filter to use when resolving a user name to a distinguished name
v Home Sametime Server
Search filter to use when resolving a user name to a
distinguished name
To authenticate a user, Sametime must know the Distinguished Name (DN) of the
user’s person entry in the LDAP directory. The ″Search filter to use when resolving
a user name to a distinguished name″ resolves the name (or text string) provided
by a user to a DN for authentication purposes.
To illustrate, consider the following default search filter in which the value ″%s″ is
substituted for the string provided by the user when logging in :
(&(objectclass=organizationalPerson)(|(cn=%s)(givenname=%s)(sn=%s)(mail=%s*)))
Note: You can find detailed information on the syntax and formatting of search
filters at the following Web site:
http://developer.netscape.com/docs/manuals/directory/41/ag/find.htm#1046960.
The default search filter above first performs a search for all entries of the type (or
objectclass) organizationalPerson. The search filter then looks for an exact match
with either the common name (cn), given name, or surname (sn) attribute of the
person entry. If the search locates a person entry with an attribute value that
matches the text string provided by the user, the Sametime server accesses the
person entry with that DN when authenticating the user.
The specific search filter used for this setting must be based on the schema of the
LDAP directory the Sametime server is accessing.
The default value is the suggested value for Microsoft Exchange 5.5, Microsoft
Active Directory, Netscape Directory, Domino Directory, and SecureWay Directory
servers.
Note: In some cases, for Microsoft Active Directory it may be necessary to
substitute (user principal name=%s*) for (mail=%s*) in the default search
filter shown above.
Chapter 4. Using LDAP Directories with Sametime 69

To configure the ″Search filter to use when resolving a user name to a
distinguished name″ setting:
1. From the Sametime server home page, click the ″Administer the Server″ link to
open the Sametime Administration Tool.
2. Choose LDAP Directory - Authentication.
3. In the ″Authentication for server″ drop-down list, select the LDAP server that
contains the LDAP directory for which you want to modify the ″Search filter to
use when resolving a user name to a distinguished name″ setting.
4. In the ″Search filter to use when resolving a user name to a distinguished
name″ setting, enter the search filter appropriate for the LDAP directory
schema.
5. Click Update and restart the server for the change to take effect.
Setting the Home Sametime Server setting for LDAP
The home Sametime server is the Sametime server on which the preferences and
data of a Community Services user are saved. Users connect to the home Sametime
server for presence and chat functionality. If you have installed multiple Sametime
servers, each user’s person entry in an LDAP directory must contain a field in
which a user’s home Sametime server can be specified.
Note: For more information on the purpose of the home Sametime server, see
Connecting to the Home Sametime server.
To support the Home Sametime Server setting requirement in an LDAP
environment, the administrator must do one of the following:
v Manually add a field to the LDAP directory to hold the name of each user’s
home Sametime server. This added field must appear in the person entry of
every Sametime user in the LDAP directory.
v Use a field that already exists in the person entries of each Sametime user (such
as the e-mail address) for this purpose.
Use the LDAP Home Sametime Server setting in the Sametime Administration Tool
to enter the name of the field that the administrator uses to hold the name of each
Sametime server. This entry can specify a the name of the field that the
administrator has added to the LDAP directory or the name of an existing field in
the LDAP directory person entries that the administrator chooses for this purpose.
To set the home Sametime server setting for LDAP:
1. From the Sametime server home page, click the ″Administer the Server″ link to
open the Sametime Administration Tool.
2. Choose LDAP Directory - Authentication.
3. In the ″Authentication for server″ drop-down list, select the appropriate LDAP
server.
4. In the ″Home Sametime server″ setting, enter the name of the field in each
user’s LDAP person entry that contains the name of the user’s home Sametime
server.
5. Click Update and restart the server for the change to take effect.
After the administrator has added the home ″Sametime server″ field to the person
entries in the LDAP directory, and specified the name of this field in the LDAP
Directory - Authentication settings of the Sametime Administration Tool, the
administrator must populate the home ″Sametime server″ field in each person
entry in the LDAP directory.
70 Sametime Administrator’s Guide

For each person entry in the LDAP directory, enter the name of a Sametime server
in the home ″Sametime server″ field. Use the full canonical name of the Sametime
server (for example, cn=sametime.acme.com/ou=west/o=acme) when entering the
server name in the ″Sametime server″ field in the LDAP directory.
Note: The server name in the LDAP directory is matched to the server name in the
Servers view ($Servers) of the Domino Directory. The name entered in the
″Sametime server″ field in the person entries of the LDAP directory should
match the name of the Sametime server as it appears in the Servers view of
the Domino Directory.
The user connects to this server for presence and chat functionality. You should try
to assign an equal number of users to each Sametime server to spread the load
evenly among multiple servers. For more information about working with multiple
Sametime servers, see Advantages of using multiple Sametime servers.
Configuring the LDAP Searching setting
The LDAP Searching settings are listed below. Detailed information on these
settings are provided in subsequent topics. The LDAP Searching setting is:
v Search filter for resolving person names
v Search filter for resolving group names
Search filter for resolving person names
To search for a user name, a Sametime end user enters a text string in the user
interface of a Sametime client. The ″Search filter for resolving person names″
setting defines the LDAP search filter responsible for selecting a user name from
the LDAP directory. This search filter matches the text string provided by the user
to information contained within the attributes of LDAP directory person entries.
To illustrate, consider the following default search filter in which the value ″%s″
represents the text string provided by the user:
(&(objectclass=organizationalPerson)(|(cn=%s*)(givenname=%s)(sn=%s)(mail=%s*)))
Note: You can find detailed information on the syntax and formatting of search
filters at the following Web site:
http://developer.netscape.com/docs/manuals/directory/41/ag/find.htm#1046960.
The default search filter first looks for entries whose type (or object class) is
organizationalPerson. The search filter looks for a prefix match (%s*) with an
entry’s common name, a complete match with an entry’s given name, or a
complete match with the entry’s surname attribute.
Using the default search filter, a search on the person name ″James″ might return
the following directory entries (provided that each directory entry is of the
objectclass organizationalPerson).
v Jameson Sanders
v James Lock
v James Clark
v Henry James
Note: The ″Where to start searching for people″ and ″Scope for searching for a
person″ settings in the Basics - People settings of the Sametime
Administration Tool define the level of the directory tree from which the
search begins and how much of the directory is searched.
Chapter 4. Using LDAP Directories with Sametime 71

The suggested value for this setting for Microsoft Exchange 5.5, Microsoft Active
Directory, Netscape Directory, Domino Directory, and SecureWay Directory servers
is:
(&(objectclass=organizationalPerson)(|(cn=%s*)(givenname=%s*)(sn=%s*)(mail=%s*))
In some cases, Microsoft Active Directory may require you to substitute (user
principal name=%s*) for (mail=%s*) in the search filter shown above.
Note: If a single search filter is not adequate to resolve user searches in your
environment, you can create a custom Java class that refines the user search
capabilities. This capability is useful in environments with complex LDAP
directory schemas. For more information, see Using a custom Java class to
control LDAP directory searches for people and groups later in this chapter.
To configure the ″Search filter for resolving person names″ setting:
1. From the Sametime server home page, click the ″Administer the Server″ link to
open the Sametime Administration Tool.
2. Choose LDAP Directory - Searching.
3. In the ″Search settings for server″ drop-down list, select the LDAP server that
contains the LDAP directory for which you want to modify the ″Search filter
for resolving person names″ setting.
4. In the ″Search filter for resolving person names″ setting, enter the search filter
appropriate for the LDAP directory schema.
5. Click Update and restart the server for the change to take effect.
Search filter for resolving group names
To search for a group name, a Sametime end user enters a text string in the user
interface of a Sametime client. The ″Search filter for resolving group names″
defines the LDAP search filter responsible for selecting the group name from an
LDAP directory. This search filter matches the text string provided by the user to
values listed for the attributes of the LDAP directory group entries.
To illustrate, consider the following default search filter in which the value ″%s″ is
substituted for the text string supplied by the user:
(&(objectclass=groupOfNames)(cn=%s*))
Note: You can find detailed information on the syntax and formatting of search
filters at the following Web site:
http://developer.netscape.com/docs/manuals/directory/41/ag/find.htm#1046960.
The default search filter first looks for directory entries of the type (or object class)
groupOfNames. The search filter then looks for a prefix match (%s*) with the
common name (cn) attribute of the groupOfNames entries.
Using the search filter above, a search on the name ″Market″ might return the
following group entries from the directory (provided that each entry also has the
groupOfNames objectclass attribute):
v Marketing
v Marketers
v Markets
Note: The ″Where to start searching for groups″ and ″Scope for searching for
groups″ settings in the Basics - Groups settings of the Sametime
72 Sametime Administrator’s Guide

Administration Tool define the level of the directory tree from which the
search begins and how much of the directory is searched.
The search filter used for resolving group names must be based on the schema of
your LDAP directory. The suggested value for Microsoft Exchange 5.5 and Domino
directory servers is the default value discussed above.
The other suggested values for this setting are:
v Microsoft Active Directory:
(&(objectclass=group)(cn=%s*))
v Netscape Directory and SecureWay Directory:
(&(objectclass=groupOfUniqueNames)(cn=%s*))
Note: If a single search filter is not adequate to resolve group searches in your
environment, you can create a custom Java class that refines the group
search capabilities. This capability is useful in environments with complex
LDAP directory schemas. For more information, see Using a custom Java
class to control LDAP directory searches for people and groups later in this
chapter.
To configure the ″Search filter for resolving group names″ setting:
1. From the Sametime server home page, click the ″Administer the Server″ link to
open the Sametime Administration Tool.
2. Choose LDAP Directory - Searching.
3. In the ″Search settings for server″ drop-down list, select the LDAP server that
contains the LDAP directory for which you want to modify the ″Search filter
for resolving group names″ setting.
4. In the ″Search filter for resolving group names″ setting, enter the search filter
appropriate for the LDAP directory schema.
5. Click Update and restart the server for the change to take effect.
Configuring the LDAP Group Contents setting
The LDAP Group Contents setting is listed below. Detailed information on this
setting is provided in a subsequent topic. The LDAP Group Contents settings is:
v Attribute in the group object class that has the names of the group members
Attribute in the group object class that has the names of the
group members
If an end user adds a group to a presence list, privacy list, or a list that restricts
meeting attendance, Sametime must obtain the list of members within the group so
that individual members of the group can be displayed. The ″Attribute in the
group object class that has the names of the group members″ setting defines the
attribute within an LDAP directory group entry that holds the names of all
members of the group.
Suggested values for this setting are:
v Microsoft Active Directory, Microsoft Exchange 5.5 Directory, and Domino
Directory: member
v Netscape Directory and IBM Secureway Directory: UniqueMember
This setting assumes that the LDAP directory schema uses a single directory entry
to represent a group, and that names of group members are held in one attribute
Chapter 4. Using LDAP Directories with Sametime 73

that contains multiple values. This assumption is true for Microsoft Exchange 5.5,
Microsoft Active Directory, Netscape Directory, and Domino 5 environments.
To configure the ″Attribute in the group object class that has the names of the
group members″ setting:
1. From the Sametime server home page, click the ″Administer the Server″ link to
open the Sametime Administration Tool.
2. Choose LDAP Directory - Group Contents.
3. In the ″Settings for determining the content of groups for server″ drop-down
list, select the LDAP server that contains the LDAP directory for which you
want to modify the ″Attribute in the group object class that has the names of
the group members″ setting.
4. In the ″Attribute in the group object class that has the names of the group
members″ setting, enter the appropriate group entry attribute.
5. Click Update and restart the server for the change to take effect.
Using SSL to encrypt connections between the Sametime and LDAP
servers
When Sametime is configured to connect to an LDAP server, the Sametime server
makes five separate connections to the LDAP server. Sametime makes a separate
connection to the LDAP server to perform each of these five tasks:
v Authenticate users
v Resolve a user name to a distinguished name as part of the login procedure
v Resolve user and group names (for example, as a response to an ″Add Person or
Group″ request from a Sametime Connect client)
v Browse the directory
v Get the content of public groups
The Sametime and LDAP servers exchange directory information, including user
names and passwords, over these connections. To ensure this information is secure,
the administrator can use SSL to encrypt the data that passes over these
connections. The administrator should consider the level of protection required
before enabling SSL. Using SSL to encrypt these connections can slow the server
performance. The administrator has the following options when using SSL to
encrypt the data transmitted between the Sametime and LDAP servers:
v Encrypt all data - This option encrypts all directory information (both user
names and passwords) that is transmitted between the Sametime server and the
LDAP server. If you encrypt all data, all five connections between the Sametime
server and LDAP server are encrypted with SSL. This option provides the most
security but also has the greatest affect on server performance.
v Encrypt only user passwords - This option encrypts passwords but not other
directory information (such as user names) passing over the connections
between the Sametime and LDAP servers. If you encrypt only user passwords,
only the ″authenticating users″ connection between the Sametime server and the
LDAP server is encrypted with SSL. This option provides an intermediate level
of security and has less affect on server performance than encrypting all of the
data.
v Encrypt no data - This option allows all directory information and passwords to
pass unencrypted between the Sametime and LDAP servers. This option does
not affect server performance and should be used if the administrator feels there
74 Sametime Administrator’s Guide

is no chance that an unauthorized user can intercept information transmitted
over the connections between the Sametime and LDAP servers.
Note: If you are encrypting connections between an AIX version of the Sametime
server and an LDAP directory, xlC.aix50.rte must be 6.0.0.3 (or higher).
Using SSL to encrypt all data transmitted between the
Sametime and LDAP servers
The administrator can use SSL to authenticate and encrypt all data passing over all
five connections between the Sametime and LDAP servers. Encrypting all data
passing between the Sametime and LDAP servers provides the highest level of
security but can slow the performance of the Sametime server.
Encrypting all data transmitted between the Sametime and LDAP servers involves
three basic procedures:
v Enabling the ″Use SSL to authenticate and encrypt the connection between the
Sametime and the LDAP server″ setting in the Sametime Administration Tool.
v Modifying the Directory Assistance document of the LDAP server to encrypt the
connection between the servers.
v Ensuring that the Sametime server trusts the server certificate of the LDAP
server.
To encrypt all data passing between the Sametime and LDAP servers, follow the
steps below.
1. From the Sametime server home page, click the ″Administer the Server″ link to
open the Sametime Administration Tool.
2. Choose LDAP Directory - Connectivity.
3. In the ″Host name or IP address of the LDAP server″ drop-down list, select the
name of the LDAP server to which you want to connect using SSL.
4. Select the ″Use SSL to authenticate and encrypt the connection between the
Sametime server and the LDAP server″ option.
5. In the ″LDAP SSL port″ field, specify the port on which the LDAP server is
listening for SSL LDAP connections. The default port for this setting is port 636.
6. Click Update and close the Sametime Administration Tool.
7. Perform the procedure described in ″Modifying the Directory Assistance
document of the LDAP server to encrypt the connection between the servers″
later in this chapter.
8. Ensure the Sametime server trusts the LDAP server certificate by performing
the procedure below that is appropriate for your platform. Each of these
procedures is described later in this chapter.
v Ensuring that the Sametime server trusts the LDAP server certificate
(Windows and AIX/Solaris servers)
v Ensuring that the Sametime server trusts the LDAP server certificate (i5/OS
servers)9. Stop and restart the Sametime server.
Using SSL to encrypt only user passwords passing between
the Sametime and LDAP servers
The administrator can use SSL to encrypt passwords but not directory information
(such as user names) passing over the connection between the Sametime and
Chapter 4. Using LDAP Directories with Sametime 75
LDAP servers. This option provides an intermediate level of security and affects
server performance less than encrypting all data that is transmitted between the
Sametime and LDAP servers.
When Sametime is configured in this way, only one connection between the
Sametime and LDAP server is encrypted with SSL; the encrypted connection is the
″authenticating users″ connection. Data passing over the other four connections
between the Sametime and LDAP servers is not encrypted. In this scenario, the
Sametime server must bind to the LDAP server as an anonymous user.
Note: Data that passes over the ″authenticating users″ connection includes the user
names and passwords that all users enter to authenticate when creating or
attending meetings, or logging in to Sametime Connect. User names and
passwords are never sent over the other four connections between a
Sametime and LDAP server unless the Sametime server is required to
authenticate when binding to the LDAP server. If the Sametime server is
required to authenticate when binding to the LDAP server, instead of
binding as an anonymous user, the user name and password the Sametime
server uses to authenticate with the LDAP server is transmitted on all five
connections between the Sametime server and the LDAP server. If you
perform the configurations described here to encrypt only the
″authenticating users″ connection, and simultaneously require the Sametime
server to bind to the LDAP server as an authenticated user, the user name
and password Sametime uses to bind to the LDAP directory is passed in the
clear on four connections between the Sametime and LDAP server. To
prevent the Sametime server from transmitting this user name and password
on four unencrypted connections, the Sametime server must bind to the
LDAP server as an anonymous user.
For more information about anonymous binding to the LDAP server, see
Administrator distinguished name and password for authenticated binding. For
more information about connections to an LDAP server, see Using SSL to encrypt
connections between the Sametime and LDAP servers.
Encrypting user passwords passing between the Sametime and LDAP servers
involves five basic procedures:
v Enabling the Sametime server to bind to the LDAP server as an anonymous
user. To enable the Sametime server to bind to the LDAP server as an
anonymous user, you must ensure that the ″Administrator distinguished name″
and ″Administrator password″ settings in the Sametime Administration Tool
LDAP Directory-Connectivity settings do not contain entries. For more
information, see Administrator distinguished name and password for
authenticated binding.
v Enabling the ″Use SSL to authenticate and encrypt the connection between the
Sametime and the LDAP server″ setting in the Sametime Administration Tool.
v Modifying the ST_DB_LDAP_SSL_ONLY_FOR_PASSWORDS setting in the
Sametime.ini file on the Sametime server.
v Modifying the Directory Assistance document of the LDAP server to encrypt the
connection between the servers.
v Ensuring that the Sametime server trusts the certificate of the LDAP server.
To encrypt only user passwords passing between the Sametime and LDAP servers,
follow the steps below.
76 Sametime Administrator’s Guide

1. From the Sametime server home page, click the ″Administer the Server″ link
to open the Sametime Administration Tool.
2. Choose LDAP Directory - Connectivity.
3. In the ″Host name or IP address of the LDAP server″ drop-down list, select
the name of the LDAP server to which you want to connect using SSL.
4. Make sure that both the ″Administrator distinguished name″ and
″Administrator password″ fields are blank. If either of these fields contains an
entry, remove the entry from the field.
Note Clearing the entries from these fields ensures that the Sametime server
will bind to the LDAP server as an anonymous user. For more information,
see Administrator distinguished name and password for authenticated
binding.
5. Select the ″Use SSL to authenticate and encrypt the connection between the
Sametime server and the LDAP server″ option.
6. In the ″LDAP SSL port″ field, specify the port on which the LDAP server is
listening for SSL LDAP connections. The default port for this setting is port
636.
7. Click the Update button and close the Sametime Administration Tool.
8. Use a text editor to open the Sametime.ini file located in the
C:\Lotus\Domino directory on the Sametime server.
9. In the Sametime.ini file, set the following parameter to ″1.″
[Directory] ST_DB_LDAP_SSL_ONLY_FOR_PASSWORDS=1
If set to 1, the ST_DB_LDAP_SSL_ONLY_FOR_PASSWORDS setting encrypts
one of the five connections to the LDAP server. (Sametime uses SSL to encrypt
the connection to the LDAP server over which users are authenticated.)
10. Save and close the Sametime.ini file.
11. Perform the procedure described in ″Modifying the Directory Assistance
document of the LDAP server to encrypt the connection between the servers″
later in this chapter.
12. Ensure the Sametime server trusts the LDAP server certificate by performing
the procedure below that is appropriate for your platform. Each of these
procedures is described later in this chapter.
v Ensuring that the Sametime server trusts the LDAP server certificate
(Windows and AIX/Solaris servers)
v Ensuring that the Sametime server trusts the LDAP server certificate (i5/OS
servers)13. Restart the Sametime server.
Allowing all data to pass unencrypted between the Sametime
and LDAP servers
If the administrator is not concerned with unauthorized users intercepting
transmissions between the Sametime and LDAP servers, the administrator should
disable the ″Use SSL to authenticate and encrypt the connection between the
Sametime server and the LDAP server″ option in the LDAP Directory -
Connectivity settings of the Sametime Administration Tool.
When this option is disabled, none of the connections between the Sametime and
LDAP servers are encrypted with SSL and all directory information and passwords
pass unencrypted between the two Sametime servers.
Chapter 4. Using LDAP Directories with Sametime 77

To disable the ″Use SSL to authenticate and encrypt the connection between the
Sametime server and the LDAP server″ option:
1. From the Sametime server home page, click the ″Administer the Server″ link to
open the Sametime Administration Tool.
2. Choose LDAP Directory - Connectivity.
3. In the ″Host name or IP address of the LDAP server″ drop-down list, select the
name of the LDAP server to which Sametime connects.
4. Verify that the ″Use SSL to authenticate and encrypt the connection between the
Sametime server and the LDAP server″ option is not selected. If this option is
selected, deselect it.
5. If you deselected the ″Use SSL to authenticate and encrypt the connection
between the Sametime server and the LDAP server″ option, click Update and
restart the server for the change to take effect.
Note: If you had previously set the ST_DB_LDAP_SSL_ONLY_FOR_PASSWORDS
parameter in the Sametime.ini file to 1 to encrypt only passwords, you
should also set that parameter to ″0″ or remove it from the Sametime.ini file
to prevent the encryption of the server-to-server connection that
authenticates users.
Modifying the Directory Assistance document of the LDAP
server to encrypt the connection between the Sametime
server and the LDAP servers
This procedure is required when you use SSL to encrypt all data transmitted
between the Sametime and LDAP server or use SSL to encrypt only user
passwords that are transmitted between the Sametime and LDAP servers. For more
information, see Using SSL to encrypt all data transmitted between the Sametime
and LDAP servers or Using SSL to encrypt only user passwords passing between
the Sametime and LDAP servers.
In this procedure, you modify the Directory Assistance document for the LDAP
server to ensure that the connection between the Sametime server and the LDAP
server is encrypted using SSL.
1. From a Lotus Notes client, open the Directory Assistance database (da.nsf).
v Choose File - Database - Open.
v For Server, select Local.
v Select the Directory Assistance database (da.nsf).
v Click Open. 2. Double-click the Directory Assistance document for the LDAP server to open
the document. (The Directory Assistance documents are displayed in the right
pane of the Directory Assistance database.)
3. Click Edit Directory Assistance.
4. Click the LDAP tab.
5. In the ″Perform LDAP search for″ field, select the ″Notes Clients/Web
Authentication″ option.
6. In the ″Channel encryption″ field, select SSL.
7. In the Port field, specify the same port that was specified in the ″LDAP SSL
port″ field of the LDAP Directory - Connectivity options of the Sametime
Administration Tool. (This port is the one on which the LDAP server listens
for SSL connections. The default port for SSL connections is port 636.)
78 Sametime Administrator’s Guide

8. In the ″Accept expired SSL certificates″ field, select Yes (the default setting) to
accept a certificate from the LDAP directory server, even if the certificate has
expired. For tighter security, select No. If No is selected, the Sametime server
checks the certificate expiration dates. If the certificate presented by the LDAP
server has expired, the connection is terminated.
9. In the ″SSL protocol version″ field, select the version number of the SSL
protocol to use. The choices are:
v V2.0 only - This setting allows only SSL 2.0 connections.
v V3.0 handshake - This setting attempts an SSL 3.0 connection. If this
connection attempt fails but Sametime detects that SSL 2.0 is available on
the LDAP server, Sametime attempts the connection using SSL 2.0.
v V3.0 only - This setting allows only SSL 3.0 connections.
v V3.0 and V2.0 handshake - This setting attempts an SSL 3.0 connection, but
starts with an SSL 2.0 handshake that displays relevant error messages. This
setting is used to receive V2.0 error messages when trying to connect to the
LDAP server. These error message might provide information about any
compatibility problems found during the connection.
v Negotiated - This setting allows SSL to determine the handshake and
protocol version required.10. In the ″Verify server name with remote server’s certificate″ field, select
Enabled (the default setting) to verify the server name with the remote
server’s certificate. If Enabled is selected, the Sametime server verifies the
name of the LDAP server with the remote server’s certificate. If the names do
not match, the connection is terminated. For more relaxed security, select
Disabled (the server name is not verified with the certificate).
11. Click Save and Close to close the Directory Assistance document.
12. Close the Directory Assistance database.
Next step
After modifying the Directory Assistance document of the LDAP server to encrypt
the connection between the Sametime server and the LDAP servers, you must
Ensuring that the Sametime server trusts the LDAP server certificate.
Ensuring that the Sametime server trusts the LDAP server
certificate (Windows and AIX/Solaris servers)
This procedure is required when you use SSL to encrypt all data transmitted
between the Sametime and LDAP server or use SSL to encrypt only user
passwords that are transmitted between the Sametime and LDAP servers. For more
information, see Using SSL to encrypt all data transmitted between the Sametime
and LDAP servers or Using SSL to encrypt only user passwords passing between
the Sametime and LDAP servers.
This procedure enables a Sametime server that operates on a Windows or
AIX/Solaris platform to trust the SSL server certificate of the LDAP server. To
ensure the Sametime server trusts the certificate of the LDAP server, the
administrator must perform the following procedures:
v Install the IKeyMan program on the Sametime server.
v Create a key database on the Sametime server named ″key.kdb″ and store this
database in the root Sametime directory.
v Ensure that the key.kdb database on the Sametime server contains the SSL
trusted root certificate that enables the Sametime server to trust the SSL server
certificate of the LDAP server.
Chapter 4. Using LDAP Directories with Sametime 79

These procedures are described below:
Install the IKeyMan program on the Sametime server
The Sametime server must have access to an SSL trusted root certificate to
complete the SSL handshake when making an SSL connection to the LDAP server.
This certificate is stored in an SSL key database. The tool provided with a
Sametime 7.0 server to create the key database and manage SSL certificates for
Sametime server to LDAP server connections is the IBM IKeyMan utility.
You must install the IBM IKeyMan utility on the Sametime server so that you can
manage the SSL certificates required to encrypt connections between the Sametime
server and LDAP server with SSL. Follow the instructions below to install
IKeyMan on either a Windows or AIX/Solaris Sametime server.
Installing IKeyMan on a Windows Sametime server
To install IKeyMan onto the Windows Sametime server, the administrator must run
the setup.exe file located on Sametime CD2 in the GSKit directory. For example, to
install IKeyMan:
1. Insert the Sametime 7.0 server CD 2 into the Sametime server machine.
2. Open a command prompt on the Sametime server machine.
3. In the command prompt window, change to the CD drive.
4. In the command prompt window, change to the ″GSKit″ folder on the
Sametime 7.0 server CD 2. (For example, enter ″cd GSKit″ at the command
prompt.)
5. From the <CD drive>:\GSKit directory, enter the following command: setup.exe
GSKit <Sametime installation directory> -s f1setup.iss. For example, your
command string might look like this:
D:\GSKit>setup.exe GSKit C:\Lotus\Domino -s -f1setup.iss
This command performs a silent installation of the IKeyMan program into the
Sametime installation directory on the Sametime server. If your Sametime
server is installed into a directory other than C:\Lotus\Domino, use the
installation directory that is appropriate for your environment in the command
string.
6. To verify that the installation is successful, do the following:
v Check that the C:\Lotus\Domino\IBM\GSK6 folder exists on the Sametime
server.
v Verify that the HKLM\Software\IBM\GSK6 registry key has been created on
the Sametime server machine.7. After installing the IBM IKeyMan utility, you must define the Java environment
on the Sametime server machine. Follow the steps below:
a. From the Windows desktop, right click on the My Computer icon and select
″System Properties.″
b. Select the ″Advanced″ tab.
c. Click the ″Environment Variables″ button.
d. For ″System Variables,″ select ″New.″
e. Enter the following in the Variable Name and Variable Value fields:
Variable Name: JAVA_HOME
Variable Value: C:\Lotus\Domino\ibm-jre\jre8. Use a text editor to add ″com.ibm.spi.IBMCMSProvider″ to the list of providers
in the C:\Lotus\Domino\ibm-jre\jre\lib\security\java.security file. Follow the
steps below:
80 Sametime Administrator’s Guide

a. Use a text editor to open the java.security file located in the directory path
shown above on the Sametime server.
b. Type the following line into the list of security providers in the java.security
file: security.provider.3=com.ibm.spi.IBMCMSProvider. The example below
illustrates this line added to the java.security file.
#
# List of providers and their preference orders (see above)
#
security.provider.1=sun.security.provider.Sun
security.provider.2=com.ibm.crypto.provider.IBMJCE
security.provider.3=com.ibm.spi.IBMCMSProvider
9. Delete the file ″gskikm.jar″ from the following location:
C:\Lotus\Domino\ibm-jre\jre\lib\ext\gskikm.jar.
Installing IKeyMan on an AIX/Solaris Sametime server
To install IKeyMan on an AIX/Solaris Sametime server, follow the instructions
below:
1. Insert the Sametime 7.0 server CD 2 into the Sametime server machine.
2. Open a command prompt on the Sametime server machine.
3. Login to the AIX/Solaris server as root.
4. From the command prompt, change to the GSKit directory on Sametime 7.0
server CD 2.
On AIX, use one of these procedures to perform the installation:
v Use the System Managment Interface Tool (SMIT) utility to install the
gskak.rte package. The package name is ″6.0.7.4 AIX Certificate and SSL Base
ACME Runtime Toolkit″.
v Use the installp command. For example:
installp -acgqw /var/spool/pkg gskak.rteOn Solaris, uncompress and untar the gsk6bas.tar.Z file, and then use one of
these procedures to perform the installation:
v Use the admintool application to install the package.
v Use the pkgadd command. For example:
pkgadd -d /var/spool/pkg gsk6bas5. Use a text editor to open the java.security file.
On AIX:
v Open the java.security file located at
/opt/ibm/lotus/notes/latest/ibmpow/ibm-jre/jre/lib/security/java.security
On Solaris:
v Open the java.security file located at
/opt/ibm/lotus/notes/latest/sunspa/ibm-jre/jre/lib/security/java.security6. In the java.security file, type this line into the list of security providers:
security.provider.3=com.ibm.spi.IBMCMSProvider
The example below illustrates this line added to the java.security file:
security.provider.1=sun.security.provider.Sun
security.provider.2=com.ibm.crypto.provider.IBMJCE
security.provider.3=com.ibm.spi.IBMCMSProvider
security.provider.4=com.ibm.crypto.provider.IBMJCA
7. Delete the file ″gskikm.jar″ from the system.
On AIX:
v Delete gskikm.jar from this location:
/opt/ibm/lotus/notes/latest/ibmpow/ibm-jre/jre/lib/ext
Chapter 4. Using LDAP Directories with Sametime 81

On Solaris:
v Delete gskikm.jar from this location:
/opt/ibm/lotus/notes/latest/sunspa/ibm-jre/jre/lib/ext8. Set the JAVA_HOME environment variable to the java VM installed under the
sametime binaries directory:
On AIX:
JAVA_HOME=/opt/ibm/lotus/notes/latest/ibmpow/ibm-jre/jre
On Solaris:
JAVA_HOME=/opt/ibm/lotus/notes/latest/sunspa/ibm-jre/jre export
JAVA_HOME
Create a key database on the Sametime server named ″key.kdb″
and store this database in the root Sametime directory
Use the IKeyMan utility you have just installed to create an SSL key database
named key.kdb on the Sametime server. When creating this database, store the
database in the directory in which Sametime is installed.
Note: Sametime 7.0 installs on a Domino server in the same directory in which
Domino is installed. The Domino server installs to the C:\Lotus\Domino
directory by default. If the Domino server is installed in this default
directory, the Sametime server also installs to the C:\Lotus\Domino
directory.
To create the key.kdb database, follow the instructions below:
1. Start the IBM IKeyMan utility.
On Windows:
v Run the gsk6ikm.exe file located in the C:\Lotus\Domino\IBM\gsk6\bin
directory on the Sametime server.On AIX:
v Run the gsk6ikm file located in the /usr/opt/ibm/gskak/bin directory on
the Sametime server.On Solaris:
v Run the gsk6ikm file located in the /opt/ibm/gsk6/bin directory on the
Sametime server.2. From the IBM IKeyMan menu bar, select Key Database File-New.
3. In the New window, do the following:
a. For Key database type, select ″CMS key database file.″
b. For File Name, enter ″key.kdb.″
c. For Location, enter the Sametime server Data directory. For example, on
Windows enter C:\Lotus\Domino\Data.
d. Click OK.4. In the Password prompt window, do the following:
a. Type a password and confirm the password used to access the key
database. The password is at your discretion.
b. Select the ″Stash the password to a file?″ Check box.
c. Click OK.An information window appears indicating the password is encrypted and
saved in the location C:\Lotus\Domino\Data\key.sth (or <Sametime install
directory>\key.sth).
82 Sametime Administrator’s Guide

After creating the key.kdb database, ensure the key.kdb database contains the
appropriate trusted root certificate.
Ensuring the key.kdb database on the Sametime server contains
the appropriate trusted root certificate
If the LDAP server is set up to listen for SSL connections, the LDAP server will
include an SSL key database that contains (at minimum) two certificates.
These certificates are:
v A trusted root (or ″signer″) certificate signed by a specific Certificate Authority
(CA), such as VeriSign.
v A server certificate signed by the same CA as a trusted root certificate.
The LDAP server presents its SSL server certificate to the Sametime server during
the SSL connection handshake. The key database on the Sametime server
(″key.kdb″ created above) must contain one of the following:
v A copy of the SSL server certificate used by the LDAP server. This certificate can
be exported from the key database on the LDAP server and imported into the
key.kdb database on the Sametime server as a signer certificate.
v A trusted root (or ″signer″) certificate that matches the trusted root certificate for
the CA that signed the LDAP server certificate.
For example, if the key database on the LDAP server contains a ″VeriSign Class
4 Public Primary Certification Authority″ trusted root certificate and the LDAP
SSL server certificate is signed by VeriSign, the key database on the Sametime
server must also contain a ″VeriSign Class 4 Public Primary Certification
Authority″ trusted root certificate.
When the key.kdb database is created, the database contains several trusted root
(or ″signer″) certificates by default. If the appropriate trusted root certificate exists
in the key.kdb database by default, no other procedures are required to ensure that
the Sametime server trusts the LDAP server certificate. The procedure required to
ensure the Sametime server trusts the SSL certificate of the LDAP server is
complete.
Ensuring that the Sametime server trusts the LDAP server
certificate (i5/OS servers)
This procedure is required when you use SSL to encrypt all data transmitted
between the Sametime and LDAP server or use SSL to encrypt only user
passwords that are transmitted between the Sametime and LDAP servers. For more
information, see Using SSL to encrypt all data transmitted between the Sametime
and LDAP servers or Using SSL to encrypt only user passwords passing between
the Sametime and LDAP servers.
This procedure enables a Sametime server that operates on the i5/OS platform to
trust the SSL server certificate of the LDAP server. To ensure the Sametime for
i5/OS server trusts the certificate of the LDAP server, the administrator must
perform the following procedures:
v Install and setup the software required to use the integrated Digital Certificate
Manager (DCM) on the i5/OS server where the Sametime server is located
v Ensure that the i5/OS LDAP client on the Sametime server system trusts the
Certificate Authority (CA) that signed the SSL server certificate of the LDAP
server.
Chapter 4. Using LDAP Directories with Sametime 83
v Ensure that Sametime has appropriate access to the system certificate store on
the i5/OS server.
Install and setup required DCM software on i5/OS server
For i5/OS servers, certificates are managed using the integrated Digital Certificate
Manger (DCM), rather than IKeyMan. You must install and setup the DCM
software so that you can manage the SSL certificates required to encrypt
connections between the Sametime server and LDAP server with SSL. All of the
following software must be installed on the i5/OS server where your Sametime
server is located:
v 5722-SS1 Option 34, Digital Certificate Manager
v 5722-DG1, IBM HTTP Server
v 5722-AC3, Crypto Access Provider 128-bit
If you need more detailed information about setting up and using DCM in order to
complete the steps in this section, see the iSeries Information Center at
http://www.ibm.com/as400/infocenter. After selecting the i5/OS release and your
preferred language, select the ″Digital Certificate Manager″ topic in the ″Security″
section.
If you do not already have a *SYSTEM certificate store, use DCM to create it.
Ensure that i5/OS LDAP client trusts the server certificate of the
LDAP server
Sametime for i5/OS uses the LDAP client included with the IBM Directory Server
which is installed as part of the i5/OS operating system.
In order for the Sametime server to communicate with the LDAP server using SSL,
the IBM Directory Server LDAP client must trust the Certificate Authority (CA)
that signed the LDAP directory server’s server certificate.
Note: As an alternative to the method described here, you may choose instead to
ensure that the i5/OS LDAP client trusts the server certificate of the LDAP
server. Only one of these methods is necessary. The LDAP client must trust
the Certificate Authority (CA) that signed the LDAP directory server’s server
certificate OR it must trust the server certificate of the LDAP server.
1. Use the Digital Certificate Manager (DCM) to ensure that the CA Certificate
that signed the LDAP directory server’s server certificate has been imported to
the DCM *SYSTEM certificate store on the i5/OS server where you are running
Sametime.
Well-known public Internet Certificate Authorities (CA) that most web
browsers can recognize readily, such as VeriSign, are included in the DCM. If
you are using a private certificate authority, you must import the CA’s
certificate into the DCM *SYSTEM certificate store.
2. Import the LDAP directory server’s server certificate to the DCM *SYSTEM
certificate store on the i5/OS server.
3. Then use DCM to add that CA Certificate to the trust list of the IBM Directory
Server LDAP client application. The application id is
QIBM_GLD_DIRSRV_CLIENT.
Ensure Sametime has access to the system certificate store
Sametime must be able to access certificates located in the DCM *SYSTEM
certificate store when connecting to an LDAP server using SSL.
84 Sametime Administrator’s Guide

The DCM *SYSTEM certificate store is located in the
/qibm/userdata/icss/cert/server directory on an i5/OS server. Run the following
command from any i5/OS command line to view the contents of this directory:
WRKLNK ’/QIBM/USERDATA/ICSS/CERT/Server/*’
By default, the certificate store is named default.kdb, but it may have another
name.
QNOTES is an i5/OS user profile created by Domino and used by Sametime when
it is running. By default, the QNOTES user profile does not have access to the
DCM *SYSTEM certificate store or the /qibm/userdata/icss/cert/server directory.
The higher level directories usually have *PUBLIC *RX authority which allows
QNOTES to access those directories.
For example, run the following commands from any i5/OS command line to
ensure QNOTES has the necessary authority to the DCM *SYSTEM certificate store
and associated directory:
CHGAUT OBJ(’/QIBM/USERDATA/ICSS/CERT/Server’) USER(QNOTES) DTAAUT(*RX)
CHGAUT OBJ(’/QIBM/USERDATA/ICSS/CERT/Server/DEFAULT.RDB’) USER(QNOTES) DTAAUT(*RX)
CHGAUT OBJ(’/QIBM/USERDATA/ICSS/CERT/Server/DEFAULT.KDB’) USER(QNOTES) DTAAUT(*RX)
Adding a new administrator in the LDAP environment
When using LDAP, an administrator uses the Sametime Administration Tool for
Sametime server administration. The administrator is authenticated against the
Domino Directory on the Sametime server when accessing the Sametime
Administration Tool.
One Sametime administrator is specified during the Sametime server installation
procedure. To allow other administrators to access the Sametime Administration
Tool, follow the instructions in Adding a new Sametime administrator.
Note: In the LDAP environment, you can use the Sametime Administration Tool to
perform LDAP configuration procedures. You cannot modify entries in the
LDAP directory using the Sametime Administration Tool. Person and group
entries in the LDAP directory must be modified using the software and
procedures required by the LDAP server. See the documentation for your
LDAP server for more information.
Access Control Lists and LDAP User Names
When using LDAP, authentication to individual databases on the Sametime server
is controlled by database ACLs.
To access the database ACLs when Sametime is configured to operate as a client to
an LDAP server:
1. From the Sametime server home page, click the ″Administer the Server″ link to
open the Sametime Administration Tool.
2. Choose LDAP Directory - Access Control.
Administrators should be aware of the following when entering names from an
LDAP directory in the ACL of a database on the Sametime server:
Chapter 4. Using LDAP Directories with Sametime 85

v When entering the names of users or groups registered in an LDAP directory to
a database ACL, use the fully-qualified Distinguished Name (DN), but use
forward slashes (/) as delimiters instead of commas (,). For example, if the DN
for the user in the LDAP directory is:
uid = Joe Waters, ou=West, o=Acme
enter this name in the database ACL:
uid = Joe Waters/ou=West/o=Acme
v You can also use an asterisk as a wildcard character when entering names from
an LDAP directory in an ACL. For example, entering */ou=West/o=Acme is
equivalent to entering all users in the ou=West, o=Acme branch of the directory
to the ACL.
With the exceptions noted above, the ACL settings of Sametime databases should
operate as they do when Sametime is configured to operate with a Domino
Directory. For more information about working with database ACLs, see Using
database ACLs for identification and authentication.
Setting up an LDAP connection after selecting the Domino directory
during the server installation
During the Sametime server installation, you must specify the directory type
(either Domino or LDAP) used in your Sametime community. If you select the
Domino directory during the installation, and later decide you want to configure
Sametime to connect to an LDAP server, use the procedure below to set up the
LDAP connection to the LDAP server.
Note: Using this procedure prevents you from having to reinstall the Sametime
server and specify the LDAP directory type during the server installation to
connect to the LDAP server.
There are six procedures associated with enabling Sametime to connect to an
LDAP server if you have selected the Domino directory during the server
installation:
1. Shut down the Sametime services but keep the Domino services active.
2. Set up a Directory Assistance database on the Sametime server.
3. Identify the Directory Assistance database on the Sametime server.
4. Create a Directory Assistance document in the Directory Assistance database
that enables the Sametime server to access the LDAP server.
5. Create an LDAP document in the Configuration database (stconfig.nsf) on the
Sametime server.
6. Copy and rename .DLL files, edit the Notes.ini file, or edit the Sametime.ini
file.
7. Run the Lotus Sametime Name Conversion Utility.
8. Configure the LDAP Directory settings in the LDAP document. (You can use
either a Lotus Notes client or the Sametime Administration Tool to configure
these settings.)
9. Restart the Sametime services on your Domino server.
86 Sametime Administrator’s Guide

Shut down the Sametime services but keep the Domino
services active
This procedure is the first of nine associated with enabling Sametime to connect to
an LDAP server if you have selected the Domino directory during the server
installation.
In this procedure, you must shut down the Sametime services while you make
configuration changes on the Sametime server. You must leave the Domino server
running so you can access Domino databases on the server.
To shut down the Sametime services:
1. Open the Domino server console on the Sametime/Domino server.
2. In the Domino server console, type the following command:
For Windows, AIX, and Solaris servers:
Tell STADDIN Quit
For IBM i5/OS servers:
Tell STADDIN2 Quit
Next step
Set up a Directory Assistance database
Set up a Directory Assistance database
This procedure is the second of nine associated with enabling Sametime to connect
to an LDAP server if you have selected the Domino directory during the server
installation.
Because Sametime uses Directory Assistance to access an LDAP server, you must
ensure that a Directory Assistance database exists on the Sametime server. Setting
up Directory Assistance enables Web browser users to authenticate against entries
in the LDAP directory when accessing databases on the Sametime server that
require basic password authentication.
Note: The Sametime Connect client does not require Directory Assistance to
authenticate against the LDAP directory or perform name and group
lookups in the LDAP directory.
You can either create a new Directory Assistance database on the Sametime server
or replicate an existing Directory Assistance database to the Sametime server.
Use the same process to set up Directory Assistance for a Sametime server as you
would for a Domino server without Sametime. If you have already created a
Directory Assistance database for the Domino environment in which Sametime is
installed, you can replicate the existing Directory Assistance database to the
Sametime server instead of creating a new Directory Assistance database.
Creating a new Directory Assistance database
To create a new Directory Assistance database:
1. Open a Lotus Notes client.
2. Choose File - Database - New.
3. Select the Sametime server (or select the Local server if you are running
Sametime on a Windows server and you opened the Notes client on the
server).
Chapter 4. Using LDAP Directories with Sametime 87

4. Create the Directory Assistance database on the server using the template
DA50.NTF. Provide a database name and file name (for example, da.nsf) for the
Directory Assistance database.
Replicating an existing Directory Assistance database
To replicate an existing Directory Assistance database, follow the normal Domino
procedure for replicating a database. First create a new replica of the Directory
Assistance database on the Sametime server, and then create a Connection
document to schedule replication of the database. See your Domino server
administration documentation for information on these procedures.
Next step
After you have ensured that a Directory Assistance database exists on the
Sametime server, you must identify the Directory Assistance database on the
Sametime server.
Identify the Directory Assistance database on the Sametime
server
This procedure is the third of nine associated with enabling Sametime to connect to
an LDAP server if you have selected the Domino directory during the server
installation.
After you have ensured that a Directory Assistance database exists on the
Sametime server, you must identify the Directory Assistance database on the
Sametime server. Enter the database filename in the ″Directory Assistance database
name″ field in the Basics section of the Sametime server Server document.
1. From a Notes client, choose File - Database - Open.
2. Select the Sametime server (or select the Local server if you are running
Sametime on a Windows server and you opened the Notes client on the
server).
3. Select the Domino directory (names.nsf) and click Open.
4. Select Server - Servers to open the Servers view.
5. Double-click the name of the Sametime server to open the Server document.
6. If necessary, select the Basics tab of the Server document.
7. Click Edit Server.
8. In the ″Directory Assistance database name″ field, enter the filename (for
example, da.nsf) of the Directory Assistance database.
9. Click Save and Close.
Next step
After you have identified the Directory Assistance database on the Sametime
server, create a Directory Assistance document that enables the Sametime server to
access the LDAP server.
Create a Directory Assistance document that enables the
Sametime server to access the LDAP server
This procedure is the fourth of nine associated with enabling Sametime to connect
to an LDAP server if you have selected the Domino directory during the server
installation.
The Directory Assistance database on the Sametime server must contain a
Directory Assistance document that enables the Sametime server to access the
88 Sametime Administrator’s Guide

LDAP server. The procedure below explains how to create the Directory Assistance
document for the LDAP server and provides suggested values for the fields in the
Directory Assistance document. You can change the suggested values as required
by your environment.
To create the Directory Assistance document:
1. From the Notes client open the Directory Assistance database (usually named
da.nsf) on the Sametime server.
2. Click ″Add Directory Assistance″.
3. In the Basics tab, make these settings:
Setting Value
Domain type Select LDAP.
Domain name Enter any descriptive name; the name must be different from
any other in Directory Assistance. Do not use the Domino
domain name.
Company name Enter the name of your company.
Search order The suggested value is 1. The search order specifies the order
this directory is searched relative to other directories in
Directory Assistance.
Group expansion The suggested setting is Yes. This setting enables Directory
Assistance to examine the contents of groups in the LDAP
directory. This capability is necessary if you enter the name of
a group defined in the LDAP directory in the ACL of a
database on the Sametime server.
Nested group expansion The suggested setting is Yes. This setting enables Directory
Assistance to examine the content of an LDAP directory
group that is a member of another LDAP directory group.
This capability is also used when an LDAP directory group
name is entered in the ACL of a database on the Sametime
server.
Enabled Set to Yes to enable Directory Assistance for the LDAP
Directory.
4. Select the Rules tab. Configure Rule 1 as needed for your Domino environment.
The suggested values for Rule 1 are as follows:
v The OrgUnit1, OrgUnit2, OrgUnit3, OrgUnit4, Organization, and Country
fields should all contain an asterisk. Using all asterisks in this setting ensures
that all entries in the LDAP directory can be searched and authenticated.
Note The Rules setting indicates the names in the directory that can be
authenticated. You can modify the Rules setting as needed according to the
structure of the LDAP Directory the Sametime server is accessing. For more
information on using naming rules in Directory Assistance, see the Domino
server administration documentation. (Domino documentation is available
from www.lotus.com/ldd/doc and also provided with the Domino server.)
v The ″Enabled″ and ″Trusted for Credentials″ fields should both be set to
″Yes.″5. Select the LDAP tab. The LDAP tab contains the following settings:
Setting Value
Hostname The host name for the LDAP server (for example,
ldap.acme.com).
Chapter 4. Using LDAP Directories with Sametime 89
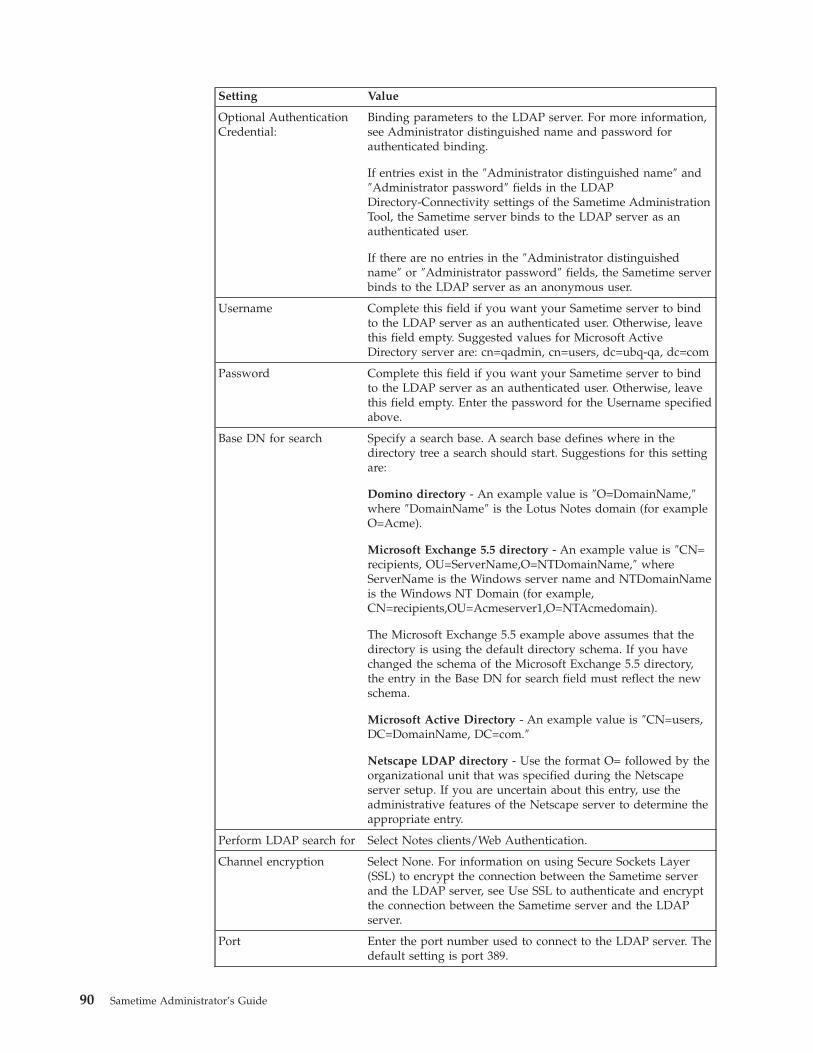
Setting Value
Optional Authentication
Credential:
Binding parameters to the LDAP server. For more information,
see Administrator distinguished name and password for
authenticated binding.
If entries exist in the ″Administrator distinguished name″ and
″Administrator password″ fields in the LDAP
Directory-Connectivity settings of the Sametime Administration
Tool, the Sametime server binds to the LDAP server as an
authenticated user.
If there are no entries in the ″Administrator distinguished
name″ or ″Administrator password″ fields, the Sametime server
binds to the LDAP server as an anonymous user.
Username Complete this field if you want your Sametime server to bind
to the LDAP server as an authenticated user. Otherwise, leave
this field empty. Suggested values for Microsoft Active
Directory server are: cn=qadmin, cn=users, dc=ubq-qa, dc=com
Password Complete this field if you want your Sametime server to bind
to the LDAP server as an authenticated user. Otherwise, leave
this field empty. Enter the password for the Username specified
above.
Base DN for search Specify a search base. A search base defines where in the
directory tree a search should start. Suggestions for this setting
are:
Domino directory - An example value is ″O=DomainName,″
where ″DomainName″ is the Lotus Notes domain (for example
O=Acme).
Microsoft Exchange 5.5 directory - An example value is ″CN=
recipients, OU=ServerName,O=NTDomainName,″ where
ServerName is the Windows server name and NTDomainName
is the Windows NT Domain (for example,
CN=recipients,OU=Acmeserver1,O=NTAcmedomain).
The Microsoft Exchange 5.5 example above assumes that the
directory is using the default directory schema. If you have
changed the schema of the Microsoft Exchange 5.5 directory,
the entry in the Base DN for search field must reflect the new
schema.
Microsoft Active Directory - An example value is ″CN=users,
DC=DomainName, DC=com.″
Netscape LDAP directory - Use the format O= followed by the
organizational unit that was specified during the Netscape
server setup. If you are uncertain about this entry, use the
administrative features of the Netscape server to determine the
appropriate entry.
Perform LDAP search for Select Notes clients/Web Authentication.
Channel encryption Select None. For information on using Secure Sockets Layer
(SSL) to encrypt the connection between the Sametime server
and the LDAP server, see Use SSL to authenticate and encrypt
the connection between the Sametime server and the LDAP
server.
Port Enter the port number used to connect to the LDAP server. The
default setting is port 389.
90 Sametime Administrator’s Guide

Setting Value
Timeout The suggested setting is 60 seconds. This setting specifies the
maximum number of seconds allowed for a search of the LDAP
directory.
Maximum number of
entries returned
The suggested setting is 100. This setting specifies the
maximum number of names the LDAP server will return for
the name searched. If the LDAP server also has a maximum
setting, the lower setting takes precedence.
6. Click ″Save and Close.″ The warning message notifies you that your connection
does not include SSL settings; you can ignore the warning and continue with
the procedure. For more information on the SSL configuration, see Use SSL to
authenticate and encrypt the connection between the Sametime server and the
LDAP server.
Next step
After you create the Directory Assistance document that enables the Sametime
server to access the LDAP server, you must create an LDAP document in the
Configuration database on the Sametime server.
Create an LDAP document in the Configuration database
This procedure is the fifth of nine associated with enabling Sametime to connect to
an LDAP server if you have selected the Domino directory during the server
installation.
The Configuration database (stconfig.nsf) stores administration settings made from
the Sametime Administration Tool. These administration settings are stored on
individual documents within the Configuration database. You must use a Lotus
Notes client to create an LDAP document in the Configuration database on the
Sametime server. The LDAP document you create will hold the LDAP Directory
settings that enable Sametime to search and authenticate against entries in the
LDAP directory.
To create an LDAP document in the Configuration database:
1. Use a Lotus Notes client to open the Sametime Configuration database
(stconfig.nsf) on the Sametime server.
2. Select Create - LDAPServer.
A document opens that contains the LDAP administration settings. You can
configure these settings using either the Sametime Administration Tool or a
Lotus Notes client. If you want to use the Lotus Notes client, leave the
document open and continue to the next procedure (see ″Next step″ below).
If you want to use the Sametime Administration Tool to configure the LDAP
settings, choose File - Save to save the LDAP document. Close the LDAP
document and close the Lotus Notes client.
Next step
After you have created an LDAP document in the Configuration database, you
must copy and rename the .DLL files or edit the Notes.ini file.
Chapter 4. Using LDAP Directories with Sametime 91

Copy and rename the .DLL files, edit the Notes.ini file, or edit
the Sametime.ini file
This procedure is the sixth of nine associated with enabling Sametime to connect to
an LDAP server if you have selected the Domino directory during the server
installation.
The procedure you perform at this point depends on whether your Sametime
server runs on the Windows, AIX/Solaris, or IBM i5/OS operating system.
v If your Sametime server runs on the Windows operating system, you must copy
and rename some .DLL files from the C:\Sametime\DirectoryBB\Ldap directory
to the C:\Sametime directory.
v If your Sametime server runs on the AIX/Solaris operating system, you must
edit the Sametime.ini file.
v If your Sametime server runs on the IBM i5/OS operating system, you must edit
the Notes.ini file.
Follow the procedure below that is appropriate for your environment.
Copying and renaming the DLL files (Windows only)
If your Sametime server runs on the Windows operating system, perform this
procedure:
1. On the Sametime server, create a working directory to copy files to so that
you can rename them.
2. Copy the ″STAuthenticationLdap.dll″ from the directory
C:\Sametime\DirectoryBB\Ldap to the working directory.
3. In the working directory, rename the ″STAuthenticationLdap.dll″ file to
″STAuthentication.dll.″
4. Copy the renamed ″STAuthentication.dll″ file to the C:\Sametime directory.
Note Copying the ″STAuthentication.dll″ file to the C:\Sametime directory
will overwrite an existing file of the same name.
5. Copy the file ″STGroupsLdap.dll″ from the directory
C:\Sametime\DirectoryBB\Ldap to the working directory.
6. Rename the ″STGroupsLdap.dll″ file to ″STGroups.dll.″
7. Copy the renamed STGroups.dll file to the C:\Sametime directory.
Note Copying the ″STGroups.dll″ file to the C:\Sametime directory will
overwrite an existing file of the same name.
8. Copy the file ″STResolveLdap.dll″ from the directory
C:\Sametime\DirectoryBB\Ldap to the working directory.
9. Rename the ″STResolveLdap.dll″ file to ″STResolve.dll.″
10. Copy the renamed ″STResolve.dll″ file to the C:\Sametime directory.
Note Copying the ″STResolve.dll″ file to the C:\Sametime directory will
overwrite an existing file of the same name.
11. Copy the ″StBrowseLdap.dll″ file from the directory
C:\Sametime\DirectoryBB\Ldap to the working directory.
12. Rename the ″StBrowseLdap.dll″ file to ″StBrowse.dll.″
13. Copy the renamed STBrowse.dll file to the C:\Sametime directory.
92 Sametime Administrator’s Guide

Editing the Sametime.ini file (AIX/Solaris only)
If your Sametime server runs on the AIX/Solaris operating system, perform this
procedure to edit the Sametime.ini file in the Sametime server installation directory.
You must change the DirectoryType parameter from ″Domino″ to ″LDAP″ in the
Sametime.ini file.
1. Use a text editor to open the Sametime.ini file located in the Sametime server
installation directory (for example, <root>/lotus/domino).
2. In the [CONFIG] section of the Sametime.ini file edit the DirectoryType=
parameter so that it specifes LDAP as shown below:
DirectoryType=LDAP
3. Save and close the Sametime.ini file.
Editing the Notes.ini file (IBM i5/OS only)
If your Sametime server runs on the IBM i5/OS operating system, perform this
procedure to edit the Notes.ini file. You must change the SametimeDirectoryType
parameter from ″Domino″ to ″LDAP″ in the Notes.ini file:
1. To edit the notes.ini file, run the WRKDOMSVR command and then enter
option 13 next to your Sametime server.
2. Change the line that reads ″SametimeDirectoryType=DOMINO″ to
″SametimeDirectoryType=LDAP″.
3. Press F3 twice to close the file and save the changes.
Next step
After you have copied and renamed the .DLL files, you must run the Lotus
Sametime Name Conversion Utility.
Run the Lotus Sametime Name Conversion Utility
This procedure is the seventh of nine associated with enabling Sametime to
connect to an LDAP server if you have selected the Domino directory during the
server installation.
You must run the Lotus Sametime Name Conversion Utility to ensure that the user
and group names that are stored in the vpuserinfo.nsf database on the Sametime
server are converted from the native Domino directory name format to the LDAP
directory format.
Users create buddy lists and privacy lists from the Sametime Connect client by
selecting user names and group names from the directory accessed by the
Sametime server.
If the Sametime Connect client users in your environment have created buddy lists
and privacy lists by selecting names from the Domino directory, the user and
group names in these lists are stored in the vpuserinfo.nsf database on the
Sametime server in the native Domino directory format. You must run the
Sametime Name Conversion Utility to convert the names in the vpuserinfo.nsf
database to the LDAP directory format.
The Name Conversion Utility is provided with the Sametime 7.0 server. For more
information, see the appendix Using the Name Conversion Utility later in this
documentation.
Next step
After you have run the Sametime Name Conversion Utility, you must configure
the LDAP directory settings.
Chapter 4. Using LDAP Directories with Sametime 93

Configuring the LDAP directory settings
This procedure is the eighth of nine associated with enabling Sametime to connect
to an LDAP server if you have selected the Domino directory during the server
installation.
This procedure is described in Configure the LDAP Directory settings earlier in
this chapter.
Next step
After you have run the Sametime Name Conversion Utility, you must restart the
Sametime services on your Domino server.
Restart the Sametime services on your Domino server
This procedure is the last of nine associated with enabling Sametime to connect to
an LDAP server if you have selected the Domino directory during the server
installation.
In this procedure, you restart the Sametime services on the Domino server. You can
either stop the server and restart it, or just restart the Sametime services by
following these steps:
1. Open the Domino server console on the Sametime/Domino server.
2. In the Domino server console, type the following command:
For Windows, AIX, and Solaris servers:
Load STADDIN
For IBM i5/OS servers:
Load STADDIN2
Using Java classes to customizing LDAP directory searches
This section explains how you can write Java classes that provide greater control
over how the Sametime server conducts user name and group name searches of an
LDAP directory. You can also write a Java class that controls how user names
returned from LDAP directory searches are formatted. This section includes these
topics:
v Using a Java class to control directory searches for people and groups
v Using a Java class to control the format of user names returned by directory
searches
Using a Java class to control directory searches for people
and groups
The ″Search filter for resolving person names″ and the ″Search filter for resolving
group names″ settings in the LDAP directory settings of the Sametime
Administration Tool define the LDAP directory search filters responsible for
selecting user and group names from the LDAP directory.
In some LDAP directory environments, the LDAP directory schema may be too
complex to use a single search filter to select user names (or group names) from
the LDAP directory.
If a single search filter is not adequate to resolve user name (or group name)
searches, you can write a Java class containing a method that specifies exactly how
directory searches are conducted. This Java class can invoke different LDAP seach
94 Sametime Administrator’s Guide

filters depending on the search criteria entered by the end user. Writing a Java
class can ensure that the search capability functions exactly as needed for a
particular directory schema.
The following example illustrates the extent to which you can control searching
behavior when you use a Java class for this purpose. This example assumes that
three different users want to add the user Victor Lazlow to their Sametime Connect
buddy lists. Each of the three users searches for Victor Lazlow in a different way.
The logic of the Java class dictates the results of these three user searches.
v User 1 enters ″Victor L*″ into the Sametime client user interface to add Victor
Lazlow to the buddy list. This search attempt returns an error because the Java
class is programmed to return an error when the user enters a text string that
includes an asterisk.
v User 2 enters ″[email protected]″ into the Sametime client interface. This
search attempt succeeds and returns the value ″[email protected]″
(Victor Lazlow’s e-mail address) from the LDAP directory. The search attempt
succeeds in this way because the Java class is programmed to return an LDAP
search filter that can resolve an LDAP directory search to a user’s e-mail
address. The Java class returns this e-mail address search filter if the search text
string entered by the end user includes the ″at″ character (@).
v User 3 enters ″Victor L″ into the Sametime client interface. This search attempt
succeeds and returns the common name (cn) directory attribute of ″Victor
Lazlow.″ The search attempt succeeds in this way because the Java class is
programmed to return an LDAP search filter that can resolve an LDAP directory
search to a user’s common name (cn). The Java class returns this common name
search filter if the search text string entered by the end user does not include
either an asterisk or ″at″ (@) character.
When using a Java class to control the directory searching behavior, you write the
Java class so that it provides the searching behavior desired for your particular
LDAP directory schema. The search behavior is not limited to the behavior
described in the example above; the behavior is controlled by the code you write.
To use a custom Java class to control the LDAP directory searching behavior, you
must perform the following procedures:
1. Write a Java source code file containing the Java class and method that defines
the searching behavior.
2. Compile the source code file and copy the resulting Java class file to the
Sametime server computer.
3. Update the Sametime.ini file parameters.
4. Enter the Java class and method name in the Sametime Administration Tool.
Each of these procedures is described below.
Writing a Java source code file containing the Java class and
method that defines the searching behavior
Writing a Java source code file containing the Java class and method that defines
the searching behavior is the first of four steps required to use a Java class to
control LDAP directory searches for people and groups.
The specific source code that you write to support customized LDAP searches is
entirely dependent on your environment. This section provides a code sample to
help you understand how to write the Java class appropriate for your
environment.
Chapter 4. Using LDAP Directories with Sametime 95

Note: The Java code that you write must be compatible with the Java Run-Time
Environment (JRE 1.4.2).
In this example, you write a Java class consisting of a Java method that invokes
different LDAP directory search filters based on the text string that is entered into
the Sametime user interface by an end user. The search filters invoked by the
method are dependent on the directory schema and the search behavior needed for
the environment.
The code sample below shows the Java source code that produces the search
behavior described in the example of the three different user searches discussed
earlier in this section. This code creates a Java class named ″StLdapCustomized″
that includes the ″peopleResolveFilter″ method. The if statements in the
peopleResolveFilter method examine the text string entered by the user in the
Sametime client user interface and return the appropriate LDAP search filter based
on this text string. The comments in the source code explain the purpose of each if
statement.
public class StLdapCustomized
{
/**
* Generates a search filter for finding a user, given the user’s * name. * * @param
name The user’s name as provided by the Sametime client.
* @return The search filter, or null if the name is invalid. */ public static String
peopleResolveFilter (String name) { // prevent users from adding their own
wildcards
if (name.indexOf(’*’) != -1) return null;
// if name looks like e-mail, do not search with wildcards if (name.indexOf(’@’) !=
-1) return ″(&(objectclass=person)(mail=″ + name + ″)) ″;
// otherwise, search as CN with wildcard
return ″(&(objectclass=person) (cn=″ + name + ″*))″;
}
}
If you also want to customize searches for groups, you must write a similar java
source code file that contains the logic you want to employ for group searches.
Note: You do not have to write Java classes to control the search behavior for both
users and groups. You can use a Java class to control the search behavior for
users while using a single LDAP search filter to control the search behavior
for groups, or vice versa.
96 Sametime Administrator’s Guide
Compiling the source file and copying the Java class file to the
Sametime server computer
Compiling the source file and copying the Java class file to the Sametime server
computer is the second of four steps required to use a custom Java class to control
LDAP directory searches for people and groups.
To complete this step, perform these procedures:
1. Compile the Java source code file to produce the Java class file.
This example assumes that you compile the sample source code from the
previous step to produce a Java class file named ″StLdapCustomized.class.″
2. Copy the compiled class file (StLdapCustomized.class) to the ″java″
subdirectory of the Sametime server installation directory. In a default
Sametime server installation, the correct directory path for the class file is:
c:\Lotus\Domino\java.
Note: You should copy the Java class file to the C:\Lotus\Domino\java location
because this is the default class path specified for the Meeting Services in
the Windows registry settings. Copying the class file to this location ensures
that LDAP directory searches conducted from both Meeting Services clients
and Community Services clients will return user names in the programmed
format.
Update the Sametime.ini file parameters
Updating the Sametime.ini file Java parameters is the third of four steps required
to use a custom Java class to control LDAP directory searches for people and
groups.
In this procedure, you update the ST_JAVA_CLASS_PATH parameter and the
ST_JAVA_JVM_PATH parameters in the Sametime.ini file on the Sametime server.
This step ensures that the Sametime Community Services class path and JVM
location settings are configured appropriately for the environment.
The ST_JAVA_CLASS_PATH parameter must specify the location of the Java class
file copied in the previous step (c:\Lotus\Domino\java\StLdapCustomized.class in
this example).
The ST_JAVA_JVM_PATH parameter should specify the location of the jvm.dll file
used by the Sametime Meeting Services. By default, the Meeting Services use the
jvm.dll file located at c:\Lotus\Domino\wsc-jre\jre\bin\classic\jvm.dll.
To update the Sametime.ini file:
1. Use a text editor to open the Sametime.ini file located in the C:\Lotus\Domino
directory.
2. In the [Config] section of the Sametime.ini file, ensure that the
ST_JAVA_CLASS_PATH parameter specifies the ″java″ subdirectory of the
Sametime server installation directory (default C:\Lotus\Domino\java), as
shown in the example below.
ST_JAVA_CLASS_PATH=C:\Lotus\Domino\StConfig.jar;C:\Lotus\Domino\StConfigXml.jar;C:\Lotus\Domino
3. In the [Config] section of the Sametime.ini file, ensure that the
ST_JAVA_JVM_PATH parameter specifies the directory path to the jvm.dll file
on the Sametime server that is used by the Meeting Services. The
recommended setting for the ST_JAVA_JVM_PATH parameter is:
ST_JAVA_JVM_PATH=C:\Lotus\Domino\wsc-jre\jre\bin\classic\jvm.dll
Chapter 4. Using LDAP Directories with Sametime 97

Note The Community Services loads the JVM specified by the
ST_JAVA_JVM_PATH parameter in the Sametime.ini file. In some
circumstances, the Meeting Services may load the JVM before the Community
Services does. Specifying the same JVM for both of these services ensures
consistent searching behavior for both Community Services and Meeting
Services clients, regardless of which service loads the JVM.
4. Save and close the Sametime.ini file.
Enter the Java class and method name in the Sametime
Administration Tool
Entering the Java class and method name in the Sametime Administration Tool is
the last of four steps required to use a custom Java class to control LDAP directory
searches for people and groups.
In this procedure, you enter the Java class name and method name into the ″Search
filter for resolving person names″ setting in the LDAP directory settings of the
Sametime Administration Tool.
Use the format ″Classname.methodname()″ when entering the java class name and
method name into the ″Search filter for resolving person names″ setting. Following
our earlier example, you would enter ″StLdapCustomized.peopleResolveFilter()″ in
the ″Search filter for resolving person names″ setting.
Follow the instructions below:
1. From the Sametime server home page, click the ″Administer the Server″ link to
open the Sametime Administration Tool.
2. Choose LDAP Directory - Searching.
3. In the ″Search settings for server″ drop-down list, select the LDAP server that
contains the LDAP directory for which you want to modify the ″Search filter
for resolving person names″ setting.
4. In the ″Search filter for resolving person names″ setting, enter the class name
and method name in the format ″Classname.methodname().″
Following our earlier example, you would enter
StLdapCustomized.peopleResolveFilter() in the ″Search filter for resolving
person names″ setting.
5. If you have also created a Java class to define the group search behavior, enter
the ″Classname.methodname()″ for group searches in the ″Search filter for
resolving group names″ setting.
6. Click Update and restart the server for the changes to take effect.
Using a Java class to control the format of user names
returned in LDAP directory searches
You can write a Java class to control the format of user names returned in LDAP
directory searches. In a typical Sametime deployment, the ″The attribute of the
person entry that defines the user’s name″ setting in the LDAP Directory settings
of the Sametime Administration Tool controls the format of the user name that is
returned by an LDAP directory search.
In most environments, the value of the ″The attribute of the person entry that
defines the user’s name″ setting can specify a common LDAP directory attribute,
such as cn (common name) or mail (e-mail address). When configured in this way,
the search returns the value assigned to a user’s cn or mail directory attribute and
displays this value in the Sametime client user interface.
98 Sametime Administrator’s Guide

Some environments may require LDAP directory searches to return a user name in
a format that is not available in an LDAP directory entry attribute. In this case,
you can write a Java class that manipulates existing information in the LDAP
directory to produce the user name in the desired format. For example, you might
write a Java class that combines the values of two LDAP directory attributes to
produce the user name in a desired format. Or, you can write a Java class that
edits the information in a single LDAP directory attribute to produce the user
name in a format that is different than the value specified by the attribute.
To illustrate this feature, consider an example environment in which all of the
following are true:
v LDAP searches must return a user name in the format LastName, FirstName (for
example: Smith, John)
v None of the LDAP directory attributes specify the user name in the LastName,
FirstName format.
v The LDAP directory attribute sn specifies each user’s last name.
v The LDAP directory attribute givenName specifies each user’s first name.
In this example, you can write a Java class that takes values from the sn and
givenName directory attributes and combines these values into a single display
name in the format of LastName, FirstName.
You can then configure the Sametime server to use this Java class to return the
names in that format when the LDAP directory is searched.
To use a custom Java class to control the LDAP directory searching behavior, you
must perform the following procedures.
Note: These procedures are very similar to the procedures discussed in the Using
a custom Java class to control LDAP directory searches for people and
groups topic earlier in this chapter.
1. Write the Java source code file that returns the user name.
2. Compile the source code file and copy the resulting Java class file to the
Sametime server.
3. Update the Sametime.ini file.
4. Enter the Java class and method name in the Sametime Administration Tool
LDAP directory settings.
Each of these procedures is described below.
Writing the Java source code file that returns the user name
Writing the Java source code file that returns the user name is the first of four
steps required to use a custom Java class to control the format of user names
returned in LDAP directory searches.
The specific source code that you write to support customized LDAP searches is
entirely dependent on the user name requirements of your environment. This
section provides a code sample to help you understand how to write the Java class
appropriate for your environment.
Note: The Java code that you write must be compatible with the Java Run-Time
Environment (JRE 1.4.2).
Chapter 4. Using LDAP Directories with Sametime 99

This code sample below shows the code you might use to combine values stored in
the sn and givenName LDAP directory entry attributes into a single display name
in the format of LastName, FirstName.
public class StLdapCustomizedAttributes
{
public static String displayName (String givenName, String sn)
{
String result = sn + ″, ″ + givenName;
return result;
}
}
Compiling the source file and copying the Java class file to the
Sametime server
Compiling the source file and copying the Java class file to the Sametime server is
the second of four steps required to use a Java class to control the format of user
names returned in LDAP directory searches.
To complete this step, perform these procedures:
1. Compile the Java source code file to produce the Java class file.
This example assumes you compile the source code file example from the
previous procedure to produce a Java class file named
″StLdapCustomizedAttributes.class.″
2. Copy the compiled class file (StLdapCustomizedAttributes.class) to the ″java″
subdirectory of the Sametime server installation directory. In a default
Sametime server installation, the correct directory path for the class file is:
c:\Lotus\Domino\java.
Note: You should copy the Java class file to the C:\Lotus\Domino\java location
because this is the default class path specified for the Meeting Services in
the Windows registry settings. Copying the class file to this location ensures
that LDAP directory searches conducted from both Meeting Services clients
and Community Services clients will return user names in the programmed
format.
Update the Sametime.ini file
Updating the Sametime.ini file is the third of four steps required to use a custom
Java class to control the format of user names returned in LDAP directory searches.
In this procedure, you update the ST_JAVA_CLASS_PATH and the
ST_JAVA_JVM_PATH parameters in the Sametime.ini file on the Sametime server.
This step ensures that the Sametime Community Services class path and JVM
location settings are configured appropriately for the environment.
The ST_JAVA_CLASS_PATH parameter must specify the location of the Java class
file copied in the previous step
(c:\Lotus\Domino\java\StLdapCustomizedAttributes.class in this example).
100 Sametime Administrator’s Guide

The ST_JAVA_JVM_PATH parameter should specify the location of the jvm.dll file
used by the Sametime Meeting Services. By default, the Meeting Services use the
jvm.dll file located at c:\Lotus\Domino\wsc-jre\jre\bin\classic\jvm.dll.
To update the Sametime.ini file:
1. Use a text editor to open the Sametime.ini file located in the C:\Lotus\Domino
directory.
2. In the [Config] section of the Sametime.ini file, ensure that the
ST_JAVA_CLASS_PATH parameter specifies the java subdirectory of the
Sametime server installation directory (default C:\Lotus\Domino\java), as
shown in the example below:
ST_JAVA_CLASS_PATH=C:\Lotus\Domino\StConfig.jar;C:\Lotus\Domino\StConfigXml.jar;C:\Lotus\Domino
3. In the [Config] section of the Sametime.ini file, ensure that the
ST_JAVA_JVM_PATH parameter specifies the directory path to the jvm.dll file
on the Sametime server that is used by the Meeting Services. The
recommended setting for the ST_JAVA_JVM_PATH parameter is:
ST_JAVA_JVM_PATH=C:\Lotus\Domino\wsc-jre\jre\bin\classic\jvm.dll
Note The ST_JAVA_JVM_PATH parameter specifies the to the JVM loaded by
the Community Services. Either the Community Services or the Meeting
Services can load the JVM. Specifying the same JVM for both of these services
ensures consistent searching behavior for both Community Services and
Meeting Services clients, regardless of which of these services loads the JVM.
4. Save and close the Sametime.ini file.
Enter the Java class and method name in the Sametime
Administration Tool LDAP Directory settings
Entering the Java class and method name in the Sametime Administration Tool
LDAP Directory settings is the last of four steps required to use a Java class to
control the format of user names returned in LDAP directory searches.
In this procedure, you enter the Java class and method name into ″The attribute of
the person entry that defines the user’s name″ setting in the LDAP Directory
settings of the Sametime Administration Tool.
Use the format ″Classname.methodname()″ when entering the Java class name and
method name in the Sametime Administration Tool setting. Following our earlier
example, you would enter the class name and method name as
″StLdapCustomizedAttributes.displayName(givenName, sn).″
Follow the instructions below:
1. From the Sametime server home page, click the ″Administer the Server″ link to
open the Sametime Administration Tool.
2. Choose LDAP Directory - Basics.
3. In the ″Search settings for server″ drop-down list, select the LDAP server that
contains the LDAP directory for which you want to modify the ″The attribute
of the person entry that defines the user’s name″ setting.
4. In the ″The attribute of the person entry that defines the user’s name″ setting,
type the class name and method name in the format classname.methodname().
For example:
StLdapCustomizedAttributes.displayName(givenName, sn)
5. Click Update and restart the server for the change to take effect.
Chapter 4. Using LDAP Directories with Sametime 101

Solving token authentication problems in mixed server and multiple
LDAP directory environments
A token authentication problem may occur when a Sametime server is deployed in
the same environment as a portal server (or any other application server that
issues authentication tokens). This problem occurs when the Sametime server and
the portal server access different LDAP directories to authenticate users.
Several Sametime Java applet clients present an authentication token to the
Sametime server when connecting to the server. These clients include the Sametime
Connect for browsers client, the Sametime Meeting Room client, and Sametime
Links clients.
If a Web browser user first authenticates to a portal server, and then later attempts
to connect to the Sametime server using one of the Sametime Java applet clients,
the Sametime client connection may fail.
This problem occurs because the Sametime client sends the authentication token it
received from the portal server to authenticate the connection to the Sametime
server. The portal server creates this authentication token by gathering user
credentials from the LDAP directory that it accesses. When the Sametime server
receives this token, it extracts these user credentials and compares them to user
credentials in the different LDAP directory that it accesses. The authentication fails
because the user credentials do not match.
To further illustrate this token authentication problem, consider an example
environment in which all of the following are true:
v A portal server is deployed and connected to a Netscape LDAP directory. In the
Netscape LDAP directory, the user Victor Lazlow has a distinguished name
entry of cn=Victor Lazlow,ou=People,dc=Acme,dc=com.
v A Sametime server is deployed and connected to a Domino LDAP directory. In
the Domino LDAP directory, the user Victor Lazlow has a distinguished name
entry of cn=Victor Lazlow,o=Acme.
v An application using Sametime Links is deployed on the portal server.
The sequence of events below illustrates the token authentication problem.
1. Victor Lazlow accesses the portal server with a Web browser and enters his
user name and password. The portal server authenticates this user name and
password against Victor’s person entry in the Netscape LDAP directory.
2. The portal server sends a Lightweight Third Party Access (LTPA) token to
Victor’s Web browser. This LTPA token contains Victor’s user name as specified
in the Netscape LDAP directory (cn=Victor
Lazlow,ou=People,dc=Acme,dc=com).
3. Victor Lazlow accesses the Sametime Links application on the portal server.
4. The Sametime Links client applet loads to Victor’s Web browser and connects
to the Sametime server. To authenticate this connection, the client transmits the
LTPA token obtained from the portal server to the Sametime server.
5. The Sametime server extracts the user name from the LTPA token (cn=Victor
Lazlow,ou=People,dc=Acme,dc=com) and compares the user name to Victor’s
person entry in the Domino LDAP directory (cn=Victor Lazlow,o=Acme).
6. Since the name extracted from the token is not an identical match with the
name obtained from the LDAP directory, the authentication fails and Victor
cannot use the Sametime Links application.
102 Sametime Administrator’s Guide

Solving the token authentication problem
Sametime 7.0 contains logic designed to solve the token authentication problem.
This solution, and its configuration, is discussed below.
When the user accesses Sametime Links on the portal server, the Sametime client
sends an authentication by token request to the Sametime server. This
authentication by token request contains two parameters:
v The Sametime user name (cn=Victor Lazlow, o=acme in this example). This
name is known by the portal server and passed to the client from the portal
server.
v The LTPA token containing the user name from the directory accessed by the
portal server (cn=Victor Lazlow, ou=People, dc=Acme, dc=com in this example).
Upon receiving the authentication by token request, the Sametime 7.0 server can
do the following:
1. Extract the text string ″Victor Lazlow″ from the cn=Victor Lazlow, ou=People,
dc=Acme, dc=com user name provided in the LTPA token.
2. Search the Domino directory accessed by the Sametime server to locate a
directory entry containing the same user name text string (Victor Lazlow).
3. Sametime then takes the Domino user ID from the Domino directory entry it
locates (cn=Victor Lazlow, o=acme in this example) and compares this user ID
with the Sametime user name that was received as a parameter in the
authentication by token request from the client. If this comparison produces a
match, the authentication by token is successful.
To configure this logic, the administrator must add two parameters to the Notes.ini
file on the Sametime/Domino server. These two parameters are used by the
Sametime logic to extract the user name text string (″Victor Lazlow″ in this
example) from the full canonical user name provided in the LTPA token.
The two Notes.ini parameters are:
v ST_UID_PREFIX=
v ST_UID_POSTFIX=
Sametime uses the value of the ST_UID_PREFIX= parameter to strip out the
characters that precede the user name text string that you want to extract. In this
example, those characters are ″cn=″.
Sametime uses the value of the ST_UID_POSTFIX= parameter to identify the first
character that follows the user name text string that you want to extract. In this
example, that character is a comma (,).
The correct configuration for the Notes.ini parameters in the example scenario
described earlier is shown below:
v ST_UID_PREFIX=cn=
v ST_UID_POSTFIX=,
When configured in this way, Sametime extracts the user name by first stripping
the prefix of cn= from the cn=Victor Lazlow, ou=People, dc=Acme, dc=com user
name to produce the text string Victor Lazlow, ou=People, dc=Acme, dc=com
Sametime then locates the postfix character (,) and strips that character and all
characters that follow it from the user name string. In this example, Sametime
Chapter 4. Using LDAP Directories with Sametime 103

would strip the text string ,ou=People, dc=Acme, dc=com from the user name to
produce the text string of ″Victor Lazlow.″
Sametime then searches the directory it accesses and performs the authentication
by token as discussed earlier.
Notes
v If the ST_UID_PREFIX= and ST_UID_POSTFIX= parameters do not exist in the
Notes.ini file, Sametime compares the user name taken from the LTPA token
(cn=Victor Lazlow, ou=People, dc=Acme, dc=com in this example) to the user
name it receives as a parameter in the authentication by token request (cn=Victor
Lazlow, o=Acme in this example).
v In some complex directory environments, or in environments in which the token
authentication logic is customized, the out-of-the-box solution provided with
Sametime 7.0 may not be adequate for the authentication to succeed as
discussed above. In these environments, it is possible to create a custom DLL to
compare the name received in an LTPA authentication token to the name
received as a parameter in the authentication by token request.
Managing users in buddy lists and privacy lists in an LDAP
environment
If you make changes to user names or group names in the LDAP directory, you
must run the Name Conversion Utility to ensure these same name changes are
made in the buddy lists and privacy lists that display in the Sametime Connect
client. The buddy list and privacy list names are stored in a Domino database
(vpuserinfo.nsf) and must be managed separately from the names in the LDAP
directory. For more information, see the appendix Using the Name Conversion
Utility later in this documentation.
104 Sametime Administrator’s Guide

Chapter 5. Configuring Ports and Network Connectivity
This chapter discusses the connectivity settings and issues associated with the IBM
Lotus Sametime server.
This chapter discusses:
v Ports used by the Sametime server
v Forward proxy support for Sametime clients
v Configuring Sametime Networks and Ports administration settings
v Sametime client connection processes
v Changing the default connectivity settings of the Sametime Connect for browsers
client
v HTTP tunneling
v Reverse proxy support for the Sametime server
Ports used by the Sametime server
The tables below list the default ports used by all Sametime services, including:
v HTTP Services, Domino Services, LDAP Services, and Sametime intraserver
ports
v Community Services ports
You can use the Sametime Administration Tool to configure the ports on which the
Sametime services listen for connections from clients.
The port settings for all services can be accessed from the Configuration-Connectivity-″Networks and Ports″ options of the Sametime Administration Tool.
HTTP Services, Domino Services, LDAP Services, and
Sametime intraserver ports
The following ports are used by the Sametime HTTP Services, Domino Application
Services, and LDAP Services.
Default
Port Purpose
Port 80 If the administrator allows HTTP tunneling on port 80 during the Sametime
installation, the Community Services multiplexer on the Sametime server
listens for HTTP connections from Web browsers and Sametime Connect
clients on port 80.
If the administrator does not allow HTTP tunneling on port 80 during the
Sametime installation, the Domino HTTP server listens for HTTP connections
on this port.
© Copyright IBM Corp. 2005 105

Default
Port Purpose
Alternate
HTTP port
(8088)
If the administrator allows HTTP tunneling on port 80 during the Sametime
installation (or afterward), the Domino HTTP server on which Sametime is
installed must listen for HTTP connections on a port other than port 80. The
Sametime installation changes the Domino HTTP port from port 80 to port
8088 if the administrator allows HTTP tunneling on port 80 during a
Sametime server installation.
Note: If the administrator allows HTTP tunneling on port 80 during the
Sametime installation, Web browsers make HTTP connections to the
Community Services multiplexer on port 80, and the Community Services
multiplexer makes an intraserver connection to the Domino HTTP server on
port 8088 on behalf of the Web browser.
This configuration enables the Sametime server to support HTTP tunneling
on port 80 by default following the server installation. For more information,
see About HTTP tunneling.
Port 389 If you configure the Sametime server to connect to an LDAP server, the
Sametime server connects to the LDAP server on this port. For more
information, see Using LDAP with the Sametime server.
Port 443 The Domino HTTP server listens for HTTPS connections on this port by
default.
This port is used only if you have set up the Domino HTTP server to use
Secure Sockets Layer (SSL) for Web browser connections. To configure the
Sametime HTTP server to use SSL for Web browser connections, see About
SSL and Sametime.
Port 1352 The Domino server on which Sametime is installed listens for connections
from Notes clients and Domino servers on this port.
Port 9092 The Event Server port on the Sametime server is used for intraserver
connections between Sametime components. Make sure that this port is not
used by other applications on the server.
Port 9094 The Token Server port on the Sametime server is used for intraserver
connections between Sametime components. Make sure that this port is not
used by other applications on the server.
Community Services ports
The following ports are used by the Sametime Community Services. Most of these
ports are configurable.
Default
Port Purpose
Port 1516 The Community Services listen for direct TCP/IP connections from the
Community Services of other Sametime servers on this port. If you have
installed multiple Sametime servers, this port must be open for presence,
chat, and other Community Services data to pass between the servers.
106 Sametime Administrator’s Guide

Default
Port Purpose
Port 1533 The Community Services listen for direct TCP/IP connections and
HTTP-tunneled connections from the Sametime Connect client on this port.
Note: The term ″direct″ TCP/IP connection means that the Sametime
Connect client uses a unique Sametime protocol over TCP/IP to establish a
connection with the Community Services.
The Community Services also listen for HTTPS connections from the
Sametime Connect clients on this port by default. The Sametime Connect
clients attempt HTTPS connections when accessing the Sametime server
through an HTTPS proxy server. If a Sametime Connect client connects to the
Sametime server using HTTPS, the HTTPS connection method is used, but
the data passed on this connection is not encrypted.
If the administrator does not allow HTTP tunneling on port 80 during the
Sametime installation, the Sametime Connect client attempts HTTP-tunneled
connections to the Community Services on port 1533 by default. For more
information, see About HTTP tunneling.
Port 80 If the administrator allows HTTP tunneling on port 80 during the Sametime
installation, the Sametime Connect clients can make HTTP-tunneled
connections to the Community Services multiplexer on port 80. For more
information, see About HTTP tunneling.
Note: When HTTP tunneling on port 80 is allowed during the Sametime
installation, the Community Services multiplexer listens for HTTP-tunneled
connections on both port 80 and port 1533. The Community Services
multiplexer simultaneously listens for direct TCP/IP connections on port
1533.
Port 8082 When HTTP tunneling support is enabled, the Sametime Connect clients can
make HTTP-tunneled connections to the Community Services multiplexer on
port 8082 by default. Sametime Connect clients can make HTTP-tunneled
connections on both ports 80 and 8082 by default.
Port 8082 ensures backward compatibility with previous Sametime releases.
In previous releases, Sametime clients made HTTP-tunneled connections to
the Community Services only on port 8082. If a Sametime Connect client
from a previous Sametime release attempts an HTTP-tunneled connection to
a Sametime 7.0 server, the client might attempt this connection on port 8082.
Proxy support for Sametime clients
The Sametime Connect client can connect to a Sametime server through these
proxy server types:
v SOCKS 4 proxy
v SOCKS 5 proxy
v HTTP proxy
v HTTPS proxy
Note: When connecting to the Sametime server through an HTTPS proxy, the
Sametime Connect client uses the HTTPS connection method to establish the
connection to the server through the proxy. However, the data passing over
this HTTPS connection is not encrypted with SSL.
Chapter 5. Configuring Ports and Network Connectivity 107

Overview of Sametime client connectivity
This section includes descriptions of the connectivity settings available from the
Configuration-Connectivity-Networks and Ports tab of the Sametime
Administration Tool. These settings control the ports on which the Sametime server
listens for connections from Sametime Connect clients. For information about the
connectivity settings in the Sametime Administration Tool, see Configuring
Sametime ″Networks and Ports″ settings.
This section also describes the Sametime Connect client connection process to
illustrate how the connectivity settings on the ″Networks and Ports″ tab affect the
connection process of the clients.
Configuring Sametime ″Networks and Ports″ settings
Sametime connectivity settings are available from the ″Networks and Ports″ tab of
the Sametime Administration Tool. To access the ″Networks and Ports″ tab, open
the Sametime Administration Tool and select Configuration-Connectivity-″Networks and Ports.″
The settings on the ″Networks and Ports″ tab define the host names and ports on
which the Sametime services listen for connections from clients and control other
aspects of connectivity, such as HTTP-tunneling functionality. Changing these
settings can affect the connection processes of Sametime Connect clients.
The connectivity options available from the ″Networks and Ports″ tab include:
v HTTP Services settings - These settings specify the ports on which the Domino
HTTP server listens for HTTP connections from Web browsers. If the
administrator allows HTTP tunneling on port 80, the Sametime Community
Services multiplexer listens for HTTP connections on port 80, and the Domino
HTTP server must listen on a different port to prevent a port conflict. For more
information, see HTTP Services settings.
v Community Services Network settings - These settings specify the Community
Services host names and ports and affect the connection processes of
Community Services clients, including the client HTTP-tunneling functionality.
The Community Services support all presence and chat features of Sametime.
The Community Services clients include Sametime Connect, the Sametime
Meeting Room client (participant list and chat components), and the Community
Services of other Sametime servers. For more information, see Community
Services Network settings.
v Reverse Proxy Support - These settings enable a Sametime server to be
deployed behind a reverse proxy server. The administrator must configure these
settings to ensure that Sametime Connect clients can communicate with a
Sametime server through the reverse proxy server. For more information see
Using reverse proxy or portal servers with the Sametime server and Configuring
a Sametime server to operate with a reverse proxy server.
HTTP Services settings
Sametime installs on a Domino server and uses the HTTP server provided with the
Domino server.
During a Sametime installation, the administrator can allow HTTP tunneling on
port 80. To support the HTTP tunneling on port 80 functionality, the Community
Services multiplexer on the server listens for HTTP connections from clients
108 Sametime Administrator’s Guide

(including Web browsers) on port 80. A Web browser connects to the Community
Services multiplexer on port 80, and the Community Services multiplexer makes an
intraserver connection to the Domino HTTP server on behalf of the Web browser.
If the administrator allows HTTP tunneling on port 80 during the Sametime
installation, the Domino HTTP server must listen for HTTP connections on a port
other than port 80. In this scenario, the Sametime server installation
programmatically changes the HTTP port of the Domino HTTP server to port 8088
during the Sametime server installation. It is not necessary to manually change the
setting.
If the administrator does not allow HTTP tunneling on port 80 during the
Sametime installation, the Domino HTTP server listens for HTTP connections on
port 80 by default.
For more information about the HTTP tunneling functionality supported by
Sametime, see About HTTP tunneling.
On some platforms, you can configure Sametime to operate using a Microsoft IIS
HTTP server or IBM WebSphere HTTP server. For information on setting up
Sametime to use a different HTTP Web server, see the installation guide that
shipped with the Sametime software.
Follow these instructions if you need to change the HTTP port of the Domino
HTTP server:
1. Open the Sametime Administration Tool.
2. Select Configuraton-Connectivity-″Networks and Ports.″
3. Select ″Configure HTTP Services on a Web page in its own window.″
4. Select Ports.
5. Select Internet Ports.
If the Domino server is set up for HTTP connections from Web browsers, you
can change the ″TCP/IP port number″ setting.
The ″TCP/IP port number″ for the HTTP server is located under the ″Web
(HTTP/HTTPS)″ column of the settings. To change the port used by the HTTP
server, change the port associated with the ″TCP/IP port number″ field. (For
example, if you are enabling HTTP tunneling on port 80 on a Sametime server
that includes a single IP address, you may want to change the HTTP port
from port 80 to 8088.)
6. Select ″Internet Protocols.″
7. Select ″Domino Web Engine.″
8. Under the ″Generating References to this server″ section, make the following
changes:
If the HTTP server uses HTTP for Web browser connections:
v In the Protocol setting, select ″http.″
v In the ″Port number″ setting, enter the same port entered in the ″TCP/IP
port number″ setting in Step 5. 9. Click ″Save and Close″ to save the Server document.
10. Restart the Domino server for the change to take effect.
Community Services Network settings
The Community Services Network settings control the host names and ports on
which the Sametime Community Services multiplexer listens for connections from
Chapter 5. Configuring Ports and Network Connectivity 109

Sametime Connect clients. The administrator can also enable or disable the HTTP
tunneling functionality from the Community Services Network settings.
Access the Community Services Network settings from the Sametime
Administration Tool by selecting Configuration-Connectivity-Networks and Ports.
The Community Services multiplexer (or ″mux″) is the component of the
Community Services that handles connections from clients. The Community
Services multiplexer handles TCP/IP connections and HTTP-tunneled to the
Community Services. For more information, see Sametime Connect client
connection processes.
The Community Services Network settings include:
v Address for server connections
v Address for client connections
v Address for HTTPS-tunneled client connections
v Enable the Sametime Connect for browsers client to try HTTP tunneling to the
Community Server after trying other options
v Address for HTTP-tunneled client connections (Community Services)
Address for server connections (Community Services)
The Community Services Network ″Address for server connections″ settings
control the IP addresses or DNS names and the ports on which the Community
Services listen for connections from the Community Services of other Sametime
servers.
The ″Address for server connections″ setting includes these fields:
v Host name
v Port number
Host name: The ″Host name″ field allows an administrator to specify the IP
addresses or DNS names (for example, www.sametime.com) on which the
Community Services multiplexer listens for connections from the Community
Services of other Sametime servers.
If this field is blank, the Community Services multiplexer listens for the
Community Services server-to-server connections on all IP addresses or DNS
names assigned to the machine on which the server is installed.
If only one IP address or DNS name is assigned to the Sametime server, Lotus
software recommends leaving the ″Host name″ field blank.
If you enter one or more IP addresses or DNS names in the ″Host name″ field, the
Community Services multiplexer listens for server-to-server connections only on
the IP addresses or DNS names specified in the ″Host name″ field. When entering
multiple IP addresses or DNS names in this field, separate each entry with a
comma.
Note: If you are running Sametime on an IBM i5/OS or IBM pSeries server, you
can run multiple Sametime servers on a single machine. In this case, use the
″Host name″ field to ensure that each of the multiple servers is assigned a
separate IP address. For more information, see Assigning IP addresses to
multiple Sametime servers installed on a single server machine.
110 Sametime Administrator’s Guide

If you change this setting, click the Update button and restart the server for the
changes to take effect.
Port number: The ″Port number″ setting specifies the TCP/IP port (default 1516)
on which the Community Services multiplexer listens for connections from the
Community Services of other Sametime servers. Community Services
server-to-server connections are direct TCP/IP connections that cannot occur
through a proxy server.
This port is also used by the Community Services for intraserver connections to
other components of the Community Services. For example, the Community
Services multiplexer can listen for connections from Community Services clients on
port 1533 and port 80. The Community Services multiplexer connects to other
components of the Community Services on port 1516.
For more information about working with multiple Sametime servers, see:
v Integrating a Sametime server into an existing Sametime community
v Extending Sametime to Internet users
If you change this setting, click the Update button and restart the server for the
changes to take effect.
Address for client connections (Community Services)
The Community Services Network ″Address for client connections″ settings control
the IP addresses or DNS names and the ports on which the Community Services
multiplexer listens for TCP/IP connections, HTTP-tunneled connections, and
HTTPS-tunneled connections from clients.
The Community Services multiplexer contains a connectivity agent that enables the
multiplexer to simultaneously listen for connections that use different protocols
(HTTP, HTTPS, or TCP/IP) on a single port. This feature enables Sametime
Connect clients to establish connections to the Sametime server in a wide variety of
network environments. For information on the connection process, see Sametime
Connect client connection processes.
Note: The term ″TCP/IP connection″ means that the clients and server use a
unique Sametime protocol operating over TCP/IP to establish a connection.
The client can make this TCP/IP connection directly to the Community
Services on the Sametime server or through a SOCKS proxy. A direct
TCP/IP connection provides the best performance. The direct TCP/IP
connection is also called a ″Direct connection using Sametime protocol″ in
the Sametime Connect client Sametime Connectivity settings.
The ″Address for client connections″ setting includes these fields:
v Host name
v Port number
Host name: The ″Host name″ field allows an administrator to specify the IP
addresses or DNS names (for example, www.sametime.com) on which the
Community Services multiplexer listens for TCP/IP connections, HTTP-tunneled
connections, and HTTPS-tunneled connections from clients.
If the ″Host name″ field is blank, the Community Services multiplexer listens for
these connections on all IP addresses or DNS names assigned to the machine on
which the Sametime server is installed.
Chapter 5. Configuring Ports and Network Connectivity 111

If only one IP address or DNS name is assigned to the server, Lotus software
recommends leaving the ″Host name″ field blank.
If you enter one or more IP addresses or DNS names in the ″Host name″ field, the
Community Services multiplexer listens for TCP/IP connections only on the IP
addresses or DNS names specified in the ″Host name″ field. When entering
multiple IP addresses or DNS names in this field, separate each entry with a
comma.
Note: If you are running Sametime on an IBM i5/OS or IBM pSeries server, you
can run multiple Sametime servers on a single machine. In this case, use the
″Host name″ field to ensure that each of the multiple servers is assigned a
separate IP address. For more information, see Assigning IP addresses to
multiple Sametime servers installed on a single server machine.
The ″Host name″ field can also be used if you decide to use multiple IP addresses
to support the HTTP tunneling functionality. For more information, see
Configuring HTTP tunneling on a machine that uses multiple IP addresses.
If you change the ″Host name″ setting, click the Update button and restart the
server for the change to take effect.
Port number: The ″Port number″ setting allows an administrator to specify the
ports (default 1533) on which the Community Services multiplexer listens for
TCP/IP connections, HTTP-tunneled connections, and HTTPS-tunneled connections
from Sametime Connect clients.
If multiple ports exist in the ″Port number″ field, the Community Services
multiplexer listens for these connections on all ports specified in the field. For
example, if the administrator enters ports 1533 and 1522 in this field, the
Community Services multiplexer listens for TCP/IP, HTTP-tunneled, and
HTTPS-tunneled connections on both ports 1533 and 1522. When entering multiple
ports in this field, separate each entry with a comma.
The Sametime Connect client can attempt a TCP/IP connection, an HTTP-tunneled
connection, or an HTTPS-tunneled connection to the Community Services on this
port. The type of connection the Sametime Connect client attempts is dependent on
the connectivity setting that is specified in the Options-Preferences-Sametime
Connectivity tab of the Sametime Connect client. For more information about this
connection process, see:
v Basic Sametime Connect client connection process
v Sametime Connect client connection processes using the Java Plug-in
connectivity settings
If you change the ″Port number″ setting, click the Update button and restart the
server for the change to take effect.
Address for HTTPS-tunneled client connections (Community
Services)
The Community Services Network ″Address for HTTPS-tunneled client
connections″ settings control the IP addresses or DNS names and the ports on
which the Community Services multiplexer listens for HTTPS-tunneled connections
from the Sametime Connect client. For information about this connection process,
see Sametime Connect client connection process.
The ″Address for HTTPS-tunneled client connections″ setting includes these fields:
112 Sametime Administrator’s Guide

v Host name
v Port number
Host name: The ″Host name″ field allows an administrator to specify the IP
addresses or DNS names (for example, www.sametime.com) on which the
Community Services multiplexer listens for HTTPS-tunneled connections from
Sametime Connect clients.
If the ″Host name″ field is blank, the Community Services multiplexer listens for
HTTPS-tunneled connections on all IP addresses or DNS names assigned to the
machine on which the Sametime server is installed.
If only one IP address or DNS name is assigned to the server, Lotus software
recommends leaving the ″Host name″ field blank.
If you enter one or more IP addresses or DNS names in the ″Host name″ field, the
Community Services multiplexer listens for HTTPS-tunneled connections only on
the IP addresses or DNS names specified in the ″Host name″ field. When entering
multiple IP addresses or DNS names in this field, separate each entry with a
comma.
Note: If you are running Sametime on an IBM i5/OS or IBM pSeries server, you
can run multiple Sametime servers on a single machine. In this case, use the
″Host name″ field to ensure that each of the multiple servers is assigned a
separate IP address. For more information, see Assigning IP addresses to
multiple Sametime servers installed on a single server machine.
If you change the ″Host name″ setting, click the Update button and restart the
server for the changes to take effect.
Port number: The ″Port number″ setting allows an administrator to specify the
ports (default 1533) on which the Community Services multiplexer listens for
HTTPS-tunneled connections from Sametime Connect clients. If multiple ports exist
in the ″Port number″ field, the Community Services multiplexer listens for
HTTPS-tunneled connections on all ports specified. For example, if the
administrator enters ports 1533 and 443 in this field, the Community Services
multiplexer listens for HTTPS-tunneled connections on both ports 1533 and 443.
When entering multiple ports in this field, separate each entry with a comma.
The Sametime Connect client attempts HTTPS-tunneled connections through an
HTTPS proxy when the Use Proxy and ″Use HTTPS proxy″ options are selected in
the Sametime Connect client Sametime Connectivity settings. For more
information, see Basic Sametime Connect client connection process.
Many organizations have firewall or network configurations that prevent HTTPS
connections on the default port of 1533. For the Sametime Connect clients to
connect to the Community Services multiplexer, you might need to specify port
443 as the ″Address for HTTPS client connections″ port. If you specify port 443 as
a Community Services HTTPS-tunneled client connection port, note the following:
v The Sametime Connect clients must have the ″Use proxy″ and ″Use HTTPS
proxy″ options selected in the Sametime Connectivity settings.
v The ″Community port″ setting in the Sametime Connect client Sametime
Connectivity settings must match the Community Services Network-Address for
HTTPS client connections-″Port number″ setting in the Sametime Administration
Tool. If you specify port 443 as the Community Services Network-Address for
Chapter 5. Configuring Ports and Network Connectivity 113

HTTPS client connections-″Port number″ setting, the ″Community port″ setting
in the Sametime Connect clients must also specify port 443.
v Sametime Connect client establishes an HTTPS connection but this HTTPS
connection is not encrypted with SSL. To secure chat messages, users should
select the ″Secure messages I start″ option in the Options-Preferences-Messages
settings of the Sametime Connect client.
Note: The HTTPS connection method is implemented to enable the Sametime
Connect client to pass data through the HTTPS proxy. However, the data
passing over this HTTPS connection is not encrypted.
v If you have configured the Domino HTTP server to use SSL for Web browser
connections, the Domino HTTP server listens for HTTPS connections on port
443. In this case, you cannot specify port 443 as the Community Services
Network-Address for HTTPS client connections-″Port number″ setting unless
you assign multiple IP addresses to the Sametime server machine. This
configuration would cause both the Community Services multiplexer and the
Domino HTTP server to listen for HTTPS connections on the same port number
and IP address. For more information on this issue, see the ″Things you need to
know″ section of the Sametime 7.0 Release Notes (strn70.nsf or strn70.pdf on the
Sametime CD).
If you change the HTTPS Tunneled Client Connections Port setting, click the
Update button and restart the server for the changes to take effect.
Enable the Sametime Connect for browsers client to try HTTP
tunneling to the Community Server after trying other options
The Community Services Network ″Enable the Sametime Connect for browsers
client to try HTTP tunneling to the Community Server after trying other options″
setting enables the Sametime Connect client to automatically attempt an
HTTP-tunneled connection to the Community Services multiplexer if other
connection attempts fail.
Enabling this setting increases the chances that clients will connect to the
Community Services successfully in environments where you are not certain how
users have configured the connectivity settings of their Sametime Connect for
browsers clients. This setting affects the Sametime Connect for browsers client
connection process when the ″Use my Java Plug-in settings″ option is selected in
the Sametime Connect client Connectivity settings.
For more information about this setting, review the topics in the Sametime Connect
client connection processes using the Java Plug-in connectivity settings section later
in this chapter.
Address for HTTP-tunneled client connections (Community
Services)
The Community Services Network ″Address for HTTP tunneled client connections″
settings control the IP addresses or DNS names and the ports on which the
Community Services multiplexer listens for HTTP-tunneled connections from
Sametime Connect clients.
The fields included with this setting are:
v Host name
v Port number
114 Sametime Administrator’s Guide

Host name: The ″Host name″ field allows an administrator to specify the IP
addresses or DNS names (for example, www.sametime.com) on which the
Community Services multiplexer listens for HTTP-tunneled connections from
clients.
If the ″Host name″ field is blank, the Community Services multiplexer listens for
HTTP-tunneled connections on all IP addresses or DNS names assigned to the
machine on which the Sametime server is installed.
If only one IP address or DNS name is assigned to the server, Lotus software
recommends leaving the ″Host name″ field blank.
If you enter one or more IP addresses or DNS names in the ″Host name″ field, the
Community Services multiplexer listens for HTTP-tunneled connections only on
the IP addresses or DNS names specified in the ″Host name″ field. When entering
multiple IP addresses or DNS names in this field, separate each entry with a
comma.
Note: If you are running Sametime on an IBM i5/OS or IBM pSeries server, you
can run multiple Sametime servers on a single machine. In this case, use the
″Host name″ field to ensure that each of the multiple servers is assigned a
separate IP address. For more information, see Assigning IP addresses to
multiple Sametime servers installed on a single server machine.
The ″Host name″ field can also be used if you decide to use multiple IP addresses
to support the HTTP tunneling functionality. For more information, see
Configuring HTTP tunneling on a machine that uses multiple IP addresses.
If you change the Address for HTTP-tunneled connections ″Host name″ setting,
click the Update button and restart the server for the changes to take effect.
Port number: The ″Port number″ field allows an administrator to specify the
ports on which the Community Services multiplexer listens for HTTP-tunneled
connections from Sametime clients.
The default port numbers are dependent on the ″Allow HTTP tunneling on port
80″ option available to the Sametime administrator during the Sametime server
installation.
v If the administrator chooses the ″Allow HTTP tunneling on port 80″ option
during the Sametime server installation, the default port number is port 80.
v If the administrator does not choose the ″Allow HTTP tunneling on port 80″
option during the Sametime server installation, the default port numbers are
ports 1533 and 8082.
If multiple ports exist in this ″Port number″ field, the Community Services
multiplexer listens for HTTP-tunneled connections on all ports specified. For
example, when ports 80 and 8082 are entered in this field, the Community Services
multiplexer simultaneously listens for HTTP-tunneled connections on both ports 80
and 8082. When entering multiple ports in this field, separate each entry with a
comma.
Note: The Community Services multiplexer will also listen for HTTP-tunneled
connections on the Community Services Network-Address for client
connections-Port number (default 1533).
Chapter 5. Configuring Ports and Network Connectivity 115

The Sametime Meeting Room client, the Sametime Connect client, and the
Sametime Broadcast client can make HTTP-tunneled connections to the
Community Services multiplexer. These HTTP-tunneled connections are discussed
below.
Sametime Connect client connection: The Sametime Connect client can attempt
an HTTP-tunneled connection to the Community Services multiplexer when any of
the following options are selected in the Sametime Connectivity tab of the
Sametime Connect client:
v Direct connection using HTTP protocol
v Use Proxy and Use HTTP proxy
v Use my Java Plug-in settings is selected and an HTTP proxy server is specified
in the Java Plug-in settings
The Sametime Connect client will use the port specified as the ″Community port″
(default 1533) in the Options-Preferences-Sametime Connectivity tab of the
Sametime Connect client to establish an HTTP-tunneled connection with the
Community Services multiplexer. To enable the Sametime Connect client to
successfully establish an HTTP-tunneled connection to the Community Services,
the ″Community port″ setting in the Sametime Connect client must match one of
the port numbers on which the Community Services multiplexer listens for
HTTP-tunneled connections. Note that the Community Services multiplexer will
listen for HTTP-tunneled connections on these ports:
v The ″Port number″ setting under ″Address for client connections″ in the
Community Services Network settings of the Sametime Administration Tool
v The ″Port number″ setting under ″Address for HTTP-tunneled client
connections″ in the Community Services Network settings of the Sametime
Administration Tool
If the Sametime Connect client must connect to the Sametime server through a
firewall that allows only HTTP connections on port 80, the ″Community port″
setting on the Sametime Connect client must specify port 80 and one of the
Community Services Network administrations settings listed above must also
specify port 80 to enable the client to establish an HTTP-tunneled connection to the
server.
For more information about the Sametime Connect client connection processes, see
the following:
v Basic Sametime Connect client connection process
v Sametime Connect client connection processes using the Java Plug-in
connectivity settings
v Configuring HTTP tunneling settings
Note: The port 8082 setting in the ″Port number″ field under ″Address for HTTP
tunneled client connections″ in the Community Services Network settings
ensures backward compatibility with previous Sametime releases. In
previous releases, Sametime clients made direct TCP/IP connections to the
Community Services on port 1533 and HTTP connections on port 8082. If a
Sametime Connect client or Sametime Meeting Room client from a previous
Sametime release attempts an HTTP-tunneled connection to a Sametime 7.0
server, the client might attempt this connection on port 8082 by default.
Listing port 8082 in the HTTP Tunneling port setting ensures that these
clients can establish HTTP-tunneled connections with the Community
Services on the Sametime 7.0 server.
116 Sametime Administrator’s Guide
If you change the ″Port number″ setting, click the Update button and restart the
server for the changes to take effect.
Community Services connectivity and the home Sametime server
Sametime includes the concept of a home Sametime server. The home Sametime
server plays an important part in client connectivity to the Community Services.
If your environment includes multiple Sametime servers or you have deployed
other applications enabled with Sametime technology on Domino servers, it is
mandatory that every user be assigned to a ″home″ Sametime server. To assign a
user to a home Sametime server, you must enter the name of the Sametime server
in the ″Sametime server″ field of the user’s Person document in the Domino
Directory. For more information, see Assigning users to a home Sametime server.
Note: Sametime 7.0 supports Community Services server clustering that enables
users to receive Community Services functionality from any of a group of
clustered Sametime servers. In this scenario, each user can be assigned to a
home Sametime server cluster instead of a home Sametime server. For more
information, see Setting up a Community Services cluster .
The concept of the home Sametime server is important to Community Services
connectivity for the following reasons:
v Users need a single place to store their Community Services preferences - The
home server is the Sametime server to which each user logs in to appear in a
presence list in a Sametime client. The home Sametime server stores a user’s
Community Services preferences settings, contact lists, and privacy information.
This information is stored in the Notes database vpuserinfo.nsf on the user’s
home Sametime server. The client must retrieve this information each time the
user logs in to the Community Services. In multiple server environments, this
information must be stored on a single server. If this information were stored on
multiple servers and the user changed the Community Services preferences
settings while logged in to one Sametime server, the user could receive different
Community preferences settings when logging in to a different Sametime server.
For this reason, the user is always required to log in to the same home Sametime
server.
v Users can only log in to one Sametime server at a time - A user’s presence can
only be registered to the Community Services on one Sametime server at a time.
When multiple Sametime servers are integrated into a single community, the
Community Services will not allow a single user to simultaneously log in to the
Community Services on two separate Sametime servers. If a user attempts to do
so, the first connection to the Community Services is disconnected. The home
Sametime server setting ensures that a user always connects to a single
Sametime server to receive the Community Services functionality.
Note: Another characteristic of the Community Services is that a user’s presence
can originate from only one machine (or IP address) at a time. A user who
has two machines can only log in to the Community Services from one of
the machines. If the user attempts to log in to the Community Services
from Sametime clients on two separate machines, the client that logged in
to the Community Services first is disconnected. Although the home
Sametime server concept does not solve this issue, the administrator
should be aware of this Community Services characteristic if the user
population includes many users with multiple machines.
Chapter 5. Configuring Ports and Network Connectivity 117

Sametime Connect and the home Sametime server
The Sametime Connect client includes settings that enable any user to specify the
Sametime server to which the Sametime Connect client will connect. The user
specifies a particular Sametime server from the Options - Preferences - Sametime
Connectivity settings on the Sametime Connect client.
Lotus software recommends that the Sametime Connectivity settings of the
Sametime Connect client and the ″Sametime server″ setting on a user’s Person
document specify the same Sametime server.
If the Sametime Connectivity settings of a user’s Sametime Connect client specify a
different Sametime server than the ″Sametime server″ field of the user’s Person
document, the client first connects to the server specified in the Sametime
Connectivity settings of the client, but the connection is redirected to the server
specified in the ″Sametime server″ field of the Person document. Logging in to
Community Services occurs on the Sametime server specified in the user’s Person
document.
Connectivity functions more efficiently if the Sametime Connectivity settings of the
Sametime Connect client specify the same Sametime server as the ″Sametime
server″ setting in a user’s Person document because it is not necessary to redirect
the connection to a different Sametime server.
For more information on Community Services connection processes, see Sametime
Connect client connection process
Assigning users to a home Sametime server
To assign a user to a home Sametime server, enter the Sametime server name in
the ″Sametime server″ field in the Administration section of a user’s Person
document in the Domino Directory.
In the ″Sametime server″ field on the Person document, you can enter the name of
the Sametime server in the Domino hierarchical name format (for example,
sametime.acme.com/west/acme). The ″Sametime server″ field automatically
converts the name to the full canonical name format. For example, if you enter
sametime.acme.com/west/acme in the ″Sametime server″ field, the name is stored
as cn=sametime.acme.com/ou=west/o=acme. You can also use the full canonical
format when entering the server name in the ″Sametime server″ field.
Note: Community Services reads the server name from the Servers view ($Servers)
of the Domino Directory. The name entered in the ″Sametime server″ field
on the Person document must match the name of the Sametime server as it
appears in the Servers view of the Domino Directory. If you are using an
agent to populate the home ″Sametime server″ field for several different
users, ensure that the agent specifies the full canonical name of the server.
For information about assigning users to a home Sametime server when Sametime
is configured to access an LDAP directory, see Setting the Home Sametime Server
setting for LDAP.
Home Sametime servers and self-registration
If you are allowing self-registration, the ″Sametime server″ field on the Person
document is automatically populated when the user self-registers. The field is
118 Sametime Administrator’s Guide

populated with the name of the Sametime server on which the user self-registered.
For more information about self-registration, see Using Sametime self-registration.
Sametime Connect client connection processes
This section discusses the connection processes of the Sametime Connect client.
Read this section to gain a better understanding of how the Sametime Connect
client connects to the server and the configuration settings that affect the
connection processes. These configuration settings include both settings on the
Sametime Connect client and the ″Networks and Ports″ settings in the Sametime
Administration Tool.
The Sametime Connect clients connect to the Community Services on the Sametime
server. The Community Services support all Sametime presence and chat
capabilities. Sametime Connect clients can establish connections with the
Community Services using either direct TCP/IP connections or through
HTTP-tunneled connections. The Sametime Connect client can also connect to the
Community Services through an HTTPS proxy.
Sametime is designed to enable Sametime Connect clients that operate behind
restrictive firewalls to connect to the Sametime services using HTTP over port 80.
For detailed information on this capability, see the connection process topics below
and About HTTP tunneling.
The Sametime Connect clients offer a variety of different connectivity options to
ensure connectivity can be established in any network environment. Because there
are many different connectivity options, the discussion of Sametime Connect client
connection processes is divided into two topics: Basic Sametime Connect client
connection process and Sametime Connect client connection process using the Java
Plug-in settings.
Basic Sametime Connect client connection process
The ″Basic Sametime Connect client connection process″ topic discusses the basic
connection process used by the Sametime Connect for browsers client.
The ″Basic Sametime Connect client connection process ″ topic discusses all
connectivity processes with the exception of the connectivity processes that occur
when the user’s Java Plug-in settings are used to establish connections with the
server.
Sametime Connect client connection process using the Java
Plug-in settings
The ″Sametime Connect client connection process using the Java Plug-in settings″
topic discusses the connection processes that can occur when the Sametime
Connect client is configured to establish a connection using connectivity settings
defined in the Java Plug-in.
Basic Sametime Connect client connection process
The Sametime Connect client connects to the Community Services on the Sametime
server. The Community Services support all Sametime presence and chat
capabilities.
Note: This topic describes all Sametime Connect client connection scenarios with
the exception of the scenario that occurs when the ″Use my Java Plug-in
Chapter 5. Configuring Ports and Network Connectivity 119

settings″ option is selected in the Sametime Connect client Sametime
Connectivity settings. For information on these connection processes, see
Sametime Connect client connection processes using the Java Plug-in
connectivity settings.
Settings that affect the connection process
The Sametime Connect client connection process is controlled by two groups of
settings: the Sametime Connect client Sametime Connectivity settings (available on
the client) and the Community Services Network settings (available on the server).
v The Sametime Connect client Sametime Connectivity settings are available from
the Options - Preferences - Sametime Connectivity menu in the Sametime
Connect client.
The Sametime Connectivity settings enable the Sametime Connect client to make
a direct TCP/IP connection (also called a ″Direct connection using Sametime
protocol″) or a direct HTTP-tunneled connection to the Community Services. The
Sametime Connectivity settings also enable Sametime Connect clients that access
the Internet or intranet through HTTP, HTTPS, or SOCKS proxy servers to
connect to the Community Services. Sametime Connect uses the port specified in
the ″Community port″ setting of the Sametime Connectivity settings when
attempting connections to the Community Services.
v The Community Services Network settings are available from the
Configuration-Connectivity-Networks and Ports settings of the Sametime
Administration Tool. The Community Services Network settings include the
″Address for client connections,″ the ″Address for HTTPS client connections,″
and the ″Address for HTTP tunneled client connections.″ These server-side
settings control the IP addresses or DNS names and the ports on which the
Sametime server Community Services multiplexer listens for Sametime Connect
client connections.
Connection process
The basic connection process of the Sametime Connect client is described below.
The connection process depends on the Connection, ″Proxy type,″ and Port settings
that are selected in the Sametime Connect client Sametime Connectivity settings.
1. The Sametime Connect for browsers client loads in the user’s Web browser.
2. The Sametime Connect client examines the values in the ″Host″ field and the
″Community Port″ field (default 1533) of the Sametime Connect client
Sametime Connectivity settings.
The Sametime Connect client uses the ″Host″ and ″Community Port″ values to
determine the Host name and port it should use when attempting a connection
to the Sametime server.
Note For the most efficient connectivity, the Host field of the Sametime Connect
client Sametime Connectivity settings and the ″Sametime server″ field of a
user’s Person document should specify the same Sametime server (the user’s
home Sametime server). For more information, see Connecting to the Home
Sametime server.
3. The Sametime Connect client uses the ″Connection″ setting in its Sametime
Connectivity settings to determine how to make the connection to the Host
machine specified in the Sametime Connectivity settings. The possible
Connection settings are:
v Use my Java Plug-in settings
v Direct connection using Sametime protocol
v Direct connection using HTTP protocol
v Use Proxy
120 Sametime Administrator’s Guide

Use my Java Plug-in settings - The connection process that occurs when the
″Use my Java Plug-in settings″ is selected is described in a separate section. For
more information about this connection process, see Sametime Connect client
connection processes using the Java Plug-in connectivity settings later in this
chapter.
Direct connection using Sametime protocol - Select this setting if the
Sametime Connect client can make a direct TCP/IP connection to the Sametime
server. Generally, this setting is used when the connection does not occur
through a proxy server, and the network does not block TCP/IP connections on
the port used by the Sametime Connect client.
When ″Direct connection using Sametime protocol″ is selected as the
Connection type, the Sametime Connect client attempts a connection to the
Community Services multiplexer on the Sametime server using a unique
Sametime protocol over TCP/IP. The client attempts this connection on the
″Community port″ (default port 1533) specified in the Sametime Connect client
Sametime Connectivity settings.
The Community Services on the Sametime server listen for direct Sametime
protocol over TCP/IP connections on the host name and port specified in the
″Community Services Network-Address for client connections-Host name and
Port″ settings of the Sametime Administration Tool. By default, the Community
Services listen for this connection on port 1533.
For this connection to succeed, the port setting specified in the Sametime
Connect client Sametime Connectivity settings must match one of the ports
specified in the ″Community Services Network-Address for client
connections-Port number″ setting on the Sametime server. (By default, both of
these settings specify port 1533.)
This connection can fail if the connection must pass through a proxy server or
network that prevents direct TCP/IP connections on port 1533 (or other port
specified in both the Sametime Connectivity settings of the Sametime Connect
client and the ″Community Services Network-Address for client
connections-Port number″ setting in the Sametime Administration Tool). For
more information about connecting through firewalls, see About HTTP
tunneling and Extending Sametime to Internet users.
Direct connection using HTTP protocol setting - Select this option if you want
the Sametime Connect client to use HTTP to establish a connection with the
Community Services, but you do not want this connection to occur through an
HTTP proxy server.
When ″Direct connection using HTTP protocol″ is selected, the client encases
the standard Sametime protocol connection information within an HTTP
request. The Sametime Connect client then attempts to establish an HTTP
connection directly with the Community Services multiplexer on the Sametime
server. The Sametime Connect client attempts this connection on the
″Community port″ specified in its Sametime Connectivity settings.
The Community Services multiplexer can listen for HTTP-tunneled connections
on multiple ports. The Community Services multiplexer listens for
HTTP-tunneled connections on the host name and port specified in the
″Community Services Network-Address for client connections-Host name and
Port″ settings of the Sametime Administration Tool and the host name and port
specified in the ″Community Services Network-Address for HTTP tunneled
client connections-Host name and Port number″ settings of the Sametime
Administration Tool.
Note If the administrator allows HTTP tunneling on port 80 during the
Sametime server installation, the Community Services multiplexer listens for
HTTP-tunneled connections on port 80 by default on the Community Services
Chapter 5. Configuring Ports and Network Connectivity 121

Network-Address for HTTP tunneled client connections-Port number. In this
scenario, the Community Services multiplexer also listens for HTTP-tunneled
connections on port 1533 (the Community Services Network-Address for client
connections-Port number).
This setting is used most frequently to enable Sametime Connect clients that
operate behind restrictive firewalls without HTTP proxy servers to connect to a
Sametime server available to Internet users.
The ″Direct connection using HTTP protocol″ connectivity option is intended
primarily to support the HTTP tunneling on port 80 functionality available
with the Sametime 7.0 server. For more information about HTTP tunneling on
port 80, see About HTTP tunneling.
If a Sametime Connect client operates behind a firewall that allows only HTTP
connections on port 80 and the client’s firewall or network environment does
not include an HTTP proxy server, select the ″Direct connection using HTTP
protocol″ setting and change the ″Community port″ setting in the Sametime
Connect client Sametime Connectivity settings from the default of 1533 to port
80.
The administrator must also ensure that the ″Port number″ setting under
″Address for HTTP tunneled client connections″ in the Community Services
Network settings specified in the Sametime Administration Tool also specifies
port 80. Such a configuration should enable a Sametime Connect client
operating behind a restrictive firewall to establish a connection with an Internet
Sametime server using HTTP tunneling over port 80.
Use proxy - Selecting the ″Use proxy″ option enables the Sametime Connect
client to connect through a SOCKS, HTTP, or HTTPS proxy server when
establishing a connection to the Community Services. After selecting the ″Use
proxy″ connection type, select the appropriate ″Proxy type″ in the Sametime
Connect client Sametime Connectivity options. The available ″Proxy type″
settings are:
v Use SOCKS4 proxy
v Use SOCKS5 proxy
v Use HTTPS proxy
v Use HTTP proxyNote You can also select ″Use my Java Plug-in settings″ to establish connections
through HTTP and SOCKS proxy servers. For more information, see Sametime
Connect client connection processes using the Java Plug-in connectivity settings.
Use SOCKS4 proxy and Use SOCKS5 proxy - If the Sametime Connect client
connects to a SOCKS proxy server to access the Internet or intranet, you must
select the appropriate SOCKS proxy option (either Use SOCKS4 proxy or Use
SOCKS5 proxy) as the ″Proxy type″ in the Sametime Connect client Sametime
Connectivity settings.
If you select ″Use SOCKS4 proxy″ or ″Use SOCKS5 proxy,″ you must also
specify the ″Host name″ (DNS name or IP address) of the SOCKS proxy server
and the port required to connect to the SOCKS proxy server in the ″Proxy
server″ options of the Sametime Connect client Sametime Connectivity settings.
For SOCKS5 proxies, you must also specify the user name and password
required for SOCKS5 authentication.
Sametime Connect connects to the SOCKS proxy, and the proxy server connects
to the Community Services on the Sametime server on behalf of the Sametime
Connect client. The client uses the Sametime protocol over TCP/IP for this
connection. The connection from the SOCKS proxy to the Community Services
occurs on the ″Community port″ (default 1533) specified in the Sametime
Connect client Sametime Connectivity settings.
122 Sametime Administrator’s Guide

The ″Resolve server name locally″ setting determines whether the Sametime
server host name is resolved by the Sametime Connect client or the SOCKS4 or
SOCKS5 proxy server.
When the ″Resolve server name locally″ setting is selected, the Sametime
Connect client calls a local DNS server to resolve the Sametime server name.
The Sametime Connect client passes the IP address to the SOCKS proxy; the
SOCKS proxy does not resolve the IP address.
When ″Resolve server name locally″ is not selected, Sametime Connect does not
resolve the DNS name of the Sametime server. Sametime Connect passes the
DNS name of the Sametime server to the SOCKS proxy, and the SOCKS proxy
server calls a DNS server to resolve the server name.
Some organizations do not allow their internal DNS servers to resolve the
names of external servers for security reasons. If the DNS server is configured
in this way, users should clear the check mark from the ″Resolve server name
locally″ field. The SOCKS proxy resolves the external server name by calling a
different DNS server (which is not available on the internal network).
For a connection through a SOCKS proxy to succeed, the port specified in the
″Community port″ field of the Sametime Connect client Sametime Connectivity
settings must match one of the ports listed in the ″Community Services
Network-Address for client connections-Port number″ setting in the Sametime
Administration Tool.
Use HTTP proxy - If the Sametime Connect client connects to an HTTP proxy
to access the Internet or intranet, you can select ″Use HTTP proxy″ as the
″Proxy type″ in the Sametime Connect client Sametime Connectivity settings.
If ″Use HTTP proxy″ is selected as the Proxy type, you must also specify the
″Host name″ (DNS name or IP address) of the HTTP proxy server and the port
required to connect to the HTTP proxy server in the ″Proxy server″ options of
the Sametime Connect client Sametime Connectivity settings.
Note If the HTTP proxy server requires authentication, the user name and
password required for authentication to the HTTP proxy server must also be
entered in the ″Proxy server″ options of the Sametime Connect client Sametime
Connectivity settings.
When ″Use HTTP proxy″ is selected, the client encases the standard Sametime
protocol connection information within an HTTP request. Sametime Connect
connects to the HTTP proxy, and the HTTP proxy server connects to the
Community Services multiplexer on the Sametime server on behalf of the
Sametime Connect client. The HTTP connection to the Community Services
multiplexer occurs on the ″Community port″ (default 1533) specified in the
Sametime Connect client Sametime Connectivity settings.
The Community Services multiplexer on the Sametime server listens for HTTP
connections on all ports specified in the ″Port number″ field under ″Address for
client connections″ in the Community Services Network settings of the
Sametime Administration Tool and ″Address for HTTP tunneled client
connections″ in the Community Services Network settings of the Sametime
Administration Tool.
For this connection to succeed, the port specified as the ″Community port″
setting in the Sametime Connect client Sametime Connectivity settings must
match a port number specified in one of these settings in the Sametime
Administration Tool:
v The ″Port number″ field under ″Address for client connections″ in the
Community Services Network settings of the Sametime Administration Tool.
Chapter 5. Configuring Ports and Network Connectivity 123
v The ″Port number″ field under ″Address for HTTP tunneled client
connections″ in the Community Services Network settings of the Sametime
Administration Tool.Note If the administrator allows HTTP tunneling on port 80 during the
Sametime server installation, the ″Community Services Network-Address for
client connections-Port number″ setting default to port 1533, and the
″Community Services Network-Address for HTTP tunneled client
connections-Port number″ settings are ports 80 and 8082. In this configuration,
the Sametime Connect client can complete an HTTP-tunneled connection to the
Community Services multiplexer using either port 1533, 80, or 8082.
For more information about HTTP tunneling on port 80, see About HTTP
tunneling.
Use HTTPS proxy - If the Sametime Connect client must connect to an HTTPS
proxy to access the Internet or intranet, select the ″Use HTTPS proxy″ option in
the ″Proxy type″ settings. If ″Use HTTPS proxy″ is selected as the proxy type,
you must also specify:
v The ″Host name″ (DNS name or IP address) of the HTTPS proxy server
v The port required to connect to the HTTPS proxy server in the ″Proxy server″
options of the Sametime Connect client Sametime Connectivity settingsWhen ″Use HTTPS proxy″ is selected, the client encases the standard Sametime
protocol information within an HTTPS request. Sametime Connect connects to
the HTTPS proxy, and the HTTPS proxy server connects to the Community
Services multiplexer on the Sametime server on behalf of the Sametime Connect
client. The HTTPS connection to the Community Services multiplexer occurs on
the port (default 1533) specified in the Sametime Connect client Sametime
Connectivity settings.
The Community Services multiplexer on the Sametime server listens for HTTPS
connections on all ports specified in the ″Community Services
Network-Address for HTTPS tunneled client connections-Port number″ setting
in the Configuration-Connectivity options of the Sametime Administration Tool.
For this connection to succeed, the port specified as the ″Community port″
setting in the Sametime Connect client Sametime Connectivity settings must
match the port listed in the ″Community Services Network-Address for HTTPS
tunneled client connections-Port number″ setting.
The ″Community port″ setting in the Sametime Connect client Sametime
Connectivity settings and the Community Services Network-Address for
HTTPS tunneled client connections-″Port number″ setting in the Sametime
Administration Tool both specify port 1533 by default.
Many organizations have firewall or network configurations that prevent
HTTPS connections on the default port of 1533. For the HTTPS connection to
succeed in your network environment, you might need to specify port 443 for
HTTPS connections in both of the following settings:
v The ″Community port″ setting of the Sametime Connect client Sametime
Connectivity settings
v The ″Port number″ field under ″Address for HTTPS tunneled client
connections″ in the Community Services Network settings of the Sametime
Administration ToolIf you have configured the Domino HTTP server to listen for HTTPS
connections from Web browsers on port 443, the Community Services
multiplexer cannot also listen for HTTPS connections on port 443 unless you
assign multiple IP addresses to the Sametime server. For more information on
this issue, see the ″Things you need to know″ section of the Sametime 7.0
Release Notes (strn70.nsf or strn70.pdf on the Sametime CD).
124 Sametime Administrator’s Guide

Sametime Connect client connection processes using the
Java Plug-in connectivity settings
The Sametime Connect client connectivity options enable the client to use the
connectivity settings defined in the Java Plug-in of the Sun or IBM Java Virtual
Machine (JVM) 1.4.2 to establish connections with the Community Services on the
Sametime server.
This section discusses the following connectivity scenarios associated with using
the Java Plug-in connectivity settings:
v Use my Java Plug-in settings - The ″Use my Java Plug-in settings″ option
appears in the Sametime Connectivity tab of the Sametime Connect for browsers
client when the client loads in a Web browser that runs under the Sun or IBM
JVM 1.4.2. The connection scenarios associated with this option are described in
Use my Java Plug-in settings.
v Use my Web browser setting - The ″Use my Java Plug-in settings″ include a
″Use my Web browser setting″ connectivity option. For clarity, this connectivity
option is described separately from the other Java Plug-in connectivity options.
For more information, see Use my Web browser settings.
Use my Web browser settings
When the ″Use my Web browser settings″ option is selected in the Java Plug-in
Control Panel, the Sametime Connect for browsers client can use the proxy
connectivity settings defined in the user’s Web browser.
Sametime Connect for browsers follows this connection process when the ″Use my
Web browser settings″ connectivity option is selected in the Java Plug-in Control
Panel.
1. The Sametime Connect for browsers client examines the values in the ″Host″
field and the ″Port″ field (default 1533) of the Sametime Connect client
Sametime Connectivity settings to determine the address to which it should
connect.
Note For the most efficient connectivity, the Host field of the Sametime Connect
client Sametime Connectivity settings and the ″Sametime server″ field of a
user’s Person document should specify the same Sametime server. For more
information, see Connecting to the Home Sametime server.
2. Sametime Connect for browsers attempts a direct Sametime protocol over
TCP/IP connection to the Community Services on the port specified as the
″Community port″ in the Sametime Connectivity settings (default port 1533) of
the Sametime Connect client.
The Community Services multiplexer on the Sametime server listens for this
connection on the host names and ports specified in the ″Community Services
Network-Address for client connections-Host name and Port number″ settings
(default port 1533) in the Connectivity settings of the Sametime Administration
Tool.
Sametime Connect for browsers attempts a TCP/IP connection first because this
type of connection provides better performance than the HTTP-tunneled
connection that it subsequently tries. For the TCP/IP connection to succeed,
both of the following must be true:
v The host name specified in the Host setting in the Sametime Connect client
Sametime Connectivity settings must correspond to any IP address or DNS
name specified in the ″Host name″ field under ″Address for client
connections″ in the Community Services Network settings of the Sametime
Administration Tool. If the Community Services Network-Address for client
Chapter 5. Configuring Ports and Network Connectivity 125

connections-″Host name″ field is blank, the entry in the Host setting of the
Sametime Connect for browsers client can correspond to any IP address or
DNS name assigned to the Sametime server.
v The ″Port″ setting specified in the Sametime Connect client Sametime
Connectivity settings must match one of the ports specified in the
Community Services Network-Address for client connections-Port number
setting on the Sametime server. By default, both of these settings specify port
1533.This Sametime protocol over a TCP/IP connection can fail if the connection
must pass through a proxy server or if the network configuration prevents
direct TCP/IP connections on port 1533 (or other port specified in both the
Sametime Connectivity settings of the Sametime Connect client and the
Community Services Network-Address for client connections- ″Port number″
setting in the Sametime Administration Tool).
If the Sametime protocol over a TCP/IP connection attempt is not successful
within five seconds, Sametime Connect continues with the connection process
as described below.
3. The Sametime Connect for browsers client encases the standard Sametime
protocol data within an HTTP request and attempts to connect to the
Community Services multiplexer using HTTP.
The client enters a polling state to maintain this connection. This polling state is
referred to as ″hybrid polling.″ With hybrid polling, the client and server
maintain a connection for as long as possible, but might be required to
periodically break and re-create this connection.
Note A hybrid-polling connection provides better support for accessing the
Web browser proxy settings and authenticating through HTTP proxies than the
polled HTTP connection type described in Step 4.
Sametime Connect for browsers examines the Web browser connectivity
settings to attempt this HTTP-tunneled connection (using hybrid polling) to the
Community Services multiplexer. If the Web browser settings:
v Do not specify a proxy server - The HTTP request is sent directly to the
Community Services multiplexer on the Sametime server.
v Specify a SOCKS proxy server - The HTTP request is sent to the
Community Services multiplexer through the SOCKS proxy server.
v Specify an HTTP proxy server -The HTTP request is sent to the Community
Services multiplexer through the HTTP proxy server.In all three cases above, the Host name and ″Port″ settings (default port 1533)
specified in the Sametime Connect for browsers client are used to establish the
connection to the Community Services multiplexer.
For the HTTP-tunneled connection to succeed, the following must be true:
v The port specified as the ″Community port″ setting in the Sametime Connect
client Sametime Connectivity settings must match a port number specified in
one of these settings in the Sametime Administration Tool: the ″Port number″
field under ″Address for client connections″ in the Community Services
Network settings of the Sametime Administration Tool or the ″Port number″
field under ″Address for HTTP tunneled client connections″ in the
Community Services Network settings of the Sametime Administration Tool.
v The IP address or DNS name specified in the Host setting in the Sametime
Connect client Sametime Connectivity settings must correspond to any IP
address or DNS name specified in the ″Host name″ field under ″Address for
HTTP tunneled client connections″ in the Community Services Network
settings of the Sametime Administration Tool. If the Community Services
126 Sametime Administrator’s Guide

Network-Address for HTTP tunneled client connections-″Host name″ field is
blank, the entry in the Host setting of the Sametime Connect client can
correspond to any IP address or DNS name assigned to the Sametime server.
v All networks between the Sametime Connect client and the Sametime server
must allow HTTP connections on the port specified as the ″Community port″
in the Sametime Connect client. The Community port setting in the
Sametime Connect client must also match a port specified in the the ″Port
number″ field under ″Address for client connections″ in the Community
Services Network settings of the Sametime Administration Tool or the ″Port
number″ field under ″Address for HTTP tunneled client connections″ in the
Community Services Network settings of the Sametime Administration Tool.
Note The ″Enable Sametime Connect for browsers client to try HTTP
tunneling after trying other options″ setting must be enabled in the
Community Server Network settings on the ″Networks and Ports″ tab of the
Sametime Administration Tool for the connection to occur using the port
specified as the ″Address for HTTP tunneled client connections″ in the
Community Services Network settings of the Sametime Administration Tool.4. If the Sametime Connect client is unable to establish the HTTP connection
using hybrid polling as described above, the client attempts to maintain an
HTTP-tunneled connection using a continuous-polling mode.
In this continuous-polling mode, the client continuously makes and breaks
HTTP connections. Note that the client attempts to access any proxy
connectivity settings defined for the Web browser to connect and authenticate
with a proxy when making these polled connections.
The polling functionality enables the Sametime Connect client to establish
connections through proxies that require authentication or proxies that buffer
data. However, the polling functionality can increase network traffic and limit
the scalability of the Sametime server. In some cases, the Sametime Connect
client might not be able to access the Web browser connectivity settings or
authenticate with some HTTP proxies when using this continuous-polling
functionality.
Use my Java Plug-in settings
The ″Use my Java Plug-in settings″ option appears only in the Sametime
Connectivity tab of a Sametime Connect for browsers client that loads in a Web
browser that operates with the Sun Microsystems JVM 1.4.2 or the IBM JVM 1.4.2.
Note: For information about accessing the connectivity settings of the Java Plug-in
1.4.2, see ″Notes on the connection process″ below.
Sametime Connect for browsers follows this connection process when the ″Use my
Java Plug-in settings″ connectivity option is selected in the Sametime Connectivity
tab of the Sametime Connect for browsers client.
1. The Sametime Connect for browsers client examines the values in the ″Host″
field and the ″Port″ field (default 1533) of the Sametime Connect client
Sametime Connectivity settings.
Sametime Connect for browsers uses the ″Host″ and ″Port″ values to determine
the Host name and port it should use when attempting a connection to the
Sametime server.
Note For the most efficient connectivity, the Host field of the Sametime Connect
client Sametime Connectivity settings and the ″Sametime server″ field of a
user’s Person document should specify the same Sametime server. For more
information, see Connecting to the Home Sametime server.
Chapter 5. Configuring Ports and Network Connectivity 127

2. Sametime Connect for browsers attempts a direct Sametime protocol over
TCP/IP connection to the Community Services on the port specified as the
″Community port″ in the Sametime Connectivity settings (default port 1533) of
the Sametime Connect client.
The Community Services multiplexer on the Sametime server listens for this
connection on the host names and ports specified in the ″Community Services
Network-Address for client connections-Host name and Port number″ settings
(default port 1533) in the Connectivity settings of the Sametime Administration
Tool.
Sametime Connect for browsers attempts a direct TCP/IP connection first
regardless of how the connectivity settings are configured in the Java Plug-in
Control Panel. The client attempts a direct TCP/IP connection first because this
type of connection provides the best performance of all possible connection
types. For the TCP/IP connection to succeed, both of the following must be
true:
v The host name specified in the Host setting in the Sametime Connect client
Sametime Connectivity settings must correspond to any IP address or DNS
name specified in the ″Host name″ field under ″Address for client
connections″ in the Community Services Network settings of the Sametime
Administration Tool. If the Community Services Network-Address for client
connections-″Host name″ field is blank, the entry in the Host setting of the
Sametime Connect for browsers client can correspond to any IP address or
DNS name assigned to the Sametime server.
v The ″Port″ setting specified in the Sametime Connect client Sametime
Connectivity settings must match one of the ports specified in the
Community Services Network-Address for client connections-″Port number″
setting on the Sametime server. By default, both of these settings specify port
1533.This Sametime protocol over a TCP/IP connection can fail if the connection
must pass through a proxy server or if the network configuration prevents
direct TCP/IP connections on port 1533 (or other port specified in both the
Sametime Connectivity settings of the Sametime Connect client and the
Community Services Network-Address for client connections- ″Port number″
setting in the Sametime Administration Tool).
If the Sametime protocol over a TCP/IP connection attempt is not successful,
Sametime Connect continues with the connection process as described below.
3. The Sametime Connect for browsers client examines the connectivity settings
specified in the Proxies tab of the Java Plug-in Control Panel to establish the
connection with the Community Services on the Sametime server. The possible
settings in the Proxies tab of the Java Plug-in Control Panel include:
v Use Browser Settings
v HTTP
v Secure
v Socks
v FTP (Not applicable for Sametime)
v Gopher (Not applicable for Sametime)The connection processes associated with these settings are described below.
Use my browser settings is not selected and no proxies are specified - If the
″Use my browser settings″ is not selected and no proxy servers are specified in
the Java Plug-in connectivity settings, Sametime Connect for browsers can
attempt a direct HTTP connection to the Community Services on the Sametime
server.
128 Sametime Administrator’s Guide

When Use my browser settings is not selected and no proxies are specified in
the Java Plug-in connectivity settings, the Sametime Connect for browsers client
attempts this direct HTTP connection only if the ″Enable the Sametime Connect
for browsers client to try HTTP tunneling to the Community Server after trying
other options″ setting is enabled in the Community Services Network settings
of the Sametime Administration Tool.
Direct HTTP-tunneled connections are used most frequently to enable
Sametime Connect clients that operate behind restrictive firewalls without
HTTP proxy servers to connect to a Sametime server available to Internet users.
This connection process is identical to the connection process that occurs when
the ″Direct connection using HTTP protocol″ option is selected in the Sametime
Connectivity tab of the Sametime Connect client. For details on this connection
process, see the ″Direct connection using HTTP protocol″ description in the
Basic Sametime Connect client connection process topic earlier in this chapter.
Note: The Sametime Connect for browsers client will also try a direct
HTTP-tunneled connection if the client attempts to connect through a
proxy server but the connection attempt through the proxy fails. For
more information, see ″Notes about the connection process″ below.
Use my browser settings is selected - When ″Use my browser settings″ is
specified in the Java Plug-in connectivity settings, Sametime Connect for
browsers will attempt to use the proxy settings of the Web browser to connect
to the Sametime server. For more information, see Use my Web browser
settings later in this section.
An HTTP proxy is specified - If the ″HTTP″ fields in the Proxies tab of the
Java Plug-in Control Panel specify an HTTP server address and port, the
Sametime Connect for browsers client attempts to connect to the Community
Services through the specified HTTP proxy server.
In this scenario, the client encases the standard Sametime protocol connection
information within an HTTP request. Sametime Connect for browsers connects
to the HTTP proxy, and the HTTP proxy server connects to the Community
Services multiplexer on the Sametime server on behalf of the Sametime Connect
client.
The HTTP connection from the Sametime Connect client to the HTTP proxy
server uses the port specified for the HTTP proxy server in the Proxies tab of
the Java Plug-in Control Panel. The HTTP connection from the HTTP proxy
server to the Community Services multiplexer occurs on the port (default 1533)
specified in the Sametime Connect for browsers client Sametime Connectivity
settings.
The Community Services multiplexer on the Sametime server listens for HTTP
connections on all ports specified in the ″Port number″ field under ″Address for
HTTP tunneled client connections″ in the Community Services Network
settings of the Sametime Administration Tool.
For this connection to succeed, the ports specified as the ″Port″ setting in the
Sametime Connect for browsers client must match one of these ports specified
in the Sametime Administration Tool:
v The ″Port number″ field under ″Address for client connections″ in the
Community Services Network settings of the Sametime Administration Tool.
v The ″Port number″ field under ″Address for HTTP tunneled client
connections″ in the Community Services Network settings of the Sametime
Administration Tool.If the HTTP-tunneled connection attempt through the HTTP proxy server fails,
the client can attempt a direct HTTP-tunneled connection to the Community
Chapter 5. Configuring Ports and Network Connectivity 129

Services on the Sametime server. The client attempts this direct HTTP
connection only if the ″Enable the Sametime Connect for browsers client to try
HTTP tunneling to the Community Server after trying other options″ setting is
enabled in the Community Services Network settings of the Sametime
Administration Tool.
For details on this connection process, see the ″Direct connection using HTTP
protocol″ description in the Basic Sametime Connect client connection process
topic earlier in this chapter.
For more information about HTTP tunneling on port 80, see About HTTP
tunneling.
A Secure proxy is specified - If the ″Secure″ fields in the Proxies tab of the
Java Plug-in Control panel specify an address and port, the Sametime Connect
client attempts to connect to the Community Services through the specified
HTTPS proxy server.
In this scenario, the client encases the standard Sametime protocol information
within an HTTPS request. Sametime Connect for browsers connects to the
HTTPS proxy, and the HTTPS proxy server connects to the Community
Services multiplexer on the Sametime server on behalf of the Sametime Connect
for browsers client.
The HTTPS connection from the Sametime Connect client to the HTTPS proxy
server occurs on the port specified in the Proxies tab of the Java Plug-in. The
HTTPS connection from the HTTPS proxy server to the Community Services
multiplexer occurs on the port (default 1533) specified in the Sametime Connect
for browsers client Sametime Connectivity settings.
The Community Services multiplexer on the Sametime server listens for HTTPS
connections on all ports specified in the ″Community Services
Network-Address for HTTPS tunneled client connections-Port number″ setting
in the Configuration-Connectivity options of the Sametime Administration Tool.
For this connection to succeed, the port specified as the ″Port″ setting in the
Sametime Connect for browsers client Sametime Connectivity settings must
match the port listed in the ″Community Services Network-Address for HTTPS
tunneled client connections-Port number″ setting.
The ″Port″ setting in the Sametime Connect for browsers client Sametime
Connectivity settings and the Community Services Network-Address for
HTTPS tunneled client connections-″Port number″ setting in the Sametime
Administration Tool both specify port 1533 by default.
Many organizations have firewall or network configurations that prevent
HTTPS connections on the default port of 1533. For the HTTPS connection to
succeed in your network environment, you might need to specify port 443 for
HTTPS connections in both of the following settings:
v The ″Port″ setting of the Sametime Connect for browsers client Sametime
Connectivity settings
v The ″Port number″ field under ″Address for HTTPS tunneled client
connections″ in the Community Services Network settings of the Sametime
Administration ToolIf you have configured the Domino HTTP server to listen for HTTPS
connections from Web browsers on port 443, the Community Services
multiplexer cannot also listen for HTTPS connections on port 443 unless you
assign multiple IP addresses to the Sametime server. For more information on
this issue, see the ″Things you need to know″ section of the Sametime 7.0
Release Notes (strn70.nsf or strn70.pdf on the Sametime CD).
If the HTTP-tunneled connection attempt through the HTTPS proxy server fails,
the client can attempt a direct HTTP-tunneled connection to the Community
130 Sametime Administrator’s Guide

Services on the Sametime server. The client attempts this direct HTTP
connection only if the ″Enable the Sametime Connect for browsers client to try
HTTP tunneling to the Community Server after trying other options″ setting is
enabled in the Community Services Network settings of the Sametime
Administration Tool.
For details on this connection process, see the ″Direct connection using HTTP
protocol″ description in the Basic Sametime Connect client connection process
topic earlier in this chapter.
A Socks proxy is specified - If the ″Socks″ fields in the Proxies tab of the Java
Plug-in Control panel specify an address and port, the Sametime Connect for
browsers client attempts to connect to the Community Services through the
SOCKS proxy server at the specified address.
In this scenario, Sametime Connect for browsers connects to the SOCKS proxy,
and the proxy server connects to the Community Services on the Sametime
server on behalf of the Sametime Connect client. The client uses the ″standard
Sametime protocol″ over TCP/IP for this connection.
The connection from the Sametime Connect for browsers client to the SOCKS
proxy server occurs on the port specified in the Proxies tab of the Java Plug-in
Control Panel. The connection from the SOCKS proxy server to the Community
Services occurs on the ″Port″ (default 1533) specified in the Sametime Connect
for browsers client Sametime Connectivity settings.
For this connection to succeed, the port specified in the ″Community port″ field
of the Sametime Connect client Sametime Connectivity settings must match one
of the ports listed in the ″Community Services Network-Address for client
connections-Port number″ setting in the Sametime Administration Tool or one
of the ports listed in the ″Community Services Network-Address for HTTPS
tunneled client connections-Port number″ setting in the Sametime
Administration Tool.
This connection can fail if it must pass through a firewall or network that
blocks the port specified in the ″Community port″ field of the Sametime
Connect client. For more information about connecting through firewalls, see
Extending Sametime to Internet users and About HTTP tunneling.
If the connection attempt through the SOCKS proxy server fails, the client
attempts a direct HTTP-tunneled connection to the Community Services on the
Sametime server. The client attempts this direct HTTP connection only if the
″Enable the Sametime Connect for browsers client to try HTTP tunneling to the
Community Server after trying other options″ setting is enabled in the
Community Services Network settings of the Sametime Administration Tool.
For details on this connection process, see the ″Direct connection using HTTP
protocol″ description in the Basic Sametime Connect client connection process
topic earlier in this chapter.
Notes about the connection process: Note the following about the connection
process described above:
v The Java Plug-in connectivity settings used by the client are defined in the Java
Plug-in 1.4.2 Control Panel on a user’s machine. The Java Plug-in Control Panel
is usually accessed from the Windows Control Panel on the user’s machine.
To view or change the connectivity settings defined in the Java Plug-in Control
Panel:
1. Open the Windows Control Panel from the Windows desktop
(Start-Settings-Control Panel).
2. Double-click the ″Java Plug-in 1.4.2″ icon to open the Java Plug-in Control
Panel.
Chapter 5. Configuring Ports and Network Connectivity 131

3. Select the Proxies tab to view or change the Java Plug-in connectivity
settings.v It is possible to have both the ″Use my browser settings″ option selected and a
proxy server specified in the Java Plug-in connectivity settings. In this case, the
Sametime Connect for browsers client will exhaust all possible options to
successfully establish a connection. The client will try to connect using the proxy
settings of the Web browser and if that fails the client will try to connect using
the proxy server (HTTP, Secure, or SOCKS) that is specified in the Java Plug-in
connectivity settings.
The order in which these connection attempts occur is determined by internal
operations of the client code and is not within the control of the connectivity
design. The client may attempt to connect using the Web browser settings first
and then attempt to connect through the proxy defined in the Java Plug-in
connectivity options or vice versa.
v The ″Enable the Sametime Connect for browsers client to try HTTP tunneling to
the Community Server after trying other options″ setting in the Community
Services Network settings of the Sametime Administration Tool enables the
Sametime Connect client to attempt a direct HTTP-tunneled connection to the
Community Services when all other connection attempts have failed. When this
setting is enabled, the client attempts a direct HTTP tunneled connection to the
Community Services in these scenarios:
– If the ″Use my browser settings″ option is selected and all connection
attempts using the proxy settings of the Web browser fail, the client will
attempt a direct HTTP-tunneled connection to the Community Services in a
final effort to establish a successful connection.
– If a proxy server is specified in the Java Plug-in connectivity settings and the
connection attempt through the proxy server fails, the client will attempt a
direct HTTP-tunneled connection to the Community Services in a final effort
to establish a successful connection.
– If there are no connectivity options specified in the Java Plug-in connectivity
settings, the client will attempt a direct HTTP-tunneled connection to the
Community Services to establish the connection.For details on direct HTTP-tunneled connections, see the ″Direct connection
using HTTP protocol″ description in the Basic Sametime Connect client
connection process topic earlier in this chapter.
v For information about Sametime Connect for browsers client connectivity and
reverse proxy servers, see Sametime client connectivity and reverse proxy
servers.
Changing the default connectivity settings of the Sametime Connect
for browsers client
Following a Sametime server installation, the Sametime Connect for browsers client
will load to a user’s Web browser with the Use my Java Plug-in settings option
selected by default.
The administrator can alter the default connectivity settings of the Sametime
Connect for browsers client. For example, the administrator can alter the
connectivity settings so that the Sametime Connect for browsers client is
configured by default to connect to the Sametime server through a SOCKS proxy.
Performing this configuration ensures that the Sametime Connect for browsers
client loads in a user’s web browser with connectivity settings that are appropriate
for the network environment.
132 Sametime Administrator’s Guide

Specifying the default connectivity settings of the Sametime Connect for browsers
client prevents end users from having to modify the connectivity settings. Note
that an end user can still manually modify the connectivity settings from the
administrator-specified defaults if necessary.
Note: This capability is also very useful for Sametime Connect for browsers clients
that operate in the kiosk mode. Note also that if a user alters the default
connectivity settings when the Sametime Connect for browsers client
operates in kiosk mode, the new connectivity settings will be valid only for
the duration of that instant messaging session. The next time the user starts
the client on that machine, the client will load with the administrator-defined default connectivity settings. For more information, see Enabling
Sametime Connect for browsers to function in kiosk mode.
Specifying the default configuration settings of the Sametime
Connect for browsers client
To specify the default configuration settings of the Sametime Connect for browsers
client, the administrator must add an applet parameter to the HTML code on the
Sametime server that loads the Sametime Connect for browsers client.
On a standard Sametime server deployment, the applet code that loads the
Sametime Connect for browsers client is located in the Sametime Resources
database (STSrc.nsf) on the Sametime server. You can use the Domino Designer
client to open the STSrc.nsf database and add the applet parameter to the existing
applet code. For instructions, see the following topics:
v Creating the ConnectivityMethod applet parameter
v Adding the ConnectivityMethod parameter to the STSrc.nsf database
If you have deployed a customized user interface to launch the Sametime Connect
for browsers client, a complete example of the applet code required to launch the
client with a specific default connectivity configuration is provided in the Example
of custom HTML code required to launch the Sametime Connect for browsers
client topic.
Note: To accommodate the kiosk mode, some organizations may choose to create a
custom user interface to launch the Sametime Connect for browsers client.
For more information, see Enabling Sametime Connect for browsers to
function in kiosk mode.
Creating the ConnectivityMethod applet parameter
To specify the connectivity setting that is selected by default when the Sametime
Connect for browsers client loads in a user’s Web browser, the administrator must
add a new ConnectivityMethod applet parameter to the HTML code that loads the
Sametime Connect client.
One example of this applet parameter is provided below:
<PARAM NAME="ConnectivityMethod" VALUE="directST://sametime.ibm.com:1533">
This example applet parameter instructs the Sametime Connect for browsers client
to attempt a ″Direct connection using standard Sametime protocol″ to the
Sametime server named sametime.ibm.com on port 1533 by default when the client
loads to the user’s web browser.
Chapter 5. Configuring Ports and Network Connectivity 133

The ConnectivityMethod applet parameter can be constructed to enable the
Sametime Connect client to attempt any supported connection type by default. The
syntax of the ConnectivityMethod applet parameter is discussed below. Specific
examples of the ConnectivityMethod applet parameters required to support the
different connection types are also included.
Syntax of the ConnectivityMethod applet parameter
The complete syntax of the ConnectivityMethod applet parameter is shown below.
<PARAM NAME="ConnectivityMethod" VALUE=methodName://serverName:port/proxyType=
type&proxyName=name&proxyPort=port&proxyAuthUser=
username&proxyAuthPwd=password>
When constructing the ConnectivityMethod applet parameter, note that applet
parameter will always begin with this text string:
<PARAM NAME="ConnectivityMethod"
The VALUE= component of the text string determines which connectivity option
the client tries by default. The syntax of the VALUE= component is shown below.
Note that the variables of this component are shown in bold:
VALUE=methodName://serverName:port/proxyType=type&proxyName=
name&proxyPort=port&proxyAuthUser=username&proxyAuthPwd=password
Each of the variable values in this parameter string is discussed below.
v m ethodName - The methodName variable can have any of these values:
– D irectST - This value indicates the client will default to the ″Direct
connection using standard Sametime protocol″ connection type.
– D irectHTTP - This value indicates the client will default to the ″Direct
connection using HTTP protocol″ connection type.
– p roxy - This value indicates the client will default to one of the ″Use proxy″
connection types. The specific proxy type is determined by subsequent values
in the parameter string as discussed below.
Note: For detailed information on each of these connection types, see Basic
Sametime Connect client connection process and Sametime Connect
client connection processes using the Java Plug-in connectivity settings
earlier in this chapter.v S erverName:port - The serverName:port variable specifies the name of the
Sametime server to which the Sametime Connect client connects and the port to
use for the connection. If the Sametime server name is sametime.ibm.com, some
sample values include:
– sametime.ibm.com:1533
– sametime.ibm.com:8082
The port specified must correspond to the port on which the Sametime server
listens for each specific connection type (as determined by the methodName
variable). For detailed information on the default ports used for each of the
connection types, see Basic Sametime Connect client connection process and
Sametime Connect client connection processes using the Java Plug-in
connectivity settings earlier in this chapter.
v T ype - The type variable specifies a specific proxy type and is valid only when
″proxy″ is used as the methodName. The type variable can have any of these
values:
– HTTP
134 Sametime Administrator’s Guide

– HTTPS
– SOCKS4
– SOCKS5
v name - The name variable specifies the DNS name of the proxy server and is
valid only when ″proxy″ is used as the methodName. An example value is
HTTPproxy.ibm.com.
v P ort - The port variable specifies the port on which the proxy server listens for
connections and is valid only when ″proxy″ is used as the methodName. The
value depends on the configuration of the proxy server.
v u sername - The username variable specifies the user name required to
authenticate with the proxy server. This variable is required only when ″proxy″
is used as the methodName and the proxy server requires authentication.
v P assword - The password variable specifies the password associated with the
username required to authenticate with the proxy server. This variable is
required only when ″proxy″ is used as the methodName and the proxy server
requires authentication.
Complete examples of the ConnectivityMethod applet
parameter
Listed below are some complete examples of the ConnectivityMethod applet
parameter that is used to specify a default connectivity configuration for the
Sametime Connect for browsers client. In each of these examples the Sametime
server to which the client must connect is named ″sametime.ibm.com.″
The applet parameter below enables the Sametime Connect for browsers client to
make a direct HTTP connection to a Sametime server on port 8082:
<PARAM NAME="ConnectivityMethod" VALUE="directHTTP://sametime.ibm.com:8082">
The applet parameter below enables the Sametime Connect for browsers client to
make a connection to a Sametime server through an HTTP proxy server named
″HTTPproxy.ibm.com.″ The HTTP proxy server listens for connections on port 8080
and requires authentication. The user name required to authenticate with the proxy
is ″Dawn_Ortiz″ and the password associated with this user name is ″sametime.″
<PARAM NAME="ConnectivityMethod" VALUE="proxy://sametime.ibm.com:8082/proxyType=
HTTP&proxyName=HTTPproxy.ibm.com&proxyPort=
8080&proxyAuthUser=Dawn_Ortiz&proxyAuthPwd=sametime">
The applet parameter below enables the Sametime Connect for browsers client to
make a connection to a Sametime server through SOCKS4 proxy server named
″SOCKS4proxy.ibm.com.″ The SOCKS proxy server listens for connections on port
8080 and does not require authentication.
<PARAM NAME="ConnectivityMethod" VALUE="proxy://sametime.ibm.com:8082/proxyType=
SOCKS4&proxyName=SOCKS4proxy.ibm.com&proxyPort=8080">
The applet parameter below enables the Sametime Connect for browsers client to
make a connection to a Sametime server through SOCKS5 proxy server named
″SOCKS5.ibm.com.″ The SOCKS proxy server listens for connections on port 8080
and requires authentication. The user name required to authenticate with the proxy
is ″Dawn_Ortiz″ and the password associated with this user name is ″sametime.″
<PARAM NAME="ConnectivityMethod" VALUE="proxy://sametime.ibm.com:8082/proxyType=
SOCKS5&proxyName=SOCKS5proxy.ibm.com&proxyPort=
8080&proxyAuthUser=Dawn_Ortiz&proxyAuthPwd=sametime">
Chapter 5. Configuring Ports and Network Connectivity 135

Adding the ConnectivityMethod parameter to the STSrc.nsf
database
To specify the default connectivity setting for the Sametime Connect for browsers
client, you must add the appropriate ConnectivityMethod applet parameter to the
HTML code on the Sametime server.
In a standard Sametime server deployment, this applet code exists in three
subforms of the Sametime Resources (STSrc.nsf) database on the Sametime server.
To ensure the default connectivity settings go into effect for all browser types, you
must add the ConnectivityMethod applet parameter to the HTML code in each of
these three subforms.
v WebConnect-IE (This subform applies to the Microsoft Internet Explorer
browsers.)
v WebConnect-Moz (This subform applies to Mozilla browsers.)
Note: A WebConnect-N4 subform may appear in the STSrc.nsf database, but this
subform applies to the Netscape 4 browsers and is not used with
Sametime 7.0.
To add the applet parameter to the HTML code in these subforms:
1. Use the Domino Designer client to open the STSrc.nsf database on the
Sametime server.
2. In Domino Designer expand the ″Recent Databases″ icon and ensure that the
STSrc.nsf database is selected.
3. Expand ″Resources″ and click ″Subforms.″
4. In the Subforms list, double-click on the WebConnect-IE subform.
5. In the work pane at the top of the Domino Designer client, scroll down until
you see the HTML code containing the applet parameters.
Note: An applet parameter begins with the text string <paramname=.
6. Add the applet parameter to the list of parameters.
Note: Use the information provided in ″Creating the ConnectivityMethod
applet parameter″ above to determine the correct syntax for the applet
parameter.
7. Save the subform.
8. Repeat steps 4 through 7 for the WebConnect-Moz subform.
Example of custom HTML code required to launch the
Sametime Connect for browsers client
Some organizations may choose to create a custom user interface to launch the
Sametime Connect for browsers client. The example below illustrates the applet
code that might be used in a custom HTML page or Domino application to launch
the Sametime Connect for browsers client with a specific default connectivity
configuration. If you create a custom interface for this purpose, ensure the code
includes all necessary parameters as shown below:
<APPLET>
code=com.lotus.sametime.connectapplet.ConnectApplet.class
height=100% name=ConnectApplet
style="BACKGROUND-COLOR: gray; LEFT: 0px; TOP: 0px" width=100% MAYSCRIPT=TRUE>
<PARAM NAME="cabinets" VALUE="connect.cab">
136 Sametime Administrator’s Guide

<PARAM NAME="SametimeServer" VALUE="">
<PARAM NAME="SametimePort" VALUE="">
<PARAM NAME="TokenUserId" VALUE="">
<PARAM NAME="TokenValue" VALUE="">
<PARAM NAME="ConnectivityMethod" VALUE="directHTTP://sametime.ibm.com:8082">
</APPLET>
Note: In the example, the Sametime Connect client will be configured by default to
attempt a ″Direct connection using HTTP protocol″ on port 8082 to a
Sametime server named sametime.ibm.com.
About HTTP tunneling
Many corporate networks restrict all connections to machines outside of the
corporate network with the exception of HTTP connections on port 80.
Sametime provides HTTP tunneling functionality that enables Sametime clients to
make all necessary connections to the Sametime server using HTTP over port 80.
This functionality is especially useful if you deploy a Sametime server for Internet
users or in situations where Sametime users operate behind a firewall and the
Sametime server is not located in the network protected by that firewall (the
Sametime server is external to the firewall).
Sametime supports HTTP tunneling on port 80 when the Sametime server uses
only a single IP address. If you allow HTTP tunneling on port 80 during the
Sametime server installation, you do not need to adjust any connectivity settings in
the Sametime Administration Tool or add IP addresses to the Sametime server
machine to enable the HTTP tunneling on port 80 functionality.
Read the following topics for a better understanding of the HTTP-tunneling
functionality and the administrative settings that control it:
v What is HTTP tunneling on port 80? - Briefly elaborates on the purpose of HTTP
tunneling on port 80 and provides a connection scenario to illustrate its
advantages.
v Configuring HTTP tunneling settings on a server that uses a single IP address -
Discusses the administration settings that control the HTTP tunneling
functionality. This section explains how to change the HTTP-tunneling port on a
server that includes a single IP address.
v HTTP tunneling on port 80 using multiple IP addresses (optional) - If your
Sametime server is used heavily, you can improve server performance by
assigning multiple IP addresses to the Sametime server to support the HTTP
tunneling on port 80 functionality. This section discusses how the administrator
can bind separate host names or IP addresses to the HTTP server and the
Community Services to support HTTP tunneling on port 80. Using multiple IP
addresses lessens the number of connection sockets required to maintain
connectivity and might improve the I/O performance of the server.
What is HTTP tunneling on port 80?
If you have extended a Sametime server to Internet users, the configuration of a
remote client’s firewall might prevent the client from connecting to the Sametime
server.
Chapter 5. Configuring Ports and Network Connectivity 137

For example, to exchange presence and chat data with other clients in a meeting, a
Sametime client connects to the Community Services on a Sametime server using
TCP/IP port 1533 (by default).
Many firewalls allow only HTTP connections on port 80 and will block the
connection attempt that occurs on port 1533. To establish connections in these
environments, Sametime clients can make a Community Services connection using
HTTP tunneling over port 80. Using this tunneled connection, Sametime clients are
able to communicate with the Community Services.
The example connection scenario below illustrates the advantages of the
HTTP-tunneling functionality.
Connection scenario
In this scenario, a user (″Gina″) is operating behind a corporate firewall and
attempting to access a Sametime server that is available to Internet users. Gina’s
firewall allows HTTP connections to the Internet over port 80 but blocks all other
connections.
1. A Sametime Administrator (″Ted″) employed by Instant Messaging
Incorporated in Los Angeles deploys a Sametime server for access by Internet
users.
2. An Internet user in Denver (″Gina″) employed by the Acme corporation, and
unknown to Ted, accesses the Sametime server in Los Angeles with a Web
browser using HTTP over port 80. Gina clicks on the link to load the Sametime
Connect client.
3. The Sametime Connect client loads from the Sametime server to the Web
browser on Gina’s computer.
4. The Sametime Connect client on Gina’s machine attempts to establish a
connection to the Community Services on the Sametime server on the default
TCP/IP port 1533. The Acme corporation’s firewall, which allows outbound
connections only on HTTP port 80, blocks the outbound Sametime connection
on port 1533.
5. To enable the Sametime Connect client to connect in this scenario, Gina can
make the following configuration change in the Sametime Connect client:
a. Select Options-Preferences-Sametime Connectivity
b. In the ″Sametime server″ section of the ″Sametime Connectivity″ tab, change
the ″Port″ value to 80.
c. In the ″Connection″ section of the ″Sametime Connectivity″ tab, change the
″Connection″ type to ″Direct connection using HTTP protocol.″6. This configuration enables Gina’s Sametime Connect client to connect to the
Community Services multiplexer using HTTP over port 80 and exchange
instant message and presence data with the server over this connection.
Note In step 5, Gina can also select either ″Use my Java Plug-in Settings″ or
″Use proxy″ to connect to the Community Services multiplexer using HTTP. For
more information, see Basic Sametime Connect client connection process or
Sametime Connect client connection processes using the Web browser or Java
Plug-in connectivity settings. Note that port 80 must always be specified as the
Sametime server port in the Sametime Connectivity tab to make an HTTP
connection on port 80.
138 Sametime Administrator’s Guide

Configuring HTTP-tunneling settings on a server that uses a
single IP address
This section discusses the settings in the Sametime Administration Tool that control
the HTTP-tunneling functionality and how these settings are used when a
Sametime server uses a single IP address.
If the administrator allows HTTP tunneling on port 80 during the Sametime server
installation, the Community Services multiplexer handles all HTTP-tunneled
connections, including connections to the Community Services, Meeting Services,
and Broadcast Services. The ability of the Community Services multiplexer to
handle HTTP connections for three different services on a single port enables the
Sametime server to support HTTP tunneling on port 80 when the server uses a
single IP address.
To illustrate how the settings in the Sametime Administration Tool affect the
connectivity, three examples are provided. The three examples assume you have
installed Sametime on a machine that uses a single IP address. These examples
illustrate how to:
v Allow HTTP tunneling on port 80 after the server installation
v Change the HTTP-tunneling port from port 80 to a different port
v Make HTTP-tunneled connections to individual services instead of the
Community Services multiplexer
Allowing HTTP tunneling on port 80 after the server installation
If your Sametime server uses a single IP address and you did not allow HTTP
tunneling on port 80 during the Sametime server installation, follow the example
below to enable HTTP tunneling on port 80.
1. Open the Sametime Administration Tool.
2. Select Configuration-Connectivity-″Networks and Ports.″
3. In the ″Community Services Network-Address for HTTP tunneled client
connections″ settings:
v If your Sametime server operates on a Windows server, you can leave the
″Host name″ field blank.
If your Sametime server operates on an IBM i5/OS server, you must specify
the fully-qualified host name of the Sametime server in the ″Host name″
field.
v In the ″Port number″ field, delete port 1533 and enter port 80.4. Change the HTTP port used by the Domino server to a port other than port 80
(for example 8088). The Community Services multiplexer will handle Web
browser HTTP requests and forward them to the Domino HTTP server on the
specified port. For more information, see HTTP Services settings.
5. Click Update and restart the server for the change to take effect.
Changing the HTTP-tunneling port
If your Sametime server uses a single IP address and you want to change the
HTTP-tunneling port from port 80 to a different port, follow the procedure below.
The example below assumes you are changing the HTTP tunneling port from port
80 to port 85.
1. Open the Sametime Administration Tool.
2. Select Configuration-Connectivity-″Networks and Ports.″
3. In the ″Community Services Network-Address for HTTP tunneled client
connections″ settings:
Chapter 5. Configuring Ports and Network Connectivity 139

v Leave the ″Host name″ field blank. This setting is only used if the Sametime
server machine uses multiple IP addresses or host names. For more
information, see Configuring HTTP tunneling on a machine that uses
multiple IP addresses.
v In the ″Port number″ field, delete port 80 and enter port 85.4. Click Update and restart the server for the change to take effect.
For Sametime Connect client connectivity, note the following:
v The Sametime Connect client attempts (or does not attempt) HTTP-tunneled
connections based on the Sametime Connectivity settings in the Sametime
Connect client. You cannot enable or disable HTTP-tunneling functionality for
the Sametime Connect client from the Configuration-Connectivity-″Networks
and Ports″ tab of the Sametime Administration Tool.
v The ″Community Port″ setting in the Sametime Connect client must match the
port setting in the Community Services Network settings on the Sametime
server for the connection to be successful.
For more information, see:
– Basic Sametime Connect client connection process
– Sametime Connect client connection processes using the Java Plug-in
connectivity settings
Configuring HTTP tunneling on a server that uses multiple IP
addresses
Assigning multiple IP addresses to support HTTP tunneling on port 80 is an
optional procedure the administrator can perform to improve the I/O performance
of the Sametime server. Lotus software recommends this approach if a large
number of users connect to your Sametime server using HTTP tunneling over port
80.
The administrator has the option of assigning separate IP addresses to the
Sametime HTTP server and the Community Services. In this configuration, the
HTTP server and Community Services are bound to separate IP addresses and
each service listens as a separate entity for HTTP connections on port 80. This
configuration might result in more efficient I/O performance on the server but
requires the administrator to perform the configuration procedures described
below.
Configuration procedures required
To assign multiple IP addresses to support HTTP tunneling on port 80, the
administrator must perform the procedures listed below. Each procedure is
described separately.
1. Use the Sametime Administration Tool to bind the base DNS name for the
Sametime server to the Sametime HTTP server.
2. Add a new IP address to the Sametime server machine.
3. Set up your DNS server to map the new IP address to the required DNS
names.
4. Configure the HTTP-tunneling settings in the Sametime Administration Tool.
Bind the base DNS name for the Sametime server to the
Sametime HTTP server
This procedure is the first of four required when using multiple IP addresses to
support HTTP tunneling over port 80.
140 Sametime Administrator’s Guide

In this procedure, you use the Sametime Administration Tool to bind the Sametime
HTTP server to the base DNS name currently used for the Sametime server. Before
performing this procedure, ensure that your DNS server already has one DNS
name mapped to the IP address of the Sametime server machine (for example,
www.sametime1.com). To bind the base DNS name for the Sametime server to the
Sametime HTTP server:
1. From the Sametime server home page, select ″Administer the server″ to open
the Sametime Administration Tool.
2. Select Configuration.
3. Select Connectivity.
4. Select ″Networks and Ports..″
5. Select ″Configure HTTP services on a Web page in its own window.″ The HTTP
section of the Server document in the Domino Directory opens and displays in
a separate window on the computer.
6. Under the Basics heading in the ″Host name″ field, enter the base DNS name
for the Sametime HTTP server (for example, www.sametime1.com).
In the ″Host name″ field, also enter 127.0.0.1. This entry is required for the
Sametime Administration Tool to operate in this configuration. Place a comma
between the DNS name of the HTTP server and the 127.0.0.1 entry (for
example: www.sametime1.com, 127.0.0.1).
7. In the ″Bind to Host name″ field, select Enabled.
8. Click ″Save & Close.″ (This button is located at the top of the Server
document.) When the document closes, the Server - Servers view of the
Domino Directory displays in the window.
9. Close the window displaying the Server - Servers view of the Domino
Directory.
Next, Add a new IP address to the Sametime server machine.
Add a new IP address to the Sametime server machine
This procedure is the second of four required when using multiple IP addresses to
support HTTP-tunneling over port 80.
To ensure that the HTTP server and the Community Services each has its own IP
address, the Sametime server machine requires two IP addresses. One IP address
was mapped to the base DNS name in the previous procedure. You must add an
additional IP address to the Sametime server for the Community Services.
To add an additional IP address to the Sametime server, you can either add an
additional Network Interface Card (NIC) to the Sametime server machine or assign
an additional IP address to a single NIC.
Adding additional NICs: You can add a new NIC card for the Community
Services and assign an IP address to the new NIC. The computer’s I/O might
operate more efficiently if you add a separate NIC for the Community Services.
Assigning multiple IP addresses to a single NIC: To assign multiple IP addresses
to a single NIC on a Windows machine:
1. On the Windows desktop, right-click on ″My Network Places″ and select
″Properties.″
2. Right click on the ″Local Area Connection″ icon to which you would add the IP
address. Select Properties.
Chapter 5. Configuring Ports and Network Connectivity 141
3. In the ″Local Area Connection Properties″ dialog ensure the ″General″ tab is
selected.
v In the ″This connection uses the following items:″ area, select ″Internet
Protocol (TCP/IP).″
v Select the ″Properties″ button.4. In the ″Internet Protocol (TCP/IP) Properties″ dialog box, select ″Use the
following IP address″ and enter the primary (currently assigned) IP address of
the system in the ″IP address:″ field.
5. Click the ″Advanced″ button in the lower-right corner of the ″Internet Protocol
(TCP/IP) Properties″ dialog box.
6. In the ″Advanced TCP/IP Settings″ dialog ensure the ″IP Settings″ tab is
selected.
7. In the ″IP Settings″ section of the ″IP Settings″ tab, click the Add button.
8. In the ″TCP/IP Address″ dialog, enter the IP address and Subnet mask settings
and click Add.
9. At this point, the new IP address is added. If necessary, use the ″Default
gateways″ section of the ″Advanced TCP/IP Settings″ dialog to add a new
gateway for the system.
Next, set up your DNS server to map the IP addresses to required DNS names.
Set up your DNS server to map the IP addresses to required DNS
names
This procedure is the third of four required when using multiple IP addresses to
support HTTP-tunneling over port 80.
After you have added a new IP address to the Sametime server machine, set up
your DNS server to map the new IP address to the following DNS names, where
xxx.xxx.xxx is the base DNS name that is bound to the Sametime HTTP server:
community-xxx.xxx.xxx
For example, if the base DNS name to which you have bound the Sametime HTTP
server is www.sametime1.com, map the new IP address to the following name:
community-www.sametime1.com
The Community Server prepends ″community-″ to the base DNS name of the
server to provide the Community Server with a unique DNS name. The
Community Server multiplexer listens on port 80 for connections to the
Community Services on this name. This name is passed from the server to the
client when the client attends a meeting.
Next, configure the HTTP tunneling settings in the Sametime Administration Tool.
Configure the HTTP-tunneling settings in the Sametime
Administration Tool
This procedure is the last of four required when using multiple IP addresses to
support HTTP tunneling over port 80.
In this procedure, you use the Sametime Administration Tool to bind the
Community Services to the new IP address assigned in the previous procedure.
1. From the Sametime server home page, select ″Administer the server″ to open
the Sametime Administration Tool.
142 Sametime Administrator’s Guide

2. Select Configuration.
3. Select Connectivity.
4. Select ″Networks and Ports..″
5. In the Community Services Network settings, make the following settings:
v In the ″Address for HTTP tunneled client connections-Host name″ setting,
enter the Community Services DNS name that you mapped to an IP address
in the previous procedure. The Community Services DNS name has the
format community-xxx.xxx.xxx, where xxx.xxx.xxx is the DNS name that is
bound to the HTTP server (for example, community-www.sametime1.com).
v In the ″Address for HTTP tunneled client connections-Port number″ setting,
enter 80 if it is not already listed.6. Click update and restart the Sametime server for the changes to take effect.
Additional configuration required for Sametime on IBM i5/OS servers: When
configuring a Sametime server to use multiple IP addresses to support HTTP
tunneling over port 80 on an IBM i5/OS server, you must perform this additional
configuration:
v In the Community Services Network settings of the Sametime Administration
Tool, you must also enter the Community Services DNS name in the ″Address
for Client Connections-Host Name″ field. Following the examples provided
above, you must enter community-www.sametime1.com in the ″Address for
Client Connections-Host Name″ field.
v Each Sametime Connect client user must have the client configured to connect to
the Community Services DNS name (for example, community-www.sametime1.com).
Notes about client connection processes using HTTP
tunneling on port 80
Administrators should be aware of the following issues concerning clients that
connect to the Sametime server using HTTP-tunneled connections. These issues
apply regardless of whether the server uses a single IP address or multiple IP
addresses to support the HTTP-tunneling functionality.
v Clients that do not operate behind restrictive firewalls can still make direct
TCP/IP connections to the Community Services using the Community Services
Network-Address for client connections-Port number (default 1533). For more
information on client connection processes, see Basic Sametime Connect client
connection process or Sametime Connect client connection processes using the
Java Plug-in connectivity settings.
v A Sametime Connect client that operates behind a firewall that only allows
outbound connections on port 80 can connect to the Community Services using
HTTP over port 80. The following configurations are required in the Sametime
Connect client Sametime Connectivity settings for the connection to succeed:
– Change the ″Community port″ setting to port 80.
– If the client does not access the Internet through an HTTP proxy, select
″Direct connection using HTTP protocol″ for the Connection type.
– If the client accesses the Internet through an HTTP proxy server, select ″Use
proxy″ as the Connection type. For proxy type, select ″Use HTTP proxy″ and
specify the DNS name or IP address of the HTTP proxy and the port on
which to connect to the proxy.
Note: You can also select ″Use my Java Plug-in settings″ to establish
connections to the Community Services through HTTP tunneling on
Chapter 5. Configuring Ports and Network Connectivity 143
port 80. If you select this settings, you must also ensure that the
″Community port″ setting in the Sametime Connectivity settings is set
to port 80. For more information, see Sametime Connect client
connection processes using the Java Plug-in connectivity settings.
Assigning IP addresses to multiple Sametime servers installed on a
single server machine
If you are operating Sametime on an IBM i5/OS server, you can install multiple
Sametime servers on a single server machine, within the same logical partition. In
this scenario, each Sametime server instance runs on a separate partitioned
Domino server.
Note: Do not install multiple Sametime servers on a Windows NT or Windows
2000 server. You can install only one Sametime server on each Windows
server.
When multiple Sametime servers are running on separate Domino partitions
within the same logical partition of an IBM i5/OS server, it is important for each
Sametime server to be assigned a separate IP address. Assigning separate IP
addresses ensures that a Sametime Connect client can connect to a specific
Sametime server running on the IBM i5/OS server. If you are also running any
other Domino servers or HTTP servers within the same logical partition, you must
also be certain that those servers are assigned a separate IP address to avoid port
conflicts.
For detailed instructions on properly preparing your IBM i5/OS TCP/IP
environment for Sametime and configuring multiple Sametime servers within the
same logical partition, see the Installation Guide (stinstall.nsf or stinstall.pdf) that
was shipped with Sametime for IBM i5/OS.
Connecting to other Sametime servers
If you install multiple Sametime servers, the services of the Sametime servers must
establish connections with each other to ensure that users with different home
Sametime servers have presence and chat capabilities with all users in the
community.
For more information about working with multiple servers and server-to-server
connections, see:
v Advantages of using multiple Sametime servers
v Configuring ports for server-to-server connections
Extending a Sametime server to the Internet
Many organizations need to conduct Sametime meetings that can be attended both
by users on the corporate intranet and users from the Internet.
Because of the number and complexity of connections that can be required to
connect to a Sametime server, it might be unacceptable for many organizations to
open ports through the firewall to enable Internet clients to connect to a Sametime
server on the corporate intranet.
The recommended solution for extending Sametime meetings to Internet users
involves a multiple Sametime server deployment. This solution enables users on
144 Sametime Administrator’s Guide

the corporate intranet and users from the Internet to attend the same Sametime
meetings without jeopardizing the security of the corporate intranet. This solution
requires you to:
v Install a Sametime server on the corporate intranet.
v Install a Sametime server in the network DMZ.
v Connect the two Sametime servers.
v Configure the firewalls to enable the servers and clients to establish the
appropriate connections with the servers.
For more information, see Extending Sametime to Internet users.
Using reverse proxy or portal servers with the Sametime server
A Sametime 7.0 server can be deployed behind a reverse proxy server or a portal
server. This section discusses issues related to using reverse HTTP proxy servers
with a Sametime server. The issues discussed in this section also apply to
deploying a Sametime server behind a portal server.
When a Sametime 7.0 server is deployed on an internal network behind a reverse
proxy server, the reverse proxy server operates as an intermediary between the
Sametime server and the Sametime clients. All Sametime data flowing between the
Sametime server and its clients passes through the reverse proxy server.
To accomplish its security objectives, a reverse proxy server manipulates the data
that passes through it. The manipulation of Sametime data by the reverse proxy
server imposes specific requirements and limitations on the use of reverse proxy
servers with the Sametime server.
This section includes the following topics related to the use of reverse HTTP proxy
servers with the Sametime server:
v What is a reverse proxy server?
v Requirements and limitations associated with using a reverse proxy server with
the Sametime server
v Configuring mapping rules on a reverse proxy server
v Configuring a Sametime server to operate with a reverse proxy server
v Sametime client connectivity and reverse proxy servers
Note: If you are configuring the Sametime 7.0 server to operate behind a Tivoli
Access Manager WebSEAL reverse proxy server, refer to the Lotus Sametime
Server 7.0 Release Notes for additional configuration information.
What is a reverse proxy server?
A reverse proxy server is a security device that is usually deployed in a network
DMZ to protect HTTP servers (or Sametime servers) on a corporate intranet. The
reverse proxy server performs security functions that protect the internal servers
from attacks by users on the Internet.
The reverse proxy server protects internal HTTP servers by providing a single
point of access to the internal network. Providing a single point of access to all
HTTP servers on an internal network offers these specific security advantages and
network access characteristics:
v The administrator can use the authentication and access control features of the
reverse proxy server to control who can access the internal servers and control
Chapter 5. Configuring Ports and Network Connectivity 145

which servers each individual user can access. When a reverse proxy is
deployed, the authentication process and access rights to multiple internal
servers can be controlled from a single machine, which simplifies the security
configuration.
v All traffic to your intranet servers appears to be destined for a single network
address (the address of the reverse proxy server).
When a reverse proxy server is deployed, only URLs that are associated with the
reverse proxy server are made public to Web browser users. Users from the
Internet use these URLs to access the reverse proxy server. The reverse proxy
server handles these requests from Internet users and redirects these requests to
the appropriate internal HTTP server.
The administrator performs URL mapping configurations on the reverse proxy
server that make this redirection possible. When configuring the reverse proxy
server, the administrator maps the URLs that are used to access the reverse
proxy server to the real URLs of the internal HTTP servers. When an Internet
user sends a URL to the reverse proxy server, the reverse proxy server examines
the URL and uses these mapping configurations (or rules) to rewrite the URL.
The reverse proxy server rewrites the URL by replacing the server address
provided by the Internet user (a reverse proxy address) with the real address of
the internal server. The HTTP request is then sent on the internal network from
the reverse proxy server to the internal server.
v All traffic sent to Internet users from your internal servers appears to originate
from a single network address.
When an internal HTTP server (or Sametime server) responds to a request from
an Internet user, the internal server sends the response to the reverse proxy
server and the reverse proxy server sends the response to the Internet user. The
response sent on the Internet to the Internet user contains the address of the
reverse proxy server, not the address of the internal HTTP server.
Unlike previous Sametime releases, Sametime 7.0 is designed to enable Sametime
clients to establish and maintain connectivity with a Sametime server when these
clients connect to the Sametime server through a reverse proxy server.
The security functionality of reverse proxy servers described above imposes
specific requirements and limitations on the use of reverse proxy servers with
Sametime. See any of the following topics for specific information about using
reverse proxy servers with a Sametime server.
v Requirements and limitations associated with using a reverse proxy server with
the Sametime server
v Configuring mapping rules on a reverse proxy server to support Sametime
v Configuring a Sametime server to operate with a reverse proxy server
v Sametime client connectivity and reverse proxy servers
Requirements and limitations of Sametime 7.0 reverse proxy
support
The requirements and limitations associated with using a reverse proxy server with
Sametime include:
v Reverse proxy server requirements
v Sametime client limitations and requirements
v Sametime server limitations
v Secure Sockets Layer (SSL) issues and requirements
146 Sametime Administrator’s Guide

v Client certificate authentication issues
v Lotus Enterprise Meeting Server (EMS) restrictions
Each of these topics is discussed under a separate heading below.
Reverse proxy server requirements
This section lists the requirements and issues that are specific to the reverse proxy
server.
v URL specification requirement (affinity-id requirement) - Only reverse proxy
servers that use the following URL specification to access protected internal
servers can be used with Sametime:
Http[s]://hostname:port/affinity-id/
The ″affinity-id″ is an administrator-defined alias for an internal Sametime
server. This affinity-id must be present in the URLs sent from Web browsers to
the reverse proxy server to enable Web browser users to access the Sametime
server through the reverse proxy. For detailed information on this mandatory
requirement of the reverse proxy server, see Configuring mapping rules on a
reverse proxy server.
v Multiple reverse proxy servers must use the same DNS name and mapping
configurations - If you have deployed multiple reverse proxy servers in your
network environment, and you expect users to access your Sametime server(s)
through multiple reverse proxy servers, each of the reverse proxy servers must
have the same DNS name and the same mapping configurations as noted below:
– DNS name - All reverse proxy servers must use the same DNS name. For
example, if one reverse proxy server is named reverseproxy.ibm.com all other
reverse proxy servers must be named reverseproxy.ibm.com. If the reverse
proxy servers have different DNS names, the Sametime clients will be unable
to maintain communications with a Sametime server deployed behind the
reverse proxy servers.
Note If a network environment includes multiple reverse proxy servers that
have the same DNS names, a connection dispatching device (such as an IBM
WebSphere EdgeServer) is usually used to distribute connections from Web
browsers to the multiple reverse proxy servers. These devices are frequently
used to load balance connections to multiple machines.
– Mapping configurations - Each reverse proxy server must use identical
mapping rules and configurations to govern the translation of URLs sent by
Web browsers to the reverse proxy server for the purpose of accessing an
internal Sametime server. If the translation of these URLs to the URLs of the
internal Sametime servers does not occur in exactly the same way on each of
the reverse proxy servers, the Sametime clients will be unable to maintain
communications with a Sametime server deployed behind the reverse proxy
server.
Note Each Sametime server must be represented by the same ″affinity-id″ in
the mapping rules on each of the reverse proxy servers.
For more information about the affinity-id and mapping rules, see
Configuring mapping rules on a reverse proxy server.v The reverse proxy server must use cookies for authentication - When an end
user uses a Web browser to access and authenticate with the reverse proxy
server, the reverse proxy server must send an authentication cookie to the Web
browser. All subsequent HTTP requests from a Sametime client will then pick up
this cookie and use it for automatic authentication with the reverse proxy server.
Reverse proxy servers that rewrite URLs for authentication purposes are not
supported. Some reverse proxy servers append authentication and session
Chapter 5. Configuring Ports and Network Connectivity 147

information to the end of URLs embedded in HTML that passes through the
proxy back to the client. The client will include this appended data on
subsequent requests to the reverse proxy server. When the reverse proxy server
receives these subsequent requests from the client, the reverse proxy server
strips the authentication data and rewrites the URL to accomplish the internal
routing of requests. A Sametime server cannot operate behind a reverse proxy
server that handles authentication data in this way.
v A lengthy timeout value should be specified for the authentication cookies -
The administrator should specify a lengthy timeout value for authentication
cookies generated by the reverse proxy server.
If the authentication cookie expires when the user is attending a meeting, the
user is disconnected from the meeting. To re-enter the meeting, the user must go
through the inconvenient process of reconnecting to the reverse proxy,
reauthenticating with the reverse proxy, and waiting for the Java applets to be
reloaded to the Web browser.
Setting a lengthy timeout value for authentication cookies can prevent
unexpected user disconnections due to an authentication cookie expiration.
Generally, the authentication cookie should be valid for the entire length of the
longest meetings that are routinely conducted on the Sametime server deployed
behind the reverse proxy server.
Sametime client/Web browser limitations and JVM requirements
The Sametime Connect for browsers client and Sametime Links applications can
communicate with a Sametime server through a reverse proxy server when
running in an Internet Explorer 6 or Netscape 7 browser that operates with the Sun
Microsystems JVM 1.4.2. These clients may not function appropriately with other
JVMs, including the native Microsoft VM provided for Internet Explorer.
Sametime server administration tool limitation
A user that connects to the Sametime server through a reverse proxy server cannot
access the Sametime Administration Tool. The user can open a Web browser that is
installed on the Sametime server to access the Sametime Administration Tool. The
user can also connect to the Sametime server from an internal network location
that does not route HTTP traffic through the reverse proxy server to access the
Sametime Administration Tool.
Secure Sockets Layer (SSL) issues and requirements
Note the following about SSL and Sametime in a reverse proxy environment:
v Secure Sockets Layer (SSL) can be used to encrypt data transmitted between the
Sametime clients and the reverse proxy server.
v SSL cannot be used to encrypt data transmitted between the Sametime servers
and the reverse proxy server.
If SSL is used to encrypt data transmitted between Web browsers and the reverse
proxy server, the administrator must perform the mapping configurations on the
Sametime server necessary to map the HTTPS data received from the Web browser
to the HTTP data required by the Sametime server.
The reverse proxy must also be configured to translate the HTTP data received
from the Sametime server to the HTTPS data required by the client.
When a reverse proxy server is configured to support SSL, the reverse proxy server
sends an SSL server certificate to the Web browser during the SSL connection
handshake. The Java 1.4.2 Plug-in used by the Web browser must have access to a
148 Sametime Administrator’s Guide

Signer certificate that is signed by the same Certificate Authority (CA) as the server
certificate that is sent by the reverse proxy.
By default, the Java Plug-in has access to several different Signer certificates that
can be used for this purpose. To view the Signer certificates that are available to
the Java Plug-in 1.4.2, use the Java Plug-in Control Panel as noted below:
1. From the Windows desktop, open the Control Panel (Select
Start-Settings-Control Panel).
2. Double-click on the Java Plug-in 1.4.2 icon to open the Java Plug-in Control
Panel.
3. Click the Certificates tab.
4. Select the Signer CA radio button.
The server certificate sent by the reverse proxy server to the client Web browser
must be signed by one of the CAs that appears in the signer CA list for the SSL
connection handshake to succeed.
Client certificate authentication issues
If the reverse proxy server is configured to require client certificate authentication,
the client certificate for an individual user must be imported into the Java Plug-in
1.4.2 Control Panel on that user’s machine. You can use the Certificates tab of the
Java Plug-in Control Panel to import the client certificate into the Java Plug-in key
store. For example:
1. From the Windows desktop on a user’s machine, open the Control Panel (Select
Start-Settings-Control Panel).
2. Double-click on the Java Plug-in 1.4.2 icon to open the Java Plug-in Control
Panel.
3. Click the Certificates tab.
4. In the Certificates column, select ″Secure Site.″
5. Click the Import button to import the client certificate.
Configuring mapping rules on a reverse proxy server to
support Sametime
When a Sametime server is deployed behind a reverse proxy server, the
administrator must configure mapping rules on the reverse proxy server. These
mapping rules enable the reverse proxy server to translate (or rewrite) a URL
associated with the reverse proxy server to the URL of an internal Sametime server.
This section discusses how mapping rules are configured on a reverse proxy server
to accomplish the translation (or rewriting) of URLs when the reverse proxy
operates with Sametime. This section includes the following topics:
v Affinity-id (server alias) requirement of the reverse proxy server
v Example of URL mapping configurations on the reverse proxy server
Affinity-id (server alias) requirement of the reverse proxy server
Only reverse proxy servers that support the use of an affinity-id (or server alias) in
the URLs that are associated with internal servers can be used with Sametime.
Specifically, the reverse proxy server must support this URL specification to access
protected internal servers:
Http[s]://hostname:port/affinity-id/
Chapter 5. Configuring Ports and Network Connectivity 149

In this example, the ″hostname″ represents the DNS name of the reverse proxy
server and the affinity-id is an alias for an internal server that is protected by the
reverse proxy server. A specific example of this URL format is:
Http[s]://reverseproxy.ibm.com/st01/stcenter.nsf
In the example above, the text sting ″st01″ is the affinity-id. The affinity-id is an
alias for a specific Sametime server (such as sametime.ibm.com) that is protected
by the reverse proxy server. The affinity-id is used by the reverse proxy server to
direct incoming requests to the specific internal Sametime server.
For example, if the incoming URL from the Web browser is:
Http[s]://reverseproxy.ibm.com/st01/stcenter.nsf
And the mapping rules on the reverse proxy server map the ″st01″ affinity-id to
the Sametime server named ″sametime.ibm.com,″ the affinity-id ensures the reverse
proxy server rewrites the incoming URL to:
Http[s]://sametime.ibm.com/stcenter.nsf
Essentially, the affinity-id is an administrator-defined alias for an internal Sametime
server. The affinity-id is defined in the mapping rules of the reverse proxy server.
If you have multiple Sametime servers deployed behind a reverse proxy server,
each Sametime server must have an individual affinity-id as indicated below:
Mapping rule for client-provided URL: Routed to internal server:
/st01/* http://sametime1.ibm.com/*
/st02/* http://sametime2.ibm.com/*
It is mandatory that any reverse proxy server that operates with a Sametime server
support the affinity-id (or server alias) in URLs.
For additional information about configuring mapping rules on reverse proxy
server, see Example of URL mapping configurations on the reverse proxy server
below.
Important: The Sametime Administration Tool on a Sametime server contains a
″Server Alias″ setting. This Server Alias setting must specify the same affinity-id
that is used to represent the Sametime server in the mapping rules on the reverse
proxy server. For more information, see Configuring a Sametime server to operate
with a reverse proxy server.
Example of URL mapping configurations on the reverse proxy
server
This section provides basic examples of how an administrator might configure
URL mapping configurations for a reverse proxy server deployed in front of a
Sametime server.
When a user connects to a Sametime server through a reverse proxy server, the
reverse proxy server must be configured to support the following actions that
enable Sametime users to participate in chat sessions:
v The user must be able to click on a link in the Sametime server home page to
load the Sametime Connect client. This capability requires the reverse proxy
server to rewrite the URL of the HTML pages that comprise the Sametime UI.
v The Sametime Connect client must be able to connect to the Community Services
on the Sametime server. Since this connection must occur through the reverse
150 Sametime Administrator’s Guide

proxy server, the reverse proxy server must also be able to rewrite the URLs
required to establish this connection to the Community Services.
The following sections provide examples of the mapping configurations required to
accomplish the two tasks above.
Reverse proxy mapping configurations that enable a Web browser user to
navigate the Sametime user interface: The example below illustrates how an
administrator can configure the reverse proxy server to enable users to access the
Sametime server home page. This example assumes the following:
v The Sametime server name is ″sametime.ibm.com.″
v The URL required to access the reverse proxy server is ″reverseproxy.ibm.com.″
v The affinity-id chosen by the administrator for the Sametime server is ″st01.″
v The Sametime server URL for the server home page is
http://sametime.ibm.com/stcenter.nsf
Translating the URL of the server home page: To access the Sametime server
home page through a reverse proxy server, the Web browser would send the
following URL to the reverse proxy server:
http[s]://reverseproxy.ibm.com/st01/stcenter.nsf
The reverse proxy server must contain a mapping rule that translates this URL into
the following URL required to access the Sametime server home page:
http[s]://sametime.ibm.com/stcenter.nsf
A single mapping rule can be used to translate the URL associated with the
Sametime server user interface: Through the use of wildcards, the administrator
can create a single mapping rule on the reverse proxy server to translate the URL
associated with the Sametime server interface. Following the example above, the
administrator can create a mapping rule that translates the following URL from the
Web browser:
Http[s]://reverseproxy.ibm.com/st01/*
To this Sametime server URL:
Http[s]://sametime.ibm.com/*
A single mapping rule that accomplishes this type of URL translation should
enable users to access the server home page and load the Sametime Connect client
when connecting to the Sametime server through the reverse proxy server.
Note: It is not mandatory to configure the mapping rules as described above. The
actual configuration of the mapping rules on the reverse proxy server is at
the discretion of the administrator. When configuring the mapping rules
note that the URL for any entity of the Sametime server user interface will
begin with the Sametime server name (sametime.ibm.com in this example).
Reverse proxy mapping configurations that enable Sametime Connect client
connectivity through the reverse proxy server: The following example URL
mapping enables the Sametime Connect client running in a user’s Web browser to
connect to the Community Services on the Sametime server through the reverse
proxy server:
If the incoming URLs from the Sametime Connect client are:
Http[s]://proxy.ibm.com/st01/communityCBR/
Http[s]://proxy.ibm.com/st01/CommunityCBR/
Chapter 5. Configuring Ports and Network Connectivity 151
The mapping rules on the reverse proxy must translate these URLs to:
http://sametime.ibm.com:8082/communityCBR
Http://sametime.ibm.com:8082/CommunityCBR
Notes about the Sametime Connect client mapping rules: You should be aware
of the following regarding the mapping rules:
v The mapping configuration for the Community Services connectivity should
contain two case-sensitive mapping rules as indicated above. Some pieces of the
Java code contain the lowercase ″c″ in ″communityCBR″ and some pieces of the
Java code use the uppercase ″C″ in ″CommunityCBR.″ This difference may
prevent connections if the proxy is case-sensitive.
v The port value used for the translated URLs must match a port that is specified
in the Community Services Network - Address for HTTP-tunneled client
connections option in the Networks and Ports tab of the Sametime
Administration Tool. The examples above assume that port 8082 is specified as
the Community Services HTTP Tunneling port.
If you allow HTTP tunneling on port 80, make sure that port 80 is used in the
translated URLs. For example:
http://sametime.ibm.com:80/communityCBR
Http://sametime.ibm.com:80/CommunityCBR
Note that server performance is not as efficient when the Sametime server is
configured to support HTTP tunneling on port 80 because of the connectivity
burden placed on the Community Services multiplexer. For more information, see
About HTTP tunneling.
Configuring a Sametime server to operate with a reverse
proxy server
The administrator must use the Sametime Administration Tool on the Sametime
server to configure the Sametime server to operate with a reverse proxy server.
There are two settings the administrator must configure in the
Configuration-Connectivity-Networks and Ports tab of the Sametime
Administration Tool to enable a Sametime server to operate with a reverse proxy
server. These settings include:
v Enable Reverse Proxy Discovery on the client - Selecting this setting allows the
administrator to enable or disable the reverse proxy support. This setting enables
the logic in the Sametime clients that enables them to connect to a Sametime
server through the reverse proxy server. This setting is disabled by default.
Note: Enabling this setting does not require that all users on your corporate
intranet access the Sametime server through the reverse proxy server.
Users on your corporate intranet that are not required to route
connections through the reverse proxy servers can still establish
connections with the Sametime server using the standard Sametime client
connection processes. For more information, see Connecting to a
Sametime server without going through the reverse proxy server.
v Server Alias - The Server Alias setting must specify the affinity-id that the
administrator uses to represent this Sametime server in the mapping rules on the
reverse proxy server.
Note: The term ″Server Alias″ is synonymous with affinity-id.
152 Sametime Administrator’s Guide

For example, if the administrator uses the text string ″st01″ as the affinity-id that
represents the Sametime server in the mapping rules on the reverse proxy server,
the administrator must also enter ″st01″ as the value for the Server Alias setting
in the Sametime Administration Tool.
Following a Sametime server installation, the Server Alias setting defaults to the
Sametime server name that is extracted from the fully-qualified DNS name of
the Sametime server. For example, if the fully-qualified DNS name of the
Sametime server is ″sametime.ibm.com,″ the default value for the Server Alias is
″sametime.″
Note: An administrator may want to change the default Server Alias setting to
avoid using the real Sametime server name as the affinity-id in the
mapping rules on the reverse proxy server. If the real Sametime server
name is used as the affinity-id on the reverse proxy server, the real server
name will appear in URLs transmitted on the Internet.
For more information about the affinity-id, see Configuring mapping rules on a
reverse proxy server to support Sametime.
Enabling reverse proxy support on a Sametime server
To enable reverse proxy support on a Sametime server:
1. From the Sametime server home page, click the ″Administer the Server″ link to
open the Sametime Administration Tool.
2. Choose Configuration.
3. Choose Connectivity.
4. If necessary, select the Networks and Ports tab.
5. At the bottom of the Networks and Ports tab, select ″Enable Reverse Proxy
Discovery on the client.″
6. In the ″Server Alias″ text box, type the text string that is used as the affinity-id
that represents this Sametime server in the mapping configurations on the
reverse proxy server (for example, type st01).
7. Click Update and restart the Sametime server for the changes to take effect.
Sametime client connectivity and reverse proxy servers
This section briefly discusses connectivity issues when the Sametime Connect client
operates through a reverse proxy server.
These connectivity issues are discussed in the following topics:
v Connecting to the Sametime server without using the reverse proxy server
v Notes about Sametime client connectivity through a reverse proxy server
Connecting to a Sametime server without using the reverse
proxy server
When a Sametime server is configured to operate with a reverse proxy server,
users on the corporate intranet that are not required to route connections through
the reverse proxy server can still connect to the Sametime server using the
standard Sametime client connection processes.
Note: In this scenario, both intranet and Internet users connect to the same
Sametime server. Connections from Internet users are routed through the
reverse proxy server while connections from intranet users are not routed
through the reverse proxy server.
Chapter 5. Configuring Ports and Network Connectivity 153

To configure a Sametime server to operate with a reverse proxy server, the
administrator must select the ″Enable Reverse Proxy Discovery on the client″
setting in the Sametime Administration Tool. Selecting this setting:
v Enables the additional logic in the client that is needed to connect to a Sametime
server through a reverse proxy server.
v Does not disable the existing connectivity logic in these Sametime clients.
Enabling the ″Enable Reverse Proxy Discovery on the client″ setting enhances
the existing logic in the Sametime clients by adding the reverse proxy connection
logic to the existing logic. The existing logic is still present and operable within
the clients. This design enables clients that do not connect to the Sametime
server through the reverse proxy server to follow the standard Sametime client
connection processes when connecting to the Sametime server.
Notes about Sametime client connectivity through a reverse
proxy server
This section provides additional notes about Sametime client connectivity through
a reverse proxy server.
v Generally, there are no client-side configurations required to enable a Sametime
Connect client to connect to a Sametime server through a reverse proxy server.
If the administrator has selected the ″Enable reverse proxy discovery on client″
setting and specified the ″Affinity ID″ setting in the Sametime Administration
Tool on the Sametime server, the Sametime clients should be able to
programmatically detect the presence of the reverse proxy server and connect to
the Sametime server through the reverse proxy server.
v If the client must connect to the reverse proxy server through a forward (or
client-side) HTTP or SOCKS proxy server, the connectivity settings (address and
port) of the forward proxy server should be specified in the Java Plug-in Control
Panel available from the user’s Windows Control Panel.
v The Sametime Connect client loads in the user’s Web browser with the ″Use my
Java Plug-in settings″ option selected by default in the Options-Preferences-Sametime Connectivity tab. User’s should not change this default setting when
operating with a reverse proxy server. These connectivity settings ensure the
client will make either a direct connection to the Sametime server or connect
through a forward proxy server if one is defined in the Java Plug-in as noted
above.
v The Sametime Connect client includes a ″Host name″ and ″Port″ setting in the
Options-Preferences-Sametime Connectivity tab. The values in these settings are
ignored when the Sametime server is configured to operate with a reverse proxy
server. (In a normal Sametime deployment, these settings specify the Host name
of the Sametime server to which the client should connect and the port number
on which the Sametime server listens for connections from Sametime Connect
clients).
154 Sametime Administrator’s Guide

Chapter 6. Configuring the Community Services
This chapter describes the Community Services administration settings and
features.
The Community Services administration settings:
v Control the number of user names that appear on a page in the ″add to contact
list″ feature in the Sametime Connect client user interface.
v Control the time intervals in which Community Services receive updates from
the Directory to maintain current lists of users and servers in the Sametime
Community.
v Control the maximum number of connections to Community Services.
v Show or hide the link in the IBM Lotus Sametime server user interface that
enable users to load Sametime Connect for browsers.
v Enable or disable the following features in Sametime Connect:
– File transfer (If this feature is enabled, the administrator can set a maximum
file size for transferred files)
– The send announcements feature
– Automatic loginv Force a name entry prompt to appear when the access settings of a database or
application allow anonymous access. This name entry prompt allows each user
to enter a name that is displayed in the presence list. The administrator can also
specify whether anonymous users can search or browse entries in the directory.
v Enable or disable the Sametime server’s ability to accept authentication tokens
generated by the Secrets and Tokens databases. You can disable this feature if all
of the servers in your environment are Sametime 3.0 or higher servers.
This chapter also discusses:
v Enabling the Sametime Connect for browsers client to operate in kiosk mode if
multiple users must access this client from a single Sametime server.
v Deploying a Community Services multiplexer on a separate machine to improve
the performance of the Community Services.
About the Community Services
The IBM Lotus Sametime server Community Services support all presence (or
awareness) and text chat activity in a Sametime community. The Sametime Connect
clients connect to the Community Services on the Sametime server to receive the
instant messaging and presence functionality.
Basic functionality supported by the Community Services includes:
v Handling client login requests.
v Handling connections from clients that access the Sametime server through a
direct TCP/IP connection, or a HTTP, HTTPS, or SOCKS proxy server.
Community Services clients connect to the Community Services multiplexer
component, which can be deployed on a separate machine from the core
Sametime server.
v Providing directory access for user name search and display purposes.
© Copyright IBM Corp. 2005 155

v Providing directory access to compile lists of all Sametime servers and users in
the community.
v Dissemination of presence and chat data to all users connected to Community
Services.
v Maintenance of privacy information for online users.
v Handling connections from the Community Services on other Sametime servers
when multiple servers are installed. Server-to-server connections for the
Community Services occur on default TCP/IP port 1516.
v Logging of Community Services events to the Sametime log (stlog.nsf).
v Capturing transcripts of chat conversations that occur on the Sametime server
for later retrieval. Developers must implement a chat logging feature to capture
and retrieve transcripts of chat conversations. Chat logging on a Sametime
server is not supported by default.
Community Services configuration settings
Community Services support all online presence (or awareness), instant messaging,
and chat features and activities available with Sametime.
The Community Services configuration settings control the interaction of the
Community Services with a Domino or LDAP directory and the maximum number
of Community Services users allowed on the server.
The Community Services configuration settings also enable the administrator to
show or hide the link in the end user interact that enables user’s to load the
Sametime Connect for browsers client. The administrator also controls whether the
automatic login feature of Sametime Connect for browsers is available to end users.
Note: You can also create a Community Services server cluster to support failover
and load balancing for the Community Services. For more information, see
Setting up a Community Services cluster .
You can access the Community Services configuration settings from the Sametime
Administration Tool by selecting Configuration - Community Services.
The three types of Community Services configuration settings are:
General settings
The General settings allow the administrator to:
v Control the number of entries on each page in the dialog boxes that show names
in the directory.
v Control how often to poll for new names added to the Sametime Community
directory.
v Control how often to poll for new servers added to the Sametime Community.
v Control the maximum number of user and server connections to the Community
services.
v Allow users to authenticate using either LTPA or Sametime Tokens.
Server Features settings
The Server Features settings allow the end user to determine which Community
Services options are available for end users. The administrator can:
v Enable or disable the end-user ability to transfer files
156 Sametime Administrator’s Guide

v Enable or disable the end-user ability to send announcements
Sametime Connect for browsers settings
The administrator can use the Community Services configuration settings to
determine which options are available in the Java version of Sametime Connect
(″Sametime Connect for browsers″).
The Community Services configuration settings for ″Sametime Connect for
browsers″ allow you to:
v Enable or disable the end-user ability to save the user name, password, and
proxy information when logging in to the Community Services from Sametime
Connect. This capability controls whether users can use the automatic login
feature of Sametime Connect.
v Display the ″Launch Sametime Connect for browsers″ link.
The Sametime Administration Tool also allows you to send a Message from the
administrator to all users logged in to the Community Services.
Community Services connectivity settings
For information about the ports used by the Community Services and the available
connectivity options, see Community Services Network settings.
Community Services server clusters
You can create a Community Services server cluster to support failover and load
balancing for a large community of Community Services users. For more
information on creating a Community Services cluster, see Overview of
Community Services clustering.
Number of entries on each page in dialog boxes that show
names in the directory
The ″Number of entries on each page in dialog boxes that show names in the
directory″ setting controls the number of user and group names that display when
a user browses the Domino Directory on the Sametime server.
Note: If you have configured the Sametime server to connect to an LDAP server,
see Using LDAP with the Sametime server for information about using
directory browsing features with an LDAP directory.
An end user can browse the names and groups listed in the Domino Directory on
the Sametime server (or Domino Directories available through Directory
Assistance) when performing the following operations:
v Adding users or groups to the contact list (or presence list) in the Sametime
Connect client
v Adding users or groups to a privacy list (or Who Can See If I Am Online list) in
the Sametime Connect client
v Restricting meeting attendance when creating a meeting in the Sametime
Meeting Center
When an end user browses the names and groups in the directory, the directory
entries (names and groups) are listed on ″pages″ in a dialog box. The ″Number of
entries on each page in dialog boxes that show names in the directory″ setting
controls the number of entries that appear on each of these pages in the dialog
Chapter 6. Configuring the Community Services 157

box. The end user can select entries from these pages when adding users to the
contact list, a Privacy list, or meeting attendance Restrictions list. The default is 100
entries per page, the minimum is five entries, and the maximum is 1440 entries. It
is best to use a setting between 100 and 200 entries. Higher settings cause more
data to be transmitted on the network when a user browses the Domino Directory.
To change the number of directory entries that appear on each page in the
end-user dialog boxes:
1. From the Sametime server home page, click the ″Administer the Server″ link to
open the Sametime Administration Tool.
2. Choose Configuration.
3. Choose Community Services.
4. In the ″Number of entries on each page in dialog boxes that show names in the
directory″ field, enter the number of entries that you want to appear on each
page.
5. Click the Update button and restart the server for the change to take effect.
How often to poll for new names added to the Sametime
Community directory
The Sametime Community Services maintain a cache that contains information
about the users and groups in the community. The user information that is stored
in this cache is gathered from the Domino or LDAP directory. This cache must be
updated (or refreshed) periodically to ensure that users who have recently been
added to a directory can be displayed in the presence lists of all Sametime clients.
The ″How often to poll for new names added to the Sametime Community
directory″ setting controls how frequently the cache of user names maintained by
Community Services is updated with new information from the Domino or LDAP
directory. The update occurs only if changes are made to the directory during the
update interval. The default setting is 60 minutes, the minimum setting is 5
minutes, and the maximum setting is 1440 minutes.
Note: Low settings result in frequent updates from the directory and can adversely
affect the performance of the server. Lower settings also cause more data to
be transmitted on the network.
To change how frequently the Domino or LDAP directory is polled for new user
names (and how often the cache is updated):
1. From the Sametime server home page, click the ″Administer the Server″ link to
open the Sametime Administration Tool.
2. Choose Configuration.
3. Choose Community Services.
4. In the ″How often to poll for new names added to the Sametime Community
directory″ field, specify a new number to control the time interval (in minutes)
in which polling (and updates, if necessary) will occur.
5. Click the Update button and restart the server for the change to take effect.
How often to poll for new servers added to the Sametime
Community
If you have installed more than one Sametime server, the Community Services on
each Sametime server must maintain a list of all other Sametime servers in the
Sametime Community. Community Services uses this list to ensure that users who
158 Sametime Administrator’s Guide

have different home Sametime servers or different home clusters can see each other
in presence lists and communicate through instant messaging and chat.
Note: For more information on multiple Sametime server environments, see
Advantages of using multiple Sametime servers. For more information about
Community Services clusters, see Overview of Community Services
clustering.
Before installing a Domino server, you must register the Domino server by creating
a Server document for it in the Domino directory. Each Server document includes
an ″Is this a Sametime server?″ field that identifies the server as a Sametime server.
Community Services uses these fields to build a list of Sametime servers in the
domain (or community). The Sametime Administration Tool includes a setting that
allows the administrator to control the time interval in which the Community
Server receives an updated list of all Sametime servers from the Domino Directory.
The default setting is 60 minutes, the minimum setting is five minutes, and the
maximum setting is 1440 minutes.
To change how frequently the Domino Directory is polled to detect a new
Sametime server:
1. From the Sametime server home page, click the ″Administer the Server″ link to
open the Sametime Administration Tool.
2. Choose Configuration.
3. Choose Community Services.
4. In the ″How often to poll for new servers added to the Sametime Community″
field, specify the time interval in minutes in which polling (and updates, if
necessary) will occur.
5. Click the Update button and restart the server for the change to take effect.
Maximum user and server connections to the Community
server
The administrator can specify the maximum number of connections allowed to
Community Services. The connections include both Sametime client connections
and Sametime server-to-server connections.
A client connection (or Community Services login) occurs when a user starts the
Sametime Connect client.
The limit is 20,000 connections. Generally, a server that meets the minimum system
requirements can support 8,000 TCP/IP connections. To support limits higher than
8,000 connections, use servers with high-level processing capabilities of at least 512
MB of RAM, a 10 MB or 100 MB network card, and dual processors.
Note: You can deploy a Community Services multiplexer on a separate machine
from the Sametime server. In this scenario, you cannot use the ″Maximum
user and server connections to the Community server″ field in the Sametime
Administration Tool to specify the maximum number of connections to the
Community Services. When a Community Services multiplexer is deployed
on a different machine than the Sametime server, you must use the
VPMX_CAPACITY= setting in the Sametime.ini file on the multiplexer
machine to specify the maximum number of connections. For more
information, see Deploying a Community Services multiplexer on a separate
machine.
Chapter 6. Configuring the Community Services 159

Server-to-server connections occur when the administrator has installed multiple
Sametime servers and different home Sametime servers are specified for users.
When users have different home Sametime servers, two users can be connected to
Community Services on two different Sametime servers. A server-to-server
connection must be established to enable these users to see each other in presence
lists and chat with each other.
To change the maximum user and server connections to the Community Services:
1. From the Sametime server home page, click the ″Administer the Server″ link to
open the Sametime Administration Tool.
2. Choose Configuration.
3. Choose Community Services.
4. In the ″Maximum user and server connections to the Community server″ field,
specify the maximum number of connections allowed to the Community
Server.
5. Click the Update button and restart the server for the change to take effect.
Allow users to authenticate using either LTPA or Sametime
Tokens (stauths.nsf and stautht.nsf)
When the ″Allow users to authenticate using either LTPA or Sametime Tokens″
option is selected in the Community Services-Configuration settings of the
Sametime Administration Tool, the Sametime server accepts authentication tokens
generated by both the Domino Single-Sign On (SSO) feature and the Secrets and
Tokens databases on the Sametime server. This option is selected by default.
When the ″Allow users to authenticate using either LTPA or Sametime Tokens″
option is not selected, the Sametime server accepts authentication tokens generated
only by the Domino SSO feature (LTPA tokens).
The ″Allow users to authenticate using either LTPA or Sametime Tokens″ option
must be selected when you require basic password authentication to the Sametime
Meeting Center and the Sametime 7.0 server and Sametime 2.0 or 2.5 servers
function as part of a single Sametime community.
The ″Allow users to authenticate using either LTPA or Sametime Tokens″ option
can be disabled when you require basic password authentication to the Sametime
Meeting Center and all Sametime servers in your environment are Sametime 3.0
servers or higher.
Note: By default, anonymous access is allowed to the Sametime Meeting Center
and authentication by token is not enforced on the Sametime server.
For more information, see Authentication by token using LTPA and Sametime
Tokens.
Allow users to transfer files to each other
Community Services allow end users to transfer files to each other over the
network while using Sametime Connect or attending a Sametime meeting. The
administrator can enable or disable this feature. When you enable this feature, both
authenticated and anonymous users can transfer files.
The file transfer feature does not work with Sametime Links. For more information
about Sametime Links, see the Sametime Directory and Database Access Toolkit
160 Sametime Administrator’s Guide
documentation available from IBM DeveloperWorks
(http://www.ibm.com/developerworks/lotus/products/instantmessaging/.
Follow the link for ″Toolkits and Drivers.″
Caution Computer viruses can be spread through transferred files. To protect
against this possibility, users should have current anti-virus software installed. The
anti-virus software real-time protection settings should be enabled and set to scan
all files.
Enabling file transfer
To enable the file transfer feature:
1. Select the ″Allow users to transfer files to each other″ check box on the
Configuration - Community Services tab in the Sametime Administration Tool.
Enabling this feature might increase the amount of network bandwidth
consumed by Sametime users. This functionality is similar to allowing users to
attach files to an e-mail and transmit these files on the network.
2. Enter a maximum file size for transferred files, in KB. The default maximum
size is 1000 KB. Keep in mind that the larger this number, the more network
bandwidth it is possible for Sametime users to consume with file transfers.
When you select this check box, a user who is sending a file can:
v Send a file to anyone who is online (with active or away status) in Sametime
Connect or in an online meeting. Users cannot send files to people whose status
is offline or ″do not disturb,″ and audience members in a broadcast meeting
cannot send or receive files. The transferred file must be within the size limit set
by the administrator in step 2 above.
v Send a file to only one person at a time.
v Enter a description of the file.
v Receive notification that the file has been sent.
v Receive notification that the other user has accepted or rejected the file.
Note Users must send files to other users in the Sametime Community. It is not
possible to send a file to an AOL Instant Messenger user or to someone in an
external community using the SIP Gateway functionality.
The person receiving the file can:
v Accept or reject the file.
v See how large the file is before sending it.
v Save and open the file on his or her computer.
Disabling file transfer
To disable the file transfer feature for authenticated users, clear the ″Allow
authenticated users to transfer files to each other″ check box on the Configuration -
Community Services tab in the Sametime Administration Tool. When you disable
this feature, all references to file transfer are hidden from users in the end user
interface.
Allow users to send announcements
Community Services allow end users to send unencrypted announcements to
others who are online in the Sametime Community. The administrator can enable
or disable this feature.
Chapter 6. Configuring the Community Services 161

Note: Users of Sametime Links can also receive and respond to announcements.
For more information about Sametime Links, refer to the Sametime Software
Development Kit documentation.
Allowing users to send announcements
To allow users to send announcements, select the ″Allow users to send
announcements″ check box in the Configuration - Community Services settings of
the Sametime Administration Tool.
When you enable this feature end users can:
v Send unencrypted announcements to anyone who is online in Sametime
Connect. (To receive an announcement, a user must be online, and in either
active or away status. Users who are offline or have a status of ″do not disturb″
do not receive announcements.)
v Allow the recipients of the announcement to respond to the announcement, or
prevent them from responding.
Preventing users from sending announcements
To prevent users from sending announcements, clear the ″Allow users to send
announcements″ check box in the Configuration - Community Services settings of
the Sametime Administration Tool. When you disable this feature, all menu items
and toolbar buttons for sending announcements are removed from the end user
interface of Sametime Connect.
Allow Connect users to save their user name, password, and
proxy information (automatic login)
Sametime Connect includes a feature that saves a user’s login information and logs
that user into the Connect client automatically. The administrator can enable or
disable this setting in the Sametime Connect for browsers client from the
Community Services configuration settings of the Sametime Administration Tool.
Enabling automatic login
To enable automatic login for ″Sametime Connect for browsers,″ select the ″Allow
Connect users to save their user name, password, and proxy information
(automatic login)″ check box in the Configuration - Community Services options of
the Sametime Administration Tool.
When you enable the automatic login feature, a user can select an ″Automatically
log me on″ option when starting Sametime Connect. If the user selects this option,
the user name, password, and connectivity information for the user are stored on
the Sametime server. The next time the user starts Sametime Connect, this
information is automatically retrieved from the server. This feature prevents users
from having to enter the user name and password each time Sametime Connect is
started.
Disabling automatic login
Organizations that require strict security might have policies that prevent storing
user names and passwords on the server. If you do not want the user names and
passwords stored on the server, you should disable the automatic login feature of
Sametime Connect. When automatic login is disabled, all automatic login features
are hidden in the user interface of the Sametime Connect client and automatic
login is unavailable to the end users.
To disable the automatic login feature for ″Sametime Connect for browsers,″ clear
the ″Allow Connect users to save their user name, password, and proxy
162 Sametime Administrator’s Guide

information (automatic login)″ check box in the Configuration - Community
Services options of the Sametime Administration Tool.
Display the ″Launch Sametime Connect for browsers″ link
Use the ″Display the ’Launch Sametime Connect for browsers’ link″ setting to
make the Java version of Sametime Connect available or unavailable to end users.
End users start Sametime Connect for browsers by accessing the Sametime server
home page with a Web browser, dragging the cursor over the ″Launch Sametime
Connect″ option and selecting the ″Launch Sametime Connect for browsers″ link.
The Web page containing Sametime Connect for browsers is loaded to the user’s
Web browser. Sametime Connect for browsers establishes connections with the
Community Services using the process described in Sametime Connect client
connection process.
The administrator uses the ″Display the ’Launch Sametime Connect for browsers’
link″ setting to show or hide the ″Launch Sametime Connect for browsers″ link on
the Sametime home page. If the administrator disables this setting, the ″Launch
Sametime Connect for browsers″ link is hidden on the Sametime server home page
and end users cannot use Sametime Connect for browsers.
To allow or prevent user access to Sametime Connect for browsers:
1. From the Sametime server home page, click the ″Administer the Server″ link to
open the Sametime Administration Tool.
2. Choose Configuration.
3. Choose Community Services.
4. To allow end users to use Sametime Connect for browsers, place a check mark
in the ″Display the ’Launch Sametime Connect for browsers’ link″ check box.
Selecting this check box causes the ″Launch Sametime Connect for browsers″
link to appear on the Sametime server home page.
To prevent end users from using Sametime Connect for browsers, clear the
check mark from the ″Display the ’Launch Sametime Connect for browsers’
link″ check box. When the check mark is cleared from this setting, the ″Launch
Sametime Connect for browsers″ link is hidden from the end users.
5. Click the Update button and restart the server for the change to take effect.
Anonymous Access Settings for Community Services
Sametime developers can create Domino databases or Web applications that
include Sametime presence lists. These applications can be deployed on a Domino
or Sametime server and configured to connect to the Community Services on the
Sametime server to access the presence and instant messaging functionality. If the
Access Control List (ACL) settings of the database or application allow anonymous
access, user’s can access the database or application without authenticating
(providing a user name and password).
The Community Services Anonymous Access Settings in the Sametime
Administration Tool allow the administrator to force a name entry dialog box to
appear when anonymous access is allowed to a database or application that
includes a presence list. This name entry dialog box accepts any name the user
provides and has no security functions. The name entered by the user is for
presence list display purposes only. The display name serves to uniquely identify
the user in any presence list in the database or application.
Chapter 6. Configuring the Community Services 163

If you allow anonymous access to a database or application that includes a
presence list, and you do not force this name entry dialog box to appear, every
user present in the database or application is listed as ″Anonymous″ in the
presence list.
If a database or application connects to the Community Services and allows
anonymous access, the ″Anonymous users can enter virtual places″ setting in the
Configuration - Community Services - Anonymous Access settings of the Sametime
Administration Tool must be selected to allow an anonymous user to access the
database or application. This setting is selected by default.
Note: To force users to authenticate (enter a user name and password that is
verified against entries in a directory) when accessing a Domino database,
change the database ACL settings. For more information, see Using database
ACLs for identification and authentication and Basic password
authentication and database ACLs.
The administrator can also specify the level of access that anonymous users have
to the directory. These administrative settings control an anonymous user’s ability
to search for entries in a directory or browse a list of all entries in the directory.
The Anonymous Access settings include:
v Anonymous users can enter virtual places.
v Users of Sametime applications (Domino databases or Web applications) can
specify a display name so that they do not appear online as ″Anonymous.″
– Default domain for anonymous users
– Default namev Directory Searching and Browsing options.
– Users cannot search or browse the Directory
– Users can type names (resolve users and groups) to add them to an
awareness list.
– Users can browse the directory (see a list of names) or type names (resolve
users and groups).
– Users can browse the directory to see group content and names, or type
names (resolve users and groups).
Anonymous users can enter virtual places
The ″Anonymous users can enter virtual places″ setting must be selected to enable
an anonymous user to access a Domino database or Web application that includes
Sametime presence and instant messaging capabilities.
Note: The ACL settings of the Domino database or Web application must also
allow anonymous access to enable anonymous users to attend meetings in
the Sametime Meeting Center.
When the ″Anonymous users can enter virtual places″ setting is selected, the
administrator can use the following settings in the Configuration - Community
Services - Anonymous Access tab of the Sametime Administration Tool to control
how the anonymous users enter display names when accessing the Sametime
Meeting Center.
v Users of Sametime applications (Domino databases or Web applications) can
specify a display name so that they do not appear online as anonymous.
v Default domain name for anonymous users.
164 Sametime Administrator’s Guide

v Default name.
Note: The settings listed above do not take effect unless the ″Anonymous users
can enter virtual places″ setting is selected.
About ″virtual places″
A ″virtual place″ is a programming concept. Users can enter a virtual place and
have awareness of other users in the same virtual place. For example, a user can
enter a chat room and use a presence list in the chat room to have awareness of
other users who are in the same chat room (or ″virtual place″). This capability is
sometimes called ″Place-based awareness.″
Place-based awareness differs from ″Community-wide awareness.″ In the example
above, the presence list in the chat room displays the names of users who have
entered the chat room, but does not display other members of the Sametime
community who are online, but not in the chat room. With Community-wide
awareness, users can have awareness of any user in the Community (any user
entered in the directory) who is online. Sametime Connect provides users with
Community-wide awareness functionality. Anonymous users are not allowed to
have Community-wide awareness in any Sametime clients.
For more information on virtual places, see the the Sametime Directory and
Database Access Toolkit documentation available from IBM DeveloperWorks
(http://www.ibm.com/developerworks/lotus/products/instantmessaging/.
Follow the link for ″Toolkits and Drivers.″
Users of Sametime applications can specify a display name
so that they do not appear online as ″anonymous.″
The ″Users of Sametime applications can specify a display name so that they do
not appear online as anonymous″ setting enables an anonymous user to enter a
unique display name when accessing a database or application that includes a
Sametime presence list. This display name allows the anonymous user to be
individually identified in any presence lists in the Sametime application.
The following conditions are required to allow anonymous users to access a
Sametime application or database. Both of these conditions exist by default
following a Sametime server installation:
v The ACL settings of the database or application must allow anonymous access.
v The ″Anonymous users can enter virtual places″ setting in the Configuration -
Community Services - Anonymous Access settings of the Sametime
Administration Tool must be selected.
When both of the above conditions are true, you can select the ″Anonymous users
of Sametime applications can specify a display name so that they do not appear
online as anonymous″ setting to force a name entry dialog box to appear when an
anonymous user enters the database or application that includes a presence list.
The name entry dialog box that appears enables a user to enter a name so that the
user can be individually displayed in the presence list. The name entry dialog box
accepts any name that the user enters; the name is strictly for display purposes in
the presence list. The user is not authenticated.
If the access control settings of a Sametime database or application allow
anonymous access and the ″Anonymous users of Sametime applications can
specify a display name so that they do not appear online as anonymous″ setting is
Chapter 6. Configuring the Community Services 165

not selected, users are not required to enter a user name when accessing the
database or application. Every user is displayed as ″Anonymous″ in the presence
list. Users will not be individually identified in the presence list.
If the ″Users of Sametime applications can specify a display name...″ setting is
selected, you can also edit the ″Default domain for anonymous users″ and ″Default
name″ settings described below.
Default domain for anonymous users
If the ″Users of Sametime applications can specify a display name so that they do
not appear online as anonymous″ setting is selected, you are forcing a name entry
dialog box to appear when a user accesses a Sametime database or application that
allows anonymous access.
The ″Default domain for anonymous users″ setting enables a domain name to be
automatically appended to the name entered by the user at the name entry dialog
box.
For example, if the ″Default domain for anonymous users″ setting contains the
entry ″/Guest,″ and a user enters ″John Smith″ at the name entry dialog box, the
user’s name appears as ″John Smith/Guest″ in the presence list.
Default name
If the ″Users of Sametime applications can specify a display name so that they do
not appear online as anonymous″ setting is selected, you are forcing a name entry
dialog box to appear when a user accesses a Sametime database or application that
allows anonymous access.
The ″Default name″ setting enables you to specify a name to appear by default in
the name entry dialog box.
For example, if the ″Default name″ setting contains the entry ″User,″ the first
person entering a database sees ″User″ displayed by default in the user name field
of the name entry dialog box. If the person accepts the default and enters the
meeting, the person is identified as ″User 1″ in any presence list in the database or
application.
For each person who accepts the default name, the number that follows the default
name is incremented by one. For example, the next two users who accept the
default name setting in the name entry dialog box are identified as ″User 2″ and
″User 3″ in any presence list in the database or application.
Directory Searching and Browsing options
The administrator might need to specify the level of access that an anonymous
user of a database enabled with Sametime technology has to the directory. This
functionality is used if the database or application that allows anonymous access
includes the capability to browse the directory that supports the Sametime
community.
For security purposes, the administrator can limit an anonymous user’s ability to
view names in the directory. The ″Directory Searching and Browsing″ options
might be used to prevent anonymous users from browsing all names in a directory
or searching for names in the directory. Also, applications that are custom-built by
Sametime developers using the Sametime Software Development Kit might require
specific Community Services ″Directory Searching and Browsing″ settings
configurations to enable the custom applications to function properly.
166 Sametime Administrator’s Guide
Note: The term ″anonymous user″ refers to a user who is not authenticated when
accessing a database or application that includes Sametime presence
technology. The access control settings of the database or Web application
determine whether a user is authenticated or allowed to access the database
anonymously.
The four ″Directory Searching and Browsing″ options are described below.
Users cannot search or browse the directory
If this option is selected, anonymous users cannot search or browse the directory.
Users can type names (resolve users and groups) to add them to
an awareness list
If this option is selected, anonymous users can type text in an end-user search
interface to search for person or group entries in the directory. However, users
cannot view (or browse) a list containing all entries in the directory. Users might
perform such searches to add users to a presence list.
Users can browse the directory (see a list of names) or type
names (resolve users and groups)
If this option is selected, anonymous users can type text in an end-user search
interface and search for group or person entries in the directory. Anonymous users
can also browse lists that contain all entries in the directory. When this option is
selected, anonymous users can see all group and name entries in the directory, but
cannot see the content of a group entry (the list of names within a group entry).
Note: If Sametime is configured to connect to an LDAP server, users cannot
browse the LDAP directory on the LDAP server.
Users can browse the directory to see group content and names,
or type names (resolve users and groups)
If this option is selected, anonymous users have all searching and browsing
privileges described for the ″Users can browse the directory (see a list of names) or
type names (resolve users and groups)″ setting above. In addition, users can search
and browse within group entries in the directory and access the user and group
names that are specified within group entries in the directory.
Allowing users to control the default screen location and size of chat
windows
When a Sametime server is in its default state, end users cannot control the default
screen location or screen size of chat windows. For example, when a Sametime
Connect user initiates a chat session with another user, the chat window always
pops up immediately to the left of the Sametime Connect window.
The administrator can configure a Sametime server so that users can determine the
screen location and size that a chat window will have when the window first pops
up on the user’s screen.
Note: This configuration must be performed on a user’s ″home″ Sametime server
for the user to have access to this feature. For more information about the
home Sametime server, see Community Services connectivity and the home
Sametime server.
Chapter 6. Configuring the Community Services 167

When the administrator has configured a user’s home Sametime server in this way,
the end user can perform the following actions to control the default screen
location and size of chat windows:
1. An end user initiates a chat session with another user from the Sametime
Connect client. The chat window pops up immediately to the left of the
Sametime Connect client.
2. The end user moves the chat window to the upper-left corner of the screen (or
any other desired screen location) and resizes the chat window.
3. The end user selects the ″Set dialog as default″ item from the ″Options″ menu
in the chat window.
After the user has performed these actions, the chat window will always pop up at
the screen location and size that it has at the time the user selects the ″Set dialog as
default″ menu item. The chat window pops up at this location and size any time
the user initiates a chat session with another user or another user initiates a chat
session with this user.
After the user sets a default screen location and size for the chat window, the user
has the following options for controlling chat window behavior:
v The user can move the chat window from the selected default location without
changing the default location. For example, the user can move the chat window
from the upper-left corner of the screen to the lower-right corner of the screen.
The chat window will remain positioned in the lower right corner of the screen
for the remainder of the chat session (unless the user moves it again).
When the user starts a new chat session with a different user, the initial chat
window for the new chat session will pop up at the user-defined default
location (the upper-left corner of the screen), not the location to which the screen
was moved in the previous chat.
v The user can move the chat window from the selected default location and
specify a new default location. For example, the user can move the chat window
from the upper-left corner of the screen to the lower-right corner and select the
″Set dialog as default″ menu item. The lower-right corner of the screen becomes
the new default screen location. The initial chat window for all subsequent chat
sessions will pop up in the lower-right corner of the screen.
One-to-one chat windows and n-way chat windows
There are two different chat windows launched from Sametime clients:
″one-to-one″ chat windows and ″n-way″ chat windows. The default locations of
these windows must be set separately.
A ″one-to-one chat window″ launches when one user engages one other user in a
chat session. An ″n-way chat window″ launches when one user invites more than
one other user to a chat session (an ″n-way″ chat session is any chat session
consisting of three or more users).
A user must specify individual default locations for each of these chat windows.
For example, if the user selects the ″Set dialog as default″ menu item while
engaged in a one-to-one chat, this setting will only apply to the one-to-one chat
window. The user must also select the ″Set dialog as default″ menu item while
engaged in an n-way chat to set the default location of the n-way chat window.
The default setting for the one-to-one chat window can be different than the
default setting of the n-way chat window.
168 Sametime Administrator’s Guide

Enabling users to select the default location and size of chat
windows
To enable users to select the default location and size of chat windows, the
administrator must add an ST_FIXED_CHAT_SUPPORTED setting to the [Client]
section of the Sametime.ini file on the Sametime server.
To enable users to select the default location and size of chat windows:
1. Use a text editor to open the Sametime.ini file on the Sametime server. The
Sametime.ini file is located in the Sametime installation directory.
Note Sametime installs into the same directory as the Domino server. The
default Sametime installation directory on the Windows platform is
C:\Lotus\Domino.
2. The Sametime.ini file contains a [Client] section. At the bottom of the [Client]
section, manually add the following setting by typing it into the Sametime.ini
file:
ST_FIXED_CHAT_SUPPORTED=1
Note You can change the value of the setting above to zero to disable this
feature. For example, ST_FIXED_CHAT_SUPPORTED=0 disables the feature.
3. Save and close the Sametime.ini file and restart the Sametime server.
After the administrator enables the feature and restarts the server, end users can
use the ″Set dialog as default″ setting in the Sametime Connect client to set the
default locations of chat windows.
Prohibiting logins from insecure clients to the server
Earlier versions of the Sametime client contain security vulnerabilities which could
result in exposure of user credentials or message data. To ensure that information
exchanged between Sametime clients and the server remain confidential, the server
requires clients connecting to the server to be running the security level of a
minimum client version. The server prevents logins from clients running Sametime
versions earlier than the minimum version. By default, this minimum client
version is set to Sametime 2.5. You can retain this default behavior, or change the
security level to match a different client version.
In most cases it is best to prohibit earlier client versions from logging in to the
server. If all clients connecting to the server are running Sametime 6.5.1 or higher,
increasing the default security level to 6510 ensures that all information exchanged
between client and server after the handshake is encrypted. By prohibiting logins
from earlier versions of the Sametime client you ensure that all connections are
encrypted.
However, if you must support older versions of the client, decrease the security
level to enable logins from these earlier client versions. Setting a security level less
than 6510 allows the server to accept non-encrypted connections.
To control how servers respond to login requests from different client versions, the
sametime.ini and STsecurity.ini files provides settings that enable you to perform
the following tasks:
v Specify the security level (minimum client version) for the server
v Enable or disable logins from clients running versions that do not conform to the
security level
Chapter 6. Configuring the Community Services 169

v Configure the server to generate instant messages automatically in response to
login requests from clients that do not conform to the security level
v Specify the text of the message that the server sends in response to login
requests from clients that do not conform to the security level
v Specify sender’s name to display on the title bar of instant messages sent by the
server
Specifying the security level (minimum allowed client version)
Each server is configured to allow logins from a minimum client version, which
defines the security level of the server. By default, the server allows logins from
Sametime 2.5 and later clients. To specify a different security level, you must
change the value of the VP_SECURITY_LEVEL setting in the sametime.ini file. You
can specify a minimum client version of 3.1 or later, 3.0 or later, 2.5 or later, and so
forth. After you specify a minimum version, you can then specify other settings to
control how the server responds to login requests from client versions earlier than
the specified minimum version.
To specify the security level for the server
1. Open the sametime.ini file in a text editor. By default the file is located in the
Sametime installation folder, for example, C:\Lotus\Domino\Sametime.ini.
2. In the [Config] section of the sametime.ini file, specify the minimum Sametime
client version that can log in to the server by providing one of the following
values for the VP_SECURITY_LEVEL setting:
Value Description
0<no zeros> Select this option to disable security filtering and allow logins from all clients
regardless of version level.
20<no
zeros>
Select this option to set the minimum client level to Sametime 2.0 clients and
later. To determine the client level, the server detects whether the client uses
the Diffie-Hellman public key agreement protocol to encrypt the user’s
password. Any client that does not authenticate using the Diffie-Hellman
method is determined to be a 1.5 client.
25<no
zeros>
(Default) Select this option to set the minimum client level to Sametime 2.5.
To determine the client level, after the client logs in using the Diffie-Hellman
method, the server attempts to create a chat channel to the client. If the
server successfully creates the chat channel, the client version is determined
to be 2.5 or later.
30<no
zeros>
Select this option to set the minimum client level to Sametime 3.0. The server
determines the client version from information that the client sends during
the handshake.
31<no
zeros>
Select this option to set the minimum client level to Sametime 3.1. The server
determines the client version from information that the client sends during
the handshake.
6510<no
zeros>
Select this option to set the minimum client level to Sametime 6.5.1. The
server determines the client version from information that the client sends
during the handshake.
70<no
zeros>
Select this option to set the minimum client level to Sametime 7.0. The server
determines the client version from information that the client sends during
the handshake
3. Save and close the file.
170 Sametime Administrator’s Guide

Effect of security level settings on server connections
The security level that you set on the server also determines the server versions
from which the server accepts connections. When a Sametime server receives a
connection request from another server, it uses information sent as part of the
server handshake to determine the security level of the requesting server. To
prevent older clients from logging in to a Sametime 7.0 server by way of less
secure servers running earlier versions of Sametime, the server blocks incoming
connections from Sametime servers running versions earlier than the defined
security level, and from Sametime servers that do not have a defined security level.
By default, there is no security level defined for Sametime servers earlier than
version 3.1.
To ensure interconnectivity with Sametime 3.0 and earlier servers, install the
Sametime CF1 patch on these servers and configure the security level on all servers
to a value consistent with the earliest version server in the community. For
example, if the environment includes Sametime 2.0 servers, after you apply the
CF1 patch on all version 3.0 and earlier servers, set the value of the
VP_SECURITY_LEVEL setting on all servers to 20. Later, if you upgrade the 2.0
servers to a later version, increase the value of the setting to match the version of
the upgraded servers.
If you choose not to apply the CF1 patch on Sametime 3.0 and earlier servers and
want to allow earlier versions of the Sametime server to connect to a Sametime 7.0
server, disable security level checking on the 7.0 server by setting the value of
VP_SECURITY_LEVEL to 0.
Allowing logins from clients that do not conform to the
security level
By default, the server automatically logs out users who attempt to connect from
clients of versions earlier than the specified minimum. To allow users with earlier
clients to continue to access the server during the transition to the new server
version, you can configure the server to allow logins from client versions earlier
than the specified minimum.
Maintaining a flexible login policy is especially important in environments that
include a large number of older Sametime clients. In such an environment,
immediately enforcing a minimum client version can result in a high volume of
help desk calls. To avoid locking users out of Sametime, give users several weeks
to upgrade and use the VP_SECURITY_ALLOW_USER setting to enable servers to
continue to accept logins from earlier client versions. After the deadline for
upgrading passes, change the value of the setting to block logins from clients that
do not meet the minimum security level.
To specify whether the server allows logins from clients that do
not conform to the security level
1. Open the sametime.ini file in a text editor. By default the file is located in the
Sametime installation folder, for example, C:\Lotus\Domino\Sametime.ini.
2. In the [Config] section of the sametime.ini file, specify whether to allow logins
from clients earlier than the minimum allowed version by providing one of the
following values for the VP_SECURITY_ALLOW_USER setting:
Value Description
0 (Default) Reject login attempts from clients of versions earlier than allowed by
the VP_SECURITY_LEVEL setting.
Chapter 6. Configuring the Community Services 171

Value Description
1 Allow logins from all clients, regardless of version.
3. Save and close the file.
Configuring the server to send instant messages to clients
that do not conform to the security level
You can use the VP_SECURITY_MESSAGE setting in the STSecurity.ini file to
provide additional information to users who attempt to log in to the server from
Sametime clients running versions earlier than what is allowed by the specified
security level. This setting configures the server to automatically respond to login
requests from clients that do not conform to the server’s security level by sending
an instant message containing specified text. The message you specify functions as
either a warning message or a disconnection notification, depending on whether
the value of the VP_SECURITY_LEVEL setting allows logins from earlier clients. If
the VP_SECURITY_LEVEL setting allows logins, use the text of the message to
warn users that they need to upgrade and to explain how to obtain and install the
client upgrade. If the VP_SECURITY_LEVEL setting does not allows logins, use the
text of the message to explain why login was denied.
Note the following before you configure the settings in the STSecurity.ini file:
v All platforms - Double-byte characters are not allowed in the message text or
sender name.
v All platforms - If you want to use accented characters (for example, Æ,é,ä,ñ) in
the message text or sender name, you should use Notepad on a Windows client
or server to edit the file. When you finish making your changes with Notepad,
save the STSecurity.ini file as a UTF-8 file (select File-Save As And specify UTF-8
as the Encoding option, then save the file).
v IBM i5/OS platform only - It is recommended that you map a network drive to
make the STSecurity.ini file on the server accessible from your workstation. Then
you can run Notepad from your workstation and update the file directly on
your ibm i5/OS server. (By default, the file is located in the Sametime
installation folder, for example, C:\Lotus\Domino\STSecurity.ini).
Alternatively, you can copy the file from the ibm i5/OS server to your client
workstation using any convenient means (for example, dragging and dropping
from ibm i5/os Navigator or FTP), edit the file on your workstation using
Notepad, and then copy the updated file back to the server.
v IBM i5/OS platform only - When you have updated the file on your IBM i5/OS
server, ensure that the file is owned by QNOTES. To update the file ownership,
run the following command:
CHGOWN OBJ(’server_data_directory/stsecurity.ini’) NEWOWN(QNOTES)
Use the following procedure to configure the server to send an instant message to
users who attempt to log in from client versions earlier than the specified
minimum.
To configure the server to send messages to clients that do not
conform to the security level
1. Use a text editor to open the STSecurity.ini file. By default the file is located in
the Sametime installation folder, for example, C:\Lotus\Domino\STSecurity.ini.
172 Sametime Administrator’s Guide

Value Description
null (Default) Do not send an instant message.
text Specifies the text of the instant message that is sent in response to login
requests from clients that do not conform to the server’s security level.
If the VP_SECURITY_ALLOW_USER setting is set to 0 (reject logins from
client versions earlier than the specified minimum), the text you provide
serves as a disconnection notification. The server sends the specified text to
the client as an instant message and then disconnects the client.
If the VP_SECURITY_ALLOW_USER setting is set to 1 (allow logins from
client versions earlier than the specified minimum), and you provide a value
for VP_SECURITY_MESSAGE, the text you provide serves as a warning
message. The server allows the login and then sends the specified text. You
can use the message to provide users with information on upgrading. For
example, you can include an address that specifies the location of a
download site. After receiving the instant message with the address link,
users can click the address link to open the link location.
To include non-ASCII characters in the message text, save the STSecurity.ini
file in UTF-8 format.
2. Save and close the file.
Specifying the name to display in the title bar of instant
messages sent by the server
By default, when the server generates an instant message in response to a login
from a client older than the minimum defined version, the instant message
window does not identify the sender. Use the following procedure to specify the
name to display in the title bar of the instant message window.
To specify the name to display in the title bar of the instant
message window
1. Use a text editor to open the STSecurity.ini file. By default the file is located in
the Sametime installation folder, for example, C:\Lotus\Domino\STSecurity.ini.
Value Description
null (Default) When the server sends an instant message in response to a login
request from an older client, the title bar of the instant message window
does not display a user name.
name Specifices the user name to display in the title bar of the instant message
window when the server sends an instant message in response to a login
request from a client that does not conform to the server’s security level.
2. Save and close the file.
Chat Logging
Programming tools are available to implement chat logging on a Sametime server.
The chat logging feature can capture all chat conversations that occur on the
Sametime server, including instant messages, chat conferences (chats involving
more than two people), and Meeting Room chats. The text of these conversations is
stored on the server and retrievable through the chat logging feature.
For more information on chat logging, see the the Sametime Directory and
Database Access Toolkit documentation available from IBM DeveloperWorks
Chapter 6. Configuring the Community Services 173

(http://www.ibm.com/developerworks/lotus/products/instantmessaging/.
Follow the link for ″Toolkits and Drivers.″
Deploying a Community Services multiplexer on a separate machine
This section discusses the performance advantages and procedures associated with
deploying a Community Services multiplexer on a separate machine from the
Sametime server.
Note: This section discusses deploying a separate multiplexer in front of a
Sametime server machine (or machines) that does not operate as part of a
Community Services cluster. If you want to deploy a separate Community
Services multiplexer to handle connections for a Community Services cluster,
do not use the procedures in this section. To deploy a separate Community
Services multiplexer in front of a Community Services cluster, see Deploying
separate Community Services multiplexers (optional) in the Setting up a
Community Services cluster chapter of this documentation.
Each Sametime server contains a Community Services multiplexer (or MUX)
component. The function of the Community Services multiplexer is to handle and
maintain connections from Sametime clients to the Community Services on the
Sametime server.
During a normal Sametime server installation, the Community Services multiplexer
is installed with all other Sametime components on the Sametime server machine.
The Sametime server CD provides an option to install only the Community
Services multiplexer component. This option enables the administrator to install
the Community Services multiplexer on a different machine than the Sametime
server.
When the Sametime Community Services multiplexer is installed on a different
machine than the Sametime server:
v The Sametime Connect clients connect to the Community Services multiplexer
machine, not the Sametime server. This configuration frees the Sametime server
from the burden of managing the live client connections; the multiplexer
machine is dedicated to this task.
v The Community Services multiplexer maintains a single IP connection to the
Sametime server. The data for all Community Services clients is transmitted over
this single IP connection to the Community Services on the Sametime server.
In this scenario, the Community Services connection-handling load is removed
from the Sametime server. The Sametime server does not need to employ system
resources to maintain thousands of client connections. Removing the
connection-handling load from the Sametime server ensures these system resources
can be dedicated to other Community Services processing tasks.
The Community Services multiplexer machine dedicates its system resources to
handling client connections but does not perform other Community Services
processing. Distributing the Community Services workload between multiple
servers in this way enables the Community Services on the Sametime server to
handle a larger number of connections (users) and to function more efficiently.
174 Sametime Administrator’s Guide

Performance improvements with a separate multiplexer
If the Community Services multiplexer operates on the same machine as the
Sametime server, the Sametime server can handle approximately 8,000 to 10,000
Community Services connections and also perform other Community Services
processing tasks adequately.
However, if the Sametime server is not required to expend system resources to
maintain client connections, the server can service approximately 100,000
connections. (The Sametime server is capable of processing the Community
Services data that is passed over 100,000 connections if it does not have to
maintain the connections themselves.)
When a Sametime Community Services multiplexer is installed on a separate
machine, the Community Services multiplexer can support approximately 20,000
live IP port connections. You can also deploy multiple Community Services
multiplexers in front of a Sametime server.
To summarize the performance benefits of a separate multiplexer deployment,
consider the following example:
v You can install three separate Community Services multiplexers in front of a
single Sametime server. If each Community Services multiplexer handles 20,000
connections, as many as 60,000 users can be connected to a single Sametime
server at one time.
v If the Sametime server is capable of servicing 100,000 connections, the server
performance will not degrade under the load produced by 60,000 connections.
v If the multiplexer operates on the Sametime server instead of being deployed
separately, the Sametime server can service a maximum of 10,000 users. By
deploying three separate multiplexers in front of a single Sametime server, you
can service 50,000 more users (assuming one connection per user) than if the
multiplexer operates on the same machine as the Sametime server.
v If you deploy separate multiplexers in the manner described above, you can also
implement a rotating DNS system, or IBM WebSphere Edge Server, in front of
the multiplexers to load balance connections to the separate multiplexers.
To deploy separate Community Services multiplexers in your Sametime
environment, see Installing and setting up a separate Community Services
multiplexer.
Installing and setting up a separate Community Services
multiplexer
Installing and setting up a separate Community Services multiplexer involves the
following considerations an procedures:
1. Community Services multiplexer preinstallation considerations.
2. Install the Community Services multiplexer.
3. Configure security settings in the Configuration database on the Sametime
server.
4. Configure settings in the Sametime.ini file on the multiplexer machine.
5. Configure client connectivity to the multiplexer machine.
6. (Optional) Dynamically load balancing connections to the multiplexers.
Chapter 6. Configuring the Community Services 175

Community Services multiplexer preinstallation
considerations
Considering the requirements of the Community Services multiplexer machine is
the first of six procedures associated with installing and setting up a separate
Community Services multiplexer.
Consider the following before installing a Community Services multiplexer on a
separate machine:
v The minimum system requirements for the Community Services multiplexer
machine are the same as the system requirements for the core Sametime server.
For more information, see the Sametime Installation Guide (stinstall.nsf or
stinstall.pdf).
A machine that meets the minimum system requirements should be able to
handle approximately 20,000 simultaneous client connections.
Testing indicates that machines with dual 1133 MHz CPUs and 2 GB of RAM
can handle approximately 30,000 simultaneous client connections.
v TCP/IP connectivity must be available between the Community Services
multiplexer machine and the Sametime server. Port 1516 is the default port for
the connection from the Community Services multiplexer machine to the
Sametime server.
Next step:
Install the Community Services multiplexer machine
Install the Community Services multiplexer
Installing the Community Services multiplexer machine is the second of six
procedures associated with installing and setting up a separate Community
Services multiplexer.
To install the Community Services multiplexer:
1. Insert the Sametime CD into the Community Services multiplexer machine and
choose the option to install the Community Services multiplexer (or MUX).
2. Follow the instructions on the installation screens. Ensure that you enter the
DNS name or IP address of the Sametime server to which the multiplexer will
connect. The DNS name or IP address of the Sametime server is the only
significant parameter you must enter during the Community Services
multiplexer installation
3. You can repeat these steps to install additional Community Services
multiplexers on other machines.
Next step:
Configure security settings in the Configuration database on the Sametime server.
Configure security settings in the Configuration database on
the Sametime server
Configuring security settings in the Configuration database is the third of six
procedures associated with installing and setting up a separate Community
Services multiplexer.
After you have installed the Community Services multiplexer on a separate
machine, you must configure the Sametime server to accept connections from the
Community Services multiplexer.
176 Sametime Administrator’s Guide

A Sametime server only accepts connections from a Community Services
multiplexer that is listed in the stconfig.nsf database on the Sametime server.
Specifically, the Community Services multiplexer machine must be listed in the
″CommunityTrustedIps″ field of a ″CommunityConnectivity″ document in the
stconfig.nsf database. This security setting prevents a Community Services
multiplexer on unauthorized machines from connecting to the Sametime server.
To enable the Sametime server to accept connections from the Community Services
multiplexer(s):
1. Use a Lotus Notes client to open the stconfig.nsf database on the Sametime
server.
2. Open the CommunityConnectivity document in the stconfig.nsf database by
double-clicking on the date associated with the document.
If the CommunityConnectivity document does not exist in the stconfig.nsf
database, you must create it. To create the CommunityConnectivity document,
choose Create-CommunityConnectivity from the menu bar in the stconfig.nsf
database.
3. In the ″CommunityTrustedIps″ field, enter the IP addresses of the Community
Services multiplexer machine(s). If you enter multiple addresses, separate each
address with a comma.
Note The IP addresses of SIP Connector machines associated with a Sametime
community are also entered in this field.
4. Save and close the CommunityConnectivity document.
Next step:
Configure settings in the Sametime.ini file on the multiplexer machine.
Configure settings in the Sametime.ini file on the multiplexer
machine
Configuring settings in the Sametime.ini file is the fourth of six procedures
associated with installing and setting up a separate Community Services
multiplexer.
When the multiplexer is installed on a separate machine, the configuration of the
multiplexer is controlled by the settings in the Sametime.ini file on the multiplexer
machine. In most cases, it is not necessary to change any of the settings in the
Sametime.ini file but you should review the information below to be sure.
The configuration parameters in the Sametime.ini file include:
v The host name of the Sametime server to which the Community Services
multiplexer connects (specified during the Community Services multiplexer
installation and in the stconfig.nsf database as discussed in the previous
procedure).
v The port the Community Services multiplexer uses to establish the connection
with the Sametime server (default port 1516).
v The maximum number of simultaneous connections allowed to the multiplexer.
To specify a maximum number of simultaneous connections, use the
VPMX_CAPACITY= parameter of the Sametime.ini file. The default value is
20,000 connections (for example, VPMX_CAPACITY=20000).
Notes about the VPMX_CAPACITY= setting:
– The Sametime Administration Tool contains a Configuration-Community
Services-Maximum user and server connections to the Community Server
Chapter 6. Configuring the Community Services 177

setting that controls the maximum number of Community Services
connections allowed to the Sametime server. When the Community Services
multiplexer is installed on a separate machine, Community Services users do
not connect to the Sametime server and the ″Maximum user and server
connections to the Community Server″ setting cannot be used to control the
maximum number of connections allowed. Use the VPMX_CAPACITY=
parameter in the Sametime.ini file to control the maximum number of
connections instead of the setting in the Sametime Administration Tool.
– Multiplexer machines that meet the minimum system requirements can
successfully handle 20,000 connections. This value may vary depending on
the processing capabilities of the multiplexer machine. Multiplexer machines
that have dual 1133 MHz CPUs and 2GB of RAM can successfully handle as
many as 30000 connections.
If it is necessary to modify the settings above, open the Sametime.ini file on the
Community Services multiplexer machine with a text editor, alter the setting, and
save the Sametime.ini file.
Next step:
Configuring client connectivity to the Community Services multiplexer machine.
Configuring client connectivity to the Community Services
multiplexer machine
Configuring client connectivity to the Community Services multiplexer machine is
the fifth of six procedures associated with installing and setting up a separate
Community Services multiplexer.
After you have installed and configured the Community Services multiplexer, you
must ensure that Sametime Connect clients are configured to connect to the
Community Services multiplexer instead of the Sametime server.
A Sametime Connect client attempts to connect to the network address specified in
the Options-Preferences-Sametime Connectivity-Host setting available on the
Sametime Connect client.
To ensure that Sametime Connect clients connect to the Community Services
multiplexer machine instead of the Sametime server machine, each user in the
Sametime community must enter the DNS name or IP address of the Community
Services multiplexer machine in the ″Host″ field of the Sametime Connect clients.
For example, each user may need to perform this procedure:
1. Open Sametime Connect.
2. Choose Options-Preferences-Sametime Connectivity.
3. In the Host field enter the DNS name of the Community Services multiplexer
machine.
If you have deployed multiple Community Services multiplexers, your user
community should connect to these multiplexers in a balanced fashion. For
example, if you have deployed two Community Services multiplexers, half of
your users should configure the Sametime Connect client to connect to
multiplexer 1 and the other half of the users should configure Sametime
Connect to connect to multiplexer 2.
Notes about configuring client connectivity:
v You can configure the Sametime Connect for browsers client so that the client
loads to the user’s Web browser with connectivity settings pre-configured
178 Sametime Administrator’s Guide

appropriately for your environment. This configuration prevents the end user
from having to change the connectivity settings to connect to the server. For
more information, see Changing the default connectivity settings of the
Sametime Connect for browsers client in the ″Configuring Ports and Network
Connectivity chapter of the administrator’s guide.
v The next topic discusses an optional configuration you can employ to provide a
more dynamic form of connection load balancing across multiple Community
Services multiplexer machines than is discussed above. If you dynamically load
balance connections to the multiplexers, the Host field in the Sametime Connect
client must contain the DNS name or IP address of the load balancing
mechanism, not the multiplexer machine as described above.
Next step:
(Optional) Dynamically load balancing client connection to the multiplexers.
(Optional) Dynamically load balancing client connection to the
multiplexers
Dynamically load balancing connections to multiple Community Services
multiplexers is the last of six procedures associated with installing and setting up a
separate Community Services multiplexer.
Dynamically load balancing connections is an optional procedure. Also, this
procedure is only valid when you have installed multiple Community Services
multiplexers.
To dynamically load balance client connections to multiple Community Services
multiplexers, you can do one of the following:
v Set up a rotating DNS system to accomplish load balancing. Use rotating DNS to
associate the IP addresses of the Community Services multiplexer machines to a
single DNS name.
For example, associate the IP address of Community Services multiplexer
machine 1 (11.22.33.44) and Community Services multiplexer machine 2
(11.22.33.55) to the DNS name cscluster.sametime.com.
v Set up an IBM WebSphere Edge Server (Network Dispatcher) in front of the
Sametime servers that you intend to cluster. Use the WebSphere Edge Server
Network Dispatcher to distribute connections to the Community Services
multiplexer machines. See the documentation for the IBM WebSphere Edge
Server for more information.
Notes about dynamically load balancing client connections to the multiplexers:
v The topic Set up the load-balancing mechanism (rotating DNS or Network
Dispatcher) in the ″Setting up a Community Services cluster″ chapter of this
documentation illustrates a rotating DNS system set up in front of a separate
multiplexer deployment. Note that the deployment shown in that topic
illustrates multiple multiplexers in front of a Community Services server cluster
instead of a single, non-clustered Sametime server.
v For information about rotating DNS limitations, see Rotating DNS Limitations
with cached DNS resolve requests.
Chapter 6. Configuring the Community Services 179

Enabling Sametime Connect for browsers to function in kiosk mode
In some Sametime deployments, it may be necessary for multiple users to access
the Sametime Connect for browsers client on a Sametime server from the same
client machine. For example, several different users may access the Sametime
Connect client from the same public computer in an airport. In situations where it
is necessary for multiple users to access the Sametime Connect for browsers client
from the same client machine, you can enable the Sametime Connect for browsers
client to function in kiosk mode.
When the Sametime Connect for browsers client loads on a computer, a
JavaConnect.ini file is created on that computer. The JavaConnect.ini file stores
many of the client preference settings that a user selects from the menus in the
Sametime Connect for browsers client.
When different users access the Sametime Connect for browsers client from the
same machine, each user will start a different instance of the Sametime Connect for
browsers client on that machine. These different instances of the Sametime Connect
for browsers client will modify the single JavaConnect.ini file on that machine. In
this scenario, it is possible for a current user to gain access to the preferences
settings of a previous user because the JavaConnect.ini file will contain the values
specified by the most recent user. This possibility may pose some security risks
and may also cause the Sametime Connect for browsers client to operate in
unexpected ways for the end users.
To prevent these problems, you can configure the Sametime Connect for browsers
client to operate in kiosk mode.
When the Sametime Connect for browsers client operates in kiosk mode, the client
preference settings are not stored on the client machine (the JavaConnect.ini file is
not created on the client machine). The client preference settings are stored in
memory and the settings a user makes are valid only for the duration of the
current instant messaging session. When the user closes the Sametime Connect for
browsers client, the settings are lost and cannot be picked up by a subsequent
instance of the Sametime Connect client that loads on that machine.
When the Sametime Connect for browsers client operates in kiosk mode, the
administrator can also set the default connectivity configuration of the Sametime
Connect for browsers client. Specifying the default connectivity configuration
ensures that the client loads with the default connectivity settings required to
successfully connect to the Sametime server from the client machine. For more
information about specifying the default connectivity configuration, see Changing
the default connectivity settings of the Sametime Connect for browsers client.
Note: If you enable the Sametime Connect for browsers client to operate in kiosk
mode, it is not mandatory to also specify the default connectivity
configuration of the Sametime Connect for browsers client. Specifying the
default connectivity configuration is a separate optional procedure from
enabling the client to function in kiosk mode.
Enabling the kiosk mode
To enable kiosk mode, the administrator must add the following applet parameter
to the HTML code on the Sametime server that loads the Sametime Connect for
browsers client.
<PARAM NAME="KioskMode" VALUE="1">
180 Sametime Administrator’s Guide

Note: If this parameter specifies any value other than 1, the Sametime Connect for
browsers client will not operate in kiosk mode. The client will operate in its
default mode and the preferences settings will be saved in the
JavaConnect.ini file on the client machine.
On a standard Sametime server deployment, the applet code that loads the
Sametime Connect for browsers client is located the Sametime Resources database
(STSrc.nsf) on the Sametime server. You can use the Domino Designer client to
open the STSrc.nsf database and add the applet parameter to the existing applet
code. For instructions, see ″Enabling the kiosk mode by altering the HTML in the
STSrc.nsf database.″
Note: If you enable the kiosk mode by adding the applet parameter to the HTML
in the STSrc.nsf database, the Sametime Connect for browsers client will
operate in kiosk mode for all users of this Sametime server. If some of those
users access the Sametime server from private workstations, those users will
not be able to specify permanent preferences settings for the Sametime
Connect for browsers client.
To accommodate the kiosk mode, some organizations may choose to customize the
user interface of the Sametime server by creating a custom HTML page or Domino
application specifically to launch the Sametime Connect for browsers client. This
custom interface would be accessible only from those client machines that must
operate in the kiosk mode. This possibility is briefly discussed in ″Example of
custom HTML code that enables the kiosk mode.″
Enabling the kiosk mode by adding an applet parameter to the
HTML in the STSrc.nsf database
To enable the kiosk mode on a standard deployment of the Sametime server, you
must add the required applet parameter to the HTML code in the Sametime
Resources (STSrc.nsf) database on the Sametime server.
This applet code exists in three subforms of the Sametime Resources (STSrc.nsf)
database on the Sametime server. To ensure the default connectivity settings go
into effect for all browser types, you must add the ConnectivityMethod applet
parameter to the HTML code in each of these two subforms.
v WebConnect-IE (This subform applies to the Microsoft Internet Explorer
browsers.)
v WebConnect-Moz (This subform applies to Mozilla browsers.)
Note: A WebConnect-N4 subform may appear in the STSrc.nsf database, but this
subform applies to the Netscape 4 browsers and is not used with
Sametime 7.0.
To add the applet parameter to the HTML code in the STSrc.nsf database:
1. Use the Domino Designer client to open the STSrc.nsf database on the
Sametime server.
2. In Domino Designer expand the ″Recent Databases″ icon and ensure that the
STSrc.nsf database is selected.
3. Expand ″Resources″ and click ″Subforms.″
4. In the Subforms list, double-click on the WebConnect-IE subform.
5. In the work pane at the top of the Domino Designer client, scroll down until
you see the HTML code containing the applet parameters.
Chapter 6. Configuring the Community Services 181
Note: The applet parameters begin with the text string ″<paramname=.″
6. Add the applet parameter below to the list of applet parameters in the
WebConnect-IE subform:
<paramname=″KioskMode″ value=″1″>
7. Save the subform.
8. Repeat steps 4 through 7 for the WebConnect-Moz subform.
Note: When enabling the kiosk mode, you may also want to add an applet
parameter that specifies the default connectivity configuration of the
Sametime Connect for browsers client. For more information, see Changing
the default connectivity setting of the Sametime Connect for browsers client.
Example of custom HTML code that loads the Sametime
Connect for browsers client
The example below illustrates the applet code that might be used in a custom
HTML page or Domino application to launch the Sametime Connect for browsers
client in the kiosk mode. If you create a custom interface for this purpose, ensure
the code includes the kiosk mode applet parameter as shown below:
<APPLET>
code=com.lotus.sametime.connectapplet.ConnectApplet.class
height=100% name=ConnectApplet
style="BACKGROUND-COLOR: gray; LEFT: 0px; TOP: 0px" width=100% MAYSCRIPT=TRUE>
<PARAM NAME="cabinets" VALUE="connect.cab">
<PARAM NAME="SametimeServer" VALUE="">
<PARAM NAME="SametimePort" VALUE="">
<PARAM NAME="TokenUserId" VALUE="">
<PARAM NAME="TokenValue" VALUE="">
<PARAM NAME="KioskMode" VALUE="1">
</APPLET>
Note: When enabling the kiosk mode, you may also want to add an applet
parameter that specifies the default connectivity configuration of the Sametime
Connect for browsers client. For more information, see Changing the default
connectivity setting of the Sametime Connect for browsers client.
182 Sametime Administrator’s Guide

Chapter 7. Monitoring the Sametime Server
The IBM Lotus Sametime server includes charts that allow you to monitor current
Sametime server statistics. The monitoring charts, which are presented as tables,
provide up-to-the-second information about Community Services activity and free
disk space on the server.
Accessing the Monitoring charts
To access the monitoring charts:
1. Open the Sametime Administration Tool.
2. Select Monitoring.
3. Select the appropriate chart for monitoring:
v General Server Status
v Logins
v Miscellaneous
General Server Status
The tables in the General Server Status monitoring chart allow you to see the
status of the Sametime server at a glance. Use this chart to keep track of the
Community Services logins to the server and the number of chats active at a
particular moment.
Total Community Logins
Community Services clients include the Sametime Connect and the Participant List
component of the Sametime Meeting Room. A user can be logged in to the
Community Services from more than one client.
The Total Community Logins chart displays current information about:
v Total Community Logins - The total number of logins to Community Services
on the Sametime server that you are monitoring. The Total Community Logins
chart includes multiple logins from the same user. For example, if a user is
logged in from both the Sametime Connect client and the Participant List
component of the Meeting Room, this chart records two logins for that user.
v Total Unique Logins - If a user is simultaneously logged in from multiple
Community Services clients, the Total Unique Logins chart records only one
login for that user. A user logged in from multiple clients is considered a single
″unique″ login. Use this chart to determine the current number of Community
Services users.
v Total 2-way Chats - The total number of 2-person chats taking place on the
Sametime server. This chart only includes chats that were started from the
Sametime server you are monitoring. For example, if you are monitoring
Sametime server A and a user who has specified Sametime server A as her home
server starts a chat with another user, that chat will be counted in the ″Total
2-way Chats″ chart. You will not see chats that were started by users who have
specified a server other than Sametime server A as their home server.
v Total n-way Chats - The total number of multi-person chats taking place on the
Sametime server. This chart only includes chats that were started from the
Sametime server you are monitoring. For example, if you are monitoring
© Copyright IBM Corp. 2005 183

Sametime server A and a user who has specified Sametime server A as her home
server starts a chat with two other users, that chat will be counted in the ″Total
n-way Chats″ chart. You will not see chats that were started by users who have
specified a server other than Sametime server A as their home server.
v Total Number of Active Places - The ″Total Number of Active Places″ chart lists
the combined number of n-way Chats and active meetings. Both n-way Chats
and online meetings are counted as ″Active Places;″ 2-way Chats are not counted
in this chart.
Note: Use the Total Community Logins portion of the General Server Status
Monitoring chart to determine current login information. For detailed
information about logins over a longer period of time (such as several
minutes) choose Monitoring - Total Logins.
Logins
The Logins chart displays:
v Community Server Total Logins - The total number of logins to Community
Services, including multiple logins from the same user. For example, if a user is
logged in from both the Sametime Connect client and another application
enabled with IBM Lotus instant messaging technology, this chart records two
logins for that user.
Internal components of the Community Services also log in to the Community
Services. These are intraserver connections between Community Services
components that occur as part of the normal operations of the Community
Services. These logins are also counted in the total logins chart.
v Community Server Total Unique Logins - If a user is simultaneously logged in
from multiple Community Services clients, this chart records only one login for
that user. A user logged in from multiple clients is considered a single ″unique″
login. Use this chart to determine the current number of Community Services
users.
Note: Use the Logins chart to determine detailed information about logins over a
longer period of time (such as several minutes). For up-to-the-second login
information, choose Monitoring - General Server Status and view the Total
Community Logins chart.
The Logins chart updates at the time interval specified in the Polling Interval field
(in seconds). Enter a new interval to change the rate at which the chart updates. To
update the chart immediately, click Refresh.
To access the Logins chart, open the Sametime Administration Tool and select
Monitoring - Logins.
Miscellaneous
The Miscellaneous charts are part of the Lotus Domino Web Administration pages.
To access the Domino Web Administration pages, choose Monitoring -
Miscellaneous in the Sametime Administration Tool, and then click the link that
appears on the right. The Domino Web Administration pages launch in a new
browser window. The three charts that are useful for Sametime administrators are
Memory, Disk Space, and Web Statistics.
184 Sametime Administrator’s Guide
Memory
To access the Memory chart, click Analysis in the Domino Web Administration
Tool, and then click Memory. A pie chart that depicts free memory on the server
appears. Use this information to troubleshoot memory problems. In addition to the
pie chart, the memory status is displayed as Painful, Normal, or Plentiful. If the
value is Painful, consider adding more memory.
Disk Space
To access the Disk Space chart, click Analysis in the Domino Web Administration
Tool, and then click Diskspace. A pie chart of each hard disk on the server appears.
Use this information to free disk space before users receive out-of-disk-space errors
when trying to create Discussion databases or save data (such as whiteboard files)
to the server.
You can also use the information in the Disk Space chart to check the free disk
space when setting logging parameters for the Sametime log. Small logging
intervals in the logging parameters can rapidly increase the size of the Sametime
log database.
Web Statistics
To access the Web Statistics chart, click Analysis in the Domino Web
Administration Tool and then click Web Statistics. This monitor tracks HTTP
requests and commands. An option at the bottom of this monitor allows you to
select either Domino HTTP Requests or Domino HTTP Commands. Each of these
charts is explained below. These charts are refreshed automatically every 60
seconds.
Domino HTTP Requests
When you select Domino HTTP Requests, a bar chart of server request statistics for
the current server session (the period from when the server was last started to the
current time) appears. A server request occurs when a user or another server asks
your server to perform a task. The bar chart shows the average and peak numbers
of requests per minute, per every five minutes, per hour, and per day. It also
shows the total number of requests during the current session.
Monitor this chart to determine whether the rate of requests to the server is rising
or whether the server is constantly at peak load. A rise in server requests indicates
a potential performance problem and might indicate the need for a server upgrade
or an additional server.
Domino HTTP Commands
When you click Domino HTTP Commands at the bottom of the screen, the
Sametime Administration Tool displays a bar chart for server command statistics
for the current server session. Use this information to analyze the type and number
of tasks your server must handle, which can help you monitor and manage server
performance. The Sametime Administration Tool also displays statistics for HTTP
commands such as OpenDatabase and EditDocument.
Chapter 7. Monitoring the Sametime Server 185

186 Sametime Administrator’s Guide

Chapter 8. Logging Sametime Activity
IBM Lotus Sametime server activity is recorded in the Sametime log. The Sametime
Administration Tool includes log settings that allow the administrator to control
whether Sametime information is logged to a database or a text file. The log
settings also enable the administrator to specify the information recorded in the log
and to control the size of the log. If the administrator logs Sametime information to
a database, the administrator can view the log from the Sametime Administration
Tool. For more information about log settings, see ″Sametime log settings″ in this
chapter.
The Sametime Administration Tool also allows an administrator to launch the
Domino Web Administration Tool to view the Domino log. The Domino log
includes information about available memory and disk space, server performance,
and databases that need maintenance. For more information, see ″Domino log″ in
this chapter.
Community Logins/Logouts
The Community Logins/Logouts section of the Sametime log displays successful
user logins to Community Services and failed user attempts to log in to
Community Services. If a single user is logged in to Community Services from
more than one client, each login for that user is recorded in the log. A user can be
logged in to Community Services from Sametime Connect and from the Participant
List component of the Sametime Meeting Room.
You can view login and logout information in the following ways:
v Login/Logout by Time: Login and logout times for each user who logged in to
Community Services, sorted by time. This option only appears if the Successful
logins option in the Community Server Events to Log settings is selected.
v Login/Logout by User: Login and logout times for each user who logged in to
Community Services, sorted by user name. This option only appears if the
Successful logins option in the Community Server Events to Log settings is
selected.
v Failed Logins by Time: Failed attempts to log in to Community Services, sorted
by time. This option only appears if the ″Failed logins″ option in the Community
Server Events to Log settings is selected.
Community Login/Logout information
Each of the options listed above contains some or all of the following information
about user attempts to log in to a Sametime community:
v User ID - A Lotus Notes User ID (canonical name, such as cn=John Smith,
ou=West, o=Acme), a User Name as specified in the Person document of the
Sametime directory, or a Distinguished Name from an LDAP directory.
Anonymous users are identified by numbers.
v Time - The date and time that a user logged in or logged out.
v Event Type - The type of event being logged: Community Login, Community
Logout, or Failed Login.
v IP Address - The IP address of the user’s computer.
v Application Type - The type of application from which a user logged in:
© Copyright IBM Corp. 2005 187
– Connect for browser: Sametime Connect for browsers. Indicates a user is
authenticated.
– Web: Any application created with the Sametime Java Software Development
Kit that supports IBM Lotus Instant Messaging.
– Sametime links: An application created with the Sametime Links Software
Development Kit.
– DB: An application created with the C++ Software Development Kit.
– Unknown type: Appears when the Application Type cannot be determined.v Client Version - The user’s client version. If ″Pre V3.1″ or ″Post 3.1″ appears in
this field, then the precise version of the client could not be detected.
v Connectivity - The connectivity method used by the client:
– Direct
– HTTP polling
– HTTP tunneling
Note For more information about these connectivity methods, see Sametime
Connect client connection processes.v Failure Reason - The reason a login failed.
v Reason - The reason a login failed. Also indicates if a user was able to log out
normally.
The administrator can use the ″Successful logins″ and ″Failed logins″ options in the
Community Server Events to Log settings to record information in the Community
Logins/Logouts section of the log.
To access the Community Logins/Logouts section of the Sametime log, select
Logging - Community Logins/Logouts in the Sametime Administration Tool.
Community Statistics
The Community Statistics section of the Sametime log displays information about
the peak and total number of Community Services users and logins, as well as the
peak and total number of chats and places created on the server. If a user is logged
in to Community Services from more than one client, each login for that user is
recorded in the Total Logins category. A user can log in to Community Services
from Sametime Connect and from Domino applications that contain instant
messaging and presence components.
You can view Community Statistics in the following ways:
v Users and Logins by Day
v Users and Logins by Week
v Users and Logins by Month
v Users and Logins by Year
v Chats and Places by Day
v Chats and Places by Week
v Chats and Places by Month
v Chats and Places by Year
Community Statistics information
Each of the options listed above contains some or all of the following information:
188 Sametime Administrator’s Guide

v Date/Week Beginning/Month Beginning/Year Beginning -The heading depends
upon the Community Statistics view chosen from the drop-down menu. The
date that users accessed Community Services.
v Peak Users - The number of users accessing Community Services when server
usage is at its highest.
v Peak User Time -The time when thepeak number of users occurs.
v Total Users - The number of new users that accessed Community Services
during the selected date range. Users who accessed Community Services prior to
the selected date range are not included in this number.
v Peak Logins - The number of logins to Community Services when server usage
is at its highest.
v Peak Login Time - The time when the peak number of logins occurs.
v Total Logins - The number of new Community Services logins during the
selected date range. Users who logged in prior to the selected date range are not
included in this number.
v Peak 2-Way Chats - The maximum number of 2-way chats that existed during
the selected date range, regardless of when the chats were started.
v Peak 2-Way Chat Time - The time when the peak number of 2-way chats occurs.
v Total 2-Way Chats - The number of new 2-way chats created during the selected
date range. Chats that were started prior to the selected date range are not
included in this number.
v Peak n-Way Chats - The maximum number of n-way chats that existed during
the selected date range, regardless of when the chats were started.
v Peak n-Way Chat Time - The time when the peak number of n-way chats
occurs.
v Total n-Way Chats - The number of new n-way chats created during the selected
date range. Chats that were started prior to the selected date range are not
included in this number.
v Peak Places - The maximum number of places that existed during the selected
date range, regardless of when the places were created.
v Peak Place Time - The time when the peak number of places occurs.
v Total Places - The number of new places that were created during the selected
date range. Places that were created prior to the selected date range are not
included in this number.
The administrator can use the Sametime Statistics settings to record information in
the Community Statistics section of the Sametime log.
To view information about Community Services statistics, select Logging -
Community Statistics in the Sametime Administration Tool.
Community Events
The administrator can use the Community Events section of the Sametime log to
view information about Community Services on the Sametime server. For example,
you can view the name and status (started or stopped) of the service.
You can view community events in the following ways:
v Community Server Events by Date-Community Services events listed by date
v Community Server Events by Name-Community Services events listed by event
name
Chapter 8. Logging Sametime Activity 189

Community Events information
Each of the options above contains some or all of the following information:
v Date - The date the service was startedor stopped
v Time-The time the service was started or stopped
v Application Name-The name of the Community Service
v Description-The status of the service (Started or Stopped)
v Reason - The reason that the Community Service was stopped
The administrator can use the Community server events and activities option in
the Community Server Events to Log settings to record Community server events
in the Community Events section of the log.
To access information about Community events, select Logging - Community
Events in the Sametime Administration Tool.
Place Login Failures
Use the Place Login Failures option to view failed user attempts to authenticate
when accessing a Sametime ″place.″ You can also use this option to view password
failures that occur when users attempt to access password-protected Sametime
places. Sametime does not log password failures that occur when users attempt to
view recorded meetings or the meeting details of password-protected meetings.
For information about how users are authenticated when accessing the Sametime
server, see Working with Sametime security.
Note: A Sametime ″place″ or ″virtual place″ is a programming concept that is
generally synonymous with an online meeting or an n-way chat (a chat
session involving three or more users). Each Sametime n-way chat occurs in
a virtual place. Users are authenticated in the virtual place through the
″login by token″ or ″login by password″ processes described in About
Sametime security. The Place Login Failure option records information about
user authentication and password failures to n-way chats. Programmers can
also use the Sametime Software Development Kit to build other applications
that create different types of online places. If such applications exist on the
Sametime server, login failures to those places are also recorded in the Place
Login Failure option. Some Place Login Failure information is recorded only
for places that are created with the Sametime Software Development Kit. For
more information, see About ″virtual places.″
You can view Place Login Failure information in the following ways:
v Global Error-Contains authentication failure information for places in which
authentication fails for unknown reasons.
v Bad Encryption Level - Records failures that occur when the encryption level
required by the place is higher than the encryption level supported by the client.
For example, if a Sametime 1.5 client that supports RC2 40-bit encryption
attempts to access a place that requires RC2 128-bit encryption, the client will be
unable to log in.
v Login Already Participating - Records authentication failures that occur when a
user has already authenticated to a place and attempts to authenticate to the
same place a second time using the same client. Recorded only for places that
are created with the Sametime Software Development Kit.
190 Sametime Administrator’s Guide

v Meeting Password Failures - Records failures that occur when users enter
incorrect meeting passwords for password-protected Sametime meetings. These
failures are not applicable to the IBM Lotus Instant Messaging Limited Use
version of Sametime.
v Missing Mandatory Activity - Records failures that occur when a place that is
missing a required activity (such as chat) is created. Recorded only for places
that are created with the Sametime Software Development Kit.
v Place Already Exists - Records failures that occur when the name of a
newly-created place is identical to the name of an already existing place.
Recorded only for places that are created with the Sametime Software
Development Kit
v Place is Full - Records failures that occur when the place is limited to a specific
number of users and that number is exceeded. Recorded only for places that are
created with the Sametime Software Development Kit.
v Place Not Found - Records failures that occur when a user attempts to log in to
a place that doesn’t exist. For example, if a user attempts to join an instant
meeting after all other participants have already left the meeting.
v User Authentication Failures - Records authentication failures that occur when a
specific user attempts to enter a specific online place.
v User Has No Permissions - Records failures that occur when a place is restricted
to specific users and a user without permission to enter the place attempts to
enter it.
v Wrong Place Type - Records failures that occur when the wrong place type is
used to enter to enter a place. For example, if a user attempts to use the
″published″ type to enter a place of the ″private″ type, a Wrong Place Type
failure is recorded. Conversely, if a user attempts to use the ″private″ type to
enter a place of the ″published″ type, a Wrong Place Type failure is also
recorded. Users can enter either both private and published places by using the
″Don’t care″ place type. This type of login failure is recorded only for places that
are created with the Sametime Software Development Kit.
Place Login Failure information
The options listed above contain the following information. The Global Error event
type might not include data for each of these fields.
v Severity - All events on the server have a severity from 0 to 4, which indicates
the impact of the event on the server (4 is the highest severity, indicating a
critical problem on the server).Authentication failures and meeting password
failures are considered high severity events because they might indicate attempts
by unauthorized people to gain illegal access to a place. These failures also
indicate that users were unable to access meetings or other Sametime places.
v Place Login Failure Event Type - The Place Login Failure Event Type is either
Global Error, Login already participating, Meeting Password Failure, or User
Authentication Failure. Each event type is described above.
v Date and Time - The date and time that the authentication failure or meeting
password failure occurred.
v Place ID - A unique identifier of the place in which the authentication failure or
meeting password failure occurred. The Sametime server assigns a unique ID to
each place. A client must obtain this ID during the connection process to connect
to a specific place or meeting on the server.
v User Name - The User Name of the person for whom the authentication failure
or meeting password failure occurred.
Chapter 8. Logging Sametime Activity 191

The administrator can use the Failed logins option in the Community Server
Events to Log settings to record information in the Place Login Failures section of
the Sametime log.
To access information about failed logins to places, select Logging - Place Login
Failures in the Sametime Administration Tool.
Domino log
An administrator can view additional information about the Sametime server in
the Domino log database (log.nsf). The Domino log database records server activity
information related to the Domino server and Domino databases, including
databases used by the Sametime server (such as the Sametime Meeting Center).
During setup, the Domino log database is automatically created and the server is
assigned Manager access in the database’s Access Control List (ACL). The default
access for all other users is Reader.
The Domino log database records information about all server activities, such as
database size and usage, server events, calls made to and from the server, and
billing for server services. Check the Domino log to monitor:
v Available server disk space
v Available server memory
v Server load
v Server performance
v Databases that need maintenance
Note: The Domino log is only available from the Sametime Administration Tool. If
you record Sametime log information in a text file, the text file does not
include information about the Domino log.
Content of the Domino log
The administrator cannot use the Sametime log settings or the Sametime
Administration Tool options to determine what appears in the Domino log. The
Domino log records information about the activities of the Domino server on
which Sametime is installed. Generally, the default settings should provide an
adequate record of server activity. However, you can record additional information
in this log file by altering settings in the Notes.ini file. Recording this additional
information might be necessary to troubleshoot a specific system problem.
For more information, see the Maintenance section of the Domino R5
Administration documentation.
Views in the Domino log
The Domino log includes many views that do not apply to Sametime. Use the table
below to determine which views are relevant for Sametime.
192 Sametime Administrator’s Guide

View Description
Database-Sizes Lists the size of the database, the percentage of the database’s disk
space in use, and the weekly usage for all databases on the server.
Use this view to check unused views, database size, and unused space
in a database.
Note: The stconf.nsf database grows in size depending on the number
of meetings that have been created. You can archive this database
frequently to prevent it from growing too large.
Database-Usage Lists the date and time the database was accessed, the type of access,
and the name of the user accessing the database for all databases on
the server.
Use this view to check unused views and unused space in a database.
Mail Routing
Events
Not used by the Sametime server.
Miscellaneous
Events
Shows Sametime events and error messages not contained in other
views. Messages are sorted in order of occurrence.
Use this view to check for Sametime error messages, server crashes,
and corrupted databases.
NNTP Events Not used by the Sametime server.
Object Store Usage Not used by the Sametime server.
Passthru
Connections
Not used by the Sametime server.
Phone Calls-By
Date
Not used by the Sametime server.
Phone Calls-By
User
Not used by the Sametime server.
Replication Events Not used by the Sametime server.
Sample Billing Shows the same information provided in the Usage views, but the
information is not categorized. The information in this view can be
easily exported to a spreadsheet.
Use this view for billing purposes, such as Meeting Center usage,
network usage, and database usage.
Usage-By Date Shows Sametime user transactions sorted by date. Transactions are
operations such as starting meetings, attending meetings, opening
documents, and updating documents. Each record lists the date and
time of the transaction, the user name, the minutes of usage, the
number of read operations, the number of write operations, the size of
the database, and the total number of transactions.
Use this view to check database use on a specific date and users’
transactions with the server.
Usage-By User Shows Sametime user transactions by user name. Transactions are
operations such as starting meetings, attending meetings, opening
documents, and updating a document. Each record lists the user name,
the date and time of the transaction, the minutes of usage, the number
of read operations, the number of write operations, the size of the
database, and the total number of transactions.
Use this view to check a particular user’s transactions on a database.
Chapter 8. Logging Sametime Activity 193

To access the Domino log, choose Logging - Domino Log in the Sametime
Administration Tool, and then click the link that appears on the right. The Domino
log launches in a new browser window.
Sametime log General settings
To access the Sametme log General settings allow you to specify the format and
content of the Sametime log.
To access the log General settings, choose Logging - Settings in the Sametime
Administration Tool.
General log settings
The General log settings allow you to specify the format for the Sametime log and
to control the information that the log records. The four types of General log
settings are:
v Database or text file settings -Allow you to specify the format for the log and to
automatically remove information from the log.
v Sametime Statistics settings - Allow you to control whether to log statistics
related to chats and users.
v Community Server Events to Log settings - Allow you to control which
Community Services events are recorded in the Sametime log.
Database or text file settings
The ″database or text file″ settings allow you to specify the format for the log and
to automatically remove old information from the log.
Enable logging to a Domino database (STLog.nsf): Select this setting to record
Sametime Community Services data in the Sametime log database (stlog.nsf).
During setup of the Sametime server, the Sametime Log database is automatically
created, and the administrator specified during setup is assigned Manager access
in the database Access Control List (ACL). The server is also assigned Manager
access to the database so that it can write information to the log. The default access
for all other users is Reader.
When this option is selected, a Sametime administrator can view all of the
information in the Sametime log by opening the Sametime Administration Tool
and selecting Logging. The links available from the Logging menu display different
views of the Sametime log database. For more information, see Viewing the
Sametime log.
When this option is selected, you can use the ″Remove history after (days)″ setting
to prevent the Sametime log from growing too large.
If the ″Enable logging to a Domino database″ option is not selected, Sametime
activity is not recorded in the Sametime database, and the links beneath the
logging option in the Sametime Administration Tool do not appear.
If you select this option, you cannot select the ″Enable logging to a text file″
option; it is not possible to record Sametime activity in both database and text file
format.
After selecting this option, click Update and restart the server for the setting to
take effect.
194 Sametime Administrator’s Guide
Remove history after (days): Select this setting to automatically remove old
information from the Sametime log database (stlog.nsf). In the field provided,
specify the age (in days) of information that is automatically removed from the
database. The default setting is 60 days.
This setting only applies to the Sametime log database; it does not remove
Sametime log information stored in text files. You must manually delete old text
files.
After selecting this option, click Update and restart the server for the setting to
take effect.
Enable logging to a text file: Select this setting to record Sametime log
information in a text file. When this option is selected, a new Sametime log text file
is created every day. By default, the name of each text file contains the date on
which the file was created (for example, log_23_Mar_2005.txt). After you select this
option, specify a directory for the text files in the ″Path to log text file″ field. To
view the file, open it in your preferred text editor. You cannot view the text file log
from the Sametime Administration Tool.
If you log Sametime activity to a text file:
v Sametime activity is not recorded in the Sametime log database, and the links
beneath the logging option in the Sametime Administration Tool do not appear.
You cannot access the Domino log when you log to a text file.
v You must manually delete the text files from the server hard drive periodically
to conserve hard disk space.
If you select this option, you cannot simultaneously select the ″Enable logging to a
Domino database″ option; it is not possible to record Sametime activity in both
database and text file format.
After selecting this option, click Update and restart the server for the setting to
take effect.
To access the ″Database or text file″ settings, open the Sametime Administration
Tool , select Logging - Settings, and click the General tab.
Sametime Statistics
The Sametime Statistics log settings allow you to record statistics related to chats,
meetings, and users. These statistics appear in the Community Statistics section of
the Sametime log.
To record these statistics, select the Sametime Statistics option. Sametime statistics
are recorded every 60 minutes.
After selecting this option, click Update and restart the server for the settings to
take effect.
To access the Sametime Statistics settings, open the Sametime Administration Tool,
select Logging - Settings, and click the General tab.
Community Server Events to Log
The Community Server Events to Log settings allow you to control which
Community Services events are recorded in the Sametime log. After selecting any
of these options, click Update for the settings to take effect.
Chapter 8. Logging Sametime Activity 195
Note: The settings take effect within a reasonable time period. The longest time
period you will wait for these settings to take effect is the time interval
specified for the ″How often to poll for new servers added to the Sametime
community″ setting in the Configuration - Community Services settings of
the Sametime Administration Tool. The default time interval for that setting
is 60 minutes.
Successful logins: Select this setting to record information about successful
Community Services logins and logouts in the Community Logins/Logouts section
of the Sametime log. This option is selected by default.
Failed logins: Select this setting to record information about failed logins to
Community Services in the Place Login Failures and Community Logins/Logouts
sections of the Sametime log.
Community server events and activities: Select this setting to record information
about Community Services events in the Community Events section of the
Sametime log. For example, you can view the name and status of each service.
To access the Community Server Events to Log settings, open the Sametime
Administration Tool, select Logging - Settings, and click the General tab.
196 Sametime Administrator’s Guide
Chapter 9. Managing Security
This chapter discusses:
v Authentication of Web browser and IBM Lotus Sametime server client
connections
v Database Access Control Lists (ACLs)
v Self-registration security issues
v Encryption
v Using SSL with Sametime
v Ensuring Sametime servlet access when Domino requires SSL for all connections
Getting started with Sametime security
This section includes basic security information to help you get started with
Sametime security. This section discusses:
v The required fully qualified server name
v Basic password authentication and authentication by token
v User requirements for basic password authentication
v Changing a user’s password
The required fully qualified server name
The end user must enter the fully qualified DNS name of the Sametime server (for
example, sametimeserver.meetings.acme.com) in the Web browser URL locator
when accessing the Sametime server to authenticate with a Sametime 7.0 server.
The Domino Single Sign-On (SSO) feature must be enabled on the Sametime 7.0
server. The Domino SSO feature requires the user to enter the fully qualified DNS
name of the server for a successful authentication. For more information, see
Authentication by token using LTPA and Sametime tokens.
Basic password authentication and authentication by token
Sametime uses two types of authentication:
v Basic password authentication
v Authentication by token
Basic password authentication
Sametime uses basic password authentication to authenticate Web browser
connections and Sametime Connect client connections. Sametime uses the same
Internet and intranet security features as a Domino server to authenticate the Web
browser connections. These features include Domino database Access Control Lists
(ACLs) and security settings in the Server document of the Domino server on
which Sametime is installed. End users must access the Sametime Center
(stcenter.nsf) database on the Sametime server with a Web browser to load the
Sametime Connect for browsers client.
The Domino security features also allow you to configure databases for
anonymous access. When a database is configured for anonymous access, the user
is not authenticated when accessing the database.
© Copyright IBM Corp. 2005 197

The following topics in this section discuss basic password authentication:
v User requirements for basic password authentication
v Using database ACLs for identification and authentication
v Basic password authentication and database ACLs
v Setting up basic password authentication in a database Access Control List
(ACL)
Authentication by token
A Sametime 7.0 server can be integrated with Domino servers to provide instant
messaging and presence functionality to Domino Web applications residing on the
Domino servers. In this scenario, the Domino Web applications must connect to the
Community Services on the Sametime server to access the instant messaging and
presence functionality. Sametime uses ″authentication by token″ to authenticate the
connections from these applications to the Community Services on the Sametime
server.
For this authentication to succeed, one of the following must be true:
v Both the Domino server hosting the Web application and the Sametime server
must support the Domino Single Sign-On (SSO) feature.
v Both the Domino server hosting the Web application and the Sametime server
must support the Secrets and Tokens authentication databases.
For detailed instructions on integrating a Sametime 7.0 server with Domino Web
Access, see the Domino 7.0 Administration documentation available at
www.lotus.com/ldd/doc.
The following topics discuss authentication by token:
v Authentication by token
v Authentication by token using the Domino Single Sign-On (SSO) feature
v Authentication by token using Secrets and Tokens databases
User requirements for basic password authentication
When accessing the Sametime server with a Web browser, a user must enter a user
name and Internet password to access any protected database on the Sametime
server, such as the Sametime Center database (stcenter.nsf). A protected database is
a database that has its Access Control List (ACL) set to require basic password
authentication. If the ACL settings of a database allow anonymous access, the user
is not authenticated (prompted for a user name and Internet password) when
accessing the database.
A Sametime Connect user must also be authenticated each time the user starts the
Sametime Connect client and connects to the Community Services on the Sametime
server. Sametime Connect users must enter the user name and Internet password
from the Person document in the Domino Directory when logging on to Sametime
Connect.
Note: If you have configured Sametime to operate with an LDAP directory,
Sametime authenticates users based on the user names and passwords
stored in the person entries of the LDAP directory.
198 Sametime Administrator’s Guide

Person document, User names, and Internet passwords in the
Domino Directory
This section discusses the requirements for basic password authentication when
Sametime is installed to operate with a Domino Directory. You must choose either
the Domino Directory or an LDAP directory during the Sametime installation.
Each member of the Sametime community must have a Person document in the
Domino Directory to authenticate with the Sametime server. The names and
password that a user can enter when accessing a Sametime server database or
logging in to the Sametime Connect client are maintained in the Basics tab of a
Person document in the Domino Directory.
To access a Person document, open the Sametime Administration Tool and select
Domino Directory-Domino-Manage People. Double-click a person’s name to open
that user’s Person document.
The table below shows a sample entry in the Basics section of a user’s Person
document. The text that follows the table explains how these entries are used in
the Web browser and Sametime Connect client password authentication processes.
Sample settings in the Basics section of a Person document
Field Entry Comment
First name Gary This field is optional.
Middle initial This field is optional.
Last name Ollerman This field is required.
User name Gary
Ollerman/Community
GOllerman
Note: The Community
(or domain) name is
appended to the first
entry in the user name
field by default.
This field is required.
Alternate name This field is optional.
Short name/UserID This field is optional.
Generational
qualifier
This field is optional.
Internet password (FCF5F3960B0A289D376B1F6C7D64AA14) This field is required.
The following fields on the Person document are used by the authentication
process:
v First name - This field is optional.
Web browser - If an entry exists in the ″First name″ field in the Basics tab of the
Person document, the user can enter just this name at the User Name prompt
that appears when accessing a protected database (such as stcenter.nsf) on the
Sametime server with a Web browser. The user must also enter the Internet
password to access the database. (A protected database is a database that has its
ACL set to require basic password authentication.)
Sametime Connect - The first name is not a valid entry at the User Name prompt
that appears when logging on to the Sametime Connect client.
Chapter 9. Managing Security 199

v Last name - This field is required. An entry must exist in the ″Last name″ field
of the Basics tab of a Person document.
The last name can be entered in the User Name prompt that appears when
accessing a protected database on the Sametime server with a Web browser. The
last name can also be used when logging on from the Sametime Connect client.
A user must also enter the Internet password to complete the authentication
process.
Note: If both the ″First name″ and ″Last name″ fields contain entries, the user
can enter the first and last names at the User Name prompt that appears
when accessing the Sametime server.
v User name - This field is required. An entry must exist in the ″User name″ field
in the Basics tab of a Person document.
Generally, it is good practice to use a user’s first and last name in the ″User
name″ field. The ″User name″ field can contain multiple entries. In our example,
the User name field contains both Gary Ollerman/Community and GOllerman.
(Each entry must be separated by a semicolon or a carriage return in the ″User
name″ field of the Person document.)
A user can enter any name that appears in the ″User name″ field of the Person
document when logging on to the Sametime server from the Sametime Connect
client or a Web browser. For example, the user could enter Gary
Ollerman/Community or GOllerman at a Sametime Connect or Web browser
User Name prompt. The name entered by the user is resolved to the topmost
name (Gary Ollerman/Community in the example) in the ″User name″ field. The
topmost name in the ″User name″ field is the name that is displayed in the
presence lists of all Sametime clients.
Note: If you want a user’s e-mail address to display in presence lists, enter the
user’s e-mail address as the topmost name in the ″User name″ field of the
Person document. If the e-mail address is included in the User name field,
the user can also enter the e-mail address at the ″User name″ prompt
when logging in from a Sametime Connect client or Web browser.
Sametime uses the topmost name in the ″User name″ field to validate a user in a
database ACL. If you require basic password authentication for a database (such
as stcenter.nsf) and you enter the names of individual users in the ACL of a
database, enter the topmost name that appears in the ″User name″ field of the
Person document in the database ACL. Although the user can enter ″GOllerman″
when logging on, Sametime uses ″Gary Ollerman/Community″ to validate the
user in the database ACL. Therefore, ″Gary Ollerman/Community″ must be the
name that appears for this user in database ACLs.
v Internet password - This field is required. Users must enter the Internet
password to authenticate with the Sametime server using a Web browser or the
Sametime Connect client. In the example, the Internet password is ″sametime.″
The password displays as a series of random characters because Internet
passwords are encrypted on the Person document.
Self-registration
If you are using the self-registration feature of the Sametime server, a Person
document containing a last name, user name, and Internet password is
automatically created for a user in the Domino Directory on the Sametime server at
the time the user self registers. Agents in the Self-Registration database (streg.nsf)
access the Domino Directory to create these Person documents. The signers of
these agents must have the proper access levels and permissions in the Domino
Directory for self-registration to work properly. If you allow self registration, you
200 Sametime Administrator’s Guide

might need to add these signers to the Domino Directory ACL. For more
information, see Using Sametime self-registration in a Domino environment.
The Sametime self-registration feature cannot be used if you have configured the
Sametime server to operate with an LDAP directory.
LDAP
If you have configured the Sametime server to operate with an LDAP directory, the
authentication process uses the user names and passwords stored in the LDAP
directory. It is not necessary to create Person documents containing separate user
names and passwords in the Domino Directory on the Sametime server.
For more information, see Using LDAP with the Sametime server.
Changing a user’s password
When accessing the Sametime server from a Sametime client or Web browser, the
user might be prompted for a user name and password. The password is specified
in the Internet password field on the user’s Person document in the Domino
Directory on the Sametime server. To change a user’s password, open the user’s
Person document and enter a new password in the ″Internet password″ field.
Note: If you have configured the Sametime server to operate with an LDAP
directory, the authentication process uses the passwords specified in the
LDAP directory. Use the administrative tools provided with the LDAP
server to access the LDAP directory and make password changes for
individual users. You cannot change passwords stored in an LDAP directory
from the Sametime Administration Tool.
To change a user’s Internet password in the Domino Directory on the Sametime
server:
1. From the Sametime server home page, open the Sametime Administration Tool.
2. Select Domino Directory.
3. Select Domino.
4. Select Manage People.
5. Double-click the name of the user whose password you want to change.
6. Click Edit Person.
7. Enter the new password in the ″Internet password″ field of the Person
document. You might want to write the new password down before closing
and saving the Person document. After you close and save the Person
document, the Internet password is encrypted and you cannot view it.
8. Select ″Save and Close.″
Domino security and the Web browser connection
To load the Sametime Connect for browsers client from the Sametime server home
page in the Sametime Center database (stcenter.nsf), a user first connects to the
Sametime HTTP server with a Web browser. By default, the user is not
authenticated when accessing the Sametime server over this port and can access
the stcenter.nsf database without entering a user name and password.
By using the Access Control List (ACL) settings of individual databases, the
Sametime administrator can force users to authenticate using basic password
authentication when they attempt to access the stcenter.nsf database on the server.
Chapter 9. Managing Security 201

By default, the ACL settings of the stcenter.nsf database allow anonymous access
so users can access the Sametime server home page without being authenticated
(entering a user name and password that is verified against entries in a directory).
After accessing the home page, a user selects links to access other databases on the
Sametime server. Most users will access the Sametime Meeting Center (stconf.nsf).
The Sametime Administrator can alter the ACLs of these databases to force users to
authenticate at the time they select the link that accesses the database.
The databases on the Sametime server that are accessible from the Sametime server
home page include:
v Self-Registration (streg.nsf) - An administrator controls whether self-registration
is available on the server. The administrator controls self-registration by selecting
or clearing the ″Allow people to register themselves in the Directory″ check box
available from the Domino Directory - Domino option in the Sametime
Administration Tool. The self-registration database (streg.nsf) should always
allow anonymous access to enable anonymous users to self register when the
administrator allows self-registration. For more information about the security
considerations associated with self-registration, see Security recommendations
for self-registration.
v Server Administration - You must add users to the ACLs of several Sametime
databases when allowing other users to have administrative privileges on the
Sametime server. For more information about controlling access to the Sametime
Administration Tool, see Adding a new Sametime administrator.
Notes:
v Users do not access a database to load the Sametime Connect for browsers
client. Sametime Connect for browers loads as a Java applet to the user’s Web
browser when the user selects the ″Launch Sametime Connect for browsers″ link
from the Sametime server home page. Users are prompted for authentication by
the client when it attempts to connect to the Community Services on the
Sametime server.
v By default, the connection from a Web browser to the Sametime server is neither
authenticated nor encrypted. The authentication occurs at the time a user
accesses an individual database on the Sametime server. You can configure
Sametime so that all HTTP traffic (including passwords and authentication
tokens) that passes over the connection between the Web browser and the HTTP
server is encrypted using the Secure Sockets Layer (SSL). For more information,
see About SSL and Sametime.
Using database ACLs for identification and authentication
Identification and authentication is the process of determining the name of a user
and verifying that users are who they say they are. You can use database Access
Control Lists (ACLs) to control access to individual databases on the server. For
each database on the server, you can set the ACL to allow:
v Anonymous access
or
v Basic password authentication
The settings in the database ACLs work together with the ″Maximum Internet
name & password″ setting for each database to control the level of access that Web
browser users have to a database on the Sametime server.
202 Sametime Administrator’s Guide

Using database ACLs
The database ACL defines user access to the content of the database. Before you set
up basic password authentication or anonymous access to a database, you should
be familiar with how to add users to a database ACL and the available settings
within the ACL. For more information, see:
v Adding a name to a database ACL
v Database ACL settings
Maximum Internet name & password setting
The ″Maximum Internet name & password″ setting on the Advanced panel of each
database ACL specifies the maximum level of access to the database that is
allowed for Web browser clients. This setting overrides individual levels set in the
ACL.
Generally, administrators should not need to change the ″Maximum Internet name
& password″ settings for databases on the Sametime server. The default settings
should function adequately in most cases.
Adding a name to a database Access Control List (ACL)
To add a name to a database Access Control List:
1. From the Sametime server home page, click the ″Administer the Server″ link
to open the Sametime Administration Tool.
2. If you are using a Domino Directory with the Sametime server, select Domino
Directory - Domino. If you are using an LDAP directory with the Sametime
server, select LDAP Directory.
3. Select Access Control.
4. Select a database from the list.
5. Click the Access button. The database ACL displays.
6. Click Add.
7. In the dialog box, type the exact user name from a Person document or the
group name from a Group document. Click OK.
When entering a user name for a user with a Person document in the Domino
Directory on the Sametime server, type the name exactly as it appears in the
topmost entry of the ″User name″ field in the user’s Person document.
When entering the names of users or groups registered in an LDAP directory
in a Sametime database ACL, use the fully qualified Distinguished Name, but
use forward slashes (/) as delimiters instead of commas. For example, if the
Distinguished Name for the user in the LDAP directory is:
v uid = Joe Waters, ou=West, o=Acmeenter the name in the Sametime database ACL as follows:
v uid = Joe Waters/ou=West/o=AcmeYou can also use asterisks for wildcards when entering names from an LDAP
directory or a Domino Directory in an ACL. For example, entering
*/ou=West/o=Acme is equivalent to entering all users in the ou=West/o=Acme
branch of the directory to the ACL.
Note It is possible to enter entities other than user and group names in an
ACL. For more information about the types of entries that can exist in an
ACL, see User type - ACL settings.
8. Click the name entered in the previous step so that the name is selected
(highlighted).
Chapter 9. Managing Security 203

9. In the User Type box, select the type of user (Unspecified, Person, Server,
Person Group, Server Group, or Mixed Group). For more information, see
User type - ACL settings.
10. In the Access Box, assign an access level for the user (Manager, Designer,
Editor, Author, Reader, Depositor, or No Access). For more information, see
Access level - ACL settings.
11. Edit the privileges if necessary. For more information, see Privileges - ACL
settings.
12. Click Submit.
Database ACL settings
A database Access Control List (ACL) contains a list of users and defines user
access to the contents of the database. For each user in the database ACL, you can
specify the following ACL settings:
v User Type
v Access Level
v Privileges
v Roles
User type - ACL settings
When you add a user or group to an ACL, you specify a user type for the entry in
the ACL. A user type identifies whether a name in the ACL is for a person, server,
group, or other entity. You assign a user type to a name to specify the type of ID
required for accessing the database with that name.
You can designate an entry in the ACL as any of the following user types:
Unspecified
Select the Unspecified user type if you want to enable the name you are entering
to access the database with any type of ID (Person, Server, or Group). The Default
entry in an ACL is always assigned the Unspecified user type. IDs used to sign
agents, such as Sametime Development/Lotus Notes Companion Products, are also
assigned the Unspecified user type when entered in a database ACL.
Person
Select the Person user type if the name you are entering belongs to a user who has
a Person document containing a user name and Internet password in the Directory
on the Sametime server or if the user has a Person entry in an LDAP directory on
a third-party server.
Server
Select the Server user type if the name you are entering belongs to another server
in the Domino domain. When multiple servers are installed in a Domino
environment, it might be necessary for a server to access data within the database
or to replicate a database. Server names are frequently added to the pre-existing
LocalDomainServers and OtherDomainServers server groups. The Server user type
is generally used only if you have installed Sametime in a Domino environment.
This user type performs the same function as it does on a Domino server.
Mixed Group
204 Sametime Administrator’s Guide

Select the Mixed Group user type if the name you are entering belongs to a group
that consists of both Server and Person names.
Person Group
Select the Person Group user type if you are entering the name of a group that
contains only people. You can enter a group from the Directory on the Sametime
server, or you can enter a group stored in an LDAP directory on a third-party
server in the ACL of a database.
Server Group
Select the Server Group user type if the name you are entering belongs to a group
that consists of only servers.
Access level - ACL settings
Access levels are the database ACL settings that control the type of actions a user
can perform on the contents of a database and on the database itself. Access levels
range from No Access, which prevents a user from opening a database, to
Manager, which lets a user read, create, and edit the ACL and all documents in the
database.
Users that are listed both individually and in one or more groups in the ACL
might be assigned different levels of access. The access level granted in an
individual entry takes precedence over the access level granted through a group
entry. If a user is in multiple groups, the user is granted the access level of the
group with the highest level of access.
If a user or group has one level of access in the ACL and another level of access in
a database component (such as a Read or View access list), the database
component access level takes precedence over the user or group access level.
The following access levels are listed from lowest to highest. A higher access level
has all the privileges granted to lower access levels. For example, Authors can
perform all of the functions of a Depositor and a Reader.
No Access
No Access prevents a user from accessing the database. For example, if you assign
No Access as the Default access for a database, only a user who has a Person
document in the Address Book and is listed in the ACL can access the database.
You can set the ACL access level of the stcenter.nsf database to No Access if you
want to require users to authenticate before accessing the Sametime server home
page.
Depositor
Depositor access allows a user to create documents but not view any documents in
the database, including the documents created by the user. This access level is not
generally used for Sametime databases. This ACL type is most frequently used for
automatic agents to write documents into a database for Domino workflow
applications.
Reader
Chapter 9. Managing Security 205

Reader access allows a user to read documents in a database, but not create or edit
documents.
Author
Author access allows a user to create and edit documents. Users with Author
access can edit documents they have created themselves, but they cannot edit
documents created by other users.
Editor
Editor access allows users to read, create, and edit all documents in the database,
including those created by other users.
Designer
Designer access allows a user to create full-text indexes, modify all database design
elements, and read, create, and edit all documents in the database. This access level
is primarily for programmers and database developers.
Manager
Manager access allows a user to read, create, and edit the ACL and all documents
in a database, modify ACL settings, and delete the database. Modifying the ACL
and deleting databases are tasks permitted by no other access level. This access
level is usually assigned to Sametime administrators and is not recommended for
general users.
Each database must have at least one Manager. Generally, the Manager access level
is provided in each database to the person specified as the administrator during
the Sametime installation and setup procedure. You should assign Manager access
to two people in case one manager is unavailable. For information about granting
other users administrative privileges, see Allowing others to use the Sametime
Administration Tool.
Privileges - ACL settings
The database Access Control List (ACL) defines privileges for users. Depending on
the access level assigned to a user, some ACL permissions are granted, denied, or
optional. Privileges listed in the ACL are:
Create documents
This privilege allows users to create documents in a database. This privilege is:
v Permanently granted to Managers, Designers, Editors, and Depositors
v Permanently denied to Readers
v Optionally granted to Authors
Delete documents
This privilege allows users to delete documents from a database. This privilege is:
v Permanently denied to Readers and Depositors
v Optionally granted to Managers, Designers, Editors, and Authors
Create personal agents
206 Sametime Administrator’s Guide

This privilege allows an Lotus Notes developer or user to create agents that
perform automated procedures in a database. This privilege is:
v Permanently granted to Managers and Designers
v Optionally granted to Editors, Authors, and Readers
Clear this option on server databases to prevent certain users from creating
personal agents that take up server disk space and processing time. Use the
Programmability Restrictions settings in the Security tab of the Server document in
the Directory to prevent users from running personal agents on a server, even if
the ″Create personal agents″ permission in a server database ACL is selected.
Create personal folders/views
This privilege is:
v Permanently granted to Managers and Designers
v Permanently denied to Depositors
v Optionally granted to Editors, Authors, and Readers
Personal folders and views created on a server are more secure and are available
on multiple servers. Also, administrative agents can operate only on folders and
views stored on a server. If this permission is not selected, users can still create
personal folders and views that are stored on their local workstations. Clear this
option to save disk space on a server.
Create shared folders/views
This privilege is:
v Permanently granted to Managers and Designers
v Permanently denied to Authors, Readers, and Depositors
v Optionally granted to Editors
Deny this privilege to Editors to save disk space on a server and maintain tighter
control over database design.
Create LotusScript
This privilege is:
v Permanently granted to Managers
v Permanently denied to Depositors
v Optionally granted to Designers, Editors, Authors, and Readers
Clear this option on server databases to prevent certain users from running
unrestricted methods and operations and restricted LotusScript agents that take up
server disk space and processing time. Use the Programmability Restrictions
settings in the Security tab of the Server document in the Directory to prevent
users from running unrestricted methods and operations and restricted LotusScript
agents on a server, even if the ″Create personal agents″ permission in a server
database ACL is selected.
Read Public Documents
This privilege is:
v Permanently granted to Managers, Designers, Editors, Authors, and Readers
Chapter 9. Managing Security 207

v Optionally granted to Depositors
Write Public Documents
This privilege is:
v Permanently granted to Managers, Designers, and Editors
v Optionally granted to Authors, Readers, and Depositors
Roles - ACL settings
Database Access Control List (ACL) roles grant access to individual database
components, such as forms or views. You can use ACL roles to delegate authority
for managing specific documents in a database. For example, you can assign the
roles of UserCreator and UserModifier in the Directory (Address Book) ACL to the
administrator who has the responsibility for creating and maintaining Person
documents.
ACL roles are optional in most databases. You can choose to rely on a broader
access level and not use roles.
For more information on roles available in important Sametime databases, see
Roles in Sametime databases ACLs.
Note: You can create up to 75 roles in a database.
Anonymous access and database ACLs
You can set a database ACL to allow anonymous access. Anonymous access has
the following characteristics:
v Users are not identified or authenticated when they access databases and
applications on the server.
v Data sent between the user and the Sametime server is not encrypted.
v Anonymous users are not identified in the maintenance log files. All anonymous
user activity is recorded under the name ″Anonymous.″
The anonymous access level requires the least maintenance from the administrator,
but it is the least secure. You should only allow anonymous access when you do
not need to know the identity of users accessing your server. For example, use
anonymous access if the Sametime server is behind your firewall and you plan to
only allow trusted intranet users to access it.
Setting up anonymous access in a database Access Control List
(ACL)
To allow anonymous access to a database, you can add the Anonymous entry to
the ACL and assign an access level to the Anonymous entry.
Note: Alternatively, you can remove the Anonymous entry from the ACL and
assign an access level to the Default entry in the ACL. When the
Anonymous entry is removed from the ACL, anonymous users receive the
access level and privileges assigned to the Default entry in the database
ACL.
Use the following procedure to allow anonymous users to access a database:
1. From the Sametime server home page, click the ″Administer the Server″ link to
open the Sametime Administration Tool.
208 Sametime Administrator’s Guide

2. If you are using a Domino Directory with the Sametime server, select Domino
Directory - Domino. If you are using an LDAP directory with the Sametime
server, select LDAP Directory.
3. Select Access Control.
4. Select a database from the list.
5. Click the Advanced button.
6. Set the ″Maximum Internet name & password″ access to Manager, which is the
maximum access level.
Note The ″Maximum Internet name & password″ setting on the advanced
panel of each database Access Control List (ACL) specifies the maximum
database access level granted to Web browser clients. This setting overrides
higher individual access levels set in the ACL. For example, if you set the
″Maximum Internet name & password″ to Author, and assign Editor access to
the Anonymous entry in the database ACL, anonymous users will only have
Author access to the database. Alternatively, if you set the ″Maximum Internet
name & password″ to Manager, and assign Reader access to the Anonymous
entry in the database ACL, anonymous users will only have Reader access to
the database.
7. Click the Access button.
If the Anonymous entry exists in the ACL, select the Anonymous entry and
assign an access level (for example, Author). Edit the default privileges if
necessary.
If the Anonymous entry does not exist in the ACL, users who access the
database anonymously receive the access level and privileges assigned to the
Default entry in the ACL.
Note If the Anonymous entry does not exist in the ACL, the administrator also
has the option to create an Anonymous entry and assign an access level and
privileges. In this case, users receive the access level associated with the
Anonymous entry instead of the Default entry.
8. Click Submit.
Basic password authentication and database ACLs
You can set a database ACL to require basic password authentication. Basic
password authentication has the following characteristics:
v Users are identified or authenticated when they access databases and
applications on the server.
v A Web browser user must have a user name and an Internet password stored in
the user’s Person document to access databases. Only users with these
credentials can access a database that requires basic password authentication.
v Data transmitted between the user and the Sametime server (including the name
and password) is not encrypted.
v Users are identified in the maintenance log files.
Basic password authentication identifies users, but it does not prevent
unauthorized users from listening to network transmissions or gaining server
access by guessing passwords. For information on using Secure Sockets Layer
(SSL) to encrypt the data that passes over the Web browser connection to the
Sametime server, see About SSL and Sametime.
Chapter 9. Managing Security 209

Using the Default entry or individual names in database ACLs
When basic password authentication is enabled for a database, browser clients are
authenticated when they attempt to open a database. For example, a Web browser
user might be authenticated when accessing the stcenter.nsf database that contains
the Sametime server home page.
The Sametime server challenges the user to supply a valid name and password
and then verifies that the user’s response matches the information stored in the
user’s Person document in the Domino Directory (or LDAP directory if you have
configured Sametime to operate with an LDAP directory). Authentication succeeds
if the user name and password provided by the user matches the user name and
password in the directory and:
v The user is listed individually or as a member of a group in the database ACL.
or
v The Anonymous entry is set to No Access while an access level is specified for
the Default entry in the ACL. Using this method allows you to require users to
authenticate but prevents you from having to add individual entries for every
user and group in the ACL.
When the Anonymous entry in the database ACL is set to No Access, users are
presented with a logon prompt when they attempt to access the database.
Users must enter the user name and Internet password at the logon prompt. Users
that are successfully authenticated are then provided with the access level that is
specified for the Default entry in the database ACL.
If both the Anonymous entry and the Default entry in the database ACL are set to
No Access, a user must be listed in the ACL individually or as part of a group to
access the database. Setting the Anonymous and Default entries to No Access
provides the strictest control over access to the database because only users and
groups that are listed in the ACL are allowed to access the database.
An individual name receives precedence over the Default entry. If a user’s name is
entered in a database ACL and provided with an access level, the user receives the
access level assigned to the user name entry in the database. Only users who are
not listed individually in the database ACL receive the Default access level.
Note: If the Anonymous entry does not exist in the database ACL, the Default
entry in the ACL must be set to ″No access″ to require basic password
authentication to the database. When the Anonymous entry does not exist in
the database ACL, anonymous users can access the database and receive the
access level assigned to the Default entry in the database. If the Anonymous
entry exists in the ACL and is assigned the ″No access″ access level, users
are authenticated when accessing the database and receive the access level
specified for the Default entry in the ACL.
Setting up basic password authentication in a database Access
Control List (ACL)
To require users to specify a valid name and password when accessing a database
on the Sametime server:
1. From the Sametime server home page, click the ″Administer the Server″ link
to open the Sametime Administration Tool.
2. If you are using a Domino Directory with the Sametime server, select Domino
Directory - Domino. If you are using an LDAP directory with the Sametime
server, select LDAP Directory.
210 Sametime Administrator’s Guide

3. Select Access Control.
4. Select a database from the list.
5. Click the Advanced button.
6. Set the ″Maximum Internet name & password″ access to Manager, which is
the maximum access level.
Note The ″Maximum Internet name & password″ setting on the advanced
panel of each database Access Control List (ACL) specifies the maximum
database access level granted to Web browser clients. This setting overrides
higher individual access levels set in the ACL. For example, if you set the
″Maximum Internet name & password″ to Author and assign Manager access
to the Anonymous entry in the database ACL, anonymous users will only
have Author access to the database. Alternatively, if you set the ″Maximum
Internet name & password″ to Manager and assign Reader access to the
Anonymous entry in the database ACL, anonymous users will only have
Reader access to the database.
7. Click the Access button.
8. Select the Anonymous entry, and then select No Access in the Access box.
If the Anonymous entry does not exist, you must create it. Use the following
procedure to create an Anonymous entry and assign the No Access level to
the entry:
v Click Add.
v Type Anonymous in the dialog box and click OK.
v Select the Anonymous entry, and then select No Access in the Access box. 9. Select the Default entry. You can either set an access level for the Default
entry, or set the Default entry to No Access.
v If you specify an access level for the Default entry other than No Access, all
users are required to authenticate when accessing the database. Each
authenticated user receives the access level you have specified for the
Default entry. It is not necessary to enter individual names or groups in the
ACL. After selecting an access level for the Default entry, click Submit. You
have finished the procedure required to set up basic password
authentication in a database ACL. Skip the remaining steps.
v If you select No Access for the Default entry, you must enter individual
user names or group names in the ACL. Only the names and groups you
enter can access the database. Complete steps 10 and 11 to add users to the
ACL.10. Click the Add button to add user names or group names to the ACL. Click
OK after adding each name.
11. Click Submit.
Authentication by token using LTPA and Sametime tokens
Sametime uses authentication by token to authenticate connections that occur after
a user has authenticated to Domino once using password authentication.
Authentication by token prevents a user from having to re-enter authentication
credentials when accessing different servers or using Sametime Web clients or
Domino applications that connect to a Sametime server.
The Sametime server includes two separate security features capable of generating
the authentication token used by Sametime:
v Domino Single Sign-On (SSO) authentication feature - The Domino SSO feature
must be enabled on a Sametime 7.0 server.
Chapter 9. Managing Security 211

If the Domino SSO feature is not enabled on the Domino server when you install
Sametime, the Sametime installation automatically enables and configures the
Domino SSO feature. In some environments, you might need to alter the default
SSO configuration provided by the Sametime installation. For more information,
see Altering the Domino Web SSO configuration following the Sametime server
installation.
The end user must enter the fully qualified domain name of the Sametime server
(for example, sametimeserver.meetings.acme.com) in the Web browser URL
locator when accessing the Sametime server to authenticate successfully using
SSO.
If your Sametime environment includes only Sametime 3.0 (or higher) servers,
and you do not use Sametime TeamRoom or Discussion databases that were
available with earlier Sametime server releases, only the Domino SSO feature is
required to support authentication by token.
If your Sametime environment includes Sametime 3.0 (or higher) servers that
interoperate with Sametime servers from releases earlier than Sametime 3.0, both
the Domino SSO feature and the Secrets and Tokens databases must be
supported on the Sametime 7.0 server to enforce authentication by token.
Sametime includes a custom logon form for the SSO feature. This custom logon
form can be used in place of the default SSO logon form. The custom logon
form is presented to the user the first time the user accesses a database on the
server that requires basic password authentication.
A Sametime 7.0 server can also be integrated with Domino servers to provide
instant messaging and presence functionality to Domino Web applications
residing on the Domino servers. In this scenario, the Domino Web applications
must connect to and authenticate with the Community Services on the Sametime
server. These Domino applications can use LTPA tokens generated by the
Domino SSO feature to authenticate the connection to the Community Services
on the Sametime server. For this authentication to succeed, both the Domino
server hosting the Web application and the Sametime server to which the
application connects must have the Domino SSO feature enabled. For detailed
instructions on integrating a Sametime 7.0 server with Domino Web Access, see
the Domino 7.0 Administration documentation available at
www.lotus.com/ldd/doc.
Note: When a Sametime 7.0 server is integrated with Domino servers to provide
instant messaging and presence functionality to Domino Web applications,
you can use either the Domino SSO feature or the Sametime Secrets and
Tokens authentication databases to support authentication by token from
the Domino applications. In this scenario, the Domino SSO feature is the
recommended way to support authentication by token.
v Secrets and Tokens authentication databases - Sametime server releases earlier
than Sametime 3.0 used only the Secrets and Tokens authentication databases to
create authentication tokens. When Sametime 7.0 operates in environments that
include servers from Sametime releases earlier than Sametime 3.0, the Sametime
7.0 server supports both the Domino SSO feature and the Secrets and Tokens
authentication databases.
A Sametime 7.0 server supports Secrets and Tokens authentication by default.
The following are required to support Secrets and Tokens authentication:
– The Secrets and Tokens databases must be present on the server following a
Sametime 7.0 server installation.
212 Sametime Administrator’s Guide

– The ″Allow users to authenticate using either LTPA token or Sametime Token
(stauths.nsf and stautht.nsf)″ option must be selected in the
Configuration-Community Services-General settings of the Sametime
Administration Tool.Both conditions above exist on a Sametime 7.0 server following the server
installation, so no additional procedures are required to support Secrets and
Tokens authentication following the installation. However, if you have enhanced
security by enabling the SametimeSecretsGenerator agent in one Secrets database
on one Sametime server in your community, you must ensure that this Secrets
database is replicated to all Sametime servers in the community. For more
information, see Replicating the Secrets database (optional).
Authentication by token using the Domino Single Sign-On
(SSO) feature
The Domino Single Sign-On (SSO) feature must be enabled on the Sametime 7.0
server. This feature creates Lightweight Third Party Authentication (LTPA) tokens
that enable Web browser users to log in a single time to access multiple Sametime,
Domino, or IBM WebSphere®
servers that are in the same DNS domain. This
capability is called ″single sign-on.″
When Single Sign-On (SSO) is enabled, an LTPA token is generated and passed to
the user’s Web browser when the user authenticates with the Sametime server. The
LTPA token contains the user’s authentication information and can be used to
authenticate the user when the user accesses other Sametime, Domino, or
WebSphere servers in the same DNS domain during a single Web browser session.
The other Sametime, Domino, or WebSphere servers must also support the SSO
feature (that is, the servers must accept LTPA tokens).
A Sametime 7.0 server can also be integrated with Domino servers to provide
instant messaging and presence functionality to Domino Web applications residing
on the Domino servers. In this scenario, the Domino Web applications must
connect to the Community Services on the Sametime server. The Domino
applications can send LTPA tokens generated on the Domino server to the
Sametime server to authenticate when establishing this connection to the Sametime
server. For this authentication to succeed, the Domino Web SSO feature must be
enabled on both the Domino server hosting the Domino Web Application and the
Sametime server.
Note: For detailed instructions on integrating a Sametime 7.0 server with Domino
Web Access, see the Domino 7.0 Administration documentation available at
www.lotus.com/ldd/doc.
Authentication by LTPA token occurs after a user has already authenticated once
using password authentication. For example, authentication by token on a
Sametime server integrated with a Domino Web Access server might occur as
follows:
1. A user accesses the Domino Web Access server.
2. An SSO logon form appears, and the user enters a valid user name and
password from the Domino Directory (or LDAP directory) to authenticate.
3. After a successful authentication, the Domino Single Sign-On (SSO) feature
generates an LTPA token containing the user’s authentication information and
passes the token to the user’s Web browser in a cookie.
The user’s Web browser must have cookies enabled to accept the LTPA token.
Chapter 9. Managing Security 213

4. The Domino Web Access application connects to the Community Services on
the Sametime server to access the instant messaging and presence functionality.
The Domino Web Access application passes the LTPA token to the Community
Services and the connection is authenticated using the LTPA token. The user in
not required to re-enter authentication credentials to authenticate these
connections.
The same LTPA token described above can be used to authenticate the user when
the user accesses other Sametime, Domino, or WebSphere servers in the same DNS
domain during a single Web browser session, as long as the other servers are
configured to accept LTPA tokens for authentication.
If the Domino SSO feature is not enabled when you install Sametime, the
Sametime installation automatically enables and configures the Domino SSO
feature. In some environments, it may be necessary to alter the SSO configuration
following the Sametime server installation. For more information, see Altering the
Domino Web SSO configuration following the Sametime server installation.
Note: When a Sametime 7.0 server is integrated with Domino servers to provide
instant messaging and presence functionality to Domino Web applications,
you can use either the Domino SSO feature or the Sametime Secrets and
Tokens authentication databases to support authentication by token from the
Domino applications. However, the Domino SSO feature is the
recommended way to support authentication by token on a Sametime 7.0
server.
Altering the Domino Web SSO configuration following the
Sametime server installation
The Sametime installation automatically enables and configures the Domino SSO
feature on the Domino server. In some cases, it may be necessary to alter the
default configuration of the Domino SSO feature following the Sametime server
installation.
This topic discusses the following issues pertaining to the Sametime installation
and the Domino SSO feature:
v SSO configurations performed by the Sametime server - This section explains
how the Sametime installation configures the Domino Web SSO feature. You can
use this information to determine if it is necessary to alter the default SSO
configuration following a Sametime server installation.
v Altering the SSO configuration - This section explains the most common reasons
for altering the SSO configuration following the Sametime server installation. In
multiple Sametime server environments, it is frequently necessary to add the
Domino server names of Sametime servers to the Domino Web SSO
Configuration document.
v Viewing and editing the Domino Web SSO configuration document - This
section explains how to edit the Domino Web SSO configuration document in
the Domino Directory. This document contains the parameters for the Web SSO
configuration that you may need to change.
v Sametime includes a custom SSO logon form. See Using the Sametime custom
logon form for SSO for information about enabling this form following the
Sametime server installation.
Note: If for some reason it is necessary to manually enable the Domino SSO
feature, you can use the procedures described in Manually enabling the
214 Sametime Administrator’s Guide

Domino SSO feature . You can also review these procedures to understand
all configurations that are required to support SSO for the Sametime server.
SSO configurations performed by the Sametime installation
The Sametime installation enables the Domino SSO feature and performs the SSO
configurations described below. The Sametime installation:
v Generates an LTPA token named LtpaToken. This token (or cookie) is used to
authenticate Web browser and Sametime client connections to the Sametime
server.
v Creates a Web SSO Configuration document and populates the following fields
in the Web SSO Configuration document:
– DNS Domain - To populate the DNS Domain field, the installation determines
the fully-qualified domain name of the Sametime server machine and then
subtracts the hostname value from the fully-qualified domain name.
For example, if the installation determines the fully qualified name of the
Sametime server is ″Sametimeserver.east.acme.com,″ the installation writes
″.east.acme.com″ in the DNS Domain field.
The LTPA token is then valid for the servers that belong to the DNS domain
specified in the DNS Domain field.
– Expiration (minutes) - This field specifies the length of time for which the
LTPA token is valid. This value is 30 minutes by default. You may want to
provide a longer value for the token expiration. Lotus software recommends a
setting of 120 minutes.
– Domino Server Names: Each Domino/Sametime server that can accept the
SSO token must be listed in the Domino Server Names field. By default, the
installation writes only the name of the Domino server on which Sametime is
installed in this field. It may be necessary to add the names of all other
Domino/Sametime servers in the community to this field. For more
information, see Altering the SSO configuration.v Alters the Sametime/Domino server Server document. The installation changes
the Internet Protocols-Domino Web Engine-Session authentication field in the
Server document to the value ″Multiple servers (SSO).″ The Server
authentication field must have the ″Multiple servers (SSO)″ value even if your
Sametime community uses only one Sametime server. If the ″Multiple server
(SSO)″ value is not selected, the SSO feature will not function properly for
Sametime.
v Automatically configures the Sametime server to use the Sametime custom logon
form for SSO. To enable the custom logon form, the Sametme installation:
– Creates a Domino Configuration database named domcfg.nsf in the root data
directory of the Domino server.
Note: If a domcfg.nsf database already exists on the Domino server when
Sametime is installed, the Sametime installation overwrites the existing
domcfg.nsf database.
– Creates a ″Mapping a Login Form″ document in the domcfg.nsf database.
– Populates the following fields in the Mapping a Login Form document:
Target database filename - This field is set to the value ″stcenter.nsf.″
Target form name - This field is set to STLogonForm.nsf.The configurations described above ensure that the custom logon form named
″STLogonForm.nsf″ displays to users when users authenticate with the server.
Chapter 9. Managing Security 215

Altering the SSO configuration
The default configuration outlined above meets the basic requirements necessary
for a Sametime server to support SSO. In some cases, it may be necessary for the
administrator to alter the ″DNS Domain″ field or the ″Domino Server Names″ field
of the Domino Web SSO Configuration document following the Sametime server
installation.
v Altering the DNS Domain field - The Sametime installation may not always
accurately detect the fully-qualified domain name of the Sametime server
machine. If this problem occurs, the DNS Domain field may not specify the
appropriate DNS domain. The administrator might need to manually edit the
Domino Web SSO Configuration document to add the appropriate entry in the
DNS Domain field of the Domino Web SSO Configuration document. Follow the
instructions in ″Viewing and editing the Domino Web SSO Configuration
document″ below to manually edit the document.
v Altering the Domino Server Names field - If the Sametime community consists
of multiple Sametime/Domino servers, the Domino server names of all of the
Sametime/Domino servers in the Sametime community must exist in the
″Domino Server Names″ field of the Domino Web SSO Configuration document.
By default, the installation writes only the name of the Domino server on which
Sametime is installed to this field. If you have multiple Sametime servers, it may
be necessary to manually open the Domino Web SSO configuration document
and enter the names of the Domino/Sametime servers in the ″Domino Server
Names″ field.
For example, if you have Sametimeserver1/East/Acme and
Sametimeserver2/East/Acme in your Sametime community, and you install
Sametimeserver3/East/Acme, only Sametimeserver3/East/Acme is written to
the Domino Server Names field during the Sametime installation. The
administrator may need to open the Domino Web SSO Configuration document
and manually enter the names Sametimeserver1/East/Acme and
Sametimeserver2/East/Acme in the ″Domino Server Names″ field on the
Domino Web SSO Configuration document on Sametimeserver3/East/Acme to
ensure that all servers in the community are entered in this field. To manually
open the Domino Web SSO Configuration document, see ″Viewing and editing
the Domino Web SSO Configuration document″ below.
Note that in multiple server environments, the Domino Directory may already
be replicated to the Domino server at the time the Sametime server is installed.
If the Domino Directory already exists on the server and contains a Domino Web
SSO configuration document, the Sametime installation will not attempt to alter
the existing configuration in any way. In this case, the existing Domino Web SSO
configuration document may already contain the names of the existing servers in
the community and it may be necessary to add the name of the newly installed
Sametime server to the Domino Web SSO configuration document.
For example, the names Sametimeserver1/East/Acme and
Sametimeserver2/East/Acme may already exist in the Domino Web SSO
configuration document in the Domino Directory on the server reserved for the
Sametimeserver3/East/Acme installation. Since the
Sametimeserver3/East/Acme installation does not alter an existing SSO
configuration, that server name will not appear in the Domino Web SSO
Configuration document following the Sametime server installation. In this
scenario, it is necessary to open the Domino Web SSO configuration document
in the Domino Directory on Sametimeserver3/East/Acme and manually enter
″Sametimeserver3/East/Acme″ in the ″Domino Server Names″ field. All other
parameters in the existing Web SSO Configuration document should be valid for
the newly-added server.
216 Sametime Administrator’s Guide

Viewing and editing the Domino Web SSO Configuration
document
To view or edit the Web SSO configuration document that is created by the
Sametime installation, do the following:
1. From a Lotus Notes client, open the Domino Directory on the Sametime server.
2. Choose the Configuration - Web - Web Configurations view.
3. In the right-hand pane, select the twistie to display the document under ″Web
SSO Configurations.″
4. Double-click on the document titled ″Web SSO Configuration for LtpaToken″ to
open the Domino Web SSO Configuration document.
5. Click the Edit button to put the document in edit mode.
6. Edit the appropriate field (for example, the DNS Domain or Domino Server
Names field).
7. Click Save and Close after editing the document.
Manually enabling the Domino SSO feature
If your environment requires you to manually enable the Domino SSO feature
instead of using the default configuration provided by the Sametime installation,
you can use the steps in this section to manually enable the Domino SSO feature.
This procedure is identical to the procedure used to enable the SSO feature on a
Domino server. After manually enabling the feature, you can configure the server
to use the Sametime custom SSO logon form.
Generally, the Domino SSO feature will be enabled by default during the Sametime
installation and it is not necessary to manually enable the feature. For more
information, see Altering the Domino Web SSO feature following the Sametime
server installation.
To enable the Domino SSO feature on the Sametime 7.0 server:
1. Create a Web SSO Configuration document in the Domino Directory.
2. Enable SSO and Name & Password authentication in the Server document.
3. Start the HTTP task on the SSO-enabled server.
Using the custom Sametime SSO logon page
After enabling the Domino SSO feature, follow the procedure described in Using
the custom Sametime SSO logon page to use the custom Sametime SSO logon
form.
Create the Web SSO Configuration document in the Domino
Directory
This procedure is the first of three required to manually enable the Domino SSO
authentication feature on a Sametime 7.0 server.
In this procedure you create a Web SSO document that specifies the servers
participating in the shared authentication, the time-out value for the cookie
containing the LTPA access token, and the encrypted secret used to create the
cookie.
1. Using a Lotus Notes client, open the Domino Directory on the Sametime
server.
2. Select Configuration - Servers - All Server Documents.
3. Select the Web pull-down menu button from the task bar.
4. Select Create Web SSO Configuration.
Chapter 9. Managing Security 217

5. In the document, select the Keys pull-down menu button.
6. Select Create Domino SSO Key.
7. Configure the Token Expiration field. Note that a token does not expire based
on inactivity; it is valid only for the number of minutes specified from the
time of issue. The token is also valid only for a single browser session. Lotus
software recommends an expiration value of 120 minutes.
Note Generally, the expiration value should reflect the average length of a
Sametime meeting in your environment. Setting a high value may create a
security risk. If the LTPA token is intercepted by an attacker, the attacker may
use the token to illegally gain access to the Sametime server until the token
expires. Setting up the Domino server to support SSL for Web browser
connections provides the highest level of security against attempts to intercept
LTPA tokens.
8. In the DNS Domain field, enter the DNS domain (for example, lotus.com or
meetings.acme.com) for which the tokens will be generated. The servers
enabled for SSO must all belong to the same DNS domain. This field is
required.
When users access the Sametime 7.0 server, they must enter the fully qualified
domain name of the Sametime server for authentication to be successful (for
example, sametimeserver.meetings.acme.com).
9. In the Server Names field, enter the servers that will be participating in SSO.
Generally, this field should contain the Domino hierarchical names of all
Sametime servers in your environment. You can browse and select the server
names from the Domino Directory.
Note Groups and wildcards are not allowed in the field.
10. Select ″Save and Close″ to save the Web SSO Configuration document. The
document will appear in the Web Configurations view. This document will be
encrypted for the creator of the document, the members of the Owners and
Administrators fields, and the servers specified in the Server Names field.
Next step
Next, enable SSO and ″Name & Password″ authentication in the Server document.
Enable SSO and ″Name & Password″ authentication in the Server
document
This procedure is the second of three required to manually enable the Domino SSO
authentication feature on a Sametime 7.0 server. Use this procedure to enable SSO
and ″Name & Password″ authentication in the Server document of the Sametime
server for which you are enabling the Domino SSO feature.
1. In the Configuration - Servers - All Server Documents view of the Domino
Directory, double-click the name of the Sametime server to open the Server
document.
2. Select Edit Server to put the Server document in edit mode.
3. Select the Ports tab.
4. Select the Internet Ports tab.
5. Select the Web tab (if it is not displayed by default).
6. For the HTTP TCP/IP port Authentication Options, select Yes in the ″Name &
Password″ field.
7. Select the Internet Protocols tab.
8. Select the Domino Web Engine tab.
218 Sametime Administrator’s Guide

9. In the ″HTTP Sessions″ section, select ″Multiple server (SSO)″ in the ″Session
authentication″ field.
Note You must select the ″Multiple server (SSO)″ value even if your
environment includes only a single Sametime server.
10. Click ″Save and Close″ to save the Server document.
Next step
Next, start (or restart) the HTTP task on the SSO-enabled server.
Start (or restart) the HTTP task on the SSO-enabled server
This procedure is the last of three required to manually enable the Domino SSO
authentication feature on a Sametime 7.0 server.
To start the HTTP task on the SSO-enabled server:
1. Open the Domino console.
2. Start the HTTP server, or stop and restart the HTTP server if it is already
running.
v Use the Tell HTTP Quit command to stop the HTTP server.
v Use the Load HTTP command to start the HTTP server.3. On the Domino console, the following message should appear:
HTTP: Successfully loaded Web SSO Configuration
4. If a server enabled for SSO cannot find a Web SSO Configuration document or
is not included in the Server Names field (and thus cannot decrypt the
document), then the following message should appear on your server’s console.
HTTP: Error Loading Web SSO configuration. Reverting to single server session
authentication.
Next step
Next, Lotus software recommends using the custom Sametime SSO logon form. If
you do not use this logon form, users will see the default Domino SSO logon form
the first time they access a database on the server that requires authentication.
Note: Authentication by token does not occur if you allow anonymous access to
the Sametime server and all its databases.
To configure the Sametime server to use the custom Sametime SSO logon form, see
Using the Sametime custom logon form for SSO.
Using the Sametime custom logon form for SSO
The Sametime installation automatically configures the Sametime server to use the
Sametime custom logon form for SSO. The Sametime installation performs the
following configurations to enable the custom logon form. The Sametime
installation:
1. Creates a Domino Configuration database named domcfg.nsf in the root data
directory of the Domino server on which Sametime is installed. This database is
created from the domcfg5.ntf template available with the Domino server.
2. Creates a ″Mapping a Login Form″ document in the domcfg.nsf database.
3. Populates the following fields in the Mapping a Login Form document:
v Target database filename - This field is set to the value ″stcenter.nsf.″
v Target form name - This field is set to STLogonForm.nsf.
Chapter 9. Managing Security 219

The configurations described above ensure that the custom logon form named
″STLogonForm.nsf″ displays to users when users authenticate with the server.
If a database named domcfg.nsf exists on the Sametime server when Sametime is
installed, the administrator must manually enable the custom logon form. This
procedure is described below.
Manually enabling the custom logon form.
Follow the procedure below to manually enable the Sametime custom logon form
for SSO. The custom logon form displays when the user accesses the first database
on the server that requires authentication or selects the ″Log on to Sametime″ link
in the Sametime Meeting Center.
Note: The custom logon form exists in the Sametime server home page database
(stcenter.nsf). If you want to require users to authenticate when accessing
the server, you should allow anonymous access to the Sametime server
home page (stcenter.nsf) and require authentication to the Sametime Meeting
Center database (stconf.nsf). With this arrangement, users access the server
home page anonymously and are presented with the SSO logon form when
attempting to create or attend a meeting.
To use the Sametime custom logon form for SSO, you must configure settings in
the Domino Configuration database (domcfg.nsf) provided with the Domino server
on which Sametime is installed.
To use the Sametime custom logon form for SSO:
1. Verify that the Sametime server has a Domino Configuration database named
domcfg.nsf.
Note If your server includes an existing domcfg.nsf database, but you do not
want to use that database you can delete the existing domcfg.nsf database and
create a new one. To create a new domcfg.nsf database, use the Domino
Configuration (R5) template (domcfg5.ntf) available with a Domino server.
When creating the new database, you must select the ″Show advanced
templates″ option to access the domcfg5.ntf template.
2. If necessary, copy the domcfg.nsf Domino Configuration database to the root
data directory of the Domino server on which Sametime is installed (for
example C:\Lotus\Domino\Data directory).
3. From a Lotus Notes client, open the Domino Configuration database.
4. Choose Add Mapping.
5. Under Site Information, accept the default of All Web Sites/Entire Server.
6. In the ″Target database filename″ field, enter stcenter.nsf.
7. In the ″Target form name″ field, enter STLogonForm.
Required ACL settings for the Sametime Center database
(stcenter.nsf)
The Sametime Center database (stcenter.nsf) must meet the following ACL
requirements for the custom logon form to operate properly.
v In the Advanced options of the stcenter.nsf ACL settings, the ″Maximum Internet
name & password″ field must allow at least Reader access. If either Depositor or
No Access are selected, the logon form will not appear.
v In the Basics options of the stcenter.nsf ACL settings, anonymous users must
have an access level of Reader or higher. If the access level provided for
220 Sametime Administrator’s Guide

anonymous users is less than Reader, the logon form will not appear. The ″Write
public documents″ and ″Read public documents″ options should also be
selected.
Authentication by token using Secrets and Tokens databases
To authenticate by token, the Sametime 7.0 server can accept an authentication
token created by the Secrets and Tokens authentication databases, the Domino
Single Sign-On (SSO) feature, or both. The Sametime 7.0 server can also generate
tokens using the Secrets and Tokens authentication databases or the Domino SSO
feature.
If the Sametime 7.0 server is operating in an environment that includes Sametime
servers from releases earlier than Sametime 3.0, or if Domino databases enabled
with Sametime technology (such as the Sametime Discussion and TeamRoom
databases that were available with earlier releases) are used in your environment,
the Sametime server must support both the Secrets and Tokens authentication
databases and the Domino SSO authentication feature.
The Sametime 7.0 server is set up to support Secrets and Tokens authentication by
default. The basic requirements for this authentication system are:
v The Secrets (stauths.nsf) and Tokens (stautht.nsf) databases must exist on the
Sametime server. These databases are created during the Sametime server
installation.
v The ″Allow users to authenticate using either LTPA or Sametime Tokens
(stauths.nsf and stautht.nsf)″ option must be selected in the Sametime
Administration Tool. (This option is selected by default.)
Note that previous releases of Sametime allowed an administrator to enhance the
level of security provided by the Secrets and Tokens databases by enabling the
SametimeSecretsGenerator agent in one Sametime Secrets database (stauths.nsf) on
one Sametime server in the Sametime community. If you enable the
SametimeSecretsGenerator agent on one Secrets database on one Sametime server,
that Secrets database must be replicated to all Sametime servers in the community.
If your environment includes Sametime servers from previous releases and you are
currently replicating a Secrets database to all of the servers in your environment,
you must also replicate that Secrets database to the Sametime 7.0 servers.
There are two procedures associated with ensuring the Secrets and Tokens
authentication databases on the Sametime 7.0 server are functioning properly:
1. If necessary, select the ″Allow users to authenticate using either LTPA or
Sametime Tokens (stauths.nsf and stautht.nsf)″ option in the Sametime
Administration Tool. (This option is selected by default.)
2. Replicating the Secrets and Tokens databases (optional) - This step is necessary
only if you have deployed Domino databases enabled with Sametime
technology (such as Sametime TeamRoom and Discussion databases) or if you
have enhanced security by enabling the SametimeSecretsGenerator agent in the
Secrets database.
Note: When a Sametime 7.0 server is integrated with Domino servers to provide
instant messaging and presence functionality to Domino Web applications,
you can use either the Domino SSO feature or the Sametime Secrets and
Tokens authentication databases to support authentication by token from the
Domino applications. However, the Domino SSO feature is the
recommended way to support authentication by token on a Sametime 7.0
Chapter 9. Managing Security 221

server. For detailed instructions on integrating a Sametime 7.0 server with
Domino Web Access, see the Domino 7.0 Administration documentation
available at www.lotus.com/ldd/doc.
Selecting the ″Allow users to authenticate using either LTPA or
Sametime Tokens (stauths.nsf and stautht.nsf)″ option
This procedure is the first of two associated with setting up the Secrets and Tokens
authentication system on a Sametime 7.0 server.
Note: This procedure might not be necessary as the ″Allow users to authenticate
using either LTPA or Sametime Tokens (stauths.nsf and stautht.nsf)″ setting
is enabled by default following the server installation.
The ″Allow users to authenticate using either LTPA or Sametime Tokens
(stauths.nsf and stautht.nsf)″ setting must be enabled in the Sametime
Administration Tool to enable the Sametime server to accept both the LTPA and
Sametime Tokens. This setting must be set consistently on all Sametime 7.0, 6.5.1,
3.1 and 3.0 servers in your environment; if you enable this setting on one
Sametime server, you must enable it on all Sametime servers in your environment.
If you disable it on one Sametime server, you must disable it on all Sametime
servers in the environment.
To enable this setting:
1. From the Sametime server home page, click the ″Administer the Server″ link to
open the Sametime Administration Tool.
2. Choose Configuration.
3. Choose Community Services.
4. Select the ″Allow users to authenticate using either LTPA or Sametime Tokens
(stauths.nsf and stautht.nsf)″ option.
5. Click the Update button and restart the server for the change to take effect.
Next step
You have the option of replicating the Secrets database to enhance security.
Replicating the Secrets and Tokens databases (optional)
This topic discusses the second of two procedures associated with setting up the
Secrets and Tokens authentication system on a Sametime server.
The Secrets and Tokens databases exist on every Sametime server. If you have
installed multiple Sametime servers, you can enable the SametimeSecretsGenerator
agent in the Secrets database. Enabling the SametimeSecretsGenerator agent is an
optional procedure that increases security against outside attacks.
If you enable the SametimeSecretsGenerator agent, only one Secrets database
should be used for all Sametime servers in the environment. You should replicate
the Sametime Secrets database in which you have enabled the
SametimeSecretsGenerator agent to all Sametime servers in the environment.
Create a replication schedule for the Secrets database in which you have enabled
the SametimeSecretsGenerator agent to ensure it replicates at regular intervals.
Delete all other copies of the Secrets database from all Sametime servers in the
environment. For more information, see Integrating a Sametime server into an
existing Sametime community.
222 Sametime Administrator’s Guide

Do not replicate the Tokens database to the other Sametime servers. The replicated
Secrets database can work with the Tokens database that exists on each Sametime
server by default following the server installation.
If you do not enable the SametimeSecretsGenerator agent in any Secrets database
on any Sametime server, it is not necessary to replicate the Secrets database. If you
do not enable the SametimeSecretsGenerator agent, administration is simpler
because no replications or replication schedules are required, but the security level
is not as high.
Security recommendations for self-registration
The Sametime server includes a self registration feature available from the Register
link on the Sametime server home page. From the Register link, any anonymous
Web browser user can create a Person document that contains a user name and
Internet password in the Directory on the Sametime server. These credentials on
the Person document enable a Web browser user to authenticate with the
Sametime server.
Note: Self-registration is not available if you have configured the Sametime server
to access an LDAP directory on a third-party server. Users cannot register
themselves in an LDAP directory on another server.
The administrator has the option of allowing or not allowing self-registration. To
turn self-registration on or off, use the ″Allow people to register themselves in the
Domino Directory″ setting in the Directory options available from the Sametime
Administration Tool.
Allowing self-registration enables any anonymous user to access Sametime Connect
to chat with other members of the Sametime Community. A self-registered user can
also authenticate to access protected areas of the server with a Web browser.
Follow these recommendations to secure your server if you allow users to self
register:
v In the ACL of the Directory (names.nsf) on the Sametime server, set the
Anonymous entry to No Access. This setting prevents anyone who has not
authenticated from accessing the Directory. Some activities of authenticated users
are recorded in the Notes Log.
v In the ACL of the Directory on the Sametime server, set the Default entry to No
Access. This setting protects privacy, which might be a concern if your Sametime
server is accessible by the general public. The initial setting for the Default entry
in the Directory ACL is Reader. Setting the Default entry to No Access prevents
users from browsing the Directory and viewing the user names in the Directory.
v Verify that the Sametime Development/Lotus Notes Companion Products ID has
the appropriate settings in the ACL of the Directory on the Sametime server.
Self-registration is supported by the Self Registration database (streg.nsf) on the
Sametime server. When a user clicks the Register link from the Sametime server
home page, the user is accessing the Self Registration database. This database
contains agents that access the Directory (names.nsf) on the Sametime server to
create a Person document for the user who self registers. These agents also
access the Directory for password changes. The Directory must have the file
name ″names.nsf″ for these agents to access the Directory.
The agents in the Self Registration database are signed by the Sametime
Development/Lotus Notes Companion Products ID. For self-registration to work
properly, this ID must exist in the ACL of the Directory on the Sametime server.
Chapter 9. Managing Security 223

The proper ACL settings for the Sametime Development/Lotus Notes
Companion Products ID in the Directory (names.nsf) ACL are:
– User Type: Unspecified
– Access: Author
– Roles: [Group Creator], [Group Modifier], [User Creator], [User Modifier]
Note: After installing Sametime (either on a dedicated server or on a Domino
server), the administrator must manually add the Sametime
Development/Lotus Notes Companion Products ID and assign the
proper ACL settings as described above.v An end user can click the Register link on the Sametime server home page to
access a user interface that enables the user to change the Internet password on
the user’s Person document in the Domino Directory.
Domino includes an ″Update to More Secure Internet Password″ option that
allows an administrator to upgrade a user’s Internet password to a more secure
password format. The administrator selects this option by opening a user’s
Person document with a Lotus Notes client and selecting Actions - Upgrade to
More Secure Internet Password Format.
If the administrator selects the ″Upgrade to More Secure Internet Password″
option for a self-registered Sametime user, the user cannot change the Internet
Password from the self-registration user interface available on the Sametime
server home page.
Using SSL with Sametime
The Secure Sockets Layer (SSL) protocol can be used to encrypt Web browser
connections to Sametime or to encrypt connections between Sametime and an
LDAP server.
Encrypting Web browser connections
Sametime installs on a Domino server and uses the HTTP server provided with the
Domino server. To encrypt Web browser connections to the Sametime server with
SSL, you must configure the Domino HTTP server to support SSL. If the Domino
HTTP server supports SSL, Web browser connections to Sametime are also
encrypted with SSL.
To encrypt Web browser connections to the Sametime server, you must configure
the Domino HTTP server to support SSL. The procedure required to configure the
Domino HTTP server to support SSL varies depending on the operating system on
which Sametime runs. To encrypt Web browser connections to the Sametime server,
perform the procedure below that is appropriate for your environment:
v Setting up SSL for Sametime on Windows
v Setting up SSL for Sametime on Solaris/AIX
Ensuring access to Sametime servlets when Domino requires
SSL for all connections
When setting up a Domino server to support SSL, the administrator has the option
of forcing all HTTP connections to the server to use SSL. If a Domino server is
configured in this way, you must configure the Sametime server to support SSL for
HTTP connections to servlets on the Sametime server. If you do not configure the
Sametime server to support SSL access to its servlets, the Sametime server will not
function properly and users will be unable to access the server.
224 Sametime Administrator’s Guide

For more information about this procedure, see Ensuring Sametime servlet access
when Domino requires SSL for all connections.
Encrypting connections to an LDAP server
If you have configured Sametime to connect to an LDAP directory on an LDAP
server, you can also use SSL to encrypt the connections between Sametime and the
LDAP server. For more information, see Use SSL to authenticate and encrypt the
connection between the Sametime server and the LDAP server.
Setting up SSL for Sametime on Windows
Use these instructions to encrypt Web browser connections to the Domino HTTP
server if your Sametime server operates on the Windows operating system:
1. Set up the Domino HTTP server to support SSL (Windows)
2. Use IKeyMan to create a key file on the Sametime server
3. Import the SSL trusted root or SSL server certificate into the key store database
o the Sametime server
4. Modify the Sametime.ini file
Set up the Domino HTTP server to support SSL (Windows)
Setting up the Domino HTTP server to support SSL is the first of four procedures
required to set up SSL for a Sametime server on Windows.
Use the procedures described in the Security chapter of the Domino server
administration documentation to set up a Domino server to support SSL for HTTP
connections. These procedures are summarized below.
To set up SSL on a Domino server:
1. Set up the Server Certificate Admin application (CERTSRV.NSF), which Domino
creates automatically during server setup.
2. Create a server key ring file to store the server certificate.
3. Request an SSL server certificate from the CA.
4. Merge the CA certificate as a trusted root into the server key ring file.
5. The CA approves the request for a server certificate and sends notification that
you can pick up the certificate.
6. Merge the approved server certificate into the key ring file.
7. Configure the port for SSL.
The Domino administration documentation that describes these procedures in
detail is available both on the Domino server and from the IBM Lotus
documentation library at www.lotus.com/ldd/doc.
When you perform the procedures above, be sure to save and have available a
copy of one of these two SSL certificates:
v The trusted root certificate that is merged into the server key ring file in step 4.
v The server certificate that is merged into the key ring file in step 6.
In a subsequent procedure, you must add one of these certifcates to a key store
database used by the Sametime server.
Next step:
Use IKeyMan to create a key file on the Sametime server
Chapter 9. Managing Security 225

Use IKeyMan to create a key store file on the Sametime server
(Windows)
Creating the IBM IKeyMan key store file is the second of four procedures required
to set up SSL for a Sametime server on Windows.
In this procedure, you use the IKeyMan program provided on the Sametime server
to create a key store file named ″stkeys.jks and store this file in the Sametime
installation directory. In this example, the Sametime installation directory is the
default installation directory of C:\Program Files\Lotus\Domino.
To create a key database on the Sametime server:
1. Start the IKeyMan program from a command prompt on the Sametime server.
The IKeyMan program resides in the ″jvm″ sub-directory of the Sametime
server installation directory (default C:\Program Files\Lotus\Domino). Use the
command ″java com.ibm.gsk.ikeyman.Ikeyman″ to start the IKeyMan program.
For example, the command string to start IkeyMan might look like this:
C:\Program Files\Lotus\Domino\jvm>java com.ibm.gsk.ikeyman.Ikeyman
2. From the menu bar, select Key Database File - New....
3. In the New window, complete these fields:
Key database type: - Accept the default of ″JKS.″
File name: - Enter the file name for the key database. The file name is at your
discretion. This example assumes that you name the key database ″stkeys.jks.″
Location: - Enter the directory in which the ″stkeys.jks″ key database will be
stored. The Location is at your discretion. This example assumes the key
database is stored in the C:\Program Files\Lotus\Domino\jvm directory.
Click OK after completing the fields in the New window.
4. In the Password prompt window, do the following:
a. Type and confirm the password that will be used to access the stkeys.jks
key database. The password is at your discretion.
b. Check ″Set expiration time?″ And specify the number of days for which the
password will be valid before it must be changed. If no expiration date is
required, you can leave the ″Set expiration time?″ Field blank.
In a production environment, it is recommended that you set an expiration
date for the password for the highest level of security.
c. Click OK.5. Close the stkeys.jks key database file.
Next step:
Import the SSL trusted root or SSL server certificate into the key store database o
the Sametime server
Import the SSL trusted root or SSL server certificate into the key
store database on the Sametime server (Windows)
Importing the SSL trusted root certificate or SSL server certificates used by the
Domino HTTP server is the third of four procedures required to set up SSL for a
Sametime server on Windows.
Before beginning this step, make sure you have one of these certificates available.
You were instructed to save one of these certificates earlier in this procedure
In this procedure, you must do one of the following:
226 Sametime Administrator’s Guide

v The SSL trusted root certificate imported into the Domino HTTP server key ring
file
v The SSL server certificate imported into the Domino HTTP server key ring file
Note: In this procedure, you must import one of these certificates into the
stkeys.jks database you have just created. Import the certificate as a signer
certificate.
To import an SSL certificate to the IKeyMan key store file (stkeys.jks):
1. Start the IKeyMan program from a command prompt on the Sametime server.
The IKeyMan program resides in the ″jvm″ sub-directory of the Sametime
server installation directory (default C:\Program Files\Lotus\Domino). Use the
command ″java com.ibm.gsk.ikeyman.Ikeyman″ to start the IKeyMan program.
For example, the command string to start IkeyMan might look like this:
C:\Program Files\Lotus\Domino\jvm>java com.ibm.gsk.ikeyman.Ikeyman
2. Choose Key Database File - Open.
Browse to and select the ″stkeys.jks″ key database (or other database you have
created to manage the SSL certificates on the WebSphere server).
3. Enter the password required to access the Stkeys.jks file.
4. In the Key database content area, select ″Signer certificates.″
5. Click the ″Add″ button.
6. In the ″Add Cas certificate from a File″ dialog box:
v Verify that ″Base64-encoded ASCII data″ is selected as the Data type.
v Browse to and select the SSL certificate you want to import.Click OK.
7. In the ″Enter a Label″ dialog box, provide a label for the certificate. This label
identifies the certificate in the Signer Certificates list of the IBM IKeyMan
program. Click OK.
The certificate label will display in the Signer Certificates list.
Next step:
Modify the Sametime.ini file
Modify the Sametime.ini file (Windows)
Modifying the Sametime.ini file is the last of four procedures required to set up
SSL for a Sametime server on Windows.
The Sametime.ini file on the Sametime server must contain the parameters that
enable the Sametime servers to connect to the Domin HTTP server using SSL. You
must use a text editor to edit the Sametime.ini file.
Follow these instructions to edit the Sametime.ini file in the Sametime installation
directory on the Sametime/Domino server.
1. Open a text editor on the Sametime server.
2. Open the Sametime.ini file located in the Sametime server installation directory
(the default directory is C:\program files\lotus\domino).
3. Locate the ″ConfigurationPort=″ setting. Make sure that the
″ConfigurationPort=″ setting, specifies the port on which the Domino HTTP
server listens for SSL connections (default port 443). You may need to alter the
ConfigurationPort setting to specify the Domino HTTP server SSL port. For
example:
Chapter 9. Managing Security 227

ConfigurationPort=443
4. The following settings must exist in the Sametime.ini file. If necessary,
manually add the following settings to the [Config] section of the Sametime.ini
file. (At the bottom of the Config section, manually type these settings into the
file):
[Config] ConfigurationSSLEnabled= javax.net.ssl.keyStore=
javax.net.ssl.trustStore= javax.net.ssl.keyStorePassword=
javax.net.ssl.trustStorePassword=
Use the instructions below to populate each of the fields in the Sametime.ini
file:
v ConfigurationSSLEnabled - This setting should be set to true. An example
value is:
ConfigurationSSLEnabled=true.
v javax.net.ssl.keyStore - This setting must specify the complete file path,
including the filename, of the IKeyMan database you have created on the
Sametime server. For example:
javax.net.ssl.keyStore=C:\program files\lotus\domino\stkeys.jks
v javax.net.ssl.trustStore - This setting must also specify the complete file path,
including the filename, of the IKeyMan database you have created on the
Sametime server. For example:
javax.net.ssl.trustStore=C:\program files\lotus\domino\stkeys.jks
v javax.net.ssl.keyStorePassword - This setting must specify the password you
provided for the IKeyMan database when you created the database. The
example shown here assumes the password is ″sametime.″ Alter the setting
to reflect your password.
javax.net.ssl.keyStorePassword=sametime
v javax.net.ssl.trustStorePassword - This setting must also specify the
password you provided for the IKeyMan database when you created the
database. The example shown here assumes the password is ″sametime. Alter
the setting to reflect your password.
javax.net.ssl.trustStorePassword=sametime5. Save the Sametime.ini file.
6. Restart the Domino server.
Setting up SSL for Sametime on Solaris/AIX
Use these instructions to encrypt Web browser connections to the Domino HTTP
server if your Sametime server operates on the Solaris or AIX operating system:
1. Create a certificate authority database
2. Enable SSL on the Domino server
3. Copy the text of the certificate stored in the Certificate Authority Key Ring
4. Transfer files to the server
5. Use IKeyMan to create a key file
6. Modify the Sametime.ini file
Create a certificate authority database (Solaris/AIX)
Creating a certificate authority database is the first of six procedures required to
use SSL to encrypt Web browser connections to a Sametime server that runs on the
Solaris or AIX operating system. In this procedure, you create a certificate
228 Sametime Administrator’s Guide

authority database and use this database to create a certificate authority key ring
and a server authority key ring. You also create a certificate for each of these key
rings.
To create a certificate authority database:
1. Open a Lotus Notes client and use the advanced template named ″Domino R5
Certificate Authority″ to create a certificate authority database named ″CA.nsf.″
2. Open the CA.nsf database in the Notes client.
3. Click on ″1. Create Certificate Authority Key Ring & Certificate.″ If you receive
an error, close the CA.nsf database, reopen it, and then try this step again.
Complete the following steps:
a. Accept the default Key Ring file name - [CAKey.kyr].
b. Enter the Key Ring Password and verify it.
c. Set the ″Key Size″ to [1024].
d. Enter the common name (a descriptive name such as ″Servername CA″),
organization, state/province and country.
e. Click on the ″Create Certificate Authority Key Ring″ button.4. Click on ″2. Configure Certificate Authority Profile.″ Accept all defaults and
click on ″Save and Close.″
5. Click on ″3. Create Server Key Ring & Certificate″ and complete the following
steps:
a. Accept the default key ring file name - [keyfile.kyr].
b. Enter the Key Ring Password and verify it.
c. Accept the default key size.
d. Enter the CA Certificate Label; for example, ″servername CA.″
e. Enter the common name (the fully-qualified DNS name of the server),
organization, state/province and country.
f. Click on the ″Create Server Key Ring″ button.
g. Enter the password for the authority that you entered when you clicked on
″1. Create Certificate Authority Key Ring and Certificate.″
Next step:
Enable SSL on the Domino server (Solaris/AIX)
Enable SSL on the Domino server (Solaris/AIX)
Enabling SSL on the Domino server is the second of six procedures required to use
SSL to encrypt Web browser connections to a Sametime server that runs on the
Solaris or AIX operating system.
In this procedure, you configure settings on the Domino server Server document to
enable SSL.
1. Using a Notes client, open the Domino directory (names.nsf ).
2. Open the Server document for the Sametime server and follow the steps below.
a. Go to Ports-Internet Ports.
b. Ensure that the ″SSL key file name″ matches the default server key ring file
name (keyfile.kyr) you created in the previous procedure.
c. Set the ″TCP/IP Port Status″ to Disabled.
d. Set the ″SSL Port Status″ to Enabled.3. Click on ″Save and Close.″
Chapter 9. Managing Security 229

Next step:
Copy the text of the certificate stored in the Certificate Authority Key Ring
(Solaris/AIX)
Copy the text of the certificate stored in the Certificate Authority
Key Ring (Solaris/AIX)
Copying the text of the certificate stored in the Certificate Authority Key Ring is
the third of six procedures required to use SSL to encrypt Web browser connections
to a Sametime server that runs on the Solaris or AIX operating system.
In this procedure, you copy the text of the SSL certificate stored in the Certificate
Authority Key Ring file and paste it into a text document to create a copy of the
certificate.
1. Open a Web browser and browse to http://servername/CA.nsf. (This URL is
case sensitive.)
2. On the left, click on ″Accept This Authority In Your Server.″ The certificate text
appears on the right.
3. Copy the certificate text, including the ″BEGIN CERTIFICATE″ and ″END
CERTIFICATE″ lines.
4. Use a text editor to create a new text file and paste the certificate text into the
text file.
5. Insert a new line (carriage return) in the text file after the ″END CERTIFICATE″
line.
6. Save the text file as CA.txt.
Next step:
Transfer files to the server (Solaris/AIX)
Transfer files to the server (Solaris/AIX)
Transferring files to the server is the fourth of six procedures required to use SSL
to encrypt Web browser connections to a Sametime server that runs on the Solaris
or AIX operating system.
In this procedure you use FTP to transfer files from their current locations to the
Domino server data directory.
v Use FTP to transfer the keyfile.kyr and keyfile.sth files from the data directory of
your Notes client to the data directory of your Domino server (for example, the
/local/notesdata directory).
v Use FTP to transfer the CA.txt file you created in the previous procedure from
its current location to the Domino server data directory.
Next step:
Use IKeyMan to create a key file on the server (Solaris/AIX)
Use IKeyMan to create a key file on the server (Solaris/AIX)
Using IKeyMan to create a key file on the server is the fifth of six procedures
required to use SSL to encrypt Web browser connections to a Sametime server that
runs on the Solaris or AIX operating system.
230 Sametime Administrator’s Guide

In this procedure, you use IKeyMan to create a key store file on the server and
then import the CA.txt file you created earlier into this key store file. This
procedure involves two steps:
v Verify that the SAMETIME_HOME variable is set correctly
v Creating the key file
Verify that the SAMETIME_HOME variable is set correctly: Before you run the
ikeyman.sh file to start IKeyMan, you may need to edit the file to ensure that the
SAMETIME_HOME variable specifies the server installation directory.
By default, the SAMETIME_HOME variable in the ikeyman.sh file specifies these
installation directories:
v AIX - /opt/ibm/lotus/notes/latest/ibmpow
v Solaris - /opt/ibm/lotus/notes/latest/sunspa
If you have installed the Sametime server to a different directory, use a text editor
to open the ikeyman.sh file and change the SAMETIME_HOME variable so that it
specifies the installation directory appropriate for your server. The ikeyman.sh file
is located in the server installation directory.
Creating the key file: In this step you start IKeyMan and use it to create the key
file.
1. From the command line, change your directory to the server’s binary directory.
The binary directories are shown below:
v AIX - /opt/ibm/lotus/notes/latest/ibmpow
v Solaris - /opt/ibm/lotus/notes/latest/sunspa2. Run the ikeyman.sh file.
Note The ikeyman.sh file must have execute privileges.
3. When IKeyMan starts, choose Key Database File - New.
4. In the New window, complete these fields:
v Key database type: - Accept the default of ″JKS.″
v File name: - Enter the name ″key.jks″ as the file name.
v Location: - Enter the server’s data directory. For example, enter
/local/notes/dataClick OK after completing the fields in the New window.
5. In the Password prompt window, do the following:
v Type and confirm the password that will be used to access the keys.jks key
database. This documentation assumes you enter a password of ″sametime.″
The actual password is at your discretion.
v Check ″Set expiration time?″ And specify the number of days for which the
password will be valid before it must be changed. If no expiration date is
required, you can leave the ″Set expiration time?″ Field blank.6. Import the Certificate Authority certificate text file (ca.txt) into the key file.
a. Click on the Add button.
b. In the dialog box that appears, make sure that the ″Data Type″ field is set to
″Base64-encoded ASCII data.″
c. Set the ″Certificate file name″ to the name of the text file (CA.txt) into which
you copied the certificate.
d. Set the ″Location″ to the location to which you transferred the CA.txt file to
via FTP in the previous procedure (for example, /local/notes/data).
Chapter 9. Managing Security 231

e. Click OK.7. Close IKeyMan after the file imports successfully.
Next step:
Modify the Sametime.ini file (Solaris/AIX)
Modify the Sametime.ini file (Solaris/AIX)
Modifying the Sametime.ini file is the last of six procedures required to use SSL to
encrypt Web browser connections to a Sametime server that runs on the Solaris or
AIX operating system.
In this procedure, you use a text editor to edit the Sametime.ini file so that it
includes the parameters needed to support SSL connections. You must stop the
Sametime server before modifying the Sametime.ini file and then start the server
after you are finished modifying the file.
1. Stop the Sametime server.
2. Open a text editor on the Sametime server.
3. Open the Sametime.ini file located in the server’s data directory. Add these
settings to the Sametime.ini file. (If these settings are already in the file, change
the value as indicated below.)
ConfigurationPort=443
ConfigurationSSLEnabled=true
javax.net.ssl.keyStore=/local/notesdata/key.jks
javax.net.ssl.trustStore=/local/notesdata/key.jks
javax.net.ssl.keyStorePassword=sametime
javax.net.ssl.trustStorePassword=sametime
Note For javax.net.ssl.keyStorePassword and javax.net.ssl.trustStorePassword,
enter the password you specified when creating the keys.jks file. Also, if these
two lines exist in the Sametime.ini file, remove them:
javax.net.ssl.trustStoreType=JKS
javax.net.ssl.keyStoreType=JKS
4. Save and close the Sametime.ini file.
5. Start the Sametime server.
Ensuring Sametime servlet access when Domino requires SSL for all
connections
A Sametime server installs on a Domino server and relies on the Domino HTTP
server to handle all HTTP traffic to the Sametime server. To encrypt Web browser
access to the Sametime Meeting Center with SSL, the administrator must configure
the Domino HTTP server to support SSL.
Note: For information about how to configure a Domino HTTP server to support
SSL, see Using SSL with Sametime.
When setting up a Domino HTTP server to support SSL, the administrator can
force all connections to the Domino server to use SSL. The administrator forces all
HTTP connections to use SSL by performing either of the following configurations
in the Ports-Internet Ports-Web section of the Domino server Server document
during the Domino HTTP server SSL set up procedure:
232 Sametime Administrator’s Guide
v Setting the Web HTTP ″TCP IP port status″ setting to ″Disabled″ and setting the
Web HTTP ″SSL port status″ to ″Enabled.″
v Setting the Web HTTP ″TCP IP port status″ to ″Redirect to SSL.″
If the administrator forces all HTTP connections to use SSL, the administrator must
also configure the Sametime server to support SSL for HTTP connections to its
servlets. If the administrator does not configure the Sametime server to support
SSL for connections to its servlets, users will be unable to access the Sametime
server.
To ensure access to the Sametime servlets when Domino requires SSL for all
connections, the administrator must perform the procedures below. You can use
these procedures regardless of whether your Sametime server operates on the
Windows, AIX, Solaris, or IBM i5/OS operating system.
To ensure access to the Sametime servlets when Domino requires SSL for all
connections:
1. Obtain the appropriate SSL trusted root or SSL server certificate.
2. Import the SSL certificate into the STKeys.jks database..
3. Configure the Sametime.ini file on the Sametime server.
Each of these procedures is described in detail in a subsequent topic.
Note: It is possible to configure a Domino server to allow unencrypted HTTP
connections on port 80 and simultaneously allow SSL-encrypted HTTP (or
HTTPS) connections on port 443. This configuration enables you to encrypt
connections to databases containing sensitive data while allowing
unencrypted connections to databases that do not contain sensitive data.
Since the Domino server on which Sametime is installed is dedicated to
supporting only Sametime, it is unlikely that such a configuration would be
implemented on a Domino/Sametime server.
Obtaining the appropriate SSL trusted root or SSL server
certificate
Obtaining the appropriate SSL trusted root or SSL server certificate is the first of
three procedures needed to ensure Sametime servlets can be accessed using SSL
when the Domino HTTP server is configured to require SSL for all connections.
If the Domino HTTP server is configured to require SSL for all connections, the
Domino Server Certificate Admin database on the Domino/Sametime server will
already contain two certificates that are required to support SSL connections:
v An SSL trusted root certificate signed by a specific Certificate Authority (CA),
such as VeriSign.
v An SSL server certificate signed by the same CA as the trusted root certificate.
You must obtain a copy of one of these certificates. Later in this process, you must
import one of the certificates described above into a key database on the Sametime
server. To clarify, you must obtain either the same SSL trusted root certificate that
the Domino server uses to sign its SSL server certificate or a copy of the SSL server
certificate used by the Domino server. You must have a copy of one of these
certificates, but you do not need a copy of both of them.
Below are some examples of how you can obtain either the SSL server certificate
used by the Domino server or an SSL trusted root certificate.
Chapter 9. Managing Security 233

Obtaining a copy of the SSL server certificate used by the
Domino server
When the Domino server is configured to use SSL, an SSL server certificate is
received from a Certification Authority (CA) and merged into the Domino Server
Certificate Admin (certsrv.nsf) database.
If you saved a copy of this certificate, make sure a copy of the certificate is
available on the Sametime server hard drive or an accessible network location and
continue to the next procedure. The certificate must be available so that you can
import it into a key database in a subsequent procedure.
If you did not save a copy of the Domino server SSL server certificate, you can
attempt to import one into your Web browser and then export the server certificate
from the Web browser to your local file system. For example:
1. From the Internet Explorer Web browser, browse to the Domino/Sametime
server that requires SSL for all connections. (For example, enter the URL
https://Sametime.acme.com to browse to the server).
2. When prompted to ″select the certificate to use when connecting,″ click OK.
3. At the Security Alert dialog box, select View Certificate.
4. At the Certificate dialog box, click Install Certificate.
5. At the Certificate Manager Import Wizard, click Next.
6. Select the ″Automatically select the certificate store based on the type of
certificate″ option. Click Next.
7. At the Certificate Manager Import Wizard screen, click Finish. You should see
a message indicating that the SSL server certificate was imported successfully.
Click OK and then close the Certificate and Security Alert dialog boxes.
8. From the Web browser, choose Tools - Internet Options.
9. Select the Contents tab.
10. Select the Certificates button.
11. Select the Intermediate Certification Authorities tab.
12. Scroll down the list of certificates and select the server certificate that you
imported earlier in this procedure. The certificate name should provide some
indication that the certificate is associated with the Domino server from which
it was imported. For example, if the certificate was imported from a server
named Sametime.acme.com, the certificate might be issued to ″Sametime″ or
″Acme.″
13. Click the Export button.
14. At the Certificate Manager Export Wizard screen, click Next.
15. At the Certificate Export File screen, select ″Base64 encoded X.509 (.CER).″
Click Next.
16. At the Export File Name screen, provide a name for the file and browse to a
location on the local file system in which you want to store the SSL server
certificate file.
For example, on the Windows platform you might enter C:\My
Documents\SSLservercertificate.cer to store the file in the C:\My Documents
directory.
Note For the i5/OS operating system, save the file directly to your server if
you have mapped to the server drive. Otherwise, save the file on your client
workstation. Later, you can use ftp or any other convenient method to copy it
to your i5/OS server.
Click Next.
234 Sametime Administrator’s Guide

17. When the message appears indicating the export was successful, click OK.
Obtaining a trusted root certificate from a Certification Authority
If you are unable to obtain a copy of the Domino server SSL server certificate, you
can request a trusted root certificate from a CA or export a trusted root certificate
from your Web browser.
If you need to obtain a trusted root certificate, you must obtain the same trusted
root certificate that is used by the Domino server to sign the Domino SSL server
certificate. For example, if the VeriSign Class 4 Public Primary Certification
Authority trusted root certificate is used to sign the Domino SSL server certificate,
you must either export this certificate from your Web browser or request a
VeriSign Class 4 Public Primary Certification Authority trusted root certificate from
VeriSign.
The easiest way to obtain a trusted root certificate is to export one from your Web
browser. Web browsers include many different SSL trusted root certificates by
default. If your Web browser contains a trusted root certificate that corresponds
with the Domino server trusted root certificate used to sign the Domino SSL server
certificate, you can export the trusted root certificate from the Web browser.
The procedure below illustrates how you can export a trusted root certificate from
an Internet Explorer Web browser:
1. From the Internet Explorer Web browser, choose Tools - Internet Options.
2. Select the Contents tab.
3. Select the Certificates button.
4. Select the Trusted Root Certification Authorities tab.
5. Select the appropriate trusted root certificate from the list.
6. Click the Export button.
7. At the Certificate Manager Export Wizard screen, click Next.
8. At the Certificate Export File screen, select ″Base64 encoded X.509 (.CER).″
Click Next.
9. At the Export File Name screen, provide a name for the file and browse to a
location on the local file system in which you want to store the SSL server
certificate file.
For example, on the Windows platform you might enter C:\My
Documents\SSLservercertificate.cer to store the file in the C:\My Documents
directory.
Note For the i5/OS operating system, save the file directly to your server if
you have mapped to the server drive. Otherwise, save the file on your client
workstation. Later, you can use ftp or any other convenient method to copy it
to your i5/OS server.
10. When the message appears indicating that the export was successful, click OK.
Another way to obtain a trusted root certificate is to request the certificate directly
from a CA. Normally, you request a certificate from a CA by browsing to the CA’s
web site.
For example, to request a certificate from VeriSign, begin by browsing to the
www.verisign.com Web site. Follow the instructions on the Web site to request a
certificate. Once the certificate request is approved, you will receive an e-mail
explaining how to pick up the certificate. (Normally, you pick up the certificate by
browsing to the Web site and copying it from a field on a Web page.) You can
Chapter 9. Managing Security 235

provide a file name for the certificate when receiving it from the CA and store the
trusted root certificate on a local directory or network directory accessible from the
Sametime server.
Next step
Import the SSL certificate into the STKeys.jks key database.
Import the SSL certificate into the STKeys.jks key database
Importing the SSL trusted root or SSL server certificate into the STKeys.jks
database is the second of three procedures needed to ensure access to Sametime
servlets when the Domino HTTP server is configured to require SSL for all
connections.
In this procedure, you import an SSL certificate into the STKeys.jks key database.
(The STKeys.jks key database is provided by default with all Sametime servers on
all platforms.)
For Windows, AIX and Solaris servers, you use the iKeyman program to import
the certificate. For i5/OS servers, you can use iKeyman if you already have it
installed and normally use it for managing certificates. Otherwise , you use a
qshell command called keytool.
You must import either the SSL trusted root certificate or the SSL server certificate
used by the Domino server for SSL connections into the STKeys.jks file. You
obtained this certificate in an earlier procedure titled Obtaining the appropriate
SSL trusted root or SSL server certificate.
Two procedures for importing the SSL certificate into the key database are
provided below: one procedure applies to a Sametime server that runs on the
Windows, AIX, or Solaris operating system and the other procedure applies to a
Sametime server that runs on the IBM i5/OS operating system. Follow the
procedure appropriate for your environment.
Note: Each of these procedures assumes you have exported the required SSL
certificate to a file on the local operating system and that you will import
this file from a local directory. The IBM IKeyMan program offers several
other options for importing SSL certificates, including importing a certificate
that has been copied to the Windows clipboard or importing a certificate
from a remote network location. For more information about the other
options for importing SSL certificates, see the IKeyMan documentation. This
documentation is available by selecting Start - Programs - IBM IKeyMan -
Documentation from the Windows desktop.
Importing the SSL certificate to the key database on a Windows,
AIX, or Solaris version of the Sametime server
If your Sametime server runs on the Windows, AIX, or Solaris operating system,
use this procedure to import the SSL certificate into the STKeys.jks key database:
1. Start the IKeyMan program from the command prompt of the Sametime server:
For AIX/Solaris servers, enter this command:
/Lotus/Domino/WAS51Client/java/jre/bin/java.com.ibm.gsk.ikeyman.IKeyman
For Windows servers, enter this command:
C:\Lotus\Domino\WAS51Client\java\jre\bin\IKeyMan.exe
2. Choose Key Database File - Open.
236 Sametime Administrator’s Guide
3. Browse to and select the ″STkeys.jks″ key database (located in the Sametime
server data directory).
4. Enter the password required to access the STKeys.jks file. The default password
for the STKeys.jks file is ″Sametime.″
5. In the Key database content area, select ″Signer certificates.″ (Signer certificates
may be selected by default.)
6. Click the ″Add″ button.
7. In the ″Add Cas certificate from a File″ dialog box:
v Verify that ″Base64-encoded ASCII data″ is selected as the Data type.
v Browse to and select the SSL certificate you want to import.
v Click Open and then click OK.8. In the ″Enter a Label″ dialog box, provide a label for the certificate. This label
identifies the certificate in the Signer Certificates list of the IBM IKeyMan
program. Click OK.
If the certificate is imported successfully, the certificate label displays in the
Signer Certificates list.
Importing the SSL certificate to an IBM i5/OS version of the
Sametime server
If you already have iKeyman installed and normally use it for managing
certificates, you can use it as described in the previous section. Otherwise, you can
use a qshell command called keytool that is provided with the i5/OS operating
system to import the certificate.
1. If you saved the SSL trusted root or SSL server certificate to your client
workstation in the previous step, use ftp or another convenient method to copy
it to your i5/OS server. The example in a later step assumes that you have
copied it to the Sametime server data directory but this is not required.
2. From any i5/OS command line, run the following command to start qshell:
strqsh
3. From qshell, run the following keytool command:
keytool -import -alias <certificate_name>
-file <file_containing_certificate>
-storepass <keystore_password> -keystore <keystore_name>
You must specify the full pathname to the file containing the certificate and the
server keystore. The keytool command example below assumes the following:
v The certificate file name is stserver1cert.
v The server keystore file name is stkeys.jks.
v The password for the stkeys.jks keystore is sametime. (Be sure you are in a
secure environment when issuing this command because the command
includes the keystore password.)
v Both the certificate file and the stkeys.jks database are stored in the Sametime
server data directory.
keytool -import -alias stserver1cert
-file /lotus/domino/data/stserver1cert
-storepass sametime -keystore /lotus/domino/data/stkeys.jks
4. After you have imported the certificate, you can use this command to view the
list of certificates in the stkeys.jks file to verify that the certificate was imported
successfully.
keytool -list -storepass sametime
-keystore /lotus/domino/data/stkeys.jks
5. Press F3 to exit qshell.
Chapter 9. Managing Security 237
Next step
Configure the Sametime.ini file on the Sametime server.
Configure the Sametime.ini file on the Sametime server
Configuring the Sametime.ini file on the Sametime server is the last of three
procedures needed to ensure Sametime servlets can be accessed using SSL when
the Domino HTTP server is configured to require SSL for all connections.
The Sametime.ini file is located in the Sametime installation directory (default
C:\Lotus\Domino on Windows or <root>/Lotus/Domino on IBM i5/OS). The
Sametime.ini file on the Sametime server contains parameters that must be
configured appropriately to ensure HTTP connections to the Sametime servlets can
be encrypted with SSL.
To configure the Sametime.ini file on the Sametime server:
1. Use a text editor to open the Sametime.ini file in the Sametime server install
directory on Windows or the Sametime server data directory on i5/OS.
2. In the [Config] section of the Sametime.ini file, alter the following settings (the
default values for some of these settings may already be set to the appropriate
value):
v ConfigurationPort - This Sametime.ini setting must specify the same SSL
port specified in the Ports-Internet Ports-Web section of the Domino server
Server document. An example value for this setting for a Sametime server on
either the Windows or IBM i5/OS platform is:
ConfigurationPort=443
v ConfigurationSSLEnabled - This setting must be set to true for Sametime
servers on both the Windows and IBM i5/OS platforms, as shown in the
example below:
ConfigurationSSLEnabled=true
v J avax.net.ssl.keyStore -This setting must specify the complete file path to
the STKeys.jks file for Windows, AIX and Solaris servers. For i5/OS servers,
specify the path relative to the server data directory. Examples are provided
below:
For ’windows:
Javax.net.ssl.keyStore=c:\lotus\domino\stkeys.jks
For AIX/Solaris:
Javax.net.ssl.keyStore=/lotus/domino/stkeys.jks
For i5/OS:
Javax.net.ssl.keyStore=stkeys.jks
v J avax.net.ssl.trustStore - This setting must also specify the complete file
path to the STKeys.jks file for Windows, AIX and Solaris servers. For i5/OS
servers, specify the path relative to the server data directory. Examples are
provided below:
For ’windows:
Javax.net.ssl.keyStore=c:\lotus\domino\stkeys.jks
For AIX/Solaris:
Javax.net.ssl.keyStore=/lotus/domino/stkeys.jks
For i5/OS:
Javax.net.ssl.keyStore=stkeys.jks
238 Sametime Administrator’s Guide

v J avax.net.ssl.keyStorePassword - This setting must specify the password
required to access the STKeys.jks file. The default password for the
STKeys.jks file on all platforms is ″sametime,″ as shown in the example
below:
Javax.net.ssl.keyStorePassword=sametime
v J avax.net.ssl.trustStorePassword - This setting must also specify the
password required to access the STKeys.jks file. The default password for the
STKeys.jks file on all platforms is ″sametime,″ as shown in the example
below:
javax.net.ssl.trustStorePassword=sametime
Javax.net.ssl.keyStoreType=jks3. Save and close the Sametime.ini file and restart the Sametime server.
This concludes the procedures required to ensure Sametime servlets can be
accessed using SSL when the Domino HTTP server is configured to require SSL for
all HTTP connections.
Chapter 9. Managing Security 239

240 Sametime Administrator’s Guide

Chapter 10. Deploying Multiple Lotus Sametime Servers
A Sametime community can include more than one IBM Lotus Sametime server. If
you have a large number of Sametime users, you can install multiple Sametime
servers for load balancing and to reduce network usage. This chapter includes:
v Information about installing multiple Sametime servers and synchronizing
multiple Sametime servers to operate as a single community.
v A brief discussion of techniques that can be used to extend a single Sametime
community across multiple Domino domains.
Note: This chapter discusses how you can deploy multiple Sametime servers
without creating Sametime server clusters. If you are interested in clustering
Sametime servers, see the chapter titled ″Setting up a Community Services
cluster.″
About Sametime server clusters
Sametime includes the concept of Sametime server clustering. You can create
Sametime Community Services server clusters to support server failover and load
balancing for large populations of Community Services users.
This chapter discusses how to deploy multiple Sametime servers without creating
Sametime server clusters. If you are interested in creating a multiple server
environment in which the Sametime servers are clustered, see Setting up a
Community Services cluster .
Advantages of using multiple Sametime servers
You can install multiple Sametime servers to:
v Spread the load of a large user population among multiple servers.
v Securely extend instant messaging and presence capabilities to Sametime server
deployed outside the firewall in your network DMZ. This arrangement allows
Internet users to participate in chats with users on your corporate intranet
without compromising network security.
When multiple Sametime servers are installed, you can synchronize the Sametime
servers to operate as a single Sametime community. Synchronizing multiple
Sametime servers allows you to assign different home Sametime servers for
members of the Sametime community.
Assigning different home Sametime servers to users in the community allows you
to spread the load of a large number of users among the Community Services of
multiple Sametime servers.
The home Sametime server is the server to which each user connects for the online
presence (or awareness) and chat functionality supported by the Community
Services. After installing a new Sametime server, you can assign specific users to
the new server by entering the name of the new Sametime server in the ″Sametime
server″ field in each user’s Person document.
All users in the community will have presence and chat capabilities with all other
users, but users connect to different Sametime servers to get this functionality.
© Copyright IBM Corp. 2005 241

Server-to-server connections among the Community Services of the multiple
Sametime servers ensure that all users in the community have presence and chat
capabilities with all other users.
For more information on the purpose of the home Sametime server, see Connecting
to the home Sametime server.
You can also extend instant messaging and presence capabilities to users on the
Internet by deploying a Sametime server in your network DMZ and connecting to
this Sametime server to a Sametime server on your internal network (inside the
firewall). For information on the firewall configurations required to support this
scenario, see Extending Sametime to Internet users.
Note: Sametime also provides a Community Services clustering solution to
support large populations of Community Services users. For more
information, see Overview of Community Services clustering.
Integrating a Sametime server into an existing Sametime community
The basic processes and issues involved with integrating a new Sametime server
into an existing Sametime community include:
v Installing a Sametime server into an existing Sametime community
– Managing administration settings for multiple Sametime serversv Configuring ports for server-to-server connections
v Synchronizing the Sametime server with other Sametime servers
– Directory management for multiple Sametime servers
– Assigning users to the new Sametime server (setting the home Sametime
server)
Installing a Sametime server into an existing Sametime
community
Installing the Sametime server is the first procedure you must perform when
integrating a new Sametime server into an existing Sametime community.
Before you install the new Sametime server, decide whether you want the server to
be accessed by Internet and intranet clients or intranet clients only. If you want the
server to be accessed by both Internet and intranet clients, you should install the
Sametime server on a server that is located in the network DMZ (outside the
firewall that protects the corporate intranet). For more information, see Extending
Sametime to Internet users.
Managing administration settings for multiple Sametime servers
When you have a multiple Sametime server environment, there are specific
administration settings that must be kept consistent across all Sametime servers in
the Sametime community. The administrator can use the Sametime Administration
Tool on each Sametime server to manually configure the settings on each Sametime
server so that the settings specify the same values on all servers in the community.
Note: You should not replicate the entire Configuration database (stconfig.nsf)
among the Sametime servers. Some documents in the Configuration
database contain the IP address or host name of a Sametime server.
Replication of these parameters to a different Sametime server will prevent
that server from functioning properly.
242 Sametime Administrator’s Guide

The administration settings that must have the same values on all Sametime
servers in the community are listed below. It is mandatory that some of these
settings are consistent on all Sametime servers in the community. For other
settings, it is recommended that you keep consistent settings across all Sametime
servers in the community, but it is not mandatory.
Administration settings that must be consistent on all Sametime servers in a
community: It is mandatory that the administration settings below have the same
values on all Sametime servers in a community. If these settings are not consistent
across all servers, the servers may not function properly.
Community Services settings: In the Configuration-Community Services tab of
the Sametime Administration Tool, the following settings must specify the same
values on all Sametime servers in the community:
v Number of entries on each page in dialog boxes that show names in the
directory
v How often to poll for new names added to the directory
v How often to poll for new servers added to the community
For more information on the settings above, see Community Services configuration
settings.
In the Configuration-Community Services-Anonymous Access tab of the Sametime
Administration Tool, the following settings must specify the same values on all
Sametime servers in the community:
v Anonymous users can participate in meetings or enter virtual places
v Users of Sametime applications (databases such as stconf.nsf or Web sites) can
specify a display name so that they do not appear online as ″anonymous″
– Default domain name for anonymous users
– Default namev Users cannot browse or search the Directory
v Users can type names (resolve users and groups) to add them to an awareness
list
v Users can browse the directory (see a list of names) or type names (resolve users
and groups)
v Users can browse the directory to see group content and names, or type names
(resolve users and groups)
For more information on the settings above, see Anonymous Access Settings for
Community Services.
LDAP Directory settings: If your community of users is defined in an LDAP
directory (or directories), all LDAP Directory configuration settings must be
consistent on all Sametime servers in the community. The Sametime LDAP
Directory settings are divided into five categories in the Sametime Administration
Tool:
v LDAP Directory - Connectivity settings
v LDAP Directory - Basics settings
v LDAP Directory - Authentication settings
v LDAP Directory - Searching settings
v LDAP Directory - Group Content settings
Chapter 10. Deploying Multiple Lotus Sametime Servers 243

For more information on these settings, see LDAP directory settings.
Administration settings that should be consistent on all Sametime servers in a
community: If the settings below are not consistent on all Sametime servers in the
community, the servers will continue to function. However, it is recommended that
you keep these settings consistent on all Sametime servers in a community to
ensure consistency of end user functionality and logging functions across all
servers in your community.
Community Services settings: In the Configuration-Community Services tab of
the Sametime Administration Tool, the following settings should be consistent on
all Sametime servers in the community:
v Allow Connect users to save their user name, password, and proxy information
(automatic login)
v Display the ″Launch Sametime Connect for browsers″ link on the Sametime
home page
v Allow users to send announcements
For more information on the settings above, see Community Services configuration
settings.
Logging settings: In the Logging-Settings-General tab of the Sametime
Administration Tool, the following settings should be consistent on all Sametime
servers in the community:
v Community Server events to log
– Successful logins
– Failed logins
– Community Server events and activities
For more information on the settings above, see General log settings.
Next step: After you ensure that the administrative settings are consistent for the
new Sametime server, verify that the appropriate ports are open for
communication between the two servers. See Configuring ports for server-to-server
connections.
Configuring ports for server-to-server connections
When multiple Sametime servers are installed in a Domino environment, the
Sametime servers must be able to communicate on specific ports.
Note: If you are deploying a Sametime server in the network DMZ for access by
Internet users, see Extending Sametime to Internet users for more
information about the firewall configurations required to support
communications between the two servers.
Ports required for communication between Sametime servers
The table below lists the ports on which Sametime servers communicate with each
other. When these ports are open, Community Services data can pass between the
two servers, and one Sametime server can invite the other to a meeting.
244 Sametime Administrator’s Guide

Port Description
Port 1516 The Community Services listen for direct TCP/IP connections from the
Community Services of other Sametime servers on this port. If you have
installed multiple Sametime servers, this port must be open for presence, chat,
and other Community Services data to pass between the servers.
The communications that occur on this port also enable one Sametime server
to start a meeting on another server (or ″invite″ the other server to the
meeting).
Port 1352 The servers must be able to communicate on port 1352 for replication to occur
between the Sametime servers. This is the port used for Notes and Domino
Remote Procedure Calls (RPCs).
Next step
Next, perform the procedures described in Synchronize the Sametime server with
other Sametime servers deployed in the environment.
Synchronizing the Sametime server with other Sametime
servers
When multiple Sametime servers are installed, you must synchronize the Sametime
servers to operate as a single community. Synchronizing multiple Sametime servers
to operate as a single community involves the following:
v Directory management for multiple Sametime servers
v Assigning users to the new Sametime server (setting the home Sametime server)
Directory management for multiple Sametime servers
After you have installed a new Sametime server, the administrator should
determine how to manage the Directory for the Sametime community.
Use these recommendations to manage Domino Directories in multiple Sametime
server environments:
v If the Sametime server is installed into a Domino environment that uses only a
single Domino Directory, the Directory in which all Sametime servers are
registered must be replicated to each Sametime server.
v If the Sametime server is installed into a Domino environment that uses multiple
Domino Directories, the primary Domino Directory (the Directory in which the
Sametime server is registered) should be replicated to the Sametime server.
Directory Assistance should be set up on the Sametime server to access the other
Domino Directories of interest in the environment. The Sametime server can use
Domino Directory Assistance to obtain all needed Directory information from
the other Directories used in the environment. Ideally, the Directory Assistance
database should point to a Directory server that is dedicated to providing
Directory services. However, it is not a requirement that Directory servers be
used in a Sametime community that includes multiple Sametime servers.
For information on setting up Directory Assistance on the Sametime server, see
your Domino server Administration documentation. Use the same procedures to
set up Directory Assistance on a Sametime server that you use to set up
Directory Assistance on a Domino server. The Domino Administration
documentation is available from the Documentation Library at the following
Internet location: http://www.lotus.com/ldd/doc (and also in the Help
subdirectory of the Domino server on which Sametime is installed).
v Optionally, in a Domino environment that uses multiple Domino Directories, an
Extended Server Directory Catalog can be set up on the Sametime server to
Chapter 10. Deploying Multiple Lotus Sametime Servers 245

enable the server to access Directory information from all directories of interest
in the environment. For more information on setting up an Extended Server
Directory Catalog for use with Sametime, see Alternate ways to share Directory
information across domains.
For more information about the Directory issues relevant to extending a single
Sametime community across multiple Domino domains, see Extending a single
Sametime community across multiple Domino domains.
Next step: After determining your directory management strategy, assign users to
the new Sametime server.
Assign users to the new Sametime server (setting the home
Sametime server)
To assign a user to the new Sametime server, enter the Sametime server name in
the ″Sametime server″ field in the Real-Time Collaboration section of a user’s
Person document in the Domino Directory. This field identifies the ″home″
Sametime server of each user.
Note: Only a portion of the users in your environment should be assigned to the
new Sametime server. For load balancing purposes, you should assign an
equal number of users to each Sametime server in your environment. The
network proximity of the user to the server is also a consideration when
assigning users to a home Sametime server. Generally, you should assign the
user to the closest Sametime server on the network. For more information
on the home Sametime server, see Connecting to the Home Sametime server.
To specify a home Sametime server, open the Domino Directory (Address Book),
go to the Real-Time Collaboration section of each user’s Person document, and
enter the name of a Sametime server in the ″Sametime server″ field. If necessary,
you can create a simple agent to automate the process of populating the Sametime
server field in each user’s Person document with the name of a Sametime server.
When entering the name of the Sametime server in the ″Sametime server″ field on
the Person document, you can enter the name of the Sametime server in the
Domino hierarchical name format (for example sametime.acme.com/west/acme).
The ″Sametime server″ field automatically converts the name to the full canonical
name format. For example, if you enter sametime.acme.com/west/acme in the
″Sametime server″ field, the server name is stored as
cn=sametime.acme.com/ou=west/o=acme. You can also enter the server name in
the ″Sametime server″ field using the full canonical name format.
Community services reads the server name from the Servers view ($Servers) of the
Domino Directory. The name entered in the ″Sametime server″ field on the Person
document must match the name of the Sametime server as it appears in the
Servers view of the Domino Directory. If you are using an agent to populate the
home ″Sametime server″ field, ensure that the agent specifies the full canonical
name of the Sametime server.
Note also that a user’s Sametime Connect client Sametime Connectivity settings
should specify the same Sametime server as the ″Sametime server″ field on the
user’s Person document. In the Sametime Connect client Sametime Connectivity
settings, the server name must be specified using the DNS name or IP address of
the Sametime server (for example, sametime.acme.com or 111.111.111.111).
246 Sametime Administrator’s Guide

Next step: At this point, the newly installed Sametime server is fully integrated
into the existing Sametime community.
Extending Sametime to Internet users
In some situations, you may want to allow Internet users to chat with users on
your corporate intranet. Generally, firewall restrictions make it impossible for users
from the Internet to directly access a Sametime server on your corporate intranet.
The recommended solution for extending Sametime to Internet users involves a
multiple Sametime server deployment in which a server inside your corporate
firewall communicates with a server outside the firewall (in the network DMZ).
This solution requires you to install a Sametime server on the corporate intranet
and a Sametime server in the network DMZ, synchronize the two Sametime
servers, and configure the firewalls to enable the servers and clients to establish
the appropriate connections with the servers.
The remaining topics in this section describe the recommended solution for
extending Sametime meetings to Internet users and provide information on the
firewall configurations required:
v Positioning a Sametime server in the network DMZ
v Opening ports on the internal firewall
v Opening ports on the external firewall
Positioning a Sametime server in the network DMZ
Allowing users on a corporate intranet and users from the Internet to attend the
same Sametime meetings requires a multiple server deployment. Generally, one
Sametime server is installed on the corporate intranet and another Sametime server
is installed in the network DMZ as shown in the illustration below.
Note: DMZ is a networking term that comes from the military term ″demilitarized
zone.″ DMZ refers to an area of a network, usually between two firewalls,
where users from the Internet are permitted limited access over a defined
set of network ports and to predefined servers or hosts. A DMZ is used as a
boundary between the Internet and a company’s internal network. The
Chapter 10. Deploying Multiple Lotus Sametime Servers 247

network DMZ is the only place on a corporate network where Internet users
and internal users are allowed at the same time.
The two servers are installed and synchronized according to the procedures and
recommendations described in Advantages of using multiple Sametime servers and
Synchronizing the Sametime server with other Sametime servers earlier in this
chapter. Following these procedures enables a Sametime server inside your firewall
to exchange Community Services data with a Sametime server deployed in the
network DMZ. In this scenario, Internet users can connect to the Sametime server
deployed in the network DMZ to communicate with users connected to the
Sametime server on your corporate intranet.
After you have installed and synchronized the two Sametime servers, you must
make firewall configurations to both the internal firewall that protects the
corporate intranet and the external firewall that separates the network DMZ from
the Internet to ensure that the servers and users can communicate through the
firewalls. See the following topics for information on the firewall configurations
required:
v Opening ports on the internal firewall
v Opening ports on the external firewall
Opening ports on the internal firewall
After you have deployed a Sametime server on the corporate intranet and a
Sametime server in the network DMZ, you must configure the internal firewall to
enable the Sametime servers to communicate with each other and for users to
communicate with the servers.
The illustration below shows an internal firewall machine that separates the
internal Acme corporate network from the Acme network DMZ. The firewall
machine contains two Network Interface Cards (NICs). One NIC is connected to
the internal network and the other NIC is connected to the network DMZ.
The table below provides port configurations for the internal firewall that will
enable the clients and Sametime server inside the firewall to communicate with the
Sametime server in the network DMZ.
248 Sametime Administrator’s Guide

Port Explanation
Port 1516 Open TCP port 1516 on the internal firewall for outbound/inbound connections
between the Acme corporate network and the Acme network DMZ.
Opening port 1516 enables the Community Services of the two Sametime
servers to exchange presence and chat data and to perform directory updates.
Port 1352 If you have integrated the Sametime server in the network DMZ into the same
community as the internal Sametime server, you must open TCP port 1352 for
outbound/inbound access through the internal firewall. Port 1352 supports
Notes Remote Procedure Calls (RPCs). Opening port 1352 enables the two
Sametime servers to replicate Notes databases and also allows an administrator
on the internal network to access the DMZ Sametime server with a Notes client,
if necessary.
Opening ports on the external firewall
The illustration below shows an external firewall machine containing two Network
Interface Cards (NICs). One NIC is connected to the network DMZ; the other NIC
connects to the Internet. You must configure the external firewall that protects the
network DMZ to enable Internet clients to make the appropriate connections to the
external Sametime server deployed in the network DMZ.
The table below provides information on port configurations for the external
firewall that will enable the Internet clients to make the appropriate connections
with the Sametime server in the Acme network DMZ.
Chapter 10. Deploying Multiple Lotus Sametime Servers 249

Port Explanation
Port 1533
or
Port 8082
Open either TCP port 1533 or 8082 to enable the Internet users to access the
Community Services on the DMZ Sametime server. Port 1533 is the
recommended port for Community Services client connections.
Opening port 1533 enables Sametime clients from the Internet to access the
Sametime server using a direct TCP/IP connection, a direct HTTP connection,
or through an HTTP proxy server.
Note: The Sametime Connect client includes a Preferences-Sametime
Connectivity-Community Port setting that specifies the port on which the
Sametime Connect client attempts connections to the Community Services. The
default Community Port setting is port 1533. The Community Port setting on
the Sametime Connect client must specify the port that is open through the
firewall to enable a Sametime Connect client from the Internet to connect to the
Sametime server in the network DMZ.
For more information on Community Services connectivity, see Community
Services Network settings.
Some Internet clients may operate behind restrictive firewalls that block
outbound connections to the Internet on port 1533 or 8082. The recommended
method for enabling these clients to establish connections with the DMZ
Sametime server is to enable HTTP tunneling on port 80. For more information,
see HTTP Tunneling on port 80.
Extending a single Sametime community across multiple Domino
domains
This section provides instructions and suggestions on how to link different Domino
domains into a single Sametime community. Read this section if your organization
includes multiple Domino domains and you want users in the multiple Domino
domains to belong to the same Sametime community. When separate Domino
domains are linked into a single Sametime community, users in each domain can
share presence and chat capabilities with users in the other domain. This section
includes the following topics:
v Example of extending a single Sametime community across two Domino
domains
v Alternate ways to share Directory information across domains
Example of extending a single Sametime community across
two Domino domains
The procedure below provides an example of how one Sametime server in a
Domino domain can be linked with a different Sametime server operating in a
different Domino domain. Linking the two Sametime servers extends a single
Sametime community to both Domino domains.
When a single Sametime community is extended to both Domino domains:
v Users in one Domino domain can add users from the other Domino domain to
presence lists in Sametime clients and engage in Sametime communications with
users in the other domain.
v Users in the Sametime community can authenticate on either of the domains to
participate in Sametime meetings and communications.
250 Sametime Administrator’s Guide

Follow the procedures below to link two Sametime servers that operate in different
Domino domains:
1. Set up the environment.
2. Connect the communities (share Directory information).
Setting up the environment
This is the first of two procedures that illustrate how you can extend a single
Sametime community across multiple Domino domains.
To set up the environment, you must ensure that the two Sametime servers are
cross-certified.
In this example, the two Sametime servers are Sametimeserver1/East and
Sametimeserver2/West. To cross-certify these servers, the West organization
certifier (/West) must obtain a cross-certificate for the East organization certifier
(/East). Conversely, the East organization certifier must obtain a cross-certificate
for the West organization certifier. These cross-certificates are stored in the Domino
Directories on the respective Sametime servers.
The example below describes the simplest way to cross-certify the two Sametime
servers.
1. On Sametimeserver1/East, open the Notes client. From the Windows desktop
choose Start - Run and browse to C:\Sametime\nlnotes.exe. Click OK.
2. Select File - Database - Open and specify the Sametimeserver2/West server.
3. When prompted for a cross-certificate, select OK.
4. Repeat this procedure, except this time use the Notes client on
Sametimeserver2/West to access Sametimeserver1/East, and accept the
cross-certificate from the Sametimeserver2/West server.
Note: For more information about cross-certification, see the Domino
Administration Help database available in the Help directory of a Domino
server. Domino administration documentation is also available from the
documentation library at www.lotus.com/ldd/doc.
Next step: After performing this procedure for both Sametime servers, the servers
should be cross-certified and contain the appropriate certificates in their Domino
Directories. Next, you must connect the communities.
Connecting the communities
This is the last of two procedures that illustrate how you can extend a single
Sametime community across two Domino domains.
In this procedure, the administrator connects the Sametime communities by
ensuring that Directory information is shared between the two Domino domains.
This procedure includes the following steps:
1. Replicating the Directories
2. Setting up Directory Assistance
In this example, the two Sametime servers that operate in different domains are
Sametimeserver1/East and Sametimeserver2/West.
Note: This example describes replicating the entire Directories of both domains.
There are more efficient ways to share Directory information between two
Domino domains when connecting the communities. For more information
Chapter 10. Deploying Multiple Lotus Sametime Servers 251

on alternate methods for sharing the Directory information, see Alternate
ways to share Directory information across domains.
Step 1 - Replicating the Directories: This procedure provides an example of
replicating Directories between two Sametime servers (Sametimeserver1/East and
Sametimeserver2/West) operating in different Domino domains.
1. Using the Lotus Notes client on Sametimeserver1/East, open the Directory
(names.nsf) on Sametime server2/West.
2. Choose File - Replication - New Replica.
3. Specify ″Local″ for the Server and change the filename (names.nsf) to
something different, such as sametimeserver2west.nsf.
4. Select Create: ″Immediately″ to ensure that the database is created immediately.
Click ″OK.″
5. Repeat this procedure, except this time create a replica of the Directory existing
on Sametimeserver1/East on the Sametimeserver2/West server.
After you have created replicas of the Directories on each Sametime server, you
must create Connection Documents to ensure the Directories replicate at regular
intervals. When creating the Connection Documents:
v For Connection Type, select Local Area Network.
v Complete the Destination Server, Source Domain, Destination Domain, and
Optional Network Address fields.
v For Replication Type, select Pull Push.
v In the ″Files/Directories to Replicate″ field, enter names.nsf.
v In the Schedule field, select Enabled.
Note Be sure to create a Connection Document on each server. One Connection
Document should enable the names.nsf file on Sametimeserver1/East to replicate
to the Sametimeserver1east.nsf file on the Sametimeserver2/West server. The
other Connection Document should enable the names.nsf file on
Sametimeserver2/West to replicate to the sametimeserver2west.nsf file on the
Sametimeserver1/East server.
After creating the Connection Documents, set up Directory Assistance on each of
the Sametime servers to ensure that each Sametime server can locate the
Directories you have just replicated.
Step 2 - Setting up Directory Assistance: The procedures required for setting up
Directory Assistance on each of the Sametime servers are summarized below. For
more information on Directory Assistance, see the Domino server Administration
Help available at www.lotus.com/ldd/doc of the Help directory on the Domino
server.
To set up Directory Assistance you must:
v Ensure that a Directory Assistance database is available on the Sametime server.
v Identify the Directory Assistance database on the Sametime server.
v Create a Directory Assistance Document within the Directory Assistance
database that points to the appropriate Directory.
Follow the procedures below to set up Directory Assistance:
252 Sametime Administrator’s Guide
Ensure that a Directory Assistance database is available on each Sametime
server: To ensure that a Directory Assistance database is available on each
Sametime server, you can either replicate an existing Directory Assistance database
to the Sametime server or create a new Directory Assistance database on the
Sametime server.
If a Directory Assistance database is already in use on Domino servers in the
domain, you can replicate the existing Directory Assistance database to the
Sametime server. To replicate an existing Directory Assistance database, follow the
normal Domino procedure for replicating a database. First create a new replica of
the Directory Assistance database on the Sametime server and then create a
Connection Document to schedule replication of the database. See the Domino
server Administration Help for more information on these procedures.
To create a new Directory Assistance database on each Sametime server:
1. Start a Lotus Notes client .
2. Choose File - Database - New.
3. Create the Directory Assistance database as you would any other Domino
database.
v Create the database on the Sametimeserver1/East server
v Provide a database name and filename for the Directory Assistance database
v Use the Directory Assistance template (da50.ntf) when creating the database4. Repeat this procedure to create a Directory Assistance database on the
Sametime server in the other domain (Sametimeserver2/West in this example).
5. Perform the procedure below to identify the Directory Assistance database on
each Sametime server.
Identify the Directory Assistance database on each Sametime server: After
replicating or creating the Directory Assistance databases on the Sametime servers,
you must identify the Directory Assistance databases on each server.
To identify a Directory Assistance database on each Sametime server:
1. Start a Lotus Notes client.
2. Select Configuration - Server - All Server Documents.
3. Double-click the name of the Sametime server (Sametimeserver1/East) to open
the Server document.
4. If necessary, select the Basics tab of the Server document.
5. Click Edit Server.
6. In the ″Directory Assistance database name″ field, enter the filename (for
example, da.nsf) of the Directory Assistance database.
7. Click ″Save and Close.″
8. Repeat this procedure to identify the Directory Assistance database on the
Sametime server in the other domain (Sametimeserver2/West in this example).
9. Perform the procedure below to create a Directory Assistance Document in each
Directory Assistance database.
Create a Directory Assistance Document in each Directory Assistance database:
You must create a Directory Assistance Document in each Directory Assistance
database on each Sametime server so that each Sametime server can access the new
Directory information that has been replicated to it.
Chapter 10. Deploying Multiple Lotus Sametime Servers 253

To create a Directory Assistance document in the Directory Assistance database on
each Sametime server:
1. From the Notes client:
v Choose File - Database - Open.
v Select the Sametimeserver1/East server.
v Select the Directory Assistance database (default name is da.nsf).
v Click Open.2. Click ″Add Directory Assistance.″
In the Basics tab, enter these settings:
Setting Value
Domain type Choose Notes.
Domain name Enter the name of the Domino domain associated with the
secondary Directory (or Directory that was replicated from
the other domain to this Sametime server). The domain name
must be different from the primary Notes domain and from
all other domain names configured in Directory Assistance.
Company name Enter the name of your company.
Search order A number representing the order in which this directory is
searched, relative to other directories in the Directory
Assistance database.
Group expansion The suggested setting is Yes. This setting enables Directory
Assistance to examine the contents of groups in the LDAP
directory. This capability is necessary if you enter the name of
a group defined in the LDAP directory in the ACL of a
database on the Sametime server.
Nested group expansion The suggested setting is Yes. This setting enables Directory
Assistance to examine the content of an LDAP directory
group that is a member of another LDAP directory group.
This capability is also used when an LDAP directory group
name is entered in the ACL of a database on the Sametime
server.
Enabled Set to Yes to enable Directory Assistance for the LDAP
Directory.
3. Select the Rules tab and enter these settings.
Setting Value
Rule # One or more rules that describe the names in the directory.
By default, the first rule contains all asterisks, indicating all
names in the Directory.
Enabled Choose one:
v No to disable a specific rule.
v Yes to enable a specific rule.
By default, the first rule is enabled.
Trusted for Credentials Choose Yes to allow Domino to use this Directory to
authenticate Web clients.
254 Sametime Administrator’s Guide

4. Select the Replicas tab and do the following:
Setting Value
Database Links Open the replica of the secondary directory, and then choose
Edit - Copy As Link - Database Link.
Select the ″Database links″ field, and then choose Edit - Paste.
For example, assume you are creating the Directory
Assistance document in the Directory Assistance database on
the Sametimeserver1/East server and you have replicated the
directory file named sametimeserver2west.nsf to the
Sametimeserver1/East server. In this example, you must open
the sametimeserver2west.nsf file and copy the file as a
Database Link. Paste this Database Link into the ″Database
links″ field in the Directory Assistance Document you are
creating in the Directory Assistance database on the
Sametimeserver1/East server.
Conversely, when creating a Directory Assistance Document
on the Sametimeserver2/West server, you would open the
directory file sametimeserver1east.nsf, copy the file as a
Database Link, and paste the link into the ″Database links″
field.
5. You must repeat this procedure to create a Directory Assistance document in
the Directory Assistance database on the Sametime server in the other domain
(Sametimeserver2/West in this example).
Alternate ways to share Directory information across domains
The example procedure for extending a single Sametime community across two
Domino domains earlier in this section explains how you can share Directory
information to connect two Sametime communities. This topic discusses the
Directory information that is shared and describes some alternate, more efficient
ways to share Directory information when connecting Sametime communities.
When extending a single Sametime community across multiple Domino domains,
each Sametime server that is part of the community must have access to the
following Directory information for the other domain(s):
v Person documents
v Group documents
v Server documents - The following fields in the Server document are needed for
each Sametime server to support online presence (or awareness) between
servers:
Server name - This field in the Basics tab of the Server document must contain
the name of the Sametime server.
Is this a Sametime server? - This field in the Basics tab of the Server document
must be set to ″Yes″ to indicate that the Server document describes a Sametime
server.
Port - This field in the Ports-Notes Network Ports tab of the Server document
must be set to TCPIP.
Net Address - This field in the Ports-Notes Network Ports tab must contain the
TCP/IP address (for example, sametime.acme.com) of the Sametime server.
Note: For more detailed information about the Directory information required by
Sametime, see Directory views used according to Sametime feature.
Chapter 10. Deploying Multiple Lotus Sametime Servers 255
To share this Directory information, each domain must replicate the information to
the other domains that comprise the Sametime community. In the example scenario
described in Example of extending a single Sametime community across two
Domino domains, the entire Directories of two separate Domino domains are
replicated between the two Sametime servers. The Domino components of
Sametime provide features that you can use to replicate the Directory information
in a more efficient manner. You can use either of the following alternate techniques
to share Directory information across Domino domains.
v Selective replication of Directory information across domains
v Set up Extended Directory Catalogs to share Directory information across
domains
Each technique is discussed briefly below.
Selective replication of Directory information across domains: Instead of
replicating the entire Domino Directory between domains, you can use selective
replication to replicate only the Person, Group, and Server documents. For
example, you can open the Directory database to be replicated to the other domain
and use the Replication Settings to replicate a subset of the documents contained
in the database. Use a selection formula, such as
(Type=″Person″)|(Type=″Group″)|(Type=″Server″ and Sametime=″1″) to ensure
that only the Person, Group, and Server documents (for which the ″Is this a
Sametime server?″ field is set to Yes) are replicated.
For more information on selective replication, see the Domino Administration
documentation available from the Documentation Library at the Web site
www.lotus.com/ldd.)
Using Extended Directory Catalogs to share Directory information across
domains: An Extended Directory Catalog is another Domino feature that can be
used to share Directory information when a Sametime community is extended
across multiple Domino domains. The Extended Directory Catalog feature allows
you to aggregate directory information from several different Domino directories,
including directories for different Domino domains, into a single directory catalog.
The servers are then configured to access the Extended Server Directory catalog to
access directory information.
Before using this feature, the administrator should read the documentation in
Domino Administration Help that explains the function and set up of Extended
Server Directory Catalogs. This documentation is available from the documentation
library on the www.lotus.com/ldd site.
You can follow the procedures in the Domino administration documentation to set
up an Extended Server Directory Catalog on the Sametime server. When setting up
the Extended Server Directory Catalog to be used by Sametime, note the following
when creating the Configuration document for the Extended Server Directory
Catalog.
v The Configuration document includes an ″Additional fields to include″ list in the
Basics tab. The following field name entries must exist in the ″Additional fields
to include″ list to ensure that all information needed by Sametime is available in
the Extended Server Directory Catalog:
Field Name Description
ServerName Server name field in the Basics section of the Server
document.
256 Sametime Administrator’s Guide

Field Name Description
ServerTitle Server title field in the Basics section of the Server document.
Domain Domain name field in the Basics section of the Server
document.
ServerBuildNumber Server build number field in the Basics section of the Server
document.
Administrator Administrator field in the Basics section of the Server
document.
ServerPlatformDisplay Operating system field in the Basics section of the Server
document.
Sametime Is this a Sametime server? field in the Basics section of the
Server document.
Port_0 - Port_7 Ports fields in the Ports - Notes Network Ports section of the
Server document. The Port_0 field is required. For
completeness it is recommended that you list seven port
fields (for example Port_0, Port_1, Port_2, Port_3, Port_4,
Port_5, Port_6, and Port_7).
Protocol_0 - Protocol_7 Protocol fields in the Ports - Notes Network Ports section of
the Server document. For completeness, it is recommended
that you list seven protocol fields (for example, Protocol_0,
Protocol_1, Protocol_2 and so on).
NetName_0 - NetName_7 Notes Network fields in the Ports - Notes Network Ports
section of the Server document. For completeness, it is
recommended that you list seven Notes Network fields (for
example, NetName_0, NetName_1, NetName_2, and so on.
NetAddr_0 - NetAddr_7 Net Address fields in the Ports - Notes Network Ports section
of the Server document. The NetAddr_0 field is required. For
completeness, it is recommended that you list seven Net
Address fields.
Enabled_0 - Enabled_7 Enabled fields in the Ports - Notes Network Ports section of
the Server document. The Enabled_0 field is required. For
completeness, it is recommended that you list seven Enabled
fields.
SametimeServer Sametime server field in the Administration section of the
Person document.
v The ″Advanced″ tab of the Configuration document provides a ″Selection
formula (do not include form)″ setting that enables you to specify a selection
formula that ensures only the Directory documents required by Sametime are
used when the Dircat task creates the Directory Catalog. The selection formula
for selecting only the documents required by Sametime is (Type = ″Person″) |
(Type = ″Group″) | (Type = ″Server″ and Sametime = ″1″).
Chapter 10. Deploying Multiple Lotus Sametime Servers 257

258 Sametime Administrator’s Guide

Chapter 11. Setting up a Community Services cluster
Community Services clusters provide Community Services load balancing and
failover functionality for large communities. This chapter provides an example of
how to cluster the Community Services of a group of IBM Lotus Sametime servers.
The example in this chapter explains how to cluster the Community Services of
two Sametime servers. Once you understand how to cluster the Community
Services of two Sametime servers, you can easily add the Community Services of
other Sametime servers to the cluster.
This chapter includes the following topics:
v Overview of Community Services clustering
v Community Services cluster setup procedures (without the EMS)
v Adding another server to a Community Services cluster
v Creating multiple Community Services clusters in a single Sametime community
v Rotating DNS Limitations with cached DNS resolve requests
Overview of Community Services clustering
A Community Services cluster consists of multiple Sametime servers configured to
operate together, providing failover and load balancing for the Sametime instant
messaging and presence functionality.
Failover ensures that a large community of Sametime users has continuous access
to the Community Services. If a server fails, the users in the community can
reconnect to a different Sametime server in the Community Services cluster to
receive the Community Services functionality.
Load balancing ensures that the Community Services client connections are
distributed equally among the Sametime servers in the Community Services
cluster.
This section provides an overview of Sametime Community Services clustering.
This section discusses the following topics:
v Differences between Community Services clustering and the single server
approach - Creating a Community Services cluster overcomes the limitations
imposed by the single-server approach to Community Services used in previous
Sametime releases.
v Load balancing and failover in Community Services clusters - Discusses how
load balancing and failover occurs for the Community Services.
Differences between the clustering and single-server
approaches
The Community Services single-server approach requires a user to receive all
Community Services functionality from a single Sametime server (or ″home″
Sametime server).
The Community Services clustering approach enables a user to receive the
Community Services functionality from any server within a group (or cluster) of
Sametime servers. This capability ensures that users have continuous access to
© Copyright IBM Corp. 2005 259

Community Services functionality if a Sametime server fails. The differences
between the Community Services single-server and clustering approaches are
discussed below.
Community Services single-server approach
In contrast to the Community Services clusters, you can employ a single-server
approach to provide Community Services functionality to a community of users.
The single-server approach provides Community Services functionality to the
community but has no failover capabilities if a server goes down. In the
single-server approach:
v Each user receives Community Services functionality from a single Sametime
server, which is referred to as a user’s ″home″ Sametime server.
v To assign a user to a specific home Sametime server, the administrator enters the
name of the home Sametime server in the ″Sametime server″ field of a user’s
Person document in the Domino Directory.
Note: If the Sametime server is configured to connect to an LDAP directory, the
administrator must manually add a field to the LDAP directory to contain
the name of each user’s home Sametime server, or use an existing field in
the LDAP directory to hold the name of each user’s home Sametime
server. For more information, see Setting the Home Sametime Server
setting for LDAP.
v If the Sametime community includes multiple Sametime servers, the user can
make a Community Services connection to any Sametime server in the
community, but the user is always redirected to the home Sametime server to
receive Community Services functionality. The user receives all Community
Services functionality from a single server.
Note: Although the user can connect to any Sametime server, the user is always
logged in to the Community Services on the user’s home Sametime server.
If the user connects to a Sametime server that is not the user’s home
Sametime server, the Community Services determine the user’s home
Sametime server by examining the user’s directory information and then
direct the user login to the home server. Server-to-server communications
between the Community Services on different Sametime servers enable
the user to be directed to the appropriate server.
The single-server approach provides a form of static load balancing. For
example, if a community includes 12,000 users and two Sametime servers, the
administrator can assign 6,000 users to home Sametime server 1 and 6,000 users
to home Sametime server 2. With this form of load balancing, there is no attempt
to distribute the load dynamically. For example, all 6000 users might be logged
into Sametime server 1, while only 1,000 users are logged into Sametime server
2. Sametime makes no attempt to divide the load evenly between the two
servers.
The single-server approach provides no server failover. In the example above, if
Sametime server 1 fails, 6,000 users lose the Community Services functionality.
Sametime server 2 could support these 6,000 users; however, the users cannot log
in to Sametime server 2 because each user must receive the Community Services
functionality from a single ″home″ Sametime server. The users assigned to home
Sametime server 1 must wait until the server is functional again to use any
Community Services features.
Note: For more information about using multiple Sametime servers without server
clustering, see Deploying multiple Sametime servers.
260 Sametime Administrator’s Guide
Community Services clustering approach
The Community Services clustering approach enables the administrator to cluster
the Community Services of multiple Sametime servers. In the example above, the
administrator can cluster the Community Services of Sametime servers 1 and 2 so
that they operate as a single logical server. When the Community Services of these
servers are clustered, and one server fails, the Sametime Connect client can
reconnect and receive the Community Services functionality from another
Sametime server in the Community Services cluster. The user is not dependent on
a single home Sametime server for Community Services functionality.
In the Community Services clustering approach:
v The administrator creates a Domino server cluster. The Domino servers on
which the Sametime servers are installed must be clustered to support the
Community Services cluster. The administrator also sets up real-time replication
of the Sametime databases required to support the Community Services cluster.
v The administrator deploys a rotating DNS system or IBM WebSphere Edge
Server (Network Dispatcher) that directs client connections to the Community
Services multiplexers on the Sametime servers. This configuration ensures that
user connections are distributed equally to the clustered servers. The rotating
DNS system or WebSphere Edge Server accomplishes load balancing between
the clustered servers.
v (Optional) The administrator can install Community Services multiplexers on
separate computers in front of the cluster to remove the connection-handling
load from the clustered servers. If the administrator installs Community Services
multiplexers on separate computers, the rotating DNS system or WebSphere
Edge Server is set up to load balance connections to the Community Services
multiplexer machines instead of the Sametime server machines.
v The administrator defines a Community Services cluster by creating a document
in the Configuration database (stconfig.nsf) on a Sametime server. This
document contains a name for the cluster, the DNS name of the rotating DNS
system or WebSphere Edge Server that performs load balancing operations, and
the list of Sametime servers in the cluster. A user can receive Community
Services functionality from any server in the cluster.
v Sametime Connect clients that connect to the Community Services cluster must
specify the DNS name of the rotating DNS system or WebSphere Edge Server in
the ″Host″ field of the Sametime Connect client Sametime Connectivity settings
to connect to the Community Services cluster.
v The administrator assigns each user to a home Sametime cluster (instead of a
home Sametime server as required with the single-server approach). The
administrator enters the name of the Sametime cluster in the ″Sametime server″
field of a user’s Person document in the Domino Directory. This Community
Services cluster includes multiple Sametime servers and the user can receive
Community Services functionality from any Sametime server in the cluster.
If the Sametime server is configured to connect to an LDAP directory, the
administrator manually adds a field to the LDAP directory to contain the name
of each user’s home Sametime cluster. This is essentially the same requirement
as with the single-server approach. The difference is that the field added to the
LDAP directory must contain the name of the Community Services cluster
instead of a single home Sametime server.
Chapter 11. Setting up a Community Services cluster 261

Load balancing and failover in Community Services clusters
Load balancing and failover in a Community Services cluster is accomplished
primarily through the rotating DNS system or WebSphere Edge Server (Network
Dispatcher). Community Services load balancing and failover are discussed briefly
below.
Load balancing
When creating a Community Services cluster, you must deploy a rotating DNS
system or IBM WebSphere Edge Server in front of the clustered servers. As each
client connects, the rotating DNS system or IBM Edge Server distributes the client
connections evenly to the servers in the Community Services cluster.
Server failover
If a server in a Community Services cluster fails, the Sametime Connect client
attempts a reconnection. The rotating DNS system or WebSphere Edge Server
ensures that the client connects to a different server on subsequent connection
attempts.
After you have clustered the Community Services, a user is not dependent on a
single Sametime server for the Community Services functionality. A successful
reconnection to a different server in the cluster enables the Sametime Connect
client to continue receiving the Community Services functionality.
For a step-by-step example of how to create a Community Services cluster, see
Setting up a Community Services cluster.
Community Services cluster setup procedures
The procedures required to set up a Community Services cluster without clustering
the Meeting Services are listed below. Use the information in these procedures in
conjunction with your existing knowledge of your Sametime environment when
clustering the Community Services of your Sametime servers. Your unique
Sametime environment might require some variation from these procedures.
These procedures provide an example of how to cluster the Community Services of
two Sametime servers. Once you understand how to cluster the Community
Services of two servers, you can easily add the Community Services of other
Sametime servers to the cluster.
The process of setting up a Community Services cluster without clustering the
Meeting Services is described in ten steps:
1. Community Services clustering preparations.
2. Deploying an LDAP Directory server.
3. Installing the Sametime servers.
4. Creating a Domino server cluster.
5. Setting up replication of Sametime databases.
6. (Optional) Deploying separate Community Services multiplexers.
7. Setting up the load balancing mechanism (rotating DNS or Network
Dispatcher).
8. Creating a cluster document in the Configuration database (stconfig.nsf).
9. Creating a cluster document on other Sametime servers in the community.
10. Configuring client connectivity.
262 Sametime Administrator’s Guide

Note: The process of setting up a Community Services cluster requires you to
create a Domino server cluster (as described in step 4). A maximum of six
Domino servers can operate as part of a Domino server cluster. Because of
this limitation, the maximum number of Sametime servers that can operate
as part of a Community Services cluster is six. Generally, the largest
communities can be supported with less than six Sametime servers
operating in a cluster.
Community Services clustering preparations
Ensuring you have the hardware necessary to complete this example is the first of
ten tasks associated with setting up a Community Services cluster without
clustering the Meeting Services.
This example of a Community Services cluster requires the test computers listed
below.
v Two computers are required for Sametime server installations.
v (Optional) One computer to serve as an LDAP Directory server. You can
maintain your Sametime community in either an LDAP or a Domino Directory.
v (Optional) Two computers are required if you want to install Community
Services multiplexers on separate machines.
This example also requires you to set up a rotating DNS system or IBM WebSphere
Edge Server (Network Dispatcher) to accomplish load balancing for the
Community Services cluster. The rotating DNS system is configured on a DNS
server. If you decide to use a WebSphere Edge Server for load balancing instead of
rotating DNS, an additional machine is also required for the IBM WebSphere Edge
Server installation.
Next step:
Next, review the information provided for deploying an LDAP Directory server.
Deploying an LDAP directory server
Deploying an LDAP Directory server is the second of ten tasks associated with
setting up a Community Services cluster without clustering the Meeting Services.
Using an LDAP directory is optional. You can use the Domino Directory that is on
the Sametime servers that operate as part of the Community Services cluster as the
directory that defines your community of users. The Domino Directory can be
maintained in its native format; it is not mandatory to enable the LDAP task on
the Domino servers on which Sametime is installed. If you do not want to use an
LDAP directory, skip the procedure ″Using a Domino server as an LDAP server,″
described below, and continue to the next procedure, ″Installing the Sametime
servers.″
In this example, the community of users is defined in an LDAP directory that is
maintained on a separate server; the server containing the LDAP directory is not
part of the Community Services cluster.
If you want to use an LDAP directory with your Community Services cluster,
continue with the procedures below. Note the following advantages and issues
pertaining to deploying an LDAP directory on a separate server:
v Using an LDAP directory on a separate server can conserve system resources for
the real-time interactive services of Sametime by removing directory
management tasks from the Sametime servers.
Chapter 11. Setting up a Community Services cluster 263

v You can set up the LDAP directory server to failover to another LDAP directory
server. Providing failover for the directory server improves the reliability of the
Community Services cluster.
v After you install the Sametime servers that will be part of the Community
Services cluster, you must configure the Sametime servers to connect to the
LDAP server. This process is described in Installing the Sametime servers.
Using a Domino server as an LDAP server
In this example, you maintain the LDAP directory on a separate Domino server.
This Domino server is not part of the Community Services cluster. The Domino
server has the LDAP task enabled so that the Domino Directory on the server can
function as an LDAP directory.
Note: If you choose to use an LDAP directory with your Community Services
cluster, you are not limited to using a Domino directory with the LDAP task
enabled. You can also use other LDAP directories, such as Microsoft
Exchange 5.5, Microsoft Active Directory, Netscape LDAP directory, or IBM
SecureWay directory as the directory that defines your Sametime
community.
The information below summarizes how you can use a Domino server as an LDAP
server. For more detailed information on this topic, see the Lotus Domino
Administrator 7 Help available from the documentation library at
www.lotus.com/ldd.
To use a Domino server as the LDAP directory server:
1. Install the Domino server and either replicate an existing Domino Directory to
the server or populate the Domino Directory by registering users.
Note Sametime requires each user to have an Internet password on their Person
document in the Domino Directory.
2. Create a full-text index for the Domino Directory on the Domino server.
3. Start the Domino server.
4. Start the LDAP task. To start the LDAP task, enter ″load LDAP″ at the Domino
server console.
Next step:
Next, review the information provided for installing the Sametime servers.
Installing the Sametime servers for the Community Services
cluster
Installing the Sametime servers is the third of ten tasks associated with setting up a
Community Services cluster without clustering the Meeting Services. Note the
following about the Sametime server installations.
v You must install two Domino 7.0 servers and install the Sametime 7.0 servers on
top of the Domino servers, as described in the Lotus Sametime Installation Guide
(stinstall.nsf or stinstall.pdf).
v The Sametime servers must operate as part of the same Domino domain. To be
part of the same Domino domain, the Sametime servers must be registered in
the same Domino Directory. The Domino Directory must replicate between the
servers.
Note: The Domino Directory must replicate between the Sametime/Domino
servers even if you are maintaining the user community in an LDAP
264 Sametime Administrator’s Guide

directory on a separate server that is not part of the Community Services
cluster. Replication of the Domino Directory is required for administrative
purposes. The LDAP directory serves as the user repository for the
members of the Sametime community; the Domino Directory is required
for the proper functioning of the Domino servers on which Sametime is
installed.
v The Sametime servers must have TCP/IP connectivity on the following ports:
– Port 1516 - The default port for Sametime server-to-server Community
Services connections and for extending meeting invitations to other Sametime
servers in a community to support Sametime ″invited server″ functionality.
– Port 1503 - The default port for Sametime server-to-server Meeting Services
connections.
– Port 1352 - The default port for server-to-server connections between the
Domino servers on which the Sametime servers are installed.v If you have deployed an LDAP directory on a separate server, each of the
Sametime servers must be configured to connect to the LDAP directory server
you set up in the previous procedure ( ″Deploying an LDAP directory server″).
The Sametime servers must have TCP/IP connectivity to the LDAP server on
port 389 (the default LDAP port for Sametime).
Setting up a connection to a Domino LDAP server
If you are maintaining your Sametime community in a Domino LDAP-enabled
directory, you can use the information below to enable the Sametime servers to
connect to the LDAP directory.
If you are maintaining your Sametime community in a Domino directory in its
native format (the directory is not LDAP-enabled), skip this procedure and
continue to the procedure titled create a Domino server cluster.
Note: The values used below are suggested values for a Domino Directory enabled
for LDAP access and do not apply to other LDAP directories. For more
information about setting up the LDAP connection and the configuration
settings described below, or to configure Sametime to access an LDAP
directory on a different LDAP server (such as a Microsoft, Netscape, or IBM
LDAP server), see Using LDAP with the Sametime server and Setting up an
LDAP connection.
To set up a connection to a Domino LDAP server:
1. Install a Domino server and then install a Sametime server on top of the
Domino server as described in the Lotus Sametime Installation Guide
(stinstall.nsf or stinstall.pdf).
2. During the Sametime server installation, choose ″LDAP directory″ when
prompted for the directory type.
3. After the installation completes, open the Sametime Administration Tool on
the Sametime server.
4. Select LDAP Directory-Connectivity.
5. In the LDAP Directory-Connectivity settings of the Sametime Administration
Tool, enter the following settings:
v Host name or IP address of the LDAP server - Must specify the address of
the LDAP server.
v Position of this server in the search order - Suggested value is ″1.″
Chapter 11. Setting up a Community Services cluster 265

v Use authenticated binding to the LDAP server (optional) - For a test
deployment, clear the check mark from this setting to enable the Sametime
server to bind to the LDAP server as an anonymous user.
v Use SSL to authenticate and encrypt the connection between the
Sametime server and the LDAP server - For a test deployment, clear the
check mark from this setting to prevent passwords and other directory
information that is passing between the Sametime server and the LDAP
server from being encrypted with SSL. 6. Click the Update button at the bottom of the Connectivity tab.
7. Select LDAP Directory-Basics.
8. In the LDAP Directory-Basics settings of the Sametime Administration Tool,
enter the following settings:
v Where to start searching for people - Suggested value is o=servername
(where servername is the name of the LDAP server).
v Scope for searching for a person - Suggested value is ″recursive.″
v The attribute of the person entry that defines the person’s name -
Suggested value is ″cn.″
v Attribute used to distinguish between two similar person names -
Suggested value is ″mail.″
v The object class used to determine if an entry is a person - Suggested
value is ″organizationalPerson.″
v Where to start searching for groups - Leave this setting blank.
v Scope for searching for groups - Suggested value is ″recursive.″
v Attribute used to distinguish between two similar group names -
Suggested value is ″description.″
v The group object class used to determine if an entry is a group -
Suggested value is ″groupOfNames.″ 9. Click the Update button.
10. Select LDAP Directory-Authentication.
11. In the LDAP Directory-Authentication settings of the Sametime Administration
Tool, make the following settings:
v Search filter to use when resolving a user name to a distinguished name -
Suggested value is:
(&(objectclass=organizationalPerson)(|(cn=%s)(givenname=%s)(sn=%s)(mail=%s*)))
v Name of the Home Server attribute - Suggested value is the attribute in the
LDAP directory that holds the home Sametime server name. In a Domino
Directory, this is the ″Sametime Server″ field of the Person document.12. Click the Update button.
13. Select LDAP Directory-Searching.
14. In the LDAP Directory-Searching settings of the Sametime Administration
Tool, make the following settings:
v Search filter for resolving person names - Suggested value is:
(&(objectclass=organizationalPerson)(|(cn=%s*)(givenname=%s*)(sn=%s*)(mail=%s*)))
v Search filter for resolving group names - Suggested value is:
(&(objectclass=groupOfNames)(cn=%s*))15. Click the Update button.
16. Select LDAP Directory-Group Contents.
17. In the LDAP Directory-Group Contents settings of the Sametime
Administration Tool, make the following setting:
266 Sametime Administrator’s Guide

v Attribute in the group object class that has the names of the group
members - Suggested value is ″member.″18. Click the Update button and restart the server for the changes to take effect.
Next step:
Next, create a Domino server cluster.
Creating a Domino server cluster
Creating a Domino server cluster is the fourth of ten tasks required to set up a
Community Services cluster without clustering the Meeting Services.
Note: This topic provides basic information on creating a Domino server cluster. If
you are unfamiliar with the functioning of Domino clusters, see the Lotus
Domino Administrator 7 Help, which is available from the Documentation
Library at www.lotus.com/ldd, before creating the Domino server cluster.
To create a cluster, you must have at least Author access and Delete Documents
rights in the Domino Directory, and at least Author access in the Administration
Requests database.
To create a Domino server cluster:
1. On one of the Sametime servers, start the Domino administrator client. (To start
this client on a Windows machine, choose Start - Run and type nlnotes.exe
adminonly.)
Note When the administrator client starts, make sure the Sametime server is
the current server.
2. Click the Configuration tab.
3. In the Tasks pane, expand Server and click All Server Documents.
4. In the Results pane, select the servers you want to add to the cluster. (Select
both Sametime servers that you installed in the previous step.)
5. Click ″Add to Cluster.″
6. In the Cluster Name dialog box, choose Create New Cluster, and then click OK.
7. Type the name of the new cluster and then click OK.
8. Choose Yes to add the servers to the cluster immediately. The cluster
information is immediately added to the Domino Directory of the server you
used to create the cluster.
9. If the server you used to create the Domino cluster is part of the cluster, the
server immediately starts the cluster processes and replicates its Domino
Directory with another server in the cluster. This process informs other servers
in the cluster that they are a part of the cluster. If you did not use a cluster
member to create the cluster, this process starts when the Domino Directory of
the server you used to create the cluster replicates with the Domino Directory
of a server in the cluster.
Note: The Domino Administration Process can also be used to create a Domino
server cluster. For more information about Domino server clusters, see the
Lotus Domino Administrator 7 Help, which is available from the
Documentation Library at www.lotus.com/ldd.
Chapter 11. Setting up a Community Services cluster 267
Verifying a cluster was created properly
You can do the following to verify the cluster was created correctly.
Action What you should see
From the Domino Administrator, expand
Clusters in the Server pane.
The name of the cluster followed by the
names of the cluster servers.
From the Domino Administrator, click a
cluster server in the Server pane, and then
click the Server - Status tab.
CLDBDIR (the Cluster Database Directory
Manager) and CLREPL (the Cluster
Replicator) in the Task list.
From the Domino Administrator, click a
cluster server in the Server pane, and then
click the Files tab.
The title ″Cluster Directory (R4)″ and the file
name ″cldbdir.nsf″ to show that Domino
created the Cluster Database Directory.
Compare the replica IDs of the Cluster
Database Directories on each cluster server.
The same replica ID on each server.
Next step:
Next, set up replication of the Sametime databases required to support the
Community Services cluster.
Setting up replication of Sametime databases
Setting up replication of Sametime databases is the fifth of ten tasks associated
with setting up a Community Services cluster without clustering the Meeting
Services.
To set up real-time replication between the clustered Domino servers, you must
create a new replica of each of the databases listed below on the clustered Domino
servers. For example, on Sametime server 1, use a Notes client to open
vpuserinfo.nsf, choose File-Replication-New Replica, and create a new replica of
vpuserinfo.nsf on Sametime server 2.
Creating the new replica is the only procedure required to set up real-time
replication of the databases in the Domino server cluster. Whenever a change
occurs to one of the databases, the change is automatically pushed to the replicas
on the other servers in the Domino cluster.
Note: By default, a Domino server does not allow you to create new replicas on a
server. To ensure you can create new replicas on the Sametime server, you
must do the following:
1. Use a Notes client to open the Server document of the Domino server on which
Sametime is installed.
2. Click on the Security tab.
3. In the Server Access - Create replica databases: field, enter the appropriate user
or group name to enable those users to create new replicas on the Domino
server.
To support a Community Services cluster, the following databases must replicate in
real-time between the clustered Domino servers. You must create replicas of the
following databases on each of the clustered Domino servers that will be part of
the Community Services cluster:
v The Privacy database (vpuserinfo.nsf) - Stores privacy information and contact
lists for Sametime Connect users.
268 Sametime Administrator’s Guide

v The Domino Directory database (names.nsf) - Contains Domino and Sametime
server configuration data. This database must be replicated to all Sametime
servers in the Community Services cluster.
Note: Real-time replication functionality is available only in a Domino server
cluster. If you are unfamiliar with the functioning of Domino clusters, you
should review the information in Lotus Domino Administrator 7 Help, which is
available from the Documentation Library at www-10.lotus.com/ldd, before
creating the Domino server cluster.
Ensuring database synchronization and prompt replication
The administrator should be aware of these issues regarding replication of the
Sametime databases:
v To ensure that these databases remain synchronized, you should also set up a
scheduled replication of the databases using Domino Connection documents.
You might want to schedule these replications to occur during times of low
server usage to minimize their impact on server performance for the users.
v The vpuserinfo.nsf database must replicate quickly. If a user makes changes to
the privacy settings in the Sametime Connect client, these changes should be
reflected on all servers in the Community Services cluster in the shortest time
possible. If real-time replication is taking too long for these changes to be
reflected on all servers in the cluster, modify the server parameter
VP_OD_CACHE_AGE in the [Config] section of the Sametime.ini file on the
server. Set the value of VP_OD_CACHE_AGE to the maximum interval in
minutes between replication operations. The value specifies the maximum
amount of time it should take for a change to the vpuserinfo.nsf database on one
server to replicate to another server.
The diagram below shows the server cluster at this point:
Next step:
Next, deploy separate Community Services multiplexers on separate machines.
Chapter 11. Setting up a Community Services cluster 269

Deploying separate Community Services multiplexers
(optional)
Deploying separate Community Services multiplexers is the sixth of ten tasks
associated with setting up a Community Services cluster without clustering the
Meeting Services. Deploying separate multiplexers in front of a Community
Services cluster is an optional configuration that increases the Community Services
load-handling capabilities.
Each Sametime server contains a Community Services multiplexer (or MUX)
component that maintains connections from Sametime clients to the Community
Services on the Sametime server.
During a normal Sametime server installation, the Community Services multiplexer
is installed with all other Sametime components on the Sametime server computer.
The Sametime server CD provides an option to install only the Community
Services multiplexer component. This option enables the administrator to install
the Community Services multiplexer on a different machine than the Sametime
server.
When the Sametime Community Services multiplexer is installed on a different
computer than the Sametime server:
v The Sametime Connect clients connect to the Community Services multiplexer
computer, not the Sametime server. This configuration frees the Sametime server
from the burden of managing the live client connections; the multiplexer
machine is dedicated to this task.
v The Community Services multiplexer maintains a single IP connection to each
Sametime server in the cluster. The data for all Community Services clients is
transmitted over this single IP connection to the Community Services on the
Sametime server.
Installing a Community Services multiplexer on a separate computer to remove the
connection-handling load from the Sametime server computer enables the
Sametime server to handle a larger number of users and improves the stability of
the Sametime server.
For more information about deploying separate Community Services multiplexers,
see:
v Deploying separate multiplexers in front of Sametime servers in a Community
Services cluster
v Installing and configuring a Community Services multiplexer
If you do not want to deploy separate Community Services multiplexers, continue
to the procedure Set up the load balancing mechanism (rotating DNS or Network
Dispatcher).
Deploying separate multiplexers in front of a Community
Services cluster
The illustration below shows separate Community Services multiplexers deployed
in front of clustered Sametime servers to reduce the client connection load on the
clustered servers.
270 Sametime Administrator’s Guide

In the illustration, note the following:
v The Community Services multiplexers are installed on separate computers and
handle the connections from the Community Services clients.
Note: In a subsequent step, you can set up a rotating DNS mechanism or
WebSphere Edge Server (Network Dispatcher) to distribute the client
connections to the Community Services multiplexer machines.
v Each Community Services multiplexer maintains a single IP connection to
Sametime server 1, and a single IP connection to Sametime server 2. The
Community Services data is passed from the multiplexer computers to the
Sametime servers over these IP connections. Each Sametime server maintains
only two IP connections to handle all Community Services data.
v The scenario shown above can significantly increase the Community Services
load-handling capabilities of the Sametime servers. The table below illustrates
the advantages of deploying separate multiplexers.
Multiplexer deployment
Number of Community Services
connections
Two Sametime servers with the multiplexer
installed on the same machines as the servers
Each Sametime server can handle
approximately 10,000 Community Services
connections, for a total of 20,000
connections.
Chapter 11. Setting up a Community Services cluster 271

Multiplexer deployment
Number of Community Services
connections
Two Sametime servers with the multiplexers
installed on different machines (as seen in the
illustration above)
v Each Sametime server can service
approximately 100,000 active Community
Services connections.
Note: This estimate of 100,000
connections assumes that the Meeting
Services and Broadcast Services are not
in use. When the Sametime server is
simultaneously supporting interactive
and broadcast meetings, it will support
fewer Community Services users.
v Each Community Services multiplexer
machine can handle as many as 20,000 to
30,000 live IP port connections, for a
possible total of 60,000 connections.
v The machines in the illustration above
might be able to handle 160,000 active
connections. You can increase the load
handling capability further by adding
additional Community Services
multiplexers in front of the two
Sametime servers. For example, adding
two more Community Services
multiplexers to the cluster shown above
might accommodate as many as 120,000
active connections (4 x 30,000 connections
per Community Services multiplexer).
Note: The server capacity numbers used above are approximations meant to
provide a rough estimate of the possible load-handling improvement if you
deploy Community Services multiplexers on separate machines. The actual
server capacity is affected by variables such as:
v The average number of users in the contact lists of all Sametime clients
v The number of HTTP-tunneled connections
v The number of instant messages that users send
Installing and configuring a Community Services multiplexer
Use the instructions below to install and configure a Community Services
multiplexer on a separate machine.
Preinstallation considerations: Consider the following before installing a
Community Services multiplexer on a separate machine:
v The minimum system requirements for the Community Services multiplexer
machine are the same as the system requirements for the core Sametime server.
For more information, see the Lotus Sametime Installation Guide (stinstall.nsf or
stinstall.pdf).
A machine that meets the minimum system requirements should be able to
handle approximately 20,000 simultaneous client connections.
Testing indicates that machines with dual 1133 MHz CPUs and 2 GB of RAM
can handle approximately 30,000 simultaneous client connections.
272 Sametime Administrator’s Guide

v TCP/IP connectivity must be available between the Community Services
multiplexer machine and the Sametime servers in the cluster. Port 1516 is the
default port for the connection from the Community Services multiplexer
machine to the Sametime servers.
Installing the Community Services multiplexer: To install the Community
Services multiplexer:
1. Insert the Sametime CD into the Community Services multiplexer computer
and choose the option to install the Community Services multiplexer (or MUX).
2. Follow the instructions on the installation screens. Ensure that you enter the
DNS name or IP address of one of the Sametime servers in the Community
Services cluster. The DNS name or IP address of the Sametime server is the
only significant parameter you must enter during the Community Services
multiplexer installation.
3. Configure the settings in the Configuration database (stconfig.nsf) on the
Sametime server machine and the Sametime.ini file on the Community Services
multiplexer machine as described below.
Configuring security settings in the Configuration database (stconfig.nsf) on the
Sametime server: After you have installed the Community Services multiplexers
on separate machines, you must configure the Sametime servers in the Community
Services cluster to accept connections from the Community Services multiplexers.
A Sametime server only accepts connections from Community Services
multiplexers that are listed in the stconfig.nsf database on the Sametime server.
Specifically, the Community Services multiplexer machines must be listed in the
″CommunityTrustedIps″ field of a ″CommunityConnectivity″ document in the
stconfig.nsf database. This security setting prevents Community Services
multiplexers on unauthorized machines from connecting to the Sametime server.
To enable the Sametime servers in the Community Services cluster to accept
connections from the Community Services multiplexers:
1. Use a Lotus Notes client to open the Sametime Configuration database
(stconfig.nsf) on one Sametime server in the server cluster.
2. Open the CommunityConnectivity document in the stconfig.nsf database by
double-clicking on the date associated with the document.
If the CommunityConnectivity document does not exist in the stconfig.nsf
database, you must create it. To create the CommunityConnectivity document,
choose Create-CommunityConnectivity from the menu bar in the stconfig.nsf
database.
3. In the ″CommunityTrustedIps″ field, enter the IP addresses of the Community
Services multiplexer machines.
Note The IP addresses of SIP Connector machines associated with a Sametime
community are also entered in this field.
4. Save and close the CommunityConnectivity document.
5. Repeat this procedure on the other Sametime server in the Community Services
server cluster. All servers in the Community Services cluster must contain the
IP addresses of the Community Services multiplexer machines in a
CommunityConnectivity document. This CommunityConnectivity document
must be available in each Configuration database on each Sametime server in
the cluster.
Note You can either create the CommunityConnectivity document manually as
described above or copy the CommunityConnectivity document from the
Chapter 11. Setting up a Community Services cluster 273

Configuration database on one Sametime server and paste it into the
Configuration database on the other Sametime server. Do not replicate the
Configuration database between the Sametime servers in the Community
Services cluster.
Configuration settings available in the Sametime.ini file on the multiplexer
machine: The Sametime.ini file on the Community Services multiplexer machine
contains all configuration parameters for the Community Services multiplexer,
including:
v The host name of the Sametime server to which the Community Services
multiplexer connects (specified during the Community Services multiplexer
installation and in the stconfig.nsf database as discussed above).
v The port the Community Services multiplexer uses to establish the connection
with the Sametime server (default port 1516).
v The maximum number of simultaneous connections allowed for the multiplexer.
To specify a maximum number of simultaneous connections, use the
VPMX_CAPACITY= parameter of the Sametime.ini file. The default value is
20,000 connections (for example, VPMX_CAPACITY=20000).
Note: Multiplexer machines that meet the minimum system requirements can
successfully handle 20,000 connections. This value may vary depending
on the processing capabilities of the multiplexer machine. Machines with
dual 1133 MHz CPUs and 2GB of RAM can successfully handle as many
as 30000 connections.
If it is necessary to modify the settings above, open the Sametime.ini file on the
Community Services multiplexer machine with a text editor, alter the setting, and
save the Sametime.ini file.
Next step:: Set up the load balancing mechanism (rotating DNS or Network
Dispatcher).
Set up the load-balancing mechanism (rotating DNS or
Network Dispatcher)
Setting up the load-balancing mechanism is the seventh of ten tasks associated
with setting up a Community Services cluster without clustering the Meeting
Services.
The way in which you set up the load-balancing mechanism varies slightly
depending on whether you have deployed Community Services multiplexers on
separate machines.
Without separate Community Services multiplexers
If you have not deployed Community Services multiplexers on separate machines,
do one of the following to set up the load balancing mechanism:
v Set up a rotating DNS system to accomplish load balancing. Use rotating DNS to
associate the IP addresses of the Sametime server machines to a single DNS
name.
For example, associate the IP address of Sametime server 1 (11.22.33.66) and
Sametime server 2 (11.22.33.77) to the DNS name cscluster.sametime.com.
v Set up an IBM WebSphere Edge Server (Network Dispatcher) in front of the
Sametime servers that you intend to cluster. Use the WebSphere Edge Server
Network Dispatcher to distribute connections to the Sametime server machines.
See the WebSphere Edge Server documentation for more information. This
274 Sametime Administrator’s Guide

documentation is available at the Web site www.redbooks.ibm.com and also
provided with the WebSphere Edge Server.
The diagram below shows the Sametime servers with the rotating DNS system in
place. Note that the WebSphere Edge Server can be used in place of the rotating
DNS system.
With separate Community Services multiplexers
If you have deployed Community Services multiplexers on separate machines, do
one of the following to set up the load balancing mechanism:
v Set up a rotating DNS system to accomplish load balancing. Use rotating DNS to
associate the IP addresses of the Community Services multiplexer machines to a
single DNS name.
For example, associate the IP address of Community Services multiplexer
machine 1 (11.22.33.44) and Community Services multiplexer machine 2
(11.22.33.55) to the DNS name cscluster.sametime.com.
v Set up a WebSphere Edge Server (Network Dispatcher) in front of the Sametime
servers that you intend to cluster. Use the WebSphere Edge Server Network
Dispatcher to distribute connections to the Community Services multiplexer
machines. See the WebSphere Edge Server documentation for more information.
Documentation for the WebSphere Edge Server is available at the Web site
www.redbooks.ibm.com.
The diagram below shows the Community Services multiplexers with the rotating
DNS system in place. Note that the WebSphere Edge Server can be used in place of
the rotating DNS system.
Chapter 11. Setting up a Community Services cluster 275

Next step:
Next, create a cluster document in the Configuration database (stconfig.nsf) to
define the Community Services cluster.
Creating a cluster document in the Configuration database
(stconfig.nsf)
Creating a cluster document in the Sametime Configuration database (stconfig.nsf)
is the eighth of ten tasks associated with setting up a Community Services cluster
without clustering the Meeting Services.
The Sametime administrator must manually create a cluster document in the
Sametime Configuration database (stconfig.nsf) on a Sametime server in the
Community Services cluster. The cluster document defines the Community Services
cluster.
The cluster document stores the following information:
v The Community Services cluster name.
v The DNS name assigned to the rotating DNS system or IBM WebSphere Edge
Server that performs the load-balancing operations.
v A list of all servers in the Community Services cluster.
To create the cluster document in the Sametime Configuration database:
1. Using a Notes client, open the Sametime Configuration database (stconfig.nsf)
that replicates between the Sametime servers in the cluster.
2. Choose Create-Cluster Information.
3. In the Cluster Name field, enter the cluster name.
The cluster name is at your discretion. You can name the cluster after one of
the servers in the cluster, but it is not mandatory. If you name the cluster after
one of the servers in the cluster:
276 Sametime Administrator’s Guide

v You might save time when you add the cluster name to the ″Sametime
server″ field of each user’s Person document to configure client connectivity;
some users will already have that server name listed in their Person
documents (or LDAP directory person entries).
v Use the full canonical name of the server when entering the name in the
Cluster Name field (for example, cn=servername/ou=organizational
unit/o=organization).4. In the ″DNS Name″ field, enter the fully-qualified DNS name for the cluster.
This name must be the DNS name of the rotating DNS system or the
WebSphere Edge Server Network Dispatcher that performs the load balancing
operations for the clustered Community Services.
5. In the ″List of Servers in Cluster″ field, enter the names of all the servers that
are part of the cluster. The names must be entered in the Domino full canonical
name format. Do not use the fully-qualified DNS names in the ″List of Servers
in Cluster″ field. You must separate the server names with a semicolon and a
space as shown in the example below.
Example: cn=sametimeserver1/ou=west/o=acme;
cn=sametimeserver2/ou=west/o=acme
6. Save and close the cluster document.
Leave the Configuration database open. In the next procedure, you must copy
the Cluster Information document you just created to all other Sametime
servers in the Sametime community.
Next step:
Next, create a cluster document on all other Sametime servers in the community.
Creating a cluster document on other Sametime servers in the
community
Creating a cluster document on other Sametime servers in the community is the
ninth of ten tasks associated with setting up a Community Services cluster without
clustering the Meeting Services.
You must copy the Cluster Information document to all Sametime servers that are
part of the community; this includes all Sametime servers that are part of the
Community Services cluster and all Sametime servers that are part of the
community, but not part of the Community Services cluster.
Note: Every server in the Sametime Community must contain the Cluster
Information document in its Configuration database. This document enables
the servers in the cluster to operate as part of the cluster and enables servers
outside of the cluster to interoperate with the cluster. This procedure enables
users who have a home Sametime server that is not part of the Community
Services cluster to share presence and instant messaging capabilities with
users who are assigned to the Community Services cluster (have the cluster
name listed as the home cluster in the user’s Domino or LDAP directory
entry). Do not replicate the Configuration database. The Configuration
database contains some fields that cannot be replicated to all Sametime
servers in a community.
To copy the Cluster Information document to all other Sametime servers in the
community:
1. If necessary, open the Sametime Configuration database (stconfig.nsf) in which
you created the Cluster Information document that defines the cluster. (The
Chapter 11. Setting up a Community Services cluster 277

database should still be open if you created the Cluster Information document
in the as discussed in the previous topic.)
2. Copy the Cluster Information document. To copy this document:
a. Locate Cluster Information in the Form Name column of the Configuration
database.
b. In the Cluster Information - Last Modified Date column, right-click on the
date that represents the Cluster Information document.
c. Select Copy.
d. From the menu bar, select File-Close to close the Configuration database.3. Paste the Cluster Information document into the Configuration database on
each Sametime server in the community. To paste this document in the
Configuration databases on other Sametime servers:
a. From the Lotus Notes client, choose File-Database-Open.
b. In the Server field, enter the name of another Sametime server in the
community.
c. Click Open.
d. In the Database list, select the Configuration database (stconfig.nsf).
e. Click Open.
f. Select the Edit-Paste menu option to paste the Cluster Information document
into the Configuration database on this Sametime server. The document
name and date will appear in the Form Name - Last Modified Date column
of the Configuration database.
g. Save and close the Configuration database.
h. Repeat step 3 for every Sametime server in the Sametime community.
Perform this procedure on both the clustered Sametime servers and the
non-clustered Sametime servers.
Next step:
Next, ensure that clients can access the Community Services cluster by Configuring
client connectivity for the Community Services cluster.
Configuring client connectivity for the Community Services
cluster
Configuring client connectivity for the Community Services cluster is the last of ten
tasks associated with setting up a Community Services cluster without clustering
the Meeting Services.
After you have created and named the cluster, you must make the configuration
changes required to ensure that the Community Services clients can connect to the
Community Services cluster. The configuration fields that affect client connectivity
are:
v The ″Sametime server″ field of the user’s Person document in the Domino
Directory, or a Sametime cluster field you have added to an LDAP directory.
Note: Sametime uses this field to ensure that a user connects to one of the
Sametime servers in the Community Services cluster. This field serves the
same purpose as the ″home Sametime server″ field in the single-server
approach to Community Services deployment that was used in previous
Sametime releases. For more information, see Community Services
connectivity and the home Sametime server and Differences between the
clustering and single server approaches.
278 Sametime Administrator’s Guide
v The ″Host″ field in the Sametime Connect client.
Adding the cluster name to a field in each user’s Person entry in
the LDAP directory
When the Sametime servers are configured to connect to an LDAP directory on an
LDAP server (as in this example), the administrator can do one of the following:
v Manually add a field to the LDAP directory to contain the name of the
Community Services cluster. The added field must exist in the Person record of
every Sametime user in the LDAP directory. For more information, see Setting
the Home Sametime Server setting for LDAP.
v Use an existing field in the LDAP directory to hold the name of the Community
Services cluster. This field must exist in the Person record of every Sametime
user in the LDAP directory. In this case, you must specify the cluster name in
this field in the LDAP directory.
Note: This example uses the ″Sametime server″ field of each user’s Person
document in the Domino Directory as the field that holds the Sametime
cluster name. The field you select to hold the name of the Community
Services cluster must be specified in the LDAP Directory-Authentication-Name of the Home Server attribute setting in the Sametime
Administration Tool. In this example, the ″Sametime server″ field was
specified when you configured the connection to the LDAP server when
installing the Sametime servers.
To complete the example, you can enter the cluster name in the ″Sametime
server″ field of each user’s Person document in the Domino Directory on the
Domino LDAP server. Note that you defined the cluster name when creating a
cluster document in the Configuration database.
If you used a server name as the cluster name, you can enter the server name in
the Domino hierarchical name format (sametimeserver1/west/acme) when
entering the name in the Sametime server field of the Person document.
Configuring the ″Host″ field for Sametime Connect clients
The Sametime Connect client attempts to connect to the network address specified
in the Options-Preferences-Sametime Connectivity-Host field of the Sametime
Connect client. The users in the Sametime community must enter the DNS name or
IP address of the load-balancing mechanism for the Community Services cluster in
the ″Host″ field of their Sametime Connect clients:
v If you have set up a rotating DNS system for load balancing, users must specify
the DNS name (for example, sametime.cscluster.com) of the rotating DNS system
in this field.
v If you have set up a WebSphere Edge Server to perform load balancing, users
must enter the IP address or DNS name of the WebSphere Edge Server machine
in this field.
Running the client packager application
You can run the Sametime client packager application on a Sametime server to
ensure that each Sametime Connect client downloaded from a Sametime server is
pre-configured with the appropriate connectivity settings for your environment,
including the Host name setting required to connect to the rotating DNS system or
WebSphere Edge Server. For more information, see the Lotus Sametime Installation
Guide (stinstall.nsf or stinstall.pdf).
Connectivity issues associated with a rotating DNS setup
If DNS resolve requests are cached, users might experience some problems when
reconnecting following a server failure. For more information on connectivity
Chapter 11. Setting up a Community Services cluster 279

issues associated with using a rotating DNS setup to accomplish load balancing,
see Rotating DNS Limitations with cached DNS resolve requests.
Next step:
At this point, your Community Services cluster is complete.
Adding another server to the Community Services cluster
Once you have created a Community Services cluster, you can easily add another
Sametime server to a Community Services cluster that is not controlled by the
EMS.
To add a Sametime server to an existing Community Services cluster:
1. Add the Sametime server to the Domino server cluster following the guidelines
described in Creating a Domino server cluster.
2. Replicate the Sametime databases to the newly-added Sametime server
following the guidelines described in Setting up replication of Sametime
databases.
3. Update the Cluster Information document and copy the updated document to
all Sametime servers in the community. To update and copy the Cluster
Information document:
a. Add the name of the new Sametime server to the ″List of Servers in
Cluster″ field in the Cluster Information document in the Configuration
database (stconfig.nsf) on one Sametime server.
Enter the server name in the Domino full canonical name format (for
example, cn=servername/ou=organizational unit/o=organization). Do not
use the fully-qualified DNS names in this field. Separate the server names
with a semicolon and a space as shown in the example below:
cn=sametimeserver1/ou=west/o=acme;
cn=sametimeserver2/ou=west/o=acme
After adding the new Sametime server name to the ″List of Servers in
Cluster″ field of the Cluster Information document, the ″List of Servers in
the Cluster″ field should contain the names of every Sametime server in the
Community Services cluster.
b. Copy the updated Cluster Information document and paste it into the
Configuration databases on all Sametime servers in the community. Make
sure you add the Cluster Information document to the Configuration
databases on both clustered and non-clustered Sametime servers.
Note: After pasting the new Cluster Information document in the
Configuration database, you can delete the previous version of the Cluster
Information document.4. (Optional) You can deploy an additional Community Services multiplexer as
described in Deploying separate Community Services multiplexers to ensure
the connection load for your Community Services cluster is handled efficiently.
However, if you do not deploy another Community Services multiplexer, the
existing Community Services multiplexers can still make connections to the
newly-added Sametime server.
If you deploy an additional Community Services multiplexer, make sure to
update the CommunityConnectivity configuration document on each Sametime
server in the cluster to include the IP address of the new Community Services
multiplexer.
280 Sametime Administrator’s Guide
Creating multiple Community Services clusters in a single Sametime
community
If you have a large Sametime community consisting of many Sametime servers, it
is possible to create multiple Community Services clusters within this single
Sametime community.
You might want to create multiple Community Services clusters if you have users
who are in the same community, but work in remote locations. For example, you
might want to create a Community Services cluster for workers in your Dublin
office and a separate Community Services cluster for workers in your Paris office.
Creating two separate clusters enables the clusters to function more efficiently. If
the servers in Dublin and the servers in Paris were part of the same Community
Services cluster, it would be necessary to replicate databases in real-time across a
WAN connection, which might result in inefficient performance.
Creating multiple Community Services clusters
To create multiple Community Services clusters in a single community:
1. Create each Community Services cluster using the procedures described earlier
in this chapter.
2. Copy the Cluster Information documents to all servers in the Sametime
community.
Each of these steps is described in more detail below.
Create the Community Services clusters
When creating multiple Community Services clusters in the same Sametime
community, you can create each cluster using the procedures described in Setting
up a Community Services cluster without clustering the Meeting Services.
Copy the Cluster Information documents to all servers in the
community
When you create a Community Services cluster, you create a Cluster Information
document in the Configuration database (stconfig.nsf) on one Sametime server in
the cluster and copy this Cluster Information document to the Configuration
databases of every Sametime server in the community.
When you create multiple Sametime server clusters in a single community, the
Configuration database of every Sametime server in the community must include a
Cluster Information document for every cluster in the Sametime community. In
such an environment, the Configuration database on each Sametime server in the
community will contain multiple Cluster Information documents.
For example, if you have three Community Services clusters in your community
(Cluster 1, Cluster 2, and Cluster 3), the configuration database of every Sametime
server in the community must include three cluster documents (one for each
cluster).
Note that the rule above applies to all servers in the community, even if the servers
do not operate as a member of a cluster. For example, each server in the three
clusters must have three cluster documents in the Configuration database. A server
that is in the community but not a member of any cluster must also have the three
Cluster Information documents in its Configuration database.
Chapter 11. Setting up a Community Services cluster 281

For more information, see Creating a cluster document in the Configuration
database (stconfig.nsf) and Creating a cluster document on other Sametime servers
in the community.
Rotating DNS Limitations with cached DNS resolve requests
This section describes some of the limitations related to setting up a rotating DNS
system to load balance connections to the Community Services cluster.
Ideally, as users connect to the rotating DNS system, consecutive attempts to
resolve a cluster name will result in an even distribution of connections to the
servers in the cluster. In practice, the DNS caching mechanism can cause Sametime
Connect to repeatedly attempt connections to the same server in the cluster. If a
server fails, and the DNS resolve requests are cached, Sametime Connect might
attempt to reconnect to the server that is down instead of failing over to a different
server.
The Sametime Connect client Sametime Connectivity settings control whether the
client attempts to connect to the Sametime server through a proxy server or
attempts a direct connection to the Sametime server. These connectivity settings
affect the failover behavior when DNS resolve requests are cached. This behavior
varies for the ″Sametime Connect for the desktop″ client and the ″Sametime
Connect for browsers″ client.
The failover behavior of the Sametime Connect clients when DNS resolve requests
are cached is discussed below.
Sametime Connect for the desktop
When the DNS resolve requests are cached and a server fails, ″Sametime Connect
for the desktop″ automatically attempts reconnection to another server in the
cluster. When any of the following settings are selected on the Sametime
Connectivity tab, successful reconnection to the cluster depends on the client
machine and its settings:
v Direct connection using standard Sametime protocol
v Use SOCKS4 proxy with ″Resolve server name locally″ checked
v Use SOCKS5 proxy with ″Resolve server name locally″ checked
v Direct connection using HTTP protocol
If Sametime Connect cannot reconnect to the cluster when these settings are
selected, the user can try any of the following options:
v On Windows NT and Windows 98 machines, restart the Sametime Connect
client or restart the Web browser.
v On Windows 2000 machines, change the registry key that controls the cache time
for DNS requests so the DNS requests are cached for only one second:
1. Start the registry editor and open
HKEY_LOCAL_MACHINE\SYSTEM\CurrentControlSet\Services\Dnscache\Parameters
2. Change the value of the registry key ″MaxCacheEntryTtlLimit ″ to ″1″
v In the Sametime Connect client Sametime Connectivity settings, change the
name in the Host setting from the cluster name to a specific server in the cluster.
When any of the following settings are selected in the Sametime Connectivity tab,
a proxy server resolves the cluster name. Resolving the cluster name depends on
282 Sametime Administrator’s Guide

the settings of the proxy server. The proxy server might return a valid server name
in the cluster, or it might return the address of the server that is already down.
v Use HTTP proxy
v Use HTTPS proxy
v Use SOCKS4 proxy with ″Resolve server name locally″ unchecked
v Use SOCKS5 proxy with ″Resolve server name locally″ unchecked
If Sametime Connect cannot reconnect to the cluster when these settings are
selected, check the settings on the proxy server to verify the proxy is attempting to
connect to the servers in the cluster in rotating order.
When the ″Use my Microsoft Internet Explorer browser settings″ option is selected
in the Sametime Connectivity tab, the behavior of the client depends on the proxy
connectivity settings of the Internet Explorer Web browser.
v If the browser settings do not specify a proxy server, the client attempts a
″Direct connection using HTTP protocol.″ If the client is unable to reconnect
following a server failure, the user can try any of the options listed for ″Direct
connection using HTTP protocol″ above.
v If the browser settings specify an HTTP proxy server, the HTTP proxy server
resolves the cluster name. If the client cannot reconnect, check the settings on
the proxy server to verify the proxy is attempting to connect to the servers in
the cluster.
Sametime Connect for browsers
With ″Sametime Connect for browsers,″ the client resolves the cluster name when
any of the following options are selected:
v Direct connection using standard Sametime protocol
v Direct connection using HTTP protocol
v Use SOCKS4 proxy with ″Resolve server name locally″ checked
v Use SOCKS5 proxy with ″Resolve server name locally″ checked
If Sametime Connect for browsers cannot reconnect to the cluster when these
settings are selected, the user should:
v On Windows NT and Windows 98 machines, restart the Sametime Connect
client or restart the Web browser.
v On Windows 2000 machines, change the registry key that controls the cache time
for DNS requests so the DNS requests are cached for only one second:
1. Start the registry editor and open
HKEY_LOCAL_MACHINE\SYSTEM\CurrentControlSet\Services\Dnscache\Parameters
2. Change the value of the registry key ″MaxCacheEntryTtlLimit ″ to ″1″
v In the Sametime Connect client Sametime Connectivity settings, change the
name in the Host field from the cluster name to a specific server in the cluster.
When any of the following settings are selected in the ″Sametime Connect for
browsers″ Sametime Connectivity tab, a proxy server resolves the cluster name.
Resolving the cluster name depends on the settings of the proxy server. The proxy
server might return a valid server name in the cluster, or it might return the
address of the server that is already down.
v Use SOCKS4 proxy with ″Resolve server name locally″ unchecked
v Use SOCKS5 proxy with ″Resolve server name locally″ unchecked
v Use HTTP proxy
Chapter 11. Setting up a Community Services cluster 283

v Use HTTPS proxy
If Sametime Connect cannot reconnect to the cluster when these settings are
selected, check the proxy settings to verify the proxy is attempting to connect to
the servers in the cluster in rotating order.
When the ″Use my browser settings″ option is selected in the Sametime
Connectivity tab, the behavior of the client depends on the proxy connectivity
settings of the Web browser.
v If the browser settings do not specify a proxy server, the client attempts a
″Direct connection using standard Sametime protocol″ or a ″Direct connection
using HTTP protocol.″ If the client is unable to reconnect following a server
failure, the user can try any of the options listed for ″Direct connection using
standard Sametime protocol″ and ″Direct connection using HTTP protocol″
above.
v If the browser settings specify a SOCKS proxy server, and the client is unable to
reconnect following a server failure, the user can try any of the options listed for
the Use SOCKS4 and Use SOCKS5 proxy settings above.
v If the browser settings specify an HTTP or HTTPS proxy server, the proxy server
resolves the cluster name. If the client cannot reconnect, check the settings on
the proxy server to verify the proxy is attempting to connect to the servers in
the cluster.
284 Sametime Administrator’s Guide

Chapter 12. Using the StdebugTool.exe utility
You can use the StdebugTool.exe utility to produce trace files and create new trace
file sets for troubleshooting purposes. These trace files contain debug messages
that aid IBM Technical Support in troubleshooting IBM Lotus Sametime problems.
If you have never worked with Sametime trace files before, you should use the
StdebugTool.exe utility only under the guidance of IBM Technical Support.
Note: The StdebugTool.exe utility is available only for Sametime servers that run
on the Windows operating system.
Trace file reporting on a Sametime server is controlled through settings in the
Sametime.ini file. You use the StdebugTool.exe utility to change settings in the
Sametime.ini file to produce specific trace files. If you use this utility to change the
Sametime.ini file settings, you do not need to restart the Sametime server to begin
producing the trace files. The server will begin creating these files immediately
after you run the tool.
You can use the StdebugTool.exe utility to change trace file settings on either a
local or remote Sametime server.
An administrator can also produce trace files by using a text editor to manually
edit the trace file settings in the Sametime.ini file. However, if you manually edit
the Sametime.ini file settings, you must restart the Sametime server before it will
begin producing the trace files.
For more information on using this utility, see ″Running the StdebugTool.exe
utility.″
Running the StdebugTool.exe utility
To start the StdebugTool.exe utility, you enter the StdebugTool.exe command from
the server command prompt.
Note: If you intend to alter settings in a Sametime.ini file on a remote computer,
you must append the IP address of the remote computer to the
StdebugTool.exe command when starting the utility. If you want to alter
settings in a Sametime.ini file on the local computer, it is not necessary to
append the IP address of the local computer to the StdebugTool.exe
command. A step-by-step example of running the StdebugTool.exe utility is
provided below.
When the utility starts, you are presented with a second command prompt. At this
second command prompt, you enter a command option to direct the
StdebugTool.exe utility to perform a specific action.
The possible command options are described below. These options include: ?, s, I,
f, p, r, q:
v ? - Prints a help message
v S <FLAG_NAME> <value> - Sets a value to enable or disable a trace file flag
that already exists in the Sametime.ini file. The <FLAG_NAME> string is a
© Copyright IBM Corp. 2005 285

variable representing a specific trace flag. The <value> parameter is usually
either ″1″ to enable the flag or ″0″ to disable it.
For example, the VP_DB_TRACE flag in the Sametime.ini file is used to enable
or disable all trace file reporting capabilities. The following s command option
will enable the trace file reporting capabilities if the VP_DB_TRACE=0 setting
already exists in the Sametime.ini file:
s VP_DB_TRACE 1
v i <FLAG_NAME> <value> - Adds a specific flag to the Sametime.ini file and
sets a value to enable or disable the trace file flag. Use this option if the flag you
want to use does not currently exist in the Sametime.ini file.
For example, the VP_LDAP_TRACE flag controls trace file reporting for LDAP
directory access operations. The following I command option will add the
VP_LDAP_TRACE flag to the Sametime.ini file and enable the LDAP access
trace file reporting:
I VP_LDAP_TRACE 1
v f - Prints a list of debug flags
v p - Prints a list of services
v r - Replaces existing trace files with new ones. Use this option to delete existing
trace files, or copy over existing trace files with new ones.
v q - Stops (quits) the StdebugTool.exe utility.
Trace file location
If you use the StdbugTool.exe file to produce trace files, the trace files are output to
the <Sametime server installation>\Trace directory (for example,
C:\Lotus\Domino\Trace).
Step-by-step example of running the StdebugTool.exe utility
A step-by-step example of running the StdebugTool.exe utility is provided below.
Note that StdebugTool.exe utility resides in the Sametime server installation
directory (default C:\Lotus\Domino\Sametime) following a Sametime server
installation. You must run the StdebugTool.exe utility from the Sametime server
installation directory.
To run the StdebugTool.exe utility:
1. Start the server command prompt.
2. Change to the Sametime server installation directory. For example, enter the
following command at the server command prompt:
Cd Lotus\Domino\Sametime
3. Enter StdebugTool.exe to start the StdebugTool.exe utility.
For example, you can enter the following command to start the utility if you
want to alter settings in the Sametime.ini file on the local computer:
C:\Lotus\Domino\Sametime>StdebugTool.exe
Or, you can enter the following command if you want to alter settings in the
Sametime.ini file on a remote computer that has the IP address 1.2.3.5
C:\Lotus\Domino\Sametime>StdebugTool.exe 1.2.3.5
4. The StdebugTool command prompt displays. At this command prompt, enter
the command option that you want to run. For example, if you want to display
a list of all debug flags, type:
F (and press Enter)
286 Sametime Administrator’s Guide

5. After the first command completes, you can run additional commands from the
StdebugTool command prompt.
For example, you could enter the following command to produce a trace file
with debug messages pertaining to LDAP directory access operations:
I VP_LDAP_TRACE 1 (and press Enter)
When the command above completes, you can enter another command if
necessary. For example, you could enter the following command to disable
general trace file reporting. This example assumes the VP_DB_TRACE=1 setting
currently exists in the Sametime.ini file.
s VP_DB_TRACE 0 (and press Enter)
6. When you are finished running commands, type the letter q at the StdebugTool
command prompt to quit the utility.
Chapter 12. Using the StdebugTool.exe utility 287

288 Sametime Administrator’s Guide

Chapter 13. Using the Name Conversion Utility
You use the IBM Lotus Sametime Name Conversion Utility to ensure that name
updates you make in a Domino or LDAP directory are also made in Sametime
Connect client buddy lists and privacy lists.
This section discusses the following topics concerning the Name Conversion
Utility:
v When to run the Name Conversion Utility
v Preparing to run the Name Conversion Utility
v Running the Name Conversion Utility
v Debug and trace file information
v Known issues and limitations
When to run the Name Conversion Utility
Run the Sametime Name Conversion Utility after you make updates to user and
group name data in a Sametime server Domino or LDAP directory. This utility
ensures that the name updates you make in the directory are also made in
Sametime Connect client buddy lists and privacy lists.
Users create buddy lists and privacy lists from the Sametime Connect client by
selecting user names and group names from the directory that is used with the
Sametime server. These buddy lists and privacy lists are stored on the Sametime
server in the vpuserinfo.nsf database. When a user starts the Sametime Connect
client, the lists are downloaded from the vpuserinfo.nsf database on the Sametime
server to the client on the user’s local computer.
If you change user or group name data in the Sametime server directory, you must
run the Name Conversion Utility to ensure that those same name change updates
are made in the buddy lists and privacy lists that are stored in the vpuserinfo.nsf
database on the Sametime server.
Note: Since the Name Conversion utility makes changes to the vpuserinfo.nsf
database that is located on the server and shared by all users who connect
to the server, you must schedule running the utility at a time when it is
convenient to stop all Sametime server activity.
You can use this utility to make the following changes to the buddy list and
privacy list names that are stored in the vpuserinfo.nsf database:
v If you convert the Sametime server directory from the native Domino format to
the Domino LDAP format, you must run this utility to ensure the names in the
buddy lists and privacy lists are also converted to the Domino LDAP format.
v You can make changes to individual user names and group names that exist in
the lists stored in the vpuserinfo.nsf database.
Specifically, you can use this utility to:
– Change the first or last names of individual users. For example, you can
change the user name ″Yafit Telyas″ to ″Yafit Sami″ in all lists stored in the
vpuserinfo.nsf database.
© Copyright IBM Corp. 2005 289

– Change the names of groups. For example, you can change the group name
″Haifa Development Team″ to ″Westford Development Team″ in all lists
stored in the vpuserinfo.nsf database.If you change the first or last name of a user in the user’s Person document in
the Sametime server directory, or if you change the name of a Group in a Group
document in the Sametime server directory, you must run this utility to ensure
these same updates are made in the buddy lists and privacy lists.
v You can make changes to organizational unit names in the lists stored in the
vpuserinfo.nsf database. For example, you can use this utility to change the
organizational unit name attribute ″/team/com″ to ″/branch/team/org″ in all
buddy lists and privacy lists.
If you make organizational unit name changes in the Sametime server directory,
you must run this utility to ensure these same updates are reflected in the
buddy lists and privacy lists.
Preparing to run the Name Conversion Utility
Review this information before running the utility. This section provides basic
information about managing the vpuserinfo.nsf database and working with the text
files that control the operation of the Name Conversion Utility.
Managing the vpuserinfo.nsf database
The Name Change Utility alters names that are stored in the vpuserinfo.nsf
database. Before you run the utility:
v Make a backup copy of the vpuserinfo.nsf database. The vpuserinfo.nsf database
is located in the Sametime server Data directory. (On Windows, the default
directory is C:\Lotus\Domino\Data).
After you make a backup copy of the vpuserinfo.nsf database, you can run the
utility on the copy of the vpuserinfo.nsf database in the Sametime server Data
directory.
Alternately, you can copy the vpuserinfo.nsf database from the Data directory of
an active Sametime server to a working directory and run the utility on the
vpuserinfo.nsf database in the working directory. When the conversion is
complete, you can stop the Sametime server and then copy the converted
vpuserinfo.nsf from the working directory over the unconverted vpuserinfo.nsf
database in the Sametime server Data directory.
Note that if you use this method to convert the vpuserinfo.nsf database, users
may make changes to the buddy lists and privacy lists in the vpuserinfo.nsf
database that is active on the Sametime server while you are performing the
conversion on the vpuserinfo.nsf that you copied to the the working directory.
Any buddy list or privacy list changes that users make during this time period
will be lost when you replace the unconverted vpuserinfo.nsf database with the
converted database from the working directory.
v If you have clustered the Community Services on the Sameitme servers in your
environment, be sure that you stop all Sametime servers in the cluster before
running the utility to convert names in the vpuserinfo.nsf database. After you
have converted the database, make sure to replicate the converted vpuserinfo.nsf
database to all servers in the cluster.
Editing the text files that control the operation of the utility
The two text files that control the operation of the Name Conversion Utility are
located in the Sametime server Data directory and are named:
v NameConvUtil.ini
290 Sametime Administrator’s Guide

v NameConvUtil.txt
The step-by-step procedures for running the utility that appear later in this
Appendix require you to edit these text files. Note the following when editing the
NameConvUtil.txt file and the NameConvUtil.ini files:
v The NameConvUtil.txt file must always begin with lines shown below. Never
remove these lines from the file:
#don’t delete/change/move this first section
#save the file in UTF-8 format only
[Encoding]
UTF_8=1
v To comment a line out of either of the text files, enter the # character at the
beginning of the line.
v The edited NameConvUtil.txt and NameConvUtil.ini file must reside in the Data
directory of the Sametime server on which you run the Name Conversion Utility.
v On the IBM i5/OS platform, the owner of the NameConvUtil.txt and
NameConvUtil.ini file must be QNOTES.
v Always save the NameConvUtil.txt file in the UTF-8 format. This format is
mandatory when running the Name Conversion Utility on AIX/Solaris versions
of Sametime and recommended when running the utility on either the i5/OS or
Windows versionsof Sametime.
Note: If either the NameConvUtil.txt or NameConvUtil.ini file contains any
special characters (DBCS, accented characters, or any other extending
ASCII characters), then the Name Conversion Utility requires that these
files be saved in UTF-8 format. The NameConvUtil.txt file is most likely
to contain special characters.
Follow the instructions below to save a file in the UTF-8 format:
For Windows servers: Use the File-Save As menu option in your text editor to
save the file in the UTF-8 format.
For AIX/Solaris servers: You can use any Unix UTF-8 text editor on an AIX or
Solaris computer to edit and save a file in the UTF-8 format.
You can also use a UTF-8 text editor on a Windows computer to edit a file and
then FTP the edited file to the AIX or Solaris system using BINARY FTP. You
cannot FTP the edited file to an AIX or Solaris system using ASCII FTP.
For IBM i5/OS servers:
– From your client workstation, you can map a network drive to make the
Sametime server Data directory accessible from your work station. Then you
can run a text editor such as Notepad from your workstation and update the
file directly on your IBM i5/OS server. Be sure to select File-Save As...and
specify UTF-8 as the Encoding option, then save the file.
Alternately, you can copy the files to your workstation using any other
convenient method (for example, dragging and dropping with IBM i5/OS
Navigator or FTP). Edit the files on your workstation, save them in UTF-8
formati, and then transfer them back to the Sametime server Data directory.
Note: Some file transfer methods may not preserve the file owner when you
replace the file.
– To verify that QNOTES is the owner of each file, run the following OS/400
commands: WRKAUT OBJ(’server_data_directory/NameConvUtil.ini’)
WRKAUT OBJ(’server_data_directory/NameConvUtil.txt’)
If necessary, run these commands to change the owner for each file to
QNOTES: CHGOWN OBJ(’server_data_directory/NameConvUtil.ini’)
Chapter 13. Using the Name Conversion Utility 291

NEWOWN(QNOTES) CHGOWN
OBJ(’server_data_directory/NameConvUtil.txt’) NEWOWN(QNOTES)
Running the Name Conversion Utility
You can run the Name Conversion Utility to make three basic types of name
changes in the vpuserinfo.nsf database. You can run this utility to change:
v Buddy lists and privacy lists from the native Domino directory format to the
Domino LDAP directory format.
v Individual user names and group names that exist within the buddy lists and
privacy lists.
v Organizational unit names that exist within the buddy lists and privacy lists.
You must run the utility separately to make each type of change. For example, if
you want to change individual user names and group names and also change
organizational unit names, you must run the utility twice: run the utility once to
make the individual user and group name changes and then run the utility a
separate time to make the organizational unit name changes.
See the appropriate topic below for step-by-step instructions for making each type
of name change:
v Converting buddy lists and privacy lists from the Domino directory format to
the LDAP directory format
v Changing user names and group names
v Changing organizational unit names
Converting buddy lists and privacy lists from the Domino
directory format to the LDAP directory format
Use these steps to convert the names in buddy lists and privacy lists in the
vpuserinfo.nsf database from the native Domino directory format to the Domino
LDAP directory format.
Note: You can use this utility only to convert the names from the native Domino
directory format to the Domino LDAP directory format. You cannot convert
the names from the native Domino directory format to other LDAP directory
formats, such as a Netscape or Microsoft LDAP directory format.
1. Review the information in ″Preparing to run the Name Conversion Utility″
before you run the utility.
2. Stop all Sametime activity on the server where you plan to run the Name
Conversion Utility.
v For Windows: Stop the Sametime server from the Windows Control Panel.
v For AIX/Solaris: Enter ″quit″ on the Domino Console to stop Domino and
Sametime.
v For IBM i5/OS: End the Sametime components on the server where you plan
to run the name conversion utility but allow the server to remain active by
running the following command from the Domino server console:
tell staddin2 quit3. Open the NameConvUtil.ini file that is located in the Sametime server Data
directory and make the following changes in the [CONFIG] section:
[CONFIG]
CONV_INPUT_FILE_NAME=NameConvUtil.txt
292 Sametime Administrator’s Guide

DOMINO_TO_LDAP=1
ORGANIZATION_NAME=0
This configuration specifies that the NameConvUtil.txt file as the file that
contains the name change rules, enables the Domino to LDAP name
conversion, and disables the organizational unit name changing functionality.
4. Save and close the NameConvUtil.ini file.
5. Run the Name conversion utility to convert the names in the buddy lists from
the native Domino format to the Domino LDAP format.
For Windows:
Open a server command prompt and run the NameConvUtil.exe file that is
located in the Sametime server Data directory.
By default, the vpuserinfo.nsf database also resides in the Sametime server Data
directory. In this case, you do not need to specify an additional parameter. If
you are using the default for the Sametime server Data directory, use this
command at the server command prompt to run the utility:
C:\Lotus\Domino\Data>NameConvUtil.exe
If you have moved the vpuserinfo.nsf database to a different directory, add the
directory path to the vpuserinfo.nsf database as a parameter to the command.
For example:
C:\Lotus\Domino\Data>NameConvUtil.exe C:\Work\vpuserinfo.nsf
Also note that if the Domino server was installed as a partitioned server, the
Data directory for the Domino server will reside on a different logical drive
than the other Domino server files. In this case, you must include the full drive
and directory path to the vpuserinfo.nsf database in the command. For
example, if the Data directory resides on the D: drive, use a command such as
this to run the utility from the server command prompt:
C:\Lotus\Domino\Data>NameConvUtil.exe D:\Lotus\Domino\Data\vpuserinfo.nsf
For AIX/Solaris:
Use a text editor to open the stname.sh file in the Domino server Data
directory.
You must edit two parameters in the stname.sh file. The BINDIR parameter
must specify the path to the Bin subdirectory of the Domino server (this is a
different location for AIX and Solaris). The LOTUSDIR parameter must specify
the path to the Domino server Data directory. Examples of the edited
parameters are provided below.
BINDIR=/opt/lotus/notes/latest/ibmpow
LOTUSDIR=/local/notesdata
Save and close the stname.sh file.
To start the utility, use the command line to run the following command from
the Domino server Data directory:
./stname.sh
For IBM i5/OS:
By default, the vpuserinfo.nsf database resides in the Sametime server Data
directory. If you have not moved the database to a different location, run the
name conversion utility by issuing the following command from the Domino
server console:
LOAD STNameConv
If vpuserinfo.nsf is not located in the server Data directory, then you must
specify the full path name for the database as a parameter on the command.
For example,
LOAD STNameConv /Work/vpuserinfo.nsf
Chapter 13. Using the Name Conversion Utility 293

When the name conversions are complete, restart the Sametime components by
running the following command from the Domino server console:
Load STADDIN2
6. If you have clustered the Community Services on the Sametime servers in your
environment, ensure the converted vpuserinfo.nsf database is replicated to all
Sametime servers in the cluster.
Changing user names and group names
You can change individual user names (first and last names) and group names in
the buddy lists and privacy lists that are stored in the vpuserinfo.nsf database.
You can do all of the following when using this utility to make user name and
group name changes:
v You can change both user names and group names during a single execution of
the utility. It is NOT necessary to run the utility one time to make user name
changes and then a second time to make the group name changes.
v You can change multiple user names and group names during a single execution
of the utility. For example, you can perform six user name changes and three
group name changes at the same time.
v You can change the user and group names regardless of whether the names are
stored in the buddy lists and privacy lists in the native Domino format or an
LDAP format. However, different name change rules are used for each of these
formats.
v You can make user and group name changes when the user and group names
are stored in any LDAP format supported by the Sametime server. For example,
if the Sametime server is configured to use an IBM or Netscape® LDAP
directory, you could use this utility to change names that are stored in either of
those formats.
Follow the steps below to make individual user or group name changes:
1. Review the information in ″Preparing to run the Name Conversion Utility″
before you run the utility.
2. Stop all Sametime activity on the server where you plan to run the Name
Conversion Utility.
v For Windows: Stop the Sametime server from the Windows Control Panel.
v For AIX/Solaris: Enter ″quit″ on the Domino Console to stop Domino and
Sametime.
v For IBM i5/OS: End the Sametime components on the server where you
plan to run the name conversion utility but allow the server to remain
active by running the following command from the Domino server console:
tell staddin2 quit 3. Open the NameConvUtil.ini file that is located in the Sametime server Data
directory and make the following changes in the [CONFIG] section:
[CONFIG]
CONV_INPUT_FILE_NAME=NameConvUtil.txt
DOMINO_TO_LDAP=0
ORGANIZATION_NAME=0
This configuration specifies that the NameConvUtil.txt file as the file that
contains the name change rules, and disables both the Domino to LDAP name
conversion and the organizational unit name changing functionality.
4. Save and close the NameConvUtil.ini file.
294 Sametime Administrator’s Guide

5. Open the NameConvUtil.txt file that is located in the Sametime server Data
directory and make the changes described in the next steps.
6. Complete this step if you want to change group names in the vpuserinfo.nsf
database.
Under the [GROUPS] heading in the NameConvUtil.txt file, enter the rule that
governs the group name change. Use this syntax for entering the group name
change rule:
OLDGROUPID-->NEWGROUPID
To illustrate the name change syntax, assume that you want to change the
group named ″Marketing″ to ″Sales.″ The specific syntax you use depends on
whether group names are stored in Domino LDAP format, or stored in native
Domino directory format, as noted below:
v Group names stored in Domino LDAP format - If the group names are
stored in the Domino LDAP directory format, use the DN of the group
name for each GROUPID, as shown here:
[GROUP]
CN=Marketing,OU=East,O=Acme-->CN=Sales,OU=East,O=Acme
v Group names stored in native Domino directory format - If the group
names are stored in the vpuserinfo.nsf database in the native Domino
directory format, enter the GROUPID for each group in this format:
Domino directory replica ID/Group name
It is important that you specify the Domino directory replica ID in the
format that Sametime uses, rather than the format used by Domino. When
including the Domino directory replica ID in the name change rule syntax,
you must replace the colon character (:) of the replica ID with a space,
reverse the order of the two numeric sequences that comprise the replica
ID, and then remove the leading zeros.
For example, assume you have changed the group named
″Marketing/East/Acme″ to ″Sales/East/Acme″ by editing the Group
document for this group in the Domino directory, which shows the
following replica ID on the ″i″ tab of the database properties:
85256500:0052e811
For this example, the Domino directory replica ID must be specified as
follows:
52e811 85256500
To make this group name change in the buddy lists stored in the
vpuserinfo.nsf database, you must use this syntax in the group name
change rule:
[GROUPS]
52e811 85256500/Marketing/East/Acme-->52e811
85256500/Sales/East/Acme
You can enter more than one group name change rule under the [GROUP]
heading in the NameConvUtil.txt file if you want to change multiple group
names when you run the Sametime Name Conversion Utility.Note: There is an alternative way to retrieve the group ID that you must enter
in the group name change rule. Perform the following procedure:
a. Open a Sametime Connect client.
b. Add a group to your buddy list from the same directory where you have
changed the group name, or plan to change the group name.
c. Save your buddy list to a file, using the People - Save List... menu option
Chapter 13. Using the Name Conversion Utility 295

d. Use a text editor such as Notepad to open the saved buddy list (.dat) file.
e. Find the entry for the group you added to the list. The first column of the
entry contains a G and the next item in the entry is the replica ID in this
format:
52e811;85256500
f. Replace the semi-colon (;) with a blank space when specifying this replica
ID in the NameConvUtil.txt file. 7. Complete this step if you want to change the first or last names of individual
users in buddy lists and privacy lists of the vpuserinfo.nsf database.
Under the [USERS] heading in the NameConvUtil.txt file, enter the rule that
governs the user name change. Use this format for entering this rule:
OLDUSERID-->NEWUSERID
v User names stored in Domino LDAP format - If the user names are stored
in the Domino LDAP directory format, your name change rules should use
commas as separators instead of the forward slashes, as shown in these
examples:
[USERS]
CN=Lisa Marth,OU=Haifa,O=IBM-->CN=Lisa Smith,OU=Haifa,O=IBM
CN=Avi Bino,OU=Haifa,O=IBM-->CN=Avner Bino,OU=Haifa,O=IBM
v User names stored in native Domino directory format - If the user names
are stored in the vpuserinfo.nsf database in the native Domino directory
format, you can use rules such as these to change the first and last names of
users:
[USERS]
CN=Lisa Marth/OU=Haifa/O=IBM-->CN=Lisa Smith/OU=Haifa/O=IBM
CN=Avi Bino/OU=Haifa/O=IBM-->CN=Avner Bino/OU=Haifa/O=IBM
Note: When composing the name change rules, be sure to use the full name
formats for the user names, as shown in these examples. Do not use
shortened versions of the user names, or user display names, in the name
change rules. For example, you should never compose a name change rule
such as this:
CN=Lisa Marth-->CN=Lisa Smith 8. Before saving and closing the NameConvUtil.txt file, make sure to delete or
comment out any unwanted name change rules that appear under the
[GROUPS] or [USERS] headings in the NameConvUtil.txt file. Make sure that
the name change rules underneath the [GROUPS] or [USERS] headings
specify only the name changes that you want to occur during this running of
the utility.
9. Save and close the NameConvUtil.txt file. (Save the file in UTF-8 format if
necessary.)
10. Follow the instructions below to run the Name conversion utility to make the
name changes that you have configured in the NameConvUtil.txt file.
For Windows:
Open a server command prompt and run the NameConvUtil.exe file that is
located in the Sametime server Data directory.
By default, the vpuserinfo.nsf database also resides in the Sametime server
Data directory. In this case, you do not need to specify an additional
parameter. If you are using the default for the Sametime server Data directory,
use this command at the server command prompt to run the utility:
C:\Lotus\Domino\Data>NameConvUtil.exe
296 Sametime Administrator’s Guide

If you have moved the vpuserinfo.nsf database to a different directory, add
the directory path to the vpuserinfo.nsf database as a parameter to the
command. For example:
C:\Lotus\Domino\Data>NameConvUtil.exe C:\Work\vpuserinfo.nsf
Also note that if the Domino server was installed as a partitioned server, the
Data directory for the Domino server will reside on a different logical drive
than the other Domino server files. In this case, you must include the full
drive and directory path to the vpuserinfo.nsf database in the command. For
example, if the Data directory resides on the D: drive, use a command such as
this to run the utility from the server command prompt:
C:\Lotus\Domino\Data>NameConvUtil.exe D:\Lotus\Domino\Data\vpuserinfo.nsf
For AIX/Solaris:
Use a text editor to open the stname.sh file in the Domino server Data
directory.
Edit the following parameter in the stname.sh file so that it specifies the path
to the Bin subdirectory of the Domino server (this is a different location for
AIX and Solaris):
BINDIR=/opt/lotus/notes/latest/ibmpow
LOTUSDIR=/local/notesdata
Save and close the stname.sh file.
To start the utility, use the command line to run the following command from
the Domino server Data directory:
./stname.sh
For IBM i5/OS:
By default, the vpuserinfo.nsf database resides in the Sametime server Data
directory. If you have not moved the database to a different location, run the
name conversion utility by issuing the following command from the Domino
server console:
LOAD STNameConv
If vpuserinfo.nsf is not located in the server Data directory, then you must
specify the full path name for the database as a parameter on the command.
For example,
LOAD STNameConv /Work/vpuserinfo.nsf
When the name conversions are complete, restart the Sametime components
by running the following command from the Domino server console:
Load STADDIN2
11. If you have clustered the Community Services on the Sametime servers in
your environment, replicate the converted vpuserinfo.nsf database is replicated
to all Sametime servers in the cluster.
Changing organizational unit names
You can change organizational unit names in the buddy lists and privacy lists that
are stored in the vpuserinfo.nsf database.
Use the steps below to change organizational unit names in the buddy lists and
privacy lists that are stored in the vpuserinfo.nsf database.
1. Review the information in ″Preparing to run the Name Conversion Utility″
before you run the utility.
2. Stop all Sametime activity on the server where you plan to run the Name
Conversion Utility.
v For Windows: Stop the Sametime server from the Windows Control Panel.
Chapter 13. Using the Name Conversion Utility 297

v For AIX/Solaris: Enter ″quit″ on the Domino Console to stop Domino and
Sametime.
v For IBM i5/OS: End the Sametime components on the server where you
plan to run the name conversion utility but allow the server to remain
active by running the following command from the Domino server console:
tell staddin2 quit 3. Open the NameConvUtil.ini file that is located in the Sametime server Data
directory and make the following changes in the [CONFIG] section:
[CONFIG]
CONV_INPUT_FILE_NAME=NameConvUtil.txt
DOMINO_TO_LDAP=0
ORGANIZATION_NAME=1
This configuration specifies the NameConvUtil.txt file as the file that contains
the name change rules, disables the Domino to LDAP name conversion, and
enables the organizational unit name changing functionality.
4. Save and close the NameConvUtil.ini file.
5. Open the NameConvUtil.txt file that is located in the Sametime server Data
directory.
6. Enter the organizational unit name change rules under both the [GROUPS]
and [USERS] headings in the NameConvUtil.txt file, as discussed below.
Use this format when entering the organizational unit name change rules
under the [GROUPS] and [USERS] headings:
OLDDOMAINSUFFIX-->NEWDOMAINSUFFIX
To illustrate the organizational unit name change rule syntax, assume that you
want to make these two organizational unit name changes in the buddy lists
and privacy lists stored in the vpuserinfo.nsf database. You want to change:
/team/com to /branch/team/org
/teamspace to /team space
The specific syntax you use depends on whether names are stored in the
native Domino directory format or the Domino LDAP format:
v Names stored in native Domino directory format - For group names stored
in the vpuserinfo.nsf database in the native Domino directory format, enter
the domain suffix changes in the Domino hierarchical format, as shown
below:
[GROUPS]
/team/com-->/branch/team/org
/teamspace-->/team space
For user names stored in the native Domino directory format, you must
enter two organizational name change rules for each organizational unit
name change that you want to make. One rule must specify the
organizational unit in the cannonical format and the other must specify the
organizational unit in the hierarchical format, as shown below:
[USERS]
/ou=team/O=com-->/ou=branch/ou=team/o=Acme /team/com-->/branch/team/org
/o=teamspace-->/o=team space /teamspace-->/team space
Note: Two rules are required for each organizational unit user name change
because the userID and the user display name parameters are stored in a
native Domino directory in different formats. A separate rule is required for
each of these parameters.
298 Sametime Administrator’s Guide
v Names stored in Domino LDAP format - If the group and user names are
stored in the Domino LDAP directory format, use commas as the seperators
in the organizational unit name change rules instead of the forward slashes,
as shown in the examples below:
[GROUPS]
,ou=team,o=com-->,ou=branch,ou=team,o=org
,dc=teamspace-->,dc=team space
[USERS]
,ou=team,o=com-->ou=branch,ou=team,o=org
,dc=teamspace-->,dc=team space
Note: Only one rule is required for each organizational unit user name
change when names are stored in the LDAP directory format. 7. Before saving and closing the NameConvUtil.txt file, make sure to delete or
comment out any unwanted name change rules that appear under the
[GROUPS] or [USERS] headings in the NameConvUtil.txt file. Make sure that
the name change rules underneath the [GROUPS] or [USERS] headings
specify only the name changes that you want to occur during this running of
the utility.
8. Save and close the NameConvUtil.txt file. (Save the file in UTF-8 format if
necessary.)
9. Run the Name conversion utility to make the name changes that you have
configured in the NameConvUtil.txt file.
For Windows:
Open a server command prompt and run the NameConvUtil.exe file that is
located in the Sametime server Data directory.
By default, the vpuserinfo.nsf database also resides in the Sametime server
data directory. In this case, you do not need to specify an additional
parameter. If you are using the default for the Sametime server Data directory,
use this command at the server command prompt to run the utility:
C:\Lotus\Domino\Data>NameConvUtil.exe
If you have moved the vpuserinfo.nsf database to a different directory, add
the directory path to the vpuserinfo.nsf database as a parameter to the
command. For example:
C:\Lotus\Domino\Data>NameConvUtil.exe C:\Work\vpuserinfo.nsf
Also note that if the Domino server was installed as a partitioned server, the
Data directory for the Domino server will reside on a different logical drive
than the other Domino server files. In this case, you must include the full
drive and directory path to the vpuserinfo.nsf database in the command. For
example, if the Data directory resides on the D: drive, use a command such as
this to run the utility from the server command prompt:
C:\Lotus\Domino\Data>NameConvUtil.exe D:\Lotus\Domino\Data\vpuserinfo.nsf
For AIX/Solaris:
Use a text editor to open the stname.sh file in the Domino server Data
directory.
Edit the following parameter in the stname.sh file so that it specifies the path
to the Bin subdirectory of the Domino server (this is a different location for
AIX and Solaris):
BINDIR=/opt/lotus/notes/latest/ibmpow
LOTUSDIR=/local/notesdata
Save and close the stname.sh file.
Chapter 13. Using the Name Conversion Utility 299

To start the utility, use the command line to run the following command from
the Domino server Data directory:
./stname.sh
For IBM i5/OS:
By default, the vpuserinfo.nsf database resides in the Sametime server Data
directory. If you have not moved the database to a different location, run the
name conversion utility by issuing the following command from the Domino
server console:
LOAD STNameConv
If vpuserinfo.nsf is not located in the server Data directory, then you must
specify the full path name for the database as a parameter on the command.
For example,
LOAD STNameConv /Work/vpuserinfo.nsf
When the name conversions are complete, restart the Sametime components
by running the following command from the Domino server console:
Load STADDIN2
10. If you have clustered the Community Services on the Sametime servers in
your environment, replicate the converted vpuserinfo.nsf database is
replicated to all Sametime servers in the cluster.
Debug and trace file information
You can enable the Sametime Name Conversion Utility to produce trace messages
for debugging purposes. These trace messages can be output to a file or to the
monitor.
To output trace messages, follow these instructions:
1. Use a text editor to open the Sametime.ini file located in the Sametime server
installation directory.
2. In the Sametime.ini file, enable trace reporting by setting the following
parameter as shown: NAME_CONV_TRACE_DEBUG=1
3. Save and close the Sametime.ini file.
4. Open the NameConvUtil.ini file in the Sametime server Data directory.
5. Use the VP_USERS_TRACE_STDOUT parameter to determine the output
location for the trace messages as shown below:
v Set VP_USERS_TRACE_STDOUT=0 to output trace messages to a file in the
<Sametime server installation>\Trace directory.
v Set VP_USERS_TRACE_STDOUT=1 to output trace messages to the monitor.6. Save and close the NameConvUtil.ini file.
To disable the trace message reporting, set the NAME_CONV_TRACE_DEBUG=
parameter to 0 (zero) in the Sametime.ini file. No other procedures are required to
disable the message reporting.
Known issues and limitations
This topic lists the known issues and limitations of the Name Conversion Utility:
v You can use this utility to convert all names in the buddy lists and privacy lists
from the native Domino directory format to the Domino LDAP directory format
but you cannot use this utility to convert names to other LDAP directory
300 Sametime Administrator’s Guide

formats. For example, you cannot use this utility to convert names from the
native Domino directory format to a Netscape LDAP directory or Microsoft
LDAP directory format.
v You can use this utility to make changes to individual user and group names, or
make organizational unit name changes to names that are currently stored in
buddy lists and privacy lists in any directory format supported by the Sametime
server. For example, you can make these types of name changes to user or group
names that are stored in the native Domino directory server or any LDAP
directory format that is supported by Sametime (such as IBM, Netscape, or
Microsoft LDAP directory formats).
v When you change a user’s name in the directory, be sure to run this utility to
also change the name in the vpuserinfo.nsf database BEFORE the user logs into
the Community Service using the new name.
If the user logs in with the new name, and then you later run this utility to
convert the user’s name in the vpuserinfo.nsf database, the vpuserinfo.nsf
database will contain two separate records with the same userID. In this
situation, the administrator must manually delete one of duplicate records from
the vpuserinfo.nsf database.
v If a Sametime server accesses two (or more) Domino directories, and these
directories are converted from the native Domino directory format to the
Domino LDAP directory format, the administrator should be aware of the
following issue concerning groups that have the same name in both directories.
When you run the conversion utility to convert the names in the vpuserinfo.nsf
database from the native Domino format to the Domino LDAP format, only the
group from one Domino LDAP directory will exist in the lists in the
vpuserinfo.nsf database after the conversion completes.
This problem occurs because groups with the same names in multiple LDAP
directories have the same GroupID.
v The following issue applies if users authenticate to a Domino 6.0.2 LDAP
directory when logging into the Community Services.
If you use this utility to change a user’s name, and the changed user name
includes any of these special characters (″,″ ″=″ ″+″ ″<″ ″>″ ″#″ ″;″), the changed
user’s buddy lists and privacy lists will be lost after the name conversion. The
user must recreate the buddy lists after the name conversion.
This problem occurs because of the way that the special characters are handled
by the Domino authentication process. This problem is not seen with Domino 5
LDAP directories.
v When creating a name change rule in the NameConvUtil.txt file to change a user
name, be sure that the name change rule uses the full version of the user’s name
as it exists in the vpuserinfo.nsf database. Do not use a shortened version of the
user’s name (such as the user’s display name) when creating a name change
rule.
For example, to change the user name Lisa Mane to Lisa Smith, use the full
hierarchical name format in the name change rule, as shown below:
CN=Lisa Mane/OU=Haifa/O=IBM-->CN=Lisa Smith/OU=Haifa/O=IBM
Using shortened versions of the user name in a name change rule may result in
unwanted user name changes due to character matching issues. For example,
consider this example below of an incorrect name change rule that uses
shortened forms of the user names:
Lisa Mane-->Lisa Smith
Chapter 13. Using the Name Conversion Utility 301

This name change rule will change the user’s display name from Lisa Mane to
Lisa Smith. However, this rule will also change any other longer user names that
begin with the same set of characters. For example, this name change rule would
also make the following name changes:
– Lisa Manet to Lisa Smitht
– Lisa Manelli to Lisa SmithlliTo avoid these character matching issues, use the full name of the user in the
name change rules.
v Be sure to stop the Sametime server before running this utility.
Alternately, you can copy the vpuserinfo.nsf database from the Data directory of
an active Sametime server to a working directory and run the utility on the
vpuserinfo.nsf database in the working directory. When the conversion is
complete, you can stop the Sametime server and then copy the converted
vpuserinfo.nsf from the working directory over the unconverted vpuserinfo.nsf
database in the Sametime server Data directory.
Note that if you use this method to convert the vpuserinfo.nsf database, users
may make changes to the buddy lists and privacy lists in the vpuserinfo.nsf
database that is active on the Sametime server while you are performing the
conversion on the vpuserinfo.nsf that you copied to the the working directory.
Any buddy list or privacy list changes that users make during this time period
will be lost when you replace the unconverted vpuserinfo.nsf database with the
converted database from the working directory.
v Running this utility to change user names or group names in the group lists and
privacy lists in the vpuserinfo.nsf database will not change the display name for
a user in the Sametime Connect client. When the Sametime server is configured
to access a native Domino directory, the Sametime Connect client uses the
topmost entry in the ″User name″ field of the user’s Domino directory Person
document as the display name. When the Sametime server is configured to
access a Domino LDAP directory, the display name is determined by the
″Attribute of a person entry that defines the person’s name″ setting in the LDAP
directory -Basics settings of the Sametime Administration Tool.
302 Sametime Administrator’s Guide

Chapter 14. Using the IBM Lotus Instant Messaging Limited
Use version of Sametime with standard Sametime servers
This appendix discusses the configuration requirements and issues associated with
deploying the IBM Lotus Instant Messaging Limited Use version of the Sametime
server into a community that also includes standard Sametime servers. This
appendix includes the following topics:
v Using the IBM Lotus Instant Messaging Limited Use version of Sametime in an
environment that includes standard Sametime servers
v Preventing instant messaging-only users from creating or attending meetings
v End user issues in a mixed environment
Assign users to an appropriate home Sametime server
Assigning users to an appropriate home Sametime server is one of two
configurations you must perform when the Instant Messaging Limited Use version
of the Sametime server is deployed in the same community as the standard
Sametime server.
Use the following guidelines to assign users to appropriate home Sametime
servers:
v Each user who is licensed only for the Instant Messaging Limited Use version of
Sametime must have an Instant Messaging Limited Use server assigned as the
home Sametime server.
v Each user who is licensed for the standard Sametime server must have a
standard Sametime server assigned as the home Sametime server.
A Sametime instant messaging client user is authenticated by the home Sametime
server. The default configuration of the IBM Lotus Instant Messaging Limited Use
version of Sametime ensures that only the clients supported by that server can be
authenticated by that server. Assigning users to an appropriate home Sametime
server ensures that users can only use the instant messaging clients for which they
are licensed.
To assign a user to a home Sametime server, you enter the server name in the
″Sametime server″ field of the user’s Person record in the Domino or LDAP
directory. For more information about the home Sametime server, see Community
Services connectivity and the home Sametime server.
Next:
Preventing instant messaging-only users from creating or attending meetings
Preventing instant messaging-only users from creating or attending
meetings
Preventing instant messaging-only users from creating or attending meetings is the
last of two configurations you must perform in an environment that includes both
the Instant Messaging Limited Use version of the Sametime server and the
standard version of the Sametime server.
© Copyright IBM Corp. 2005 303

This configuration prevents users who are licensed only for the Instant Messaging
Limited Use version of Sametime from creating or attending meetings on the
standard Sametime servers.
To prevent these users from creating or attending meetings on a standard
Sametime server, you must perform these procedures:
1. Disable Anonymous access and Default access in the ACLs of the Sametime
Meeting Center database (stconf.nsf).
2. Create directory Groups for the standard Sametime server users.
3. Add the Groups of standard Sametime server users to the database ACLs.
Each of these procedures is described in this section.
Disable Anonymous access and Default access in the ACL of
the Sametime Meeting Center database
Disabling Anonymous access and Default access in the ACL of the Sametime
Meeting Center database is the first of three procedures required to prevent instant
messaging-only users from creating or attending meetings on standard Sametime
servers.
Users must have access to the Sametime Meeting Center database to create
scheduled meetings. This is the first of three procedures needed to ensure that only
standard Sametime server users can access this database.
Use the following procedure to disable Anonymous access and Default access in
the stconf.nsf database.
1. From the Sametime server home page, click the ″Administer the Server″ link
to open the Sametime Administration Tool.
2. If you are using a Domino Directory with the Sametime server, select Domino
Directory - Domino.
If you are using an LDAP directory with the Sametime server, select LDAP
Directory.
3. Select Set Access Control.
4. From the Databases list, select Sametime Online Meeting Center (stconf.nsf).
5. Click the Access button.
6. Select the Anonymous entry.
7. In the Access Box, select the ″No access″ level for the Anonymous entry.
8. Select the Default entry.
9. In the Access Box, select the ″No access″ level for the Default entry.
10. Click Submit.
Note: You must perform this procedure on each standard Sametime server in your
environment.
Next step:
Create directory Groups for the standard Sametime server users
304 Sametime Administrator’s Guide

Create directory Groups for the standard Sametime server
users
Creating directory Groups for the standard Sametime server users is the second of
three procedures required to prevent instant messaging-only users from creating or
attending meetings on standard Sametime servers.
In this procedure, you must create groups in the Sametime community directory
that include all users licensed to use your standard Sametime servers.
Use the following guidelines when creating these groups:
v If you want all users licensed to use the standard Sametime servers to have the
ability to both create and attend meetings, you can include all standard
Sametime server users in a single group.
If you have a large Sametime community, you can create multiple groups for
this purpose. For example, you might create groups named ″Meeting Creator
Group 1″ and ″Meeting Creator Group 2.″
v If you want some standard Sametime users to have the ability to both create and
attend meetings while limiting other standard Sametime servers to attendee-only
privileges, you must create a minimum of two groups.
One group must contain the users who can both create and attend meetings and
the other group must contain users who can attend meetings but not create
them. For example, you might create two groups: one named ″Meeting Creators″
and one named ″Meeting Attendees.″
If you have a large Sametime community, you can create multiple groups for
each purpose. For example, you can create two separate groups that contain
users who can create and attend meetings and two separate groups that contain
users who can only attend meetings. These groups might be named as follows:
– Meeting Creator Group 1
– Meeting Creator Group 2
– Meeting Attendee Group 1
– Meeting Attendee Group 2
For more information about creating a group in a Domino directory, see Creating a
group in the ″Using Domino Directories″ chapter. For information about creating
groups in an LDAP directory, see the documentation provided with your LDAP
directory.
Next step:
Add the groups of standard Sametime server users to the Sametime Meeting
Center database ACL
Add the groups of standard Sametime server users to the
Sametime Meeting Center database ACL
Adding the groups of standard Sametime server users to the database ACLs is the
last of three procedures required to prevent instant messaging-only users from
creating or attending meetings on standard Sametime servers.
In this procedure, you add the group(s) of standard Sametime server users that
you have just created to the ACL of the Sametime Meeting Center database. For
Chapter 14. Using the IBM Lotus Instant Messaging Limited Use version of Sametime with standard Sametime servers 305
step-by-step instructions on adding a group name to a database ACL, see Adding a
name to a database Access Control List (ACL) in the ″Working with Sametime
Security″ chapter.
When you add the group names to the database ACL, the access level that you
provide to each group determines whether that group can both attend and create
meetings or only attend meetings. These access levels are discussed below.
v Meeting Creators: Assign the Author access level with the Write Public
Documents privilege to the group names that you are allowing to create, modify,
and attend meetings on the server.
v Meeting Attendee-only: Assign the Reader access level to the group names that
you want to have attendee-only access to the Sametime Meeting Center. These
users can attend meetings but cannot create them.
If you want a group with the Reader access level to attend unlisted meetings,
you must also select the Write Public Documents privilege for the group.
End user issues in a mixed environment
The administrator should be aware of the following end user issues that may occur
in an environment that includes both the IBM Lotus Instant Messaging Limited
Use version of Sametime and the standard Sametime server.
v If an Instant Messaging Limited Use Sametime user accesses the Sametime
Meeting Center on a standard Sametime server and clicks the ″Attend a
Meeting″ or a ″Schedule a Meeting″ link, the user receives a message that they
are not authorized to perform that action. The ACL settings of the Meeting
Center database (stcenter.nsf) prevent the user from performing these actions.
v A standard Sametime server user can add Instant Messaging Limited Use
Sametime users to the contact list of a Sametime Connect client and exchange
instant messages with these users or invite these users into chat conferences
involving more than two users.
The standard Sametime server user receives no indication that the user added to
the contact list is an Instant Messaging Limited Use Sametime user.
If the standard Sametime server user invites an Instant Messaging Limited Use
Sametime user to an instant meeting, both of these users will receive a meeting
invitation on the desktop. The standard Sametime server user can successfully
enter this instant meeting but receives no message indicating the Instant
Messaging Limited Use user cannot join the meeting.
The Instant Messaging Limited Use Sametime user can click the Respond button
on the meeting invitation to tell the meeting initiator that they do not have Web
conferencing capabilities.
If the Instant Messaging Limited Use Sametime user attempts to join this
meeting, the user sees a message indicating the Sametime Meeting Room is
being prepared but is never allowed to join the meeting. The user must
manually close this window.
v The Sametime Connect for browsers client that loads from the Instant Messaging
Limited Use version of Sametime may include user interface options that
indicate the user can start instant meetings. For example, a user may be able to
right-click on a name in the Contact list and select a ″Collaborate″ option to
attempt to start an instant meeting. The Sametime Connect for browser client
user receives an error message when selecting any user interface option to start
an instant meeting.
306 Sametime Administrator’s Guide

Appendix. Notices
This information was developed for products and services offered in the U.S.A.
IBM may not offer the products, services, or features discussed in this document in
other countries. Consult your local IBM representative for information on the
products and services currently available in your area. Any reference to an IBM
product, program, or service is not intended to state or imply that only that IBM
product, program, or service may be used. Any functionally equivalent product,
program, or service that does not infringe any IBM intellectual property right may
be used instead. However, it is the user’s responsibility to evaluate and verify the
operation of any non-IBM product, program, or service.
IBM may have patents or pending patent applications covering subject matter
described in this document. The furnishing of this document does not grant you
any license to these patents. You can send license inquiries, in writing, to:
IBM Director of Licensing
IBM Corporation
North Castle Drive
Armonk, NY 10504-1785
U.S.A.
For license inquiries regarding double-byte (DBCS) information, contact the IBM
Intellectual Property Department in your country or send inquiries, in writing, to:
IBM World Trade Asia Corporation
Licensing
2-31 Roppongi 3-chome, Minato-ku
Tokyo 106-0032, Japan
The following paragraph does not apply to the United Kingdom or any other
country where such provisions are inconsistent with local law:
INTERNATIONAL BUSINESS MACHINES CORPORATION PROVIDES THIS
PUBLICATION “AS IS” WITHOUT WARRANTY OF ANY KIND, EITHER
EXPRESS OR IMPLIED, INCLUDING, BUT NOT LIMITED TO, THE IMPLIED
WARRANTIES OF NON-INFRINGEMENT, MERCHANTABILITY OR FITNESS
FOR A PARTICULAR PURPOSE. Some states do not allow disclaimer of express or
implied warranties in certain transactions, therefore, this statement may not apply
to you.
This information could include technical inaccuracies or typographical errors.
Changes are periodically made to the information herein; these changes will be
incorporated in new editions of the publication. IBM may make improvements
and/or changes in the product(s) and/or the program(s) described in this
publication at any time without notice.
Any references in this information to non-IBM Web sites are provided for
convenience only and do not in any manner serve as an endorsement of those Web
sites. The materials at those Web sites are not part of the materials for this IBM
product and use of those Web sites is at your own risk.
IBM may use or distribute any of the information you supply in any way it
believes appropriate without incurring any obligation to you.
© Copyright IBM Corp. 2005 307

Licensees of this program who wish to have information about it for the purpose
of enabling: (i) the exchange of information between independently created
programs and other programs (including this one) and (ii) the mutual use of the
information which has been exchanged, should contact:
IBM Corporation
Office 4360
One Rogers Street
Cambridge, MA 02142
U.S.A.
Such information may be available, subject to appropriate terms and conditions,
including in some cases, payment of a fee.
The licensed program described in this information and all licensed material
available for it are provided by IBM under terms of the IBM Customer Agreement,
IBM International Program License Agreement, or any equivalent agreement
between us.
COPYRIGHT LICENSE:
This information contains sample application programs in source language, which
illustrate programming techniques on various operating platforms. You may copy,
modify, and distribute these sample programs in any form without payment to
IBM, for the purposes of developing, using, marketing or distributing application
programs conforming to the application programming interface for the operating
platform for which the sample programs are written. These examples have not
been thoroughly tested under all conditions. IBM, therefore, cannot guarantee or
imply reliability, serviceability, or function of these programs.
Trademarks
The following terms are trademarks of International Business Machines
Corporation in the United States, other countries, or both:
IBM
the IBM logo
1-2-3
AIX
AS/400
DB2
Domino
Domino Designer
iNotes
i5/OS
Lotus
Lotus Notes
MQSeries
Netfinity
Notes
QuickPlace
Sametime
SmartSuite
S/390
Tivoli
WebSphere
Word Pro
308 Sametime Administrator’s Guide

Microsoft, Windows, and Windows NT are trademarks of Microsoft Corporation in
the United States, other countries, or both.
Java and all Java-based trademarks are trademarks of Sun Microsystems, Inc. in the
United States, other countries, or both.
UNIX is a registered trademark of The Open Group in the United States and other
countries.
Other company, product, or service names may be trademarks or service marks of
others.
Third Party Notices
The Apache Software License, Version 1.1
Copyright (c) 1999-2000 The Apache Software Foundation. All rights reserved.
Redistribution and use in source and binary forms, with or without modification,
are permitted provided that the following conditions are met:
1. Redistributions of source code must retain the above copyright notice, this list
of conditions and the following disclaimer.
2. Redistributions in binary form must reproduce the above copyright notice, this
list of conditions and the following disclaimer in the documentation and/or
other materials provided with the distribution.
3. The end-user documentation included with the redistribution, if any, must
include the following acknowledgment: ″This product includes software
developed by the Apache Software Foundation (http://www.apache.org/).″
Alternately, this acknowledgment may appear in the software itself, if and
wherever such third-party acknowledgments normally appear.
4. The names ″Xerces″ and ″Apache Software Foundation″ must not be used to
endorse or promote products derived from this software without prior written
permission. For written permission, please contact [email protected].
5. Products derived from this software may not be called ″Apache,″ nor may
″Apache″ appear in their name, without prior written permission of the Apache
Software Foundation.
THIS SOFTWARE IS PROVIDED ``AS IS’’ AND ANY EXPRESSED OR IMPLIED
WARRANTIES, INCLUDING, BUT NOT LIMITED TO, THE IMPLIED
WARRANTIES OF MERCHANTABILITY AND FITNESS FOR A PARTICULAR
PURPOSE ARE DISCLAIMED. IN NO EVENT SHALL THE APACHE SOFTWARE
FOUNDATION OR ITS CONTRIBUTORS BE LIABLE FOR ANY DIRECT,
INDIRECT, INCIDENTAL, SPECIAL, EXEMPLARY, OR CONSEQUENTIAL
DAMAGES (INCLUDING, BUT NOT LIMITED TO, PROCUREMENT OF
SUBSTITUTE GOODS OR SERVICES; LOSS OF USE, DATA, OR PROFITS; OR
BUSINESS INTERRUPTION) HOWEVER CAUSED AND ON ANY THEORY OF
LIABILITY, WHETHER IN CONTRACT, STRICT LIABILITY, OR TORT
(INCLUDING NEGLIGENCE OR OTHERWISE) ARISING IN ANY WAY OUT OF
THE USE OF THIS SOFTWARE, EVEN IF ADVISED OF THE POSSIBILITY OF
SUCH DAMAGE.
This software consists of voluntary contributions made by many individuals on
behalf of the Apache Software Foundation and was originally based on software
Appendix. Notices 309

copyright (c) 1999, International Business Machines, Inc., http://www.ibm.com.
For more information on the Apache Software Foundation, please see
http://www.apache.org/.
For DSIG base64
COPYRIGHT 1995 BY: MASSACHUSETTS INSTITUTE OF TECHNOLOGY (MIT),
INRIA
This W3C software is being provided by the copyright holders under the following
license. By obtaining, using and/or copying this software, you agree that you have
read, understood, and will comply with the following terms and conditions:
Permission to use, copy, modify, and distribute this software and its documentation
for any purpose and without fee or royalty is hereby granted, provided that the
full text of this NOTICE appears on ALL copies of the software and documentation
or portions thereof, including modifications, that you make.
THIS SOFTWARE IS PROVIDED ″AS IS,″ AND COPYRIGHT HOLDERS MAKE
NO REPRESENTATIONS OR WARRANTIES, EXPRESS OR IMPLIED. BY WAY OF
EXAMPLE, BUT NOT LIMITATION, COPYRIGHT HOLDERS MAKE NO
REPRESENTATIONS OR WARRANTIES OF MERCHANTABILITY OR FITNESS
FOR ANY PARTICULAR PURPOSE OR THAT THE USE OF THE SOFTWARE OR
DOCUMENTATION WILL NOT INFRINGE ANY THIRD PARTY PATENTS,
COPYRIGHTS, TRADEMARKS OR OTHER RIGHTS. COPYRIGHT HOLDERS
WILL BEAR NO LIABILITY FOR ANY USE OF THIS SOFTWARE OR
DOCUMENTATION.
The name and trademarks of copyright holders may NOT be used in advertising
or publicity pertaining to the software without specific, written prior permission.
Title to copyright in this software and any associated documentation will at all
times remain with copyright holders.
For STLport
License Agreement
Boris Fomitchev grants Licensee a non-exclusive, non-transferable, royalty-free
license to use STLport and its documentation without fee.
By downloading, using, or copying STLport or any portion thereof, Licensee agrees
to abide by the intellectual property laws and all other applicable laws of the
United States of America, and to all of the terms and conditions of this Agreement.
Licensee shall maintain the following copyright and permissionnotices on STLport
sources and its documentation unchanged :
Copyright 1999,2000 Boris Fomitchev
This material is provided ″as is″, with absolutely no warranty expressed or
implied. Any use is at your own risk.
Permission to use or copy this software for any purpose is hereby granted without
fee, provided the above notices are retained on all copies. Permission to modify the
310 Sametime Administrator’s Guide

code and to distribute modified code is granted, provided the above notices are
retained, and a notice that the code was modified is included with the above
copyright notice.
The Licensee may distribute binaries compiled with STLport (whether original or
modified) without any royalties or restrictions.
The Licensee may distribute original or modified STLport sources, provided that:
The conditions indicated in the above permission notice are met; The following
copyright notices are retained when present, and conditions provided in
accompanying permission notices are met :
Copyright 1994 Hewlett-Packard Company
Copyright 1996,97 Silicon Graphics Computer Systems, Inc.
Copyright 1997 Moscow Center for SPARC Technology.
Permission to use, copy, modify, distribute and sell this software and its
documentation for any purpose is hereby granted without fee, provided that the
above copyright notice appear in all copies and that both that copyright notice and
this permission notice appear in supporting documentation. Hewlett-Packard
Company makes no representations about the suitability of this software for any
purpose. It is provided ″as is″ without express or implied warranty.
Permission to use, copy, modify, distribute and sell this software and its
documentation for any purpose is hereby granted without fee, provided that the
above copyright notice appear in all copies and that both that copyright notice and
this permission notice appear in supporting documentation. Silicon Graphics
makes no representations about the suitability of this software for any purpose. It
is provided ″as is″ without express or implied warranty.
Permission to use, copy, modify, distribute and sell this software and its
documentation for any purpose is hereby granted without fee, provided that the
above copyright notice appear in all copies and that both that copyright notice and
this permission notice appear in supporting documentation. Moscow Center for
SPARC Technology makes no representations about the suitability of this software
for any purpose. It is provided ″as is″ without express or implied warranty.
Copyright 2001 by STLport
For MD5 hash
Copyright (C) 1990, RSA Data Security, Inc. All rights reserved. License to copy
and use this software is granted provided that it is identified as the ″RSA Data
Security, Inc. MD5 Message-Digest Algorithm″ in all material mentioning or
referencing this software or this function.
License is also granted to make and use derivative works provided that such
works are identified as ″derived from the RSA Data Security, Inc. MD5
Message-Digest Algorithm″ in all material mentioning or referencing the derived
work.
Appendix. Notices 311

RSA Data Security, Inc. makes no representations concerning either the
merchantability of this software or the suitability of this software for any particular
purpose. It is provided ″as is″ without express or implied warranty of any kind.
These notices must be retained in any copies of any part of this documentation
and/or software.
For Log4J Logging
The Apache Software License, Version 1.1 at http://www.apache.org/LICENSE, 24
May 2002
The Apache Software License, Version 1.1
Copyright (c) 2000 The Apache Software Foundation. All rights reserved.
Redistribution and use in source and binary forms, with or without modification,
are permitted provided that the following conditions are met:
1. Redistributions of source code must retain the above copyright notice, this list
of conditions and the following disclaimer.
2. Redistributions in binary form must reproduce the above copyright notice, this
list of conditions and the following disclaimer in the documentation and/or
other materials provided with the distribution.
3. The end-user documentation included with the redistribution, if any, must
include the following acknowledgment: ″This product includes software
developed by the Apache Software Foundation (http://www.apache.org/).″
Alternately, this acknowledgment may appear in the software itself, if and
wherever such third-party acknowledgments normally appear.
4. The names ″Apache″ and ″Apache Software Foundation″ must not be used to
endorse or promote products derived from this software without prior written
permission. For written permission, please contact [email protected].
5. Products derived from this software may not be called ″Apache″, nor may
″Apache″ appear in their name, without prior written permission of the Apache
Software Foundation.
THIS SOFTWARE IS PROVIDED ``AS IS’’ AND ANY EXPRESSED OR IMPLIED
WARRANTIES, INCLUDING, BUT NOT LIMITED TO, THE IMPLIED
WARRANTIES OF MERCHANTABILITY AND FITNESS FOR A PARTICULAR
PURPOSE ARE DISCLAIMED. IN NO EVENT SHALL THE APACHE SOFTWARE
FOUNDATION OR ITS CONTRIBUTORS BE LIABLE FOR ANY DIRECT,
INDIRECT, INCIDENTAL, SPECIAL, EXEMPLARY, OR CONSEQUENTIAL
DAMAGES (INCLUDING, BUT NOT LIMITED TO, PROCUREMENT OF
SUBSTITUTE GOODS OR SERVICES; LOSS OF USE, DATA, OR PROFITS; OR
BUSINESS INTERRUPTION) HOWEVER CAUSED AND ON ANY THEORY OF
LIABILITY, WHETHER IN CONTRACT, STRICT LIABILITY, OR TORT
(INCLUDING NEGLIGENCE OR OTHERWISE) ARISING IN ANY WAY OUT OF
THE USE OF THIS SOFTWARE, EVEN IF ADVISED OF THE POSSIBILITY OF
SUCH DAMAGE.
This software consists of voluntary contributions made by many individuals on
behalf of the Apache Software Foundation. For more information on the Apache
Software Foundation, please see <http://www.apache.org/>.
312 Sametime Administrator’s Guide

Portions of this software are based upon public domain software originally written
at the National Center for Supercomputing Applications, University of Illinois,
Urbana-Champaign.
Appendix. Notices 313

314 Sametime Administrator’s Guide

Index
AAccess control
client version and 169
Access Control ListsAccess Level 204
adding a name 203
anonymous access 208
basic password authentication 209,
210
identification and authentication 85,
202
Privileges 204, 206
Roles 27, 204
setting for administrator access 24
settings 204, 205, 206, 208
User Type 204
using 202, 203
Access LevelACL 204, 205
Active placesnumber on server, monitoring 183
Adding a new administrator 23, 24, 26,
42, 85
database roles 27
Adding a new Sametime server 241,
242, 244, 245, 246
Adding an administrator 22, 27
Adding an LDAP server 59
Adding users from the Sametime
Administration Tool 38
Adding users in the Domino
environment 35
Additional Sametime servers 241, 242,
244, 245, 246
Administrative tasks 18, 19, 20, 21
Administratoradding 23, 42
setting database roles for 27
Administrator distinguished name 57
Agent access to the Domino
Directory 34
AgentsSametime signer and directory
access 34, 37
Allow Connect users to save their user
name, password, and proxy information
(automatic login) 162
Announcementsdisabling 161
unencrypted 161
Anonymous access 208
ACLs 208
Community Services 163, 164
setting up in a database ACL 208
to LDAP directory 57
Attribute 63, 64, 65, 68, 73
Audio/Videoports 105, 244
Authentication 54, 69, 70, 77, 87
by token 211, 213, 221
Domino SSO, setting up 217
Authentication (continued)LDAP settings 57
Name and Password 217, 218
setting up a database ACL 209
tokens 160
with Sametime server 75, 197
Automatic login 162
disabling for Sametime Connect 162
BBandwidth 241
Basic password authentication 209, 210
setting up a database ACL 209, 210
Basics settings for LDAP 54, 60, 61, 62,
63, 64, 66, 67, 68
Broadcast clientconnectivity 114
Broadcast Gatewayconnections to on server 183
Broadcast Servicesnetwork and ports settings 108, 114
network bandwidth usage 183
ports 105
Browsers 11
CCascaded directories 245
Changing a user’s password 39, 201
Chat 4
capturing conversations 173
logging 173
Meeting Room client 4
pop-up chat window placement 167
Chat windowscreen placement and size 167
client version leveland server access 169
clientssecurity level and 169
Clients 11
Community Services 111
Cluster documentCommunity Services 276
ClusteringMeeting Services 268
Collaborative activities 4
chat 4
presence 4
transferring files 4
Community 7
extending across multiple Domino
domains 250, 251
Community logins/logoutslogging 187
Community ServicesAnonymous Access Settings 163
client connection settings 111
configuration 20, 156, 157, 158, 159
Community Services (continued)connecting to 117
file transfer feature 160
logging 195
logging server events 189
monitoring 184
multiplexer 108, 109, 112, 174, 270,
272
Network and Ports settings 108, 109,
110, 114
overview 155
ports 105
server connection settings 110
users 183, 188
Community Services clusteringadding a server 264, 280
creating 263, 264, 267, 268, 270, 274,
276, 278
Community statisticslogging 188
Compatibilitywith previous releases 114
ConfigurationCommunity Services 20
Connectivity 108
Network and Ports settings 108
Ports and Network 20
Configuration database 91
Connecting 144, 242
Connection Documentscreating 251
Connection processesSametime clients 119, 125
Connectivity 8, 20, 248, 249
from the Internet 247, 248, 249
Sametime clients 108, 111, 119, 247,
248, 249
Sametime Connect for browsers 132
with a Community Services
cluster 278
Connectivity settings for LDAP 54, 56,
57, 59, 74
Cross-certificationSametime servers and 251
Custom Logon formfor SSO 219
DDatabase size
logging 192
Default domain for anonymous
users 165
Default name 165
DirectoryDomino 7
LDAP 8
managing for multiple servers 32,
245
replicating to different domains 251
© Copyright IBM Corp. 2005 315

Directory Assistance 32, 49, 50, 78, 87,
88, 245
setting up 251
Directory entrygroup or person 64, 68
Directory Searching and Browsing
(Anonymous Access Settings) 166
Disk spacelogging 192
monitoring 184
Display name 163, 165
DNS base namebound to HTTP server 140
Domino Directory 7
adding a group 40
deleting a group 41
deleting users 39
managing in the Domino
environment 31
multiple directory environments 32
roles 28
security considerations 34
sharing Directory information across
domains 255
single directory environments 31
user management 19, 43
Domino domains 250
Sametime and multiple domain
environments 250, 251
Domino log 192
Domino Services 12
Domino Web Administration databaseroles 29
Domino Web Administration pagesmonitoring 184
EEditing a group 41
Enable Reverse Proxy Discovery on the
client 152
EncryptionSSL and LDAP servers 74, 75, 77, 78,
79, 224
End user features of Sametime 4
error message reporting 285
Extended Server Directory Catalog 32
FFile transfer feature 4
enabling 160
Firewalls 8, 244
connection with HTTP protocols 119
HTTPS connections and 112
restrictive 140
FormatSametime log 194
GGroup 40, 41
Group Content settings for LDAP 73
Group document 42
creating 40
editing 41
Group document (continued)for administrators 24, 42
Group object classattributes 68
HHome page
Sametime server 3, 5
Home Sametime server 41, 51, 117, 246
LDAP 70
Host name or IP address of Community
Services 110
Host name or IP address of the LDAP
server 56
HTTP port 105
HTTP serverbound to base DNS name 140
HTTP ServicesNetwork and Ports settings 108
HTTP taskSSO-enabled server and 219
HTTP tunneling 137
Community Services client
connections 114
enabling and disabling 109, 140
multiple IP addresses 140, 141, 142
ports 108, 114, 137, 141, 142
settings, explained 139
single IP address 139
HTTPS tunnelingCommunity Services client
connections 112
IInstant meetings
home server and 117
Internetaccess to internal servers 144, 241,
244
extending Sametime 247
passwords 41, 201
Invited servers 242
IP addressesassigning for multiple servers 144
assigning multiple for HTTP
tunneling 140, 141, 142
Community Services 110
mapping to DNS names 142
Kkiosk mode 180
LLDAP 263
adding and removing servers 59
administration 47
authentication 47, 57
connectivity 47, 56
Home Sametime server 70
reference material 55
searches 47, 94, 98
LDAP (continued)using SSL 59, 78
using with Sametime 45, 47
using with server clusters 263
LDAP Authentication settings 47, 54, 69,
70
LDAP Basics settings 47, 54, 60, 61, 62,
63, 64, 66, 67, 68, 98
LDAP Connectivity settings 47, 49, 50,
54, 56, 57, 59, 77, 86
LDAP Directory 8, 19, 34, 85
LDAP directory search behaviorcontrolling with Java classes 94, 98
LDAP Directory Settings 51, 54
LDAP documentcreating 91
LDAP Group Content settings 47, 54, 73
LDAP ports 105
LDAP Searching settings 47, 54, 71, 72
LDAP serverconnecting to 49, 74, 86, 91
LDAP server transmissionsencryption 77, 79
LDAP settingsaccessing 56, 60
LDAP, setting up (Domino
environment) 49, 51, 86, 87, 88
Lightweight Third Party Authentication
(LTPA) tokens 213
Limiting server access 159
Load balancing 241, 274, 282
Logging 9, 18
chat conversations 173
Community logins/logouts 187
Community server events 189
Community Services 195
Community statistics 188
database size 192
disk space 192
Domino log 192
general settings 194
place login failures 190
Sametime activity 187
Sametime statistics 195
server memory 192
server performance 192
settings 194
settings for Community Services 195
Loginsto Community Services 184, 187, 188,
195
Logon formcustom, for SSO 219
Logoutsfrom Community Services 187, 195
Lotus Notes 11
LTPA tokens 213, 222
MManaging security 21
Managing users 19
Managing users and LDAP
directories 19
Maximum user and server connections to
the Sametime server 159
316 Sametime Administrator’s Guide

Meeting Room client connectionsmonitoring 183
Meeting Servicesports 105
Meeting Services clusteringcreating 264
Meeting Services networkNetwork and Ports settings 108
Meetingsextending to Internet users 144
on server, monitoring 183
Message From Administrator 18
Minimum client versionsetting for a server 170
Mixed-release environmentMeeting Center authentication
and 160
Monitoring 9, 18
accessing tools 183
Community Services 184
disk space 184
Domino Web Administration
pages 184
server memory 184
Web statistics 184
Multimedia Servicesports 244
Multiple Sametime servers 21, 241, 242,
245, 246
installing 242
MultiplexerCommunity Services 174, 270
Mux (Community Services
multiplexer) 174
described 109
NNetwork and Ports settings 108
Broadcast Services network 108
Community Services network 108
HTTP Services 108
Interactive Audio/Video 108
Meeting Services network 108
NIC cardsadding 141
assigning IP addresses to 141
Notes 11
Number of entries on each page in dialog
boxes that show names in the
directory 157
OObject class
person 64
Overview of the Sametime
Administration Tool features 16
PPassword 41
changing 39, 201
encrypting with SSL 75
for user authentication 198, 211
Password (continued)requiring for database access 209,
210
Performance optimization 140, 241
Person document 41, 198
editing 39
Placeslogging 190
Port 80 tunneling 108, 137, 140, 143
Ports 105
Audio/Video Services 105, 244
Broadcast Services 105
Community Services 105
for LDAP connections 57
HTTP 105
LDAP 105
Meeting Services 105
Multimedia Services 244
numbers 105
server to server connections 244
SSL 105
UDP 105
Position of this server in the search
order 56
Presence 4, 156
Presence lists 4
PrivilegesACL 204, 206
Proxy servers 8
Proxy support 8, 107
Public groupadding or removing users 41
creating 40
deleting 41
RRestarting the Sametime server 13
Restarting the server 13
Reverse proxy support 145
affinity id (server alias) 149
configuring reverse proxy mapping
rules 149, 150
enabling on a Sametime server 152
requirements and limitations 146
Sametime client connectivity 153
RolesACLs 208
Configuration database 28
Domino Directory 28
Domino Web Administration
database 29
in Sametime databases 27
Rotating DNS 274
limitations 282
SSametime Administration Tool 6
adding a new administrator 22
configuration settings, storing 42
managing users 38
starting 15
user name and password
requirements 15
Sametime Administration Tool (continued)using in an LDAP environment 47,
85
Sametime basics 3
Sametime Community 7
Sametime Connect client 11, 163
availability 163
connection to server 119, 125
disabling announcements 161
home server and 117
SOCKS, HTTP or HTTPS proxy
connectivity 119
Sametime Connect for browsers clientchanging default connectivity
settings 132
kiosk mode 180
Sametime Linksannouncements and 161
file transfer and 4
Sametime logas database or text file 194
Community logins/logouts 187
Community server events 189
Community statistics 188
database size 192
disk space 192
Domino log 192
format 194
general settings 194
place login failures 190
server memory 192
server performance 192
settings 194
Sametime Meeting Centerpassword authentication 160
restricting access for meeting
managers and attendees 42
Sametime serveractivity logging 187
authenticating with 197
checking status of 183
cross-certifying 251
defined 6
installing 3, 49
starting and stopping 13
using LDAP with 45, 79
Sametime serversdeploying multiple servers 21, 158
Sametime services 12
Sametime terms and features 5
Sametime tokens 222
Scope for searching for a person 62
Scope for searching for groups 67
Search filter for resolving group
names 72, 94
Search filter for resolving person
names 71, 94
Search filter to use when resolving a user
name to a distinguished name 69
Search resultgroup or person 64, 68, 98
Searching settings for LDAP 54, 71, 72,
94
Secrets and Tokens authentication
database 211, 221, 222
Security 9, 197
anonymous access 208
Index 317

Security (continued)Domino Directory security
considerations 31, 34
encryption 75
for client connections 169, 197
for Web browser connections 201
Internet access 241
Internet password 198
managing 21
Person document 198
restricting access for meeting
managers and attendees 42
Self Registration 37, 223
Security filteringclient version level and 170
Security levelclient logins and 171
effect on incoming server
connections 170
setting 170
Self Registration 8, 117, 223
enabling 37
security considerations 37, 198, 223
using in the Domino
environment 36, 37
Server Alias 152
Server documentmodifying for administrator
access 26
required fields 42
Server memorylogging 192
monitoring 184
Server Overview feature 17
Server performancelogging 192
Server to server connections 108
Community Services 110
Serversconnections to, monitoring 183
stopping and starting 13
Servers, multiple 3
connecting services 144
example configuration 144
on single machine 144
ServicesSametime 12
Set dialog as default 167
SettingsSametime log 194
SSL 232
for servlet access 232
ports 105
using with LDAP 59, 74, 75, 78, 79
SSO authentication 211, 221
custom logon form for 219
setting up on Sametime server 217,
218, 219
Starting the Sametime Administration
Tool 15
Starting the Sametime server 13
StatisticsCommunity Services 188, 195
logging chat, meeting, and user 195
monitoring 184
StdebugTool 285
Stopping the Sametime server 13
Synchronizing multiple Sametime
servers 245, 246
TTCP/IP connection
client to server 111
Sametime Connect client 119
Templatesincluded in Sametime 3
TokensLTPA or Sametime 160
Toolkitlogging for Toolkit places 190
trace file 285
Transfer files 4
troubleshooting 285
Tunneling on port 80 108, 140, 143
configuring 140, 143
UUDP
ports 105
Upgradingfrom previous releases 114
Use my Internet Explorer browser
settings 125
Use my Internet Explorer HTTP
settings 125
Use my Java Plug-in settings 125
User management 19, 34, 38, 39, 41
assigning users to a new Sametime
server 246
Domino environment 31, 38
User TypeACLs 204
Usersaccess to Sametime home page 3
Community Services 188, 195
Users can browse the directory 166
Users can get group content 166
Users can participate in meetings or enter
virtual places 164
Users can type names to resolve
them 166
Users have no access to the
directory 166
Users of Sametime applications can
specify a display name 165
VViews
required for online presence 43
Virtual placeslogging 190
WWeb Application Services 12
Web browser 11
security 87, 201, 213, 224
Web SSO documentcreating 217
Web statisticsmonitoring 184
Welcome to Sametime page 5
What is Sametime 1
Where to start searching for groups 66
Where to start searching for people 61
318 Sametime Administrator’s Guide


����
Part Number: AD0EVNA
Program Number: 5724-J23
Printed in USA
G210-2082-00
(1P)
P/
N: AD
0EVN
A


