22
USER’S GUIDE User’s Guide SoundStation ® IP 3000 - 3COM ® NBX ®
| Date post: | 30-Jun-2018 |
| Category: |
Documents |
| Upload: | vuongtuyen |
| View: | 249 times |
| Download: | 0 times |

USER’S
GU
IDE
User’s Guide
SoundStation® IP 3
000 - 3
COM
® NBX
®
Table of Contents
Introduction .......................................................................................................... 1
Parts List .............................................................................................................. 1
Installing SoundStation IP 3000 - 3COM NBX ............................. 2 Preparing for Installation ...................................................................................... 2 Installing and Connecting to the Network ........................................................... 2 Startup Sequence................................................................................................... 3
For Best Performance ........................................................................................... 3
Features .............................................................................................................. 3
Using the SoundStation IP 3000 - 3COM NBX ............................. 4
Placing a Call ........................................................................................................ 4 Internal Calls ................................................................................................ 4 Calling Using the User Directory ................................................................ 4 External Calls................................................................................................ 4 Answering a Call .................................................................................................. 4 Answering Behaviors ................................................................................... 4 Ending a Call ........................................................................................................ 5 Placing a Call On Hold and Resuming It ............................................................. 5 Placing Additional Calls and Switching Among Calls ......................................... 5 Redialing a Call .................................................................................................... 5 Muting a Call ....................................................................................................... 5 Changing the Volume ........................................................................................... 5
Transferring a Call .......................................................................................... 6
Announced Transfer.............................................................................................. 6 Blind Transfer ...................................................................................................... 6 Direct Mail Transfer ............................................................................................. 6
Conferencing ....................................................................................................... 7
Advanced Conference Call Options...................................................................... 7
Feature Codes ..................................................................................................... 8
Call Parking and Pickup .............................................................................. 9
Call Park & Retrieve ............................................................................................ 9 Call Pickup ........................................................................................................... 9 Direct Call Pickup ................................................................................................ 9
Hunt Groups and Calling Groups ........................................................... 10
Hunt Groups ......................................................................................................... 10 Calling Groups ..................................................................................................... 10
Paging .............................................................................................................. 11
Internal Paging ..................................................................................................... 11 External Paging .................................................................................................... 11 Simultaneous ........................................................................................................ 11
Speed Dial ............................................................................................................ 12
One-Touch Speed Dials ....................................................................................... 12 Personal Speed Dials ............................................................................................ 12 System-Wide Speed Dials .................................................................................... 12
Settings ................................................................................................................... 13
Entering the Settings Area ................................................................................... 13 Adjusting the LCD Contrast ................................................................................ 13 Viewing the Language Settings ............................................................................ 13 Selecting a Ringer Sound, or Turning the Ringer Off .......................................... 13 Changing the Time Format .................................................................................. 14 Changing the Date Format ................................................................................... 14 Leaving the Settings Area .................................................................................... 14
Troubleshooting ............................................................................................... 14 No Dial Tone ........................................................................................................ 14 SoundStation IP 3000 - 3COM NBX Does Not Ring .......................................... 14 Flickering LCD .................................................................................................... 14 Quick Keypad Input Is Not Registered ................................................................ 14
Safety and Compliance ............................................................................... 14
Polycom Limited Warranty & Limitation Liability .................... 16
Exclusions ............................................................................................................ 16
Warranty Exclusive ......................................................................................... 16
Service Agreements ..................................................................................... 17
Limitations of Liability ............................................................................... 17
Disclaimer ........................................................................................................... 17
Governing Law ................................................................................................ 15
.......

SoundSt
ation IP 3
00
0 -
3CO
M N
BX
Use
r’s G
uide
1
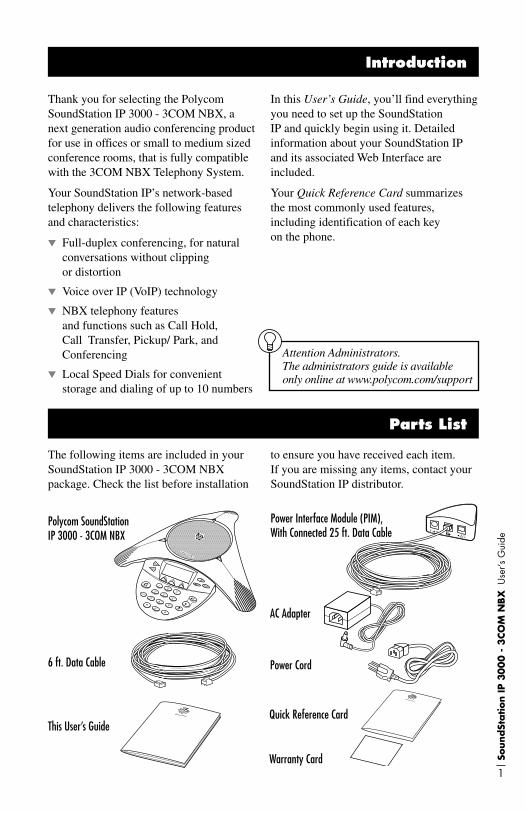
Thank you for selecting the Polycom SoundStation IP 3000 - 3COM NBX, a next generation audio conferencing product for use in offices or small to medium sized conference rooms, that is fully compatible with the 3COM NBX Telephony System.
Your SoundStation IP’s network-based telephony delivers the following features and characteristics:
Full-duplex conferencing, for natural conversations without clipping or distortion
Voice over IP (VoIP) technology
NBX telephony features and functions such as Call Hold, Call Transfer, Pickup/ Park, and Conferencing
Local Speed Dials for convenient storage and dialing of up to 10 numbers
In this User’s Guide, you’ll find everything you need to set up the SoundStation IP and quickly begin using it. Detailed information about your SoundStation IP and its associated Web Interface are included.
Your Quick Reference Card summarizes the most commonly used features, including identification of each key on the phone.
Introduction
Parts List
6 ft. Data Cable
Power Interface Module (PIM), With Connected 25 ft. Data Cable
AC Adapter
This User’s Guide
The following items are included in your SoundStation IP 3000 - 3COM NBX package. Check the list before installation
to ensure you have received each item. If you are missing any items, contact your SoundStation IP distributor.
Quick Reference Card
Warranty Card
Power Cord
Attention Administrators. The administrators guide is available only online at www.polycom.com/support
Polycom SoundStation IP 3000 - 3COM NBX
SoundSt
ation IP 3
00
0 -
3CO
M N
BX
Use
r’s G
uide
2
If you are installing the SoundStation IP yourself, first:
Verify that your system administrator has prepared the network and IP telephony infrastructure for the SoundStation IP 3000 - 3COM NBX.
For information on setting up your NBX Telephony System, please refer to the applicable 3COM documentation.
Note: a special license key is required on the NBX to enable this phone to operate.
Caution: Be sure to read the Release Notes (online at www.polycom.com) and both the Parts List and the Safety Notices sections in this guide before you set up and use this product.
Installing SoundStation IP 3000 - 3COM NBX
Preparing for Installation
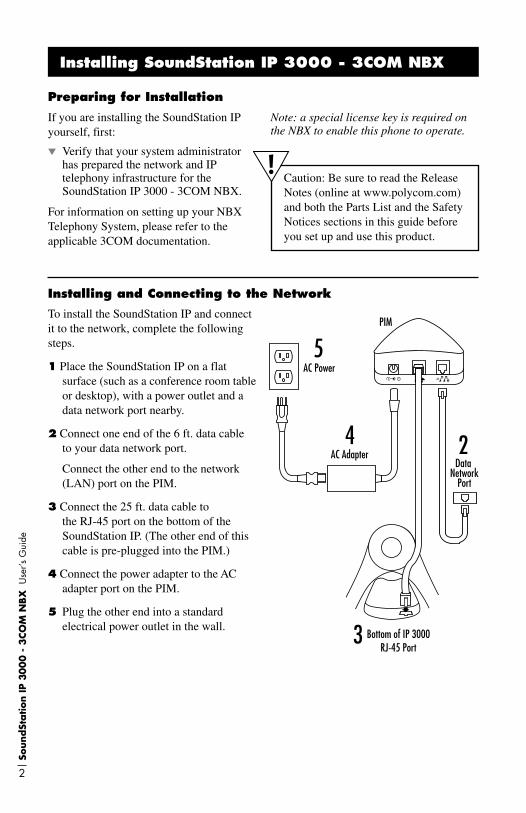
To install the SoundStation IP and connect it to the network, complete the following steps.
1 Place the SoundStation IP on a flat surface (such as a conference room table or desktop), with a power outlet and a data network port nearby.
2 Connect one end of the 6 ft. data cable to your data network port.
Connect the other end to the network (LAN) port on the PIM.
3 Connect the 25 ft. data cable to the RJ-45 port on the bottom of the SoundStation IP. (The other end of this cable is pre-plugged into the PIM.)
4 Connect the power adapter to the AC adapter port on the PIM.
5 Plug the other end into a standard electrical power outlet in the wall.
Installing and Connecting to the Network
Data Network
Port
AC Power
PIM
AC Adapter 2
3
4
5
Bottom of IP 3000RJ-45 Port
SoundSt
ation IP 3
00
0 -
3CO
M N
BX
Use
r’s G
uide
3
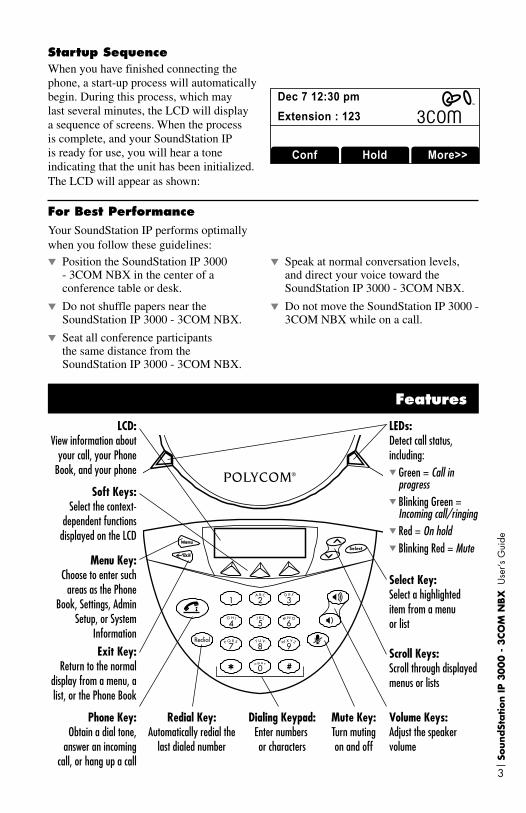
When you have finished connecting the phone, a start-up process will automatically begin. During this process, which may last several minutes, the LCD will display a sequence of screens. When the process is complete, and your SoundStation IP is ready for use, you will hear a tone indicating that the unit has been initialized. The LCD will appear as shown:
Startup Sequence
Dec 7 12:30 pm
Extension : 123
Conf Hold More>>
For Best PerformanceYour SoundStation IP performs optimally when you follow these guidelines:
Position the SoundStation IP 3000 - 3COM NBX in the center of a conference table or desk.
Do not shuffle papers near the SoundStation IP 3000 - 3COM NBX.
Seat all conference participants the same distance from the SoundStation IP 3000 - 3COM NBX.
Speak at normal conversation levels, and direct your voice toward the SoundStation IP 3000 - 3COM NBX.
Do not move the SoundStation IP 3000 - 3COM NBX while on a call.
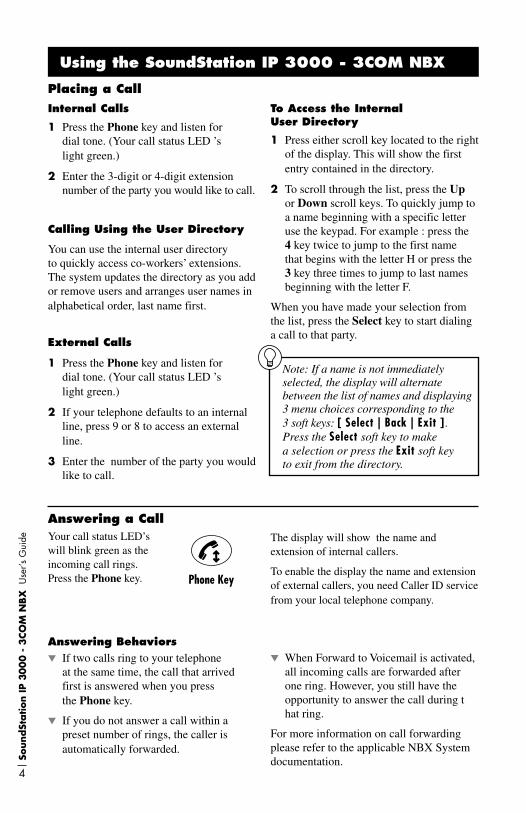
Features
Exit Key:Return to the normal
display from a menu, a list, or the Phone Book
LCD:View information about
your call, your Phone Book, and your phone
Phone Key:Obtain a dial tone,
answer an incoming call, or hang up a call
Redial Key:Automatically redial the
last dialed number
Menu Key:Choose to enter such
areas as the Phone Book, Settings, Admin
Setup, or System Information
Soft Keys:Select the context-
dependent functions displayed on the LCD
LEDs: Detect call status, including:
Green = Call in progress
Blinking Green = Incoming call/ringing
Red = On hold Blinking Red = Mute
Scroll Keys:Scroll through displayed menus or lists
Select Key:Select a highlighted item from a menu or list
Volume Keys:Adjust the speaker volume
Mute Key:Turn mutingon and off
Dialing Keypad:Enter numbers or characters
A B C
2
J K L
5
T U V
8
o p e r
0
1
G H I
4
P Q R S
7Redial
*
D E F
3
M N O
6
W X Y Z
9
#
SoundSt
ation IP 3
00
0 -
3CO
M N
BX
Use
r’s G
uide
4
Using the SoundStation IP 3000 - 3COM NBX
Placing a Call
Your call status LED’s will blink green as the incoming call rings. Press the Phone key.
Answering a Call
Phone Key
Calling Using the User Directory
You can use the internal user directory to quickly access co-workers’ extensions. The system updates the directory as you add or remove users and arranges user names in alphabetical order, last name first.
External Calls
1 Press the Phone key and listen for dial tone. (Your call status LED ’s light green.)
2 If your telephone defaults to an internal line, press 9 or 8 to access an external line.
3 Enter the number of the party you would like to call.
The display will show the name and extension of internal callers.
To enable the display the name and extension of external callers, you need Caller ID service from your local telephone company.
Answering Behaviors If two calls ring to your telephone
at the same time, the call that arrived first is answered when you press the Phone key.
If you do not answer a call within a preset number of rings, the caller is automatically forwarded.
When Forward to Voicemail is activated, all incoming calls are forwarded after one ring. However, you still have the opportunity to answer the call during that ring.
For more information on call forwarding please refer to the applicable NBX System documentation.
Internal Calls
1 Press the Phone key and listen for dial tone. (Your call status LED ’s light green.)
2 Enter the 3-digit or 4-digit extension number of the party you would like to call.
1 Press either scroll key located to the right of the display. This will show the first entry contained in the directory.
2 To scroll through the list, press the Up or Down scroll keys. To quickly jump to a name beginning with a specific letter use the keypad. For example : press the 4 key twice to jump to the first name that begins with the letter H or press the 3 key three times to jump to last names beginning with the letter F.
When you have made your selection from the list, press the Select key to start dialing a call to that party.
To Access the Internal User Directory
Note: If a name is not immediately selected, the display will alternate between the list of names and displaying 3 menu choices corresponding to the 3 soft keys: [ Select | Back | Exit ]. Press the Select soft key to make a selection or press the Exit soft key to exit from the directory.
SoundSt
ation IP 3
00
0 -
3CO
M N
BX
Use
r’s G
uide
5
Press the Phone key.
While on a call, press the Hold soft key. (Your call status LED’s light red to indicate that the call is on hold.)
To return to the held call, press the Toggle soft key.
Ending a Call
Placing a Call On Hold and Resuming It
Placing Additional Calls and Switching Among CallsIf your ongoing call(s) are on hold, you can place an additional call, and then toggle among them.
1 With your ongoing call(s) on hold, press the Phone key, then dial the number.
2 To switch between active calls press the Toggle soft key.
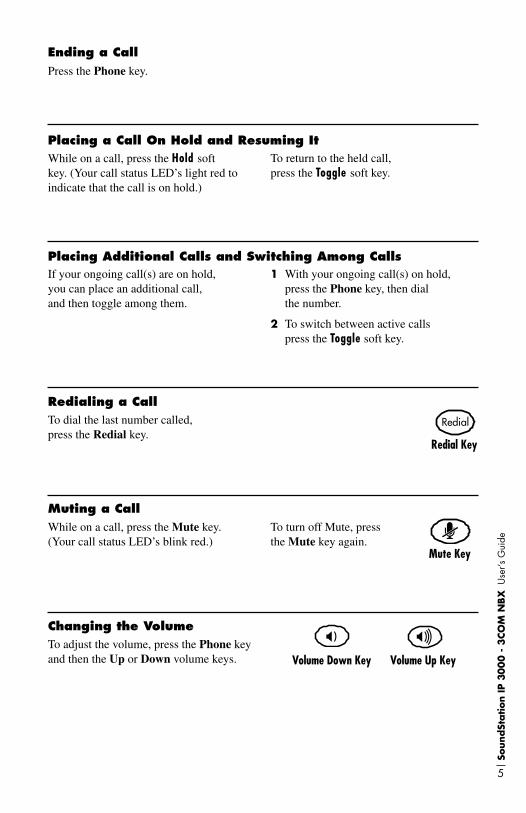
To dial the last number called, press the Redial key.
Redialing a Call
Redial
Redial Key
While on a call, press the Mute key. (Your call status LED’s blink red.)
To turn off Mute, press the Mute key again.
Muting a Call
To adjust the volume, press the Phone key and then the Up or Down volume keys.
Changing the Volume
Volume Down Key
Mute Key
Volume Up Key
SoundSt
ation IP 3
00
0 -
3CO
M N
BX
Use
r’s G
uide
6
Blind TransferIn a blind transfer, you transfer the call without notifying the recipient. 1 While on a call, press the Transfer soft
key. The system places the caller on hold and selects a new line.
2 Dial the number to which you want to transfer the call.
3 Press the Complete soft key as soon as you hear ringing, and then press the Phone key.
To Do a Blind Transfer
Announced TransferWhen you make an announced transfer, you notify the recipient that you are about to connect a call before you complete the transfer. This allows the recipient to refuse to take the call.
1 While on a call, press the Transfer soft key. The system places the caller on hold and selects a new line.
2 Dial the number to which you want to transfer the call.
3 When the recipient answers the telephone, announce the call.
4 If the recipient does not want to take the call, retrieve it by pressing the Cancel soft key from which the call originated.
If the recipient wants to take the call, proceed with the next step.
5 Press the Complete soft key to complete the transfer, and then end press the Phone key.
To Announce a Transfer
Transferring a Call
Note: As an alternative to step 2 it is possible to select a party from the directory or from a Speed Dial list as the destination of a call transfer.
Please refer to the appropriate sections on how to select numbers in this fashion.

SoundSt
ation IP 3
00
0 -
3CO
M N
BX
Use
r’s G
uide
7
You can make conference calls with up to four parties, including yourself. The other three parties can be any combination of internal and external calls.
1 While on a call, press the Conference soft key. The system selects a new line and places the other party on hold.
2 Place a call to another party, wait for that party to answer the call, and press the Join soft key.
To cancel the conference attempt before joining, press the Cancel soft key and then press the Toggle soft key to resume the call.
3 Repeat steps 1 and 2 to conference in another party.
Press the Conf Drop soft key to drop the last call party added to the conference call.
To Place a Conference Call
Advanced Conference Call Options To place a conference call on hold, press
the Hold soft key. The other parties can talk among themselves, but they cannot hear you.
To transfer a conference call to another extension, press the Transfer soft key. Dial the number to which you want to transfer the call, and press the Complete soft key again. All of the parties will be transferred.
Conferencing
Note: As an alternative to step 2 it is possible to select a party from the directory or from a Speed Dial list as the participant in a conference.
Please refer to the appropriate sections on how to select numbers in this fashion.

SoundSt
ation IP 3
00
0 -
3CO
M N
BX
Use
r’s G
uide
8
You can access system-wide features by pressing the Phone key, pressing the Feature soft key, and entering the relevant feature code.
The following table 2 lists feature codes for some useful features. Please refer to 3COM NBX documentation for more detailed information.
Feature Code Then...
Account Codes for Call Detail Reports 888 Enter account codes and press # (NBX V5000)
Calling Line Identity Restriction, 889 Dial the number as usualall calls (NBX 100 and V5000)
Calling Line Identity Restriction, 890 Dial the number as usualnext call only (NBX 100 and V5000)
Call Park 444 Enter a call park extension
Call Pickup Directed Call Pickup 455 Enter the telephone’s extension Group Call Pickup 456 Enter the Call Pickup Group number
Conference Drop (NBX 100 and V5000) 431 The system drops the last caller you added to the conference
Direct Mail Transfer 441 Enter the telephone extension to which you want to transfer the call
Flash 260 Enter the code provided by your local telephone company
Hunt Group and Calling Pgoup Ranges 850-879 Enter the group number and password 900-959
Default Paging Feature Codes
Paging Feature Code
External Paging 620
Internal Paging 621
Internal and External Paging 622
Feature Codes

SoundSt
ation IP 3
00
0 -
3CO
M N
BX
Use
r’s G
uide
9
Call Parking and Pickup
Call Park allows you to place a call in a “holding pattern” and make it available for others to pick up from any telephone on the system. You can use the internal paging feature, the external paging feature, or both, to announce the call to all users and the recipient can retrieve the call by entering the Call Park extension given during the announcement.
When parking a call, you assign it a 3-digit Call Park Extension which is used to retrieve it.
To Park a Call
1 While you are on a call, press the Feature soft key, followed by 4-4-4. Or, press the Menu key, scroll and select Call Park.
2 Use the key pad to enter a Call Park extension.
If you select a Call Park extension that is already in use, the display panel displays Park Cancelled and the call rings back to your telephone. You can try another Call Park extension.
To Retrieve a Parked Call
1 Press the Phone key.
2 Dial the Call Park extension assigned to the call.
Call Park & Retrieve
Call PickupCall Pickup allows you to retrieve a call that is ringing on another telephone.
You can retrieve a call ringing on another telephone only if both that user and you are members of the same Call Pickup group, or if that user is a member of a Call Pickup group that allows “non-member pickup.”
There Are Two Types of Call Pickup
Directed Call Pickup — Retrieves a call ringing to a specific telephone.
Group Call Pickup — Retrieves a call ringing to any one of a group of telephones.
Directed Call PickupTo retrieve a call ringing on another user’s telephone:
1 Press the Phone key.
2 Press the Feature soft key followed by 4-5-5 and the user’s extension. The call will redirected to your phone. Or, press the Menu key, scroll and select Call Pickup.
Group Call PickupTo retrieve a call ringing on group members’ telephones :
1 Press the Phone key.
2 Press the Feature soft key followed by 4-5-6 and the Group number. Or, press the Menu key, scroll and select Call Pickup.
The call will be redirected to your phone.
Note: Call Park extensions are defined by your administrator.
SoundSt
ation IP 3
00
0 -
3CO
M N
BX
Use
r’s G
uide
10
Hunt GroupsHunt groups allow you to establish informal “call centers” so that individual calls can be directed to several phones. Calls ring to a member of the hunt group. If that member is not available to answer the call the system “hunts” for another member of the group until the call is answered or forwarded to the group call coverage path. For example, if there are no available members of the hunt group, the call might be forwarded to a group mailbox.
Calling Groups
Another type of group is a calling group. Calling groups allow an incoming call to be directed to a group of telephones, for example, a service group. The call rings simultaneously on all telephones in the group.
Hunt groups can be either static or dynamic. When you are a member of a static hunt group, you are always part of that group along with the other members. With a dynamic hunt group, you must log in to the group to be part of it. Hunt groups can also be configured so that when you step away from your desk and a hunt group call comes in to your telephone and goes unanswered, you are logged out of the group so that further calls do not ring at an unattended telephone.
Hunt Groups and Calling Groups
To Log In To a Hunt Group Using The Phone
1 Press the Phone key .
2 Press the Feature soft key followed by the hunt group number. Or, press the Menu key, scroll and select Hunt Group Login. Hunt group numbers range from 850 through 879 and 900 through 969.
3 Enter the hunt group password and press #.
To log out of the hunt group, press the Feature Code button followed by the hunt group number.
SoundSt
ation IP 3
00
0 -
3CO
M N
BX
Use
r’s G
uide
11
You can broadcast a message in three ways:
Internal Paging
External Paging
Simultaneous Paging
Internal paging allows you to broadcast a message over the speaker of every telephone on the system, provided the telephones are not on a call.
To Page Internally
1 Press the Phone key.
2 Dial 6-2-1 (the Internal Paging extension).
3 Announce your message.
4 When you are finished, press the Phone key again to end the broadcast.
Internal Paging
If your business is equipped with a paging amplifier and speaker system connected to the system, you can broadcast a message over the speakers.
To Page Externally
1 Press the Phone key.
2 Dial 6-2-0 (the External Paging extension).
3 Announce your message.
4 When you finish, press the Phone key again to end the broadcast.
External Paging
To page both externally and internally:
1 Press the Phone key.
2 Dial 6-2-2 (the simultaneous paging extension).
3 Announce your message.
4 Phone key again to end the broadcast.
Simultaneous Paging
Paging
SoundSt
ation IP 3
00
0 -
3CO
M N
BX
Use
r’s G
uide
12
You can create a list of up to 10 local speed dials. These are available only from the telephone for which they were created.
To Use a Personal Speed Dial
1 Press the Phone key and listen for dial tone.
2 Press the Menu key.
3 Use the scroll keys to highlight the Access Local Speed Dials option.
4 Press the Select key.
5 Use the scroll keys to highlight an item from the Speed Dial list.
6 Press the Dial soft key.
The NBX system offers three types of speed dials, which are discussed in the following sections:
One-touch Speed Dials
Personal Speed Dials
System-wide Speed Dials
SoundStation IP 3000 - 3COM NBX supports local Speed Dials only.
Local Speed Dials
Speed Dials
SoundSt
ation IP 3
00
0 -
3CO
M N
BX
Use
r’s G
uide
13
1 Press the Menu key.
2 Press the Up or Down scroll key to highlight Local Functions.
3 Press the Select key.
4 Press the Up or Down scroll key to highlight Settings.
5 Press the Select key.
Settings
Adjusting the LCD Contrast
Entering the Settings Area
1 From within the Settings area, press the Up or Down scroll key to highlight Contrast.
2 To adjust the LCD’s contrast, press the - or + soft key.
Your SoundStation IP’s language is set to English. In future versions, other language settings will be available.
Viewing the Language Setting
1 From within the Settings area, press the Up or Down scroll key to highlight Ringer.
2 To display the list of ringer sounds, press the Change soft key.
3 Press the Up or Down scroll key to highlight one of the five sounds named. Or, if you would prefer the SoundStation IP not to ring, highlight Ringer Off at the bottom of this list.
4 To hear the ringer sound you have highlighted, press the Listen soft key.
5 Repeat the above steps until you have found the ringer sound you want to keep.
6 Press the Save soft key.
Selecting a Ringer Sound, or Turning the Ringer Off
SoundSt
ation IP 3
00
0 -
3CO
M N
BX
Use
r’s G
uide
14
To return to the resting display, press the Exit key. (Or, press the Menu key to access the menu for selecting another area.)
Leaving the Settings Area
Troubleshooting
No Dial Tone
Check that all connections are tight and in place.
Make sure all connections are correct. See “Installing and Connecting to the Network,” page 4.
SoundStation IP 3000 - 3COM NBX Does Not Ring
Check that the ringer is not turned off. See “Selecting a ringer sound, or turning the ringer off,” page 7.
If the volume is turned all the way down, increase the volume with the Up volume key.
Flickering LCD
If your screen appears to flicker, it may be because you are using a certain type of older fluorescent lighting in your building. Move the SoundStation IP away from the lights, or replace the lights.
Quick Keypad Input Is Not Registered
Press the keys more slowly. Because of system responsiveness, some keys may not be recognized if you press them quickly.
If the problem you are experiencing is not resolved here, please contact your system administrator.
Safety and Compliance
This device complies with part 15 of the FCC Rules. Operation is subject to the following two conditions:
(1) This device may not cause harmful interference, and
(2) This device must accept any interference received, including interference that may cause undesired operation.
Part 15 Rules
SoundSt
ation IP 3
00
0 -
3CO
M N
BX
Use
r’s G
uide
15
Class B Digital Device or Peripheral
NOTE: This equipment has been tested and found to comply with the limits for a Class B digital device, pursuant to part 15 of the FCC Rules. These limits are designed to provide reasonable protection against harmful interference in a residential installation. This equipment generates, uses and can radiate radio frequency energy and, if not installed and used in accordance with the instructions, may cause harmful interference to radio communications. However, there is no guarantee that interference will not occur in a particular installation. If this equipment does cause harmful interference to radio or television reception, which can be determined by turning the equipment off and on, the user is encouraged to try to correct the interference by one or more of the following measures:
Reorient or relocate the receiving antenna.
Increase the separation between the equipment and receiver.
Connect the equipment into an outlet on a circuit different from that to which the receiver is connected.
Consult the dealer or an experienced
radio/TV technician for help.
Modifications
In accordance with part 15 of the FCC rules, the user is cautioned that any changes or modifications not expressly approved by Polycom Inc. could void the user’s authority to operate the equipment.
Installation Instructions
Installation must be performed in accordance with all relevant national wiring rules.
L’Installation doit être exécutée conformément à tous les règlements nationaux applicable au filage électrique.
Plug Acts as Disconnect Device
The socket outlet to which this apparatus is connected must be installed near the equipment and must always be readily accessible.
La sortie à la quelle l’appareil est branchée doit être installée près de l’équipement et doit toujours être facilement accessible.
Industry Canada (IC)
This Class [B] digital apparatus complies with Canadian ICES-003.
Cet appareil numérique de la classe [B] est conforme à la norme NMB-003 du Canada.
CE and VCCI Mark
This SoundStation® IP 3000 - 3COM® NBX® has been marked with the CE mark. This mark indicates compliance with EEC directories 89/336/EEC and 73/23/EEC. A full copy of the Declaration of Conformity can be obtained from Polycom Ltd,270 Bath Road, Slough, Berkshire, SL1 4DX, UK.
SoundSt
ation IP 3
00
0 -
3CO
M N
BX
Use
r’s G
uide
16
LIMITED WARRANTY. Polycom warrants to the end user (“Customer”) that this product will be free from defects in workmanship and materials, under normal use and service, for one year from the date of purchase from Polycom or its authorized reseller
Polycom’s sole obligation under this express warranty shall be, at Polycom’s option and expense, to repair the defective product or part, deliver to Customer an equivalent product or part to replace the defective item, or if neither of the two foregoing options is reasonably available, Polycom may, in its sole discretion, refund to Customer the purchase price paid for the defective product. All products that are replaced will become the property of Polycom. Replacement products or parts
may be new or reconditioned. Polycom warrants any replaced or repaired product or part for ninety (90) days from shipment, or the remainder of the initial warranty period, whichever is longer.
Products returned to Polycom must be sent prepaid and packaged appropriately for safe shipment, and it is recommended that they be insured or sent by a method that provides for tracking of the package. Responsibility for loss or damage does not transfer to Polycom until the returned item is received by Polycom. The repaired or replaced item will be shipped to Customer, at Polycom’s expense, not later than thirty (30) days after Polycom receives the defective product, and Polycom will retain risk of loss or damage until the item is delivered to Customer.
Polycom Limited Warrantyand Limitation Liability
Exclusions
Polycom will not be liable under this limited warranty if its testing and examination disclose that the alleged defect or malfunction in the product does not exist or results from:
Failure to follow Polycom’s installation, operation, or maintenance instructions.
Unauthorized product modification or alteration.
Unauthorized use of common carrier communication services accessed through the product.
Abuse, misuse, negligent acts or omissions of Customer and persons under Customer’s control; or
Acts of third parties, acts of God, accident, fire, lighting, power surges or outages, or other hazards.
Warranty Exclusive
IF A POLYCOM PRODUCT DOES NOT OPERATE AS WARRANTED ABOVE, CUSTOMER’S SOLE REMEDY FOR BREACH OF THAT WARRANTY SHALL BE REPAIR, REPLACEMENT, OR REFUND OF THE PURCHASE PRICE PAID, AT POLYCOM’S OPTION. TO THE FULL EXTENT ALLOWED BY LAW, THE FOREGOING WARRANTIES AND REMEDIES ARE EXCLUSIVE AND ARE IN LIEU OF ALL OTHER WARRANTIES, TERMS, OR CONDITIONS, EXPRESS OR IMPLIED, EITHER IN FACT OR BY OPERATION OF LAW, STATUTORY OR OTHERWISE, INCLUDING
WARRANTIES, TERMS, OR CONDITIONS OF MERCHANTABILITY, FITNESS FOR A PARTICULAR PURPOSE, SATISFACTORY QUALITY, CORRESPONDENCE WITH DESCRIPTION, AND NON-INFRINGEMENT, ALL OF WHICH ARE EXPRESSLY DISCLAIMED. POLYCOM NEITHER ASSUMES NOR AUTHORIZES ANY OTHER PERSON TO ASSUME FOR IT ANY OTHER LIABILITY IN CONNECTION WITH THE SALE, INSTALLATION, MAINTENANCE OR USE OF ITS PRODUCTS.
SoundSt
ation IP 3
00
0 -
3CO
M N
BX
Use
r’s G
uide
17
Limitations of Liability
LIMITATION OF LIABILITY. TO THE FULL EXTENT ALLOWED BY LAW, POLYCOM EXCLUDES FOR ITSELF AND ITS SUPPLIERS ANY LIABILITY, WHETHER BASED IN CONTRACT OR TORT (INCLUDING NEGLIGENCE), FOR INCIDENTAL, CONSEQUENTIAL, INDIRECT, SPECIAL, OR PUNITIVE DAMAGES OF ANY KIND, OR FOR LOSS OF REVENUE OR PROFITS, LOSS OF BUSINESS, LOSS OF INFORMATION OR DATA, OR OTHER FINANCIAL LOSS ARISING OUT OF OR IN CONNECTION WITH THE SALE, INSTALLATION,
MAINTENANCE, USE, PERFORMANCE, FAILURE, OR INTERRUPTION OF ITS PRODUCTS, EVEN IF POLYCOM OR ITS AUTHORIZED RESELLER HAS BEEN ADVISED OF THE POSSIBILITY OF SUCH DAMAGES, AND LIMITS ITS LIABILITY TO REPAIR, REPLACEMENT, OR REFUND OF THE PURCHASE PRICE PAID, AT POLYCOM’S OPTION. THIS DISCLAIMER OF LIABILITY FOR DAMAGES WILL NOT BE AFFECTED IF ANY REMEDY PROVIDED HEREIN SHALL FAIL OF ITS ESSENTIAL PURPOSE.
Disclaimer
Some countries, states, or provinces do not allow the exclusion or limitation of implied warranties or the limitation of incidental or consequential damages for certain products supplied to consumers, or the limitation of liability for personal injury, so the above limitations and exclusions may be
limited in their application to you. When the implied warranties are not allowed to be excluded in their entirety, they will be limited to the duration of the applicable written warranty. This warranty gives you specific legal rights which may vary depending on local law.
Governing Law
This Limited Warranty and Limitation of Liability shall be governed by the laws of the State of California, U.S.A., and by the laws of the United States, excluding their conflicts of laws principles. The United Nations Convention on Contracts for the International Sale of Goods is hereby excluded in its entirety from application to this Limited Warranty and Limitation of Liability.
All rights reserved under International and Pan-American Copyright Conventions. No part of the contents of this manual may
be copied, reproduced, or transmitted in any form or by any means, or translated into another language or format, in whole or part, without written consent from Polycom, Inc.
Do not remove (or allow anybody else to remove) any product identification, copyright or other notices.
Polycom, the Polycom logo design, and SoundStation are trademarks of Polycom, Inc. in the U.S. and various other countries.
Service Agreements
Please contact your Polycom Authorized Reseller for information about service agreements applicable to your product.

Technical Support in the United States Internet http://www.polycom.com/support
Polycom, Inc.1565 Barber Lane
Milpitas, CA 95035
1725 07174 001 REV A
Polycom®, SoundStation®, and the Polycom logo design are registered trademarks of Polycom, Inc. in the U.S. and various countries. ©2001 Polycom, Inc. All Rights Reserved.
3COM® and NBX® are registered trademarks of 3COM Corporation.


