108
BERNINA Q -matic Instruction Manual
| Date post: | 14-Jun-2018 |
| Category: |
Documents |
| Upload: | trankhuong |
| View: | 223 times |
| Download: | 0 times |

BERNINA Q -maticInstruction Manual
Q-matic_Manual_UG.indd 1 06.07.2016 13:37:29

Welcome
3
Dear BERNINA customerThank you very much! You have decided on a top-quality accessory for your BERNINA Longarm machine and therefore on a product which will delight you for years. For more than 100 years our family company has attached greatest importance to satisfied customers. As for me, it is a matter of personal concern to offer you Swiss development and precision at the height of perfection, future-orientated sewing technology and a comprehensive customer service.
The BERNINA Longarm machines are ultramodern models whose development not only focused the highest demands on technique and the ease of use but also the development of complex accessorie and software. After all we sell our products to creative people like you, who do not only appreciate high quality but who also keep making progress in creativity, adapting artistic competences and increasing your skills with our products.
Enjoy creative Longarm-quilting with the BERNINA Q-matic software and visit us for further information at www.bernina.com. Our highly trained BERNINA dealers will inform you about further service and maintenance offers. I wish you lots of pleasure and creative hours with your BERNINA Longarm and Q-matic.
H.P. Ueltschi
Owner
BERNINA International AG
CH-8266 Steckborn

Edition notice
4
Edition notice
Text, Setting and LayoutBERNINA International AG
FotosBERNINA International AG
Artikelnummer2016.08 en 1018305.0.04
Translation of the original instruction manual
1st Edition
Copyright2016 BERNINA International AG
All rights reserved: For technical reasons and for the purpose of product improvements, changes concerning the features of the machine can be made at any time and without advance notice. The supplied accessory can vary depending on the country of delivery.

Contents
5
Contents
IMPORTANT SAFETY INSTRUCTIONS Software 8
SAVE THESE INSTRUCTIONS 11
IMPORTANT SAFETY INSTRUCTIONS Hardware 11
SAVE THESE INSTRUCTIONS! 18
1 My Q-matic 19
1.1 Introduction 19
1.2 Welcome to the world of BERNINA 19
1.3 Key to signs 20
1.4 Introduction and the operation principle of the BERNINA Q-matic 20Q-matic system 20Q-matic Software 20Art & Stitch software 21Interactions between the programs Q-matic and Art & Stitch 21Operating principle with the two file types quilt design and quilt project (Q-matic Software) 21
1.5 Overview system 22Overview front 22Overview side 23
1.6 Overview User interface 23Overview menu bar 23Overview functions and visual display 24Overview Display 24Overview upper Tool Center 25Overview lower Tool Center 25Overview icons 26
1.7 Delivery content 27Delivery content Art & Stitch software 27Delivery content Q-matic system 27
1.8 Installation and operation of the software and the PC/Monitor 27Internet use with the Q-matic Touch PC 27Replacing the All-in-One Touch PC 27Reinstalling Windows 28Reinstalling or Update of the Art & Stitch Software 28Reinstalling or Update of the Q-matic software/firmware 28Update Q-matic software 28Update Q-Series firmware 29Saving quilt designs and tags on a BERNINA USB Stick 30
2 Quilting preparation 31
2.1 Connecting and switching on the Frame machine 31
2.2 Spool pin 31
2.3 Presser foot 31
2.4 Needle and stitch plate 31
2.5 Threading 31

Contents
6
2.6 Calling up help concerning Q 20 / Q 24 31
2.7 Q-matic system status and troubleshooting 31
2.8 Starting and switching off the Q-matic 33
2.9 Pressing the emergency stop knob 34
2.10 Restarting the system after a case of emergency 34
2.11 Creating the safe area 34
3 Settings 36
3.1 Activating/Deactivating securing 36
3.2 Sewing on/off 36
3.3 Grid on/off 36
3.4 Signals on/off 36
3.5 The needle is centered in the «Editing Display» 36
3.6 Changing the Easy Glide settings of the machine 37
4 Creative quilting 38
4.1 Selecting a quilt design 38
4.2 Deleting quilt designs from the «Design Center» 38
4.3 Searching quilt designs 39
4.4 Editing quilt designs 40Calling up the Help 40Moving quilt designs 40Copying quilt designs 41Deleting quilt designs 41Zooming in the view of the quilt design at the desired position 41Changing the 1:1 view of the quilt design 42Adapting the view of the quilt design to the size of the display 42Zooming the view of the quilt design in or out 42Entering the size of the quilt top 43Placing and deleting markers 44Realigning the safe area in the «Editing Display» 44Realigning the safe area at the reference point 45Grab and drop 46Defining the sewing sequence 47Put quilt patterns in a waiting queue or remove it 47Changing the sewing direction 48Rotating quilt designs 49Mirroring quilt designs 50Masking quilt designs using «Design» 51Masking quilt designs using «Create Region» via the «Sewhead» 53Masking quilt designs using «Create Region» in the «Editing Display» 55Defining a boundary via the «Sewhead» 56Defining a boundary in the «Editing Display» 58Trimming quilt designs via the «Sewhead» 60Trimming quilt designs in the «Editing Display» 62Duplicating quilt designs (E2E) 64Mutliple duplication of quilt designs 65Connecting quilt designs 67
Contents
7
Separating quilt designs 68Aligning quilt designs in the «Editing Display» 68Aligning quilt designs via the «Sewhead» 70Altering the size of quilt designs in the «Editing Display» 71Altering the size of quilt designs via the «Sewhead» 73Altering the size of quilt designs via the enter keys 74Transferring quilt designs to the program Art & Stitch 75
4.5 Administrating quilt projects and quilt designs 76Saving a quilt project 76Opening a quilt project 76Creating a new quilt project 77Saving quilt designs 77Saving quilt designs on the BERNINA USB stick 77Importing quilt designs 77Importing quilt designs from the BERNINA USB stick 78Deleting quilt designs from the «Design Center» 79Deleting quilt designs from the «Design Pool» 79Deleting quilt projects 80Creating tags 80Altering tags 81Deleting tags 81Allocating tags to a quilt design 82Allocating tags to several quilt designs 83Removing tags from one quilt design 83Removing tags from several quilt designs 84
5 Quilting 86
5.1 Sewing quilt designs 86
5.2 Interrupting the sewing process of quilt designs 86
5.3 Interrupting the sewing process of a quilt design after a thread breakage 87
6 Attachment 88
6.1 Cleaning the display 88
6.2 Cleaning the energy chain and the X-Y-belts 88
6.3 Troubleshooting 89
6.4 Error messages Q-matic software 90
6.5 Overview quilt designs 91Tips around the quilt designs 91Amanda Murphy 91Keryn Emmerson 94Patricia Ritter 96Aggy Burczyk 98Basic Shapes by AB 100Alfonsina Uriburu 102Linzi Upton 104Gerda Raschle 105Lisa Calle 106
Index 107

Important safety instructions
8
IMPORTANT SAFETY INSTRUCTIONS SoftwareNot any part of the publication or the enclosed software may be copied or spread, transferred, converted, saved in a database, translated to a human or a computer language or made accessible to a third party in any form or in any way, neither electronically nor mechanically nor manually or in any other way.
NOTE
The illustrated screen pictures of the software, which are showed in this manual, serve the purpose to visualize and can differ from the ones which really appear in the software.
PRINTED INSTRUCTION MANUAL
Registered owners of the BERNINA Q-matic software are allowed to copy the BERNINA Q-matic instruction manual for the personal use once (1). This copy can be printed by a private printer or by a commercial printing office.
LIMITED WARRANTY
BERNINA International AG warrants for 90 days, starting on the day when the software has been transferred to you that product is free of any defects in workmanship and materials. You are given the possibility to return the products which are covered by this warranty along with the proof of having purchased them to BERNINA or to the specialised BERNINA dealer during this particuar warranty duration. You will get replacement free of cost. Any other costs such as cost of shipment or insurance shall be those of the purchaser. The risk of lost, damage or loss of the products is the purchaser's alone. The purchaser relies on his personal knowledge and on his own judgement when choosing the software which is only needed for private use. The purchaser assumes the complete risk concerning the results and the perfomance of the software. Subject to legally determined warranties and conditions BERNINA International AG

Important safety instructions
9
declines any acceptation of all other warranties and conditions, be it explicit or implicit, unconditionally and without restriction any warranties and conditions concerning the general useability, the suitability for a certain purpose, property rights and the invasion of third-party rights. Particularly BERNINA International AG doesn't provide the guarantee that the software meets the purchaser's requirements, runs flawlessly or appears exactly as this is shown in the accompanying documentation.
LIMITED LIABILITY
As far as legally tolerable, neither BERNINA International AG, their developers, the people in power, the employees nor subcompanies are responsible to you for consequential, incidental or indirect damages (compensation for losses in sale, operational interruptions, loss of data etc.), whether predictable or not, which emerge from the use or the non-usability of the software or the provided safety device and cable as well as the instruction manual, independent on the basis for a claim and also when BERNINA or an authorized BERNINA retailer has been informed aobut the eventuality of such damges. Some states or jurisdictions don't allow the exclusion of incidental or consequential, indirect or particular damages, which means that the before mentioned limited liability may not apply for you.
CONCLUSION
Your license to use the BERNINA Q-matic software is legally valid as long as you stick to the terms of the license agreement. If you do not stick to even one term of the license agreement, the immediate annulment of the license agreement will follow automatically without any announcing notice by BERNINA International AG. You can conclude the license at any time by returning the BERNINA Q-matic

Important safety instructions
10
software plus any copies of it, the backup device and the cable as well as the complete accompanying documentation to BERNINA International AG.
Application of the anti-virus software and other programs:
On the All-in-one Touch PC which is supplied with the Q-matic, basically no other programs than the ones included in the delivery content should be installed. Only access the Internet when this is explicitly required by the customer service/support provided by BERNINA or Art & Stitch in connection with the technical support. Explicitly no other anti-virus software than the program «Windows Defender» which is already installed in Windows 10 is to be used. This
Important safety instructions
11
is the only way to ensure that the Q-matic system runs flawlessly. Always use your personal laptop or PC to surf the World wide web when purchasing new designs or to run another software.
License agreements of the Q-matic software and the Art & Stitch Software
By installing and using the Q-matic software and Art & Stitch software, the general terms of the license agreements are accepted automatically by the user.
SAVE THESE INSTRUCTIONS
Appropriate useYour BERNINA®-Q-matic software has been developed and designed for private household use. It's purpose is to quilt fabrics and other materials as it is decribed in this instruction manual. Any other use is not considered appropriate. BERNINA assumes no liability concerning consequences resulting from an inappropriate usage.
IMPORTANT SAFETY INSTRUCTIONS HardwarePlease be aware of the following basic safety instructions when using your machine. Before using this machine, read instruction manual carefully.
DANGER!To reduce the risk of electrical shock:
• Neverleavethemachineunattendedaslongasitispluggedin.

Important safety instructions
12
• Alwaysunplugthemachinefromtheelectricaloutletimmediatelyafter using and before cleaning.
Protection against LED radiation:
• DonotviewtheLEDlightdirectlywithopticalinstruments(e.g.magnifier). The LED light corresponds with protection class 1M.
WARNINGTo reduce the risk of burns, fire, electric shock or injury to persons:
• Toassemblethesystematleast2adultpeopleareneeded.
• Theinstallation,theoperationandtherepairsareonlytobecarried out by people who have sufficient knowledge of the system and this instruction. In addition to that, these people must know any warnings and precautions which are indicated in the safety notes. Furthermore these people need to possess the education, instructions and the authorization to connect and disconnect circuits and devices according to the existing safety regulations.
• Beforeyoustartinstallingandoperatingthesystem,pleasecheckall the components for any transport or installation damages. Don't try to disassemble the system or system components. Contact the authorized BERNINA dealer if components need to be repaired or replaced.
• Neverliftthesystemholdingthemotorcables,powercablesorhydraulic tubes. Keep the motor cables, power cables and the hydraulic tubes away from heat, sharp edges and wetness. Stop operating the product immediately when you notice that motor cables, power cables or hydraulic tubes are damaged and replace the damaged components at once. Do never carry out any repairs on motor cables, power cables or hydraulic tubes.

Important safety instructions
13
• Don'toperatethesystemoutdoor.Don'texposethesystemtodamp or wet conditions. Avoid surroundings with chemical influences or corrosive environment. Don't operate the system near inflammable dissolvents, propellants and/or explosive substances (e.g. gas, steam, dust etc.). Avoid temperatures beyond the acceptable temperature range from 5° to 45°C. Don't expose the components of the system to vibrations and/or impact loads.
• Don'tinsertanyobjectsintothesystemwhenitisconnectedtothe power supply.
• Becarefulwhenlayingtheextensioncables.Makesurethatthecables are not pinched or taut. Position the cable so that tripping can be avoided. Only use spare parts and accessory parts which are authorized or provided by BERNINA.
• Todisconnect,turnthemainpowerswitchatthecontrolcabinetto «0» then remove the plug from the outlet. Do not unplug by pulling the cord, instead grasp the plug to pull it from the outlet.
• Alwaysdisconnectthepowerplugfromtheelectricaloutletbefore cleaning and maintenance adjustments, which are mentioned in the instruction manual, are carried out.
• Cleanthesystemcomponentswithamilddetergentandadampcloth. Don't use corrosive detergent or high pressure wash systems to clean the components. Make sure that the system is clean and dry before you connect it to the power supply and start operating it again.
• Usethissystemonlyforpurposesasdescribedinthismanual.
Possible risks
• Neverletchildrenbeunattendedinthesurroundingofthesystemwhen it is working autonomically.
Important safety instructions
14
• Donotusethesystemasatoy.Closeattentionisnecessarywhenthis Q-matic system is used by or near children.
• Childrenarenotallowedtoplaywiththesystem.
• Whileassemblingthesingleandsmallparts,becarefulthattheyare out of the reach of children (choking hazard)!
• Choking hazard! Keep plastic bags away from children and babies. Don't pull the bags over the head.
• Cleaningandmaintenanceworkmustnotbecarriedoutbychildren unless they are supervised.
• Standing/Sittingontheframeisstrictlyforbidden.Inappropriateuse of the system can result in serious injuries.
• Makesurethatyoudon'tpinchyourfingersduringtheassembly.
• Neveroperatethissystemifithasadamagedcordorplugorifitis not working properly. Contact the nearest authorized BERNINA dealer for further assistance.
General warnings
• WiththeQ-maticinstallation,thechannellocks(Optionalaccessory) must not be attached to the system anymore. Otherwise it can result in bruises.
• WiththeQ-maticinstallation,themagneticparkpositioningbrackets with a magnet at the carriage must be removed and replaced by the new Q-matic stand-off.
• Stayingwithin(betweenthefabricrailsandthetable)orbeneaththe quilt frame is strictly forbidden during the automatic operation.
• Onlyprovenservicetechniciansareallowedtoopenthecontrolcabinet. Inside the control cabinet current-carrying parts are accessible. Danger!
Important safety instructions
15
• Sideclampscanbecomeunfastenedfromthefabric.Children(orshort people) shouldn't stand on the side where the side clamps could be catapulted to.
• Switchingoffthesystemmustbecarriedoutviathemainswitchand not via the emergency stop knob. The emergency stop knob is considered to be used only in emergency situations.
• WhenthePCissuppliedviathecontrolcabinet,itmustbeshutdown via the regular operating system prior to switching off the Q-matic system. Otherwise damages to the software resp. the operating system or the loss of data can occur.
• Neverpluginoroutanycableswhenthesystemisswitchedon.
For all grounded, cord-connected appliances
• GROUNDING INSTRUCTIONS: This appliance must be grounded. In the event of malfunction or breakdown, grounding provides a path of least resistance for electric current to reduce the risk of electric shock. This appliance is equipped with a cord having an equipment-grounding conductor and a grounding plug. The plug must be plugged into an appropriate outlet that is properly installed and grounded in accordance with all local safety regulations.
• DANGER Improper connection of the equipment-grounding conductor can result in a risk of electric shock. The conductor with insulation having an outer surface that is green with or without yellow stripes is the equipment-grounding conductor. If repair or replacement of the cord or plug is necessary, do not connect the equipment-grounding conductor to a live terminal. Check with a qualified electrician or serviceman if the grounding instructions are not completely understood, or if in doubt as to whether the appliance is properly grounded. Do not modify the plug provided with the appliance – if it will not fit the outlet, have a proper outlet installed by a qualified electrician.

Important safety instructions
16
Notes on assembly instruction
• Toconnectthecablingtothemotordrivestheircasingsmustbeopened. Therefore a contact with sensitive electronic components is possible. As a consequence it is necessary to be grounded before mounting the cables to the motor drives so that any

Important safety instructions
17
electrostatic charge can be discharged. This can be done by touching an exposed metal part of the existing quilt frame beforehand.
Extending the Frame
DANGER The Frame isn't provided with extended legsThe Frame is likely to topple.> Purchase and attach the appropriate upgrade kit at the specialized BERNINA dealer's.
ð The Frame must be equipped with extended legs. If this is not the case, the Q-matic system must not be assembled on any terms.
Make sure that the Frame is equipped with extended legs before the Q-matic-System is assembled. If this is not the case, purchase the appropriate upgrade kit at the specialized BERNINA dealer and attach it to the Frame.

Important safety instructions
18
Frame without extended legs:
77.4 cm (30.5 inch)
Frame with extended legs:
89.4 cm (35.2 inch)
SAVE THESE INSTRUCTIONS!
Appropriate useYour BERNINA machine with Frame is built and designed for ambitious hobby practice. It answers the purpose of quilting fabrics as described in the separate instruction manual of BERNINA Q 20 / Q 24. Any other usage is not intended. BERNINA doesn't assume liability resulting from inappropriate application.

My Q-matic
19
1 My Q-matic
1.1 IntroductionOn the machines Q 20 / Q24 large quilt projects can be created. All your personal settings can be saved and recalled at any time.
The Q-matic program supports you when quilting and provides more than 230 quilt designs (Q-matic system) and 350 quilt designs (Art & Stitch).
In addition to this instruction manual, the machine offers a help program which provides useful support and helpful details concerning some functions of the Q-matic system.
The Help program contains information on particular functions and applications in the user interface.
Further Information
In addition to this instruction manual, further information products are enclosed in your Q-matic.
The current version of your instruction manual as well as a lot of further information on the machine and accessories can be found on our website at http://www.bernina.com
1.2 Welcome to the world of BERNINAMade to create, this is the slogan of BERNINA. Not only our machines do support you to implement your ideas, but on top of that, our below mentioned opportunities also offer various inspirations and instructions for your future projects as well as the option to exchange ideas with other sewing, quilting and embroidering enthusiasts. We wish you lots of pleasrue doing that.
inspiration – the sewing magazine
Are you looking for ideas and instructions for great projects? In that case the BERNINA magazine «inspiration» is exactly what you need. «inspiration» offers extraordinary sewing and embroidery ideas four times a year. From seasonal fashion trends to trendy accessories and practical tips to decorate your home in an original way.
http://www.bernina.com/inspiration
The magazine is available in the languages English, German, Dutch and French. Not available in all countries.
BERNINA Blog
Fancy instructions, free sewing patterns and embroidery motifs as well as many new ideas: all this you can find in the weekly blog by BERNINA. Our experts give valuable tips and explain step by step how you can achieve the desired result. In the community you can upload your own projects and exchange experiences and ideas with other sewing and embroidering enthusiasts.
http://www.bernina.com/blog
Provided in the languages English, German and Dutch.
BERNINA YouTube Channel
On YouTube we offer a wide range of how-to videos and support concerning the most important functions of our machines. Detailed explanations are also provided as for the various presser feet, so that your projects will succeed completely.
http://www.youtube.com/BerninaInternational
Provided in the languages English and German.

My Q-matic
20
BERNINA Social Media
Follow us on the social networking to learn more about events, thrilling projects as well as tips and tricks all about sewing and embroidering. We will keep you informed and we are looking forward to presenting you the one or the other highlight from the world of BERNINA.
http://www.bernina.com/social-media
1.3 Key to signs
DANGER Labels a danger with a high risk which can lead to severe injury or even to death unless it is avoided.
WARNING Labels a danger with a medium risk which can lead to severe injury unless it is avoided.
CAUTION Labels a danger with a low risk which can lead to light or medium injury unless it is avoided.
NOTICE Labels a danger which can end up with damage unless it is avoided.
Tips provided by BERNINA Quilt experts can be found next to this sign.
By means of illustration, sample pictures are used in this instruction manual. The machines as well as the accessory shown in the pictures may vary from the delivery content of your machine.
1.4 Introduction and the operation principle of the BERNINA Q-matic
Q-matic system
The Q-matic system is a comprehensive, contemporary and automated Longarm system which has been designed to create quilt projects in a computerized way. The system constis of various mechanic components, electronic, the All-in-One touch PC as well as the software programs Q-matic and Art & Stitch.
Q-matic Software
By means of the Q-matic software, you can design a quilt project easily and inuitively. At first you should define the Safe Area, so that the section which is to be quilted has been determined. The function EasyGlide supports the movements of the machine. Afterwards you enter the size of your quilt so that the editing area matches exactly with the size of your quilt. Now you are ready to start your quilt project.
You can choose from more than 230 quilt designs mustern in the Design Pool and for a better overview you copy them into the Design Center where they are directly available during the creative process. You can edit quilt designs easily by mirroring, enlarging, rotating, trimming, combining or masking. Afterwards the quilt designs can be positioned perfectly on the quilt top by the help of Boundary, Markers or Grab/Drop. Using the function Align, quilt designs can be also aligned along a line.
You can create a Pantograph in a few steps by choosing the function E2E more or Multiply. To improve the view of the editing area, various zooming functions are provided.
As soon as you are satisfied with your quilt project, you can start sewing. In doing so you can determine in which sequence the quilt designs are to be sewn. You can also remove quilt designs from the waiting line if you don't intend to sew them at the moment. After you have sewn the first rows of a Pantograph and you need to roll the quilt, then the function Realign Safe Area is on hand to join the following rows seamlessly to

My Q-matic
21
the already sewn ones. You can pause the sewing process on the Sewhead at any time to adjust the stitch length or the thread tension. After a thread breakage the machine stops and with the help of the quilt sequence control function the quilt process can be resumed seamlessly at the position of the breakage.
Quilt designs and quilt projects can be saved and called up at any time. This means that all your personally designed creations are always available.
Art & Stitch software
The Art & Stitch software provides a very comprehensive digitalization program. This software enables you to create your own quilt designs. Using Art & Stitch, files and designs consisting of various Longarm formats and vector graphics can be opened. You also have the option to digitize a quilt design based on a picture, to create an applique design easily or to design creative filling patterns as a background. Moreover you can edit an already exisiting quilt design so that it meets your expectations.
Afterwards you can save the quilt designs in any common Longarm format. Moreover, Art & Stitch provides more than 350 quilt designs so you can let your creativity run free.
Interactions between the programs Q-matic and Art & Stitch
You have the option to switch from the Q-matic software to the Art & Stitch Software at the touch of a button. In doing so, the previously selected quilt design is directly transferred to the Art & Stitch and can be edited in detail. Subsequently the edited quilt design can be transferred at the touch of a button back to the Q-matic interface to be quilted. At the same time the quilt design is saved in two formats (.ans und .bqm). This allows you to import the edited quilt design into the Q-matic software at a later time, to upload it to the Design Pool and to edit it further on.
Operating principle with the two file types quilt design and quilt project (Q-matic Software)
A quilt design consists of one single quilt design or several joined and grouped quilt designs which form one unit. The quilt design can be edited and altered as a unit. To save a quilt design it must be selected and can then be saved under any name. The quilt design is saved automatically in the format *.bqm and filed in the folder «Designs» on the desktop. It can also be saved at any other location, for example in the folder «Personal files» or on a BERNINA USB stick.
A quilt project consists of several quilt designs which have been edited individually or together but which have not been necessarily grouped. Moreover a quilt project involves information concerning the quilt size and the aligning of the different quilt designs on the quilt. In short, the complete project. Quilt projects can also be saved. The project is saved on the desktop in the format *.bqp in the folder «Projects». The projects can also be saved at any other location. Saved quilt projects can be opened and edited further on at any time.

My Q-matic
22
Quilt designs can be imported into the Q-matic software directly in the formats *.bqm and *.dxf.
The following illustration shows individual quilt designs (red). By placing designs on the quilt (beige) a whole quilt project is produced.
1.5 Overview system
Overview front
12
3
4
1 USB ports 2 Switching on the PC/Monitor
3 Y-Drive 4 X-Drive

My Q-matic
23
Overview side
3
1 2
1 Emergency stop knob red 3 Power switch
2 Start button green
1.6 Overview User interface
Overview menu bar
The menu bar provides the dropdown menu with the functions. Some functions are also available in the «Tool Center». All functions of the menu bar are explained in detail in the instruction manual.
• File • Edit • View • Tools • DesignTools • Settings • DesignLibrara • ?(Help)
My Q-matic
24
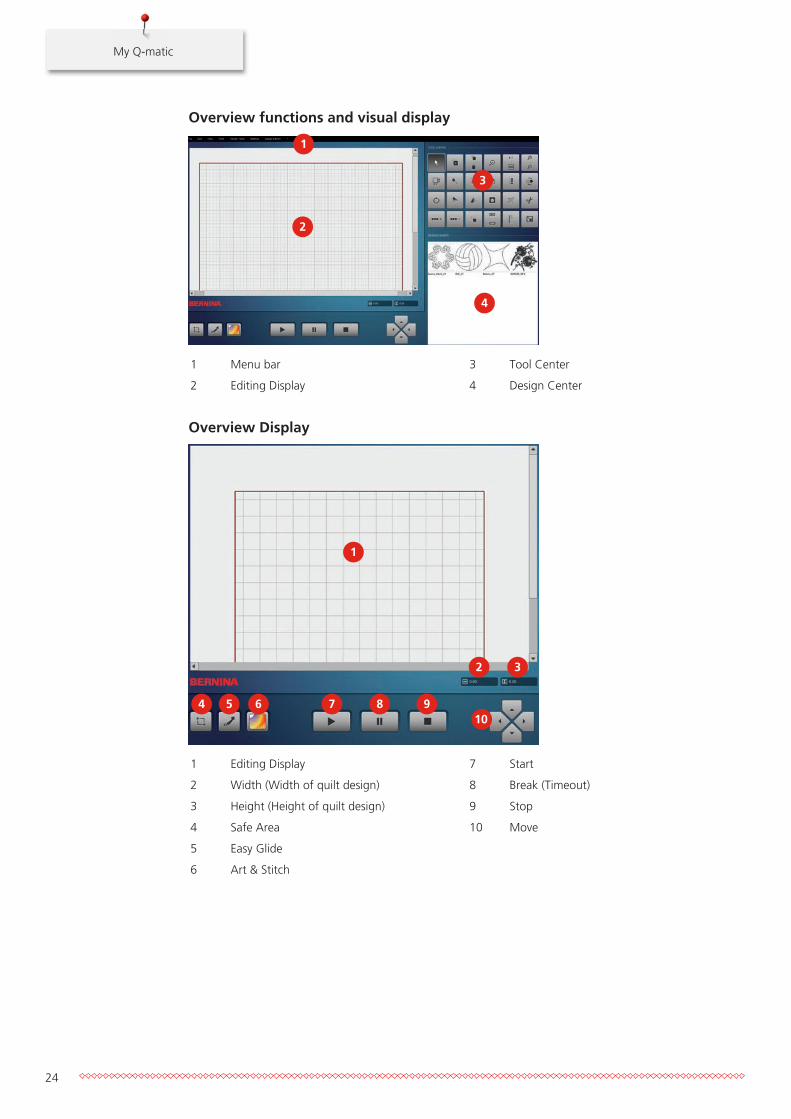
Overview functions and visual display
3
4
2
1
1 Menu bar 3 Tool Center
2 Editing Display 4 Design Center
Overview Display
5 6 710
1
2 3
4 8 9
1 Editing Display 7 Start
2 Width (Width of quilt design) 8 Break (Timeout)
3 Height (Height of quilt design) 9 Stop
4 Safe Area 10 Move
5 Easy Glide
6 Art & Stitch

My Q-matic
25
Overview upper Tool Center
1 2 3 4 5 6
7 8 9 10 11 12
1 Select 7 Quilt Size (Size of quilt design)
2 Add Design (Adding a quilt design) 8 Markers (Marker points)
3 Copy/Delete 9 Realign Safe Area
4 Center Zoom 10 Grab/Drop
5 ActualSize(1:1)/FullView 11 Sew Options (Sequence of sewing)
6 Zoom In/Zoom Out 12 Reverse Sew (Changing the sewing direction)
Overview lower Tool Center
1 2 3 4 5 6
7 8 9 10 11 12
1 Rotate 7 E2E More (Edge to edge +)
2 Flip (Mirror-image up/down) 8 E2E Less (Edge to edge -)
3 Mirror (Mirror-image left/right) 9 Multiply
4 Mask 10 Connect/Unconnect
5 Boundary 11 Align
6 Trim 12 Resize (Adjusting the size)
My Q-matic
26
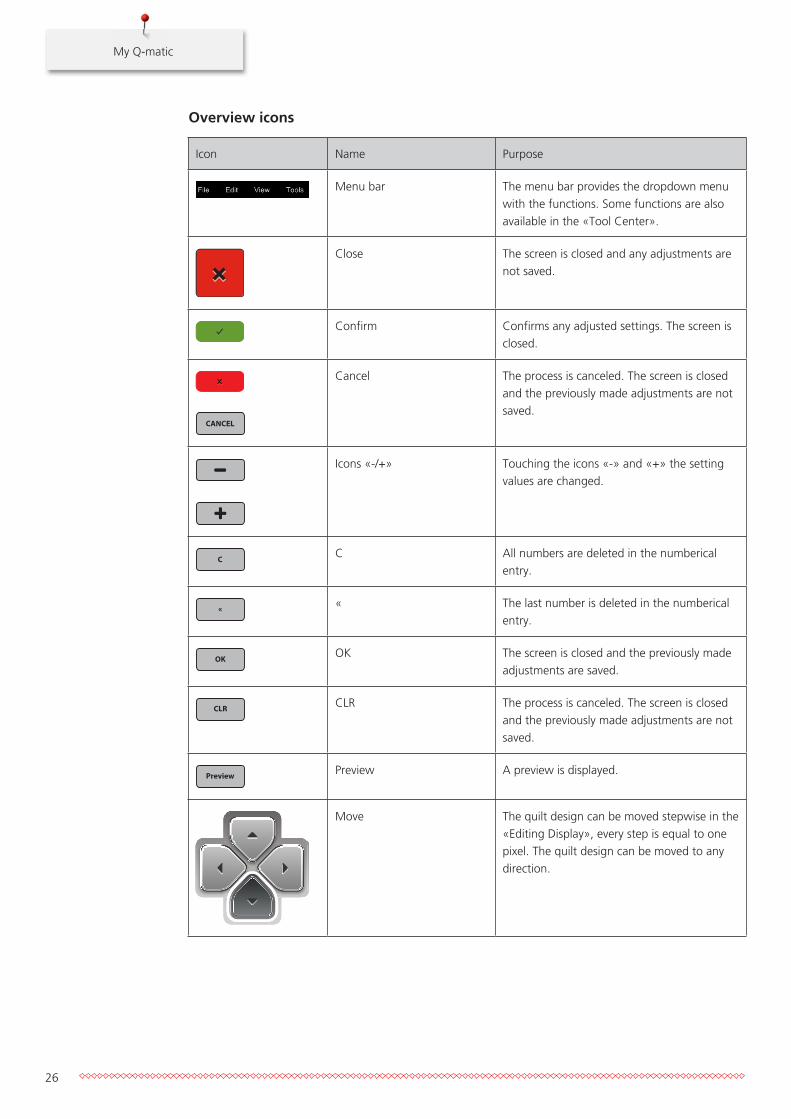
Overview icons
Icon Name Purpose
Menu bar The menu bar provides the dropdown menu with the functions. Some functions are also available in the «Tool Center».
Close The screen is closed and any adjustments are not saved.
Confirm Confirms any adjusted settings. The screen is closed.
CANCEL
Cancel The process is canceled. The screen is closed and the previously made adjustments are not saved.
Icons «-/+» Touching the icons «-» and «+» the setting values are changed.
C C All numbers are deleted in the numberical entry.
« « The last number is deleted in the numberical entry.
OK OK The screen is closed and the previously made adjustments are saved.
CLR CLR The process is canceled. The screen is closed and the previously made adjustments are not saved.
Preview Preview A preview is displayed.
Move The quilt design can be moved stepwise in the «Editing Display», every step is equal to one pixel. The quilt design can be moved to any direction.

My Q-matic
27
1.7 Delivery content
Delivery content Art & Stitch software
The delivery content of the program Art & Stitch consists of the following parts: CD cover, quick start guide and CD.
Two licenses of the program are offered. The «Art & Stitch Software» is installed on the supplied PC/Monitor. For larger projects it is easier and more comfortable to carry out the work on another computer. Therefore the second license has been provided.
On their website, http://artandstitch.com, Art & Stitch provides two instruction manuals (HowToActivate/Dectivate and UserGuide) as well as further information.
The instruction manuals can also be found in the Help menu of Art & Stitch.
Delivery content Q-matic system
The Q-matic software is also installed on the the supplied PC.
1.8 Installation and operation of the software and the PC/MonitorAfter having concluded the assembly according to the «Q-matic Assembly Manual», chapter «Initial startup operation», the Q-matic system is completely installed and ready for operation. This means that the software programs can be started and worked with.Hereinafter useful information is given how the Q-matic system is provided with the latest software and firmware updates.
Internet use with the Q-matic Touch PC
NOTICE Use of the InternetOnly access the internet if this is particularly demanded by the customer service/support by BERNINA or Art & Stitch in the context of technical support.Only a simple virus protection program is installed on the PC (Standard delivery Windows 10), therefore viruses are likely to get access and could do harm.> Explicitly no other virus protection software is to be used than the already installed program «Windows
Defender» of Windows 10.> Only by this it can be guaranteed that the Q-matic system runs properly.> Therefore always use your personal laptop or PC to surf the World Wide Web if you would like to buy
other designs or run another software.
The Internet is only to be used for diagnostic reasons of technical support, because only a simple virus protection program is installed on the PC/Monitor: http://windows.microsoft.com/de-ch/windows-10/getstarted-protect-your-pc
Replacing the All-in-One Touch PC
If the PC doesn't work anymore, please contact your specialized BERNINA dealer. We recommend you in case of a new purchase (out of the warranty duration) to buy it at the specialized BERNINA dealer. This includes the advantage that all the programs which are needed for the Q-matic system are installed on the PC. Therefore the compatibility with the complete Q-matic system can be ensured. This means that you will only have to attach and connect the new PC and can continue quilting.
My Q-matic
28
Reinstalling Windows
If you have to reinstall the Microsoft program for any reason, please find further information at: http://windows.microsoft.com/en-us/windows-10/windows-10-recovery-options
Reinstalling or Update of the Art & Stitch Software
Always save your personal data as for programs, designs and projects, before you reinstall or update the software!
You can find more information and software updates at: http://artandstitch.com
Please note: The existing licence code of the present version is usually taken over automatically.
Reinstalling or Update of the Q-matic software/firmware
Always save your personal data as for programs, designs and projects, before you reinstall or update the software!
You can find more information and software updates at: www.bernina.com/longarm
When the Q-matic system is provided with the new software/firmware, make sure that always the latest versions of all components are installed. There are three different updates, which must be compatible with each other:
1. Q-matic software (user interface on the Win 10 touch PC) 2. Q-matic firmware (controlling unit in the control cabinet) 3. Q-Serie firmware (Q 20 resp. Q 24 machine)
Update Q-matic software
Hereinafter the update for the Q-matic software is explained in detail. After the accomplished update of the Q-matic software, the details concerning the update of the Q-matic firmware can be found on the desktop of the touch PC in the folder «Q-matic Software-Firmware» as PDF. Always install the latest Q-matic firmware after having updated Q-matic software. Only by doing this, the proper and accurate interaction of software and firmware can be ensured.
> In the menu bar of the Q-matic software, touch «? —> About».– A screen is opened where the presentely installed version number of the Q-matic software is
displayed.
> Keep the number of the software version number in your mind resp. write it down.> Visittheinternetpagewww.bernina.com/longarmonanothercomputer.> Under BERNINA Q-matic, click on the respective icon resp. the link.> Check the two software version numbers against each other (installation on the PC and available version
online). If on the homepage an updated version is available, carry on in the following way:> Download the software.> Insert the BERNINA USB stick into the computer.> Copy the firmware to the BERNINA USB stick.> Close the Q-matic software on the PC/Monitor if this is still open.> Start the setup from the BERNINA USB-Stick by touching the icon of the installation program twice in
close succession.> Follow the instructions on the display.> Start the Q-matic software and check whether the latest version has been installed under «About».
Please note: Basically, no user data (designs, projects) is overwritten and all program settings are preserved.
Please note: After the update of the Q-matic software, the latest Q-matic firmware is also to be installed. Only by doing this, the proper and accurate interaction of software and firmware can be ensured! After the accomplished update of the Q-matic software, the details concerning the update of the Q-matic firmware can be found on the desktop of the touch PC in the folder «Q-matic Software-Firmware».

My Q-matic
29
Update Q-Series firmware
The update of the Q 20 / Q 24 firmware can contain relevant adaptions for Q-matic but can also provide mere updates Q 20 / Q 24. Therefore it is recommended to also install the latest Q-Series firmware.
NOTICE BERNINA USB stick (optional accessory) has been removed too earlyThe software has not been updated and the machine cannot be used.> Remove the BERNINA USB stick (optional accessory) only after the update has been completed
successfully.
The current software can be downloaded from www.bernina.com/longarm. As a rule, personal data and settings are taken over automatically during a software update. For safety reasons it is recommended to save data and settings on a BERNINA USB stick before the software update is carried out. If personal data and settings should get lost during a software update, they can be transferred to the machine again afterwards.
> Insert the BERNINA USB stick with the latest software version into the computer.
1
> Touch the icon «Home».
> Touch the icon «Setup-Program».
> Touch the icon «Machine settings».
> Touch the icon «Maintenance/Update».
> Touch the icon «Updating the machine».
> Touch the icon «Saving date on the USB stick» to start the saving process.
> Toch the icon «Update» to start the update process.

My Q-matic
30
Saving quilt designs and tags on a BERNINA USB Stick
The data base of the tags and the imported quilt designs should be saved on a BERNINA USB Stick regularly. If it should be necessary to reinstall the Q-matic software, the data base of the tags and quilt designs can be replaced by this backup.
Prerequisite:
• TheBERNINAUSBstickmustbeinsertedinthePC/Monitor.
> Enter/Copy following path to the PC/Monitor: %localappdata%\Bernina> Confirm by pressing «Enter».> Drag the folder «Q-matic» to the BERNINA USB stick.

Quilting preparation
31
2 Quilting preparation
2.1 Connecting and switching on the Frame machineThe BERNINA Q 20 / Q 24 with the Frame and the Q-matic is switched on via the main switch.
2.2 Spool pinFurther information can be found in the instruction of «BERNINA Q 20 / Q 24».
2.3 Presser footFurther information can be found in the instruction of «BERNINA Q 20 / Q 24».
2.4 Needle and stitch plateFurther information can be found in the instruction of «BERNINA Q 20 / Q 24».
2.5 ThreadingFurther information can be found in the instruction of «BERNINA Q 20 / Q 24».
2.6 Calling up help concerning Q 20 / Q 24Further information can be found in the instruction of «BERNINA Q 20 / Q 24».
2.7 Q-matic system status and troubleshootingAt the control cabinet as well as at the two X-Y-drives, two little transparent spy windows are mounted which allow a view of the inner components. Wen the Q-matic system is started, various LEDs light up resp. flash for a short time. After a few seconds, only one green LED per component should light up continuously under normal conditions. If other LEDs are on or keep flashing after the starting process, a problem must have occurred. In this case, shut the system down completely, disconnect it entirely from the power supply and restart the system. If the problem couldn't be solved after the second attempt, check whether or not the USB cable is plugged in the socket of the PC correctly or the power cable is connected correctly at the back of the Q-machine. If these actions don't help, please turn to your BERNINA partner resp. the technical support.
Quilting preparation
32
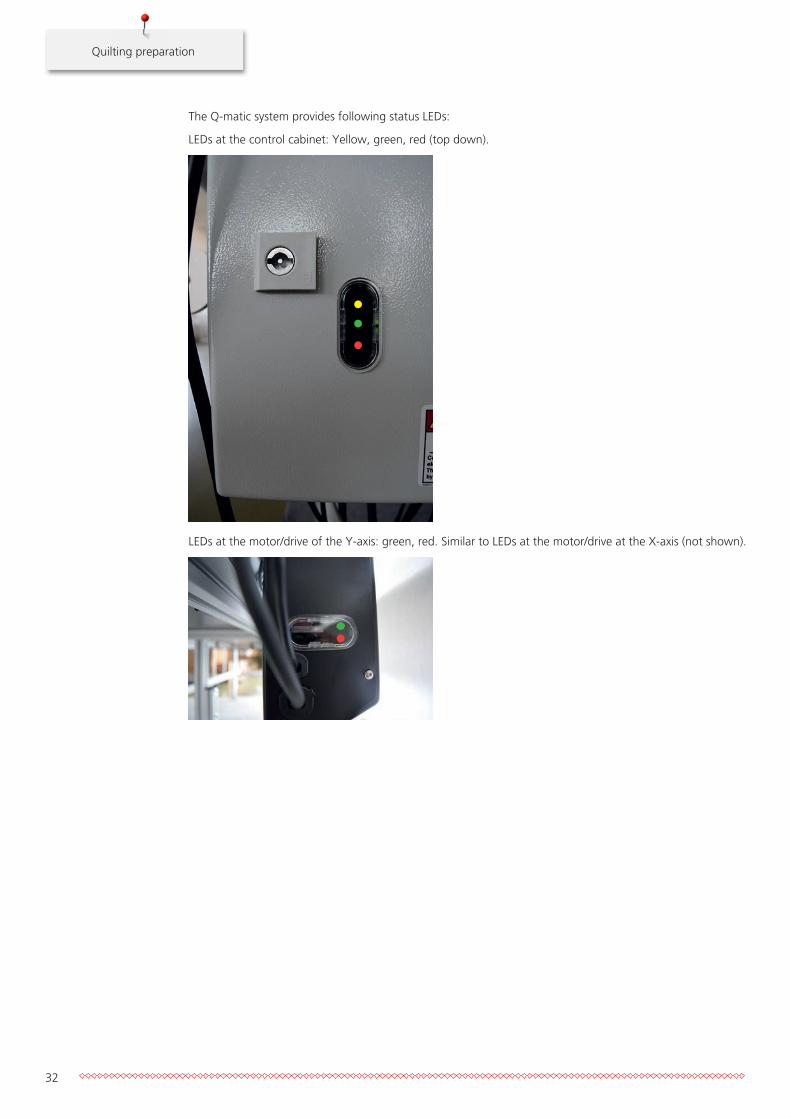
The Q-matic system provides following status LEDs:
LEDs at the control cabinet: Yellow, green, red (top down).
LEDs at the motor/drive of the Y-axis: green, red. Similar to LEDs at the motor/drive at the X-axis (not shown).

Quilting preparation
33
2.8 Starting and switching off the Q-matic
DANGER Don't interfere with the running system!Can lead to severe injuries in the worst case.> Never interfere with the running Q-matic system (computer-controlled operation). Only the touch screen
at the front of the machine head of the Q 20 / Q 24 and the touch screen of the PC as well as the red emergency stop knob may be used to operate the system. No other parts of the Frame, the Q 20 / Q 24 or the Q-matic system is to be touched during the computer-controlled operation.
> Switch on the main switch at the control cabinet (1).
1
> Turn the red emergency stop knob (3) in arrow direction to unlock it.> Keep the green start button (2) pressed for 3 seconds until a click sound can be heard.
2
3
> On the right of the PC/Monitor press the lowest button to switch on the PC/Monitor.> Touch the «Q-matic» icon on the display with your finger twice in close succession to start the Q-matic
software.> If the machine Q 20 / Q 24 hasn't been switched on yet, please find further information in the instruction
«Q 20 / Q 24».– Now you can work with theQ-matic software.
> In the display top right touch the icon «Close» to finish the program.> On the right of the PC/Monitor press the lowest button to switch the PC/Monitor off.> Switch off the main switch at the control cabinet.
Quilting preparation
34
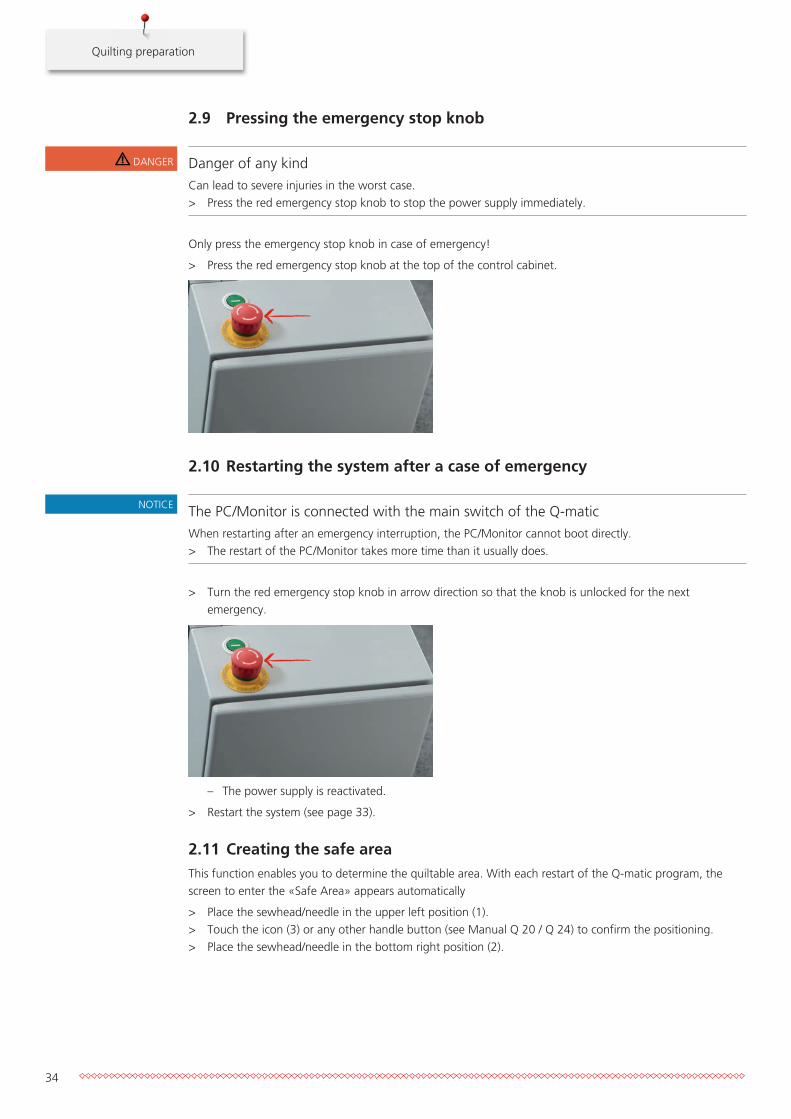
2.9 Pressing the emergency stop knob
DANGER Danger of any kindCan lead to severe injuries in the worst case.> Press the red emergency stop knob to stop the power supply immediately.
Only press the emergency stop knob in case of emergency!
> Press the red emergency stop knob at the top of the control cabinet.
2.10 Restarting the system after a case of emergency
NOTICE The PC/Monitor is connected with the main switch of the Q-maticWhen restarting after an emergency interruption, the PC/Monitor cannot boot directly.> The restart of the PC/Monitor takes more time than it usually does.
> Turn the red emergency stop knob in arrow direction so that the knob is unlocked for the next emergency.
– The power supply is reactivated.
> Restart the system (see page 33).
2.11 Creating the safe areaThis function enables you to determine the quiltable area. With each restart of the Q-matic program, the screen to enter the «Safe Area» appears automatically
> Place the sewhead/needle in the upper left position (1).> Touch the icon (3) or any other handle button (see Manual Q 20 / Q 24) to confirm the positioning.> Place the sewhead/needle in the bottom right position (2).
Quilting preparation
35
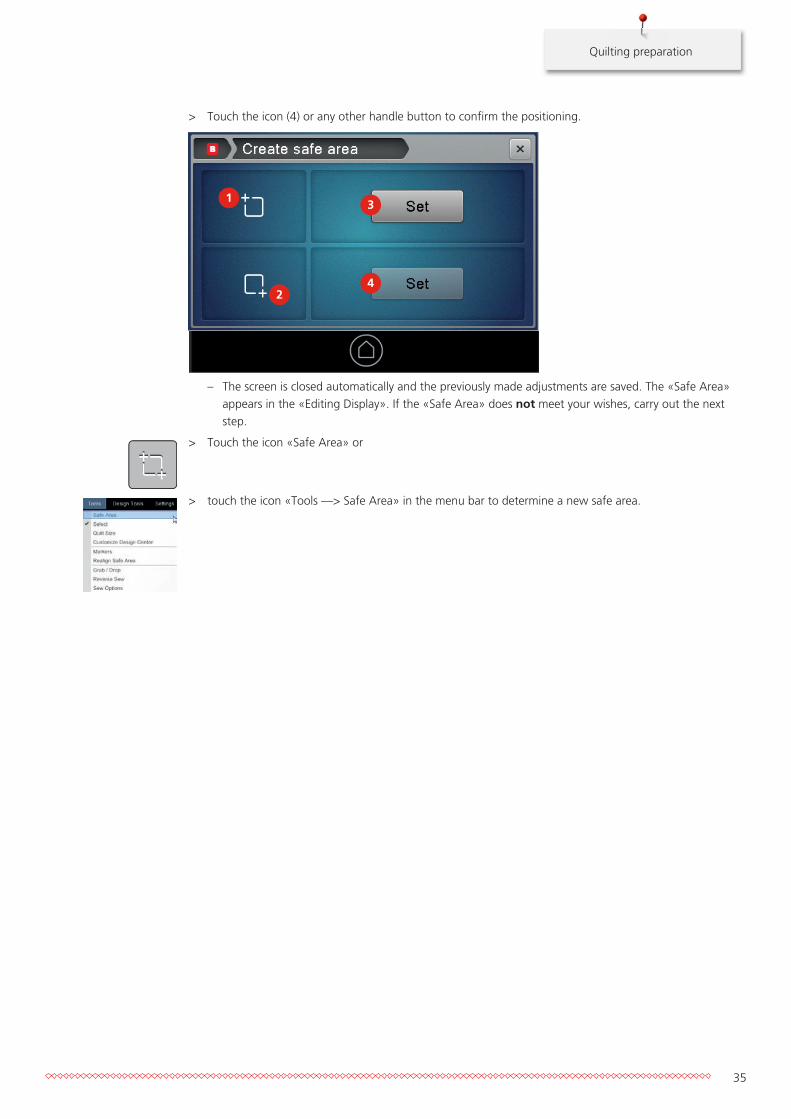
> Touch the icon (4) or any other handle button to confirm the positioning.
3
4
1
2
– The screen is closed automatically and the previously made adjustments are saved. The «Safe Area» appears in the «Editing Display». If the «Safe Area» does not meet your wishes, carry out the next step.
> Touch the icon «Safe Area» or
> touch the icon «Tools —> Safe Area» in the menu bar to determine a new safe area.

Settings
36
3 Settings
3.1 Activating/Deactivating securingThe number of securing stitches can be adjusted. Please find further information in the instruction «BERNINA Q 20 / Q 24».
> Touch «Settings —> Tie On/Off ON» to deactivate securing.– The display changes from «Tie On/Off ON» to «Tie On/Off OFF» and is checked off.
> Touch «Settings —> Tie On/Off OFF» in the menu bar to activate securing.– The display changes from «Tie On/Off OFF» to «Tie On/Off ON» and is unchecked.
3.2 Sewing on/offBy selecting the respective menu item, it can be determined whether the machine is to sew design or to travel the design without sewing. This selection can be changed at any time.
> Touch «Setting —> Sewing OFF» in the menu bar to sew a quilt design.– The display changes from «Sewing OFF» to «Sewing ON» and is checked off.
> Touch «Setting —> Sewing ON» in the menu bar to travel a quilt design.– The display changes from «Sewing ON» to «Sewing OFF» and is unchecked.
3.3 Grid on/offBy activating the grid, the quilt design can be positioned more exactly. The quilt designs are drawn to the magnetic grid.
> Touch «Setting —> Snap to Grid OFF» in the menu bar to activate the magnetic grid.– The display changes from «Snap to Grid OFF» to «Snap to Grid ON» and is checked off.
> Touch «Setting —> Snap to Grid ON» in the menu bar to deactivate the magnetic grid.– The display changes from «Snap to Grid ON» to «Snap to Grid OFF» and is unchecked.
3.4 Signals on/offWith every activity on the display, an acoustic signal can be heard to confirm that the activity has been successful.
Please find further information concerning the signal selection in the instruction of the «PC/Monitor».
> Touch «Settings —> Sound OFF» to activate the signal.– The display changes from «Sound OFF» to «Sound ON» and is checked off.
> Touch «Settings —> Sound ON» to deactivate the signal.– The display changes from «Sound ON» to «Sound OFF» and is unchecked.
3.5 The needle is centered in the «Editing Display»This function enables the machine to select a section of the quilt, which will then be displayed centered in the «Editing Display». Therefore it is always visible in the «Editing Display» where the needle is positioned.
> Touch«View—>Needlecenter»inthemenubar.– The needle is positioned in the center of the «Editing Display». When the machine is moved, the
needle keeps being positioned centered in the «Editing Display». Only the view of the «Editing Display» is changed.

Settings
37
> Touch«View—>NormalView»inthemenubar.– The needle is detached from the center.
3.6 Changing the Easy Glide settings of the machine The Easy Glide of the X- and Y-axis is improved, so that the machine can be moved easier. «Easy Glide» is always activated after a restart.
> Touch the icon «Easy Glide».– The icon is deactivated until it is touched again.
> In the menu bar, touch «Setting —> Easy Glide».– A new screen is opened.
> Touch the icon (1) or the icon (2) to adjust the support of the Easy Glide in the range of 0 - 20.> Touch the icon «Accept» (3) to confirm the entry.
2
3
1
– The screen is closed and the previously made adjustments are saved.
Creative quilting
38
4 Creative quilting
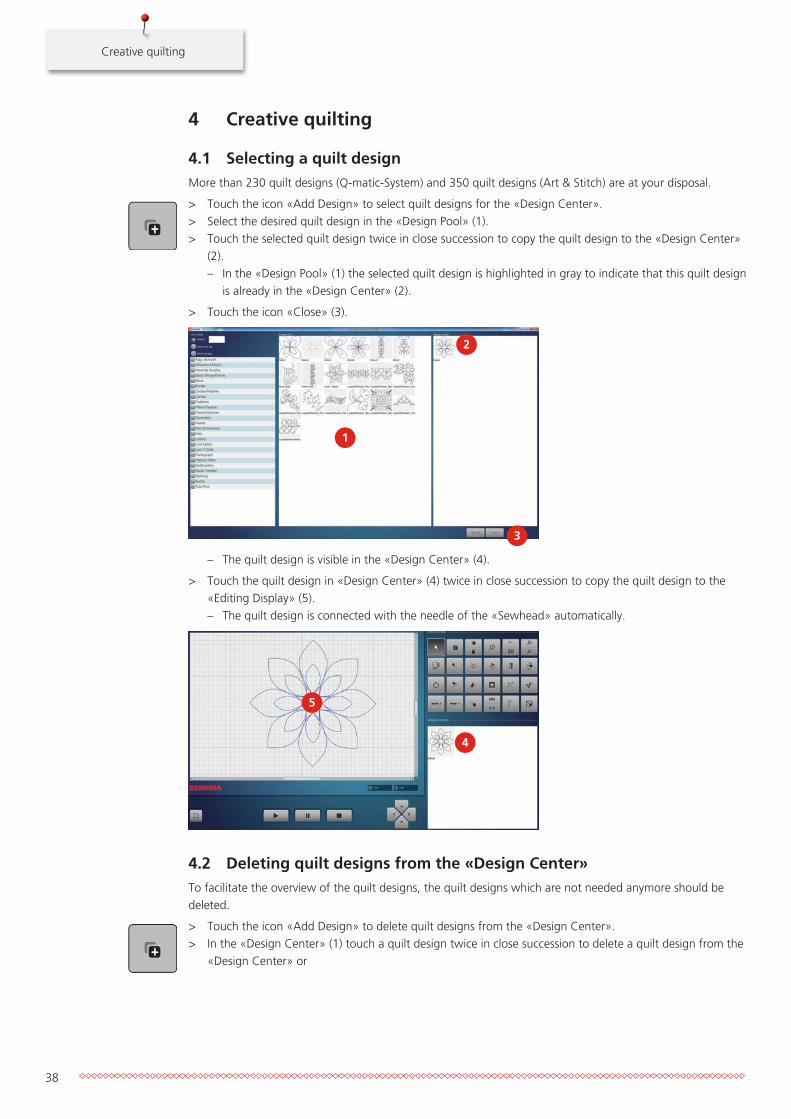
4.1 Selecting a quilt designMore than 230 quilt designs (Q-matic-System) and 350 quilt designs (Art & Stitch) are at your disposal.
> Touch the icon «Add Design» to select quilt designs for the «Design Center».> Select the desired quilt design in the «Design Pool» (1).> Touch the selected quilt design twice in close succession to copy the quilt design to the «Design Center»
(2).– In the «Design Pool» (1) the selected quilt design is highlighted in gray to indicate that this quilt design
is already in the «Design Center» (2).
> Touch the icon «Close» (3).
2
1
3
– The quilt design is visible in the «Design Center» (4).
> Touch the quilt design in «Design Center» (4) twice in close succession to copy the quilt design to the «Editing Display» (5).– The quilt design is connected with the needle of the «Sewhead» automatically.
5
4
4.2 Deleting quilt designs from the «Design Center»To facilitate the overview of the quilt designs, the quilt designs which are not needed anymore should be deleted.
> Touch the icon «Add Design» to delete quilt designs from the «Design Center».> In the «Design Center» (1) touch a quilt design twice in close succession to delete a quilt design from the
«Design Center» or

Creative quilting
39
> touch the icon «Clear All» (2) to delete all quilt designs from the «Design Center».
1
2
4.3 Searching quilt designsSearching a quilt design via name or tag.
> Touch the icon «Add Design» to search quilt designs in the «Find Design».> Enter the name, e.g. «bellflower» or the letter in the text box (1) and the located quilt designs will be
displayed in the «Design Pool» (2).
1
2
> Touch the icon «Match any tag» (3).> Select the desired tags in the area (5) (see page 80).
– All of the quilt designs which contains at least one of these tags will appear in the «Design Pool» (2).
> Touch the icon «Match all tag» (4).
Clear All

Creative quilting
40
> Select the desired tags in the area (5).
3
4
5
– All quilt designs which contain all of these tags will be displayed in the «Design Pool» (2).
4.4 Editing quilt designs
Calling up the Help
Prerequisite:
• Thequiltdesignhasbeenselectedfromthe«ToolCenter»andisvisibleinthe«EditingDisplay».
> Touch the icon «Select».> Activate the quilt design in the «Editing Display» with the finger.> Touch the icon «Markers», «Realign Safe Area», «Sew Option», «Mask», «Boundary», «Trim»,
«Multiply», «Connect», «Resize», «Rotate» or «Align».– A new screen is opened.
> Touch the icon «Help» to open the Help Display.– Support concerning the selected functions is given in the display.
Moving quilt designs
Prerequisite:
• Thequiltdesignhasbeenselectedfromthe«ToolCenter»andisvisibleinthe«EditingDisplay».
> Touch the icon «Select» or
> touch «Tools —> Select» in the menu bar.> Activate and move the quilt design in the «Editing Display» with the finger.
– The active quilt design is colored in red.
> Touch the icon «Select» again to deactivate the function.
?

Creative quilting
41
Copying quilt designs
Prerequisite:
• Thequiltdesignhasbeenselectedfromthe«ToolCenter»andisvisibleinthe«EditingDisplay».
> Touch the icon «Select».> Activate the quilt design in the «Editing Display» with the finger.
> Touch the upper icon «Copy» or
> touch «Edit —> Copy Design» in the menu bar to copy the quilt design.– The copied quilt design is inserted directly behind the existing quilt design and therefore the quilt
design is displayed darker.
> Move the upper quilt design so that the copied quilt design appears in the «Editing Display».
Deleting quilt designs
Prerequisite:
• Thequiltdesignhasbeenselectedfromthe«ToolCenter»andisvisibleinthe«EditingDisplay».
> Touch the icon «Select».> Activate the quilt design in the «Editing Display» with the finger.
> Touch the lower icon «Delete» or
> touch «Edit —> Delete Design» in the menu bar to delete the quilt design.
Zooming in the view of the quilt design at the desired position
The view of the quilt design can be zoomed in specifically at the desired position.
Prerequisite:
• Thequiltdesignhasbeenselectedfromthe«ToolCenter»andisvisibleinthe«EditingDisplay».
> Touch the icon «Center Zoom» or
> touch«View—>CenterZoom»inthemenubar.> In the «Editing Display» touch the position of the quilt design where the view is to be zoomed in.> Keep touching the same position until the wanted view size of the quilt design has been reached.
> Touch the icon «Center Zoom» again to deactivate the function.

Creative quilting
42
Changing the 1:1 view of the quilt design
The view of the quilt design can be changed to the 1:1 view.
Prerequisite:
• Thequiltdesignhasbeenselectedfromthe«ToolCenter»andisvisibleinthe«EditingDisplay».
> Touch the upper icon «Actual Size 1:1» or
> touch«View—>ActualSize»inthemenubartogettothe1:1-view.
Adapting the view of the quilt design to the size of the display
The view of the quilt design can be adapted to the size of the display.
Prerequisite:
• Thequiltdesignhasbeenselectedfromthe«ToolCenter»andisvisibleinthe«EditingDisplay».
> Touchthelowericon«FullView»or
> touch«View—>FullView»inthemenubartogettoaviewofthequiltdesignwhichfitsthedisplay.
Zooming the view of the quilt design in or out
The view of the quilt design can be zoomed in or out.
Prerequisite:
• Thequiltdesignhasbeenselectedfromthe«ToolCenter»andisvisibleinthe«EditingDisplay».
> Touch the upper icon «Zoom In» or
> touch«View—>ZoomIn»inthemenubartozoomintheviewofthequiltdesign.
> Touch the lower icon «Zoom Out» or
1 1
1 1

Creative quilting
43
> touch«View—>ZoomOut»inthemenubartozoomouttheviewofthequiltdesign.
Entering the size of the quilt top
The size of the quilt top can be entered and appears in the «Editing Display» as a big red frame. Therefore it always visible how large the quilt is and the desired quilt designs or the Pantograph designs can be adjusted to the quilt size.
> Touch the icon «Quilt Size» or
> touch «Tools —> Quilt Size» in the menu bar.> Touch the upper/lower icon «60.00».
– A new screen is opened.
> Enter the width or the height of the quilt top via touching the calculator keys.
> Touch the icon «OK» to confirm the adjustments.
> Touch the icon «Confirm».– The screen is closed and the previously made adjustments are saved. In the «Editing Display» a red
frame appears which is equal to the size of the quilt top.
OK

Creative quilting
44
Placing and deleting markers
Markers can be placed which help to position quilt designs exactly. Moreover, these markers can be connected with each other. Afterwards the line can be moved, edited and sewn out like a quilt design
> Touch the icon «Markers» or
> touch «Tools —> Markers» in the menu bar.> Move the «Sewhead» to the desired marker.> In the «Sewhead Display» touch the icon «Set» or press any handle button.
– The marker is positioned and appears in the «Editing Display».
> Place further markers and with each additional marker touch the icon «Set» or press any handle button.> Touch the icon (1) to connect the markers with each other.> Touch all the markers in the «Editing Display» in sequence.
– The markers are connected with a line.
> Touch the icon (2) to have the center of all markers displayed.> Touch the icon «Confirm».
1
2
– The screen is closed and the previously made adjustments are saved.
> Touch the icon «Markers» again.
> Touch the icon «CLR» to delete all markers. The connection lines remain active like a quilt design.
Realigning the safe area in the «Editing Display»
When planning a quilt with applique or embroidery, use the foot 43 or the foot 44C (Optional accessory). These feet with the round soles can glide easily on uneven surfaces.
«»This function is particularly used for Pantograph guilting. The «Safe Area »can be moved and realigned in the «Editing Display» so that the following rows of a Pantograph can be sewn exactly and accurately.
Prerequisite:
• APantographhasbeencreatedinthe«EditingDisplay»andthefirstrowsofthePantographhavealready been quilted.
CLR

Creative quilting
45
• The«SafeArea»islargeenoughsothatatleastonerowofaPantographcanbeplaced.
> Roll up the quilt.> Touch the icon «Realign Safe Area» or
> touch «Tools —> Realign Safe Area» in the menu bar.> Touch the icon (1).> Move the needle/sewhead to a reference point in the previously sewn quilt design, near the diverting bar.> Move the cross hairs in the «Editing Display» to the same reference point of the quilt design.
– The «Safe Area» is moved by moving the cross hairs.
> Touch the icon «Confirm».– The screen is closed and the previously made adjustments are saved.
> The following rows of the Pantograph can be quilted.
1
Realigning the safe area at the reference point
When planning a quilt with applique or embroidery, use the foot 43 or the foot 44C (Optional accessory). These feet with the round soles can glide easily on uneven surfaces.
This function is particularly used for Pantograph guilting. The «Safe Area» can be moved and realigned on the base of one of the reference point so that the next rows of the Pantograph can be sewn exactly and accurately.
Prerequisite:
• APantographhasbeencreatedinthe«EditingDisplay»andthefirstrowsofthePantographhavealready been quilted.
• The«SafeArea»islargeenoughsothatatleastonerowofaPantographcanbeplaced.
> Roll up the quilt.> Zoom the quilt design in (see page 42) to position the reference point more exactly.> Touch the icon «Realign Safe Area» or

Creative quilting
46
> touch «Tools —> Realign Safe Area» in the menu bar.> Touch the icon (2).> Touch a reference point of the previously sewn quilt design in the «Editing Display» to determine a red
reference point. The reference point can be repositioned several times.– Move the needle/sewhead to the previously selected reference point on the quilt.
> Touch the icon «Confirm».– The screen is closed, the previously made adjustments are saved and the «Safe Area» is realigned so
that the following rows of the Pantograph can be quilted.
> The following rows of the Pantograph can be quilted.
2
Grab and drop
The quilt design can be moved and exactly positioned by the machine
Prerequisite:
• Thequiltdesignhasbeenselectedfromthe«ToolCenter»andisvisibleinthe«EditingDisplay».
> Touch the icon «Select» or
> touch «Tools —> Grab and drop» in the menu bar.
> Activate the quilt design in the «Editing Display» with the finger.> Touch the icon «Grab/Drop» to connect the starting point of the selected quilt design with the needle of
the «Sewhead».– The quilt design can now be moved and positioned by the machine.
> Touch the icon «Grab/Drop» again to disconnect the starting point of the selected quilt design from the needle of the «Sewhead».

Creative quilting
47
Defining the sewing sequence
As soon as a quilt design has been sewn out, it will be automatically taken out of the waiting line. To sew it again, it has to be taken back to the waiting line again.
The quilt designs can be sewn in a defined sequence. The quilt designs can also be placed in the waiting line to be sewn at a later time.
Prerequisite:
• Thequiltdesignhasbeenselectedfromthe«ToolCenter»andisvisibleinthe«EditingDisplay».
> Touch the icon «Sew Options» or
> touch «Tools —> Sew Options» in the menu bar.> Touch the icon (1).> Touch the quilt designs in the «Editing Display» according to the desired sequence in which they are to
be sewn.– The quilt designs are numbered.
> Touch the icon «Confirm».– The screen is closed and the previously made adjustments are saved.
1
Put quilt patterns in a waiting queue or remove it
If you do not want to proceed a pattern on the quilt, it can be removed from the queue and be sewn later. Is a quilt patterns not in the queue, it is colored light gray. If you want to proceed a design, it can be placed in the queue again to be sewn.
21
3
Creative quilting
48
Prerequisite:
• Thequiltdesignhasbeenselectedfromthe«ToolCenter»andisvisibleinthe«EditingDisplay».
> Touch the icon «Sew Options» or
> touch «Tools —> Sew Options» in the menu bar.> Touch the icon «Confirm».
– The screen is closed and the previously made adjustments are saved.
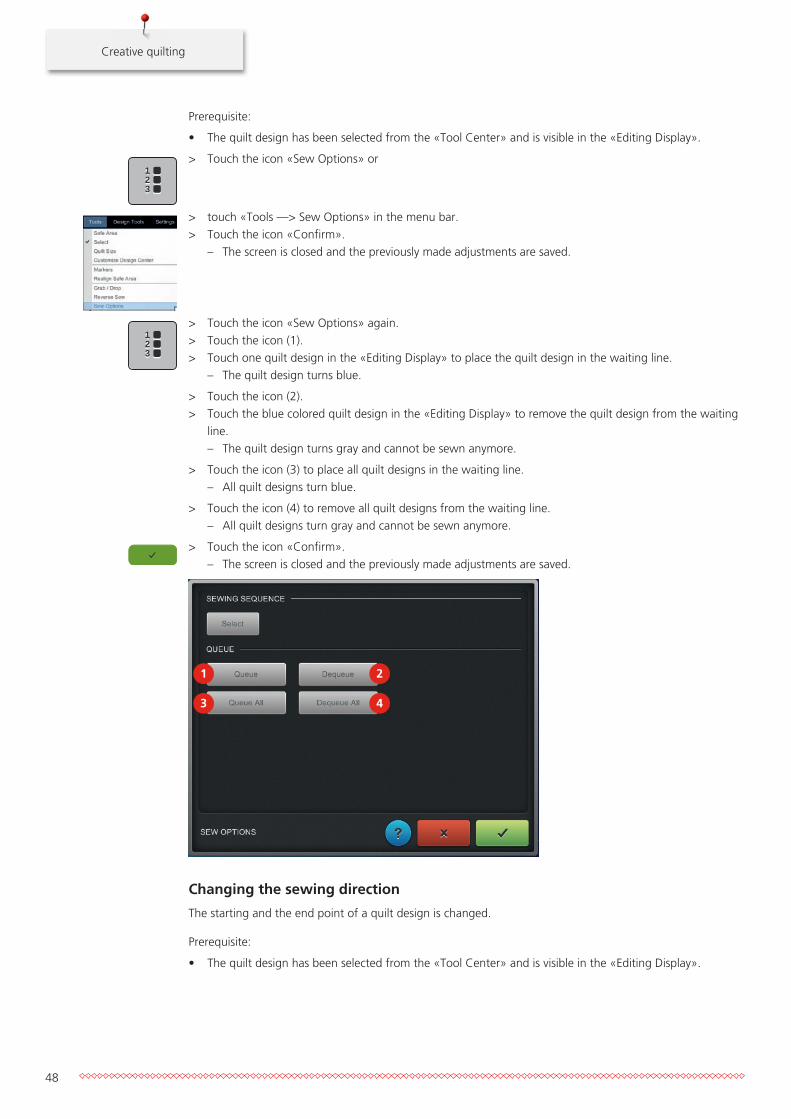
> Touch the icon «Sew Options» again.> Touch the icon (1).> Touch one quilt design in the «Editing Display» to place the quilt design in the waiting line.
– The quilt design turns blue.
> Touch the icon (2).> Touch the blue colored quilt design in the «Editing Display» to remove the quilt design from the waiting
line.– The quilt design turns gray and cannot be sewn anymore.
> Touch the icon (3) to place all quilt designs in the waiting line.– All quilt designs turn blue.
> Touch the icon (4) to remove all quilt designs from the waiting line.– All quilt designs turn gray and cannot be sewn anymore.
> Touch the icon «Confirm».– The screen is closed and the previously made adjustments are saved.
1
3
2
4
Changing the sewing direction
The starting and the end point of a quilt design is changed.
Prerequisite:
• Thequiltdesignhasbeenselectedfromthe«ToolCenter»andisvisibleinthe«EditingDisplay».
21
3
21
3

Creative quilting
49
> Touch the icon «Select».> Activate the quilt design in the «Editing Display» with the finger.
> Touch the icon «Reverse Sew» or
> touch «Tools —> Reverse Sew» in the menu bar to change the sewing direction.
Rotating quilt designs
The quilt design can be rotated in single degree steps or manually. The red point is the center of rotation around which the quilt design will revolve. Every point can be chosen as rotation center.
Prerequisite:
• Thequiltdesignhasbeenselectedfromthe«ToolCenter»andisvisibleinthe«EditingDisplay».
> Touch the icon «Select».> Activate the quilt design in the «Editing Display» with the finger.
> Touch the icon «Rotate» or
> touch «Design Tools —> Rotate» in the menu bar.– The quilt design is given a grid with nine different points.
> Rotate the quilt design around the red point to the left or to the right with the finger.> Touch one of the green points and keep pressed until the green point turns red.
– The red point will be the new rotation center.
> Rotate the quilt design around the red point to the left or to the right with the finger.

Creative quilting
50
> Touch the icon (1) to enter the degree of rotation via pressing the keys of the calculator.
> Touch the icon «OK».
> Touch the icon «Apply» (2) to confirm the adjustments.> Touch the icon (3) to rotate the quilt design in 0.1°-steps clockwise.> Touch the icon (4) to rotate the quilt design in 5°-steps clockwise.> Touch the icon (5) to rotate the quilt design in 45°-steps clockwise.> Touch the icon (6) to rotate the quilt design in 0.1°-steps counterclockwise.> Touch the icon (7) to rotate the quilt design in 5°-steps counterclockwise.> Touch the icon (8) to rotate the quilt design in 45°-steps counterclockwise.> Touch the icon (9) to move the red point automatically to the starting point of the quilt design.> Touch the icon «Confirm».
– The screen is closed and the previously made adjustments are saved.
1
3 4 5
6 7 8
9
2
Mirroring quilt designs
The quilt designs can be mirrored vertically as well as horizontally.
Prerequisite:
• Thequiltdesignhasbeenselectedfromthe«ToolCenter»andisvisibleinthe«EditingDisplay».
OK
Apply

Creative quilting
51
> Touch the icon «Select».> Activate the quilt design in the «Editing Display» with the finger.
> Touch the icon «Flip» or
> touch «Design Tools —> Flip» in the menu bar to mirror the quilt design sideways (vertically).
> Touch the icon «Mirror» or
> touch «Design Tools —> Mirror» in the menu bar to mirror the quilt design lengthwise (horizontally).
Masking quilt designs using «Design»
A quilt design can be masked with another quilt design. In doing so, it can be decided whether everything inside the mask (mask inside) or outside the mask (mask outside) is to be deleted.
Prerequisite:
• Bothquiltdesignshavebeenselectedfromthe«ToolCenter»andarevisibleinthe«EditingDisplay»andhave already been positioned correctly. The quilt design to be masked is activated.
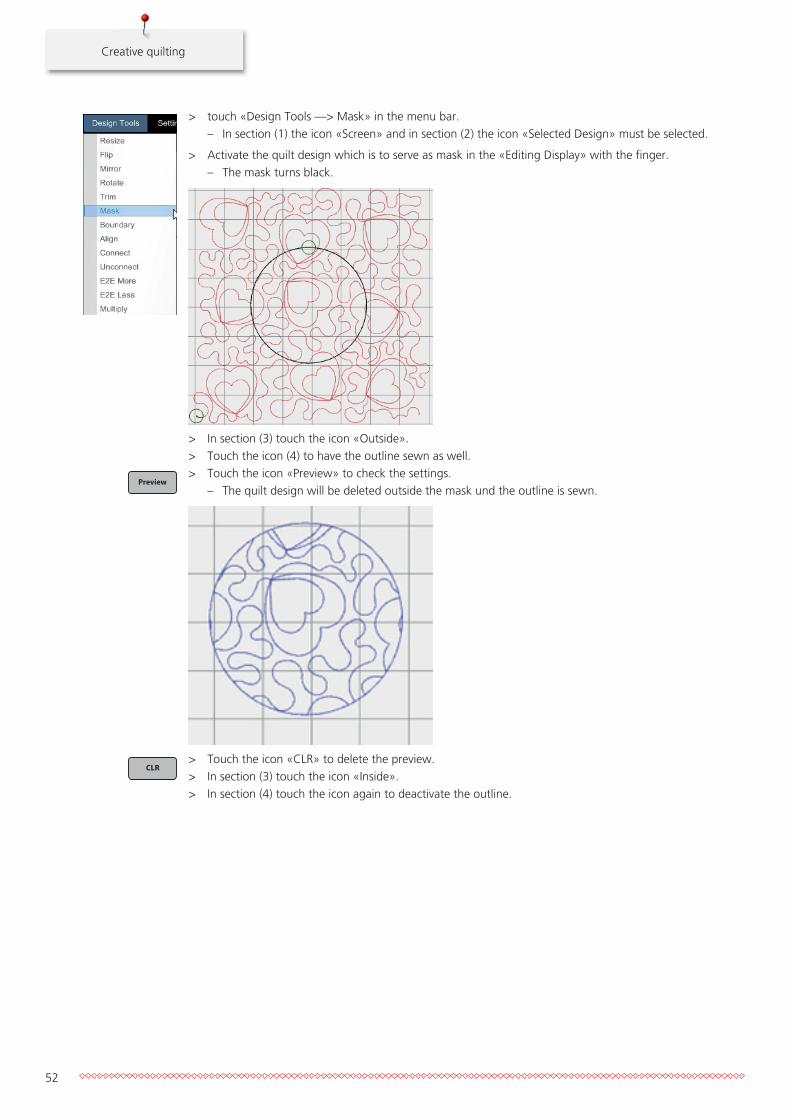
> Touch the icon «Mask» or
Creative quilting
52
> touch «Design Tools —> Mask» in the menu bar.– In section (1) the icon «Screen» and in section (2) the icon «Selected Design» must be selected.
> Activate the quilt design which is to serve as mask in the «Editing Display» with the finger.– The mask turns black.
> In section (3) touch the icon «Outside».> Touch the icon (4) to have the outline sewn as well.> Touch the icon «Preview» to check the settings.
– The quilt design will be deleted outside the mask und the outline is sewn.
> Touch the icon «CLR» to delete the preview.> In section (3) touch the icon «Inside».> In section (4) touch the icon again to deactivate the outline.
Preview
CLR
Creative quilting
53
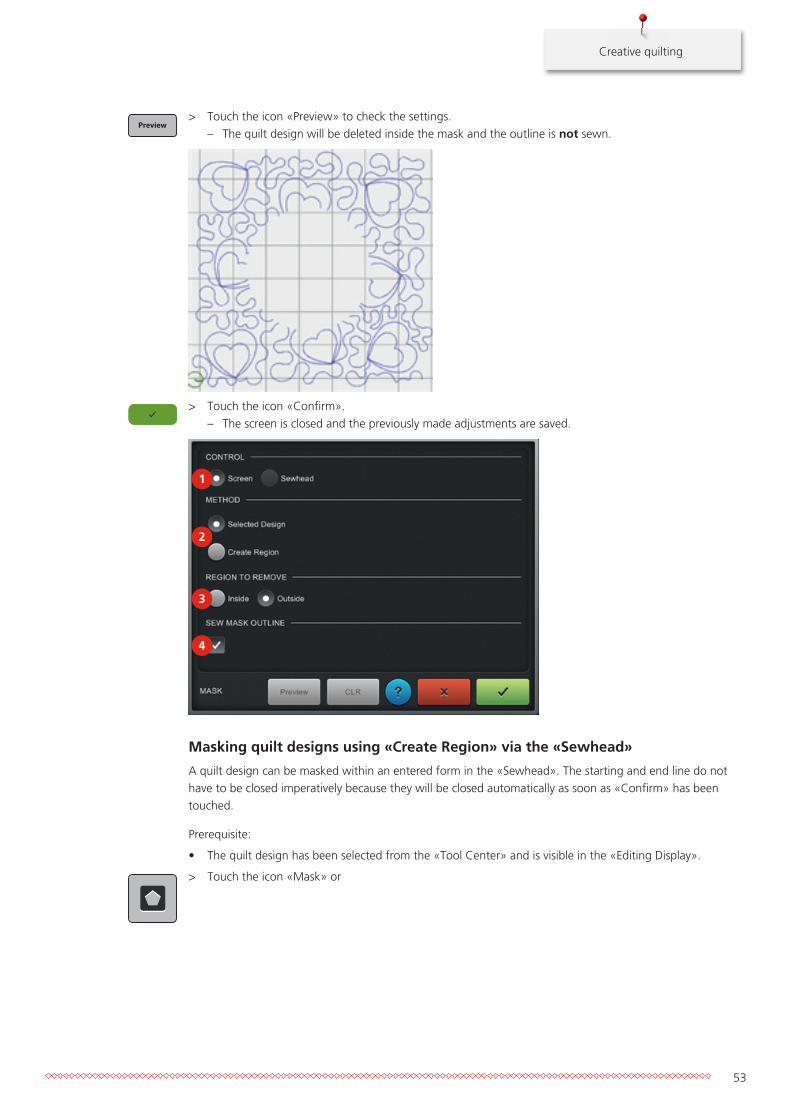
> Touch the icon «Preview» to check the settings.– The quilt design will be deleted inside the mask and the outline is not sewn.
> Touch the icon «Confirm».– The screen is closed and the previously made adjustments are saved.
1
2
3
4
Masking quilt designs using «Create Region» via the «Sewhead»
A quilt design can be masked within an entered form in the «Sewhead». The starting and end line do not have to be closed imperatively because they will be closed automatically as soon as «Confirm» has been touched.
Prerequisite:
• Thequiltdesignhasbeenselectedfromthe«ToolCenter»andisvisibleinthe«EditingDisplay».
> Touch the icon «Mask» or
Preview

Creative quilting
54
> touch «Design Tools —> Mask» in the menu bar.> In section (2) touch the icon «Create Region».> In section (1) select the icon «Sewhead».> Place points on the quilt clockwise or counter clockwise.> In the «Sewhead Display» touch the icon «Set» or press any handle button to place the starting point.> Place the next point to connect the points with lines.> Place the next point until the mask is created and closed.
> In section (3) touch the icon «Outside».> Touch the icon (4) to have the outline sewn.> Touch the icon «Preview» to check the settings.
– The quilt design will be deleted outside the mask and the outline is sewn.
> Touch the icon «CLR» to delete the preview.> Place masking points again.> In section (3) touch the icon «Inside».> In section (4) touch the icon again to deactivate the outline.> Touch the icon «Preview» to check the settings.
– The quilt design will be deleted inside the mask and the outline is not sewn.
> Touch the icon «Confirm».– The screen is closed and the previously made adjustments are saved.
1
2
3
4
Preview
CLR
Preview

Creative quilting
55
Masking quilt designs using «Create Region» in the «Editing Display»
A quilt design can be masked with an entered form in the «Screen». The starting and end line do not have to be closed imperatively because they will be closed automatically as soon as «Confirm» has been touched.
Prerequisite:
• Thequiltdesignhasbeenselectedfromthe«ToolCenter»andisvisibleinthe«EditingDisplay».
> Touch the icon «Mask» or
> touch «Design Tools —> Mask» in the menu bar.> In section (2) touch the icon «Create Region».> In section (1) select the icon «Screen».> Press the finger on the «Editing Display» to place the starting point of the mask.> Place the next point to connect the points with lines.> Place the next point until the mask is created and closed.
– The mask will turn black.
> In section (3) touch the icon «Outside».> Touch the icon (4) to have the outline sewn.> Touch the icon «Preview» to check the settings.
– The quilt design will be deleted outside the mask and the outline is sewn.
> Touch the icon «CLR» to delete the preview.> Place masking points again.> In section (3) touch the icon «Inside».> In section (4) touch the icon again to deactivate the outline.> Touch the icon «Preview» to check the settings.
– The quilt design will be deleted inside the mask and the outline is not sewn.
Preview
CLR
Preview

Creative quilting
56
> Touch the icon «Confirm».– The screen is closed and the previously made adjustments are saved.
1
2
3
4
Defining a boundary via the «Sewhead»
Using this function, the boundary can be defined via the «Sewhead». This boundary mustn't be exceeded by the subsequently inserted quilt design. You can choose whether the proportion are to be maintained or whether it is to be distorted.
Prerequisite:
• Aquiltdesignhasbeenselectedfromthe«ToolCenter»andisvisibleinthe«EditingDisplay».
> Touch the icon «Select».> Activate a quilt design in the «Editing Display» with the finger.
> Touch the icon «Boundary» or
> touch «Design Tools —> Boundary» in the menu bar.> In section (1) select «Sewhead» to define the boundary points via the «Sewhead».> Place four points on the quilt either clockwise or counterclockwise.> Select the first boundary point in the «Sewhead Display».> In the «Sewhead Display» touch the icon «Set» or any handle button.> Select three other boundary points and confirm them in the «Sewhead Display».> In section (2) touch the icon «Maintain Ratio».

Creative quilting
57
> Touch the icon «Preview» to position the proportional quilt design within the boundary area.
> Touch the icon «CLR» to delete the settings.> Place four new boundary points via the «Sewhead».> In section (2) select «Morph to Fit».> Touch the icon «Preview» to position the unproportional quilt design within the boundary area.
> Touch the icon «CLR» to delete the settings.> Place four new boundary points via the «Sewhead».> Touch the icon (3).> To position the quilt design at a distance to the boundary line, enter a positive value in inch (e. g. 0.5).> To position the quilt design over the boundary line, enter a negative value in inch (e. g. -0.5).> Touch the icon «OK».
> Touch the icon «Preview».
Preview
CLR
Preview
CLR
OK
Preview

Creative quilting
58
> Touch the icon «Confirm» to confirm the settings.
1
2
3
Defining a boundary in the «Editing Display»
Using this function, a boundary can be defined in the «Editing Display» and this boundary mustn't be exceeded by the subsequently inserted quilt design. You can choose whether the proportion are to be maintained or whether it is to be distorted.
Prerequisite:
• Aquiltdesignhasbeenselectedfromthe«ToolCenter»andisvisibleinthe«EditingDisplay».
> Touch the icon «Select».> Activate a quilt design in the «Editing Display» with the finger.
> Touch the icon «Boundary» or
> touch «Design Tools —> Boundary» in the menu bar.> In section (1) «Screen» is selected to place the boundary points in the «Editing Display».> In the «Editing Display» place four points clockwise or counterclockwise.> In section (2) select «Maintain Ratio».

Creative quilting
59
> Touch the icon «Preview» to position the proportional quilt design within the boundary area.
> Touch the icon «CLR» to delete the settings.> Place four new boundary points.> In section (2) select «Morph to Fit».> Touch the icon «OK».
> Touch the icon «Preview» to position the unproportional quilt design within the boundary area.
> Touch the icon «CLR» to delete the settings.> Place four new boundary points.> Touch the icon (3).> To position the quilt design at a distance to the boundary line, enter a positive value in inch (e. g. 0.5).> To position the quilt design over the boundary line, enter a negative value in inch (e. g. -0.5).> Touch the icon «OK».
> Touch the icon «Preview».
Preview
CLR
OK
Preview
CLR
OK
Preview

Creative quilting
60
> Touch the icon «Confirm» to confirm the settings.
1
2
3
Trimming quilt designs via the «Sewhead»
The quilt designs can be trimmed in different ways. They can be trimmed horizontally, vertically or by means of a rotation center. Additionally yo have the option to decide which quilt design part has to be trimmed.
Prerequisite:
• Thequiltdesignhasbeenselectedfromthe«ToolCenter»andisvisibleinthe«EditingDisplay».
> Touch the icon «Select».> Activate the quilt design in the «Editing Display» with the finger.
> Touch the icon «Trim» or
> touch «Design Tools —> Trim» in the menu bar.> In section (1) touch «Sewhead» to define the cutting line via the «Sewhead».> In section (2) touch «Entire Quilt» to trim the complete quilt.> In section (2) touch «Selected Design» to trim one quilt design.> In section touch (3) touch «Horizontal» to define the cutting line accordingly.> Move the «Sewhead» to the desired point.

Creative quilting
61
> In the «Sewhead Display» touch the icon «Set» or any other handle button to define a horizontal cutting line.– A red line appears in the «Editing Display» and the quilt design has turned black above the line. The
part colored in black will be trimmed.
> Touch the icon (4) to switch the trimmed area.– The quilt design has now turned black beneath the line.
> Touch the icon (4) again to switch the trimmed area again.> Move the «Sewhead» to reposition the cutting line.> In the «Sewhead Display» touch the icon «Set» or any other handle button to define a horizontal line.> Insection(3)touch«Vertical»todefineaverticallineviathe«Sewhead».> In section (3) touch «Angle» to define a cutting line with a rotation point via the «Sewhead».
– The first point which has been placed with «Angle» is and remains the rotation point.
> Move the «Sewhead» to the desired point to place the rotation point and a cutting line. To reposition the cutting line, move the «Sewhead» again.
> In the «Sewhead Display» touch the icon «Set» or any other handle button to place a new cutting line.> If the rotation point is to be repositioned, touch the icon «Close» and touch the icon «Trim» again.> Touch the icon (5) to connect the trimmed quilt design with a jump stitch.> Touch the icon (5) again to connect the trimmed quilt design with a joining seam.> Touch the icon «Preview» to check the settings.> Touch the icon «CLR» to delete the preview or
CLR
Creative quilting
62
> touch the icon «Confirm».– The screen is closed and the previously made adjustments are saved.
3
4
1
5
2
Trimming quilt designs in the «Editing Display»
Prerequisite:
• Thequiltdesignhasbeenselectedfromthe«ToolCenter»andisvisibleinthe«EditingDisplay».
> Touch the icon «Select».> Activate the quilt design in the «Editing Display» with the finger.
> Touch the icon «Trim» or
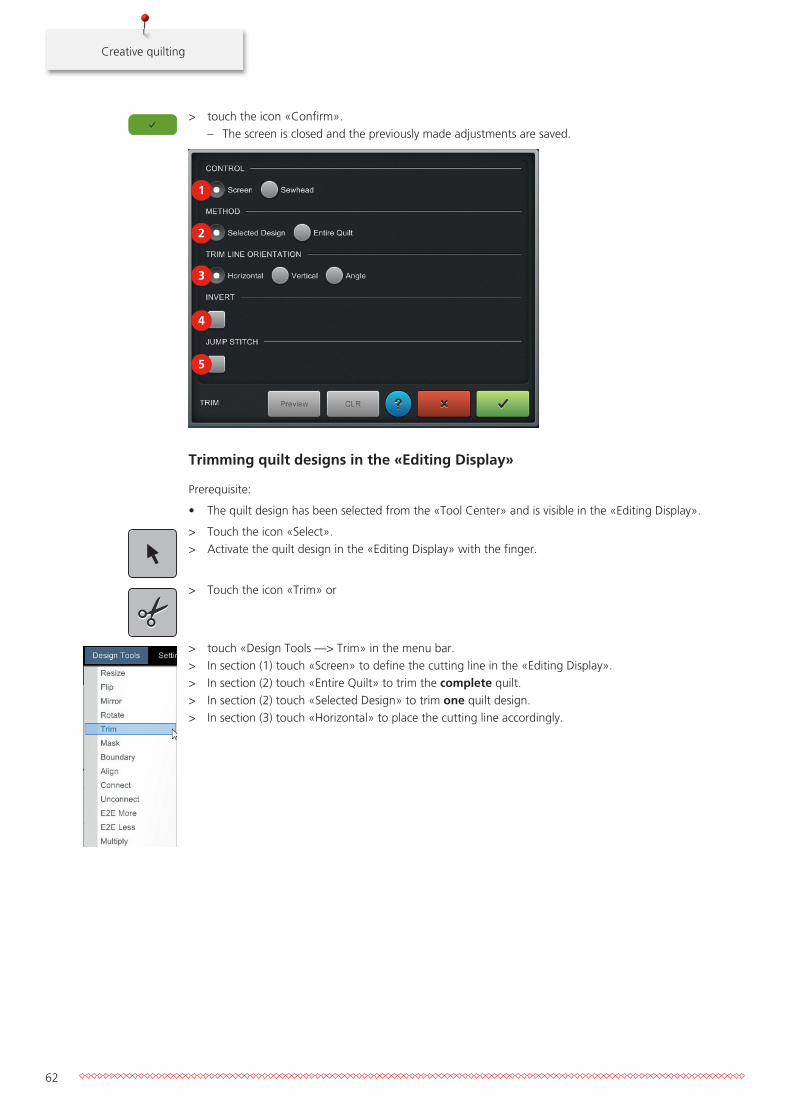
> touch «Design Tools —> Trim» in the menu bar.> In section (1) touch «Screen» to define the cutting line in the «Editing Display».> In section (2) touch «Entire Quilt» to trim the complete quilt.> In section (2) touch «Selected Design» to trim one quilt design.> In section (3) touch «Horizontal» to place the cutting line accordingly.

Creative quilting
63
> Touch the «Editing Display» to place a horizontal cutting line accordingly. To reposition the cutting line, touch the «Editing Display» again.– A red line appears in the «Editing Display» and the quilt design turns black above the line. The black
colored part of the quilt design will be trimmed.
> Touch the icon (4) to switch the trimmed area.– The quilt design has now turned black beneath the line.
> Touch the icon (4) again to switch the trimmed area again.> Insection(3)touch«Vertical»toplaceaverticalcuttingline.> In section (3) touch «Angle» to place a cutting line with a rotation point.
– The first point which has been placed with «Angle» is and remains the rotation point.
> If the rotation point is to be repositioned, touch the icon «Close» and touch the icon «Trim» again.> Touch the icon (5) to connect the trimmed quilt design with a jump stitch.> Touch the icon (5) again to connect the trimmed quilt design with a joining seam.> Touch the icon «Preview» to check the settings.> Touch the icon «CLR» to delete the preview or

Creative quilting
64
> touch the icon «Confirm».– The screen is closed and the previously made adjustments are saved.
3
4
1
5
2
Duplicating quilt designs (E2E)
The quilt design is duplicated and at the same time the endpoint of the first quilt design is joined with the starting point of the new quilt design. The quilt design can be duplicated and joined several times. By using this function, a Pantograph can be created very quickly and easily. A quilt design which has the same starting and end point cannot be duplicated as Pantograph.
Prerequisite:
• Aquiltdesignwhich is suitable for a Pantograph has been selcted from the «Tool Center» and is visible in the «Editing Display».
> Touch the icon «Select».> Activate the quilt design in the «Editing Display» with the finger.
> Touch the icon «E2E more» or
> touch «Design Tools —> E2E more» in the menu bar to duplicate and join the quilt design at the same time.
> Touch the icon «E2E less» or

Creative quilting
65
> touch «Design Tools —> E2E less» in the menu bar to delete the quilt design and to delete the connection at the same time.
Mutliple duplication of quilt designs
Multiple duplication allows almost unlimited creativity. You can rotate the quilt designs horizontally and vertically or both in combination. As well the spaces between the quilt designs can be increased or reduced.
In this instruction manual only the section (1) is explained, as the application in section (2) is exactly the same except that the quilt designs will be duplicated vertically and not horizontally. Quilt designs which are not suitable for a Pantograph can also be duplicated. A design that has the same start and end point is not suitable as a pantograph.
Prerequisite:
• Aquiltdesignwhich is suitable for a Pantograph has been selcted from the «Tool Center» and is visible in the «Editing Display».
> Touch the icon «Select».> Activate the quilt design in the «Editing Display» with the finger.
> Touch the icon «Multiply» or
> touch «Design Tools —> Multiply» in the menu bar.> In section (1) enter the desired number or quilt designs via the icons «-» or «+» or> enter the number of the desired number or quilt designs directly in the white box (between «-»/«+») by
pressing the keys of the calculator.

Creative quilting
66
> Touch the icon «OK».
> Touch the icon «Preview» to check the adjustments.
> Touch the icon «CLR» to delete the preview.> Insection(1)touchtheicon«Hor»and/or«Vert»andtouchtheicon«All»tomirrorall quilt designs
horizontally or vertically.> Touch the icon «Preview» to check the adjustments.
> Touch the icon «CLR» to delete the preview.> Insection(1)touchtheicon«Hor»and/or«Vert»andtheicon«Alt»tomirroreverysecond quilt design
horizontally or vertically.> Touch the icon «Preview» to check the adjustments.
> Touch the icon «CLR» to delete the preview.> In section (3) adjust the horizontal distance (in inch) between the quilt designs by touching the icons «-»
or «+» or> enter the desired distance directly in the white box (between «-»/«+») by touching the keys of the
calculator.> Touch the icon «OK» to confirm the adjustments.> In section (4) adjust the vertical distance (in inch) between the quilt designs by touching the icons «-» or
«+» or> enter the desired distance directly in the white box (between «-»/«+») by touching the keys of the
calculator.> Touch the icon «OK» to confirm the adjustments.> In section (5) adjust the offset (in inch) of each second quilt design row via the icons «-» or «+» or> enter the desired offset directly in the white box (between «-»/«+») by pressing the keys of the
calculator.> Touch the icon «OK» to confirm the adjustments.
> Touch the icon «Preview» to check the adjustments.
> Touch the icon «CLR» to delete the preview or
> Touch the icon «Confirm».– The screen is closed and the previously made adjustments are saved.
1
2
3
4
5
OK
Preview
CLR
Preview
CLR
Preview
CLR
OK
OK
OK
Preview
CLR

Creative quilting
67
Connecting quilt designs
There are three ways to connect quilt designs with each other.
Prerequisite:
• Anumberofquiltdesignshavebeenselectedfromthe«ToolCenter»andarevisibleinthe«EditingDisplay».
> Touch the icon «Select».> Activate a quilt design in the «Editing Display» with the finger.
> Touch the upper icon «Connect» or
> touch «Design Tools —> Connect» in the menu bar.> Touch the icon «Group» (1).> In the «Editing Display» select another quilt design with the finger.
– The quilt designs are grouped together and can be edited as one quilt design. They remain in their position and are sewn as a group.
> Select other quilt designs to extend the group as you like.– The quilt designs are sewn in the sequence as they have been selected.
> Touch the icon «Confirm».– The screen is closed and the previously made adjustments are saved.
> Touch the icon «Connect» again.> Touch the icon «Attach» (2).> In the «Editing Display» select another quilt design with the finger.
– The starting point of the quilt design is joined with the endpoint of the first quilt design. Now it is considered as one quilt design.
> Touch the icon «Confirm».– The screen is closed and the previously made adjustments are saved.
> Touch the icon «Connect» again.> Touch the icon «Link» (3).> In the «Editing Display» select another quilt design with the finger.
– The starting point the quilt design is joined with the endpoint of the first quilt design by a joining seam. The joined quilt designs remain at their position and are sewn as one quilt design.

Creative quilting
68
> Touch the icon «Confirm».– The screen is closed and the previously made adjustments are saved.
2
3
1
Separating quilt designs
Disconnects links which have been done by using the function «Linking quilt designs» (see page 67).
> Activate the previoulsy linked quilt design «Editing Display» with the finger.> Touch the lower icon «Unconnect» or
> touch «Design Tools —> Unconnect» in the menu bar.– The quilt designs are separated.
Aligning quilt designs in the «Editing Display»
A number of quilt designs can be aligned in different ways. As soon as the way of alignment is selected, the alignment line can be placed and it can be decided which quilt designs are to be aligned along this line.
Prerequisite:
• Anumberofquiltdesignshavebeenselectedfromthe«ToolCenter»andarevisibleinthe«EditingDisplay».
> Touch the icon «Select».> Activate any quilt design in the «Editing Display» with the finger.
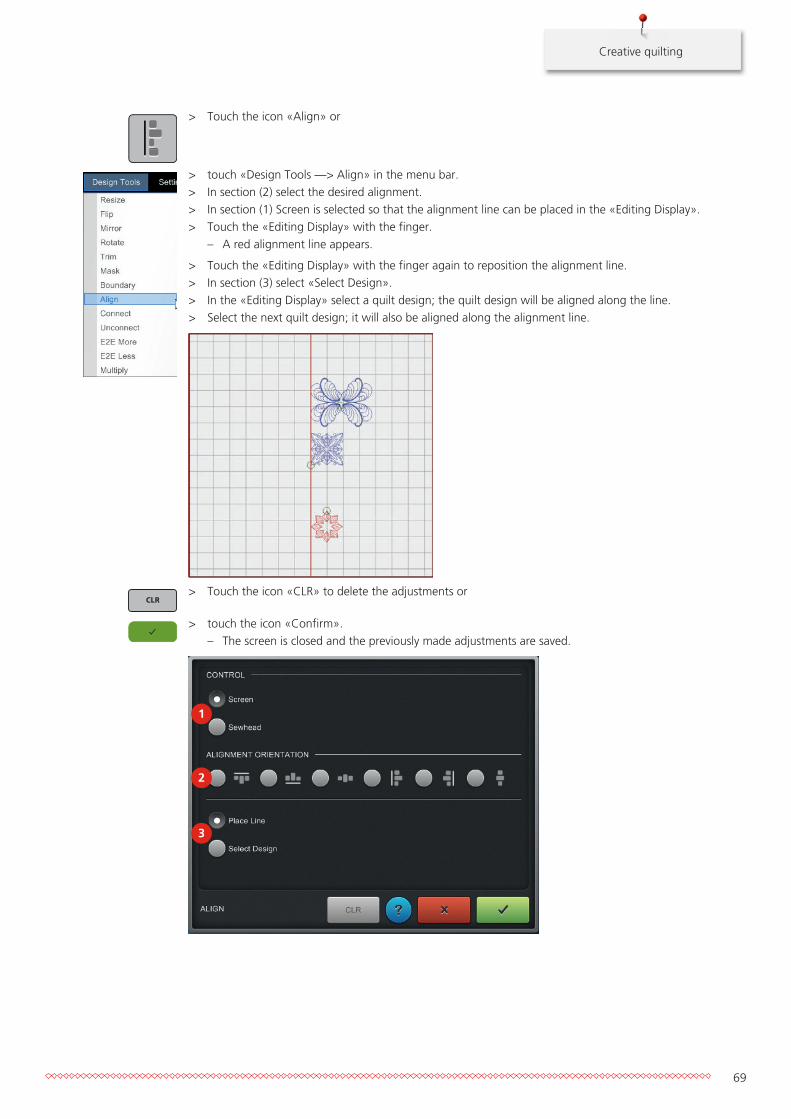
Creative quilting
69
> Touch the icon «Align» or
> touch «Design Tools —> Align» in the menu bar.> In section (2) select the desired alignment.> In section (1) Screen is selected so that the alignment line can be placed in the «Editing Display».> Touch the «Editing Display» with the finger.
– A red alignment line appears.
> Touch the «Editing Display» with the finger again to reposition the alignment line.> In section (3) select «Select Design».> In the «Editing Display» select a quilt design; the quilt design will be aligned along the line.> Select the next quilt design; it will also be aligned along the alignment line.
> Touch the icon «CLR» to delete the adjustments or
> touch the icon «Confirm».– The screen is closed and the previously made adjustments are saved.
1
2
3
CLR

Creative quilting
70
Aligning quilt designs via the «Sewhead»
A number of quilt designs can be aligned in different ways. As soon as the way of alignment is selected, the alignment line can be placed and it can be decided which quilt designs are to be aligned along this line.
Prerequisite:
• Anumberofquiltdesignshavebeenselectedfromthe«ToolCenter»andarevisibleinthe«EditingDisplay».
> Touch the icon «Select».> Activate any quilt design in the «Editing Display».
> Touch the icon «Align» or
> touch «Design Tools —> Align» in the menu bar.> In section (2) select the desired alignment.> In section (1) select «Sewhead» so that the alignment line can be placed via the «Sewhead».> Place an alignment line via the «Sewhead».> In the «Sewhead Display» touch the icon «Set» or any other handle button to confirm the alignment line.
– An alignment line appears in the «Editing Display».
> In section (3) select «Select Design».> In the «Editing Display» select a quilt design; the quilt design will be aligned along the line.> Select the next quilt design; it will also be aligned along the alignment line.
> Touch the icon «CLR» to delete the adjustments or
> touch the icon «Confirm».
CLR
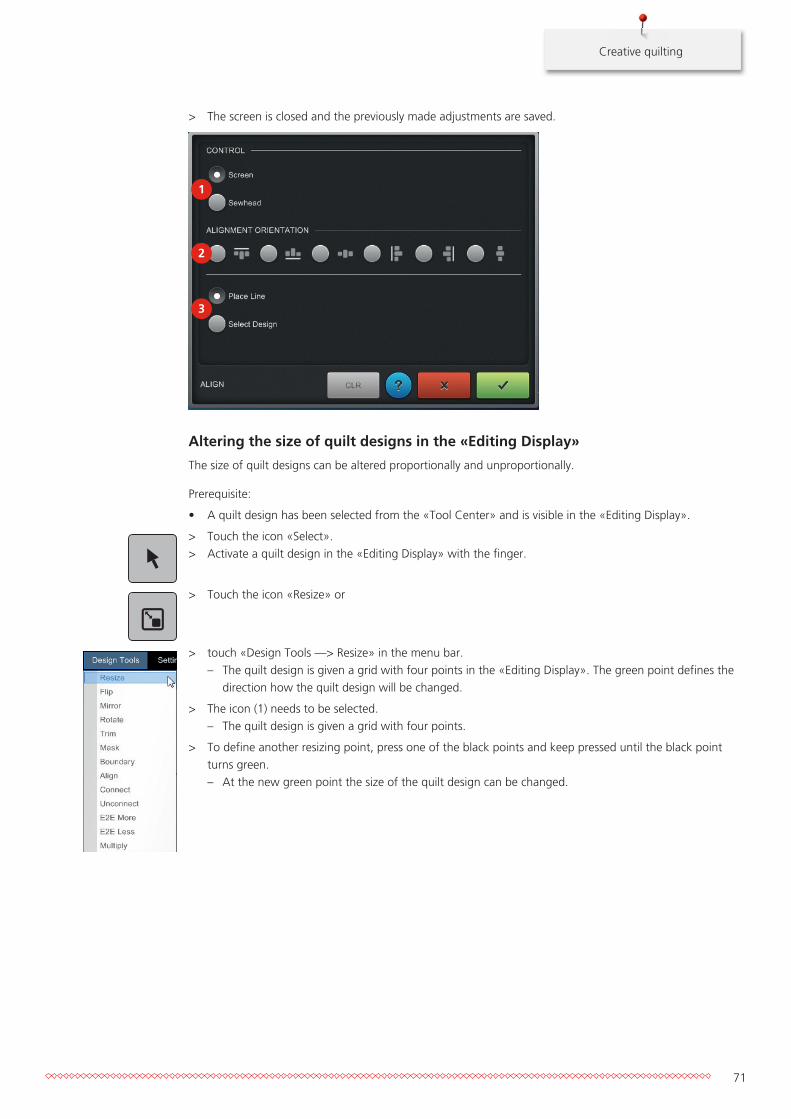
Creative quilting
71
> The screen is closed and the previously made adjustments are saved.
1
2
3
Altering the size of quilt designs in the «Editing Display»
The size of quilt designs can be altered proportionally and unproportionally.
Prerequisite:
• Aquiltdesignhasbeenselectedfromthe«ToolCenter»andisvisibleinthe«EditingDisplay».
> Touch the icon «Select».> Activate a quilt design in the «Editing Display» with the finger.
> Touch the icon «Resize» or
> touch «Design Tools —> Resize» in the menu bar.– The quilt design is given a grid with four points in the «Editing Display». The green point defines the
direction how the quilt design will be changed.
> The icon (1) needs to be selected.– The quilt design is given a grid with four points.
> To define another resizing point, press one of the black points and keep pressed until the black point turns green.– At the new green point the size of the quilt design can be changed.

Creative quilting
72
> Press the green point of the quilt design and pull outwards or inwards to resize the quilt design proportionally.
– Below the «Editing Display» on the right the width and the height of the quilt design is indicated (see page 24).
> Touch the icon (2) to resize the quilt design unproportionally.– The quilt design is given a grid with eight points.
> Press the green point and pull outwards or inwards to resize the quilt design unproportionally.> Touch the icon «CLR» to delete the adjustments or
> touch the icon «Confirm».– The screen is closed and the previously made adjustments are saved.
CLR

Creative quilting
73
1
2
Altering the size of quilt designs via the «Sewhead»
The size of quilt designs can be altered proportionally and unproportionally.
Prerequisite:
• Aquiltdesignisselectedandvisibleinthe«EditingDisplay».
> Touch the icon «Select».> Activate a quilt design in the «Editing Display» with the finger.
> Touch the icon «Resize» or
> touch «Design Tools —> Resize» in the menu bar.– The quilt design is given a grid with four points in the «Editing Display». The green point defines the
direction how the quilt design will be changed.
> To define another resizing point, press one of the black points and keep pressed until the black point turns green.
> Touch the icon (1) to alter the size of the quilt design via the «Sewhead».> Move the «Sewhead» to the starting point on the quilt which must be diagonally opposite the green
point.> In the «Sewhead Display» touch the icon «Set» or press any handle button.
– The starting point is placed.
> Move the «Sewhead» to the endpoint.> In the «Sewhead Display» touch the icon «Set» or press any handle button.
– The endpoint is placed and the size of the quilt design is proportionally altered and visible in the «Editing Display». Below the «Editing Display» on the right the width and the height of the quilt design is indicated.
> Touch the icon (2) to resize the quilt design unproportionally.> Place the starting point and the endpoint as described beforehand.
– The size of the quilt design is altered unproportionally and visible in «Editing Display».

Creative quilting
74
> Touch the icon «Confirm».– The screen is closed and the previously made adjustments are saved.
2
1
Altering the size of quilt designs via the enter keys
The size of quilt designs can be altered proportionally and unproportionally.
Prerequisite:
• Aquiltdesignhasbeenselectedfromthe«ToolCenter»andisvisibleinthe«EditingDisplay».
> Touch the icon «Select».> Activate a quilt design in the «Editing Display» with the finger.
> Touch the icon «Resize» or
> touch «Design Tools —> Resize» in the menu bar.> Touch the icon (1).> Touch the icon (2) to enter the size of the quilt design via the enter keys.
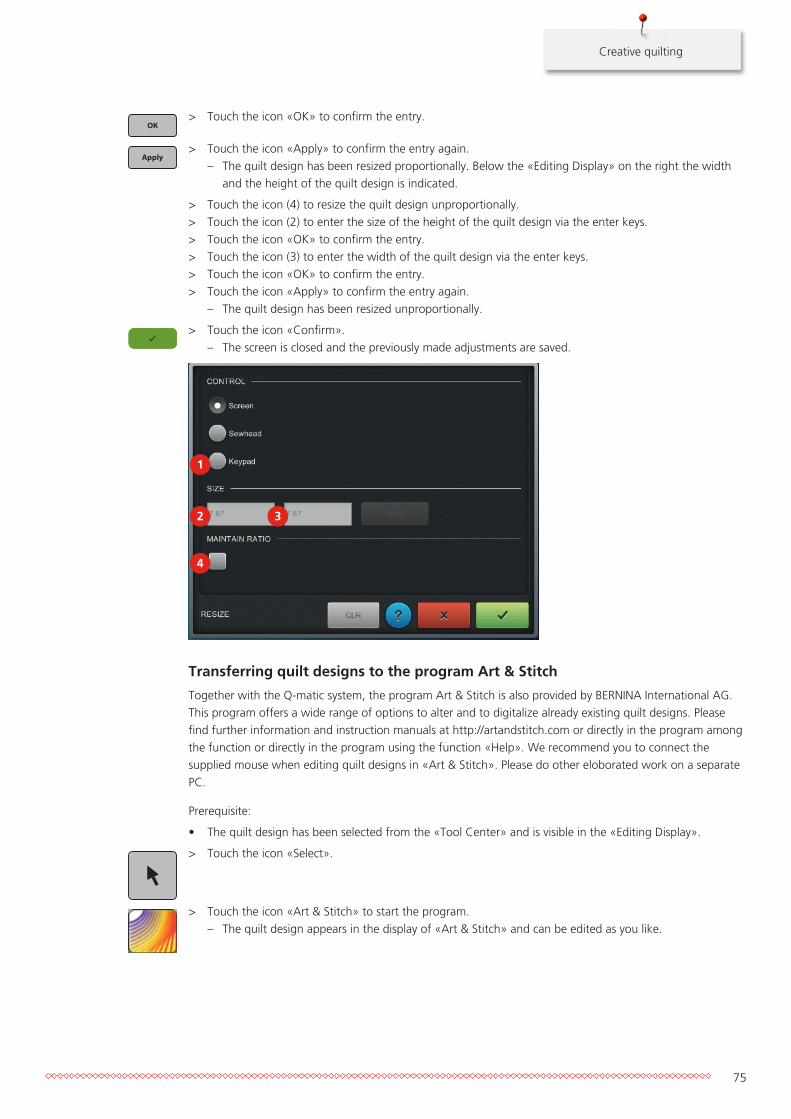
Creative quilting
75
> Touch the icon «OK» to confirm the entry.
> Touch the icon «Apply» to confirm the entry again.– The quilt design has been resized proportionally. Below the «Editing Display» on the right the width
and the height of the quilt design is indicated.
> Touch the icon (4) to resize the quilt design unproportionally.> Touch the icon (2) to enter the size of the height of the quilt design via the enter keys.> Touch the icon «OK» to confirm the entry.> Touch the icon (3) to enter the width of the quilt design via the enter keys.> Touch the icon «OK» to confirm the entry.> Touch the icon «Apply» to confirm the entry again.
– The quilt design has been resized unproportionally.
> Touch the icon «Confirm».– The screen is closed and the previously made adjustments are saved.
2 3
1
4
Transferring quilt designs to the program Art & Stitch
Together with the Q-matic system, the program Art & Stitch is also provided by BERNINA International AG. This program offers a wide range of options to alter and to digitalize already existing quilt designs. Please find further information and instruction manuals at http://artandstitch.com or directly in the program among the function or directly in the program using the function «Help». We recommend you to connect the supplied mouse when editing quilt designs in «Art & Stitch». Please do other eloborated work on a separate PC.
Prerequisite:
• Thequiltdesignhasbeenselectedfromthe«ToolCenter»andisvisibleinthe«EditingDisplay».
> Touch the icon «Select».
> Touch the icon «Art & Stitch» to start the program.– The quilt design appears in the display of «Art & Stitch» and can be edited as you like.
OK
Apply
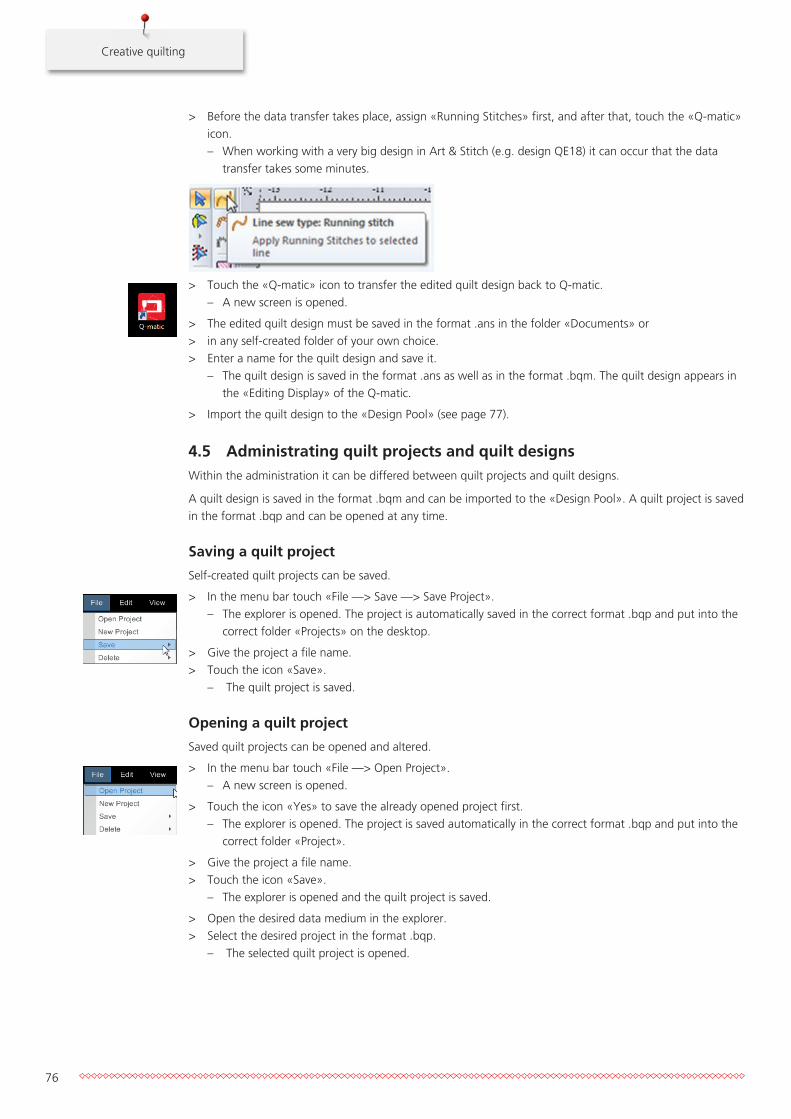
Creative quilting
76
> Before the data transfer takes place, assign «Running Stitches» first, and after that, touch the «Q-matic» icon.– When working with a very big design in Art & Stitch (e.g. design QE18) it can occur that the data
transfer takes some minutes.
> Touch the «Q-matic» icon to transfer the edited quilt design back to Q-matic.– A new screen is opened.
> The edited quilt design must be saved in the format .ans in the folder «Documents» or> in any self-created folder of your own choice.> Enter a name for the quilt design and save it.
– The quilt design is saved in the format .ans as well as in the format .bqm. The quilt design appears in the «Editing Display» of the Q-matic.
> Import the quilt design to the «Design Pool» (see page 77).
4.5 Administrating quilt projects and quilt designsWithin the administration it can be differed between quilt projects and quilt designs.
A quilt design is saved in the format .bqm and can be imported to the «Design Pool». A quilt project is saved in the format .bqp and can be opened at any time.
Saving a quilt project
Self-created quilt projects can be saved.
> In the menu bar touch «File —> Save —> Save Project».– The explorer is opened. The project is automatically saved in the correct format .bqp and put into the
correct folder «Projects» on the desktop.
> Give the project a file name.> Touch the icon «Save».
– The quilt project is saved.
Opening a quilt project
Saved quilt projects can be opened and altered.
> In the menu bar touch «File —> Open Project».– A new screen is opened.
> Touch the icon «Yes» to save the already opened project first.– The explorer is opened. The project is saved automatically in the correct format .bqp and put into the
correct folder «Project».
> Give the project a file name.> Touch the icon «Save».
– The explorer is opened and the quilt project is saved.
> Open the desired data medium in the explorer.> Select the desired project in the format .bqp.
– The selected quilt project is opened.

Creative quilting
77
Creating a new quilt project> In the menu bar touch «File —> New Project».
– A new screen is opened.
> Touch the icon «Yes» to save the already opened project first.– The explorer is opened. The project is saved automatically in the correct format .bqp and put into the
correct folder «Project».
> Give the project a file name.> Touch the icon «Save».
– The quilt project is saved and a new editing area is opened.
Saving quilt designs
Self-created or altered quilt designs can be saved.
> In the menu bar touch «File —> Save —> Save Design File».– The explorer is opened. The project is saved automatically in the correct format .bqp and put into the
correct folder «Designs» on the desktop.
> Change the filename of the quilt design.> Touch the icon «Save».
– The quilt design is saved.
> The quilt design can be imported to the «Design Pool» (see page 77).
Saving quilt designs on the BERNINA USB stick
Quilt designs can be edited in the program «Art and Stitch» on another computer (PC).
> Insert the BERNINA USB stick into the USB port on the right of the PC/Monitor.> In the menu bar touch «File —> Save —> Save Design File».
– The explorer is opened.
> In the explorer, select the BERNINA USB stick.> Change the filename of the quilt design.> Touch the icon «Save».
– The quilt design will be saved on the BERNINA USB stick.
Importing quilt designs
Only quilt designs in the formats .bqm and .dxf can be imported.
> In the menu bar touch «Design Library —> Import Design».> Select the folder in the «Explorer» where the quilt designs are saved.> Touch the desired quilt design to see the quilt design in the display «Files».> In the display «Files» touch the desired quilt design to see it as preview in the display «Design Preview».> In the display «Files» touch the desired quilt design twice in short succession to see the quilt design in the
display «Importing».> Allocate the wanted tags to the quilt design (see page 82).> Touch the icon «Import» to import the quilt design to the «Design Pool» or
> touch the icon «Clear» to delete all quilt designs or> touch a quilt design twice in short succession to delete it.> Touch the icon «Select all» to select all.
– All quilt designs are copied to the section «Importing».
Import
CLR
Select All

Creative quilting
78
> Touch the icon «Import».
– The name of the quilt design is indicated in the display «Files» with the supplement «Imported».
> Touch the icon «Close».– The quilt designs are visible in the «Design Center».
Importing quilt designs from the BERNINA USB stick
Only quilt designs in the formats .bqm and .dxf can be imported.
> Insert the BERNINA USB stick into the USB port on the right of the PC/Monitor.> In the menu bar touch «Design Library —> Import Design».> Select the USB stick in the «Explorer».> Touch the desired quilt design to see the quilt design in the display «Files».> In the display «Files» touch the desired quilt design to see it as preview in the display «Design Preview».> In the display «Files» touch the desired quilt design twice in short succession to see the quilt design in the
display «Importing».> Allocate the wanted tags to the quilt design (see page 82).> Touch the icon «Import» to import the quilt design to the «Design Pool» or
> touch the icon «Clear» to delete all quilt designs or> touch a quilt design twice in short succession to delete it.> Touch the icon «Select all» to select all.
– All quilt designs are copied to the section «Importing».
> Touch the icon «Import».
– The name of the quilt design is indicated in the display «Files» with the supplement «Imported».
> Touch the icon «Close».– The quilt designs are visible in the «Design Center».
Import
Close
Import
CLR
Select All
Import
Close

Creative quilting
79
Deleting quilt designs from the «Design Center»
Deleting single or all quilt designs from the «Design Center».
> Touch the icon «Add Design» to remove quilt designs from the «Design Center» (1).> In section «Design Center» (1) touch a quilt design twice in short succession to delete it.
> Touch the icon «Clear All» to delete all quilt designs from «Design Center».> Touch the icon «Close» (2).
1
2
– The quilt design is not visible in the «Design Center» anymore.
Deleting quilt designs from the «Design Pool»
Deleting particular quilt designs from the «Design Pool».
> In the menu bar touch «File —> Delete —> Design File».– A new screen is opened.
> Touch the desired quilt designs which are to be deleted.– The selected quilt designs are highlighted.
> Touch the icon «Delete».> Touch the icon «Yes» or «No» to delete the quilt designs or to cancel.> Touch the icon «Close».
Clear All
Delete
Close

Creative quilting
80
Deleting quilt projects
Self-created quilt projects can be deleted.
> In the menu bar touch «File —> Delete—> Delete project».– A new screen is opened.
> In section (1) activate the quilt project which is to be deleted.– Das The selected quilt project is highlighted in blue.
1
> Touch the icon «Delete».> Touch the icon «Yes» or «No» to delete the quilt project or to cancel the process.> Touch the icon «Close» to save the adjustment.
Creating tags
Tags for quilt designs can be created e.g. after designers, shapes and kind etc. This facilitates the search for appropriate quilt designs.
> In the menu bar touch «Design Library —> Manage Tags».– The screen «Manage Tags» is opened.
> Touch the icon «Add» (1).
1
> Enter the tag via the keypad.> Touch the icon «Confirm».
– The screen is closed and the previously made adjustments are saved.
> Touch the icon «Close» to save the adjustment.
Delete
Close
Close

Creative quilting
81
Altering tags
Altering tags for quilt designs.
> In the menu bar touch «Design Library —> Manage Tags».– The screen «Manage Tags» is opened.
> Select the desired tag which is to be altered.> Touch the icon «Modify» (1).
1
> Alter the tag via the keypad.> Feld «Confirm» drücken.
– The screen is closed and the previously made adjustments are saved.
> Touch the icon «Close» to save the adjustment.
Deleting tags
Deleting tags of quilt designs.
> In the menu bar touch «Design Library —> Manage Tags».– The screen «Manage Tags» is opened.
> Select the desired tag which is to be deleted.
Close

Creative quilting
82
> Touch the icon «Delete» (1) to delete the tag.
1
> Touch the icon «Close» to save the adjustment.
Allocating tags to a quilt design
Allocating tags to a quilt design. This facilitates the search for a suitable quilt design.
> In the menu bar touch «Design Library —> Design Tags».– A new screen is opened.
> In the display «Design Pool» (1) touch the desired quilt design twice in short succession.– The quilt design appears in the display «Selected Designs» (2).
– The selected quilt design is hightlighted in gray in the display «Design Pool» (1).
– All tags are indicated in the display «Tags» (3). The tag which has already been allocated to the quilt design is checked.
1
23
> Touch further tags in the display «Tags» to allocate them to the quilt design.> Touch the icon «Add Tags» and confirm by touching the icon «OK».
– All checked tags have been allocated to this quilt design.
> Touch the icon «Clear» or the quilt design twice in short succession to delete it from the «Selected Designs» (2).
> Allocate more tags to the particular quilt designs or> touch the icon «Close» to save the alterations.
Close
Add Tags
Clear
Close

Creative quilting
83
Allocating tags to several quilt designs
Allocating the same tags to several quilt designs. This facilitates the search for the suitable quilt designs.
> In the menu bar touch «Design Library —> Design Tags».– A new screen is opened.
> In the display «Design Pool» (1) touch all desired quilt designs twice in short succession to which the same tags are to be allocated.– They appear in the display «Selected Designs» (2).
– The selected quilt designs are hightlighted in gray in the display «Design Pool» (1).
– All tags are indicated in the display «Tags» (3). All tags which have already been allocated to the quilt designs are checked.
1
23
> Remove all check marks from the tags.> Touch further tags in the display «Tags» to allocate them to the quilt designs.> Touch the icon «Add Tags» and confirm by touching the icon «OK».
– All checked tags have been allocated to all quilt designs.
> Touch the icon «Clear» to delete all quilt designs from the display «Selected Designs».> Allocate the tags to further quilt designs or> touch the icon «Close» to save the alterations.
Removing tags from one quilt design
Removing tags from one quilt design.
> In the menu bar touch «Design Library —> Design Tags».– A new screen is opened.
Add Tags
Clear
Close

Creative quilting
84
> In the display «Design Pool» (1) touch the desired quilt design twice in short succession so that it appears in the display «Selected Designs» (2).– The selected quilt design is hightlighted in gray in the display «Design Pool» (1).
– All tags are indicated in the display «Tags» (3). All tags which have already been allocated are checked.
1
23
> Remove all check marks from the tags, which are not to be deleted.> Touch the icon «Remove Tags» and confirm by touching the icon «OK».
– All checked tags have been removed from this quilt design.
> Touch the icon «Clear» or the quilt design twice in short succession to delete it from the display «Selected Designs».
> Remove tags from other single quilt designs or> touch the icon «Close» to save the alterations.
Removing tags from several quilt designs
Removing tags from several quilt designs.
> In the menu bar touch «Design Library--> Design Tags».– A new screen is opened.
> In the display «Design Pool» (1) touch all the desired quilt designs where the same tags are to be removed twice in short succession. They appear in the display «Selected Designs» (2).– The selected quilt design is highlighted in gray in the display «Design Pool» (1).
– All tags are indicated in the display «Tags» (3). All tags which have already been allocated are checked.
1
23
> Remove all check marks from the tags which are not to be deleted.
Remove Tags
Clear
Close

Creative quilting
85
> Touch «Remove Tags» and confirm by touching the icon «OK».– All checked tags have been removed from these quilt designs.
> Touch the icon «Clear» to delete all quilt designs from the display «Selected Designs».> Remove tags of further quilt designs or> touch the icon «Close» to save alterations.
Remove Tags
Clear
Close

Quilting
86
5 Quilting
5.1 Sewing quilt designs All active quilt designs in the «Safe Area» can be sewn out. The quilting process can be interrupted or canceled at any time.
Prerequisite:
• Inthe«Settings»securingon/offmustbeactivated.• Thequiltdesignhasbeenselectedandisvisibleinthe«EditingDisplay».
> Touch the icon «Select».> Activate the quilt design in the «Editing Display» with the finger.
> Touch the icon «Start» to start sewing.– A new screen is opened in the «Sewhead Display».
> Touch the icon «Confirm».– The screen is closed and the machine travels to the starting point.
> Touch the icon «Securing» at the «Sewhead» or press the handle buttons I to sew a complete stitch or> touch the icon «Securing» at the «Sewhead» or keep the handle buttons I pressed to sew the
preprogrammed securing stitches.
> Touch the icon «Needle up/down» at the «Sewhead» or press the handle buttons II, so that the needle is lowered.
> Touch the icon «Needle up/down» at the «Sewhead» or press the handle buttons II again, so that the needle is raised.
> Touch the icon «Confirm».– The screen is closed and the machine sews the quilt design.
5.2 Interrupting the sewing process of quilt designs Sewing can be interrupted either via the «Sewhead» or the PC/Monitor. If the sewing is interrupted, the thread tension and the SPI (stitches per inch) can be adjusted.
Prerequisite:
• Thequiltdesignisbeingsewn.
> Touch the icon «Break» to interrupt sewing.– In the «Sewhead Display» a new screen appears to adjust the thread tension or the SPI (stitches per
inch).
> In section (1) alter the SPI via the icons «-» and «+».> In section (2) adjust the thread tension via the icons «-» and «+».
1
2

Quilting
87
> Touch the icon «Confirm».– Sewing is continued.
5.3 Interrupting the sewing process of a quilt design after a thread breakage
After a thread breakage or when the bobbin is empty with activated bobbin thread indicator (refer to instruction manaul Q 20 / Q 24), the machine stops automatically.
After a thread breakage, the needle can be repositioned either at the stop point or at any other point of the quilt design with the help of the Thread Break Recovery.
Prerequisite:
• Inthemenubarunder«Settings»the«Securingon/off»mustbeactivated.• Thequiltdesignisbeingsewn.
> Touch the icon Stop to stop sewing e.g. after a thread breakage or when the bobbin is empty..
> Touch the icon «Start».– A new screen is opened.
> Touch the icon «Confirm».> Move the «Sewhead» to the desired point of the interruption to resume sewing from there.> Touch the icon «At closest Point on design».
– A new screen is opened in the «Sewhead Display». Find further information about this topic«» (see page 86).
> or> Touch the icon Stop to stop sewing e.g. after a thread breakage or when the bobbin is empty..
> Touch the icon «Start».– A new screen is opened.
> Touch the icon «Confirm».
> Touch the icon «At Stop Point».– The machine resumes sewing at that position where it has stopped.

Attachment
88
6 Attachment
6.1 Cleaning the display> Clean the display when it is switched off with a soft slightly damp microfiber cloth.
6.2 Cleaning the energy chain and the X-Y-beltsIt must be ensured that the energy chain and the X-Y-belts are free from thread remnants and lint.
Please find further information about «Checking and cleaning the carriage» in the instruction manual «BERNINA Q 20 / Q24».

Attachment
89
6.3 Troubleshooting
Fault Cause Repair
The machine doesn't start. The red emergency stop knob is still pressed.
> Turn the red emergency stop knob in arrow direction so that the emergency stop knob is in the correct position.
The «Safe Area» cannot be defined.
The clutch of the X- and Y- belt clamps are unlocked.
> Make sure that the clutch of the X- and Y- belt clamps are locked.
The quilt design is not sewn out correctly.
The quilt design is only sewn in the Y- or X- axis.
> Make sure that the clutch of the X- and Y- belt clamps are locked.
Too less free capacity on the BERNINA USB stick.
Not enough free capacity available on the BERNINA USB stick.
> Make sure that the BERNINA USB stick is used.> Delete data from the BERNINA USB stick.
No BERNINA USB stick is inserted. Make sure that during the complete automatic update always the same BERNINA USB stick remains inserted.
The BERNINA USB stick is not inserted.
> Use a BERNINA USB stick providing enough free capacity.
The machine doesn't start. LEDs light up or flash at the control cabinet or the X-Y-drives after the starting process.
> Further information (see page 31).
After pushing the Sewhead the machine runs on its own.
Easy Glide setting of the machine is set too high.
Change Easy Glide setting. (see page 37).

Attachment
90
6.4 Error messages Q-matic software
Message on the display Cause Repair
The system has reported a fault: A thread break fault has occurred.
The upper thread is used up. > Rethread. Start the machine touching «Play», (see page 87).
The upper thread has broken.
The system has reported a fault: A thread break fault has occurred.
The bobbin thread is used up. > Rethread. Start the machine touching «Play», (see page 87).
The bobbin thread has broken. > Clean the hook.> Rethread. Start the machine touching «Play», (see
page 87).
The system has reported a fault: There is a problem with the machine. Please check the sewhead.
The machine is not switched on. > Switch the machine on.
The connection cable to the Q-matic system is not plugged in.
> Plug in the cable.
A design is partially outside of the safe area or there are no queued designs in the safe area.
The quilt design can't be sewn out.
> Reposition the quilt design in the «Safe Area» or redefine the «Safe Area».
> Move the quilt design back to the waiting line (see page 47).
The system has reported a fault: The controller has lost communication with the motor drives. Please ensure the STOP-button is not pressed.
The motor drive doesn't work.
At the X-Y-drive both or only one of the LED control lamps light up in «orange».
> Make sure that the plugs of both cables are plugged in correctly and that they are not defect.
> Both LED control lamps must light up in «green».> The «Safe Area» must be redefined.> Restart the machine by touching Play.
The system has reported a fault: A X-axis has fault occurred. The controller has lost communication with the motor drives. Please ensure the STOP-button is not pressed.
The controlling of the X-Y-drive doesn't work.
At the X-Y-drive both or only one of the LED control lamps light up in «orange».
> Make sure that the plugs of both cables are plugged in correctly and that they are not defect.
> Both LED control lamps must light up in «green».> The «Safe Area» must be redefined.> Restart the machine by touching Play.
The system has reported a fault: A needle fault has occurred.
Moving the handwheel while positioning the «Sewhead».
> The Q-matic system needs to be restarted.
The sewhead is too far away from any design. Please reposition the sewhead then click Start.
The «Sewhead» is too far away from the quilt design.
> Move the «Sewhead» closer to the quilt design.
The system has reported a fault: A sequence fault has occurred.
The machine is not switched on. The machine has an old firmware version.
> Switch the machine on.> Update the machine with the latest firmware.
The system has reported a fault: Unable to sew because designs are too large.
The design is too large. The created design is too long (length or number of stitches) and cannot be proceeded.
Reduce the design size of linked or multiplied designs via «Unlink» or split the design into smaller parts in Art & Stitch.

Attachment
91
6.5 Overview quilt designs
Tips around the quilt designs
The implemented quilt designs have been digitalized very exactly as for their geometry. Therefore the Q-matic system sews them out exactly and accurately. Nevertheless, inaccuracy can be visible especially with large designs. The reasons for this are: The deformation of the fabric layers during the quilting process.
Actions to minimize deformation • Beforequiltingisstarted,fixthequiltblockandthequiltsandwichwithbastingstitchesfirst. • Asforquiltdesignswithanoutlineoraframe,alwayssewtheouterareasfirstbeforesewingtheinner
areas. • Stretchthequilttopaswellasthebacksidefabricproperly;don'tletthefabricfloat. • Stretchthebacksidefabricsidewaysbythehelpofsideclamps.Doneverchangethisstretchingwhile
quilting. • Neitherleanagainstthefrontbarnorsupportthearmsonit. • Afterextremeenlargementsorreductions,alwayssewoutaquilttest.
Jump Stitch
A «Jump Stitch » means that while quilting a design, the needle has to change from one position to another, before the quilting process can be continued. There is a gap (jump) between the previous and the following stitch. This jump is done by the machine without adding any stitches in between. The user can decide whether the machine should stop at the position of the jump stitches to secure the thread or whether the machine should continue at these jumps without a stop and therefore without this immediate securing option. Designs with «jump stitches» have indicated the number of «jump stitches» in the follwoing overview below its name («Jump stitches: »x).
Included quilt designs
To find more information about the famous designers and quilters that created the designs included in BERNINA Q-matic please search for the people by name in the world wide web and visit their webpages or blogs. Q-matic includes Designs from Lisa H. Calle, Keryn Emmerson, Amanda Murphy, Tula Pink, Patricia Ritter,LinziUpton,AlfonsinaUriburu,SarahVedeleretc.
Amanda Murphy
Name Quilt design Name Quilt design
LoopedFlowers_ Border
LoopedFlowers_ Border_L
LoopedFlowers_ Corner
LoopedFlowers_ Panto1
LoopedFlowers_ Panto2
LoopedFlowers_ Panto3

Attachment
92
Name Quilt design Name Quilt design
LoopedFlowers_ Segment
LoopedFlowers_ Square
LoopedFlowers_ Triangle
LoopedFlowers_ Wreath
LooseSwirlFeathers_ Border
LooseSwirlFeathers_ Corner
LooseSwirlFeathers_ Panto
LooseSwirlFeathers_ Segment
LooseSwirlFeathers_ Square
LooseSwirlFeathers_ Triangle
Panto_Candle Panto_Hearts1*
*Only results in a Pantograph with the quilt design «Panto_Hearts2»
Panto_Hearts2*
*Only results in a Pantograph with the quilt design «Panto_Hearts1»
Panto_LooseSwirls
Panto_Square Meander Panto_Stars
Panto_SwirlFlower Panto_Swirls

Attachment
93
Name Quilt design Name Quilt design
PebblesShell_Square
Jump stitch: 1 S
PebblesShells_Border
PebblesShells_Corner PebblesShells_Panto
PebblesShells_ Segment
PebblesShells_Triangle
PebblesShells_Wreath SwirlsPaisley_Border
SwirlsPaisley_Corner SwirlsPaisley_Panto
SwirlsPaisley_Segment SwirlsPaisley_Square1
SwirlsPaisley_Square2 SwirlsPaisley_Triangle
SwirlsPaisley_Wreath TightSwirls_Continuous
VinesBerries_Block VinesBerries_Border

Attachment
94
Name Quilt design Name Quilt design
VinesBerries_Border2 VinesBerries_Corner
VinesBerries_Panto VinesBerries_Triangle
VinesBerries_Wreath
Keryn Emmerson
Name Quilt design Name Quilt design
Bellflower Bellflower2
Bramble Bramble2
Camelia Camelia2
Cherish Cherish2
China grove China grove2
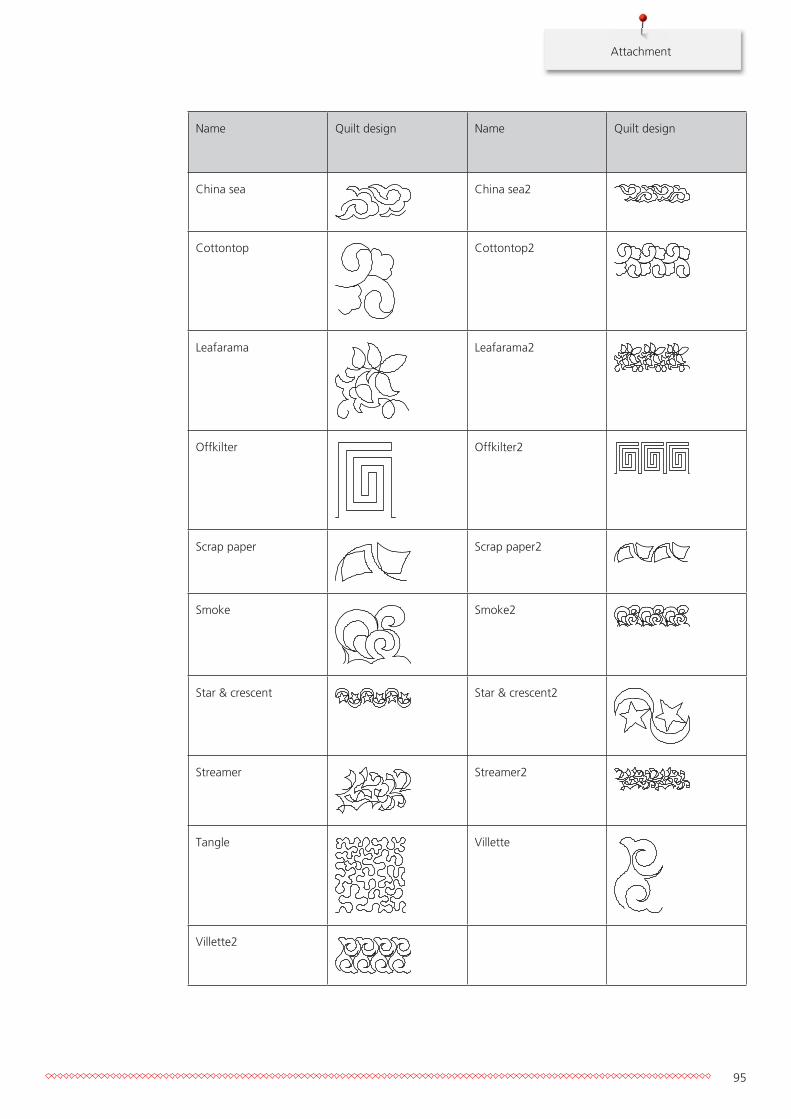
Attachment
95
Name Quilt design Name Quilt design
China sea China sea2
Cottontop Cottontop2
Leafarama Leafarama2
Offkilter Offkilter2
Scrap paper Scrap paper2
Smoke Smoke2
Star & crescent Star & crescent2
Streamer Streamer2
Tangle Villette
Villette2

Attachment
96
Patricia Ritter
Name Quilt design Name Quilt design
Aloha Block Petite Corner_PR053
Aloha Block1_PR009
Aloha Block2_PR010 Aloha Petite_ PRPANTO10
Aloha Sashings_ PRPANTO35
Aralia
Leaf Sashing1 Morning Glory
PR007 PR011
PR012 PR016
PR082 PR0125
PR126 PR127
PR128 PRPANTO01
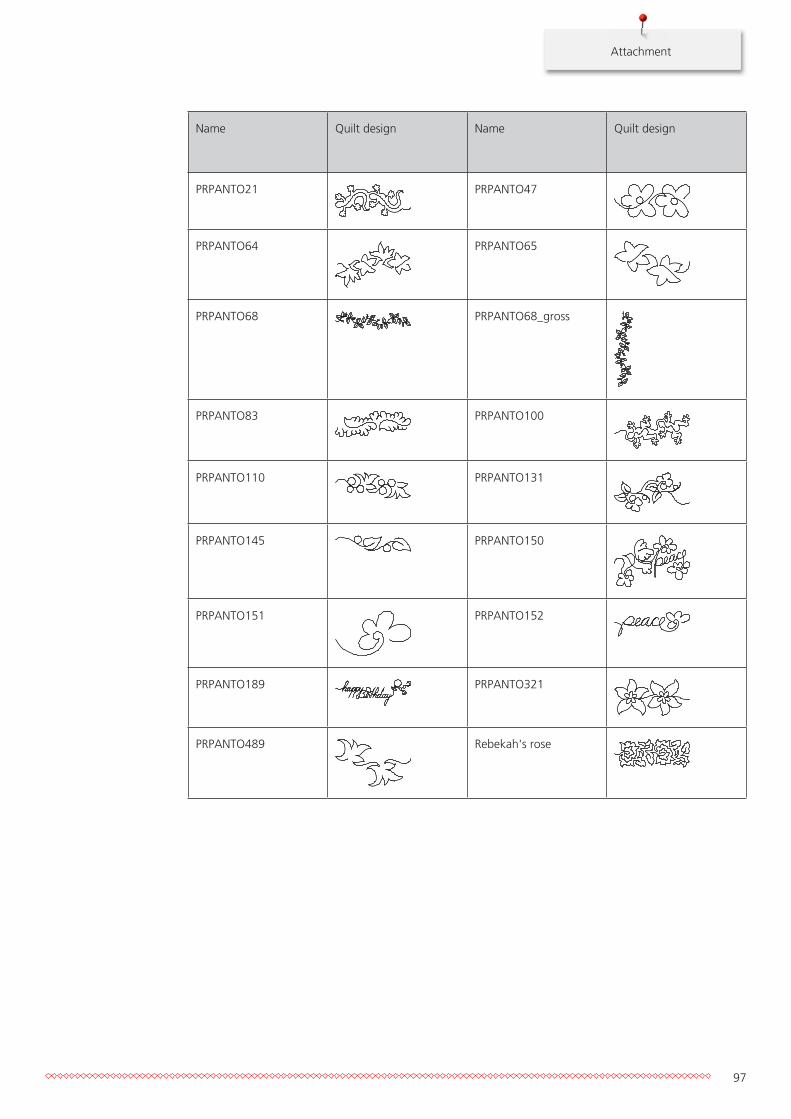
Attachment
97
Name Quilt design Name Quilt design
PRPANTO21 PRPANTO47
PRPANTO64 PRPANTO65
PRPANTO68 PRPANTO68_gross
PRPANTO83 PRPANTO100
PRPANTO110 PRPANTO131
PRPANTO145 PRPANTO150
PRPANTO151 PRPANTO152
PRPANTO189 PRPANTO321
PRPANTO489 Rebekah's rose

Attachment
98
Aggy Burczyk
Name Quilt design Name Quilt design
Ayana_basic Ayana_block_01
Ayana_block_02 Ayana_block_03
Jump stitch: 1
Ball_01 Bellini_01
Bellini_02 Butterfly_01
Butterfly_01_E2E Butterfly_02
Butterfly_03_E2E Circles
Denebola Feathers and Pearls_01
Feathers and Pearls_02
Jump stitches: 3
Georgette_01

Attachment
99
Name Quilt design Name Quilt design
Georgette_02 Half Moon_Border_01
Half Moon_Border_02 Half Moon_Border_03
Jump stitches: 2
Half Moon_Border_03_XS
Jump stitches: 3
Hexagon_fill_01
Hexagon_fill_02 Hexagon_fill_03
Hexagon_fill_04 Hexagon_fill_05
Pearls on a string Pearls on a string_heart
Pearls on a string_ring Pearls_basic

Attachment
100
Name Quilt design Name Quilt design
Skijumper Square_fill_01
Square_fill_02 Swirl_01
Waves_Circles_double Waves_Circles_single
Basic Shapes by AB
Name Quilt design Name Quilt design
Basics_01 Basics_02
Basics_03 Basics_04
Basics_05 Basics_06
Basics_07 Basics_08

Attachment
101
Name Quilt design Name Quilt design
Basics_09 Basics_10
Cake Circle
Double_Swirl_3 Heart_01
Heart_02 Hexagon
Pentagon Rectangle_ASS
Spiral_4 Spiral_6
Square Star_01

Attachment
102
Name Quilt design Name Quilt design
Star_02 Swirl_basic
Swirl_3 Triangle
Waves_basic
Alfonsina Uriburu
Name Quilt design Name Quilt design
Celia1 Celia3
Delia1 Delia3
Elina1 Elina2
Heart line Heart line2_1
Hock block Julia

Attachment
103
Name Quilt design Name Quilt design
Julia block Laura Block
Lilli Lourdes
Mejillon block Patricia
Petal Petal element

Attachment
104
Linzi Upton
Name Quilt design Name Quilt design
QE1
Jump stitches: 7
QE5
Jump stitch: 1
QE9 QE10
QE11 QE12
QE13
Jump stitches: 1
QE18
Jump stitches: 3
QE19
Jump stitches: 4
QE23
Jump stitch: 1

Attachment
105
Gerda Raschle
Name Quilt design Name Quilt design
Ball_Block Circle_Flower
Dog-foot Fantasy
Feet Feet_1
Fingerprint Flower_evergreen_02
Flower_evergreen_01 Hands
Mandala no
Ovale_Stone Pebbles Square

Attachment
106
Name Quilt design Name Quilt design
Pictures Frame Rosa
Row of houses Swiss _Flower
Yes
Lisa Calle
Name Quilt design Name Quilt design
LC 13 Swan's Journey Block 2
LC13V1Swan'sJourney Block 2A
Jump stitches: 5
LC13V2Swan'sJourney Block 1
Jump stitches: 7
LC 14 Swan's Journey Corner Large
Jump stitch: 1
LC 15 Swan's Journey Corner Sm
Jump stitch: 1
LC 16 Swan's Journey Frame
LCPANTO24 Swan's Journey BDR
LCPANTO25 Swan's Journey Panto LG
LCPANTO26 Swan's Journey Small
LCPANTO27 Swan's Journey Sash
Tula Pink and Sarah Vedeler
Coming soon.

Index
107
A
Activating/Deactivating securing 36
Adapting the view of the quilt design to the size of the display 42
Aligning quilt designs in the «Editing Display» 68
Aligning quilt designs via the «Sewhead» 70
Allocating tags to a quilt design 82
Allocating tags to several quilt designs 83
Altering tags 81, 81
Altering the size of quilt designs in the «Editing Display» 71
Altering the size of quilt designs via the «Sewhead» 73
Altering the size of quilt designs via the enter keys 74
C
Calling up the Help 40
Changing the 1:1 view of the quilt design 42
Changing the Easy Glide settings of the machine 37
Changing the sewing direction 48
Cleaning the energy chain and the X-Y-belts 88
Connecting and switching on the Frame machine 31
Connecting quilt designs 67
Copying quilt designs 41
Creating a new quilt project 77
Creating tags 80
Creating the safe area 34
D
Defining a boundary 56
Defining a boundary in the «Editing Display» 58
Defining a boundary via the «Sewhead» 56
Defining the sewing sequence 47
Deleting quilt designs 41
Deleting quilt designs from the «Design Center» 38, 79
Deleting quilt designs from the «Design Pool» 79
Deleting quilt projects 80
Deleting tags 81
Delivery content Art & Stitch 27
Delivery content Q-matic system 27
Duplicating quilt designs (E2E) 64
E
Introduction 19
Entering the size of the quilt top 43
Error messages Q-matic software 90
G
Grab and drop 46
Grid on/off 36
I
Importing quilt designs 77
Importing quilt designs from the BERNINA USB stick 78
Interrupting the sewing process of a quilt design after a thread breakage 87
Interrupting the sewing process of quilt designs 86
J
Jump Stitch 91
K
Key to signs 20
M
Maintenance and Cleaning 88
Masking quilt designs using «Create Region» in the «Editing Display» 55
Masking quilt designs using «Create Region» via the «Sewhead» 53
Masking quilt designs using «Design» 51
Mirroring quilt designs 50
Moving quilt designs 40
Mutliple duplication of quilt designs 65
O
Opening a quilt project 76
Overview quilt designs 91
Overview Display 24
Overview front 22
Overview functions and visual display 24
Overview icons 26
Overview lower Tool Center 25
Overview side 23
Overview upper Tool Center 25
P
Placing and deleting markers 44
Pressing the emergency stop knob 34
Put quilt patterns in a waiting queue or remove it. 47

Index
108
R
Realigning the safe area at the reference point 45
Realigning the safe area in the «Editing Display» 44
Reinstalling or Update of the Art & Stitch Software 28
Reinstalling or Update of the Q-matic software/firmware 28
Reinstalling Windows 28
Removing tags from one quilt design 83
Removing tags from several quilt designs 84
Replacing the All-in-One Touch PC 27
Restarting the system after a case of emergency 34
Rotating quilt designs 49
S
Saving a quilt project 76
Saving quilt designs 77
Saving quilt designs and tags on a BERNINA USB Stick 30
Saving quilt designs on the BERNINA USB stick 77
Searching quilt designs 39
Selecting a quilt design 38
Separating quilt designs 68
Sewing on/off 36
Sewing quilt designs 86
Signals on/off 36
Starting and switching off the Q-matic 33
Störungsbehebung 89
T
The needle is centered in the «Editing Display» 36
Trimming quilt designs in the «Editing Display» 62
Trimming quilt designs via the «Sewhead» 60
U
Update Q-Series firmware 29
Use of the Internet 27
W
Welcome to the world of BERNINA 19
Z
Zooming in the view of the quilt design at the desired position 41
Zooming the view of the quilt design in or out 42

Q-matic_Manual_UG.indd 2 06.07.2016 13:38:00


