15
Stephanie Tomasetta 2014 portfolio
| Date post: | 14-Jul-2015 |
| Category: |
Engineering |
| Upload: | stephanieltomas |
| View: | 99 times |
| Download: | 2 times |
Stephanie Tomasetta2014 portfolio
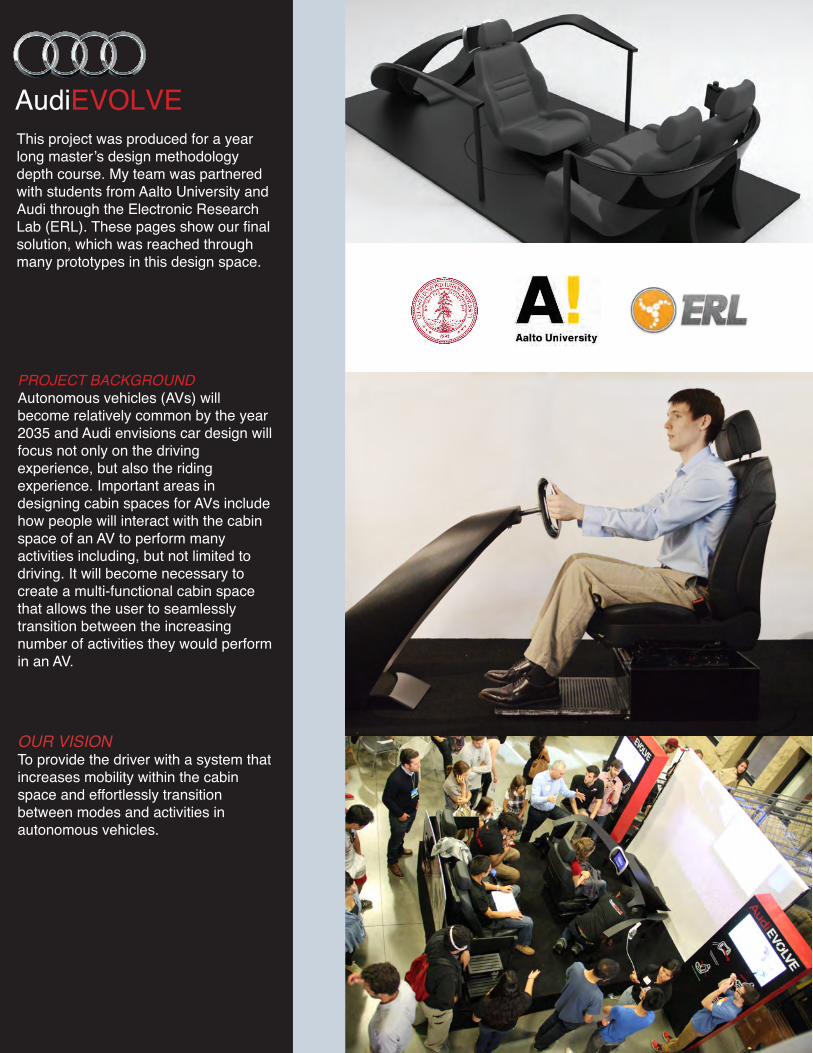
AudiEVOLVE
OUR VISIONTo provide the driver with a system that increases mobility within the cabin space and effortlessly transition between modes and activities in autonomous vehicles.
PROJECT BACKGROUNDAutonomous vehicles (AVs) will become relatively common by the year 2035 and Audi envisions car design will focus not only on the driving experience, but also the riding experience. Important areas in designing cabin spaces for AVs include how people will interact with the cabin space of an AV to perform many activities including, but not limited to driving. It will become necessary to create a multi-functional cabin space that allows the user to seamlessly transition between the increasing number of activities they would perform in an AV.
This project was produced for a year long master’s design methodology depth course. My team was partnered with students from Aalto University and Audi through the Electronic Research Lab (ERL). These pages show our final solution, which was reached through many prototypes in this design space.

The processes used to create this prototype were lasercutting, milling, waterjet cutting, acrylic bending, fiberglass, woodworking, and 3d printing.
The Anticipatory Chair. The centered driver seat gives the driver maximum in-car mobility. The highly sensitive chair sensors read the driver’s needs and intelligently sense different body movements. The chair can respond with a 180-degree rotation or a recline adjustment. With a slight twist of the upper body, the chair will begin to rotate. With a push on the seat back, the chair reclines. The system also integrates a “foot actuator” that initiates backward and forward movement based on the driver’s force applied with their feet.
PROCESS:
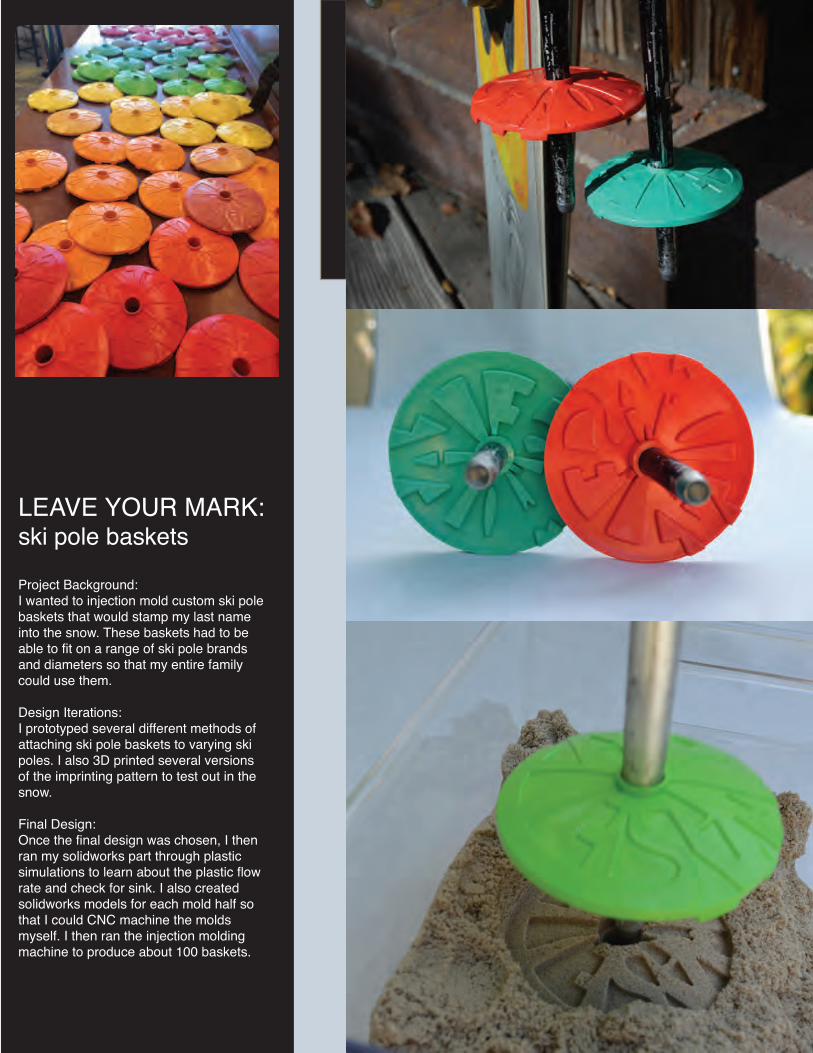
LEAVE YOUR MARK:ski pole baskets
Project Background:I wanted to injection mold custom ski pole baskets that would stamp my last name into the snow. These baskets had to be able to fit on a range of ski pole brands and diameters so that my entire family could use them.
Design Iterations:I prototyped several different methods of attaching ski pole baskets to varying ski poles. I also 3D printed several versions of the imprinting pattern to test out in the snow.
Final Design: Once the final design was chosen, I then ran my solidworks part through plastic simulations to learn about the plastic flow rate and check for sink. I also created solidworks models for each mold half so that I could CNC machine the molds myself. I then ran the injection molding machine to produce about 100 baskets.

Prototypes
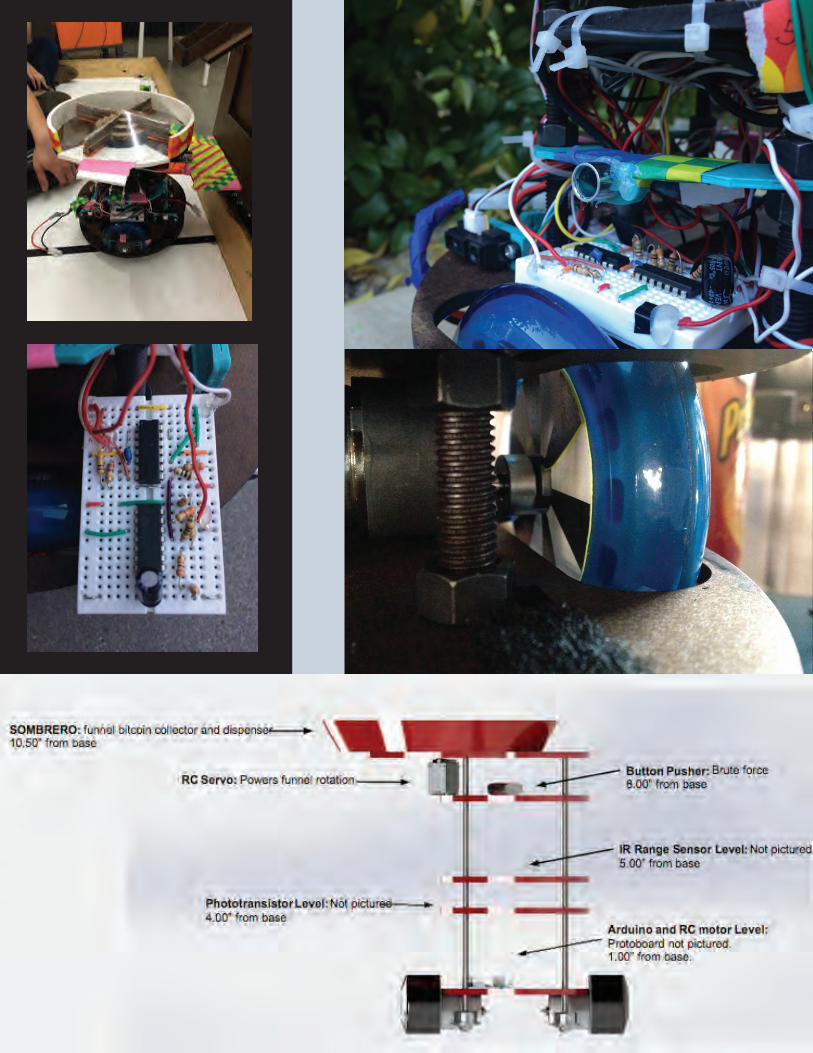
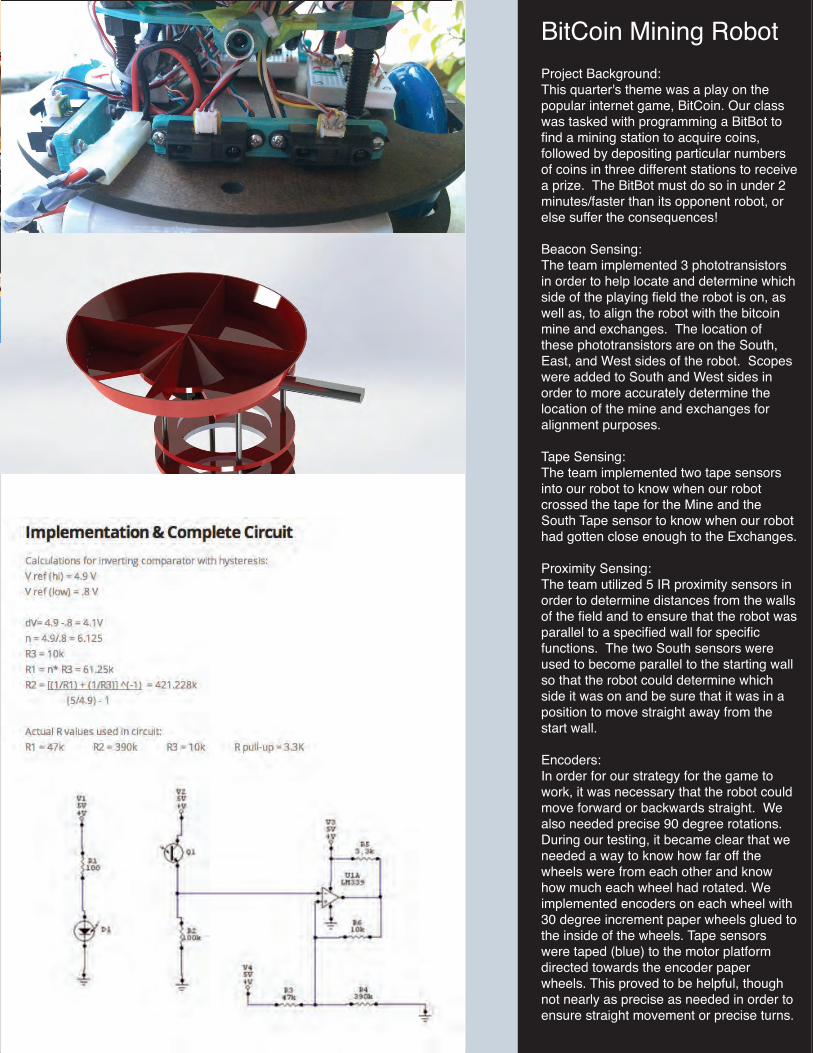
BitCoin Mining Robot Project Background:This quarter's theme was a play on the popular internet game, BitCoin. Our class was tasked with programming a BitBot to find a mining station to acquire coins, followed by depositing particular numbers of coins in three different stations to receive a prize. The BitBot must do so in under 2 minutes/faster than its opponent robot, or else suffer the consequences!
Beacon Sensing:The team implemented 3 phototransistors in order to help locate and determine which side of the playing field the robot is on, as well as, to align the robot with the bitcoin mine and exchanges. The location of these phototransistors are on the South, East, and West sides of the robot. Scopes were added to South and West sides in order to more accurately determine the location of the mine and exchanges for alignment purposes.
Tape Sensing:The team implemented two tape sensors into our robot to know when our robot crossed the tape for the Mine and the South Tape sensor to know when our robot had gotten close enough to the Exchanges.
Proximity Sensing: The team utilized 5 IR proximity sensors in order to determine distances from the walls of the field and to ensure that the robot was parallel to a specified wall for specific functions. The two South sensors were used to become parallel to the starting wall so that the robot could determine which side it was on and be sure that it was in a position to move straight away from the start wall.
Encoders:In order for our strategy for the game to work, it was necessary that the robot could move forward or backwards straight. We also needed precise 90 degree rotations. During our testing, it became clear that we needed a way to know how far off the wheels were from each other and know how much each wheel had rotated. We implemented encoders on each wheel with 30 degree increment paper wheels glued to the inside of the wheels. Tape sensors were taped (blue) to the motor platform directed towards the encoder paper wheels. This proved to be helpful, though not nearly as precise as needed in order to ensure straight movement or precise turns.
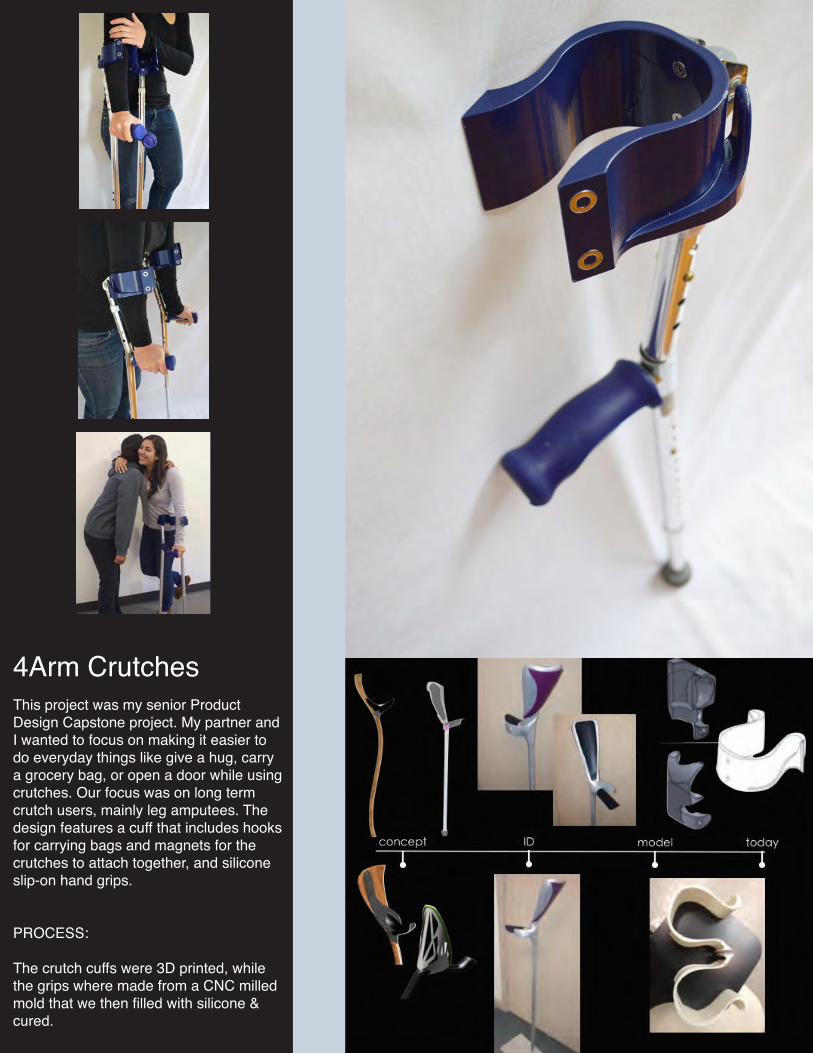
4Arm Crutches This project was my senior Product Design Capstone project. My partner and I wanted to focus on making it easier to do everyday things like give a hug, carry a grocery bag, or open a door while using crutches. Our focus was on long term crutch users, mainly leg amputees. The design features a cuff that includes hooks for carrying bags and magnets for the crutches to attach together, and silicone slip-on hand grips.
PROCESS:
The crutch cuffs were 3D printed, while the grips where made from a CNC milled mold that we then filled with silicone & cured.
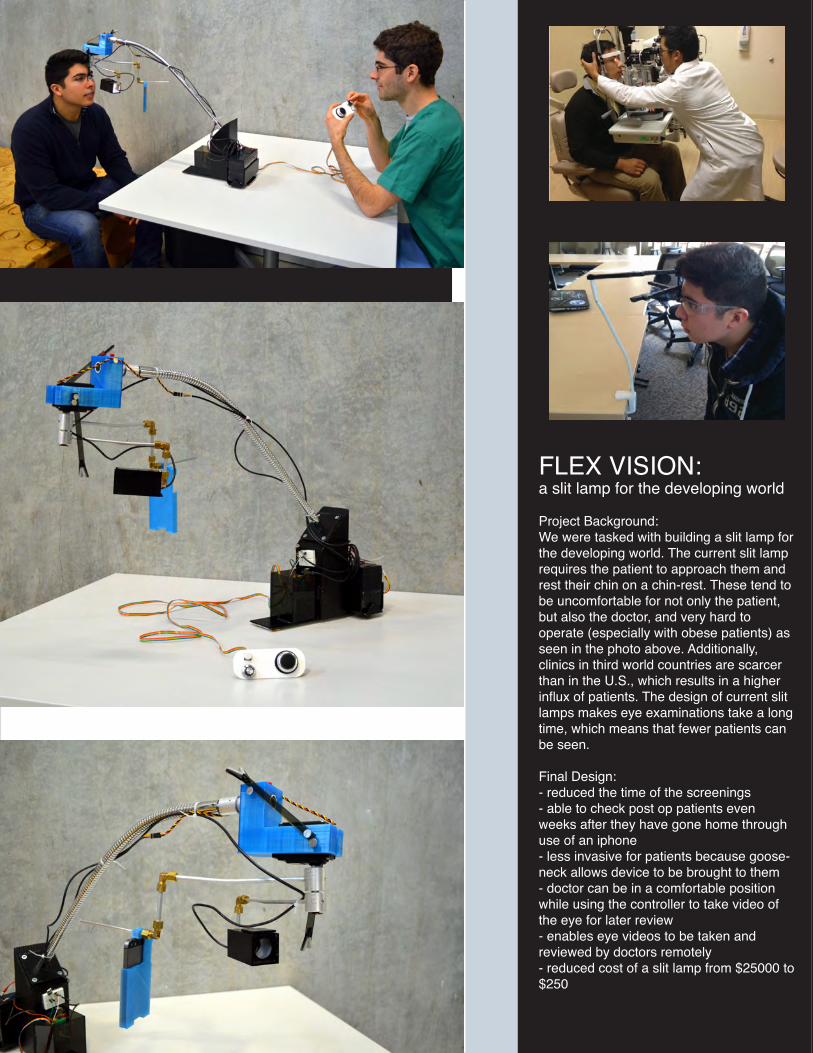
FLEX VISION:a slit lamp for the developing world
Project Background:We were tasked with building a slit lamp for the developing world. The current slit lamp requires the patient to approach them and rest their chin on a chin-rest. These tend to be uncomfortable for not only the patient, but also the doctor, and very hard to operate (especially with obese patients) as seen in the photo above. Additionally, clinics in third world countries are scarcer than in the U.S., which results in a higher influx of patients. The design of current slit lamps makes eye examinations take a long time, which means that fewer patients can be seen.
Final Design:- reduced the time of the screenings- able to check post op patients even weeks after they have gone home through use of an iphone- less invasive for patients because goose-neck allows device to be brought to them- doctor can be in a comfortable position while using the controller to take video of the eye for later review - enables eye videos to be taken and reviewed by doctors remotely- reduced cost of a slit lamp from $25000 to $250
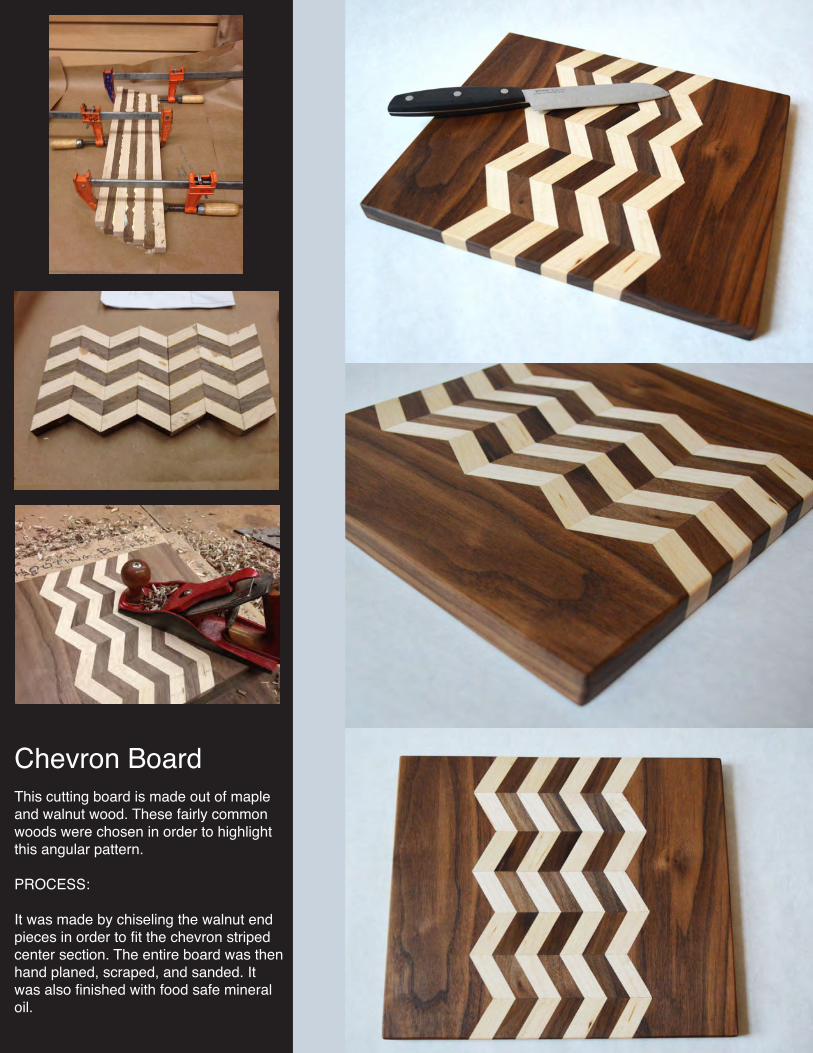
Chevron Board This cutting board is made out of maple and walnut wood. These fairly common woods were chosen in order to highlight this angular pattern.
PROCESS: It was made by chiseling the walnut end pieces in order to fit the chevron striped center section. The entire board was then hand planed, scraped, and sanded. It was also finished with food safe mineral oil.
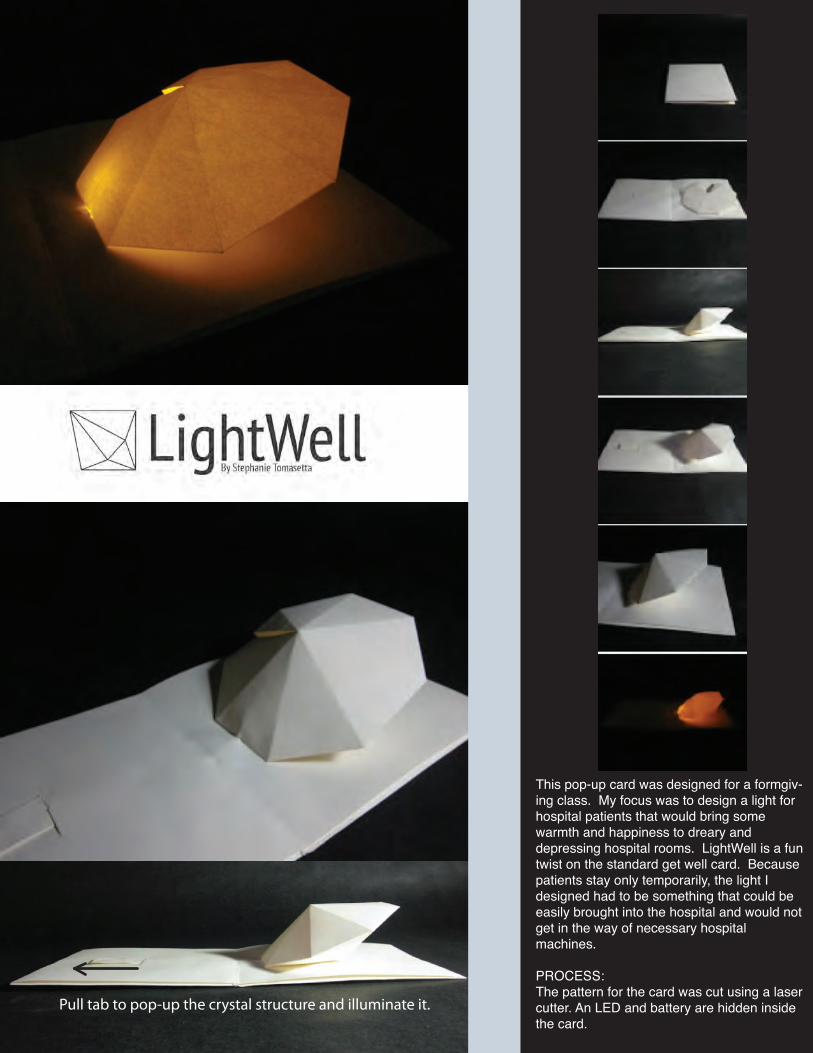
This pop-up card was designed for a formgiv-ing class. My focus was to design a light for hospital patients that would bring some warmth and happiness to dreary and depressing hospital rooms. LightWell is a fun twist on the standard get well card. Because patients stay only temporarily, the light I designed had to be something that could be easily brought into the hospital and would not get in the way of necessary hospital machines.
PROCESS:The pattern for the card was cut using a laser cutter. An LED and battery are hidden inside the card.
Pull tab to pop-up the crystal structure and illuminate it.
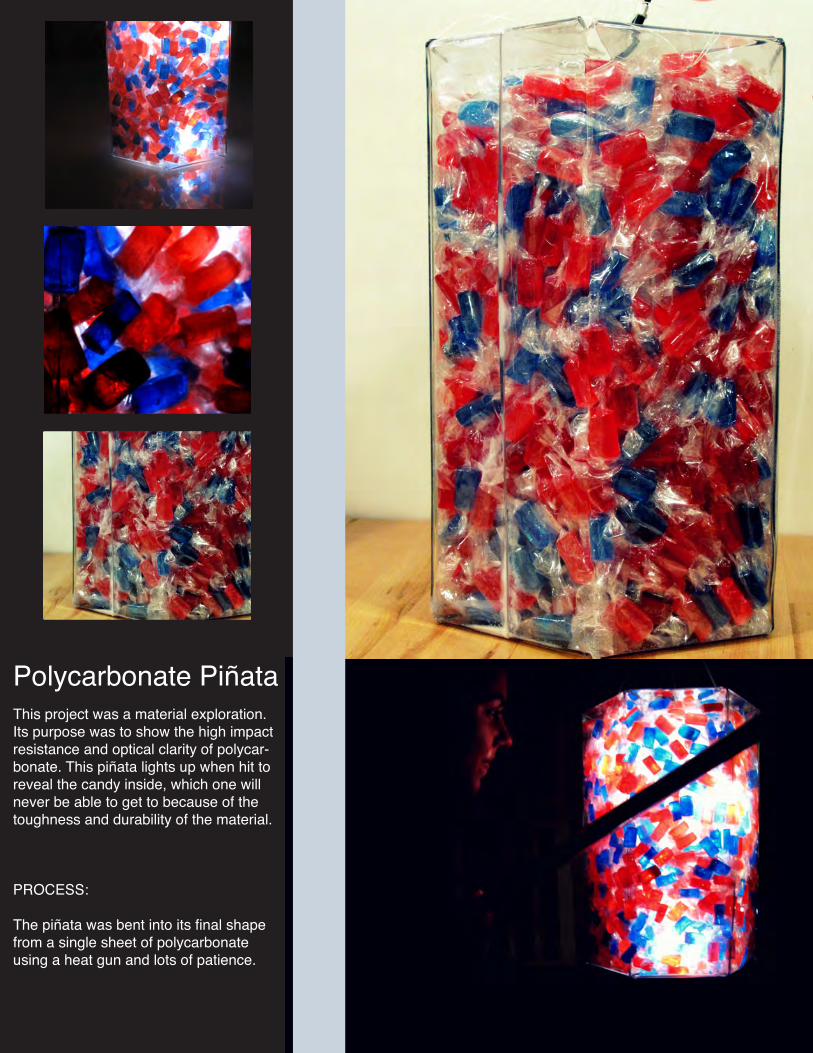
Polycarbonate Piñata This project was a material exploration. Its purpose was to show the high impact resistance and optical clarity of polycar-bonate. This piñata lights up when hit to reveal the candy inside, which one will never be able to get to because of the toughness and durability of the material.
PROCESS:
The piñata was bent into its final shape from a single sheet of polycarbonate using a heat gun and lots of patience.
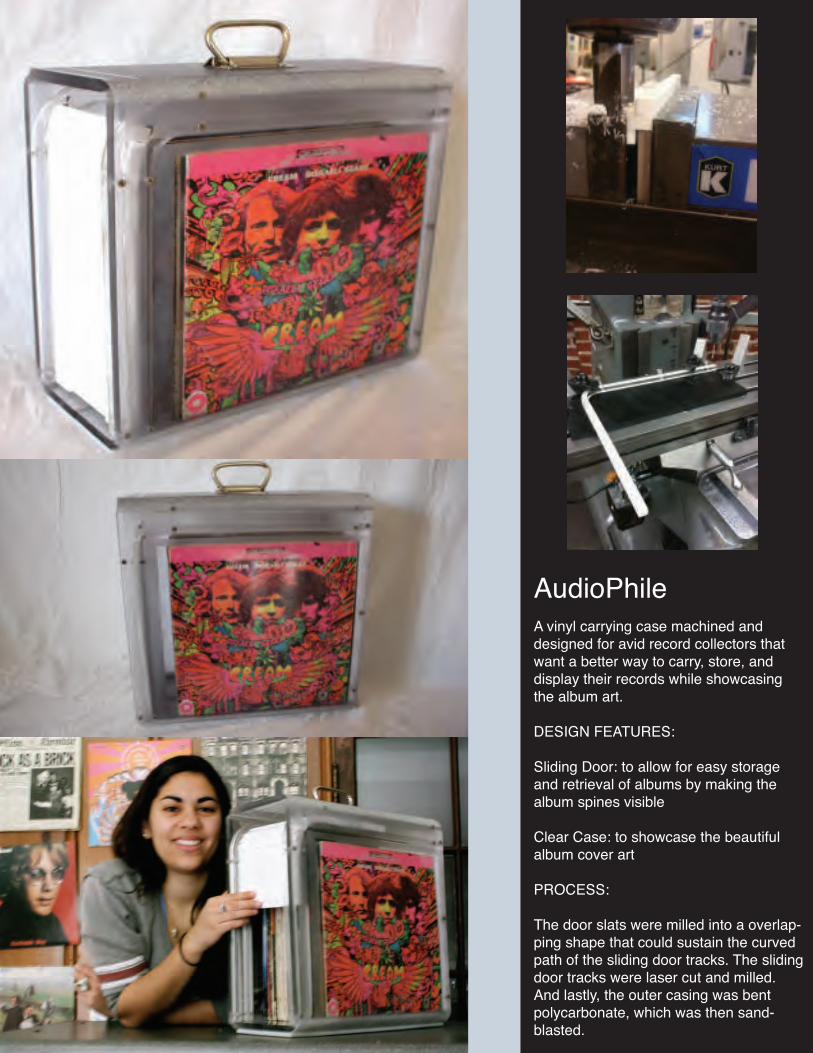
AudioPhile
A vinyl carrying case machined and
designed for avid record collectors that
want a better way to carry, store, and
display their records while showcasing
the album art.
DESIGN FEATURES:
Sliding Door: to allow for easy storage
and retrieval of albums by making the
album spines visible
Clear Case: to showcase the beautiful
album cover art
PROCESS:
The door slats were milled into a overlap-
ping shape that could sustain the curved
path of the sliding door tracks. The sliding
door tracks were laser cut and milled.
And lastly, the outer casing was bent
polycarbonate, which was then sand-
blasted.

Andalucia
This line of tabletop accessories was
designed to fit into Pottery Barn's product
line. To the right are models of salt and
pepper shakers and renderings of the
entire line of accessories. Above are
photographs of the process and inspira-
tion for the line.
PROCESS:
These shakers were made from modulan
foam. They were bandsawed & filed to
shape, and then the pattern was
dremelled into the foam.
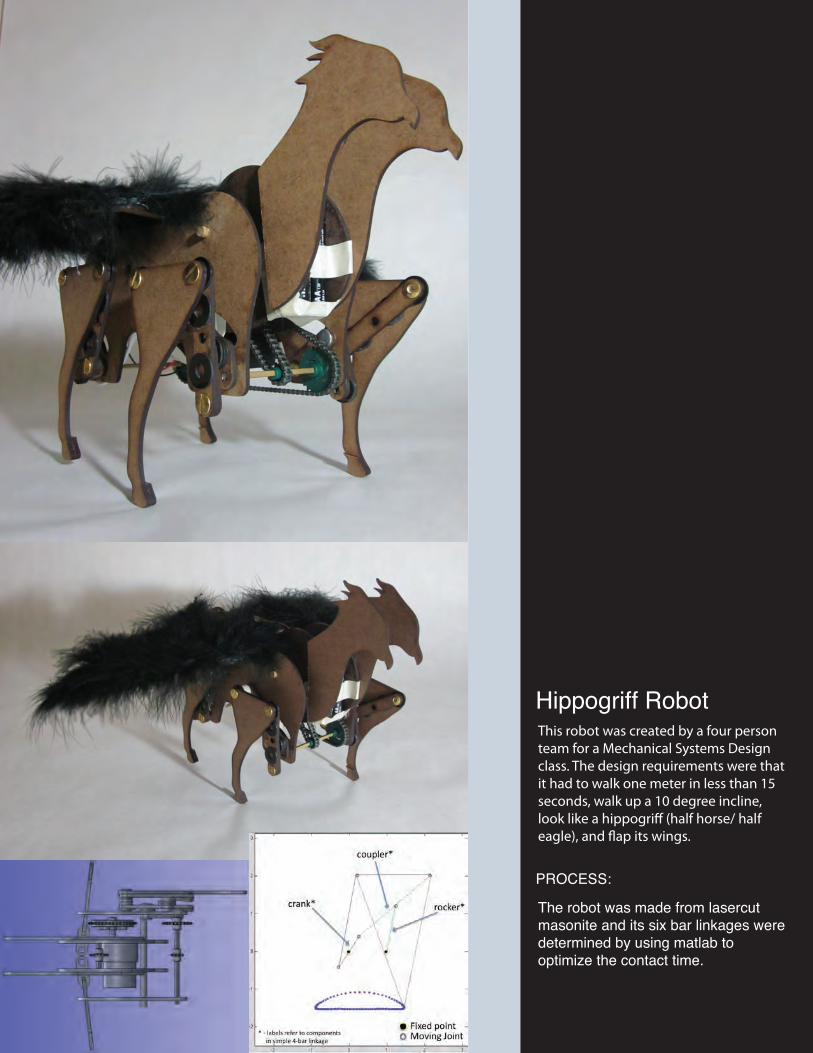
Hippogriff Robot
PROCESS:
This robot was created by a four person team for a Mechanical Systems Design class. The design requirements were that it had to walk one meter in less than 15 seconds, walk up a 10 degree incline,
The robot was made from lasercut masonite and its six bar linkages were determined by using matlab to optimize the contact time.


