17
Video Conferencing Equipment Guide

Video Conferencing Equipment
Guide

1
Table of Contents
Disclaimer ………………………………..……………………………………………….2
Calling and Answering ..……………….…….……………….………………………….3
Answering a Video Call …………………………………………………………3
Mute ……………………………………………………………………………..3
Placing a Video Call …………………………………………………………....3
Calling by Name or IP …………………………………………………..4
Recent Calls List ………………………………………………………...4
Contacts or Speed Dial List ……………………………………………..5
Directory ………………………………………………………………...5
Ending a Video Call ……………………………………………………..5
Multipoint Calls (internal MCU) …………..…...………………………………………6
Camera Controls …………………………..……………….……………………………7
Pan and Tilt ………….…………………………………………………………...7
Near End Camera Control ……………………………………………………….7
Far End Camera Control …………………………………………………………7
Setting and Using Camera Presets ……………….…………………………………….8
Remote Control Diagram - VSX Series ……..…...……….…………………………….9
Remote Control Diagram - ViewStation (older style)………….………………………10
Showing Content and Video Sources ……………………….…………………….…..11
Visual Concert ………………………………………………………………….11
Document Camera, VCR, or DVD player ……………………………………...12
Working with the Polycom Directory (Address Book) …………………….………..13
Troubleshooting Tips ………………………………………………………………….14
Support and Scheduling (MCU call) ……….…………..………………………….....15
Video Conferencing Tips ……………………………………………………………..16
Video Etiquette …………………………………………………………………16

2
Disclaimer:
This user guide is intended to be a ‘general’ reference guide to aid in troubleshooting Polycom video
conference issues that arise at the local level. The different Polycom models currently in use are too
vast and varied for this guide to be used specifically as a step-by-step instruction set for training or
troubleshooting purposes. Your particular model of Polycom unit may require a slightly different set
of steps than the ones represented in this reference guide.
When available, always use the user guide that is specific to your model of hardware and software
in place of this reference guide.
You may search for documentation on your particular model of Polycom video conferencing unit at
the following web site:
http://www.polycom.com/support/video/index.html

3
Calling and Answering
Answering a Video Call
When a call comes in, you hear a ringing sound, and you may see a message
that includes the number of the location calling. If the location is listed in the
directory, you’ll also see the location’s name.
The system administrator configures the system to answer incoming calls in one
of these ways:
1) The system prompts you to answer the calls manually.
2) The system answers incoming calls automatically.
• Typically, your system will be configured to answer incoming calls
automatically.
To answer the call manually:
When the system notifies you that a call is coming in, select Answer or press
Call on the remote control.
Mute _____________________________________________________________
If you see this icon on your screen, your system may be configured to
automatically mute near-end audio when a call comes in. To un-mute your
system, press Mute on the remote control. Or, you may also press the red
mic button on your tabletop microphone. When the red light turns green or
no longer displays red, you may begin speaking. Remember: Red = Mute.
Placing a Video Call
You can use your system to place a video call in any of these ways:
1) Entering a name or number
2) Choosing from a list of recently-called sites (if available)
3) Choosing a site from the Contacts or Speed Dial list on the Place a Call
screen, if your system has been configured to use this feature
4) Using the Directory (Address Book)

4
Calling by Entering a Name or IP Address
To place a call by entering a name or number:
1) In the dialing field, enter the dialing information. Depending on the capabilities
of your system and the system you are calling, the dialing information will look
like one of these samples:
� The IP address (for example, 165.234.136.105)
� H.323 Alias Name (for example, itd3.bismarck)
______________________________________________________________________
The system automatically determines the type of call to make based on the information
you enter.
______________________________________________________________________
2) Enter any additional information needed for the call. The available
settings depend on the type of call and your system’s configuration. Not all
calls require these settings:
� Call Quality – For most calls, choose Auto to let the system
determine the best quality for the call.
� Gateway extension – For most calls, this should not be necessary. If
you need to dial an extension, enter the extension in the second entry
field. If your system is not configured with a second entry field, you
can enter the extension when the gateway prompts you.
3) Press Call on the remote control to place the call.
Call progress indicators appear on the screen to show that the call is in
progress. When the indicators turn green, the call is connected.
Calling from the Recent Calls List (if available)
You may be able to choose a number to call from a list of the sites you have called
recently. The Recent Calls screen provides details of all incoming and outgoing calls,
including the time of the calls.
To place a call from the Recent Calls screen:
1) Select Recent Calls from the Place a Call screen.
2) Scroll to the entry you want to call.
3) Press Call to place the call.
To see more details about a call listed on the Recent Calls screen, highlight the call and
press Help on the remote control.
5
Calling from the Contacts or Speed Dial List
Your system administrator may have customized a Contacts or Speed Dial list for easy
calling.
To place a call using the Contacts or Speed Dial list:
1) Select Speed Dial or Contacts from the Place a Call screen.
2) Scroll to the entry you want to call.
3) Press Call to place the call.
Calling by Using the Directory
The directory or address book is a list of names and numbers that are stored locally on
some Polycom systems. If the system is registered with a global directory, it may also
include entries from the global directory server. Entries appear with corresponding IP
addresses or H.323 alias names as well.
To place a call from the directory:
1) Press Directory or navigate to the Address Book with the remote
control.
2) Find the entry to call
3) Press Call to place the call.
____________________________________________________________________
By default, the systems are configured to use IP dialing.
____________________________________________________________________
For additional information about the Directory, see Working with the Polycom
Directory (Address Book) in this manual.
____________________________________________________________________
Ending a Video Call
To hang up from a call:
1) Press Hang Up or Call-Hang Up on the remote control.
2) Confirm that you want to end the call.
____________________________________________________________________
If you don’t confirm that you want to hang up, the system disconnects the call
automatically after 60 seconds.
____________________________________________________________________

6
Multipoint Calls (internal MCU)
Placing a Multipoint Call
Some Polycom units are equipped with an internal MCU (Multipoint Control Unit) that allows
the endpoint to connect up to three more additional sites (4 total) without the use of an external
MCU or bridge.
________________________________________________________________
Multipoint capability is optional and most systems are not equipped with an internal
MCU. Multipoint calls will typically require the use of an external MCU. See Support
and Scheduling (MCU Call) in this manual.
__________________________________________________________________
If your system is equipped with an internal MCU, you can place multipoint calls in several ways.
� Place a call, then add more sites to that call by pressing Call on the remote control,
selecting Add Video Call, and place a call to the next site. Repeat until all sites are
connected.
� Select Multipoint from the Home screen if your system is configured to display that
button. Enter the names of the sites you want to call by using the Directory or by manually
entering the phone numbers of the sites. Press Call.
� Press Directory or navigate to the Address Book with the remote control, find a
multiple site entry in the directory list, and press Call on the remote control.
7
Camera Controls
Adjusting your cameras lets you show conference participants what you want them to see. You can
adjust cameras and other video sources before the meeting starts and while the meeting is in progress.
You can adjust the pan, tilt and zoom of local and far end cameras if you are in a point-to-point call
and if both systems are Polycom units (other brands may not work).
________________________________________________________________________
You can adjust the far end camera only if the camera supports electronic pan and tilt, and the
far site system is configured to allow you to control its camera.
________________________________________________________________________
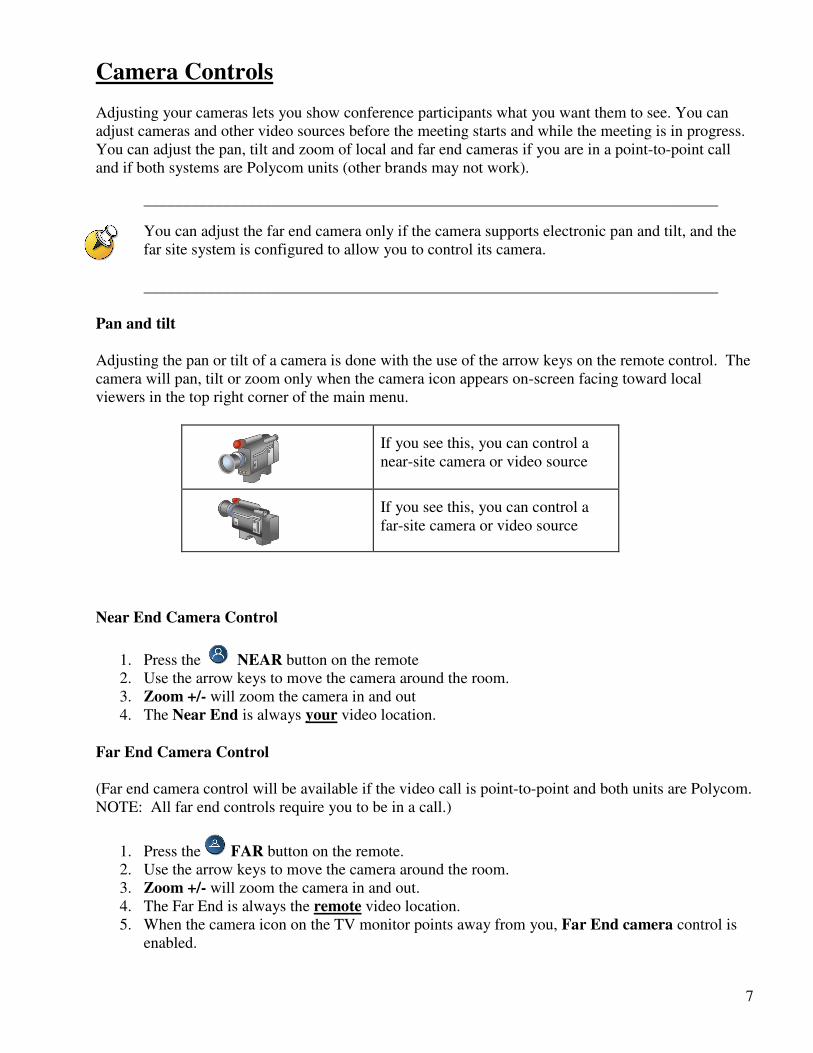
Pan and tilt
Adjusting the pan or tilt of a camera is done with the use of the arrow keys on the remote control. The
camera will pan, tilt or zoom only when the camera icon appears on-screen facing toward local
viewers in the top right corner of the main menu.
If you see this, you can control a
near-site camera or video source
If you see this, you can control a
far-site camera or video source
Near End Camera Control
1. Press the NEAR button on the remote
2. Use the arrow keys to move the camera around the room.
3. Zoom +/- will zoom the camera in and out
4. The Near End is always your video location.
Far End Camera Control
(Far end camera control will be available if the video call is point-to-point and both units are Polycom.
NOTE: All far end controls require you to be in a call.)
1. Press the FAR button on the remote.
2. Use the arrow keys to move the camera around the room.
3. Zoom +/- will zoom the camera in and out.
4. The Far End is always the remote video location.
5. When the camera icon on the TV monitor points away from you, Far End camera control is
enabled.
8
Setting and Using Camera Presets
Camera presets are stored camera positions that you can create ahead of time or during a call and they
will automatically point a camera to a pre-defined location in a room.
If your system’s main camera supports electronic pan, tilt, and zoom movement, you can create many
preset camera positions for the near site. Each preset stores the camera number, its zoom level, and the
direction it points (if appropriate). Near end presets are available on many Polycom systems. They
remain in effect until you delete or change them.
.
To move the camera to a preset:
1. If a call is connected, press Near.
2. Press a number from 0 to 9.
The camera moves to the preset position for the camera or other video
source.
To view your near end presets (VSX room systems only):
Press Preset on the remote control.
Icons for presets 0-9 are shown on the screen. The colored icons indicate
stored camera positions, and the gray icons indicate available presets.
To store a preset:
1. If you are in a call, press Near to choose a near end camera or
other video source.
If you selected a camera that supports electronic pan, tilt, and zoom,
you can adjust the camera’s position:
� Press the arrow buttons on the remote control to move the camera up,
down, to the left, or to the right.
� Press Zoom to zoom the camera in or out.
Press Preset on the remote control.
Press and hold a number to store the preset position (0-9).
Any existing preset stored at the number you enter is replaced.
To delete all presets:
1. If a call is connected, press Near to choose a near-site video
source.
2. Press Preset on the remote control.

9
10
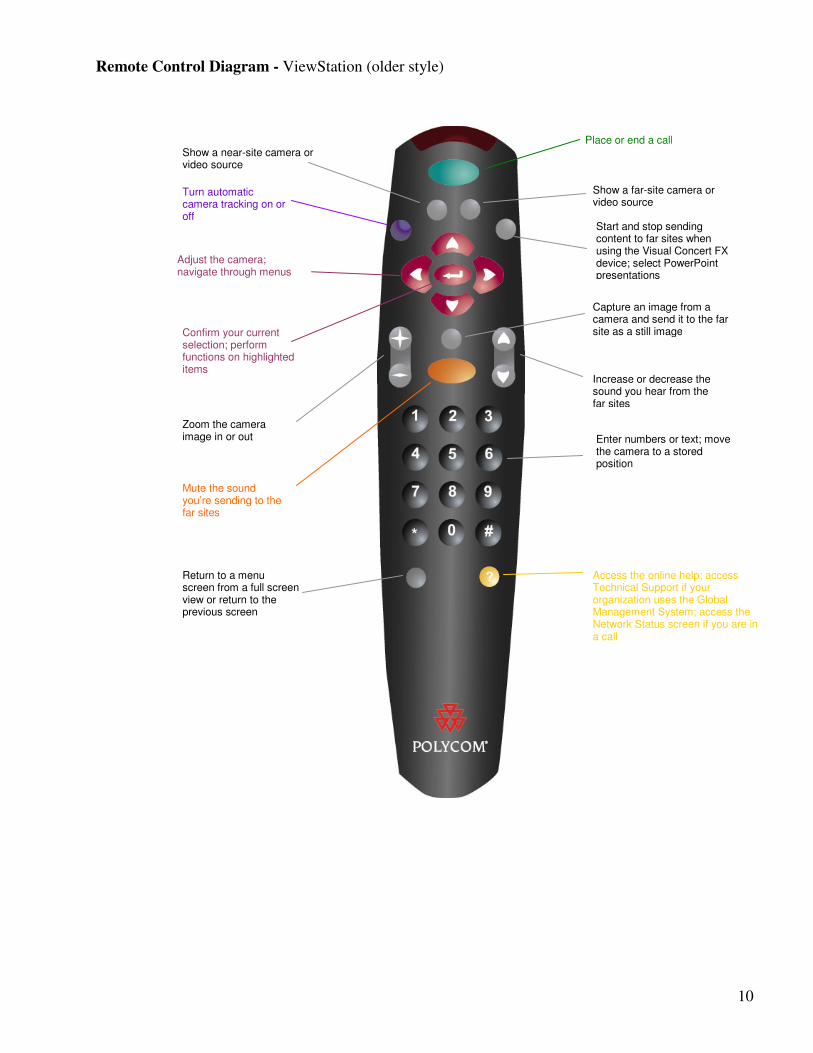
Remote Control Diagram - ViewStation (older style)
Place or end a call Show a near-site camera or video source
Show a far-site camera or video source
Turn automatic camera tracking on or off
Confirm your current selection; perform functions on highlighted items
Zoom the camera image in or out
Capture an image from a camera and send it to the far site as a still image
Increase or decrease the sound you hear from the far sites
Mute the sound you’re sending to the far sites
Return to a menu screen from a full screen view or return to the previous screen
Access the online help; access Technical Support if your organization uses the Global Management System; access the Network Status screen if you are in a call
Adjust the camera; navigate through menus
Start and stop sending content to far sites when using the Visual Concert FX device; select PowerPoint presentations
Enter numbers or text; move the camera to a stored position

11
Showing Content and Video Sources
You may be able to show the following to the far sites depending on the equipment and capabilities of
your Polycom system:
� Any information stored on a laptop or PC
� A paper document or object placed on a document camera
� A videotape or DVD
What You See When You Show Content
If your video conference system supports Dual Monitor Emulation, you can
see both the people at the far site and any content or shared video source at the
same time. This is possible because the system can send and receive two
sources of video simultaneously.
In video conferences that do not support dual images, the far sites can only
receive one video source over the network. Therefore, they can only see the
content. The site sending the content can see the content as well as the other
sites because the content is local.
Showing Content from a Laptop or PC
If you have a Polycom unit with a Visual Concert connected to it, you can
attach a laptop or PC and show content that is stored on the computer.
If your computer is connected to a local area network, you can also share
content from network locations. When you share content from a laptop or PC,
the far site sees just what you see on the computer screen.
Showing Content with the Visual Concert:
Connect the laptop to a Visual Concert device:
12
______________________________________________________
For more information about using the Visual Concert VSX device, see the Visual
Concert VSX Quick Tips, available at www.polycom.com/videodocumentation.
_______________________________________________________
To start showing content using a Visual Concert
1. Press on the Visual Concert or press Graphics on the
remote control.
To stop showing content using a Visual Concert:
2. Press on the Visual Concert or press Graphics on the
remote control.
Using a Document Camera, VCR, or DVD Player
Most Polycom systems enable you to show different types of information to other sites in a call, such
as through a document camera, VCR, or DVD player.
The Camera button on the remote control allows you to select which input is to be used (for
older systems press Near). After pressing the Camera button, press the number or use the arrow
keys to select any other video source at the near end. For example, press 1 to select the main camera.
The image from the camera or video source you selected appears on the screen.
Before the call begins:
1. Make sure the document camera, VCR, or DVD player is connected
and powered on.
2. Position your document or object in the document camera or insert
the videotape or DVD.
To start showing a document, object, videotape, or DVD in a call:
1. Press Camera on the remote control (or press Near).
2. Select the appropriate video source with the arrow keys.
3. Press on the remote control.
To stop showing a document, object, videotape, or DVD in a call:
1. Press Camera on the remote control (or press Near).
2. Select the main camera.
3. Press on the remote control.

13
Working with the Polycom Directory (Address Book)
The directory or address book on your Polycom system stores dialing information that helps you make
calls quickly and easily. When a site listed in the directory calls your system, the system displays the
name on the screen when the call comes in. If a site that calls you is not listed in the directory, you are
prompted to save the contact information in the directory when the call ends.
If your system is registered with a global directory server, your directory contains two types of entries:
� Local entries: Information about sites that you have added, sites that
you have called, and sites that have called you. These entries are stored
locally on your system, and depending on your system setup, you can
edit these entries. Local entries are available to anyone who uses the
system.
� Global entries: Information about other active sites that are registered
with the same Global Directory Server. These entries are stored on the
Global Directory Server, and you cannot edit them. You can make a
local copy if you want to make changes.
Global entries are marked with .
Depending on your system configuration, you may also be able to remove or edit names or dialing
information in the local directory.
Searching the Directory
You can find entries in the directory by:
� Spelling the first or last name using the number buttons on the remote
control
� Pressing Keyboard to use the on-screen keyboard to spell the name
� Scrolling through the list of names using the arrow buttons on the
remote control
� Using the alphabet tabs to move through the directory and then scrolling
to the name you want
Adding, Editing, and Deleting Directory Entries
You can create entries for point-to-point calls and multipoint calls and save them in the system’s
directory. Everyone at your site who uses the system can use the entries you create, and you can use
the entries created by others. You can also edit the information in a local entry.
To add a single-site entry to the directory:
1. Press Directory on the remote control.
2. Select New and specify that this is an entry for one site.
3. Enter the information requested from the screen prompts.
4. Select Save to save the entry.
14
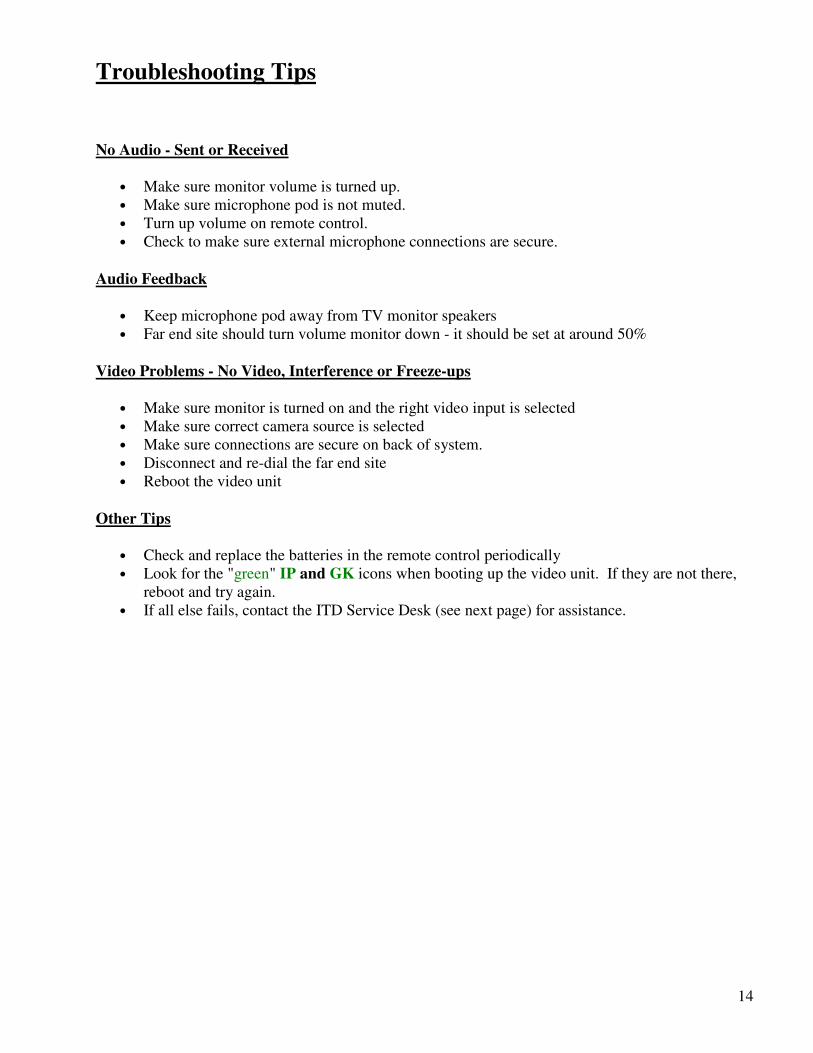
Troubleshooting Tips
No Audio - Sent or Received
• Make sure monitor volume is turned up.
• Make sure microphone pod is not muted.
• Turn up volume on remote control.
• Check to make sure external microphone connections are secure.
Audio Feedback
• Keep microphone pod away from TV monitor speakers
• Far end site should turn volume monitor down - it should be set at around 50%
Video Problems - No Video, Interference or Freeze-ups
• Make sure monitor is turned on and the right video input is selected
• Make sure correct camera source is selected
• Make sure connections are secure on back of system.
• Disconnect and re-dial the far end site
• Reboot the video unit
Other Tips
• Check and replace the batteries in the remote control periodically
• Look for the "green" IP and GK icons when booting up the video unit. If they are not there,
reboot and try again.
• If all else fails, contact the ITD Service Desk (see next page) for assistance.

15
Support and Scheduling (MCU call)
Call the ITD service desk if you would like to schedule a multipoint video conference with multiple
endpoints hosted on an MCU (Multipoint Control Unit).
Video Conferencing
Customer Service & Support
Information Technology Department (ITD) supports video conferencing events hosted by: state
agencies, political subdivisions, and K-12 schools.
For customer service & support (problems, inquires, questions and scheduling assistance), contact the
Service Desk, and submit an incident. The following methods are available 24 x 7.
o Call: 701-328-4470 or 877-328-4470
o Online: https://www.nd.gov/itd/support/selfservice/createincident.aspx
Please provide the following information when submitting the incident.
o Your name,
o Site name and location(i.e. room #),
o Description of the problem,
o Name of Event and Reservation number,
� If unknown, please state start time and end time of meeting
o Call back number
Example: This is John Doe from the Center High School Technology Room. We need Mandan High School
Tech Room connected to our event entitled “New Student Orientation”. It is reservation #1650. My call
back number is (701) 555-0000.
Service Support Hours:
o Support will be provided 24 X 7.
• Business hours (7am – 5pm), Monday through Friday: provided by the Service Desk.
• After 5pm, Monday through Friday: provided by ITD’s Operational Team. They will assist
with these calls.
• On-Call weekends & holidays: provided by the Service Desk. Phone calls and online
submissions are monitored. Phone messages are logged by an automatic system that will
alert/page the on-call Service Desk Analyst.
16
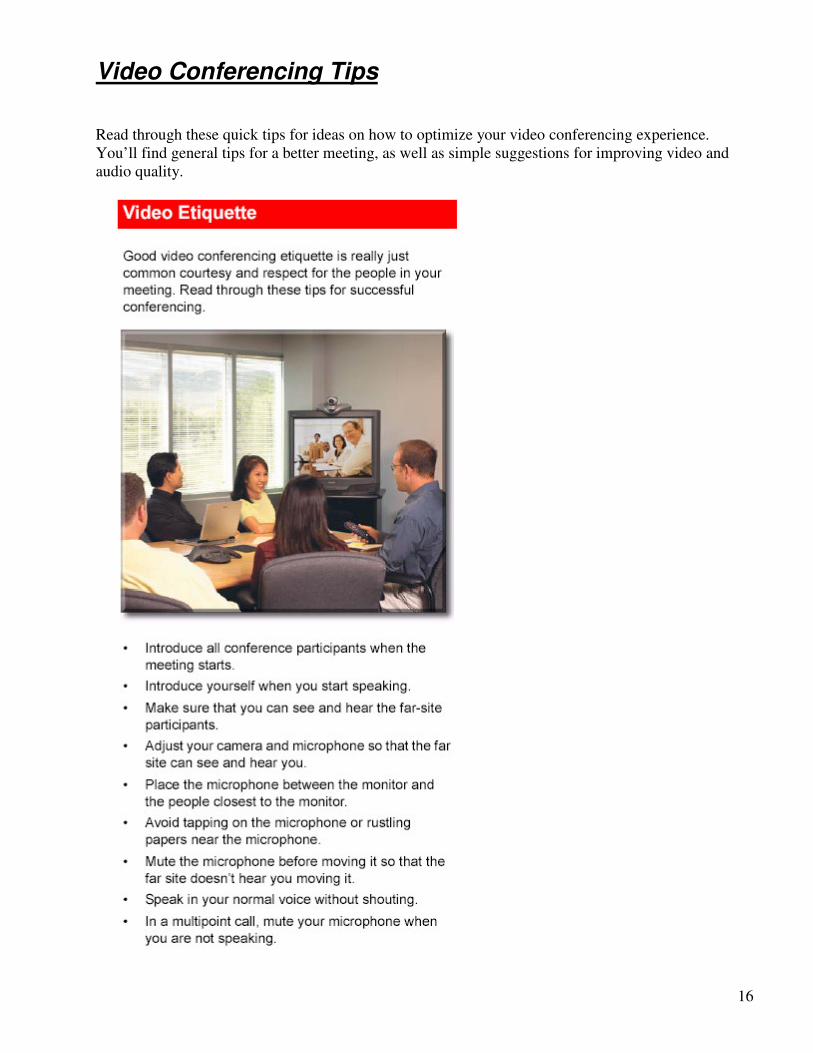
Video Conferencing Tips
Read through these quick tips for ideas on how to optimize your video conferencing experience.
You’ll find general tips for a better meeting, as well as simple suggestions for improving video and
audio quality.


